


USER’S OPERATION MANUAL
Before operating this unit, please read this manual
thoroughly, and retain for future reference.
MODEL: HWGA9014
HWGA8014
English
The following symbols are used throughout the manual and they have the following meanings:
Information, advice, tip, or recommendation
Warning – general danger
Warning – danger of electric shock
Warning – danger of hot surface
Warning – danger of fire
It is important that you carefully read the instructions.

CONTENTS
4 SAFETY PRECAUTIONS
10 WASHING MACHINE DESCRIPTION
11 Technical specifications
12 Control unit
14 INSTALLATION AND CONNECTION
14 Removing the blocking rods
15 Moving and transport after installation
16 Selecting the room
16 Adjusting the washing machine feet
18 Connecting to water supply
20 Aqua - stop
20 Total aqua - stop
21 Connecting and securing the water discharge hose
23 Connecting the appliance to the power mains
24 BEFORE USING THE APPLIANCE FOR THE FIRST TIME
25 WASHING PROCESS, STEP BY STEP (1–7)
25 Step 1: Heed the labels on the laundry
26 Step 2: Preparing the washing process
29 Step 3: Choosing the washing programme
33 Step 4: Choosing the settings
39 Step 5: Selecting additional functions
43 Step 6: Starting the washing programme
44 Step 7: Change of washing programme or manual (physical) cancellation
45 Step 8: End of the washing programme
INTRODUCTION
PREPARING
THE WASHING
MACHINE
BEFORE FIRST
USE
STEPS OF
THE WASHING
PROCESS
46 INTERRUPTIONS AND CHANGING THE PROGRAMME
50 MAINTENANCE & CLEANING
50 Cleaning the dispenser tray
51 Cleaning the water supply hose, detergent dispenser housing, and
rubber door gasket
52 Cleaning the pump filter
53 Cleaning the washing machine exterior
54 TROUBLESHOOTING
54 What to do ...?
55 Troubleshooting and error table
59 Servicing
60 RECOMMENDATIONS FOR WASHING AND ECONOMIC USE YOUR
WASHING MACHINE
64 Stain removal tips
66 DISPOSAL
67 PROGRAM DURATION AND SPINNING RATE TABLE
69 INFORMATION FOR TEST INSTITUTE
WASHING
MACHINE
CLEANING AND
MAINTENANCE
TROUBLESHOOTING
MISCELLANEOUS
3
802371

SAFETY PRECAUTIONS
Carefully read the instructions for use before using the
washing machine.
Please, do not use the washing machine without reading
and understanding these instructions or use first.
These instructions for use of a washing machine are
supplied with different types or models of washing
machines. Therefore, they may include descriptions
of settings or equipment that are not available in your
washing machine.
Failure to observe the instructions for use or inappropriate
use of the washing machine may result in damage to the
laundry or the appliance, or injury to the user. Keep the
instruction manual handy, near the washing machine.
Instructions for use are available through Hisense customer
service centers.
Your washing machine is intended solely for household
use. If the washing machine is used for professional,
for-profit purpose or purpose exceeding normal use in a
household, or if the washing machine is used by a person
who is not a consumer, the warranty period shall be equal to
the shortest warranty period required by relevant legislation.
802371
4

Follow the instructions for correct installation of the Hisense
washing machine and connection to the water and power
mains (see chapter »INSTALLATION AND CONNECTION«).
Connection to water and power supply has to be executed
by an adequately trained technician or expert.
Any repair and maintenance pertaining to safety or
performance should be done by trained experts.
To avoid danger, a damaged power cord may only be
replaced by the manufacturer, a service technician, or an
authorized person.
Before connecting the washing machine to the power
mains, wait for at least 2 hours until it reaches room
temperature.
In case of a defect, only use approved spare parts by
authorized manufacturers.
In case of incorrect washing machine connection, incorrect
use, or servicing by an unauthorized person, the user shall
bear the cost of any damage as such damage shall not be
covered by warranty.
The washing machine may not be connected to the power
mains using an extension cord.
Do not connect the washing machine to power mains using
an external switching device such as a programme timer, or
connect it to power mains that is regularly switched on and
off by the power supply provider.
802371
5

Do not connect the washing machine to an electrical outlet
intended for an electric shaver or hair dryer.
Do not install the washing machine in a room where the
temperature can drop to below 5°C, as washing machine
parts may be damaged in case of water freezing.
Place the washing machine on a level and stable solid
(concrete) base.
If the washing machine is placed on an elevated stable base,
the washing machine has to be additionally secured against
tipping.
Before the first use of the washing machine, remove the
blocking rods, as switching on a blocked washing machine
can result in serious damage (see chapter »INSTALLATION
AND CONNECTION/Removing the blocking rods«). Warranty
shall be void in cases of such damage.
To connect the washing machine to water supply, make
sure to use the supplied water supply hose and gaskets.
Water pressure has to be between 0.05 and 0.8 MPa (0.5 – 8
bar).
Always use a new water supply hose to connect the washing
machine to water supply; do not reuse an old water supply
hose.
The end of the water discharge hose should reach into a
water drain line.
Before the start of the washing cycle, press the door on the
802371
6

indicated spot until it locks into place. The door cannot be
opened during washing machine operation.
We recommend removing any impurities from the
washing machine drum before the first wash using the
White 90°C programme (see PROGRAMME TABLE).
After the washing cycle, close the water tap and pull out
the washing machine plug from the power socket.
Clean the pump filter whenever the symbol
appears on the
display unit.
Only use the washing machine for washing laundry, as
described in the instruction manual. The machine is not
intended for dry cleaning.
Only use agents for machine washing and care of
laundry. We shall not be responsible for any damages or
discolouration of gaskets and plastic parts resulting from
incorrect use of bleaching or colouring agents.
When descaling, only use descaling agents with added
anti-corrosion protection. (Only use non-corrosive descaling
agents.) Follow the manufacturer's instructions. Finish the
descaling process with several rinse cycles or by running the
Drum Clean (Self-cleaning programme) in order to remove
any residual acid (e.g. vinegar etc.).
Do not use detergents that contain solvents as this could
lead to release of poisonous gases, damage to the washing
machine, and risk of fire and explosion.
802371
7

No silver ions are released during the washing programme.
The washing machine is not intended for use by persons
(including children) with physical or mental impairments,
or persons with lacking experience and knowledge. These
persons should be instructed about the use of the washing
machine by a person responsible for their safety.
The warranty does not cover consumables, minor
deviations in colour, increased noise that results from
appliance age and which does not affect the functionality of
the appliance, and aesthetic defects on components, which
do not affect the functionality and safety of the appliance.
CHILD SAFETY
Before closing the washing machine door and running the
programme, make sure there is nothing except laundry in the
drum (e.g. if a child climbed into the washing machine drum
and closed the door from the inside).
Keep the detergent and conditioner out of reach of children.
Activate the child lock. See chapter »CHOOSING THE
SETTINGS/Child lock«.
Do not let children younger than three years come
near the appliance, unless they are under constant
supervision.
The washing machine is made in compliance with all
relevant safety standards.
This washing machine may be used by children aged 8
years and above and by persons with reduced physical,
802371
8

sensory or mental capabilities or lack of experience and
knowledge, but only if they are supervised during the use of
the washing machine, if they have been provided relevant
instructions regarding safe use of the washing machine, and
if they understand the hazards of inappropriate use. Make
sure children do not play with the appliance. Children may
not clean the washing machine or perform any maintenance
tasks without supervision.
DANGER OF HOT SURFACE
At higher washing temperatures, the door glass will heat up.
Be careful to avoid burns. Make sure children do not play
near the door glass.
WATER OVERFLOW PROTECTION (WITH WASHING
MACHINE SWITCHED ON)
If the water level in the appliance rises above normal level,
then the excess water level protection will be activated. It will
shut off the water supply and start pumping out the water.
The program is interrupted and an error is reported (see
TROUBLESHOOTING TABLE).
TRANSPORT/TRANSPORT AFTER INSTALLATION
If you intend to move the washing machine after it has
been installed, then it should be blocked by inserting
at least one blocking rod (see chapter »INSTALLATION
AND CONNECTION«). Before inserting the blocking rods,
disconnect the washing machine from the power mains!
802371
9
WASHING MACHINE DESCRIPTION
FRONT
1 Control unit
2 Start/pause button
3 Programme selector knob
4 On/off/reset button
5 Dispenser tray
6 Door
7 Rating plate
8 Pump filter
BACK
1 Water supply hose
2 Power cord
3 Water discharge hose
4 Adjustable feet
6 87
3
34 25
1
2
802371
1
4
10

TECHNICAL SPECIFICATIONS
(DEPENDING ON THE MODEL)
Rating plate with basic information about the washing machine is fitted on the front wall of the
washing machine door opening (see chapter »WASHING MACHINE DESCRIPTION«).
Maximum load See rating plate
Width 600 mm 600 mm
Height 850 mm 850 mm
Washing machine depth (a) 545 mm 610 mm
Depth with door closed 577 mm 640 mm
Depth with door open (b) 1062 mm 1125 mm
Washing machine weight 8kg/9kg (depending on the model)
Rated Voltage See rating plate
Nominal power See rating plate
Connection See rating plate
Water pressure See rating plate
Current See rating plate
Frequency See rating plate
Rating plate
TYPE: PS15/XXXXX MODEL: XXXXXX.X
Art.No.: XXXXXX Ser.No.: XXXXXXXX
220-240 V ~ XX Hz XX A Pmax.: XXXX W
XXXX W XXXX/min X kg 0,05-0,8 MPa
IPX4
MADE IN SLOVENIA
11
802371

CONTROL UNIT
1 3
ON/OFF/RESET
1
BUTTON
Use this button to turn the
washing machine on and
off, and to reset the washing
programme.
The button is lit when the
washing machine is switched
on.
PROGRAMME
2
SELECTOR KNOB
2a Light next to the selected
washing programme is lit.
2 2a
START/PAUSE BUTTON
3
Use this button to start or
pause a programme.
Upon start-up or during pause,
the button backlight will flash;
when the programme is started
and in progress, it will be lit
continuously.
802371
12
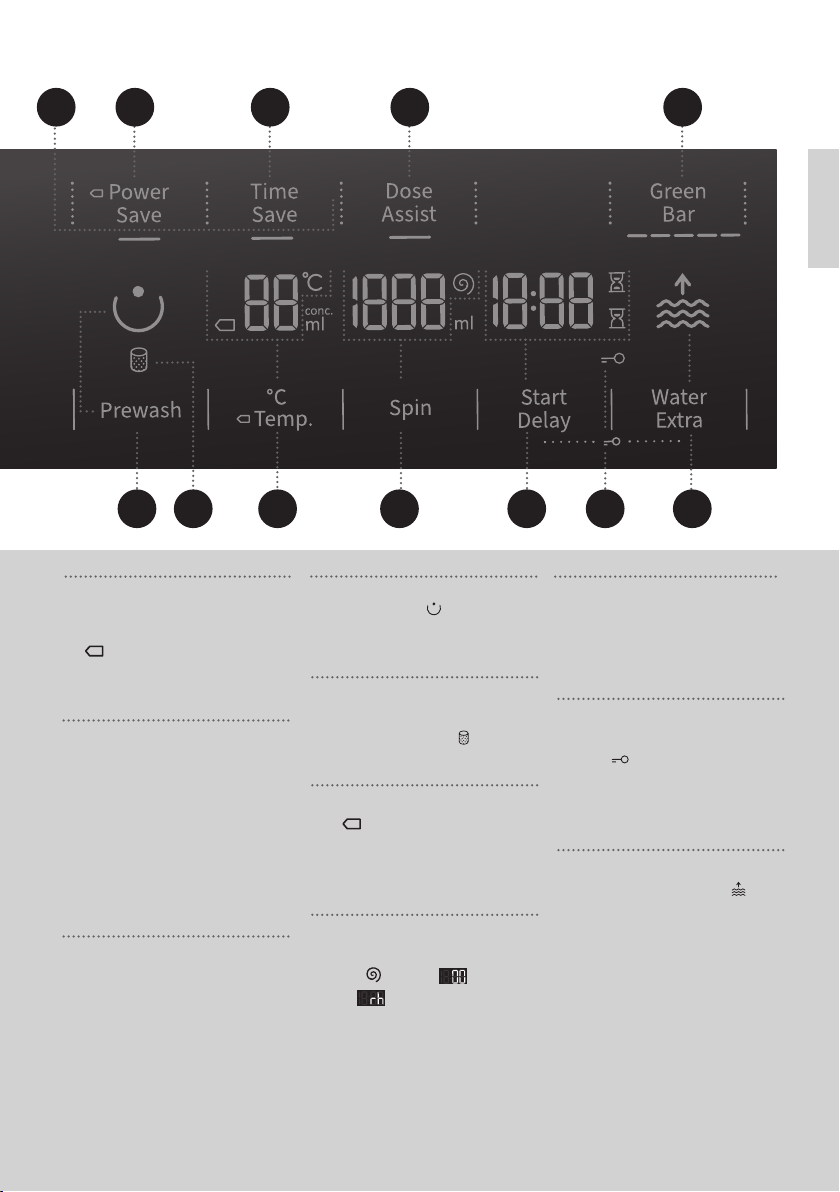
654b4a4
7 98 10
WASHING MODE
4
4a POWER SAVE
4b TIME SAVE
DOSE ASSIST
Information on
5
recommended amount of
powder and liquid detergent,
according to the selected
settings and the amount of
laundry in the drum.
GREEN BAR
6
Information on water and
power consumption, according
to the selected washing
settings.
PREWASH
7
CLEAN THE PUMP
8
FILTER symbol
TEMP. (WASHING
9
TEMPERATURE)
Temperature settings options
SPIN (SPINNING RATE
10
STOP )
Option to set the spinning rate
/DRAIN /PUMP
lighting
11
12
START DELAY
11
Option to set a start
delay
CHILD LOCK symbol
12
Press the positions 11+13 and
hold them for 3 seconds.
13
Option to set the higher water
level (2 levels)
lighting
WATER EXTRA
(HIGH WATER LEVEL)
13
13
802371
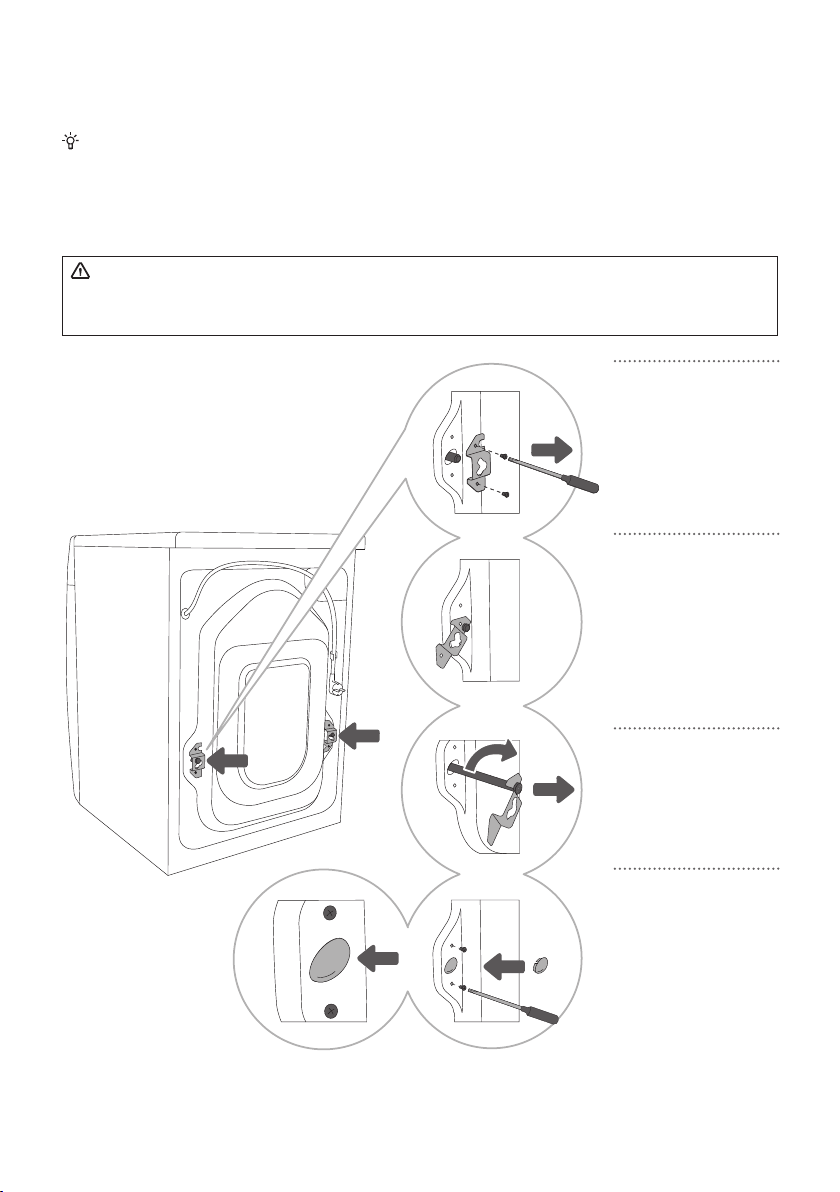
INSTALLATION AND CONNECTION
Remove all packaging. When removing the packaging, make sure not to damage the appliance
with a sharp object.
REMOVING THE BLOCKING RODS
Before the first use of the appliance, transport rods must be removed. A blocked washing
machine may be damaged when it is switched on for the first time. Warranty shall be void in
cases of such damage!
Move the hoses
1
and undo the
screws on the back of
the washing machine.
Remove the two
angular pieces.
Slide the angular
2
pieces onto the
grove in the blocking
rod; before doing so,
rotate the right angular
piece to the opposite
side.
802371
14
Use the angular
pieces to rotate
3
the blocking rods by
90°and pull them out.
Cover the two
holes through
4
which the blocking
rods were inserted
with plastic plugs, and
redo the screws that
you undid in step 1.
The plastic plugs are
supplied in the bag with
the washing machine
instruction manual.

MOVING AND TRANSPORT AFTER INSTALLATION
If you wish to move the washing machine after it has been installed, the angular pieces and at
least one blocking rods have to be re-installed to prevent vibration damage to the washing machine
during transport (see chapter »INSTALLATION AND CONNECTION/Removing the blocking rods«). If
you lost the angular pieces and the blocking rods, they can be ordered from the manufacturer.
After transport, the washing machine should be left to stand still for at least two hours
before it is connected to the power mains, so that it can reach room temperature. The
appliance should be installed and connected by a trained technician.
Carefully read the instructions for use before connecting the washing machine. Repair or
any warranty claim resulting from incorrect connection or use of the washing machine shall
not be covered by the warranty.
15
802371

SELECTING THE ROOM
It is recommended to place the washing machine on a firm solid base such as a concrete floor if
possible. This will help in reducing noise and vibration that are normal for high speed spin cycles. It
should be clean and dry; otherwise, the washing machine may slide. Also, clean the bottom surface
of adjustable feet.
The washing machine must stand level and stable on a solid base.
ADJUSTING THE WASHING MACHINE FEET
Use a water scale and spanner No. 32 (for feet) and 17 (for the nut).
Level the washing
1
machine in
longitudinal and
traverse direction by
rotating the adjustable
feet.
After adjusting
2
the height of the
feet, firmly tighten the
jam nuts (counter nuts)
using a spanner No
17, by turning them
towards the bottom of
the washing machine
(see figure).
Incorrect levelling of the washing machine with the adjustable legs may cause vibration,
appliance sliding across the room, and loud operation. Incorrect levelling of the washing machine is
not subject to warranty.
Sometimes, unusual or louder noise may appear during appliance operation; these are mostly
the result of improper installation.
802371
16
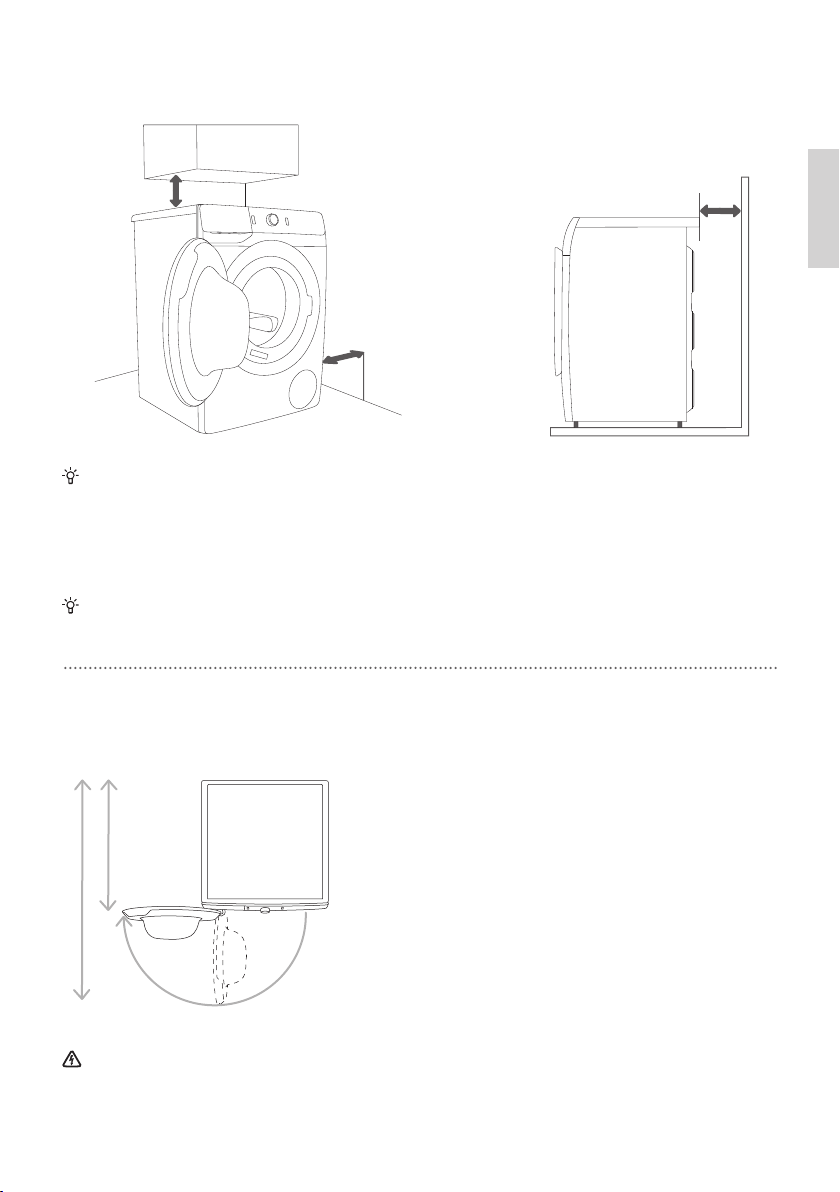
Washing machine installation clearances
25 mm
25 mm
1
The washing machine may not be in contact with a wall or adjacent furniture. For optimum
washing machine operation, we recommend observing the clearances from the walls as indicated in
the figure.
In case of failure to observe the minimum required clearances, safe and correct washing machine
operation cannot be ensured. Moreover, overheating can also occur (figures 1 and 2).
Installing the washing machine under a countertop is not recommended.
2
50 mm
Opening the washing machine door (bird's-eye view)
See chapter »WASHING MACHINE
DESCRIPTION/Technical information«).
b
a
180°
Before connecting the washing machine to the power mains, wait for at least 2 hours until
it reaches room temperature.
a = Washing machine depth
b = Depth with door open
17
802371

CONNECTING TO WATER SUPPLY
Attach the hose to the water tap by screwing it onto the thread.
A
AQUA - STOP
A
B
C
TOTAL AQUA -
B
STOP
REGULAR
CONNECTION
C
If your washing machine features a hot and cold water connection, but you only wish to connect
it to cold water supply, do not install the hot water hose and close the hot water connection on the
back of the washing machine with the supplied cap.
If your washing machine features hot and cold water connection with full aquastop (option
B), and you only wish to connect it to the cold water supply, then seal the hot water hose with a
suitable 3/4" plug that is not supplied with the appliance. The 3/4" plug is available in specialized
plumbing supplies stores.
For normal washing machine operation, the pressure in the water mains should be between 0.05
and 0.8 MPa (0,5 - 8 bar). Minimum dynamic water pressure can be determined by measuring the
water flow. In 15 seconds, 3 litres of water should flow from a fully open tap.
802371
18

If your model has connections for both hot and cold water, then connect one hose to the
cold water supply (blue wing nut or blue mark on the hose) and the other one to the hot water
supply (red wing nut or red mark on the hose), as indicated on the back of the washing machine.
Connections are labelled with letters C and H (C = cold, H = hot). Warm water (mixture of hot and
cold water) is only added for programmes at 40°C or higher.
Tighten the water supply hose by hand, firmly enough for the hose to have a good seal (max. 2 Nm).
After connecting the hose, the seal must be checked for any leaks. Do not use pliers or similar tools
when connecting the hose as this could damage the nut thread.
Only use the water supply hose supplied with the appliance. Do not use any used or other hoses.
19
802371

AQUA - STOP
If an internal tube or hose is damaged, a shut-off system is activated that cuts the water supply
to the washing machine. In such case, the control glass (a) will turn red. Replace the water supply
hose.
(ONLY WITH SOME MODELS)
a
TOTAL AQUA - STOP
If an internal tube or hose is damaged and if water is present on the bottom of the washing
machine, a shut-off system is activated that cuts the water supply to the washing machine. In this
case, the washing process will be stopped, water supply will be cut off, and the washing machine
will switch on the pump and signal an error.
Do not dip the water supply hose with the AQUA - STOP system in water as it contains an
electric valve.
When connecting the water supply hose, make sure to connect it in a way that allows adequate
and unobstructed water supply.
802371
(ONLY WITH SOME MODELS)
20

CONNECTING AND SECURING THE WATER DISCHARGE
HOSE
Feed the water discharge hose into a washbasin or a bathtub, or connect it directly to a drain
(discharge hose minimum diameter 4 cm). The vertical distance from the floor to the end of the
discharge hose may be no more than 100 cm and no less than 60 cm. It can be attached in three
ways (A, B, C).
Discharge
hose end may
A
be placed over a
washbasin or a
bathtub. B Use a
string fed through the
opening in the elbow
support to attach the
hose and prevent it
from slipping to the
floor.
Discharge hose
B
may also be
attached directly to the
washbasin drain.
max 100 cm
min 60 cm
max 150 cm
A
max 100 cm
B
C
max 90 cm
max 90 cm
max 160 cm
A
max 30 - 40 cm
Discharge hose
can also be
C
attached to a wall
drain with a trap;
such trap should be
properly installed to
allow cleaning.
B
C
min 60 cm
max 100 cm
802371
21

The discharge
hose has to be
D
attached and affixed to
the pin on the back of
the washing machine,
as shown in the figure.
If the discharge hose is not correctly attached, safe and correct washing machine operation
cannot be ensured.
802371
22

CONNECTING THE APPLIANCE TO THE POWER MAINS
2 h
Before connecting the washing machine to the power mains, wait for at least 2 hours until
it reaches room temperature.
Connect the washing machine to a grounded power outlet. After installation, the wall outlet should
be freely accessible. The outlet should be fitted with an earth contact (in compliance with the
relevant regulations).
Information on your washing machine is indicated on the rating plate (see chapter »WASHING
MACHINE DESCRIPTION/Technical information«).
We recommend using over-voltage protection to protect the appliance in case of a
lightning strike.
The washing machine may not be connected to the power mains using an extension cord.
Do not connect the washing machine to an electrical outlet intended for an electric shaver or hair
dryer.
Any repair and maintenance pertaining to safety or performance should be done by trained
experts.
A damaged power cord may only be replaced by a person authorized by the manufacturer.
23
802371
 Loading...