

Page 1

1
HM618
P
adPOS
User Guide
Page 2

2
Sa
fety Precautions
Do n
ot subject the device to severe impact or drop it from heights.
Do not use the device in extreme hot or cold, dusty or damp conditions. Do not expose it
to direct sunlight.
Avoid using the device near strong magnetic fields.
Norma
l functioning of the product may be disturbed by ESD. If so, simply reset and
restart the device following the instruction manual. During file transmission, please
handle with care and operate in a static-free environment.
Keep
the device away from water and other liquids. In the event that water or other liq-
uids enter the device, power off the product immediately and clean the device.
Do
not use chemicals to clean the device in order to avoid corrosion. Clean it with a dry
cloth.
Do
not install this equipment in a confined space such as a book case or similar unit.
The ventilation should not be impeded by covering the ventilation openings with items
such as newspaper, table-cloths, curtains etc.
No naked flame sources, such as lighted candles, should be placed on the apparatus.
Atte
ntion should be drawn to environmental aspects of battery disposal.
Use
the apparatus in moderate climates.
We
are not responsible for damage or lost data caused by malfunction, misuse, modification of the device or battery replacement.
Do not attempt to disassemble, repair or modify the product. This will invalidate the
warranty.
If
the device will not be used for an extended period of time, please charge the battery at
least once per month to maintain battery life.
Charge the battery if:
a) The battery level icon displays
(An
empty battery)
b) The device powers off automatically when restarted.
c) There is no response when pressing keys with keys unlocked and battery full.
Do n
ot interrupt the connection when the device is being formatted or transferring files.
Otherwise, data may be corrupted or lost.
Whe
n the device is used as a portable HD, please use only per the instructions. Other-
wise, permanent data loss could occur.
Please
use and install data using the attachments/accessories provided and only accord-
ing to the manufacturer’s instruction.
Please
refer to the information on the bottom of the device for electrical and safety in-
formation before installing data or operating the device.
To
reduce the risk of fire or electric shock, do not expose this device to rain or moisture.
The device should not be exposed to dripping or splashing. Never place objects filled
with liquids, such as vases, on the device.
There
is danger of explosion if the battery is replaced incorrectly. Replace only with the
same or equivalent type.
The batt
ery (battery or batteries or battery pack) should not be exposed to ex-
cessive heat such as sunlight, fire or the like.
Page 3
3
Please follow responsible procedures for battery disposal.
If
the power adaptor disconnected from the device, the device will remain operable as
long as the battery has sufficient charge.
The
power adaptor is a CLASS II apparatus with double insulation, and no external
ground is provided.
Safety s
ymbol explanation:
-
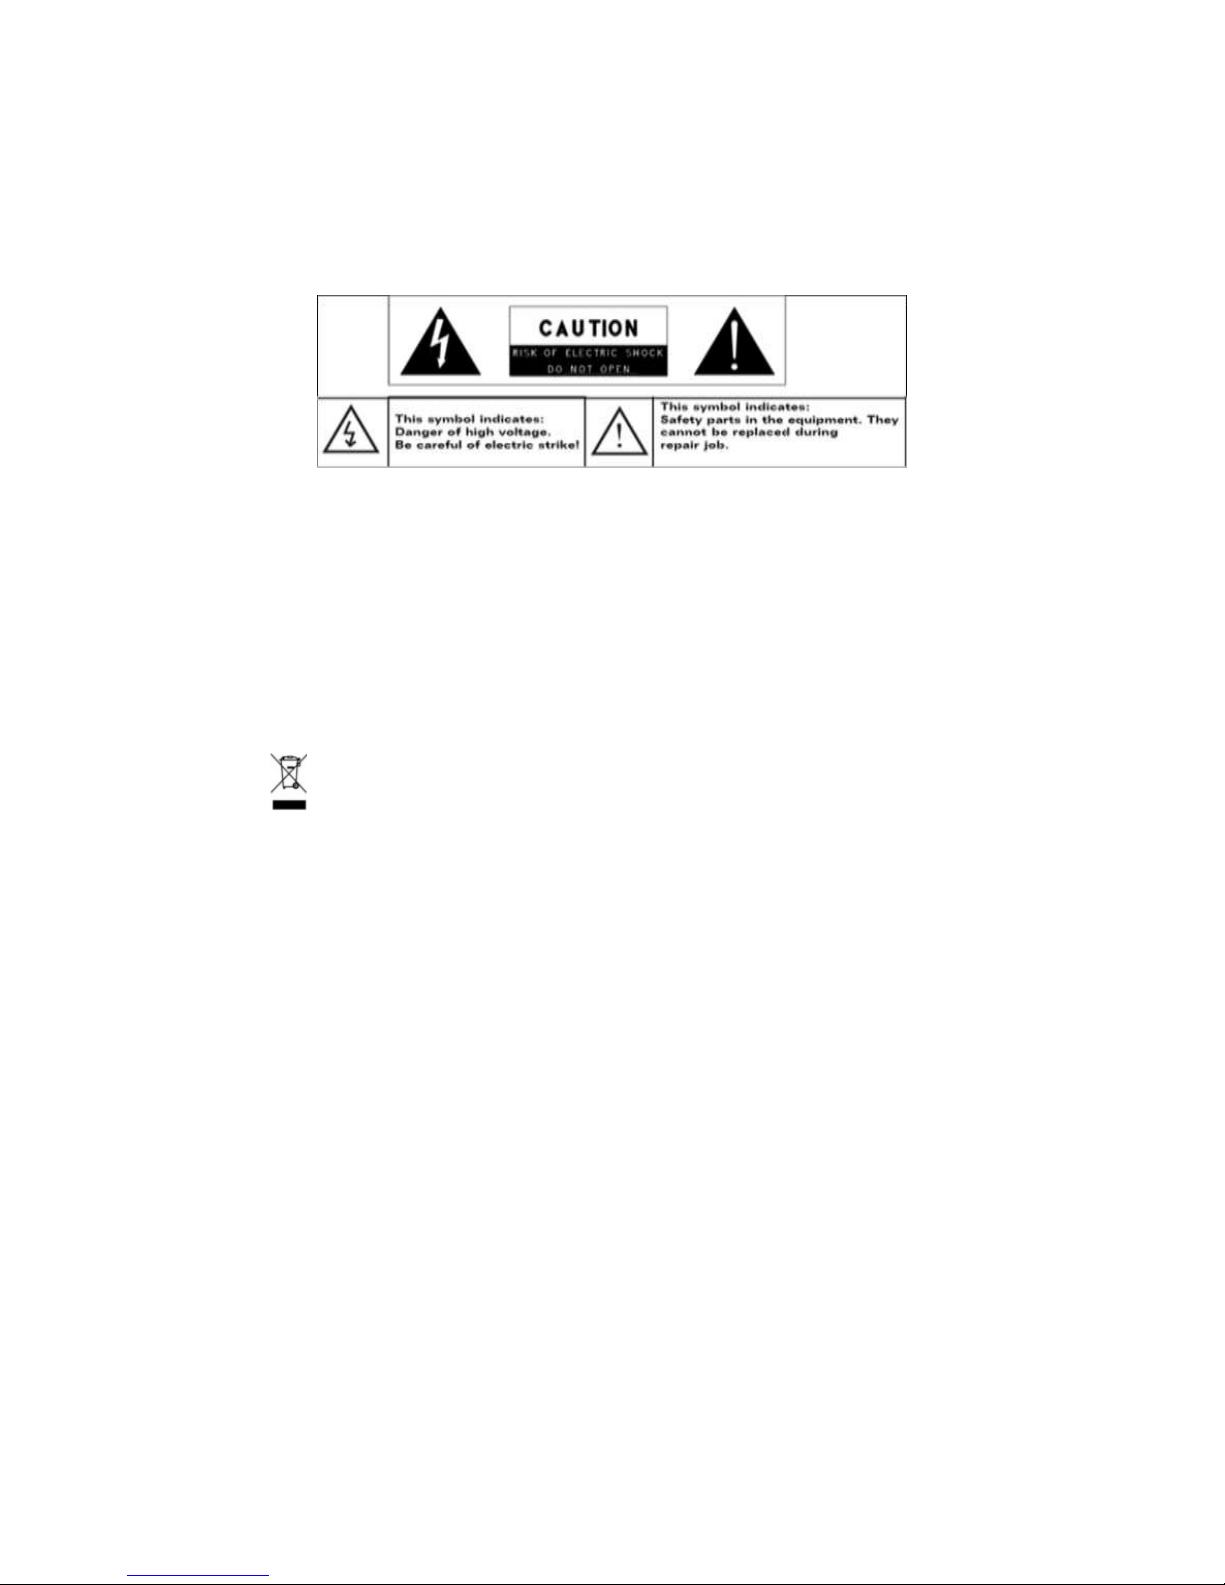
The light
ning flash with arrowhead symbol within an equilateral triangle is intended to alert the user to the presence of non-insulated “dangerous voltage”
within the product’s enclosure that may be of sufficient magnitude to constitute a
risk of electric shock.
- To reduce the risk of electric shock, do not remove the cover (or back) as there are
no user-serviceable parts inside. Refer servicing to qualified personnel.
- The exclamation point within an equilateral triangle is intended to alert the user to
the presence of important operating and maintenance instructions in the literature
accompanying the device.
-
Correct
Disposal of this product. This marking indicates that this product
should not be disposed of with other household waste in the EU. To prevent possible harm to the environment or human health from uncontrolled waste disposal,
recycle it responsibly to promote the sustainable reuse of material resources. To
dispose of your used device, please use the return and collection systems available
in your area or contact the retailer where the product was purchased. They can take
this product for safe environmental recycling.
This
equipment should be installed and operated with minimum distance 20cm between
the radiator & your body.
CE in
which countries where the product may be used freely: Germany, UK, Italy, Spain,
Belgium, Netherlands, Portugal, Greece, Ireland, Denmark, Luxembourg, Austria, Finland, Sweden, Norway and Iceland.
Page 4

4
Li
stening Cautions
This
product respects the current regulations for limiting the output volume of consumer
audio devices to a safe level. By listening to your device with headphones or earbuds at
high volumes, you run the risk of permanent damage to your ears. Even if you get used
to listening at high volumes and it seems normal to you, you still risk the possibility of
damaging your hearing. Reduce the volume of your device to a reasonable level to avoid
permanent hearing damage. If you hear ringing in your ears, reduce the volume or shut
off your device. This device has been tested with the supplied earphones. In order to
preserve your hearing, it is advised that you use only the following headphone models:
the earphones supplied with your device, or any other headphones that respect the current regulations. Other types of headphones may produce higher volume levels.(At full
power ,the prolonged listening of the walkman can damage the ear of the use)
Do
not use while operating a motorized vehicle. It may create a traffic hazard and is il-
legal in many areas.
Y
ou should use extreme caution or temporarily discontinue use in potentially hazardous
situations created by obstructed hearing.
Ev
en if your headphones or earphones are the open-air type designed to let you hear
outside sounds, don’t turn up the volume so high that you can’t hear what’s around you.
Sou
nd can be deceiving. Over time your hearing “comfort level” adapts to higher volumes of sound. What sounds “normal” can actually be loud and harmful to your hearing. Guard against this by setting the volume of your device at a safe level BEFORE
your hearing adapts.
To establish a safe volume level:
a. Start your volume control at a low setting.
b. Slowly increase the sound until you can hear it comfortably and clearly, and
without distortion. Once you have established a comfortable sound level, leave it
there.
This man
ual contains only some basic information about the device. Refer to the actual device for more
exact details. All information is subject to change without prior notice.
Page 5
5
Features & Functionality
T
ablet
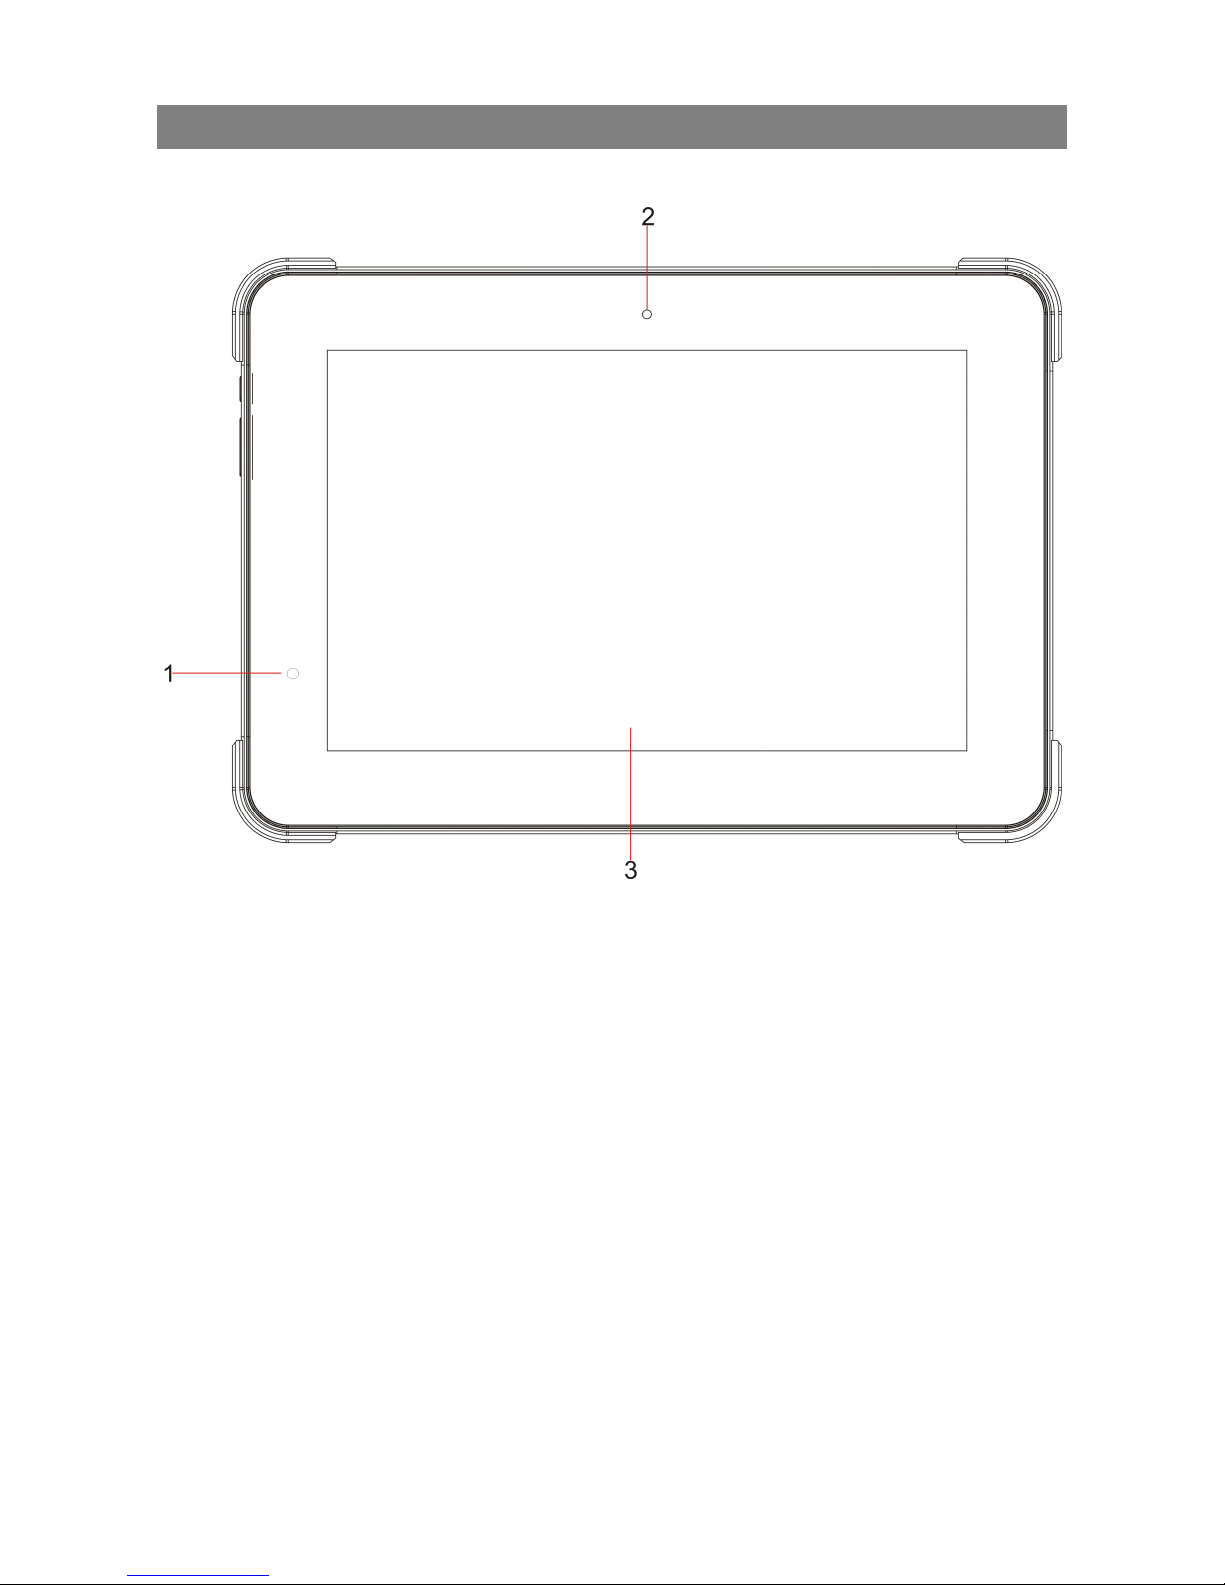
Front view
1
. Power indicator Indicates the battery-charge status.
2. Front camera Capture a front view picture or record videos.
3. Tounch screen Support muli-touch.
Page 6
6
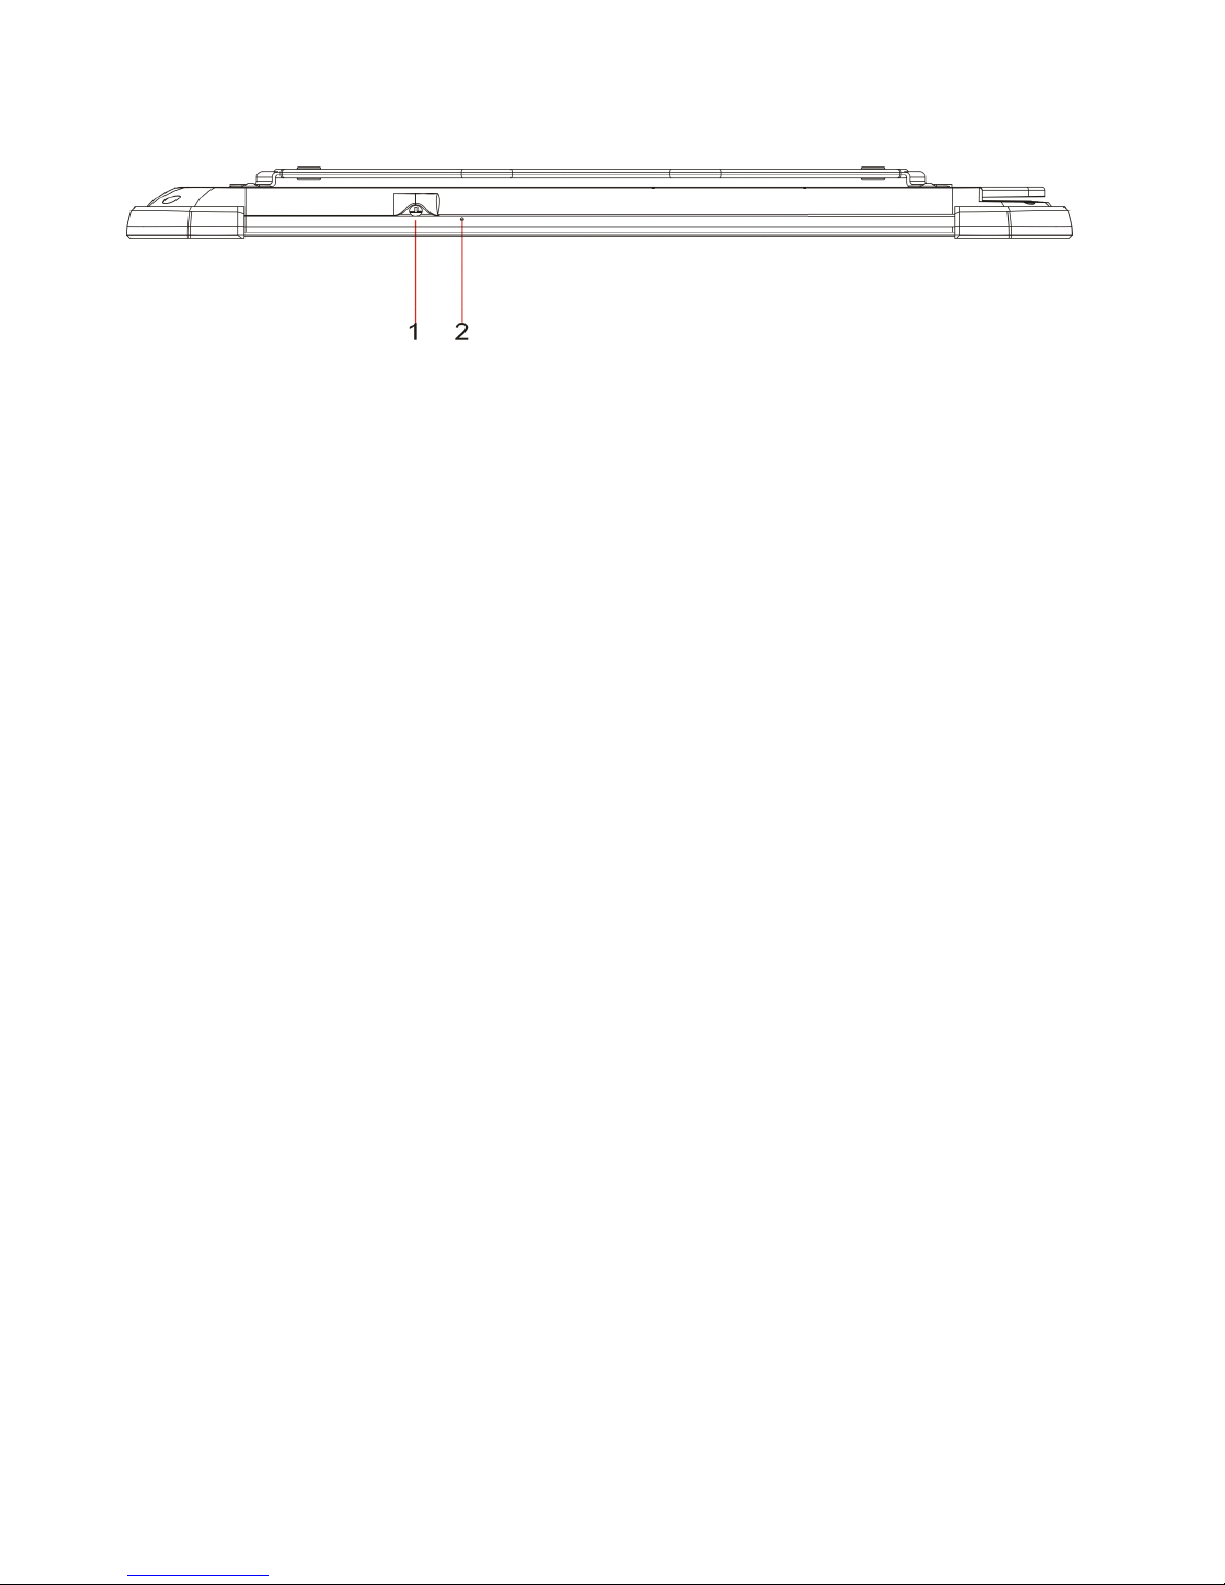
Top view
1. Combo audio jack Connect to headsets.
2. Built-in microphone
Capture voice which can provide sound input to
make calls using. web-based apps, audio recording.
Page 7
7
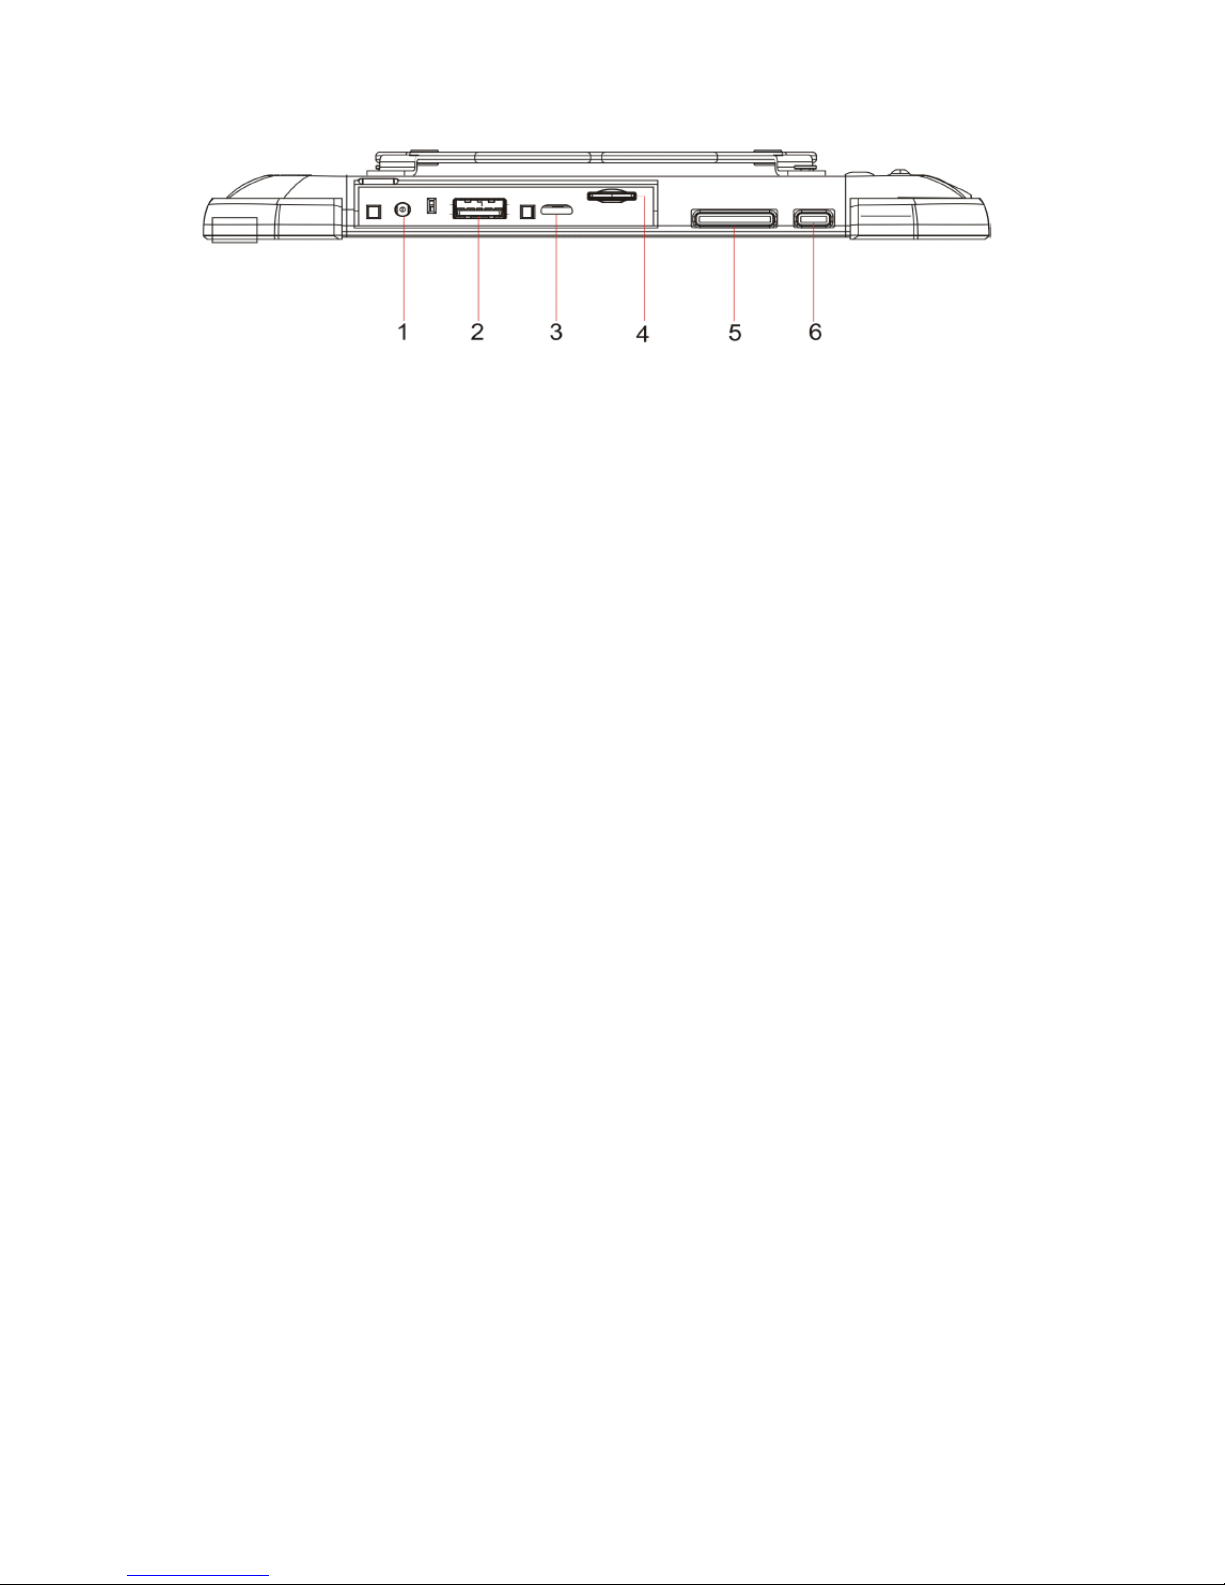
Left-side view
1. AC power apdapter jack Connects to the AC power adapter.
2. USB 3.0 port
3. Micro USB port
4.
Connects to USB devices.
Connects to USB devices.
5.
Micro SD card slot Accommadate micro SD card.
6.
Volum button Increases or decreases the volum level.
Power button Press and hold on to turn on or turn off the devices.
Page 8
8
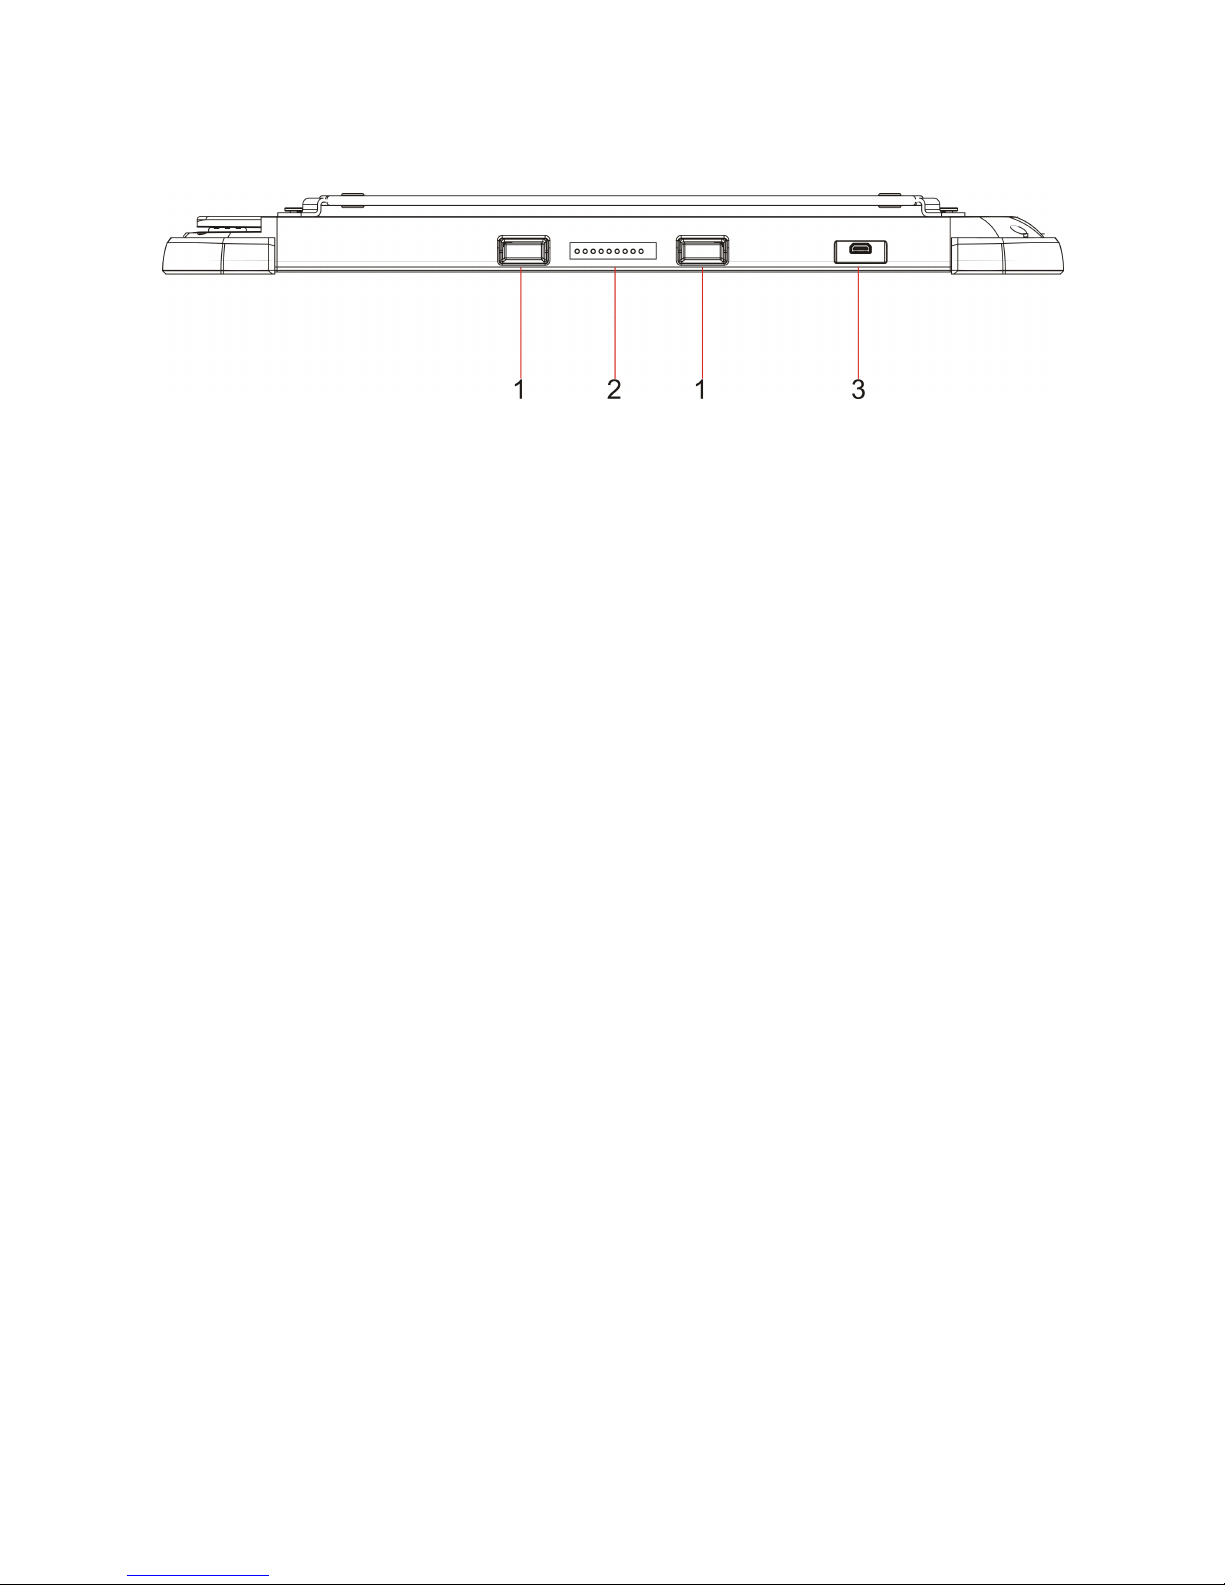
Bo
ttom view
1.
Dock latch Attaches the table to the dock keeping the tablet
fixed in place.
2. Pogo pin connector Connects the tablet to the dock .
3.
Micro HDMI port Connects the tablet to a TV or an external display .
Page 9
9
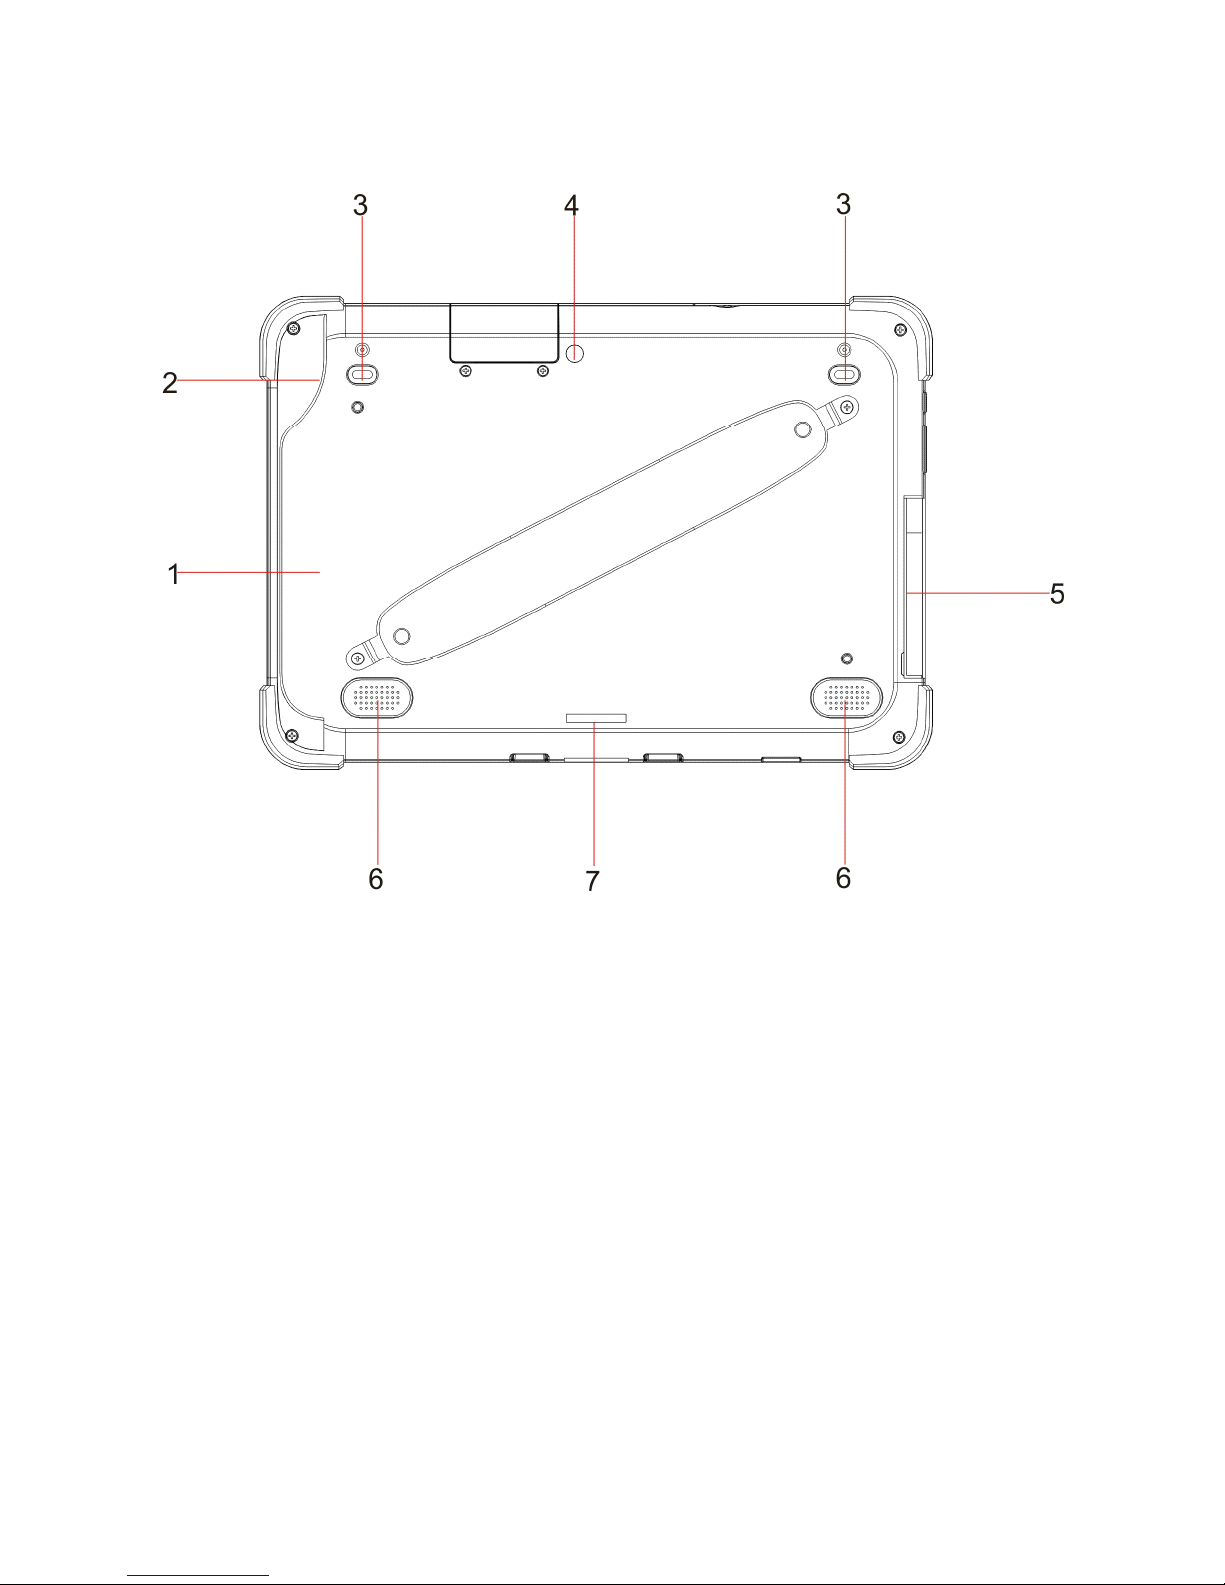
Rear view
1. Magnetic card reader
2. Non-contact card reader
Swipes Magnetic cards.
Contactless integrated circuit card.
3. Scan button Press the button to scan.
4. Rear camera Captures pictures or videos.
5. Port cover Built-in ports.
6. Speaker Provides audio output.
7. Lock latch Lock the tablet on the multifunctional dock.
Page 10
10
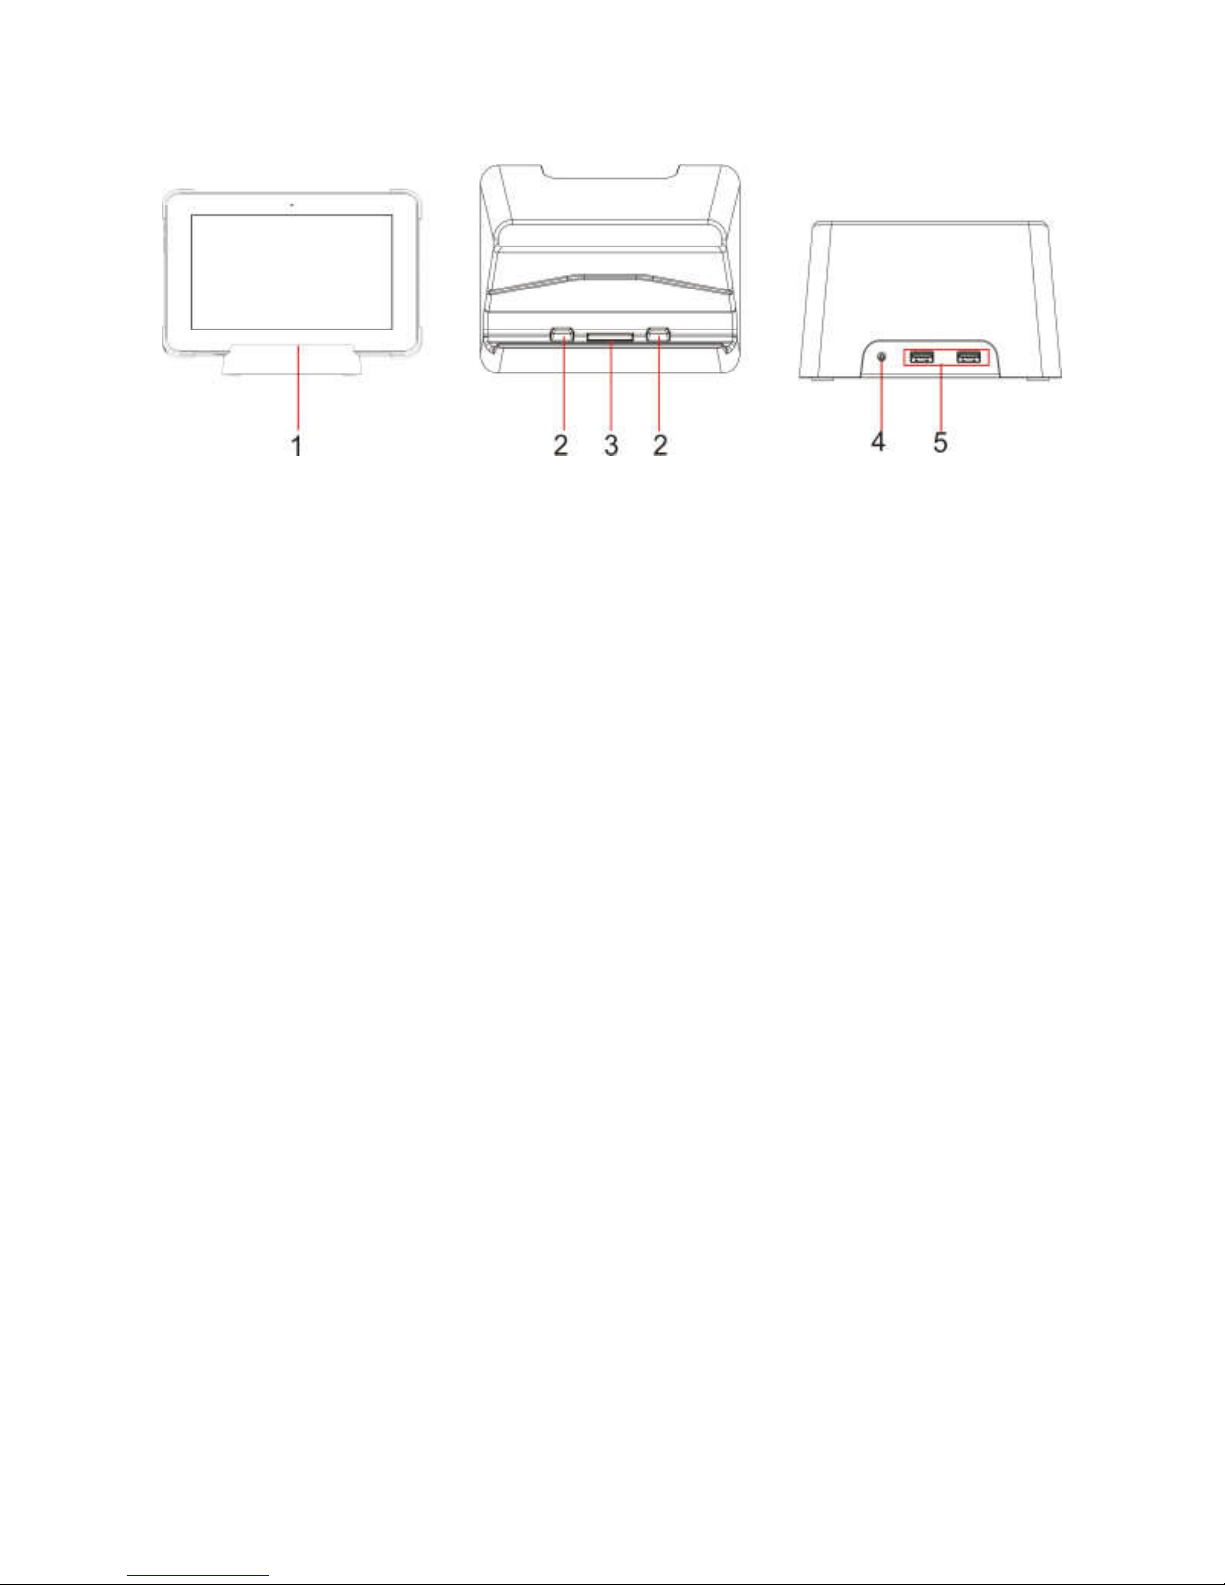
Dock
(optional)
Attach the
tablet to the dock Top view Rear view
1. Dock
2.
Dock
latch
Atta
ches the table to the dock.
keeping the tablet.fixed in place.
3. P
ogo pin connector Connects the tablet to the dock
4. AC power apdapter jack Connects to the AC power adapter.
5. USB 2.0 port
Connects to USB devices.
Page 11
11
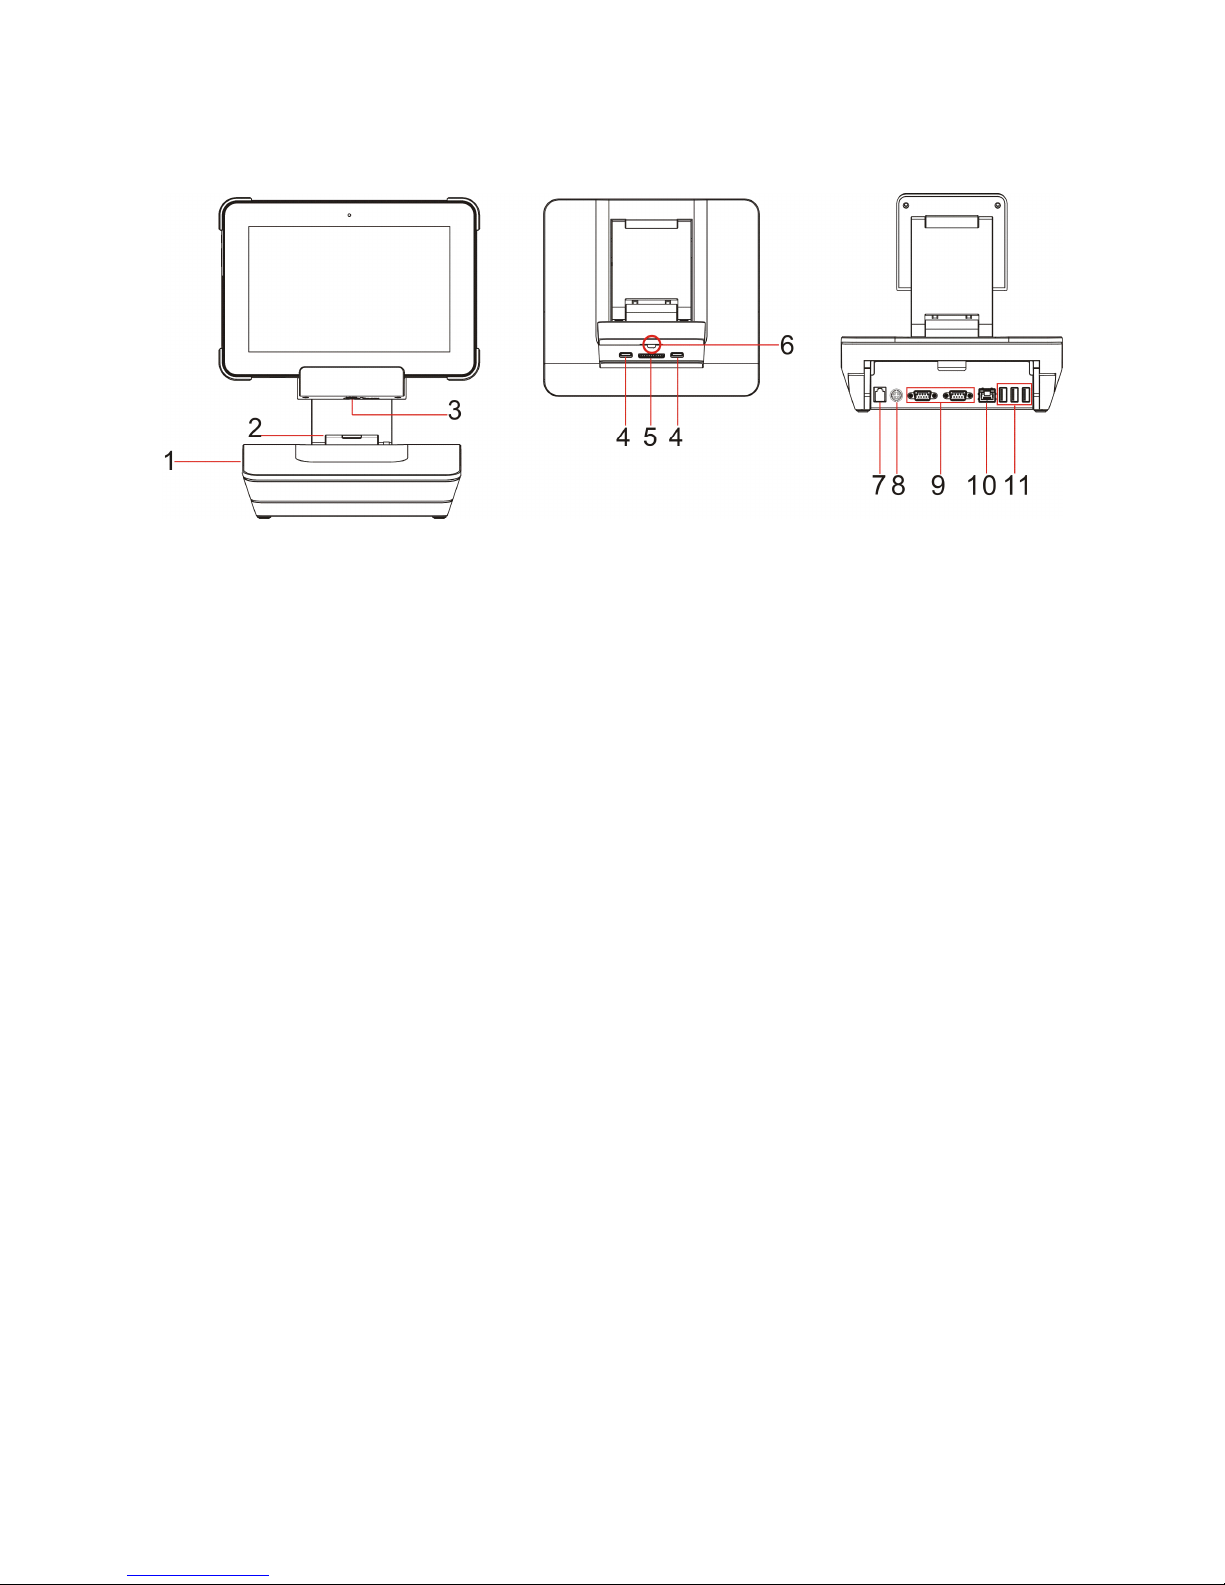
Multi
functional dock(optional)
Attach
the tablet to the dock Top view Rear view
1. Multifunctional dock
2. Printer cover
Cover for printer.(not supplied).
3. Keyhole
Inserts a key to lock the tablet.
4. Dock latch Attach the tablet to the dock
keeping the tablet fixed in palce
5. Pogo pin connector Connects the tablet to the dock.
6. Lock-tongue
Lock the tablet on the multifunctional dock.
7. Cashdrawer port
Acess Cashdrawer.
8. AC power adapter jack Connects to the AC power adapter.
9. COM
RS232 CO
M.
10. Ethernet port Connects to cable.
11. USB 2.0 port
Connects to USB devices .
Page 12
12
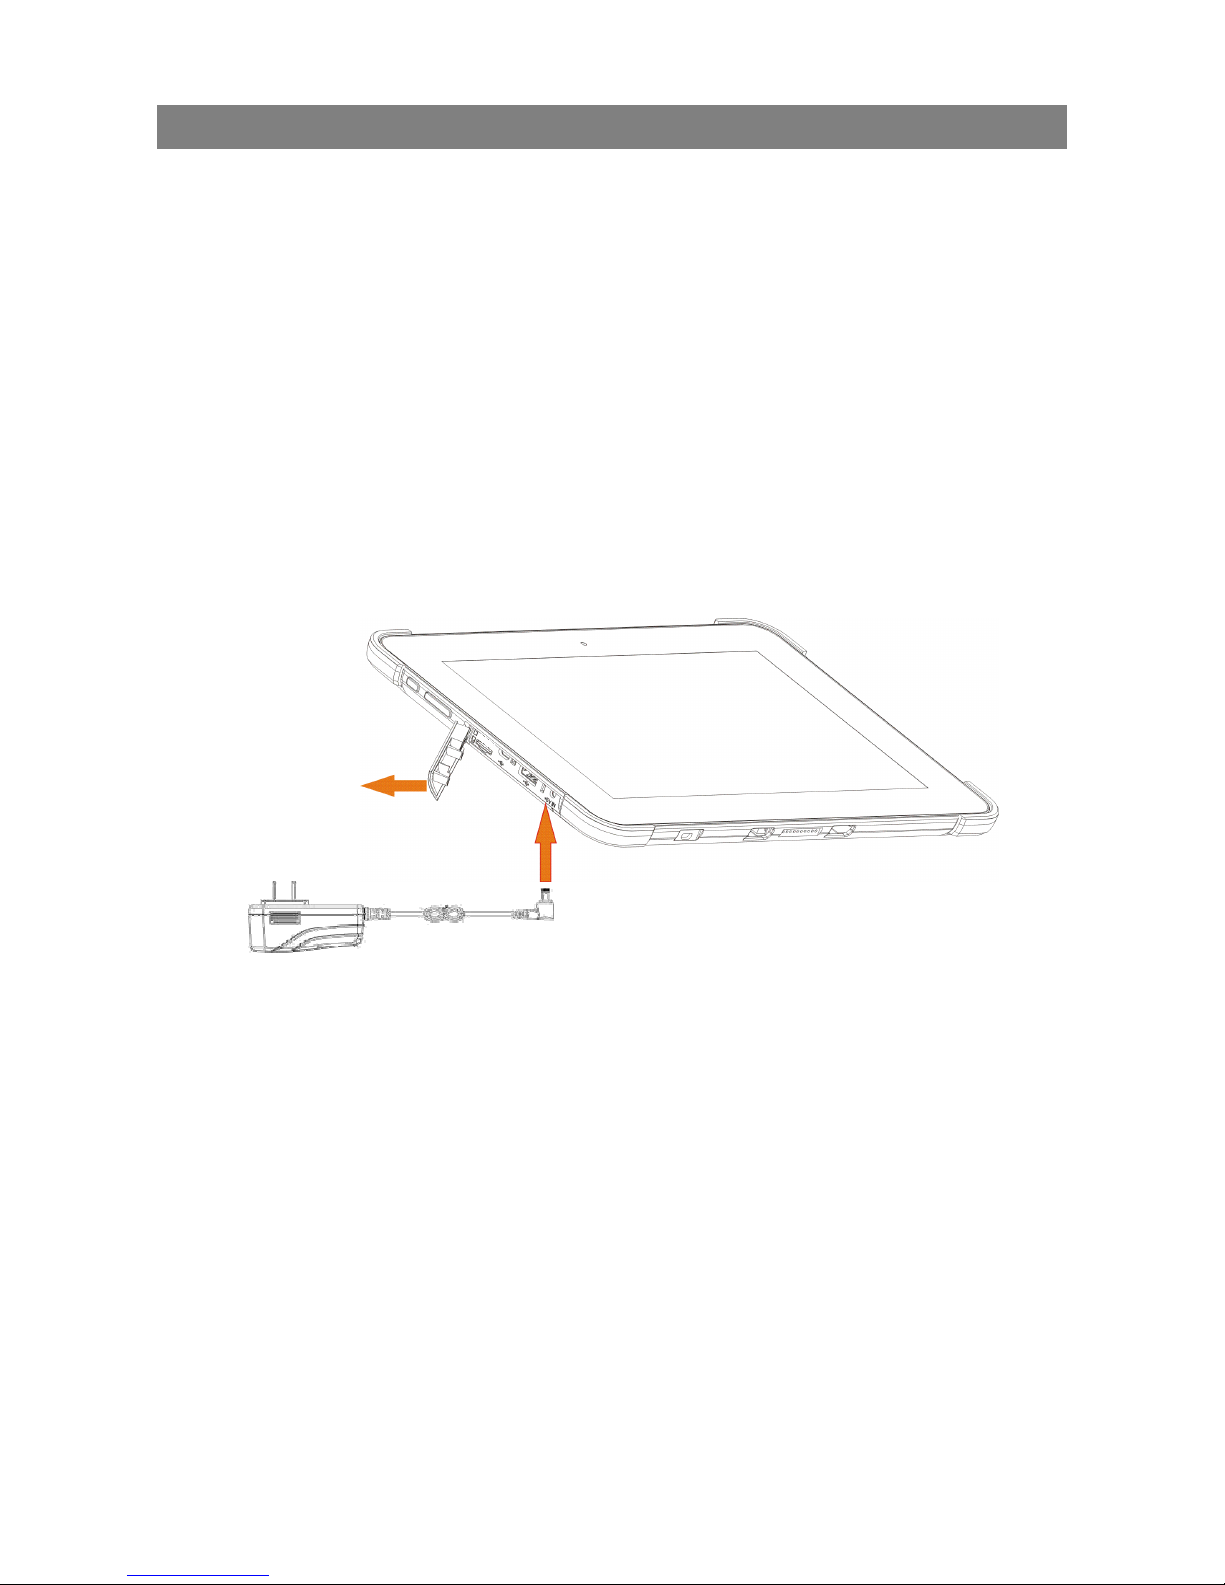
Basic Connections
Charging the tablet
Notes:
If using t
he tablet for the first time, or after a long period of idle time, charge the
batt
ery for more than half an hour before turning it on, to ensure system stability.
The tablet has a built-in rechargeable battery. Charge the device when the battery level
is low.
1. Plug the power adapter into the DC-In socket.
2. Open the port cover on the left.
3. Connect the power adapter to an electrical outlet and charge the tablet until the battery
is fully charged.
Caution:
Charg
e the battery in an ambient temperature of 0 °C to 35 °C.
Use only the supplied power adapter to charge your tablet. Using unauthorized
power adapters may severely damage your tablet.
Page 13
13
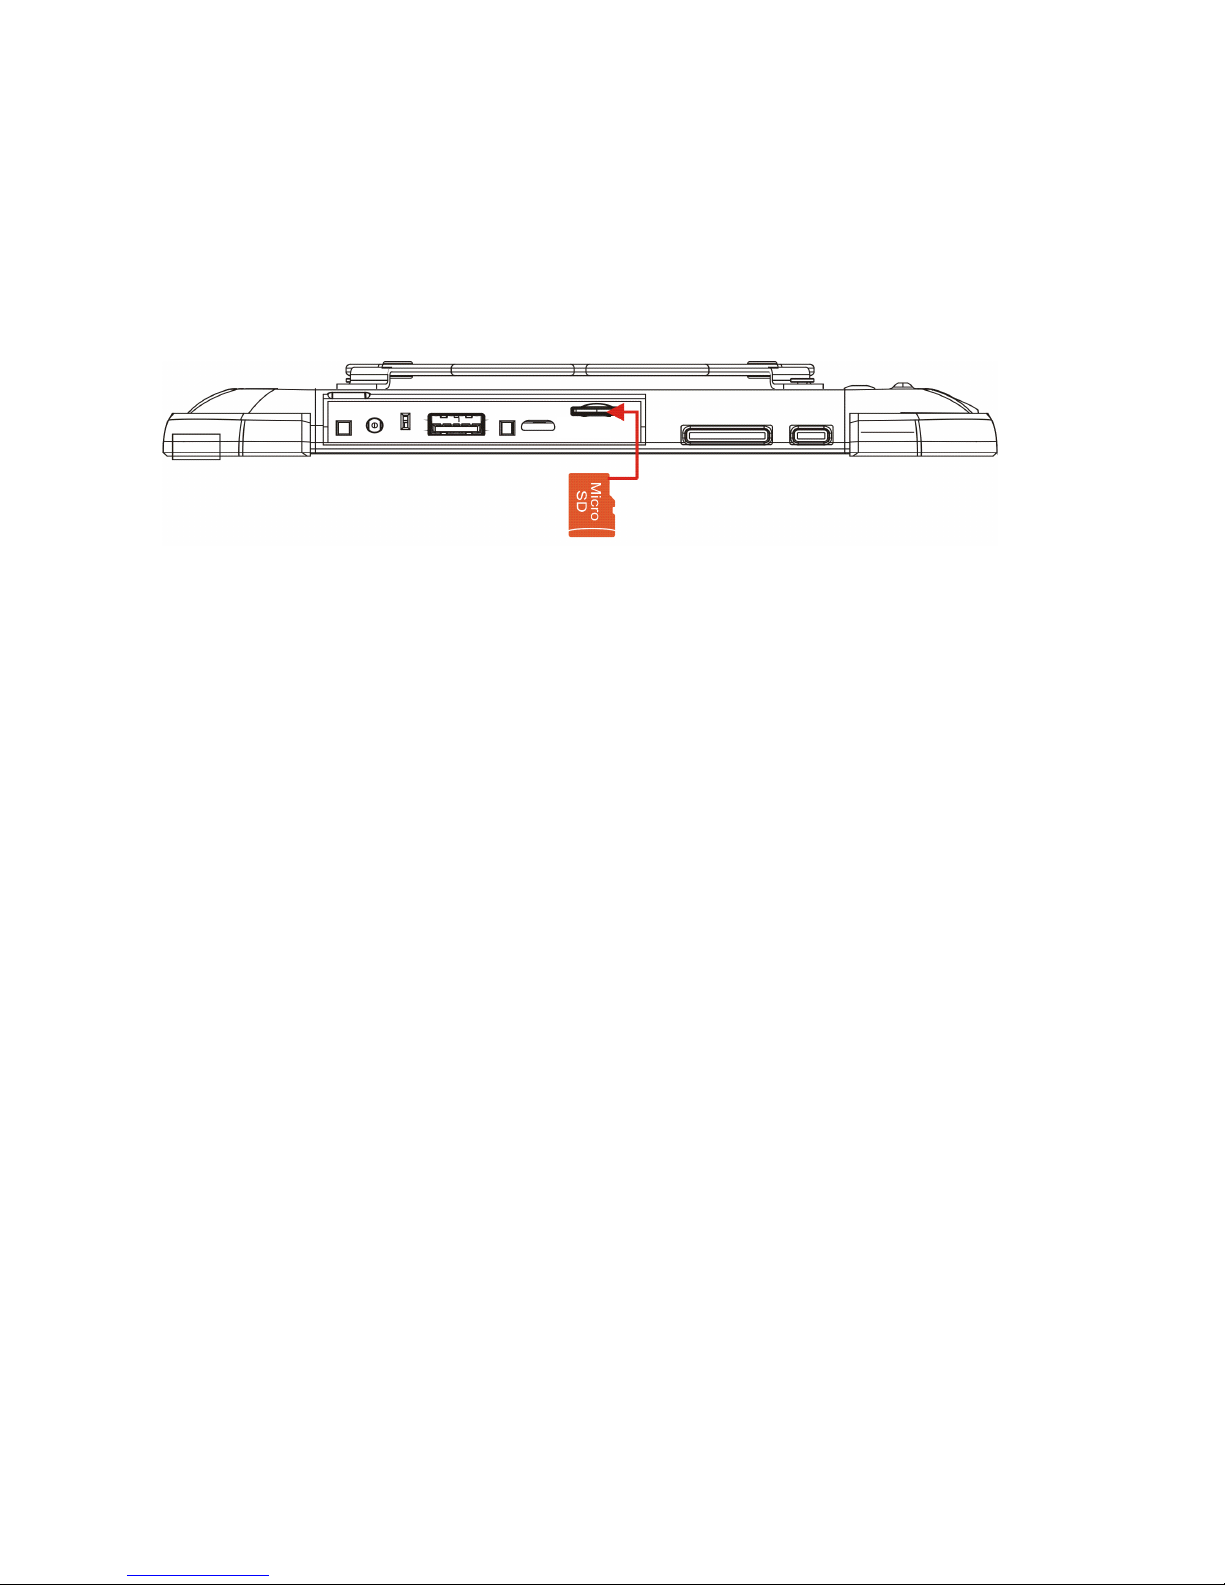
Inserting a micro SD card
1. Open the port
cover on the left.
2. Pick up a micro SD card.
3. Align the micro SD card so that the pins are pointed toward the card slot.
4. Push the micro SD card into the card slot until it locks into place.
Removing a micro SD card
1. Touch the Tray
button in the notification area in the lower-right corner of the screen.
2. Touch Safely Remove Hardware .
3. Touch Eject XXXX SD Card. A message appears confirming that the micro SD card
can be safely removed. If a warning message appears stating the micro SD card cannot
be removed, ensure all data transfers involving the micro SD card are complete.
4. Press on the micro SD card to release it.
5. Slide the card out after it pops out from the micro SD card slot.
Caution:
Removing the micro SD card while it is in use may cause data loss or result in appli-
cation errors.
Make sure all save operations to the microSD card are complete before removing the
micro SD card.
Page 14
14
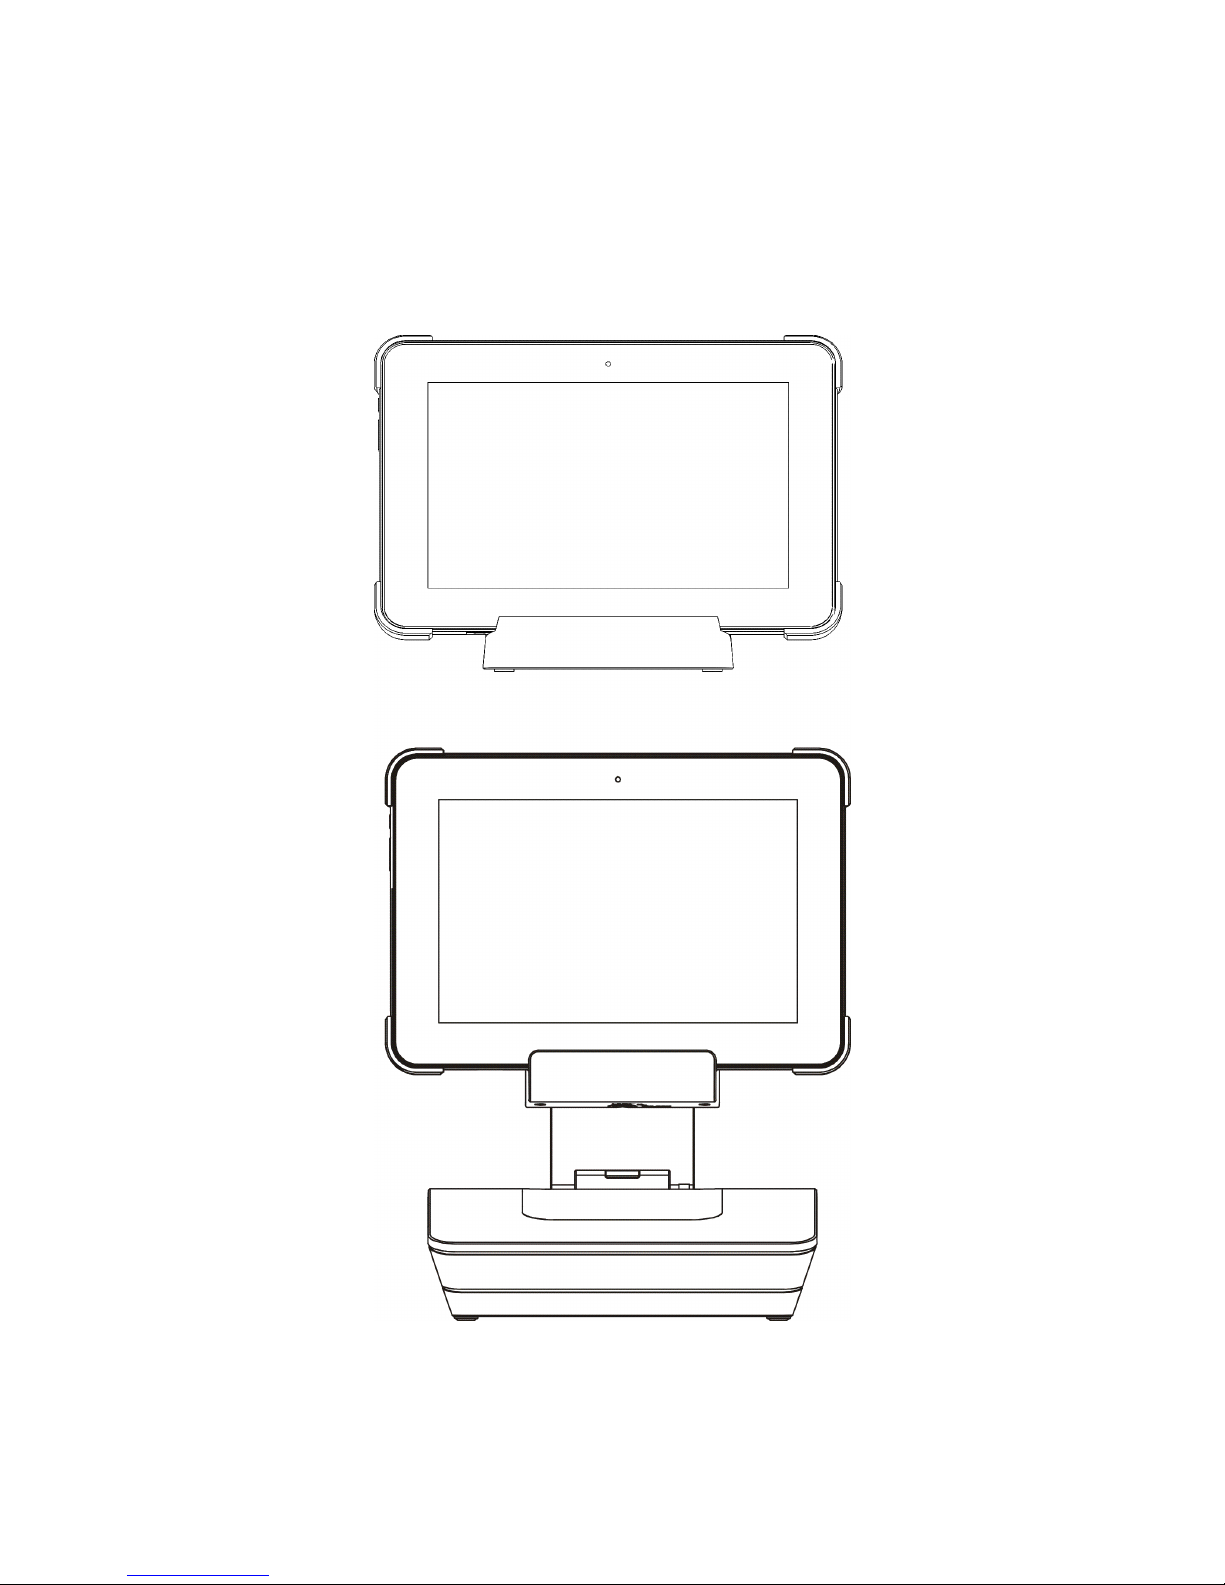
Connecting the Base Connector
1. Place the base connector on an even plane like the top of a desk
2. Connect the tablet to the base connector, aligning the Pogo pin jack and the positioning
slots.
3. To separate the tablet from the base connector, hold the base connector with one hand,
then grab the top edge of the tablet and drag it apart.
Page 15
15
Basic
Operation
Turning On the Tablet
Note: Thi
s device has been equipped with Windows 10 system at the factory, so user need not
perform Windows setup again before using for the first time.
Press and hold the Power button to turn on your tablet. The lock screen appears.
Now the tablet is ready for use.
Note: If the login screen is not enabled in Windows 10, you will be taken directly from the
lock screen to the Start screen.
Turning Off the Tablet
You c
an turn off the tablet in two ways:
Using the Power button:
1. Press and hold the Power button for at least 4 seconds.
2. Swipe-down the shutdown confirmation screen to the bottom edge of the display to
turn off the tablet.
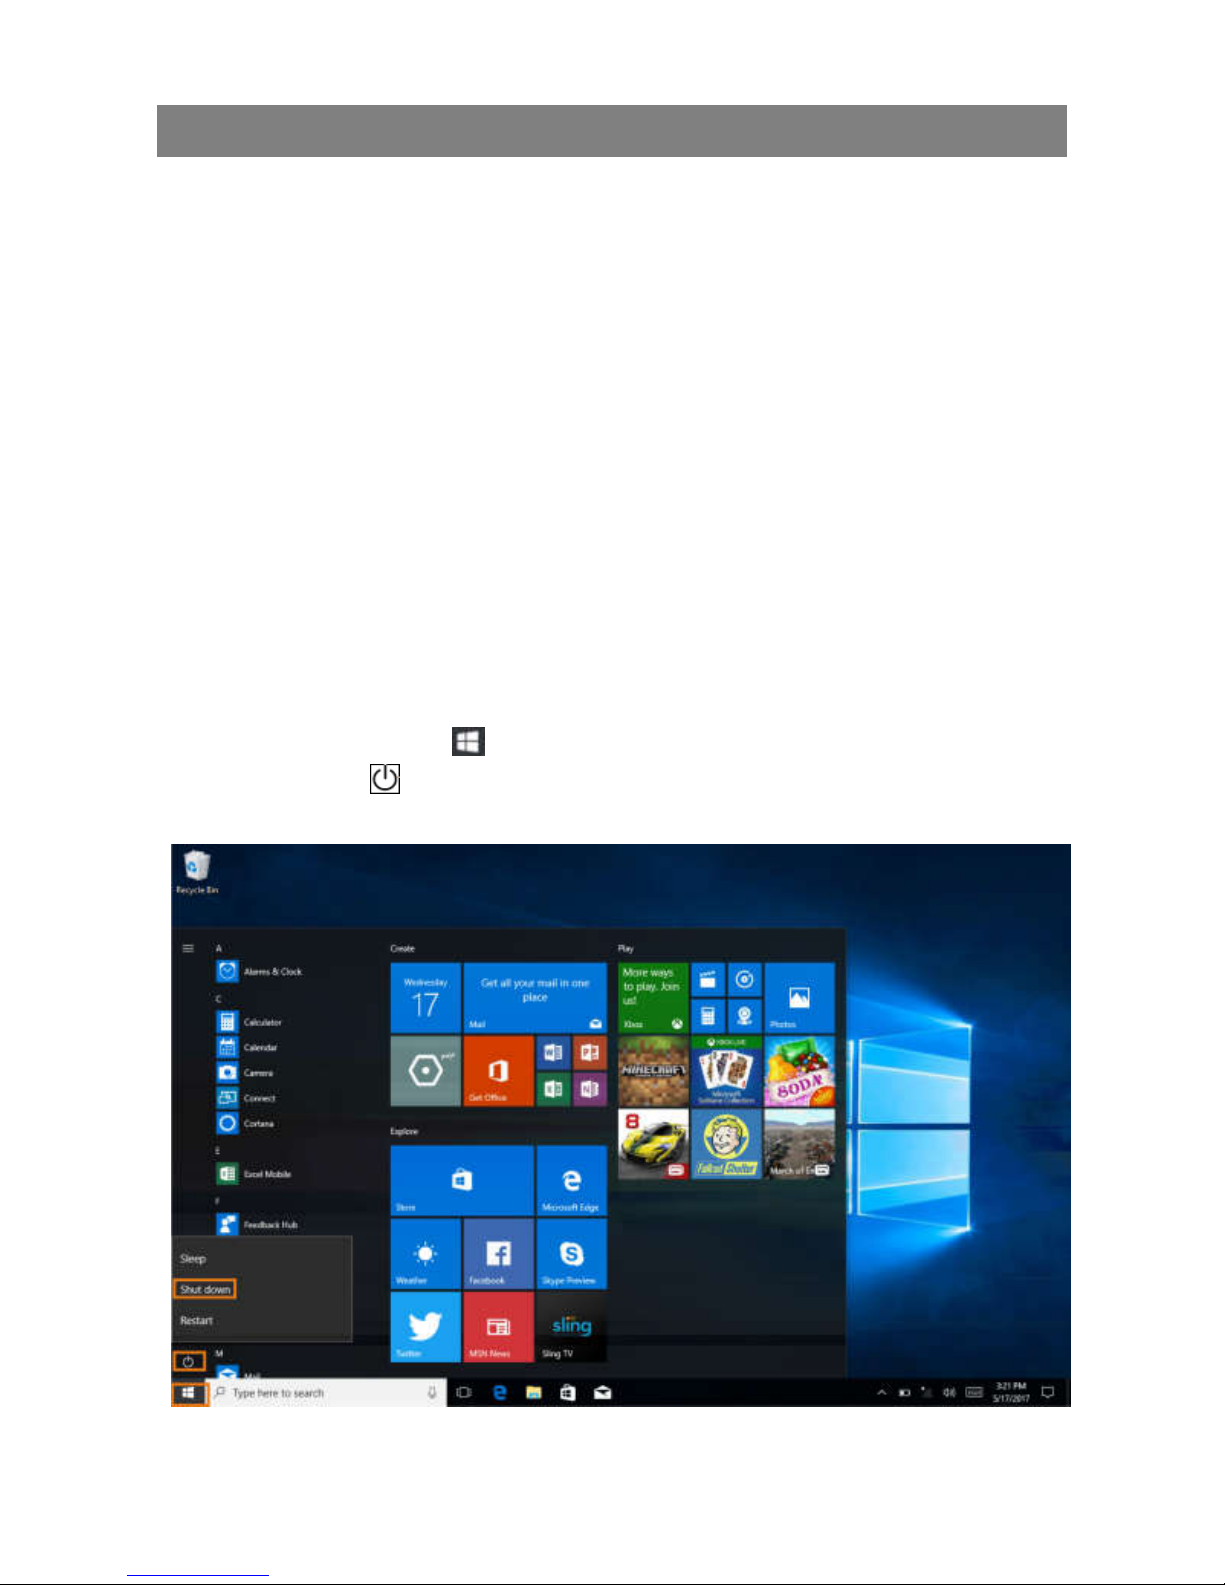
Using Start menu:
1. Touch the Start button
to b
ring up Start menu.
2. Touch Power
→ Shutdown
to turn off the tablet.
Page 16
16
Turning On/Off screen
Usually, user can press once the power button to turn on/ off the screen display
.
Optionally, user can also use the Start menu:
1. Touch the Start button
to bri
ng up Start menu.
2. Touch Power
→ Sleep to turn off t
he screen.
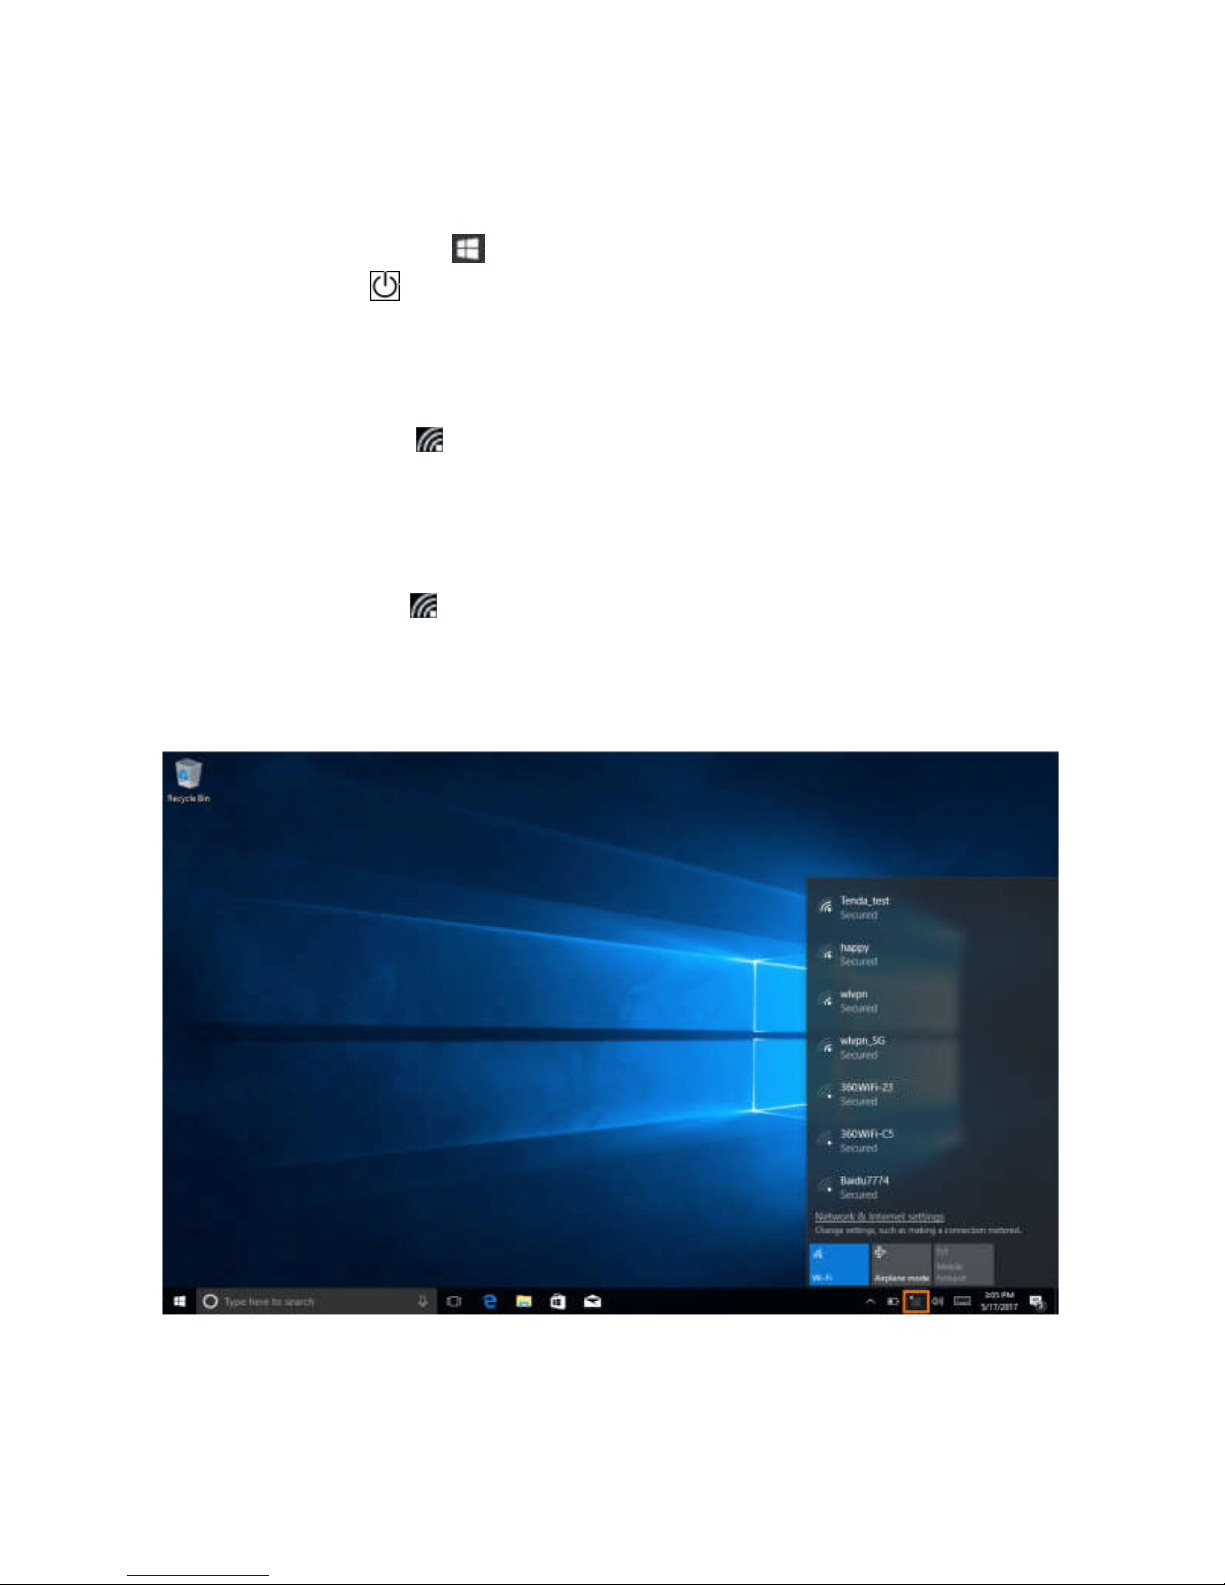
Connecting to a wireless network
Turning On
/Off Wi-Fi
1. Touch Wi-Fi icon
on the lower-
right corner of the taskbar to view the available
wireless networks.
2. Touch Available Wi-Fi icon to turn on/off Wi-Fi connection.
Connecting to a wireless network.
1. Touch WiFi icon
on the lo
wer-right corner of the taskbar to view the available
wireless networks.
2. Select a wireless network ,clik the network name from the list,then touch Connect.
3. Input the password if necessary, then touch Connect to start connecting to the Internet.
Page 17
17
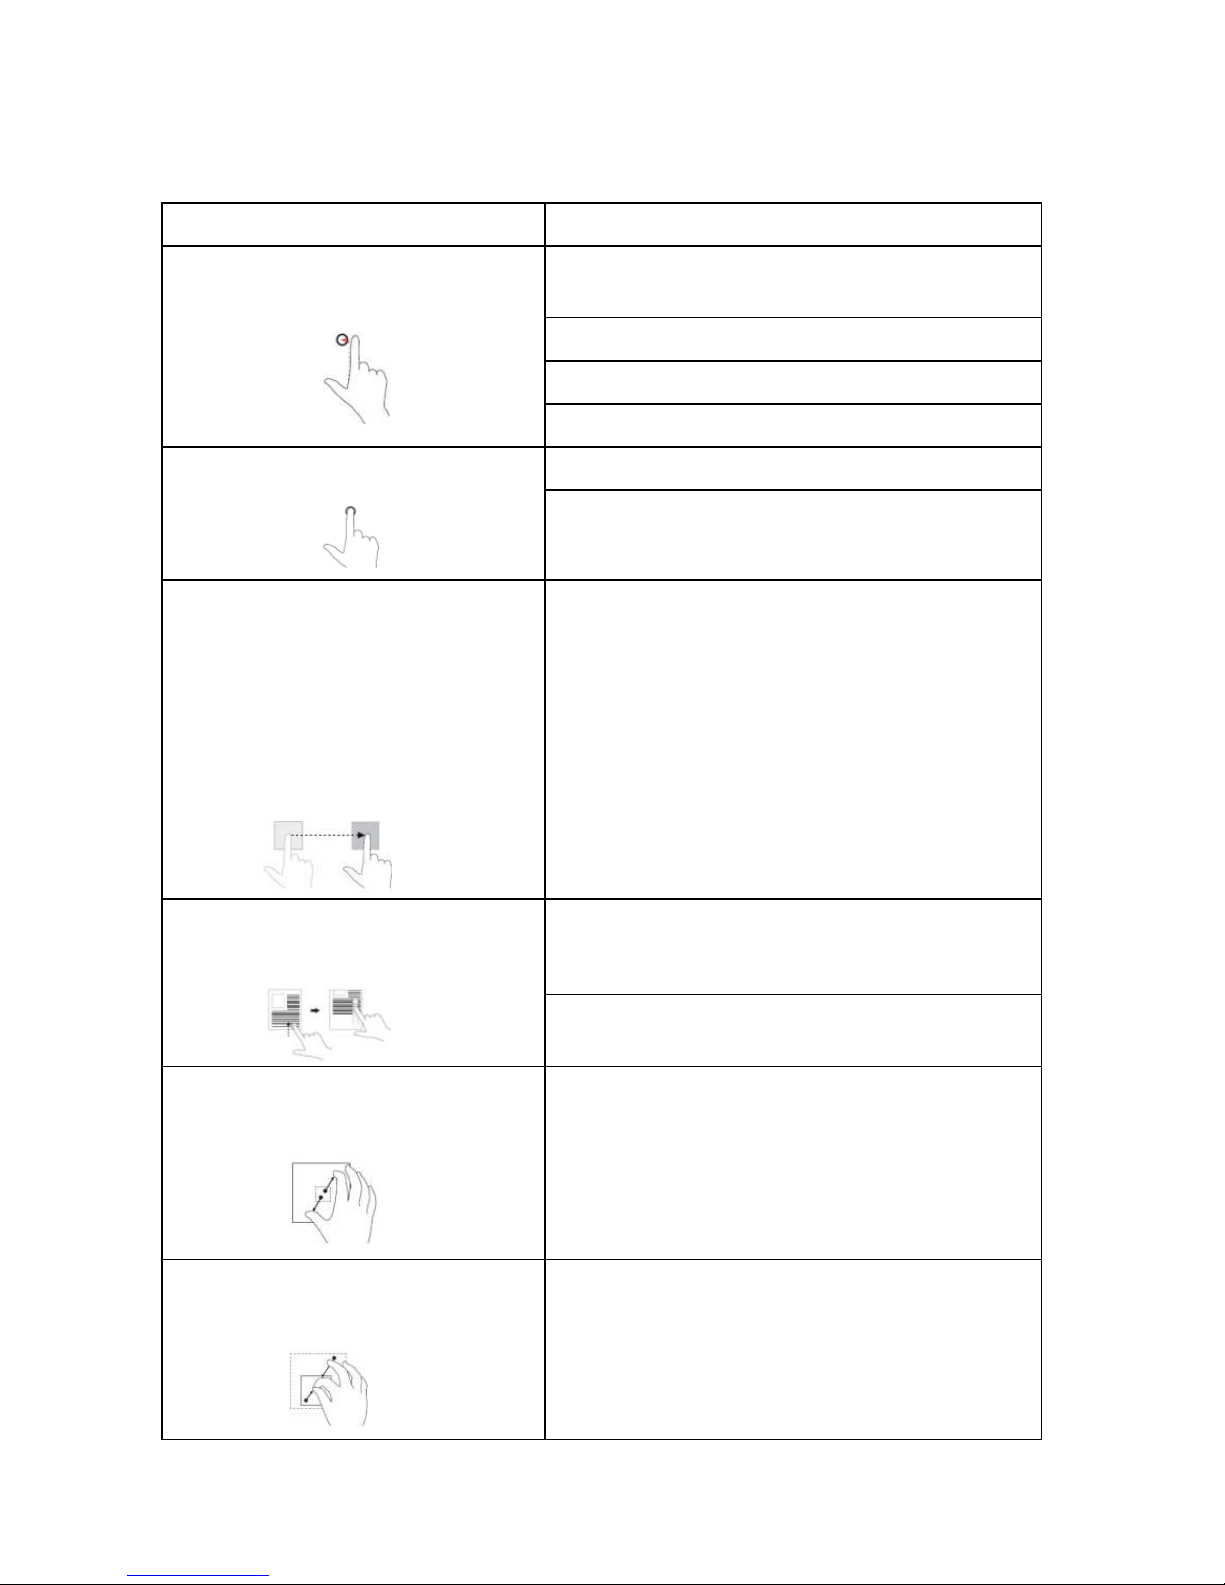
Gestures
Your tablet has a multi-touch display. You can touch the screen to operate the tablet.
Finger Gesture You can do
Touch
Tap
gently on the display with your
fingertip.
Select items on the screen, including options, entries,
images, and icons.
Start apps.
Touch buttons
on the screen.
Input text
using the on-screen keyboard.
Touch
and Hold
Touch and hold your finger on the display.
Display detailed information about an item.
Open the cont
ext menu of an item to perform further
actions.
Drag
1. Touch and
hold your finger on an item
on the screen.
2. Keeping your finger in contact with the
display, move your fingertip to the
desired location.
3. Take your finger off the display to drop
the item in the desired location.
Move items such as images and icons on the screen.
Swipe
or Slide
Move your finger in a vertical or horizontal direction on the display.
Scroll through the Start screen, web pages, lists, en-
tries, photos, contacts, and so on.
Close an app.
(Swipe the app to the bottom of the
display.)
Zoom i
n
Touch the display with two fingers and
then move the fingers apart.
Enlarge the view of an image or web page.
Zoom ou
t
Touch the display with two fingers and
then move the fingers closer.
Reduce the view of an image or web page.
Page 18
19
Locking the screen orientation
For optimal viewing e
xperience, the screen orientation changes automatically to portrait or
landscape format depending on how you hold the tablet. You can disable automatic screen
rotation and lock the screen in portrait or landscape mode.
Note: Some apps may not support automatic screen rotation and are designed to work only
in one orientation.
1. Change the screen to the desired orientation.
2. Touch Action Center button in the notification area to access the Action Center.
3. Touch Rotation lock icon to lock or unlock screen rotation.
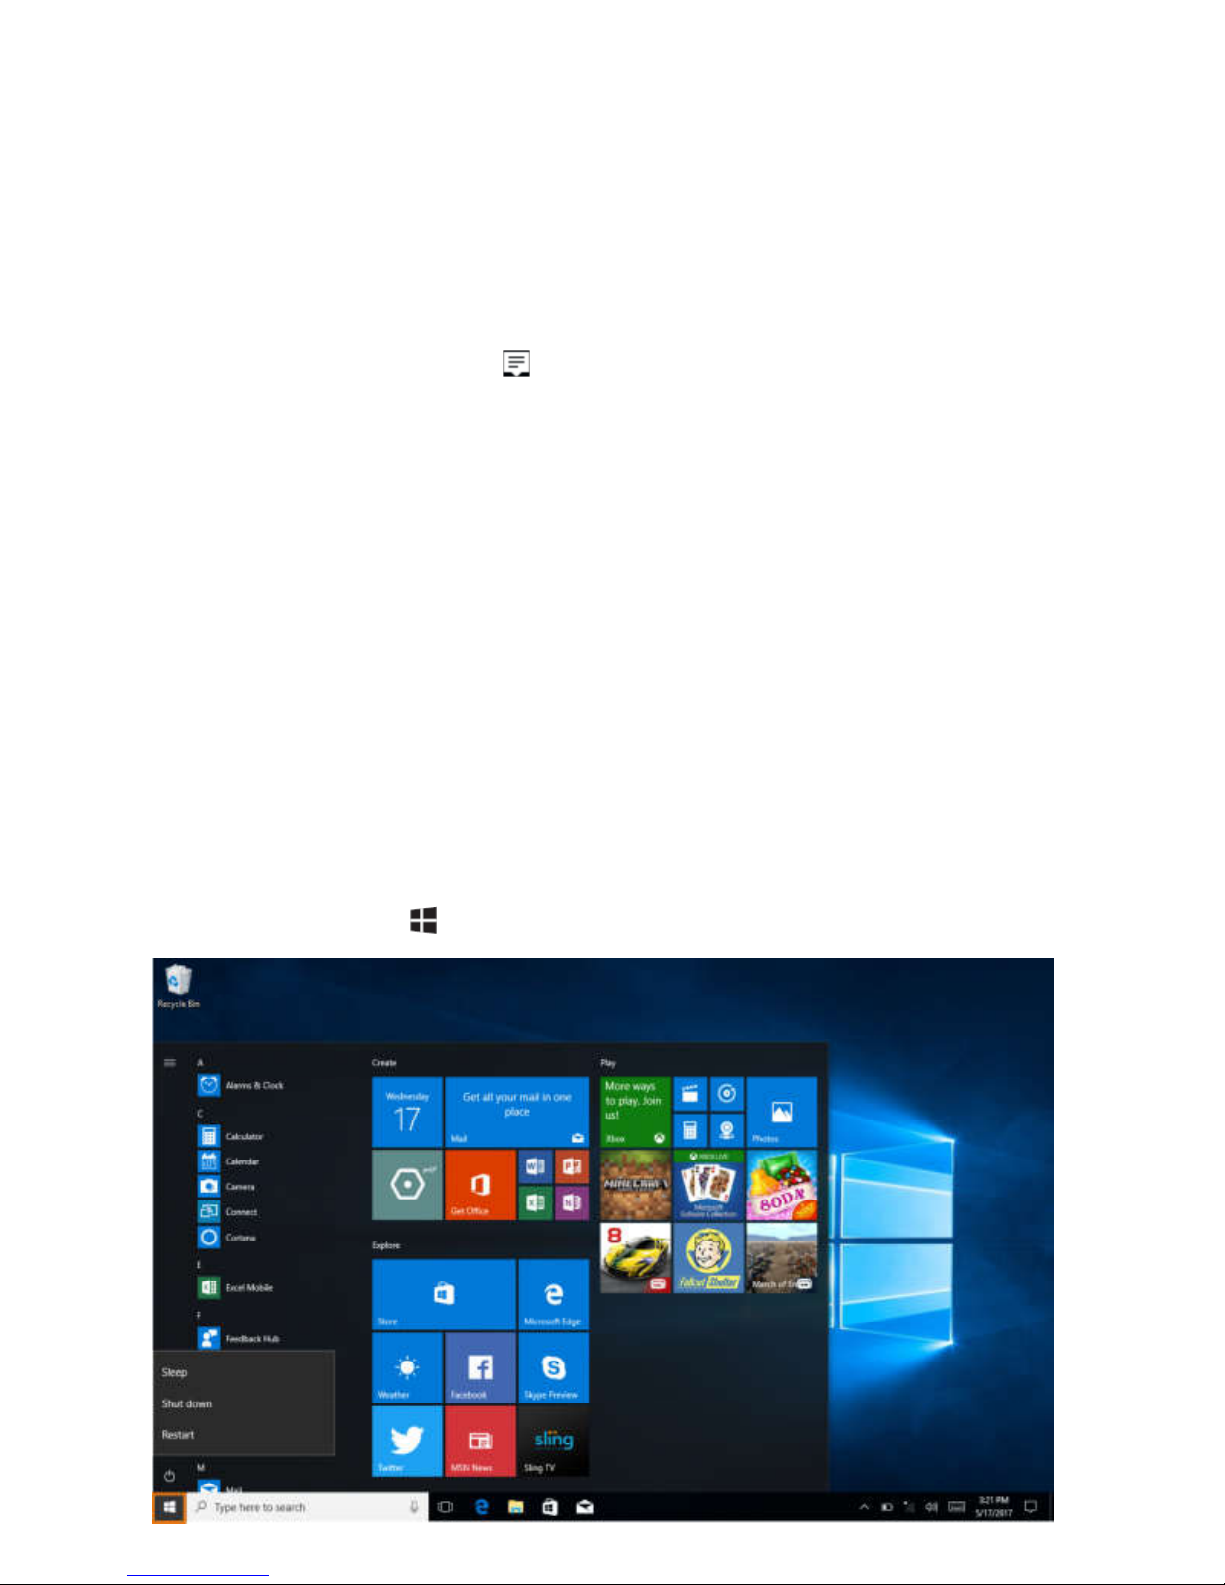
Windows 10 Start Screen
The Windows
10 Start screen displays a list of default and custom Live Tiles, which act as a
shortcut to Mail, Microsoft Edge, Weather app, Calendar, Windows Store, and other installed
apps.
Live Tiles on your Start screen change and update in real time to show news and sports updates, weather updates, social-networking feeds, and so on.
The tile
-based user interface gives you direct access to your most recently used apps, emails,
photos, music, videos, contacts, updates from social-networking sites, and frequently viewed
websites. You can pin your favorite apps as tiles to customize the Start screen.
You also can personalize the Start screen by setting your favorite picture as the wallpaper.
Accessing the Start screen
When your
computer boots into Windows, the Start screen appears by default. To access the
start screen from any other window or app, use any of the following methods:
1. Touch the Sta
rt button
in the lower left corner of th
e screen.
18
Page 19

19
Maintenance
Cleaning Your Tablet
Caution:
Before yo
u clean your tablet, disconnect all the cables and turn off the tablet. Clean
your tablet with a soft cloth dampened with water. Do not use liquid or aerosol cleaners, which may contain flammable substances.
1. Turn off your tablet. For more information on turning off your tablet,
2. Disconnect any attached devices, headphones, and speakers from the tablet and
from their electrical outlets.
3. Moisten a soft, lint-free cloth with either water or a display cleaner, and wipe the
surface of the tablet until it is clean. Do not allow water from the cloth to seep
down to the tablet ports or buttons.
Caution:
1. To avoid damaging the tablet or display, do not spray cleaning solution directly
onto the display. Only use products specifically designed for cleaning displays
and follow the instructions included with the product.
2. Do not clean the keyboard with a moist cloth.
Resetting your tablet
If your PC
isn’t running well, resetting it might help. This lets you choose to keep your
files or remove them, and then reinstall Windows.
To restore your tablet:
1. Touch
button
in the notification area to access the Action Center;
2. Touch All Settings →Update & security→ Recovery→ Reset this PC.
3. Touch Get started to choose an option from Keep my files or Remove every thing.
4. You can have more choices if you select Advanced startup.
Note:
Apps installed from the Windows Store are automatically reinstalled after the refresh
is complete. Apps installed from sources other than the Windows Store are removed
and have to be manually installed. A list of apps removed during this process is
created on the desktop after the process is complete.
In shutdown status, user can press and hold Power & Vol- keys at the same time to
boot the device and enter Recovery mode, for the purpose of repairing or resetting
the system.
Caution:
Resetting your tablet erases all data from your tablet, including your account configuration, apps, music, pictures, files, and so on. Make sure that you back up all the
required data before you proceed.
Page 20
20
Major Specifications
Note: The follo
wing specifications may contain technical inaccuracies or typographical
errors. We reserves the right to improve and/ or change specifications at any time
without prior notice.
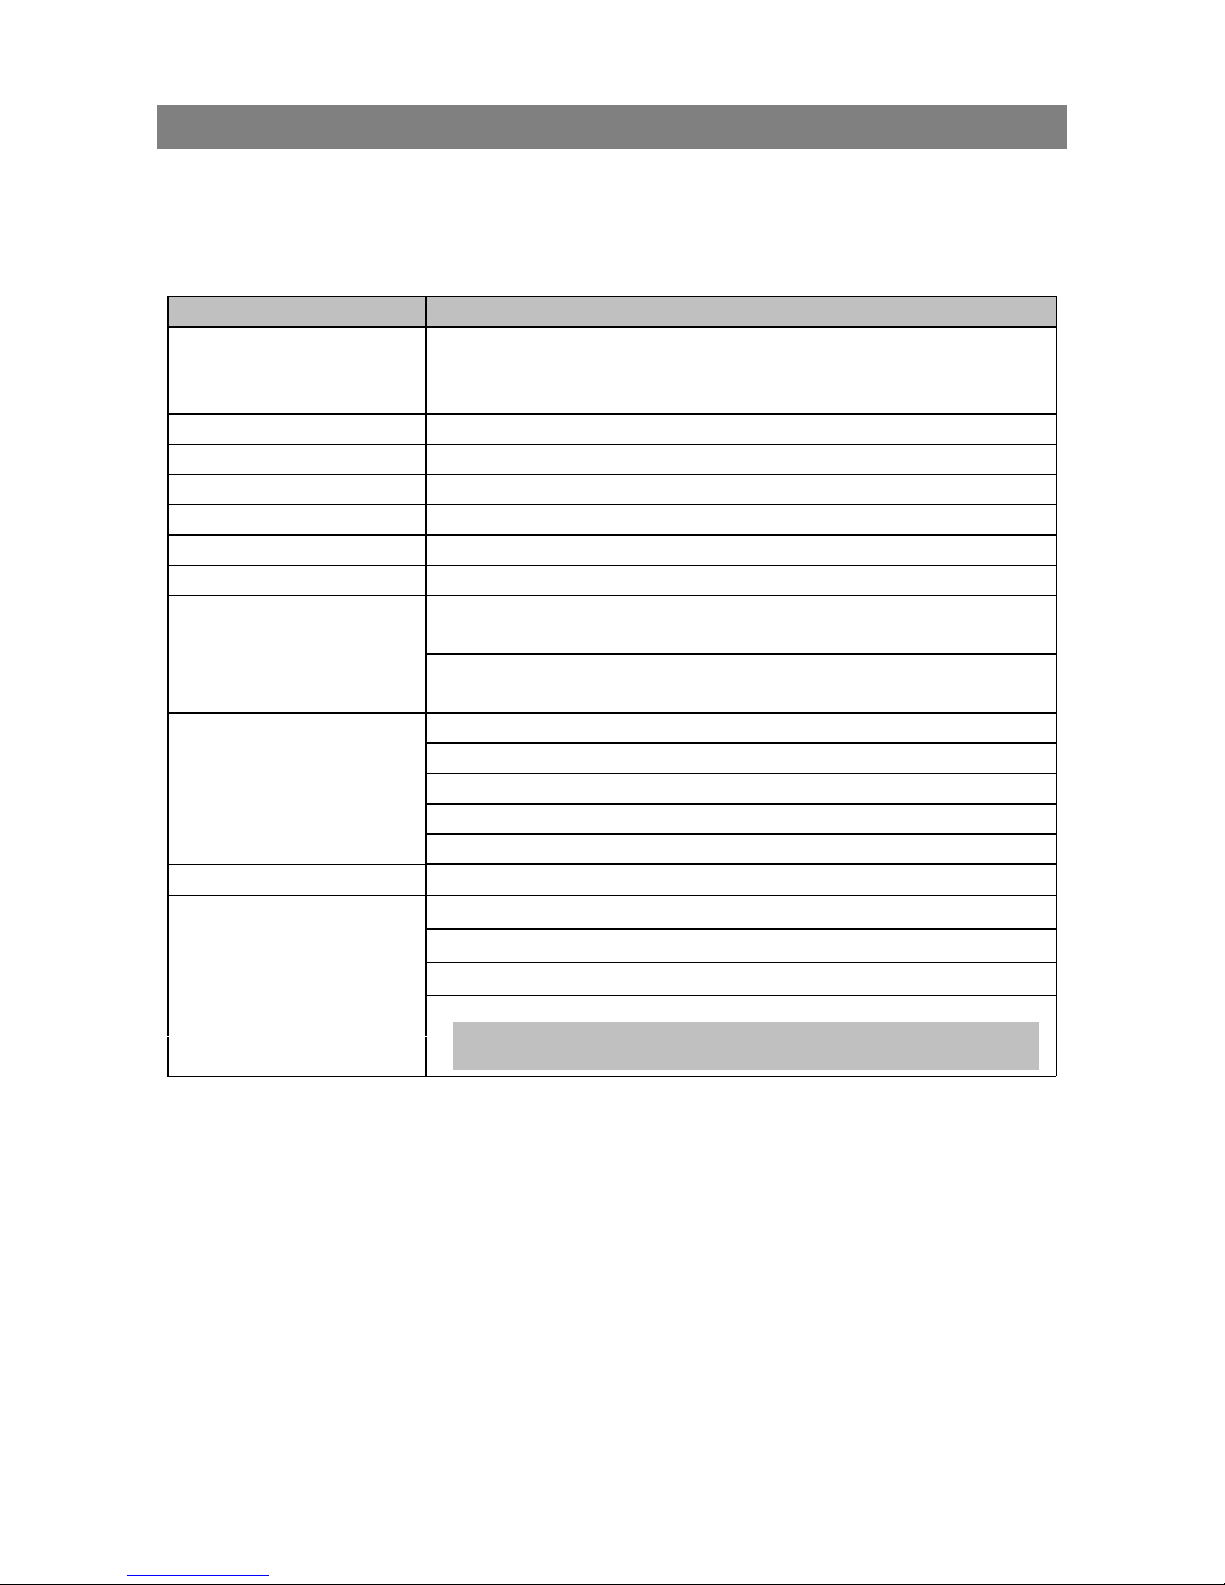
Item Descriptions
CPU
View the system information for details*
You can view details as follows: Open the Control Panel, and select
System and Security
→ System
Memory Maximum supported capacity 4 GB
Storage 64 GB
Camera
Front camera :2.0 MP;Rear camera:5.0 MP
Display
Touch screen :Multi-touch screen
Display resolution Resolution :1280*800 Pixels, 10.1 inch LCD
Battery pack Rechargeable lithium battery, 9000 mAh
AC power adapter
AC power adapter(for pad and e
xpress dock
)
Input:100-240 V,50-60 Hz AC;Output:5 V DC:power: 20 W
AC power adapter(for Multi-function dock )
Input:100-240 V,50-60 Hz AC;Output:24 V DC:power: 60 W
I/O Ports(Pad)
Combo audio jack ×1
Micro HDMI port ×1
Micro USB 2.0 port ×1
USB 3.0 port ×1
Micro SD slot ×1
I/O Ports (Express dock)
Micro USB 2.0 port ×2
I/O Ports
multi-function dock
Micro USB 2.0 port ×3
Ethernet port ×1
RS232 port ×2
Casher draw port ×1
Note: The simple dock and multi-function dock are optional ,
please refer
to the actual product.
Page 21

21
This device complies with part 15 of the FCC Rules. Operation is subject to the following
two conditions: (1) This device may not cause harmful interference, and (2) this device must
accept any interference received, including interference that may cause undesired operation.
Any Changes or modifications not expressly approved by the party responsible for
compliance could void the user's authority to operate the equipment.
Note: This equipment has been
tested and found to comply with the limits for a Class B
digital device, pursuant to part 15 of the FCC Rules. These limits are designed to provide
reasonable protection against harmful interference in a residential installation. This
equipment generates uses and can radiate radio frequency energy and, if not installed and
used in accordance with the instructions, may cause harmful interference to radio
communications. However, there is no guarantee that interference will not occur in a
particular installation. If this equipment does cause harmful interference to radio or television
reception, which can be determined by turning the equipment off and on, the user is
encouraged to try to correct the interference by one or more of the following measures:
-Reorient or relocate the receiving antenna.
-Increase the separation between theequipment and receiver.
-Connect the equipment into an outlet on a circuit different from that to which the receiver is
connected.
-Consult the dealer or an experienced radio/TV technician for help.
The device has been evaluated to meet general RF exposure requirement. The device can be
used in portable exposure condition without restriction.
This manual was correct and complete at the time of printing. However, new specifications
and updates can occur at any time without prior notice. No part of this manual may be copied,
republished, reproduced, transmitted or distributed in any way without prior written consent
of Hisense. Any unauthorized distribution of this manual is expressly forbidden.
Hisense may find it necessary to modify, amend or otherwise change or update this manual.
We reserve the right to do this at any time, without any prior notice. All specifications and
features are subject to change without notice. All screen shots shown are simulated and may
not represent the actual screen on production units sold to consumers.
This equipment complies with FCC radiation exposure limits set forth for an uncontrolled
environment .The device has been evaluated to meet general RF exposure requirement. The
device can be used in portable exposure condition without restriction.
RF exposure statement :
FCC Statement
FCC Caution:
 Loading...