

series
K300
HL32K300L HL50K300PL
ES-G121504
User’s manual
Please read this manual carefully before
operating your TV set and retain it for further reference.
Model Number:
Part Number:
Http://www.hisense.com.au

Ver 2012-02-24
1
1
HISENSE WARRANTY
TERMS AND CONDITIONS
1. HISENSE Australia will provide parts and labour to you the Customer as set
out herein.
2. Nothing in the warranty, limits any rights you may have under the trade
practices act or any other Commonwealth or State Legislation. Such rights
cannot be changed by the conditions in this warranty. Subject to the
conditions below this appliance is warranted by Hisense and/or its Agents to
be free from defects in materials and workmanship for a period of 36 months
and 12 months on Remote & 3D glasses from the date of purchase (the
“Warranty period”)
3. This warranty: -
a. covers products purchased as NEW, manufactured for use in Mainland
Australia and Tasmania;
b. commences from the date of purchase as listed on the Customers
invoice;
c. provides for the labour and replacement parts necessary to maintain your
product in good operating condition as specified in this warranty however,
if repair is needed because o
Hisense has the option to repair or replace the defective product or part
of the product w
and a replacement part may be new or reconditioned of like kind and
quality and may cost less than the original product purchased and no
charges or refunds will be made based on the replacement product cost
difference;
d. applies only to the original purchaser and cannot be transferred;
e. Covers product for c
EG signage and/or advertising usage.
4. Product Identification
a. Hisense rese
the Customer requesting such work or services from Hisense and/or its
agents cannot produce for verification the serial number and the proof of
purchase as per original purchase invoice.
b. The warranty will be voided if any Serial Number sticker provided to be
placed on the equipment is
c. In the e
the Serial Number sticker is not attached to the product or the customer
cannot produce for
affect any repairs on the product and the Customer will be charged a
service call-out fee.
5. What is covered by this warranty
a. The equipment is covered for faulty workmanship on parts that have
failed under normal use which ar
b. Hisense and/or its Agents will decide if there are any defects in the
material and/or workmanship
c. This warranty
out within Mainland Australia and Tasmania
6. What is not Covered by this warranty (excluded):a. any damage or failure:
i. of equipment due to the product being inadequately serviced to
manufacturer’s recommendations;
ii. resulting from environmental conditions including and not
dirt, dust, rodents, insects, rust, corrosion, salt built-up, of any part
of the product including its parts; or
iii. resulting from
iv. resulting from poor installation including and not limited to
positioning and externally fitted equipment such as plumbing and
drainage, cabling, antennae or due to Incompatibility of connected
equipment;
v. to the product caused by overheating as a result of siting or
positioning of the equipme
adequate vent
vi. caused if your appliance has been dismantled, repaired or serviced
by any person ot
vii. to a product or components, caused by power surges or spikes,
including and not limited to, mains power and telecommunications
connections, or to other unspecified sources, incorrect power
current, voltage fluctuation, amperage fluctuation, rust or corrosion
viii. due to a dropped product; collision with another object, use of which
is not designed, negligence, accident or deliberate misuse, theft,
abuse, vandalism, f
other act of God or any war related events;
b. costs of attendance and testing where no mechanical or electrical
failure is identified;
c. initial setup and installation of the product;
ith a product or part of the product of like kind and quality
ommercial purposes for a period of 90 days
rves the right to reject claims for any services or work where
vent that a request for repair is made against a warranty where
verification the original invoice, the repairer will not
is only applicable for repairs on declared equipment carried
excessive use “fair wear and tear”;
ilation or a
her than someone authorised by Hisense;
f product failure during normal usage,
damaged, modified or removed.
e contained within the product.
limited to
nt, where there is not provision for
dust free environment;
;
lood, fire, earthquake, electrical storms or any
d. Normal maintenance costs and costs incurred through the installation
e. products with removed or altered serial numbers;
f. consumables such as but not limited to bulbs/globes, batteries, remote
g. remo
h. cosmetic or structural items including shelves and doors;
i. Any failures due to the interference from or to other products and/or
j. Inability of the product to read or ou
7. The Warranty Ceases if: a. The product ceases to carry the original manufacturer’s serial number
b. The product is rented;
c. Damage to
d. Failure to pay monies owing on invoices as a result of non warranty
8. Neither Hisense nor its representatives provide loan equipment under the
ter
9. Our goods come with guarantees that cannot be excluded under the
Australian Consumer Laws. You are entitled to a replacement or refund
for a major failure and for compensation for any other reasonably
foreseeable loss
repaired or replaced if the goods fail to be of acceptable quality and the
failure does not amount to a major failure.
10. Any unauthorised access to the internal hardware
this warranty.
11. Replacement items are “Like for like” and is not “new for old” and does
not indicate in any way that a faulty product will be replaced with a new
part or unit. “Like for like” may either be a quality checked (QC)
refurbishe
/specifications.
12. If you reside outside of the service coverage area of your nearest
authorised service agent, this warranty does not cover the
transportation or travel expenses to and from your home.
13. Hisense accepts no liability for items that are lost, damaged, or stolen as
a result of freight, transport or storage. If you are required to transport the
appliance to an authorised service centre, you must ensure that it is
securely packed
14. On Public Holidays or other periods when regular business and
wholesale operations are temporarily ceased, repairer availability and
warranty response
times due to the availability of repairers and parts.
15. Special Conditions relating to Plasma TV’s, LCD TV’s, Panels, Projection
Television and Projections Equipment
a. All LCD and Plasma Panels exhibit some bright, dark or partially lit
b. Image retention or burn-in can be a problem for all phosphor based
c. Where a product is positioned higher than 1.2m from the lowest mount
16. Any repair perf
be found, or the item is deemed by Hisense, or an authorised Hisense
agent, to be not faulty under this warranty, or the repair or fault is not
covered under the warranty, a No Fault Found fee is payable by the
warranty h
17. Any repairs or services required that are outside of the terms and
conditions of
customer or due to site at
warranty as the product not been installed or setup correctly; a credit
card may be required prior to the commencement of such services.
listed as requiring periodic replacement;
of items
controls;
val and reinstallation of an internal component not performed by a
factory authorised service centre;
sources;
tput damaged or copied media;
or is sold at an auction;
the product has occurred as listed in point 6b.
work been carried out at the request of the end user as per point 15.
ms of this warranty.
or damage. You are also entitled to have the goods
of the product will void
d or reconditioned unit of the same or later batch of model/size
costs of
and insured.
times may extend beyond the standard response
pixels, a normal limitation of these technologies, and the
manufacturing proce
viewing normal screen images and defective pixels are not a warranty
ssue unless they exceed the manufacturer’s specifications for pixel
i
defects. Where there are no manufacturer specifications, Hisense
covers the screen provided for 12 or more pixels that are failing to
display
displays. In extreme cases, permanent phosphor burn can occur if
still/repetitiv
time. Such damage to the screen is not covered
Please ensure that the precautions in any documentation supplied with
your product are followed in order to avoid permanent damage to your
display.
point, is wall/ceiling mounted or where aftermarket mounts and/or
stands are used, or where the unit has not been installed by a
professional installer,
refix this product.
older of a minimum of $125 inc GST.
sses involved and are usually not noticeable when
e images are left on the screen for extended periods of
by the warranty.
an extra service charge will apply to unfix and
ormed on a product under the warranty where no fault can
the warranty can be carried out at the request of the
tendance were fault is not covered under
WARRANTY CLAIMS PROCEDURE
2
2
Please retain this portion for your records
36 MONTHS IN HOME REPLACEMENT WARRANTY*
Hisense Australia will provide its nearest service centre for repairs under warranty. You will need to ensure that you have
already called Hisense Warranty Centre and received a JOB NUMBER.
*Non Combination Models only
12 MONTHS IN HOME REPLACEMENT LCD WARRANTY*
Hisense Australia will provide its nearest service centre for repairs or replacement under warranty. You will need to ensure that you have already called
* Excludes DV
12 MONTHS COURIER HOTSWAP DVD DRIVE WARRANTY*
Hisense Australia will provide a replacement removable DVD Drive, should you be experiencing DVD related faults, via courier which can easily be
*The faulty DVD drive must be returned to Hisense Australia or you may be liable for the cost of the part and freight
Before making a claim, please make sure that you understand the terms and conditions of the warranty
• Check and ensure the installation of all power cables to the power point are secure and power is turned on, all cables
leads and connectors are connected properly and that all switches are turned on and functioning
• Check that there is power at the power point by using a small appliance
• Check that all settings are set according to the instruction manual
• Please keep this certificate in a safe place together with your product receipt. Should you need t
responsibility of proof of owners
this warranty, or no faulty hardware components are found, you will be charged at Hisense or Hisense Authorised Service
Center's standard service charge plus an administration fee.
Hisense Warranty Centre and have received a JOB NUMBER.
D Drive related faults which Hisense Australia provides a separate service stated below
replaced by following the instructions for replacement within this manual.
o make a claim, the
hip of the equipment is on you. If a claim is made that is found not to be covered under
PLEASE REFER TO THE TROUBLESHOOTING GUIDE
AT THE END OF THIS MANUAL
Service Procedure
Please have your original invoice, model, and serial number ready. To receive service, you are required to:
•
Call 1800 447 367. Service claims may be made between
5PM Sat. to Sun.
•
You
MUST
number.
•
You are required to fax or email your original invoice prior to a replacement been shipped.
provide a serial number and purchase detail to lodge a valid job. You will then be provided a job
excluding public holidays.
8:30AM – 7:30 PM Mon. to Fri. and 9AM –
WARRANTY REGISTRATION
In order to register your warranty, please fill out and return with a copy of your invoice to:
Congratulations on your purchase, This Document sets out terms
and conditions of your product warranty. Please Keep it with your
proof of purchase information in a safe place for future reference
should you require service to your product.
NAME OF PURCHASER _______________________________________________
ADDRESS __________________________________________________________
___________________________________________________________
CITY ______________________________ STATE _______ POSTCODE ________
PHONE (_____)_____________________
MOBILE (_____)_____________________
FAX (_____)_____________________
Hisense Warranty Registration
PO BOX 360 Ferntree Gully VIC 3156 Australia
The Undersigned hereby acknowledges receipt of the Hisense
warranty service provided. I have read and understand the
conditions and terms of the warranty in its entirety.
SERIAL NUMBER
____________________________________________________________
STORE PURCHASED FROM
____________________________________________________________
CITY _______________________ STATE _______ POSTCODE ________
INVOICE NO. _______________________________________
MODEL NO. _______________________________________
DATE OF PURCHASE _________/___________/__________
SIGNATURE _________________________________________________

This page has been left blank intentionally.
3

4
Table of Contents
Table of Contents
Hisense Declaration...................................................................................
Important safety precautions.....................................................................
Safeguards.....................................................................................
Warning..........................................................................................
Setting Up..................................................................................................
Accessories....................................................................................
Installing the Stand.........................................................................
TV Front..........................................................................................
TV Rear..........................................................................................
Rear TV Connectors.......................................................................
Connection Instructions..................................................................
Using the Remote Control.........................................................................
Installing batteries...........................................................................
The Remote Control Panel..............................................................
Quick start.......................................................................................
Changing the TV Settings.........................................................................
Using the Installation Guide Menu.................................................
Using the Channel Menu...............................................................
Using the Picture Menu.................................................................
Using the Sound Menu..................................................................
Using the Option Menu..................................................................
Using the Lock Menu.....................................................................
Using the Screen Menu.................................................................
PC Setting .....................................................................................
Using the DMP Menu.....................................................................
Appendix...................................................................................................
Trouble shooting.............................................................................
Specifications..................................................................................
If you have any queries please contact ph 1800 447 367.
5
6
6
9
10
10
10
11
12
13
14
16
16
17
18
21
21
22
24
25
26
29
30
31
32
35
35
36

5
Hisense Declaration
Any content and service accessed through this device, while only intended for individual non-commercial use,
shall be the property of the applicable third party and subject to protection by regulations and laws on copyright,
patent, trademark and other intellectual property rights. No part of such content and service may be modified,
duplicated, published, uploaded, distributed, translated, marketed, or used to make and distribute products
derived from it without the prior permission of the content owner or service provider.
You acknowledge and agree explicitly that you will solely bear the risk associated with the use of this device,
and further you will solely bear any risk related to satisfactory quality, performance and accuracy for any content
and service accessed through this device. To the maximum extent permitted by applicable law,this device and
any third party's content and service is provided as it is without any guarantee, express or implied.
Hisense hereby declare explicitly that Hisense shall not be held liable for any guarantee and conditions, express
or implied, related to this device and any content and service, including but not limit to warranty on marketability,
satisfactory quality, fitness for a particular purpose, accuracy, quiet use and non-violation of any third party’s
rights; to the maximum extent permitted by applicable law, Hisense gives no guarantee on the accuracy, validity,
timeliness, legitimacy and completeness of any content or service provided through this device, or the fitness of
such device, content or service for your particular requirement, or the protection from interruption and error
during operation of such device, content or service; to the maximum extent permitted by applicable law, in any
case, including fault or neglect, Hisense shall not be held liable for legal actions or indemnity obligation arising
from any consequence as a result of or related to any information loaded in this device or use of such device,
content or service by you or any third party .
Any content and service provided as it is together with this device shall be the property of the applicable third
party, therefore Hisense gives no declaration or warranty on modification, suspension, cancellation, termination
or abortion thereof, and shall not be held liable for legal actions or indemnity obligation arising thereof.
Hisense reserves the rights to restrict the use or access of certain content or service. As the content and service
are transmitted through third party’s network and transmission facilities, Hisense undertakes no customer
service thereof or the obligation for such customer service.
Hisense Declaration
6
Important safety precautions
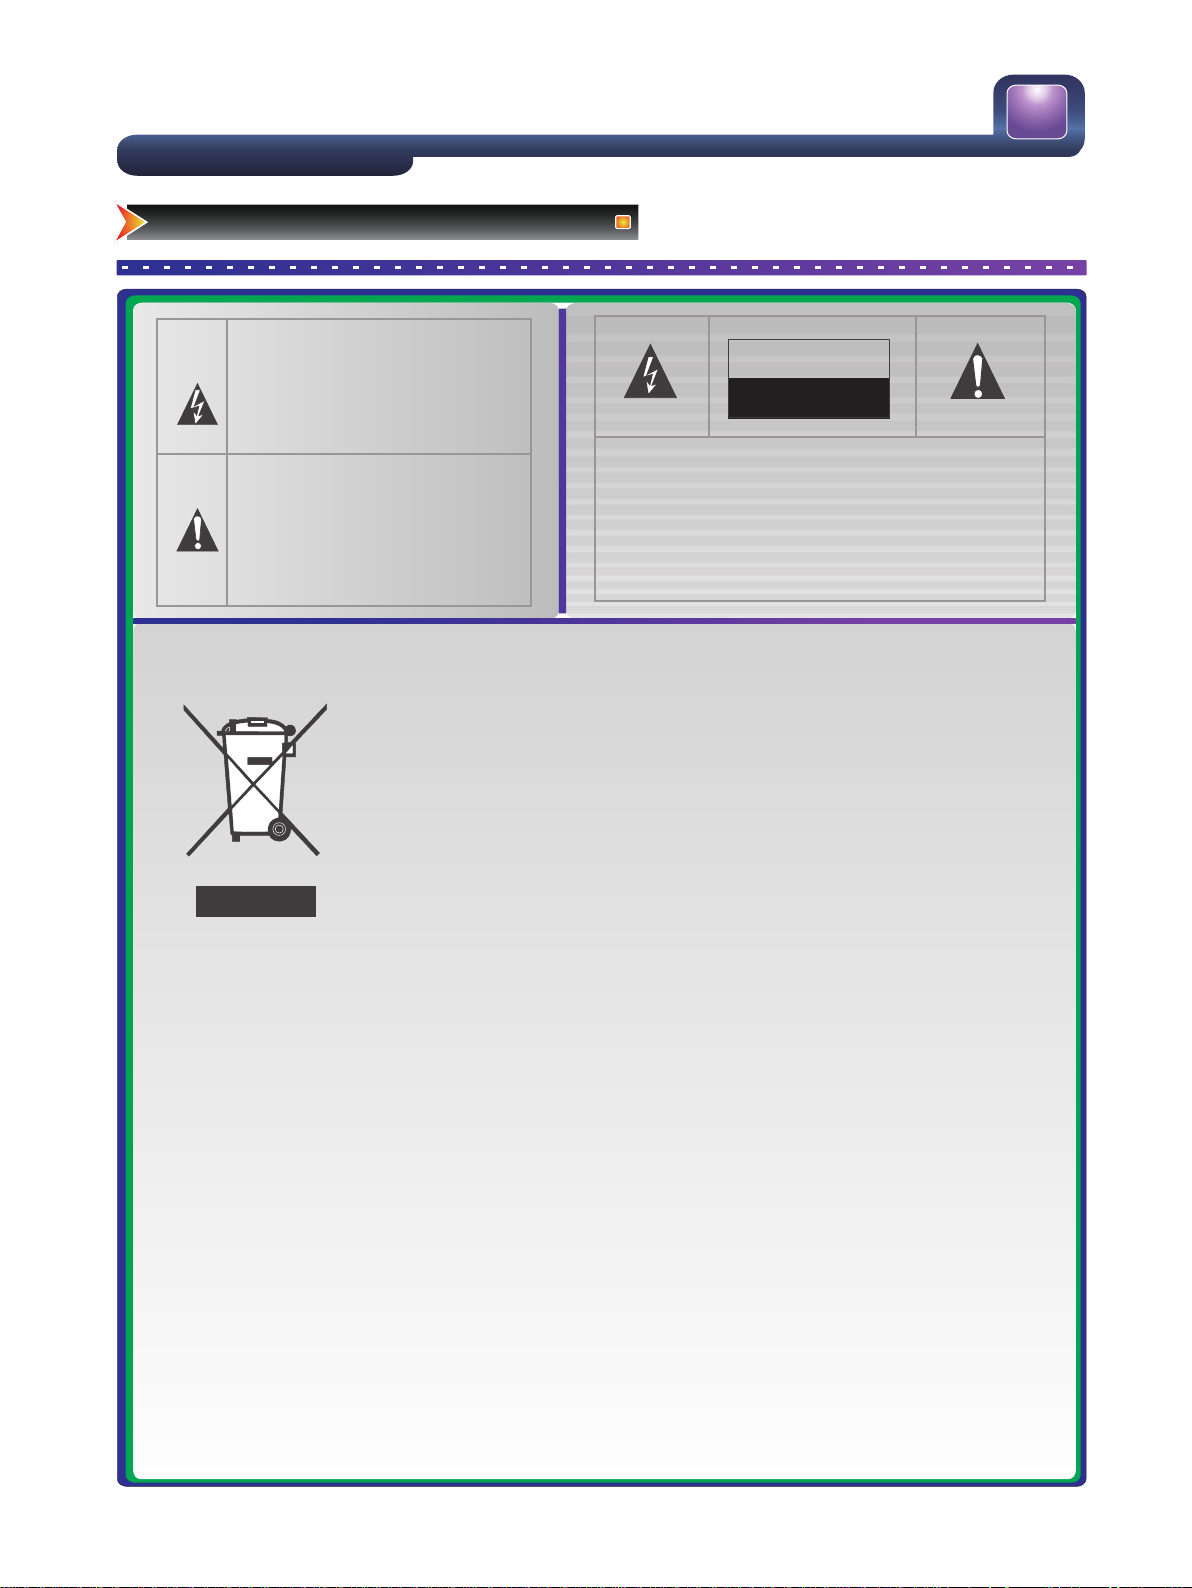
Safeguards
This symbol alerts user about the presence of
a dangerous voltage not isolated inside the
product which can be sufficiently powerful to
constitute a risk of electrocution.
ATTENTION
RISK OF SHOCK
ELECTRIC
This symbol alerts user about the presence of
important operating instructions and
maintenance in the document enclosed in the
package.
Do not open the back cover
In no case the user is allowed to operate inside the TV
set.Only a qualified technician is entitled to operate.
Disposal of Used Electrical & Electronic Equipment
Packaging and electrical goods should be recycled appropriately, and not treated as
household waste. Please dispose of this equipment at your applicable collection point for
the recycling of electrical & electronic equipment waste. By ensuring the correct disposal
of this product, you will help prevent potentially hazardous to the environment and to
human health, which could otherwise be caused by unsuitable waste handling of this
product. The recycling of materials will help conserve natural resources. Please do not
therefore dispose of your old electrical and electronic equipment with your household
waste. For more detailed information about recycling of this product, please contact your
local city office, your household waste disposal service or the shop where you purchased
the product.
IMPORTANT INFORMATION
If a television is not positioned in a sufficiently stable location, it can be potentially hazardous due to falling. Many
injuries, particularly to children, can be avoided by taking simple precautions such as:
● Using cabinets or stands recommended by the manufacturer of the television.
● Only using furniture that can safely support the television.
● Ensuring the television is not overhanging the edge of the supporting furniture.
● Not placing the television on tall furniture (for example, cupboards or bookcases) without anchoring both the
furniture and the television to a suitable support.
● Not standing the televisions on cloth or other materials placed between the television and supporting furniture.
● Educating children about the dangers of climbing on furniture to reach the television or its controls.

7
Important safety precautions
Safeguards
Please read the following safeguards for your TV and retain for future reference.
Always follow all warnings and instructions marked on the television.
1. A note about safety and operating instructions
Read and follow all safety and operating instructions, and retain them safely for future reference.
2. Heed Warnings
Adhere to all warnings on the appliance and in the operating instructions.
3. Cleaning
Unplug the TV from the wall outlet before cleaning. Do not use liquid, abrasive, or aerosol cleaners. Cleaners can permanently
damage the cabinet and screen. Use a lightly dampened cloth for cleaning.
4. Wall Bracket
Wall brackets are not supplied with this product. After market brackets may be available to purchase locally. Please refer to
the specification page for dimensions.
5. Water and Moisture
Avoid dripping or splashing of liquids onto the product. Objects filled with liquids, such as vases, should not be placed on the
product.
6. Setting
Do not place this TV on an unstable cart, stand or table. Placing the TV on an unstable base can cause the TV to fall, resulting
in serious personal injuries as well as damage to the TV. Use only a cart, stand, bracket or table recommended by the
manufacturer or salesperson.
7. Ventilation
Slots and openings in the cabinet are provided for ventilation, to ensure reliable operation of the TV and to protect it from
overheating. Do not cover the ventilation openings in the cabinet and never place the set in a confined space such as built-in
cabinet unless proper ventilation is provided. Leave a minimum 10cm gap all around the unit.
8. Power Source
This TV should be operated only from the type of power source indicated on the marking label. If you are not sure of the type
of power supplied to your home, consult your appliance dealer or local power company.
9. Grounding or Polarization
This TV is equipped with a polarized alternating current line plug. This plug will fit into the power outlet only one way. This is a
safety feature. If you are unable to insert the plug fully into the outlet, try reversing the plug. If the plug should still fail to fit,
contact your electrician to replace your obsolete outlet. Do not defeat the safety purpose of the polarized plug. A warning that
an apparatus with CLASSⅠconstruction must be connected to a MAINS socket outlet with a protective earthing connection.
10. Power-Cord Protection
Power- supply cords should be routed so that they are not likely to be walked on or pinched by items placed upon or against
them, paying particular attention to cords at plug, wall outlets, and the point where they exit from the TV. MAIN plug is used
as the disconnect device, the disconnect device shall remain readily operable.
11. Lightning
For added protection for this TV during a lightning storm, or when it is left unattended and unused for long periods of time,
unplug it from the wall outlet and disconnect the antenna or cable system. This will prevent damage to the TV due to lightning
or power-line surge.

8
Important safety precautions
Safeguards
12.Power Lines
An outside antenna system should not be located in the vicinity of overhead power lines or other electric light or power
circuits, or where it can fall into such power lines or circuits. Where installing an outside antenna system, extreme care should
be taken to keep from touching such power lines or circuits as contact with them might be fatal.
13.Overloading
Do not overload wall outlets and extension cords as this can result in a risk of fire or electric shock.
14.Object and Liquid Entry
Never push objects of any kind into this TV through openings as they may touch dangerous voltage points or short-out parts
that could result in fire or electric shock. Never spill liquid of any kind on or into the TV.
15.Outdoor Antenna Grounding
If an outside antenna or cable system is connected to the TV, be sure the antenna or cable system is grounded so as to
provide some protection against voltage surges and built-up static charges. Section 810 of the National Electric Code,
ANSI/NFPA No. 70-1984,provides information with respect to proper grounding of the mast and supporting structure,
grounding of the lead in wire to an antenna discharge unit, connection to grounding electrodes, and requirements for the
grounding electrode.
16.Servicing
Do not attempt to service this TV yourself as opening or removing covers may expose you to dangerous voltage or other
hazards. Refer all servicing to qualified service personnel.
17.Damage Requiring Service
Unplug the TV from the wall outlet and refer servicing to qualified service personnel under the following conditions:
(a) When the power - supply cord or plug is damaged.
(b) If liquid has been spilled, or objects have fallen into the TV.
(c) If the TV has been exposed to rain or water.
(d) If the TV does not operate normally by following the operating instructions. Adjust only those controls that are covered by
the operating instructions as an improper adjustment of other controls may result in damage and will often require extensive
work by a qualified technician to restore the TV to its normal operation.
(e) If the TV has been dropped or the cabinet has been damaged.
(f) When the TV exhibits a distinct change in performance - this indicates a need for service.
18.Replacement Parts
When replacement parts are required, be sure the service technician has used replacement parts specified by the
manufacturer or have the same characteristics as the original part. Unauthorized substitutions may result in fire, electric shock
or other hazards.
19.Safety Check
Upon completion of any service or repair to the TV, ask the service technician to perform safety checks to determine that the
TV is in safe operating condition.
20.Heat
The product should be situated away from heat sources such as radiators, heat registers, stoves, or other products (including
amplifiers) that produce heat.

9
Important safety precautions
Warning
If a television is not positioned in a sufficiently stable location, it can be potentially hazardous due to falling. Many injuries,
particularly to children, can be avoided by taking simple precautions such as:
● Using cabinets or stands recommended by the manufacturer of the television.
● Only using furniture that can safely support the television.
● Ensuring the television is not overhanging the edge of the supporting furniture.
● Not placing the television on tall furniture (for example, cupboards or bookcases) without anchoring both the furniture and
the television to a suitable support.
● Not standing the televisions on cloth or other materials placed between the television and supporting furniture.
● Educating children about the dangers of climbing on furniture to reach the television or its controls.
AAA
10
Setting Up
Accessories/Installing the Stand
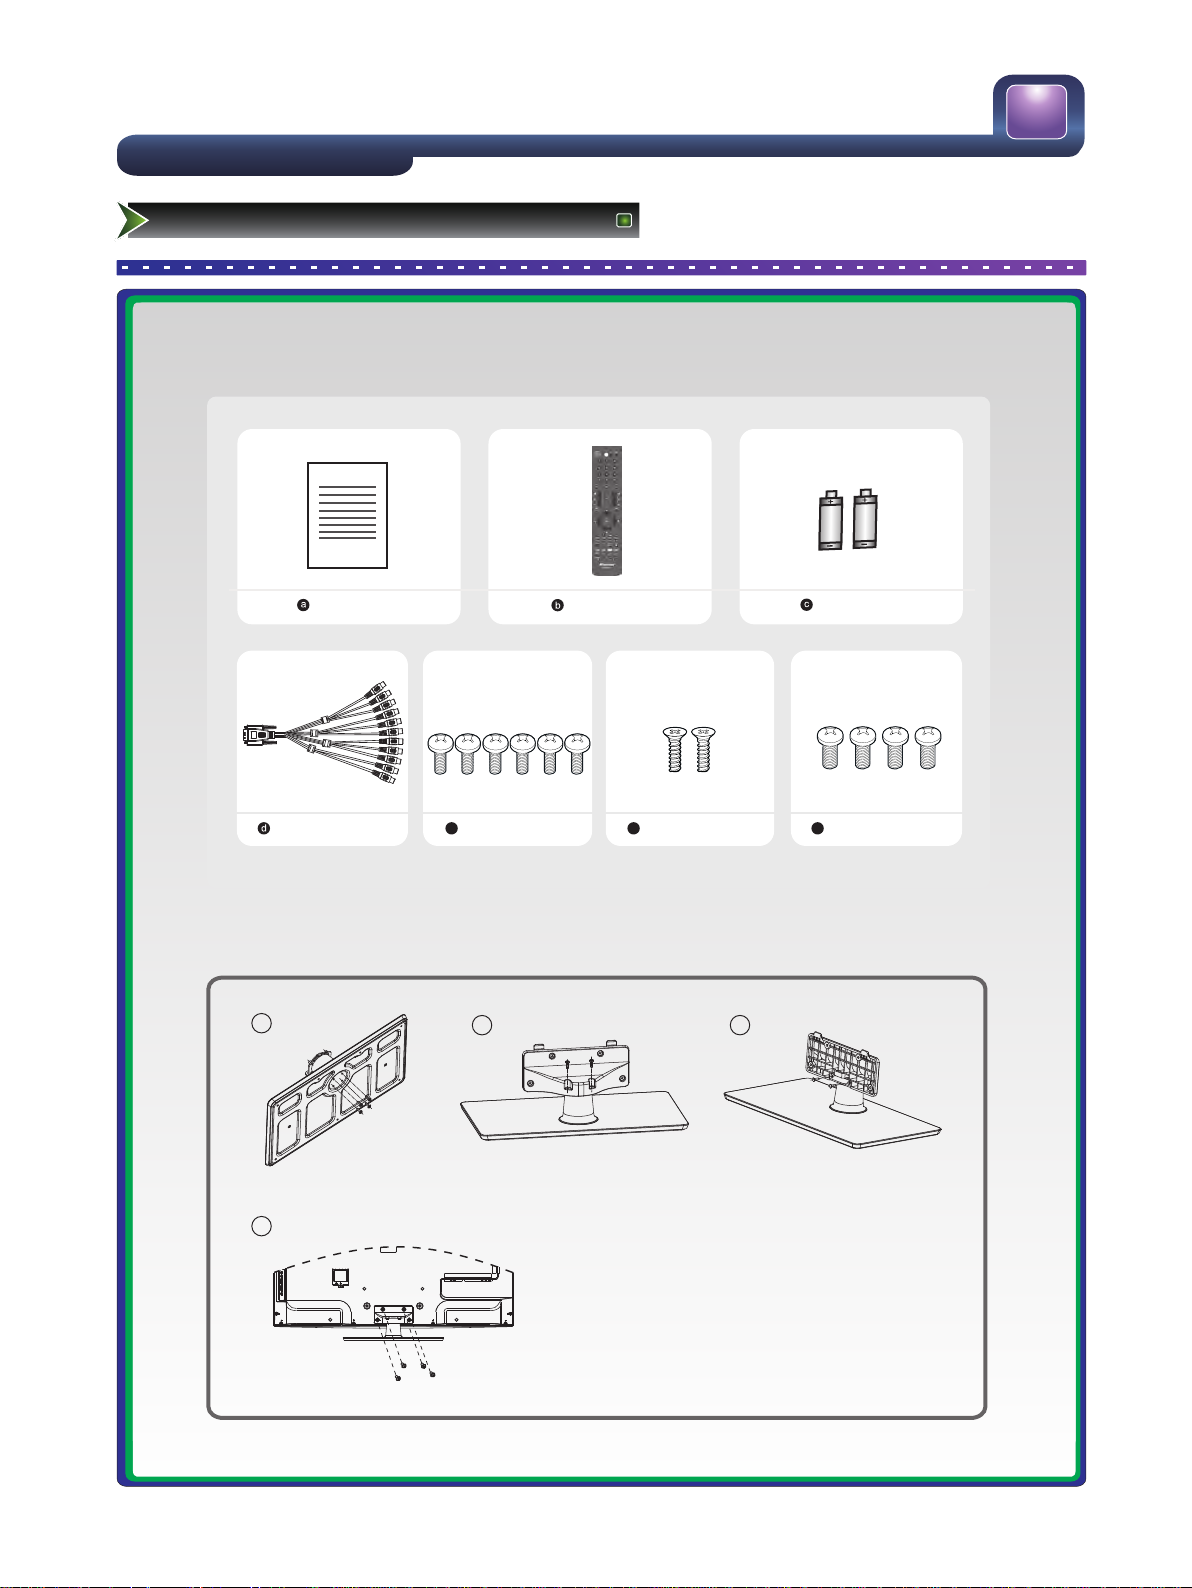
Accessories list
Manual Book
Remote
Batteries
AV/COMP Adapt
(M4×L12) ×6
(ST4×L14)×2
(M5×L12)×4
Installing the Stand
AAA
ALCD101
AV
VOUT
A
COMP
AUDIO
e ()mddfdsaf
1
4
2 3
1. S ec ur e the s ta nd colu mn t o the b as e plate w it h the 4
f
g
screws ( M4 x L1 2) p rovid ed .
2. S ec ur e the s ta nd cover to t he st an d co lum n ve rt icall y
with t he 2 scre ws ( M4 x L1 2) provid ed .
3. S ec ur e the s ta nd cover to t he st an d co lumn
horizo nt al ly wi th t he 2 sc re ws (S T4 x L14) p ro vi ded.
4. S ec ur e the s ta nd to t he T V with th e 4 pro vi de d screw s
(M5 x L12).
MENU
11
Setting Up
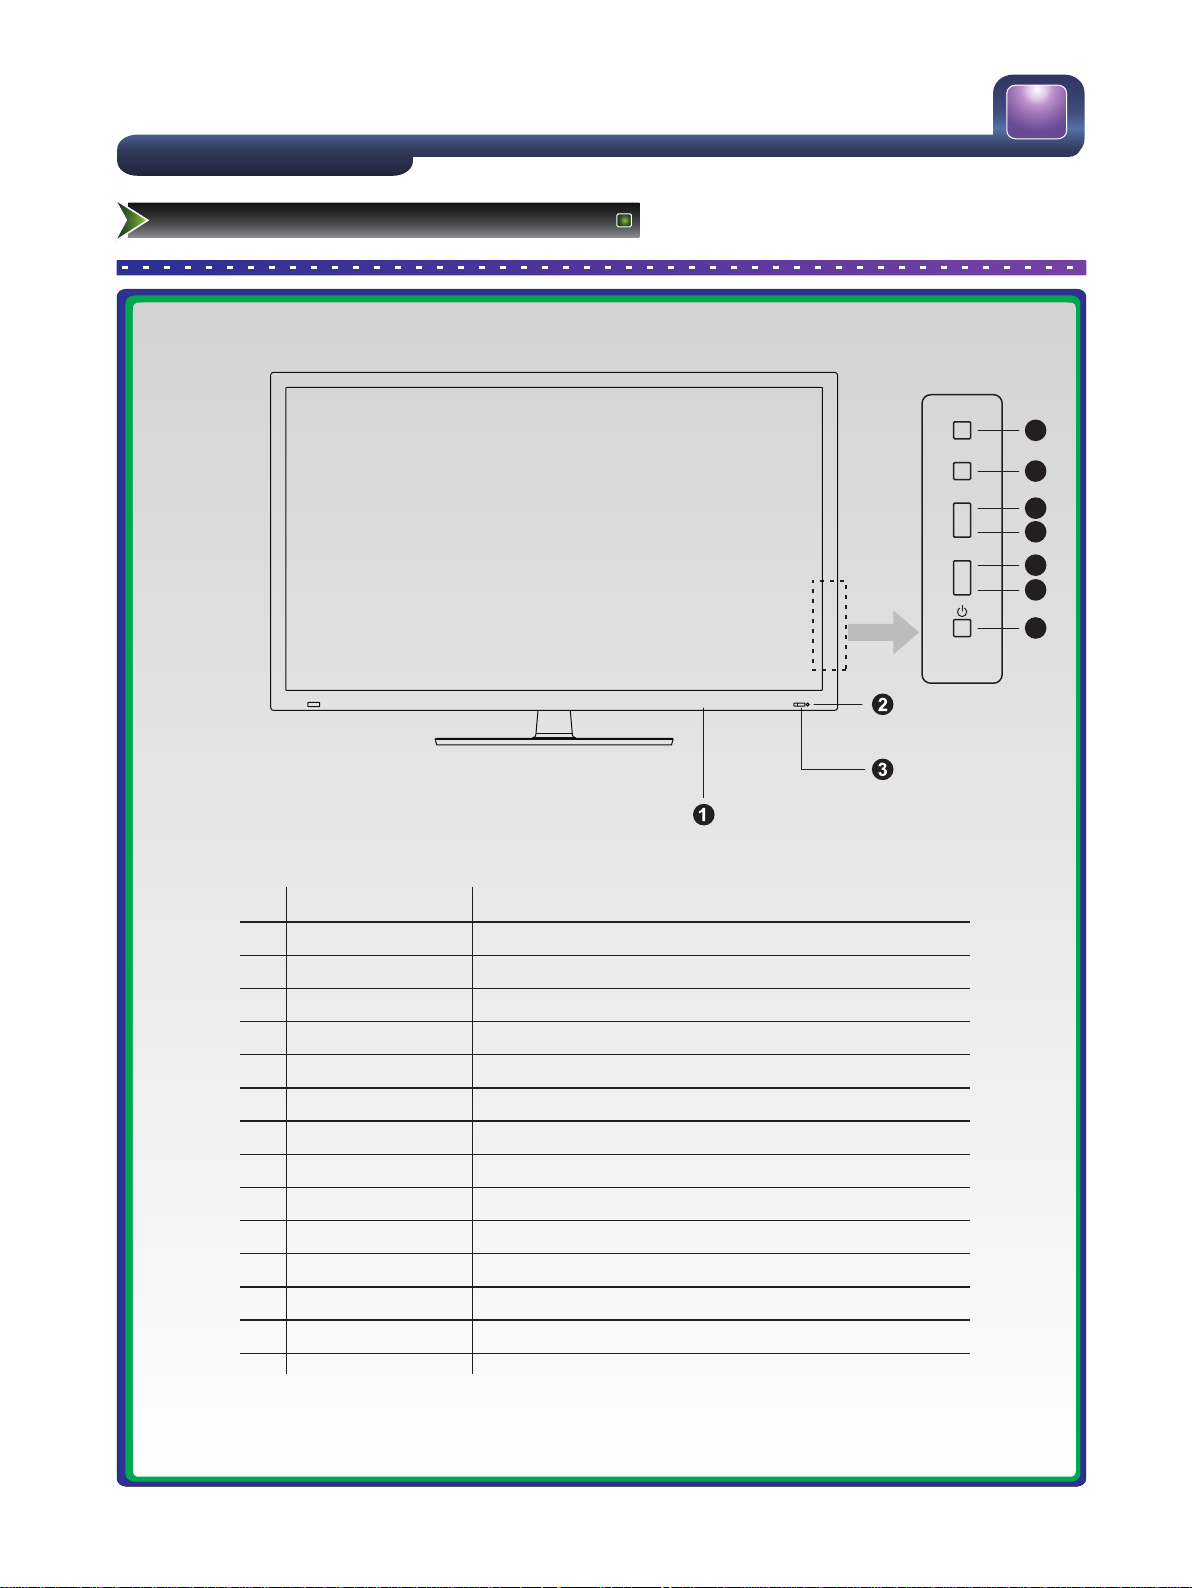
TV Front
TV Front
No.
Component
Component Description
1
POWER Switch
2
POWER Indicator
3
Remote sensor
Receives signals from the remote control. Do not block.
Press to turn the main power ON or OFF.
Red indicates standby mode. Blue shows that the unit is on.
4
MENU button
Press to activate the on-screen display (OSD).
5
SOURCE button
Press to select the signal source for your TV.
6
VOL∧
Press to increase the volume.
7
VOL∨
Press to decrease the volume.
8
CH∧
Press to go to the next channel.
9
CH∨
Press to go to the previous channel.
10
Standby button
Press to turn your TV on or off (standby mode).
SOURCE
VOL
˄
˅
CH
˄
˅
4
5
6
7
8
9
10

AC INPUT
12
Setting Up
TV Rear
TV Rear
USB 1
DC 5V 0.5A(MAX)
USB 2
DC 5V 0.5A(MAX)
HDMI 2 HDMI 1
ANT 75Ω
OPTICAL
HDMI 4 HDMI 3
VGA AUDIOVGA COMP/AV/AV OUT
HEADPHONE

13
Setting Up
Rear TV Connectors
Connectors
Yellow
White
TV
Cables
Brief Description
ANT 75Ω
Connect an outdoor VHF/UHF antenna.
Connect a composite video cable and left-right audio cables from external
equipment.
Connect a composite video cable and left-right audio cables to external
equipment for monitoring or recording video.
COMP/AV/AV OUT
HDMI
Connect a HDMI High Definition Multimedia cable from external equipment.
VGA
Input
VGA
Connect a VGA cable from your PC to use the TV as a monitor. Connect an
audio cable from the PC audio out.
OPTICAL
Connect an optical cable to an external digital audio system.
USB
Connect a USB device for browsing photos, music and movies.
HEADPHONE
Yellow
White
Red
Red
Red
Red
Green
Blue
White
Connect a component video cable and left-right audio cables from external
equipment.
VGA
AUDIO
Connect Headphone for audio out.

14
■ Connecting an Aerial (For analogue and digital signals)
To view television channels correctly, a signal must be received by the set from the following source:
-An outdoor VHF/UHF antenna
-Before connecting any external device please connect the supplied 15 pin to RCA adaptor.
■ Connecting External A/V Devices
-Connect a Video RCA cable to an appropriate external A/V device such as a VCR, DVD or Camcorder.
-Connect RCA audio cables to “R - AUDIO - L” and Video on the rear of your set and the other ends to
corresponding audio and Video out connectors on the A/V device.
■ Connecting Component Devices (DVD/PVR)
-Connect Component video and audio cables to Component inputs (“PR”, “PB”, “Y”) on the rear of your set and
the other ends to corresponding component video out connectors on the PVR or DVD.
-The Y, PB and PR connectors on your component devices (PVR or DVD) are sometimes labeled Y, B-Y and R-Y
or Y, CB and CR. (Colours for inputs and cables must correspond on both devices.)
NOTE:
Some devices such as a PVR or DVD player require a ‘Component/YPBPR’signal to be set to output in the
devices settings - please consult your device user manual for instructions.
■ Connecting HDMI
-Supports digital connections between HDMI - enabled AV devices such as (PVRs, DVD, BluRay, HDDVD, AV
receivers and digital devices.).
-No sound connection is needed for HDMI to HDMI connection.
NOTE:
Some devices such as a PVR or DVD players require a HDMI signal to be set to output in the device's settings.
-Please consult your device user manual for instructions.
What is HDMI?
-HDMI, or high-definition multimedia interface, is a high resolution interface that enables the transmission of digital
audio and video signals using a single cable without compression.
-“Multimedia interface” is a more accurate name for it especially because it allows multiple channels of digital
audio (5.1 channels).The difference between HDMI and DVI is that the HDMI device is smaller in size, has the
HDCP (High Bandwidth Digital Copy Protection) coding feature installed, and supports multi - channel digital
audio.
-Use the HDMI terminal for HDMI connection to a compatible device. If your external device has DVI only, you
should use a DVI-to-HDMI cable (or adapter) for the connection, and the “R -AUDIO - L” terminal on DVI for
sound output.
■ Connecting a Computer
-Connect the D- Sub cable to “VGA” on the rear of your set and the other end to the Video Card of your
computer.
-Connect the stereo audio cable to “VGA AUDIO ” on the rear of your set and the other end to “Audio Out” of the
sound card on your computer.
-Primarily this unit is intended for use as an LCD TV. If using as a monitor, and compatibility is a problem; please
contact the manufacturer of the PC Video/Graphic's card for further support. Perfect compatibility is not
warranted.
Setting Up
Connection Instructions

15
■ Connecting AUDIO
-Connect RCA audio cables to “R - AUDIO - L” the cable supplied on the rear of your set and the other ends to
corresponding audio in connectors on the Amplifier or DVD Home Theater.
■ Connecting USB data Devices
-Connect a USB device for browsing photos, listening music, watching movies, reading text files. This USB port
also can be used for servicing and updating software on your TV.
■ Optical Audio
Connect an optical audio device to this jack (Toslink optical cable is needed).
■ Headphones
-Headphones can be connected to the headphone output on the side of your set. (While the headphone is
connected, the sound from the built-in speakers will be disabled. )
Setting Up
Connection Instructions

1 2 3
16
Using the Remote Control
Installing batteries
Installing the remote control batteries
1. Slide open the battery cover on the back of the remote control.
2. Install two AAA size(1.5V) batteries. Match the “+” and “-” signs on the batteries to the signs on the battery
compartment.
3. Close the battery cover.
NOTE:
1. Dispose of your batteries in a designated disposal area. Do not throw the batteries into fire.
2. Do not mix battery types or combine used batteries with new ones.
3. Remove depleted batteries immediately to prevent battery acid from leaking into the battery compartment.
4. If you do not intend to use the remote control for a long time, remove the batteries.
5. The effective range of remote control is suggested in the figure below.
Remote control range
1. The remote control range is 8 meters in front of the TV set.
2. The remote control operates within distance of up to 6m within horizontal angles of 30 degrees or vertical
angles of 15 degrees.
gently
push

1
17
Using the Remote Control
The Remote Control Panel
(1) Remote sensing Window.
(2) Indicator glows from white to red when buttons are pressed.
(3) D/A: Digital /Analog TV.
(4) Power Standby: Power button.
(5) Source: Available source selection.
(6) 1,2,... numbers: For direct channel access.
(7) Last: To return to the last view program.
(8) Info: Display current information.
(9) Picture: Picture Mode selection.
(10) Sound: Sound Mode selection.
(11) FAV: Fast access to your saved favorite programs.
(12) Mute: Mute the sound.
(13) VOL+/VOL-: Volume Up/Volume Down
(14) CH+/CH-: Channel Up/Channel Down
(15) Menu: Display the main menu/Back menu display.
(16) EXIT: Exit all menu display.
(17) OK: Enter or confirm the operation
[▲/▼/◄/ ►]: Up/Down/Left/Right
(18) Zoom: Zoom image.
(19) EPG: Electronic Program Guide
(20) Still: Picture Freeze.
(21) I/II: Mono/Stereo operation,Audio select button.
(22) Rotate: Rotation of images on the USB device.
(23) Radio/Browse: Switch to DTV Radio program.
(24) Audio/Page up: Select Audio language in DTV Mode/page up
(25) Subtitle/Page down: Display the subtitle content of the signal/page down
(26) Play/Pause: Play button - to enter and open the file - also used
for PAUSING the display.
(27) Stop: Stops playing the slideshow or movie.
(28) Media: DMP Media
(29) D/EMP: Enter the DMP Media Player Mode.
(30) In DMP mode:
[ ◄◄ ] button - press to fast back in video playing.
[ ►► ] button - press to fast forward in video playing.
[ I◄◄ ] button - press to play the previous video
[ ►►I ] button - press to play the next video
(31) Sleep: Sets the sleep timer of your TV.
Index: Display the EPG list according to time/channel.
The other keys are not supported in this TV.
NOTE:
Buttons without comments are not intended to use with this television.
The Remote Control Panel
Buttons instructions(from up to down)
2
3
4
5
6
7
11
13
+
+
8
9
10
12
14
-
-
15
16
17
20
21
22
23
28
29
I/I I
row se
B
Rad io
D/E MP
Sti ll
ota te
R
T.Shi ft
Med ia
PVR
Zoo m
p
u
Pag e
Aud io
Pla y/Pau se
EPG
Pag e
Sub title
S
dow n
top
Set up
Text
Sle ep
Hol d
Siz e
Ind ex
Rev eal
Int ernet
Sub .Code
Can cel
Mix
18
19
24
25
26
27
30
31
EN- 31611A

18
Using the Remote Control
Quick start
■ Turning your TV on and off
To turn your TV on: Connect the TV to an AC power outlet and an external antenna, then turn on the power via
switch located below the front right hand side of unit. A few seconds later an image will appear on the screen.
Use the setup wizard select your state and press [OK], then press [OK] again to start the turning process.
● Turning off to standby mode: Press [Power Standby ] on the back RHS panel or on the remote control to
switch to standby mode. You can activate the unit again by pressing [Power Standby ].
● Power indicator: Light indicates standby mode. There will be no light when the power switch is in the off
position.
NOTE:
Turn the power switch off when you do not intend to use the TV for long periods, for example overnight. Remove
the connection from the wall power outlet if you do not intend to use the unit for longer periods, for example if
you plan to be away a few days. Wait at least 5 seconds after turning off if you want to re-start the TV.
■ Selecting the video source
● Select the video source depending on the video device you have connected to your TV.
● To select the video source:
Press [Source] . When the list of video sources appears, press [▲/▼] to select the source, then Press [OK] to
connect.
[D/A] button: Press the [D/A] button to switch between the Digital/Analog TV signal input.
■ Adjusting the volume
● To adjust the volume:
Press [VOL+/VOL- ] to increase or decrease the volume. Press [Mute] to turn the sound off. Press [Mute]
again to turn the sound back on.
■ Changing channels
● To change channels:
Press [CH+/CH-] to go to the next higher or lower channel. Or, Press the number buttons to select a channel.
For example, to select channel 12, press [1], then [2]. Or, press [Last] to go to the last viewed channel.
■ Selecting the sound mode
● To select the sound mode:
Press the [Sound] button to select between 4 different pre-adjusted sound modes:
Standard, Music,movie, Speech, and User (configurable mode). The User mode preserves your preferred
sound settings after using the Equalizer available under the Sound submenu.

19
Using the Remote Control
Quick start
■ Selecting the picture mode
● To select a picture mode:
Press the [Picture] button to select between 5 different pre-adjusted picture modes: Dynamic, Bright,
Standard, Soft and User (configurable mode). The User mode automatically preserves your personal
settings after adjusting brightness, colour and contrast etc.
■ Selecting the aspect ratio
● To select the aspect ratio:
Press the [Zoom] button to change the screen aspect ratio among Auto, 16:9, 4:3, Zoom1 ,Zoom2 ,
panorama and 1:1.
■ Freezing a picture
● To freeze a picture:
Press the [Still] button to snapshot the present viewing picture, and press again to return to normal.
■ Setting the sleep timer
You can specify the amount of time you want your TV to wait before it automatically turns off.
● To set the sleep timer:
Pressing [Sleep] button repeatedly will allow you to change the sleep timer mode: Off, 10 minutes, 20
minutes, 30 minutes, 60 minutes, 90 minutes, 120minutes, 180minutes and 240minutes.
■ Audio function
● Pressing [ I/II ] button the TV screen will display the Audio options such as Mono/Stereo.
■ Displaying channel lists
● Press [OK] to display the full list of digital and analogue channels available.

20
Using the Remote Control
Quick start
■ Electronic Programming Guide (EPG)
Provides convenient access to the television programs that will be available in the next 7 days. The information
displayed by the EPG is made available by the commercial television networks for digital channels only.
The EPG also provides a simple way to program the recording of your favourite programs. There is no need to
setup complicated timers.
● Press [EPG] in your remote controller to display the electronic programming guide. Programs can be shown
in either Time mode or Channel mode; press [Index] to select the mode of your choice.
● Time mode
1. Press [◄/►] to select Time mode when the highlighted area
(yellow bar) is at the top in Program Guide. Alternatively use the
[Index] button.
2. Select the date area with [▲/▼] and change to the desired day
of the week using [◄/►].
3. Explore the list of programs available at the current time using
[▲/▼].
4. Press [Index] from any position in the list to jump to the top
(Program guide)
5. If the EPG displays “No Information” please highlight that
particular channel and press [OK]. The information will be
available after a short delay.
● Channel mode
1. Press [◄/►] to select Channel mode when the highlighted area
(yellow bar) is at the top in Program Guide. Alternatively use the
[Index] button.
2. Select the Channel area with [▲/▼] and change to the desired
digital channel using [◄/►].
3. Explore the list of programs available with [▲/▼].
4. Press [Index] from any position in the list to jump to the top
(Program guide).
● Recording a program
Using the EPG listing highlight the program of interest and press the [RED] button "Record". A submenu will
display detailed program and time information, simply press [OK] to confirm the recording.
-Scheduled recordings will proceed automatically at the correct time if the television is left in standby mode.
No user intervention is required.
NOTE:
An USB storage device must be attached to the television for recording purposes. Please refer to the PVR
section of this manual.
● EPG functions
The Remind function will change automatically channels at the correct time so that you do not miss programs
of interest. Select the program from the EPG and press the [BLUE] button "Remind" to setup this feature.
-Press the [GREEN] button "Info" when the EPG is active to display detailed information and comments
about television programs.
-Press the [YELLOW] button "Schedule" to display a list of scheduled recordings and reminders.
PROGRAM GUIDE Time
1
PROGRAM GUIDE Time
2
7 7 Digital Royal Pains
7 7 Digital Royal Pains
70 7 Digital Royal Pains
70 7 Digital Royal Pains
71 7 Digital 1 Royal Pains
71 7 Digital 1 Royal Pains
3
72 7TWO The World At War
72 7TWO The World At War
73 7mate Warehouse 13
73 7mate Warehouse 13
74 TV4ME Psychic Live & Interactive
74 TV4ME Psychic Live & Interactive
19 Dec 01:19
19 Dec 01:19
Record Info Schedule Remind
Record Info Schedule Remind
PROGRAM GUIDE Channel
1
PROGRAM GUIDE Channel
2
00:30-01:30 Royal Pains
00:30-01:30 Royal Pains
01:30-02:30 Love Bites
01:30-02:30 Love Bites
01:30-02:30 Love Bites
02:30-03:00 The Real Seachange
02:30-03:00 The Real Seachange
03:00-03:30 Brand Developers
03:00-03:30 Brand Developers
3
03:30-04:00 Brand Developers
03:30-04:00 Brand Developers
04:00-05:00 NBC Today
04:00-05:00 NBC Today
05:00-06:00 NBC meet The Press
05:00-06:00 NBC meet The Press
06:00-06:30 Sunrise Extra
06:00-06:30 Sunrise Extra
Record Info Schedule Remind
Record Info Schedule Remind
OK
OK Index
OK
OK Index
CH 7 7 Digital
CH 7 7 Digital
OK
OK Index
OK
OK Index
INDEX
INDEX
INDEX
INDEX

lnstallation Guide
21
Changing the TV Settings
Using the Installation Guide Menu
The Installation Guide menu appears the first time you
turn on the TV. It will assist you to specify the Mode
Settings, OSD Language, Country, Scan Type and Auto
Tuning.
● Make sure that you have:
Installed the remote control batteries.
Connected an antenna or cable.
Connected the power cord.
● Press [POWER Switch] to turn on your TV. The
Installation Guide menu displays.
■ Mode Setting - Press [◄/► ] to select your Mode Setting: Home Mode or Shop Mode.
-Shop mode is only intended for commercial environments. Personal viewing preferences will not be retained
after turning the unit off.
-Home Mode is the recommended setting which offers full functionality of the television.
■ OSD Language – Press [◄/► ] to select your OSD Language.
■ Country – Press [◄/► ] to select your Country.
■ Scan Type – Press [◄/► ] to select the desired signals to be found ATV, DTV+ATV or DTV.
■ Auto Tuning - Press [►/OK ] to automatically start tuning channels available in your viewing area.
If you press [Menu] to select Skip, your TV disconfirms the correct search.
Select exit to terminate the auto – tuning process.
lnstallation Guide
Mode Setting Home Mode
Mode Setting Home Mode
OSD Language English
OSD Language English
Country Australia
Country Australia
Scan Type DTV+ATV
Scan Type DTV+ATV
Auto Tuning
Auto Tuning
“In Shop Mod, your settings will
“In Shop Mod, your settings will
not be saved.”
not be saved.”
Are you sure to select Shop
Are you sure to select Shop
Mode?
Mode?
Yes No
Yes No

CHANNAL
22
Changing the TV Settings
Using the Channel Menu
● Press [Menu] to open the main menu.
● Press [▲/▼] to select Channel, then press [►/OK] to
enter the Channel menu.
● Press [▲/▼] to select an option.
● Press [◄/►] to adjust the option or press [►/OK] to
enter the submenu.
● Press [Menu] to return the previous menu.
● Press [EXIT] to terminate this menu.
■ Country
● Press [▲/▼] to select the Country option.
● Press [◄/►] to select the Country you are in.
■ Tuning Type
● Press [▲/▼] to select the Tuning Type.
● Press [◄/►] to select DTV+ATV, DTV or ATV.
■ Auto Tuning
This is the easiest and most effective way to install all channels available in your area automatically.
-In both the Analog and Digital signal source
● Press [▲/▼] to select Auto Tuning.
● Press [OK] start an automatic search, and this will memorize all the available channels.
Auto Tuning will take a few minutes; please wait until it has finished.
■ DTV Manual Tuning
-In Digital signal source
● Press [▲/▼] to select the DTV Manual Tuning, then press [OK] to enter DTV Manual Tuning menu.
● Press [◄/►] to select a channel then press [OK] to search.
Country Australia
Tuning Type
Auto Tuning
DTV Manual Tuning
ATV Manual Tuning
Program Edit
Signal information
DTV+ATV

23
Changing the TV Settings
Using the Channel Menu
■ ATV Manual Tuning
-In Analog signal source
Manual Install is only needed when analogue channels are not found with an automatic tuning.
● Press [▲/▼] to select ATV Manual Tuning, then press [►/OK] to enter ATV Manual Tuning menu.
● Press [▲/▼] to select search then press [◄/►] to being tuning.
● Storage - You can select the channel 1……100 .
● Color System - Select AUTO for automatic setup of the colour system. This television is compatible with PAL,
NTSC and SECAM systems.
● Audio System - Please select BG for Australia. Other options available are: I, DK and L.
● Current CH - You can select Current CH 1 to Current CH 100.
● Search - Auto search the channel.
● Fine-Tune - Fine adjusts for frequency to improve image under poor reception conditions.
● Press [RED] button to save the channel.
■ Program Edit
Use the SKIP button to mark channels that you want to skip automatically when using CH+/-. You can still select
the skipped channels using the number buttons.
● Delete channels: Use the [RED] button to delete the channels you have selected, once to select and twice
to delete.
● Rename channels: Use the [GREEN] button, [◄/►] and [▲/▼] to rename the channels you have selected.
● Move channels: Use the [YELLOW] button and press [▲/▼] to Move the channels to another position then
press MOVE a second time to finalize.
NOTE: "RENAME" and "MOVE" are for analogy TV channels only.
● Skip channels: Use the [BLUE] button to Skip the channels you have selected.
● FAV channels: Use the [FAV] button to add channels to the favorite list.
■ Signal Information
● This menu is used to check the signal strength of your antenna system. Usually strengths of above 75%
indicates an acceptable signal for your TV to display correct image. Each channel may vary in signal / quality
strengths and its common for broadcast strengths to change in your area. The signal strength of the channel
on the screen is displayed.
* If lower than 75% we advise to have your antenna system checked by qualified personal.

PICTURE
24
Changing the TV Settings
Using the Picture Menu
● Press [Menu] to open the main menu.
● Press [▲/▼] to select Picture, then press [►/OK] to
enter the Picture menu.
● Press [▲/▼] to select an option.
● Press [◄/►] to adjust the option or press [►/OK] to
enter the submenu.
● Press [Menu] to return the previous menu.
● Press [EXIT] to terminate this menu.
■ Picture Mode - Press [◄/► ] to select between 5 different pre-adjusted picture modes: Dynamic, Bright,
Standard, Soft and User (configurable mode). The User mode automatically preserves your personal settings
after adjusting brightness, color and contrast etc.
■ Brightness - Adjust the overall luminance of the image from dark to bright according with room lighting
conditions or according to personal preferences.
■ Contrast - Adjusts of the relative intensity of both black and white areas of the image simultaneously. As the
contrast increases blacks are deeper and whites are brighter.
■ Color - Adjusts the saturation of colours. Higher settings produce more vivid and intense colours.
■ Sharpness - Increasing the sharpness setting will produce better defined edges. It is advisable to reduce
sharpness to minimize image noise present in low quality video content.
■ Tint - This control is only intended for reducing colour bias of NTSC colour system signals.
■ Back light - Controls the luminosity of the LCD panel of the television. Optimal energy consumption will result
from using low backlight settings that are adequate for the lighting conditions of the room.
■ Color Temperature - The options Cool, Warm and Normal produce subtle colour balance differences to suit
personal preferences and correction of content with a particular colour imbalance.
■ Noise Reduction - Some lower quality video content can be improved by using this noise filter.
Picture Mode Standard
Brig htnes s
Cont rast
Color
Shar pness
Tint
Back Light
Color Temperature Normal
Noise Reduction Medium
50
50
50
50
50
50

SOUND
25
Changing the TV Settings
Using the Sound Menu
● Press [Menu] to open the main menu.
● Press [▲/▼] to select Sound, then press [►/OK] to
enter the Sound menu.
● Press [▲/▼] to select an option.
● Press [◄/►] to adjust the option or press [►/OK] to
enter the submenu.
● Press [Menu] to return the previous menu.
● Press [EXIT] to terminate this menu.
■ Sound Mode - Press [◄/►] to select between 5 different pre-adjusted sound modes:
Standard, Music, Movie, Speech and User(configurable mode). The User mode preserves your preferred
sound settings after using the Equalizer available under the Sound submenu.
■ Equalizer - Set the User mode of sound.
Press [◄/►] button to select the audio frequency band between 120HZ, 500HZ, 1.5KHZ, 5KHZ, and 10KHZ.
Press [▲/▼] button to increase or decrease the volume.
The sound Equalizer can also be easily configured for most frequent situations by pressing the [SOUND]
button on your remote controller. Preset settings are provided for User, Music, Standard and Speech
conditions. Standard mode delivers a flat frequency response, which preserves the natural characteristics of
the original sound. In Music mode the extremes of low and high frequencies are accentuated to enhance
musical instrument reproduction. The opposite effect is accomplished in Speech mode where very low and
high frequencies are attenuated to improve the reproduction and intelligibility of the human voice.
■ Balance - Press [◄/►] to adjust the volume from the left and right speakers.
■ Auto Volume - Can be used to minimize unwanted variations in sound level, for example, during
advertisement.
■ SPDIF Output - Auto, PCM, AC3 options are available for compatibility with different audio equipment.
■ Lip-Sync - Allows very subtle adjustments between the syncing of sound and vision, You can select 1 to10.
Usually this is set to 5.
Sound Mode Standard
Equalizer
Balance
Auto Volume
SPDIF Output
Lip-Sync 5
0
Off
AC3

OPTION
26
Changing the TV Settings
Using the Option Menu
● Press [Menu] to open the main menu.
● Press [▲/▼] to select Function, then press [►/OK] to
enter the Function menu.
● Press [▲/▼] to select an option.
● Press [◄/►] to adjust the option or press [►/OK] to
enter the submenu.
● Press [Menu] to return the previous menu.
● Press [EXIT] to terminate this menu.
■ OSD Language - Press [◄/►] to select the OSD Language.
■ Audio Language - Press [◄/►] to select the Audio Language. (Available only for DTV source)
■ Subtitle Language - Press [◄/►] to select the Subtitle Language. (Available only for DTV source)
■ Blue Screen - Press [◄/►] to turn on/off the Blue Screen effect by selecting “On” or “Off”.
■ Installation Guide - Press [◄/►] to turn on/off the Installation Guide effect by selecting “On” or “Off”. When
you set up as "On", you can restart the TV set, and the Installation Guide menu will pop up.
■ Time - Press [▲/▼] to select Time in the Option OSD, and press [►/OK] to enter. It contains Clock, Off Time,
On Time, Sleep Timer, Auto Sleep and Time Zone.
● Clock - Display date and time. Press [►/OK] to enter the menu, then press [▲/▼] to select the Date, Month,
Year, Hour and Minute. Press [◄/►] to adjust the value.
● Off Time - Set the Off Time. Press [►/OK] to enter the menu, then press [▲/▼] to select the Off Time
mode, Hour and Minute. Press [◄/►] to adjust the value.
● On Time - Set the On Time. Press [►/OK] to enter the menu, then press [▲/▼] to select the Off Time
mode, Hour and Minute. Press [◄/►] to adjust the value.
● Sleep Timer - Press [◄/►] to set the Sleep Timer between 0-240minutes.
● Auto Sleep - During the time, if there is no operation, the TV into standby mode. You can press [◄/►] to set
this time from Off, 3H and 4H.
● Time Zone - Press [◄/►] to set a Time Zone corresponding to your region.
■ OSD Settings - The time it takes the OSD to disappear when no operations are performed.
● OSD Time Out - You can change it from Off, 10, 15, 30, 45, and 60 seconds.
● OSD Transparency - You can change it from Off ,1,2,3,4. to suit the required transparency.
OSD Language English
Audio Language
Subtitle Language
Blue Screen Off
Installation Guide Off
Time
OSD Settings
Restore Factory Default
PVR File System

OPTION
27
Changing the TV Settings
Using the Option Menu
● Press [Menu] to open the main menu.
● Press [▲/▼] to select Function, then press [►/OK] to
enter the Function menu.
● Press [▲/▼] to select an option.
● Press [◄/►] to adjust the option or press [►/OK] to
enter the submenu.
● Press [Menu] to return the previous menu.
● Press [EXIT] to terminate this menu.
■ Restore Factory Default - Select Restore Factory Default and press [OK], you will be asked via the OSD to
confirm your selection. Factory default restores the original setting of picture and sound.
Press [►] you will be asked to confirm the password.
NOTE: Password and parental options are NOT reset.
■ PVR Personal Video Recorder function
● Select the PVR File System option to initialize your USB mass storage device by creating a recording
partition.
● Use the Format option if the disk has been previously used for other purposes. Formatting the disk will
erase all existing files, please backup those files before proceeding.
● Most good quality HD disks and memory keys with USB connection available can be used.
● Only FAT 32 file format devices are compatible with this television.
● It is highly recommended to employ a dedicated USB storage device for exclusive use for PVR and Time
Shift purposes.
● Avoid using a general purpose drive containing other personal files or data which could be lost accidentally.
■ PVR operation
● The PVR function is only available in DTV mode.
● Press [PVR] to start recording the current program. It is not possible to record a television program while
watching a different one.
● Press [Stop] to finalize a recording.
● Stop a recording before changing channels or turning the television off.
● Recordings are stored in Transport Stream format in files with .TS extension in the USB memory device.
● TS files can be selected and played using either the [Index] button or the DMP media player function of this
television.
■ Time Shift operation
● The Time Shift function is only available in DTV mode.
● Press [T.Shift] to pause the current program.
● Press [Play] continue watching the program.
● Press [Stop] to exit time shift mode
● Stop time shift before changing channels.
● The longest time that a program can be paused depends on the capacity of the USB storage device in use.
Auto-Light Off
Software Update (USB)
Version V00.01.00aC0423

28
Changing the TV Settings
Using the Option Menu
■ Auto-Light - Set DBC (Dynamic Backlight Control) option on to enable Auto-Light. This feature increases the
dynamic contrast ratio, that is the relative light intensity between black and white areas of the image. Some
video content may produce brightness flickering, in which case DBC should be turned off.
■ Software Update (USB) - Software updates are only required when your TV is not functioning due to
corruption of internal software. Please contact ph 1800 447 367 for advise on available software.
Insert the update USB disk to the service/USB port.
● Press [▲/▼] to select Software Update.
● Press [►/OK] to enter the Software Update menu.
● Press [◄/►] to select Yes or No to Software Update.
■ Version - To find out the software version of TV.

LOCK
29
Changing the TV Settings
Using the Lock Menu
● Press [Menu] to open the main menu.
● Press [▲/▼] to select Lock, then press [►/OK] to enter
the Lock menu.
● Press [▲/▼] to select an option.
● Press [◄/►] to adjust the option or press [►/OK] to
enter the submenu.
● Press [Menu] to return the previous menu.
● Press [EXIT] to terminate this menu.
When you first use this function, the default password is [0000]. Once you input this password, you can continue
to the next operation.
NOTE: The factory initial password is “0000”.
■ Lock System - Press [◄/►] to turn on or turn off the Lock System effect by selecting “On” or “Off”.
■ Change Password - to set or change the password.
● First input the old password.
● Second input a new password.
● Then input the new password again.
NOTE: Please store your new password in a safe place.
■ Block Program - The MENU below will be displayed listing your available channels. Select the channel to block
and push the Green button to block it.
■ Parental Guidance
● Classifies the programs into the following:
● No Block - No programs are blocked.
● Block R and above - All "R" rated classified programs are blocked.
● Block AV and above - Adult audiences, strong violence, 15 years and older.
● Block MA and above - Mature audiences only, 15 years and older.
● Block M and above - Mature audiences only, parental guidance is strongly advised.
● Block PG and above - Parental guidance recommended.
● Block G and above - General audiences.
● Block all - All programs are blocked.
Lock System Off
Chang Password
Subtitle Language
Block Program
Parental Guidance No Block

SCREEN
30
Changing the TV Settings
Using the Screen Menu
● Press [Menu] to open the main menu.
● Press [▲/▼] to select Screen, then press [►/OK] to
enter the Screen menu.
● Press [▲/▼] to select an option.
● Press [◄/►] to adjust the option or press [►/OK] to
enter the submenu.
● Press [Menu] to return the previous menu.
● Press [EXIT] to terminate this menu.
■ H. Position - Adjust the horizontal position of the image.
■ V. Position - Adjust the vertical position of the image.
■ H. Size - Adjust the horizontal size of the image.
■ V. Size - Adjust the vertical size of the image.
■ Phase - Adjust the VGA phase to match the PC. (VGA mode only)
■ Clock - Adjust the VGA Clock to match the PC clock. (VGA mode only)
■ Auto Adjust - Auto adjust the VGA image position. (VGA mode only)
H. Position
V. Position
H. Size
V. Size
Phase
Clock
Auto Adjust
0
0
0
0
0
0
0

31
Changing the TV Settings
PC Setting
PC Setting
Set the PC Software properly to match one of the below options.
Supported VGA Modes:
VGA____ (640×480 60Hz)
SVGA___ (800×600 60Hz)
XGA____ (1024×768 60Hz)
SXGA___ (1280×1024 60Hz)
Note: Your PC/Notebook may not be able to display some of these resolutions.
Take Windows XP as an example, and the Windows system display setting is as illustrated:
1. Right click anywhere on your display, select 'Properties'.
2. Find the Settings tab on the dialogue box, set the screen Resolution.
3. See above details about the resolutions supported by this unit.
4. Click OK to exit.
Please note:Primarily this unit is intended for use as an LCD TV. If compatibility is a problem when using this unit
as a monitor, please contact the manufacturer of the PC Video/Graphic's card for further support. Perfect
compatibility is not warranted.

USB
ALL
32
Changing the TV Settings
Using the DMP Menu
● Press [Source] to open Source menu.
● Press [▲/▼] to select DMP, then press
[►/OK] to enter the DMP menu.(or press
[D/EMP] to enter the DMP menu.)
● Press [▲/▼] to select an option, press
[OK] to enter the option.
● Press [▲/▼/◄/►] to select a file, press [OK] to
confirm the file is selected, press
[Play/Pause] to play the file.
● Press [Exit] to return to the previous menu.
DMP Browser function :
This unit incorporates a browser to view all your photos, Music, Movies and Text files on screen.
■ First insert your USB device with files you wish to view into the USB port - This can be inserted while the TV is
on or off. Press [Source] and select DMP.
■ Browse photo
Select the PHOTO option.
● Press [▲/▼/◄/►] to select a photo, press [OK] to enter, press [Play/Pause] to play or pause the selected
photo.
● Press [ I◄◄/►►I ] to select the photo previous or next.
● Press [►] to rotate the selected photo with 90 degrees,180 degrees, 270 degrees, 360 degrees .
● Press [Zoom] to zoom the selected photo, then press [▲/▼/◄/►] to move the field of view.
■ Listen to music
Select the MUSIC option.
● Press [▲/▼/◄/►] to select a music file, press [OK] to enter, press [Play/Pause] to play the music.
Also can select more than one song. Press [Play/Pause] to play all selected songs.
● Press [◄◄ /►►] to set the play speed "fast rewind" or "fast forward".
● Press [ I◄◄/►►I ] to select previous or next.
ALL
Return F1 F2 F3
MOVIE
MUSIC
01.MP3 02.MP3 03.MP3 04.MP3
PHOTO
BookTEXT
-6dBA 60.mp3
OK
MENU EXIT
Move Select Return Exit Media
1000hz.mp3
01.Horizons .mp3
Repeat Mode: All 00:00:33 / 00:01:00
Play State:
1 / 1
MEDIA
Select Mark Play / Pause Return
Information
Name
Play
Title: -6dBA 60.mp3
Album:
Year:
Artist:
Bit Rate: 128K
Sampling: 44K
TOG Mode

33
Changing the TV Settings
Using the DMP Menu
■ Watching a movie
Select the MOVIE option.
● Press [▲/▼/◄/►] to select a movie, press [OK] to enter, then press [Play/Pause] to play the movie.
Also you can select more than one movie at the same time, press [Play/Pause] to play all the movies.
● Press [◄◄ /►►] to set the play speed "fast back" or "fast forward".
● Press [ I◄◄/►►I ] to select preview or next.
■ Reading a text file
Select the TEXT option.
● Press [▲/▼/◄/►] to select a TEXT, press [OK] to enter.
● Press [Subtitle] to pull-down the text file, press [Audio] to pull-up the text file.
● Press [ I◄◄/►►I ] to select the text file previous or next.
NOTE: The following file extensions are compatible.
PHOTO: *.jpg ,*.bmp
MUSIC: *.mp3
MOVIE: *.mpg (encoding: Mpeg), AVI.
TEXT: *.txt
NOTE:
This multimedia player is compatible with many file formats available today, however full compatibility is not
guaranteed.
Some USB storage devices exceed the maximum supply capability of the USB port of this television, which may
cause malfunction and loss of data. The use of a powered USB hub is recommended to overcome the limitation.

1011
34
Changing the TV Settings
Using the DMP Menu
Changing the TV Settings
Using the DMP Menu
Tool Bar Menu:
If you've opened a photo, press [Menu] to open the play menu Tool Bar, the following items will be available:
(1) - Back - Select previous photograph.
(2) - Forward - Select next photograph.
(3) - Rotates the photograph clockwise.
(4) - Rotates the photograph anti clockwise.
(5) - Press [Play] to enter and open the photograph - also for PAUSING the slide show.
(6) - Stop - Returns to Thumbnails screen.
(7) - Zoom in - enlarges the image.
(8) - Zoom out - decreases the image.
(9) - Options setting -
Show Speed : Press [◄/►] to set image displaying speed.
Background Music : Press [◄/►] to ON/OFF Background music. Once set to ON, the user can browse
images while enjoying the music in the current folder.
(10) - Picture information - View image information.
(11) - Switching music while picture browsing (the music option set to ON)
Press Red button: Play previous song if there are songs in current folder.
Press Green button: Play next song if there are songs in current folder.
NOTES:
1. Only supports JPEG format files.
2. Max support = 2000 files.
3. Only supports HARD DISK Primary partitioning.
4. Do not take out USB device when the screen is “Loading,please wait…”.

If you feel there's a problem with your TV, you can try turning off the TV then restart it. You can also
check below chart of remedies. If the problem isn't resolved, please contact ph 1800 447 367. for
further assistance.
Appendix
Trouble shooting
Symptom
Remedy
● No sound or picture
● The picture is normal, but
there is no sound
● No picture and white or black
picture
● The sound and picture are
interfered
● Unclear picture or picture
with snow
● The remote control does not
work
● H/V strip or the picture
shaking
● The TV cabinet makes a
“Clicking” sound
● The DMP function not
working
PLEASE NOTE:
Files on my USB are not
playing
1. Check if the power line is in the outlet and if it has electricity.
2. Check if you have pressed Power button on the TV or Power button on
the remote control.
3. Check the setting of picture brightness and contrast.
4. Check the volume.
1. Check the volume.
2. Check if Mute mode is set.
1. Adjust Picture Setting.
2. Check Colour System.
1. Try to find the appliance affecting the TV set, and move it far away from
the TV set.
2. Insert the power plug of the TV set into another outlet.
1. Check the direction, position and connection of your antenna.
2. Adjust the direction of your antenna or reset or fine tune the channel.
1. Change the batteries in the remote control.
2. Clean the upper side of the remote control (radiating window)
3. Check the contacting points of the batteries.
4. Check if there is obstruction between the remote control and the monitor.
5. Check if the batteries are correctly installed.
Check if there is interfering source nearby, such as appliances or electric
tools.
This happens due to temperature change causing the television cabinet to
expand or contract. This is normal, and shouldn't cause alarm.
Images, music and video files which were modified and or damaged by
computer virus' or corrupted may affect proper play.
Check the USB devices for corruption.
If your digital picture is pixelating and blotchy it may be due to the antenna
System, It may not be in an adequate position or a new antenna system is
required along with suitable cabling for digital television receivers.
Check the signal strength in the Channel menu to verify.
Some forms of files cannot be played due to restrictions. This is not a fault
with your TV.
35

36
Appendix
Specifications
HL32K300L HL50K300PL
Model
Screen Diagonal Size
32 inches 50 inches
Screen Resolution
1366x768 Pixels 1920x1080 Pixels
Power Consumption
Refer to the rating label.
Power Supply
AC 50/60Hz 220-240V
Colour System
PAL
Television System
PAL B DVB-T
Sound Output (RMS)
6W+6W 10W+10W
(480I/60Hz, 480P/60Hz, 576I/50Hz,576P/50Hz,720P/50Hz
Component mode
720P/60Hz,1080I/50Hz,1080I/60Hz,1080P/50Hz,1080P/60Hz)
VGA mode
(480I/60Hz, 480P/60Hz, 576I/50Hz,576P/50Hz,720P/50Hz,720P/60Hz,
HDMI mode
1080I/50Hz,1080I/60Hz,1080P/50Hz,1080P/60Hz)
(640X480, 800X600,1024X768,1280X1024 60Hz)
Size with base(mm)
751x516x200 1150x745x285
Size without base(mm)
751x456x64 1150x688x56
Weight with base(kg)
9.0kg 24kg
Weight without base(kg)
7.7kg 21kg
Wall Mount size
100mm x 100mm 400mm x 400mm
Environmental Conditions
Temperature 5˚C~35˚C
Humidity: 20%-80%RH
Atmospheric pressure: 86kPa-106kPa
NOTE: Hisense is committed to continued product improvement which may result in changes to
specifications and appearance without previous notice.
HL50K300PL: (640X480, 800X600,1024X768,1280X1024 60Hz)
HL32K300L: (640X480, 800X600,1024X768 60Hz)

HL32K300L HL50K300PL
1117093
Http://www.hisense.com.au
条形码定位框
该定位框不做印刷
物料号:
 Loading...