

Page 1

WFE 380 /
WFE 450-E
Bedienungsanleitung de
Operating instructions en
Mode d’emploi fr
Ръководство за обслужване bg
Upute za uporabu hr
Instrukcja obsługi pl
Инструкция по зксплуатации ru
Návod na obsluhu sk
Navodila za uporabo sl
Návod k obsluze cs
Használati utasítás hu
Printed: 07.07.2013 | Doc-Nr: PUB / 5131018 / 000 / 00
Page 2
1
Printed: 07.07.2013 | Doc-Nr: PUB / 5131018 / 000 / 00
Page 3

2 3
4
5 6
7
Printed: 07.07.2013 | Doc-Nr: PUB / 5131018 / 000 / 00
Page 4
PVC
P 60
P 80
P 100
P 120
P 150
P 180
Holz
wood
bois
150
Drehzahl
speed
vitesse
Artikelnummer
item number
code d' article
Bestell-Bezeichnung
ordering designation
référence
Typ
type
type
Farbe / Lacke
paint / varnish
painture / vernis
P 40
P 60
P 80
P 100
P 120
P 180
P 220
P 320
P 400
CFE 150-VW
CFE 150-VW
CFE 150-VW
CFE 150-VW
CFE 150-VW
CFE 150-VW
CFE 150-VP
CFE 150-VP
CFE 150-VP
CFE 150-VP
CFE 150-VP
CFE 150-VP
CFE 150-VP
CFE 150-VP
CFE 150-VP
315730/2
315731/0
315732/8
315733/6
315735/1
315737/7
315742/7
315743/5
315744/3
315745/0
315746/8
315750/0
315752/6
315756/7
315757/5
optimal geeignet, ideal, tout indiquée
....
geeignet, good, indiquée
....
3-6 3-6 1-5 1-5 1-5 1-5
Hilti = registered trademark of Hilti Corporation, Schaan, Liechtenstein
Internet: www.hilti.com
WFE 450-E
WFE 380
150
8 9
Printed: 07.07.2013 | Doc-Nr: PUB / 5131018 / 000 / 00
Page 5

1
1. Allgemeine Hinweise
Signalwort für die Gefahr «VORSICHT»
um die Aufmerksamkeit auf eine Gefährlichkeit oder
unsichere Verfahrensweise zu lenken, die zu einer Verletzung von Personen oder einem Eigentumsschaden
führen könnte.
Piktogramme
Lesen Sie die Bedienungsanleitung vor Inbetriebnahme
unbedingt durch.
Bewahren Sie diese Bedienungsanleitung immer beim Gerät auf.
Geben Sie das Gerät nur mit
Bedienungsanleitung an andere
Personen weiter.
Inhalt Seite
1. Allgemeine Hinweise 1
2. Beschreibung 2
3. Technische Daten 2
4. Sicherheitshinweise 3
5. Inbetriebnahme 5
6. Bedienung 5
7. Betrieb 6
8. Pflege und Instandhaltung 7
9. Fehlersuche 8
10. Entsorgung 8
11. Herstellergewährleistung Geräte 8
12. Konformitätserklärung (Original) 9
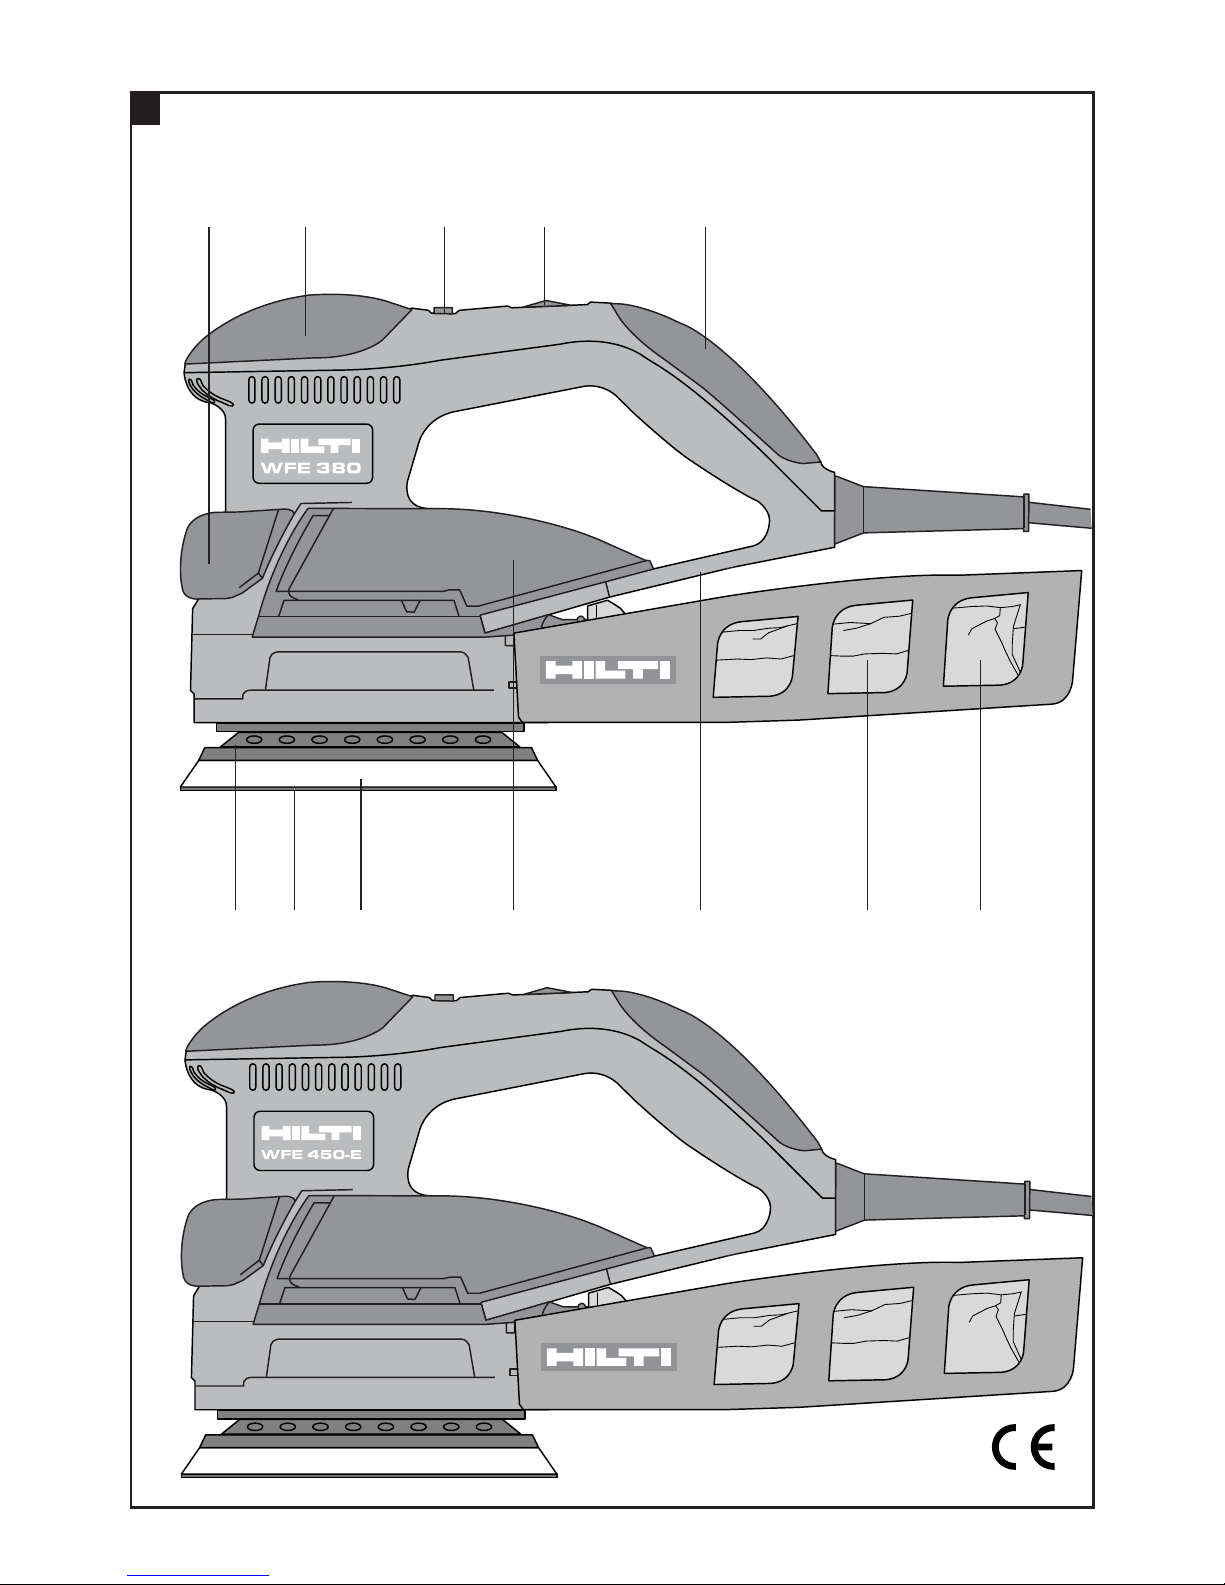
Bedienungselemente
Ein-/Ausschalter
Stellrad zur Drehzahlvorwahl
Gerätebauteile
Typenschild
Handgriff
Führungsgriff
Zusatzhandgriff
Qualitätsgriff
Schleifteller
Schleifmittel mit Kletthaftung
쐅 Befestigungsschrauben Schleifteller
쐈 Bremsring
쐉 Staubbox
씈 Staubsack
씉 Absaugstutzen / Absaugschlauch
씊 Positionierhilfe für Schleifmittel
ORIGINAL BEDIENUNGSANLEITUNG
WFE 380 / WFE 450-E Exzenterschleifer
Die Zahlen verweisen jeweils auf Abbildungen. Die
Abbildungen zum Text finden Sie auf den ausfaltbaren
Umschlagseiten. Halten Sie diese beim Studium der
Anleitung geöffnet.
Im Text dieser Bedienungsanleitung bezeichnet «das
Gerät» immer den Exzenterschleifer.
Ort der Identifizierungsdetails auf dem Gerät
Die Typenbezeichnung und die Serienkennzeichnung
sind auf dem Typenschild Ihres Geräts angebracht. Übertragen Sie diese Angaben in Ihre Bedienungsanleitung
und beziehen Sie sich bei Anfragen an unsere Vertretung oder Servicestelle immer auf diese Angaben.
Typ:
Serie Nr.:
Warnzeichen
Gebotszeichen
Gehör-
schutz
benutzen
Schutz-
handschuhe
benutzen
Leichten
Atemschutz
benutzen
Augen-
schutz
benutzen
Vor Benutzung
Bedienungs an-
leitung lesen
Symbole
Warnung vor
allgemeiner
Gefahr
Warnung vor
gefährlicher
elektrischer Spannung
Warnung vor
heisser
Oberfläche
Abfälle der
Wiederverwertung
zuführen
Printed: 07.07.2013 | Doc-Nr: PUB / 5131018 / 000 / 00
Page 6

2
3. Technische Daten WFE380 WFE450-E
Nennleistung 380 W 450 W
Nennspannung ✱ 110 V 220 V 230 V 240 V 110 V 220 V 230 V 240 V
Nennstrom 3,6 A 1,8 A 1,7 A 1,6 A 4,2 A 2,3 A 2,2 A 2,1 A
Netzfrequenz ✱ 50–60 Hz
Leerlaufhubzahl 5000–10000 /min
Schwingzahl 10000–20000 /min
Schleifteller ∅ 150 mm
Exzenterhub 4 mm
Außendurchmesser Absaugadapter 30 mm
Gewicht entsprechend EPTA-Procedure 01/2003 2,2 kg
HINWEIS
Der in diesen Anweisungen angegebene Schwingungspegel ist entsprechend einem in EN 60745 genormten Mess verfahren gemessen worden und kann für den Vergleich von Elektrowerkzeugen miteinander verwendet werden.
Er eignet sich auch für eine vorläufige Einschätzung der Schwingungsbelastung. Der angegebene Schwingungspegel
repräsentiert die hauptsächlichen Anwendungen des Elektrowerkzeugs. Wenn allerdings das Elektrowerkzeug für
andere Anwendungen, mit abweichenden Einsatzwerkzeugen oder ungenügender Wartung eingesetzt wird, kann
der Schwingungspegel abweichen. Dies kann die Schwingungsbelastung über den gesamten Arbeitszeitraum deutlich erhöhen. Für eine genaue Abschätzung der Schwingungsbelastung sollten auch die Zeiten berücksichtigt
werden, in denen das Gerät abgeschaltet ist oder zwar läuft, aber nicht tatsächlich im Einsatz ist. Dies kann die
Schwingungsbelastung über den gesamten Arbeitszeitraum deutlich reduzieren. Legen Sie zusätzliche Sicher-
● Manipulationen oder Veränderungen am Gerät sind
nicht erlaubt
● Benutzen Sie, um Verletzungsgefahren zu vermeiden,
nur original Hilti Zubehör
● Arbeiten Sie nicht ohne geeignetes Absaugsystem.
Beachten Sie besonders beim Schleifen von gesundheitsgefährdenden Materialien (z.B. Eichen- oder Buchenholz, Farbanstriche die Blei oder andere Schadstoffe enthalten) die Sicherheits- und die Entsorgungsvorschriften
Beachten Sie die Angaben zu Betrieb, Pflege und Instandhaltung in der Bedienungsanleitung
Wesentliche Gerätemerkmale
– Elektrische Schutzklasse II (doppelt schutzisoliert)
Z (nach EN 60745)
– Vibrationsdämpfende, ergonomische Handgriffe
- Handgriff
- Führungsgriff
- Qualitätsgriff
– Integrierter Zusatzhandgriff
– Stufenlose Drehzahleinstellung
– Schleifteller für universellen Einsatz, weitere Teller
im Zubehör erhältlich
Anforderung an den Benutzer
● Das Gerät ist für den professionellen Benutzer bestimmt
● Das Gerät darf nur von autorisiertem, eingewiesenem
Personal bedient, gewartet und instand gehalten werden. Dieses Personal muss speziell über die auftretenden Gefahren unterrichtet sein
2. Beschreibung
Der Exzenterschleifer WFE380 / WFE450-E ist ein
elektrisch angetriebenes Gerät zum Schleifen von Holz,
Holzmaterialien, Verbundwerkstoffen, Lacken, Farben,
Kunststoffen, Gips, Spachtelmassen und ähnlichen Materialien.
Das Gerät ist für den professionellen Kunden bestimmt.
Zum Lieferumfang gehören: Gerät mit Staubbox, Staubsack, Bedienungsanleitung und Transportkoffer, WFE380
in Kartonschachtel.
Bestimmungsgemässer Gebrauch
● Das Gerät ist bestimmt zum flächigen Schleifen von
Material, wie Holz, Furnier, Füller, Spachtel, Kunststoff
und Gips mittels verschleissender, auswechselbarer
Schleifmittel.
● Das Arbeitsumfeld kann sein: Baustelle, Werkstatt,
Renovierung, Umbau und Neubau.
● Die Umgebung soll trocken sein.
● Der Betrieb darf nur mit der auf dem Typenschild ange-
gebenen Netzspannung und – frequenz erfolgen.
● Die Anwendung muss mit gesichertem Werkstück
und sicherem Stand stattfinden.
● Metalle und asbesthaltige Stoffe dürfen nicht geschliffen werden
● Das Gerät darf nur handgeführt zum Einsatz kommen
● Setzen Sie das Gerät nicht Niederschlägen aus, benüt-
zen Sie es nicht in feuchter, nasser oder explosionsgefährlicher Umgebung
● Verwenden Sie das Gerät nicht für Nassschliff
Printed: 07.07.2013 | Doc-Nr: PUB / 5131018 / 000 / 00
Page 7

3
heitsmassnahmen zum Schutz des Bedieners vor der Wirkung von Schwingungen fest wie zum Beispiel: Wartung
von Elektrowerkzeug und Einsatzwerkzeugen, Warmhalten der Hände, Organisation der Arbeitsabläufe.
Geräusch- und Vibrationsinformation (gemessen nach EN 60745)
Typischer A-bewerteter Schallleistungspegel 93 dB (A)
Typischer A-bewerteter Emissions-Schalldruckpegel 82 dB (A)
Für die genannten Schallpegel nach EN 60745 beträgt die Unsicherheit 3 dB.
Gehörschutz benutzen!
Triaxiale Vibrationswerte (Vibrations-Vektorsumme) WFE 380 WFE450-E
Oberflächen schleifen (a
h
) 4,1 m/s
2
3,9 m/s
2
Unsicherheit (K) für triaxiale Vibrationswerte 1,5 m/s
2
1,5 m/s
2
✱ Das Gerät wird in verschiedenen Nennspannungen angeboten. Die Nennspannung und Nennstromauf nah-
me Ihres Gerätes entnehmen Sie bitte dem Typenschild.
Technische Änderungen vorbehalten
4. Sicherheitshinweise
HINWEIS
Die Sicherheitshinweise in Kapitel 4.1 beinhalten alle allgemeinen
Sicherheitshinweise fur Elektrowerkzeuge, die gemäß den anwendbaren Normen in der Bedienungsanleitung aufzufuhren sind. Es
können demnach Hinweise enthalten sein, die fur dieses Gerät
nicht relevant sind.
4.1 Allgemeine Sicherheitshinweise fur Elektrowerkzeuge
a) WARNUNG! Lesen Sie alle Sicherheitshinweise und
Anweisungen. Versäumnisse bei der Einhaltung der Sicher-
heitshinweise und Anweisungen können elektrischen Schlag,
Brand und/oder schwere Verletzungen verursachen. Bewah-
ren Sie alle Sicherheitshinweise und Anweisungen fur die
Zukunft auf. Der in den Sicherheitshinweisen verwendete Begriff
"Elektrowerkzeug" bezieht sich auf netzbetriebene Elektrowerkzeuge (mit Netzkabel) und auf akkubetriebene Elektrowerkzeuge (ohne Netzkabel).
4.1.1 Arbeitsplatzsicherheit
a) Halten Sie Ihren Arbeitsbereich sauber und gut beleuchtet.
Unordnung oder unbeleuchtete Arbeitsbereiche können zu Unfällen fuhren.
b) Arbeiten Sie mit dem Elektrowerkzeug nicht in explosi-
onsgefährdeter Umgebung, in der sich brennbare Flussigkeiten, Gase oder Stäube befinden. Elektrowerkzeuge erzeu-
gen Funken, die den Staub oder die Dämpfe entzunden können.
c) Halten Sie Kinder und andere Personen während der Benut-
zung des Elektrowerkzeugs fern. Bei Ablenkung können Sie
die Kontrolle uber das Gerät verlieren.
4.1.2 Elektrische Sicherheit
a) Der Anschlussstecker des Elektrowerkzeugs muss in die
Steckdose passen. Der Stecker darf in keiner Weise verändert werden. Verwenden Sie keine Adapterstecker gemeinsam mit schutzgeerdeten Elektrowerkzeugen. Unveränder-
te Stecker und passende Steckdosen verringern das Risiko
eines elektrischen Schlages.
b) Vermeiden Sie Körperkontakt mit geerdeten Oberflächen
wie von Rohren, Heizungen, Herden und Kuhlschränken.
Es besteht ein erhöhtes Risiko durch elektrischen Schlag, wenn
Ihr Körper geerdet ist.
c) Halten Sie Elektrowerkzeuge von Regen oder Nässe fern.
Das Eindringen von Wasser in ein Elektrowerkzeug erhöht das
Risiko eines elektrischen Schlages.
d) Zweckentfremden Sie das Kabel nicht, um das Elektro-
werkzeug zu tragen, aufzuhängen oder um den Stecker aus
der Steckdose zu ziehen. Halten Sie das Kabel fern von Hitze, Öl, scharfen Kanten oder sich bewegenden Geräteteilen. Beschädigte oder verwickelte Kabel erhöhen das Risiko
eines elektrischen Schlages.
e) Wenn Sie mit einem Elektrowerkzeug im Freien arbeiten,
verwenden Sie nur Verlängerungskabel, die auch fur den
Aussenbereich geeignet sind. Die Anwendung eines fur den
Aussenbereich geeigneten Verlängerungskabels verringert das
Risiko eines elektrischen Schlages.
f) Wenn der Betrieb des Elektrowerkzeugs in feuchter Umge-
bung nicht vermeidbar ist, verwenden Sie einen Fehlerstromschutzschalter. Der Einsatz eines Fehlerstrom-
schutzschalters vermindert das Risiko eines elektrischen Schlages.
4.1.3 Sicherheit von Personen
a) Seien Sie aufmerksam, achten Sie darauf, was Sie tun, und
gehen Sie mit Vernunft an die Arbeit mit einem Elektrowerkzeug. Benutzen Sie kein Elektrowerkzeug, wenn Sie
mude sind oder unter dem Einfluss von Drogen, Alkohol
oder Medikamenten stehen. Ein Moment der Unachtsamkeit
beim Gebrauch des Elektrowerkzeugs kann zu ernsthaften Verletzungen fuhren.
b) Tragen Sie persönliche Schutzausrustung und immer eine
Schutzbrille. Das Tragen persönlicher Schutzausrustung, wie
Staubmaske, rutschfeste Sicherheitsschuhe, Schutzhelm oder
Gehörschutz, je nach Art und Einsatz des Elektrowerkzeugs,
verringert das Risiko von Verletzungen.
c) Vermeiden Sie eine unbeabsichtigte Inbetriebnahme. Ver-
gewissern Sie sich, dass das Elektrowerkzeug ausgeschaltet
ist, bevor Sie es an die Stromversorgung und/oder den Akku
anschliessen, es aufnehmen oder tragen. Wenn Sie beim
Tragen des Elektrowerkzeugs den Finger am Schalter haben
Printed: 07.07.2013 | Doc-Nr: PUB / 5131018 / 000 / 00
Page 8

4
4.2 Zusätzliche Sicherheitshinweise
4.2.1 Sicherheit von Personen
a) Tragen Sie Gehörschutz. Die Einwirkung von Lärm
kann Gehörverlust bewirken.
b) Benutzen Sie, falls mitgeliefert, die Zusatzhandgrif-
fe. Der Verlust der Kontrolle kann zu Verletzungen fuhren.
c) Halten Sie die Geräte an isolierten Griffoberflächen,
wenn Sie Arbeiten ausfuhren, bei denen der Schleifteller mit verdeckt liegenden elektrischen Leitungen
oder mit dem eigenen Netzkabel in Beruhrung kommen kann. Kontakt des Schleiftellers mit einer strom-
fuhrenden Leitung kann bewirken, dass freiliegende
Metallteile unter Spannung stehen und der Werkzeugbenutzer einen elektrischen Schlag erhält.
d)Halten Sie das Gerät immer mit beiden Händen an
den vorgesehenen Handgriffen fest. Halten Sie die
Handgriffe trocken, sauber und frei von Öl und Fett.
e)Führen Sie beim Arbeiten das Netz- und das Ver-
länge rungs kabel immer nach hinten vom Gerät
weg.
Dies vermindert die Sturzgefahr über das Kabel
während des Arbeitens.
f) Benutzen Sie Schutzhandschuhe für den Werk zeug-
wechsel, da das Werkzeug durch den Einsatz heiss
wird.
g)Betreiben Sie das Gerät nur bestimmungsgemäss
und in einwandfreiem Zustand.
h)Verwenden Sie eine Staubabsaugung, einen Atem-
schutz und eine Schutzbrille.
Durch Schleifen entstehender Staub kann die Lunge und die Augen schädigen.
i) Stellen Sie sicher, dass schädlicher Schleifstaub
nach den nationalen und regionalen Vorschriften
entsorgt wird.
Durch Schleifen von z.B. Eichen- oder
Buchenholz, Farbanstrichen, die Blei oder andere
Schadstoffe enthalten, entsteht schädlicher Schleifstaub.
j) Machen Sie Arbeitspausen und Entspannungs- und
Fingerübungen zur besseren Durchblutung Ihrer Finger.
k)Stäube von Materialien wie bleihaltigem Anstrich, eini-
gen Holzarten, Mineralien und Metall können gesundheitsschädlich sein. Berühren oder Einatmen der Stäube können allergische Reaktionen und/oder Atemwegserkrankungen des Benutzers oder in der Nähe
befindlicher Personen hervorrufen. Bestimmte Stäube wie Eichen- oder Buchenstaub gelten als krebserzeugend, besonders in Verbindung mit Zusatzstoffen
zur Holzbehandlung (Chromat, Holzschutzmittel).
Asbesthaltiges Material darf nur von Fachleuten bearbeitet werden. Benutzen Sie möglichst eine Staub-
absaugung. Um einen hohen Grad der Staubabsaugung zu erreichen, verwenden Sie einen geeigneten, von Hilti empfohlenen Mobilentstauber für
Holz und/oder Mineralstaub der auf dieses Elektrowerkzeug abgestimmt wurde. Sorgen Sie für gute
oder das Gerät eingeschaltet an die Stromversorgung anschliessen, kann dies zu Unfällen fuhren.
d) Entfernen Sie Einstellwerkzeuge oder Schraubenschlus-
sel, bevor Sie das Elektrowerkzeug einschalten. Ein Werkzeug oder Schlussel, der sich in einem drehenden Geräteteil
befindet, kann zu Verletzungen fuhren.
e) Vermeiden Sie eine abnormale Körperhaltung. Sorgen Sie
fur einen sicheren Stand und halten Sie jederzeit das Gleichgewicht. Dadurch können Sie das Elektrowerkzeug in uner-
warteten Situationen besser kontrollieren.
f) Tragen Sie geeignete Kleidung. Tragen Sie keine weite Klei-
dung oder Schmuck. Halten Sie Haare, Kleidung und Handschuhe fern von sich bewegenden Teilen. Lockere Kleidung,
Schmuck oder lange Haare können von sich bewegenden Teilen erfasst werden.
g) Wenn Staubabsaug- und -auffangeinrichtungen montiert
werden können, vergewissern Sie sich, dass diese angeschlossen sind und richtig verwendet werden. Verwendung
einer Staubabsaugung kann Gefährdungen durch Staub verringern.
4.1.4 Verwendung und Behandlung des Elektrowerkzeugs
a) Überlasten Sie das Gerät nicht. Verwenden Sie fur Ihre Arbeit
das dafur bestimmte Elektrowerkzeug. Mit dem passenden
Elektrowerkzeug arbeiten Sie besser und sicherer im angegebenen Leistungsbereich.
b) Benutzen Sie kein Elektrowerkzeug, dessen Schalter defekt
ist. Ein Elektrowerkzeug, das sich nicht mehr ein- oder ausschalten lässt, ist gefährlich und muss repariert werden.
c) Ziehen Sie den Stecker aus der Steckdose und/oder ent-
fernen Sie den Akku, bevor Sie Geräteeinstellungen vornehmen, Zubehörteile wechseln oder das Gerät weglegen.
Diese Vorsichtsmassnahme verhindert den unbeabsichtigten
Start des Elektrowerkzeugs.
d) Bewahren Sie unbenutzte Elektrowerkzeuge ausserhalb
der Reichweite von Kindern auf. Lassen Sie Personen das
Gerät nicht benutzen, die mit diesem nicht vertraut sind
oder diese Anweisungen nicht gelesen haben. Elektro-
werkzeuge sind gefährlich, wenn Sie von unerfahrenen Personen benutzt werden.
e) Pflegen Sie Elektrowerkzeuge mit Sorgfalt. Kontrollieren
Sie, ob bewegliche Teile einwandfrei funktionieren und nicht
klemmen, ob Teile gebrochen oder so beschädigt sind, dass
die Funktion des Elektrowerkzeugs beeinträchtigt ist. Lassen Sie beschädigte Teile vor dem Einsatz des Gerätes reparieren. Viele Unfälle haben Ihre Ursache in schlecht gewarte-
ten Elektrowerkzeugen.
f) Halten Sie Schneidwerkzeuge scharf und sauber. Sorgfäl-
tig gepflegte Schneidwerkzeuge mit scharfen Schneidkanten
verklemmen sich weniger und sind leichter zu fuhren.
g) Verwenden Sie Elektrowerkzeug, Zubehör, Einsatzwerk-
zeuge usw. entsprechend diesen Anweisungen. Berucksichtigen Sie dabei die Arbeitsbedingungen und die auszufuhrende Tätigkeit. Der Gebrauch von Elektrowerkzeugen
fur andere als die vorgesehenen Anwendungen kann zu gefährlichen Situationen fuhren.
4.1.5 Service
a) Lassen Sie Ihr Elektrowerkzeug nur von qualifiziertem Fach-
personal und nur mit Original-Ersatzteilen reparieren. Damit
wird sichergestellt, dass die Sicherheit des Elektrowerkzeugs
erhalten bleibt.
Printed: 07.07.2013 | Doc-Nr: PUB / 5131018 / 000 / 00
Page 9

5
Belüftung des Arbeitsplatzes. Es wird empfohlen,
eine Atemschutzmaske mit Filterklasse P2 zu tragen. Beachten Sie in Ihrem Land gültige Vorschriften für die zu bearbeitenden Materialien.
l) Das Gerät ist nicht bestimmt, für die Verwendung
durch Kinder oder schwache Personen ohne Unterweisung.
m) Kinder sollten unterwiesen sein, dass sie nicht mit
dem Gerät spielen dürfen.
4.2.2 Sorgfältiger Umgang und Gebrauch von
Elektrowerkzeugen
a) Sichern Sie das Werkstück. Benutzen Sie Spann-
vor richtungen oder einen Schraubstock, um das
Werkstück festzuhalten.
Es ist damit sicherer gehalten als mit der Hand, und Sie haben ausserdem beide Hände zur Be dienung des Geräts frei.
b) Bei Stromunterbrechung Gerät ausschalten und
Netz stecker ziehen.
Dies verhindert die unbeabsichtigte Inbetriebnahme des Geräts bei Spannungswiederkehr.
4.2.3 Elektrische Sicherheit
a) Kontrollieren Sie regelmässig die Anschlusslei-
tung des Geräts und lassen Sie diese bei Beschädigung von einem anerkannten Fachmann erneuern. Kontrollieren Sie Verlängerungsleitungen
regelmässig und ersetzen Sie diese, wenn sie
beschädigt sind. Wird bei der Arbeit das Netz- oder
Verlängerungskabel beschädigt, dürfen Sie das
Kabel nicht berühren. Ziehen Sie den Netzstecker
aus der Steckdose.
Beschädigte Anschlussleitungen und Verlängerungs l eitungen stellen eine Gefährdung durch elektrischen Schlag dar.
b) Lassen Sie verschmutzte Geräte bei häufiger Bear-
beitung von leitfähigen Materialien in regelmässigen Abständen vom Hilti-Service überprüfen.
An der Geräteoberfläche haftender Staub, vor allem
von leitfähigen Materialien oder Feuchtigkeit können unter ungünstigen Bedingungen zu elektrischem
Schlag führen.
4.2.4 Arbeitsplatz
a) Sorgen Sie für gute Beleuchtung des Arbeitsbe-
reichs.
b) Sorgen Sie für gute Belüftung des Arbeitsplatzes.
Schlecht belüftete Arbeitsplätze können Gesundheits schäden durch Staubbelastung hervorrufen.
4.2.5 Persönliche Schutzausrüstung
Der Benutzer und die sich in der Nähe aufhaltenden
Personen müssen während des Einsatzes des Geräts
eine geeignete Schutzbrille, Gehörschutz, Schutzhandschuhe und einen leichten Atemschutz benutzen.
5. Inbetriebnahme
Lesen und befolgen Sie unbedingt die Sicherheitshinweise in dieser Bedienungsanleitung.
Die Netzspannung muss mit der Angabe auf dem Typenschild übereinstimmen.
Bei Einsatz von Verlängerungskabel: Nur für den Einsatzbereich zugelassene Verlängerungskabel verwenden. Kontrollieren Sie regelmässig das Verlängerungskabel und die Netzleitung auf Beschädigungen.
Verlängerungskabel im Freien
Verwenden Sie im Freien nur dafür zugelassene und entsprechend gekennzeichnete Verlängerungskabel.
Seien Sie stets aufmerksam
Arbeiten Sie stets konzentriert. Gehen Sie überlegt vor
und verwenden Sie das Gerät nicht, wenn Sie unkonzentriert sind.
6. Bedienung
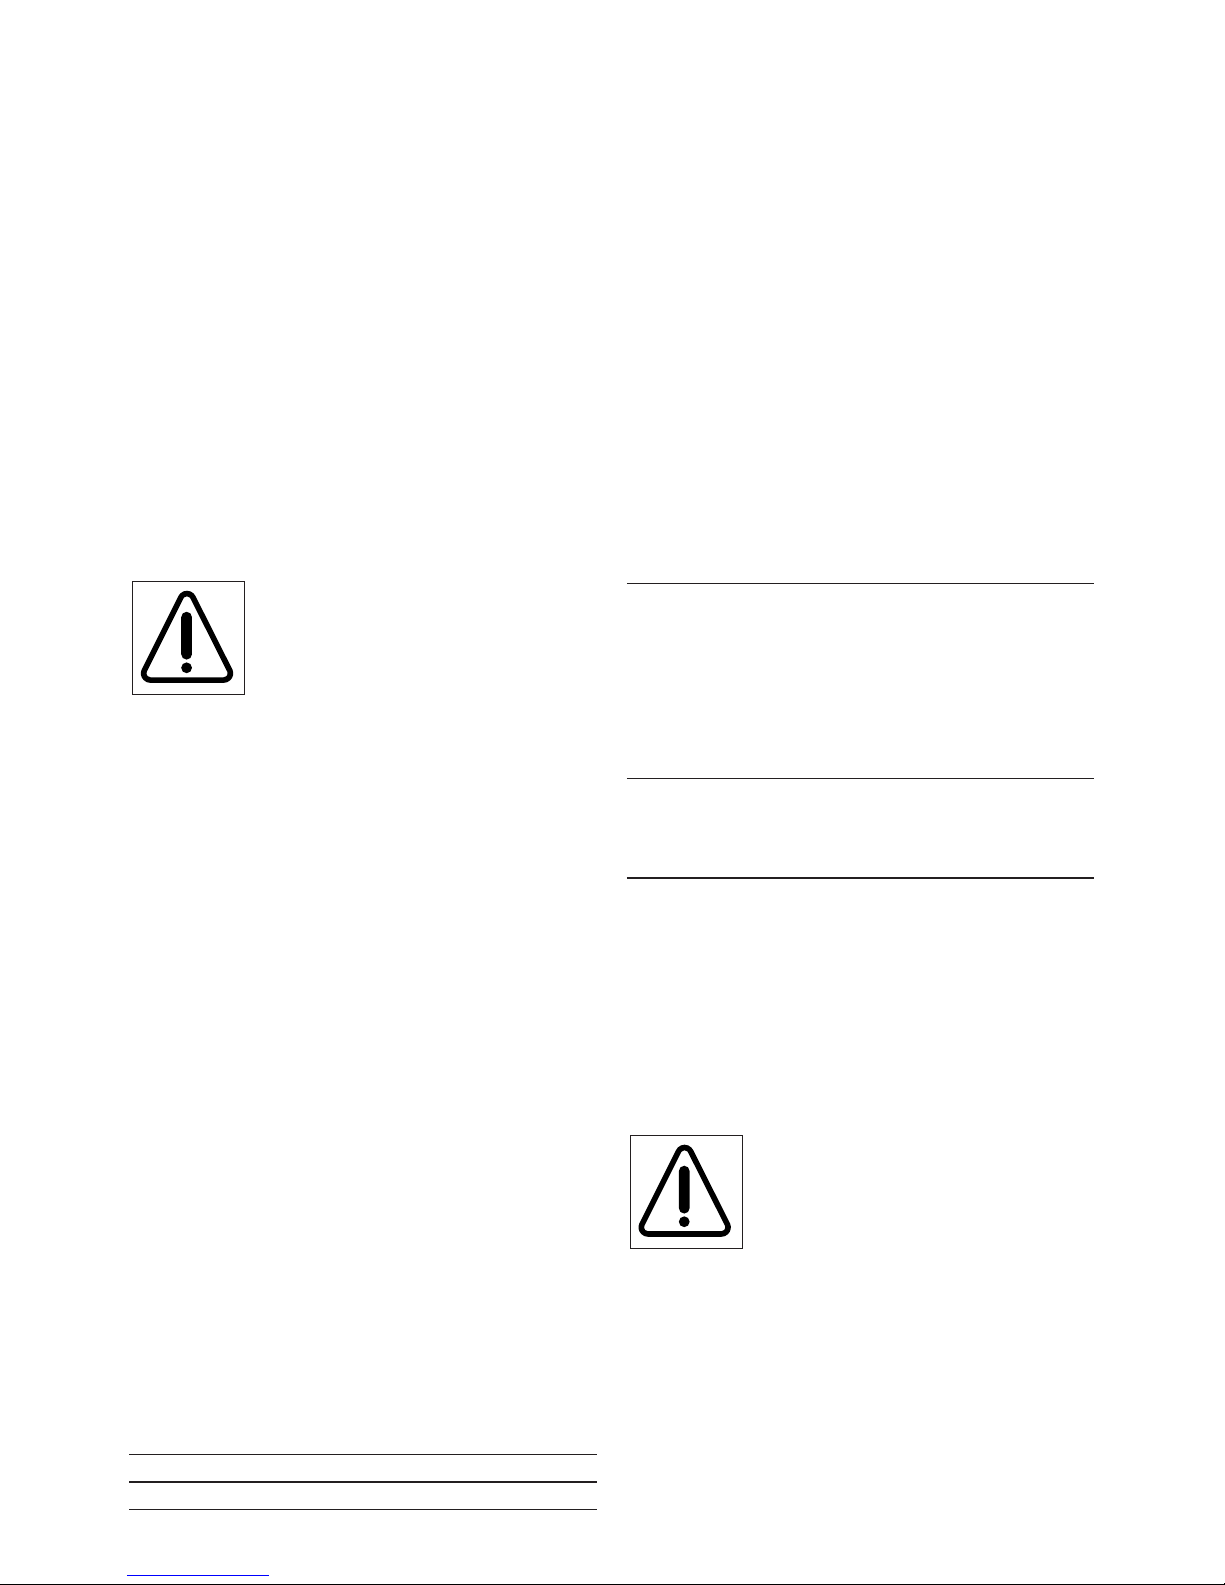
System
Durch die Wahl des Schleifmittels (Körnung), der Drehzahl und des Anpressdrucks wird die Abtragsleistung
und das Schleifbild (Qualität) bestimmt.
Gerät, Schleifteller und Schleifmittel bilden ein System.
Achten Sie darauf, dass Sie für die Anwendung die jeweils
geeignete Kombination und Geräteeinstellung verwenden.
Schleifmittel aufsetzen (Schleifpapier)
Setzen Sie das Schleifmittel mit einem Aussendurchmesser 150 mm mit Klettbefestigung ein.
Sie können Schleifmittel mit 6 Absauglöchern (Teilkreisdurchmesser 80 mm) und 9 Löcher (8 auf dem Teilkreis 120 mm und ein Loch in der Mitte des Schleifmittels) einsetzen.
● Ziehen Sie zum Schutz gegen unbeabsichtigten Anlauf,
den Netzstecker aus der Steckdose.
● Achten Sie darauf, dass die Absauglöcher des Schleifmittels mit denjenigen des Schleiftellers übereinstimmen.
Gehörschutz
benutzen
Schutz-
hand schuhe
benutzen
Leichten
Atemschutz
benutzen
Augenschutz
benutzen
Printed: 07.07.2013 | Doc-Nr: PUB / 5131018 / 000 / 00
Page 10
6
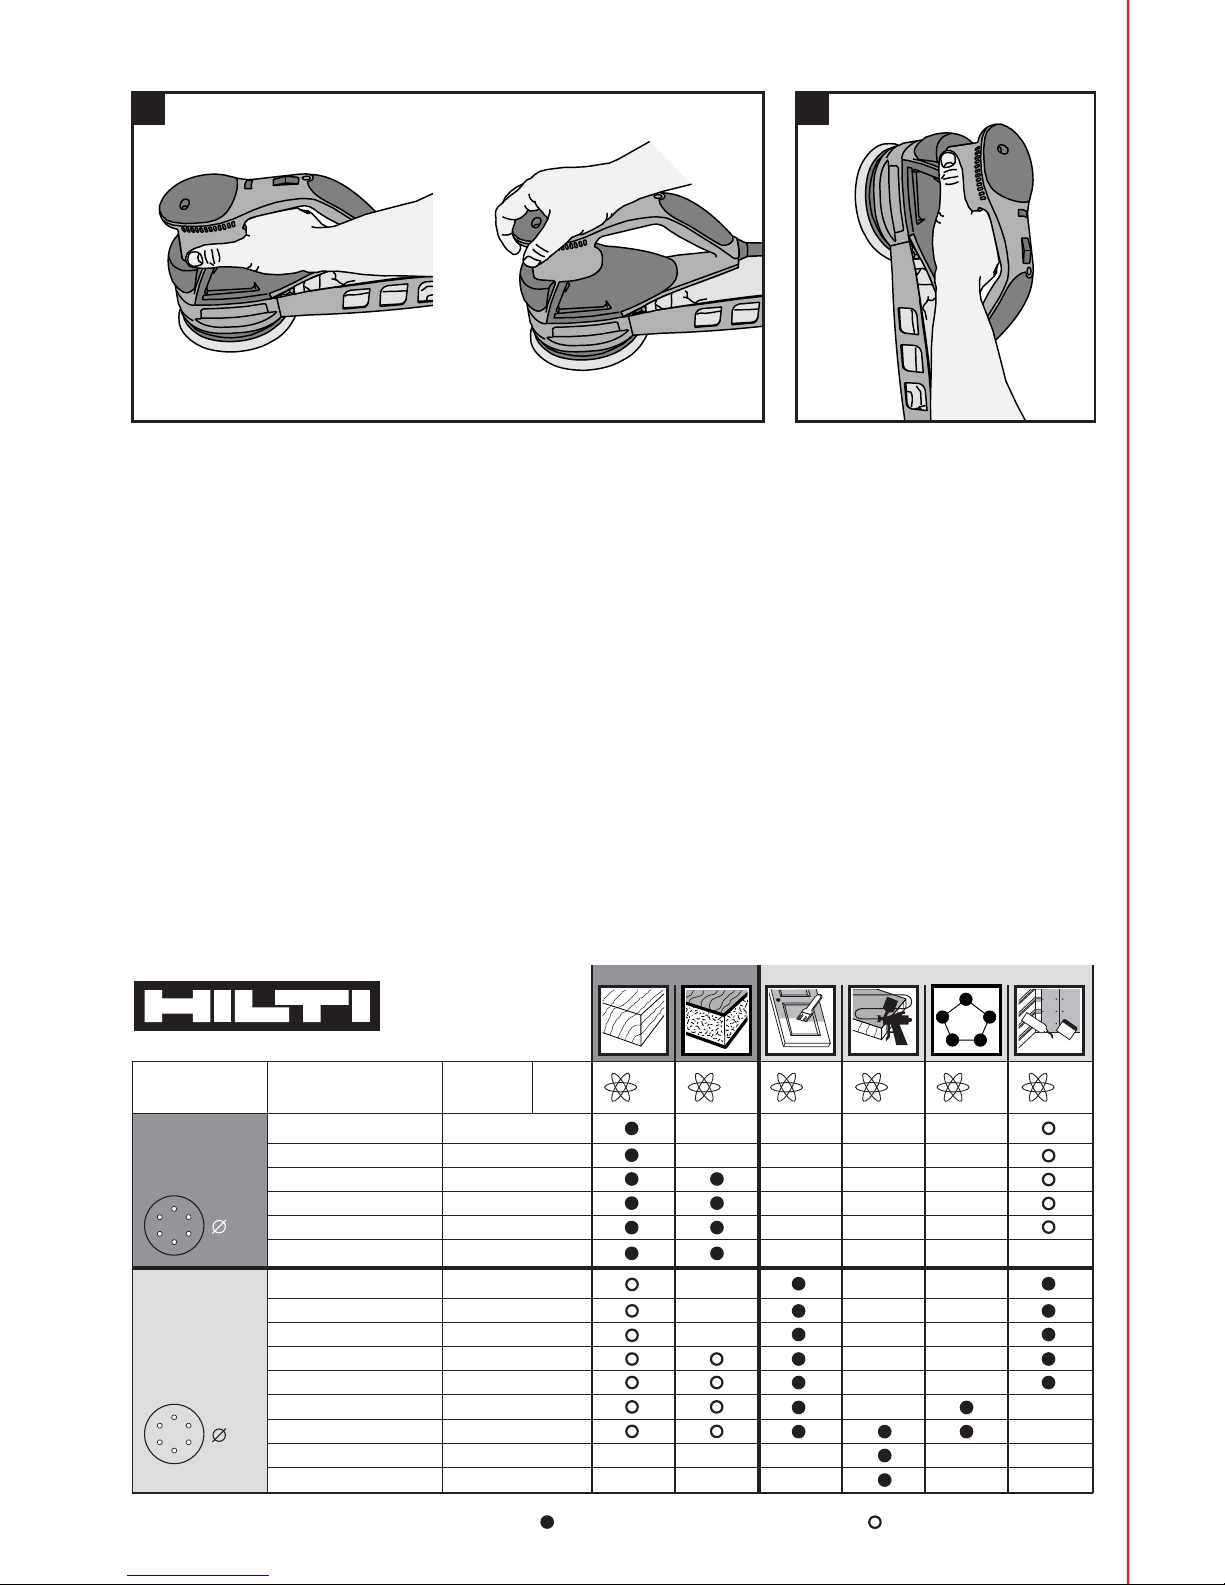
Handhabung, empfohlene Griffposition
Für Abtragsarbeiten
● Führen Sie das Gerät mit beiden Händen
● Verwenden Sie den Handgriff und den integrierten
Zusatzgriff. Ziehen Sie den Zusatzgriff aus der Grundposition in die Arbeitsposition. (Anstelle des Zusatzgriffs
kann der Führungsgriff verwendet werden)
Für Qualitätsarbeiten
● Führen Sie das Gerät mit einer Hand
● Verwenden Sie den Qualitätsgriff. Dieser ermöglicht
eine einwandfreie und leichte Einhandführung nahe an
der Oberfläche. Damit wird, z.B. beim Lack-Zwischenbzw. Endschliff, ein gefühlvolles Arbeiten ermöglicht.
Für Arbeiten an vertikalen Flächen
(z.B. Wand, Kanten, etc.)
● Führen Sie das Gerät am Qualitätsgriff. Die Schwerpunktlage des Geräts ist so gelegt, dass bei vertikalen
Arbeiten der Schwerpunkt in der Hand liegt. Dies ermöglicht ein sicheres und ermüdungsarmes Arbeiten
VORSICHT
Durch Schleifen kann gefährlicher Schleifstaub entstehen.
Schleifstaub kann die Lunge und die Augen schädigen.
Verwenden Sie eine Staubabsaugung, eine Atemschutzmaske und eine Schutzbrille.
Schleifen
● Vergewissern Sie sich, dass das Gerät ausgeschaltet
ist
● Stecken Sie den Netzstecker in die Steckdose
● Wählen Sie die Drehzahl
● Legen Sie das Gerät mit der ganzen Schleiffläche auf
das zu bearbeitende Werkstück
● Schalten Sie das Gerät ein und bewegen Sie es mit
mässigem Druck (ca. 20 N) über das Werkstück
● Wenn Sie die Arbeit beenden oder unterbrechen, empfehlen wir, das laufende Gerät vom Werkstück abzuheben und anschliessend auszuschalten
7. Betrieb
Einstellen der Hubzahl
Durch Drehen am Stellrad der Drehzahlvorwahl können
Sie die empfohlene Drehzahl stufenlos vorwählen. Das
Ändern der Drehzahl ist auch während dem Betrieb möglich.
Die Drehzahl ist vom zu schleifenden Werkstoff abhängig. Ermitteln Sie sie durch praktische Versuche (siehe
Produktinformation der Schleifmittel und Anwendungstabelle).
Stufe 1 6
Drehzahl klein gross
Nach dem Einschalten stellt sich das Gerät auf die vorgewählte Drehzahl ein.
Schleifmittel
Hilti bietet für die im bestimmungsgemässem Gebrauch
erwähnten Anwendungen die entsprechenden Schleifmittel an. Für alle Holzanwendungen führt Hilti die "Wood
Line" mit den Körnungen P60 bis P180, für die Lackanwendungen die "Paint Line" mit der Körnungsreihe P40
bis P400.
Schleifteller
(Der Schleifteller ist ein Verschleissteil und untersteht
nicht den allgemeinen Garantieansprüchen)
Das Gerät ist werkseitig mit einem universellen Schleifteller ausgerüstet. Dieser Schleifteller erzeugt eine sehr
gute Abtragsleistung und eine gute Schleifqualität. Der
Schleifteller vereinigt die wichtigsten Standards an
Absauglöchern.
Wählen Sie je nach Anwendung den geeigneten Schleifteller aus.
Schleifteller universal Abtragsschleifen
– Holz, Holzwerkstoffe
– Spachtelmassen
– alte Farb- und Lackanstriche
– Verbundwerkstoffe
– Kunststoffe
Vor-und Zwischenschliff
– Lacke und Farben
Schleifteller weich Zwischen und Endschliff von
Farben und Lacken
Schleifen von gewölbten
Flächen
Schleiftellerbremse
(Der Bremsring ist ein Verschleissteil und unterliegt nicht
den allgemeinen Garantieansprüchen)
Das Gerät ist mit einer Schleiftellerbremse ausgerüstet.
Durch die Schleiftellerbremse wird die Drehzahl des
Schleiftellers im Leerlauf abgesenkt. Damit wird ein
gefahrenloses Aufsetzen auf die Werkstoffoberfläche
ermöglicht.
Staubabsaugung
VORSICHT
Durch Schleifen kann gefährlicher Schleifstaub entstehen.
Schleifstaub kann die Lunge und die Augen schädigen.
Verwenden Sie eine Staubabsaugung, eine Atemschutzmaske und eine Schutzbrille.
Staubabsaugung mit Staubbox und Staubsack
(Die Staubbox ist ein Verschleissteil und unterliegt nicht
den allgemeinen Garantieansprüchen)
Verwenden Sie die Staubbox mit Staubsack aus dem
Lieferumfang des Geräts.
Printed: 07.07.2013 | Doc-Nr: PUB / 5131018 / 000 / 00
Page 11

7
Entfernen Sie abgelagerten Staub gründlich (z.B. durch
Absaugen).
Staubabsaugung mit Staubsauger
Bei der Staubabsaugung mit Staubsauger können, in
seltenen Fällen unter ungünstigen Umständen im Zusammenspiel mit niedriger Luftfeuchtigkeit, Entladungen
auftreten.
Dieses physikalische Phänomen beruht nicht auf sicherheitstechnischen Mängeln des Geräts. Es kann bei Verwendung des empfohlenen Hilti Staubsaugers W-VC40
ausgeschlossen werden.
Hilti Elektrowerkzeuge entsprechen den derzeit gültigen
Vorschriften. Sollte trotz Beachtung der Hilti-SystemEmpfehlung das Phänomen auftreten, kontaktieren Sie
umgehend unter Angabe der bei Ihnen gegebenen Betriebsbedingungen den nächstgelegenen Hilti-Service.
Entfernen Sie abgelagerten Staub gründlich (z.B. durch
Absaugen).
8. Pflege und Instandhaltung
VORSICHT
Halten Sie das Gerät, insbesondere die Griffflächen
trocken, sauber und frei von Öl und Fett. Verwenden
Sie keine silikonhaltigen Pflegemittel.
Die äussere Gehäuseschale des Geräts ist aus einem
schlagfesten Kunststoff gefertigt. Die Griffpartie ist aus
Elastomer-Werkstoff. Betreiben Sie das Gerät nie mit
verstopften Lüftungsschlitzen! Reinigen Sie die Lüftungsschlitze vorsichtig mit einer trockenen Bürste. Verhindern Sie das Eindringen von Fremdkörpern in das
Innere des Geräts. Reinigen Sie die Geräteaussenseite
regelmässig mit einem leicht angefeuchteten Putzlappen. Verwenden Sie kein Sprühgerät, Dampfstrahlgerät
oder fliessendes Wasser zur Reinigung! Die elektrische
Sicherheit des Geräts kann dadurch gefährdet werden.
Schleifteller
Prüfen Sie den Schleifteller auf Verschleiss und Verschmutzung. Verschlissene oder verschmutzte Schleifteller führen zu verminderter Haftung des Schleifmittels
auf dem Schleifteller. Reinigen Sie den Schleifteller oder
wechseln Sie ihn gegebenenfalls aus (beschädigte Schleifteller müssen sofort ausgetauscht werden).
Schleifteller auswechseln
● Ziehen Sie den Stecker aus der Steckdose
● Stellen Sie das Gerät auf die Standflächen des Führungs-
griffs, so dass die Kornseite des Schleifmittels sichtbar
ist
● Ziehen Sie das Schleifmittel ab
● Lösen Sie mit einem geeigneten Werkzeug die drei
Befestigungsschrauben
● Entfernen Sie den alten Schleifteller
● Reinigen und prüfen Sie die Schleiftellerbremse. Tau-
schen Sie sie gegebenenfalls aus und setzen Sie den
neuen Schleifteller auf
● Halten Sie den Schleifteller fest und ziehen Sie die drei
Befestigungsschrauben fest
● Prüfen Sie ob der Schleifteller richtig montiert ist (kein
Verkanten, Kontakt mit dem Bremsring)
● Verwenden Sie die Positionierhilfe zum Aufsetzen des
Schleifmittels, so sind Sie sicher, dass die Absauglöcher
des Schleifmittels mit denjenigen des Schleiftellers übereinstimmen
Schleiftellerbremse
Wenn die Leerlaufdrehzahl im Laufe der Zeit stetig ansteigt,
ist dies ein Hinweis auf eine Abnutzung des Bremsrings
der Schleiftellerbremse, der in diesem Falle ersetzt werden muss.
Bremsring auswechseln
● Ziehen Sie den Stecker aus der Steckdose
● Entfernen Sie den Schleifteller wie unter «Schleif teller
auswechseln» beschrieben
● Ziehen Sie den alten, ans Gerätegehäuse befestigten
Bremsring ab
● Achten Sie darauf, dass die sich am Bremsring befindenden, unsymmetrisch angeordneten Aussparungen
mit den vier Geräteschrauben übereinstimmen
● Drücken Sie den Bremsring in die entsprechenden
Aussparungen und achten Sie auf das Einrasten der
Schnapphaken
● Den ordnungsgemässen Montagezustand erkennen
Sie an der Planheit der Dichtlippe
● Montieren Sie den Schleifteller wie unter «Schleifteller auswechseln» beschrieben
Instandhaltung
Prüfen Sie regelmässig alle aussenliegenden Teile des
Geräts auf Beschädigungen und alle Bedienungselemente auf einwandfreie Funktion. Betreiben Sie das Gerät
nicht, wenn Teile beschädigt sind, oder Bedienelemente nicht einwandfrei funktionieren. Lassen Sie das Gerät
vom Hilti-Service reparieren.
Reparaturen an elektrischen Teilen dürfen nur durch
einen Elektrofachmann ausgeführt werden.
Printed: 07.07.2013 | Doc-Nr: PUB / 5131018 / 000 / 00
Page 12
8
10. Entsorgung
Hilti-Geräte sind zu einem hohen Anteil aus
wiederverwendbaren Materialien hergestellt.
Voraussetzung für eine Wiederverwendung
ist eine sachgemässe Stofftrennung. In vielen Ländern
ist Hilti bereits eingerichtet, Ihr Altgerät zur Verwertung
zurückzunehmen. Fragen Sie den Hilti Kundenservice
oder Ihren Verkaufsberater.
Nur für EU-Länder
Werfen Sie Elektrowerkzeuge nicht in den
Hausmüll!
Gemäss Europäischer Richtlinie über Elektro- und Elektronik-Altgeräte und Umsetzung in nationales Recht
müssen verbrauchte Elektrowerkzeuge getrennt gesammelt und einer umwelt gerechten Wiederverwertung
zugeführt werden.
11. Herstellergewährleistung Geräte
Hilti gewährleistet, dass das gelieferte Gerät frei von
Material- und Fertigungsfehler ist. Diese Gewährleis -
9. Fehlersuche
Fehler Mögliche Ursache Behebung
Gerät läuft nicht an Netzstromversorgung unterbrochen Anderes Elektrogerät einstecken,
Funktion prüfen
Netzkabel oder Stecker defekt Von Elektrofachkraft prüfen und
gegebenenfalls ersetzen lassen
Unterbruch Elektronikmodul Von Elektrofachkraft prüfen und
(z.B. Ein-/Ausschalter defekt) gegebenenfalls ersetzen lassen
Gerät hat nicht volle Leistung Verlängerungskabel mit zu Verlängerungskabel mit ausreichen-
geringem Querschnitt dem Querschnitt einsetzen
Stellrad Drehzahlvorwahl auf Hubzahlvorwahl auf Stellung 5 oder 6
Stellung klein (1 oder 2)
Keine Absaugleistung Schleifblatt nicht richtig aufgesetzt, Schleifblatt abnehmen und richtig
Absauglöcher stimmen nicht aufsetzen
überein
Staubsack voll alten Staubsack entsorgen und neuen
einlegen
Absaugstutzen verstopft Staubbox abnehmen und
Absaugkanal reinigen
Schleifblatt haftet nicht am Verschmutzter Schleifteller Schleifteller reinigen
Schleifteller Klettbelag des Schleiftellers ist Schleifteller ersetzen
verschlissen
Elektrostatische Entladung Staubsauger ohne Hilti Sicherheitssauger WVC40-M
Antistatikausrüstung verwenden
Unterbruch im Erdleiter Endleiterprüfung durchführen
tung gilt unter der Voraussetzung, dass das Gerät in
Übereinstimmung mit der Hilti Bedienungsanleitung
richtig eingesetzt und gehandhabt, gepflegt und ge reinigt wird, und dass die technische Einheit gewahrt
wird, d.h. dass nur Original Hilti Verbrauchsmaterial,
Zubehör und Ersatzteile mit dem Gerät verwendet werden.
Diese Gewährleistung umfasst die kostenlose Reparatur oder den kostenlosen Ersatz der defekten Teile
während der gesamten Lebensdauer des Gerätes. Teile, die dem normalen Verschleiss unterliegen, fallen
nicht unter diese Gewährleistung.
Weitergehende Ansprüche sind ausgeschlossen,
soweit nicht zwingende nationale Vorschriften ent gegenstehen. Insbesondere haftet Hilti nicht für
unmittelbare oder mittelbare Mangel- oder Man gelfolgeschäden, Verluste oder Kosten im Zusam menhang
mit der Verwendung oder wegen der Un möglichkeit
der Verwendung des Gerätes für ir gendeinen Zweck.
Stillschweigende Zusicherungen für Verwendung
oder Eignung für einen bestimmten Zweck werden
ausdrücklich ausgeschlossen.
Für Reparatur oder Ersatz sind Gerät oder betroffene
Teile unverzüglich nach Feststellung des Mangels an
die zuständige Hilti Marktorganisation zu senden.
Printed: 07.07.2013 | Doc-Nr: PUB / 5131018 / 000 / 00
Page 13

9
12. Konformitätserklärung (Original)
Bezeichnung: Exzenterschleifer
Typenbezeichnung: WFE 380 / WFE 450-E
Konstruktionsjahr: 2000
Wir erklären in alleiniger Verantwortung, dass dieses
Produkt mit den folgenden Richtlinien und Normen über einstimmt: 2004/108/EG, 2006/42/EG, EN 60745-1, EN
60745-2-4, EN ISO 12100, 2011/65/EU.
Die vorliegende Gewährleistung umfasst sämtliche
Gewährleistungsverpflichtungen seitens Hilti und er setzt alle früheren oder gleichzeitigen Erklärungen,
schriftlichen oder mündlichen Verabredungen betref fend Gewährleistung.
Hilti Aktiengesellschaft, Feldkircherstrasse 100,
FL-9494 Schaan
Paolo Luccini Jan Doongaji
Head of BA Ececutive Vice President
Quality & Process Management BU Power Tools & Accessories
BA Electric Tools & Accessories
01/2012 01/2012
Technische Dokumentation bei:
Hilti Entwicklungsgesellschaft mbH
Zulassung Elektrowerkzeuge
Hiltistrasse 6
86916 Kaufering
Deutschland
Printed: 07.07.2013 | Doc-Nr: PUB / 5131018 / 000 / 00
Page 14

10
Printed: 07.07.2013 | Doc-Nr: PUB / 5131018 / 000 / 00
Page 15
11
1. General information
Indication of hazards
“Caution”
This word is used to draw attention to a hazard or unsafe
method or procedure which could lead to personal injury
or damage to the machine, material or other property.
Pictograms
It is essential that the operating
instructions are read before the
tool is operated for the first time.
Always keep these operating
instructions together with the tool.
Ensure that the operating
instructions are with the tool when
it is given to other persons.
Contents Page
1. General information 11
2. Description 12
3. Technical data 12
4. Safety rules 13
5. Before use 15
6. Operation 15
7. Working with the tool 16
8. Care and maintenance 16
9. Troubleshooting 17
10. Disposal 18
11. Manufacturer's warranty – tools 18
12. Declaration of conformity (original) 18
Operating controls
On / off switch
Thumbwheel for speed pre-selection
Component parts
Type plate
쐏 Main grip
쐄 Guiding grip
쐂 Auxiliary grip
쐆 Finishing grip
쐊 Sanding plate
쐎 Sanding sheet with Velcro-type attachment
쐅 Sanding plate fastening screws
쐈 Brake ring
쐉 Dust box
씈 Dust bag
씉 Extraction connector / extraction hose
씊 Positioning aid for sanding sheets
ORIGINAL OPERATING INSTRUCTIONS
WFE 380 / WFE450-E
random orbit sander
The numbers refer to the illustrations. The illustrations can be found on the fold-out cover pages. Keep
these pages open while you read the operating instructions.
“The tool” referred to in these operating instructions is
always the random orbit sander.
Location of identification data on the tool
The type designation and the serial number can be found
on the type plate of the tool. Make a note of this data in
your operating instructions and always refer to it when
making an enquiry to your Hilti representative or service department.
Type:
Serial no.:
Warning signs
Obligation signs
Wear
ear
protection
Wear
protective
gloves
Wear
breathing
protection
Wear
eye
protection
Read the
operating
instructions
before use
Symbols
General
warning
Warning:
electricity
Warning:
hot surface
Return waste
material for
recycling
Printed: 07.07.2013 | Doc-Nr: PUB / 5131018 / 000 / 00
Page 16

12
3. Technical data WFE380 WFE450-E
Nominal power rating 380 W 450 W
Nominal voltage ✱ 110 V 220 V 230 V 240 V 110 V 220 V 230 V 240 V
Nominal current input 3.6 A 1.8 A 1.7 A 1.6 A 4.2 A 2.3 A 2.2 A 2.1 A
Mains frequency ✱ 50–60 Hz
Stroke rate under no load 5000–10000 /min
Speed of oscillation 10000–20000 /min
Sanding plate 150 mm dia.
Eccentricity 4 mm
Extraction adapter, outside diameter 30 mm
Weight as per EPTA-Procedure 01/2003 2.2 kg
NOTE
The vibration emission level given in this information sheet has been measured in accordance with a standardised
test given in EN 60745 and may be used to compare one tool with another. It may be used for a preliminary assessment of exposure. The declared vibration emission level represents the main applications of the tool. However if
the tool is used for different applications, with different accessories or poorly maintained, the vibration emission
may differ. This may significantly increase the exposure level over the total working period. An estimation of the
level of exposure to vibration should also take into account the times when the tool is switched off or when it is
running but not actually doing the job. This may significantly reduce the exposure level over the total working period. Identify additional safety measures to protect the operator from the effects of vibration such as: maintain the
tool and the accessories, keep the hands warm, organisation of work patterns.
● The tool must not be changed, modified or manipulated in any way other than as described in the operating instructions.
● To avoid the risk of injury, always use only original
Hilti accessories.
● Do not operate the tool without a suitable dust extraction system. The safety and disposal regulations must
be observed particularly when sanding materials which
present a health hazard (e.g. oak or beech wood, paint
containing lead or other harmful substances).
Observe the information given in the operating instructions concerning operation, care and maintenance.
Most important features of the tool
– Class II electrical protection (double insulated) Z
(as per EN 60745)
– Vibration absorbing, ergonomic grips
- main grip
- guiding grip
- finishing grip
– Built-in auxiliary grip
– Infinite speed pre-selection
– Sanding plate for universal use, other plates available
as accessories.
Conditions to be fulfilled by the user
● The tool is designed for professional use.
● The tool may be operated, maintained and repaired
by authorised, trained personnel only. This personnel
must be informed, in particular, of the applicable hazards.
2. Description
The WFE 380 / WFE 450-E random orbit sander is an
electrically powered tool for sanding wood, wood materials, composite materials, paint, lacquer, plastics, plaster, fillers and similar materials.
The tool has been designed for professional use.
The following items are supplied : power tool with dust
box, dust bag, operating instructions and toolbox. The
WFE 380 is supplied in a cardboard box.
Correct use
● The tool is designed to use replaceable sanding sheets
for sanding the surfaces of materials such as wood,
veneer, filler, plastic and plaster.
● The working environment may be on a construction
site or in a workshop and may involve renovation, conversion or new building work.
● The working environment should be dry.
● The tool may be operated only when connected to a
mains supply providing a voltage and frequency in compliance with the information given on the type plate.
● When using the tool, the workpiece must be secured
to prevent movement and the operator must work from
a secure stance.
● Sanding metals and materials containing asbestos is
not permissible.
● The tool is for hand-held use only.
● Never expose the tool to rain or snow and do not oper-
ate it in damp or wet environments or where there is a
risk of explosion.
● Do not use the tool for wet sanding.
Printed: 07.07.2013 | Doc-Nr: PUB / 5131018 / 000 / 00
Page 17

13
Noise and vibration information (according to EN 60745)
Typical A-weighted sound power level 93 dB (A)
Typical A-weighted emission sound pressure level 82 dB (A)
For the given sound power level as per EN 60745, the tolerance is 3 dB.
Wear ear protection!
Triaxial vibration value (vibration vector sum) WFE380 WFE 450-E
Surface grinding (a
h
) 4.1 m/s
2
3.9 m/s
2
Uncertainty (K) for triaxial vibration value 1.5 m/s
2
1.5 m/s
2
✱ The tool is offered in different versions for various mains voltages. Please refer to the information on the
type plate for the nominal voltage and nominal current input.
Right of technical changes reserved
4. Safety instructions
NOTE
The safety rules in section 4.1 contain all general safety rules for
power tools which, in accordance with the applicable standards,
require to be listed in the operating instructions. Accordingly, some
of the rules listed may not be relevant to this tool.
4.1 General Power Tool Safety Warnings
a) WARNING! Read all safety warnings and all instruc-
tions. Failure to follow the warnings and instructions may result
in electric shock, fire and/or serious injury. Save all warnings
and instructions for future reference. The term “power tool”
in the warnings refers to your mains-operated (corded) power
tool or battery-operated (cordless) power tool.
4.1.1 Work area safety
a) Keep work area clean and well lit. Cluttered or dark areas
invite accidents.
b) Do not operate power tools in explosive atmospheres, such
as in the presence of flammable liquids, gases or dust. Power tools create sparks which may ignite the dust or fumes.
c) Keep children and bystanders away while operating a pow-
er tool. Distractions can cause you to lose control.
4.1.2 Electrical safety
a) Power tool plugs must match the outlet. Never modify the
plug in any way. Do not use any adapter plugs with earthed (grounded) power tools. Unmodified plugs and matching
outlets will reduce risk of electric shock.
b) Avoid body contact with earthed or grounded surfaces,
such as pipes, radiators, ranges and refrigerators. There is
an increased risk of electric shock if your body is earthed or
grounded.
c) Do not expose power tools to rain or wet conditions. Water
entering a power tool will increase the risk of electric shock.
d) Do not abuse the cord. Never use the cord for carrying,
pulling or unplugging the power tool. Keep cord away from
heat, oil, sharp edges or moving parts. Damaged or entan-
gled cords increase the risk of electric shock.
e) When operating a power tool outdoors, use an extension
cord suitable for outdoor use. Use of a cord suitable for outdoor use reduces the risk of electric shock.
f) If operating a power tool in a damp location is unavoidable,
use a residual current device (RCD) protected supply. Use
of an RCD reduces the risk of electric shock.
4.1.3 Personal safety
a) Stay alert, watch what you are doing and use common sense
when operating a power tool. Do not use a power tool while
you are tired or under the influence of drugs, alcohol or
medication. A moment of inattention while operating power tools
may result in serious personal injury.
b) Use personal protective equipment. Always wear eye pro-
tection. Protective equipment such as dust mask, non-skid safety shoes, hard hat, or hearing protection used for appropriate
conditions will reduce personal injuries.
c) Prevent unintentional starting. Ensure the switch is in the
off-position before connecting to power source and/or battery pack, picking up or carrying the tool. Carrying power
tools with your finger on the switch or energising power tools
that have the switch on invites accidents.
d) Remove any adjusting key or wrench before turning the
power tool on. A wrench or a key left attached to a rotating part
of the power tool may result in personal injury.
e) Do not overreach. Keep proper footing and balance at all
times. This enables better control of the power tool in unexpected situations.
f) Dress properly. Do not wear loose clothing or jewellery.
Keep your hair, clothing and gloves away from moving parts.
Loose clothes, jewellery or long hair can be caught in moving
parts.
g) If devices are provided for the connection of dust extrac-
tion and collection facilities, ensure these are connected
and properly used. Use of dust collection can reduce dust-
related hazards.
4.1.4 Power tool use and care
a) Do not force the power tool. Use the correct power tool for
your application. The correct power tool will do the job better
and safer at the rate for which it was designed.
b) Do not use the power tool if the switch does not turn it on
and off. Any power tool that cannot be controlled with the switch
is dangerous and must be repaired.
Printed: 07.07.2013 | Doc-Nr: PUB / 5131018 / 000 / 00
Page 18

14
4.2 Additional safety precautions
4.2.1 Personal safety
a) Wear ear protectors. Exposure to noise can cause hear-
ing loss.
b) Use auxiliary handle(s), if supplied with the tool. Loss
of control can cause personal injury.
c) Hold power tool by insulated gripping surfaces, when
performing an operation where the sanding plate
may contact hidden wiring or its own cord. Sanding
plate contacting a "live" wire may make exposed metal
parts of the power tool "live" and could give the operator an electric shock.
d)Always hold the tool securely with both hands on
the grips provided. Keep the grips clean, dry and
free from oil and grease.
e)To avoid tripping and falling when working, always
lead the sypply cord, extension cord and dust extraction hose away tho the rear.
f) Wear protective gloves when changing insert tools.
The insert tool may become hot during use.
g)Operate the tool only as directed and only when it
is in faultless condition.
h)Use a dust extraction system and wear respirato-
ry protection and protective goggles.
Sanding may
produce hazardous sanding dust. Sanding dust may
be harmful to the lungs and eyes.
i) The operator must ensure that hazardous sanding
dust is disposed of in accordance with national and
regional regulations.
Hazardous sanding dust is
created when sanding materials such as oak or beech
wood, paint coatings containing lead or other harmful substances.
j) Exercise your fingers during pauses between work
to improve the blood circulation in your fingers.
k)
Dust from material such as paint containing lead,
some wood species, minerals and metal may be harmful. Contact with or inhalation of the dust may cause
allergic reactions and/or respiratory diseases to the
operator or bystanders. Certain kinds of dust are classified as carcinogenic such as oak and beech dust
especially in conjunction with additives for wood conditioning (chromate, wood preservative). Material
containing asbestos must only be treated by specialists.
Where the use of a dust extraction device
is possible it shall be used. To achieve a high level of dust collection, use a suitable vacuum cleaner of the type recommended by Hilti for wood dust
and/or mineral dust together with this tool. Ensure
that the workplace is well ventilated. The use of a
dust mask of filter class P2 is recommended. Follow national requirements for the materials you
want to work with.
l) The tool is not intended for use by children, by debil-
itated persons or those who have received no instruction or training.
m) Children must be instructed not to play with the
tool.
4.2.2 Power tool use and care
a) Secure the workpiece. Use clamps or a vice to hold
the workpiece in place.
The workpiece is thus held
more securely than by hand and both hands remain
free to operate the tool.
b) In the event of a power faillure, switch the tool off
and unplug the supply cord.
This prevents inad-
vertent starting when the power returns.
4.2.3 Electrical safety
a) Check the condition of the supply cord and its plug
connections and have it replaced by a qualified
electrician if damage is found. Check the condition of the extension cord and replace it if damage is found.
Do not touch the supply in the event of it suffering
damage while working. Disconnect the supply cord
plug from the socket
. Damaged supply cords and
extension cords present a risk of electric shock.
b) Dirty or dusty electric tools should thus be checked
at a Hilti service center at regular intervals, especially if used frequently for working on conductive
materials.
Dust (especially dust from conductive
materials) or dampness adhering to the surface of
the tool may, under unfavorable conditions, present a risk of electric shock.
4.2.4 Work area
a) Ensure that the workplace is well lit.
b) Ensure that the workplace is well ventilated.
Poorly ventilated workplaces may be injurious to
the health due to exposeure to dust.
c) Disconnect the plug from the power source and/or the bat-
tery pack from the power tool before making any adjustments, changing accessories, or storing power tools. Such
preventive safety measures reduce the risk of starting the power tool accidentally.
d) Store idle power tools out of the reach of children and do
not allow persons unfamiliar with the power tool or these
instructions to operate the power tool. Power tools are dan-
gerous in the hands of untrained users.
e) Maintain power tools. Check for misalignment or binding
of moving parts, breakage of parts and any other condition
that may affect the power tool’s operation. If damaged, have
the power tool repaired before use. Many accidents are caused
by poorly maintained power tools.
f) Keep cutting tools sharp and clean. Properly maintained cut-
ting tools with sharp cutting edges are less likely to bind and are
easier to control.
g) Use the power tool, accessories and tool bits etc. in accor-
dance with these instructions, taking into account the working conditions and the work to be performed. Use of the pow-
er tool for operations different from those intended could result
in a hazardous situation.
4.1.5 Service
a) Have your power tool serviced by a qualified repair person
using only identical replacement parts. This will ensure that
the safety of the power tool is maintained.
Printed: 07.07.2013 | Doc-Nr: PUB / 5131018 / 000 / 00
Page 19

15
4.2.5 Personal protective equipment
The user and any other persons in the vicinity must
wear suitable eye protection, ear protection and protective gloves when the tool is in use. Breathing protection must be worn if no dust removal system is used.
5. Before use
It is essential that the safety precautions printed in these
operating instructions are read and observed.
The mains supply voltage must comply with the information given on the type plate.
If extension cords are used: Only extension cords of a
type approved for the intended application may be used.
Check the extension cord and the supply cord for damage at regular intervals.
Extension cords for outdoor use
For outdoor work use only extension cords approved
and correspondingly marked as suitable for outdoor use.
Pay attention at all times
Always concentrate on the job. Proceed carefully and
do not use the tool if you are distracted from your work.
6. Operation
System
The sanding finish and speed of material removal is
determined by the choice of sanding sheet (grit), the
speed setting and the pressure applied to the sander.
The electric tool, the sanding plate and the sanding sheet
form a system. Take care to ensure that the most suit-
able combination and tool settings are used for the application.
Fitting sanding sheets
Use sanding sheets with an outside diameter of 150 mm
and Velcro-type attachment.
Sanding sheets with 6 dust extraction holes (80 mm
pitch circle diameter) or 9 holes (8 holes on 120 mm
pitch circle and 1 hole in the centre of the sheet) may be
used.
● Prevent unintentional starting by disconnecting the
supply cord plug from the mains socket.
● Take care to ensure that the dust extraction holes in
the sanding sheet are in alignment with the holes in the
sanding plate.
Holding the sander - recommended grip positions
For fast removal
● Guide the tool with both hands.
● Use the main grip and the built-in auxiliary grip. Pull
the auxiliary grip out into the working position (the guiding grip may be used instead of the auxiliary grip).
For finishing work
● Guide the tool with one hand.
● Use the finishing grip. This makes it possible to guide
the tool precisely and easily with 1 hand close to the surface being sanded and ensures a sensitive touch, for
example, for intermediate sanding between coats of paint
or fine finishing sanding.
For working on vertical surfaces
(e.g. walls, edges, etc.)
● Guide the tool by the finishing grip. The centre of balance of the tool then lies in the hand when working on
vertical surfaces. This makes it possible to work safely
and without undue fatigue.
CAUTION
Sanding may produce hazardous sanding dust.
Sanding dust may be harmful to the lungs and eyes.
Use a dust extraction system and wear respiratory protection and protective goggles.
Sanding
● Ensure that the tool is switched off.
● Connect the supply cord plug to the mains socket.
● Select the desired speed.
● Place the tool on the workpiece, ensuring that the
entire sanding surface is in contact.
● Switch on the tool and move it over the workpiece
while applying moderate pressure (approx. 20 N).
● When you are finished working or during pauses
between work, we recommend that the tool is lifted away
from the workpiece while running and then switched off.
Wear ear
protection
Wear
protective
gloves
Wear
breathing
protection
Wear eye
protection
Printed: 07.07.2013 | Doc-Nr: PUB / 5131018 / 000 / 00
Page 20

16
7. Working with the tool
Setting the sanding speed
The recommended sanding speed (oscillation rate) can
be pre-selected by turning the speed pre-selection thumbwheel to the desired setting (infinite adjustment possible). The sanding speed may also be adjusted while the
tool is running.
Sanding speed depends on the material to be sanded.
The ideal speed can be found by carrying out practical
tests (please refer to the product information provided
with the sanding sheets and to the table of applications).
Setting 1 6
Speed low high
After switching on, the tool then runs at the pre-select-
ed speed.
Sanding sheets
Hilti offers the appropriate sanding sheets for the applications listed under “correct use”. Hilti offers the “Wood
Line” in P60 to P180 grit for all wood applications and the
“Paint Line” in P40 to P400 grit for paint applications.
Sanding plate
The sanding plate is a wearing part which is not covered
by the general warranty conditions.
The tool is fitted in the factory with a universal sanding
plate. This sanding plate achieves a very good rate of
removal and a good finish. It is equipped with dust extraction holes which combine the most important standards.
Select the most suitable sanding plate, depending on
the application.
Universal sanding Initial sanding
plate – Wood, wood materials
– Filler
– Old paint and lacquer
– Composite materials
– Plastics
Preliminary and intermediate
sanding
– Paint and lacquer
Soft sanding plate Intermediate and finishing
sanding of paint and lacquer.
Sanding curved surfaces
Sanding plate brake
The tool is equipped with a sanding plate brake. The
brake ring is a wearing part which is not covered by the
general warranty conditions.
The sanding plate brake reduces the speed of the sanding plate when idling so that the sander can be brought
into contact with the workpiece without risk of kick-back.
Dust extraction
CAUTION
Sanding may produce hazardous sanding dust.
Sanding dust may be harmful to the lungs and eyes.
Use a dust extraction system and wear respiratory protection and protective goggles.
Dust extraction with dust box and dust bag
The dust box is a wearing part which is not covered by
the general warranty conditions.
Use the dust box with the dust bag supplied with the
tool.
Remove dust deposits thoroughly (e.g. use a vacuum
cleaner).
Dust extraction using a vacuum cleaner
In rare cases under unfavourable circumstances and in
conjunction with low air humidity, an electrostatic discharge may occur when a vacuum cleaner is used for
dust extraction purposes.
This physical phenomena is not due to any technical
fault in the tool. The possibility of an occurrence of this
kind can be excluded by using the recommended Hilti
W-VC 40 vacuum cleaner. Hilti electric tools and appliances comply with the presently applicable regulations.
Should you however, despite observing the Hilti system
recommendations, still experience this phenomena,
please contact your nearest Hilti service centre, providing a description of the conditions under which the tool
and appliance were used.
Remove dust deposits thoroughly (e.g. using a vacuum
cleaner).
8. Care and maintenance
CAUTION
Keep the power tool, especially its grip surfaces, clean
and free from oil and grease. Do not use cleaning agents
which contain silicone.
The outer casing of the tool is made from impactresistant plastic. Sections of the grip are made from a synthetic rubber material. Never operate the tool when the
ventilation slots are blocked. Clean the ventilation slots
carefully using a dry brush. Do not permit foreign objects
to enter the interior of the tool. Clean the outside of the
tool at regular intervals with a slightly damp cloth. Do not
use a spray, steam pressure cleaning equipment or running water for cleaning. This may negatively affect the
electrical safety of the tool.
Sanding plate
Check the sanding plate for wear and dirt. A worn or dirty
sanding plate may result in poor attachment of the sanding sheet to the sanding plate. Clean the sanding plate
or replace it if necessary (damaged sanding plates must
be replaced immediately).
Printed: 07.07.2013 | Doc-Nr: PUB / 5131018 / 000 / 00
Page 21

17
9. Troubleshooting
Fault Possible cause Solution
The tool does not start Fault in the electric power supply Plug in another electric tool and check
whether it starts.
Defective supply cord or plug Have it checked by an electrical
specialist and replaced if necessary.
Fault in the electronics module Have it checked by an electrical
(e.g. on / off switch defective) specialist and replaced if necessary.
The tool does not produce full Cross-section of the extension Use an extension cord with adequate
power cord is inadequate cross-section.
Speed pre-selection thumbwheel Adjust speed pre-selection to setting 5
set too low (1 or 2) or 6.
Poor extraction performance Sanding sheet not fitted correctly, Remove the sanding sheet and refit it
extraction holes not in correctly.
alignment
Dust bag is full Dispose of the old dust bag and fit a
new bag.
Extraction connections blocked Remove the dust box and clean the
extraction channel.
Sanding sheet does not remain Sanding plate is dirty Clean the sanding plate.
attached to the sanding plate Velcro-type attachment surface Replace the sanding plate.
of the sanding plate is worn.
Electrostatic discharge Vacuum cleaner without anti- Use the Hilti WVC 40-M safety
static equipment used vacuum cleaner.
Break in earth / ground conductor Check the earth / ground conductor.
Replacing the sanding plate
● Disconnect the supply cord plug from the mains
socket.
● Stand the tool on the grip surfaces so that the grit
side of the sanding sheet is visible.
● Remove the sanding sheet.
● Use a suitable tool to release the fastening screws.
● Remove the old sanding plate.
● Clean and check the sanding plate brake. Replace it
if necessary and then fit the new sanding plate.
● Hold the sanding plate securely and tighten the 3 fastening screws.
● Check that the sanding plate is fitted correctly (not
canted, in contact with the brake ring).
● Use the positioning aid when fitting sanding sheets.
This ensures that the dust extraction holes in the sanding sheet are in alignment with the holes in the sanding
plate.
Sanding plate brake
If the speed of rotation when idling increases steadily
after a period of use, this is an indication that the brake
ring of the sanding plate brake has become worn and
should be replaced.
Replacing the brake ring
● Disconnect the supply cord plug from the mains
socket.
● Remove the sanding plate as described at “Replacing the sanding plate”.
● Pull off the old brake ring from the tool housing.
● Take care to ensure that the asymmetrically posi-
tioned recesses in the brake ring are in alignment with
the four screws in the tool.
● Press the brake ring into the corresponding recesses, ensuring that the snap-in lugs engage securely.
● The sealing lip should then lie flat, indicating that
the brake ring has been fitted correctly.
● Fit the sanding plate as described at “Replacing the
sanding plate”.
Maintenance
Regularly check all external parts of the tool for damage and ensure that all controls operate faultlessly. Do
not operate the tool if parts are damaged or when the
controls do not function faultlessly. Have the tool repaired
at a Hilti service centre if necessary.
Repairs to the electrical section may be carried out only
by a trained electrical specialist.
Printed: 07.07.2013 | Doc-Nr: PUB / 5131018 / 000 / 00
Page 22

18
10. Disposal
Most of the materials from which Hilti electric tools are manufactured can be recycled.
The materials must be correctly separated
before they can be recycled. In many countries, Hilti
has already made arrangements for taking back your
old electric tools for recycling. Please ask your Hilti
customer service department or Hilti representative
for further information.
Only for EU countries
Disposal of electric tools together with house-
hold waste is not permissible!
In observance of European Directive on waste electri-
cal and electronic equipment and its implementation
in accordance with national law, electric tools that have
reached the end of their life must be collected separately and returned to an environmentally compatible
recycling facility.
11. Manufacturer's warranty – tools
Hilti warrants that the tool supplied is free of defects
in material and workmanship. This warranty is valid so
long as the tool is operated and handled correctly,
cleaned and serviced properly and in accordance with
the Hilti Operating Instructions, and the technical system is maintained. This means that only original Hilti
consumables, components and spare parts may be
used in the tool.
This warranty provides the free-of-charge repair or
replacement of defective parts only over the entire lifespan of the tool. Parts requiring repair or replacement
as a result of normal wear and tear are not covered by
this warranty.
Additional claims are excluded, unless stringent
national rules prohibit such exclusion. In particular,
Hilti is not obligated for direct, indirect, incidental
or consequential damages, losses or expenses in
connection with, or by reason of, the use of, or inability to use the tool for any purpose. Implied warranties
of merchantability or fitness for a particular purpose
are specifically excluded.
For repair or replacement, send tool or related parts
immediately upon discovery of the defect to the address
of the local Hilti marketing organization provided.
This constitutes Hilti's entire obligation with regard to
warranty and supersedes all prior or contemporaneous comments and oral or written agreements concerning warranties.
12. Declaration of conformity
(original)
Description: Random orbit sander
Designation: WFE 380 / WFE 450-E
Year of design: 2000
We declare, under our sole responsibility, that this product complies with the following directives and standards:
2004/108/EC, 2006/42/EC, EN 60745-1, EN 60 745-2-4,
EN ISO 12100, 2011/65/EU.
Hilti Corporation, Feldkircherstrasse 100,
FL-9494 Schaan
Paolo Luccini Jan Doongaji
Head of BA Ececutive Vice President
Quality & Process Management BU Power Tools & Accessories
BA Electric Tools & Accessories
01/2012 01/2012
Technical documentation filed at:
Hilti Entwicklungsgesellschaft mbH
Zulassung Elektrowerkzeuge
Hiltistrasse 6
86916 Kaufering
Deutschland
Printed: 07.07.2013 | Doc-Nr: PUB / 5131018 / 000 / 00
Page 23

19
1. Consignes générales
Mot de signalisation de danger
«ATTENTION»
pour attirer l'attention sur un risque de danger ou une
façon incertaine de travailler qui pourrait entraîner des
risques de dommages personnels ou matériels.
Pictogrammes
Avant de mettre en marche cet
appareil, lire absolument son
mode d'emploi.
Le présent mode d'emploi doit
toujours accompagner l'appareil.
Ne prêter ou céder cet appareil à
quelqu'un d'autre qu'en lui fournissant aussi le mode d'emploi.
Sommaire Page
1. Consignes générales 19
2. Description 20
3. Caractéristiques techniques 20
4. Consignes de sécurité 21
5. Mise en marche 23
6. Utilisation 23
7. Fonctionnement 24
8. Nettoyage et entretien 25
9. Guide de dépannage 26
10. Recyclage 26
11. Garantie constructeur des appareils 26
12. Déclaration de conformité (original) 27
Eléments de commande
Interrupteur Marche/Arrêt
Molette de réglage (de présélection) de la vitesse de
rotation
Eléments de l'appareil
Plaquette signalétique
쐏 Poignée principale
쐄 Poignée de guidage
쐂 Poignée supplémentaire
쐆 Poignée pour ponçage au fini soigné
쐊 Plateau de ponçage
쐎 Disque abrasif autogrippant
쐅 Vis de fixation du plateau de ponçage
쐈 Bague de freinage
쐉 Cuve de récupération de la poussière
씈 Sac à poussière
씉 Tubulure d'aspiration/flexible d'aspiration
씊 Centreur du disque abrasif
NOTICE ORIGINALE
Ponceuse excentrique WFE 380 / WFE 450-E
Les chiffres renvoient toujours à des illustrations correspondant au texte que vous trouverez sur les pages
rabattables précédentes. Pour lire le mode d'emploi,
rabattre ces pages de manière à voir les illustrations en
même temps.
Dans le texte du présent mode d'emploi, le terme «appareil» désigne toujours la ponceuse excentrique WFE380/
WFE450-E.
Situation des détails d'identification sur l'appareil
La désignation du modèle et l'identification (le numéro
de série) figurent sur la plaquette signalétique de votre
appareil.
Inscrivez ces renseignements dans votre mode d'emploi pour vous y référer en cas de contact avec votre
agence/point de service après-vente Hilti le plus proche.
Modèle:
N° de série:
Symboles d'avertissement
Symboles d'obligation
Porter
un casque
antibruit
Porter des
gants de
protection
Porter un
masque
respiratoire
léger
Porter des
lunettes de
protection
Lire le mode
d'emploi avant
d'utiliser
l'appareil
Symboles
Avertissement
danger général
Avertissement tension
électrique dangereuse
Avertissement
surfaces chaudes
Recycler les
déchets
Printed: 07.07.2013 | Doc-Nr: PUB / 5131018 / 000 / 00
Page 24

20
3. Caractéristiques techniques WFE380 WFE 450-E
Puissance nominale: 380 W 450 W
Tension nominale: ✱ 110 V 220 V 230 V 240 V 110 V 220 V 230 V 240 V
Intensité nominale: 3,6 A 1,8 A 1,7 A 1,6 A 4,2 A 2,3 A 2,2 A 2,1 A
Fréquence du secteur: ✱ 50–60 Hz
Vitesse de rotation à vide: 5000–10000 /min
Vitesse de rotation en charge: 10000–20000 /min
Plateau de ponçage: ∅ 150 mm
Excentricité: 4 mm
Diamètre extérieur de l’adaptateur d’aspiration: 30 mm
Poids selon la procédure EPTA 01/2003: 2,2 kg
REMARQUE
Le niveau de vibrations mentionné dans ces instructions a été mesuré conformément à un procédé de mesure normalisé selon EN 60745 et peut être utilisé comme base de comparaison entre outils électroportatifs. Il permet
également de procéder à une évaluation préalable des sollicitations vibratoires. Le niveau de vibrations mentionné
correspond aux principales applications de l'outil électroportatif. Ce niveau peut néanmoins différer si l'outil électroportatif est utilisé pour d'autres applications, avec des outils à monter différents ou que l'entretien s'avère insuffisant. Ceci peut augmenter considérablement les sollicitations vibratoires dans tout l'espace de travail. Pour une
évaluation précise des sollicitations vibratoires, il convient également de prendre en compte les temps durant lesquels l'appareil est arrêté ou marche à vide. Ceci peut sensiblement réduire les sollicitations vibratoires dans tout
l'espace de travail. Par ailleurs, il convient de prendre des mesures de sécurité supplémentaires en vue de proté-
● Ne pas utiliser l’appareil pour des ponçages à l'eau.
● Il est interdit d'effectuer toutes manipulations ou modi-
fications sur l'appareil.
● Pour éviter tous risques de blessures, n'utiliser que
des accessoires Hilti d'origine.
● Toujours travailler avec un système d'aspiration adap-
té. Lors de travaux de ponçage de matériaux nocifs à la
santé (p. ex. bois de chêne ou de hêtre, peintures contenant du plomb ou d'autres éléments nocifs), veiller tout
particulièrement à bien respecter les consignes de sécurité et de recyclage.
Bien respecter les indications concernant l'utilisation,
le nettoyage et l'entretien de l'appareil qui figurent dans
le présent mode d'emploi.
Principales caractéristiques de l'appareil
– Classe de protection électrique II (double isolation) Z
(selon EN 60745)
– Poignées ergonomiques, antivibratiles
- poignée principale
- poignée de guidage
- poignée pour ponçage au fini soigné
– Poignée supplémentaire intégrée
– Réglage progressif de la vitesse de rotation
– Plateau de ponçage universel ; autres plateaux disponibles
en option
Exigences vis-à-vis de l'utilisateur
● L'appareil est destiné aux utilisateurs professionnels.
● Il ne doit être utilisé, entretenu et réparé que par du
personnel agréé, formé spécialement, qui doit être tenu
au courant des dangers afférents.
2. Description
La ponceuse excentrique WFE 380 / WFE 450-E est un
appareil électroportatif destiné au ponçage du bois, des
dérivés du bois, matériaux composites, laques, vernis,
peintures, plastiques, plâtre, mastics ou tous autres
matériaux du même type.
Cet appareil est destiné aux utilisateurs professionnels.
L'appareil est livré en coffret plastique (en boîte carton
pour la WFE 380) avec une cuve de récupération de la
poussière, un sac à poussière et un mode d'emploi.
Utilisation conforme aux directives
● L'appareil est destiné aux travaux de ponçage en surface de matériaux comme le bois, les placages, les
matières de charge, les mastics, les plastiques et le plâtre,
avec des disques abrasifs s’usant dans le temps, interchangeables.
● L'appareil peut être utilisé sur les chantiers, dans les
ateliers, pour les réparations, les transformations et dans
les constructions neuves.
● Le milieu ambiant doit être sec.
● L'appareil ne doit être utilisé qu'avec la tension et la
fréquence du secteur indiquées sur sa plaquette signalétique.
● Avant d'utiliser l'appareil, il est nécessaire de fixer et
de bloquer correctement la pièce.
● Il est interdit de poncer tous métaux et tous matériaux contenant de l'amiante.
● L'appareil ne doit être utilisé que guidé des deux
mains.
● Ne pas utiliser l'appareil sous la pluie ou la neige, ni
dans un milieu ambiant humide, mouillé ou déflagrant.
Printed: 07.07.2013 | Doc-Nr: PUB / 5131018 / 000 / 00
Page 25

21
ger l'utilisateur des effets des vibrations, telles que : bien entretenirl'outil électroportatif ainsi que les outils à monter, maintenir les mains chaudes, optimiser l'organisation des opérations.
Valeurs de bruit et de vibrations (mesurées selon EN 60745)
Niveau de puissance acoustique pondéré A type: 93 dB (A)
Niveau de pression acoustique d’émission pondéré A type:
82 dB (A)
Pour le niveau sonore selon EN 60745, l'incertitude est de 3 dB. Utiliser un casque antibruit!
Valeurs de vibrations triaxiales
(somme vectorielle des vibrations) WFE380 WFE450-E
Ponçage de surfaces (a
h
) 4,1 m/s
2
3,9 m/s
2
Incertitude (K) des valeurs de vibrations triaxiales: 1,5 m/s
2
1,5 m/s
2
✱ L'appareil existe en plusieurs versions (tensions différentes). Vous pouvez lire la tension et l'intensité absorbée nominales de votre appareil sur sa
plaquette signalétique.
Sous réserve de toutes modifications techniques!
4. Consignes de sécurité
REMARQUE
Les indications de sécurité du chapitre 4.1 contiennent toutes les
indications générales de sécurité pour les appareils électriques qui,
selon les normes applicables, doivent être spécifiées dans le présent mode d'emploi. Par conséquent, il est possible que certaines
indications ne se rapportent pas à cet appareil.
4.1 Indications générales de sécurité pour les appareils électriques
a) AVERTISSEMENT ! Lire et comprendre toutes les
consignes de sécurité et instructions. Le nonrespect des
consignes de sécurité et instructions indiquées ci-après peut
entraîner un choc électrique, un incendie et / ou de graves blessures sur les personnes. Les consignes de sécurité et ins-
tructions doivent être intégralement conservées pour les utilisations futures. La notion d’« outil électroportatif » mentionnée
dans les consignes de sécurité se rapporte à des outils électriques
raccordés au secteur (avec câble de raccordement) et à des outils
électriques à batterie (sans câble de raccordement).
4.1.1 Sécurité sur le lieu de travail
a) Maintenez l’endroit de travail propre et bien éclairé. Un lieu
de travail en désordre ou mal éclairé augmente le risque d’accidents.
b) N'utilisez pas l'outil électroportatif dans un environnement
présentant des risques d’explosion et où se trouvent des
liquides, des gaz ou poussières inflammables. Les outils
électroportatifs génèrent des étincelles risquant d’enflammer
les poussières ou les vapeurs.
c) Tenez les enfants et autres personnes éloignés durant l’uti-
lisation de l’outil électroportatif. En cas d’inattention vous risquez de perdre le contrôle de l’appareil.
4.1.2 Sécurité relative au système électrique
a) La fiche de secteur de l’outil électroportatif doit être appro-
priée à la prise de courant. Ne modifiez en aucun cas la
fiche. N'utilisez pas de fiches d’adaptateur avec des outils
électroportatifs avec mise à la terre. Les fiches non modifiées
et les prises de courant appropriées réduisent le risque de choc
électrique.
b) Évitez le contact physique avec des surfaces mises à la ter-
re tels que tuyaux, radiateurs, cuisinières et réfrigérateurs.
Il y a un risque élevé de choc électrique au cas où votre corps
serait relié à la terre.
c) N'exposez pas les outils électroportatifs à la pluie ou à l’hu-
midité. La pénétration d’eau dans un outil électroportatif augmente le risque d’un choc électrique.
d) N'utilisez pas le câble à d’autres fins que celles prévues,
n'utilisez pas le câble pour porter l'outil électroportatif ou
pour l’accrocher ou encore pour le débrancher de la prise
de courant. Maintenez le câble éloigné des sources de chaleur, des parties grasses, des bords tranchants ou des parties de l’appareil en rotation. Un câble endommagé ou tor-
sadé augmente le risque d’un choc électrique.
e) Au cas où vous utiliseriez l’outil électroportatif à l’extérieur,
utilisez uniquement une rallonge homologuée pour les applications extérieures. L’utilisation d’une rallonge électrique homo-
loguée pour les applications extérieures réduit le risque d’un
choc électrique.
f) Si l'utilisation de l'outil électroportatif dans un environne-
ment humide ne peut pas être évitée, un interrupteur de
protection contre les courants de court-circuit doit être utilisé. L'utilisation d'un tel interrupteur de protection réduit le risque
d'une décharge électrique.
4.1.3 Sécurité des personnes
a) Restez vigilant, surveillez ce que vous faites. Faites preu-
ve de bon sens en utilisant l’outil électroportatif. N'utilisez
pas l'outil électroportatif lorsque vous êtes fatigué ou après
avoir consommé de l’alcool, des drogues ou avoir pris des
médicaments. Un moment d’inattention lors de l’utilisation de
l'outil électroportatif peut entraîner de graves blessures sur les
personnes.
b) Portez des équipements de protection. Portez toujours des
lunettes de protection. Le fait de porter des équipements de
protection personnels tels que masque anti-poussière, chaussures de sécurité antidérapantes, casque de protection ou protection acoustique suivant le travail à effectuer, réduit le risque
de blessures.
c) Évitez une mise en service par mégarde. S'assurer que l'ou-
til électroportatif est arrêté avant de le brancher à la source de courant et/ou au blocaccu, de le prendre ou de le porter. Le fait de porter l'outil électroportatif avec le doigt sur l’in-
terrupteur ou de brancher l’appareil sur la source de courant
Printed: 07.07.2013 | Doc-Nr: PUB / 5131018 / 000 / 00
Page 26

22
4.2 Consignes de sécurité spécifiques au produit
4.2.1 Sécurité des personnes
a) Porter un casque antibruit. Le bruit peut entraîner des
pertes auditives.
b) Si elle est fournie, utiliser la poignée supplémentai-
re. La perte de contrôle peut entraîner des blessures.
c) Tenir fermement les appareils par les surfaces de
préhension isolées, lors d'interventions dans des
zones où le plateau de ponçage risque d'entrer en
contact avec des câbles ou gaines électriques cachés,
ou son propre câble d'alimentation. En cas de contact
du plateau de ponçage avec un câble conducteur, il y a
risque que les pièces métalliques non isolées soient
mises sous tension et que l'utilisateur de l’outil reçoive
alors un choc électrique.
d)Toujours tenir l'appareil des deux mains par les poi-
gnées prévues à cet effet. Essuyer les poignées afin
d'éliminer toute trace d'humidité et enlever toute
trace de graisse ou d'huile.
e)Pour éviter tout risque de chute, toujours tenir le
cordon d'alimentation, le câble de rallonge et le
tuyau flexible d'aspiration vers l'arrière de l'appareil.
f) Utilisez les gants de protection pour changer d'ou-
til. L'appareil peut être très chaud après utilisation.
g)Utiliser l’appareil uniquement s’il est dans un état
impeccable et seulement conformément à l’usage
prévu.
h)Utiliser un dispositif d'aspiration de la poussière,
un masque respiratoire et des lunettes de protection.
Le ponçage peut entraîner la formation de poussière dangereuse. Cette poussière de ponçage peut
être nocive pour les poumons et les yeux.
i) L'exploitant est tenu de s'assurer que cette pous-
sière de ponçage nocive sera bien éliminée conformément aux directives nationales et régionales
en vigueur.
Le ponçage de bois de chêne ou de hêtre
p. ex., de peintures contenant du plomb ou d'autres
éléments nocifs, entraîne la formation de poussière nocive.
j) Faire régulièrement des pauses et des exercices de
relaxation et de massage des doigts pour favoriser
l'irrigation sanguine dans les doigts.
k)
Les poussières de matériaux telles que des poussières de peinture au plomb, de certains types de bois,
minéraux et métaux, peuvent être nocives pour la
santé. Le contact ou l'aspiration des poussières peut
provoquer des réactions allergiques et/ou des maladies respiratoires de l'utilisateur ou de toute personne se trouvant à proximité. Certaines poussières, telles
que des poussières de chêne ou de hêtre, sont considérées comme cancérigènes, en particulier lorsqu'elles
sont combinées à des additifs destinés au traitement
du bois (chromate, produit de protection du bois).
Les matériaux contenant de l'amiante doivent seulement être manipulés par un personnel spécialisé.
Un
dispositif d'aspiration doit être utilisé dans la mesure du possible. Pour une aspiration optimale de la
lorsque l’interrupteur est en position de fonctionnement, peut
entraîner des accidents.
d) Enlevez tout outil de réglage ou toute clé avant de mettre
l'outil électroportatif en fonctionnement. Une clé ou un outil
se trouvant sur une partie en rotation peut causer des blessures.
e) Adoptez une bonne posture. Veillez à garder toujours une
position stable et équilibrée. Ceci vous permet de mieux
contrôler l'outil électroportatif dans des situations inattendues.
f) Portez des vêtements appropriés. Ne portez pas de vête-
ments amples ni de bijoux. Maintenez cheveux, vêtements
et gants éloignés des parties de l’appareil en rotation. Des
vêtements amples, des bijoux ou des cheveux longs peuvent
être happés par des pièces en mouvement.
g) Si des dispositifs servant à aspirer ou à recueillir les pous-
sières doivent être utilisés, vérifiez que ceux-ci sont effectivement raccordés et qu’ils sont correctement utilisés. L'uti-
lisation d'un dispositif d'aspiration peut engendrer un risque à
cause des poussières.
4.1.4 Utilisation et maniement de l'outil électroportatif
a) Ne surchargez pas l'appareil. Utilisez l’outil électroportatif
approprié au travail à effectuer. Avec l'outil électroportatif
approprié, vous travaillerez mieux et avec plus de sécurité à la
vitesse pour laquelle il est prévu.
b) N'utilisez pas un outil électroportatif dont l’interrupteur est
défectueux. Un outil électroportatif qui ne peut plus être mis en
ou hors fonctionnement est dangereux et doit être réparé.
c) Retirez la fiche de la prise de courant et/ou le bloc-accu
avant d'effectuer des réglages sur l'appareil, de changer
les accessoires, ou de ranger l'appareil. Cette mesure de
précaution empêche une mise en fonctionnement par mégarde de l'outil électroportatif.
d) Gardez les outils électroportatifs non utilisés hors de por-
tée des enfants. Ne permettez pas l’utilisation de l’appareil
à des personnes qui ne se sont pas familiarisées avec celuici ou qui n’ont pas lu ces instructions. Les outils électropor-
tatifs sont dangereux lorsqu’ils sont utilisés par des personnes
non initiées.
e) Prenez soin des outils électroportatifs. Vérifiez que les par-
ties en mouvement fonctionnent correctement et qu’elles
ne sont pas coincées, et contrôlez si des parties sont cassées ou endommagées de telle sorte que le bon fonctionnement de l'outil électroportatif s’en trouve entravé. Faites
réparer les parties endommagées avant d’utiliser l'outil électroportatif. De nombreux accidents sont dus à des outils élec-
troportatifs mal entretenus.
f) Maintenez les outils de coupe aiguisés et propres. Des outils
soigneusement entretenus avec des bords tranchants bien aiguisés se coincent moins souvent et peuvent être guidés plus facilement.
g) L'outil électroportatif, les accessoires, les outils à monter,
etc. doivent être utilisés conformément à ces instructions.
Tenez compte également des conditions de travail et du travail à effectuer. L’utilisation des outils électroportatifs à d’autres
fins que celles prévues peut entraîner des situations dangereuses.
4.1.5 Service
a) Ne faites réparer l'outil électroportatif que par un person-
nel qualifié et seulement avec des pièces de rechange d’origine. Ceci permet d’assurer la sécurité de l'outil électroportatif.
Printed: 07.07.2013 | Doc-Nr: PUB / 5131018 / 000 / 00
Page 27
23
poussière, utiliser de préférence l'aspirateur mobile approprié pour bois et/ou poussières minérales
recommandé par Hilti, qui est spécialement étudié
pour cet outil électroportatif. Veiller à ce que la place de travail soit bien ventilée. Il est recommandé
de porter un masque anti-poussière de la classe de
filtre P2. Respecter les prescriptions locales en
vigueur qui s'appliquent aux matériaux travaillés.
l) L'appareil n'est pas destiné à être utilisé par des
enfants ou des personnes affaiblies sans encadrement.
m) Avertir les enfants et veiller à ce qu'ils ne jouent
pas avec l'appareil.
4.2.2 Sécurité relative au système électrique
a)Bloquer la pièce travaillée. Pour ce faire, utiliser
un dispositif de serrage ou un étau, pour maintenir
la pièce travaillée en place. Elle sera ainsi mieux
tenue qu'à la main, et les deux mains restent alors
libres pour commander la machine.
b)Lors d'une coupure de courant : mettre l'appareil
sur arrêt, débrancher la fiche.
Ceci évite toute mise
en marche intempestive de l’appareil en cas de remise sous tension.
4.2.3 Sécurité relative au système électrique
a) Contrôler régulièrement les câbles de raccorde-
ment de l'appareil et les faire remplacer par un spécialiste s'ils sont endommagés. Contrôler régulièrement les câbles de rallonge et les remplacer s'ils
sont endommagés.Si le cordon d'alimentation ou
le câble de rallonge est endommagé pendant le travail, ne pas le toucher. Débrancher la prise.
Les
câbles de raccordement et les câbles de rallonge
endommagés représentent un risque d’électrocution.
b)Si vous travaillez souvent sur des matériaux conduc-
teurs, faites contrôler les appareils encrassés à
intervalles réguliers par le S.A.V. Hilti.
Ne jamais
faire fonctionner l'appareil s'il est encrassé ou mouillé.
Dans de mauvaises conditions d'utilisation, la poussière collée à la surface de l'appareil, surtout la poussière de matériaux conducteurs, ou l'humidité, peut
entraîner une électrocution.
4.2.4 Place de travail
a) Veiller à ce que l'espace de travail soit correcte-
ment éclairé.
b) Veiller à ce que l'espace de travail soit bien venti-
lé.
Un espace de travail mal ventilé peut être nocif
pour la santé en raison des nuisances dues à la poussière.
4.2.5 Equipement de protection individuel
L'utilisateur et les personnes se trouvant à proximité
pendant l'utilisation de l'appareil doivent porter des
lunettes de protection adaptées, un casque antibruit,
des gants de protection et, lorsqu'ils n'utilisent pas de
dispositif d'aspiration de la poussière, un masque respiratoire léger.
5. Mise en marche
Lire et respecter absolument les consignes de sécurité
figurant dans le présent mode d'emploi.
La tension du secteur doit correspondre à celle indiquée
sur la plaquette signalétique de l'appareil.
En cas d'utilisation de rallonges, n'utiliser que des câbles
de rallonges agréés pour l'utilisation prévue. Contrôler
régulièrement si la rallonge et le cordon ne sont pas abîmés.
Câbles de rallonges à l'extérieur
A l'extérieur, n'utiliser que des câbles de rallonges agréés
à cet effet et correctement identifiés.
Toujours rester attentif
Pour travailler, toujours rester attentif. Procéder de manière réfléchie et ne pas utiliser l'appareil si vous n’êtes pas
concentré sur votre travail .
6. Utilisation
Système
Le rendement en ponçage et l'aspect de la surface poncée (le fini) dépendent essentiellement du choix du disque
abrasif (du grain), de la vitesse de rotation et de la pression d'appui.
L'appareil, le plateau de ponçage et le disque abrasif
constituent un système complet et homogène. Attention de toujours utiliser la combinaison la mieux adaptée à votre application et de bien régler l'appareil.
Porter un
casque
antibruit
Porter des
gants de
protection
Porter un
masque
respiratoire
léger
Porter des
lunettes de
protection
Printed: 07.07.2013 | Doc-Nr: PUB / 5131018 / 000 / 00
Page 28

24
Montage du disque (papier) abrasif
Placer le disque abrasif de 150 mm de diamètre extérieur à fixation autogrippante.
Vous pouvez utiliser des disques abrasifs avec 6 trous
d'aspiration (diamètre primitif de référence 80 mm) ou
9 trous (8 sur le cercle primitif 120 mm et 1 trou au milieu
du disque abrasif).
● Pour éviter tout démarrage intempestif de l'appareil,
le débrancher.
● Attention: les trous d’aspiration du disque abrasif doivent coïncider avec ceux du plateau de ponçage.
Maniement, position recommandée pour tenir l'appareil
Pour les travaux de ponçage
● Guider l'appareil des deux mains.
● Utiliser la poignée principale et la poignée supplé-
mentaire intégrée. Tirer la poignée supplémentaire de sa
position de base jusque dans sa position de travail (A sa
place, il est possible d'utiliser la poignée de guidage).
Pour des travaux au fini soigné
● Guider l'appareil d'une main
● Utiliser la poignée pour ponçage au fini soigné qui
vous permet de guider facilement et impeccablement
l'appareil d'une main près de la surface et de travailler
avec beaucoup de doigté, p. ex. pour le ponçage de
laques/vernis, pour le ponçage intermédiaire et/ou le
ponçage de finition.
Pour les travaux contre des surfaces verticales
(p. ex. mur, bords, etc.)
● Guider l'appareil avec la poignée pour ponçage au fini
soigné. Le centre de gravité de l'appareil est situé de telle manière qu'il se trouve dans la main pour travailler de
manière sûre, sans fatigue, contre les surfaces verticales.
ATTENTION
Le ponçage peut dégager de la poussière dangereuse.
La poussière de ponçage peut être nocive pour les poumons et les yeux.
Utiliser un dispositif d'aspiration de la poussière, un
masque respiratoire et des lunettes de protection.
Ponçages
● Vous assurer que l’interrupteur de l'appareil est bien
en position Arrêt.
● Débrancher l'appareil.
● Sélectionner la vitesse de rotation.
● Poser l'appareil (la surface complète du disque abra-
sif) sur la pièce à poncer.
● Mettre en marche l'appareil et le déplacer en exerçant
une pression modérée (env. 20 N) sur la pièce.
● Pour mettre fin au travail ou l'interrompre, nous vous
conseillons de soulever l'appareil en marche de la pièce avant de l'arrêter.
7. Fonctionnement
Réglage de la vitesse de rotation
Pour présélectionner progressivement la vitesse de rotation recommandée, tourner la molette de réglage correspondante. La vitesse de rotation peut être modifiée
même en marche.
La vitesse de rotation dépend du matériau à poncer et
doit être déterminée au moyen d'essais pratiques (voir
les informations sur les disques abrasifs et le tableau
d'applications).
Niveau 1 6
Vitesse Petite vitesse Grande vitesse
Après mise en marche, l'appareil se règle automatique-
ment sur la vitesse de rotation présélectionnée.
Disques abrasifs
Hilti propose toute une gamme de disques abrasifs qui
conviennent pour les applications indiquées au paragraphe «Utilisation conforme aux directives». Pour toutes
les applications Bois, Hilti propose une «gamme Bois»
(granulométries comprises entre P60 et P180); pour
toutes les applications Laques et vernis, une «gamme
Vernis» (granulométries comprises entre P40 et P400).
Plateau de ponçage
(Le plateau de ponçage est une pièce d'usure et ne rentre
donc pas dans le cadre des conditions générales de
garantie.) L'appareil livré départ usine est équipé d'un
plateau de ponçage universel qui permet un très bon
rendement en ponçage et un fini soigné. Ce plateau de
ponçage est muni de trous d'aspiration standard (les
plus courants). Choisir le plateau de ponçage le mieux
adapté à votre application.
Plateau de ponçage Ponçage
universel – bois, dérivés du bois
– mastics
– anciennes peintures et
anciens vernis
– matériaux composites
– plastiques
Dégrossissage et ponçage
intermédiaire,
– vernis et peintures
Plateau de ponçage Ponçage intermédiaire et
souple ponçage de finition de
peintures et vernis.
Ponçage de surfaces incurvées
Frein du plateau de ponçage
(La bague de freinage est une pièce d'usure et ne rentre
donc pas dans le cadre des conditions générales de
garantie.)
L'appareil est équipé d'un frein du plateau de ponçage
qui permet de diminuer la vitesse de rotation à vide du
plateau de ponçage pour l'appliquer sur la surface du
matériau sans risque.
Printed: 07.07.2013 | Doc-Nr: PUB / 5131018 / 000 / 00
Page 29

25
Aspiration de la poussière
ATTENTION
Le ponçage peut dégager de la poussière dangereuse.
La poussière de ponçage peut être nocive pour les poumons et les yeux.
Utiliser un dispositif d'aspiration de la poussière, un
masque respiratoire et des lunettes de protection.
Aspiration de la poussière avec cuve de récupération
de la poussière et sac à poussière
(La cuve de récupération de la poussière est une pièce
d'usure et ne rentre donc pas dans le cadre des conditions générales de garantie.)
Utiliser la cuve de récupération de la poussière avec le
sac à poussière fourni avec l'appareil.
Bien enlever la poussière qui s'est accumulée (p. ex. en
l'aspirant).
Aspiration de la poussière avec un aspirateur
En cas d'aspiration de la poussière avec un aspirateur,
il peut se produire, dans certaines conditions défavorables, rares fort heureusement (air à faible hygrométrie), un phénomène de «décharges».
Ce phénomène physique n'est pas dû à des défauts techniques de sécurité de l'appareil. En cas d'utilisation de
l'aspirateur W-VC 40 Hilti recommandé, ce type de phénomène est exclu.
Les outils électriques Hilti répondent, en effet, aux directives les plus récentes. Toutefois, en cas d’apparition de
ce phénomène, malgré l'emploi recommandé du système Hilti, contacter immédiatement votre agence Hilti
ou le S.A.V. Hilti le plus proche en indiquant bien les
conditions dans lesquelles vous avez utilisé l'appareil.
Enlever la poussière qui s'est accumulée (p. ex. en l'aspirant).
8. Nettoyage et entretien
ATTENTION
Tenir l'appareil, en particulier les surfaces de préhension, sec, propre et exempt d'huile et de graisse.
Ne pas utiliser de nettoyants à base de silicone.
La coque extérieure du boîtier de l'appareil est fabriquée
en plastique résilient. La partie préhensile est en élastomère.
Ne jamais faire fonctionner l'appareil si ses ouïes d'aération sont bouchées ! Les nettoyer avec précaution au
moyen d'une brosse sèche. Éviter toute pénétration de
corps étrangers à l'intérieur de l'appareil. Nettoyer régulièrement l'extérieur de l'appareil avec un chiffon légèrement humide. Ne pas utiliser d'appareil diffuseur, d'appareil à jet de vapeur ou d'eau courante pour le nettoyage
afin de garantir sa sûreté électrique !
Plateau de ponçage
Vérifier l'usure et l'état d'encrassement du plateau de
ponçage. Si le plateau est usé ou encrassé, le disque
abrasif tient moins bien. Nettoyer le plateau de ponçage ou le remplacer éventuellement (en tout cas immédiatement dès qu'il est abîmé).
Remplacement du plateau de ponçage
● Débrancher l'appareil.
● Tenir l'appareil par la poignée de guidage de telle sor-
te que la face granulée du disque abrasif soit visible.
● Démonter le disque abrasif.
● Desserrer les trois vis de fixation avec un outil appro-
prié.
● Démonter l'ancien plateau de ponçage.
● Nettoyer et vérifier le frein du plateau de ponçage. Le
remplacer éventuellement et replacer un disque de ponçage neuf.
● Tenir fermement le plateau de ponçage et serrer les
trois vis de fixation à fond.
● Vérifier si le plateau de ponçage est correctement
monté (bien à plat, en contact avec la bague de freinage).
● Pour placer le disque abrasif et être certain que ses
trous d'aspiration correspondent bien aux trous du plateau de ponçage, utiliser le centreur.
Frein du plateau de ponçage
Si la vitesse de rotation à vide ne cesse d'augmenter au
fil du temps, c'est que la bague du frein du plateau de
ponçage est usée et doit être remplacée.
Remplacement de la bague de frein
● Débrancher l'appareil.
● Enlever le plateau de ponçage comme décrit sous
«Remplacement du plateau de ponçage».
● Tirer et démonter l'ancienne bague de frein fixée dans
le boîtier de l'appareil.
● Attention: les évidements disposés de manière asymétrique sur la bague de frein doivent coïncider avec
les 4 vis de l’appareil.
● Enfoncer la bague de frein dans les évidements correspondants; attention: les crochets doivent s’encliqueter!
● Un montage correctement effectué se reconnaît à la
planéité de la lèvre d’étanchéité.
● Monter le plateau de ponçage comme décrit sous
«Remplacement du plateau de ponçage».
Entretien
Vérifier régulièrement toutes les pièces extérieures de
l'appareil pour voir si elles ne sont pas abîmées et tous
les éléments de commande pour établir s'ils fonctionnent bien. Ne jamais faire fonctionner l'appareil si des
pièces sont abîmées ou si des éléments de commande
ne fonctionnent pas bien. Faire réparer l'appareil par le
S.A.V. Hilti.
Seul un électricien qualifié est habilité à réparer les parties électriques de l’appareil.
Printed: 07.07.2013 | Doc-Nr: PUB / 5131018 / 000 / 00
Page 30

26
10. Recyclage
Les appareils Hilti sont fabriqués pour une
grande part en matériaux recyclables dont la
réutilisation exige un tri correct. Dans de nombreux pays, Hilti est déjà équipé pour reprendre votre
ancien appareil afin d'en recycler les composants.
Consultez le service clients Hilti ou votre conseiller
commercial.
Pour les pays européens uniquement
Ne pas jeter les appareils électriques dans les
ordures ménagères!
Conformément à la directive européenne relative aux
déchets d'équipements électriques ou électroniques
(DEEE), et à sa transposition dans la législation nationale, les appareils électriques doivent être collectés à
part et être soumis à un recyclage respectueux de l’environnement.
11. Garantie constructeur des appareils
Hilti garantit l'appareil contre tout vice de matières et
de fabrication. Cette garantie s'applique à condition
que l'appareil soit utilisé et manipulé, nettoyé et entretenu correctement, en conformité avec le mode d'emploi Hilti, et que l'intégrité technique soit préservée,
c'est-à-dire sous réserve de l'utilisation exclusive de
consommables, accessoires et pièces de rechange
d'origine Hilti.
Cette garantie se limite strictement à la réparation gratuite ou au remplacement gracieux des pièces défectueuses pendant toute la durée de vie de l'appareil. Elle
ne couvre pas les pièces soumises à une usure normale.
Toutes autres revendications sont exclues pour autant
que des dispositions légales nationales impératives
ne s'y opposent pas. En particulier, Hilti ne saurait
être tenu pour responsable de toutes détériorations,
pertes ou dépenses directes, indirectes, accidentelles ou consécutives, en rapport avec l'utilisation
ou dues à une incapacité à utiliser l'appareil dans
quelque but que ce soit. Hilti exclut en particulier
les garanties implicites concernant l'utilisation et
l'aptitude dans un but bien précis.
9. Guide de dépannage
Défauts Causes possibles Comment y remédier
L'appareil ne fonctionne plus. Alimentation électrique Brancher un autre appareil électrique,
interrompue vérifier s'il fonctionne.
Cordon ou fiche défectueux Les faire vérifier et, éventuellement,
remplacer par un électricien qualifié.
Interruption du module Le faire vérifier et, éventuellement,
électronique (p. ex. interrupteur remplacer par un électricien qualifié.
Marche/Arrêt défectueux)
L'appareil ne fonctionne pas à La section du câble de rallonge Utiliser un câble de rallonge de section
plein régime. est trop faible. suffisante.
Molette de réglage (de présélection) Placer la molette de réglage sur la
de la vitesse de rotation sur la position 5 ou 6.
position 1 ou 2
L'aspiration ne fonctionne pas. Le disque abrasif n'est pas bien Démonter le disque abrasif et le placer
placé, les trous d'aspiration ne correctement.
correspondent pas.
Sac à poussière plein Eliminer l'ancien sac à poussière et en
replacer un neuf.
Tubulure d'aspiration bouchée Enlever la cuve de récupération de la
poussière et nettoyer le conduit
d'aspiration.
Le disque abrasif n'adhère pas Plateau de ponçage encrassé Nettoyer le plateau.
sur le plateau de ponçage Le revêtement autoagrippant du Remplacer le plateau.
plateau de ponçage est usé.
Décharge électrostatique Aspirateur sans équipement Utiliser un aspirateur de sécurité
antistatique WVC 40-M
Interruption dans le fil de terre Vérifier le fil de terre.
Printed: 07.07.2013 | Doc-Nr: PUB / 5131018 / 000 / 00
Page 31

27
12. Déclaration de conformité
(original)
Désignation: Ponceuse excentrique
Modèle: WFE 380 / WFE 450-E
Année de conception: 2000
Nous déclarons sous notre seule et unique responsabilité que ce produit est conforme aux directives et normes
sui vantes: 2004/108/CEE, 2006/42/CEE, EN 60 745-1, EN
60745-2-4, EN ISO 12100, 2011/65/EU.
Pour toute réparation ou tout échange, renvoyer l'appareil ou les pièces concernées au réseau de vente Hilti compétent, sans délai, dès constatation du défaut.
La présente garantie couvre toutes les obligations d'Hilti et annule et remplace toutes les déclarations antérieures ou actuelles, de même que tous accords oraux
ou écrits concernant des garanties.
Hilti Corporation, Feldkircherstrasse 100,
FL-9494 Schaan
Paolo Luccini Jan Doongaji
Head of BA Ececutive Vice President
Quality & Process Management BU Power Tools & Accessories
BA Electric Tools & Accessories
01/2012 01/2012
Documentation technique par :
Hilti Entwicklungsgesellschaft mbH
Zulassung Elektrowerkzeuge
Hiltistrasse 6
86916 Kaufering
Deutschland
Printed: 07.07.2013 | Doc-Nr: PUB / 5131018 / 000 / 00
Page 32

28
Printed: 07.07.2013 | Doc-Nr: PUB / 5131018 / 000 / 00
Page 33

29
1.
Общи сведения
Сигнална дума за опасност «ВНИМАНИЕ»
за да се обърне внимание за опасност или неправилна
работа, които биха могли да доведат до наранявания
на хора или материални щети.
Пиктогарми
Преди употреба прочетете
задължително това ръководство.
Съхранявайте това ръководство
винаги при уреда.
Давайте уреда на други лица
винаги в комплект с това
ръководство.
Съдържание Стр.
1.
Общи сведения
29
2.
Описание
30
3.
Технически данни
30
4.
Техника на безопасност
31
5.
Пускане в експлоатация
33
6.
Експлоатация
33
7.
Работа
34
8.
Обслужване и поддръжка
35
9.
Причини и отстраняване на грешки
36
10.
Предаване на вторични суровини
36
11.Гаранция от производителя за уредите 36
12.
Съвместимост
(оригинал)
37
Елементи за управление
Пусков ключ
Колело за предварителен избор на оборотите
Основни елементи на уреда
쐋
Типова табелка
쐏
Ръкохватка
쐄
Ръкохватка за водене
쐂
Помощна ръкохватка
쐆
Ръкохватка за качествена работа
쐊
Подложка за шлифоване
쐎
Шкурка със закрепване тип ”велкро”
쐅
Закрепващи винтове на подложката
쐈
Спирачен пръстен
쐉
Кутия за прахта
씈
Торбичка за прахта
씉
Щуцер / маркуч за прахоулавяне
씊
Помощ за позициониране на шкурката
ОРИГИНАЛНА ИНСТРУКЦИЯ ЗА ИЗПОЛЗВАНЕ
WFE 380/WFE 450-E Електрическа шлайфмашина
Тези номера указват номера на картината.
Съответстващата картина се намира на разгъващата
се страница. Дръжте винаги отворена тази част на
ръководството.
Наричания в текста на това ръководство за обслужване
«уред» се отнася винаги за ексцентричната
шлайфмашина.
.
Място на идентификационните детайли на уреда
Обозначението на типа и серийния номер на Вашия
уред са нанесени на типовата му табелка. Препишете
тези данни и във Вашето ръководство за обслужване
и винаги ги съобщавайте когато отивате при нашия
представител или сервиз.
Тип:
Сериен NO:
Предупредителни знаци
Препоръчителни знаци
Да се
използват
антифони
Да се
използват
защитни
ръкавици
Да се
използва
респиратор
Да се
използват
защитни
очила
Преди употреба
да се прочете
Ръководството
за експлоатация
Символи
Предупреждение
за опасност от
общ характер
Предупреждение за
опасно електрическо
напрежение
Предупреждение
за гореща
повърхност
Отпадъците да
се рециклират
Printed: 07.07.2013 | Doc-Nr: PUB / 5131018 / 000 / 00
Page 34

30
3.
Технически данни
WFE380 WFE450-E
Номинална мощност
380 W 450 W
Захранващо напрежение
✱ 110 V 220 V 230 V 240 V 110 V 220 V 230 V 240 V
Ток на консумация
3,6 A 1,8 A 1,7 A 1,6 A 4,2 A 2,3 A 2,2 A 2,1 A
Честота на захранващото напрежение
✱ 50–60 Hz
Обороти на празен ход
5000–10000
/min
Брой на ходовете на празен ход
10000–20000
/min
Шлайфподложка
∅ 150
мм
Ход на ексцентрика
4
мм
Диаметър на адаптора за прахозащита
30
мм
Тегло съгласно EPTA-Procedure 01/2003
2,2
кг
УКАЗАНИЕ
Даденото в тези указания ниво на трептения е измерено съгласно метод за измерване по стандарт EN 60745 и може да
се използва за сравнение на електроинструменти. Той е подходящ и за предварителна оценка на натоварването от
трептения. Даденото ниво на трептения е представително за основните приложения на електроинструмента. Ако обаче
електроинструментът се ползва за други приложения с различни работни инструменти или при недостатъчна поддръжка,
в нивото на трептенията може да има отклонения. Това може значително да повиши натоварването от трептения през
целия период на експлоатация. За точна преценка на натоварването от трептения трябва да се вземат предвид и периодите,
в които уредът е изключен или работи, но не е в реална експлоатация. Това може значително да намали натоварването
от трептения през целия период на експлоатация. Определете допълнителни защитни мерки за работещия срещу
въздействието на трептенията, като например: поддръжка на електроинструмента и работните инструменти, поддържане
на топли ръце, организация на работните процеси.
●
Забранени са реконструкции и промени на уреда.
●
За да се избягнат опасности от наранявания,
използвайте само оригинални Хилти-принадлежности.
●
Не работете без подходяща система за изсмукване
на прахта. Спазвайте винаги правилата по техника на
безопасност и реда за изхвърляне на отпадъчния
материал по време на обработване на опасни за
здравето вещества (н.пр. дъбов и буков материал, бои
съдържащи олово или други вредни вещества).
Спазвайте правилата за работа, обслужване и поддръжка
указани в това ръководство.
Съществени особенности на уреда
–
Елктро защита II (двойна изолация)Z(съгласно
EN 60 745)
–
Омекотяващи вибрациите, ергонокични ръкохватки:
-
ръкохватка
-
ръкохватка за водене
-
ръкохватка за качествена работа
–
Интегрирана помощна ръкохватка
–
Плавно регулиране на оборотите
–
Шлайфподложка за универсално приложение, други
подложки като принадлежности
Изисквания към работещия с уреда
●
Уреда е консруиран за работа с него от
професионалисти.
●
Уреда може да се експлоатира, почиства и поддържа
само от оторизиран за това и обучен персонал. Този
персонал трябва да е обучен и за възможните опасности
по време на работа.
2.
Описание
Уредът WFE 380 / WFE 450-E е електрическа
шлайфмашина за шлифоване на дърво, дървени
материали, шперплат, лакове, бои, изкуствени
материали, гипс, китови повърхности и други подобни
материали.
Уредът е прдназачен за употреба от професионалисти.В
опаковката, в която се доставя има: уреда с прахозащитна
кутия, торбичка за прах, ръководство за експлоатация
и куфар, WFE 380 е в картонена кутия.
Използаване по предназначение
●
Уреда е предназначен за шлифоване на плоскости
от дърво, фурнир, китове, изкуствени материали и
гипс с помощта на износващи се и сменяеми шкурки.
●
Работното място може да е: строителна площадка,
работилница, реставрация, реконструкция и ново
строителство.
●
Трябва да се работи в суха среда.
●
Уреда да се включва към захранващо напрежение
в съответствие с това, което е указано на типовата
табелка.
●
Да се работи само когато предмета на обработване
е закрепен.
●
Да не се обработват метали и метализирани
материали.
●
Да се работи само в ръчен режим.
●
Не употребявайте уреда на открито по време на
дъжд и във влажна, мокра и експлозионно опасни
среди.
●
Употребявайте уреда само за сухо шлифоване.
Printed: 07.07.2013 | Doc-Nr: PUB / 5131018 / 000 / 00
Page 35

31
Информация за шумовете и вибрациите (измерени по EN 60745)
А-стойности на нивото на шума
93 dB (A)
А-стойности на мощността на шума
82 dB (A)
За посочените нива на звука, съгласно EN 60745, толерансът е 3 dB.
Да се използват атнифони!
Триосови стойности на вибрациите (векторна сума на вибрациите) WFE380 WFE450-E
Плоско шлифоване (a
h
) 4.1
м/сек23.9
м/сек
2
Отклонение от посочените нива (K) за триосовитестойности на вибрациите: 1.5
м/сек21.5
м/сек
2
✱
Уреда се предлага за различни захранващи напрежения. Захранващото напрежение и тока на консумация на Вашия уред може да прочетете
на типовата му табелка.
Запазено правото за технически промени.
4. Указания за безопасност
УКАЗАНИЕ
Указанията за безопасност в раздел 4.1 съдържат всички общи
указания за безопасност за електроуреди, посочени в Ръководството за експлоатация съгласно приложимите норми и
стандарти. Поради това е възможно да има указания, които не
се отнасят за този уред.
4.1 Общи указания за безопасност за електроинструменти
a) ПРЕДУПРЕЖДЕНИЕ! Запознайте се с всички ука-
зания за безопасност и инструкции. Неспазването на при-
ведените по-долу указания за безопасност и инструкции
може да доведе до токов удар, пожар и/или тежки травми.
Съхранявайте всички указания за безопасност и инструк-
ции за бъдещи справки. Използваното в указанията за без-
опасност понятие "електроинструмент" се отнася до захран-
вани от електрическата мрежа електроинструменти (със
захранващ кабел) и до захранвани от акумулаторна бате-
рия електроинструменти (без захранващ кабел).
4.1.1 Безопасност на работното място
a) Поддържайте работното си място чисто и добре осве-
тено. Безпорядъкът или недостатъчното осветление могат
да доведат до злополуки.
b) Не използвайте електроинструмента във взривоопас-
на среда или на места, където има горими течности,
газове или прах. По време на работа в електроинстру-
ментите се отделят искри, които могат да възпламенят пра-
хообразни материали или пари.
c) Дръжте деца и странични лица на безопасно разстоя-
ние, докато работите с електроинструмента. Ако внима-
нието Ви бъде отклонено, може да загубите контрола над
електроинструмента.
4.1.2 Безопасност при работа с електроинструменти
a) Щепселът на електроинструмента трябва да е подхо-
дящ за контакта. В никакъв случай не се допуска изме-
няне на конструкцията на щепсела. Когато работите със
занулени електринструменти, не използвайте адапто-
ри за щепсела. Ползването на оригинални щепсели и кон-
такти намалява риска от токов удар.
b) Избягвайте допира на тялото Ви до заземени тела, напри-
мер тръби, отоплителни уреди, пещи и хладилници. Рис-
кът от електрически удар се увеличава, когато тялото ви е
заземено.
c) Предпазвайте електроинструментие от дъжд и влага.
Проникването на вода в електроинструмента повишава опасността от токов удар.
d) Не използвайте кабела за цели, за които не е предназ-
начен, например за носене на електроуреда, за окачване или за издърпване на щепсела от контакта. Предпазвайте кабела от нагряване, масла, остри ръбове или
движещи се части на уреда. Повредени или усукани кабе-
ли увеличават риска от токов удар.
e) Когато работите с електроинструмента на открито, изпол-
звайте само удължителни кабели, подходящи за работа
на открито. Използването на удължител, предназначен за
работа на открито, намалява риска от токов удар.
f) Ако не можете да избегнете работа с електроуреда във
влажна среда, използвайте дефектотокова защита. Използването на дефектотокова защита намалява риска от електрически удар.
4.1.3 Безопасен начин на работа
a) Бъдете концентрирани, следете внимателно действията
си и постъпвайте предпазливо и разумно. Не използвайте електроинструмента, когато сте уморени или под
влиянието на наркотични вещества, алкохол или упойващи лекарства. Един миг разсеяност при работа с елек-
троинструмента може да доведе до изключително тежки
наранявания.
b) Работете със защитно работно облекло и винаги с пред-
пазни очила. Носенето на лични предпазни средства, като
дихателна маска, здрави плътно затворени обувки със стабилен грайфер, защитна каска или шумозаглушители (антифони) – според вида и употребата на електроинструмента
– намалява риска от злополука.
c) Внимавайте да не включите електроинстру- мента слу-
чайно. Уверете се, че електроуредът е изключен, преди
да го свържете към електрозахранването и/или акумулатора, преди да го вдигнете или пренасяте. Ако при
носене на електроинструмента държите пръста си върху
пусковия прекъсвач или ако при включено положение свържете електроинструмента към електрозахранването, съществува опасност от злополука.
d) Преди да включите електроинструмента, се уверете, че
сте отстранили от него всички помощни инструменти
или гаечни ключове. Помощен инструмент, забравен на
въртящо се звено, може да причини травми.
Printed: 07.07.2013 | Doc-Nr: PUB / 5131018 / 000 / 00
Page 36

32
4.2 Специфични за уреда указания за безопасност
4.2.1 Безопасен начин на работа
a) Носете антифони. Шумът може да доведе до загу-
ба на слуха.
b) Ползвайте допълнителните ръкохватки, ако са
доставени. Загубата на контрол може да доведе до
наранявания.
c) Дръжте уредите за изолираните места за хваща-
не, когато извършвате дейности, при които шлайфподложката може да засегне скрити електропроводници или своя собствен захранващ кабел.
Контактът на шлайф-подложката с тоководещ проводник може да постави под напрежение свободни
метални части и да предизвика нанасянето на токов
удар върху ползвателя на инструмента.
d)Дръжте уреда винаги с две ръце здраво за
предвидените за целта ръкохватки. Поддържайте
ръкохватките сухи и винаги чисти от масла и
мазнини.
e)За да избегнете евентуално препъване, винаги
водете захранващия кабел, кабелния удължител
и маркуча на прахоуловителя зад уреда.
f) При смяна на инструмента използвайте защитни
ръкавици. По време на работа инструментът
може да се нагорещи.
g)
Използвайте уреда само по предназначение и в
изправност.
h)
Използвайте прахоотвеждаща система, респираторна
маска и защитни очила.
По време на шлифоване
мо„ат да се отделят вредни прахове. Този прах
може да увреди белите дробове и очите.
i)
Работещият с уреда трябва да се увери, че вредния
прах се изхвърля, според националните и
регионалните изисквания.
По врене на шлифоване
на дъбов и буков дървен материал и на бои, които
съдържат олово или дру„и вредни вещества, се
отделят вредни прахове.
j) Правете почивки и гимнастика на пръстите за
подобря ване на кръвообращението в тях.
k)
Прахове от материали, като съдържаща олово боя, някои
видове дървесина и метали, могат да са вредни за здравето.
При допир или вдишване на праховете могат да възникнат
алергични реакции и/или заболявания на дихателните
пътища на ра-ботещия и на намиращите се в близост
лица. Някои прахове, като прах от дъб и бук, се считат
за ра-кообразуващи, особено в комбинация с добавки
за дървообработка (хромат, средства за дървесна защита).
Съдържащ азбест материал трябва да се обработва само
от специалисти.
Използвайте по възможност
прахоуловител. За да постигнете висока степен
на прахоулавяне, използвайте подходящ,
препоръчан от Хилти преносим пра- хоуловител
за дървесни и/или минерални пра-хове, който е
подходящ за дадения електро- инструмент.
Осигурете добро проветряване на работното
e) Избягвайте неудобните положения на тялото. Работете
в стабилно положение на тялото и във всеки един момент
поддържайте равновесие. Така ще можете да контроли-
рате електроинструмента по-добре и по-безопасно, ако възникне неочаквана ситуация.
f) Работете с подходящо облекло. Не работете с широки
дрехи или украшения. Дръжте косата си, дрехите си и
ръкавиците си на безопасно разстояние от въртящите
се звена на електроинструментите. Широките дрехи, укра-
шенията и дългите коси могат да бъдат захванати и увлечени от въртящите се звена.
g) Ако е възможно използването на външна аспирацион-
на система, се уверете, че тя е включена и функционира изправно. Използването на прахоуловител може да нама-
ли породените от прахове опасности.
4.1.4 Използване и третиране на електроинструмента
a) Не претоварвайте уреда. Използвайте електроинстру-
ментите само съобразно тяхното предназначение. Ще
работите по-добре и по-безопасно, когато използвате подходящия електроинструмент в зададения от производителя диапазон на натоварване.
b) Не използвайте електроинструмент, чийто ключ е пов-
реден. Електроинструмент, който не може да бъде изключван и включван по предвидения от производителя начин, е
опасен и трябва да бъде ремонтиран.
c) Извадете щепсела от контакта и/или акумулатора, преди
да предприемете действия по настройка на уреда или
смяна на принадлежностите, или преди да приберете
уреда. Тази мярка премахва опасността от задействане на
електроинструмента по невнимание.
d) Съхранявайте електроинструментите на места, където
не могат да бъдат достигнати от деца. Не допускайте
уредът да бъде използван от лица, които не са запознати с него или не са прочели тези инструкции. Когато
са в ръцете на неопитни потребители, електроинструментите могат да бъдат изключително опасни.
e) Отнасяйте се към електроинструментите грижливо. Про-
верявайте дали подвижните елементи функционират
безупречно, дали не заклинват, дали има счупени или
повредени детайли, които нарушават или изменят функциите на електроинструмента. Преди да използвате
електроинструмента, се погрижете повредените детайли да бъдат ремонтирани. Много от злополуките се дъл-
жат на недобре поддържани електроинструменти.
f) Поддържайте режещите инструменти винаги добре зато-
чени и чисти. Добре поддържаните режещи инструменти
с остри ръбове оказват по-малко съпротивление, не заклинват и се водят по-леко.
g) Работете с елестроинструменти, принадлежности, сме-
няеми инструменти и т.н. съобразно настоящите инструкции. Съобразявайте се и с конкретните работни условия, както и с дейностите, които трябва да бъдат извършени. Използването на електроинструменти за цели, раз-
лични от предвидените от производителя, повишава опасността от злополука.
4.1.5 Сервиз
a) Ремонтът на електроинструментите трябва да се извър-
шва само от квалифицирани специалисти и само с ори-
гинални резервни части. По този начин се гарантира съх-
раняване на безопасността на електроинструмента.
Printed: 07.07.2013 | Doc-Nr: PUB / 5131018 / 000 / 00
Page 37

33
място. Препоръчва се носенето на прахозащитна
маска с филтър клас P2. Спаз-вайте местните
разпоредби за обработваните материали.
l) Уредът не е предназначен за употреба от деца
или хора с крехка физика, които не са инструктирани.
m) Децата трябва да са инструктирани, че не бива
да си играят с уреда.
4.2.2 Грижливо отношение към
електроинструментите
a) Закрепете детайла, с който ще работите.
Използвайте стяги или менгеме, за да го закрепите
неподвижно.
По този начин закрепването е по-сигурно,
отколкото при държане с ръка, а двете Ви ръце са
свободни за работа с уреда.
b)При прекъсване на токозахранването: Изключете
уреда и извадете щепсела от контакта.
По този
начин се предотвратява неволното включване на уреда
при възстановяване на захранването.
4.2.3 Безопасност при работа с
електроинструменти
a) Проверявайте редовно изправността на
електрическия кабел и при повреда дайте уреда
за поправка в спец иализиран сервиз.
Проверявайте редовно удъл жител ните кабели
и ги подменяйте, ако те са повредени. Ако по
време на работа захранващият или удължителният
кабел се повредят, не трябва да ги докосвате.
Извадете щепсела от контакта.
Повредени
електропроводи и електрически кабели създават опасност
от електрически удар.
b)Поради това регулярно давайте замърсени уреди
на проверка в сервизите на Хилти, особено ако
често се работи с електропроводими материали.
Прахта по повърхността на уреда (най-вече от проводими
материали) или влагата при неблагоприятни условия
могат да предизвикат електрически удар.
4.2.4 Работно място
a) сигурете добро осветление на работната площадка.
b)Осигурете добро проветряване на работното
място.
Повишено запрашване на работното място
поради недостатъчна вентилация може да доведе до
увреждане на здравето.
4.2.5 Средства за персонална защита
Ползвателят и намиращите се в близост до него лица
трябва да носят по време на работа с уреда подходящи
защитни очила, антифони и защитни ръкавици. Ако не
ползвате прахоуловител, ползвайте респиратор.
5.
Пускане в експлоатация
Прочетете и спазвайте правилата по техника на
безопасност отразени в това ръководство.
Захранващото напрежение трябва да отговаря на това,
което е указано на табелата на уреда.
При работа с удължителен кабел: Да се използват
само пригодени за това кабели. Проверявайте редовно
удължителния и захранващия кабели за вероятни
увреждания.
Работа с удължителен кабел на открито
При работа на открито използвайте само подходящите
и обозначени за това удължителни кабели.
Работете винаги с повишено внимание.
Работете винаги концентрирани. Работете винаги
убедени в това, което вършите и никога не работете
когато не сте концентрирани.
6.
Експлоатация
Системата
Чрез избора на средството за шлифоване (зърненост),
оборотите и притиска с който се работи, се определят
производителността и картината (качестовто) на
шлифоване.
Уредът, подложката му и шкурката образуват една
система. Винаги следете за това, да използвате
подходящта за конкретната работа комбинация.
Поставяне на средството за шлифоване (шкурка)
Поставете шкурка с външен диаметър 150 мм и
закрепване тип «велкро».
Вие можете да използвате шкурки с 8 отвора ( в
окръжност с вътрешен диаметър 80 мм ) и с 9 отвора
( 8 в окръжност с диаметър 120 мм и един отвор в
средата на шкурката ).
●
За защита от нежелателно пускане на уреда,
издърпвайте щекера от контакта.
●
Внимавайте винаги, отворите за прахоотвждане на
Да се
използват
антифони
Да се използват
защитни
ръкавици
Да се
използва
респиратор
Да се
използват
защитни очила
Printed: 07.07.2013 | Doc-Nr: PUB / 5131018 / 000 / 00
Page 38

34
шкурката, да съответстват на тези на подложката за
шлифоване.
Работа и препоръчителен захват
За грубо шлифоване
●
Винаги водете уреда с двете ръце
●
Използвайте основната и вградената допълнителна
ръкохватка. Издърпвайте допълнителната ръкохватка
от основна в работна позиция. (Вместо допълнителната
може да се използва водещата ръкохватка).
За качествено шлифоване
●
Водете уреда с една ръка
●
Използвайте ръкохватка за качествена работа. Този
начин Ви позволява безупречна и лека работа с една
ръка в близост до повърхността за обработване. Така
е възможна много прецизна работа при междинно или
крайно шлифоване на лак.
При работа на вертикални площи
(н.пр. стени, ръбове и т.н.)
●
Водете уреда за ръкохватката за качественна работа.
Тежестта на уреда е така разпределена, че по време
на вертикална работа тя се поема от ръката. Това
позволява сигурна и неуморителна работа.
ВНИМАНИЕ
По време на шлифоване могат да се отделят вредни
прахове.
Този прах може да увреди белите дробове и очите.
Използвайте прахоотвеждаща система, респираторна
маска и защитни очила.
Шлифоване
●
Уверете се, че уреда не е включен
●
Включте щекера в контакта
●
Изберете правилните оборори
●
Поставете уреда с цялата му площ върху материала
за обработване
●
Включете уреда и го движете с преценен натиск
(около 20 N) върху материала за обработване
●
Ние Ви препоръчваме при приключване или
прекъсване на работата, първо да отделите работещия
уред от материала и тогава да го изключите.
7.
Работа с уреда
Нагласяване на оборотите
Чрез завъртане на колелото за предварителен избор
на оборотите могат плавно да се изберат
препоръчителните обороти. Промяна на оборотите
по време на работа е възможно.
Оборотите зависят от вида на материала за обработване.
Установете това и с практически опити (виж продуктовата
информация за шкурката и таблицата за приложение).
Степен
16
Обороти ниски високи
След включване уреда достига избраните обороти.
Средства за шлифоване
Хилти предлага за упоменатия вече начин на употреба
по предназначение подходящи средства за
шлифоване.За обработване на всички видове дърво
Хилти има «линия дърво» със зърненост Р60 до Р180,
за обработване на лакове и бои «линия бои» със
зърненост Р40 до Р400.
Подложки за шлифоване
(Подложките са нормално износващи се части и не
подлежат на общите гаранционни условия)
Уреда е заводски оборудван с универсална подложка.
Тази подложка има много добра производителност
на отнемане на материал и много добро качество на
шлифоване. Тя отговаря на най-важните стандарти за
отвори за прахозасмукване.
В зависимост от употребата изберете подходящата
подложка.
Универсална За отнемане на материал
подложка
–
Дърво и дървен материал
–
Китове
–
Стари лакови покрития и
бои
–
Изкуствени материали
Предварително и междинно
шлифоване
–
Лакове и бои
Мека подложка Междинно и крайно
шлифоване на лакове и бои
Шлифоване на сводове и
извити площи
Шлайфспирачка
(Спирачните пръстени са нормално износващи се
части и не подлежат на общите гаранционни условия).
Уреда винаги е оборудван с шлайфспирачка.С помощта
на тази спирачка се намаляват оборотите на подложката
на празен ход. По този начин е възможно безопасното
поставяне на уреда върху площта за обработване.
Изсмукване на прахта
ВНИМАНИЕ
По време на шлифоване могат да се отделят вредни
прахове.
Този прах може да увреди белите дробове и очите.
Използвайте прахоотвеждаща система, респираторна
маска и защитни очила.
Printed: 07.07.2013 | Doc-Nr: PUB / 5131018 / 000 / 00
Page 39

35
Прахосъбиране с кутия и торбичка за прахта
(Кутията за прах е нормално износваща се част и не
подлежи на общите гаранционни условия).
Използвайте прахозащитни кутии и торбички от
оборудването на уреда.
Отделяйте изцяло насъбралия се прах (н.пр. с
прахосмукачка).
Прахозащита с прахосмукачка
При прахозащита с прахосмукачка може в рядки случаи
при неблагоприятни условия свързани с много ниска
влажност на въздуха, да се получи електростатичен
разряд.
Този физически феномен не е прдизвикан от технически
недостатъци на уреда. Това не може да се случи при
употрба на препоръчителната Хилти прахосмукачка
W-VC 40.
Всички Хилти електро уреди отговарят на съвременните
изисквания. Ако въпреки спазването на Хилти
препоръките за системата, се появи този феномен,
се свържете незабавно с Хилти сервиз със сведения
за работните условия, при които се е получил.
Отделяйте изцяло насъбралия се прах (н.пр. с
прахосмукачка).
8.
Обслужване и поддръжка
ВНИМАНИЕ
Поддържайте уреда и най вече повърхностите за
хващане сухи, чисти и почистени от масла и смазки.
Не използвайте почистващи средства, съдържащи
силикон.
Външният корпус на уреда е направен от удароустойчива
пластмаса. Ръкохватките са от еластомерен материал.
Никога не работете с уреда при запушени вентилационни
отвори! Почиствайте ги внимателно със суха четка. Не
допускайте попадането на чужди тела във вътрешността на
уреда. Редовно почиствайте уреда с леко навлажнена кърпа.
Не използвайте пръскачки, пароструйки или течаща вода
при почистване! Те могат да нарушат електрическата
безопасност на уреда.
Шлайфподложки
Проверявайте редовно дали подложките са износени
или замърсени. Износените или замърсените подложки
водят до невъзможност за закрепване на шкурките
към подложката. Почиствайте редовно подложките и
в случай на необходимост ги заменяйте с нови( повредена
подложка трябва незабавно да бъде сменена).
Смяна на шлайфподложка
●
Издърпайте щекера от контакта
●
Поставете уреда на страна върху водещата ръкохватка,
така че да се вижда челната част на шкурката
●
Отлепете шкурката с издърпване
●
Развийте с подходящ инструмент трите закрепващи
винтчета
●
Махнете старата подложка
●
Почиствайте и проверявайте шлайф спирачката. В
случай на необходимост я сменете и поставете новата
подложка.
●
Хванете здраво подложката и затегнете добре трите
винтчета.
●
Проверете дали подложката е монтирана правилно
( да не е под ъгъл и да опира в спирачката ).
●
Използвайте позициониращите помощи при поставяне
на шкурките. По този начин ще бъдете сигурни, че
отворите за отвеждане на прахта на шкурката и
подложката са един срещу друг.
Спирачка на шлайфподложката
Когато оборотите на празен ход постоянно с течение
на времето се повишават, това е ясен признак за
износване на спирачния пръстен на спирачката на
шлайфподложката, който в този случай е задължително
за подмяна.
Смяна на спирачния пръстен
●
Издърпайте щекера от контакта
●
Свалете подложката по начин описан в «Смяна на
шлайфподложка»
●
Извадете стария спирачен пръстен, който е закрепен
за корпуса на уреда
●
Внимавайте за съответствието на намиращите се
несиметрично разположени прорези на спирачния
пръстен с четирите винта на уреда
●
Притиснете спирачния пръстен в съответноте
прорези и следете за изщракването на заключващата
скоба
●
Правилното състояние на монтажа се разпознава
по положението на уплътнителните устни.
●
Монтирайте подложката по начин описан в «Смяна
на шлайфподложка»
Поддръжка
Проверявайте редовно всички външно лежащи части
на уреда за наранявания и всички обслужващи елементи
за правилното им функциониране. Никога не пускайте
уреда в експлоатация ако има повредени части или
ако обслужващите елементи не функционират
безупречно. Занесете уреда за ремонт в Хилти-сервиз.
Ремонти в електрическата част на уреда могат да се
извършват само от оторизирани електро специалисти
.
Printed: 07.07.2013 | Doc-Nr: PUB / 5131018 / 000 / 00
Page 40

36
10.
Предаване на отпадъците
В по-голямата си част уредите на Хилти са
произведени от материали за многократна
употреба. Предпоставка за многократното им
използване е тяхното правилно разделяне. В много страни
фирмата Хилти вече е създала организация за изкупуване
на Вашите употребявани уреди. По тези въпроси се обърнете
към центъра за клиентско обслужване на Хилти или към
търговско-техническия Ви консултант.
Само за страни от ЕС
Не изхвърляйте електроуреди заедно с битови
отпадъци!
Съобразно Директивата на относно износени електрически
и електронни уреди и отразяването й в националното
законодателство износените електроуреди следва да се
събират отделно и да се предават за рециклиране според
изискванията за опазване на околната среда.
11. Гаранция от производителя за
уредите
Хилти гарантира, че доставеният уред е без дефекти в
материала и производствени дефекти. Тази гаранция
важи само при условие, че уредът се използва правилно,
под дъ ржа се и се почиства съобразно Ръководството за
експлоа тация на Хилти, и се съблюдава техническата
цялост на уреда, т.е. използват се само оригинални кон сумативи, резервни части и принадлежности на Хилти.
Настоящата гаранция включва безплатен ремонт или
безплатна подмяна на дефектиралите части през целия
период на експлоатация на уреда. Части, които подлежат
на нормално износване, не се обхващат от настоящата
гаранция.
Всякакви претенции от друго естество са изключени,
ако не са налице други задължителни местни раз поредби. По-специално Хилти не носи отговорност
за преки или косвени дефекти или повреди, загуби
или разходи във връзка с използването или поради
невъзможността за използване на уреда за някаква
цел. Изрично се изключват всякакви неофици ални
уверения, че уредът може да се използва или е
подхо дящ за определена цел.
9.
Причини и отстраняване на грешки
Грешка Вероятна причина Отстраняване
Уредът не работи Прекъснато е захранването Включете друг електро уред и
пробвайте функционирането му
Захранващия кабел или контакта Да се проверят от електро
са дефектни специалист и при необходимост да
се заменят с нови
Прекъсване в електрониката Да се проверят от електро
(н.пр. дефектен пусков ключ) специалист и при необходимост да
се заменят с нови
Уреда няма пълна мощност Удължителния кабел не е с Да се замени с кабел с достатъчно
необходомото сечение сечение
Колелото за избор на оборотите Да се постави на пложение 5 или 6
е на ниски обороти (1 или 2)
Няма достатъчно мощност на Шкурката не е поставена Отлепете шкурката и я поставете
засмукване на прахта правилно и отворите не правилно
съвпадат един с друг
Торбичката за прах е пълна Сменете старата торбичка с нова
Гърловината на уреда е Свалете кутията за прах и почистете
запушена каналите за прахоотвеждане
Шкурката не може да се закрепи Замърсена шлайфподложка Почистете шлайфподложката
за подложката Лепящата повърхност на Сменете шлайфподложката
подложката е износена
Електростатичен разряд Прахосмукачка без антистатично Използвайте прахосмукачка Хилти
оборудване WVC 40-M
Прекъсване на земното Проверете захранващия кабел
Printed: 07.07.2013 | Doc-Nr: PUB / 5131018 / 000 / 00
Page 41

37
12.
Съвметстимост (оригинал)
Обозначение:
Електрическа шлайфмашина
Обозначение на табелката:
WFE 380 / WFE 450-E
Година на производство:
2000
Ние гарантираме на собствена отговорност, че този уред
отговаря на следните изисквания и норми:
2004/108/EG,
2006/42/EG, EN 60745-1, EN 60745-2-4, EN ISO 12100,
2011/65/EU.
При установяване на даден дефект уредът или отделните
му части трябва да се изпратят незабавно за ремонт или
подмяна на съответния доставчик на Хилти.
Настоящата гаранция обхваща всички гаранционни
задължения от страна на Хилти и замества всички пре дишни или настоящи декларации, писмени или устни
уговорки относно гаранцията.
Hilti Corporation, Feldkircherstrasse 100,
FL-9494 Schaan
Paolo Luccini Jan Doongaji
Head of BA Ececutive Vice President
Quality & Process Management BU Power Tools & Accessories
BA Electric Tools & Accessories
01/2012 01/2012
Техническа документация при:
Hilti Entwicklungsgesellschaft mbH
Zulassung Elektrowerkzeuge
Hiltistrasse 6
86916 Kaufering
Deutschland
Printed: 07.07.2013 | Doc-Nr: PUB / 5131018 / 000 / 00
Page 42

38
Printed: 07.07.2013 | Doc-Nr: PUB / 5131018 / 000 / 00
Page 43

39
1.
Opće upute
Riječ «OPREZ» je upozorenje na opasnost.
Služi skretanju pažnje na opasnost ili nesigurno postupanje koje može prouzročiti povrede osoba ili materijalne štete.
Piktogrami
Uputu za uporabu obavezno
pročitajte prije početka rada.
Uputu za uporabu držite uvijek uz
ekscentričnu brusilicu.
Ekscentričnu brusilicu prosljeujte
drugim osobama samo zajedno s
Uputom za uporabu.
KazaloStranica
1.
Opće upute
39
2.
Opis
40
3.
Tehnički podaci
40
4.
Upute za siguran rad
41
5.
Stavljanje u pogon
43
6.
Posluživanje
43
7.
Rad ekscentričnom brusilicom
44
8.
Čišćenje i održavanje
44
9.
Kvarovi i popravci
45
10.
Zbrinjavanje
46
11.
Jamstvo proizvoača o strojevima
46
12.
Izjava o sukladnosti (original)
46
Elementi posluživanja
Uključno/isključna sklopka
Kotačić za predbiranje broja okretaja
Dijelovi ekscentrične brusilice
쐋
Označna pločica
쐏
Rukohvat
쐄
Ručka za voenje
쐂
Pomoćni rukohvat
쐆
Ručka za fino brušenje
쐊
Tanjurasta podloga za brusni papir
쐎
Sredstvo za brušenje sa «čičkom»
쐅
Vijci za pričvršćivanje tanjuraste podloge za brusni
papir
쐈
Kočioni prsten
쐉
Kutija za prašinu
씈
Vreća za prašinu
씉
Nastavak za usisavanje/usisno crijevo
씊
Pomagalo za pozicioniranje sredstva za brušenje
ORIGINALNE UPUTE ZA UPORABU
WFE 380/WFE 450-E Ekscentrična brusilica
Brojevi skreću pažnju na slike. Slike za tumačenje teksta nalaze se na unutrašnjim, presavijenim omotnim stranicama. Kod proučavanja Upute uvijek ih držite otvorene.
U tekstu Upute riječ «brusilica» uvijek se odnosi na ekscentričnu brusilicu.
Pojedinosti za identifikaciju ekscentrične brusilice
Oznake tipa i serije navedene su na označnoj pločici vaše
ekscentrične brusilice. Prepišite ove podatke u vašu Uputu za uporabu i pozivajte se na njih uvijek kad se obraćate našem zastupstvu ili servisu.
Tip:
Serijski broj:
Upozorni znaci
Obvezujući znaci
Nosite
zaštitu za
uši
Nosite
zaštitne
rukavice
Nosite
laganu zaštitu
organa za
disanje
Nosite
zaštitne
naočale
Prije uporabe
pročitajte upute
za uporabu
Simboli
Upozorenje na
opću opasnost
Upozorenje na opasni
električni napon
Upozorenje na
vruću površinu
Otpatke donesite
na ponovnu
preradu
Printed: 07.07.2013 | Doc-Nr: PUB / 5131018 / 000 / 00
Page 44

40
3.
Tehnički podaci
WFE380 WFE450-E
Nazivna snaga
380 W 450 W
Nazivni napon
✱ 110 V 220 V 230 V 240 V 110 V 220 V 230 V 240 V
Nazivna struja
3,6 A 1,8 A 1,7 A 1,6 A 4,2 A 2,3 A 2,2 A 2,1 A
Frekvencija mrežnog napona
✱ 50–60 Hz
Broj okretaja u praznom hodu
5000–10000 /min
Broj vibracija
10000–20000 /min
Tanjurasta podloga za brusni papir
∅ 150 mm
Duljina hoda ekscentra
4 mm
Vanjski promjer adaptera za usisno crijevo
30 mm
Težina prema EPTA-postupku 01/2003
2,2 kg
NAPOMENA
Razina titranja koja je navedena u ovim uputama izmjerena je sukladno postupku mjerenja normiranom u EN 60745
te se može koristiti za meusobnu usporedbu alata. Primjerena je i za privremenu procjenu titrajnog opretećenja.
Navedena razina titranja predstavlja glavne primjene električnih alata. Ako se električni alat inače koristi za druge
primjene s usadnicima koji se razlikuju ili nisu dovoljno dobro održavani, razina titranja se može razlikovati. Isto može
znatno povećati titrajno opterećenje tijekom cijelokupnog radnog vijeka. Za točnu procjenu titrajnog opterećenja
trebaju se uzeti u obzir i vremena, tijekom kojih je alat bio isključen ili je radio, ali se zapravo nije koristio. Isto može
znatno smanjiti titrajno opterećenje tijekom cijelokupnog radnog vijeka. Odredite dodatne sigurnosne mjere za zaštitu
korisnika prije djelovanja titranja kao npr.: Održavanje električnog alata i usadnika, održavanje toplih ruku, organizacija tokova rada.
●
Rabite samo originalni Hilti-jev pribor kako biste izb-
jegli opasnost od povreda.
●
Ne radite bez prikladnog sustava za usisivanje. Posebice pri brušenju materijala štetnih po zdravlje (npr. drvo
hrasta i bukve, namazi boja koji sadrže olovo ili druge
štetne tvari) pridržavajte se propisa za sigurnost na radu
i propisa za zbrinjavanje.
Pridržavajte se podataka za korištenje, čišćenje i održavanje koji su navedeni u Uputi za uporabu.
Bitne značajke
–
Klasa zaštitne izolacije II (dvostruka zaštitna izolacija)
Z
(odgovara EN 60745)
–
Ergonomski rukohvati s prigušenim prijenosom vibracija
-
rukohvat
-
ručka za voenje
-
ručka za fino brušenje
–
Ugraeni pomoćni rukohvat
–
Bestepeno namještanje broja okretaja
–
Tanjurasta podloga za brusni papir, namijenjena univer zal noj uporabi. Ostale tanjuraste podloge spadaju
u pribor.
Zahtjevi koji se postavljaju korisniku
●
Brusilica je namijenjena profesionalnom korisniku.
●
Brusilicu smije posluživati, održavati i popravljati samo
ovlašteno i poučeno osoblje koje se mora posebno upoznati s mogućim opasnostima.
2.
Opis
Ekscentrična brusilica WFE380/WFE450-E je električni
ručni alat za brušenje drva, drvnih materijala, kombiniranih materijala, laka, boja, plastičnih materijala, gipsa,
masa za zaglaivanje i sličnih materijala.
Namijenjena je profesionalnoj uporabi. U sadržaj isporuke spada: ekscentrična brusilica s kutijom za prašinu,
vreća za prašinu, Uputa za uporabu i transportni kovčeg.
WFE380 se isporučuje u kartonskoj kutiji.
Propisna uporaba
●
Ekscentrična brusilica je namijenjena brušenju površina
drva, furnira, masa za ispunu i zaglaivanje, plastičnih
materijala i gipsa pomoću izmjenljivih brusnih materijala
koji se troše.
●
Radno okruženje: gradilište, radionica, radovi obna-
vljanja, pregradnje i novogradnje.
●
Okruženje mora biti suho.
●
Priključiti se smije samo na mrežni napon i frekvenciju koji su navedeni na označnoj pločici.
●
Raditi se smije samo s pričvršćenim izratkom, stojeći
na sigurnoj podlozi.
●
Ne smiju se brusiti metali i materijali koji sadrže azbest.
●
Ekscentričnu brusilicu valja voditi isključivo rukom.
●
Ekscentričnu brusilicu ne izlagati djelovanju atmosferilija i ne rabiti u vlažnom, mokrom ili eksplozivnom okruženju.
●
Ekscentričnu brusilicu ne rabiti za mokro brušenje.
●
Manipulacije ili izmjene ekscentrične brusilice nisu
dopuštene.
Printed: 07.07.2013 | Doc-Nr: PUB / 5131018 / 000 / 00
Page 45

41
Podaci o buci i vibracijama (odgovara EN 60745)
Tipično procijenjena (A) razina snage zvuka
93 dB (A)
Tipično procijenjena (A) razina emisije zvučnog tlaka
82 dB (A)
Z
a navedenu razinu zvučnog tlaka prema EN 60745 iznosi nesigurnost 3 dB.
Nosite zaštitu organa sluha!
Triaksijalne vrijednosti vibracija (vektorski zbroj vibracija)
WFE380 WFE450-E
Brušenje površina
(ah) 4.1 m/s
2
3.9 m/s
2
Nesigurnost (K) za triaksijalne vrijednosti vibracija:
1.5 m/s
2
1.5 m/s
2
✱
Ekscentrična brusilica izrauje se za rad na različitim nazivnim naponima. Nazivni napon i nazivna jakost struje za vašu ekscentričnu brusilicu navedeni su na označnoj pločici.
Pridržano pravo tehničkih promjena.
4. Sigurnosne napomene
NAPOMENA
Sigurnosne napomene u poglavlju 4.1 sadrže sve opće sigurnosne napomene za električne alate koje su u uputi za uporabu navedene prema primjenjivim normama. Tamo se unatoč tome mogu
nalaziti napomene koje za ovaj alat nisu relevantne.
4.1 Opće sigurnosne napomene za električne alate
a) UPOZORENJE! Pročitajte sigurnosne napomene i
naputke. Pogreške kod pridržavanja sigurnosnih napomena i
naputaka mogu dovesti do električnog udara, požara i/ili teških
ozljeda. Molimo sačuvajte sve sigurnosne napomene i upu-
te za ubuduće. Pojam "električni alat" korišten u sigurnosnim
napomenama odnosi se na električne alate s napajanjem iz električne mreže (s mrežnim kabelom) i na električne alate s napajanjem iz akumulatorske baterije (bez mrežnog kabela).
4.1.1 Sigurnost na radnom mjestu
a) Područje rada održavajte čistim i osvijetljenim. Nered i neosvi-
jetljeno radno područje mogu dovesti do nezgoda.
b) S alatom ne radite u okolini ugroženoj eksplozijom, u kojoj
se nalaze zapaljive tekućine, plinovi ili prašine. Električni
alati proizvode iskre koje mogu zapaliti prašinu ili pare.
c) Djecu i ostale osobe tijekom korištenja električnog alata
udaljite iz područja rada. Ako bi skrenuli pozornost sa posla
mogli bi izgubiti kontrolu nad alatom.
4.1.2 Električna sigurnost
a) Priključni utikač alata treba odgovarati utičnici. Na utikaču
se ni u kojem slučaju ne smiju izvoditi izmjene. Ne koristite adapterske utikače zajedno sa zaštitno uzemljenim električnim alatima. Nepromijenjeni utikači i odgovarajuće utični-
ce smanjuju opasnost od električnog udara.
b) Izbjegavajte dodir tijela s uzemljenim površinama kao što
su cijevi, radijatori, štednjaci i hladnjaci. Postoji povećana
opasnost od električnog udara ako je vaše tijelo uzemljeno.
c) Alat držite dalje od kiše ili vlage. Prodiranje vode u električni
alat povećava opasnost od električnog udara.
d) Kabel ne upotrebljavajte za nošenje ili vješanje alata odno-
sno za izvlačenje utikača iz utičnice. Kabel držite dalje od
izvora topline, ulja, oštrih rubova ili pokretljivih dijelova alata. Oštećeni ili usukani kabeli povećavaju opasnost od električ-
nog udara.
e) Ako s električnim alatom radite na otvorenom, upotreblja-
vajte samo produžne kabele odobrene za uporabu na otvorenom. Primjena produžnog kabela prikladnog za uporabu na
otvorenom smanjuje opasnost od električnog udara.
f) Ako ne možete izbjeći rad električnog alata u vlažnom okru-
ženju, koristite zaštitnu strujnu sklopku. Uporaba zaštitne
strujne sklopke smanjuje opasnost električnog udara.
4.1.3 Sigurnost ljudi
a) Budite oprezni, pazite što činite i kod rada s električnim ala-
tom postupajte razumno. Alat ne koristite ako ste umorni
ili pod utjecajem opojnih sredstava, alkohola ili lijekova.
Trenutak nepažnje kod uporabe alata može dovesti do ozbiljnih tjelesnih ozljeda.
b) Nosite sredstva osobne zaštite i uvijek zaštitne naočale.
Nošenje sredstava osobne zaštite, kao što su zaštitna maska,
sigurnosne cipele koje ne klize, zaštitna kaciga ili štitnik za sluh,
ovisno o vrsti i primjeni električnog alata, smanjuje opasnost od
nezgoda.
c) Izbjegavajte nehotično stavljanje u pogon. Uvjerite se, da
je alat isključen, prije nego što priključite opskrbu naponom i/ili akumulatorski paket, ili ga primite ili nosite. Ako
kod nošenja alata prst držite na prekidaču ili ako je alat uključen
i priključen na električnu mrežu, to može dovesti do nezgoda.
d) Prije nego što uključite alat, uklonite alate za podešavanje
ili vijčane ključeve. Alat ili ključ koji se nalazi u rotirajućem dijelu alata može dovesti do nezgoda.
e) Izbjegavajte nenormalan položaj tijela. Zauzmite siguran i
stabilan položaj tijela i u svakom trenutku održavajte ravnotežu. Na taj način možete alat bolje kontrolirati u neočekivanim
situacijama.
f) Nosite prikladnu odjeću. Ne nosite široku odjeću ili nakit.
Neka vaša kosa, odjeća i rukavice budu što dalje od pomičnih dijelova. Mlohavu odjeću, nakit ili dugu kosu mogu zahva-
titi pomični dijelovi alata.
Printed: 07.07.2013 | Doc-Nr: PUB / 5131018 / 000 / 00
Page 46

42
4.2 Sigurnosni naputci specifični za proizvod
4.2.1 Sigurnost ljudi
a) Nosite zaštitu za sluh. Djelovanje buke može uzroko-
vati gubitak sluha.
b) Ukoliko su isporučeni, koristite dodatne rukohvate.
Gubitak kontrole može uzrokovati tjelesne ozljede.
c) Alate držite samo za izolirane prihvatne površine ako
izvodite radove kod kojih tanjurasta podloga za brusni papir može doći u doticaj sa sakrivenim električnim vodovima ili vlastitim mrežnim kabelom. Kon-
takt tanjuraste podloge za brusni papir s provodljivim
vodom može dovesti do toga da leteće čestice metala
budu pod naponom te tako osobi koja radi s alatom uzrokovati električnog udar.
d)
Stroj uvijek čvrsto držite obim rukama za predviene
rukohvate. Rukohvati moraju biti suhi, čisti, bez ostataka ulja i masti.
e)Opasnost od pada izbjegnite postavljanj
em mrežnog
i produžnog kabla i usisnog crijeva iza usisivača.
f)
Za promjenu alata nosite zaštitne rukavice. Alat može
tijekom rada postati vruć.
g)
Udarnom bušilicom radite samo propisno i kad je u
besprijekornom stanju.
h)
Upotrijebite usisivač za prašinu, masku za zaštitu organa disanja i zaštitne naočale.
Brušenjem može nastati opasna prašina. Brusna prašina može oštetiti pluća
i oči.
i)
Poslodavac mora osigurati zbrinjavanje štetne brusne prašine prema regionalnim i nacionalnim propisima.
Brušenjem može nastati štetna prašina, kao
npr. od hrastovog i bukovog drva, namaza boja koji
sadrže olovo ili druge štetne tvari).
j)
Zbog bolje prokrvljenosti prstiju napravite stanke u
radu i vježbe za opuštanje prstiju.
k)
Prašine materijala kao što su premaz koji sadrži olovo,
neke vrste drva, minerala i metala mogu biti štetni za
zdravlje. Dodirivanje ili udisanje prašina mogu uzrokovati alergijske reakcije i/ili bolesti dišnih puteva korisnika ili osoba koje se nalaze u blizini. Odreene vrste
prašina kao što su hrastova ili bukova prašina mogu
uzrokovati rak, naročito kada su u spoju s dodacima
za obradu drva (kromat, sredstvo za zaštitu drva). Materijal koji sadrži azbest smije obraivati samo stručno
osoblje.
Po mogućnosti koristite ureaj za usisivanje
prašine. Kako biste dosegli visok stupanj usisivanja
prašine, koristite primjereni mobilni ureaj za uklanjanje prašine koji je preporučio Hilti za drvo
i/ili mineralnu prašinu i koji je usklaen za ovaj električni alat.
Pobrinite se za dobro prozračivanje radnoga mjesta.
Preporuča se nošenje zaštitne maske s klasom filtra
P2. Poštuj
te važeće propise u vašoj zemlji za materi-
jale koje ćete obrai vati.
l) Ureaj nije namijenjen za to da se s njime služe djeca
ili slabe osobe bez poduke.
m) Djecu morate podučiti o tome, da
se ne smiju igrati s
ureajem.
4.2.2 Brižljivo manipuliranje i uporaba električnih alata
a)Čvrsto stegnite predmet obrade. Za pričvršćivanje
predmeta obrade upotrijebite stege ili
škrip. To je
sigurnije od pridržavanja rukom; osim toga ćete stroj
moći posluživati s obim rukama.
b)Pri prekidu struje: Isključite stroj i utikač izvadite iz
utičnice.
Time se sprječava nenamjerno pokretanja
stroja pri uspostavi napona.
4.2.3 Sigurnost od električne energije
a)Redovito provjeravajte priključni kabel stroja. Neka
ga u slučaju oštećenja zamijeni ovlašteni serviser.
Redovito provjeravajte produžne kablove i
zamijenite ih ako su oštećeni. Ne dodirujte oštećeni mrežni
odn. produžni kabel. Izvucite mrežni utikač iz utičnice.
Oštećeni priključni i produžni kabeli predstavlja-
ju opasnost od električnog udara.
b)Stoga pri češćoj obradi provodivih materijala odne-
site zaprljane strojeve u redovitim razmacima na provjeru u Hiltijev servis.
Prašina provodivih materijala,
koja se nakuplja na povr šini stroja, ili tekućine mogu
pod nepovoljnim uvjetima dovesti do električnog udara.
g) Ako se mogu montirati uređaji za usisavanje i hvatanje pra-
šine, provjerite jesu li isti priključeni i rabe li se pravilno.
Uporaba usisivača može smanjiti opasnost.
4.1.4 Uporaba i rukovanje s električnim alatom
a) Ne preopterećujte alat. Za Vaše radove koristite za to pred-
viđen električni alat. S odgovarajućim električnim alatom radit
ćete bolje i sigurnije, u navedenom području snage.
b) Ne upotrebljavajte električni alat sa neispravnim prekida-
čem. Električni alat koji se više ne može uključiti ili isključiti, opasan je i treba se popraviti.
c) Izvucite utikač iz utičnice i/ili akumulatorski paket iz alata
prije podešavanja alata, zamjene dijelova pribora ili odlaganja alata. Ovim mjerama opreza spriječit će se nehotično
pokretanje električnog alata.
d) Nekorištene električne alate spremite izvan dosega djece.
Ne dopustite da alat koristeosobe koje s njim nisu upoznate ili koje nisu pročitale upute za uporabu. Električni alati
su opasni ako ih koriste neiskusne osobe.
e) Pažljivo održavajte alate. Kontrolirajte rade li pokretljivi dije-
lovi alata besprijekorno i nisu li zaglavljeni, te jesu li dijelovi polomljeni ili tako oštećeni da negativno djeluju na funkciju alata. Oštećene dijelove popravite prije uporabe alata.
Mnoge nezgode imaju svoj uzrok zbog loše održavanih električnih alata.
f) Rezne alate održavajte oštrim i čistim. Brižljivo održavani
rezni alati s oštrim sječivima neće se zaglaviti i lakši su za vođenje.
g) Koristite električni alat, pribor, usadnike itd. sukladno ovim
uputstvima. Kod toga uzmite u obzir radne uvjete i izvođene radove. Uporaba električnih alata za neke druge primjene
različite od predviđenih, može dovesti do opasnih situacija.
4.1.5 Servisiranje
a) Popravak alata prepustite samo kvalificiranom stručnom
osoblju i samo s originalnim zamjenskim dijelovima. Na taj
će se način postići održavanje stalne sigurnosti alata.
Printed: 07.07.2013 | Doc-Nr: PUB / 5131018 / 000 / 00
Page 47

43
4.2.4 Radno mjesto
a)Pobrinite se za dobru rasvjetu na području rada.
b)Pobrinite se za dobro prozračivanje radnoga mjesta.
Loše prozračena radna mjesta mogu izazvati oštećenja zdravlja zbog opterećenja prašinom.
4.2.5 Osobna zaštitna oprema
Izvoač radova i osobe koje se nalaze u njegovoj neposred noj blizini moraju tijekom rada nositi odgovarajuće
zaštitne naočale, zaštitu za uši, zaštitne rukavice te pri
uporabi usisivača laganu zaštitu organa za disanje.
5.
Stavljanje u pogon
Obvezno pročitajte i pridržavajte se uputa za siguran rad
navedene u Uputi za uporabu.
Mrežni napon mora odgovarati podacima na označnoj
pločici.
Upotrijebiti samo onaj produžni kabel koji je dopušten za
područje uporabe brusilice. Redovito kontrolirajte jesu li
produžni i mrežni kabel oštećeni.
Produžni kabel za vanjske radove
Kod vanjskih radova upotrijebite samo dopuštene, i na
odgovarajući način označene, produžne kabele.
Budite uvijek pažljivi
Kod rada budite sabrani. Postupajte promišljeno i ne rabite brusilicu ako niste koncentrirani.
Sustav
Izborom sredstva za brušenje (veličina zrna), broja okretaja i tlačne sile odreuje se učinak skidanja materijala i
kakvoća brušenih površina.
Brusilica, tanjurasta podloga za brusni papir i brusni papir
čine sustav.
Obratite pozornost na primjenu pravilnog sustava i vrijednosti parametara brusilice kod pojedinih vrsta namjena.
Postavljanje sredstva za brušenje (brusnog papira)
Brusni papir, vanjskog promjera 150 mm, postavite i
pričvrstite čičkom.
Možete koristiti brusni papir sa 6 usisnih rupa (promjer
diobenog kruga 80 mm) ili 9 rupa (8 na diobenom krugu promjera 120 mm i jedna rupa u sredini brusnog
papira).
●
Izvucite mrežni utikač zbog zaštite od nenamjernog
pokretanja brusilice.
●
Pazite da se usisne rupe sredstva za brušenje i tanju-
raste podloge za brusni papir meusobno poklapaju.
Rukovanje, preporučeni položaj rukohvata
Skidanje materijala
●
Brusilicu vodite s obje ruke.
●
Služite se rukohvatom i ugraenim pomoćnim rukohvatom. Povucite pomoćni rukohvat iz osnovnog u radni
položaj. (Umjesto pomoćnog rukohvata može se uporabiti ručka za voenje).
Fino brušenje
●
Brusilicu vodite jednom rukom.
●
Služite se ručkom za fino brušenje. Isti omogućuje
besprijekorno i lagano voenje brusilice jednom rukom,
blizu površine i time precizan rad, npr. kod meubrušenja
i završnog brušenja laka.
Radovi na vertikalnim površinama
(npr. zid, bridovi itd.)
●
Vodite brusilicu ručkom za fino brušenje. Kod vertikalnih radova težište brusilice leži u ruci. To omogućava
siguran rad bez zamora.
OPREZ
Brušenjem može nastati opasna brusna prašina.
Brusna prašina može škoditi plućima i očima. Upotrijebite usisivač prašine, nosite zaštitnu masku za organe
disanja i zaštitne naočale.
Brušenje
●
Provjerite je li brusilica isključena.
●
Priključite mrežni utikač u utičnicu.
●
Odaberite broj okretaja.
●
Stavite brusilicu cijelom brusnom površinom na izra-
dak.
●
Uključite brusilicu i pokrečite je umjerenim pritiskan-
jem (oko 20 N) preko izratka.
Nosite
zaštitu za uši
Nosite
zaštitne
rukavice
Nosite laganu
zaštitu organa
za disanje
Nosite
zaštitne
naočale
6.
Posluživanje
Printed: 07.07.2013 | Doc-Nr: PUB / 5131018 / 000 / 00
Page 48

44
●
Kod završetka ili prekida rada preporučamo brusilicu
odmaknuti od izratka i tek nakon toga je isključiti.
7.
Rad ekscentričnom brusilicom
Namještanje broja okretaja
Kotačićem za predbiranje broja okretaja možete bestepeno namjestiti preporučenu vrijednost. Tijekom rada
moguća je promjena broja okretaja.
Broj okretaja ovisi o materijalu koji se brusi. Odredite ga
praktičnim pokusima (o brusnim sredstvima čitajte «Obavijesti o proizvodima» i Tablice primjene).
Stupanj
16
Broj okretaja mali veliki
Nakon uključivanja brusilica je podešena na predbirani
broj okretaja.
Sredstvo za brušenje
Hilti nudi odgovarajuća brusna sredstva za prije navedene, propisane primjene brusilice. Hilti vodi liniju proizvoda za sve vrste obrade drva «Wood Line», veličine zrna
P60 do P180, i liniju za obradu laka «Paint Line», veličine zrna P40 do P400.
Tanjurasta podloga za brusni papir
(Tanjurasta podloga za brusni papir je dio koji se troši pa
ne podliježe općim jamstvenim pravima).
Brusilica je u tvornici opremljena univerzalnom, tanjurastom podlogom za brusni papir. Ova tanjurasta podloga
daje jako dobar učinak skidanja i kakvoću brušenja. Najvažnije standarde ujedinjuje na usisnim rupama.
Ovisno o primjeni birajte odgovarajuću tanjurastu podlogu za brusni papir.
Univerzalna tanjurasta Skidanje sloja
podloga za brusni
–
drvo, drvni proizvodi
papir
–
mase za zaglaivanje
–
stari premazi lakova i boja
–
višeslojni vezani materijali
–
plastični materijali
Predbrušenje i meubrušenje
–
lak i boje
Mekana tanjurasta Meubrušenje i završno
podloga za brusni brušenje boja i lakova
papir Brušenje zaobljenih površina
Kočnica tanjuraste podloge za brusni papir
(Kočioni prsten je dio koji se haba i stoga ne podliježe
općim jamstvenim pravima).
Brusilica je opremljena kočnicom za tanjurastu podlogu. U praznom hodu brusilice ova kočnica smanjuje broj
okretaja tanjuraste podloge za brusni papir i na taj način
omogućuje njezino bezopasno prislanjanje na površinu
izratka.
Usisavanje prašine
OPREZ
Brušenjem može nastati opasna prašina.
Brusna prašina može oštetiti pluća i oči.
Upotrijebite usisivač za prašine, masku za zaštitu organa disanja i zaštitne naočale.
Usisavanje prašine pomoću kutije za prašinu i vreće za
prašinu
(Kutija za prašinu je dio koji se troši i stoga ne podliježe
općim jamstvenim pravima).
Upotrijebite kutiju za prašinu s vrećom za prašinu koje
su isporučene zajedno s brusilicom.
Temeljito uklonite nataloženu prašinu (npr. usisavanjem).
Usisavanje prašine usisivačem
Usisavanje prašine usisivačem može u rijetkim slučajevima u nepovoljnim uvjetima, zajedno s niskom vlažnosti zraka, prouzročiti električno pražnjenje.
Ovaj fizikalni fenomen nije prouzročen sigurnosno-tehničkim nedostacima brusilice i njegovo dogaanje može
se isključiti uporabom preporučenog Hilti-jevog usisivača W-VC 40.
Hilti-jevi električni alati odgovaraju važećim propisima.
Ako bi, usprkos pridržavanja Hilti-jeve sistemske preporuke, ipak došlo do nastupa ovog fenomena, neodgodivo se obratite najbližem Hilti-jevom servisu, uz
navoenje vaših uvjeta korištenja brusilice.
Temeljito uklonite nataloženu prašinu (npr. usisavanjem).
8.
Čišćenje i održavanje
OPREZ
Alat, te posebice rukohvat održavajte suhim, čistim, bez
ulja i masti. Ne upotrebljavajte sredstva za njegu na osnovi silikona.
Vanjski plašt kućišta alata je napravljen od plastike otporne na udarce. Rukohvat je izraen od elastomera.
Ne koristite alat ukoliko su začepljeni prorezi za ventilaciju! Proreze za ventilaciju oprezno očistite suhom četkom. Spriječite prodiranje stranih tijela u unutrašnjost
alata. Vanjsku stranu kućišta alata redovito čistite lagano navlaženom krpom za čišćenje. Za čišćenje ne upotrebljavajte ureaj za prskanje, parni raspršivač ili tekuću
vodu! Time se može ugroziti električna sigurnost alata.
Tanjurasta podloga za brusni papir
Ispitajte istrošenost i uprljanost tanjuraste podloge za
brusni papir. Istrošene i uprljane tanjuraste podloge
uzrokuju umanjeno prianjanje brusnog papira na njih.
Očistite, ili prema potrebi promijenite tanjurastu podlogu (oštećene tanjuraste podloge za brusni papir valja odmah izmijeniti).
Printed: 07.07.2013 | Doc-Nr: PUB / 5131018 / 000 / 00
Page 49

45
9.
Kvarovi i popravci
Kvar Mogući uzrok Popravak
Brusilica se ne pokreče Prekid napajanja električnom Priključiti drugi električni ureaj i
strujom ispitati njegovo funkcioniranje
Mrežni kabel ili utikač su neispravni Kvalificirani električar treba ga ispitati i
prema potrebi zamijeniti
Prekid u elektroničkom modulu Kvalificirani električar treba ga ispitati i
(npr. neispravna uključno/isključna prema potrebi zamijeniti
sklopka)
Brusilica ne radi punom snagom Produžni kabel ima suviše mali Zamijeniti produžnim kabelom s
poprečni presjek odgovarajućim presjekom
Kotačić za predbiranje broja Namjestiti predbirani broj okretaja na
okretaja je postavljen na suviše broj 5 ili 6
mali broj (1 ili 2)
Izostaje učinak usisavanja Brusni papir je nepravilno Brusni papir skinuti i ponovno pravilno
postavljen. Rupe za usisavanje namjestiti
se ne poklapaju
Vreća za prašinu je puna Punu vreću ukloniti i uložiti novu
Nastavak za usisavanje je Skinuti kutiju za prašinu i očistiti usisni
začepljen kanal
Brusni papir ne prianja na Tanjurasta podloga za brusni papir Očistiti tanjurastu podlogu za brusni
je prljava papir
tanjurastu podlogu Čičak na tanjurastoj podlozi za Promijeniti tanjurastu podlogu za
brusni papir je istrošen brusni papir
Elektrostatsko pražnjenje Usisivač nema antistatik instalaciju Upotrijebiti Hilti-jev sigurnosni usisivač
WVC 40-M
Prekid u vodiču za uzemljenje Provesti ispitivanje vodiča za
uzemljenje
Zamjena tanjuraste podloge za brusni papir
●
Izvucite utikač iz utičnice.
●
Postavite brusilicu na ravnu plohu vodećeg rukohvata tako da je vidljiva zrnata površina sredstva za
brušenje.
●
Skinite brusni papir.
●
Prikladnim alatom odvrnite tri pričvrsna vijka.
●
Uklonite staru tanjurastu podlogu za brusni papir.
●
Očistite i ispitajte kočnicu tanjuraste podloge za brusni papir. Prema potrebi izmijenite i nju, te stavite novu
tanjurastu podlogu za brusni papir.
●
Čvrsto držite tanjurastu podlogu za brusni papir i zavrnite tri pričvrsna vijka.
●
Ispitajte ispravnost montaže tanjuraste podloge za
brusni papir (bez izobličenih rubova, kontakt s kočionim prstenom).
●
Kod postavljanja brusnog papira upotrijebite ureaj
za pomoć pri pozicioniranju kako biste bili sigurni da će
se usisne rupe brusnog papira poklapati s rupama na
tanjurastoj podlozi za brusni papir.
Kočnica tanjuraste podloge za brusni papir
Neprekidno povećanje broja okretaja u praznom hodu
je pokazatelj istrošenosti kočionog prstena kočnice tanjuraste podloge za brusni papir, pa ga valja zamijeniti.
Izmjena kočionog prstena
●
Izvucite utikač iz utičnice.
●
Uklonite tanjurastu podlogu kako je opisano u «Zamje-
na tanjuraste podloge za brusni papir».
●
Skinite stari kočioni prsten koji je pričvršćen na kućište
brusilice.
●
Pazite da se asimetrično poredane rupe na kočio-
nom prstenu poklapaju s četiri vijka na brusilici.
●
Pritisnite kočioni prsten u odgovarajuće rupe i pri
tome pazite da uskoče opružne kuke.
●
Pravilnu montažu prepoznajete po planarnosti prsten-
aste brtve s oprugom.
●
Montirajte tanjurastu podlogu za brusni papir kako
je opisano u «Zamjena tanjuraste podloge za brusni
papir».
Održavanje
Redovito kontrolirajte neoštećenost svih vanjskih dijelova brusilice i besprijekornost rada svih elemenata za
posluživanje. Ne radite brusilicom ako su dijelovi oštećeni ili elementi za posluživanje ne rade besprijekorno.
Popravljajte brusilicu u Hilti-jevom servisu.
Popravke električnih dijelova smiju vršiti samo kvalificirani električari.
Printed: 07.07.2013 | Doc-Nr: PUB / 5131018 / 000 / 00
Page 50

46
10. Zbrinjavanje otpada
Strojevi tvrtke Hilti su većim dijelom izraeni
od materijala koji se mogu ponovno preraditi.
Pretpostavka za to je njihovo stručno razvrstavanje. Tvrtka Hilti je u mnogim državama spremna
za preuzimanje svojih starih strojeva na recikliranje. O
toj mogućnosti raspitajte se u Hilti servisu ili kod savjetnika za prodaju tvrtke Hilti.
Samo za EU-države
Električne alate ne odlažite u kućne otpatke!
Prema Europskoj direktivi o starim električnim i elek-
troničkim strojevima i preuzimanju u nacionalno pravo
moraju se istrošeni električni alati sakupljati odvojeno i
odvesti u pogon za reciklažu.
11.
Jamstvo proizvoača o strojevima
Hilti jamči, da isporučeni stroj nema grešaka u materi jalu i proizvodnji. Ovo jamstvo vrijedi uz pretpostavku
da se stroj pravilno rabi, koristi, njeguje i čisti u skladu
s Hiltijevom uputom o uporabi i da se održava tehni čka
cjelilina, t.j. da se sa strojem upotrebljavaju samo origi nalni Hiltijev potrošni materijal, pribor i zamjenski dijelovi.
Ovo jamstvo obuhvaća besplatni popravak ili besplatnu zamjenu pokvarenih dijelova tijekom cjelokupnog
život nog vijeka stroja. Dijelovi podložni normalnom
trošenju nisu obuhvaćeni ovim jamstvom.
Ostali zahtjevi su isključeni ukoliko ne podliježu obvezujućim nacionalnim propisima. Hilti posebice ne odgovara za neposrednu ili posrednu štetu zbog
nedostataka ili posljedičnu štetu zbog nedosta taka, gubitke ili
troškove povezane s uporabom ili nemogućnosti uporabe stroja u bilo koju svrhu. Izri čito su isključe
na prešutna
jamstva za prikladnost uporabe u neku odreūenu svrhu.
Za popravak ili zamjenu valja stroj ili dotične dijelove
odmah nakon utvrūivanja nedostatka poslati nadležnoj
Hiltijevoj trgovačkoj organizaciji.
Ovo jamstvo obuhvaća sve jamstvene obveze sa strane Hiltija i zamjenjuje sve prijašnje ili istodobne izjave,
pismene ili usmene dogovore u svezi s jamstvom.
12.
Deklaracija o sukladnosti s EU
(original)
Oznaka: Ekscentrična brusilica
Tip: WFE380 / WFE 450-E
Godina proizvodnje: 2000
Izjavljujemo, kao jedina odgovorna, pravna osoba, da
ovaj proizvod odgovara sljedećim smjernicama i normama:
2004/108/EZ, 2006/42/EZ, EN 60745-1, EN 60745-
2-4, EN ISO 12100, 2011/65/EU.
Hilti Corporation, Feldkircherstrasse 100,
FL-9494 Schaan
Paolo Luccini Jan Doongaji
Head of BA Ececutive Vice President
Quality & Process Management BU Power Tools & Accessories
BA Electric Tools & Accessories
01/2012 01/2012
Tehnička dokumentacija kod:
Hilti Entwicklungsgesellschaft mbH
Zulassung Elektrowerkzeuge
Hiltistrasse 6
86916 Kaufering
Deutschland
Printed: 07.07.2013 | Doc-Nr: PUB / 5131018 / 000 / 00
Page 51

47
1. Informacje ogólne
Identyfikacja zagro˝eƒ
“UWAGA”
To s∏owo s∏u˝y do zwrócenia uwagi na zagro˝enie,
niebezpiecznà metod´ lub procedur´, które mogà
doprowadziç do uszkodzenia cia∏a, maszyny, materia∏ów
lub innych przedmiotów.
Piktogramy
Ko niecz nie prze czy taj t´ in struk cj´
przed pierw szym u˝y ciem na rz´ dzia.
Za wsze prze cho wuj jà ra zem z na rz´ dziem, któ re go do ty czy.
Ra zem z na rz´ dziem prze ka˝ od no Ênà in struk cj´ ob s∏u gi pra cow ni kom.
ZawartoÊç Strona
1. Informacje ogólne 47
2. Opis 48
3. Dane techniczne 48
4. Ârodki bezpieczeƒstwa 49
5. Przed u˝yciem 51
6. Obs∏uga 51
7. Praca ze szlifierkà 52
8. Konserwacja i serwis 53
9. wyszukiwanie uszkodzeƒ 54
10. Utylizacja odpadów 54
11.
Gwarancja producenta na urządzenia
54
12. Deklaracja zgodnoÊci
z normami/wymaganiami
(oryginał)
55
Elementy obs∏ugi
W∏àcznik / Wy∏àcznik
Pokr´t∏o regulacji obrotów
Sk∏adniki
Tabliczka znamionowa
쐏 Uchwyt g∏ówny
쐄 Uchwyt prowadzàcy
쐂 Uchwyt pomocniczy
쐆 Uchwyt do prac wykaƒczajàcych
쐊 Talerz szlifierski
쐎 Arkusz szlifierski z rzepem
쐅 Âruby mocujàce p∏yt´ szlifierskà
쐈 PierÊcieƒ hamulca talerza
쐉 Pojemnik na py∏
씈 Worek py∏owy
씉 Króciec/wà˝ ssàcy
씊 Element pomocniczy do mocowania arkusza szlifierskiego
ORYGINALNA INSTRUKCJA OBSŁUGI
WFE 380/WFE 450-E szlifierka mimoÊrodowa
Numery odnoszà si´ do ilustracji. Ilustracje znajdujà
si´ na rozk∏adanej ok∏adce. Instrukcj´ czytaj, trzymajàc
otwartà ok∏adk´.
OkreÊlenie "narz´dzie", u˝ywane w tej instrukcji, w ka˝dym
przypadku dotyczy szlifierki mimoÊrodowej WFE 380 /
WFE 450-E.
Dane identyfikacyjne szlifierki
Na tabliczce znamionowej narz´dzia naniesione sà: typ
narz´dzia i numer seryjny. Wpisz te dane do instrukcji i
zawsze je podawaj, sk∏adajàc zamówienie u przedstawiciela
Hilti lub w serwisie.
Ty p:
Numer seryjny:
Znaki ostrzegawcze
Znaki nakazu
Używaj
ochraniaczy
uszu
Używaj rękawic
ochronnych
Używaj maski
przeciwpyłowej
Używaj okulary
ochronne
Przed
rozpoczęciem
użytkowania
przeczytaj tę
instrukcję
obsługi
Symbole
Ostrzeżenie
przed ogólnym
niebezpie -
czeństwem
Ostrzeżenie przed
niebezpiecznym
napięciem elektrycznym
Ostrzeżenie
przed gorącą
powierzchnią
Przekaż odpady do
ponownego
wykorzystania
Printed: 07.07.2013 | Doc-Nr: PUB / 5131018 / 000 / 00
Page 52

48
3. Dane techniczne
WFE380 WFE 450-E
Moc znamionowa: 380 W 450 W
Napi´cie znamionowe: ✱ 110 V 220 V 230 V 240 V 110 V 220 V 230 V 240 V
Znamionowy pobór pràdu: 3.6 A 1.8 A 1.7 A 1.6 A 4.2 A 2.3 A 2.2 A 2.1 A
Cz´stotliwoÊç sieci ✱ 50–60 Hz
Pr´dkoÊç skokowa suwu bez obcià˝enia 5000–10000 /min
Cz´stoÊç drgaƒ 10000–20000 /min
Talerz szlifierski Ârednica 150 mm
Skok mimoÊrodu 4 mm
Zewn´trzna Êrednica króçca ssàcego 30 mm
Ci´˝ar zgodny z EPTA-Procedure 01/2003
2.2 kg
WSKAZÓWKA
Podany w niniejszych instrukcjach poziom drgań został zmierzony zgodnie z metodą pomiarową według normy EN
60745 i może być zastosowany do porównywania elektronarzędzi. Można go również stosować do tymczasowego
określenia obciążenia drganiami. Podany poziom drgań dotyczy głównych zastosowań elektronarzędzia. Jeśli
ma ni pu lo waç na rz´ dziem w spo sób in ny, ni˝ opi sa ny
w in struk cji.
● Dla unik ni´ cia ob ra ˝eƒ za wsze u˝y waj tyl ko ory gi nal nych ak ce so riów Hil ti.
● Nie u˝y waj na rz´ dzia bez od po wied nie go urzà dze nia
do od sy sa nia py ∏u. Prze pi sy do ty czà ce bez pie czeƒ stwa
i li kwi da cji od pa dów mu sza byç prze strze ga ne szcze gól nie w trak cie szli fo wa nia ma te ria ∏ów za gra ˝a jà cych
zdro wiu (np. drew no d´ bo we lub bu ko we, far by za wie ra jà ce o∏ów lub in ne szko dli we sub stan cje).
Bez wzgl´d nie prze strze gaj za war tych w in struk cji in for ma cji na te mat funk cjo no wa nia, ob s∏u gi i kon ser wa cji
na rz´ dzia.
Najwa˝niejsze cechy narz´dzia
– ochrona elektryczna klasy II (podwójna izolacja) symbol
(zgodnie z EN 60745)
– ergonomiczne uchwyty t∏umiàce wibracje:
- uchwyt g∏ówny
- uchwyt prowadzàcy
- uchwyt do prac wykaƒczajàcych
- wbudowany uchwyt pomocniczy
– bezstopniowa regulacja pr´dkoÊci obrotowej
– talerz szlifierski uniwersalny, inne talerze do nabycia jako
akcesoria.
Uwa gi dla u˝yt kow ni ka
● Na rz´ dzie zo sta ∏o za pro jek to wa ne do pro fe sjo nal ne go
u˝yt ku.
● Na rz´ dzie mo ˝e byç u˝y wa ne, ob s∏u gi wa ne (kon ser wo wa ne) oraz na pra wia ne tyl ko przez au to ry zo wa ny i prze szko lo ny per so nel. Per so nel po wi nien byç po in for mo wa ny o za gro ˝e niach zwià za nych z na rz´ dziem.
2. Opis
WFE 380 / WFE 450-E jest szli fier kà mi mo Êro do wà z na p´ dem elek trycz nym do szli fo wa nia drew na, ma te ria ∏ów
drew no po chod nych, ma te ria ∏ów kom po zy to wych, farb,
la kie rów, two rzyw sztucz nych, gip sów i in nych po dob nych ma te ria ∏ów.
Na rz´ dzie zo sta ∏o za pro jek to wa ne do pro fe sjo nal ne go u˝yt ku. Do sta wa obej mu je: na rz´ dzie z po jem ni kiem na py∏,
wo rek py ∏o wy, in struk cj´ oraz walizk´ Hilti (opa ko wa nie).
WFE 380 jest do star cza na w kar to no wym pu dle.
Za sto so wa nie zgod ne z prze zna cze niem
● Na rz´ dzie zo sta ∏o za pro jek to wa ne do szli fo wa nia drew na, for ni ru, szpa chló wek i two rzyw sztucz nych przy u˝y ciu wy mie nial nych ar ku szy szli fier skich.
● Mo˝ na je u˝y waç na pla cu bu do wy, w warsz ta cie, przy
re no wa cji i mo der ni za cji obiek tów oraz w no wym bu dow nic twie.
● Âro do wi sko pra cy po win no byç su che.
● Na rz´ dzie mo ˝e funk cjo no waç tyl ko po do ∏à cze niu do
êró d∏a za si la nia, któ re za pew nia na pi´ cie i cz´ sto tli woÊç
zgod ne z in for ma cjà na ta blicz ce zna mio no wej.
● Ob ra bia ny przed miot mu si byç za mo co wa ny, a ope ra tor pra co waç w bez piecz nej po zy cji.
● Szli fo wa nie me ta li i ma te ria ∏ów za wie ra jà cych azbest
jest za bro nio ne.
● Na rz´ dzie jest prze wi dzia ne do pra cy r´cz nej.
● Nie wol no wy sta wiaç na rz´ dzia na deszcz lub Ênieg;
nie wol no u˝y waç na rz´ dzia w Êro do wi sku wil got nym lub
mo krym al bo wy bu cho wym.
● Nie wol no u˝y waç na rz´ dzia do szli fo wa nia na mo kro.
● Nie wol no do ko ny waç ˝ad nych zmian lub mo dy fi ka -
cji na rz´ dzia i sprz´ tu za bez pie cza jà ce go; nie wol no
Printed: 07.07.2013 | Doc-Nr: PUB / 5131018 / 000 / 00
Page 53

49
elektronarzędzie zostanie zastosowane do innych prac, z innymi narzędziami roboczymi lub narzędziami w nieodpowiednim
stanie technicznym, wówczas poziom drgań może odbiegać od podanego. Może to prowadzić do znacznego
zwiększenia obciążenia elektronarzędzia drganiami przez cały czas eksploatacji. Aby dokładnie określić obciążenie
drganiami, należy uwzględnić czas, w którym urządzenie jest wyłączone oraz/lub włączone, ale nie pracuje. Może
to prowadzić do znacznego zmniejszenia obciążenia elektronarzędzia drganiami przez cały czas eksploatacji. W
celu ochrony użytkownika przed działaniem drgań należy zastosować dodatkowe środki bezpieczeństwa, np.:
konserwacja elektronarzędzi i narzędzi roboczych, rozgrzanie dłoni, właściwa organizacja pracy.
Informacja o hałasach i wibracjach (mierzonych zgodnie z normą EN 60745):
Poziom ciÊnienia akustycznego A 93 dB (A)
Poziom mocy akustycznej A 82 dB (A)
Dla wymienionych poziomów ciśnienia akustycznego według EN 60745, granica tolerancji wynosí 3 dB.
Zakładaj ochraniacze słuchu!
Trójosiowe wartości dot. wibracji
(suma wektorów wibracji)
WFE380 WFE 450-E
Szlifowanie powierzchni
(ah) 4.1 m/s
2
3.9 m/s
2
Tolerancja błędu (K) dla trójosiowych
wartości dot. wibracji
1.5 m/s
2
1.5 m/s
2
✱ Narz´dzie jest oferowane tak˝e w innych wersjach dla ró˝nych napi´ç zasilajàcych. Znamionowe napi´cia
zasilania i znamionowy pobór pràdu przez narz´dzie podano na tabliczce znamionowej.
Hilti zastrzega sobie prawo do wprowadzania zmian technicznych.
4. Wskazówki bezpieczeństwa
WSKAZÓWKA
Wskazówki bezpieczeństwa z rozdziału 4.1 zawierają ogólne
informacje dotyczące bezpiecznej eksploatacji elektronarzędzi,
których należy przestrzegać zgodnie z normami zawartymi w instrukcji
obsługi. Mogą tam znajdować się również wskazówki, które nie
odnoszą się do tego urządzenia.
4.1 Ogólne wskazówki dotyczące bezpiecznej eksploatacji
elektronarzędzi
a) OSTRZEŻENIE! Należy zapoznać się ze wskazówkami
dotyczącymi bezpieczeństwa. Nieprzestrzeganie wskazówek
bezpieczeństwa może prowadzić do porażenia prądem, pożaru
i/lub ciężkich obrażeń ciała. Należy zachować do wglądu
wszystkie wskazówki i zalecenia dotyczące bezpieczeństwa.
Używane w przepisach bezpieczeństwa pojęcie "elektronarzędzie"
odnosi się do elektronarzędzi zasilanych prądem sieciowym (z
przewodem zasilającym) i elektronarzędzi zasilanych akumulatorami
(bez przewodu zasilającego).
4.1.1 Bezpieczeństwo w miejscu pracy
a) Należy dbać o czystości i dobre oświetlenie stanowiska
pracy. Nieporządek lub brak oświetlenia w miejscu pracy mogą
prowadzić do wypadków.
b) Przy użyciu tego elektronarzędzia nie pracować w otoczeniu
zagrożonym wybuchem, w którym znajdują się np. łatwopalne
ciecze, gazy lub pyły. Elektronarzędzia wytwarzają iskry, które
mogą prowadzić do zapłonu pyłów lub oparów.
c) Podczas pracy przy użyciu elektronarzędzia nie zezwalać
na zbliżanie się dzieci i innych osób. W wyniku odwrócenia
uwagi można stracić kontrolę nad urządzeniem.
4.1.2 Bezpieczeństwo elektryczne
a) Wtyczka elektronarzędzia musi pasować do gniazda. W
żaden sposób nie wolno modyfikować wtyczki. Nie należy
używać trójników w połączeniu z uziemionymi
elektronarzędziami. Niemodyfikowane wtyczki oraz odpowiednie
gniazda wtykowe zmniejszają ryzyko porażenia prądem.
b) Należy unikać kontaktu z uziemionymi powierzchniami, jak
rury, grzejniki, piece i lodówki. W przypadku kontaktu cielesnego
z uziemieniem, istnieje zwiększone ryzyko porażenia prądem.
c) Elektronarzędzie chronić przed deszczem i wilgocią. Wniknięcie
wody do elektronarzędzia powoduje zwiększenie ryzyka porażenia
prądem.
d) Nigdy nie używać przewodu niezgodnie z jego przeznaczeniem,
np. do przenoszenia lub zawieszania elektronarzędzia, ani
do wyciągania wtyczki z gniazda. Przewód chronić przed
działaniem wysokich temperatur, oleju, ostrych krawędzi
lub ruchomych części urządzenia. Uszkodzone lub skręcone
przewody zwiększają ryzyko porażenia prądem.
e) W przypadku wykonywania elektronarzędziem prac na
świeżym powietrzu należy zastosować przedłużacz
przystosowany do używania na zewnątrz. Użycie przedłużacza
przystosowanego do eksploatacji w warunkach zewnętrznych
zmniejsza ryzyko porażenia prądem.
f) Jeśli użycie elektronarzędzia w wilgotnym środowisku jest
nieuniknione, należy stosować wyłącznik różnicowo-prądowy.
Stosowanie wyłącznika różnicowo-prądowego zmniejsza ryzyko
porażenia prądem.
4.1.3 Bezpieczeństwo osób
a) Należy być czujnym, uważać na to, co się robi i do pracy
Printed: 07.07.2013 | Doc-Nr: PUB / 5131018 / 000 / 00
Page 54

50
4.2 Informacje dot. bezpieczeństwa właściwe dla danego
produktu
4.2.1 Bezpieczeństwo osób
a) Zakładać ochraniacze słuchu. Hałas może być przyczyną
utraty słuchu.
b) Jeśli w dostawie zostały dołączone dodatkowe
uchwyty do urządzenia, należy z nich korzystać.
Utrata kontroli nad urządzeniem może prowadzić do
obrażeń ciała.
c) Podczas wykonywania prac, w trakcie których talerz
szlifierski może natknąć się na zakryte przewody
elektryczne lub własny przewód zasilający, należy
trzymać urządzenie za izolowane uchwyty. Kontakt
talerza szlifierskiego z przewodem elektrycznym może
spowodować przeskok napięcia na elementy metalowe
elektronarzędzia i porażenie użytkownika prądem.
d)
Trzymaj urządzenie zawsze oburącz za przewidziane
do tego celu rękojeści. Utrzymuj rękojeści w suchym
i czystym stanie. Nie mogą one być zanieczyszczone
smarem lub zaolejone.
e)Aby uniknąć przewrócenia się, podczas pracy rozkładaj
kable sieciowe i przedłużacze oraz wąż odsysający
zawsze za urządzeniem.
f)
Podczas wymiany narzędzi noś ręka wice ochronne.
Podczas użytkowania narzędzie może się nagrzewać.
g)
Wiertarkę używaj tylko zgodnie z przeznaczeniem i gdy
znajduje się w nienagannym stanie technicznym.
h)Sto suj urzà dze nie do od sy sa nia py ∏u oraz oku la ry
ochron ne i Êrodki ochron ne górnych dróg od de cho wych.
Szli fo wa nie mo ˝e po wo do waç powstanie py -
∏u szko dli we go dla p∏uc i oczu.
i) U˝ytkownik mu si za dbaç o to, by szko dli wy py∏ by∏
usu wa ny zgod nie z kra jo wy mi oraz lo kal ny mi prze pi sa mi.
W trak cie szli fo wa nia ma te ria ∏ów ta kich, jak drew no d´ bo we lub bu ko we, farb za wie ra jà cych o∏ów lub in ne szko dli we sub stan cje po wsta je py∏ szko dli wy dla
zdro wia.
j)
Rób przerwy w pracy oraz wykonuj ćwiczenia rozluźnia jące i ćwiczenia palców w celu ich lepszego ukrwienia.
k)
Pyły z materiałów zawierających ołów, niektóre rodzaje
przy użyciu elektronarzędzi przystępować z rozwagą. Nie
używać elektronarzędzia będąc zmęczonym lub znajdując
się pod wpływem narkotyków, alkoholu lub lekarstw. Chwila
nieuwagi przy użytkowaniu elektronarzędzia może prowadzić
do poważnych obrażeń ciała.
b) Zawsze nosić osobiste wyposażenie ochronne i zakładać
okulary ochronne. Noszenie osobistego wyposażenia ochronnego,
takiego jak maska przeciwpyłowa, antypoślizgowe obuwie
robocze, kask ochronny lub ochraniacze słuchu, w zależności
od rodzaju i użytkowania elektronarzędzia, zmniejsza ryzyko
obrażeń ciała.
c) Unikać niezamierzonego uruchomienia narzędzia. Przed
podłączeniem elektronarzędzia do sieci elektrycznej i/lub
włożeniem akumulatora w urządzenie oraz wzięciem
elektronarzędzia do ręki lub przenoszeniem go, należy się
upewnić, że jest wyłączone. Jeśli podczas przenoszenia
elektronarzędzia naciskany jest przełącznik lub podczas podłączania
do sieci przełącznik jest wciśnięty, można spowodować wypadek.
d) Przed włączeniem elektronarzędzia usunąć narzędzia
nastawcze oraz klucze. Narzędzia lub klucze, które znajdują
się w ruchomych częściach urządzenia, mogą prowadzić do
obrażeń ciała.
e) Unikać niewygodnej pozycji ciała. Należy przyjąć bezpieczną
pozycję i zawsze utrzymywać równowagę. Dzięki temu możliwa
jest lepsza kontrola elektronarzędzia w nieprzewidzianych
sytuacjach.
f) Należy nosić odpowiednią odzież. Nie nosić obszernej
odzieży ani biżuterii. Nie zbliżać włosów, odzieży ani rękawic
do ruchomych części urządzenia. Obszerna odzież, biżuteria
lub długie włosy mogą zostać wciągnięte przez ruchome części
urządzenia.
g) Jeśli możliwe jest zamontowanie urządzeń odsysających
lub wyłapujących, upewnić się, czy są one właściwie
podłączone i prawidłowo użytkowane. Stosowanie urządzeń
odsysających zmniejsza zagrożenie spowodowane
rozprzestrzenianiem się pyłów.
4.1.4 Zastosowanie i obchodzenie się z elektronarzędziami
a) Nie przeciążać urządzenia. Do pracy należy używać
elektronarzędzi zgodnie z ich przeznaczeniem. Odpowiednim
narzędziem pracuje się lepiej i bezpieczniej w podanym zakresie
mocy.
b) Nie używać elektronarzędzia, którego przełącznik jest
uszkodzony. Elektronarzędzie, którego nie można włączyć lub
wyłączyć, stanowi zagrożenie i należy je naprawić.
c) Przed przystąpieniem do nastawy urządzenia, wymiany
osprzętu lub odłożeniem urządzenia należy wyciągnąć
wtyczkę z gniazda i/lub akumulator z urządzenia. Ten środek
ostrożności zapobiega niezamierzonemu włączeniu elektronarzędzia.
d) Nieużywane elektronarzędzia przechowywać w miejscu
niedostępnym dla dzieci. Nie zezwalać na użytkowanie
narzędzia osobom, które nie zapoznały się z nim lub nie
przeczytały niniejszych wskazówek. Elektronarzędzia stanowią
zagrożenie, jeśli używane są przez osoby niedoświadczone.
e) Należy starannie pielęgnować elektronarzędzia. Kontrolować,
czy ruchome części urządzenia funkcjonują bez zarzutu i
nie są zablokowane, czy części nie są popękane ani uszkodzone
w takim stopniu, że mogłoby to mieć wpływ na prawidłowe
funkcjonowanie elektronarzędzia. Przed rozpoczęciem
użytkowania urządzenia należy zlecić naprawę uszkodzonych
części. Przyczyną wielu wypadków jest niewłaściwa konserwacja
elektronarzędzi.
f) Należy zadbać o to, aby narzędzia tnące były ostre i czyste.
Starannie pielęgnowane narzędzia tnące z ostrymi krawędziami
tnącymi rzadziej zakleszczają się i łatwiej się je prowadzi.
g) Elektronarzędzia, osprzętu, narzędzi roboczych itp. należy
używać zgodnie z niniejszymi wskazówkami. Przy tym należy
uwzględnić warunki pracy i rodzaj wykonywanych czynności.
Używanie elektronarzędzi do prac niezgodnych z przeznaczeniem,
może doprowadzić do niebezpiecznych sytuacji.
4.1.5 Serwis
a) Naprawę urządzenia zlecać wyłącznie wykwalifikowanemu
personelowi, stosując tylko oryginalne części zamienne.
Gwarantuje to zachowanie bezpieczeństwa elektronarzędzia.
Printed: 07.07.2013 | Doc-Nr: PUB / 5131018 / 000 / 00
Page 55

51
drewna, minerały i metal mogą być szkodliwe dla
zdrowia. Kontakt ze skórą oraz wdychanie pyłów może
wywołać reakcje alergiczne oraz/lub prowadzić do
chorób dróg oddechowych użytkownika oraz osób
znajdujących się w pobliżu. Niektóre rodzaje pyłów,
np. dębowy lub bukowy uchodzą za rakotwórcze,
zwłaszcza w połączeniu z dodatkowymi substancjami
do obróbki drewna (chromiany, środki ochronne do
drewna). Materiał zawierający azbest może być obrabiany
wyłącznie przez fachowców.
W miarę możliwości używać
systemu odsysania zwiercin. Aby uzyskać najlepszy
efekt odsysania zwiercin, należy używać polecanego
przez Hilti odpowiedniego odkurzacza przenośnego
do pyłu drewnianego i/lub mineralnego, przystosowanego
do pracy z tym urządzeniem. Zadbać o dobrą wentylację
stanowiska pracy. Zaleca się zakładanie maski
przeciwpyłowej z
filtrem klasy P2. Należy przestrzegać
krajowych przepisów dotyczących obrabianych
materiałów.
l) Urządzenie nie może być użytkowane przez dzieci oraz
osoby fizycznie słabe bez uprzedniego pouczenia.
m) Należy pouczyć dzieci, że nie wolno bawić się
urządzeniem.
4.2.2 Staranne obchodzenie się i postępowanie z
elektronarzędziami
a)Zabezpiecz obrabiany przedmiot
. Zastosuj urządzenie
mocujące lub imadło, aby zamocować obrabiany przed miot.
Będzie on w ten sposób przytrzymywany pewniej
niż za pomocą dłoni, a ponadto będziesz miał obie
ręce wolne w celu obsługi urządzenia.
b)W razie przerwy w zasilaniu: wyłącz urządzenie i wyciąg -
nij wtyczkę z gniazdka.
Pozwala to zapobiec
niezamierzonemu uruchomieniu narzędzia w przypadku
ponownego przyłączenia napięcia.
4.2.3 Bezpieczeństwo elektryczne
a)Regularnie kontroluj przewód przyłączeniowy urządzenia,
a w razie stwierdzenia uszkodzenia oddaj do naprawy
specjaliście. Kontroluj regularnie przewody przedłużające
i wymień je na nowe, jeśli są uszkodzone. Jeśli podczas
pracy uszkodzony zostanie przewód sieciowy lub
przedłużacz, wówczas nie wolno dotykać
kabla. Wyciągnij
wtyczkę sieciową z gniazda.
Uszkodzone przewody
przyłącz eniowe i przedłużające stwarzają zagrożenie
porażenia prądem.
b)Wykonu jąc częste prace z użyciem materiałów
przewodzących, należy zabrudzone urządzenia regularnie
oddawać do kontroli w serwisie Hilti.
Osadzający się
na powierzchni urządzenia pył, w szczególności od
zwiercin materiałów przewodzących, jak również wilgoć
mogą przy niekorzystnych warunkach prowadzić do
porażenia prądem elektrycznym.
4.2.4 Miejsce pracy
a)Zadbaj o dobre oświetlenie stanowiska pracy.
b)Zadbaj o dobrą wentylację stanowiska pracy.
Uwalniane
podczas pracy pyły mogą stwarzać zagrożenie dla
zdrowia wskutek niewłaściwej wentylacji stanowiska
pracy.
Używać
ochraniaczy
uszu
Używać
rękawic
ochronnych
Używać lekkiej
ochrony dróg
oddechowych
Używać
okulary
ochronne
4.2.5 Osobiste wyposażenie ochronne
Użytkownik i znajdujące się w pobliżu osoby powinny
nosić podczas pracy urządzenia odpowiednie okulary
ochronne, nosić ochraniacze uszu, rękawice ochronne
a jeśli nie jest używany system do odsysania zwiercin,
również maskę przeciwpyłową.
5. Przed u˝y ciem na rz´ dzia
Ko niecz nie prze czy taj oraz prze strze gaj wska zó wek bez pie czeƒ stwa, za miesz czo nych w tej in struk cji.
Na pi´ cie za si la jà ce mu si byç zgod ne z da ny mi na ta blicz ce zna mio no wej.
Sto suj prze d∏u ˝a cze do pusz czo ne do eks plo ata cji w da nym za kre sie za sto so wa nia.
Przed∏u˝acze do u˝ytku na zewnàtrz
Do u˝ytku na zewnàtrz u˝ywaj tylko przeznaczone do tego,
odpowiednio oznaczone przed∏u˝acze.
Sta le za cho wuj ostro˝ noÊç
Za wsze kon cen truj si´ na wy ko ny wa nym za j´ ciu. Po st´ puj ostro˝ nie i prze ry waj pra c´, gdy coÊ in ne go ab sor bu je Twà uwa g´.
6. Ob s∏u ga
Za le ce nia ogól ne
JakoÊç szli fo wa nia oraz jego szyb koÊç za le ˝à od do bo ru
pa pie ru Êcier ne go (ziar ni stoÊç), wybranej szyb ko Êci szli fo wa nia i si ∏y przy k∏a da nej do szli fier ki. Na rz´ dzie, ta lerz
szli fier ski i pa pier Êcier ny two rzà system. Upewnij si´ czy
u˝ywasz naj bar dziej od po wied niej kom bi na cji i usta wie nia na rz´ dzi do danego zastosowania.
Printed: 07.07.2013 | Doc-Nr: PUB / 5131018 / 000 / 00
Page 56

52
Mo co wa nie pa pie ru Êcier ne go
Sto suj pa pier Êcier ny o ze wn´trz nej Êred ni cy 150 mm
z mo co wa niem na rzep. Mo˝ na sto so waç pa pier Êcier ny z 6 otwo ra mi od pro wa dza jà cy mi py∏ (otwo ry roz miesz czo ne na okr´ gu o Êred ni cy 80 mm) lub z 9 otwo ra mi (otwo ry roz miesz czo ne na okr´ gu o Êred ni cy 120
mm), bàdê te˝ jed nym otwo rem w Êrod ku ar ku sza.
● Za po bie gaj mi mo wol ne mu uru cho mie niu sil ni ka przez
wy j´ cie wtycz ki z gniaz da sie cio we go.
● Tak usy tu uj pa pier Êcier ny, by otwo ry do usu wa nia
py ∏u w pa pie rze Êcier nym po kry ∏y si´ z otwo ra mi w tar czy szli fier skiej.
Uchwyty – za le ca ne spo so by trzy ma nia na rz´ dzia
Przy szli fo wa niu zgrub nym
● Pro wadê na rz´ dzie obie ma r´ ka mi.
● U˝y waj uchwytu g∏ów nego i zin te gro wa nego uchwytu
po moc ni czego. Wy cià gnij uchwyt po moc ni czy do po zy cji ro bo czej (za miast niego mo˝ na u˝yç uchwytu pro wa dzà cego).
Przy szli fo wa niu wy kaƒ cza jà cym
● Pro wadê na rz´ dzie jed nà r´ kà.
● U˝y waj uchwytu do prac wykaƒczajàcych. Umo˝ li wia
on pre cy zyj ne pro wa dze nie na rz´ dzia tyl ko jed nà r´ kà
bli sko szli fo wa nej po wierzch ni i za pew nia do bre czu cie
przy szli fo wa niu mi´ dzy na k∏a da niem po szcze gól nych
warstw far by lub drob no ziar ni stym pa pie rem Êcier nym.
Przy szli fo wa niu po wierzch ni pio no wych
(np. Êcian, na ro˝ ni ków itd.)
● Pro wadê na rz´ dzie u˝y wa jàc uchwytu do prac
wykaƒczajàcych. Âro dek ci´˝ ko Êci na rz´ dzia znaj du je
si´ wów czas w d∏o ni. Dzi´ ki te mu mo˝ li wa jest bez piecz na i nie m´ czà ca pra ca.
OSTRO˚NIE
Szli fo wa nie mo ˝e po wo do waç wy twa rza nie py ∏u szko dli we go dla p∏uc i oczu. Sto suj urzà dze nie do od sy sa nia
py ∏u oraz oku la ry ochron ne i Êrodki ochron ne górnych
dróg od de cho wych.
Szli fo wa nie
● Sprawdê, czy na rz´ dzie jest wy ∏à czo ne.
● W∏ó˝ wtycz k´ do gniaz da sie cio we go.
● Wy bierz od po wied nià pr´d koÊç.
● UmieÊç na rz´ dzie na ob ra bia nym przed mio cie tak,
aby ca ∏a po wierzch nia pa pie ru Êcier ne go przy le ga do
przed mio tu.
● Uru chom na rz´ dzie i prze su waj je po powierzchni
przed mio tu, na ci ska jàc jed no cze Ênie z umiar ko wa nà si ∏à (ok. 20 N). Po za koƒ cze niu lub w cza sie prze rwy w pra cy za le ca my wy ∏à cza nie sil ni ka po od su ni´ ciu na rz´ dzia
od ob ra bia ne go przed mio tu.
7. Pra ca ze szli fier kà
Na sta wia nie szyb ko Êci szli fo wa nia
Za le ca nà szyb koÊç szli fo wa nia (cz´ stotliwoÊç) mo˝ na wy bie raç bez stop nio wo za po mo cà pokr´t∏a regulacji obrotów,
tak ˝e w trak cie pra cy sil ni ka.
Szyb koÊç szli fo wa nia za le ˝y od ob ra bia ne go ma te ria ∏u;
opty mal nie mo˝ na jà do braç w wy ni ku prak tycz nych te stów (szcze gó ∏y w da nych tech nicz nych pa pie ru Êcier ne go oraz w ta be li za sto so waƒ).
Usta wie nie 1 6
Szyb koÊç Ma ∏a Du ˝a
Po uru cho mie niu sil ni ka na rz´ dzie pra cu je z na sta wio nà
szyb ko Êcià.
Pa pier Êcier ny
Hil ti ofe ru je od po wied nie pa pie ry Êcier ne do ró˝ nych za sto so waƒ. Do szli fo wa nia drew na Hil ti ofe ru je "Wo od Li ne" o ziar ni sto Êci od P60 do P180, do szli fo wa nia la kie rów i farb - "Pa int Li ne" o ziar ni sto Êci od P40 do P400.
Ta lerz szli fier ski
Ta lerz szli fier ski jest cz´ Êcià zu ˝y wal nà, któ rej nie obej mu jà ogól ne wa run ki gwa ran cji.
Na rz´ dzie jest fa brycz nie wy po sa ˝o ne w uni wer sal ny ta lerz szli fier ski. Ten ta lerz szli fier ski za pew nia bar dzo do brà szybkoÊç usu wa nia ma te ria ∏u i ja koÊç pra cy. Za wie ra
on otwo ry do usu wa nia py ∏u, zgod ne z naj bar dziej po pu lar ny mi stan dar da mi. Do bierz pa pier naj bar dziej od po wied ni dla da ne go za sto so wa nia.
Uni wer sal ny ta lerz Szli fo wa nie zgrub ne
szli fier ski – drew no, ma te ria ∏y
drew no po chod ne
– szpa chlów ka
– sta ra far ba i la kier
– ma te ria ∏y kom po zy to we
– two rzy wa sztucz ne
Szli fo wa nie wst´p ne
i po Êred nie
– far ba i la kier
Mi´k ki ta lerz szli fier ski Po Êred nie i wy kaƒ cza jà ce
szli fo wa nie far by i la kie ru.
Szli fo wa nie po wierzch ni nie
wy pu k∏ych.
Ha mu lec ta le rza szli fier skie go
Na rz´ dzie jest wy po sa ˝o ne w ha mu lec ta le rza szli fier skie go. Pier Êcieƒ ha mul ca jest cz´ Êcià zu ˝y wal nà, któ rej nie
obej mu jà ogól ne wa run ki gwa ran cji.
Ha mu lec ta le rza szli fier skie go re du ku je pr´d koÊç ta le rza
na bie gu ja ∏o wym bez ry zy ka od rzu tu.
Usu wa nie py ∏u
OSTRO˚NIE
Printed: 07.07.2013 | Doc-Nr: PUB / 5131018 / 000 / 00
Page 57

53
Szli fo wa nie mo ˝e po wo do waç powstawanie py ∏u szko dli we go dla p∏uc i oczu. Sto suj urzà dze nie do od sy sa nia
py ∏u oraz oku la ry ochron ne i Êrodki ochron ne górnych
dróg od de cho wych.
Usu wa nie py ∏u do po jem ni ka i wor ka py ∏o we go
Sto suj po jem nik z wor kiem py ∏o wym, któ ry wcho dzi w sk∏ad
wy po sa ˝e nia na rz´ dzia.
Do k∏ad nie usu waj gro ma dzà cy si´ py∏ (np. przy po mo cy
od ku rza cza).
Usu wa nie py ∏u przy u˝y ciu od ku rza cza
W bar dzo rzad kich przy pad kach, w nie sprzy ja jà cych oko licz no Êciach i przy ni skiej wil got no Êci po wie trza w trak cie
u˝y wa nia od ku rza cza mo gà zda rzaç si´ wy ∏a do wa nia elek tro sta tycz ne.
To zja wi sko fi zycz ne nie jest spo wo do wa ne ja kim kol wiek
uszko dze niem na rz´ dzia. Mo˝ na mu za po biec u˝y wa jàc
za le ca ne go od ku rza cza Hil ti W -VC 40. Elek trycz ne na rz´ dzia i urzà dze nia Hil ti sà zgod ne z ak tu al nie obo wià zu jà cy mi prze pi sa mi. Gdy by jed nak zja wi sko to na dal
wy st´ po wa ∏o, pro si my o skon tak to wa nie si´ z naj bli˝ szym punk tem ser wi so wym Hil ti, przed sta wia jàc opis
wa run ków pra cy na rz´ dzia.
Do k∏ad nie usu waj gro ma dzà cy si´ py∏ (np. przy po mo cy
od ku rza cza).
8. Kon ser wa cja i serwis
OSTROŻNIE
Należy zadbać o to, aby urządzenie, zwłaszcza uchwyty,
były suche i czyste. Nie mogą one być zanieczyszczone
smarem ani olejem. Nie używać środków konserwujących
zawierających silikon.
Zewnętrzna obudowa urządzenia wykonana jest z odpornego
na uderzenia tworzywa sztucznego. Uchwyty są z elastomeru.
Nigdy nie używać urządzenia z niedrożnymi szczelinami
wentylacyjnymi! Ostrożnie czyścić szczeliny wentylacyjne
suchą szczotką. Zapobiegać przedostawaniu się ciał
obcych do wnętrza urządzenia. Zewnętrzne powierzchnie
obudowy regularnie przecierać lekko zwilżoną ściereczką.
Do czyszczenia nie używać urządzeń rozpylających,
strumienia pary ani bieżącej wody! Może to doprowadzić
do zmniejszenia bezpieczeństwa elektrycznego urządzenia.
Ta lerz szli fier ski
Spraw dzaj ta lerz szli fier ski pod wzgl´ dem zu ˝y cia i za bru dze nia. Zu ˝y ty lub brud ny ta lerz mo ˝e po gor szyç przy czep noÊç pa pie ru Êcier ne go. W mia r´ po trze by czyÊç lub
ewen tu al nie wy mieƒ ta lerz (uszko dzo ny ta lerz nie zw∏ocz nie wy mieƒ na no wy).
Wy mia na ta le rza szli fier skie go
● Od∏àcz na rz´ dzie od sie ci za si la jà cej.
● U∏ó˝ na rz´ dzie na uchwycie pro wa dzà cym, pa pie rem
Êcier nym do gó ry.
● Âcià gnij pa pier Êcier ny.
● Okr´ç Êru by mo cu jà ce.
● Zdej mij sta ry ta lerz szli fier ski.
● OczyÊç i sprawdê ha mu lec ta le rza szli fier skie go. Wy -
mie niç go w ra zie po trze by, a na st´p nie za ∏ó˝ no wy ta lerz
szli fier ski.
● Przy trzy maj ta lerz szli fier ski i do kr´ç trzy Êru by mo cu jà ce. Sprawdê, czy ta lerz szli fier ski jest pra wi d∏o wo
za mo co wa ny (nie prze krzy wio ny, sty ka si´ z pier Êcie niem ha mul ca).
● Pa pier Êcier ny na k∏a daj ko rzy sta jàc z ele men tu po moc ni cze go. Za pew ni on po kry cie si´ otwo rów do usu wa nia
py∏u w ta le rzu szli fier skim i w pa pie rze.
Ha mu lec ta le rza szli fier skie go
Je ˝e li pr´d koÊç ob ro to wa biegu ja ∏o we go wzra sta po pew nym okre sie u˝y wa nia na rz´ dzia, jest to ozna kà zu ˝y cia
ha mul ca ta le rza szli fier skie go i na le ˝y go wte dy wy mie niç.
Wy mia na ha mul ca ta le rza szli fier skie go
● Od∏àcz ka bel za si la jà cy od sie ci.
● Zdej mij ta lerz szli fier ski zgod nie z opi sem „Wymiana
talerza szlifierskiego”.
● Wyciàgnij stary hamulec z urzàdzenia.
● Upewnij si´ czy asymetrycznie zamocowane hamulce
sà w odpowiednim po∏o˝eniu w stosunku do czterech
Êrub.
● Wci Ênij no wy ha mul ec w otwo ry w na rz´ dziu.
● Upew nij si´, czy ha mu lec ta le rza szli fier skie go jest
pra wi d∏o wo za mo co wa ny (nie prze krzy wio ny, nie ma
lu zu mi´ dzy ha mul cem, a je go gniaz dem w obu do wie).
● Za mo cuj ta lerz szli fier ski zgod nie z po wy˝ szym opi sem „Wymiana talerza szlifierskiego”.
Kon ser wa cja
Re gu lar nie spraw dzaj wszyst kie ze wn´trz ne cz´ Êci na rz´ dzia pod wzgl´ dem uszko dzeƒ i kon tro luj, czy wszyst kie
ele men ty ob s∏u gi funk cjo nu jà bez b∏´d nie. Nie u˝y waj na rz´ dzia, je ˝e li ja kie kol wiek cz´ Êci sà uszko dzo ne lub gdy
ele men ty ob s∏u gi nie dzia ∏a jà pra wi d∏o wo. Na pra wy na rz´ dzia zle caj ser wi so wi Hil ti.
Na pra wy elek trycz nej sek cji na rz´ dzia mo gà byç wy ko ny wa ne tyl ko przez prze szko lo ne go spe cja li st´ elek try ka.
Printed: 07.07.2013 | Doc-Nr: PUB / 5131018 / 000 / 00
Page 58

54
10. Utylizacja
Urządzenia Hilti zostały wyprodukowane w
dużej mierze z materiałów nadających się do
ponownego wykorzystania. Warunkiem takiego
recyklingu jest prawidłowe oddzielenie materiałów. W
wielu krajach firma Hilti jest już przygotowana na
przyjmowanie starych produktów w celu ich utylizacji.
Informacje na ten temat możesz uzyskać u rzeczoznawców
technicznych lub w punkcie serwisowym Hilti.
Dotyczy tylko państw UE
Nie wyrzucaj elektronarzędzi wraz z
odpadami z gospodarstwa domowego!
Zgodnie z Europejską Dyrektywą w sprawie zużytego
sprzętu elektrotechnicznego i elektronicznego oraz
dostosowaniem jej do prawa krajowego, zużyte
elektronarzędzia należy posegregować i zutylizować w
sposób przyjazny dla środowiska.
11.
Gwarancja producenta na
urządzenia
Hilti gwarantuje, że dostarczone urządzenie jest wolne
od błędów materiałowych i produkcyjnych. Ta gwa rancja obowiązuje pod warunkiem, że urządzenie jest
właściwie wykorzystywane, obsługiwane, konserwo wane i czyszczone zgodnie z instrukcją obsługi Hilti,
oraz że zachowana jest techniczna jedność urządzenia,
tzn. że w urządzeniu stosowane są wyłącznie oryginalne
materiały, akcesoria i części zamienne Hilti.
Ta gwarancja obejmuje bezpłatną naprawę lub bez płatną wymianę uszkodzonych części podczas całego
okresu żywotności urządzenia. Części, które podlegają
normalnemu zużyciu, nie są objęte tą gwarancją.
Dalsze roszczenia są wykluczone, o ile nie zachodzi tu
sprzeczność z obowiązującymi przepisami kra jowymi.
Firma Hilti nie odpowiada przede wszystkim za szkody
bezpośrednie i pośrednie powstałe na skutek wad lub
szkody następcze, straty lub koszty związane z
zastosowaniem lub brakiem możliwości zastosowania
urządzenia do jakiegokolwiek celu. Milczące przyzwolenia
dotyczące zastosowa
nia lub przydatności do określonego
celu są wyra źnie wykluczone.
9. Wy szu ki wa nie uszko dzeƒ
Symp tom Mo˝ li wa przy czy na Roz wià za nie
Sil nik nie uru cha mia si´ Uszko dze nie sie ci za si la jà cej. Przy ∏àcz do sie ci do wol ne in ne
urzà dze nie i sprawdê, czy funk cjo nu je.
Uszko dzo ny ka bel lub wtycz ka Zleç spraw dze nie spe cja li Êcie
sie cio wa elek try ko wi, wy mieƒ w ra zie po trze by
Uszko dzo ny prze ∏àcz nik Zleç spraw dze nie spe cja li Êcie
elek try ko wi, wy mieƒ w ra zie po trze by
Wy ∏àcz nik nie jest Wci Ênij wy ∏àcz nik do opo ru.
ca∏ ko wi cie na ci Êni´ ty
Na rz´ dzie nie pracujà z pe∏ nà mo cà Zbyt ma ∏y prze krój prze d∏u ˝a cza U˝yj prze d∏u ˝a cza o wy star cza jà cym
prze kro ju.
Usta wio na zo sta ∏a zbyt ma ∏a Zmieƒ pr´d koÊç na 5 lub 6.
pr´d koÊç (sto pieƒ 1 lub 2)
Niska wydajnoÊç odsysania Pa pier Êcier ny êle za mo co wa ny, Po praw u∏o ˝e nie pa pie ru Êcier ne go.
otwo ry do usu wa nia py ∏u
nie po kry wa jà si´ ze so bà
Wo rek py ∏o wy jest pe∏ ny Usuƒ sta ry wo rek i za ∏ó˝ no wy.
Za tka ny kró ciec ssà cy Usuƒ po jem nik na py∏
i oczyÊç ka na∏ ssà cy.
Pa pier Êcier ny nie trzy ma Ta lerz szli fier ski jest brud ny OczyÊç ta lerz szli fier ski
si´ ta le rza szli fier skie go Zu ˝y ty rzep mo cu jà cy Wy mieƒ ta lerz szli fier ski.
Wy ∏a do wa nia elek tro sta tycz ne Od ku rzacz bez osprz´ tu Za sto suj bez piecz ny od ku rzacz Hil ti
an ty sta tycz ne go WVC 40 -M.
Prze rwa ny prze wód uzie mia jà cy Sprawdê prze wód uzie mia jà cy
Printed: 07.07.2013 | Doc-Nr: PUB / 5131018 / 000 / 00
Page 59

55
12. Deklaracja zgodnoÊci
(oryginał)
Nazwa: Szlifierka "mimoÊrodowa"
Oznaczenie: WFE 380 / WFE 450-E
Rok produkcji: 2000
Z pe∏ nà od po wie dzial no Êcià oÊwiad cza my, ˝e ni niej szy
pro dukt od po wia da wy ma ga niom za war tym w na st´ pu jà cych wy tycz nych oraz nor mach
: 2004/108/EG, 2006/42/EG,
EN 60745-1, EN 60745-2-4, EN ISO 12100, 2011/65/EU.
W celu naprawy lub wymiany urządzenie lub uszkodzone
części należy przesłać bezzwłocznie po stwierdzeniu
wady do przedstawicielstwa Hilti.
Niniejsza gwarancja obejmuje wszelkie zobowiązania
gwarancyjne ze strony Hilti i zastępuje wszystkie wcześ niejsze lub równoczesne oświadczenia, oraz pisemne
i ustne uzgodnienia dotyczące gwarancji.
Hilti Corporation, Feldkircherstrasse 100,
FL-9494 Schaan
Paolo Luccini Jan Doongaji
Head of BA Ececutive Vice President
Quality & Process Management BU Power Tools & Accessories
BA Electric Tools & Accessories
01/2012 01/2012
Dokumentacja techniczna:
Hilti Entwicklungsgesellschaft mbH
Zulassung Elektrowerkzeuge
Hiltistrasse 6
86916 Kaufering
Deutschland
Printed: 07.07.2013 | Doc-Nr: PUB / 5131018 / 000 / 00
Page 60

56
Printed: 07.07.2013 | Doc-Nr: PUB / 5131018 / 000 / 00
Page 61

57
1.
Информация общего характера
Обозначение опасностей «Внимание»
В тексте данного руководства это слово используется
для того, чтобы привлечь внимание к опасному или
небезопасному методу или процедуре, при выполнении
которых может произойти травмирование персонала
или повреждение машины, материалов или другого
имущества.
Пиктограммы
Перед началом эксплуатации
инструмента необходимо
прочитать Руководство по
эксплуатации.
Всегда храните данное
Руководство по эксплуатации
вместе с инструментом.
При передаче инструмента
другим лицам убедитесь, что к
инструменту приложено
Руководство по эксплуатации.
Содержание Страница
1.
Информация общего характера
57
2.
Описание
58
3.
Технические характеристики
58
4.
Требования по технике безопасности
59
5.
Подготовка к использованию
62
6.
Эксплуатация
62
7.
Работа с использованием инструмента
63
8.
Уход и техническое обслуживание
64
9.
Выявление неисправностей
65
10.
Удаление в отходы
66
11. Гарантия производителя 66
12.
Сертификат соответствия (оригинал)
66
Средства управления
Выключатель
Дисковый регулятор частоты хода
Компоненты
쐋
Пластинка с техническими данными
쐏
Основная ручка
쐄
Направляющая рукоятка
쐂
Вспомогательная рукоятка
쐆
Рукоятка для чистовой обработки
쐊
Шлифовальная пластина
쐎
Абразивный лист с креплением типа Velcro («липучка»)
쐅
Фиксирующие винты шлифовальной пластины
쐈
Тормозное кольцо
쐉
Коробка пылесборника
씈
Мешок для сбора пыли
씉
Соединитель шланга для удаления пыли / шланг
для удаления пыли
씊
Приспособление для правильной установки
абразивных листов
ОРИГИНАЛЬНОЕ РУКОВОДСТВО ПО ЭКСПЛУАТАЦИИ
Шлифовальная машина WFE 380 / WFE 450-E
орбитального действия
Эти номера соответствуют позициям на
иллюстрациях, представленным на раскладывающихся
страницах обложки. При чтении руководства держите
эти страницы раскрытыми.
В данном руководстве по эксплуатации термин
«инструмент» всегда относится к эксцентрической
шлифовальной машине.
Расположение идентификационных данных на
инструменте
Тип и серийный номер инструмента указаны на пластинке
с техническими данными. Запишите эти данные в
руководство по эксплуатации и всегда пользуйтесь
ими при обращении за помощью к представителю
компании Hilti или в сервисную службу.
Тип:
Серийный номер:
Предупреждающие знаки
Предписывающие знаки
Используйте
наушники
Используйте
защитные
перчатки
Используйте
респиратор
Используйте
защитные
очки
Перед началом
работы прочитайте
руководство по
эксплуатации
Символы
Предупреждение
об опасности
Предупреждение об
опасности поражения
электрическим током
Предупреждени
е о горячей
поверхности
Верните
отработанные
материалы на
переработку
Printed: 07.07.2013 | Doc-Nr: PUB / 5131018 / 000 / 00
Page 62

58
3.
Технические характеристики
WFE380 WFE450-E
Потребляемая мощность:
380
Вт
450
Вт
Номинальное напряжение:
✱ 110 В220 В230 В240 В110 В220 В230 В240
В
Номинальный потребляемый ток:
3,6 A 1,8 A 1,7 A 1,6 A 4,2 A 2,3 A 2,2 A 2,1 A
Частота электросети:
✱ 50–60
Гц
Частота колебаний без нагрузки:
5000–10000
/min
Частота колебаний:
10000–20000
/min
Шлифовальная пластина:
150
мм (диаметр)
Эксцентриситет:
4
мм
Переходник для шланга удаления пыли:
30
мм
Масса согласно методу EPTA 01/2003
2,2
кг
●
Запрещается использовать инструмент для шлифовки
с орошением.
●
Запрещается вносить в конструкцию инструмента
изменения и производить с ним манипуляции отличные
от тех, которые описаны в данном руководстве по
эксплуатации.
●
Во избежание получения травм пользуйтесь только
оригинальными принадлежностями Hilti.
●
Не пользуйтесь инструментом без системы
пылеудаления. Особенно тщательно следует соблюдать
правила техники безопасности и удаления отходов
при шлифовке материалов, представляющих опасность
для здоровья человека (например, дуб или береза,
содержащая свинец краска и прочие вредные вещества).
Соблюдайте меры предосторожности, представленные
в разделах руководства, посвященных эксплуатации
инструмента, уходу за инструментом и его обслуживанию.
Основные особенности инструмента
–
Электрическая защита II класса (двойная изоляция)
Z
(в соответствии с EN 60745).
–
Поглощение вибрации, эргономичные рукоятки
-
основная рукоятка
-
направляющая рукоятка
-
рукоятка для окончательной отделки
–
Утопленная вспомогательная рукоятка
–
Плавная регулировка частоты хода
–
Универсальная шлифовальная пластина, в качестве
дополнительных устройств могут поставляться другие
шлифовальные пластины.
Условия, которые должны выполняться пользователем
●
Инструмент предназначен для профессиональных
применений.
●
Эксплуатация, обслуживание и ремонт инструмента
могут выполняться только утвержденным, обученным
персоналом. Персонал должен быть проинформирован
о возможных опасностях.
2.
Описание
Шлифовальная машина WFE 380 / WFE 450-E
орбитального действия - это электроинструмент,
предназначенный для шлифования дерева, древесных
материалов, композитных материалов, краски, лака,
пластмасс, штукатурки, шпаклевок и подобных
материалов.
Инструмент предназначен для профессиональных
применений.
В комплект поставки входит следующее: электроинстру мент с коробкой пылесборника, мешок для сбора пыли,
руководство по эксплуатации и инструментальный
ящик. WFE 380 поставляется в картонной коробке.
Правильное использование
●
Инструмент предназначен для шлифовки поверхности
таких материалов, как: дерево, фанера, шпаклевка,
пластмасса и штукатурка с использованием сменных
шлифовальных листов.
●
Инструмент предназначен для использования на
строительной площадке или в мастерской при
выполнении ремонта, перепланировки или при
строительстве нового здания.
●
Атмосфера в рабочей зоне должна быть сухой.
●
Инструмент должен подключаться к электросети
переменного тока, напряжение и частота которой
соответствуют указанным на инструменте техническим
данным.
●
При использовании инструмента обрабатываемое
изделие должно быть надежно закреплено, чтобы
предотвратить его перемещение, а оператор должен
находиться в устойчивом положении.
●
Не пользуйтесь инструмент для шлифовки металлов
и материалов, содержащих асбест.
●
Инструмент может использоваться только при
удерживании его в руках.
●
Не допускайте попадания на инструмент дождя или
снега и не применяйте его в сырой, влажной и
взрывоопасной атмосфере.
Printed: 07.07.2013 | Doc-Nr: PUB / 5131018 / 000 / 00
Page 63

59
УКАЗАНИЕ
Указанный в настоящих инструкциях уровень вибрации установлен с помощью метода измерения по EN 60745 и может
использоваться для сравнения с другими электроинструментами. Он также подходит для предва- рительной оценки
вибрационной нагрузки. Указанный уровень вибрации фактически соответствует областям применения электроинструмента.
Однако если электроинструмент используется для других целей, с другими рабочими инструментами или в случае его
неудовлетворительного техобслуживания, уровень вибрации может быть иным. Вследствие этого в течение всего периода
работы инструмента возможно значительное увеличение вибрационной нагрузки. Для точного определения вибрационной
нагрузки следует также учитывать промежутки времени, в течение которых инструмент находится в выключенном состоянии
или работает вхолостую. Вследствие этого в течение всего периода работы инструмента возможно значительное
уменьшение вибрационной нагрузки. Примите дополнительные меры безопасности для защиты оператора от воздействия
возникающей вибрации, например: техническое обслуживание электроинструмента и рабочих инструментов, сохранение
тепла рук, правильная организация рабочих процессов.
Информация относительно шума и вибрации (в соответствии с EN 60745)
Типичные А-взвешенные значения уровня
мощности шума:
93
дБ (А)
Типичные А-взвешенные значения уровня
звукового давления:
82
дБ (А)
Для этих уровней звукового давления погрешность согласно EN 60745 составляет 3 дБ.
Пользуйтесь защитными наушниками!
Значения вибрации по трем осям (векторная сумма) WFE380 WFE 450-E
Шлифование поверхностей (a
h
) 4,1
м/с
2
3,9
м/с
2
Погрешность (K) значений вибрации по трем осям: 1,5
м/с
2
1,5
м/с
2
✱
Инструмент предлагается в различных версиях для различного напряжения электросети. Относительно
номинального напряжения и номинальной потребляемой мощности вашего инструмента см.
информацию на пластинке с техническими характеристиками.
Фирма-изготовитель оставляет за собой право вносить изменения
4. Указания по технике безопасности
УКАЗАНИЕ
Приведённые в главе 4.1 указания по технике безопасности
включают в себя все общие меры безопасности при эксплуатации электроинструментов, приводимые в данном руководстве
по эксплуатации согласно принятым нормам. В связи с этим
возможно наличие указаний, не относящихся к данному инструменту.
4.1 Общие указания по технике безопасности для элект-
роинструментов
a) ПРЕДУПРЕЖДЕНИЕ! Прочтите все указания по
мерам безопасности и инструкции. Невыполнение при-
веденных ниже указаний может привести к поражению электрическим током, пожару, и/или вызвать тяжелые травмы.
Сохраните все указания по технике безопасности и инструкции для следующего пользователя. Используемый
далее термин «электроинструмент» относится к электроинструменту, работающему от электрической сети (с сетевым кабелем) и от аккумулятора (без сетевого кабеля).
4.1.1 Безопасность рабочего места
a) Следите за чистотой и порядком на рабочем месте. Бес-
порядок на рабочем месте и плохое освещение могут привести к несчастным случаям.
b) Не используйте электроинструмент во взрывоопасной
зоне, где имеются горючие жидкости, газы или пыль.
При работе электроинструмент искрит, и искры могут воспламенить пыль или пары.
c) Не разрешайте детям и посторонним приближаться к
работающему электроинструменту. Отвлекаясь от работы, можно потерять контроль над электроинструментом.
4.1.2 Электрическая безопасность
a) Соединительная вилка электроинструмента должна
соответствовать розетке электросети. Не изменяйте
конструкцию вилки. Не используйте переходные вилки с электро-инструментами с защитным заземлением.
Оригинальные вилки и соответствующие им розетки снижают риск поражения электрическим током.
b) Избегайте непосредственного контакта с заземлённы-
ми поверхностями, например с трубами, отопительными приборами, печами (плитами) и холодильниками. При соприкосновении с заземлёнными предметами воз-
никает повышенный риск поражения электрическим током.
c) Предохраняйте электроинструменты от дождя или воз-
действия влаги. В результате попадания воды в электроинструмент возрастает риск поражения электрическим
током.
Printed: 07.07.2013 | Doc-Nr: PUB / 5131018 / 000 / 00
Page 64

4.2 Особые указания по технике безопасности
4.2.1 Безопасность людей
a) Надевайте защитные наушники. В результате воз-
действия шума возможна потеря слуха.
b) Используйте дополнительные рукоятки, если они
входят в комплект инструмента. Потеря контроля
над инструментом может привести к травмам.
c) При опасности повреждения шлифовальной плас-
тиной скрытой электропроводки или сетевого
60
d) Не используйте кабель не по назначению, например,
для переноски электроинструмента, его подвешивания
или для выдёргивания вилки из розетки электросети.
Защищайте кабель от воздействий высоких температур, масла, острых кромок или вращающихся узлов
электроинструмента. В результате повреждения или схлёс-
тывания кабеля повышается риск поражения электрическим током.
e) Если работы выполняются на открытом воздухе, при-
меняйте только удлинительные кабели, которые разрешено использовать вне помещений. Применение удли-
нительного кабеля, пригодного для использования вне помещений, снижает риск поражения электрическим током.
f) Если нельзя избежать работы с электроинструментом
в условиях влажности, используйте автомат защиты от
тока утечки. Использование автомата защиты от тока утечки
снижает риск поражения электрическим током.
4.1.3 Безопасность персонала
a) Будьте внимательны, следите за своими действиями и
серьезно относитесь к работе с электроинструментом.
Не пользуйтесь электроинструментом, если вы устали
или находитесь под действием наркотиков, алкоголя
или медикаментов. Незначительная ошибка при невни-
мательной работе с электроинструментом может стать причиной серьёзного травмирования.
b) Применяйте индивидуальные средства защиты и всег-
да обязательно надевайте защитные очки. Использование индивидуальных средств защиты, например, респиратора, обуви на нескользящей подошве, защитной каски или
защитных наушников, в зависимости от вида и условий эксплуатации электроинструмента, снижает риск травмирования.
c) Избегайте непреднамеренного включения элект-
роинструмента. Убедитесь в том, что электроинструмент выключен, прежде чем подключить его к электропитанию и/или вставить аккумулятор, поднимать или
переносить его. Ситуации, когда при переноске элект-
роинструмента пальцы находятся на выключателе или когда включенный электроинструмент подключается к сети,
могут при-вести к несчастным случаям.
d) Перед включением электроинструмента удалите регу-
лировочные устройства и гаечный ключ. Инструмент
или ключ, находящийся во вращающейся части электроинструмента, может привести к травмам.
e) Старайтесь избегать неестественных поз при работе.
Постоянно сохраняйте устойчивое положение и равновесие. Это позволит лучше контролировать электроинст-
румент в непредвиденных ситуациях.
f) Носите спецодежду. Не надевайте очень свободной
одежды или украшений. Оберегайте волосы, одежду и
перчатки от вращающихся узлов электроинструмента.
Свободная одежда, украшения и длинные волосы могут
быть захвачены ими.
g) Если предусмотрено подсоединение устройств для сбо-
ра и удаления пыли, убедитесь, что они подсоединены
и используются по назначению. Использование модуля
пылеудаления снижает вредное воздействие пыли.
4.1.4 Использование и обслуживание электроинструмента
a) Не допускайте перегрузки электроинстру-мента. Исполь-
зуйте электроинструмент, предназначенный именно для
данной работы. Соблюдение этого правила обеспечит
более высокое качество и безопасность работы в указанном диапазоне мощности.
b) Не используйте электроинструмент с неисправным вык-
лючателем. Электроинструмент, включение или выключение которого затруднено, представляет опасность и должен
быть отремонтирован.
c) Прежде чем приступить к регулировке элек- троинст-
румента, замене принадлежностей или перед перерывом в работе, выньте вилку из розетки и/или аккумулятор из электроинструмента. Эта мера предосторожности
предотвращает случайное включение электроинструмента.
d) Храните неиспользуемые электроинструменты в мес-
тах, недоступных для детей. Не давайте электроинструмент лицам, которые не умеют им пользоваться или
не прочитали настоящих указаний. Электроинструменты
представляют собой опасность в руках неопытных пользователей.
e) Бережно обращайтесь с электроинструментами. Про-
веряйте безупречное функционирование подвижных
частей, лёгкость их хода, целостность всех частей и
отсутствие повреждений, которые могли бы отрицательно повлиять на работу электроинструмента. Сдавайте повреждённые части инструмента в ремонт до
его использования. Причиной многих несчастных случаев
является несоблюдение правил технического обслуживания электроинструментов.
f) Необходимо следить за тем, чтобы режущие инстру-
менты были острыми и чистыми. Заклинивание содержащихся в рабочем состоянии режущих инструментов происходит реже, ими легче управлять.
g) Применяйте электроинструмент, принадлежности, вспо-
могательные устройства и т. д. согласно указаниям. Учитывайте при этом рабочие условия и характер выполняемой работы. Использование электроинструментов не
по назначению может привести к опасным ситуациям.
4.1.5 Сервис
a) Доверяйте ремонт электроинструмента только квали-
фицированному персоналу, использующему исключительно оригинальные запчасти. Этим обеспечивается
поддержание электроинструмента в безопасном состоянии.
Printed: 07.07.2013 | Doc-Nr: PUB / 5131018 / 000 / 00
Page 65

61
Используйте
защитные
наушники
Используйте
защитные
перчатки
Используйте
респиратор
Используйте
защитные очки
кабеля держите инструмент за изолированные
поверхности. При контакте шлифовальной пласти-
ны с токопроводящими предметами незащищённые
металлические части инструмента находятся под
напряжением, что может привести к поражению пользователя электрическим током.
d)Всегда крепко держите инструмент двумя руками
за рукоятки. Содержите рукоятки сухими и
чистыми, очищайте их от масла и смазки.
d) Во избежание падения сетевой кабель, удлинители
и всасывающий шланг отводите от инструмента
назад и понизу.
f) При замене сменного инструмента используйте
защитные перчатки. При работе сменные
инструменты нагреваются.
g)
Инструмент может использоваться только для тех
целей, для которых он предназначен, и только тогда,
когда он находится в нормальном рабочем состоянии.
.
h)
Следует пользоваться системой пылеудаления, а
также респиратором и защитными очками.
При
шлифовке может образовываться вредная пыль.
Образующаяся при шлифовке пыль может быть
вредной для легких и глаз.
i)
Оператор должен обеспечить удаление образующейся
при шлифовке вредной пыли в соответствии с
национальными и региональными правилами и
нормами.
При шлифовке таких материалов, как
березовая или дубовая древесина, содержащей
свинец краски, или других вредных материалов,
образуется вредная для здоровья человека пыль.
j Чтобы во время работы руки не затекали, делайте
пе ре ры вы для разминки пальцев.
k)
Пыль, возникающая при обработке материалов, содержащих
свинец, некоторых видов древесины, минералов и металлов,
может представлять собой опасность для здоровья.
Вдыхание частиц такой пыли или контакт с ней может
стать причиной появления аллергических реакций и/или
заболеваний дыхательных путей. Некоторые виды пыли
(например пыль, возникающая при обработке дуба или
бука) считаются канцерогенными, особенно в ком- бинации
с дополнительными материалами, используемыми для
обработки древесины (соль хромовой кислоты, средства
защиты древесины). Обработка материалов с содержанием
асбеста должна выполняться только специалистами.
По
возможности используйте подходящий
пылеотсасывающий аппарат. Для оптимального
удаления пыли используйте этот электроинструмент
в комбинации с подходящим переносным
пылесосом, рекомендованным Hilti для уборки
древесныхопилок и/или минеральной пыли.
Обеспечьте хорошую вентиляцию рабочей зоны.
Рекомендуется носить респиратор с фильтром
класса P2. Соблюдайте действующие национальные
предписания по обработке материалов.
l) Инструмент не предназначен для использования
детьми или физически ослабленными лицами
без соответствующего инструктажа.
m) Дети должны знать о том, что им запрещено
играть с инструментом.
4.2.2 Заботливое обращение с электроинструментом
и его правильная эксплуатация
a) Надежно фиксируйте обрабатываемую деталь.
Для фиксации детали используйте струбцины или
тиски.
Это надежнее, чем удерживать ее рукой, и при
этом можно держать инструмент двумя руками.
b) При перебоях в электроснабжении: выключите
инстру мент и отcоeдините кабель от сети.
Это
преудпредит самопроизвольное включение инструмента
при восстановлении электроснабжения.
4.2.3 Электрическая безопасность
a) Регулярно проверяйте сетевой кабель инструмента.
Для замены поврежденного кабеля привлекайте
опытного специалиста-электрика. Регулярно
проверяйте удли нительные кабели и при наличии
повреждений заме няйте их. В случае повреждения
сетевого или удлинительного кабеля во время
работы прикасаться к нему запрещается.
Отсоедините вилку сетевого кабеля от розетки.
Пользование поврежденными сетевыми или
удлинительными кабелями создает опасность поражения
электрическим током.
b)Поэтому регулярно обращай тесь в сервисную
службу Hilti для проверки инструмента, особенно
если Вы часто используете его для обработки
токопроводящих материалов.
При неблагоприятных
условиях влага и пыль, скапливающаяся на поверхности
инструмента (осо бенно от токопроводящих материалов),
могут вызвать удар электрическим током.
4.2.4 Рабочее место
a) Обеспечьте хорошее освещение рабочего места.
b)Обеспечьте хорошее проветривание рабочего
места.
Плохое проветривание рабочего места может
нанести вред Вашему здоровью из-за высокой пылевой
нагрузки.
4.2.5 Индивидуальные средства защиты
При работе с инструментом пользователь и находящиеся
в непосредственной близости лица должны иcпoльзoвaть
защитные очки, наушники и перчатки. В случае если
инструмент используется без пылеотсасывающего устрой ства, наденьте респиратор.
Printed: 07.07.2013 | Doc-Nr: PUB / 5131018 / 000 / 00
Page 66

62
5.
Перед использованием
Необходимо прочесть представленные в данном
руководстве правила безопасности и всегда их
соблюдать.
Напряжение электросети должно соответствовать
указанному на инструменте.
Если используются удлинительные шнуры: Можно
пользоваться только теми удлинительными шнурами,
которые одобрены для данного применения. Регулярно
проверяйте удлинительный шнур и шнур питания на
предмет обнаружения на них следов повреждений.
Удлинительные шнуры для наружного применения
На открытом воздухе допускается применение должным
образом утвержденных и маркированных удлинительных
шнуров.
Соблюдайте внимание
Постоянно оставайтесь сконцентрированными на
выполняемой вами работе. Выполняйте работу с
осторожностью и не пользуйтесь инструментом, если
вы отвлеклись от работы.
6.
Эксплуатация
Система
Чистота шлифовки и скорость удаления материала
определяются характеристиками абразивного листа,
установкой частоты хода и прикладываемому к
шлифовальной машине усилию. Электроинструмент,
шлифовальная пластина и абразивный лист формируют
систему. Постарайтесь выбрать оптимальную для
конкретного применения комбинацию принадлежностей
и установок машины.
Установка абразивных листов
Используйте абразивные листы с внешним диаметром
150 мм и креплением типа Velcro («липучки»).
Могут использоваться листы наждачной бумаги с 6
отверстиями для удаления пыли (расположены по
окружности диаметром 80 мм) или 9 отверстиями (8
отверстий расположены по окружности диаметром
120 мм, и 1 отверстие расположено в центре листа).
●
Примите меры для предотвращения непредна меренного пуска инструмента, вынув вилку шнура
питания из розетки сети.
●
Проверьте, что отверстия для удаления пыли в
шлифовальном листе совпадают с отверстиями в
шлифовальной пластине.
Удерживание шлифовальной машины рекомендуемые положения рукояток
Для быстрого снятия материала
●
Ведите инструмент двумя руками.
●
Используйте основную рукоятку и утопленную
вспомогательную рукоятку. Переведите вспомогательную
рукоятку в рабочее положение (вместо вспомогательной
рукоятки может использоваться направляющая рукоятка).
Для выполнения чистовой обработки
●
Ведите инструмент одной рукой.
●
Используйте рукоятку для чистовой обработки. Это
позволяет точно и легко вести инструмент одной рукой
близко к шлифуемой поверхности и обеспечивает
чувствительное касание, например, при выполнении
промежуточной шлифовки перед нанесением
последующих слоев покрытия или краски или при
выполнении тонкой чистовой шлифовки.
Для обработки вертикальных поверхностей
(например, стен, кромок и т. п.)
●
Ведите инструмент за рукоятку для чистовой
обработки. В этом случае при обработке вертикальных
поверхностей центр тяжести инструмента находится
в области руки. Это обеспечивает безопасную работу
без приложения чрезмерных усилий.
ВНИМАНИЕ
При шлифовке может образовываться вредная пыль.
Образующаяся при шлифовании пыль может быть
вредной для легких и глаз.
Следует пользоваться системой пылеудаления, а также
респиратором и защитными очками.
Шлифовка
●
Проверьте, что инструмент выключен.
●
Вставьте вилку шнура питания в розетку сети.
●
Установите нужную частоту хода.
●
Поместите инструмент на обрабатываемую
поверхность. Проверьте, что вся шлифующая
поверхность инструмента находится в контакте с
обрабатываемой поверхностью.
●
Включите инструмент и перемещайте его по
Printed: 07.07.2013 | Doc-Nr: PUB / 5131018 / 000 / 00
Page 67

63
обрабатываемой поверхности, прикладывая умеренное
давление (приблизительно 20 Н).
●
При окончании работы или в перерывах рекомендуется
сначала отводить от обрабатываемой поверхности
работающий инструмент, а затем выключать его.
7.
Работа с использованием
инструмента
Установка скорости шлифовки
Рекомендуемая скорость шлифовки (частота хода)
может быть заранее установлена с помощью дискового
регулятора частоты хода (может выполняться плавная
регулировка). Скорость шлифовки также может
регулироваться во время работы инструмента.
Скорость шлифовки зависит от обрабатываемого
материала. Оптимальная скорость может быть найдена
опытным путем (см. информацию, сопровождающую
абразивные листы и таблицу применений).
Установка
16
Скорость Низкая высокая
После включения инструмент работает с установленной
в нем скоростью.
Абразивные листы
Компания Hilti предлагает абразивные листы для
применений, перечисленных в параграфе «Правильное
использование». Компания Hilti предлагает абразивные
листы «Wood Line» с размером зерна от Р60 до Р160
для всех применений по дереву и абразивные листы
"Paint Line" с размером зерна от Р40 до Р400 для всех
применений по краске.
Шлифовальная пластина
Шлифовальная пластина - это раеходный материал,
на которую не распространяется общая гарантия.
На заводе-изготовителе на инструмент устанавливается
универсальная шлифовальная пластина. Эта
шлифовальная пластина обеспечивает очень высокую
скорость удаления материала и высокое качество
шлифовки. На ней имеются отверстия для удаления
пыли, отвечающие требованиям наиболее
распространенных стандартов.
Выберите наиболее подходящую шлифовальную
пластину в соответствии с конкретным применением.
Универсальная Первоначальная шлифовка
шлифовальная
–
Дерево, древесные
пластина материалы
–
Шпаклевка
–
Старая краска и лак
–
Композитные материалы
–
Пластмассы
Предварительная и
промежуточная шлифовка
–
Краска и лак
Мягкая Промежуточная и
шлифовальная окончательная шлифовка
пластина краски и лака. Шлифовка
кривых поверхностей
Тормоз шлифовальной пластины
Инструмент снабжен тормозом шлифовальной пластины.
Кольцо тормоза - это изнашиваемая деталь, на которую
не распространяется общая гарантия.
Тормоз шлифовальной пластины снижает скорость
шлифовальной пластины, когда шлифовальная пластина
находится в нерабочем положении, для того, чтобы
шлифовальная машина могла быть приведена в контакт
с обрабатываемой поверхностью без риска быть
отброшенной назад.
Удаление пыли
ВНИМАНИЕ
При шлифовке может образовываться вредная пыль.
Образующаяся при шлифовке пыль может быть вредной
для легких и глаз.
Следует пользоваться системой удаления пыли, а
также респиратором и защитными очками.
Удаление пыли с использованием коробки пылесборника
и мешка для сбора пыли
Коробка пылесборника - это изнашиваемая деталь,
на которую не распространяется общая гарантия.
Используйте коробку пылесборника и мешок для сбора
пыли, которые поставляются вместе с инструментом.
Тщательно удаляйте пыль (например, с помощью
пылесоса).
Удаление пыли с помощью пылесоса
В редких случаях, при неблагоприятных условиях и в
связи с низкой влажностью воздуха при использовании
для удаления пыли пылесоса могут возникать
электростатические разряды.
Это физическое явление не является следствием
технической неисправности инструмента. Чтобы
избежать возникновения электростатических разрядов
рекомендуется использовать пылесос Hilti W-VC 40.
Электроинструменты и электроприборы Hilti
соответствуют действующим в настоящее время
правилам и нормам. Если электростатические разряды
возникают даже при соблюдении рекомендаций
компании Hilti, свяжитесь с ближайшим сервисным
центром Hilti и опишите условия, при которых
используется инструмент и электроприбор.
Тщательно удаляйте пыль (например, с помощью
пылесоса).
Printed: 07.07.2013 | Doc-Nr: PUB / 5131018 / 000 / 00
Page 68

64
8.
Уход и техническое обслуживание
ОСТОРОЖНО
Содержите инструмент, в особенности поверхности
рукоятки, в чистом и сухом состоянии, без следов
масла и смазки. Запрещается использовать чистящие
средства, содержащие силикон.
Крышка инструмента изготовлена из ударопрочной
пластмассы. Накладка на корпусе изготовлена из эластомера.
При работе никогда не закрывайте вентиляционные прорези
в крышке корпуса! Осторожно очищайт вентиляционную
прорезь сухой щеткой. Защищайте инструмент от попадания
внутрь посторонних предметов. Регулярно очищайте наружную
поверхность инструмента слегка увлажненной протирочной
тканью. Запрещается использовать для очистки водяной
распылитель, парогенератор или струю воды! При чистке
такими средствами нарушается электробезопасность
инструмента.
Шлифовальная пластина
Проверьте шлифовальную пластину на предмет
обнаружения на ней следов истирания и грязи.
Изношенная или грязная шлифовальная пластина
может быть причиной ненадежного крепления на ней
абразивного. Очистите шлифовальную пластину или
замените ее в случае необходимости (поврежденные
шлифовальные пластины должны немедленно
заменяться).
Замена шлифовальной пластины
●
Извлеките вилку шнура питания из розетки сети.
●
Поставьте инструмент на рукоятки так, чтобы была
видна шлифующая поверхность абразивного листа.
●
Снимите абразивный лист.
●
Отверните фиксирующие винты.
●
Снимите старую шлифовальную пластину.
●
Очистите и проверьте тормоз шлифовальной
пластины. В случае необходимости замените его на
новый, а затем установите новую шлифовальную
пластину.
●
Крепко удерживая шлифовальную пластину, заверните
3 фиксирующих винта.
●
Проверьте, что шлифовальная пластина установлена
правильно (без перекоса, находится в контакте с
тормозным кольцом).
●
При установке абразивного листа используйте
приспособление для правильной установки абразивного
листа. Это обеспечивает такую установку, при которой
отверстия для удаления пыли в абразивном листе
совпадают с отверстиями в шлифовальной пластине.
Тормоз шлифовальной пластины
Если скорость вращения после отведения шлифовальной
машины от обрабатываемой поверхности постепенно
возрастает, это указывает на то, что износилось
тормозное кольцо шлифовальной пластины и его нужно
заменить.
Замена тормозного кольца
●
Извлеките вилку шнура питания из розетки сети.
●
Снимите шлифовальную пластину как описано в
параграфе «Замена шлифовальной пластины».
●
Выньте старое тормозное кольцо из корпуса
инструмента.
●
Установите новое тормозное кольцо так, чтобы все
асимметрично расположенные в тормозном кольце
пазы совпали с четырьмя винтами в инструменте.
●
Вставьте тормозное кольцо в соответствующие
прорези так, чтобы надежно защелкнулись фиксаторы.
●
Уплотняющая кромка должна быть расположена
заподлицо, это указывает на то, что тормозное кольцо
установлено правильно.
●
Установите шлифовальную пластину так, как описано
в параграфе «Замена шлифовальной пластины».
Техническое обслуживание
Периодически проверяйте внешние детали инструмента
на предмет обнаружения на них повреждений, а также
проверяйте работу всех органов управления.
Запрещается пользоваться инструментом, в котором
имеются поврежденные детали, и органы управления
которого не функционируют должны образом. В случае
обнаружения неисправности отремонтируйте инструмент
в сервисном центре компании Хилти.
Ремонт электрической части инструмента должен
выполняться только квалифицированным специалистом
по обслуживанию электроинструментов.
Printed: 07.07.2013 | Doc-Nr: PUB / 5131018 / 000 / 00
Page 69

65
9.
Выявление неисправностей
Признак неисправности Возможная причина Способ устранения
Инструмент не включается Нет напряжения в электросети Проверьте наличие в сети
напряжения с помощью
подключения заведомо исправного
электроприбора
Неисправен шнур питания или Шнур питания должен быть
вилка шнура питания проверен электриком, и в случае
необходимости заменен
Неисправен модуль электроники Он должен быть проверен
(например, неисправен электриком, и в случае
выключатель) необходимости должен быть заменен
Инструмент не выдает полную Недостаточное сечение проводов Используйте удлинительный шнур с
мощность удлинительного шнура проводами нужного сечения
Установлена слишком низкая Установите дисковый регулятор в
скорость (дисковый регулятор, положение 5 или 6
положение 1 или 2)
Плохо удаляется пыль Неправильно установлен Снимите абразивный лист и
абразивный лист, отверстия для установите его правильно
удаления пыли в шлифовальной
пластине не совпадают с
отверстиями для удаления пыли
в абразивном листе
Мешок для сбора пыли Удалите старый мешок для сбора
полностью заполнен пыли и установите новый
Засорились соединители шланга Снимите коробку пылесборника и
для удаления пыли очистите канал для удаления пыли
Абразивный лист не закрепляется Грязь на шлифовальной пластине Очистите шлифовальную пластину
на шлифовальной пластине Изношена крепежная поверхность Замените шлифовальную пластину
типа Velcro («липучка»)
шлифовальной пластины
Электростатические разряды Используется пылесос без Используйте безопасный пылесос
антистатического оборудования Hilti WVC 40-M
Обрыв проводника заземления Проверьте проводник заземления
Printed: 07.07.2013 | Doc-Nr: PUB / 5131018 / 000 / 00
Page 70

66
10. Утилизация
Большинство материалов, из которых изготовлены
изделия Hilti, может быть использовано повторно.
Перед утилизацией материалы следует должным
образом подготовить. Во многих странах компания Hilti уже
заключила соглашения о возвращении старых
электроинструментов для их утилизации. Дополнительную
информацию по этому вопросу можно получить в отделе по
обслуживанию клиентов или у представителя по продажам
компании Hilti.
Только для стран ЕС
Не выкидывайте электроприборы вместе с обычным
мусором!
В соответствии с европейской директивой об утилизации
старых электрических и электронных приборов и в соответствии
с местными законами электроприборы, бывшие в эксплуатации,
должны утилизовываться отдельно безопасным для
окружающей среды способом.
11. Гарантия производителя
Компания Hilti гарантирует отсутствие в поставляемом
инструменте производственных дефектов (дефектов
материалов и сборки). Настоящая гарантия действите льна только в случае соблюдения следующих условий:
эксплуатация, обслуживание и чистка инструмента
проводятся в соответствии с указаниями настоящего
руководства по эксплуатации; сохранена техническая
целостность инструмента, т. е. при работе с ним испо льзовались только оригинальные расходные материалы,
принадлежности и запасные детали производства Hilti.
Настоящая гарантия предусматривает бесплатный ремонт
или бесплатную замену дефектных деталей в течение
всего срока службы инструмента. Действие настоящей
гарантии не распространяется на детали, требующие
ремонта или замены вследствие их естественного износа.
Все остальные претензии не рассматриваются, за
исключением тех случаев, когда этого требует мест ное законодательство. В частности, компания Hilti не несет ответственности за прямой или косвен ный ущерб, убытки или затраты, возникшие вслед ствие применения или невозможности применения
данного инструмента в тех или иных целях. Нельзя
использовать инструмент для выполнения не
упомянутых работ.
При обнаружении дефекта инструмент и/или дефектные
детали следует немедленно отправить для ремонта или
замены в ближайшее представительство Hilti.
Настоящая гарантия включает в себя все гарантийные
обязательства компании Hilti и заменяет все прочие
обязательства и письменные или устные соглашения,
касающиеся гарантии.
12.
Сертификат соответствия
(оригинал)
Описание: Шлифовальная машина
орбитального действия
Обозначение: WFE 380 / WFE 450-E
Год создания: 2000
Настоящим объявляем, исключительно под свою
ответственность, что настоящая продукция отвечает
требованиям следующих стандартов и нормативных
документов:
2004/108/EC, 2006/42/EC, EN 60745-1,
EN 60745-2-4, EN ISO 12100, 2011/65/EU.
Hilti Corporation, Feldkircherstrasse 100,
FL-9494 Schaan
Paolo Luccini Jan Doongaji
Head of BA Ececutive Vice President
Quality & Process Management BU Power Tools & Accessories
BA Electric Tools & Accessories
01/2012 01/2012
Техническая документация:
Hilti Entwicklungsgesellschaft mbH
Zulassung Elektrowerkzeuge
Hiltistrasse 6
86916 Kaufering
Deutschland
Printed: 07.07.2013 | Doc-Nr: PUB / 5131018 / 000 / 00
Page 71

67
1.
Všeobecné informácie
Upozornenie na nebezpečenstvo «UPOZORNENIE»
Toto upozornenie sa používa pri upozornení na nebezpečenstvo, nebezpečný spôsob alebo postup, ktorý môže
zapríčiniť úraz osôb, poškodenie prístroja, materiálu alebo
iného majetku.
Piktogramy
Pred prvým použitím prístroja si
pozorne prečítajte návod na jeho
použitie.
Návod na použitie majte uložený na
rovnakom mieste ako prístroj.
Ak prístroj poskytnete iným osobám,
priložte aj návod na jeho použitie.
Obsah Strana
1.
Všeobecné informácie
67
2.
Popis
68
3.
Technické údaje
68
4.
Bezpečnosť pri práci
69
5.
Príprava pred použitím
71
6.
Prevádzka
71
7.
Obsluha prístroja
72
8.
Starostlivosť a údržba
72
9.
Odstraňovanie porúch
73
10.
Likvidácia
74
11.
Záruka výrobcu náradia
74
12.
Vyhlásenie o zhode (originál) 74
Ovládacie prvky
On/Off spínač
Regulátor brúsneho výkonu
Časti
쐋
Štítok s uvedením výrobného typu
쐏
Hlavná rukoväť
쐄
Vodiaca rukoväť
쐂
Výsuvná bočná rukoväť
쐆
Vnútorná rukoväť
쐊
Brúsny tanier
쐎
Povrch taniera so suchým zipsom
쐅
Skrutky na upevnenie brúsneho taniera
쐈
Brzdiaci krúžok
쐉
Kontajner na zachytávanie prachu
씈
Sáčok na zachytávanie prachu
씉
Konektor pre odsávanie
씊
Prípravok na presné nasadenie brúsneho papiera
PÔVODNÝ NÁVOD NA POUŽÍVANIE
Excentrická kruhová brúska WFE380/WFE450-E
Jednotlivé časti prístroja sú na ilustrácii označené číslami. Ilustrácia sa nachádza na vnútornej strane obalu.
Počas čítania návodu na použitie prístroja sledujte ilustrácie na uvedenej strane.
Pre účely tohto návodu bude «prístroj» znamenať kruhovú brúsku.
Umiestnenie identifikačných údajov
Na prístroji na nachádza štítok s výrobným číslom a typom
výrobku. Zaznamenajte si tieto údaje do vášho návodu
na použitie a uvádzajte ich pri každom kontakte s pracovníkom firmy Hilti alebo servisným strediskom.
Typ:
Výrobné číslo:
Výstražné symboly
Príkazové znaky
Používajte
chrániče
sluchu
Používajte
ochranné
rukavice
Používajte
ochrannú
masku
Používajte
ochranné
okuliare
Pred použitím
si prečítajte
návod
na obsluhu
Symboly
Výstraha pred
všeobecným
nebezpečenstvom
Výstraha pred
nebezpečným
elektrickým napätím
Horúci
povrch
Odpad odovzdajte
na recykláciu
Printed: 07.07.2013 | Doc-Nr: PUB / 5131018 / 000 / 00
Page 72

68
3.
Technické údaje
WFE380 WFE450-E
Nominálny výkon
380 W 450 W
Nominálne napätie
✱ 110 V 220 V 230 V 240 V 110 V 220 V 230 V 240 V
Nominálny prúd
3,6 A 1,8 A 1,7 A 1,6 A 4,2 A 2,3 A 2,2 A 2,1 A
Frekvencia siete
✱ 50–60 Hz
Počet kmitov naprázdno
5000–10000 /min
Opčet oscilácií
10000–20000 /min
Priemer brúsneho taniera 150 mm
Excentricita
4 mm
Priemer adaptéru na odsávanie
30 mm
H
motnos podľa postupu EPTA 01/2003
2,2 kg
UPOZORNENIE
Úroveň vibrácií uvedená v týchto pokynoch bola nameraná metódou zodpovedajúcou norme EN 60745 a možno ju
použiť pre vzájomné porovnanie elektrického náradia. Je vhodná aj na predbežný odhad zaťaženia vibráciami. Uvedená úroveň vibrácií sa vzťahuje na hlavné druhy použitia elektrického náradia. Pri inom druhu použitia, pri použití s
inými nástrojmi alebo nedostatočnej údržbe môže byť úroveň vibrácií odlišná. Zaťaženie vibráciami počas celej pracovnej zmeny sa tým môže výrazne zvýšiť. Pre presný odhad zaťaženia vibráciami je potrebné brať do úvahy aj čas,
kedy je náradie vypnuté alebo síce beží, ale nepoužíva sa. Zaťaženie vibráciami počas celej pracovnej zmeny sa tým
môže výrazne znížiť. Stanovte doplňujúce bezpečnostné opatrenia na ochranu pracovníka pred pôsobením vibrácií, napríklad: údržbu elektrického náradia a nástrojov, udržovanie rúk v teple, organizáciu pracovných postupov.
●
Je zakázané použiť prístroj na brúsenie za mokra.
●
Nepoužívajte prístroj na iné účely než je uvedené v
návode na použitie.
●
Za účelom vyhnutia sa riziku poranenia vždy používa-
jte iba originálne Hilti príslušenstvo.
●
Nepoužívajte prístroj bez vhodného systému odsávania prachu. Zásady bezpečnosti práce a likvidácie odpadu sa musia dodržiavať hlavne pri brúsení materiálov,
ktoré sú zdraviu škodlivé (napr. dubové alebo bukové
drevo, nátery s obsahom olova alebo iné škodlivé látky).
Dodržujte pokyny pre prevádzkovanie, čistenie a údržbu
prístroja, ktoré sú uvedené v návode na jeho použitie.
Najdôležitejšie charakteristiky prístroja
–
elektrická ochrana triedy II (s dvojitou izoláciou)
Z
(podľa EN 60745)
–
obmedzenie vibrácií, ergonomické rukoväte
-
hlavná rukoväť
-
vodiaca rukoväť
-
výsuvná rukoväť
–
zabudovaná pomocná rukoväť
–
plynulé nastavenie počtu kmitov
–
brúsny tanier pre univerzálne použitie, ostatné k dispozícii ako príslušenstvo.
Podmienky, ktoré musí dodržiavať užívateľ
●
Prístroj je určený na profesionálne používanie.
●
Prístroj môžu používať len preškolený a kompetentný
pracovníci. Obsluha prístroja musí byť informovaná o
možných rizikách a bezpečnosti práce, musí byť zdravotne a duševne spôsobilá pracovať s prístrojom.
2.
Popis
Excentrická brúska WFE 380/WFE 450-E je elektricky
poháňaný prístroj určený na brúsenie dreva, kombinovaných materiálov, farieb, lakov, plastov, omietok (sadry),
plniva a podobných materiálov.
Prístroj bol zostrojený pre odborné použitie.
Rozsah dodávky: prístroj WFE 380/WFE 450-E s kontajnérom na zachytávanie prachu, sáčkom na zachytávanie prachu, návodom na použitie v profikufri. WFE 380
sa dodáva v kartónovej krabici, bez profi kufra.
Správne používanie
●
Prístroj je zostrojený tak, aby sa používali vymeniteľné
brúsne papiere na brúsenie povrchov materiálov ako
drevo, dyha, plnivo, plasty a tmely.
●
Pracovné prostredie môže byť na stavbe, alebo v dielni a môže zahŕňať renováciu, alebo novostavbu.
●
Pracovné prostredie má byť suché.
●
Prístroj sa má používať iba vtedy, keď je napájaný zo
siete, pričom je zabezpečené napätie a frekvencia v súlade s informáciami uvedenými na typovom štítku.
●
Pri použití prístroja musí byť obrábaný kus zabezpečený proti pohybu a obsluha musí pri práci stáť v bezpečnej polohe.
●
Brúsenie kovov a materiálov obsahujúcich azbest je
zakázané.
●
Prístroj je určený na ručné použitie.
●
Prístroj nikdy nevystavujte dažďu alebo snehu a
nepoužívajte ho vo vlhkom alebo mokrom prostredí alebo
tam, kde je riziko explózie.
Printed: 07.07.2013 | Doc-Nr: PUB / 5131018 / 000 / 00
Page 73

69
Informácia o hlučnosti a vibrácii (podľa EN 60745)
Typická hladina akustického tlaku
93 dB (A)
Typická hladina akustického výkonu
82 dB (A)
P
re uvedenú hladinu hluku podľa EN 60745 je neistota 3 dB.
Používajte ochranu sluchu!
Triaxiálne hodnoty vibrácií (suma vektorov vibrácií)
WFE380 WFE450-E
Brúsenie povrchov
(ah) 4,1 m/s
2
3,9 m/s
2
Neistota (K) pre triaxiálne hodnoty vibrácií:
1,5 m/s
2
1,5 m/s
2
✱
Prístroj je dodávaný v rozličných verziách pre rôzne sieťové napätia. Sieťové napätie a menovitý prúd je uvedený na typovom štítku.
Právo na technické zmeny vyhradené
4. Bezpečnostné pokyny
UPOZORNENIE
Bezpečnostné upozornenia v kapitole 4.1 zahŕňajú všetky všeobecné bezpečnostné upozornenia pre elektrické náradie, ktoré
musia byť podľa aplikovateľnych noriem uvedené v návode na
používanie. Preto môžu byť obsiahnuté aj pokyny, ktoré pre toto
náradie nie sú relevantné.
4.1 Všeobecné bezpečnostné pokyny pre elektrické ručné nára-
die
a) VAROVANIE! Prečítajte si všetky bezpečnostné poky-
ny a inštrukcie. Nedbalosť pri dodržiavaní bezpečnostnych
pokynov a inštrukcií môže mať za následok úraz elektrickym
prúdom, požiar, prípadne ťažké poranenia. Všetky bezpeč-
nostné upozornenia a pokyny si uschovajte pre budúcu
potrebu. Pojem „elektrické náradie“ uvedeny v bezpečnostnych
upozorneniach sa vzťahuje sa sieťové elektrické ručné náradie
(so sieťovou šnúrou) a na akumulátorové elektrické ručné náradie (bez sieťovej šnúry).
4.1.1 Bezpečnosť na pracovisku
a) Na pracovisku udržujte čistotu a dbajte na dostatočné osvet-
lenie. Neporiadok na pracovisku a neosvetlené časti pracovis-
ka môžu viesť k úrazom.
b) Elektrické náradie nepoužívajte vo vybušnom prostredí, v
ktorom sa nachádzajú horľavé kvapaliny, plyny alebo prach.
Elektrické náradie vytvára iskry, ktoré môžu spôsobiť vznietenie prachu alebo vyparov.
c) Pri používaní náradia dbajte na bezpečnú vzdialenosť detí
a inych osôb. Pri odpútaní pozornosti od práce môžete stratiť
kontrolu nad náradím.
4.1.2 Elektrická bezpečnosť
a) Zástrčka sieťovej šnúry elektrického náradia musí byť vhod-
ná do danej zásuvky. Zástrčka sieťovej šnúry sa v žiadnom
prípade nesmie meniť. Uzemnené elektrické náradie nepripájajte do siete použitím zástrčkovych adaptérov. Nezme-
nené zástrčky a vhodné zásuvky znižujú riziko úrazu elektrickym prúdom.
b) Zabráňte dotyku tela s uzemnenymi predmetmi ako sú rúry,
radiátory, sporáky a chladničky. Pri uzemnení tela hrozí zvyšené riziko úrazu elektrickym prúdom.
c) Chráňte elektrické náradie pred dažďom a vlhkosťou. Vnik-
nutie vody do elektrického náradia zvyšuje riziko úrazu elek-
trickym prúdom.
d) Sieťovú šnúru nepoužívajte na účely, na ktoré nie je urče-
ná, napr. na prenášanie alebo zavesenie elektrického náradia, či na vyťahovanie zástrčky zo zásuvky. Sieťovú šnúru
chráňte pred vysokou teplotou, olejom, ostrymi hranami
alebo pred pohybujúcimi sa časťami náradia. Poškodené
alebo spletené sieťové šnúry zvyšujú riziko úrazu elektrickym
prúdom.
e) Pri práci s elektrickym ručnym náradím vo vonkajšom pro-
stredí používajte iba predlžovacie šnúry, vhodné aj pre vonkajšie prostredie. Používanie predlžovacej šnúry určenej do
vonkajšieho prostredia znižuje riziko úrazu elektrickym prúdom.
f) Pokiaľ sa nemožno vyhnúť prevádzke elektrického nára-
dia vo vlhkom prostredí, použite prúdovy chránič. Použitie
prúdového chrániča znižuje riziko úrazu elektrickym prúdom.
4.1.3 Bezpečnosť osôb
a) Pri práci buďte pozorní, dbajte na to, čo robíte a pri práci s
elektrickym ručnym náradím postupujte s rozvahou. Ak ste
unavení alebo pod vplyvom drog, alkoholu alebo liekov,
nepoužívajte žiadne elektrické náradie. Okamih nepozornosti
pri používaní elektrického náradia môže viesť k vážnym poraneniam.
b) Používajte prostriedky osobnej ochrany a vždy používajte
ochranné okuliare. Používanie prostriedkov osobnej ochrany
ako ochrannej masky, bezpečnostnej pracovnej obuvi s protišmykovou podrážkou, ochrannej prilby alebo chráničov sluchu
(podľa druhu využitia elektrického náradia) znižuje riziko poranenia.
c) Zabráňte neúmyselnému zapnutiu náradia. Pred pripoje-
ním elektrického náradia do siete a/alebo vložením akumulátora, pred uchopením náradia alebo jeho prenášaním
sa uistite, že je vypnuté. Pri prenášaní elektrického náradia s
prstom na vypínači alebo pri pripojení zástrčky do zásuvky v
čase keď je náradie zapnuté, hrozí riziko úrazu.
d) Pred zapnutím elektrického náradia odstráňte z náradia
nastavovacie nástroje alebo kľúče. Nástroj alebo kľúč, ponechany v pohybujúcom sa náradí, môže spôsobiť úraz.
e) Vyhybajte sa neprirodzenej polohe. Pri práci dbajte na sta-
bilny postoj, ktory vám vždy umožní udržať rovnováhu.
Budete tak môcť elektrické náradie v neočakávanych situáciách
lepšie kontrolovať.
f) Používajte vhodny pracovny odev. Nenoste voľny odev ale-
Printed: 07.07.2013 | Doc-Nr: PUB / 5131018 / 000 / 00
Page 74

70
4.2 Bezpečnostné pokyny, špecifické pre výrobok
4.2.1 Bezpečnosť osôb
a) Používajte chrániče sluchu. Pôsobenie nadmerného
hluku môže viesť k strate sluchu.
b) Používajte prídavné rukoväte, pokiaľ sú súčasťou
dodávky. Strata kontroly nad náradím môže viesť k poraneniam.
c) Náradie držte za izolované úchopové časti, najmä
ak vykonávate práce, pri ktorých môže brúsny tanier
prísť do styku so skrytými elektrickými vedeniami
alebo s vlastnou sieťovou šnúrou. Kontakt brúsneho
taniera s vedením pod napätím môže spôsobiť, že sa
voľne prístupné kovové súčasti dostanú pod napätie a
používateľ náradia môže utrpieť úraz elektrickým prúdom.
d)
Náradie vždy pevne držte za rukoväte oboma rukami. Rukoväte udržiavajte suché, čisté a bez prítomnosti oleja alebo tuku.
e)Aby ste predišli nebezpečenstvu pádu pri práci, sieťo-
vú apredlžovaciu šnúru a odsávaciu ha
dicu vždy veď-
te smerom dozadu od náradia.
f)
Pri výmene nástrojov používajte pracovné rukavice.
Nástroj môže byť po použití horúci.
g)
Používajte prístroj len podľa návodu a iba v bezchybnom stave.
h)
Používajte systém odsávania prachu, požívajte prostriedky na ochranu dýchacích ciest a ochranné okuliare.
Pri brúsení môže vznikať škodlivý brúsny prach.
Brúsny prach môže poškodzovať pľúca a oči.
i)
Prevádzkovateľ musí zabezpečiť likvidáciu škodlivého
prachu vznikajúceho pri brúsení v súlade so štátnou a
regionálnou legislatívou.
Pri brúsení škodlivých látok
ako bukové a dubové drevo, nátery s obsahom olova
a iných škodlivín vzniká nebezpečný prach.
j)
Pri dlhšie trvajúcej práci pravidelne prácu prerušujte
na uvoľnenie aprecvičenie prstov, aby sa prekrvili.
k)
Prach z materiálov, ako sú nátery s obsahom olova,
niektoré druhy dreva, minerály a kov môže byť zdraviu
škodlivý. Kontakt s týmto prachom alebo jeho vdychovanie môže spôsobiť alergické reakcie a/alebo ochorenie dýchacích ciest pracovníka alebo osôb v okolí.
Určitý prach, napr. prach z dubového alebo bukového
dreva, je rakovinotvorný, predovšetkým v spojení s prísadami na úpravu dreva (chromát, prostriedky na ochranu dreva). Materiál obsahujúci azbest smú obrábať len
odborníci.
Pokiaľ možno, používajte odsávanie prachu.
Na dosiahnutie vysokej účinnosti odsávania prachu
používajte vhodný mobilný vysávač na drevený prach
a/alebo minerálny prach odporúčaný spoločnosťou
Hilti, určený pre toto elektrick
é náradie. Postarajte sa
o dobré vetranie pracoviska. Odporúčame používať
respirátor s filtrom triedy P2. Dodržiavajte predpisy pre
obrábané materiály platné v príslušnej krajine.
l) Náradie nesmú bez inštruktáže používať de
ti alebo
menej zdatné osoby.
m) Nedovoľte deťom, aby sa s náradím hrali.
4.2.2 Svedomité zaobchádzanie a používanie elektrického
náradia
a)Obrobok pri práci zaistite. Na dosiahnutie pevnej polo-
hy obrobka používajte u
pínacie zariadenia alebo zver-
ák.
Obrobok má tak stabilnejšiu polohu ako pri držaní
ru kou a obe ruky sú voľné na ovládanie náradia.
b)Pri výpadku elektrickej energie: náradie vypnite azástrč-
ku sieťovej šnúry vytiahnite zo zásuvky.
Zabráni sa tak
nežiaducemu spusteniu náradia pri obnovení dodávky
elektrického prúdu.
4.2.3 Elektrická bezpečnosť
a)
Sieťovú šnúru náradia pravidelne kontrolujte avprí pade poškodenia ju nechajte vymeniť v autorizovanom servisnom stredisku. Predlžovaciu šnúru pravidelne kontrolujte avprípade poškodenia ju vymeňte. Pri
bo šperky. Vlasy, odev a rukavice epribližujte do blízkosti
pohybujúcich sa častí náradia. Voľny odev, šperky alebo dlhé
vlasy sa môžu zachytiť o pohybujúce sa časti náradia.
g) Ak je možné namontovať zariadenia na odsávanie/zachy-
távanie prachu, presvedčte sa, že tieto zariadenia sú pripojené a používajú sa správne. Používanie zariadenia na
odsávanie prachu môže znížiť ohrozenie spôsobené prachom.
4.1.4 Používanie a starostlivosť o elektrické náradie
a) Náradie nepreťažujte. Používajte vhodné náradie určené
na prácu, ktorú vykonávate. Vhodné náradie umožňuje lep-
šiu a bezpečnejšiu prácu v uvedenom rozsahu vykonu.
b) Náradie s poškodenym vypínačom nepoužívajte. Náradie,
ktoré sa nedá zapnúť alebo vypnúť, je nebezpečné a treba ho
dať opraviť.
c) Skôr než budete náradie nastavovať, meniť jeho príslu-
šenstvo alebo než ho odložíte, vytiahnite sieťovú zástrčku
zo zásuvky a/alebo vyberte akumulátor. Toto bezpečnostné
opatrenie zabraňuje neúmyselnému zapnutiu elektrického náradia.
d) Nepoužívané elektrické ručné náradie odložte na miesto
chránené pred prístupom detí. Osobám, ktoré nie sú oboznámené s náradím alebo ktoré si neprečítali tieto pokyny,
nedovoľte náradie používať. Elektrické náradie je pre neskú-
senych používateľov nebezpečné.
e) Elektrické náradie starostlivo ošetrujte. Skontrolujte, či pohyb-
livé časti elektrického náradia bezchybne fungujú a nezadŕhajú sa, či nie sú zlomené alebo poškodené v takom rozsahu, ktory by mohol ovplyvniť funkčnosť elektrického náradia. Poškodené časti nechajte pred používaním náradia opraviť. Mnohé úrazy boli zapríčinené nedostatočne udržiavanym
náradím.
f) Rezacie nástroje udržujte ostré a čisté. Starostlivo ošetro-
vané rezacie nástroje s ostrymi reznymi hranami sa menej zasekávajú a ľahšie sa vedú.
g) Elektrické náradie, príslušenstvo, vkladacie nástroje atď.
používajte v súlade s tymito pokynmi. Zohľadnite pri tom
pracovné podmienky a vykonávanú činnosť. Používanie
elektrického náradia na iné než určené účely môže viesť k nebezpečnym situáciám.
4.1.5 Servis
a) Náradie nechajte opravovať iba kvalifikovanym personá-
lom a iba s použitím originálnych náhradnych dielcov. Ta k
je možné zabezpečiť zachovanie bezpečnosti elektrického náradia.
Printed: 07.07.2013 | Doc-Nr: PUB / 5131018 / 000 / 00
Page 75

71
poškodení sieťovej alebo predlžovacej šnúry pri práci
sa nedotýkajte sieťovej šnúry. Vytiahnite zástrčku zo
zásuvky.
Poškodené pripojovacie a predlžovacie káble
spôsobujú nebezpečenstvo úrazu elektrickým prúdom.
b)
Znečistené náradie – najmä ak sa často používa na
opracúvanie vodivých materiálov – nechajte preto vpravidelných intervaloch skontrolovať vauto rizovanom
servisnom stredisku Hilti.
Prach, usadený na povrchu
náradia, pred ovšetkým na jeho vodivých častiach, alebo
vlhkosť môžu za nepriaznivých okolností viesť k úrazu
elektric kým prúdom.
4.2.4 Pracovisko
a)Dbajte na dostatočné osvetlenie pracoviska.
b)Dbajte na dobré vetranie pracoviska.
Vysoká prašnosť
môže na zle vetranom pracovisku zaviniť poškodenie
zdravia.
4.2.5 Osobné ochranné pomôcky
Používateľ a osoby, zdržujúce sa v blízkosti, musia počas
používania náradia používať vhodné ochranné okuliare,
chrániče sluchu, ochranné rukavice, a ak nepoužívate
odsávanie prachu, ľahkú ochrannú masku.
5.
Pred použitím
Je nevyhnutné prečítať si a dodržiavať bezpečnostné
pokyny uvedené v tomto návode na použitie.
Hlavne sieťové napätie musí byť v súlade s informáciou
uvedenou na typovom štítku.
Pri použití predlžovacích káblov: Môžu sa používať iba
predlžovacie káble, ktoré sú pre daný typ výrobku schválené.
Kontrolujte v pravidelných intervaloch predlžovací kábel
a jeho koncovku, či nie sú poškodené.
Predlžovacie káble pre použitie vonku
Pri práci v teréne používajte iba predlžovacie káble
schválené pre daný typ výrobku a označené ako «vhodné pre použitie vonku».
Vždy buďte sústredení
Vždy sa sústreďte na prácu. Postupujte opatrne a ak sa
na prácu nemôžete plne sústrediť, prístroj prestaňte
používať.
6.
Prevádzka
Systém
Výber brúsneho papiera je ovplyvnený charakterom brúseného povrchu a rýchlosťou obrusovania materiálu,
nastavením rýchlosti a tlakom, ktorým pôsobíme na brúsený povrch. Elektrický prístroj, brúsny tanier a brúsny
papier tvoria systém. Musíte dbať na to, aby ste pri práci vytvorili čo najvhodnejšiu kombináciu týchto prvkov.
Pripevnenie brúsneho papiera
Používajte brúsne papiere s vonkajším priemerom 150
mm, ktoré sa pripevňujú systémom suchého zipsu.
Môžu sa používať brúsne papiere so šiestimi odsávacími otvormi (80 mm priemer rozstupovej kružnice) alebo
deviatimi otvormi (8 otvorov na 120 mm rozstupovej kružnice a 1 otvor v strede papiera).
●
Odpojením napájacieho kábla zo siete predchádzajte
neúmyselnému uvedeniu prístroja do prevádzky.
●
Zabezpečte aby otvory na odsávanie prachu na brúsnom papieri boli umiestnené v zhode s otvormi na brúsnom tanieri.
Odporúčané polohy uchopenia brúsky
Pri rýchlom brúsení
●
Uchopte prístroj do obidvoch rúk.
●
Použite hlavnú rukoväť aj vnútornú rukoväť. Povytiahnutím nastavte pomocnú rukoväť do pracovnej polohy (namiesto pomocnej rukoväte sa môže použiť aj vodiaca rukoväť).
Pri dokončovacích prácach
●
Veďte prístroj jednou rukou.
●
Použite vnútornú rukoväť. Umožňuje viesť prístroj presne a ľahko jednou rukou v blízkosti brúseného povrchu a
umožňuje jemný kontakt napríklad pri brúsení strednej intenzity medzi brúsením náterov a jemným brúsením povrchu.
Pri práci na zvislých povrchoch
●
Držte prístroj za vnútornú rukoväť.
●
Pri práci na zvislých povrchoch spočíva ťažisko prístroja v ruke. To umožňuje pracovať bezpečne a bez prílišnej únavy.
UPOZORNENIE
Pri brúsení môže vznikať škodlivý brúsny prach.
Brúsny prach môže poškodzovať pľúca a oči.
Používajte
chrániče
sluchu
Používajte
ochranné
rukavice
Používajte
ochrannú
masku
Používajte
chrániče očí
Printed: 07.07.2013 | Doc-Nr: PUB / 5131018 / 000 / 00
Page 76

72
Používajte systém odsávania prachu, požívajte prostriedky
na ochranu dýchacích ciest a ochranné okuliare.
Brúsenie
●
Presvedčte sa, či je prístroj vypnutý.
●
Zapojte napájací kábel do siete.
●
Zvoľte si potrebný brúsny výkon.
●
Položte prístroj na opracovávaný materiál tak, aby celý
brúsny povrch bol s ním v kontakte.
●
Zapnite prístroj a pohybujte ním po povrchu opracovávaného materiálu a pritom pôsobte miernym tlakom
(cca 20 N).
●
Pri ukončení práce alebo počas prestávok odporúčame, aby ste prístroj z opracovávaného materiálu nadvihli počas jeho chodu a potom vypli.
7.
Obsluha prístroja
Nastavenie brúsneho výkonu
Odporúčaný brúsny výkon sa môže vopred, alebo počas
prevádzky plynule nastaviť pomocou regulátora na želanú
hodnotu.
Brúsny výkon závisí od materiálu, ktorý sa má brúsiť.
Ideálny brúsny výkon sa môže stanoviť na základe vykonania praktického testu.
Nastavenie
16
Brúsny výkon nízka vysoká
Po zapnutí bude prístroj pracovať vopred nastaveným
výkonom.
Brúsne papiere
Hilti ponúka vhodné brúsne papiere «Drevo línia» v rozsahu
hrúbky zrna od P60 po P180 pre všetky drevené aplikácie a «Náter línia» v rozsahu hrúbky zrna od P40 do P400
pre všetky aplikácie náterov.
Brúsny tanier
Brúsny tanier je časť, ktorá sa opotrebúva a nevzťahujú sa na ňu všeobecné záručné podmienky.
Prístroj je vo výrobe vybavený univerzálnym brúsnym
tanierom. Tetno brúsny tanier dosahuje veľmi dobrú mieru brúsenia a dobrú konečnú úpravu. Je vybavený otvormi na odsávanie prachu v súlade s normami. Zvoľte si
najvhodnejší brúsny tanier, v závislosti od účelu použitia.
Univerzálny brúsny Predbrúsenie
tanier
–
drevo, drevené materiály
–
tmely
–
stará farba a lak
–
kombinované materiály
–
plasty
Stredné a prípravné brúsenie
–
farba a lak
Mäkký brúsny tanier Stredné a konečné brúsenie
–
farby alebo laku.
–
brúsenie oblých povrchov
Brzdný krúžok brúsneho taniera
Prístroj je vybavený brzdou brúsneho taniera. Brzdný
krúžok je časť, ktorá sa opotrebúva a nevzťahujú sa na
neho všeobecné záručné podmienky.
Brzdný krúžok brúsneho taniera znižuje rýchlosť brúsnej
dosky pri voľnobehu tak, aby sa obsluha mohla dostať
do kontaktu s obrábaným materiálom bez rizika spätného
nárazu. Tým sa zabráňuje tvorbe prebrúsenín a ryh od
brusiva.
Odsávanie prachu
UPOZORNENIE
Brúsením sa môže produkovať rizikový brúsny prach.
Brúsny prach sa môže usadiť na pľúcach a v očiach.
Použite systém na odsávanie prachu a noste ochranné
prostriedky na ochranu dýchacích ciest a ochranné okuliare.
Kontajnér pre sáčok na prach
Použite kontajnér na prach so sáčkom na prach, ktoré
sa dodávajú spolu s prístrojom. Kontajnér je spotrebný
materiál, ktorý sa opotrebúva a nevzťahujú sa na neho
všeobecné záručné podmienky. Dôkladne odstráňuje
nános prachu.
Priemyselný vysávač na prach
V zriedkavých prípadoch za nepriaznivých okolností a v
spojení s nízkou vlhkosťou vzduchu sa môže vyskytnúť
elektrostatický výboj ak pre účely odsávania prachu
použijete vysávač. Tento fyzikálny jav nevzniká kvôli
technickej chybe prístroja. Možnosti výskytu tejto udalosti možno predísť použitím vysávača Hilti W-VC 40.
Elektrické prístroje Hilti sú v súlade v súčasnosti platnými predpismi. Ak však napriek dodržaniu systémových odporúčaní Hilti budete mať skúsenosť s týmto
javom, kontaktujte prosím naše najbližšie servisné centrum Hilti a popíšte podmienky, za ktorých boli prístroj
a zariadenie použité.
8.
Čistenie a údržba
POZOR
Náradie, predovšetkým rukoväte, udržujte čisté a bez
stôp oleja a tuku. Nepoužívajte čistiace prostriedky obsahujúce silikón.
Vonkajší kryt náradia je vyrobený z nárazuvzdorného plastu. Úchopové časti sú z elastoméru.
Náradie nikdy nepoužívajte s upchatými vetracími štrbinami! Vetracie štrbiny opatrne vyčistite suchou kefou.
Zabráňte vniknutiu cudzích telies do vnútra náradia. Zovňajšok náradia pravidelne čistite mierne navlhčenou utierkou. Na čistenie nepoužívajte rozprašovač, parný vysokotlakový čistič alebo tečúcu vodu! Môže sa tým ohroziť
elektrická bezpečnosť náradia.
Printed: 07.07.2013 | Doc-Nr: PUB / 5131018 / 000 / 00
Page 77

73
9.
Zisťovanie a odstraňovanie porúch
ChybaMožná príčina Riešenie
Prístroj sa nerozbehne Chyba v prívode elektrického Zastrčte iný elektrický prístroj
prúdu
Chybný napájací kábel alebo Dajte skontrolovať elektrikárovi
zástrčka a v prípade potreby vymeňte.
Chyba v elektronickom module Dajte skontrolovať elektrikárovi
(napr. chybný vypínač) a v prípade potreby vymeňte.
Prístroj nepodáva plný výkon Prierez predlžovacieho kábla Použite predlžovací kábel s adekvát-
je neadekvátny nym prierezom.
Regulátor brúsneho výkonu Nastavte na 5 alebo 6
je nastavený na 1 a 2
Odsávanie nemá výkon Brúsny papier nie je nasadený Opravte nasadenie papiera
správne, otvory papiera nesúhlasia
s otvormi taniera
Sáčok na zachyt. prachu je plný Vyberte starý sáčok a vložte nový
sáčok.
Zablokovaný konektor pre Vyberte kontajnér na zachytávanie
odsávanie prachu prachu a vyčistite konektor
Brúsny papier nezostáva Brúsny tanier je špinavý. Vyčistite brúsny tanier.
pripojený k brúsnemu tanieru Suchý zips je opotrebovaný Vymeňte brúsny tanier.
Elektrostatický výboj Použitý vysávač bez Použite vysávač Hilti WVC 40-M
antistatického zariadenia
Prerušenie uzemňovacieho vodiča Skontrolujte uzemňovací vodič.
Brúsny tanier
Kontrolujte opotrebenie a zašpinenie brúsneho taniera.
Opotrebený alebo špinavý brúsny tanier môžu spôsobiť
nekvalitné pripojenie brúsneho papiera k brúsnemu tanieru. Brúsny tanier čistite a v prípade potreby ho vymeňte
(poškodené brúsne taniere sa musia okamžite vymeniť).
Výmena brúsneho taniera
●
Odpojte zástrčku napájacieho kábla zo zásuvky.
●
Postavte prístroj na povrch rukovätí tak, aby bola vidi-
teľná drsná strana brúsneho taniera.
●
Vyberte brúsny papier.
●
Odstráňte starý brúsny tanier.
●
Použite kľúč vhodný na uvoľnenie upevňovacích skrutiek.
●
Vyčistite brzdu brúsneho taniera a skontrolujte ju. V
prípade potreby ju vymeňte a potom namontujte nový
brúsny tanier.
●
Bezpečne držte brúsny tanier a utiahnite 3 upevňova-
cie skrutky.
●
Skontrolujte, či je brúsny tanier správne namontovaný
(nie šikmo, musí byť v kontakte s brzdou).
●
Pri prikladaní brúsnych papierov použite polohovaciu
pomôcku. Týmto sa zabezpečí, aby otvory na odsávanie
prachu v brúsnom papieri boli v osi s otvormi na brúsnom tanieri.
Brzda brúsneho taniera
Ak rýchlosť otáčania pri voľnobehu po určitej dobe používania stále rastie, je to znak toho, že sa krúžok brzdy opotreboval a má sa vymeniť.
Výmena krúžku brzdy
●
Odpojte zástrčku napájacieho kábla zo zásuvky.
●
Vyberte brúsny tanier tak, ako je to popísané v časti
«Výmena brúsneho taniera ».
●
Vytiahnite starý brzdný krúžok brúsneho taniera.
●
Zabezpečte aby asimetrické vybrania na brzdnom krúž-
ku boli v zhode so štyrmi skrutkami na tele prístroja.
●
Zatlačte brzdný krúžok do zodpovedajúcich vybraní,
a skontrolujte bezpečné zapadnutie pružných jazýčkov.
●
Ak okraj tesnenia leží v jednej rovine, je to znak správ-
neho nasadenia brzdného krúžku.
●
Namontujte brúsny tanier podľa popisu «Výmena brús-
neho taniera».
Údržba
Pravidelne kontrolujte všetky vonkajšie časti prístroja kvôli
možnosti poškodenia a presvedčte sa, či všetky kontrolky bezchybne fungujú. Nepracujte s prístrojom, ak sú
niektoré časti poškodené alebo ak kontrolky nefungujú
bezchybne. V prípade potreby nechajte prístroj opraviť
v servisnom stredisku Hilti.
Opravy elektrických častí môže uskutočniť iba školený
odborník – elektrotechnik.
Printed: 07.07.2013 | Doc-Nr: PUB / 5131018 / 000 / 00
Page 78

74
10.
Likvidácia
Náradie Hilti je vyrobené v prevažnej miere
z recyklovateľných materiálov. Predpokladom
na opätovné využitie je odborná separácia materiálov. Vmnohých krajinách je firma Hilti už pripravená
na príjem vášho náradia na recykláciu. Informujte sa
v zákazníckom stredisku firmy Hilti alebo u vášho obchodného poradcu.
Len pre štáty EÚ
Elektrické náradie nevyhadzujte do komunál-
neho odpadu!
Podľa európskej smernice o nakladaní s použitými elek-
trickými a elektronickými zariadeniami a zodpovedajúcich ustanovení právnych predpisov jednotlivých krajín
sa použité elektrické náradie musí zbierať oddelene od
ostatného odpadu a podrobiť ekologicky šetrnej recyklácii.
11.
Záruka výrobcu náradia
Hilti ručí, že dodaný výrobok je bezchybný z hľadiska
použitého materiálu a technologického postupu výroby. Táto záruka platí iba za predpokladu, že výrobok sa
správne používa a obsluhuje, ošetruje a čistí v súlade
s návodom na používanie Hilti a že je zaručená technická jednotnosť, t. j. že s výrobkom sa používa iba originálny spotrebný materiál, príslušenstvo a náhradné
diely Hilti.
Táto záruka zahŕňa bezplatnú opravu alebo bezplatnú
výmenu chybných častí počas celej životnosti výrobku.
Časti, podliehajúce normálnemu opotrebovaniu, do tejto
záruky nespadajú.
Ďalšie nároky sú vylúčené, pokiaľ nie sú v rozpore spovinnými
národnými predpismi. Hilti neručí najmä za priame alebo
nepriame poruchy alebo z nich vyplý vajúce následné
škody, straty alebo náklady vsúvis losti spoužívaním
alebo
z dôvodov nemožnosti pou žívania výrobku na akýkoľvek
účel. Diskrétne prísľuby na použitie alebo vhodnosť na
určitý účel sú výslovne vylúčené.
Výrobok alebo jeho časti po zistení poruchy neodkladne odošlite na opravu alebo výmenu príslušnej obchodnej organizácii Hilti.
Záruka zahŕňa všetky záručné záväzky zo strany spoloč nosti Hilti a nahrádza všetky predchádzajúce alebo
súčasné vyhlásenia, písomné alebo ústne dohovory,
týkajúce sa záruky.
12.
Vyhlásenie o zhode (originál)
Opis: Excentrická kruhová brúska
Označenie: WFE 380 / WFE 450-E
Rok, v ktorom bol navrhnutý: 2000
Prehlasujeme na našu zodpovednosť, že tento výrobok
je v súlade s nasledovnými smernicami a normami:
2004/108/ES, 2006/42/ES, EN 60745-1, EN 60 745-2-4,
EN ISO 12100, 2011/65/EU.
Hilti Corporation, Feldkircherstrasse 100,
FL-9494 Schaan
Paolo Luccini Jan Doongaji
Head of BA Ececutive Vice President
Quality & Process Management BU Power Tools & Accessories
BA Electric Tools & Accessories
01/2012 01/2012
Technická dokumentácia u:
Hilti Entwicklungsgesellschaft mbH
Zulassung Elektrowerkzeuge
Hiltistrasse 6
86916 Kaufering
Deutschland
Printed: 07.07.2013 | Doc-Nr: PUB / 5131018 / 000 / 00
Page 79

75
1.
Znak za nevarnost
»Opozorilo«
Ta beseda opozarja na morebitne nevarnosti in na nevarne
postopke, ki lahko povzročijo nastanek telesne poškodbe,
okvare stroja, poškodb materiala in drugih predmetov.
Simboli
Pred prvo uporabo je potrebno
prebrati navodila za uporabo.
Vedno hranite navodila skupaj z
orodjem.
Priložite navodila za uporabo
tudi v primeru, ko stroj posodite
drugemu.
Vsebina Stran
1.
Splošne informacije
75
2.
Tehnični opis
76
3.
Tehnični podatki
76
4.
Varnostni predpisi
77
5.
Pred uporabo
79
6.
Delovanje stroja
79
7.
Delo s strojem
80
8.
Nega in vzdrževanje
80
9.
Napake pri obratovanju
81
10.
Recikliranje
82
11.
Garancija proizvajalca orodja
82
12.
Deklaracija o ustreznosti (izvirnik) 82
Pregled operacij
stikalo za vklop/izklop
stikalo za nastavitev hitrosti
Sestavni deli
Ploščica
쐏
Glavni ročaj
쐄
Vodilni ročaj
쐂
Pomožni ročaj
쐆
Ročaj za natančno brušenje
쐊
Brusna plošča
쐎
Podloga brusne plošče s prijemali
쐅
Vijaki za pritrditev brusne plošče
쐈
Zavorni obroč
쐉
Košarica
씈
Vrečka za prah
씉
Nastavek za sesalec
씊
Pripomoček za nastavitev položaja brusnega papirja
IZVIRNA NAVODILA
WFE380/WFE450-E Ekscentrični brusilnik
Številke ustrezajo skicam, ki se nahajajo na pregibni
platnici. Med branjem navodil, imejte to stran odprto.
V navodilih za uporabo pomeni beseda »stroj« ekscentrični brusilnik.
Oznaka s podatki na stroju
Tip in serijska številka stroja sta odtisnjeni na tablici, ki je
na stroju. Prepišite te podatke v navodila za uporabo (na
črti spodaj) in jih vedno navajajte pri povpraševanju pri naših
zastopnikih ali na servisu.
Tip:
Serijska številka:
Opozorilni znaki
Znaki za obveznost
Uporabljajte
zaščito za sluh
Uporabljajte
zaščitne
rokavice
Uporabljajte
lahko zaščito
za dihala
Uporabljajte
zaščito za oči
Pred začet-
kom dela
preberite
navodila za
uporabo
Simboli
Opozorilo na
splošno
nevarnost
Opozorilo na nevarno
električno napetost
Opozorilo na
vročo površi-
no
Odpadni material
oddajte v recikli-
ranje
Printed: 07.07.2013 | Doc-Nr: PUB / 5131018 / 000 / 00
Page 80

76
3.
Tehnični podatki
WFE380 WFE450-E
Nazivna moč
380 W 450 W
Napetost
✱ 110 V 220 V 230 V 240 V 110 V 220 V 230 V 240 V
Nazivni tok
3,6 A 1,8 A 1,7 A 1,6 A 4,2 A 2,3 A 2,2 A 2,1 A
Frekvenca
✱ 50–60 Hz
Število nihajev v prostem teku
5000–10000 /min
Hitrost nihanja
10000–20000 /min
Brusna plošča
∅ 150 mm
Ekscentričnost
4 mm
Nastavek za sesalec, zunanji premer
30 mm
Teža skladno s postopkom EPTA 01/2003
2,2 kg
NASVET
V teh navodilih naveden nivo vibracij je izmerjen v merilnem postopku in ustreza normi EN 60745 ter se lahko
uporabi za medsebojno primerjavo električnega orodja. Namenjen je tudi predhodni oceni obremenitve z vibracijami. Navedeni nivo vibracij predstavlja dejansko uporabo električnega orodja. Če električno orodje uporabljate
za druge namene, z neustreznimi nastavki ali ga ne vzdržujete pravilno, lahko obremenitve odstopajo. To lahko
znatno poveča obremenitev v celotnem delovnem časovnem obdobju. Za točno oceno obremenitev je treba upoštevati tudi čas, ko je orodje izključeno ali pa deluje, a ni dejansko v uporabi. To lahko znatno zmanjša obremenitev
v celotnem delovnem časovnem obdobju. Upoštevajte dodatne varnostne ukrepe za zaščito uporabnika pred
vibracijami, na primer: vzdrževanje električnega orodja in nastavkov, zaščita rok pred mrazom in organizacija poteka
dela.
●
Stroja nikakor ne smete spreminjati, predelati ali z njim
kako drugače ravnati, kot je opisano v navodilih za uporabo.
●
V izogib poškodbam in nesrečam pri delu, uporabljajte
le originalne Hilti dodatke.
●
Ne delajte s strojem brez primernega sistema odsesovanja. Pri brušenju materialov, ki vsebujejo nevarne snovi
( hrastov ali bukov les, barve, ki vsebujejo svinec ali druge
škodljive substance) upoštevajte predpise.
Upoštevajte vse informacije, ki se nanašajo na delovanje,
nego in vzdrževanje stroja.
Glavne lastnosti stroja
–
Električna zaščita razred II (dvojna izolacija)Z(po EN 60745)
–
Absorbcija vibracij, ergonomsko oblikovani ročaji
-
Glavni ročaj
-
Vodilni ročaj
-
Ročaj za natančno brušenje
–
Vgrajen pomožni ročaj
–
Predhodna brezstopenjska nastavitev hitrosti
–
Brusna plošča za univerzalno uporabo, druge plošče so
na voljo kot dodatek.
Uporabnik je dolžan upoštevati naslednje pogoje
●
Stroj je namenjen le za ročno upravljanje.
●
S strojem lahko dela, ga vzdržuje in popravlja le kvalificirana in poučena oseba. Delavec mora biti še posebej
dobro seznanjen s potencialnimi nevarnostmi.
2.
Tehnični opis
WFE 380 / WFE 450-E je električni stroj za brušenje lesa,
lesenih in kompozitnih materialov, barv, lakov, plastike,
kitov, izravnalnih mas in podobnih materialov.
Namenjen je za profesionalno uporabo.
Komplet sestavljajo: električni stroj s košarico za prah, vrečka za prah, navodila za uporabo in kovček. Brusilnik WFE
380 je v kartonu.
Pravilna uporaba
●
Stroj se uporablja za brušenje lesenih površin, furnirja,
polnil, plastike in kitov skupaj z ustreznim brusnim papirjem.
●
Brusilnik lahko uporabljamo za renovacije in korekcije
na gradbiščih in v delavnicah.
●
Stroj je namenjen za delo v suhem delovnem okolju.
●
Stroj lahko obratuje le, kadar je povezan na električni vir
z enako napetostjo in frekvenco, kot je to označeno na tablici, ki je na stroju.
●
Brušenje kovine in materialov, ki vsebujejo azbest ni
dovoljeno.
●
Stroj je namenjen le za ročno uporabo.
●
Ne izpostavljajte stroja dežju ali snegu in ne delajte s
strojem v vlažnih in mokrih prostorih ali na mestih, kjer lahko pride do eksplozije.
●
Stroja ne uporabljajte za mokro brušenje.
Printed: 07.07.2013 | Doc-Nr: PUB / 5131018 / 000 / 00
Page 81

77
Podatek o hrupu in vibracijah (po EN 60745)
Tipični A-nivo jakosti zvoka
93 dB (A)
Tipični A-nivo zvočnega tlaka
82 dB (A)
Za navedeno raven zvočnega tlaka po EN 60745 znaša nevarnost 3 dB.
Uporabljajte glušnike!
Triaksialna vrednost vibracij (vektorska vsota vibracij)
WFE380 WFE450-E
Brušenje površin
(ah) 4,1 m/s
2
3,9 m/s
2
Negotovost (K) za triaksialne vrednosti vibracij
1,5 m/s
2
1,5 m/s
2
✱
Stroj je dobavljiv z različno nazivno napetostjo. Prosimo upoštevajte podatka za nazivno napetost in nazivni
tok, ki sta označena na tablici stroja.
Pridržujemo si pravico do tehničnih sprememb
4. Varnostna opozorila
NASVET
Varnostna opozorila v poglavju 4.1 vključujejo vsa splošna varnostna opozorila za električna orodja, ki morajo biti vključena v navodilih za uporabo skladno z zahtevami zadevnih standardov. Zato
lahko vsebujejo tudi opozorila, ki se ne nanašajo na vaše orodje.
4.1 Splošna varnostna opozorila za električna orodja
a) OPOZORILO! Preberite vsa varnostna opozorila in
navodila. Posledice neupoštevanja navodil so lahko električni
udar, požar in/ali hude telesne poškodbe. Vse varnostne pred-
pise in navodila shranite za v prihodnje. Pojem "električno
orodje", ki smo ga uporabili v varnostnih predpisih, se nanaša
na električno orodje za priklop na električno omrežje (s priklju-
čnim kablom) in na električno orodje na baterijski pogon (brez
priključnega kabla).
4.1.1 Varnost na delovnem mestu
a) Poskrbite, da bo vaše delovno mesto vedno čisto in dobro
osvetljeno. Nered ali neosvetljena delovna področja lahko pov-
zročijo nezgode.
b) Prosimo, da električnega orodja ne uporabljate v okolju,
kjer je nevarnost eksplozije in v katerem se nahajajo gor-
ljive tekočine, plini in prah. Električna orodja povzročajo iskre-
nje, zato se gorljivi prah ali pare lahko vnamejo.
c) Ne dovolite otrokom in drugim osebam, da bi se med delom
približale električnemu orodju. Druge osebe lahko odvrnejo
vašo pozornost in izgubili boste nadzor nad orodjem.
4.1.2 Električna varnost
a) Priključni vtič električnega orodja mora ustrezati vtičnici.
Vtiča pod nobenim pogojem ne smete spreminjati. Upora-
ba adapterskih vtičev v kombinaciji z zaščitno ozemljenim
električnim orodjem ni dovoljena. Nespremenjen vtič in ustre-
zna vtičnica zmanjšujeta nevarnost električnega udara.
b) Izogibajte se telesnemu stiku z ozemljenimi površinami, na
primer s cevmi, grelci, štedilniki in hladilniki. Če je ozem-
ljeno tudi vaše telo, obstaja povečano tveganje električnega
udara.
c) Zavarujte električno orodje pred dežjem in vlago. Vstop vode
v električno orodje povečuje nevarnost električnega udara.
d) Električnega kabla ne uporabljajte za prenašanje ali obe-
šanje električnega orodja in ne vlecite vtiča iz vtičnice tako,
da vlečete za kabel. Kabel zavarujte pred vročino, oljem,
ostrimi robovi in premikajočimi se deli orodja. Poškodovan
ali zavozlan kabel povečuje nevarnost električnega udara.
e) Če električno orodje uporabljate na prostem, uporabljajte
samo podaljšek, ki je primeren tudi za delo na prostem. Uporaba podaljševalnega kabla, ki je primeren za uporabo na prostem, zmanjšuje nevarnost električnega udara.
f) Če se ne morete izogniti uporabi električnega orodja v vlaž-
nem okolju, uporabite zaščitno stikalo okvarnega toka. Uporaba zaščitnega stikala okvarnega toka zmanjša tveganje električnega udara.
4.1.3 Varnost oseb
a) Bodite zbrani in pazite, kaj delate. Dela z električnim orod-
jem se lotite razumno. Nikoli ne uporabljajte električnega
orodja, če ste utrujeni ali če ste pod vplivom mamil, alkohola ali zdravil. En sam trenutek nepazljivosti pri uporabi elek-
tričnega orodja ima lahko za posledico resne telesne poškodbe.
b) Uporabljajte osebno zaščitno opremo in vedno nosite zaščit-
na očala. Uporaba osebne zaščitne opreme, na primer protiprašne maske, nedrsečih zaščitnih čevljev, zaščitne čelade in
glušnikov, odvisno od vrste in načina uporabe električnega orodja, zmanjšuje tveganje telesnih poškodb.
c) Izogibajte se nenamernemu vklopu orodja. Preden elektri-
čno orodje priključite na električno omrežje in/ali akumulatorsko baterijo, ga dvignete ali nosite, se prepričajte, da
je izključeno. Če se med nošenjem električnega orodja vaš prst
nahaja na stikalu oziroma če na električno omrežje priključite
vklopljeno električno orodje, lahko pride do nezgode.
d) Pred vklopom z električnega orodja odstranite nastavitve-
na orodja ali vijačni ključ. Orodje ali ključ, ki se nahajata na
vrtečem se delu orodja, lahko povzročita nezgodo.
e) Izogibajte se neobičajni telesni drži. Poskrbite za varno sto-
jišče in ohranite ravnotežje. Tako boste lahko v nepričakova-
Printed: 07.07.2013 | Doc-Nr: PUB / 5131018 / 000 / 00
Page 82

78
4.2 Varnostna navodila v zvezi z izdelkom
4.2.1 Varnost oseb
a) Uporabljajte zaščito za sluh. Hrup lahko povzroči izgu-
bo sluha.
b) Uporabljajte dodatne ročaje, če so bili dobavljeni z
orodjem. Izguba kontrole nad orodjem lahko pripelje do
poškodb.
c) Pri izvajanju del, pri katerih lahko pride do stika bru-
silnega krožnika s skritimi električnimi vodi ali elek-
tričnim kablom orodja, orodje prijemajte samo za
izolirane prijemalne površine. Pri stiku brusilnega krož-
nika z vodnikom pod napetostjo lahko napetost preide
tudi na kovinske dele orodja in uporabnik lahko utrpi električni udar.
d)
Stroj držite vedno z obema rokama za predvidena
ročaja. Ročaji naj bodo vedno suhi, čisti in nemastni.
e)Priključni kabel in podaljšek ter sesalna cev naj se ved-
no nahajajo za strojem, da se izognete padcu pri delu.
f)
Pri zamenjavi nastavkov uporabljajte delovne rokavice. Nastavki se lahko pri uporabi segrejejo.
g)
Stroj lahko uporabljajte samo takrat, kadar je brezhiben ter v namen, za kar je konstruiran oz. predviden.
h)
Uporabljajte sesalec in nosite zaščitno masko in
zaščitna očala.
Brušenje lahko povzroča nastajanje
nevarnega prahu. Brusni prah je lahko škodljiv tako za
pljuča, kot tudi za oči.
i)
Delavec mora odlagati nevarni prah v skladu z nacionalnimi in drugimi veljavnimi predpisi.
Pri brušenju
materialov (hrastovega ali bukovega lesa, barv, ki vsebujejo svinec ali drugih škodljivih substanc) nastaja člove-
ku nevaren brusni prah.
j)
Med delom si privoščite odmor. Za boljšo prekrvitev
prstov delajte sprostitvene in razgibalne vaje.
k)
Prah nekaterih materialov, kot npr. premazi, ki vsebujejo svinec, nekatere vrste lesa, mineralov in kovin, je
lahko zdravju škodljiv. Stik ali vdihavanje prahu lahko
pri uporabniku ali osebah, ki so v bližini, povzroči alergične reakcije ali bolezni dihal. Prah določenih materialov, kot npr. hrast ali bukev, velja za kancerogen, še
posebej v povezavi z dodatnimi snovmi za obdelavo
lesa (kromati, sredstvo za zaščito lesa). Z materialom,
ki vsebuje azbest, lahko delajo le strokovnjaki.
Če je le
mogoče, uporabljajte odsesavanje prahu. Za čim bolj
učinkovito odsesavanje prahu uporabljajte za to električno orodje namenjen mobilni sesalnik za prah lesa
in/ali mineralov, ki ga priporoča Hilti. Poskrbite za dobro prezračevanje delovnega mesta. Priporočljivo je, da
nosite dihalno masko s filtrom razreda P2. Upoštevajte lokalne predpise, ki veljajo
za obdelovane materia-
le.
l) Orodje ni namenjena otrokom ali šibkim osebam, ki o
njeni uporabi niso bile poučene.
m) Razložite otrokom, da naprava ni igrača.
4.2.2 Skrbno ravnanje z električnimi orodji in njihova uporaba
a)Obdelovanec pritrdite. Obdelovanec pritrdite s pomočjo
vpenjalnih priprav ali primeža, da se ne bo premikal.
Obdelovanec bo tako varno pritrjen, vi pa boste lahko
stroj držali z obema rokama.
b)Pri prekinitvi toka: Stroj izklopite in izvlecite vtič iz vti -
č nice.
To preprečuje nenamerni vklop stroja po pono-
vni vzpostavitvi električne napetosti.
4.2.3 Električna varnost
a)Redno preverjajte priključni kabel stroja. Če je poškodo -
van, naj ga popravijo v pooblaščenem servisu. Redno preverjajte el. podaljšek in ga zamenjajte, če je
poš kodovan. Če pride pri delu do poškodb priključ-
ni situaciji bolje obvladali električno orodje.
f) Uporabljajte primerno obleko. Ne nosite širokih oblačil ali
nakita. Lasje, oblačila in rokavice naj se ne približujejo premikajočim se delom orodja. Premikajoči se deli orodja lahko
zagrabijo ohlapno obleko, nakit ali dolge lase.
g) Če je na orodje možno namestiti priprave za odsesavanje
in prestrezanje prahu, se prepričajte, ali so le-te priključene in ali jih uporabljate na pravilen način. Uporaba priprav
za odsesavanje prahu zmanjšuje ogroženost zaradi prahu.
4.1.4 Uporaba in ravnanje z električnim orodjem
a) Ne preobremenjujte orodja. Uporabljajte samo električno
orodje, ki je predvideno za opravljanje določenega dela. Z
ustreznim električnim orodjem boste delali bolje in varneje v
predvidenem območju zmogljivosti.
b) Ne uporabljajte električnega orodja, ki ima pokvarjeno sti-
kalo. Električno orodje, ki ga ni možno vklopiti ali izklopiti, je
nevarno in ga je treba popraviti.
c) Pred nastavljanjem orodja, menjavo delov pribora in odla-
ganjem orodja izvlecite vtič iz vtičnice in/ali odstranite akumulatorsko baterijo iz orodja. Ta previdnostni ukrep onemo-
goča nepredvideni zagon električnega orodja.
d) Električna orodja, ki jih ne uporabljate, shranjujte izven
dosega otrok. Osebam, ki orodja ne poznajo ali niso prebrale teh navodil, ne dovolite uporabljati orodja. Električna
orodja so nevarna, če jih uporabljajo neizkušene osebe.
e) Skrbno vzdržujte električna orodja. Preverite, ali premika-
joči se deli orodja delujejo brezhibno in se ne zatikajo oziroma ali kakšen del orodja ni zlomljen ali poškodovan do
te mere, da bi oviral delovanje električnega orodja. Pred
ponovno uporabo je treba poškodovani del orodja popraviti. Vzrok za številne nezgode so prav slabo vzdrževana elek-
trična orodja.
f) Rezalna orodja naj bodo ostra in čista. Skrbno negovana
rezalna orodja z ostrimi robovi se manj zatikajo in so bolje vodljiva.
g) Električno orodje, pribor, nastavke itd. uporabljajte v skla-
du s temi navodili. Pri tem upoštevajte delovne pogoje in
vrsto dela, ki ga nameravate opravljati. Zaradi uporabe elek-
tričnega orodja v druge, nepredvidene namene, lahko nastanejo nevarne situacije.
4.1.5 Servis
a) Orodje lahko popravlja samo usposobljen strokovnjak, in
to izključno z originalnimi nadomestnimi deli. Le tako bo tudi
vnaprej zagotovljena varna raba električnega orodja.
Printed: 07.07.2013 | Doc-Nr: PUB / 5131018 / 000 / 00
Page 83

79
nega kabla ali podaljška, se kabla ne smete dotikati.
Vtič izvlecite iz vtičnice.
Ne uporabljajte poškodovanih priključnih kablov in podaljškov zaradi nevarnosti
električnega udara.
b) Zato naj umazan stroj v rednih časovnih intervalih
pregleda Hiltijev servis, še posebej če pogosto obdelujete električno prevodne materiale.
Prah, ki se sprijema na površino stroja (še posebej električno prevoden prah), ali vlaga lahko v neugodnih razmerah
povzročita električni udar.
4.2.4 Delovno mesto
a)Poskrbite za dobro osvetljavo delovnega mesta.
b)Poskrbite za dobro prezračevanje delovnega mesta.
Slabo prezračena delovna mesta lahko zaradi prevelike koncentracije prahu škodujejo vašemu zdravju.
4.2.5 Osebna oprema za zaščito pri delu
Uporabnik in v bližini nahajajoče se osebe morajo med
uporabo stroja uporabljati primerna zaščitna očala,
zaščito za sluh, zaščitne rokavice, in, če ne uporabljajo sistema za odsesavanje prahu, tudi lahko zaščito za
dihala.
5.
Pred uporabo
Pomembno je, da si v navodilih za uporabo ogledate in
preberete napotke za varno delo.
Električna napetost mora ustrezati podatku na tablici.
Če uporabljate podaljške: uporabljajte samo preizkušene
podaljške, ki so primerni za tako uporabo. Redno prever-
jajte stanje el.kabla in podaljška.
Podaljški za zunanjo uporabo
Za delo zunaj stavb, uporabljajte le podaljške, ki so preizkušeni in označeni z oznako za zunanjo uporabo.
Med delom bodite pozorni
Povsem se posvetite delu. Delajte previdno in ne uporabljajte stroja, kadar ste raztreseni.
6.
Delovanje stroja
Sistem
Kakovost površine in hitrost brušenja sta odvisna od izbire brusnega papirja, hitrosti in od pritiska brusilnika na
površino.
Sistem tvorijo: stroj, brusna plošča in brusni papir. Za vsako aplikacijo si zagotovite optimalno kombinacijo nastavitve stroja.
Pritrditev brusnega papirja
Uporabljajte brusni papir z zunanjim premerom 150 mm in
s sprijemali.
Uporabljate lahko brusne papirje s 6 luknjami za odvajanje prahu (v krogu 80 mm) ali z 9 luknjami luknjami za odvajanje prahu (8 lukenj v krogu 120 mm in ena v sredini papirja).
●
V izogib nenamernega vklopa stroja, iz vtičnice izvleci-
te el. kabel.
●
Zagotovite, da so luknje za odvajanje prahu na papir-
ju poravnane z luknjami na brusni plošči.
Držanje brusilnika – priporočeni položaji držanja
Grobo brušenje
●
Stroj vodite z obema rokama.
●
Uporabite glavni ročaj in dodatni - vgrajeni ročaj. Izvle-
cite dodatni ročaj v položaj za delo.
Fino brušenje
●
Stroj vodite z eno roko.
●
Uporabite ročaj, ki je namenjen za fino brušenje. Ta ročaj
omogoča natančno vodenje stroja blizu površine in zagotavlja dober občutek.
Npr: za vmesno brušenje med enim in drugim nanosom
barve in pri končnem brušenju.
Brušenje navpičnih površin
(sten, robov,)
●
Stroj držite za ročaj, ki je namenjen za fino brušenje. Pri
brušenju navpičnih površin, težišče stroja leži v roki, kar
omogoča varno in neutrudno delo.
Opozorilo
Brušenje lahko povzroča nastajanje nevarnega prahu.
Uporabljajte
zaščito za
sluh
Uporabljajte
zaščitne roka-
vice
Uporabljajte
lahko zaščito
za dihala
Uporabljajte
zaščito za
oči
Printed: 07.07.2013 | Doc-Nr: PUB / 5131018 / 000 / 00
Page 84

80
Brusni prah je lahko škodljiv tako za pljuča, kot tudi za oči.
Uporabljajte sesalec, nosite zaščitno masko in zaščitna
očala.
Brušenje
●
Prepričajte se, da je stroj izklopljen.
●
Vklopite el. kabel v vtičnico.
●
Nastavite ustrezno hitrost.
●
Brusilnik položite na obdelovanec ter se prepričajte, da
je celotna brusna površina v stiku z obdelovancem.
●
Vklopite stroj ter ga z enakomernim pritiskom vodite po
površini (priblj. 20 N).
●
Priporočamo, da po končanem delu ali med premorom
umaknete stroj iz obdelovanca in ga izklopite.
7.
Delo s strojem
Nastavitev hitrosti brušenja
Priporočeno hitrost brušenja (število nihajev) lahko predhodno nastavite s stikalom za nastavitev hitrosti (možna
brezstopenjska nastavitev). Hitrost brušenja se lahko nastavi tudi med delovanjem stroja.
Hitrost brušenja je odvisna od materiala, ki ga brusite. Idealno hitrost najdete s preizkusi (prosimo, da upoštevate
informacije, ki so označene na brusnih papirjih in v tabeli
z aplikacijami).
Nastavitev
16
hitrosti majhna velika
Po vklopu stroja, le-ta deluje s predhodno nastavljeno
hitrostjo.
Brusni papirji
Hilti ima v prodajnem programu primerne brusne papirje
za aplikacije pod oznako «prava uporaba». Hilti nudi dve
vrsti brusnih papirjev: «lesni program» v granulacijah od
P60 do P180 za vse lesne aplikacije in «program barve»
od granulacije P40 do P400 za barvne aplikacije.
Brusna plošča
Brusna plošča spada med potrošni material in ni predmet garancije.
Stroj je tovarniško opremljen z univerzalno brusno ploščo,
ki dosega zelo dober učinek brušenja in kvalitetno površino. Brusna plošča ima izvrtine za odvajanje brusnega
prahu, ki ustrezajo najpomembnejšim standardom.
Izberite pravo brusno ploščo za določeno aplikacijo.
Univerzalna brusna Prvo brušenje
plošča
–
Les, leseni materiali
–
Polnila
–
Stare barve in laki
–
Kompozitni materiali
–
Plastika
Predhodno brušenje in vmesno
brušenje
–
barve in laki
Mehka brusna plošča Vmesno in končno brušenje
barv in lakov.
Brušenje krivin
Zavora brusne plošče
Stroj je opremljen z zavoro brusne plošče. Zavorni obroč
spada med potrošni material in ni predmet garancije.
Zavora brusne plošče zmanjša v praznem teku hitrost
brusni plošči. S tem se zmanjša povratni udarec, ki lahko nastane ob stiku brusne plošče in obdelovanca.
Odsesovanje prahu
Opozorilo
Brušenje lahko povzroča nastajanje nevarnega prahu.
Brusni prah je lahko škodljiv tako za pljuča, kot tudi za
oči.
Uporabljajte sesalec in nosite zaščitno masko in zaščitna očala.
Odsesovanje prahu s košarico in z vrečko
(Košarica za prah se smatra kot potrošni material in ni
predmet garancije).
Uporabite košarico in vrečko, ki sta v kompletu s strojem.
Temeljito očistite prah (uporabite sesalec).
Odsesovanje prahu s sesalcem
Kadar uporabljate sesalec za odsesovanje prahu, se lahko v redkih, neugodnih pogojih ter v kombinaciji z nizko
relativno zračno vlago, pojavi stanje elektrostatične izpraznjenosti.
Ta fizikalni pojav ni posledica okvare stroja. Z uporabo
priporočenega Hilti sesalca WVC 40-M se lahko izognete nastanku tega pojava. Hilti električni stroji in naprave
ustrezajo trenutnim veljavnim predpisom.
Če se kljub upoštevanju Hiltijevih priporočil pojavi ta fizikalni pojav, prosimo obvestite najbližji Hilti servis. Natančno opišite vse okoliščine v katerih ste uporabljali stroj in
naprave.
Temeljito očistite prah (uporabite sesalec).
8.
Nega in vzdrževanje
PREVIDNO
Orodje, še posebej pa prijemalne površine morajo biti
suhe in čiste ter ne smejo biti onesnažene z oljem ali
mastjo. Ne uporabljajte sredstev za nego, ki vsebujejo
silikon.
Zunanje ohišje orodja je izdelano iz plastike, ki je odporna proti udarcem. Ročaj je izdelan iz elastomernega materiala.
Nikoli ne uporabljajte orodja z zamašenimi prezračevalnimi režami! Prezračevalne reže previdno očistite s suho
krtačo. Izogibajte se vdoru tujkov v notranjost orodja.
Printed: 07.07.2013 | Doc-Nr: PUB / 5131018 / 000 / 00
Page 85

81
9.
Napake pri obratovanju
Napaka Možen vzrok Odprava napake
stroj se ne vklopi napaka na dovodu el. toka v vtičnico vklopite drug el. stroj in
preverite, če obratuje
poškodovan el. kabel ali vtikač elektrikar naj ga pregleda ter naj ga po
potrebi zamenja
napaka na elektroniki elektrikar naj ga pregleda ter naj ga po
(npr. na stikalu) potrebi zamenja
stroj ne obratuje s polno močjo neustrezen presek el. podaljška uporabite el. podaljšek z ustreznim
presekom
stikalo za predhodno nastavitev prestavite stikalo v položaj 5 ali 6
hitrosti je v položaju (1 ali 2)
slab učinek odsesovanja brusni papir ni pravilo pritrjen, ponovno natančno namestite brusni
luknje za odsesovanje niso papir
poravnane
vrečka za prah je polna zavržite staro vrečko za prah in
montirajte novo.
priključek za odsesovanje je odstranite košarico in očistite priključni
zamašen kanal.
brusni papir se ne obdrži na brusni brusna plošča je umazana očistite brusno ploščo
plošči na brusni plošči so izrabljene zamenjajte brusno ploščo
prijemalke
izpraznjenje elektrostatičnega uporaba sesalca, ki nima uporabite Hiltijev sesalec WVC 40-M
naboja antistatične izvedbe
prekinjen ozemljitveni vodnik preverite ozemljitveni vodnik
Zunanjost orodja redno čistite z rahlo navlaženo krpo za
čiščenje. Za čiščenje ne uporabljajte pršilnika, naprave
za čiščenje s paro ali tekoče vode! S tem lahko ogrozite
električno varnost orodja.
Brusna plošča
Preverite obrabljenost in čistočo brusne plošče. Obrabljena in umazana brusna plošča lahko vpliva na slab oprijem brusnega papirja na ploščo. Čistite brusno ploščo ter
jo po potrebi tudi zamenjajte (poškodovano brusno ploščo
takoj zamenjajte).
Menjava brusne plošče
●
Iz vtičnice izvlecite el.kabel.
●
Obrnite stroj ter ga naslonite na površine ročajev tako,
da vidite brusni papir.
●
Odstranite brusni papir.
●
Za odvitje vijakov uporabite pravšnje orodje.
●
Odstranite staro brusno ploščo.
●
Preverite in očistite zavoro brusne plošče. Če je pot-
rebno jo zamenjajte z novo.
●
Brusno ploščo pritrdite s tremi vijaki.
●
Preverite, če je brusna plošča pravilno pritrjena (ni
postrani ter je v stiku s zavornim obročem).
●
Za pritrditev brusnega papirja uporabite poseben pripomoček, ki poravna luknje za odvajanje prahu na papirju z luknjami brusne plošče.
Zavora brusne plošče
Če hitrost vrtenja v prostem teku, po določenem času
uporabe naraste, pomeni, da je obroč zavore plošče izrabljen. Potrebno ga je zamenjati.
Menjava zavore brusne plošče
●
Iz vtičnice izvlecite el.kabel.
●
Odstranite brusno ploščo na način, kot je opisan v
«Menjava brusne plošče».
●
Iz ohišja izvlecite staro zavoro brusne plošče.
●
Asimetrične vdolbine zavornega obroča naj bodo por-
avnane s štirimi vijaki na stroju.
●
Zavorni obroč pritisnite na odgovarjajoče vdolbine.
Prepričajte se, da so ušesca varno pripeta.
●
Če ustje leži ravno, potem je bil zavorni obroč pra-
vilno pritrjen.
●
Pritrdite brusno ploščo na način, kot je opisan v «Men-
java brusne plošče».
Vzdrževanje
Redno preglejte izgled stroja in preverite, če vse funkcije delujejo brezhibno. Ne uporabljajte stroja, če je kakršen
koli del poškodovan, oziroma, če funkcije ne delujejo pravilno. Stroj naj popravljajo samo v Hilti servisu.
Popravila električnih delov stroja lahko opravlja le izšolan elektrikar.
Printed: 07.07.2013 | Doc-Nr: PUB / 5131018 / 000 / 00
Page 86

82
10. Recikliranje
Orodja Hilti so pretežno narejena iz materialov,
ki jih je mogoče znova uporabiti. Pogoj za pono-
vno uporabo materialov je ustrezno razvrščanje
materiala. Hilti je v veliko državah že organiziran tako, da
lahko oddate vaše odsluženo orodje. Pozanimajte se pri
vaši servisni službi ali zastopstvu Hilti.
Samo za države EU
Električnega orodja ne odstranjujte s hišnimi
odpadki!
V skladu z Evropsko direktivo o odpadni električni in elektronski opremi in z njenim izvajanjem v nacionalni zakonodaji je treba električna orodja ob koncu njihove življenjske dobe ločeno zbirati in jih predati v postopek okolju prijaznega recikliranja.
11.
Garancija proizvajalca orodja
Hilti garantira, da je dobavljeno orodje brez napak v
materialu ali izdelavi. Ta garancija velja pod pogojem,
da se z orodjem ravna in se ga uporablja, neguje in čisti
na pravilen način v skladu z navodili za uporabo Hilti;
ter da je zagotovljena tehnična enotnost, kar pomeni,
da se z orodjem uporabljajo samo originalni Hiltijev
potrošni material, pribor in nadomestni deli.
Ta garancija obsega brezplačno popravilo ali brezplačno zamenjavo pokvarjenih delov med celotno življenjsko dobo orodja. Ta garancija ne obsega delov, ki se
nor malno obrabljajo.
Ostali zahtevki so izključeni, kolikor to ni v naspro tju z
veljavnimi nacionalnimi predpisi. Hilti ne jamči za neposredno ali posredno škodo zaradi napak, za izgube ali
stroške, povezane z uporabo ali nezmo žnostjo uporabe
orodja za kakršenkoli namen. Molče dana zagotovila glede uporabe ali primerno sti za določen namen
so izrec-
no izključena.
Orodje oziroma prizadete dele je treba takoj po ugoto vitvi napake poslati pristojni prodajni organizaciji Hilti
v popravilo oziroma zamenjavo.
Ta garancija vključuje vse garancijske obveznosti s strani Hiltija in zamenjuje vsa prejšnja ali istočasna pojasnila oziroma pisne ali ustne dogovore v zvezi z garancijo.
12. Izjava o skladnosti (izvirnik)
Opis: Ekscentrični brusilnik
Tip: WFE 380 / WFE 450-E
Leto konstrukcije: 2000
S polno odgovornostjo jamčimo, da je izdelek zasnovan
skladno s sledečimi standardi in normativi:
2004/108/ES,
2006/42/ES, EN 60745-1, EN 60745-2-4, EN ISO 12100,
2011/65/EU.
Hilti Corporation, Feldkircherstrasse 100,
FL-9494 Schaan
Paolo Luccini Jan Doongaji
Head of BA Ececutive Vice President
Quality & Process Management BU Power Tools & Accessories
BA Electric Tools & Accessories
01/2012 01/2012
Tehnična dokumentacija pri:
Hilti Entwicklungsgesellschaft mbH
Zulassung Elektrowerkzeuge
Hiltistrasse 6
86916 Kaufering
Deutschland
Printed: 07.07.2013 | Doc-Nr: PUB / 5131018 / 000 / 00
Page 87

83
1.
Všeobecné pokyny
Označení možného rizika - «VAROVÁNÍ»
Toto slovo označuje obzvláště důležité bezpečnostní pokyny
v tomto návodu k obsluze. Uváděné pokyny vždy dodržujte, abyste předešli nebezpečí vážného úrazu.
Piktogramy
Před uvedením stroje poprvé do
provozu je bezpodmínečně nutné
se seznámit s návodem k obsluze.
Návod k obsluze vždy uchovávejte
společně se strojem.
Dalším osobám předávejte stroj
vždy pouze s návodem k obsluze.
Obsah Strana
1.
Všeobecné pokyny
83
2.
Popis
84
3.
Technické údaje
84
4.
Bezpečnostní pokyny
85
5.
Před uvedením do provozu
87
6.
Funkce stroje
87
7.
Obsluha stroje
88
8.
Čištění a údržba
88
9.
Odstraňování závad
89
10.
Likvidace do odpadu
90
11.
Záruka výrobce nářadí
90
12.
Prohlášení o shodě (originál) 90
Ovládací prvky
Spínač
Regulátor brusného výkonu
Části stroje
쐋
Výrobní štítek
쐏
Hlavní rukoje
쐄
Vodící rukoje
쐂
Výsuvná boční rukoje
쐆
Vnitřní rukoje pro jednoruční použití
쐊
Brusný talíř
쐎
Povrch talíře se suchým zipem
쐅
Upevňovací šrouby talíře
쐈
Brzdící kroužek
씈
Kontejner na prachový vak
씉
Prachový vak
씉
Konektor odsávání
씊
Přípravek pro přesné nasazení listu
PŮVODNÍ NÁVOD K POUŽÍVÁNÍ
Hilti WFE380 / WFE450-E excentrická bruska
Čísla odkazují na obrázky umístěné na rozkládací obál-
ce. Při čtení tohoto návodu mějte tyto stránky rozevřené.
V textu návodu k obsluze označuje termín «stroj» vždy tuto
excentrickou brusku, která je předmětem návodu.
Umístění identifikačních údajů na stroji
Označení stroje a výrobní číslo může být umístěno na typovém štítku stroje. Zapište si prosím tyto údaje do návodu
k obsluze a vždy použijte tyto údaje ve styku s Hilti poradcem či servisním oddělením.
TYP:
VÝROBNÍ ČÍSLO:
Výstražné značky
Příkazové značky
Používejte
chrániče
sluchu
Používat
ochranné
rukavice
Používejte
dýchací
roušku
Používejte
ochranu očí
Před použitím
čtěte návod
k obsluze
Symboly
Varování před
všeobecným
nebezpečím
Varování před
nebezpečným
elektrickým napětím
Varování
před horkým
povrchem
Odpady ode-
vzdávejte k recy-
klaci
Printed: 07.07.2013 | Doc-Nr: PUB / 5131018 / 000 / 00
Page 88

84
3.
Technické údaje
WFE380 WFE450-E
Jmenovitý příkon:
380 W 450 W
Jmenovité napětí sítě:
✱ 110 V 220 V 230 V 240 V 110 V 220 V 230 V 240 V
Jmenovitý proud:
3,6 A 1,8 A 1,7 A 1,6 A 4,2 A 2,3 A 2,2 A 2,1 A
Kmitočet sítě:
✱ 50–60 Hz
Počet kmitů bez zatížení:
5000–10000 /min
Rychlost oscilací:
10000–20000 /min
Průměr brusného talíře:
∅ 150 mm
Excentricita:
4 mm
Průměr adaptéru pro odsávání:
30 mm
Hmotnost podle standardu EPTA 01/2003:
2,2 kg
UPOZORNĚNÍ
Úroveň vibrací uvedená v těchto pokynech byla naměřena metodou odpovídající normě EN 60745 a lze ji použít
pro vzájemné porovnání elektrického nářadí. Metoda je vhodná také pro předběžný odhad zatížení vibracemi.
Uvedená úroveň vibrací se vztahuje na hlavní způsoby použití elektrického nářadí. Při jiném způsobu použití, při
použití s jinými nástroji nebo nedostatečné údržbě se úroveň vibrací může lišit. Denní dávka vibračního zatížení
organismu během celé pracovní směny se tím může výrazně zvýšit. Pro přesný odhad vibračního zatížení je nutné
zohlednit také dobu, kdy je nářadí vypnuté, nebo kdy sice běží, ale nepoužívá se. Denní dávka vibračního zatížení
organismu se tím může výrazně snížit. Stanovte doplňující bezpečnostní opatření na ochranu pracovníka před působením vibrací, například: údržbu elektrického nářadí a nástrojů, udržování rukou v teple, organizaci pracovních
postupů.
nebezpečnými prachy (například piliny z dubu a buku, brusného prachu z barev obsahujících olovo a podobně), použijte odsávací zařízení třídy «M».
●
Nepoužívejte nesprávných příslušenství, například vadných prodlužovacích kabelů, nesprávné odsávače, vadných dílů a podobně.
Dodržujte informace obsažené v tomto návodu k obsluze
s bezpečnostními pokyny a instrukcemi o údržbě.
Nejzajímavější vlastnosti brusek Hilti WFE
–
Třída elektrické ochrany II (dvojitá izolace) Z(dle EN 60745).
–
Omezení vibrací konstrukcí rukojetí.
-
Hlavní rukoje.
-
Vodící rukoje.
-
Rukoje pro jednoruční obsluhu.
–
Výsuvná boční rukoje.
–
Plynulé nastavení počtu kmitů.
–
Brusný talíř pro profesionální použití, ostatní jako možné
příslušenství.
Stav stroje musí být perfektní
●
Stroj je určen pro profesionální použití.
●
Stroj může být použit pouze proškolenými a kompetentními pracovníky. Obsluha stroje musí být informována
o možných nebezpečí a bezpečnosti práce, musí být zdravotně a duševně způsobilá práce se strojem.
2.
Popis
WFE 380 / WFE 450-E je výkonná excentrická bruska s
elektrickým pohonem, určená pro broušení dřevěných, plastických a kompozitních materiálů, laků, tmelů a barev.
Je určená pro profesionální použití.
Použití pro určené účely
●
Stroj je určen k broušení dřevěných materiálů, plastických
hmot a barev, laků, tmelů.
●
Pracovní prostředí pro tento stroj je stavba nebo dílna,
při renovacích přestavbách a nové výstavbě.
●
Pracovní místo by mělo být suché.
●
Napětí napájecí sítě a kmitočet použité sítě musí odpo-
vídat údaji na typovém štítku stroje.
●
Pracoviště musí být bezpečné, broušený kus upnut a pra-
covník musí zaujmout bezpečný pracovní postoj či polohu.
●
Broušení kovů a materiálů obsahujících azbest je zakázá-
no.
●
Stroj je určen pouze pro ruční použití.
●
Nikdy nevystavujte stroj vlivu deště, sněhu, vlhkého a mokrého
prostředí, je nepřípustné pracovat s ním v prostředí s nebezpečím výbuchu nebo v blízkosti hořlavých kapalin a plynů.
●
Je zakázáno jej použít pro broušení za mokra.
●
Nepoužívejte stroj na jiné účely než je určeno návodem
k použití a bezpečnostními pokyny.
●
Nepracujte se strojem bez vhodného zachytávání brusného prachu. Opatrně pracujte s materiály se zdravím
Printed: 07.07.2013 | Doc-Nr: PUB / 5131018 / 000 / 00
Page 89

85
Hodnoty hlučnosti a vibrací stroje (měřené dle EN 60745)
Typická hladina akustického výkonu s A-filtrem
93 dB (A)
Typická hladina emitovaného akustického tlaku po A-filtraci
82 dB (A)
Pro uvedenou hladinu hluku podle EN 60745 činí nejistota 3 dB.
Použijte ochranu sluchu!
Triaxiální hodnoty vibrací (výsledný vektor vibrací)
WFE380 WFE450-E
Broušení povrchů
(ah) 4,1 m/s
2
3,9 m/s
2
Nepřesnost (K) pro triaxiální hodnoty vibrací:
1,5 m/s
2
1,5 m/s
2
✱
Stroj se dodává pro různá napětí napájecí sítě. Síové napětí a jmenovitý odebíraný proud stroje je uveden
na typovém štítku.
Technické změny vyhrazeny.
4. Bezpečnostní pokyny
UPOZORNĚNÍ
Bezpečnostní pokyny v kapitole 4.1 obsahují veškeré všeobecné
bezpečnostní pokyny pro elektrické nářadí, které musí byt podle
příslušnych norem uvedeny v návodu k obsluze. Na základě toho
mohou byt uvedeny i pokyny, které pro toto nářadí nejsou relevantní.
4.1 Všeobecné bezpečnostní předpisy pro elektrické nářadí
a) VAROVÁNÍ! Přečtěte si všechny bezpečnostní poky-
ny a instrukce. Nedbalost při dodržování bezpečnostních poky-
nů a instrukcí může mít za následek úraz elektrickym proudem,
požár, případně těžká poranění. Všechny bezpečnostní poky-
ny a instrukce uschovejte pro budoucí potřebu. Pojem „elektrické nářadí“, používany v bezpečnostních pokynech, se vztahuje na elektrické nářadí napájené ze sítě (se síťovym kabelem) a na elektrické nářadí napájené z akumulátoru (bez síťového kabelu).
4.1.1 Bezpečnost pracoviště
a) Pracoviště musí byt čisté a dobře osvětlené. Nepořádek
nebo neosvětlená místa mohou vést k úrazům.
b) S elektrickym nářadím nepracujte v prostředích ohrože-
nych explozí, kde se nacházejí hořlavé kapaliny, plyny nebo
prach. Elektrické nářadí jiskří; od těchto jisker se mohou prach
nebo páry vznítit.
c) Při práci s elektrickym nářadím zabraňte přístupu dětem a
jinym osobám na pracoviště. Rozptylování pozornosti by mohlo způsobit ztrátu kontroly nad nářadím.
4.1.2 Elektrická bezpečnost
a) Síťová zástrčka elektrického nářadí musí odpovídat zásuv-
ce. Zástrčka nesmí byt žádnym způsobem upravována. U
elektrického nářadí s ochrannym uzemněním nepoužívejte žádné adaptéry. Neupravované zástrčky a odpovídající zásuv-
ky snižují riziko úrazu elektrickym proudem.
b) Nedotykejte se uzemněnych kovovych předmětů, jako např.
trubek, topení, sporáků a chladniček. Je-li tělo uzemněno,
existuje zvyšené riziko úrazu elektrickym proudem.
c) Elektrické nářadí chraňte před deštěm a vlhkem. Vniknutí
vody do elektrického nářadí zvyšuje nebezpečí úrazu elektrickym proudem.
d) Síťovy kabel používejte jen k tomu účelu, pro ktery je určen.
Nepoužívejte jej zejména k nošení či zavěšování elektrického nářadí, ani k vytahování zástrčky ze zásuvky. Kabel
veďte vždy v bezpečné vzdálenosti od zdrojů tepla, ostrych
hran a pohyblivych dílů stroje, zamezte styku s olejem.
Poškozené nebo zamotané kabely zvyšují riziko úrazu elektrickym proudem.
e) Pokud pracujete s elektrickym nářadím venku, používejte
pouze takové prodlužovací kabely, které jsou vhodné i pro
venkovní použití. Použití prodlužovacího kabelu, ktery je vhod-
ny pro venkovní použití, snižuje riziko úrazu elektrickym proudem.
f) Pokud se nelze vyvarovat provozu elektrického nářadí ve
vlhkém prostředí, použijte proudovy chránič. Použití diferenciálního jističe snižuje riziko úrazu elektrickym proudem.
4.1.3 Bezpečnost osob
a) Buďte pozorní, dávejte pozor na to, co děláte a přistupujte
k práci s elektrickym nářadím rozumně. Elektrické nářadí
nepoužívejte, jste-li unaveni nebo pod vlivem drog, alkoholu nebo léků. Moment nepozornosti při použití elektrického
nářadí může vést k vážnému poranění.
b) Používejte osobní ochranné pomůcky a vždy noste ochran-
né bryle. Používání osobních ochrannych pomůcek, jako jsou
dychací maska proti prachu, bezpečnostní obuv s protiskluzovou podrážkou, ochranná přilba nebo jističe sluchu, podle druhu nasazení elektrického nářadí snižuje riziko úrazu.
c) Zabraňte neúmyslnému uvedení nářadí do provozu. Před
zapojením elektrického nářadí do sítě a/nebo vložením akumulátoru, před uchopením nářadí nebo jeho přenášením
se ujistěte, že je vypnuté. Držíte-li při přenášení elektrického
nářadí prst na spínači nebo připojujete-li nářadí k síti zapnuté,
může dojít k úrazu.
d) Dříve než elektrické nářadí zapnete, odstraňte seřizovací
nástroje nebo šroubovák. Nástroj nebo klíč ponechany v otáčivém dílu nářadí může způsobit úraz.
e) Udržujte přirozené držení těla. Zaujměte bezpečny postoj
a udržujte rovnováhu. Tak můžete elektrické nářadí v neočekávanych situacích lépe kontrolovat.
f) Noste vhodné oblečení. Nenoste volny oděv ani šperky. Vla-
sy, oděv a rukavice držte v bezpečné vzdálenosti od pohybujících se dílů. Volny oděv, šperky a dlouhé vlasy jimi mohou
byt zachyceny.
Printed: 07.07.2013 | Doc-Nr: PUB / 5131018 / 000 / 00
Page 90

86
4.2 Bezpečnostní pokyny specifické pro výrobek
4.2.1 Bezpečnost osob
a) Používejte ochranu sluchu. Hluk může způsobit ztrá-
tu sluchu.
b) Pokud jsou součástí dodávky, používejte pomocné
rukojeti. Ztráta kontroly může vést ke zraněním.
c) Může-li brusný talíř za provozu narazit do skrytého
elektrického vedení nebo do vlastního napájecího
kabelu, držte nářadí za izolované rukojeti. Kontakt
brusného talíře s vedením pod proudem může způsobit, že se volně přístupné kovové součásti dostanou také
pod napětí a uživatel tak může utrpět úraz elektrickým
proudem.
d)
Přístroj držte vždy pevně oběma rukama za rukojeti,
které jsou k tomu určené. Udržujte rukojeti suché,
čisté a beze stop oleje a tuku.
e Aby se při práci zamezilo nebezpečí pádu, veďte
síťový a prodlužovací kabel a odsávací hadici vždy od
přístroje dozadu.
f)
Při výměně nástroje používejte ochranné rukavice.
Nástroj se může používáním zahřát.
g)
Používejte přístroj pouze v bezvadném stavu a správným
způsobem.
h)
Použijte bezpečný odsávací systém, dýchací respirátor
a ochranné brýle.
Broušení může vyvíjet zdraví nebezpečný prach. Škodlivý brusný prach se může usazovat v plicích a v očích.
i)
Obsluha musí být seznámena s tímto nebezpečím
a musí být náležitě poučena a zabezpečena dle příslušných národních předpisů.
Prach ohrožující zdraví
obsluhy se vytváří při broušení některých materiálůjako
je dubové, bukové a některé cizokrajné dřevo, plniva
laků, tmelů a pod.
j)
Dělejte pracovní přestávky a provádějte relaxační cvi čení; také s prsty, aby se lépe prokrvily.
k)
Prach z materiálů, jako jsou nátěry s obsahem olova,
některé druhy dřeva, minerály a kov může být zdraví
škodlivý. Kontakt s tímto prachem nebo jeho vdechování může způsobit alergické reakce a/nebo onemocnění dýchacích cest pracovníka nebo osob v okolí.
Určitý prach, např. prach z dubového nebo bukového
dřeva, je rakovinotvorný, zejména ve spojení s přísadami pro úpravu dřeva (chromát, prostředky na ochranu dřeva). Materiál obsahující azbest smí obrábět pouze odborníci.
Pokud možno používejte odsávání prachu. Pro dosažení vysoké účinnosti odsávání prachu
používejte vhodný mobilní vysavač na dřevěný prach
a/nebo minerální prach doporučený společností Hilti,
určený pro toto elektrické nářadí. Postarejte se o dobré větrání pracoviště. Doporučujeme používat respirátor
s filtrem třídy P2. Dodržujte předpisy pro obráběné
materiály platné v příslušné zemi.
l) N
ářadí nesmí bez instruktáže používat děti nebo méně
zdatné osoby.
m) Děti je nutno upozornit, že si s nářadím nesmí hrát.
4.2.2 Pečlivé zacházení s elektrickým nářadím a jeho
používání
a)Zajistěte obrobek. Používejte upínací přípravky nebo
svěrák pro pevné uchycení obrobku.
Tímto je bezpečněji držen než rukou a kromě toho máte obě ruce
volné pro obsluhu přístroje.
b)Při přerušení proudu: vypněte přístroj, vytáhněte
zástrčku.
Zabrání se tak nežádoucímu spuštění nářa-
dí při obnovení dodávky elektrického proudu.
4.2.3 Elektrická bezpečnost
a)
Pravidelně kontrolujte přívodní vedení přístroje a při
poškození je dejte opravit uznávaným odborníkem.
Pravidelně kontrolujte prodlužovací kabely a v případě poškození je vyměňte. Jestliže se při práci poškodí
síťový nebo prodlužovací kabel, nesmíte se kabelu
dotýkat. Vytáhněte síťovou zástrčku ze zásuvky.
Poškozené přípojovací a prodlužovací kabely představují nebezpečí úrazu elektrickým proudem.
b)Nechávejte proto znečištěné přístroje pravidelně kon-
trolovat v servisu Hilti, a to především, když často
opracováváte vodivé materiály.
Prach usazený na
g) Lze-li namontovat odsávací zařízení nebo lapače prachu,
přesvědčte se, že jsou připojeny a správně použity. Použi-
tím odsávání prachu můžete snížit ohrožení vlivem prachu.
4.1.4 Použití elektrického nářadí a péče o něj
a) Nepřetěžujte nářadí. Pro danou práci použijte nářadí, kte-
ré je pro ni určeno. S vhodnym elektrickym nářadím budete v
dané vykonové oblasti pracovat lépe a bezpečněji.
b) Nepoužívejte elektrické nářadí, jehož spínač je vadny. Elek-
trické nářadí, které nelze zapnout nebo vypnout, je nebezpečné a musí se opravit.
c) Dříve než budete nářadí seřizovat, měnit jeho příslušenství,
nebo než jej odložíte, vytáhněte síťovou zástrčku ze zásuvky a/nebo vyjměte akumulátor. Toto preventivní opatření zabrá-
ní neúmyslnému zapnutí elektrického nářadí.
d) Nepoužívané elektrické nářadí neukládejte v dosahu dětí.
Nenechte pracovat s nářadím osoby, které s ním nejsou
obeznámeny nebo nečetly tyto pokyny. Elektrické nářadí je
nebezpečné, je-li používáno nezkušenymi osobami.
e) O elektrické nářadí se pečlivě starejte. Kontrolujte, zda
pohyblivé díly elektrického nářadí bezvadně fungují a neváznou, zda díly nejsou zlomené nebo poškozené tak, že je
narušena funkce nářadí. Poškozené díly nechte před použitím elektrického nářadí opravit. Mnoho úrazů má na svě-
domí nedostatečná údržba elektrického nářadí.
f) Řezné nástroje udržujte ostré a čisté. Pečlivě ošetřované řez-
né nástroje s ostrymi řeznymi hranami méně váznou a dají se
lehčeji vést.
g) Elektrické nářadí, příslušenství, nástroje atd. používejte v
souladu s těmito instrukcemi. Respektujte přitom pracovní podmínky a prováděnou činnost. Použití elektrického nářa-
dí k jinému účelu, než ke kterému je určeno, může byt nebezpečné.
4.1.5 Servis
a) Nářadí svěřujte do opravy pouze kvalifikovanym odbornym
pracovníkům, kteří mají k dispozici originální náhradní díly.
Tak zajistíte, že elektrické nářadí bude i po opravě bezpečné.
Printed: 07.07.2013 | Doc-Nr: PUB / 5131018 / 000 / 00
Page 91

87
povrchu přístroje, především z vodivých materiálů,
nebo vlhkost, mohou za nepřízni vých podmínek způsobit úraz elektrickým proudem.
4.2.4 Pracoviště
a)Zajistěte dobré osvětlení pracoviště.
b)Dbejte na dobré větrání pracoviště.
Vysoká prašnost
může na špatně větraném pracovišti zavinit poškození
zdraví.
4.2.5 Osobní ochranné pomůcky
Obsluha jakož i osoby, které se zdržují v blízkosti, musí
během provozování přístroje používat vhodné ochranné
brýle, ochranu sluchu, ochranné rukavice, a když
nepoužíváte odsávání prachu, používejte lehký přístroj
na ochranu dýchacích cest.
5.
Před uvedením do provozu
Je velmi důležité dodržet bezpečnostní pravidla a doporučení
tohoto návodu k obsluze.
Elektrické hodnoty přívodní sítě musí být v souladu s údaji na štítku stroje.
Při použití prodlužovacích kabelů jsou povoleny pouze
kabely s dostatečným průřezem a se schválením pro daný
způsob použití. Poškozené prodlužovací kabely musí být
vyměněny za nové. Kontrolujte stupeň poškození přívod-
ních a prodlužovacích kabelů v pravidelných intervalech
a dle platných národních předpisů.
Prodlužovací kabely pro venkovní použití
Při práci na stavbě či ve venkovním prostředí musí být
použity kabely určené pro venkovní použití.
Vždy dávejte pozor při práci
Vždy se soustřete na práci. Pracujte opatrně a přestaňte pracovat, pokud se z jakéhokoliv důvodu nemůžete soustředit na práci.
6.
Funkce stroje
Systém
Výsledek broušení, tzn. jakost povrchu a brousící výkon je
závislý na typu brusného listu, na tlaku na stroj a na způsobu práce.
Excentrická bruska, brusný talíř a brusné listy tvoří jeden
ucelený široký systém.
Vždy správně vyberte a použijte správnou kombinaci pro
dané použití.
Připevnění brusného listu
Použijte brusný list o průměru 150 mm s uchycením na
suchý zip (VELCRO systém).
Brusný list s 6 otvory na odvádění prachu (na průměru 80
mm) nebo 9 otvory (8 otvorů na průměru 120 mm a 1 otvor
ve středu) je vhodný.
●
Vytáhněte zástrčku přívodního kabelu ze sítě.
●
Pečlivě nasaďte brusný list na brusnou desku tak, aby
otvory pro odsávání prachu byly ve stejné pozici.
Způsoby držení brusky pro danou práci
Pro rychlé broušení
●
Držte stroj oběma rukama.
●
Použijte pro držení hlavní a vysunutou boční rukoje.
Boční rukoje lze použít i nevysunutou.
Pro jemné broušení
●
Držte stroj jednou rukou.
●
Použijte vnitřní rukoje. Takto lze jednou rukou velmi jemně a precizně brousit povrchy, například před posledním
nátěrem.
Pro broušení na kolmých plochách
Držte stroj jednou rukou.
●
Použijte vnitřní rukoje. Těžiště stroje máte přímo v dlani a snadno brousíte bez zbytečné námahy.
VAROVÁNÍ
Broušení může vyvíjet zdraví nebezpečný prach.
Škodlivý brusný prach se může usazovat v plicích a v očích.
Použijte bezpečný odsávací systém, dýchací respirátor a
ochranné brýle.
Broušení
●
Zkontrolujte, zda stroj má spínač v poloze «vypnuto».
●
Zastrčte zástrčku přívodního kabelu do sítě.
●
Nastavte požadovaný brousící výkon regulátorem.
●
Položte brusku brusným listem na povrch, který chce-
te brousit.
●
Zapněte spínač stroje a pohybujte jím po obráběném
povrchu s malým přítlakem (cca 20 N).
●
Při docílení žádaného vybroušení povrchu velmi opatrně zvedněte brusku z povrchu a teprve potom vypněte
spínač.
Používejte
chrániče
sluchu
Používejte
ochranné
rukavice
Používejte
dýchací
roušku
Používejte
ochranu očí
Printed: 07.07.2013 | Doc-Nr: PUB / 5131018 / 000 / 00
Page 92

88
7.
Obsluha stroje
Nastavení brousícího výkonu
Potřebný brousící výkon může být přednastaven regulátorem nebo během broušení plynule měněn dle potřeby.
Brousící výkon je závislý na materiálu který je broušen a na
typu brusného listu. Ideální brusný výkon zjistíme lehce
testem.
Nastavení
16
Brousící výkon malý velký
Po zapnutí spínače brusný výkon dosáhne plynule nasta-
vené hodnoty regulátorem.
Brusné listy
Hilti nabízí přiměřený sortiment brusných listů, «Wood linie»
s listy o zrnitosti P60 až P180 pro broušení dřevěných materiálů a «Paint linie» s listy o zrnitosti P40 až P400 pro broušení lakovaných a tmelených materiálů.
Brusné talíře
Brusné talíře jsou běžný spotřební materiál, který nespadá do základní garance stroje.
Stroj je z výrobního závodu vybaven univerzálním brusným
talířem, který je vhodný na většinu brousících prací. Tento
brusný talíř je vybave univerzální sadou odsávacích otvorů.
Další typy brusných talířů jsou možné další příslušenství.
Univerzální brusný talíř Předbroušení
–
dřevo, dřevěné materiály
–
tmely
–
staré barvy a laky
–
kompozitní materiály
–
plastické hmoty
Střední a přípravné broušení
–
barvy a laky
Brusný talíř pro Střední a konečné broušení
jemné broušení
–
barvy a laky
–
broušení oblých ploch
Brzda brusného talíře
Stroj je vybaven brzdou brusného talíře. Brzdící kroužek je
spotřební materiál a nespadá do základní garance stroje.
Brzdící kroužek brusného talíře zabraňuje roztočení talíře
před nasazením na plochu a redukuje zpětný náraz (protipohyb). Tím zabraňuje tvorbě probroušení a rýh od brusiva.
Odsávání brusného prachu
VAROVÁNÍ
Broušení může vyvíjet zdraví nebezpečný prach.
Škodlivý brusný prach se může usazovat v plicích a v očích.
Použijte bezpečný odsávací systém, dýchací respirátor a
ochranné brýle.
Kontejner pro prachový vak
Kontejner pro prachový vak je spotřební materiál a naspadá do základní garance stroje.
Použijte kontejner pro prachový vak s prachovým vakem
dodávaný se strojem. Odstraňuje prach z broušení dostatečně.
Průmyslový vysavač
Ve většině případů můžeme použít jakýkoliv průmyslový
vysavač pro odsátí brusného prachu.
Fyzikální parametry odsávání splňuje celá řada strojů, pro
broušení materiálů nebezpečných zdraví je nutné použít
speciální zařízení, které splňuje požadavky pro odsávání
těchto materiálů. Jsou to průmyslové vysavače třídy «M».
Doporučujeme vám použít Hilti WVC40-M průmyslový
vysavač, který tyto kritéria splňuje.
Pokud nemáte zkušenosti s tímto provozem, obrate se na
zákaznické oddělení firmy Hilti.
8.
Čištění a údržba
POZOR
Nářadí, zejména rukojeti, udržujte čisté a beze stop oleje a tuku. Nepoužívejte prostředky pro ošetření s obsahem silikonu.
Vnější kryt nářadí je vyroben z plastické hmoty odolné
proti nárazům. Oblast rukojeti je z elastomeru.
Nikdy nepoužívejte nářadí s ucpanými ventilačními štěrbinami! Ventilační štěrbiny čistěte opatrně suchým kartáčem. Nepřipusťte, aby do vnitřního prostoru nářadí vnikly cizí předměty. Povrch nářadí čistěte pravidelně mírně
navlhčeným hadříkem. K čištění nepoužívejte rozprašovače,
parní postřikování ani tekoucí vodu! Může tím být ohrožena elektrická bezpečnost nářadí.
Brusné talíře
Vyměňte talíř, když je odřený a špinavý (ucpaný). Opotřebovaný nebo špinavý talíř nemá dostatečnou schopnost držení
brusného listu. Pečlivě vyčistěte brusný talíř nebo jej vyměňte za nový. Poškozené talíře musí být vyměněny okamžitě.
Výměna brusného talíře
Použijte kontejner pro prachový vak s prachovým
●
Odpojte přívodní kabel ze sítě.
●
Postavte stroj na hlavní rukoje plochou brusného talíře
proti sobě.
●
Sejměte brusný list.
●
Použijte příslušný klíč na odšroubování brusného talíře.
●
Sejměte brusný talíř.
●
Vyčistěte prostor okolo brzdícího kroužku brusného talíře.
●
Připevněte bezpečně nový brusný talíř třemi šrouby.
●
Zkontrolujte namontovaný brusný talíř (musí být v kon-
taktu s brzdným kotoučem).
●
Použijte přípravek na přesné nasazení brusného listu na
brusný talíř, v transportním profikufru.
Printed: 07.07.2013 | Doc-Nr: PUB / 5131018 / 000 / 00
Page 93

89
9.
Vyhledávání závad
Závada Možná příčina Odstranění
Stroj se nerozbíhá závada v silnoproudém přívodu zkuste jiný elektrický stroj v
zásuvce
vadný síový přívod nebo zástrčka kontrola elektroodborníkem, případně
nechejte vyměnit
vadný spínač nebo elektronika oprava či výměna dílu v servisu
Hilti
Stroj nemá plný výkon průřez prodlužovacího kabelu použijte správný kabel,
je nedostatečný
regulátor brousícího výkonu nastavte na 5 nebo 6
je nastaven na 1 či 2
Špatně vybroušený povrch brusný list je nasazen chybně opravte nasazení listu použijte přípravek
otvory listu a talíře nesouhlasí na profiboxu
prachový vak je plný vyměňte prachový vak za nový
konektor pro odsávání je vyndejte kontejner na prachový vak a
zablokovaný vyčistěte konektor
Brusný list nedrží na brusném talíři brusný talíř je «zalepen» vyčistěte brusný talíř
suchý zip (Velcron) je opotřebován, vyměňte brusný talíř za nový
obroušen
Elektrostatické výboje vysavač bez antistatického použijte WVC40-M průmyslový
vybavení vysavač
přerušený zemní vodič vysavače zkontrolujte funkci ochranného
(zemního) vodiče
Brzda brusného talíře
Pokud při chodu naprázdno se brusný talíř točí, je nutné
vyměnit brzdu brusného talíře.
Výměna brzdného kroužku
●
Odpojte přívodní kabel od sítě.
●
Sejměte brusnou desku dle instrukcí v «Výměna brus-
ného talíře».
●
Vyjměte starý brzdící kroužek z těla stroje.
●
Opatrně a pečlivě nařiďte kroužek do správné asym-
etrické polohy v souladu s pozicí čtyř šroubů ve stroji.
●
Natlačte brzdný kroužek do příslušného uložení tak,
že kroužek se bezpečně zajistí v patřičné poloze.
●
Těsnící kartáče by měly být ve správné pozici, pokud
byl brzdný kroužek namontován korektně.
●
Namontujte brousnou desku dle instrukcí «Výměna
brusného talíře».
Údržba
Kontrolujte pravidelně neporušenost všech funkčních částí
a správnou funkci provozních ovládacích prvků. Nikdy stroj
nepoužívejte, pokud jsou některé jeho části poškozeny
nebo pokud některé ovládací prvky nevykazují správnou
funkci. Stroj nechejte opravit v servisním středisku Hilti.
Opravy stroje smí provádět pouze odborník s příslušnou
elektrotechnickou kvalifikací.
Printed: 07.07.2013 | Doc-Nr: PUB / 5131018 / 000 / 00
Page 94

90
10. Likvidace
Přístroje firmy Hilti jsou převážně vyrobeny
z recyklovatelných materiálů. Předpokladem
pro recyklaci materiálů je jejich řádné třídění.
V mnoha zemích již je firma Hilti zařízena na příjem Vašeho starého přístroje na recyklaci. Ptejte se zákaznického
servisního oddělení Hilti nebo Vašeho obchodního zástupce.
Jen pro státy EU
Elektrické nářadí nevyhazujte do komunálního
odpadu!
Podle evropské směrnice o nakládání s použitými elek-
trickými a elektronickými zařízeními a odpovídajících
ustanovení právních předpisů jednotlivých zemí se použitá
elektrická nářadí musí sbírat odděleně od ostatního
odpadu a podrobit ekologicky šetrnému recyklování.
11.
Záruka výrobce nářadí
Hilti zaručuje, že dodané nářadí nemá žádné materiá lové ani výrobní vady. Tato záruka platí za předpokladu,
že se nářadí správně používá, ošetřuje a čistí v souladu
s návodem k obsluze firmy Hilti, a že je dodržena technic ká jednota nářadí, tj. že se s nářadím používá jen originální spotřební materiál, příslušenství a náhradní díly
od firmy Hilti.
Tato záruka zahrnuje bezplatnou opravu nebo výměnu
vadných dílů po celou dobu životnosti nářadí. Na díly,
které podléhají normálnímu opotřebení, se tato záruka
nevztahuje.
Další nároky jsou vyloučeny, pokud to neodporuje závazným
národním předpisům. Hilti neručí zejména za bezprostřední nebo nepřímé škody vzniklé záva dou nebo zaviněné
vadným výrobkem, za ztráty nebo náklady vzniklé vsouvislosti s použitím nebo kvůli nemožnosti použití nářadí
pro určitý účel. Zamlčená ujištění o použití nebo vhodnosti pro určitý
účel jsou výslovně vyloučena.
Pro opravu nebo výměnu je nutno nářadí nebo příslušné
díly zaslat neprodleně po zjištění závady kompetentní
prodejní organizaci Hilti.
Předkládaná záruka zahrnuje ze strany Hilti veškeré
záruční závazky a nahrazuje všechna předcházející nebo
současná prohlášení, písemné nebo ústní dohody ohledně záruk.
12.
Prohlášení o shodnosti s EU
(originál)
Označení: Ruční okružní pila
Typové označení: Hilti WFE 380 / WFE 450-E
Rok konstrukce: 2000
Prohlašujeme s plnou odpovědností, že tento výrobek
odpovídá následujícím normám a směrnicím:
2004/108/ES,
2006/42/ES, EN 60745-1, EN 60745-2-4, EN ISO 12100,
2011/65/EU.
Hilti Corporation, Feldkircherstrasse 100,
FL-9494 Schaan
Paolo Luccini Jan Doongaji
Head of BA Ececutive Vice President
Quality & Process Management BU Power Tools & Accessories
BA Electric Tools & Accessories
01/2012 01/2012
Technická dokumentace u:
Hilti Entwicklungsgesellschaft mbH
Zulassung Elektrowerkzeuge
Hiltistrasse 6
86916 Kaufering
Deutschland
Printed: 07.07.2013 | Doc-Nr: PUB / 5131018 / 000 / 00
Page 95

91
1.
Általános tudnivalók
Veszélyforrások feltüntetése «FIGYELEM!»
A «FIGYELEM!» szó feltüntetésével mindig valamilyen,
személyre, a gépre, egyéb dolgokra vonatkozó folyamat,
illetve eljárás kockázati tényezőire, vagy veszélyeire hívjuk
fel a figyelmet.
Piktogrammok
Üzembehelyezés előtt gondosan
olvassa el a használati utasítást!
A használati utasítás mindig a géppel együtt tárolandó!
Ha a gépet átadja másnak, adja
oda a használati utasítást is!
Tartalomjegyzék Oldal
1.
Általános tudnivalók
91
2.
A gép leírása
92
3.
Műszaki adatok
92
4.
Biztonságtechnikai útmutató
93
5.
Üzembehelyezés
95
6.
A gép használata
95
7.
Csiszolás
96
8.
Ápolás, karbantartás
97
9.
Hibakeresés
97
10.
Környezetvédelem
98
11.
Készülékek gyártói garanciája
98
12.
EU-megfelelőségi nyilatkozat (eredeti) 98
Kezelőszervek
kapcsoló
f
ordulatszámszabályzó kerék
A gép elemei
쐋
adattábla
쐏
fő markolat
쐄
vezetőmarkolat
쐂
kiegészítő markolat
쐆
befejező markolat
쐊
csiszolótányér
쐎
tépőzáras csiszolótányér
쐅
csiszolótányér rögzítő csavarok
쐈
fékgyűrű
쐉
porzsáktartó
씈
porzsák
씉
porszívó csatlakozó
씊
csiszolólap elhelyező
EREDETI HASZNÁLATI UTASÍTÁS
WFE380/WFE450-E excentrikus csiszoló gép
Az ábrákhoz tartozó szöveget ilyen számok jelölik. A
képes oldalak kihajthatók. Használja egyszerre a képes és
a szöveges magyarázatot.
A használati utasítás szövegében «gép» alatt mindig az
excentrikus csiszológépet értjük.
Azonosítási adatok a gépen
A típusjelölés és a sorozatszám a gép adattábláján található. Kérjük jegyezze fel ezeket az adatokat a használati
utasítás alábbi részén és mindig ezekre hivatkozzon:
Típus:
Sorozatszám:
Figyelmeztető jelek
Kötelező védőfelszerelések
Viseljen
fülvédőt
Viseljen
védőkesztyűt
Viseljen
légzőmaszkot
Viseljen
védő s-
zemüveget
Használat előtt
olvassa el a
használati
utasítást
Szimbólumok
Legyen
óvatos!
Vigyázat:
elektromos áram
Vigyázat:
forró felület
A hulladékokat adja le
újrafeldolgozásra
Printed: 07.07.2013 | Doc-Nr: PUB / 5131018 / 000 / 00
Page 96

92
3.
Műszaki adatok
WFE380 WFE450-E
Teljesítményfelvétel
380 W 450 W
Feszültség
✱ 110 V 220 V 230 V 240 V 110 V 220 V 230 V 240 V
Felvett áramerősség
3,6 A 1,8 A 1,7 A 1,6 A 4,2 A 2,3 A 2,2 A 2,1 A
Hálózati frekvencia
✱ 50–60 Hz
Üresjárati rezgésszám
5000–10000
/min
Csiszolótányér rezgésszáma
10000–20000
/min
Csiszolótányér átmérője
150 mm
Tengelykitérés (excentricitás)
4 mm
Porszívó csatlakozó (külső átm.)
30 mm
Súly a 01/2003 EPTA-Procedure-nak megfelelően
2,2 kg
INFORMÁCIÓ
A használati útmutatóban közölt rezgésszintet az EN 60745 szabványban szabályozott mérési eljárás kereté-
ben mértük meg és alkalmas elektromos szerszámok egymással történő összehasonlítására. Ugyancsak alkalmas
a rezgésterhelés előzetes megbecsülésére. A megadott rezgésszint az elektromos szerszám lényeges alkalmazásait mutatja. Ha az elektromos szerszámot más célra, eltérő betétszerszámokkal használják vagy nem
megfelelően tartják karban, akkor a rezgésszint értéke ettől eltérhet. Ez jelentősen megnövelheti a rezgésterhelést
a munkaidő teljes időtartamára. A rezgésterhelés pontos megbecsüléséhez azokat az időszakokat is figyelembe
kell venni, amikor a gépet lekapcsolták vagy bár a gép működik, de ténylegesen nem használják. Ez jelentősen csökkentheti a rezgésterhelést a munkaidő teljes időtartamára. Annak érdekében, hogy megvédje a gép
kezelőjét a rezgések okozta hatásoktól, tegyen meg kiegészítő biztonsági intézkedéseket, mint például: elektromos
●
A gép csak a használati utasításban leírt módon alakít-
ható át, vagy változtatható meg.
●
Sérülések elkerülése végett csak eredeti Hilti tartozé-
kokat használjon.
●
Ne használja a gépet megfelelő porelszívás nélkül. A
biztonsági és hulladéktárolási előírásokat be kell tartani,
különösen egészségre káros anyagok esetén (pl. tölgy,
bükk, illetve ólmot, vagy más káros anyagot tartalmazó
festékek).
Olvassa el és tartsa be a használati utasításban leírtakat a
használatról, elővigyázatosságról és karbantartásról.
A gépek legfontosabb jellemzői
–
II. érintésvédelmi osztályú (kettős szigetelésű, az EN 60745
szerint)
Z
–
Vibrációcsökentés, kényelmes markolatok
-
fő markolat
-
vezető markolat
-
befejező markolat
-
kiegészítő markolat
–
Finoman szabályozható kapcsoló
–
Univerzális használatra alkalmas csiszolótányér (tartozékként
egyéb típusok kaphatók)
A használótól elvárt feltételek
●
A gép professzionális alkalmazásra készült.
●
A gép csak megfelelő szaképzettséggel használható,
karbantartható és javítható. Az ilyen személyeket különösen körültekintően kell tájékoztatni a lehetséges kockázatokról.
2.
A gép leírása
A WFE 380 / WFE 450-E excentrikus csiszológép egy elektromos kéziszerszám faanyagok, kompozitok, festék, lakk,
műanyagok, tömítőanyagok és hasonló anyagok csiszolásához használható.
A gépet professzionális használatra tervezték.
Szállítási felszereltség: gép, porzsáktartó, porzsák, használati utasítás és műanyag koffer (a WFE 380 kartondobozban)
Helyes használat
●
A gépet cserélhető csiszolólapokkal történő csiszolásra tervezték fa, festék, lakk, tömítőanyag, műanyag és glettelt felületeken.
●
A munkakörnyezet lehet építkezés, műhely. A végzett
munka lehet felújítás, átalakítás, illetve építés.
●
A környezetnek száraznak kell lennie.
●
A gép csak az adattáblán meghatározott feszültségen
és hálózati frekvencián működtethető.
●
A gép használata során a munkadarabot stabilan rögzíteni
kell és a használónak megfelelő távolságot kell attól tartani.
●
Fémek és azbesztet tartalmazó anyagok csiszolása nem
megengedett.
●
A gép csak kézben tartva használható.
●
Ne hagyja, hogy a gépre eső, vagy hó hulljon, és ne
működtesse nedves, vizes, illetve robbanásveszélyes környezetben.
●
Ne használja a gépet nedves/vizes csiszolásra.
Printed: 07.07.2013 | Doc-Nr: PUB / 5131018 / 000 / 00
Page 97

93
szerszámok és betétszerszámok karbantartása, a gépkezelő kezének melegen tartása, a munkafolyamatok
megszervezése.
Zaj és vibrációs értékek (az EN 60745 szabvány szerint)
Tipikus A-súlyozású hangnyomásszint
93 dB (A)
Tipikus A-súlyozású emissziós hangnyomásszint
82 dB (A)
A megadott EN 60745 szerinti hangnyomás-értékek bizonytalansága 3 dB.
Viseljen fülvédőt!
Triaxiális rezgésgyorsulási érték (vibrációs vektorösszeg) WFE380 WFE 450-E
Felületcsiszolás (a
h
) 4,1 m/s
2
3,9 m/s
2
A triaxiális rezgésgyorsulási értékek bizonytalansága (K) 1,5 m/s
2
1,5 m/s
2
✱
A gép többféle hálózati feszültségnek megfelelő változatban készül. Kérjük, ellenőrizze, hogy a hálózati feszültség egyezik-e a gép adattábláján megadott értékkel!
A műszaki adatok változtatásának jogát fenntartjuk!
4. Biztonsági előírások
INFORMÁCIÓ
Az 4.1 biztonságtechnikai útmutatót tartalmazó fejezet minden általános biztonsági tudnivalót leír azokkal az elektromos kéziszerszámokkal kapcsolatban, amelyeket a használati utasításban található alkalmazható szabványok szerint fel kell tuntetni. Ezek olyan
tudnivalókat is tartalmazhatnak, amelyek a gépre nem vonatkoznak.
4.1 Általános biztonsági előírások az elektromos kéziszer-
számhoz
a) FIGYELEM! Olvasson el minden biztonsági tudniva-
lót és utasítást. A biztonsági tudnivalók és utasítások betartá-
sának elmulasztása áramutéshez, tűzhöz és / vagy súlyos tes-
ti séruléshez vezethet. Őrizzen meg minden biztonsági uta-
sítást és útmutatást a jövőbeni használathoz. A biztonsági
utasításokban használt „elektromos kéziszerszám" fogalom
hálózatról uzemelő elektromos kéziszerszámokra (tápkábellel
egyutt értve) és akkumulátoros elektromos kéziszerszámokra
(tápkábel nélkul) vonatkozik.
4.1.1 Munkahelyi biztonság
a) Tartsa tisztán a munkahelyét és jól világítsa meg. Rendet-
len munkahelyek és megvilágítatlan munkateruletek balese-
tekhez vezethetnek.
b) Ne dolgozzon az elektromos kéziszerszámmal olyan rob-
banásveszélyes környezetben, ahol éghető folyadékok,
gázok vagy porok vannak. Az elektromos kéziszerszámok
szikrákat bocsáthatnak ki, amelyek meggyújthatják a port vagy
a gyúlékony gőzöket.
c) Tartsa távol a gyerekeket és az idegen személyeket a mun-
kahelytől, ha az elektromos kéziszerszámot használja. Ha
elvonják a figyelmét a munkától, könnyen elvesztheti az ural-
mát a berendezés felett.
4.1.2 Elektromos biztonsági előírások
a) Az elektromos kéziszerszám csatlakozódugójának illesz-
kednie kell a dugaszolóaljzathoz. A csatlakozódugót sem-
milyen módon sem szabad megváltoztatni. Védőföldeléssel ellátott elektromos kéziszerszámokhoz ne használjon
csatlakozóadaptert. Az eredeti csatlakozódugó és a hozzá
illeszkedő csatlakozóaljzat csökkenti az elektromos áramutés
kockázatát.
b) Ne érjen hozzá földelt feluletekhez, mint például csövek-
hez, fűtőtestekhez, kályhákhoz és hűtőszekrényekhez. Az
áramutés veszélye növekszik, ha a teste le van földelve.
c) Tartsa távol az elektromos szerszámot az esőtől és a ned-
vesség hatásaitól. Ha víz hatol be az elektromos kéziszerszámba, az növeli az elektromos áramutés kockázatát.
d) Ne használja a kábelt a rendeltetésétől eltérő célokra, vagyis
az elektromos kéziszerszámot soha ne hordozza vagy
akassza fel a kábelnél fogva, és sohase húzza ki a hálózati csatlakozódugót a kábelnél fogva. Tartsa távol a kábelt
hőforrásoktól, olajtól, éles élektől és sarkaktól, mozgó gépalkatrészektől. A sérult vagy összetekert vezeték növeli az elekt-
romos áramutés kockázatát.
e) Ha az elektromos kéziszerszámmal szabadban dolgozik,
akkor csak a szabadban való használatra engedélyezett
hosszabbítót használjon. A kultérre is alkalmas hosszabbító-
vezeték használata csökkenti az elektromos áramutés kockázatát.
f) Használjon hibaáram-védőkapcsolót, ha az elektromos kézi-
szerszám nedves környezetben történő uzemeltetése nem
kerulhető el. A hibaáram-védőkapcsoló használata csökkenti
az elektromos áramutés kockázatát.
4.1.3 Egyéni biztonsági előírások
a) Munka közben mindig figyeljen, ugyeljen arra, amit csinál,
és meggondoltan dolgozzon az elektromos kéziszerszámmal. Ne használja az elektromos kéziszerszámot, ha fáradt,
ha kábítószerek vagy alkohol hatása alatt áll, vagy orvosságokat vett be. Az elektromos kéziszerszámmal végzett mun-
ka közben már egy pillanatnyi figyelmetlenség is komoly sérulésekhez vezethet.
b) Viseljen személyi védőfelszerelést, és mindig viseljen védő-
szemuveget. A személyi védőfelszerelések, úgymint porvédő
Printed: 07.07.2013 | Doc-Nr: PUB / 5131018 / 000 / 00
Page 98

94
4.2A termékre jellemző biztonságtechnikai útmutató
4.2.1 Személyi biztonsági előírások
a) Viseljen fulvédőt. A zaj halláskárosodáshoz vezethet.
b) Ha a géphez mellékeltek kiegészítő fogantyúkat, min-
dig használja azokat. A gép feletti ellenőrzés elvesztése sérulést okozhat.
c) Olyan munkavégzés közben, amelynek során a csis-
zolótányér rejtett elektromos kábelekhez vagy a saját
elektromos csatlakozókábeléhez érhet, a gépeket
mindig a szigetelt markolatuknál fogja meg. Ha a
csiszolótányér elektromos feszültséget vezető vezetékhez ér, akkor a szabadon lévő fémrészek feszültség alá
kerülhetnek, és ez elektromos áramütéshez vezethet.
d)
Munka közben mindig biztosan, két kézzel tartsa, az
erre a célra szolgáló markolatoknál fogva. A markolatot tartsa száraz, tiszta, olaj- és zsírmentes állapotban.
e)A megbotlás veszélyét elkerülendő a készülék elektro -
mos kábelét, a hosszabbítóvezetéket és az elszívótöm lőt mindig a fúrógép mögött vezesse el munka közben.
f)
Használjon védőkesztyűt, amikor a szerszámot cseréli. A behelyezett szerszám használat közben felforrósodhat.
g)
Csak az utasítások szerint használja a gépet és csak
kifogástalan állapotban.
h)
Használjon elszívó berendezést, viseljen védőszemüveget és légzőmaszkot.
A csiszolás veszélyes
porokat termelhet, ami káros lehet a szemre és a tüdőre.
i)
Veszélyes por képződésekor a nemzeti és regionális előírások szerint kell eljárni.
Veszélyes por keletkezhet tölgy, bükk, illetve ólmot, vagy más káros anyagot tartalmazó festék csiszolásakor.
j)
Tartson munkaszüneteket és végezzen lazító és ujj gyakorlatokat, ujjainak jobb vérellátása érdekében.
k)
Ólomtartalmú festékek, néhány fafajta, ásványés fém
pora káros lehet az egészségre. Ezen porok belélegzése vagy érintése a gép kezelőjénél vagy a közelében tartózkodóknál allergiás reakciót válthat ki, és /
vagy légzési nehézséget okozhat. Bizonyos porok, mint
például a tölgyfa vagy a bükkfa pora rákkeltő, különö-
álarc, csúszásbiztos védőcipő, védősapka és fulvédő használata az elektromos kéziszerszám használata jellegének megfelelően csökkenti a személyi sérulések kockázatát.
c) Kerulje el az elektromos kéziszerszám akaratlan uzembe
helyezését. Mielőtt az elektromos kéziszerszámot az elektromos hálózatra és / vagy az akkumulátorra csatlakoztatja, vagy felveszi, ill. hordja, győződjön meg róla, hogy a gép
ki van kapcsolva. Ha az elektromos kéziszerszám felemelése
közben az ujját a kapcsolón tartja, vagy ha a készuléket bekapcsolt állapotban csatlakoztatja az áramforráshoz, az balesetekhez vezethet.
d) Az elektromos kéziszerszám bekapcsolása előtt feltétlenul
távolítsa el a beállító szerszámokat vagy csavarkulcsokat.
Az elektromos kéziszerszám forgó részeiben felejtett beállító
szerszám vagy csavarkulcs séruléseket okozhat.
e) Kerulje el a normálistól eltérő testtartást. Ügyeljen arra,
hogy mindig biztosan álljon és megtartsa az egyensúlyát.
Így az elektromos kéziszerszám felett váratlan helyzetekben is
jobban tud uralkodni.
f) Viseljen megfelelő munkaruhát. Ne viseljen bő ruhát vagy
ékszereket. Tartsa távol a haját, a ruháját és a kesztyűjét a
mozgó részektől. A bő ruhát, az ékszereket és a hosszú hajat
a mozgó alkatrészek magukkal ránthatják.
g) Ha az elektromos kéziszerszámra fel lehet szerelni a por
elszívásához és összegyűjtéséhez szukséges berendezéseket, ellenőrizze, hogy azok megfelelő módon hozzá vannak kapcsolva a készulékhez és rendeltetésuknek megfelelően működnek. Porelszívó egység használata csökkenti a
munka során keletkező por veszélyes hatását.
4.1.4 Elektromos szerszám használata és kezelése
a) Ne terhelje túl a gépet. A munkájához csak az arra szolgá-
ló elektromos kéziszerszámot használja. A megfelelő elekt-
romos kéziszerszámmal a megadott teljesítménytartományon
belul jobban és biztonságosabban lehet dolgozni.
b) Ne használjon olyan elektromos kéziszerszámot, amelynek
a kapcsolója elromlott. Egy olyan elektromos kéziszerszám,
amelyet nem lehet sem be-, sem kikapcsolni, veszélyes, és meg
kell javíttatni.
c) A gép beállítása, a tartozékok cseréje, vagy a gép lehelye-
zése előtt húzza ki a csatlakozódugót a csatlakozóaljzatból
és / vagy vegye ki az akkuegységet a gépből. Ez az elővi-
gyázatossági intézkedés meggátolja a gép akaratlan uzembe
helyezését.
d) A használaton kívuli elektromos kéziszerszámokat olyan
helyen tárolja, ahol azokhoz gyerekek nem férhetnek hozzá. Ne hagyja, hogy olyan személyek használják az elektromos kéziszerszámot, akik nem ismerik a szerszámot, vagy
nem olvasták el ezt az útmutatót. Az elektromos kéziszer-
számok veszélyesek, ha azokat gyakorlatlan személyek használják.
e) Mindig gondosan ápolja az elektromos kéziszerszámot.
Ellenőrizze, hogy a mozgó alkatrészek kifogástalanul működnek-e, nincsenek-e beszorulva, és nincsenek-e eltörve vagy
megrongálódva olyan alkatrészek, amelyek hatással lehetnek az elektromos kéziszerszám működésére. Használat
előtt javíttassa meg a gép megrongálódott alkatrészeit. Sok
olyan baleset történik, amelyet az elektromos kéziszerszám nem
kielégítő karbantartására lehet visszavezetni.
f) Tartsa tisztán és éles állapotban a vágószerszámokat. Az
éles vágóélekkel rendelkező és gondosan ápolt vágószerszámok ritkábban ékelődnek be, és azokat könnyebben lehet vezetni és irányítani.
g) Az elektromos kéziszerszámokat, tartozékokat, betétszer-
számokat stb. a jelen utasítások figyelembe vételével használja. Vegye figyelembe a munkafeltételeket és a kivitelezendő munka sajátosságait. Az elektromos kéziszerszám ere-
deti rendeltetésétől eltérő célokra való alkalmazása veszélyes
helyzetekhez vezethet.
4.1.5 Szerviz
a) Az elektromos kéziszerszámot csak szakképzett személy-
zet, kizárólag eredeti pótalkatrészek felhasználásával, javíthatja. Ez biztosítja, hogy az elektromos kéziszerszám bizton-
ságos szerszám maradjon.
Printed: 07.07.2013 | Doc-Nr: PUB / 5131018 / 000 / 00
Page 99

95
sen ha fakezelési adalékanyagokkal (kromát, favédő
anyagok) együtt használják azokat. Az azbeszttartalmú anyagokat csak szakemberek munkálhatják meg.
Lehetőleg használjon porelszívó egységet. Annak
érdekében, hogy a porelszívás hatékony legyen, használjon megfelelő, a Hilti által ajánlott és az elektromos
szerszámmal összehangolt, fához és / vagy ásványi
porhoz alkalmas mobil porelszívót. Biztosítsa a munkahely jó szellőzését. Javasoljuk, hogy munkavégzés
közben viseljen P2 szűrőosztályú légzőmaszkot. Tartsa be a megmunkálandó anyagra vonatkozó érvényes nemzeti előírásokat.
l) A készülék használata eligazítás nélkül nem engedé-
lyezett gyermekek vagy gyenge személyek számára.
m) A gyerekeket meg kell tanítani arra, hogy nem játsz-
hatnak a készülékkel.
4.2.2 Az elektromos kéziszerszámok gondos kezelése
és használata
a)Rögzítse a munkadarabot. A munkadarab rögzítésére
használjon szorítókat vagy satut.
Így biztosabban rögzíti, mint ha kézzel tartaná, ezenkívül mindkét kezét
használ hatja a gép kezelésére
.
b)Áramkimaradás, szakadás esetén: Kapcsolja ki a gé -
pet, és húzza ki a csatlakozódugót.
Ez megakadályozza, hogy a gép véletlenül (nem szándékosan) beinduljon, amikor visszatér a feszültség.
4.2.3 Elektromos biztonsági előírások
a)Rendszeresen ellenőrizze a gép csatlakozóvezetékét,
és sérülés esetén cseréltesse ki egy felhatalmazott
szakemberrel. Rendszeresen ellenőrizze a hosszab bítóvezetéket, és cserélje ki, ha sérült. Ne érintse a
vezetéket, ha az munka közben megsérül. Húzza ki a
gép csatlakozóvezetékét a dugaszolóaljzatból.
A sérült
csatlakozóvezetékek és hosszabbítóvezetékek veszélyesek, elektromos áramütést okozhatnak.
b)Ezért a szennyezett gépet, különösen ha gyakran munkál
meg elektromosan vezető anyagot, rendszeres
időközönként vizsgáltassa meg a Hilti szervizzel.
A gép
felületére tapadó por, mindenekelőtt az elek tromosan
vezető anyagok pora, illetve a nedvesség kedvezőtlen
körülmények között elektromos áramütéshez vezethet
.
4.2.4 Munkahely
a)Biztosítsa a munkaterület megfelelő megvilágítottságát.
b)Biztosítsa a munkahely jó szellőzését.
A rosszul szellőztetett munkahely a porterhelésből eredő egészségkárosodást okozhat.
4.2.5 Személyi védőfelszerelések
A gép használójának és a közvetlen közelében tartóz -
kodóknak kötelező a védőszemüveg, könnyű légzőmaszk
és fülvédő használata.
5.
Üzembehelyezés
Üzembehelyezés előtt feltétlenül olvassa el a használati
utasítás biztonságtechnikai útmutatóját.
A hálózati feszültségnek meg kell egyeznie a gép adattábláján feltüntetett értékkel.
Hosszabbítókábel használata esetén: csak szabályosan
szerelt, megfelelő vezetőkeresztmetszetű kábelt használjon. Rendszeresen ellenőrizze a csatlakozó- és hos-
szabbítókábeleket, nem sérültek-e.
Hosszabbító kábelek kültéri használatra
Csak az e célra engedélyezett és megfelelően jelölt kábelek használhatók.
Mindig figyeljen
Koncentráljon a munkájára. Ne használja a gépet, ha nem,
vagy csak részben tud munkájára figyelni.
6.
A gép használata
Rendszer
A felületminőség és a leválasztás gyorsasága függ a csi szolópapír finomságától, a fordulatszámtól, és az alkalma zott nyomóerőtől. A gép, a csiszolótányér és a csiszolóvászon rendszert alkotnak. Bizonyosodjon meg afelől,
hogy a legmegfelelőbb összeállítást használja és a gép
beállításai optimálisak.
Csiszolópapír felhelyezés
150 mm külső átmérőjű és tépőzárral ellátott csiszolópapíro-kat használjon.
Használhatók a 6 lyukas (80 mm átmérőjű körön elhelyezve), illetve a 9 lyukas (8 lyuk 120 mm átmérőjű körön
elhelyezve, a 9-ik középen) csiszolóvásznak.
●
Hálózatra csatlakoztatás előtt bizonyosodjon meg
afelől, hogy a gép ki van kapcsolva.
●
Bizonyosodjon meg afelől, hogy a vászon és a csis-
zolótalp elszívónyílásai egy vonalba essenek.
Viseljen
fülvédőt
Viseljen
védőkesztyűt
Viseljen
légzőmaszkot
Viseljen védős-
ze müveget
Printed: 07.07.2013 | Doc-Nr: PUB / 5131018 / 000 / 00
Page 100

96
A gép tartása – javasolt fogáshelyzetek
Gyors leválasztás
●
Tartsa a gépet két kézzel.
●
Használja a fő- és a kiegészítő markolatot. Ez utóbbit
húzza ki alkalmazási helyzetbe (a kiegészítő helyett használható a vezető markolat is)
Befejező munkákhoz
●
Egy kézzel vezesse a gépet.
●
Használja a befejező markolatot. Ezzel vezethető a gép
a legpontosabban és legkönnyedébben, közel a felülethez.
Merőleges felületeken
(pl. falak, szegélyek)
●
A befejező markolatnál fogja a gépet. Ilyenkor van a gép
leginkább egyensúlyban, ami fáradtságmentes és biztonságos munkát eredményez.
FIGYELEM!
A csiszolás veszélyes porokat termelhet, ami káros lehet
a szemre és a tüdőre.
Használjon elszívó berendezést, viseljen védőszemüveget
és légzőmaszkot.
Csiszolás
●
Győződjön meg róla, hogy a gép ki van kapcsolva.
●
Csatlakoztassa a gépet a hálózathoz.
●
Válassza ki a megfelelő fordulatszámot.
●
Helyezze a gépet a csiszolandó felületre és mozgassa,
kb. 20 N erővel nyomva.
●
Ha befejezte, vagy ideiglenes szünetet tart, emelje le a
még működésben lévő gépet, és úgy állítsa le.
7.
Csiszolás
A megfelelő fordulatszám beállítása
A szükséges teljesítmény a fordulatszámszabályzó kerékkel pontosan és finoman szabályozható, akár menet közben is.
A fordulatszám függ a csiszolandó anyagtól. Az ideális fordulatszámhoz ajánlatos teszteket végezni, illetve a használati utasításban és a csiszolópapírok használatánál leírtakat betartani.
Beállítás
16
Fordulatszám alacsony magas
Bekapcsolás után a gép a beállított fordulatszámon műkö-
dik majd.
Csiszolólapok
A Hilti a megfelelő csiszolólapokat ajánlja a «Helyes használat» részben körülírt alkalmazásokhoz: faanyag csiszolásához P60-P180, festékek csiszolásához P40-P400
finomságút.
Csiszolótányér
A csiszolótányér kopó alkatrész, melyre nem vonatkoznak
az általános garanciális feltételek.
A gépet univerzális tányérral szerelve szállítjuk. Ez a csi szolótányér kiváló leválasztási és befejezési tulajdonságokkal bír. A legfontosabb szabványoknak megfelelő porelszíváshoz alkalmas.
Univerzális Kiinduló csiszolás
csiszolótányér
–
fa, faanyagok
–
tömítőanyagok
–
elöregedett festék, lakk
–
kompozitanyagok
–
műanyagok
Előkészítő és közbenső
csiszolás
–
festék és lakk
Puha csiszolótányér Festék és lakk előkészítő és
közbenső csiszolása, ívelt
felületek.
Csiszolótányér-fék
A gépet felszereltük egy, a csiszolótányért fékező gyűrűvel,
amire kopóalkatrészként nem vonatkoznak az általános
garanciális feltételek.
A fék lassítja a csiszolótányér üresjárati mozgását, csökkentve ezzel a visszarúgást, amikor a gép hozzáér a felülethez.
Porelszívás
FIGYELEM!
A csiszolás veszélyes porokat termelhet, ami káros lehet
a szemre és a tüdőre. Használjon elszívó berendezést,
viseljen védőszemüveget és légzőmaszkot.
Porelszívás porzsákkal és porzsáktartóval
Használja a porzsáktartót a géppel szállított porzsákkal.
Alaposan távolítsa el a porlerakódásokat (pl. porszívóval).
Porelszívás porszívóval
Porszívó használatakor, különösen kedvezőtlen esetekben, továbbá, ha alacsony a páratartalom, elektromos
kisülés történhet.
Ez nem a gép hibája, de elkerülhető a Hilti WVC 40 faipari porszívóját használva. Valamennyi Hilti elektromos
kézi szerszám és alkalmazás megfelel a jelenleg érvényes előírásoknak. Ha mégis kisülést tapasztalna, lépjen
kap csolatba a l egközelebbi Hilti Centerrel, vagy javítóműhelly el, és kérjen segítséget.
Alaposan távolítsa el a porlerakódásokat (pl. porszívóval).
Printed: 07.07.2013 | Doc-Nr: PUB / 5131018 / 000 / 00
 Loading...