

Page 1
UH240-A
*000000*
000000
Bedienungsanleitung de
Operating instructions en
Hilti Corporation
FL-9494 Schaan
Tel.: +423/ 2342111
Fax: +423 /2342965
www.hilti.com
Hilti = registered trademark of Hilti Corp., Schaan W 0000 0403 0,5-Pos. 1 1 Printed in Liechtenstein © 2003
Right of technical and programme changes reserved S. E. & O.
000000/A
Page 2
1
1
2
L
R
6
STOP
2
3 6
4 51
7
3
1
2
3
7
4
1
8
10
5791
1-15
15
9
5
Page 3
11
en
It is essential that the operating instructions
are read before the tool is operated for the
first time.
Always keep these operating instructions
together with the tool.
Ensure that the operating instructions are with
the tool when it is given to other persons.
UH240-A cordless hammer drill
1. General information
1.1 Signal words and their meaning
-CAUTION-
Used to draw attention to a potentially dangerous situation which could lead to minor personal injury or damage
to the equipment or other property.
-NOTE-
Used to draw attention to an instruction or other useful
information. Not used for dangerous situations or where
damage to the equipment or property could occur.
1.2 Pictograms
Contents Page
1. General information 11
2. Description 12
3. Accessories 12
4. Technical data 13
5. Safety precautions 13
6. Before use 15
7. Operation 16
8. Care and maintenance 17
9. Troubleshooting 18
10. Disposal 18
11. Warranty 19
12. Declaration of conformity 19
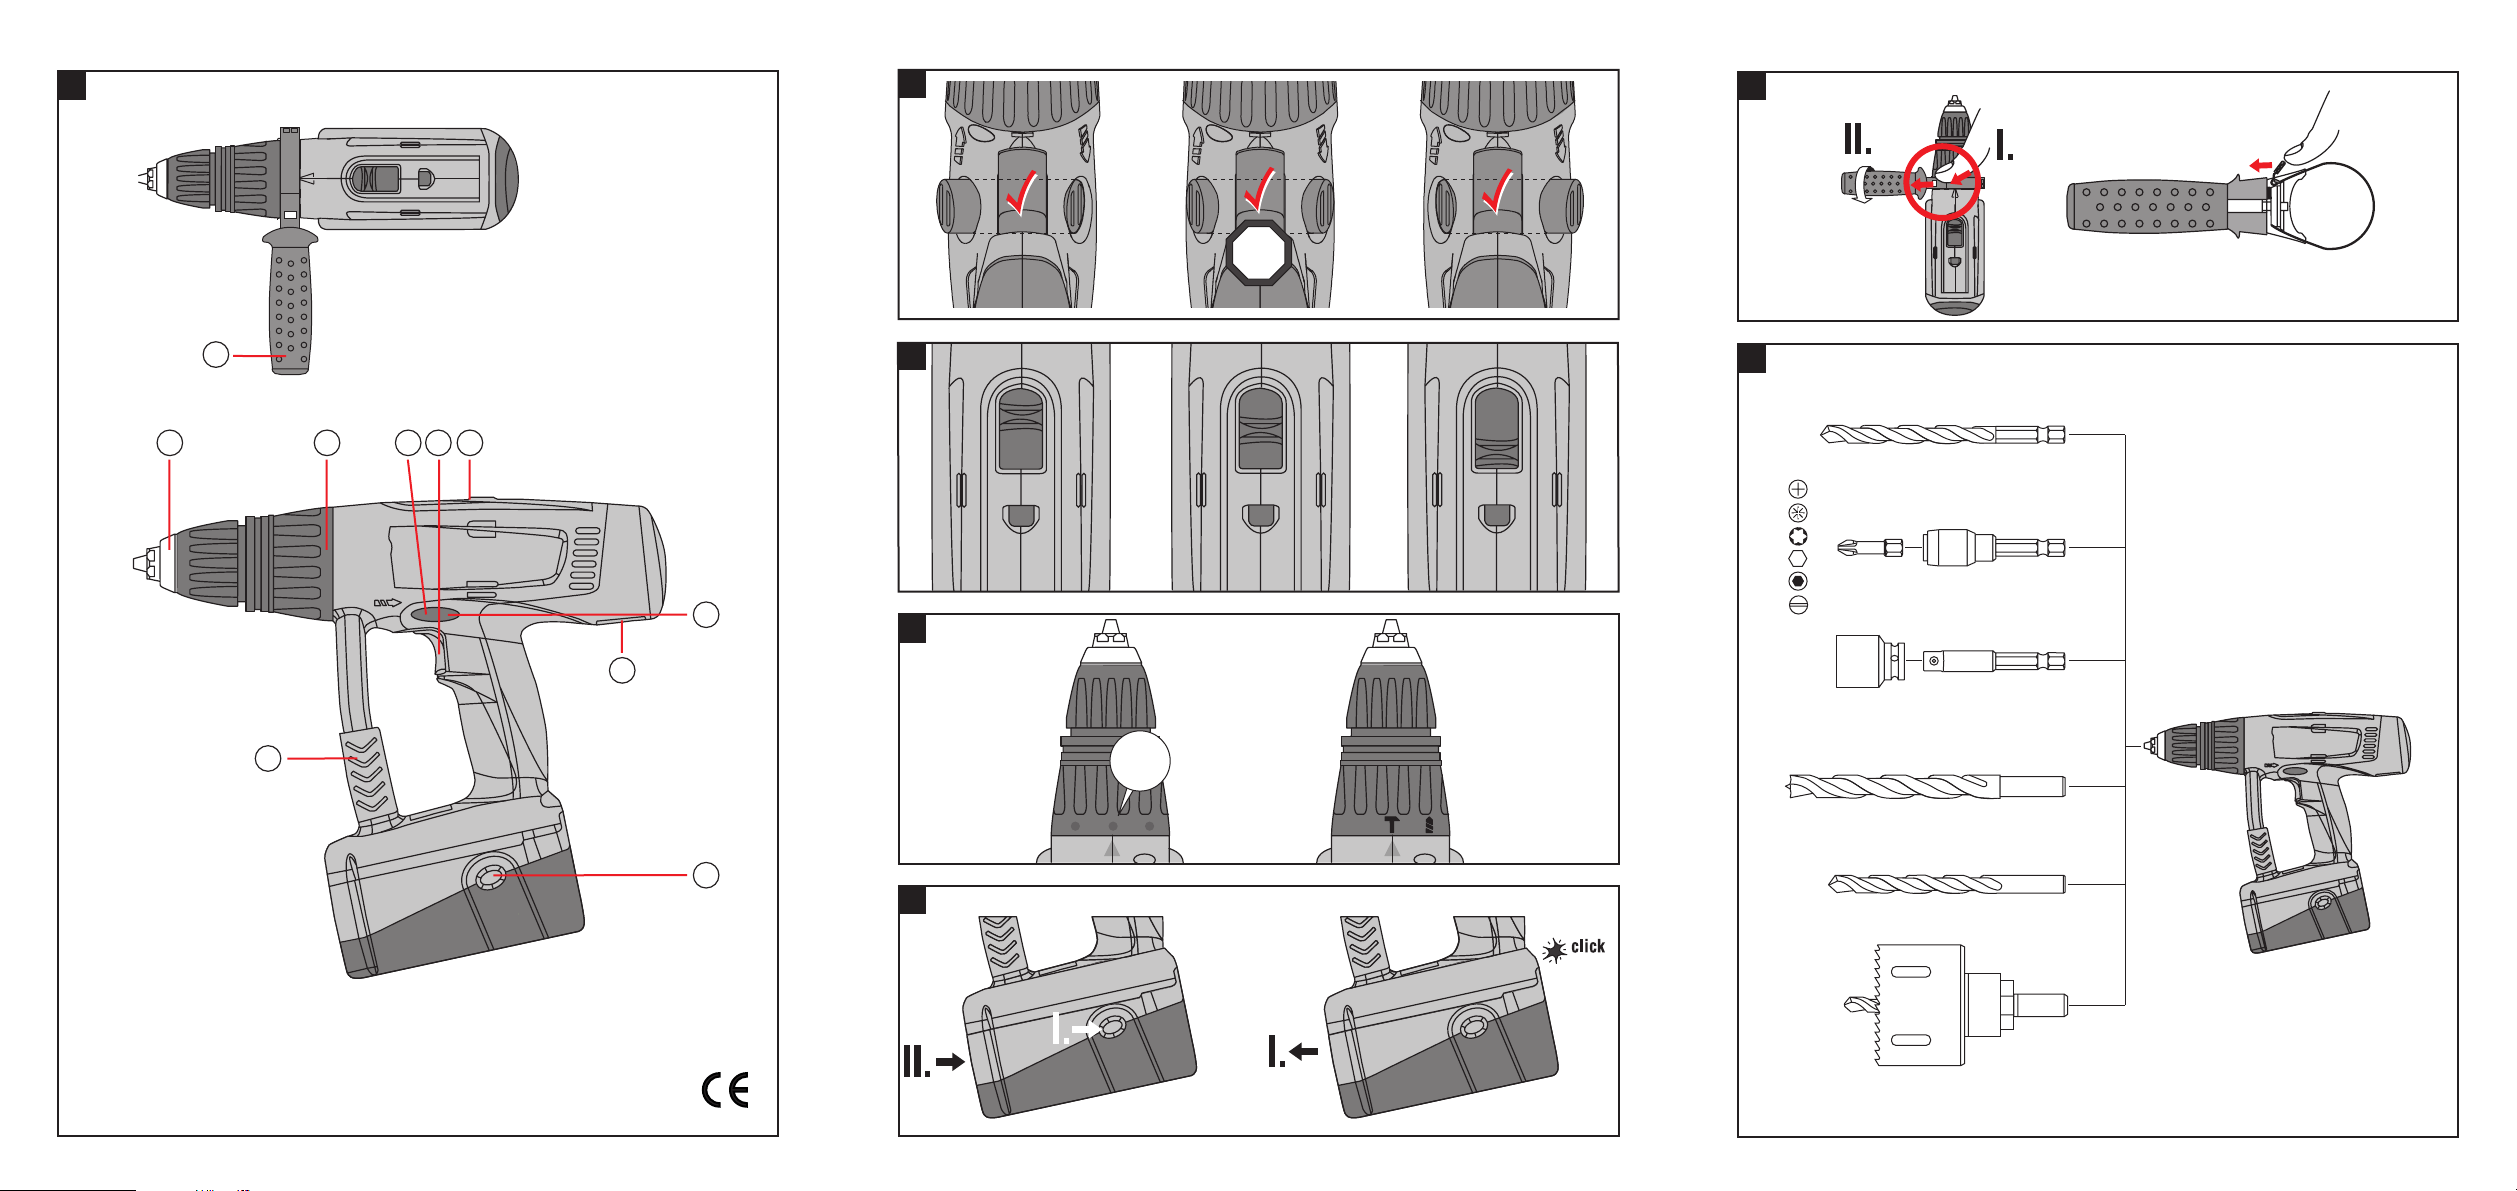
Operating controls and parts
Quick release clutch
Side handle
Torque clutch setting ring
Forward / reverse switch
Control switch
(with electronic speed control)
3-speed gear selector switch
Motor brake
Rating plate
Battery release buttons (2)
Bit box
These numbers refer to the corresponding illustrations. The illustrations can be found on the fold-out cover
pages. Keep these pages open while studying the operating instructions.
In these operating instructions, the UH 240-A cordless
hammer drill with battery fitted is referred to as “the tool”.
Warning signs
General
warning
Warning:
electricity
Warning:
caustic
substances
Obligation signs
Wear
breathing
protection
Wear
ear
protection
Wear
protective
gloves
Wear
eye
protection
Warning:
hot surface
Symbols
Read the
operating
instructions
before use
Return waste material for
recycling
Do not dispose of
batteries with
general refuse
V= volts
–––
- - -
= direct current
n
o = no load speed
/min = revolutions per minute
j = hammer drilling
= rotation only
02 BA UH240-A en 02.12.2003 11:54 Uhr Seite 11
Page 4
12
en
2. Description
The UH 240-A is a cordless hammer drill for professional
use.
The tool is suitable for use by right or left-handed
persons. The ergonomically designed rubber-padded
grip reduces fatigue and is designed to provide a secure
hold.
The items supplied include: Electric tool with side handle,
3 bits and magnetic bit holder, two B24/2.0 NiCd, B24/2.4
NiCd or B24/3.0 NiMH batteries, C 7/24, C 7/36-ACS or
TCU 7/36 charger in toolbox or cardboard box.
2.1 Correct use
The UH 240-A is hand-held cordless hammer drill for
driving and removing screws, drilling in steel, wood and
masonry and hammer drilling in masonry only.
It is intended for use on construction sites of all kinds
for general construction, interior finishing, conversion
and renovation work.
● The tool may be used only in a dry environment.
● Do not use the tool where there is a risk of fire or explo-
sion.
● Use only the insert tools and accessories intended for
use with this tool.
● The tool may be powered only by the batteries approved
for use with this tool.
● Do not use the batteries as a power source for other
equipment.
● Use only the recommended battery charger.
● Modification or manipulation of the tool other than
described in these operating instructions is not permissible.
● To avoid the risk of injury, use only original Hilti acces-
sories and additional equipment.
● Observe the information printed in the operating instruc-
tions concerning operation, care and maintenance.
● The tool and its ancillary equipment may present ha-
zards when used incorrectly by untrained personnel
or when used not as directed.
2.2 Important features of the tool
– Vibration-absorbing grip (rubber-padded)
– Smooth speed control
– Gearing and clutch with permanent lubrication
(grease)
– Automatic cut-out carbon brushes
– Forward / reverse rotation
3. Accessories
Magnetic bit holder S-BH 50M
Bits EU USA
Pozidrive S-B PZD 3T 2 Phillips S-B PH 3×2″
Torx S-B TX 30T 1 Phillips S-B PH SQ2
Torx S-B TX 40
Charger C 7/24
Charger C 7/36-ACS
Charger TCU 7/36
Battery B24/2.0 NiCd, B24/2.4 NiCd or B24/3.0 NiMH
Toolbox / cardboard box
Belt adaptor BAP 24
Dust shield
Location of identification data on the tool
The type designation, item number, year of manufacture
and technical status can be found on the rating plate on
the tool. The serial number is located on the left side of
the motor housing. Make a note of this data in your operating instructions and always refer to it when making
an enquiry to your Hilti representative or service department.
Type:
Serial no.:
02 BA UH240-A en 02.12.2003 11:54 Uhr Seite 12
Page 5

13
en
4. Technical data
Tool
Rated voltage 24 V
–––
- - -
Weight of tool including battery and chuck 3.8 kg
Dimensions (L×H×W) 320×286×92 mm
Speed 1
st
gear: 0– 350 r.p.m.
2
nd
gear:0– 1300 r.p.m.
3rdgear: 0– 1950 r.p.m.
Chuck / clamping dia. range (quick-release chuck) 1.5–13 mm
Torque Max. 45 Nm (at drilling setting)
Torque adjustment 5–17 Nm (in 15 increments)
Speed control Electronic control switch
Forward / reverse Electrical switch with interlock to prevent activation
when running
Spindle lock When control switch is in the “off” position
Motor brake By way of the control switch
Gearing section sealed to prevent entry of dust and with permanent lubrication (maintenance-free)
Noise and vibration information (measured in accordance with EN 50260):
Typical A-weighted noise power level: 104 dB (A)
Typical A-weighted noise pressure level: 93 dB (A)
Wear ear protection!
Typical weighted vibration at the grips: 7 m/s
2
Battery B24/2.0 NiCd B24/2.4 NiCd B24/3.0 NiMH
Rated voltage 24 V
–––
- - -
24 V
–––
- - -
24 V
–––
- - -
Battery capacity 24 V × 2.0 Ah 24 V × 2.4 Ah 24 V × 3.0 Ah
= 48 Wh = 58 Wh = 72 Wh
Weight 1.38 kg 1.38 kg 1.45 kg
Temperature monitoring yes yes yes
Type of cell Nickel-cadmium Nickel-cadmium Nickel-metal hydride
SUB C type SUB C type SUB C type
No. of cells 20 20 20
Right of technical changes reserved!
5. Safety precautions
5.1 Basic information concerning safety
In addition to the information relevant to safety given in
each of the sections of these operating instructions, the
following points must be strictly observed at all times.
CAUTION! To reduce the risk of fire, battery leakage and
personal injury, the following basic safety precautions
must be observed when battery-powered tools are used:
Read all these instructions before operating this product
and save these instructions.
5.2 Take the necessary precautions to make the
workplace safe
● Ensure that the workplace is well lit.
● Ensure that the workplace is well ventilated.
● Keep the workplace tidy. Objects which could cause
injury should be removed from the working area. Untidiness at the workplace can lead to accidents.
● Use clamps or a vice to secure the workpiece.
The workpiece is thus held more securely than by
hand and both hands remain free to operate the
tool.
● Wear goggles and wear breathing protection during
jobs that create dust.
● Use the dust shield (accessory) to protect the chuck
when drilling overhead.
● Do not wear loose clothing, loose long hair or jewelry
as these can become caught up in moving parts. Wear
suitable headgear if you have long hair.
02 BA UH240-A en 02.12.2003 11:54 Uhr Seite 13
Page 6

14
en
● Wear non-slip shoes or boots and always ensure that
you have a secure stance.
● When working, keep other persons, particularly chil-
dren, outside the range of the tool.
● Do not permit other persons to touch the tool.
● Avoid unfavorable body positions when working. Work
from a secure stance and always stay in balance.
● Concealed electric cables or gas and water pipes pre-
sent a serious hazard if damaged while you are working.
Accordingly, check the area in which you are working
beforehand (e.g. using a metal detector). Avoid contact between your body and earthed / grounded objects,
such as pipes or radiators. External metal parts of the
tool may become live, for example, when an electric
cable is drilled into inadvertently.
5.3 General safety precautions
● Use the right electric tool for the job. Do not use the
tool for purposes for which it was not intended. Use
the tool only as directed and when it is in faultless condition.
● Avoid contact with rotating parts.
● Use only the original accessories or ancillary equip-
ment listed in the operating instructions. Use of other
insert tools or accessories may present a risk of personal injury.
● Take the influences of the surrounding area into account.
Do not expose the tool to rain or snow and do not use
it in damp or wet conditions. Do not use the tool where
there is a risk of fire or explosion.
● Keep the grips dry, clean and free from oil and grease.
● Do not overload the tool. It will work more efficiently
and more safely within its intended performance range.
● The side handle must be fitted for all types of work.
● The tool may be used hand-held only.
● Always hold the tool with both hands on the grips pro-
vided.
● Operate the tool only as directed and only when it is in
faultless condition.
● The battery should be removed from the tool when
the tool is not in use, before work breaks, before maintenance, before changing insert tools and before transport.
● Avoid unintentional starting. Do not carry the tool with
your finger on the on/off switch.
● Disconnect the tool from its battery pack when the tool
is not in use, during pauses between work, before maintenance, when changing bits and during transport.
● Take care of your insert tools. You will be able to work
more efficiently and more safely if the insert tools are
kept sharp and clean. Observe instructions on care and
maintenance and on changing insert tools.
● Check the electric tool for possible damage. Protec-
tive devices and any parts that may have suffered slight
damage should be checked for correct operation and
functionality before further use of the electric tool.
Damaged safety devices or other damaged parts should
be replaced or repaired properly by an authorized repair
workshop unless otherwise indicated in the operating instructions.
● The tool may be operated only when the bit box is
closed.
● Do not insert wires or other similar objects into the
ventilation slots.
5.3.1 Mechanical hazards
● Check that wrenches etc. have been removed from
the tool before switching it on.
● Follow the instructions concerning care and mainte-
nance.
● Check that the insert tools used are compatible with
the chuck system and that they are secured in the chuck
or gear housing correctly.
● Check that moving parts function faultlessly and that
they are not sticking or damaged. All parts must be
correctly fitted and fulfil all requirements in order to
ensure that the tool operates faultlessly.
● Use only original Hilti insert tools.
5.3.2 Electrical hazards
● Protect yourself against electric shock. Avoid body
contact with earthed / grounded objects, e.g. pipes,
radiators, cookers and fridges.
● Check the condition of the tool. Do not operate the tool
if it is found to be damaged, if it is not complete or if
its controls cannot be operated faultlessly.
● Damaged switches must be replaced at a Hilti service
center. Do not use the tool if it cannot be switched off
and on properly.
● The tool may be repaired by trained electrical specialists
only (Hilti service) using original Hilti spare parts. Failure to observe this point may present considerable risk
to the user.
● Never operate the tool when it is dirty or wet.
● Avoid short circuiting the battery terminals. A short
circuit may cause a fire.
● Ensure that the battery contacts cannot be short circuited
by other metal objects such as screws or nails etc.
● Ensure that the outer surface of the battery is clean
and dry before inserting the battery in the appropriate charger for charging.
● Use only the batteries listed in these operating instructions.
● Check that the battery is securely attached to the tool.
A falling battery could injure you or other persons.
● Batteries that have reached the end of their life must
be disposed of safely.
02 BA UH240-A en 02.12.2003 11:54 Uhr Seite 14
Page 7

15
en
6. Before use
● Ensure that batteries are charged using the correct
charger recommended by the manufacturer. Incorrect
use may result in a risk of electric shock, overheating
or leaking of corrosive liquid from the battery.
5.3.3 Thermal hazards
● The insert tool may become hot during use. You should
therefore wear protective gloves when changing insert
tools.
5.3.4 Liquids
● A caustic liquid may leak from defective batteries. Avoid
contact with this liquid. In the event of contact with the
skin, wash the area affected with soap and plenty of
water. Should the liquid come into contact with the
eyes, flush the eyes with water immediately and subsequently consult a doctor.
5.4 Requirements to be met by users
● The tool is intended for professional use.
● The tool may be operated, serviced and repaired only
by authorized, trained personnel. This personnel must
be informed of any special hazards that may be encountered.
● Always concentrate on the job you are doing. Proceed
carefully and do not use the tool if your full attention
is not on the job.
5.5 Personal protective equipment
● The operator and other persons in the immediate vicin-
ity must always wear eye protection, ear protection
and breathing protection while the tool is in use.
1. It is essential that the safety precautions printed in
these operating instructions are read and observed.
2. It is essential that a new battery is charged correctly
before initial use so that the battery cells can form
correctly. Incorrect initial charging can lead to a permanent reduction of battery capacity.
– With the C 7/24 or TCU 7/36 charger: Charge for 24
hours in normal charging mode or for 12 hours in
conditioning mode.
– With the C 7/36-ACS charger: The charger detects
automatically whether initial charging or normal
charging is necessary.
-NOTE-
● The tool may be used only with B24/2.0 NiCd, B24/2.4
NiCd or B24/3.0 NiMH batteries.
● Battery performance drops at low temperatures.
● Batteries should be stored at room temperature.
● Never store batteries where they are exposed to the
heat of the sun, on a radiator, behind a motor vehicle
windscreen or at a window.
● Never use the battery until the cells become fully dis-
charged. Change to the second battery as soon as a
drop in performance is noticed and recharge the battery immediately so that it is ready for re-use.
● Use bits with a standard
1
/4″ hex. shank.
6.1 Fitting the side handle
1. Open the side handle clamping band by turning the
handle.
2. Slide the side handle clamping band over the chuck
and onto the tool.
3. Pivot the side handle into the desired position.
4. Secure the side handle by turning the handle.
Wear
breathing
protection
Wear
ear
protection
Wear
protective
gloves
Wear
eye
protection
02 BA UH240-A en 02.12.2003 11:54 Uhr Seite 15
Page 8

16
en
7. Operation
-CAUTION-
● The screwdriving procedure may
cause the material to splinter.
● Splintering material may cause injury
to the body, respiratory passages and
the eyes.
● Wear eye and breathing protection.
-CAUTION-
● Noise is emitted by the tool and the
screwdriving or drilling procedure.
● Excessive noise may damage the
hearing.
● Wear ear protection.
7.1 Setting forwards or reverse rotation
The direction of rotation can be selected by operating the
forward / reverse push switch . An interlock prevents
operation of the switch while the motor is running. When
in the middle position, the on / off switch is locked.
– Forwards rotation: Push the forward / reverse switch
to the right (as seen from the direction in which the
tool is used).
– Reverse rotation: Push the forward / reverse switch
to the left (as seen from the direction in which the tool
is used).
7.2 Setting the speed (3-speed gear selector switch)
-CAUTION-
Operate the gear selector switch only when rotation has
stopped.
1. Set the switch to position 1 for a speed range of 0–400
r.p.m., position 2 for a speed range of 0–1200 r.p.m.
or position 3 for a speed range of 0–2000 r.p.m.
7.3 Screwdriving
1. Set the desired direction of rotation by way of the forward / reverse switch.
7.3.1 Torque setting
1. Set the torque by turning the torque clutch setting
ring to the desired torque setting(1–15).
7.4 Hammer drilling
1. Turn the torque clutch setting ring to the hammer
drilling symbol.
-CAUTION-
Take care to avoid pinching the fingers between the chuck
and setting ring.
7.5 Drilling
1. Turn the torque clutch setting ring to the drilling symbol.
-CAUTION-
A high torque is experienced if the insert tool sticks while
drilling with large-diameter drill bits and hole saws.
Accordingly, use the side handle and hold the tool with
both hands (one hand on the grip and one hand on the
side handle).
7.6 Switching on and off
Should a sticking drill bit cause the motor to stall for
longer than 2–3 seconds, the tool must be switched off
in order to avoid damage to it.
1. Use the forward / reverse switch to select the direction of rotation.
2. The speed of the tool can be controlled smoothly
between zero and maximum by pressing the on / off
switch slowly.
7.7 Removing the battery (2-finger operation)
1. Press in both release buttons.
2. Pull the battery downwards out of the tool.
7.8 Fitting the battery
Use only Hilti B24/2.0 NiCd, B24/2.4 NiCd or B24/3.0
NiMH batteries.
1. Push the battery into the tool from below until it is
heard to engage.
7.9 Charging the battery
The battery cannot be charged through the belt adaptor.
Use only the Hilti C 7/24, C 7/36-ACS or TCU 7/36 chargers.
Incorrect use may lead to electric shocks, overheating
of the battery or leakage of a caustic liquid from the battery.
Read the operating instructions for the charger before
beginning charging.
7.10 Changing the insert tool
-CAUTION-
● The insert tool may become hot dur-
ing use.
● There is a risk of burning the hands.
● Wear protective gloves when chang-
ing insert tools.
02 BA UH240-A en 02.12.2003 11:54 Uhr Seite 16
Page 9

17
en
8. Care and maintenance
8.1 Care of insert tools
Remove any dirt adhering to the surface of the insert
tools and protect them from corrosion by rubbing them
with an oily cloth from time to time.
8.2 Care of the tool
Before cleaning, remove the battery from the tool in order
to prevent inadvertent starting.
The outer casing of the tool is manufactured from impactresistant plastic. The grip comprises a synthetic rubber
section.
The ventilation slots must be unobstructed and kept clean
at all times. Use a dry brush to clean the ventilation slots
carefully. Do not permit foreign objects to enter the interior of the tool. Use a slightly damp cloth to clean the outside of the tool at regular intervals. Do not use a spray,
steam-cleaning system or running water for cleaning.
This may negatively affect the electrical safety of the tool.
Always keep the grip sections of the tool free from oil
and grease. Do not use cleaning agents or polishes, etc.
containing silicone.
8.3 Maintenance
Check all external parts of the tool for damage at regular
intervals and check that all controls operate faultlessly.
Do not operate the tool when parts are damaged or when
the controls do not operate faultlessly. If necessary, have
the tool repaired at a Hilti service center.
Electrical parts of the tool may be repaired only by trained
electrical specialists.
8.4 Care of the battery
Keep the electrical contacts free from dust, oil and grease.
If necessary, use a clean cloth to clean the contact surfaces.
Do not continue to operate the tool until the battery is
completely discharged as this may damage the battery
cells. Recharge the battery as soon as a drop in performance is noticed.
At monthly intervals or, at the latest, when battery capacity drops significantly, the battery should be conditioned
as follows:
– With the C 7/24 or TCU 7/36 charger: Charge for 24
hours in normal charging mode or for 12 hours in conditioning mode.
– With the C 7/36-ACS charger: The charger detects
automatically whether initial charging or normal charging is necessary.
If, after conditioning, battery capacity is still unsatisfactory, we recommend returning the battery to Hilti for diagnosis.
8.5 Checking the tool after care and maintenance
After carrying out care and maintenance work on the tool,
check that all protective and safety devices are fitted and
that they function faultlessly.
02 BA UH240-A en 02.12.2003 11:54 Uhr Seite 17
Page 10

18
en
10. Disposal
Most of the materials from which Hilti power tools are manufactured can be recycled. The materials must be correctly separated before they can be recycled. In many countries, Hilti has already made arrangements for taking
back your old electric tools for recycling. Please ask your Hilti customer service department or Hilti sales representative for further information. Should you wish to return the electric tool yourself to a disposal facility for recycling, proceed as follows: Dismantle the tool as far as possible without the need for special tools. Use absorbent
paper to wipe greasy parts clean and collect any grease that runs out. This paper should also be disposed of correctly. On no account should grease be allowed to enter the waste water system or find its way into the ground.
Separate the individual parts as follows:
Part / assembly Main material Recycling
Toolbox Plastic Plastics recycling
Outer casing Plastic / synthetic rubber Plastics recycling
Electronic switch Various Electronics scrap
Motor Steel, copper Scrap metal
Gearing parts Steel Scrap metal
Battery Nickel-cadmium *
Nickel-metal hydride
Screws, small parts Steel Scrap metal
* Return waste material for recycling.
** Dispose of the battery in accordance with national regulations or return used
* ** batteries to Hilti for recycling.
Fault Possible cause Remedy
Tool doesn‘t run Battery is discharged or not correctly Refit the battery. It must be heard to engage
fitted with an audible “click”. Charge the battery if
necessary.
Electrical fault Remove the battery and contact your
nearest Hilti service center.
Tool runs too fast / too Adjust the 3-speed gear selector Set the 3-speed gear selector switch to the
slow switch. desired position.
No hammer action Tool set to the wrong mode Set the tool to hammer drilling mode.
Clutch releases while drilling Tool set to screwdriving mode Set the tool to drilling mode.
On / off switch cannot be Forward / reverse switch is set to Move the forward / reverse switch to the
pressed middle position left/right.
Speed suddenly drops The battery is almost exhausted. Stop working with the exhausted battery
and charge it fully.
Battery becomes dis- Battery condition is not optimal. Charge the battery using conditioning mode
charged faster than usual (see battery charger operating instructions).
Battery does not engage Dirt on battery locking mechanism Clean battery locking mechanism and refit
with an audible “click” the battery. Contact your nearest Hilti ser-
vice center if the problem persists.
Tool or battery overheats Electrical fault. Switch off the tool immediately. Remove
the battery and contact your nearest Hilti
service center.
Overload due to exceeding Select the right tool for the application.
application limit
Drill bit or screwdriving bit Chuck not tightened correctly Tighten the chuck securely by applying
slips in the chuck reasonable force.
9. Troubleshooting
02 BA UH240-A en 02.12.2003 11:54 Uhr Seite 18
Page 11

19
en
11. Warranty
Hilti warrants that the tool supplied is free of defects in
material and workmanship. This warranty is valid as long
as the tool is operated and handled correctly, cleaned
and serviced properly and in accordance with the Hilti
Operating Instructions, all warranty claims are made
within 12 months from the date of the sale (invoice date),
and the technical system is maintained. This means that
only original Hilti consumables, components and spare
parts may be used in the tool.
This warranty provides the free-of-charge repair or
replacement of defective parts only. Parts requiring repair
or replacement as a result of normal wear and tear are
not covered by this warranty.
Additional claims are excluded, unless stringent
national rules prohibit such exclusion. In particular,
Hilti is not obligated for direct, indirect, incidental or
consequential damages, losses or expenses in connection with, or by reason of, the use of, or inability
to use the tool for any purpose. Implied warranties of
merchantability or fitness for a particular purpose are
specifically excluded.
For repair or replacement, send tool and/or related parts
immediately upon discovery of the defect to the address
of the local Hilti marketing organization provided.
This constitutes Hilti’s entire obligation with regard to
warranty and supersedes all prior or contemporaneous
comments and oral or written agreements concerning
warranties.
12. EC declaration of conformity
We declare, on our sole responsibility, that this product
complies with the following standards or standardisation
documents: 98/37/EG, 89/336/EWG, 91/157/EWG,
93/86/EWG, EN 50260-1, EN 50260-2-1, EN 50260-2-2,
EN 55014-1, EN 55014-2, EN 61000-6-3.
Designation: Cordless hammer drill
Type: UH240-A
Year of design: 2003
Hilti Corporation
Jan Doongaij Dr. Joachim Schneider
Head of Marketing BU Rotary & UCD Head of BA LDS
June 2003 June 2003
02 BA UH240-A en 02.12.2003 11:54 Uhr Seite 19
Page 12

02 BA UH240-A en 02.12.2003 11:54 Uhr Seite 20
 Loading...