

Hilti PD-C, PD-CS Operating Manual

PD-C
PD-CS
Printed: 10.11.2016 | Doc-Nr: PUB / 5270043 / 000 / 04
English

Printed: 10.11.2016 | Doc-Nr: PUB / 5270043 / 000 / 04

Contents
1 Information about the documentation . . . . . . . . . . . . . . . . . . . . . . . . . . . . . . . . . . . . 4
1.1 About this documentation . . . . . . . . . . . . . . . . . . . . . . . . . . . . . . . . . . . . . . . . . . . . . 4
1.2 Explanation of symbols used . . . . . . . . . . . . . . . . . . . . . . . . . . . . . . . . . . . . . . . . . . . 4
1.2.1 Warnings . . . . . . . . . . . . . . . . . . . . . . . . . . . . . . . . . . . . . . . . . . . . . . . . . . 4
1.2.2 Symbols in the documentation . . . . . . . . . . . . . . . . . . . . . . . . . . . . . . . . . . . . . 4
1.2.3 Symbols in the illustrations . . . . . . . . . . . . . . . . . . . . . . . . . . . . . . . . . . . . . . . 4
1.3 About this documentation . . . . . . . . . . . . . . . . . . . . . . . . . . . . . . . . . . . . . . . . . . . . . 4
1.4 Laser information on the product . . . . . . . . . . . . . . . . . . . . . . . . . . . . . . . . . . . . . . . . 5
1.5 Declaration of conformity . . . . . . . . . . . . . . . . . . . . . . . . . . . . . . . . . . . . . . . . . . . . . 5
1.6 Product information . . . . . . . . . . . . . . . . . . . . . . . . . . . . . . . . . . . . . . . . . . . . . . . . 5
2 Safety . . . . . . . . . . . . . . . . . . . . . . . . . . . . . . . . . . . . . . . . . . . . . . . . . . . . . . . . . 5
2.1 Basic information concerning safety . . . . . . . . . . . . . . . . . . . . . . . . . . . . . . . . . . . . . . 5
2.2 Proper preparation of the working area . . . . . . . . . . . . . . . . . . . . . . . . . . . . . . . . . . . . 7
2.3 Electromagnetic compatibility . . . . . . . . . . . . . . . . . . . . . . . . . . . . . . . . . . . . . . . . . . 7
2.4 Working safely with laser tools . . . . . . . . . . . . . . . . . . . . . . . . . . . . . . . . . . . . . . . . . . 7
2.5 General safety rules . . . . . . . . . . . . . . . . . . . . . . . . . . . . . . . . . . . . . . . . . . . . . . . . 8
3 Introduction to the tool . . . . . . . . . . . . . . . . . . . . . . . . . . . . . . . . . . . . . . . . . . . . . 9
3.1 Product overview . . . . . . . . . . . . . . . . . . . . . . . . . . . . . . . . . . . . . . . . . . . . . . . . . . 9
3.2 Intended use . . . . . . . . . . . . . . . . . . . . . . . . . . . . . . . . . . . . . . . . . . . . . . . . . . . . 10
3.3 Items supplied . . . . . . . . . . . . . . . . . . . . . . . . . . . . . . . . . . . . . . . . . . . . . . . . . . . 10
3.4 Integrated battery . . . . . . . . . . . . . . . . . . . . . . . . . . . . . . . . . . . . . . . . . . . . . . . . . 10
3.5 Technical data . . . . . . . . . . . . . . . . . . . . . . . . . . . . . . . . . . . . . . . . . . . . . . . . . . . 11
3.5.1 Distance measurement . . . . . . . . . . . . . . . . . . . . . . . . . . . . . . . . . . . . . . . . 11
3.5.2 Touchscreen . . . . . . . . . . . . . . . . . . . . . . . . . . . . . . . . . . . . . . . . . . . . . . . 11
3.5.3 Power source . . . . . . . . . . . . . . . . . . . . . . . . . . . . . . . . . . . . . . . . . . . . . . 11
3.5.4 Laser . . . . . . . . . . . . . . . . . . . . . . . . . . . . . . . . . . . . . . . . . . . . . . . . . . . . 12
3.5.5 Other characteristics of the product . . . . . . . . . . . . . . . . . . . . . . . . . . . . . . . . . 12
3.6 Basic principle . . . . . . . . . . . . . . . . . . . . . . . . . . . . . . . . . . . . . . . . . . . . . . . . . . . 12
3.7 Navigating on the display . . . . . . . . . . . . . . . . . . . . . . . . . . . . . . . . . . . . . . . . . . . . 13
3.7.1 Preparations at the workplace . . . . . . . . . . . . . . . . . . . . . . . . . . . . . . . . . . . . 13
3.7.2 Start page . . . . . . . . . . . . . . . . . . . . . . . . . . . . . . . . . . . . . . . . . . . . . . . . 13
3.7.3 Measuring application . . . . . . . . . . . . . . . . . . . . . . . . . . . . . . . . . . . . . . . . . 13
3.7.4 Toolbar . . . . . . . . . . . . . . . . . . . . . . . . . . . . . . . . . . . . . . . . . . . . . . . . . . 14
3.7.5 Navigation bar . . . . . . . . . . . . . . . . . . . . . . . . . . . . . . . . . . . . . . . . . . . . . . 14
3.8 Buttons and icons for triggering and ending measurements . . . . . . . . . . . . . . . . . . . . . . . 14
3.8.1 Ending measurements and functions . . . . . . . . . . . . . . . . . . . . . . . . . . . . . . . . 14
3.9 Inclination sensor . . . . . . . . . . . . . . . . . . . . . . . . . . . . . . . . . . . . . . . . . . . . . . . . . 14
3.10 Measuring aids . . . . . . . . . . . . . . . . . . . . . . . . . . . . . . . . . . . . . . . . . . . . . . . . . . 14
3.10.1 Measuring extension PDA 72 . . . . . . . . . . . . . . . . . . . . . . . . . . . . . . . . . . . . . 14
3.10.2 Short measuring extension . . . . . . . . . . . . . . . . . . . . . . . . . . . . . . . . . . . . . . 14
3.10.3 Fitting a measuring extension to the base of the tool . . . . . . . . . . . . . . . . . . . . . . 15
3.10.4 Target plates . . . . . . . . . . . . . . . . . . . . . . . . . . . . . . . . . . . . . . . . . . . . . . . 15
3.10.4.1 Target plate PDA 50 . . . . . . . . . . . . . . . . . . . . . . . . . . . . . . . . . . . . 15
3.10.4.2 Target plate PDA 51 . . . . . . . . . . . . . . . . . . . . . . . . . . . . . . . . . . . . 15
3.10.4.3 Target plate PDA 52 . . . . . . . . . . . . . . . . . . . . . . . . . . . . . . . . . . . . 15
3.11 Measuring very short distances . . . . . . . . . . . . . . . . . . . . . . . . . . . . . . . . . . . . . . . . 15
Printed: 10.11.2016 | Doc-Nr: PUB / 5270043 / 000 / 04
English 1

3.12 Measuring accuracy . . . . . . . . . . . . . . . . . . . . . . . . . . . . . . . . . . . . . . . . . . . . . . . 15
3.12.1 ‘Picture’ for advanced users . . . . . . . . . . . . . . . . . . . . . . . . . . . . . . . . . . . . . 16
3.12.2 The influence of surfaces on the measurement . . . . . . . . . . . . . . . . . . . . . . . . . . 16
3.12.2.1 Rough surfaces . . . . . . . . . . . . . . . . . . . . . . . . . . . . . . . . . . . . . . . 16
3.12.2.2 Curved or inclined surfaces . . . . . . . . . . . . . . . . . . . . . . . . . . . . . . . 16
3.12.2.3 Wet or shiny surfaces . . . . . . . . . . . . . . . . . . . . . . . . . . . . . . . . . . . 16
3.12.2.4 Transparent surfaces or surfaces that absorb light . . . . . . . . . . . . . . . . . 17
3.12.2.5 Disruption between the tool and the measuring target . . . . . . . . . . . . . . . 17
4 Introduction to the measuring application . . . . . . . . . . . . . . . . . . . . . . . . . . . . . . . . 17
4.1 Measuring application functions and assistants . . . . . . . . . . . . . . . . . . . . . . . . . . . . . . 17
4.1.1 Functions . . . . . . . . . . . . . . . . . . . . . . . . . . . . . . . . . . . . . . . . . . . . . . . . . 17
4.1.2 Measuring with the help of the trigger, timer and aiming camera . . . . . . . . . . . . . . . 17
4.1.3 Standard laser (single measurement) . . . . . . . . . . . . . . . . . . . . . . . . . . . . . . . . 18
4.1.4 Permanent laser (multiple measurement) . . . . . . . . . . . . . . . . . . . . . . . . . . . . . . 18
4.1.5 Using the aiming camera . . . . . . . . . . . . . . . . . . . . . . . . . . . . . . . . . . . . . . . 18
4.1.6 Measuring references . . . . . . . . . . . . . . . . . . . . . . . . . . . . . . . . . . . . . . . . . 19
4.2 Measuring with the help of triggers and timers . . . . . . . . . . . . . . . . . . . . . . . . . . . . . . . 19
4.2.1 Activation and deactivation . . . . . . . . . . . . . . . . . . . . . . . . . . . . . . . . . . . . . . 19
4.2.2 Trigger ‘Minimal’ . . . . . . . . . . . . . . . . . . . . . . . . . . . . . . . . . . . . . . . . . . . . 19
4.2.3 Measuring minimum distance . . . . . . . . . . . . . . . . . . . . . . . . . . . . . . . . . . . . 19
4.2.4 Trigger ‘Maximal’ . . . . . . . . . . . . . . . . . . . . . . . . . . . . . . . . . . . . . . . . . . . . 20
4.2.5 Measuring maximum distance . . . . . . . . . . . . . . . . . . . . . . . . . . . . . . . . . . . . 20
4.2.6 Trigger ‘Horizontal’ . . . . . . . . . . . . . . . . . . . . . . . . . . . . . . . . . . . . . . . . . . 20
4.2.7 Measuring horizontal distances . . . . . . . . . . . . . . . . . . . . . . . . . . . . . . . . . . . 20
4.2.8 Trigger‘Vertical’ . . . . . . . . . . . . . . . . . . . . . . . . . . . . . . . . . . . . . . . . . . . . . 20
4.2.9 Measuring vertical distance . . . . . . . . . . . . . . . . . . . . . . . . . . . . . . . . . . . . . . 20
4.2.10 Delayed measurement using ‘Timer’ . . . . . . . . . . . . . . . . . . . . . . . . . . . . . . . . 20
4.3 Measurements, managing project folders and exporting data . . . . . . . . . . . . . . . . . . . . . . 21
4.3.1 Measurements . . . . . . . . . . . . . . . . . . . . . . . . . . . . . . . . . . . . . . . . . . . . . . 21
4.3.2 Displaying measurements . . . . . . . . . . . . . . . . . . . . . . . . . . . . . . . . . . . . . . . 21
4.3.3 Managing project folders . . . . . . . . . . . . . . . . . . . . . . . . . . . . . . . . . . . . . . . 21
4.3.4 Buttons for managing project folders . . . . . . . . . . . . . . . . . . . . . . . . . . . . . . . . 22
4.3.5 Exporting data . . . . . . . . . . . . . . . . . . . . . . . . . . . . . . . . . . . . . . . . . . . . . . 22
4.3.6 Exported data in flash memory . . . . . . . . . . . . . . . . . . . . . . . . . . . . . . . . . . . . 22
4.4 Point measurements and range (multiple) measurements . . . . . . . . . . . . . . . . . . . . . . . . 23
4.5 Measuring range . . . . . . . . . . . . . . . . . . . . . . . . . . . . . . . . . . . . . . . . . . . . . . . . . 23
4.5.1 Increase ranges . . . . . . . . . . . . . . . . . . . . . . . . . . . . . . . . . . . . . . . . . . . . . 23
4.5.2 Reduced ranges . . . . . . . . . . . . . . . . . . . . . . . . . . . . . . . . . . . . . . . . . . . . . 23
4.6 Recording measuring targets with the help of the camera . . . . . . . . . . . . . . . . . . . . . . . . 23
5 Preparation and settings . . . . . . . . . . . . . . . . . . . . . . . . . . . . . . . . . . . . . . . . . . . 23
5.1 Charging the built-in battery . . . . . . . . . . . . . . . . . . . . . . . . . . . . . . . . . . . . . . . . . . 23
5.2 Switching on and off, standby mode and unlocking . . . . . . . . . . . . . . . . . . . . . . . . . . . . 23
5.2.1 Switching on . . . . . . . . . . . . . . . . . . . . . . . . . . . . . . . . . . . . . . . . . . . . . . . 23
5.2.2 Standby mode or switching off . . . . . . . . . . . . . . . . . . . . . . . . . . . . . . . . . . . . 23
5.2.3 Activating standby mode . . . . . . . . . . . . . . . . . . . . . . . . . . . . . . . . . . . . . . . 24
5.2.4 Unlocking the tool . . . . . . . . . . . . . . . . . . . . . . . . . . . . . . . . . . . . . . . . . . . . 24
5.2.5 Switching off . . . . . . . . . . . . . . . . . . . . . . . . . . . . . . . . . . . . . . . . . . . . . . . 24
5.3 Adjusting the inclination sensor . . . . . . . . . . . . . . . . . . . . . . . . . . . . . . . . . . . . . . . . 24
2 English
Printed: 10.11.2016 | Doc-Nr: PUB / 5270043 / 000 / 04

5.4 Establishing a Bluetooth connection . . . . . . . . . . . . . . . . . . . . . . . . . . . . . . . . . . . . . 24
5.5 Establishing a WLAN connection . . . . . . . . . . . . . . . . . . . . . . . . . . . . . . . . . . . . . . . 25
5.6 Settings for the measuring application . . . . . . . . . . . . . . . . . . . . . . . . . . . . . . . . . . . . 25
6 Working with the measuring application . . . . . . . . . . . . . . . . . . . . . . . . . . . . . . . . . 26
6.1 Direct measurements using the ‘Direct’ function . . . . . . . . . . . . . . . . . . . . . . . . . . . . . 26
6.1.1 Taking single, direct distance measurements . . . . . . . . . . . . . . . . . . . . . . . . . . . 26
6.1.2 Continuous measuring (tracking) mode . . . . . . . . . . . . . . . . . . . . . . . . . . . . . . . 26
6.1.3 Activating continuous measuring (tracking) mode . . . . . . . . . . . . . . . . . . . . . . . . 26
6.2 Determining and recording distances in pictures using the ‘Picture’ function . . . . . . . . . . . . 26
6.2.1 ‘Measure from picture’ . . . . . . . . . . . . . . . . . . . . . . . . . . . . . . . . . . . . . . . . 27
6.2.1.1 Determining distances in pictures . . . . . . . . . . . . . . . . . . . . . . . . . . . 27
6.2.1.2 ‘Measure from picture’ ‒ additional functions . . . . . . . . . . . . . . . . . . . 27
6.2.2 Recording measured distances in pictures (‘Draw in picture’) . . . . . . . . . . . . . . . . 27
6.2.2.1 Documenting the distances measured on pictures ‒ additional functions . . . . 28
6.3 Calculating areas and volumes . . . . . . . . . . . . . . . . . . . . . . . . . . . . . . . . . . . . . . . . 28
6.3.1 Functions‘Area and Volume’ . . . . . . . . . . . . . . . . . . . . . . . . . . . . . . . . . . . . . 28
6.3.2 Calculating rectangular areas . . . . . . . . . . . . . . . . . . . . . . . . . . . . . . . . . . . . . 28
6.3.3 Calculating rectangular areas ‒ additional functions . . . . . . . . . . . . . . . . . . . . . . . 28
6.3.4 Calculating cubic volumes . . . . . . . . . . . . . . . . . . . . . . . . . . . . . . . . . . . . . . 28
6.3.5 Calculating cylindrical volumes . . . . . . . . . . . . . . . . . . . . . . . . . . . . . . . . . . . . 28
6.4 Indirect measurements . . . . . . . . . . . . . . . . . . . . . . . . . . . . . . . . . . . . . . . . . . . . . 29
6.4.1 Using indirect measurements . . . . . . . . . . . . . . . . . . . . . . . . . . . . . . . . . . . . . 29
6.4.1.1 Guidelines for indirect measurements . . . . . . . . . . . . . . . . . . . . . . . . . 29
6.4.1.2 ‘Indirect’ versus ‘Pythagoras’ . . . . . . . . . . . . . . . . . . . . . . . . . . . . . 29
6.4.2 ‘Indirect’,‘Vertical’ . . . . . . . . . . . . . . . . . . . . . . . . . . . . . . . . . . . . . . . . . . . 29
6.4.3 Measuring horizontal distances indirectly . . . . . . . . . . . . . . . . . . . . . . . . . . . . . 29
6.4.4 Measuring vertical distances indirectly . . . . . . . . . . . . . . . . . . . . . . . . . . . . . . . 30
6.4.5 Measuring horizontal distance overhead indirectly . . . . . . . . . . . . . . . . . . . . . . . . 30
6.4.6 ‘Indirect’,‘Not reflecting’ . . . . . . . . . . . . . . . . . . . . . . . . . . . . . . . . . . . . . . . 30
6.4.7 Measure the height of an object when only one target point is clearly visible – indirect
measurement . . . . . . . . . . . . . . . . . . . . . . . . . . . . . . . . . . . . . . . . . . . . . . 30
6.4.8 Minimum and maximum distances and the difference between them within an
area . . . . . . . . . . . . . . . . . . . . . . . . . . . . . . . . . . . . . . . . . . . . . . . . . . . . 31
6.4.8.1 Min/Max/Delta . . . . . . . . . . . . . . . . . . . . . . . . . . . . . . . . . . . . . . . 31
6.4.8.2 Determining the difference between the minimum and maximum distances
within an area . . . . . . . . . . . . . . . . . . . . . . . . . . . . . . . . . . . . . . . . 31
6.5 Measurements using Pythagoras functions . . . . . . . . . . . . . . . . . . . . . . . . . . . . . . . . . 31
6.5.1 Function group ‘Pythagoras’ . . . . . . . . . . . . . . . . . . . . . . . . . . . . . . . . . . . . . 31
6.5.2 Function‘Pythagoras I’ . . . . . . . . . . . . . . . . . . . . . . . . . . . . . . . . . . . . . . . . 31
6.5.3 Measuring using the ‘Pythagoras I’ function . . . . . . . . . . . . . . . . . . . . . . . . . . . 31
6.5.4 Function‘Pythagoras II’ . . . . . . . . . . . . . . . . . . . . . . . . . . . . . . . . . . . . . . . . 32
6.5.5 Measuring using the ‘Pythagoras II’ function . . . . . . . . . . . . . . . . . . . . . . . . . . . 32
6.5.6 Function‘Pythagoras III’ . . . . . . . . . . . . . . . . . . . . . . . . . . . . . . . . . . . . . . . 32
6.5.7 Measuring using the ‘Pythagoras III’ function . . . . . . . . . . . . . . . . . . . . . . . . . . 32
6.6 Measurements using trapezoid functions . . . . . . . . . . . . . . . . . . . . . . . . . . . . . . . . . . 32
6.6.1 Function group ‘Trapezoid’ . . . . . . . . . . . . . . . . . . . . . . . . . . . . . . . . . . . . . . 32
6.6.2 Function‘Trapezoid I’ . . . . . . . . . . . . . . . . . . . . . . . . . . . . . . . . . . . . . . . . . 33
6.6.3 Measuring using the ‘Trapezoid I’ function . . . . . . . . . . . . . . . . . . . . . . . . . . . . 33
6.6.4 Function ‘Trapezoid II’ . . . . . . . . . . . . . . . . . . . . . . . . . . . . . . . . . . . . . . . . 33
6.6.5 Measuring using the ‘Trapezoid II’ function . . . . . . . . . . . . . . . . . . . . . . . . . . . . 33
Printed: 10.11.2016 | Doc-Nr: PUB / 5270043 / 000 / 04
English 3
7 Care and maintenance . . . . . . . . . . . . . . . . . . . . . . . . . . . . . . . . . . . . . . . . . . . . . 33
7.1 Cleaning . . . . . . . . . . . . . . . . . . . . . . . . . . . . . . . . . . . . . . . . . . . . . . . . . . . . . . 33
7.2 Touchscreen . . . . . . . . . . . . . . . . . . . . . . . . . . . . . . . . . . . . . . . . . . . . . . . . . . . . 33
7.3 Adjusting the inclination sensor . . . . . . . . . . . . . . . . . . . . . . . . . . . . . . . . . . . . . . . . 33
8 Transport and storage . . . . . . . . . . . . . . . . . . . . . . . . . . . . . . . . . . . . . . . . . . . . . 34
8.1 Transport and storage of cordless tools . . . . . . . . . . . . . . . . . . . . . . . . . . . . . . . . . . . 34
9 Troubleshooting . . . . . . . . . . . . . . . . . . . . . . . . . . . . . . . . . . . . . . . . . . . . . . . . . 34
10 Disposal . . . . . . . . . . . . . . . . . . . . . . . . . . . . . . . . . . . . . . . . . . . . . . . . . . . . . . 34
11 Manufacturer’s warranty . . . . . . . . . . . . . . . . . . . . . . . . . . . . . . . . . . . . . . . . . . . 34
12 FCC statement (applicable in US) / IC statement (applicable in Canada) . . . . . . . . . . . . 34
1 Information about the documentation
1.1 About this documentation
• Read this documentation before initial operation or use. This is a prerequisite for safe, trouble-free
handling and use of the product.
• Observe the safety instructions and warnings in this documentation and on the product.
• Always keep the operating instructions with the product and make sure that the operating instructions
are with the product when it is given to other persons.
1.2 Explanation of symbols used
1.2.1 Warnings
Warnings alert persons to hazards that may occur when handling or using the product. The following signal
words are used in combination with a symbol:
DANGER! Draws attention to an imminent hazard that will lead to serious personal injury or
fatality.
WARNING! Draws attention to a potential hazard that could lead to serious personal injury or
fatality.
CAUTION! Draws attention to a potentially dangerous situation that could lead to minor personal
injury or material damage.
1.2.2 Symbols in the documentation
The following symbols are used in this document:
Read the operating instructions before use
Instructions for use and other useful information
1.2.3 Symbols in the illustrations
The following symbols are used in illustrations:
These numbers refer to the corresponding illustrations found at the beginning of these operating
instructions.
The numbering reflects the sequence of operations shown in the illustrations and may deviate
from the steps described in the text.
Item reference numbers are used in the overview illustration and refer to the numbers used in
the key in the product overview section.
This symbol is intended to draw special attention to certain points when handling the product.
1.3 About this documentation
▶ Read these operating instructions before the product is used or operated for the first time. This is a
prerequisite for safe, trouble-free handling and use of the product.
4 English
Printed: 10.11.2016 | Doc-Nr: PUB / 5270043 / 000 / 04

▶ The information provided in the detailed operating instructions installed in the tool as well as the
supplements and updates provided at www.hilti.com must also be observed.
▶ Observe the safety instructions and warnings in this documentation and on the product.
▶ This document forms a permanent, integral part of the product described and must always be with the
product when it is handed over to other persons.
1.4 Laser information on the product
Laser information
Laser radiation. Do not stare into the beam. Class 2 laser.
1.5 Declaration of conformity
We declare, on our sole responsibility, that the product described here complies with the applicable directives
and standards. A copy of the declaration of conformity can be found at the end of this documentation.
The technical documentation is filed and stored here:
Hilti Entwicklungsgesellschaft mbH | Tool Certification | Hiltistraße 6 | 86916 Kaufering, DE
1.6 Product information
Hilti products are designed for professional use and may be operated, serviced and maintained only by
trained, authorized personnel. This personnel must be informed of any particular hazards that may be
encountered. The product and its ancillary equipment may present hazards when used incorrectly by
untrained personnel or when used not as directed.
▶ Write down the serial number in the table below. You will be required to state the product details when
contacting Hilti Service or your local Hilti organization to enquire about the product.
Product information
Type: PD-C | PD-CS
Generation: 01
Serial number:
2 Safety
2.1 Basic information concerning safety
CAUTION
Possible hazard or risk of electric shock or burning injuries! Attempting to remove the battery
presents a risk of electrical hazards, e.g. short circuiting, burning injuries and leakage of harmful
substances.
▶ Do not attempt to open the product. Have the battery replaced only by Hilti Service.
CAUTION
Possible hazard or risk of electric shock or burning injuries! Ingress of liquids such as rainwater,
dew or condensation, etc. into the product presents a risk of electrical hazards, e.g. short circuiting,
burning injuries and explosion.
▶ Keep the product clean and dry at all times.
▶ Keep the hinged cover cap closed to prevent dampness entering the interior of the product.
Printed: 10.11.2016 | Doc-Nr: PUB / 5270043 / 000 / 04
English 5

CAUTION
Possible hazards as result of short circuiting, overload and fire. Possible hazards due to heat
radiation, ejection of molten material or chemical reactions caused by short circuiting, overloading or
through resulting fire.
▶ Do not expose the product to high temperatures or fire. The battery contained in the tool could
explode or release toxic substances.
▶ Use only the approved USB AC adapter with standard micro-USB cable.
▶ Under abusive conditions, liquid may be ejected from the battery. Avoid contact with this liquid.
Rinse with water if contact occurs. In the event of eye contact with the liquid, a doctor should also
be consulted. The liquid that leaks from a battery may cause skin irritation or burns.
WARNING
Warning: hazardous high-frequency or low-frequency electromagnetic radiation! Electromag-
netic radiation may cause spontaneous activation/starting. The emission of radiation may cause interference to other devices.
▶ Do not use the product in the proximity of persons who have a cardiac pacemaker.
▶ Do not use the product in the proximity of medical instruments and appliances.
▶ Operation of the product in the proximity of military installations, airports, radio astronomy facilities
or in aircraft is not permissible unless prior permission has been obtained.
CAUTION
Visible and invisible laser radiation present hazards. Looking into the laser beam causes eye
damage.
▶ Secure the area in which you will be taking measurements. Take care to avoid directing the laser
beam toward other persons or toward yourself when setting up the product.
▶ Do not look directly into the light source. In the event of direct eye contact with the laser beam,
close your eyes and move your head out of the path of the laser beam.
▶ Keep laser tools out of reach of children.
CAUTION
Unintentional activation of the laser beam presents a hazard. The laser beam may be switched on
by inadvertently pressing a measure command button or by a software error.
▶ Avoid unintentional activation of the laser beam.
▶ When handling the product, always bear in mind that the laser beam could be switched on
inadvertently. Before looking toward the path of the laser beam, make sure that the laser beam is
switched off or that the product is switched off completely.
WARNING
Risk of explosion! Operation in the vicinity of flammable liquids, gases or dusts is hazardous.
▶ Pay attention to the ambient conditions. Do not use the product where there is a risk of fire or
explosion.
Possible measurement errors Measurement errors are possible when the operating temperature
range is not observed, when there is a high concentration of particles in the air, when the lens is dirty,
when measurements are taken from unsuitable surfaces or when the product is used incorrectly.
▶ After switching on and while using the product, always pay attention to the information and
warnings displayed on the touchscreen.
▶ Check the accuracy of the product before using it for measuring.
▶ When the product is brought into a warm environment from very cold conditions, or vice-versa,
allow it to become acclimatized before use.
6 English
Printed: 10.11.2016 | Doc-Nr: PUB / 5270043 / 000 / 04

Incorrect settings may have damaging consequences. Incorrect settings, e.g. due to use of a
measuring extension of a different length, may lead to incorrect results and consequential damage.
▶ Always pay attention to the information and warnings displayed on the touchscreen.
▶ Make sure that you use the correct settings when taking measurements.
In addition to the safety rules listed in the individual sections of these operating instructions, the
following rules must be strictly observed at all times. The product and its ancillary equipment may
present hazards when used incorrectly by untrained personnel or when used not as directed.
▶ Keep all safety instructions and information for future reference.
▶ Stay alert, watch what you are doing and use common sense when working with the product. Do not
use the product while you are tired or under the influence of drugs, alcohol or medication. A moment of
inattention while operating the product may result in serious personal injury.
▶ Do not render safety devices ineffective and do not remove information and warning notices.
▶ If the product is opened improperly, laser radiation in excess of Class 2 may be emitted. Have the
product repaired only by Hilti Service.
▶ Tampering with or modification of the product is not permitted.
▶ Check that the product functions correctly each time before use.
▶ Measurements taken from surfaces with low reflectivity in highly reflective surroundings may be
inaccurate.
▶ Measurements taken through panes of glass or other objects may be inaccurate.
▶ The measurement may be incorrect if the conditions under which the measurement is taken change
rapidly, e.g. due to people walking through the path of the laser beam.
▶ Do not point the product toward the sun or other powerful light sources.
▶ The product and its ancillary equipment may present hazards when used incorrectly by untrained
personnel or when used not as directed.
▶ To avoid the risk of injury, use only genuine Hilti accessories and additional equipment.
▶ Observe the information printed in the operating instructions concerning operation, care and maintenance.
▶ Never use the product without having received the appropriate instruction on its use or without having
read this documentation.
▶ Due to the principle employed, the results of measurements may be negatively affected by the surrounding
conditions. This includes, e.g. close proximity to equipment that generates powerful magnetic or
electromagnetic fields, taking measurements from unsuitable surfaces and use of unsuitable reflectors.
▶ Measurements to plastic foam surfaces, e.g. polystyrene foam, to snow or to highly reflective surfaces,
etc. may result in incorrect readings.
2.2 Proper preparation of the working area
▶ Avoid unfavorable body positions when working from ladders. Make sure you have a safe stance and
that you stay in balance at all times.
▶ Secure the site at which you are taking measurements and take care to avoid directing the laser beam
toward other persons or toward yourself.
▶ Use the product only within its specified limits. Do not direct the laser beam toward mirrors, stainless
steel, polished stone or similar surfaces.
▶ Keep the laser exit window clean in order to avoid measurement errors.
▶ Observe the accident prevention regulations applicable in your country.
2.3 Electromagnetic compatibility
Although the laser range meter complies with the strict requirements of the applicable directives, Hilti cannot
entirely rule out the possibility of interference to the laser range meter caused by powerful electromagnetic
radiation, possibly leading to incorrect operation. Accuracy must be checked by taking measurements by
other means when working under such conditions or if you are unsure. Likewise, Hilti cannot rule out the
possibility of interference with other devices (e.g. aircraft navigation equipment). The laser range meter
complies with the requirements of class A: The possibility of interference occurring in a domestic environment
cannot be excluded.
2.4 Working safely with laser tools
▶ Laser Class 2 tools may be operated only by appropriately trained persons.
▶ Laser beams should not be projected at eye height.
English 7
Printed: 10.11.2016 | Doc-Nr: PUB / 5270043 / 000 / 04

▶ Precautions must be taken to ensure that the laser beam does not unintentionally strike highly reflective
surfaces.
▶ Precautions must be taken to ensure that persons do not stare directly into the beam.
▶ The laser beam must not be allowed to project beyond the controlled area.
▶ Switch the laser tool off when it is not in use.
▶ Activate the locking function in the tool settings in order to prevent unauthorized persons, especially
children, from activating the laser beam.
▶ Store laser tools, when not in use, in places to which unauthorized persons have no access.
2.5 General safety rules
▶ Check the product for damage before use. Have the damage repaired by Hilti Service.
▶ Before using the product, just to be sure, check the product’s preset settings and any settings you have
made yourself.
▶ Do not use the product while you are driving a vehicle or operating a machine.
▶ Check the accuracy of the product after it has been dropped or subjected to other mechanical stresses.
▶ Although the product is designed for the tough conditions of jobsite use, as with other measuring
instruments it should be treated with care.
▶ Although the product is protected against the entry of moisture, it should be wiped dry before being put
away in its transport container.
▶ Store tools and appliances out of reach of children when not in use. Do not allow persons who are
unfamiliar with the product, or with these instructions, to operate the product. Tools or appliances are
dangerous in the hands of untrained, inexperienced persons.
8 English
Printed: 10.11.2016 | Doc-Nr: PUB / 5270043 / 000 / 04
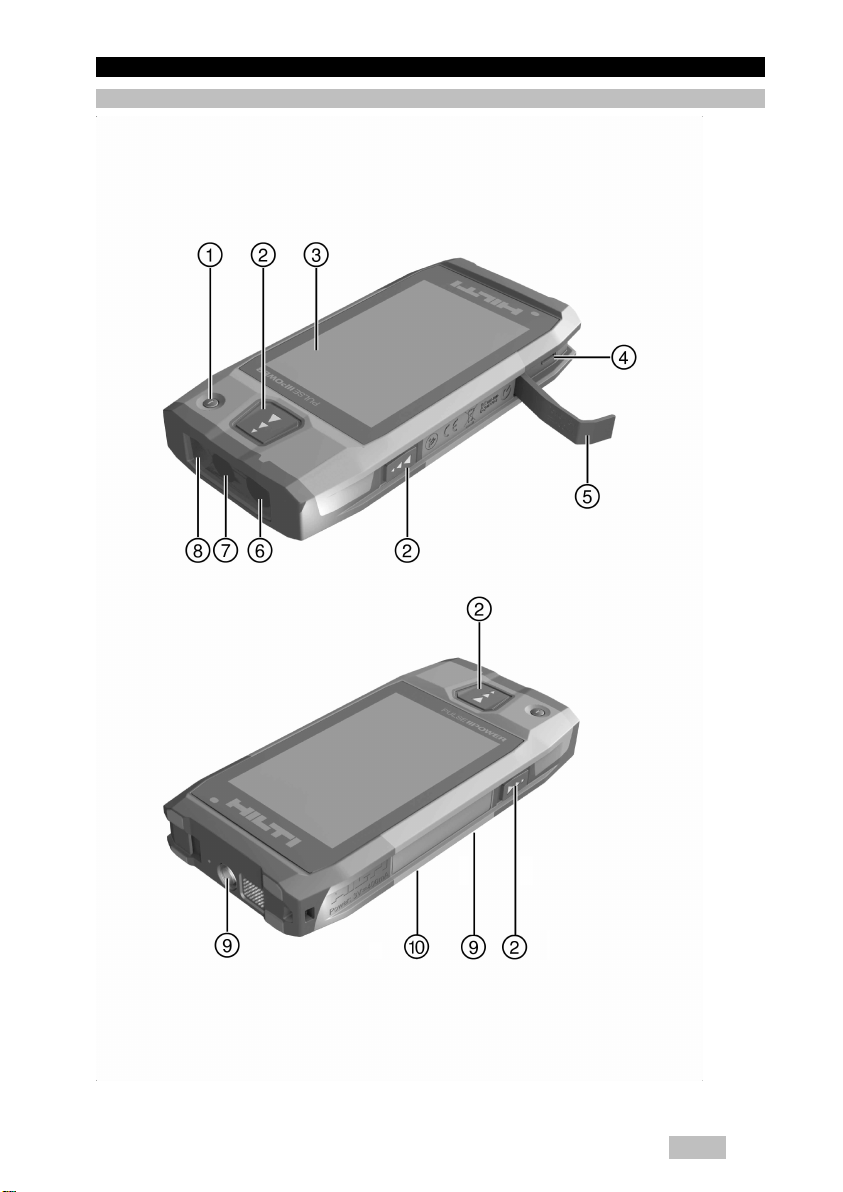
3 Introduction to the tool
3.1 Product overview
On/off switch
@
Printed: 10.11.2016 | Doc-Nr: PUB / 5270043 / 000 / 04
Measure command buttons
;
English 9

Touchscreen
=
Micro-USB socket, type B
%
Hinged cover
&
Laser exit window
(
3.2 Intended use
The product described is a laser range meter. It is designed to be used for measuring distances. The
measured distances can be used in conjunction with a wide range of calculation functions, e.g. areas,
volumes, minimum/maximum distances, Pythagoras calculations, laying out, etc.
3.3 Items supplied
Laser range meter, wrist strap, soft pouch, short measuring extension, AC adapter with micro-USB cable.
You can find other system products approved for your product at your local Hilti Center or online at:
www.hilti.com.
3.4 Integrated battery
The product comes with a permanently integrated 3220 mAh Li-ion battery.
The Li-ion battery will typically last for 500 full charging cycles or at least two years of moderate to heavy use.
When the battery is discharged, the charging operation lasts for roughly three hours – provided that the USB
cable and plug adapter supplied by Hilti are used.
Note
If, at the start of the charging operation, the battery was completely or almost completely discharged,
the charging signal may only appear after roughly 30 minutes.
At temperatures over 30 °C (86 °F), the time required to charge the battery will increase considerably. Optimal
battery charging times are achieved at normal interior temperatures, away from direct sunlight.
In the case of very high exterior temperatures, i.e. 32 °C (90 °F) and over, the charging operation will take
longer. The charging operation may even be automatically interrupted in order to maintain a safe battery
temperature.
The charging operation may take longer if the USB cable supplied by Hilti is connected to a PC for charging.
We do not recommend using micro-USB cables from other manufacturers. If this cannot be avoided, you
should first ensure that the cable in question is suitable for use with 5.0 V/2.1 A power sources. The time
required to charge the tool may be significantly increased if a different make of micro-USB cable is used. If a
micro-USB cable from another manufacturer is regularly used in place of the one supplied by Hilti, this may
impair the battery life.
▶ When starting the tool for the first time, ensure that the battery is completely charged before putting the
tool into operation.
▶ Do not charge the tool in direct sunlight.
▶ If the charging operation stops or is taking a very long time, try to find a cooler environment in which to
charge the battery.
▶ If there is anything unusual about the battery charging operation or if the battery life falls below two
hours, contact your Hilti Service team.
▶ The tool should only be charged using the micro-USB cable supplied by Hilti. Connect the cable to a
USB port on a PC or, using the plug adapter supplied, a power outlet.
▶ If you lose the micro-USB cable or the plug adapter supplied with the tool, contact your Hilti Service
team for a replacement.
WARNING
Risk of injury caused by the laser beam. Failure to follow the correct procedures when opening may
cause uncontrolled emission of laser radiation.
▶ Always have repairs carried out by Hilti Service.
▶ The Li-ion battery must be replaced by Hilti Service as the tool has to be reconfigured once the battery
has been replaced.
Camera lens
)
Glass cover
+
Tripod thread
§
Image-recording camera (PD-CS)
/
10 English
Printed: 10.11.2016 | Doc-Nr: PUB / 5270043 / 000 / 04

3.5 Technical data
3.5.1 Distance measurement
Note
Distance and inclination measurement accuracy: Influences such as high temperature fluctuations,
dampness, shock, dropping, etc. can affect the accuracy of the tool. Unless stated otherwise, the tool
was adjusted or calibrated under standard ambient conditions (MIL-STD-810G). As a basic principle,
when taking distance measurements an additional distance-dependent error of 0.02 mm per meter is
to be taken into account. The reference for inclination measurements is the underside of the tool.
PD-C PD-CS
Operating modes
Distance measurement accuracy (2σ, standard
• Single measurements
• Range (multiple)
measurements
±1.0 mm ±1.0 mm
• Single measurements
• Range (multiple)
measurements
deviation)
Inclination measurement accuracy (2σ, standard
±0.3° ±0.3°
deviation)
Beam divergence
Measuring range with target plate
Minimum distance for aiming with the laser
point and cross hairs without use of the zoom
function
Minimum distance for aiming with the laser
point and cross hairs at the maximum zoom
setting
0.20 mrad …0.45 mrad 0.20 mrad …0.45 mrad
0 m …200 m
(0 ft …656 ft)
> 2 m
(> 6 ft - 10 in)
> 5 m
(> 16 ft)
0 m …200 m
(0 ft …656 ft)
> 2 m
(> 6 ft - 10 in)
> 5 m
(> 16 ft)
3.5.2 Touchscreen
Indicators
Continuous display of distance, operating status
and battery charge status
Touchscreen diagonal size
10.16 cm
(4.00 in)
3.5.3 Power source
PD-C
PD-CS PD-CS
Liion battery
Rated voltage
Capacity
Standby time
Length of time until the automatic sleep mode is
activated
Battery life under normal operating conditions,
display switched on
Charging time (depending on battery charger
and charging cable)
Battery charger input voltage
Battery charger input frequency
Battery charger rated current
Battery charger output voltage
Printed: 10.11.2016 | Doc-Nr: PUB / 5270043 / 000 / 04
Built-in
3.7 V
3,220 mAh
> 200 h
20 min
≈ 10 h
≈ 3 h
100 V …240 V
50 Hz …60 Hz
0.5 A
5 V
English 11
 Loading...