How it Works
Log In / Sign Up
Buy Points
How it Works
FAQ
Contact Us
Questions and Suggestions
Users
Hikvision
Loading...
D
DS-7604
3
DS-7604HI-S
2
DS-7604HI-S-500GB
2
DS-7604-HI-ST
3
DS-7604HI-ST-A
DS-7604NI-E1
4
DS-7604NI-E1/4N
DS-7604NI-E1/4P
7
DS-7604NI-E1-4P-1TB
3
DS-7604NI-E1-4P-2TB
3
DS-7604NI-E1-4P-3TB
3
DS-7604NI-E1-4P-4TB
3
DS-7604NI-E1/N
DS-7604NI-E1/P
DS-7604NI-K1
DS-7604NI-K1-4P
3
DS-7604NI-K1-4P-B
2
DS-7604NI-K1(B)
DS-7604NI-KI/W
DS-7604NI-Q1-4P
4
DS-7604NI-Q1-4P-1TB
3
DS-7604NI-Q1-4P-2TB
3
DS-7604NI-Q1-4P-4TB
3
DS-7604NI-S
3
DS-7604NI-SE
5
DS-7604NI-SE/N
4
DS-7604NI-SE/P
6
DS-7604NI-SE-P-1TB
DS-7604NI-SE-P-2TB
3
DS-7604NI-SE-P-3TB
3
DS-7604NI-SE-P-4TB
3
DS-7604NI-SE-P-6TB
3
DS-7604NI-SE-P-8TB
3
DS-7604NI-S-M
2
DS-7604NI-SN
4
DS-7604NI-SN/N
4
DS-7604NI-SN/P
4
DS-7604NI-V
4
DS-7604NI-VP
3
DS-7608
DS-7608HI-ST-A
DS-7608NI-E1
3
DS-7608NI-E2
5
DS-7608NI-E2/8N
2
DS-7608NI-E2/8P
10
DS-7608NI-E2-8P-1TB
3
DS-7608NI-E2-8P-2TB
3
DS-7608NI-E2-8P-3TB
3
DS-7608NI-E2-8P-4TB
3
DS-7608NI-E2-8P-6TB
3
DS-7608NI-E2-8P-8TB
3
DS-7608NI-E2/N
DS-7608NI-E2/P
DS-7608NI-I2
5
DS-7608NI-I2/8P
9
DS-7608NI-I2-8P-12TB
3
DS-7608NI-I2-8P-1TB
3
DS-7608NI-I2-8P-2TB
3
DS-7608NI-I2-8P-4TB
3
DS-7608NI-I2-8P-6TB
3
DS-7608NI-I2-8P-8TB
3
DS-7608NI-K1/8P(B)
DS-7608NI-K1B
3
DS-7608NI-K2
DS-7608NI-K2-8P
3
DS-7608NI-KI/W
DS-7608NI-Q1
DS-7608NI-Q1/8P
DS-7608NI-Q2
DS-7608NI-Q2/8P
4
DS-7608NI-Q2-8P-12TB
3
DS-7608NI-Q2-8P-16TB
3
DS-7608NI-Q2-8P-1TB
3
DS-7608NI-Q2-8P-2TB
3
DS-7608NI-Q2-8P-4TB
3
DS-7608NI-Q2-8P-8TB
3
DS-7608NI-S
DS-7608NI-SE
5
DS-7608NI-SE/8P
4
DS-7608NI-SE-8P-1TB
3
DS-7608NI-SE-8P-2TB
3
DS-7608NI-SE-8P-3TB
3
DS-7608NI-SE-8P-4TB
3
DS-7608NI-SE-8P-6TB
3
DS-7608NI-SE-8P-8TB
3
DS-7608NI-SE/N
4
DS-7608NI-SE/P
5
DS-7608NI-SN
4
DS-7608NI-SN/N
4
DS-7608NI-SN/P
4
DS-7608NI-SP
3
DS-7608NI-ST
7
DS-7608NI-V
4
DS-7608NI-VP
4
DS-7608NXI-12
DS-7608NXI-4S
DS-7608NXI-8P
DS-7608NXI-I2-4S
DS-7608NXI-I2-8P-4S
2
DS-7616
Loading...
Loading...
Nothing found
DS-7608NI-E2/8P
Quick Start Guide
16 pgs
1.69 Mb
0
Quick Start Manual
16 pgs
2.02 Mb
0
Quick Start Manual
26 pgs
2.38 Mb
0
Quick Start Manual
33 pgs
1.87 Mb
0
Specsheet
1 pgs
377.12 Kb
0
User Manual
135 pgs
7.08 Mb
0
User Manual
204 pgs
14.44 Mb
1
User Manual
114 pgs
5.55 Mb
0
User Manual
225 pgs
6.2 Mb
0
User Manual
248 pgs
14.07 Mb
0
Table of contents
Loading...
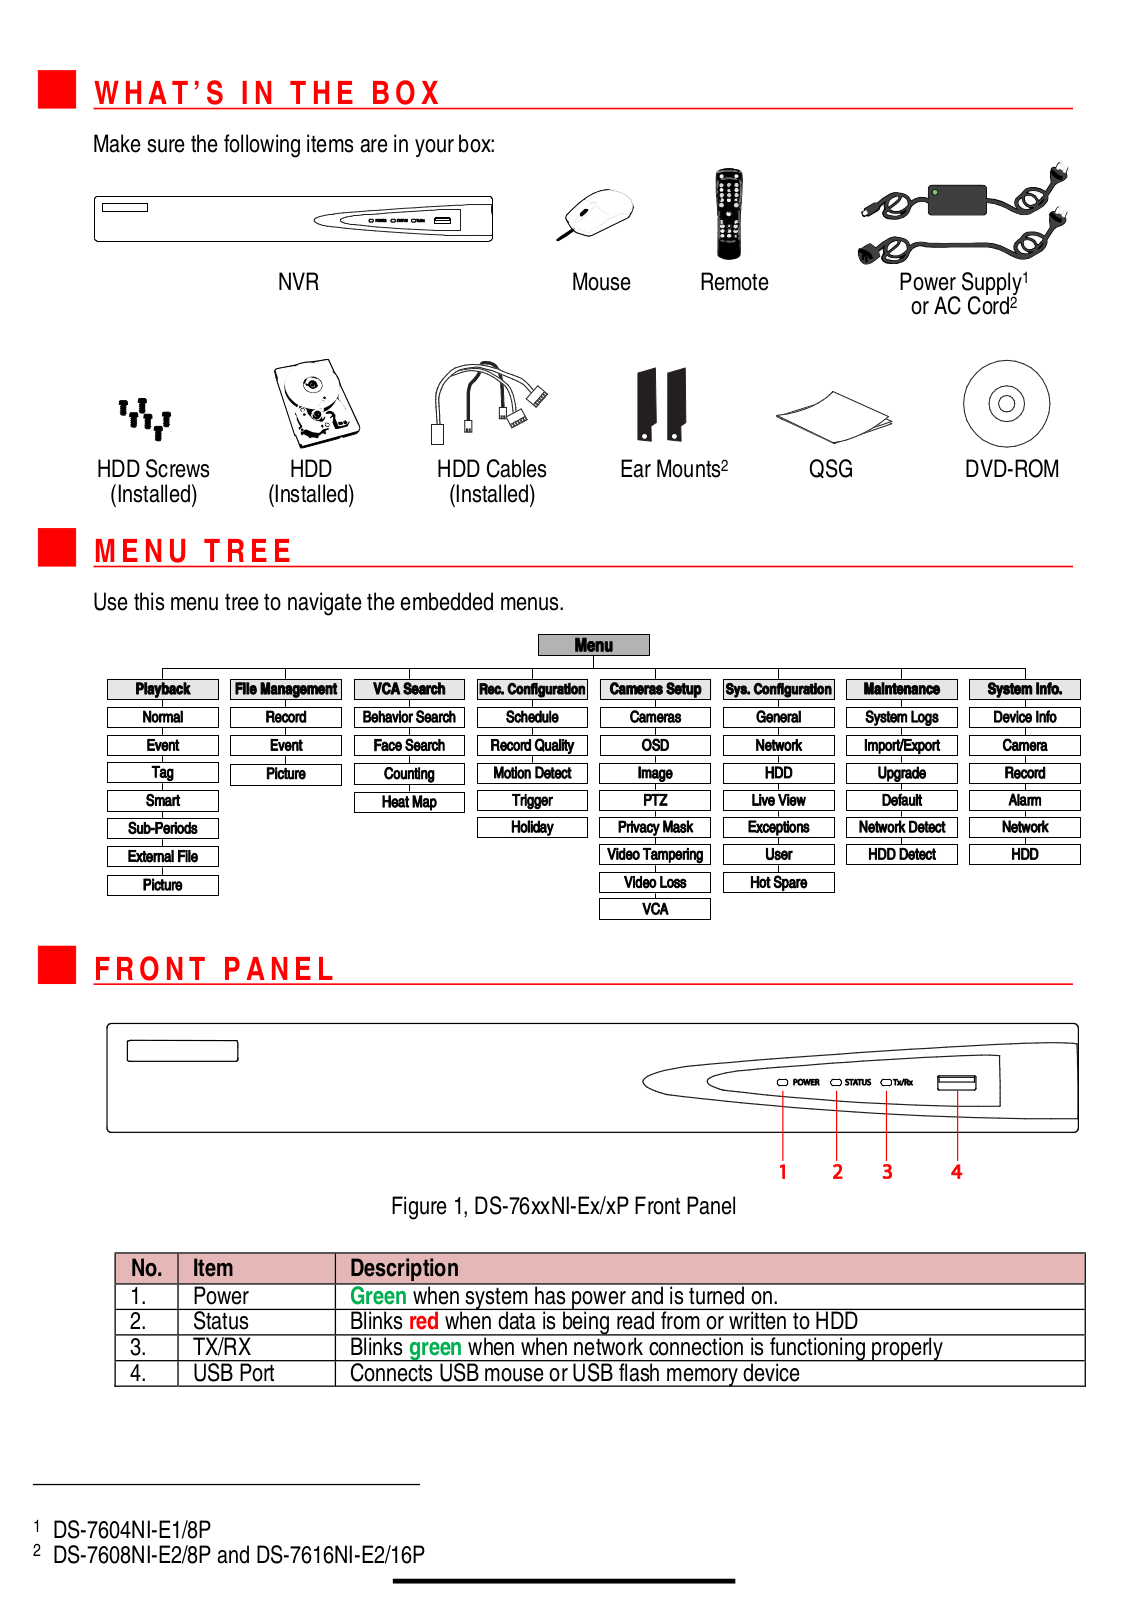
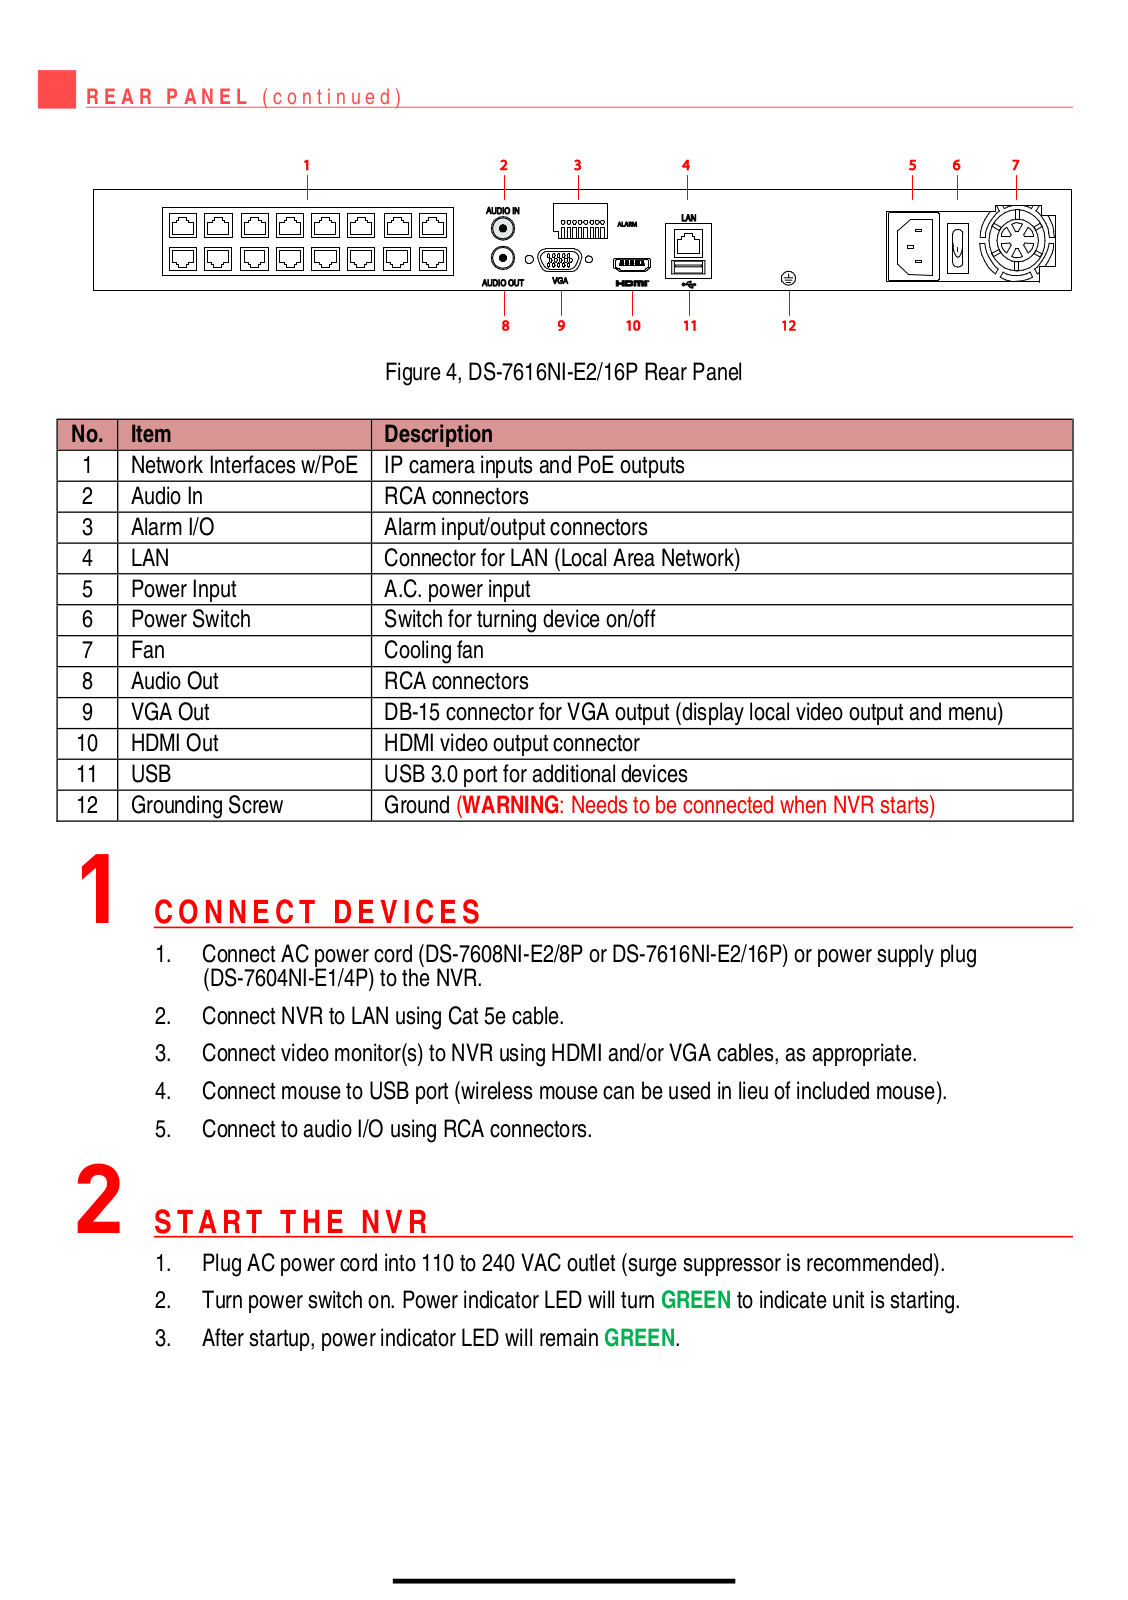
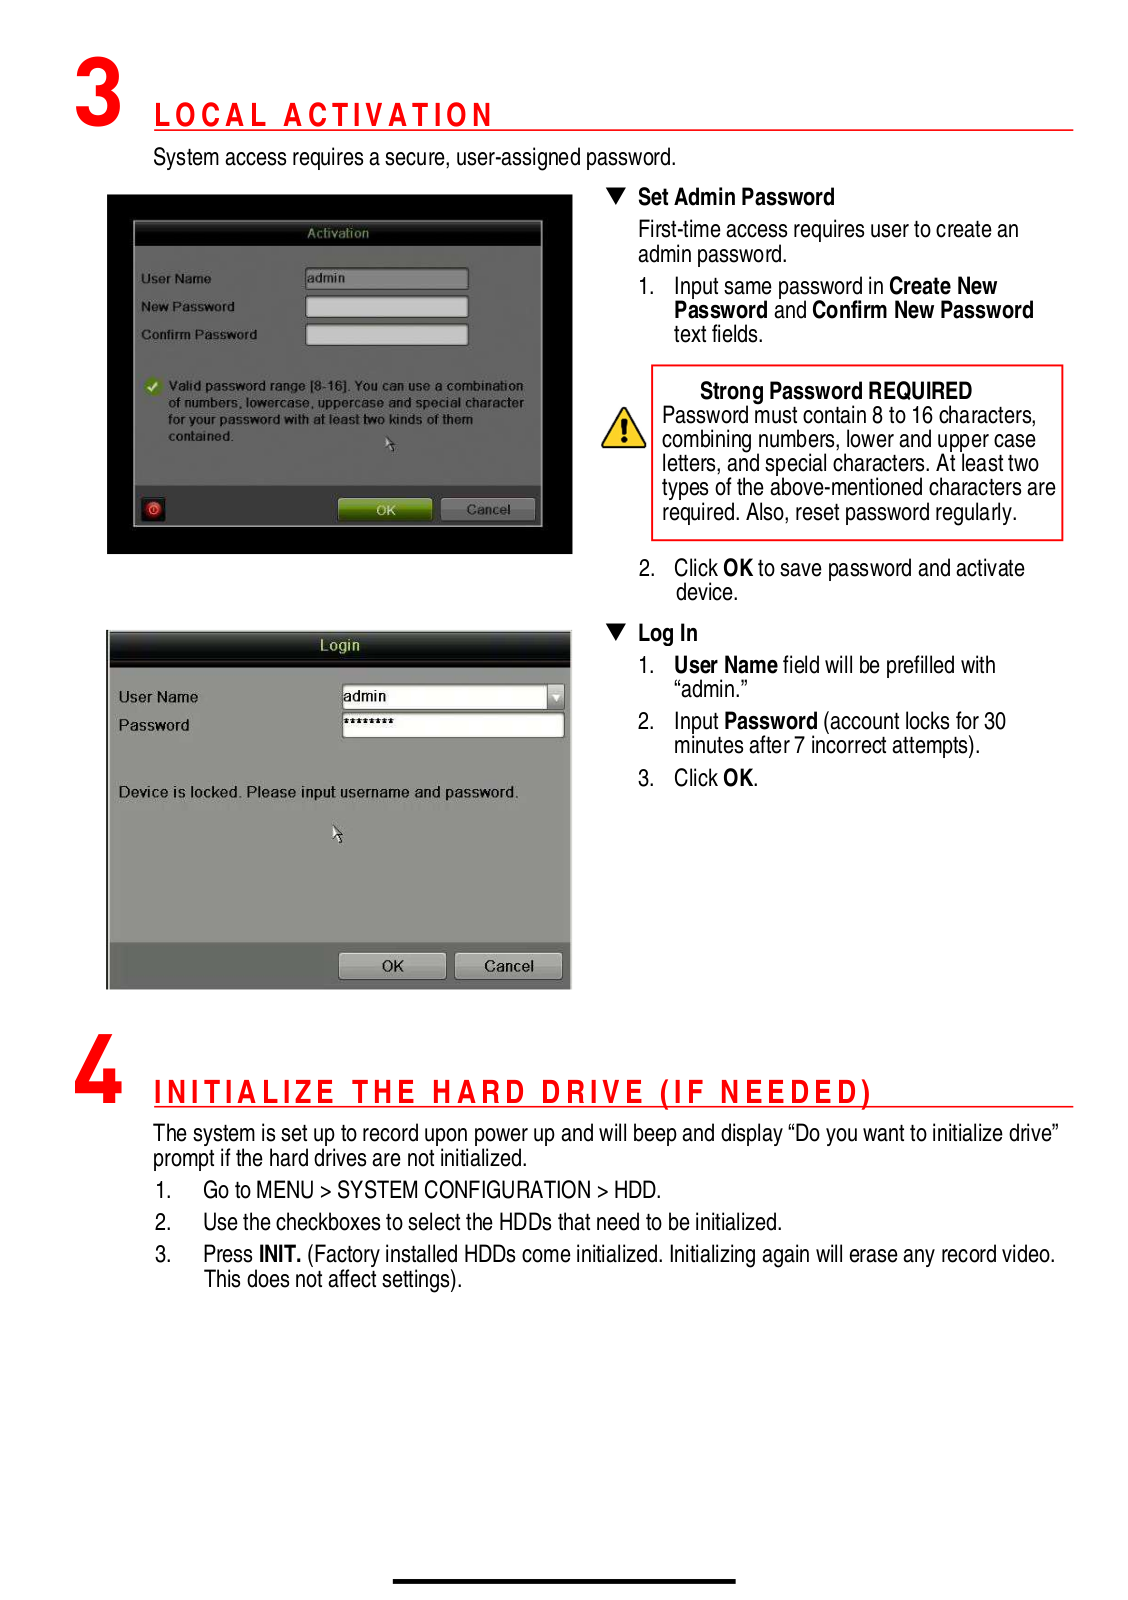
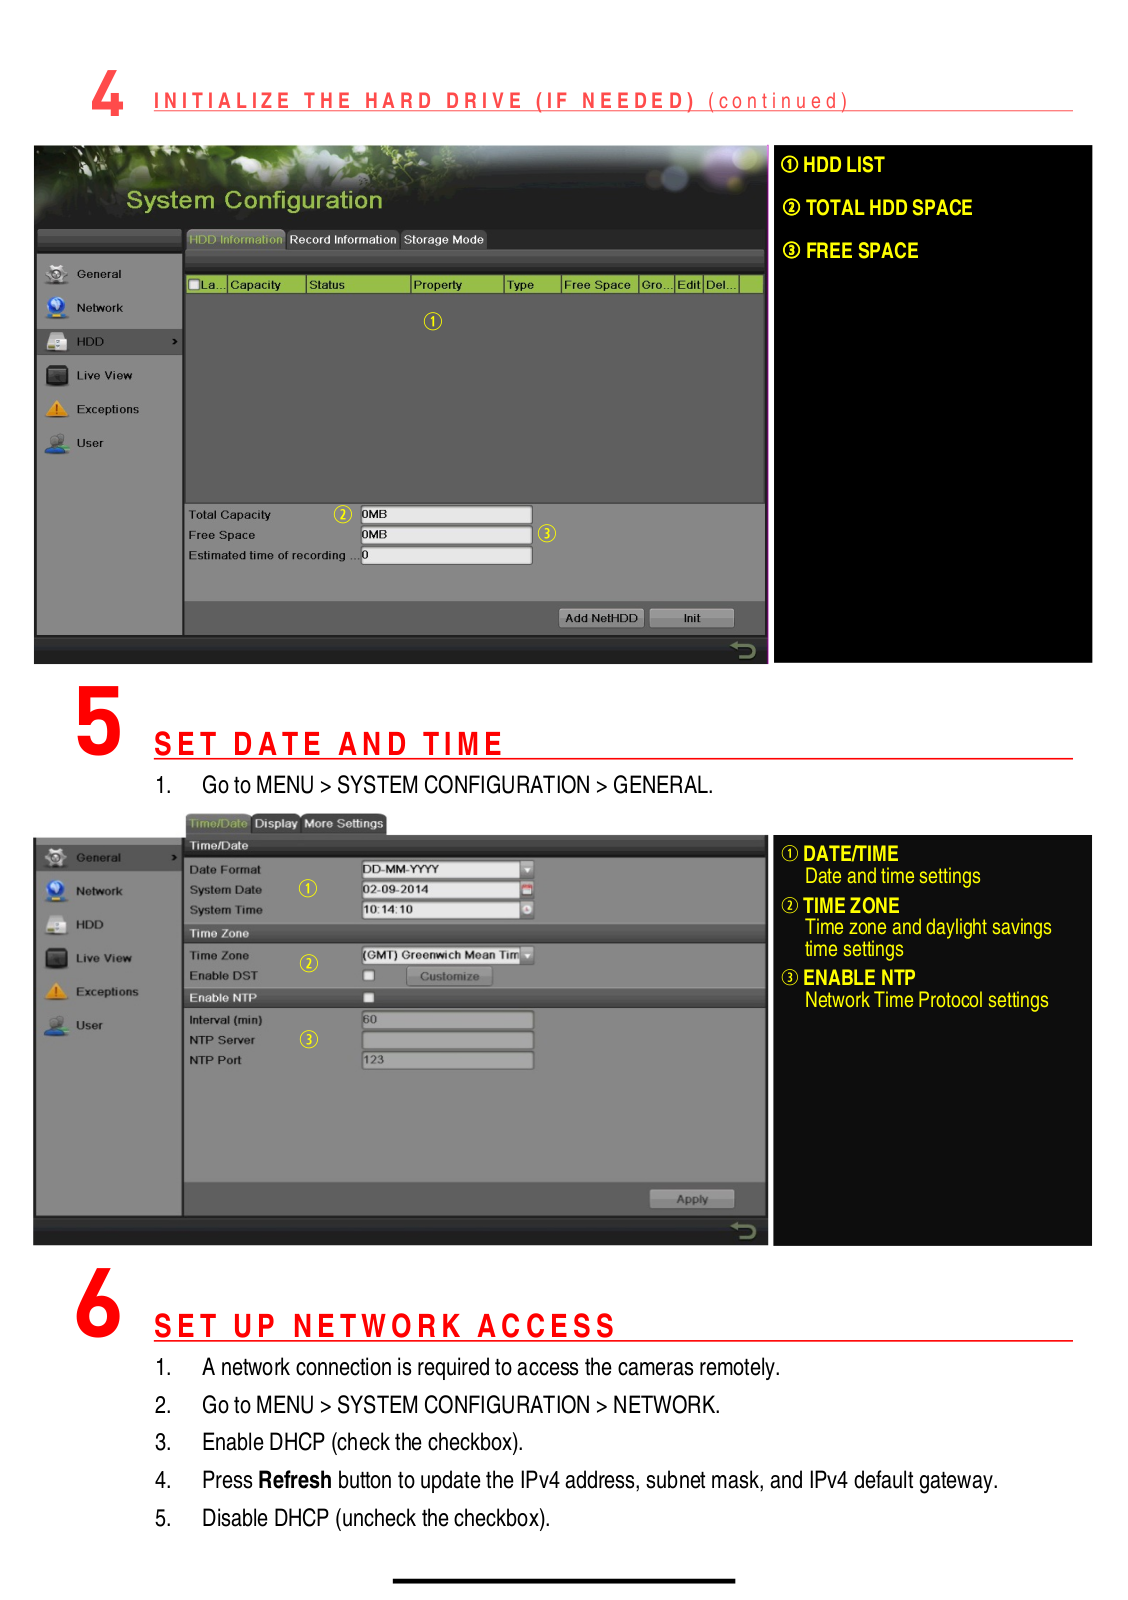
Hikvision DS-7608NI-E2-8P Quick Start Guide
...
Hikvision Quick Start Guide
Download
Specifications and Main Features
Frequently Asked Questions
User Manual
Download
Loading...
+
hidden pages
Unhide
You need points to download manuals.
1 point = 1 manual.
You can buy points or you can get point for every manual you upload.
Buy points
Upload your manuals