

Hickory N-6.5G Service Manual
Hickory Industries, Inc.
Installation & Operation Manual
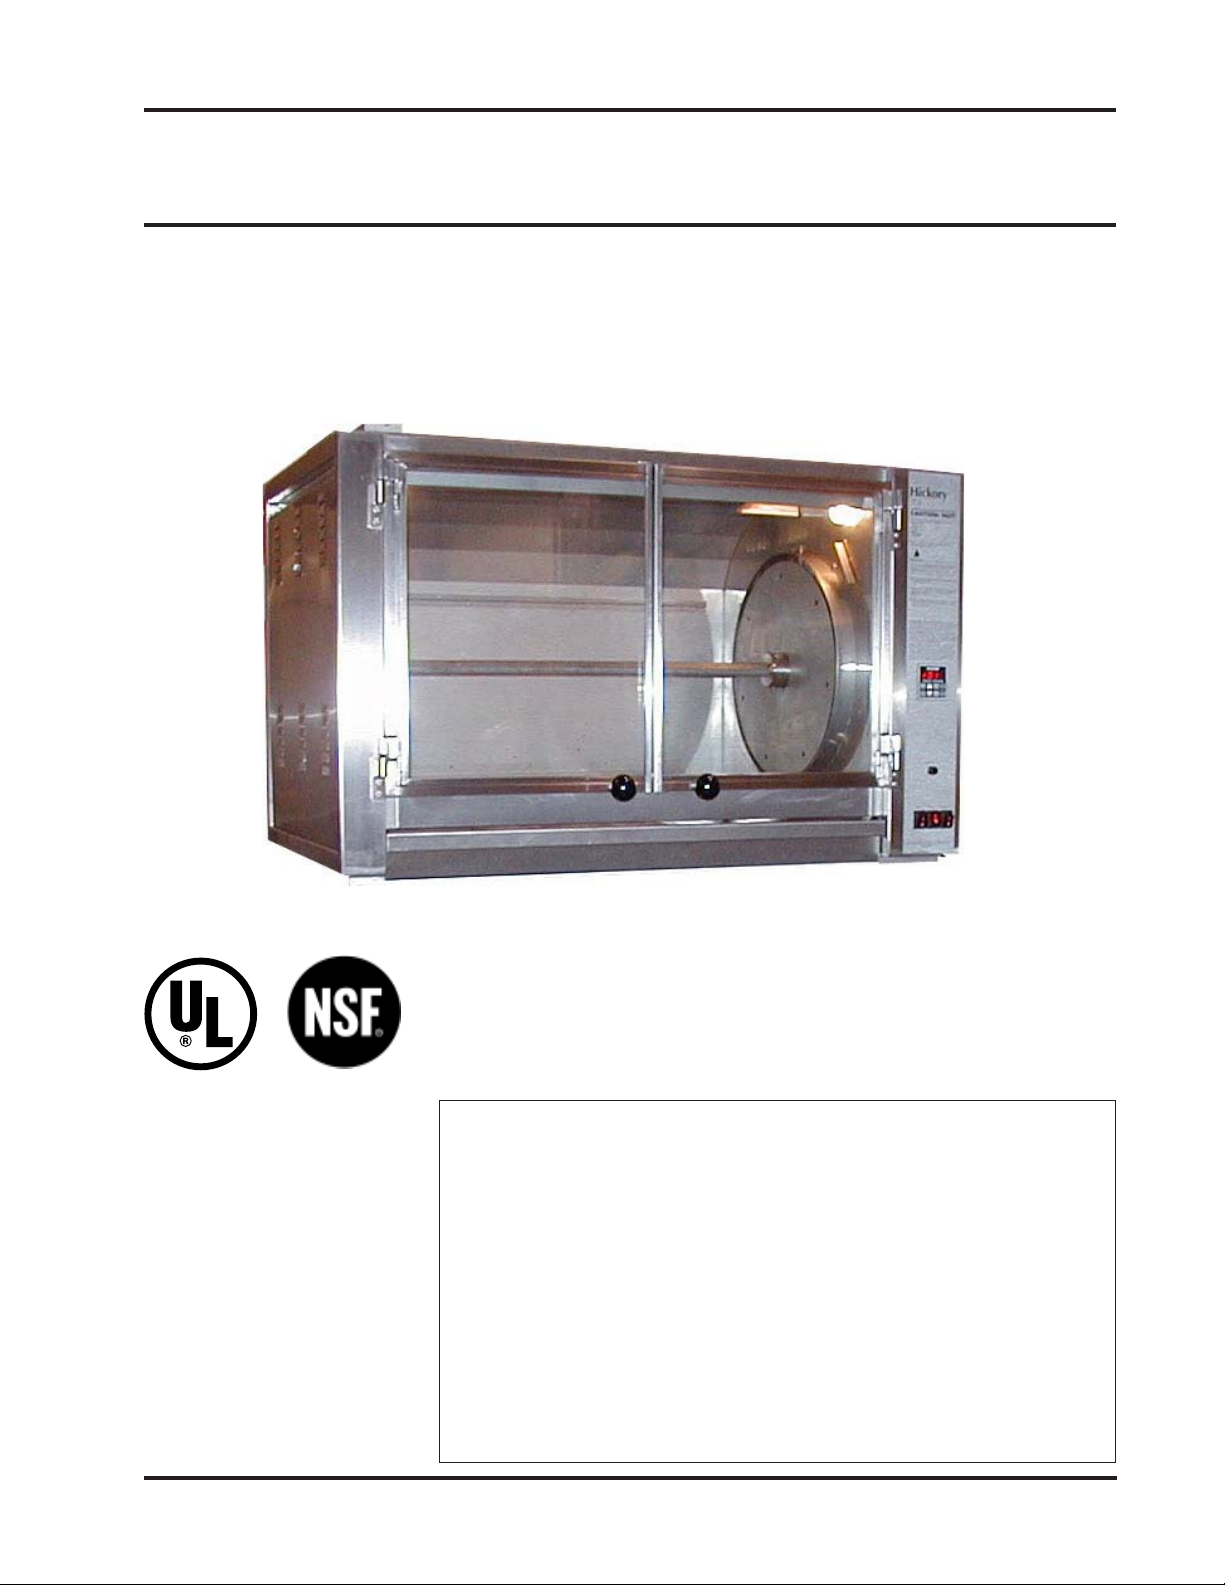
Hickory Rotisseries
Model: N/6.5G & N/7.5 G
USA
(7.5G Shown)
Voltage: 120V single phase, Amps: 3, Hz: 60
Cooking burners: 1 Pressurized burner
6.5G 7.5G
BTU's / Cooking Burner: Natural 42,000 99,000
Propane 40,000 98,000
Manifold Pressure: 5.5 in W.C. Natural
11 in W.C. Propane
Minimum Installation Clearance:
3 Inches sides and back. 15 inches rear with glass door in back
Lamps should be replaced with 120V, 40W rated bulbs or equivalent
Specifications and manual subject to change without notice
4900 Westside Avenue, North Bergen, New Jersey 07047
Tel: [201] 223-0050 Fax: [201] 223-0950
12 /2015
Page 1 of 24

Hickory Industries, Inc.
Table of Contents
Installation Instructions ........................................ 3
Unpacking The Unit ............................................ 4
Setting Up The Rotisserie .................................. 4
General Information ............................................ 5
Machine Drawings and Dimensions ................... 6
Spit Preparation Using Angle Spits .................... 7
Spit Preparation Using Spits & Skewers ............ 12
Daily Operation .................................................. 17
Cleaning ............................................................ 17
Thermometer Guidelines .................................... 18
Temperature Chart ............................................. 19
Do's and Don'ts ................................................. 20
Parts Diagram ................................................... 21
Electrical Diagram ............................................. 22
Warranty ............................................................ 23
4900 Westside Avenue, North Bergen, New Jersey 07047
Tel: [201] 223-0050 Fax: [201] 223-0950
12 /2015
Page 2 of 24

Hickory Industries, Inc.
Installation Instructions
a. When installing these units, it is important to comply with the most recently established
rules and regulations as deemed pertinent by the local and national electrical, gas, ventilation,
sanitation, and fire codes. These units are classified by Underwriters Laboratories, Inc. as
Gas-Fired Food Service Equipment in accordance with American National Standards Institute
ANSI Z83.11b-1991, Gas Food Service Equipment - Ranges and Unit Boilers.
b. These gas units may not be directly connected to a gas flue or exhaust. However, the
units may only be operated in conjunction with a canopy type exhaust hood.
c. The room where the units are being installed must be ventilated in accordance to the
valid codes and regulations.
d. The units are to be installed securely and horizontally. The units may be installed on
combustible floors.
e. The minimum clearance to the rear or side walls must be 3 inches. It is also important
to insure that the bottom of the units is kept clear so that proper ventilation or air exchange can
occur.
f. Normally, the units will be sent to the operator already set up for the particular type of
gas available at their location. However, unless otherwise specified, the units will be set up for
natural gas use. Before installing and using the units for the first time, it is important to make
sure that the gas type and pressure indicated on the data plate matches the type of gas available in the location. Should this not be the case, it is imperative to change or convert the units
to the needed gas type.
g. The units must be fitted with the manual shut-off gas cock (valve) supplied with the
machine. This manual valve is needed to shut off the gas to the machine during maintenance
work, repairs, pressure testing and if the unit needs to be disconnected for any reason. DO
NOT REMOVE otherwise warranty will be voided.
h. A gas regulator is also supplied with the machine. This component is needed so that
the appropriate gas pressure can be set and insure an optimum operation of the unit. DO
NOT REMOVE otherwise warranty will be voided.
i. When installing this unit with a gas quick disconnect, a tethering device must be used.
j. Depending on local codes or if deemed necessary, a gas filter may also be required.
k. Do connect the unit to a 3/4" gas line. Connecting the unit to a lesser line can reduce
the units effectiveness or cause improper operation.
4900 Westside Avenue, North Bergen, New Jersey 07047
Tel: [201] 223-0050 Fax: [201] 223-0950
12 /2015
Page 3 of 24

Hickory Industries, Inc.
l. After connecting the unit, make sure that the line has been bled and that a static pressure reading of at least 7" water column pressure is obtained.
m. The unit is equipped with a water/drip tray. Always operate the unit at least 2 gallons
of water. Contents are emptied by unscrewing the drain plug.
Unpacking the unit:
a. After the unit is un-crated, roll the unit and all accessories into place.
b. Remove all vinyl paper on the stainless steel
c. Remove all tape from glass surfaces and metal surfaces
d. Carefully remove and inspect parts that are inside the unit. Ensure that all materials
sent with the crate are inspected:
Setting Up The Rotisserie
a. Clean, rinse and sanitize the spits. If baskets and accessories are ordered, clean and
sanitize as well.
b. The rotisserie is now ready to be plumbed by a licensed gas fitter.
4900 Westside Avenue, North Bergen, New Jersey 07047
Tel: [201] 223-0050 Fax: [201] 223-0950
12 /2015
Page 4 of 24

General Information
The Operating Instructions are to be given to the operator of the rotisserie. All unit
operators are to be familiar with the functions of the rotisserie.
The Operating Instructions should be kept in a location close to the rotisserie. It should be
easily recognizeable and easily accessible.
Electric units can be ordered to meet most electrical specifications.
It is recommended that a repair and maintenance contract be signed with the
manufacturer's agent, distributor, or service agency.
Hickory Industries, Inc.
WARNING!
This unit must be installed and connected in accordance to the latest regulations
and may require operation in conjunction with a forced ventilation or exhaust hood.
This unit has been designed for professional use only
and may only be installed or repaired by licensed service agencies!
Before installing or using this equipment, read these instructions!
4900 Westside Avenue, North Bergen, New Jersey 07047
Tel: [201] 223-0050 Fax: [201] 223-0950
12 /2015
Page 5 of 24

Machine Drawings and Dimensions
The following drawing of the Front View and Side View indicate where the
dimensions are taken and should be used to plan the installation of the units.
N/ 6.5 G
N/ 6.5 G inches
Height 39-1/2"
Width 40-1/2"
Depth 27-1/2"
Hickory Industries, Inc.
Front View Side View
N/ 7.5 G
N/ 7.5 G inches
Height *34-1/2"
Width 50-1/4"
Depth 30"
*Dimension without legs
Front View
Side View
4900 Westside Avenue, North Bergen, New Jersey 07047
Tel: [201] 223-0050 Fax: [201] 223-0950
12 /2015
Page 6 of 24
Hickory Industries, Inc.
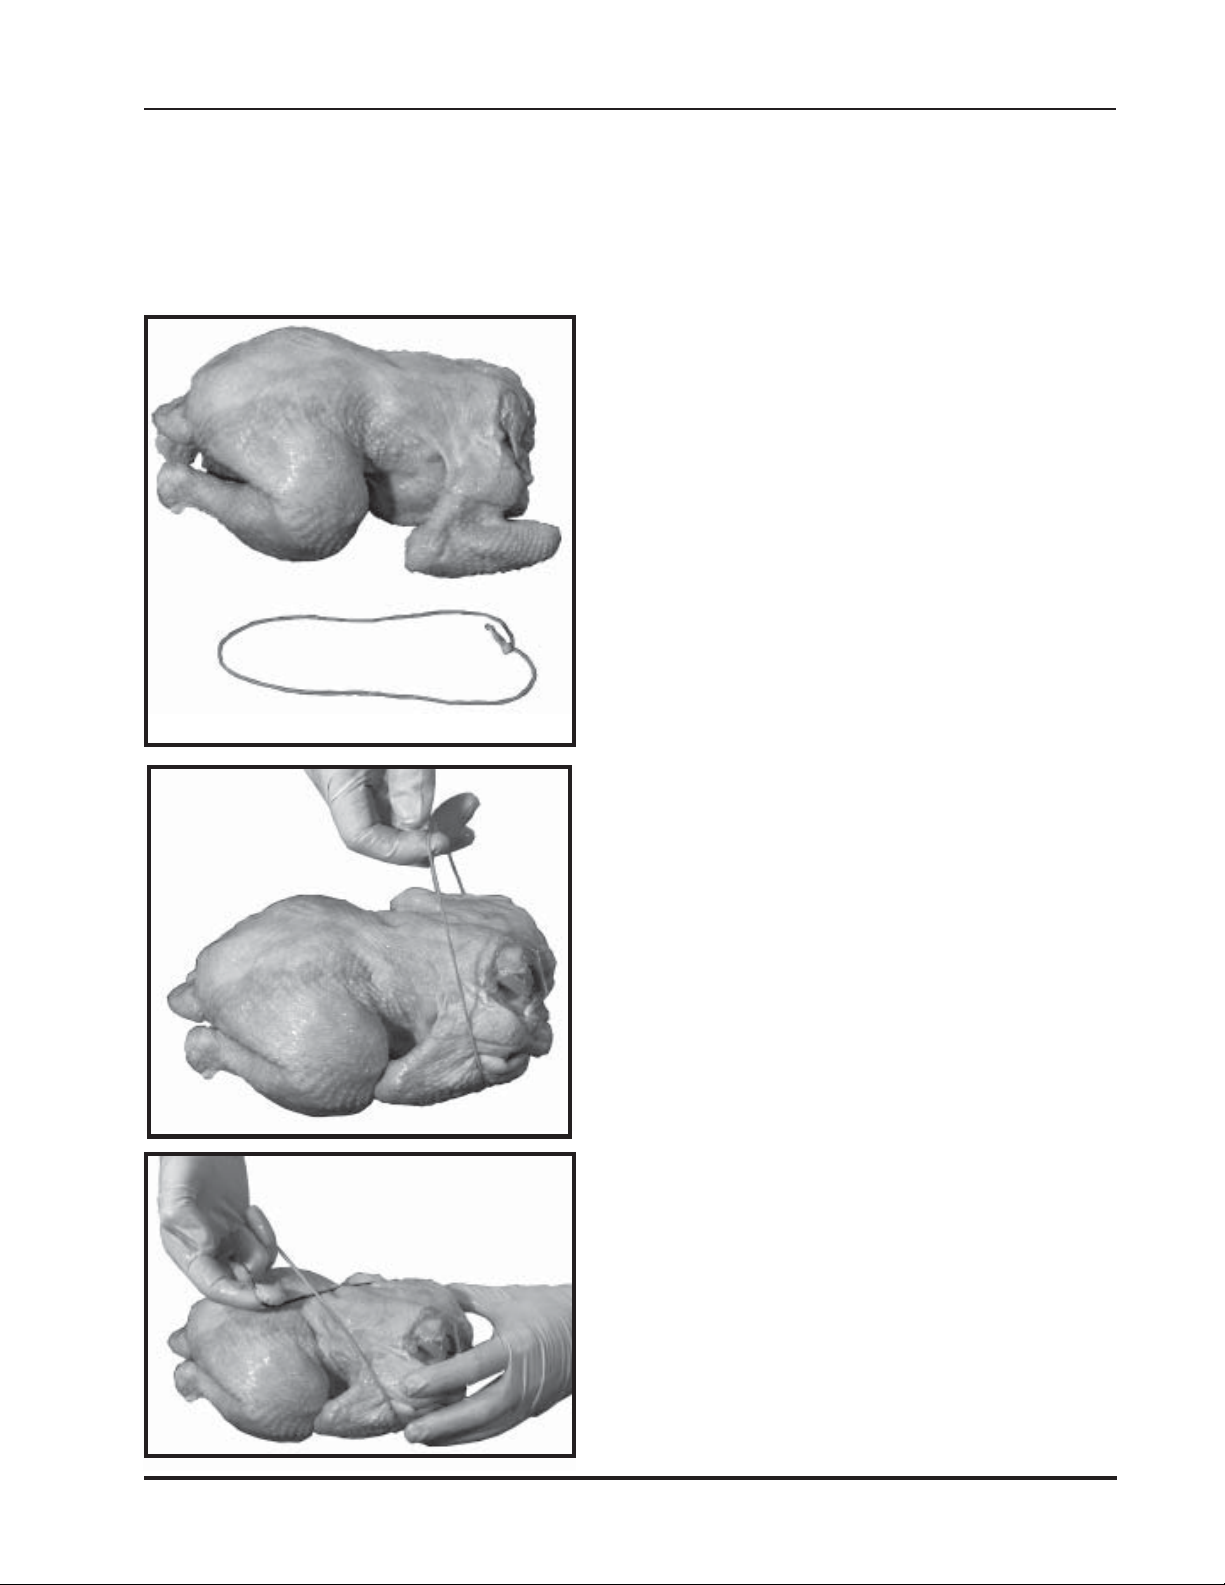
Spitting Chickens
The most important part in getting started with a rotisserie is knowing how to properly spit the product.
This is quite easy, but it must be learned! As an operator, you will become an expert in spitting chickens
within half an hour! There are two types of commonly used spits: the angle spit and the regular spit. The
following pages describe and show how spitting is done with both these types of spits.
A. Using Angle Spits
Figure 1. Chickens Ties
When using a “V” or angle spit, it is very important to tie
or truss the product being cooked. This prevents the
product from moving around the spit and also prevents
damage by preventing the legs and wings from flopping.
In this section, we will show how to properly truss a
chicken. It is important to use a tie to fit the size of the
product. In this case, we are tieing a 2 3/4 lb. chicken
with a 6” tie.
Figure 2. Trussing Wings
With the back of the chicken facing up, take the tie and
wrap it around the breast, making sure to tuck the wings
against the breast. Pull on the tie as pictured. You will
also need to hold the chicken with your other hand.
Figure 3. Trussing Across Back
While pulling on the tie, cross the strings so that you
make an “X” across the back of the chicken. With the
“loop” in your hand, you will now need to tie the legs of
the chicken.
4900 Westside Avenue, North Bergen, New Jersey 07047
Tel: [201] 223-0050 Fax: [201] 223-0950
12 /2015
Page 7 of 24
Hickory Industries, Inc.
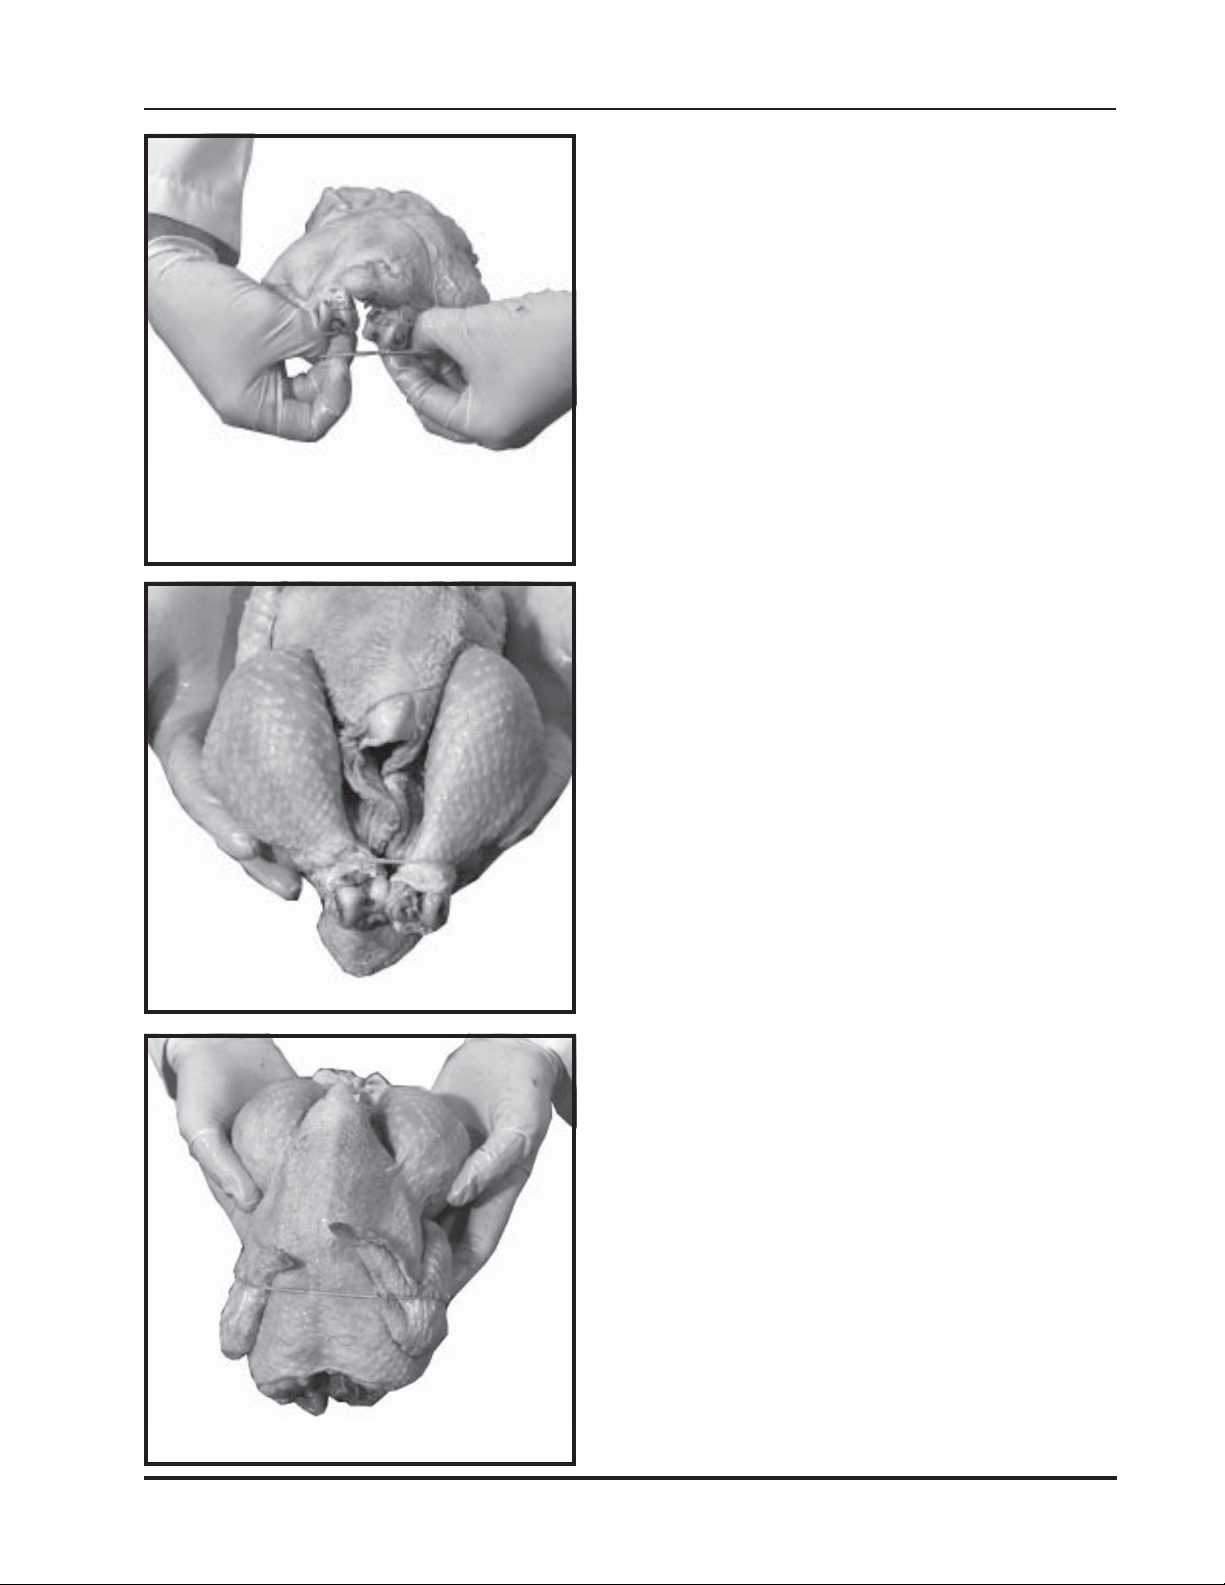
Figure 4. Trussing Legs
While pulling on the tie, loop the strings over the legs of
the chicken.
Figure 5.
Trussed Legs
Make sure that both legs are securely held by the tie.
Figure 6. Trussed wings
Make sure that both wings are securely held by the tie
against the breast of the chicken.
4900 Westside Avenue, North Bergen, New Jersey 07047
Tel: [201] 223-0050 Fax: [201] 223-0950
12 /2015
Page 8 of 24
 Loading...