

Page 1
Installation Manual
Owner's Operating Manual
Hickory Rotisseries
Models: N/3ES thru N/9E
USA
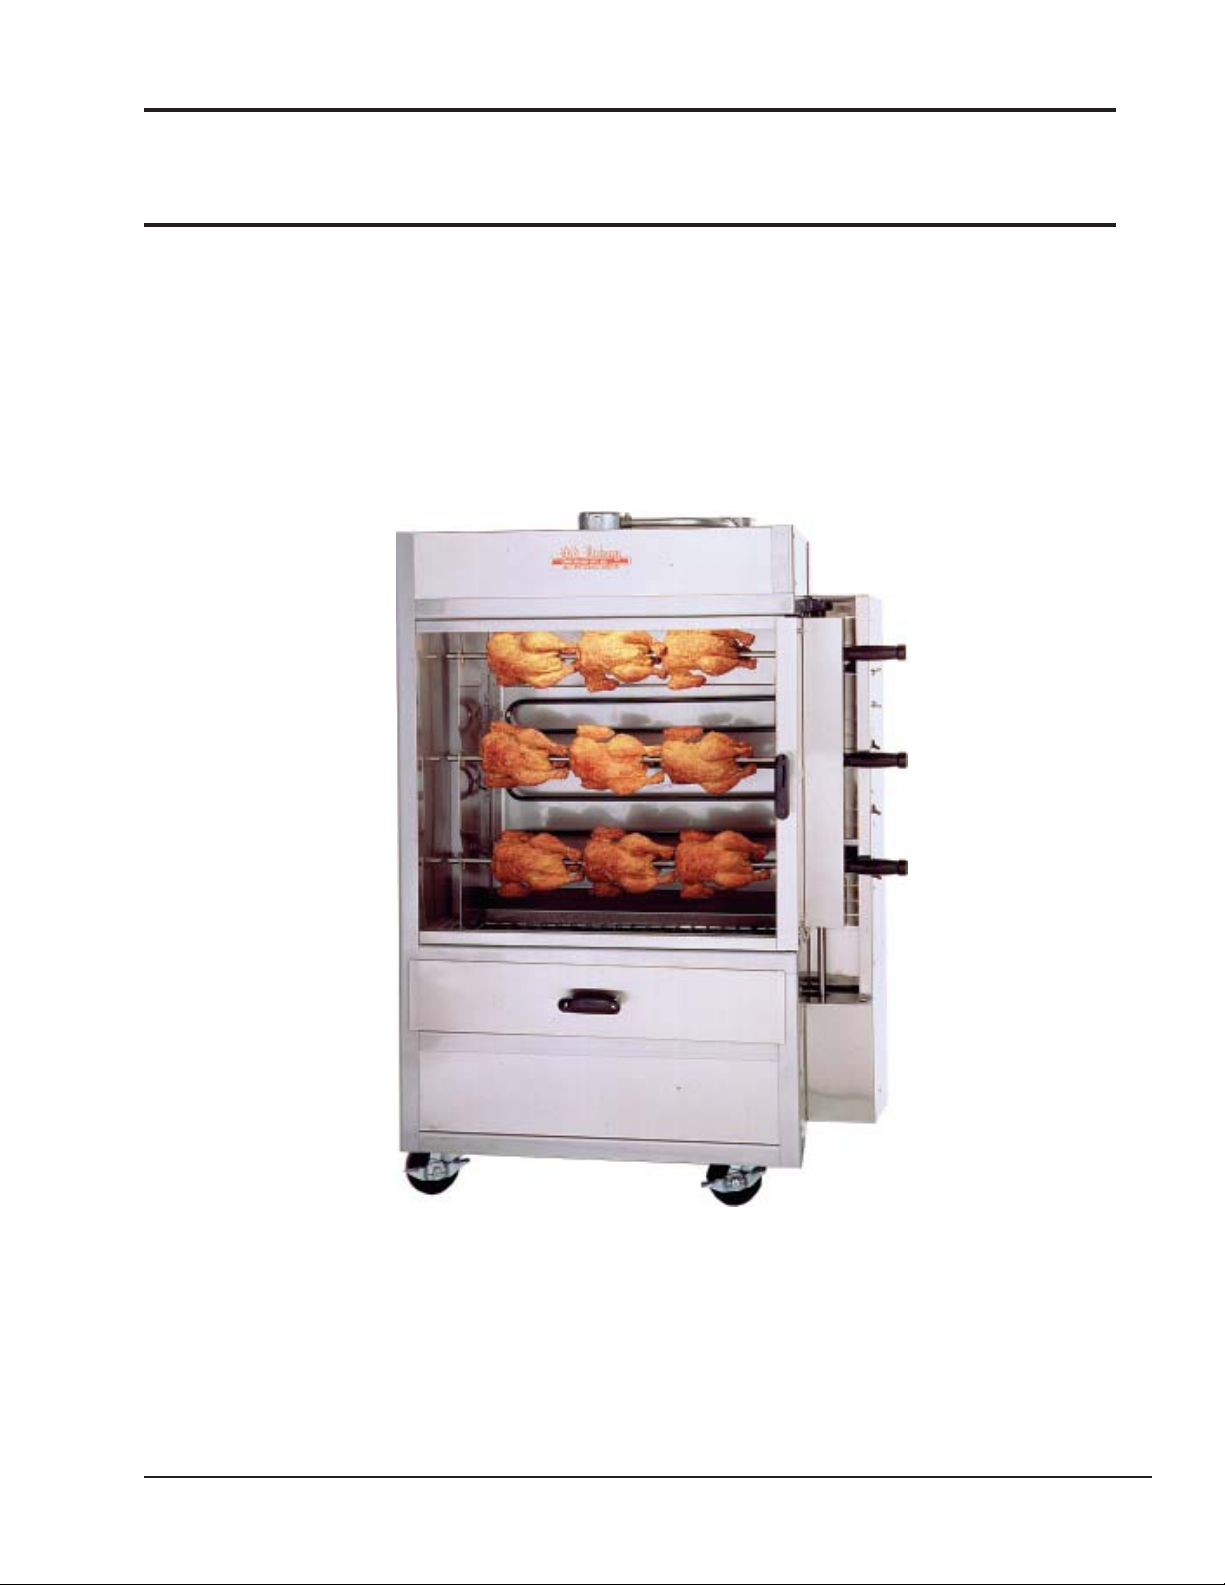
N/3ES Shown
(Right Hand Unit)
4900 Westside Avenue, North Bergen, New Jersey 07047
Tel: [201] 223-0050 Fax: [201] 223-0950
Hickory Manual 9/99
Page 1 of 13
Page 2

Table of Contents
1.0 Installation Instructions 3
1.1 General Information 3
1.2 Machine Drawings and Dimensions 4
1.3 Machine Dimensions 6
1.4 Maintenance, Response to Technical Problems, and Solutions 7
1.5 Electrical Diagram 7
1.6 Parts List 8
1.7 Parts List with Diagrams 8
2.0 Operating Instructions
2.1 Start up 10
2.2 Shut down 10
2.3 Working with the Rotisserie 11
2.4 Cooking Times 12
2. 5 Daily Cleaning 12
2.6 Important Information 13
4900 Westside Avenue, North Bergen, New Jersey 07047
Tel: [201] 223-0050 Fax: [201] 223-0950
Hickory Manual 9/99
Page 2 of 13
Page 3

1.0 Installation Instructions
a. When installing these units, it is important to comply with the most recently
established rules and regulations as deemed pertinent by the local and national
electrical, ventilation, sanitation, and fire codes. These units are classified
by Underwriters Laboratories, Inc.
b. The room where the units are being installed must be ventilated in accordance to
the valid codes and regulations.
c. The units are to be installed securely and horizontally. The units may be
installed on combustible floors. The units may be installed on adjustable legs or on
casters (wheels).
d. The minimum clearance to the rear or side walls must be 6 inches. The minimum
clearance between the spit handle side of the machine and the side wall should be
24 inches for a sliding door and 10 inches for a hinged door. It is also important to
insure that the bottom of the units is kept clear so that proper ventilation or air
exchange can occur.
e. Uunits will be sent to the operator already set up for the particular
type of electrical requirements available at their location.
1.1 General Information
The Operating Instructions are to be given to the operator of the rotisserie. All unit
operators are to be familiar with the functions of the rotisserie.
The Operating Instructions should be kept in a location close to the rotisserie. It should be
easily recognizeable and easily accessible.
It is recommended that a repair and maintenance contract be signed with the
manufacturer's agent, distributor, or service agency.
WARNING!
This unit must be installed and connected in accordance to the latest regulations
and can only be operated in conjunction with forced ventilation or exhaust hood.
This unit has been designed for professional use only
and may only be installed or repaired by licensed service agencies!
Before installing or using this equipment, read these instructions!
4900 Westside Avenue, North Bergen, New Jersey 07047
Tel: [201] 223-0050 Fax: [201] 223-0950
Hickory Manual 9/99
Page 3 of 13
Page 4
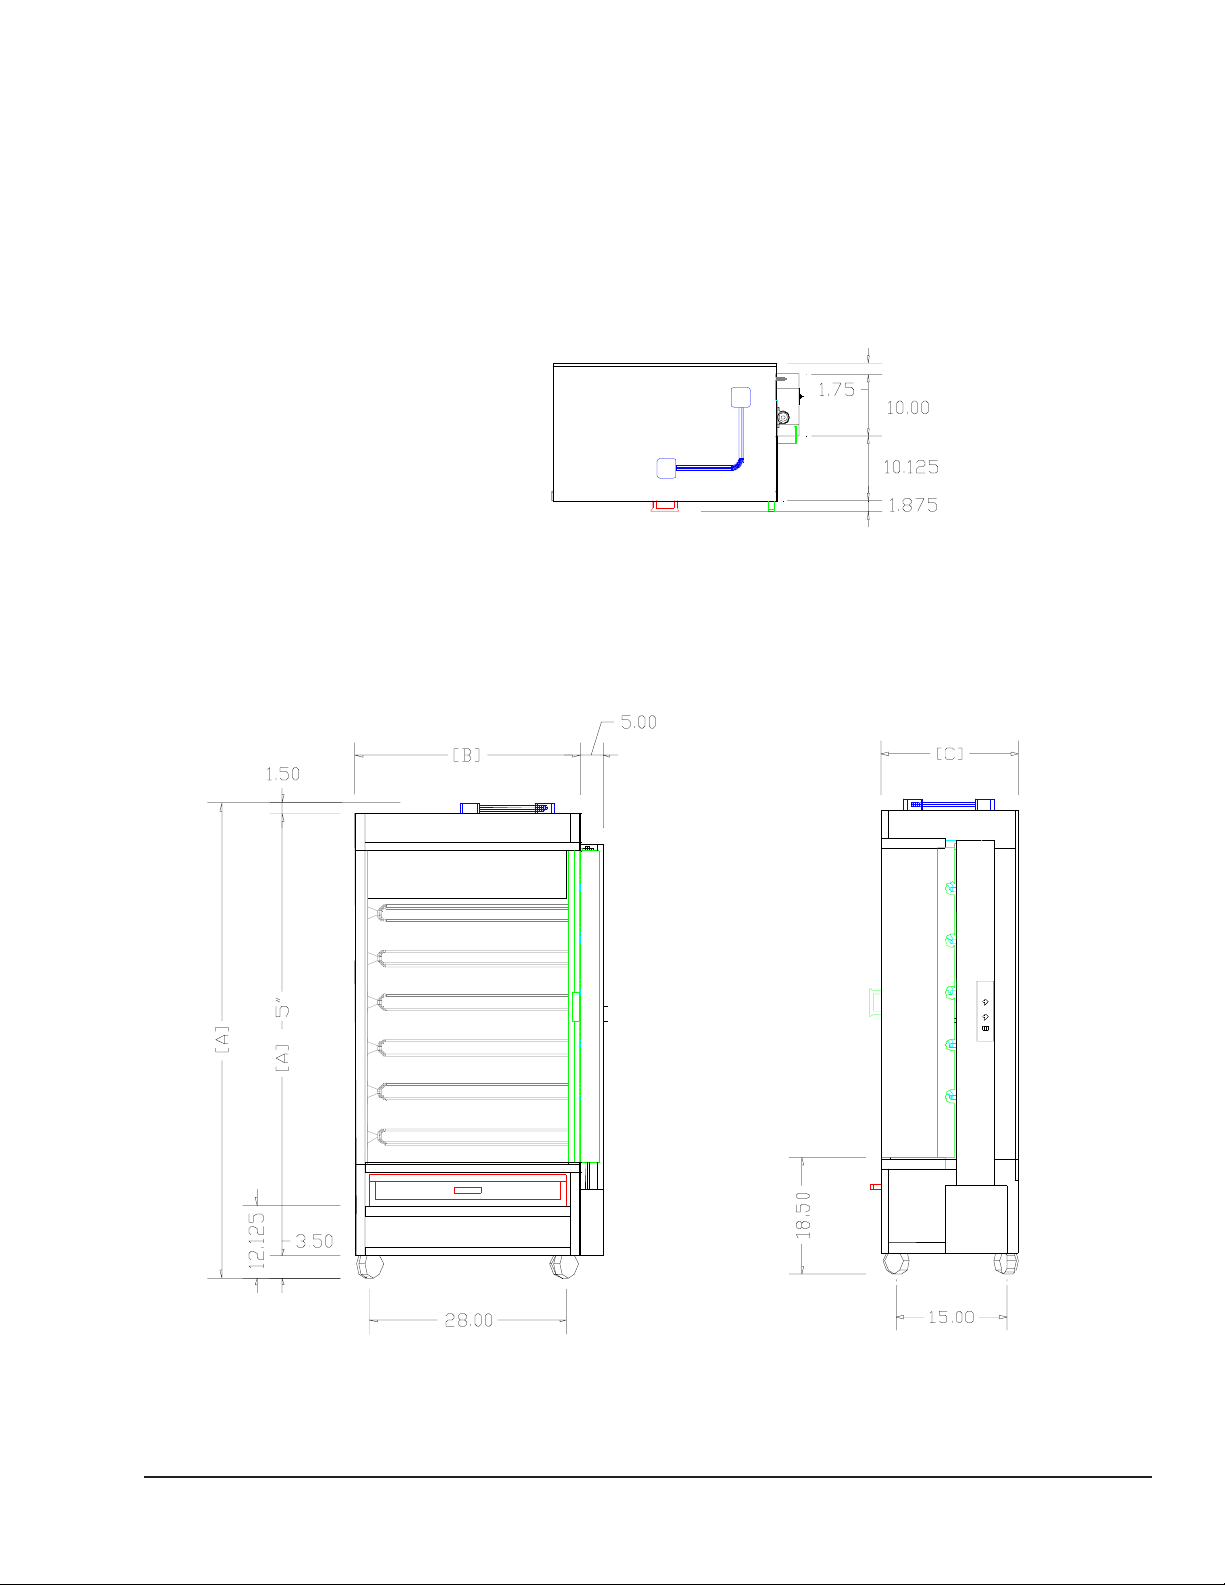
1.2 Machine Drawings and Dimensions
The following drawing of the Front View, Side View, and Top View indicate where the
dimensions are taken and should be used to plan the installation of the units.
Top View
Front View
Side View
4900 Westside Avenue, North Bergen, New Jersey 07047
Tel: [201] 223-0050 Fax: [201] 223-0950
Hickory Manual 9/99
Page 4 of 13
Page 5

1.3 Main dimensions in inches
3ES 3E 5E 7E 9E
Height [A] 48-1/4 60-1/4 74-1/4 74-1/4 88-1/4
Width [B] 34-1/4 38-1/4 38-1/4 38-1/4 38-1/4
Depth [C] 21-3/4 21-3/4 21-3/4 21-3/4 21-3/4
1.4 Maintenance, response to technical problems, reasons for problems and solutions
Should a technical problem arise for any reason, shut off the machine and call for technical
service.
1.5 Electrical Diagram - All Models
4900 Westside Avenue, North Bergen, New Jersey 07047
Tel: [201] 223-0050 Fax: [201] 223-0950
Hickory Manual 9/99
Page 5 of 13
Page 6

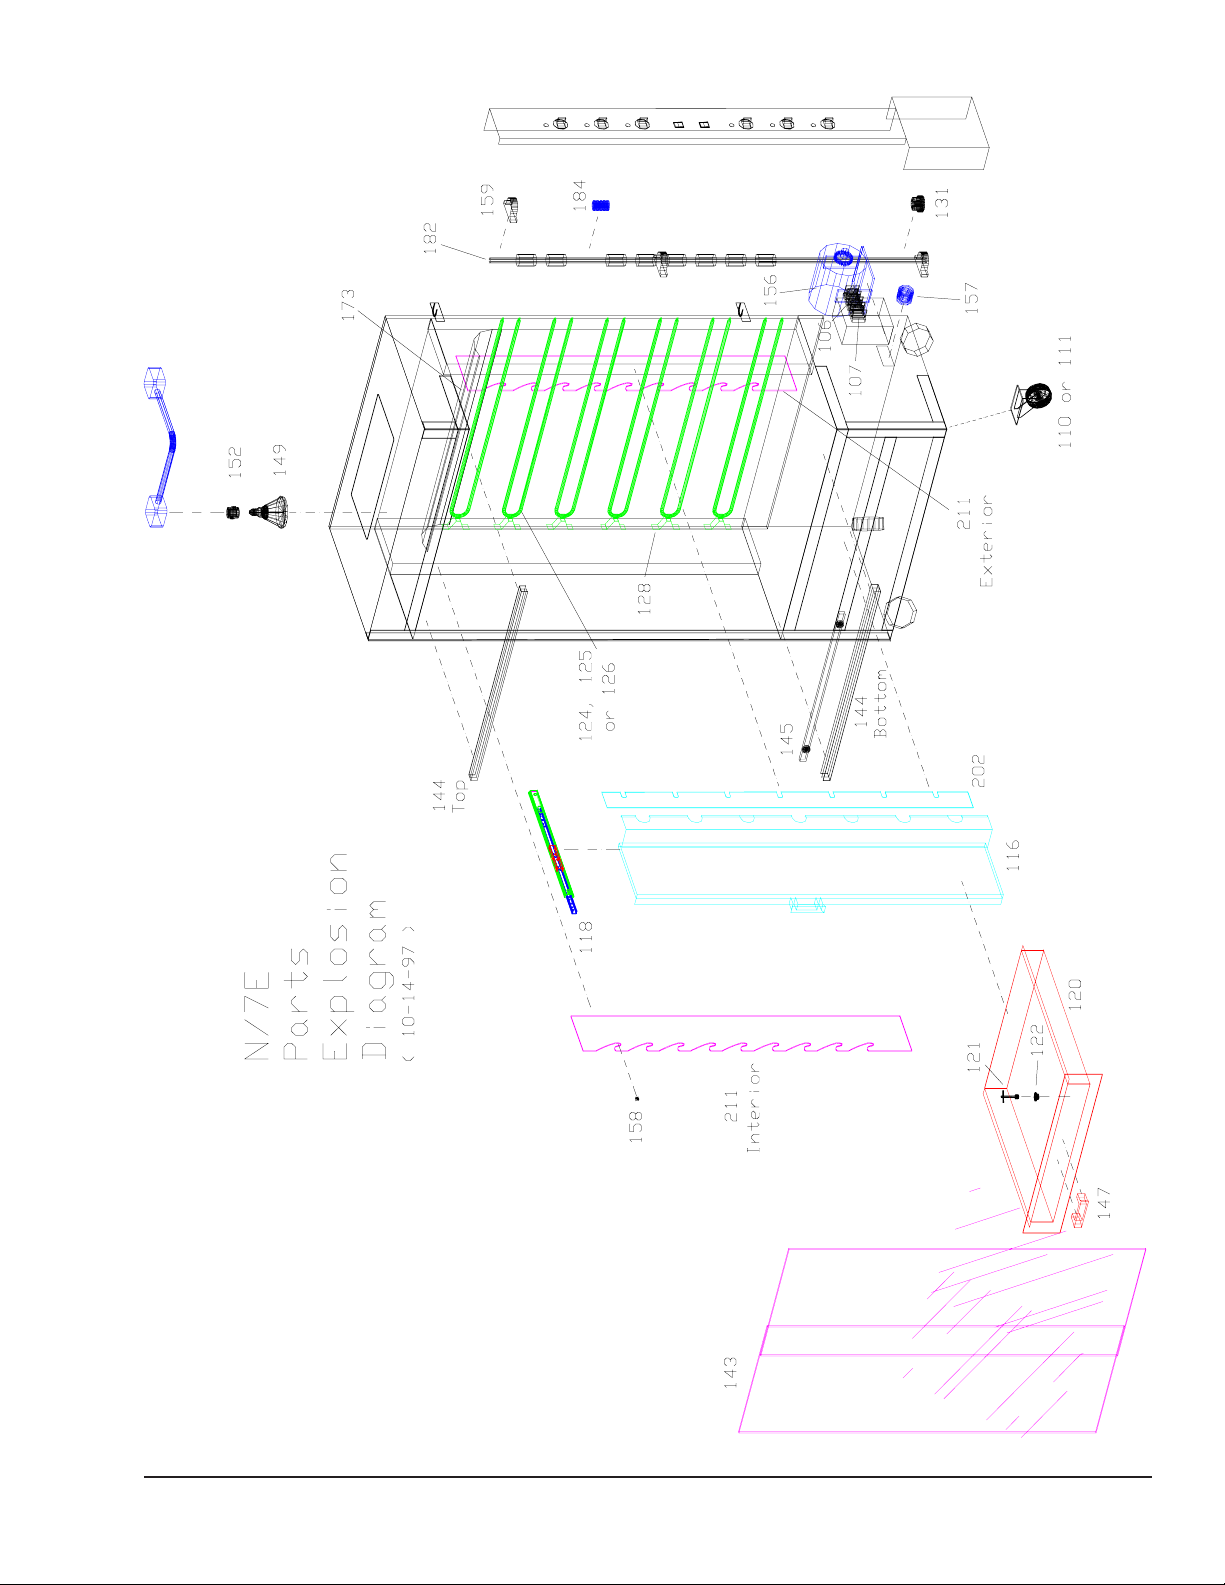
1.6 Parts List for N / 3ES thru N / 9E with Diagrams
Item Qty. Description Material Length Size Manufacturer
106 1 Contact Section 824 (terminal) Buchanan
107 1 Contact Section 830 (end-piece) Buchanan
110 2 Caster w/ brake Nylon Hickory
111 2 Caster w/o brake Nylon Hickory
116 1 Sliding Door SS Hickory
118T 1 Door Slide Assembly Long, Top SS Hickory
118B 1 Door Slide Assembly Long, Bottom SS Hickory
120 1 Drip Pan SS Hickory
121 1 Drip Pan Plug Brass Hickory
122 1 Drip Pan Receptacle Brass Hickory
126 6 Element U-Shape 240 Volts, 2500 Watts Hickory
127 6 Element Holder Large Hickory
129 12 Element Porcelain Insulator Hickory
131 1 Fiber Motor Worm Gear Fiber Hickory
143 2 Glass Tempered, 457 x 1219 mm Hickory
144T 1 Glass Track, Top SS Hickory
144B 1 Glass Track, Bottom SS Hickory
145 2 Glass Trolley, Regular Alum. Hickory
147 2 Handle Plastic Hickory
148 1 Lamp Cover Regular Hickory
150 1 Lamp Par, 240 V Hickory
152 1 Lamp Socket, Vossloh-Schwabe Ceramic Hickory
155 1 Motor, 1/3 HP - 240V Hickory
157 1 Motor Worm Steel SS Hickory
158 5 or 7 Oil Lite Bushing Brass Hickory
159 3 Pillow Block Bearing 5/8" SS Hickory
167 1 Rack Grill Single Unit Hickory
171 1 Reflector Bottom Single Electric SS Hickory
172 3 Reflector Panel Electric SS Hickory
182 1 Shaft 5/8" SS Hickory
184 9 Shaft Worm Nylon Hickory
201 1 Spit Lock, N / 5 SS Hickory
202 1 Spit Lock, N / 7 SS Hickory
210I 1 Spit Plate, N / 5 Interior SS Hickory
210E 1 Spit Plate, N / 5 Exterior SS Hickory
211I 1 Spit Plate, N / 7 Interior SS Hickory
211E 1 Spit Plate, N / 7 Exterior SS Hickory
6 Infinity Switches w/ Knobs Hickory
6 Indicator Lights Hickory
4900 Westside Avenue, North Bergen, New Jersey 07047
Tel: [201] 223-0050 Fax: [201] 223-0950
Hickory Manual 9/99
Page 6 of 13
Page 7

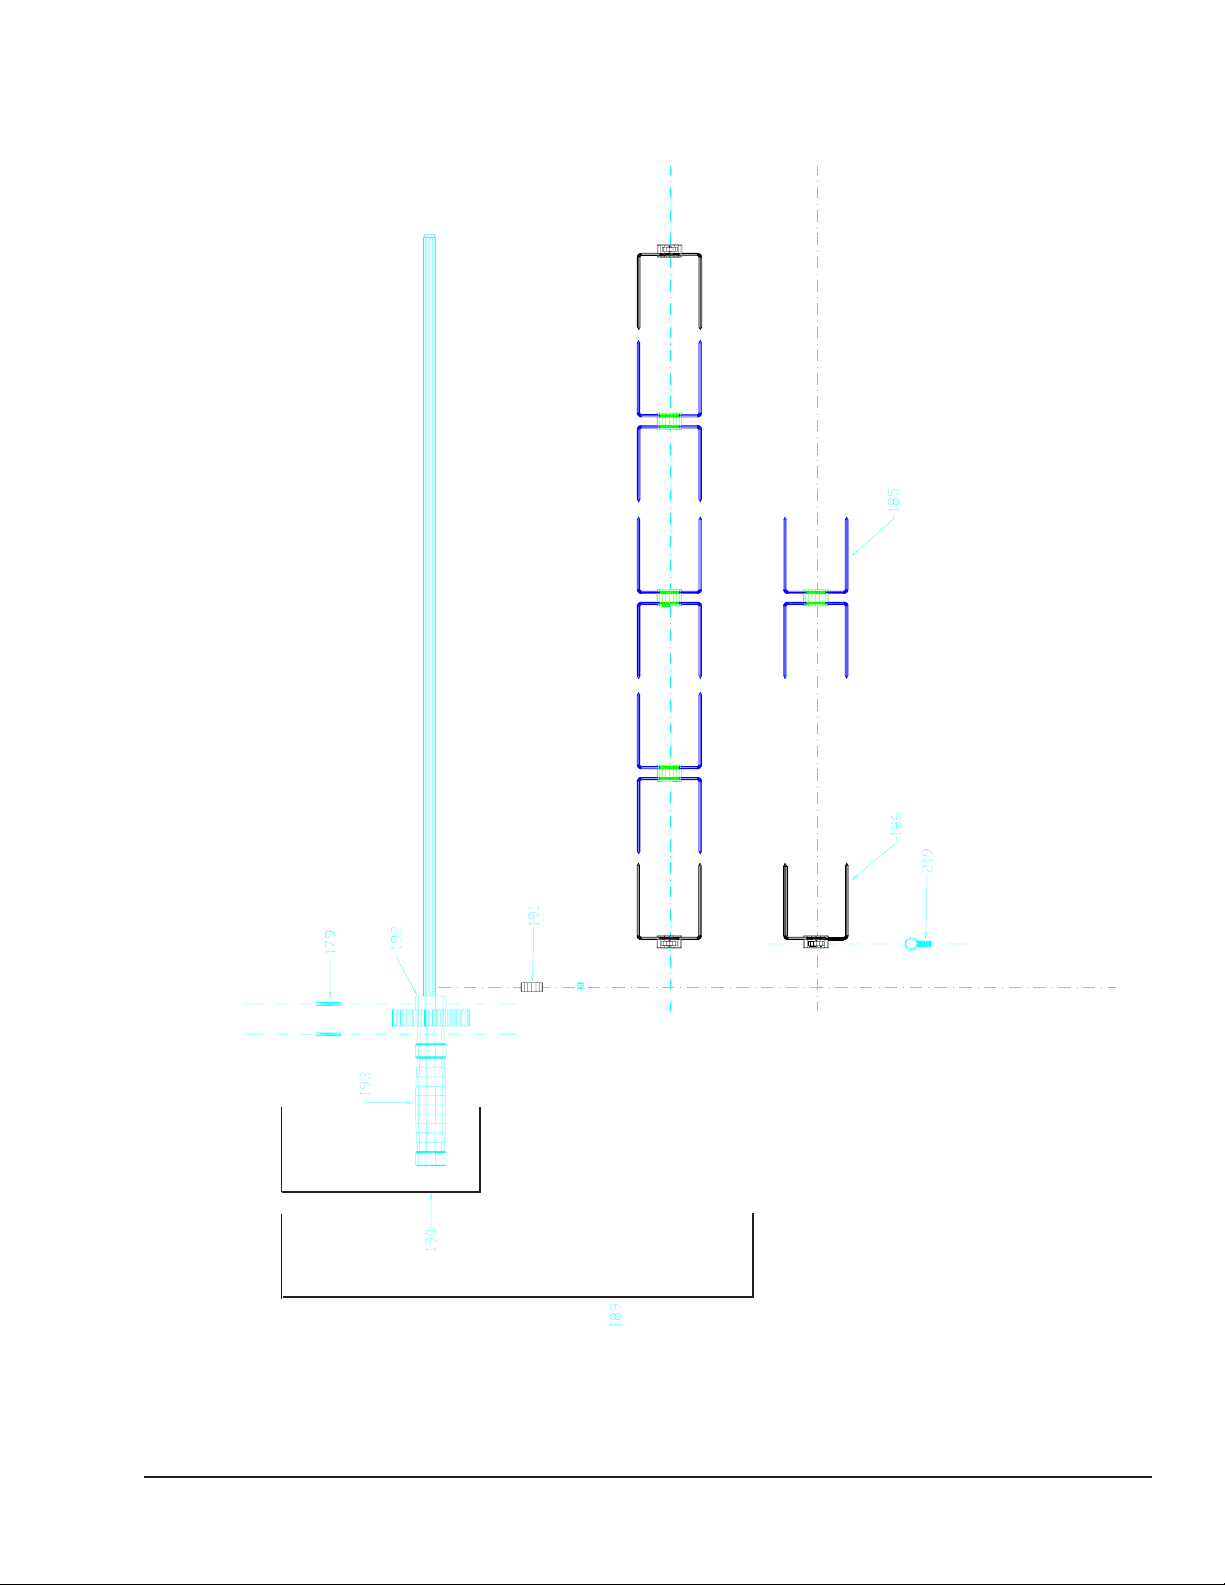
1.6 Parts List for N/3ES thru N/9E with Diagrams (Contd.)
Item Qty. Description Material Length Size Manufacturer
189 5 or 7 Spit Regular Complete (with screws) SS Hickory
179 2/spit Roll Pin 1/8" Stainless SS Hickory
190 5 or 7 Spit Regular, without collar SS Hickory
191 5 or 7 Spit Collar SS Hickory
192 5 or 7 Spit Gear Nylon Hickory
193 5 or 7 Spit Handle, 8" Regular Nylon Hickory
185 5/Spit Skewer Double SS Hickory
186 5/Spit Skewer Single SS Hickory
219 1/Acc.Thumb Screw Steel Hickory
*All components are inventories and sold through Hickory Industries and their distributors and
dealers.
4900 Westside Avenue, North Bergen, New Jersey 07047
Tel: [201] 223-0050 Fax: [201] 223-0950
Hickory Manual 9/99
Page 7 of 13
Page 8
4900 Westside Avenue, North Bergen, New Jersey 07047
Tel: [201] 223-0050 Fax: [201] 223-0950
Hickory Manual 9/99
Page 8 of 13
Page 9
4900 Westside Avenue, North Bergen, New Jersey 07047
Tel: [201] 223-0050 Fax: [201] 223-0950
Hickory Manual 9/99
Page 9 of 13
Page 10

2 Operating Instructions
2.1 Start Up
1. Switch the exhaust hood to on.
2. Switch on electrical element.
3. Repeat the procedure for the other elements.
4. Allow the unit to pre-heat for about 15 minutes.
5. When ready to load the spits with product, turn the light and the motor
switches to the on position.
2.2 Shut Down
1. Switch of all electrical elements.
2. After all of the loaded spits have been removed, turn the motor and lights off.
3. Turn off the exhaust hood.
WARNING! Do not clean the machine or glass while these are hot! Everything
should be cooled down before cleaning.
4900 Westside Avenue, North Bergen, New Jersey 07047
Tel: [201] 223-0050 Fax: [201] 223-0950
Hickory Manual 9/99
Page 10 of 13
Page 11

2.3 Working with the Rotisserie
Grilling Temperature
The desired temperature in the rotisserie can only be set by turning elements on or off.
Having all elements "on" is for the high setting and represents about 540°F. The grilling
temperature can be reduced by turning every other element off.
As a general rule, the higher the grilling temperature, the shorter the cooking time.
However, when working with the Old Hickory rotisserie, one must consider that the
temperatures will vary from top to bottom. The top of the unit will have higher
temperatures due to the natural convection. The cooking temperatures indicated above
refer to the top section of the machine. For this reason, the product on the top spits will
be cooked faster than the product on the lower spits.
This factor allows for continuous cooking. As the top spits are ready, they should be
removed. The spits directly below should then be moved up one spit position, thus freeing a
spit position at the bottom of the unit. This bottom position can then be loaded with fresh,
raw product. By loading raw product to the bottom, there is no danger of cross
contamination.
WARNING: The only way to be sure that the product is completely cooked is by
taking the internal temperatures. For example, with poultry, the
internal temperature must be at least 185°F at the inner side of the thigh.
For example, when preparing chicken.
a. After the unit has been ignited and it has warmed up for at least 15 minutes, load
all spits with chicken.
b. Depending on the size and weight of the chickens, check the internal temperature of
a chicken (on the inner thigh) on the top spit after approximately 55 minutes. If the
internal temperature exceeds 185°F, remove the top spit.
c. Move the remaining spits up one spit position. The bottom spit position should
now be free.
d. Add a new spit, loaded with raw chickens, to the bottom spit position.
e. Repeat this procedure as needed during the day.
f. After the "rush" has ended and demand has decreased, turn the manifold valve
knobs to the low temperature settings. This will keep the product in the rotisserie
hot over a long period of time, without burning the product.
4900 Westside Avenue, North Bergen, New Jersey 07047
Tel: [201] 223-0050 Fax: [201] 223-0950
Hickory Manual 9/99
Page 11 of 13
Page 12

2.4 Cooking Times
Product Cooking Time Temperature
Chicken 45 - 60 minutes "ON"
Turkey 120 - 170 minutes 1/2 power
Ribs 20 - 45 minutes "ON"
Beef Roast 45 minutes (to 104°F) "ON"
Pork Loin 45 minutes (to 135 °F) "ON"
Salmon 20 - 30 minutes "ON"
Duck 120 minutes 1/2 power - 105 minutes
Vegetables 20 minutes "ON"
(Zuccini)
increase to "ON" for last 20 min.
"ON" - 15 minutes
Potatoes 40 minutes "ON"
2.5 Daily Cleaning
The rotisserie should be cleaned on a daily basis.
1. The exterior should be cleaned with a stainless steel cleaner.
2. The glass should be cleaned with a soft cloth and degreaser. If necessary, a plastic
scraper can also be used to remove carbon when using a degreaser.
WARNING! The glass must be cool. Do not use steel wool or abrasives to clean
3. The spits and drip pans should be removed from the machine and cleaned
thoroughly with a degreaser.
the glass! This will weaken the tempered glass and could cause it
to shatter.
4900 Westside Avenue, North Bergen, New Jersey 07047
Tel: [201] 223-0050 Fax: [201] 223-0950
Hickory Manual 9/99
Page 12 of 13
Page 13

4. Before cleaning the interior surfaces carefully cover, protect, or remove all ceramics.
5. The interior stainless steel surfaces can be sprayed with a degreaser for best results.
6. For best results on the interior metal, use a steam cleaner or a scrubbing sponge. Be
careful not to use excessive water since this could damage the insulation on the rear,
side, and front panels.
7. The filters in the exhaust hood must be cleaned as required by the manufacturer.
2.6 Important Information
In case of repairs, only an approved and certified service technician should be called in.
The installation can only be carried out by a certified installer. Otherwise, the warranty
will be null and void.
4900 Westside Avenue, North Bergen, New Jersey 07047
Tel: [201] 223-0050 Fax: [201] 223-0950
Hickory Manual 9/99
Page 13 of 13
 Loading...