

Page 1

HP Photosmart E327
Digital Camera
Quick Start Guide
Guía de comienzo rápido
4" X 6" FRONT COVER
Page 2

www.hp.com/support
Argentina (Buenos Aires)
Argentina
Brasil (Sao Paulo)
Brasil
Canada
(Mississauga Area)
Canada
Chile
Colombia (Bogota)
Colombia
Costa Rica
Ecuador (Andinatel)
Ecuador (Pacifitel)
El Salvador 800-6160
Guatemala
Jamaica
Mexico (Mexico City)
Mexico
Pan ama
Parag uay
Per ú
Puerto Rico
República Dominicana
Trinidad & Tobago
United States
Uruguay
Venezuela
54-11-4708-1600
0-800-555-5000
55-11-4004-7751
0-800-709-7751
(905) 206-4663
1-800-474-6836
800-360-999
571-606-9191
01-8000-51-4746-8368
0-800-011-1046
1-999-119
800-711-2884
1-800-225-528
800-711-2884
1-800-711-2884
1-800-711-2884
55-5258-9922
01-800-472-68368
1-800-711-2884
009 800 54 1 0006
0-800-10111
1-877-232-0589
1-800-711-2884
1-800-711-2884
1-800-474-6836
0004-054-177
0-800-474-68368
Page 3
E327_ChengHo_QSG.fm Page 1 Friday, November 4, 2005 3:19 PM
HP Photosmart E327
Digital Camera
Quick Start Guide
English
1
Page 4
E327_ChengHo_QSG.fm Page 2 Friday, November 4, 2005 3:19 PM
Legal notices
© Copyright 2005 Hewlett-Packard Development Company, L.P.
The information contained herein is subject to change without notice. The only
warranties for HP products and services are set forth in the express warranty
statements accompanying such products and services. Nothing herein should
be construed as constituting an additional warranty. HP shall not be liable for
technical or editorial errors or omissions contained herein.
®
Windows
Disposal of waste equipment by users in private households in the European
Union
waste electrical and electronic equipment. The separate collection and
recycling of your waste equipment at the time of disposal will help to conserve
natural resources and ensure that it is recycled in a manner that protects
human health and the environment. For more information about where you
can drop off your waste equipment for recycling, please contact your local city
office, your household waste disposal service or the shop where you purchased
the product.
For future reference, please enter the following information:
Model Number (on the front of the camera)
Serial Number (10-digit number on the
bottom of the camera)
Date the camera was purchased
is a U.S. registered trademark of Microsoft Corporation.
SD logo is a trademark of its proprietor.
This symbol on the product or on its packaging indicates that this
product must not be disposed of with your other household waste.
Instead, it is your responsibility to dispose of your waste equipment by
handing it over to a designated collection point for the recycling of
2
HP Photosmart E327 Quick Start Guide
Page 5
E327_ChengHo_QSG.fm Page 3 Friday, November 4, 2005 3:19 PM
1Getting started
This printed Quick Start Guide provides the information
you need to get started using the essential features of your
camera. For detailed information about camera features,
see the electronic User Guide.
Quick Start Guide Electronic User Guide
This printed guide will
help you to:
• Start using your
camera quickly
• Install the
HP Photosmart
Software
• Introduce you to
your camera’s
features
The electronic User Guide includes:
• Descriptions of all the camera features
• A description of icons on the Image
Display
• Using the camera without installing
the HP Photosmart Software
• Battery information, including:
• Extending battery life
• The different battery types and
the number of shots per battery
• Safety precautions
• A description of the power
indicator icons
• Troubleshooting
• Getting assistance from HP
• Purchasing camera accessories
• Caring for your camera
• Camera specifications
English
3
Page 6
E327_ChengHo_QSG.fm Page 4 Friday, November 4, 2005 3:19 PM
Viewing the electronic User Guide
The electronic User Guide is on the HP Photosmart
Software CD. To view the electronic User Guide:
1. Insert the HP Photosmart Software CD into the CD drive of
your computer.
2. On Windows: Click View User Guide on the Main page
of the installation screen.
On Macintosh: Open the readme file in the docs folder
on the CD.
The electronic User Guide is also copied to your computer
when you install the HP Photosmart Software. To view the
electronic User Guide after it has been installed on your
computer:
• On Windows: Open the HP Solution Center and click on
Help and Support.
• On Macintosh: Open the HP Device Manager and select
User Guide from the Information and Settings pop-up
menu.
Getting assistance
• For tips and tools to help you use your camera more
effectively, visit www.hp.com/photosmart (english-only)
or www.hp.com.
• For product assistance, diagnostics, and driver
downloads 24x7, visit www.hp.com/support.
• For help with the HP Photosmart Software, see
Help feature in the HP Photosmart Software.
4
HP Photosmart E327 Quick Start Guide
Page 7
E327_ChengHo_QSG.fm Page 5 Friday, November 4, 2005 3:19 PM
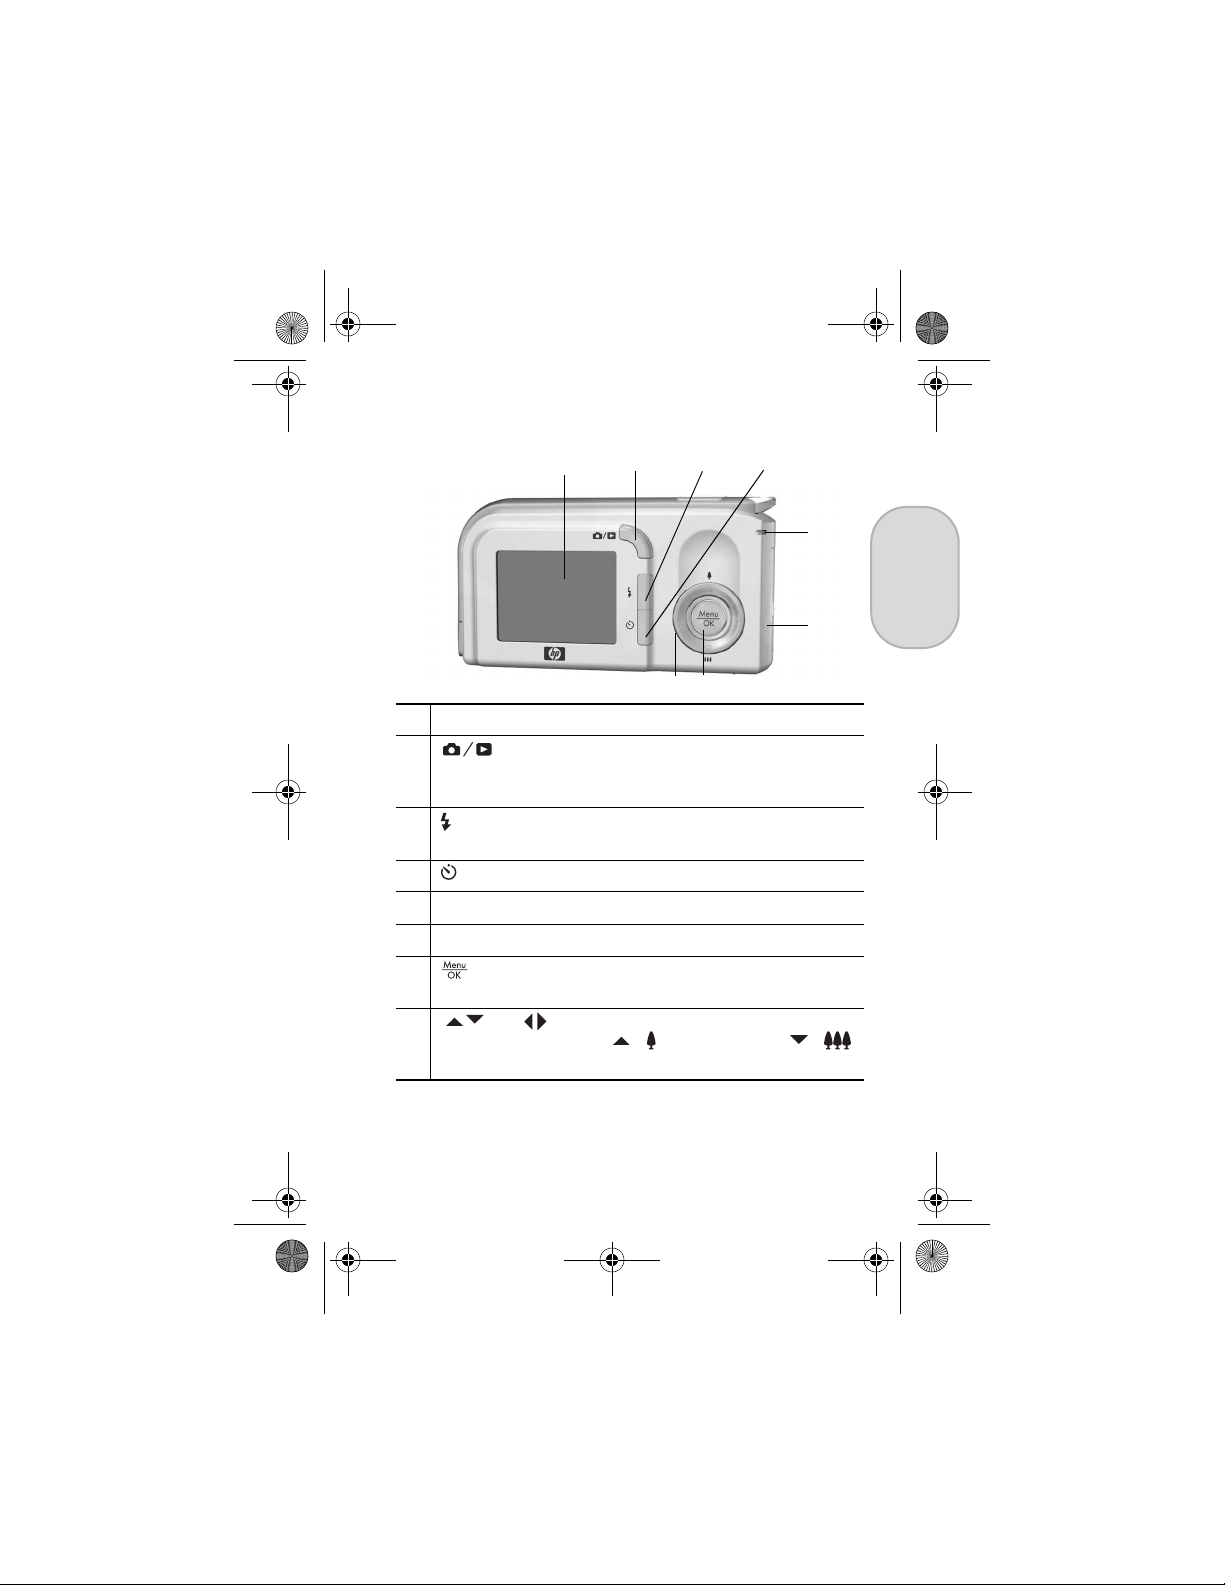
Camera back
1
1 Image Display.
2 Live View/Playback button—Switches between
Live View and Playback (see Live View and Playback
on page 16).
3
Flash button—Settings are Auto Flash, Red-Eye, Flash On,
Flash Off.
4 Self-timer button.
5Power/Memory light.
6 Battery/Memory card door.
7
8
button—Displays camera menus, selects options, and
confirms actions.
and buttons—Scrolls through menus and images;
while in Live View, press
to zoom out.
2
3
8
7
/ to zoom in; press /
4
5
English
6
5
Page 8
E327_ChengHo_QSG.fm Page 6 Friday, November 4, 2005 3:19 PM
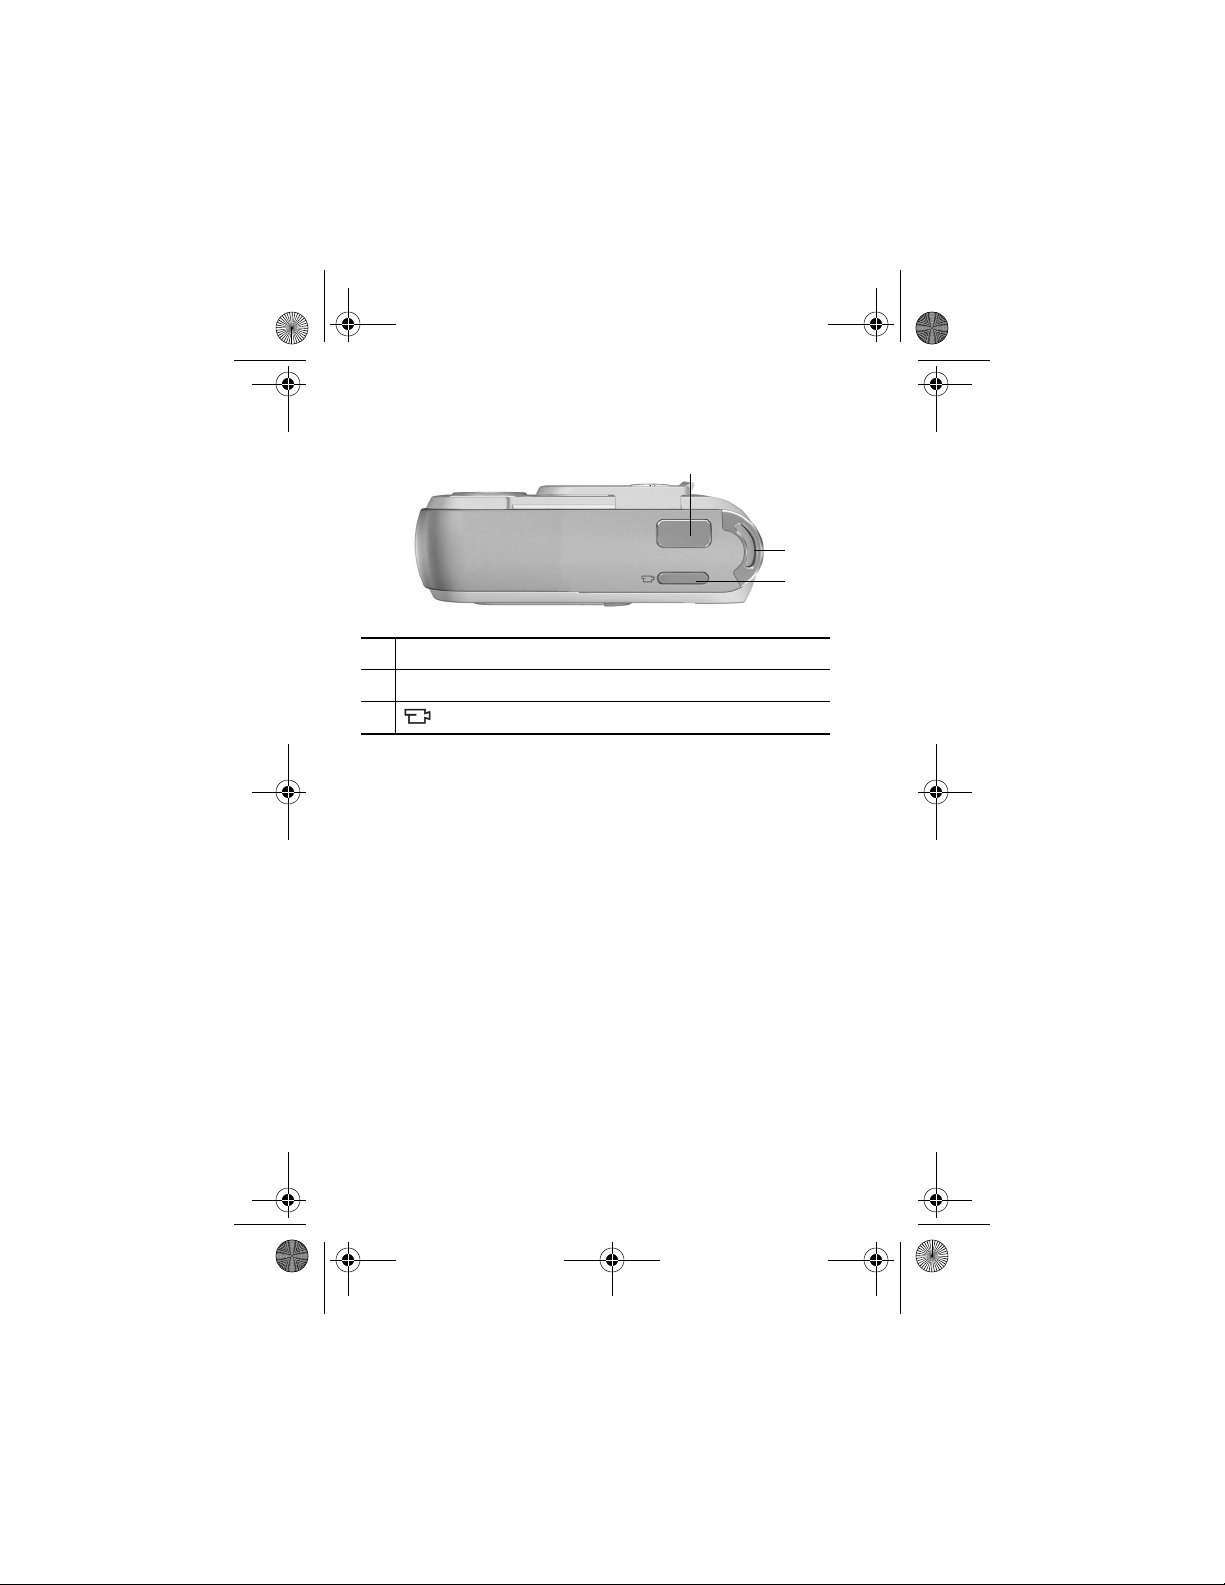
Camera top
1
1 Shutter button.
2 Wrist strap mount.
3
Video button.
2
3
6
HP Photosmart E327 Quick Start Guide
Page 9
E327_ChengHo_QSG.fm Page 7 Friday, November 4, 2005 3:19 PM
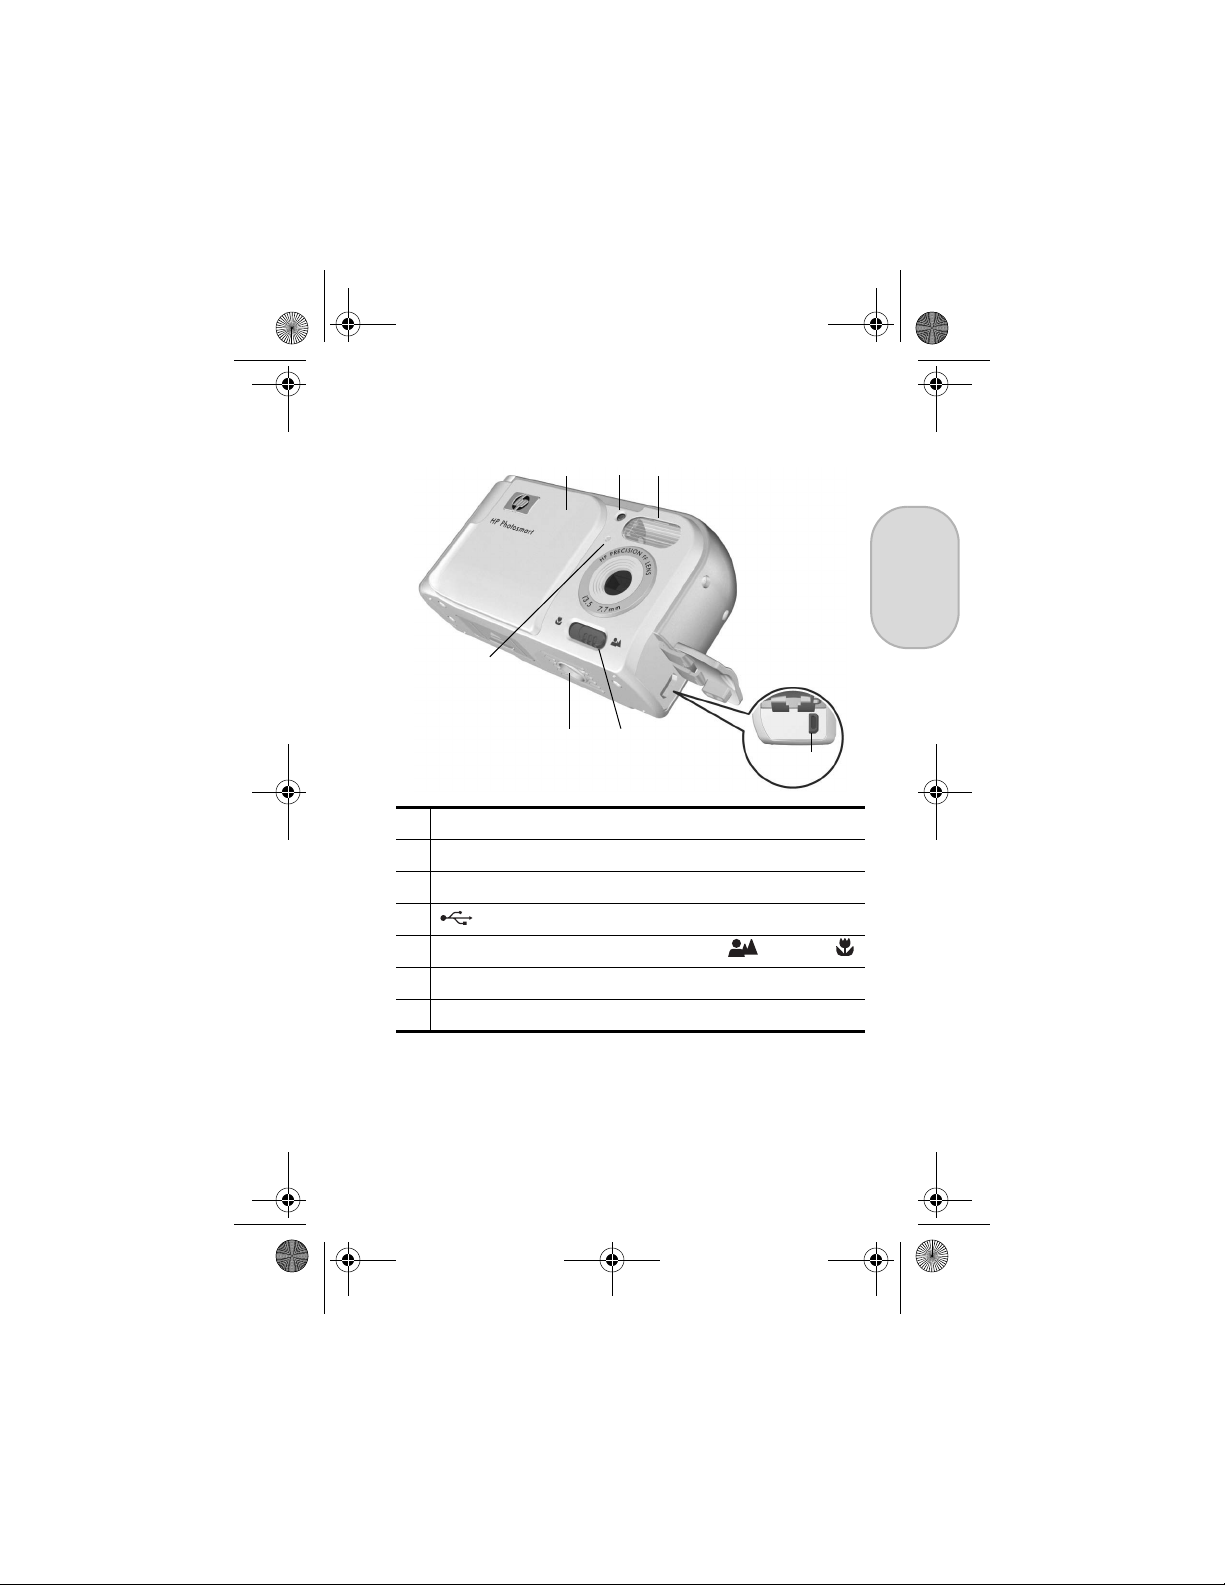
Camera front, side, and bottom
2
1
7
6
.
1 Lens cover/Power switch.
2 Self-timer/Video light.
3Flash.
4USB connector.
5 Focus Mode switch—Settings are Normal or Macro .
6 Tripod mount.
7Microphone.
3
5
English
4
7
Page 10
E327_ChengHo_QSG.fm Page 8 Friday, November 4, 2005 3:19 PM
2 Setting up your camera
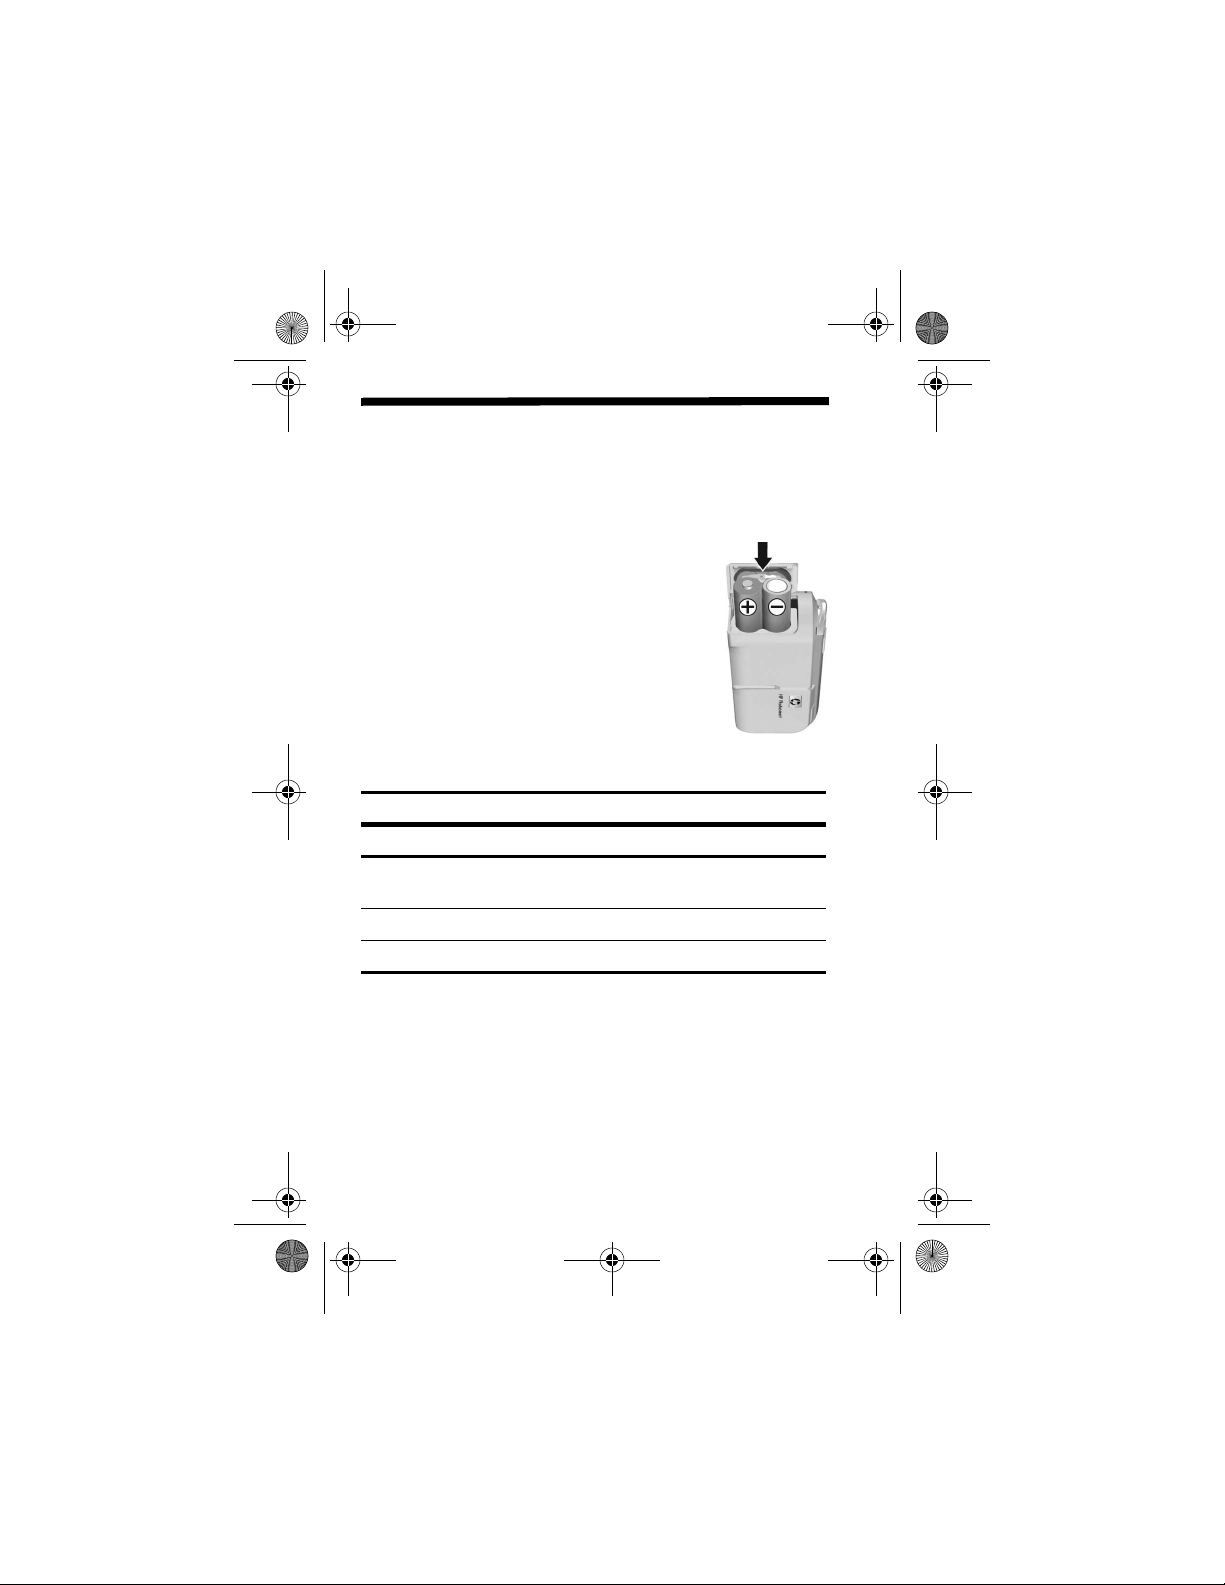
Install the batteries
1. Open the Battery/Memory card door.
2. Insert the batteries.
3. Close the Battery/Memory card.
NOTE: Turn the camera off before removing
the batteries. If using rechargeable NiMH
batteries, make sure they are fully charged
before using them the first time.
Camera usage and battery type will affect
battery life. For complete information, see
Appendix A in the electronic User Guide.
Number of shots
Battery type Minimum Maximum Average
High Drain
Alkaline
NiMH 110 280 190
Lithium 260 490 340
70 120 100
8
HP Photosmart E327 Quick Start Guide
Page 11
E327_ChengHo_QSG.fm Page 9 Friday, November 4, 2005 3:19 PM
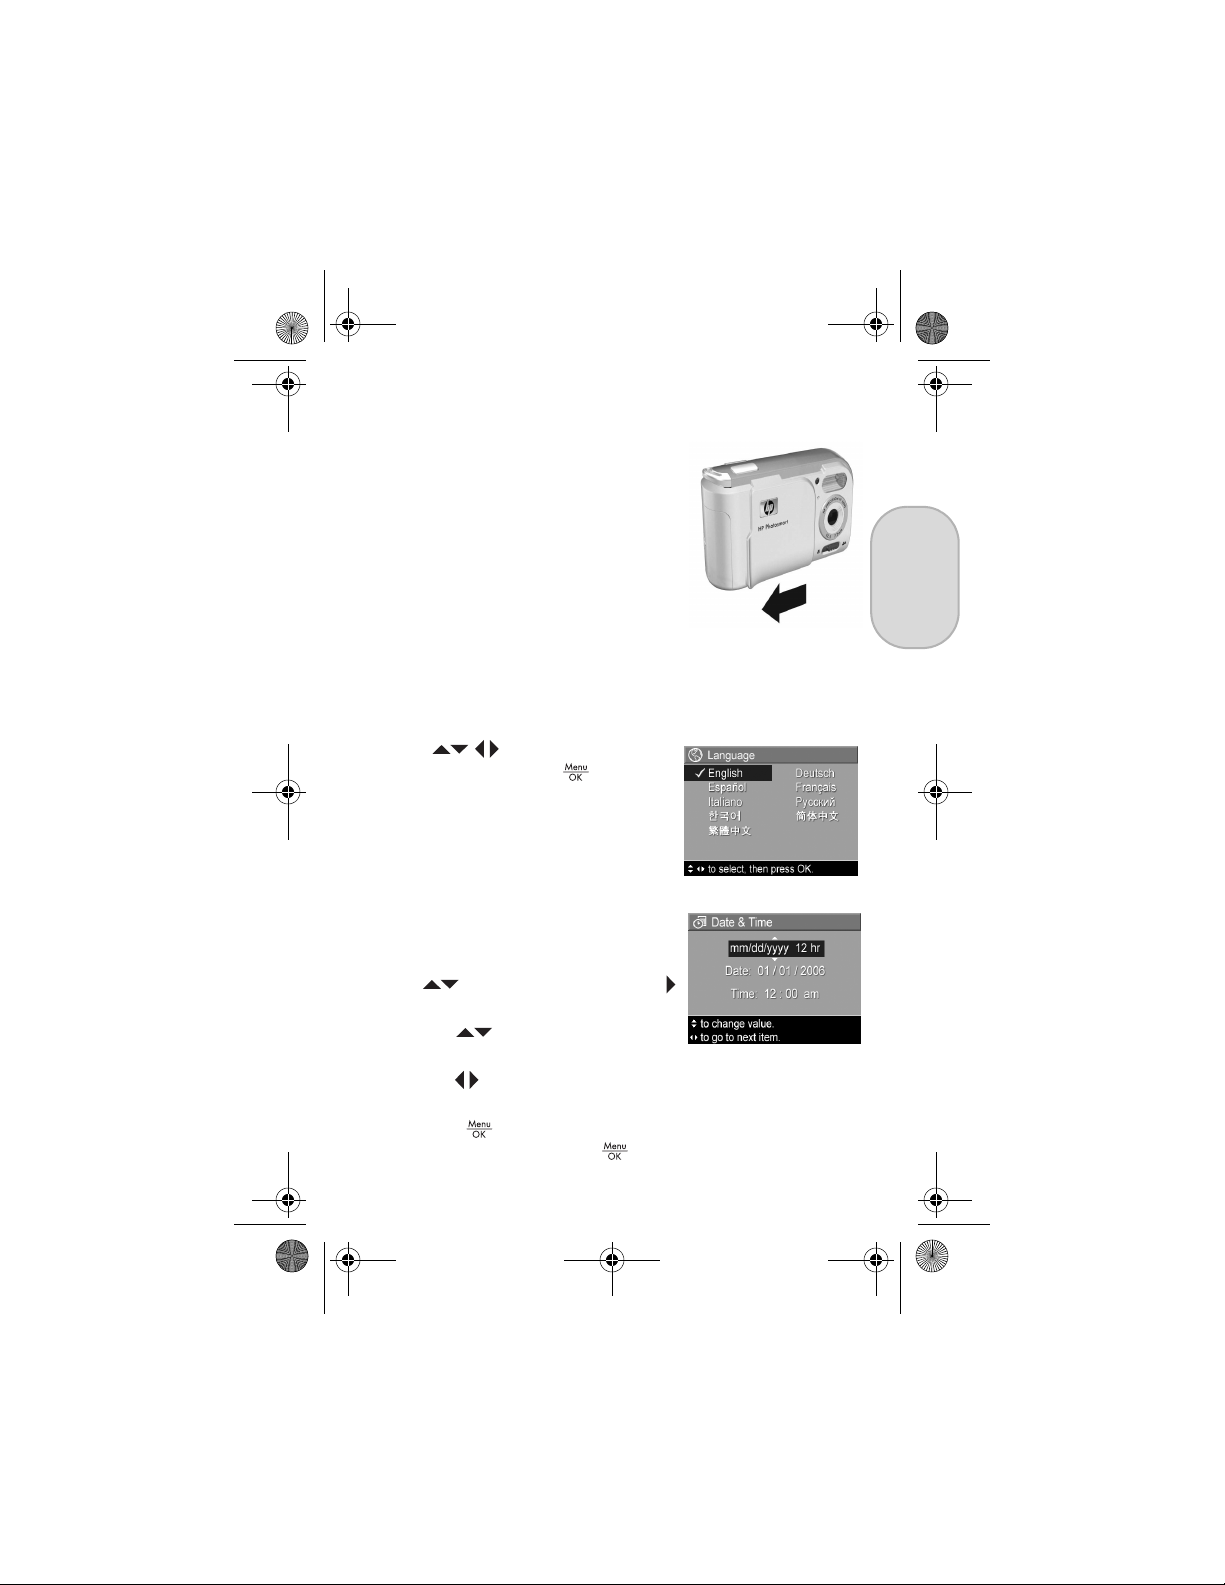
Turn on the camera
To turn on the camera, slide the lens
cover open until it clicks, uncovering
the lens.
To turn off the camera, slide the lens
cover closed until it clicks, covering
the lens.
CAUTION: When sliding the lens
cover, keep your fingers clear of
the lens. Fingerprints on the lens
can impair the quality of the picture.
Choose the Language
Use to select the language
you want, then press .
Set the Date and Time
English
1. The first item highlighted is the
date and time format. If you want
to change the format, use the
buttons. Otherwise, press
to move to the next selection.
2. Use to adjust the highlighted
value.
3. Use to move to the other selections and repeat Step 2
until the date and time are set correctly.
4. Press when the date and time format and settings
are correct, then press again to confirm.
9
Page 12
E327_ChengHo_QSG.fm Page 10 Friday, November 4, 2005 3:19 PM
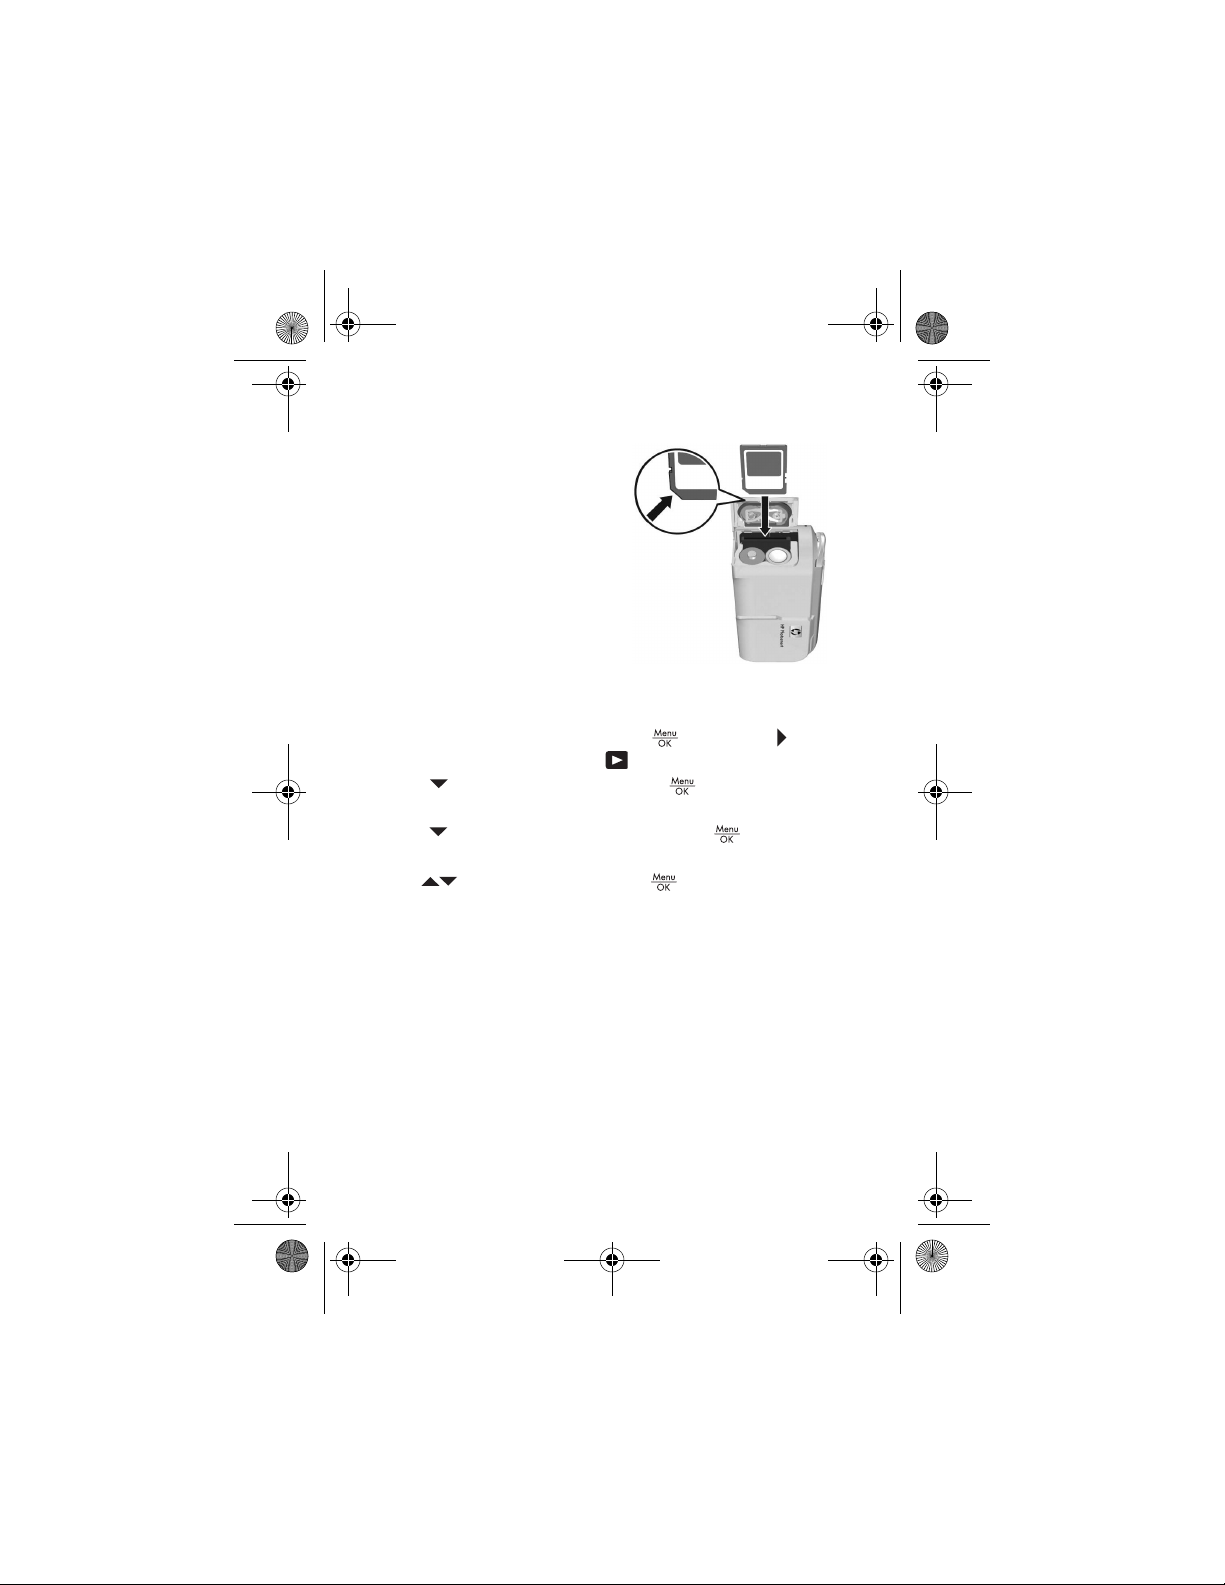
Install and format a memory card
1. Turn off the camera and open
the Battery/Memory card
door.
2. Insert the optional memory
card in the smaller slot as
shown. Make sure the memory
card snaps into place.
3. Close the Battery/Memory
card door and turn on the
camera.
Always format memory cards
before first use.
1. With the camera turned on, press , then press to
move to the Playback Menu .
2. Press to select Delete, then press to display the
Delete sub-menu.
3. Press to select Format Card, then press to display
the Format Card confirmation screen.
4. Use to select Yes, then press to format the card.
Once you install a memory card, all new images and video
clips are stored on the card, rather than in internal memory.
To use internal memory and view images stored there,
remove the memory card.
10
HP Photosmart E327 Quick Start Guide
Page 13
E327_ChengHo_QSG.fm Page 11 Friday, November 4, 2005 3:19 PM
Install the software
The HP Photosmart Software allows you to transfer images
from the camera, and then view, edit, print, or e-mail them.
If you do not install HP Photosmart Software, you can still use
the camera but certain camera features will be affected.
If you have trouble installing or using the HP Photosmart
Software, see the HP Customer Care website for more
information: www.hp.com/support.
Windows
1. Close all programs and temporarily disable any virus
protection software.
2. Insert the HP Photosmart Software CD into the CD drive of
your computer and follow the on-screen instructions. If the
installation window does not appear, click Start, click
Run, type D:\Setup.exe, where D is the letter of your CD
drive, then click OK.
3. When the software has finished installing, re-enable the
virus protection software.
Macintosh
English
1. Insert the HP Photosmart Software CD into the CD drive
of your computer.
2. Double-click the CD icon on the computer desktop.
3. Double-click the installer icon, and then follow the
on—screen instructions.
11
Page 14
E327_ChengHo_QSG.fm Page 12 Friday, November 4, 2005 3:19 PM
3 Taking pictures and
recording video clips
Live View allows you to frame pictures and video clips in the
Image Display.
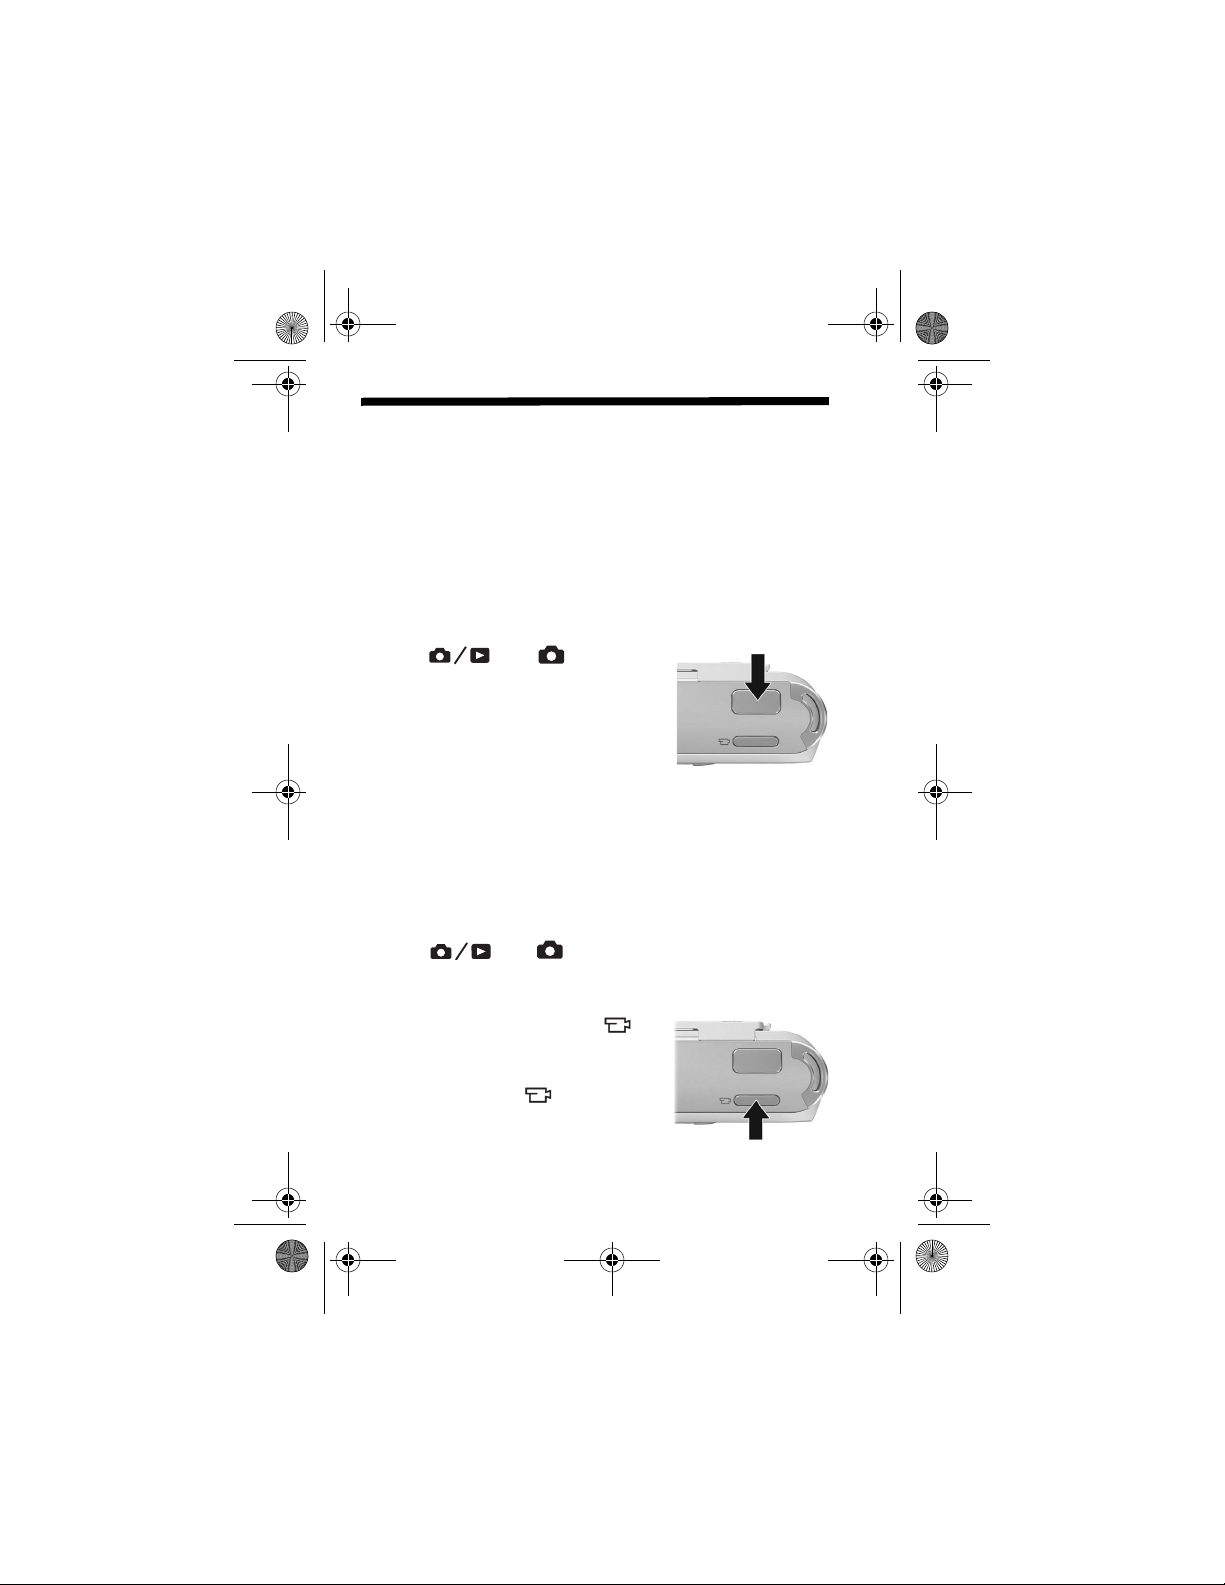
Take a still picture
1. Press until appears in
the upper left corner of the Image
Display. This indicates you are in
Live View.
2. Frame the subject for your picture.
3. Press the Shutter button to take the
picture.
TIP: Hold the camera with both hands when pressing the
Shutter button to reduce camera shake and prevent blurry
pictures.
Record a video clip
1. Press until appears in the upper left corner
of the Image Display. This indicates you are in Live View.
2. Frame the subject.
3. Press and release the Video
button.
4. To stop recording video, press and
release the Video button again.
12
HP Photosmart E327 Quick Start Guide
Page 15

E327_ChengHo_QSG.fm Page 13 Friday, November 4, 2005 3:19 PM
4 Reviewing and deleting
images and video clips
Review images and video clips
You can review and manipulate images and video clips in
Playback.
1. Press until appears briefly in the upper left
corner of the Image Display. This indicates you are in
Playback.
2. Use to scroll through your images and video clips
(which play automatically).
Delete an image
You can delete individual images during Playback.
1. Press until appears briefly in the upper left
corner of the Image Display. This indicates you are in
Playback.
2. Use to select the image you want to delete.
3. Press to display the Playback Menu.
4. Use to select the Delete option, then press .
5. Use to select This Image, then press to delete
the image.
English
13
Page 16

E327_ChengHo_QSG.fm Page 14 Friday, November 4, 2005 3:19 PM
5 Transferring and printing
images
Transfer images
If you have installed the HP Photosmart Software, use this
method to transfer images and video clips to your computer.
If you have not installed the HP Photosmart Software, see the
electronic User Guide for an alternate method.
1. Connect the camera and
computer using the USB
cable that came with your
camera.
2. Turn on the camera and
follow the information on
the computer screen to
transfer the images. For
more information, see
Help feature in the
HP Photosmart Software.
14
HP Photosmart E327 Quick Start Guide
Page 17

E327_ChengHo_QSG.fm Page 15 Friday, November 4, 2005 3:19 PM
Print images from the camera
You can connect the camera to any PictBridgecertified printer to print still images. You cannot
print video clips directly to a printer.
1. Check that the printer is turned on, there is
paper in the printer, and there are no printer
error messages.
2. Connect the camera and
printer using the USB cable
that came with your camera,
then turn on the camera.
3. When the camera is
connected to the printer, the
Print Setup Menu displays on
the camera. To change the
settings, use on the
camera to select a menu
option, then use on the
camera to change the setting.
4. Press to begin printing.
English
15
Page 18

E327_ChengHo_QSG.fm Page 16 Friday, November 4, 2005 3:19 PM
6 Camera quick reference
Use this chapter as a quick reference to camera features.
To learn more about these camera features, refer to the
electronic User Guide.
Live View and Playback
•Playback allows you to review and manipulate images
and video clips. To activate Playback, press until
appears briefly in the upper left corner of the Image
Display. Playback also refers to a menu (described below).
•Live View allows you to frame pictures and video clips.
To activate Live View, press until you appears
briefly in the upper left corner of the Image Display.
Menus
When you press from either
Playback or Live View, you access
the tabbed camera menus, as
shown in the example screen.
Use to move to the desired
menu. Within a menu, use
to move to specific selections.
The following table lists the menu
and menu options.
To exit the menu, press at any time.
16
HP Photosmart E327 Quick Start Guide
Page 19

E327_ChengHo_QSG.fm Page 17 Friday, November 4, 2005 3:19 PM
Menu Options
Capture Menu allows
you to adjust camera
settings that affect the
characteristics of images
and video clips you
capture with your camera.
Playback Menu allows
you to work with images
you have stored in the
camera.
Setup Menu allows you
to change the camera’s
behavior.
• Shooting Mode (Auto Mode,
Action, Landscape, Portrait,
Sunset)
• Image Quality
• Date & Time Imprint
• EV Compensation
• White Balance
• ISO Speed
• Delete
• View Thumbnails
• Magnify
• Print
• Rotate
• Record Audio
• Display Brightness
• Camera Sounds
• Date & Time
• USB Configuration
• Language
• Move Images to Card
• Reset Settings
English
17
Page 20

E327_ChengHo_QSG.fm Page 18 Friday, November 4, 2005 3:19 PM
18
HP Photosmart E327 Quick Start Guide
Page 21

E327_ChengHo_QSG.fm Page 1 Thursday, November 3, 2005 1:31 PM
HP Photosmart E327
Cámara digital
Guía de inicio rápido
Español
1
Page 22

E327_ChengHo_QSG.fm Page 2 Thursday, November 3, 2005 1:31 PM
Avisos legales
© Copyright 2005 Hewlett-Packard Development Company, L.P.
La información que aparece en este documento está sujeta a cambios sin
previo aviso. Las únicas garantías de los productos y servicios de HP se
detallan en las declaraciones de garantía expresa que acompañan a dichos
productos y servicios. Nada de lo que aquí se contenga se considerará como
garantía adicional. HP no se hará responsable de los errores u omisiones
técnicos o editoriales aquí contenidos.
®
Windows
Corporation.
Eliminación de materiales desechables por parte de usuarios en domicilios
privados en la Unión Europea
de equipos eléctricos y electrónicos desechables. La recogida selectiva y el
reciclado de su equipamiento desechable en el momento de su eliminación
ayudará a conservar los recursos naturales y asegurará su reciclaje de forma
que se proteja la salud humana y el medio ambiente. Para obtener más
información sobre donde tirar su material desechable para su reciclado,
contacte con el departamento responsable en su ciudad, el servicio de
recogida de material desechable o la tienda donde compro el aparato.
Introduzca la siguiente información para referencias futuras:
Número de modelo
(en la parte delantera de la cámara)
Número de serie (número de 10 dígitos en
la parte inferior de la cámara)
Fecha de adquisición de la cámara
es una marca registrada en Estados Unidos de Microsoft
El logotipo SD es una marca comercial de su propietario.
Este símbolo en el producto o en su embalaje indica que este producto
no ha de ser desechado junto al resto de residuos domésticos.
En cambio, ha de hacerse cargo de eliminar su material desechable
tirándolo en un punto de recogida indicado para el reciclado
2
Guía de inicio rápido de HP Photosmart E327
Page 23

E327_ChengHo_QSG.fm Page 3 Thursday, November 3, 2005 1:31 PM
1Pasos iniciales
La guía de inicio rápido impresa contiene la información
necesaria para empezar a utilizar las características
esenciales de su cámara. Para información más concreta
acerca de las características de la cámara, vea el manual
del usuario en formato electrónico.
Guía de inicio rápido Manual electrónico del usuario
Esta guía impresa le
ayudará a:
• Empezar a utilizar
su cámara
rápidamente
• Instalar el software
de HP Photosmart
• Le presenta las
características de
su cámara
El manual del usuario en formato
electrónico incluye:
• Descripción de todas las
características de la cámara.
• Una descripción de los iconos en
el visor de imágenes.
• Utilización de la cámara sin instalar
el software HP Photosmart.
• Información sobre la batería:
• Alargar la vida de la batería.
• Los diferentes tipos de batería
y el número de fotografías que
se pueden hacer por batería.
• Precauciones de seguridad.
• Descripción de los iconos
indicadores de la energía
de la batería.
• Resolución de problemas.
• Cómo conseguir asistencia de HP.
• Compra de accesorios para la cámara.
• Cuidado de la cámara.
• Especificaciones de la cámara.
Español
3
Page 24

E327_ChengHo_QSG.fm Page 4 Thursday, November 3, 2005 1:31 PM
Visualización del manual del
usuario electrónico
El manual del usuario electrónico se encuentra
en el CD del software de la HP Photosmart.
Para ver el manual del usuario electrónico:
1. Inserte el CD del software HP Photosmart en la unidad
de CD de el equipo.
2. En Windows: haga clic en Ver Manual del usuario
en la página principal de la pantalla de instalación.
En Macintosh: abra el archivo Léame en la carpeta docs
en el CD.
El manual del usuario también se copia en el equipo
al instalar el software HP Photosmart. Para ver el manual
de usuario en formato electrónico después de estar instalado
en el equipo:
• En Windows: abra el Centro de soluciones HP y haga clic
en Ayuda y soporte.
En Macintosh: abra el Gestor de dispositivos HP y seleccione
•
Guía de usuario del menú emergente Informaición y ajustes.
Obtener asistencia
• Si desea obtener asistencia y herramientas que le ayuden
a utilizar la cámara de manera más eficaz, visite
www.hp.com/photosmart (Inglés sólo) o www.hp.com.
• Para obtener asistencia sobre el producto, diagnósticos
y descargas de controladores las 24 horas, los 7 días
a la semana, visite www.hp.com/support.
• Para obtener ayuda para el software HP Photosmart,
ver la Ayuda en el software HP Photosmart.
4
Guía de inicio rápido de HP Photosmart E327
Page 25

E327_ChengHo_QSG.fm Page 5 Thursday, November 3, 2005 1:31 PM
Parte posterior de la cámara
1
1 Visor de imágenes.
2 El botón Vista en directo/Reproducción: cambia
entre Vista en directo y Reproducción (ver Vista en directo
yreproducción en página 18).
3
Botón Flash: las opciones son Flash automático, Ojos
2
3
8
7
rojos, Encender Flash, Apagar Flash.
4 Botón Temporizador automático.
5 Luz de energía/memoría.
6 Compartimiento de batería/tarjeta de memoria.
7Botón
8 Botones
: muestra los menús de la cámara y permite
seleccionar y confirmar acciones.
y : permite desplazarse entre menús
e imágenes; mientras en Vista en directo, pulse
acercar el zoom;
/ para alejar el zoom.
4
5
6
Español
/ para
5
Page 26

E327_ChengHo_QSG.fm Page 6 Thursday, November 3, 2005 1:31 PM
Parte superior de la cámara
1
1Botón del obturador.
2 Montaje para la correa de la muñeca.
3
Botón de vídeo.
2
3
6
Guía de inicio rápido de HP Photosmart E327
Page 27

E327_ChengHo_QSG.fm Page 7 Thursday, November 3, 2005 1:31 PM
Parte delantera, lateral e inferior
de la cámara
2
1
7
6
.
1 Tapa del lente/Interruptor de encendido.
2 Temporizador automático/luz de vídeo.
3Flash.
4Conector USB.
5 Interruptor Modo de foco: las opciones son Normal
oMacro .
6 Soporte para trípode.
7Micrófono.
3
5
Español
4
7
Page 28

E327_ChengHo_QSG.fm Page 8 Thursday, November 3, 2005 1:31 PM
2 Configuración de la cámara
Instalación de las pilas
1. Abra la tapa para baterías/tarjeta de
memoria.
2. Inserte las baterías.
3. Cierre la tapa para baterías/tarjeta de
memoria.
NOTA: Apague la cámara antes de quitar
las pilas. Si utiliza pilas recargables
NiMH, asegúrese de que están totalmente
cargadas antes de utilizarlas por primera
vez.
La utilización de la cámara y el tipo de pilas afecta a la vida
útil de la batería. Para obtener información completa,
consulte el Apéndice A en el manual del usuario electrónico.
Número de fotografías
Tipo de batería Mínimo Máximo Media
Alcalina de
alto drenaje
NiMH 110 280 190
Litio 260 490 340
70 120 100
8
Guía de inicio rápido de HP Photosmart E327
Page 29

E327_ChengHo_QSG.fm Page 9 Thursday, November 3, 2005 1:31 PM
Encendido de la cámara
Para encender la cámara, abra
la tapa del objetivo hasta que oiga
un clic y el objetivo quede al
descubierto.
Para apagar la cámara, deslice
y cierre la tapa del objetivo hasta
que oiga un clic y el objetivo quede
cubierto.
PRECAUCIÓN: Al deslizar la tapa
del objetivo, procure no tocar el
objetivo con los dedos. Las huellasde
dedos en el objetivo pueden
reducir la calidad de la imagen.
Elección del idioma
Utilice para seleccionar el
idioma deseado y, a continuación,
pulse .
Español
9
Page 30

E327_ChengHo_QSG.fm Page 10 Thursday, November 3, 2005 1:31 PM
Ajuste de fecha y hora
1. El primer elemento que aparece
resaltado es el formato de la
fecha y la hora. Si quiere
cambiar el formato, utilice los
botones . De lo contrario,
pulse para desplazarse a la
siguiente selección.
2. Utilice para ajustar el valor resaltado.
3. Utilice para desplazarse a las otras selecciones
y repita el Paso 2 hasta que la fecha y la hora se
ajusten correctamente.
4. Pulse cuando el formato de fecha y hora y los
ajustes sean correctos y, a continuación, pulse
de nuevo para confirmar.
10
Guía de inicio rápido de HP Photosmart E327
Page 31

E327_ChengHo_QSG.fm Page 11 Thursday, November 3, 2005 1:31 PM
Instalación y formato de una tarjeta
de memoria
1. Apague la cámara y abra
el compartimiento de la
batería/tarjeta de memoria.
2. Inserte la tarjeta de memoria
opcional en la ranura más
pequeña tal como se muestra.
Asegúrese de que encaja en
su sitio.
3. Cierre la tapa y encienda la
cámara.
Formatee siempre las tarjetas de
memoria antes de utilizarlas por primera vez.
1. Con la cámara encendida, pulse y, a continuación,
pulse para desplazarse al Menú de reproducción
2. Pulse para seleccionar Borrar y, a continuación, pulse
para mostrar el submenú Borrar.
3. Pulse para seleccionar Formatear tarjeta y,
a continuación, pulse para mostrar la pantalla de
confirmación Formatear tarjeta.
4. Utilice para seleccionar Sí y, a continuación, pulse
para formatear la tarjeta.
Una vez haya instalado la tarjeta de memoria, todas las
imágenes y vídeos se almacenarán en la tarjeta, en lugar
de en la memoria interna.
Para utilizar la memoria interna y ver las imágenes
almacenadas allí, quite la tarjeta de memoria.
Español
11
Page 32

E327_ChengHo_QSG.fm Page 12 Thursday, November 3, 2005 1:31 PM
Instalación del software
El software HP Photosmart le permite transferir imágenes de
la cámara, visualizarlas, editarlas, imprimirlas o -enviarlas
por correo electrónico. Si no instala el software
HP Photosmart, aún podrá utilizar la cámara pero algunas
características no funcionarán correctamente.
Si tiene dificultades para instalar o utilizar el software
HP Photosmart, encontrará más información en el sitio Web
de asistencia técnica al cliente de HP:
www.hp.com/support.
Windows
1. Cierre todos los programas y desactive temporalmente
cualquier software de antivirus que tenga instalado.
2. Introduzca el CD del software HP Photosmart en la
unidad de CD de su equipo y siga las instrucciones que
aparecen en la pantalla. Si no aparece la pantalla de
instalación, en el menú Inicio, haga clic en Ejecutar
yescriba D:\Setup.exe, donde D es la letra de la unidad
de CD-ROM y, a continuación, haga clic en Aceptar.
3. Cuando el software haya acabado de instalarse, vuelva
a activar el software de antivirus.
Macintosh
1. Inserte el CD del software HP Photosmart en la unidad
de CD del equipo.
2. Haga doble clic en el icono del CD en el escritorio del
equipo.
3. Haga doble clic en el icono del instalador y,
a continuación, siga las instrucciones mostradas
en la pantalla.
12
Guía de inicio rápido de HP Photosmart E327
Page 33

E327_ChengHo_QSG.fm Page 13 Thursday, November 3, 2005 1:31 PM
3 Captura de fotografías
y grabación de vídeos
Vista en directo le permite enmarcar imágenes y vídeos en
el visor de imágenes.
Toma de una imagen fija
1. Pulse hasta que aparezca
en la esquina superior
izquierda del visor de imágenes.
Esto indica que está en Vista en
directo.
2. Enmarque el contenido para su
imagen.
3. Pulse el botón del Disparador para
tomar la fotografía.
CONSEJO: sujete la cámara con ambas manos cuando
presione el disparador para reducir el movimiento de
la cámara y evitar que las fotografías salgan movidas.
Español
13
Page 34

E327_ChengHo_QSG.fm Page 14 Thursday, November 3, 2005 1:31 PM
Grabación de un clip de vídeo
1. Pulse hasta que aparezca en la esquina
superior izquierda del visor de imágenes. Esto indica que
está en Vista en directo.
2. Enmarque el contenido.
3. Pulse y suelte el botón Vídeo .
4. Para detener la grabación del
vídeo, pulse y suelte el botón
Vídeo .
14
Guía de inicio rápido de HP Photosmart E327
Page 35

E327_ChengHo_QSG.fm Page 15 Thursday, November 3, 2005 1:31 PM
4 Revisión y borrado de
imágenes y clips de vídeo
Revisión de imágenes y clips
de vídeo
Puede revisar y manipular imágenes y vídeoclips en
Reproducción.
1. Pulse hasta que aparezca brevemente
en la esquina superior izquierda del visor de imágenes.
Esto indica que está en Reproducción.
2. Utilice para desplazarse por sus imágenes y clips de
vídeo (que se reproducen automáticamente).
Borrado de una imagen
Puede borrar imágenes individualmente durante la
Reproducción.
1. Pulse hasta que aparezca brevemente
en la esquina superior izquierda del visor de imágenes.
Esto indica que está en Reproducción.
2. Utilice para seleccionar la imagen que quiere
borrar.
3. Pulse para mostrar el Menú reproducción.
4. Utilice para seleccionar la opción Borrar y,
a continuación, pulse .
5. Utilice para seleccionar Esta imagen y,
a continuación, pulse para borrar la imagen.
Español
15
Page 36

E327_ChengHo_QSG.fm Page 16 Thursday, November 3, 2005 1:31 PM
5 Transferencia e impresión
de imágenes
Transferencia de imágenes
Si tiene instalado el software HP Photosmart, utilice este
método para transferir imágenes y clips de vídeo al equipo.
Si no tiene instalado el software HP Photosmart, consulte
el manual de usuario electrónico para utilizar un método
alternativo.
1. Conecte la cámara al
equipo mediante el cable
USB que acompana la
cámara.
2. Encienda la cámara y siga
las instrucciones que
aparecen en la pantalla del
equipo para transferir las
imágenes. Para obtener
más información, consulte
la Ayuda en el software
HP Photosmart.
16
Guía de inicio rápido de HP Photosmart E327
Page 37

E327_ChengHo_QSG.fm Page 17 Thursday, November 3, 2005 1:31 PM
Impresión de imágenes de la
cámara
Puede conectar la cámara a cualquier impresora
certificada PictBridge para imprimir imágenes
fijas. No puede imprimir directamente clip de
vídeos en una impresora.
1. Compruebe que la impresora esté encendida, que ésta
contenga papel y que no aparezcan mensajes de error
en la misma.
2. Conecte la cámara al equipo
mediante el cable USB que
acompana la cámara y,
acontinuación, encienda
la cámara.
3. Cuando la cámara esté
conectada a la impresora,
el Menú de configuración
de impresión aparecerá en
la cámara. Para cambiar los
ajustes, utilice en la cámara para seleccionar una
opción del y, a continuación, utilice en la cámara
para cambiar el ajuste.
4. Pulse para empezar la impresión.
Español
17
Page 38

E327_ChengHo_QSG.fm Page 18 Thursday, November 3, 2005 1:31 PM
6 Referencia rápida
de la cámara
Utilice este capítulo como referencia rápida para las
características de la cámara. Para saber más sobre las
características de esta cámara, consulte el manual de
usuario electrónico.
Vista en directo y reproducción
• Puede revisar y manipular imágenes y vídeoclips en
Reproducción. Para activar la reproducción pulse
hasta que aparezca brevemente en la esquina
superior izquierda del visor de imágenes. Reproducción
también hace referencia a un menú (descrito abajo).
•Vista en directo le permite enmarcar imágenes y clip de
vídeos. Para activar la Vista en directo pulse
hasta que aparezca brevemente brevemente en
la esquina superior izquierda del visor de imágenes.
Menús
Cuando pulse tanto desde
Reproducción como Vista en
directo , accederá a los menús
etiquetados de la cámara como
se muestra en el ejemplo.
Utilice para desplazarse al
menú deseado. Dentro de un
menú, utilice para desplazarse a selecciones
específicas. La siguiente tabla ofrece una lista de los menús
y de las opciones de menú.
18
Guía de inicio rápido de HP Photosmart E327
Page 39

E327_ChengHo_QSG.fm Page 19 Thursday, November 3, 2005 1:31 PM
Para salir del menú, pulse en cualquier momento.
Menú Opciones
El menú de captura
le permite ajustar la
configuración de la
cámara que afecta a las
características de las
imágenes y clip de vídeos
que captura con su
cámara.
El menú de
reproducción le permite
trabajar con imágenes
que tiene almacenadas en
la cámara.
Menú de configuración
le permite cambiar el
comportamiento de la
cámara.
• Modo de captura (modo
automático, acción, paisaje,
retrato, puesta de sol)
• Calidad de imagen
• Impresión de fecha y hora
• Compensación EV
• Balance en blanco
• Velocidad ISO
• Borrar
• Ver muestras
• Aumentar
• Imprimir
• Rotar
• Grabar audio
• Brillo
• Sonido de la cámara
• Fecha y hora
• Configuración USB
• Idioma
• Mover las imágenes a la tarjeta
• Reestablecer ajustes
Español
19
Page 40

E327_ChengHo_QSG.fm Page 20 Thursday, November 3, 2005 1:31 PM
20
Guía de inicio rápido de HP Photosmart E327
Page 41

TahitiUM.book Page 4 Sunday, January 4, 2004 2:47 PM
Page 42

TahitiUM.book Page 4 Sunday, January 4, 2004 2:47 PM
Page 43

TahitiUM.book Page 4 Sunday, January 4, 2004 2:47 PM
Page 44

© 2006 Hewlett-Packard Development Company, L.P.
Printed in China
www.hp.com
*L2433−90101*
L2433-90101
4" X 6" BACK COVER
 Loading...