

Page 1

ac100
Action Camcorder
User Manual
Page 2

Preface
About this Manual
This manual is designed to demonstrate the features of your HP Action Camcorder AC150. All information presented is
as accurate as possible but is subject to change without notice.
HP shall not be liable for technical or editorial errors or omissions contained herein. For the latest reversion, visit
www.hp.com/support.
Copyright
This manual contains proprietary information protected by copyright. All rights are reserved. No part of this manual
may be reproduced by any mechanical, electronic or other means, in any form, without prior written permission of the
manufacturer. © Copyright 2013
Federal Communications Commission notice
This equipment has been tested and found to comply with the limits for a Class B digital device, pursuant to Part 15 of
the FCC Rules. These limits are designed to provide reasonable protection against harmful interference in a residential
installation. This equipment generates, uses, and can radiate radio frequency energy and, if not installed and used in
accordance with the instructions, may cause harmful interference to radio communications. However, there is no
guarantee that interference will not occur in a particular installation.
If this equipment does cause harmful interference to radio or television reception, which can be determined by turning
the equipment off and on, the user is encouraged to try to correct the interference by one or more of the following
1
Page 3

measures:
Reorient or relocate the receiving antenna.
Increase the separation between the equipment and receiver.
Connect the equipment to an outlet on a circuit different from that to which the receiver is connected.
Consult the dealer or an experienced radio or television technician for help.
Modifications:
The FCC requires the user to be notified that any changes or modifications made to this device that are not expressly
approved by HP may void the user's authority to operate the equipment.
Trademark Recognition
Windows XP/Vista/Windows 7/Windows 8 are registered trademarks of Microsoft Corporation in the United States
and/or other countries. Macintosh and Mac OS are registered trademarks of Apple Inc. In addition, all other companies or
product names are trademarks or registered trademarks of their respective companies.
Radiation Exposure Statement
The product comply with the FCC portable RF exposure limit set forth for an uncontrolled environment and are
safe for intended operation as described in this manual. The further RF exposure reduction can be
achieved if the product can be kept as far as possible from the user body or set the device to lower output
power if such function is available.
2
Page 4

Functions
Thank you for purchasing the HP Action Cam ac100! The ac100 can produce high-definition videos with excellent
continuity of dynamic images. The unique ultraportable design is adopted for this
applicable in various fields to enable your daily life convenient, fun and colorful. Make sure to read this manual
carefully and keep for reference in the future.
This user's manual has referred to the latest information during compiling. The screen display and illustrations
are used in this user's manual for the purpose of introducing details of this digital camera in a more specific
and direct way. Difference may arise between these displays and illustrations and the digital camera actually
available for you due to difference in technological development and production batch, under which case, the
actual functions of this video camera shall prevail.
Action Cam and it is
Announcements
Please read the Announcements carefully before using this video camera for proper and safe operation, so as
to bring its optimum performance into play and extend its service life.
Do not expose the video camera to sunshine directly, nor point its lens to sunlight. Otherwise, the image
sensor of the video camera may be damaged.
3
Page 5

Important Information
Do not store the product in dusty, dirty, or sandy areas, as its components may be damaged.
Do not store the product in a hot environment. High temperatures can shorten the life of electronic devices,
damage batteries and warp or melt certain plastics.
Do not store the product in cold areas. When the product warms up to its normal temperature, moisture
can form inside, which may damage the electronic circuits.
Do not attempt to open the casing or attempt your own repairs. High-voltage internal components create
the risk of electric shock when exposed.
Do not drop or knock the product. Rough handling may damage the internal components.
Do not use harsh chemicals, cleaning solvents or strong detergents to clean the product. Wipe the product
with a slightly damp soft cloth.
Do not open the battery cover while an image is being recorded. Doing so will not only make storage of the
current image impossible, it can also corrupt other image data already stored on file.
If the product or any of its accessories are not working properly, take them to your nearest qualified
service center. The personnel
there will assist you and if necessary, arrange for the product to be repaired.
Test for proper operation before using the camcorder.
4
Page 6

The micro-SD memory card is made of precision electronic components. The following situations may
cause loss or damage of your data:
1. Improper use of the memory card
2. The memory card is bent, dropped or collided.
3. Placement under high temperature or moist environment or expose to sunshine directly.
4. Electrostatic or electromagnetic field exists around the memory card.
5. Taking out the memory card or interrupt the power supply when this Action Cam or computer
is connected to the memory card (i.e. during reading, writing and formatting).
6. Touch the metal contact surface of the memory card with fingers or metal materials.
7. The service life of the memory card expires (please replace the memory card regularly).
Product Introduction
This product is small in size and easy for installation.
This
The video mode supports four
The photo mode supports four sizes, i.e. 12M, 10M. 8M and 5M.
Action Cam can produce high-definition videos with excellent continuity of dynamic images, even
under low illumination conditions, and supports H.264 HD video format.
video recording modes, i.e. HD (60FPS), HD (30FPS) and FHD (1920x1080
30FPS).
5
Page 7

Support high-speed USB2.0
It supports a mirco-SD card with a capacity expansion up to 32G
memory cards.
This Action Cam supports HDMI video output and live playback functions. Videos can be output to
high-definition TVs for playing clear and sharp pictures.
Please use class 6 or faster speed rated
Minimum System Requirements
System Requirements
Operating System Microsoft Windows2000, XP, Vista, 7
CPU Intel Pentium III of more than 800MHz or other CPU with equivalent
performance
Internal Memory Larger than 512MB
Sound Card and
Display Card
CD Driver Speed of 4 times or faster
Hard Disk Free space of more than 500MB
Others One standard USB1.1 or USB2.0 port
The sound card and video card shall support DirectX8 or higher
version.
6
Page 8
r
r
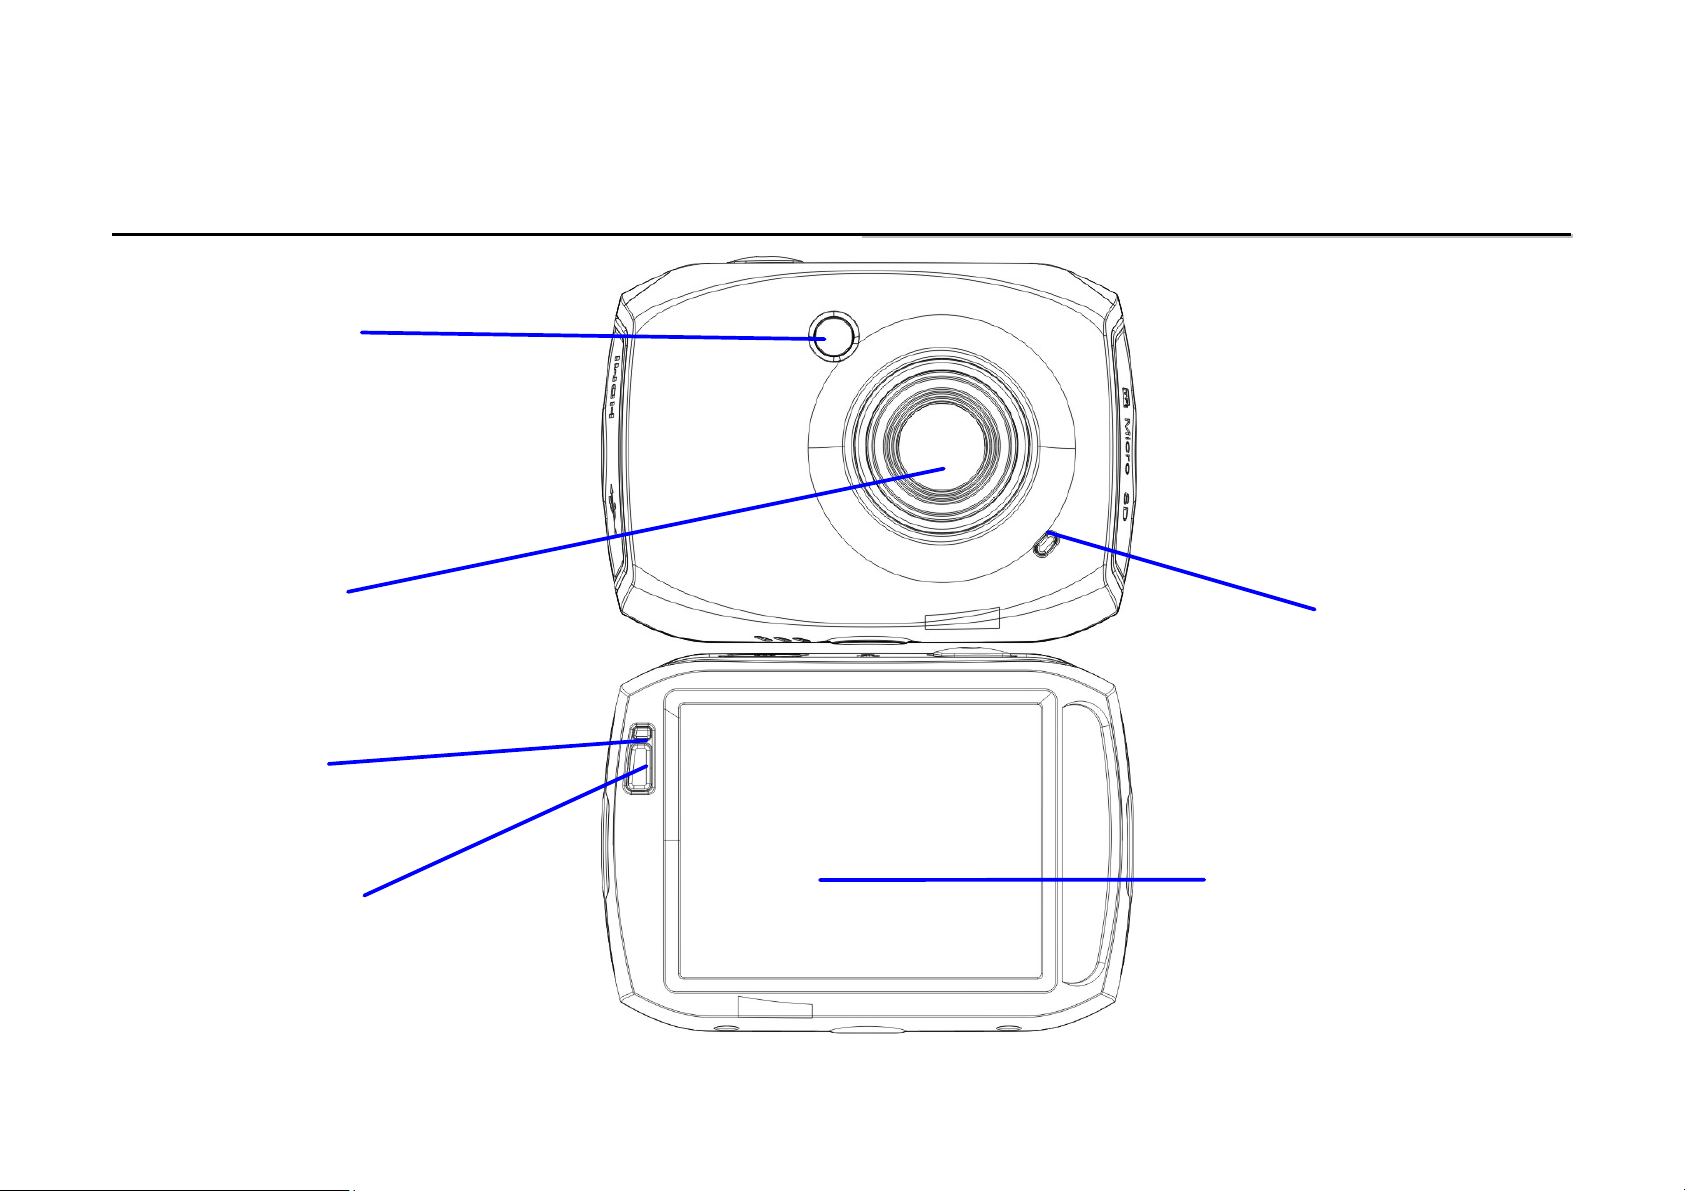
Introduction to Appearance and Keypad
Infrared light
e
CCaamme
alens
a
SSccrreeeenn--ooffff lliigghhtt
IInnddiiccaattoorr LLiigghhtt
DDiissppllaayy ssccrreeeenn
ooffff//oonn bbuuttttoonn
TFT Touch LCD
7
Page 9

TTrriippoodd nnuut
MMiiccrrooSSDD sslloott
MMiiccrroopphhoonnee
t
PPoowweerr BBuuttttoonn
SShhuutttteerr BBuuttttoonn
HHDDMMII iinntteerrffaaccee
Reset BBuuttttoonn
USB interface
8
Page 10

b
b
UUssaagge
1. Charge the battery
e
UUSSBBCCa
a
e
lle
Indicator Light for
charging isoonn..
To charge the Action Cam, connect it to a computer/laptop or many standard USB AC power adapters using the
USB cable included with the package. The charge indicator light (red) will be on. After the
charged, the charge indicator light will turn off.
Typical charging time is approximately 2-4 hours.
9
Action Cam is fully
Page 11

2. Use of Memory Card
1. Push the Micro-SD card into the card slot until it “clicks”/locks into position.
2. To remove the Micro-SD card, gently press the end of the memory card inward until a click is heard,
release pressure and remove.
Warning: Do not remove the micro-SD card while data is being recorded or the Action Cam is powered on. Doing so may
corrupt video/photos and damage the card.
Note: No built-in memory is available in this video camcorder. Make sure to insert a memory card before using.
(Advise using Micro-SD cards speed class 6 or above)
10
Page 12

3. Startup/Shutdown
3.1 Startup: Press and hold the POWER button for 2 seconds. The screen of the display is activated and
the camera is turned on.
3.2 Shut down: Press the POWER button and hold, until the Action Cam powers down.
3.3 Auto Screen-off: When the Action Cam is idle for about a minute, the screen will automatically power
off to conserve battery power. Touch the screen or push the display screen off/on button to resume.
If idle for nearly 5 minutes, the Action Cam will power down.
3.4 Shutdown at low battery level: When the battery capacity drops to a depleted level, the icon will
appear on the LCD display, Please charge the battery, When the icon turns red and flashing, the video
camera will shut down automatically.
11
Page 13

4. Swithing Function Modes
The Action Cam has 4 modes: video recording mode, Vehicle recording mode, photo mode and playback mode.
These modes can be switched by touching the icon in the upper left corner of the LCD display (lower right for
playback) after startup.
Video recording mode Photo mode Vehicle mode Playback mode
5. Indicator light
When the Action Cam is powered on but idle, the indicator light will be a solid blue color.
When the Action Cam is recording video or taking pictures, the indicator light will flash blue.
When the Action Cam is charging, the indicator light will be a solid red. Once fully charged, the indicator light
will turn off.
12
Page 14

6. Video recording mode
When the Action Cam is powered up, it will be in video recording mode. Begin recording video by pressing the
shutter button or touching the focus brackets on the LCD in the live view state. To stop video recording, just
press this shutter button or touch the focus brackets. When the memory card is full or the battery drops to a
depleted level, the Action Cam will automatically stop video recording.
Video screen layout
1. Mode icon: currently indicating in video record mode.
2. Video resolution and speed: Options are FHD (1080p
@30fps) / HD (720p @60fps) / HD (720p @30 fps).
Touch to adjust to the desired resolution.
3. Recording time: indicates the approximate remaining
recording time left on the micro-SD memory card.
4. Date and Time setting icon. Touch to adjust the date
and time.
5. Battery icon: indicates the approximate battery level.
6. Digital zoom-in icon: touch to digitally zoom in on the
subject.
13
Page 15

7. Digital zoom magnification level: up to 4x zoom.
8. Digital zoom-out icon: touch to digitally zoom out on the subject.
9. Playback icon: touch to display the Playback content icons.
10. Playback content icons: these icons will be displayed after touch the Playback icon. Touch the video icon
to playback recorded video. Touch the photo icon to playback captured photos. Touch the vehicle icon to
playback the loop recorded video files.
7. Photo mode:
When the Action Cam is powered up, it will be in video recording mode. To switch to the photo mode, touch the
mode icon until the Photo mode is displayed. You can take photos by pressing the shutter button or touching
the focus brackets in the center of the LCD.
1. Mode icon: currently indicating in photo mode.
2. Photo size icon: options are 5M/8M/10M/12M.
3. Counter: Indicates the approximate number of remaining photos that can be taken.
4. Face Tracking icon: touch to enable or disable face tracking.
5. Date and Time setting icon. Touch to adjust the date and time.
6. Battery icon: indicates the approximate battery level.
14
Page 16

7. Digital zoom-in icon: touch to digitally zoom in on the
subject.
8. Digital zoom magnification level: up to 4x zoom.
9. Digital zoom-out icon: touch to digitally zoom out on
the subject.
10. Playback icon: touch to display the Playback content
icons.
11. Playback content icons: these icons will be displayed
after touch the Playback icon. Touch the video icon to
playback recorded video. Touch the photo icon to
playback captured photos. Touch the vehicle icon to
playback the loop recorded video files.
12. Additional photo mode features: touch to select OFF,
10s self timer, 3 photo burst.
15
Page 17

8. Vehicle mode:
1. Mode icon: currently indicating in vehicle mode.
2. Video resolution and speed: Options are FHD (1080p @30fps)
/ HD (720p @60fps) / HD (720p @30 fps).
Touch to adjust to the desired resolution.
3. Recording time: indicating the length of remaining time
to be recorded.
4. Date and Time setting icon. Touch to adjust the date and time.
5. Display orientation icon: touch this icon to flip the display
180 degrees to adjust for mounting orientation.
6. Battery icon: indicates the approximate battery level.
7. Playback icon: touch to display the Playback content icons.
4
5
6
1
2
3
Note: Touch this icon, the display can be flipped 180 degrees to take video normally, click again
to change back. This feature is available only in vehicle mode.
7
16
Page 18

9. Playback mode:
9.1 After powering on the camera touch the Playback icon ( ) in the lower right corner of the LCD display
to activate the menu ( ). Click the / to switch to the file list mode. Then playback
video clips by touching a file name in the list.
Touch to display recorded video files
Touch to display recorded vehicle video files
Touch to display captured photo files
17
Page 19

9.2 Playback video clips:
In the playback mode, press to pause. Touch the fast forward icon to forward quickly and
touch the fast rewind icon
Press STOP
9.3 Playback photos:
After powering on the camera and enabling the Preview state, touch the Playback icon (
right corner of the LCD display to activate the menu (
playback mode. View the next or previous photos by pressing the "◄" or "►" icons as shown on the
following page.
to exit the playback mode to return to the list options.
to reverse quickly.
) in the lower
). Press the to switch to the photo
18
Page 20

9.4 File deletion:
After touching the Delete File icon , the screen will appear as shown below:
Touch the YES option to delete the current file immediately, or click NO to cancel the deletion operation.
19
Page 21

Connecting the camera to a high-definition TV:
Connect the camera to a high-definition TV with a HD cable (as shown below , not included). In a few seconds,
the playback UI will be displayed on the TV. Use the Action Cam to select the recorded video or photos to
playback on the TV.
Connection diagram
Signal transmission
20
Page 22

Application on the personal computer
Connect the Action Cam to the PC or laptop using the supplied USB. to a PC
The Action Cam is provided with the plug and play function . Connect the Action Cam to the computer with
USB line under turning-on state, then it will be switched into the movable hard disk mode.
Icon of movable disk will appear on the window of “my computer”. The photos you have taken can be
saved in the removable disk under the file folder I:\jpg (“I” is the removable disk of the camera). Your
video files will be saved under the folder of I:\video.Note: if movable disk function is used in windows
2000 or windows operating system with a higher edition, it is unnecessary to install drivers.
Remote Control Overview
1 Keys of remote control
The keys on the remote control are shown in the right figure
Signal transmission port
OFF Button
SNAP Button
REC Button
21
Page 23

2 Use of the remote control:
Using the remote control will help you with video recording, taking photos and shutting down
without operating the Action Cam directly. While using the remote control, face the signal
transmitter port toward the infrared signal receiver of the Action Cam as shown below. Record
videos, take photos or shut down the camera by pressing the corresponding buttons on the remote
control.
Infrared receiver light
22
Page 24

Waterproof Case Using Notice
Before closing the waterproof case, keep the housing’s rubber seal clean and free of debris to reduce the
risk of a leak. Test the waterproof case by closing the case without inserting the Action Cam. Submerse
the case completely in water for about a minute. Remove the case from the water, dry off its exterior
with a towel, then open the case. If the entire interior is dry, the case is safe for use under water.
Remember to put the Action Cam in your desired recording mide before inserting into the waterproof case.
If needed, use the remote control to switch between photo and video mode.
After every use in salt water please rinse the outside of the housing with tap water and dry. This will help
reduce the risk of corrosion to the hinge pin and salt buildup in the seal, which can cause failure.
To clean the seal, rinse in fresh water and shake dry (drying with a cloth may cause lint to compromise the
seal). Re-install the seal into the grooves in the backdoor of the housing.
23
Page 25

Technical parameters
Image sensor 5M pixels (CMOS)
Function modes Video recording, photo, removable disk
Camera lens F3.1 f=2.9mm
Digital zooming 4X
Shutter Electronic shutter
LCD display screen 2.4-inch touch screen
Image resolution 12M (4000 × 3000), 10M (3648x2736), 8 M (3264x2448), 5M (2560×1920)
Video resolution
White balance Automatic
Exposure Automatic
File formats
Storage medium MicroSD card (Supporting up to 32GB),( without build-in flash memory)
USB interface High-speed USB 2.0 interface
Power Supply Built-in 3.7V rechargeable lithium
Dimensions
(width x height x depth)
Weight Approx. 78g
HD: 1280x720 (60 frames/sec.) HD: 1280x720 (30 frames/sec), FHD: 1920x1080
(30 frames/sec)
Video AVI
Photo JPEG
74mm(W) x 52mm (H) x 33mm (D)
2.9" x 2.1" x 1.3"
24
Page 26

Standard packaging
25
 Loading...