

Page 1

Hercules Wireless G Series
CONTENTS
Click a title in this table of contents to access the corresponding section
1. HERCULES WIRELESS G AND WINDOWS VISTA ........................................................ 3
1.1. Connecting to a wireless network ............................................................................... 3
1.2. Connecting to a Livebox wireless network.................................................................. 6
1.3. Disconnecting from a wireless network .................................................................... 10
1.4. Managing your favorite networks .............................................................................. 11
2. WELCOME TO THE WIRELESS ATTITUDE!................................................................. 13
2.1. Some requirements................................................................................................... 13
2.2. Computers running Windows Vista: Sharing folders, a printer
or an ADSL connection ............................................................................................. 13
2.2.1. Enabling sharing ........................................................................................... 13
2.2.2. Windows Vista: Sharing public or personal folders....................................... 16
2.2.3. Computers running Windows Vista: Accessing shared folders .................................. 18
2.2.4. Windows Vista: Sharing a printer.......................................................................... 18
2.2.5. Computers running Windows Vista : Accessing the shared printer ............................ 20
2.2.6. Windows Vista: Sharing an ADSL connection in an Infrastructure type
network.......................................................................................................... 22
ENGLISH FRANÇAIS
ESPAÑOL NEDERLANDS DEUTSCH ITALIANO
Page 2

Page 3
Hercules Wireless G Series
1. HERCULES WIRELESS G AND WINDOWS VISTA
The aim of this manual is to help you search for a wireless network, connect to it and set its sharing options,
once you have installed an adapter from the Hercules Wireless G family on a computer equipped with the
Windows Vista operating system. While awaiting the impending availability of WiFi Station software for
Windows Vista, we suggest that you use the Microsoft Windows Vista automatic configuration utility to
carry out these tasks. Don’t hesitate to regularly visit the www.hercules.com
of the latest version of WiFi Station, including Windows Vista drivers, and get the most out of all of the
functionalities of your Hercules adapter.
website to verify the availability
1.1. Connecting to a wireless network
Note: The procedure described hereafter is deliberately intuitive and non-exhaustive. If you have mastered
Windows Vista, you will note that there are other ways to achieve the same results. You will find our
procedure set out in the pages that follow, although you are free to choose your own preferred method.
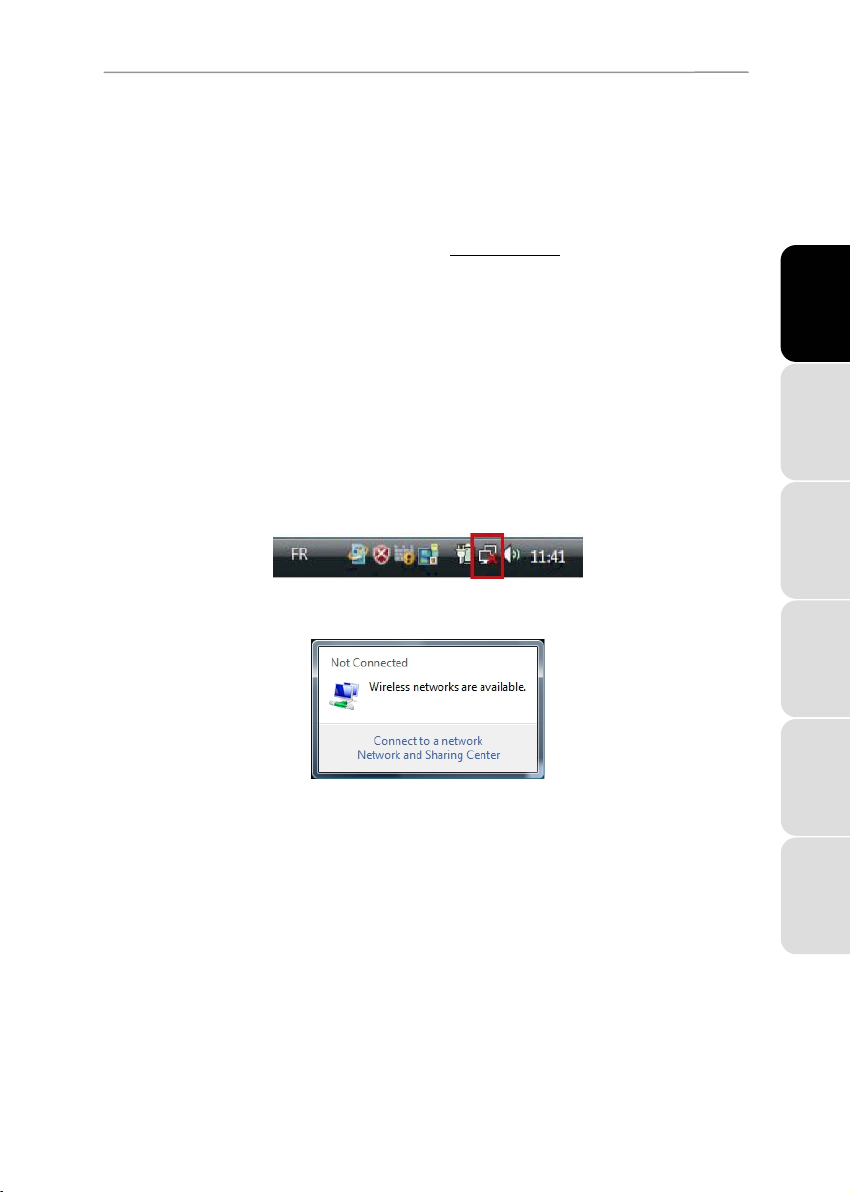
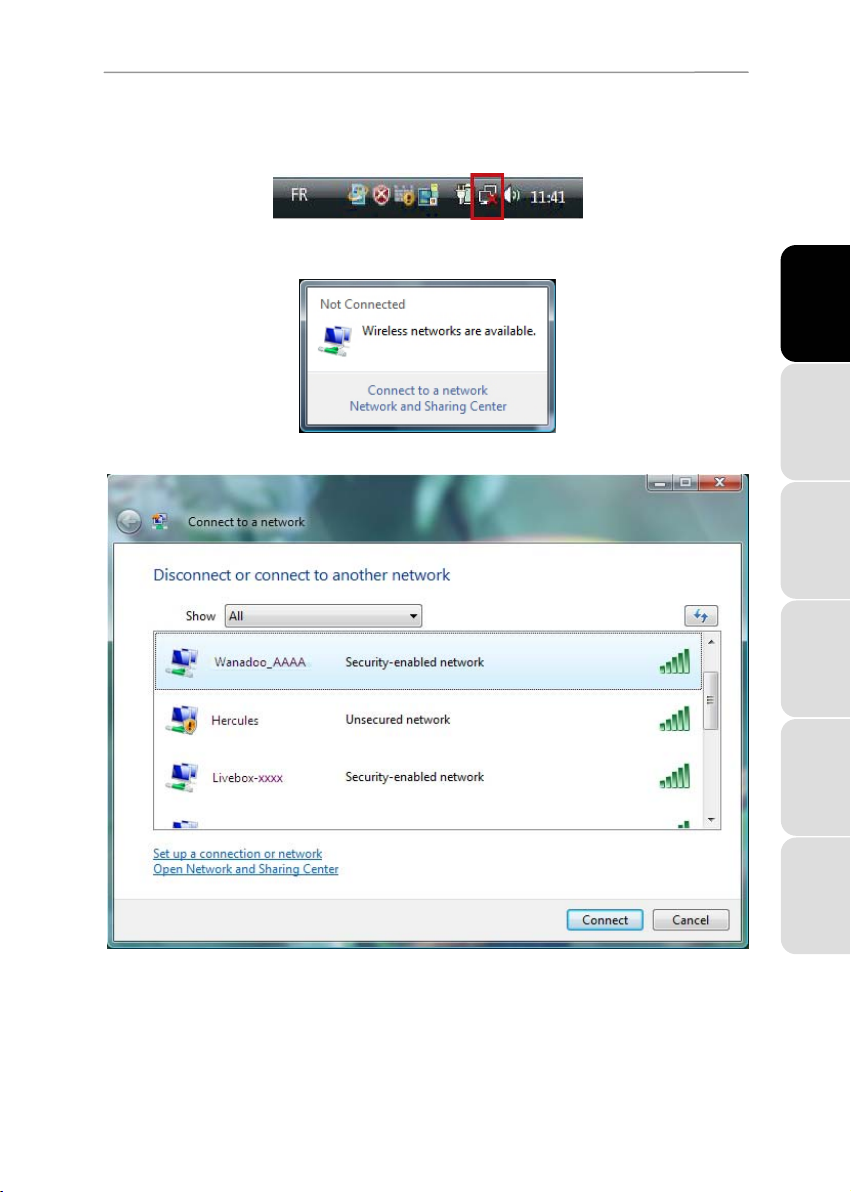
Once your computer is switched on, your WiFi adapter automatically detects the wireless networks available
and displays them in a specific window.
To view the detected wireless networks:
- In the Windows Vista taskbar, click the network icon, which includes both wireless and wired networks.
The message Wireless networks are available is displayed once your WiFi adapter has detected wireless
networks.
- Click this message to display the list of networks. The Connect to a network window appears.
ENGLISH FRANÇAIS
DEUTSCH
User Manual – 3/24
ESPAÑOL NEDERLANDS ITALIANO
Page 4

Hercules Wireless G Series
- Browse through the list and select your wireless network (here, the Hercules network, highlighted in blue).
You will note that this network is unsecured. You will therefore not be asked to provide a key.
Note: If you select a security-enabled network, you must enter the key in the window. To do so, you must
know the key defined when setting up your wireless network. For information on the different types of keys,
please refer to the Securing your WiFi network using the assistant chapter in your Hercules Wireless G
Modem Router or Hercules Wireless G Router manual, or The security options chapter in your WiFi PCI
Card / WiFi USB2 Key – For Livebox or Hercules Wireless G PCMCIA / PCI / USB2 manual.
- Click the Connect button.
Wait a few moments. Once the connection to the
Hercules network has been established, you can
save this network in your favorites by ticking the
Save this network box and Start this connection
automatically, if you wish. In that case, your
computer will always attempt to connect to this
network at the start of each new session.
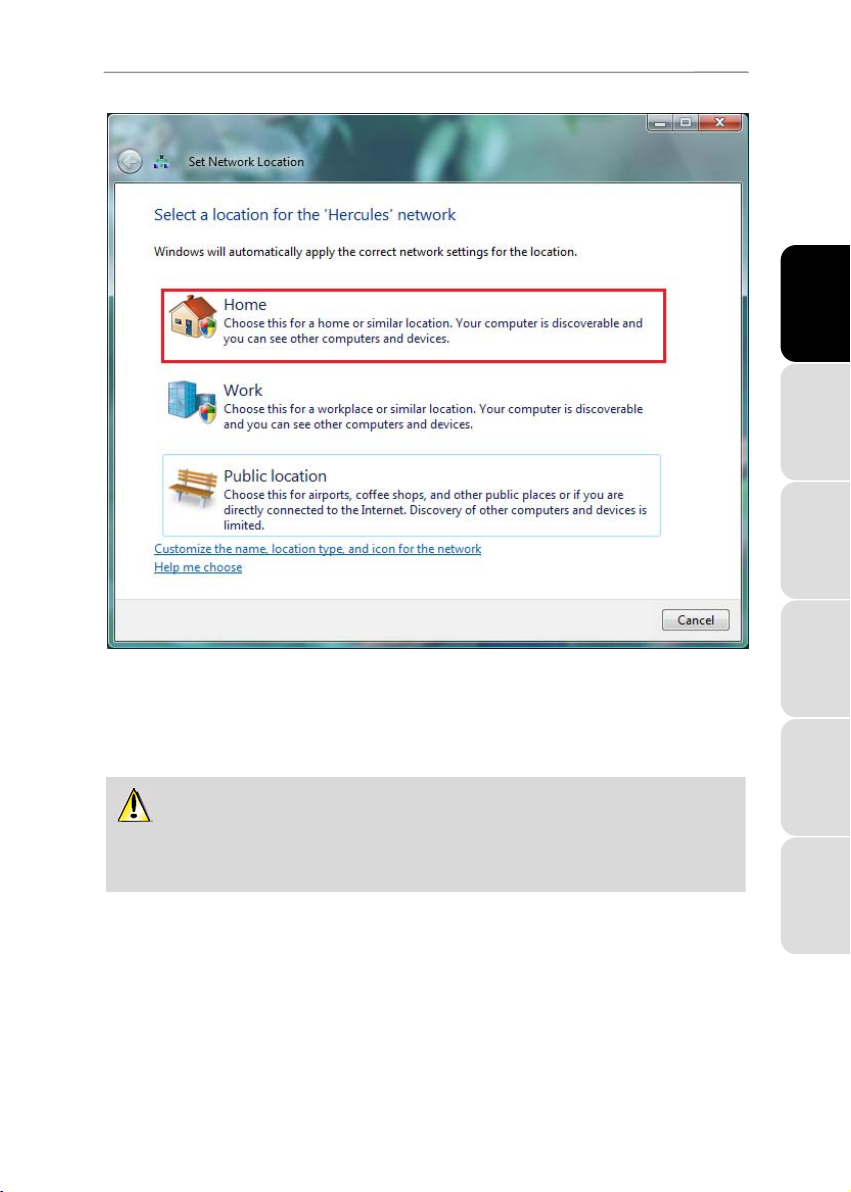
- Select your network location: Home, Work, Public location.
4/24 – User Manual
Page 5
Hercules Wireless G Series
ENGLISH FRANÇAIS
DEUTSCH
For our purposes, we will consider that you will be using your network at home, which will allow you as well as
other network users to view the computers present on the network (the “See and be seen” principle,
indispensable to be able to share folders, a printer and an ADSL connection).
Note: If you prefer to connect to a public hotspot, while you are in a railway station, for example, please refer
to the explanations provided by Windows Vista.
Windows Vista may not prompt you to select your network location at this point and select a public
location for you by default (this will typically be the case if you are already connected to a network). To
select another location, you must click the Customize link located opposite the name of your network in
the Hercules (public network) zone of the Network and Sharing Center.
Windows Vista prompts you to confirm your connection choice.
- Click I confirm the connection request, then Continue.
- Click Close.
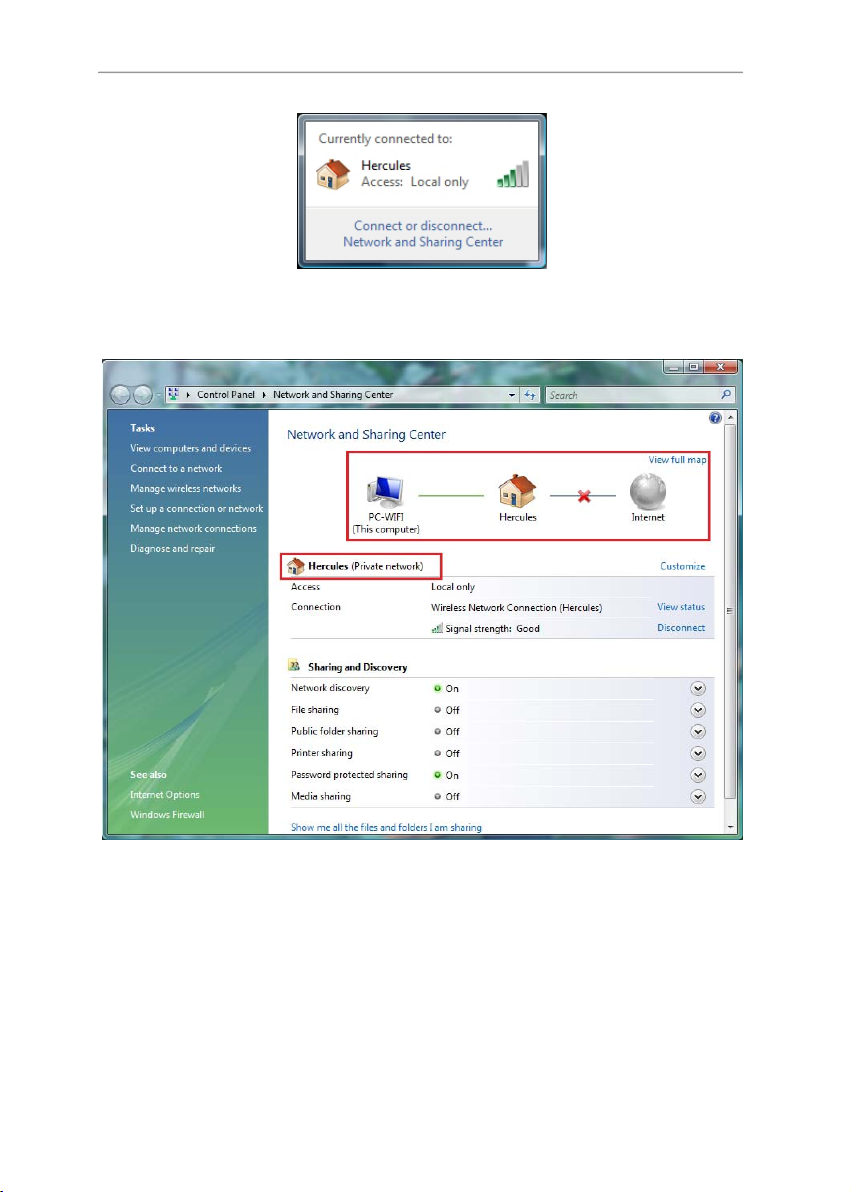
- In the taskbar, click the network connection icon to verify that you are connected to the Hercules network
(the message Currently connected to: Hercules should be displayed).
User Manual – 5/24
ESPAÑOL NEDERLANDS ITALIANO
Page 6
Hercules Wireless G Series
- Click the Hercules network to access its properties.
The Network and Sharing Center appears. In the top part of the window, you will see that your computer
called PC-WIFI is connected to the Hercules network, which is itself connected to the Internet.
By default, your computer is part of a private network (as opposed to a public network). For information on
the differences between private and public networks, please refer to the Computers running
Windows Vista: Sharing folders, a printer or an ADSL connection section.
1.2. Connecting to a Livebox wireless network
Note: The procedure described hereafter is deliberately intuitive and non-exhaustive. If you have mastered
Windows Vista, you will note that there are other ways to achieve the same results. You will find our
procedure set out in the pages that follow, although you are free to choose your own preferred method.
Once your computer is switched on, your WiFi adapter automatically detects the wireless networks available
and displays them in a specific window.
6/24 – User Manual
Page 7
Hercules Wireless G Series
To view the detected wireless networks:
- In the Windows Vista taskbar, click the network icon, which includes both wireless and wired networks.
The message Wireless networks are available is displayed once your WiFi adapter has detected wireless
networks.
- Click this message to display the list of networks. The Connect to a network window appears.
ENGLISH FRANÇAIS
DEUTSCH
- Browse through the list and select your wireless network (here, the Wanadoo_AAAA network, highlighted in
blue). You will note that this network is security-enabled. You will therefore be asked to provide a key.
User Manual – 7/24
ESPAÑOL NEDERLANDS ITALIANO
Page 8
Hercules Wireless G Series
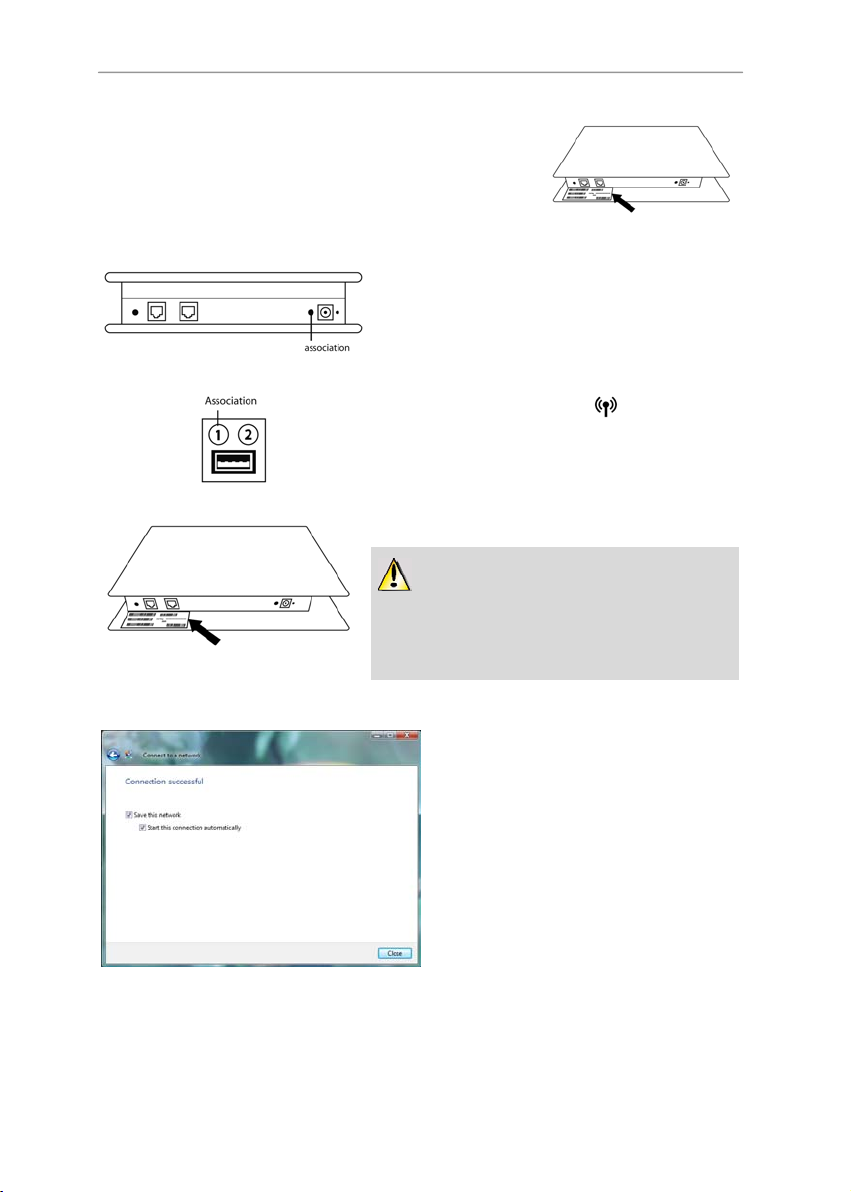
To find out the name of the WiFi network transmitted by your Livebox,
please refer to the sticker on the underside of your Livebox unit and make
a note of the name found under the term SSID.
SAGEM model:
INVENTEL model:
- Click the Connect button.
- Step 1: Verify that you have selected the network
transmitted by your Livebox.
If this is the first time that you are connecting your PCI
Card or your WiFi USB2 Key to your Livebox network,
you must switch your Livebox to “Association” mode. To
do so, press the REG button located on the underside of
your Livebox unit next to the power connector (for
SAGEM models) or the c button located at the back of
your Livebox unit (INVENTEL models).
The WiFi LED on your Livebox
flashes throughout
the “Association” mode activation period (10 minutes).
This procedure only has to be carried out once for each
WiFi adapter connecting to your Livebox.
- Step 2: Enter the security key for your network if
prompted to do so.
The WiFi network transmitted by Livebox units is
generally security-enabled. To connect to this network, you
must know the security key used (generally WEP). The 26
characters that make up the key are found on the sticker
found on the underside of your Livebox unit.
Wait a few moments. Once the connection to the
Wanadoo_AAAA network has been established,
you can save this network in your favorites by
ticking the Save this network box and Start this
connection automatically, if you wish. In that
case, your computer will always attempt to connect
to this network at the start of each new session.
- Select your network location: Home, Work, Public location.
8/24 – User Manual
Page 9

Hercules Wireless G Series
ENGLISH FRANÇAIS
DEUTSCH
For our purposes, we will consider that you will be using your network at home, which will allow you as well as
other network users to view the computers present on the network (the “See and be seen” principle,
indispensable to be able to share folders, a printer and an ADSL connection).
Note: If you prefer to connect to a public hotspot, while you are in a railway station, for example, please refer
to the explanations provided by Windows Vista.
Windows Vista may not prompt you to select your network location at this point and select a public
location for you by default (this will typically be the case if you are already connected to a network). To
select another location, you must click the Customize link located opposite the name of your network in
the Wanadoo_AAAA (public network) zone of the Network and Sharing Center.
Windows Vista prompts you to confirm your connection choice.
- Click I confirm the connection request, then Continue.
- Click Close.
- In the taskbar, click the network connection icon to verify that you are connected to the Wanadoo_AAAA
network (the message Currently connected to: Wanadoo_AAAA should be displayed).
User Manual – 9/24
ESPAÑOL NEDERLANDS ITALIANO
Page 10

Hercules Wireless G Series
- Click the Wanadoo_AAAA network to access its properties.
The Network and Sharing Center appears. In the top part of the window, you will see that your computer
called PC-WIFI is connected to the Wanadoo_AAAA network, which is itself connected to the Internet.
By default, your computer is part of a private network (as opposed to a public network). For information on
the differences between a public and private network, please refer to the Computers running
Windows Vista: Sharing folders, a printer or an ADSL connection section.
1.3. Disconnecting from a wireless network
One you are connected to a network, you can disconnect via the Network and Sharing Center, for example.
Via the Network and Sharing Center:
10/24 – User Manual
Page 11

- Click the Disconnect link.
Hercules Wireless G Series
ENGLISH FRANÇAIS
Windows Vista disconnects your network.
1.4. Managing your favorite networks
A favorite is a group of settings for connecting to an known Infrastructure or Ad hoc network (your own, a
neighbor’s, a friend’s). The Windows Vista Network and Sharing Center allows you to save the settings for a
network, or add or remove favorites.
To display your favorite networks, or add or remove a network, click the Manage wireless networks link in
the Tasks zone.
User Manual – 11/24
DEUTSCH
ESPAÑOL NEDERLANDS ITALIANO
Page 12

Hercules Wireless G Series
For example, to remove the Hercules network to which you have just connected, select it in the list (it is then
highlighted in blue), then click the Remove button.
To add a network, click the Add button. Windows Vista launches the manual connection to a wireless network
assistant. Follow the on-screen instructions.
Finally, you can change the connection priority by clicking the Move down or Move up buttons.
12/24 – User Manual
Page 13

Hercules Wireless G Series
2. WELCOME TO THE WIRELESS ATTITUDE!
In the following chapters, we will show you just how user-friendly and easy to use working with a wireless
network can be. Sharing your folders, a printer, or letting your friends use your ADSL connection for online
gaming are some of the examples that we will show you how to accomplish. Enter the world of wireless and
join in the Wireless Attitude!
2.1. Some requirements
- Each computer that you wish to put on the network must be equipped with a WiFi adapter.
- To share an ADSL connection, your ADSL modem must be switched on and your ADSL line must be active.
- You must determine in advance whether you are using an Infrastructure or Ad hoc network. Reminder:
Infrastructure is a type of network with an access point + at least two computers, whereas in Ad hoc mode,
you have two computes without an access point.
- The wireless network is created on the access point.
- Computers equipped with an earlier operating system than Windows Vista must have the same workgroup
name.
2.2. Computers running Windows Vista: Sharing folders, a
printer or an ADSL connection
To create a network of computers, share data, a printer or an ADSL connection between computers
running Windows Vista, it is not imperative that the computers belong to the same workgroup. However, if
you wish to share between Windows Vista and an earlier operating system, make sure to define the same
workgroup on all computers. For information on how to create a workgroup, please refer to the manual of
your Hercules product.
Note: The access paths described hereafter may vary slightly if you have modified the default display in
Windows Vista (that is to say, the Start menu properties and the Control Panel display).
You have connected your computer to a private network (as opposed to a public network). Therefore, the
discovery options (namely, the ability to view outside devices and computers and to be seen by other
networks) are enabled, but sharing options are not. You must therefore enable them manually before you
can share your folders, your Internet connection or your printer.
ENGLISH FRANÇAIS
DEUTSCH
2.2.1. Enabling sharing
Before setting up sharing for your folders, your printer or your Internet connection, you must enable sharing in
the Network and Sharing Center.
User Manual – 13/24
ESPAÑOL NEDERLANDS ITALIANO
Page 14

Hercules Wireless G Series
Note: To open the Network and Sharing Center, click the network icon in the Windows taskbar, then the
Network and Sharing Center link.
Enabling file sharing
- In the Sharing and Discovery zone, click the Off link or the
button located opposite File sharing.
- Select the Turn on file sharing radio button.
- Click Apply. In the Windows Vista confirmation window, click Continue.
Enabling public folder sharing
Note: A public folder is a folder which can be shared by other users of the same computer or of the same
network.
14/24 – User Manual
Page 15

Hercules Wireless G Series
- In the Sharing and Discovery zone, click the Off link or the button located opposite Public folder
sharing.
- Select the Turn on sharing so anyone with network access can open files radio button (they will only be
able to consult files) or select Turn on sharing so anyone with network access can open, change, and
create files (there will be no limitations on the contents of these folders in terms of viewing, making changes
and additions or other actions).
- Click Apply. In the Windows Vista confirmation window, click Continue.
Enabling printer sharing
Note: To enable printer sharing, you must first have installed a printer.
ENGLISH FRANÇAIS
- In the Sharing and Discovery zone, click the Off link or the
- Select the Turn on printer sharing radio button.
- Click Apply. In the Windows Vista confirmation window, click Continue.
Enabling media file sharing
Note: This option allows you to enable sharing of your music, videos and images.
- In the Sharing and Discovery zone, click the Off link or the
- Click Change…
button located opposite Printer sharing.
button located opposite Media sharing.
DEUTSCH
ESPAÑOL NEDERLANDS ITALIANO
User Manual – 15/24
Page 16

Hercules Wireless G Series
- In the Media Sharing window that appears, tick the Share my media box.
- Click Apply. In the Windows Vista confirmation window, click Continue.
- In the following window, you can define the different settings, such as: authorize or refuse groups of users,
set parental controls, select media types to be shared, and so on.
- When you’re done, click Apply, then OK.
2.2.2. Windows Vista: Sharing public or personal folders
Reminder: In Windows Vista, there are two types of folders: personal or local folders and public folders.
A personal folder is a folder belonging to a specific user created on the computer, whereas a public folder is
a folder that can be shared by any other user of the same computer or the same network. In essence, a
public folder is shared, and therefore available to everyone for viewing (minimum authorization level). For
sharing personal folders (your folder of your own images, for example), you must select the users who will be
able to access their contents and set the authorization level, as indicated in the following procedure.
16/24 – User Manual
Page 17
Hercules Wireless G Series
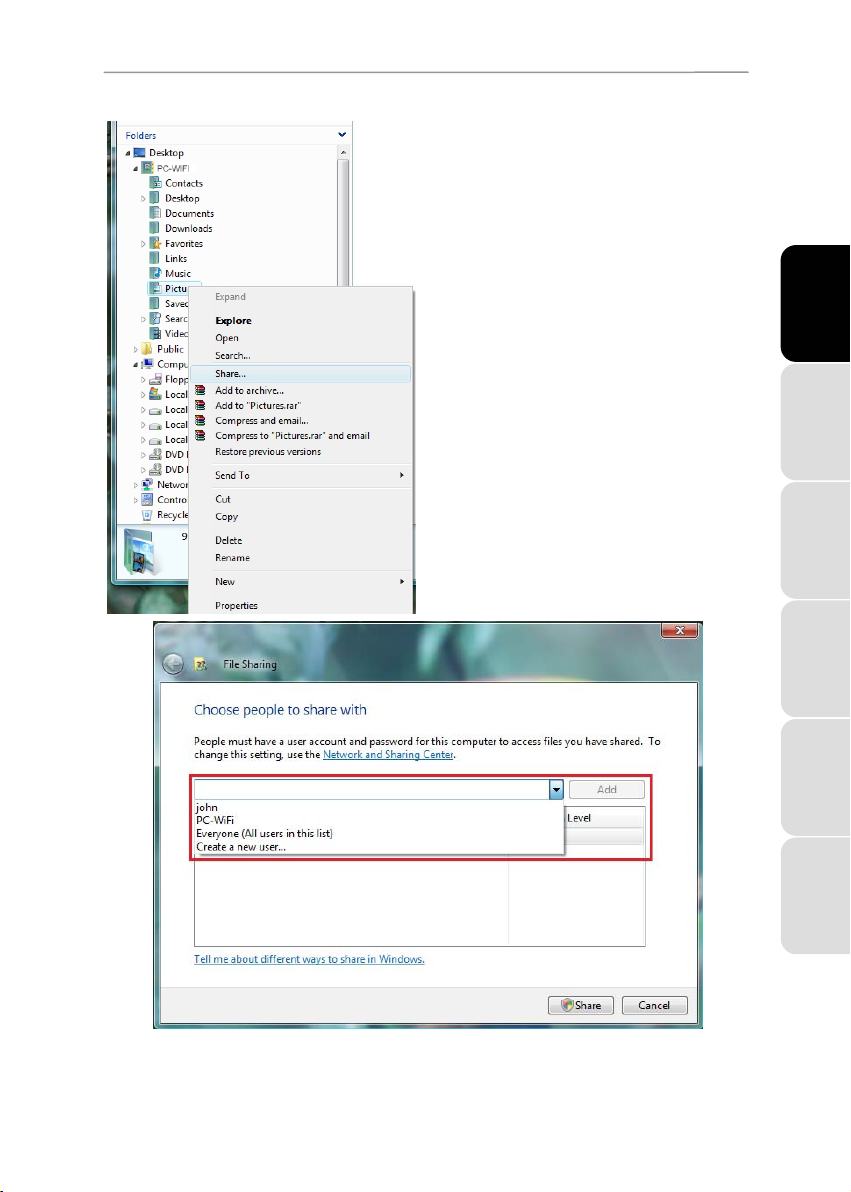
1. Select the folder that you wish to share, without
opening it. Here, your Pictures folder.
2. Right-click the folder. Select Share.
ENGLISH FRANÇAIS
DEUTSCH
3. In the File Sharing window, select the user(s) who will be able to access this folder, then click Add.
User Manual – 17/24
ESPAÑOL NEDERLANDS ITALIANO
Page 18

Hercules Wireless G Series
Note: You can provide access to all users with no restrictions (Everyone option) or select specific users
previously created on your PC. You can also create new users by clicking Create a new user… in the dropdown list.
4. Select the Permission Level you wish to assign by clicking on the line for that user: Reader (authorization
to view only), Contributor (authorization to view, add and delete) or Co-owner (authorization to view,
modify, add and delete).
5. Click Share. Be sure to note the path indicated, which will allow for access to the shared folder on the
network from another computer. For example: \\PC-WIFI\Users\My documents\Shared Pictures
Folders.
6. Click Done.
The folder is now shared. You can now display all shared folders and files on the computer or the shared files
on the network by clicking the links in the Network and Sharing Center.
2.2.3. Computers running Windows Vista: Accessing shared folders
1. In the file explorer, accessible via
Start/Computer, double-click
Network.
You access the list of the computers
on the same network. Use the path
indicated by Windows when setting up
sharing (for example : \\PC-
WIFI\Users\My documents\Shared
Pictures Folders).
2. Double-click the computer sharing
the folders you wish to access.
3. If a password has been defined,
enter your user name and your
password.
All shared folders appear. Depending
on your authorization level, you can
display, modify, add and/or delete
shared folders and files.
2.2.4. Windows Vista: Sharing a printer
You can put a printer on the network and thereby share it with all computers in your home equipped with a
WiFi adapter.
To access a printer on the network, sharing for the printer must first be set up in the Network and
Sharing Center (please refer to chapter 2.2.1 Enabling sharing). The printer must then be set up for
sharing on the computer to which is connected and on which it is installed.
18/24 – User Manual
Page 19

On the computer connected to the printer:
1. Click Start/Control Panel.
2. Under the Hardware and Sound heading, click the Printer link.
Hercules Wireless G Series
ENGLISH FRANÇAIS
DEUTSCH
The list of installed printers is displayed.
3. Right-click the printer and select the Sharing…
option.
User Manual – 19/24
ESPAÑOL NEDERLANDS ITALIANO
Page 20

Hercules Wireless G Series
4. In the Printer Properties window, click the
Change sharing options button.
5. In the Windows Vista confirmation window, click
Continue.
6. Tick the Share this printer box.
7. Select the name of the printer which will be
displayed on the network under Share name.
8. Click Apply, then OK.
2.2.5. Computers running Windows Vista : Accessing the shared printer
On the computers that will use the shared printer:
1. Click Start/Control Panel.
2. Under the Hardware and Sound heading, click the Printer link.
20/24 – User Manual
Page 21

Hercules Wireless G Series
ENGLISH FRANÇAIS
DEUTSCH
3. Click the Add a printer button.
The Add a printer assistant appears.
4. Click Add a network, wireless or Bluetooth
printer.
ESPAÑOL NEDERLANDS ITALIANO
User Manual – 21/24
Page 22

Hercules Wireless G Series
5. Windows searches for the shared printers on your
network. Select the shared printer.
6. Click Next.
7. if required, accept installation of the printer’s
drivers when you are being prompted by
Windows.
8. Validate the name of your printer, then click Next.
9. Click Finish to close the assistant.
2.2.6. Windows Vista: Sharing an ADSL connection in an
Infrastructure type network
Reminder: If you have a Livebox, a modem router or a router connected to a modem and one or more
computers, your network will be in Infrastructure mode by default. In this mode, the WiFi adapters are
connected to your access point, which might be your Livebox, your Hercules Modem Router or your Hercules
Router connected to a modem. Infrastructure mode is ideal for exchanging data, playing online, and also for
sharing an Internet connection and/or printer among several computers. Follow the instructions below to
finally free yourself from the cable that connects you to your modem… without cutting the links to your ADSL
connection. Viva the Wireless Attitude!
Proceed as follows for each computer that will use the shared Internet connection:
1. Connect to your wireless network (Hercules or
Livebox_AAAA, for example).
2. Access the Network and Sharing Center. To do
so, click the network icon on the Windows
taskbar, then click the Network and Sharing
Center link.
3. Click the View status link.
22/24 – User Manual
Page 23

Hercules Wireless G Series
4. In the Wireless Network Connection Status
window, click Properties.
5. In the Windows Vista confirmation window, click
Continue.
6. In the Wireless Network Connection Properties
tab, select Internet Protocol version 4
(TCP/IPv4).
7. Click Properties.
8. In the Wireless Network Connection Properties
tab, select Internet Protocol version 4
(TCP/IPv4).
9. Click Properties.
ENGLISH FRANÇAIS
DEUTSCH
ESPAÑOL NEDERLANDS ITALIANO
User Manual – 23/24
Page 24

Hercules Wireless G Series
10. In the Internet Protocol version 4 (TCP/IPv4)
window, select Obtain an IP address
automatically and Obtain DNS server address
automatically.
11. Click OK to validate.
12. Do the same for Internet Protocol version 6
(TCP/IPv6).
To access the Internet, simply launch your Internet
browser.
Copyright
Hercules® is a registered trademark of Guillemot Corporation S.A. Intel® and Pentium® are registered
trademarks of Intel Corporation. Microsoft® Windows® 98, Millennium,2000,XP and Vista are trademarks
or registered trademarks of Microsoft Corporation in the United States and/or other countries. All other
trademarks and brand names are hereby acknowledged and are property of their respective owners.
Illustrations not binding. Contents, designs and specifications are subject to change without notice and may
vary from one country to another.
24/24 – User Manual
 Loading...