

Page 1
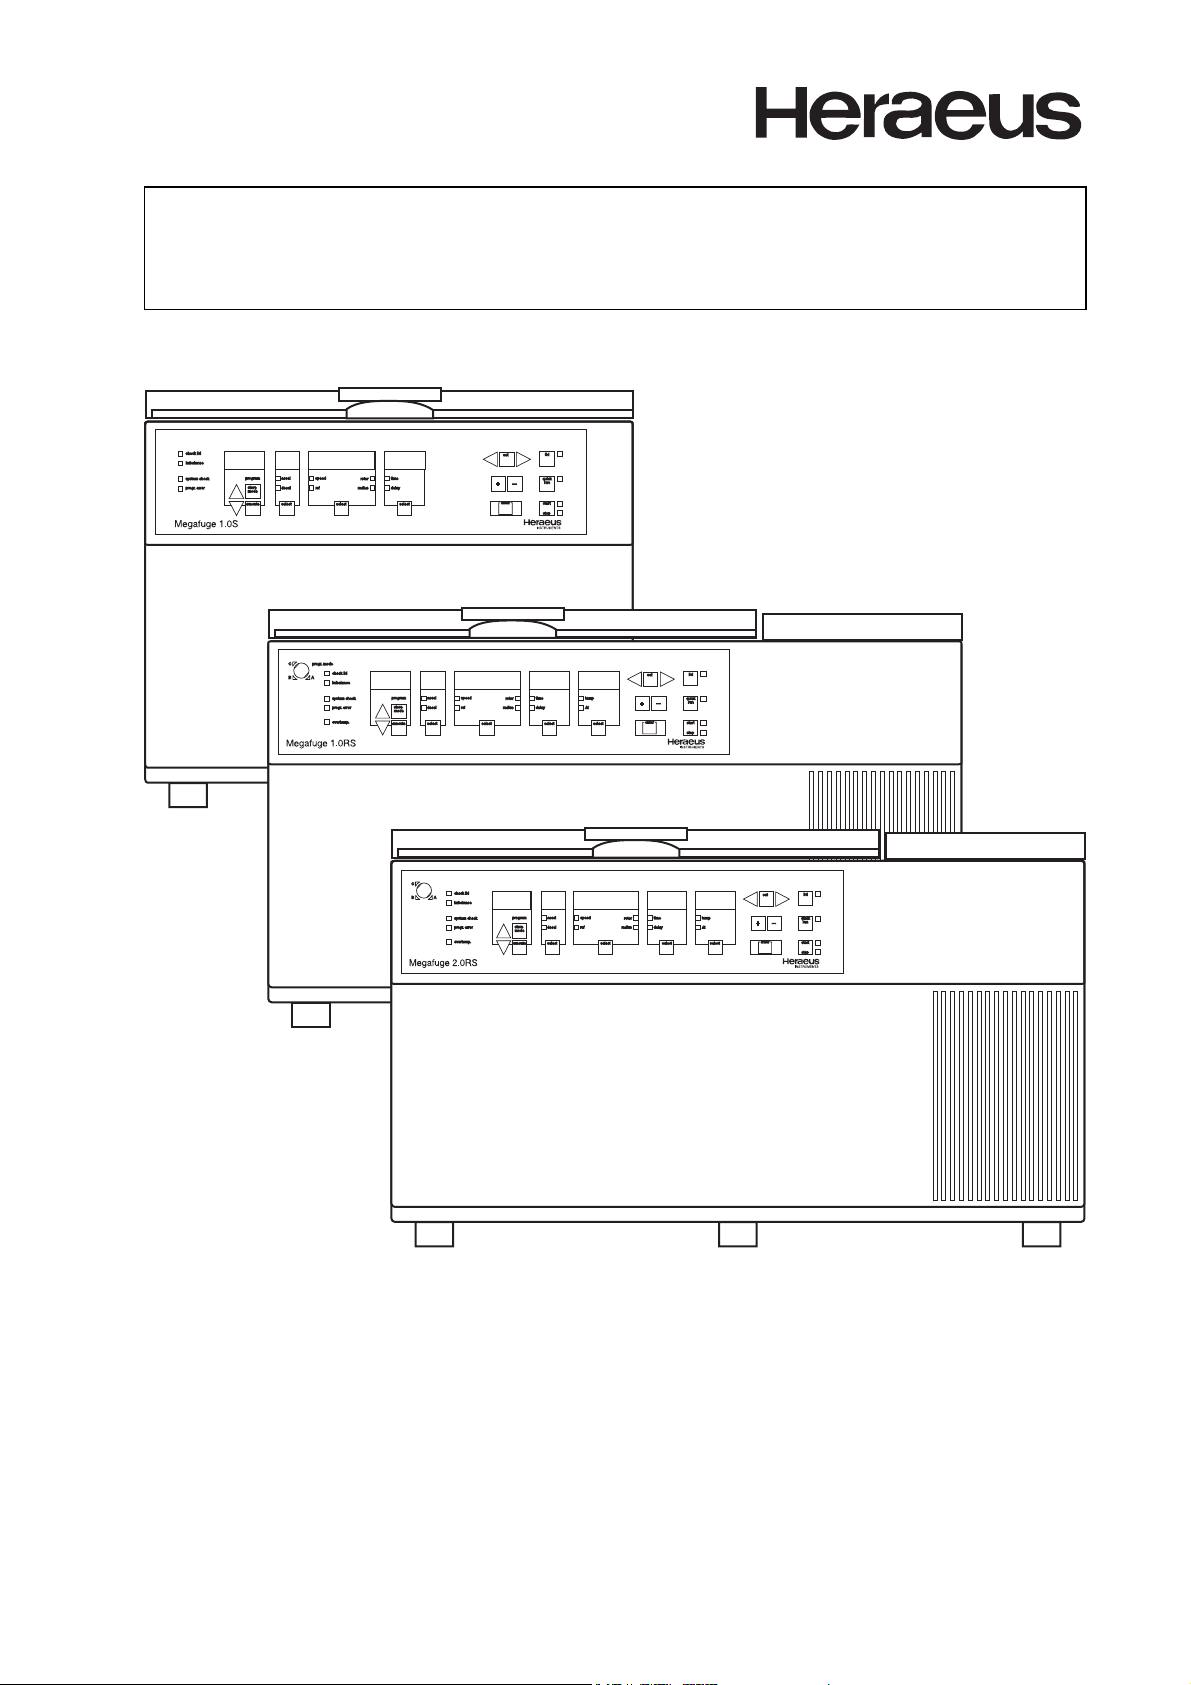
MEGAFUGE 1.0S
MEGAFUGE 1.0RS Operating instructions
MEGAFUGE 2.0RS User interface "Sepacontrol"
Page 2
User interface "Sepacontrol"
User interface "Sepacontrol"
The user interface "Sepacontrol" from Heraeus is designed for programming and using the operating functions. The present description substitutes the corresponding section of your operating instructions.
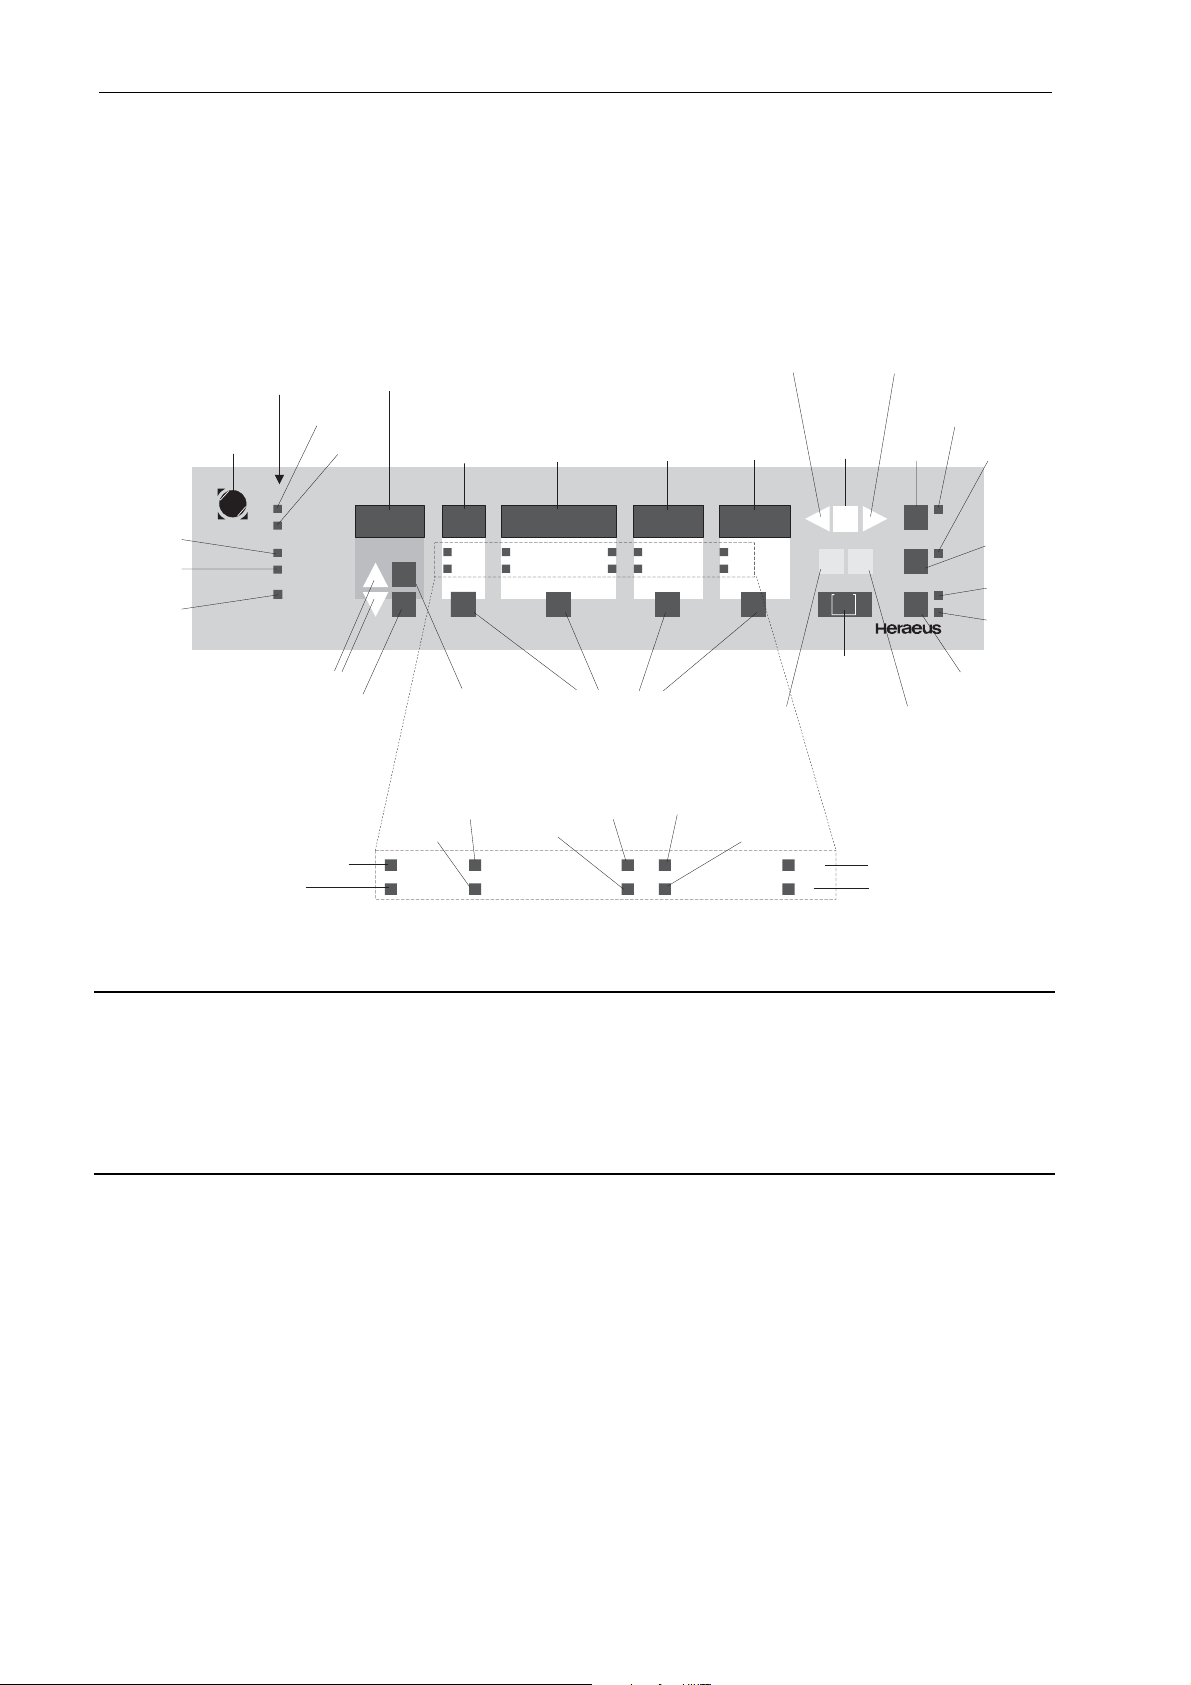
The figure below shows the user interface of the Megafuge 1.0RS, which is described in detail below. On
the last page of the Appendix you will find the same figure enlarged to full-page size.
Key-operated switch
left and right digit selection, respectively
setpoint
display,
temperature,
overtemperature
setpoint setting setpoint setting
setpoint
change
set
+
–
enter
copying
into working
memory
open lid
lid
quick
run
start
stop
INSTRUMENTS
start/stop key
lid release
Quick Run
release
Quick Run
"ready for
start"
display
stop
release
system
check
programming
error
over-
temperature
key-operated switch
progr.mode
C
BA
Megafuge 1.0RS
program number selection
diagnostic
LEDs
lid open
check lid
imbalance
system check
progr.error
overtemp.
storage in memory
program display
unbalance
display
display
acceleration/
braking
curves
store
mode
accel
decel
select
call
program
storage
mode
program
execute select select select
RCF,
rotor type,
radius,
special
messages
speed
rcf delay ∆t
rotor
radius
"select" keys
run time,
start
delay
time temp
run time
start delay
time temp
operating temperature
overtemperature
acceleration
deceleration
accel
decel
speed
RCF
rotor type
radius
speed
rcf delay ∆t
rotor
radius
assignment LEDs
You can use the key-operated switch to set the operating mode of "Sepacontrol".
Position A: Unlimited programming. You can call or change all programs.
Position B: The program memory is protected against modifications. However, the current centrifugation
program in the main memory can still be modified.
Position C: Program and main memory are protected against modifications. The preset centrifugation
program can be run an unlimited number of times by actuating the control keys.
The setpoints can be displayed any time by pressing "set" or the select key ("select").
You can pull out the key in any position. The respective setting is then valid until the next modification.
If you are in a hurry:
Setting the centrifugation conditions without storing the parameters.
Prerequisites: The centrifuge is properly installed, the rotor correctly loaded and balanced, the keyoperated switch in position A or B.
2
Page 3

User interface "Sepacontrol"
General procedure for all "select" fields:
• Press the "set" key. The display selected for the previous run flashes.
• Press the "select" key under the desired function field until the red LED next to the parameter to be
changed (e.g. "temp") is lit. Choose the digit to be altered by briefly pressing one of the direction keys
to the left and right of the "set" key (
+
count by pressing the
- or – key until the desired number is displayed.
set
) (repeatedly if necessary), and increase or decrease the
• By briefly pressing the key you increase or decrease the chosen digit by one step at a time. If you
press and hold the chosen key, the display changes continuously upward and downward, respectively. Release the key as soon as you have reached the desired value, and fine-tune if necessary by
repeatedly pressing the key.
• Acknowledge each entry by pressing "enter".
To enter parameters:
1. Press first the "set" and then the "select" key under the four-function field ("speed", "rcf", "rotor", "radius") until the red LED next to "rotor" is lit, and enter the order number of the rotor (only possible when
centrifuge is at rest).
Entering the rotor order number is mandatory. The built-in electronics uses this information to rec-
ognize the maximum permissible speed and sees to it that it is not exceeded.
2. Optional: Choose one of the accelerating and braking curves ("accel" and "decel", respectively, possible choices no. 1–9 for both, plus 0 for brakeless deceleration with "decel", see Appendix).
NOTE: If with the braking curve preset to 0, the set speed is lowered during the run, the newly set speed is
triggered with braking curve 1; the preset curve 1 remains unchanged.
3. Optional: Enter the centrifugation radius. You can set the radius in steps of 10 mm and 1 mm, respectively, from the nominal radius (maximum value) to the smallest radius compatible with the design.
When preselecting an RCF value (see below), the set RCF value corresponds to the radius entered here.
4. Set the speed, or alternatively the relative centrifugal force (RCF, in multiples of the earth gravity g). To
do this, choose the respective parameter ("speed" or "rcf") in the four-function field ("speed", "rcf", "rotor", "radius"), and enter the desired value.
5. Set the run time. Select "time", and enter the desired run time. The time measured is the one between
the start and the end of the braking process.
h.min: Entry and display in hours and minutes, between 0.00 and 9.59
h: Entry and display in hours, between 10 and 99
hld Continuous operation (hld = "hold")
6. Optional: Enter the desired start delay (1 min to 99 hours, display: "delay").
7. Only refrigerated centrifuges (MEGAFUGE series RS): Set the temperature to a value between 0 °C
and 40 °C.
8. Optional (only refrigerated centrifuges – MEGAFUGE series RS): Set the overtemperature control to
the desired value (minimum 5 K, upper limit set by the built-in microprocessor). The centrifuge switches
automatically off when the overtemperature is exceeded (setpoint + ∆t).
NOTE: Altered parameters are accepted by the main memory only if acknowledged with "enter" (or "start").
Otherwise, following a timeout of about 2 min (or about 20 s with the centrifuge running), the instrument
switches the display to the actual values without accepting the modifications.
Operation without program
1. Close the centrifuge lid if still open. The yellow LED next to the "lid" key is lit, the "ready for start" display next to the start/stop key (green LED) is activated, and the centrifuge is ready for use.
2. Press the start/stop key. The centrifuge starts according to the factory-set default value with the acceleration curve no. 9 (acceleration curves see Appendix). The "lid" LED goes out, the lid cannot be
opened any more. The very moment the centrifuge starts, the stop function is released (red LED next to
the start/stop key is lit).
3. Wait until the instrument stops automatically after completing the set run time ( braking curve, see Appendix). However, you may stop the centrifugation any time by pressing the start/stop key. At this point
the green LED is lit anew, e. g. you can continue a manually interrupted run at any time.
3
Page 4

User interface "Sepacontrol"
Turning off the continuous tone after centrifugation: any key for current run, "enter" key in actual value
mode for all subsequent runs (in this case brief display "Alert off"; renewed "enter" or mains supply
ON/OFF results in "Alert on").
Display
Actual values
If none of the display panels flashes, actual values are displayed; this is true both during a centrifuge run
and at rest. The display values changes as soon as the instrument registers new actual values (e. g.
speed during a run, temperature at rest, etc.). Following a centrifuge run, the time display reads the remaining run time (which is different from 0 only in case of premature STOP) or the run time passed (if "hld"
has been preselected). This gives the operator an opportunity to check whether the run has been prematurely interrupted e. g. by a short-term power failure. The actual time display is overwritten with the new
actual values only following a renewed start or power OFF/ON.
By pressing the respective "select" key you can switch between the parameters (acceleration or deceleration, speed, RCF etc.). The LED for the currently displayed parameter is lit (see figure under "assignment
LEDs"). Further explanations see in the following section under "setpoint values".
Setpoint values
In order to display the current setpoint values, always press first the "set" key (display panels flash) and
then the key listed below as required.
Program display displays the number of the currently active program after pressing "store
mode" key (01–32)
acceleration/
braking curves
speed, RCF, rotor type,
radius
displays the number of the acceleration curve (1–9), upon pressing the
"select" key the number of the braking curve (0–9) (see Appendix)
displays the set speed, and upon pressing the "select" key successively
the relative centrifugal force (in multiples of the earth gravity g), the rotor
type (identical to the rotor or bucket order no.) and the radius setting
run time, start delay displays the set run time and upon pressing the "select" key the start
delay (if set)
temperature, overtemperature displays the temperature setpoint, and upon pressing the "select" key the
overtemperature control (if set; lowest value 5 K)
4
Page 5

User interface "Sepacontrol"
Program settings
Entering settings for multiple runs (permanent storage in the program memory)
Prerequisites: key-operated switch in position A; centrifuge at rest.
You have the choice between the two methods described below to permanently store programs in the
program memory:
A Opening the program memory before
1. Press one of the keys
(for increasing the value) or (for decreasing the value) in the "program" field
setting the run parameters
to set the desired number (01 to 32).
2. Open the current memory location by pressing the "store mode" key. The opening is signalled by a
flashing display of one of the parameter fields and of the selected program number in the program display.
NOTE: The selected memory location can only be opened if one of the parameter display panels is flash-
ing (press one of the keys
, or "set" if necessary). Upon opening a memory location you cannot
switch to another location.
3. Set the setpoints for the parameters as detailed on page 3.
4. After having completed all settings, press "execute" key. The program number display and the parameter display stop flashing, thus showing that the recent settings have been copied from the main memory
into the program memory and are available for future runs under the chosen program number.
B Opening the program memory after
setting the run parameters
1. Select the intended program memory location exactly as described under A 1.
2. Set the desired setpoints as detailed on page 3. As soon as you change the first parameter with the "+"
or "-" key, the program number display reads "--".
3. Open the program memory selected according to B 1. by pressing "store mode" (cf. A 2.).
4. Store the program by actuating the "execute" key (cf. A 4.).
NOTE: If a memory location opened with "store mode" is not closed by "execute", it is closed automatically following a timeout of 2 min. Both program memory and main memory keep their respective former
values, i. e. any settings altered in the display are discarded.
Operation with program
You can run preset programs either as stored, or you may change individual settings for the current run.
The stored program settings are not modified by changing individual settings (this is possible only via the
programming routine, see above).
Prerequisites: The centrifuge is properly installed, the rotor correctly loaded and balanced, the keyoperated switch in position A or B.
Program run as stored
1. Program selection: Press one of the direction keys
or until the desired program number is dis-
played.
2. Press the start/stop key within 2 min. The contents of the selected program memory location is loaded
into the main memory, and the program is executed immediately. You may stop the centrifugation any
time by pressing the start/stop key once again.
Program run with modifications
1. Program selection: Press one of the direction keys
or until the desired program number is dis-
played.
2. Press the "execute" or "enter" key, the program settings are loaded into the main memory.
3. Make the desired changes as detailed on page 3. The program display reads "--" as a reminder that
the current settings do no longer correspond to those of the originally selected program. However, the
original, stored program is unchanged and still available.
4. Press the start/stop key. The program run is started at once. You may stop the centrifugation any time
by pressing the start/stop key once again.
5
Page 6

User interface "Sepacontrol"
"Quick-Run" operation
Independent of set values you can, with the lid closed, start a centrifuge run using the "Quick-Run" key.
ATTENTION – WARNING!
As long as the "Quick-Run" key is pressed, the rotor is accelerated with maximum force to its
maximum permissible speed, i. e. the set speed is ignored.
The run is continued until the key is released, upon release the rotor is braked with maximum force. By
pressing the key once again, you can switch back to acceleration.
6
Page 7

Appendix
Diagnostic LEDs
LED "lid"
check lid
Appendix
Centrifuge lid not closed.
LED "imbalance"
Rotor not evenly loaded.
rotor imbalance
LED "system check"
Electronics malfunction.
system check
LED "program error"
Operating error.
program error
LED "overtemp."
The set temperature limit is exceeded.
overtemperature
Malfunctions – measures for self-help
Malfunction Cause Remedy
Symptom Behavior
Set position
flashes upon
pressing the
"set key
Setting with "+/-"
keys impossible,
lid cannot be
opened, start and
Position of key-operated switch
prevents programming.
stop OK.
Displays remain dark
Drive stops suddenly, rotor stops
Power failure. Check power supply, if OK call
without braking, lid
cannot be opened.
Turn key-operated switch from
position C to A or B, if no response, call Service.
Service.
Displays fail
briefly
Unusually loud
running noise,
possibly with
display "imbalance"
"OPEN" message displayed
"check lid" LED
is lit and interval tone sounds
Drive stops suddenly, rotor stops
without braking.
Drive fails, brakes
or keeps running
noisily.
Centrifuge cannot
be started; lid apparently closed.
Drive is turned off
and coasts brakeless to standstill.
Short-term power failure. Start anew.
1. Sudden imbalance due to
broken vessel and mass
shift.
2. Rotor or drive damage.
3. Malfunction in the control.
If the centrifuge does not stop by
itself, press "quick run" key Look
for apparent cause at standstill
and relieve if possible. Otherwise call Service.
4. Damaged fans or compressor.
1. Lid lock not properly engaged.
2. Lid lock defective.
1. Lid lock was opened manually during the run, action
not permitted!
2. Lid lock safety circuit has
tripped.
Press lid forcefully down, do not
bang!
If LED does not go out, call Service.
1. Press lid shut immediately,
switch mains supply OFF/ON,
press "start" to resume centrifugation, otherwise "stop".
2. Safety circuit malfunction, call
Service.
7
Page 8

Appendix
Malfunction Cause Remedy
Symptom Behavior
"imbalance"LED is lit, interval tone
"overtemp"LED LED is lit,
interval tone
Centrifuge brakes
maximally with
braking profile 9.
After starting:
Drive switched off,
refrigerating unit
running.
1. Rotor unevenly loaded.
2. Bucket does not swing out
properly or not at all.
3. Sudden vessel breakage
with center of gravity shift by
leaking liquid.
4. Defective drive mechanism
(damaged motor shaft).
5. Mechanical or other changes
on rotor or buckets.
6. Centrifuge tilted.
∆t-alarm is activated because
the rotor chamber has not been
precooled to temperature setpoint.
1. Distribute buckets, inserts
and fillings evenly.
2. Clean and grease
(#70006692) rotor pin and
opposite surface on the
bucket.
3. Remove splinters, broken
parts and sample residues,
clean buckets and fill anew,
restart with reduced speed if
necessary.
4. Do not start drive any
more! Call Service.
5. Discontinue use of rotor
and/or buckets! Inform Service.
6. Align centrifuge (drive), call
Service if necessary.
Open lid, turn off ∆t ("--"), close
lid and start; wait until cooled to
desired setpoint temperature
range, then activate ∆t.
During operation:
Centrifuge stops
without braking,
refrigerating unit
running.
"E-17" display,
"system
Upon pressing "lid"
key at standstill
check"-LED is
lit, interval tone
"system
check"-LED is
lit, interval tone
"E-xx" display
flashes in the
speed panel,
other possible
xx numbers 00-
During operation:
Drive coasts
brakeless to
standstill.
At standstill:
Drive switched off
after start.
24
Overtemperature alarm, displayed temperature exceeds
permissible threshold value:
temperature of the environment
(35 °C max.) or distance to wall
(15 cm).
1. ∆t dependent: cooling capacity of refrigerating unit insufficient
2. No ∆t programmed: defective
refrigerating unit
1. Lid lock mechanism jammed,
does not open
2. Lid lock defective
Tripping of a thermal or electrical protection function, e. g. E-
08.
Malfunctions in data transmission or measuring.
Wait until centrifuge has cooled,
possibly remove and cool samples after standstill, precool centrifuge and run again if necessary, do not operate near heat
generators.
Repeat run with reduced speed,
if deviations are considerable
call Service.
Call Service.
Mains supply OFF, check lid lock
mechanism and correct if necessary.
Call Service.
Switch off centrifuge and resume
operation after a minimum of 15
min, if error occurs repeatedly
call Service.
Mains supply OFF/ON, if error
persistent call Service.
8
Page 9

Appendix
Technical data of "Sepacontrol"
Feature Possible settings
Program memory for 32 complete sets of parameters
Program backup unauthorized intervention in stored programs lockable via a three-step
key-operated switch
Data storage almost unlimited with NV-RAMs
Diagnostic messages
via LEDs for
• lid not closed during operation
• unbalanced loading
• general malfunction of the instrument
• data transmission error
• overtemperature
Digital parameter display for program number, acceleration and braking profiles, speed, RCF,
rotor, radius, time, start delay, temperature and overtemperature
Acceleration curves 1–9 profiles selectable
Braking curves 1–9 profiles and 0 = coasting to standstill
Speed selection continuously between 100 min
1000, 100 and 10 min
-1
-1
and maximum speed in steps of
RCF selection continuously between 1 x g and maximum RCF value in steps of
1000, 100, 10 and 1 x g
Rotor selection integral numbers, organized according to order numbers in ascending
order
Radius selection dependent on rotor in 0.1-cm steps
Time selection in 3 modes:
hld continuous operation
h.min 1 min – 9 h 59 min
h 10 h – 99 h
Start delay in 3 modes:
-- immediate start (no delay)
h.min 1 min – 9 h 59 min
h 10 h – 99 h
Time display with "Quick Run":
min. sec mode 1 s – 9 min 59 s
t mode 10 h – 99 h
Temperature selection 0 °C – 40 °C in steps of 10 K and 1 K
Overtemperature control ∆t:
-- no overtemperature control
5 K ≤ ∆t ≤ (40 °C –T
5 K ≤ ∆t ≤ 10 K
) if 0 °C ≤ T
setpoint
if 31 °C ≤ T
setpoint
setpoint
≤ 30 °C
≤ 40 °C
adjustable in 1 K steps
9
Page 10

Appendix
Acceleration and braking curves
Acceleration curves
speed [rpm]
4000
3000
2000
1000
23456789
1
0 60 120 180 240 300
Braking curves
4000
3000
2000
speed [rpm]
1000
8
9
7
6
time [s]
5
4
3
2
1
10
0
0 60 120 180 240 300 360 420
time [s]
Page 11

Appendix
Quick Run
release
Quick Run
"ready for
stop
start"
release
display
lid release
lid
open lid
run
start
quick
stop
INSTRUMEN T S
start/stop key
operating temperature
setpoint setting
overtemperature
–
set
setpoint
display,
setpoint
change
left and right digit selection, respectively
temperature,
over-
temperature
run time,
start
delay
temp
time
enter
+
select
∆t
select
delay
copying
into working
memory
∆t
temp
setpoint setting
run time
start delay
delay
time
diagnostic
display
RCF,
display
program display
LEDs
rotor type,
acceleration/
lid open
radius
RCF
rotor
speed
accel
radius
assignment LEDs
rcf
decel
rotor
radius
select
radius,
special
messages
rcf
speed
accel
decel
braking
curves
select
"select" keys
rotor type
call
program
storage
mode
speed
store
mode
program
execute
unbalance
storage in memory
check lid
imbalance
system check
progr.error
overtemp.
progr.mode
A
acceleration
B
C
Megafuge 1.0RS
deceleration
program number selection
key-operated switch
error
check
system
programming
over-
temperature
11
Page 12

Appendix
Contents
User interface "Sepacontrol" .........................................................................................2
Key-operated switch.....................................................................................................................................2
If you are in a hurry: Setting the centrifugation conditions without storing the parameters.........................2
Entering parameters.................................................................................................................................3
Operation without program ..........................................................................................................................3
Display..........................................................................................................................................................4
Actual values ............................................................................................................................................4
Setpoint values.........................................................................................................................................4
Program settings ..........................................................................................................................................5
Entering settings for multiple runs (permanent storage in the program memory) ...................................5
A Opening the program memory before
B Opening the program memory after setting the run parameters ..........................................................5
Operation with program ...............................................................................................................................5
Program run as stored..............................................................................................................................5
Program run with modifications................................................................................................................5
"Quick-Run" operation..................................................................................................................................6
Appendix ..........................................................................................................................7
Diagnostic LEDs...........................................................................................................................................7
Malfunctions – measures for self-help .........................................................................................................7
Technical data of "Sepacontrol"...................................................................................................................9
Acceleration and braking curves............................................................................................................... 10
Acceleration curves ............................................................................................................................... 10
Braking curves....................................................................................................................................... 10
setting the run parameters .......................................................5
12
Page 13

Kendro Laboratory Products GmbH
Postbox 15 63
D-63405 Hanau / Germany
Telephone:
(+49) 61 81/ 35-300
Telefax:
(+49) 61 81/ 3 57 49, Sales
(+49) 55 22/ 31 62 76, Service
Telephone:
(+49) 55 22/ 31 62 22, Service
In the interest of continuous product
development, we reserve the right to
make changes without express notice.
20056899 Mega S_GB 10/98
Printed in Germany
 Loading...