


Models
CSL
CSM
CSB
CSG
H
ENNY PENNY
Sure Chef®Combi-Steamers
Applications Manual
and Cooking Guide
CSL
CSM
CSB
CSG
This manual should be retained in a convenient location for future reference.
Wiring diagram for this appliance is located on the inside access door below the control panel.
Post in a prominent location, instructions to be followed in event user smells gas. This information shall be
obtained by consulting the local gas supplier. (Gas units only)
FOR YOUR SAFETY DO NOT STORE OR USE GASOLINE OR OTHER FLAMMABLE VAPORS AND LIQUIDS
IN THE VICINITY OF THIS OR ANY OTHER APPLIANCE. (Gas units only)
Keep appliance area free and clear from combustibles.
Do not obstruct the flow of combustion and ventilation air. Adequate clearance must be left all around appliance
for sufficient air to the combustion chamber. (Gas units only)
WARNING: Improper installation, adjustment, alteration, service or maintenance can cause property damage, injury
or death. Read the installation, operating and maintenance instructions thoroughly before installing or servicing this
equipment.
LIMITED WARRANTY FOR HENNY PENNY APPLIANCES
Subject to the following conditions, Henny Penny Corporation makes the following limited warranties to the original purchaser
only for Henny Penny appliances and replacement parts:
New Equipment Any part of a new appliance, except lamps and fuses, which proves to be defective in material or workmanship
within one year from date of original installation, will be repaired or replaced without charge F.O.B. factory, Eaton, Ohio, or
F.O.B. authorized distributor. To validate this warranty, the registration card for the appliance must be mailed to Henny Penny
within 10 days after installation.
Replacement Parts Any appliance replacement part, except lamps and fuses, which proves to be defective in material or workmanship within 90 days from date of original installation will be repaired or replaced without charge F.O.B. factory, Eaton, Ohio,
or F.O.B. authorized distributor.
This warranty covers only the repair or replacement of the defective par t and does not include any labor charges for the removal
and installation of any parts, travel or other expenses incidental to the repair or replacement of a part.
Any claim must be presented to either Henny Penny or the distributor from whom the appliance was purchased. No allowance
will be granted for repairs made by anyone else without Henny Penny’s written consent. If damage occurs during shipping, notify the carrier at once so that a claim may be filed.
THE ABOVE LIMITED WARRANTY SETS FORTH THE SOLE REMEDY AGAINST HENNY PENNY FOR ANY BREACH OF
WARRANTY OR OTHER TERM. BUYER AGREES THAT NO OTHER REMEDY (INCLUDING CLAIMS FOR ANY INCIDENTAL OR CONSEQUENTAL DAMAGES) SHALL BE AVAILABLE.
The above limited warranty does not apply (a) to damage resulting from accident, alteration, misuse, or abuse; (b) if the equipment’s serial number is removed or defaced; or (c) for lamps and fuses.
THE ABOVE LIMITED WARRANTY IS EXPRESSLY IN LIEU OF ALL OTHER WARRANTIES, EXPRESS OR IMPLIED,
INCLUDING MERCHANT ABILITY AND FITNESS, AND ALL OTHER WARRANTIES ARE EXCLUDED. HENNY PENNY
NEITHER ASSUMES NOR AUTHORIZES ANY PERSON TO ASSUME FOR IT ANY OTHER OBLIGATION OR LIABILITY.

Dear Customer:
Congratulations on your decision to purchase a new Henny Penny Sure Chef®Combi-Steamer. In our
opinion, you now possess the most advanced combi-steamer in the industry. As you begin to become
familiar with its operation and more confident in the results, you will see the incredible potential for
quality, variety and productivity this unit has to offer. In fact, this new concept in cooking may change
your entire approach to hot food production.
The Sure Chef Combi-Steamer is not difficult to operate. But it is a fairly complex piece of equipment.
We recommend a thorough study of this Application Manual. It is filled with information, suggestions
and explanations that will help you achieve the potential of the unit. Keep the manual in a safe place,
but accessible for easy reference.
Henny Penny products are known for their outstanding craftsmanship, leading edge technology and
user-friendly operation. As a company, we believe in establishing a partnership with our customers that
leads both parties to long-term success. In that spirit, we remain interested in any questions, comments, suggestions or ideas you may have concerning the combi-steamer you have purchased, as well
as this manual.
We hope you enjoy good food and good profits with your new Sure Chef Combi-Steamer. Welcome to
the world of imaginative cooking!
Henny Penny Corporation
800-417-8417

Table of Contents
Glossary of Terms . . . . . . . . . . . . . . . . . . . . . . . . . . . . . . . . . . . . . . . . . . . . . . . . . . . . . . . . . . . . . . . 5
Features at a Glance . . . . . . . . . . . . . . . . . . . . . . . . . . . . . . . . . . . . . . . . . . . . . . . . . . . . . . . . . . . . . . 7
Loading and Unloading . . . . . . . . . . . . . . . . . . . . . . . . . . . . . . . . . . . . . . . . . . . . . . . . . . . . . . . . . . . 9
Control Panel Functions at a Glance . . . . . . . . . . . . . . . . . . . . . . . . . . . . . . . . . . . . . . . . . . . . . . . . . 11
Basic Operation
Cooking Modes . . . . . . . . . . . . . . . . . . . . . . . . . . . . . . . . . . . . . . . . . . . . . . . . . . . . . . . . . . . . . . . . 16
Steam Mode . . . . . . . . . . . . . . . . . . . . . . . . . . . . . . . . . . . . . . . . . . . . . . . . . . . . . . . . . . . . . . . . . . 20
Convection Mode . . . . . . . . . . . . . . . . . . . . . . . . . . . . . . . . . . . . . . . . . . . . . . . . . . . . . . . . . . . . . . 24
Combination Mode . . . . . . . . . . . . . . . . . . . . . . . . . . . . . . . . . . . . . . . . . . . . . . . . . . . . . . . . . . . . . 28
Tender Steaming . . . . . . . . . . . . . . . . . . . . . . . . . . . . . . . . . . . . . . . . . . . . . . . . . . . . . . . . . . . . . . . 32
Rethermalizing . . . . . . . . . . . . . . . . . . . . . . . . . . . . . . . . . . . . . . . . . . . . . . . . . . . . . . . . . . . . . . . . 36
Forced Steaming . . . . . . . . . . . . . . . . . . . . . . . . . . . . . . . . . . . . . . . . . . . . . . . . . . . . . . . . . . . . . . . 40
SDHC . . . . . . . . . . . . . . . . . . . . . . . . . . . . . . . . . . . . . . . . . . . . . . . . . . . . . . . . . . . . . . . . . . . . . . . . 42
Probe Cooking . . . . . . . . . . . . . . . . . . . . . . . . . . . . . . . . . . . . . . . . . . . . . . . . . . . . . . . . . . . . . . . . 45
Cool Down . . . . . . . . . . . . . . . . . . . . . . . . . . . . . . . . . . . . . . . . . . . . . . . . . . . . . . . . . . . . . . . . . . . . 49
Steam Injection . . . . . . . . . . . . . . . . . . . . . . . . . . . . . . . . . . . . . . . . . . . . . . . . . . . . . . . . . . . . . . . . 51
Half Fan Speed . . . . . . . . . . . . . . . . . . . . . . . . . . . . . . . . . . . . . . . . . . . . . . . . . . . . . . . . . . . . . . . . 53
Half Energy . . . . . . . . . . . . . . . . . . . . . . . . . . . . . . . . . . . . . . . . . . . . . . . . . . . . . . . . . . . . . . . . . . . 54
Pulse Fan . . . . . . . . . . . . . . . . . . . . . . . . . . . . . . . . . . . . . . . . . . . . . . . . . . . . . . . . . . . . . . . . . . . . . 55
Delta-T . . . . . . . . . . . . . . . . . . . . . . . . . . . . . . . . . . . . . . . . . . . . . . . . . . . . . . . . . . . . . . . . . . . . . . . 57
Quick Guide To Programming . . . . . . . . . . . . . . . . . . . . . . . . . . . . . . . . . . . . . . . . . . . . . . . . . . . . . 58
Cleaning . . . . . . . . . . . . . . . . . . . . . . . . . . . . . . . . . . . . . . . . . . . . . . . . . . . . . . . . . . . . . . . . . . . . . . . . 60
Installation – Electric Units . . . . . . . . . . . . . . . . . . . . . . . . . . . . . . . . . . . . . . . . . . . . . . . . . . . . . . . . 62
Installation – Gas Units . . . . . . . . . . . . . . . . . . . . . . . . . . . . . . . . . . . . . . . . . . . . . . . . . . . . . . . . . . . . 66
Cooking Guidelines . . . . . . . . . . . . . . . . . . . . . . . . . . . . . . . . . . . . . . . . . . . . . . . . . . . . . . . . . . . . . . 74

Indication of Safety Warnings
Throughout this manual you will see the following words and symbols relating to important issues
of personal safety and proper operation. Their usage is described here:
DANGER
The word DANGER indicates an imminent hazard which
will result in highly serious injury, such as severe burns.
WARNING
The word WARNING is used to alert you to a procedure,
that if not performed properly, may cause personal injury.
CAUTION
The word CAUTION is used to alert you to a procedure
that, if not performed properly, may damage the equipment.
IMPORTANT
The word IMPORTANT is used to highlight especially important information
NOTE
The word NOTE is used to separate additional useful subject matter for the sake of clarity.

CSL
CSM
CSB
CSG
5
Glossary of Terms
for Sure Chef®Combi-Steamers
Auto Flush–A built-in feature that periodically and automatically drains, flushes and
refills the steam generator.
Cooking Mode–Any of several settings that produce a particular cooking medium or
environment.
Steam Mode–Cooking by pressureless steam produced in the built-in steam generator
and circulated by the high-speed fan.
Convection Mode–Dry heat produced by heating elements and circulated by the
high speed fan.
Combination Mode–A cooking mode that combines steam and convection heat to
produce a controlled environment.
Temperature Control–The method in which the cooking temperature in the cabinet
is selected or changed.
Timer–A switch that sets and measures cooking time in the cabinet and stops the
cooking process when time has elapsed.
Digital Readout (LED)–A lighted panel that displays the mode, function or other
information about the operation of the unit.
Food Probe–A device that monitors the internal temperature of food product during
cooking and stops the cooking process at a preselected temperature.
Probe Cooking–Any cooking method that utilizes the food probe.
Hand Held Sprayer–A spray nozzle for cleaning the unit that is attached to a
retractable hose built into the unit and connected to the unit’s water line.
Tender Steaming–A low temperature cooking method used to produce delicate foods
with less air turbulence at temperatures between 86° (30°C) to 212°F (100°C).
Rethermalizing Mode–A cooking mode that quickly brings precooked (chilled)
product back to serving temperatures and conditions.
For a better understanding of the settings, functions and general operation of Sure Chef CombiSteamers as described in this manual, please familiarize yourself with the following terms, definitions and symbols.

6
Programming–A function that allows the storing of up to 99 sets of cooking steps (recipes
in the unit’s memory.
Steam Injection–A feature of the Convection mode that sprays a 4-second burst of water onto
the heating elements to create a small amount of steam momentarily. Often used to help in the
browning of certain foods.
Half-Energy–A function that shuts off half the heating elements in order to extend the
cooking time for slow-cooked product.
Half-Fan Speed–A function that reduces fan speed by one-half for less turbulence.
Pulse Fan–A function that operates the fan intermittently: On for 10 seconds, off for 110
seconds. Often used in cooking delicate items.
Fully Digital–All control panel functions are controlled by computer and activated by touch
pad buttons.
Delta T Cooking–A cooking technique that raises the cooking temperature in the cabinet
in direct relationship to the rise in product’s internal temperature. Often used in preparing
large fresh or cured meat roasts.
Auto Reverse Fan–A function that operates the fan 2 minutes forward then 2 minutes
reverse. Helps produce even browning.
Filterless Grease Extraction–A feature of the Auto Reverse Fan that removes grease from
the air centrifugally, eliminating the need for grease filters.
SDHC–The acronym for Smart Digital Humidity Control. This is a control technology that
automatically measures and regulates the level of humidity in the cooking cabinet.
Cool Down–A feature that quickly reduces the cabinet temperature by allowing the fan to
operate while the door is open.
Forced Steaming–A cooking method in which convection heat is used to drive up cabinet
temperatures, allowing steaming at temperatures between: 213° (101°C) and 265°F (130°C).

CSL
CSM
CSB
CSG
7
Sure Chef®Combi-Steamers – Features
at a glance
Models
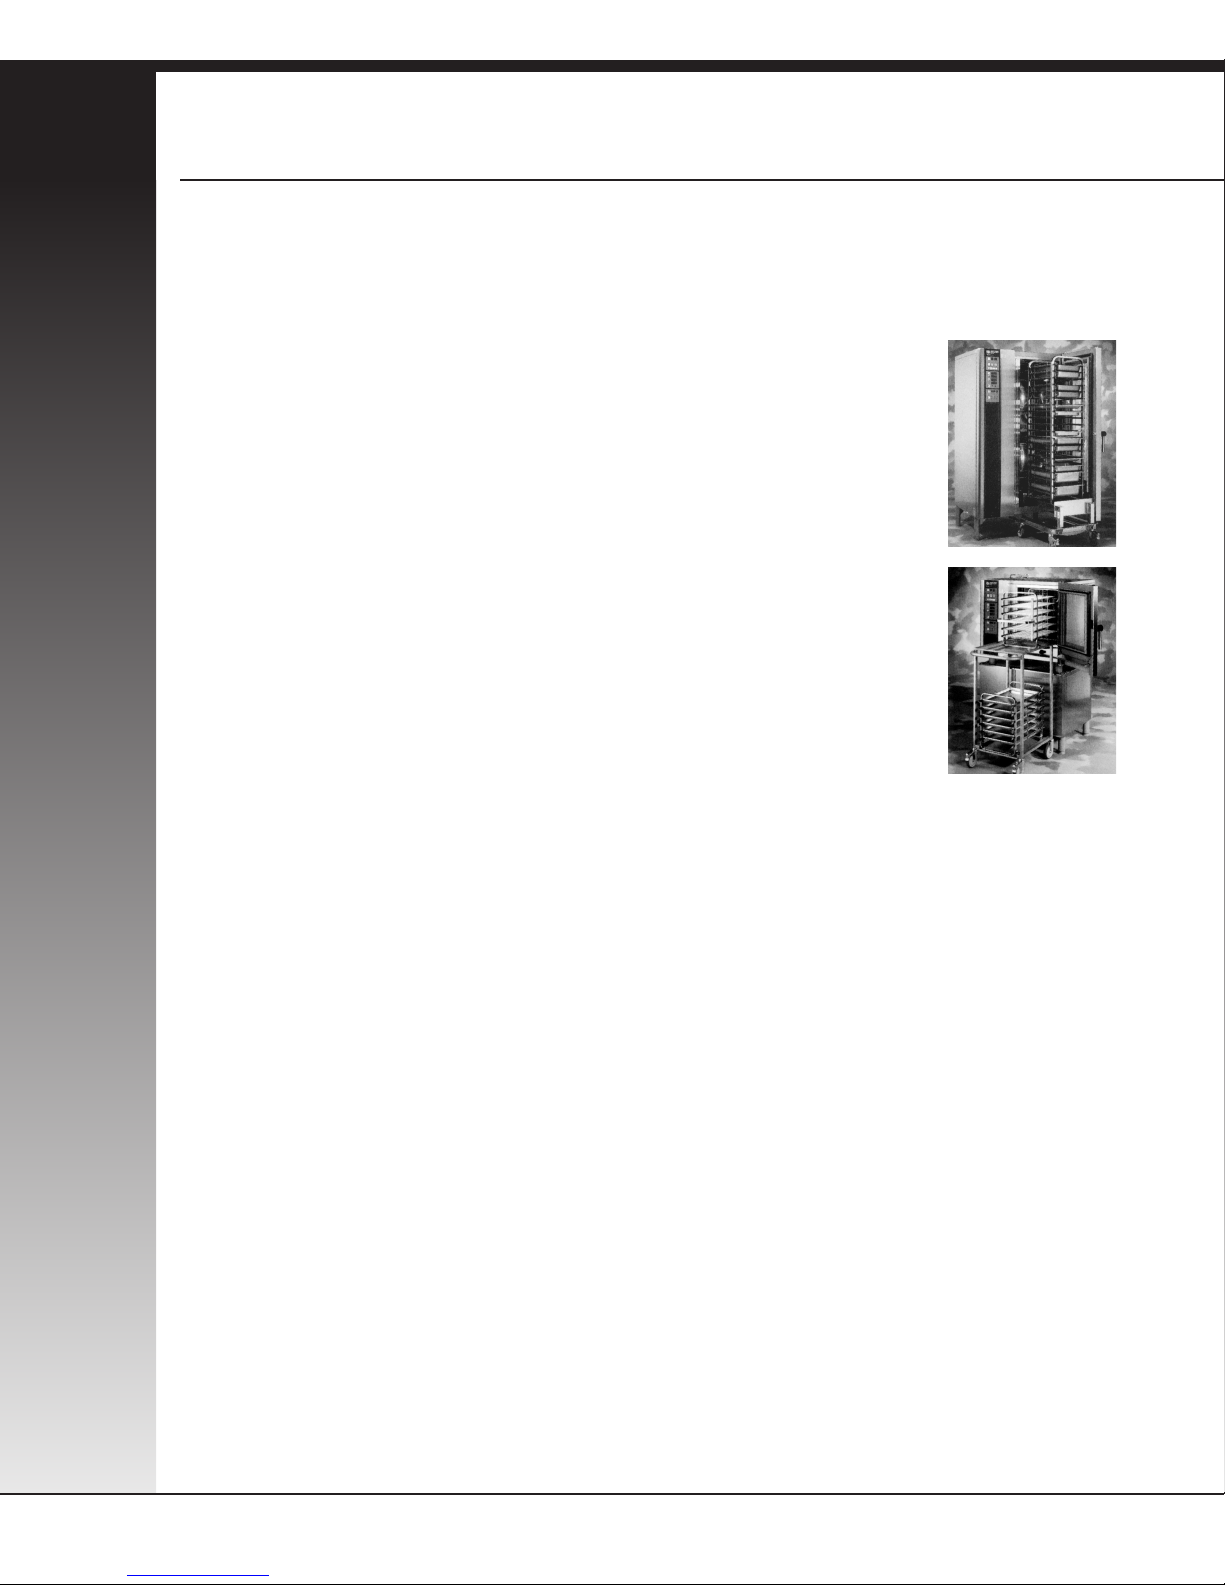
Sure Chef Combi-Steamers come in three electric models: CSB, CSM, and CSL;
and one gas model, CSG.
Sizes
• Model Sizes are designated by the number of 12” x 20” x 2
1
⁄
2
” pans each is capable
of holding.
• Electric models come in five sizes: 6 (6-pan, counter model), 10 (10-pan, counter
model), 1020 (20-pan, counter model*), 20 (20-pan, floor model) and 40 (40-pan,
floor model**).
• Gas models come in three sizes: 10 (10-pan, counter model), 12 (12-pan, counter
model), and 20 (20-pan, floor model).
NOTE: Features vary according to model type. Accessories tend to vary according to unit
size. You may occasionally see references such as CSB/M/L-6. This means that the reference
applies to all electric models in that size. A reference such as CSL-6/10/20/40 applies to the
CSL model in all sizes.
* The 1020 model is designed for holding up to (10) full size 18” x 26” bun pans with adaptor,
as well as (20) 12” x 20” x 2
1
⁄2“ steam pans.
** The 40 model is designed to hold up to (20) 18” x 26” bun pans with adaptor.

8
Feature CSL CSM CSB CSG
Auto Flush
••••
Auto-Reverse Fan
•••
Cooking Modes
Combination
••••
Convection
••••
Rethermalizing In Combination
••
Steam
••••
Tender Steaming In Steam
••
Cool-Down
•••
Delta-T Cooking
•
Digital Readout
•• •
Dual Glass Door
•••
Electro-Mechanical Controls
•••
Electronic Touch Pad Controls
••
Filterless Grease Extraction
•••
Hand Held Sprayer
••
Optional
•
Half Energy
••
Half Fan
••
Probe Cooking
••
Optional
•
Programmable Operation
••
Pulse Fan
•
SDHC Full Limited
Steam Injection
••
All units require drain and water source.
Units can be ordered with left-hand hinged door, optional.
Please specify phase and voltage with order. These cannot be changed in the field.
CSL
CSM
CSB
CSG
9
Loading & Unloading
Your Sure Chef Combi-Steamer includes a Mobile Oven Rack that is integral to the unit’s
operation. All food product is loaded onto the oven rack which is then loaded into the
cooking cabinet.
• Floor Models–CSB/M/L-20 and 40, and CSG-20, use Mobile Oven
Racks designed to roll directly into cabinets. Door closes and seals
around Mobile Oven Rack.
• Counter Models–CSB/M/L-6, 10 and 1020, and CSG-10 and 12
utilize Transport Carts upon which Mobile Oven Racks may be
placed. The Transport Cart is rolled up to the unit, and the Mobile
Oven Rack rolls directly into the cabinet.
IMPORTANT: During the loading and unloading process for counter
models, lock front casters of Transport Cart when car t is stationary. Lock
front wheels on Mobile Oven Rack with locking lever near right front wheel.
Unlock wheels of Mobile Oven Rack ONLY when rolling in or out of unit.
This will keep Mobile Oven Rack stable on Transport Cart.
Full Loads
To Load
• Place food product on appropriate grids, pans and racks. Load onto Mobile Oven Rack.
• Preheat unit to desired temperature.
•Open door slightly until fan stops and heat dissipates. Open door fully with care.
• (Floor models) Roll loaded Mobile Oven Rack directly into unit.
(Counter models) Roll loaded Mobile Oven Rack on Transport Cart up to unit.
Lock front casters on Transport Cart to prevent movement. Release wheel lock on
Mobile Oven Transport Cart and roll into unit.
• Shut door and begin cooking.
To Unload
• Signal will sound when cooking cycle is complete
• Open door slightly until fan stops and heat dissipates. Open door fully with care.
• (Floor models) Roll Mobile Oven Rack straight out of unit and to appropriate location.
(Counter models) Roll Transport Cart up to unit, lock front casters on Transport Cart
and roll Mobile Oven Rack out of unit and onto Transport Cart. Lock front wheel of
Mobile Oven Rack. Release locked front caster on Transport Cart and roll away from
unit to appropriate location.

10
Partial Loads
Individual pans or racks of product can be easily loaded or unloaded while the unit is in
operation.
•Open door slightly until fan stops and heat dissipates. Open door fully with care.
• Load or unload pans or racks directly to or from Mobile Oven Rack in unit. It is not
necessary to remove Mobile Oven Rack.
• Shut door. Cooking process continues automatically.
Tips
• No flavor transfer occurs during cooking, so consider load by the type of cooking mode
(Steam, Convection, Combination) being used.
•When cooking for longer periods, or on Continous cooking, load items that will be done
sooner toward the front of the rack. These can be removed individually when done.
• For greatest efficiency, try to cook with full loads. In general, cooking times and temperatures are not affected by the quantity of product in the cooking cabinet.
•When loading roasts, or large cuts of meat, place product directly on racks and load near
the bottom of the Mobile Oven Rack. Load an empty pan directly beneath roast to catch
drippings and roast bones.
• For counter models, consider ordering Combi-Steamer Base Units. Several styles are
available that include enclosed pan storage for convenient access to pans, grids and racks.
X
Opening Door During Operation
Open door slightly to allow hot steam and/or vapors to escape. KEEP FACE AND HANDS AWAY FROM OPENING or
burns could result. When steam and/or heat has dissipated open door fully with care. Escaping hot steam and/or vapors
can cause serious burns. Interior surfaces extremely hot, including pans, grids and oven racks. To prevent burns, allow
unit to cool, or use appropriate heat resistant protective mitt or pad when handling.
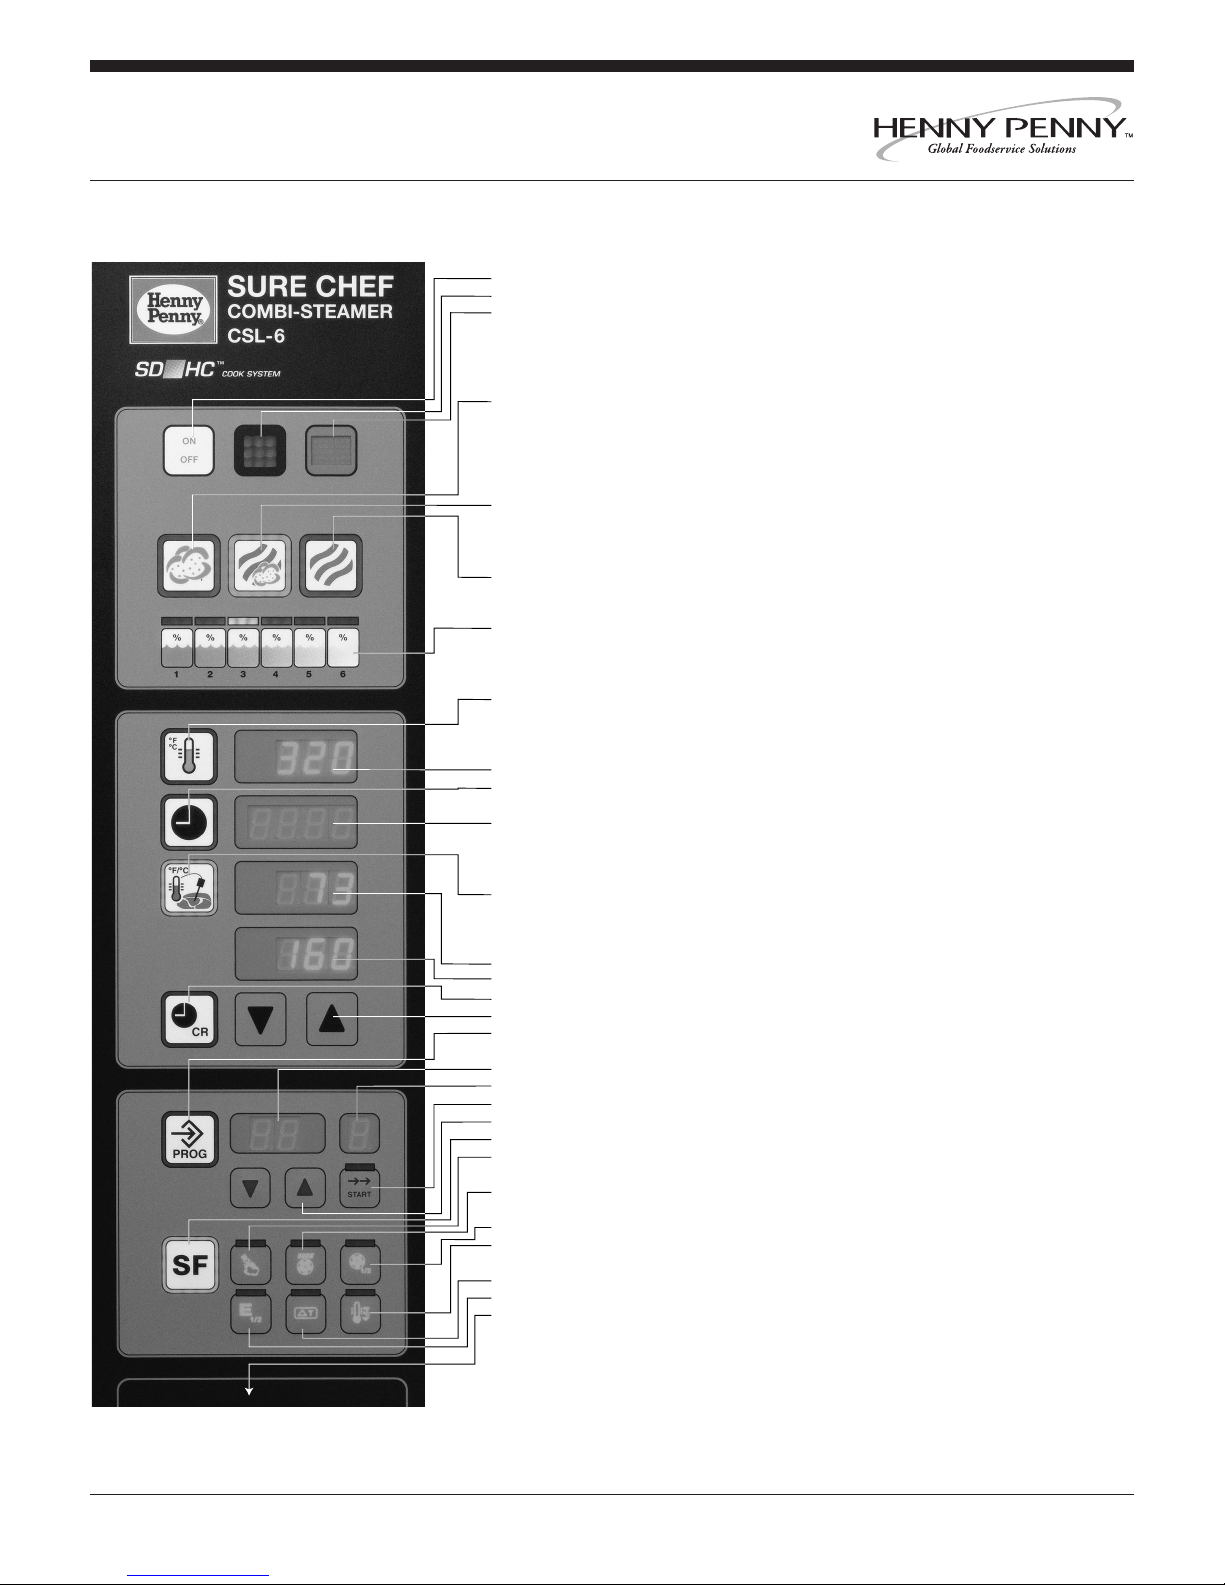
Sure Chef
®
Combi-Steamer models CSL-6/10/1020/20/40
1 ON/OFF switch
2 ON indicator light (green)
3Message display
• NO WATER warning–check water supply
• Displays steam exhaust flap position
• Displays SDHC humidity level
Cooking mode selection key (lighted display indicates the selected mode)
4 STEAM mode–86°F to 266°F (30°C to 130°C)
•Normal steaming, pre-set at 212°F (100°C)
• Tender Steaming 86°F to 212°F (30°C to 100°C)
• Forced steaming, 213°F to 266°F (101°C to 130°C)
• Light ring around Steam key flashes when cabinet temperature exceeds
pre-selected temperature by 20°F (10°C)
5 COMBINATION mode–86°F to 575°F (30°C to 300°C)
• Pre-set to 320°F (160°C) and 100% SDHC
• Control humidity with SDHC function (7)
• Rethermalize in this mode
6 CONVECTION mode–86°F to 575°F (30°C to 300°C)
• Pre-set to 320°F (160°C) and 100% SDHC
• Reduce humidity with SDHC function (7)
7 SDHC Smart Digital Humidity Control
• Six possible moisture levels from 100% to 0%
• Control humidity in Combination mode
• Reduce humidity (from cooking product) in Convection mode
8 CABINET TEMPERATURE indicator key
• Press to indicate temperature selection. Adjust and select with SELECT arrow keys (16)
• Press and hold to display actual cabinet temperature
• Key lights up during preheating
9 Interior cabinet temperature display
10 TIMER activation key
• Press to activate cook time. Adjust and select with SELECT arrow keys (16)
11 COOKING TIME display
• Selected time (0 to 24 hr) displayed with period between hours and minutes. When
timer selection is activated, period flashes. Actual cooking time remaining is displayed
with flashing colon between hours and minutes.
12 PROBE COOKING activation key
• Press to activate Probe Cooking function. Adjust and select food internal “done”
temperature range from 68°F to 210°F (20°C to 99°C) using SELECT arrow keys (16).
• Upon reaching “done” temperature, audio signal sounds and unit shuts off automatically
13 Actual food probe temperature display
14 Pre-selected “done” temperature display
15 Continuous Run key
16 SELECT arrow keys for temperature, time and food probe temperature
17 PROGRAM activation key
• Press to enter programming function and display program number
18 Program number (1 to 98 for cooking programs, plus number 99 pre-programmed for cleaning)
19 Program stage (1 to 9 intervals)
20 Program START key
21 Program SELECT arrow keys
22 SPECIAL FUNCTIONS activation key (press to display)
23 STEAM INJECTION
• Four-second burst of steam in Convection mode between 250°F (120°C) and 480°F (250°C)
24 PULSE FAN
• Fan runs ON 10 seconds, OFF 110 seconds
25 HALF-FAN SPEED
26 COOL DOWN
• Fan continues to operate when door is open, reducing cabinet temperature rapidly
27 DELTA-T Cooking
28 HALF-ENERGY
29 Unit serial number
Please refer to this number when requesting service
11
Control Panel Functions
at a glance

Sure Chef
®
Combi-Steamer models CSM-6/10/1020/20/40
1 ON indicator light (green)
2 Message display
•NO WATER warning–check water supply
•Displays steam exhaust flap position
3 Mode selection switch (lighted display indicates the selected mode)
4 STEAM mode–212°F (100°C)
• For steaming, stewing, blanching, preserving, etc.
• 212°F (100°C), and 100% humidity
• Steam Mode LED flashes when cabinet temperature exceeds 239°F (115°C) in Steam mode
5 CONVECTION mode–86°F to 575°F (30°C to 300°C)
• For roasting, baking grilling, etc
• Pre-setting: flap closed
6 COMBINATION mode–86°F to 575°F (30°C to 300°C)
• For Combi-Steaming instead of roasting and glazing or baking with moisture
• Forced Steaming between 213°F to 266°F (101°C to 130°C)–firm vegetables
or potatoes are cooked more quickly
• Pre-setting: flap closed
7 TENDER STEAMING mode–86°F to 210°F (30°C to 99°C)
• For blanching, poaching, simmering, soaking, vacuum cooking
• Pre-setting: flap closed
•Message display flashes when cabinet temperature exceeds pre-selected
temperature by 20°F (10°C)
8 RETHERMALIZING mode–86°F to 575°F (30°C to 300°C)
• For reheating pre-cooked (chilled) food
• Pre-setting: Flap closed
9 PROGRAM function
• Create and store up to 99 cooking programs of 9 steps each
10 CABINET TEMPERATURE indicator key
• Key lights up during preheating
• Press key to display cabinet temperature
11 TEMPERATURE SELECTION dial
12 TEMPERATURE DISPLAY
•Displays selected cooking temperature
•Displays cabinet temperature when CABINET TEMPERATURE key is pressed
13 TIMER activation key
• Select time using the TIMER/PROBE COOKING dial (15)
• Press key to activate timer
14 COOKING TIME display
• Shows actual cooking time remaining
15 TIMER/PROBE COOKING dial
• Set TIMER for 0 minutes to 120 minutes, press TIMER activation key (13)
• Set PROBE temperature from 68°F to 210°F (20°C to 99°C), press PROBE
COOKING key (16)
• Select “CR” for Continuous Run
16 PROBE COOKING key
• Select food internal “done” temperature using TIMER/PROBE COOKING dial (15)
• Press key to select Probe Cooking function
17 PROBE COOKING display
• Upper display indicates actual internal food temperature
• Lower display shows pre-selected “done” temperature
Additional functions
18 HALF-FAN SPEED
19 STEAM INJECTION
• Four-second burst of steam in Convection mode between 250°F (120°C) and 480°F (250°C)
20 COOL DOWN
• Fan continues to operate when door is open, reducing cabinet temperature rapidly
21 HALF-ENERGY
22 SDHC (Smart Digital Humidity Control) operational in Convection, Combination and
Rethermalizing modes
• Pre-setting for all modes: flap closed
• Lighted display: Left–moisture removed to 50% humidity. Right–all moisture removed (0%),
flap open. No display–no moisture removed (100%), flap closed.
Programming (press and display)
23 Program number (1 to 99)
24 Program stage (1 to 9 intervals)
25 Program START key
26 Program SELECT arrow keys
27 Unit serial number
Please refer to this number when requesting service
12
Control Panel Functions
at a glance

Sure Chef
®
Combi-Steamer models CSB-6/10/1020/20/40
1 Warning light– lights red when cabinet temperature exceeds 239°F (115°C)
in Steam mode
2 NO WATER Warning light–check water supply
3 ON indicator light (green)
4 Mode selection switch
5 STEAM mode–212°F (100°C)
• For steaming, stewing, blanching, preserving...
6 CONVECTION mode–140°F to 575°F (60°C to 300°C)
• For roasting, baking grilling, etc.
7 COMBINATION mode–140°F to 575°F (60°C to 300°C)
• For Combi-Steaming instead of roasting and glazing or baking with
moisture rethermalizing
• Forced Steaming between 213°F to 266°F (101°C to 130°C)–firm vegetables
or potatoes are cooked more quickly
8 Additional function COOL DOWN
• Fan continues to operate when door is open, reducing cabinet
temperature rapidly
9 TEMPERATURE selection dial
• For convection and combination modes
10 HEAT ON indicator
• Lights during preheating
11 TIMER (0 to 100 minutes)
• Set on “D” for Continuous Run
12 FOOD PROBE DISPLAY 68°F to 210°F (20°C to 99°C)–(optional feature)
• Indicates pre-selected food probe temperature
• Indicates internal temperature of food
13 FOOD PROBE pre-selected TEMPERATURE
switch–(optional feature)
14 Unit serial number
Please refer to this number when requesting service.
13
Control Panel Functions
at a glance
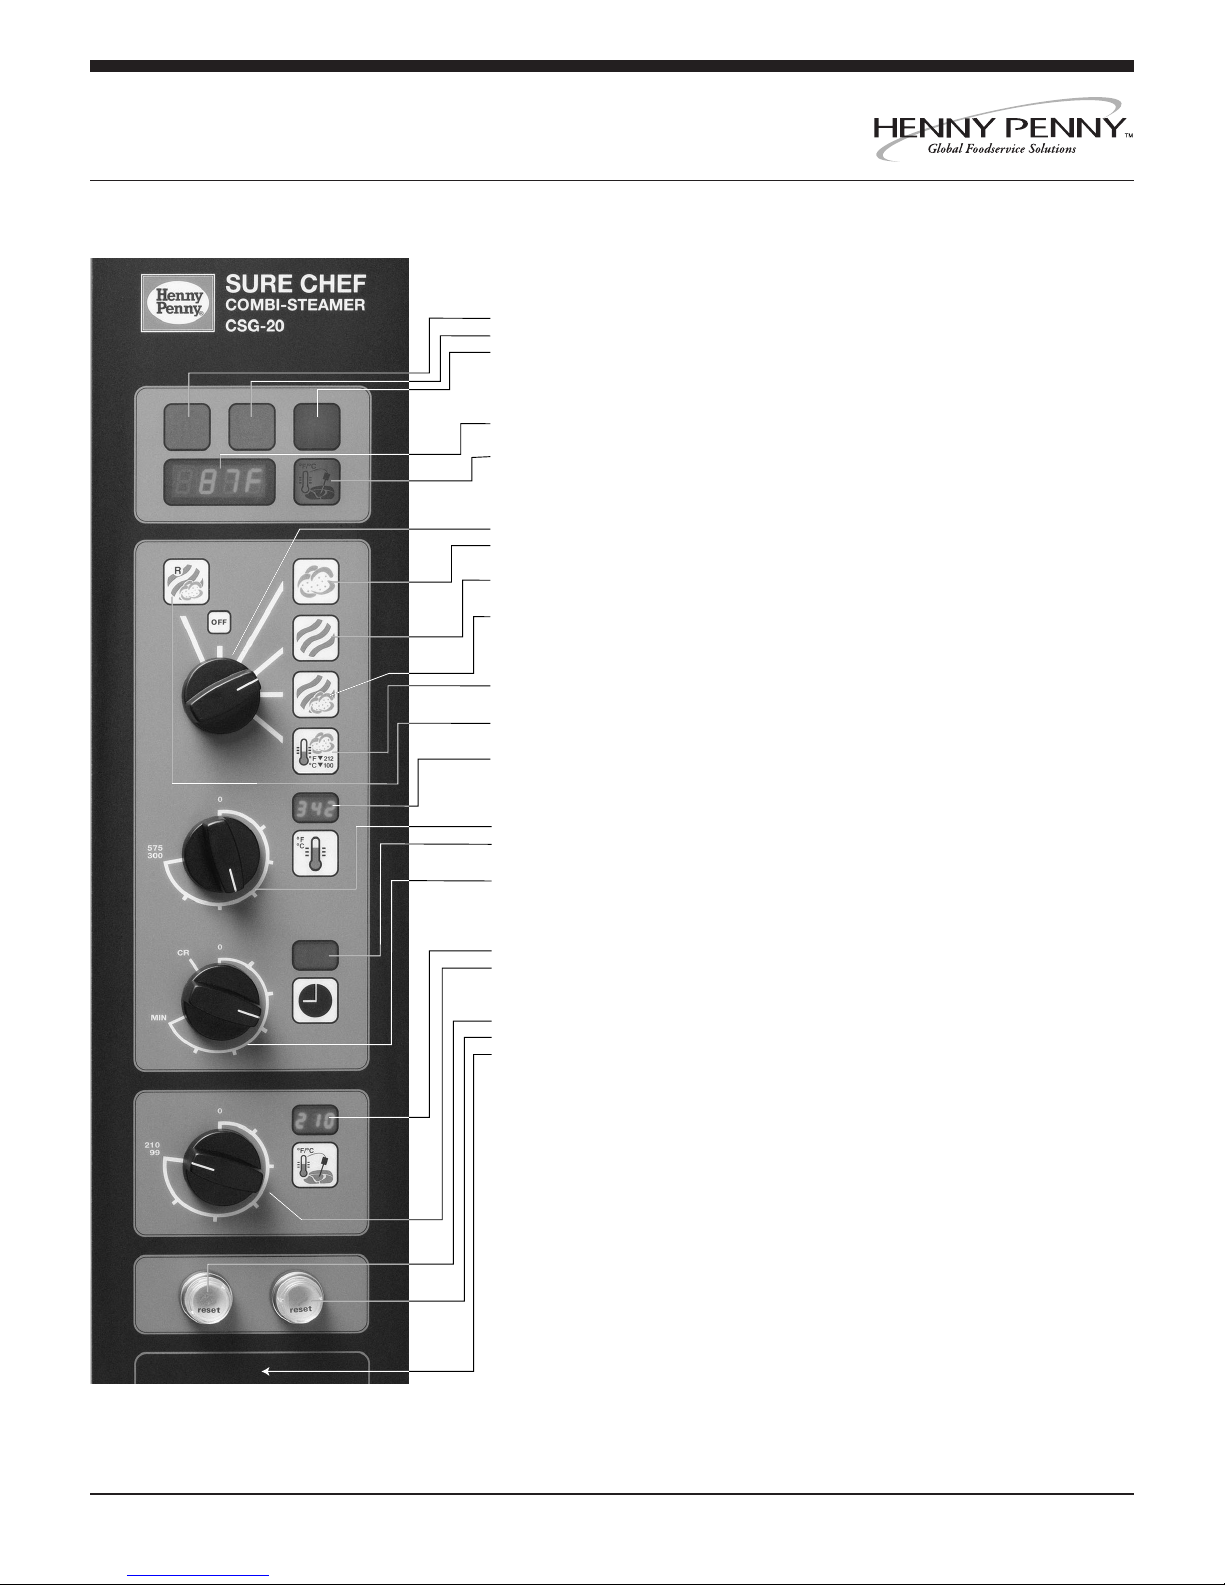
Sure Chef
®
Combi-Steamer models CSG-10/12/20
1Warning light–lights red when cabinet temperature exceeds 239°F (115°C)
2 NO WATER warning light (red)–check water supply
3 ON indicator light (green)
4Digital COOKING/PROBE TEMPERATURE display–actual cabinet
or internal food/probe temperature
5 PROBE COOKING indicator display
6Mode selection switch (lighted display indicates the selected mode)
7 STEAM mode–212°F (100°C)
• For steaming, stewing, blanching, preserving, etc.
8CONVECTION mode–86°F to 575°F (30°C to 300°C)
• For roasting, baking grilling, etc
9COMBINATION mode–86°F to 575°F (30°C to 300°C)
• For Combi-Steaming instead of roasting and glazing or baking with moisture
• Forced Steaming between 213°F to 266°F (101°C to 130°C)–firm vegetables
or potatoes are cooked more quickly
10 TENDER STEAMING mode–86°F to 210°F (30°C to 99°C)
• For blanching, poaching, simmering, soaking, vacuum cooking
11 RETHERMALIZING mode–86°F to 575°F (30°C to 300°C)
• For reheating pre-cooked (chilled) food
12 SELECTED TEMPERATURE display
13 TEMPERATURE SELECTION dial
14 COOKING TIME display
• Shows actual cooking time remaining
15 TIMER dial (0 to 120 minutes)
• Select “CR” for Continuous Run
16 PROBE pre-selected “DONE” TEMPERATURE display
17 PROBE TEMPERATURE SELECTION dial
• Select from 68°F to 210°F (20°C to 99°C)
• Unit shuts off automatically when “done” temperature is reached
18 Warning light–Steam burner malfunction
19 Warning light–Convection burner malfunction
20 Unit serial number
Please refer to this number when requesting service
14
Control Panel Functions
at a glance

15
Basic
Operations
CSL
16
CSM
CSB
CSG
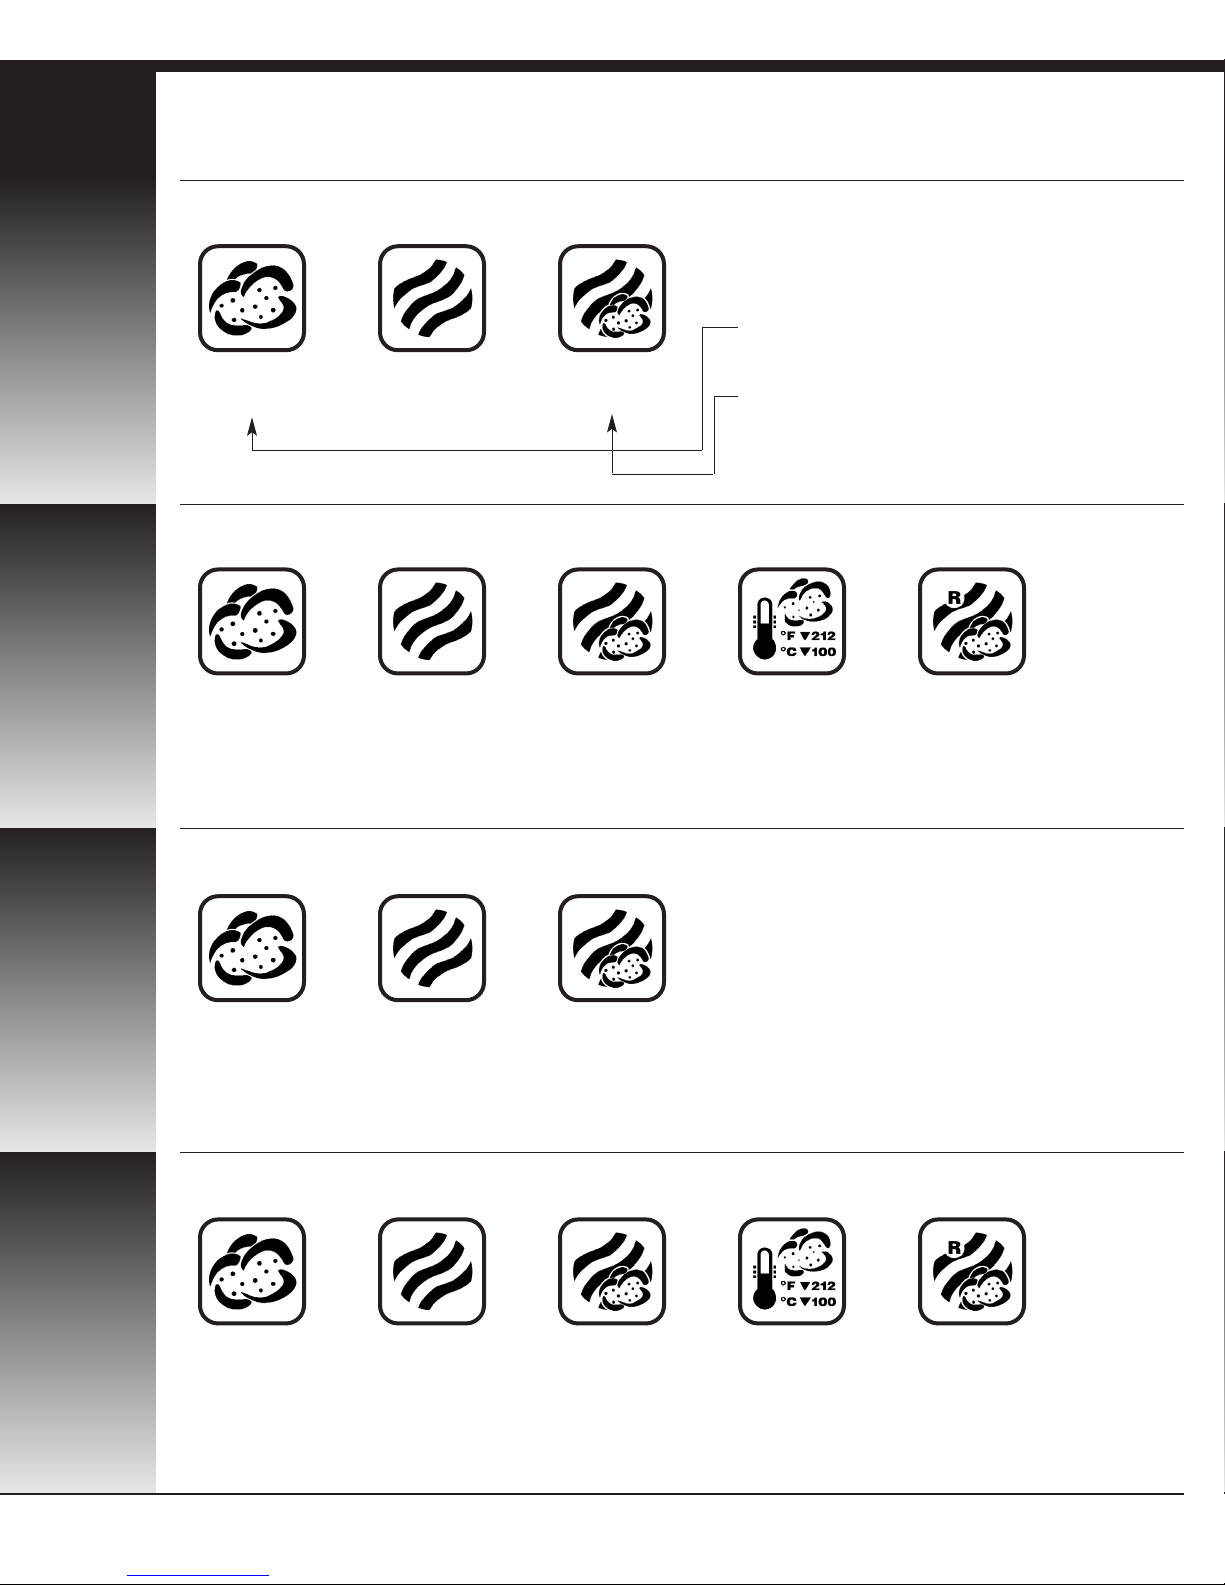
CSL models have three basic cooking modes:
CSM models have five basic cooking modes:
CSB models have three basic cooking modes:
CSG models have five basic cooking modes:
Cooking Modes
Steam
Mode
Convection
Mode
Combination
Mode
Steam
Mode
Convection
Mode
Combination
Mode
Tender
Steaming
Mode
Rethermalizing
Mode
Steam
Mode
Convection
Mode
Combination
Mode
Steam
Mode
Convection
Mode
Combination
Mode
Tender
Steaming
Mode
Rethermalizing
Mode
Fully digital operation of the CSL offers a wider
range of control within these modes. Therefore...
Tender Steaming
is accomplished in the Steam Mode.
Rethermalizing
is accomplished in the Combination Mode.

CSL
17
CSM
CSB
CSG
Steam mode–for moist heat
The steam generator produces hygienic steam and releases it pressureless into the cooking cabinet
where it is is circulated at high speeds by the fan. The unit’s control system allows only as much steam
into the cabinet as the food is able to absorb. The cooking temperature in this mode can be regulated
from 86°F (30°C) to 265°F (130°C) to accomplish Tender Steaming as well as normal steaming.
Convection mode–for dry heat
Powerful heating elements heat the air inside the cabinet. The fan circulates this hot, dry air evenly
throughout the interior. Temperature can be regulated precisely between 86°F (30°C) to 575°F
(300°C)
• Cooking environment can be manipulated extensively with additional functions and SDHC.
Steam mode–for moist heat
The steam generator produces hygienic steam and releases it pressureless into the cooking cabinet
where it is is circulated at high speeds by the fan. The unit’s control system allows only as much steam
into the cabinet as the food is able to absorb. The cooking temperature in this mode is fixed at 212°F
(100°C).
Convection mode–for dry heat
Powerful heating elements heat the air inside the cabinet. The fan circulates this hot, dry air evenly
throughout the interior. Temperature can be regulated precisely between 140°F (60°C) to 575°F
(300°C)
Steam mode–for moist heat
The steam generator produces hygienic steam and releases it pressureless into the cooking cabinet
where it is is circulated at high speeds by the fan. The unit’s control system allows only as much steam
into the cabinet as the food is able to absorb. The cooking temperature in this mode is fixed at 212°F
(100°C).
Convection mode–for dry heat
A powerful heat exchanger heats air through an indirect process–exhaust fumes cannot enter the
cooking cabinet. The fan circulates this hot, dry air evenly throughout the interior. Temperature can
be regulated precisely between 86°F (30°C) to 575°F (300°C).
Cooking Modes
(continued)

18
Combination mode–for variable temperature moist heat
The unit’s control system combines both Steam and Convection modes to create a humid cooking environment at
temperatures higher or lower than 212°F (100°C). Temperatures can be selected from 86°F (30°C)
to 575°F (300°). Cooking environment remains at optimal humidity to prevent food from dr ying out.
• Cooking environment can be manipulated extensively with additional functions and SDHC.
• Rethermalizing is accomplished in this mode at 60% SDHC or less.
• Cooking Modes can be used individually, in sequence or in any combination to achieve desired results.
Combination mode–for variable temperature moist heat
The unit’s control system combines both Steam and Convection modes to create a humid cooking environment at
temperatures higher or lower than 212°F (100°C). Temperatures can be selected from 86°F (30°C) to 575°F
(300°C). Cooking environment remains at optimal humidity to prevent food from dr ying out.
• Cooking environment can be manipulated extensively with additional functions and SDHC.
Tender Steaming mode–for low temperature moist heat
In this mode, an automatic sensor keeps the pre-selected temperature constant within a moist cooking environment. Temperatures can be selected from 86°F (30°C) to 210°F (99°C). Temperature may vary +/- 3
1
⁄2°F ( 1°C)
Combination mode–for high temperature moist heat
The unit’s control system combines both Steam and Convection modes to create a humid cooking environment at
temperatures higher than 212°F (100°C). Temperatures can be selected from 140°F (60°C) to 575°F (300°C).
Cooking environment retains 100% humidity to prevent food from dr ying out.
• Cooking Modes can be used individually, in sequence or in any combination to achieve desired results.
Combination mode–for variable temperature moist heat
The unit’s control system combines both Steam and Convection modes to create a humid cooking environment at
temperatures higher than 212°F (100°C). Temperatures can be selected from 86°F (30°C) to 575°F (300°C).
Cooking environment remains at optimal humidity to prevent food from dr ying out.
Tender Steaming mode–for low temperature moist heat
In this mode, an automatic sensor keeps the pre-selected temperature constant within a moist cooking
environment. Temperatures can be selected from 86°F (30°C) to 210°F (99°C). Temperature may vary +/3
1
⁄
2°F
(1°C)

19
Rethermalizing mode–for optimum reheating
This is a specialized mode that combines moist and dry heat to create the ideal environment for reheating
previously cooked foods. Rethermalizing restores the look, taste and temperature of food without drying or water
marks. Temperatures can be selected from 86°F (30°C) to 575°F (300°C).
• Cooking environment can be manipulated extensively with additional functions and SDHC.
• Humidity is limited to a maximum of 60%.
• Cooking Modes can be used individually, in sequence or in any combination to achieve desired results.
Rethermalizing mode–for optimum reheating
This is a specialized mode that combines moist and dry heat to create the ideal environment for reheating
previously cooked foods. Rethermalizing restores the look, taste and temperature of food without drying or water
marks. Temperatures can be selected from 86°F (30°C) to 575°F (300°C)
• Cooking Modes can be used individually, in sequence or in any combination to achieve desired results.
• Humidity is controlled to approximately 60%.
Cooking Modes
(continued)

CSL
CSM
CSB
CSG
20
Advantages
• Extremely short preheating time
• Excellent food consistency
• Conserves nutrients, color
• No added fats or oils
• Cook different products at same time with no taste transfer
• Can be partially unloaded for serving convenience
• No need to boil water in pots
Cooking examples
• Cooking preparations
Tomatoes concasees, garnish, mushrooms, blanched vegetables for stuffing, peeling, etc.
• Starters, appetizers
Scrambled, poached or boiled eggs; vegetable pate, asparagus, stuffed vegetable, canneloni
• Entrees
Cooked beef, ham, turkey legs, steamed fish, chicken breasts
• Sides
Rice, dumplings, pasta, fresh and frozen vegetables, boiled potatoes
Cooking methods
• Steaming
• Stewing
• Blanching
• Poaching
• Simmering
• Soaking
• Thawing
• Rethermalizing
•Preserving
Steam Mode
moist heat at 212°F(100°C)

CSL
21
CSM
CSB
CSG
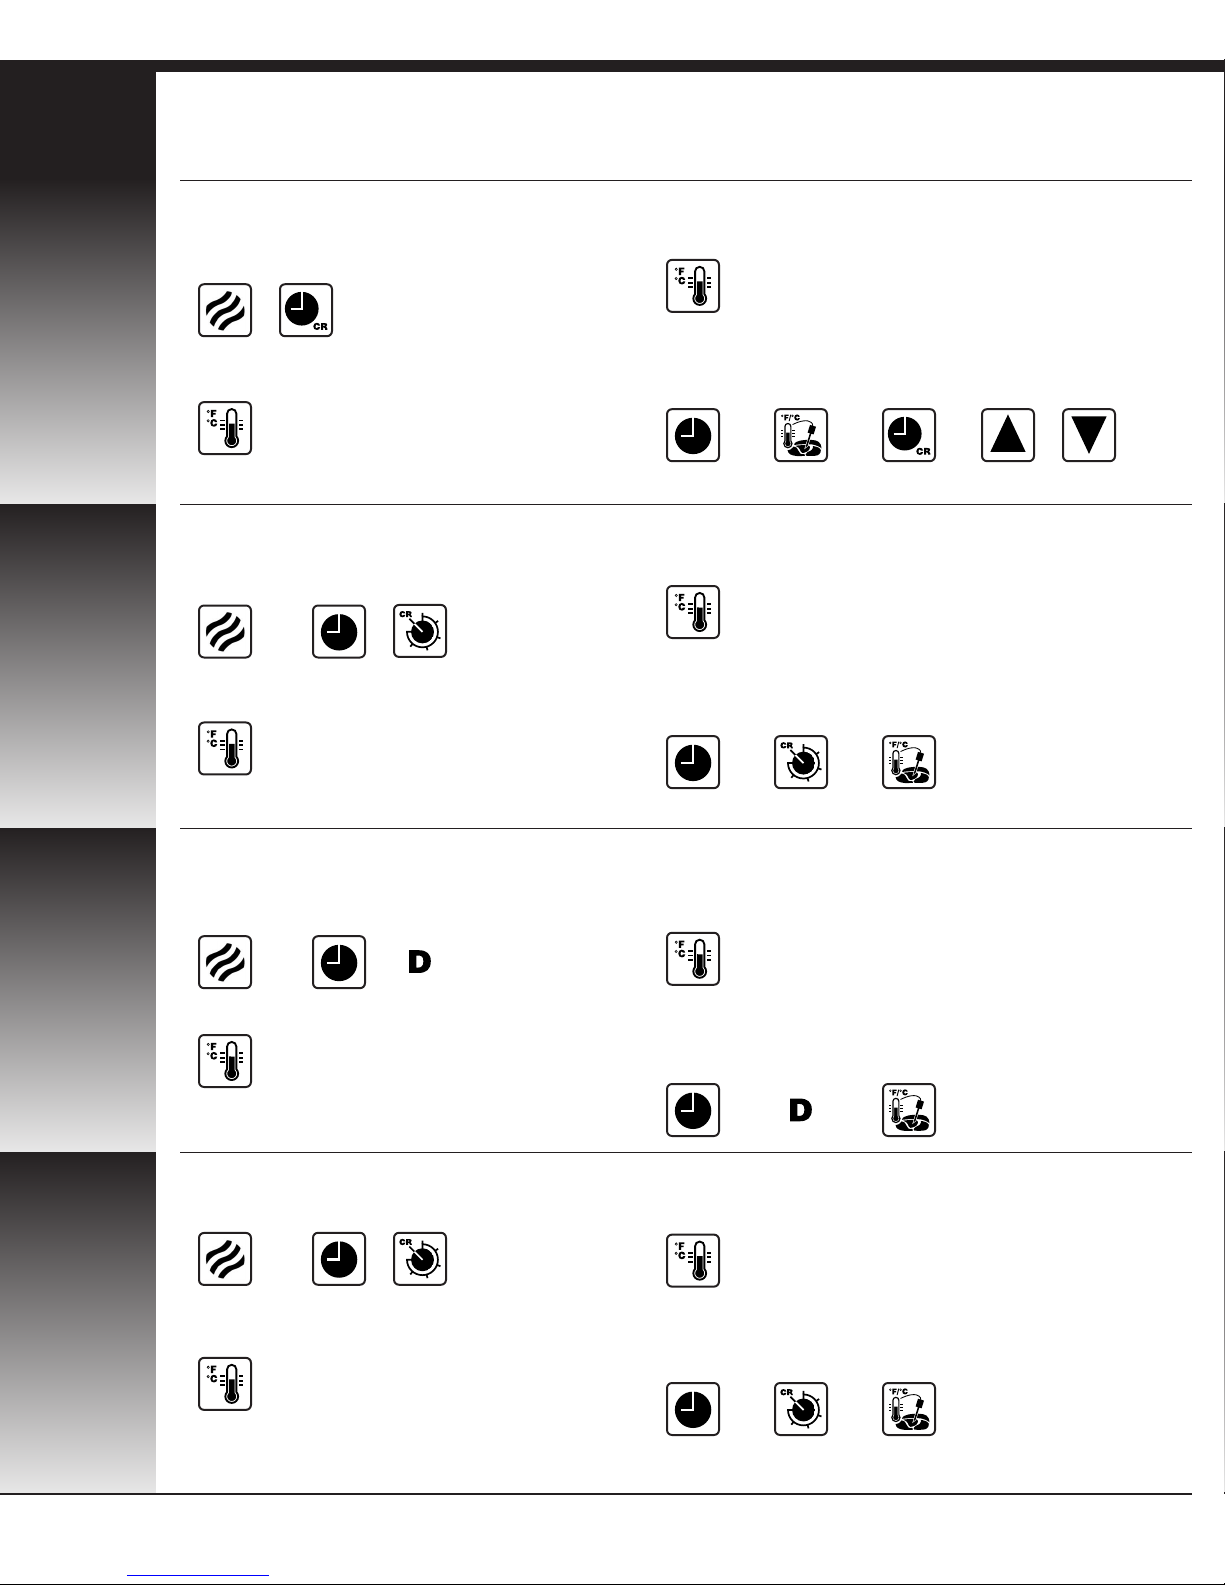
Operation
•Turn unit on
• Select STEAM mode and select CR
• Preheat until “warm-up” control light goes out.
Temperature will remain at 212°F (100°C).
• Load mobile oven rack, place or roll into cabinet
Setting
• Select TIMER and set desired cooking time
OR select PROBE COOKING and set desired probe
“done” temperature OR select continuous operation
or or
Operation
• Set on STEAM mode, activate TIMER and set on CR
• Preheat until “warm-up” control light goes out.
Temperature will remain at 212°F (100°C).
• Load mobile oven rack, place or roll into cabinet
Setting
• Set desired cooking time and activate TIMER
OR set on continuous operation OR set desired probe
“done” temperature and activate PROBE COOKING
or or
Operation
• Set on STEAM mode, and set TIMER
on Continuous Run
• Preheat until window is misted over.
Temperature will remain at 212°F (100°C).
• Load mobile oven rack, place or roll into cabinet
Setting
• Set desired cooking TIME
OR continuous operation
OR set desired PROBE (optional) “done” temperature
or or
Operation
• Set on STEAM mode, set TIMER on CR
• Preheat until “warm-up” control light goes out.
Temperature will remain at 212°F (100°C).
• Load mobile oven rack, place or roll into cabinet
Setting
• Set desired cooking TIME
OR set on continuous operation
OR set desired PROBE “done” temperature
or or
Steam Mode
moist heat at 212°F(100°C) – (continued)

22
Unload
When done, open door slightly until fan stops and
steam dissipates. Open door fully to remove pans.
Unit automatically shuts off when door is opened.
Unload
When done, open door slightly until fan stops and
steam dissipates. Open door fully to remove pans.
Unit automatically shuts off when door is opened.
Unload
When done, open door slightly until fan stops and
steam dissipates. Open door fully to remove pans.
Unit automatically shuts off when door is opened.
Unload
When done, open door slightly until fan stops and
steam dissipates. Open door fully to remove pans.
Unit automatically shuts off when door is opened.
X
Opening Door During Operation
Open door slightly to allow hot steam and/or
vapors to escape. KEEP FACE AND HANDS
AWAY FROM OPENING or burns could result.
When steam and/or heat has dissipated open
door fully with care. Escaping hot steam
and/or vapors can cause serious burns. Interior
surfaces extremely hot, including pans, grids
and oven racks. To prevent burns, allow unit to
cool, or use appropriate heat resistant protective
mitt or pad when handling.

CSL
CSM
CSB
CSG
23
Tips
• Determine which foods can be cooked together for the greatest efficiency. This is best
done by considering the cooking modes and temperatures. Keep in mind that fish,
meat, vegetables, fruit, etc can be cooked at the same time because there is no flavor
transfer.
• Potatoes should always be cooked in perforated pans. This allows steam to circulate
for faster, more even cooking.
• In general, two shallower pans are better than one deeper pan. This avoids bruising.
• Dumplings should be placed in shallow pans not too close together.
• Rice is the only type of food to which water must be added prior to cooking. Longer
soaking times mean shorter cooking times.
•Tomatoes can be skinned easily when steamed for 30 to 60 seconds, then chilled in
cold water.
• Stock can be collected by inserting a container in the bottom of the mobile oven rack.
Steam Mode
(continued)

CSL
CSM
CSB
CSG
24
Advantages
• Powerful heating capability up to 575°F (300°C), even when fully loaded
• Fast pre-heating
• Convection heat for faster cooking than traditional methods
• Even heating for high quality food production
• Consistent cooking and even browning at any rack level
• No added fats or oils
• Cook different products at same time with no taste transfer
• Can be partially unloaded for serving convenience
Cooking examples
• Cooking preparations
Roasted bones for stock, melting butter, thawing frozen prepared foods, etc.
• Starters, appetizers
Meatballs, roast beef, grilled ham, sausage, chicken wings, quiches, tarts,
breadsticks, bread, rolls, etc.
• Entrees
Beef and pork roasts, ribs, chicken whole or piece, turkey, frozen lasagna,
pizza, pizza rolls,
• Sides
Baked potatoes, souffles
• Desserts
Sponge cake, marble cake, puff pastries, frozen fruit puffs, pies, etc.
Cooking methods
•Broiling
• Roasting
• Baking
•Browning
• Thawing
Convection Mode
dry heat 86°F to 575°F (30°C to 300°C)
Setting
• Set desired cooking TEMPERATURE
• Set desired cooking TIME and activate timer
OR set on continuous operation OR set desired probe
“done” temperature and activate PROBE COOKING
CSL
25
CSM
CSB
CSG
Convection Mode
dry heat 86°F to 575°F (30°C to 300°C) – (continued)
Operation
• Turn unit on
• Select CONVECTION mode and select CR
• Preheat until set temperature is reached
or “warm-up” control light goes out
• Load mobile oven rack, place or roll into cabinet
Setting
• Select desired cooking TEMPERATURE
• Select TIMER and set desire cooking time
OR select PROBE COOKING and set desired probe
“done” temperature OR select continous operation
or or
Operation
• Set on CONVECTION mode,
activate TIMER and set on CR
• Preheat until set temperature is reached
or “warm-up” control light goes out
• Load mobile oven rack, place or roll into cabinet
or or
Operation
• Set on CONVECTION mode,
and set TIMER on Continuous Run
• Preheat until set temperature is reached
• Load mobile oven rack, place or roll into cabinet
Setting
• Set desired cooking TEMPERATURE
140°F to 575°F (60°C to 300°C)
• Set desired cooking TIME
OR continuous operation
OR set desired PROBE (optional) “done” temperature
or or
Operation
• Set on CONVECTION mode, set TIMER on CR
• Preheat until set temperature is reached
or “warm-up” control light goes out
• Load mobile oven rack, place or roll into cabinet
Setting
• Set desired cooking TEMPERATURE
• Set desired cooking TIME
OR set on continuous operation
OR set desired probe “done” temperature
or or

26
Unload
When done, open door slightly until fan stops and
steam dissipates. Open door fully to remove pans.
Unit automatically shuts off when door is opened.
Unload
When done, open door slightly until fan stops and
steam dissipates. Open door fully to remove pans.
Unit automatically shuts off when door is opened.
Unload
When done, open door slightly until fan stops and
steam dissipates. Open door fully to remove pans.
Unit automatically shuts off when door is opened.
Unload
When done, open door slightly until fan stops and
steam dissipates. Open door fully to remove pans.
Unit automatically shuts off when door is opened.
X
Opening Door During Operation
Open door slightly to allow hot steam and/or
vapors to escape. KEEP FACE AND HANDS
AWAY FROM OPENING or burns could result.
When steam and/or heat has dissipated open
door fully with care. Escaping hot steam
and/or vapors can cause serious burns. Interior
surfaces extremely hot, including pans, grids
and oven racks. To prevent burns, allow unit to
cool, or use appropriate heat resistant protective
mitt or pad when handling.

CSL
CSM
CSB
CSG
27
Convection Mode
(continued)
Tips
Cooking times
Proper cooking times will vary depending on the quality, weight or size of the product.
Generally, cooking time is not affected by the size of the load. However, avoid overloading
grids or pans so air will circulate evenly around product.
Roasting, broiling
• Always preheat unit at 575°F (300°C), then set to desired temperature.
• For steaks, chops, cutlets, or loin cuts, 1/2” to 1” thickness is ideal.
• Cook on grids with drip pans below. This allows even browning on sides and bottom.
• Try to place similar sized product on same grids.
Browning, finishing
Preheat to 575°F (300°C), or until light goes out. After loading, set to desired temperature.
Fish
Do not cover with flour.
For whole fish, wrap tail in foil and support it from underneath with raw potatoes.
Cook in previously unheated enameled pans.
Baking
• Preheat to baking temperature. In general, Combi-Steamer baking temperatures
will be 70°F to 80°F (20°C to 25°C) LOWER than traditional ovens.
•When baking bread and rolls, use only every second rack. Baking trays should not
be higher than 2 3/4” (7.0 cm).
• When baking frozen prepared food items, preheat to 575°F (300°C), do not defrost.
Then set to desired baking temperature, load and begin.
• Defrost frozen bread dough and let rise for a short time before baking.
• When baking full loads of “wet” product (frozen or dough), remove built-up humidity
with SDHC* or open door briefly.
*Available on CSL and CSM models, only
X
Opening Door During Operation
Open door slightly to allow hot steam and/or vapors to escape. KEEP FACE AND HANDS AWAY FROM
OPENING or burns could result. When steam and/or heat has dissipated open door fully with care. Escaping
hot steam and/or vapors can cause serious burns. Interior surfaces extremely hot, including pans, grids and
oven racks. To prevent burns, allow unit to cool, or use appropriate heat resistant protective mitt or pad when
handling.

CSL
CSM
CSB
CSG
28
Combination Mode
For variable temperature moist heat, 86°F to 575°F (30°C to 300°C)
Advantages
• Fast preheating
• The ability to cook with steam at temperatures above 212°F (100°C)
• Less shrinkage of food due to dehydration
• More servings per uncooked pound
• Automatic basting
• Food retains more nutrients and flavor
• No added fats or oils
• Even heating for high quality food production
• Even heating for large meat portions
• Cook different products at same time with no taste transfer
• Consistent cooking and even browning at any rack level
• Can be partially unloaded for serving convenience
Cooking examples
• Cooking preparations
Roasted bones for stock
• Starters, appetizers
Quiche, pastas, bread, rolls (frozen), etc.
• Entrees
Roast (beef, veal, pork, lamb) stuffed peppers, roast whole chicken, turkey legs,
casseroles, lasagna, etc.
• Sides
Potatoes au gratin, baked potatoes, frozen vegetables, baked apples, etc
• Desserts
Yeast dough (choux pastr y)
Cooking methods
• Combi-steaming • Combi-roasting
• Combi-baking • Glazing
•Browning • Basting
• Braising

CSL
29
CSM
CSB
CSG
Operation
• Turn unit on
• Select COMBINATION mode and select CR
• Preheat until set temperature is reached
or “warm-up” control light goes out
• Load mobile oven rack, place or roll into cabinet
Setting
• Select desired cooking TEMPERATURE
• Select TIMER and set desired cooking time OR select
PROBE COOKING and set desired probe “done”
temperature OR select continuous operation
Operation
• Set on COMBINATION mode,
activate TIMER and set on CR
• Preheat until set temperature is reached
or “warm-up” control light goes out
• Load mobile oven rack, place or roll into cabinet
Setting
• Set desired cooking TEMPERATURE
• Set desired cooking TIME and activate timer
OR set on continuous operation
OR set desired probe “done” temperature
and activate PROBE COOKING
Operation
• Set on COMBINATION mode, and set TIMER
on Continuous Run
• Preheat until set temperature is reached
• Load mobile oven rack, place or roll into cabinet
Setting
• Set desired cooking TEMPERATURE
212°F to 575°F (100°C to 300°C)
• Set desired cooking TIME
OR continuous operation,
OR set desired PROBE (optional) “done” temperature
Operation
• Set on COMBINATION mode, set TIMER on CR
• Preheat until set temperature is reached
or “warm-up” control light goes out
• Load mobile oven rack, place or roll into cabinet
Setting
• Set desired cooking TEMPERATURE
• Set desired cooking TIME
OR set on continuous operation
OR set desired PROBE “done” temperature
or or
or or
or or
or or
Combination Mode
for variable temperature moist heat – 86°F to 575°F (30°C to 300°C)

• Use SDHC to achieve desired humidity, if necessary
Unload
When done, open door slightly until fan stops and
steam dissipates. Open door fully to remove pans.
Unit automatically shuts off when door is opened.
• Use SDHC to achieve desired humidity, if necessary
Unload
When done, open door slightly until fan stops and
steam dissipates. Open door fully to remove pans.
Unit automatically shuts off when door is opened.
Unload
When done, open door slightly until fan stops and
steam dissipates. Open door fully to remove pans.
Unit automatically shuts off when door is opened.
Unload
When done, open door slightly until fan stops and
steam dissipates. Open door fully to remove pans.
Unit automatically shuts off when door is opened.
X
Opening Door During Operation
Open door slightly to allow hot steam and/or
vapors to escape. KEEP FACE AND HANDS
AWAY FROM OPENING or burns could result.
When steam and/or heat has dissipated open
door fully with care. Escaping hot steam
and/or vapors can cause serious burns. Interior
surfaces extremely hot, including pans, grids
and oven racks. To prevent burns, allow unit to
cool, or use appropriate heat resistant protective
mitt or pad when handling.
In Combination Mode steam is not visible.
Cabinet looks dry, but is full of steam. KEEP
FACE AND HANDS AWAY FROM OPENING
or burns could result.
30
(continued)

CSL
CSM
CSB
CSG
31
Combination Mode
(continued)
Tips
•To ensure even cooking and browning, always cook roasts on grids with plenty of
space around each roast for air to circulate.
• When practical, place meat grain parallel to the air circulation for even better results.
• Cook large, fat encrusted roasts in STEAM mode for the first one-third of the total
cooking time. This helps seal in juices, flavors and nutrients, and reduces shrinkage.
• Condensation and juices can be collected in a pan under the roasts, to be used later
with roasted bones for sauce stocks.
• Use chicken grid to roast whole chickens upright for even cooking and browning.
• When combi-steaming poultry and other juicy items, use SDHC* to regulate humidity
in the cooking environment (CSL, CSM models, only).
*Available on CSL and CSM models, only

CSL
CSM
CSG
32
Tender Steaming
Low temperature steaming, 86°F to 210°F (30°C to 99°C)
NOTE: Tender Steaming not available on CSB models.
Advantages
• Fast preheating
• Gentle steaming for a variety of delicate items.
• Excellent consistency and taste for different many kinds of meat and fish.
• Lower cooking temperatures mean less sticking and crumbling.
• Less shrinkage results in juicier, more attractive portions, especially when held
in display merchandisers.
• No added fats or oils.
• Less cooking time required than traditional methods.
• The ability to select and maintain desired cooking temperature at lower levels.
• Can be partially unloaded for serving convenience
Cooking examples
• Cooking preparations
Blanching bacon and ham, soups, sauces, stocks, fish garnishings, etc.
• Starters, appetizers
Poached eggs, seafood, cakes, pates, etc.
• Entrees
Fish (salmon, sole, orange roughy), poultry, vacuum cooking items,
boneless chicken and turkey filets, beef filets, sausages, etc...
• Sides
Vegetable casseroles
• Desserts
Fruit, cheese cakes, delicate moist items, etc.
Cooking methods
• Scalding • Simmering • Soaking
• Poaching • Blanching • Vacuum cooking
• Thawing • Rethermalizing • Preserving
•Proofing

CSL
33
CSM
CSG
Tender Steaming
Low temperature steaming – 86°F to 210°F (30°C to 99°C)
Operation
•Turn unit on
• Select STEAM mode and select CR
• Preheat until set temperature is reached
or “warm-up” control light goes out
• Load mobile oven rack, place or roll into cabinet
Setting
• Set desired Tender Steaming TEMPERATURE
86°F to 210°F(30°C to 99°C)
• Select TIMER and set desired cooking time
OR select PROBE COOKING and set desired probe
“done” temperature OR select continuous operation
or or
Operation
• Set on TENDER STEAMING mode, activate TIMER
and set on CR
• Preheat until set temperature is reached
or “warm-up” control light goes out
• Load mobile oven rack, place or roll into cabinet
Setting
• Set desired Tender Steaming TEMPERATURE
86°F to 210°F(30°C to 99°C)
• Set desired cooking time and activate TIMER
OR set on continuous operation OR set desired probe
“done” temperature and activate PROBE COOKING
or or
Operation
• Set on TENDER STEAMING mode,
set TIMER on CR
• Preheat until set temperature is reached
or “warm-up” control light goes out
• Load mobile oven rack, place or roll into cabinet
Setting
• Set desired Tender Steaming TEMPERATURE
86°F to 210°F(30°C to 99°C)
• Set desired cooking TIME
OR set on continuous operation
OR set desired PROBE “done” temperature
or or

34
Unload
When done, open door slightly until fan stops and steam
dissipates. Open door fully to remove pans.
Unit automatically shuts off when door is opened.
Notes
• When Tender Steaming, fan will operate intermittently
in order to slow down the cooking process and maintain the selected cooking temperature (+/- 1/2°F).
• To maintain selected cooking temperatures below
149°F (65°C), fan operates at half-speed.
• When cabinet temperature falls below any selected
Tender Steaming temperature, fan will automatically
adjust to full speed until selected temperature is
regained.
Unload
When done, open door slightly until fan stops and steam
dissipates. Open door fully to remove pans.
Unit automatically shuts off when door is opened.
X
Opening Door During Operation
Open door slightly to allow hot steam and/or
vapors to escape. KEEP FACE AND HANDS
AWAY FROM OPENING or burns could result.
When steam and/or heat has dissipated open
door fully with care. Escaping hot steam
and/or vapors can cause serious burns. Interior
surfaces extremely hot, including pans, grids
and oven racks. To prevent burns, allow unit to
cool, or use appropriate heat resistant protective
mitt or pad when handling.
(continued)

CSL
CSM
CSG
35
Tender Steaming
Low temperature steaming – (continued)
Tips
Cooking times
The same principles for Steam mode apply. Generally, the lower the cooking temperature, the longer the cooking time.
Cooking temperatures
Approximate temperature ranges for some common items that can be Tender Steamed:
Soup garnishings: 167°F to 194°F (75°C to 90°C)
Fish, seafood: 149°F to 194°F (65°C to 90°C)
Pork, veal: 161°F to 167°F (72°C to 75°C)
Chicken/white meat: 167°F to 185°F (75°C to 85°C)
Chicken/dark meat: 176°F to 194°F (80°C to 90°C)
Poultry (other): 176°F (80°C)
Beef, lamb: 135°F to 165°F (58°C to 74°C)
Desserts: 149°F to 194°F (65°C to 90°C)
Seasoning
Season lightly. A food’s natural food taste, as well as the taste of seasonings, is intensified
by low temperature cooking. For this reason, also use less essences or reducing agents.
Texture, appearance
Tender Steaming is especially valuable in preparing certain foods for presentation in
display merchandisers.
• Excellent color
• Firm structure for clean portioning
• Less shrinkage, for plump, taught skins
• Fewer and smaller “bursts”, even when skin is damaged

CSL
CSM
CSB
CSG
36
Rethermalizing
Advantages
• Different food products can be reheated without being covered.
• Food can be cooked and then reheated and served hours later.
• Allows more time to prepare dishes and trays.
• Allows foodservice operation to run more efficiently.
• Perfect function for handling large, catered orders in off-peak hours.
• Rethermalize directly on plates or in pans.
• Reduced humidity prevents water drops from forming on plated food when rethermalized.
Cooking examples
• Starters, appetizers
Pasta, vegetable dishes, macaroni & cheese, casseroles, spring rolls, etc
• Entrees
Roasts, casseroles, frozen meat and fish, frozen entrees, ribs, leg of veal,
stuffed vegetable dishes, etc.
• Sides
Rice, potatoe pancakes, noodles, vegetables, potatoes, fries, etc.
• Desserts
Fruit pies, cheese cakes, stewed fruit, etc.

CSL
37
CSM
CSB
CSG
Operation
• Turn unit on
• Select COMBINATION mode and select CR
• Preheat until set temperature is reached
or “warm-up” control light goes out
• Load mobile oven rack, place or roll into cabinet
Setting
• Select Rethermalizing TEMPERATURE
• Select TIMER and set desired cooking time OR select
PROBE COOKING and set desired probe “done”
temperature OR select continuous operation
Operation
• Set on RETHERMALIZING mode,
activate TIMER and set on CR
• Preheat until set temperature is reached
or “warm-up” control light goes out
• Load mobile oven rack, place or roll into cabinet
Setting
• Set Rethermalizing TEMPERATURE
Generally between 280°F (140°C) and 320°F (160°C)
• Set desired cooking TIME and activate timer OR set on
continuous operation OR set desired probe “done”
temperature and activate PROBE COOKING
• Set TIMER on Continuous Run
• PREHEAT to the selected mode temperature
• Load mobile oven rack, place or roll into cabinet
Operation
• Set on RETHERMALIZING mode, set TIMER on CR
• Preheat until set temperature is reached
or “warm-up” control light goes out
• Load mobile oven rack, place or roll into cabinet
Setting
• Set Rethermalizing TEMPERATURE
Generally between 280°F (140°C) and 320°F (160°C)
• Set desired cooking TIME
OR set on continuous operation
OR set desired PROBE “done” temperature
or or
or or
or or
Rethermalizing
(continued)
Operation
NOTE: CSB models do not have Rethermalizing mode.
REHEATING is possible in any of the three operating
modes – STEAM, CONVECTION, COMBINATION
• Set desired cooking MODE.
This will depend on the type of food being reheated.
or or

• Use SDHC to achieve desired humidity, if necessary
• Use SDHC to achieve desired humidity, if necessary
38
Setting
• Set reheating TEMPERATURE
Generally between 280°F (140°C) and 320°F (160°C)
• Set desired cooking TIME
OR set on continuous operation,
OR set desired PROBE (optional) “done” temperature
or or
Notes
•Proper rethermalizing temperatures will vary
according type of food.
• Normally, a setting of 60% SDHC or lower is preferred
for Rethermalizing.
•Proper rethermalizing times depend on type of food,
starting internal food temperature and number of
plates or pans. Times should average from 5 to 8 minutes.
• When practical, consider using probe cooking to
rethermalize. Ideal ser ving temperatures are easier
to achieve.
Notes
•Proper rethermalizing temperatures will vary
according type of food.
• Rethermalizing mode limits humidity to maximum of 60%.
Therefore, SDHC range is limited to 60%, 30% or 0%.
•Proper rethermalizing times depend on type of food,
starting internal food temperature and number of
plates or pans. Times should average from 5 to 8 minutes.
• When practical, consider using probe cooking to
rethermalize. Ideal ser ving temperatures are easier
to achieve.
Notes
•Proper rethermalizing temperatures will vary
according type of food.
• Humidity levels in both Steam and Combination modes will
be 100%.
•Proper rethermalizing times depend on type of food,
starting internal food temperature and number of
plates or pans. Times should average from 5 to 8 minutes.
• When practical, consider using probe cooking to
rethermalize. Ideal ser ving temperatures are easier
to achieve.
Notes
•Proper rethermalizing temperatures will vary
according type of food.
• Rethermalizing mode controls humidity to approximately 60%.
•Proper rethermalizing times depend on type of food,
starting internal food temperature and number of
plates or pans. Times should average from 5 to 8 minutes.
• When practical, consider using probe cooking to
rethermalize. Ideal ser ving temperatures are easier
to achieve.

CSL
CSM
CSB
CSG
39
Rethermalizing
(continued)
Unload
When done, open door slightly until fan stops and
heat dissipates. Open door fully to remove pans.
Unit automatically shuts off when door is opened.
*Available on CSL and CSM models, only
Tips on Rethermalizing
• Reheat servings on plates, especially for large functions
• Special mobile oven rack
• Designed to hold plates for rethermalization
• Rolls in and out easily
• Thermal cover available to keep plates warm for short periods, or during transport
•Make sure food is arranged evenly on plates
• Sauces–pour over product before reheating, or on side after reheating
• Program rethermalization settings for similar, recurring situations*
• Use SDHC to “fine tune” rethermalization to achieve desired results*
X
Opening Door During Operation
Open door slightly to allow hot steam and/or
vapors to escape. KEEP FACE AND HANDS
AWAY FROM OPENING or burns could result.
When steam and/or heat has dissipated open
door fully with care. Escaping hot steam
and/or vapors can cause serious burns. Interior
surfaces extremely hot, including pans, grids
and oven racks. To prevent burns, allow unit to
cool, or use appropriate heat resistant protective
mitt or pad when handling.

CSL
CSM
CSB
CSG
40
Forced Steaming
High temperature steaming, 213°F to 266°F (101°C to 130°C)
Advantages
• Creates an intensified cooking process
• Shorter cooking times
• Retains color, nutrients
• Less shrinkage
Cooking examples
• Potatoes, carrots, celery
• Frozen prepared foods
Tips
Cooking temperatures
Approximate temperatures for Forced Steaming items:
Celery: 230°F (110°C)
Carrots: 240°F (115°C)
Potatoes: 257°F (125°C)
Turnips, yams: 248°F (120°C)
Frozen lasagna: 248°F (120°C)
Frozen vegetables: 248°F (120°C)
Rice 248°F (120°C)

CSL
41
CSM
CSB
CSG
Operation
•Turn unit on
• Select STEAM mode and select CR
• Preheat until set temperature is reached
or “warm-up” control light goes out
• Load mobile oven rack, place or roll into cabinet
Setting
• Select desired Forced Steaming TEMPERATURE
213°F to 266°F (101°C to 130°C)
• Select TIMER and set desired cooking time
OR select PROBE COOKING and set desired probe
“done” temperature OR select continuous operation
or or
Operation
• Set on COMBINATION mode, activate TIMER
and set on CR
• Preheat until set temperature is reached
or “warm-up” control light goes out
• Load mobile oven rack, place or roll into cabinet
Setting
• Select desired Forced Steaming TEMPERATURE
213°F to 266°F (101°C to 130°C)
• Set desired cooking time and activate TIMER
OR set on continuous operation OR set desired probe
“done” temperature and activate PROBE COOKING
or or
Operation
• Set on COMBINATION mode, and set TIMER
on Continuous Run
• Preheat until set temperature is reached
• Load mobile oven rack, place or roll into cabinet
Setting
• Select desired Forced Steaming TEMPERATURE
213°F to 266°F (101°C to 130°C)
• Set desired cooking TIME
OR continuous operation
OR set desired PROBE (optional) “done” temperature
or or
Operation
• Set on COMBINATION mode, set TIMER on CR
• Preheat until set temperature is reached
or “warm-up” control light goes out
• Load mobile oven rack, place or roll into cabinet
Setting
• Select desired Forced Steaming TEMPERATURE
213°F to 266°F (101°C to 130°C)
• Set desired cooking TIME
OR set on continuous operation
OR set desired PROBE “done” temperature
or or
Forced Steaming
High temperature steaming, 213°F to 266°F (101°C to 130°C)

CSL
CSM
42
Cooking Functions: SDHC
For controlling humidity in the cooking environment
Advantages
Control humidity to:
• Improve quality of foods with different textures and consistency
• Enable precise finishing of delicate items
• Cook a wide variety of foods at the same time, including sauces, stocks
• Achieve proper cooking intensity for doughy pastries
Increase humidity to:
• Achieve basting
• Retain foods natural flavors and nutrients
• Prevent dehydration for increased portions
Remove humidity to:
• Achieve browning
• Increase crispness and texture
• Maintain consistent environment when baking or roasting “wet” foods
Cooking examples
• Crisp crusts for roast chicken
• Tender consistency for beef and pork roasts, ribs, casseroles, meat loaf, etc.
• Even consistency for light breads, cakes, pastries, etc.
• Perfect browning for au gratin dishes, casseroles, fruit pastries, dumplings, etc.
Full SDHC – CSL Models Limited SDHC – CSM Models
Using the SDHC function gives you the ability to maintain
or adjust the humidity level when cooking in Convection or
Combination modes. With this flexibility, you can create the
ideal cooking environment for a wide range of items, at any
stage in the cooking process.

Operation
• Select from CONVECTION, COMBINATION
or RETHERMALIZING modes
• Set SDHC at 0%, 50% or 100%.
Message display indicates selection as follows:
• Message display indicates exhaust flap position
Setting
• Set desired cooking temperature
• Set desired cooking TIME and activate timer
OR set desired PROBE “done” temperature and activate
probe cooking OR set on continuous operation
CSL
43
CSM
Operation
• Select mode–either CONVECTION
or COMBINATION
• Select desired SDHC level.
Six levels are available:
• Message display indicates exhaust flap position
Setting
• Set desired cooking TEMPERATURE
• Select timer, probe cooking or continuous operation
or
or
or or
or or
Open
Closed
or
Open
Closed
or or
Cooking Functions: SDHC
(continued)
For controlling humidity in the cooking environment
60% 30% 0%
(When Rethermalizing)
%%%%%%
100% 80% 60% 40% 20% 0%
100% 0%50%

44
Control
• Press selected SDHC to display the actual humidity in
the cooking cabinet
• Select SDHC function and/or change levels at any stage
of the cooking process to achieve desired results
• Input SDHC levels along with times and temperatures
when programming cooking procedures
Tips
• SDHC is most effective with food items that have high
moisture content
• One of the best approaches to using SDHC is to obser ve
the cooking process and react with
the appropriate SDHC level. Use SDHC when:
• Food perspires
• Condensation forms on the pans
• When browning needs to proceed more rapidly
• Any situation in which humidity needs to be
maintained or adjusted
• SDHC is also well suited to controlling the variable
humidity that occurs when cooking fully or partially
frozen meats, casseroles, entrees or side dishes.
• Use SDHC benefits, such as faster cooking times–
especially for frozen items–to make your foodservice
production schedule more efficient.
Control
• Select SDHC function and/or change levels at any
stage of the cooking process to achieve desired results
• Input SDHC levels along with times and temperatures
when programming cooking procedures
Tips
• SDHC is most effective with food items that have high
moisture content
• One of the best approaches to using SDHC is to obser ve
the cooking process and react with
the appropriate SDHC level. Use SDHC when:
• Food perspires
• Condensation forms on the pans
• When browning needs to proceed more rapidly
• Any situation in which humidity needs to be
maintained or adjusted
• SDHC is also well suited to controlling the variable
humidity that occurs when cooking fully or partially
frozen meats, casseroles, entrees or side dishes.
• Use SDHC benefits, such as faster cooking times–
especially for frozen items–to make your foodservice
production schedule more efficient.
0% Moist 50% Moist 100% Moist
%%%%%%
100% 80% 60% 40% 20% 0%

CSL
CSM
CSB
CSG
45
Cooking Functions: Probe Cooking
For achieving precise “done” temperatures
Using the Probe Cooking function allows you to select the desired “done” temperature
as well as the cooking temperature. The probe measures the food’s actual internal
temperature and displays it on the control panel.
Advantages
• Achieve precise, repeatable cooking results
• Prevents overcooking, less waste
• Results in less shrinkage, more portions
• Requires no constant obser vation of cooking process
• High food quality with improved production efficiency
• Eliminates the need for wasteful intrusive testing methods, such as needle, finger,
fork or cut
• Built-in probe and control panel display makes Probe Cooking easy to accomplish
Cooking methods
Probe Cooking function can be used in all modes
Cooking examples
Roasts, meats, poultry, casseroles, frozen entrees, soups, etc. rethermalizing plated
portions

CSL
46
CSM
CSB
CSG
Operation
Probe Cooking possible in all modes.
• Load mobile oven rack, place or roll into cabinet.
• Insert probe tip into the thickest portion of the meat
or other food item on center rack
NOTE: Be sure probe is clean and cool prior to inser tion
Setting
• Select desired cooking TEMPERATURE
• Select PROBE COOKING and set desired
probe “done” temperature–68°F to 210°F
(20°C to 99°C)
• Selected “done” temperature is displayed–
timer does not operate
Control
• No operator control or observation is necessary
• Completion signal sounds when “done” temperature is
reached. Unit shuts off automatically.
• Change previous settings when necessar y
Operation
Probe Cooking possible in all modes.
• Load mobile oven rack, place or roll into cabinet.
• Insert probe tip into the thickest portion of the meat
or other food item on center rack
NOTE: Be sure probe is clean and cool prior to inser tion
Setting
• Set desired cooking TEMPERATURE
• Set desired probe “done” temperature and
activate PROBE COOKING
• Selected “done” temperature is displayed–
timer does not operate
Control
• No operator control or observation is necessary
• Completion signal sounds when “done” temperature is
reached. Unit shuts off automatically.
• Change previous settings when necessar y
Operation
NOTE: Probe Cooking function and Food Probe are
optional on model CSB
Probe Cooking possible in all modes.
• Load mobile oven rack, place or roll into cabinet.
• Insert probe tip into the thickest portion of the meat
or other food item on center rack
NOTE: Be sure probe is clean and cool prior to inser tion
Setting
• Set desired cooking TEMPERATURE
• Set desired PROBE “done” temperature
• Selected “done” temperature is displayed–
timer does not operate
Control
• No operator control or observation is necessary
• Completion signal sounds when “done” temperature is
reached. Unit shuts off automatically.
• Change previous settings when necessar y
Operation
Probe Cooking possible in all modes.
• Load mobile oven rack, place or roll into cabinet.
• Insert probe tip into the thickest portion of the meat
or other food item on center rack
NOTE: Be sure probe is clean and cool prior to inser tion
Setting
• Set desired cooking TEMPERATURE
• Set desired PROBE “done” temperature
• Selected “done” temperature is displayed–
timer does not operate
Control
• No operator control or observation is necessary
• Completion signal sounds when “done” temperature is
reached. Unit shuts off automatically.
• Change previous settings when necessar y

CSL
CSM
CSB
CSG
47
Cooking Functions: Probe Cooking
(continued)
For achieving precise “done” temperatures
Tips for Probe Cooking
• When roasting meat for sliced cold servings, food probe temperature should be set
approximately 9°F (5°C) lower than normal “done” temperature because the roast
continues to cook as it cools.
•A hot probe may sear the meat on contact, leaving a hole or scar when probe is
removed. Always cool the probe prior to insertion.
•Probe “done” temperature can be changed or reset at any time in the cooking process.
Example
The fully-cooked internal temperature of a roast may be 176°F (80°C). But, you may
wish to change modes or accelerate the cooking time when the internal temperature
reaches140°F (60°C). At that point, change mode, increase cooking temperature and
reset probe “done” temperature to the fully cooked setting.
X
Probe sensor may be extemely hot. When not in use, always place in holder. Do not let probe
sensor hang loose outside the cooking cabinet. Remove probe sensor from food before unloading
unit.

48
Probe Cooking Guide to “Doneness”
Meat Probe “Done” Temp Appearance
Beef
Rare 130°F (55°C) Dark, blood red
Medium rare 140°F (60°C) Red meat, blood-red juice
Medium 145°F (63°C) Light pink core
Well done 167°F to 189°F (75°C to 85°C) Gray-brown throughout
Veal
Fully cooked 155°F to 170°F (69°C to 77°C) Reddish-brown to gray-white
Pork
Medium 150°F (65°C) Light pink
Well done 167°F to 176°F (75°C to 80°C) Pale brown to gray-white
Cured 150°F (65°C) Pale red-brown or nearly colorless
Lamb
Fully cooked 165°F (74°C) Gray to pale-red meat, clear juice
Mutton
Fully cooked 165°F (74°C) Pale gray meat, red juice
Poultry
Fully cooked 185°F (85°C) White meat, nearly colorless juice

CSL
CSM
CSB
49
Additional Functions: Cool Down
To reduce cabinet temperature quickly
COOL-DOWN is a convenience function that enables the fan to continue operating when
the door is open, dissipating heat quickly.
Advantages
• Achieve rapid reduction in cabinet temperature when switching to a lower cooking
temperature from a higher cooking or preheating temperature
• Saves time for efficient operation
• Prevents overcooking and dehydration
X
Opening Door During Operation
Open door slightly to allow hot steam and/or vapors to escape. KEEP FACE AND HANDS AWAY FROM
OPENING or burns could result. When steam and/or heat has dissipated open door fully with care. Escaping
hot steam and/or vapors can cause serious burns. Interior surfaces extremely hot, including pans, grids and
oven racks. To prevent burns, allow unit to cool, or use appropriate heat resistant protective mitt or pad when
handling.

CSL
50
CSM
CSB
Operation
Cool-down may be used in any mode. Unit must
be in operation with door closed.
• Select SPECIAL FUNCTION
• Select COOL-DOWN
• Open door with care
• Close door when desired cabinet temperature
is achieved to continue cooking
Control
• Lighted display indicates Cool-Down function
in operation
• Actual cabinet temperature is displayed with
flashing digits
Operation
Cool-down may be used in any mode. Unit must
be in operation with door closed.
• Select COOL-DOWN
• Open door with care
• Close door when desired cabinet temperature
is achieved to continue cooking
Control
• Lighted display indicates Cool-Down function
in operation
• Actual cabinet temperature is displayed with
flashing digits
Operation
Unit must be in operation with door closed.
• Set mode switch to COOL-DOWN
• Open door with care
• Close door when desired cabinet temperature
is achieved to continue cooking

CSL
CSM
51
STEAM INJECTION is a feature of the Convection mode that, when activated, sprays an
immediate burst of water (up to 4-seconds) onto the heating elements to create a briefly
humidified environment in the cooking cabinet. Often used to help in the browning of
certain foods.
Advantages
• Improves rising and browning
• Adds slight glaze to pastries
•Prevents dehydration
• Additional control for fruit or meat pastries and other items with varied textures
and consistency
Tips
• Steam Injection should be used sparingly. It is not meant as a means of maintaining a
humidified cooking environment. Use Combination Mode or Forced Steaming.
• Generally, Steam Injection is used early in the baking process to improve dough and
pastry rising
Additional Functions: Steam Injection
To add immediate in Convection mode (248°F to 482°F (120°C to 250°))

CSL
52
CSM
Operation
STEAM INJECTION can only be used in
CONVECTION mode
• Select SPECIAL FUNCTION
•Press STEAM INJECTION and hold to activate.
Display will light. Hold for up to 4 seconds per
burst. Release to stop at any time.
• Repeat as desired
Settings
• Cooking temperature must be set between
248°F to 482°F (120°C to 250°C)
NOTE: Steam Injection will not operate until temperature
of 248°F (120°C) or higher is achieved.
• Can be used at any time in the cooking process
Operation
STEAM INJECTION can only be used in
CONVECTION mode
• Press STEAM INJECTION and hold to activate.
Display will light. Hold for up to 4 seconds per
burst. Release to stop at any time.
• Repeat as desired
Settings
• Cooking temperature must be set between
248°F to 482°F (120°C to 250°C)
NOTE: Steam Injection will not operate until temperature
of 248°F (120°C) or higher is achieved.
• Can be used at any time in the cooking process

53
Additional Functions: Half Fan Speed
For gentler cooking
CSL
CSM
Operation
HALF FAN SPEED can be used in any MODE
• Select desired cooking time, temperature and/or
probe “done” temperature
• Select SPECIAL FUNCTION
• Select HALF FAN SPEED.
Display will light when activated.
HALF FAN SPEED is a feature that reduces fan speed by one-half for less turbulence in
the cooking environment.
Advantages
•Maintains a gentle cooking environment
• Less turbulence when rising or finishing delicate pastries
• Even cooking and browning
Tips
• Use Half Fan Speed for baking large braided or shaped loaves
• Create an even gentler cooking climate by combining Half Fan Speed with the Pulse
Fan function*.
• The Half Fan Speed function may be input into any cooking program
* Fan operates intermittently on Pulse Fan. See “Pulse Fan” operation, page 55.
CSL
CSM
or
Operation
HALF FAN SPEED can be used in any MODE
• Set desired cooking time, temperature and/or
probe “done” temperature
• Select HALF FAN SPEED.
Display will light when activated.
or

CSL
CSM
HALF ENERGY is a feature that efficiently reduces the unit’s electrical operating requirement to about half of the energy normally used.
Advantages
• Saves on energy costs when operated during hours of peak power rates
• Helps control “slow” cooking process at desired lower temperatures
NOTE: In most cases, cooking times will be longer when using HALF ENERGY feature.
CSL
CSM
54
Operation
HALF ENERGY can be used in any MODE
• Select desired cooking time (adjusted for Half
Energy), temperature and/or probe “done”
temperature
• Select SPECIAL FUNCTION
• Select HALF ENERGY.
Display will light when activated.
or
Operation
HALF ENERGY can be used in any MODE
• Set desired cooking time (adjusted for Half
Energy), temperature and/or probe “done”
temperature
• Select HALF ENERGY.
Display will light when activated.
or
Additional Functions: Half Energy
To reduce heat output and energy consumption

CSL
55
Additional Functions: Pulse Fan
Fan operates intermittently
PULSE FAN is a control feature that runs the fan on and off at intervals.
It is available only on CSL models
Advantages
•Creates a gentler cooking environment, and promotes even cooking at lower
temperatures.
• Conserves energy over longer cooking times
• Helps control climate for slow-cooking
Advantages of Slow Cooking
• Meat tenderizes as it cooks, releasing tastier juices
• Meat retains moisture and juices, resulting in less shrinkage and weight loss.
This means more portions served per uncooked pound.
• Convenience of cooking and holding overnight, with no super vision necessary
• Energy efficient and economical way to prepare roasts
Cooking Examples
Consider using PULSE FAN when cooking medium to large cuts of meat, such as
leg of lamb, beef roast, cured ham, leg of veal, pork roast, turkey.
Operation
PULSE FAN can be used in any MODE
• Select desired cooking time, temperature
and/or probe “done” temperature
• Select SPECIAL FUNCTION
• Select PULSE FAN.
Display will light when activated.
or

56
Tips
• When cooking roasts, Pulse Fan can be used after the internal temperature reaches 140°F
(60°C). At that point, it is not necessary to maintain the cooking temperature with the fan
running constantly. The existing heat is enough to complete the cooking process with Pulse Fan
operation.
• Pulse Fan can be programmed at any stage of the cooking process.
• For low temperature cooking, experiment by using Pulse Fan along with the Half Speed Fan
and/or Half Energy features to create the desired gentle cooking environment for various items.
• Use SDHC to remove excess moisture from the cabinet.
Two-Stage Slow Cooking
1. After preheating, roast for a short time at temperatures from 248°F (120°C) to 356°F (180°C).
2. For the duration of the cooking process, set at low temperatures, from 135°F (57°C) to 194°F
(90°C) using Pulse Fan. As the internal food temperature rises and the cabinet temperature
decreases, both environments converge to a point at which cooking and holding can continue
for up to 24 hours without overcooking.
Simple Slow Cooking
Often done overnight, this process simply establishes the proper difference between cabinet and
probe temperatures–the rest is automatic. As a general rule, set the cooking temperature 9°F
(5°C) above the desired probe “done” temperature for the item you are cooking.
For example:
When holding, reduce the cabinet temperature to match the probe “done” temperature.
Foods cannot be cooked and held for more than 24 hours.
6 lb (2.7 kg) Roast Beef
Probe “done” temperature = 126°F (52°C)
+ 9°F (5°C)
Cooking temperature = 135°F (57°C)
Cooking time = 5 hours
Temperature scale
320°F
(160°C)
250°F
(120°C)
150°F
(65°C)
32°F
h
0
Roast
Mature Cook and hold
core temperature
h
0,5
interior cabinet temperature
up to 24 hours

CSL
57
Additional Functions: Delta-T Cooking
Specialized cooking method
DELTA-T cooking is a special built-in function that automatically causes the cooking
temperature to rise slowly, in direct proportion to the rise in the internal temperature of
the food product. The Delta-T, or “difference in temperature” is the constant difference
between the two.
Advantages
• Creates a specific, gentle cooking process for hams and large cuts of marinated meat
• Causes proteins to coagulate and meat fibers to swell, retaining juices and nutrients
• Rapidly created outer crust prevents loss of proteins and other nutrients
Operation
DELTA-T function can be used in any MODE
• Select desired cooking MODE
• Select PROBE COOKING and set desired
“done” TEMPERATURE
• Select SPECIAL FUNCTION
• Select DELTA-T
• Enter Delta value using temperature selection keys
Tips
• In general, the Delta-T, or temperature difference determines the cooking time. The
greater the difference, the faster the item will cook. Experience has shown that the
Delta-T should not be less than 68°F (20°C), nor greater than 158°F (70°C).
• The Delta-T function can be programmed, making the process automatic
Temperature scale
390°F
(200°C)
300°F
(150°C)
212°F
(100°C)
120°F
(50°C)
Delta-T
temperature
h
0
cooking time
interior
cabinet
temperature
core
temperature

CSL
CSM
58
Both CSM and CSL models are equipped with programming capability. Operators can input different parameters, such as Mode,
Time, Temperature, Probe Cooking and Special Functions, to create a customized cooking program that will operate the unit
automatically to these parameters.
The numbered control panel functions illustrated in this section correspond to those in Control Panel Functions, pp 11-12.
If you are not already familiar with the CSL and CSM control panels, please review those pages before attempting to program
your CSL or CSM unit.
Memory
• Up to (99) total cooking programs–(98) are available to operator. Program 99 is set at the factory for Cleaning.
• Up to (9) stages (sets of parameters) are available for each cooking program.
Control
• Automatic–Unit begins operation when program START key is pressed. Unit shuts down when last program stage has
been completed.
• Manual Override–Program operation can be interrupted at any time by simply selecting or setting a new value or
special function. The new value or function affects cooking process only in the stage in which the program was
overridden. Overriding the program DOES NOT cancel it. When the new value or function is achieved, and/or that
stage of the program is completed, program operation continues with the next programmed stage, or shuts down unit if
program is complete.
IMPORTANT–On CSL models, program may be inadvertantly canceled under the following circumstance:
If operator activates Probe Cooking while unit is operating in a programmed stage in which Probe Cooking is NOT utilized.
• Program Lock–Cooking programs can be locked to prevent any unauthorized or undesired changes to the program.
If a program number is locked out, “NP” will be displayed, and no input can be received under that number.
NOTE: The program display will flash when a program number is selected in which no program has been placed.
Programming the CSL Model
Note: The CSL unit is fully digital. The internal clock feature on this unit
permits automatic start-up. See “Setting the clock” and “Setting automatic
start-up time” below.
To Program
• Begin by pressing PROG (17)
• Select program number using program SELECT arrow keys (21)
• Enter the individual values (mode, temperature, time/probe temperature)
and additional functions desired for each of nine available cooking stages
• Save program by pressing PROG key (17)
• To start cooking program, press program START key (20)
To change a saved program
• Repeat process to modify the values set
• Save program by pressing PROG key (17)
To lock a program
• Set TIMER to “1111.” Press Left (DOWN) SELECT arrow key (21).
“NP” will be displayed.
• To unlock, repeat using Right (UP) arrow key. “P” will be displayed.
Quick Guide To Programming
17
21 20

CSL
CSM
Quick Guide To Programming
(continued)
Setting the clock
•Press the TIMER key (10)
• Set clock time (military time) using SELECT arrow keys (16)
•Press and hold TIMER key (10). While TIMER key is pressed,
switch unit off and then back on using ON/OFF key (1).
• Switch unit off again
• Wait (4) seconds, then switch unit back on. Real time is now
stored and displayed.
Setting automatic start-up time
• Press TIMER key (10) until the period in the time display flashes
• Set the desired start-up time (military time) using SELECT arrow keys (16)
• Set cooking mode, temperature, time/probe temperature, and additional
functions as usual, or select a program number
• Enter automatic start-up function by pressing both SELECT arrow keys (16)
simultaneously. When the programmed time is reached, unit will
automatically start up.
Delta-T Cooking
• Select PROG (17)
• Select program number using program SELECT arrow keys (21)
• Select any cooking MODE.
• Set desired probe temperature value using the temperature
SELECT arrow keys (16)
• Press SPECIAL FUNCTIONS key (22).
• Press DELTA-T key (27) and enter Delta value using the temperature
SELECT arrow keys (16)
• Save program by pressing PROG key (17)
Programming the CSM Model
To Program
• Begin by turning the mode selector dial (3) to PROG (9)
• Select program number using program SELECT keys (26)
• Enter the individual values (mode, temperature, time/probe temperature)
and additional functions desired for each of nine available cooking stages.
IMPORTANT–If you wish to use the same mode in two consecutive intervals
of a program you must reset the mode before programming the next interval.
This is done by quickly turning the mode selector dial (3) away from and
back to the original mode setting without selecting another mode.
• Save program by pressing both program SELECT arrow keys (26) simultaneously
• Turn unit off for 4 seconds. Then turn back on
• To start cooking program, press program START (25) key
NOTE:
• PROG must be selected each time a program is started
• The mode selector dial must be set to OFF for at least 4 seconds prior
to selecting PROG
To change a saved program
• Repeat process to modify the values set
• Press both program SELECT arrow keys (26) to save changes
To lock a program
• Set mode selector dial (3) to PROG (9). Press timer activation key (13).
Set TIMER (15) to “110.” Press Right (DOWN) SELECT arrow key (26).
“NP” will be displayed.
• To unlock, repeat using Left (UP) arrow key. “P” will be displayed.
10
16
22
17
27
3
26
25
9
13
15
21
59

CSL
CSM
CSB
CSG
60
Cleaning
X
Opening Door During Operation
Open door slightly to allow hot steam and/or vapors to escape. KEEP FACE AND HANDS AWAY FROM OPENING or
burns could result. When steam and/or heat has dissipated open door fully with care. Escaping hot steam and/or
vapors can cause serious burns. Interior surfaces extremely hot, including pans, grids and oven racks. To prevent
burns, allow unit to cool, or use appropriate heat resistant protective mitt or pad when handling.
Your Sure Chef®Combi-Steamer MUST be cleaned at least once a day to ensure proper hygiene and continued trouble-free
operation. For best results, use Henny Penny Oven and Grill Cleaner and the Henny Penny hand-pump sprayer.
TO CLEAN
1) Leave mobile oven racks, grids and containers in the cooking cabinet
2) Allow cooking cabinet to cool down below 130°F (55°C)
3) Spray all interior cabinet sur faces–even behind the pivoted air baf fle–as well as oven rack, grids and pans
thoroughly with Oven and Grill Cleaner
NOTE: If using Program Cleaning (CSL, CSM models only), set mode selector switch on PROG, select program 99 and
press START. Skip steps 4 thru 6.
4) Let cleaner act for approximately 20 minutes
5) Set Combi-Steamer on STEAM mode
6) Steam for 15 minutes
7) Repeat process for heavily soiled cabinet
8) Rinse thoroughly with built-in hand sprayer (optional on CSB models)
NOTES
• To activate the hand-sprayer water flow, pull hose to full extension and release to rest-position. Squeeze spray gun lever.
• The rails on which oven rack rolls into the unit (table top units, only) can be removed for cleaning.
To remove the rails, shift the rails horizontally toward the front of the unit, then pull up.
• The air baffle, covering the left side of the interior cabinet, provides even air flow and protects operator from heating
elements and fan. To open the baffle for cleaning:
1. Turn unit off
2. For table top units, remove the left oven rack rail by pulling it towards front of unit, then up
3. Using a flat-head screwdriver, turn the two quick fastening locks one-quarter turn counterclockwise. Baffle will swing
open for cleaning.
NOTE – floor units have 2 air baf fles that open in this manner

CSL
CSM
CSB
CSG
61
X
Do not spray cold water into the interior cabinet at temperature above 212° (100°C), or burns could result.
Cleaning
(continued)
X
• Do not clean with a high pressure cleaner. Damage to the unit may result.
• Do not treat stainless steel surfaces with acids or expose to acidic vapors. Damage, discoloration
and/or chemical degradation may result.
• Do not use chlorine bleach on stainless steel
• Temperature increase of the door glass may exceed 60°F
• Turn off water supply to unit when not in use for long periods

CSL
CSM
CSB
62
INTRODUCTION
This section provides the installation instructions for the Henny Penny Electric Combi-Steamers.
NOTE: The installation of this unit must conform to all local, state, and federal codes. In the absence of codes use
ANSI/NFPA No. 70-latest edition.
NOTE: Canadian installations must conform with the Canadian electrical code, C22.1, Part 1 and/or local codes.
NOTE: The installation of this equipment should be per formed by a qualified technician.
LOCATION
The proper location of the unit is very important for operation and convenience. Choose a location which will provide easy
loading and unloading without interfering with the final assembly of food orders.
NOTE: Adequate clearance must be provided for servicing and for operation.
Table Units:
Minimum clearances have to be maintained from the adjacent walls.
Left Side
Right Side Back Side
CSB,CSM,CSL-6, 10, 1020 6” (150mm) 2” (50mm) 2” (50mm)
NOTE: 14” (350mm) is recommended at the left side of the unit for service purposes.
Place the combi-steamer on an original Henny Penny stand or on a level and sturdy surface. Recommended stand height
is 28.5” (725mm).
Minor unevenness of the surface/floor can be compensated by adjusting the legs of the stand or the appliance.
The weight of the units are as follows:
CSB, CSM, CSL-6 297 lbs. (134.5 kg)
CSB, CSM, CSL-10 349 lbs. (158.0 kg)
CSB, CSM, CSL-1020 507lbs. (230.0 kg)
Installation planning should encourage sufficient space to keep the transport trolley/mobile rack at the left-hand side
of the unit.
NOTE: Ventilation must conform to local, state and national codes. Consult your local fire department or building authorities.
X
Do Not puncture the cabinet with any objects such as drills or screws as electrical shock, or component
damage could result.
X
When moving the unit with a pallet jack ensure it is located under the 1-5/8” x 1-5/8” structure frame before
lifting the unit.
Installation – Electric Units

CSL
CSM
CSB
63
Installation – Electric Units
(continued)
Floor Units:
NOTE: Adequate clearance must be provided for servicing and for operation.
Minimum clearances have to be maintained from the adjacent walls.
Left Side
Right Side Back Side
CSB, CSM, CSL-20, 40 14” (350mm) 2” (50mm) 2” (50mm)
Place the combi-steamer on a level and sturdy surface. Minor unevenness of the surface/floor can be compensat-
ed by adjusting the legs of the appliance (+-15mm).
NOTE: The unit must be fixed to the floor to prevent moving when pushing oven racks into unit.
The oven rack must be positioned vertically in the unit, not tilting.
For minor unevenness in floor, the oven rack can be leveled using the optional leveling device. If necessary, con-
struct ramps to level floor in front of units.
The weights of the units are as follows:
CSB, CSM, CSL-20 764 lbs. (345.5 kg)
CSB, CSM, CSL-40 1066 lbs. (483.5 kg)
Installation planning should encourage sufficient space for an additional roll-in rack at the left-hand side of the
unit.(20 pan - 29”, 40 pan - 52”)
When moving the unit with a pallet jack, ensure it is located under the 1-5/8” x 1-5/8” structuring frame before lift-
ing unit.
Do Not support the unit at the service door. Damage to the unit will result.

CSL
CSM
CSB
64
ELECTRICAL SUPPLY
Standard electrical supply for all Combi-Steamers is 208-240 volt, 3 phase, 50-60 Hz.
NOTE: The power connections are located behind the service door (see section 5-3).
Each unit requires a separate fused service according to the following table: (3 phase only)
Model Voltage Phase Amps Load
CSL/M/B-6 208V 3 27 9.6KW
CSL/M/B-6 208V 1 46 9.6KW
CSL/M/B-6 240V 3 27 9.6KW
CSL/M/B-6 240V 1 40 9.6KW
CSL/M/B-10 208V 3 52 18.6KW
CSL/M/B-10 240V 3 45 18.6KW
CSL/M/B-1020 208V 3 88 31.5KW
CSL/M/B-1020 240V 3 76 31.5KW
CSL/M/B-20 208V 3 103 37.2KW
CSL/M/B-20 240V 3 90 37.2KW
CSL/M/B-40 208V 3 175 63KW
CSL/M/B-40 240V 3 152 63KW
NOTE: When the oven is installed it must be electrically grounded in accordance with local codes, or in the absence of local
codes, with the National Electric Code, ANSI/NFPA 70-1990.
NOTE: All connections must comply with the oven data plate. A separate fused disconnect switch or circuit breaker
(not furnished) MUST be installed in the electrical supply line FOR EACH OVEN!
NOTE: The electrical diagram is located behind the service door.
The electric supply terminal block, located behind the service door, is clipped on a mounting rail which is attached to the
frame of the unit. The three phases of the power cord are connected to the three gray colored terminals. Ground is connected to the yellow-green terminal.
NOTE: The phase sequence does not have to be observed because of the automatic reversing action of the fan motor.
CHANGES IN VOLTAGE
To change voltages of the Combi-Steamers (ex: 208 to 240 volt) the following has to be changed:
1) Air and steam elements
2) Contactor LS5
3) CSM and CSL units - the wires on the control panel transformer and the interior light transformer must be switched to
the correct voltage terminals.
Do Not use conduit as a supply ground, or electrical shock could result.

CSL
CSM
CSB
65
WATER SUPPLY
The Combi-Steamer should only be connected to a cold water supply which meets the quality requirements by the
EPA on drinking water. Soft water must be at least 5 or 6 grains.
The recommended water supply pressure is 44 psi, but 22 to 87 psi will work.
The water connection is done on a 3/4” NPT thread fitting, and a manual shut off valve must be installed between
the main cold water supply and the units supply line.
NOTE: A check valve is built into the unit to prevent backflow.
DRAIN CONNECTION
The Combi-Steamer is to be installed to comply with the applicable Federal, State, or local plumbing codes.
The unit has an integrated vented drain system which acts as a reverse flow check valve, so it may be connected
directly with a P-trap to the drain system.
Installation – Electric Units
(continued)
A minimum water conductivity of 20 micro Siemens is required for proper operation. If below this figure
the steam generator will over-fill.
The drain must have a constant slope and a diameter of 2 inches over its entire length to ensure sufficient
discharge during Auto Flush from the steam generator, which is 3/4 quarts per second.
The drain must be steam temperature resistant pipe, which average drain temperature is 150°F (65°C).
No hose should be used.
Should the water pressure exceed 87 psi, a pressure regulator must be installed into the supply line or
damage to the unit could result.

CSG
66
INSTALLATION GAS UNITS
This section provides the installation instructions for the Henny Penny Gas Combi-Steamers
NOTE: The installation must conform with local codes or in the absence of local codes, with ANSI Z223.1 latest edition and
electrical code ANSI/NFPA No. 70 latest edition.
NOTE: For Canadian installations it should be done in accordance with the CAN/CGA B149.1 or.2 installation code and/or
local code and the Canadian electrical code, Part 1, CSA C22.1 for the electrical features.
NOTE: The installation of this equipment should be performed by a qualified technician.
LOCATION-CSG
The proper location of the unit is very important for operation and convenience. Choose a location which will provide easy
loading and unloading without interfering with the final assembly of food orders.
Installation – Gas Units
Do Not puncture the cabinet with any objects such as drills or screws as electrical shock, or component damage
could result.
Adequate clearance must be considered during installation between the unit and combustible walls. Also, clearance should be provided for servicing and operation of the unit. The minimum clearances are as follows:
Left Side
Right Side Back Side
14” (350mm) 4” (100mm) 4” (100mm)
Place the Combi-Steamer on an original Henny Penny stand or on a level and sturdy surface. Recommended
stand height is 22” (555mm).
Due to the size of the steam generator, the left side of the unit weighs more than the right side. This weight
difference must be compensated by placing the lifting device more towards the left side of the unit, or damage
to the unit or personal injury could result.

CSG
67
Minor unevenness of the surface/floor can be compensated by adjusting the metal legs of the stand or the
appliance. The weight of the units are as follows:
CSG-10 556 lbs. (252 Kg)
CSG-12 529 lbs. (240 Kg)
CSG-20 1015 lbs. (460 Kg)
VENTILATION-CSG
The gas Combi-Steamers all should be located with a provision for venting into an adequate exhaust hood or ventilation
system. We recommend you consult a local ventilation or heating company to help in designing an adequate system.
NOTE: Ventilation must conform to local, state, and national codes. Consult your local fire department or building
authorities.
Ventilation of CSG-12:
NOTE: The Combi-Steamer CSG-12 is not suitable for connection to Type B Gas Vent and must be installed under a
ventilation hood.
Your Henny Penny Combi-Steamer CSG-12 is shipped fully assembled. In a second smaller carton you will find a
draft hood which has to be assembled to the unit.
Ventilation of CSG-12 table top version:
The draft hood must be assembled over the two flue outlets at the back of the Combi-Steamer CSG-12.
Ventilation of CSG-12 stacked version:
The stacked version kit comprises two different draft hoods, one with a single outlet and the second with a double
outlet.
A flue riser completes the stacked version flue assembly. Fix the single outlet draft hood over the flue outlets of
the lower unit. Place the flue riser over the top flue collar of the draft hood. Attach the double outlet draft hood
over the flue outlets of the upper unit so that the flue riser projects into the lower opening of this draft hood.
Ventilation of CSG-10:
The draft hood must be installed over the flue risers on top of the Combi-Steamer CSG-10 when the flue gas is discharged via a Type B gas vent.
When the flue gas of a CSG-10 is discharged to a ventilation hood the draft hood will not be installed.
Ventilation of CSG-20:
The draft hood must be installed over the flue risers on top of the Combi-Steamer CSG-20 when the flue gas is discharged via Type B gas vent.
When the flue gas of a CSG-20 is discharged to a ventilation hood the draft hood will not be installed.
Installation – Gas Units
(continued)
Do Not obstruct the flow of combustion and ventilation air to and from the unit. DO NOT obstruct the
ventilation holes in the panels of the unit, as these provide the combustion air for the burner, or damage
to the unit could result.

CSG
68
WATER SUPPLY-CSG
The Combi-Steamer should only be connected to a cold water supply which meets the quality requirements by the EPA on
drinking water. Soft water must be at least 5 or 6 grains.
The recommended water supply pressure is 44 psi, but 22 to 87 psi will work.
The water connection is done on a 3/4” NPT thread fitting, and a manual shut-off valve must be installed between the main
cold water supply and the units supply line.
NOTE: A check valve is built into the unit to prevent backflow.
DRAIN CONNECTION-CSG
The Combi-Steamer is to be installed to comply with the applicable Federal, State, or local plumbing codes.
The unit has an integrated vented drain system which acts as a reverse flow check valve, so it may be connected directly
with a P-trap to the drain system.
Should the water pressure exceed 87 psi, a pressure regulator must be installed into the supply line or damage to
the unit could result.
A minimum water conductivity of 20 micro Siemens is required for proper operation, If below this figure the
steam generator will over-fill.
The drain must have a constant slope and a diameter of 2 inches over its entire length to ensure sufficient
discharge during Auto Flush from the steam generator, which is 3/4 quarts per second.
The drain must be steam temperature resistant pipe, which average drain temperature is 150°F (65°C). No hose
should be used.
Both water and gas connections are 3/4” NPT fittings. Be sure to connect to proper pipe. Check label on unit for each.

CSG
69
Installation – Gas Units
(continued)
ELECTRICAL SUPPLY-CSG
The gas Combi-Steamer requires 120 volt, single phase, 60 Hertz, 15 amp, 3 wire grounded ser vice. The gas unit
is factory equipped with a grounded cord and plug.
NOTE: The unit will not function and the reset signal will stay on with the white wire connected to the live black wire
and the black connected to neutral. An electrical schematic is located behind the left side panel of unit. A separate
fused disconnect switch, or circuit breaker, must be installed for each unit.
GAS SUPPLY-CSG
The gas Combi-Steamer is factory available for either natural or propane gas. Check the data plate to determine
the proper gas supply requirements.
DO NOT DISCONNECT THE GROUND PLUG. This unit MUST be adequately and safely grounded or
electrical shock could result. Refer to local electrical codes for correct grounding procedures or in
absence of local codes, with the National Electrical Code, ANSI Z223.1 latest edition and electrical code
ANSI/NFPA No. 70-1990 latest edition. In Canada, all electrical connections are to be made in accordance
with the CAN/CGA B149.1 or .2 installation code and/or local code and the Canadian electrical code,
Part 1, CSA C22.1.
Before connecting incoming power to the unit, no more than 120 volts should show at each leg to ground.
Connecting a high leg to the black lead of the unit will severly damage many electrical components in the
unit and void all warranties. Call your local electrician or electric power supply company.
DO NOT attempt to use any gas other than that specified on the data plate. Conversion kits can be
installed by your distributor if required. Incorrect gas supply could result in a fire or explosion resulting
in severe injuries and/or property damage.
To avoid possible serious personal injury, the installation must conform with local codes, or in the
absence of local codes, with the National Fuel Gas Code, ANSI Z223.1-1988 or latest edition. In Canada,
CAN/CGA-B 149.1 Natural Gas Installation Code CAN/CGA-B 149.2 Propane Installation Code.
All Henny Penny Combi-Steamers are equipped with two heat exchanger systems. One is responsible for steam
production, the second for convection heat. Each individual heat exchanger is heated with a separate burner
assembly.

CSG
70
GAS SUPPLY-CSG
RIGHT
MINIMUM PULL of equipment away from
wall permissible for accessibility to
Quick Disconnect Device
WRONG
AVOID SHARP BENDS AND KINKS when
pulling equipment away from wall. (Maximum
pull will kink ends, even if installed properly,
and reduce Connector life.)
Couplings and hose should be installed in
the same plane as shown at left. DO NOT
OFFSET COUPLINGS – this causes torsional
twisting and undue strain causing premature
failure.
This is the correct way to install metal hose
for vertical travers. Note the single, natural
loop.
Allowing a sharp bend, as shown at right,
strains and twists the metal hose to a point of
early failure at the coupling.
Maintain the minimum or larger bending
diameter between the couplings for longest
life.
Closing in the diameter at the couplings, as
shown at right, creates double bends causing
work fatigue failure of the fittings.
In all installations where “self-draining” is not
necessary, connect metal hose in a vertical
loop.
DO NOT CONNECT METAL HOSE
HORIZONTALLY...unless “self-draining”
is necessary then use support on lower plane
as shown at left.
CABLE RESTRAINT
Please refer to the illustration below when
installing cable restraint on all moveable units.
I-bolt is to be secured to the building using
acceptable building construction practices.
DRYWALL CONSTRUCTION
Secure I-bolt to a building stud.
DO NOT attach to drywall only. Also,
locate the I-bolt at the same height as
the gas service. Preferred installation is
approximately six inches to either side
of service. Cable restraint must be at
least six inches shorter than flexible
gas line.
Utilize elbows when necessary to avoid
sharp kinks or excessive bending. For
ease of movement, install with a “lazy”
loop. Gas appliance must be disconnected prior to maximum movement.
(Minimum movement is permissible for
hose disconnection.)

CSG
71
GAS SUPPLY (continued)
A steam burner gas valve and dr y heat burner gas valve respectively are responsible for the gas supply to the individual burners. The Combi-Steamer models CSG have manual shut-off valves, that can be reached from the front
without tools.
The manual shut-off valves of these units are located behind the service cover under the operator panel. To operate the valves, unscrew the 2 knurled screws and pull the service cover off.
GAS LEAK TEST-CSG
After the piping and fittings have been installed, check for gas leaks. A simple checking method is to turn on the
gas and brush all connections with a soap solution. If bubbles occur, it indicates escaping gas. In this event, the
piping connection must be redone.
GAS PRESSURE-CS
The gas pressure should be measured when all other gas appliances in the kitchen are on high flame. The minimum and maximum incoming line flow pressures should be as follows:
Natural: 7-11” water column
Propane: 11” water column
Installation – Gas Units
(continued)
Never use a lighted match or open flame to test for gas leaks. Escaping gas could cause an explosion resulting in
severe personal injury and/or property damage.
During pressure testing note the following:
1. The Combi-Steamer and its individual shut-of f valve must be disconnected from the gas supply piping system
during any pressure testing of that system at test pressure in excess of 1/2 psig (3.45 kPa). Turn OFF main
gas shut-off valve or main gas supply line.
2. The appliance must be isolated from the gas supply piping system by closing its individual manual shut-off
valve during any pressure testing of the gas supply piping system at test pressure equal to or less than
1/2 psig (3.45 kPa).
3. If incoming w.c pressure is over 14” w.c. a separate regulator must be installed before the manual gas
shut-off valve.

CSG
72
NOTE: After turning on the gas, the manual shut-off valve must remain open, except during pressure testing as outlined in the
above steps, or when necessary during service maintenance.
This incoming pressure reading can be taken by installing a gas pressure gauge on the front of the unit’s main gas valves
test port. This should be done with all gas appliances in operation on the same gas supply line. Should the manifold pressure drop below the desired level, consult your local gas utility ser vice.
TO PREVENT DAMAGE TO THE CONTROL VALVE REGULATOR DURING INITIAL TURN ON OF GAS IT IS
VERY IMPORTANT TO OPEN MANUAL SHUT-OFF VALVE VERY SLOWLY.


74
Cooking
Guidelines
The following section offers basic guidelines for preparing a wide variety of menu items in the
Sure Chef
®
Combi-Steamers. As you gain experience with this equipment you may wish to add items
or adjust times, temperatures or other recommendations to suit your own preferences. You will find
a blank chart at the end of this section to assist you in recording your own recipes or adjustments.
Below is a key to terms and abbreviations used in these guidelines:
Pans, Grids
Perf = Perforated
Unperf = Unperforated
Alum = Aluminum
Gran = “Granite” style enamel pan
Chicken Grid = Special grid for cooking whole birds upright
Grid = Grid Shelf
Sheet = Sheet Pan
Modes
C=Combination
CV = Convection
S=Steam
TS = Tender Steam
RT = Rethermalizing

Chicken/Poultry
Proper Temp. Approx.
Container CSB CSM CSL CSG in Cook Time Special
Food Hints or Grid Mode Mode Mode Mode °F(°C) in Min. Function
Roast Dry, season, Chicken grid, C/CV C/CV C/CV C/CV 355 - 390 40 - 45 SDHC
Chicken tie, preheat grid, (180 - 199)
3
/
4
˝ Perf Pan
Rotisserie Dr y, season, Chicken grid, C/CV C/CV C/CV C/CV 340 - 390 30 - 40 SDHC
Style tie, preheat grid, (171 - 199)
Chicken
3
/
4
˝ Perf Pan
Chicken Fresh/frozen, thawed, Grid, C/CV C/CV C/CV C/CV 390 30 - 40 SDHC
Legs season, preheat
3
/
4
˝ Perf Pan (199)
Chicken Leg Fresh/frozen, thawed, Grid, C/CV C/CV C/CV C/CV 325 - 400 20 - 25 SDHC
Quarters season, preheat 575°3/4˝ Perf Pan (163 - 205)
Chicken Fresh/frozen, thawed, Grid, C/CV C/CV C/CV C/CV 350 30 - 40 SDHC
Breasts season, preheat
3
/4˝ Perf Pan (177)
Chicken Fresh/frozen, thawed, Grid,
3
/
4
˝Gran CV CV CV CV 320 - 450 12 - 17 SDHC
Breasts boneless, skinless
3
/
4
˝ Non Per f (160 - 232)
Chicken Fresh/frozen, thawed, Grid, C/CV C/CV C/CV C/CV 350 30 - 40 SDHC
Thighs season, preheat
3
/4˝ Perf Pan (177)
Half Fresh/frozen, thawed, Grid, C/CV C/CV C/CV C/CV 350 30 - 40 SDHC
Chicken season, preheat
3
/
4
˝ Perf Pan (177)
Chicken Fresh/frozen, thawed, Grid, C/CV C/CV C/CV C/CV 320 - 350 5 C SDHC
Wings season, preheat
3
/4˝ Perf Pan (160 - 177) 10 - 15 CV
Cooked For salads, etc. Grid, S TS S TS 175 35 - 40* Probe
Chicken
3
/4˝ Perf Pan (80) 180°F (82°C)
Cornish Fresh/frozen, thawed, Grid, C/CV C/CV C/CV C/CV 350 10 C SDHC
Game Hen season, preheat
3
/
4
˝ Perf Pan (177) 20 - 30*CV
Goose Season, could Grid, S/C/CV S/C/CV S/C/CV S/C/CV 285 - 390 120 - 150 SDHC
be stuffed 11/
2
˝ Gran (141 - 199)
Duck Season Grid or C/CV C/CV C/CV C/CV 280 - 390 20 - 60 SDHC
11/2˝ Gran (138 - 199)
Duck Breast Boned, Grid S TS S TS 160 40 - 60
(Vacuum vacuum well (71)
Cooking)
Turkey, Stuff possibly, season, Grid, C/CV C/CV C/CV C/CV 265 - 350 12 - 25/lb Probe
Whole baste if needed
3
/
4
˝ Pan (129 - 177) 180°F (82°C)
Turkey Fresh/thawed, tr y Grid S/C/ C/CV S/C/CV TS/C/CV 320 - 350 15 - 20 Probe
Tenderloin dif ferent modes CV/TS (160 - 177) 170°F (76°C)
and medias
Turkey Season Grid S/C/CV S/C/CV S/C/CV S/C/CV 275 - 355 20 - 30/lb Probe
Breast (135 - 180) 180°F (82°C)
75
Cooking Examples

76
Chicken/Poultry
Proper Temp. Approx.
Container CSB CSM CSL CSG in Cook Time Special
Food Hints or Grid Mode Mode Mode Mode °F(°C) in Min. Function
Turkey Season Grid S/C/CV S/C/CV S/C/CV S/C/CV 275 - 355 25 - 30/lb Probe
Breast, (135 - 180) 180°F (82°C)
Bone In
Turkey Bread if needed
3
/
4
˝ Gran Pan CV CV CV CV 390 10 - 15 SDHC
Cutlets (199)
Liver Paté Fill into forms, Grid C/CV C/CV C/CV C/CV 285 90 - 120 SDHC
cover well (141)
Oven Fried Follow recipe to bread, Grid, CV CV CV CV 450 15 - 20 SDHC
Chicken place on pans
3
/4˝
Unperf Pan
(233)

77
Beef
Proper Temp. Approx.
Container CSB CSM CSL CSG in Cook Time Special
Food Hints or Grid Mode Mode Mode Mode °F(°C) in Min. Function
Filet Steak Season, oil lightly, Grid CV CV CV CV 520 - 540 7 - 9 SDHC
preheat to 575°F (300°C)
(281 - 282)
Sirloin Steak Season, oil lightly, Grid CV CV CV CV 520 - 540 8 - 10 SDHC
preheat to 575°F (300°C)
(281 - 282)
Roast Beef Season Grid, S/C/CV S/C/CV S/C/CV S/C/CV 180 - 320 10 - 18/lb
Time Cook
3
/
4
˝ Gran
1
/
2
Fan
1
/
2
Fan (83 - 160)
Roast Beef Season, use probe Grid, CV CV CV CV 225 - 320 Probe
Probe Cook
3
/4˝ Gran
1
/2Fan
1
/2Fan (107 - 160) 130°F (55°C)
Rare
Rib Roast Season Grid, CV CV CV CV 325 15 - 18/lb Probe
1
1
/4˝ Perf Pan
1
/2Fan if1/2Fan if (163) 130° (55°C)
Low Temp Low Temp
Cook Cook
Beef Season Grid, C/CV C/CV C/CV C/CV 285 - 320 15 - 30 Probe
Tenderloin 1
1
/
4
˝ Perf Pan (160 - 216) per Roast 130°F (55°C)
Roast Rare
Short Ribs Season 21/2˝ Pan CCCC275 (135) 30 - 35/lb
Beef Stew Brown meat first with 2
1
/
2
˝ Pan C/CV C/CV C/CV C/CV 225 - 275 5 CV
CV. Mix rest of ingre- (107 - 135) 1 - 1
1
/
2
dients, cover, cook hrs. C
Meatballs Prepare recipe
3
/4˝ Granite C/CV C/CV C/CV C/CV 350 (177) 10 C/5 CV SDHC
Meatloaf Smooth sur face of Mold S/C/CV S/C/CV S/C/CV S/C/CV 300 - 340 50 - 70 Probe
meatloaf, possibly fill on Grids (149 - 172) 160°F (71°C)
in forms or loaf pans.
Beef Liver Cut into
1
/4˝ to 1/2˝
3
/4˝ Granite C/CV C/CV C/CV C/CV 480 8 - 10
slices, flour, preheat, (249)
spray pan
Beef Rolls Season, cook in sauce 2
1
/2˝ Pan CCCC265 - 285 60 - 80
(130 - 141)
Veal Chops Season, Grid CV CV CV CV 430 - 465 10 - 12 SDHC
preheat to 575°F (300°C)
(222 - 241)
Veal Leg Season, use drip pan Grid Plus S/C/CV S/C/CV S/C/CV S/C/CV 285 - 340 80 - 90 Probe
for drippings 21/2˝ Pan (141 - 172) 150°F (66°C)
Osso Bucco Marinate, 2
1
/
2
˝ Pan CCCC285 - 340 80 - 90
use equal slices (141 - 172)
Veal Rinse three times 1
1
/2˝ Pan C TS S S 175 10 - 18
Sweet in cold water, (80)
Breads prepare again
Corned Beef Fresh 2
1
/2˝or 4˝ Pan CCCC270 - 290 150
(132 - 143)
Cooking Examples
(continued)

78
Other Meats
Proper Temp. Approx.
Container CSB CSM CSL CSG in Cook Time Special
Food Hints or Grid Mode Mode Mode Mode °F(°C) in Min. Function
Hamburgers Preheat to 575°F (300°C) Grid, CV CV CV CV 395 - 430 15 SDHC
11/
2
˝ Gran (202 - 222)
Veal Cutlets Bread, oil pan lightly 11/
2
˝ Granite CV CV CV CV 485 (252) 6 - 8 SDHC
Venison Leg Boned, seasoned Grid, S/C/CV S/C/CV S/C/CV S/C/CV 285 - 320 60 - 70 Probe
well
3
/
4
˝ Pan (141 - 160) 145°F (63°C)
Venison Marinate, season 2
1
/
2
˝ Pan C CCC285 - 300 80 - 100 Probe
Shoulder (141 - 160) 145°F (63°C)
Roast Braise, use 2
1
/2˝ Pan C CCC285 - 300 90 - 120 Probe
Venison drip pan (141 - 160) 145°F (63°C)
Pheasant Season, rub oil, Grid, C/CV C/CV C/CV C/CV 280 - 340 25 - 35 SDHC
preheat
3
/
4
˝ Unperf Pan (138 - 172)
Quail Season, rub oil, Grid, C/CV C/CV C/CV C/CV 280 - 340 25 - 35 SDHC
preheat
3
/4˝ Unperf Pan (138 - 172)
Lamb Leg Season, could stuf f, Grid C/CV C/CV C/CV C/CV 265 20 - 30/lb SDHC
no oil, boned possible (129) Probe
140°F (60°C)
Lamb Rack Season, French cut Grid, CV CV CV CV 285 - 355 10 - 20/lb SDHC
3
/4˝ Gran (141 - 179) Probe
135°F (58°C)
Lamb Chops Season, score, Grid, CV CV CV CV 480 6 - 10 SDHC
oil lightly,
3
/4˝ Gran (249)
preheat to 575°F (300°C)
Lamb Filets Season, lightly oil, Grid, CV CV CV CV 480 6 - 12 SDHC
preheat to 575°F (300°C)3/
4
˝ Gran (249)
Lamb Stew Braise meat first,
3
/4˝ Gran, C/CV C/CV C/CV C/CV 285 - 480 40 - 80
mix in pan with then (141 - 249)
ingredients, cover well 21/2˝ Pan

Pork
Proper Temp. Approx.
Container CSB CSM CSL CSG in Cook Time Special
Food Hints or Grid Mode Mode Mode Mode °F(°C) in Min. Function
Pork Loin, Season well Grid, C/CV C/CV C/CV C/CV 300 - 355 10 - 15/lb SDHC
Boneless
3
/
4
˝ Gran (149 - 177) Probe
170°F (77°C)
Pork Loin, Season well, Grid, S/C/CV S/C/CV S/C/CV S/C/CV 225 - 355 SDHC
Boneless time cook
3
/
4
˝ Gran (107 - 177) Probe
170°F (77°C)
Pork Chops Score with knife, Grid, CV CV CV CV 395 - 430 10 - 15 SDHC
oil, rub in seasoning,
3
/
4
˝ Alum Perf (202 - 221)
preheat to 575°F (300°C)
Pork Cutlets Oil pan, bread pork
3
/4˝ Gran CV CV CV CV 390 - 430 10 - 15 SDHC
(Fried)
3
/4˝ Perf Pan (199 - 221)
Pork Season, oil lightly, Grid CV CV CV CV 485 6 - 8
Medallions preheat to 575°F (252)
Fresh Ham On grid or in pan Grid or S/C/CV S/C/CV S/C/CV S/C/CV 212 - 325 S/C/CV Probe
3
/
4
˝ Perf Pan (100 - 163) 15 - 30/lb 171°F (77°C)
Bacon Place paper layer Alum CCCC4005 - 7
on pan, preheat Perf Pan (205)
Ham, Whole or sliced, Grid or 2
1
/
2
˝ CCCC21215 - 17/lb SDHC
Smoked on grid or in pans Unperf Pan (100) Probe
150°F (77°C)
Spare Ribs Marinate or season, Grid, C/CV C/CV C/CV C/CV 356 - 374 30 SDHC
preheat to 575°F (300°C)3/4˝ Perf Pan (180 - 188)
Baby Back Marinate or season, Grid, S/C S/C S/C S/C 212 - 350 20 - 40 SDHC
Ribs preheat to 212°F
3
/4˝ Perf Pan (100 - 177)
Pork Season well, seal Grid or S/C/CV S/C/CV S/C/CV S/C/CV 300 - 355 20 - 30/lb SDHC
Shoulder shortly in steam mode
3
/4˝ Gran. (145 - 177) Probe
170°F (77°C)
Pork Roast Season well Grid or S/C/CV S/C/CV S/C/CV S/C/CV 225 - 250 20 - 25/lb SDHC
(Low Temp)
3
/4˝ Gran. (107 - 121) Probe
170°F (77°C)
Sausage, Place on grid Grid, Alum C/CV C/CV C/CV C/CV 320 - 350 8 - 12 SDHC
Links or in pans Perf,
1
/2˝ Pan, (160 - 177)
Half Sheet
Sausage, Dredge in flour, Grid, Alum C/CV C/CV C/CV C/CV 320 - 350 8 - 10 SDHC
Patties place on pan Pan,
1
/2˝ Pan, (160 - 177)
or grid Half Sheet
Sausage, Place on grid Grid, S/C S/C S/C S/C 212 (100) 13 - 15
Italian, or in pans Perf Pans, CV CV CV 450 - 500 8 - 13
Brats, etc. Alum Pan (233 - 260)
Hot Dogs Place on grid Grid, SSSS21210
or in pans Perf Pans (100)
79
Cooking Examples
(continued)

80
Pork
Proper Temp. Approx.
Container CSB CSM CSL CSG in Cook Time Special
Food Hints or Grid Mode Mode Mode Mode °F(°C) in Min. Function
Ham Place on grid Grid, C/CV C/CV C/CV S/CV 320 - 350 8 - 10/lb SDHC
Hocks or in pans
3
/
4
˝ Pan (160 - 177)
Sausage Retherm - Grid, CCCC2127 - 11Probe
cooked sausages
3
/
4
˝ Pan (100) 140°F (60°C)
Smoked Place on grid Grid, C/CV C/CV C/CV C/CV 280 - 350 5 - 10 SDHC
Sausage or in pans
3
/
4
˝ Pan (138 - 177)
Pork Season lightly, Grid, CV/C CV/C CV/C CV/C 375 - 425 10 - 15 SDHC
Tenderloin peel silver skin,
3
/4˝ Perf Pan (191 - 218) Probe
Roast preheat to 450°F 161°F (72°C)
Pork Fresh or frozen
3
/4˝ Gran CV/C CV/C CV/C CV/C 380 - 450 8 - 10 SDHC
Tenderloin breaded (194 - 249)
Breaded

81
Seafood
Proper Temp. Approx.
Container CSB CSM CSL CSG in Cook Time Special
Food Hints or Grid Mode Mode Mode Mode °F(°C) in Min. Function
Whole Bend out belly bones,3/
4
˝ or 1
1
/
2
˝ S/C S/C/TS S/C TS/S/C 165 - 212 25 - 45 Probe
Salmon prop up with potatoes Unperf Pan (74 - 100) 145°F - 150°F
from inside (63°C - 66°C)
Salmon Lightly oil, season Grid, CCCC4506 - 12SDHC
Steaks
3
/
4
˝ Gran (233)
Salmon Place in serving dish, Grid, C TS/C C TS/C 165 - 212 8 - 15
Fillets season, oil lightly
3
/
4
˝ Unperf (74 - 100)
Orange Bread or season light-
3
/4˝ Unperf C TS/S S/C TS/S 165 - 212 8 - 12 SDHC
Roughy ly, add vegetables (74 - 100)
Scrod/Cod Bread, top with
3
/4˝ Unperf C/CV C/CV C/CV C/CV 212 - 350 8 - 15 SDHC
crumbs or season, (100 - 177)
and add vegetables
Tuna Shark Lightly oil, season, Grid, CV CV CV CV 450 8 - 12 SDHC
Sword Steaks preheat oven
3
/
4
˝ Gran (233)
Pollock, Season, add
3
/4˝ Unperf C TS/C S/C TS/C 165 - 212 8 - 12
Blue Fish vegetables (74 - 100)
Sole, Season, add vege- 1
1
/
2
˝ Unperf C TS/C S/C TS/C 165 - 212 10 - 14 SDHC
Rolled tables, add wine (74 - 100)
Turbot Season, add wine, 1
1
/2˝ Unperf C TS/C S/C TS/C 165 - 212 10 - 14
vegetables (74 - 100)
Sole, Season, add
3
/4˝ Unperf C TS/C S/C TS/C 165 - 212 8 - 14
Flounder vegetables, wine (74 - 100)
Trout, Bread, lightly
3
/
4
˝ Gran C CV CV CV 450 8 - 14 SDHC
Fried oil pan (233)
Catfish Bread, lightly
3
/4˝ Gran C CV CV CV 450 8 - 14 SDHC
Fillets oil pan (233)
Perch, Bread, lightly
3
/4˝ Gran CV CV CV CV 450 8 - 14 SDHC
Breaded oil pan (233)
Halibut Season lightly, Grid, CV CV CV CV 450 8 - 14
Steaks lightly oil
3
/4˝ Gran (233)
Trout, Blend belly out,
3
/
4
˝ Unperf S S/TS S S/TS 160 - 212 10 - 15
Au Bleu season lightly (72 - 100)
Cooking Examples
(continued)

82
Seafood
Proper Temp. Approx.
Container CSB CSM CSL CSG in Cook Time Special
Food Hints or Grid Mode Mode Mode Mode °F(°C) in Min. Function
Mussels, In shell 11/
2
˝ Unperf S S/TS S S/TS 165 - 212 8 - 14
Oysters (74 - 100)
Shrimp, Thawed, peeled (time 1
1
/
2
˝ Unperf S S/TS S S/TS 160 - 212 6 - 14
Peeled will depend on size) (72 - 100)
Peel & Eat In shell, season 1
1
/
2
˝ Unperf SSSS2124 - 10
Shrimp (100)
Escargots In shell, stuf fed,
3
/4˝ Pan CCCC3506 - 10SDHC
frozen (177)
Scallops, Fresh/frozen,
3
/4˝ Unperf S S/TS S S/TS 165 - 212 4 - 8
Bay thawed (74 - 100) 6 - 12*
Scallops, Fresh/frozen,
3
/
4
˝ Unperf S S/TS S S/TS 165 - 212 6 - 10
Sea thawed (74 - 100) 7 - 15*
Lobster, Fresh Grid or SSSS21210 - 14
Whole
3
/4˝ Perf (100)
Lobster, Frozen, thawed,
3
/
4
˝ Perf or S/C/CV S/C/CV S/C/CV S/C/CV 212 - 350 10 - 20
Tails split Unperf (100 - 177)
Fish, Frozen,
3
/4˝ Gran, CCCC320 - 420 10 - 15 SDHC
Breaded preheat to 575°F Alum Perf (160 - 216)
Stuffed Fill evenly
3
/4˝ Unperf C/CV C/CV S/C/CV S/C/CV 165 - 212 10 - 20
Probe
Lobster (74 - 100)
145°F
(63°C)
Salmon Fill molds evenly Grid or S C/TS S/C C/TS 165 - 212 15 - 20
Mousse
3
/
4
˝ Unperf (74 - 100)
Fish Terrine Fill molds evenly Grid or S C/TS S/C C/TS 165 - 212 30 - 45
Probe
3
/4˝ Unperf (74 - 100)
145°F
(63°C)
Fish Balls Form well, cover 1
1
/2˝ Unperf S C/TS S/C C/TS 165 - 212 12 - 16
until needed (74 - 100)
*If Tender Steaming, use longer cooking times.

83
Vegetables
Proper Temp. Approx.
Container CSB CSM CSL CSG in Cook Time Special
Food Hints or Grid Mode Mode Mode Mode °F(°C) in Min. Function
Broccoli Fresh 21/
2
˝ Perf SSSS212 (100) 5 - 8
Broccoli Frozen 21/
2
˝ Perf SSSS212 (100) 5 - 10
Cauliflower Fresh 21/
2
˝ Perf SSSS212 (100) 5 - 10
Cauliflower Frozen 21/
2
˝ Perf SSSS212 (100) 5 - 10
Carrots, Fresh 2
1
/
2
˝ Perf SSSS212 (100) 10 - 15
Baby
Carrots, Frozen 2
1
/
2
˝ Perf S/C* S/C S/C S/C 212 - 240 12 - 18
Baby (100 - 116)
Carrots, Fresh 2
1
/2˝ Perf SSSS212 (100) 6 - 10
Coins
Carrots, Frozen 2
1
/2˝ Perf SSSS212 (100) 8 - 10
Coins
Carrots, Fresh 2
1
/
2
˝ Perf SSSS212 (100) 8 - 10
Sticks
Corn, Cob Fresh 21/2˝ Perf S* S* S* S* 212 (100) 8 - 14
Corn, Cob Frozen 21/
2
˝ Perf S* S* S* S* 212 (100) 8 - 14
Corn, Cut Frozen 21/2˝ Perf SSSS212 (100) 7 - 14
Asparagus Fresh 21/2˝ Perf SSSS212 (100) 6 - 10
Asparagus Frozen 21/
2
˝ Perf SSSS212 (100) 6 - 12
Brussels Fresh 2
1
/2˝ Perf SSSS212 (100) 6 - 12
Sprouts
Green Beans Fresh 21/2˝ Perf SSSS212 (100) 6 - 12
Green Beans Frozen 21/2˝ Perf SSSS212 (100) 10 - 15
Lima Beans Frozen 21/2˝ Perf S* S* S* S* 212 (100) 8 - 14
Tomatoes Blanched for
3
/4˝ Perf SSSS212 (100) 2 - 3
concessees
*Forced steaming may be used.
Cooking Examples
(continued)

84
Vegetables
Proper Temp. Approx.
Container CSB CSM CSL CSG in Cook Time Special
Food Hints or Grid Mode Mode Mode Mode °F(°C) in Min. Function
Zucchini Sliced, strips 11/
2
˝ - 2
1
/
2
˝ SSSS212 (100) 5 - 8
Unperf
Yellow Sliced, strips 1
1
/
2
˝ - 2
1
/
2
˝ SSSS212 (100) 5 - 8
Squash Unperf
Spinach Fresh 1
1
/
2
˝ - 2
1
/
2
˝ SSSS212 (100) 6 - 8
Perf
Spinach Frozen, thawed 1
1
/2˝ - 21/2˝ SSSS212 (100) 10 - 18
Perf, Unper f
Mushrooms, Wash, sprinkle with 1
1
/2˝ - 21/2˝ SSSS212 (100) 6 - 8
Whole lemon or white wine Perf, Unper f
Onions, Cut top and 2
1
/
2
˝ Perf, SSSS212 (100) 2 - 5
Whole bottom off Unperf
Peas Frozen, season 1
1
/2˝ - 21/2˝ SSSS212 (100) 4 - 12
Perf, Unper f
Snow Peas Frozen 1
1
/
2
˝ - 2
1
/
2
˝ SSSS212 (100) 3 - 6
Perf, Unper f
Cabbage, Fresh 2
1
/2˝ Perf SSSS212 (100) 4 - 8
Cut
Cabbage, Fresh 2
1
/2˝ Perf SSSS212 (100) 4 - 8
Leaves
Peppers Fresh, for stuffed 11/
2
˝ Perf SSSS212 (100) 6 - 7
Mixed Frozen 1
1
/2˝ - 21/2˝ SSSS212 (100) 8 - 18
Vegetables Perf, Unper f
Spaghetti Cut in half, seed 1
1
/2˝ Perf SSSS212 (100) 20 - 35
Squash
Carrots, Vacuum packed Grid SSSS212 (100) 12 - 25
Sliced
Vegetable Distribute evenly 1
1
/2˝ - 21/2˝C/CV C/CV C/CV C/CV 285 - 320 30 - 50 SDHC
Souffles in pans Unperf (141 - 160)
Vegetable Precook, season, add Grid S C/R T S/C C/RT 230 - 265 8 - 10 SDHC
Platters butter before serving (110 - 129)

85
Potatoes, Legumes
Proper Temp. Approx.
Container CSB CSM CSL CSG in Cook Time Special
Food Hints or Grid Mode Mode Mode Mode °F(°C) in Min. Function
Potato, Peeled, quartered,
3
/
4
˝ - 2
1
/
2
˝ - 4˝ S/C S/C S/C S/C 212 - 260 25 - 40
Boiled season, toss well Perf (100 - 122)
Potato, Cut if needed,
3
/
4
˝ - 2
1
/
2
˝ - 4˝ S/C S/C S S/C 212 - 260 25 - 40
Skin on season, toss well Perf (100 - 122)
Potato, Cut, season, toss well,
3
/
4
˝ Unperf CV CV CV CV 445 15 SDHC
Fried preheat pan. Potatoes then
3
/
4
˝ Gran (229)
can be steamed first, SSSS21215
then fried (100)
Potato, Cut even slices, 1
1
/2˝ Unperf C/CV C/CV C/CV C/CV 300 - 400 35 - 40 SDHC
Augratin preheat to 575°F or 11/2˝ Gran (145 - 205)
Potato, Prepare potatoes, Alum Perf or CV CV CV CV 390 15 - 20 SDHC
Stuffed arrange in or on pans3/4˝ Unperf (199)
Potato, Cut, steam first for 25
3
/
4
˝ Gran SSSS21220 - 25
Roasted min., remove, preheat (100)
450°F CV, season and CV CV CV CV 350 15 - 20
oil lightly (177)
Potato, Peel, quarter, place in Grid SSSS21225 - 30
Vacuumed vacuum bag, seal, (100)
place on grid
Potato, Wash, season if Grid, CCCC320 - 380 30 - 40
Baked needed, place on grid
3
/
4
˝ Pan (160 - 193)
Potato, Prepare recipe, let soak
3
/4˝ Unperf SSSS21212 - 20
Dumpling in water until cooked (100)
Potato, Peel, cut, soak in
3
/4˝ Unperf S/C S/C S S 212 - 250 25 - 40
Quartered water until needed, (100 - 122)
preheat pan
Potato, Peel, cut, soak 1
1
/2˝ - 21/2˝ S/C S/C S/C S/C 212 - 240 25 - 40
Sweet until needed Perf (100 - 116)
Beans, Dry Wash, soak until 2
1
/2˝ Unperf SSSS21225 - 40
needed (100)
Rice, Instant Follow directions 2
1
/2˝ Unperf SSSS2128 - 25
on box (100)
Rice, Soak to shorten cook 2
1
/2˝ Unperf S* S* S/C* S/C* 212 - 240 30 - 40
Long Grain time, 1 par t rice to (100 - 116)
Converted 11/2part water
Rice Pudding Sugar, cinnamon, 2
1
/
2
˝ Unperf S S/TS S/C S/TS 145 - 212 35 - 40
milk, eggs (63 - 100)
*Forced steaming may be used.
Cooking Examples
(continued)

86
Potatoes, Legumes
Proper Temp. Approx.
Container CSB CSM CSL CSG in Cook Time Special
Food Hints or Grid Mode Mode Mode Mode °F(°C) in Min. Function
Semalina Hot water, drop 21/
2
˝ Unperf SSSS21218 - 30
of oil (100)
Noodles Spaghetti, egg, 2
1
/
2
˝ Unperf SSSS21210 - 15
macaroni, cook small (100)
batches. NOTE: stir
halfway through cooking
Lasagna Fill until 1˝ from rim 21/
2
˝ Unperf C/CV C/CV C/CV C/CV 285 - 320 35 - 40 SDHC
(from scratch) (141 - 160)
Grain Prepare cold, leave 2
1
/2˝ Unperf CCCC175 - 212 10 - 20
Cereals to soak, shortens (80 - 100)
the cooking time

87
Breads
Proper Temp. Approx.
Container CSB CSM CSL CSG in Cook Time Special
Food Hints or Grid Mode Mode Mode Mode °F(°C) in Min. Function
Brown Bread Let dough rise,
3
/
4
˝ Gran, C/CV C/CV S/C/CV C/CV 320 - 355 18 - 30 SDHC
every second runner1/
2
Sheet Pan TS TS (160 - 180)
White Bread Every second runner, Grid, CV CV S/CV C/CV 320 - 355 18 - 30 SDHC
let proof* Alum Perf TS TS (160 - 180)
French Form well, proof,*
3
/
4
˝ Gran C/CV C/CV S/C/CV C/CV 320 - 355 20 - 25 SDHC
Bread ever y second runner TS TS (160 - 180)
Bread, Form well, proof,*
3
/4˝ Gran C/CV TS/C/CV S/C/CV CV 320 - 355 10 - 15 SDHC
Rolls every second runner TS (160 - 180) Steam
Inject
Whole Wheat Form well, proof,*
3
/4˝ Gran C/CV C/CV S/C/CV C/CV 320 - 355 20 - 25 SDHC
Bread ever y second runner TS TS (160 - 180)
Rolls, Place on pans
3
/
4
˝ Gran C/CV C/CV C/CV C/CV 320 - 345 5 - 10 SDHC
Par Baked (160 - 174)
Croissants Place on pan,
3
/4˝ Gran C/CV C/CV S/C/CV C/CV 320 - 370 12 - 20 SDHC
proof* as required TS TS (160 - 188)
Quick Breads Fill pans evenly Grid C/CV C/CV C/CV C/CV 300 - 340 25 - 40 SDHC
(149 - 172)
Bread Sticks, Place on pans, brush
3
/4˝ Gran CV CV CV CV 360 - 380 5 - 10 SDHC
Par Baked with melted butter. (183 - 193) Steam
Use steam injection Inject
to brown.
Bagels, Proof,* preheat oven
3
/4˝ Gran CV CV S/CV CV 360 - 380 12 - 16 SDHC
Raw TS TS (183 - 193)
Danish Prepare dough,
3
/
4
˝ Gran C/CV CV S/C/CV C/CV 300 - 330 12 - 20 SDHC
proof* as required TS TS (149 - 166)
Muffins Spray tins with non- Grids C/CV C/CV C/CV C/CV 325 - 340 15 - 25 SDHC
stick spray, fill tins (163 - 172) Half Fan
evenly every second
runner. Special
functions Half Fan speed.
Cinnamon Proof* as required
3
/4˝ Gran C/CV C/CV S/C/CV C/CV 300 - 325 12 - 18 SDHC
Rolls TS TS (149 - 163)
Biscuits, Raw Prepare recipe
3
/4˝ Gran CV CV CV CV 320 - 350 6 - 12 SDHC
(160 - 177)
Biscuits, Thawed, previously
3
/
4
˝ Gran CV CV CV CV 400 2 - 3 SDHC
Precooked frozen (205)
Toast Butter lightly Grid CV CV CV CV 480 3 - 5 SDHC
(249)
*All proofing is done at 95°F (35°C). Tender Steaming may be used for proofing.
Cooking Examples
(continued)

88
Desserts
Proper Temp. Approx.
Container CSB CSM CSL CSG in Cook Time Special
Food Hints or Grid Mode Mode Mode Mode °F(°C) in Min. Function
Fruit Pies From scratch, frozen, Grid or C/CV C/CV C/CV C/CV 350 - 400 20 - 25 SDHC
brush water or egg Alum Perf (177 - 205) 30 - 50 Steam
on top If frozen Inject
Cobblers Prepare recipe 1
1
/
2
˝ - 2
1
/
2
˝C/CV C/CV C/CV C/CV 320 - 360 25 - 40 SDHC
Unperf (160 - 183) Steam
Inject
Apple Prepare recipe 1
1
/
2
˝ - 2
1
/
2
˝C/CV C/CV C/CV C/CV 350 - 360 15 - 25 SDHC
Dumpling Unperf (177 - 183)
Cheese Cake Spread mixture evenly, 1
1
/2˝ Unperf C/CV C/CV C/CV C/CV 325 40 - 60 SDHC
preheat to 305°F Half Sheet (163)
Sponge Cake Spread evenly,
3
/4˝ Gran CV CV CV CV 350 - 360 15 - 25 Steam
(Genoise)
preheat to 575°F (300°C)
(177 - 183) Inject
Cake with Spread batter and
3
/
4
˝ Gran CV CV CV CV 320 - 355 20 - 35 SDHC
Crumb crumbs evenly (160 - 180)
Topping
Plum Cake Spread evenly
3
/4˝ Gran CV CV CV CV 320 - 335 25 - 40 SDHC
with fruit (160 - 169)
Marble Cake Put batter into forms Grid, CV CV CV CV 340 - 360 15 - 25 SDHC
or 3/
4
˝ gran pan
3
/
4
˝ Gran (172 - 183)
Sheet Cake Prepare recipes,
3
/4˝ Gran, CV CV CV CV 340 - 360 15 - 25 SDHC
spray pan with Half Sheet (172 - 183)
non-stick spray
Yeast Cake Ever y second r unner
3
/4˝ Gran C/CV C/CV C/CV CV 320 - 350 20 - 30 SDHC
(160 - 177)
Tea Cookies Cut shapes
3
/4˝ Gran, CV CV CV CV 350 - 375 9 - 13 SDHC
Half Sheet (177 - 191)
Brownies Spread evenly in pan
3
/4˝ Gran, CV CV CV CV 350 15 - 20 SDHC
Half Sheet (177)
Cookies Prepare recipe, cut,
3
/4˝ Gran, CV CV CV CV 300 - 350 5 - 18 SDHC
drop, or form, follow Half Sheet (149 - 177)
recipe directions
Angel Food Fill molds or pans Grid, CV CV CV CV 300 - 340 20 - 35 SDHC
Cake Half Sheet (149 - 171)
Vacuum Slice fruit, add Grid S TS S TS 175 - 212 20 - 30
Packed liqueur or syr up, (80 - 100)
Fruits place in bag, seal
Waf fles Frozen Grid, CV CV CV CV 340 - 360 5 - 8 SDHC
3
/4˝ Gran (172 - 183)
Pancakes Frozen, spray pans 1
1
/2˝ Gran CV CV CV CV 350 - 390 4 - 8 SDHC
(177 - 199)

89
Pastry/Miscellaneous
Proper Temp. Approx.
Container CSB CSM CSL CSG in Cook Time Special
Food Hints or Grid Mode Mode Mode Mode °F(°C) in Min. Function
Strudel Glaze with either egg,3/
4
˝ Gran or C/CV C/CV C/CV C/CV 340 - 400 20 - 35 SDHC
milk or sugar water Alum Perf (171 - 205)
Turnovers Preheat to 575°F
3
/
4
˝ Gran or CV CV CV CV 390 15 - 30 SDHC
3
/
4
˝Alum Perf (199)
Sponge Roll Spread evenly,
3
/
4
˝ Gran CV CV CV CV 355 - 390 10 - 15 SDHC
Cake preheat to 575°F (180 - 199) Half Fan
Puff Glaze with egg,
3
/4˝ Gran or C/CV C/CV C/CV C/CV 355 - 390 16 - 24 SDHC
Pastry (1) preheat to 575°F
3
/4˝Alum Perf (180 - 199)
Puff Force steam for
3
/4˝ Gran or C/CV C/CV C/CV C/CV 355 - 390 8 - 10 SDHC
Pastry (2) 10 to 30 seconds
3
/4˝Alum Perf (180 - 199) Steam
Inject
Puff Pastr y Ever y second runner
3
/
4
˝ Gran or C/CV C/CV C/CV C/CV 355 - 390 15 - 20 SDHC
Shell
3
/
4
˝Alum Perf (180 - 199)
Puff Pastr y Spread evenly,
3
/4˝ Gran or C/CV CV CV CV 390 20 - 25 SDHC
with Fruit glaze with egg
3
/4˝Alum Perf (199) Steam
Inject
Choux Pipe evenly, eclairs,
3
/
4
˝ Gran or CV CV CV CV 375 - 390 10 - 1 SDHC
Pastry (1) preheat oven
1
/
2
˝ Sheet Pan (191 - 199)
Choux Pipe evenly, puffs,
3
/4˝ Gran or CV CV CV CV 375 - 390 10 - 15 SDHC
Pastry (2) every second runner
1
/2˝ Sheet Pan (191 - 199) Steam
Inject
Fruit Cake Fill to
1
/2˝ from top 11/2˝ Gran or CV CV CV CV 340 - 355 30 - 35 SDHC
with Sponge 2
1
/2˝ Unperf (172 - 180)
Cake Base
Garnishing Apples, pears, etc.,
3
/4˝ Unperf SSSS2126 - 9
Fruit evenly cored (100)
Hot Fruit Frozen fruit, berries Grid or S S/TS S/C S/TS 175 - 212 5 - 8
in serving utensils 11/2˝ Unperf (80 - 100)
Stewed Fruit Cut fruit, syrup on Grid S S/TS S/C S/TS 190 - 212 30 - 40
(Pre- juice, place in jars (88 - 100)
seasoned)
Bread Prepare recipe, spray 2
1
/2˝ Unperf S S/TS S/C S/TS 185 - 212 30 - 45
Pudding pan with non-stick (85 - 100)
spray
Créme Prepare recipe,
3
/
4
˝ - 2
1
/
2
˝S S/TS S/C S/TS 185 - 212 20 - 30
Carmel fill molds Unperf Pan (85 - 100)
Cooking Examples
(continued)

90
Miscellaneous
Proper Temp. Approx.
Container CSB CSM CSL CSG in Cook Time Special
Food Hints or Grid Mode Mode Mode Mode °F(°C) in Min. Function
Eggs, Hard Leave in cardboard Grid or SSSS21210 - 15
Cooked racks Perf Pan (100)
Eggs, Cook in pan or Grid or S S/TS S/C S/TS 195 - 212 9 - 15
Poached containers 21/
2
˝ Unperf (91 - 100)
Egg Royal Fill in forms or Grid or S S/TS S/C S/TS 212 20 - 35
container 21/
2
˝ Unperf (100)
Farmer’s Distribute the mixture 1
1
/
2
˝ - 2
1
/
2
˝C/CV C/CV C/CV C/CV 285 - 320 20 - 35 SDHC
Omlet evenly, leave
1
/2˝ from Unper f (141 - 160)
rim of pan
Eggs, Make egg mixture, 2
1
/2˝ Unperf S S/TS S S/TS 195 - 212 15 - 20
Scrambled cover until needed, (91 -100)
spray or butter pan
Quiche Precook most meats, Alum, C/CV C/CV C/CV C/CV 280 - 325 30 - 40 SDHC
vegetables, distribute Grid (138 - 163)
evenly egg mixture
with cheese
Cabbage In pan with sauce, 2
1
/
2
˝ Unperf C/CV C/CV C/CV C/CV 225 - 325 25 - 35 SDHC
Rolls fresh or thawed (107 - 163)
Stuffed In pan with sauce, 2
1
/2˝ Unperf C/CV C/CV C/CV C/CV 225 - 325 25 - 35 SDHC
Peppers fresh or thawed (107 - 163)
Egg Rolls Frozen, reheat
Gran or Alum
C/CV C/CV C/CV C/CV 300 - 400 10 - 15 SDHC
or
2
1
/
2
˝ Unperf (149 - 205)
Stir Fry Preheat pan Gran Alum C/CV C/CV C/CV C/CV 400 - 450 10 - 15 SDHC
to 450°F (205 - 233)
Chicken Frozen then thawed
3
/4˝ Gran, C/CV C/CV C/CV C/CV 300 - 350 20 - 35 SDHC
Cordon Bleu 21/2˝ Unperf (149 - 177)
Fish Sticks Preheat to 575°F
3
/4˝ Unperf C/CV C/CV CV CV 350 - 420 10 - 20 SDHC
(177 - 216)
Quiche Frozen Grid, C/CV C/CV C/CV CV 280 - 350 10 - 25 SDHC
Half Sheet 138 - 177)
Lasagna Frozen then thawed In proper CCCC275 - 350 30 - 75 SDHC
pan (135 - 177)
Probe
160°F
(72°C)
Pizza Fresh dough, pre-cook Grid, CV CV CV CV 425 8 - 15 SDHC
crust first. Pre-made or Half Sheet (218)
frozen, put directly in oven
Corn Dogs Frozen Gran/Alum CV CV CV CV 275 - 350 10 - 15 SDHC
(133 - 177)
Burritos Frozen/fresh
1
/2˝ - 21/2˝CVCVCVCV275 - 350 15 - 20 SDHC
Unperf (133 - 177)
Entrees Frozen Grid or in CCCC275 - 350 40 - 75
Probe
Proper Pan (133 - 177)
160°F
(72°C)
Entrees Fresh/frozen Grid or in CCCC275 - 350 30 - 50
Probe
then thawed Proper Pan (133 - 177)
160°F
(72°C)

91
Proper Temp. Approx.
Container CSB CSM CSL CSG in Cook Time Special
Food Hints or Grid Mode Mode Mode Mode °F(°C) in Min. Function


Henny Penny Corporation
P.O. Box 60, Eaton, OH 45320
513-456-8400
800-417-8417 Toll-free
513-456-8402 Fax
Form No.: FM01-426 © 1995 Henny Penny Corporation, Eaton, OH 45320
 Loading...