

Page 1

Henny Penny
Blast Chiller/Freezer
Models BCF-24/65/110
BCM-110
TECHNICAL MANUAL
Page 2

Page 3

Model BCF-24/65/110, BCM-110
T ABLE OF CONTENTS
Section Page
Section 1. TROUBLESHOOTING...........................................................................................................1-1
1-1. Introduction ..................................................................................................................1-1
1-2. Safety........................................................................................................................... 1-1
1-3. Troubleshooting ............................................................................................................1-1
1-4. Alarm Messages..........................................................................................................1-5
Section 2. MAINTENANCE ....................................................................................................................2-1
2-1. Introduction ..................................................................................................................2-1
2-2. Maintenance Hints.......................................................................................................2-1
2-3. Compressor, Drier, Expansion Valve, Sight Glass, and Condenser Fan.......................2-1
2-4. Display Board and Auxiliary Display Board ................................................................2-1
2-5. Control Board ..............................................................................................................2-2
2-6. Buzzer ..........................................................................................................................2-3
2-7. Contactor .....................................................................................................................2-3
2-8. Door Frame Heater .....................................................................................................2-4
2-9. Evaporator Fan ............................................................................................................ 2-4
2-10. Air Probe and Evaporator Probe .................................................................................2-5
2-11. Frigiprobe ..................................................................................................................... 2-5
2-12. Fuse and Fuse Holder ..................................................................................................2-6
2-13. Condensation Evaporator.............................................................................................2-6
2-14. Door Seal .....................................................................................................................2-7
2-15. Run Capacitor ..............................................................................................................2-8
2-16. Start Capacitor and Start Relay ...................................................................................2-8
2-17. Preventive Maintenance ..............................................................................................2-9
Wiring Diagram ......................................................................................................................2-10
Refrigeration Diagram............................................................................................................2-11
Electrical/Refrigeration Diagram............................................................................................2-13
Wiring Information of PC Board ............................................................................................2-14
Section 3. PAR TS INFORMATION .........................................................................................................3-1
3-1. Introduction ..................................................................................................................3-1
3-2. Genuine Parts ..............................................................................................................3-1
3-3. How to Order Parts .....................................................................................................3-1
3-4. Prices ...........................................................................................................................3-1
3-5. Delivery .......................................................................................................................3-1
3-6. Warranty ............................................................................................................3-1
3-7. Recommended Spare Parts for Distributors .........................................................3-1
FM06-023
Revised 08-03-06
206 i
Page 4

Page 5
Model BCF-24/65/110, BCM-110
SECTION 1. TROUBLESHOOTING
1-1. INTRODUCTION
This section provides troubleshooting information in the form
of an easy-to-read table.
If a problem occurs during the first operation of a cabinet,
recheck the installation per the Installation Section of the Operator’s
Manual.
Before troubleshooting, always recheck the operation procedures in
the Operator’s Manual.
1-2. SAFETY Where information is of particular importance or is safety
related, the words NOTICE, CAUTION, or WARNING are
used. Their usage is described below .
SAFETY ALER T SYMBOL is used with DANGER,
W ARNING, or CAUTION which indicates a personal
injury type hazard.
NOTICE is used to highlight especially important
information.
1-3. TROUBLESHOOTING
CAUTION used without the safety alert symbol indicates
a potentially hazardous situation which, if not avoided,
may result in property damage.
CAUTION used with the safety alert symbol indicates a
potentially hazardous situation which, if not avoided,
may result in minor or moderate injury.
W ARNING indicates a potentially hazardous situation
which, if not avoided, could result in death or serious
injury.
T o isolate a malfunction, proceed as follows:
1. Clearly define the problem or symptom and when it occurs.
2. Locate the problem in the troubleshooting table.
3. Review all possible causes. Then, one at a time work through
the list of corrections until problem is solved.
If maintenance procedures are not followed corr ectly,
injuries and/or property damage could result.
603 1-1
Page 6
Model BCF-24/65/110, BCM-110
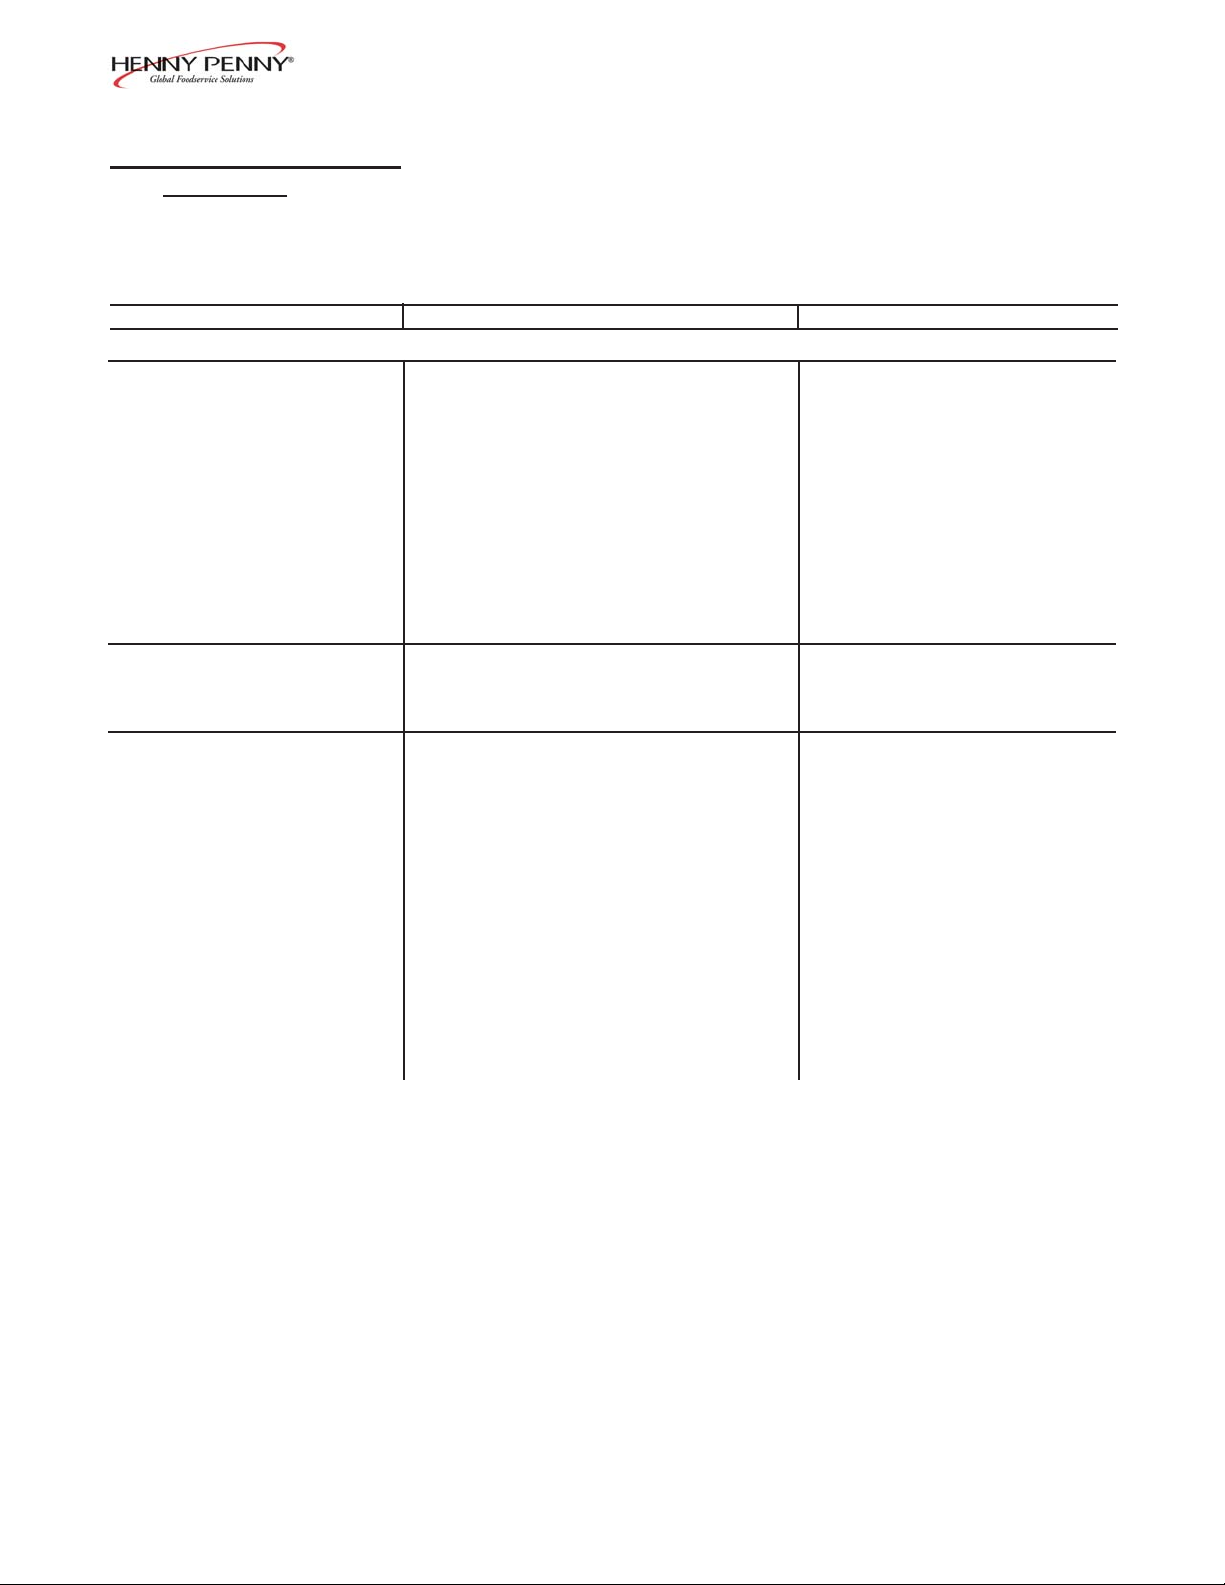
1-3. TROUBLESHOOTING
(Continued)
Problem Cause Correction
The evaporator is iced-up Faulty de-icing heater Replace de-icing heater
after a De-icing Cycle
Evaporator temperature at end Increase the setting of step 8, in
of De-icing Cycle too low Programming Section of
Operator’s Manual
Maximum time of De-icing Cycle Increase the setting of step 7, in
too short Programming Section of
Operator’s Manual
T oo much water on evaporator The unit has been shut down without Start a De-icing Cycle
fins a De-icing Cycle
Slow to decrease Compressor not working properly Check compressor and rein temperature (decline in place if necessary
performance)
Evaporator fan not working properly Check the fan and replace if
necessary
T emperature of room too high Ventilate the room
Not enough clearance around unit Relocate the unit; see Location
Section of the Operator’s
Manual
1-2 603
Page 7

Model BCF-24/65/110, BCM-110
1-3. TROUBLESHOOTING
(Continued)
Problem Cause Correction
Slow to decrease Condenser obstructed by dirt Clean the conden ser
in temperature (decline in
performance) Evaporator iced up Perform a De-icing Cycle
Refrigerating problem Check refrigeration circuit and
components
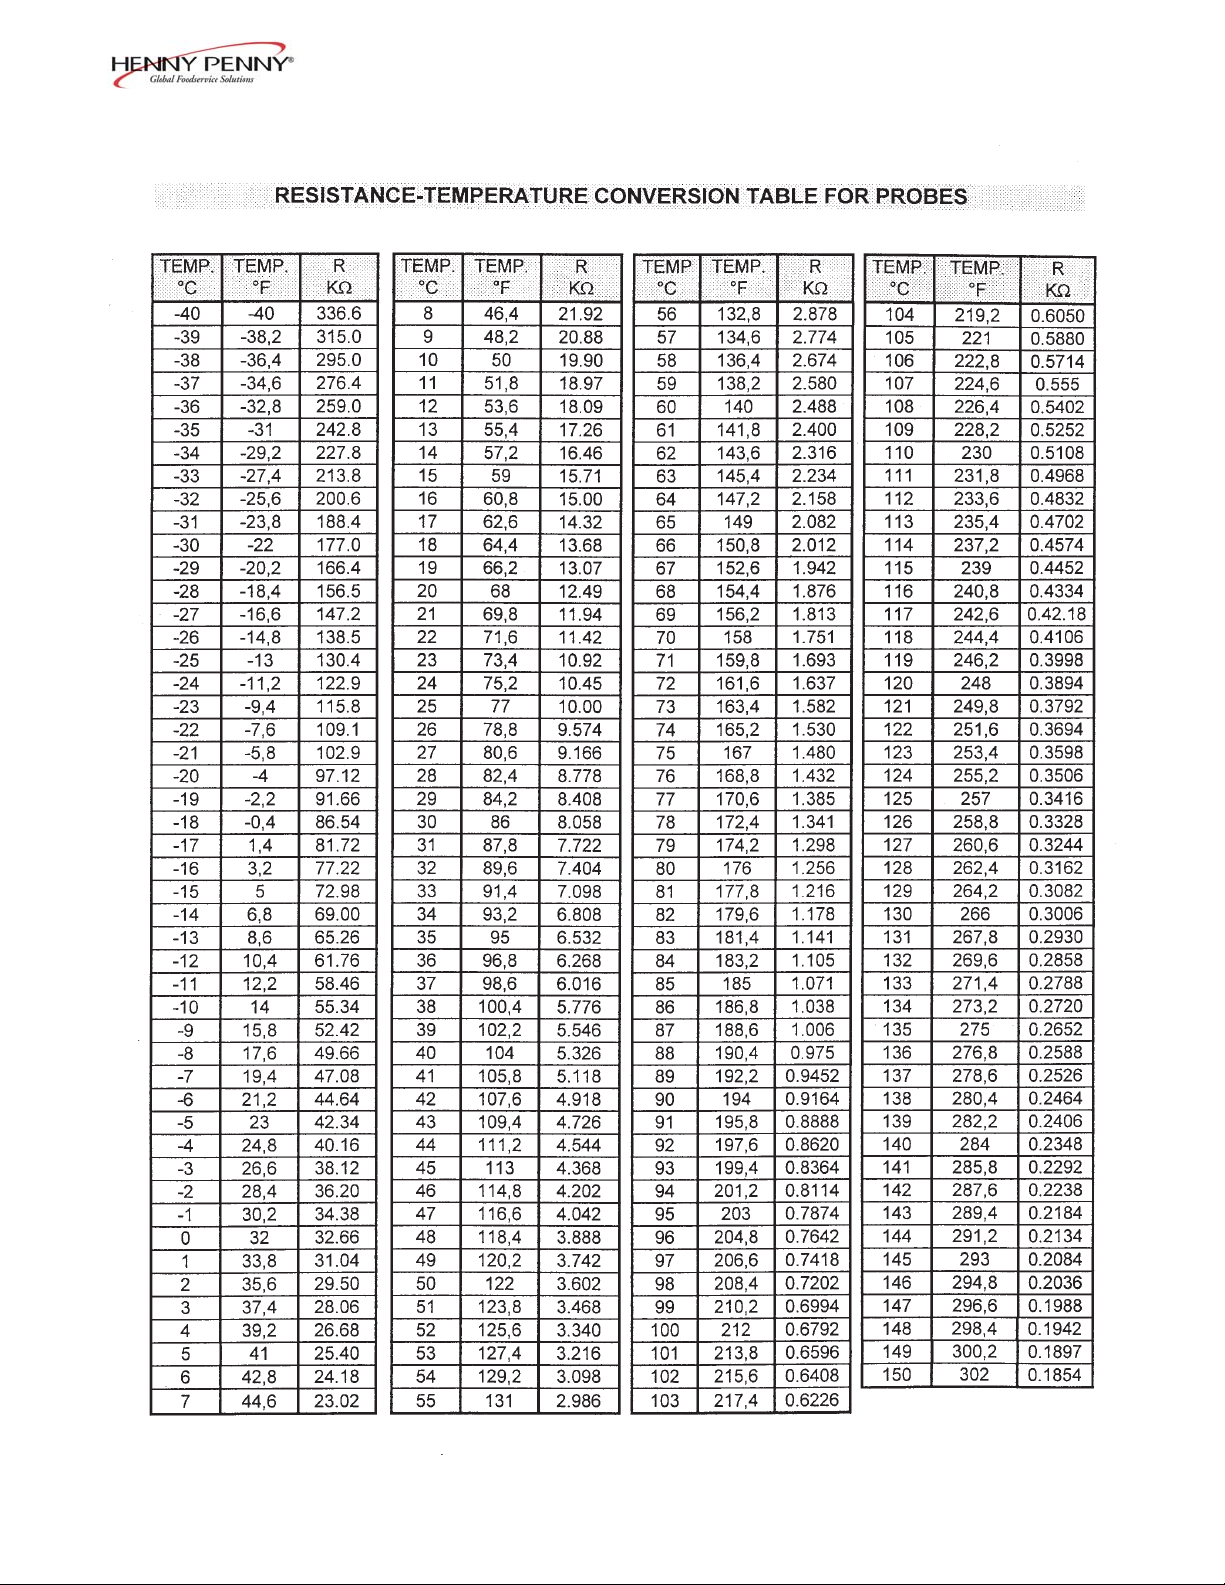
Display temperature does In Frigiprobe Mode, the display Normal
not match the actual inlet air shows the product temperature
temperature (No alarm)
In timer mode, or hold mode, Ohm out the probe and check
the probe may be showing the the reading with the table located
wrong temperature in this section; change the probe
if it is out of tolerance
Green compressor indicator Compressor and condenser fan
light on and the compressor do not work:
not working, or working - Faulty contactor Check contactor and change if
sometimes necessary
- Faulty control board relay-no Replace control board
voltage across terminals 10-11
Compressor works, but condenser
fan does not:
- Faulty condenser fan Replace fan
Compressor and condenser fan
work together:
- Faulty protection component Check items and replace if
for the compressor (overload necessary
protector, potential relay , start
and run capacitor)
- Faulty overload protector of Check fan and replace if
condenser fan necessary
603 1-3
Page 8

Model BCF-24/65/110, BCM-110
1-3. TROUBLESHOOTING
(Continued)
Problem Cause Correction
Green compressor indicator V oltage across terminals 10-11
light off and compressor of control board:
is working - Control board relay bad Replace control board
No voltage across terminals 10-11
of control board:
- Faulty contactor Replace contactor
Green fan indicator light V oltage across terminals 8-9 of
on and fan(s) not working control board.
- Fan or capacitor bad Replace fan or its capacitor
- Fan thermo-switch tripped Allow the fan motor to cool to
see if the fan comes back on;
if the fan does not come back
on, or it keeps tripping, replace the fan
No voltage across terminals 8-9
of control board:
- Faulty control board relay Replace control board
All in dicator l ights of f and Check electrical supply Plug unit into receptacle, or
ON/OFF switch will not reset wall circuit breaker
operate
Fuse of control board blown Change the fuse
No voltage from the control Change the control board
board transformer
Connector between the control Check the connection
board and display board not
connected properly
Bad wire in the connector between Replace the connector
the control board and display
board
1-4 603
Page 9
Model BCF-24/65/110, BCM-110
1-4. ALARM MESSAGES In the event of a system failure, the digital display will show an
alarm message. These messages are coded; “AL-1”, “AL-2”,
“AL-3”, “AL-5”, and “AL-6.” When an alarm occurs, the red
alarm LED will illuminate and a buzzer (optional) will sound. Press
the ALARM button to stop the buzzer .
The unit can operate on auto back-up if an alarm sounds for a
faulty probe. Must select the Timer Mode, and enter a time.
Display Cause Correction
“AL-1” Faulty air temperature Replace the probe; unit can operate on auto
probe back-up until a new probe is installed
“AL-2” Faulty evaporator probe Replace the probe; the de-icing cycle can operate at
50% of the setting in step 7 of the Programming Section
“AL-3” Faulty Frigiprobe Replace the probe; the Frigiprobe Mode will not
operate, but the unit will operate in the Timer Mode
“AL-5” Temperature too low Faulty control board - replace control board;
in the hold mode faulty contactor - replace contactor
“AL-6” T emperature too high in Faulty control board - replace control board;
the hold mode door opened too much - make sure door stays
closed as much as possible
603 1-5
Page 10
Model BCF-24/65/110, BCM-110
1-6 603
Page 11
Model BCF-24/65/110, BCM-110
SECTION 2. MAINTENANCE
2-1. INTRODUCTION This section provides procedures for the checkout and replacement
of the various parts used within the blast chiller/freezer. Before
replacing any parts, refer to the Troubleshooting Section. It
will aid you in determining the cause of the malfunction.
2-2. MAINTENANCE HINTS 1. Y ou may want to use a multimeter to check the electric
components.
2. When the manual refers to the circuit being closed, the
multimeter should read zero unless otherwise noted.
3. When the manual refers to the circuit being open, the multimeter reads infinity .
2-3. COMPRESSOR, DRIER, These parts involve manipulating the refrigerant in the system.
EXPANSION VALVE, Any removal or adjustments to these parts must be handled by a
SIGHT GLASS, AND certified refrigeration expert.
CONDENSER FAN
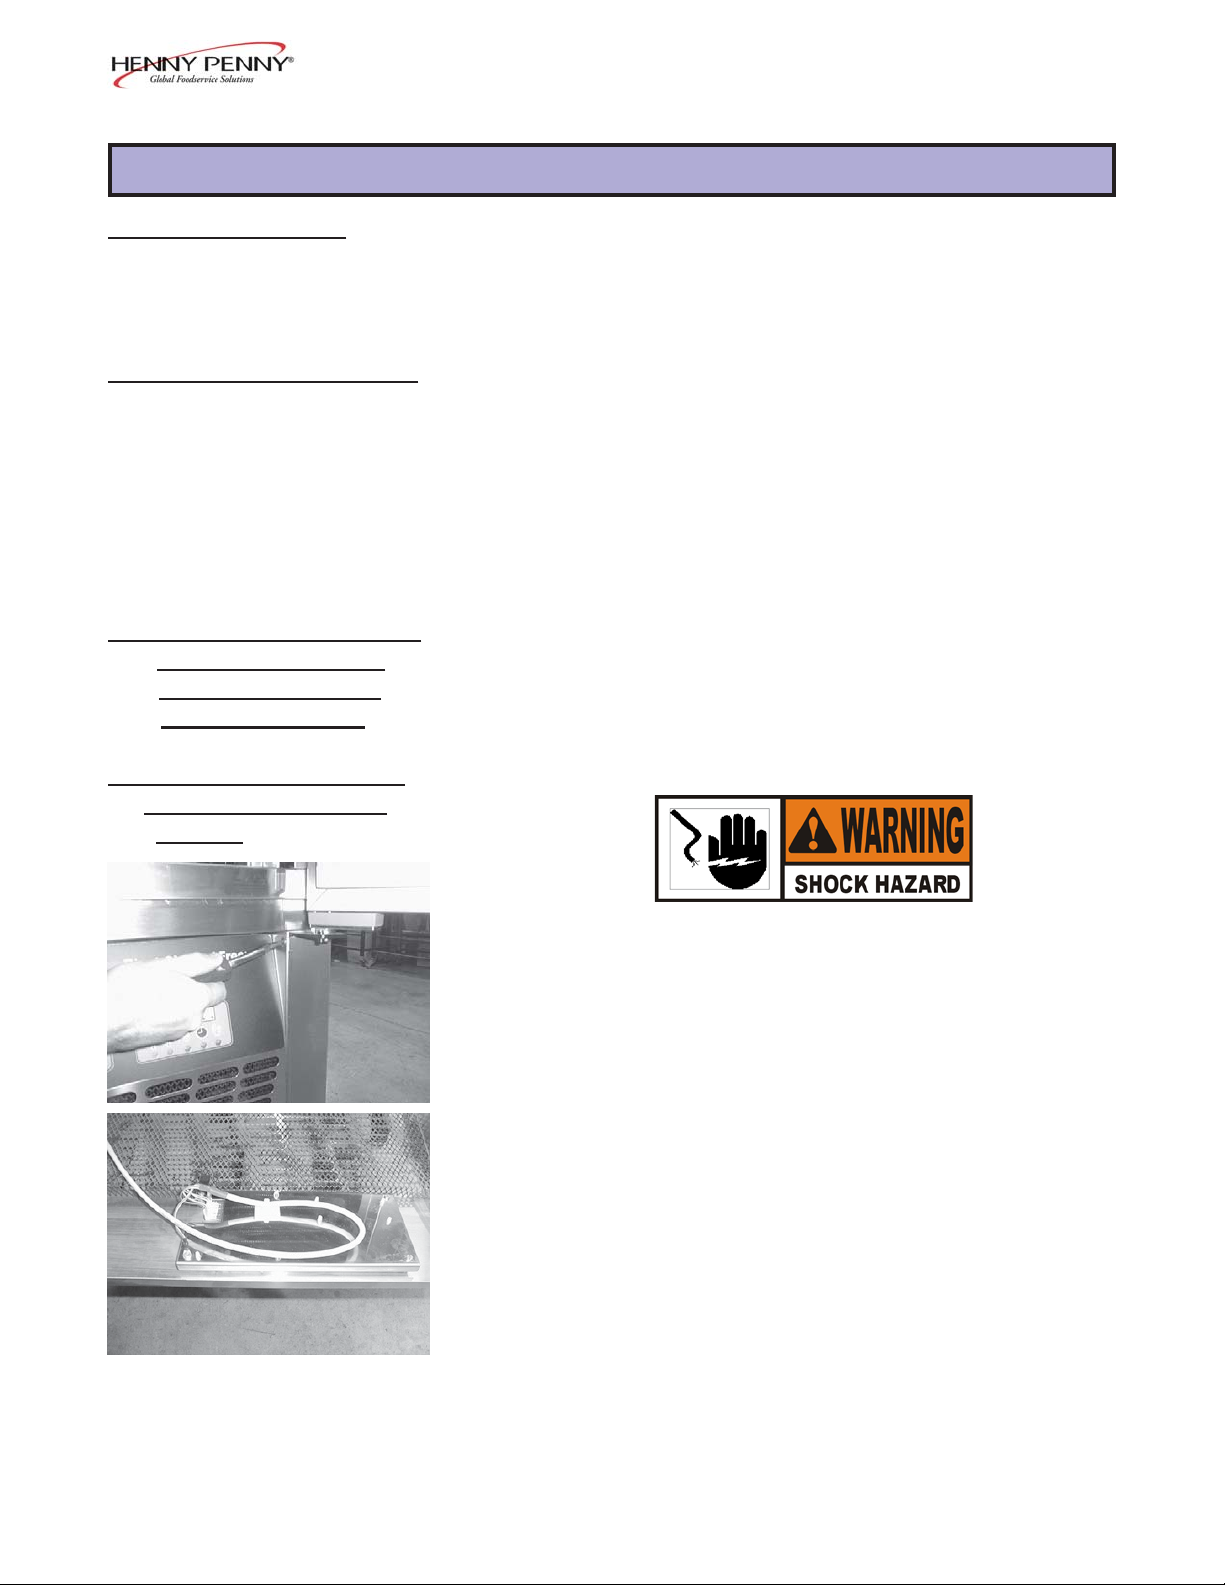
2-4. DISPLA Y BOARD AND 1. Remove the electrical power to the unit.
AUXILIARY DISPLA Y
BOARD
T o avoid electrical shock or pr operty damage, move the
power switch to OFF and disconnect main cir cuit breaker ,
or unplug cord at wall receptacle.
2. Using a Phillips head screwdriver, remove the two screws
securing the front panel, and lower the panel.
3. Pull the connector from the corner of the display board.
4. Using a flathead screwdriver, remove the screws securing
the bracket to the panel, and pull the bracket from the panel.
5. Using a flathead screwdriver, push in on the clips on the
plastic studs and pull the studs through the bracket. Remove
the display board from the bracket.
6. Install the new board in reverse order .
603 2-1
Page 12
Model BCF-24/65/110, BCM-110
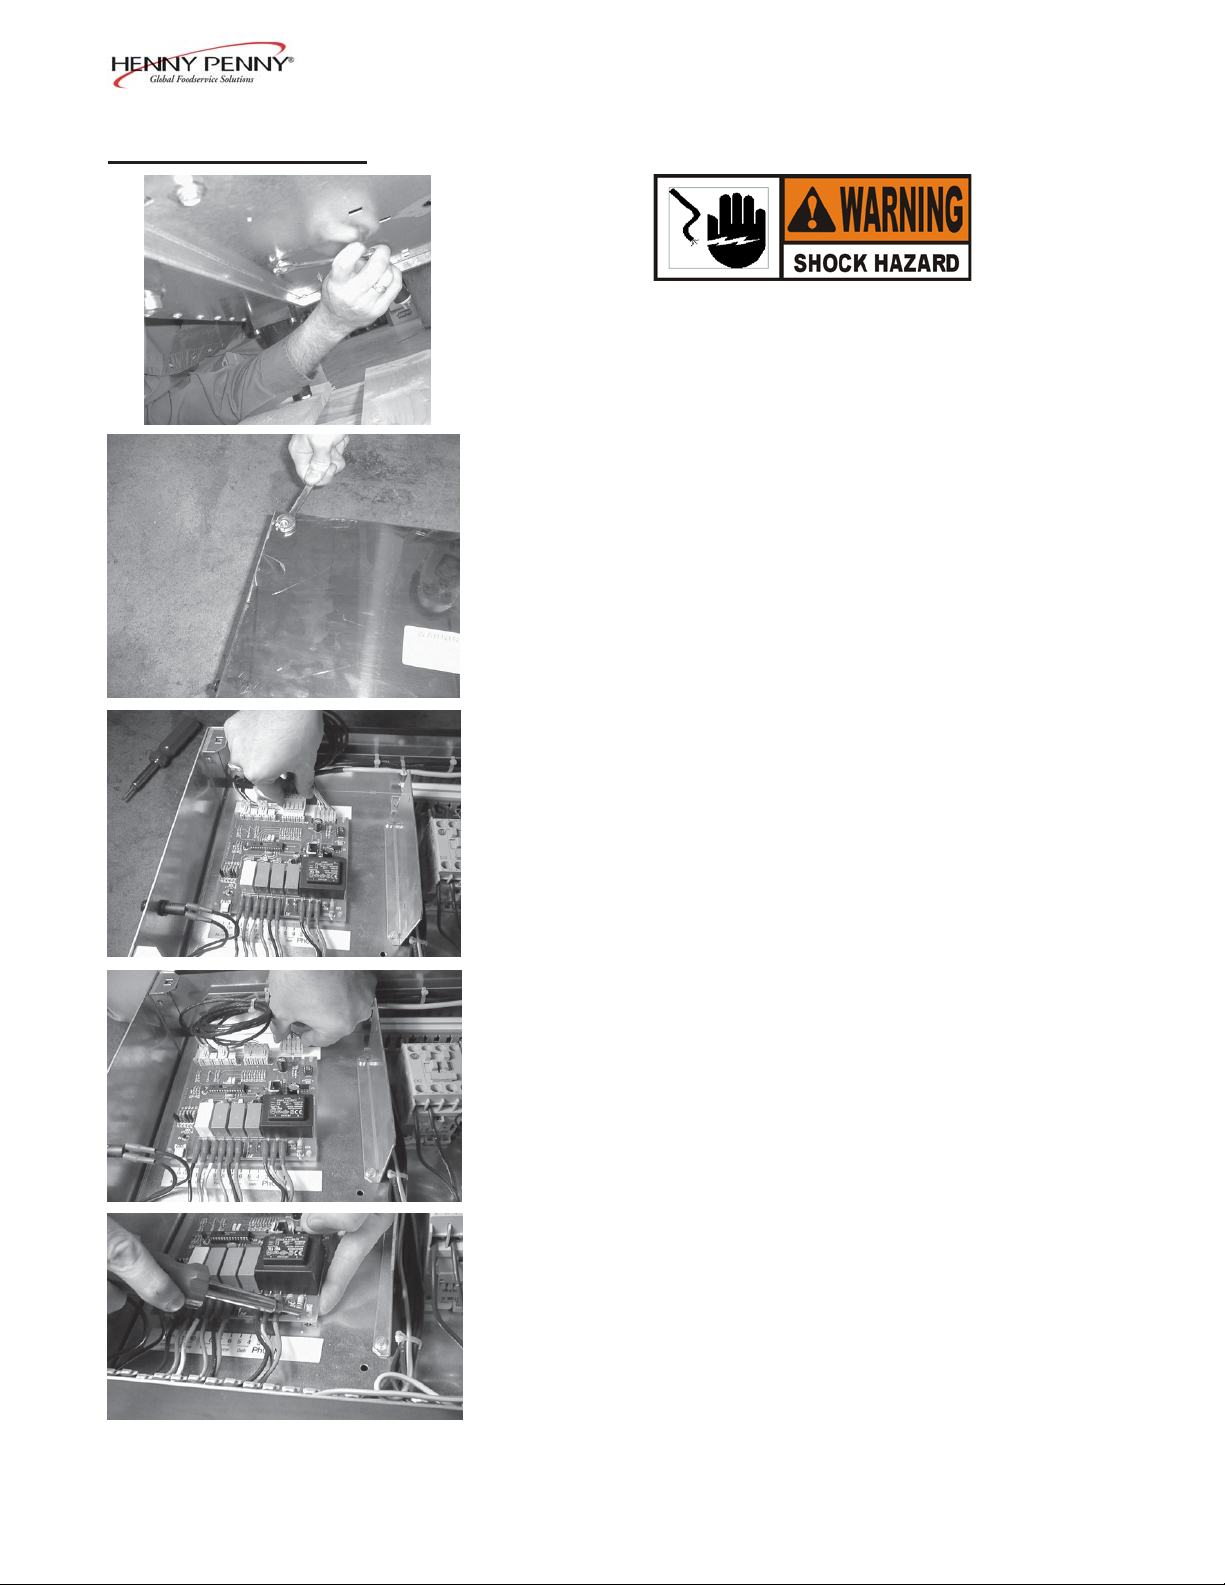
2-5. CONTROL BOARD 1. Remove the electrical power to the unit.
T o avoid electrical shock or pr operty damage, move the
power switch to OFF and disconnect main cir cuit breaker ,
or unplug cord at wall receptacle.
2. Using a Phillips head screwdriver, remove the two screws
securing the front panel, and lower the panel.
3. Remove the two bolts (under unit) securing the control box.
4. Pull the box from the front of the unit.
5. Remove the four screws securing the control box top and
pull the top from the box.
6. Pull the connectors from the control board.
7. Label and pull the wires from the control board.
8. Using a flathead screwdriver, push in on the clips on the
plastic studs and pull the studs through the bracket. Remove
the control board from the box.
9. Install the new board in reverse order.
2-2 603
Page 13

Model BCF-24/65/110, BCM-110
2-6. BUZZER 1. Remove the electrical power to the unit.
T o avoid electrical shock or pr operty damage, move the
power switch to OFF and disconnect main cir cuit breaker ,
or unplug cord at wall receptacle.
2. Using a Phillips head screwdriver, remove the two screws
securing the front panel, and lower the panel.
3. Remove the two bolts (under unit) securing the control box.
4. Pull the box from the front of the unit.
5. Remove the four screws securing the control box top and
pull the top from the box.
6. Label and remove the wires to the buzzer .
7. Remove the two screws securing the buzzer to the bracket
and remove the buzzer from the bracket.
8. Install new buzzer in reverse order .
2-7. CONT ACTOR 1. Remove the electrical power to the unit.
T o avoid electrical shock or pr operty damage, move the
power switch to OFF and disconnect main cir cuit breaker ,
or unplug cord at wall receptacle.
2. Follow steps 2 through 5 in the Control Board Section.
3. Using a flathead screwdriver, remove the two screws
securing the bracket to the box, and remove the bracket.
4. Label and remove the wires from the contactor .
5. Slide the contactor off the retainer .
6. Install new contactor in reverse order .
603 2-3
Page 14

Model BCF-24/65/110, BCM-110
2-8. DOOR FRAME HEA TER 1. Remove the electrical power to the unit.
T o avoid electrical shock or pr operty damage, move the
power switch to OFF and disconnect main cir cuit breaker ,
or unplug cord at wall receptacle.
2. Remove the door to the unit by removing the screws in the
lower hinge of the door.
3. Remove the control box from the unit, following steps 2
through 5 in the Control Board Section.
3. Remove the plastic tabs that secures the decorator covers
around the door opening, and remove the covers.
4. Peel the heater out of the groove and disconnect the wires
(inside control box) to the element, and remove the element
from the unit.
5. Install new heater in reverse order and press the plastic tabs
in place to secure the decorator covers (tabs included with new
heater).
2-9. EVAPORATOR FAN 1. Remove the electrical power to the unit.
T o avoid electrical shock or pr operty damage, move the
power switch to OFF and disconnect main cir cuit breaker ,
or unplug cord at wall receptacle.
2. Using a Phillips head screwdriver, remove the two screws
securing the fan shroud, and pull out on the shroud.
3. Using a Phillips head screwdriver, remove the three screws
securing the fan guard, and remove the guard.
4. Remove the control box from the unit, following steps 2
through 5 in the Control Board Section.
5. Disconnect the wires (inside control box) to the fan.
6. Remove the three screws securing the fan to the evaporator
door, and pull the fan from the unit.
2-4 205
7. Install new fan in reverse order.
Page 15

Model BCF-24/65/110, BCM-110
2-10. AIR PROBE AND 1. Remove the electrical power to the unit.
EVAPORATOR PROBE
T o avoid electrical shock or pr operty damage, move the
power switch to OFF and disconnect main cir cuit breaker ,
or unplug cord at wall receptacle.
2. Using a Phillips head screwdriver, remove the two screws
securing the evaporator door, and pull out on the door .
3. Remove the appropriate probe from the bracket. (See photo
Air Probe Evaporator
Probe
at left).
4. Remove the control box from the unit, following steps 2
through 5 in the Control Board Section.
5. Find the appropriate wires to the PC board and remove the
wires from the board.
6. Pull the probe wire through the wiring harness.
7. Install new probe in reverse order.
2-11. FRIGIPROBE 1. Remove the electrical power to the unit.
T o avoid electrical shock or pr operty damage, move the
power switch to OFF and disconnect main cir cuit breaker ,
or unplug cord at wall receptacle.
2. Using a Phillips head screwdriver, remove the two screws
securing the evaporator door, and pull out on the door .
3. Remove the control box from the unit, following steps 2
through 5 in the Control Board Section.
4. Find the appropriate wires to the PC board and remove the
wires from the board.
Frigiprobe
5. Pull the probe wire through the wiring harness.
6. Install new probe in reverse order.
603 2-5
Page 16

Model BCF-24/65/110, BCM-110
2-12. FUSE AND FUSE If the unit has no power, the fuse may be blown. T o access the
HOLDER fuse:
1. Remove the electrical power to the unit.
T o avoid electrical shock or pr operty damage, move the
power switch to OFF and disconnect main cir cuit breaker ,
or unplug cord at wall receptacle.
2. Remove the two screws securing the front panel and pull
down the panel.
3. Unscrew the fuse cap and pull the 10 amp fuse from the
holder.
T o check and replace the fuse holder:
1. Remove the two screws securing the front panel and pull
Fuse Holder
down the panel.
2. Remove the two bolts securing the control box and pull the
control box from the unit. (See Control Board Section.)
3. Remove the four screws securing box top and remove the top.
4. Remove the wires from the fuse holder and check for continuity across the terminals. The circuit should show closed.
If open, replace fuse holder.
5. Reinstall the control box and front panel, and unit is now
ready for use.
2-13. CONDENSA TION 1. Remove electrical power to unit and allow evaporator to cool.
EVAPORATOR
T o avoid electrical shock or pr operty damage, move the
power switch to OFF and disconnect main cir cuit breaker ,
or unplug cord at wall receptacle.
Also, if evaporator is functional, it will be very hot! Allow
evaporator to cool before removing, or burns could result.
2-6 603
Page 17

Model BCF-24/65/110, BCM-110
2-13. CONDENSA TION 2. Bend out the clips securing the rodent cover on the back of
EVAPORATOR (Continued) the unit, and pull the cover down.
3. Disconnect the wires to the evaporator.
4. Pull up on the bottom of the evaporator to disengage the
evaporator from the bracket. The evaporator is snapped into
place. No hardware is securing it.
5. Replace evaporator in reverse order.
2-14. DOOR SEAL 1. Open door and pull out on a corner of the seal until seal
clears the retainer .
2. Continue around the door, pulling the seal from the door.
3. Install new seal, starting with the four corners first.
603 2-7
Page 18

Model BCF-24/65/110, BCM-110
2-15. RUN CAP ACITOR 1. Remove the electrical power to the unit.
T o avoid electrical shock or pr operty damage, move the
power switch to OFF and disconnect main cir cuit breaker ,
or unplug cord at wall receptacle.
2. Remove the two screws securing the front panel and pull
down the panel.
Run Capacitor
3. Bend out the clips securing the rodent cover on the back of
the unit, and pull the cover down.
4. Using a Phillips head screwdriver, remove the two screws
securing the cover of the junction box, and remove the cover.
5. Disconnect the wires from the relay to the capacitor .
6. Remove the capacitor from the unit, from the front.
7. Install new capacitor in reverse order.
2-16. ST ART CAPACIT OR AND 1. Remove the electrical power to the unit.
START RELAY
T o avoid electrical shock or pr operty damage, move the
power switch to OFF and disconnect main cir cuit breaker ,
or unplug cord at wall receptacle.
2. Bend out the clips securing the rodent cover on the back of
the unit, and pull the cover down.
3. Using a Phillips head screwdriver, remove the two screws
securing the cover of the junction box, and remove the cover.
(See section 2-12 above).
Start Relay Start Capacitor
4. Disconnect the wires to either the relay or the capacitor, and
remove component from the unit.
5. Install new component in reverse order.
2-8 603
Page 19

Model BCF-24/65/110, BCM-110
2-17. PREVENTIVE MAINTENANCE As in all food equipment, the Henny Penny Blast
Chiller/Freezer does require care and proper maintenance. The table below provides a summary of scheduled maintenance.
Procedure Frequency
Clean all surfaces with a soft cloth, soap and water; Daily
do not use abrasives
De-ice the evaporator Daily
Clean the condenser of dust and obstructions Monthly
603 2-9
Page 20

Model BCF-24/65/110, BCM-110
Wiring Diagrams BCF/BCM-110
2-10 603
Page 21

Model BCF-24/65/110, BCM-110
Wiring Diagram BCF-24/65
Refrigeration Diagram BCF-24/65
603 2-11
Page 22

Model BCF-24/65/110, BCM-110
Refrigeration Diagram BCF/BCM-110-UL
Refrigeration Diagram BCF/BCM-110-Int’l.
2-12 603
Page 23

Model BCF-24/65/110, BCM-110
Electrical/Refrigeration Diagram
603 2-13
Page 24

Model BCF-24/65/110, BCM-110
Wiring Information of PC Board
1- 3 POWER SUPPL Y
2 COMPULSORY EARTHING CONNECTION
4- 5 POWER SUPPL Y OUTPUT FOR ELECTRIC HEA TING ELEMENT FOR DE-ICING OF THE EV APORA TOR
(NOT USED)
6- 7 POWER SUPPL Y OUTPUT FOR BUZZER SIGNAL
8- 9 POWER SUPPL Y OUTPUT TO F AN(S) AND FRONT FRAME HEA TER (ANTI-FOGGING)
10-11 POWER SUPPLY OUTPUT TO COMPRESSOR UNIT
12-13 12VDC OUTPUT TO ALARM BUZZER (NOT USED)
14 DISPLA Y INPUTS
15-19 FRIGIPROBE INPUTS (BLACK WIRE TO 15, WIRING UNIMPORT ANT FOR OTHER COLORS)
20-21 0 TO 1 VOLT OUTPUT TO GRAPHIC RECORDER : (HOTTEST FRIGIPROBE TEMPERA TURE,
NOT USED)
22-23 EVAPORA TOR TEMPERA TURE PROBE INPUTS
24-25 PHOTO-ELECTRIC RESISTOR INPUTS (NOT USED)
26-27 AIR TEMPERA TURE PROBE INPUTS
2-14 603
Page 25

Page 26

Model BCF-24/65/110, BCM-110
LIMITED WARRANTY FOR HENNY PENNY EQUIPMENT
Subject to the following conditions, Henny Penny Corporation makes the following limited warranties to the original
purchaser only for Henny Penny appliances and replacement parts:
NEW EQUIPMENT: Any part of a new appliance, except baskets, lamps, and fuses, which proves to be defective in
material or workmanship within two (2) years from date of original installation, will be repaired or replaced without
charge F .O.B. factory , Eaton, Ohio, or F .O.B. authorized distributor . Baskets will be repaired or replaced for ninety (90)
days from date of original installation. Lamps and fuses are not covered under this Limited W arranty. To validate this
warranty, the registration card for the appliance must be mailed to Henny Penny within ten (10) days after installation.
FILTER SYSTEM: Failure of any parts within a fryer filter system caused by the use of the non-OEM filters or
other unapproved filters is not covered under this Limited Warranty .
REPLACEMENT PARTS: Any appliance replacement part, except lamps and fuses, which proves to be defective in
material or workmanship within ninety (90) days from date of original installation will be repaired or replaced without
charge F .O.B. factory , Eaton, Ohio, or F .O.B. authorized distributor .
The warranty for new equipment covers the repair or replacement of the defective part and includes labor charges and
maximum mileage charges of 200 miles round trip for a period of one (1) year from the date of original installation.
The warranty for replacement parts covers only the repair or replacement of the defective part and does not include any
labor charges for the removal and installation of any parts, travel, or other expenses incidental to the repair or replacement of
a part.
EXTENDED FRYPOT WARRANTY: Henny Penny will replace any frypot that fails due to manufacturing or workmanship
issues for a period of up to seven (7) years from date of manufacture. This warranty shall not cover any frypot that fails due to
any misuse or abuse, such as heating of the frypot without shortening.
0 TO 3 YEARS: During this time, any frypot that fails due to manufacturing or workmanship issues will
be replaced at no charge for parts, labor, or freight. Henny Penny will either install a new frypot at no cost or
provide a new or reconditioned replacement fryer at no cost.
3 TO 7 YEARS: During this time, any frypot that fails due to manufacturing or workmanship issues will
be replaced at no charge for the frypot only . Any freight charges and labor costs to install the new frypot as
well as the cost of any other parts replaced, such as insulation, thermal sensors, high limits, fittings, and
hardware, will be the responsibility of the owner.
Any claim must be presented to either Henny Penny or the distributor from whom the appliance was purchased. No
allowance will be granted for repairs made by anyone else without Henny Penny’s written consent. If damage occurs during
shipping, notify the sender at once so that a claim may be filed.
THE ABOVE LIMITED WARRANTY SETS FOR TH THE SOLE REMEDY AGAINST HENNY PENNY FOR ANY BREACH
OF W ARRANTY OR OTHER TERM. BUYER AGREES THA T NO OTHER REMEDY (INCLUDING CLAIMS FOR ANY INCIDENT AL OR CONSEQUENTIAL DAMAGES) SHALL BE AV AILABLE.
The above limited warranty does not apply (a) to damage resulting from accident, alteration, misuse, or abuse; (b) if the
equipment’s serial number is removed or defaced; or (c) for lamps and fuses. THE ABOVE LIMITED WARRANTY IS EXPRESSL Y IN LIEU OF ALL OTHER W ARRANTIES, EXPRESS OR IMPLIED, INCLUDING MERCHANT ABILITY AND FITNESS, AND ALL OTHER W ARRANTIES ARE EXCLUDED. HENNY PENNY NEITHER ASSUMES NOR AUTHORIZES ANY
PERSON TO ASSUME FOR IT ANY OTHER OBLIGA TION OR LIABILITY.
Revised 01/01/07
Page 27

Model BCF-24/65/110, BCM-110
SECTION 3. P ARTS INFORMATION
3-1. INTRODUCTION This section identifies and lists the replaceable parts of the
Henny Penny blast chiller/freezer.
3-2. GENUINE P ARTS Use only genuine Henny Penny parts in your cabinet. Using a
part of lesser quality or substitute design may result in cabinet
damage or personal injury .
3-3. HOW TO ORDER P ARTS Once the part you want to order has been found in the Parts
List, write down the following information:
1. From the Parts List
(Sample)
Item Number 13
Part Number 9501.6267
Description Condenser
2. From the data plate
(Sample)
Product Number BCF .100
Serial Number 0001
Voltage 208V
3-4. PRICES Y our distributor has a price parts list and will be glad to inform you
of the cost of your parts order.
3-5. DELIVERY Commonly replaced items are stocked by your distributor
and will be sent out when your order is received. Other parts
will be ordered by your distributor from Henny Penny Corporation. Normally , these will be sent to your distributor within three
working days.
3-6. WARRANTY All replacement parts (except lamps and fuses) are covered
under warranty for 90 days against manufacturing defects
and workmanship. If damage occurs during shipping, notify
the carrier at once so that a claim may be properly filed. Refer
to warranty on the front of this section for other rights and
limitations.
3-7. RECOMMENDED
SPARE P ARTS FOR
DISTRIBUTORS
Recommended replacement parts, stocked by your distributor, are
indicated with
√ √
√ in the parts lists. Please use care when ordering
√ √
recommended parts, because all voltages and variations are
marked. Distributors should order parts based upon common
voltages and equipment sold in their territory .
206 3-1
Page 28

Model BCF-24/65/110, BCM-110
Figure 1. Evaporator, Fan, & Expansion Valve
BCM-110
Item No. Part No. Description BCF-24 BCF-65 BCF-110
√√
√ 1 9560.0326 Evaporator Fan - BCF-24 1 - -
√√
√√
√ 1 9560.0334 Evaporator Fan - BCF-65; BCF/BCM-110 - 1 2
√√
√√
√ 1 9501.5939 Evaporator Fan - BCF-24 - Int’l. - 50 Hz. 1 - -
√√
√√
√ 1 9501.5947 Evaporator Fan - BCF-65/110 - Int’l. - 50 Hz. - 1 2
√√
√√
√ 2 9502.5375 Thermostatic Expansion V alve-BCF-24 (before 7/99) 1 - -
√√
√√
√ 2 9502.5383 Thermostatic Expansion V alve-BCF-65 (before 10/99) - 1 -
√√
√√
√ 2 9503.4377 Thermostatic Expansion V alve-BCF-24 (7/99 & after) 1 - -
√√
√√
√ 2 9503.4062 Thermo. Expan.V alve-BCF-65 (10/99 & after); BCF/M-110 - 1 1
√√
√√
√ 3 9500.7209 Evaporator Probe 1 1 1
√√
4 9501.6291 Evaporator - BCF-24 1 - 4 9500.6953 Evaporator - BCF-65 - 1 4 9501.6275 Evaporator - BCF/BCM-110 - - 1
√√
√ 5 9500.7209 Air Probe 1 1 1
√√
6 9500.2036 Drain Cover 1 1 1
7* 9500.8819 Nozzle-Expansion V alve-BCF-24 (before 7/99) 1 - 7* 9503.4070 Nozzle-Expansion V alve-BCF-24 (7/99 & after) 1 - 7* 9500.8835 Nozzle-Expansion V alve-BCF-65 (before 10/99) - 1 7* 9503.4393 Nozzle-Expansion V alve-BCF-65 (10/99 & after) - 1 7* 9503.4401 Nozzle-Expansion V alve-BCF/BCM-110 - - 1
√√
√ recommended parts
√√
*not shown
3-2 206
Page 29

Model BCF-24/65/110, BCM-110
Figure 2. Drier & Condenser
BCM-110
Item No. Part No. Description BCF-24 BCF-65 BCF-110
8 9503.3593 Decal - BCF-24 1 - 8 9503.3619 Decal - BCF-65 - 1 8 9503.7859 Decal - BCF/BCM-110 - - 1
9 9505.0530 Foot - BCF-24/65 (before 7/99); BCF-65 (before 10/99) 4 4 * 9500.4016 Cage Nut (used w/9505.0530) 4 4 9 9503.6562 Foot - BCF-24 (7/99 & after); BCF-65 (10/99 & after) 4 4 4
10 9503.3601 Decal - Control 1 1 1
√√
√ 10a 9504.0128 Power Switch 1 1 1
√√
√√
√ 11 9503.3650 Fuse 10 Amp 1 1 1
√√
12 9500.7936 Drier - BCF-24 (before 7/99); BCF-65 (before 10/99) 1 1 12 9503.7800 Drier - BCF-24 (7/99 & after); BCF-65 (10/99 & after) 1 1 1
13 9501.6267 Condenser-BCF-24-208 volt-60 Hz. units 1 - 13 9503.3749 Condenser-BCF-65-208 volt-60 Hz. units - 1 13 9503.7784 Condenser-BCF/BCM-110 - 208-240 volt-60 Hz units
and 400 volt-50 Hz units - - 1
13 9502.7595 Condenser-BCF-24-Int’l.-50 Hz. units 1 - 13 9503.4120 Condenser-BCF-65-Int’l.-50 Hz. units - 1 -
√√
√ recommended parts/*not shown
√√
206 3-3
Page 30

Model BCF-24/65/110, BCM-110
Figure 3. Electrical Parts
BCM-110
Item No. Part No. Description BCF-24 BCF-65 BCF-110
√√
√ 14 9503.3643 Fuse Holder 1 1 1
√√
√√
√ 15 9504.0205 Control Board 1 1 1
√√
√√
√ 16 9503.0912 Contactor - 208 Volt - UL 1 1 1
√√
√√
√ 16 9501.5160 Contactor - 240 Volt - 50 Hz. 1 1 1
√√
√√
√ 17* 9503.0185 Varistor - V320LA20A 1 1 1
√√
√√
√ 18 9503.3726 Buzzer - 240 V olt - UL 1 1 1
√√
√√
√ 18 9501.8701 Buzzer - 230 V olt - 50 Hz. 1 1 1
√√
√√
√ 19* 9503.7719 Communication Board 1 1 1
√√
√√
√ recommended parts
√√
*not shown
3-4 206
Page 31

Model BCF-24/65/110, BCM-110
Figure 4. Capacitor, Receiver, & Rear Cover
BCM-110
Item No. Part No. Description BCF-24 BCF-65 BCF-110
√√
√ 19 9502.5649 Run Capacitor 1.5 mF - BCF-24* 1 - -
√√
√√
√ 19 9502.6563 Run Capacitor 4 mF -BCF-65*; BCF/BCM-110 - 1 2
√√
√√
√ 19 9502.5243 Run Capacitor 2 mF-50 Hz.-Int’l.-BCF-24* 1 - -
√√
√√
√ 19 9502.5235 Run Capacitor 6 mF-50 Hz.-Int’l.-BCF-65*; BCF/BCM-110 -1 2
√√
20 9503.2041 Liquid Receiver - BCF-24/65 1 1 20 9502.5045 Liquid Receiver - BCF/BCM-110 - - 1
20 9500.5989 Liquid Receiver - BCF-24 - Int’l. 1 - 20 9503.4096 Liquid Receiver - BCF-65; BCF/BCM-110 - Int’l. - 1 1
21 9542.3588 Rear Rodent Cover - BCF-24 (before 7/99) 1 - 21 9542.3596 Rear Rodent Cover - BCF-65 (before 10/99) - 1 21 9542.6193 Rear Rodent Cover - BCF-24 (7/99 & after) 1 - 21 9542.6227 Rear Rodent Cover 21 9542.9049 Rear Rodent Cover - BCF/BCM-110 - Int’l - - 1
21A 9503.3411 Cord and Plug Assembly 1 1 -
√√
√ recommended parts * Included in the electrical component set for the compressor
√√
606 3-5
BCF/BCM-110/65 UL (10/99 & after) -1 1
Page 32

Model BCF-24/65/110, BCM-110
Figure 5. Compressor & Sight Glass
BCM-110
Item No. Part No. Description BCF-24 BCF-65 BCF-110
22 9503.0771 Compressor - UL - BCF-24 1 - -
√√
√ 9526.0683 Elec. Component Set-Compressor-BCF-24 1 - -
√√
22 9503.3049 Compressor - UL - BCF-65 - 1 -
√√
√
√√
22 9502.5417 Compressor - Int’l.-BCF-24-230 Volt-50 Hz. 1 - -
√√
√
√√
22 9502.5425 Compressor - Int’l.-BCF-65-230 Volt-50 Hz. - 1 -
√√
√
√√
22 9503.3577 Compressor - Int’l.-BCF-24-200 Volt-50 Hz. 1 - -
√√
√
√√
22 9503.4104 Compressor - Int’l.-BCF-65-200 Volt-50 Hz. - 1 -
√√
√ 9526.0824 Elec. Comp. Set-Compressor-208 V.-50 Hz. - 1 -
√√
22 9505.1371 Compressor-UL-BCF/BCM-1 10-208-240 V-60 Hz. - - 1
22 9503.6117 Compressor-Int’l.-BCF/BCM-110-400 V-50 Hz. - - 1
23 9503.3007 Condensate Evaporator-UL 1 1 -
√√
√ 24* 9503.7966 Heater Cartridge (Condensation Evap.) 1 1 -
√√
25 9503.2058 Sight Glass - BCF-24 1 - 25 9503.2066 Sight Glass - BCF-65 - 1 1
25 9500.8785 Sight Glass - BCF-24 - Int’l. 1 - 25 9500.8777 Sight Glass - BCF-65 - Int’l. - 1 1
26 9504.0250 Valve - Rotolock 1 1 1
√√
√ * 9503.7818 High Pressure Controller, BCF/BCM-1 10 - - 1
√√
√√
√ * 9503.6174 Thermal Overload Relay, BCF/BCM-110 - - 1
√√
√√
√ recommended parts/* not shown
√√
9526.0691 Elec. Component Set-Compressor-BCF-65 - 1 -
9526.0832 Elec. Comp. Set-Compressor-230 V.-50 Hz. 1 - -
9526.0840 Elec. Comp. Set-Compressor-230 V.-50 Hz. - 1 -
9526.0816 Elec. Comp. Set-Compressor-208 V.-50 Hz. 1 - -
The Electric Component Sets contain overload protector, start relay, run capacitor, and start capacitor.
3-6 806
Page 33

Model BCF-24/65/110, BCM-110
Figure 6. Display Board & Frigiprobe B CM- 110
Item No. Part No. Description BCF-24 BCF-65 BCF-110
√√
√ 26 9503.3692 Display Board 1 1 1
√√
√√
√ 27 9503.3700 Auxiliary Display Board 1 1 1
√√
28 9503.3759 Connecting Cable 1 1 1
29* 9540.8613 Evap. Deflector-BCF-24 (
29* 9542.7076 Evap. Deflector-BCF-24 (7/99 & after); BCF-65(10/99 & after) 11 1
30 9505.3989 Evap. Fan Grid - UL-BCF-24 1 - 30 9505.3963 Evap. Fan Grid - UL-BCF-65; BCF/BCM-110 - 1 2
√√
√ 31 9502.0400 Frigiprobe 1 1 1
√√
√√
√ recommended parts/*not shown
√√
206 3-7
before 7/99); BCF-65(before 10/99)1 1 -
Page 34

Model BCF-24/65/110, BCM-110
Figure 7. Motor & Fan Blade
BCM-110
Item No. Part No. Description BCF-24 BCF-65 BCF-1 10
√√
√ 32 9503.3304 Condenser Fan Motor-UL-BCF-24/65 1 1 -
√√
√√
√ 32 9502.1846 Condenser Fan Motor-UL-BCF/BCM-110 --1
√√
√√
√ 32 9502.7561 Condenser Fan Motor - Int’l. - BCF-24 1 - -
√√
√√
√ 32 9503.4112 Condenser Fan Motor-Int’l. - BCF-65 - 1 -
√√
√√
√ 32 9503.9343 Condenser Fan Motor-Int’l. - BCF/BCM-110 --1
√√
33 9503.3312 Fan Blade - Condenser-BCF-24 - UL 1 - 33 9503.9627 Fan Blade - Condenser-BCF/BCM-110-UL --1
34 ----------- Start Relay (use Elec. Component Set-page 3-6) 1135 ----------- Start Capacitor (use Elec. Component Set-page 3-6) 11-
√√
√ recommended parts
√√
3-8 606
Page 35

Model BCF-24/65/110, BCM-110
Figure 8. Heaters & Racks
BCM-110
Item No. Part No. Description BCF-24 BCF-65 BCF-110
37 9526.0501 Front Frame Heater-BCF-24-UL (before 7/99) 1 - 37 9503.1084 Front Frame Heater-BCF-24-UL (7/99 & after) 1 - 37 9526.0493 Front Frame Heater-BCF-65-UL (before 10/99) - 1 37 9503.1076 Front Frame Heater-BCF-65-UL (10/99 & after) - 1 37 9503.7735 Front Frame Heater-BCF/BCM-110-UL - - 1
37 9526.0709 Front Frame Heater-BCF-24-Int’l. (before 7/99) 1 - 37 9502.0061 Front Frame Heater-BCF-24-Int’l. (7/99 & after) 1 - 37 9526.0717 Front Frame Heater-BCF-65-Int’l. (before 10/99) - 1 37 9501.5616 Front Frame Heater-BCF-65-Int’l. (10/99 & after) - 1 37 9503.7073 Front Frame Heater-BCF/BCM-110-Int’l. - - 1
38 9542.2184 Left, Front Vertical Rack-BCF-24 (before 7/99) 1 - 38 9542.5153 Left, Front Vertical Rack-BCF-24 (7/99 & after) 1 - 38 9541.9966 Left, Front Vertical Rack - BCF-65 (before 10/99) - 1 38 9542.6854 Left, Front Vertical Rack - BCF-65 (10/99 & after) - 1 38 9542.5617 Left, Front Vertical Rack - BCF-110 - - 1
39 9511.8832 Right Shelf Support 3 6 10
39* 9511.8840 Left Shelf Support 3 6 10
40 9542.2267 Right Rear Vertical Rack - BCF-24 (before 7/99) 1 - 40 9542.6144 Right Rear Vertical Rack - BCF-24 (7/99 & after) 1 - 40 9542.2242 Right Rear Vertical Rack - BCF-65 (before 10/99) - 1 40 9542.6888 Right Rear Vertical Rack - BCF-65 (10/99 & after) - 1 40 9542.6169 Right Rear Vertical Rack - BCF-110 - - 1
*not shown
(Continued)
603 3-9
Page 36

Model BCF-24/65/110, BCM-110
BCM-110
Item No. Part No. Description BCF-24 BCF-65 BCF-110
40* 9542.2259 Left Rear Vertical Rack-BCF-24 (before 7/99) 1 - 40* 9542.5161 Left Rear Vertical Rack-BCF-24 (7/99 & after) 1 - 40* 9542.2234 Left Rear Vertical Rack-BCF-65 (before 10/99) - 1 40* 9542.6870 Left Rear Vertical Rack-BCF-65 (10/99 & after) - 1 40* 9542.5625 Left Rear Vertical Rack-BCF-110 - - 1
41 9542.2192 Right Front Vertical Rack-BCF-24 (before 7/99) 1 - 41 9542.6136 Right Front Vertical Rack-BCF-24 (7/99 & after) 1 - 41 9541.9982 Right Front Vertical Rack-BCF-65 (before 10/99) - 1 41 9542.6862 Right Front Vertical Rack-BCF-65 (10/99 & after) - 1 41 9542.6151 Right Front Vertical Rack-BCF-110 - - 1
42 9540.9496 Front Panel - BCF-24 (before Jan. 2000) 1 - 42 9543.2183 Front Panel - BCF-24 (Jan. 2000 to Dec. 2004) 1 - 42 9543.4781 Front Panel(w/power switch)-BCF-24
42 9540.9504 Front Panel - BCF-65 (before Jan. 2000) - 1 42 9543.2365 Front Panel - BCF-65 (Jan. 2000 to Dec. 2004) - 1 42 9543.4780 Front Panel(w/power switch)-BCF-65 (Jan. 2005 and after) -142 9542.7720 Front Panel - BCF/BCM-110 (before Dec. 2004) - - 1
42 9543.4780 Front Panel(w/power switch)-BCF/BCM-110 (Jan. 2005 and after) --1
43 9501.8875 Bottom Pivot - Door Hinge 1 1 1
44 9501.4601 Return Pivot - Door Hinge 1 1 1
45 9503.3296 Pins-V ertical Rack Holding-BCF-65 (before 10/99)
-BCF-24 (before 7/99) 8 8 -
45 9505.4664 Pins-Right Front Vertical Holding-BCF-24 (7/99 & after)
-BCF-65 (10/99 & after) 2 2 2
45 9505.4672 Pins-Left Front Vertical Holding-BCF-24 (7/99 & after)
-BCF-65 (10/99 & after) 2 2 2
45 9505.4474 Pins-Right Rear Vertical Holding-BCF-24 (7/99 & after)
-BCF-65 (10/99 & after) 2 2 2
45 9505.4482 Pins-Left Rear Vertical Holding-BCF-24 (7/99 & after)
-BCF-65 (10/99 & after) 2 2 2
46 9550.0724 Door - BCF-24 (before 7/99) 1 - 46 9518.2051 Door - BCF-24 (7/99 & after) 1 - 46 9550.0732 Door - BCF-65 (before 10/99) - 1 46 9518.2069 Door - BCF-65 (10/99 & after) - 1 46 9518.2077 Door - BCF/BCM-110 - - 1
47 9502.1713 Door Seal - BCF-24 (before 7/99) 1 - 47 9505.4425 Door Seal - BCF-24 (7/99 & after) 1 - 47 9502.1721 Door Seal - BCF-65 (before 10/99) - 1 47 9505.4433 Door Seal - BCF-65 (10/99 & after) - 1 47 9505.4441 Door Seal - BCF/BCM-110 - - 1
48 9505.4524 Top Pivot - Door Hinge 1 1 1
49 9540.2376 Side Front Frame - Door BCF-24 (before 7/99) 2 - 49 9540.2384 Side Front Frame - Door BCF-65 (before 10/99) - 2 49 9542.8926 Right Side Front Frame - Door-BCF-24 (7/99 & after) 1 - 49 9542.8934 Right Side Front Frame - Door-BCF-65
49 9542.8942 Right Side Front Frame - Door - BCF/BCM-110 - - 1
49 9542.8967 Left Side Front Frame - Door-BCF-24 (7/99 & after) 1 - 49 9542.8975 Left Side Front Frame - Door-BCF-65 (10/99 & after) - 1 49 9542.8983 Left Side Front Frame - Door-BCF/BCM-110 - - 1
* not shown
(Jan. 2005 and after) 1--
(10/99 & after) - 1 -
(Continued)
3-10 1105
Page 37

Model BCF-24/65/110, BCM-110
BCM-110
Item No. Part No. Description BCF-24 BCF-65 BCF-110
50 9540.2368 Top/Bottom Front Frame-Door -BCF-24 (before 7/99)
Door-BCF-65 (before 10/99) 2 2 -
50 9542.8900 Top Front Frame-Door-BCF-24 (7/99 & after)
BCF/BCM-110;BCF-65 (10/99 & after) 1 1 1
50 9542.8918 Bottom Front Frame-Door-BCF-24 (7/99 & after)
BCF/BCM-110;BCF-65 (10/99 & after) 1 1 1
9503.3635* Decal-Door Handle-BCF-24 1 - -
9503.3627* Decal-Door Handle-BCF-65;BCF/BCM-110 -11
9543.6198* MOR Support - BCM-110 - - 1
03201* Printer Mounting Bracket Accessory 1 1 1
9526.0568* Set Screws AR AR AR
√√
√
√√
√√
√ recommended parts
√√
9504.0128* Power Switch 1 1 1
* not shown
206 3-11
Page 38

 Loading...