

Heatmiser Senior User Manual

HEATMISER SENIOR
OPERATING AND ENGINEERS INSTRUCTIONS
These instructions apply to software versions 9.0 or above.
Software versions less than this may not have all of the features mentioned in this manual.
1

Contents Page
Contents Page
Control Terminology
Understanding the Run Mode
Understanding the Override facility
Programming the Day/Night temperature
Programming Switching times
Setting the Current Time & Date
Setting the User security code
Setting the Holiday periods
Logging Hours Run
Logging Temperatures
Understanding the Inputs
Configuration Introduction
Optimiser Configuration
Relay & Input connections
Compensator Configuration
Relay & Input connections
High/Low Configuration
Relay & Input connections
Boiler Sequencer Configuration
Specification / Troubleshooter
Wiring Diagrams
2

Control Terminology
Self Learning Optimisation is a system whereby the Heatmiser Control will automatically
calculate the start-up time to ensure the building is up to temperature for the programmed
switching time.
It does this by monitoring the internal temperature readings, so that for example, in milder
weather conditions heat up times are reduced - thus saving energy.
Preheat is the number of hours the control can come on before the programmed switching
time (when in optimising mode)
This is set under the Engineers code and can be set to no more than 8 hours.
Rate of change is the time it takes to raise the building 1oC. The factory default for this
setting is 20 minutes but the control will automatically adjust this according to the fabric of
the building.
Override Using the Override button on the Heatmiser Keypad allows the user to override
the zone for a selected number of hours, to allow for unscheduled use of the system.
A maximum can be set to stop users entering long override periods.
Switching period status
Day is when the control is being controlled to an actual switching time. (For example
between 07.00 - 08.00 the control would be in a DAY condition. Outside of those hours the
control would be in a NIGHT condition)
Night is when no switching times have been programmed. At these times the control is set
back to the night temperature.
Normal RUN mode is when the control is operating normally and is not being
programmed.(ie: showing the Time/Day or the Info screen) It is important to remember
that when any alterations have been made to the Heatmiser’s program, the RUN button is
pressed to return the control to the RUN mode.
Hysterysis Value
The hysterysis value is responsible for how the control maintains boiler temperature. With a
hysterysis value of 04, and a required boiler temperature of 70 the boiler would fire at 68
and shut down at 72.
Slope Value
This setting controls how the flow temperature adjusts to the outside temperature. For
example with a slope temperature of 06, which is the factory default, means that for every
1 degree rise in temperature outside the flow temperature will be reduced by 3 degrees C.
Remote Override Input
A remote override can be wired into the Heatmiser for zones 1-3. Should this input be
made it will override the zone ON for the maximum override period.
Remote Holiday Input
A remote Holiday Input can be wired into the Heatmiser. Should this input be made, it will
put the entire system into the NIGHT condition.
Remote Summer Input
A remote Summer input can be wired into the Heatmiser. Should this input be made, it will
put all zones into the NIGHT condition. If however you have selected boiler enable on Zone
2, relays 1 & 2 will continue to function normally.
3
User Instructions.
Understanding the Normal Run Mode
The Normal Run Mode is when any of the zone status screens or the Time and Date screen
is being displayed.
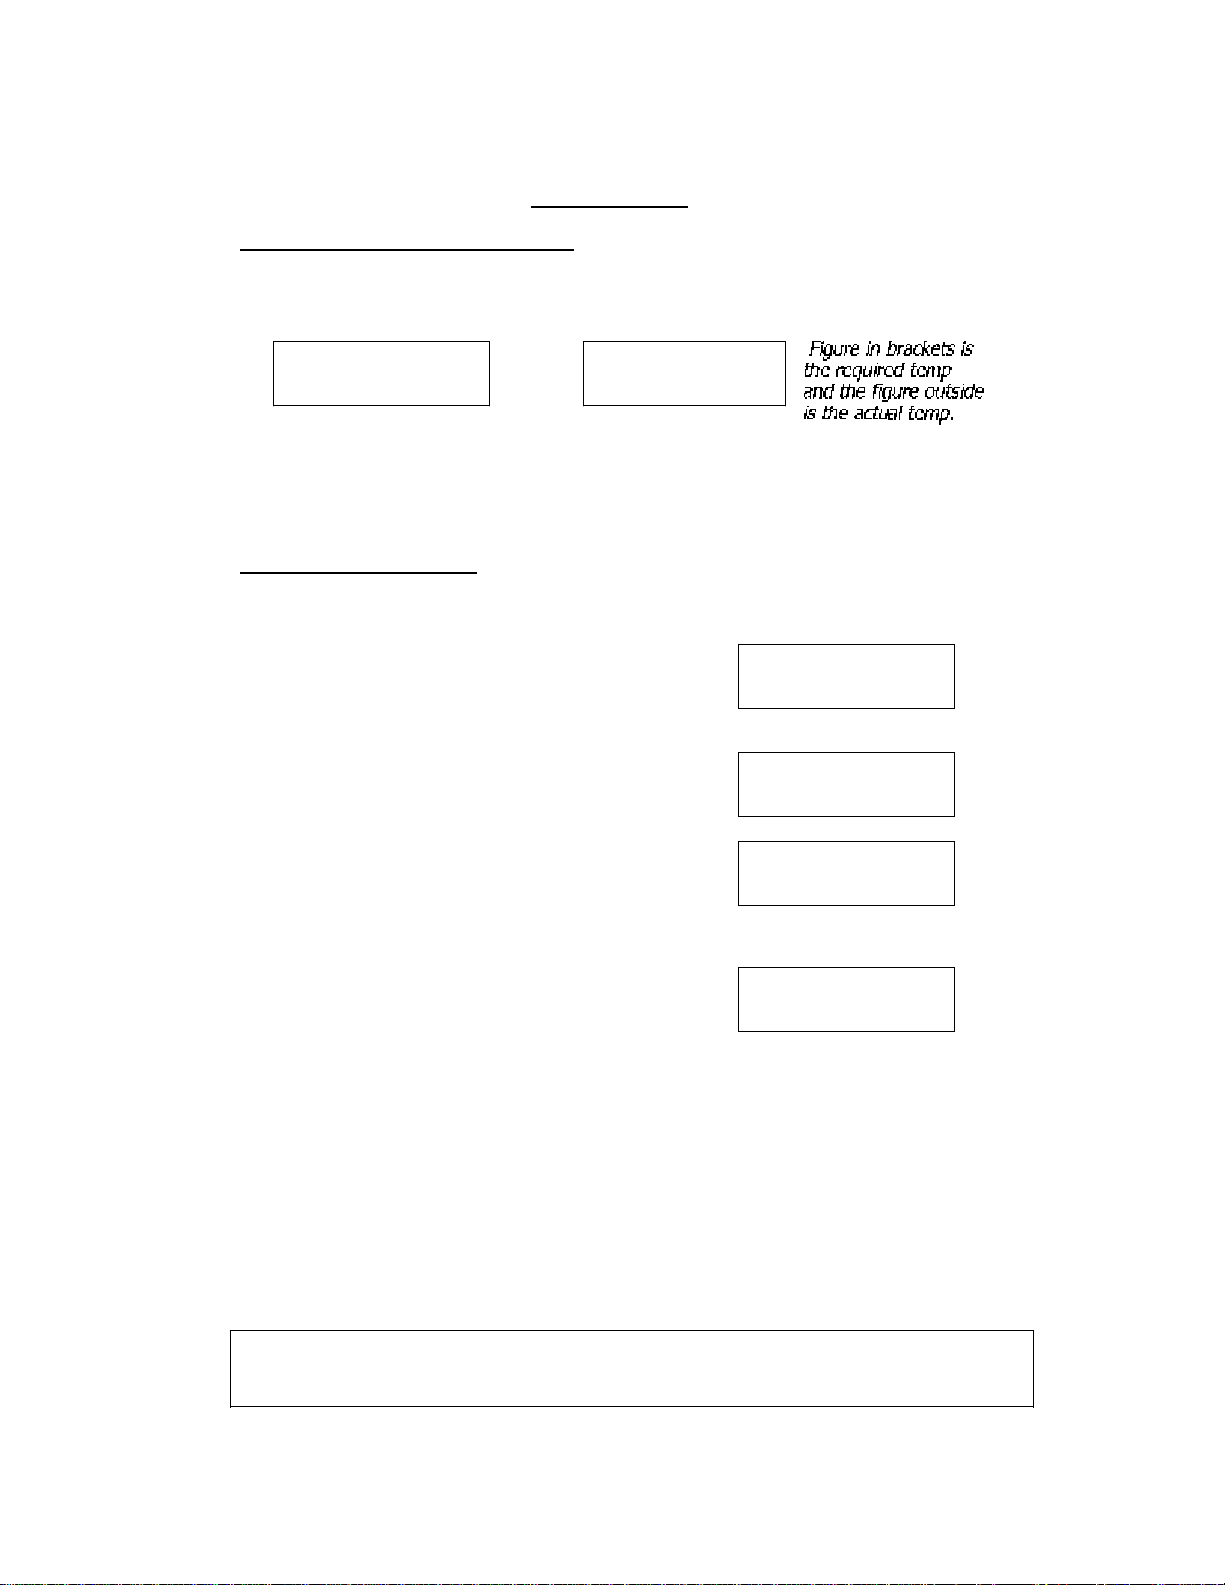
SAT 16-06-01
14.18.46 N N N
Using the scroll key on the Heatmiser Senior enables you to scroll through the Zone Status
screens and then back to the Time and Date screen. Depending on the number of zones
setup on your system will determine the number of Zone Status screens that you will see.
Using the Override Facility
The Heatmiser Senior allows the user to override the heating to an ON condition or to an
OFF condition without the need to alter the programmed switching times.
To override the Heatmiser, press the Override key and the
following screen will appear.
At this point, you are required to select the zone you wish
to override.
You are then prompted to choose whether you wish to
override the zone ON(will maintain the Day temperature)
or OFF (will maintain the NIGHT temperature.
Whether you choose to override the zone ON or OFF you
are prompted to enter the length of the override period
.The engineer who installed the system will have
programmed a maximum override time to prevent long
override periods being entered. Should you wish this setting to be altered contact your
control installer.
The Heatmiser will flash on screen the length of the
override left every ten seconds.
ZONE 1 (04) :16
RELAY OFF
ENTER THE ZONE
NUMBER (1-3)
OVERRIDE TO
1)ON or 2)OFF
ENTER OVERRIDE
(08 hrs MAX):00
OVERRIDE TIME
LEFT 59 MINS
!To cancel an override, repeat the steps above reducing the length of the override period to 00 .
4

Understanding the User Programming section
The Heatmiser Senior has 4 programming options which are available to the user.
These are accessed by pressing the program button from
any of the Normal Run Mode screens. You are then
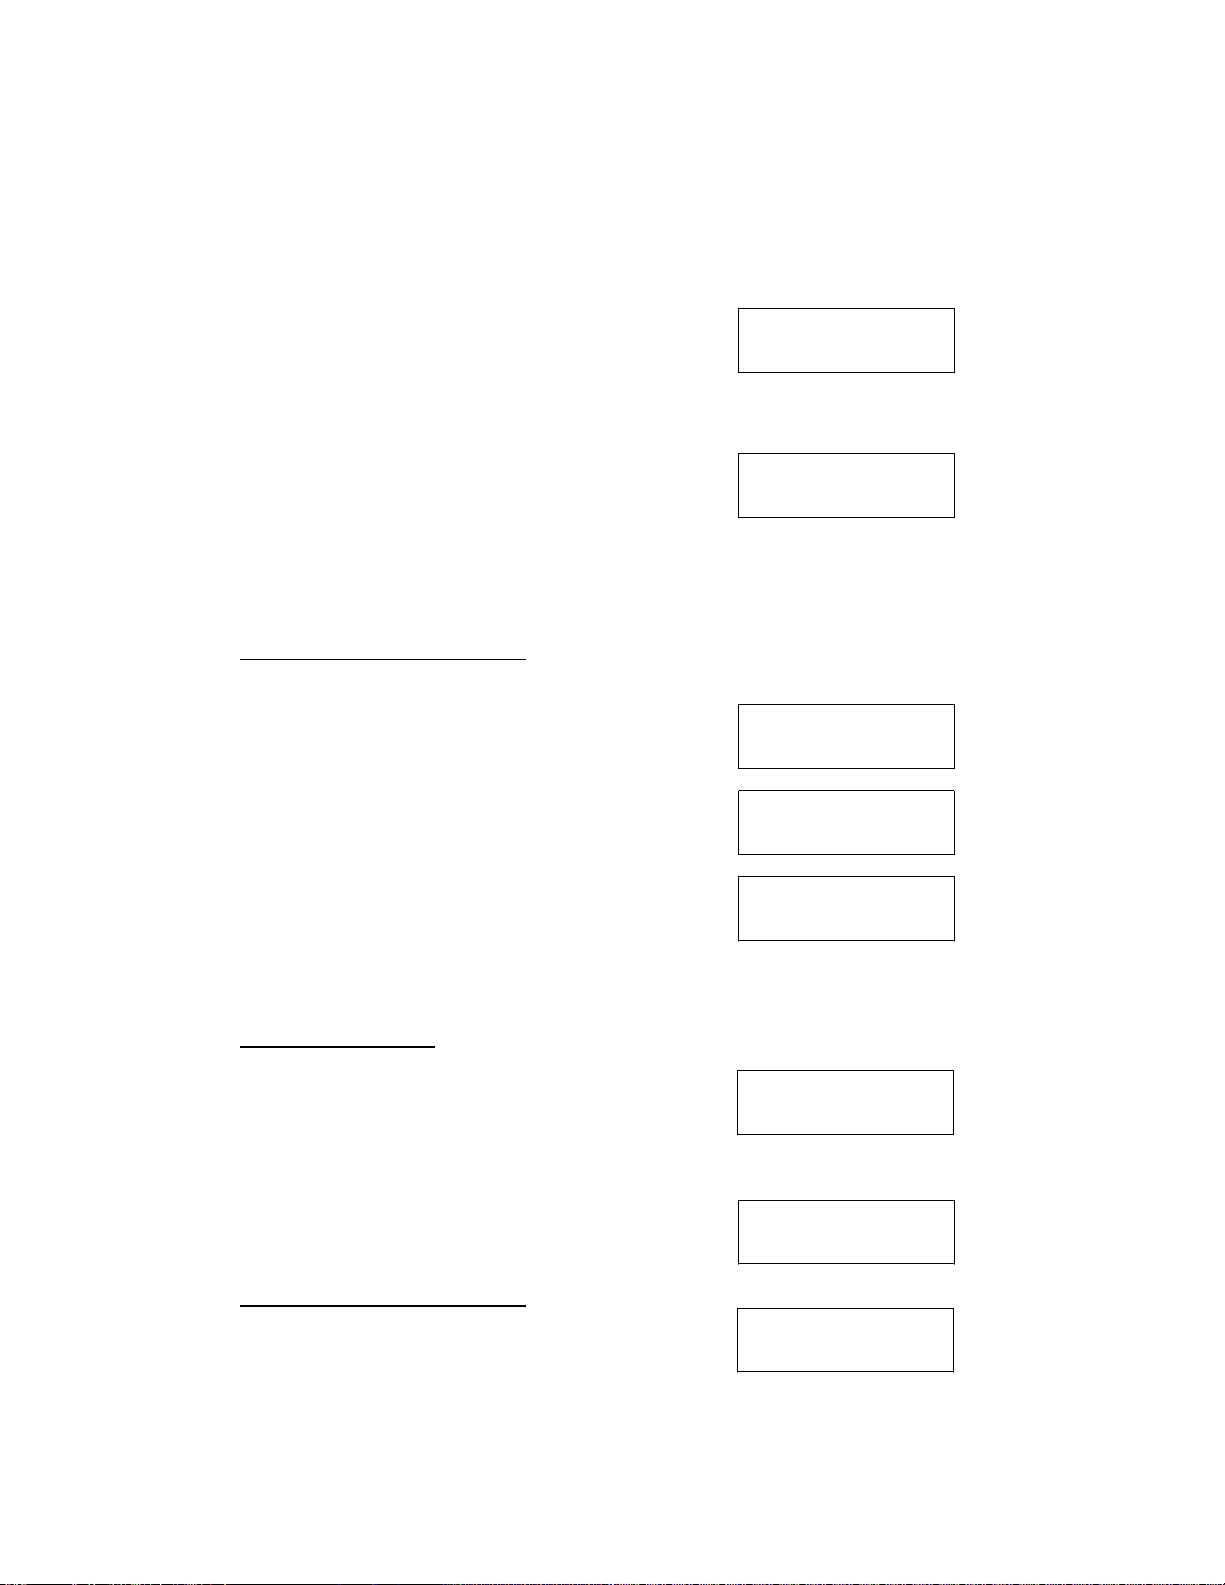
Enter code
to continue:
prompted to enter the User security code. This code is set
to 0000 as a factory default but can be altered by the user, we explain how to do this later
in this manual.
You are then presented with the Programming Options
Menu and the 4 available options. These are briefly
1)DATA 2)TIME
3)CODE 4)HOLS
described below.
Data. Under this section you can alter the DAY and NIGHT temperature settings and the
programmed switching times.
Time Under this section you can set the current time and date.
Code Under this section you can view/change the user security code.
Hols Under this section you can set the holiday periods for the year.
Programming the DAY and NIGHT Temperatures
From the Programming Options Menu press 1 for DATA.
You are then prompted to select the zone you wish to
alter. If you only have 2 zones under control from the
ENTER THE ZONE
NUMBER (1-3)
Heatmiser Senior, this screen will list only 1-2 as the
available zones.
The DAY temperature for the zone selected is shown on
screen. At this point you can either type in a new
temperature or to leave the current setting, press the
ENTER REQUIRED
DAY TEMP. 20
Enter key.
Pressing Enter will display the NIGHT temperature setting.
Again, you are able to alter this temperature or pressing
Enter accepts the programmed setting. After pressing
ENTER REQUIRED
NIGHT TEMP. 04
Enter you are able to continue program the switching
times.
Programming the Switching Times
From the Programming Options Menu, select 1 for Data and then select the zone number
you wish to alter. Press the Enter key to accept the DAY and NIGHT temperature and to
advance to the Switching Times settings.
You have 4 switching periods available per day, and remember you should use 24 hour
clock notation when programming the Heatmiser.
To program a switching period, begin to type the Start time for example 08.00. Then press
the Enter key to accept the Start time and to move to the
End time setting. Now type the required End time and
when done press the Enter key.
DAY PERIOD 1 MON
S:08.00 E:00.00
5
Pressing the Enter key advances the program to the next switching period. Remember that
you have 4 periods available per day. Therefore you are now able to program a further 3
periods for Monday as described above. If you do not wish to use the remaining switching
periods simply leave them set to 00.00 and press the Enter key to advance through the
program.
After programming the 4 switching periods for Monday you
will see a new screen appear prompting you to enter the
switching periods for Tuesday.
DAY PERIOD 1 TUE
S:00.00 E:00.00
At this point you can enter the switching times as described above, or if the switching times
are identical to Monday you can press the COPY button. This function copies all of the
switching times from Monday into Tuesday, you will then notice the program advances to
Wednesday.
Repeat where necessary for the rest of the week. You can
DAY PERIOD 1 WED
S:00.00 E:00.00
press the RUN key at any time to store the entered
switching times and return to the Programming Options Menu.
From the Programming Options Menu press the RUN key to return to the Normal RUN
mode.
Setting the current Time & Date
From the Programming Options Menu press 2 for Time.
On screen you will see a display similar to the one shown
here. Simply type the new Time, using 24 hour clock
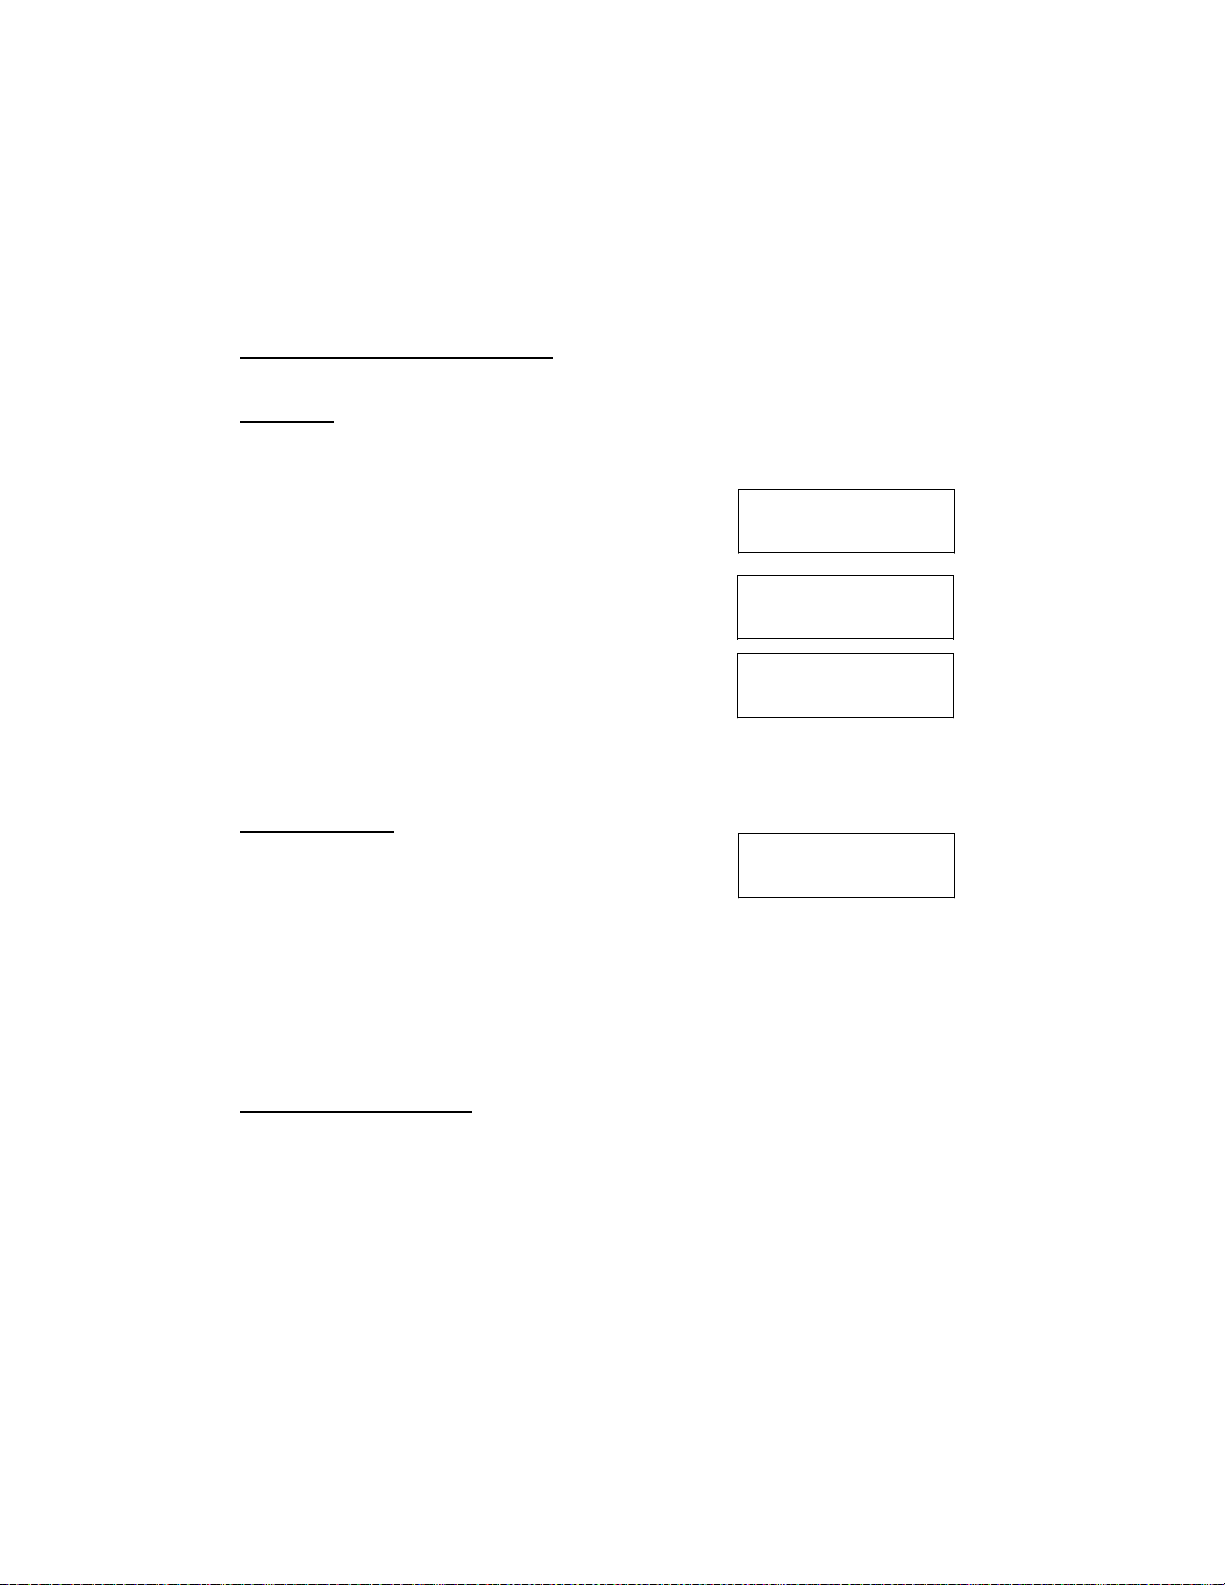
TIME IS :12.11
NEW TIME: 12.34
notation, where prompted and then press Enter.
You are then shown the following screen.
Here you should type the new Date and press Enter.
DATE IS:17-06-01
NEW ONE:18-06-01
Finally you need to select the Day. (Eg 01 = Monday
07=Sunday) When you have entered the Day, press Enter
ENTER DAY 01=MON
07=SUN : 01
to return to the Programming Options Menu.
From the Programming Options Menu you can press RUN to return to the Normal RUN
mode.
Setting the User Code
From the Programming Options Menu press 3 for Code.
1)MANAGER CODE
You will then be shown the following screen. From this
2)OVERRIDE CODE
screen you are able to select whether you wish to set the
code for the Manager or for the Override. The Override code simply passwords the Override
button and the Manager code locks the switching times and temperatures.
Pressing either 1 or 2 will present you with the following
screen. At this screen you are able to enter a new security
CODE IS: 0000
NEW CODE: 2222
code.
Programmming Holiday Periods
From the Programming Options Menu press 4 for Hols.
HOLIDAY PERIOD 1
S:00-00-00 L:00
You can program upto 5 holiday periods in the Heatmiser
6
Senior. To program the Holiday period first enter the Start date and then press Enter. (For
example 23-12-01) Then type the Length of the Holiday period and then press Enter. (For
example 10)
Repeat the steps above to program further holiday periods.
You can press the RUN key at any time to return to the Programming Options Menu.
From the Programming Options Menu, press the RUN key to return to the Normal RUN
mode.
Accessing the Logging Information
Hours Run
From the Normal RUN mode you are able to enter the code 0376 to view the Hours Run
data and Temperature Log.
Pressing 1-3 will allow you to view the Hours Run for relays
1-3. You can view the past 4 weeks hours run data.
1)R1 2)R2 3)R3
4)S1 5)S2 6)S3
Pressing 1 will show you last weeks Hours Run data for relay
1. Keep pressing the Enter key to scroll through the
previous 3 weeks.
WEEK 18
HOURS RUN 23.04
On screen you will see the Week Number and the hours
run total for the week. This is shown in hours and minutes.
WEEK 17
HOURS RUN 20.19
After pressing the Enter key four times, the display will revert back to the main Logging
Menu where you can either press the RUN key to return to the Normal RUN mode or you
can select another option.
Temperature Log
Selecting 4-6 allows you to look at the temperature log for
the relevant zone for the past 24 hours. The temperature is
12.00 16
RELAY OFF NIGHT
logged every 15 minutes. When you select 4-6 a screen
like shown here will be displayed. The log starts at midnight for the current day upto the
current time . After the current time, you will be viewing yesterdays log.
For example, if the current time is 20.40 the log from 12.00 until 20.30 will be todays log,
after 20.30 will be yesterdays log.
Remember that under the Engineers Code you can delete the Monitoring Log from
memory.(Option 4 C.Log)
Understanding the Inputs
The Heatmiser Senior has 5 inputs, used for remote override and summer/holiday shut
down. There are two types of inputs, there is a fixed input and a pulse input. The fixed
input will give an override for as long as the input is made and the pulse input will give
Input 1-3 Linking across + and 1, 2 or 3 will put zone 1-3 into an Override condition. The
zone will stay on for the length of the maximum Override period. If the input is broken the
zone will go off.
Input 4 Linking across + and 4 will put the control into Summer Mode. If the control is
configured as a compensator and zone 2 has been programmed to enable the boiler, relay
1&2 will continue to function to allow for normal use of the hotwater.
7

CONFIGURING THE HEATMISER SENIOR
Notes: The Heatmiser Senior can control upto 3 three zones of radiant tubes or warm air
heaters. The limiting factor to the number of heaters that can be controlled within 1 zone is
the zone relay, which is rated at 3amps.
I
N
T
R
O
D
U
C
T
I
O
N
There is a 12v output on the Heatmiser Senior which enables you to wire out from the
Heatmiser in low voltage, reducing the cost of installation. You will need to fit 12v relays
adjacent to each heater if you opt to use the 12v output.
The Senior can compensate 1 zone and can give optimised control of another zone. The
compensator can be configured to work direct on the boiler or through a valve.
To begin configuring the Heatmiser Senior press the
PROGram button and enter the Engineers code. (A sticker
with this code on will have placed inside the control
enclosure) If this is missing, contact your control supplier.
You are then given 4 options from the Engineers Setup
Menu. These are explained below;
ENTER CODE TO
CONTINUE: ****
1)DATA 2)SETUP
3)CODE 4)C.LOG
ï÷ Data Allows you to calibrate the sensors and setup the different zones.
î÷ Setup Allows you to setup the control type, number of zones and input type.
í÷ Code Allows you to change the User security code.
ì÷ C.Log Clears the monitoring log from memory.
There are two steps to programming the Heatmiser Senior, the first is to setup the Control
Type and number of zones. The second is to setup the individual zones.
We have outlined the different configurations below and the setup routine that should be
followed.
The three Control types on the Senior, are as follows;
01 = Optimiser
02 = Compensator
03 = High/Low Control
04 = Boiler Sequencer
The Boiler Sequencer is an option and should be specified when ordering.
8
 Loading...