

Heatmaster HM2-RO-18, HM2-RO-24, HM2-RO-33, HM2-SO-18, HM2-SO-24 Installation And Operating Instructions Manual
...Page 1
UNVENTED (GAS LOG) ROOM HEATER
INSTALLATION AND OPERATING INSTRUCTIONS
This heater is equipped with a PILOT LIGHT SAFETY SYSTEM designed to turn off the heater
if not enough fresh air is available.
Models HM2-MAN, HM2-T and HM2-MIL-18”, 24” and 33” Burner Units
with HM2-RO and HM2-SO Log Sets
Do not store or use gasoline or other flammable vapors and liquids in the vicinity of this or any other
appliance.
WHAT TO DO IF YOU SMELL GAS
+ Do not try to light any appliance.
+ Do not touch any electrical switch; do not use any phone in your building.
+ Immediately call your gas supplier from a neighbor’s phone. Follow the gas
supplier’s instructions.
+ If you cannot reach your gas supplier, call the fire department.
Installation and service must be performed by a qualified installer, service agency or the gas supplier.
WARNING: Improper installation, adjustment, alteration, service or
maintenance can cause property damage, personal injury or loss of life. Refer to
this manual for information. Installation and service must be performed by a
qualified installer, service agency or the gas supplier.
16-1010 (04/01)
This is an unvented gas-fired heater. It uses air (oxygen) from the room
in which it is installed. Provisions for adequate combustion and
ventilation air must be provided. Refer to page 5 of these instructions.
This appliance is for supplemental heating only. It should not
be used as a primary heat source for a dwelling.
DO NOT TAMPER WITH PILOT LIGHT SAFETY SYSTEM
WARNING: If the information in this manual is not followed exactly, a fire or explosion
may result causing property damage, personal injury or loss of life.
Page 2
WARNING!
When used without fresh air, heater may give off CARBON MONOXIDE, an
odorless poisonous gas.
This heater is equipped with a PILOT LIGHT SAFETY SYSTEM designed to turn off the heater if not
enough fresh air is available.
If heater shuts off, do not relight until you provide fresh air.
If heater keeps shutting off, have it serviced by a qualified installer, service agency or the gas supplier.
Keep burner and control compartment clean.
2
IMPORTANT: BEFORE BEGINNING INSTALLATION
READ COMPLETE INSTRUCTIONS
CAREFULLY.
DO NOT TAMPER WITH PILOT LIGHT SAFETY SYSTEM
WARNING
+
Before installing in a solid fuel burning fireplace, the chimney flue and firebox must be cleaned
of soot, creosote, ashes and loose paint by a qualified chimney installer.
+ This appliance is for installation only in a solid-fuel burning fireplace or approved ventless
firebox enclosure.
+ Do not allow fans to blow directly into the fireplace. Avoid any drafts that alter the burner flame
patterns.
+ Do not use a blower insert, heat exchanger or other accessory not approved for use with this
burner.
ATTENTION INSTALLER:
REVIEW AND LEAVE THESE INSTRUCTIONS WITH CUSTOMER FOR FUTURE
REFERENCE.
Page 3

3
WARNING: This appliance is for installation only in a solid-fuel burning fireplace or approved
ventless firebox enclosure.
+ Do not use this room heater if any part has been under water. Immediately call a qualified
service technician to inspect the room heater and to replace any part of the control system
and any gas control which has been under water.
+ Early signs of carbon monoxide poisoning resemble the flu, with headache, dizziness and/or
nausea. If you have these signs, heater may not be working properly. Get fresh air at
once! Have heater serviced.
+ Some people - pregnant women, persons with heart or lung disease, anemia, those under
the influence of alcohol and those at high altitudes are more affected by carbon monoxide
than others.
+ WARNING: When used without fresh air, heater may give off CARBON MONOXIDE, an
odorless poisonous gas.
+ If heater shuts off, do not relight until you provide fresh air.
+ If heater keeps shutting off, have it serviced. Keep burner and control compartment clean.
WARNING
A. Due to high surface temperatures, the appliance should be located out of traffic and away
from furniture and draperies.
B. Children and adults should be alerted to the hazard of high surface temperature and should
stay away to avoid burns or clothing ignition.
C. Young children should be carefully supervised when they are in the same room as the
appliance.
D. Adults must be present at all times while operating this appliance.
E. Do not place clothing or other flammable material near the appliance.
F. Do not leave this appliance operating while unattended or while occupants are sleeping.
G. Any safety screen or guard removed for servicing the appliance must be replaced prior to
operating the appliance.
H. Installation and repair should be done by a qualified service person. The appliance should be
inspected before use and at least annually by a professional service person. More frequent
cleaning may be required due to excessive lint from carpeting, bedding material, etc. It is
imperative that control compartments, burners and circulating air passageways of the
appliance be kept clean.
I. Any change to this heater or its controls can be dangerous.
Page 4
IMPORTANT INFORMATION
+ This appliance is design certified by CSA International under the ANSI Z21.11.2b-1998
Unvented Heaters, ANSI Z21.60-1996 CGA 2.26-M96, Decorative Appliances
for Installation in Solid-Fuel Burning Fireplaces. ANSI Z21.60-1996 CGA 2.26-M96
only applies to manual and millivolt control valve units and does not apply to
thermostat control units. State or local codes may only allow operation of this
appliance in a vented configuration. Check your state or local codes.
+ This appliance must have a fireplace screen in place while the appliance is operating
and, unless other provisions for combustion air are provided, the screen shall have an
opening(s) for introduction of combustion air.
+ The flue damper in an existing vented solid-fuel burning fireplace must be closed at all
times when operated as an unvented room heater.
+ No solid-fuels shall be burned in a fireplace where an unvented room heater is
installed.
+ This appliance must not be installed in a bedroom, bathroom or any room where an
occupant could possibly be sleeping.
+ Always have glass fireplace doors open completely and have fireplace screen closed
when operating this appliance.
+ When installing this appliance in a fireplace with a mantle, always follow guidelines
listed in the Installation Clearances section of this brochure.
+ If a hood is required to be installed on your fireplace due to mantle clearances,
contact your dealer or HEATMASTER, INC. for availability of the hood.
Any outside air ducts and/or ash dumps in the fireplace shall be
permanently closed at the time of the appliance installation.
4
WARNING
+
This room heating appliance is factory designed to produce a flame having a clean and
virtually transparent appearance. If at any time the appliance begins to appear
abnormal due to excessive yellow flames, noticeable odor, or any carbon deposits on
the logs, immediately turn the appliance to the “OFF” position and contact a
qualified service technician or the gas company.
+ While operating this appliance using propane (LP) gas, the flame burning
characteristics may vary as the gas level in the LP tank approaches empty or less than
¼ full.
+ Unvented gas logs are intended for supplemental heat and are not to be used as a
primary heating source. When operated for an extended period of time this room
heating appliance can produce moisture that could create condensation, requiring
additional ventilation to the home. (EXAMPLE: Partially open a window, partially
open the fireplace vent, if applicable.)
+ Do not remove from this unit any of the attached metal plates which contain
important safety and operating information.
Page 5

5
COMBUSTION AND VENTILATION PROVISIONS
WARNING: This heater shall not be installed in a confined space or unusually tight construction unless
provisions are provided for adequate combustion and ventilation air.
Confined Space and Unconfined Space
The National Fuel Gas Code, ANSI Z223.1 defines a confined space as a space whose volume is less than
50 cubic feet per 1,000 Btu per hour (4.8m³ per kw) of the aggregate input rating of all appliances
installed in that space and an unconfined space as a space whose volume is not less than 50 cubic feet
per Btu per hour (4.8m³ per kw) of the aggregate input rating of all appliances in that space. Rooms
communicating directly with the space in which the appliances are installed, through openings not
furnished with doors, are considered a part of the unconfined space.
Unusually tight construction is defined as construction where
:
a. Walls and ceilings exposed to the outside atmosphere have a continuous water vapor retarder
with a rating of 1 perm (6 x10-¹¹ kg per pa-sec-m²) or less with openings gasketed or sealed, and
b. Weather stripping has been added to openable windows and doors, and
c. Caulking or sealants are applied to areas such as joints around windows and door frames,
between sole plates and floors, between wall-ceiling joists, between wall panels, at penetrations
for plumbing, electrical and gas lines and at other openings.
Instructions for determining maximum Btu’s for a room
Step 1
This calculation is for combustion and ventilation air provisions only and is not intended to be used for
sizing for heating comfort. To determine the maximum Btu’s allowed for a given room size you will need
to calculate the volume of the room in cubic feet. To perform this calculation, fill in the table below and
multiply the room’s width, length and height to obtain the room volume in cubic feet.
Example:If your room is 20 feet in length, 16 feet wide and has an 8 foot ceiling height, the
calculation would be as follows: 20 x 16 x 8 = 2,560 cubic feet.
Step 2
Divide the room volume by 50 cubic feet to determine the maximum Btu’s per hour the room can
utilize.
Example:Using the above example: 2,560 cubic feet divided by 50 = 51.2 x 1,000 = 51,200 Btu’s.
If the rating of your appliance plus any other gas appliances installed in the space is rated at more Btu’s
than the example calculated above, you must follow instructions for confined space. See shaded
WARNING above. If your appliance is rated at less Btu’s than the example calculated above, then your
area is considered unconfined space.
WARNING: If the area in which the heater may be operated is smaller than that defined as an
unconfined space or if the building is of unusually tight construction, provide adequate
combustion and ventilation air by one of the methods described in the National Fuel Gas
Code, ANSI Z223.1, Section 5.3 or applicable local codes.
ROOM
LENGTH
ROOM
WIDTH
ROOM
HEIGHT
ROOM VOLUME
IN CUBIC FEET
X X =
Page 6
6
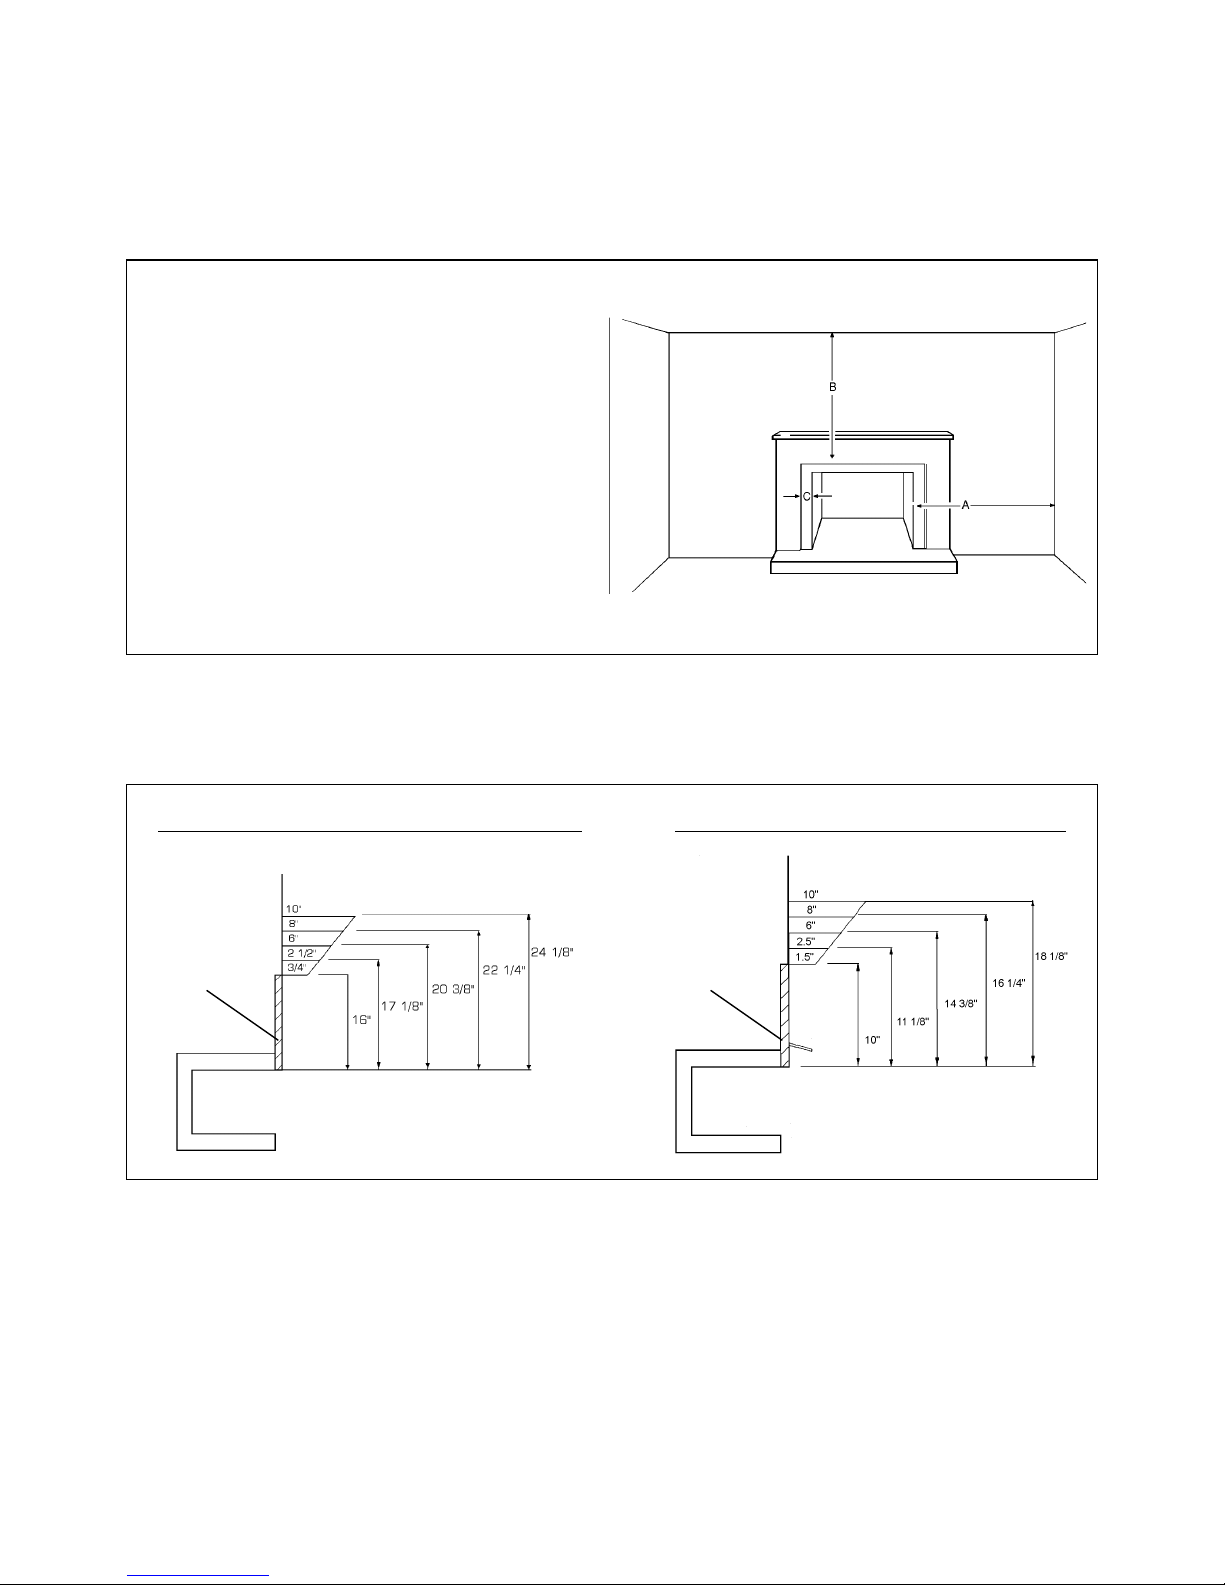
INSTALLATION CLEARANCES
To ensure a safe installation in a masonry or approved factory built fireplace, the following instructions must
be carefully followed.
Minimum mantle clearance when unit is installed as a vent free appliance in a pre-existing fireplace.
+ A) Minimum clearance from the
side of the fireplace opening to
any combustible wall should
not be less than 15 inches.
+ B) Minimum clearance from the top
of the fireplace opening to any
combustible ceiling should not be
less than 42 inches.
+ C) Minimum clearance from the
side of the fireplace opening to
part of a mantle piece should not
be less than 6 inches. See figure
at right.
Minimum Mantle Clearance Without Hood Minimum Mantle Clearance With Hood
HEAT
RESISTANT
MATERIAL
12”
MINIMUM
HEAT
RESISTANT
MATERIAL
8”
MINIMUM
NOTE: The stated installation clearances provide the safest distance for combustible materials to
ensure that walls, ceilings and mantle components will not be affected by heat discoloration,
warpage, or possible fire. Each appliance installation presents a different set of variables which
can create problems beyond the control of the gas log manufacturer. It is the responsibility of
the installer to stay within the minimum clearances stated and set forth by the manufacturer
within this instruction manual.
Page 7

INSTALLATION INSTRUCTIONS WHEN
INSTALLING AS A VENT FREE APPLIANCE
The installation of this appliance must conform with local codes or, in the absence of local codes with
the National Fuel Gas Code, ANSI Z223.1.
NOTE: Before the unit is connected to any gas line, check the name plate on the unit for the proper
gas type you will be using.
The appliance regulator furnished on the appliance is not intended to regulate any gas pressure above ½psig.
If using LP gas, a low pressure regulator (not furnished) must be installed in the gas line between the tank
and appliance. Do not connect the appliance to the gas line if this regulator is not in place. If using natural
gas, check with the gas company to insure that proper gas pressure is available.
WARNING: An explosion could occur if a connection is made directly to an unregulated LP gas tank.
GAS
PRESSURE: Minimum inlet gas supply pressure must be 5.0” WC for natural gas or 11” WC for
LP gas for the purpose of input adjustment. Maximum inlet gas supply pressure must not exceed 10.5”
WC for natural gas, or 14” WC for LP gas. The gas line supplying the appliance must be sufficient size
to furnish the appropriate supply pressure to the appliance when being operated on the high setting.
+ The appliance and its individual shutoff valve must be disconnected from the gas supply
piping system during any pressure testing of that system at test pressures in excess of ½
psig (3.5kPa).
+ The appliance must be isolated from the gas supply piping system by closing its individual
manual shutoff valve during any pressure testing of the gas supply piping system at test
pressures equal to or less than ½psig (3.5kPa).
+ Always keep appliance area clear and free from combustible materials, gasoline and other
flammable vapors and liquids.
+ Pressure tap screws must be closed before turning on gas to appliance.
+ Any outside air ducts and/or ash dumps in the fireplace shall be permanently closed at the
time of the appliance installation.
+ Special provisions should be made if the unit is to be installed into a sunken fireplace by
raising the floor of the fireplace using non-combustible materials to ensure adequate
airflow.
7
Page 8

8
ASSEMBLY INSTRUCTIONS
1. Remove grate/burner assembly from the box and place in the center of the fireplace.
2. Connect the gas line to the appliance regulator located under the grate. NOTE: The manual and
thermostat valve units will have this appliance regulator. The millivolt valve will not have this
regulator. The appliance regulator is built into the millivolt valve and the gas line is connected to the
valve.
3. Make sure the gas connections are tight. Turn on the gas and coat each joint with a soap and water
solution and watch for air bubbles, which will indicate leaks. Any leaks must be corrected before
proceeding with installation. DO NOT USE A FLAME OR ANY IGNITION SOURCE TO
CHECK FOR LEAKS.
4. Remove logs from the box. Notice the notches in the larger logs and the numbers on the bottom of
the same logs. The log placement is very important to the safe operation of the appliance.
NOTE: Match the log placement photo in this instruction manual with the model number of your log set
for correct log placement. The logs MUST be placed exactly as shown. If there is any evidence of carbon or
blackening on the logs, they may be incorrectly placed. There should not be any carbon or blackening on
the logs at any time.
5. Place the back log in the grooves on the elevated cradle toward the back of the grate making sure
the grooves in the bottom of the log fit on the cradle.
6. Place the middle log in the grooves on the center elevated section of the cradle making sure the
grooves in the bottom of the log fit on the cradle. This will position this log between the burner.
7. Place the front log on the front of the grate in front of the cradle making sure the grooves on the
bottom and front of the log fit the bars on the grate.
8. Place the small top logs in the grooves on top of the front and back log, making sure these logs lay
across the middle log in the appropriate groove.
9. Match the model number of your log set with the log set on pages 13 and 14 of this instruction
manual. Your log set should look like this. If it doesn’t, follow steps 5 through 8 above.
This appliance may be installed in an aftermarket *permanently located, manufactured (mobile)
home, where not prohibited by state or local codes.
*Aftermarket: Completion of sale, not for the purpose of resale, from the manufacturer.
This appliance is only for use with the type of gas indicated on the rating plate. This appliance is
not convertible for use with other gases.
Page 9

9
OPERATING INSTRUCTIONS
for
LOG SET AS IT COMES FROM THE FACTORY
If a wall switch, thermostat or remote control has been purchased, you must follow installation and operating
instructions on pages 11and 12 of this instruction manual.
HM2-MAN 18,24 & 33 LP and Natural Gas (See FIG. 1)
1. Notice the white marker line between the igniter button and the control knob. This white marker
line is the line-up mark for the control knob.
2. Follow the safety information on page 15 of this instruction manual.
3. Follow the lighting instructions on page 15 of this instruction manual.
4. NOTE: Your log set main burner will ignite when you complete the next step.
5. Once the pilot is lit, rotate the control knob counterclockwise . As you rotate the control knob
counterclockwise , the main burner will ignite on the minimum heat setting. Continuing to
rotate the knob counterclockwise will allow the burner to increase to the highest setting. You
can leave the control knob where you prefer, either at the low or high setting.
6. To turn the main burner OFF, simply rotate the control knob clockwise to the “PILOT”
position. This will allow the pilot to continue to burn, until you are ready to burn the set again.
7. Your log set has two settings, HI and LOW. You can burn your log set at the range you prefer.
8. To turn you log set completely off, simply rotate the control knob clockwise to the “OFF”
position. If this is done, the pilot must be re-ignited the next time you use your log set.
HM2-T 18,24 & 33 LP and Natural GAS (See FIG. 1)
1. Notice the white marker line between the igniter button and the control knob. This white marker
line is the line-up mark for the control knob.
2. This log set operates by a thermostatic bulb that is attached to the control valve. The manufacturer
attaches the bulb at a location that should give you fairly accurate operation of the control, however,
the bulb can be relocated to a place farther away from the flame. If this is done, be sure not to crimp
the small tube that attaches the bulb to the valve. This will cause damage resulting in thermostat
malfunction.
3. Follow the safety information on page 15 of the instruction manual.
4. Follow the lighting instructions on page 15 of this instruction manual.
5. NOTE: Your log set main burner will ignite when you complete the next step.
6. Once the pilot is lit, rotate the control knob counterclockwise . As you rotate the control knob
counterclockwise , the main burner will ignite first on the minimum heat setting. Continuing to
rotate the knob counterclockwise will allow the burner to increase to the highest setting.
FIG. 1
IGNITER
CONTROL
KNOB
Page 10

10
7. Allow the unit to operate at the highest setting until the room temperature reaches your comfort
level.
8. Turn the control knob clockwise until the flame goes out. This sets the control valve to operate
in this temperature range.
9. After the log set cycles a few times, you can increase or decrease the temperature setting simply by
rotating the control knob toward “HI” or “LOW”.
10. To turn the main burner off, simply rotate the control knob clockwise to the “PILOT” position.
This will allow the pilot to continue to burn until you are ready to use the log set again.
11. To turn the log set completely off, rotate the control knob clockwise to the “OFF” position. If
this is done, the pilot must be re-ignited the next time you use your log set.
HM2-MIL 18, 24 & 33 LP & Natural Gas (See FIG. 2)
NOTE: This log set is shipped from the factory to operate without the use of any accessory (i.e. wall switch,
thermostat, remote control). If any of these accessories are used, you must follow the appropriate instructions
for these accessories.
+ Notice the marking slots that are located adjacent to the control knobs. These notches are the line-
up points for the control knob positions.
+ The ON/OFF control knob cannot be turned unless it is pushed in slightly.
1. Place the ON/OFF control knob in the “OFF” position.
2. Follow the safety information on page 16 of this instruction manual.
3. Follow the lighting instructions on page 16 of this instruction manual.
4. NOTE: Make sure the ON/OFF switch is in the “OFF” position or your log set main burner will ignite
when you follow the next step.
5. Once the pilot is lit, rotate the ON/OFF control knob counterclockwise to the “ON” position.
6. Flip the ON/OFF switch to the “ON” position.
7. You can now set the log set to HI or LOW by turning the HI/LOW knob to the desired position.
8. Your log set can be operated at any position between HI or LOW, depending on the amount of heat
output you prefer.
9. To turn the main burner off, flip the ON/OFF switch to the “OFF” position. This will allow the pilot
to continue to burn until you are ready to use the log set again.
10. To turn the log set back on, flip the ON/OFF switch to the “ON” position. (You can turn your log set
off and on with the toggle switch.)
11. To turn your log set completely off, flip the ON/OFF switch to the “OFF” position and rotate the
ON/OFF control knob clockwise to the “OFF” position. If this is done, the pilot must be reignited the next time you use the log set.
THTP
TP TH
PILOT
it
PILOT
S
ON
OFF
LO
HI
FIG. 2
PIEZO
ON/OFF
SWITCH
Page 11

INSTALLATION INSTRUCTIONS for HM2 MIL 18,24 & 33 ACCESSORIES
(Wall Switch, Thermostat, Remote Control)
WALL SWITCH
+ It is suggested by the manufacturer that a qualified individual complete this installation.
+ Your HM2 MIL Series log set is shipped from the factory set up to operate without the use of any
of the accessories. To hook up this accessory you must follow these instructions:
+ Notice the electric terminal block on the control valve, located on the left hand side of the valve
when facing the front of the valve and the two wires that are attached to the back of the ON/OFF
switch. (FIG. 3)
1. Remove the wire that is connected to the two terminals marked TH on the terminal block
and remove the other ends of the wires that are attached to the ON/OFF switch and discard
the wire.
2. Run wire (included) from the log set to the location of the wall switch.
3. It is recommended that only the wire furnished with the thermostat
is used.
4. Attach the two wires to the wall switch, one to each of the terminals on the wall switch.
5. Make sure the wall switch is turned off and install the switch in the wall box (not furnished) and
install the cover.
6. Attach the two wires at the log set to the two terminals marked TH on the terminal block. (Make
sure the wall switch is turned off.)
7. Notice the notch in the metal plate on the right hand side of the ON/OFF knob. This notch is the
line-up mark for the ON/OFF control knob.
8. Follow the safety information on page 16 of this instruction manual.
9. Follow the lighting instructions on page 16 of this instruction manual.
10. After lighting the pilot and turning on the main ON/OFF control knob, turn the wall switch to the
“ON” position. This should cause the gas log set to come on. You can now adjust the HI/LOW knob
to the desired level.
11. You can turn your log set off and on with the wall switch and not use the ON/OFF control knob.
12. It is recommended that you turn the ON/OFF control knob to the “OFF” position when leaving
home for any period of time.
WALL THERMOSTAT
+ It is suggested by the manufacturer that a qualified individual complete this installation.
+ Your HM2 MIL Series log set is shipped from the factory set up to operate without the use of any
of the accessories. To hook up this accessory you must follow these instructions:
+ Notice the electric terminal block on the control valve, located on the left hand side of the valve
when facing the front of the valve and the two wires that are attached to the back of the ON/OFF
switch. (FIG. 3)
1. Remove the jumper wire that is connected to the two terminals marked TH on the terminal block
and remove the other ends of the wires that are attached to the ON/OFF switch and discard the
wire. (NOTE: The ON/OFF switch will no longer have any function once you have installed one of
the accessories.)
2. Run wire (included) from the log set to the location of the wall thermostat.
3. It is recommended that only the wire furnished with the thermostat is used.
THTP
TP TH
PILOT
it
PILOT
S
ON
OFF
LO
HI
FIG. 3
PIEZO
ON/OFF
SWITCH
TH
11
Page 12

4. Attach the two wires to the wall thermostat, one to each of the terminals on the wall thermostat.
5. Make sure the ON/OFF lever on the wall thermostat is turned off and mount the wall thermostat.
The cover of the thermostat snaps off for access to the mounting screw location.
6. Attach the two wires at the log set to the two terminals marked TH on the terminal block. (Make
sure the wall thermostat is turned off.)
7. Notice the notch in the metal plate on the right hand side of the ON/OFF knob. This notch is the
line-up mark for the ON/OFF control knob.
8. Follow the safety information on page 16 of this instruction manual.
9. Follow the lighting instructions on page 16 of this instruction manual.
10. After lighting the pilot and turning on the main ON/OFF control
knob, turn the wall thermostat ON/OFF lever to the “ON” position.
Adjust the temperature lever to the desired position. The gas log set
will operate on and off depending on the position of the temperature control lever. You can
now adjust the HI/LOW knob to the desired level. If you have the HI/LOW control knob on “HI”
the log set will burn on high flame when the thermostat calls for heat. If you have the HI/LOW
control knob on “LOW” the log set will burn on low flame when the thermostat calls for heat.
11. You can allow your log set to operate by the thermostat setting or, you can keep the log set from
operating by turning the ON/OFF lever to “OFF” on the thermostat.
12. It is recommended that you turn the ON/OFF control knob on the control valve to the “OFF”
position when leaving home for any period of time.
THERMOSTAT REMOTE CONTROL
+ It is suggested by the manufacturer that a qualified individual complete this installation.
+ Your HM2 MIL Series log set is shipped from the factory set up to operate without the use of any
of the accessories. To hook up this accessory you must follow these instructions:
+ Notice the electric terminal block on the control valve, located on the left hand side of the valve
when facing the front of the valve and the two wires that are attached to the back of the ON/OFF
switch. (FIG. 3)
1. Remove the jumper wire that is connected to the two terminals marked TH on the terminal block
and remove the other ends of the wires that are attached to the ON/OFF switch and discard the
wire. (NOTE: The ON/OFF switch will no longer have any function once you have installed one of
the accessories.)
2. Follow the instructions supplied with the Thermostat Remote Control. This is a millivolt gas valve.
It is recommended by Heatmaster, Inc. that all precautions are followed exactly. (In the instructions
supplied with the remote control, there are instructions about a crackling sound system. This is an
optional system and is not available from Heatmaster, Inc.)
3. Notice the notch in the metal plate on the right hand side of the ON/OFF knob. This notch is the
line-up mark for the ON/OFF control knob.
4. Follow the safety information on page 16 of this instruction manual.
5. Follow the lighting instructions on page 16 of this instruction manual.
6. After lighting the pilot and turning on the main “ON/OFF” control knob, you can now operate
the log set according to the remote control instructions. You can now adjust the HI/LOW knob
to the desired level. There is a notch in the metal plate at the bottom of the HI/LOW control knob
that is used for a line-up mark. If you have the HI/LOW control knob on “HI” the log set
will burn on high flame when the thermostat calls for heat. If you have the HI/LOW
control knob on “LOW” the log set will burn on low flame when the thermostat calls for heat.
7. It is recommended that you turn the ON/OFF control knob on the control valve to the “OFF” position
when leaving home for any period of time.
12
FIG. 3
PIEZO
ON/OFF
SWITCH
TH
TP TH
HI
S
LO
OFF
THTP
PILOT
it
ON
PILOT
Page 13

LOG PLACEMENT PHOTOS (RO SERIES)
HM2-RO-18 Front View HM2-RO-18 Side View
HM2-RO-24 Front View HM2-RO-24 Side View
HM2-RO-33 Front View HM2-RO-33 Side View
13
WARNING: Failure to position the parts in accordance with these diagrams or failure to use only the
parts specifically approved with the heater may result in property damage or personal
injury.
Page 14

LOG PLACEMENT PHOTOS (SO SERIES)
HM2-SO-18 Front View HM2-SO-18 Side View
HM2-SO-24 Front View HM2-SO-24 Side View
HM2-SO-33 Front View HM2-SO-33 Side View
14
WARNING: Failure to position the parts in accordance with these diagrams or failure to use only the
parts specifically approved with the heater may result in property damage or personal
injury.
Page 15

15
FOR YOUR SAFETY READ BEFORE LIGHTING
A. This appliance has a pilot which must be lighted by hand. When lighting the pilot, follow these instructions exactly.
This appliance is equipped with a push button piezo ignition device which can be used to light the pilot. If the piezo
fails to ignite the pilot, then follow the instructions for lighting pilot with match.
B. BEFORE LIGHTING smell all around the appliance area for gas. Be sure to smell next to the floor because some
gas is heavier than air and will settle on the floor.
WHAT TO DO IF YOU SMELL GAS
+ Do not try to light any appliance.
+ Do not touch any electrical switch; do not use any phone in your building.
+ Immediately call your gas supplier from a neighbor’s phone. Follow the gas supplier’s instructions.
+ If you cannot reach your gas supplier, call the fire department.
C. Use only your hand to push in or turn the gas control handle. Never use tools. If the handle will not push in or turn
by hand, do not try to repair it. Call a qualified service technician. Force or attempted repair may result in fire or
explosion.
D. Do not use this appliance if any part has been under water. Immediately call a qualified service technician to inspect
the appliance and to replace any part of the control system and any gas control which has been under water.
LIGHTING INSTRUCTIONS
1. STOP! Read the safety information previously listed above.
2. Turn gas control knob clockwise to the “OFF” position. Do not force. (FIG. 5)
3. Wait five (5) minutes to clear out any gas. Then smell for gas, including near the floor. If you smell gas, STOP! Follow
“B” in the safety information above on this label. If you don’t smell gas, go to the next step.
4. Locate pilot - follow metal tube from gas control. The pilot is mounted on a bracket that is fastened to the side of the
right hand cradle. (FIG. 4)
5. Turn knob on gas control (FIG. 5) counterclockwise to the “PILOT” position.
6. Push in control knob all the way and hold in. While still holding the control knob, press in the igniter push button
(FIG. 5) several times. This will cause a spark at the pilot burner which will ignite the pilot flame. Continue to hold
the control knob (FIG. 5) in for about (1) minute after the pilot is lit. Release knob and it will pop back out. Pilot
should remain lit. If it goes out, repeat steps 1 through 6.
+ If the knob does not pop out when released, stop and immediately call your service technician or gas supplier.
+ If the pilot will not stay lit after several tries, turn the gas control knob to “OFF” and call your service technician or
gas supplier.
+ LIGHTING PILOT WITH MATCH: Turn control knob (FIG. 5) to the “PILOT”position. Place a lit match at the
pilot burner (FIG. 4), then push the knob in. Continue to hold the control knob in for about one (1) minute after the
pilot is lit. Release knob and it will pop back out. Pilot should remain lit. If it goes out, repeat the above step.
+ If the pilot will not stay lit after several tries, turn the gas control knob (FIG. 5) to “OFF” and call your service
technician or gas supplier.
7. Turn knob counterclockwise to “HI” or “LOW”.
TO TURN OFF GAS TO APPLIANCE
Turn gas control knob (FIG. 5) clockwise to the “OFF” position. Do not force. If optional power is used, it must be
turned off.
FIG. 4
WARNING: If you do not follow these instructions exactly, a fire or explosion may result causing property damage,
personal injury or loss of life.
FIG. 5
IGNITER
CONTROL KNOB
IGNITER
PILOT BURNER
Page 16

16
FOR YOUR SAFETY READ BEFORE LIGHTING
A. This appliance has a pilot which must be lighted by hand. When lighting the pilot, follow these instructions exactly.
This appliance is equipped with a push button piezo ignition device which can be used to light the pilot. If the piezo
fails to ignite the pilot, then follow the instructions for lighting pilot with match.
B. BEFORE LIGHTING smell all around the appliance area for gas. Be sure to smell next to the floor because some
gas is heavier than air and will settle on the floor.
WHAT TO DO IF YOU SMELL GAS
+ Do not try to light any appliance.
+ Do not touch any electrical switch; do not use any phone in your building.
+ Immediately call your gas supplier from a neighbor’s phone. Follow the gas supplier’s instructions.
+ If you cannot reach your gas supplier, call the fire department.
C. Use only your hand to push in or turn the gas control knob. Never use tools. If the knob will not push in or turn
by hand, do not try to repair it. Call a qualified service technician. Force or attempted repair may result in fire or
explosion.
D. Do not use this appliance if any part has been under water. Immediately call a qualified service technician to inspect
the appliance and to replace any part of the control system and any gas control which has been under water.
LIGHTING INSTRUCTIONS
1. STOP! Read the safety information previously listed above.
2. Turn main gas control knob (FIG. 7) clockwise to the “OFF” position.
3. Wait five (5) minutes to clear out any gas. Then smell for gas, including near the floor. If you smell gas, STOP! Follow
“B” in the safety information above on this label. If you don’t smell gas, go to the next step.
4. Locate pilot - mounted on the inside of the right hand bracket that holds the burner in place, just behind the front
part of the burner. (FIG. 6)
5. Depress main control knob (FIG. 7) slightly and turn counterclockwise to the “PILOT” position.
With main control knob (FIG. 7) at “PILOT”, depress until it stops and press on the igniter push-button several
times. (FIG. 7) This will cause a spark at the pilot burner which will ignite the pilot flame. Continue to hold the main
control knob (FIG. 7) in for about (1) minute after the pilot is lit. Release knob and it will pop back out. Pilot
should remain lit. If it goes out, repeat steps 1 through 5.
+ If the knob does not pop out when released, stop and immediately call your service technician or gas supplier.
+ LIGHTING PILOT WITH MATCH: Turn main control knob (FIG. 7) to the “PILOT”position. Place a lit match at
the pilot burner, then push the main control knob in. Continue to hold the control knob in for about one (1) minute
after the pilot is lit. Release knob and it will pop back out. Pilot should remain lit. If it goes out, repeat the above
step.
+ If the pilot will not stay lit after several tries, turn the gas control knob (FIG. 7) to “OFF” and call your service
technician or gas supplier.
6. Slightly depress main control knob (FIG. 7) and turn counterclockwise to the “ON” position. Adjust heat output
to the desired level by turning the HI/LOW control knob.
TO TURN OFF GAS TO APPLIANCE
Turn main gas control knob (FIG. 7) clockwise to the “OFF” position. Do not force.
FIG. 6
WARNING: If you do not follow these instructions exactly, a fire or explosion may result causing property damage,
personal injury or loss of life.
FIG. 7
ON/OFF
SWITCH
PIEZO
PILOT BURNER
IGNITOR
TP TH
THTP
HI
LO
PILOT
S
OFF
it
ON
PILOT
Page 17

CLEANING AND MAINTENANCE INSTRUCTIONS
ALWAYS REMEMBER:
1. Do not operate this appliance without the fireplace screen closed.
2. Do not place any combustible material near the appliance.
3. Do not place any paper, trash or other material on the log set or in the heater.
4. Do not touch any part of the appliance when the unit is operation.
Your gas log set is designed to be virtually maintenance free, although periodic visual inspection and
cleaning is required. Follow the instructions below for the correct procedures.
If at any time the flames on your log set look abnormal or an odor is noticed that you feel is coming
from the appliance, contact a qualified service technician or the gas company.
Periodically, visually inspect the main burner flames as well as the pilot flame. The appearance of these
flames should resemble the drawings on page 18. Any measurements are approximate. Flame heights
may vary slightly.
Fireplaces can be very dusty areas, therefore at least monthly during the heating season clean the unit
by following the guidelines below.
CAUTION: Before cleaning the appliance, be sure it is turned completely off. The pilot should also be
turned off. The unit must be completely cooled.
DO NOT USE ANY CLEANING FLUIDS OR TOOLS FOR CLEANING PURPOSES
1. Remove logs from grate assembly and place on the floor close to the fireplace.
2. Lightly vacuum any loose particles or dust from the grate and burner.
3. Lightly vacuum any loose particles or dust from the pilot flame area, being sure not to touch any part
of the pilot with the vacuum.
4. Lightly vacuum any dust from the logs.
NOTE: If any of the appliance parts are hit with the vacuum or the grate assembly is moved during
cleaning, gas leaks could occur. If this happens, be sure to check for leaks as described in this
instruction manual.
5. Carefully replace logs on the grate assembly and relight the pilot as instructed in this manual.
17
Page 18

18
MANUAL AND THERMOSTATIC VALVES
MILLIVOLT VALVES
18” Log Set 24” Log Set
33” Log Set
PROPANE GAS NATURAL GAS
NATURAL GAS PROPANE GAS
Page 19

INSTALLATION INSTRUCTIONS
WHEN INSTALLING AS A VENTED DECORATIVE APPLIANCE
When installing as a vented appliance, the following statements and charts must be followed.
+ Thermostat models can not be installed as a vented appliance under ANSI Z21.60-CGA 2.26-
M96T standard (i.e. HM2-Tstat-24 and HM2-Tstat-33).
+ This appliance must be installed only in a solid-fuel burning fireplace with a working flue, and
constructed of noncombustible material.
+ Solid fuels shall not be burned in a fireplace where a decorative appliance is installed.
The minimum permanent free opening (in square inches) that must be provided by either a
fireplace chimney or chimney damper must be provided (See chart on next page.)
+ The chimney damper must be fixed in a manner which will maintain the minimum permanent
vent opening at all times. To accomplish this, install a damper clamp on the edge of the damper
blade to prevent its closing, or drill a hole or holes in the damper.
+ See chart below when installing as a vented decorative appliance for the minimum size
fireplace that can be used.
Height of Front
Opening
Width of Front
Opening
Depth
HM2-18LP
HM2-18 NAT
HM2-MIL-18LP
HM2-MIL-18NAT
15”
20”
14”
HM2-24LP
HM2-24-NAT
HM2-MIL-24LP
HM2-MIL-24NAT
15”
25”
14”
HM2-33-LP
HM2-33-NAT
HM2-MIL-33LP
HM2-MIL-33NAT
15”
34”
14”
19
Page 20

20
TABLE 1A
for
FACTORY BUILT FIREPLACES
Free opening area of chimney damper for venting combustion products from decorative appliances for
installation in solid fuel burning fireplaces.
TABLE 2A
for
MASONRY BUILT FIREPLACES
Free opening area of chimney damper for venting combustion products from decorative appliances for
installation in solid fuel burning fireplaces.
MINIMUM PERMANENT FREE OPENING IN SQUARE INCHES
Chimney
Height (Feet)
10
15
20
25
30
35
40
18” Log Set
LP Gas
16.6
12.6
10.8
9.6
9.1
8
7.5
18” Log Set
Natural Gas
16.6
12.6
10.8
9.6
9.1
8
7.5
24” Log Set
LP Gas
22.1
17.3
14.5
12.6
11.3
10.8
10.2
24” Log Set
Natural Gas
22.1
17.3
14.5
12.6
11.3
10.8
10.2
33” Log Set
LP Gas
22.1
17.3
14.5
12.6
11.3
10.8
10.2
33” Log Set
Natural Gas
22.1
17.3
14.5
12.6
11.3
10.8
10.2
MINIMUM PERMANENT FREE OPENING IN SQUARE INCHES
Chimney
Height (Feet)
6
8
10
15
20
30
18” Log Set
LP Gas
25.7
23.7
21.7
19.9
18.5
16.9
18” Log Set
Natural Gas
25.7
23.7
21.7
19.9
18.5
16.9
24” Log Set
LP Gas
33.8
31.2
28.7
26.1
23.7
21.6
24” Log Set
Natural Gas
33.8
31.2
28.7
26.1
23.7
21.6
33” Log Set
LP Gas
33.8
31.2
28.7
26.1
23.7
21.6
33” Log Set
Natural Gas
33.8
31.2
28.7
26.1
23.7
21.6
Page 21

21
LOG PARTS LIST
KEY
NUMBER
1
2
3
4
5
6
7
8
9
10
11
12
13
14
15
16
17
18
19
20
PART NO.
Log # 429
Log # 430
Log # 431
Log # 432
Log # 444
Log # 409
Log # 439
Log # 440
Log # 441
Log # 416
Log # 438
Log # 415
Log # 426
Log # 427
Log # 428
Log # 410
Log # 409
Log # 424
Log # 408
Log # 435
PART NO.
Log # 436
Log # 437
Log # 416
Log # 438
Log # 415
Log # 405
Log # 406
Log # 407
Log # 410
Log # 409
Log # 408
Log # 274
Log # 411
Log # 412
Log # 413
Log # 414
Log # 416
Log # 433
Log # 415
Log # 274
Log # 434
DESCRIPTION
Front Log
Middle Log
Back Log
Right Log
Left Log
Middle Top Log
Front Log
Middle Log
Back Log
Right Log
Left Log
Middle Top Log
Front Log
Middle Log
Back Log
Right Log
Left Bottom Log
Left Top Log
Middle Top Log
Front Log
KEY
NUMBER
21
22
23
24
25
26
27
28
29
30
31
32
33
34
35
36
37
38
39
40
41
DESCRIPTION
Middle Log
Back Log
Right Log
Left Log
Middle Top Log
Front Log
Middle Log
Back Log
Right Log
Left Bottom Log
Left Top Log
Center Right Log
Center Left Log
Front Log
Middle Log
Back Log
Right Log
Left Top Log
Left Bottom Log
Center Bottom Log
Center Right Log
Parts may be ordered directly from:
HEATMASTER, INC.
3625 Benson Road, P.O. Box 1717
Angier, NC 27501
(919) 639-4568
When ordering, please include complete part number, part name and description.
HM2-RO-18 HM2-RO-24 HM2-RO-33
HM2-SO-18 HM2-SO-24 HM2-SO-33
1
2
3
4
5
6
7
8
9
10
11
12
13
14
15
16
17
18
19
20
21
22
23
24
25
26
28
29
30
31
32
33
34
35
36
37
38
39
40
41
27
Page 22

PARTS DIAGRAM
22
D
F
E
HM2 MANUAL LP & NAT PILOT
A
S
I
D
G
B
FF
C
K
F
C
D
E
HM2 MILLIVOLT LP PILOT
C
C
D
DD
Q
TP TH
B
CC
FF
TO ALL PILOTS
E
PILOT REGULATORS FOR ALL NAT.
D
EE
H
T
TO PILOT HOLE ON VALVE
U
T
HI
THTP
PILOT
HM2 MILLIVOLT VALVE ASSEMBLY
Y
V
E
W
D
N
OUT
IN
S
LO
OFF
it
ON
PILOT
X
D
Y
Z
C
CARLING
AA
BB
ON
AA
OFF
O
D
GG
J
K
L
HM2 MILLIVOLT NAT PILOT
R
M
HM2 MANUAL VALVE ASSEMBLY
Q
N
DD
B
F
E
CC
FF
O
P
Page 23

PARTS LIST
KEY
LETTER
A
A
A
B
B
B
C
D
E
F
F
F
F
G
H
I
I
I
J
K
L
L
M
N
N
PART NO.
11-1181b
11-1182b
11-1183b
11-1350
16-1100
16-1110
01-1080
01-1095
11-1076
11-1075
11-1080
16-1040
16-1045
11-1060
03-1000
11-1265b
11-1270b
11-1275b
11-1295
01-1004
06-1030
06-1031
11-1185
11-1095
11-1100
PART NO.
16-1030
16-1035
11-1164
11-1166
11-1170
11-1036
03-1003
01-1031
11-1036
11-1155
11-1150
16-1050
03-1000
07-1020
16-1014
01-1158
16-1120
11-2265
16-1125
11-1445
02-1075
11-1101
16-1130
11-1441
DESCRIPTION
Burner, HM2-18
Burner, HM2-24
Burner, HM2-33
Pilot Bracket for HM2 Manual
Pilot Bracket for LP HM2 Millivolt
Pilot Bracket for NAT HM2 Millivolt
Screw, 10-32 X 1/2"
Nut, 10-32
Nut & ferrule for 3/16" tubing
#57 Pilot ODS LP (Manual Valve)
#56 Pilot ODS NG(Manual Valve)
ODS Pilot (LP Millivolt Valve)
ODS Pilot (NG Millivolt Valve)
Thermocouple
3/16" Pilot gas line 16"
Grate, HM2-18
Grate, HM2-24
Grate, HM2-33
Valve Cover Plate
Brass 3/8" MPT to 3/8" Flare Male
Half Union
Regulator 10.0 (LP) 3/8"
Regulator 4.0 (Nat) 3/8"
3/8" Nipple 3.5" long
Valve, Manual SIT 522
Valve, Thermostatic SIT 504
KEY
LETTER
N
N
O
O
P
Q
R
R
S
T
U
U
V
W
X
Y
Z
AA
BB
CC
DD
EE
FF
GG
DESCRIPTION
Valve, Millivolt LP 10"
Valve, Millivolt NAT 3.5"
Piezo (Manual and Thermostatic)
Piezo (Millivolt Valve Assembly)
Screw, 10-32 X 2 1/2"
Burner Orifice (HMU style)
3/8" Gas Line 12" long
3/8" Flare Nuts
Valve Orifice (HMU style)
Compression connectors, 3/16
Com X 1/8 MPT (Nat Only)
Maxitrol 3.0" Pilot Reg (Man/Therm
Nat Only)
Maxitrol 4.5" Pilot Reg (Millivolt Nat
Only)
3/16" Pilot gas line 2.5" (Nat Only)
3/8" NPT 90° St Elbow
14" long Jumper with 4 Female
Spade Cripons
Screw, 10-32 x 1/4" (Millivolt Valve Only)
HM2 Millivolt Valve Bracket
Carling Single Pole / Single Throw Switch
On/Off Indicator for Switch Y01
Screw, 8-32 x 5/16
Keps Nut, 8-32
Thermostatic bulb holding Plastic Clip
Piezo Wire 12"
3/16" Loxit Nut & Sleeve
23
Parts may be ordered directly from:
HEATMASTER, INC.
3625 Benson Road, P.O. Box 1717
Angier, NC 27501
(919) 639-4568
When ordering, please include complete part number, part name and description.
Page 24

24
HEATMASTER, INC.
LIMITED WARRANTY
All refractory cement logs manufactured by HEATMASTER, Inc. have a lifetime warranty against
breakage due to heat to the original owner in the original installation.
All other logs supplied from HEATMASTER, Inc. have a 2 year warranty against breakage due to heat to
the original owner in the original installation.
+
All metal parts, including burners and grate assemblies are warranted for 5 years.
+
All other mechanical parts are warranted for 1 year.
LIMITATIONS
1.
2.
3.
4.
5.
HEATMASTER, Inc.’s obligations to the purchaser under this warranty is limited to the repair or
replacement of defective part.
Repairs or replacement will be performed by HEATMASTER, Inc. following delivery of the product
by the purchaser to HEATMASTER, Inc.’s facility in Angier, North Carolina. The cost of mailing or
other delivery to HEATMASTER, Inc. shall be borne by the purchaser. The mailing address is:
HEATMASTER, Inc., P.O. Box 1717, 3625 Benson Rd., Angier, NC 27501.
Along with the product, the purchaser shall include a written explanation of the approximate date the
product was purchased, the dealer or person from whom the product was purchased, the date the defect
was first noticed, a description of the nature of the defect, and what the purchaser did, if anything, to
repair or correct the defect.
To the extent allowed by law, any implied warranty of merchantability or fitness applicable to this
product is limited to the duration of this warranty. HEATMASTER, Inc. shall not be liable for loss of
use of this product, loss of time, inconvenience, commercial loss or consequential damages. The remedy
of repair or replacement of a defective part during the warranty period herein specified shall be the
purchaser’s exclusive remedy.
HEATMASTER, Inc. is not responsible for any loss or damages caused by purchaser’s failure to follow
operating and maintenance instructions provided in the owner’s manual.
*******************************
Dear Purchaser:
We are pleased that you have selected our product and take this opportunity to assure you that qualified
service is available if required.
Please review and complete the enclosed Warranty/Registration card.
Who gets the warranty?
What is covered?
What is not covered?
DEFECTIVE PARTS OR BROKEN LOGS FOR REPLACEMENTS MUST BE RETURNED TO
THE FACTORY PREPAID ALONG WITH PROOF OF PURCHASE. FACTORY WILL REPAIR OR
REPLACE AT FACTORY OPTION AND RETURN TO PURCHASER FREIGHT PREPAID.
The warranty is limited to the consumer who originally purchased the product.
This limited warranty covers all imperfections in workmanship and material.
This limited warranty does not cover damage resulting from accident, misuse
or abuse, lack of proper maintenance, affixing of any attachments not
provided with the products, or loss of parts. IN NO EVENT SHALL
HEATMASTER, INC. BE LIABLE FOR ANY SPECIAL, INCIDENTAL OR
CONSEQUENTIAL DAMAGES RESULTING FROM MISUSE OR
MODIFICATION OF THIS PRODUCT.
 Loading...