

Heat Controller B-DVC09SD-0, B-DVH12SD-0, A-DVH09SD-0, A-DVC09SD-0, B-DVC12SD-0 Service Manual
...Page 1
SERVICE MANUAL
DVC/DVH 09/12/18/24
Inverter Single Zone
Ductless Mini-Split
AITONS/MARS 35 Brownridge Road, Unit 6, Halton Hills, ON L7G 0C6 • 1-888-744-2911 • info@aitons.com • www.aitons.com
Page 2

DVC/DVH Inverter Mini-Split Heat Controller
TABLE OF CONTENTS
1. Precaution ........................................................................................................................................................................3
1.1 Safety Precaution ......................................................................................................................................................3
1.2 Warning .....................................................................................................................................................................4
2. Part Identication and Functions ...................................................................................................................................5
2.1 Model Numbers of Indoor/Outdoor units ...................................................................................................................5
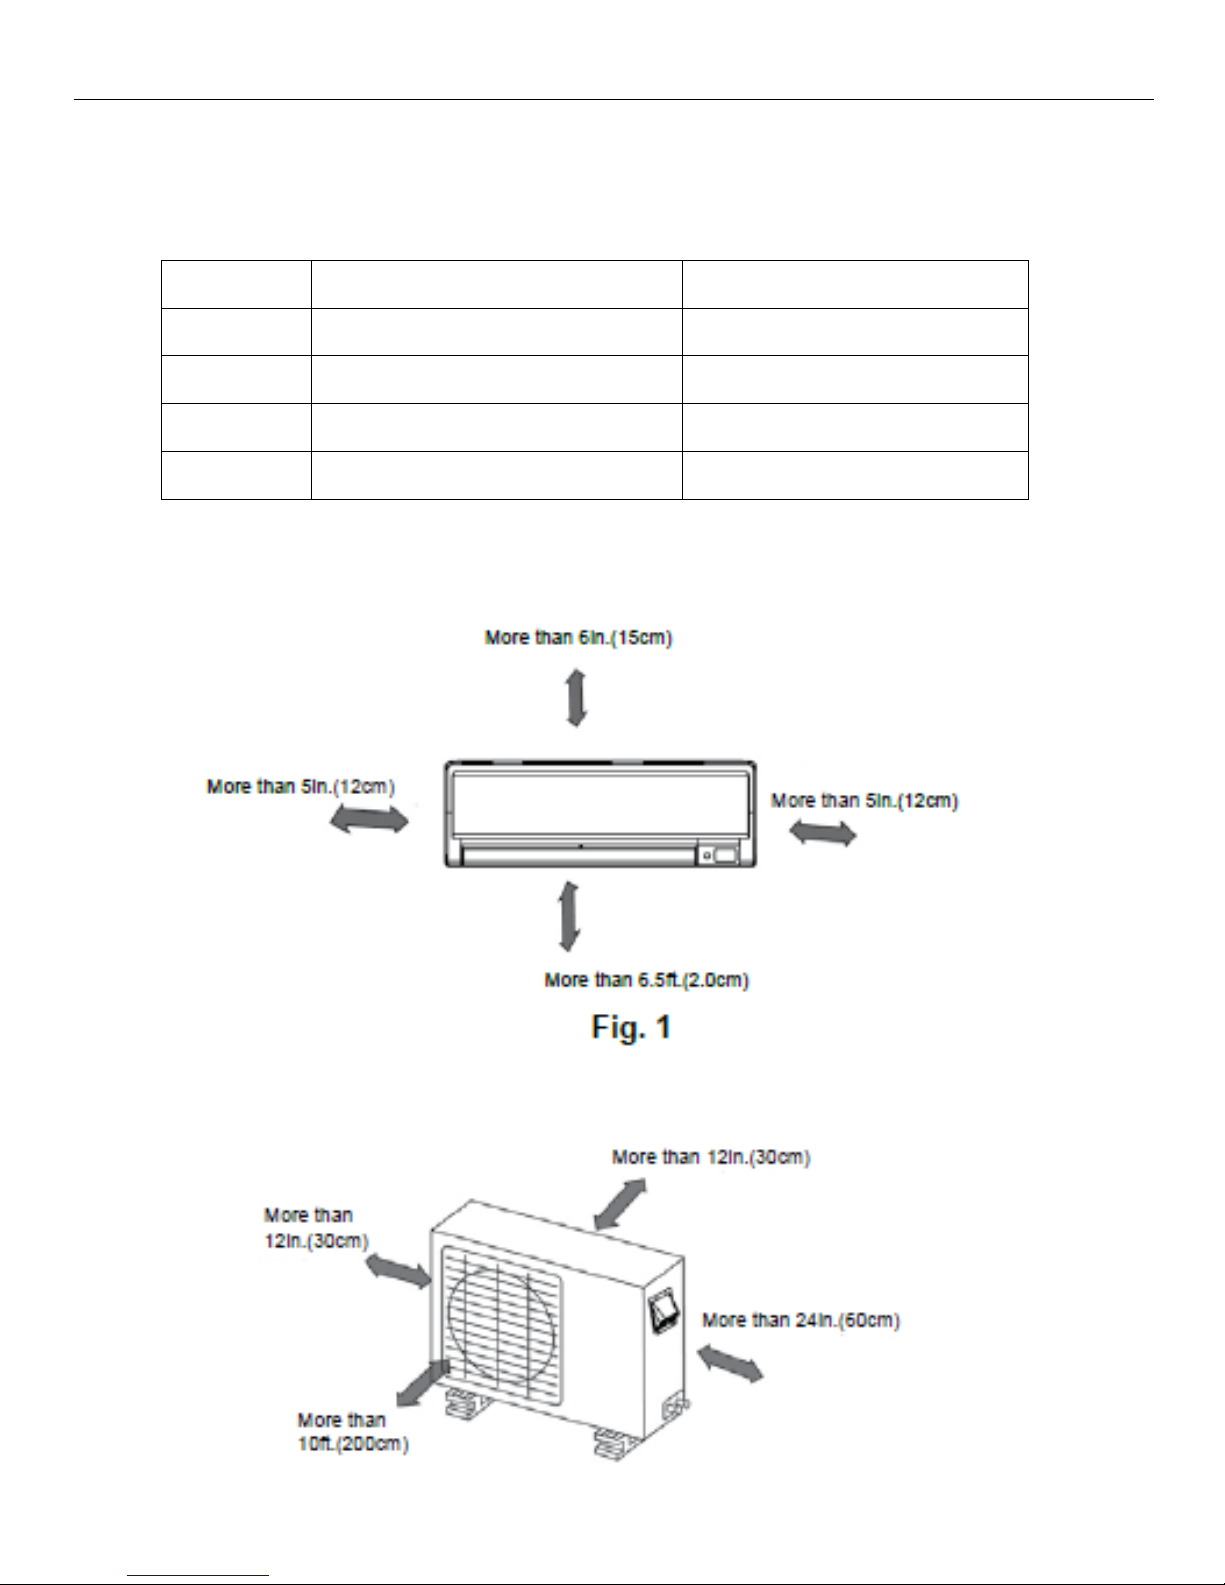
2.2 Required clearances for Indoor/Outdoor units .......................................................................................................5-6
2.3 Features .................................................................................................................................................................6-7
3. Dimensional Data ............................................................................................................................................................8
3.1 Indoor Unit ................................................................................................................................................................8
3.2 Indoor Unit Mounting Bracket ...................................................................................................................................9
3.3 Outdoor Unit ............................................................................................................................................................10
4. Refrigerant Cycle Diagram ...........................................................................................................................................11
4.1 Cooling Only Models (DVC) .................................................................................................................................... 11
4.2 Heat Pump Models (DVH) ......................................................................................................................................12
5. Wiring Diagrams ............................................................................................................................................................13
5.1 Indoor Units ........................................................................................................................................................13-14
5.2 Outdoor Units ..........................................................................................................................................................15
6. Installation Details .........................................................................................................................................................16
6.1 Electrical .................................................................................................................................................................16
6.2 Line Set Connection Sizes ......................................................................................................................................16
6.3 Line Set Lengths and Elevations ............................................................................................................................16
6.4 Field Charging .........................................................................................................................................................16
7. Operating Conditions ....................................................................................................................................................17
8. Electronic Display Functions .......................................................................................................................................18
8.1 Abbreviations ..........................................................................................................................................................18
8.2 Display Functions ....................................................................................................................................................18
8.3 Main Protection .......................................................................................................................................................18
9. Operation Modes and Functions ..................................................................................................................................19
9.1 Fan Only Mode .......................................................................................................................................................19
9.2 Cooling Mode .....................................................................................................................................................19-21
9.3 Heating Mode .....................................................................................................................................................21-23
9.4 Defrost Mode .....................................................................................................................................................23-24
9.5 Evaporator Coil Temp. Protection ...........................................................................................................................24
9.6 Auto-Mode ..........................................................................................................................................................24-25
9.7 Dry Mode ................................................................................................................................................................25
9.8 Forced Operation ....................................................................................................................................................25
9.9 Timer Function ...................................................................................................................................................25-26
9.10 Sleep Mode ...........................................................................................................................................................26
9.11 Auto-Restart Function............................................................................................................................................26
9.12 Automatic Panel Function .....................................................................................................................................26
9.13 47°F (8°C) Heating ................................................................................................................................................26
10. Troubleshooting ..........................................................................................................................................................27
10.1 Indoor Unit Error Codes ........................................................................................................................................27
10.2 Outdoor Unit Errors and Troubleshooting ........................................................................................................28-31
10.3 Diagnosis and Solution ....................................................................................................................................32-48
10.4 Pressure on Service Port ......................................................................................................................................49
WARNING
• InstallationMUSTconformwithlocalbuildingcodesor,intheabsenceoflocalcodes,withtheNationalElectricalCode
NFPA70/ANSIC1-1993orcurrenteditionandCanadianElectricalCodePart1CSAC.22.1.Whereconictsexist,thelocal
and/or national codes shall prevail.
• Theinformationcontainedinthemanualisintendedforusebyaqualied,licensedservicetechnicianfamiliarwithsafety
proceduresandequippedwiththepropertoolsandtestinstruments
• Installationorrepairsmadebyunqualiedpersonswillvoidthewarrantyandmaycausehazardsorincorrectoperation.
• Failuretocarefullyreadandfollowallinstructionsinthismanualcanresultinequipmentmalfunction,propertydamage,
personal injury and/or death.
2
Page 3

Heat Controller DVC/DVH Inverter Mini-Split
1. Precaution
1.1 Safety Precaution
To prevent injury to the user or other
people and property damage, the following
instructions must be followed.
Incorrect operation due to ignoring
instruction will cause harm or damage.
Before service the unit, be sure to
read this service manual at first.
1.2 Warning
Installation
Do not use a defective or underrated
circuit breaker. Use this appliance on a
dedicated circuit.
There is risk of fire or electric shock.
For electrical work, contact the dealer,
seller, a qualified electrician, or an
authorized service center.
Do not disassemble or repair the product,
there is risk of fire or electric shock.
Always ground the product.
There is risk of fire or electric shock.
Install the panel and the cover of
control box securely.
There is risk of fire of electric shock.
Always install a dedicated circuit and
breaker.
Improper wiring or installation may cause
electric shock.
Use the correctly rated breaker of
fuse.
There is risk of fire or electric shock.
Do not install, remove, or reinstall the
unit by yourself (customer).
There is risk of fire, electric shock, explosion,
or injury.
Be caution when unpacking and
installing the product.
Sharp edges could cause injury, be especially
careful of the case edges and the fins on the
condenser and evaporator.
3
Take care to ensure that power cable
could not be pulled out or damaged during
operation.
There is risk of fire or electric shock..
Do not touch (operation) the product
with wet hands..
Do not allow water to run into
electrical parts or the unit.
It may cause fire, failure of the product, or
electric shock.
Do not store or use flammable gas or
combustible materials near the product.
There is risk of fire or failure of product.
Do not use the product in a tightly
closed space for a long time.
Oxygen deficiency could occur.
If abnormal noises or smoke comes
from product, turn the breaker off or
disconnect the power supply cable.
There is risk of electric shock or fire.
Do not open the inlet grill of the
product during operation. (Do not touch the
electrostatic filter, if the is equipped with
one .)
There is risk of physical injury, electric shock,
or product failure..
Turn the main power off when
cleaning or maintaining the product.
There is risk of electric shock.
When the product will not be used for
a long period of time, turn off the circuit
breaker.
There is risk of product damage or failure, or
unintended operation.
CAUTION
Always check for refrigerant leakage
after installation or repair of product.
Low refrigerant levels may cause operational
failure.
Install the drain hose to ensure that
water is drained away properly.
Improper installation may cause water
leakage and damage to personal property.
Page 4

DVC/DVH Inverter Mini-Split Heat Controller
Keep the unit level even when
installing the product.
This helps to avoid vibration or water leakage.
Do not install the product where it will
be directly exposed to seaside wind (salty
air).
It may cause corrosion on the product.
Corrosion, particularly on the condenser and
evaporator fins, could cause product
malfunction or inefficient operation.
Operational
Do not block the inlet or outlet of air
flow.
Use a soft cloth to clean. Do not use
harsh detergents, solvents, etc.
There is risk of fire, electric shock, or damage
to the plastic parts of the product.
Do not touch the metal parts of the
product when removing the air filter. They
are very sharp.
Always insert the filter securely.
Clean the filter every two weeks or more
often if necessary.
A dirty filter reduces the efficiency of the air
conditioner and could cause product
malfunction or damage.
Do not insert hands or other objects
through air inlet or outlet while the product
is operated.
Replace the all batteries in the remote
control with new ones of the same type. Do
not mix old and new batteries or different
brands of batteries.
There is risk of fire or explosion.
If battery acid from the batteries gets
onto your skin or clothes, wash it well with
clean water and contact your local poison
control center. Do not use the remote of the
batteries have leaked.
4
Page 5
Heat Controller DVC/DVH Inverter Mini-Split
2. Part Identification and Functions
2.1 Model Numbers of Indoor/Outdoor units
Capacity Indoor Units Outdoor Units
9KBTU/H
12KBTU/H
18KBTU/H
24KBTU/H
B-DVH09SD-0 / B-DVC09SD-0 A-DVH09SD-0 / A-DVC09SD-0
B-DVH12SD-0 / B-DVC12SD-0 A-DVH12SD-0 / A-DVC12SD-0
B-DVH18SD-1 / B-DVC18SD-1 A-DVH18SD-1 / A-DVC18SD-1
B-DVH24SD-1 / B-DVC24SD-1 A-DVH24SD-1 / A-DVC24SD-1
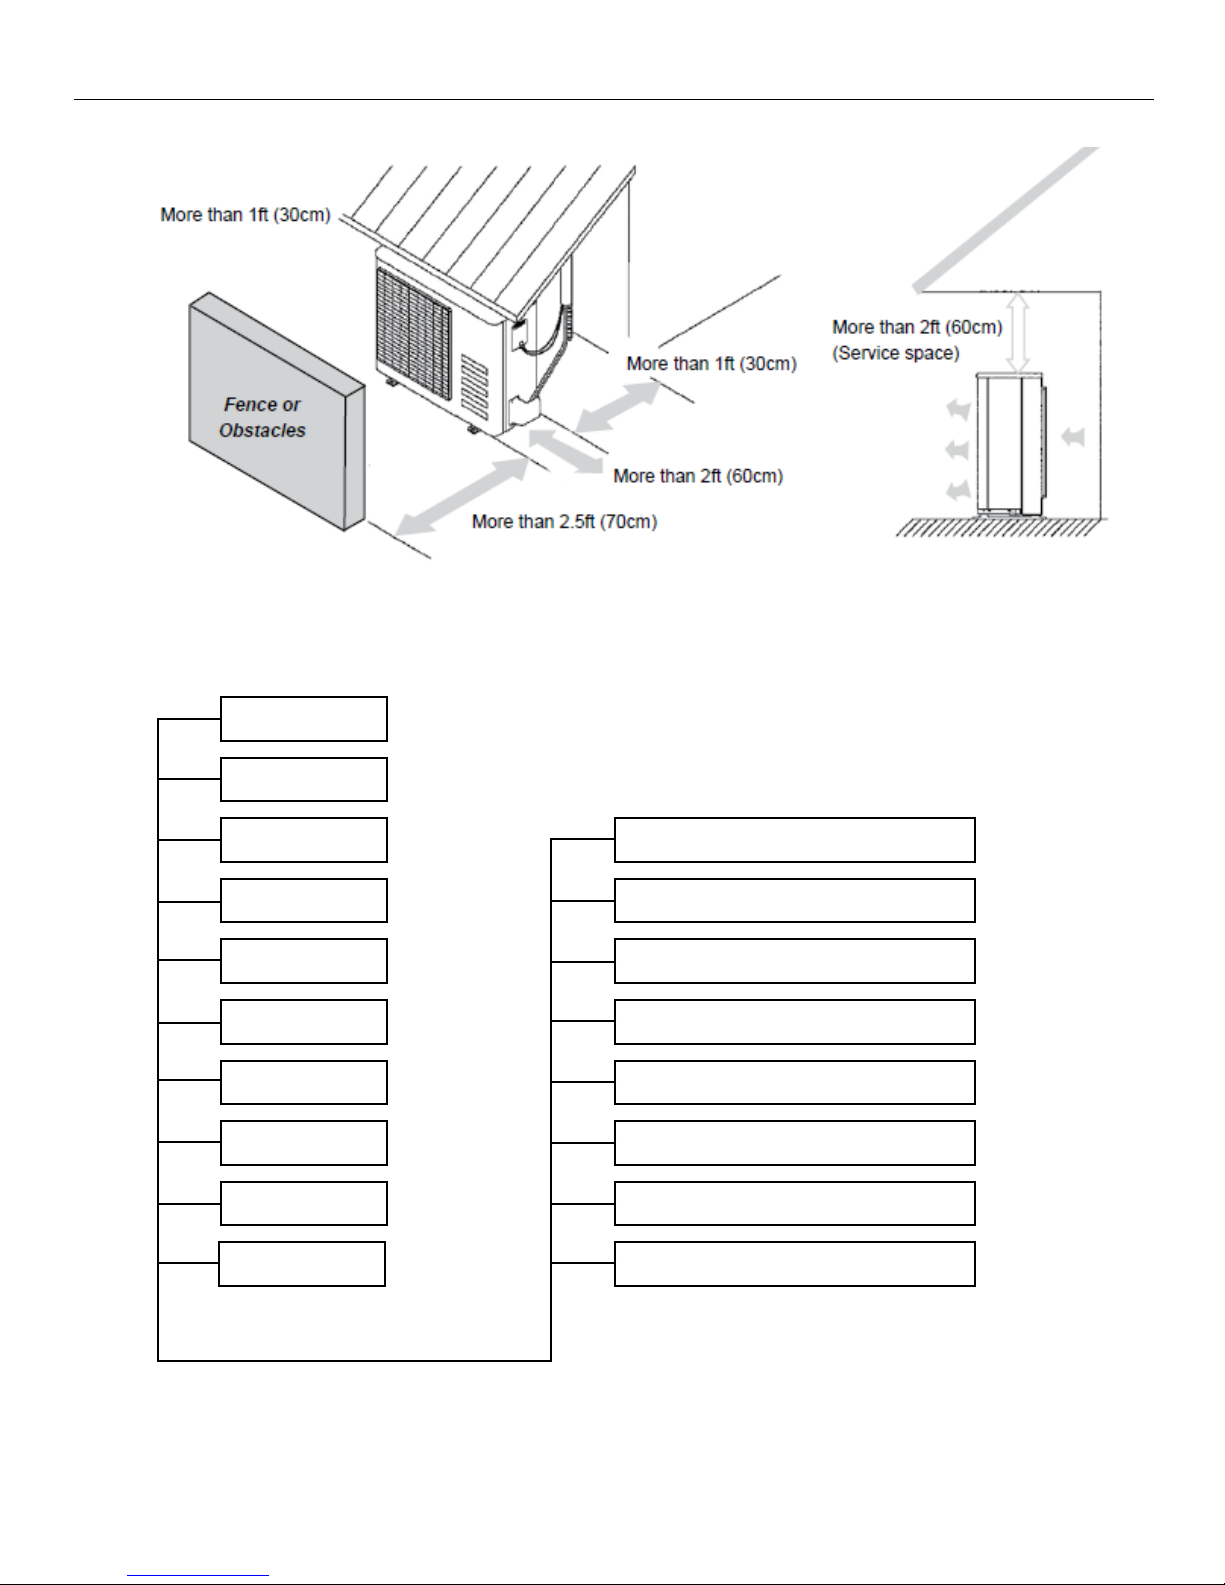
2.2 Required Clearances for Indoor and Outdoor units
5
Page 6
DVC/DVH Inverter Mini-Split Heat Controller
Note:
2.3 Features
For Reference Only. Your model may differ and is subject to change.
Auto Restart
Sleep Mode
Turbo Mode
Anti-ColdBlow
Silver Ico Filter
LowAmbient
Golden Fin
Self Clean
FollowMe
Horizontal&VerticalSwingFunction
Louver Position Memory Function
Refrigerant Leakage Detect
Self-Diagnosis Function
Anti-Rust Cabient
Valve Protection Cover
Slump Heater
LowHeating
Room Temp.
Compressor Crankcase Heater
6
Page 7

Heat Controller DVC/DVH Inverter Mini-Split
2.3.1 Description of Features and Functions
• Auto-Restart:
The unit will memorize the set conditions before a power failure and resume operation automatically when the
power re-starts.
• Sleep Mode:
This feature helps keep the room conditions at the most desirable levels when you sleep.
• Turbo Mode:
Turbo mode allows the unit to quickly heat or cool and room, at a high speed fan setting.
• Anti-Cold Blow:
In heating mode, this feature prevents cold air from blowing until warm air is ready to be delivered.
• Silver Ion Filter:
The silver filter sterilizes bacteria in the air stream by decomposing cell wall of bacteria.
• Low Ambient Operation:
Allows the unit to operate under low outdoor temperatures.
• Gold Hydrophilic Condensers Fin Coating:
This coating improves the heating efficiency by accelerating the defrosting process. The anticorrosive gold
coating on the condenser helps withstand salty air and corrosive elements for sea side applications.
• Self Clean:
This function wicks away any moisture, essentially cleaning the inside of indoor unit to prevents bacteria for
forming. This feature is especially useful at the end of the season and/or when the unit will not be used for
an extended period of time.
• Follow me:
A temperature sensor is built in the remote control, which signals the unit to automatically change the
operation mode to supply a comfortable temperature. Using this feature allows the unit to sense the
conditions where you are in the room, rather than up high in the room where it traditionally senses the
conditions via the indoor unit.
• Low Room Temperature Protection:
Allows the unit to maintain a set temperature to protect the area it is installed in from freezing when you will be
away for an extended period of time in the winter.
• Louver Swing and Position Memory:
The louvers can swing to make a breeze like affect in the air flow from the indoor unit. When starting the unit
after shutting down, the louver will restore the user’s settings for louver position.
• Refrigerant Leak Detection:
The refrigerant leakage detect function prevents the unit from freezing due to low charge and protects the
compressor from being damaged.
• Self-Diagnosis Function:
The system monitors itself for abnormal operations and turns of the unit automatically to protect it from further
damage, then displays an error code to help troubleshoot the problem for a quick solution.
• Sump Heater:
A PTC heater is installed in the base pan of the outdoor unit to prevent the rain, snow or defrosted water from
accumulating and icing up the unit.
• Compressor Crankcase Heater:
The oil dissolves easily into the refrigerant, especially in low temperature condition, therefore the crankcase
heating belt is used to warm the bottom of the compressor to avoid pumping out too much oil within the
refrigerant, which helps to protect the compressor.
7
Page 8
DVC/DVH Inverter Mini-Split Heat Controller
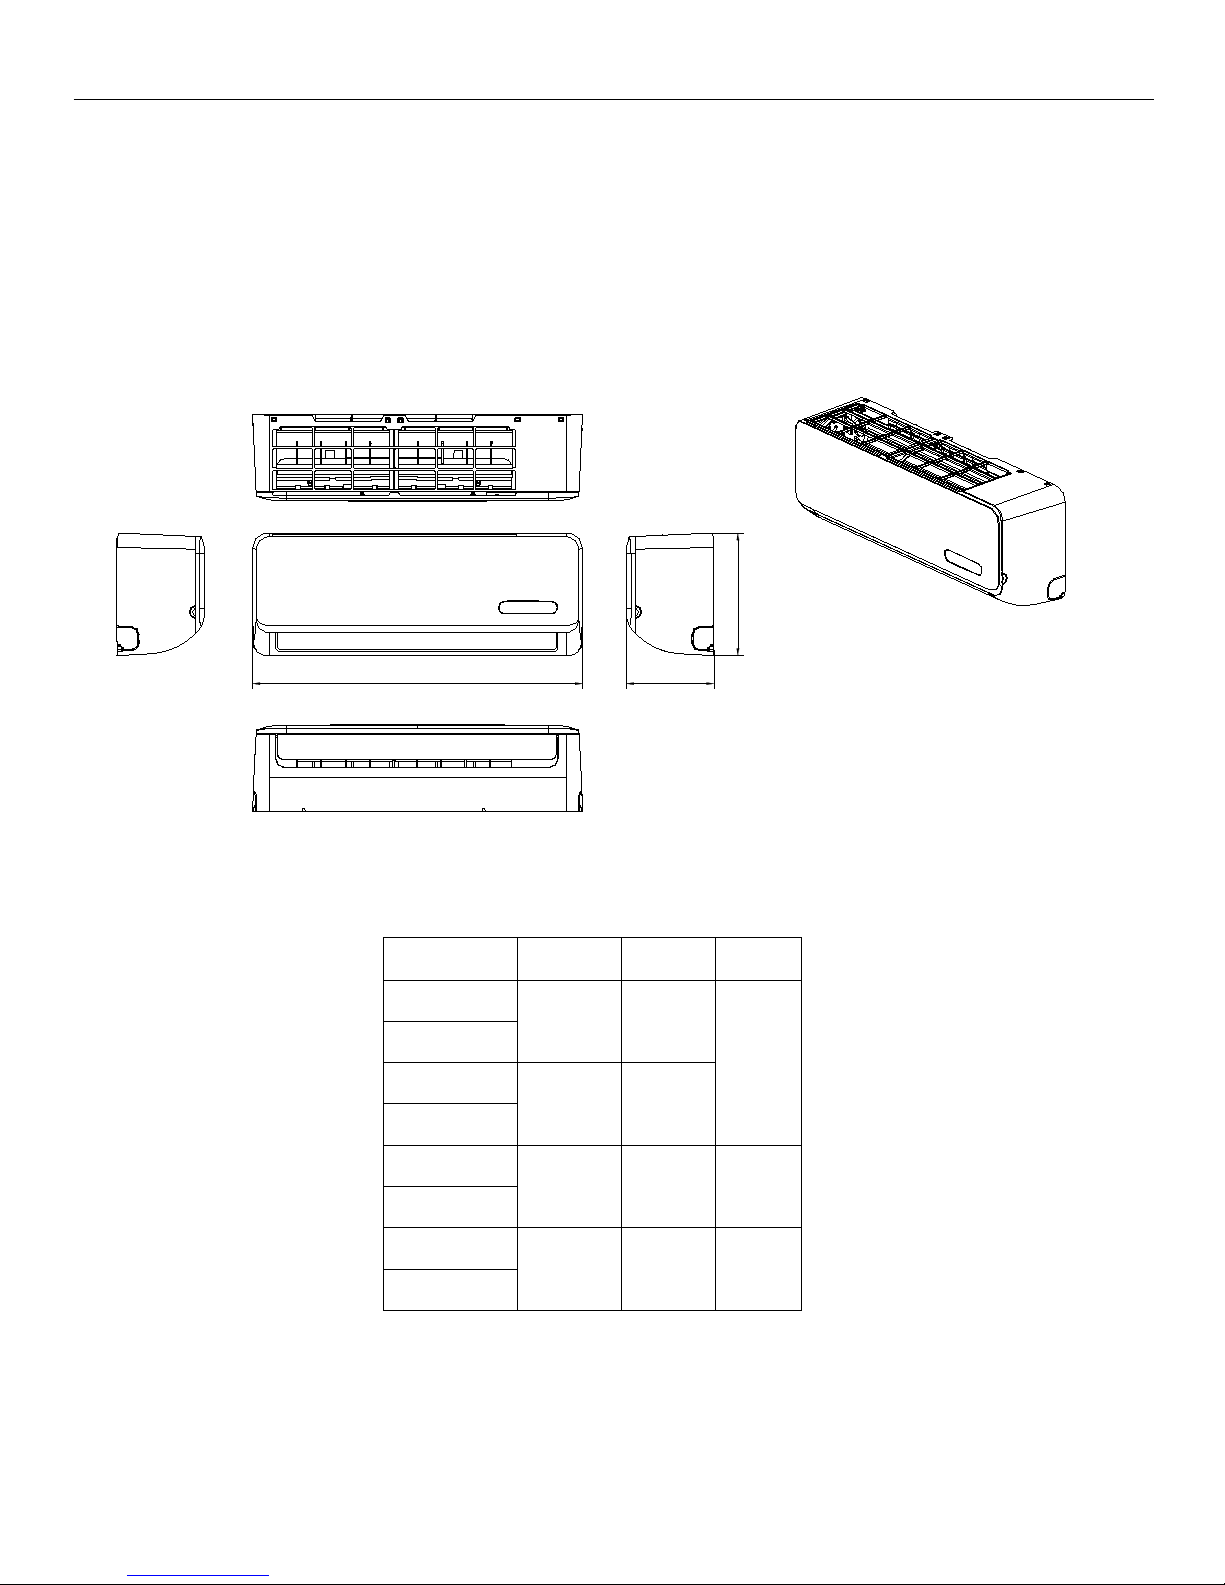
3. Dimensional Data
3.1 Indoor Unit
Note: The drawings below are only for reference. Actual dimensions may be different and are subject
to change.
H
W
D
Note: The above drawing is only for reference. The dimensions of your actual unit may be different
and are subject to change.
Model W D H
B-DVC09SD-0
B-DVH09SD-0
B-DVC12SD-0
B-DVH12SD-0
B-DVC18SD-1
B-DVH18SD-1
B-DVC24SD-1
B-DVH24SD-1
26.8in
(680mm)
30.3in
(770mm)
35.6in
(905mm)
40.6in
(1030mm)
7.0in
(178mm)
7.4in
(188mm)
7.8in
(198mm)
8.6in
(218mm)
10.0in
(255mm)
10.8in
(275mm)
12.4in
(315mm)
8
Page 9
Heat Controller DVC/DVH Inverter Mini-Split
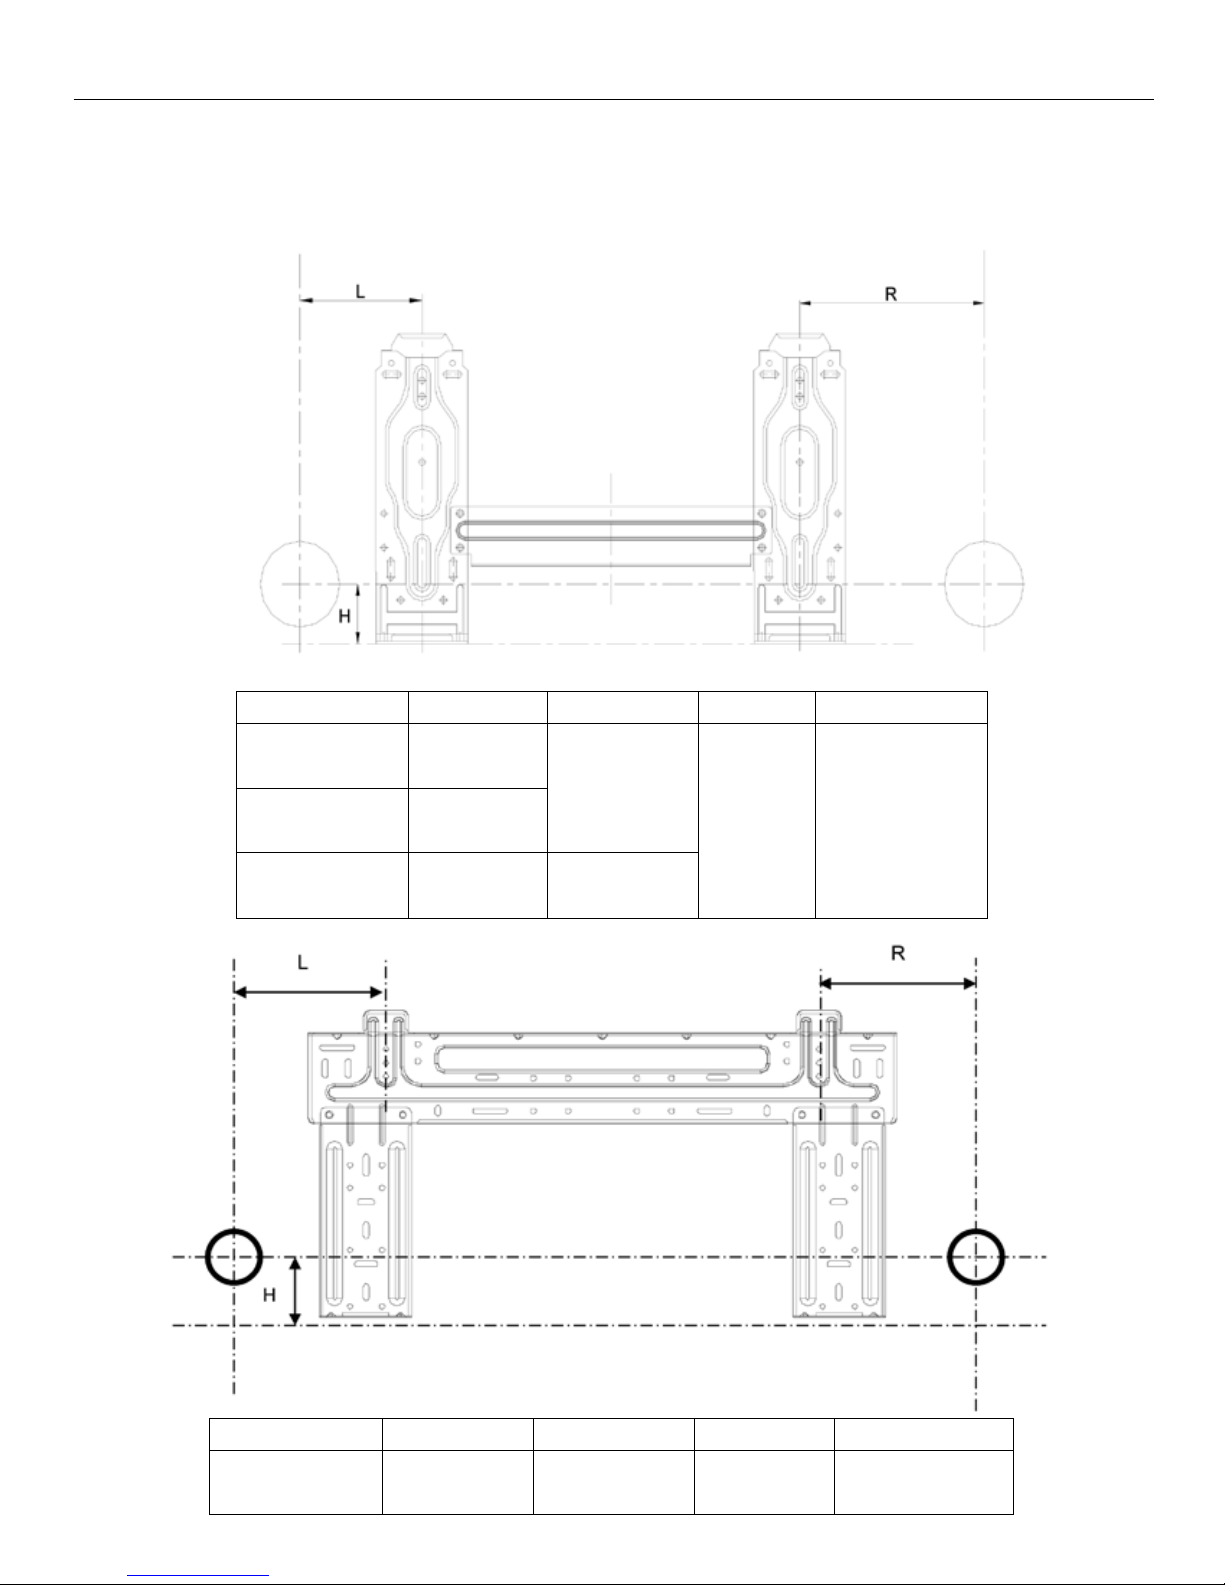
3.2 Indoor Unit Mounting Bracket
Note: The drawings below are only for reference. Actual dimensions may be different and are subject
to change.
L
H
R
Model R L H Hole Diameter
B-DVC/DVH09 3.6in(92mm)
6.7in
B-DVC/DVH12 3.7in(95mm)
(170mm)
1.8in
(45mm)
Φ2.56in
(65mm)
B-DVC/DVH18 3.1in(80mm) 3.9in(100mm)
L
H
R
Model R L H Hole Diameter
B-DVC/DVH24 6.4in(163mm) 11.5in(293mm) 1.8in(45mm) Φ2.56in(65mm)
9
Page 10
DVC/DVH Inverter Mini-Split Heat Controller
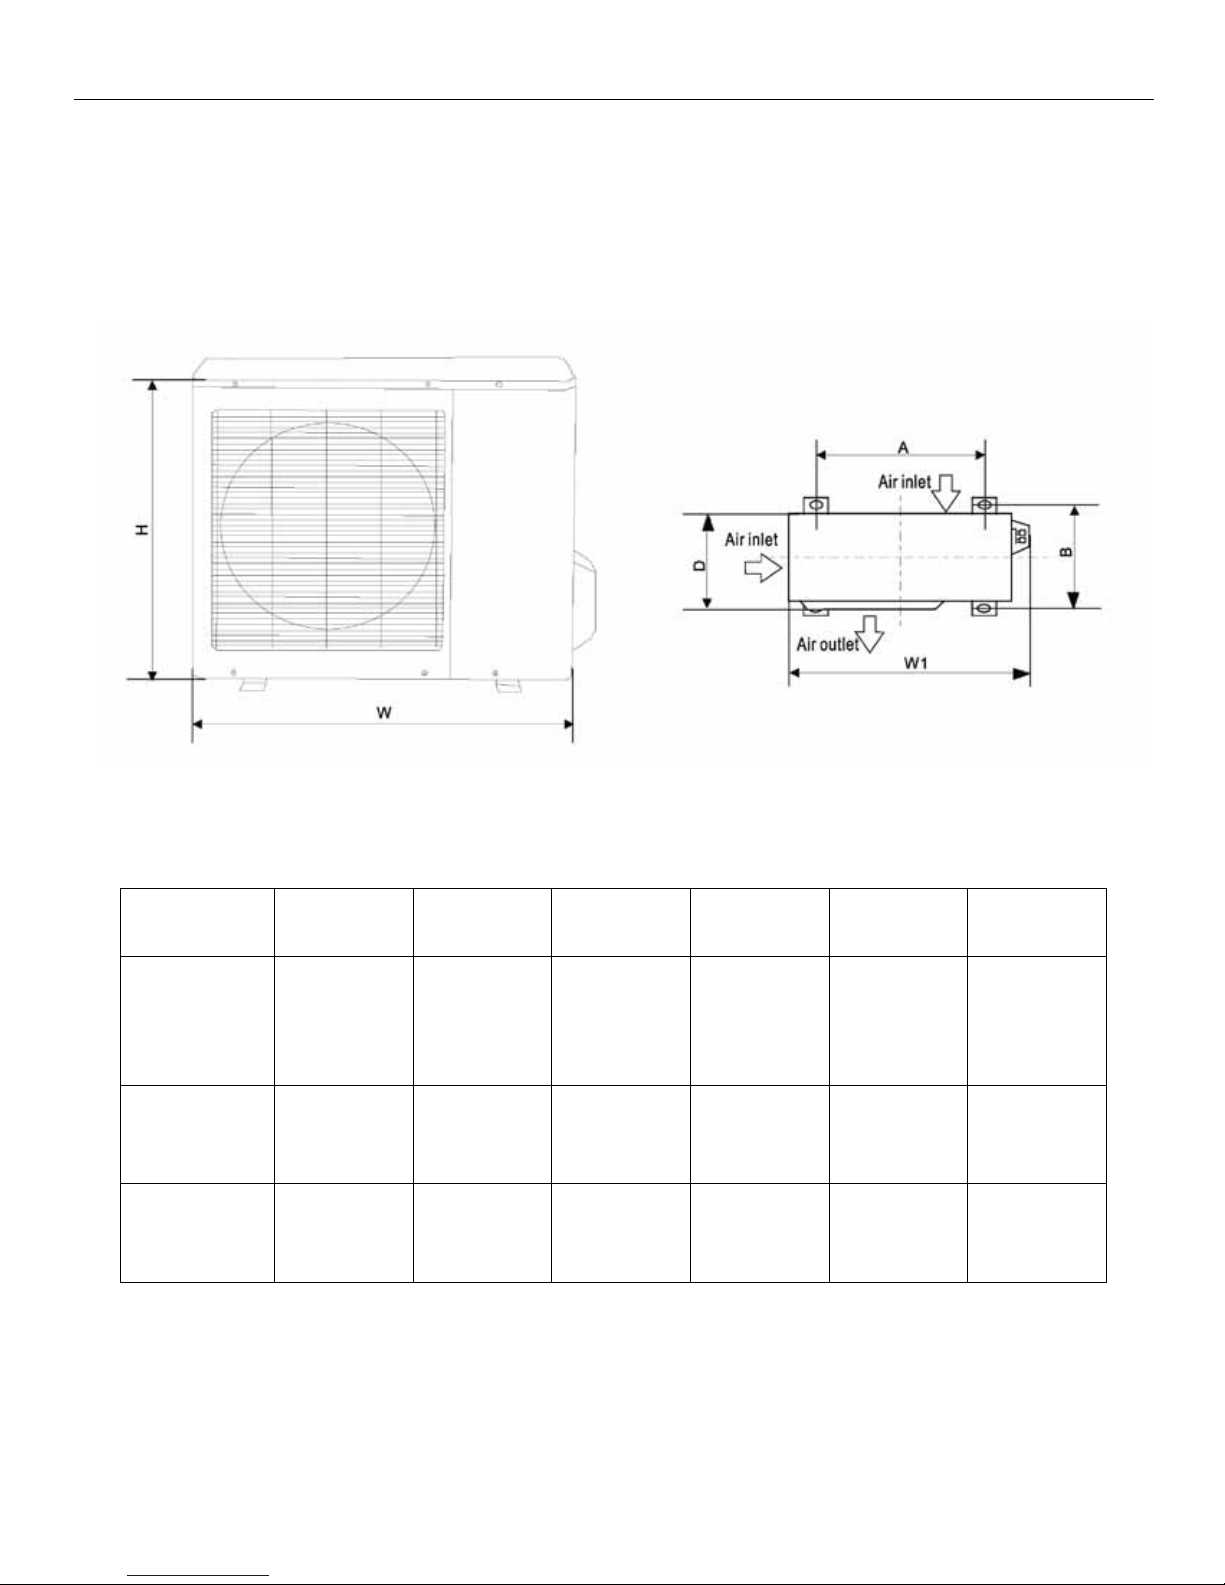
3.3 Outdoor Unit
Note: The drawings below are only for reference. Actual dimensions may be different and are subject
to change.
Note: The above drawing is only for reference. The dimensions of your actual unit may be different
and are subject to change.
Model W H D W1 A B
A-DVC/DVH09
A-DVC/DVH12
A-DVC/DVH18
A-DVC/DVH24
26.0in
(660mm)
30in
(760mm)
33.3in
(845mm)
10.5in
(265mm)
11.25in
(285mm)
12.5in
(320mm)
21.25in
(540mm)
23.2in
(590mm)
27.6in
(700mm)
28.8in
(732mm)
32.5in
(823mm)
35.7in
(908mm)
18in
(458mm)
20.9in
(530mm)
22in
(560mm)
10.9in
(276mm)
11.5in
(290mm)
13.2in
(335mm)
10
Page 11
Heat Controller DVC/DVH Inverter Mini-Split
INDOOR OUTDOOR
maintenance or replacement of
evacuated for maintenance or
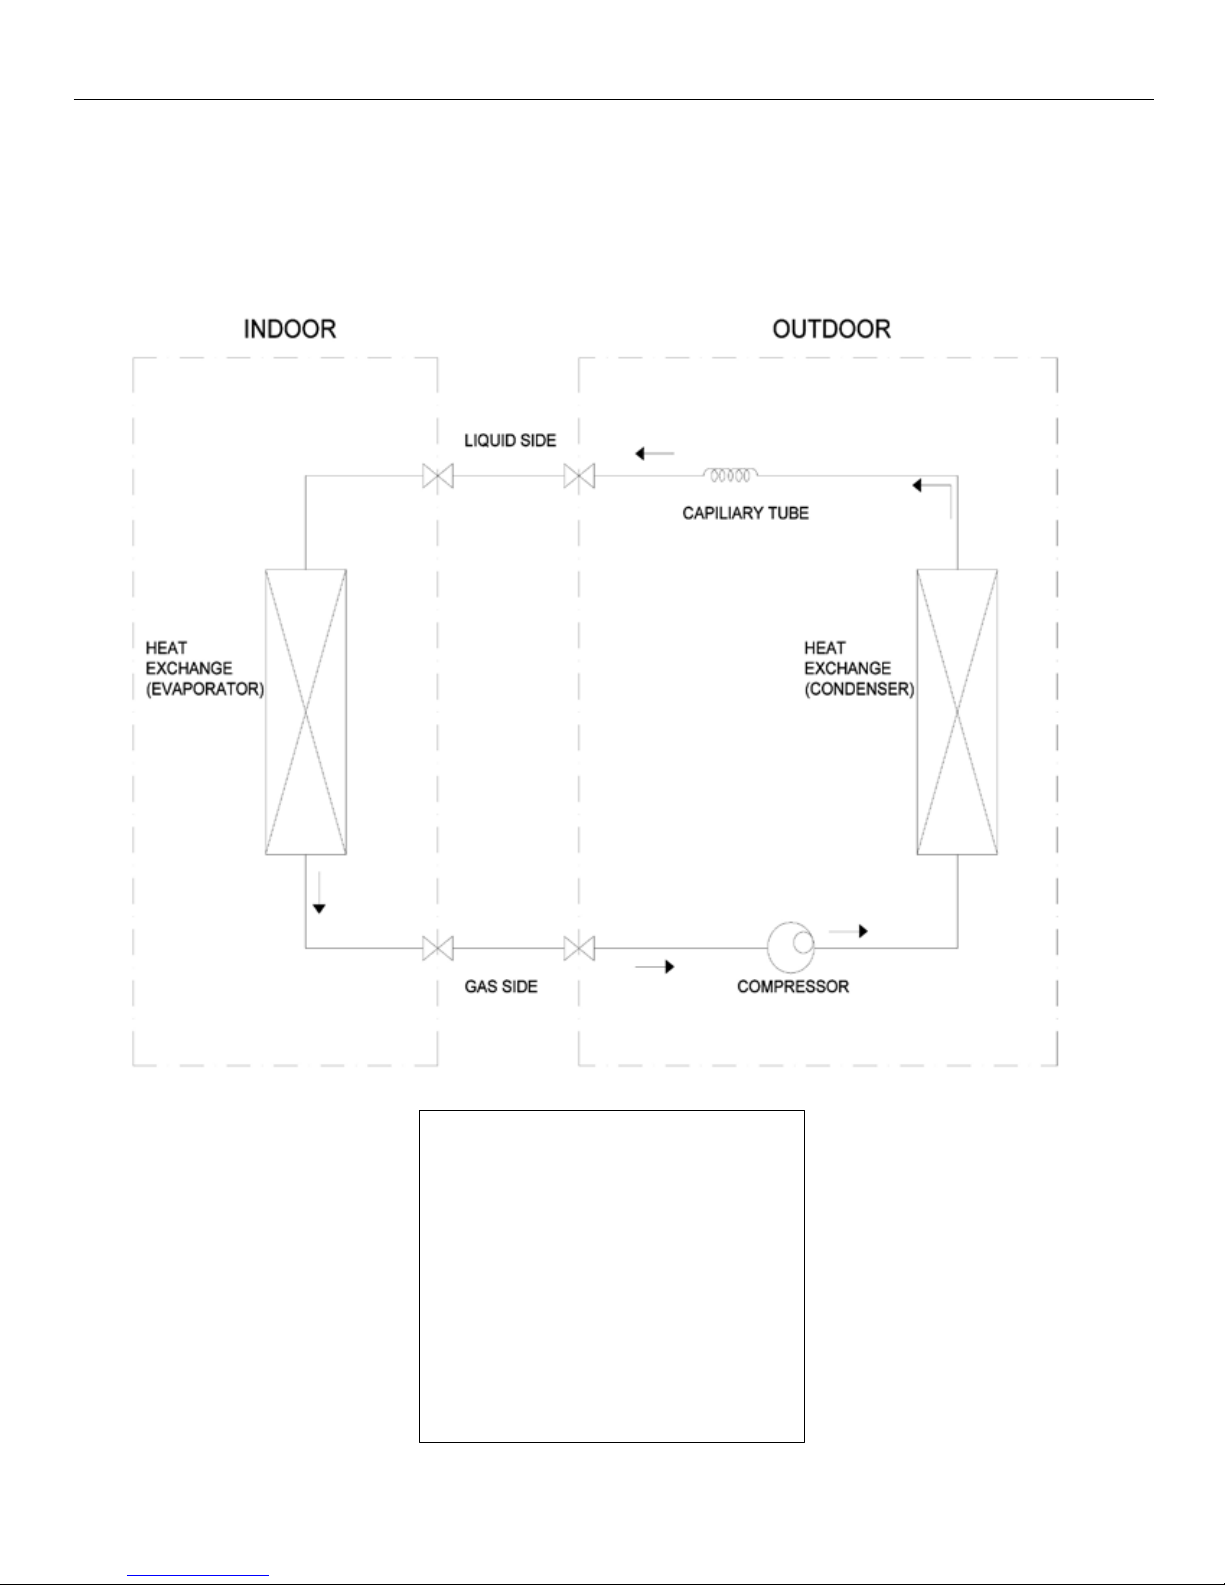
4. Refrigerant Cycle Diagram
4.1 Cooling Only Models (DVC):
LIQUID SIDE
CAPILIARY TUBE
HEAT
EXCHANGE
(EVAPORATOR)
GAS SIDE
ATTENTION:
Units can be pumped down for service
and recharged.
• A servicer can pump down the
refrigerant into the outdoor unit for
HEAT
EXCHANGE
(CONDENSER)
COMPRESSOR
the indoor unit.
• Also the entire system can be
replacement of the outdoor unit.
11
Page 12
DVC/DVH Inverter Mini-Split Heat Controller
INDOOR OUTDOOR
maintenance or replacement of
evacuated for maintenance or
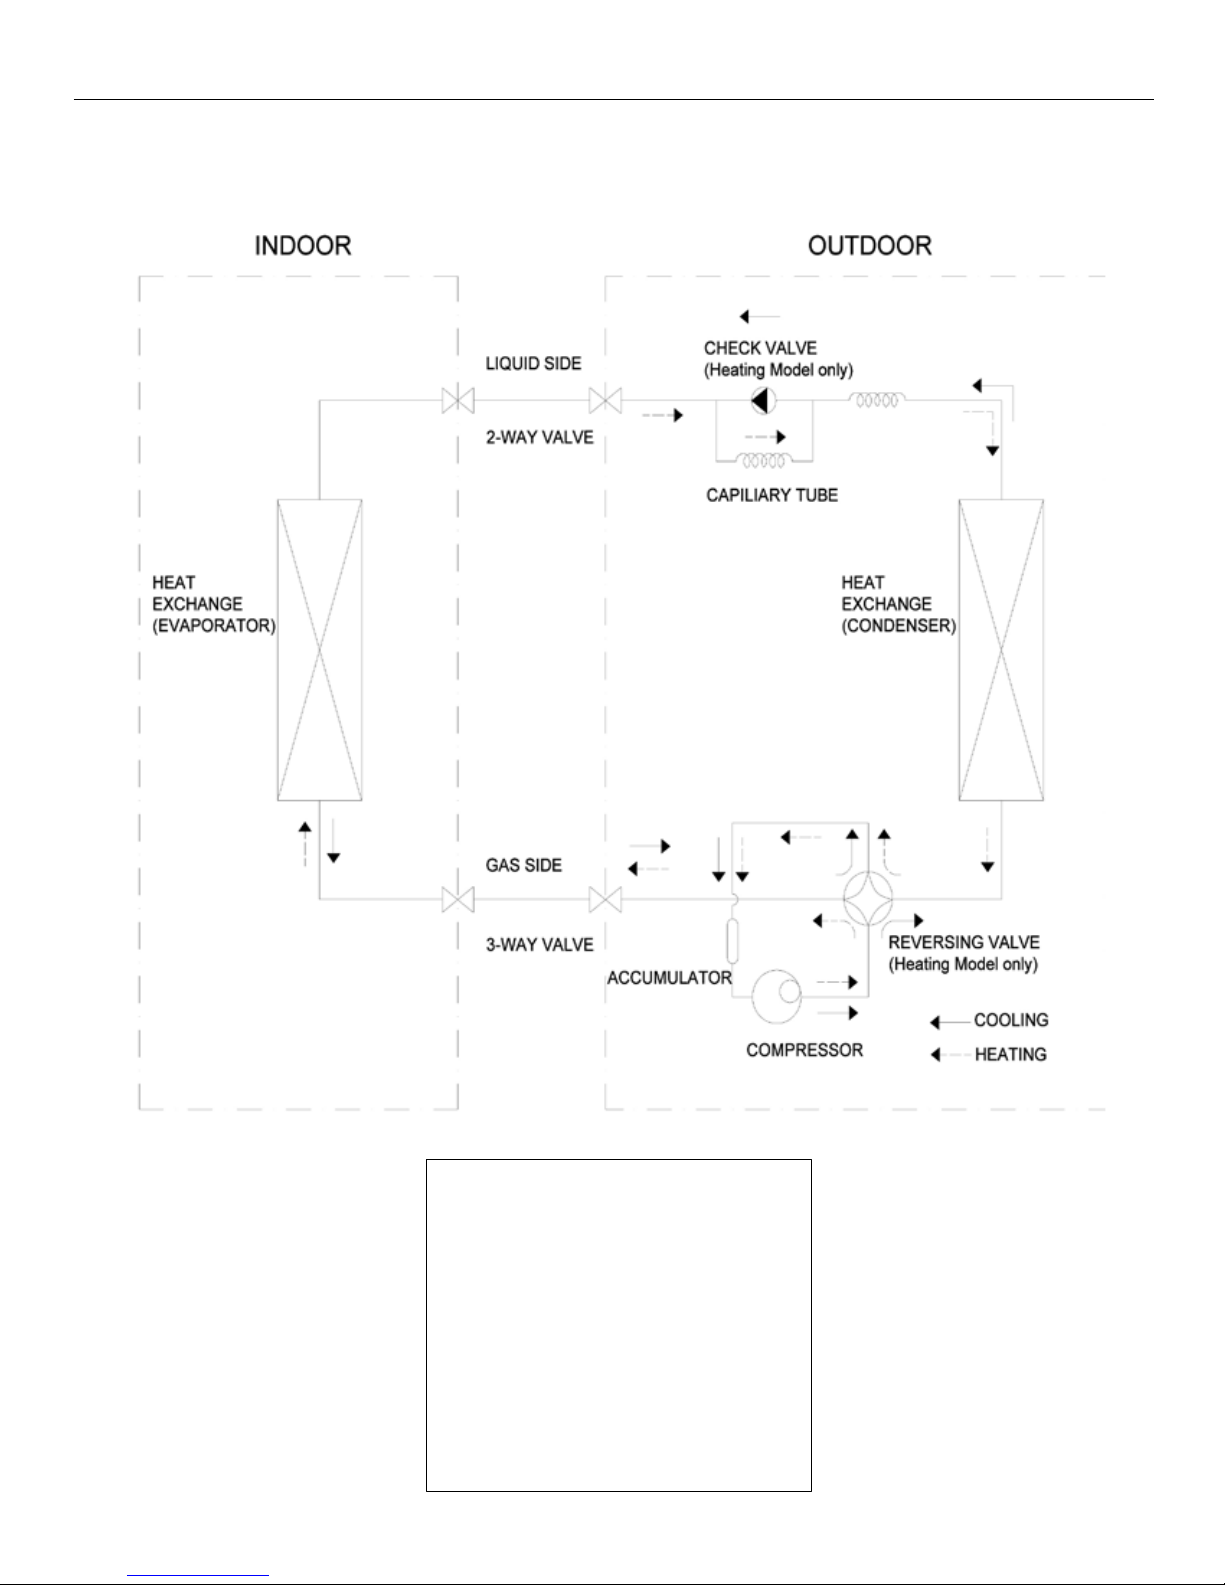
4.2 Heat Pump Models (DVH):
LIQUID SIDE
2-WAY VALVE
HEAT
EXCHANGE
(EVAPORATOR)
CHECK VALVE
(Heating Model only)
CAPILIARY TUBE
GAS SIDE
HEAT
EXCHANGE
(CONDENSER)
3-WAY VALVE
ACCUMULATOR
COMPRESSOR
ATTENTION:
Units can be pumped down for service
and recharged.
• A servicer can pump down the
refrigerant into the outdoor unit for
the indoor unit.
• Also the entire system can be
replacement of the outdoor unit.
12
REVERSING VALVE
(Heating Model only)
COOLING
HEATING
Page 13
Heat Controller DVC/DVH Inverter Mini-Split
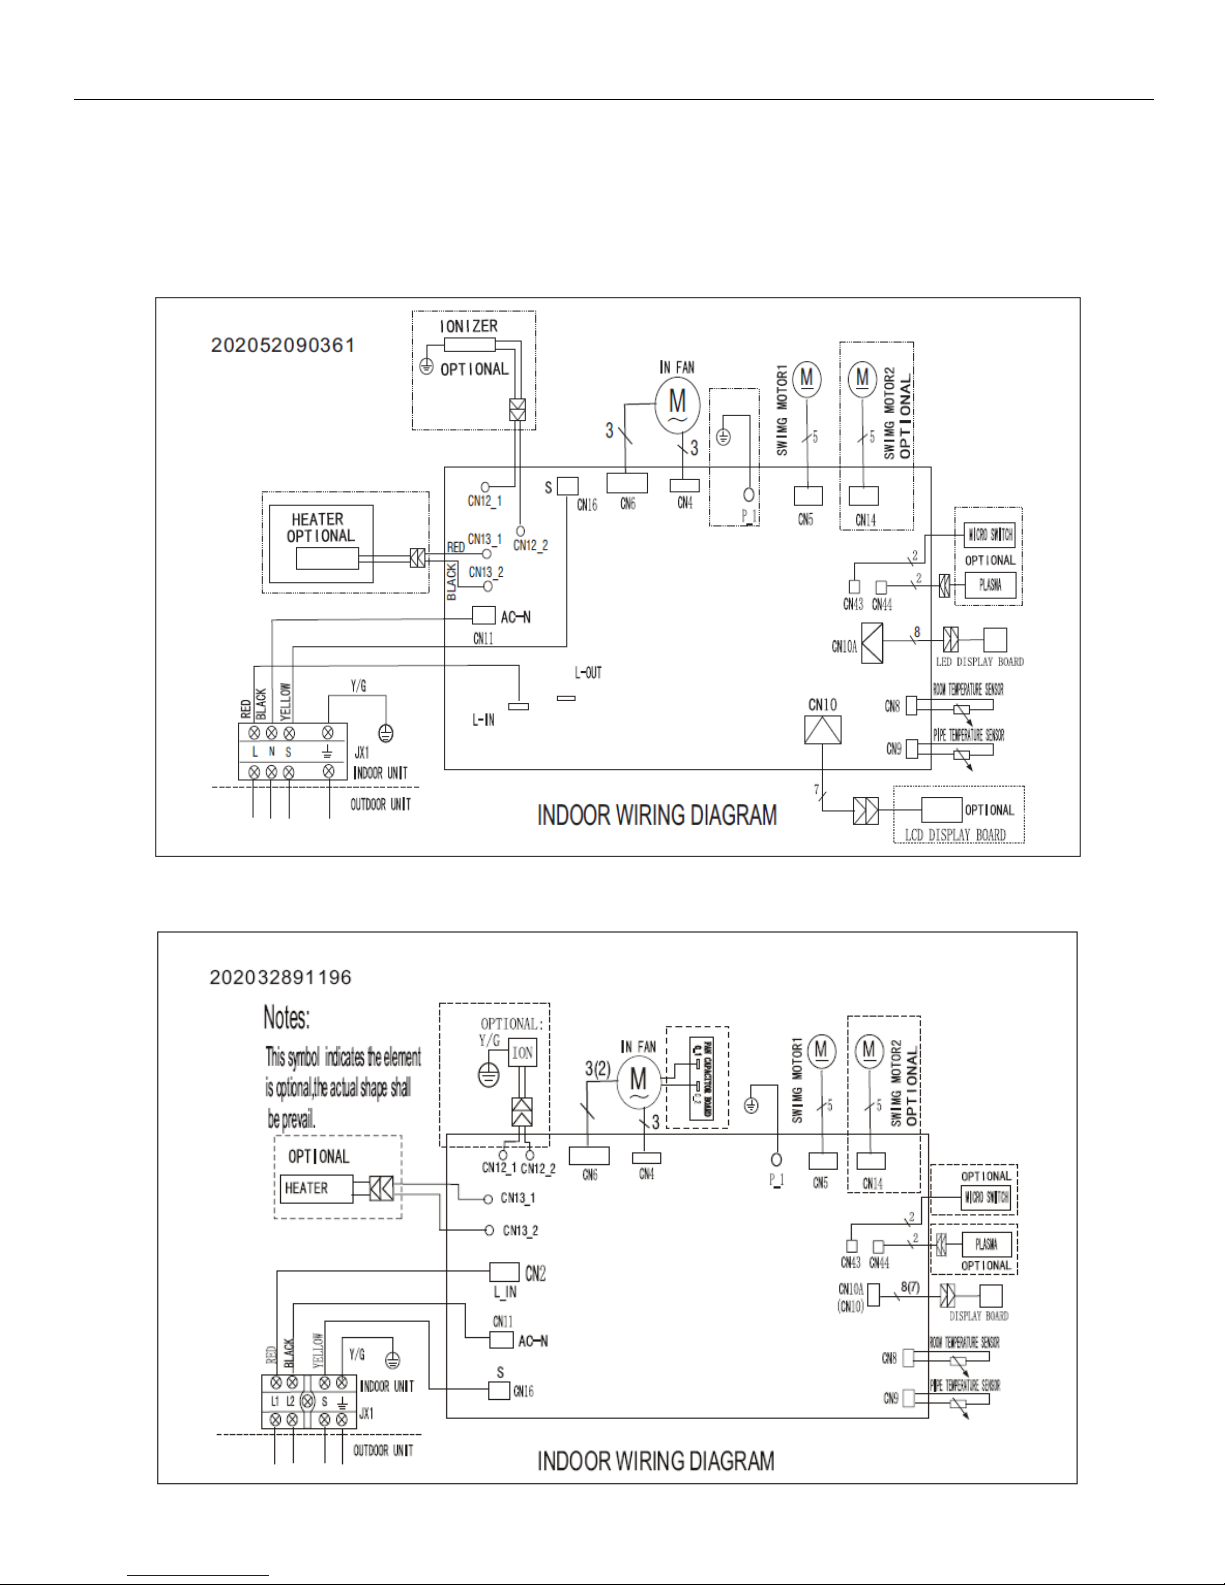
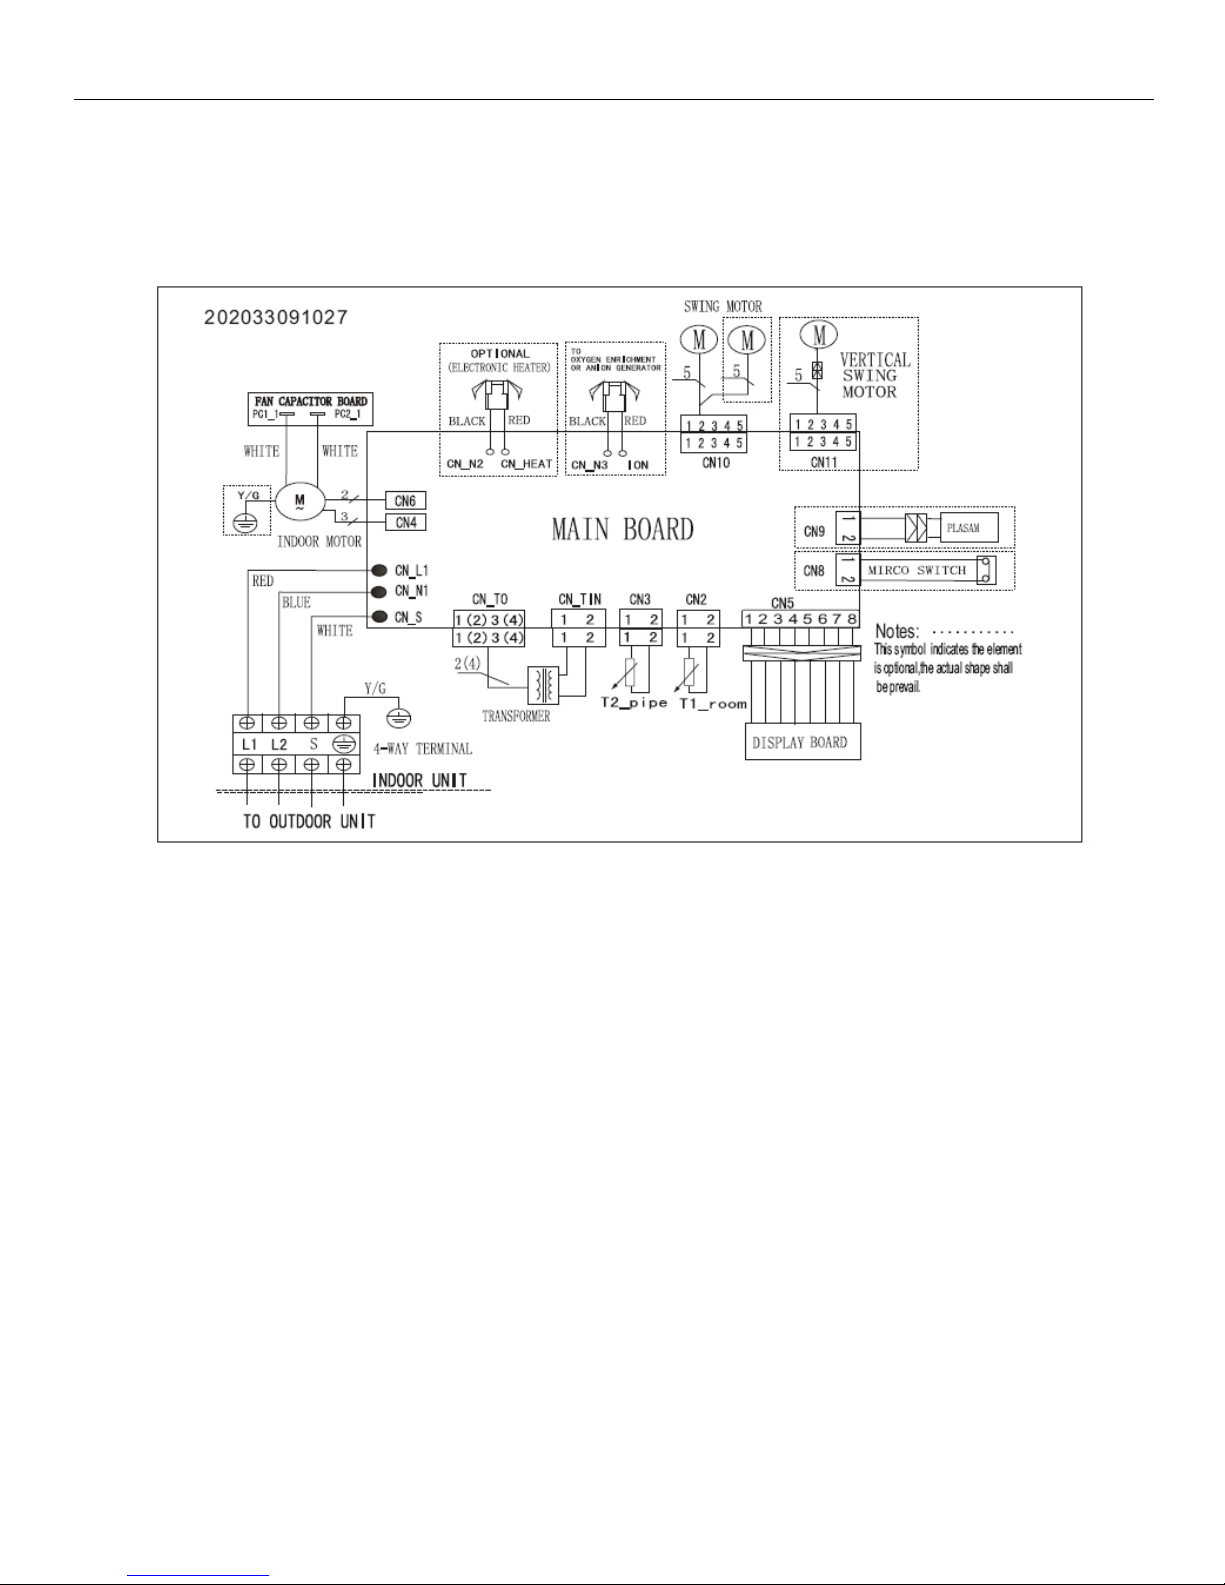
5.0 Wiring Diagrams:
5.1 Indoor Units:
B-DVC09SD-0, B-DVH09SC-0, B-DVH12SD-0, B-DVH12SD-0
B-DVC18SD-1, B-DVH18SD-1
13
Page 14
DVC/DVH Inverter Mini-Split Heat Controller
B-DVC24SD-1, B-DVH24SD-1
14
Page 15
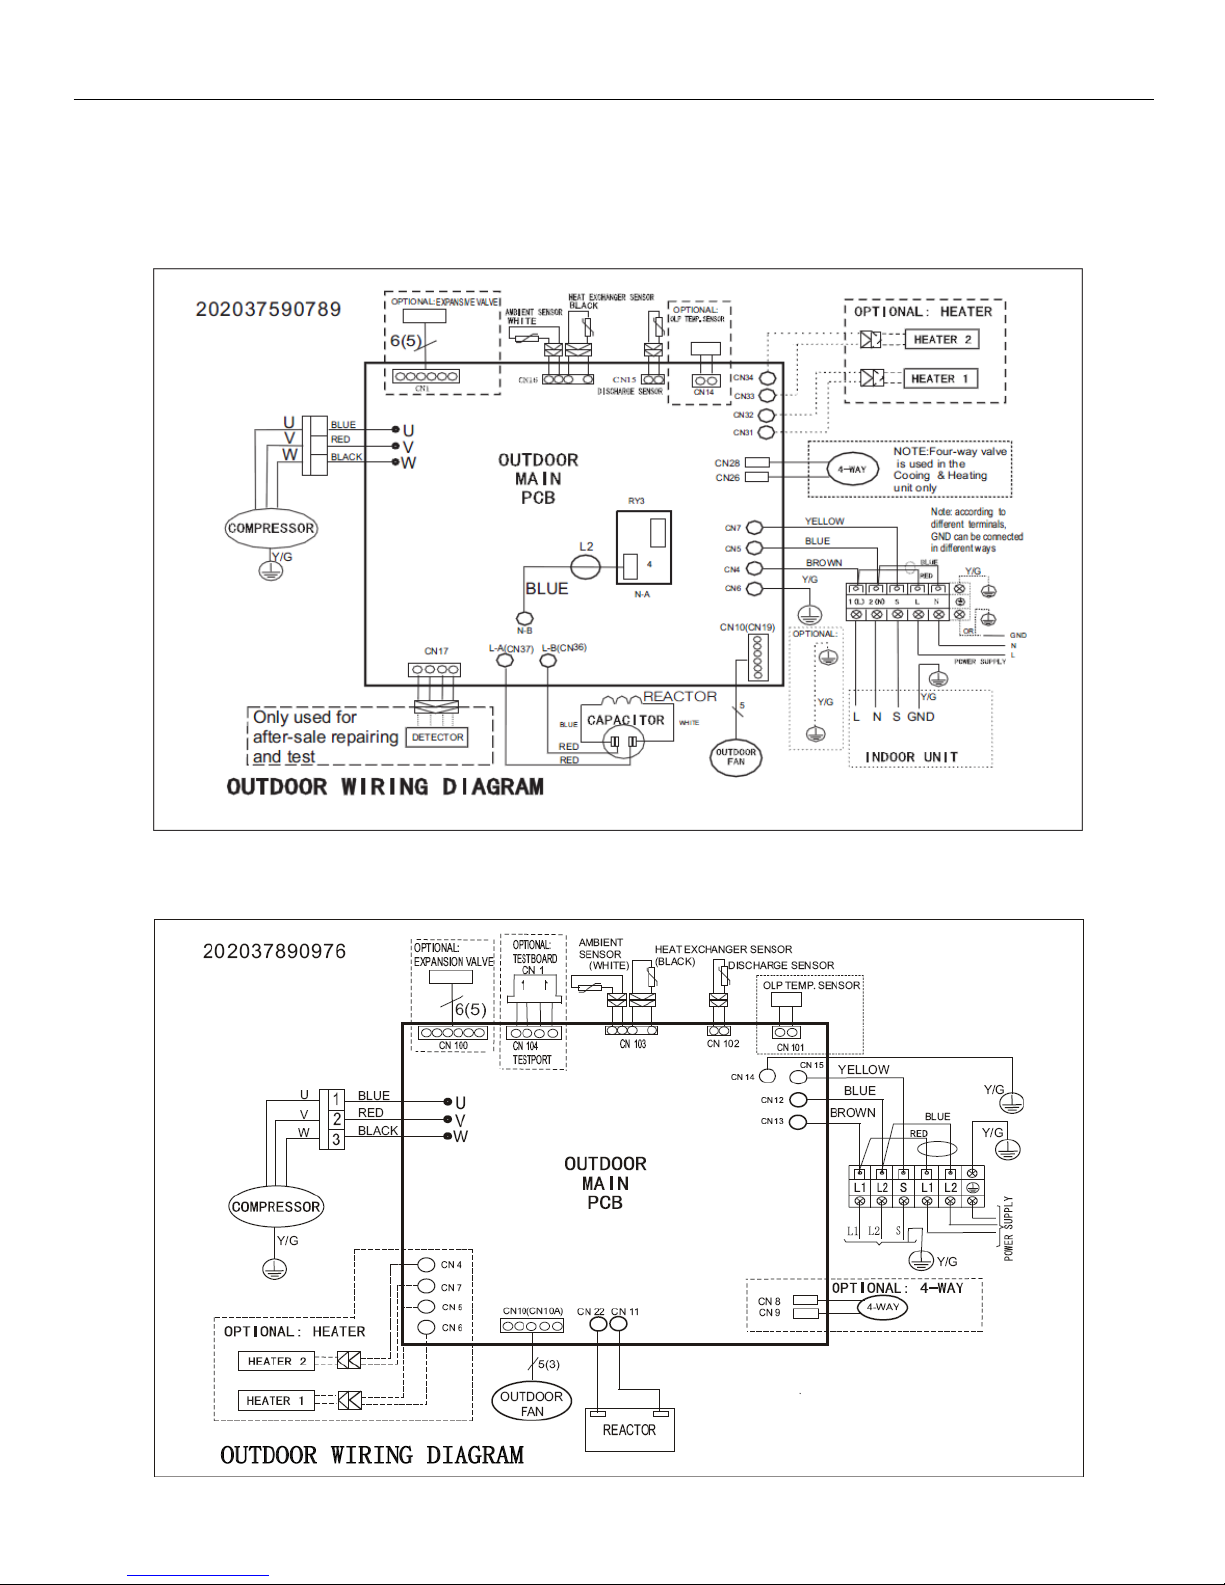
Heat Controller DVC/DVH Inverter Mini-Split
5.2 Outdoor Units
A-DVC09SD-0, A-DVH09SD-0, A-DVC12SD-0, A-DVH12SD-0
A-DVC18SD-1, A-DVH18SD-1
15
Page 16
DVC/DVH Inverter Mini-Split Heat Controller
6 Installation Details
6.1 Electrical
All electrical wiring must be done according to
local codes. Additionally installations in the
USA, must conform to the current National
Electric Code (NEC) and Installations in
Canada must conform to current Canadian
Electric Code (CEC).
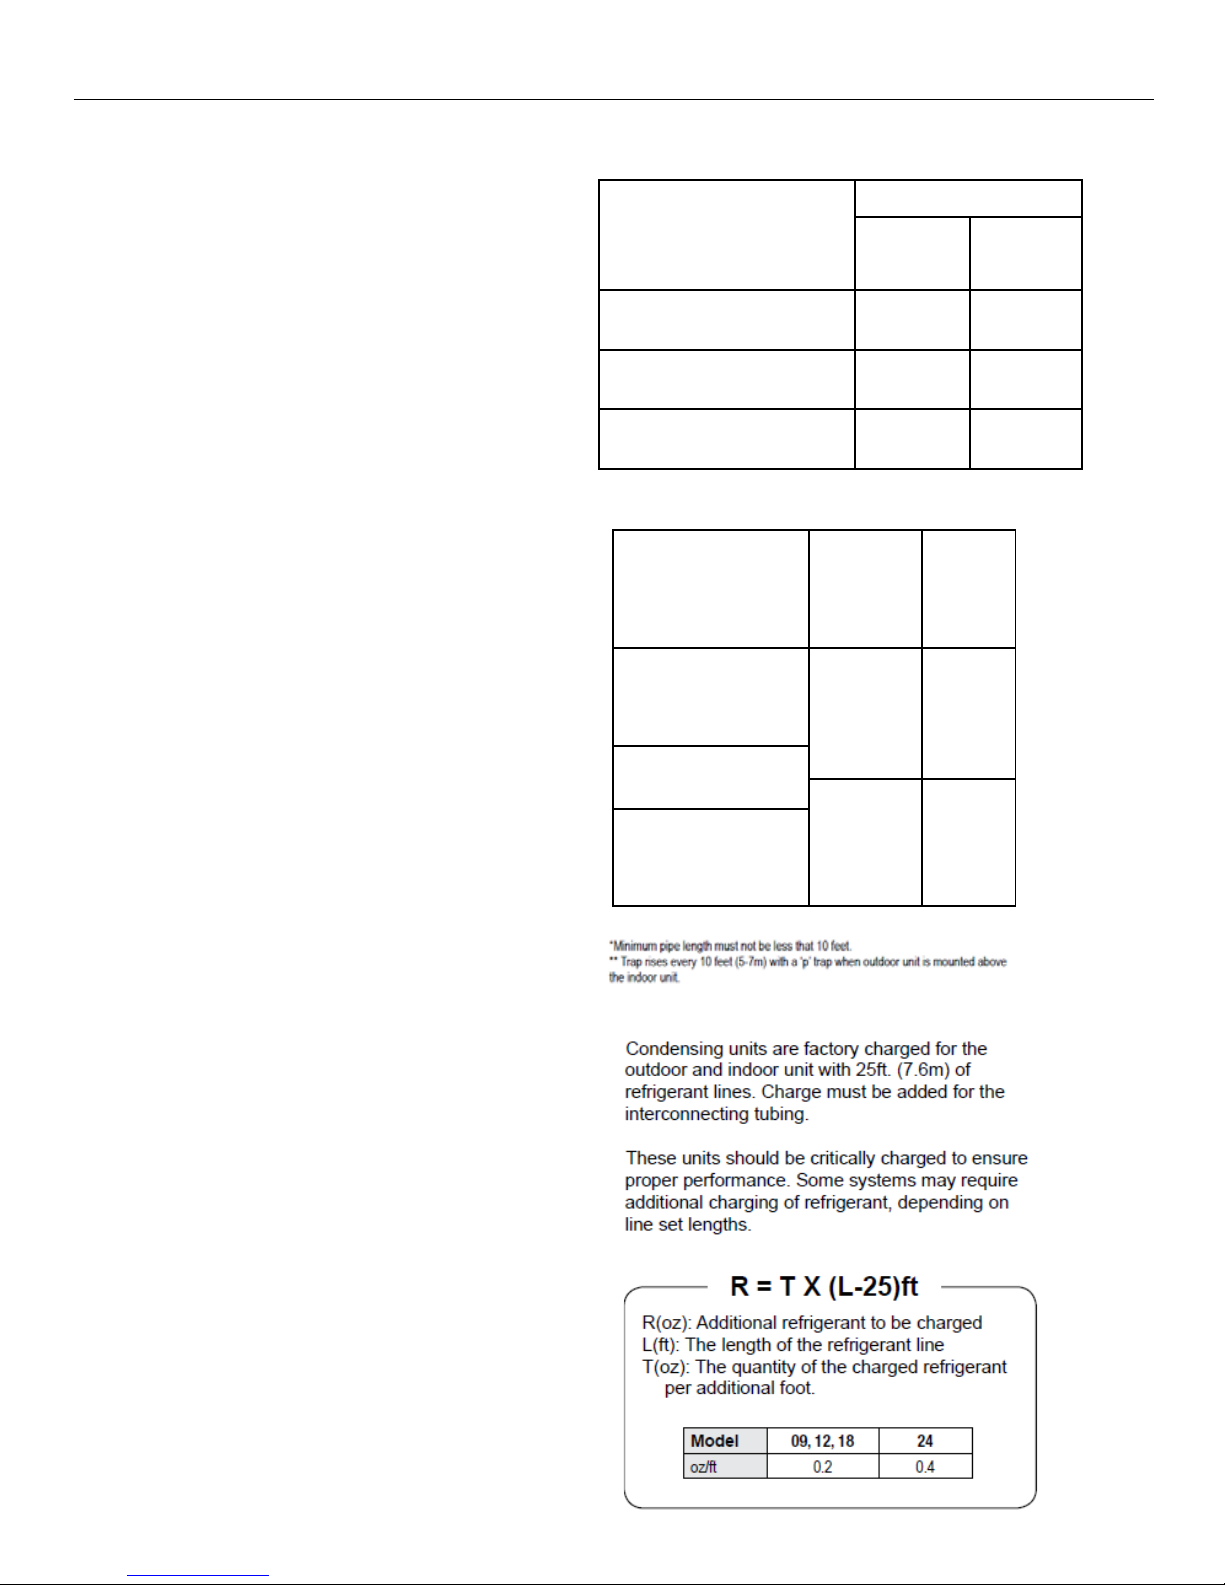
6.2 Line Set Connection Sizes
Connection Size
Models
DVC09SD-0 / DVH09SD-0
DVC12SD-0 / DVH12SD-0
DVC18SD-1 / DVH18SD-1
DVC24SD-1 / DVH24SD-1
Gas Liquid
3/8in
(9.52mm)
1/2in
(12.7mm)
5/8in
(15.9mm)
1/4in
(6.35mm)
1/4in
(6.35mm)
3/8in
(9.52mm)
Nameplate data indicates the operating voltage,
phase, ampacity, maximum over current
6.3 Line Set Lengths and Elevations
protection, and minimum voltage.
The contractor is to provide an individual
branch circuit for over current protection for the
Models
Max.
Elevation
Max.
Length
unit as required by code. Some codes may
require a disconnect between the indoor and
outdoor unit. Run power supply wiring through
a weatherproof disconnect box and conduit to
the unit connection. Disconnects are required
to be within sight and easy reach of the unit
(usually within 3 feet).
DVC/DVH09SD-0
DVC/DVH12SD-0
DVC/DVH18SD-1
DVC/DVH24SD-1
26ft (8m)
33ft (10m)
66ft
(20m)
82ft
(25m)
Circuit breakers and disconnect switches
should be properly sized based on the required
codes and the unit’s nameplate requirements.
Check the unit wiring diagram for the number of
6.4 Field Charging:
conductors required. Ensure that the proper
AWG (gauge) and type of wired is used to
comply with code and the unit’s nameplate.
Route neatly and protect from sharp edges and
damage. Inadequate wiring and/or improper
electrical supply will likely result in failure of the
compressor and other electrical components
and voids the warranty.
16
Page 17

Heat Controller DVC/DVH Inverter Mini-Split
7. Operating Conditions
Indoor (Room)
Temperature
Cool Mode Heat Mode Dry Mode
≥62°F(17°C) ≤86°F(30°C)
>50°F(10°C)
Outdoor (Ambient)
Temperature
5°F - 122°F
(-15°C - 50°C)
5°F - 86°F
(-15°C - 30°C)
32°F - 122°F
(0°C - 50°C)
CAUTION:
1. If the unit is used outside of the above conditions, certain safety protection features may come into
operation and cause the unit to operate abnormally.
2. If the room relative humidity is greater than 80%, the surface of the indoor unit may attract
condensation. To lessen the chance for condensate dripping, set the vertical air flow louver to its maximum
angle (vertically to the floor) and set the fan mode to HIGH.
17
Page 18

DVC/DVH Inverter Mini-Split Heat Controller
8. Electronic Display Functions
8.3 Main Protection
8.1 Abbreviations
T1: Indoor room temperature
T2: Coil temperature of evaporator
T3: Coil temperature of condenser
T4: Outdoor ambient temperature
T5: Compressor discharge temperature
Ts: Temperature Set Point
8.2 Display functions
8.2.1 Icon Identification on indoor display board.
This indicator illuminates when the
Defrost
Run
Timer
Signal
Receiver
air conditioner starts defrosting
automatically or when the warm air
control feature is activated in
heating mode
Flashes when the unit is in standby.
Illuminates a solid light when the
unit is on
This indicator illuminates when
TIMER is set ON/OFF.
Temperature indicator
Displays the temperature settings
when the unit is operational, also
displays any error codes for
diagnosis and troubleshooting.
Receives the signal from the remote
control.
.
8.3.1 Compressor Three Minute Time Delay
st
There is a 1 minute delay the 1
started-up, then a 3 minute delay each time the
unit is started up after the 1
8.3.2 Compressor Top Temperature
Protection
The unit will stop working when the top of the
compressor temperature is reached, and will
restart after the compressor top temperature
protector restarts.
8.3.3 Compressor Discharge Temperature
Protection
When the compressor discharge temperature is
getting high, the frequency of the compressor
will be limited as stated below:
When the compressor discharge temperature
T5>239°F(115°C) for 5s, the compressor will
stop. However, when the temperature is
between 226.4°F (108°C)<T5<239°F (115°C),
the compressor frequency will decrease to the
lowest level every 3 minutes. Then when the
temperature is 194°F (90°C) <T5<221°F
(105°C), the compressor will keep running at
the current frequency. When T5<194°F
(90°C), there will be no limit on the compressor
frequency.
8.3.4 Out of Control Fan Speed
18
When Indoor Fan Speed runs at 300RPM or
lower, for a designated period of time, the unit
will stop running and the appropriate error code
will show on the display.
8.3.5 Inverter Module Protection
The Inverter module has protection features
regarding current, voltage and temperature. If
these any of these are abnormal, the
corresponding error code will display on indoor
unit and the unit will stop working.
8.3.6 Indoor fan delayed open function
When the unit starts up, the louver will be active
immediately, but the indoor fan will not start for
10s. If the unit is in heating mode, the indoor
fan will be also controlled by anti-cold wind
function to eliminate cold blow.
time the unit is
st
time.
Page 19

Heat Controller DVC/DVH Inverter Mini-Split
8.3.7 Compressor Crankcase Heater
If the outdoor ambient temperature T4<38°F
(3°C) and the unit connects to a new power
supply or if the compressor has stopped for
over 3 hours, the crankcase heater will turn on.
When T4>41°F (5°C) or the compressor starts
running, the crankcase heater will turn off.
8.3.8 Zero Crossing Detection Error
If the unit detects a time interval is not correct
for a continuous 240s, the unit will stop and the
LED will display the appropriate error code. The
correct zero crossing signal time interval should
be between 6-13ms.
8.4.2.9 Condenser temperature protection
131°F (55°C) <T3<140°F (60°C), the
compressor frequency will decrease until it
reaches level F1 and will continue to run at this
level. When T3<129°F (54°C), the compressor
will keep running at the current frequency.
However, if T3<126°F (52°C), the compressor
will not limit the frequency and resume to the
former frequency based on demand. But, if
T3>140°F (60°C) for 5 seconds, the
compressor will stop until T3<126°F (52°C).
8.4.2.10 Evaporator temperature protection
When T2<32°F(0°C), the compressor will stop
and will restart when T2
≥41°F(5°C). At
32°F(0°C) ≤T2≤39°F(4°C), the compressor
frequency will be limited and decreased to the
lower level. However when the temperature is
39°F(4°C)≤T2≤45°F(7°C)≤, the compressor will
keep the current frequency. At T2>45°F(7°C)≤,
the compressor frequency will not be limited.
9.0 Operation Modes and Functions
9.1 Fan Only Mode
In Fan only mode, the outdoor fan and
compressor stop running. The temperature
setting function is disabled and no setting
temperature is displayed on the indoor unit.
The Indoor fan can be set to high/med/low/auto
in fan only mode. The louver will operate the
same as it does in cooling mode. When the
fan only mode is placed in Auto Mode, it
operates as shown below:
°F (°C)
81.5 (27.5)
27.5
High
27
80.6 (27)
77.9 (25.5)
25.5
7.7 (25)
25
Medium
Low
9.2 Cooling Mode
9.2.1 Compressor Operation-Cooling Mode
The maximum operating frequency (Fmax),
follows the chart below based on the outdoor
ambient temperature T4
°F (°C)
113 (45)
109.4 (43)
104 (40)
118.4 (38)
88.7 (31.5)
85.1 (29.5)
71.6 (22)
68 (20)
19
45
43
40
38
31.5
29.5
22
20
Fmax=F4
Fmax=F7
Fmax=F8
Fmax=F6
Fmax=F3
Page 20

DVC/DVH Inverter Mini-Split Heat Controller
However, if the unit is turned on using the
remote control, the compressor will run at the
Fmax frequency for 7 minutes according to the
outdoor ambient temperature T4. But after 7
minutes, the operation will take into account the
difference (ΔT) in indoor room temperature (T1)
and the Set Point Temperature (Ts) and the
compressor frequency will operate as follows:
ΔT =T1-Ts
X ΔT°
3.5
3.0
2.5
2.0
1.5
1.0
0.5
A
B
C
D
E
F
Additionally, the compressor running frequency
is always limited by the current. Therefore, the
running currents also must be taken into
account. I3COOL, I2COOL, and I1COOL
refer to different running current values in the
table below.
I
I3COOL
I2COOL
I1COOL
Decrease
Off
Hold
Resume
-0.5
-1.0
G
H
The zones (A,B,C...H) shown on the chart
above correspond to the various compressor
running frequencies as a result (ΔT) of the
difference between T1-Ts. When the
temperature differential (ΔT) of T1-Ts remains
in the same zone for 3 minutes, the compressor
will run as follows:
In zones A thru E the ΔT is between 3.5 and 1
Degree, the compressor will continue to
increase the frequency until it reaches its
highest level where Fmax=F8.
In zone F, the compressor continues to run at
its current frequency when the temperature
differential (ΔT) is between 0.5 and 1 degree.
Once the temperature differential (ΔT) falls
below 0.5 degrees, the compressor’s frequency
will decrease unit it reaches the lowest level
where Fmax=F1.
In zone H, where the ΔT is -1 degree or less,
the compressor will run at the lowest frequency
where Fmax=F1 for 1hour.
However, when the temperature differential (ΔT)
is less than -2 degrees, the compressor will
stop.
Indoor units I1COOL
(Amps)
B-DVC09SD-0
B-DVH09SD-0
B-DVC12SD-0 13.0 14.0 15.0
B-DVH12SD-0 13.0 14.0 15.0
B-DVC18SD-1 10.0 11 .0 13.0
B-DVH18SD-1 10.5 11 .5 13.0
B-DVC24SD-1 12.0 13.0 14.0
B-DVH24SD-1 12.0 13.0 14.0
13.0 14.0 15.0
13.0 14.0 15.0
I2COOL
(Amps)
I3COOL
(Amps)
If the running current is too high (above
I3COOL) in the “Off” zone of the chart above,
the compressor will stop. Between I3COOL
and I2COOL, in the “Decrease” zone the
compressor will lower the frequency to the
lowest level. The “Hold” zone allows the
compressor to continue to run at the current
frequency. Note: When the unit is in “hold”
zone for 3 minutes, the compressor frequency
will rise to the next highest level. This rise in
frequency can occur twice at most while in this
zone. The “Resume” zone places no limitation
on the frequency.
20
Page 21

Heat Controller DVC/DVH Inverter Mini-Split
9.2.2 Outdoor Fan Operation - Cooling Mode
9.3 HEATING MODE
The outdoor fan operates based on the Outdoor
Ambient Temperature (T4):
9.3.1 Compressor Operation-Heating Mode
The maximum operating frequency (Fmax),
T4
°F (°C)
follows the chart below based on the outdoor
ambient temperature T4:
22
72 (22)
20
68 (20)
High
Low
When the outdoor ambient temperature T4 is
above 78°F(22°C), the outdoor fan runs high
speed, however when the temperature is below
this, the fan speed decreases to low and
continues to run at low speed when the
temperature is 68°F(20°C) or below.
9.4.2.3 Indoor Fan Operation-Cooling Mode
In cooling mode, indoor fan runs all the time
and the speed can be set to high, medium, low
or auto. When the fan is placed in auto mode,
while the unit is in cooling mode, the auto fan
operation takes into account the difference (ΔT)
in indoor room temperature (T1) and the set
point temperature (Ts):
ΔT =T1-Ts
ΔT°
4
3
1.5
1
High
Medium
Low
When there is a 3 to 4 degree difference (ΔT) in
set and room temperatures, the fan runs high
speed. When the difference in temperature
(ΔT) is between 1 and 3 degrees, the fan speed
is medium. However, as the room temperature
begins to get closer to the set temp, within 1
degree or less temperature differential (ΔT), the
fan speed will run on low.
T4
°F (°C)
93 (34)
34
92 (33)
33
83 (28)
28
81 (27)
27
71 (25)
25
75 (24)
24
72 (22)
22
70 (21)
21
66 (19)
19
18
65 (18)
63 (17)
17
61 (16)
16
59 (15)
15
57 (14)
14
54 (12)
12
52 (11)
11
43 (6)
6
41 (5)
5
Off
Fmax=F2
Fmax=F3
Fmax=F4
Fmax=F5
Fmax=F6
Fmax=F7
Fmax=F8
Fmax=F9
Fmax=F10
21
Page 22

DVC/DVH Inverter Mini-Split Heat Controller
However, if the unit is turned on using the
remote control, the compressor will run at the
Fmax frequency for 7 minutes according to the
outdoor ambient temperature T4. But after 7
minutes, the operation will take into account the
difference (ΔT) in indoor room temperature (T1)
Additionally, the compressor running frequency
is always limited by the current. Therefore, the
running currents also must be taken into
account. I3HEAT, I2HEAT, and I1HEAT refer to
various running current values, see chart.
I
and the Set Point Temperature (Ts) and the
compressor frequency will operate as follows:
ΔT =T1-Ts
ΔT°
+5.0
+4.5
+3.5
H
H
G
I3HEAT
Decrease
I2HEAT
I1HEAT
Off
Hold
+3.0
+2.5
+2.0
+1.5
+1.0
+0.5
F
E
D
C
B
A
The zones (A,B,C...H) shown on the chart
above correspond to the various compressor
running frequencies as a result (ΔT) of the
difference between T1-Ts. When the
temperature differential (ΔT) of T1-Ts remains
in the same zone for 3 minutes, the compressor
will run as follows:
When the ΔT is between 0.5 and 2.5 Degrees,
in zones A thru E, the compressor frequency
will increase until it reaches the highest level
Fmax=F10.
In zone F, where the ΔT is 3 Degrees, the
compressor will continue to run at the current
frequency.
Once the ΔT is between 3.5 and 5 degrees in
zone G, the compressor will decrease the
frequency to its lowest level where Fmax=F1.
When ΔT is above 5 Degrees in the H zone, the
compressor will continue to run at Fmax=F1 for
1hour.
When ΔT is greater and 6 degrees, the
compressor will stop.
Resume
I1HEAT
Indoor Unit
(Amps)
B-DVC09SD-0 6.5 7.5 8.5
B-DVH09SD-0 14.0 15.0 16.0
B-DVC12SD-0 6.0 7.0 8.0
B-DVH12SD-0 14.0 15.0 16.0
B-DVC18SD-1 9.0 10.0 11. 0
B-DVH18SD-1
B-DVC24SD-1
B-DVH24SD-1
10.5 11 .5 13.0
11. 0 12.0 13.0
12.0 13.0 14.0
I2HEAT
(Amps)
I3HEAT
(Amps)
If the running current is too high (above I3HEAT)
in the “Off” zone of the chart above, the
compressor will stop. Between I3HEAT and
I2HEAT, in the Decrease zone, the compressor
will lower the frequency to the lowest level.
The “Hold” zone allows the compressor to
continue to run at the current frequency. Note:
When the unit is in “hold” zone for 3 minutes,
the compressor frequency will rise to the next
highest level. This rise in frequency can occur
twice at most while in this zone. The “Resume”
zone places no limitation on the frequency.
22
Page 23

Heat Controller DVC/DVH Inverter Mini-Split
9.3.2 Outdoor Fan Operation-Heating Mode
The outdoor fan operates based on the Outdoor
Ambient Temperature (T4):
T4
°F (°C)
forced to run for 127seconds in breeze
mode. During this period, the
anti-cold-wind is disabled.
• If the unit runs in forced operation mode,
the indoor fan will run with rating speed
and the anti-cold-wind function is
disabled.
9.3.3.1 Auto Fan Operation-Heating Mode
17
63 (17)
Low
When the fan is placed in auto mode, while the
15
59 (15)
High
unit is in cooling mode, the auto fan operation
takes into account the difference (ΔT) in indoor
room temperature (T1) and the set point
temperature (Ts):
When the outdoor ambient temperature T4 is
above 63°F(17°C), the outdoor fan runs low
speed, however when the temperature is below
ΔT =T1-Ts
ΔT°
Low
2.5
this, the fan speed increases to high and
continues to run at high speed when the
temperature is 63°F(17°C) or below.
9.3.3 Indoor Fan Operation-Heating Mode
The indoor fan runs based on the evaporator
2
Medium
1.5
1
High
coil temperature (T2) as follows:
T2°
T2
TEL8
TEL7
TEL6
TEL5
TEL4
TEL3
TEL2
TEL1
TEL0
TEL0 TEL1 TEL2 TEL3 TEL4 TEL 5 TEL6 TEL7 TEL8
Setting
Breeze
Off
Medium
Low
Super
Breeze
The indoor fan will run at low speed when the
ΔT is greater than 2.5Degrees, medium speed
when the ΔT is between 2.5 and 1.5 degrees,
and high speed between 1.5 and 1 degrees or
less.
9.4 Defrost Mode
9.4.1 Defrosting Conditions:
When T4>32°F(0°C), if the following two items
are satisfied, the units start defrosting:
1. T3<38°F(3°C) for 40 minutes and T3
remains lower than 21°F(-6°C) for more
than 3 minutes.
2. T3<38°F(3°C) for 80 minutes and T3
remains lower than 25°F(-4°C) for more
than 3 minutes.
75°F
(24°C)
83°F
(28°C)
90°F
(32°C)
95°F
(35°C)
97°F
(36°C)
102°F
(39°C)
111° F
(44°C)
When T4<32°F(0°C), both the first and second
conditions are satisfied, then the program will
determine if T2 has decreased more than
Notes:
• If the compressor stops due to the room
temperature rising, the indoor fan will be
41°F(5°C) or not. When T2 has decreased
more than 41°F(5°C), the unit enter the defrost
mode.
23
Page 24

DVC/DVH Inverter Mini-Split Heat Controller
However, no matter what value T4 is, if the unit
runs with T3<38°F(3°C) for more than 120
minutes and T3 remains lower than 29°F(-2°C)
for more than 3 minutes, the unit will enter
defrosting mode whether or not T2 drops more
than 41°F(5°C) or not.
9.4.2 Ending Defrosting Operation:
If any one of the following items is satisfied, the
defrost operation will end and the unit will return
to normal heating mode.
• T3 rises to be higher than TCDE1.
• T3 remains higher than TCDE2 for 80
DVC/DVH 18K, 24K:
Compressor
4-way valve
Outdoor fan
Indoor fan
on
off
on
off
on
off
on
off
Frequency F2
Frequency
F8
seconds.
• The unit has run in defrosting mode for
10 minutes.
Indoor fan breeze(10s)
10s
xx
10s
Indoor units TCDE1 TCDE2
no longer than 10m
30s
B-DVC/DVH 09, 12 54°F(12°C)
B-DVC/DVH 18, 24
59°F(15°C)
9.4.3 Defrosting Process:
DVC/DVH 9K,12K:
Frequency
Compressor
4-way valve
Outdoor fan
Indoor fan
Indoor fan breeze(10s)
on
off
on
off
on
off
on
off
10s
xx
Where xx= 60seconds.
47°F(8°C)
F2
FrequencyF8
10s
no longer than 10m
30s
Where xx=60seconds for 18K model
Where xx=90seconds for 24K model
9.5 Evaporator Coil Temp. Protection
When T2>140°F(60°C), the compressor will
turn off, but will restart when T2<119°F(48°C).
When T2>128°F(53°C), the compressor
frequency will decrease to a lower level and
runs at this level for 20seconds to protect the
unit. When the frequency decreases to
Fmax= F2 and T2>128°F(53°C) for 3 minutes,
the compressor will turn off. However, when the
coil temperature lowers to T2<119°F (48°C) or
T2 remains at 119°F(48°C) for 6 minutes, the
frequency will not be limited by the evaporator
coil temperature (T2).
9.6 Auto-Mode
This mode can be selected using the remote
control. The set temperature (Ts ) can be
changed between 63-86°F (17-30°C).
In auto mode, the machine will choose the
mode according to ΔT, where ΔT =T1-Ts :
ΔT=T1-Ts Auto Mode Function:
ΔT>1°
-1°<ΔT≤1° Fan-only
ΔT≤-1°
Cooling
Heating
24
Page 25

Heat Controller DVC/DVH Inverter Mini-Split
Indoor fan will run in auto fan mode and the
louver will operate based on the mode selected
automatically (Heat, Cool, Fan-Only).
Notes:
frequency and Outdoor fan are all limited in the
same method that they would be in the cooling
mode.
9.8 Forced Operation
• If the unit switches between heating
and cooling modes automatically, the
compressor will stop for 15 minutes and
re-select the mode according to the ΔT
conditions.
• If the setting temperature is modified,
the machine will choose running
function again based on ΔT.
Note: See Forced Operation information in the
Installation instructions.
When the unit is off, pressing the AUTO/COOL
button on the indoor unit, under the main cover
panel, will force the unit into auto mode. If the
AUTO/COOL button is pressed again within 5
seconds of the first time it was pushed, the
machine will go into forced cooling mode.
9.7 Dry mode
9.7.1 Dry Model Fan Speed and Louver
Function
Indoor fan speed is fixed at breeze speed and
can’t be changed. The louver angle will operate
the same as it does in cooling mode.
9.7.2 Compressor Operation in Dry Mode
Pressing the AUTO/COOL button again, any
time after 5 seconds of the first time it was
pushed, will turn off the unit. In forced
operation mode, all general protections and
remote control are available.
9.8.1 Operation rules:
Forced cooling mode:
The compressor will run at Fmax=F2 frequency
ΔT =T1-Ts
ΔT°
2.5
F3
2.0
and indoor fan runs in breeze mode. After
running for 30 minutes this way, the unit will
then run in auto mode with 75°F(24°C) set
temperature (Ts). Note: See Auto-Mode
section of this manual for more information.
1.5
1.0
F2
9.9 Timer function
9.9.1 Timer Range
0.5
0.0
F1
F1
In Dry mode, the compressor’s frequency will
decrease from F3 to F1, as the temperature
difference (ΔT) between indoor room
temperature (T1) and the Set point temperature
(Ts) decreases from 2.5 to 0 Degrees.
9.7.3 Low Room Temperature Protection
In dry mode, if room temperature is lower than
50°F(10°C), the compressor will stop and will
not resume operation until room temperature
exceeds 54°F(12°C).
9.7.4 Additional Protections in this Mode:
Evaporator anti-freezing, condenser high
temperature protection and Compressor
The timer range is 24 hours and is relevant time,
which means it is the time that has elapsed
from the time the timer is set.
9.9.2 Timer On
The unit will turn on automatically when the
Timer On set time is reached.
9.9.3 Timer Off
The unit will turn off automatically when the
timer off set time is reached.
9.9.4 Timer On/Off
The unit will turn on automatically when the
Timer On set time is reached and then the unit
will automatically turn off when the timer off set
time is reached.
9.9.5 Timer Off/On
The unit will turn off automatically when the
timer off set time is reached and then
25
Page 26

DVC/DVH Inverter Mini-Split Heat Controller
automatically turn on when the Timer On set
time is reached.
9.9.6 Mode within Timer Funtion
The timer function will not change the current
operation mode.
9.10 Sleep Mode
9.10.1 Sleep Mode Duration
Sleep mode operates for 7 hours when it is
activated. After 7 hours, the unit turns off.
9.10.2 Sleep Mode Operation
When sleep mode is activated while the unit is
in cooling mode, the set temperature rises 1°
every hour for 2 hours. After 2 hours, the set
temperature stops rising and indoor fan is fixed
at low speed.
When sleep mode is activated while the unit is
in heating mode, the set temperature
decreases 1°every hour for 2 hours. After 2
hours, the set temperature stops rising and
indoor fan is fixed at low speed (Anti-cold wind
function will still have the priority).
9.10.3 Timer Function in Sleep Mode
The Timer function is still available during sleep
mode. When the timer off is set for less than 7
hours while in sleep mode, the sleep mode will
stop once the set time off is reached.
However, if the timer off is set for more than 7
hours, the unit will not stop operating until
reaches the set time in sleep mode.
9.11 Auto-Restart Function
In case of a sudden power failure, the unit will
memorize the set conditions before the power
failure. When the power returns, the unit will
resume its previous operation settings (except
for the swing function) automatically after 3
minutes.
9.12 Automatic panel function
The panel will automatically move to the closing
direction at an angle of 50° when the unit is
receiving power, and this action is not affected
by any signal from remote control.
9.12.1 Panel Operation when Powering On
When the unit is turned on, the panel is opened
automatically at an angle of 50° and then the
horizontal louver will open.
9.12.2 Panel Operation when Powering Off
When the unit is turned off, the panel is closed
automatically at an angle of 50° and then the
horizontal louver will close.
9.12.3 Panel Interference
If the panel is being closed when the horizontal
louver is still moving, the unit will stop the
horizontal louver from moving and allow the
panel to move first. After this, the horizontal
louver will continue its pervious movement.
9.13 47°F(8°C) Heating
Note: This is an optional feature and may not
be present on your actual model.
In heating operation, the set temperature of the
unit can be set as low as 47°F(8°C) in order to
keep the room temperature above freezing
when the house is unoccupied for an extended
period of time in severe cold weather.
26
Page 27

Heat Controller DVC/DVH Inverter Mini-Split
strong current
10. Troubleshooting
10.1 Indoor Unit Error Codes
KEY: ☆ = Flashing Light X = Light is Off O= Solid Light is On
Operation Timer Display Error:
☆ 1 time
☆ 2 times
☆ 3 times
☆ 4 times
☆ 5 times
☆ 6 times
☆ 7 times
☆ 2 times
☆ 3 times
X E0 Indoor unit EEPROM parameter error
X E1
X E2
X E3 Indoor fan speed is out of control
X E4
X E5
X EC Refrigerant leakage detection error
O F1
O F2
Communication Error between indoor and outdoor
unit
Zero-crossing signal detection error
T1 Indoor room temperature sensor has an open
or short circuit
T2 Evaporator coil temperature sensor has an
open or short circuit
T4 Outdoor temperature sensor has an open or
short circuit
T3 Condenser coil temperature sensor has an
open or short circuit
☆ 4 times
☆ 5 times
☆ 1 times ☆
☆ 2 times ☆
☆ 3 times ☆
☆ 5 times
O F3
O F4 Outdoor unit EEPROM parameter error
☆
T5 Compressor discharge temperature sensor
has an open or short circuit
IPM malfunction or IGBT over-
P0
protection error
P1 Over voltage or over low voltage protection error
P2 High temperature protection of compressor top
P4 Inverter compressor drive error
27
Page 28

DVC/DVH Inverter Mini-Split Heat Controller
10.2 Outdoor Unit Errors and Trouble shooting
WARNING: Risk of Electrical Shock
Discharge the power in the capacitors on the board (if it contains electrolytic capacitors):
Electrolytic Capacitors
(HIGH VOLTAGE! CAUTION!)
Note: All images are for reference only, they may vary from your particular model.
A-DVC09SD-0, A-DVH09SD-0, A-DVC12SD-0, and A-DVH12SD-0
LED1 is Blue. Slow flash = Standby Mode. Fast flash = Error.
28
Page 29

Heat Controller DVC/DVH Inverter Mini-Split
A-DVC24SD-1, A-DVH24SD-1
LED1 is Blue. Slow flash = Standby Mode. Fast flash = Error.
29
Page 30

DVC/DVH Inverter Mini-Split Heat Controller
DVC18SD-1 and DVH18SD-1
This board contains four LED lights, shown above. (This image is for reference only).
• LED1 is Red and signals PCB Power by a solid light when the unit is operating or in standby
mode.
• LED2 is Yellow, which will flash slowly when the unit is in standby mode and remain solid
when the unit is in operation. If this light flashes fast, there is an error.
• LED3 is Red and LED4 is Green. These LEDs are both controlled by the compressor drive
chip. See the following chart for more information on how these lights correspond with the
indoor unit error codes.
30
Page 31

Heat Controller DVC/DVH Inverter Mini-Split
DVC18SD-1 and DVH18SD-1 LED3 and LED4 Error Codes:
KEY: ☆ = Flashing Light X = Light is Off O= Solid Light is On
No. Error
1 Standby (Normal Operation) O X N/A
2 Operating Normally X O N/A
3 IPM malfunction or IGBT over-strong current protection
4 Over voltage or too low voltage protection O O P1
5 Over voltage or too low voltage protection O
6 Inverter compressor drive error X
7 Inverter compressor drive error
8 Inverter compressor drive error
LED4
(Green)
☆
☆
☆ ☆
LED3
(Red)
X P0
☆
☆
O P4
Indoor Unit
Display
P1
P4
P4
31
Page 32

DVC/DVH Inverter Mini-Split Heat Controller
10.3 Diagnosis and Solution
10.3.1 EEPROM Parameter Error Diagnosis and Solution (E0/F4)
Error Code
Malfunction Main PCB chip is not receiving feedback from EEPROM chip
Possible Causes ● Installation error
E0/F4
(Indoor/Outdoor)
● Faulty PCB
Trouble shooting:
Shut off the power supply and
turn it on 5 seconds later. Is it
No
No further action.
still displaying the error code?
Yes
If the EEPROM chip
If the EERPROM chip
is welded on main
isweldedonmain
PCB, replace the
PCB,replacetheentire
main PCB directly.
mainPCB.Otherwise,
Otherwise, check
checkwhetherthe
whether the
EEPROM chip is prop-
EEPROM chip
erly plugged in main
plugged in main PCB
PCBwell?
No
Correct the connection.
well?
Yes
Replace the main PCB.
EEPROM: Has a read-only memory, whose contents can be erased and reprogrammed using a pulsed
voltage. For the location of EEPROM chip, please refer to the representative photos below.
Indoor PCB
Outdoor PCB
32
Page 33

Heat Controller DVC/DVH Inverter Mini-Split
10.3.2 Indoor / Outdoor Unit Communication Error Diagnosis and Solution (E1)
Error Code
Malfunction Indoor unit does not receive the feedback from outdoor unit during
Possible Causes ● Wiring error
Trouble shooting:
Power off, then turn on the unit 5 seconds
later(reconnect the power wire).Is the error
still displaying after several minutes?
Measure Vs, is it moving alternately
MeasureVs,*isitmovingalternately
with positive value?
withpositivevalue?(Vsisthevoltage
(Vs is the voltage between L2 and S
betweenL2andSofoutdoorunit.
of outdoor unit. Connect the red pin of
Connecttheredpinofmultimeterwith
multimeter with L2 port, black pin with
L2port,blackpinwithSport)*
S port)
E1
110 seconds and this condition happens four times continuously.
● Faulty Indoor/Outdoor PCB
No
Yes
Yes
No further action.
No
Yes
Check all the wiring with outdoor
units. Is the wiring to the outdoor
main PCB connect ed correctly? I s
the reactor connected well?
Yes
Measure the resistance of the
Measure the resistance of the reactor
reactor(The one without capacitor).
(theonewithoutcapacitor).Ifisiszero,
followthestepbelow.Ifnot,replace
If it is zero ,follow the below step. If
not, replace a new reactor.
withanewreactor.
Replace the outdoor main PCB.
Power on. Is the error extinguished?
Poweron.Istheerrorstilldisplaying?
Yes
No
Check all the wiring with indoor units.
Is the wiring to the indoor main PCB
connected correctly?
Yes
Replace the indoor main PCB.
Poweron.Istheerrorstilldisplaying?
Power on. Is the error extinguished?
No
Yes
Replace the indoor main PCB.
Note: See next page for measuring Vs and the resistance of the reactor.
*Note: See next page for masuring Vs and the resistance of the reactor.
Replace the outdoor main PCB.
33
Page 34

DVC/DVH Inverter Mini-Split Heat Controller
32
Remark:
Use a multimeter to test the DC
voltage between the L2 and S
terminals of the outdoor unit.
The red pin of the multimeter should
connect to L2 terminal while the black
pin is for the S terminal.
When the unit running normally, the
voltage will alternate between -50V to
50V.
If the outdoor unit has a malfunction,
the voltage will alternate with positive
voltage values.
If the indoor unit has malfunction, the
voltage will be a constant value.
Remark:
Use a multimeter to test the
resistance of the reactor (which does
not connect with the capacitor).
The normal value should be around
zero ohms. Otherwise, the reactor
has malfunctioned and needs to be
replaced.
34
Page 35

Heat Controller DVC/DVH Inverter Mini-Split
10.3.3 Zero Crossing Detection Error Diagnosis and Solution (E2)
Error Code
Malfunction When PCB does not receive zero crossing signal feedback for 4
Possible Causes ● Connection Error
E2
minutes or the zero crossing signal time interval is abnormal.
● Faulty PCB
Trouble shooting:
Check if the connections and
power supply is normal?
No
Correct the connections. Turn on the
unit when the power supply is good.
Yes
Indoor main PCB is
defective. Replace indoor
main PCB.
35
Page 36

DVC/DVH Inverter Mini-Split Heat Controller
10.3.4 Fan Speed is Out of Control Diagnosis and Solution (E3)
Error Code
Malfunction decision
conditions
E3
When indoor fan speed runs at 300RPM or lower for certain
period of time, the unit will stop and the LED will display the
failure.
Possible Causes ● Wiring error
● Faulty Fan Assembly
● Faulty Fan Motor
● Faulty PCB
Trouble shooting:
Shut off the power supply
and turn it on 5 seconds
later. Is it still displaying
the error code?
Yes
Shut off the power supply,
rotate the fan by hand.
Does it rotate properly?
Yes
No
No
The unit operates normally.
Find out the cause and
Find out the cause and
have it solved. For
trytoxit.Forexample,
example, check
checkwhetherthefan
whether the fan is
is blocked or the
blocked or the bearing
bearingisbroken?
is broken?
Check the wires of fan
motor. Are all the
No
Correct the connections.
connections good?
Yes
Check whether the fan
motor is normal through
index 1?
No
Replace the fan
motor
No
Yes
Replace the
Check whether the main PCB is
normal through index 2?
No
main PCB.
The
malfunction is
solved?
Yes
Note: See next page for information pertaining to Index 1 and 2.
If the
If the malfunc-
malfunction is
tion is still
still existing,
exists,replace
replace the
the main PCB
main PCB
36
Page 37

Heat Controller DVC/DVH Inverter Mini-Split
10.3.4 Index 1: Indoor AC Fan Motor
Measure the resistance value of each winding by using the tester.
Position
Black -
Red
White -
Black
RPG13B RPG15A RPG20B RPG28H
530Ω±8%
(20℃/68℉)
(Brand:
Weiling)
315Ω±8%
(20℃/68℉)
(Brand:
Weiling)
75Ω±8%
(20℃/68℉)
(Brand:
Weiling)
150Ω±8%
(20℃/68℉)
(Brand:
Weiling)
Resistance Value
381Ω±8%
(20℃/68℉)
(Brand:
Weiling)
267Ω±8%
(20℃/68℉)
(Brand:
Weiling)
183.6Ω±8%
(20℃/68℉)
(Brand:
Weiling)
206Ω±8%
(20℃/68℉)
(Brand:
Weiling)
RPG45B
112Ω±8%
(20℃/68℉)
(Brand:
Weiling)
82Ω±8%
(20℃/68℉)
(Brand:
Weiling)
118.5Ω±8%
(20℃/68℉)
(Brand:
Dayang)
78.5Ω±8%
(20℃/68℉)
(Brand:
Dayang)
10.3.4 Index 2: Indoor AC Fan Motor
Power on and set the fan speed to high. After running for 15 seconds, measure the voltage of pin1
and pin2. If the value of the voltage is less than 100V (208~240V power supply) or 50V (115V power
supply), the PCB is defective and needs to be replaced.
37
Page 38

DVC/DVH Inverter Mini-Split Heat Controller
10.3.5 Open or Short Circuit of Temperature Sensor Diagnosis and Solution (E5)
Error Code
Malfunction If the sampling voltage is lower than 0.06V or higher than 4.94V,
Possible Causes ● Wiring Error
E5
the LED will display the this error code.
● Faulty Sensor
Trouble shooting:
Check the connections
between temperature
sensor and main PCB.
Are the connections
good?
Yes
Check the resistance value
Check if the resistance value
of the sensor via
of the sensor is normal
table1(p64)and table
*Seefollowingtables
2(p65), is it normal?
No
Yes
Correct the connections.
Replace indoor or
outdoor main PCB.
No
Replace the sensor and
check if the problem happen
again?
Disconnect the temperature sensor from PCB,
measure the resistance value of each winding by
using the multi-meter.
Temperature Sensors:
T1: Room Temperature Sensor
T2: Indoor Coil Temperature Sensor
T3: Outdoor Coil Temperature Sensor
T4: Outdoor Ambient Temperature Sensor
T5: Compressor Discharge Temperature Sensor
38
Page 39

Heat Controller DVC/DVH Inverter Mini-Split
T1, T2, T3,T4 Temperature Sensor Resistance Value Table
℃ ℉
-20 -4 115.266 20 68 12.6431 60 140 2.35774 100 212 0.62973
-19 -2 108.146 21 70 12.0561 61 142 2.27249 101 214 0.61148
-18 0 101.517 22 72 11.5 62 144 2.19073 102 216 0.59386
-17 1 96.3423 23 73 10.9731 63 145 2.11241 103 217 0.57683
-16 3 89.5865 24 75 10.4736 64 147 2.03732 104 219 0.56038
-15 5 84.219 25 77 10 65 149 1.96532 105 221 0.54448
-14 7 79.311 26 79 9.55074 66 151 1.89627 106 223 0.52912
-13 9 74.536 27 81 9.12445 67 153 1.83003 107 225 0.51426
-12 10 70.1698 28 82 8.71983 68 154 1.76647 108 226 0.49989
-11 12 66.0898 29 84 8.33566 69 156 1.70547 109 228 0.486
-10 14 62.2756 30 86 7.97078 70 158 1.64691 110 230 0.47256
-9 16 58.7079 31 88 7.62411 71 160 1.59068 111 232 0.45957
-8 18 56.3694 32 90 7.29464 72 162 1.53668 112 234 0.44699
-7 19 52.2438 33 91 6.98142 73 163 1.48481 113 235 0.43482
-6 21 49.3161 34 93 6.68355 74 165 1.43498 114 237 0.42304
-5 23 46.5725 35 95 6.40021 75 167 1.38703 115 239 0.41164
-4 25 44 36 97 6.13059 76 169 1.34105 116 241 0.4006
-3 27 41.5878 37 99 5.87359 77 171 1.29078 117 243 0.38991
-2 28 39.8239 38 100 5.62961 78 172 1.25423 118 244 0.37956
-1 30 37.1988 39 102 5.39689 79 174 1.2133 119 246 0.36954
0 32 35.2024 40 104 5.17519 80 176 1.17393 120 248 0.35982
1 34 33.3269 41 106 4.96392 81 178 1.13604 121 250 0.35042
2 36 31.5635 42 108 4.76253 82 180 1.09958 122 252 0.3413
3 37 29.9058 43 109 4.5705 83 181 1.06448 123 253 0.33246
4 39 28.3459 44 111 4.38736 84 183 1.03069 124 255 0.3239
5 41 26.8778 45 113 4.21263 85 185 0.99815 125 257 0.31559
6 43 25.4954 46 115 4.04589 86 187 0.96681 126 259 0.30754
7 45 24.1932 47 117 3.88673 87 189 0.93662 127 261 0.29974
8 46 22.5662 48 118 3.73476 88 190 0.90753 128 262 0.29216
9 48 21.8094 49 120 3.58962 89 192 0.8795 129 264 0.28482
10 50 20.7184 50 122 3.45097 90 194 0.85248 130 266 0.2777
11 52 19.6891 51 124 3.31847 91 196 0.82643 131 268 0.27078
12 54 18.7177 52 126 3.19183 92 198 0.80132 132 270 0.26408
13 55 17.8005 53 127 3.07075 93 199 0.77709 133 271 0.25757
14 57 16.9341 54 129 2.95896 94 201 0.75373 134 273 0.25125
15 59 16.1156 55 131 2.84421 95 203 0.73119 135 275 0.24512
16 61 15.3418 56 133 2.73823 96 205 0.70944 136 277 0.23916
17 63 14.6181 57 135 2.63682 97 207 0.68844 137 279 0.23338
18 64 13.918 58 136 2.53973 98 208 0.66818 138 280 0.22776
19 66 13.2631 59 138 2.44677 99 210 0.64862 139 282 0.22231
K Ohm
℃ ℉
K Ohm
℃ ℉
K Ohm
℃ ℉
K Ohm
39
Page 40

DVC/DVH Inverter Mini-Split Heat Controller
T5 Temperature Sensor Resistance Value Table
℃ ℉
-20 -4 542.7 20 68 68.66 60 140 13.59 100 212 3.702
-19 -2 511.9 21 70 65.62 61 142 13.11 101 214 3.595
-18 0 483 22 72 62.73 62 144 12.65 102 216 3.492
-17 1 455.9 23 73 59.98 63 145 12.21 103 217 3.392
-16 3 430.5 24 75 57.37 64 147 11.79 104 219 3.296
-15 5 406.7 25 77 54.89 65 149 11.38 105 221 3.203
-14 7 384.3 26 79 52.53 66 151 10.99 106 223 3.113
-13 9 363.3 27 81 50.28 67 153 10.61 107 225 3.025
-12 10 343.6 28 82 48.14 68 154 10.25 108 226 2.941
-11 12 325.1 29 84 46.11 69 156 9.902 109 228 2.86
-10 14 307.7 30 86 44.17 70 158 9.569 110 230 2.781
-9 16 291.3 31 88 42.33 71 160 9.248 111 232 2.704
-8 18 275.9 32 90 40.57 72 162 8.94 112 234 2.63
-7 19 261.4 33 91 38.89 73 163 8.643 113 235 2.559
-6 21 247.8 34 93 37.3 74 165 8.358 114 237 2.489
-5 23 234.9 35 95 35.78 75 167 8.084 115 239 2.422
-4 25 222.8 36 97 34.32 76 169 7.82 116 241 2.357
-3 27 211.4 37 99 32.94 77 171 7.566 117 243 2.294
-2 28 200.7 38 100 31.62 78 172 7.321 118 244 2.233
-1 30 190.5 39 102 30.36 79 174 7.086 119 246 2.174
0 32 180.9 40 104 29.15 80 176 6.859 120 248 2.117
1 34 171.9 41 106 28 81 178 6.641 121 250 2.061
2 36 163.3 42 108 26.9 82 180 6.43 122 252 2.007
3 37 155.2 43 109 25.86 83 181 6.228 123 253 1.955
4 39 147.6 44 111 24.85 84 183 6.033 124 255 1.905
5 41 140.4 45 113 23.89 85 185 5.844 125 257 1.856
6 43 133.5 46 115 22.89 86 187 5.663 126 259 1.808
7 45 127.1 47 117 22.1 87 189 5.488 127 261 1.762
8 46 121 48 118 21.26 88 190 5.32 128 262 1.717
9 48 115.2 49 120 20.46 89 192 5.157 129 264 1.674
10 50 109.8 50 122 19.69 90 194 5 130 266 1.632
11 52 104.6 51 124 18.96 91 196 4.849
12 54 99.69 52 126 18.26 92 198 4.703
13 55 95.05 53 127 17.58 93 199 4.562
14 57 90.66 54 129 16.94 94 201 4.426
15 59 86.49 55 131 16.32 95 203 4.294
16 61 82.54 56 133 15.73 96 205 4.167
17 63 78.79 57 135 15.16 97 207 4.045
18 64 75.24 58 136 14.62 98 208 3.927
19 66 71.86 59 138 14.09 99 210 3.812
K Ohm
℃ ℉
K Ohm
℃ ℉
40
K Ohm
℃ ℉
K Ohm
Page 41

Heat Controller DVC/DVH Inverter Mini-Split
10.3.6 Refrigerant Leakage Detection Diagnosis and Solution (EC)
Error Code
EC
Malfunction In the first 5 minutes that the compressor starts up, if the temperatures
do not remain a constant function where T2 < (Tcool – 2)
for 4 seconds
and occurs 3 times, the display will show error code “EC” and unit will
turn off.
T2 is the Indoor Coil Temperature Sensor
Tcool is the temp when the compressor first begins to run.
Possible Causes ● T2 Sensor faulty
● Indoor PCB Faulty
● Refrigeration Circuit problems, such as gas leakage or blockages.
Trouble shooting:
Shut off the power supply and
turn it on 5 seconds later. Is it
still displaying the error code?
Yes
Check if T2 sensor is well
Check if T2 sensor is connected
Is there cool air blowing
out from indoor air outlet?
Yes
fixed. Correct the installation
well.Correcttheconnectionor
replace T2 sensor. Does the
or replace T2 sensor. Does
problemhappenagain?
the problem remain again?
No
Is there any leakage? Especially
Istherearefrigerantleak?
the connection parts, such as the
Check at the connection joints of the
gas valve and the liquid valve.
gas and liquid valve.
No
Is there any block ing? (Such as the
Isthereanyblockage?(Suchasthecapillary
capillary or the welded points of the pipes.)
ortheweldedjointsofthepipes.)
Yes
Clear the blockage or replace blocked
Clear the blocking.
component,suchascapillarytubes.
Yes
Yes
Replace indoor PCB.
Repair the leakage and
Repair the leak and recharge the
systemwithrefrigerant.
recharge the refrigerant.
41
Page 42

DVC/DVH Inverter Mini-Split Heat Controller
10.3.7 IPM Malfunction or IGBT Over Current Protection Diagnosis and Solution (P0)
Error Code
Malfunction decision
conditions
P0
When the voltage signal that IPM sends to compressor drive
chip is abnormal, the display LED will show “P0” and unit will
turn off.
Possible Causes ● Wiring error
● IPM malfunction
● Outdoor Fan Assembly faulty
● Compressor Malfunction
● Outdoor PCB Faulty
Trouble shooting:
Check if the wiring between main
PCB and compressor connected by
error and if the wires and connectors
are broken?
No
IPM continuity check. Check if the
IPM terminal resistance values are
uniform. Refer to page 64.
No
Yes
Correct the connection or replace
the wires and connectors.
Replace the IPM board or replace the
main PCB if the IPM board and main
PCB are integrated together.
Yes
Check if the outdoor fan runs
properly or the outdoor unit
ventilation is good.
Yes
Check if the compressor resistance
values are uniform .Refer to page 63.
Yes
Replace the outdoor main PCB if the
main PCB and IPM are separate.
No
please refer to the below remark, check whether the
resistance of the fan motor is normal. If not, replace
the fan motor.
No
Replace the compressor.
42
Page 43

Heat Controller DVC/DVH Inverter Mini-Split
10.3.7 Index: IPM continuity check
Turn off the power, let the electrolytic capacitors discharge completely, and dismount the IPM.
Use a digital tester to measure the resistance between P and U,V,W,N; U,V,W and N.
Digital tester Normal resistance value Digital tester Normal resistance value
(+)Red (-)Black
N U
P
U V
V W
W (+)Red
∞
(Several MΩ)
Note:
1) DVC09SD-0, DVH09SD-0, DVC12SD-0, DVH12SD-0 models:
Measure the black pin and red pin of the motor connector, the resistance should be around 50Ω at 20℃(68℉)
2) DVC18SD-1 and DVH24SD-1 models:
Measure the black pin and red pin of the motor connector, the resistance should be around 84.5Ω at 20℃(68℉)
3) DVC24SD-1 and DVH24SD-1 models:
Measure the black pin and red pin of the motor connector, the resistance should be around 88.5Ω at 20℃(68℉)
(+)Red (-)Black
N
∞
(Several MΩ)
P-U
43
Page 44

DVC/DVH Inverter Mini-Split Heat Controller
P-V
P-W
44
Page 45

Heat Controller DVC/DVH Inverter Mini-Split
P-N
45
Page 46

DVC/DVH Inverter Mini-Split Heat Controller
10.3.8 High Temperature Protection of Compressor Top Diagnosis and Solution (P2)
Error Code
P2
Malfunction If the sampling voltage is not 5V, the LED will display the error.
Possible Causes ● Power Supply Problems.
● Refrigerant Circuit leakage or blockage
● PCB Faulty
Trouble shooting:
Check if the air flow system
Checkiftheairowofthe
of indoor and outdoor units
indoor and outdoor units are
are obstructed?
obstructed?
No
Yes
Clear up the air inlet and outlet or the heat
Remove any obsticles blocking the
exchanger of indoor and outdoor units.
air inlets or outlets.
Turn off the power supply and turn
it on 10 minutes later.
Yes
Check if the unit can
Does the unit start
start normally.
normally?
Yes
Check if the system is
Check if the refrigerant
properly charged.
charge volume is normal?
Yes
Refrigerant system is blocked, such
Refrigerant circuit is blocked.
as capillary or welded point of pipes.
Check the capillary tubes
orweldedjointsofpipes.
Fixblockageorreplace
blocked component.
No
Check if all the connection, especially
Checkifalltheconnections,
the connection of OLP (Over Load
especially if the OLP (Over Load
Protector) sensor is good.
Protector) senor is properly connected.
Yes
Measure the resistance
Measure the resistance
between the two ports of
betweenthetwoterminals
the OLP. Is it zero?
oftheOLP.Itiszero?
No
Yes
Recharge the correct
Recharge to the correct
refrigerant volume.
refrigerant volume.
No
Correct the connection.
No
Replace the OLP.
Replace the outdoor control PCB.
46
Page 47

Heat Controller DVC/DVH Inverter Mini-Split
10.3.9 Inverter Compressor Drive Error Diagnosis and Solution (P4)
Error Code
Malfunction decision
conditions
P4
An abnormal inverter compressor drive is detected by a special
detection circuit, including communication signal detection,
voltage detection, and compressor rotation speed signal
detection, etc.
Possible Causes ● Wiring mistake
● IPM Malfunction
● Outdoor Fan Assembly Faulty
● Compressor Malfunction
● Outdoor PCB Faulty
Trouble shooting:
Check if the wiring between main
Checkifthewiringbetweenmain
PCB and compressor connected by
PCB and compressor are properly
connectedandifanywiresor
error and if the wires and connectors
are broken?
IPM continuity check. Check if the
IPM terminal resistance values are
terminal resistance values are uniform.
uniform. Refer to page 64.
connectorsarebroken?
No
IPM continuity check. Check if the IPM
Refer to pages 40-41.
No
Yes
Correct the connection or replace
the wires and connectors.
Replace the IPM board or replace the
main PCB if the IPM board and main
PCB are integrated together.
Yes
Check if the outdoor fan runs
Check if the outdoor fan runs
properly or the outdoor unit
properly and if the outdoor
unit’s ventilation is good.
ventilation is good.
Yes
Check if the compressor resistance
Check if the compressor resistance
values are uniform .Refer to page 63.
values are uniform.
Refertothefollowingpage.
Yes
Replace the outdoor main PCB if the
main PCB and IPM are separate.
No
For MSV1-09HRFN1-MT0W and MSV1-12HRFN1- MT0W
models, r
of control malfunction . Find out the cause and have it
remark, check whether the resistance of the fan motor
efer to the solution of fan speed has been out
Checkwhethertheresistance
solved. For other models, please refer to the below
of the fan motor is normal.
Ifnot,replacethefanmotor.
Refer to pages 34-35.
is normal. If not, replace the fan motor.
No
47
Replace the compressor.
Page 48

DVC/DVH Inverter Mini-Split Heat Controller
10.3.9 Index: Compressor Resistance
Measure the resistance value of each winding by using the tester.
Position Resistance Value
DA108X1C-23EZ DA130M1C-31FZ DA150S1C-20FZ
Blue - Red
Blue - Black
Red - Blue
1.1Ω
(20℃/68℉)
1.77Ω
(20℃/68℉)
0.95Ω
(20℃/68℉)
48
Page 49

Heat Controller DVC/DVH Inverter Mini-Split
IDT
IDT
IDT
10.4: Pressure on Service Port
10.4.1 Cooling:
℉
(℃)
BAR 70/59 8.2 7.8 8.1 8.6 10.1
BAR 75/63 8.6 8.3 8.7 9.1 10.7
BAR 80/67 9.3 8.9 9.1 9.6 11.2
ODT
75
(23.89)
85
(29.44)
95
(35)
105
(40.56)
115
(46.11)
℉
(℃)
PSI 70/59 119 113 117 125 147
PSI 75/63 124 120 126 132 155
PSI 80/67 135 129 132 140 162
℉
(℃)
MPA 70/59 0.82 0.78 0.81 0.86 1.01
MPA 75/63 0.86 0.83 0.87 0.91 1.07
MPA 80/67 0.93 0.89 0.91 0.96 1.12
12.0
10.0
ODT
ODT
8.0
6.0
75
(23.89)
75
(23.89)
85
(29.44)
85
(29.44)
95
(35)
95
(35)
105
(40.56)
105
(40.56)
115
(46.11)
115
(46.11)
70/59
75/63
4.0
2.0
0.0
75 (23.89) 85 (29.44) 95 (35) 105 (40.56) 115 (46.11)
80/67
49
Page 50

DVC/DVH Inverter Mini-Split Heat Controller
IDT
IDT
IDT
10.4.2 Heating Chart:
℉
(℃)
BAR 55 30.3 28.5 25.3 22.8 20.8
BAR 65 32.5 30.0 26.6 25.4 23.3
BAR 75 33.8 31.5 27.8 26.3 24.9
ODT
57/53
(13.89/11.67)
47/43
(8.33/6.11)
37/33
(2.78/0.56)
27/23
(-2.78/-5)
17/13
(-8.33/-10.56)
℉
(℃)
PSI 55 439 413 367 330 302
PSI 65 471 435 386 368 339
PSI 75 489 457 403 381 362
℉
(℃)
MPA 55 3.03 2.85 2.53 2.28 2.08
MPA 65 3.25 3.00 2.66 2.54 2.33
MPA 75 3.38 3.15 2.78 2.63 2.49
40.0
35.0
30.0
25.0
20.0
15.0
10.0
ODT
ODT
57/53
(13.89/11.67)
57/53
(13.89/11.67)
47/43
(8.33/6.11)
47/43
(8.33/6.11)
37/33
(2.78/0.56)
37/33
(2.78/0.56)
27/23
(-2.78/-5)
27/23
(-2.78/-5)
17/13
(-8.33/-10.56)
17/13
(-8.33/-10.56)
55
65
75
5.0
0.0
57/53
(13.89/11.67)
(8.33/6.11)
47/43
37/33
(2.78/0.56)
50
27/23
(-2.78/-5)
17/13
(-8.33/-10.56)
Page 51

Heat Controller DVC/DVH Inverter Mini-Split
This page is left intentionally blank.
51
Page 52

DVC/DVH Inverter Mini-Split Heat Controller
AITONS/MARS 35 Brownridge Road, Unit 6, Halton Hills, ON L7G 0C6 • 1-888-744-2911 • info@aitons.com • www.aitons.com
4/2014
52
 Loading...