


1050 Fountain St N. Cambridge, Ontario, Canada N3H-4R7
Business (519) 650-5775 Fax (519) 650-3773 Toll Free Phone: 1-877-650-5775 Toll Free Fax: 1-800-327-5609
The Artisan
Installation and Operating Instructions
The Artisan is listed to
ULC Standard S-627 &
UL 1482 by Warnock
Hersey Professional
Services Ltd
SAVE THESE
INSTRUCTIONS FOR
FUTURE USE.
Note: Please read these instructions thoroughly before attempting to install this unit.
SAFETY NOTICE: If this stove is not properly installed, a house fire may result, for your safety, follow the installation directions, contact local building or fire officials about restrictions and installation inspection requirements in your area.
IMPORTANT: Check around oven chamber on a weekly basis for soot and creosote accumulation. Clean the chamber thoroughly from the top, side and bottom with the rake provided. Burn the stove hot daily to reduce creosote accumulation. Use only dry wood aged for one year. Failure to do so could result in chimney fire and void the warranty.
The temperature registered by the oven door thermometer may not necessarily correspond with the reading taken with a thermometer inside the oven
OVERFIRING CAUTION
Repeated or extended overfiring will void warranty on this appliance. See page 18 for details.
ATTENTION INSTALLER: Leave this manual with the appliance.
© 2006 HEARTLAND APPLIANCES INC.
PLEASE NOTE: Specifications contained in this manual are subject to change without notice
WOODSTOVES
01/07 EINS 515000

FOR YOUR SAFETY
DO NOT STORE OR USE GASOLINE OR OTHER FLAMMABLE VAPOURS OR LIQUIDS IN THE VICINITY OF THIS STOVE.
Stove Location - If the stove must be located near a window, avoid using long curtains which could blow over the stove top, causing a fire hazard.
Any openings in the wall behind the stove or in the floor under the stove must be sealed.
Do not set unopened glass or metal containers on the stove.
Grease accumulation is the cause of many cooking fires. Clean the oven compartment regularly.
Do not attempt to extinguish a grease fire with water. Cover grease fires with a pot lid or baking soda.
Avoid the use of aerosol containers near the stove.

Artisan
CONSUMER WARRANTY
ENTIRE PRODUCT –LIMITED ONE YEAR WARRANTY
HEARTLAND warrants the replacement or repair of all parts of the Artisan which prove to be defective in material or workmanship. Painted porcelain enamel finish or plated surfaces have a 90 day warranty from the date of original purchase. Such parts will be replaced or repaired at the option of Heartland without charge, subject to the terms and conditions set out below.
The warranty does not include normal wear or firebox parts or gaskets.
TERMS AND CONDITIONS
1.This warranty applies only for single family domestic use when the Wood Cookstove has been properly installed according to the instructions supplied by Heartland and is connected to an adequate and proper chimney and chimney connections. Damage due to faulty installation, improper usage and care, abuse, accident, fire, flood, acts of God, commercial, business or rental use, and alteration, or the removal or defacing of the serial plate, cancels all obligations of this warranty. Service during this warranty must
be performed by a factory Authorized Service Person.
2.Warranty applies to product only in the country in which it was purchased.
3.Heartland is not liable for any claims or damages resulting from any failure of the Wood Cookstove or from service delays beyond their reasonable control.
4.To obtain warranty service, the original purchaser must present the original Bill of Sale, Model and Serial number.
Components repaired or replaced are warranted through the remainder of the original warranty period only.
5.The warranty does not cover expense involved in making this appliance readily accessible for servicing.
6.This warranty gives you specific legal rights. Additional warranty rights may be provided by law in some areas.
7.Adjustments such as calibrations, levelling, tightening of fasteners, or chimney and chimney connections normally associated with original installation are the responsibility of the dealer or installer and not that of the Company.
8. Overfiring of this appliance will void warranty. Some crazing may occur if the cast top surface is quickly cooled by spillage of liquids and by overfiring of the cooker.
TO ENSURE PROMPT WARRANTY SERVICE, SEND IN YOUR WARRANTY CARD WITHIN 10 DAYS OF PURCHASE.
If further help is needed concerning this warranty, contact:
Customer Service |
Business (519) 650-5775 |
||||
Heartland Appliances Inc. |
Fax (519)650-3773 |
||||
1050 Fountain St N. |
Toll Free Telephone1-877-650-5775 |
||||
Cambridge, Ontario, N3H-4R7 |
|
|
|||
PLACE OF PURCHASE: |
|
|
|||
|
|
|
|
|
|
DATE OF PURCHASE: |
|
|
|||
|
|
|
|
|
|
SERIAL NUMBER: |
|
|
|||
|
|
|
|
||
MODEL NUMBER: |
|
|
|||
|
|
|
|
|
|
3

TABLE OF CONTENTS
1) |
Welcome ........................................................................................................................... |
Pg 5 |
2) |
Installation ......................................................................................................................... |
Pg 6 |
3) |
Installation Requirements ................................................................................................. |
Pg 7 |
4) |
Clearances Single Wall Connector .................................................................................. |
Pg 8 |
5) |
Clearances Double Wall Connector ................................................................................. |
Pg 9 |
6) |
Installing the Chimney Connector ..................................................................................... |
Pg 10 |
7) |
Chimney and Draft ............................................................................................................ |
Pg 11 |
8) |
Floor Protection ................................................................................................................ |
Pg 11 |
9) |
User Instructions ............................................................................................................... |
Pg 12 |
10) Door Operation ................................................................................................................. |
Pg 13 |
|
11) Lighting the Fire ................................................................................................................ |
Pg 13 |
|
12) Refuelling ........................................................................................................................... |
Pg 14 |
|
13) Break-In Fire ..................................................................................................................... |
Pg 15 |
|
14) Flue way Cleaning ............................................................................................................ |
Pg 16 |
|
15) Fresh Air Kit ...................................................................................................................... |
Pg 17 |
|
16) Understanding Combustion .............................................................................................. |
Pg 17 |
|
17) Over firing ......................................................................................................................... |
Pg 18 |
|
18) Trouble Shooting .............................................................................................................. |
Pg 19 |
|
19) Cooking Instruction ........................................................................................................... |
Pg 22 |
|
19) Contact Information .......................................................................................................... |
Pg 24 |
|
4

Welcome
Getting Acquainted
The Artisan stove is a time proven heating and cooking appliance. Take your time to acquaint yourself with the principles on which your new stove operates as a heater and a cooking stove.
Familiarizing yourself with the primary principles of the air intake controls, the oven damper, the flame path for the fire and the relationship to the chimney will give you a very comprehensive understanding of what you are trying to accomplish with the stove.
Save These Instructions
Keep the manual available for future reference. The manual is an important part of your stove. If your stove is sold, deliver the manual to the new owner along with the stove.
The quality of the installation (especially the chimney connector and chimney), and the quality of the fuel being burned will affect the performance of your stove, but the most important factor is the way you operate the stove. With the help of this manual, you will learn how to effectively heat and cook with your stove. Be sure to read it entirely, including the terms of reference and function.
In addition, your own experience will help you to learn the role that the chimney plays in stove performance. The Artisan has been tested and is listed by Warnock Hersey. The test standards are ULC S-627 for Canada and UL 1482 for U.S.
The Artisan is listed for burning wood only. Do not burn other materials or garbage. The Artisan is not listed for installation in mobile homes. Do not install the stove in mobile homes.
Safety Notice: If your stove is not properly installed and maintained, a house fire may result. For your safety, follow all installation, operation and maintenance directions. Contact local building officials about restrictions and installation inspection requirements in your area. (“Makeshift” compromises in the installation may result in hazardous conditions, including a house fire.)
Note: DO NOT connect to or use in conjunction with any air distribution ductwork. This stove is not approved for such installations.
DO NOT use chemical fluids to start the fire.
DO NOT burn garbage or flammable fluids such as gasoline or engine oil.
CAUTION: Stove is hot while in operation. Keep children, clothing and furniture away. Contact may cause skin burns.
Spend some time becoming familiar with the various parts of the stove by operating them before you burn your stove.
After a few weeks of operating the stove, re-read this manual. Many of the procedures will become clearer after you have had some experience with the stove.
The serial number is located on a pull-out plate at the bottom right hand side of the front of the unit. The listed rating plate is located on the back wall of the unit.
5
Installation
Place the stove in the intended position and lift out the hotplate, checking that the joint between the underside of the hob and the top of the stove is intact. Any joints which have opened should be made good with the fire cement provided.
Replace the hotplate making sure that it is seated evenly on the soft rope and that it is approximately 0.1” (1.5mm) higher than the enamelled top plate, with an equal space all round. Fit the flue chamber which should have a rope seal already installed. The flue chamber is screwed to the stove making a good seal as any air leak at this point will impede the working of the stove.
P/N - RS4M301136 A
Flue Chamber Box is located in Main Oven compartment during shipment.
Remove all bubble wrap and protective film from inside of oven doors prior to stove ignition.
Refer to Fig. 7 for definition of terms and installation orientation of Flue Chamber.
a.Remove two screws (1/4” x 20) and fiber washers from oven top cutout.
b.Prior to positioning Flue Chamber, ensure that chamber damper is in its full open position to allow for access to screw hole locations.
c.Position Flue Chamber on stove top ensuring that it is nested as close as possible to the stove top, to allow for a minimal gap - front and side.
d.Install fiber washers and 1/4” x 20 screws - ensuring fasteners are tightly securing Flue Chamber.
e.Close Flue Chamber door.
Open the firebox and ashpit doors and check that the reciprocating bottom grate bars are in position. Make sure the three restriction plates are in place on the bottom grate - one at the front and two at the rear. The riddling lever will not operate with restriction plates in place - it is intended for cleaning purposes only.
Be sure to read the sections on clearances, floor protection and chimneys before actively starting the installation.
A woodburning stove radiates heat in all directions. Heat directed toward living areas in front of the stove is usually very welcome. However, heat radiating in other directions will not be as welcome if it results in overheating nearby walls, ceilings and floors.
An important part of planning a safe installation is to be sure that the combustible material located near your stove does not overheat.
Clearance is the distance between your stove and stovepipe and nearby walls, ceilings and floors.
If there is adequate clearance, then the nearby surfaces will not overheat.
It is very important that you match the stove pipe you are
using to the clearances specified. Failure to do so will result in an unsafe condition.
Unit must be placed on a continuous non-combustible pad (floor tile with grouting or sheet metal pad) extending 21” (540mm) in front and 8” (203mm) to the side and back.
Air flowing between the stove pipe and nearby surfaces carries away heat. Do not fill the empty space with any insulating material.
A chimney approved to CSA B.365-01 in Canada or NFPA 211 in the USA must be used to connect to the stove pipe.
Fig. 1 |
DESN 515137 |
|
|
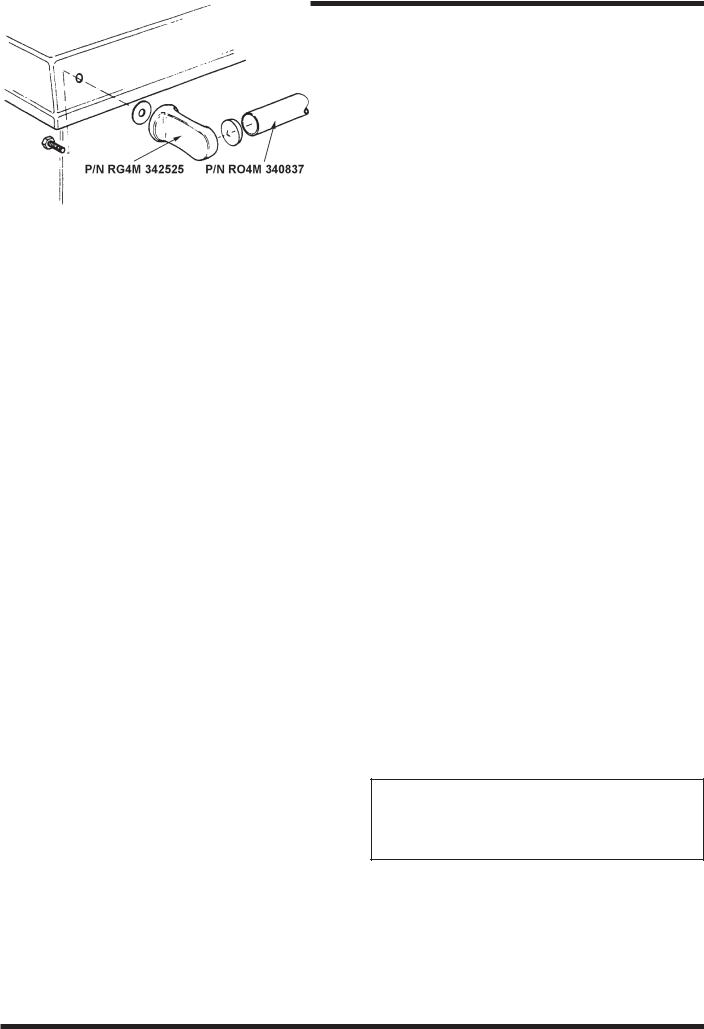
Handrail:
The handrail brackets are held on the front ends of the stove top-plate casting. Remove the travel nuts and replace with the handrail brackets ensuring the fibre protecting washers are in position. Insert the handrail with fitted endcaps into the brackets, positioning them correctly, and tighten the locating bolts (See Fig. 1). Do not use handrail to move stove.
Endcaps, brackets and hardware, referenced in Fig. 1 are located in the lower warming drawer during shipment. Handrail is located on Stovetop in a round tube during shipment.
Do not hang combustible material on handrail during stove operation.
Warning
The ashpit and firebox door must be closed during normal use, except when lighting or refuelling
Clearances must be maintained at all combustible material. These include doors, trim, furniture, drapes, newspapers and clothes. See local codes for a description of combustible material.
Make sure that no floor or chimney supports will be cut due to chimney installation.
Contact local building officials about restrictions and installation inspection in your area.
6
Heartland Appliances Inc. 1050 Fountain St North, Cambridge, ON N3H 4R7
|
|
|
Installation Requirements |
|
|
Model Heartland Artisan |
|
|||||||
Due to continuing product improvements, Heartland Appliances reserves the right to amend |
|
|||||||||||||
specifications without notice. Please contact Heartland for the most up to date information, as it |
Help Desk |
|||||||||||||
applies to product being purchase, or download latest Site Preparation Specifications from |
877-650-5775 |
|||||||||||||
|
|
|
|
|
www.heartlandapp.com. |
|
|
|
|
|
||||
|
|
|
|
|
|
|
|
|
|
|
||||
|
|
|
|
|
|
|
|
|
|
|
|
|
||
|
|
|
|
ARTISAN |
|
|
|
|
|
|
|
CHIMNEY CONNECTOR |
||
|
|
|
|
REQUIREMENTS |
|
|
|
|
|
|
REQUIREMENTS |
|||
How-to Steps |
|
|
|
|
|
|
|
|
|
|
How-to Steps |
|
||
Note: Information herein is for recommendation purposes |
|
|
Note: Information herein is for recommendation purposes |
|||||||||||
only. All clearances are subject to local, Provincial or |
|
|
only. All clearances are subject to local, Provincial or State |
|||||||||||
State building and fire codes. Clearances may change |
|
|
building and fire codes. Clearances may change without |
|||||||||||
without notice. Always consult with local building |
|
|
notice. Always consult with local building inspector. |
|||||||||||
inspector. Improperly installed and/or maintained stove |
|
|
Improperly installed and/or maintained stove may result in |
|||||||||||
may result in a house fire. |
|
|
|
|
|
a house fire. |
|
|||||||
Clearances |
|
|
|
|
|
|
|
Chimney Connector Approvals |
|
|||||
Single Wall Stove Pipe |
|
|
|
|
|
|
For Single and listed Double Wall |
|
||||||
z |
Left side of stove adjacent to combustible material: |
|
|
Use only 6” diameter approved and listed chimney to the |
||||||||||
|
6 inches/152.4 mm |
|
|
|
|
|
|
|||||||
|
|
|
|
|
|
|
following standards: |
|
||||||
z |
Right side of stove adjacent to combustible material: |
|
|
|
||||||||||
|
|
|
|
|
|
|
||||||||
|
6 inches/152.4 mm |
|
|
|
|
|
|
|
z |
Canada: ULC Standard S629 |
|
|||
z |
Rear clearance to combustible material: 6 |
|
|
|
|
z |
U.S.: UL 103 HT |
|
||||||
|
inches/152.4mm |
|
|
|
|
|
|
Clearance Guidelines |
|
|||||
z |
Corner clearance to combustible material: 6 inches/ |
|
|
|
||||||||||
|
152.4mm |
|
|
|
|
|
|
|
Part of planning a safe installation is to be sure that |
|||||
z |
Front clearance to combustible material: 36 |
|
|
|
combustible materials located near your stove do not |
|||||||||
|
inches/915mm |
|
|
|
|
|
|
overheat. |
|
|||||
z |
Minimum clearance to combustible ceiling: 51.75 |
|
|
|
|
|
Safety |
|
||||||
|
inches/1321mm |
|
|
|
|
|
|
|
|
|
|
|||
Double Wall Stove Pipe |
|
|
|
|
|
|
|
|
|
|
|
|||
|
|
|
|
|
|
z Clearances specified herein must be adhered to as a |
||||||||
z |
Left side of stove adjacent to combustible material: |
|
|
|||||||||||
|
|
|
minimum. Local building codes may require |
|||||||||||
|
3 inches/76.2 mm |
|
|
|
|
|
|
|
||||||
|
|
|
|
|
|
|
|
additional spacing. Please confirm with your local |
||||||
z |
Right side of stove adjacent to combustible material: |
|
|
|
||||||||||
|
|
|
regulations before commencing any work. |
|||||||||||
|
3 inches/76.2mm |
|
|
|
|
|
|
|
||||||
|
|
|
|
|
|
|
|
|
|
|
|
|||
z |
Rear clearance to combustible material: 3 inches/ |
|
|
z Floor or ceiling supports must not be cut due to |
||||||||||
|
76.2mm |
|
|
|
|
|
|
|
||||||
|
|
|
|
|
|
|
|
|
chimney installation (adjust stove location accordingly |
|||||
|
Corner clearance to combustible material: 3 inches/ |
|
|
|
||||||||||
z |
|
|
|
to avoid chimney interference with these critical |
||||||||||
|
76.2mm |
|
|
|
|
|
|
|
|
|||||
|
|
|
|
|
|
|
|
|
areas). |
|
||||
|
Front clearance to combustible material: 36 inches/ |
|
|
|
|
|||||||||
z |
|
|
z Certain States require fresh air supply kits to be |
|||||||||||
|
915mm |
|
|
|
|
|
|
|
||||||
z |
Minimum clearance to combustible ceiling: 51.75 |
|
|
|
installed. Contact state or local authorities for specific |
|||||||||
|
inches/1321mm |
|
|
|
|
|
|
|
details prior to installing unit. |
|
||||
|
|
WARNING |
|
|
|
|
|
|
z Do not pass stovepipe chimney connector through |
|||||
|
|
|
|
|
|
|
|
|
combustible walls. |
|
||||
|
|
Combustible Walls |
|
|
|
|
|
|
|
|||||
|
|
|
|
|
|
|
z Always use an approved, insulated wall/ceiling pass |
|||||||
Please |
contact |
your |
local |
building |
inspector |
for |
|
|
||||||
|
|
|
through (refer to CSA B365 in Canada and NFPA 211 |
|||||||||||
confirmation of |
what |
construction |
materials |
are |
|
|
|
|||||||
|
|
|
in U.S.) |
|
||||||||||
considered combustible or non-combustible in your |
|
|
|
|
||||||||||
|
|
|
|
|
|
|
||||||||
particular application. Combustible materials include, but |
|
|
z Do not use stovepipe as an outside chimney. |
|||||||||||
are |
not |
limited |
to, doors, |
trim, furniture, drapes, |
|
|
z Chimney connector should be exposed and accessible |
|||||||
newspapers, woodpiles and clothes. |
|
|
|
|
||||||||||
|
|
|
|
|
for inspection and cleaning (never pass through |
|||||||||
Floor Protection |
|
|
|
|
|
|
|
|
||||||
|
|
|
|
|
|
|
|
combustible ceiling). |
|
|||||
Unit must be placed on a continuous non-combustible |
|
|
z Chimney connector must be securely attached to the |
|||||||||||
pad (floor tile with grouting or sheet metal pad) extending |
|
|
||||||||||||
|
|
|
pipe and chimney. Individual sections must be |
|||||||||||
21” (534mm) in front and 8” (203mm) to the sides and |
|
|
|
|||||||||||
|
|
|
attached together. |
|
||||||||||
back of the unit. |
|
|
|
|
|
|
|
|
|
|||||
|
|
|
|
|
|
|
|
|
|
|
|
|||
Hearth MUST extend to the walls if using clearances |
|
|
z Stove pipe must not be connected to an air |
|||||||||||
less than these dimensions. |
|
|
|
|
|
|
distribution duct. |
|
||||||
|
|
|
|
|
|
|
|
|
|
|
|
|
|
|
|
|
|
|
|
|
|
|
|
|
|
|
|
|
|
|
|
|
|
|
|
|
|
|
|
|
|
|
|
|
|
|
|
|
|
|
|
|
7 |
|
|
|
|
|
|

Clearances to Combustibles Single Wall Chimney Connector
All measurements must be done before starting the installation.
Dimensions
All drawings are for reference only, showing approximate dimensions for rough-in purposes. In some installations, two or more clearances to combustible walls may contradict each other. The clearances with the greater numerical value is to be used.
Fig. 2 |
DESN 515002 |
Rough In Measurements
Non-combustible hearth must extend 8 inches (203mm) to the sides and back of the unit. Must extend 21 inches (534mm) to the front in Canada and 18 inches (458mm) to the front in U.S. Hearth must extend fully to the wall if using clearances that are less than these dimensions.
|
|
|
|
|
|
|
|
Fig. 3 |
|
DESN 515004 |
|
8
 Loading...