

Heartland 9730 Installation And Operating Instructions Manual

INSTALLATION
AND
OPERATING
INSTRUCTIONS
Save these
instructions
1050 Fountain St N.
Cambridge, Ontario,
Canada N3H-4R7
Business (519) 650-5501
Fax (519) 650-3773
Toll Free Phone: 1-800-361-1517
Toll Free Fax: 1-800-327-5609
for future use
Note: Please read these instructions
thoroughly before attempting to install
this unit. Failure to follow installation
instructions will result in costly service
calls.
NOTE: Clock must be set or your
oven will not function!
The oven door thermometer
does not sense temperature. It is
for aesthetics only and is
nonfunctional.
®
Model 9730
CONVECTION SELF CLEAN AND HALF WALL OVEN
Manual #9716
0042605
© 2005 HEARTLAND APPLIANCES INC.
ATTENTION INSTALLER: Leave this manual with appliance
C
US
Electric Self Clean Model 9730
CONSUMER WARRANTY
ENTIRE PRODUCT – LIMITED ONE YEAR WARRANTY
HEARTLAND warrants the replacement or repair of all parts, of this appliance which prove to be defective in material
or workmanship, with the exception of the painted or porcelain enamel finish or plated surfaces, for one year from the
date of original purchase. Such parts will be repaired or replaced at the option of Heartland without charge, subject to
the terms and conditions set out below.
The warranty period against defects in the painted or porcelain enamel finish, or plated surfaces, is 90 days from date
of original purchase. The warranty does not include replacement of oven lamps or filters.
OVEN ELEMENTS - LIMITED SECOND THROUGH THIRD YEAR WARRANTY
HEARTLAND warrants the oven heating elements against defects in material or workmanship for an additional two
years. These parts will be repaired or replaced at the option of Heartland without charge, but you pay for labour and
transportation subject to the terms and conditions set out below.
TERMS AND CONDITIONS
1. This warranty applies only for single family domestic use when the appliance has been properly installed according
to the instructions supplied by Heartland and is connected to an adequate and proper utility service. Damage due
to faulty installation, improper usage and care, abuse, accident, fire, flood, acts of God, commercial, business
or rental use, and alteration, or the removal or defacing of the serial plate, cancels all obligations of this
warranty.Service during this warranty must be performed by a factory Authorized Service Person.
2. Warranty applies to product only in the country in which it was purchased.
3. Heartland is not liable for any claims or damages resulting from any failure of the Cookstove or from service delays
beyond their reasonable control.
4. To obtain warranty service, the original purchaser must present the original Bill of Sale, Model and Serial number.
Components repaired or replaced are warranted through the remainder of the original warranty period only.
5. The warranty does not cover expense involved in making this appliance readily accessible for servicing.
6. This warranty gives you specific legal rights. Additional warranty rights may be provided by law in some areas.
7. Adjustments such as calibrations, levelling, tightening of fasteners, or utility connections normally associated with
original installation are the responsibility of the dealer or installer and not that of the Company.
TO ENSURE PROMPT WARRANTY SERVICE, SEND IN YOUR WARRANTY CARD WITHIN 10 DAYS OF PURCHASE.
If further help is needed concerning this warranty, contact:
Customer Service
1050 Fountain St N.
Cambridge, Ontario,
Canada N3H-4R7
PLACE OF PURCHASE______________________________
DATE OF PURCHASE_______________________________
SERIAL NUMBER__________________________________
MODEL NUMBER__________________________________
Business (519) 650-5775
Fax (519)650-3773
Toll Free Telephone 1-800-361-1517
Toll Free Fax 1-800-327-5609

Contents
1. Installation ...................................3
2. Unpacking........................................................3
3. Prepare for Installation ....................................4
4. Beginning Installation.......................................5
5. Final Installation...............................................6
8. Features ....................................... 7
8. Dual Oven Control Panel Features ................. 7
9. Dual Oven Features........................................8
10. Important Safety Instructions . 9
11. Oven Safety ..................................................9
12. Self Clean Oven Safety .................................9
14. Operation .................................10
15. Before You Start.......................................... 10
16. Getting to Know Your Oven.........................10
17. Oven Bake Broil Control.............................. 11
18. Clock / Timer Function ............................... 12
19. Time of Day Setting.....................................12
20. Minute Minder ..............................................12
21. Time Bake...................................................13
22. How to Self Clean........................................14
23. Time Delay Self Clean ................................15
24. How to Select Cooking Methods .................17
25. Standard Cooking........................................17
26. Standard Broiling.........................................17
28. Convection Cooking ....................................18
28. Convection Roasting...................................18
29. Roasting Times and Temperature Guide....19
31. Broiling Tips ................................................20
31. Broiling Guide .............................................. 21
32. Baking Times and Temperature Guide .......22
33. Poultry Times and Temperature Guide.......23
34. Care and Cleaning ..................24
35. Porcelain .....................................................24
36. Nickel Trim ..................................................24
37. Convection Fan Filter ..................................24
38. Oven Light Replacement.............................24
39. Standard Oven Cleaning ............................. 25
40. Self Clean Oven Cleaning ........................... 26
41. The Broiler Pan ...........................................26
42. Main Oven Door Removal ........................... 27
43. Lower Oven Door Removal.........................28
44. Interior Oven Rack Removal .......................29
45. Rack Supports Removal ............................ 29
46. Range Problem Solver ................................ 30
47. Oven Thermostat ........................................30
48. If you still require help— ..............................30
49. Parts Chart / List .....................31
50. Wiring Diagrams .........................................32
27. Convection ..................................................18
THE OVEN THERMOMETER DOES NOT SENSE TEMPERATURE
The thermometer on the oven door is for aesthetics only and is
51. Products .................................. 33
nonfunctional.
1

PLEASE READ THESE IMPOR T ANT SAFETY
POINTS
PROPER INSTALLATION - BE SURE YOUR APPLIANCE IS PROPERLY INSTALLED AND
GROUNDED BY A QUALIFIED TECHNICIAN.
FOR YOUR SAFETY ... DO NOT STORE OR USE GASOLINE OR OTHER FLAMMABLE VAPOURS
OR LIQUIDS IN THE VICINITY OF THIS APPLIANCE.
1. Do not leave children alone. Children should not be left alone or unattended in area where appliance is in use. They should
never be allowed to sit or stand on any part of the appliance.
2. Wear proper apparel. Loose fitting or hanging garments should never be worn while using the appliance.
3. User servicing; do not repair or replace any part of the appliance unless specifically recommended in the manual. All
other servicing should be referred to a qualified technician.
4. Use only dry pot holders-Moist or damp pot holders on hot surfaces may result in burns from steam. Do not let pot holder
touch hot heating elements. Do not use a towel or other bulky cloth.
5. Do not use the oven as a heater.
6. Do not heat unopened glass or metal containers in the oven.
7. Grease accumulation is the cause of many cooking fires. Clean the oven regularly.
8. Do Not Use Water on Grease Fires - Smother fire or flame or use dry chemical or foam-type extinguisher.
9. Avoid the use of aerosol containers near the oven.
10. Never place pans, cookie sheets or roasters directly on the oven bottom. Use the rack in its lowest position.
Do not use aluminium foil.
11. Allow at least 1" of space all around pots, pans or cookie sheets in the oven to permit convection air flow.
To fully enjoy your new oven, it is important that you read this manual thoroughly.
2

Installation
Installation
Unpacking
1. With unit sitting on the floor, cut banding, and remove wooden crating. Cut plastic wrap and
remove foam packing.
2. Have someone on the left and the right side of the unit lifting it up from the bottom, remove
all packaging materials around and under the unit.
3. Set unit on a table or some other supporting platform, so that the face of the unit overhangs but
is not supporting any weight. Be sure to do this or the porcelain front may chip!
Caution : Do not set this edge on the table or the floor, as
porcelain coating will chip. Always place over an edge
3
Installation
Prepare for Installation
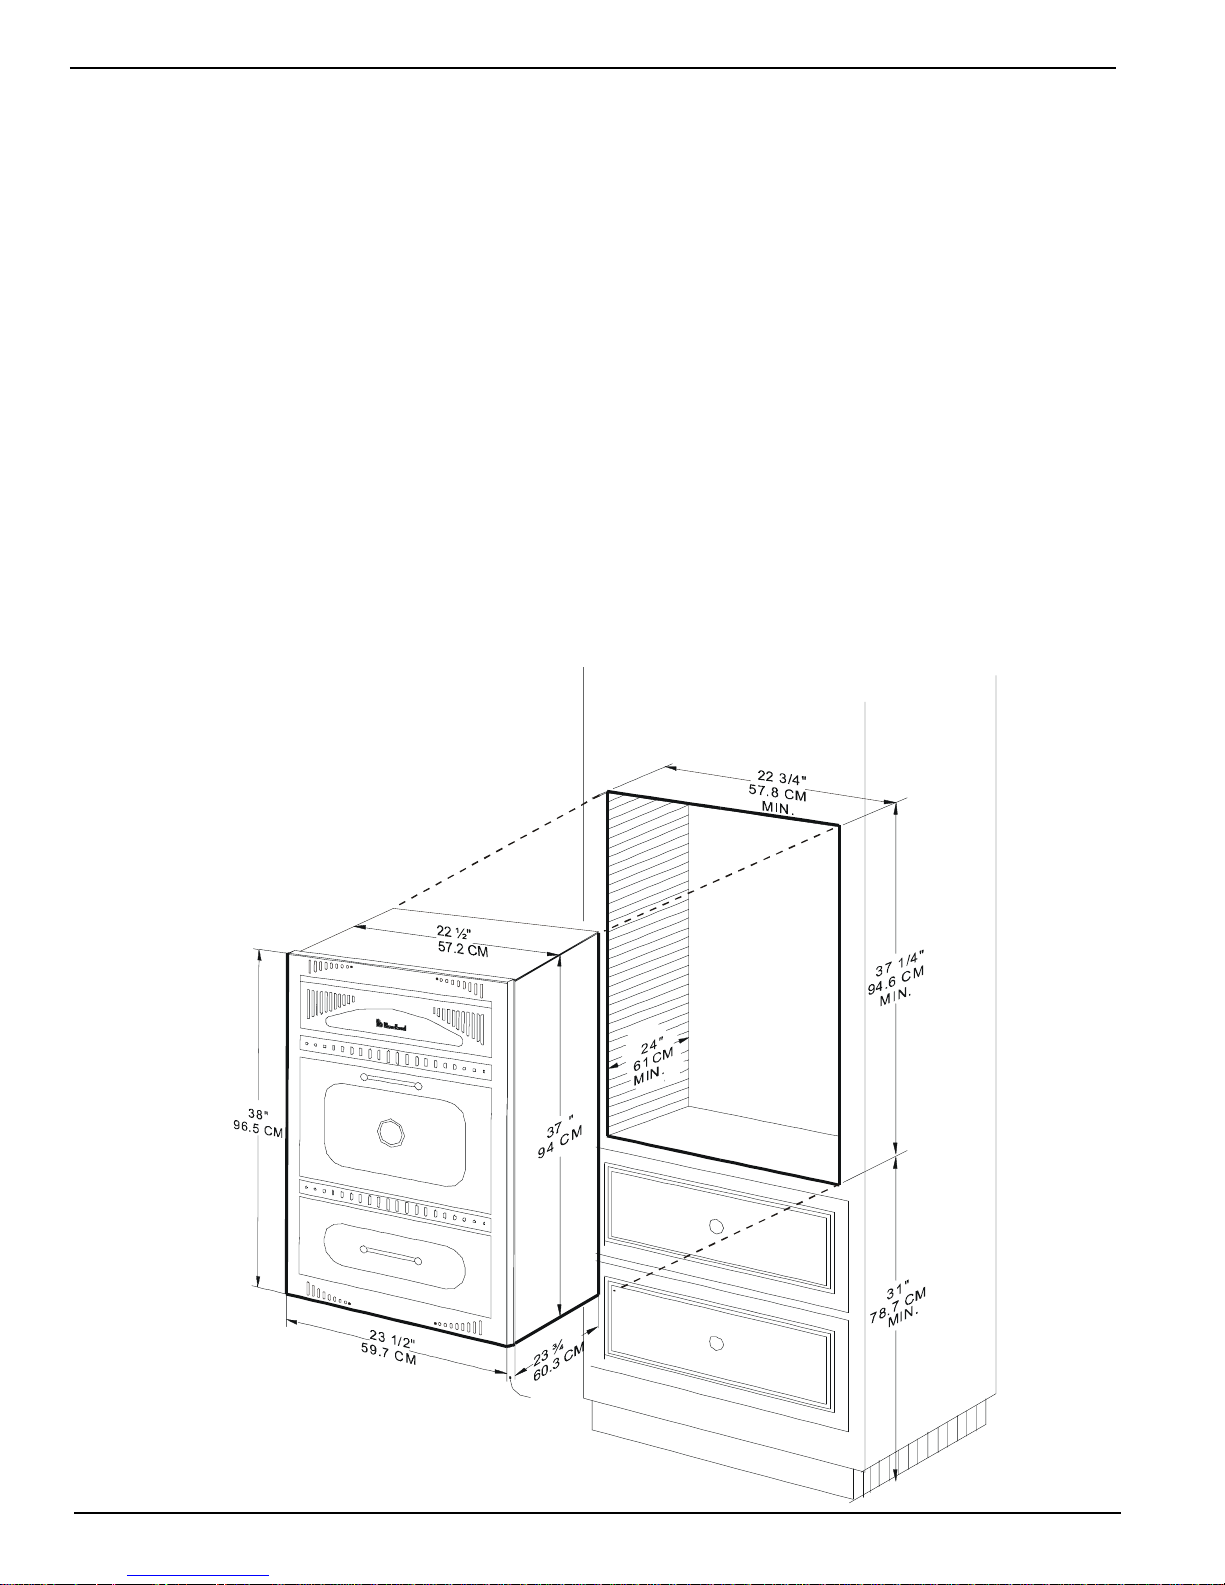
This illustration shows the size of enclosure required for the appliance and the dimensions of the
appliance. Dimensions are shown in inch measurement and metric centimeter measurement. For
best cooking results your oven must be level. This can be checked at the final installation stage with a
carpenters level across the top of the appliance front. If levelling is required, shim the oven between
the bottom of the cabinet opening and the oven bottom. Please note that the power supply box must
be mounted in the cupboard below, modifications to the cupboard may be required.
CAUTION- Children climbing on oven to reach items could be seriously injured therefore,
do not store items of interest to children in cabinet above the oven.
Please note: The wall oven face will meet your cabinet facing resulting in some heat transfer to
the cabinet facing. If your cabinets have a plastic coating or veneer check with the manufacturer
to ensure it was applied with a (300
adhesive are not heat resistant, it is possible that the coating will deform or become detached,
particularly along the edges that meet the wall oven.
°F) heat resistant adhesive. If the plastic coating and the
You must have a qualified electrician
connect the new oven to ensure that all
electrical codes and rules are observed.
1 ½"
3.81 CM
4
Installation
Beginning installation
1. Once the location of the unit has been determined construct an enclosure with dimensions as
shown on page 4. Be sure to take your time and measure accurately.
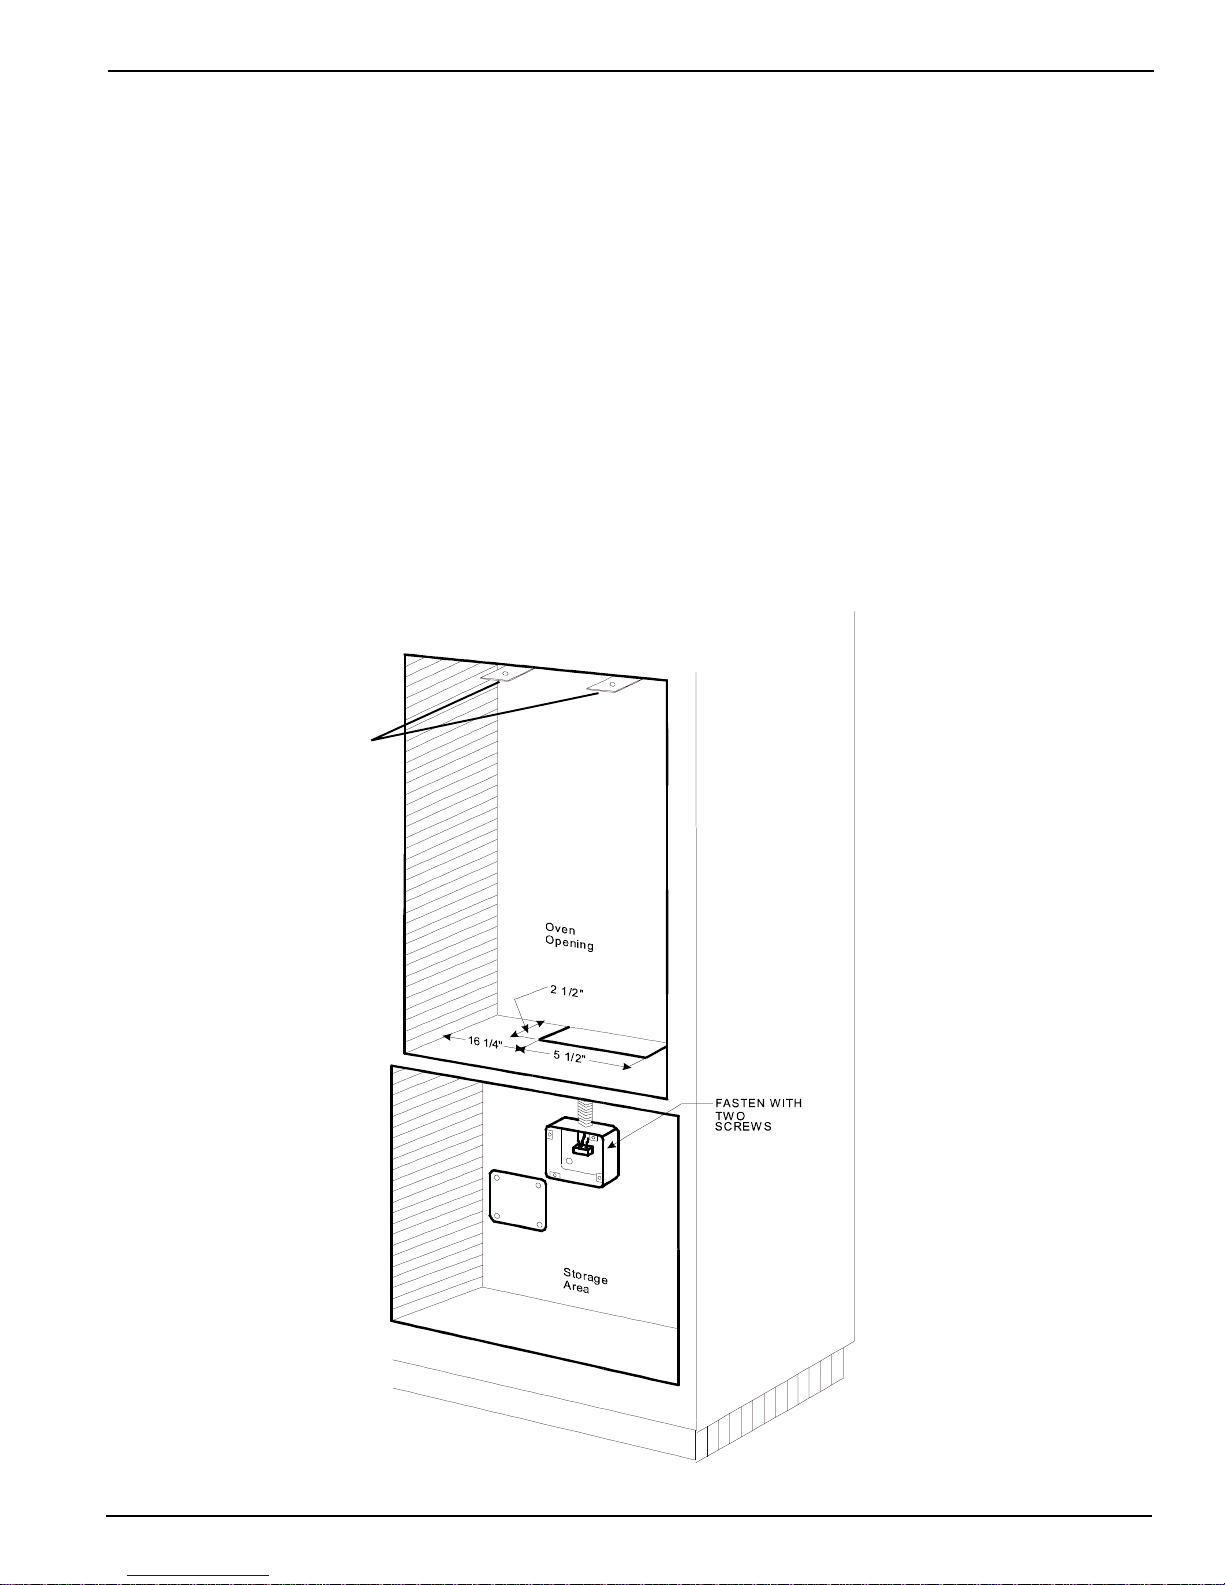
2. At this point you will have to create the opening for the power supply box. The power supply
box (included with the unit) must be mounted in the cupboard under the appliance opening. The
power supply box comes with 36" cable and can be mounted anywhere within the length of the
cable. At the rear of the opening and 16 1/4" from the left side, cut a slot 5 1/2" x 2 1/2" (see
illustration below). Ensure that you can easily slide the supply box through it. (The power
supply box is permanently attached to the appliance and is mounted after the appliance is
installed.)
3. Screw the anchor clips to the top of the cabinet opening as shown on page 6. These clips will
later secure the unit to the cabinet and must be installed. Find the centre of the opening and
mount the clips 7 3/16" on each side of the centre point, and extending from the opening
approximately 5/8".
Mount clips here
(see page 6)
5
Installation
Final installation
Note: It is recommended to have two people for lifting the oven.
1. Lift the unit up to the opening and guide the supply box through the slot into the lower cupboard
at the back of the opening. The power supply box and cable must be fully inserted into the lower
cupboard or the appliance will not install completely into the enclosure.
2. Slide the unit into place and check that the unit is level by placing a spirit level across the top
of appliance front. If levelling is required, shim the unit between the base and the bottom opening.
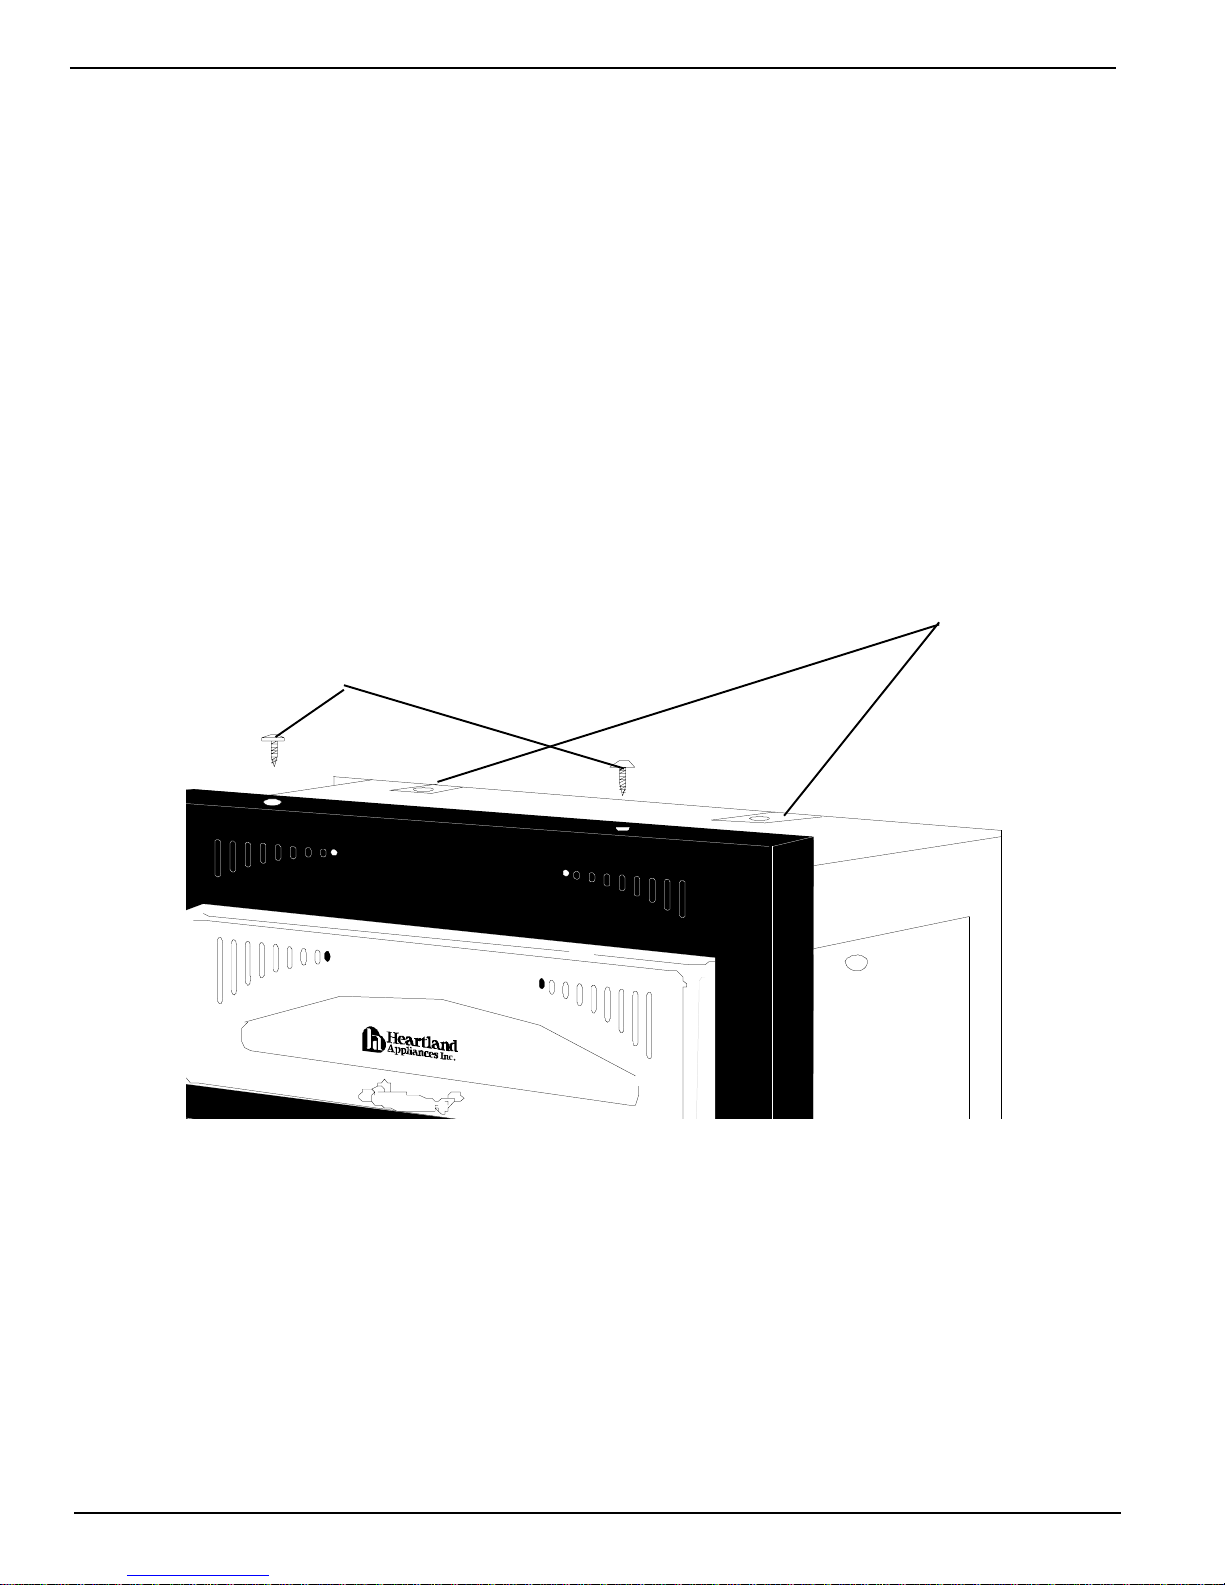
3. After unit has been levelled, secure the unit to the cupboard with two screws along the top, into
the two anchor clips installed previously. (see below and page 5 illustration )
4. Remove cover of the power supply box and fasten the supply box to the back of the cupboard
Anchor clips
Screw unit to anchor clips
installed in cabinet opening
below with four wood screws (See page 5).
5. The unit can now be wired into the power source by a qualified electrician.
6. Before turning the unit on please read “Before you Start” under the Operation section on page
10.
Note:
The oven face should not go inside the opening. Following these directions the face-plate will
over lap the cabinet by 1/4" top and bottom and on the sides. The flange will extend 1 1/2" off
the face of the cabinet when mounted.
6
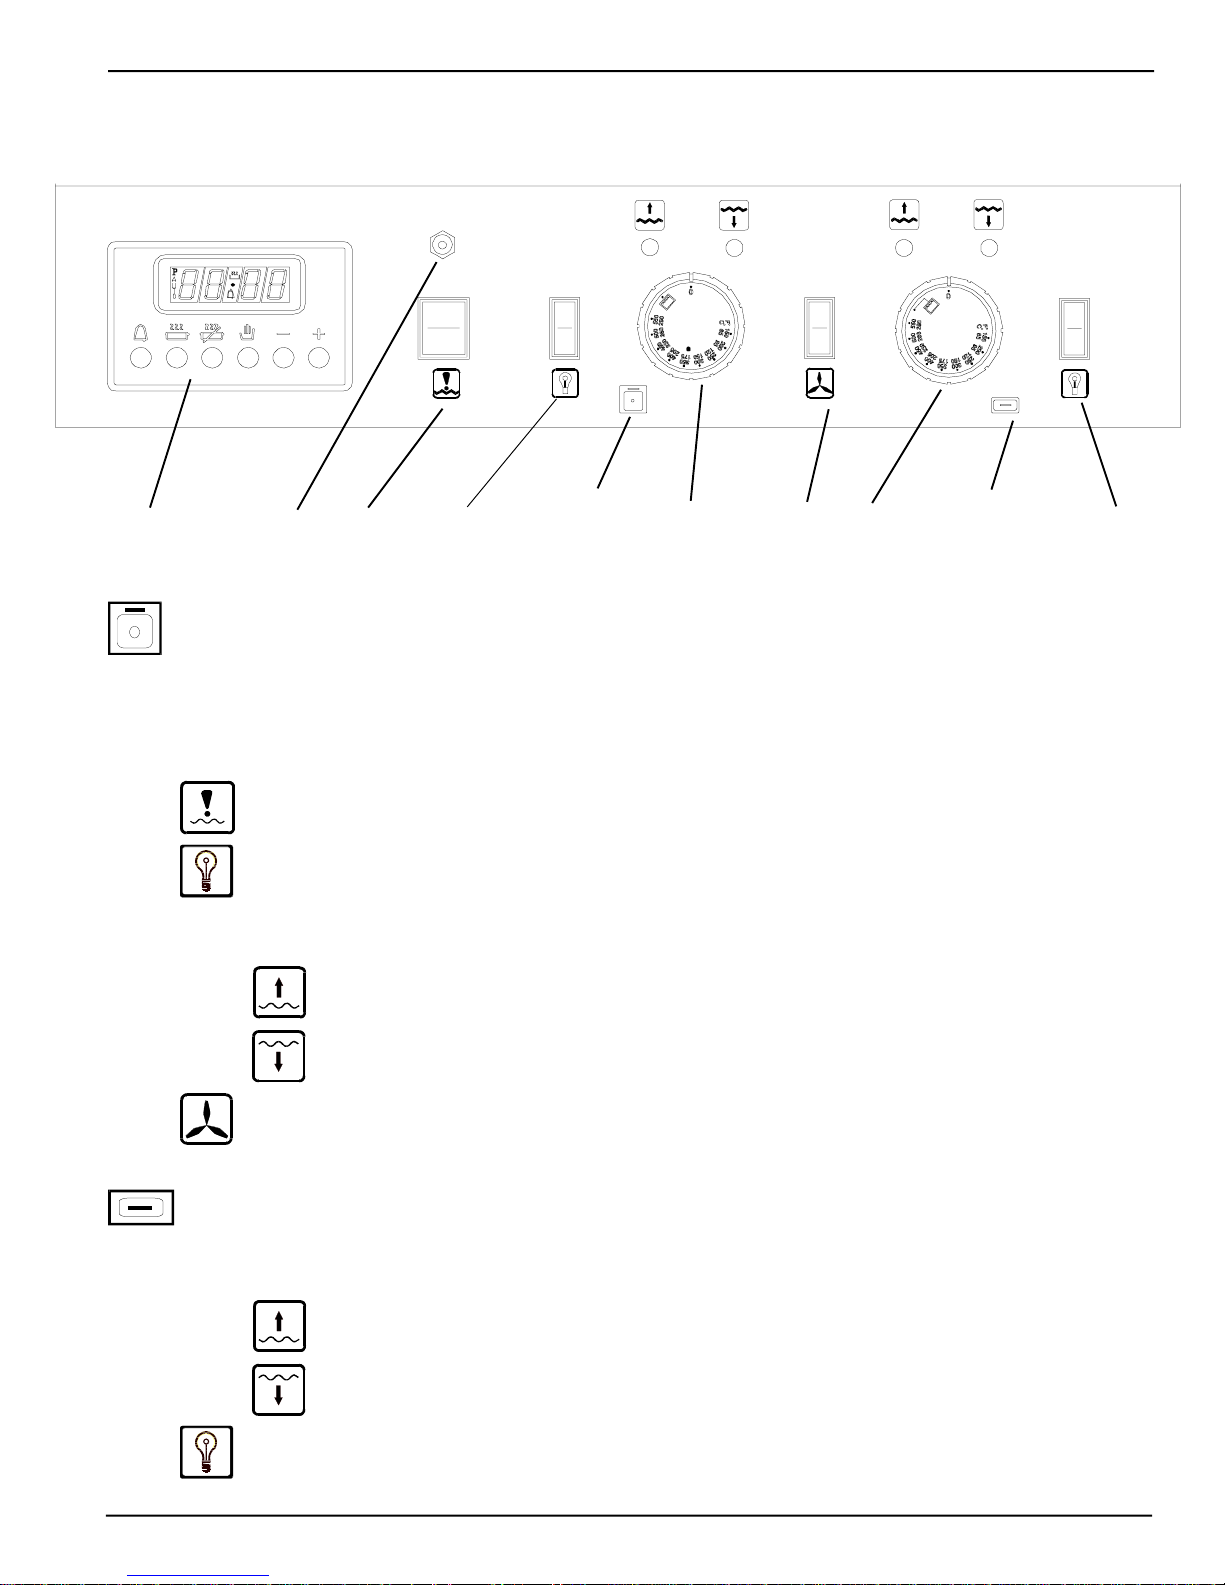
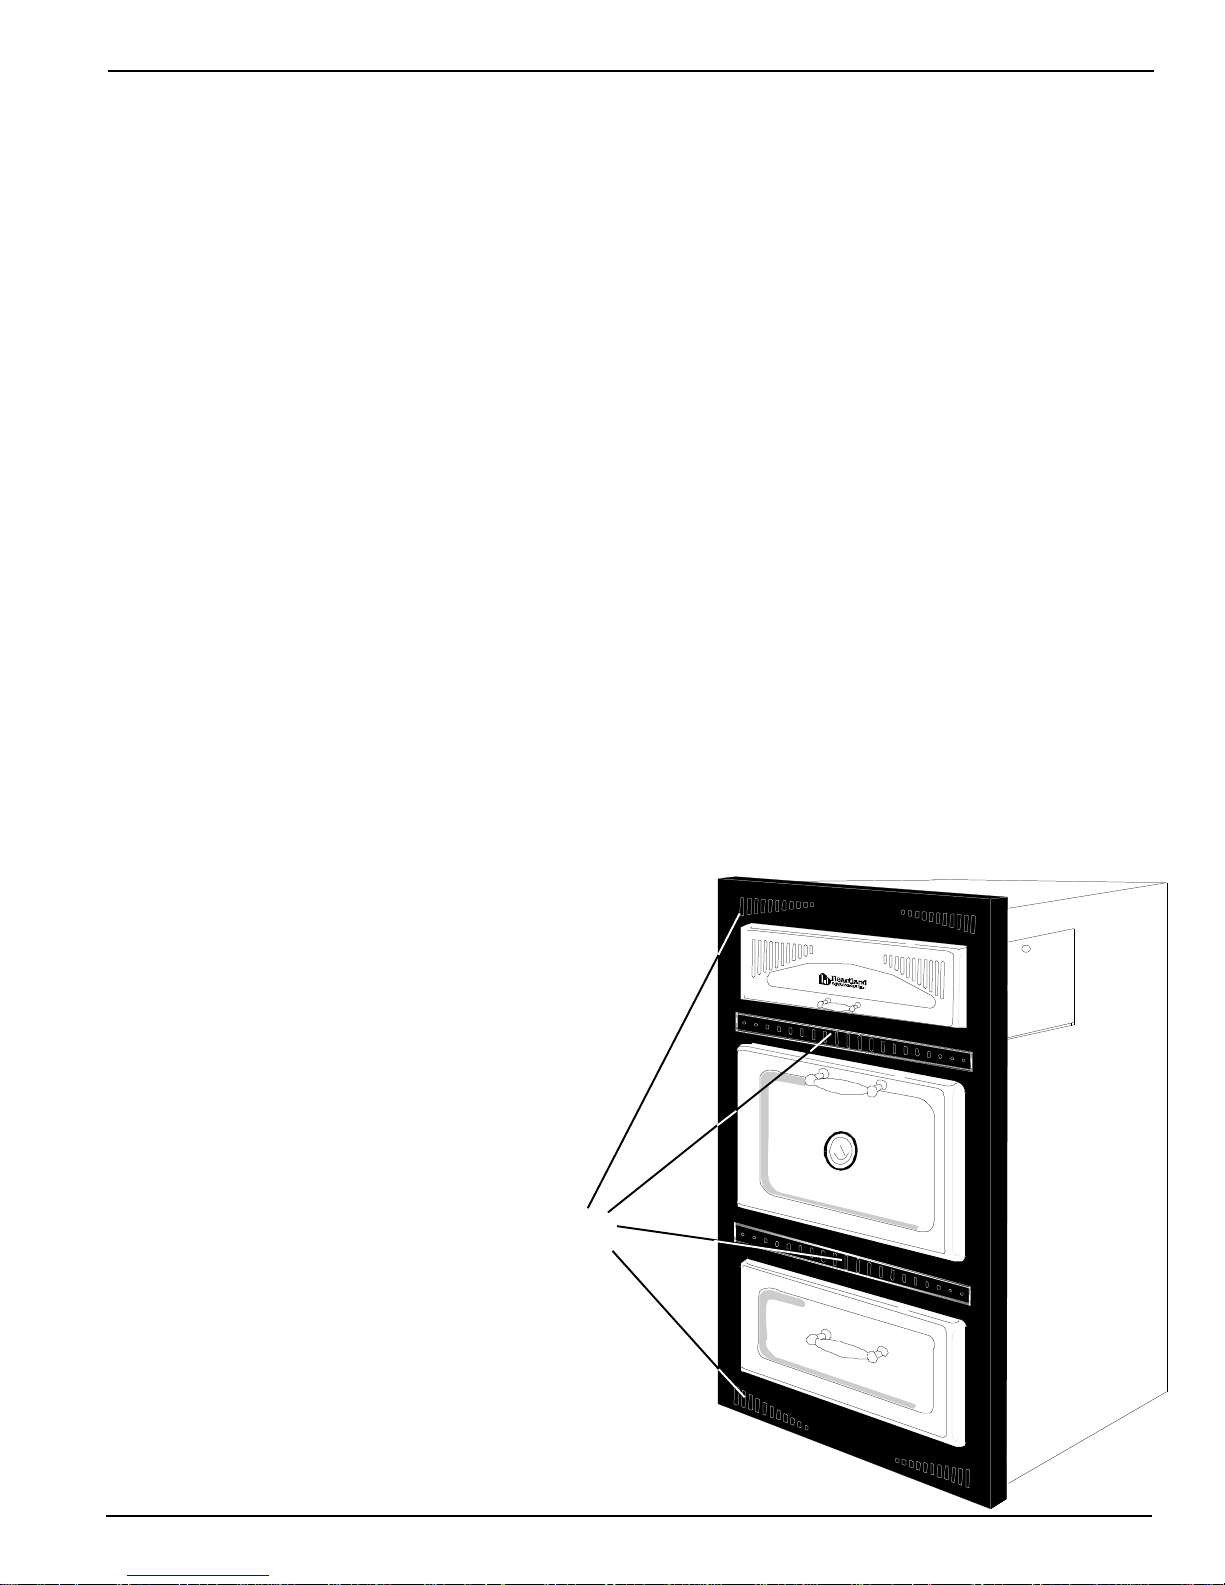
Features
Features
T
A
E
H
E
R
P
Lower oven
symbol
A
B
Main oven
CD
symbol
E
G H
F
Dual Oven Control Panel Features
#9730 Self Clean
A) Digital Timer - With minute minder and automatic stop and start cooking and self clean functions.
B) Self clean oven reset button (self clean only)
C) Rocker Switch, controls self clean function (see page 14)
D) Oven light on/off switch. Up position is "Off"
E) Main Oven Temperature Control in Fahrenheit and Celsius with -
bake indicator
broil indicator
F) On / off switch - Controls convection fan for regular baking/broiling and convection baking/
broiling. Up position is "Off"
Lower Oven Controls:
G) Lower Oven Temperature Control -
bake indicator
broil indicator
H) Oven light on/off switch. Up position is "Off"
I ) Control Panel door Cover :
7

Features
Dual Oven Features
door slides up into the unit to reveal control
panel with timer, light switches, oven indicators
and controls. Also houses self clean control.
J) Main Oven:
- baking, broiling
- timed baking, broiling
- convection baking, broiling
- timed convection baking,
- 4 position racking
- 2.7 cubic feet of energy
- self clean feature
K) Lower Oven :
- for regular baking and broiling
- 2 position racking.
-1.5 cubic feet of energy efficient baking area
(.04 cubic meters)
boiling
efficient baking area (.07
cubic meters)
L) A grease filter is included that may be fitted onto
the fan shield to limit grease build-up when roasting
or broiling meats in an uncovered vessel in
convection mode.
8
Safety
Important Safety Instructions
Oven Safety
DO NOT TOUCH HEATING ELEMENTS OR INTERIOR SURFACES OF OVEN-Heating elements may be hot even though
they are dark in color. Interior surfaces of an oven become hot enough to cause burns.
During and after use, do not touch, or let clothing or other flammable materials contact heating elements or interior surfaces
of oven until they have had sufficient time to cool.
Other surfaces of the appliance may become hot enough to cause burns. For example, oven vent opening surfaces near
these openings and oven doors. Do not set cooking utensils directly on oven floor!
Note: In the lower oven the bake element is contained under the oven floor. This facilitates easier cleaning and more usable
space in the oven.
1. Use care when opening door - let hot air or steam escape before removing or replacing food.
2. Do not heat unopened food containers - build-up of pressure may cause container to burst and result in injury.
3. Keep oven vent ducts clear of obstruction. See illustration below
4. Placement of oven racks-always place oven racks in desired location while oven is cool. If rack must be moved while
oven is hot, do not let pot holder contact hot heating element in oven.
Self Clean Safety Instructions
Read the instructions below and the appropriate timer instructions before attempting to operate. Do not leave
food or cooking utensils, etc, in the oven during self-cleaning mode of operation.
Do not touch heating elements or interior surfaces of oven—heating elements may be hot even though they are dark
in colour. Interior surfaces of an oven become hot enough to cause
burns.
During and after use, do not touch, or let clothing or other
flammable materials to contact heating elements or interior
surfaces of oven until they have had sufficient time to cool.
Other surfaces of the appliance may become hot enough to
cause burns—among these surfaces are, for example, oven
vent openings, oven doors and surfaces near these openings.
1. Remove utensils and cookware from the oven. Oven
racks and rack supports should be removed from the oven.
Racks and supports left in the oven during self clean will
become discoloured, but it will not
affect the protective coating.
2. DO NOT clean the gasket. The
door gasket is essential for a good
seal. Care should be taken not to
rub, damage or move the gasket.
Vents must be
kept clear of
obstructions
3. Never use a commercial oven
cleaner in a self cleaning oven. This will damage the finish.
4. Make sure the convection fan and oven light is off. The convection
fan and light switch must be turned off at the control panel.
9
 Loading...