

Page 1
IMPORTANT NOTES
Your Measure for Good Health™
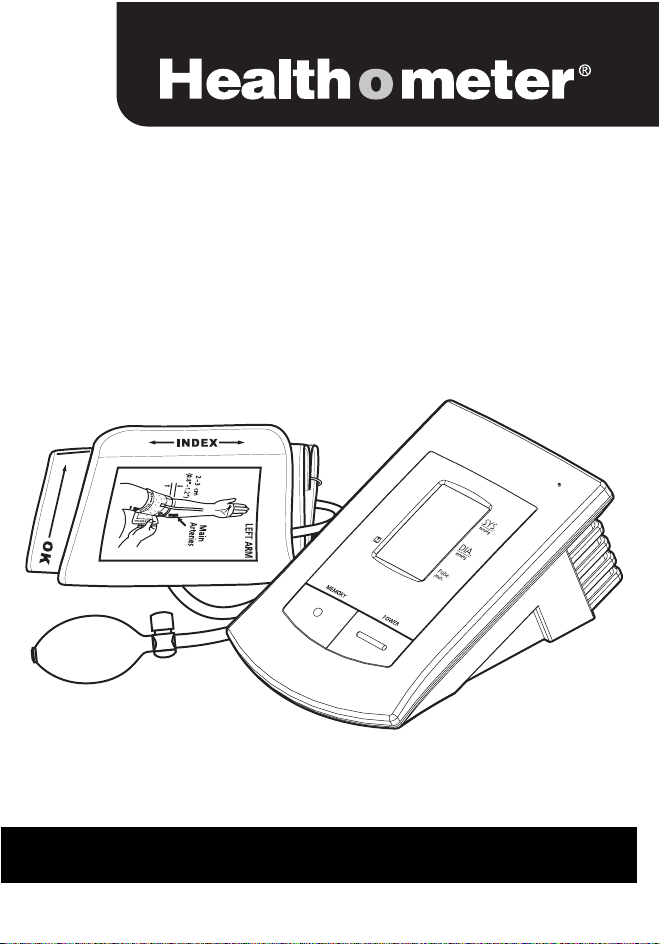
UPPER ARM
Blood Pressure
Monitor
Page 2

2
IMPORTANT SAFETY INSTRUCTIONS
Upper Arm Blood
Pressure Monitor
DO NOT DESTROY
Features:
• Semi-Automatic
• Large, Easy-To-Read Digital Display
• 60 Automatic Memory Feature
• Convenient Storage Case
In accordance with International Standards:
Page 3

3
Table of Contents
Introduction . . . . . . . . . . . . . . . . . . . . . . . . . . . . . . . . . . . . . . . . . . . . . . . . . 3-4
Product Component Identification . . . . . . . . . . . . . . . . . . . . . . . . . . . . . . . . 4
Standards of Quality . . . . . . . . . . . . . . . . . . . . . . . . . . . . . . . . . . . . . . . . . . . 5
About Blood Pressure . . . . . . . . . . . . . . . . . . . . . . . . . . . . . . . . . . . . . . . . . . 5
Blood Pressure Standard . . . . . . . . . . . . . . . . . . . . . . . . . . . . . . . . . . . . . . . 6
Blood Pressure Fluctuation . . . . . . . . . . . . . . . . . . . . . . . . . . . . . . . . . . . . . . 6
Display Explanations . . . . . . . . . . . . . . . . . . . . . . . . . . . . . . . . . . . . . . . . . . . 7
Installing Batteries . . . . . . . . . . . . . . . . . . . . . . . . . . . . . . . . . . . . . . . . . . . 7-8
HOW TO USE . . . . . . . . . . . . . . . . . . . . . . . . . . . . . . . . . . . . . . . . . . . . . . . 8-12
• Helpful Tips . . . . . . . . . . . . . . . . . . . . . . . . . . . . . . . . . . . . . . . . . . . . . . . . 8
• Applying the Cuff . . . . . . . . . . . . . . . . . . . . . . . . . . . . . . . . . . . . . . . . . 9-10
• Taking a Measurement . . . . . . . . . . . . . . . . . . . . . . . . . . . . . . . . . . . 10-11
• Recalling Memory . . . . . . . . . . . . . . . . . . . . . . . . . . . . . . . . . . . . . . . . . . 12
Troubleshooting . . . . . . . . . . . . . . . . . . . . . . . . . . . . . . . . . . . . . . . . . . . . . . 13
Precautionary Notes . . . . . . . . . . . . . . . . . . . . . . . . . . . . . . . . . . . . . . . . . . 14
Specifications . . . . . . . . . . . . . . . . . . . . . . . . . . . . . . . . . . . . . . . . . . . . . . . . 15
Warranty Information . . . . . . . . . . . . . . . . . . . . . . . . . . . . . . . . . . . . . . . . . . 16
Introduction
Congratulations on your purchase of the new Health o meter®Arm Blood Pressure
Monitor Model 7630. This semi-automatic device is both easy to use and ideally
suited for daily measurements. The large display includes systolic, diastolic and
pulse measurements, all clearly shown at the completion of each reading.
In addition, you can store up to 60 measurements using the monitor’s built-in
memory feature, ideal for users who want to monitor and track their blood pressure
on a regular basis. The Health o meter
®
blood pressure monitor is portable,
making it ideal for both home and travel usage.
Page 4
Blood pressure measurements determined with the Health o meter®blood pressure
monitor are equivalent to those using the cuff/stethoscope auscultation method
and are within the limits prescribed by the American National Standards Institute
(ANSI). This monitor is to be used by an adult and is intended for in-home use.
Note: Please read this manual carefully before use. For specific information about
your own blood pressure, contact your physician. Please be sure to keep this
manual for future reference.
Product Component Identification:
A. LCD Display E. 4 AA Size 1.5v Batteries (Included)
B. Memory Recall Button F. Power Button (for ON/OFF)
C. Arm Cuff G. Air Tube and Connector
D. Air Release Valve H. Inflating Bulb
64
Page 5

5
Standards of Quality
This Blood Pressure Monitor conforms with the American National Standards
Institute/American Association of Medical Instrumentation Standards for Non-Invasive
Blood Pressure Monitors. In addition, the device complies with the European
regulations and bears the CE mark “CE 0366”. The quality of the device has been
verified and conforms to the provisions of the EC council directive 93/42/EEC dated
14 June 1993 concerning medical devices, as well as the EMC directive 89/336/EEC:
ANSI/AAMI SP10 Electronic or automated Sphygmomanometers
EN 1060-1 (Dec. 1995) Non-invasive blood pressure measuring equipment
General requirements
EN 1060-3 (Feb. 1997) Non-invasive blood pressure measuring equipment
Supplementary requirements for electromechanical
blood pressure measuring systems
ABOUT
BLOOD PRESSURE
What is Blood Pressure?
Blood pressure is the pressure exerted on the inside of the artery wall while
blood flows through the artery. The pressure measured when the heart
contracts and sends blood out of the heart is the “systolic” reading (higher
number). The pressure measured when the heart dilates with blood flowing
into the heart is called the “diastolic” (lowest number) blood pressure.
Why Measure Your Blood Pressure?
Various health problems associated to high blood pressure are quite common with
people in today’s society. There is a significant correlation of high blood pressure
with cardiovascular disease. This correlation has made measuring one’s blood
pressure a necessity for those individuals identified with high blood pressure,
placing them into a high risk category pertaining to cardiovascular disease.
Also, as a person ages, one’s blood pressure can change over time, thus it makes
good “health sense” to monitor your blood pressure on a regular basis.
Page 6
6
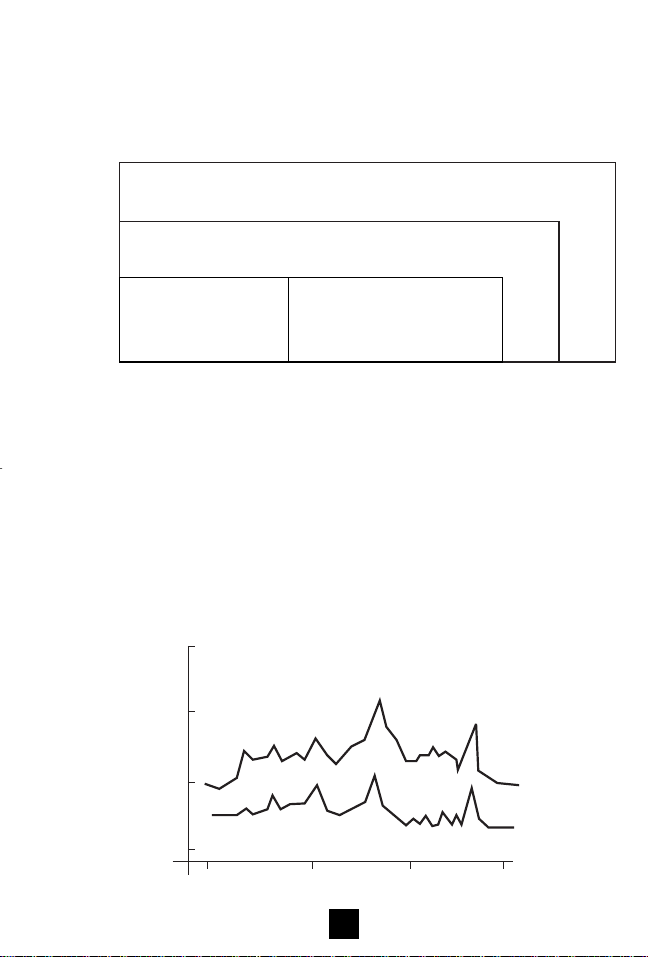
Blood Pressure Standard
The World Health Organization (WHO) has developed a blood pressure
standard, according to which areas of low and high-risk blood pressure
are identified. This standard, however, is a general guideline as individual
blood pressure varies among different people and different age groups, etc.
It is important that you consult with your physician regularly.
Your physician can tell you your optimal blood pressure range.
Blood Pressure Fluctuation
Blood pressure fluctuates all the time!
Blood pressure will change over the course of the month, week and even
throughout the day. It is also influenced by seasonal and temperature changes.
Systolic over 160
Diastolic over 100
Hypertension
Systolic 140 ~159
Diastolic 90 ~ 94
Borderline
Systolic under 139
Diastolic under 89
Normal
Systolic
under 99
Hypotension
Systolic (mmHg) →
140100
90
95
160
Diastolic (mmHg)→
Fluctuation Within a Day
(Case: Male, 35 Years Old)
WakeUpArrive
Office
Discussion
on the
Telephone
Argument
in a
Meeting
Leave
Office
6 PM 12 AM 12 PM6 AM
50
100
150
200
mm Hg
Dinner
/Sleep
Systolic Pressure
Diastolic Pressure
Fluctuación Durante un Día
(Caso: Varón, 35 Años de Edad)
Levan-
tarse
Al Llegar
a la Oficina
Discusión
por
Teléfono
Discusión
a la
Oficina
Al Salir de
la Oficina
6 PM 12 AM12 PM6 AM
50
100
150
200
mmHg
Cena
/Sueño
Presión Sistólica
Presión Diastólica
Sistólica sobre 160
Diastólica sobre 100
Hipertensión
Sistólica 140 ~159
Diastólica 90 ~ 94
Fronteriza
Sistólica debajo 139
Diastólica debajo 89
Normal
Sistólica
baja 99
Bajo Presión
Sistólica (mmHg) →
140100
90
95
160
Diastólica (mmHg)→
Page 7
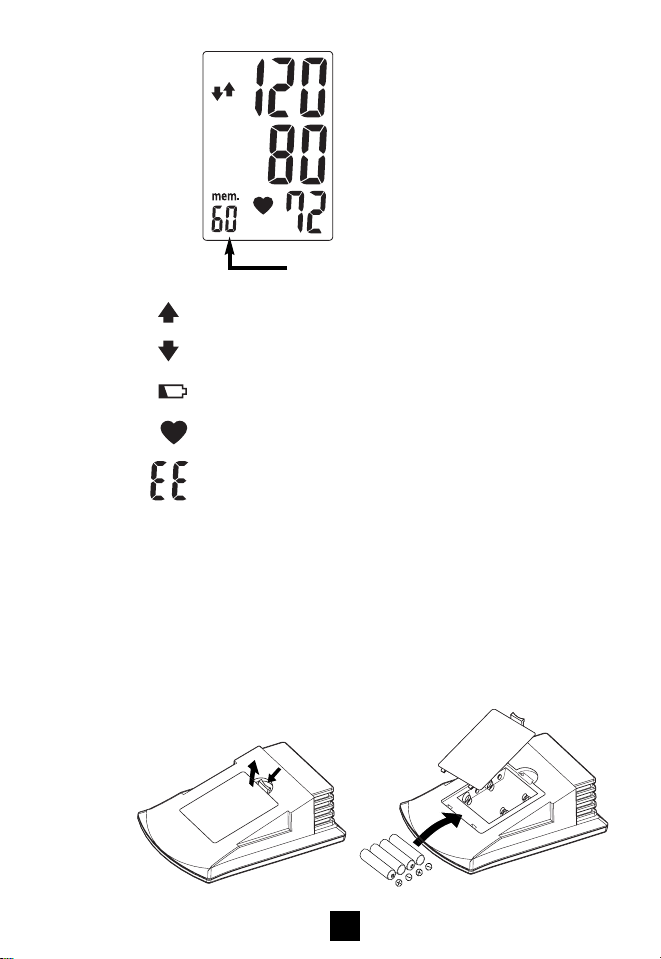
Display Explanations
Display:
Systolic Pressure
Diastolic Pressure
Pulse Rate
No. of Memory Sequence
Icons:
Appears when manual cuff inflation is needed
Appears when manual cuff deflation is needed
Appears when batteries should be replaced
Shows the Pulse Rate per minute
Occurs when a mistake wasmade during measurement
Installing Batteries
1. Press down and lift the battery cover in the direction of the arrow
to open the battery compartment.
2. Install or replace 4 AA 1.5v batteries in the battery compartment
according to the battery direction indicators molded on the inside
of the compartment.
3. Replace the battery cover by inserting the bottom tabs first, then push
in the top clip of the battery door until it engages.
7
Page 8

You need to replace the batteries when:
1. The “low battery” icon appears on the display.
2. The “POWER” button is pushed and nothing appears on the display.
Note: Discard used Alkaline batteries as directed by your local
environmental codes.
HOW TO USE:
Helpful Tips
Here are a few tips to help you obtain more accurate readings:
• Do not measure your blood pressure immediately after consuming a
large meal. To obtain more accurate readings, please wait one hour
before measuring.
• Do not smoke or drink alcohol before measuring your blood pressure.
• You should not be physically tired or exhausted when taking
a measurement.
• It is important that you relax during measurement. Try to take
a 15-minute rest before taking a reading.
• Do not take measurements if you are under stress or under tension.
• Take your blood pressure at normal body temperature. If you are
feeling cold or hot, wait a while before taking a measurement.
• If the monitor is stored at very low temperature (near freezing),
have it placed at a warm location for at least one hour before using it.
• Wait about 5 minutes before taking a SECOND blood pressure
measurement.
14
8
Page 9
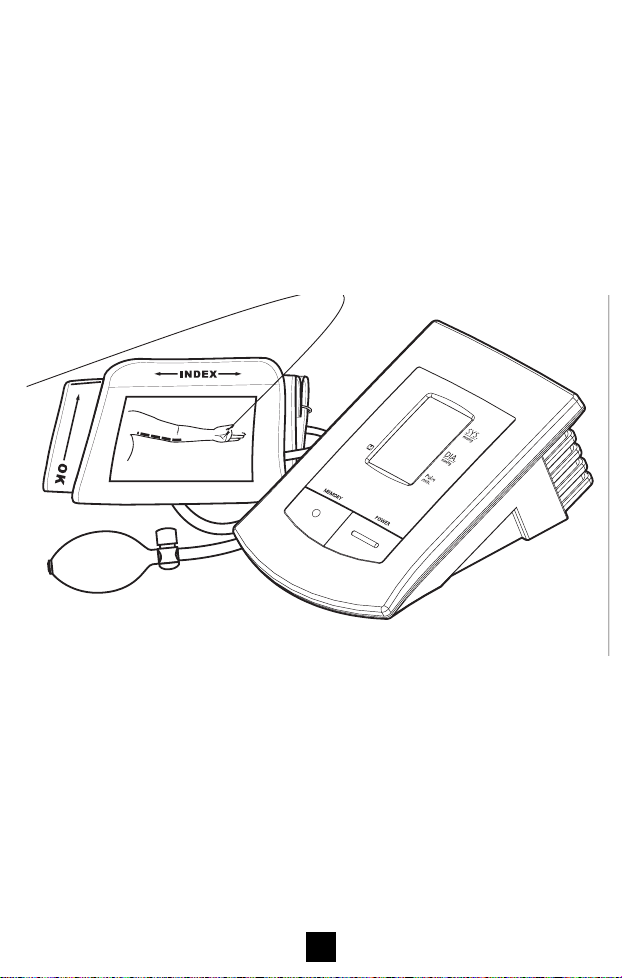
Applying the Arm Cuff
1.0 Inch
2 - 3 cm
1. Plug the cuff connector tube (A) into the unit.
2. Unwrap the arm cuff, leaving the “Index” end of the cuff through
the metal D-ring (B) of the cuff.
A
B
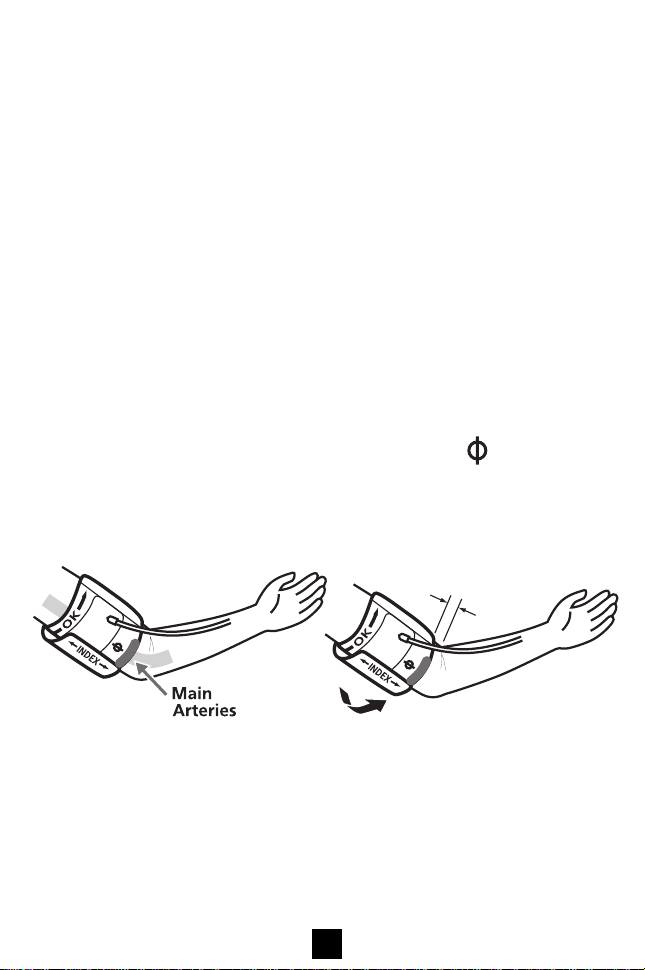
3. Put your left arm through the cuff loop. The “OK” range indication should
be positioned at the top with the rubber tube pointing downward in the
direction of your forearm. Position the artery mark [ ] over the
main arteries on the inside of your arm as shown in the figure below.
The tube should be running down the center of your arm.
4. Turn your left palm upward and place the edge of the arm cuff at
approximately 1 inch above your elbow. Tighten the cuff by pulling the
“Index” end of the cuff. The cuff should be tensioned onto the arm to
allow the insertion of two fingers between the cuff and arm. If the
tension on the cuff is too tight or too loose, it may result in an error “EE”
message on the display.
9
Page 10

10
5. If the Index line falls within the “OK” range, indicated at the edge of the
cuff, this cuff is suitable for your use. If the Index line falls outside of
the “OK” range, you may need a larger cuff for accurate measurement.
Please consult your local retailer for the purchase of a larger cuff
or visit the Health o meter
®
website at www.healthometer.com.
Sit in a chair with your feet flat on the floor. Rest your left arm on a table
so that the arm cuff is at the same level as your heart.
Taking a Measurement
1. Press the POWER button (Fig. 1). All display segments will appear for
approximately one second before returning to “0”. If the downward
arrow “ ” flashes, this means that there is air remaining in the cuff.
(Fig. 2). Release it by pressing the “Air Release Valve” (Fig. 3) until “0”
appears on display.
Fig. 1 Fig. 2 Fig. 3
The unit is ready for measurement at this point.
Page 11

2. Squeeze the bulb to increase pressure in the arm cuff. The display will show
the pressure reading within the cuff. Continue pumping until the pressure
reaches approximately 50~60 mmHg above your normal systolic pressure.
If the pressure in the cuff is not high enough, an upward arrow ( )
will display to remind you that you should continue pumping.
3. Sit still and wait for the cuff to deflate and measure your blood pressure.
It is important to remain still and quiet during measurement.
Any significant movement may affect measurement results.
4. When the monitor completes the measurement, it will automatically display
and store the systolic, diastolic, and pulse reading into memory. The last
60 measurement readings will be saved into memory.
The display will indicate a downward arrow ( ). Keep pressing the
air release valve above the bulb until all pressure in cuff is released.
5. Press the POWER button to turn the unit off. The unit will automatically
shut off after 1 minute if no buttons are pressed.
11
Page 12

Recalling Memory
1. To recall stored blood pressure readings from the memory, simply press
the MEMORY button. The last set of readings recorded in memory
will be displayed.
2. Another press of the MEMORY button will recall the previous set
of readings.
3. All readings stored in memory will be displayed with their corresponding
sequence number.
Note:
1. The data in the memory will not be lost even when the Blood Pressure
Monitor is switched off.
2. You can erase the memories stored by removing the batteries.
22
12
Page 13

Troubleshooting
If a problem should arise during use, please check the following points.
Symptom
No display when the POWER
button is pressed
EE mark shown on the display
or the blood pressure value
is displayed excessively low
(or high)
Check Point
Have the batteries run down?
Have the batteries been
properly positioned in the
compartment?
Is the cuff placed correctly?
Is the cuff tensioned correctly?
Is the cuff pressure pumped
enough? (50-60mmHg above
normal systolic value)
Did you talk or move during
the measurement?
Did you shake the arm with
the cuff on it?
Correction
Replace them with 4 new
“AA” alkaline batteries
Re-insert the batteries
in the correct position
Wrap the cuff properly so
that it is positioned and
tensioned correctly
Measure it again and pump
up 50-60mmHg more than
normal systolic value
Measure it again quietly
Note: If the unit still does not work, please see the Warranty Information
in this manual. Under no circumstance should you disassemble
the unit and attempt repairs yourself.
13
Page 14

Precautionary Notes:
1. Your Health o meter®monitor contains high-precision components.
Therefore, avoid extreme temperatures, humidity, and direct sunlight.
Avoid dropping or sharp impacts to the main unit, and protect it from dust.
2. Clean the blood pressure monitor body and the cuff carefully with a slightly
dampened soft cloth. Do not press on the unit too hard. Do not wash the cuff
or use chemical cleaners on it. Never use thinner, alcohol or petrol (gasoline)
as cleaner.
3. Leaky batteries can damage the unit. Remove the batteries when the unit
is not used for an extended period of time.
4. To avoid hazardous situations, the unit should not be operated by children.
5. If the unit is stored near a freezing temperature, allow it to reach room
temperature before use.
6. Your Health o meter
®
Blood Pressure Monitor is not field serviceable.
You should not use any tool to open the device nor should you attempt to
make any adjustments to it. If the monitor is not working properly please contact
Sunbeam Products, Inc. as outlined under the Warranty information in this manual.
7. For users diagnosed with common arrhythmia (atrial or ventricular premature beats
or atrial fibrillation), diabetes, poor circulation of blood, kidney problems, or for
users who have suffered from stroke, or for unconscious users, this device may
not be suitable for use. Please consult your physician prior to use.
14
Page 15

Specifications:
Measurement Method : Oscillometric
Measurement Range : Pressure: 20~280mmHg; Pulse: 40~180 beats/minute
Pressure Sensor : Semi Conductor
Accuracy : Pressure: ± 3mmHg; Pulse: ± 5% of reading
Inflation : Manual Inflation
Deflation : Automatic Pressure Release Valve
Memory capacity : 60-set memory
Auto-shut-off : 1 minute after last button operation
Operation Environment : Temperature: 10°C – 40°C (50°F – 104°F); Humidity: 40 – 85%
Storage Environment : Temperature: -5°C – 60°C ( 23°F – 140°F ); Humidity:10 – 95%
Power Source : 6 Volts / Four 1.5 Volt DC (AA) Batteries
Dimensions : 105 (L) x 160 (W) x 68 (H) mm
Weight : 335 g (G.W.) (without Batteries)
Arm circumference : Adult : 22 – 32 cm (8.7 – 12.6 inches) (standard)
: Large Adult : 32 – 42 cm (12.6 – 16.5 inches) (optional)
K.B. : Short time operation 2 minutes
: Classification of type BF
*To ensure accurate measurements, it is recommended that calibration be completed every two years.
**Specifications are subject to change without notice.
15
Page 16

Warranty Information
®
Your Health o meter
Blood Pressure Monitor is covered under the limited Warranty
offered by Sunbeam Products, Inc. (“Sunbeam”). Sunbeam warrants that for a period
of five years from the date of purchase, this product will be free from defects in
material and workmanship. Sunbeam, at its option, will repair or replace this product or
any component of the product found to be defective during the warranty period.
Replacement will be made with a new or remanufactured product or component.
If the product is no longer available, replacement may be made with a similar product
of equal or greater value. This is your exclusive warranty. This warranty is valid for the
original retail purchaser from the date of initial retail purchase and is not transferable.
Keep the original sales receipt. Proof of purchase is required to obtain warranty
performance. Sunbeam dealers, service centers or retail stores selling Sunbeam
Products do not have the right to alter, modify or in any way change the terms and
conditions of this warranty.
This warranty does not cover normal wear of parts or damage resulting from any of the
following: negligent use or misuse of the product, use on improper voltage or current,
use contrary to the operating instructions, disassembly, repair or alteration by anyone
other than Sunbeam or an authorized service center. Further, the warranty does not
cover Acts of God or Nature, such as fire, flood, hurricane and/or tornado.
Sunbeam shall not be liable for any incidental or consequential damages caused
by the breach of any express or implied warranty. Except to the extent prohibited
by applicable law, any implied warranty of merchantability or fitness for a particular
purpose is limited in duration to the duration of the above warranty. Some states,
provinces or jurisdictions do not allow the exclusion or limitation of incidental
or consequential damages or limitations on how long an implied warranty lasts,
so the above limitations or exclusion may not apply to you. This warranty gives
you specific legal rights, and you may also have other rights that vary from state
to state or province to province.
For more information, or to obtain warranty service, contact Sunbeam Products, Inc. at
800 672-5625 or visit the Health o meter
©2002 Sunbeam Products, Inc. All rights reserved.
Health o meter
®
is a registered trademark of Sunbeam Products, Inc.
®
website at www.healthometer.com
Distributed by Sunbeam Products, Inc., Boca Raton, FL 33431.
Manual printed in Taiwan.
16
Page 17

NOTAS IMPORTANTES
Your Measure for Good Health™
DE BRAZO
Medidor de Presión
Arterial
Page 18

2
INSTRUCCIONES DE MEDIDAS IMPORTANTES
Medidor de Presión
Arterial
NO DESTRUYA
Características:
• Semi-Automático
• Pantalla Digital Grande,
Fácil de Leer
• Brinda 60 Memorias Automáticas
• Caja de Almacenamiento
Muy Conveniente
De Conformidad con Estándares Internacionales:
Page 19

3
Indice
Introducción . . . . . . . . . . . . . . . . . . . . . . . . . . . . . . . . . . . . . . . . . . . . . . . . 3-4
Identificación de los Componentes del Producto . . . . . . . . . . . . . . . . . . . . 4
Estándares de Calidad . . . . . . . . . . . . . . . . . . . . . . . . . . . . . . . . . . . . . . . . . . 5
Acerca de la Presión Arterial . . . . . . . . . . . . . . . . . . . . . . . . . . . . . . . . . . . . 5
Estándar de Presión Arterial . . . . . . . . . . . . . . . . . . . . . . . . . . . . . . . . . . . . . 6
Fluctuaciones de la Presión Arterial . . . . . . . . . . . . . . . . . . . . . . . . . . . . . . 6
Descripción de la Pantalla . . . . . . . . . . . . . . . . . . . . . . . . . . . . . . . . . . . . . . 7
Instalación de las Baterías . . . . . . . . . . . . . . . . . . . . . . . . . . . . . . . . . . . . 7-8
COMO SE USA . . . . . . . . . . . . . . . . . . . . . . . . . . . . . . . . . . . . . . . . . . . . . . 8-12
• Consejos Útiles . . . . . . . . . . . . . . . . . . . . . . . . . . . . . . . . . . . . . . . . . . . . 8
• Colocación del Brazalete . . . . . . . . . . . . . . . . . . . . . . . . . . . . . . . . . 9-10
• Tomando una Medición . . . . . . . . . . . . . . . . . . . . . . . . . . . . . . . . . . 10-11
• Lectura de las Memorias . . . . . . . . . . . . . . . . . . . . . . . . . . . . . . . . . . . 12
Solución de Problemas . . . . . . . . . . . . . . . . . . . . . . . . . . . . . . . . . . . . . . . . 13
Precauciones . . . . . . . . . . . . . . . . . . . . . . . . . . . . . . . . . . . . . . . . . . . . . . . . 14
Especificaciones . . . . . . . . . . . . . . . . . . . . . . . . . . . . . . . . . . . . . . . . . . . . . 15
Información Sobre la Garantía . . . . . . . . . . . . . . . . . . . . . . . . . . . . . . . . . . 16
Indroducción
Felicitaciones por la compra de su nuevo Monitor de Presión Arterial de Brazo
Health o meter® Modelo 7630. Este aparato semiautomático es fácil de usar y muy
adecuado para tomar mediciones diarias. La pantalla grande incluye la medición
sistólica, la diastólica y la del pulso, todas ellas mostradas claramente una vez que
se completa cada lectura.
Además, usted puede almacenar hasta 60 mediciones utilizando la característica
de memoria incorporada que tiene el monitor, lo cual es ideal para aquellos
usuarios que desean mantener el control y seguimiento de su presión arterial en
una manera regular. El monitor de presión arterial Health o meter® es portátil, lo
cual lo hace ideal para el uso en el hogar y también durante los viajes.
Page 20

4
Page 21

Estándares de Calidad
Este Monitor de Presión Arterial se ajusta al Instituto de Estándares Nacional
Americano / Asociación Americana de Estándares de Instrumentos Médicos
para Monitores de Presión Arterial No-Invasivos. Además, el aparato cumple
con las regulaciones Europeas y lleva el sello “CE 0366” de la CE. La calidad
de este aparato ha sido verificada y se ajusta a las previsiones de la directiva
93/42/EEC del Consejo CE de fecha 14 de Junio de 1993 respecto a aparatos
médicos, así como la directiva 89/336/EEC de la EMC.
ANSI/AAMI SP10 Esfigmomanómetros Electrónicos o automáticos
EN 1060-1 (Dic. 1995) Equipo de medición de la presión arterial no-invasivo
Requerimientos Generales
EN 1060-3 (Feb. 1997) Equipo de medición de la presión arterial no-invasivo
Requerimientos suplementarios para sistemas
electromecánicos de medición de la presión arterial
ACERCA DE LA PRESIÓN ARTERIAL
¿Qué es la Presión Arterial?
La presión arterial es la presión ejercida contra el interior de la pared arterial
durante el flujo de la sangre a través de la arteria. La presión medida cuando el
corazón se contrae y envía la sangre fuera del corazón es la lectura “sistólica”
(el número más alto) La presión medida cuando el corazón se dilata con la
sangre fluyendo hacia adentro del corazón es llamada la presión arterial
“diastólica” (número más bajo).
¿Para qué se Mide la Presión Arterial?
Varios problemas de la salud relacionados con la presión alta son muy comunes
entre la gente de la sociedad actual. Hay una significativa interrelación entre la
presión arterial alta y las enfermedades cardiovasculares. Esta correlación ha
hecho que la medición de la presión arterial sea una necesidad para aquellos
individuos identificados con presión arterial elevada, colocándolos en la
categoría de alto riesgo respecto a las enfermedades cardiovasculares.
Además, conforme envejecen las personas, su presión arterial puede cambiar
con el tiempo, lo cual hace que sea muy sensato monitorear su presión arterial
en una forma regular.
5
Page 22

Systolic over 160
Diastolic over 100
Hypertension
Systolic 140 ~159
Diastolic 90 ~ 94
Borderline
Systolic under 139
Diastolic under 89
Normal
Systolic
under 99
Hypotension
Systolic (mmHg) →
140100
90
95
160
Diastolic (mmHg)→
Fluctuation Within a Day
(Case: Male, 35 Years Old)
Wake
Up
Arrive
Office
Discussion
on the
Telephone
Argument
in a
Meeting
Leave
Office
6 PM 12 AM 12 PM6 AM
50
100
150
200
mm Hg
Dinner
/Sleep
Systolic Pressure
Diastolic Pressure
Fluctuación Durante un Día
(Caso: Varón, 35 Años de Edad)
Levan-
tarse
Al Llegar
a la Oficina
Discusión
por
Teléfono
Discusión
a la
Oficina
Al Salir de
la Oficina
6 PM 12 AM12 PM6 AM
50
100
150
200
mmHg
Cena
/Sueño
Presión Sistólica
Presión Diastólica
Estándar de Presión Arterial
Sistólica sobre 160
Diastólica sobre 100
Hipertensión
Sistólica 140 ~159
Diastólica 90 ~ 94
Fronteriza
Sistólica debajo 139
Diastólica debajo 89
Normal
Sistólica
baja 99
Bajo Presión
Sistólica (mmHg) →
140100
90
95
160
Diastólica (mmHg)→
La Organización Mundial de la Salud (WHO) ha desarrollado un estándar de
presión arterial, de acuerdo al cual se han identificado las áreas de alto y bajo
riesgo de la presión arterial. Este estándar, sin embargo, es un lineamiento
general porque la presión arterial del individuo cambia de una persona a otra y
en los diferentes grupos de edades diferentes, etc.
Es importante que usted consulte con su médico regularmente.
Su médico puede decirle cuál es su óptimo rango de presiones arteriales.
Fluctuaciones de la Presión Arterial
¡La presión arterial fluctúa todo el tiempo!
La presión arterial cambiará a lo largo del mes, de la semana y aún a lo largo
de un día. También influyen los cambios de estaciones y de temperaturas.
6
Page 23

Descripciónes de la Pantalla
Pantalla:
Presión Sistólica
Presión Diastólica
Pulso
No. de Secuencia de La Memoria
Símbolos:
Aparece cuando se requiere el inflado manual del brazalete
Aparece cuando se requiere el desinflado manual del brazalete
Aparece cuando las baterías deben ser reemplazadas
Muestra el pulso por minuto
Ocurre cuando se ha cometido un error durante la medición
Instalación de las Baterías
1. Presione y levante la tapa de las baterías en la dirección de la flecha
para abrir el compartimiento de baterías.
2. Instale o reemplace 4 baterías de 1.5 V tipo “AA” en el compartimiento
de baterías de acuerdo con los indicadores de dirección de baterías
estampadas en el interior del compartimiento.
3. Reinstale la tapa de las baterías insertando las orejetas inferiores primero,
luego empuje la parte alta del clip de la tapa de baterías hasta que enganche.
7
Page 24

Usted debe cambiar baterías cuando:
1. El símbolo de “batería baja” aparece en la pantalla.
2. Usted presiona el botón “POWER” y no aparece nada en la pantalla.
Nota: Descarte las baterías Alcalinas usadas como lo indican
las normas ambientales locales.
COMO SE USA:
Consejos Utiles
Aquí le damos unos consejos útiles para ayudarle a obtener lecturas más exactas:
• No mida su presión arterial inmediatamente después de ingerir una comida
copiosa. Para obtener lecturas más exactas, por favor espere una hora antes
de medirse.
• No fume ni ingiera alcohol antes de medirse la presión arterial.
• No se tome la medición cuando usted esté físicamente agotado o cansado.sted dTD3333 -2 TDEs immástiera quedición •No se tom2 Trocur
8
Page 25

Colocación del Brazalete en el Brazo
1. Enchufe el tubo (A) conector del brazalete en la unidad.
2. Desenvuelva el brazalete de brazo, dejando el extremo “Indice” del brazalete
a través del anillo en D (B) del brazalete.
3. Pase su brazo izquierdo entre el aro que forma el brazalete. El indicador de
alcance “OK” debe ser puesto encima con el tubo de jebe apuntando hacia
abajo en la dirección de su antebrazo.
sobre las arterias principales en el lado interior de su brazo como se muestra
en la figura de abajo.
El tubo debe correr hacia abajo por el centro de su brazo.
Coloque la señal de arteria [ ]
4. Voltee su palma izquierda hacia arriba y coloque el borde del brazalete de
brazo a aproximadamente 1 pulgada por encima de su codo. Ajuste el
brazalete jalando el extremo “Index” del brazalete. El brazalete debe ser
ajustado sobre el brazo de modo de permitir la inserción de dos dedos entre
el brazalete y el brazo. Si la tensión en el brazalete está muy apretada o muy
floja, se puede presentar un mensaje de error “EE” en la pantalla.
9
Page 26

5. Si la línea de Índice cae dentro del espacio “OK”, indicado en el borde del
brazalete, este brazalete es adecuado para su empleo. Si la línea de Índice
cayera fuera del rango “OK”, es muy posible que usted requiera un brazalete
más grande para obtener una medición precisa. Por favor consulte con su
distribuidor local para comprar un brazalete más grande o visite las páginas
de Internet del Health o meter
Siéntese en una silla con los pies planos en el piso. Descanse su brazo izquierdo sobre
una mesa de modo que el brazalete de brazo esté al mismo nivel que su corazón.
®
en el www.healthometer.com.
Tomando una Medición
1. Presione el botón POWER (Fig. 1). Todos los segmentos de pantalla
aparecerán por más o menos un segundo antes de volverse un “0”.
Si la flecha hacia abajo “ ” parpadea, esto significa que hay aire
estancado dentro del brazalete. (Fig. 2) Libérelo presionando la válvula
“Air Release Valve” (Fig. 3) hasta que aparezca “0” en la pantalla.
Fig. 1 Fig. 2 Fig. 3
La unidad ya está lista para tomar medidas.
10
Page 27

2. Aprete la bombilla para aumentar la presión en el brazalete de brazo.
La pantalla mostrará la lectura de la presión dentro del brazalete.
Continúe bombeando hasta que la presión alcance aproximadamente
50~60 mmHg sobre su presión sistólica normal.
Si la presión en el brazalete no estuviera lo suficientemente alta, una flecha
hacia arriba ( ) aparecerá a la vista para avisarle que usted debe seguir
bombeando.
3. Siéntese quieto y espere hasta que el brazalete se desinfle y mida su presión
arterial. Es importante que se mantenga usted quieto y tranquilo durante
la medición. Cualquier movimiento marcado puede afectar los resultados
de la medición.
4. Cuando el monitor complete su medición, automáticamente mostrará y
almacenará su lectura sistólica, la diastólica y el pulso dentro de la memoria.
Las últimas 60 lecturas de medición se almacenarán dentro de la memoria.
La pantalla indicará una flecha hacia abajo ( ). Siga presionando
la válvula de desfogue de aire sobre la bombilla hasta que toda la presión
del brazalete se haya desinflado.
5. Presione el botón POWER para apagar la unidad. La unidad se apagará
automáticamente después de un minuto si es que no se presiona ningún botón.
11
Page 28

Lectura de las Memorias
1. Para leer las lecturas almacenadas de presión arterial de la memoria,
simplemente presione el botón MEMORY. Aparecerá el último grupo
de lecturas grabadas en la memoria.
2. Al presionar nuevamente el botón MEMORY se mostrará el anterior
juego de lecturas.
3. Todas las lecturas almacenadas en la memoria serán mostradas
con su correspondiente número de secuencia.
Nota:
1. Los datos de la memoria no se perderán aún cuando se apagara el Monitor
de Presión Arterial.
2. Para borrar la memoria almacenada, remueve las baterías.
12
Page 29

Solución de Problemas
Si se presentara algún problema durante el uso, por favor verifique los
siguientes puntos.
Síntoma
Ninguna exhibición de
pantalla cuando se presiona
POWER
La pantalla muestra la señal
EE o el valor de presión
arterial mostrado es
demasiado bajo (o alto)
Punto a Verificar
¿Están agotadas las baterías?
¿Han sido colocadas las
baterías en la posición
correcta dentro del
compartimiento?
¿Está correctamente tensado
el brazalete?
¿Está el brazalete colocado
correctamente?
¿La presión del brazalete está
bombeada suficientemente?
(50-60mmHg)? sobre el valor
sistólico normal
¿Habló usted o se movió
durante la medición?
¿Agitó usted su brazo estando
con el brazalete colocado?
Reemplácelas con 4 baterías
alcalinas nuevas tamaño “AA”
Re-inserte las baterías
en posición correcta
Envuelva el brazalete
apropiadamente de modo
que esté bien posicionado
y con la tensión correcta
Mídala nuevamente y
bombee hasta 50-60mmHg
encima del valor sistólico
normal
Mida de nuevo con
más tranquilidad
Nota: Si la unidad todavía no funciona bien, por favor vea la Información de
Garantía en este manual. Bajo ningún motivo desarme usted la unidad
ni intente hacerle reparaciones usted mismo.
Solución
13
Page 30

Precauciones
1. Su monitor Health o meter®contiene componentes de alta precisión.
Por lo tanto, evite las temperaturas y la humedad extremas y los rayos directos
del sol. Evite dejar caer o los impactos agudos contra la unidad principal,
y protéjala contra el polvo.
2. Limpie cuidadosamente el cuerpo del monitor de presión arterial y el brazalete con
un paño suave ligeramente humedecido. No presione la unidad con mucha fuerza.
No lave el brazalete ni utilice limpiadores químicos. Nunca utilice solvente
(thinner), alcohol ni derivados del petróleo (gasolina) como limpiador.
3. Las baterías con fugas pueden dañar la unidad. Quite las baterías cuando
la unidad no esté en uso por un largo período de tiempo.
4. Para evitar situaciones peligrosas, la unidad no debe ser operada por niños.
5. Si la unidad estuviera almacenada cerca a la temperatura de congelación,
deje que alcance primero la temperatura de la habitación antes de emplearla.
6. Su Monitor de Presión Arterial Health o meter
el usuario. Usted no debe utilizar ninguna herramienta para abrir la unidad ni
tampoco debe intentar hacerle ningún tipo de ajustes. Si el monitor no estuviera
funcionando apropiadamente por favor contacte a Sunbeam Products, Inc.
como se describe más abajo en Información de Garantía de este manual.
7. Para los usuarios diagnosticados con arritmia común (latidos prematuros del
atrio o ventriculares o fibrosis del atrio), diabetes, mala circulación o problemas
de la sangre o de los riñones, o para los usuarios que hayan sufrido de derrames,
o los usuarios inconscientes, este artefacto puede no ser adecuado para usted.
Por favor consulte con su médico antes de su empleo.
®
no puede ser reparado por
14
Page 31

Especificaciones:
Método de Medición
Rango de Medición
Sensor de Presión
Precisión
Inflación
Desinflado
Capacidad de Memoria
Se apaga automáticamente
Ambiente de Operación
Condiciones del Ambiente
de Almacenamiento
Fuente de Alimentación
Dimensiones
Peso
Circunferencia del Brazo
K.B
*Para estar seguro de la exactitud de las mediciones, se recomienda que se haga una calibración completa cada dos años.
**Las especificaciones están sujetas a cambios sin previo aviso
:
Oscilométrico
:
Presión 20~ 280mmHg; Pulso: 40– 180 latidos/minuto
:
Semi conductor
:
Presión ± 3mmHg; Pulso: ± 5% de lectura
:
Inflado Manual
:
Válvula de Desfogue de Presión Automática
:
Memoria de 90 juegos de datos
:
1 minuto después de la última operación del botón
:
Temperatura: 10°C – 40°C (50°F – 104°F); Humedad: 40 – 85%
:
Temperatura: -5°C – 60°C ( 23°F – 140°F ) : Humedad: 10 – 95%
:
6 Voltios / Cuatro Baterías (AA) de 1.5 Voltios CD
: 1
05 (L) X 160 (W) X 68 (H) mm
:
335 g (sin Baterías)
:
Adulto: 22 – 32 cm (8.7 pu. – 12.6 pu.) (estándar)
:
Adulto grande: 32 – 42 cm (12.6 pu. – 16.5 pu.) (opcional)
:
Operación breve de 2 minutos
:
Clasificación de tipo BF
.
15
Page 32

16
Información Sobre la Garantía
Su Monitor de Presión Arterial Health o meter®está cubierto por la Garantía limitada ofrecida por
Sunbeam Products, Inc. (“Sunbeam”). Sunbeam Products, Inc. (“Sunbeam”) garantiza que por un período
de cinco años a partir de la fecha de la compra, este producto estará libre de defectos en material y mano
de obra. Sunbeam, a su opción, reparará o substituirá este producto o cualquier componente del producto
que se encuentre defectuoso durante el período de la garantía. El reemplazo será hecho con un producto
o componente nuevo o remanufacturado. Si el producto ya no estuviera disponible, el reemplazo se puede
hacer con un producto similar de valor igual o mayor. Esta es su exclusiva garantía. Esta garantía es
válida para el comprador minorista original a partir de la fecha inicial de compra al por menor y no es
transferible. Guarde el recibo de compra original. La prueba de la compra se requiere para obtener la
validez de la garantía. Los distribuidores, los centros de servicio o las tiendas al por menor Sunbeam que
venden productos Sunbeam no tienen el derecho de alterar, modificar o de ningún modo cambiar los
términos y condiciones de esta garantía.
Esta garantía no cubre el desgaste normal de piezas ni los daños resultantes de cualquiera de los
siguientes: uso negligente o mal uso del producto, uso en voltaje o corriente incorrectos, uso contrario
a las instrucciones de funcionamiento, desmontaje, reparación o alteración por cualquier persona con
excepción de Sunbeam o de un centro de servicio autorizado. Aún más, la garantía no cubre los Actos
de Dios o de la Naturaleza, tales como los incendios, las inundaciones, huracanes y / o tornados.
Sunbeam no será responsable por ningún daño fortuito o consecuente causado por el incumplimiento
de
cualesquiera garantías expresas o implicadas. Excepto hasta donde lo prohíba la ley aplicable,
cualquier
garantía implicada de comerciabilidad o la adecuación para un propósito particular se limita en la
duración a la duración de la garantía antedicha. Algunos estados, provincias o jurisdicciones no permiten
la exclusión o la limitación de daños fortuitos o consecuentes o limitaciones sobre cuánto tiempo dura
una garantía implicada, de modo que las limitaciones o exclusión anteriores pueden no aplicarse a usted.
Esta garantía le da a usted derechos legales específicos, y usted puede también tener otros derechos
que varíen de estado a estado o de provincia a provincia.
Para mayor información, o para obtener servicio de garantía, contacte a Sunbeam Products, Inc. en el
1 800 672-5625 o visite las páginas de Internet de Health o meter
®
website en www.healthometer.com
©2002 Sunbeam Products, Inc. Todos los derechos reservados
Health o meter
®
es una marca registrada de Sunbeam Products, Inc.
Distribuida por Sunbeam Products, Inc., Boca Raton, FL 33431.
Manual impreso en Taiwan.
 Loading...