

Page 1
3102KL-AM
P/N UM3102KL_AM_Rev20180723
Heavy Duty Antimicrobial Platform Scale
PELSTAR, LLC 9500 West 55
USER INSTRUCTIONS
th
St. McCook, IL 60525-7110 USA www.homscales.com
© Pelstar, LLC 2018
1
Page 2
Model 3102KL-AM
Thank you for your purchase of this Health o meter® Professional product. Please read this manual
carefully, and keep it for easy reference or training.
TABLE OF CONTENTS
Cautions and Warnings ................................................................................................. 3
Specifications ................................................................................................................ 4
Set Up Instructions ........................................................................................................ 5
Operating Instructions ................................................................................................... 7
Maintenance and Cleaning ............................................................................................ 10
Troubleshooting ............................................................................................................. 13
Calibration ..................................................................................................................... 14
Warranty ........................................................................................................................ 15
Note: This scale has been factory calibrated, and does not require
calibration prior to use.
2
Page 3

CAUTIONS AND WARNINGS
INTENDED USE
This Health o meter® Professional platform scale is intended to be used in a professional medical environment
by trained medical staff. This product was designed to weigh patients who are safely positioned and standing
on the platform. Do not modify the product or use it for anything other than its intended purpose.
To prevent patient/caregiver injury or damage to your scale, please follow the instructions in this
user manual very carefully.
Do not exceed the weight capacity specified for this scale.
For accurate weighing, this scale must be placed on a flat, stable surface.
For accurate weighing, verify before each use the proper operation according to the procedure
described in this manual.
Do not use in the presence of flammable or explosive materials.
If the scale becomes damaged, it should not be operated until properly serviced.
Do not wheel or pull the scale down stairs, doing so may damage internal parts.
Ensure that the AC adapter and scale do not come in contact with liquids, excessive temperature,
or excessive humidity.
The weight of this scale is substantial as it is designed for heavy-duty use in a clinical environment.
Use care when using or moving this device.
Patient/caregiver safety
This scale is designed for static weighing of patients only. No scale should be used for patient
transfer.
To prevent patient injury, the patient must be attended throughout the entire weighing event.
Caregivers should ensure that the patient is stable and provide support as needed when getting
onto and off of the scale.
Patient should wear socks or other form of lightweight foot covering during weighing event.
When operating the scale with the AC adapter:
Operate this scale exclusively with the AC adapter that is provided (ADPT50). Use of an
unspecified adapter will void the warranty, and can pose a serious safety hazard.
Prior to using this scale, inspect the AC adapter cord for cracking / fraying, or for broken / bent plug
prongs.
Prior to using this scale, ensure that the AC adapter is plugged into an outlet with the rated voltage
appropriate for operation.
Ensure that the AC adapter outlet is wired to a circuit breaker or other protected power source.
Unplug the AC adapter, and carefully store both the adapter and adapter cord before moving the
scale.
Operating this scale at voltages and frequencies other than specified can damage the equipment
and will void the warranty.
When operating the scale with batteries:
If the display indicates that the batteries are low replace the batteries or switch to the AC adapter
as soon as possible.
When replacing / inserting batteries, be sure to use all new batteries.
In no event whatsoever shall Pelstar, LLC be liable for damages or injuries whatsoever arising out
of or connected with the assembly, use, or misuse of its products.
3
Page 4
Capacity and
Resolution:
1000 lb x 0.2 lb (454 kg x 0.1 kg)
Power
Requirements:
100-240V AC – 6V DC 50-60Hz, Adapter Model ADPT50 (included),
or 6 D-cell batteries (included)
Environmental:
Operating Temperature: 50°F to 104°F / 10°C to 40° C
Storage Temperature: 30°F to 125°F (-1°C to +52°C)
Maximum Humidity: 85% RH in use or in storage
Pelstar, LLC has been officially certified as the manufacturer
of Health o meter® Professional medical devices. The Pelstar,
LLC quality assurance system covers the development,
production, sales and service of medical scales and
measuring systems.
*WARNING:
For use with AC Adapter Model ADPT50 or with 6 D-cell batteries.
Equipment is not suitable for use in the presence of flammable anesthetic mixture with air or with oxygen or nitrous
oxide.
SPECIFICATIONS
General
Health o meter® Professional model 3102KL-AM uses sophisticated microprocessor technology.
This precision instrument is designed to provide accurate, reliable and repeatable weight
measurements and features that make the weighing process simple, fast and convenient.
Although the patient’s weight can be displayed in either pounds (LB) or kilograms (KG), the scale
is shipped from the factory locked into KG mode. See the instructions on page 8 to unlock the
weight measuring unit.
This scale is set up to use motion-sensing weighing technology in order to determine the weight of
a moving patient. This scale can be powered using an AC adapter, ADPT50 (included), or by
6 D-cell batteries (included).
Antimicrobial Powder Coating
Unique to the 3102KL-AM scale, the handrails, transport handle and all other painted surfaces
have been fabricated with a permanent, antimicrobial powder coating. The antimicrobial coating
utilizes silver ionic technology to inhibit the growth of microbes.
Certifications
4
Page 5
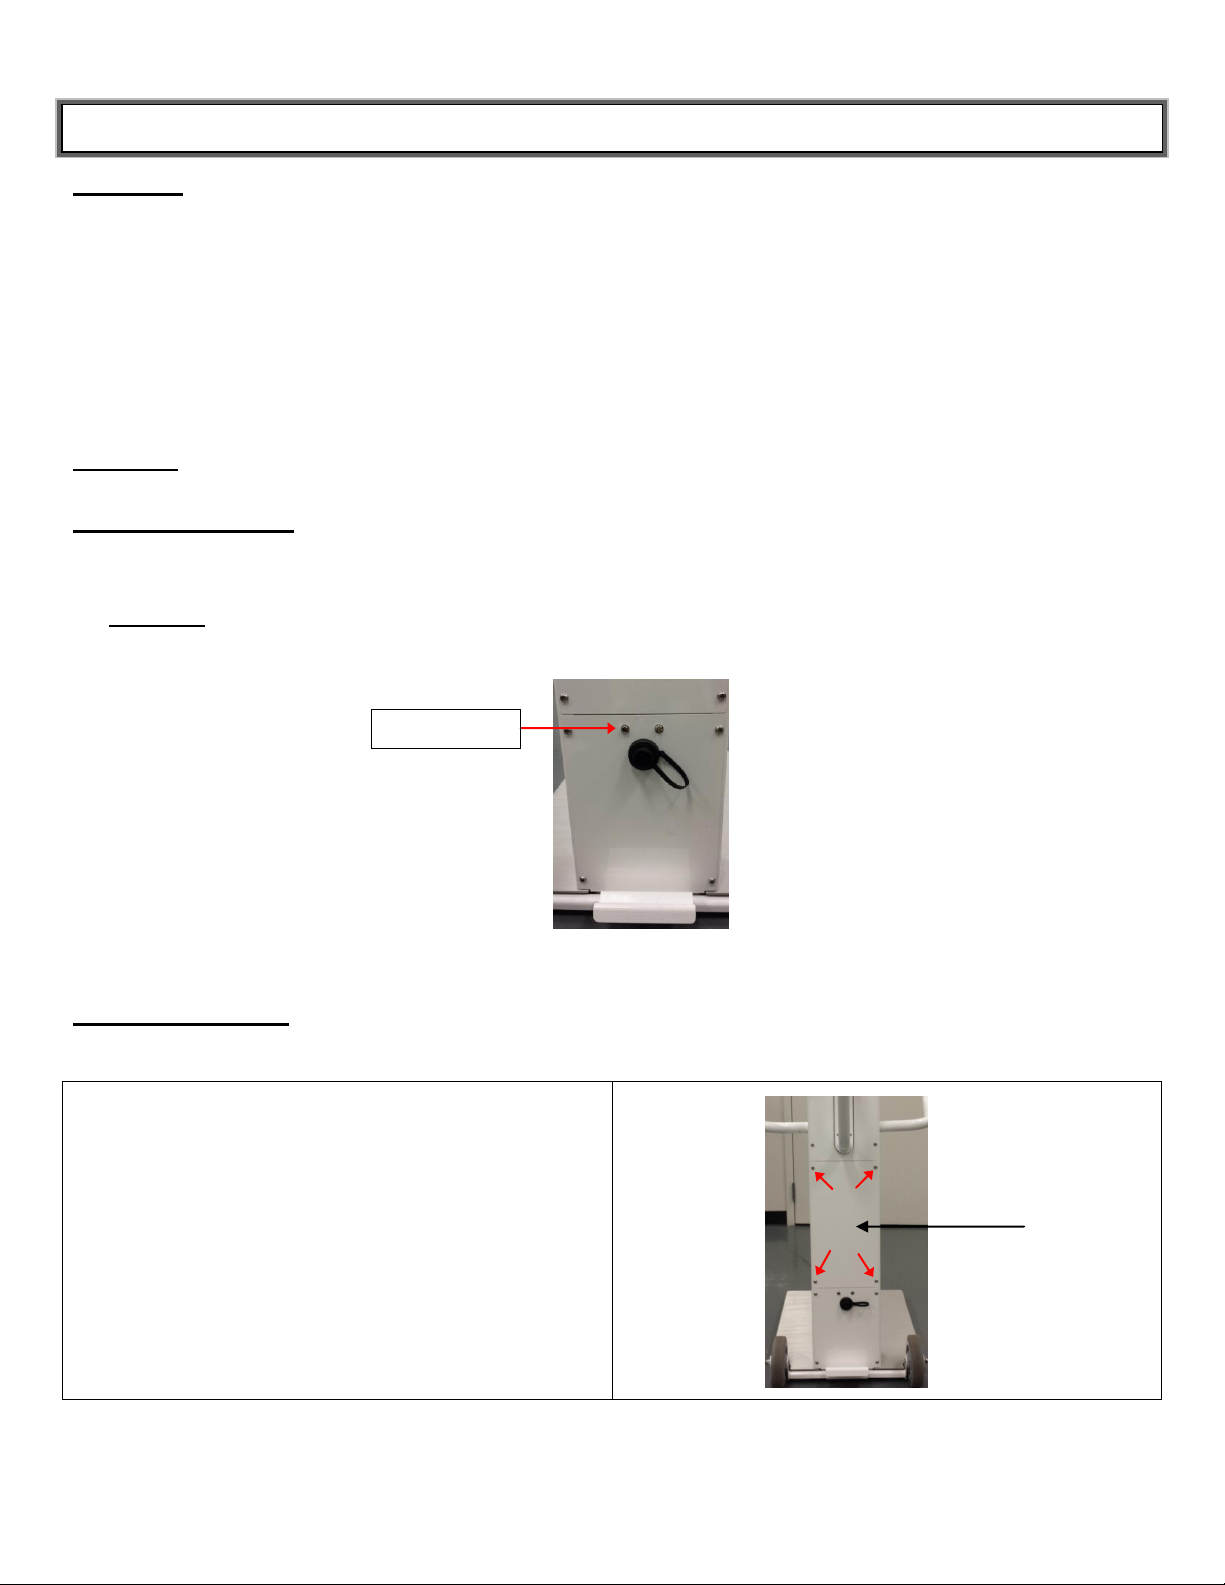
1. The battery compartment is located behind
the protective metal plate on the back of the
scale. Using the included T30 Torx head
wrench, remove the four screws securing the
metal plate. Start with the bottom two screws,
holding the plate in place as you remove the
remaining screws. After all screws are
removed, carefully set the metal plate and
screws aside.
Adapter Jack
SET UP INSTRUCTIONS
Parts List
3102KL-AM Scale, Fully Assembled
User Instructions (located in enclosed envelope)
Quick Reference Guide (located in enclosed envelope)
(6) D-cell Batteries (located in brown box inside packaging)
(1) AC Power Adapter (ADPT50)
(1) T30 Torx Head Wrench
(2) ¼ 250V Amp Fuse (for replacement use if needed)
Warning: To avoid damaging the load cells, do not drop the scale.
Powering the Scale
1. Plug the AC adapter into the power adapter jack (the jack is located on the rear of the column),
then plug the scale’s AC adapter into the power source.
Warning: To avoid a safety hazard, do not use an unspecified AC adapter. Only use the
Health o meter® Professional AC adapter model ADPT50 designed for this scale.
2. For battery operation, see Battery Installation below.
Battery Installation
Caution: If the AC adapter is connected, unplug it from the power source before installing or
replacing the batteries.
5
Page 6

2. Remove the battery compartment cover by
unscrewing the 4 thumb screws. Note: Take
care not to drop the thumb screws into the
scale mechanism.
3. Install 6 D-cell batteries following the +illustrations on the compartment. Do not use
zinc-carbon batteries.
4. Place the battery cover on by reattaching the
4 thumb screws.
5. Place the protective metal plate onto the back
of the pillar by reattaching the four screws,
starting with the top two screws.
3102KL-AM SET UP INSTRUCTIONS (continued)
Warning: If the scale will not be used for some time, remove all batteries to avoid a safety hazard.
Disposal of batteries should be done according to the national, regional or local regulations.
Note: To preserve battery power, this scale will automatically power off after 5 minutes of inactivity.
6
Page 7

KEY
FUNCTION
ENTER
Used during calibration procedure
Powers scale ON and OFF.
REWEIGH
Allows repeated weighing of patient without stepping off the scale.
HOLD
Holds the value of the weight measurement on the display until the button is
pressed again to clear the value.
RECALL
Recalls the previous weight until the button is pressed again to clear the
value.
ZERO
Zeroes the scale prior to weighing.
LB/KG
Allows user to change weight measuring unit.
OPERATING INSTRUCTIONS
Using the Keypad
Weighing a Patient
1. Make sure there is nothing on the weighing platform.
2. Press the button to turn on the scale.
3. Wait until ‘0.0’ and ‘Zero’ appear on the display. If the scale has been moved it may be necessary to
press the ZERO button to clear the display.
4. Ask the patient to step on the scale. The scale will begin to display the patient’s weight and will lock on
the patient’s weight when completed. Depending on the movement of the patient on the scale, it may
take several seconds for the scale to lock onto the weight.
5. The weight will change until the patient weight is captured. The scale will beep three times and the
word “Lock” will appear on the display.
6. The weight may be held on the display by pressing the HOLD button. To release, press the HOLD
button again.
7. After recording the weight, have the patient step off the scale.
8. Press the button to power the scale off.
Holding a Weight Value
Once a patient’s weight has been determined, the weight value can be held while assisting the patient off
of the scale. To hold the weight value, press the HOLD button while the patient remains on the scale. To
clear the weight value, press the HOLD button again.
7
Page 8

OPERATING INSTRUCTIONS (CONT.)
Weight Recall
The last weight reading on the scale can be recalled by pressing the RECALL button. To clear the
display of the recalled weight, press the RECALL button again. Note: Clearing the recalled weight from
the display will ot clear the recalled weight from memory. The recalled weight will remain in memory until
another weight is obtained.
Reweigh
To reweigh the patient without the patient stepping off of the scale, press the REWEIGH button.
Unit of Measure Configuration
Note: You must first follow the “Deactivating the KG Only Lock” procedure below to unlock the weight
measuring unit before the weight measuring unit can be changed.
1. Press the button to turn the scale on.
2. Wait for “0.0” LB or “0.0” KG to appear on the display.
3. Press the LB/KG button until the desired unit of measure is displayed.
4. Release the LB/KG button and the scale will operate in the selected mode.
5. Repeat steps 3-4 to change the weighing mode to a different unit of measure.
Deactivating the KG Only Lock
The scale is shipped from the factory locked into KG mode. Follow this procedure to deactivate the KG
lock.
Caution: Please make sure you carefully and precisely follow the directions below as you will be
in the PROGRAM MODE of your scale. Any modification outside of what is listed below may
greatly affect the functionality of your scale.
1. Press the button to power on the scale. As soon as you turn on the scale, press the REWEIGH
button once, the ZERO button twice, and then the REWEIGH button once again. The scale will display
“CAL”.
2. Press the REWEIGH button twice and “PROG” will be displayed.
3. Press the ENTER button and OP1-0 will be displayed.
4. Press the REWEIGH button once and the display will read “OP2-1”for the KG lock function. To disable
the KG lock press the ZERO button so the display reads “OP2-0”.
5. Press the REWEIGH button (7 times) until display reads “DONE”
6. Press the ENTER button, the scale will read “START”, then read “0.0”
Locking the Weight Measuring Unit to KG Only
Caution: Please make sure you carefully and precisely follow the directions below as you will be
in the PROGRAM MODE of your scale. Any modification outside of what is listed below may
greatly affect the functionality of your scale.
1. Press the button to power on the scale. As soon as you turn on the scale, press the REWEIGH
button once, the ZERO button twice, and then the REWEIGH button once again. The scale will display
“CAL”.
2. Press the REWEIGH button twice and “PROG” will show on the display.
3. Press the ENTER button and OP1-0 will be displayed.
4. Press the REWEIGH button once and the display will read “OP2-0”for the KG lock function. To enable
the KG lock, press the ZERO button so the display reads “OP2-1”.
5. Press the REWEIGH button (7 times) until display reads “DONE”
6. Press the ENTER button, the scale will read “START”, then read “0.0 Kg”
8
Page 9

USB Port Cover
USB Port
OPERATING INSTRUCTIONS (CONT.)
Moving the Scale
The 3102KL-AM was designed with a convenient transport handle that allows users to easily move
the scale throughout their facility. The rugged, scuff-proof wheels ensure smooth movement and
enhanced portability. When moving the scale:
1. Place foot on the kickplate located on the bottom rear of the pillar.
2. Push downwards on the kickplate and pull backwards on the transport handle to tip the scale
onto its wheels.
3. Push or pull the scale to its desired location.
4. Gently lower the scale’s platform onto the floor to avoid damaging the load cells.
Connectivity Information
To enable reliable transmission of weight, height, and Body Mass Index (BMI) data, this scale is
designed to connect to a computer, monitor, or other electronic device via a built-in USB port. The
USB port is located behind the black plastic cover towards the bottom of the pillar. To access the
USB port, unscrew the cover by turning it counterclockwise.
For more information regarding how to connect this scale to other electronic devices, please contact
Health o meter® Professional Scales Technical Support at 1-800-638-3722.
9
Page 10

MAINTENANCE AND CLEANING
General
This section provides instructions for maintenance, cleaning, and troubleshooting the 3102KL-AM.
Maintenance operations other than those described in this section should be performed by qualified
service personnel such as Biomed or Engineering.
1. This scale contains electronic parts. Use it carefully. Do not drop, kick or jump on it.
2. Do not store near chemicals, heaters or radiators.
3. Do not store the scale on its side.
Before first use and after periods of non-use, check the scale for proper operation. If the scale
does not operate correctly, refer to qualified service personnel such as Biomed or Engineering. For
additional questions contact Health o meter Professional Scales Customer Service at 1-800-815-
6615.
1. Check overall appearance of the scale for any obvious damage, abuse, etc.
2. Inspect condition of AC adapter cord and prongs.
Cleaning and Disinfecting
Proper care and cleaning is essential to ensure a long life of accurate and effective weighing.
Caution: Disconnect the scale from the AC adapter power source prior to cleaning the
unit.
1. Health o meter® Professional recommends using one of the following solutions on a soft cloth or
disposable wipe:
● mild soap and water solution
● 70% isopropyl alcohol
● solution with 1-5% hydrogen peroxide concentration
After cleaning/disinfecting, wipe with a cloth dampened with water and then with a clean dry cloth.
To avoid residue build-up or damp surfaces, ensure the screen and scale parts are completely dry
after cleaning.
2. Never use rough or abrasive materials to clean the scale, as these will damage the scale’s finish.
3. Do not submerge the scale in water or any other liquid.
4. Do not pour or spray fluids directly on the scale.
10
Page 11

1. Using the included T30 Torx head wrench,
remove the 4 screws to detach the middle
metal plate on the back of the pillar.
2. Locate the black fuse holder and carefully
unsnap it open.
Fuse
MAINTENANCE (CONT.)
Replacing the Fuse
Should your scale experience an influx of excessive electric current, the fuse may need to be
replaced.
Caution: If the AC adapter is connected, unplug it from the power source before replacing the
fuse.
11
Page 12

3. Gently lift the wire out of the fuse holder and
remove the fuse from the terminal.
4. Insert the new fuse into the terminal. Gently
place the fuse and wire back into the fuse
holder while placing the other end of the fuse
into the remaining terminal.
5. Place the fuse and wire back into the fuse
holder and snap the holder closed. Position
the fuse holder back inside the pillar.
Reattach the metal plates onto the back of the
pillar.
MAINTENANCE (CONT.)
12
Page 13

Scale does not turn
on
1. Dead battery
2. Faulty electrical outlet
3. Bad power supply
4. Blown fuse
1. Replace batteries
2. Use a different outlet
3. Check LED light at the
bottom rear of the pillar to
determine if adapter cord is
working. If the light is not
illuminated the adapter may
need to be replaced.
4. If your scale experienced an
influx of excessive electric
current, the fuse may need to
be replaced. See page 11 for
fuse replacement
instructions.
Questionable weight
or the scale does not
zero
1. External object
interfering with the
scale
2. The display did not
show ‘0.0’ before
weighing
3. Scale is not placed on
a level floor
4. Scale is out of
calibration
1. Remove interfering
object from the scale
2. Assist the patient off the
scale, zero the display
and begin weighing
process again.
3. Place the scale on a
level floor and begin
weighing process again
4. Check weight with
known weight value
The display shows
“OVER”
The load on the scale exceeds
the capacity (1000 lb/454 kg)
Remove the excess weight and
use the scale according to its
design rating.
The display indicates
that the batteries are
low
The batteries are depleted
Replace batteries according to
instructions
TROUBLESHOOTING
4.
Refer to the following instructions to check and correct any failure before contacting
Customer Service at 1-800-815-6615.
SYMPTOM POSSIBLE CAUSE CORRECTIVE ACTION
13
Page 14

ACTION
DISPLAY SHOWS
Press the button to turn on the scale and while “START” is
displayed, press REWEIGH - ZERO - ZERO - REWEIGH
“CAL”
Press ENTER to start the calibration procedure.
“Load/300.0”
Load 300lb onto the scale platform, then press ENTER.
“CLEAR”
After “CLEAR” appears on the display, remove the weight from
the platform, then press ENTER. The scale will then calibrate
zero.
“-----------”
When zero calibration is complete, the display will ask for 300lb
weight again.
“PUT/300.0”
Load 300lb onto the platform, then press ENTER.
“DONE”/“CLEAR”
After “CLEAR” appears on the display, remove the weight from
the platform and the scale will reboot.
“-----------”
Scale is ready for normal operation after reboot and the display
returns to “0.0”.
“0.0”
CALIBRATION
This scale is factory calibrated and does not require calibration prior to use.
The calibration procedure should be performed using a known / certified weight in pounds. The
3102KL-AM requires 300 pounds for calibration. If you prefer to calibrate in kilograms, please
call Customer Service at 1-800-815-6615.
14
Page 15

P/N UM3102KL_AM_Rev20180723
WARRANTY
Limited Warranty
What does the Warranty Cover?
This Health o meter® Professional scale is warranted from date of purchase against defects of materials or in workmanship for a period
of two (2) years. If product fails to function properly, return the product, freight prepaid and properly packed to Pelstar, LLC (see “To
Get Warranty Service”, below, for instructions). If the manufacturer determines that a defect of material or in workmanship exists, the
customer’s sole remedy will be replacement of the scale at no charge. Replacement will be made with a new or remanufactured
product or component. If the product is no longer available, replacement may be made with a similar product of equal or greater value.
All replaced parts are covered only for the original warranty period.
Who is Covered?
The original purchaser of the product must have proof of purchase to receive warranty service. Please save your invoice or receipt.
Pelstar dealers or retail stores selling Pelstar products do not have the right to alter, or modify or any way change the terms and
conditions of this warranty.
What is Excluded?
Your warranty does not cover normal wear of parts or damage resulting from any of the following: negligent use or misuse of
the product, use on improper voltage or current, use contrary to the operating instructions, abuse including tampering, damage in
transit, or unauthorized repair or alternations. Further, the warranty does not cover natural disasters, such as fire, flood, hurricanes and
tornadoes. This warranty gives you specific legal rights, and you may also have other rights that vary from country to country, state to
state, province to province or jurisdiction to jurisdiction.
To get Warranty Service make sure you keep your sales receipt or document showing proof of purchase. Call (+1) 800-6383722 or (+1) 708-377-0600 to receive a return authorization (RA) number, which must be included on the return label. Attach your proof
of purchase to your defective product along with your name, address, daytime telephone number and description of the problem.
Carefully package the product and send with shipping and insurance prepaid to:
Pelstar, LLC
Attention R/A#_____________
Return Department
9500 West 55th Street
McCook, IL 60525
Extended Warranty Available
This product is eligible for Health o meter® Professional ScaleSurance Extended Warranty Program. ScaleSurance extends the
warranty period for an additional two years. This extension to the standard Limited Warranty can be purchased with new products or for
a facility’s existing product before its current warranty has expired. To learn more, visit www.homscales.com/scalesurance/ or contact
your medical supply distributor.
PELSTAR, LLC
9500 West 55th Street • McCook, IL 60525 • USA
1-800-638-3722 or 1-708-377-0600
PLEASE REGISTER YOUR SCALE FOR WARRANTY COVERAGE AT: http://www.homscales.com
Health o meter® is a registered trademark of Sunbeam Products, Inc. used under license.
Health o meter® Professional products are manufactured, designed, and owned by Pelstar, LLC.
We reserve the right to improve, enhance, or modify Health o meter® Professional product features or specifications without notice.
© Pelstar, LLC 2018
15
 Loading...