

Health O Meter 2842KL Operation Manual
Health o meter
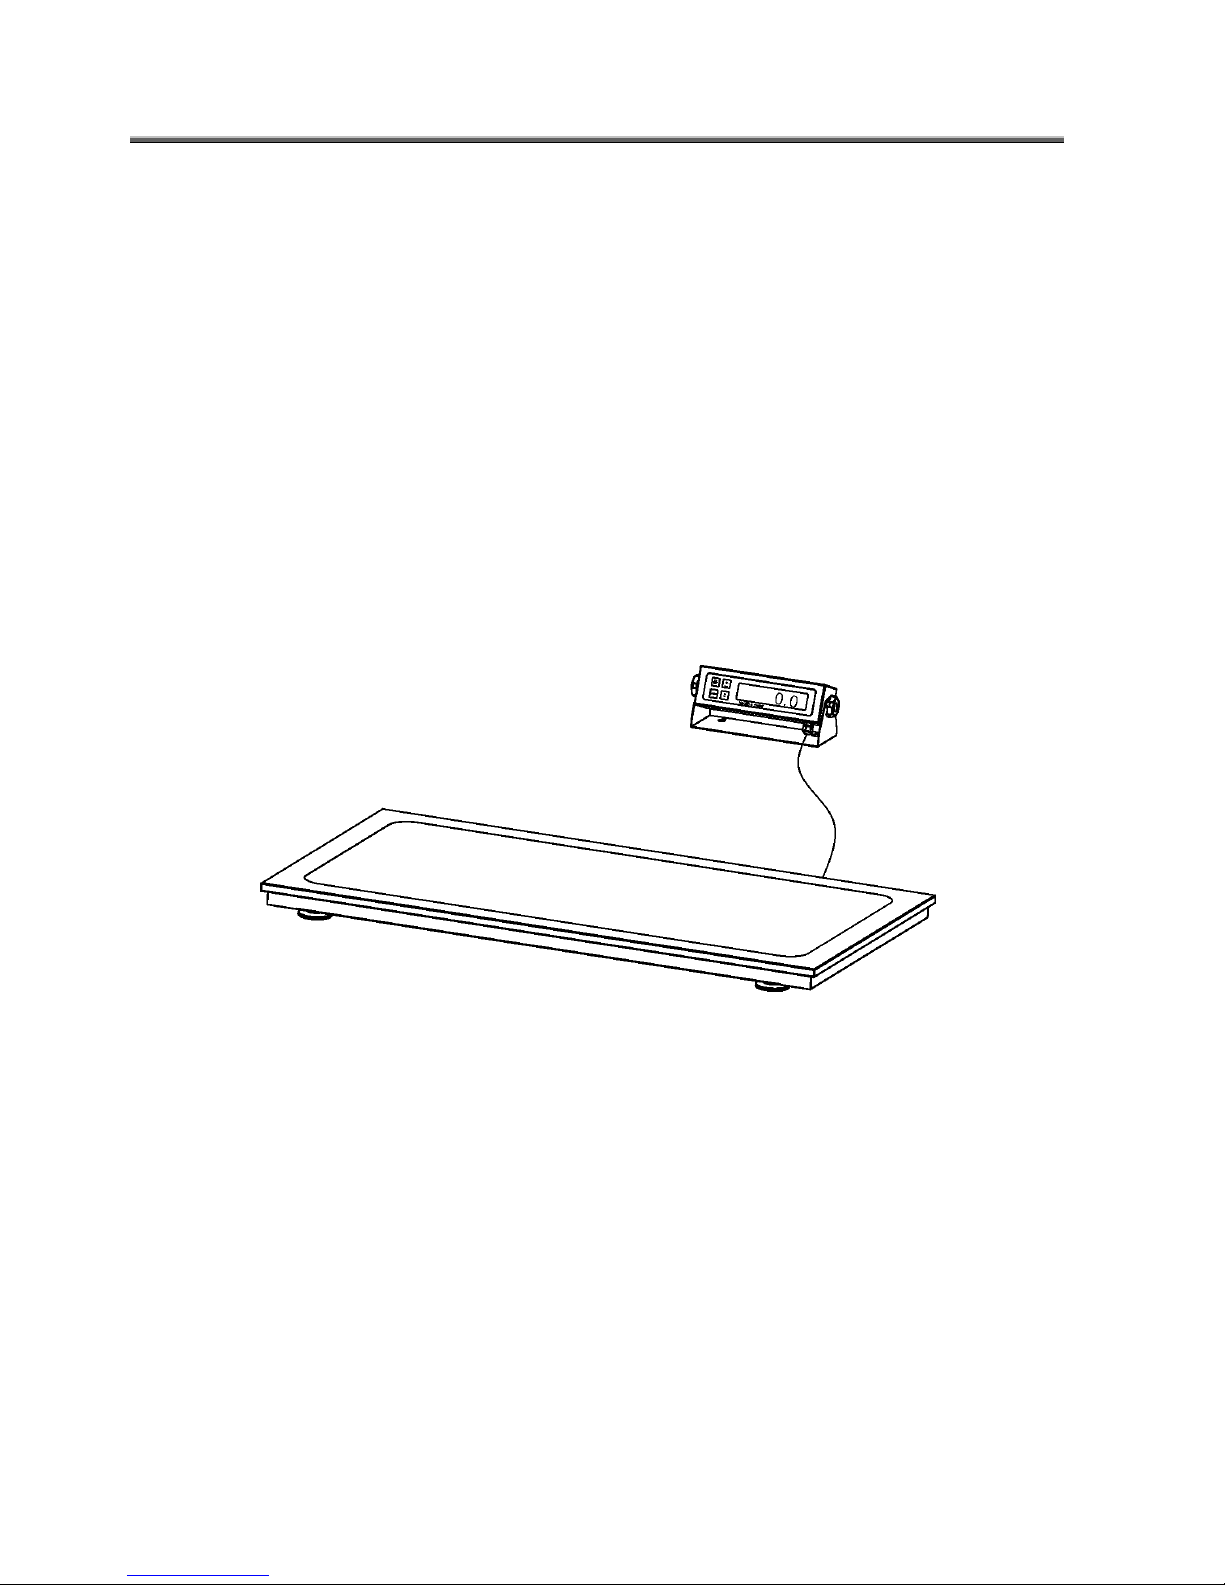
LOW PROFILE VETERINARY SCALE
BALANCE VETERINAIRE
BALANZA VETERINARIA
MODEL 2842KL
MODELE 2842KL
MODELO 2842KL
OPERATION MANUAL
MODE D'EMPLOI
MANUAL DE OPERACIÓN

LOW PROFILE VETERINARY SCALE MODEL 2842KL
Thank you
Please read this manual carefully and keep it handy for ready reference.
Merci
Veuillez lire attentivement ce manuel et le garder à portée de main pour pouvoir le consulter
à tout moment
d'avoir acheté ce produit.
Gracias
Lea por favor este manual cuidadosamente y manténgalo a su alcance para una pronta
referencia.
for your purchase of this product.
por la adquisición de este producto.
ENGLISH............................................................................................ 1
FRANÇAIS ......................................................................................... 12
ESPAÑOL .......................................................................................... 23
TABLE OF CONTENTS
CAUTION AND WARNING.................................................................................................... 2
SPECIFICATIONS.................................................................................................................2
ASSEMBLY INSTRUCTIONS ...............................................................................................3
SET UP..................................................................................................................................4
OPERATION INSTRUCTIONS.............................................................................................. 6
MAINTENANCE.....................................................................................................................6
TROUBLESHOOTING........................................................................................................... 7
CALIBRATION PATH ............................................................................................................ 8
EXPLODED VIEW OF SCALE .............................................................................................. 9
PARTS LIST ..........................................................................................................................10
WARRANTY ..........................................................................................................................11
1
CAUTION AND WARNING
• To prevent injury, never leave animal unattended while on the scale.
• To prevent injury, do not transport the scale while the animal is in the weighing tray.
• For accurate animal weighing the scale must be placed on a flat, stable surface.
• For accurate weighing, verify proper operation according to the procedure described in this
manual before each use.
• Do not use in the presence of flammable materials.
• Operating at other voltages and frequencies than specified could damage the equipment.
• If the “LO BAT” indicator activates, for accurate weighing, replace the batteries or connect
the scale to an AC power source as soon as possible.
SPECIFICATIONS
GENERAL
Health o meter’s Low Profile Veterinary Scale model 2842KL uses highly sophisticated
microprocessor technology. Each precision instrument is designed to provide accurate,
reliable and repeatable weight measurements and features that make the weighing process
simple, fast and convenient.
The actual weighing is performed by motion-sensing weighing technology, to determine the
weight of an active animal.
The animal’s weight can be displayed in pounds or in kilograms. The scale includes a
specially designed removable rubber mat for easy cleaning.
The unit can be operated using its AC power adapter or by 6-C cell batteries.
SCALE SPECIFICATIONS
Capacity and Resolution
Power Requirements
Environmental
Physical Dimensions
600 Lb x 0.2 Lb (270 Kg x 0.1 Kg)
Adapter 120VAC - 60Hz 6 x C size batteries
Operating temperatures: 50°F to 95°F (10°C to 35°C)
Storage temperatures: 30°F to 125°F (0°C to 50°C)
Humidity: 85%
Length: 42” (106.6 cm)
Width: 22⅜” (56.8 cm)
Height: 2” (5 cm)
Weight: 45 Lb (20.45 Kg)
2
ASSEMBLY INSTRUCTIONS
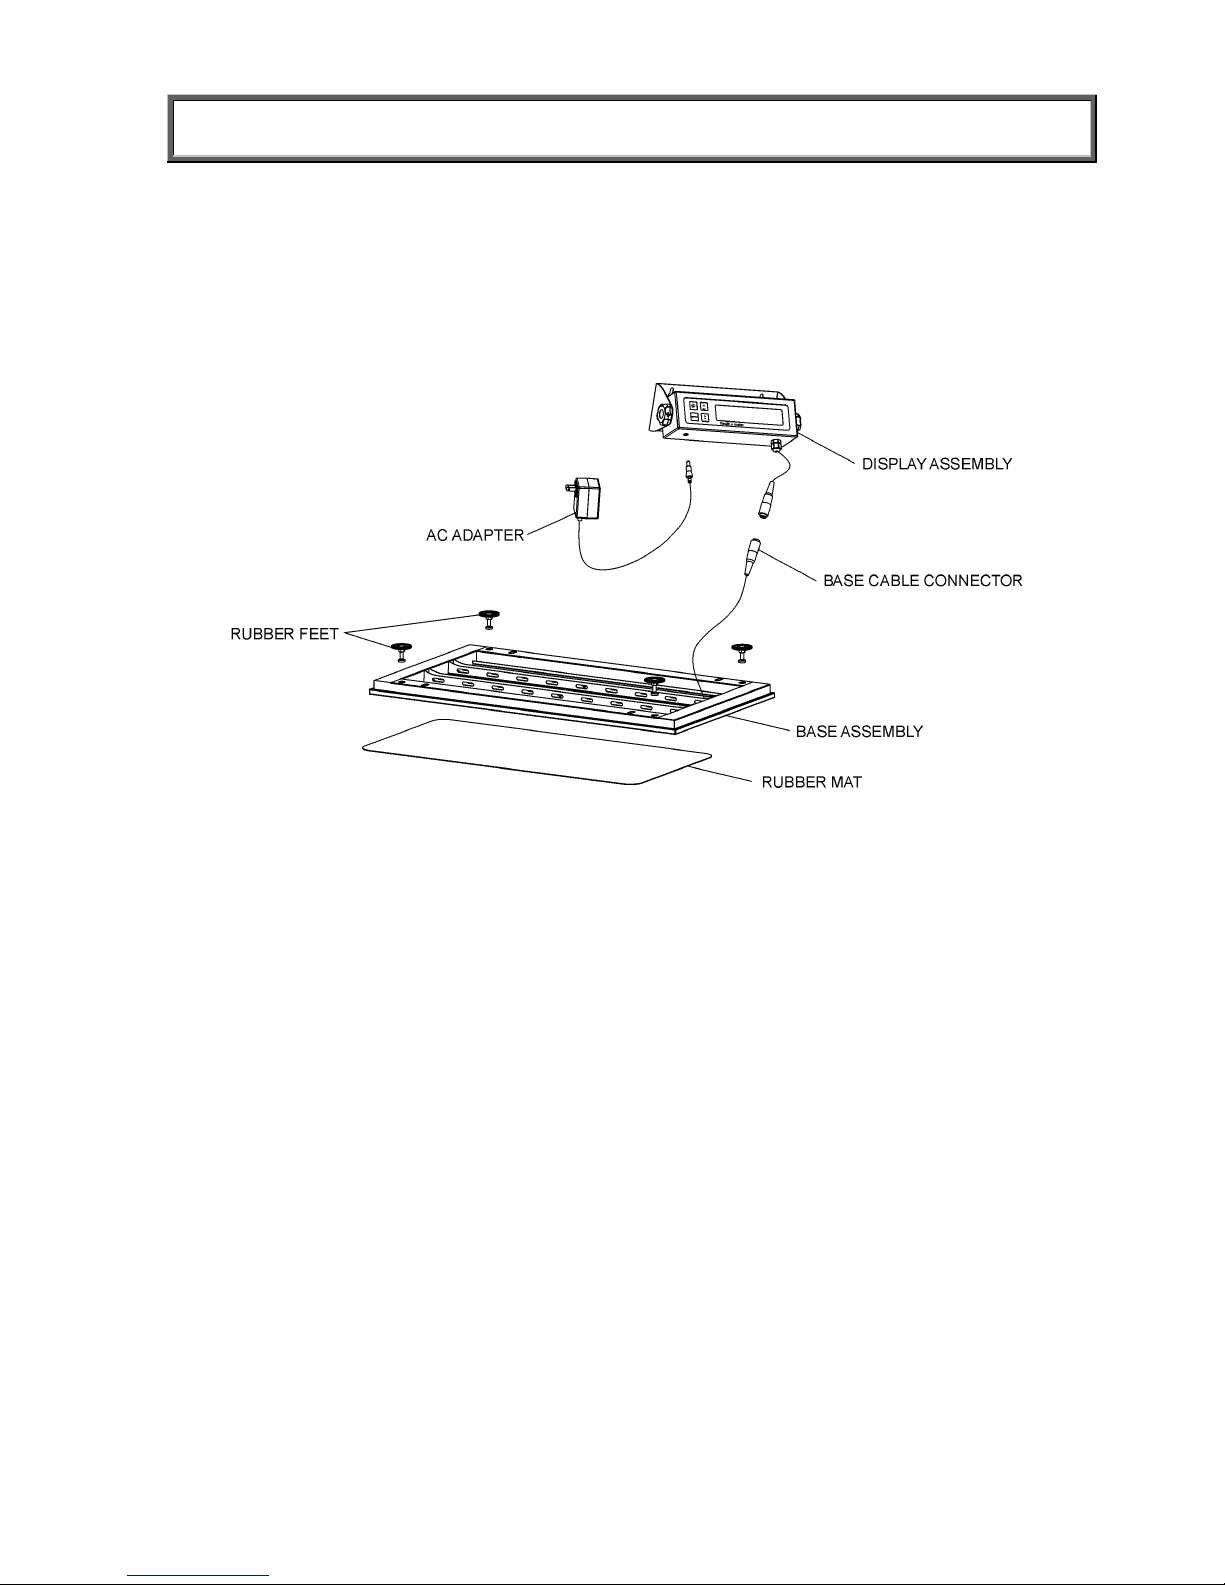
This 2842KL scale has been calibrated at the factory. It is shipped in four assembled parts:
the base assembly, the display assembly, the rubber mat and rubber feet. Remove each
assembly from its carton and unwrap packing material carefully to prevent scratching the
unit’s parts.
Figure 1. Assembly After Shipment
1. Place the base assembly upside down on a steady surface.
2. Screw the four feet onto the base assembly as shown.
3. Turn the base assembly right side up.
4. Plug the display cable connector into the base cable connector.
5. Place the display assembly on the table or mount it on the wall, as desired.
For mounting the display assembly on the wall use 5/16” or 8mm drill bit.
6. Place the rubber mat on the base assembly, inside the designated frame.
The scale may be operated by an AC power source adapter or by 6-C cell batteries.
The scale will automatically switch to battery operation when an AC power source is absent.
3
SET UP
1. Place batteries in the battery holder (see “Replacing Batteries” below).
2. Plug the scale’s AC adapter into the display assembly and into the power source.
3. Press the ON/OFF button to turn the scale on. The display will show “start” and
then ”0.0”.
4. When the self-test function is complete:
• The digital display should read
”0.0”.
• “LB” should be indicated on the right side of the display. (To change the default
units of the scale to kilograms (Kg), please contact our Technical Support Center
at 1.800.638.3722 or 1.708.598.9100).
5. Place a weight [not to exceed 600 Lb (270 Kg)] on the scale. The digital display will
blink “
------
“ until the weight calculation is complete.
------
6. Press the LBS/KG button to select the weight mode, either in kilograms or pounds.
7. Press the REWEIGH button; the digital display should read again the weight of the item
on the scale.
8. Remove the weight from the scale. The digital display should continue to read the
weight of the item that was on the scale.
9. Press the ZERO button; the digital display should return to zero.
10. Disconnect the power source connector from the scale, then turn the scale on using
ON/OFF button. The scale should automatically switch to battery power.
NOTE:
If the set up procedure failed, go to the troubleshooting instructions. If the problem is not
corrected, refer to qualified service personnel.
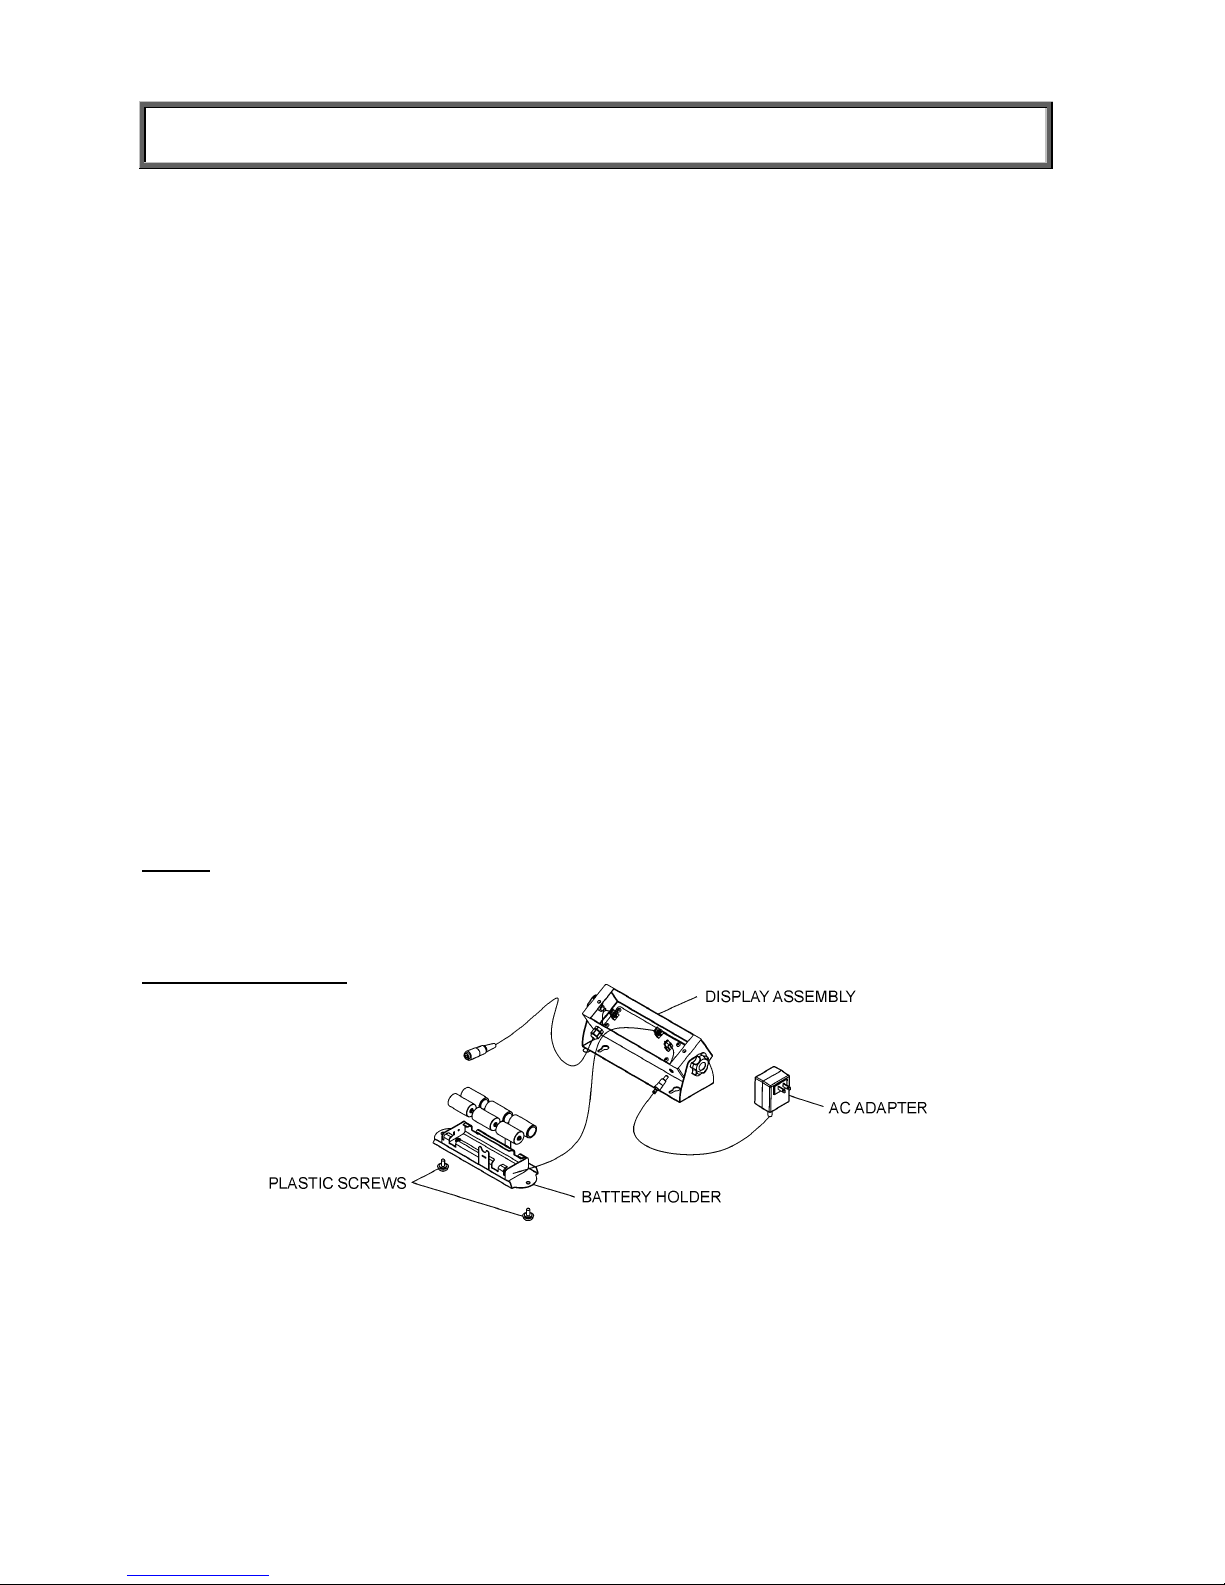
Replacing Batteries
1. Disconnect the scale from the AC power source.
2. Unscrew two plastic screws and carefully remove the battery holder from the display
assembly.
3. Release attachable strap from the batteries. Replace the batteries with new ones and
reattach the strap.
4. Position the battery holder into the display assembly and reinstall two plastic screws.
Figure 2. Replacing Batteries
4
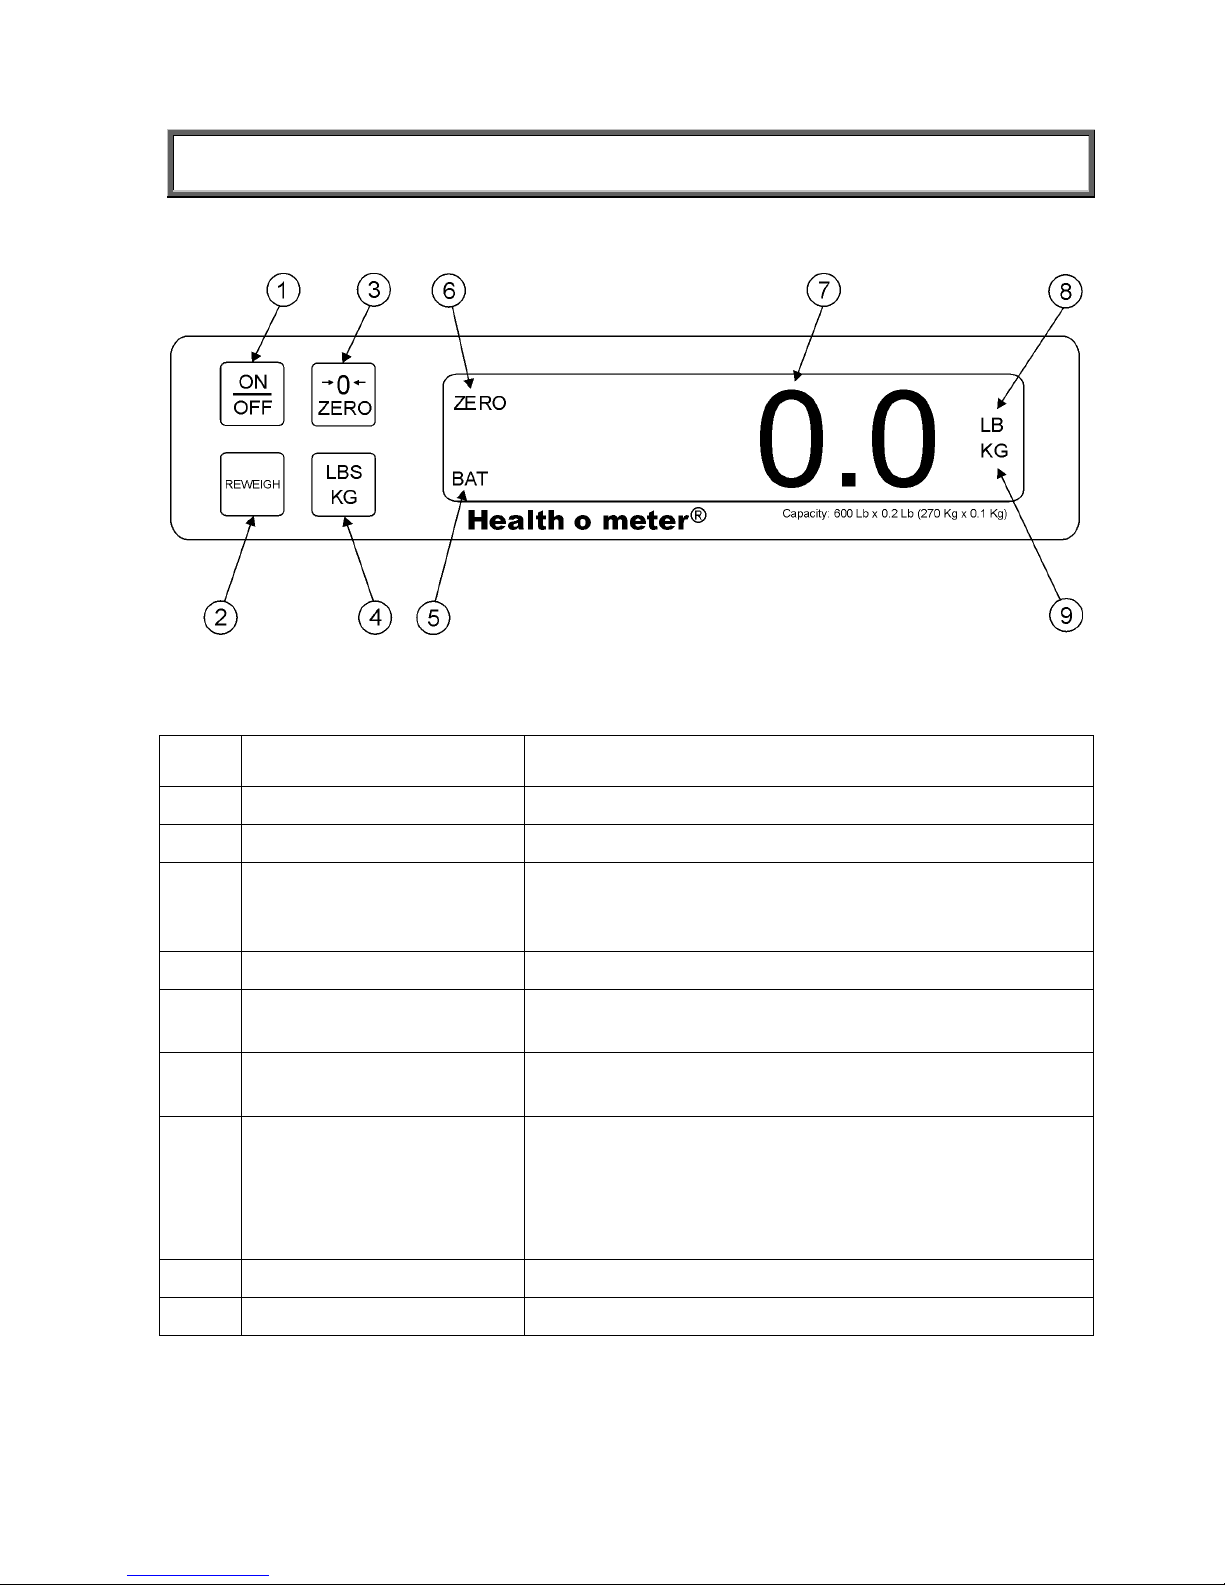
SET UP
Figure 3. Control Panel
ITEM DESCRIPTION FUNCTION
1 ON/OFF button Turns scale ON and OFF.
2 REWEIGH button Allows repeated reweighing of animal.
3 ZERO button Zeros Digital Display prior to weighing. Enables the
cancellation (tare) of weight of mat or other accessories
on the scale.
4 LBS/KG button Selects kilograms or pounds.
5 BAT indicator When ON, indicates scale batteries are low. The
batteries should be replaced.
6 ZERO indicator When ON, indicates the scale is stable and ready for
use.
7 Digital Display 6 Digit LCD Displays animal weight in kilograms or pounds as
shown by the “LB” or “KG” indicator on the right side of
the display. When REWEIGH button is depressed,
display will blink “
determined.
8 LB indicator When ON, indicates displaying weight in pounds.
9 KG indicator When ON, indicates displaying weight in kilograms.
------
------
until animal’s weight is
”
5
OPERATION INSTRUCTIONS
1. Press the ON/OFF button to turn the scale on.
2. Wait until ”0.0” appears on the digital display.
3. If you choose to use a mat, blanket or other accessory on top of the built-in rubber,
make sure that the edges of the accessory are on the scale and are not touching the
surface on which the scale is positioned. Press the ZERO button to cancel the weight of
the accessory that is on the scale.
4. Place an animal on the scale. The display will blink “
is determined.
5. If you wish to reweigh without to remove and to place an animal on the scale again,
press the REWEIGH button.
6. Remove the animal from the scale. The digital display should continue to read the
animal’s weight until REWEIGH or ZERO button is pressed.
NOTE:
After 2 minutes of inactivity, the scale will turn itself off to conserve power. To restart
the scale press the ON/OFF button.
------
------
until the weight of the animal
”
MAINTENANCE
GENERAL
This section provides instructions for maintenance, cleaning, troubleshooting and operator
replaceable parts for the Low Profile Veterinary Scale model 2842KL. Maintenance
operations other than those described in this section should be performed by qualified service
personnel.
MAINTENANCE
Before first use and after periods of non-use, check the scale for proper operation and
function. If the scale does not operate correctly, refer to qualified service personnel.
1. Check overall appearance of the total scale for any obvious damage, wear and tear.
2. Inspect AC adapter for cord cracking or fraying or for broken or bent prongs.
CLEANING
Proper care and cleaning is essential to ensure a long life of accurate and effective operation.
Disconnect the scale from the AC power source.
1. Clean all external surfaces with a clean damp cloth or tissue. Mild soap and water
solution may be used. Dry with a clean soft cloth.
2. Do not immerse the scale base or display assembly into cleaning or other liquid
solution.
3. Do not use Isopropyl Alcohol or other solutions to clean the display surface.
6
TROUBLESHOOTING
Refer to the following instructions to check and correct any failure before contacting service
personnel.
SYMPTOM POSSIBLE CAUSE CORRECTIVE ACTION
Scale does not turn on 1. Dead Battery
2. Faulty electrical outlet
3. Bad power supply
Questionable weight or
the scale does not zero
2. The display did not show
3. Scale is not placed on a
4. Scale is out of calibration 4. Check weight with
The display shows “OL” The load on the scale
The display shows “UL” The scale is in under-load
The display shows “LO BAT” The batteries are low Replace batteries according
1. External object
interfering with the scale
”0.0” before weighing
stable surface
exceeds the capacity
condition
1. Replace batteries
2. Use a different outlet
3. Replace adapter
1. Remove interfering
object from the scale
2. Remove animal, zero the
scale and begin
weighing process again
3. Place the scale on a
stable surface and begin
weighing process again
known weight value
Remove the excess weight
and use the scale according
to its limits
Make sure the rubber mat is
placed on the base
to instructions
7
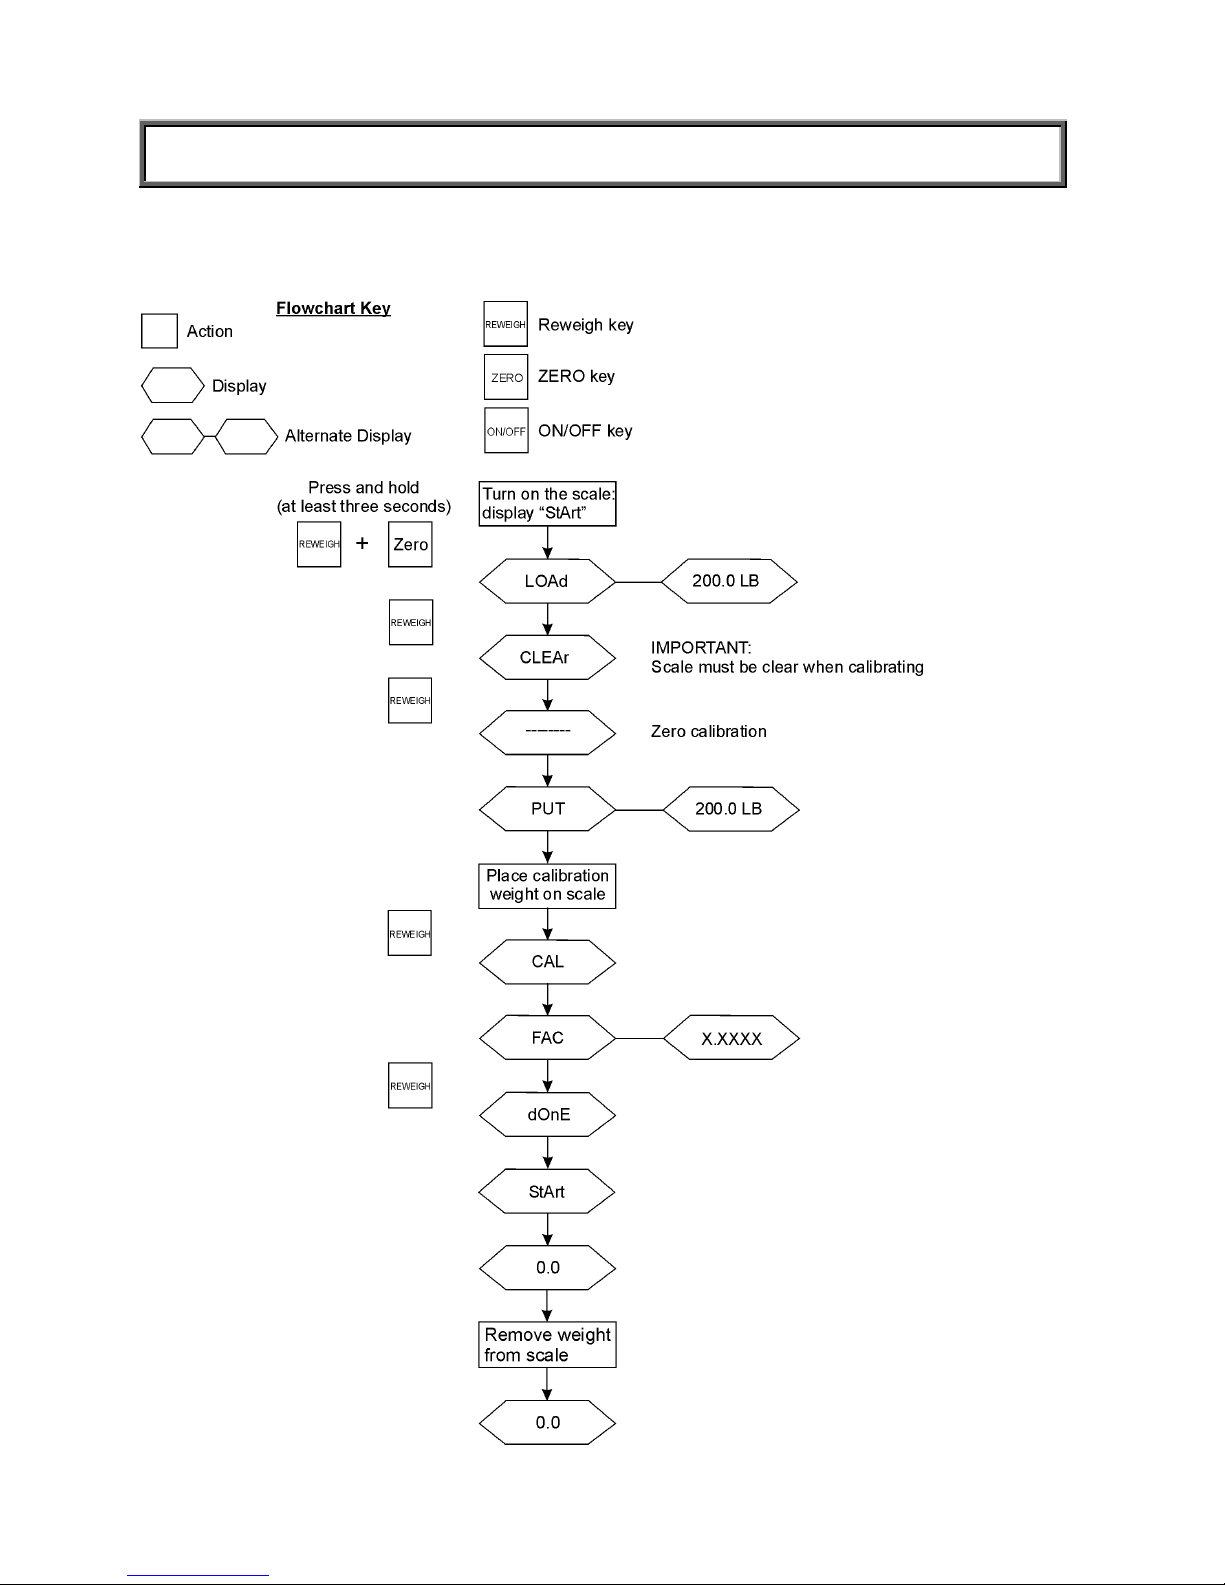
CALIBRATION PATH
The modes are accessible by holding certain keys pressed after power-up.
The keys must be pressed and held for at least three seconds.
8
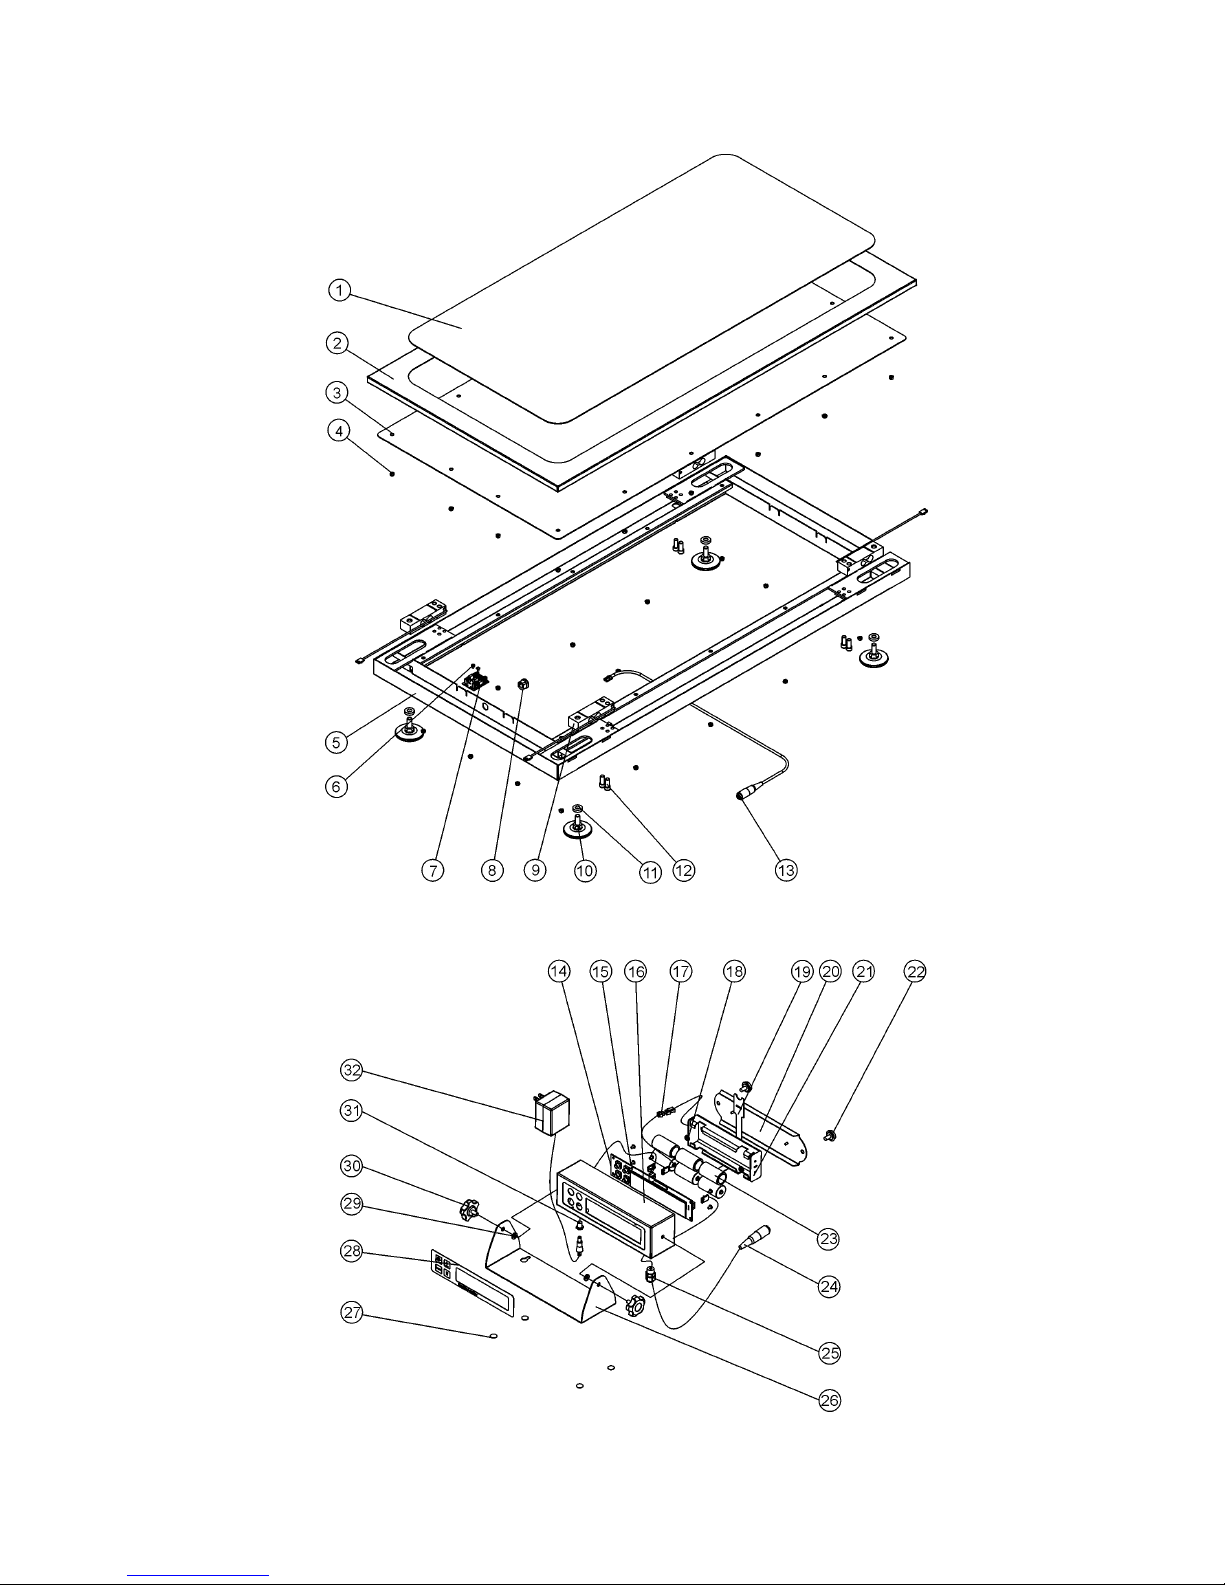
EXPLODED VIEW OF SCALE
9
PARTS LIST
Key No. Part No. Description Qty.
1 3811201-0 RUBBER MAT 1
2 3811101-0 PLATFORM 1
3 3810601-0 COVER PLANE 1
4 SELF LOCK NUT M5 32
5 3811001-0 SCALE BASE ASSY. 1
6 PHIL.PAN HEAD SCREW NC6*1/4" 2
7 2138302-0 JUNCTION BOX 5
8 400142 STRAIN RELIEF 1
9 1304201-0 LOAD CELL 4
10 3810001-0 RUBBER FOOT NC3/8" 4
11 RUBBER WASHER 4
12 HEX. SOCKET SCREW NC5/16*3/4" 8
13 2005502-0 JUN. BOX - MAIN BOARD CABLE 1
14 2138803-0 FALCON BOARD 1
15 PHIL. PAN HEAD SCREW NC6*1/4" 6
16 3812901-0 EL. BOX 1
17 NUT WITH LOCK WASHER NC6 2
18 2033301-0 MAIN BOARD - CONN. TWO PIN CABLE 1
19 401124 BATTERY HOLDER STRAP 1
20 3812601-0 REAR COVER 1
21 2032801-0 BATTERY HOLDER 1
22 PLASTIC HEAD SCREW M6*12 2
23 C CELL BATTERIES 6
24 2032701-0 MAIN BOARD TO LOAD CELL CABLE 1
25 400525 CABLE HOLDER - P.G.7 1
26 3813001-0 DISPLAY HOLDER 1
27 ROUND PLASTIC LEG 4
28 3513201-0 FACE PLATE-PELSTAR 2842 1
29 PLASTIC WASHER M6 2
30 ROSETTE HEAD SCREW M6*13.5 2
31 2033001-0 ADAPTER - MAIN BOARD CABLE 1
32 420964 ADAPTER 120VAC 9VDC 1
10
 Loading...