

Health O Meter 2500KL, 2600KL Use Instruction
Model 2500KL / 2600KL
Digital Patient Wheelchair Scales
P/N UM2500KL / 2600KL Rev 20150217
User Instructions
1

Model 2500KL / 2600KL
Thank you for your purchase of this Health o meter® Professional product. Please read this
manual carefully, and keep it for easy reference or training.
TABLE OF CONTENTS
Caution and Warning.................................................................................................3
Specifications............................................................................................................4
Certifications / Connectivity / Disposal ......................................................................5
2500KL Assembly Instructions .................................................................................6
2600KL Assembly Instructions .................................................................................14
Setup / Batteries .......................................................................................................19
Quick Start Instructions.............................................................................................21
Maintenance..............................................................................................................25
Calibration.................................................................................................................26
Troubleshooting ........................................................................................................27
Warranty....................................................................................................................28
Note: These scales have been factory calibrated, and do not
require calibration prior to use.
Please register your scale for warranty coverage at:
www.homscales.com
For User Instructions updates and revisions, please go to:
www.homscales.com
2

CAUTION AND WARNING
To prevent injury and damage to your scale, please follow these instructions very
carefully.
Assemble and operate the scale per the enclosed user instructions.
Operate these scales exclusively with the AC adapter provided by Health
o meter. Use of an unspecified adapter will void the warranty, and can
pose a serious safety hazard.
Prior to using these scales, inspect the AC adapter cord for
cracking/fraying, or for broken/bent plug prongs.
Prior to using these scales, ensure that the AC adapter is plugged into an
outlet with the rated voltage appropriate for operation.
Ensure that the AC adapter outlet is wired to a circuit breaker or other
protected power source.
Unplug the AC adapter, and carefully store both the adapter and adapter
cord before moving the scale.
Ensure that the AC adapter and scale do not come in contact with liquids,
excessive temperature, or excessive humidity.
Operating these scales at voltages and frequencies other than specified
can damage the equipment and will void the warranty.
Do not transport the scale with any weight on the platform.
Do not exceed recommended weight limit of 1000 lb / 454 kg for these
scales.
For accurate weighing, these scales must be placed on a flat, stable
surface.
For accurate weighing, verify before each use the proper operation
according to the procedure described in this manual.
Do not use in the presence of flammable or explosive materials.
For accurate weighing, if the “Lo bAtt” indicator activates, replace the
batteries or switch to the AC adapter as soon as possible.
When replacing / inserting batteries, be sure to use all new batteries.
To prevent patient injury, the patient must be attended throughout the
entire weighing event.
If the scale is being connected to another medical device, the power
adapter must not be used. Disconnect the power adapter from the scale
and use only the battery power.
3

SPECIFICATIONS
General
The 2500KL and 2600KLscales use highly sophisticated microprocessor technology. Each
precision scale is designed to provide accurate, reliable, and repeatable weight measurements.
In addition, each scale is designed to provide the user with features that make the weighing
process simple, fast, and convenient.
These scales are set up to use motion-sensing weighing technology in order to determine the
actual weight of a moving patient.
Weight can be displayed in pounds (lb) or in kilograms (kg). These scales feature a 180° swivel
display head for privacy and for easy operator reading from either side of the scale. For easy
mobility, the 2500KL Scale has 2 built-in wheels, along with the 2600KL Scale with 4 built-in
wheels. Each scale can be powered using an AC adapter (ADPT30 included), or by 6 - AA
batteries (not included).
2500KL / 2600KL Specifications
Capacity and Resolution
Power Requirements
Environmental
Physical Dimensions
Physical Dimensions
2500KL / 2600KL: 1000 lb x 0.2 lb (454 kg x 0.1 kg)
120V-240V AC, 50-60Hz-9V DC adapter (ADPT30) or 6 - AA batteries
Operating temperatures: 50°F to 95°F (10°C to 35°C)
Storage temperatures: 30°F to 125°F (0°C to 50°C)
Maximum Humidity: 85% RH
Platform-2500KL
Length: 28-¼” (71.8 cm)
Width: 29-3/8” (74.6 cm)
Height: 2-3/8” (6 cm)
Platform-2600KL
Length: 32-¼” (81.9 cm)
Width: 36” (91.4 cm)
Height: 2-1/2” (6.4 cm)
Assembled Size and Weight
Length: 34-¼” (87 cm)
Width: 40-¼” (102 cm)
Height: 45-1/2” (115.6 cm)
Weight: 81 lb (37 kg)
Assembled Size and Weight
Length: 43-7/8 ” (111.4 cm)
Width: 48-1/8” (122.4 cm)
Height: 49-7/16” (125.5 cm)
Weight: 93 lb (42 kg)
4
CERTIFICATIONS / CONNECTIVITY / DISPOSAL
Certification Descriptions
Pelstar, LLC has been officially certified as the manufacturer
of Health o meter® Professional medical devices. The Pelstar,
LLC quality assurance system covers the development,
production, sales and service of medical scales and
measuring systems.
This product is tested to and meets the requirements of:
1. UL60601-1 First Edition: Safety for Medical Electrical
Equipment
2. CSA C22.2 No. 601-1 M90: Medical Electrical Equipment
2500KL / 2600KL Scale Connectivity Information
To enable reliable transmission of weight, height, and Body Mass Index (BMI) data, these
scales are designed to connect to a computer, monitor, or other electronic device via a built-in
USB port. This connectivity helps minimize a source of potential medical errors caused by
incorrectly copying and then recording patient data.
These scales are EMR-EHR compatible. For more information regarding how to connect these
scales to other electronic devices, please contact Health o meter® Professional Scales
Technical Support, available during normal business hours at 1-800-683-3722.
2500KL / 2600KL Scale Disposal
These Health o meter® Professional scales must be disposed of properly as electronic waste.
Follow the national, regional or local regulations which apply to you for disposal of electronic
waste or batteries. Do not dispose of this device in the domestic waste stream.
5

2500KL ASSEMBLY INSTRUCTIONS
Before Assembly
Each 2500KL scale is shipped disassembled in a single carton. Carefully inspect the carton for
shipping damage before unpacking. If damage is found, contact your shipper or a Health o
meter® Professional representative immediately at 1-800-815-6615. Claims must be filed with
the shipper as soon as possible after receipt of the package. The following information details
what you will find inside the main carton as you unpack the parts for assembly.
To prevent scratching any components, carefully remove each assembly from the carton and
unwrap the packing materials. Set the carton aside for storage. To avoid damaging the scale
parts when unpacking, do not use a box cutter, knife, scissors, or any sharp object to open the
protective inner packaging.
Parts List
(1) Scale platform
(1) Handrail
(1) Small brown box
The small brown box contains:
(1) Box containing the AC adapter
(4) Feet
(1) Long white box
(1) 5mm Allen wrench
(1) User Information
(1) Display assembly
(1) Plastic bag containing:
o (2) Covers for Display Support (Front & Back)
o Hardware for assembly (see Figure 1)
The long white box contains:
(1) AC adapter holder
(2) Pivot bracket screw covers
Tools Required
Phillips head screwdriver (not included), Allen wrench (included).
6

2500KL ASSEMBLY INSTRUCTIONS (CONTINUED)
Assembling the 2500KL Scale (Refer to Figures 1-7)
Caution: It is recommended that the assembly be performed by two persons.
1. Place scale platform on a flat, level, and dry surface.
2. Locate and pick up the handrail. Find the load cell cable, located at the bottom of the
handrail.
3. Untie the load cell cable, and carefully pull the load cell cable end out the handrail bottom.
4. Position the handrail over the left and right handrail mounting holes array on the platform
(see Figure 3).
5. Feed the cable through the large center hole of the handrail mounting holes (located on
the right side of the “Health o meter” logo). Be sure not to pinch the cable.
6. Fasten the handrail to the platform using the (8) M8 1.25 x ¾ screws (A), (8) M8 washers
(D) and the included 5mm Allen wrench (see Figure 1).
Caution: Do not over-tighten the screws.
7. Pull forward on the handrail to tip the scale over, and gently place it face down on the
floor.
Caution: Take care to hold the ramp down when moving the scale - the ramp can flip
open when the scale is tipped forward.
8. Grasp the load cell cable protruding from the bottom of the platform and feed it through
the protective metal shield. Plug the cable’s load cell connector into the load cell port (see
Figure 4).
9. Pull the excess cable through the top of the handrail.
10. Thread the (4) feet into the underside of the platform. Each of the feet should be
completely hand tightened. Back feet out 1-½ full turns. This will allow for proper load cell
operation and scale accuracy (see Figure 5).
11. Carefully tilt the scale back to an upright position on the floor.
Caution: Take care to hold the ramp down when moving the scale - the ramp can flip
open when the scale is tipped back.
Warning: Do not drop the scale on its feet. This can result in permanent load cell
damage.
12. Adjust the feet to level the scale. Be certain that the feet are not completely tightened
into the base assembly (refer to the scale platform - feet assembly instruction above).
13. Rotate the display support so that it is perpendicular to the handrail (see Figure 6).
Position the display assembly close to the display support. Plug the load cell cable
connector into the load cell port on the rear of the display assembly. The port is labeled
“LOAD CELL” (see Figure 7).
Do not attach the AC adapter power cord into the back of the display assembly at this
Note:
point.
7

2500KL ASSEMBLY INSTRUCTIONS (CONTINUED)
14. Align the four mounting holes on the back of the display assembly with the four mounting
holes in the display support. Fasten the display assembly onto the metal display support.
Use the (4) Phillips pan head #5 x 3/8 screws (C) (see Figure 1).
15. Place the pivot bracket screw covers over the pivot screws. Fasten the covers to the
back of the display assembly using the (4) Phillips pan head #5 x 3/8 screws (C) (see Figure
1).
16. Attach the adapter holder to the left side of the handrail using the (2) #8 x ½ sheet metal
screws (B) (see Figure 1).
17. Connect the AC adapter to the power port, located on the back of the display assembly.
Caution: Do not plug the scale into a power source until the scale is fully assembled.
18. Rotate the display to align it parallel to the handrail. Attach the front and rear display
support covers by applying light pressure while snapping the covers into place.
19. The scale is now assembled. Plug the AC adapter into a power source and / or insert the
batteries.
8

2500KL ASSEMBLY INSTRUCTIONS (CONTINUED)
Ramp Assembly Instructions
1. Follow these instructions for moving the ramp to the opposite side of the scale, or for
adding a second ramp to the scale (B2500RAMP option):
2. On the side of the platform opposite to the ramp, remove the guardrail mounted to the end
of the platform by unscrewing and then removing the 4 guardrail assembly screws (see
Figure 3).
3. Fold the ramp onto the platform surface.
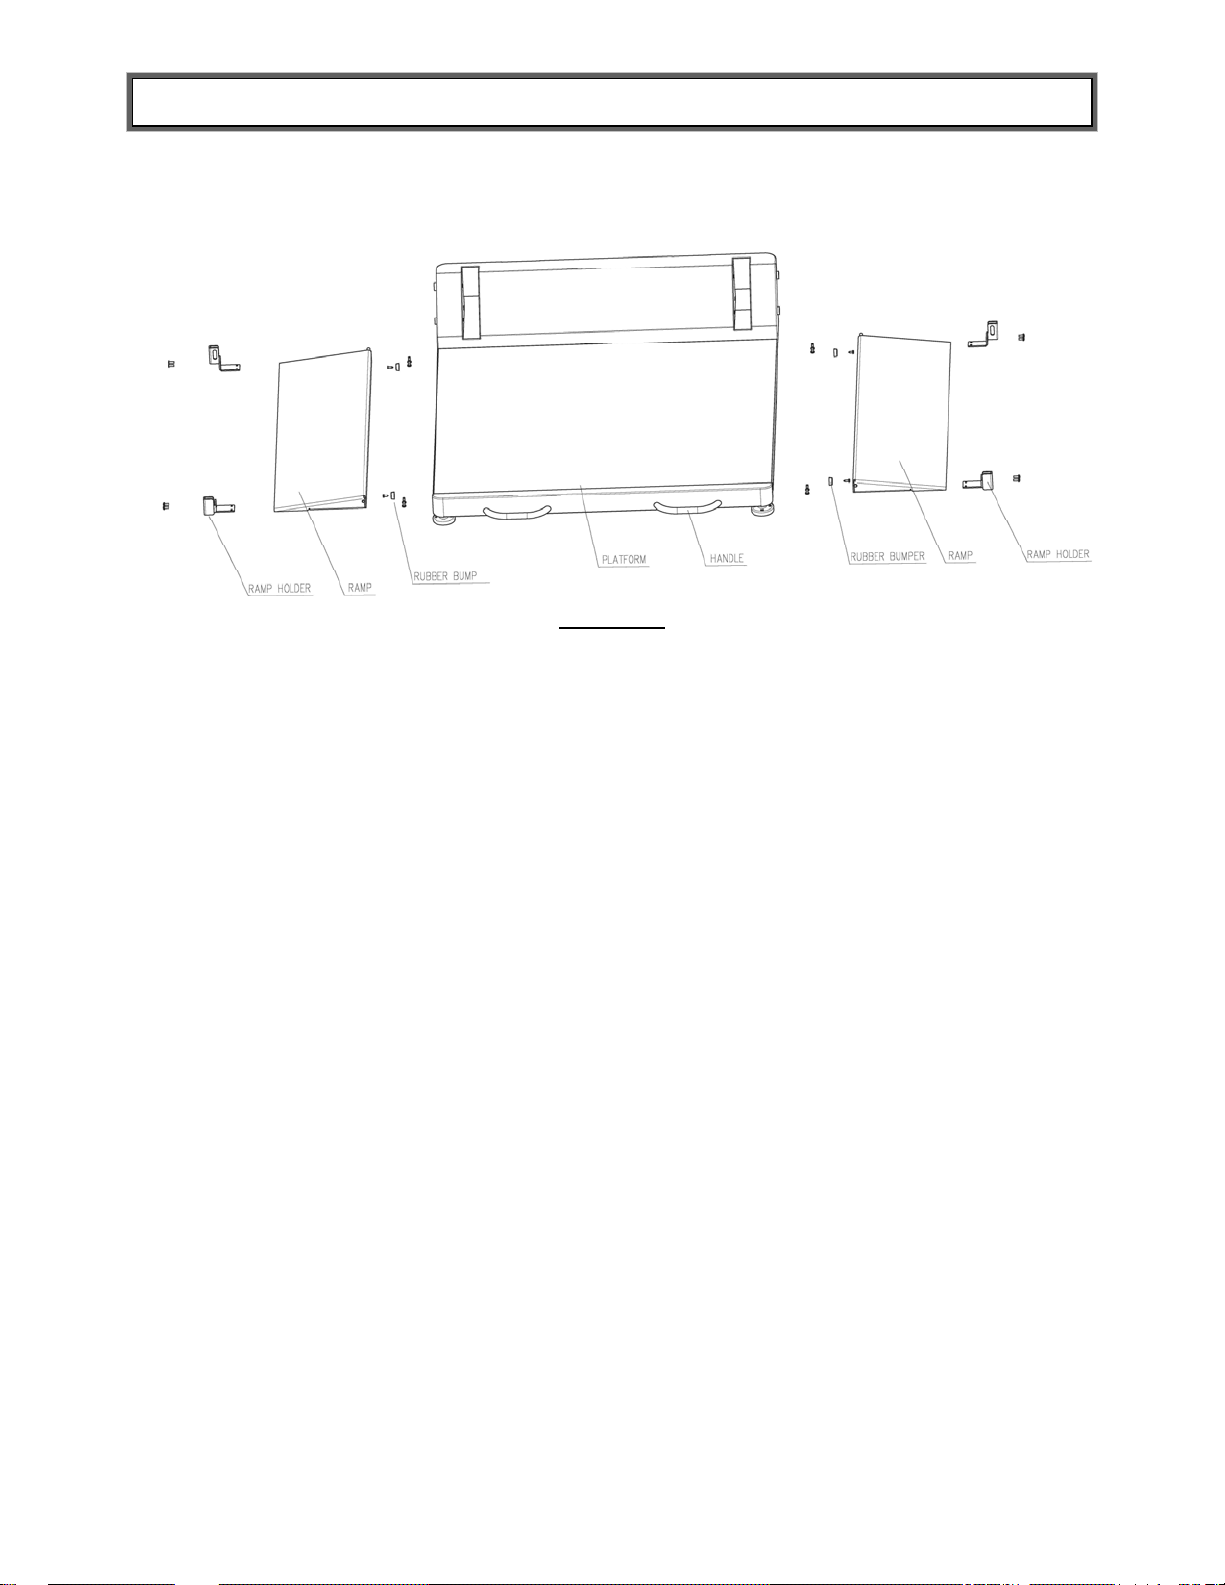
4. Remove the screws attaching the 2 rubber bumpers, located on the side of the platform
(see Figure 2).
5. Remove the bumpers, and re-install them on the opposite side of the platform. Use the
appropriate mounting holes (see Figure 2).
6. Loosen the screws holding each ramp holder to the platform.
7. Remove the ramp from the ramp holders. Remove the ramp holders by pulling out on
them slightly.
8. Install the ramp holders at the opposite side of the platform, but do not tighten the screws.
9. Insert the ramp between the ramp holders, and tighten the assembly screws.
10. Install the guardrail on the opposite side of the platform.
It is necessary to make small clearance holes in the mat in order to re-install the
Note:
guardrail assembly screws (the mounting holes are located beneath the mat). Use an awl or
small Phillips screwdriver to make the holes. Use the guardrail as a guide to locate the two
holes beneath the mat.
Note:
A second ramp is available separately as B2500RAMP.
9

2500KL ASSEMBLY INSTRUCTIONS (CONTINUED)
Figure 1
Figure 2
10
2500KL ASSEMBLY INSTRUCTIONS (CONTINUED)
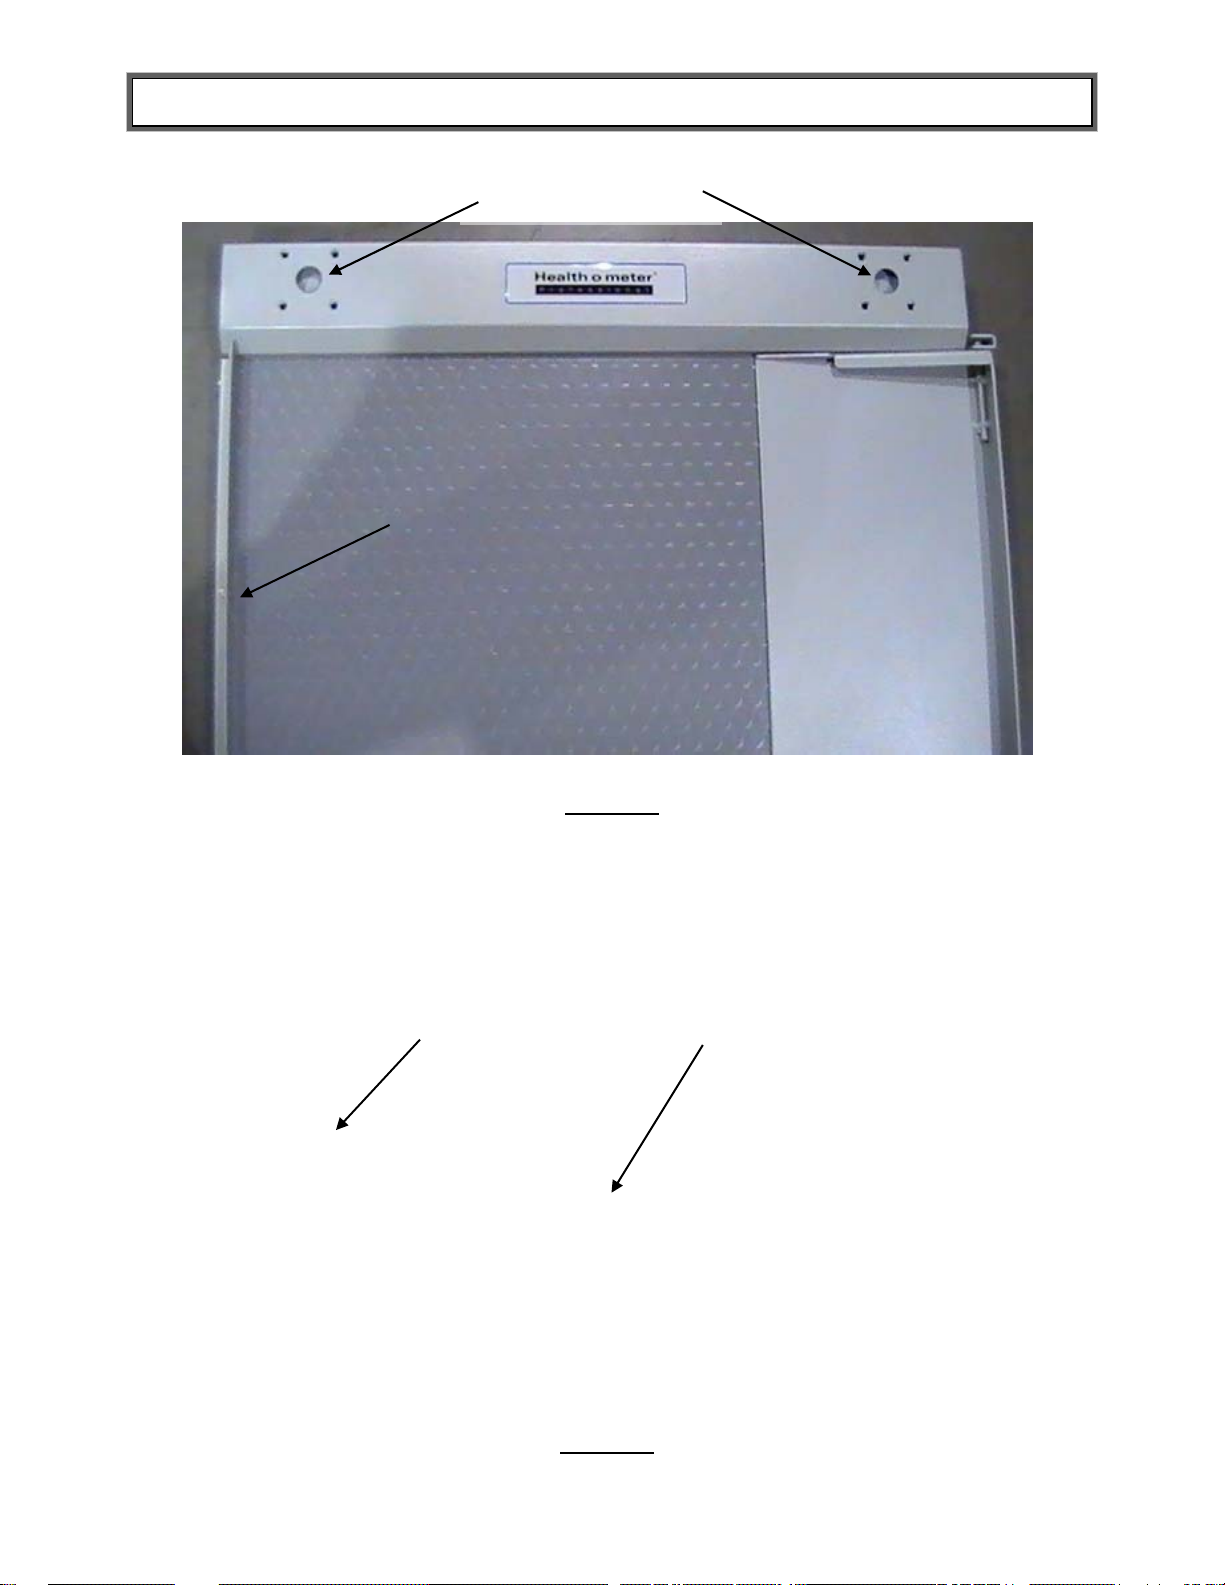
t
t
d
Left Righ
Guardrail
Handrail Mounting Holes
Load Cell Por
Figure 3
Shiel
Figure 4
11

2500KL ASSEMBLY INSTRUCTIONS (CONTINUED)
Figure 5
Figure 6
12

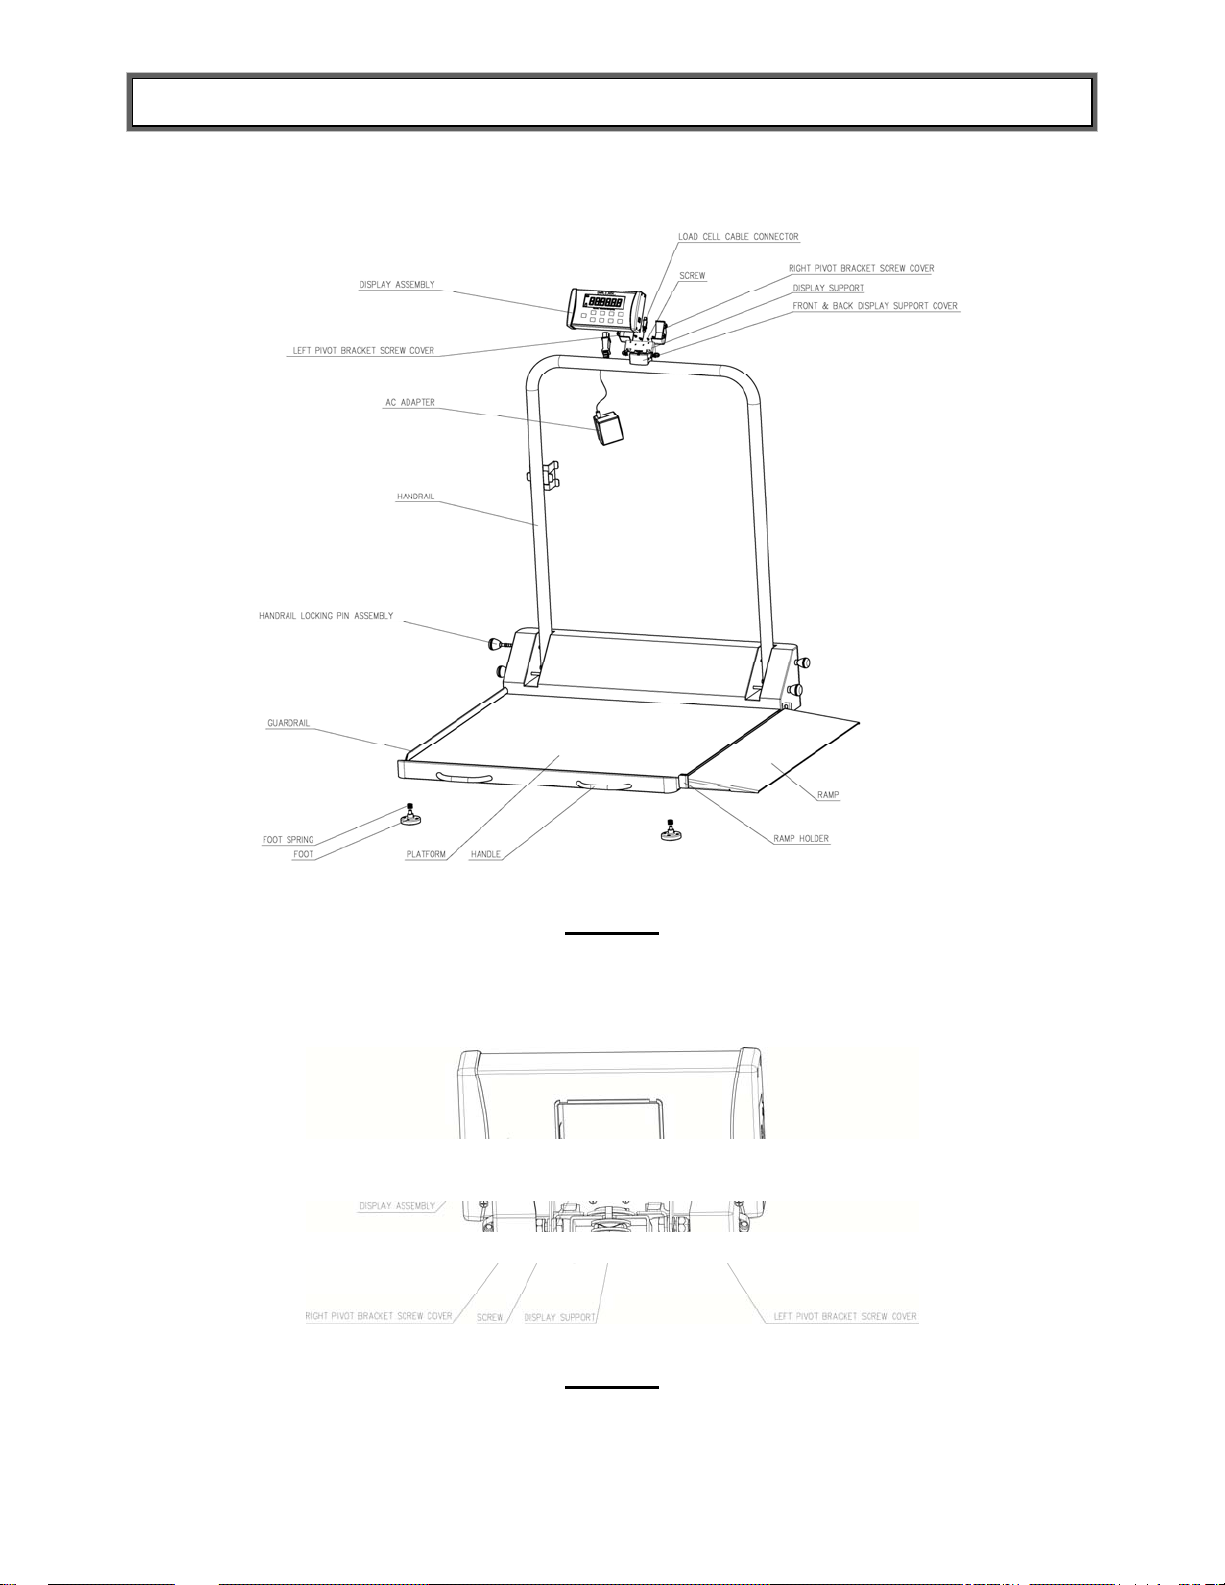
2500KL ASSEMBLY INSTRUCTIONS (CONTINUED)
Rear of Display Head on 2500KL and 2600KL
Figure 7
13

2600KL ASSEMBLY INSTRUCTIONS
Before Assembly
Each 2600KL scale is shipped disassembled in a single carton. Carefully inspect the carton for
shipping damage before unpacking. If damage is found, contact your shipper or a Health o
meter® Professional representative immediately at 1-800-815-6615. Claims must be filed with
the shipper as soon as possible after receipt of the package. The following information details
what you will find inside the main carton as you unpack the parts for assembly.
To prevent scratching any components, carefully remove each assembly from the carton and
unwrap the packing materials. Set the carton aside for storage. To avoid damaging the scale
parts when unpacking, do not use a box cutter, knife, scissors, or any sharp object to open the
protective inner packaging.
Parts List
(1) Scale platform
(1) Small brown box
The small brown box contains:
(1) Box containing the AC adapter
(4) Feet
(1) Long white box
(1) User Information
(1) Display assembly
(1) Plastic bag containing:
o (2) Covers for Display Support (Front & Back)
o Hardware for assembly (see Figure 1 on Page 10)
The long white box contains:
(1) AC adapter holder
(2) Pivot bracket screw covers
Tools Required
Phillips head screwdriver (not included).
14

2600KL ASSEMBLY INSTRUCTIONS (CONTINUED)
Assembling the 2600KL Scale (Refer to Figures 7-10)
Caution: It is recommended that the assembly be performed by two persons.
1. Remove the scale assembly from the carton by first removing the inserts, then tucking the
bag down around the end of the box, and finally tilting the carton up on its end. Carefully roll
the scale out of the carton.
2. Remove the bag from around the scale, and safely store or discard the bag.
3. Thread the (4) feet into the underside of the scale platform (see Figure 8). Each foot
should initially be completely hand tightened. Back feet out 1-½ full turns. This will allow for
proper load cell operation and scale accuracy.
4. Open the scale to its operational position.
Warning: Do not drop the scale on its feet. This can result in permanent load cell
damage.
5. Rotate the display support so that it is perpendicular to the handrail.
6. Position the display assembly close to the display support on the handrail. Connect the
load cell cable connector to the load cell port, located on the back of the display assembly.
The port is labeled “LOAD CELL” (see Figure 7).
Do not attach the AC adapter power cord into the back of the display assembly at this
Note:
point.
7. Align the four mounting holes on the back of the display assembly with the four mounting
holes in the display support, and fasten the display assembly onto the metal display support
using the (4) Phillips pan head #5 x 3/8 screws (C) (see Figures 1 and 9).
8. Place the pivot bracket screw covers over the pivot screws, and fasten the covers to the
back of the display assembly using the (4) Phillips pan head #5 x 3/8 screws (C) (See
Figures 1 and 9).
9. Attach the adapter holder to the left side of the handrail using the (2) #8 x ½ sheet metal
screws (B) (see Figure 1).
10. Connect the AC adapter to the power port, located on the back of the display assembly.
Caution: Do not plug the scale into a power source until the scale is fully assembled.
11. Rotate the display assembly to align it parallel to the handrail, and then attach the front
and rear display support covers by applying light pressure while snapping the covers into
place.
12. Make any necessary adjustments to level the scale by turning the feet in or out.
13. The scale is now assembled. Plug the AC adapter into a power source and / or insert the
batteries.
15

2600KL ASSEMBLY INSTRUCTIONS (CONTINUED)
Ramp Assembly Instructions
1. Follow these instructions for moving the ramp to the opposite side of the scale, or for
adding a second ramp to the scale (B2600RAMP option):
2. On the side of the platform opposite to the ramp, remove the guardrail mounted to the end
of the platform by unscrewing and then removing the 4 guardrail assembly screws (see
Figure 3).
3. Fold the ramp onto the platform surface.
4. Remove the screws attaching the 2 rubber bumpers, located on the side of the platform
(see Figure 10).
5. Remove the bumpers, and re-install them on the opposite side of the platform. Use the
appropriate mounting holes (see Figure 10).
6. Loosen the screws holding each ramp holder to the platform.
7. Remove the ramp from the ramp holders. Remove the ramp holders by pulling out on
them slightly.
8. Install the ramp holders at the opposite side of the platform, but do not tighten the screws.
9. Insert the ramp between the ramp holders, and tighten the assembly screws.
10. Install the guardrail on the opposite side of the platform.
It is necessary to make small clearance holes in the mat in order to re-install the
Note:
guardrail assembly screws (the mounting holes are located beneath the mat). Use an awl or
small Phillips screwdriver to make the holes. Use the guardrail as a guide to locate the two
holes beneath the mat.
Note
: A second ramp is available separately as B2600RAMP.
16
2600KL ASSEMBLY INSTRUCTIONS (CONTINUED)
Figure 8
Figure 9
17
2600KL ASSEMBLY INSTRUCTIONS (CONTINUED)
Figure 10
18

SETUP / BATTERIES
Opening the 2600KL Scale
1. From its upright folded position, gently lower the scale onto its feet. Use the scale
handles, located on the front of the platform (see Figure 10).
2. Loosen all four of the handrail locking pin assemblies by turning the locking pins
counterclockwise (see Figure 8).
Note:
The assemblies are spring loaded, and will pop out when completely loosened.
3. Grasp the center handrail near the display assembly, and lift the handrail to an upright
position.
4. Lock the center handrail in the upright position by tightening the two upper handrail
locking pin assemblies. In addition, to avoid damage to the pin assemblies, tighten the two
lower locking pin assemblies as well.
Preparing the 2500KL / 2600KL Scale for Use
1. Remove the protective plastic film covering the display (the film says “FACTORY
CALIBRATED”).
2. Place batteries into the battery holder (see “Replacing / Inserting Batteries” information
below).
3. Connect the AC adapter into the adaptor jack on the display assembly (if not already
connected during assembly).
4. Plug the scale’s AC adapter into the power source.
5. Ensure all objects are removed from the scale’s platform. Press the ON/OFF button to
turn the scale on. The display will show “Start”, then “0.0LB” or “0.0KG”.
6. Press the UNIT button to select the weight mode (lb or kg).
These scales will always default to the settings and units last used (lb or kg).
Note:
7. When you disconnect the scale’s AC adapter from the power source, the scale will switch
to battery power if batteries are installed.
Note:
If the setup procedure failed, refer to the troubleshooting instructions. If the problem is
not corrected, refer to qualified service personnel.
19

SETUP / BATTERIES (CONTINUED)
Replacing / Inserting Batteries (2500KL / 2600KL)
1. Unplug the AC adapter from the power source.
2. Remove the battery cover on the side of the display head by unscrewing the (2) battery cover
screws (see Figure 11).
3. Replace or install the batteries with new units. Health o meter recommends using an alkaline
or lithium battery, rated for 130°F (54°C) operation. Do not use Zinc-Carbon batteries.
4. Re-attach the battery cover to the display assembly.
Warning:
safety hazard. Disposal of batteries must be performed in accordance with the prevailing
national, regional or local regulations which apply to you.
If the scale will not be used for some time, remove the batteries to avoid a
Figure 11
20
QUICK START / OPERATING INSTRUCTIONS
Keypad
Figure 12
Function Description
ON/OFF
ZERO
HOLD/RELEASE
►
BMI
RECALL
TARE/PRETARE
UNIT/▲
REWEIGH
ENTER
Turns scale on and off.
Zeros the scale prior to a weighing.
Holds the weight value of the patient on the display until the button is
pressed again to clear the value. Also moves the cursor from left to right
on the display for entering height and pretare value.
Prompts entry of height data to calculate patient’s Body Mass Index
(BMI).
Recalls the previous weight.
TARE-Tares out weight of an object on the platform.
PRETARE-Prompts entry of a tare value that will be deducted from the
weight on the platform. Also releases tare weight (returns display to zero).
Toggles between pounds and kilograms.
Also used to increment height value and pretare value.
Allows repeated weighing of the patient without stepping off the scale.
Used to accept height value in BMI mode, and tare value in PRETARE
mode. Also releases the recall value and BMI value.
21

QUICK START / OPERATING INSTRUCTIONS (CONT)
Tare Function
When using these scales, the weight of an object, such as a wheelchair, can be subtracted from
the total weight in order to determine the weight of the patient alone. The Tare Function
automatically performs this subtraction. The 2500KL and 2600KL scales allow tare weight to be
entered manually by using the keypad, or automatically, as outlined in this section.
TARE
1. With all weight off the scale, press the ON/OFF button to turn on the scale.
2. Wait until the “0.0LB” or “0.0KG” appears on the display.
3. Place the wheelchair on the scale. The display will show a value for the wheelchair’s weight.
4. Press the TARE button. The scale will zero out, and the word “TARE” will appear at the
bottom center of the display, indicating that there is a tare value for this patient’s wheelchair.
5. Remove the wheelchair from the scale. Once it is removed from the scale, the display will
show a negative weight, equal to the weight of the wheelchair.
6. Place the patient and wheelchair on the scale. The scale will automatically deduct the tare
weight of the wheelchair from the gross weight of the patient and wheelchair together.
7. The weight of the patient will appear on the scale.
8. With no weight on the scale, the tare value will remain on the display until changed, cleared,
or until the scale is turned off.
9. To remove the Tare, press the TARE button again. The word “TARE” will disappear from the
bottom of the display, and the tare value will be cleared from the display. The scale will resume
normal operation.
PRETARE (Limit 200.0 lb)
1. Make sure that there is no object on the weighing platform.
2. Press the ON/OFF button to turn on the scale.
3. Wait until the “0.0LB” or “0.0KG” and “ZERO” appear on the display.
4. Hold down the TARE button for 3 to 5 seconds. The word “TARE” will appear at the bottom
center of the display, and the user will be prompted to enter the tare value.
5. Use the keypad ► and ▲ buttons to enter the weight of the wheelchair or other object. Press
the ENTER button.
6. The value entered will show as a negative value on the display.
22

QUICK START / OPERATING INSTRUCTIONS (CONT)
7. Place the patient in the wheelchair and roll the wheelchair on the scale. The scale will
automatically deduct the tare weight as entered, from the gross weight of the patient and the
wheelchair.
8. The weight of the patient will appear on the scale.
9. With no weight on the scale, the tare value will remain on the display until changed, cleared,
or until the scale is turned off.
10. To remove the Tare, press the TARE button again. The word “TARE” will disappear from the
display and the tare value will be cleared from the display. The scale will resume normal
operation.
Weighing a Patient
: When these scales are turned on, they will always default to the settings and units last
Note
used (lb or kg).
1. Make sure there is no object on the weighing platform.
2. Press the ON/OFF button to turn the scale on.
3. Wait until the “0.0lb” or “0.0kg” appears on the display.
4. Tare out the weight of the wheelchair, and roll the patient in the wheelchair onto the scale.
The scale will begin to display weight information and will lock on the patient’s weight when the
stable weight of the patient is determined. Depending on the movement of the patient on the
scale, it may take several seconds for the scale to lock onto the weight.
Caution: To prevent patient injury, the patient must be attended throughout the entire
weighing event. Exercise caution when transporting patient onto and off of the scale.
5. Once a weight has been displayed, while the patient is still on the scale, Health o meter
recommends performing a second weighing by pressing the REWEIGH button.
6. The weight may be held on the display by pressing the HOLD/RELEASE button. To release,
press the HOLD/RELEASE button again.
7. After the weight measurement has been taken and is recorded, roll the patient off the scale.
8. Press the ON/OFF button to turn the scale off.
Weight Recall
The last weight reading on the scale can be recalled by pressing the RECALL button. To clear
the display of the recalled weight, press the ENTER button.
Note
: Clearing the recalled weight from the display will not clear the recalled weight from
memory. The recalled weight will remain in memory until another weight is obtained.
23

QUICK START / OPERATING INSTRUCTIONS (CONT)
BMI Function
Body Mass Index is another name for Quetelet Index, a formula that is a convenient indicator of
BMI with various exemptions, such as athletes, children, the elderly, and the infirm.
: The scale will not calculate BMI for a patient that is 24 pounds (12 kg) or less. If a height
Note
is not entered for the patient within 30 seconds of pressing the BMI button, the scale will return
to the normal weighing mode.
1. Make sure there is no object on the weighing platform.
2. Press the ON/OFF button to turn the scale on.
3. Wait until the “0.0” LB or “0.0” KG appears on the display.
Ask the patient to step on the scale. The scale will begin to display weight information and will
4
lock on the patient’s weight when the stable weight of the patient is determined. Depending on
the movement of the patient on the scale, it may take several seconds for the scale to lock onto
the weight.
5. Once a weight has been displayed, while the patient is still on the scale, Health o meter
recommends performing a second weighing by pressing the REWEIGH button.
6. After obtaining the patient’s weight on the scale, press the BMI button while the scale is on.
7. The scale will prompt you to enter the patient’s height. Use the keypad ▲ and ► buttons to
enter the patient’s height.
: When weighing in pounds, the height is displayed in inches. When weighing in kilograms,
Note
the height is displayed in centimeters.
8. Once height is keyed in, press the ENTER button.
9. The display will show the patient’s BMI.
10. Press the ENTER button to return to the normal weighing mode of the scale.
24

MAINTENANCE
Maintenance
The following pages provide instructions for maintenance, cleaning, calibrating, and
troubleshooting for the 2500KL or 2600KL scale. Maintenance operations other than those
described in this manual should be performed by qualified service personnel.
Caution: Before first use, or after long periods of non-use, check the scale for proper
operation and function. If the scale does not operate correctly, refer to qualified service
personnel.
1. Check overall appearance of the total scale for any obvious damage, wear, and tear.
2. Inspect the AC adapter for cord cracking or fraying, or for broken/bent prongs.
Cleaning
Proper care and cleaning is essential to ensure a long life of accurate and effective operation.
Caution: Disconnect the scale from the AC adapter power source prior to cleaning the
unit.
1. Clean all external surfaces with a clean damp cloth or tissue. Mild antimicrobial or
antibacterial soap and water solution may be used. Dry with a clean soft cloth.
2. Do not immerse the scale into cleaning or other liquid solutions.
3. Do not use Isopropyl Alcohol or other solutions to clean the display surface.
4. Do not use abrasive cleaners.
25

CALIBRATION
Calibration
These scales have been factory calibrated, and do not require calibration prior to use.
For maintenance, the scale can be calibrated. Calibration of your 2500KL or 2600KL scale is
performed using kilograms (kg) or pounds (lb), according to the units of measure used upon
entering into the calibration path. The following calibration assumes the scale is set to pounds,
and 400 lb (the default weight) is employed as the calibration weight.
Scale Calibration
Operator Action Display
1. Make sure the display is turned off, then press and hold the
HOLD/RELEASE button while pressing the ON/OFF button.
2. Press the ENTER button. “CAL”.
3. Make sure there is nothing on the scale, then press the ENTER
button again.
4. Use the ► and ▲ buttons to set the calibration weight to a
value other than the default weight. The calibration weight should
be as high as possible, with 400 lb as a minimum calibration
weight.
5. Press the ENTER button.
6. Load the scale with the required weight.
7. Without touching or shaking the scale, allow the display to
stabilize, then press the ENTER button.
8. If the calibration is successful, the display will show SUCC and
turn off. If the calibration is not successful, the display will show
Err1 and turn off. Contact customer service for an Err1 display
(+1 800-638-3722).
“U 01” followed by a 5 digit
‘idle scale count’ number.
“Clear” followed by
“0400.0LB”.
Shows “400.0” or entered
calibration weight.
Alternating “Load” followed
by “400.0LB”.
Display increments showing
raw weight data.
“SUCC” or “Err1”.
-------
.
26
 Loading...