

Page 1

Register Online!
hatcocorp.com
(see page 2)
Installation and Operating Manual
Original Instructions
Instrucciones originales
Instructions originales
Originalanleitung
Istruzioni originali
Vertaling van de
originele instructies
HEATMAX
Heated Wells
RHW/RCTHW Series
For and Non- Models
Suppen- und Soßenwärmer
Serien RHW/RCTHW
Installations- und Bedienungshandbuch
P 13
Registrieren Sie sich online!
Compartiments Chauffants
Séries RHW/RCTHW
Manuel d'installation et d'utilisation
P 35
S'inscrire en ligne!
Verwarmingskuipen
Modelreeksen RHW/RCTHW
Handleiding voor Installatie en Bediening
P 57
Registreer online!
P/N 07.04.374.00 © 2016 Hatco Corporation
Manual de Instalación y Operación
Manuale per l'installazione e l'uso
Recipientes Termicos
Series RHW/RCTHW
P 24
¡Regístrese en línea!
Pozzetti Riscaldati
Serie RHW/RCTHW
P 46
Registratevi online!
Page 2
WARNING
NOTICE
CAUTION
Correct Disposal of this Product
This marking indicates that this product and its electronic
components should not be disposed of with other
commercial waste. To prevent possible harm to the
environment or human health from uncontrolled waste
disposal, recycle responsibly to promote the sustainable
reuse of material resources. To dispose of product and its
electronic components, contact supplier where product
was purchased for environmentally safe recycling.
CONTENTS
Important Owner Information ..............................................2
Introduction...........................................................................2
Important Safety Instructions..............................................3
Model Description.................................................................4
Model Designation................................................................5
Specifications........................................................................5
Plug Configurations .............................................................5
Electrical Rating Chart .........................................................5
Dimensions ..........................................................................6
Installation.............................................................................7
General ................................................................................7
Installing a Built-In Model.....................................................7
IMPORTANT OWNER INFORMATION
Record the model number, serial number, voltage, and
purchase date of the unit in the spaces below (specification
label located on the back of the unit). Please have this
information available when calling Hatco for service assistance.
Model No. ________________________________________
Serial No. ________________________________________
Voltage __________________________________________
Date of Purchase __________________________________
Operation...............................................................................9
General ................................................................................9
Maintenance ........................................................................10
General ..............................................................................10
Daily Cleaning....................................................................10
Options and Accessories...................................................10
Troubleshooting Guide.......................................................11
International Limited Warranty..........................................12
Service Information ............................................................12
Business
Hours: 7:00
Telephone: 414-671-6350
E-mail: partsandservice@hatcocorp.com
Additional information can be found by visiting our web site at
www.hatcocorp.com.
AM to 5:00 PM Central Standard Time (C.S.T.)
(Summer Hours: June to September—
7:00
AM to 5:00 PM C.S.T. Monday–Thursday
7:00
AM to 4:00 PM C.S.T. Friday)
Register your unit!
Completing online warranty registration will prevent delay in
obtaining warranty coverage. Access the Hatco website at
www.hatcocorp.com, select the Parts & Service pull-down
menu, and click on “Warranty Registration”.
INTRODUCTION
Hatco HEATMAX Heated Wells are specially designed to cook
or hold a wide variety of foods including soups, curry, gravies
and a variety of toppings. For RHW units, products for cooking
or holding are placed in a pot which is heated or warmed by a
heating plate. For RCTHW units, products are placed in a
standard size pan which is placed in the heated well. The
heating element temperature is monitored by an electronic
controller for optimum results. Heat is evenly distributed
throughout the unit to hold foods at desired temperatures and
the insulated stainless steel design provides easy maintenance
and durable performance.
All units are equipped with a control panel featuring three
temperature setpoints from 50°C (122°F) to 100°C (212°F) and
an energy saving low power mode that saves electricity during
off-peak hours.
Hatco HEATMAX Heated Wells are quality built to meet
the demands of foodservice operations and provide years of
trouble-free performance. The heating elements are
guaranteed against breakage and burnout for 1 year.
HEATMAX Heated Wells are products of extensive research
and field testing. The materials used were selected for
maximum durability, attractive appearance, and optimum
performance. Every unit is inspected and tested thoroughly
prior to shipment.
This manual provides the installation, safety, and operating
instructions for HEATMAX Heated Wells. Hatco recommends all
installation, operating, and safety instructions appearing in this
manual be read prior to installation or operation of the heated
wells.
Safety information that appears in this manual is identified by
the following signal word panels:
WARNING indicates a hazardous situation which, if not
avoided, could result in death or serious injury.
CAUTION indicates a hazardous situation which, if not
avoided, could result in minor or moderate injury.
NOTICE is used to address practices not related to personal
injury.
2
Form No. RHWCEM-0816
Page 3

IMPORTANT SAFETY INFORMATION
NOTICE
CAUTION
WARNING
WARNING
Read the following important safety information before using this equipment to avoid serious
injury or death and to avoid damage to equipment or property.
ELECTRIC SHOCK HAZARD:
• Plug unit into a properly grounded electrical receptacle
of the correct voltage, size, and plug configuration. If
plug and receptacle do not match, contact a qualified
electrician to determine and install the proper voltage
and size electrical receptacle.
• Turn OFF power switch, unplug power cord, and allow
unit to cool before performing any cleaning,
adjustments, or maintenance.
• DO NOT submerge or saturate with water. Unit is not
waterproof. Do not operate if unit has been submerged
or saturated with water.
• Unit is not weatherproof. Locate unit indoors where
ambient air temperature is a minimum of 21°C (70°F).
• Do not steam clean or use excessive water on unit.
• This unit is not “jet-proof” construction. Do not use jetclean spray to clean this unit.
• Do not pull unit by power cord.
• Discontinue use if power cord is frayed or worn.
• Do not attempt to repair or replace a damaged power
cord. Cord must be replaced by Hatco, an Authorized
Hatco Service Agent, or a person with similar
qualifications.
• DO NOT use unit to melt or hold ice. Doing so may
cause condensation, creating an electrical hazard and
causing personal injury and/or damage to unit. Damage
caused by condensation is not covered by warranty.
• Use only Genuine Hatco Replacement Parts when
service is required. Failure to use Genuine Hatco
Replacement Parts will void all warranties and may
subject operators of the equipment to hazardous
electrical voltage, resulting in electrical shock or burn.
Genuine Hatco Replacement Parts are specified to
operate safely in the environments in which they are
used. Some aftermarket or generic replacement parts
do not have the characteristics that will allow them to
operate safely in Hatco equipment.
FIRE HAZARD:
• Locate unit a minimum of 25 mm (1″) from combustible
walls and materials. If safe distances are not
maintained, discoloration or combustion could occur.
• Do not use harsh chemicals such as bleach (or
cleaners containing bleach), oven cleaners, or
flammable cleaning solutions to clean this unit.
Make sure all operators have been instructed on the safe
and proper use of the unit.
This unit is not intended for use by children or persons
with reduced physical, sensory, or mental capabilities.
Ensure proper supervision of children and keep them away
from the unit.
This unit has no “user-serviceable” parts. If service is
required on this unit, contact an Authorized Hatco Service
Agent or contact the Hatco Service Department at
414-671-6350.
BURN HAZARD:
• Some exterior surfaces on unit will get hot. Use caution
when touching these areas.
• Hot water in unit may cause scalding injury. Allow unit
to cool before draining or cleaning.
Locate unit at the proper counter height in an area that is
convenient for use. The location should be level to prevent
the unit or its contents from falling accidentally and strong
enough to support the weight of the unit and contents.
Do not move or relocate unit when it contains food product.
Turn off unit, remove food product, and allow to cool
completely before moving or cleaning.
Standard and approved manufacturing oils may smoke up
to 30 minutes during initial startup. This is a temporary
condition. Operate unit without food product until smoke
dissipates.
Use non-abrasive cleaners and cloths only. Abrasive
cleaners and cloths could scratch finish of unit, marring its
appearance and making it susceptible to soil accumulation.
Do not lay unit on the side with the control panel. Damage
to the unit could occur.
Remote mounted control panels must have a minimum
152 mm (6″) clearance from unit (not to exceed 1420 mm
[56″]). Mounting control panel closer may cause heat
damage to electrical system in control panel.
Do not locate unit in an area subject to excessive
temperatures or grease from grills, fryers, etc. Excessive
temperatures could cause damage to the unit.
Unit is designed and recommended for use in or on
metallic countertops. Damage to any countertop material
is not covered under the Hatco warranty. For other
surfaces, verify with manufacturer that material is suitable
for prolonged temperatures up to 100°C (212°F).
Do not use excessive force when tightening mounting
screws on built-in units. This may damage unit and/or
countertop.
Do not operate unit without food product/water in well.
Damage to unit could occur.
Form No. RHWCEM-0816
3
Page 4
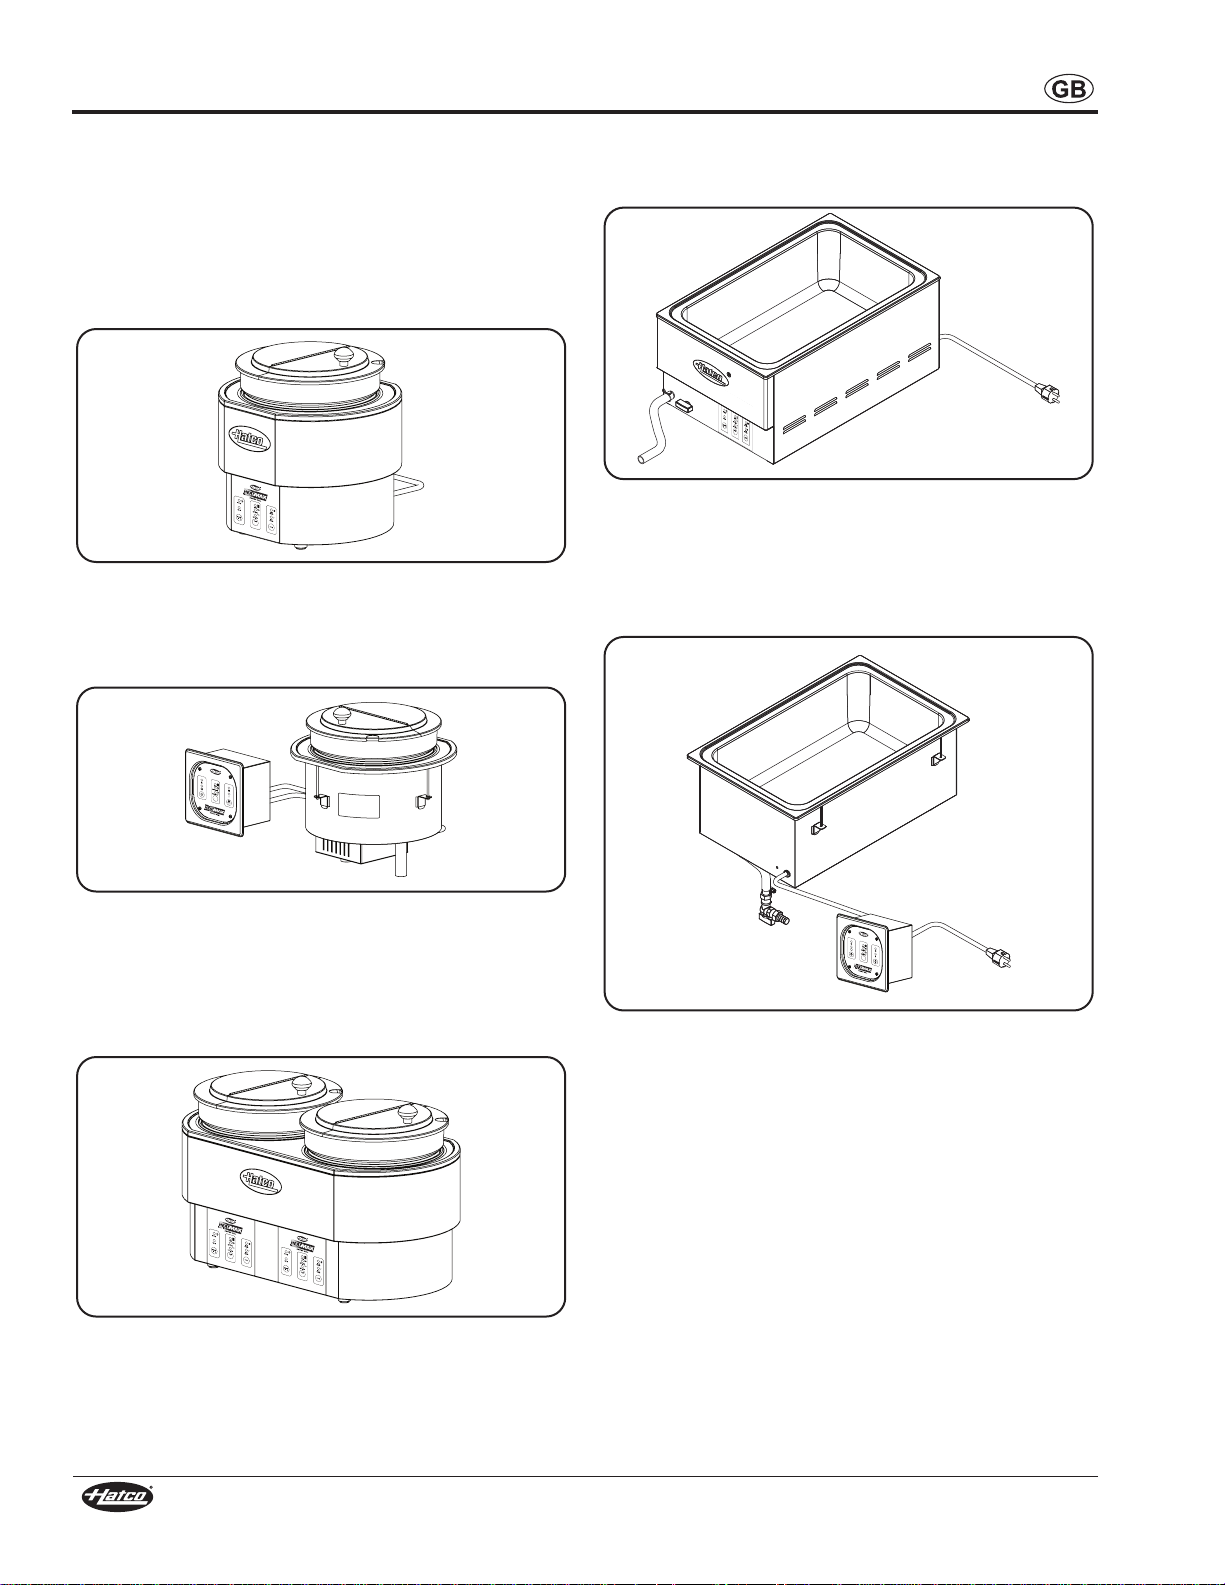
MODEL DESCRIPTION
All Models
All HEATMAX Heated Well units are reliable and versatile. In
addition for use as a Heated Well to keep food hot for serving, food
also can be steamed when used with an accessory adapter kit.
RHW-1
RHW-1 is equipped with a single heating element for holding food
or cooking soups or sauces. It is supplied with a speciallydesigned, stainless steel 10 liter (11 qt) round pot and hinged lid.
Model RHW-1
RHW-1B
RHW-1B is equipped the same as the RHW-1 but is a built-in
model equipped with a remote mounted control panel.
RCTHW-1
RCTHW-1 is equipped with three heating elements and a front
drain. It can hold a standard size food pan.
Model RCTHW-1
RCTHW-1B
RCTHW-1B is equipped the same as the RCTHW-1 but is a
built-in model equipped with a remote mounted control panel
and a bottom drain.
Model RHW-1B
RHW-2
RHW-2 is equipped with two individually controlled heating
elements for holding food or cooking soups or sauces. It is
supplied with two specially-designed, stainless steel 10 liter
(11 qt) round pots and hinged lids.
Model RHW-2
Model RCTHW-1B
4
Form No. RHWCEM-0816
Page 5

Plug Configurations
WARNING
CEE 7/7 Schuko
BS-1363
AS 3112
X H W - 1 B
R = Round
RCT = Rectangular
Heated Well
B = Built-In w/Remote Control
No Character = Countertop
1 = Single Unit
2 = Dual Unit
Units are supplied from the factory with an electrical cord and
plug. Plugs are supplied according to the application.
ELECTRIC SHOCK HAZARD: Plug unit into a properly
grounded electrical receptacle of the correct voltage, size,
and plug configuration. If plug and receptacle do not
match, contact a qualified electrician to determine and
install the proper voltage and size electrical receptacle.
NOTE: The specification label is located on the back of the
unit. See label for serial number and verification of unit
electrical information.
MODEL DESIGNATION
SPECIFICATIONS
Plug Configurations
Electrical Rating Chart
Model Voltage Watts Amps Plug Configuration Shipping Weight
RHW-1 230 (CE) 1250 5.4 BS-1363, CEE 7/7 Schuko, or AS 3112 10 kg (21 lbs.)
RHW-1B 230 (CE) 1250 5.4 BS-1363, CEE 7/7 Schuko, or AS 3112 10 kg (21 lbs.)
RHW-2 230 (CE) 2500 10.9 BS-1363, CEE 7/7 Schuko, or AS 3112 17 kg (36 lbs.)
RCTHW-1 230 (CE) 3000 13 BS-1363, CEE 7/7 Schuko, or AS 3112 12 kg (26 lbs.)
RCTHW-1B 230 (CE) 3000 13 BS-1363, CEE 7/7 Schuko, or AS 3112 13 kg (29 lbs.)
NOTE: Shipping weight includes packaging.
Form No. RHWCEM-0816
5
Page 6

SPECIFICATIONS
POWER
FAULT
100°C
70°C-90°C
50°C-70°C
TEMP
ON/OFF
o
_
FULL
POWER
ENERGY
SAVE
MODE
~
~
~
~
POWER
FAULT
100°C
70°C-90°C
50°C-70°C
TEMP
ON/OFF
o
_
FULL
POWER
ENERGY
SAVE
MODE
~
~
~
~
HEATMAX
HEATED WELL
A
A
D
E
RCTHW-1
RHW-1 RHW-1B RHW-2
RCTHW-1B
C
C
B B
B
E
D D
E
B B
C
A
C
A
C
A
Dimensions
Width Depth Height Footprint Footprint
Model (A) (B) (C) Width (D) Depth (E)
RHW-1 359 mm 330 mm 355 mm 179 mm 224 mm
(14-1/8") (13") (14") (7") (8-7/8")
RHW-1B 359 mm 330 mm 341 mm N/A N/A
(14-1/8") (13") (13-7/16")
RHW-2 630 mm 330 mm 355 mm 389 mm 249 mm
(24-3/4") (13") (14") (15-3/8") (9-7/8")
RCTHW-1 368 mm 611 mm 283 mm 347 mm 535 mm
(14-1/2") (24-1/16") (11-3/16") (14") (21-7/16")
RCTHW-1B 368 mm 582 mm 226 mm N/A N/A
(14-1/2") (22-15/16")
(8-15/16")
6
Form No. RHWCEM-0816
Page 7
INSTALLATION
WARNING
NOTICE
CAUTION
Drain Hose
Hose Clamp
Hose Clamp
Drain Fitting
Bottom
Panel
Bottom
Panel
Screw
Drain Valve
NOTICE
General
HEATMAX Heated Well units are shipped from the factory with
most components assembled and ready for use. Care should
be taken when unpacking shipping carton to avoid damage to
unit and the components enclosed.
ELECTRIC SHOCK HAZARD: Unit is not weatherproof.
Locate unit indoors where ambient air temperature is a
minimum of 21°C (70°F).
FIRE HAZARD: Locate unit a minimum of 25 mm (1″) from
combustible walls and materials. If safe distances are not
maintained, discoloration or combustion could occur.
Locate unit at the proper counter height in an area that is
convenient for use. The location should be level to prevent
the unit or its contents from falling accidentally and strong
enough to support the weight of the unit and contents.
Do not move or relocate unit when it contains food
product. Turn off unit, remove food product, and allow to
cool completely before moving or cleaning.
Do not lay unit on the side with the control panel. Damage
to the unit could occur.
Do not locate unit in an area subject to excessive
temperatures or grease from grills, fryers, etc. Excessive
temperatures could cause damage to the unit.
1. Remove the unit from the carton.
2. Remove the information packet.
3. Remove tape and protective packaging from all surfaces of
the unit and any accessories.
4. If the unit is a countertop model, place the unit in the
desired location.
• Locate the unit in an area where the ambient air
temperature is constant and a minimum of 21°C
(70°F). Avoid areas that may be subject to active air
movements or currents (i.e., near exhaust fans/hoods
and air conditioning ducts).
• Make sure the unit is at the proper counter height in an
area convenient for use.
• Make sure the countertop is level and strong enough to
support the weight of the unit and food product.
• Make sure all the feet on the bottom of the unit are
positioned securely on the countertop.
5. If the unit is a built-in model, perform the “Installing a BuiltIn Model” procedure in this section.
Installing a Built-In Model
Use the following procedure(s) to install a built-in model into a
countertop. If the unit is a rectangular built-in model, perform
the “Installing the Drain Assembly” first.
Unit is designed and recommended for use in or on
metallic countertops. Damage to any countertop material
is not covered under the Hatco warranty. For other
surfaces, verify with manufacturer that material is suitable
for prolonged temperatures up to 100°C (212°F).
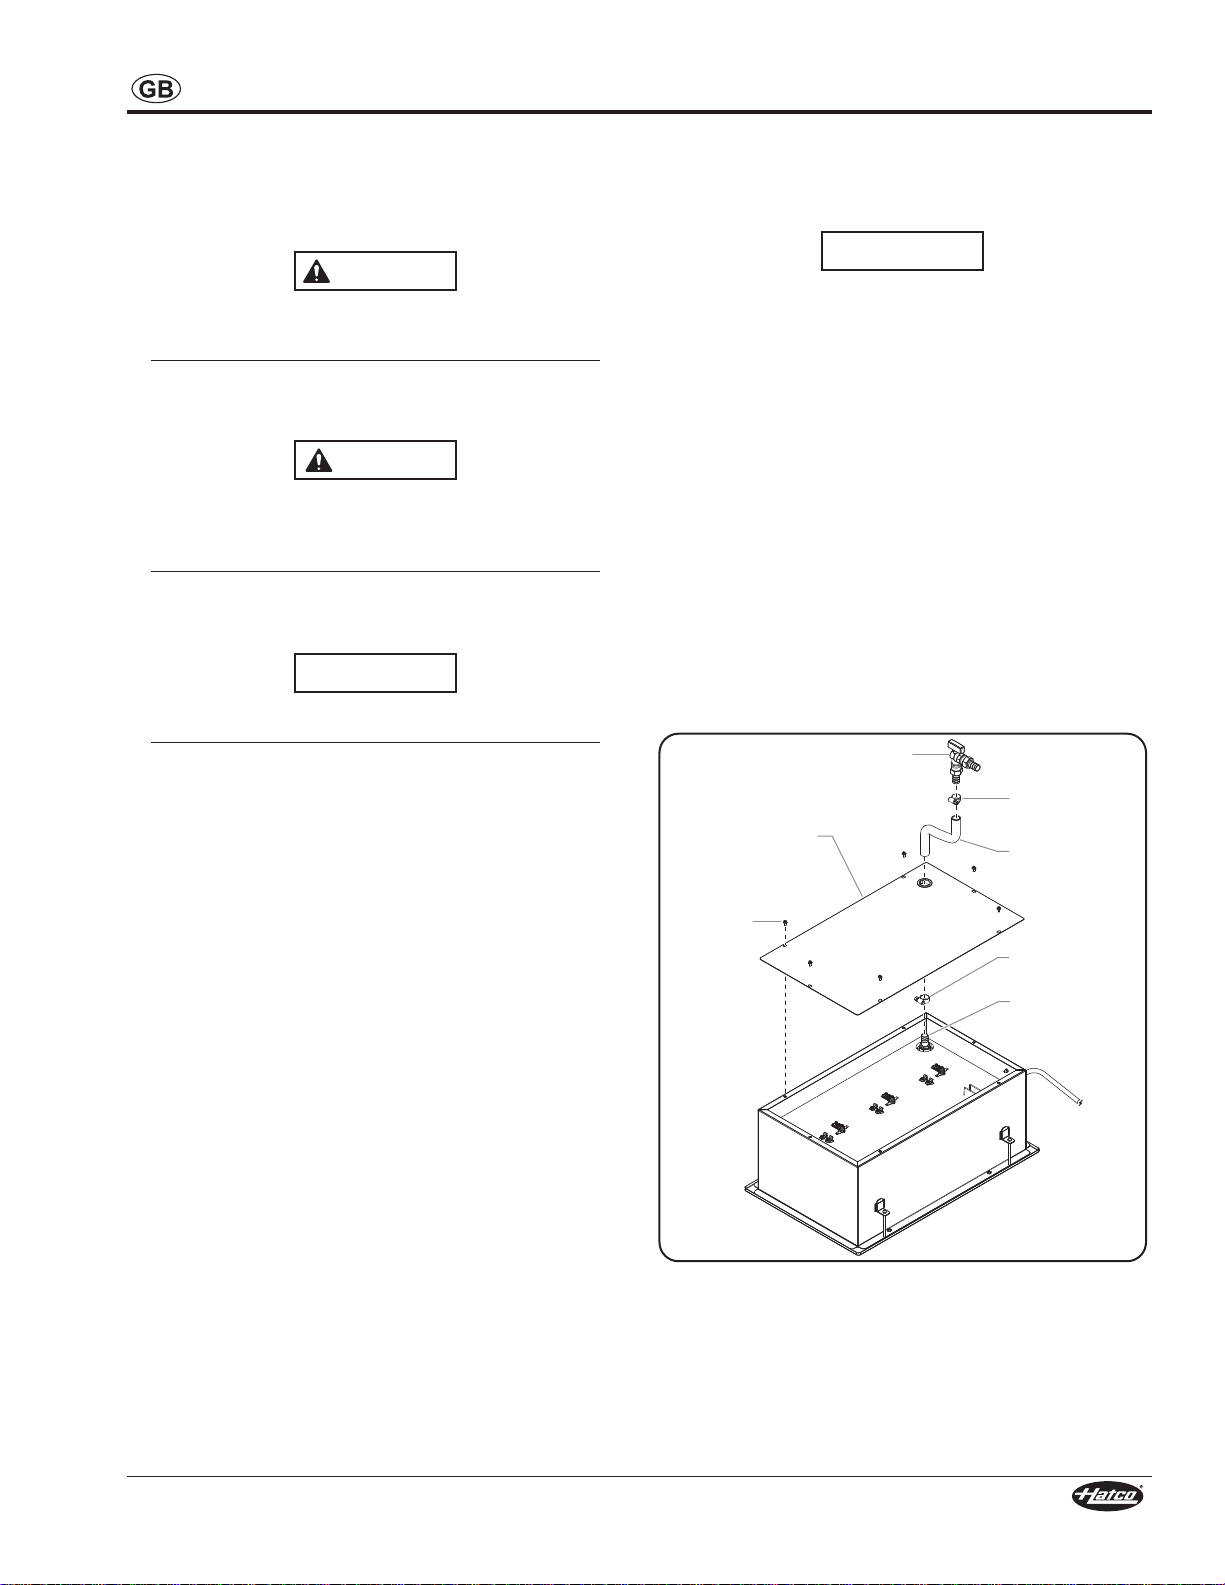
Installing the Drain Assembly
Before installing a rectangular model into the countertop,
perform the following procedure to install the drain assembly.
1. Carefully turn over the unit and lay it on its top side.
2. Remove the bottom panel screws and bottom panel.
3. Connect one end of the drain hose to the drain fitting using
the supplied hose clamp .
4. Route the drain hose through the hole in the bottom panel
and reinstall the bottom panel using the original screws.
5. Connect the other end of drain hose to a drain valve using
the supplied hose clamp.
6. Perform the “Installing the Unit into a Countertop”
procedure in this section. After installing the unit, the drain
valve may connect to external drain pipe, if desired.
Installing the Drain Assembly
(Built-in rectangular models only)
Form No. RHWCEM-0816
7
Page 8

INSTALLATION
NOTICE
ScrewScrew
Top Flange
Countertop
L BracketL Bracket
Countertop
Cutout
Control Box
Cutout
ScrewControl
Box
Front
Cover
Front
Cover
Control Box Housing
Mounting
Flange
Front
Cover
Screws
132 mm
(5-1/8″)
144 mm
(5-9/16″)
65 mm
(2-9/16″)
33 mm
(1-5/16″)
154 mm
(6″)
Ø 4,5 mm
(3/16″)
550 mm
(21-11/16″)
344 mm
(13-9/16″)
RCTHW-1B
305 mm
12″
RHW-1B
NOTICE
Installing the Unit
1. Cut the appropriate opening in the countertop for the unit
being installed (see below).
Countertop Cutout Dimensions
NOTE: The countertop must be level to ensure proper draining
of the rectangular well.
Installing the Unit
4. Assemble the L-brackets to the
underside of the unit.
5. Tighten the L-bracket screws until
the top flange lies flat on the
countertop.
Remote mounted control panels must have a minimum
152 mm (6″) clearance from unit (not to exceed 1420 mm
[56″]). Mounting control panel closer may cause heat
damage to electrical system in control panel.
The remote mounted control box should be installed outside
of heat zone. Locating the control box inside heat zone will
cause the control(s) to overheat, malfunction, and fail.
2. Cut the appropriate opening for the control box in a vertical
surface at least 152 mm (6″) from the unit, but no more
than 1420 mm (56″) (see below).
NOTE: The electrical cord between the unit and the control box
3. Remove the four screws that secure the front cover to the
control box. Remove the front cover and guide the control
box with the front cover removed and the electrical cords
through the countertop cutout, and then lower the unit into
the cutout.
Control Box Cutout Dimensions
is 1420 mm (56″) in length.
Do not use excessive force when
tightening mounting screws on
built-in units. This may damage unit
and/or countertop.
Installing the Remote Mounted Control Box (RMB)
1. Install the control box in the control box cutout:
a. Pass one of the mounting flanges on the control box
housing through the cutout. Tilt and slide the other
flange through the cutout.
b. Align the holes on the mounting flanges with the screw
holes in the installation surface, and secure the control box
housing to the surface using four M4 screws (not supplied).
c. Install the front cover on the control box using the four
front cover screws.
Installing the Remote Mounted Control Box
2. Plug the power cord into a properly grounded electrical
outlet of the correct voltage, size, and plug configuration.
See the SPECIFICATIONS section for details.
8
Form No. RHWCEM-0816
Page 9
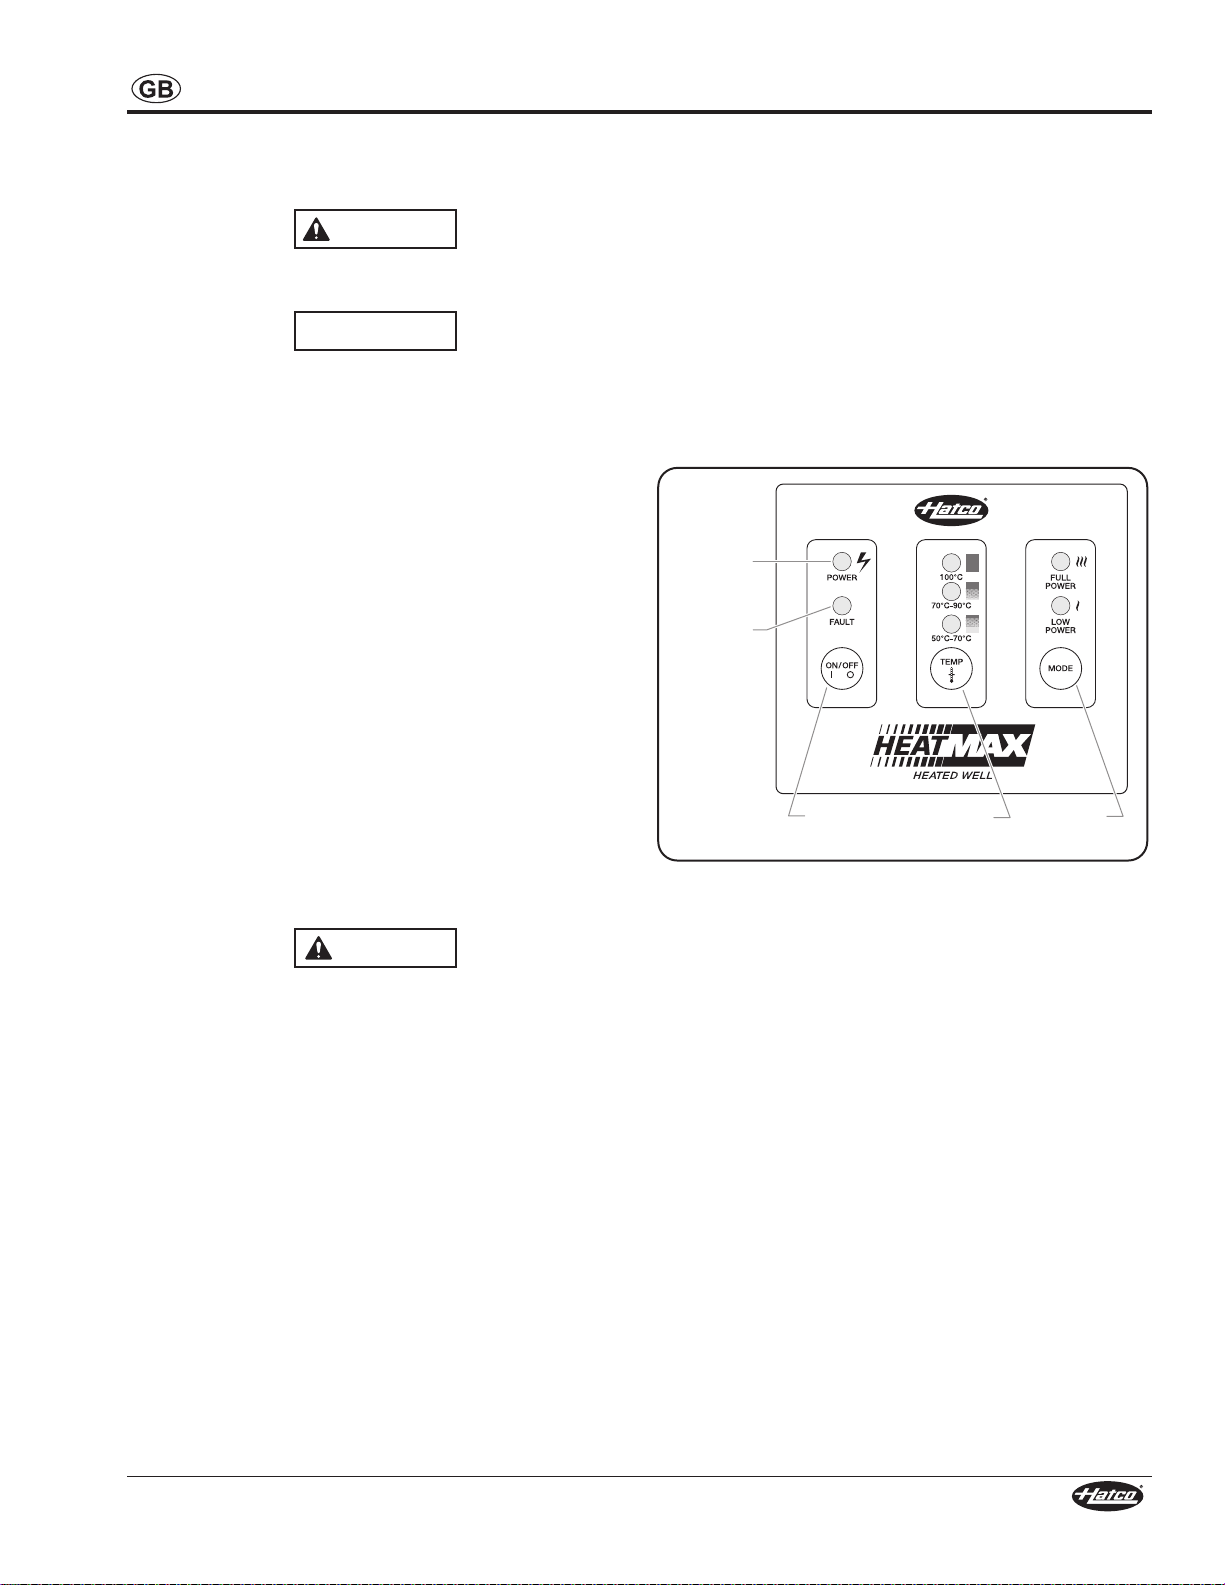
OPERATION
CAUTION
WARNING
NOTICE
TEMP
Button
POWER
Indicator
ON/OFF
(I/O) Button
MODE
Button
FAULT
Indicator
General
Use the following procedure to operate the HEATMAX Heated
Wells.
Read all safety messages in the IMPORTANT SAFETY
INFORMATION section before operating this equipment.
Do not operate unit without food product/water in well.
Damage to unit could occur.
NOTE: For proper heat transfer, operate the RHW series,
(Round Heated Wells), with the special pan supplied.
This pan has a curved bottom to match the shape of
the heating element.
1. Plug the unit into a properly grounded electrical outlet of
the correct voltage, size, and plug configuration. See the
SPECIFICATIONS section for details.
• The POWER indicator will glow red when the unit has
power.
2. Place a pan/pot filled with food product or water into the
unit.
NOTE: Do not operate the unit without a food pan or with an
empty/dry pan. The unit will overheat and go into
FAULT mode.
3. Press the ON/OFF (I/O) button to turn on the unit.
• The POWER indicator will glow green when the unit is
on and heating.
NOTE: The FAULT indicator will illuminate and the unit will
beep when the unit is overheated or if the temperature
sensor short circuits. When this happens, power is cut
off automatically until the temperature returns to normal
range or the temperature sensor functions normally.
4. Press the TEMP button to scroll through and select the
desired temperature setting. The indicator above each
temperature setting will glow when that setting is selected.
There are three temperature settings:
• 90–100°C (194–212°F)—Steaming and rethermalizing
• 70–90°C (158–194°F)—Food warming/holding
• 50–70°C (122–158°F)—Food warming/holding
5. Press the MODE button to scroll through and select the
desired heating mode. The indicator above each mode will
glow when that mode is selected. There are two heating
modes:
• FULL POWER Mode — Unit operates at 100% power.
• LOW POWER Mode — Unit operates at 50% power for
food warming and to avoid burning.
Control Panel
BURN HAZARD: Some exterior surfaces on unit will get
hot. Use caution when touching these areas.
Form No. RHWCEM-0816
9
Page 10

MAINTENANCE
NOTICE
WARNING
RHW-LID
RHW-11QT-LID-HG
RHW-11QT-POT
RHW-SP
RCTHW-Basket
RCTHW-1/3SP
RCTHW-SW
RCTHW-SK
RCTHW-2/3SP
RCTHW-SP
General
HEATMAX Heated Wells are designed for maximum durability
and performance with minimum maintenance.
ELECTRIC SHOCK HAZARD:
• Turn OFF power switch, unplug power cord, and allow
unit to cool before performing any cleaning,
adjustments, or maintenance.
• DO NOT submerge or saturate with water. Unit is not
waterproof. Do not operate if unit has been submerged
or saturated with water.
• Do not steam clean or use excessive water on unit.
• This unit is not “jet-proof” construction. Do not use jetclean spray to clean this unit.
• Use only Genuine Hatco Replacement Parts when
service is required. Failure to use Genuine Hatco
Replacement Parts will void all warranties and may
subject operators of the equipment to hazardous
electrical voltage, resulting in electrical shock or burn.
Genuine Hatco Replacement Parts are specified to
operate safely in the environments in which they are
used. Some aftermarket or generic replacement parts
do not have the characteristics that will allow them to
operate safely in Hatco equipment.
FIRE HAZARD: Do not use harsh chemicals such as bleach
(or cleaners containing bleach), oven cleaners, or
flammable cleaning solutions to clean this unit.
This unit has no “user-serviceable” parts. If service is
required on this unit, contact an Authorized Hatco Service
Agent or contact the Hatco Service Department at
414-671-6350.
Daily Cleaning
To preserve the bright finish of the unit it is recommended that
the exterior surfaces be cleaned daily.
Use non-abrasive cleaners and cloths only. Abrasive
cleaners and cloths could scratch finish of unit, marring its
appearance and making it susceptible to soil accumulation.
1. Turn off the unit, unplug the power cord, and allow the unit
to cool.
2. Remove food pans and any accessories for proper
cleaning in a dishwasher or wash sink.
3. Drain or remove water from the well.
4. Wipe down all metal surfaces using a soft, damp cloth.
Stubborn stains may be removed with a good non-abrasive
cleaner. Hard to reach areas should be cleaned with a
small brush and mild soap.
5. Wipe dry the entire unit using a dry, non-abrasive cloth.
NOTE: Hard water scale will build up above the RCTHW
elements. Use a solution consisting of 2-parts white
vinegar to 5-parts water to dissolve the scale. Allow the
solution to soak for at least one hour (or overnight for
heavy buildup), scrub the well with a plastic scouring
pad, drain the solution, and then rinse well with clean
water. Do not allow scale to accumulate. This may
cause the heating elements to over-heat.
OPTIONS AND ACCESSORIES
RHW-SP.....................6-Basket Round Steam Plate
RHW-11QT-LID-HG ...10 liter (11 qt.) round hinged lid with
RHW-11QT-POT ........10 liter (11 qt.) round pan —
RHW-11QT-LID..........10 liter (11 qt.) round lid with plastic knob
RCTHW-SW............Sauce Warmer Adapter
RCTHW-SK.............7 liter (7 qt.) Soup Kettle Adapter
RCTHW-2/3SP........2-Basket Steam Plate w/ Gastronorm
RCTHW-1/3SP........4-Basket Steam Plate w/ Gastronorm
RCTHW-SP.............6-Basket Steam Plate
RCTHW-Basket......Noodle Basket
RCTHW-PC.............Pasta Cooker (not shown, holds 6 baskets)
plastic knob
221 x 203 mm (8-11/16″ dia x 8″H)
RHW Accessories
2/3 pan cutout
1/3 pan cutout
RCTHW Accessories
10
Form No. RHWCEM-0816
Page 11
TROUBLESHOOTING GUIDE
WARNING
WARNING
This unit must be serviced by trained and qualified
personnel only. Service by unqualified personnel may lead
to electric shock or burn.
ELECTRIC SHOCK HAZARD: Turn OFF power switch,
unplug power cord, and allow unit to cool before
performing any cleaning, adjustments, or maintenance.
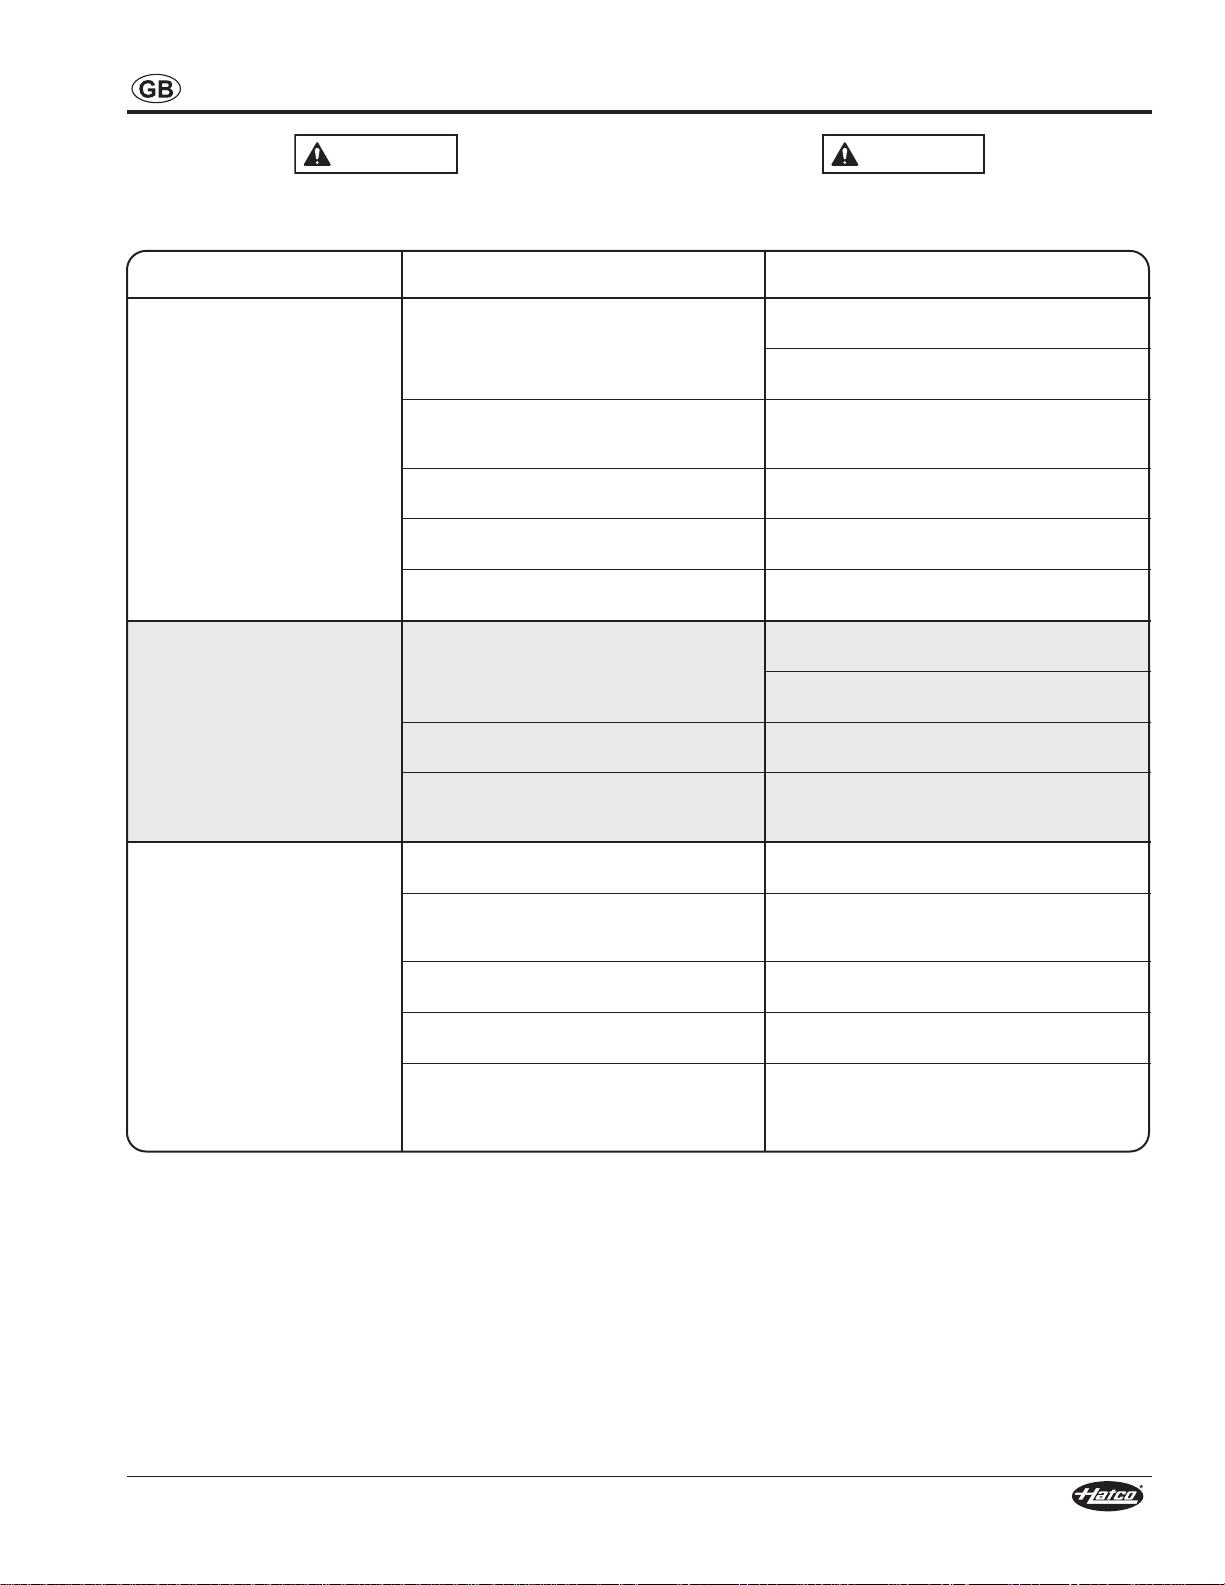
Symptom Probable Cause Corrective Action
Food well not hot enough. Temperature setting too low. Use MODE button to change from LOW POWER to
Wrong pot installed in unit (RHW models). Use specially-designed round pots for RHW models
Heating element not working. Contact Authorized Service Agent or Hatco for
Temperature Control not working properly. Contact Authorized Service Agent or Hatco for
Voltage supplied is incorrect. Verify correct voltage is supplied to unit. Low supply
Food well too hot. Temperature setting too high. Use MODE button to change from FULL POWER to
Temperature Control not working properly. Contact Authorized Service Agent or Hatco for
Voltage supplied is incorrect. Verify correct voltage is supplied to unit. High supply
No heat. Unit turned off. Use ON/OFF button to turn on unit. Follow
Circuit breaker tripped. Reset circuit breaker. If circuit breaker continues to
Temperature Control not working properly. Contact Authorized Service Agent or Hatco for
Heating element not working. Contact Authorized Service Agent or Hatco for
High-limit switch tripped. Make sure well is clean and filled to proper level with
FULL POWER setting.
Use TEMP button to change to higher temperature
setting.
from Hatco only. Other pots may not provide the
proper contact between the unit and the pot.
assistance.
assistance.
voltage will cause improper heating.
LOW POWER setting.
Use TEMP button to change to lower temperature
setting.
assistance.
voltage will cause unit to overheat and my damage
the unit.
procedure in OPERATION section.
trip, contact Authorized Service Agent or Hatco for
assistance.
assistance.
assistance.
water. Heavy scale build-up and/or operating unit
without water can cause unit to over-heat and highlimit switch to trip.
Troubleshooting Questions?
If you continue to have problems resolving an issue, please
contact the nearest Authorized Hatco Service Agency or Hatco
for assistance. To locate the nearest Service Agency, log onto
the Hatco website at www.hatcocorp.com and click on
Find Service Agent, or contact the Hatco Parts and Service
Team at:
Telephone: 414-671-6350
e-mail: partsandservice@hatcocorp.com
Form No. RHWCEM-0816
11
Page 12
INTERNATIONAL LIMITED WARRANTY
1. PRODUCT WARRANTY
Hatco warrants the products that it manufactures (the
“Products”) to be free from defects in materials and
workmanship, under normal use and service, for a period of
one (1) year from the date of purchase when installed and
maintained in accordance with Hatco’s written instructions or
18 months from the date of shipment from Hatco. Buyer must
establish the Product’s purchase date by registering the
Product with Hatco or by other means satisfactory to Hatco in
its sole discretion.
Hatco warrants the following Product components to be free
from defects in materials and workmanship from the date of
purchase (subject to the foregoing conditions) for the period(s)
of time and on the conditions listed below:
a) Two (2) Year Parts Warranty:
Conveyor Toaster Elements (metal sheathed)
Drawer Warmer Elements (metal sheathed)
Drawer Warmer Drawer Rollers and Slides
Strip Heater Elements (metal sheathed)
Display Warmer Elements (metal sheathed air heating)
Holding Cabinet Elements (metal sheathed air heating)
Heated Well Elements — HW and HWB Series
(metal sheathed)
b) Five (5) Year Parts Warranty:
3CS and FR Tanks
c) Ten (10) Year Parts Warranty:
Electric Booster Heater Tanks
Gas Booster Heater Tanks
d) Ninety (90) Day Parts Warranty:
Replacement Parts
THE FOREGOING WARRANTIES ARE EXCLUSIVE AND
IN LIEU OF ANY OTHER WARRANTY, EXPRESSED OR
IMPLIED, INCLUDING BUT NOT LIMITED TO ANY IMPLIED
WARRANTY OF MERCHANTABILITY OR FITNESS FOR A
PARTICULAR PURPOSE OR PATENT OR OTHER
INTELLECTUAL PROPERTY RIGHT INFRINGEMENT.
Without limiting the generality of the foregoing, SUCH
WARRANTIES DO NOT COVER: Coated incandescent light
bulbs, fluorescent lights, heat lamp bulbs, coated halogen
light bulbs, halogen heat lamp bulbs, xenon light bulbs, LED
light tubes, glass components, and fuses; Product failure in
booster tank, fin tube heat exchanger, or other water heating
equipment caused by liming, sediment buildup, chemical
attack, or freezing; or Product misuse, tampering or
misapplication, improper installation, or application of
improper voltage.
2. LIMITATION OF REMEDIES AND DAMAGES
Hatco’s liability and Buyer’s exclusive remedy hereunder will be
limited solely to replacement of part or Product using, at Hatco’s
option, new or refurbished parts or Product by Hatco or a Hatcoauthorized service agency with respect to any claim made
within the applicable warranty period referred to above. Hatco
reserves the right to accept or reject any such claim in whole or
in part. In the context of this Limited Warranty, “refurbished”
means a part or Product that has been returned to its original
specifications by Hatco or a Hatco-authorized service agency.
Hatco will not accept the return of any Product without prior
written approval from Hatco, and all such approved returns shall
be made at Buyer’s sole expense. HATCO WILL NOT BE
LIABLE, UNDER ANY CIRCUMSTANCES, FOR
CONSEQUENTIAL OR INCIDENTAL DAMAGES, INCLUDING
BUT NOT LIMITED TO LABOR COSTS OR LOST PROFITS
RESULTING FROM THE USE OF OR INABILITY TO USE THE
PRODUCTS OR FROM THE PRODUCTS BEING
INCORPORATED IN OR BECOMING A COMPONENT OF
ANY OTHER PRODUCT OR GOODS.
SERVICE INFORMATION
The warranty on Hatco HEATMAX Heated Wells is for one year
from date of purchase or eighteen months from date of shipping
from Hatco, whichever occurs first.
If you experience a problem with a Heated Well during the
warranty period, please do the following:
Contact Local Hatco Dealer
When contacting the Hatco dealer for service assistance,
please supply the dealer with the following information to
ensure prompt processing:
• Model of unit
• Serial number (located on the back of the unit)
• Specific problem with the unit
• Date of purchase
• Name of business
• Shipping address
• Contact name and phone number
The Hatco dealer will do the following:
• Provide replacement part(s) as required
• Submit warranty claim to Hatco for processing
Non-Warranty Problems
If you experience a non-warranty problem that requires
assistance, please contact the nearest Authorized Hatco
Service Agency.
To locate the nearest Service Agency:
• access our website at www.hatcocorp.com, select the
Resources pull-down menu, and click on “Find Service
Agent/Distributor”
• call Hatco Service at 414-671-6350
• e-mail Hatco Service at partsandservice@hatcocorp.com
12
Form No. RHWCEM-0816
Page 13
HINWEIS
VORSICHT
WARNUNG
Ordnungsgemäße Entsorgung dieses Produkts
Dieses Symbol zeigt an, dass dieses Produkt und seine
elektronischen Komponenten nicht zusammen mit anderem
Gewerbeabfall entsorgt werden darf. Um Schädigungen der
Umwelt oder der menschlichen Gesundheit durch eine
unkontrollierte Entsorgung von Abfällen zu vermeiden, sollten
Sie es einer fachgerechten Entsorgung zuführen, um die
umweltverträgliche Wiederverwendung von Materialressourcen
zu fördern. Wenn Sie dieses Produkt und seine elektronischen
Komponenten entsorgen möchten, informieren Sie sich bitte
beim Händler, bei dem Sie es erworben haben, welche Möglichkeiten zu einer umweltfreundlichen Entsorgung bestehen.
INHALT
Wichtige Informationen für den Benutzer ........................13
Einleitung ............................................................................13
Wichtige Sicherheitshinweise ...........................................14
Modellbeschreibung...........................................................15
Modellbezeichnung ............................................................16
Technische Daten ...............................................................16
Steckerkonfigurationen ......................................................16
Tabelle der elektrischen Anschlüsse..................................16
Abmessungen....................................................................17
Aufstellen des Gerät...........................................................18
Allgemeines .......................................................................18
WICHTIGE INFORMATIONEN FÜR DEN BENUTZER
Schreiben Sie die Modellbezeichnung, die Seriennummer
(Typenschild befindet sich auf der Rückseite des Geräts), die
Spannung und das Kaufdatum in die folgenden Zeilen. Haben
Sie bitte dies Information zur Hand, wenn Sie Hatco wegen
einer Service-Unterstützung anrufen.
Modellbezeichnung
Seriennummer
Spannung
Kaufdatum
________________________________________
________________________________________
Registrieren Sie Ihr Gerät!
Wenn Sie die Online-Garantieregistrierung ausfüllen,
vermeidet das Verzögerungen beim Erhalt der
Garantiedeckung. Rufen Sie die Hatco Website unter
www.hatcocorp.com auf, wählen Sie das Pulldown-Menü
„Parts & Service“ (Ersatzteile und Wartung) aus und klicken
Sie auf „Warranty Registration“ (Garantieregisrtierung).
________________________________
____________________________________
Anbringen eines Einbaumodells ........................................18
Betrieb .................................................................................20
Allgemeines .......................................................................20
Wartung ...............................................................................20
Allgemeines .......................................................................20
Reinigung...........................................................................21
Optionen und Zubehör .......................................................21
Richtlinien zur Störungsbeseitigung ................................22
Internationale Beschränkte Garantie ................................23
Hinweise zur Garantieleistung ..........................................23
Geschäftszeiten: 7.00 Uhr bis 17.00 Uhr
Central Standard Time (CST)
(im Sommer: Juni bis September –
7.00 Uhr bis 17.00 Uhr (CST)
Montag bis Donnerstag
7.00 Uhr bis 16.00 Uhr (CST) Freitag)
Telefon: 414-671-6350
E-mail: partsandservice@hatcocorp.com
Weitere Informationen finden Sie auf unserer Website unter
www.hatcocorp.com.
Die HEATMAX Suppen- und Soßenwärmer von Hatco wurden zum
Kochen oder Warmhalten einer Vielfalt von Speisen wie Suppen,
Curry- und anderen Soßen und vieler verschiedener Dessertsoßen
entwickelt. Bei der Serie RHW werden Produkte zum Kochen oder
Warmhalten in einen Topf gegebem, der dann von einer Heizplatte
erhitzt oder erwärmt wird. Bei der Serie RCTHW werden Produkte
in einen Tiegel in Standardgröße gegeben, der dann in den Suppenund Soßenwärmer gestellt wird. Die Heizelementtemperatur wird
von einer elektronischen Regelung überwacht, um optimale
Ergebnisse zu erhalten. Die Wärme wird im ganzen Gerät einheitlich
verteilt, um Speisen bei der gewünschten Temperatur warm halten
zu können, und das isolierte Edelstahldesign ermöglicht eine
einfache Instandhaltung und beständige Leistung.
Alle Geräte sind mit einem Bedienfeld mit drei
Temperatursollwerten zwischen 50 °C und 100 °C versehen;
außerdem ermöglicht dieses die Wahl eines Energiesparmodus,
der bei nur gelegentlichem Gebrauch Strom spart.
Suppen- und Soßenwärmer von Hatco sind von höchster Qualität,
damit sie die Anforderungen diverser Bewirtungsbetriebe erfüllen
und viele Jahre lang störungsfrei arbeiten können. Auf die
Heizelemente wird eine einjährige Garantie gegen Bruch und
Durchbrennen gewährt.Hinter den Suppen- und Soßenwärmern
von Hatco stehen umfangreiche Forschungsarbeiten und
Einsatzerprobungen. Die verwendeten Materialen wurden
ausgewählt, um eine lange Lebensdauer, eine attraktive
Erscheinung und eine optimale Leistung zu erzielen. Jedes Gerät
wird vor der Auslieferung gründlich überprüft und getestet.
Form-Nr. RHWCEM-0816
EINLEITUNG
In diesem Handbuch sind die Einbau-, Sicherheits- und
Bedienungsanweisungen für Suppen- und Soßenwärmer
enthalten. Wir empfehlen, dass Sie alle in diesem Handbuch
enthaltenen Einbau-, Sicherheits- und Bedienungsanweisungen
für Suppen- und Soßenwärmer vor deren Installation und
Inbetriebnahme lesen.
Sicherheitshinweise sind in diesem Handbuch durch ein
Warnsymbol mit den folgenden Signalwörtern gekennzeichnet:
WARNUNG bedeutet, dass eine Gefahr schwerer oder
tödlicher Verletzungen besteht, wenn die Situation nicht
vermieden wird.
VORSICHT bedeutet, dass eine Gefahr leichter oder
mittelschwerer Verletzungen besteht, wenn die Situation
nicht vermieden wird.
HINWEIS bedeutet, dass eine Gefahr von Geräte- oder
Sachschäden besteht.
13
Page 14
WICHTIGE SICHERHEITSHINWEISE
VORSICHT
HINWEIS
WARNUNG
WARNUNG
Vor der Anwendung dieser Ausrüstung lesen Sie die folgenden wichtigen
Sicherheitsinformationen, um ernste Verletzung oder Tod zu vermeiden und Schaden der
Ausrüstung oder des Eigentums zu vermeiden.
GEFAHR VON ELEKTROSCHOCKS:
• Das Gerät muss an eine ordnungsgemäß geerdete
Steckdose mit der richtigen Spannung, Größe und
Steckerkonfiguration angeschlossen werden. Wenn
Stecker und Steckdose nicht übereinstimmen, wenden Sie
sich an einen qualifizierten Elektriker, um die richtige
Netzspannung und Steckerart zu ermitteln und die korrekte
Steckdose zu installieren.
• Schalten Sie die Stromversorgung aus, ziehen Sie das
Netzkabel aus der Steckdose und lassen Sie das Gerät
abkühlen, bevor Sie es reinigen, einstellen oder warten.
• Tauchen Sie das Gerät NICHT in Wasser und reinigen Sie
das Gerät NICHT mit übermäßig viel Wasser. Das Gerät ist
nicht wasserdicht. Es darf nicht betrieben werden, wenn
es in Wasser getaucht oder mit übermäßig viel Wasser
gereinigt wurde.
• Das Gerät ist nicht witterungsfest. Stellen Sie das Gerät in
einem Raum an einer Stelle auf, an der die
Umgebungstemperatur mindestens 21 °C beträgt.
• Reinigen Sie das Gerät nicht mit Dampf oder übermäßig
viel Wasser.
• Dieses Gerät ist nicht für direktes Absprühen mit einem
Wasserstrahl geeignet. Es darf nicht mit einem Sprühstrahl
gereinigt werden.
• Ziehen Sie das Gerät nicht am Kabel.
• Betreiben Sie das Gerät nicht, wenn das Netzkabel
durchgescheuert oder abgenutzt ist.
• Versuchen Sie nicht, ein beschädigtes Netzkabel zu
reparieren oder zu ersetzen. Das Kabel muss durch Hatco,
einen autorisierten Servicebetrieb oder einen qualifizierten
Techniker ersetzt werden.
• Den Behälter nicht zum Schmelzen oder Aufbewahren von
Eis benutzen. Das kann zu Kondensation und damit
elektrischen Gefahren führen, die Verletzungen und/oder
Geräteschäden verursachen können. Kondensatschäden
sind nicht von der Garantie gedeckt.
• Verwenden Sie bei der Reparatur von Hatco Geräten
ausschließlich Hatco Ersatzteile. Wenn Sie keine OriginalHatco-Ersatzteile verwenden, werden alle Garantien
ungültig und Sie setzen die Bediener der Geräte
möglicherweise gefährlichen elektrischen Spannungen
aus, welche zu Stromschlag oder Verbrennungen führen
können. Original-Hatco-Ersatzteile sind für den sicheren
Betrieb unter den gegebenen Einsatzbedingungen
ausgelegt. Manche Ersatzteile anderer Hersteller oder
Nachbauteile verfügen nicht über die geforderten
Eigenschaften und funktionieren nicht sicher in Hatco
Geräten.
BRANDGEFAHR:
• Stellen Sie das Gerät mit mindestens 25 mm Abstand zu
entflammbaren Wänden oder Materialen auf. Wenn dieser
Sicherheitsabstand nicht eingehalten wird, können
Verfärbungen entstehen und brennbare Stoffe können sich
entzünden.
• Keine aggressiven Chemikalien (oder Reiniger mit
Bleichmittel), Ofenreiniger oder brennbare
Reinigungslösungen zum Reinigen dieses Geräts
benutzen.
Sicherstellen, dass alle Bediener im sicheren und
fachgerechten Gebrauch des Geräts geschult sind.
Dieses Gerät ist nicht für den Gebrauch durch Kinder oder
Personen mit eingeschränkten körperlichen, sensorischen
oder geistigen Fähigkeiten vorgesehen. Für eine
ordnungsgemäße Beaufsichtigung von Kindern sorgen und
diese von dem Gerät fern halten.
Falls eine Reparatur dieses Geräts erforderlich sein sollte,
wenden Sie sich an Ihren autorisierten Hatco Servicebetrieb
oder an die Hatco Serviceabteilung unter +1-414-671-6350
(Telefon).
VERBRENNUNGSGEFAHR:
• Einige Außenflächen des Geräts werden heiß. Beim
Berühren dieser Flächen Vorsicht walten lassen.
• Heißes Wasser im Gerät kann Verbrühungen verursachen.
Das Gerät vor dem Entleeren oder Reinigen abkühlen
lassen.
Stellen Sie das Gerät unter Einhaltung der richtigen Thekenhöhe
an einer geeigneten Stelle auf. Der Aufstellungsort sollte eben
sein, um versehentliches Umkippen des Geräts bzw.
Herausfallen des Inhalts zu verhindern, und standfest genug,
um das Gewicht von Gerät und Speisen zu tragen.
Nicht verschieben oder umstellen, wenn das Gerät
Speisenprodukte enthält. Das Gerät abschalten, die Speisen
herausnehmen und das Gerät komplett abkühlen lassen, bevor
es verschoben oder gereinigt wird.
Standardmäßige und zugelassene Fertigungsöle rauchen bei
der anfänglichen Inbetriebnahme bis zu 30 Minuten lang. Das
ist ein vorübergehender Zustand. Zur Gewährleistung des
sicheren Betriebs muss das Gerät solange ohne Speisen
betrieben werden, bis kein Rauch mehr entsteht.
Verwenden Sie nur nicht scheuernde Reinigungsmittel und
Tücher. Scheuernde Reinigungsmittel und Tücher können die
Geräteoberfläche zerkratzen und so deren Erscheinungsbild
beeinträchtigen und sie anfällig für Verschmutzungen machen.
Legen Sie das Gerät nicht auf die Seite mit dem Bedienfeld,
um Beschädigungen zu verhindern.
Fernbedienungen müssen einen Minimalabstand von 152 mm
(6″) vom Gerät haben (und einen Maximalabstand von 1420 mm
[56″]). Wenn die Fernbedienung näher montiert wird, kann die
Elektrik in der Fernbedienung durch Hitze beschädigt werden.
Das Gerät nicht in einem Bereich mit zu hohen Temperaturen
oder Fett von Grills, Friteusen usw. aufstellen. Zu hohe
Temperaturen können das Gerät beschädigen.
Das Gerät wurde für die Verwendung in oder auf metallischen
Arbeitsplatten konstruiert. Schäden an Arbeitsplatten sind nicht von
der Hatco-Garantie abgedeckt. Klären Sie bei anderen Oberflächen
mit dem Hersteller ab, ob das Material für einen längeren Zeitraum
Temperaturen von bis zu 100 °C standhalten kann.
Beim Festziehen der Befestigungsschrauben auf
Einbaumodellen nicht zu starke Kraft anwenden. Das kann das
Gerät und/oder die Tischfläche beschädigen.
Verwenden Sie das Gerät nicht ohne Nahrungsmittel/Wasser in
der Wanne. Das kann zu Beschädigungen führen.
14
Form-Nr. RHWCEM-0816
Page 15
MODELLBESCHREIBUNG
Alle Modelle
Alle HEATMAX Suppen- und Soßenwärmer sind zuverlässig
und vielseitig. Sie können nicht nur als reine Suppen- und
Soßenwärmer eingesetzt werden, die Speisen bei
Serviertemperatur halten, sondern eignen sich bei Verwendung
des als Zusatzausrüstung erhältlichen Adaptersatzes auch zum
Dämpfen von Speisen.
RHW-1
Das Modell RHW-1 ist mit einem einzelnen Heizelement
ausgestattet, um Speisen warm zu halten oder Suppen oder
Soßen zu kochen. Es wird mit einem speziell entworfenen 10Liter-Edelstahlbehälter und Klappdeckel geliefert.
Modell RHW-1
RHW-1B
Das Modell RHW-1B ist ein Einbaugerät mit Fernbedienung,
das ansonsten über die gleiche Ausstattung verfügt wie das
Modell RHW-1.
RCTHW-1
RCTHW-1 verfügt über drei Heizelemente und einen Ablauf an
der Vorderseite. Er bietet Platz für eine Speiseschale in
Standardgröße.
Modell RCTHW-1
RCTHW-1B
Der RCTHW-1B verfügt über die gleiche Ausstattung wie der
RCTHW-1, hat aber zusätzlich ein außerhalb befestigtes
Bedienfeld und einen Abfluss unten.
Modell RHW-1B
RHW-2
RHW-2 ist mit zwei einzeln gesteuerten Heizelementen
ausgestattet, um Speisen warm zu halten oder Suppen und
Saucen zu kochen. Es wird mit zwei speziell entworfenen 10Liter-Edelstahlbehältern und Klappdeckeln geliefert.
Modell RHW-2
Form-Nr. RHWCEM-0816
Modell RCTHW-1B
15
Page 16

WARNUNG
CEE 7/7 Schuko
BS-1363
AS 3112
MODELLBEZEICHNUNG
R H W - 1 B
R = Rund
RCT = Rechteckig
Suppen- und Soßenwärmer
B = Eingebaut mit Fernbedienung
Kein Zeichen = Arbeitsfläche
1 = Einzeleinheit
2 = Doppeleinheit
TECHNISCHE DATEN
Steckerkonfigurationen
Geräte werden werkseitig mit einem Netzkabel mit
angebrachtem Stecker ausgerüstet. Die gelieferten Stecker
entsprechen der jeweiligen Anwendung.
GEFAHR VON ELEKTROSCHOCKS: Das Gerät muss an
eine ordnungsgemäß geerdete Steckdose mit der richtigen
Spannung, Größe und Steckerkonfiguration
angeschlossen werden. Wenn Stecker und Steckdose
nicht übereinstimmen, wenden Sie sich an einen
qualifizierten Elektriker, um die richtige Netzspannung und
Steckerart zu ermitteln und die korrekte Steckdose zu
installieren.
ANMERKUNG : Das Typenschild befindet sich auf der
Rückseite des Geräts. Das Typenschild
enthält die Seriennummer und alle Daten
zum Überprüfen der elektrischen
Informationen.
Steckerkonfigurationen
ANMERKUNG : Die Steckdose wird nicht von Hatco
bereitgestellt.
Tabelle Der Elektrischen Anschlüsse
Modell Spannung Watts Ampere
RHW-1 230 (CE) 1250 5.4 BS-1363, CEE 7/7 Schuko, AS 3112 7 kg (15 lbs.)
RHW-1B 230 (CE) 1250 5.4 BS-1363, CEE 7/7 Schuko, AS 3112 8 kg (18 lbs.)
RHW-2 230 (CE) 2500 10.9 BS-1363, CEE 7/7 Schuko, AS 3112 12 kg (26 lbs.)
RCTHW-1 230 (CE) 3000 13 BS-1363, CEE 7/7 Schuko, AS 3112 12 kg (26 lbs.)
RCTHW-1B 230 (CE) 3000 13 BS-1363, CEE 7/7 Schuko, AS 3112 13 kg (29 lbs.)
ANMERKUNG : Das Versandgewicht ist einschließlich Verpackung angegeben.
16
Steckerkonfiguration Versandgewicht
Form-Nr. RHWCEM-0816
Page 17

Abmessungen
POWER
FAULT
100°C
70°C-90°C
50°C-70°C
TEMP
ON/OFF
o
_
FULL
POWER
ENERGY
SAVE
MODE
~
~
~
~
POWER
FAULT
100°C
70°C-90°C
50°C-70°C
TEMP
ON/OFF
o
_
FULL
POWER
ENERGY
SAVE
MODE
~
~
~
~
HEATMAX
HEATED WELL
A
A
D
E
RCTHW-1
RHW-1 RHW-1B RHW-2
RCTHW-1B
C
C
B B
B
E
D D
E
B B
C
A
C
A
C
A
Breite Tiefe Höhe Breite zwischen Tiefe zwischen
Modell (A) (B) (C) Füßen (D) Füßen (E)
RHW-1 359 mm 330 mm 355 mm 179 mm 224 mm
(14-1/8") (13") (14") (7") (8-7/8")
RHW-1B 359 mm 330 mm 341 mm N/A N/A
(14-1/8") (13") (13-7/16")
RHW-2 630 mm 330 mm 355 mm 389 mm 249 mm
(24-3/4") (13") (14") (15-3/8") (9-7/8")
RCTHW-1 368 mm 611 mm 283 mm 347 mm 535 mm
(14-1/2") (24-1/16") (11-3/16") (14") (21-7/16")
RCTHW-1B 368 mm 582 mm 226 mm N/A N/A
(14-1/2") (22-15/16")
(8-15/16")
TECHNISCHE DATEN
Form-Nr. RHWCEM-0816
17
Page 18

AUFSTELLEN DES GERÄTS
HINWEIS
VORSICHT
WARNUNG
Bodenplatten-
schraube
Afvoerslang
Schlauchschelle
Schlauchschelle
Nippel
Ablaufventil
Bodenplatte
HINWEIS
Allgemeines
HEATMAX Suppen- und Soßenwärmer werden ab Werk mit
den meisten Komponenten fertig zusammengebaut und
gebrauchsfertig geliefert. Beim Auspacken des Versandkartons
vorsichtig sein, um Schäden am Gerät und den beiliegenden
Komponenten zu verhüten.
GEFAHR VON ELEKTROSCHOCKS: Das Gerät ist nicht
witterungsfest. Stellen Sie das Gerät in einem Raum an
einer Stelle auf, an der die Umgebungstemperatur
mindestens 21 °C beträgt.
BRANDGEFAHR: Stellen Sie das Gerät mit mindestens 25
mm Abstand zu entflammbaren Wänden oder Materialen
auf. Wenn dieser Sicherheitsabstand nicht eingehalten
wird, können Verfärbungen entstehen und brennbare
Stoffe können sich entzünden.
Stellen Sie das Gerät unter Einhaltung der richtigen
Thekenhöhe an einer geeigneten Stelle auf. Der
Aufstellungsort sollte eben sein, um versehentliches
Umkippen des Geräts bzw. Herausfallen des Inhalts zu
verhindern, und standfest genug, um das Gewicht von
Gerät und Speisen zu tragen.
Nicht verschieben oder umstellen, wenn das Gerät
Speisenprodukte enthält. Das Gerät abschalten, die
Speisen herausnehmen und das Gerät komplett abkühlen
lassen, bevor es verschoben oder gereinigt wird.
Verwenden Sie nur nichtscheuernde Reinigungsmittel.
Scheuernde Reinigungsmittel können die Oberfläche des
Geräts verkratzen und es damit unansehnlich und anfällig
für das Festsetzen von Verunreinigungen machen.
Das Gerät nicht in einem Bereich mit zu hohen
Temperaturen oder Fett von Grills, Friteusen usw. aufstellen.
Zu hohe Temperaturen können das Gerät beschädigen.
1. Nehmen Sie das Gerät aus dem Versandbehälter.
2. Entnehmen Sie das Informationspaket.
3. Entfernen Sie Klebeband und Schutzfolien von allen
4. Wenn das Modell ein Tischflächenmodell ist, das Gerät an
Oberflächen des Geräts.
der gewünschten Stelle aufstellen.
• Das Gerät in einem Bereich mit konstanter
Umgebungslufttemperatur (mindestens 21 °C [70 °F])
anbringen. Bereiche, die aktiven Luftbewegungen oder
-strömen ausgesetzt sind (z. B. in der Nähe von
Gebläsen/Lüftern und Klimatisierungsrohren) sind zu
meiden.
• Wählen Sie einen Ort mit der richtigen Thekenhöhe und
bequemem Zugang.
• Stellen Sie sicher, dass der Aufstellungsort eben und
standfest genug ist, um das Gewicht von Gerät und
Speisen zu tragen.
• Achten Sie darauf, dass alle Füße an der Unterseite
des Geräts fest auf der Theke stehen.
5. Wenn das Modell ein Einbaugerät ist, das Verfahren
„Anbringen eines Einbaumodells“ in diesem Abschnitt
durchführen.
Anbringen eines Einbaumodells
Ein Einbaumodell anhand des folgenden Verfahrens in einer
Tischfläche montieren. Wenn das Gerät ein rechteckiges
Einbaumodell ist, zuerst das Verfahren „Einbau der
Ablaufbaugruppe“ durchführen.
Das Gerät wurde für die Verwendung in oder auf
metallischen Arbeitsplatten konstruiert. Schäden an
Arbeitsplatten sind nicht von der Hatco-Garantie
abgedeckt. Klären Sie bei anderen Oberflächen mit dem
Hersteller ab, ob das Material für einen längeren Zeitraum
Temperaturen von bis zu 100 °C standhalten kann.
Einbau der Ablaufbaugruppe
Vor Anbringen eines rechteckigen Modells in einer Tischfläche
muss das folgende Verfahren durchgeführt werden, um die
Ablaufbaugruppe einzubauen.
1. Drehen Sie das Gerät vorsichtig um und setzen Sie es mit
dem Boden nach oben ab.
2. Entfernen Sie die Schrauben und die Bodenplatte.
3. Schließen Sie ein Ende der Ablaufleitung mit der im
Lieferumfang enthaltenen Schlauchschelle am
Anschlussnippel an.
4. Führen Sie die Schlauchleitung durch das Loch in der
Bodenplatte und befestigen Sie die Bodenplatte mit den
Originalschrauben wieder am Gerät.
5. Schließen Sie das andere Ende der Ablaufleitung mit der im
Lieferumfang enthaltenen Schlauchschelle am Ablaufventil an.
6. Das Verfahren „Anbringen des Geräts in einer Tischfläche“
in diesem Abschnitt durchführen. Das Ablaufventil kann
nach erfolgtem Einbau in die Arbeitsplatte bei Bedarf auch
an einem externen Ablaufrohr angeschlossen werden.
18
Einbau der Ablaufbaugruppe
(nur rechteckige Einbaumodelle)
Form-Nr. RHWCEM-0816
Page 19

ScrewSchraube
Oberer
Flansch
Arbeitsplatte
L Bracket
L-förmigen
Halterungen
HINWEIS
Tischflächenöffnung
Fernbedienung-öffnung
ScrewVordere
Abdeckung des
Schaltkastens
Front
abdeckung
Bedien feldge häuse
Befestigung
flansch
Einbau des Geräts
132 mm
(5-1/8″)
144 mm
(5-9/16″)
65 mm
(2-9/16″)
33 mm
(1-5/16″)
154 mm
(6″)
Ø 4,5 mm
(3/16″)
550 mm
(21-11/16″)
344 mm
(13-9/16″)
RCTHW-1B
305 mm
12″
RHW-1B
HINWEIS
1. Die entsprechende Öffnung für das vorliegende Modell aus
der Tischfläche ausschneiden.
Abmessungen der Öffnung in der Tischfläche
ANMERKUNG : Die Tischfläche muss waagrecht sein, damit
die rechteckige Wanne ordnungsgemäß
ablaufen kann. Die Fernbedienung muss
außerhalb der Hitzezone angebracht werden.
Wenn die Fernbedienung in der Hitzezone
angebracht wird, überhitzen sich die
Bedienungselemente und versagen.
2. Eine geeignete Öffnung für die Fernbedienung in eine
vertikale Fläche schneiden, die mindestens 152 mm (6″),
jedoch nicht mehr als 1420 mm (56″) vom Gerät entfernt ist.
AUFSTELLEN DES GERÄTS
Einbau des Geräts
Beim Festziehen der Befestigungsschrauben auf
Einbaumodellen nicht zu starke Kraft anwenden. Das kann
das Gerät und/oder die Tischfläche beschädigen.
4. Befestigen Sie die L-förmigen
Halterungen an der Unterseite des
Geräts.
5. Ziehen Sie die Schrauben der Lförmigen Halterung soweit an, bis
der obere Flansch flach auf der
Arbeitsfläche aufliegt.
Einbau der Fernbedienung
(RMB)
1. Die Fernbedienung in der Öffnung
für die Fernbedienung anbringen:
a. Einen der Befestigungsflansche auf dem
Fernbedienungsgehäuse durch die Öffnung
durchreichen. Neigen Sie den anderen Flansch und
führen Sie ihn durch die Aussparung.
b. Die Löcher auf den Befestigungsflanschen auf die
Schraubenlöcher in der Einbaufläche ausrichten und
das Fernbedienungsgehäuse mit vier M4-Schrauben
(nicht mitgeliefert) an der Fläche befestigen.
c. Die Frontabdeckung mit vier Frontabdeckungsschrauben
auf der Fernbedienung befestigen.
Fernbedienungen müssen einen Minimalabstand von
152 mm (6″) vom Gerät haben (und einen Maximalabstand
von 1420 mm [56″]). Wenn die Fernbedienung näher
montiert wird, kann die Elektrik in der Fernbedienung
durch Hitze beschädigt werden.
ANMERKUNG : Das Stromkabel zwischen dem Gerät und der
3. Entfernen Sie die vier Schrauben, mit denen die vordere
Form-Nr. RHWCEM-0816
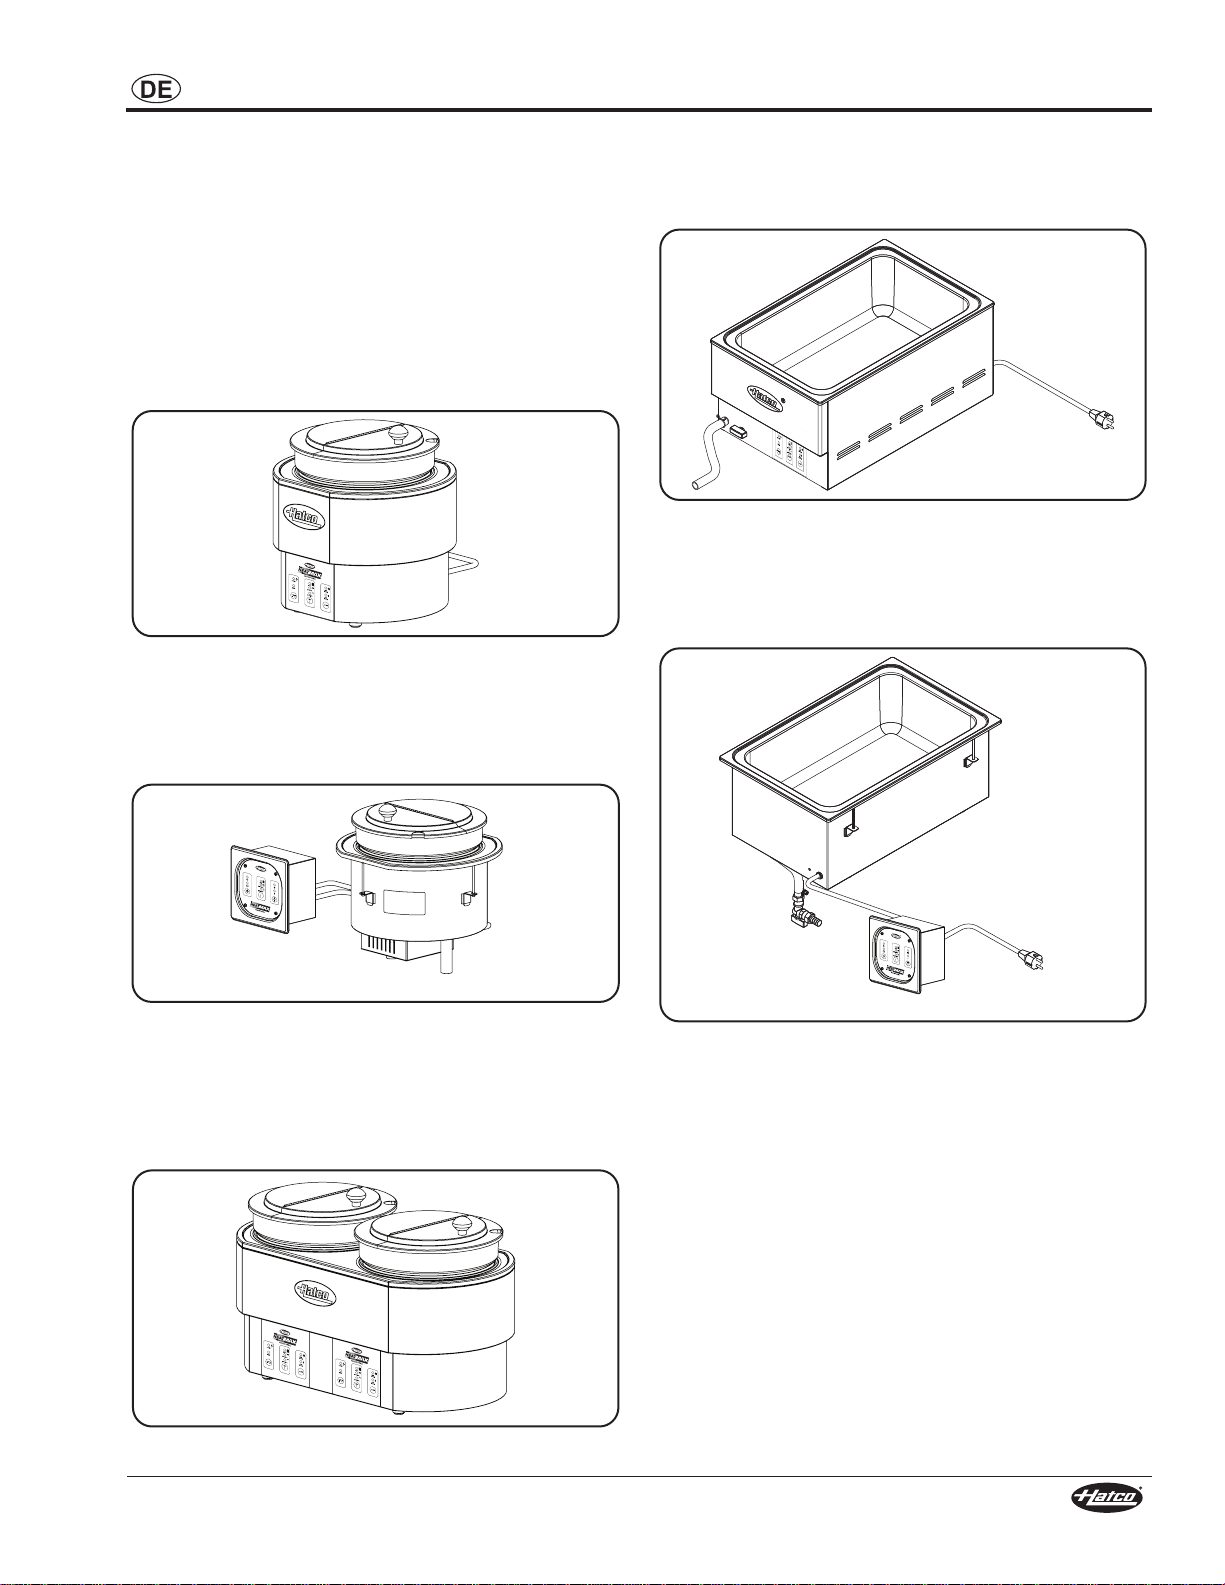
Abmessungen der Öffnungen für die Fernbedienung
Fernbedienung ist 1420 mm (56 Zoll) lang.
Abdeckung am Schaltkasten befestigt ist. Nehmen Sie die
vordere Abdeckung ab und führen Sie den Schaltkasten
ohne vordere Abdeckung und elektrische Kabel durch die
Aussparung der Arbeitsfläche, und lassen Sie das Gerät
dann in die Aussparung sinken.
Einbau der Fernbedienung
2. Die Löcher auf den Befestigungsflanschen auf die
Schraubenlöcher in der Einbaufläche ausrichten und das
Fernbedienungsgehäuse mit vier M4-Schrauben (nicht
mitgeliefert) an der Fläche befestigen.
19
Page 20

BETRIEB
WARNUNG
HINWEIS
TEMP-Knopf
Betriebsanzeige
Betriebsschalter
MODE-Knopf
Fehleranzeige
VORSICHT
WARNUNG
WARNUNG
Allgemeines
Die Suppen- und Soßenwärmer HEATMAX Heated Wells
anhand des folgenden Verfahrens benutzen.
Lesen Sie alle Sicherheitshinweise im Abschnitt WICHTIGE
SICHERHEITSHINWEISE, bevor Sie das Gerät verwenden.
Verwenden Sie das Gerät nicht ohne Nahrungsmittel/Wasser
in der Wanne. Das kann zu Beschädigungen führen.
ANMERKUNG : Für eine ordnungsgemäße Wärmeübertragung
müssen Modelle der Serie RHW (runde
Suppen-/Soßenwärmer) mit dem im
Lieferumfang enthaltenen Spezialtiegel
betrieben werden. Dieser Teigel hat einen
gekrümmten Boden, der der Form des
Heizelements angepasst ist.
1. Das Gerät muss an eine geerdete Steckdose mit korrekter
Spannungsversorgung und passender Ausführung
angeschlossen werden. Details sind unter TECHNISCHE
DATEN zu finden.
• Die Netzkontrollleuchte leuchtet rot, wenn der Wärmer
mit Spannung versorgt wird.
2. Einen Topf/Tiegel mit Speisenprodukt oder Wasser in den
Wärmer geben.
ANMERKUNG : Den Wärmer nicht ohne einen Speisentiegel
oder mit einem leeren/trockenen Topf
betreiben. Der Wärmer überhitzt sich und
schaltet sich in den FEHLER-Modus.
3. Den Betriebsschalter ON/OFF betätigen, um den Wärmer
einzuschalten.
• Die Betriebsanzeige leuchtet grün, wenn der Wärmer
eingeschaltet ist und heizt.
ANMERKUNG : Bei einer Überhitzung des Geräts oder einem
Kurzschluss des Temperatursensors leuchtet
die FEHLER-Anzeige und ertönt ein Signalton.
In diesem Fall wird die Stromzufuhr
automatisch unterbrochen, bis die Temperatur
wieder im Normalbereich liegt oder der
Temperatursensor wieder normal funktioniert.
Verbrennungsgefahr: Einige Außenflächen des Geräts
werden heiß. Beim Berühren dieser Flächen Vorsicht
walten lassen.
4. Den TEMP-Knopf drücken, um durch die gewünschten
Temperatureinstellungen zu blättern und eine
auszuwählen. Die Anzeige über jeder
Temperatureinstellung leuchtet, wenn diese Einstellung
ausgewählt ist. Es gibt drei Temperatureinstellungen:
• 90–100°C (194–212°F) — Dämpfen und
Wiedererwärmung
• 70–90°C (158–194°F) — Warmhalten/Bereithalten
von Speisen
• 50–70°C (122–158°F) — Warmhalten/Bereithalten
von Speisen
5. Den MODUS-Knopf drücken, um durch die gewünschten
Heizmodi zu blättern und einen auszuwählen. Die Anzeige
über jedem Modus leuchtet, wenn dieser Modus
ausgewählt ist. Es gibt folgende zwei Heizmodi:
• Modus VOLL- LEISTUNG — Der Wärmer wird mit
100 % Betriebsleistung betrieben.
• Modus STROMSPAREN — Der Wärmer wird mit 50 %
Betriebsleistung betrieben, um Speisen warmzuhalten
und Anbrennen zu vermeiden.
Bedienfeld
WARTUNG
Allgemeines
HEATMAX Suppen- und Soßenwärmer sind für maximale
Haltbarkeit und Leistung bei minimaler Wartung ausgelegt.
GEFAHR VON ELEKTROSCHOCKS:
•
Schalten Sie die Stromversorgung aus, ziehen Sie das
Netzkabel aus der Steckdose und lassen Sie das Gerät
abkühlen, bevor Sie es reinigen, einstellen oder warten.
• Tauchen Sie das Gerät NICHT in Wasser und reinigen
Sie das Gerät NICHT mit übermäßig viel Wasser. Das
Gerät ist nicht wasserdicht. Es darf nicht betrieben
werden, wenn es in Wasser getaucht oder mit
übermäßig viel Wasser gereinigt wurde.
• Reinigen Sie das Gerät nicht mit Dampf oder übermäßig
viel Wasser.
GEFAHR VON ELEKTROSCHOCKS:
• Dieses Gerät ist nicht für direktes Absprühen mit einem
Wasserstrahl geeignet. Es darf nicht mit einem
Sprühstrahl gereinigt werden.
• Verwenden Sie bei der Reparatur von Hatco Geräten
ausschließlich Hatco Ersatzteile. Wenn Sie keine
Original-Hatco-Ersatzteile verwenden, werden alle
Garantien ungültig und Sie setzen die Bediener der
Geräte möglicherweise gefährlichen elektrischen
Spannungen aus, welche zu Stromschlag oder
Verbrennungen führen können. Original-HatcoErsatzteile sind für den sicheren Betrieb unter den
gegebenen Einsatzbedingungen ausgelegt. Manche
Ersatzteile anderer Hersteller oder Nachbauteile
verfügen nicht über die geforderten Eigenschaften und
funktionieren nicht sicher in Hatco Geräten.
20
Form-Nr. RHWCEM-0816
Page 21

BRANDGEFAHR : Keine aggressiven Chemikalien (oder
HINWEIS
WARNUNG
RHW-LID
RHW-11QT-LID-HG
RHW-11QT-POT
RHW-SP
RCTHW-Basket
RCTHW-1/3SP
RCTHW-SW
RCTHW-SK
RCTHW-2/3SP
RCTHW-SP
Reiniger mit Bleichmittel), Ofenreiniger oder brennbare
Reinigungslösungen zum Reinigen dieses Geräts benutzen.
Falls eine Reparatur dieses Geräts erforderlich sein sollte,
wenden Sie sich an Ihren autorisierten Hatco
Servicebetrieb oder an die Hatco Serviceabteilung unter
+1-414-671-6350 (Telefon).
Reinigung
Um die Oberfläche des Geräts zu präservieren und die
Leistungsfähigkeit zu erhalten, sollte das Gerät täglich gereinigt
werden.
Verwenden Sie nur nicht scheuernde Reinigungsmittel und
Tücher. Scheuernde Reinigungsmittel und Tücher können die
Geräteoberfläche zerkratzen und so deren Erscheinungsbild
beeinträchtigen und sie anfällig für Verschmutzungen machen.
1. Den Wärmer ausschalten, das Netzkabel abziehen und
den Wärmer abkühlen lassen.
2. Speisentiegel und Zubehörteile herausnehmen und in
einem Geschirrspüler oder in einer Spüle waschen.
3. Wasser aus dem Behälter entfernen.
WARTUNG
4. Alle Metallflächen mit einem weichen, feuchten Tuch
reinigen. Hartnäckige Flecken können mit einem guten,
nicht-scheuernden Reiniger entfernt werden. Schwer
erreichbare Stellen können mit einer kleinen Bürste und
milder Seife gereinigt werden.
5. Gesamtes Gerät mit einem trockenen, weichen Tuch
abwischen.
ANMERKUNG : Auf den RCTHW-Elementen werden mit der
Zeit Kalkablagerungen durch hartes Wasser
entstehen. Verwenden Sie eine Lösung aus 2
Teilen weißem Essig und 5 Teilen Wasser, um
den Kalk zu entfernen. Lassen Sie die Lösung
mindestens eine Stunde lang einwirken (bei
starken Ablagerungen über Nacht),
schrubben Sie die Wanne mit einem
Topfreiniger aus Kunststoff, lassen Sie die
Lösung ablaufen und spülen Sie die Wanne
anschließend mit klarem Wasser aus. Achten
Sie darauf, dass sich der Kalk nicht anlagert.
Dies könnte dazu führen, dass die
Heizelemente überhitzen.
RHW-SP....................Runde Dampfplatte für 6 Behälter
RHW-11QT-LID-HG ..Runder Klappdeckel mit
RHW-11QT-POT........Runde Wanne, 10 Liter
RHW-11QT-LID ........Runde Wanne mit Kunststoffknopf,
RCTHW-SW ..............Soßenwärmeradapter
RCTHW-SK ..............Suppenkesseladapter für ca. 6,6 Liter
RCTHW-2/3SP ..........Dampfplatte für 2 Behälter mit 2/3
RCTHW-1/3SP ..........Dampfplatte für 4 Behälter mit 1/3
RCTHW-SP ..............Dampfplatte für 6 Behälter
RCTHW-Basket ........Nudelbehälter
RCTHW-PC ..............Pastakocher (keine Abbildung)
OPTIONEN UND ZUBEHÖR
Kunststoffknopf, 10 Liter
10 Liter
RHW-Zubehör
(7 Quart)
Wannenaussparungen m. Gastronorm
Wannenaussparungen m. Gastronorm
RCTHW-Zubehör
Form-Nr. RHWCEM-0816
21
Page 22

RICHTLINIEN ZUR STÖRUNGSBESEITIGUNG
WARNUNG
WARNUNG
Reparaturen am das Gerät dürfen nur von qualifiziertem
Personal durchgeführt werden. Von unqualifiziertem
Personal durchgeführte Reparaturen können zu
Elektroschocks oder Verbrennungen führen.
GEFAHR VON ELEKTROSCHOCKS: Schalten Sie die
Stromversorgung aus, ziehen Sie das Netzkabel aus der
Steckdose und lassen Sie das Gerät abkühlen, bevor Sie es
reinigen, einstellen oder warten.
Symptom Mögliche Ursache Abhilfemassnahme
Gerät ist nicht
ausreichend heiß.
Gerät ist zu heiß. Sockel-Sollwerttemperatur ist zu hoch. Wechseln Sie mit der Taste MODUS von der Einstellung VOLLE
Keine Heizleistung. Wärmer ist ausgeschaltet. Den Wärmer mit dem Betriebsschalter einschalten. Das
Sockel-Sollwerttemperatur ist zu niedrig. Wechseln Sie mit der Taste MODUS von der Einstellung
Falscher Tiegel in Wärmer eingesetzt (RHWModelle).
Heizelement funktioniert nicht. Wenden Sie sich an Ihren Hatco Händler vor Ort oder an den
Temperaturregelung funktioniert nicht korrekt. Wenden Sie sich an Ihren Hatco Händler vor Ort oder an den
Inkorrekte Spannungsversorgung. Überprüfen, ob der Wärmer mit der korrekten Spannung versorgt
Kontrolle der Temperatur nicht richtig funktioniert Wenden Sie sich an Ihren Hatco Händler vor Ort oder an den
Spannung ist falsch. Überprüfen, ob der Wärmer mit der korrekten Spannung versorgt
Trennschalter gefallen. Trennschalter zurücksetzen. Wenn der Trennschalter weiter
Digitale Temperaturregelung ist defekt. Wenden Sie sich an Ihren Hatco Händler vor Ort oder an den
Sockel-Heizelement ist ausgebrannt. Wenden Sie sich an Ihren Hatco Händler vor Ort oder an den
Begrenzungsregler ausgelöst. Stellen Sie sicher, dass die Wanne sauber und bis zur
GERINGE LEISTUNG zu VOLLE LEISTUNG.
Mit dem TEMP-Knopf den höheren Temperaturbereich einstellen.
Nur die speziell konzipierten runden Töpfe für RHW-Modelle von
Hatco benutzen. Andere Töpfe können nicht den korrekten
Kontakt zwischen Wärmer und Topf erzeugen.
Kundendienst von Hatco.
Kundendienst von Hatco.
wird. Niedrige Versorgungsspannung führt zu unsachgemäßer
Beheizung.
LEISTUNG zu GERINGE LEISTUNG.
Mit dem TEMP-Knopf den niedrigeren Temperaturbereich
einstellen.
Kundendienst von Hatco.
wird. Hohe Versorgungsspannung führt zum Überhitzen des
Wärmers und kann das Gerät beschädigen.
Verfahren im Abschnitt BETRIEB durchführen.
ausgelöst wird, wenden Sie sich an Ihren Hatco Händler vor Ort
oder an den Kundendienst von Hatco.
Kundendienst von Hatco.
Kundendienst von Hatco.
vorgegebenen Höhe mit Wasser gefüllt ist. Starke Kalkablagerung
und/oder der Betrieb des Geräts ohne Wasser kann zu
Überhitzung führen, wodurch der Begrenzungsregler ausgelöst
wird.
Haben Sie Fragen zur Störungsbeseitigung?
Wenn Sie weiterhin Probleme beim Beheben einer Störung haben, dann setzen Sie sich bitte mit einem autorisierten HatcoServicebetrieb in Ihrer Nähe oder mit Hatco in Verbindung. Um einen Servicebetrieb in Ihrer Nähe zu finden, können Sie die
Hatco-Website unter www.hatcocorp.com besuchen und dort auf „Find Service Agent“ klicken. Sie können sich auch mit dem
Ersatzteil- und Serviceteam von Hatco in Verbindung setzen. Sie erreichen dieses wie folgt:
Telefon: 414-671-6350
e-mail: partsandservice@hatcocorp.com
Form-Nr. RHWCEM-0816
22
Page 23

INTERNATIONALE BESCHRÄNKTE GARANTIE
1. PRODUKTGARANTIE
Hatco gewährleistet, dass die von ihr hergestellten Produkte
(die "Produkte") bei normalem Gebrauch und Einsatz für einen
Zeitraum von einem (1) Jahr ab dem Kaufdatum keinerlei
Materialfehler aufweisen werden, vorausgesetzt, dass sie
gemäß der schriftlichen Anleitung von Hatco installiert und
gewartet wurden, bzw. für einen Zeitraum von 18 Monaten ab
dem Datum der Lieferung durch Hatco. Der Käufer muss das
Kaufdatum des Produkts bestätigen, indem das Produkt bei
Hatco registriert wird, oder durch andere Maßnahmen, die
ausschließlich nach eigenem Ermessen von Hatco als
zufrieden stellend angesehen werden.
Hatco garantiert, dass die folgende Produktteile ab dem
Kaufdatum (gemäß den obigen Bedingungen) für folgenden
Zeitabschnitte und unter folgenden Bedingungen frei von
Materialfehlern sind:
a) Beschränkte Zweijahres-Garantie auf Teile:
Durchlauftoaster-Elemente (Metallmantel)
Metall-ummantelte Wärme-Elemente der Lade
Ladenrollen und -bahnen der Wärme-Lade
Metall-ummantelte Speisenwärmer-Elemente
Metall-ummantelte Luft-Wärme-Elemente für Schaukästen
Metall-ummantelte Luft-Wärme-Elemente für
Aufbewahrungskästen
Eingebaute, metallummantelte Heizschachtelemente —
HW- und HWB-Serien
b) Fünf (5) Jahre Garantie auf Teile:
3CS- und FR-Tanks
c) Zehn (10) Jahre Garantie auf Teile:
Elektrische Booster-Heiztanks
Booster-Gasheiztanks
d) Neunzig (90) Tage Garantie auf Teile:
Ersatzteile
DIE OBIGEN GARANTIEBEDINGUNGEN GELTEN ALLEIN
UND AUSSCHLIESSLICHE ANSTELLE ALLER ANDEREN
GARANTIEBEDINGUNGEN, AUSDRÜCKLICH ODER IMPLIZIT,
INKLUSIVE, ABER NICHT DARAUF EINGESCHRÄNKT, JEDER
IMPLIZIERTEN GARANTIE AUF VERWERTBARKEIT ODER
EIGNUNG FÜR EINEN BESTIMMTEN ZWECK ODER PATENT
ODER VERLETZUNG EINES ANDEREN RECHTS AUF
GEISTIGES EIGENTUM. Ohne die Allgemeingültigkeit der obigen
Bedingungen einzuschränken, GELTEN SOLCHE GARANTIEN
NICHT FÜR: Beschichtete Glühlampen, Leuchtstoffröhren,
Leuchtenwärmer-Heizlampen, beschichtete Halogenleuchten,
Halogenheizleuchten, Xenon-Lampen, LED-Röhren,
Glaskomponenten und Sicherungen; Produktausfälle im
Durchlauferhitzer-Tank, Lamellenwärmetauscher oder andere
Wasserheizvorrichtungen, verursacht durch Verkalkung,
Sedimentablagerung, chemischen Angriff oder Frieren,
Produktmissbrauch, Manipulation oder falsche Anwendung,
unsachgemäße Installation oder Anlegen einer falschen
Stromspannung.
2. EINSCHRÄNKUNG DER ERSATZLEISTUNGUND DES
SCHADENERSATZES
Die Haftung seitens Hatco und das ausschließliche Rechtsmittel
des Käufers ist nach Ermessen von Hatco oder einer von Hatco
autorisierten Serviceagentur nur der Ersatz des von der Garantie
geschützten Teils oder Produktes, sofern die oben angeführten
Garantiefristen eingehalten wurden. Hatco behält sich das Recht
vor, Garantieansprüche zur Gänze oder teilweise abzulehnen. Im
Sinne dieser beschränkten Garantie bezieht sich der Begriff
„überholt“ auf ein Teil oder Produkt, dessen ursprüngliche
technische Daten von Hatco oder einem von Hatco autorisierten
Reparaturdienst wieder hergestellt wurden. Die Kosten jeder
bewilligten Rücksendungen hat ausschließlich der Käufer zu
tragen. UNTER KEINEN UMSTÄNDEN IST HATCO FÜR
FOLGE- ODER WEITERE SCHÄDEN, INKLUSIVE, ABER
NICHT DARAUF BESCHRÄNKT, KOSTEN DER ARBEITSZEIT
ODER ENTGANGENER GEWINNE, WELCHE AUS DER
VERWENDUNG ODER NICHT MÖGLICHEN VERWENDUNG
DER PRODUKTE ODER DEM EINBAU ODER DEM EINSATZ
ALS TEIL EINES ANDEREN PRODUKTS ODER WARE
ENTSTEHEN, HAFTBAR.
Die Garantie für die Hatco Suppen- und Soßenwärmer der
HEATMAX Serie gilt ein Jahr ab dem Kaufdatum oder achtzehn
Monate ab der Auslieferung von Hatco, je nachdem, was zuerst
eintritt.
Falls während der Garantielaufzeit ein Problem an einem
Suppen- und Soßenwärmer auftritt, bitte Folgendes machen:
Setzen Sie sich mit Ihrem Hatco-Händler vor Ort in
Verbindung
Bei der Kontaktaufnahme mit einem Hatco-Händler zur
Anforderung von Kundendienstleistungen halten Sie bitte
folgende Informationen bereit, um eine umgehende
Bearbeitung zu gewährleisten:
• Modellbezeichnung des Geräts
• Seriennummer (befindet sich auf der Rückseite des
Geräts)
• Beschreibung des am Geräts auftretenden Problems
• Kaufdatum
• Name Ihres Unternehmens
• Versandadresse
• Kontaktperson und Telefonnummer
Form-Nr. RHWCEM-0816
HINWEISE ZUR GARANTIELEISTUNG
Der Hatco-Händler Dealer wird:
• Nach Bedarf Ersatzteil(e) bereitstellen
• Den Garantieanspruch zur Bearbeitung an Hatco
weiterleiten.
Nicht-Garantie Probleme
Falls ein nicht von der Garantie gedecktes Problem auftritt, für
das Unterstützung erforderlich ist, wenden Sie sich bitte an die
nächste von Hatco autorisierte Serviceagentur.
Aufsuchen der nächsten Serviceagentur:
• Rufen Sie unsere Website unter www.hatcocorp.com auf,
wählen Sie das Pulldown-Menü „Resources“ (Ressourcen)
aus und klicken Sie auf „Find Service Agent/Distributor“
(Serviceagentur/Vertriebsgesellschaft suchen)
• Rufen Sie Hatco-Service unter der Rufnummer
+1 414-671-6350 an
• Senden Sie eine E-Mail an Hatco Service:
partsandservice@hatcocorp.com
23
Page 24

AVISO
ATENCIÓN
ADVERTENCIA
Desecho correcto de este producto
Esta marca indica que este producto y sus componentes
electrónicos no deben desecharse con otros residuos
comerciales. Para evitar posibles daños al medio ambiente o
a la salud humana debido al desecho no controlado de
residuos, recicle en forma responsable para promover el
reuso sustentable de los recursos materiales. Para desechar
este producto y sus componentes electrónicos,
comuníquese con el proveedor en donde compró el producto
para conocer las normas de reciclaje ambiental seguro.
CONTENIDO
Información Importante para el Propietario .....................24
Introducción ........................................................................24
Información Importante de Seguridad..............................25
Descripción del Modelo .....................................................26
Denominación del Modelo .................................................27
Especificaciones.................................................................27
Configuraciones del Enchufe.............................................27
Cuadro de Clasificación Eléctrica......................................27
Dimensiones .....................................................................28
Instalación ...........................................................................29
Generalidades....................................................................29
Instalación de los Modelos Empotrados............................29
Operación ............................................................................31
Generalidades....................................................................31
Mantenimiento ....................................................................31
Generalidades....................................................................31
Limpieza.............................................................................32
Opciones y accesorios ......................................................32
Guía de Resolución de Problemas ...................................33
Garantía Internacional Limitada ........................................34
Información del Servicio de Garantía ...............................34
INFORMACIÓN IMPORTANTE PARA EL PROPIETARIO
Anote el número de modelo, número de serie (la etiqueta con
las especificaciones técnicas se encuentra en la parte posterior
de la unidad), voltaje y fecha de compra de su unidad en los
espacios a continuación. Por favor, tenga esta información
disponible cuando llame a Hatco para recibir asistencia técnica.
Modelo No. ______________________________________
Serie No. ________________________________________
Voltaje __________________________________________
Fecha de compra __________________________________
¡No Olvide Registrar Su Aparato!
Registre la garantía en nuestro sitio web para evitar retrasos
en la obtención de la cobertura de la garantía. Visite el sitio
web de Hatco: www.hatcocorp.com, seleccione el menú
desplegable “Piezas & Mantenimiento” (Parts & Service) y
haga clic en “Registrar la Garantía” (Warranty Registration).
Horario de atención: 7:00
Teléfono: 414-671-6350
Correo Electrónico: partsandservice@hatcocorp.com
Puede encontrar información adicional si visita nuestro sitio
Web en www.hatcocorp.com.
AM a 5:00 PM
Horario de la zona central
(Horario de verano: junio a septiembre
7:00
AM a 5:00 PM horario de la zona
central, lunes a jueves
7:00
AM a 4:00 PM horario de la zona
central, viernes)
INTRODUCCIÓN
Los pocillos térmicos HEATMAX de Hatco están especialmente
diseñados para cocinar o mantener caliente una gran variedad de
alimentos, que incluyen sopas, curry, salsas y una variedad de
aderezos. En el caso de las unidades RHW, los productos para
cocinar o mantener caliente se colocan en una olla que se calienta
o mantiene caliente con la plancha calefactora. En el caso de las
unidades RCTHW, los productos se colocan en una bandeja de
tamaño estándar, la cual se coloca en el pocillo térmico. Un
regulador electrónico controla la temperatura de las resistencias
para garantizar un funcionamiento óptimo. El calor se distribuye
de manera uniforme por toda la unidad para mantener las comidas
a la temperatura deseada, y el diseño de acero inoxidable aislado
permite un fácil mantenimiento y un rendimiento durable.
Todas las unidades están equipadas con un panel de control que
cuenta con tres puntos de ajuste de temperatura desde
50 °C (122 °F) hasta 100 °C (212 °F) y un modo de ahorro de
energía que ahorra electricidad durante horas de poco uso.
Los pocillos térmicos Hatco están construidos con calidad para
satisfacer las demandas de las operaciones de servicio de
alimentos, y proporcionan años de rendimiento sin problemas.
Los elementos calefactores están garantizados contra rotura y
quemado durante 1 año.
Los pocillos térmicos HEATMAX de Hatco se han sometido a
extensas investigaciones y pruebas de campo. Los materiales
utilizados se seleccionaron por su máxima durabilidad, apariencia
atractiva y rendimiento óptimo. Cada unidad se inspecciona y
prueba minuciosamente antes de salir al mercado.
Este manual proporciona las instrucciones de instalación,
seguridad y operación de los pocillos térmicos. Recomendamos
que lea todas las instrucciones de instalación, operación y
seguridad que aparecen en este manual antes de instalar u operar
sus pocillos térmicos.
La información de seguridad que aparece en este manual se
identifica a través de los siguientes paneles con señales y
palabras:
ADVERTENCIA indica una situación peligrosa que, en caso
de no evitarse, puede resultar en lesiones graves e incluso
la muerte.
ATENCIÓN indica una situación peligrosa que, en caso de
no evitarse, puede resultar en lesiones menores o
moderadas.
AVISO se usa para abordar prácticas que no están
relacionadas con lesiones personales.
24
Nº de formulario. RHWCEM-0816
Page 25

INFORMACIÓN IMPORTANTE DE SEGURIDAD
AVISO
ATENCIÓN
ADVERTENCIA
ADVERTENCIA
Lea la siguiente importante información de seguridad para evitar lesiones personales o la
muerte, y para evitar daños al equipo o la propiedad.
PELIGRO DE DESCARGA ELÉCTRICA:
• Enchufe la unidad a un tomacorriente adecuadamente
conectado a tierra del voltaje, tamaño y configuración del
enchufe correctos. Si el enchufe y el tomacorriente no
coinciden, comuníquese con un electricista calificado para
determinar e instalar el voltaje y el tamaño de
tomacorriente correctos.
• Antes de realizar cualquier tipo de limpieza, ajuste o
mantenimiento, APAGUE el interruptor, desenchufe el
cable de alimentación y deje que la unidad se enfríe.
• NO sumerja ni sature la unidad con agua. La unidad no es
impermeable. No opere la unidad si ésta se sumergió o
saturó con agua.
• La unidad no es a prueba de intemperie. Coloque la unidad
en interiores donde la temperatura del aire ambiente sea
de un mínimo de 21° C (70° F).
• No limpie con vapor ni use agua en exceso en la unidad.
• Esta unidad no tiene una construcción “a prueba de
chorros”. No use un pulverizador de limpieza a chorro para
limpiar la unidad.
• No tire la unidad por el cable de alimentación.
• No use la unidad si el cable de alimentación está
deshilachado o desgastado.
• No intente reparar ni reemplazar un cable de alimentación
dañado. El cable deberá reemplazarlo Hatco, un agente de
servicio Hatco autorizado o una persona con
calificaciones similares.
• No utilice esta unidad para almacenar o fundir hielo, ya que
esto podría generar condensación y crear un riesgo de
origen eléctrico que podría provocar lesiones a personas
y/o daños a la unidad. La garantía no cubre los daños
originados por condensación.
• Use sólo repuestos Hatco originales cuando se necesite
realizar mantenimiento. En caso de no utilizase repuestos
Hatco originales, se anularán todas las garantías y se puede
someter a los operadores del equipo a voltajes eléctricos
peligrosos, dando como resultado descargas eléctricas o
quemaduras. Los repuestos Hatco originales están
especificados para operar en forma segura en los entornos
en los que se usan. Los repuestos de mercado secundario
o genéricos no cuentan con las características que les
permiten operar en forma segura en los equipos Hatco.
RIESGO DE INCENDIO:
• Coloque la unidad a un mínimo de 25 mm de paredes y
materiales que sean combustibles. Si no se mantienen las
distancias seguras, podría provocarse combustión o
decoloración.
• No utilice productos químicos agresivos tales como lejía
(o productos de limpieza que contengan lejía),
limpiahornos o soluciones de limpieza inflamables para
limpiar esta unidad.
Esta unidad no tiene piezas a las que el usuario pueda realizar
mantenimiento. Si necesita realizar mantenimiento en esta
unidad, comuníquese con un agente de servicio autorizado de
Hatco o con el Departamento de Servicio de Hatco al
414-671-6350.
Esta unidad no ha sido diseñada para su uso por parte de
niños o personas con alguna discapacidad física, sensorial o
mental. Asegúrese de que los niños están debidamente
supervisados y manténgalos alejados de esta unidad.
Esta unidad no ha sido diseñada para su uso por parte de
niños o personas con alguna discapacidad física, sensorial o
mental. Asegúrese de que los niños están debidamente
supervisados y manténgalos alejados de esta unidad.
Asegúrese de que todos los usuarios de esta unidad han
recibido la formación adecuada para el funcionamiento
correcto y seguro de la misma.
PELIGRO DE QUEMADURAS:
• Algunas superficies exteriores de la unidad se calientan.
Tenga precaución al tocar estas áreas.
• El agua caliente de esta unidad puede provocar
quemaduras. Deje que la unidad se enfríe antes de vaciarla
o limpiarla.
Coloque la unidad a la altura correcta del mesón en un área
que sea cómoda para su uso. La ubicación debe estar nivelada
para evitar que la unidad o su contenido caigan
accidentalmente y ser lo suficientemente firme para soportar
el peso de la unidad y el contenido.
Cuando la unidad contenga alimentos, no la mueva ni la
cambie de posición. Apague la unidad, saque los alimentos y
deje enfriar la unidad completamente antes de moverla o de
proceder a su limpieza.
El aceite empleado en la fabricación de la unidad está
homologado y puede generar humo durante un periodo de hasta
30 minutos durante el encendido inicial. El humo sólo aparecerá
durante el encendido inicial. No introduzca alimentos en la
unidad hasta que el humo se haya disipado.
Utilice únicamente paños y productos de limpieza no abrasivos.
Los paños o productos de limpieza abrasivos podrían rayar el
acabado de la unidad, deteriorando su apariencia y haciéndola
susceptible a la acumulación de suciedad.
No coloque la unidad sobre el lado del panel de control o
podrían producirse daños en la unidad.
El panel de control externo debe colocarse a una distancia
mínima de 152 mm (6″) y a una distancia máxima de 1.420 mm
[56″]) de la unidad. Si no respeta la distancia mínima, podría
provocar un sobrecalentamiento del sistema eléctrico del
panel de control.
No sitúe esta unidad en zonas con temperaturas demasiado
elevadas o en las que haya grasa procedente de aparatos
como parrillas o freidoras. Las temperaturas demasiado
elevadas pueden dañar la unidad.
La unidad está diseñada para ser usada en o sobre mesadas
metálicas y se recomienda respetar esas indicaciones de diseño.
La garantía de Hatco no cubrirá ningún daño ocasionado en
materiales de las mesadas. Para otras superficies, consulte al
fabricante para saber qué material es adecuado para
temperaturas sostenidas de hasta 100 °C (212 °F).
No apriete con excesiva fuerza los tornillos de fijación de las
unidades empotradas, ya que podría dañar la unidad y/o la
encimera.
No opere la unidad sin alimentos o agua en el cajón térmico.
Podrían producirse daños en la unidad.
Nº de formulario. RHWCEM-0816
25
Page 26

DESCRIPCIÓN DEL MODELO
Todos los Modelos
Todas las unidades de pocillos térmicos HEATMAX son fiables
y versátiles. Además de su uso como pocillo térmico para
mantener la comida caliente antes de servirla, la comida
también puede cocerse al vapor cuando se utiliza con el juego
adaptador opcional.
RHW-1
El modelo RHW-1 está equipado con un solo elemento
calefactor para mantener la comida caliente o para cocinar
sopa o salsas. Se entrega con un recipiente redondo de 10
litros (11 cuartos de galón) y una tapa abatible de acero
inoxidable diseñados especialmente.
Modelo RHW-1
RHW-1B
El modelo RHW-1B está equipado de manera idéntica al
modelo RHW-1 pero se trata de una unidad empotrada
equipada con un panel de control remoto.
RCTHW-1
El modelo RCTHW-1 está equipado con tres elementos de
calentamiento y un drenaje delantero. Puede contener una
bandeja de comida de tamaño estándar.
Modelo RCTHW-1
RCTHW-1B
El modelo RCTHW-1B está equipado de la misma manera que
el RCTHW-1 pero es un modelo integrado con un panel de
control instalado remoto y un drenaje inferior.
Modelo RHW-1B
RHW-2
RHW-2 está equipado con dos elementos de calentamiento
controlados individualmente para contener alimentos o cocinar
sopas o salsas. Se entrega con dos recipientes redondos de 10
litros (11 cuartos de galón) y tapas abatibles de acero
inoxidable diseñados especialmente.
Modelo RHW-2
26
Modelo RCTHW-1B
Nº de formulario. RHWCEM-0816
Page 27

Configuraciones del Enchufe
ADVERTENCIA
CEE 7/7 Schuko
BS-1363
AS 3112
R H W - 1 B
R = Redonda
RCT = Rectangular
Pocillos Térmicos
B = Integrada con Control Remoto
Sin carácter = mostrador
1 = Unidad Sencilla
2 = Unidad Doble
Las unidades salen de fábrica con un cable eléctrico y un
enchufe instalados. Los enchufes se suministran de acuerdo
con las aplicaciones.
PELIGRO DE DESCARGA ELÉCTRICA: Enchufe la unidad
a un tomacorriente adecuadamente conectado a tierra del
voltaje, tamaño y configuración del enchufe correctos. Si
el enchufe y el tomacorriente no coinciden, comuníquese
con un electricista calificado para determinar e instalar el
voltaje y el tamaño de tomacorriente correctos.
NOTA: La etiqueta con las especificaciones técnicas se
encuentra en la parte posterior de la unidad. Para
comprobar el número de serie y la información relativa
a la electricidad de este aparato, consulte la etiqueta.
DENOMINACIÓN DEL MODELO
ESPECIFICACIONES
Configuraciones del Enchufe
NOTA: Hatco no proporciona el tomacorriente.
Cuadro de Clasificación Eléctrica
Configuraciones
Modelo Voltaje Vatios Amperios del Enchufe Peso de Envío
RHW-1 230 (CE) 1250 5.4 BS-1363, CEE 7/7 Schuko, AS 3112 7 kg (15 lbs.)
RHW-1B 230 (CE) 1250 5.4 BS-1363, CEE 7/7 Schuko, AS 3112 8 kg (18 lbs.)
RHW-2 230 (CE) 2500 10.9 BS-1363, CEE 7/7 Schuko, AS 3112 12 kg (26 lbs.)
RCTHW-1 230 (CE) 3000 13 BS-1363, CEE 7/7 Schuko, AS 3112 12 kg (26 lbs.)
RCTHW-1B 230 (CE) 3000 13 BS-1363, CEE 7/7 Schuko, AS 3112 13 kg (29 lbs.)
NOTA: El peso de envío incluye el material de embalaje.
Nº de formulario. RHWCEM-0816
27
Page 28

ESPECIFICACIONES
POWER
FAULT
100°C
70°C-90°C
50°C-70°C
TEMP
ON/OFF
o
_
FULL
POWER
ENERGY
SAVE
MODE
~
~
~
~
POWER
FAULT
100°C
70°C-90°C
50°C-70°C
TEMP
ON/OFF
o
_
FULL
POWER
ENERGY
SAVE
MODE
~
~
~
~
HEATMAX
HEATED WELL
A
A
D
E
RCTHW-1
RHW-1 RHW-1B RHW-2
RCTHW-1B
C
C
B B
B
E
D D
E
B B
C
A
C
A
C
A
Dimensiones
Ancho Profundidad Altura Ancho de Profundidad
Modelo (A) (B) (C) las patas (D) de las patas (E)
RHW-1 359 mm 330 mm 355 mm 179 mm 224 mm
(14-1/8") (13") (14") (7") (8-7/8")
RHW-1B 359 mm 330 mm 341 mm N/A N/A
(14-1/8") (13") (13-7/16")
RHW-2 630 mm 330 mm 355 mm 389 mm 249 mm
(24-3/4") (13") (14") (15-3/8") (9-7/8")
RCTHW-1 368 mm 611 mm 283 mm 347 mm 535 mm
(14-1/2") (24-1/16") (11-3/16") (14") (21-7/16")
RCTHW-1B 368 mm 582 mm 226 mm N/A N/A
(14-1/2") (22-15/16")
(8-15/16")
28
Nº de formulario. RHWCEM-0816
Page 29

INSTALACIÓN
AVISO
ATENCIÓN
ADVERTENCIA
AVISO
Pinza de la
Manguera
Pinza de la
Manguera
Tornillo del
Panel Inferior
Panel Inferior
Valvula de Drenje
Accesorio
Manguera de
Drenaje
Generalidades
La mayoría de los componentes de los Recipientes Termicos
HEATMAX vienen montados de fábrica y están listos para ser
usados. Tenga cuidado al desembalar la caja de envío para
evitar posibles daños a la unidad y a los accesorios incluidos.
PELIGRO DE DESCARGA ELÉCTRICA: La unidad no es a
prueba de intemperie. Coloque la unidad en interiores
donde la temperatura del aire ambiente sea de un mínimo
de 21° C (70° F).
RIESGO DE INCENDIO: Coloque la unidad a un mínimo de
25 mm de paredes y materiales que sean combustibles. Si
no se mantienen las distancias seguras, podría provocarse
combustión o decoloración.
Coloque la unidad a la altura correcta del mesón en un área
que sea cómoda para su uso. La ubicación debe estar
nivelada para evitar que la unidad o su contenido caigan
accidentalmente y ser lo suficientemente firme para soportar
el peso de la unidad y el contenido.
Cuando la unidad contenga alimentos, no la mueva ni la
cambie de posición.Apague la unidad, saque los alimentos
y deje enfriar la unidad completamente antes de moverla o
de proceder a su limpieza.
Use sólo limpiadores no abrasivos. Los limpiadores abrasivos
podrían rayar el acabado de la unidad, estropear su apariencia
y hacerla susceptible a la acumulación de suciedad.
No sitúe esta unidad en zonas con temperaturas
demasiado elevadas o en las que haya grasa procedente
de aparatos como parrillas o freidoras. Las temperaturas
demasiado elevadas pueden dañar la unidad.
1. Retire la unidad de la caja.
2. Saque el paquete de información.
3. Quite la cinta y el material de embalaje de todas las
superficies de la unidad.
4. Si la unidad es un modelo para mostrador, colóquela en el
lugar correspondiente.
• Sitúe la unidad en un área donde la temperatura
ambiente sea constante y como mínimo de 21°C (70°F).
Evite áreas en las que se puedan dar movimientos o
corrientes de aire (p.ej., cerca de extractores/ventiladores
y de conductos de aire acondicionado).
• Asegúrese de que la unidad está a la altura correcta
del mesón en un área cómoda para su uso.
• Asegúrese de que la superficie del mesón esté a nivel
y sea lo suficientemente firme para soportar el peso de
la unidad y los alimentos.
• Asegúrese de que todas las patas de la parte inferior de
la unidad se ubiquen en forma segura sobre la
superficie del mesón.
5. Si la unidad es un modelo empotrado, lleve a cabo el
procedimiento descrito en el apartado "Instalación de los
Modelos Empotrados" de esta sección.
Instalación de los Modelos Empotrados
Para instalar un modelo empotrado en el mostrador, siga los pasos
enumerados a continuación. Si la unidad es un modelo empotrado
rectangular, en primer lugar debe seguir el procedimiento descrito
en el apartado “Instalación del Sistema de Drenaje”.
La unidad está diseñada para ser usada en o sobre
mesadas metálicas y se recomienda respetar esas
indicaciones de diseño. La garantía de Hatco no cubrirá
ningún daño ocasionado en materiales de las mesadas.
Para otras superficies, consulte al fabricante para saber
qué material es adecuado para temperaturas sostenidas
de hasta 100 °C (212 °F).
Instalación del Sistema de Drenaje
Antes de comenzar la instalación de un modelo empotrado
rectangular, debe llevar a cabo el procedimiento descrito a
continuación para instalar el sistema de drenaje:
1. Voltee cuidadosamente la unidad y colóquela sobre su
superficie superior.
2. Retire los tornillos y el panel inferior.
3. Conecte un extremo de la manguera de drenaje al
accesorio usando la pinza para manguera suministrada.
4. Tienda la manguera a través del orificio en el panel inferior
y reinstale el panel inferior a la unidad, usando los tornillos
originales.
5. Conecte el otro extremo de la manguera de drenaje a la
válvula de drenaje usando la pinza para manguera
suministrada.
6. Lleve a cabo el procedimiento descrito en el apartado
"Instalación de los Modelos Empotrados" de esta sección.
Después de instalar la unidad en el mostrador, la válvula
de drenaje puede conectarse a la tubería externa de
drenaje, si así se desea.
Instalación del Sistema de Drenaje
(sólo para modelos empotrados rectangulares)
Nº de formulario. RHWCEM-0816
29
Page 30

INSTALACIÓN
AVISO
ScrewTornillo
Brida
Superior
Mostrador
L BracketSoporte en L
Hueco del
Mostrador
Hueco para la Instalación
de la Caja del Panel de Control
ScrewTapa delantera de
la caja de control
Tapa
Caja del Panel
de Control
Brida de
Fijación
AVISO
550 mm
(21-11/16″)
344 mm
(13-9/16″)
RCTHW-1B
305 mm
12″
RHW-1B
132 mm
(5-1/8″)
144 mm
(5-9/16″)
65 mm
(2-9/16″)
33 mm
(1-5/16″)
154 mm
(6″)
Ø 4,5 mm
(3/16″)
Instalación de la Unidad
1. Practique un orificio en el mostrador teniendo en cuenta
las dimensiones del modelo que desea instalar.
Dimensiones del Hueco del Mostrador
NOTA: Asegúrese de que la superficie del mostrador está
nivelada para garantizar el correcto drenaje del recipiente
rectangular.
El panel de control externo debe colocarse a una distancia
mínima de 152 mm (6″) y a una distancia máxima de
1.420 mm (56″) de la unidad. Si no respeta la distancia
mínima, podría provocar un sobrecalentamiento del
sistema eléctrico del panel de control.
La caja que contiene el panel de control debe quedar
instalada fuera de la zona de emisión de calor. Si instala la
caja del panel de control dentro de la zona de emisión de
calor, los mandos podrían sobrecalentarse, funcionar de
forma incorrecta o dejar de funcionar.
2. Para instalar la caja del panel de control, practique el
orificio correspondiente sobre una superficie vertical a una
distancia mínima de 152 mm (6″) y a una distancia máxima
de 1.420 mm (56″) de la unidad (dimensiones
especificadas en la figura que se muestra a continuación).
3. Retire los cuatro tornillos que sujetan la tapa delantera a la
caja de control. Retire la tapa delantera y guíe la caja de
control con la tapa delantera extraída y los cables de
alimentación a través del recorte del mostrador y, luego,
baje la unidad hasta el recorte.
Instalación de la Unidad
4. Monte los soportes en L en la
parte inferior de la unidad.
5. Apriete los tornillos de los soportes
en L hasta que la brida superior
quede a ras con el mostrador.
No apriete con excesiva fuerza los
tornillos de fijación de las unidades
empotradas, ya que podría dañar la
unidad y/o la encimera.
Instalación de la Caja del Panel de Control Externo
1. Instale la caja del panel de control en el hueco realizado
específicamente para la misma:
a. Introduzca una de las bridas de fijación de la caja del
panel de control por el hueco hasta que alcance la parte
delantera de la superficie de montaje. Incline y deslice
la otra brida a través del recorte.
b. Asegúrese de que los orificios de montaje de las bridas de
fijación y los orificios para tornillos de la superficie de
instalación coinciden, y fije la caja a la superficie utilizando
dos tornillos M4 (tornillos no incluidos con la unidad).
c. Instale la tapa en la caja del panel de control utilizando
los 4 tornillos de la tapa.
Dimensiones del Hueco para el Panel de Control Externo
NOTA: El cable eléctrico que conecta la unidad con el panel de
control tiene una longitud de 1.420 mm (56″).
Instalación de la Caja del Panel de Control Externo
2. Enchufe el cable de alimentación una toma de corriente
puesta a tierra que tenga un voltaje, tamaño y tipo de
clavija adecuados. Consulte la sección "Especificaciones"
de este manual para obtener más información.
30
Nº de formulario. RHWCEM-0816
Page 31

Generalidades
ADVERTENCIA
AVISO
ATENCIÓN
Botón de selección
de temperatura
Indicador de
Encendido
Conmutador
de Encendido/
Apagado
Botón de Selección
de Función
Indicador
de Fallos
ADVERTENCIA
ADVERTENCIA
Para utilizar los Recipientes Termicos HEATMAX, siga el
procedimiento descrito a continuación.
Lea todos los mensajes de seguridad de la sección
Información de seguridad importante antes de operar el
equipo.
No opere la unidad sin alimentos o agua en el cajón
térmico. Podrían producirse daños en la unidad.
NOTA: Para lograr una correcta transferencia de calor, opere la
serie RHW (pocillos térmicos redondos), con la
bandeja especial suministrada. Esta bandeja tiene un
fondo curvo que coincide con la forma del elemento
calefactor.
1. Enchufe la unidad en la toma de corriente eléctrica,
apropiadamente conectada a tierra, con la configuración
de tensión, tamaño y enchufe correctos. Vea la sección
ESPECIFICACIONES para detalles.
• El indicador de encendido (POWER) se iluminará de
color rojo cuando la unidad esté conectada a la red
eléctrica.
2. Introduzca una bandeja/olla que contenga comida o agua
en la unidad.
NOTA: No haga funcionar la unidad sin una bandeja/olla o con
una bandeja/olla que esté vacía. La unidad se
recalentará y entrará en el modo "fallo" (FAULT).
3. Pulse el interruptor de encendido/apagado (ON/OFF) para
encender la unidad .
• El indicador de encendido (POWER) se iluminará de
color verde cuando la unidad esté encendida y
comience a calentar.
NOTA: Cuando la unidad se sobrecalienta o si el sensor de
temperatura sufre un cortocircuito, el indicador FAULT
(fallo) se encenderá y la unidad emitirá un sonido.
Cuando esto sucede, se interrumpe el suministro
eléctrico automáticamente hasta que la temperatura
regresa al rango normal o el sensor de temperatura
funciona normalmente.
OPERACIÓN
PELIGRO DE QUEMADURAS: Algunas superficies exteriores
de la unidad se calientan. Tenga precaución al tocar estas áreas.
4. Pulse el botón de selección de temperatura (TEMP) para
seleccionar la opción de temperatura deseada. El
indicador situado sobre cada una de las opciones de
temperatura se iluminará cuando la opción esté
seleccionada. Hay tres opciones de temperatura:
• 90–100°C (194–212°F) — Cocina al vapor y
recalentamiento
• 70–90°C (158–194°F) — Calentamiento y/o
mantenimiento de la
temperatura de los alimentos
• 50–70°C (122–158°F) — Calentamiento y/o
mantenimiento de la
temperatura de los alimentos
5. Pulse el botón de selección de función (MODE) para
seleccionar la función deseada. El indicador situado sobre
cada una de las opciones de función se iluminará cuando
la función esté seleccionada. Hay dos funciones para
calentar los alimentos:
• Función de Potencia Máxima — La unidad funciona con
el 100% de su potencia.
• Función de Potencia Baja — La unidad funciona con el
50% de su potencia para calentar alimentos y evitar que
estos se quemen.
Generalidades
El diseño de los Recipientes Termicos HEATMAX garantiza una
resistencia y un rendimiento óptimos con un mantenimiento
mínimo.
PELIGRO DE DESCARGA ELÉCTRICA:
• Antes de realizar cualquier tipo de limpieza, ajuste o
mantenimiento, APAGUE el interruptor, desenchufe el
cable de alimentación y deje que la unidad se enfríe.
• NO sumerja ni sature la unidad con agua. La unidad no
es impermeable. No opere la unidad si ésta se sumergió
o saturó con agua.
Nº de formulario. RHWCEM-0816
Panel de Control
MANTENIMIENTO
PELIGRO DE DESCARGA ELÉCTRICA:
• No limpie con vapor ni use agua en exceso en la
unidad.
• Esta unidad no tiene una construcción “a prueba de
chorros”. No use un pulverizador de limpieza a chorro
para limpiar la unidad.
31
Page 32

MANTENIMIENTO
ADVERTENCIA
AVISO
RHW-LID
RHW-11QT-LID-HG
RHW-11QT-POT
RHW-SP
RCTHW-Basket
RCTHW-1/3SP
RCTHW-SW
RCTHW-SK
RCTHW-2/3SP
RCTHW-SP
PELIGRO DE DESCARGA ELÉCTRICA:
• Use sólo repuestos Hatco originales cuando se
necesite realizar mantenimiento. En caso de no
utilizase repuestos Hatco originales, se anularán todas
las garantías y se puede someter a los operadores del
equipo a voltajes eléctricos peligrosos, dando como
resultado descargas eléctricas o quemaduras. Los
repuestos Hatco originales están especificados para
operar en forma segura en los entornos en los que se
usan. Los repuestos de mercado secundario o
genéricos no cuentan con las características que les
permiten operar en forma segura en los equipos Hatco.
RIESGO DE INCENDIO: No utilice productos químicos
agresivos tales como lejía (o productos de limpieza que
contengan lejía), limpiahornos o soluciones de limpieza
inflamables para limpiar esta unidad.
Esta unidad no tiene piezas a las que el usuario pueda
realizar mantenimiento. Si necesita realizar mantenimiento
en esta unidad, comuníquese con un agente de servicio
autorizado de Hatco o con el Departamento de Servicio de
Hatco al 414-671-6350.
Limpieza
Se recomienda que la unidad se limpie diariamente para
preservar el acabado de la unidad así como para mantener su
rendimiento.
Utilice únicamente paños y productos de limpieza no
abrasivos. Los paños o productos de limpieza abrasivos
podrían rayar el acabado de la unidad, deteriorando su
apariencia y haciéndola susceptible a la acumulación de
suciedad.
1. Apague la unidad, desenchufe el cable de alimentación y
deje que la unidad se enfríe.
2. Para una correcta limpieza de la unidad en el lavaplatos o
en el fregadero, saque las bandejas de alimentos y
cualquier accesorio.
3. Deje escurrir o elimine el agua de los recipientes.
4. Limpie todas las superficies de metal utilizando un paño
húmedo. Puede eliminar las manchas difíciles con un
limpiador no abrasivo. Puede limpiar las zonas de difícil
acceso con un pequeño cepillo y jabón neutro.
5. Seque toda la unidad con un paño seco no abrasivo.
NOTA: Se acumulará oxidación de agua dura sobre los
elementos del modelo RCTHW. Utilice una solución de
2 partes de vinagre blanco y 5 partes de agua para
disolver la oxidación. Deje trabajar la solución durante
al menos una hora (o durante toda la noche en el caso
de acumulaciones severas), frote el cajón térmico con
una almohadilla de decapado plástica, desagote la
solución y luego enjuague con agua limpia. No deje
que se acumule oxidación. Puede hacer que los
elementos calefactores se sobrecalienten.
OPCIONES Y ACCESORIOS
RHW-SP....................Plancha de vapor redonda para 6
RHW-11QT-LID-HG ..Tapa redonda de 10 litros (11 cuartos de
RHW-11QT-POT........Bandeja redonda de 10 litros (11 cuartos
RHW-11QT-LID ........Tapa redonda de 10 litros (11 cuartos de
RCTHW-SW ..............Adaptador para calentadores de salsas
RCTHW-SK ..............Adaptador para ollas soperas de 6,6
RCTHW-2/3SP ..........Plancha de vapor para 2 canastos c/
RCTHW-1/3SP ..........Plancha de vapor para 4 canastos c/
RCTHW-SP ..............Plancha de vapor para 6 canastos
RCTHW-Basket ........Canasto para fideos
canastos
galón) abatible con perilla de plástico
de galón) — 221 x 203 mm (8-11/16
pulg. de diám. x 8 pulg. de alto)
galón)
Accesorios de RHW
litros (7 cuartos de galón)
recorte para bandejas 2/3 Gastronorm
recorte para bandejas 1/3 Gastronorm
RCTHW-PC ..............Accesorio para cocinar pastas (no se
muestra)
Accesorios de RCTHW
32
Nº de formulario. RHWCEM-0816
Page 33

GUÍA DE RESOLUCIÓN DE PROBLEMAS
ADVERTENCIA
ADVERTENCIA
Sólo personal calificado debe realizar mantenimiento a la
unidad. El mantenimiento realizado por personal no
calificado puede causar descargas eléctricas o
quemaduras.
PELIGRO DE DESCARGA ELÉCTRICA: Antes de realizar
cualquier tipo de limpieza, ajuste o mantenimiento,
APAGUE el interruptor, desenchufe el cable de
alimentación y deje que la unidad se enfríe.
Síntoma Causa Probable Acción Correctiva
Unidad no suficientemente
caliente.
Unidad demasiado
caliente.
La unidad no calienta. La unidad está apagada. Utilice el interruptor de encendido/apagado (ON/OFF) para
Temperatura base de punto de ajuste demasiado
baja.
El modelo de olla instalado no es el adecuado para
la unidad (modelos RHW).
La resistencia no funciona. Póngase en contacto con un agente de servicio autorizado
Regulador electronico de temperatura defectuoso. Póngase en contacto con un agente de servicio autorizado
El voltaje de la fuente de alimentación no es el
adecuado.
Temperatura base de punto de ajuste demasiado
alta.
Control de temperatura no funciona correctamente. Póngase en contacto con un agente de servicio autorizado
Tensión suministrada es incorrecta. Compruebe que la fuente de alimentación de la unidad es
El interruptor general del cuadro de suministro
eléctrico se ha desconectado.
Controlador de temperatura digital defectuoso. Póngase en contacto con un agente de servicio autorizado
Elemento de calentamiento de base fundido. Póngase en contacto con un agente de servicio autorizado
Se activó el interruptor de límite alto. Asegúrese de que el cajón térmico esté limpio y lleno de
Utilice el botón de selección de temperatura (TEMP) para
seleccionar una temperatura más elevada.
Use el botón MODO para cambiar el ajuste de BAJA
POTENCIA a POTENCIA MÁXIMA.
Utilice ollas redondas diseñadas específicamente para los
modelos RHW de Hatco. Un tipo de olla distinto no tendrá
la misma superficie de contacto con la unidad.
o con Hatco para asistencia.
o con Hatco para asistencia.
Compruebe que la fuente de alimentación de la unidad es
del voltaje adecuado. Un voltaje demasiado bajo puede
provocar un mal funcionamiento de las resistencias.
Utilice el botón de selección de temperatura (TEMP) para
seleccionar una temperatura más baja.
Use el botón MODO para cambiar el ajuste de POTENCIA
MÁXIMA a BAJA POTENCIA.
o con Hatco para asistencia.
del voltaje adecuado. Un voltaje demasiado elevado
puede provocar un recalentamiento de la unidad y dañarla.
encender la unidad. Siga el procedimiento descrito en la
sección "OPERACIÓN" de este manual.
Vuelva a conectar el interruptor general. Si el interruptor
general vuelve a desconectarse, póngase en contacto con
un Centro de Servicio Autorizado o con Hatco para solicitar
asistencia.
o con Hatco para asistencia.
o con Hatco para asistencia.
agua hasta el nivel correcto. La acumulación severa de
oxidación y/o el operar la unidad sin agua puede hacer
que la unidad se sobrecaliente y que se active el
interruptor de límite alto.
¿Tiene preguntas sobre cómo resolver un problema?
Si no logra resolver un problema, póngase en contacto con el agente de servicio autorizado de Hatco más cercano para obtener
ayuda. Para encontrar al agente de servicio más cercano, inicie sesión en el sitio web de Hatco en www.hatcocorp.com y haga
clic en Find Service Agent (Encontrar un agente de servicio) o póngase en contacto con el Equipo de piezas y servicio de Hatco:
Teléfono: 414-671-6350
Correo
electrónico: partsandservice@hatcocorp.com
Nº de formulario. RHWCEM-0816
33
Page 34

GARANTÍA INTERNACIONAL LIMITADA
1. GARANTÍA DEL PRODUCTO
Hatco garantiza que los productos que fabrica estarán libres
de defectos en los materiales, bajo condiciones normales de
uso y servicio, durante un período de un (1) año a partir de la
fecha de compra cuando se instalan y reciben mantenimiento
de acuerdo con las instrucciones por escrito de Hatco, o por
18 meses a partir de su envío por Hatco. El comprador debe
establecer la fecha de compra del producto registrando el
producto con Hatco o por otros medios que Hatco considere
satisfactorios a su discreción exclusiva.
Hatco garantiza que los siguientes componentes del producto
están libres de defectos en materiales a partir de la fecha de
compra (sujetos a las condiciones precedentes) durante los
períodos de tiempo y las condiciones que figuran a continuación:
a) Garantía de Dos (2) Años para las Piezas:
Componentes de la Tostadora de Correa Transportadora
(recubiertos de metal)
Resistencias de los Cajones Térmicos
(recubiertos de metal)
Cajones Térmicos, rodillos del cajón y piezas deslizantes
Elementos calentadores de banda (recubiertos de metal)
Resistencias del vitrinas expositoras
(calor por aire recubierto de metal)
Resistencias de vitrinas mantenedoras
(calor por aire recubierto de metal)
Elementos de embalse acalorados — Series HW y HWB
(recubiertos de metal)
b) Garantía de Cinco (5) Años para las Piezas:
Depósitos 3DS y FR
c) Garantía de Diez (10) Años para las Piezas:
Calentadores de agua eléctricos de refuerzo
Calentadores de agua a gas de refuerzo
d) Garantía de Noventa (90) Días para las Piezas:
Piezas de Repuesto
LAS GARANTÍAS ANTERIORES SON EXCLUSIVAS Y
SUSTITUYEN A CUALQUIER OTRA GARANTÍA, EXPRESA O
IMPLÍCITA, INCLUYENDO PERO SIN LIMITARSE A
CUALQUIER GARANTÍA IMPLÍCITA DE COMERCIABILIDAD O
ADECUACIÓN PARA UN FIN PARTICULAR O PATENTE U
OTRA INFRACCIÓN DEL DERECHO DE PROPIEDAD
INTELECTUAL. Sin limitar la generalidad de lo anterior, TALES
GARANTÍAS NO CUBREN: Bombillas incandescentes revestidas,
bombillas fluorescentes, bombillas para lámparas de calor,
bombillas halógenas revestidas, bombillas halógenas para
lámparas de calor, bombillas de xenón, tubos de LED,
componentes de vidrio y fusibles; mal funcionamiento del Producto
en los calentadores de agua, en los intercambiadores de calor de
tubos aleteados o en cualquier otro equipo de calefacción de agua
causado por acumulación de cal, acumulación de sedimentos,
productos químicos o congelación; o por el uso indebido,
manipulación, aplicación indebida, instalación deficiente o
suministro de tensión eléctrica inadecuado al Producto.
2. LIMITACIÓN DE REMEDIOS Y DAÑOS
La responsabilidad de Hatco y los derechos del Comprador
descritos a continuación se limitarán exclusivamente al
reemplazo de la pieza o del Producto empleando, a discreción de
Hatco, piezas nuevas o restauradas o un Producto nuevo o
restaurado por Hatco o uno de sus centros de servicio
autorizados siempre que la reclamación se haya efectuado
dentro de los plazos de garantía mencionados anteriormente.
Hatco se reserva el derecho a aceptar o rechazar de forma total
o parcial cualquier reclamación efectuada. A efectos de la
presente Garantía Limitada, se entenderá por "restaurado/a” la
pieza o el Producto que haya recuperado sus especificaciones
originales tras haber sido reparado/a por Hatco o por uno de sus
centros de servicio autorizados.Hatco no aceptará la devolución
de ningún producto sin la previa aprobación de Hatco por escrito,
y en todas las devoluciones aprobadas el comprador correrá con
los gastos. HATCO NO SERÁ RESPONSABLE, BAJO
NINGUNA CIRCUNSTANCIA, DE DAÑOS INDIRECTOS O
INCIDENTALES, INCLUYENDO PERO SIN LIMITARSE A
COSTOS DE MANO DE OBRA O PÉRDIDA DE INGRESOS
QUE RESULTEN DEL USO O DE LA INCAPACIDAD DE USAR
EL PRODUCTO O DE QUE EL PRODUCTO SE INCORPORE
A OTRO PRODUCTO O MERCANCÍA O SEA UN
COMPONENTE DE DICHO
PRODUCTO.
INFORMACIÓN DEL SERVICIO DE GARANTÍA
El periodo de garantía de los Recipientes Termicos HEATMAX
de Hatco es de un año a partir de la fecha de compra o de
dieciocho meses a partir de la fecha de envío, lo que tenga
lugar primero.
Si tiene algún problema con uno de nuestros Recipientes
Termicos durante la vigencia de la garantía, siga los pasos
descritos a continuación:
Póngase en Contacto con un Distribuidor Local de
Hatco
Al comunicarse con un distribuidor de Hatco para recibir
asistencia con el servicio, proporcione al distribuidor la siguiente
información para asegurar un pronto procesamiento:
• Modelo de la Unidad
• Número de Serie (situado en la parte posterior de la unidad)
• Problema Específico con la Unidad
• Fecha de Compra
• Nombre de su Negocio
• Dirección de Envío
• Nombre de Contacto y Número de Teléfono
El distribuidor de Hatco hará lo siguiente:
• Proporcionará piezas de repuesto, según sea requerido
• Presentará un reclamo bajo la garantía a Hatco para su
procesamiento
Problemas no relacionados con la garantía
Si tiene un problema no relacionado con la garantía y que
requiere asistencia, póngase en contacto con el Centro de
Servicio Autorizado por Hatco más cercano. Para localizar el
Centro de Servicio más próximo:
• Visite el sitio web de Hatco: www.hatcocorp.com,
seleccione el menú desplegable “Recursos” (Resources) y
haga clic en “Localizar un Centro de Servicio/Distribuidor”
(Find Service Agent/Distributor)
• Llame al número de teléfono del Servicio de Atención al
Cliente de Hatco: 414-671-6350
• Mande un e-mail al Servicio de Atención al Cliente de
Hatco a la siguiente dirección:
partsandservice@hatcocorp.com
34
Nº de formulario. RHWCEM-0816
Page 35

AVIS
ATTENTION
AVERTISSEMENT
Mise au rebut correcte de ce produit
Cette indication signale que ce produit et ses composants
électroniques ne doivent pas être jetés avec les autres
déchets commerciaux. Dans le but d'éviter tout danger pour
l'environnement ou la santé humaine susceptible d'être causé
par la mise au rebut non contrôlée des déchets, recyclez de
manière responsable afin de promouvoir la réutilisation
durable des ressources matérielles. Contactez le vendeur du
produit pour mettre au rebut ce produit et ses composants
électroniques afin de recycler de manière écologique.
SOMMAIRE
Informations Importantes pour le Propriétaire ................35
Introduction.........................................................................35
Consignes de Sécurité Importantes .................................36
Description du Modèle .......................................................37
Désignation du Modèle ......................................................38
Caractéristiques Techniques.............................................38
Configuration des Fiches ...................................................38
Tableau des valeurs nominales électriques.......................38
Dimensions ........................................................................39
Installation...........................................................................40
Généralités.........................................................................40
INFORMATIONS IMPORTANTES POUR LE PROPRIÉTAIRE
Noter le numéro de modèle, le numéro de série (L'étiquette des
caractéristiques techniques se situe au dos de l'appareil), le
voltage et la date d’achat de votre appareil ci-dessous. Veuillez
avoir cette information à portée de la main si vous appelez
Hatco pour assistance.
Modèle No. ______________________________________
Numéro de série __________________________________
Voltage __________________________________________
Date d’achat ______________________________________
Enregistrez Votre Appareil!
Remplissez la garantie en ligne pour éviter les retards pour
faire jouer la garantie. Accédez au site Web Hatco
www.hatcocorp.com, sélectionnez le menu déroulant Parts
& Service, puis cliquez sur Warranty Registration.
Installation d'un Modèle Encastré ......................................40
Mode d'emploi.....................................................................42
Généralités.........................................................................42
Maintenance ........................................................................42
Généralités.........................................................................42
Nettoyage...........................................................................43
Options et accessoires ......................................................43
Guide de Dépannage ..........................................................44
Garantie Limitée Internationale .........................................45
Informations de Service .....................................................45
Horaires
ouvrables : 7h00 à 17h00
Heure du Centre des États-Unis (CST)
(Horaires d’été : juin à septembre—
7h00 à 17h00 CST du lundi au jeudi
7h00 à 16h00 CST le vendredi)
Téléphone : +1-414-671-6350
Courriel: partsandservice@hatcocorp.com
Des renseignements supplémentaires sont disponibles sur
notre site Web à www.hatcocorp.com.
Le HEATMAX Heated Wells de chez Hatco est spécialement
conçu pour cuire ou chauffer une grande variété d'aliments tels
que la soupe, le curry, les sauces au jus ainsi qu'une variété de
garnitures. Pour les éléments RHW, les produits à cuire ou
réchauffer sont placés dans une poêle de taille standard placée
au dessus du Heating Well. La température de l'élément
chauffant est surveillée par un contrôleur électronique pour des
résultats optimums. La chaleur est repartie uniformément à
travers l'appareil afin de garder les aliments aux températures
désirées, et le design isolant en acier inoxydable permet un
entretien facile ainsi qu'une performance durable.
Tous les appareils sont équipés d'un tableau de contrôle
comprenant trois consignes de températures de 50°C (122°F)
a 100°C (212°F), et d'un mode d'économie d'énergie qui
économise l'électricité pendant les heures creuses.
Le Heated Wells de chez Hatco est conçu avec qualité afin de
satisfaire les demandes des exploitations du service
alimentaire, et de fournir des années de performance sans
problèmes. Les éléments de réchaud sont garantis un an
contre la casse et le surmenage électrique.
Le HEATMAX Heated Wells de chez Hatco est un produit issu
d'une recherche intensive et de tests sur terrain. Les matériaux
utilisés ont été sélectionnés pour une longévité maximum, une
présentation attrayante ainsi qu'une performance optimum.
Chaque appareil est entièrement inspecté et testé avant
livraison.
Formulaire n° RHWCEM-0816
INTRODUCTION
Ce manuel fournit les instructions d'installation, de sécurité et
de fonctionnement du Heated Wells. Nous vous recommandons
de lire toutes les instructions d'installation, de sécurité et de
fonctionnement avant l'installation et la mise en marche de votre
Heated Wells.
Les consignes de sécurité qui apparaissent dans ce manuel sont
identifiées par les mots indicateurs suivants :
AVERTISSEMENT indique une situation dangereuse qui, si
elle n’est pas évitée, peut provoquer la mort ou des
blessures graves.
ATTENTION indique une situation dangereuse qui, si elle
n’est pas évitée, peut provoquer des blessures légères ou
moyennes.
AVIS est utilisé pour des questions sans rapport avec des
blessures corporelles.
35
Page 36

CONSIGNES DE SÉCURITÉ IMPORTANTES
AVIS
ATTENTION
AVERTISSEMENT
AVERTISSEMENT
Lisez l'information de securite importante suivante avant d'utiliser cet équipement pour éviter
des dommages ou la mort sérieux et pour éviter d'endommager l'équipement ou la propriété.
DANGER DE DÉCHARGE ÉLECTRIQUE :
• Brancher l’appareil sur une prise de courant avec terre
de tension, de format et de configuration des broches
corrects. Si la fiche et la prise ne se correspondent pas,
s’adresser à un électricien qualifié pour déterminer et
installer une prise de courant de format et de tension
corrects.
• Mettre hors tension en utilisant l'interrupteur,
débrancher le cordon d'alimentation et laisser l'unité
refroidir avant d'effectuer tout nettoyage, tout réglage
ou tout entretien.
• NE PAS immerger l’appareil ni le saturer d’eau.
L’appareil n’est pas étanche à l’eau. Ne pas le faire
fonctionner s’il a été immergé ou saturé d’eau.
• L’appareil n’est pas à l’épreuve des intempéries. Placer
l’appareil à l’intérieur à une température ambiante de
21°C minimum.
•Ne pas nettoyer à la vapeur ni utiliser trop d’eau sur l’appareil.
• Cet appareil n’est pas étanche aux jets. Ne pas utiliser
de jet sous pression pour nettoyer l’appareil.
• Ne pas tirer l’appareil par son cordon électrique.
• Ne pas utiliser l’appareil si le cordon est endommagé
ou usé.
• Ne pas tenter de réparer ni de changer un cordon
électrique endommagé. Ce cordon doit être changé par
Hatco, par un réparateur Hatco agréé ou par une
personnes de qualifications comparables.
• Ne pas utiliser l'appareil pour y faire fondre ou y mettre
des glaçons. Risque de condensation qui posera un
danger électrique et causera des blessures et/ou
endommagera l'appareil. Les dégâts causés par la
condensation ne sont pas couverts par la garantie.
• Pour les réparations, utiliser exclusivement des pièces
de rechange Hatco d’origine. Utilisez des pièces
détachées Hatco authentiques sous peine d'annuler
toutes les garanties et d'exposer l’utilisateur à des
tensions électriques dangereuses pouvant entraîner
une électrocution ou des brûlures. Les pièces de
rechange Hatco d’origine sont conçues pour
fonctionner sans danger dans les environnements
dans lesquels elles sont utilisées. Certaines pièces de
rechange génériques ou de second marché ne
présentent pas les caractéristiques leur permettant de
fonctionner sans danger dans la matériel Hatco.
DANGER D’INCENDIE :
• Placer l’appareil à un minimum de 25 mm des parois et
matières combustibles. Si une distance sûre n’est pas
maintenue, la chaleur peut provoquer une combustion
ou une altération de couleur.
• Ne pas utiliser de produits chimiques puissants tels que
de l'eau de Javel (ou des nettoyants contenant de l'eau de
Javel), des nettoyants pour four ou des solutions
nettoyantes inflammables pour nettoyer cet appareil.
Cet appareil ne contient aucune pièce réparable par
l’utilisateur. Si cet appareil doit être réparé, contacter un
réparateur Hatco agréé ou le Service après-vente Hatco au
+1-414-671-6350.
Assurez-vous que tous les opérateurs ont été formés à
l'utilisation sûre et correcte de l'appareil.
Cet appareil ne doit pas être utilisé par des enfants ou des
personnes avec des capacités physiques, sensorielles ou
mentales diminuées. Assurez-vous que les enfants sont
bien surveillés et tenez-les à l'écart de l'appareil.
DANGER DE BRÛLURE :
• Certaines surfaces extérieures de l’appareil deviennent
chaudes. Toucher ces zones de l’appareil avec précaution.
• L'eau chaude dans l'appareil pourra causer des brûlures.
Laisser refroidir l'appareil avant de le vider ou de le nettoyer.
Placer l’appareil sur un plan de travail de hauteur correcte
à un endroit qui convient pour son utilisation. Le support
doit être de niveau pour éviter toute chute accidentelle du
grille-pain ou de son contenu et suffisamment solide pour
résister au poids de l’appareil et de son contenu.
Ne pas déplacer l'appareil quand il contient des aliments.
L'éteindre, enlever les aliments et laisser complètement
refroidir avant de déplacer ou nettoyer.
Les huiles de fabrication standard et approuvées pourront
fumer pendant 30 minutes après l'allumage initial. C'est un
problème temporaire. Utiliser l'appareil à vide jusqu'à
dissipation de la fumée.
Utiliser seulement des nettoyants non abrasifs et des
chiffons doux. Les chiffons et nettoyant abrasifs pourraient
érafler la finition de l'unité, entachant son apparence et la
rendant susceptible à l'accumulation de saleté.
Ne pas poser l’appareil sur le côté du panneau de
commande sous peine de l’endommager.
Les panneaux de commande montés à distance doivent
être au minimum à 152 mm (6 “) de l'appareil (1 420 mm
[56“] maximum). Toute installation plus proche risque
d'abîmer le système électrique du panneau de commande
sous l'effet de la chaleur.
Ne pas utiliser l'appareil à un endroit exposé à des
températures excessives ou de la graisse de grils,
friteuses, etc. Les températures excessives risquent
d'abîmer l'appareil.
L'unité est conçue et recommandée pour fonctionner
encastrée ou posée sur un comptoir en métal. La garantie
Hatco ne couvre pas les dommages faits au comptoir. Pour
les autres surfaces, vérifier auprès de leurs fabricants que
le matériau peut supporter de façon durable des
températures atteignant 100 °C (212 °F).
Ne pas utiliser de force excessive pour serrer les vis sur
les modèles encastrés. Risque d'endommagement de
l'appareil et/ou du comptoir.
Ne pas faire fonctionner l'unité à vide (sans nourriture ni
eau dans le puits). L'unité pourrait être endommagée.
36
Formulaire n° RHWCEM-0816
Page 37

DESCRIPTION DU MODÈLE
Tous les modèles
Tous les appareils HEATMAX Heated Well sont fiables et
polyvalents. En plus de garder les aliments au chaud avant
service comme le fait le Heated Well, les aliments peuvent
aussi être cuits à la vapeur grâce a un kit optionnel à adapter.
RHW-1
Le RHW-1 est équipé d'un seul élément de chauffage qui garde
les aliments au chaud ou permet la cuisson de soupes ou de
sauces. L'appareil est fourni avec un couvercle à charnière et
un bac rond de 10 litres (11 qt) en acier inoxydable
spécialement conçus pour celui-ci.
Modèle RHW-1
RHW-1B
Le RHW-1B est équipé comme le RHW-1, la différence étant
que ce modèle est un appareil d'assemblage équipé d'un
tableau de contrôle a distance.
RCTHW-1
Le modèle RCTHW-1 est équipé de trois éléments chauffants
et d'un orifice de vidange avant. Il peut contenir un bac de taille
standard.
Modèle RCTHW-1
RCTHW-1B
Le RCTHW-1B est équipé de manière identique au RCTHW-1;
cependant, c'est un modèle encastré muni d'un panneau de
commande intégré à distance et d'un système de vidange
inférieur.
Modèle RHW-1B
RHW-2
Le modèle RHW-2 est équipé de deux éléments chauffants à
commande individuelle pour garder la nourriture au chaud ou
cuisiner des soupes ou des sauces. L'appareil est fourni avec
deux couvercles à charnière et bacs ronds de 10 litres (11 qt)
en acier inoxydable spécialement conçus pour celui-ci.
Modèle RHW-2
Formulaire n° RHWCEM-0816
Modèle RCTHW-1B
37
Page 38

DÉSIGNATION DU MODÈLE
AVERTISSEMENT
CEE 7/7 Schuko
BS-1363
AS 3112
R H W - 1 B
R = Rond
RCT = Rectangulaire
Compartiment Chauffant
B = Intègrè avec Tèlècommande
Aucun caractère = Comptoir
1 = Modèle Simple
2 = Modèle Double
CARACTÉRISTIQUES TECHNIQUES
Configuration des fiches
Les appareils sont livrés avec un cordon électrique avec fiche.
Différentes fiches sont fournies selon les applications.
DANGER DE DÉCHARGE ÉLECTRIQU : Brancher l’appareil
sur une prise de courant avec terre de tension, de format
et de configuration des broches corrects. Si la fiche et la
prise ne se correspondent pas, s’adresser à un électricien
qualifié pour déterminer et installer une prise de courant de
format et de tension corrects.
NOTA : L'étiquette des caractéristiques techniques se situe au
dos l'appareil. Se reporter à l'étiquette du numéro de
série et des données électriques de l'appareil.
Configuration des fiches
NOTA: Prise non fournie par Hatco.
Tableau des valeurs nominales électriques
Modèle Tension Intensité Amps de Fiches d’embarquement
RHW-1 230 (CE) 1250 5.4 BS-1363, CEE 7/7 Schuko, AS 3112 7 kg (15 lbs.)
RHW-1B 230 (CE) 1250 5.4 BS-1363, CEE 7/7 Schuko, AS 3112 8 kg (18 lbs.)
RHW-2 230 (CE) 2500 10.9 BS-1363, CEE 7/7 Schuko, AS 3112 12 kg (26 lbs.)
RCTHW-1 230 (CE) 3000 13 BS-1363, CEE 7/7 Schuko, AS 3112 12 kg (26 lbs.)
RCTHW-1B 230 (CE) 3000 13 BS-1363, CEE 7/7 Schuko, AS 3112 13 kg (29 lbs.)
NOTA: Le poids d'embarquement comprend l'emballage.
Configuration Poids
38
Formulaire n° RHWCEM-0816
Page 39

CARACTÉRISTIQUES TECHNIQUES
POWER
FAULT
100°C
70°C-90°C
50°C-70°C
TEMP
ON/OFF
o
_
FULL
POWER
ENERGY
SAVE
MODE
~
~
~
~
POWER
FAULT
100°C
70°C-90°C
50°C-70°C
TEMP
ON/OFF
o
_
FULL
POWER
ENERGY
SAVE
MODE
~
~
~
~
HEATMAX
HEATED WELL
A
A
D
E
RCTHW-1
RHW-1 RHW-1B RHW-2
RCTHW-1B
C
C
B B
B
E
D D
E
B B
C
A
C
A
C
A
Dimensions
Largeur Profondeur Hauteur Empattement Empattement
Modèle (A) (B) (C) Largeur (D) Profondeur (E)
RHW-1 359 mm 330 mm 355 mm 179 mm 224 mm
(14-1/8") (13") (13-9/16") (7") (8-7/8")
RHW-1B 359 mm 330 mm 341 mm N/A N/A
(14-1/8") (13") (13-7/16")
RHW-2 630 mm 330 mm 355 mm 389 mm 249 mm
(24-3/4") (13") (14") (15-3/8") (9-7/8")
RCTHW-1 368 mm 611 mm 283 mm 347 mm 535 mm
(14-1/2") (24-1/16") (11-3/16") (14") (21-7/16")
RCTHW-1B 368 mm 582 mm 226 mm N/A N/A
(14-1/2") (22-15/16")
(8-15/16")
Formulaire n° RHWCEM-0816
39
Page 40

INSTALLATION
AVIS
ATTENTION
AVERTISSEMENT
AVIS
Vis du panneau
inférieur
Tuyau
d’ècoulement
Fixation du Tuyau
Fixation du Tuyau
Ajustage
Panneau Arrière
Valve d’ècoulement
Généralités
Les compartiments chauffants HEATMAX sont expédiés de
l'usine avec la plupart des composants assemblés et prêts à
l'emploi. Faire attention lors du déballage pour éviter
d’endommager l’appareil et ses composants.
DANGER DE DÉCHARGE ÉLECTRIQUE : L’appareil n’est
pas à l’épreuve des intempéries. Placer l’appareil à
l’intérieur à une température ambiante de 21°C minimum.
DANGER D’INCENDIE : Placer l’appareil à un minimum de
25 mm des parois et matières combustibles. Si une
distance sûre n’est pas maintenue, la chaleur peut
provoquer une combustion ou une altération de couleur.
Placer l’appareil sur un plan de travail de hauteur correcte
à un endroit qui convient pour son utilisation. Le support
doit être de niveau pour éviter toute chute accidentelle du
grille-pain ou de son contenu et suffisamment solide pour
résister au poids de l’appareil et de son contenu.
Ne pas déplacer l'appareil quand il contient des aliments.
L'éteindre, enlever les aliments et laisser complètement
refroidir avant de déplacer ou nettoyer.
Utiliser uniquement des produits nettoyants non abrasifs.
Les produits nettoyants abrasifs peuvent rayer la finition
de l’appareil, ce qui altère son apparence et le rend plus
susceptible d’accumuler la saleté.
Ne pas utiliser l'appareil à un endroit exposé à des
températures excessives ou de la graisse de grils,
friteuses, etc. Les températures excessives risquent
d'abîmer l'appareil.
1. Retirer l'appareil de sa boîte.
2. Retirer la pochette d'informations.
3. Retirer le ruban et le film de protection de toutes les
4. Si l'appareil est un modèle sur comptoir, le placer à
5. Si l'appareil est un modèle encastré, effectuer la procédure
surfaces de l'appareil.
l'endroit souhaité.
• Placer l’appareil à un endroit où la température
ambiante est constante et de 21 °C (70 °F) minimum.
Éviter les endroits susceptibles d’activer les
mouvements ou les courants d’air (proximité des
ventilateurs ou hottes aspirantes et conduites de
climatisation).
• S’assurer que l’appareil est sur un plan de travail de
hauteur correcte à un endroit qui convient pour son
utilisation.
• S’assurer que le plan de travail est de niveau et
suffisamment solide pour résister au poids de l’appareil
et des produits alimentaires.
• Vérifier que tous les pieds sous l’appareil reposent
solidement sur le plan de travail.
« Installation d'un modèle encastré » dans cette section.
Installation d'un Modèle Encastré
Procéder comme suit pour installer un modèle encastré dans un
comptoir. Si l'appareil est un modèle encastré rectangulaire,
effectuer tout d'abord la procédure « Installation de l'ensemble
de vidange ».
L'unité est conçue et recommandée pour fonctionner
encastrée ou posée sur un comptoir en métal. La garantie
Hatco ne couvre pas les dommages faits au comptoir. Pour
les autres surfaces, vérifier auprès de leurs fabricants que
le matériau peut supporter de façon durable des
températures atteignant 100 °C (212 °F).
Installation de l'ens Emble de Vidange
Avant d'installer un modèle rectangulaire dans le comptoir,
procéder comme suit pour installer l'ensemble de vidange.
1. Tournez l'appareil avec précaution et couchez-le sur le
dessus de l'appareil.
2. Enlever les vis et le panneau arrière.
3. Connectez le bout du tuyau d'écoulement à la fixation
d'ajustement fournie.
4. Orienter le tuyau dans le trou du le tableau arrière et
réinstaller le tableau sur l'appareil en utilisant les vis
d'origine.
5. Connecter l'autre bout du tuyau d'écoulement a la valve
d'écoulement en utilisant la fixation fournie.
6. Effectuer la procédure « Installation d'un modèle encastré
» dans cette section. Apres avoir installé l'appareil sur le
comptoir, vous pourrez connecter la valve d'écoulement a
la canalisation extérieure.
Installation de l'ensemble de vidange
(modèles rectangulaires intégré seulement)
40
Formulaire n° RHWCEM-0816
Page 41

AVIS
ScrewVis
Bride
supérieure
Comptoir
L Bracket
L-Braquets
Découpe du
Comptoir
Découpe Pour
Boîtier de Commande
ScrewPanneau avant
du boîtier
de commande
Couvercle
Avant
Boîtier de
Commande
Bride de Montage
Vis du couvercle avant
Installation de l'appareil
AVIS
550 mm
(21-11/16″)
344 mm
(13-9/16″)
RCTHW-1B
305 mm
12″
RHW-1B
132 mm
(5-1/8″)
144 mm
(5-9/16″)
65 mm
(2-9/16″)
33 mm
(1-5/16″)
154 mm
(6″)
Ø 4,5 mm
(3/16″)
1. Découper dans le comptoir l'ouverture appropriée pour
l'appareil installé (voir ci dessous).
Dimensions des Découpes de Comptoir
NOTA: Le comptoir doit être horizontal pour garantir la vidange
correcte du compartiment rectangulaire.
INSTALLATION
Installation de l'appareil
4. Assemblez les L-braquets sous
l'appareil.
5. Serrez les vis des L-braquets
jusqu'à ce que les collerettes du
dessus s'aplatissent sur le
comptoir.
Les panneaux de commande montés à distance doivent
être au minimum à 152 mm (6 “) de l'appareil (1 420 mm
[56“] maximum). Toute installation plus proche risque
d'abîmer le système électrique du panneau de commande
sous l'effet de la chaleur.
Le boîtier de commande à distance doit être installé en
dehors de la zone de chauffe. Le positionnement du boîtier
de commande à l'intérieur de la zone chauffée entraînera la
surchauffe, le dysfonctionnement et la panne des
commandes.
2. Découper l'ouverture appropriée pour le boîtier de
commande dans une surface verticale à au moins 152 mm
(6″) de l'appareil, mais pas à plus de 1 420 mm (56″).
Ne pas utiliser de force excessive pour
serrer les vis sur les modèles
encastrés. Risque d'endommagement
de l'appareil et/ou du comptoir.
Installation du Boîtier de Commande Monté à
Distance
1. Installer le boîtier de commande dans sa découpe :
a. Enfiler une des brides de montage sur le boîtier de
commande par la découpe. Basculez l'autre rebord et
faites-le glisser dans la découpe.
b. Aligner les trous de montage des brides de montage sur
ceux des vis de la surface d'installation, et fixer le boîtier
de commande à la surface par deux vis M4 (non fournies).
c. Installer le couvercle avant sur le boîtier de commande
à l'aide des quatre vis du couvercle.
NOTA: Le cordon électrique entre l'appareil et le boîtier de
3. Enlevez les quatre vis sécurisant le panneau avant du
Formulaire n° RHWCEM-0816
Dimensions des Découpes du Boîtier de Commande
commande mesure 1 420 mm (56″) de longueur.
boitier de commande. Enlevez le panneau avant et guidez
le boîtier de commande et les fils électrique à travers la
découpe du comptoir, puis appuyez pour que le dispositif
s'enclenche dans la découpe.
Installation du Boîtier de Commande Monté à Distance
2. Brancher le cordon d'alimentation sur une prise électrique
correctement mise à la terre du type, de la taille et de la
tension corrects. Pour des détails, voir la section
CARACTÉRISTIQUES TECHNIQUE.
41
Page 42

AVERTISSEMENT
AVIS
ATTENTION
Bouton
TEMP
Indicateur de
Puissance
ON/OFF
Interrupteur
Bouton
MODE
Indicateur de
Faille
MODE D'EMPLOI
AVERTISSEMENT
AVERTISSEMENT
Généralités
Procéder comme suit pour utiliser les compartiments chauffants
HEATMAX.
Lire tous les messages de sécurité de la section
Consignes de sécurité importantes avant d’utiliser ce
matériel.
Ne pas faire fonctionner l'unité à vide (sans nourriture ni
eau dans le puits). L'unité pourrait être endommagée.
NOTA: Pour un transfert de chaleur adapté, faites fonctionner
les séries RHW (Round Heated Well), avec la poêle
spécialement fournie. Cette poêle est creuse afin de
correspondre a la forme de l'élément chauffant.
1. Brancher l’appareil sur une prise électrique correctement
mise à la terre du type, de la taille et de la tension corrects.
Voir des détails à la section CARACTÉRISTIQUES
TECHNIQUES.
• Le voyant s'allume en rouge à la mise sous tension de
l'appareil.
2. Placer un récipient/un faitout rempli d'aliments ou d'eau
dans l'appareil.
NOTA: Ne pas utiliser l'appareil sans récipient à aliments ou
récipient vide/sec. L'appareil surchauffera et passera
en mode Erreur (FAULT).
3. Appuyer sur le bouton ON/OFF pour allumer l'appareil.
• Le voyant POWER s'allume en vert lorsqu'il est sous
tension et chauffe.
NOTA: l'indicateur FAULT sera en marche et l'appareil
sonnera lorsqu'il sera en surchauffe, ou si le détecteur
de température court circuit. Lorsque cela se produit
l'alimentation est automatiquement coupée jusqu'à ce
que la température retourne à la normale ou jusqu'à
ce que le détecteur de température fonctionne
normalement.
DANGER DE BRÛLURE : Certaines surfaces extérieures de
l’appareil deviennent chaudes. Toucher ces zones de
l’appareil avec précaution.
4. Appuyer sur le bouton TEMP pour faire défiler les
températures et en choisir une. Le voyant au-dessus du
réglage de température choisi s'allume. Trois réglages de
température sont proposés :
• 90–100°C (194–212°F) — Réchauffage à la vapeur et
remise en température
• 70–90°C (158–194°F) — Chauffage/maintien de la
nourriture
• 50–70°C (122–158°F) — Chauffage/maintien de la
nourriture
5. Appuyer sur le bouton MODE pour faire défiler les modes
de chauffe et en choisir un. Le voyant au-dessus du mode
choisi s'allume. Deux modes de chauffe sont proposés :
• Mode FULL POWER — L'appareil fonctionne à
puissance maximale.
• Mode LOW POWER — L'appareil fonctionne à 50 % de
sa puissance maximale pour réchauffer les aliments et
éviter des les brûler.
MAINTENANCE
Généralités
Les compartiments chauffants HEATMAX sont conçus pour
une durabilité et une performance maximum et un minimum
d'entretien.
DANGER DE DÉCHARGE ÉLECTRIQUE :
• Mettre hors tension en utilisant l'interrupteur,
débrancher le cordon d'alimentation et laisser l'unité
refroidir avant d'effectuer tout nettoyage, tout réglage
ou tout entretien.
• NE PAS immerger l’appareil ni le saturer d’eau.
L’appareil n’est pas étanche à l’eau. Ne pas le faire
fonctionner s’il a été immergé ou saturé d’eau.
Panneau de commande
DANGER DE DÉCHARGE ÉLECTRIQUE :
• Ne pas nettoyer à la vapeur ni utiliser trop d’eau sur
l’appareil.
• Cet appareil n’est pas étanche aux jets. Ne pas utiliser
de jet sous pression pour nettoyer l’appareil.
42
Formulaire n° RHWCEM-0816
Page 43

DANGER DE DÉCHARGE ÉLECTRIQUE :
AVERTISSEMENT
AVIS
RHW-LID
RHW-11QT-LID-HG
RHW-11QT-POT
RHW-SP
RCTHW-Basket
RCTHW-1/3SP
RCTHW-SW
RCTHW-SK
RCTHW-2/3SP
RCTHW-SP
• Pour les réparations, utiliser exclusivement des pièces
de rechange Hatco d’origine. Utilisez des pièces
détachées Hatco authentiques sous peine d'annuler
toutes les garanties et d'exposer l’utilisateur à des
tensions électriques dangereuses pouvant entraîner
une électrocution ou des brûlures. Les pièces de
rechange Hatco d’origine sont conçues pour
fonctionner sans danger dans les environnements
dans lesquels elles sont utilisées. Certaines pièces de
rechange génériques ou de second marché ne
présentent pas les caractéristiques leur permettant de
fonctionner sans danger dans la matériel Hatco.
DANGER D’INCENDIE: Ne pas utiliser de produits
chimiques puissants tels que de l'eau de Javel (ou des
nettoyants contenant de l'eau de Javel), des nettoyants
pour four ou des solutions nettoyantes inflammables pour
nettoyer cet appareil.
Cet appareil ne contient aucune pièce réparable par
l’utilisateur. Si cet appareil doit être réparé, contacter un
réparateur Hatco agréé ou le Service après-vente Hatco au
+1 414-671-6350.
MAINTENANCE
Nettoyage
Pour préserver la finition de l'appareil et maintenir la
performance, il est recommandé de nettoyer tous les jours
l'appareil.
Utiliser seulement des nettoyants non abrasifs et des
chiffons doux. Les chiffons et nettoyant abrasifs pourraient
érafler la finition de l'unité, entachant son apparence et la
rendant susceptible à l'accumulation de saleté.
1. Pour éteindre l'appareil, débrancher le cordon
d'alimentation et laisser refroidir.
2. Enlever les récipients et autres accessoires pour les
nettoyer correctement au lave-vaisselle ou dans l'évier.
3. Vider l'eau du compartiment.
4. Essuyer toutes les surfaces métalliques à l'aide d'un chiffon
doux humide. Les taches tenaces s'enlèvent avec un bon
nettoyant non abrasif. Les zones difficiles d'accès doivent
être nettoyées avec une petite brosse et du savon doux.
5. Essuyer l'unité entière à l'aide d'un chiffon sec non abrasif.
NOTA: l'eau dure formera un dépôt au-dessus des éléments
RCTHW. Pour dissoudre ce dépôt, utiliser une solution
constituée de deux volumes de vinaigre blanc pour cinq
volumes d'eau. Laisser la solution agir pendant au
moins une heure (toute la nuit en cas de dépôt
important), récurer le compartiment avec une éponge à
récurer en plastique, vidanger la solution puis rincer le
compartiment avec de l'eau propre. Ne pas permettre
au dépôt de s'accumuler. Cela pourrait entraîner une
surchauffe des éléments de chauffage.
RHW-SP ......................Plaque vapeur rondes à six paniers
RHW-11QT-LID-HG......Couvercle rond pour bac de 10 litres
RHW-11QT-POT ..........Bac rond de 10 litres (11 qt.) —
RHW-10QT-LID ............Couvercle rond pour bac de 10 litres
RCTHW-SW ..............Adaptateur de chauffe-sauce
RCTHW-SK ..............Adaptateur de soupière de 6,6 l (7 qt.)
RCTHW-2/3SP ..........Plaque vapeur à 2 paniers avec
RCTHW-1/3SP ..........Plaque vapeur à 4 paniers avec
RCTHW-SP ..............Plaque vapeur à 6 paniers
RCTHW-Basket ........Panier à nouilles
Formulaire n° RHWCEM-0816
(11 qt) avec bouton en plastique
221 x 203 mm (8-11/16″ x 8″)
(11 qt.) avec bouton en plastique
Accessoires RHW
découpe pour plat Gastronorm 2/3
découpe pour plat Gastronorm 1/3
OPTIONS ET ACCESSOIRES
RCTHW-PC ..............Cuiseur de pâtes (non illustré)
Accessoires RCTHW
43
Page 44

AVERTISSEMENT
AVERTISSEMENT
GUIDE DE DÉPANNAGE
La réparation de cet appareil doit être confiée
exclusivement à du personnel qualifié. Les réparations par
des personnes non qualifiées peuvent provoquer des
décharges électriques et des brûlures.
DANGER DE DÉCHARGE ÉLECTRIQUE: Mettre hors
tension en utilisant l'interrupteur, débrancher le cordon
d'alimentation et laisser l'unité refroidir avant d'effectuer
tout nettoyage, tout réglage ou tout entretien.
Symptôme Cause Probable Solution
Appareil pas assez
chaud.
Appareil trop chaud. Point de consigne de température de base trop
Pas de chaleur. Appareil hors tension. Appuyer sur le bouton ON/OFF pour allumer l'appareil. Suivre
Point de consigne de température de la base
trop bas.
Mauvais pot installé dans l'appareil (modèles
RHW).
L'élément chauffant ne fonctionne pas. Contactez votre agent de maintenance agréé ou Hatco pour
Le thermostat ne marche pas correctement. Contactez votre agent de maintenance agréé ou Hatco pour
Tension fournie incorrecte. Vérifier si la tension correcte est fournie à l'appareil. Une basse
élevé.
Contrôle de température ne fonctionne pas
correctement.
Tension fournie est incorrecte. Vérifier si la tension correcte est fournie à l'appareil. Une haute
Le coupe-circuit a disjoncté. Réarmer le coupe-circuit. Si le coupe-circuit continue à se
Régulateur de température numérique
défectueux.
Élément chauffant de la base grillé. Contactez votre agent de maintenance agréé ou Hatco pour
Interrupteur de sécurité déclenché. S'assurer que le compartiment est propre et rempli d'eau
Utiliser le bouton TEMP pour monter la température.
Utilisez le bouton « MODE » pour passer du mode
« LOW POWER » (faible puissance) au mode
« FULL POWER » (pleine puissance).
Utiliser seulement les pots ronds Hatco spécialement conçus
pour les modèles RHW. Les autres pots risquent de ne pas
procurer le contact adéquat entre l'appareil et le pot.
assistance.
assistance.
tension d'alimentation engendrera une chauffe insuffisante.
Utiliser le bouton TEMP pour baisser la température.
Utilisez le bouton « MODE » pour passer du mode
« FULL POWER » (pleine puissance) au mode
« LOW POWER » (faible puissance).
Contactez votre agent de maintenance agréé ou Hatco pour
assistance.
tension d'alimentation engendrera la surchauffe et
l'endommagement possible de l'appareil.
la procédure à la section MODE D'EMPLOI.
déclencher, contacter un agent technique agréé ou Hatco pour
assistance.
Contactez votre agent de maintenance agréé ou Hatco pour
assistance.
assistance.
jusqu'au niveau adéquat. Un dépôt très important et/ou le
fonctionnement de l'unité sans eau peut entraîner une
surchauffe et déclencher l'interrupteur de sécurité.
Vous avez des questions en ce qui concerne les pannes ?
Si le problème persiste, veuillez contacter l'agence d'entretien agréée Hatco la plus proche ou Hatco pour obtenir une assistance.
Pour trouver l'agence d'entretien la plus proche, rendez-vous sur le site Internet de Hatco (www.hatcocorp.com) et cliquez sur
Trouver un agent d'entretien, ou contactez l'équipe d'entretien et de pièces détachées de Hatco :
Numéro de
téléphone: 414-671-6350
Courriel: partsandservice@hatcocorp.com
Formulaire n° RHWCEM-0816
44
Page 45

GARANTIE LIMITÉE INTERNATIONALE
1. GARANTIE DU PRODUIT
Hatco garantit que les produits qu'il fabrique (les " produits ")
seront dépourvus de vices de matériel, dans des conditions
normales d'utilisation et de maintenance, pendant une période
d'un (1) an à partir de la date d'achat à condition qu'ils soient
installés et entretenus conformément aux instructions écrites de
Hatco ou de 18 mois à partir de la date d'expédition de l'usine
Hatco. L'acheteur doit prouver la date d'achat du Produit par
l'enregistrement du produit auprès de Hatco ou par d'autres
moyens satisfaisants pour Hatco, à sa seule discrétion.
Hatco garantit que les composants du produit suivant ne
présentent aucuns défauts dans les matériaux employés pour
leur construction, à partir de la date d’achat (sujet aux conditions
en vigueur), pour la (les) période(s) de temps listées ci-dessous:
a) Deux (2) ans de garantie des pièces :
Les éléments de grille-pain de la rampe (gaine métallique)
Éléments de tiroir chauffant (gaine métallique)
Tiroir chauffant Rouleaux chauffants et Glissières
Éléments de rampe chauffante (gaine métallique)
Vitrine chauffante (gaine métallique, chauffage par air)
Éléments d’armoire de stockage
(gaine métallique, chauffage par air)
Éléments de puits chauffant intégrés —
des séries HW et HWB (gaine métallique)
b) Cinq (5) ans de garantie des pièces :
Réservoirs 3CS et FR
c) Dix (10) ans de garantie des pièces :
Chauffe-eau d'appoint électriques
Chauffe-eau d'appoint au gaz
d) Quatre-vingt dix (90) jours de garantie des pièces :
Pièces détachées de rechange
LES GARANTIES PRÉ-CITÉES SONT EXCLUSIVES ET EN
LIEU DE TOUTES AUTRES GARANTIES, EXPRIMÉES OU
IMPLICITES, INCLUANT MAIS NON LIMITÉ À TOUTE
GARANTIE COMMERCIALE OU DE COMPATIBILITÉ POUR
UN PROPOS PARTICULIER OU TOUTE VIOLATION DE
BREVET OU AUTRE DROIT DE PROPRIÉTÉ
INTELLECTUELLE. Sans limitation quand aux garanties précitées, DE TELLES GARANTIES NE COUVRENT PAS: Les
ampoules à incandescence enduites, les lampes fluorescentes,
les ampoules de lampes chauffantes, les ampoules halogènes
enduites, les ampoules chauffantes halogènes, Ampoules au
xénon, tubes à DEL, les éléments en verre et les fusibles; la
défaillance de produit dans le réservoir d'appoint, l'échangeur de
chaleur à tube fin, ou d'autres équipements de chauffage d'eau
provoquée par le collage, l'accumulation de sédiments , les
attaques chimiques ou le gel, ou une mauvaise utilisation,
manipulation ou application du produit, une mauvaise installation,
ou l'application de tension inadaptée.
2. LIMITATION DES REMÈDES ET DOMMAGES
La responsabilité de Hatco et le recours exclusif de l'acheteur cidessous seront limités seulement au remplacement de tout ou
partie du produit en utilisant, au choix de Hatco, les pièces
neuves ou remises à neuf ou le produit par Hatco ou un
organisme de réparations agréé Hatco à l'égard de toute
réclamation faite dans le délai de la garantie applicable
mentionée ci-dessus. Hatco se réserve le droit d'accepter ou de
rejeter toute réclamation de ce type en tout ou partie. Dans le
contexte de cette garantie limitée, « remis à neuf » signifie qu'une
pièce ou un produit a été ramené à ses caractéristiques
techniques par Hatco ou par un centre de réparation agréé par
Hatco. Hatco n’acceptera pas le renvoi de tel produit que ce soit
sans une autorisation écrite préalable de Hatco, et les coûts
d’expédition des renvois approuvés sont à la charge exclusive
de l’acheteur. HATCO NE PEUT ÊTRE TENU RESPONSABLE,
SOUS AUCUNE CIRCONSTANCE, POUR DES DOMMAGES
CONSÉCUTIFS OU INCIDENTS, INCLUANT MAIS NON
LIMITÉS AU COÛT DE LA MAIN D’ŒUVRE OU A LA PERTE
DE PROFIT RÉSULTANT DE L’UTILISATION OU DE
L’IMPOSSIBILITÉ D’UTILISER LES PRODUITS OU DU FAIT
QUE LE PRODUIT SOIT INCORPORÉ OU DEVIENNE UN
COMPOSANT D’UN AUTRE PRODUIT OU MARCHANDISE.
La garantie des compartiments chauffants Hatco HEATMAX
est d'un an à partir de la date d'achat ou de 18 mois à partir de
la date d'expédition de chez Hatco, selon la première des deux
échéances.
En cas de problème avec un compartiment chauffant durant la
période de garantie, procéder comme suit :
Contacter un Revendeur Hatco
Se tenir prêt à lui fournir les informations suivantes pour
garantir un traitement rapide:
• Modèle
• Numéro de Série (au dos de l'appareil)
• Problème Spécifique
• Date d'achat
• Nom de l'entreprise
• Adresse d'expédition
• Nom de la Personne à Contacter et Téléphone
Formulaire n° RHWCEM-0816
INFORMATIONS DE SERVICE
Ensuite, le Revendeur Hatco:
• Fournira les pièces détachées requises
• Enverra la réclamation sous garantie à Hatco pour
traitement
Problèmes non liés à la garantie
En cas de problème hors garantie exigeant une assistance,
contactez le centre de SAV agréé par Hatco le plus proche.
Pour trouver le centre de SAV le plus proche :
• allez sur notre site Web www.hatcocorp.com,
sélectionnez le menu déroulant Resources, puis cliquez
sur « Find Service Agent/Distributor »
• appelez le SAV Hatco au 414-671-6350
• envoyez un courriel au SAV Hatco à
partsandservice@hatcocorp.com
45
Page 46

AVVISO
ATTENZIONE
AVVERTENZA
Corretto smaltimento di questo prodotto
Questo contrassegno indica che il prodotto e i relativi
componenti elettronici non devono essere smaltiti insieme
ad altri rifiuti commerciali. Per prevenire possibili danni
all’ambiente o alla salute causati da uno smaltimento non
adeguato, riciclare in modo responsabile per promuovere il
riutilizzo sostenibile delle risorse materiali. Per smaltire
questo prodotto e i relativi componenti elettronici, contattare
il fornitore presso cui è stato acquistato per informazioni
sulle modalità di riciclaggio sicure per l'ambiente.
INDICE
Informazioni Importanti per il Proprietario.......................46
Introduzione ........................................................................46
Importanti Informazioni Sulla Sicurezza ..........................47
Descrizione dei Modelli ......................................................48
Designazione del Modello..................................................49
Dati Tecnici..........................................................................49
Configurazioni delle Spine .................................................49
Tabella di corrispondenza electtrica ..................................49
Dimensioni ........................................................................50
Installazione ........................................................................51
Informazioni Generali.........................................................51
Installazione di un Modello Incassato................................51
Funzionamento ...................................................................53
Informazioni Generali.........................................................53
Manutenzione......................................................................53
Informazioni Generali.........................................................53
Pulizia ................................................................................54
Opzioni e accessori ............................................................54
Guida alla Soluzione dei Problemi....................................55
Garanzia Limitata Internazionale.......................................56
Informazioni Sugli Interventi in Garanzia.........................56
INFORMAZIONI IMPORTANTI PER IL PROPRIETARIO
Indicare il numero del modello, il numero di serie (la targhetta
delle specifiche è ubicata sul retro dell'unità), la tensione di
alimentazione e la data di acquisto della propria unità negli
spazi di seguito. Queste informazioni dovranno essere fornite
nel momento in cui verrà richiesta l’assistenza Hatco.
N. del modello ____________________________________
N. di serie ________________________________________
Tensione di alimentazione ____________________________
Data di acquisto____________________________________
Orario d’ufficio: dalle 7 alle 17
Fuso orario centrale degli USA
(Orario estivo: da giugno a settembre–
dalle 7 alle 17 fuso orario centrale
degli USA da lunedì a giovedì
dalle 7 alle 16.00 fuso orario centrale
degli USA il venerdì)
Telefono: 414-671-6350
E-mail: partsandservice@hatcocorp.com
Si possono ottenere informazioni supplementari visitando il
nostro sito Web all’indirizzo www.hatcocorp.com.
Registrare l'unità!
Completando la registrazione della garanzia online si
eviteranno ritardi nell'inizio della copertura. Visitare il sito
Hatco all'indirizzo www.hatcocorp.com, selezionare il menu
"Parts & Service" e fare clic su "Warranty Registration".
INTRODUZIONE
Le unità riscaldanti Hatco HEATMAX sono concepite per la
cottura di un'ampia gamma di alimenti - minestre, riso, salse e
condimenti - o per il loro mantenimento alla temperatura ideale.
Con i modelli RHW, gli alimenti da cuocere o mantenere caldi
vanno messi in una pentola riscaldata o mantenuta calda da
una piastra, mentre con i modelli RCTHW gli alimenti vanno
messi in un contenitore di dimensioni specifiche introdotto
nell'elemento riscaldante. La temperatura dell'elemento
riscaldante è regolata da un controller elettronico per assicurare
risultati ottimali. Il calore si distribuisce uniformemente
nell'unità, la cui struttura in acciaio inossidabile dotata di
isolamento assicura facilità di manutenzione, prestazioni
affidabili e lunga durata.
Tutti i modelli sono dotati di un pannello di controllo che
permette di scegliere fra tre valori prefissati per la temperatura,
da 50 a 100 °C, nonché di selezionare una modalità di basso
consumo energetico, utile nei periodi di uso sporadico.
Le unità riscaldanti Hatco sono prodotti di qualità, costruiti
specificamente per rispondere ai requisiti di questo tipo di
operazioni su generi alimentari e assicurare anni e anni di
funzionamento senza problemi; sono garantite contro la rottura
e la bruciatura per un anno.
Le unità riscaldanti Hatco HEATMAX sono il risultato di lunghe
ricerche e collaudi sul campo. I materiali adoperati sono stati
selezionati in modo da assicurare massima durabilità, estetica
gradevole e prestazioni ottimali. Ogni unità è stata ispezionata
e collaudata prima della spedizione.
Questo manuale contiene le istruzioni per l'uso e l'installazione
e le misure di sicurezza relative alle unità riscaldanti. Si
suggerisce di leggere tutte le istruzioni prima di procedere
all'installazione o all'uso delle unità riscaldanti.
Le informazioni di sicurezza del presente manuale sono
segnalate con le seguenti scritte:
AVVERTENZA indica una situazione pericolosa che se non
viene evitata può causare lesioni gravi o letali.
ATTENZIONE indica una situazione pericolosa che se non
viene evitata può causare lesioni lievi o moderate.
AVVISO serve a indicare situazioni che non riguardano
lesioni della persona.
46
N. di pubblicazione RHWCEM-0816
Page 47

IMPORTANTI INFORMAZIONI SULLA SICUREZZA
AVVISO
ATTENZIONE
AVVERTENZA
AVVERTENZA
Leggere le seguenti importanti informazioni sulla sicurezza, al fine di evitare
infortuni gravi o anche fatali, ed evitare danni alle apparecchiature o alle cose.
PERICOLO DI SCOSSA ELETTRIC:
• Collegare l’unità a una presa elettrica opportunamente
messa a terra e di corretta tensione e configurazione di
spina. Se la spina e la presa non corrispondono, mettersi
in contatto con un elettricista qualificato per stabilire la
tensione corretta e installare la presa elettrica della misura
giusta.
• Prima di eseguire qualsiasi intervento di pulizia,
regolazione o manutenzione, disattivare
l'alimentazione, staccare il cavo di alimentazione e
lasciare raffreddare l'unità.
• NON immergere in acqua o inzuppare d’acqua. L’unità non
è impermeabile. Non usare l’unità se è stata immersa in
acqua o inzuppata d’acqua.
• L’unità non è a prova di intemperie. Sistemare l’unità al
chiuso in un posto in cui la temperatura ambiente sia un
minimo di 21 °C (70 °F).
• Non pulire a vapore o usare una quantità eccessiva
d’acqua sull’unità.
• La costruzione di questa unità non è a prova di getto. Non
usare spruzzi a getto per pulire l’unità.
• Non tirare l’unità dal cavo di alimentazione.
• Smettere di usare l’unità se il cavo di alimentazione si
consuma o si logora.
• Non cercare di riparare o sostituire un cavo di
alimentazione danneggiato. Il cavo di alimentazione
deve essere sostituito da parte di Hatco, un
rappresentante di servizio autorizzato Hatco o una
persona con simili qualifiche professionali.
• Non utilizzare l'unità per sciogliere o mantenere il
ghiaccio. Tale operazione potrebbe formare condensa
e costituire un pericolo elettrico causa di lesioni
personali e/o danni all'unità. I danni provocati dalla
condensa non sono coperti dalla garanzia.
• Nell’eseguire interventi sull’unità usare solo pezzi di
ricambio originali di Hatco. Ogni inadempienza nell'uso
di pezzi di ricambio originali Hatco renderà nulle le
garanzie e può determinare tensioni elettriche
pericolose per gli operatori generando scosse
elettriche o ustioni. I pezzi di ricambio originali di Hatco
sono necessari per un funzionamento sicuro negli
ambienti d’uso previsti. Alcuni pezzi di ricambio
generici o di altri produttori non possiedono le stesse
caratteristiche e non consentono il funzionamento
degli apparecchi Hatco in condizioni di sicurezza.
PERICOLO DI INCENDIO:
• Sistemare l’unità a un minimo di 25 mm (1 pollice) da
pareti o materiali infiammabili. Se non si mantengono le
distanze di sicurezza, l’unità può scolorirsi o bruciare.
• Non utilizzare sostanze chimiche abrasive, quali
candeggina o detergenti a base di candeggina,
detersivi da forno o soluzioni di pulizia infiammabili per
pulire l'unità.
Questa unità non contiene parti su cui “l’utente” può
intervenire. Se l’unità richiede un intervento di assistenza
mettersi in contatto con un Agente di assistenza
autorizzato di Hatco o con il Reparto di assistenza di Hatco
al numero telefonico 414-671-6350.
Questa unità non è destinata all'uso da parte di bambini o
persone con facoltà fisiche, sensoriali o mentali ridotte.
Sorvegliare opportunamente i bambini e tenerli lontani
dall'unità.
Assicurarsi che tutti gli operatori siano stati istruiti sull'uso
sicuro e appropriato dell'unità.
PERICOLO DI USTIONE:
• Alcune superfici esterne dell’unità diventano molto
calde. Fare attenzione quando si toccano queste aree.
• L'acqua calda nell'unità può provocare ustioni. Lasciar
raffreddare l'unità prima di procedere al drenaggio o
alla pulizia.
Sistemare l’unità su di un banco di altezza adatta in un’area
che sia pratica per l’uso. La posizione dovrebbe essere in
piano, per evitare che l’unità e il suo contenuto possano
rovesciarsi, e forte a sufficienza da supportare il peso
dell’unità stessa e del suo contenuto.
Non muovere o spostare l'unità quando contiene prodotti
alimentari. Spegnere l'unità, rimuovere i prodotti alimentari
e lasciarla raffreddare completamente prima di spostarla o
pulirla.
Gli oli normali e di produzione approvati possono causare
fumi fino a 30 minuti durante l'avvio iniziale. Questa è una
condizione temporanea. Azionare l'unità senza prodotti
alimentari fino alla dissipazione del fumo.
Usare solo panni e detergenti non abrasivi. Detergenti e
panni abrasivi potrebbero graffiare la finitura dell'unità,
rovinandone l'aspetto e rendendolo sensibile all'accumulo
di sporcizia.
Non appoggiare l’unità sul lato con il pannello dei controlli
perché così facendo si potrà danneggiare l’unità.
I pannelli di controllo a distanza devono essere montati a
una distanza minima di 152 mm (6”) dall'unità (e non
superiore a 1420 mm [56”]). L'installazione dei pannelli a
una distanza ravvicinata può causare danni termici al
sistema elettrico del pannello di controllo.
Non posizionare l'unità in un'area soggetta ad escursioni
termiche estreme o in cui siano presenti oli e grassi di grill,
friggitrici, ecc. Le temperature eccessive possono arrecare
danni all'unità.
L’unità è progettata per piani di lavoro metallici, nei o sui quali
se ne consiglia l'utilizzo. I danni al materiale del piano di
lavoro non metallico non sono coperti dalla garanzia Hatco.
Per altre superfici, verificare con il produttore che il materiale
sia adeguato a temperature prolungate fino a 100 °C (212 °F).
Non applicare una forza eccessiva quando si serrano le viti
di montaggio sulle unità incassate, onde non danneggiare
l'unità e/o il piano di lavoro.
Non azionare l’unità senza prodotti alimentari/acqua nel
pozzetto. L'unità potrebbe danneggiarsi.
N. di pubblicazione RHWCEM-0816
47
Page 48

DESCRIZIONE DEI MODELLI
Tutti i Modelli
Tutte le unità riscaldanti HEATMAX sono affidabili e versatili;
oltre che per mantenere gli alimenti caldi alla giusta
temperatura di consumazione, mediante il kit di adattamento in
opzione possono essere adoperate per la cottura a vapore.
RHW-1
Il modello RHW-1 è dotato di un singolo elemento riscaldante
per mantenere gli alimenti caldi o cuocere zuppe o salse.
Fornito con uno speciale coperchio incernierato per ripiano
rotondo da 10 litri (11 qt) in acciaio inox.
Modello RHW-1
RHW-1B
Il modello RHW-1B è dotato di un singolo elemento analogo a
quello del modello RHW-1, ma è da incasso e funziona con un
pannello di controllo remoto.
RCTHW-1
RCTHW-1 è dotato di tre elementi riscaldanti e un drenaggio
anteriore. Può supportare un ripiano per il cibo di dimensioni
standard.
Modello RCTHW-1
RCTHW-1B
La RCTHW-1B ha le stesse dotazioni della RCTHW-1 ma è un
modello incorporato fornito di un pannello di controllo a distanza
e uno scarico inferiore.
Modello RHW-1B
RHW-2
RHW-2 è dotato di due elementi riscaldanti regolabili
autonomamente per mantenere caldi gli alimenti o cuocere
minestre o salse. Fornito con due speciali coperchi incernierati
per ripiano rotondo da 10 litri (11 qt) in acciaio inox.
Modello RHW-2
48
Modello RCTHW-1B
N. di pubblicazione RHWCEM-0816
Page 49

Configurazioni delle spine
AVVERTENZA
CEE 7/7 Schuko
BS-1363
AS 3112
R H W - 1 B
R = Circolare
RCT = Rettangolare
Unità Riscaldante
B = Da incasso con Pannello di Controllo Remoto
Nessun carattere = piano di appoggio
1 = Unità Singola
2 = Unità Doppia
Ciascun apparecchio viene fornito dalla fabbrica con cavo di
alimentazione e spina installati. Le spine sono fornite in base
alle applicazioni.
PERICOLO DI SCOSSA ELETTRIC: Collegare l’unità a una
presa elettrica opportunamente messa a terra e di corretta
tensione e configurazione di spina. Se la spina e la presa
non corrispondono, mettersi in contatto con un elettricista
qualificato per stabilire la tensione corretta e installare la
presa elettrica della misura giusta.
NOTA : La targhetta delle specifiche è ubicata sul retro
dell'unità. Vedere l'etichetta per le informazioni relative
al numero di serie e verificare i dati elettrici dell'unità.
DESIGNAZIONE DEL MODELLO
DATI TECNICI
Configurazioni delle spine
NOTA: Presa non fornita da Hatco.
Tabella di corrispondenza electtrica
Configurazione Peso di
Modello Tensione Watts Ampere della Spina Spedizione
RHW-1 230 (CE) 1250 5.4 BS-1363, CEE 7/7 Schuko, AS 3112 7 kg (15 lbs.)
RHW-1B 230 (CE) 1250 5.4 BS-1363, CEE 7/7 Schuko, AS 3112 8 kg (18 lbs.)
RHW-2 230 (CE) 2500 10.9 BS-1363, CEE 7/7 Schuko, AS 3112 12 kg (26 lbs.)
RCTHW-1 230 (CE) 3000 13 BS-1363, CEE 7/7 Schuko, AS 3112 12 kg (26 lbs.)
RCTHW-1B 230 (CE) 3000 13 BS-1363, CEE 7/7 Schuko, AS 3112 13 kg (29 lbs.)
NOTA: Il peso di spedizione comprende l'imballaggio.
N. di pubblicazione RHWCEM-0816
49
Page 50

DATI TECNICI
POWER
FAULT
100°C
70°C-90°C
50°C-70°C
TEMP
ON/OFF
o
_
FULL
POWER
ENERGY
SAVE
MODE
~
~
~
~
POWER
FAULT
100°C
70°C-90°C
50°C-70°C
TEMP
ON/OFF
o
_
FULL
POWER
ENERGY
SAVE
MODE
~
~
~
~
HEATMAX
HEATED WELL
A
A
D
E
RCTHW-1
RHW-1 RHW-1B RHW-2
RCTHW-1B
C
C
B B
B
E
D D
E
B B
C
A
C
A
C
A
Dimensioni
Larghezza Profondità Altezza Larghezza Profondità
Modello (A) (B) (C) d’igombro (D) d’igombro (E)
RHW-1 359 mm 330 mm 355 mm 179 mm 224 mm
(14-1/8") (13") (14") (7") (8-7/8")
RHW-1B 359 mm 330 mm 341 mm N/A N/A
(14-1/8") (13") (13-7/16")
RHW-2 630 mm 330 mm 355 mm 389 mm 249 mm
(24-3/4") (13") (14") (15-3/8") (9-7/8")
RCTHW-1 368 mm 611 mm 283 mm 347 mm 535 mm
(14-1/2") (24-1/16") (11-3/16") (14") (21-7/16")
RCTHW-1B 368 mm 582 mm 226 mm N/A N/A
(14-1/2") (22-15/16")
(8-15/16")
50
N. di pubblicazione RHWCEM-0816
Page 51

ATTENZIONE
AVVISO
AVVERTENZA
AVVISO
Fascetta
Fascetta
Pannello Inferiore
Attacco
Valvola di Scarico
Tubo Flessibile
di Scarico
Vite pannello
inferiore
INSTALLAZIONE
Informazioni Generali
I pozzetti riscaldati HEATMAX sono spediti dalla fabbrica con
la maggioranza dei componenti preassemblata e sono quindi
pronti per l'uso. Aver cura di non danneggiare l'unità e i suoi
componenti nell'estrarla dall'imballaggio.
PERICOLO DI SCOSSA ELETTRIC: L’unità non è a prova
di intemperie. Sistemare l’unità al chiuso in un posto in cui
la temperatura ambiente sia un minimo di 21 °C (70 °F).
PERICOLO DI INCENDIO: Sistemare l’unità a un minimo di
25 mm (1 pollice) da pareti o materiali infiammabili. Se non
si mantengono le distanze di sicurezza, l’unità può
scolorirsi o bruciare.
Sistemare l’unità su di un banco di altezza adatta in un’area
che sia pratica per l’uso. La posizione dovrebbe essere in
piano, per evitare che l’unità e il suo contenuto possano
rovesciarsi, e forte a sufficienza da supportare il peso
dell’unità stessa e del suo contenuto.
Non muovere o spostare l'unità quando contiene prodotti
alimentari. Spegnere l'unità, rimuovere i prodotti alimentari
e lasciarla raffreddare completamente prima di spostarla
o pulirla.
Non appoggiare l’unità sul lato con il pannello dei controlli
perché così facendo si potrà danneggiare l’unità.
Non posizionare l'unità in un'area soggetta ad escursioni
termiche estreme o in cui siano presenti oli e grassi di grill,
friggitrici, ecc. Le temperature eccessive possono arrecare
danni all'unità.
1. Rimuovere l'unità dalla scatola.
2. Rimuovere il pacchetto informativo.
3. Rimuovere il nastro e la pellicola protettiva da tutte le
superfici dell'unità.
4. Se l'unità è un modello non da incasso, collocarla nella
posizione desiderata.
• Sistemare l'unità in un'area in cui la temperatura
ambiente sia costante e con un valore minimo di 21°C
(70˚F). Evitare i luoghi soggetti a flussi e correnti d'aria
attivi (ossia, in prossimità di condotti dell'aria
condizionata o condotte aspiranti).
• Accertarsi che l’unità sia su di un banco di altezza
adatta in un’area pratica per l’uso.
• Accertasi che il ripiano del banco sia in piano e
sufficientemente robusto da supportare l’unità e i
prodotti alimentari.
• Accertarsi che tutti i piedi sul fondo dell’unità si
posizionino in modo sicuro sul ripiano del banco.
5. Se l'unità è un modello da incasso, attenersi alla procedura
"Installazione di un modello incassato" di questa sezione.
Installazione di un Modello Incassato
Attenersi alla seguente procedura per installare un modello
incassato nel piano di lavoro. Se l'unità è un modello incassato
rettangolare, procedere prima come descritto in "Installazione
del gruppo di scarico".
L’unità è progettata per piani di lavoro metallici, nei o sui
quali se ne consiglia l'utilizzo. I danni al materiale del piano
di lavoro non metallico non sono coperti dalla garanzia
Hatco. Per altre superfici, verificare con il produttore che il
materiale sia adeguato a temperature prolungate fino a
100 °C (212 °F).
Installazione del Gruppo di Scarico
Prima di installare un modello rettangolare nel piano di lavoro,
attenersi alla seguente procedura per installare il gruppo di
scarico.
1. Capovolgere con cautela l'unità e poggiarla sulla parte
superiore.
2. Estrarre le viti e togliere il pannello inferiore.
3. Collegare un'estremità del tubo flessibile di scarico
all'attacco mediante la fascetta in dotazione.
4. Introdurre il tubo flessibile nel foro del pannello inferiore e
fissare il pannello all'unità mediante le viti tolte in
precedenza.
5. Collegare l'altra estremità del tubo flessibile di scarico alla
valvola di scarico mediante la fascetta in dotazione.
6. Eseguire la procedura descritta in "Installazione dell'unità
in un piano di lavoro" di questa sezione. Una volta installata
l'unità nel banco, se si desidera si può collegare la valvola
di scarico a una tubazione di scarico all'esterno.
Installazione del gruppo di scarico
(solo modelli incassati rettangolari)
N. di pubblicazione RHWCEM-0816
51
Page 52

AVVISO
IIIIIVite
Flangia
superiore
Banco
L BracketStaffa a L
Apertura del
piano di lavoro
Apertura per
scatola di controllo
ScrewSportello
anteriore
centralina
Copertura Anteriore
Alloggiamento
Scatola di Controllo
Flangia di Montaggio
AVVISO
550 mm
(21-11/16″)
344 mm
(13-9/16″)
RCTHW-1B
305 mm
12″
RHW-1B
132 mm
(5-1/8″)
144 mm
(5-9/16″)
65 mm
(2-9/16″)
33 mm
(1-5/16″)
154 mm
(6″)
Ø 4,5 mm
(3/16″)
INSTALLAZIONE
Installazione dell'unità
1. Realizzare un'apertura di dimensione corretta nel piano di
lavoro per l'inserimento dell'unità.
Dimensioni dell'apertura nel piano di lavoro
NOTA: Il piano di lavoro deve essere a livello per assicurare il
drenaggio corretto del pozzetto rettangolare.
Installazione dell'unità
4. Montare le staffe a L sul lato
inferiore dell'unità.
5. Serrare le viti di ciascuna staffa a
L finché la flangia superiore non
poggia piatta sul banco.
I pannelli di controllo a distanza devono essere montati a
una distanza minima di 152 mm (6”) dall'unità (e non
superiore a 1420 mm [56”]). L'installazione dei pannelli a
una distanza ravvicinata può causare danni termici al
sistema elettrico del pannello di controllo.
La scatola del comando a distanza deve essere installata
lontano dalla zona di riscaldamento. Diversamente, i
controlli potrebbero surriscaldarsi, funzionare
erroneamente o guastarsi.
2. Realizzare un'apertura di dimensione corretta per la scatola
di controllo in una superficie verticale ad almeno 152 mm
(6”) di distanza dall'unità, ma non oltre 1420 mm (56”).
Non applicare una forza eccessiva
quando si serrano le viti di
montaggio sulle unità incassate,
onde non danneggiare l'unità e/o il
piano di lavoro.
Installazione La Scatola del Comando a Distanza
1. Installare la scatola di controllo nell'apertura:
a. Far passare una delle flange di montaggio
dell'alloggiamento della scatola di controllo attraverso
l'apertura. Inclinare e far passare l'altra flangia
attraverso l'apertura.
b. Allineare i fori di montaggio delle flange di montaggio
con i fori nella superficie di installazione e avvitare
l'alloggiamento della scatola di controllo alla superficie
con quattro viti M4 (non fornite).
c. Installare la copertura anteriore della scatola di controllo
con le quattro viti apposite.
Dimensioni dell'apertura per la scatola di controllo
NOTA: Il cavo elettrico tra l'unità e la scatola di controllo è
lungo 1420 mm (56”).
3. Rimuovere le quattro viti che fissano lo sportello anteriore
alla centralina. Rimuovere lo sportello anteriore e guidare
la centralina con lo sportello anteriore rimosso e i cavi
elettrici attraverso l'apertura del piano di appoggio e quindi
introdurre l'unità nell'apertura.
Installazione La Scatola del Comando a Distanza
2. Inserire il cavo di alimentazione in una presa elettrica munita
di massa, di tensione corretta e con una presa conforme.
Vedere la sezione DATI TECNICI per ulteriori dettagli.
52
N. di pubblicazione RHWCEM-0816
Page 53

AVVERTENZA
AVVISO
ATTENZIONE
Tasto
TEMP
Spia di
Alimentazione
Pulsante di Accensione/
Spegnimento (ON/OFF)
Tasto
MODE
Spia di
Guasto
FUNZIONAMENTO
AVVERTENZA
AVVERTENZA
Informazioni Generali
Attenersi alla seguente procedura per utilizzare i pozzetti
riscaldati HEATMAX.
Prima di usare l’unità, leggere tutti i messaggi di sicurezza
contenuti nella sezione Importanti informazioni sulla
sicurezza.
Non azionare l’unità senza prodotti alimentari/acqua nel
pozzetto. L'unità potrebbe danneggiarsi.
NOTA: Per assicurare il corretto trasferimento di calore, usare
i modelli RHW (unità cilindriche) con la speciale
pentola in dotazione, il cui fondo è curvo per adattarsi
alla forma dell'elemento riscaldante.
1. Collegare l'unità a una presa elettrica opportunamente
munita di messa a terra e di tensione, misura e
configurazione di spina corrette. Per ulteriori dettagli,
vedere la sezione SPECIFICHE.
• L'indicatore di alimentazione si illumina in rosso quando
l'unità è sotto tensione.
2. Inserire una bacinella/casseruola con il prodotto alimentare
o piena d'acqua nell'unità.
NOTA: Non azionare l'unità senza una bacinella inserita o con
una bacinella vuota. L'unità si surriscalderà ed entrerà
in modalità FAULT (GUASTO).
3. Premere il tasto ON/OFF per accendere l'unità.
• L'indicatore di alimentazione si illumina in verde quando
l'unità è accesa e si sta riscaldando.
NOTA: la spia di guasto (FAULT) si accende e viene emesso un
segnale acustico se l'unità si surriscalda o se il sensore
di temperatura va in cortocircuito; in tal caso, l'unità si
spegne automaticamente finché la temperatura non
rientra nel normale intervallo o il sensore di
temperatura funziona normalmente.
4. Premere il tasto TEMP per passare in rassegna e
selezionare l'impostazione di temperatura desiderata.
L'indicatore sopra ciascuna impostazione di temperatura
si accende quando tale impostazione è selezionata. Le
impostazioni di temperatura sono tre:
• 90–100°C (194–212°F) — Cottura a vapore e
ritermalizzazione
• 70–90°C (158–194°F )— Riscaldamento/mantenimento
del calore del cibo
• 50–70°C (122–158°F) — Riscaldamento/mantenimento
del calore del cibo
5. Premere il tasto MODE per passare in rassegna e
selezionare la modalità di riscaldamento desiderata.
L'indicatore sopra ciascuna modalità si accende quando
tale modalità è selezionata. Le modalità di riscaldamento
sono due:
• POTENZA TOTALE — L'unità funziona alla massima
potenza (100%).
• BASSA POTENZA — L'unità funziona al 50% di
potenza per riscaldare il prodotto e per evitare
scottature.
PERICOLO DI USTIONE: Alcune superfici esterne dell’unità
diventano molto calde. Fare attenzione quando si toccano
queste aree.
Informazioni Generali
I pozzetti riscaldati HEATMAX sono stati progettati per la
massima durevolezza e prestazioni ottimali con un minimo di
manutenzione.
PERICOLO DI SCOSSA ELETTRIC:
N. di pubblicazione RHWCEM-0816
• Prima di eseguire qualsiasi intervento di pulizia,
regolazione o manutenzione, disattivare
l'alimentazione, staccare il cavo di alimentazione e
lasciare raffreddare l'unità.
• NON immergere in acqua o inzuppare d’acqua. L’unità
non è impermeabile. Non usare l’unità se è stata
immersa in acqua o inzuppata d’acqua.
• Non pulire a vapore o usare una quantità eccessiva
d’acqua sull’unità.
Pannello di Controllo
MANUTENZIONE
PERICOLO DI SCOSSA ELETTRIC:
• La costruzione di questa unità non è a prova di getto.
Non usare spruzzi a getto per pulire l’unità.
• Nell’eseguire interventi sull’unità usare solo pezzi di
ricambio originali di Hatco. Ogni inadempienza nell'uso
di pezzi di ricambio originali Hatco renderà nulle le
garanzie e può determinare tensioni elettriche
pericolose per gli operatori generando scosse
elettriche o ustioni. I pezzi di ricambio originali di Hatco
sono necessari per un funzionamento sicuro negli
ambienti d’uso previsti. Alcuni pezzi di ricambio
generici o di altri produttori non possiedono le stesse
caratteristiche e non consentono il funzionamento degli
apparecchi Hatco in condizioni di sicurezza.
53
Page 54

AVVISO
AVVERTENZA
MANUTENZIONE
RHW-LID
RHW-11QT-LID-HG
RHW-11QT-POT
RHW-SP
RCTHW-Basket
RCTHW-1/3SP
RCTHW-SW
RCTHW-SK
RCTHW-2/3SP
RCTHW-SP
PERICOLO DI INCENDIO : Non utilizzare sostanze
chimiche abrasive, quali candeggina o detergenti a base
di candeggina, detersivi da forno o soluzioni di pulizia
infiammabili per pulire l'unità.
Questa unità non contiene parti su cui “l’utente” può
intervenire. Se l’unità richiede un intervento di assistenza
mettersi in contatto con un Agente di assistenza
autorizzato di Hatco o con il Reparto di assistenza di Hatco
al numero telefonico 414-671-6350.
Pulizia
Per conservare intatta la finitura e mantenere la performance
dell'unità, si consiglia di pulirla quotidianamente.
Usare solo panni e detergenti non abrasivi. Detergenti e
panni abrasivi potrebbero graffiare la finitura dell'unità,
rovinandone l'aspetto e rendendolo sensibile all'accumulo
di sporcizia.
1. Spegnere l'unità, disinserire il cavo di alimentazione e
lasciarla raffreddare.
2. Rimuovere le bacinelle e ogni altro accessorio e lavarli in
lavastoviglie o a mano.
3. Drenare o rimuovere l'acqua dal pozzetto.
4. Detergere tutte le superfici metalliche con un panno
morbido e umido. Le macchie più ostinate possono essere
rimosse con un buon detergente non abrasivo. Le aree
difficili da raggiungere dovrebbero essere pulite con uno
spazzolino e sapone neutro.
5. Asciugare l’intera unità usando un panno asciutto non
abrasivo.
NOTA: Le incrostazioni dovute alla durezza dell’acqua si
accumuleranno sugli elementi della RCTHW. Utilizzare
una soluzione composta da 2 parti di aceto bianco e 5
parti di acqua per dissolvere le incrostazioni. Far
macerare la soluzione per almeno un’ora (o per una
notte in caso di incrostazioni pesanti), spazzolare il
pozzetto con una paglietta, far defluire la soluzione e
quindi risciacquare bene con acqua pulita. Evitare
l’accumulo delle incrostazioni. Questo potrebbe
provocare il surriscaldamento degli elementi riscaldanti.
OPZIONI E ACCESSORI
RHW-SP....................Piastra a vapore rotonda con 6 cestelli
RHW-11QT-LID-HG ..Coperchio rotondo incernierato da 10 litri
RHW-11QT-POT........Ripiano rotondo da 10 litri (11 qt.) —
RHW-11QT-LID ........Coperchio rotondo da 10 litri (11 qt.)
RCTHW-SW ..............Adattatore per scalda salse
RCTHW-SK ..............Adattatore per zuppiera 7 quarti
RCTHW-2/3SP ..........Piastra a vapore con 2 cestelli con
RCTHW-1/3SP ..........Piastra a vapore con 4 cestelli con
RCTHW-SP ..............Piastra a vapore con 6 cestelli
RCTHW-Basket ........Cestello per pasta
RCTHW-PC ..............Cuocipasta (non illustrato)
(11 qt) con manopola in plastica
221 x 203 mm (8-11/16″ dia x 8″ H)
con manopola in plastica
Accessori RHW
coperchio per ripiano 2/3 Gastronorm
coperchio per ripiano 1/3 Gastronorm
Accessori RCTHW
54
N. di pubblicazione RHWCEM-0816
Page 55

GUIDA ALLA SOLUZIONE DEI PROBLEMI
AVVERTENZA
AVVERTENZA
Interventi sull’unità devono essere eseguiti solo da parte di
personale qualificato. Interventi da parte di persone non
qualificate possono risultare in scossa elettrica o ustione.
PERICOLO DI SCOSSA ELETTRICA: Prima di eseguire
qualsiasi intervento di pulizia, regolazione o manutenzione,
disattivare l'alimentazione, staccare il cavo di
alimentazione e lasciare raffreddare l'unità.
Sintomo Causa Probabile Intervento
L'unità è troppo fredda. Il punto di temperatura prestabilito della base è
impostato su un valore troppo basso.
Inserita una casseruola errata nell'unità (modelli
RHW).
L'elemento riscaldante non funziona. Rivolgersi per assistenza al rappresentante autorizzato o
Il controllo di temperatura non funziona
correttamente.
La tensione fornita non è corretta. Verificare la tensione fornita all'unità. La bassa tensione non
L'unità è surriscaldata. La temperatura del punto prestabilito della base
è troppo alta.
Controllo di temperatura non funziona
correttamente.
Tensione fornite sono inesatte. Verificare la tensione fornita all'unità. L'alta tensione causerà il
L'unità non si riscalda. L'unità è spenta. Premere il tasto ON/OFF per accendere l'unità. Attenersi alla
Gli interruttori di circuito sono saltati. Reimpostare gli interruttori di circuito. Se un interruttore di circuito
Controller digitale della temperatura difettoso. Rivolgersi per assistenza al rappresentante autorizzato o
L'elemento riscaldante della base è fulminato. Rivolgersi per assistenza al rappresentante autorizzato o
Interruttore di limite alto scattato. Assicurarsi che il pozzetto sia pulito e riempito di acqua al giusto
Usare il pulsante MODALITÀ per passare dall'impostazione
POTENZA BASSA a quella PIENA POTENZA.
Premere il tasto TEMP per passare a un'impostazione di
temperatura superiore.
Utilizzare le apposite casseruole tonde nei modelli RHW, fornite
esclusivamente da Hatco. Altre casseruole possono non essere
in grado di realizzare il contatto corretto con l'unità.
direttamente ad Hatco.
Rivolgersi per assistenza al rappresentante autorizzato o
direttamente ad Hatco.
consentirà un riscaldamento adeguato.
Usare il pulsante MODALITÀ per passare dall'impostazione
PIENA POTENZA a quella POTENZA BASSA.
Premere il tasto TEMP per passare a un'impostazione di
temperatura inferiore.
Rivolgersi per assistenza al rappresentante autorizzato o
direttamente ad Hatco.
surriscaldamento dell'unità e potrebbe arrecarle danni.
procedura delineata nella sezione "FUNZIONAMENTO".
continua a saltare, rivolgersi per assistenza a un rappresentante
autorizzato o direttamente a Hatco.
direttamente ad Hatco.
direttamente ad Hatco.
livello. Una formazione eccessiva di incrostazioni e/o l’attivazione
dell’unità senz’acqua può provocare il surriscaldamento dell’unità
e far scattare l’interruttore di limite alto.
Domande sulla risoluzione dei problemi?
Se non si riesce a risolvere un problema, contattare il centro di assistenza autorizzato più vicino o Hatco per ricevere assistenza.
Per individuare il centro di assistenza più vicino, accedere al sito Web Hatco www.hatcocorp.com e fare clic su Find Service Agent
(Trova centro di assistenza) oppure contattare il team Hatco di ricambi e assistenza:
Telefono: 414-671-6350
e-mail: partsandservice@hatcocorp.com
N. di pubblicazione RHWCEM-0816
55
Page 56

GARANZIA LIMITATA INTERNAZIONALE
1. GARANZIA SUL PRODOTTO
La Hatco garantisce che i prodotti di sua fabbricazione (i
"Prodotti"), in normali condizioni di uso e manutenzione, sono
esenti da difetti di materiale per un (1) anno dalla data di
acquisto, se installati e mantenuti in osservanza delle istruzioni
scritte della Hatco, oppure per 18 mesi dalla data di spedizione
dalla Hatco. L’acquirente deve confermare la data di acquisto
del prodotto registrando il prodotto con Hatco o per mezzo di
altri sistemi accettati da Hatco a sua totale discrezione.
La Hatco garantisce che i seguenti componenti del Prodotto
non presenteranno difetti materiali dalla data dell’acquisto (in
conformità alle condizioni di cui sopra) per la(e) durata(e) e le
condizioni di seguito elencate:
a) Due (2) anni di garanzia per le parti:
Elementi del tostapane a convezione (guaina metallica)
Componenti scorrevoli del riscaldatore (rivestiti in metallo)
Riscaldatore , rulli del riscaldatore e scivoli del
Riscaldatore
Elementi termostrisce (rivestiti in metallo)
Componenti del visualizzatore del riscaldatore
(riscaldamento ad aria rivestito in metallo )
Componenti di sostegno dell’armatura (impianto di
riscaldamento ad aria rivestito in metallo )
Elementi del pozzo riscaldato incorporato —
serie HW e HWB (con protezione di metallo)
b) Cinque (5) anni di garanzia per le parti:
Serbatoi 3CS e FR
c) Dieci (10) anni di garanzia per le parti:
Serbatoi di acqua calda ausiliari elettrici
Serbatoi di acqua calda ausiliari a gas
d) Novanta (90) giorni di garanzia per le parti:
Parti di ricambio
LE GARANZIE DI CUI SOPRA SONO ESCLUSIVE E
SOSTITUISCONO QUALSIASI ALTRA GARANZIA, ESPRESSA
O IMPLICITA, COMPRESA TRA L'ALTRO, LA GARANZIA DI
COMMERCIABILITÀ O ADEGUATEZZA PER UNO SCOPO
PARTICOLARE O DI PROTEZIONE DALLA VIOLAZIONE DEI
DIRITTI DI BREVETTO O DI ALTRO GENERE DI PROPRIETÀ
INTELLETTUALE. Senza limitare il concetto generico di quanto
sopra, DETTE GARANZIE NON COPRONO: lampadine per
lampade incandescenti rivestite, lampade fluorescenti, lampadine
per lampade di riscaldamento, lampadine per lampade alogene
rivestite, lampadine per lampade di riscaldamento alogene,
lampadine xenon, tubi LED, componenti in vetro e fusibili, guasti
del prodotto nella vasca booster, nel tubo ad alette dello
scambiatore di calore o in altra attrezzatura per il riscaldamento
dell'acqua causati da calcinazione, accumulo di sedimentazione,
agenti chimici o congelamento, uso scorretto del prodotto,
manomissione o applicazione errata, installazione non corretta o
applicazione di tensione errata.
2.LIMITI DEGLI OBBLIGHI DI RIPARAZIONE E DI
RISARCIMENTO DANNI
La responsabilità di Hatco e l'esclusivo rimedio spettante
all'acquirente per quanto riportato di seguito, saranno limitati
esclusivamente alla sostituzione della parte di ricambio con parti
nuove o rigenerate, a scelta di Hatco, da parte di Hatco stessa
o di un centro di servizio autorizzato in relazione alla richiesta
effettuata entro il succitato periodo di garanzia pertinente. Hatco
si riserva il diritto di accettare o rifiutare eventuali reclami in tutto
o in parte. Nel contesto della presente Garanzia limitata,
"rigenerato" significa che una parte o un Prodotto è stato
riportato alle specifiche tecniche originali da Hatco o da
un'agenzia di servizio autorizzata da Hatco. La Hatco non
accetterà la restituzione dei propri Prodotti senza previa
approvazione scritta da parte della stessa e le spese di
spedizione saranno esclusivamente a carico dell’Acquirente.
LA HATCO DECLINA QUALSIASI RESPONSABILITÀ PER
EVENTUALI DANNI INDIRETTI O ACCIDENTALI, COMPRESI
TRA L'ALTRO I COSTI DI MANODOPERA O IL MANCATO
GUADAGNO CAUSATI DALL’UTILIZZO O
DALL’IMPOSSIBILITÀ DI UTILIZZARE I PRODOTTI O
DOVUTI AL MONTAGGIO DEI PROPRI PRODOTTI IN ALTRI
IMPIANTI O APPARECCHI.
INFORMAZIONI SUGLI INTERVENTI IN GARANZIA
La garanzia di tutti i pozzetti riscaldati HEATMAX di Hatco è di
un anno dalla data d'acquisto o di diciotto mesi dalla data di
spedizione dallo stabilimento Hatco, quale che sia la prima.
Se sorge un problema con il pozzetto riscaldato durante il
decorso della garanzia:
Contattare il Rivenditore Locale Hatco
Quando si contatta il rivenditore Hatco per richiedere
assistenza, fornire le seguenti informazioni per assicurare la
celerità del servizio:
• Modello dell'apparecchio
• Numero di Serie (ubicata sul retro dell'unità)
• Una Descrizione Accurata del Problema
• Data di Acquisto
• Nome dell'azienda
• Indirizzo di spedizione
• Nome e Numero Telefonico della Persona da Contattare
Il rivenditore Hatco:
• Fornirà i Ricambi Necessari
• Inoltrerà alla Hatco il Reclamo
Problemi non coperti dalla garanzia
Se sorge un problema non coperto dalla garanzia per il quale
è necessaria assistenza, rivolgersi al centro di servizio
autorizzato Hatco di zona. Per gli indirizzi dei centri di servizio:
• visitare il sito www.hatcocorp.com, selezionare il menu
"Resources" e fare clic su "Find Service Agent/Distributor".
• Chiamare l'assistenza Hatco al numero +1 414 671 6350.
• Scrivere all'assistenza Hatco all'indirizzo
partsandservice@hatcocorp.com.
56
N. di pubblicazione RHWCEM-0816
Page 57

ATTENTIE
VOORZICHTIG
WAARSCHUWING
Correcte verwijdering van dit product
Deze markering geeft aan dat dit product en de elektrische
onderdelen niet mogen worden weggegooid met ander
bedrijfsafval. Om mogelijke schade aan het milieu of de
menselijke gezondheid door ongecontroleerde afvalverwijdering te voorkomen, moet u op een verantwoorde
manier recyclen zodat het duurzame hergebruik van
materiaalbronnen wordt bevorderd. Neem contact op met
de leverancier bij wie het product is aangekocht, om dit
product en de elektrische onderdelen ervan weg te gooien
en het op een milieuvriendelijke wijze te recyclen.
INHOUD
Belangrijke Informatie Voor De Eigenaar .........................57
Inleiding ...............................................................................57
Belangrijke Veiligheidsinformatie .....................................58
Modelbeschrijving ..............................................................59
Modelbenaming ..................................................................60
Specificaties........................................................................60
Stekkerconfiguraties...........................................................60
Tabel met elektrische gegevens ........................................60
Afmetingen.........................................................................61
Installatie .............................................................................62
Algemeen...........................................................................62
BELANGRIJKE INFORMATIE VOOR DE EIGENAAR
Noteer het modelnummer, serienummer (het specificatielabel
bevindt zich op de achterzijde van het apparaat), de spanning
en de aankoopdatum van uw unit in de ruimte onderaan. Zorg
ervoor dat u deze informatie ter beschikking hebt als u Hatco
voor service belt.
Modelnr.__________________________________________
Serienr. __________________________________________
Spanning ________________________________________
Aankoopdatum ____________________________________
Registreer uw apparaat!
Als u online de garantieregistratie invult kunt u vertargingen
bij het bekomen van uw garantievoordelen vermijden. Ga
naar de Hatco-website op www.hatcocorp.com, selecteer
the Onderdelen&Onderhoud menu en klik op
“Garantieregistratie”.
Een ingebouwd model installeren......................................62
Werking................................................................................64
Algemeen...........................................................................64
Onderhoud ..........................................................................64
Algemeen...........................................................................64
Reinigen.............................................................................65
Opties en Toebehoren........................................................65
Oplossen van Problemen ..................................................66
Internationale Beperkte Garantie ......................................67
Informatie over Garantieservice........................................67
Kantooruren: 7:00 uur tot 17:00 uur
Central Standard Time (CET – 7 uur)
(Zomeruren: juni tot september –
7:00 uur tot 17:00 uur CST
maandag tot donderdag
7:00 uur tot 16:00 uur CST op vrijdag)
Telefoon: +1-414-671-6350
E-mail: partsandservice@hatcocorp.com
Bijkomende informatie vindt u op onze website:
www.hatcocorp.com.
De Hatco HEATMAX verwarmingskuipen zijn speciaal
ontworpen voor het koken of warm houden van een groot aantal
verschillende soorten voedsel zoals soep, kerrieschotels, jus en
diverse sauzen. Bij RHW apparaten worden producten die
worden gekookt of warm gehouden in een pan geplaatst die
wordt verwarmd door een verwarmingselement. Bij RCTHW
apparaten worden de producten in een pan van
standaardformaat geplaatst, die in de verwarmingskuip wordt
geplaatst. Voor een optimaal resulataat wordt de temperatuur
van het verwarmingselement gecontroleerd door een
elektronische bediening. De warmte wordt gelijkmatig over het
gehele apparaat verdeeld zodat voedsel op de gewenste
temperatuur blijft, en het geïsoleerde roestvrij staal zorgt voor
eenvoudig onderhoud en duurzame prestaties.
Alle apparaten hebben een regelpaneel met drie
temperatuurinstellingen van 50 °C (122 °F) tot 100 °C (212 °F)
en een energiebesparende modus waardoor elektriciteit wordt
bespaard tijdens niet-piekuren.
Hatco verwarmingskuipen zijn kwaliteitsproducten die aan de
eisen van foodservicebedrijven voldoen en jarenlang zonder
problemen werken. De verwarmingselementen zijn gedurende
1 jaar gegarandeerd tegen breuk en doorbranden.
Formulier nr. RHWCEM-0816
INLEIDING
De Hatco HEATMAX verwarmingskuipen zijn het resultaat van
uitgebreid onderzoek en praktijktests. De gebruikte materialen
zijn gekozen met het oog op maximale duurzaamheid,
aantrekkelijk uiterlijk en optimale prestaties. Elk apparaat is vóór
verzending grondig geïnspecteerd en getest.
Deze handleiding geeft de installatie-, veiligheids en
bedieningsinstructies voor de verwarmingskuipen. Wij raden aan alle
installatie-, bedienings- en veiligheidsinstructies in deze handleiding
te lezen alvorens de verwarmingskuipen te installeren en te gebruiken.
De veiligheidsinformatie in deze handleiding wordt voorafgegaan
door een tekstkader met een van de volgende termen:
WAARSCHUWING wijst op een gevaarlijke situatie die, als
ze niet wordt vermeden, tot ernstige of dodelijke letsels kan
leiden.
VOORZICHTIG wijst op een gevaarlijke situatie die, als ze
niet wordt vermeden, tot lichte of vrij ernstige letsels kan
leiden.
ATTENTIE wordt gebruikt om uw aandacht te vestigen op
praktijken die niet tot lichamelijke letsels leiden.
57
Page 58

BELANGRIJKE VEILIGHEIDSINFORMATIE
ATTENTIE
VOORZICHTIG
WAARSCHUWING
WAARSCHUWING
Lees de volgende belangrijke veiligheidsinformatie om mogelijk dodelijk letsel te voorkomen
en om schade aan het apparaat of materiaal te voorkomen.
GEVAAR VOOR ELEKTRISCHE SCHOKKEN:
• Steek de stekker van het apparaat alleen in een naar
behoren geaard stopcontact met de correcte spanning,
grootte en stekkerconfiguratie. Als de stekker en het
stopcontact niet passen, neemt u contact op met een
gekwalificeerd elektricien om een stopcontact met de
correcte spanning en grootte te installeren.
• Schakel de stroomschakelaar UIT, trek de stroomkabel uit
en laat de eenheid afkoelen voor u reinigings,
aanpassings- of onderhoudswerken uitvoert.
• Dompel het apparaat NIET onder en maak het ook NIET
kletsnat. Het apparaat is niet waterbestendig. Gebruik het
apparaat niet als het onder werd gedompeld of erg nat
werd gemaakt.
• Het apparaat is niet weerbestendig. Gebruik het apparaat
alleen binnenshuis op een plaats waar de
omgevingstemperatuur minimaal 21°C bedraagt.
• Maak het apparaat niet schoon met stoom en gebruik ook
niet al te veel water.
• De constructie van dit apparaat is niet bestand tegen
hogedrukspuiten. Gebruik geen sprays met een spuitstraal
om dit apparaat schoon te maken.
• Trek niet aan het elektrische snoer van het apparaat.
• Gebruik het apparaat niet langer wanneer het elektrische
snoer gerafeld of versleten is.
• Probeer een beschadigd elektrisch snoer niet te herstellen
of vervangen. Het snoer moet door Hatco, een erkende
Hatco servicevertegenwoordiger of een persoon met
vergelijkbare kwalificaties worden vervangen
• Gebruik het apparaat niet om ijs in te bewaren of te laten
smelten. Hierdoor kan condesatie worden gevormd,
waardoor er elektrisch gevaar heerst en u persoonlijk
letsel en/of schade aan het apparaat kan teweegbrengen.
Schade die veroorzaakt werd door condensatie wordt niet
gedekt door de garantie.
• Gebruik alleen authentieke Hatco vervangingsonderdelen als
het apparaat moet worden hersteld. Als er geen authentieke
Hatco-vervangingsonderdelen worden gebruikt, komen alle
garanties te vervallen en kunnen de gebruikers van de
apparatuur aan gevaarlijke elektrische spanning worden
blootgesteld, wat kan resulteren in elektrische schokken of
brandwonden. Authentieke Hatco vervangingsonderdelen
zijn specifiek ontworpen om veilig te werken in de
omgevingen waarin ze worden gebruikt. Sommige nietauthentieke of generieke vervangingsonderdelen hebben niet
de vereiste eigenschappen om veilig te kunnen werken in
apparaten van Hatco.
BRANDGEVAAR:
• Plaats het apparaat op ten minste 25 mm afstand van
brandbare wanden en materialen. Als de
veiligheidsafstand niet wordt gerespecteerd kan
ontbranding of verkleuring optreden.
• Gebruik geen chemicaliën als bleekwater (of
reinigingsproducten die bleekwater bevatten), ovenreinigers
of brandbare reinigingsoplossingen om dit apparaat te kuisen.
Dit apparaat is niet bestemd voor gebruik door kinderen of
personen met beperkte lichamelijke, gevoels- of mentale
capaciteiten. Houd kinderen uit de buurt van het apparaat.
Zorg dat alle bedieners van het apparaat goede instructies
hebben ontvangen betreffende het veilige en juiste gebruik van
het apparaat.
Dit apparaat bevat geen onderdelen die door de gebruiker
kunnen worden vervangen. Als het apparaat moet worden
hersteld neemt u contact op met een erkend Hatco
servicevertegenwoordiger of de Hatco serviceafdeling op het
nummer +1-414-671-6350.
GEVAAR VOOR BRANDWONDEN:
• Sommige oppervlakken aan de buitenkant van het apparaat
worden heet. Wees voorzichtig wanneer u deze
oppervlakken aanraakt.
• Heet water in het apparaat kan brandwonden veroorzaken.
Laat het apparaat afkoelen voordat u het reinigt od er
vloeistof laat uitlopen.
Plaats het apparaat op een hoogte en een plaats waar er
gemakkelijk mee kan worden gewerkt. Het oppervlak moet
waterpas zijn om te voorkomen dat het apparaat of de inhoud
ervan per ongeluk zou vallen en moet sterk genoeg zijn om het
gewicht van het toestel en de inhoud te kunnen dragen.
Verplaats het apparaat niet als er voedingswaren inzitten. Zet
het apparaat uit, verwijder de voedingswaren en laat het
apparaat volledig afkoelen voordat u het verplaatst of kuist.
Tijdens de eerste ingebruikneming kunnen standaard en
erkende industriële oliën tot 30 minuten rookvorming
veroorzaken. Dit is een toestand van voorbijgaande aard. Om
een veilig gebruik te garanderen laat u het toestel zonder
voedingswaren werken tot de rook is verdwenen.
Gebruik enkel niet-schurende poetsmiddelen en -lappen.
Schurende poetsmiddelen en -lappen kunnen ontsierende
krassen maken in de afwerking van de eenheid en maken
vuilophoping mogelijk.
Leg het apparaat niet op de zijkant met de bedieningselementen
want anders kan het apparaat beschadigd raken.
Gemonteerde bedieningspanelen moeten op minimum 152 mm
(6″) afstand van het apparaat worden geplaatst (en niet verder
dan 1.420 mm [56″]). Als u het bedieningspaneel dichter
monteert kan de warmte schade berokkenen in het elektrische
systeem van het bedieningspaneel.
Plaats het apparaat niet in een warme kamer of waar vet van grills
of friteuses is. Teveel warmte kan het apparaat beschadigen.
De eenheid is ontworpen en aanbevolen voor gebruik in of op
een metalen bovenblad. Schade aan het materiaal van een
bovenblad valt niet onder de garantie van Hatco. Voor andere
oppervlakken, neemt u best contact op met de fabrikant om na
te gaan of het materiaal bestand is tegen langdurige
blootstelling aan temperaturen tot 100°C (212°F).
Gebruik niet teveel kracht wanneer u de montageschroeven in
het ingebouwde apparaat draait. Dit kan het apparaat en/of het
aanrecht beschadigen.
De eenheid niet gebruiken zonder voedsel/water in de
reservoirs. De eenheid kan beschadigd raken.
58
Formulier nr. RHWCEM-0816
Page 59

MODELBESCHRIJVING
Alle modellen
Alle HEATMAX verwarmingskuipen zijn betrouwbaar en
veelzijdig. Ze kunnen niet alleen worden gebruikt als
verwarmingskuip om voedsel op serveertemperatuur te
houden, maar er kan ook voedsel in worden gestoomd wanneer
de optionele adapterset erbij wordt gebruikt.
RHW-1
De RHW-1 is uitgerust met één verwarmingselement om
voedsel warm te houden of om soep of sauzen te koken. Het
product wordt geleverd met een speciaal ontworpen
roestvrijstalen ronde pot van 10 liter (11 qt) met scharnierend
deksel.
Model RHW-1
RHW-1B
De RHW-1B heeft dezelfde kenmerken als de RHW-1 maar is
een ingebouwd apparaat met een afstandsbedieningspaneel.
RCTHW-1
De RCTHW-1 is uitgerust met drie verwarmingselementen en
een aftapvoorziening vooraan. Het is geschikt voor een
standaard kookpan.
Model RCTHW-1
RCTHW-1B
De uitrusting van de RCTHW-1B is vergelijkbaar met de
RCTHW-1 met het verschil dat het een ingebouwd model is met
een kast voor afstandsregeling en een afvoer onderaan.
Model RHW-1B
RHW-2
RHW-2 is uitgerust met twee individueel regelbare
verwarmingselementen voor het warmhouden van voedsel of
het bereiden van soep of saus. Het product wordt geleverd met
twee speciaal ontworpen roestvrijstalen ronde potten van 10
liter (11 qt) met scharnierende deksels.
Model RHW-2
Formulier nr. RHWCEM-0816
Model RCTHW-1B
59
Page 60

WAARSCHUWING
CEE 7/7 Schuko
BS-1363
AS 3112
MODELBENAMING
R H W - 1 B
R = Rond
RCT = Rechthoekig
Verwarmingskuip
B = Ingebouwd met Afstandsbediening
Geen teken = Werkblad
1 = Eén verwarmingselement
2 = Twee verwarmingselement
SPECIFICATIES
Stekkerconfiguraties
De apparaten worden met een op de fabriek geïnstalleerd
elektriciteitssnoer met stekker geleverd. Stekkers worden
geleverd volgens de toepassingen.
GEVAAR VOOR ELEKTRISCHE SCHOKKEN: Steek de
stekker van het apparaat alleen in een naar behoren geaard
stopcontact met de correcte spanning, grootte en
stekkerconfiguratie. Als de stekker en het stopcontact niet
passen, neemt u contact op met een gekwalificeerd
elektricien om een stopcontact met de correcte spanning
en grootte te installeren.
OPMERKING : Het specificatielabel bevindt zich op de
achterzijde van het apparaat. Raadpleeg het
etiket voor het serienummer en informatie over
de elektriciteit van het apparaat.
Stekkerconfiguraties
OPMERKING: Stopcontact niet door Hatco geleverd.
Tabel met elektrische gegevens
Model Spanning Watts Ampère Stekkerconfiguratie Verzendgewicht
RHW-1 230 (CE) 1250 5.4 BS-1363, CEE 7/7 Schuko, AS 3112 7 kg (15 lbs.)
RHW-1B 230 (CE) 1250 5.4 BS-1363, CEE 7/7 Schuko, AS 3112 8 kg (18 lbs.)
RHW-2 230 (CE) 2500 10.9 BS-1363, CEE 7/7 Schuko, AS 3112 12 kg (26 lbs.)
RCTHW-1 230 (CE) 3000 13 BS-1363, CEE 7/7 Schuko, AS 3112 12 kg (26 lbs.)
RCTHW-1B 230 (CE) 3000 13 BS-1363, CEE 7/7 Schuko, AS 3112 13 kg (29 lbs.)
OPMERKING: Verzendgewicht is inclusief verpakking.
60
Formulier nr. RHWCEM-0816
Page 61

SPECIFICATIES
POWER
FAULT
100°C
70°C-90°C
50°C-70°C
TEMP
ON/OFF
o
_
FULL
POWER
ENERGY
SAVE
MODE
~
~
~
~
POWER
FAULT
100°C
70°C-90°C
50°C-70°C
TEMP
ON/OFF
o
_
FULL
POWER
ENERGY
SAVE
MODE
~
~
~
~
HEATMAX
HEATED WELL
A
A
D
E
RCTHW-1
RHW-1 RHW-1B RHW-2
RCTHW-1B
C
C
B B
B
E
D D
E
B B
C
A
C
A
C
A
Afmetingen
Breedte Diepte Hoogte Breedte tussen Diepte tussen
Model (A) (B) (C) buitenkant pootjes (D) buitenkant pootjes (E)
RHW-1 359 mm 330 mm 355 mm 179 mm 224 mm
(14-1/8") (13") (14") (7") (8-7/8")
RHW-1B 359 mm 330 mm 341 mm N/A N/A
(14-1/8") (13") (13-7/16")
RHW-2 630 mm 330 mm 355 mm 389 mm 249 mm
(24-3/4") (13") (14") (15-3/8") (9-7/8")
RCTHW-1 368 mm 611 mm 283 mm 347 mm 535 mm
(14-1/2") (24-1/16") (11-3/16") (14") (21-7/16")
RCTHW-1B 368 mm 582 mm 226 mm N/A N/A
(14-1/2") (22-15/16")
(8-15/16")
Formulier nr. RHWCEM-0816
61
Page 62

INSTALLATIE
VOORZICHTIG
ATTENTIE
WAARSCHUWING
ATTENTIE
Slangklem
Slangklem
Fitting
Schroef
Onderste
Paneel
Afvoerslang
Onderpaneel
Afvoerkraan
Algemeen
De verwarmingskuipen van HEATMAX worden met de
onderdelen reeds gemonteerd en klaar voor gebruik
verscheept uit de fabriek. Wees voorzichtig bij het uitpakken
van de verzenddoos om schade aan het apparaat en de
onderdelen te vermijden.
GEVAAR VOOR ELEKTRISCHE SCHOKKEN: Het apparaat
is niet weerbestendig. Gebruik het apparaat alleen
binnenshuis op een plaats waar de omgevingstemperatuur
minimaal 21°C bedraagt.
BRANDGEVAAR: Plaats het apparaat op ten minste 25 mm
afstand van brandbare wanden en materialen. Als de
veiligheidsafstand niet wordt gerespecteerd kan
ontbranding of verkleuring optreden.
Plaats het apparaat op een hoogte en een plaats waar er
gemakkelijk mee kan worden gewerkt. Het oppervlak moet
waterpas zijn om te voorkomen dat het apparaat of de inhoud
ervan per ongeluk zou vallen en moet sterk genoeg zijn om
het gewicht van het toestel en de inhoud te kunnen dragen.
Verplaats het apparaat niet als er voedingswaren inzitten.
Zet het apparaat uit, verwijder de voedingswaren en laat het
apparaat volledig afkoelen voordat u het verplaatst of kuist.
Leg het apparaat niet op de zijkant met de
bedieningselementen want anders kan het apparaat
beschadigd raken.
Plaats het apparaat niet in een warme kamer of waar vet
van grills of friteuses is. Teveel warmte kan het apparaat
beschadigen.
1. Haal het apparaat uit de doos.
2. Haal het informatiepakket eruit.
3. Haal de tape en beschermlaag van alle oppervlakken van
het apparaat.
4. Als het een apparaat is voor op het aanrecht, plaats het
dan op de gewenste locatie.
• Plaats het apparaat in een ruimte waar de
omgevingstemperatuur constant is en minimum 21° C
(70° F) bedraagt. Vermijd ruimten waar er veel
luchtbeweging of toch is (bv.: naast
afzuigventilatoren/afzuigkappen en
airconditioningleidingen).
• Zorg ervoor dat het apparaat op een hoogte en een
plaats staat waar er gemakkelijk mee kan worden
gewerkt.
• Zorg ervoor dat het oppervlak waar het apparaat op rust
waterpas staat en sterk genoeg is om het gewicht van
het apparaat en de voedingswaren te kunnen dragen.
• Zorg ervoor dat alle pootjes op de onderkant van het
apparaat stevig op het dragende oppervlak rusten.
5. Als het een inbouwapparaat is, volg dan de procedure voor
het "installeren van een ingebouwd model" in deze rubriek.
Een Ingebouwd Model Installeren
Volg deze procedure om een ingebouwd model te installeren.
Als het apparaat een rechthoekig ingebouwd model is, voer dan
eerts stap "de afvoermontage installeren" uit.
De eenheid is ontworpen en aanbevolen voor gebruik in of
op een metalen bovenblad. Schade aan het materiaal van
een bovenblad valt niet onder de garantie van Hatco. Voor
andere oppervlakken, neemt u best contact op met de
fabrikant om na te gaan of het materiaal bestand is tegen
langdurige blootstelling aan temperaturen tot 100°C (212°F).
De afvoermontage installeren
Voordat u een rechthoekig model onder een aanrecht
installeert, volgt u deze procedure uit om de afvoermontage te
installeren.
1. Draai het apparaat voorzichtig om en leg het op de
bovenkant.
2. Verwijder de schroeven en het onderpaneel.
3. Sluit het ene uiteinde van de afvoerslang aan op de fitting
met de bijgeleverde slangklem.
4. Leid de slang door het gat in het onderpaneel en breng het
onderpaneel met de oorspronkelijke schroeven weer aan
op het apparaat.
5. Sluit het andere uiteinde van de afvoerslang aan op de
afvoerkraan met de bijgeleverde slangklem.
6. Voer de procedure "Het apparaat onder een aanrecht
installeren" uit in deze rubriek. Nadat het apparaat in de
toonbank is geïnstalleerd, kan de afvoerkraan desgewenst
op een externe afvoerpijp worden aangesloten.
De afvoermontage installeren
(enkel ingebouwde rechthoekige modellen).
62
Formulier nr. RHWCEM-0816
Page 63

ATTENTIE
ScrewSchroef
Bovenste
Klem
Toonbank
L BracketL-beugel
Uitsnijding in
Blad
Uitsnijding
Bedieningspaneel
ScrewVoordeksel
schakelkast
Voorste
cover
Behuizing
Bedieningspaneel
Montage klem
Het apparaat installeren
ATTENTIE
550 mm
(21-11/16″)
344 mm
(13-9/16″)
RCTHW-1B
305 mm
12″
RHW-1B
132 mm
(5-1/8″)
144 mm
(5-9/16″)
65 mm
(2-9/16″)
33 mm
(1-5/16″)
154 mm
(6″)
Ø 4,5 mm
(3/16″)
1. Snijdt een geschikte opening in het aanrecht om het
apparaat in te installeren.
Uitsnijafmetingen aanrecht
OPMERKING : Het aanrecht moet waterpas zijn zodat de
afvoer van de rechthoekige kuip goed werkt.
INSTALLATIE
Het apparaat installeren
4. Breng L-beugels aan op de
onderkant van het apparaat.
5. Draai de schroeven van de Lbeugels aan totdat de bovenste
flens vlak op de toonbank ligt.
Gemonteerde bedieningspanelen moeten op minimum 152
mm (6″) afstand van het apparaat worden geplaatst (en niet
verder dan 1.420 mm [56″]). Als u het bedieningspaneel
dichter monteert kan de warmte schade berokkenen in het
elektrische systeem van het bedieningspaneel.
Het bedieningspaneel moet buiten de warmtezone worden
geïnstalleerd. Als u het bedieningspaneel in de
warmtezone installeert zullen de bedieningen oververhit
geraken waardoor ze slecht gaan werken of stuk geraken.
2. Snijd uit een verticaal oppervlak de geschikte opening uit voor
het bedieningspaneel, ten minste 152 mm (6″) verwijderd van
het apparaat, maar niet verder dan 1.420 mm (56″).
Gebruik niet teveel kracht wanneer
u de montageschroeven in het
ingebouwde apparaat draait. Dit kan
het apparaat en/of het aanrecht
beschadigen.
Het Afstand Gemonteerde Bedieningspaneel
Installeren
1. Installeer het bedieningspaneel in de uitsnijding:
a. Haal een van de montageklemmen van de behuizing
van het bedieningspaneel door de uitsnijding. Kantel de
schakelkast en laat de andere flens door de uitsparing
zakken.
b. Linieer de montageklemmen met de schroefgaten in het
installatieoppervlak en maak de behuizing van het
bedieningspaneel vast aan het installatieoppervlak met
behulp van vier M4-schroeven (niet meegeleverd).
c. Installeer de voorste cover terug aan het
bedieningspaneel met behulp van de vier schroeven.
Uitsnijafmetingen bedieningspaneel
OPMERKING : Het elektrische snoer tussen het apparaat en
het bedieningspaneel meet 1.420 mm (56″).
3. Verwijder de vier schroeven die het voorpaneel op de
schakelkast bevestigen. Verwijder het voorpaneel. Steek
de schakelkast, met het voorpaneel verwijderd, en de
elektrische draden door de uitsparing in het werkblad en
laat het apparaat in de uitsparing zakken.
Formulier nr. RHWCEM-0816
Het Afstand Gemonteerde Bedieningspaneel Installeren
2. Verbind de stekker met een goed geaard stopcontact met
de correcte spanning, grootte en stekkerinrichting. Zie de
rubriek SPECIFICATIES voor meer informatie.
63
Page 64

WAARSCHUWING
ATTENTIE
VOORZICHTIG
TEMP-knop
Stroomlampje
Aan/uitschakelaar
MODUS-knop
Foutlampje
WERKING
WAARSCHUWING
WAARSCHUWING
Algemeen
Volg deze procedure om de HEATMAX verwarmingskuipen te
bedienen.
Lees alle veiligheidsvoorschriften onder Belangrijke
veiligheidsinformatie voor u dit apparaat bedient.
De eenheid niet gebruiken zonder voedsel/water in de
reservoirs. De eenheid kan beschadigd raken.
OPMERKING: Voor de juiste warmteoverdracht moet de serie
RHW (ronde verwarmingskuipen) met de
speciale bijgeleverde pan worden gebruikt.
Deze pan heeft een ronde bodem zodat hij in
het verwarmingselement past.
1. Steek de stekker van het apparaat alleen in een naar
behoren geaard stopcontact met de correcte spanning,
grootte en stekkerconfiguratie. Zie het deel
SPECIFICATIES voor details.
• De stroomindicator licht rood op wanneer het apparaat
van stroom voorzien wordt.
2. Plaats een pan/pot met voedingswaren of water in het
apparaat.
OPMERKING: Bedien het apparaat niet zonder voedselpan
of met een lege/droge pan. Want in dit geval
zal het apparaat oververjitten en naar de
FOUT-modus overgaan.
3. Fruk op de AAN/UIT-knop om het apparaat uit tte
schakelen.
• De stroomindicator licht groen op wanneer het apparaat
aan het opwarmen is.
OPMERKING: Het foutlampje brandt en het apparaat laat een
toon horen bij oververhitting van het apparaat
of bij kortsluiting van de temperatuursensor.
Wanneer dit gebeurt, wordt de stroom
automatisch uitgeschakeld totdat de
temperatuur in het normale gebied terugkomt
of de temperatuursensor normaal werkt.
ONDERHOUD
GEVAAR VOOR BRANDWONDEN: Sommige oppervlakken
aan de buitenkant van het apparaat worden heet. Wees
voorzichtig wanneer u deze oppervlakken aanraakt.
4. Druk op de TEMP-knop om de gewenste
temperatuurinstelling te selecteren. De indicator van de
geselecteerde temperatuurinstelling zal beginnen branden.
Er zijn drie temperatuurinstellingen:
• 90–100°C (194–212°F) — Stomen en heropwarmen
• 70–90°C (158–194°F) — Voedsel verwarmen/
warm houden
• 50–70°C (122–158°F) — Voedsel verwarmen/
warm houden
5. Druk op de TEMP-knop om de gewenste
temperatuurinstelling te selecteren. De indicator boven de
modus die geselecteerd is begint te branden. Er zijn twee
verwarminsgmodi:
• VOLLE KRACHT Modus — Het apparaat werkt op volle
kracht.
• LAGE KRACHT Modus — Het apparaat werkt op 50%
van zijn kracht voor het verwarmen van voedingswaren
en voorkomt het verbranden ervan.
Bedieningspaneel
Algemeen
De HEATMAX verwarmingskuipen zijn ontwikkeld voor een
maximale duurzaamheid en maximale prestaties met een
minimaal onderhoud.
GEVAAR VOOR ELEKTRISCHE SCHOKKEN:
•
Schakel de stroomschakelaar UIT, trek de stroomkabel uit
en laat de eenheid afkoelen voor u reinigings,
aanpassings- of onderhoudswerken uitvoert.
• Dompel het apparaat NIET onder en maak het ook NIET
kletsnat. Het apparaat is niet waterbestendig. Gebruik
het apparaat niet als het onder werd gedompeld of erg
nat werd gemaakt.
• Maak het apparaat niet schoon met stoom en gebruik
ook niet al te veel water.
GEVAAR VOOR ELEKTRISCHE SCHOKKEN:
• De constructie van dit apparaat is niet bestand tegen
hogedrukspuiten. Gebruik geen sprays met een
spuitstraal om dit apparaat schoon te maken.
• Gebruik alleen authentieke Hatco vervangingsonderdelen
als het apparaat moet worden hersteld. Als er geen
authentieke Hatco-vervangingsonderdelen worden
gebruikt, komen alle garanties te vervallen en kunnen de
gebruikers van de apparatuur aan gevaarlijke elektrische
spanning worden blootgesteld, wat kan resulteren in
elektrische schokken of brandwonden. Authentieke Hatco
vervangingsonderdelen zijn specifiek ontworpen om
veilig te werken in de omgevingen waarin ze worden
gebruikt. Sommige niet-authentieke of generieke
vervangingsonderdelen hebben niet de vereiste
eigenschappen om veilig te kunnen werken in apparaten
van Hatco.
64
Formulier nr. RHWCEM-0816
Page 65

ONDERHOUD
WAARSCHUWING
ATTENTIE
RHW-LID
RHW-11QT-LID-HG
RHW-11QT-POT
RHW-SP
RCTHW-Basket
RCTHW-1/3SP
RCTHW-SW
RCTHW-SK
RCTHW-2/3SP
RCTHW-SP
BRANDGEVAAR: Gebruik geen chemicaliën als bleekwater
(of reinigingsproducten die bleekwater bevatten),
ovenreinigers of brandbare reinigingsoplossingen om dit
apparaat te kuisen.
Dit apparaat bevat geen onderdelen die door de gebruiker
kunnen worden vervangen. Als het apparaat moet worden
hersteld neemt u contact op met een erkend Hatco
servicevertegenwoordiger of de Hatco serviceafdeling op
het nummer +1-414-671-6350.
Reinigen
Om de afwerking en de prestaties van het apparaat te
beschermen, wordt aanbevolen het apparaat dagelijks te
reinigen.
Gebruik enkel niet-schurende poetsmiddelen en -lappen.
Schurende poetsmiddelen en -lappen kunnen ontsierende
krassen maken in de afwerking van de eenheid en maken
vuilophoping mogelijk.
1. Zet het apparaat uit, trek de stekker uit het stopcontact en
laat het apparaat afkoelen.
2. Verwijder de veodselpannen en andere accessoires om ze
te wassen in een vaatwasser of in de gootsteen.
3. Laat het water uit de verwarmingskuip lopen.
4. Reinig alle metalen oppervlakten met een zachte, vochtige
doek. Hardnekkige vlekken kunnen met een niet-schurend
schoonmaakmiddel worden verwijderd. Moeilijk bereikbare
plaatsen moeten met een kleine borstel en milde zeep
schoon worden gemaakt.
5. Droog de hele eenheid af met een droge, niet-schurende
doek.
OPMERKING : Hard water kan kalkaanslag veroorzaken op
de RCTHW-elementen. Gebruik een oplossing
met 2 maten azijn tegenover 5 maten water
om de kalkaanslag op te lossen. Laat de
oplossing minstens een uur weken (of de hele
nacht bij grote opeenhoping), schrob het
reservoir met een plastic schuursponsje, laat
de oplossing wegvloeien en spoel gronding
met schoon water. Vermijd opeenhoping van
kalkaanslag. Dit kan ervoor zorgen dat de
verwarmingselementen oververhitten.
RHW-SP....................Stoomplaat voor 6 manden
RHW-11QT-LID-HG ..Rond scharnierend deksel voor 10 liter
RHW-PAN..................Ronde pot van 10 liter (11 qt.) —
RHW-11QT-LID ........Rond deksel voor 10 liter (11 qt.) met
RCTHW-SW ..............Sauswarmeradapter
RCTHW-SK ..............Adapter voor soepketel van 7,95 L (7
RCTHW-2/3SP ..........Stoomplaat voor 2 manden met
RCTHW-1/3SP ..........Stoomplaat voor 4 manden met
RCTHW-SP ..............Stoomplaat voor 6 manden
RCTHW-Basket ........Mand voor noedels
RCTHW-PC ..............Pastakoker (geen afbeelding)
(11 qt.) met plastic handvat
221 x 203 mm (8-11/16″ dia x 8″H))
plastic handvat
RHW-toebehoren
quart)
Gastronorm 2/3 pot uitsnijding
Gastronorm 1/3 pot uitsnijding
OPTIES EN TOEBEHOREN
RCTHW-toebehoren
Formulier nr. RHWCEM-0816
65
Page 66

WAARSCHUWING
WAARSCHUWING
OPLOSSEN VAN PROBLEMEN
Onderhoud aan en herstellingen van dit apparaat mogen
alleen worden uitgevoerd door bevoegd personeel. Als
onbevoegd personeel het onderhoud of de herstelling
uitvoert kan dat tot elektrische schokken of brandwonden
GEVAAR VOOR ELEKTRISCHE SCHOKKEN: Schakel de
stroomschakelaar UIT, trek de stroomkabel uit en laat de
eenheid afkoelen voor u reinigings, aanpassings- of
onderhoudswerken uitvoert.
leiden.
Symptoom Mogelijke Oorzaak Corrigerende-Maatregel
Apparaat niet warm
genoeg.
Apparaat te warm. Ingestelde basistemperatuur te hoog. Wijzig met de knop MODE (modus) de instelling van FULL POWER
Geen warmte. Het apparaat staat uit. Gebruik de AAN/UIT-knop om het apparaat in te schakelen. Volg de
Ingestelde basistemperatuur te laag. Wijzig met de knop MODE (modus) de instelling van LOW POWER
Verkeerde pot geïnstalleerd in het apparaat
(RHW modellen).
Het verwarmingselement werkt niet. Neem contact op met een erkend servicevertegenwoordiger of met
Temperatuurbediening werkt niet naar behoren. Neem contact op met een erkend servicevertegenwoordiger of met
De spanningstoevoer is niet correct. Verifieer of het voltage naar het apparaat correct is. Een laag
Controle van de temperatuur niet goed werkt. Neem contact op met een erkend servicevertegenwoordiger of met
Geleverde spanning is onjuist. Verifieer of het voltage naar het apparaat correct is. Een te hoog
Zekering gesprongen. Zet de zekering terug aan. Als de zekering blijft uitgaan, contacteer
Temperatuurcontrole defect. Neem contact op met een erkend servicevertegenwoordiger of met
Basisverwarmingselement uitgebrand. Neem contact op met een erkend servicevertegenwoordiger of met
Hittegevoelige onderbreker is doorgeslagen. Controleer of reservoir schoon is en voldoende gevuld is met water.
(laag vermogen) naar FULL POWER (vol vermogen).
Gebruik de TEMP-knop om de hogere temperatuurinstelling te
veranderen.
Gebruik enkel door Hatco speciaal ontworpen ronde potten voor de
RHW-modellen. Andere potten zorgen niet voor voldoende contact
tussen het apparaat en de pot.
Hatco voor assistentie.
Hatco voor assistentie.
voltage zorgt voor onvoldoende verwarming.
(vol vermogen) naar LOW POWER (laag vermogen).
Gebruik de TEMP-knop om de hogere temperatuurinstelling te
veranderen.
Hatco voor assistentie.
voltage zorgt voor oververhitting en beschadiging aan het apparaat.
procedure in de BEDIENINGS rubriek.
dan een door Hatco geauthoriseerd onderhoudsagent voor hulp.
Hatco voor assistentie.
Hatco voor assistentie.
Grote kalkopeenhoping en/of gebruik van de eenheid zonder water
kan de eenheid doen oververhitten en de hittegevoelige
onderbreker inschakelen.
Vragen over het oplossen van problemen?
Als het u niet lukt om een probleem op te lossen, kunt u met het dichtstbijzijnde door Hatco erkende serviceagentschap of met Hatco
contact opnemen voor assistentie. Om het dichtstbijzijnde serviceagentschap te vinden, meldt u zich aan op de website
www.hatcocorp.com en klikt u op Find Service Agent, of neemt u contact op met het team onderdelen en service op:
Telefoonnummer: 414-671-6350
e-mailadres: partsandservice@hatcocorp.com
Formulier nr. RHWCEM-0816
66
Page 67

INTERNATIONALE BEPERKTE GARANTIE
1. PRODUCTGARANTIE
Hatco garandeert dat de producten die zij vervaardigt (de
"Producten") vrij zijn van materiaalfouten bij normaal gebruik
en onderhoud, gedurende de periode van één (1) jaar vanaf de
aankoopdatum als ze geïnstalleerd en onderhouden worden in
overeenstemming met de schriftelijke instructies van Hatco of
gedurende 18 maanden na datum van verzending door Hatco.
De koper van het product moet de aankoopdatum valideren
door het product te registreren bij Hatco of door andere
bevredigende middelen naar Hatco's eigen goeddunken.
Hatco garandeert dat de volgende productonderdelen vrij zijn
van defecten in materialen vanaf de aankoopdatum
(onderhevig aan de voorafgaande voorwaarden) voor de
periode(n) in overeenstemming met de voorwaarden die
hieronder worden gespecificeerd:
a) Twee (2) jaar garantie op onderdelen:
Elementen bandtoaster (bekleed met metaalplaten)
Schuifverwarmingselementen (metalen bekleding)
Schuifverwarmer schuifrollers en glijdingen
Elementen van verwarmingsstrip (metalen bekleding)
Uitstalverwarmingselementen
(luchtverwarming met metalen bekleding)
Elementen van het wachtcabinet (luchtverwarming met
metalen bekleding)
Ingebouwde elementen van warmhoudketel —
HW- en HWB-serie (met metalen bekleding)
b) Vijf (5) jaar garantie op onderdelen:
3CS- en FR-tanks
c) Tien (10) jaar garantie op onderdelen:
Extra elektrische boilers
Extra gasboilers
d) Negentig (90) dagen garantie op onderdelen:
Vervangingsonderdelen
DE VOORAFGAANDE GARANTIES ZIJN EXCLUSIEF EN
VERVANGEN ALLE ANDERE GARANTIES, OFWEL
UITDRUKKELIJK OF GEÏMPLICEERD, MET INBEGRIP VAN,
MAAR NIET BEPERKT TOT, ENIGE GEÏMPLICEERDE
GARANTIE VAN VERKOOPBAARHEID, OF GESCHIKTHEID
VOOR EEN BEPAALD DOEL, OF OCTROOI, OF ANDERE
INBREUK OP INTELLECTUELE EIGENDOMSRECHTEN.
Zonder de algemeenheid van het voorafgaande te beperken
DEKKEN ZULKE GARANTIES NIET HET VOLGENDE:
Gloeilampen met coating, fluorescentielampen,
verwarmingspeertjes van lampverwarmer, glazen onderdelen,
defecten in aanjagertank, xenongloeilampen, LED-buizen,
warmtewisselaar met koelribben of andere waterverwarmingsvoorzieningen veroorzaakt door verkalking, de afzetting van
sediment, chemische aantasting of bevriezing, misbruik van,
het knoeien aan of het verkeerd gebruiken van het Product,
verkeerde installatie of het gebruik van een verkeerd voltage.
2. BEPERKING VAN REMEDIES EN SCHADE
De aansprakelijkheid van Hatco en de exclusieve rechtsmiddelen
van kopers hieronder zullen enkel en alleen beperkt zijn tot
vervanging van onderdelen of productgebruik, naar keuzen van
Hatco, nieuwe of opgeknapte onderdelen of producten of een door
Hatco geautoriseerd servicebedrijf met betrekking tot enige claims
die ingediend worden binnen de toepasselijke garantieperiode
waarnaar hierboven verwezen wordt. Hatco behoudt zich het recht
voor om elke dergelijke vordering geheel of gedeeltelijk te
aanvaarden of te verwerpen. In de context van deze beperkte
garantie betekent “opgewerkt” een onderdeel of Product dat door
Hatco of een door Hatco erkend serviceagentschap terug volgens
de originele specificaties is ingesteld. Hatco aanvaardt geen
geretourneerde Producten zonder voorafgaandelijk verkregen
schriftelijke toestemming van Hatco, en alle onkosten voor
goedgekeurde geretourneerde producten zijn ten laste van de
Koper. ONDER GEEN ENKELE OMSTANDIGHEDEN ZAL
HATCO AANSPRAKELIJK GESTELD WORDEN VOOR
GEVOLGSCHADE OF BIJKOMENDE SCHADE, MET INBEGRIP
VAN, MAAR NIET BEPERKT TOT, ARBEIDSONKOSTEN OF
WINSTDERVING RESULTERENDE VAN HET GEBRUIK VAN
OF HET ONVERMOGEN DE PRODUCTEN TE GEBRUIKEN,
OF VAN DE PRODUCTEN DIE GEÏNCORPOREERD WORDEN
IN OF EEN ONDERDEEL WORDEN VAN ENIG ANDER
PRODUCT OF ENIGE ANDERE GOEDEREN.
INFORMATIE OVER GARANTIESERVICE
The garantie voor de Hatco HEATMAX verwarmingskuipen is
voor één jaar, beginnende vanaf de dag van de aankoop, of
voor een periode van achttien maanden na de verzending door
Hatco. de periode die het eerst verstrijkt is van toepassing.
Gelieve het volgende te doen wanneer u binnen de
garantieperiode een probleem ondervindt met de
kuipverwarmer:
Contact opnemen met een Plaatselijke Hatco-dealer
Wanneer u contact opneemt met een Hatco-dealer voor hulp
en service, geef de dealer dan de volgende informatie om
verzekerd te zijn van onmiddellijke behandeling:
• Model van de unit
• Serienummer (op de achterzijde van het apparaat)
• Het Specifieke Probleem met de unit
• Aankoopdatum
• Naam van uw Bedrijf
• Verzendadres
• Naam en Telefoonnummer van Contactpersoon
Formulier nr. RHWCEM-0816
De Hatco-dealer doet het Volgende:
• Vereiste Vervangende Onderdelen Verschaffen
• Garantieclaim aan Hatco zenden voor Verwerking
Problemen buiten de garantie
Als u een probleem hebt buiten de garantie dat ondersteuning
vereist, gelieve het dichstbijzijnde door Hatco geauthoriseerd
onderhoudsbedrijf te contacteren. Om het dichstbijzijnde
onderhoudsbedrijf te vinden:
• gan naar onze website www.hatcocorp.com, selecteer de
Resources menu, en klik op “Find Service
Agent/Distributor”.
• bel Hatco Service op 414-671-6350.
• e-mail Hatco Service naar partsandservice@hatcocorp.com
67
Page 68

HATCO CORPORATION
P.O. Box 340500
Milwaukee, WI 53234-0500 U.S.A.
Telephone 414-671-6350
partsandservice@hatcocorp.com
www.hatcocorp.com
Symbol Identification
Symbolerklärung
Identificación de los símbolos
Identification de Symbole
Caution — Hot Surface
Precaución: superficie caliente
Attention - Surface Chaude
Power ON
Encendido
Puissance Sur
Power OFF
Apagado
Hors Tension
Standby
En espera
Veille
Protective Earth Ground
Puesta a tierra protectora
La Terre de Protection
Earth Ground
Puesta a tierra
Mise à la Terre
Equipotential Ground
Masa equipotencial
Rez de Potentiel
Alternating Current
Corriente alterna
Courant Alternatif
Water Fill, Low Water
Llenado de agua, bajo nivel de agua
Remplir d'eau, Bas Niveau d'eau
Humidity, Humidity Cycle
Humedad, ciclo de humedad
Humidité, Cycle Humidité
Identificazione del simbolo
Uitleg bij de symbolen
Achtung – Heiße Oberfläche
Attenzione: superficie calda
Let op: heet oppervlak
Einschalten
Acceso
Ingeschakeld
Ausschalten
Spento
Uitgeschakeld
Standby
Standby
Standby
Schutzerde
Messa a terra protettiva
Beschermende aarding
Erde
Messa a terra
Aarding
Erdung mit Potenzialausgleich
Terra equipotenziale
Vereffeningsleiding
Wechselstrom
Corrente alternata
Wisselstroom
Wasser auffüllen, Wasserstand niedrig
Riempire con acqua, acqua insufficiente
Water bijvullen, laag waterpeil
Feuchtigkeit, Befeuchtungszyklus
Umidità, ciclo di umidità
Vochtigheid, bevochtigingscyclus
August 2016 P/N 07.04.374.00 Form No. RHWCEM-0816
 Loading...