

Hatco GRPWS Installation & Operating Manual

CALENTADOR DE PIZZAS SERIE GRPWS
Manual de Instalación y Operación
RISCALDATORE PER PIZZA
Manuale di Installazione ed Uso
PIZZAWÄRMER SERIE GRPWSE
Inbau- undBetriebshandbuch
CHAUFFE-PIZZAS SÉRIE GRPWS
Manuel d'installation & et d'utilisation
PIZZAVERWARMER GRPWS
Serie Installatie- en bedieningshandleiding
Modello: Glo-Ray
Modelo: Glo-Ray
Modell: Glo-Ray
Modèle: Glo-Ray
Model: Glo-Ray
® ®
®®
®
GLO-RAY
®
Pizza Warmer
GRPWS Series
Installation &
Operating Manual
I&W #07.05.118.00
1
Form No. GRPWSCEM-0702
ILLUSTRATIONS
A NEMA 5-15P A NEMA 5-15P
B NEMA 14-20P B NEMA 14-20P
C BS 1363 C BS 1363
D NEMA 5-20P D NEMA5-20P
E AS 3112 E AS 3112
F CEE 7/7 Schuko F CEE 7/7 Schuko
A NEMA 5-15P A NEMA 5-15P
B NEMA 14-20P B NEMA 14-20P
C BS 1363 C BS 1363
D NEMA 5-20P D NEMA5-20P
E AS 3112 E AS 3112
F CEE 7/7 Schuko F CEE 7/7 Schuko
A NEMA 5-15P A NEMA 5-15P
B NEMA 14-20P B NEMA 14-20P
C BS 1363 C BS 1363
D NEMA 5-20P D NEMA5-20P
E AS 3112 E AS 3112
F CEE 7/7 Schuko F CEE 7/7 Schuko
Glo-Ray Model Glo-Ray modèle
GRPWS - 4818T GRPWS - 4818T
Glo-Ray Modell Glo-Ray Modello
GRPWS - 4818T GRPWS - 4818T
Modelo Glo-Ray model
GRPWS - 4818T de Glo-Ray GRPWS - 4818T
Dimensions - GRPWS Models - Dimensions - Modèles
Dual Shelf GRPWS - Deux étagères
Abmessungen - GRPWS-Modelle - Dimensioni - Modelli
Doppelregal GRPWS Due ripiani
Dimensiones de los modelos Afmetingen - GRPWS
GRPWS - de dos anaqueles modellen - Twee rekken
Dimensions - GRPWS Models - Dimensions - Modèles
Triple Shelf GRPWS - Trois étagères
Abmessungen - GRPWS- Dimensioni - Modelli
Modelle -Dreifachregal GRPWS Tre ripiani
Dimensiones de los modelos Afmetingen - GRPWS
GRPWS, de tres anaqueles modellen - Drie rekken
Dimensions - GRPWS Models - Dimensions - Modèles
Quadruple Shelf GRPWS - Quatre étagères
Abmessungen - GRPWS- Dimensioni - Modelli
Modelle -Vierfachregal GRPWS Quattro Ripiani
Dimensiones de los modelos Afmetingen - GRPWSGRPWS, de cuatro anaqueles modellen - Vier rekken
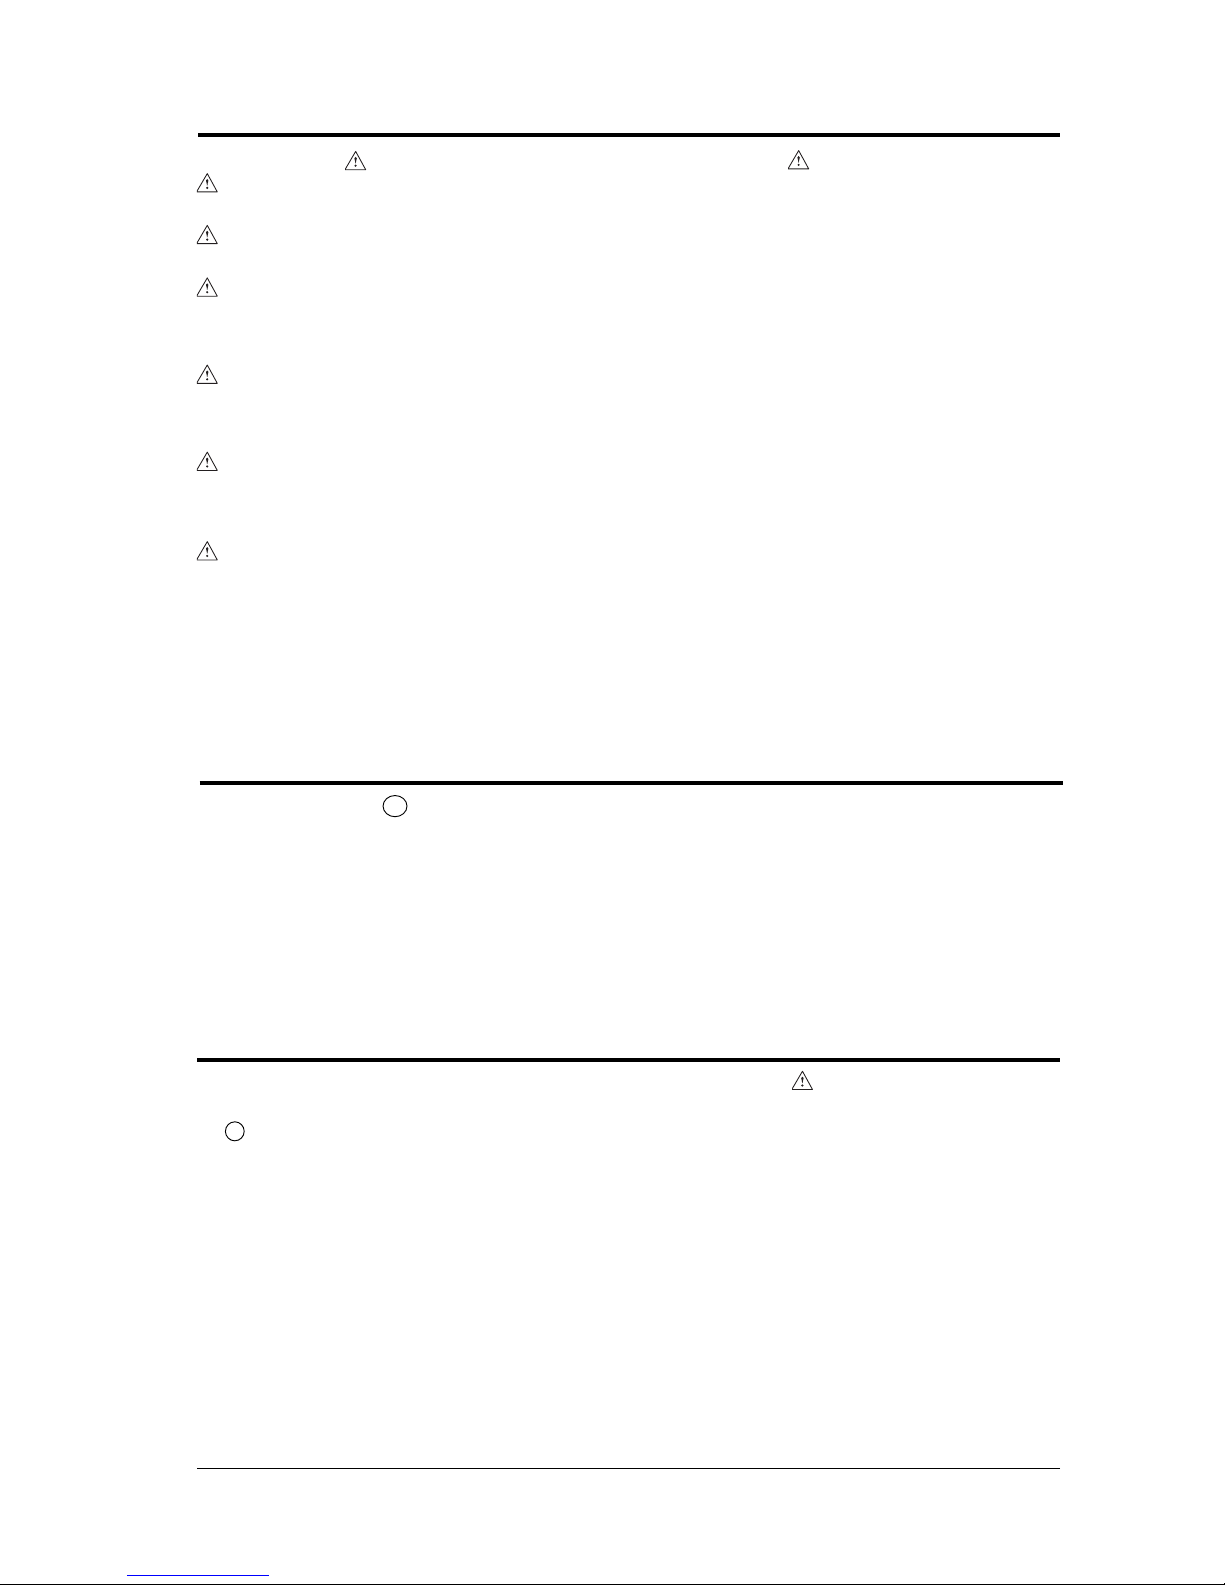
Plug Configurations Fiches disponibles
Steckerkonfigurationen Configurazioni della spina
Configuraciones de enchufes Stekkerconfiguraties
1
2
A
D
E
F
B
C
A
B
C
A
B
C
3
4
A
B
C
5

2 Form No. GRPWSCEM-0702
ILLUSTRATIONS
Leg Installation Installation des pieds
Einbau der Füße Installazione dei piedi
Instalación de las patas Installatie van poten
Controls Commandes
Bedienungselemente Controlli
Controles Knoppen
Side Glass Panel Installation Installation du panneau
de verre latéral
Einbau der Seitenglasplatten Installazione dei pannelli
laterali
Instalación del panel Installatie van
de vidrio lateral glazen zijpanelen
Box Stop Installation Installation de la butée de boîtes
Einbau des Kartonanschlags Installazione dei bordi rialzati
Instalación del tope de la caja Installatie van pallen
Controls for Triple Shelf Unit Commandes pour modèle
with TID à trois étagères avec
affichagede températures
Bedienungselemente für Controlli per l'unità a tre
Dreifachregal-Einheit mit ripiani con display
Temperaturanzeige temperatura (TID)
Controles para la unidad con tres Knoppen voor apparaat met
anaqueles con PIT drie rekken met
temperatuurdisplay
6
A
B
Glo-Ray Model GRPWS-4818T
Control Panel Figure #7
BOTTOM
MIDDLE
TOP
B
C
A
A ON/OFF Switch A Commutateur de
B Thermostat Control marche/arrêt
B Thermostat
A EIN/AUS-Schalter A Interruttore
B Thermostatregelung B Controller del termostato
A Conmutador ON/OFF AAAN/UIT-schakelaar
(Encendido/Apagado) B Thermostaat
B Control de termostato
A Thermostat Control A Thermostat
B ON/OFF Switch B Commutateur
de marche/arrêt
C Temperature Indicating C Affichage de températures
Display
A Thermostatregelung A Controller del termostato
B EIN/AUS-Schalter B Interruttore
C Temperaturanzeige C Display temperatura
A Control de termostato A Thermostaat
B Conmutador ON/OFF B AAN/UIT-schakelaar
(Encendido/Apagado) C Temperatuurdisplay
C Pantalla indicadora
de la temperatura (PIT)
7
8
9
10
3
CONTENTS
Form No. GRPWSCEM-0702
The instructions in English begin on page.....................................................................................3
Deutsche Anweisungen beginnen auf Seite.................................................................................10
Las instrucciones en Espanol comienzan en la pagina................................................................17
Les instructions en Francais commencent a la page ...................................................................24
Le istruzioni in Italiano iniziano dalla pagina.............................................................................31
Nederlandse instructies beginnen op bladzijde ...........................................................................38
INTRODUCTION
IMPORTANT SAFETY INSTRUCTIONS
This manual contains important safety information concerning
the maintenance, use and operation of this product. Failure
to follow the instructions contained in this manual may result
in serious injury. If you are unable to understand the contents
of this manual, please bring it to the attention of your supervisor.
Do not operate this equipment unless you have read and understood
the contents of this manual.
The Hatco Glo-Ray
®
GRPWS Pizza Warmers are perfect
for holding boxed or bagged pizza on a buffet line or at temporary
serving areas. These warmers hold hot wrapped pizzas and keep
them at optimum serving temperatures without affecting quality.
A thermostatically controlled heated base extends the holding times
of most wrapped food. These units also feature incandescent lights
along with a cord and plug set(s).
This manual provides the installation, safety and operating
instructions for the Glo-Ray Pizza Warmers. We recommend
all installation, operating and safety instructions appearing in this
manual be read prior to installation or operation of your Hatco Pizza
Warmer. Safety instructions that appear in this manual after
a warning symbol and the words WARNING or CAUTION
printed in bold face are very important. WARNING means
there is the possibility of serious injury or death to yourself
or others. CAUTION means there is the possibility of minor
or moderate injury. CAUTION without the symbol signifies
the possibility of equipment or property damage only.
Hatco Glo-Ray Pizza Warmers are a product of extensive research
and field testing. The materials used were selected for maximum
durability, attractive appearance and optimum performance. Every
unit is thoroughly inspected and tested prior to shipment.
Illustrations.....................................................................................1
Introduction....................................................................................3
Important Safety Instructions.......................................................3
Model Descriptions.........................................................................4
All Models..............................................................................4
Specifications ..................................................................................4
Plug Configurations ................................................................4
Electrical Rating Chart - Dual Shelf ......................................5
Electrical Rating Chart - Triple Shelf.....................................5
Electrical Rating Chart - Quadruple Shelf .............................5
Dimensions .............................................................................6
Installation ......................................................................................7
All Models..............................................................................7
Location..................................................................................7
Operation ........................................................................................7
Maintenance....................................................................................8
General....................................................................................8
Cleaning..................................................................................8
Display Light Bulb Replacement ...........................................8
Accessories ......................................................................................8
Temperature Indicating Display (TID)...................................8
Hatco Limited Warranty...............................................................9
Important Owner Information ....................................Back Cover
IMPORTANT! Read the following important safety instructions to avoid personal injury or death, and to avoid
damage to the equipment or property.
WARNINGS
Plug unit into a properly grounded electrical outlet
of the correct voltage, size and plug configuration. If
the plug and receptacle do not match, contact a qualified
electrician to determine the proper voltage and size
and install the proper electrical outlet.
To avoid any injury, turn the power switch off, unplug
the unit from the power source and allow to cool before
performing any maintenance.
For safe and proper operation, the unit must be located
a reasonable distance from combustible walls and materials.
If safe distances are not maintained, discoloration
or combustion could occur.
CAUTIONS
Some exterior surfaces on the unit will get hot. Use caution
when touching these areas to avoid injury.
Locate the unit at the proper counter height, in an area that
is convenient for use. The location should be level to prevent
the unit or its contents from accidentally falling, and strong
enough to support the weight of the unit.
4
IMPORTANT SAFETY INSTRUCTIONS
Form No. GRPWSCEM-0702
SPECIFICATIONS
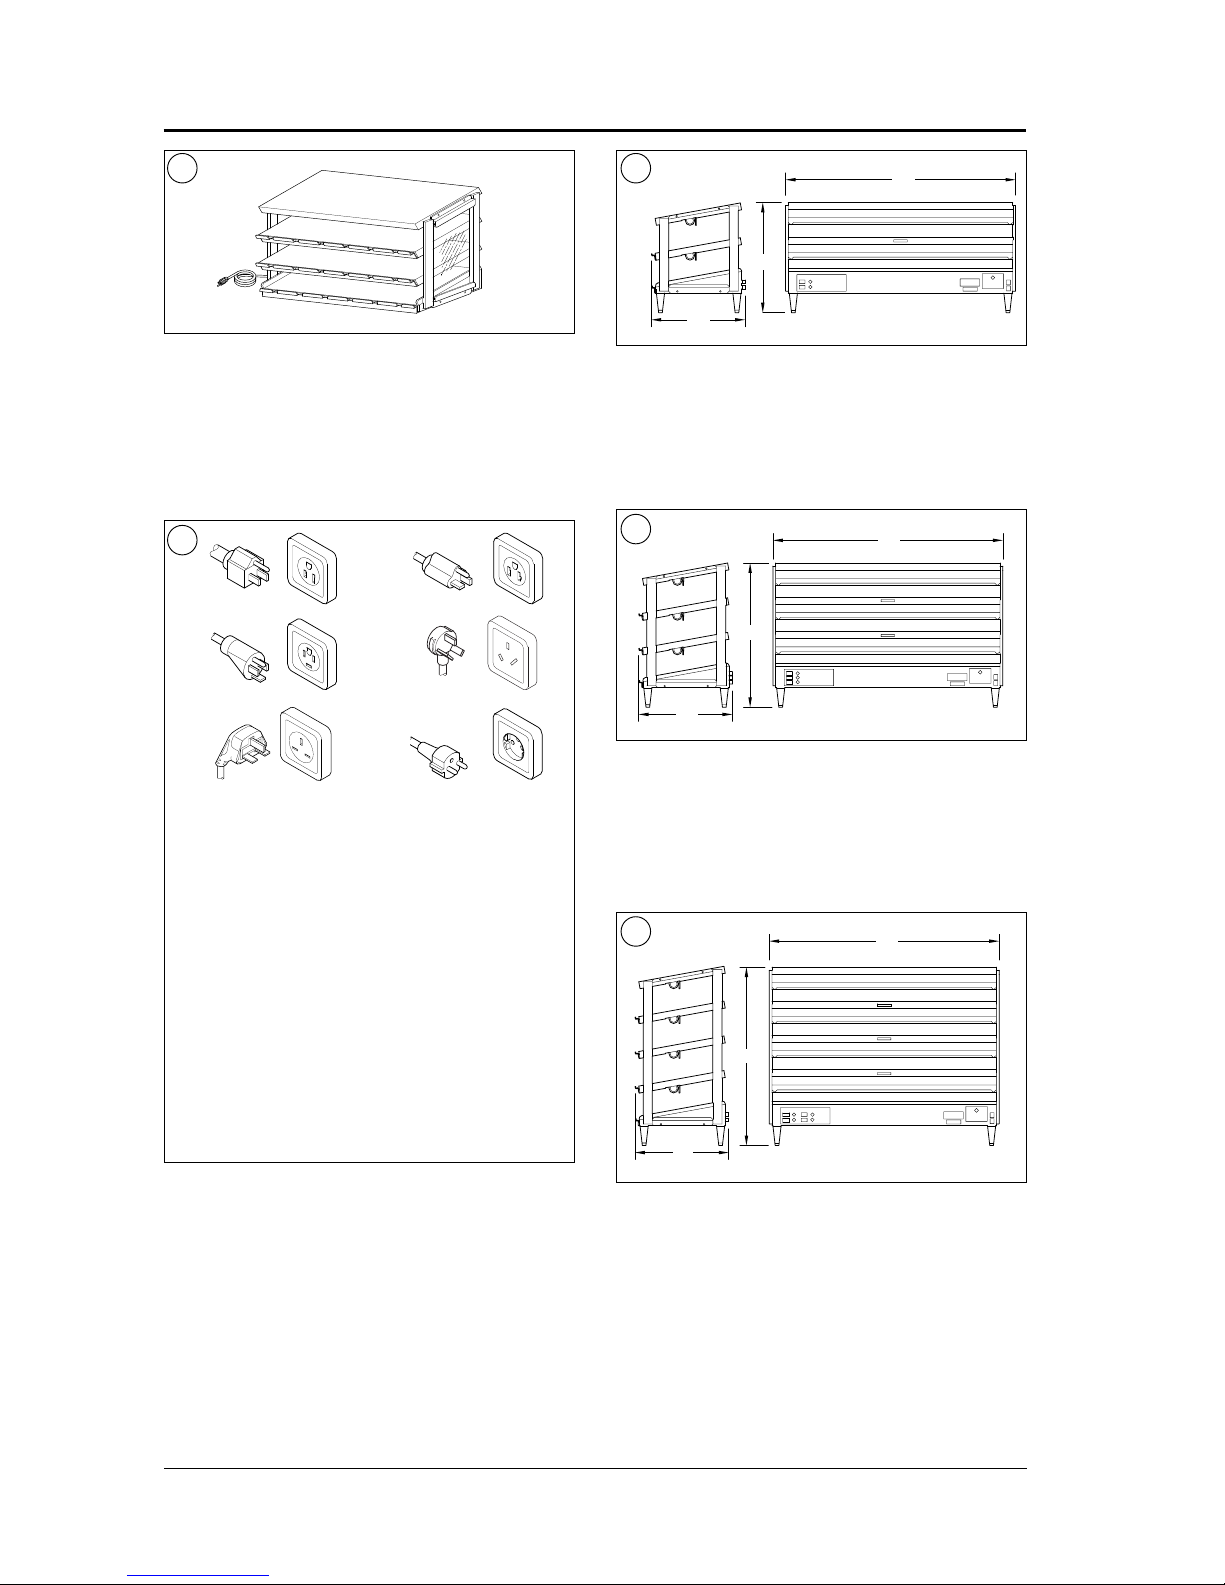
MODEL DESCRIPTION
ALL MODELS - SEE
All models are constructed of aluminum and stainless steel,
and feature tempered glass side panels, a separate on/off switch
and thermostat for each heat zone, incandescent display lights,
stainless steel box stops, legs and a cord and plug set.
PLUG CONFIGURATIONS
Units are supplied from the factory with an electrical cord and plug.
See
.
WARNINGS
Unit is not waterproof. DO NOT submerge in water. Do not
operate if it has been submerged in water.
To avoid electrical shock or personal injury, do not steam
clean or use excessive water on the unit.
Only light bulbs which meet or exceed N.S.F. standards,
specifically designed for food holding areas must be used.
Breakage of light bulbs not specially coated could result
in personal injury and/or food contamination.
If service is required on this unit, contact yourAuthorized
Hatco Service Agent, or contact the Hatco Service
Department at 800-558-0607 or 414-671-6350;
fax 800-690-2966 or International fax 414-671-3976.
This product has no “user” serviceable parts. To avoid
damage to the unit or injury to personnel, use only
Authorized Hatco Service Agents and Genuine Hatco
Replacement Parts when service is required.
Genuine Hatco Replacement Parts are specified to operate
safely in the environments in which they are used. Some
aftermarket or generic replacement parts do not have the
characteristics that will allow them to operate safely in
Hatco equipment. It is essential to use Hatco Replacement
Parts when repairing Hatco equipment. Failure to use Hatco
Replacement Parts may subject operators of the equipment
to hazardous electrical voltage, resulting in electrical shock
or burn.
CAUTIONS
The National Sanitation Foundation (NSF) requires that
GRPWS Series units over 91 cm (36") in length or weighing
more than 36 kg (80 lbs.) to be either sealed or raised
on the installation surface. If this unit cannot be sealed
at the point of use, 10 cm (4") legs are included to allow
for proper cleaning access below unit. See Hatco Accessories
for installation instructions.
CAUTIONS
Use only non-abrasive cleaners. Abrasive cleaners could scratch
the finish marring its appearance and making it susceptible
to dirt accumulation.
These models can be ordered in various widths of 61, 91, 122 cm
(24", 36", and 48"), and in depths of 46 to 61 cm (18" or 24").
The unit is available in dual, triple or quadruple shelf models.
WARNING
Plug unit into a properly grounded electrical outlet
of the correct voltage, size and plug configuration. If the plug
and receptacle do not match, contact a qualified electrician
to determine the proper voltage and size and install the proper
electrical outlet.
2
1
5
Form No. GRPWSCEM-0702
Model Voltage Watts Amps Plug Configuration Shipping Weight
GRPWS-2418Q 120 1500 12.5 NEMA 5-15P* 54 kg (119 lbs.)
GRPWS-3618Q 120 2136 17.8 NEMA 5-20P 76 kg (167 lbs.)
120/208-240 2136 8.9 NEMA 14-20P 76 kg (167 lbs.)
GRPWS-4818Q 120/208-240 2740 11.4 NEMA 14-20P 97 kg (214 lbs.)
GRPWS-2424Q 120 1900 15.8 NEMA 5-20P 69 kg (151 lbs.)
GRPWS-3624Q 120/208-240 2684 11.2 NEMA 14-20P 97 kg (214 lbs.)
GRPWS-4824Q 120/208-240 3432 14.3 NEMA 14-20P 126 kg (277 lbs.)
Model Voltage Watts Amps Plug Configuration Shipping Weight
GRPWS-2418D 120 750 6.3 NEMA 5-15P 35 kg (76 lbs.)
GRPWS-3618D 120 1068 8.9 NEMA 5-15P 48 kg (106 lbs.)
GRPWS-4818D 120 1370 11.4 NEMA 5-15P 62 kg (136 lbs.)
GRPWS-2424D 120 950 7.9 NEMA 5-15P 44 kg (96 lbs.)
GRPWS-3624D 120 1342 11.2 NEMA 5-15P 62 kg (136 lbs.)
GRPWS-4824D 120 1716 14.3 NEMA 5-15P* 81 kg (177 lbs.)
SPECIFICATIONS
ELECTRICAL RATING CHART – GRPWS MODELS - DUAL SHELF
* NEMA 5-20P for Canada
* NEMA 5-20P for Canada
ELECTRICAL RATING CHART – GRPWS MODELS - TRIPLE SHELF
ELECTRICAL RATING CHART – GRPWS MODELS - QUADRUPLE SHELF
Model Voltage Watts Amps Plug Configuration Shipping Weight
GRPWS-2418T 120 1125 9.4 NEMA 5-15P 45 kg (98 lbs.)
GRPWS-3618T 120 1602 13.4 NEMA 5-15P* 62 kg (136 lbs.)
GRPWS-4818T 120 2055 17.1 NEMA 5-20P 80 kg (175 lbs.)
120/208-240 2055 11.4 NEMA 14-20P 80 kg (175 lbs.)
GRPWS-2424T 120 1425 11.9 NEMA 5-15P 56 kg (123 lbs.)
220-230 (CE) 1276-1395 5.8-6.1 CEE 7/7 Schuko 56 kg (123 lbs.)
230-240 (CE) 1395-1518 6.1-6.3 BS-1363 56 kg (123 lbs.)
GRPWS-3624T 120 2013 16.8 NEMA 5-20P 80 kg (175 lbs.)
120/208-240 2013 11.2 NEMA 14-20P 80 kg (175 lbs.)
200 1776 8.9 AS 3112 80 kg (175 lbs.)
220-230 (CE) 1800-1967 8.2-8.6 CEE 7/7 Schuko 80 kg (175 lbs.)
230-240 (CE) 1967-2143 8.6-8.9 BS-1363 80 kg (175 lbs.)
GRPWS-4824T 120/208-240 2574 14.3 NEMA 14-20P 103 kg (227 lbs.)
220-230 (CE) 2301-2514 10.5-10.9 CEE 7/7 Schuko 103 kg (227 lbs.)
230-240 (CE) 2514-2738 10.9-11.4 BS-1363 103 kg (227 lbs.)
* NEMA 5-20P for Canada
6 Form No. GRPWSCEM-0702
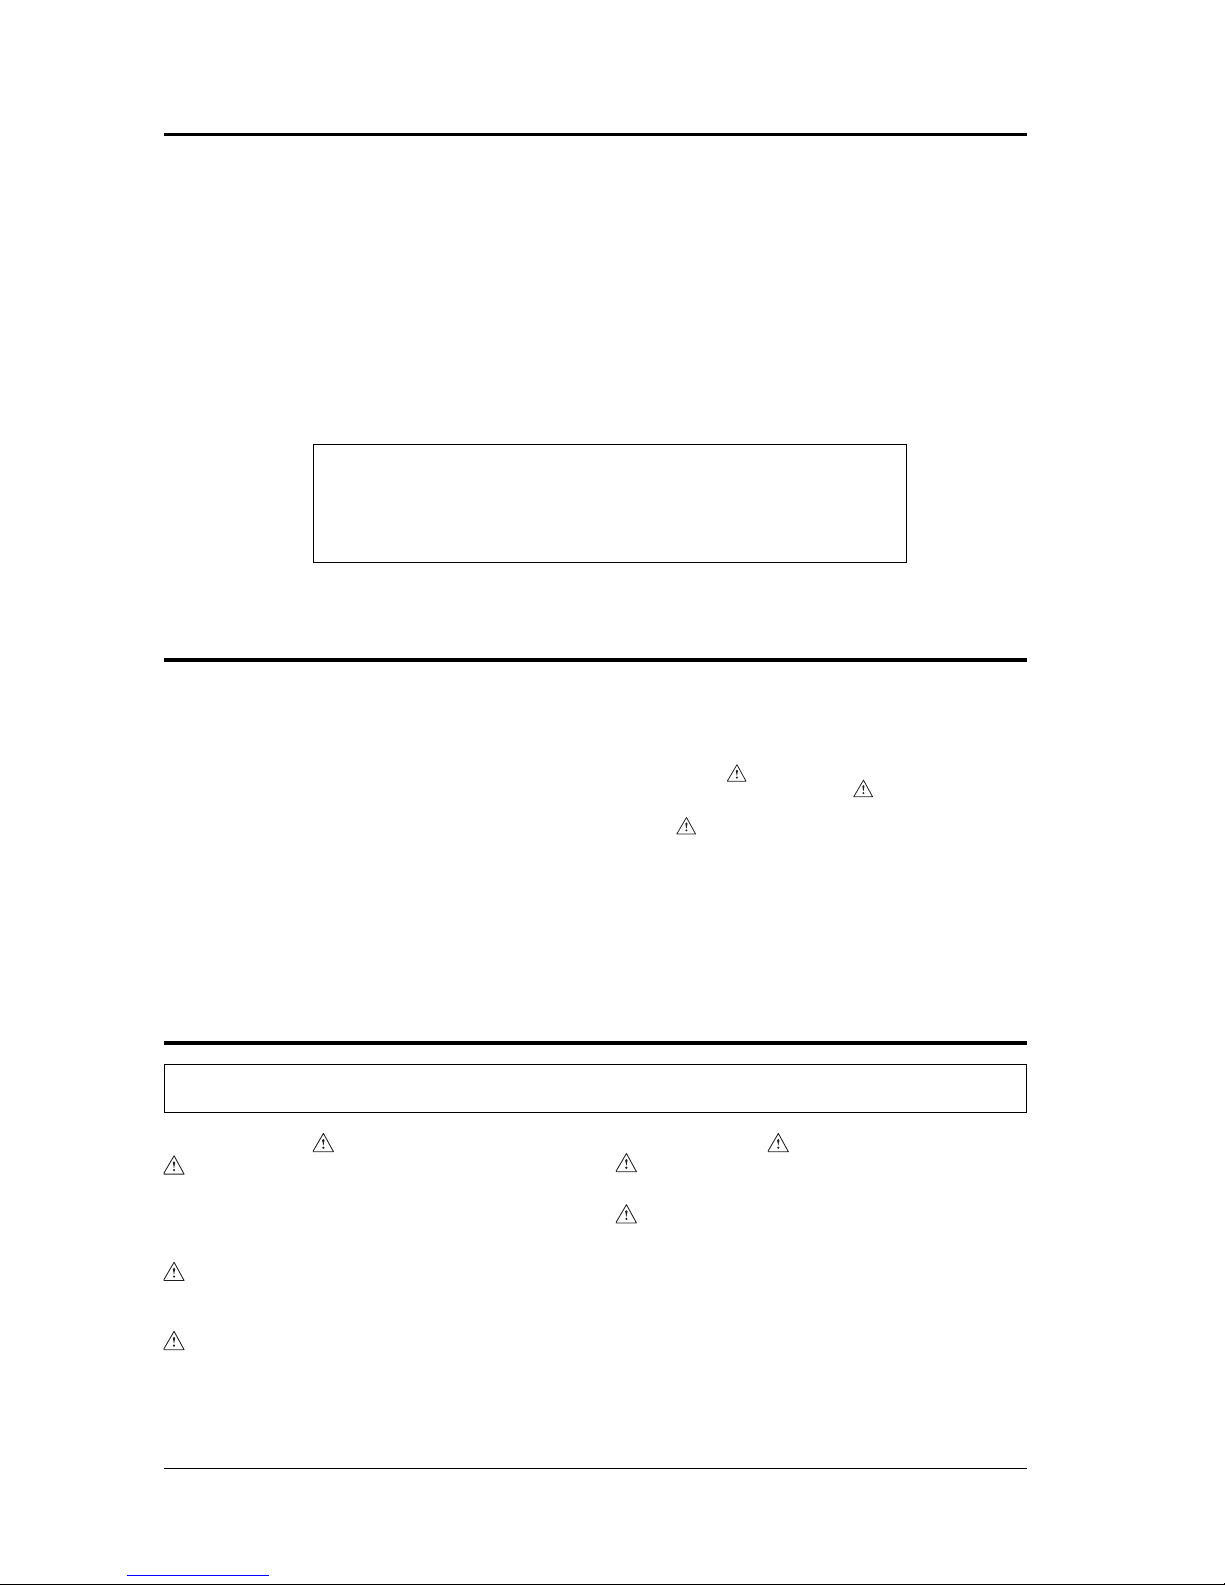
TRIPLE SHELF - SEE
Model Width Depth Height†
(A) (B) (C)
GRPWS-2418T 61 cm 46 cm 76 cm
(24") (18") (29¾")
GRPWS-3618T 91 cm 46 cm 76 cm
(36") (18") (29¾")
GRPWS-4818T 122 cm 46 cm 76 cm
(48") (18") (29¾")
GRPWS-2424T 61 cm 61 cm 78 cm
(24") (24") (30¾")
GRPWS3624T 91 cm 61 cm 78 cm
(36") (24") (30¾")
GRPWS4824T 122 cm 61 cm 78 cm
(48") (24") (30¾")
DUAL SHELF - SEE
Model Width Depth Height†
(A) (B) (C)
GRPWS-2418D 61 cm 46 cm 57 cm
(24") (18") (22½")
GRPWS-3618D 91 cm 46 cm 57 cm
(36") (18") (22½")
GRPWS-4818D 122 cm 46 cm 57 cm
(48") (18") (22½")
GRPWS-2424D 61 cm 61 cm 60 cm
(24") (24") (23½")
GRPWS-3624D 91 cm 61 cm 60 cm
(36") (24") (23½")
GRPWS-4824D 122 cm 61 cm 60 cm
(48") (24") (23½")
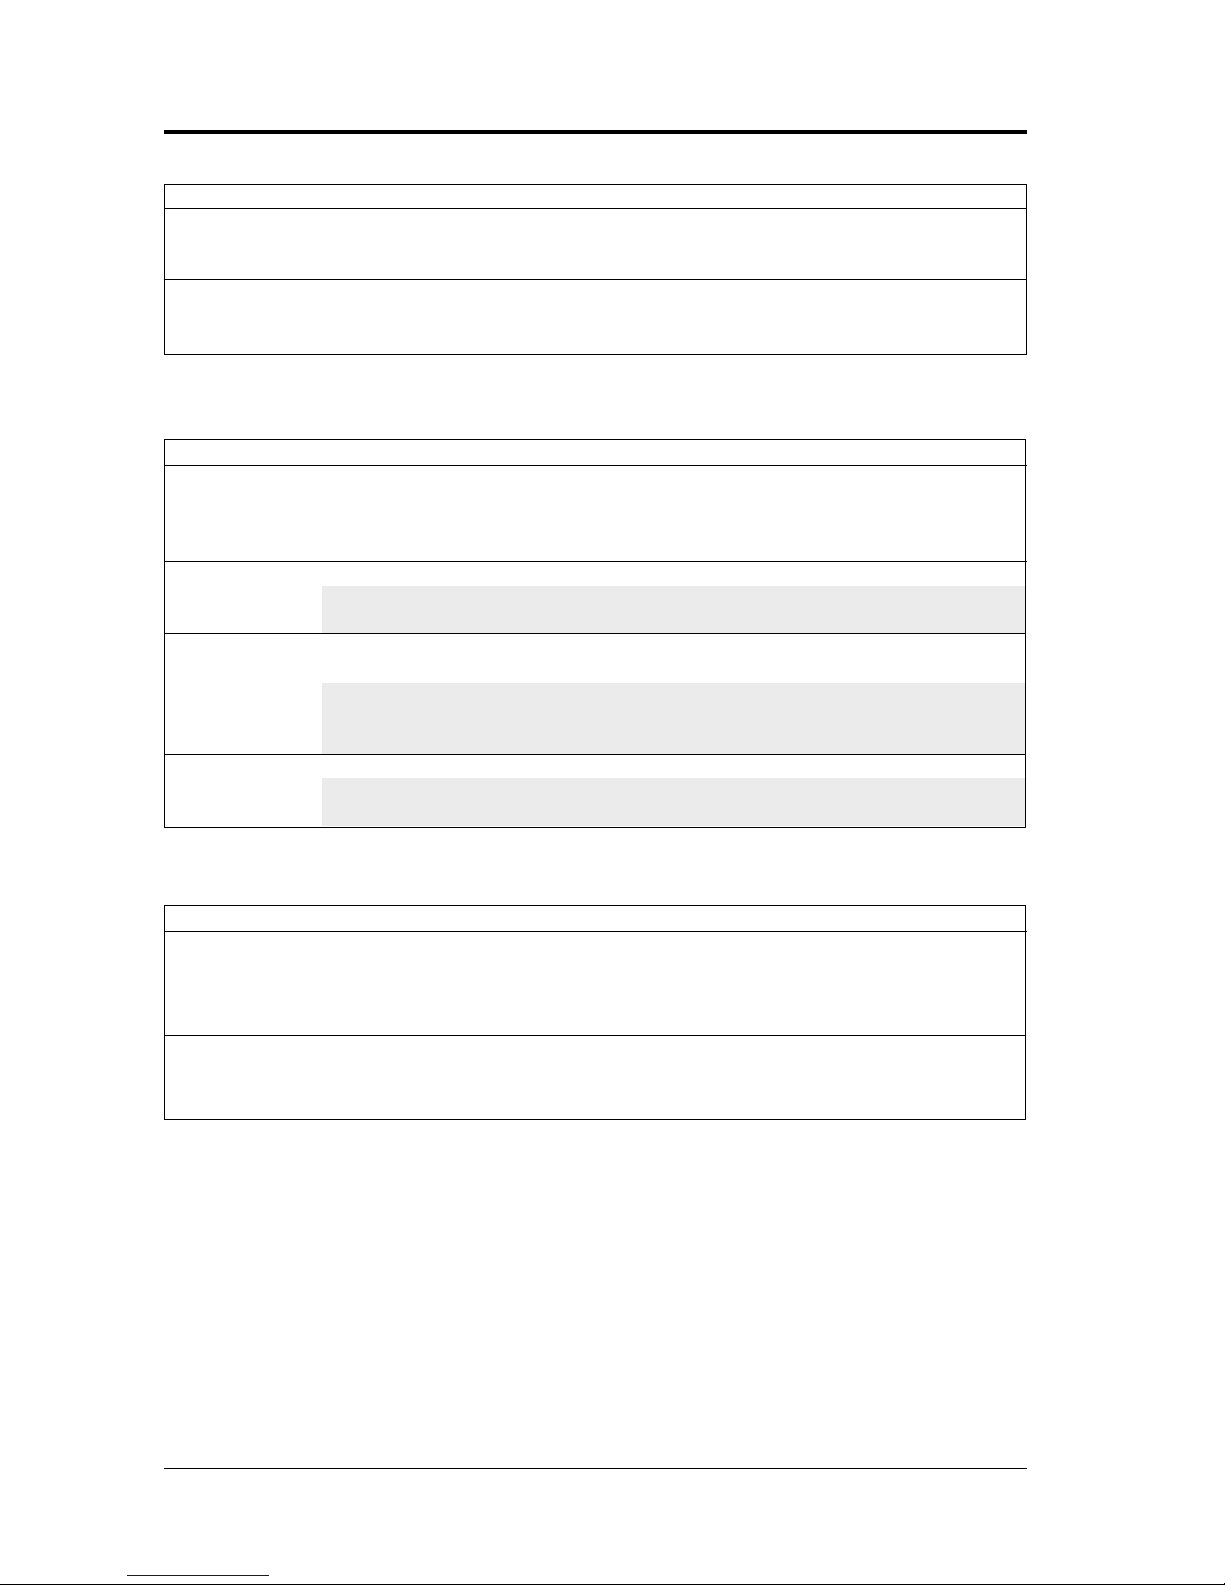
QUADRUPLE SHELF - SEE
Model Width Depth Height†
(A) (B) (C)
GRPWS-2418Q 61 cm 46 cm 93 cm
(24") (18") (36¾")
GRPWS-3618Q 91 cm 46 cm 93 cm
(36") (18") (36¾")
GRPWS-4818Q 122 cm 46 cm 93 cm
(48") (18") (36¾")
GRPWS-2424Q 61 cm 61 cm 96 cm
(24") (24") (37¾")
GRPWS-3624Q 91 cm 61 cm 96 cm
(36") (24") (37¾")
GRPWS-4824Q 122 cm 61 cm 96 cm
(48") (24") (37¾")
SPECIFICATIONS
† Height includes 10 cm (4") for legs.
† Height includes 10 cm (4") for legs.
† Height includes 10 cm (4") for legs.
DIMENSIONS - GRPWS MODELS
3
4
5
7
Form No. GRPWSCEM-0702
OPERATION
6. Slide each side glass panel into the upper channel, then lower
the panel into the lower channel. See .
7. Each unit is supplied with a stainless steel box stop for each
shelf. To install, place the box stop in the holding brackets and
twist down until secure. See .
LOCATION
NOTE: The unit must be transported in the upright position.
For proper operation and maximum performance, locate the Pizza
Warmer in an area where the ambient air temperature is constant
and is a minimum of 21°C (70°F). Areas which are susceptible
to active air movements or currents should be avoided, i.e., near
exhaust fans or hoods and air conditioning ducts.
WARNING
For safe and proper operation, the unit must be located
a reasonable distance from combustible walls and materials.
If safe distances are not maintained, discoloration
or combustion could occur.
CAUTION
Locate the unit at the proper counter height, in an area that
is convenient for use. The location should be level to prevent
the unit or its contents from accidentally falling, and strong
enough to support the weight of the unit and food displayed.
Plug unit into an electrical outlet of the correct voltage, size
and plug configuration. See SPECIFICATIONS for details.
Each shelf on the unit is controlled by an ON/OFF switch and
thermostat control. See . The switch for each shelf must be
in the ON position for that shelf to function. The thermostat control
for each shelf can be set to any desired heating level as indicated
on the control plate.
INSTALLATION
ALL MODELS
Glo-Ray Pizza Warmers are shipped with most components
pre-assembled. Care should be taken when unpacking shipping
carton to avoid damage to unit and components enclosed.
1. Remove unit from box.
2. Remove information packet. To prevent delay in obtaining
warranty coverage, fill out and mail in the warranty card.
3. Remove tape and protective packaging from all surfaces
of unit.
4. Carefully lay unit on its side and install the four legs,
See . Hand tighten legs until snug.
CAUTION
The National Sanitation Foundation (NSF) requires that
GRPWS Series units over 91 cm (36") in length or weighing
more than 36 kg (80 lbs.) to be either sealed or raised
on the installation surface. If this unit cannot be sealed
at the point of use, 10 cm (4") legs are included to allow
for proper cleaning access below unit. See Hatco Accessories
for installation instructions.
MODELS WITH 10 CM (4") ADJUSTABLE LEGS
5. Carefully lay unit on its side. Install legs to bottom of unit,
See . Hand tighten legs until snug. Do not overtighten.
Return unit to the upright position.
NOTE: Legs are adjustable for leveling the unit. Use a 16 mm
(5/8") open-end wrench to make leveling adjustments once the unit
is placed in final position.
CAUTION
Some exterior surfaces on the unit will get hot. Use caution
when touching these areas to avoid injury.
9
6
6
7
8
8 Form No. GRPWSCEM-0702
MAINTENANCE
GENERAL
Hatco Glo-Ray Pizza Warmers are designed for maximum
durability and performance, with minimum maintenance.
WARNING
To avoid any injury, turn the power switches OFF, unplug
the unit from the power source and allow to cool before
performing any maintenance.
WARNING
To avoid electrical shock or personal injury, do not steam clean
or use excessive water on the unit.
WARNING
Unit is not waterproof. DO NOT submerge in water. Do not
operate if it has been submerged in water.
CLEANING
CAUTION
Use only non-abrasive cleaners. Abrasive cleaners could scratch
the finish marring its appearance and making it susceptible
to dirt accumulation.
To preserve the bright finish of the Glo-Ray Pizza Warmer,
it is recommended that the exterior and interior surfaces be wiped
daily with a damp cloth. Stubborn stains may be removed with
a good non-abrasive cleaner. Hard to reach areas should be cleaned
with a small brush and mild soap.
Clean the glass sides using a common glass cleaner.
DISPLAY LIGHT BULB REPLACEMENT
The display light is an incandescent light bulb which illuminated
the warming area. The bulb has a special coating to guard against
injury and food contamination in the event of breakage.
1. To replace a light bulb, disconnect the power supply and wait
until the unit has cooled.
2. Light bulbs have a threaded base. Unscrew the light bulb from
the unit and replace it with a new specially coated incandescent
light bulb.
NOTE: Hatco shatter-resistant light bulbs meet N.S.F. standards
for food holding and display areas. For 120, 120/208 and 120/240
volt applications, use Hatco part #02.30.043.00. For 220-230
or 230-240 volt applications, use Hatco part #02.30.058.00.
WARNING
Only light bulbs which meet or exceed N.S.F. standards,
specifically designed for food holding areas must be used.
Breakage of light bulbs not specially coated could result
in personal injury and/or food contamination.
WARNING
If service is required on this unit, contact yourAuthorized
Hatco Service Agent, or contact the Hatco Service Department
at 800-558-0607 or 414-671-6350; fax 800-690-2966
or International fax 414-671-3976.
WARNING
This product has no “user” serviceable parts. To avoid damage
to the unit or injury to personnel, use only Authorized Hatco
Service Agents and Genuine Hatco Replacement Parts when
service is required.
WARNING
Genuine Hatco Replacement Parts are specified to operate
safely in the environments in which they are used. Some
aftermarket or generic replacement parts do not have
the characteristics that will allow them to operate safely
in Hatco equipment. It is essential to use Hatco Replacement
Parts when repairing Hatco equipment. Failure to use Hatco
Replacement Parts may subject operators of the equipment
to hazardous electrical voltage, resulting in electrical shock
or burn.
ACCESSORIES
TEMPERATURE INDICATING
DISPLAY (TID) - SEE
Units maybe equipped with temperature indicating displays which
show the current base temperature of each shelf.
NOTE: This accessory is factory installed only, not available
for retrofit.
10

9
Form No. GRPWSCEM-0702
1. PRODUCT WARRANTY
Hatco warrants the products that it manufactures (the “Products”)
to be free from defects in materials under normal use and service,
for a period of one (1) year from the date of purchase when
installed and maintained in accordance with Hatco’s written
instructions or 18 months from the date of shipment from Hatco.
Buyer must establish the product’s purchase date by returning
Hatco’s Warranty Registration Card or by other means satisfactory
to Hatco in its sole discretion.
Hatco warrants the following Product components to be free from
defects in materials from the date of purchase (subject to the
foregoing conditions) for the period(s) of time and on the conditions
listed below:
a) One (1) Year Parts PLUS One (1)
Additional Year Parts-Only Warranty:
Toaster Elements (metal sheathed)
Drawer Warmer Elements (metal sheathed)
Drawer Warmer Drawer Rollers and Slides
Food Warmer Elements (metal sheathed)
Infra-Black
®
Elements (metal sheathed)
Display W armer Elements (metal sheathed air heating)
Holding Cabinet Elements (metal sheathed air heating)
Cook and Hold Oven Elements (metal sheathed)
b) One (1) Year Parts PLUS Four (4)
Additional Years Parts-Only Warranty on
pro-rated terms that Hatco will explain at
Buyer’s Request:
Powermite®Gas Booster Heater Tanks
Mini Compact Tanks (stainless steel)
3CS and FR Tanks
c) One (1) Year Parts PLUS Four (4)
Additional Years Parts-Only Warranty PLUS
Five (5) Year Parts-Only Warranty on
pro-rated terms that Hatco will explain at Buyer’s
Request:
Booster Heater Tanks (Castone
®
)
d) One (1) Year Parts-Only Warranty
for Accessory Components not installed by Hatco:
Accessory Components (including but not limited to valves,
gauges, remote switches and remote wiring).
THE FOREGOING WARRANTIES ARE EXCLUSIVE
AND IN LIEU OF ANY OTHER WARRANTY, EXPRESSED
OR IMPLIED, INCLUDING BUT NOT LIMITED TO ANY
IMPLIED WARRANTY OF MERCHANTABILITY OR FITNESS
FOR APARTICULAR PURPOSE OR PATENT OR OTHER
INTELLECTUAL PROPERTY RIGHT INFRINGEMENT. Without
limiting the generality of the foregoing, SUCH WARRANTIES
DO NOT COVER: Coated incandescent light bulbs, fluorescent
lamps, lamp warmer heat bulbs, glass components or Product
failure in booster tank and fin tube heat exchanger caused by
liming, sediment buildup, chemical attack or freezing in tanks,
Product misuse, tampering or misapplication, improper installation,
application of improper voltage, or recalibration of thermostats
or high limit switches.
2. LIMITATION OF REMEDIES
AND DAMAGES
Hatco’s liability and Buyer’s exclusive remedy
hereunder will be limited solely, at Hatco’s option,
to repair or replace defective part or unit by a Hatco-authorized
service agency with respect to any claim made within the applicable
warranty period. Hatco reserves the right to accept or reject any
such claim in whole or in part. Hatco will not accept the return
of any Product without prior written approval from Hatco, and
all such approved returns shall be made at Buyer’s sole expense.
HATCO WILL NOT BE LIABLE, UNDER ANY
CIRCUMSTANCES, FOR CONSEQUENTIALOR INCIDENTAL
DAMAGES, INCLUDING BUT NOT LIMITED TO LABOR
COSTS OR LOST PROFITS RESULTING FROM THE USE
OF OR INABILITY TO USE THE PRODUCTS OR FROM
THE PRODUCTS BEING INCORPORATED IN OR BECOMING
A COMPONENT OF ANY OTHER PRODUCT OR GOODS.
HATCO EXPORT LIMITED WARRANTY
10 Form No. GRPWSCEM-0702
INHALT
Abbildungen....................................................................................1
Einführung....................................................................................10
Wichtige Sicherheitshinweise......................................................10
Modellbeschreibung......................................................................11
Alle Modelle..........................................................................11
Technische Daten ..........................................................................11
Steckerkonfigurationen .........................................................11
Übersicht über die elektrischen Bemessungsdaten...............12
Abmessungen........................................................................13
Einbau............................................................................................14
Alle Modelle .........................................................................14
Aufstellungsort......................................................................14
Betrieb............................................................................................14
Wartung.........................................................................................15
Allgemeine Hinweise ............................................................15
Reinigung..............................................................................15
Auswechseln des Beleuchtungskörpers................................15
Zubehör .........................................................................................15
Temperaturanzeige................................................................15
Eingeschränkte Garantie Durch Hatco......................................16
Wichtige Information für den Benutzer.........................Rückseite
EINFÜHRUNG
Dieses Handbuch enthält wichtige Sicherheitshinweise über
Wartung, Gebrauch und Betrieb dieses Produkts. Wenn Sie die
in diesem Handbuch enthaltenen Anweisungen nicht befolgen, kann
dies schwere Verletzungen zur Folge haben. Wenn Sie den Inhalt
dieses Handbuchs nicht verstehen, dann weisen Sie bitte Ihren
Vorgesetzten darauf hin. Arbeiten Sie mit diesem Gerät nur, wenn
Sie sich zuvor mit dem Inhalt dieses Handbuchs vertraut gemacht
haben.
Die Hatco Glo-Ray
®
GRPWS Pizzawärmer eignen sich ideal für
die Aufbewahrung von Pizzen in Schachteln oder Taschen auf
einem Büffet oder in kurzzeitigen Servierbereichen. Diese Wärmer
nehmen heiße verpackte Pizzen auf und halten ihre optimale
Serviertemperatur aufrecht, ohne ihre Qualität zu beeinträchtigen.
Eine thermostatisch geregelte, geheizte Basis verlängert die
Aufbewahrungszeiten der meisten eingewickelten Lebensmittel.
Diese Einheiten sind zudem mit Glühlampen und einem bzw.
Mehreren Kabel-Stecker-Sätzen ausgestattet.
In diesem Handbuch sind die Einbau-, Sicherheits- und
Bedienungsanweisungen für Glo-Ray Pizzawärmer enthalten. Wir
empfehlen, dass Sie alle in diesem Handbuch enthaltenen Einbau-,
Sicherheits- und Bedienungsanweisungen für den HatcoPizzawärmer vor dessen Installation und Inbetriebnahme lesen.
Sicherheitshinweise, welche in diesem Handbuch nach dem Symbol
‚Warnung und der Bezeichnung WARNUNG oder
VORSICHT fett gedruckt sind, sind sehr wichtig. WARNUNG
bedeutet die Möglichkeit schwerer oder tödlicher Verletzungen für
Sie und andere. VORSICHT bedeutet die Möglichkeit
leichterer oder mittelschwerer Verletzungen. VORSICHT
ohne das Symbol bedeutet die Möglichkeit einer Beschädigung
des Geräts oder anderer Sachschäden.
Hinter Hatco Glo-Ray Pizzawärmern stehen umfangreiche
Forschungsarbeiten und Einsatzerprobungen. Die verwendeten
Materialen wurden ausgewählt, um eine lange Lebensdauer, eine
attraktive Erscheinung und eine optimale Leistung zu erzielen. Jede
Einheit wurde vor der Auslieferung gründlich überprüft und getestet.
WICHTIGE SICHERHEITSHINWEISE
WICHTIG! Um die Gefahr schwerer oder tödlicher Verletzungen und einer Beschädigung des Geräts oder
Sachschäden zu vermeiden, lesen Sie die folgenden wichtigen Sicherheitshinweise.
WARNUNGEN
Stecken Sie den Netzstecker der Einheit in eine passende
Schuko-Steckdose mit der richtigen Spannung. Wenn
Stecker und Steckdose nicht übereinstimmen, setzen Sie sich
mit einem qualifizierten Elektriker in Verbindung,
um die richtige Spannung und Steckerart festzustellen,
und installieren Sie die richtigen elektrischen Armaturen.
Zur Vermeidung von Verletzungen schalten Sie den
Netzschalter aus, trennen die Einheit von ihrer
Stromversorgung und lassen das Gerät vor jeglichen
Wartungsarbeiten abkühlen.
VORSICHTSHINWEISE
Einige der Außenflächen der Einheit werden heiß. Seien
Sie beim Berühren dieser Flächen vorsichtig,
um Verletzungen zu vermeiden.
Wählen Sie einen für den Verwendungszweck derEinheit
praktischen Aufstellungsort mit der richtigen Thekenhöhe.
Dieser Aufstellungsort muss eben sein, damit die Einheit
oder ihr Inhalt nicht versehentlich herunterfallen kann,
und er muss stabil genug sein, um das Gewicht der Einheit
zu tragen.
The instructions in English begin on page.....................................................................................3
Deutsche Anweisungen beginnen auf Seite.................................................................................10
Las instrucciones en Espanol comienzan en la pagina................................................................17
Les instructions en Francais commencent a la page ...................................................................24
Le istruzioni in Italiano iniziano dalla pagina.............................................................................31
Nederlandse instructies beginnen op bladzijde ...........................................................................38
11
Form No. GRPWSCEM-0702
WICHTIGE SICHERHEITSHINWEISE
MODELLBESCHREIBUNG
ALLE MODELLE - SIEHE
Alle Modelle sind aus Aluminium und rostfreiem Stahl gefertigt
und weisen gehärtete Glasseitenplatten, einen separaten Ein-/AusSchalter und ein Thermostat für jede Heizzone, Glühlampen für
die Speisenpräsentation, Kartonanschläge aus rostfreiem Stahl,
Standfüße sowie einen Kabel-Stecker-Satz auf.
WARNUNGEN
Für einen sicheren und ordnungsgemäßen Betrieb muss
die Einheit in einer sicheren Entfernung von entflammbaren
Wänden oder Materialien aufgestellt werden. Wenn dieser
Sicherheitsabstand nicht eingehalten wird, können
Verfärbungen entstehen oder brennbare Stoffe
können sichentzünden.
Die Einheit ist nicht wasserdicht. NICHT in Wasser
eintauchen. Nach einem Eintauchen in Wassernicht
in Betrieb nehmen.
Zur Vermeidung von elektrischen Schlägen oder
Verletzungen nicht mit Dampf reinigen oder übermäßig
viel Wasserauf der Einheit benutzen.
Es dürfen nur Lampen, die speziell für NahrungsmittelAufbewahrungsbereiche geeignet sind und den Standards
der N.S.F. genügen, verwendet werden. Der Bruch von nicht
mit einer speziellen Schutzschicht versehenen Lampen kann
zu Verletzungen und/oder Glassplittern in den Speisen
führen.
Falls eine Reparatur dieses Geräts erforderlich sein sollte,
wenden Sie sich an Ihren autorisierten Hatco-Servicebetrieb
oder die Hatco-Serviceabteilung unter unter
+1 414 671 6350; Fax +1 414 671 3976.
Dieses Gerät besitzt keine Teile, die vom Benutzer gewartet
werden können. Um Beschädigungen des Geräts oder
Verletzungen zu vermeiden, setzen Sie bei notwendigen
Reparaturarbeiten ausschließlich autorisierte HatcoServicebetriebe ein, und verwenden Sie ausschließlich
Hatco-Originalersatzteile.
Nur Hatco-Originalersatzteile sind für einen sicheren
Betrieb unter ihren jeweiligen Einsatzbedingungen
ausgelegt. Manche Ersatzteile anderer Hersteller oder
Nachbauteile haben nicht die geforderten Eigenschaften,
um in Hatco-Geräten sicher zu funktionieren. Verwenden
Sie bei der Reparatur von Hatco-Geräten ausschließlich
Hatco-Ersatzteile. Wenn Sie andere als Original-HatcoErsatzteile verwenden, setzen Sie die Bediener der Geräte
möglicherweise gefährlichen elektrischen Spannungen aus,
die zu Stromschlag oder Verbrennungen führen können.
VORSICHTSHINWEISE
Nach den Vorschriften der National Sanitation Foundation
(NSF) müssen Einheiten der Serie GRPWS mit einer Länge
von über 91 cm (36") oder einem Gewicht von über 36 kg
(80 lbs.) abgedichtet oder auf der Einbaufläche angehoben
sein. Wenn diese Einheit am Einsatzort nicht abgedichtet
werden kann, sind die 10 cm (4") langen Standfüße
zu verwenden, die ein vorschriftsmäßiges Reinigen unter
der Einheit ermöglichen. Einbauanweisungen sind dem
Hatco-Zubehör zu entnehmen.
VORSICHTSHINWEISE
Nur scheuerfreie Reinigungsmittel verwenden. Scheuernde
Reinigungsmittel können die Oberfläche verkratzen,
wodurch die äußere Erscheinung der Einheit beeinträchtigt
wird und sich leichter Verunreinigungen festsetzen können.
Die Modelle können in verschiedenen Breiten 61, 91 und 122 cm
(24", 36" und 48") und Tiefen 46 bis 61 cm (18" bis 24") bestellt
werden. Die Einheit ist als Doppel-, Dreifach- und VierfachRegalausführung lieferbar.
1
STECKERKONFIGURATIONEN
Die Einheiten werden vom Werk mit einem Netzkabel mit
angebrachtem Stecker ausgerüstet. Siehe
.
WARNUNG
Stecken Sie den Netzstecker der Einheit in eine passende
Schuko-Steckdose mit der richtigen Spannung. Wenn Stecker
und Steckdose nicht übereinstimmen, setzen Sie sich mit einem
qualifizierten Elektriker in Verbindung, um die richtige
Spannung und Steckerart festzustellen, und installieren Sie
die richtigen elektrischen Armaturen.
2
TECHNISCHE DATEN
12 Form No. GRPWSCEM-0702
Modell Spannung Watt Ampère Steckerkonfiguration Versandgewicht
GRPWS-2418Q 120 1500 12.5 NEMA 5-15P* 54 kg (119 lbs.)
GRPWS-3618Q 120 2136 17.8 NEMA 5-20P 76 kg (167 lbs.)
120/208-240 2136 8.9 NEMA 14-20P 76 kg (167 lbs.)
GRPWS-4818Q 120/208-240 2740 11.4 NEMA 14-20P 97 kg (214 lbs.)
GRPWS-2424Q 120 1900 15.8 NEMA 5-20P 69 kg (151 lbs.)
GRPWS-3624Q 120/208-240 2684 11.2 NEMA 14-20P 97 kg (214 lbs.)
GRPWS-4824Q 120/208-240 3432 14.3 NEMA 14-20P 126 kg (277 lbs.)
Modell Spannung Watt Ampère Steckerkonfiguration Versandgewicht
GRPWS-2418D 120 750 6.3 NEMA 5-15P 35 kg (76 lbs.)
GRPWS-3618D 120 1068 8.9 NEMA 5-15P 48 kg (106 lbs.)
GRPWS-4818D 120 1370 11.4 NEMA 5-15P 62 kg (136 lbs.)
GRPWS-2424D 120 950 7.9 NEMA 5-15P 44 kg (96 lbs.)
GRPWS-3624D 120 1342 11.2 NEMA 5-15P 62 kg (136 lbs.)
GRPWS-4824D 120 1716 14.3 NEMA 5-15P* 81 kg (177 lbs.)
ÜBERSICHT ÜBER DIE ELEKTRISCHEN BEMESSUNGSDATEN - GRPWS-MODELLE - DOPPEL-REGAL
* NEMA 5-20P für Kanada
* NEMA 5-20P für Kanada
* NEMA 5-20P für Kanada
ÜBERSICHT ÜBER DIE ELEKTRISCHEN BEMESSUNGSDATEN - GRPWS-MODELLE - DREIFACH-REGAL
ÜBERSICHT ÜBER DIE ELEKTRISCHEN BEMESSUNGSDATEN - GRPWS-MODELLE - VIERFACH-REGAL
Modell Spannung Watt Ampère Steckerkonfiguration Versandgewicht
GRPWS-2418T 120 1125 9.4 NEMA 5-15P 45 kg (98 lbs.)
GRPWS-3618T 120 1602 13.4 NEMA5-15P* 62 kg (136 lbs.)
GRPWS-4818T 120 2055 17.1 NEMA5-20P 80 kg (175 lbs.)
120/208-240 2055 11.4 NEMA 14-20P 80 kg (175 lbs.)
GRPWS-2424T 120 1425 11.9 NEMA5-15P 56 kg (123 lbs.)
220-230 (CE) 1276-1395 5.8-6.1 CEE 7/7 Schuko 56 kg (123 lbs.)
230-240 (CE) 1395-1518 6.1-6.3 BS-1363 56 kg (123 lbs.)
GRPWS-3624T 120 2013 16.8 NEMA5-20P 80 kg (175 lbs.)
120/208-240 2013 11.2 NEMA 14-20P 80 kg (175 lbs.)
200 1776 8.9 AS 3112 80 kg (175 lbs.)
220-230 (CE) 1800-1967 8.2-8.6 CEE 7/7 Schuko 80 kg (175 lbs.)
230-240 (CE) 1967-2143 8.6-8.9 BS-1363 80 kg (175 lbs.)
GRPWS-4824T 120/208-240 2574 14.3 NEMA 14-20P 103 kg (227 lbs.)
220-230 (CE) 2301-2514 10.5-10.9 CEE 7/7 Schuko 103 kg (227 lbs.)
230-240 (CE) 2514-2738 10.9-11.4 BS-1363 103 kg (227 lbs.)
TECHNISCHE DATEN
13
Form No. GRPWSCEM-0702
DREIFACH-REGAL- SIEHE
Modell Breite Tiefe Höhe†
(A) (B) (C)
GRPWS-2418T 61 cm 46 cm 76 cm
(24") (18") (29¾")
GRPWS-3618T 91 cm 46 cm 76 cm
(36") (18") (29¾")
GRPWS-4818T 122 cm 46 cm 76 cm
(48") (18") (29¾")
GRPWS-2424T 61 cm 61 cm 78 cm
(24") (24") (30¾")
GRPWS3624T 91 cm 61 cm 78 cm
(36") (24") (30¾")
GRPWS4824T 122 cm 61 cm 78 cm
(48") (24") (30¾")
DOPPEL-REGAL - SIEHE
Modell Breite Tiefe Höhe†
(A) (B) (C)
GRPWS-2418D 61 cm 46 cm 57 cm
(24") (18") (22½")
GRPWS-3618D 91 cm 46 cm 57 cm
(36") (18") (22½")
GRPWS-4818D 122 cm 46 cm 57 cm
(48") (18") (22½")
GRPWS-2424D 61 cm 61 cm 60 cm
(24") (24") (23½")
GRPWS-3624D 91 cm 61 cm 60 cm
(36") (24") (23½")
GRPWS-4824D 122 cm 61 cm 60 cm
(48") (24") (23½")
VIERFACH-REGAL- SIEHE
Modell Breite Tiefe Höhe†
(A) (B) (C)
GRPWS-2418Q 61 cm 46 cm 93 cm
(24") (18") (36¾")
GRPWS-3618Q 91 cm 46 cm 93 cm
(36") (18") (36¾")
GRPWS-4818Q 122 cm 46 cm 93 cm
(48") (18") (36¾")
GRPWS-2424Q 61 cm 61 cm 96 cm
(24") (24") (37¾")
GRPWS-3624Q 91 cm 61 cm 96 cm
(36") (24") (37¾")
GRPWS-4824Q 122 cm 61 cm 96 cm
(48") (24") (37¾")
† Höhe einschließlich 10 cm (4") für Standfüße.
† Höhe einschließlich 10 cm (4") für Standfüße.
† Höhe einschließlich 10 cm (4") für Standfüße.
ABMESSUNGEN - GRPWS-MODELLE
3
4
5
TECHNISCHE DATEN
14 Form No. GRPWSCEM-0702
VORSICHT
Einige der Außenflächen der Einheit werden heiß. Seien Sie
beim Berühren dieser Flächen vorsichtig, um Verletzungen
zu vermeiden.
BETRIEB
6. Schieben Sie jede Seitenglasplatte in die oberen
Rahmenführung und senken Sie die Platte dann in die untere
Rahmenführung ab. Siehe .
7. Jeder Einheit liegt für jedes Regal ein Kartonanschlag
aus rostfreiem Stahl bei. Positionieren Sie den Kartonanschlag
zum Einbau in den Halterungen und drehen Sie ihn nach unten,
bis er fest verankert ist. Siehe .
AUFSTELLUNGSORT
ANMERKUNG: Die Einheit muss in aufrechter Position
transportiert werden.
Zum ordnungsgemäßen Betrieb und zur Gewährleistung einer
optimalen Leistung stellen Sie den Pizzawärmer in einem Bereich
mit einer konstanten Umgebungslufttemperatur von mindestens
21°C (70°F) auf. Bereiche, die für aktive Luftbewegungen oder strömungen anfällig sind (z.B. in der Nähe von Abluftventilatoren
oder Dunstabzugshauben und Klimatisierungskanälen), sollten
vermieden werden.
WARNUNG
Für einen sicheren und ordnungsgemäßen Betrieb muss
die Einheit in einer sicheren Entfernung von entflammbaren
Wänden oder Materialien aufgestellt werden. Wenn dieser
Sicherheitsabstand nicht eingehalten wird, können
Verfärbungen entstehen oder brennbare Stoffe
können sichentzünden.
VORSICHT
Wählen Sie einen für den Verwendungszweck derEinheit
praktischen Aufstellungsort mit der richtigen Thekenhöhe.
Dieser Aufstellungsort muss eben sein, damit die Einheit oder
ihr Inhalt nicht versehentlich herunterfallen kann, und er muss
stabil genug sein, um das Gewicht der Einheit und der zur
Schau gestellten Speisen zu tragen.
Stecken Sie den Netzstecker in eine passende Steckdose mit
der richtigen Spannung ein. Details entnehmen Sie bitte den
TECHNISCHEN DATEN.
Jedes Regal auf der Einheit wird von einem EIN/AUS-Schalter
und einem Thermostatregler gesteuert. Siehe . Der Schalter
für jedes Regal muss EINGESCHALTET sein, damit das
betreffende Regal richtig arbeitet. Die Thermostatregelung für jedes
Regal kann auf jedes gewünschte, auf der Steuerplatte angegebene
Wärmeniveau eingestellt werden.
EINBAU
ALLE MODELLE
Beim Versand sind die meisten Komponenten des Glo-Ray
Pizzawärmers bereits vom Werk zusammengebaut. Beim Auspacken
des Versandkosten muss darauf geachtet werden, dass die Einheit
und die mitgelieferten Komponenten nicht beschädigt werden.
1. Nehmen Sie die Einheit aus dem Karton.
2. Entfernen Sie das Info-Paket. Füllen Sie die Garantiekarte
aus und senden Sie sie ein, um Verzögerungen beim Erhalt
der Garantiedeckung zu vermeiden.
3. Entfernen Sie das Klebeband und die Schutzverpackung
von allen Oberflächen der Einheit.
4. Legen Sie die Einheit vorsichtig auf ihre Seite und bringen Sie
wie in Abb. gezeigt die vier Standfüße an.
VORSICHT
Nach den Vorschriften der National Sanitation Foundation
(NSF) müssen Einheiten der Serie GRPWS mit einer Länge von
über 91 cm (36") oder einem Gewicht von über 36 kg (80 lbs.)
abgedichtet oder auf der Einbaufläche angehoben sein. Wenn
diese Einheit am Einsatzort nicht abgedichtet werden kann,
sind die 10 cm (4") langen Standfüße zu verwenden, die ein
vorschriftsmäßiges Reinigen unter der Einheit ermöglichen.
Einbauanweisungen sind dem Hatco-Zubehör zu entnehmen.
MODELLE MIT 10 CM (4") LANGEN VERSTELLBAREN
STANDFÜSSEN
5. Legen Sie die Einheit vorsichtig auf ihre Seite. Montieren Sie
die Füße an der Unterseite der Einheit. Siehe . Ziehen Sie
die Füße von Hand an, bis sie fest sitzen. Ziehen Sie sie nicht
zu stark an. Stellen Sie die Einheit wieder aufrecht.
ANMERKUNG: Die Standfüße sind verstellbar und ermöglichen
dadurch eine waagerechte Aufstellung. Nehmen Sie nach der
endgültigen Aufstellung der Einheit eventuelle Höhenverstellungen
mit einem 16-mm-Maulschlüssel vor.
9
6
6
7
8
 Loading...