

Page 1
User Guide
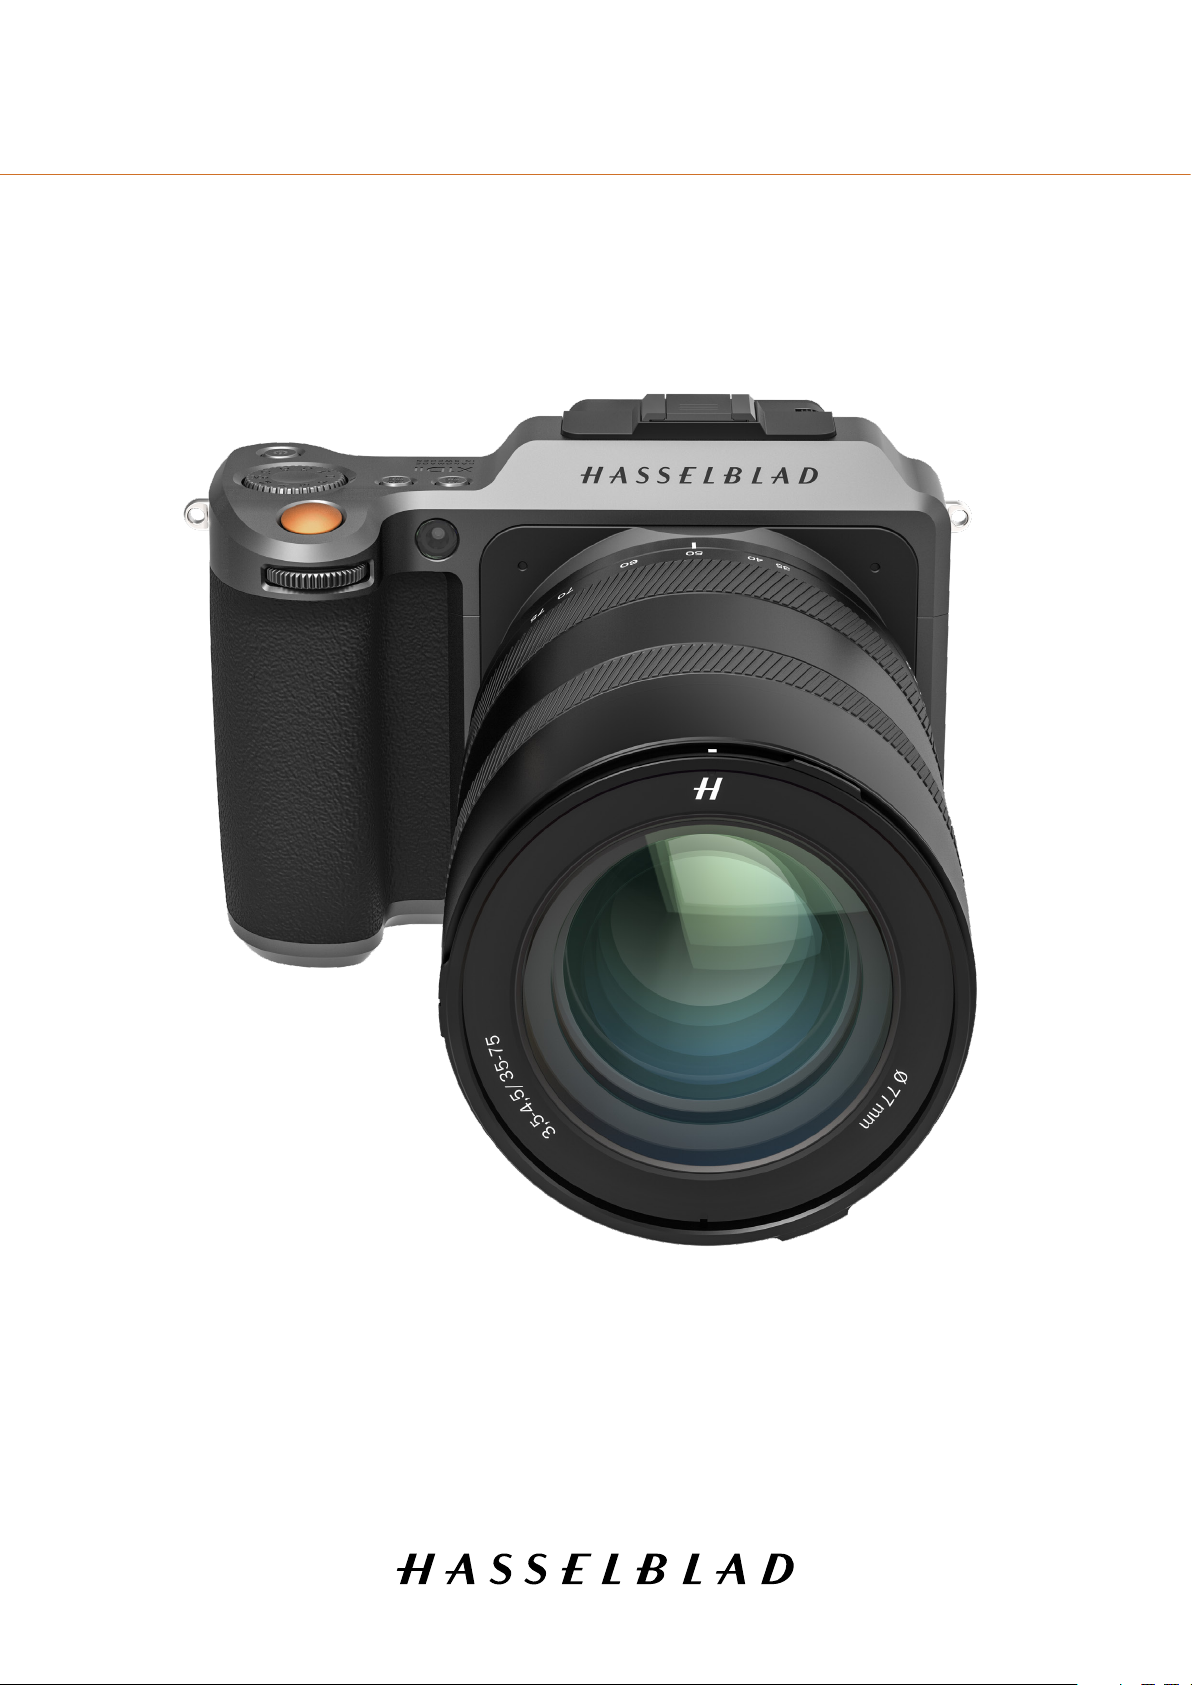
X1D II 50C
2019-12-05 V1
Page 2

Contents
1 INTRODUCTION 7
1.1 Welcome 8
1.2 X1D II 50C Features 9
Medium format advantages 9
Hasselblad Natural Colour Solution (HNCS) 9
JPEG & RAW les 9
Digital Lens Correction 9
Hasselblad Phocus Digital Imaging Software 9
Flash 9
XCD System lenses 9
H System Lenses 9
V System and XPan System Lenses 9
Other Lenses 9
1.3 Delivery Check 10
1.4 X1D II Technical Specications 11
1.5 System Requirements 13
1.6 New in this version 13
1.7 About this User Guide 13
Interactive PDF 13
Search Tools 13
Printing the X1D II User Guide 13
1.8 Glossary 13
1.9 Update X1D II Camera Firmware 13
1.10 Battery 14
1.11 Charging the Battery 15
Battery Charger 15
Charge the Battery 15
Charging from the USB port 15
1.12 Attaching the Shoulder Strap 16
2
2 SAFETY 17
2.1 Safety Guidelines 18
Camera 18
Maintenance 18
Battery 18
FCC Compliance Notice 20
3 LENSES 23
3.1 XCD Lenses 24
3.2 Remove and Attach a Lens 25
Remove the Lens 25
Attach the Lens 26
X1D II 50C USER GUIDE www.hasselblad.com
Page 3

Remove the Lens Cap 27
Attach the Lens Cap 27
Remove the Lens Shade 28
Attach the Lens Shade 28
3.3 XCD Lens Range 29
XCD 4/21 29
XCD 3.5/30 29
XCD 3.5/45 29
XCD 2.8/65 29
XCD 1.9/80 30
XCD 3.2/90 30
XCD 3.5/120 Macro 30
XCD 2.8/135 and X Converter 1.7 30
XCD 3,5-4,5/35-75 31
Filters 31
3
4 FUNCTIONS 32
4.1 Parts, Components, Buttons and Controls 33
4.2 Grip Buttons and Controls 36
4.3 Camera Body Buttons and Controls 37
4.4 Mode Dial 38
4.5 Exposure Program Modes 39
Manual Exposure Mode 40
Manual Quick Exposure Mode 41
MQ Mode Features 41
Automatic Exposure Modes 42
Custom Modes 43
How to set a Custom Mode 43
AE-L Button 44
4.6 The X1D II Interaction Displays 45
4.7 Touch Display Navigation 46
4.8 Navigating the Menus 47
Description of the Touch Display Menu Items 47
Overview of Menus and Settings on Touch Display 48
4.9 Touch Display Main Menu 49
Main Menu 49
Add shortcuts to Main Menu Favourites 49
How to Add shortcuts to Main Menu 50
How to Remove shortcuts on the Main Menu 50
How to move shortcuts on the Main Menu 50
4.10 Control Screen 51
Locked Exposure Parameters on the Control Screen 51
Settings on the Control Screen 52
Self Timer settings 56
X1D II 50C USER GUIDE www.hasselblad.com
Page 4

Interval settings 57
Interval Operation 58
Exposure Bracketing settings 59
Exposure Bracketing Operation 60
Long Exposure Screen 60
Fixed Exposure Compensation Setting 61
Exposure Compensation / Quick Adjust 62
Light Meter Mode 63
4.11 Connector Ports 64
4.12 Memory Cards 65
Insert a Memory Card 66
Recommended memory cards 66
Remove SD Memory Cards 67
Format SD Cards 68
Format Memory Cards on the Touch Display 68
4.13 Stop Down Button 69
Stop Down / Depth-of-Field Preview 69
4.14 Live View indications 70
Typical Live View Display 70
AF Indications 71
Live View Overlays 72
Zooming in Live View 72
4.15 Focusing 73
Autofocus 73
Manual Focus 75
Focus Peaking 76
4.16 Move Autofocus Point 77
4.17 Resize Autofocus Point 78
4.18 Move Autofocus Point using Touchpad 79
4.19 Change Settings on the Grip 80
ISO and White Balance 81
4.20 Browsing, Preview and Histogram 82
Browse Captures 82
Zoom in and out on the Touch Display 83
Select Card to Browse 84
Create New Folder 85
Standard Preview 86
9 View Mode 86
Preview Overlays 87
Histogram Mode 87
Capture Details Mode 87
How to change Histogram Overlay 87
Luminance Histogram Mode 87
4
X1D II 50C USER GUIDE www.hasselblad.com
Page 5

Separate Histogram RBG Mode 87
Histogram Exposure Mode 88
GPS 89
5 SETTINGS 90
5.1 Camera Settings Menu 91
Increment Step Size Settings 92
Shutter Function Settings 93
True Exposure explained 94
AE-L (AE-Lock) / Quick Adjust 95
Auto ISO / P / Full Auto 96
Crop & Orientation 97
Image Orientation 98
5.2 Image Quality Settings 99
5.3 Camera Autofocus Settings 100
5.4 Camera Flash Settings 103
5.5 Camera Conguration Settings 104
5.6 Video Settings Menu 106
5.7 General Settings Menu 107
Connectivity Settings 108
Display 109
Live View 110
Preview 111
Tou ch 112
Custom Buttons 113
Custom Modes 114
Storage 115
How to format a Memory Card 115
Sou nd 116
Date & Time 117
Power 118
Spirit Level 119
Calibrate Spirit Level 120
GPS 121
Language 122
Ser vice 123
Firmware Update 124
Lens Firmware Update 125
Log Data 126
Default Settings 127
Reset File Counter 128
About 129
5
X1D II 50C USER GUIDE www.hasselblad.com
Page 6

6 PHOCUS 130
6.1 Phocus Overview 131
Features in Phocus 132
6.2 Phocus Mobile 2 133
6.3 Connect to a Computer 134
6.4 Connect to an iPAD Pro 134
6.5 Connect the Camera to an Ipad Pro over Wi-Fi 135
Bluetooth assisted connection 135
Manual Wi-Fi connection 136
6.6 Phocus and Hasselblad Capture Files 137
7 ACCESSORIES 138
XH Lens Adapter 139
XV Lens Adapter 139
Tripod Mount Ring 75mm 139
XPan Lens Adapter 140
Release Cord X 140
Battery Charging Hub 140
7.1 Optional HC Lens Accessories 141
H 13, 26 and 52 Extension Tubes 141
Converter H 1.7x 141
Tilt/Shift Adapter HTS 1.5x 141
7.2 Optional Accessories 141
Pro Shade V/H 60 – 95 141
Pro Shade Adapters 142
UV Sky Filters 142
Pola Filters 142
X Camera Shoulder Strap 142
X Camera Black Leather Shoulder Strap 142
Tripod Quick Coupling H 142
6
8 APPENDIX 143
8.1 Change from Foreign Language 144
8.2 Error Messages 145
8.3 Clean the Sensor Filter 146
8.4 Clean the Lens Glass Surface 146
Remove Dust 146
Remove Smear 146
8.5 Information about the Hasselblad X1D User Guide 147
Updates 147
3D Product Images 147
Trademarks 147
Copyright 147
X1D II 50C USER GUIDE www.hasselblad.com
Page 7

1 INTRODUCTION
Page 8
1.1 WELCOME
Equipped with a brilliant 50-megapixel CMOS sensor, the
X1D II 50C Mirrorless Medium Format Digital camera is the
next instalment in the X System. Packed into the award-win-
ning design of the rst generation, the X1D II 50C continues to
keep medium format photography portable with its compact
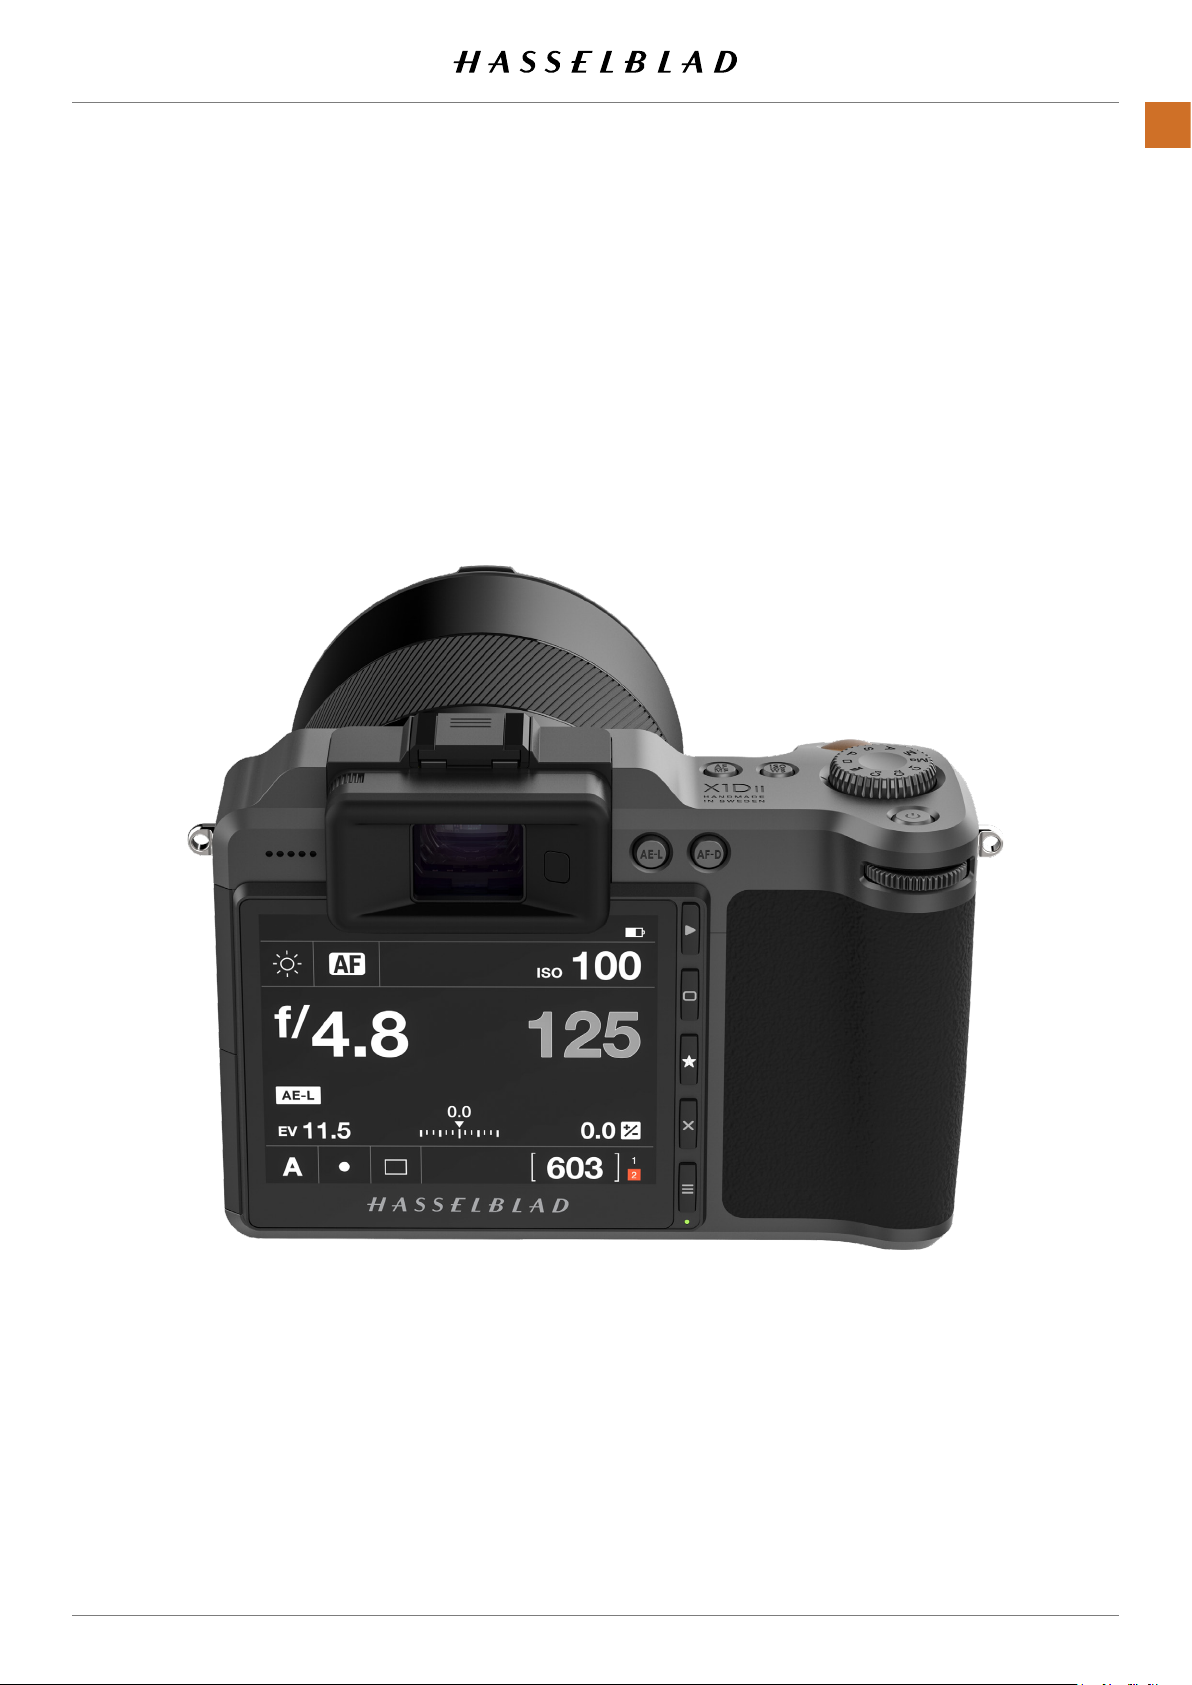
build. Its upgraded electronic platform includes an enlarged
3.6-inch touch display and an enhanced EVF, a faster live view
INTRODUCTION
refresh rate, and an intuitive and even quicker user interface
control. Connection via USB-C or Wi-Fi to Hasselblad’s Phocus
Mobile 2 allows for the ultimate, por table workow. And with
a huge range of high-quality optics to shoot with, including
XCD, HC/HCD, XPan and V System Lenses, the creative
possibilities are endless.
8
X1D II 50C USER GUIDE www.hasselblad.com
Contents
Page 9
1.2 X1D II 50C FEATURES
MEDIUM FORMAT ADVANTAGES
Large sensor for unbeatable image resolution.
Super smooth colour and tone rendition.
Enlargements in breathtaking quality.
Shallow depth of eld.
INTRODUCTION
9
HASSELBLAD NATURAL COLOUR SOLUTION (HNCS)
HNCS technology integrated into the camera’s system
provides superb colour quality for skin tones and specic
product hues, delivering exceptional, true-to-life colours that
match what the human eye sees.
JPEG & RAW FILES
The JPEG les are HNCS-proled so you can print straight
from your folder for amazing quality. RAW les are retained
for your nal masterpieces.
DIGITAL LENS CORRECTION
Digital Lens Correction, applied at the le editing stage, takes
a discerning look at any colour aberration, distortion and light
fall-off however minor (which is inherent in any lens, anywhere)
and resolves the situation automatically.
HASSELBLAD PHOCUS DIGITAL IMAGING SOFTWARE
The Hasselblad Phocus Digital Imaging Software is a Capture
Processing and File Management Application aimed primarily
at Hasselblad 3F le handling.
Phocus Mobile 2 offers remote viewing and control when
shooting tethered. Phocus Mobile 2 is free to download at
Apple´s App Store for iPad Pro and iPad Air (2019 or later).
Note!
The X1D II 50C is not compatible with the previous version of
Phocus Mobile.
FLASH
Nikon Flash Product range can be used in TTL-mode.
See Flash Compatibility on “X1D II Technical Specications”
on page 12 for details.
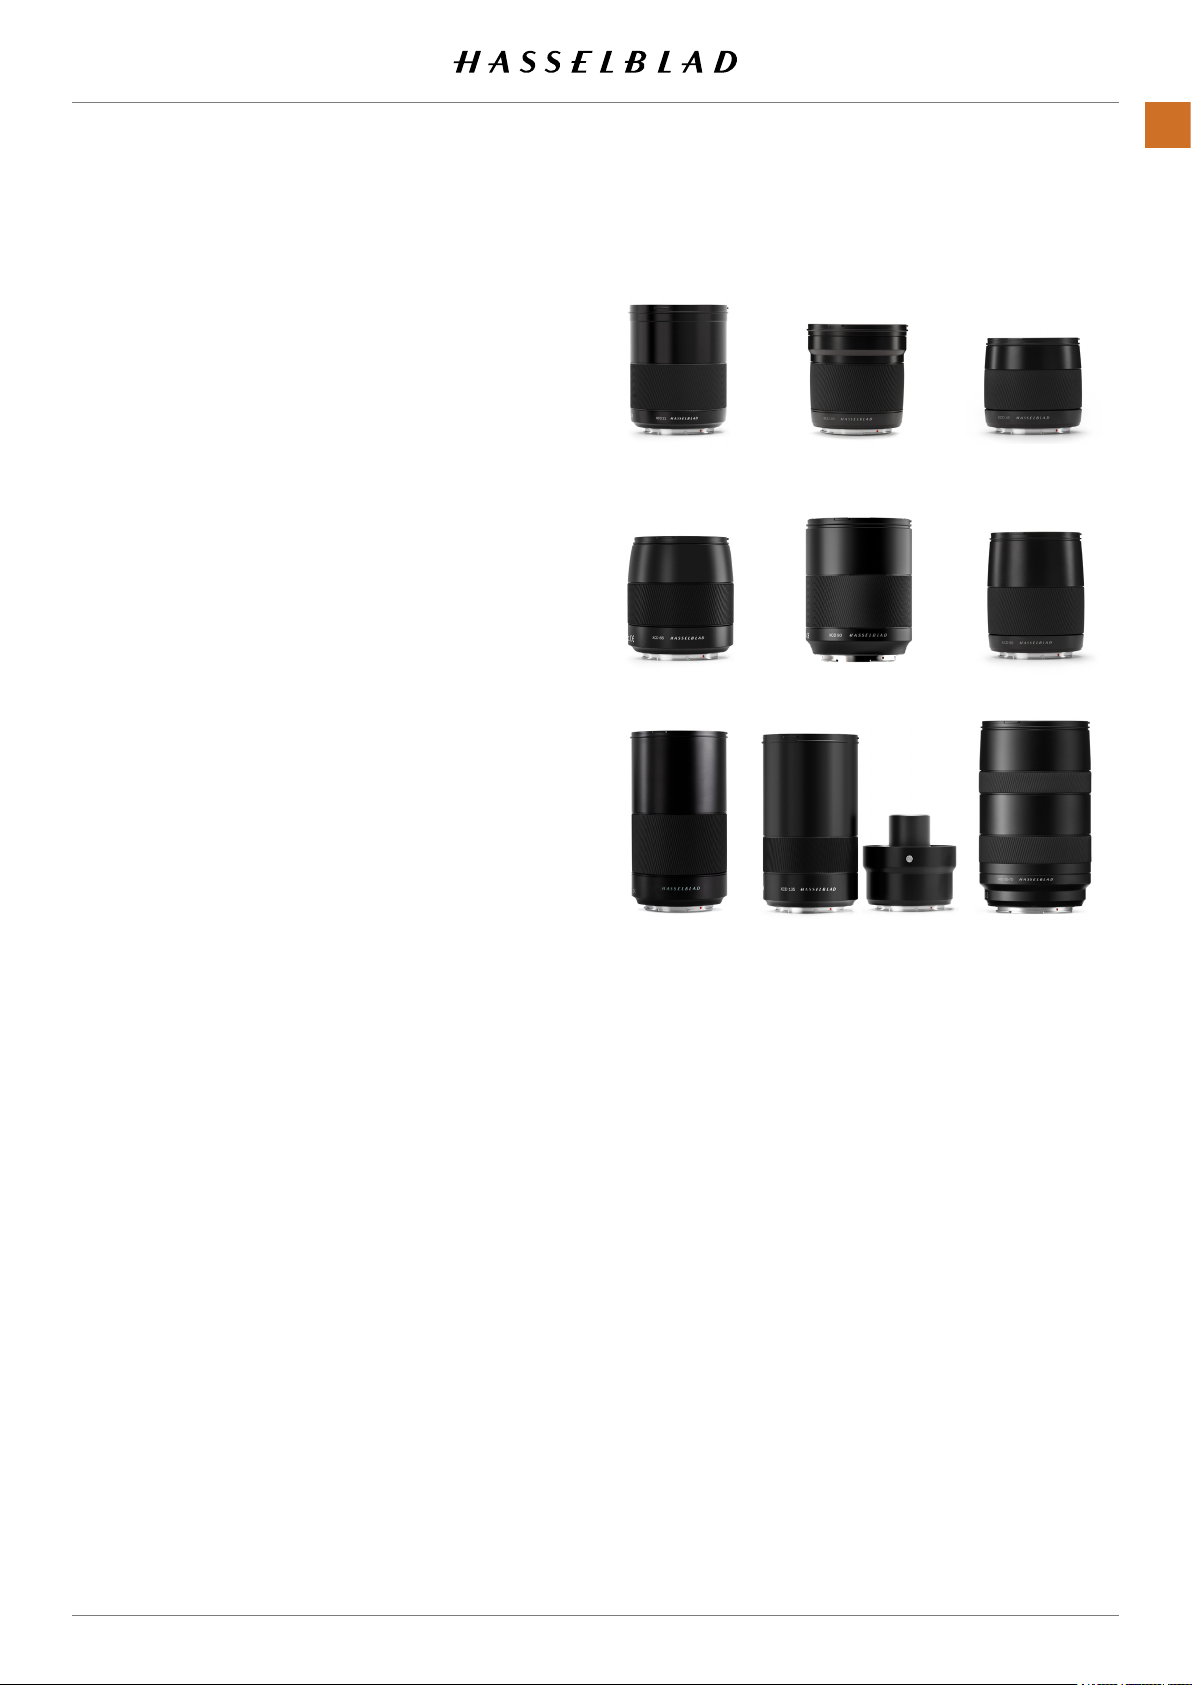
XCD 45mmXCD 30mmXCD 21mm
XCD 90mmXCD 80mmXCD 65mm
XCD 120mm
Macro
For more info, see page 24.
XCD 135mm +
X Converter 1,7
XCD 35-75
H SYSTEM LENSES
All H System lenses can be used with the optional XH Lens
Adapter (see page 139). Autofocus functionality requires
rmware version 18.0.0 or later in the H System Lens. Lenses
with older rmware cannot be updated to AF functionality.
V SYSTEM AND XPAN SYSTEM LENSES
XCD SYSTEM LENSES
There are 9 new designed high performance lenses. All have a
built-in lens shutter capable of ash sync up to 1/2000 sec.
With the optional XV Lens Adapter and XPan Lens Adapter,
the X1D II can use all lenses from the V System and XPan
System in electronic shutter mode.
OTHER LENSES
XCD 21 XCD 30
XCD 45 XCD 65
XCD 80 XCD 90
XCD 120 Macro XCD 135 + X Converter 1,7
XCD 35-75 Zoom
X1D II 50C USER GUIDE www.hasselblad.com
There are a great number of 3rd party adapters available
that will allow most other lenses to be used on the X1D II in
electronic shutter mode.
Contents
Page 10
1.3 DELIVERY CHECK
BATTERY
FRONT PROTECTIVE
COVER
INTRODUCTION
HOT SHOE
COVER
10
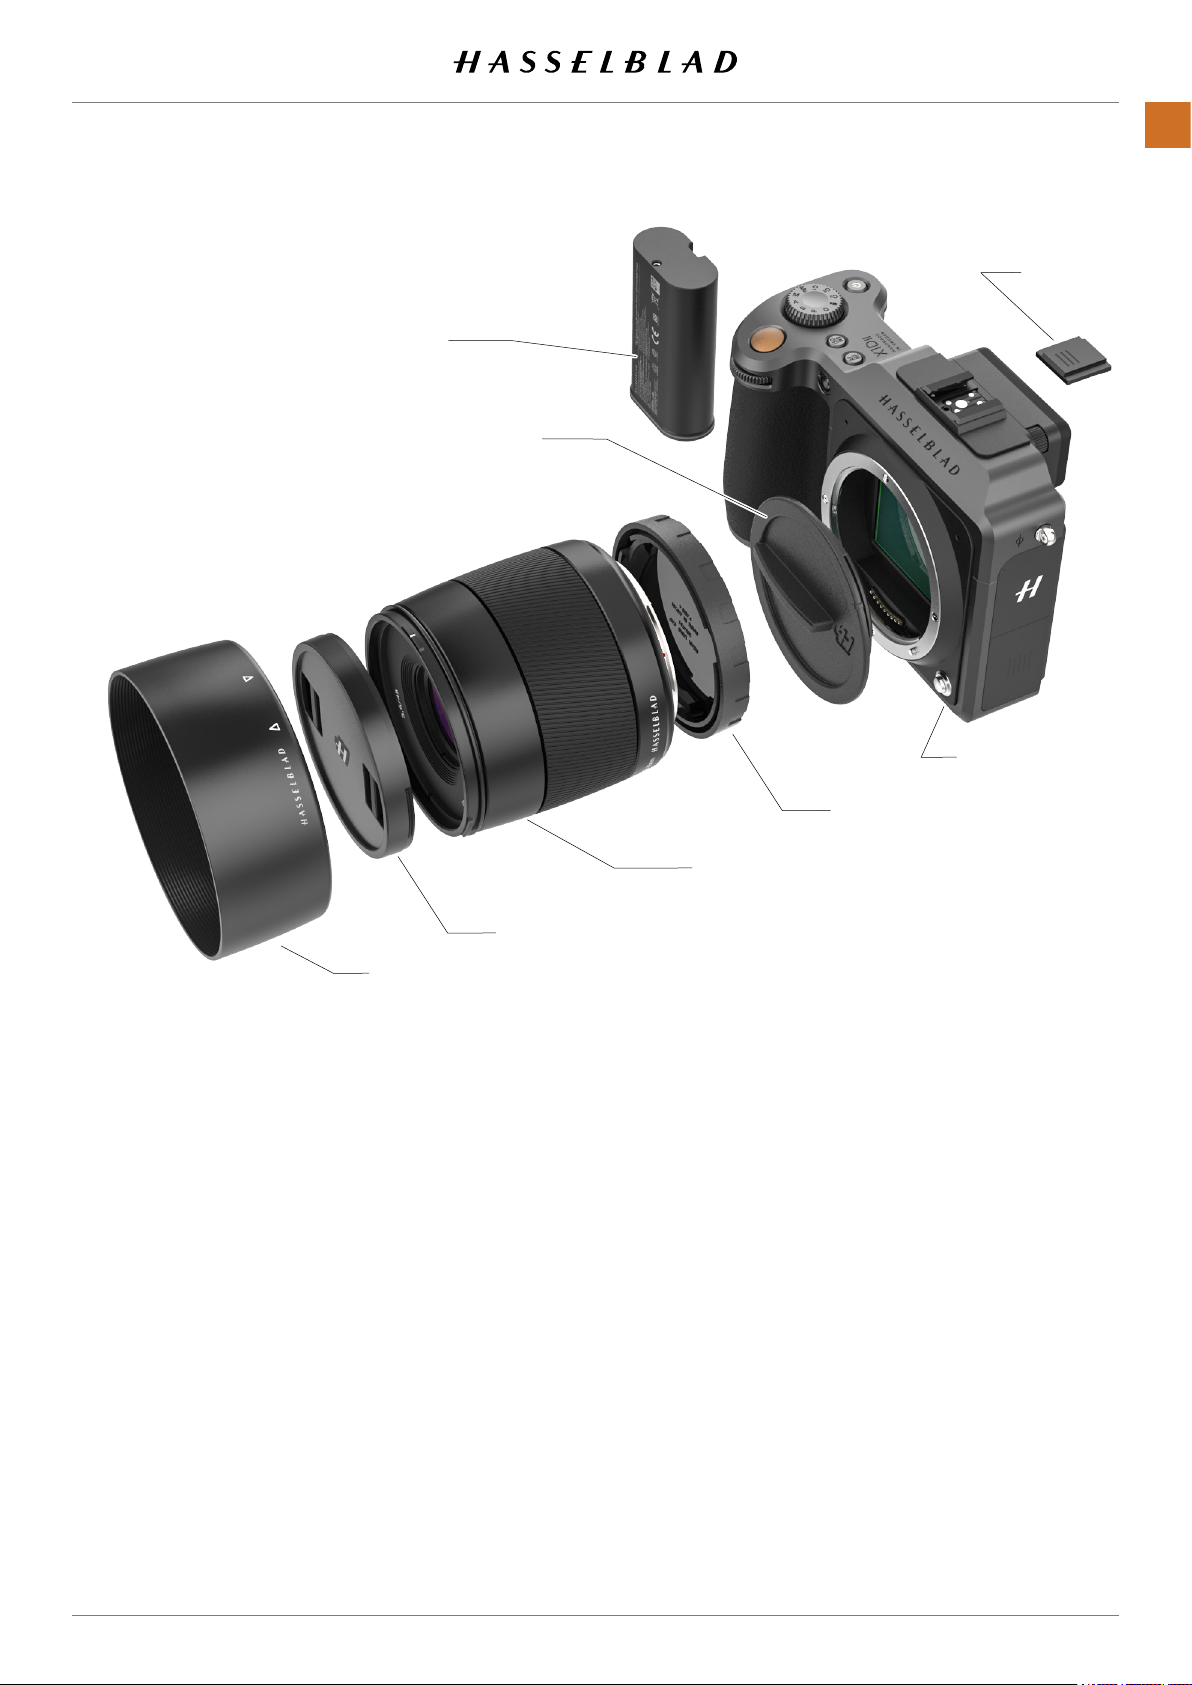
In the package
Camera Body.
Camera Front Protective Cover
Lens (if included in purchase)
Lens Hood.
Lens Protection Caps x2
3400 mAh rechargeable battery
CAMERA BODY
LENS REAR PROTECTIVE CAP
LENS
LENS FRONT PROTECTIVE CAP
LENS SHADE
In the Box document
Disclaimer and Safety Guidelines
Warranty Leaet
Battery Protective Cap
Battery Charger (included in some countries)
USB 3 Cable Type A–C, 80 cm
Shoulder Strap
X1D II 50C USER GUIDE www.hasselblad.com
Contents
Page 11

1.4 X1D II TECHNICAL SPECIFICATIONS
DATASHEET
X1D II 50C
INTRODUCTION
11
Camera Type
Construction Machined aluminium. Tripod socket 1/4”.
Sensor Type CMOS, 50 megapixels (8272 × 6200 pixels, 5.3 × 5.3 µm).
Sensor Dimensions 43.8 × 32.9 mm
Image Size
File Format Hasselblad 3FR RAW, Full size JPEG.
Shooting Mode Single shot, Continuous, Self Timer, Interval Timer and Exposure Bracketing.
Colour De nition 16-bit; Dynamic range up to 14 stops.
ISO Speed Range ISO Auto, 100, 200, 400, 800, 1600, 3200, 6400, 12800, 25600.
Storage Options
Colour Management Hasselblad Natural Colour Solution (HNCS)
Storage Capacity A 64 GB card holds approximately 600 RAW or 6000 JPEG High Quality images on average.
Capture Rate 2.7 frames per second (RAW)
User Interface
Display 3.6-inch TFT type, 24-bit colour, 2.36-million-dot; Touch functionality: Full support
Medium Format Mirrorless Digital camera with Autofocus, Auto exposure, interchangeable
lenses.
Stills: 3FR RAW capture 106 MB on average. JPEG: Up to 22 MB, TIFF 8 bit: 154 MB.
Video: To be enabled at a later date.
Dual UHS-II SD cards or tethered to Mac or PC. Max 1 TB. SD Cards can be used in Over ow or
Backup mode. Recommended cards are listed below.
Touch interface including swipe, scroll and pinch/spread to zoom. Camera grip with buttons and
Scroll Wheels. Many camera functions and settings can be controlled from a tethered computer
or iPad Pro/iPad Air (2019) over Wi-Fi or tethered.
Live View On camera and host computer with high frame rate.
View nder OLED, 3.69-million-dot Electronic View nder (EVF). Viewing Area : 100%. Magni cation: 0.87x
Histogram Feedback Yes, in Browse Mode on rear display and in EVF.
IR Filter Mounted in front of sensor.
Acoustic Feedback Yes
Software
Platform Support Macintosh: OS X version 10.12.2 or later. PC: XP/Vista/Windows 7 (32 and 64 bit)/ 8 / 10.
iOS device Support iPad Pro or iPad Air (2019 or later)
Host Connection Type USB 3.0 (5 Gbit/s) Type-C connector.
Additional Connections
Operating Temperature
Wi-Fi & GPS 802.11 b, g, n, a, ac (a and ac depending on region). GPS built-in.
Phocus for Mac and Windows. Compatible with Adobe Photoshop Lightroom® and Adobe
Camera Raw®
Phocus Mobile 2 including support for tethered connection via USB-C
Audio In/Out.
-10 to 45 ˚C. 14 to 113 ˚F.
Continued on the next page.
X1D II 50C USER GUIDE www.hasselblad.com
Contents
Page 12

DATASHEET
X1D II 50C
X1D II TECHNICAL SPECIFICATIONS
Hasselblad XCD lenses with built in electronically controlled shutter and aperture. Automatic or
manual focusing with instant manual focus override. Lens shades can be mounted in reverse for
Lenses
Shutter
Shutter Speed Range
Flash Sync Speed Flash can be used at all shutter speeds. Mechanical shutter only.
Flash Control
transport.
Compatible with all H System lenses and some H System accessories using an XH Lens Adapter.
Also compatible with V System and XPan Lenses using a XV or XPan Lens Adapter. Many other
lenses via 3rd party lens adapters (E-shutter only).
Electronically controlled lens shutter with speeds up to 1/2000 s. Flash sync at all speeds. Optional electronic shutter
68 minutes to 1/2000 s with XCD Lenses. 1/800 s or 1/2000 s with HC/HCD Lenses. Electronic
shutter 68 min to 1/10000 s.
TTL centre weighted system. Compatible with Nikon
Flash output can be adjusted (-3 to +3 EV) for ll-in purposes independent of ambient light. Sync
at all shutter speeds. Mechanical shutter only.
TM
System ashes. ISO range 100 to 6400.
INTRODUCTION
12
Flash Compatibility
Focusing
Exposure Metering Spot, centre weighted and centre spot.
Power Supply
Dimensions
Weight
In TTL-mode, the following Nikon Flash products can be used: SB-300, SB-500, SB-5000, SB-700,
SB-900, SB-910.
The following Profoto products can be used in TTL-mode: A1, B1 and B2 with Nikon interface.
Automatic and manual focusing. Instant manual focus override. Automatic focusing using contrast
detection. 100% zoom or Focus Peaking available in manual focus. Up to 117 selectable autofocus
points.
Rechargeable Li-ion battery (7.27 VDC/3400 mAh). Compatible with the 3200 mAh battery.
Can be charged in camera via USB or with optional external charger.
Complete camera w/ XCD 45 mm lens: 148 x 97 x 125 mm [W x H x D].
Camera Body only: 148 x 97 x 70 mm
1230 g (Complete camera with XCD 45mm lens, Li-ion battery and card).
650 g (Camera Body). 766 g (Camera Body with battery and SD Card).
X1D II 50C USER GUIDE www.hasselblad.com
Contents
Page 13

INTRODUCTION
13
1.5 SYSTEM REQUIREMENTS
Storage and editing of images requires certain minimum computer capabilities. Large images require a reasonably high
performance computer with sufcient memor y, advanced
graphics capabilities and a recent operating system.
It is recommended that the computer has a USB 3 connector,
which will allow you to load images more quickly from the
camera. A USB SD card reader is also required for image
transfer from the SD cards.
1.6 NEW IN THIS VERSION
This User Guide describes the functionality available with X1D
II 50C rmware version 1.1.0 or later.
New function:
● Support for Phocus Mobile 2. See page 133.
● Bluetooth assisted Wi-Fi connection.
Greatly simplies Wi-Fi connection between the
camera and an iPad Pro running Phocus Mobile 2.
See page 108 and page 135.
1.8 GLOSSARY
In this User Guide a few different terms are used:
Tap:
This means to touch a value or icon on the display with
your nger briey. This only works with a bare nger or when
special touch-display gloves are used.
Double-tap:
within 1 second. This is mainly used to zoom in an image or
Live View.
Long-press:
Swipe:
nger and slide in one direc tion. This is typically used when
selecting a value from a list or when panning in a zoomed-in
image.
Spread:
apart. Typically used for zoom in.
Pinch: Place two ngers on the display with a distance
between and move the ngers together. Typically used when
zooming out.
Quickly tap the same location on the display
Press and hold for one second.
A sliding movement is when you press and hold the
Place two ngers on the display and move them
1.7 ABOUT THIS USER GUIDE
The X1D II User Guide is designed for on-screen PDF reading
to take advantage of the interactivity functions and search
tools.
INTERACTIVE PDF
You can navigate the User Guide by selecting a chapter in
the Table of Contents. This interactive feature is available on
nearly all PDF readers, computer platforms and web browsers.
All pages contain a link to the Table of Content and most page
references also work as a link.
SEARCH TOOLS
On most PDF readers you can use the Search Tool to nd a
specic subject, function or setting.
PRINTING THE X1D II USER GUIDE
Please note that the format is A4 to conform with the most
common standard. Therefore if printing to US Letter format or
similar please ensure you select “Fit to Printable Area” in the
page scaling dialogue.
Tethering:
to a computer or an iPad Pro.
When the Camera is connected with a USB cable
1.9 UPDATE X1D II CAMERA FIRMWARE
The X1D II Camera system can be updated with improvements
and new functions.
Before you start to use your new X1D II camera, please visit
www.hasselblad.com and download the latest X1D II camera
rmware and update the camera system to make sure you get
the latest functionality.
See page 124 for an in-depth description on how to down-
load the camera rmware and update your X1D II camera.
Photo Credits
Ian Lawson – 81, 82, 83, 84, 85, 134
Jens Karlsson – 83
Mattias Hammar – 100
Philip Liljenberg – 103
X1D II 50C USER GUIDE www.hasselblad.com
Contents
Page 14
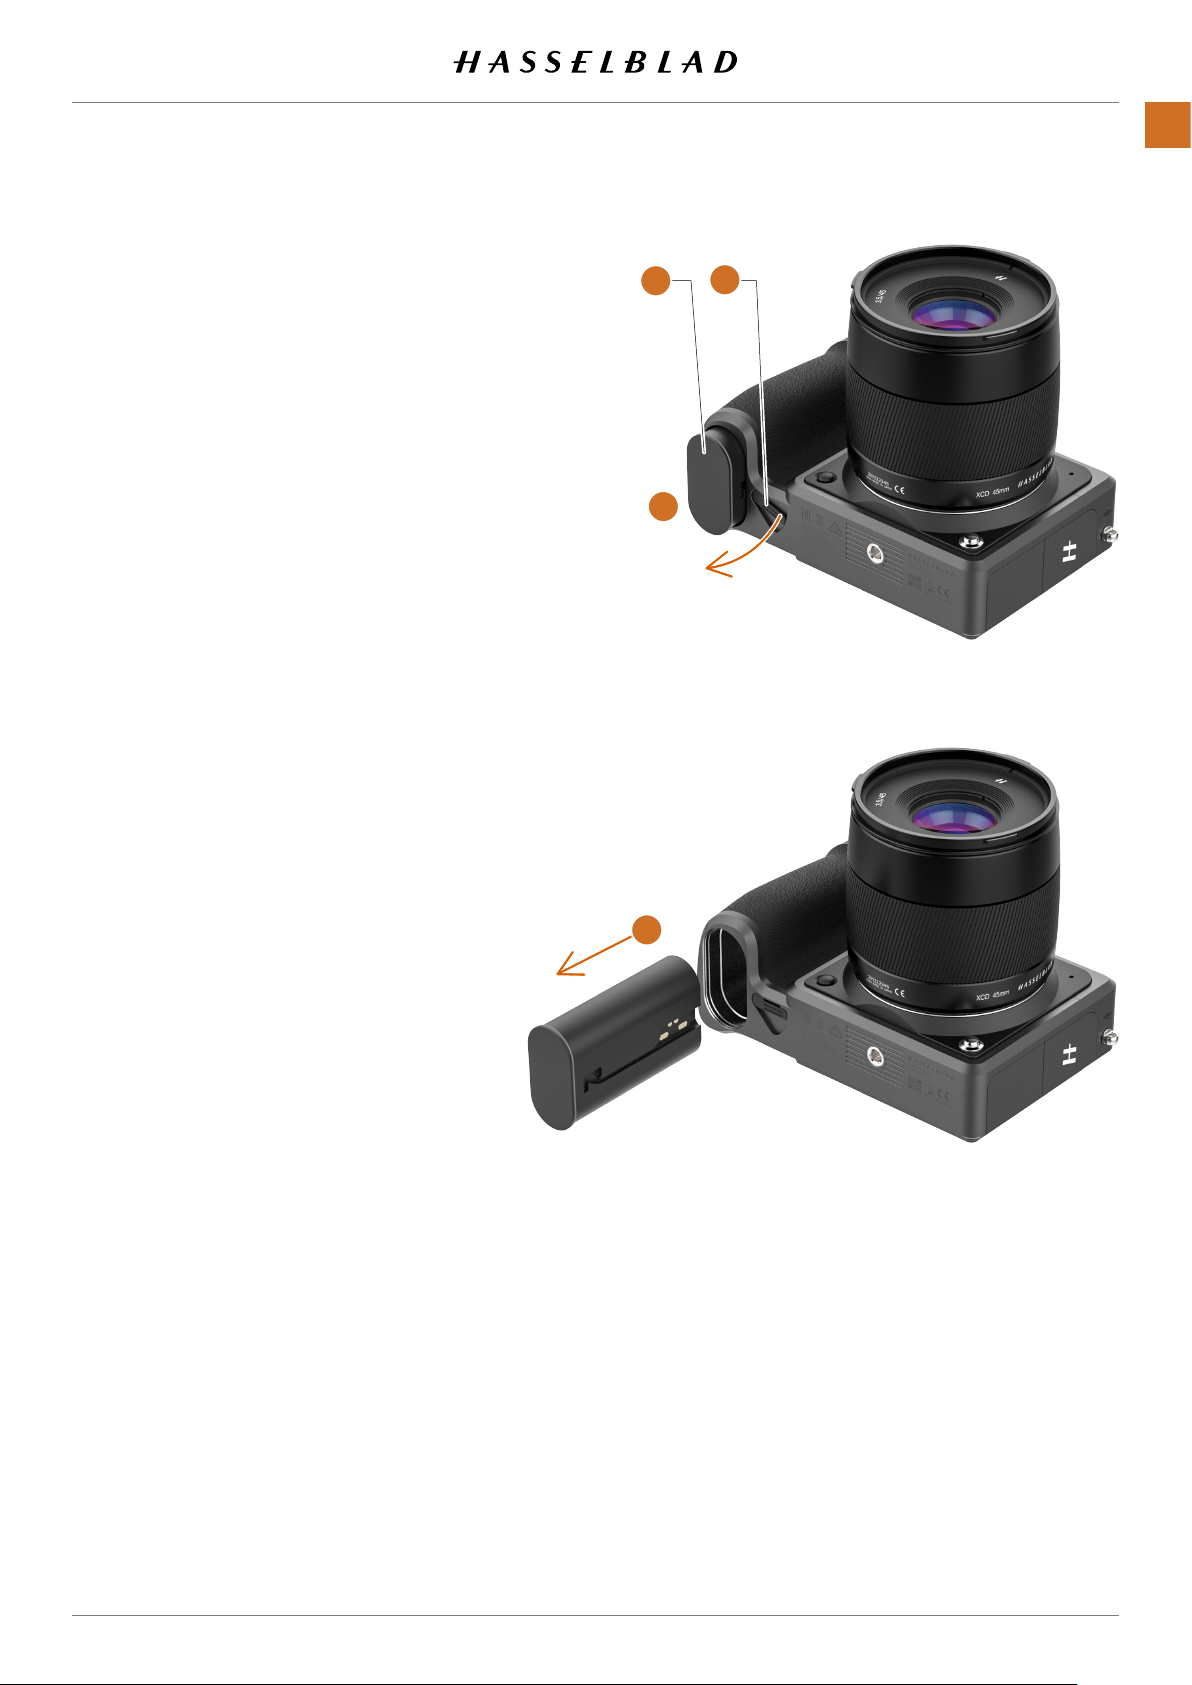
1.10 BATTERY
INTRODUCTION
14
Rechargeable Battery
The environmentally approved Battery is the standard Power
Source for the X1D II Camera (1). It is advisable to keep an
extra fully recharged battery on hand. As is the case with
most batteries, problems might be encountered when used in
very low temperatures. In this situation it is advisable to keep
the reserve battery inside a warm pocket, for example, to
maintain it near body temperature.
How to remove a Battery
1 Remove the Battery
Battery Lever
2 The Battery will move up a bit
3 Then press the Battery in a bit but not all the way, to
release it from the Camera completely.
4 Remove the battery
(2)
(1)
from the camera by rotating the
.
(3)
automatically.
(4)
.
How to mount a Battery
1 Align the battery so the contacts are facing the lens and
push it into the Camera Battery Compartment until it locks
into place.
1
2
3
Note!
When the battery is inserted, the rear Status LED will show a
blink sequence once to indicate the current battery charge
level. See next page for details.
4
X1D II 50C USER GUIDE www.hasselblad.com
Contents
Page 15
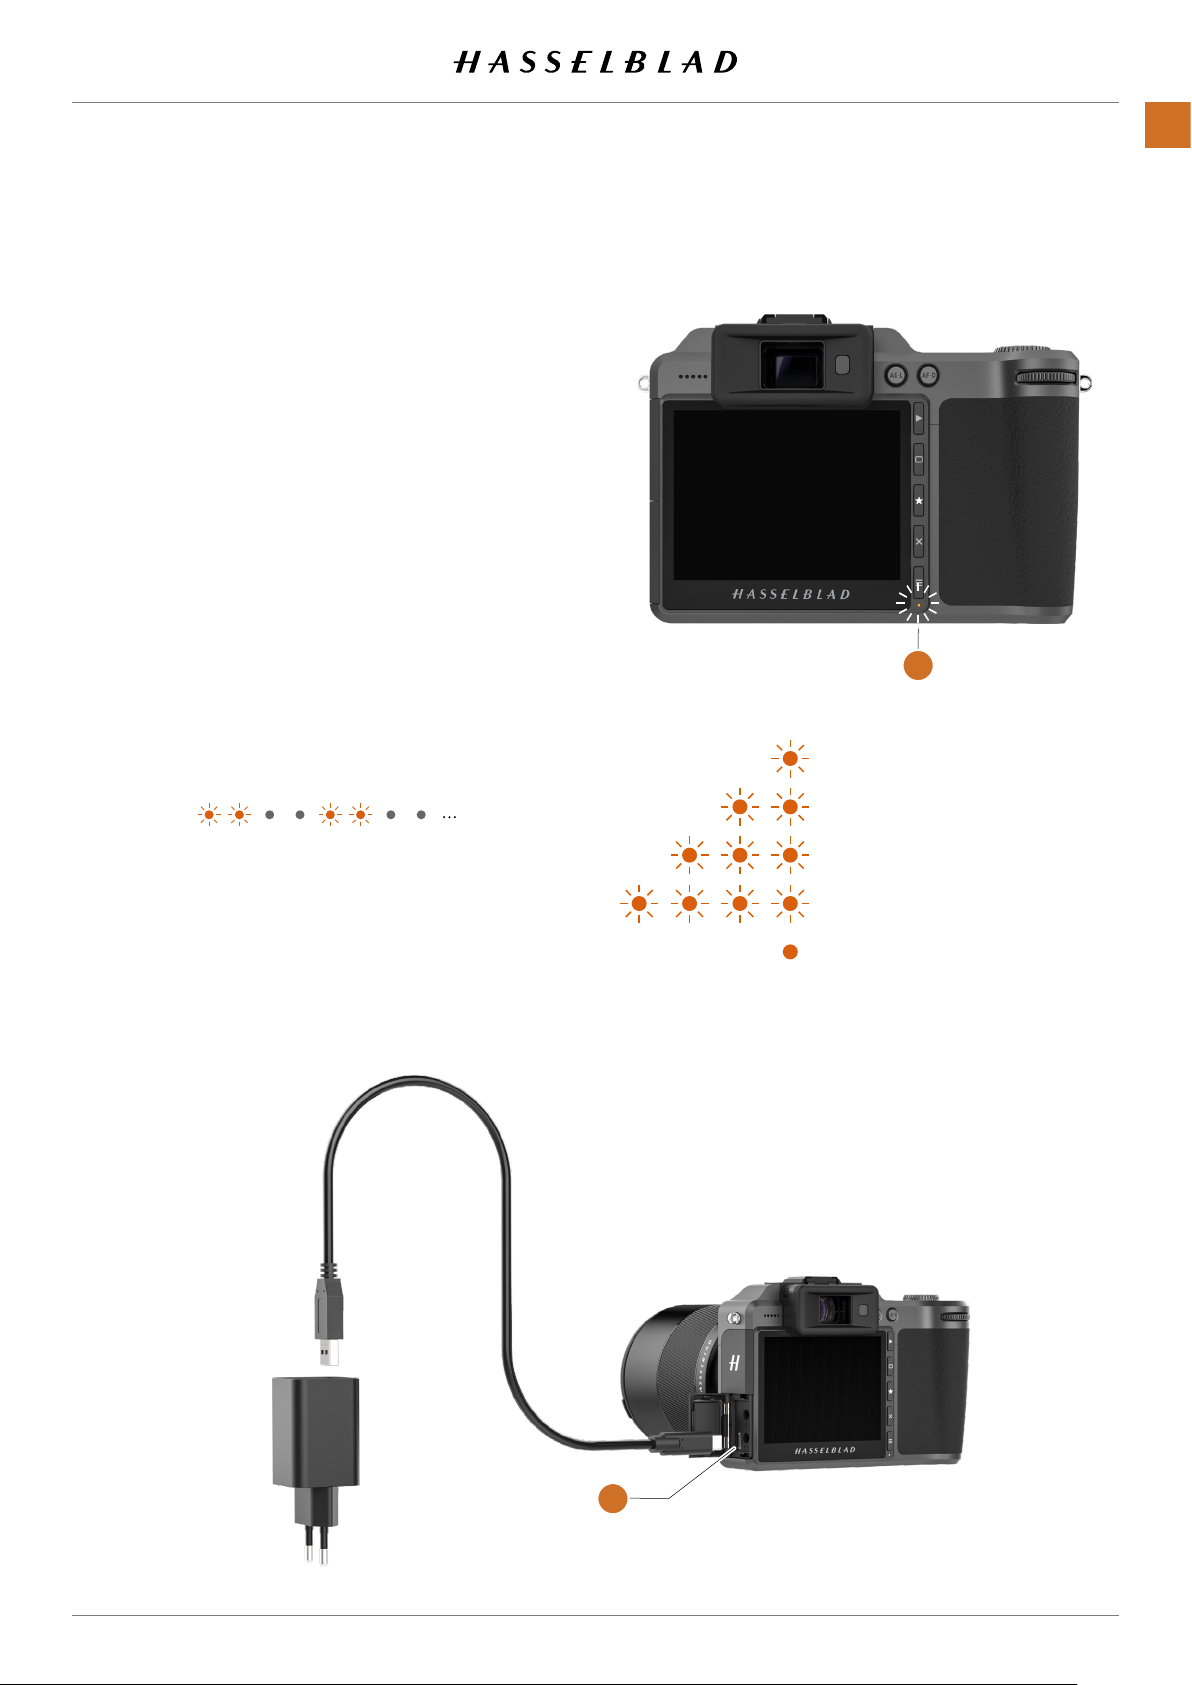
1.11 CHARGING THE BATTERY
BATTERY CHARGER
The X1D II is supplied with a USB power adapter for charging
the camera battery through the USB port of the camera.
CHARGE THE BATTERY
Turn off the camera and insert the USB-C plug from the
battery charger into the USB socket on the camera
the battery charger into a standard (100–240V~ /50–60 Hz)
domestic socket.
CHARGING FROM THE USB PORT
(A)
. Insert
INTRODUCTION
15
When the battery is charging, the Status Led
the current charge level by blinking with Orange color. See
illustration to the right. E.g. if the battery has about 50%
charge level, the LED will blink two times and then be turned
off for a short period. The blinking sequence is repeated.
See also Battery Charging Hub accessory on page 140.
(B)
indicates
B
One blink = 0% to 25%.
Two blinks = 26% to 50%.
Three blinks = 51% to 75%.
Four blinks = 76% to 95%.
Steady light, 4 sec. = 95% to 100%
A
X1D II 50C USER GUIDE www.hasselblad.com
Contents
Page 16
INTRODUCTION
16
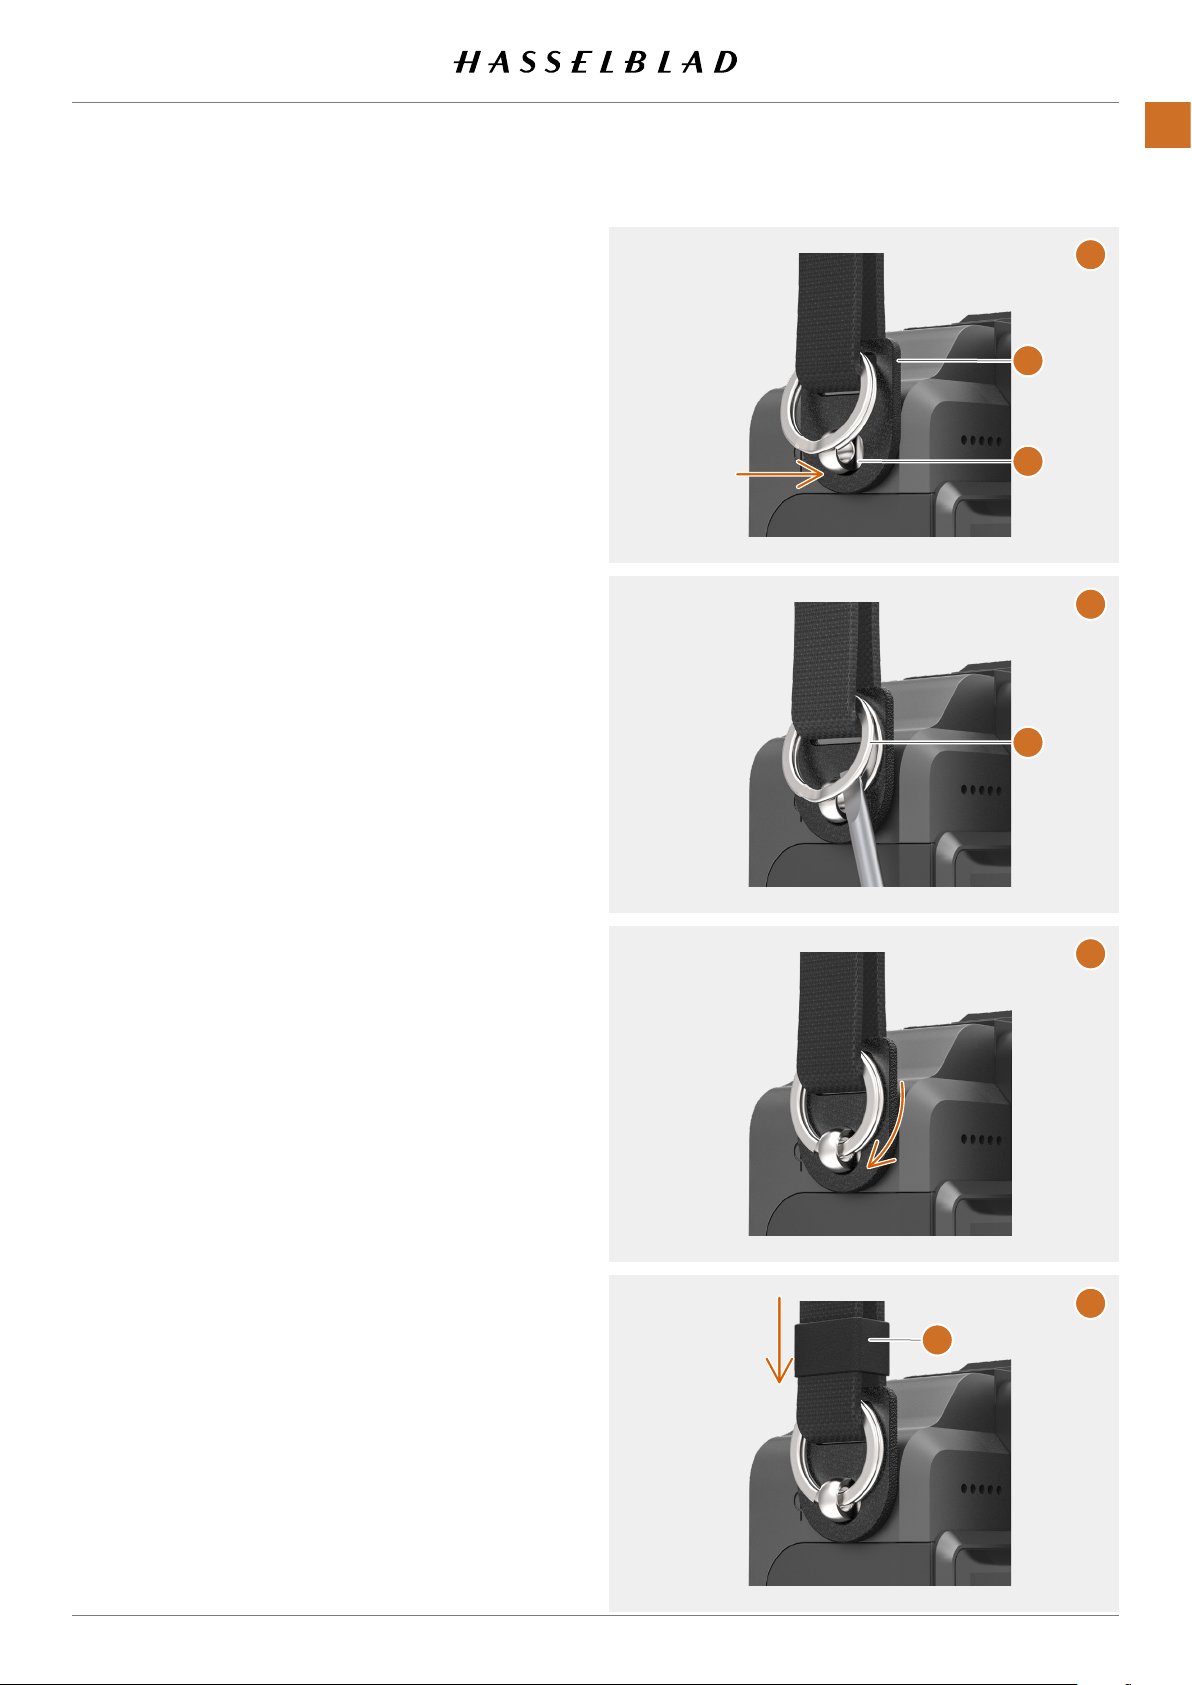
1.12 ATTACHING THE SHOULDER STRAP
Attach the included shoulder strap to the camera by following
these instructions:
A Attach the leather end
strap lug
B Open the metal ring
screwdriver or a small knife. Be careful not to scratch
the camera.
C Insert the open end of the metal ring into the hole of
the strap lug. Rotate the ring one full turn and make
sure it is fully attached to the strap lug.
D Finally, slide the plastic fastener
Repeat the process for the other side of the camera.
(2)
.
Note!
If the strap is exposed to strong pulling force there is a risk
that the metal rings or the strap itself can be damaged.
Regularly check the condition and replace the rings or the
entire strap if necessary.
(1)
of the strap to the metal
(3)
with a sharp tool. E.g. a
(4)
down.
A
1
2
B
3
C
D
4
X1D II 50C USER GUIDE www.hasselblad.com
Contents
Page 17

2 SAFETY
Page 18

2.1 SAFETY GUIDELINES
SAFETY
18
CAMERA
Usage
● Only place the camera on a at and stable surface.
Otherwise, the camera or lens may fall, causing serious
damage to the apparatus.
● DO NOT use the camera in environments that are
wet, smoky, dusty, or contain inammable gases or
materials.
● Make sure to waterproof the camera during thunder-
storms. Otherwise, it may lead to a re hazard.
● DO NOT use the camera where the temperature is too
high or too low. Otherwise, the performance of the
camera may be affected and the service life may be
decreased.
● Immediately power off the camera and remove the
battery if there is any abnormality including, but
not limited to, smoke and strange odors. Contact
Hasselblad or Hasselblad authorized dealers for further
assistance.
● DO NOT disassemble or modify the camera. Other-
wise, the warranty will be invalidated.
● DO NOT stand too close in front of the ash when the
ash unit is activated. Otherwise, your eyesight may be
temporarily affected.
● Make sure the SD card is in good condition. DO NOT
insert or remove the SD card when the status LED of
the camera is blinking. Otherwise, the data may be
lost, and the SD card may be damaged.
● Make sure to respect and abide by people’s privacy
rights when using this camera.
● Make sure to use a compatible battery to supply power.
● Storage and Transportation
● In humid conditions, it is recommended to use a
camera dry box, humidity cabinet, or silica gel sachets.
● Place the camera out of the reach of small children.
● DO NOT place heavy objects on the camera.
● DO NOT store the camera in a place where the
temperature of the environment is too high or too low.
MAINTENANCE
● Keep the camera clean and free of dirt and buildup.
Attach the protection cover lid to the camera when
the lens is detached. Otherwise, dust and dirt may be
attracted to the sensor.
● This product is delicate. Strictly follow the instructions
in the user guide to clean the camera.
● Contact Hasselblad or Hasselblad authorized dealers
for professional assistance to clean the camera.
Usage
● DO NOT allow the battery to come into contact with
any liquid. DO NOT drop the battery into water. If the
inside of the battery comes into contact with water,
corrosion may occur, potentially resulting in the battery
catching on re, and may even lead to an explosion.
● DO NOT use or charge a leaky or damaged battery. If
a battery is abnormal, contact Hasselblad or a Hasselblad authorized dealer for further assistance.
● The battery should be used in temperatures ranging
from -10˚ to 40˚ C (14˚ to 104˚ F). Use of the battery in
environments above 50˚ C (122˚ F) can lead to a re or
explosion. Use of battery below -10˚ C (14˚ F) can lead
to permanent damage.
● DO NOT disassemble or pierce the battery in any way
or the battery may leak, catch re, or explode.
● Electrolytes in the battery are highly corrosive. If any
electrolytes contact your skin or eyes, immediately
wash the affected area with fresh running water for at
least 15 minutes, and then see a doctor immediately.
● DO NOT use the battery if it was involved in a collision
or heavy impact.
● DO NOT put batteries in a microwave oven or a
pressurized container.
● DO NOT put loose cells in a pocket, bag, or drawer
where they may short-circuit against other items or
where the battery terminals may be pressed against
each other.
● DO NOT drop or strike batteries.
● DO NOT place heavy objects on the batteries or
charger.
● Clean battery terminals with a clean, dry cloth.
Battery Charging
● DO NOT charge the battery near ammable materials
or on ammable surfaces (e.g., carpet or wood).
● Charging the battery outside of the temperature
range of 5˚ to 40˚ C (41˚ to 104˚ F) may lead to leakage,
overheating, or damage to the battery. The ideal
charging temperature is 15˚ to 25˚ C (59˚ to 77˚ F).
● Disconnect the charger when not in use. Check the
charger regularly for damage to the cord, plug,
enclosure, or other parts. DO NOT use a damaged
charger.
BATTERY
X1D II 50C USER GUIDE www.hasselblad.com
Contents
Page 19

SAFETY
19
Battery Storage
● Keep batteries out of the reach of small children and
animals.
● Remove the battery from the camera if you intend to
store the camera for an extended period. Discharge
the battery to a power level between 30 and 60% and
place the battery at room temperature. The battery
power level can be checked through the touch screen
of the camera.
● DO NOT leave the battery near heat sources such as an
open re or heater. DO NOT leave the bat teries inside
a vehicle on hot days.
● Keep the battery dry. DO NOT drop the battery into
water.
● DO NOT drop, strike, impale, or manually short-circuit
the battery.
● If a battery is damaged, dispose of it in a suitable
recycling container by strictly following your local
regulations. DO NOT transport a damaged battery.
● DO NOT store the battery for an extended period
after fully discharging it. Otherwise, the battery may
over-discharge and cause irreparable damage to the
battery cell.
● The battery enters hibernation mode if depleted and
stored for an extended period. Recharge the battery to
bring it out of hibernation.
Battery Disposal
● Dispose of the battery in a suitable recycling container
only after fully discharging it. DO NOT place the
battery in a regular trash container. Strictly follow your
local regulations regarding the disposal and recycling
of batteries.
Battery Maintenance
● Fully charge and discharge the battery at least once
every three months to maintain the performance of the
battery.
● DO NOT store the battery in environments with a
temperature higher than 45˚ C (113˚ F) or lower than
0˚ C (32˚ F). Before carrying the batter y on an airline
ight, it must rst be discharged to a power level below
30%. Only discharge the batter y in a reproof location.
X1D II 50C USER GUIDE www.hasselblad.com
Contents
Page 20

SAFETY
20
FCC COMPLIANCE NOTICE
This device complies with Part 15 of the FCC Rules. Operation
is subject to the following two conditions:
may not cause harmful interference, and
accept any interference received, including interference that
may cause undesired operation.
Any changes or modications not expressly approved by
the party responsible for compliance could void the user’s
authority to operate the equipment.
This equipment has been tested and found to comply with
the limits for a Class B digital device, pursuant to part 15
of the FCC Rules. These limits are designed to provide
reasonable protection against harmful interference in a
residential installation. This equipment generates, uses and
can radiate radio frequency energy and, if not installed and
used in accordance with the instructions, may cause harmful
interference to radio communications. However, there is
no guarantee that interference will not occur in a particular
installation. If this equipment does cause harmful interference
to radio or television reception, which can be determined by
turning the equipment off and on, the user is encouraged to
try to correct the interference by one or more of the following
measures:
(1)
This device
(2)
This device must
L’émetteur/récepteur exempt de licence contenu dans
le présent appareil est conforme aux CNR d’Innovation,
Sciences et Développement économique Canada applicables
aux appareils radio exempts de licence. L’exploitation est
autorisée aux deux conditions suivantes :
doit pas produire de brouillage;
tout brouillage radioélectrique subi, même si le brouillage est
susceptible d’en compromettre le fonctionnement.
(2)
(1)
L’appareil ne
L’appareil doit accepter
INFORMATIONS SUR L’EXPOSITION RF
Ce dispositif (X1D MARK II; modèle X1D MARK II) est
conforme aux normes SAR pour les limites d’exposition ISED
non contrôlées et a été testé conformément aux méthodes et
procédures de mesure spéciées dans IEEE1528 et IEC 62209,
cet équipement doit être installé et fonctionne avec une
distance minimale de 1 cm entre le radiateur et votre visage
lorsque le fonctionnement est proche de l’œil. Et distance
minimale 20 cm entre le radiateur et votre corps lors de
l’opération manuelle.
Cet appareil et son (ses) antenne (s) ne doivent pas être
co-localisés ou fonctionner en conjonction avec une autre
antenne ou émetteur.
● Reorient or relocate the receiving antenna.
● Increase the separation between the equipment and
receiver.
● Connect the equipment into an outlet on a circuit
different from that to which the receiver is connected.
● Consult the dealer or an experienced radio/TV
technician for help.
RF EXPOSURE INFORMATION
This device (X1D MARK II; model: X1D MARK II) is compliance
with SAR for uncontrolled FCC exposure limits and had
been tested in accordance with the measurement methods
and Procedures specied in IEEE1528 and IEC 62209, this
equipment should be installed and operated with minimum
distance 1 cm between the radiator and your face when close
to eye operation. And minimum distance 20 cm between the
radiator and your body when hand-held operation.
This device and its antenna(s) must not be co-located or operating in conjunction with any other antenna or transmitter.
ISED WARNING
This device contains licence-exempt transmitter(s)/receiver(s)
that comply with Innovation, Science and Economic Development Canada’s licence-exempt RSS(s). Operation is subject to
the following two conditions:
interference.
including interference that may cause undesired operation of
the device.
(2)
This device must accept any interference,
(1)
This device may not cause
KCC WARNING MESSAGE
“해당무선설비는 운용 중 전파혼신 가능성이 있으므로
인명안전과 관련된 서비스는 할 수 없습니다.”
“해당 무선설비는 운용 중 전파혼신 가능성이 있음”
NCC WARNING MESSAGE
低功率電波輻射性電機管理辦法
第十二條 經型式認證合格之低功率射頻電機,非經許
可,公司、商號或使用者均不得擅自變更頻率、加大功率
或變更原設計之特性及功能。
第十四條 低功率射頻電機之使用不得影響飛航安全及干
擾合法通信;經發現有干擾現象時,應改善至無干擾時方
得繼續使用。前項合法通信,指依電信法規定作業之無線
電通信。低功率射頻電機須忍受合法通信或工業、科學及
醫療用電波輻射性電機設備之干擾。
EU COMPLIANCE STATEMENT
VICTOR HASSELBLAD AKTIEBOLAG hereby declares that this
device is in compliance with the essential requirements and
other relevant provisions of the Directive 2014/53/EU.
EU contact address: Utvecklingsgatan 2, 41756 Göteborg,
Sweden.
X1D II 50C USER GUIDE www.hasselblad.com
Contents
Page 21
SAFETY
21
DECLARACIÓN DE CUMPLIMIENTO UE:
VICTOR HASSELBLAD AKTIEBOLAG por la presente declara
que este dispositivo cumple los requisitos básicos y el resto
de provisiones relevantes de la Directiva 2014/53/EU.
Dirección de contacto de la UE:
Utvecklingsgatan 2, 41756 Göteborg, Sweden
EU-VERKLARING VAN OVEREENSTEMMING:
VICTOR HASSELBLAD AKTIEBOLAG verklaart hierbij dat
dit apparaat voldoet aan de essentiële vereisten en andere
relevante bepalingen van Richtlijn 2014/53/EU.
Contactadres EU: Utvecklingsgatan 2, 41756 Göteborg,
Sweden
DECLARAÇÃO DE CONFORMIDADE DA UE:
A VICTOR HASSELBLAD AKTIEBOLAG declara, através deste
documento, que este dispositivo está em conformidade com
os requisitos essenciais e outras disposições relevantes da
Diretiva 2014/53/EU.
Endereço de contacto na UE: Utvecklingsgatan 2, 41756
Göteborg, Sweden
Environmentally friendly disposal
Old electrical appliances must not be disposed
of together with the residual waste, but have
to be disposed of separately. The disposal
at the communal collecting point via private
persons is for free. The owner of old appliances
is responsible to bring the appliances to these
collecting points or to similar collection points.
With this little personal effort, you contribute to
recycle valuable raw materials and the treatment
of toxic substances.
Umweltfreundliche Entsorgung
Elektro-Altgeräte dürfen nicht mit gewöhnlichem Abfall entsorgt werden und müssen
separat entsorgt werden. Die Entsorgung an
kommunalen Sammelstellen ist für Privatpersonen kostenlos. Die Eigentümer der Altgeräte
sind für den Transport zu den Sammelstellen
verantwortlich. Durch diesen geringen Aufwand
können Sie zur Wiederverwertung von wertvollen Rohmaterialien beitragen und dafür sorgen,
dass umweltschädliche und giftige Substanzen
ordnungsgemäß unschädlich gemacht werden.
DICHIARAZIONE DI CONFORMITÀ UE:
VICTOR HASSELBLAD AKTIEBOLAG dichiara che il presente
dispositivo è conforme ai requisiti essenziali e alle altre
disposizioni rilevanti della direttiva 2014/53/EU.
Indirizzo di contatto UE: Utvecklingsgatan 2, 41756 Göteborg,
Sweden
DÉCLARATION DE CONFORMITÉ UE :
Par la présente, VICTOR HASSELBLAD AKTIEBOLAG déclare
que cet appareil est conforme aux principales exigences
et autres clauses pertinentes de la directive européenne
2014/53/EU.
Adresse de contact pour l’UE : Utvecklingsgatan 2, 41756
Göteborg, Sweden
EU-COMPLIANCE:
Hiermit erklärt VICTOR HASSELBLAD AKTIEBOLAG., dass
dieses Gerät den wesentlichen Anforderungen und anderen
einschlägigen Bestimmungen der EU-Richtlinie 2014/53/EU
entspricht.
Kontaktadresse innerhalb der EU: Utvecklingsgatan 2, 41756
Göteborg, Sweden
CAUTION: RISK OF EXPLOSION IF BATTERY IS REPLACED
BY AN INCORRECT TYPE. DISPOSE OF USED BATTERIES
ACCORDING TO THE INSTRUCTIONS.
Tratamiento de residuos responsable con el medio
ambiente
Los aparatos eléctricos viejos no pueden
desecharse junto con los residuos orgánicos,
sino que deben ser desechados por separado.
Existen puntos limpios donde los ciudadanos
pueden dejar estos aparatos gratis. El propietario de los aparatos viejos es responsable
de llevarlos a estos puntos limpios o similares
puntos de recogida. Con este pequeño
esfuerzo estás contribuyendo a reciclar valiosas
materias primas y al tratamiento de residuos
tóxicos.
Mise au rebut écologique
Les appareils électriques usagés ne doivent
pas être éliminés avec les déchets résiduels.
Ils doivent être éliminés séparément. La mise
au rebut au point de collecte municipal par
l’intermédiaire de particuliers est gratuite. Il
incombe au propriétaire des appareils usagés
de les apporter à ces points de collecte ou à des
points de collecte similaires. Avec ce petit effort
personnel, vous contribuez au recyclage de
matières premières précieuses et au traitement
des substances toxiques.
X1D II 50C USER GUIDE www.hasselblad.com
Contents
Page 22
SAFETY
22
Smaltimento ecologico
I vecchi dispositivi elettrici non devono essere
smaltiti insieme ai riuti residui, ma devono
essere smaltiti separatamente. Lo smaltimento
da parte di soggetti privati presso i punti di
raccolta pubblici è gratis. È responsabilità
del proprietario dei vecchi dispositivi portarli
presso tali punti di raccolta o punti di raccolta
analoghi. Grazie a questo piccolo impegno
personale contribuirete al riciclo di materie
prime preziose e al corretto trattamento di
sostanze tossiche.
Milieuvriendelijk afvoeren
Oude elektrische apparaten mogen niet
worden weggegooid samen met het restafval,
maar moeten afzonderlijk worden afgevoerd.
Afvoeren via het gemeentelijke inzamelpunt is
gratis voor particulieren. De eigenaar van oude
toestellen is verantwoordelijk voor het inleveren
van de apparaten op deze of vergelijkbare
inzamelpunten. Met deze kleine persoonlijke
inspanning lever je een bijdrage aan de
recycling van waardevolle grondstoffen en de
verwerking van giftige stoffen.
Thailand Warning message
Mexico Warning message
“La operación de este equipo está sujeta a las siguientes dos
condiciones:
cause interferencia perjudicial y
debe aceptar cualquier interferencia, incluyendo la que
pueda causar su operación no deseada.”
(1)
es posible que este equipo o dispositivo no
(2)
este equipo o dispositivo
Brazil Warning message
Este equipamento opera em caráter secundário, isto é, não
tem direito a proteção contra interferência prejudicial, mesmo
de estações do mesmo tipo, e não pode causar interferência
a sistemas operando em caráter primário
Eliminação ecológica
Os aparelhos elétricos antigos não podem
ser eliminados juntamente com os materiais
residuais. Têm de ser eliminados separadamente. A eliminação no ponto de recolha
público através de entidades particulares é
gratuita. É da responsabilidade do proprietário
de aparelhos antigos levá-los a estes pontos de
recolha ou a pontos de recolha semelhantes.
Com este pequeno esforço pessoal, contribui
para a reciclagem de matérias-primas úteis e
para o tratamento de substâncias tóxicas.
X1D II 50C USER GUIDE www.hasselblad.com
Contents
Page 23

3 LENSES
Page 24
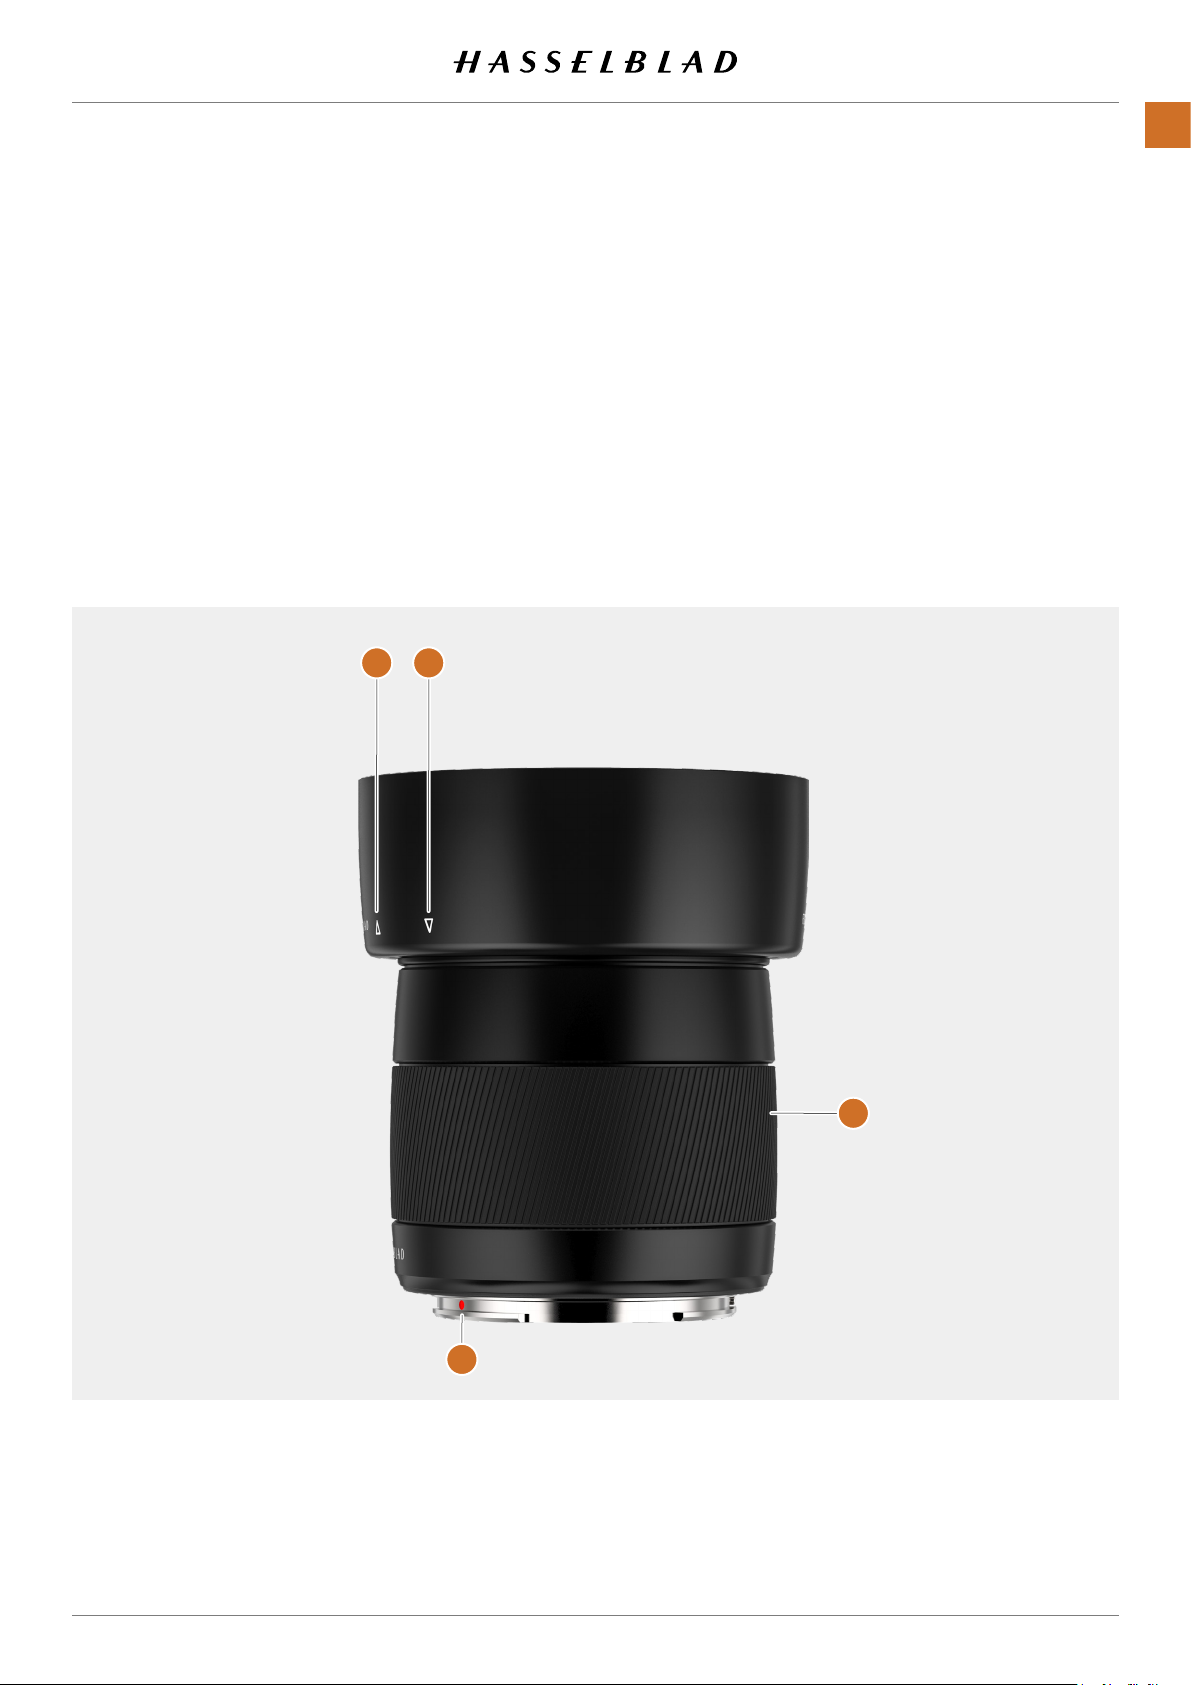
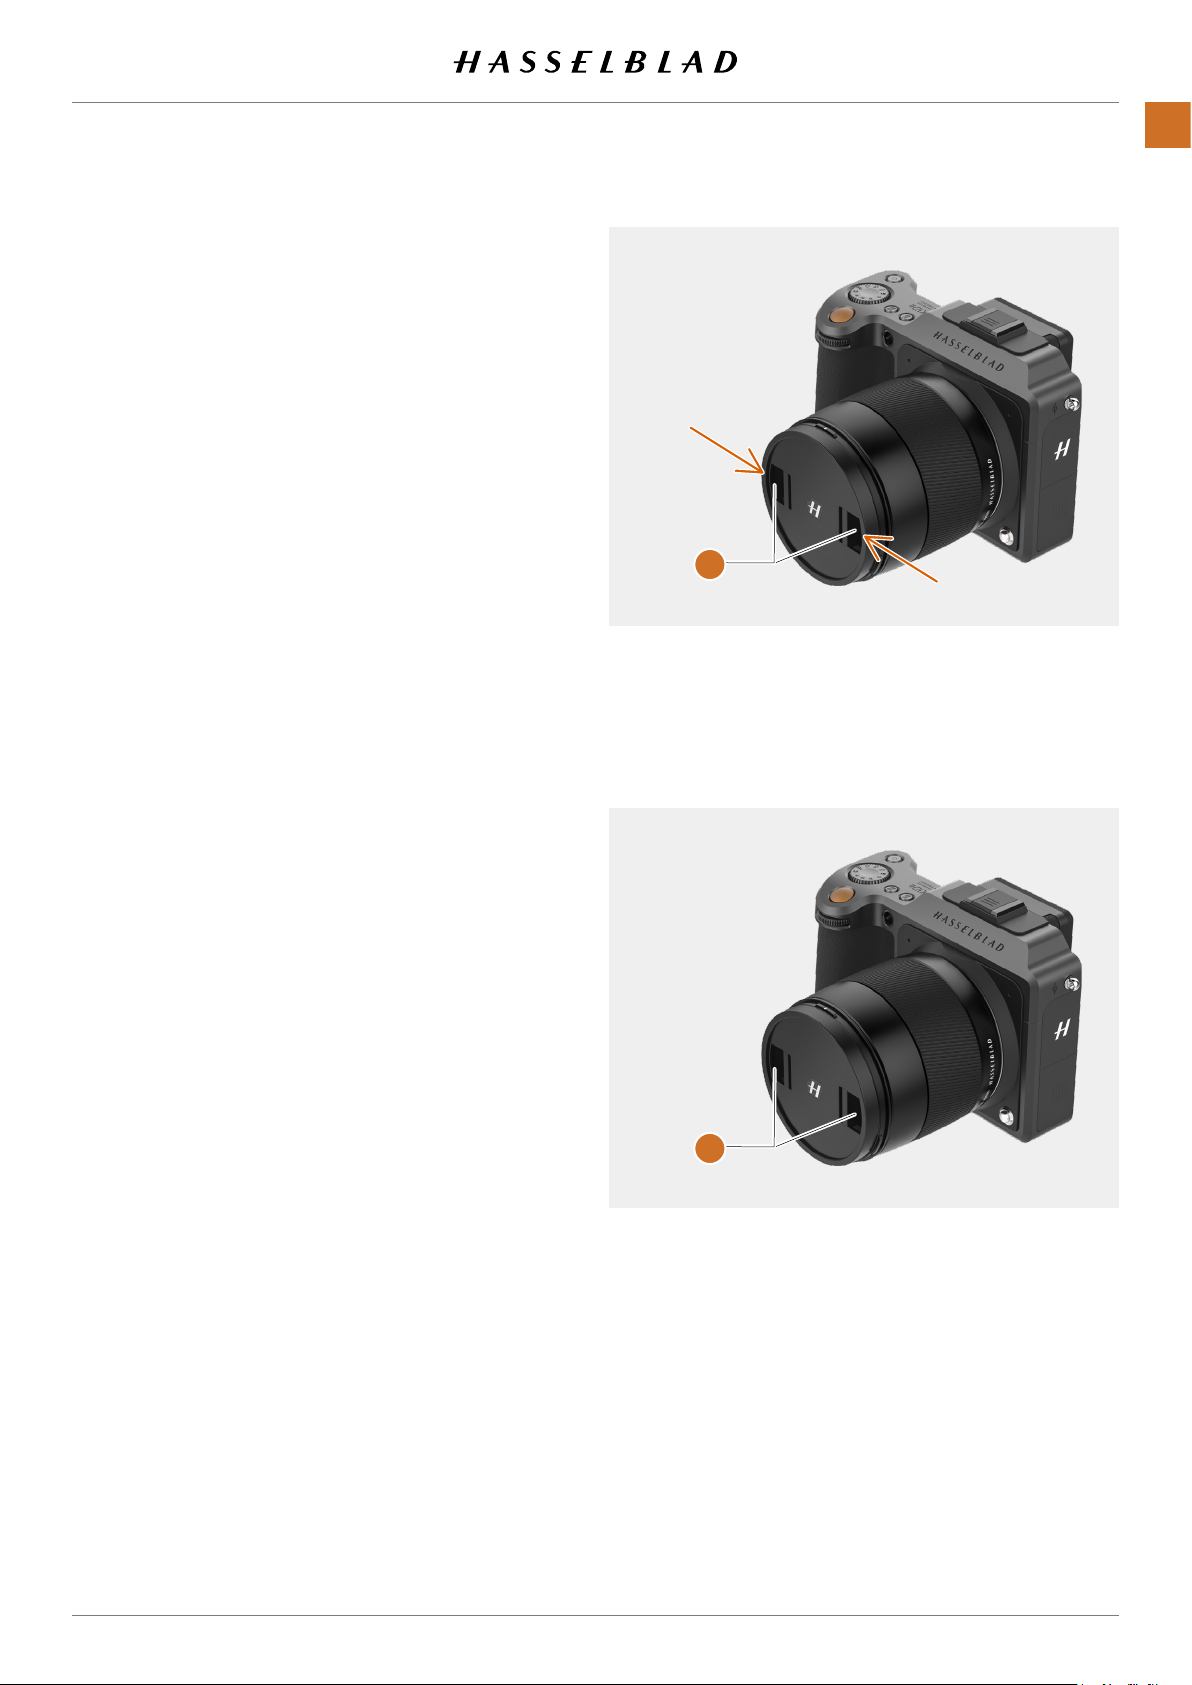
3.1 XCD LENSES
The XCD Lenses feature a built-in Central Lens Shutter, providing shutter speeds up to 1/2000 second. Flash sync is possible
at all shutter speeds. They also feature a manual focusing ring
that can be used at all times when the camera is powered on.
The Lens comes with a metal Lens Shade that can be mounted
in reverse for transport.
For more information about the XCD Lens Range, please see
page 29. You can also download technical data sheets from
the Hasselblad website, www.hasselblad.com.
2
1
LENSES
24
3
1 Lens shade index for
reverse mount
2 Lens shade index
3 Focusing ring
4 Lens index
4
X1D II 50C USER GUIDE www.hasselblad.com
Contents
Page 25
3.2 REMOVE AND ATTACH A LENS
LENSES
25
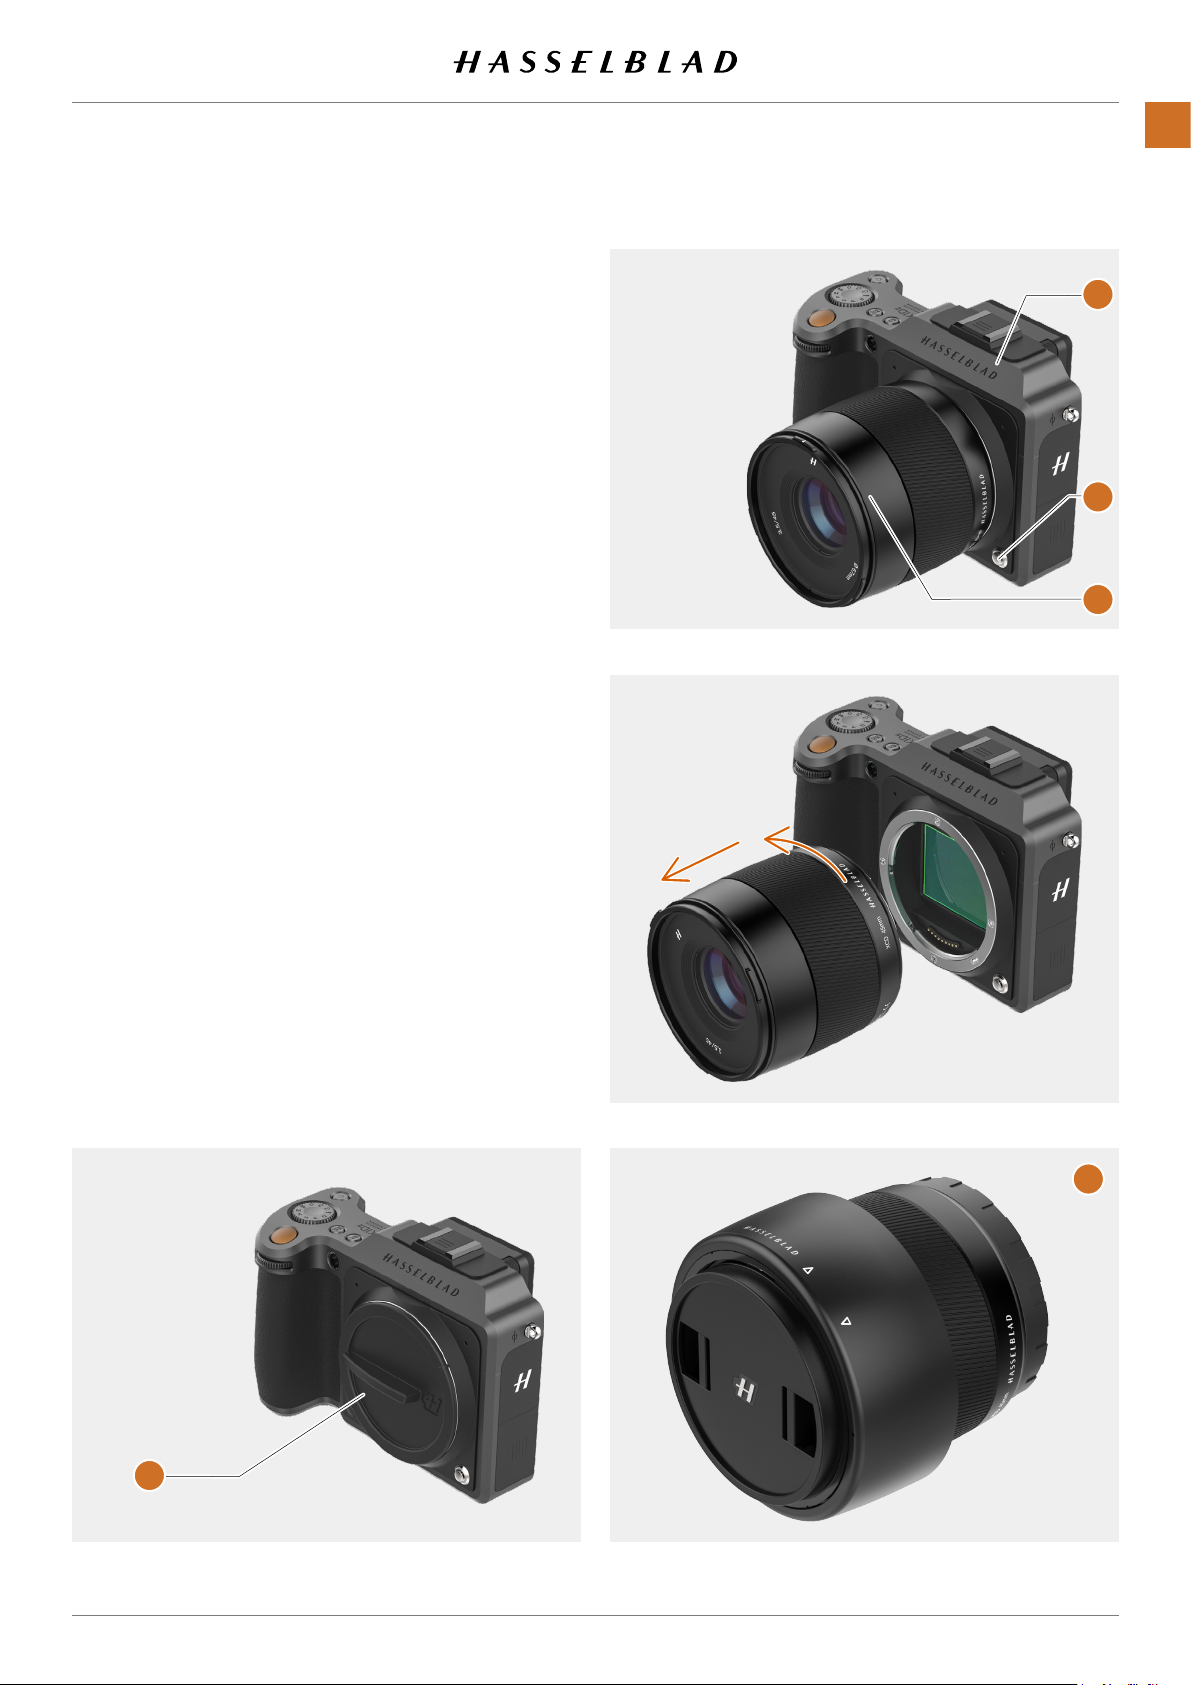
REMOVE THE LENS
Caution!
Be careful when you attach/remove the components to/from
the camera. This will help prevent damage to the data bus
connections.
Caution!
Do not insert ngers into the camera body. This can cause
damage to the equipment.
1 Hold the lens
(A)
still.
2 Push the lens removal button
3 Rotate the lens counter clockwise.
4 Push the lens
5 Attach the protection cover
directly.
6 Attach the lens protection caps on the detached lens to
prevent damage.
7 Store the lens with both lens protection caps on and the
lens hood inverted over the lens instead of in front of the
lens
(E)
(C)
with one hand and hold the camera body
(B)
.
(C)
away from the camera body.
(D)
on the camera body
.
A
B
C
E
D
X1D II 50C USER GUIDE www.hasselblad.com
Contents
Page 26
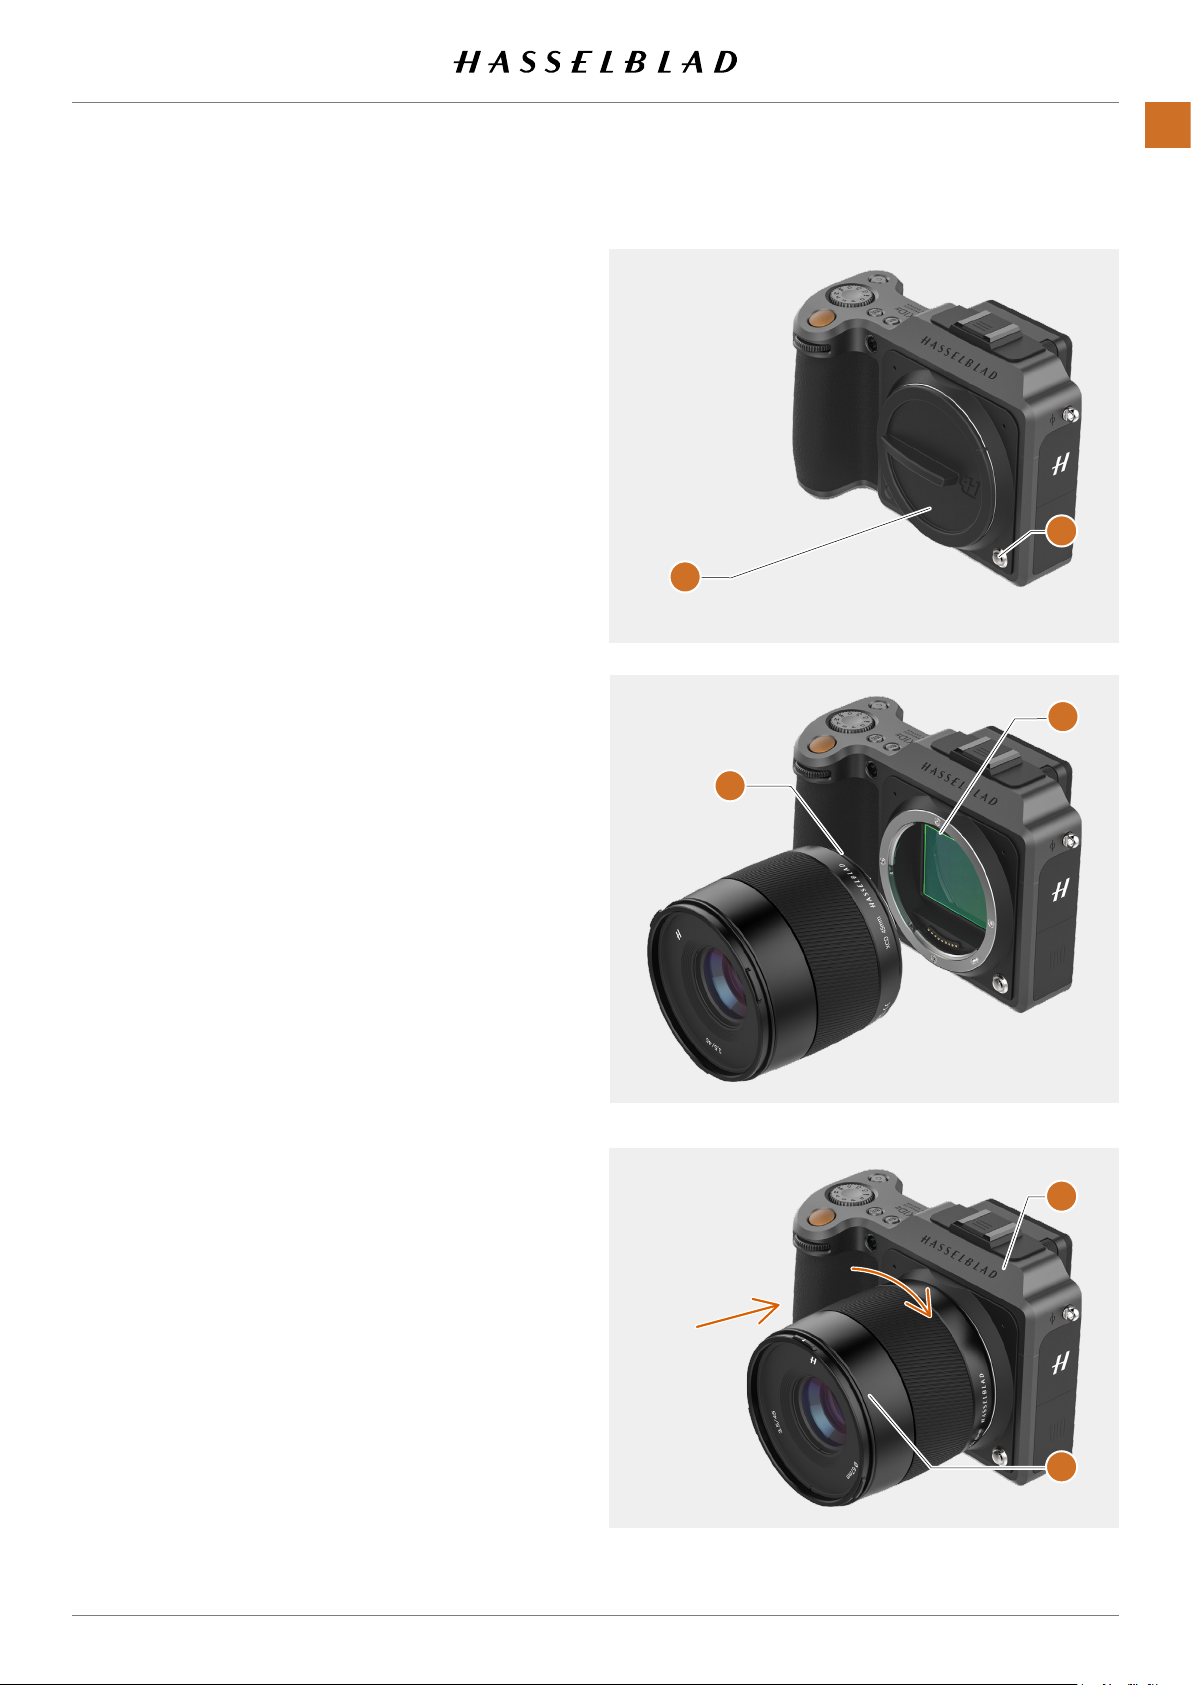
ATTACH THE LENS
Caution!
Be careful when you attach/detach the components to/from
the camera. This will help prevent damage to the data bus
connections.
Caution!
Do not insert ngers into the camera body. This can cause
damage to the equipment.
LENSES
26
1 Push the lens removal button
tion cover
2 Rotate the lens so that the red mark on the lens
with the red mark
3 Mount the lens
the lens clockwise to lock its position.
4 Make sure the lens is locked to the camera body before
using or moving the camera.
(B)
from the camera body.
(D)
on the camera body.
(E)
into the camera body
(A)
and remove the protec-
(C)
(F)
and then turn
lines up
A
B
D
C
F
E
X1D II 50C USER GUIDE www.hasselblad.com
Contents
Page 27
REMOVE THE LENS CAP
LENSES
27
1 Insert thumb and index nger into the recesses
2 Pinch the recesses
3 Remove the front lens cap.
(A)
together.
(A)
.
ATTACH THE LENS CAP
1 Insert thumb and index nger into the recesses
2 Pinch the recesses
3 Attach the front lens cap on the lens until it snaps into
place.
(A)
together.
(A)
.
A
A
X1D II 50C USER GUIDE www.hasselblad.com
Contents
Page 28
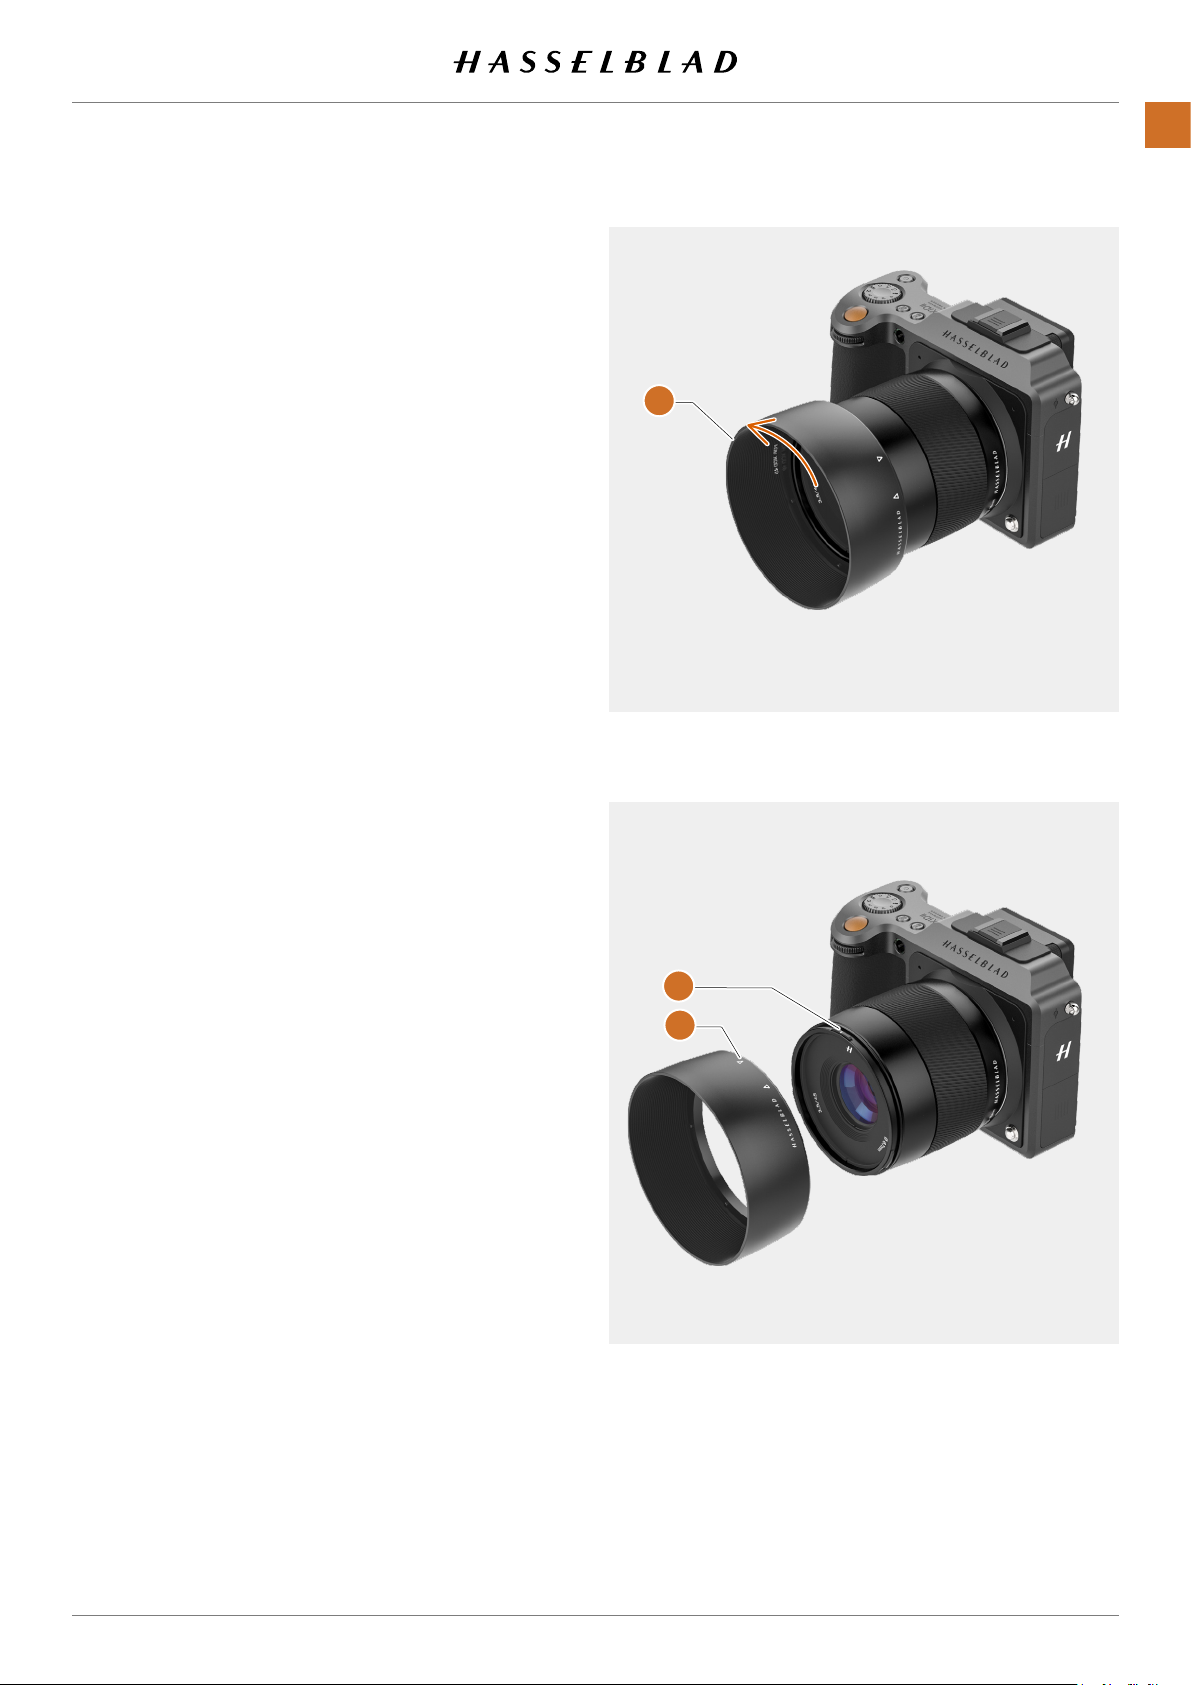
REMOVE THE LENS SHADE
All lenses are supplied with lens shades that additionally
provides extra protection for transport and storage when
mounted in reverse.
LENSES
28
1 Turn the lens shade
2 Remove the lens shade
(A)
counter-clockwise.
(A)
.
ATTACH THE LENS SHADE
All lenses are supplied with lens shades that additionally
provides extra protection for transport and storage when
mounted in reverse.
A
1 Place the lens shade on the lens.
2 Make sure that the index on the lens shade
the index on the front of the lens
3 Turn the lens cap clockwise until it snaps into place.
(B)
.
(A)
aligns with
B
A
X1D II 50C USER GUIDE www.hasselblad.com
Contents
Page 29
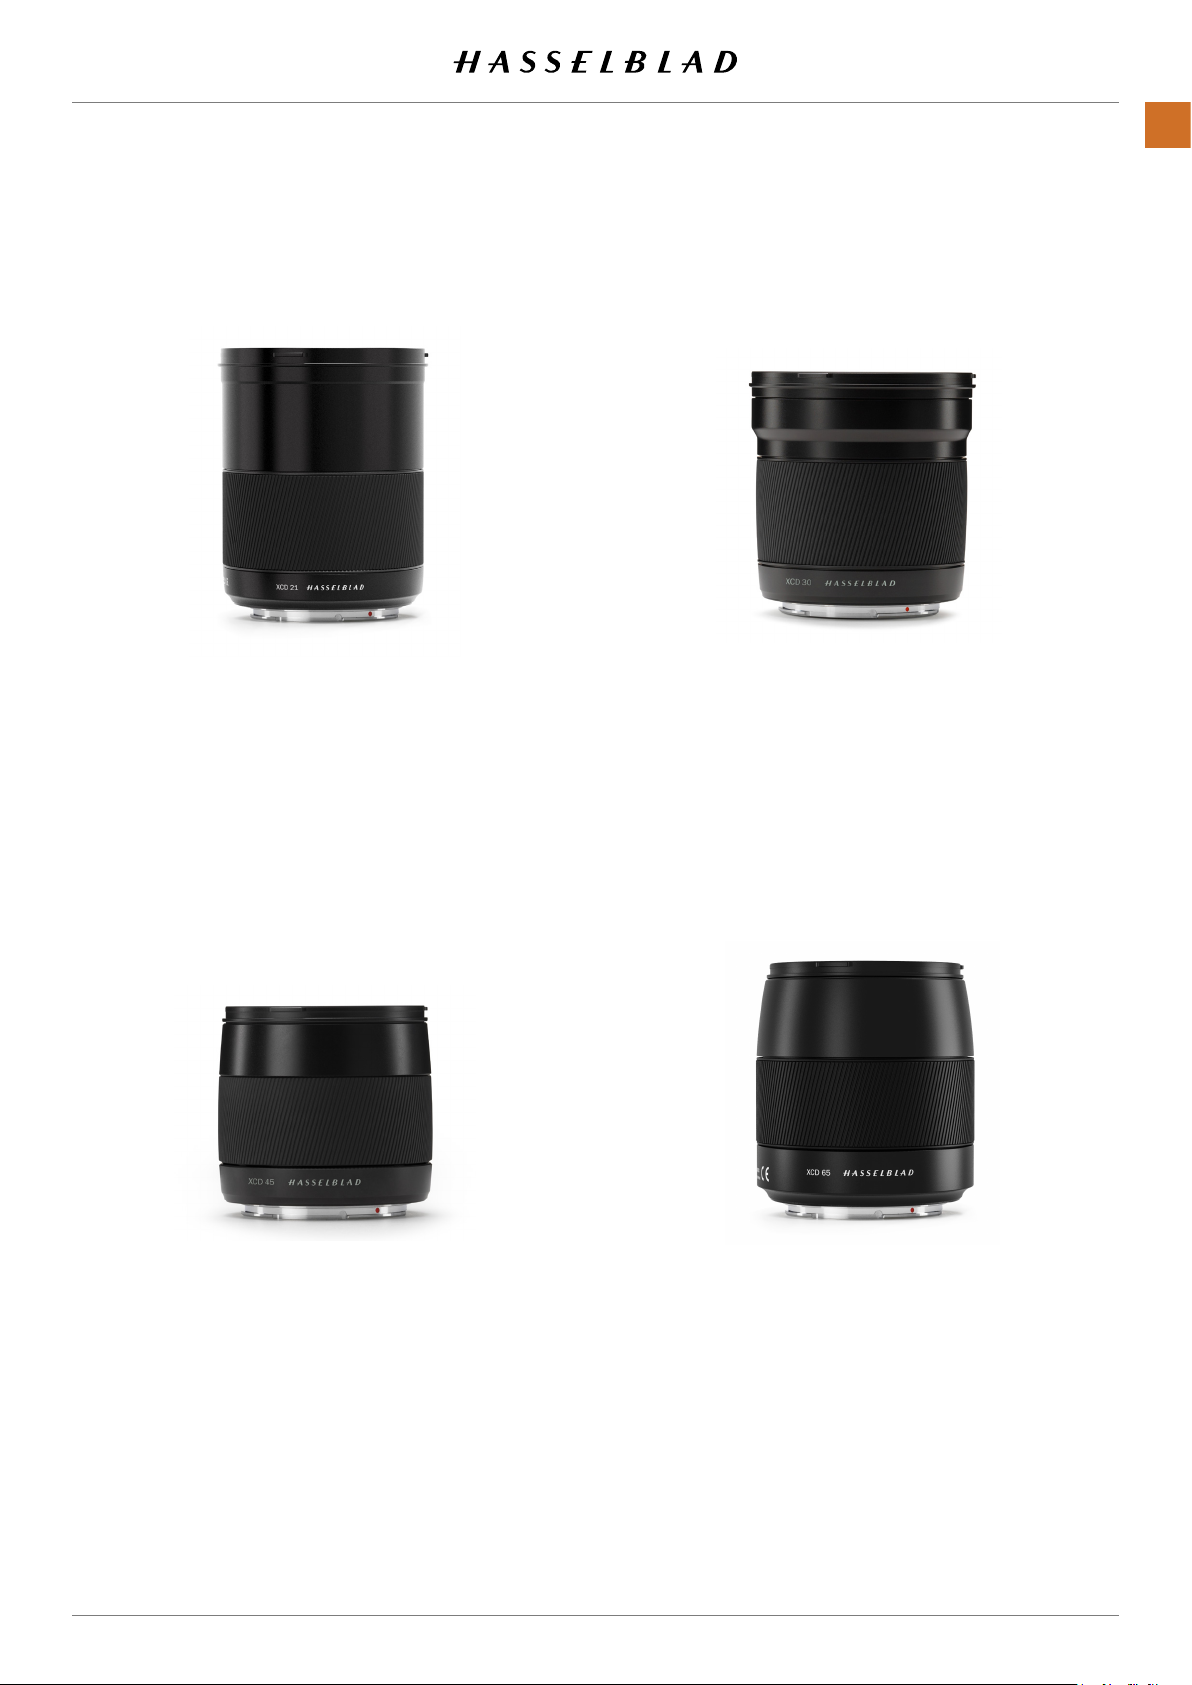
3.3 XCD LENS RANGE
LENSES
29
XCD 4/21
The XCD 21 is the ultra wide-angle
lens for the X1D II. Its extremely
short focal length provides a 17
mm full frame equivalent lens,
making it perfect for landscape
and architecture photography.
XCD 3.5/30
The XCD 30 is a wide-angle lens
for the X1D II. Its focal length
provides a 24 mm equivalent eld
of view, making it the perfect
landscape, reportage and travel
lens.
XCD 3.5/45
The XCD 45 is the ideal standard
lens for the X1D II. Its moderate
wide-angle focal length provides
a 35 mm equivalent eld of view,
making it the perfect general
purpose and travel lens.
X1D II 50C USER GUIDE www.hasselblad.com
Contents
XCD 2.8/65
The XCD 65 mm is a normal lens
for the X1D II. Its focal length
provides a 50 mm equivalent
eld of view. Its high aperture
and excellent close-range
performance makes it perfect for
general type of photography as
well as for reproduction.
Page 30

LENSES
30
XCD 1.9/80
The XCD 80 is a high-aperture
lens, providing very short depth-
of-eld with beautiful Bokeh,
especially useful for available light
portrait photography. It has a 63
mm equivalent eld of view.
XCD 3.2/90
The XCD 90 is a light and compact
short telephoto lens for the X1D II.
Its moderate focal length provides
a 71 mm equivalent eld of view,
making it a perfect all-round lens.
XCD 3.5/120 MACRO
XCD 2.8/135 AND X CONVERTER 1.7
The XCD 120 is the ideal macro
lens for the X1D II. It is suitable
for both close-up work and for
portrait or other photography
requiring a longer focal length.
Focuses down to an image scale
of 1:2. It has a 95 mm equivalent
eld of view.
X1D II 50C USER GUIDE www.hasselblad.com
Contents
The XCD 135 is a moderate telephoto lens with a dedicated 1.7x
converter, providing a 4.8/230mm
lens. 35 mm equivalent focal
lengths are 107 and 181 mm.
Page 31

XCD 3,5-4,5/35-75
LENSES
31
This Zoom lens is ideal for photographers who are looking to keep the
amount of equipment they carry when
travelling to a minimum but don’t
want to compromise on image quality.
Focuses down to 0.42m (W) / 0.6m (T). It
has a 28-58 mm equivalent eld of view.
FILTERS
The XCD Lenses have a threaded lter mount with diameter as
shown in the table to the right.
As there is no rotation of the front section of the lens when
the focus is changed, the lter do not rotate either. This is
particularly useful when using polarizing or graduated lters
where the orientation is critical.
LENS FILTER DIAMETER
XCD 21
XCD 30
XCD 45
XCD 65
XCD 80
XCD 90
XCD 120 Macro
XCD 135
XCD 35-75
ø 77mm
ø 77mm
ø 67mm
ø 67mm
ø 77mm
ø 67mm
ø 77mm
ø 77mm
ø 77mm
X1D II 50C USER GUIDE www.hasselblad.com
Contents
Page 32

4 FUNCTIONS
Page 33
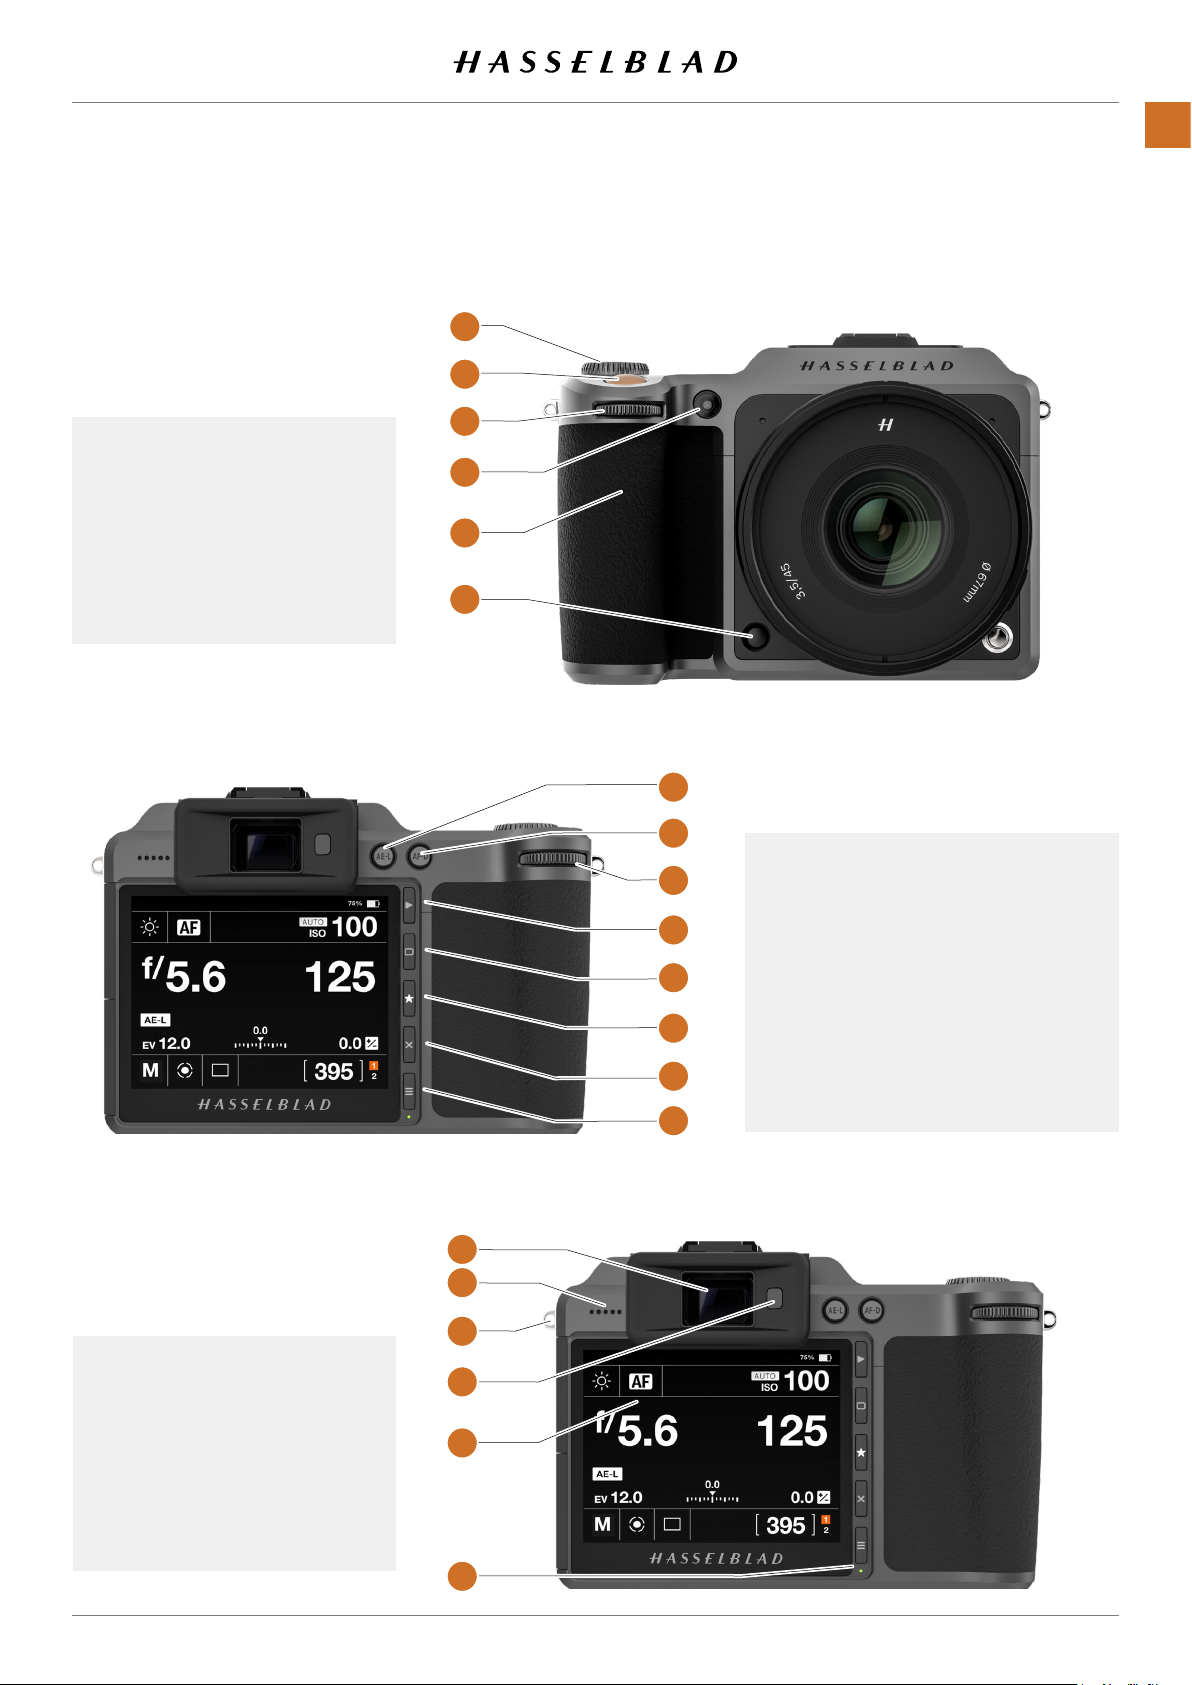
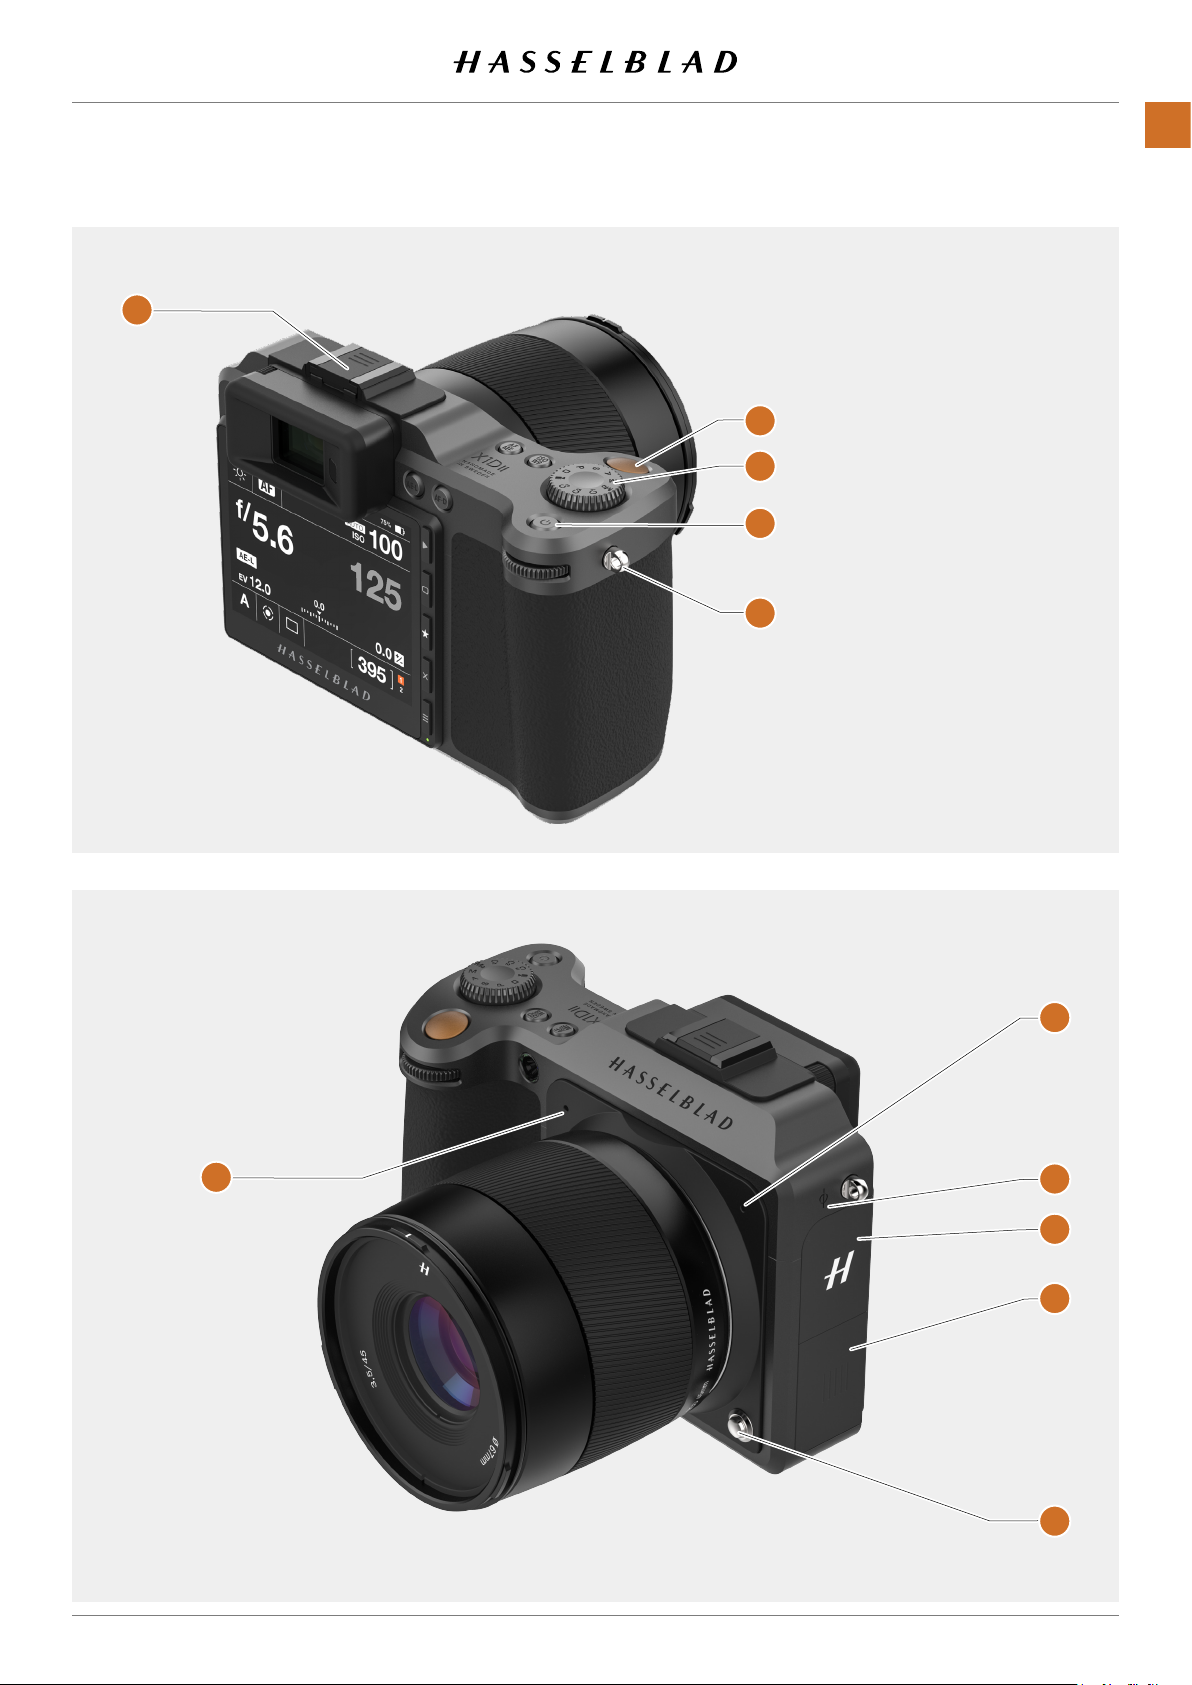
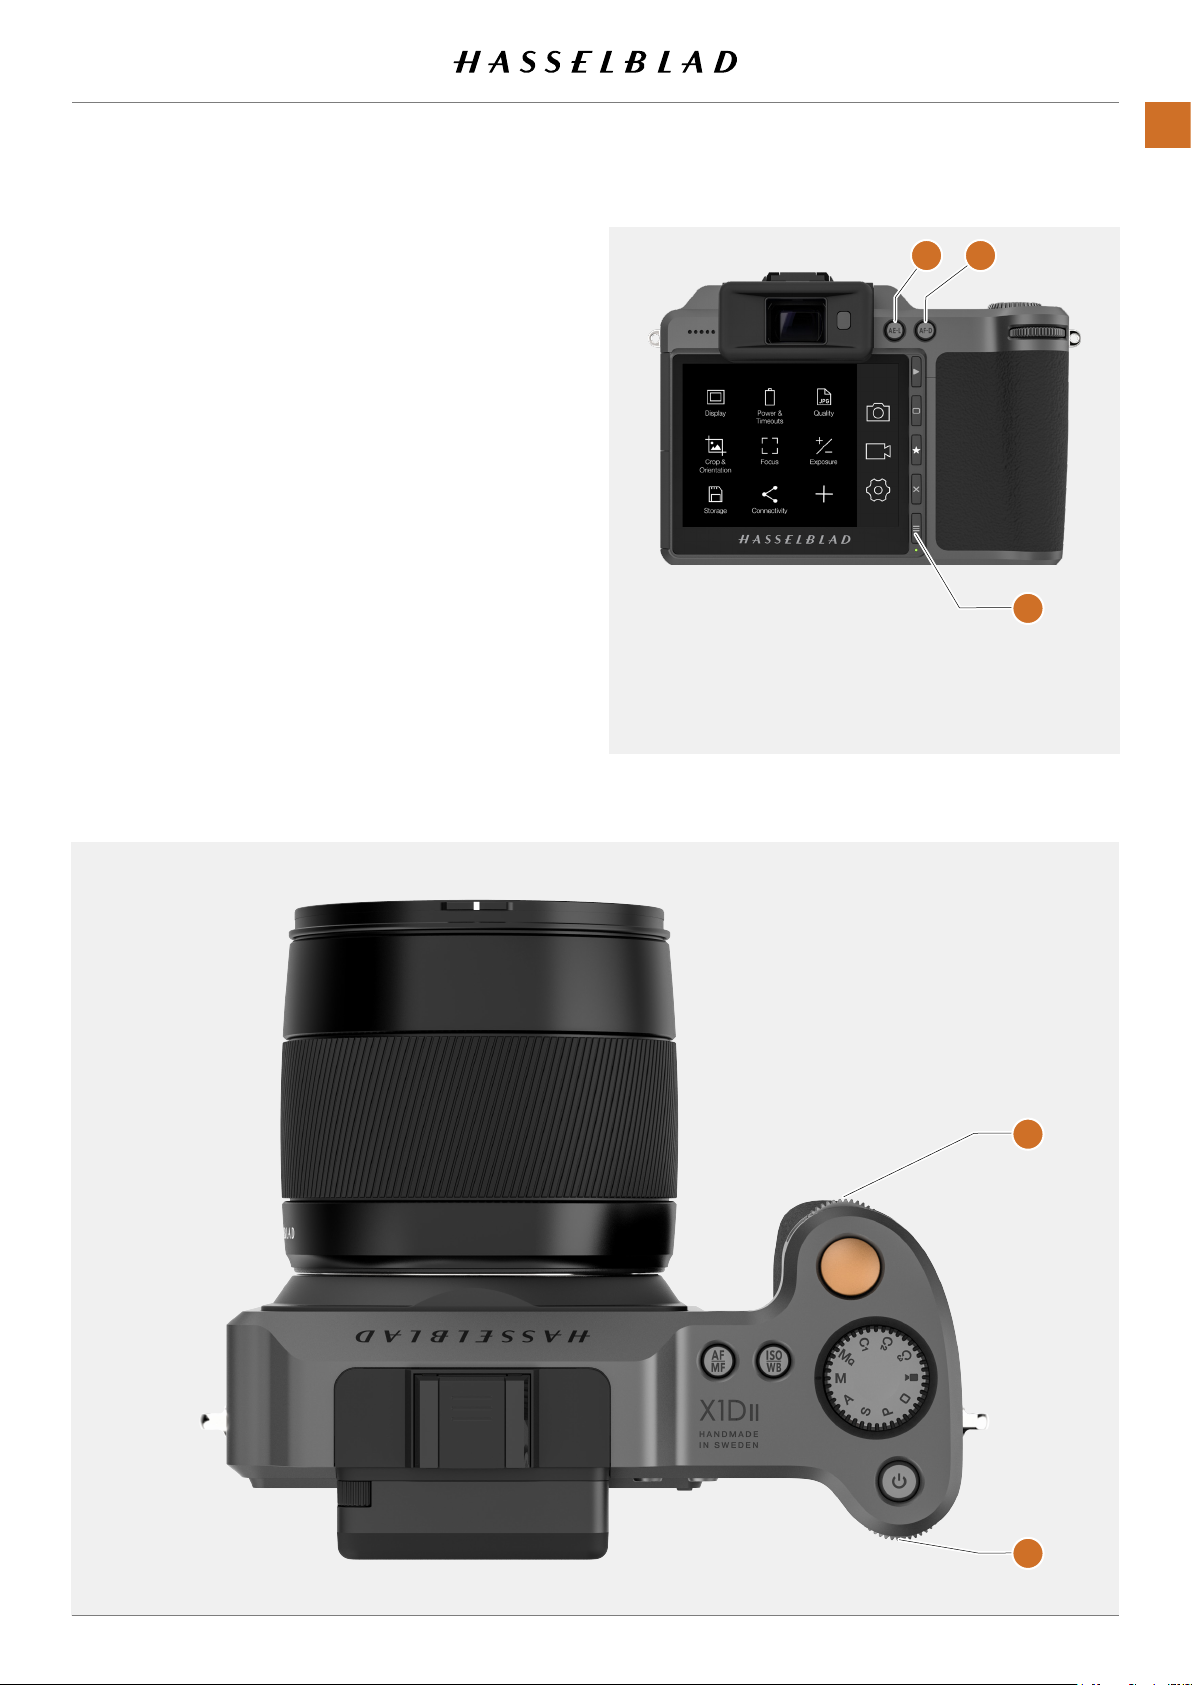
4.1 PARTS, COMPONENTS, BUTTONS
AND CONTROLS
All par ts listed in this Chapter, are described in
detail in other specic sections.
1
2
3
FUNCTIONS
33
1 Mode Dial
2 Shutter Release Button
3 Front Scroll Wheel
4 AF Illuminator LED
5 Camera Grip
6 Stop Down Button
4
5
6
7
8
9
10
11
12
13
7 AE Lock Button
8 AF Drive Button
9 Rear Scroll Wheel
10 Browse Button
11 Rectangle Button
12 Star Button
13 Cross Button/Delete Image
14 Menu Button
14
15
16
17
15 Electronic Viewnder EVF
18
16 Speaker
17 Strap Lug
19
18 Eye Sensor
19 Touch Display
20 Status LED
20
X1D II 50C USER GUIDE www.hasselblad.com
Contents
Page 34
FUNCTIONS
1
2
3
34
4
1 Flash Hot Shoe
2 Shutter Release Button
3 Mode Dial
5
4 On / Off Button
5 Strap Lug
7
6
8
9
10
6 Microphone Right
7 Microphone Left
8 Image Plane Mark
9 SD Cards Slot Lid
10 Connectors Slot Lid
11 Lens Release Button
X1D II 50C USER GUIDE www.hasselblad.com
Contents
11
Page 35
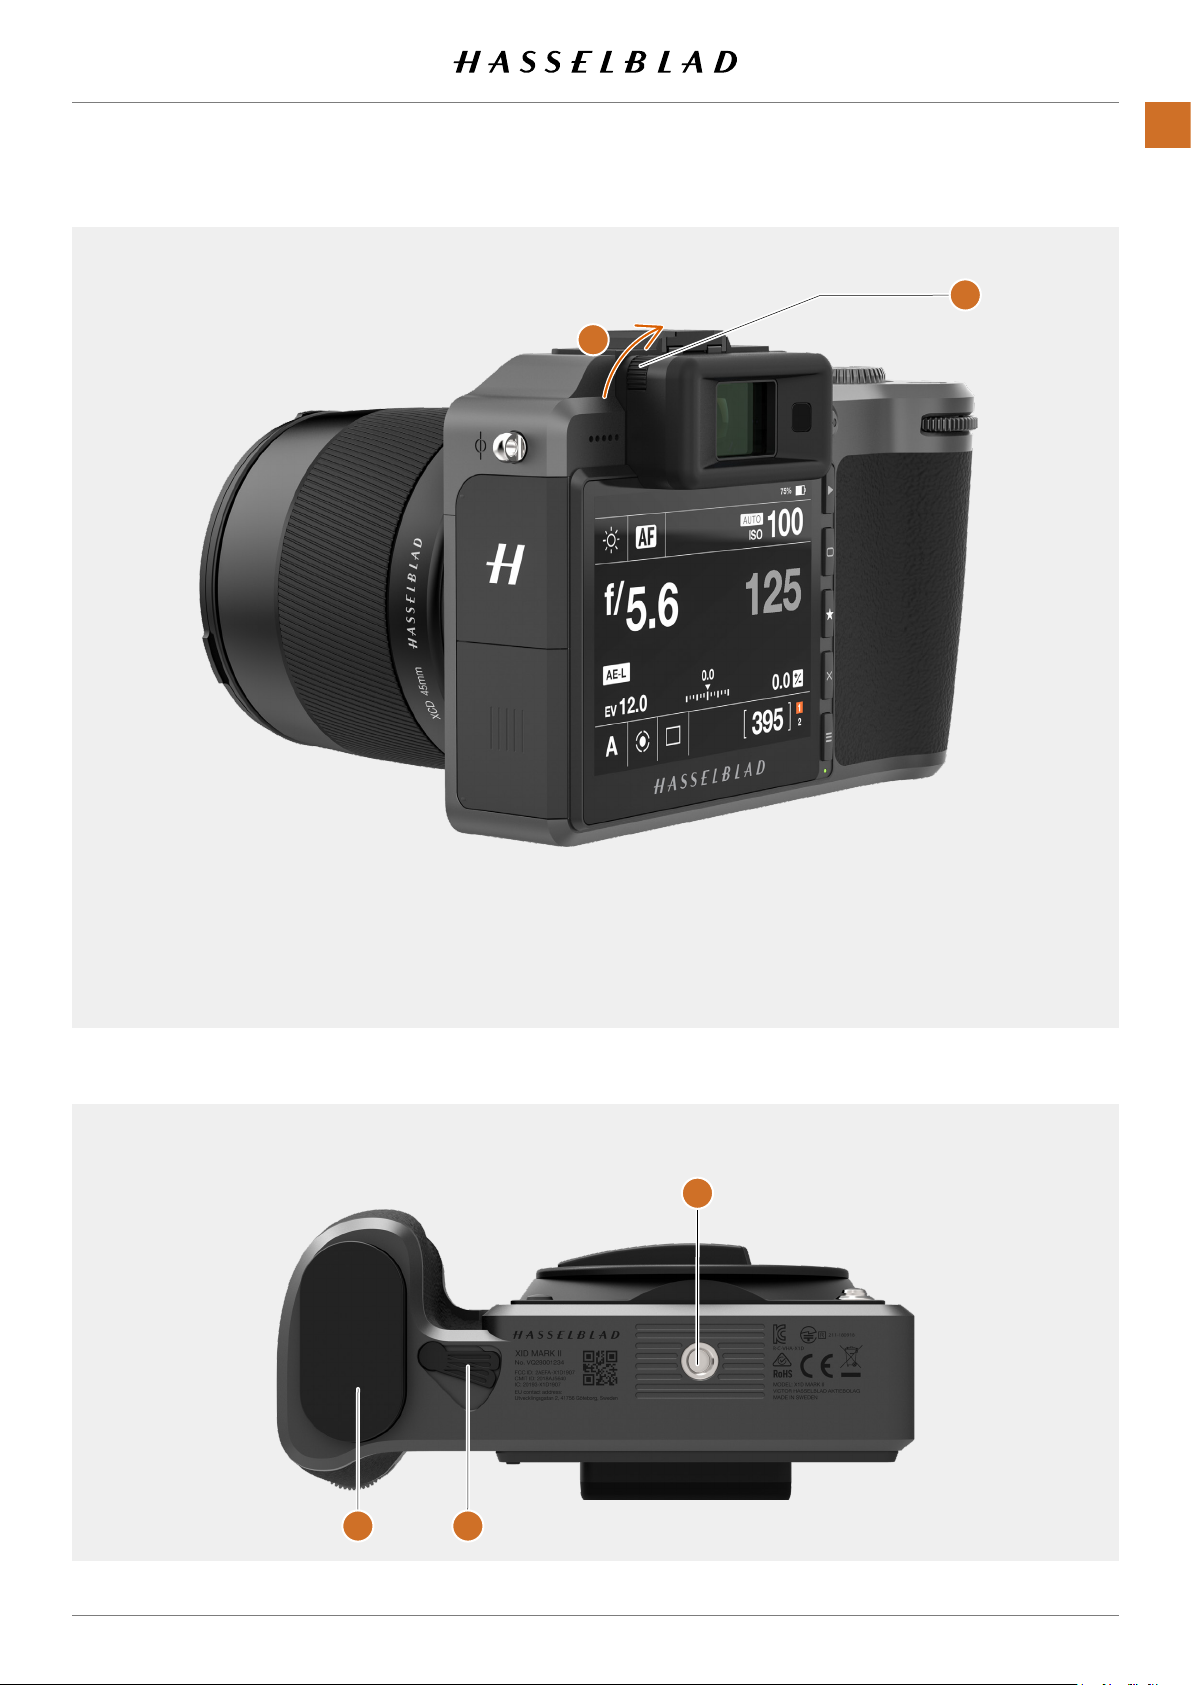
FUNCTIONS
1
2
35
Adjust Dioptre
1 Dioptre Adjustment Wheel.
2 Rotate the Dioptre Adjustment Wheel
to adjust to desired setting.
3 Tripod Thread 1/4”
4 Battery Release Lever
3
5 Battery
4 5
X1D II 50C USER GUIDE www.hasselblad.com
Contents
Page 36

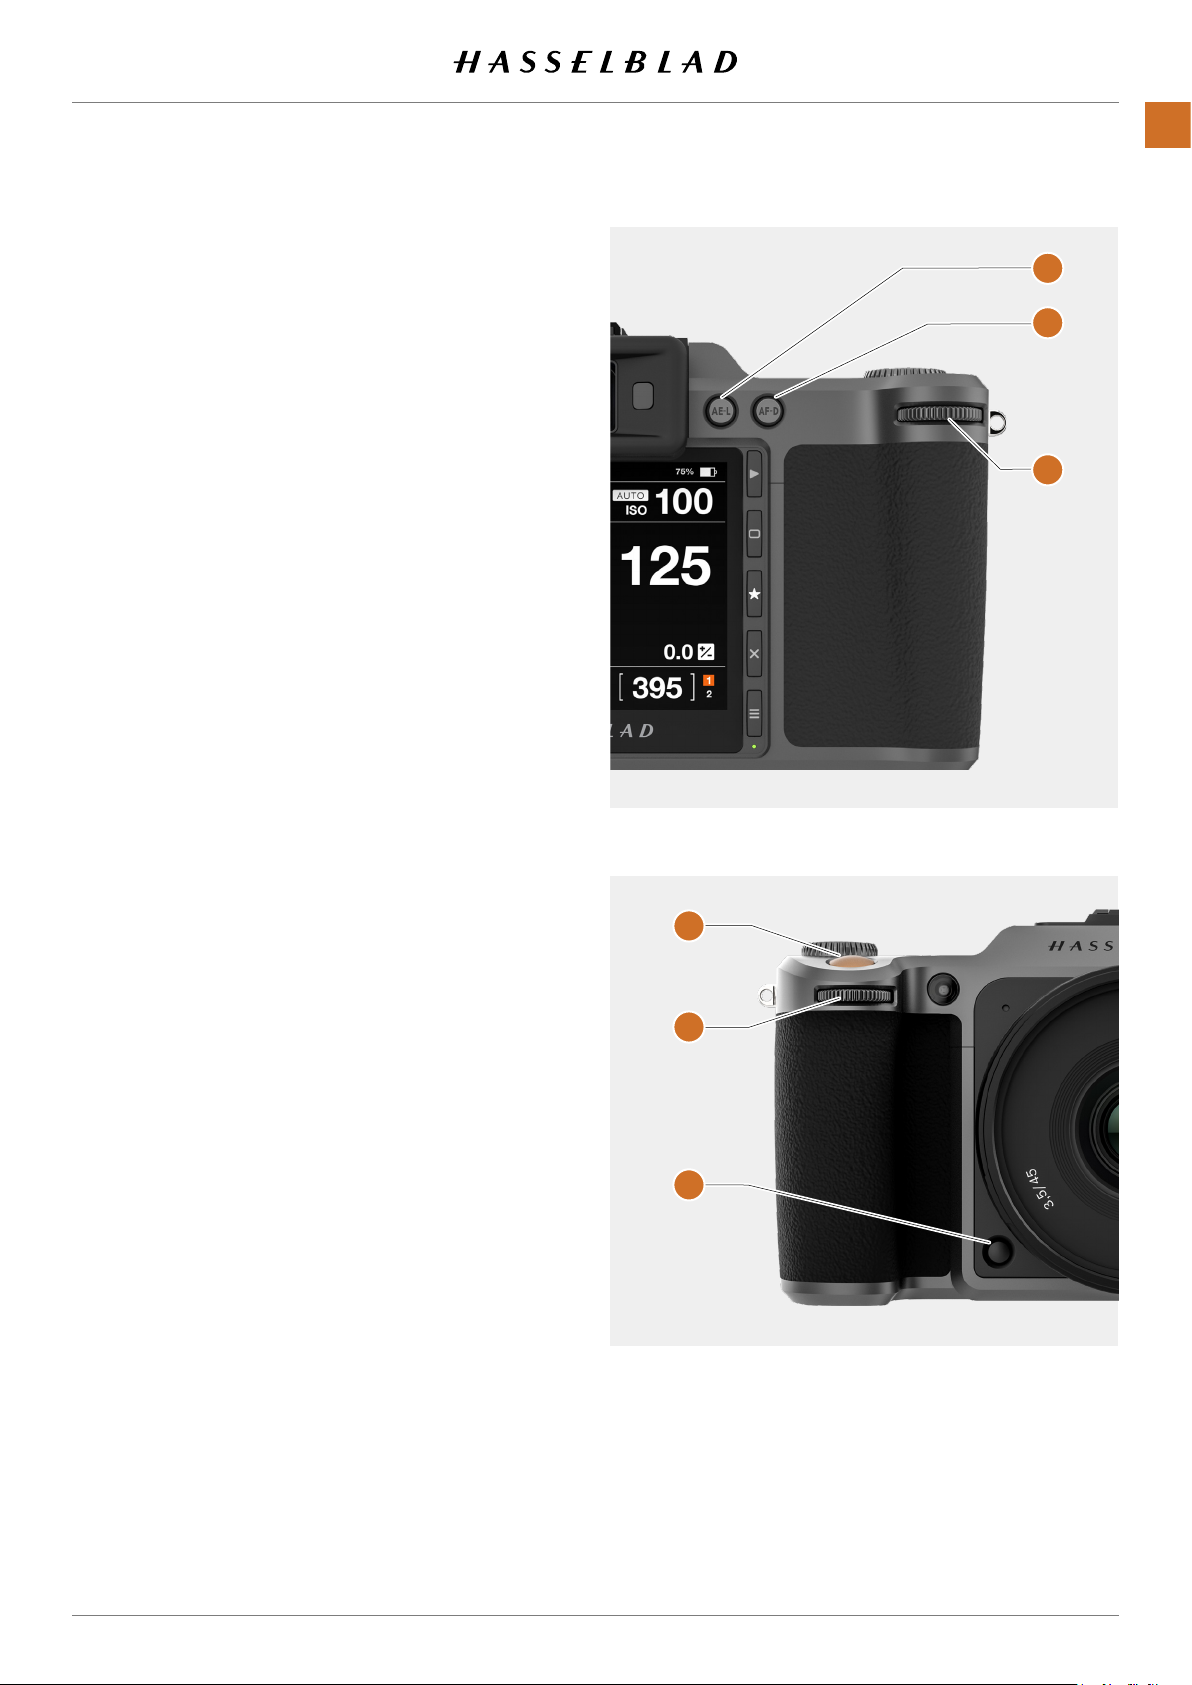
4.2 GRIP BUTTONS AND CONTROLS
FUNCTIONS
3
36
1
1
AF/MF button
The AF/MF button toggles between Autofocus and Manual
Focus.
Can be reprogrammed as described on page 113.
2
ISO/WB button
This button provides direct access to the ISO and WB
settings. Press one time to change ISO settings. Press
again to change WB settings.
Can be reprogrammed as described on page 113.
3
Front Scroll Wheel
The front and Rear Scroll Wheels are used to make
changes in exposure settings, navigate the Touch Display
Menu as well as acting as browse controls.
4
Shutter Release Button
This button has two positions. Press half way (or soft) to
activate the camera, auto focus function and exposure
meter. Press all the way down (or more rm) to release the
shutter. The chosen exposure procedure and the self timer
are also activated with this button.
5
Mode Dial
Select any of the 10 programs. MQ, M, A, S, P , Full
Automatic mode, Video mode and 3 Custom modes C3,
C2 and C1.
2
6
ON / OFF button
Press the button for 1 second to turn on the camera.
The X1D II start up logo will appear and then the Control
Screen. After a few seconds (customizable) of inactivity the
camera will enter Display Off mode. A long press on the
button turns the camera off completely (even from Display
Off mode). A short press on the button toggles Touch
Display On and Off.
7
Rear Scroll Wheel
The scroll wheel is used to make changes in exposure
settings, to navigate the Camera menus as well as acting
as browse control.
4
5
6
7
Note!
Video mode will be implemented in a coming rmware
release.
Note!
Some of the buttons have multiple functions according to the
settings made.
Note!
Some of the buttons can be reprogrammed to a different
function. See page 113.
Note!
In addition to the release button, the X1D II camera can also
be remotely released using the X System Release Cable. See
page 64 and page 140.
X1D II 50C USER GUIDE www.hasselblad.com
Contents
Page 37
4.3 CAMERA BODY BUTTONS AND
CONTROLS
FUNCTIONS
1
37
1
AE-L Button
This button activates AE-L that locks a light reading made
in both automatic and manual exposure modes. It also acts
as a Zoom out button when browsing or as Exit button
when making a setting change on the Camera, according
to mode.
2
AF-D Button
The AF Drive button (AF-D) starts the Autofocus process.
Press to start Autofocus and release to stop the Autofocus
function. The rectangle in the centre of the Viewnder
changes colour depending on the Autofocus process.
Black - Normal mode. Autofocus is not analysing the
subject.
White - Autofocus is ongoing and analysing the subject.
Green - Autofocus performed and focus is set correct.
Red - Autofocus failed to focus and is not set correct.
3
Rear Scroll Wheel
The Rear Scroll Wheel controls different settings according
to the selected function.
4
Shutter Release Button
This button has two positions. Press half-way (or soft) to
activate the camera, auto focus function and exposure
meter. Press all the way down (or rm) to release the
shutter. The chosen exposure procedure and the self timer
are also activated with this button.
2
3
4
5
5
Front Scroll Wheel
The Front Scroll Wheel controls different settings according to the selected function.
6
Stop Down Button
Press to make a visual check of the depth-of-eld on the
viewnder screen at the chosen aperture. The aperture will
close according to the setting and remain closed as long
as the pressure is maintained. You can alter the aperture at
the same time to see the changes taking place.
Can be reprogrammed as described on page 113.
X1D II 50C USER GUIDE www.hasselblad.com
6
Contents
Page 38

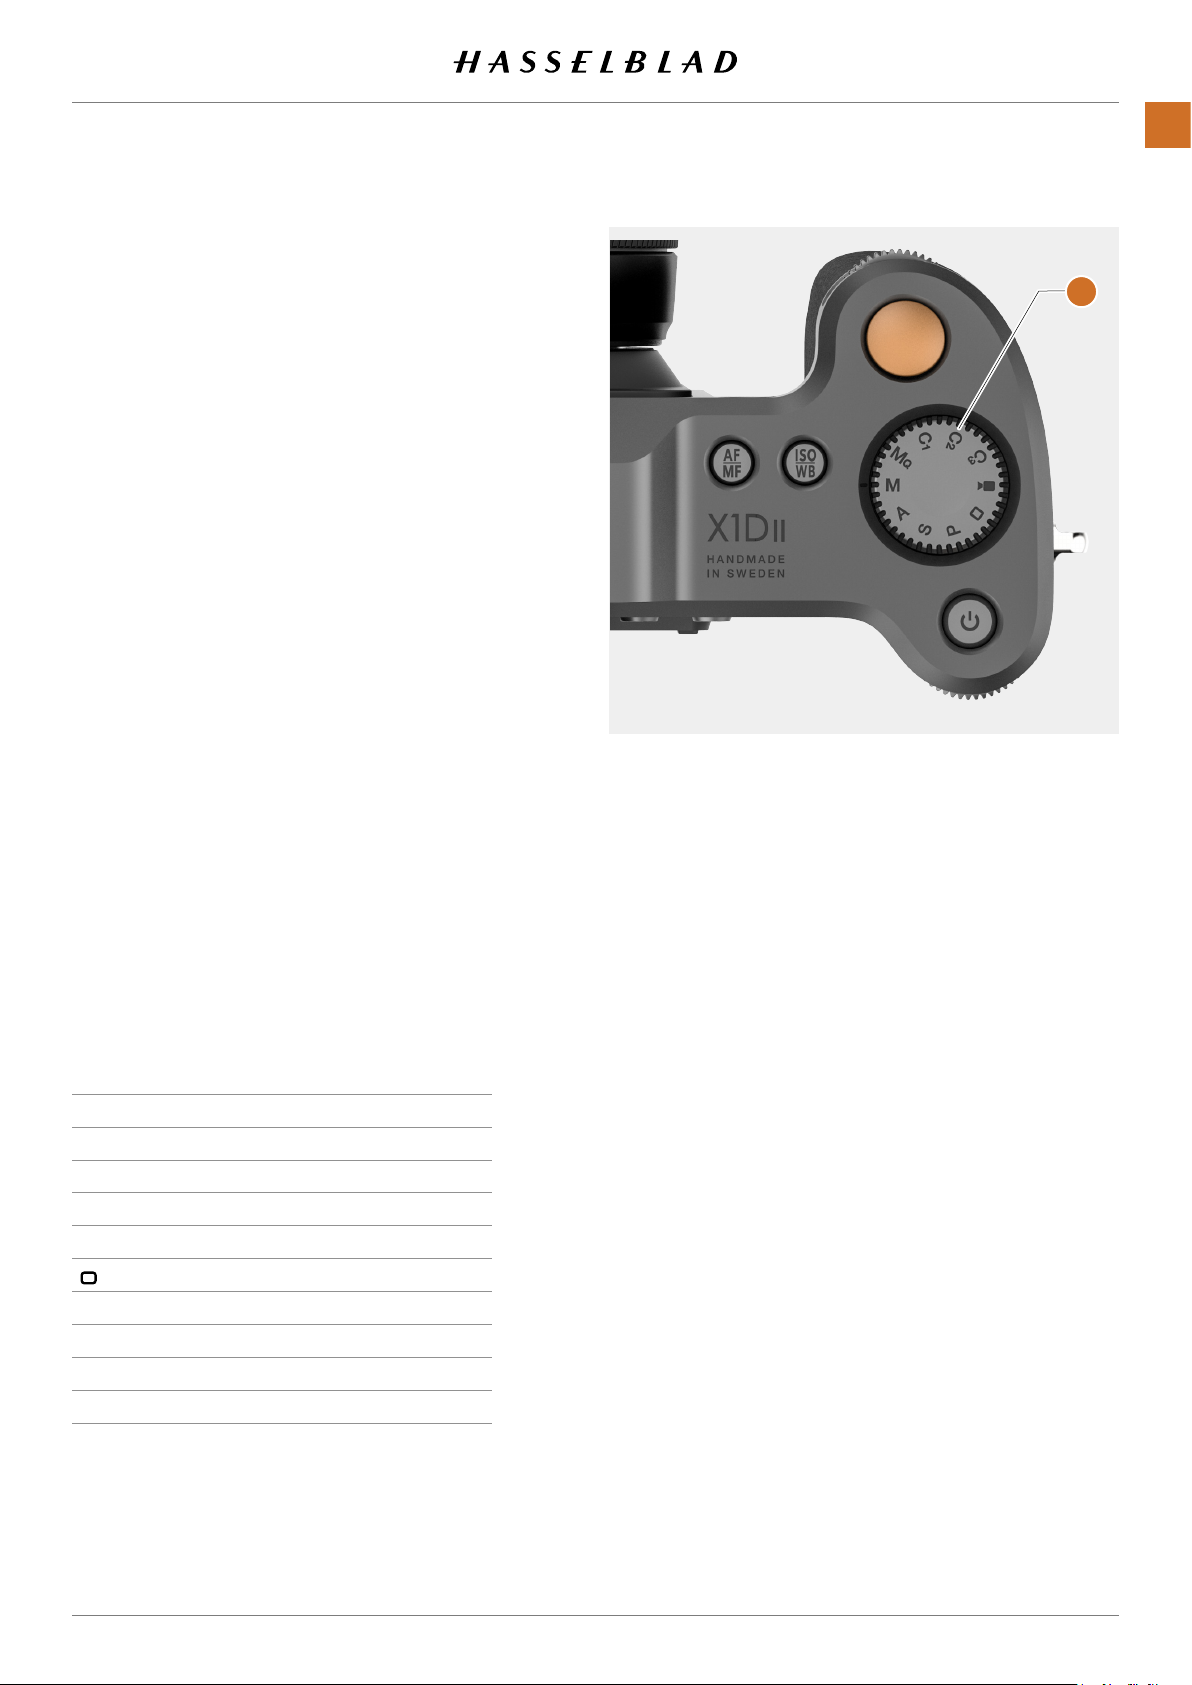
4.4 MODE DIAL
FUNCTIONS
38
Mode Dial Selector
The Mode Dial Selector
There are 10 different programs selectable on the Mode Dial.
(1)
displays the Camera Mode in use.
The Different Camera Modes
MQ Manual Quick Mode.
M Manual Mode.
A Aperture Priority Mode.
S Shutter Priority Mode.
P Program Mode.
Rectangle Automatic Mode (ISO and WB are also
automatically set).
Video Video Mode (Not yet implemented).
C3 Custom Program 3.
C2 Custom Program 2.
C1 Custom Program 1.
How to lock the Mode Dial
The Mode Dial Selector can be locked by pushing it down
(2)
How to unlock the Mode Dial
.
When in locked mode, push once to unlock the Mode Dial
Selector
(3)
.
1
2
Mode Dial
Unlocked (Up)
3
Mode Dial
Locked (Down)
X1D II 50C USER GUIDE www.hasselblad.com
Contents
Page 39
4.5 EXPOSURE PROGRAM MODES
FUNCTIONS
39
There are 7 different xed programs and 3 Custom Programs,
C3, C2 and C1. The Programs can be selected by turning the
Mode Dial
(1)
. In the illustration to the right, the camera is set
to Manual Exposure mode (M).
Programs
MQ Manual Quick Mode.
M Manual Mode.
A Aperture Priority Mode.
S Shutter Priority Mode.
P Program Mode.
Rectangle Full Automatic Mode (ISO and WB are also
automatically set).
Video Video Mode (Not yet implemented).
C3 Custom Program 3.
C2 Custom Program 2.
C1 Custom Program 1.
In Manual Mode, Aperture is set by the Front Scroll Wheel and
the Shutter Speed by the Rear Scroll Wheel.
1
In the Automatic Modes, the Aperture and Shutter Speed
settings are controlled by the Camera, either partially or
completely according to setting. There are four automatic
modes: A, S, P and Full Automatic Mode (Rectangle).
MODE FRONT WHEEL REAR WHEEL
M Aperture Shutter Speed
A Aperture Quick Adjustment
S Shutter Speed Quick Adjustment
P Program Shift Quick Adjustment
No function No function
Video Aperture Shutter Speed
C1 Depends on Mode
C2 Depends on Mode
C3 Depends on Mode
X1D II 50C USER GUIDE www.hasselblad.com
Contents
Page 40
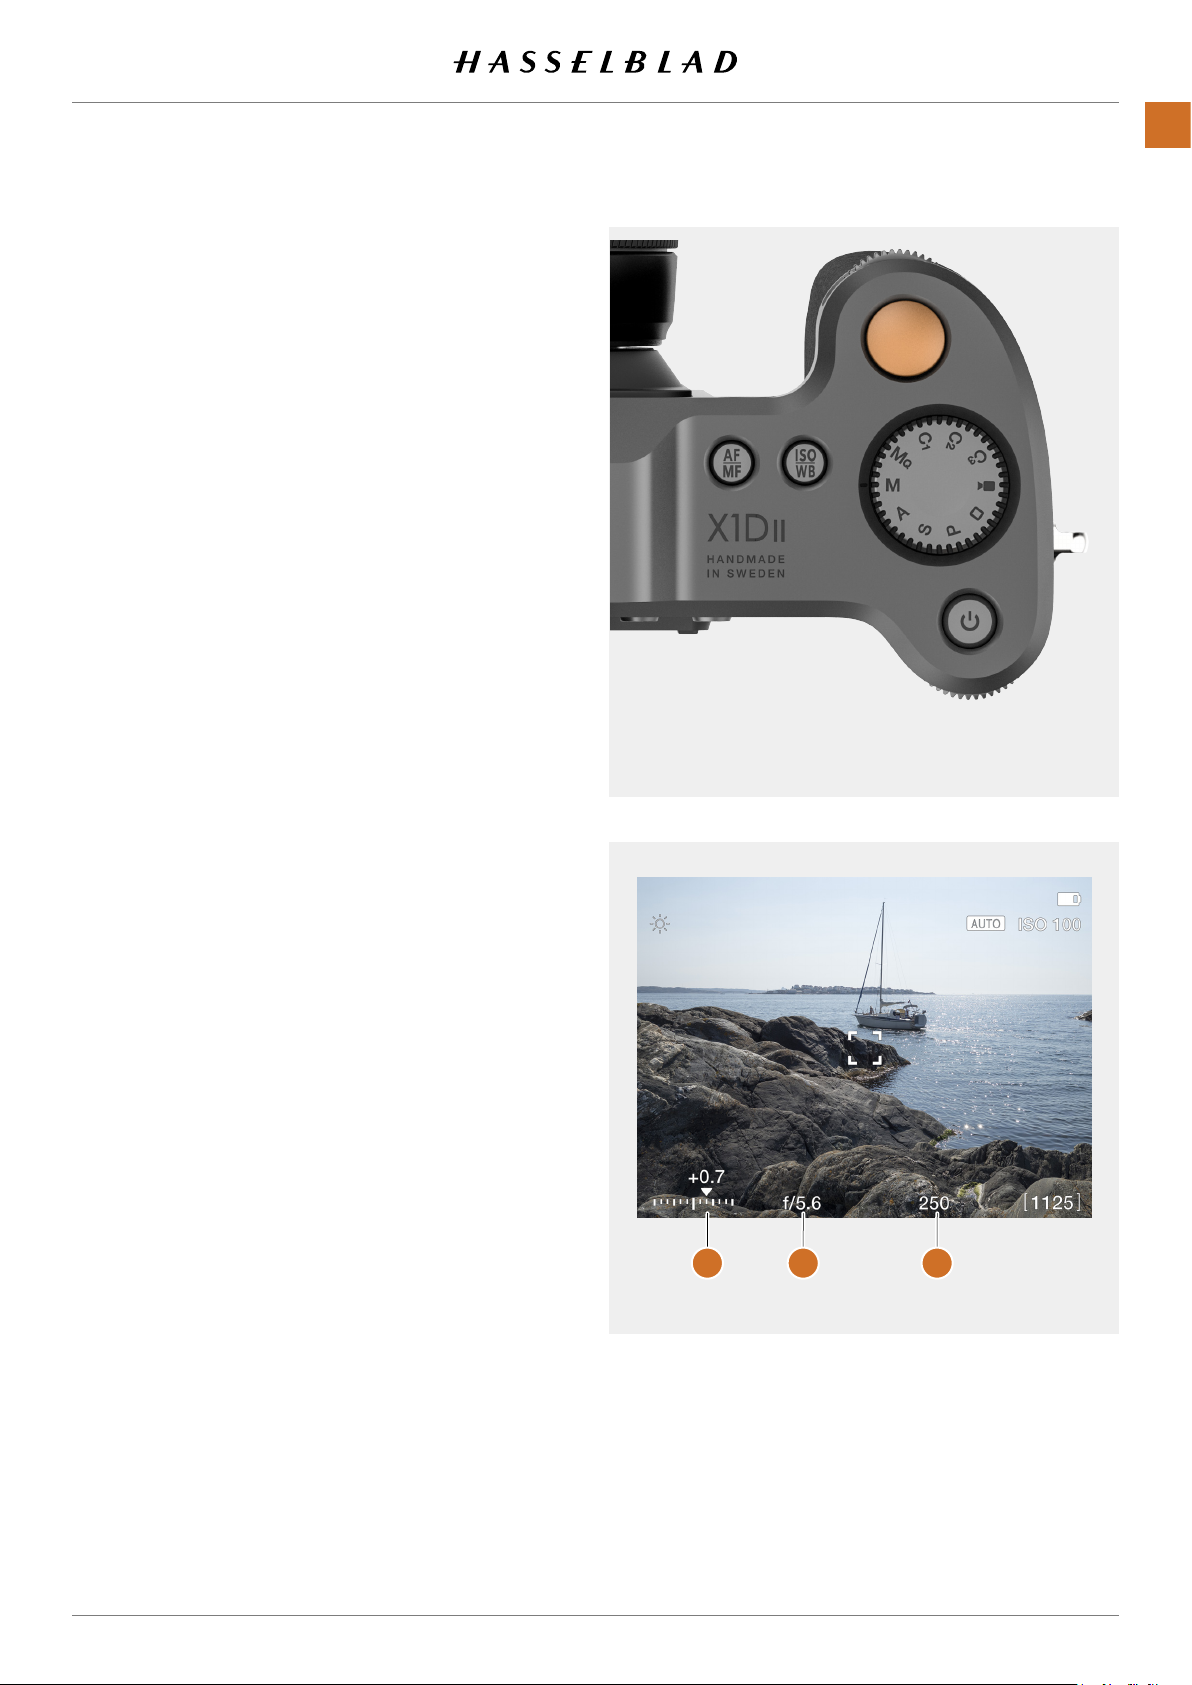
MANUAL EXPOSURE MODE
Manual mode provides total user control of the shutter and
aperture settings. In this mode the aperture settings and
shutter speed are manually chosen by turning the front and
rear scroll wheels.
The standard exposure setting is obtained when the pointer
over the exposure scale is positioned above the central index
(in the viewnder display).
Any deviation from this standard setting is displayed by:
● The pointer appearing elsewhere than above the
central index
● Figures above the scale representing the amount of
adjustment in EV steps.
FUNCTIONS
40
A ‘+ 0.7’ above the scale in the display
‘0.7 EV overexposure’ setting. Conversely, a ‘-2’, for example,
would indicate a ‘2EV underexposure’ setting. Note that
the appearance of a +/- symbol on the display and in the
viewnder, in manual mode, means that a change has been
made to the exposure compensation setting. See later section
on Exposure compensation.
The actual aperture settings
indicated to the right of the exposure scale in the conventional
manner.
(B)
(A)
, would indicate a
and shutter speed
(C)
are
Note!
Full-stops, half-stops and third-stops are also displayed,
according to setting (see increment setting on page 92).
For example, a setting between f/8 and f/11 will appear as
f/9,5 if half-stop is chosen.
Exposure Mode M
A B C
X1D II 50C USER GUIDE www.hasselblad.com
Contents
Page 41
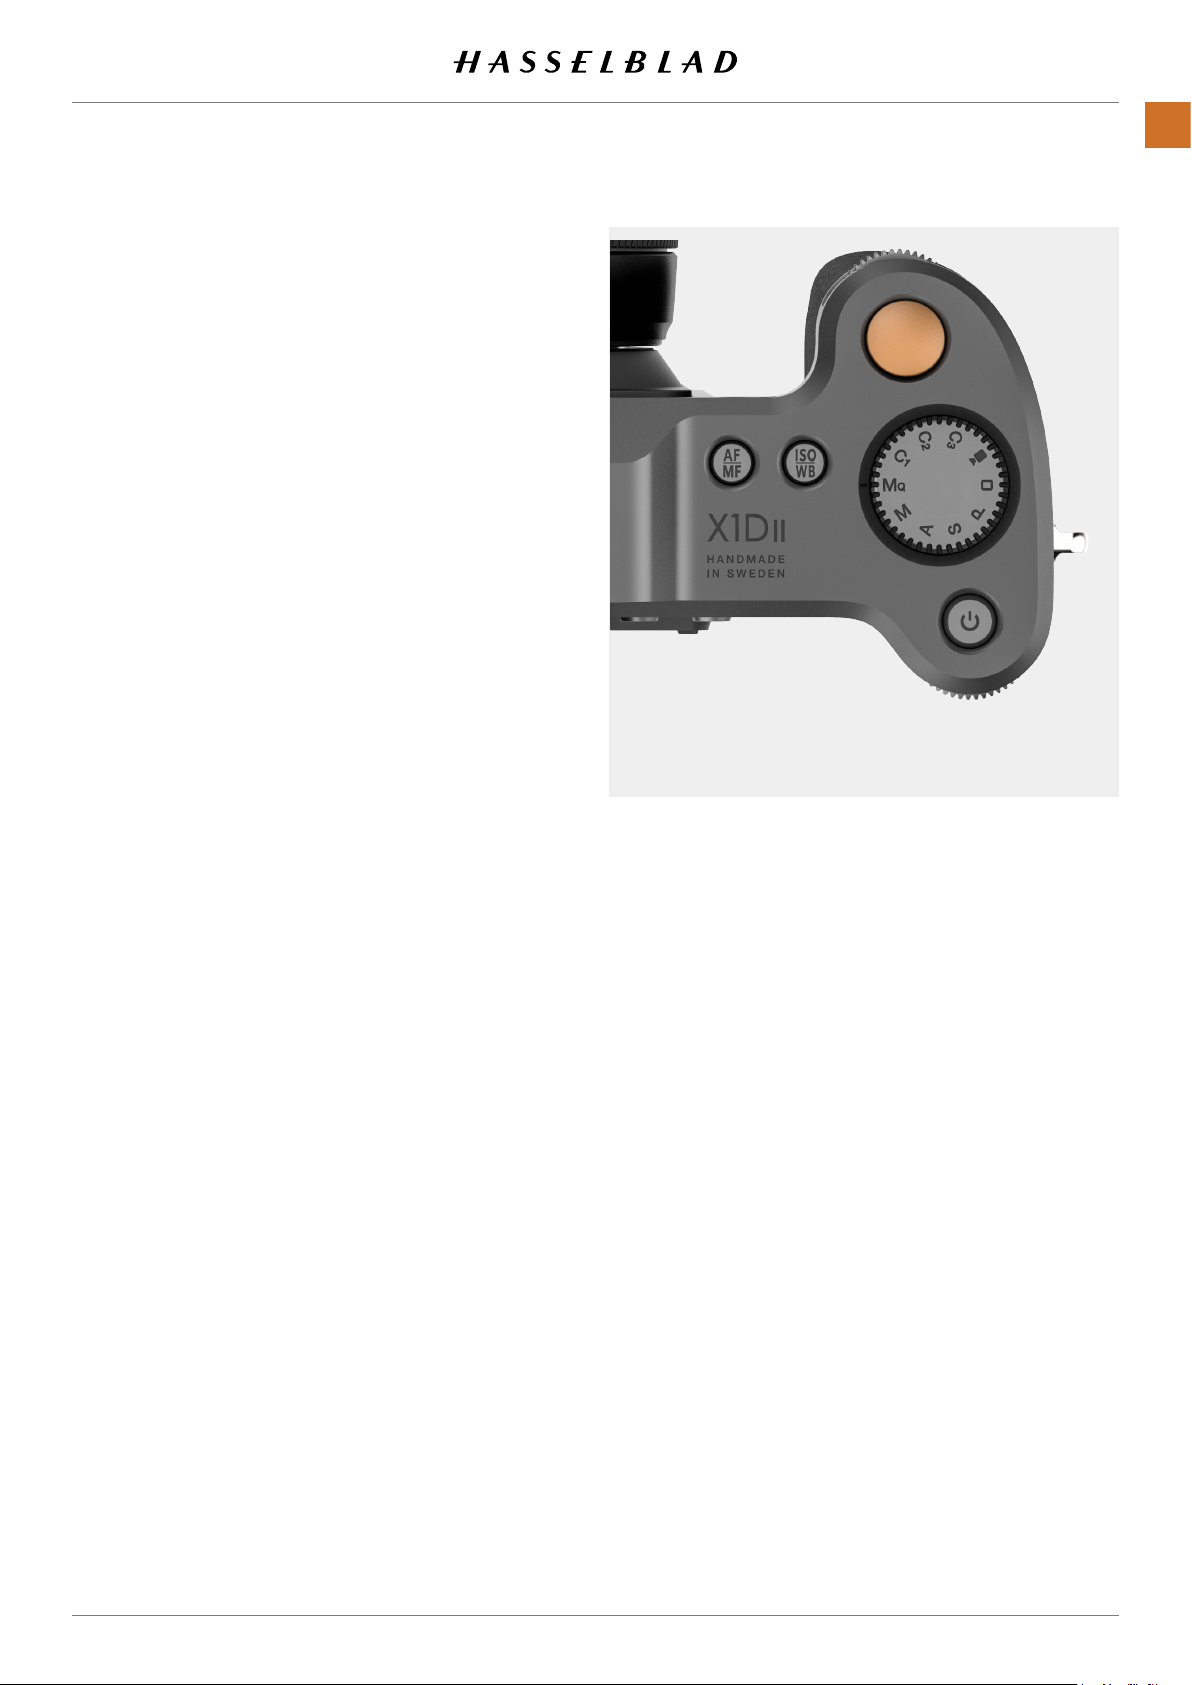
MANUAL QUICK EXPOSURE MODE
MQ mode is a Manual mode where the camera performs as
fast and quiet as possible. In this mode, the Shutter is always
closed and the Live View is disabled. This mode works best
when the X1D II Camera is used on a xed Tripod.
1 First set the Focus and Image Composition in another
Program mode like Manual mode (M) for example. MQ
mode does not support Live View.
2 Use the X1D II Camera on a xed stable Tripod.
3 Select MQ mode on the Mode Dial.
MQ MODE FEATURES
- MQ mode saves Power because the Live View is Off.
- MQ mode is faster because the Shutter is already closed
and ready for exposure.
- MQ mode is more silent due to the fact that the Camera
uses less Shutter movements.
FUNCTIONS
41
Note!
The White Balance mode “Auto”, AWB, requires Live View to
be active before it can set the correct White Balance. To use
AWB in MQ mode (without Live View option), start Live View in
(for example) M-mode before changing to MQ mode.
Exposure Mode Mq
X1D II 50C USER GUIDE www.hasselblad.com
Contents
Page 42

AUTOMATIC EXPOSURE MODES
FUNCTIONS
42
Select Exposure Mode by turning the Mode Dial
Automatic exposure provides a choice of two ways to control
the shutter speed and aperture settings semi automatically
and two ways fully automatically.
(1)
.
Aperture priority A
The aperture is manually chosen by turning the Front Scroll
Wheel, and the shutter speed is automatically chosen by the
camera.
Shutter priority S
The shutter speed is manually chosen by turning the Front
Scroll Wheel, and the aperture is automatically chosen by the
camera.
Programmed P
In this mode, an aperture/shutter combination is chosen by
the camera according to the EV measured (metering method
remains as your choice), though only within pre-set appropriate limitations to suit various requirements and applications.
The aperture and shutter speed combination chosen by the
camera can be shifted by turning the Front Scroll Wheel.
1
Exposure Mode A
Full Auto
In this mode, an aperture and shutter combination is set by
the camera. The camera is always in AF Mode and no adjustments can be made. White Balance is set to Auto, Metering
Method is Centre Weighted and Drive Mode is set to Single
Drive Mode.
Note!
In Automatic mode the Front Scroll Wheel selects alternative
aperture/shutter combinations while maintaining the same
EV and the Rear Scroll Wheel alters the amount of exposure
compensation (Quick Adjust). The compensation amount is
shown on the scale
control if Quick Adjust will be reset by an exposure or not. See
page 95.
(2)
in Live View Mode. Note that you can
Note!
Aperture and shutter speed settings can both be changed
even while the red “busy light” on the Touch Display is
ashing.
2
Note!
In Camera Settings, the Quick Adjust function can be set to
either adjust the following exposure only (default) or on all
future exposures.
X1D II 50C USER GUIDE www.hasselblad.com
Contents
Page 43
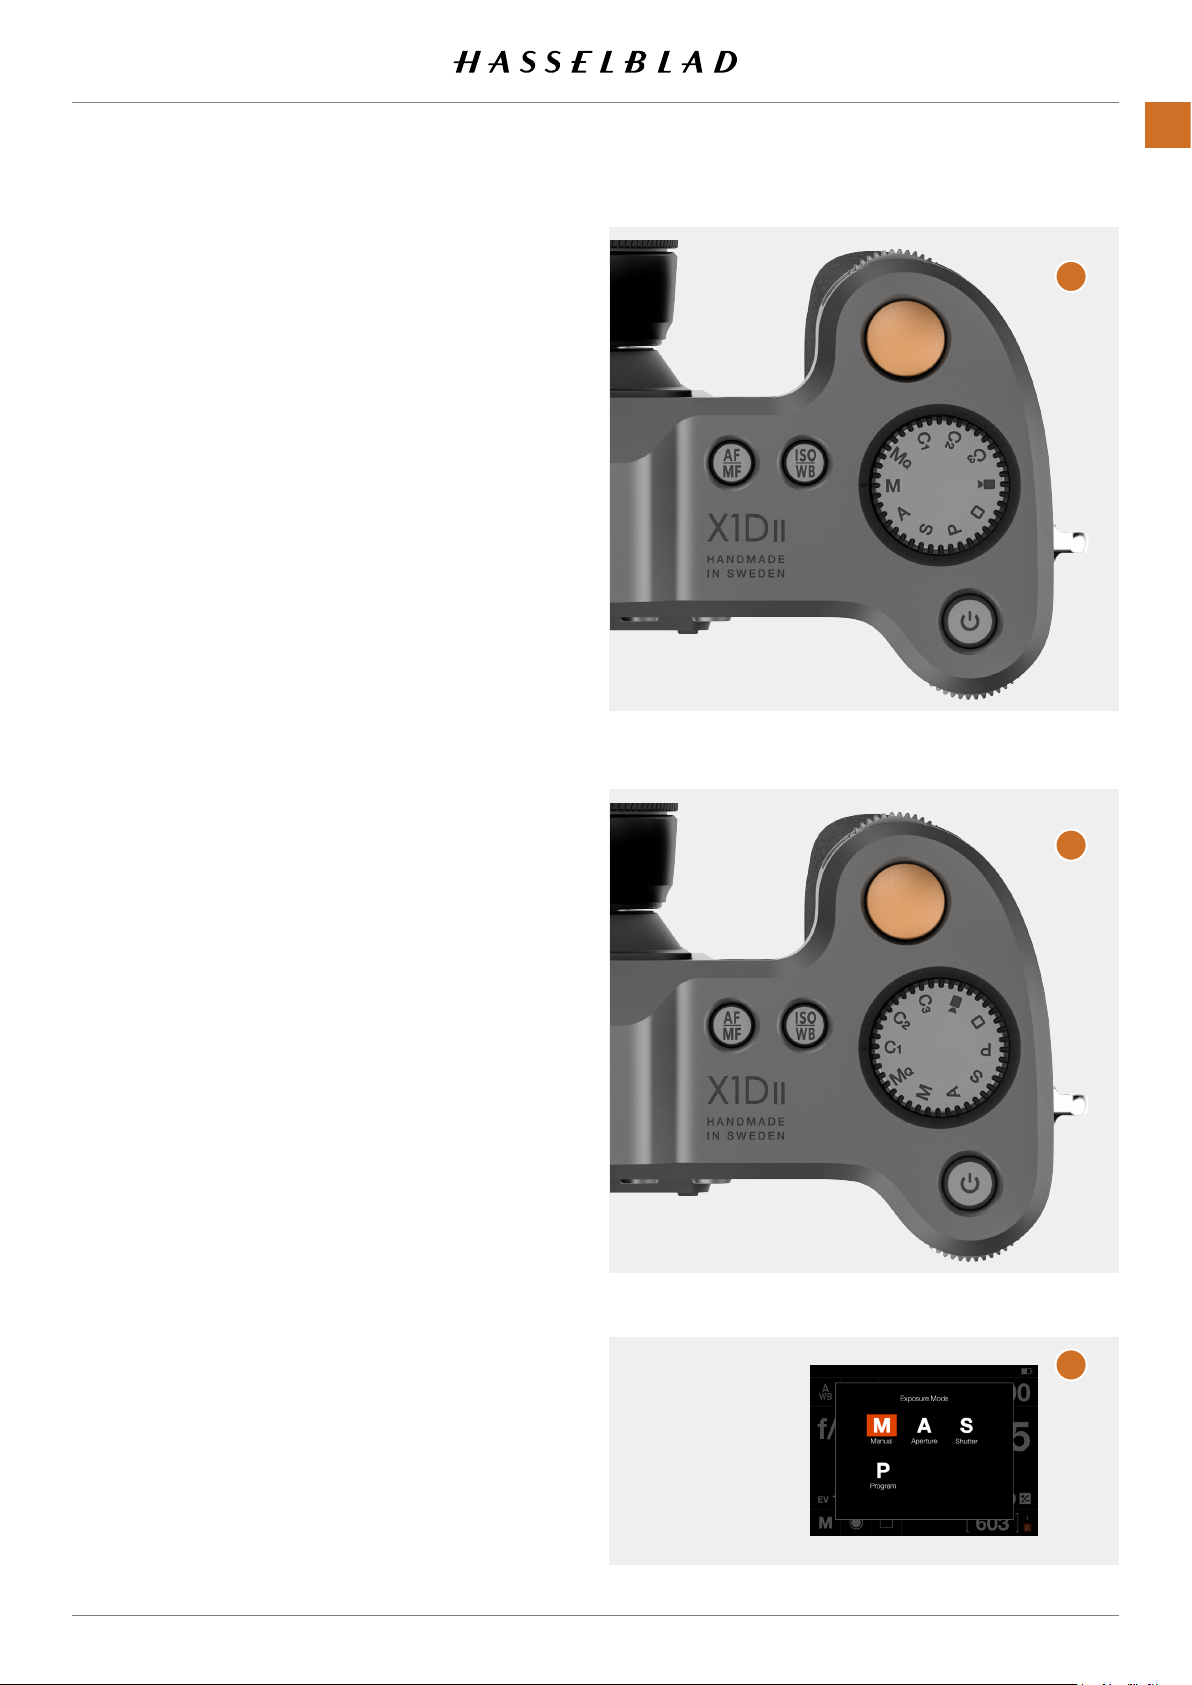
CUSTOM MODES
FUNCTIONS
43
The three Custom Modes C1, C2 and C3 can be used to save
your favourite settings and recall them instantly at any time.
HOW TO SET A CUSTOM MODE
1 Select a mode on the Mode Dial.
M, A, S or P. M is selected in this case
2 Make the changes to the Camera Settings.
Set desired ISO, AF/MF and WB for example.
3 Press the Menu Button to the right of the Touch Display to
display the Main Menu. See also page 114.
4 Select General Settings.
5 Select Custom Modes.
6 Select Save to C1, C2 or C3.
7 Select Save to save and Exit or select Exit to exit without
saving.
8 All the settings you made will now be easily accessed from
the Custom Mode C1.
9 Turn the Mode Dial to select C1
10 You can now use the Camera with all the specic settings
made in stage 2 of this instruction.
Repeat the steps 1 to 10 to create and use your 3 different
Custom Modes, C1, C2 and C3.
(B)
(A)
.
.
A
B
When the Mode Dial is set C1, C2 or C3, it is possible to
change exposure mode from the control screen by tapping
the Exposure Mode Icon in the lower left corner. This will
bring up a screen as shown in (C) where a new exposure mode
is selected by tapping the corresponding icon.
Note!
An example how to use C1-C3 is to set Primary Slot to SD1
in C1 and SD2 in C2. Now you can easily direct images to
different cards just by choosing C1 or C2. If two persons share
the same camera, this can be a simple way images being
mixed up.
Exposure Modes
M, Mq, A, S and P
mode.
C
X1D II 50C USER GUIDE www.hasselblad.com
Contents
Page 44

AE-L BUTTON
In Live View mode and in the automatic modes (A, S, P and
), this button
mode, it will lock the aperture and shutter speed combination,
allowing you to shift aperture and shutter speed combination
without changing the exposure with the scroll wheels.
In Browse mode it is used to zoom out in the image (AF-D
zooms in).
In Menu mode it is used to exit one level up in the menu (AF-D
enters one level down).
Lock an EV setting in manual and automatic modes
When the button is pressed, the light metering facility is
locked to the EV setting at that moment. An AE-L icon appears
to the left of the aperture indication on the Touch Display and
Electronic Viewnder Display to conrm the status. Press the
AE-L button again to unlock (a toggle function).
(1)
is used for locking the exposure. In Manual
FUNCTIONS
1
44
In the locked setting, the aperture and shutter speed become
interlocked. In this way, a new aperture/shutter combination
that still represents the same EV (exposure), can be rapidly
chosen. For example, if the shutter is set to 1/125s and the
aperture to f/8 and are locked together, you can access new
EV-equivalent combinations of, for example, 1/30s a f/16 or
1/500s at f/4 just by moving the front scroll wheel.
In practice this means that you can, for example, in auto mode
position the metering area (spot setting) over an area in the
subject that you determine to be equivalent to a mid-grey
and lock it with the AE-L button. You can then recompose the
picture with the metering zone positioned over an area much
brighter or darker while still retaining the original exposure
setting and choose a new combination of aperture and
shutter speed settings.
X1D II 50C USER GUIDE www.hasselblad.com
Contents
Page 45

4.6 THE X1D II INTERACTION DISPLAYS
EVF - ELECTRONIC
VIEWFINDER
DI SPLAY
TOUCH DISPLAY
FUNCTIONS
45
Electronic Viewnder Display, EVF
Electronic Viewnder Display, EVF
The EVF on the Camera displays ISO, Focus action, Exposure
compensation, Aperture, Shutter and Captures remaining.
Press the MF/AF and the ISO/WB buttons to change settings.
Use the Front Scroll Wheel or the Rear Scroll Wheel to select
desired settings. Press the same button again to Exit and
Save.
Touch Display
Touch Display
The X1D II display is touch sensitive and you can use it in the
same way you navigate on a smartphone. For example Swipe,
Select, Pinch and Spread to Zoom. You can also navigate by
using the 5 buttons to the right of the Touch Display and Scroll
Wheels on the Camera.
X1D II 50C USER GUIDE www.hasselblad.com
Contents
Page 46

4.7 TOUCH DISPLAY NAVIGATION
The Touch Display on the X1D II Camera is similar to a Phone
or Tablet with touch sensitivity. The following gestures can be
used to navigate and control the camera:
Action Function
Swipe Right Move back / Move image right.
Swipe Left Move image left. Only in Browse
mode.
Swipe Down Display Control Screen.
Swipe Up Hide Control Screen.
Tap/ Press Select action / button / setting.
Double Tap Zoom in to 100%. Double Tap again
to Zoom out to full View.
Swipe Right
FUNCTIONS
Swipe Left
46
Function Action
Select Tap / Press with one nger.
Display Control Screen Swipe down from the top of the
screen.
Hide Control Screen Swipe up.
Move back Swipe right.
Zoom in Spread (move two ngers apar t).
Zoom out Pinch (move two ngers together).
Display Control Screen
1 Swipe down from top of the rear display or press the Menu
Button to show the Control Screen.
2 The Control Screen displays the Camera Settings.
3 Most settings can be changed by tapping the value or
setting within the Control Screen Interface.
4 Swipe Up or press the Menu Button to hide the Control
Screen and display the Main Menu.
Swipe Down
1 Swipe Down 2
Swipe Up
Note!
The Control Screen is interactive and you can change most
settings. Settings that can be changed, depends on the active
Shooting Mode. See more on page 51.
X1D II 50C USER GUIDE www.hasselblad.com
Contents
Main Menu
3 Adjust settings 4 Swipe up
Control Screen
Control Screen
Main Menu
Page 47

4.8 NAVIGATING THE MENUS
DESCRIPTION OF THE TOUCH DISPLAY MENU ITEMS
FUNCTIONS
1
47
The X1D II Display Screen is Touch Sensitive. You can tap with
one nger to select and swipe in different directions to move
up, down, forward and backward through the user interface.
Button Screen function
1 Browse Button Go to image browse
2 Rectangle Button Up
3 Star Button Select
4 Cross Button Down
5 Menu Button Back to Main Menu
1
Browse Button
Activates the display and shows the last image. The user
can review images, browse and zoom. Preview images and
zoom in to view close-ups of previews for focus checking.
Zoom out to view several at once and nally to view and
select folders and media.
2
Rectangle Button
Function depends on screen information. The button
changes the overlay in Live View and Browse Mode. The
button moves the selector up when scrolling in menus.
When the Control Screen is active, the button selects
parameter that can be changed with the Scroll Wheels.
2
3
4
5
3
Star Button
The Star Button will zoom out to 9-view in Browse Mode.
In Live View the Star Button will zoom in to 50 or 100%
dpending on setting. See page page 102.
4
Cross Button
Function depends on screen information. The button
acts as Delete Image button in Browse Mode. The button
moves the selector down in menus. In Control Screen it
selects parameter that can be changed with the Scroll
Wheels.
5
Menu Button
This button opens the Main Menu. If the Main Menu is
already active, the Control Screen is shown.
Using the buttons on the control panel and the scroll wheels
on the grip, you can navigate through the various levels in the
menu. The following pages show an overview of the available
setting options.
Control Screen
Main Menu
X1D II 50C USER GUIDE www.hasselblad.com
Contents
Page 48
OVERVIEW OF MENUS AND SETTINGS ON TOUCH DISPLAY
Settings can be controlled directly on the touch sensitive
screen by pressing the menus and icons. You can scroll up,
down and from left to right as described in previous chapters.
You can also navigate the on screen menus by using the
following buttons and scroll wheels:
1 Control buttons next to the Touch Display for example
Menu Button.
2 Front Scroll Wheel.
3 AE-L Button.
4 AF-D Button.
5 Rear Scroll Wheel.
Navigation using buttons is described on page 84 (Using
Buttons).
FUNCTIONS
3 4
1
The Menu Button (1) navigates back to Main Menu or
the Control Screen.
48
2
5
X1D II 50C USER GUIDE www.hasselblad.com
Contents
Page 49

4.9 TOUCH DISPLAY MAIN MENU
MAIN MENU
In the Main Menu there are 3 different Main Settings. Camera
Settings
The placement of these 3 Settings are xed and cannot be
changed.
(1)
, Video Settings
(2)
and General Settings
(3)
.
Main Menu
FUNCTIONS
1
49
The icons on the left part of the Main Menu are Favourite
Shortcuts to Functions. In this example, they are:
Display.
Power & Timeouts.
Quality.
Crop & Orientation.
Focus.
Exposure (+/-).
Storage.
Connectivity.
ADD SHORTCUTS TO MAIN MENU FAVOURITES
To speed up your own workow you can add in the settings
you use more frequently in the Favourite settings. These
functions will then be displayed on the Main Menu until you
remove them and replace them with other Favourite settings.
To add, remove or move a shortcut, see the instructions on
the following page.
The available Shortcuts to add are:
2
3
4
1 Camera Settings
2 Video Settings (Function not yet
implemented)
3 General Settings
4 + (Plus) symbol (Add Setting)
Exposure
Image
Quality
Focus
Self Timer
Interval
Exposure Bracketing
Custom Buttons
Conguration
Wi-Fi
Display
See detailed description on how to add and remove shortcuts
to your Favourite list on the following page.
X1D II 50C USER GUIDE www.hasselblad.com
Tou ch
Custom Modes
Storage
Sound
Date & Time
Power & Timeouts
Spirit Level
Language
Service
About
Contents
Page 50
FUNCTIONS
50
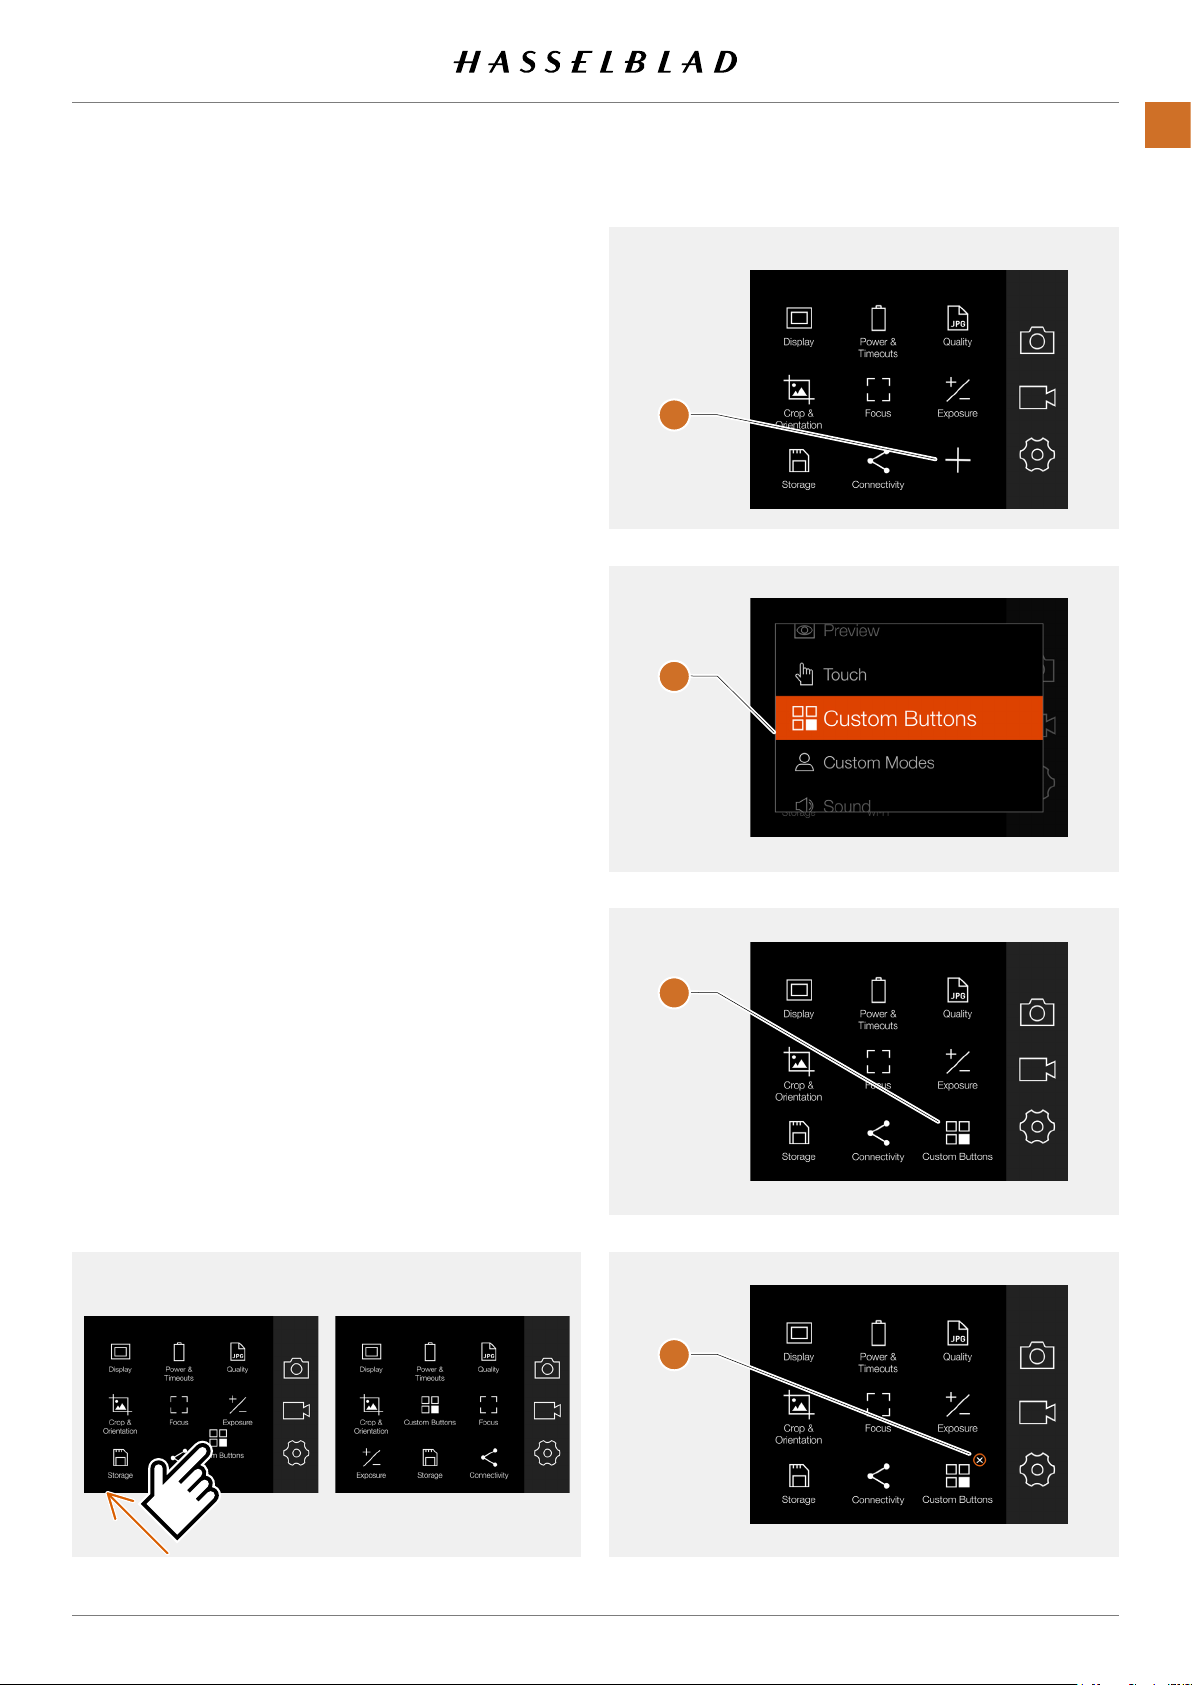
HOW TO ADD SHORTCUTS TO MAIN MENU
1 Select the + icon
2 The Add Favourite Pop up screen displays the
available options to add in a scroll list.
3 Select for example Custom Buttons
4 The Custom Buttons icon is displayed on the
Main Menu and the action is saved in the Camera
Memory.
(A)
on the Main Menu.
(B)
.
HOW TO REMOVE SHORTCUTS ON THE MAIN MENU
1 Press and Hold on the icon you would like to
remove from the Main Menu Favourites. Custom
Buttons
2 The close symbol, X, is displayed on the upper
right corner of the selected shortcut
3 Select / Press the X in the orange circle to delete
the icon and remove the function from the Main
Menu Favourites.
4 The Custom Buttons icon is no longer displayed
in the Main Menu Favourites list. You can add the
same function later at any time.
(C)
in this example.
(D)
.
Main Menu
A
Add Favourite Pop up screen
B
HOW TO MOVE SHORTCUTS ON THE MAIN MENU
1 Press and Hold on the icon you want to move
until the close symbol, X, appears
2 Press and hold the icon and drag it to a new
location. Icons will automatically rearrange.
Move Shortcut Shortcut moved
(D)
.
Main Menu with Custom Buttons added
C
Remove Shortcut
D
X1D II 50C USER GUIDE www.hasselblad.com
Contents
Page 51

FUNCTIONS
51
4.10 CONTROL SCREEN
You can access the most common settings using the
Control Screen. You can easily change these settings
by tapping on any function and adjust directly.
Display Control Screen
From any screen you can swipe down from the top of
the Touch Display or press the menu Button once or
twice to display the Control Screen.
Close the Control Screen
Swipe up from the bottom of the Touch Display or
press the Menu Button to show the main menu.
Note!
When Control Screen is displayed, there is no light
metering ongoing. The sensor is inactive to save
battery power.
LOCKED EXPOSURE PARAMETERS ON THE CONTROL SCREEN
A Mode
For Aperture priority (A) you can change the Aperture value and the Shutter value will be automatic
and displayed in grey.
Control Screen
Control Screen
A Mode
Shutter Speed is
automatic.
S Mode
For Shutter priority (S) you can change the Shutter
value and the Aperture value will be automatic and
displayed in grey.
P Mode
When you select P Mode the Aperture (5) and
Shutter (100) are automatic and displayed in grey
colour that indicates that you cannot change these
settings by touch. Note that you can use the Front
Scroll Wheel to shift aperture and shutter speed
combination and Rear Scroll Wheel to add an
exposure adjustment.
Control Screen
S Mode
Aperture is
automatic.
Control Screen
P Mode
Aperture and
Shutter Speed are
automatic.
X1D II 50C USER GUIDE www.hasselblad.com
Contents
Page 52
FUNCTIONS
52
SETTINGS ON THE CONTROL SCREEN
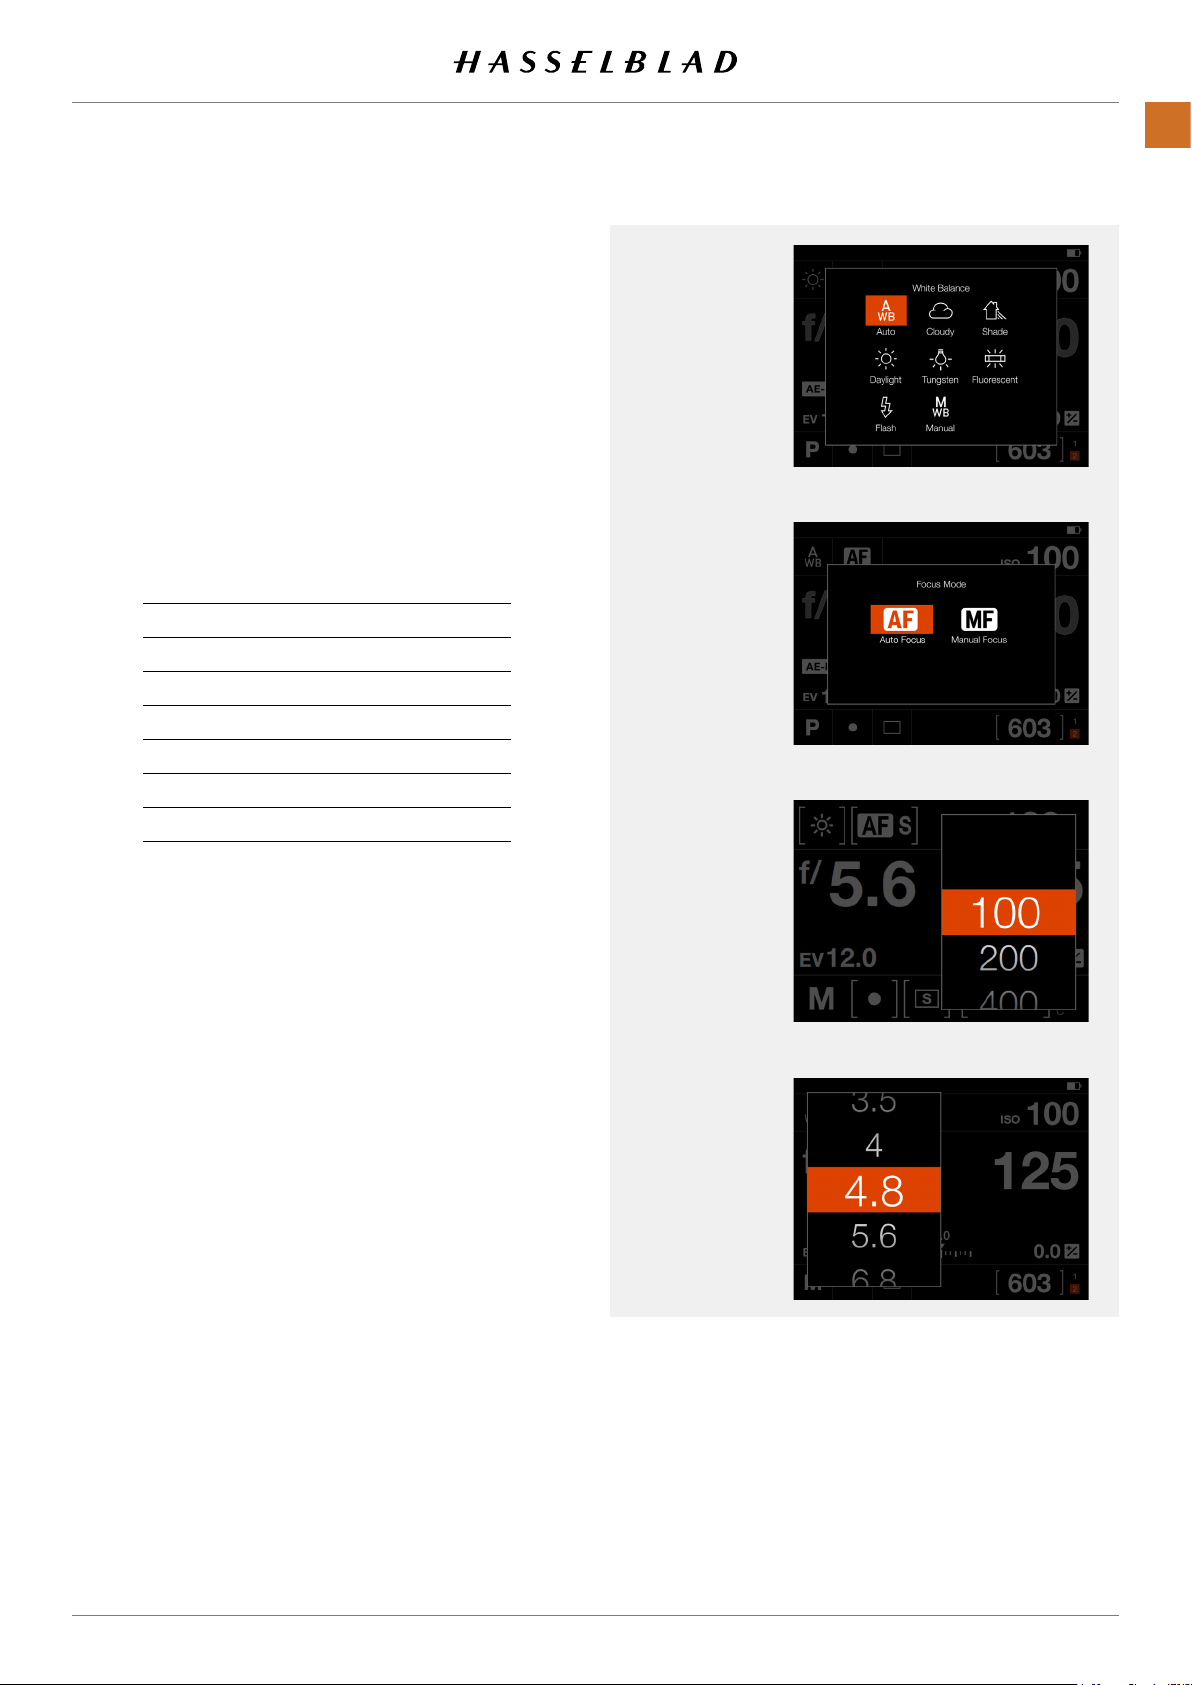
White Balance
- Auto White Balance AWB.
- Cloudy.
- Shade.
- Daylight.
- Tungsten.
- Fluorescent.
- Flash.
- Manual WB.
Temp [ºK] Tint
Cloudy
Shade
Daylight
Tungsten
Fluorescent
Flash
Manual
6500 10
7500 10
5500 10
2850 0
3800 21
5500 0
Variable 0
White Balance
Focusing
ISO
Focusing
- AF Autofocus.
- MF Manual Focus.
ISO
- Select ISO value.
Aperture
- Select Aperture value.
This Chapter continues on the next page.
Aperture
X1D II 50C USER GUIDE www.hasselblad.com
Contents
Page 53

Settings on the Control Screen
Shutter Speed
- Select Shutter Speed value.
Exposure Adjust
- Adjust Flash Exposure by sliding right or left.
- Adjust Exposure by sliding right or left.
Tapping the line to the left or right of the dot, will
increase or decrease the value with the value set
in
Main Menu > Camera Settings > Exposure >
Increment Step Size > exposure Adjust
Reset the value to zero by double-tapping the icon to
the left of the line.
.
Exposure Mode
M Manual Mode.
A Aperture Priority Mode.
S Shutter Priority Mode.
P Program Mode.
Shutter
Exposure Adjust
FUNCTIONS
53
Note!
Exposure Mode can only be set from the Control
Screen when the Mode Dial is set to C1, C2 or C3.
Metering Mode
- Centre Weighted.
- Spot.
- Centre Spot.
This Chapter continues on the next page.
Exposure Mode
Metering Mode
X1D II 50C USER GUIDE www.hasselblad.com
Contents
Page 54

Settings on the Control Screen
Drive Mode
By tapping the Drive Mode Icon (A) on the control screen, you
can select the following modes:
●
Single
The camera will only make one exposure regardless
how long the Shutter Release Button is pressed.
●
Continuous
The camera will make exposures as long as the Shutter
Release Button is pressed.
Control Screen
FUNCTIONS
54
Tap the desired function again to close the dialogue make it
active.
Continued on the next page.
A
Single frame Drive mode
B
Continuous Drive mode
X1D II 50C USER GUIDE www.hasselblad.com
Contents
Page 55
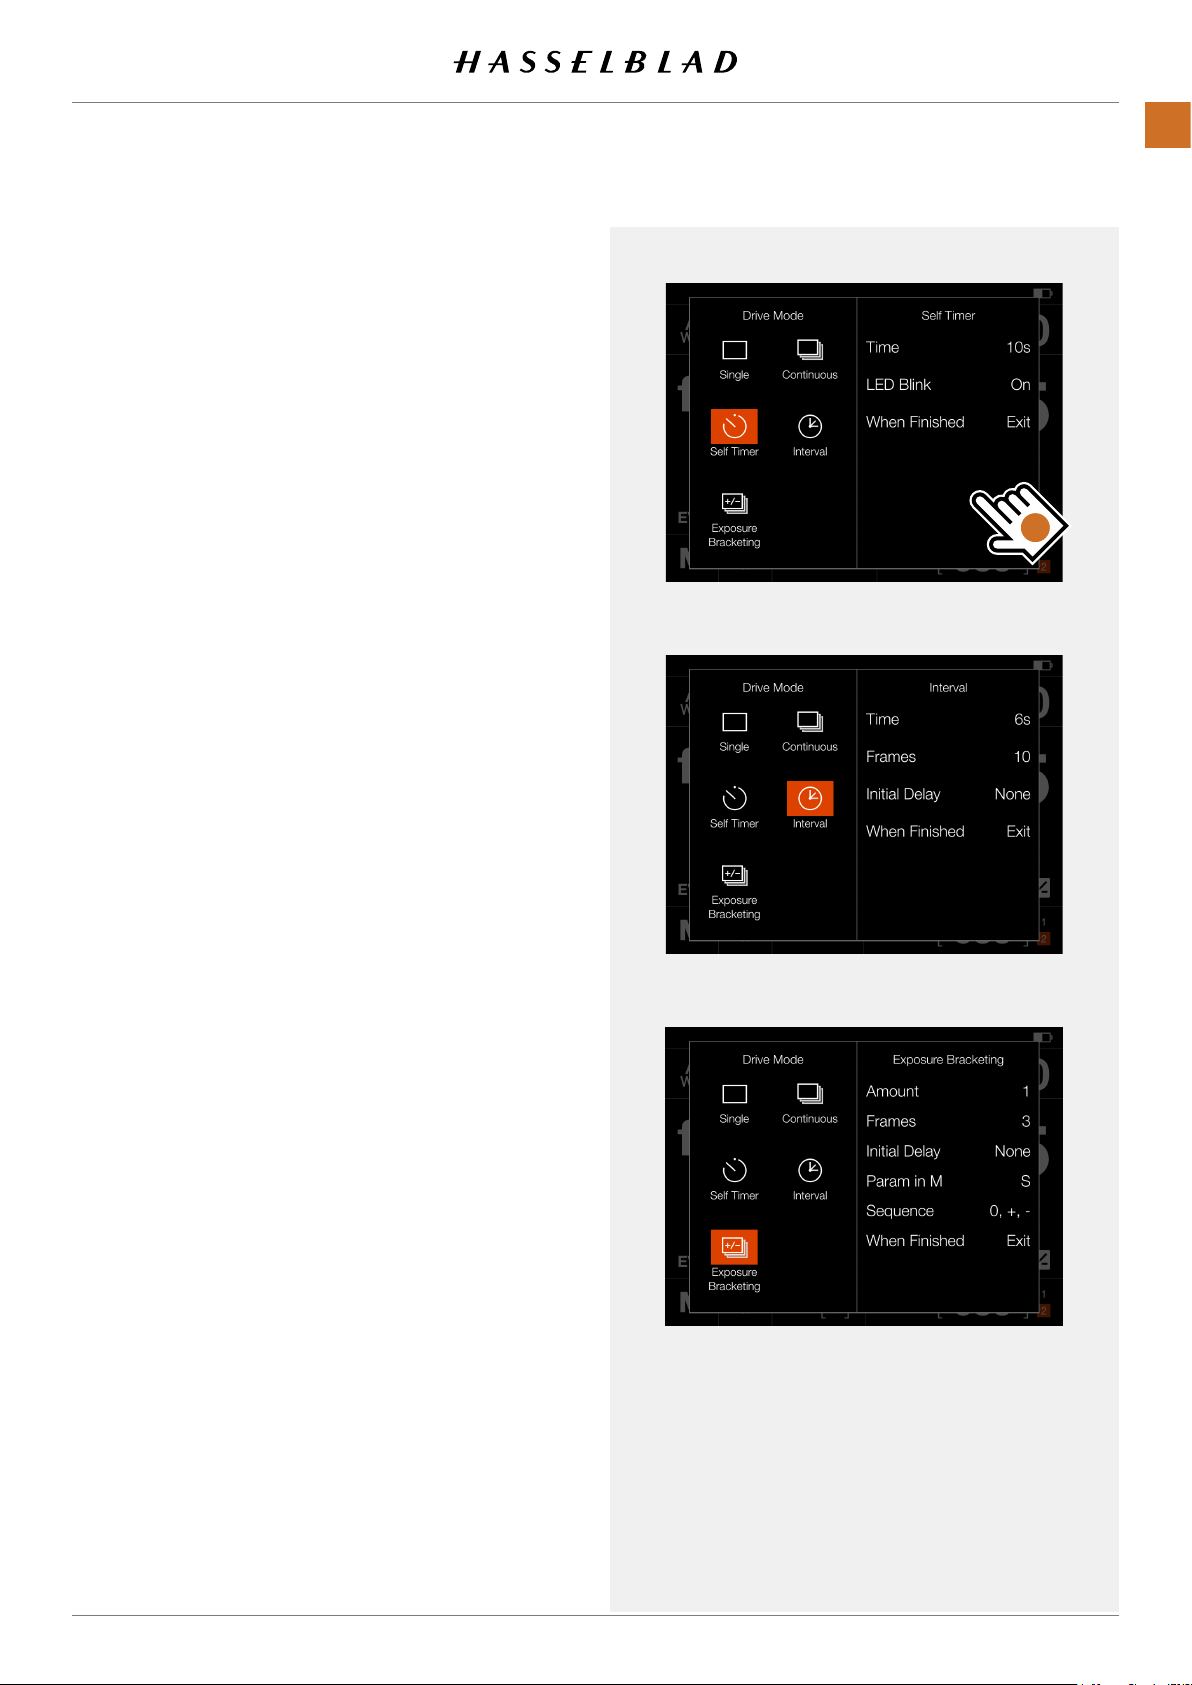
●
Self Timer
The camera will wait a pre-set time to make the
exposure after the Shutter Release Button is pressed.
Time:
Delay between Shutter Release and exposure.
LED Blink:
indicate Self Timer operation.
When Finished:
active after a completed cycle or not. If set to
Self Timer is disabled after the exposure.
●
Interval
The camera will make a pre-determined number of
exposures with a pre-set interval time.
Time:
Frames:
Initial Delay:
exposure.
Controls if the front LED shall be used to
Determines if the function shall be
Exit
The time between exposures.
How many exposures will be made.
Delay between Shutter Release and rst
, the
Self Timer
Interval
FUNCTIONS
A
55
●
Exposure Bracketing
The camera will automatically make a pre-determined
number of exposures with a pre-set exposure adjustment difference between each frame.
Amount:
each exposure.
Frames:
Initial Delay: Delay between Shutter Release and rst
exposure.
Param in M:
change if Exposure bracketing is used in Manual mode.
How much exposure difference between
The number of exposures in the sequence.
Which of Aperture or Shutter Speed to
When Finished:
active after a completed cycle or not.
For
Self Timer, Interval
part of the panel displays the current setting. If no changes
are required, tap the function icon again to make it active.
To change any of the parameters, tap the right part of the
screen (A). This will bring up the dedicated settings for the
function.
Continued on the next page.
Determines if the function shall be
and
Exposure Bracketing
the left
Exposure Bracketing
X1D II 50C USER GUIDE www.hasselblad.com
Contents
Page 56
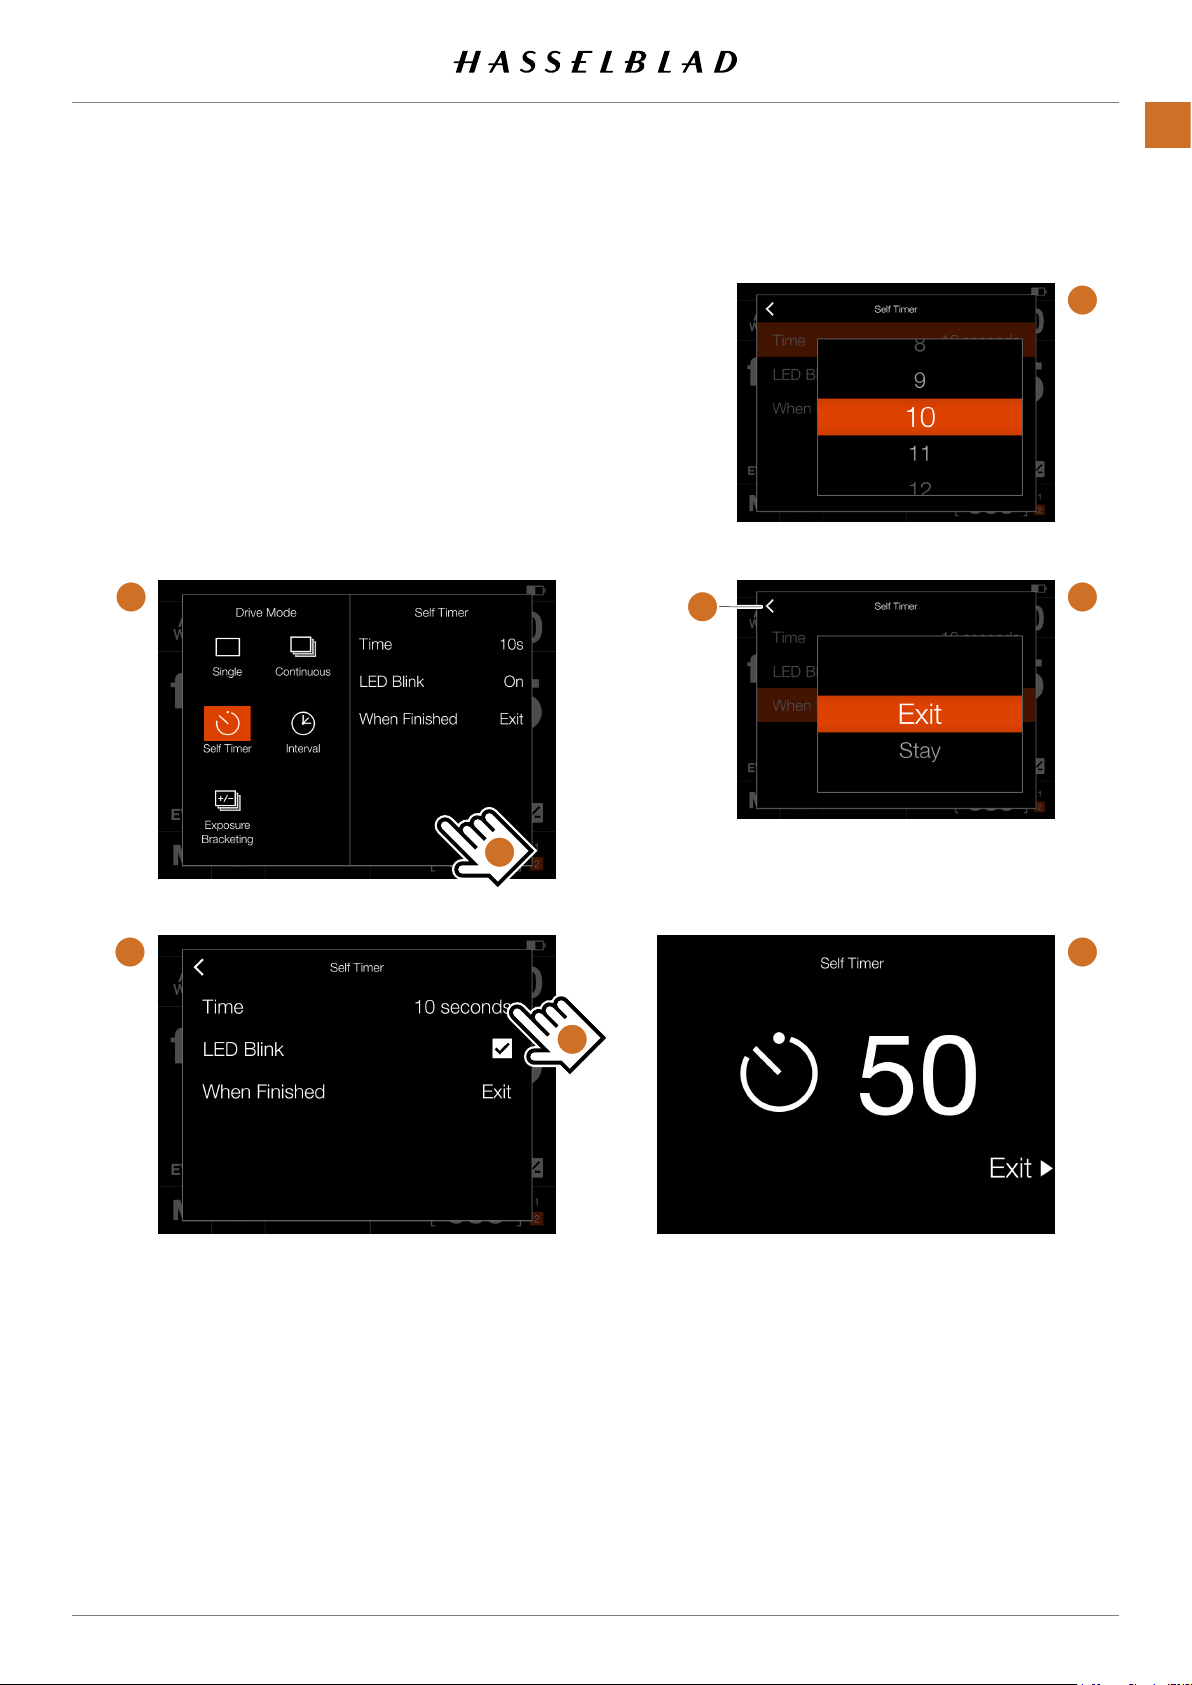
SELF TIMER SETTINGS
FUNCTIONS
56
On the Control Screen tap the Drive Mode icon which brings
up the settings screen
panel
(C)
to show the Settings Menu
(A)
. To change settings, tap the right
(B)
.
To change any of the settings, tap the value to bring up any of
the screens
When the settings are made, tap the left arrow
(E)
or
(F)
.
(G)
to return to
the Drive Mode settings screen.
When the Shutter Release is fully pressed, the rear screen or
EVF will show the Count Down
(H)
. After the pre-set time is
elapsed, the exposure will be made.
A
C
E
G
F
B
D
H
X1D II 50C USER GUIDE www.hasselblad.com
Contents
Page 57

INTERVAL SETTINGS
FUNCTIONS
57
On the Control Screen tap the Drive Mode icon which brings
up the settings screen
panel
(C)
to show the Settings Menu
(A)
. To change settings, tap the right
(B)
.
To change any of the settings, tap the value to bring up any of
the screens
When the settings are made, tap the left arrow
(E)
to
(H)
.
(I)
to return to
the Drive Mode settings screen.
A
C
E
F
G
B
D
I
H
Continued on the next page.
X1D II 50C USER GUIDE www.hasselblad.com
Contents
Page 58
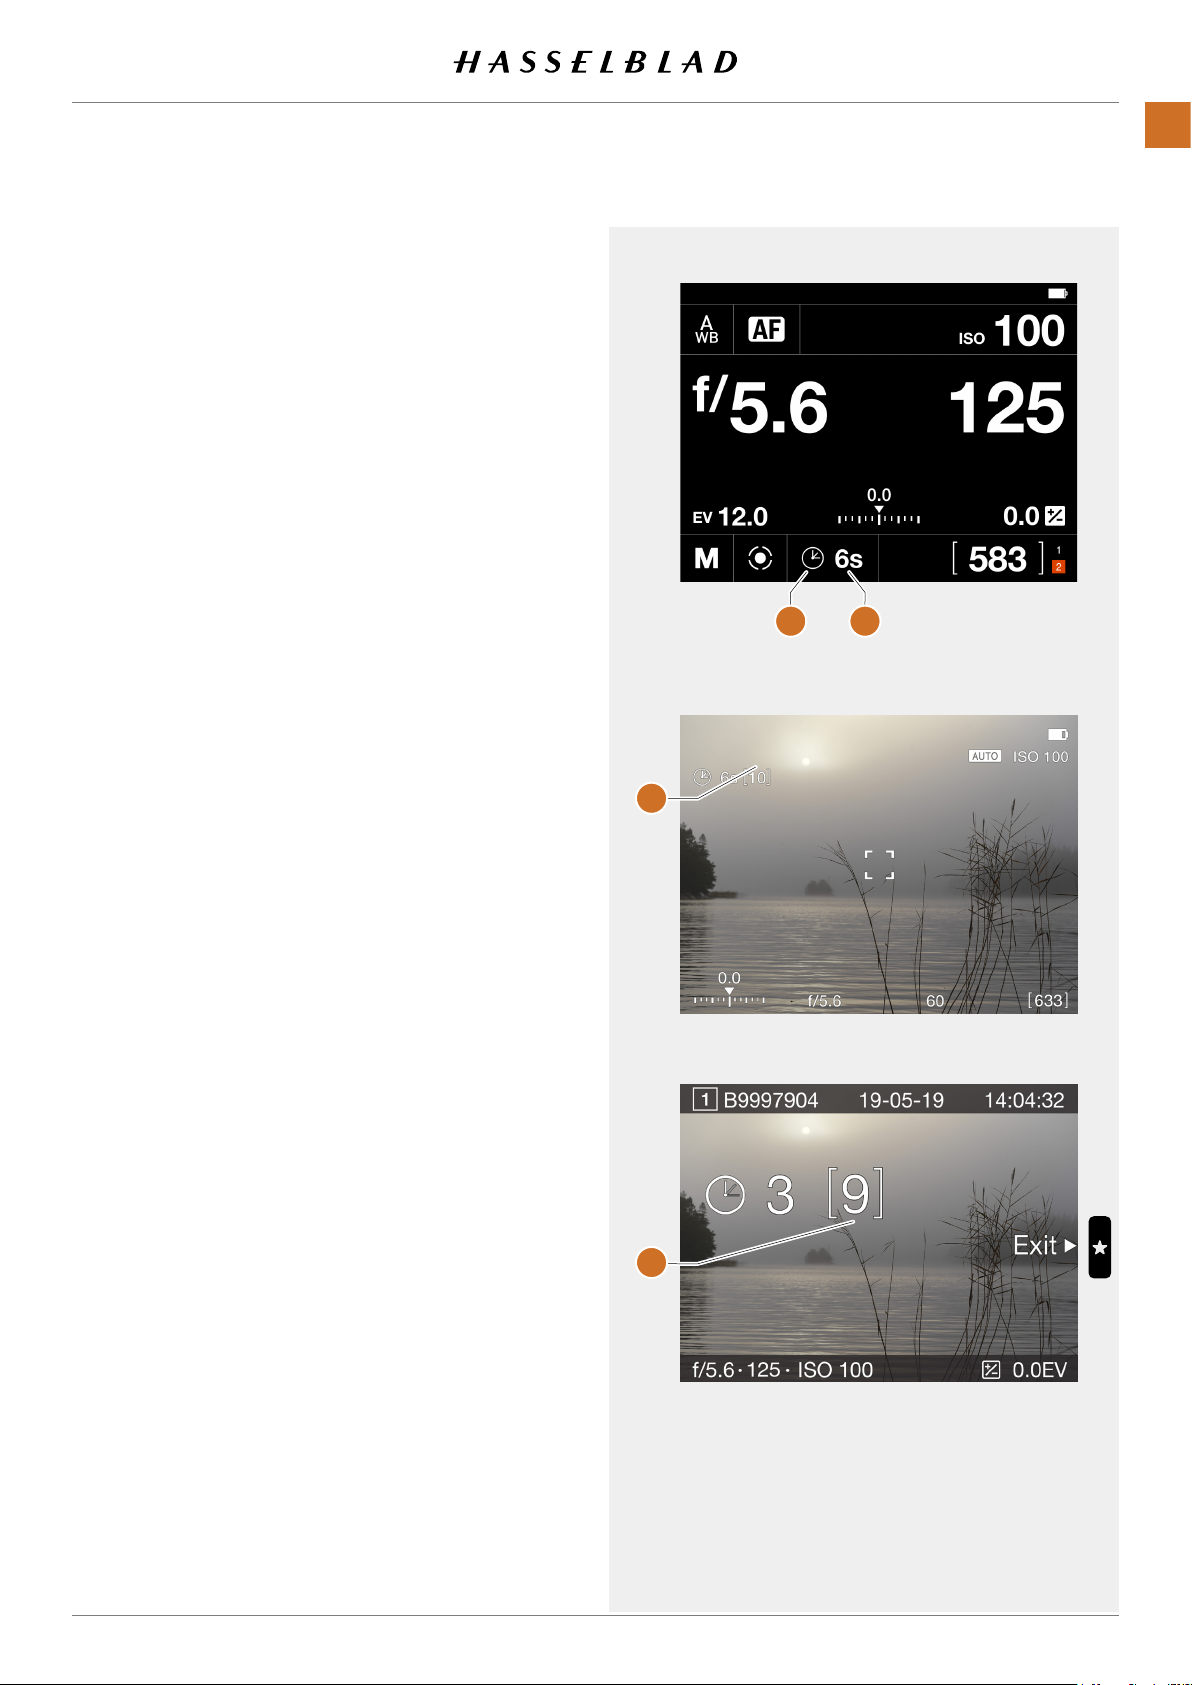
INTERVAL OPERATION
An active and pending Interval Timer, is indicated both on the
Control Screen and in Live View.
Control Screen
FUNCTIONS
58
The Control Screen shows the Interval Icon
Interval Time
show the settings screen as described on the previous page.
Live View and preview Screens show the same information
with the addition of remaining number of captures
To start the sequence, press the shutter release. If you have
set an initial delay to prevent camera shake, the camera will
rst wait the pre-set number of seconds showing a black
screen with a count-down timer, and then start the Interval
sequence.
After a capture, the image will show up on the rear screen,
together with the Interval information.
To end the sequence before all captures have been made,
press
Exit
(B)
. To see all settings, tap the Interval Icon to
(the Star Button).
(A)
and the
(C)
and
Note!
Live View is turned off during an Interval sequence.
(D)
.
A B
Live View
C
Note!
The preview can be turned off in the "
Preview > Rear Screen
" setting.
General Settings >
Note!
Interval is not supported in Phocus Mobile 2 or when tethered
to Phocus. For tethered operation, use the Capture Sequencer function in Phocus.
Note!
During a running Interval Sequence, you can press the Menu
Button to activate the Control Screen to check current status.
Preview Screen after a capture
D
X1D II 50C USER GUIDE www.hasselblad.com
Contents
Page 59
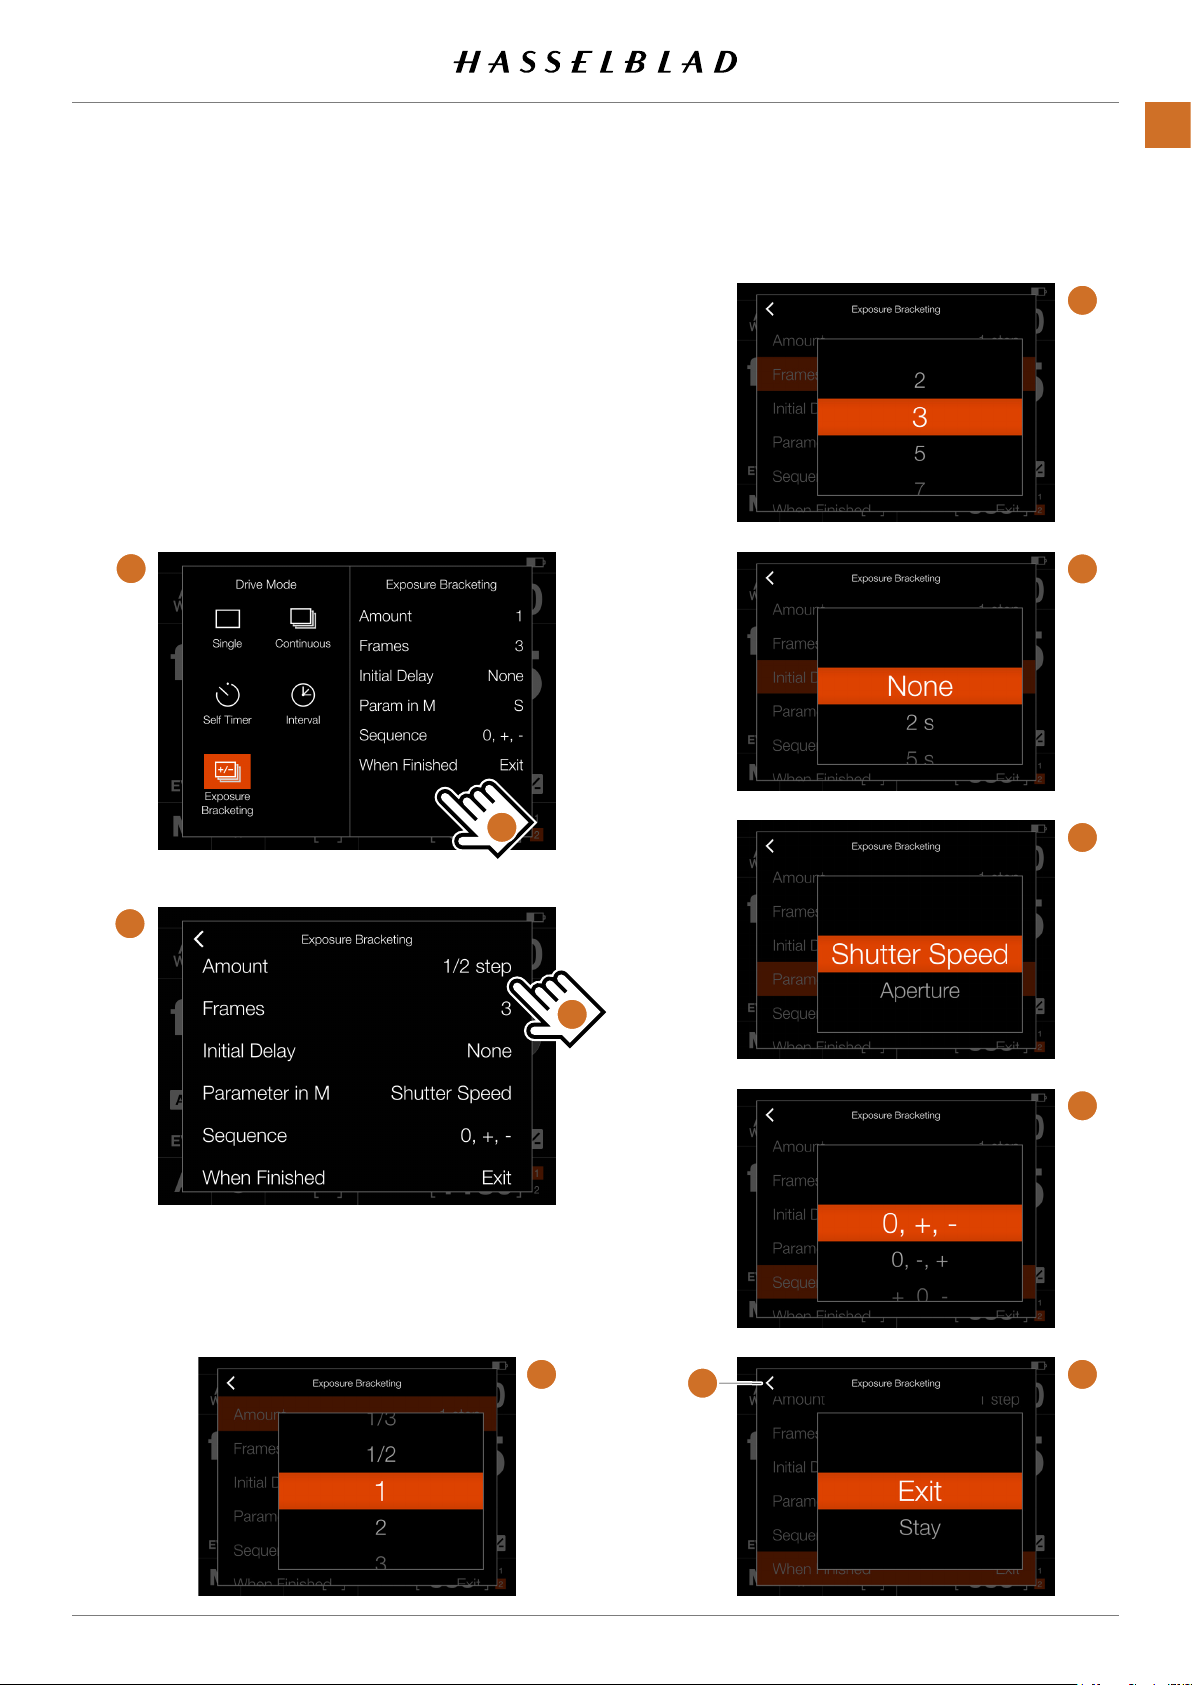
EXPOSURE BRACKETING SETTINGS
FUNCTIONS
59
On the Control Screen tap the Drive Mode icon which brings
up the settings screen
panel
(C)
to show the Settings Menu
(A)
. To change settings, tap the right
(B)
.
To change any of the settings, tap the value to bring up any of
the screens
When the settings are made, tap the left arrow
(E)
to
(J)
.
(K)
to return to
the Drive Mode settings screen.
A
C
F
G
H
B
D
I
K
J E
X1D II 50C USER GUIDE www.hasselblad.com
Contents
Page 60

EXPOSURE BRACKETING OPERATION
An active and pending Exposure Bracketing function, is
indicated both on the Control Screen and in Live View.
The Control Screen and Live View will show the Bracketing
Icon and the number of captures in the sequence. To see all
settings, tap the Interval Icon to show the settings screen as
described on the previous page.
In the example to the right, the Exposure Bracketing sequence
will use 3 images.
To start the sequence, press the shutter release. If you have
set an initial delay to prevent camera shake, the camera will
rst wait the pre-set number of seconds showing a black
screen with a count-down timer, and then start the Interval
sequence.
During the Exposure Bracketing sequence, the rear screen
and EVF will show an information overlay, as shown in
(A)
.
Control Screen
Live View
FUNCTIONS
60
To exit from the sequence before it has been completed,
press the Cross Button.
After a capture, the last image will show up on the rear screen
LONG EXPOSURE SCREEN
If the Shutter Speed is 1 second or longer, the Long Exposure
Screen
5 seconds the display will be turned off and the camera will
enter a power-save mode. You can re-activate the screen to
monitor exposure progress by moving your hand in front of
the EVF without touching the camera.
Note!
Exposure Bracketing is not supported in Phocus Mobile 2 or
when tethered to Phocus. For tethered operation, use the
Capture Sequencer function in Phocus.
Note!
Light measurement, focusing and Auto White Balance are
performed before the rst exposure and is applied to all
images in the sequence.
(B)
will be shown during the exposure. After about
Screen during Bracketing operation
Exposure Bracketing
3
3
+1.0 EV
580
Screen when shutter speed is 1 sec or longer.
Exposing
A
B
3
Finish Exposure
X1D II 50C USER GUIDE www.hasselblad.com
Contents
Page 61

FIXED EXPOSURE COMPENSATION SETTING
Exposure compensation can be set separately for Flash and
automatic exposure by using the following method.
FUNCTIONS
61
1 Tap the Exposure Adjust setting on the Control Screen
2 Slide the white dot to the left or right to set the desired
value for Flash Exposure compensation (top slider) and
Fixed Exposure compensation (bottom slider).
Tapping the line to the left or right of the dot, will increase
or decrease the value with the value set in
Main Menu >
(A)
Camera Settings > Exposure > Increment Step Size >
exposure Adjust
Alternatively, you can use the Front Scroll Wheel to set
Flash compensation and the Rear Scroll Wheel to set Fixed
compensation.
The setting is saved as soon as it is changed.
3 Tap outside the rectangle
or Half-Press the Shutter Release to return to Live View.
4 The amount of compensation is shown on the Control
Screen
between the aperture and shutter speed setting as
conrmation of the setting.
(C)
.
(B)
to return to Control Screen
. In Live View, a ‘±’ symbol
(D)
is displayed
Note!
In the adjustment setting screen you can double-tap the ash
or the ‘±’ icon to reset the setting to 0.
Tapping the line to the left or right of the dot, will increase
or decrease the value with the value set in
Main Menu >
Camera Settings > Exposure > Increment Step Size >
exposure Adjust
.
.
A
B
C
D
X1D II 50C USER GUIDE www.hasselblad.com
Contents
Page 62
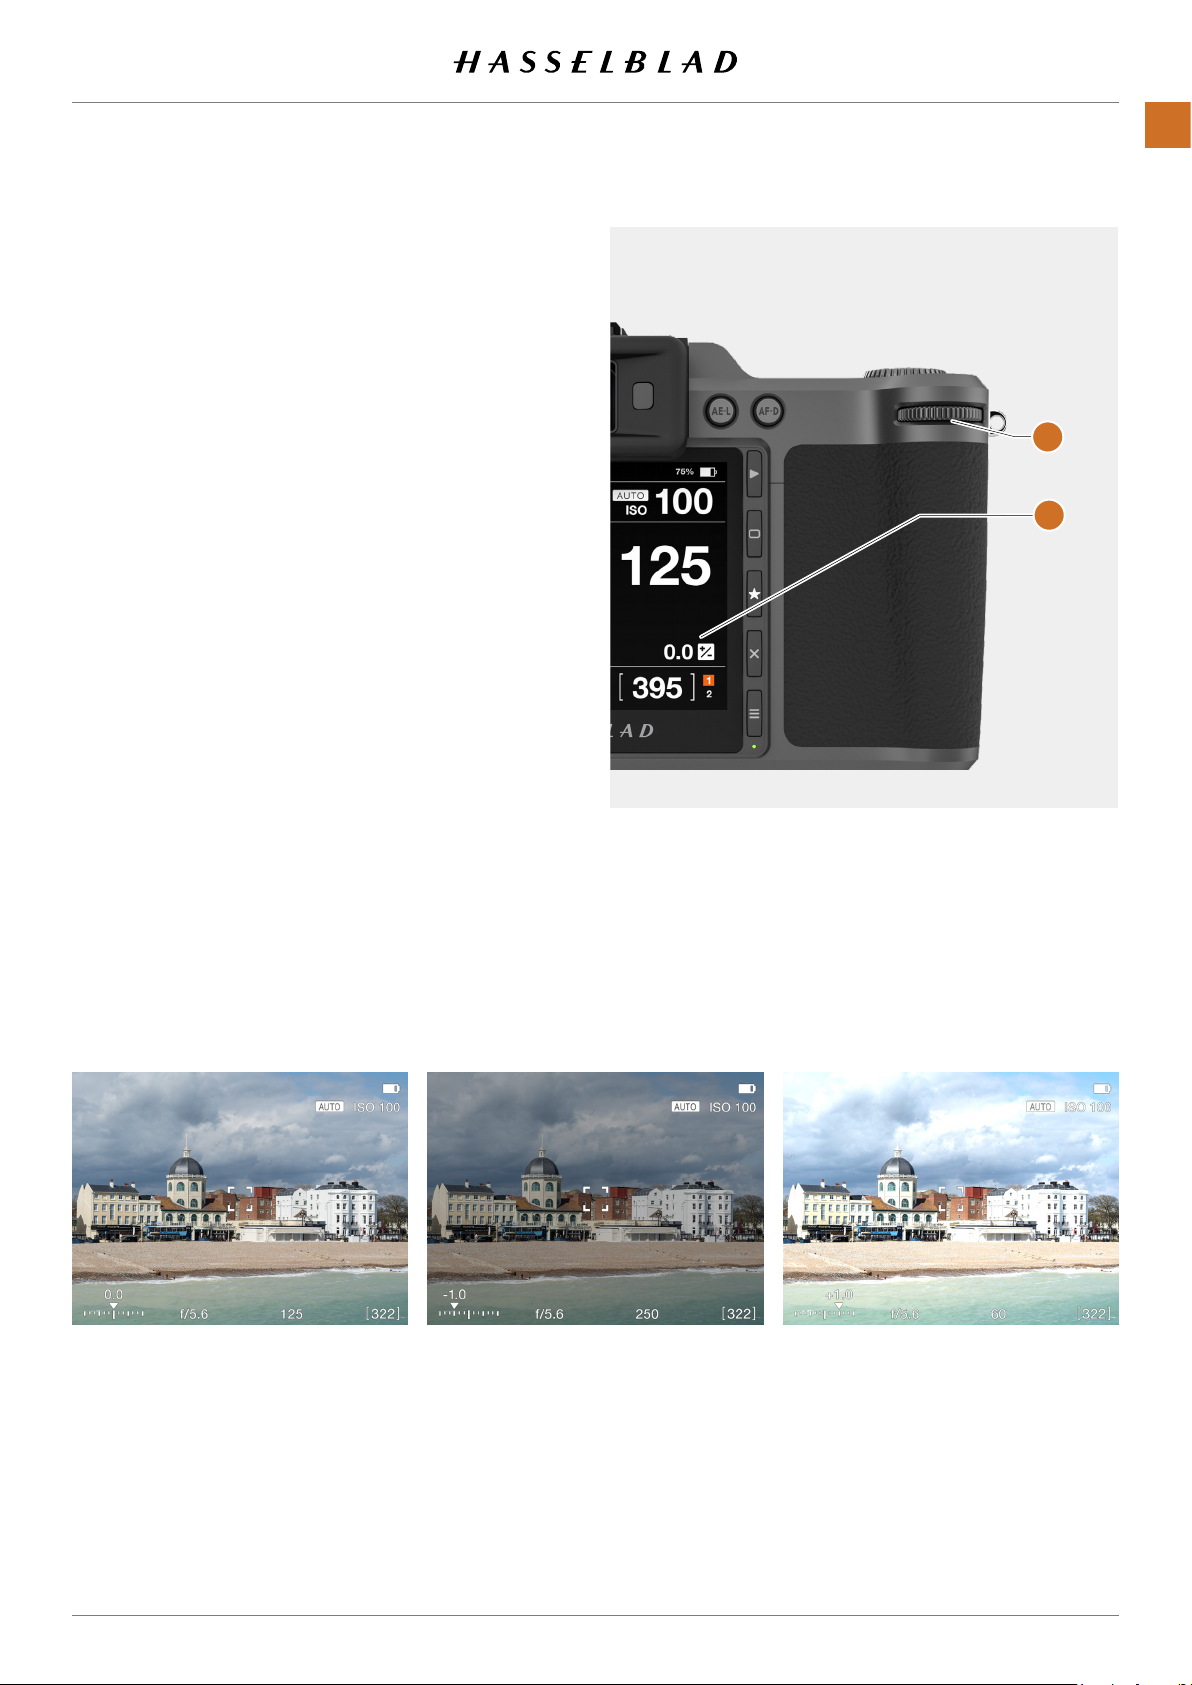
EXPOSURE COMPENSATION / QUICK ADJUST
The exposure compensation function, for both manual and
automatic modes can be set from -5 to +5 EV, in 1/3, 1/2 or 1
EV increments and is visible above the scale in the viewnder
and as a ± symbol on the Touch Display Control Screen.
The quickest way to make an adjustment in auto exposure
mode is to use the Rear Scroll Wheel
Temporary compensation setting in an auto-exposure mode
using the Quick Adjust function:
(A)
.
FUNCTIONS
A
62
Turn the rear scroll wheel
of compensation.
The amount is displayed as both an EV gure complete
with a ‘minus’ or ‘plus’ prex and as a marker above a
‘minus’ to ‘plus’ scale.
If a xed exposure compensation value set, the sum of
Fixed compensation and Quick Adjust value is displayed
on the scale.
Default settings provide 1/3 EV compensation and an immediate clearing of the setting after capture.
Live View with no Quick Adjust Live View with Quick Adjust -1 EV Live View with Quick Adjust +1 EV
(A)
to select the chosen amount
B
Note!
Make sure that the setting
Settings > Exposure
an adjustment also the
General Settings>Live View
X1D II 50C USER GUIDE www.hasselblad.com
Allow Quick Adjust
menu is checked. To see the effect of
Exposure Simulation
menu must be checked.
in the
Camera
setting in the
Contents
Page 63

LIGHT METER MODE
The Light Meter Mode can be changed on the Control Screen.
Tap the desired mode or use the Rear Wheel to select Mode.
Different Light Metering Modes
There are three reec tive metering modes available.
Metering Modes
FUNCTIONS
63
Centre Weighted
Spot
.
Centre Spot
.
.
Light Metering ModesSymbol
Centre Weighted
Used for light situations where there is no
particular dominance of light or dark areas
across the tonal range. Takes into account
approximately 25% of the image seen in
the viewnder.
Live View with Spot area
Spot
The sensitive area is equivalent to approx-
imately 2.5% of the image area (the central
spot on the viewnder screen). Any parts
of the image outside of this area will not
affect the exposure reading. This provides
a very accurate measurement of specic
tones. Also excellent for tonal comparison
measurements.
Spot area is marked in Live View screen.
Centre Spot
Emphasizes the central section of the
focusing screen equivalent to approximately
25% of the image. This provides a balanced
assessment and is a typical choice where the
main subject is in the centre of the image.
X1D II 50C USER GUIDE www.hasselblad.com
Contents
Page 64

4 .11 CONNECTOR PORTS
1 SD Card Slot 1
2 SD Card Slot 2
3 Audio in
Connector for Microphone Audio In.
3.5 mm stereo plug.
This port is also used to connect the
Release Cord X for vibration free remote
release of the camera. See page 140.
4 USB-C Port
Port for USB-C plug for USB 3 tethering
with a Mac, PC or iPad.
5 Audio Out
Connector for Audio Out.
3.5 mm Stereo Plug.
FUNCTIONS
64
1
2
3
4
5
X1D II 50C USER GUIDE www.hasselblad.com
Contents
Page 65

4.12 MEMORY CARDS
The X1D II camera uses SD cards only. There
are two SD Card slots on the X1D II Camera,
slot no 1
(1)
and slot no 2
(2)
.
FUNCTIONS
65
Note!
All cards must be formatted in the X1D II
camera before rst use.
SD Memory Card Status Display
The symbols in the status group
Control Screen:
No Card is inserted.
Card #1 is inserted and ready
for captures.
Card #1 is inserted and
is locked for captures as
indicated by the secondary
Lock Icon.
Additional secondary icons:
(4)
on the
1
2
The Card is full.
Card error.
Card read/write speed
is slow.
Status group
remaining captures, but can also show:
X1D II 50C USER GUIDE www.hasselblad.com
(3)
normally displays the
No Card.
The Card is locked.
The Card is full.
Card error.
Backup mode selected, but
no second card is inserted.
Live View when no card is inserted
Contents
3 4
Page 66
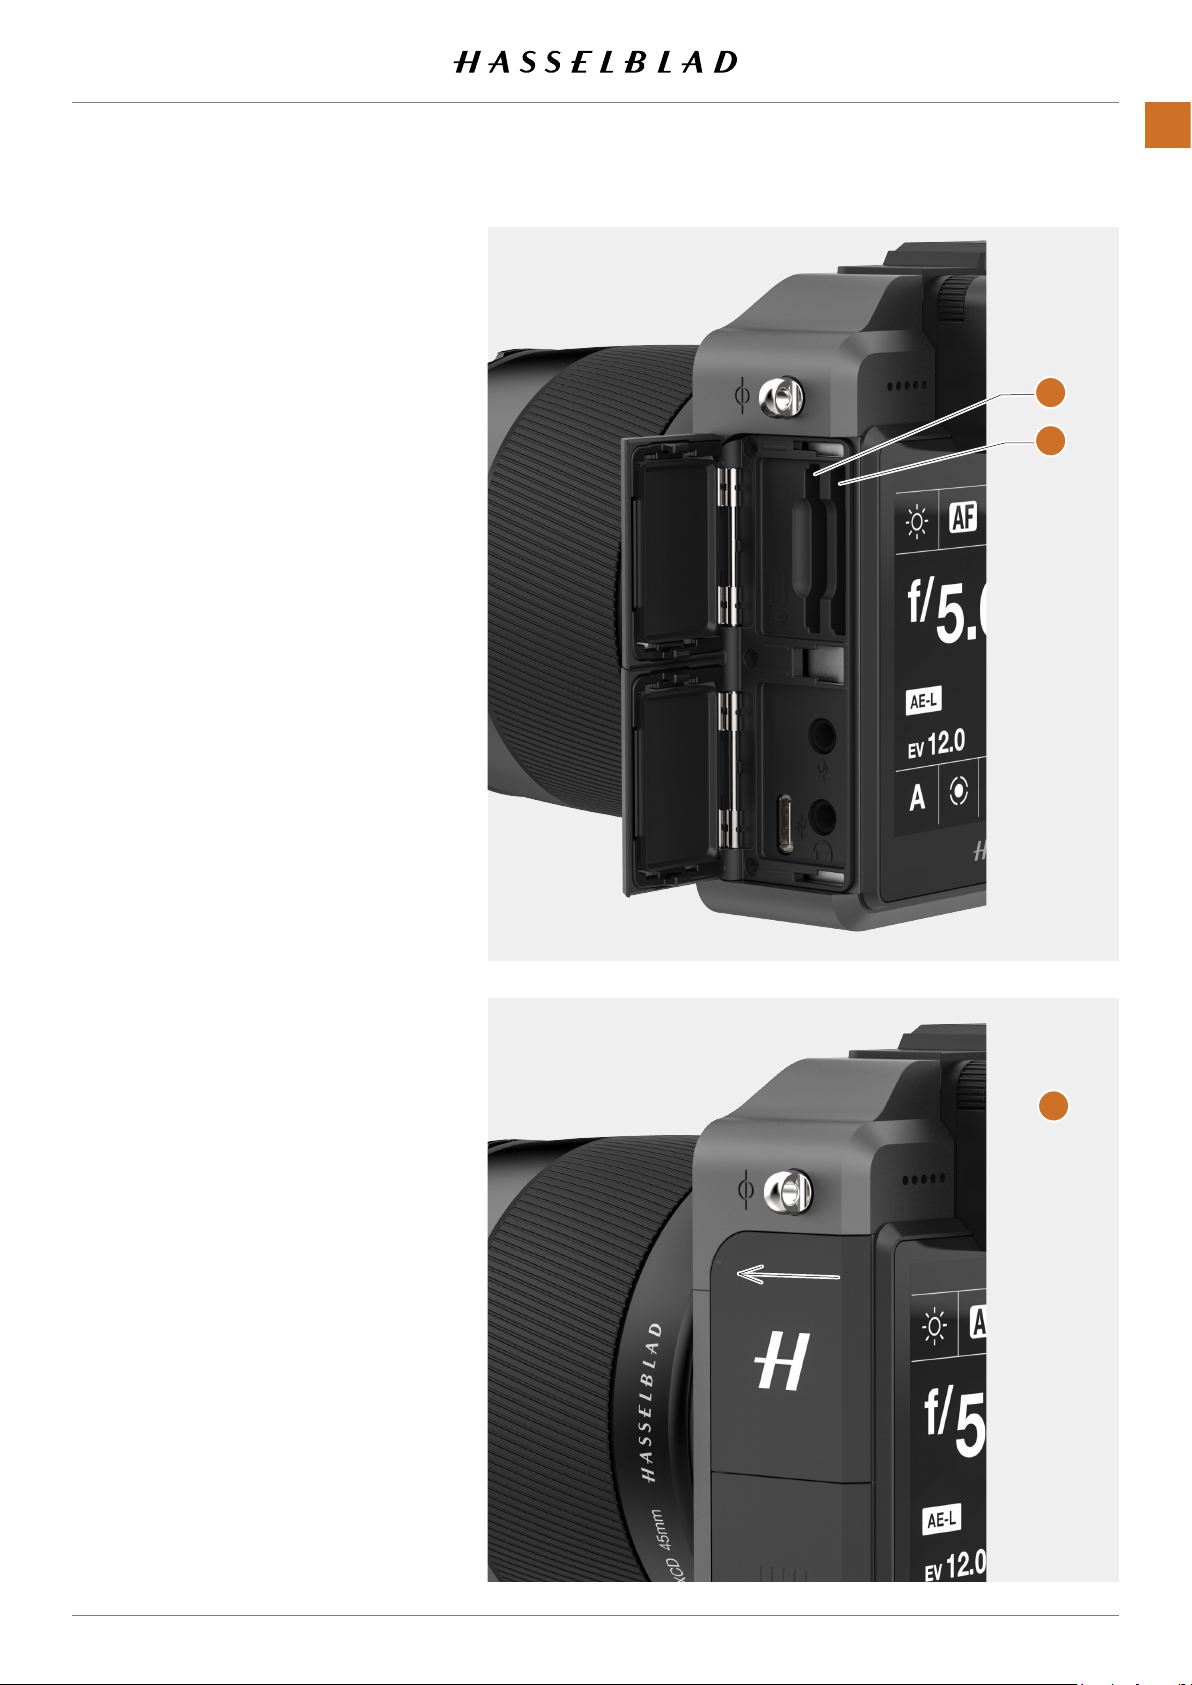
INSERT A MEMORY CARD
Insert SD card
1 Open the Memory Card Slot Cover by
sliding it towards the back of the Camera
and then rotate it clockwise.
2 When the card slot cover door is opened,
mount the SD card in the SD card slot no 1
(A)
or no 2
3 Close the slot cover by rotating it counter
clockwise and pushing it in place towards
the front of the camera
position.
(B)
.
(C)
to lock it into
RECOMMENDED MEMORY CARDS
FUNCTIONS
A
B
66
For optimal performance of the X1D II 50C,
the following SD memory cards are recommended to use:
● Sandisk Extreme PRO UHS-II 300MB/s
● Panasonic V90 UHS-II 280MB/s
● Toshiba EXCERIA PRO UHS-II 270MB/s
● SONY M UHS-II 260MB/s
Note!
Avoid using Micro SD/TF memory cards with
SD card sets. Some Sony high-speed SF-G
UHS-II SD 300MB/s memory cards might have
poor compatibility, and therefore, might not
be able to write image data properly. To avoid
this, it is recommended to use the recommended SD memory cards, as listed above, to
ensure the image data security.
C
X1D II 50C USER GUIDE www.hasselblad.com
Contents
Page 67
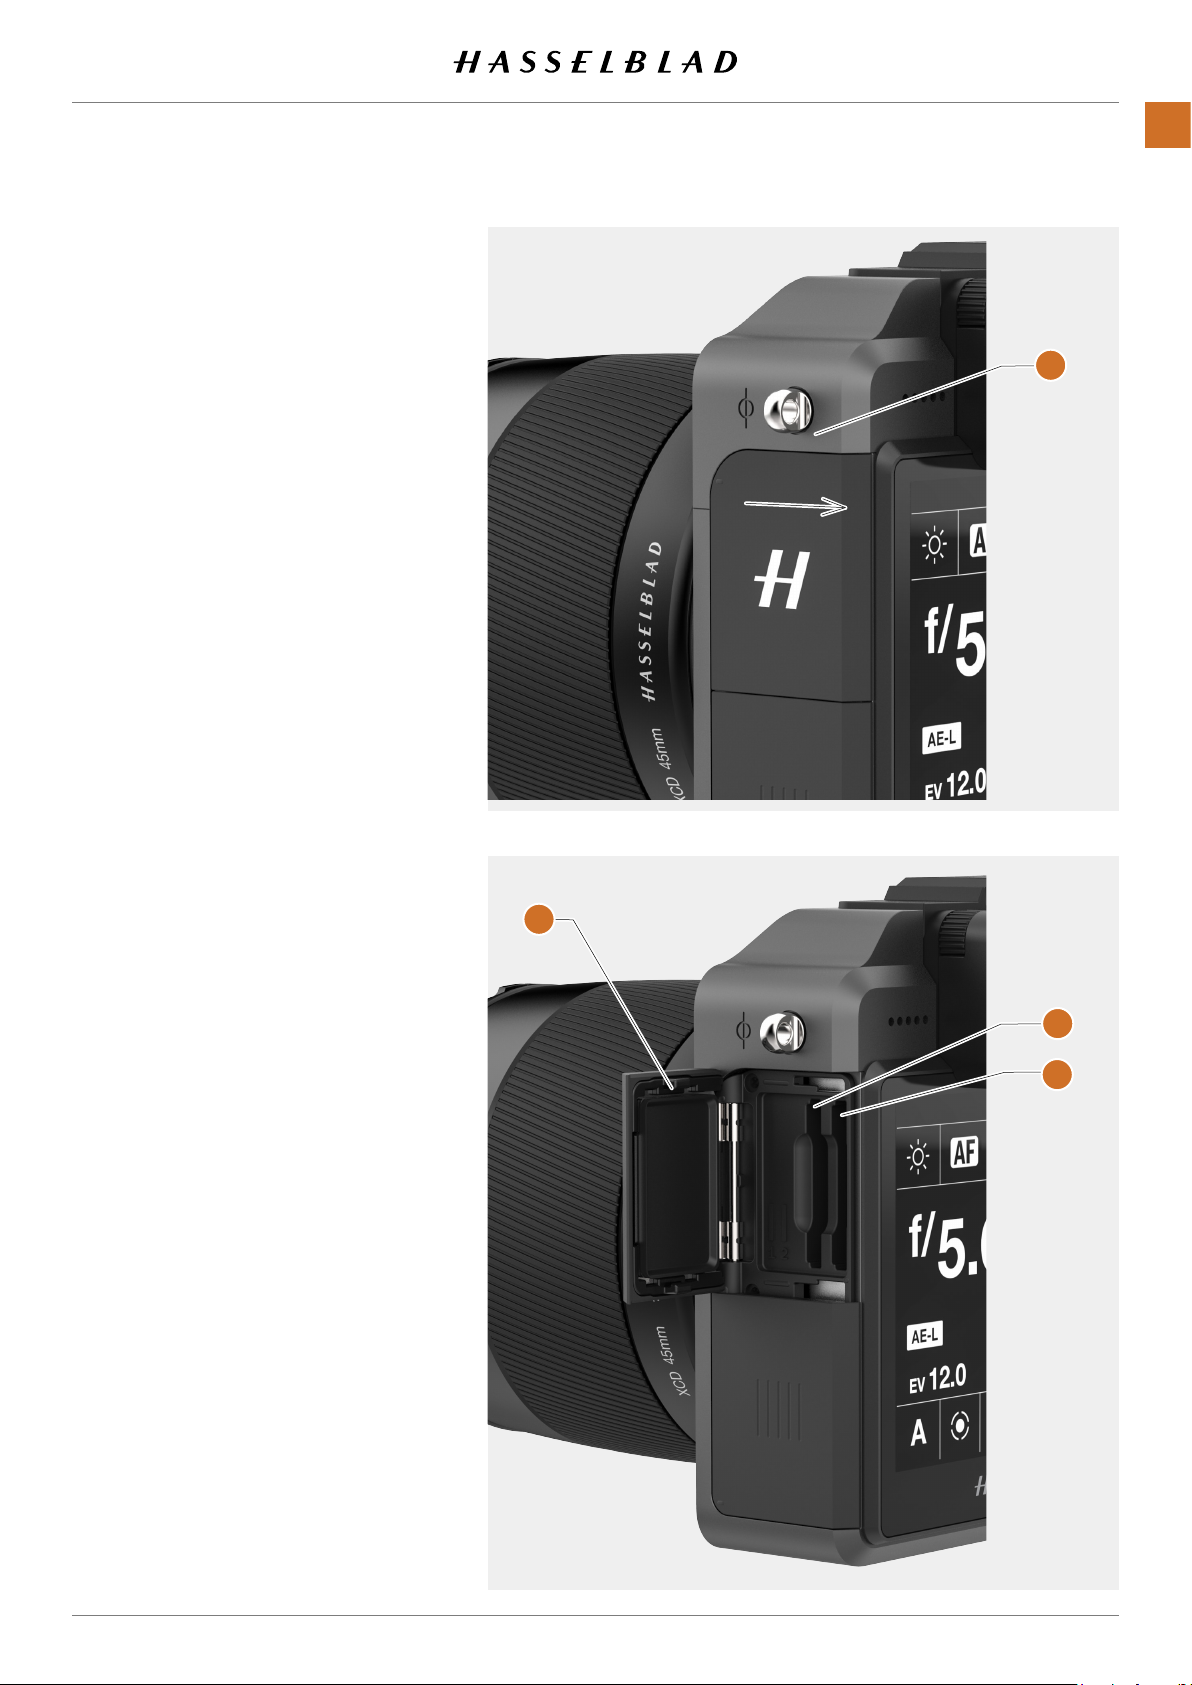
REMOVE SD MEMORY CARDS
Note!
Do not remove a memory card from the
Camera if the ‘ready’ light is blinking (placed
in the lower right corner on the Touch Display),
as this will corrupt the les on the card and
result in data loss.
Remove SD card
1 Open the memory card slot cover on the
Camera
2 Press the SD card no 1
little way in and then release it. The SD
card will then move out from the SD card
slot.
3 Grab the card and pull it away from the
Camera.
4 Close the slot cover
counter clockwise and pushing it in place
towards the front of the camera to lock it
into position.
(A)
.
(B)
or no 2
(D)
by rotating it
(C)
a
FUNCTIONS
A
67
D
B
C
X1D II 50C USER GUIDE www.hasselblad.com
Contents
Page 68
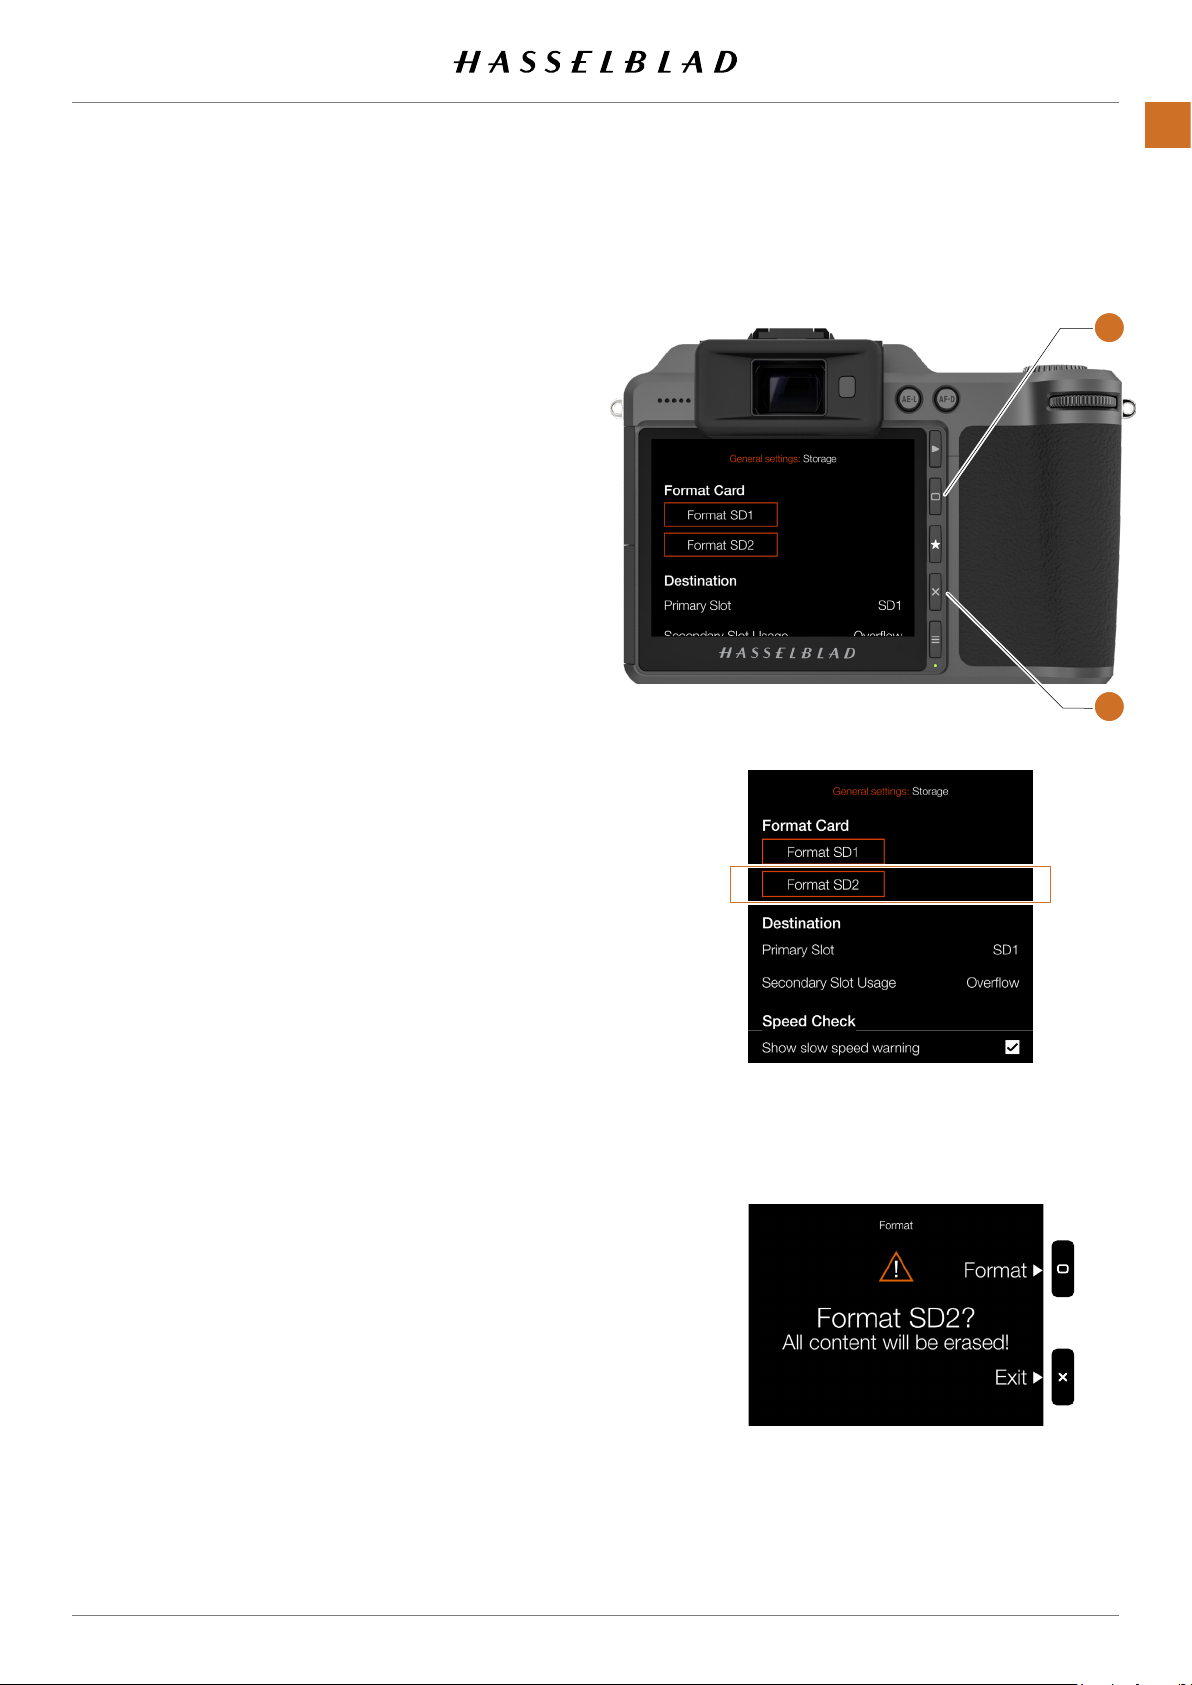
FORMAT SD CARDS
MAIN MENU > GENERAL SETTINGS > STORAGE > FORMAT
FUNCTIONS
68
Note!
All SD Memory Cards should be formatted in the X1D II
Camera before using them the rst time.
FORMAT MEMORY CARDS ON THE TOUCH DISPLAY
MAIN MENU > GENERAL SETTINGS > STORAGE > FORMAT
1 Press MENU.
2 Navigate to Storage.
3 Navigate to Format.
4 Navigate to Format SD card.
5 Select “Format SD 1” or “Format SD 2”.
6 A Format Card Dialogue appears.
7 To conrm, select Format by pressing the rectangle Button
(A)
. To exit without formatting, press the Cross Button
(B)
.
A
B
Storage Menu
Note!
You can place the Storage icon as a Shortcut on the Main
Menu screen to simplify the formatting process.
Format Card Dialogue Display
X1D II 50C USER GUIDE www.hasselblad.com
Contents
Page 69
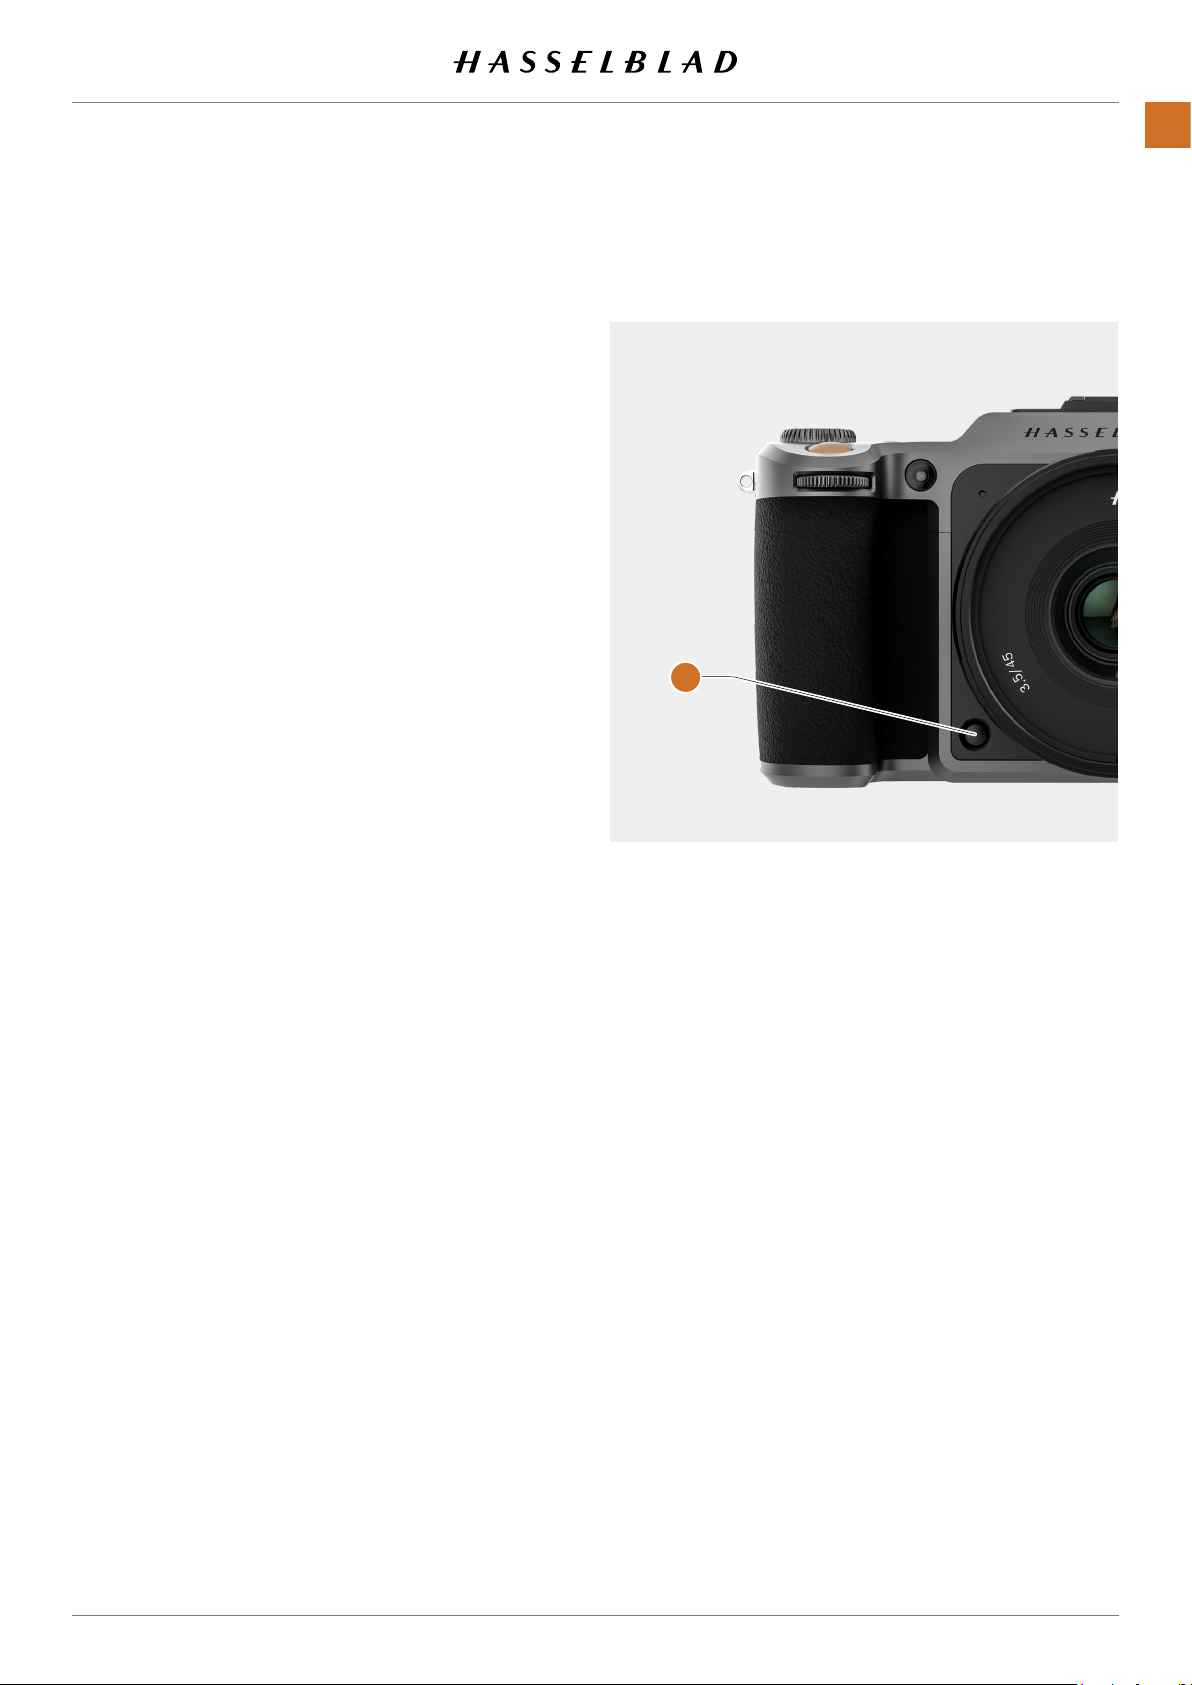
4.13 STOP DOWN BUTTON
STOP DOWN / DEPTH-OF-FIELD PREVIEW
Stop Down functionality
The Aperture normally stops down only during the exposure.
In all other situations the Aperture is completely open.
The Viewnder and the Touch Display will, as a result, show
a narrow depth-of-eld regardless of the current Aper ture
setting.
How to preview the depth-of-eld
A visual depth-of-eld preview check can be made by following these instructions.
FUNCTIONS
69
1 Press the STOP DOWN button
2 Hold the button
3 The lens is stopped down to the current Aperture setting.
4 A depth-of-eld preview is displayed in the Viewnder and
on the Touch Display screen, as long as the STOP DOWN
button
(A)
5 Verify the depth-of-eld optically in the Viewnder or on
the Touch Display screen.
6 Release the STOP DOWN button
Aperture fully again.
Note!
Depth-of-eld is not absolute. Perception of it depends on
several factors and so it should be seen only as a rough guide.
(A)
pressed down.
is completely pressed down.
(A)
.
(A)
to open up the
A
X1D II 50C USER GUIDE www.hasselblad.com
Contents
Page 70
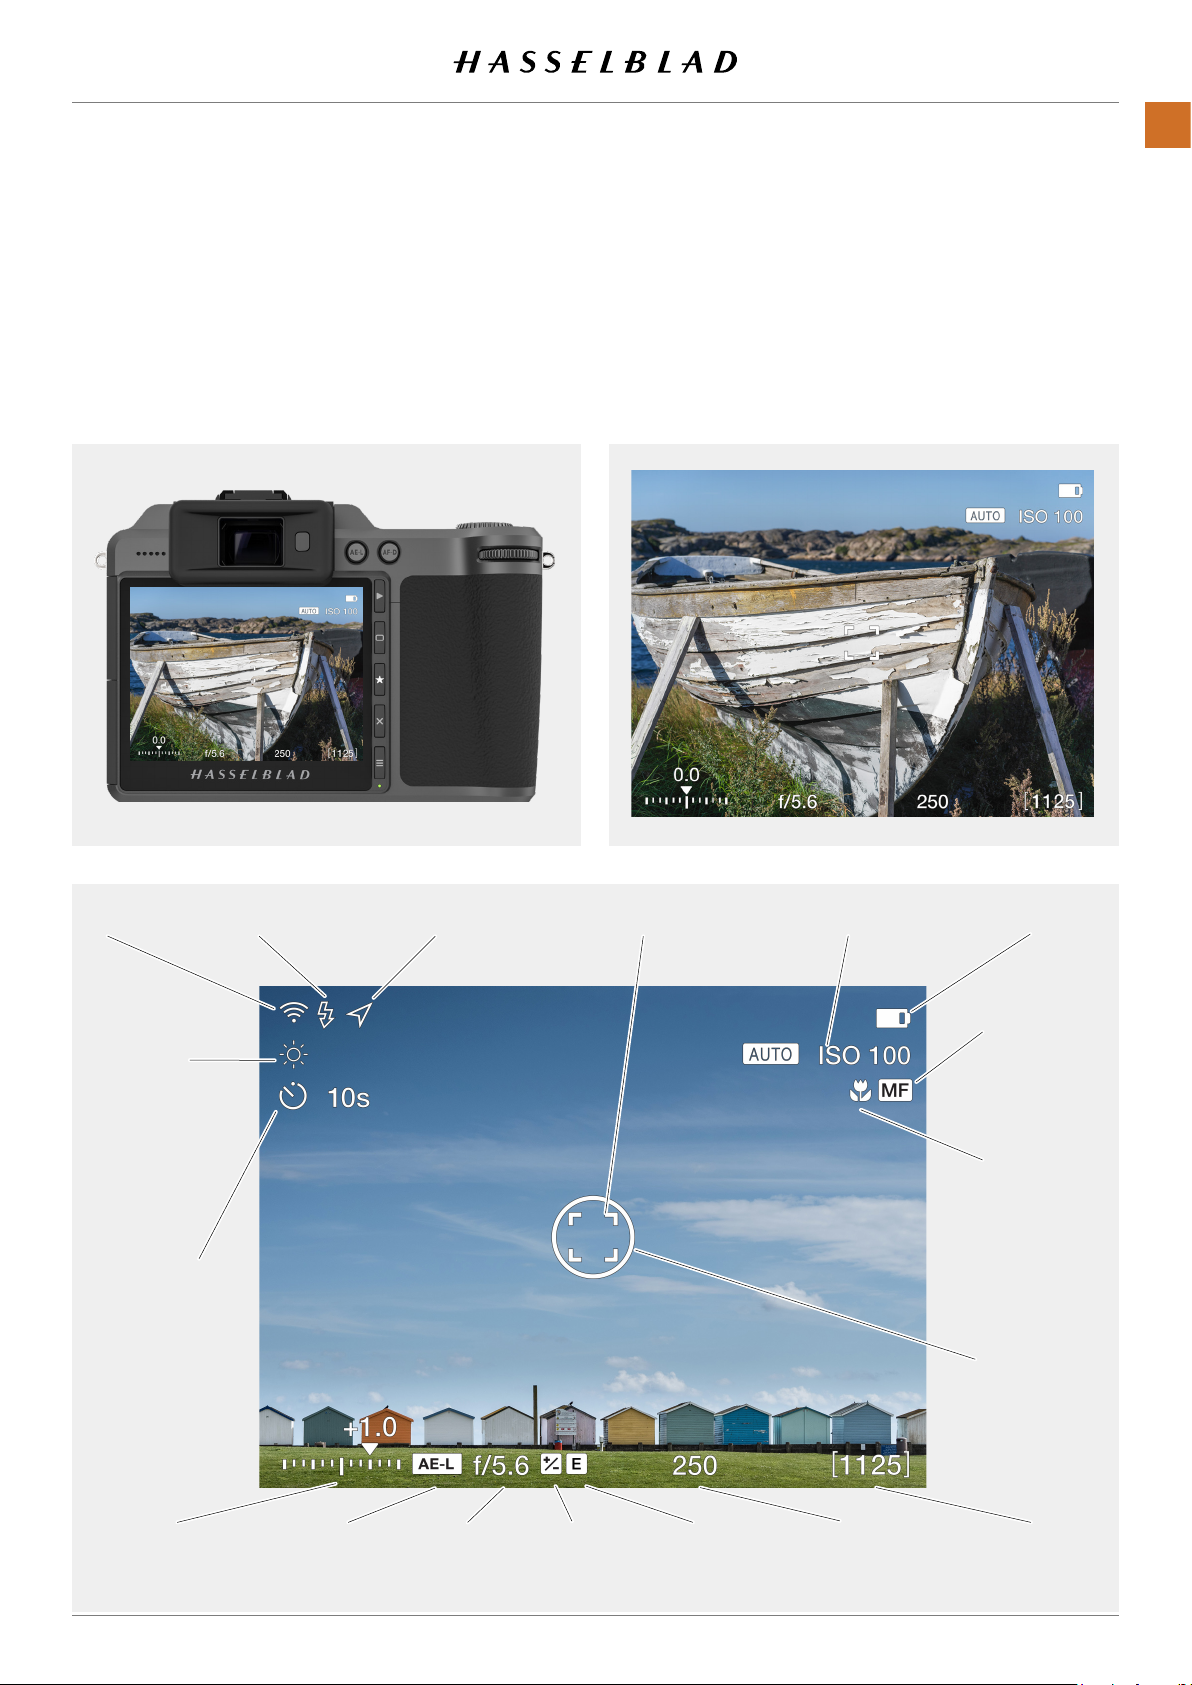
4.14 LIVE VIEW INDICATIONS
The Touch Display and the EVF show identical screens. This
page lists the possible display information.
TYPICAL LIVE VIEW DISPLAY
FUNCTIONS
70
Electronic Viewnder Display (EVF)Touch Display
Wi-Fi Focus Area Indicator Battery Status
White
Balance
setting. Not
shown in
Auto White
Balance
mode.
Self Timer.
Interval and
Bracketing
status is also
shown here.
ISO SettingGPS StatusFlash Status
Manual Focus
AF Scan
Range icon
Spot metering
area
Exposure Compensation
Setting (+1.0 EV)
X1D II 50C USER GUIDE www.hasselblad.com
AE Lock
Aperture
(f/5.6)
Exposure
adjustment
Contents
Electronic
shutter
Shutter Speed
(1/250 sec)
Remaining
Frames Counter
(1125 left)
Page 71
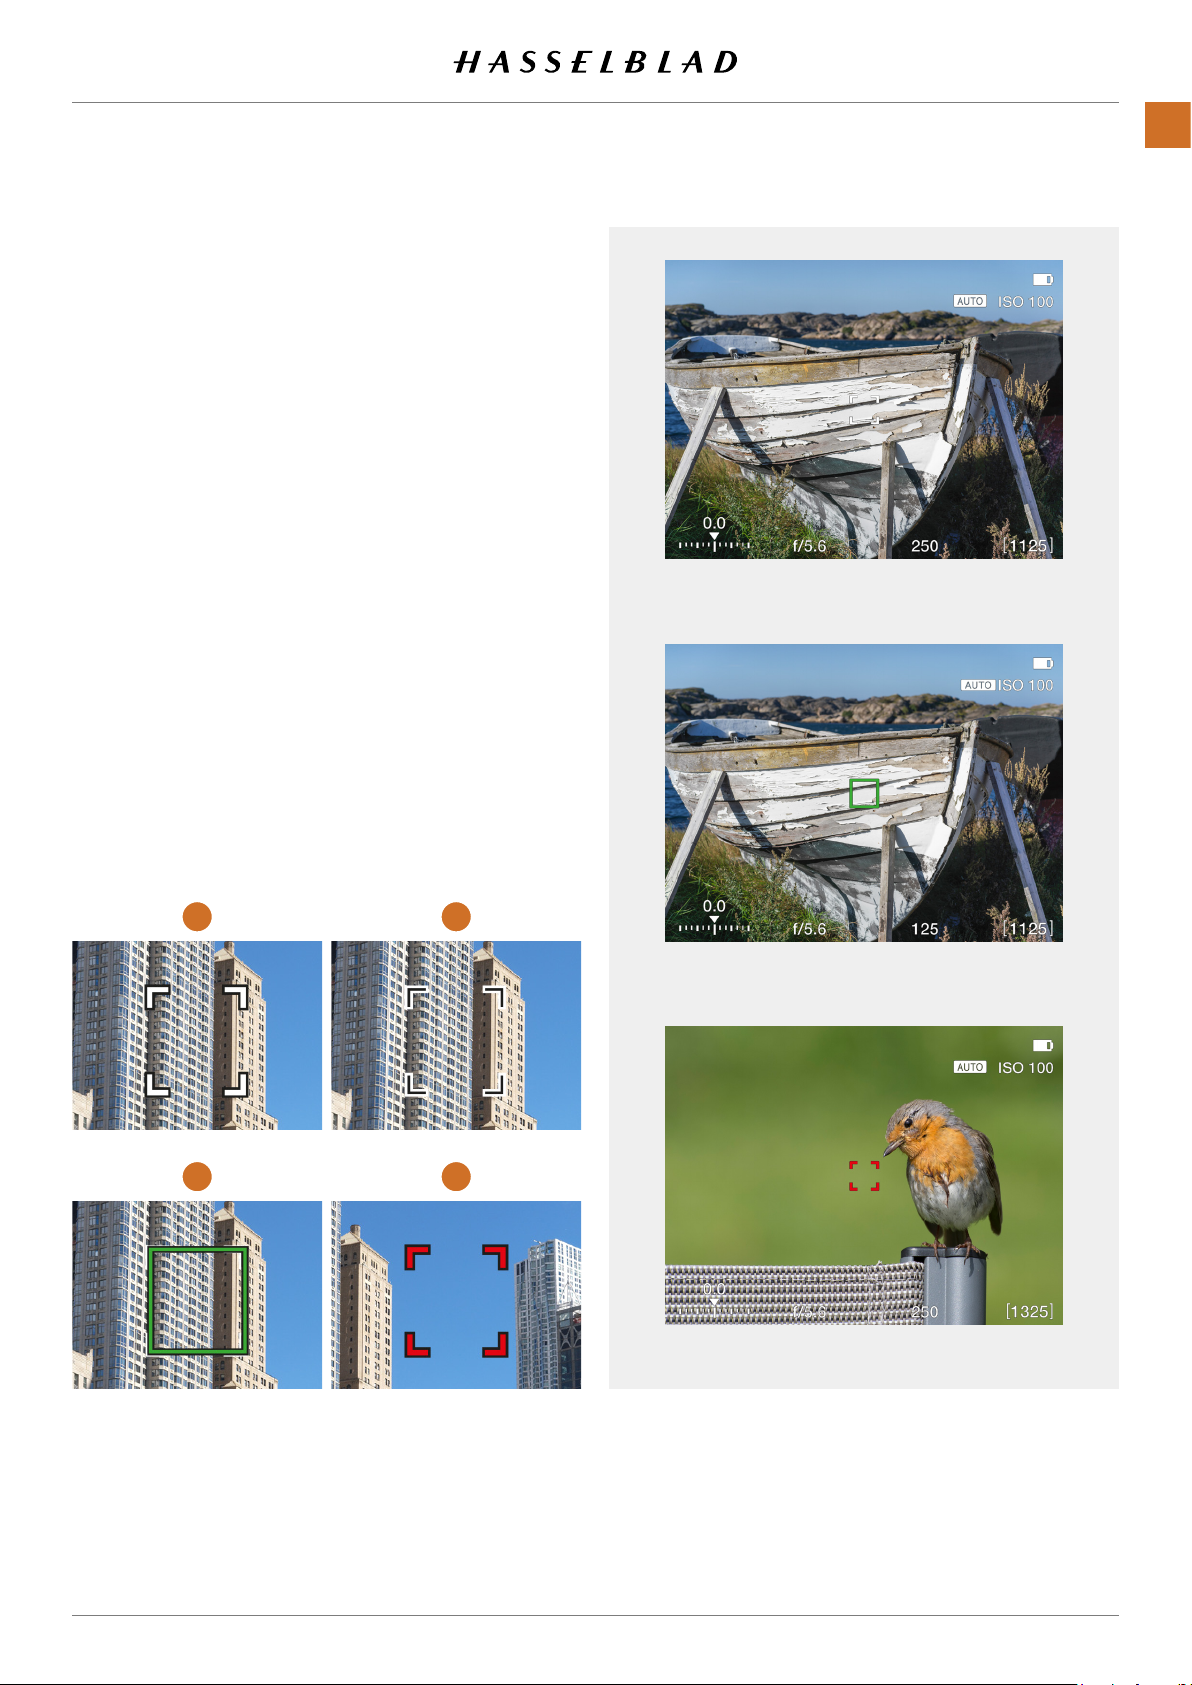
AF INDICATIONS
The AF indicator in the Live View centre indicates status of the
AF system. Start the Autofocus function by a soft half-press on
the Shutter Release Button or by pressing the AF Drive button
(AF-D).
FUNCTIONS
71
White, black outline
Normal mode. Autofocus is not analysing the subject.
Black, white outline
Autofocus is ongoing.
Green
(3)
Autofocus performed and focus is set correct.
Red
(4)
Autofocus failed to focus and is not set correct.
(1)
(2)
1 2
White AF indicator. Normal mode.
Green AF indicator. AF set correctly.
3 4
Red AF indicator. AF analysis failed to focus.
X1D II 50C USER GUIDE www.hasselblad.com
Contents
Page 72
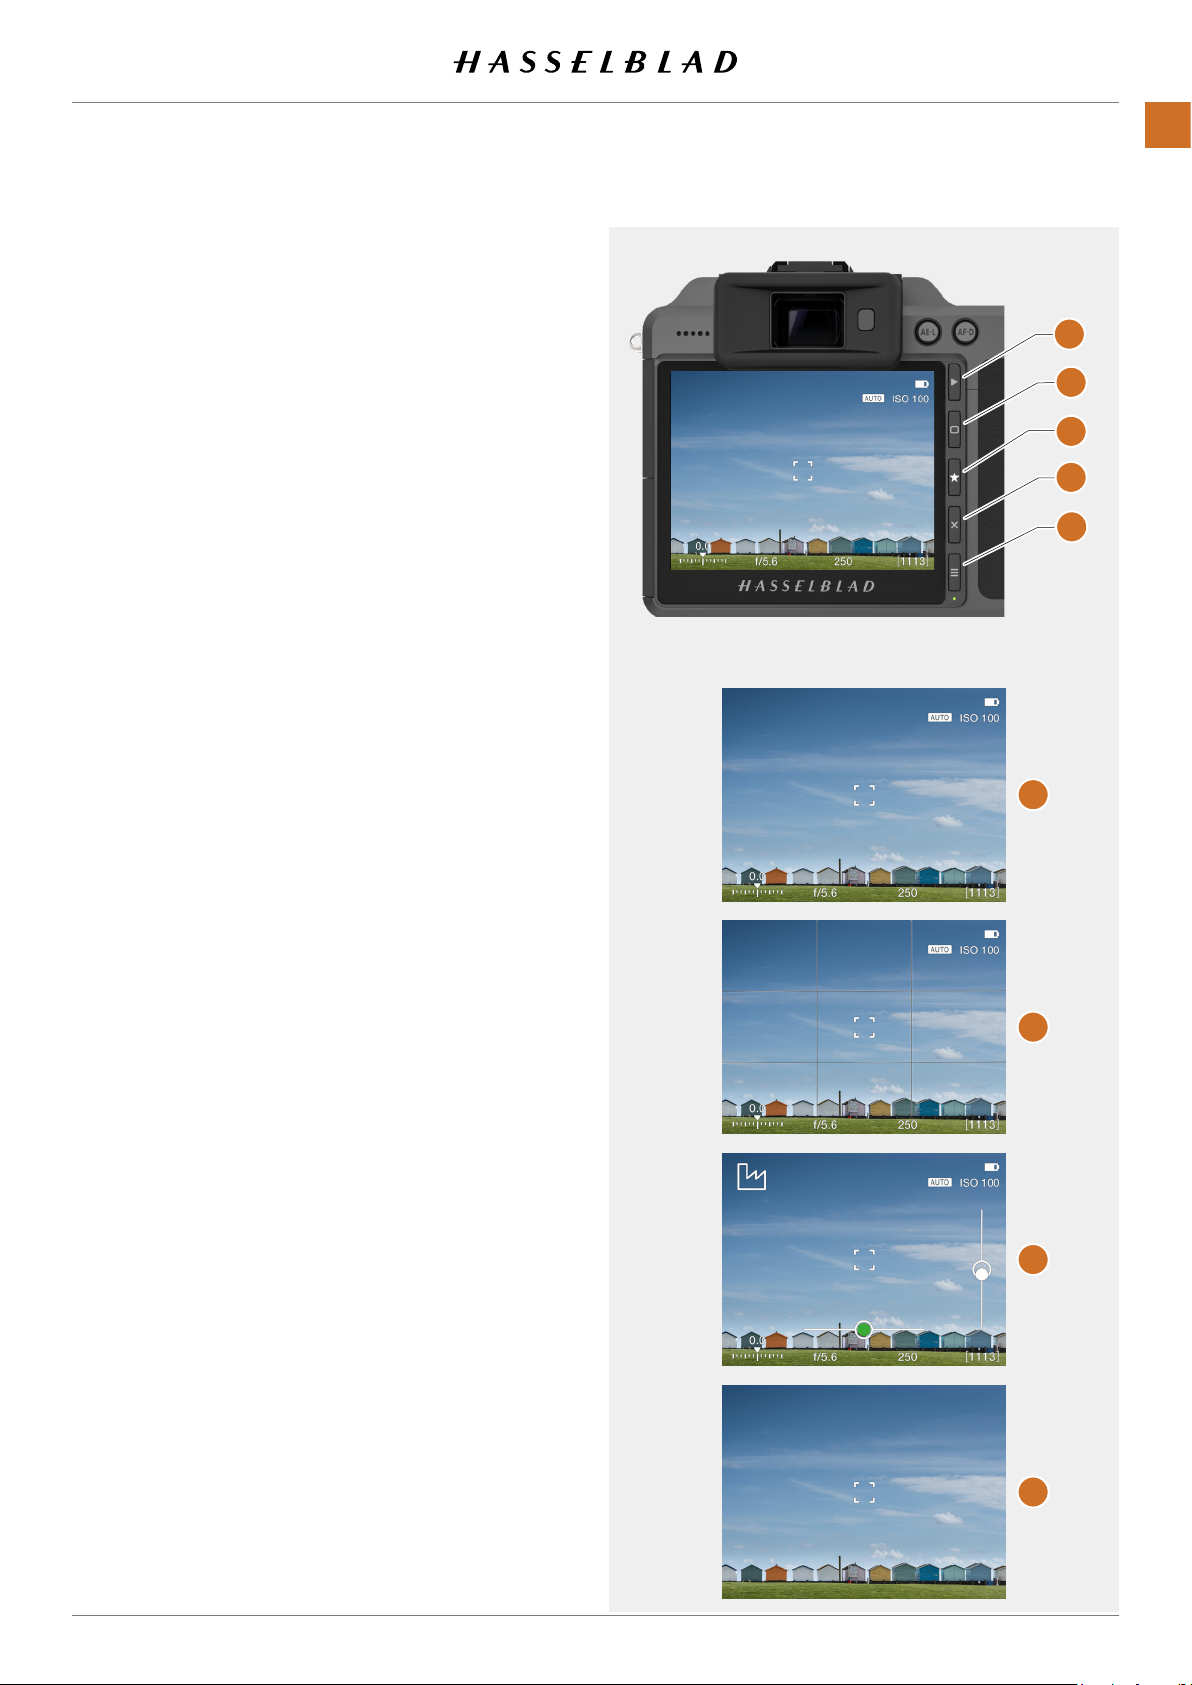
LIVE VIEW OVERLAYS
1 The Camera displays Live View when you half-press
Shutter Release Button.
2 Press the Rectangle Button
3 Press button A, or E, to Exit Live View.
Note!
If you activate the EVF (Electronic Viewnder) by approaching
the EVF with your eye and start looking into it, the Live View
function for the Touch Display will turn off the Touch Display
(to save battery) with the help of a proximity sensor to the
right of the EVF display. If you switch back again and look at
the Touch Display, the EVF is turned off and the Touch Display
is activated.
Live View Settings
Overlay
Select Overlay displayed during Live View. Scroll between
options with button (B).
(B)
to step to the next overlay.
FUNCTIONS
A
B
C
D
E
72
- Exposure information
- Exposure information + Grid
- Exposure information + Spirit Level
See chapter Spirit Level on page 119 for details.
- None
(I)
.
(F)
.
(G)
.
(H)
.
ZOOMING IN LIVE VIEW
1 Double tap the Touch Display, or press the Star Button
(C)
to Zoom in to 50% or 100% to that specic area.
Magnication factor is set in the
menu. Note that when using the EVF you must press the
Star Button to zoom in.
2 Double tap or press on the Star Button again to Zoom out
to display the entire Capture.
3 You can pan the image when zoomed in by swiping.
If using the EVF you can pan the image by swiping the
Touch Display.
Note!
Live View demands higher power consumption than normal
operation. Working with Live View will shorten the usage time
of the Camera.
Camera Settings > Focus
F
G
H
I
X1D II 50C USER GUIDE www.hasselblad.com
Contents
Page 73

FUNCTIONS
73
4.15 FOCUSING
AUTOFOCUS
Autofocus is activated by pressing the shutter release to the
half-press position or by pressing the AF-D button.
The operative range is from EV 1 to EV 19 at ISO 100.
Focus is determined by maximizing the contrast within the
central marked area.
Depending on situation, the indicated AF Area looks different.
See illustrations to the right and page 71.
AF Assist Light
AF Assist Light
operative distance is approximately up to 4 metres from the
camera.
Note!
You can select position of the AF point. See page 77.
It is also possible to choose from three different sizes. See
page 78.
(A)
is automatically activated if selected. The
A
Note!
H System lenses whose rmware version is older than 18.0.0
cannot be updated with AF functionality. The camera will
default to Manual Focus mode for such lenses.
White AF indicator.
Green AF indicator. AF set correct.
Red AF indicator. AF analysis failed to focus.
X1D II 50C USER GUIDE www.hasselblad.com
Contents
Page 74

At AF setting, the shutter release will be blocked until
the camera nds the optimum focus setting. This
ensures that no captures are made that are not nely
focused.
Note!
In this mode the lens will focus at one distance and
will remain focused at that distance while pressure
remains on the Shutter Release button
In this way, you can focus on a object, temporarily
positioned within the focusing zone on the viewing
screen and then without releasing pressure on the
Shutter Release button
the focus remains on the object chosen even though
it is now outside the focusing zone.
(A)
, recompose knowing that
(A)
.
Note!
For objects close to the camera and with wide-angle
lenses it is better to move the AF point as described
on page 79.
FUNCTIONS
A
74
Releasing the pressure on the Shutter Release button
(A)
and pressing again (half-press) would now change
the focus setting to the distance of the object within
the focusing zone.
See Manual mode on page 75 for a useful way
of working with manual and autofocus settings
combined.
Focus
X1D II 50C USER GUIDE www.hasselblad.com
Contents
Page 75

MANUAL FOCUS
FUNCTIONS
75
Manual focus setting
Manual focus can be used at any time even in Auto Focus
Mode. You can also switch to Manual Focus Mode and only
use the Focus Ring manually on the lens.
For users who prefer manual focus control but would like the
benets of autofocus, one method is to use the AF-D button
set to AF Drive. Align the AF area with the subject and press
the AF-D Button. The camera uses the Autofocus system to set
correct focus and reverts immediately to manual focus control
when the button is released. Therefore, you can recompose
the picture without having to maintain pressure on the release
button in order to retain the newly automatically made focus
setting.
Manual Focus in Live View
1 Double tap the Touch Display, or press the Star Button
to Zoom in to selected Focus Area.
2 Adjust Focal Point manually on the Lens.
Note that you have two Focus Assist options to help you
set focus accurately.
- Auto Zoom to 50% or 100%.
- Focus Peaking (see next page)
In Auto Zoom Live View will automatically zoom to 50% or
100% when the focus ring is turned. After a few seconds of
inactivity, Live View returns to full image.
Also see page 102.
3 Double tap or press on the Star Button again to Zoom out
to Display the entire Capture.
(C)
Live View
,
Auto Zoom to 50%. Subject not in focus.
Using these modes will ensure accurate and precise focusing.
Auto Zoom is the most accurate and Focus Peaking is the
fastest to use.
Auto Zoom to 50%. Focus set correctly.
X1D II 50C USER GUIDE www.hasselblad.com
Contents
Page 76

FOCUS PEAKING
FUNCTIONS
76
Subject not in focus when Focus Peaking is active
How to use Focus Peaking
The Focus Peaking function is a Manual
Focus tool to help you identify what
areas of the subject are in focus. Focus
Peaking is not active in Auto Focus
mode.
Focus Peaking display when subject is in focus
Manual Focus Settings Menu MF Assist dialogue
When Focus Peaking is active and you
adjust the focus manually, the focused
area of the subject (orange in this case)
moves in depth as you move the focus.
Manual Focus Settings Menu Contents
MF Assist
Manual Focus Assist. Choose
between:
- Focus Peaking.
- Auto Zoom.
- None.
Peaking Colour
Select Focus Peaking Colour.
- Orange.
- Yellow.
- Cyan.
- Magenta.
Manual Focus Settings Menu Peaking Colour dialogue
X1D II 50C USER GUIDE www.hasselblad.com
Contents
Page 77

FUNCTIONS
77
4.16 MOVE AUTOFOCUS POINT
The Autofocus point (A) can be moved,
and selected manually, to any one of the
available points (B). The size of the AF
point can be set to 4 mm, 2.8 mm or 2
mm. See page 78 for details on how
to resize. Also see page 79 on how to
move point while looking through the
EVF.
Move by Touch
If
Move AF Point
al Settings > Touch
tap the new location
to focus when Live View is active.
Move the Autofocus point on the Touch
Display in Live View Mode or in the
Electronic Viewnder EVF
1 Start Live View Mode or use the EVF.
2 Press and hold the AF/MF button for
1 second.
3 All focus points are now displayed as
an overlay
4 Select one of the AF points by tapping
on the Touch Display or Rotate the
Rear Scroll Wheel to move the AF
point up/down and the Front Scroll
Wheel to move left/right
5 Save and exit by a half-press on the
Shutter Release button. The AF point
is now in the new selected location
(F)
.
in
Main Menu > Gener-
is checked, you can
(B)
where you want
(D)
.
(E)
.
A B
C
E
D
F
How to use the Scroll Wheels to move
the AF point
AF point Rear Scroll Wheel
Move up Rotate left
Move down Rotate right
AF point Front Scroll Wheel
Move left Rotate left
Move right Rotate right
Save the new point with a Half-press on
the Shutter Release button.
Note!
If Spot Metering is selected and the AF point is moved, the
sensitive light metering area will follow the AF Point.
X1D II 50C USER GUIDE www.hasselblad.com
Note!
To reset the AF point back to the centre position, press the
Cross Button. The Focus Point can also be reset to centre in
Live View by pressing the Cross Button.
Note!
You can set the camera to automatically reset the Focus point
to the centre position after a capture, or maintain the selected
position, in
Focus Point
Contents
Main Menu > Camera Settings > Focus > Reset
.
Page 78

4.17 RESIZE AUTOFOCUS POINT
The Autofocus point can be removed and resized
in the Focus menu as described on page 100.
Resize by Touch
If
Move AF Point
Settings > Touch
and spread gestures to change the size of the AF
point when Live View is active.
Note that the AF point can also be moved by
touch in this case.
Resize in Grid View.
Start Live View Mode or use the EVF.
1 The single AF point is displayed in the centre
position.
2 Press and hold the AF/MF button
second.
3 A grid with possible AF points is now shown.
4 Press the Rectangle Button
the different sizes.
5 If required, you can select an AF point by touch
or by using the scroll wheels.
6 Save and exit by a half-press on the Shutter
Release button.
in
Main Menu > General
is checked, you can use pinch
(A)
for 1
(B)
to cycle through
Large
FUNCTIONS
A
B
78
Medium
Small
X1D II 50C USER GUIDE www.hasselblad.com
Contents
Page 79

4.18 MOVE AUTOFOCUS POINT USING TOUCHPAD
FUNCTIONS
79
The position of the Autofocus point can be
changed while viewing through the EVF by
sliding a nger on the rear display.
Make sure that the setting “Touchpad for EVF”
in the
General Settings > Touch
the desired option. See details on page 112.
Possible settings are:
- Right
- Left
- Top - R ight
- Top - L ef t
- Bottom-Left
- Bottom-Right
Which setting you should use, mainly depends
on which eye you use when looking through
the EVF. If the right eye is used, a good starting
point is to set “Right”. This will use the right half
of the screen as a touchpad for moving the AF
point.
menu is set to
Moving the AF point
In this example, the “Touchpad for EVF” is set to
“Rig h t ”.
AF Point in the center
Slide the nger on the rear display to move AF
point
While looking through the EVF, place your nger
on the right part of the rear display and slide upwards and slightly to the left. In the EVF you will
see the AF point moving, and when you have the
desired position, you can release the nger from
the rear display. However, it is not necessary
to release the nger before the exposure. The
AF point will stay in its position until changed.
If the option “Reset Focus Point” is set to “After
Exposure” (See page 100), the Focus Point will
return to center after the exposure.
Note!
The movement of the AF point is relative, similar
to a touchpad on a laptop computer. This means
that if you cannot move the AF point far enough
in one movement, lift the nger and return to
the starting point and repeat the movement.
AF Point moved
X1D II 50C USER GUIDE www.hasselblad.com
Contents
Page 80

4.19 CHANGE SETTINGS ON THE GRIP
How to change AF/MF and ISO/WB settings
AF / MF modes
Press the AF/MF button
MF.
ISO / WB modes
1 Press the ISO/WB button
once to select ISO.
2 Press twice to select WB.
3 Press a third time to exit.
ISO
Change ISO mode by scrolling the Rear
or Front Scroll Wheel
WB
or Front Scroll Wheel
When in WB M Manual Mode, use Rear
Scroll Wheel
Also see page 52 for more details.
Change WB mode by scrolling the Rear
(D)
to toggle between AF and
(C)
on top of the Camera Grip
(A)
left or right.
(A)
left or right.
(B)
to select setting.
(B)
(B)
FUNCTIONS
A
B
80
Mode Dial (E)
MQ Manual Quick Mode.
M Manual Mode.
A Aperture Priority Mode.
S Shutter Priority Mode.
P Program Mode.
Rectangle Automatic Mode. ISO are also
automatically set. Several functions are
limited or locked.
Video Video Mode (Not implemented yet).
C3 Custom Program 3.
C2 Custom Program 2.
C1 Custom Program 1.
C
E
D
X1D II 50C USER GUIDE www.hasselblad.com
Contents
Page 81
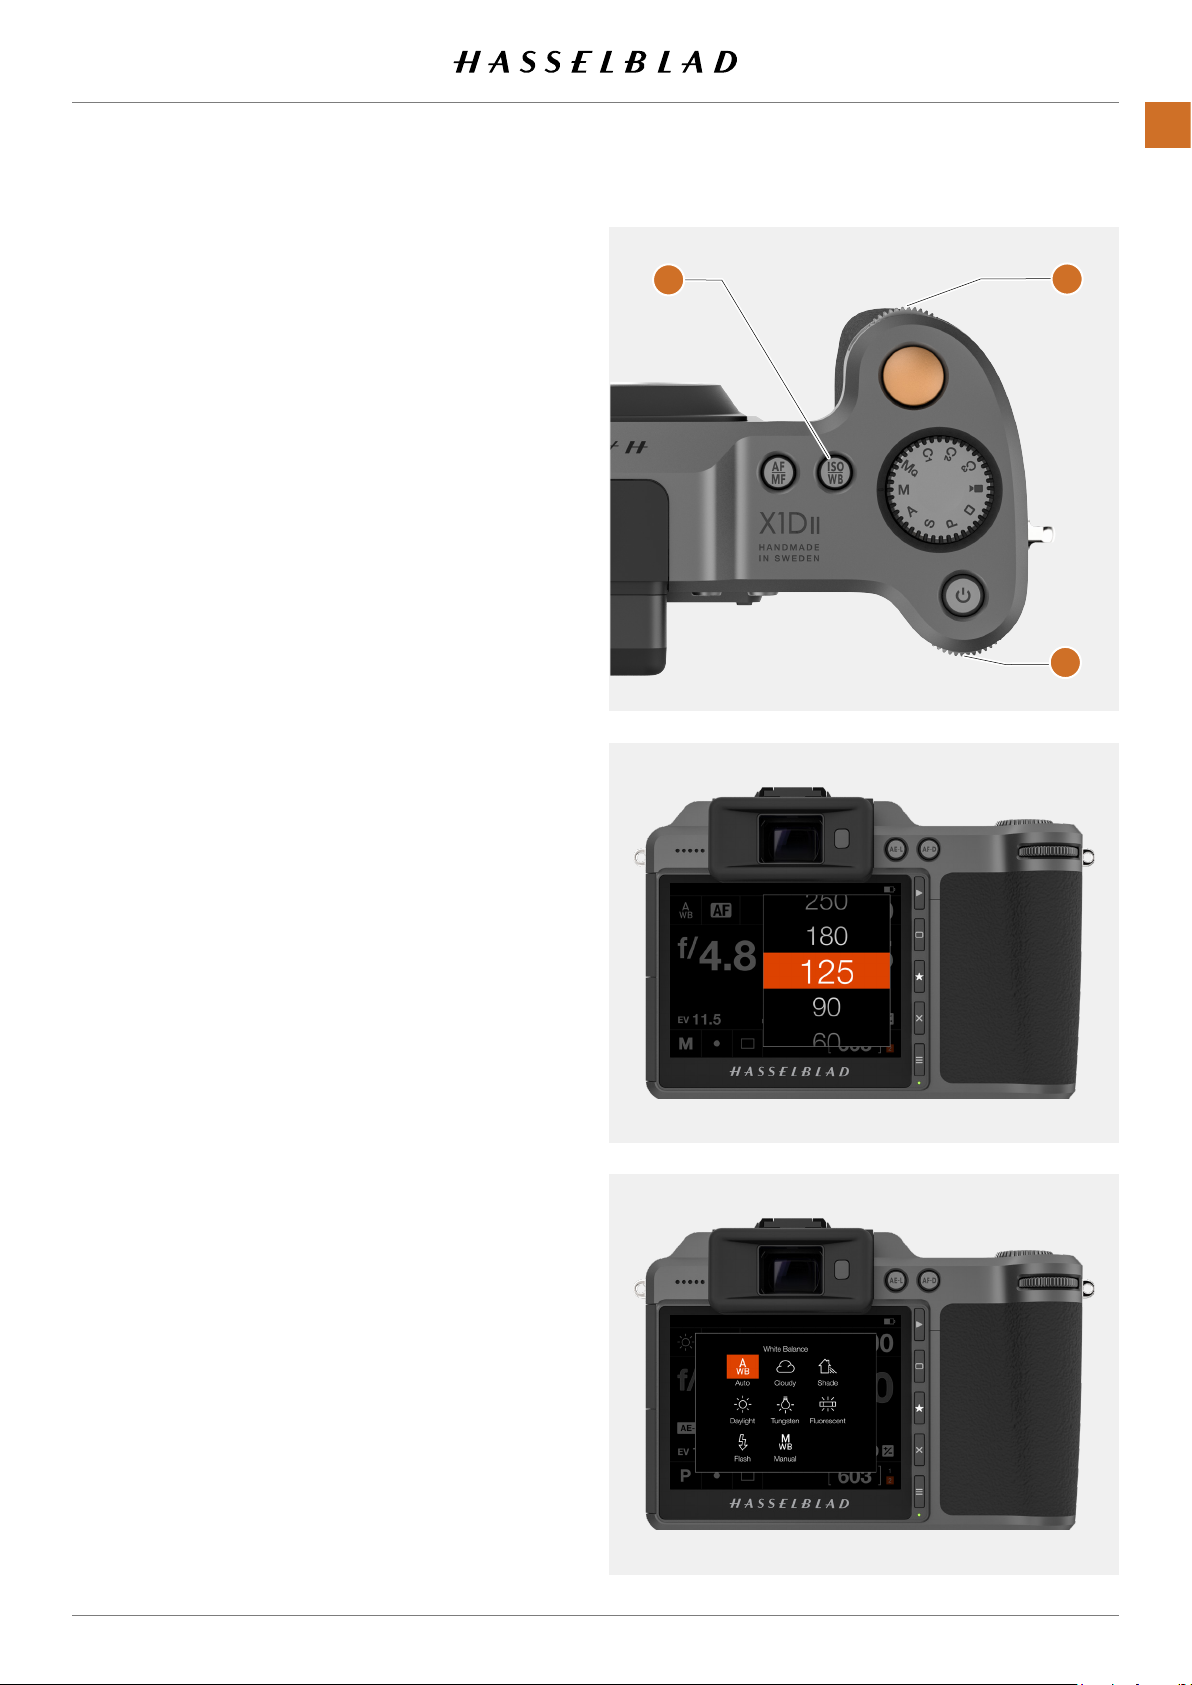
ISO AND WHITE BALANCE
FUNCTIONS
81
ISO and White Balance are set either on the Camera Grip, the
Touch Display or, when tethered, in Phocus.
● On the Camera Grip, the ISO / WB Button
immediate access to ISO and White Balance settings.
The front scroll wheel
are used to make the desired changes. These appear
on the Touch Display and in the Electronic Viewnder
(EVF).
● For the Touch Display, settings are changed on the
Touch Display or by using the buttons next to the
display.
The settings are automatically and simultaneously adjusted
within the Camera and changes display on both the Touch
Display and in the Electronic Viewnder.
(B)
and Rear Scroll Wheel
(A)
provides
(C)
Note!
The changes are only displayed on the Touch Display after
the settings have been saved. See more information about
making manual White Balance settings in the ‘Touch Display
Settings’ section.
ISO
1 Press ISO / WB button
2 Turn the Front Scroll Wheel
(A)
.
(B)
to select ISO setting.
A
B
C
White Balance WB
1 Press ISO / WB button
2 Turn the Front Scroll Wheel
Daylight, Shade, Cloudy, Flash, Fluorescent, Tungsten or
Manual WB).
3 To set the Colour Temperature manually, turn the Front
Scroll Wheel
Colour Temperature value is displayed at the bottom of
the screen.
4 Use the Rear Scroll Wheel
(B)
(A)
.
(B)
to select WB (Auto AWB,
until “M/WB” is displayed. Then the
(C)
to set the Manual WB.
Note!
White Balance settings are technically not necessary for RAW
3F/3FR les. The raw format les contain all the information
required for correction in Phocus and/or other software,
regardless of the original colour temperature of the light
source or colour temperature setting of the camera at the time
of exposure.
If you intend to shoot RAW & JPEG or use Phocus for JPEG
production and plan to deliver or print the JPEG les directly,
then you should make a White Balance setting.
Note!
ISO and White Balance settings are made either on the
Camera Grip or the Touch Display. The settings are automatically updated on both the Touch Display and the Electronic
Viewnder.
X1D II 50C USER GUIDE www.hasselblad.com
Contents
Page 82

4.20 BROWSING, PREVIEW AND HISTOGRAM
FUNCTIONS
A
82
BROWSE CAPTURES
Captures on the cards can be browsed on the rear display or
in the EVF. Where the captures are shown, depends on which
display is active when the Play / Browse Button
Browsing captures on the rear display
To enter Browse mode, press the Browse Button
the Touch Display.
In Browse mode, swipe right or left or use the Front Scroll
Wheel
(A)
on the Camera Grip to Browse captures in a folder.
In Browse mode on the rear display, swipe right or left to
Browse captures.
Zoom out to Folder View to select another folder to Browse as
described on page 84.
Press Shutter Release Button
the Menu Button
Access the Delete Image Dialogue by pressing the Cross
Button
(D)
To select another overlay, use the rear scroll wheel.
(E)
.
.
(B)
to exit Browse mode or press
(C)
is pressed.
(C)
next to
B
C
You can zoom out to 9-view by pressing the AE-L button in
full image view. You can zoom out further to view Folders and
nally select card as described on page 84 (Using buttons).
The Image Preview setting in the
menu, includes a setting where you can choose to automatically see a preview in the EVF after each capture. See more on
page 111.
General Settings > Preview
Browsing captures in the EVF
With the EVF active, press the Play / Browse Button
last capture will be shown.
To view another image, use the front scroll wheel or swipe the
rear display.
To select another overlay, use the rear scroll wheel.
You can zoom in using the AF-D button. To zoom out, use the
AE-L button. A long-press (1 sec), will auto-zoom in or out.
Zooming in the last image will be done around the focus point
used.
When zoomed-in, you can pan the images by swiping the rear
display. Which area of the rear screen that is used, can be set
as shown on page 112.
(C)
. The
D
E
X1D II 50C USER GUIDE www.hasselblad.com
Contents
Page 83
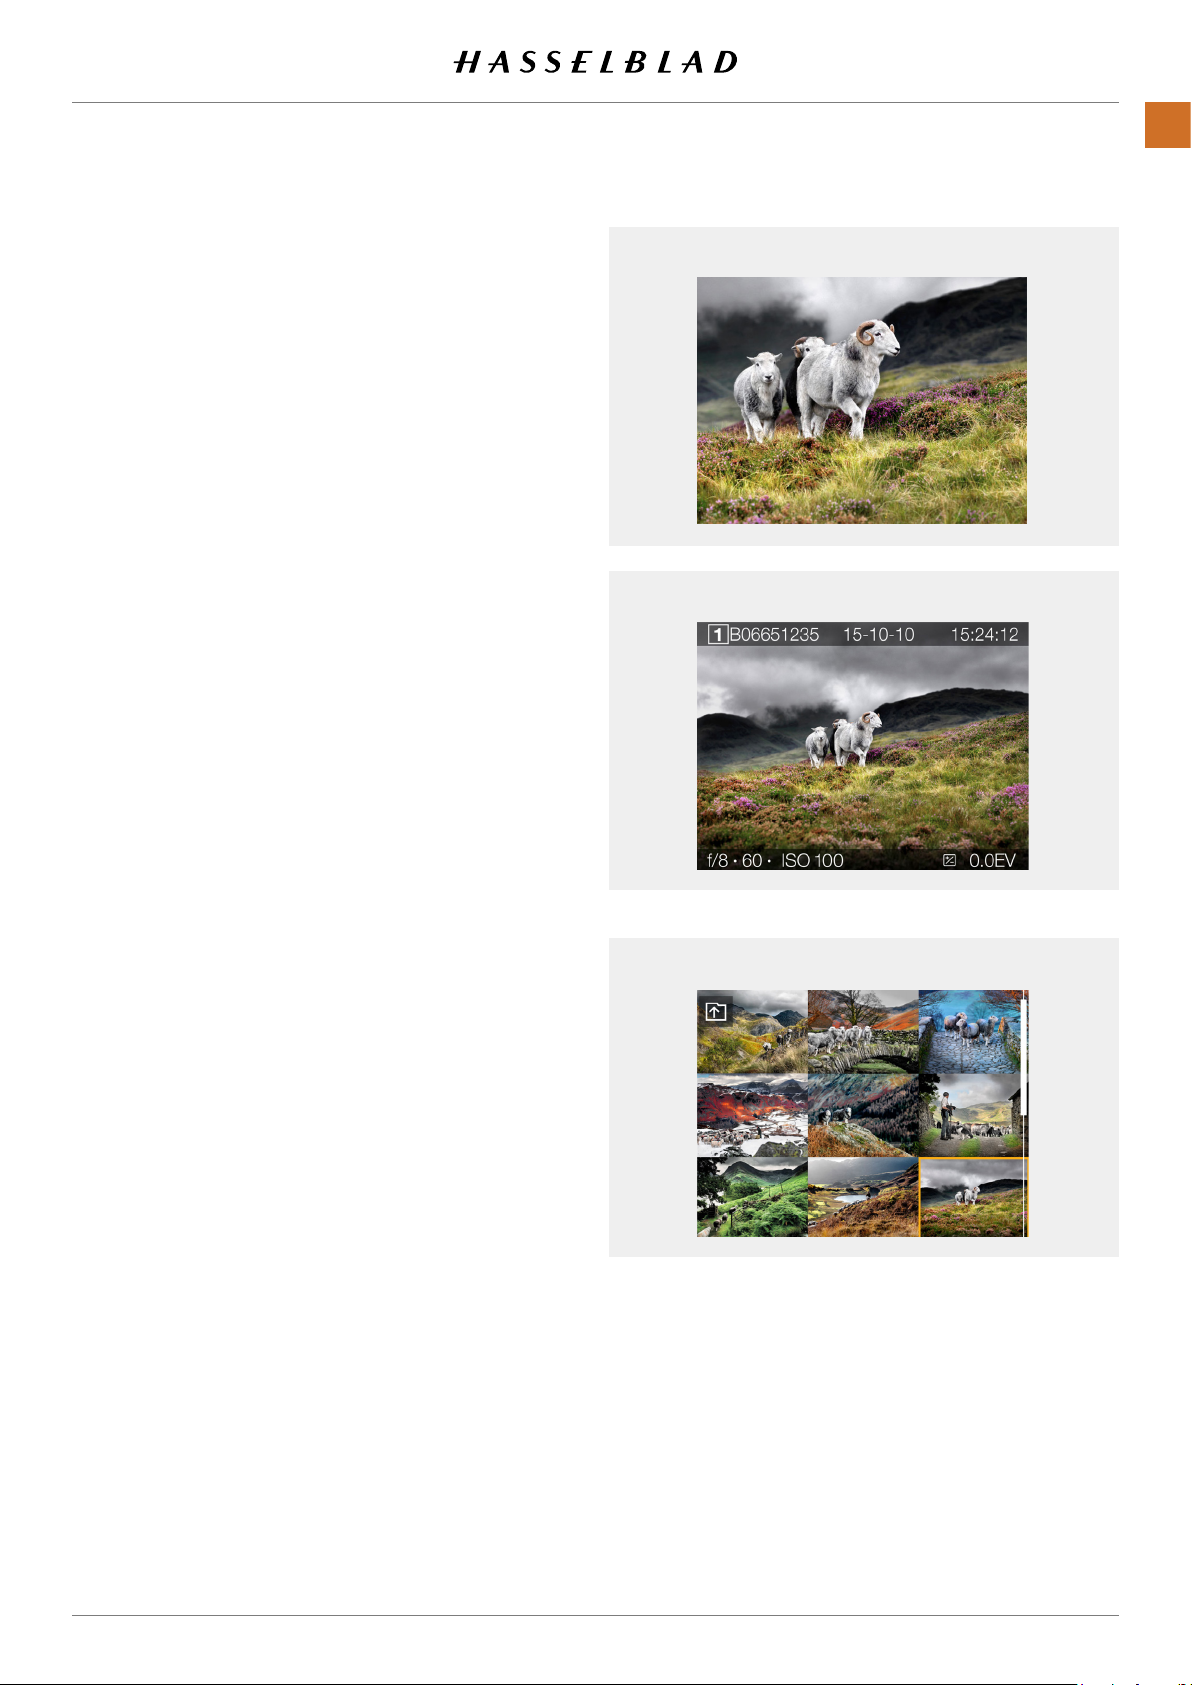
FUNCTIONS
83
ZOOM IN AND OUT ON THE TOUCH DISPLAY
The following gestures can be used to Zoom in and out on the
Touch Display:
Function Action
Zoom in Spread (move two ngers apar t).
Zoom out Pinch (move two ngers together).
Action Function
Double Tap Zoom in to 100%. Double Tap again
to Zoom out to full View.
Zoomed View
Standard Preview
9 View Mode
9 View Mode displays an overview of up to 9 captures. Scroll
down to display all Captures in the Folder.
Enter 9 View Mode by pressing the AE-L button, or zoom out
with a two nger “pinch”.
9 View Mode
X1D II 50C USER GUIDE www.hasselblad.com
Contents
Page 84

SELECT CARD TO BROWSE
You can select SD 1 Card or SD 2 Card to Browse Captures.
FUNCTIONS
84
To select which card to review, navigate up in the folder struc-
ture until you reach the “Select Card to Browse” dialogue.
The folder structure is the following:
Memory Cards
Folders
9 images
1 image
It is possible to navigate to the card selection dialogue either
using touch or buttons and scroll-wheels.
By touch:
1 When viewing one image
images view
2 In the 9 images view - Press the “Folder Up” button
the top left corner to go to folders.
3 In the folders view - Press the “Folder Up” button in the top
left corner to go to Card level .
4 Select Card to Browse.
5 Select folder by clicking the folder name (322HASBL).
6 Select the image you want to view from the 9 images view.
7 The selected image is shown.
(2)
.
(1)
Pinch inwards to go to the 9
(A)
in
Using buttons:
1 2
3 4
5
A
6
8 When viewing one image
to the 9 images view
9 Continue to press the AE-L button repeatedly to go up in
folder structure.
10 Select Card to Browse using any of the scroll-wheels
11 Use the AF-D button to select card.
12 Repeatedly use scroll-wheels and AF-D button to select
folder to review.
(2)
(1)
- Press the AE-L button to go
.
7
X1D II 50C USER GUIDE www.hasselblad.com
Contents
Page 85

CREATE NEW FOLDER
It is possible to create a new folder on the currently active SD
card. When a new folder is created, all new images will be
stored in that folder. The folder name is auto-generated and
cannot be changed.
It is not possible to store images in a previous folder.
By touch:
1-view
FUNCTIONS
A
85
1 When viewing one image
images view
2 In the 9 images view - Press the “Folder Up” button
the top left corner to go to folders.
3 In the folders view - Press the “Add folder” button
the top right corner to create a new folder.
4 In the Create Folder dialogue
a new folder or
(C)
.
Exit
to skip.
(A)
, pinch inwards to go to the 9
(D)
(E)
, choose
Create
to create
(B)
in
in
Or using buttons:
1 When viewing one image
to the 9 images view
2 Press the AE-L button again to view the folder structure.
3 Select the “Add folder” icon
using any of the scroll-wheels
4 Use the AF-D button to show the Create Folder dialogue
(E)
.
5 In the dialogue, choose
Exit
to skip.
When the new folder is created, the folder view
show the new folder. To view images in the previous folder
(259HASBL), proceed as described on the previous page. New
images will automatically be stored in the new folder.
(C)
(A)
- press the AE-L button to go
.
(D)
in the top right corner
Create
to create a new folder or
(F)
will
9-view
B
C
Folder view
D
Create folder dialogue
Note!
It is only possible to create a new folder on the currently active
card. When browsing the other card, the “Add Folder” icon
will not be available.
Folder view
X1D II 50C USER GUIDE www.hasselblad.com
Contents
E
F
Page 86
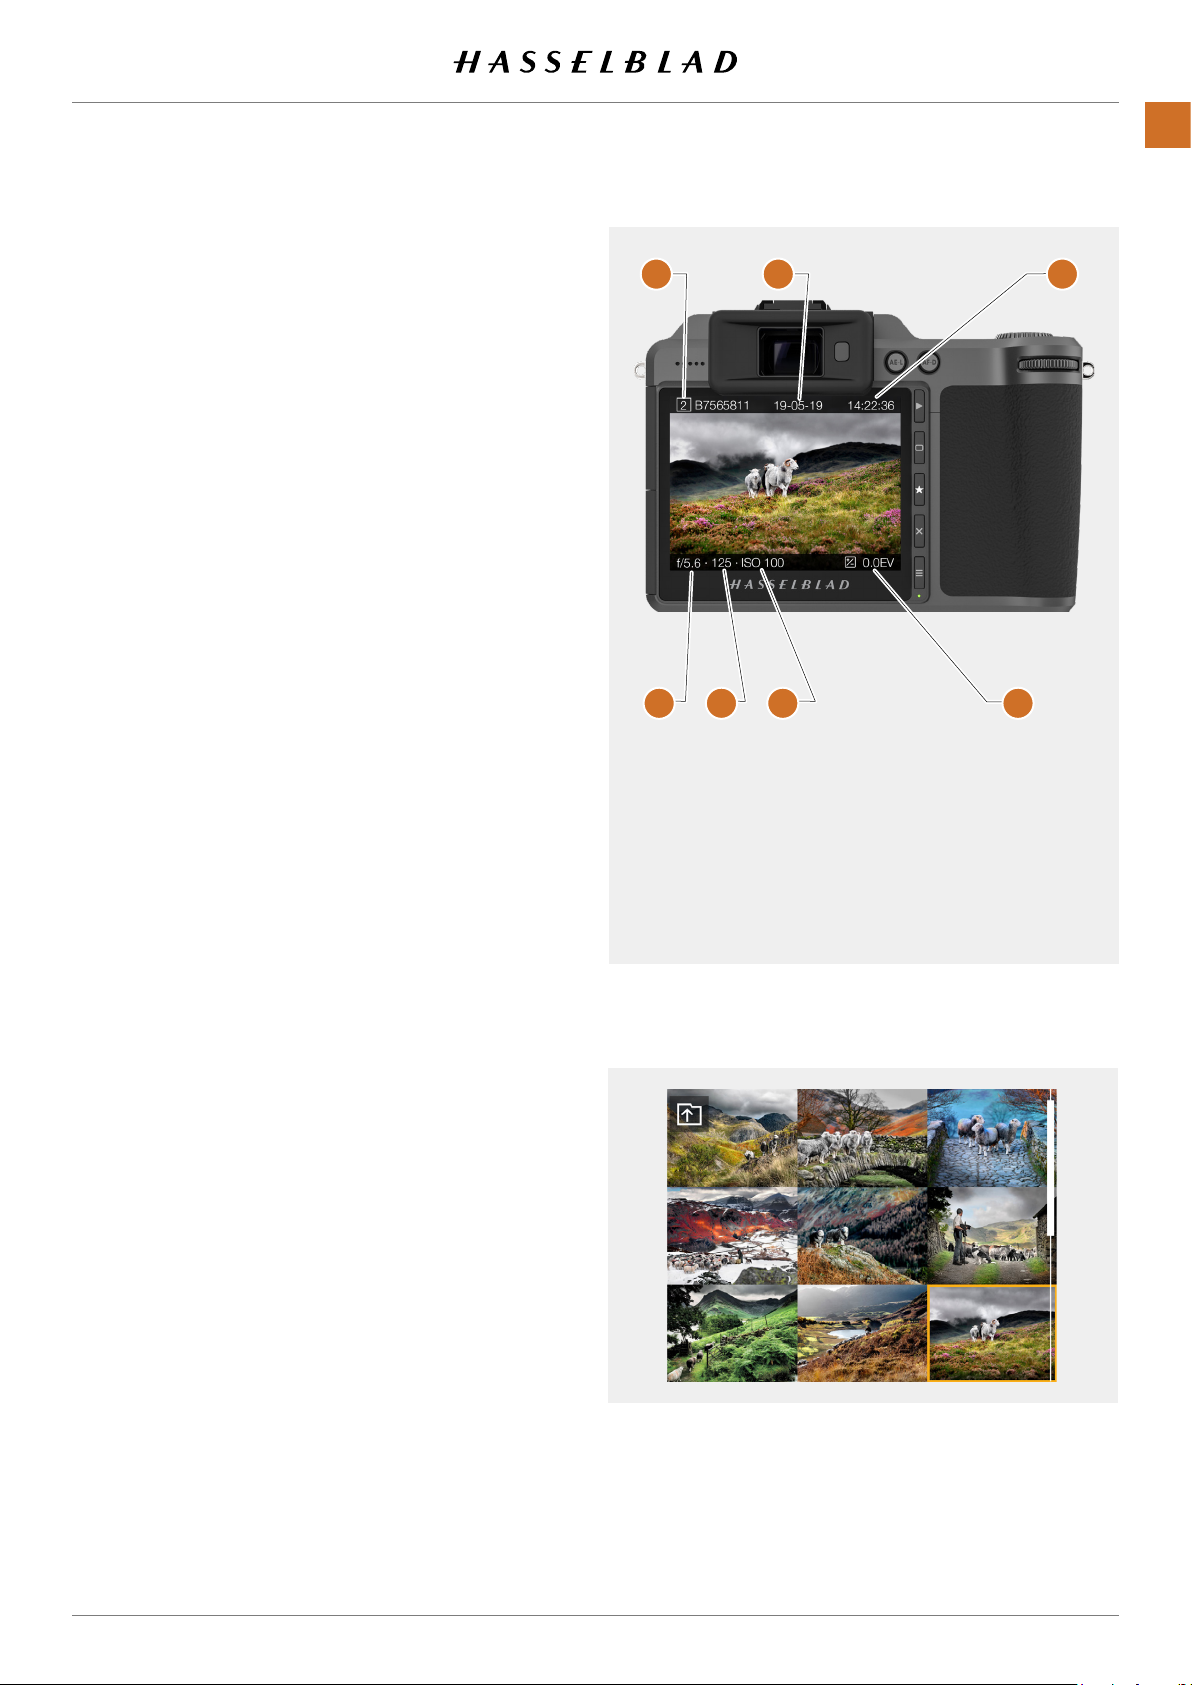
STANDARD PREVIEW
FUNCTIONS
86
The Standard Preview is displayed when you rst turn on the
camera and is probably the view you will use most often.
It displays a preview of your most recent capture and basic
information about the settings.
1 2 3
4 5 6 7
1 Card (1 or 2)
2 Capture Date
3 Capture Time
4 Aperture (f/5.6)
5 Shutter Speed (125)
6 ISO Setting (100)
7 +/- Exposure Adjust
Indicator and
Exposure Adjust
value (0.0 EV)
9 VIEW MODE
To display 9 View Mode, press the AE-L button when in
Browse Mode. In this Mode you can see an overview of up to
9 captures. If you have more than 9 captures, swipe down to
scroll through the captures.
Tap on one of the small images to view in full screen.
X1D II 50C USER GUIDE www.hasselblad.com
Contents
Page 87

FUNCTIONS
87
PREVI EW OV ERLAYS
In addition to the Standard overlay as described on page
83, the available overlays are: Histogram Mode, Capture
Details Mode, Luminance Histogram Mode and Separate
Histogram RGB Mode.
HISTOGRAM MODE
Histogram mode displays RGB Histogram with separate RGB
channels visible. The RGB details are stored with the capture
le, and can be referred to in Phocus and other applications.
HOW TO CHANGE HISTOGRAM OVERLAY
Tap the lower part of the image or use the rear scroll wheel or
Rectangle Button to alter between the available Histogram
representations.
LUMINANCE HISTOGRAM MODE
The Luminance Histogram mode displays the luminosity. The
luminance is represented by a White Graph.
CAPTURE DETAILS MODE
The Capture Details Mode displays SD Card (1), Date (19-05-
19), Time (14:32:08), selected Aperture (f/11), Shutter Speed
(250), ISO (100), EV Settings (+/- 0.0), Mode (A), Light Meter
Mode (Center Weighted), White Balance (Daylight), Focal
Length (45mm).
SEPARATE HISTOGRAM RBG MODE
In Separate Histogram RGB Mode, the individual RBG
channels are displayed. The Red R channel rst, the Green G
channel in the middle and the Blue B channel below the Red
and Green channels.
X1D II 50C USER GUIDE www.hasselblad.com
Contents
Page 88

HISTOGRAM EXPOSURE MODE
Underexposure Even exposure Overexposure
Histogram Exposure
The Histogram provides a graph that indicates the total
number of pixels at each brightness level, with brightness
in range from black on the left to white on the right. It is a
valuable tool for evaluating captures.
FUNCTIONS
88
A well exposed shot usually has a full range of levels, while
underexposed and overexposed Captures tend to show levels
concentrated at the left or right part of the scale.
The histogram is only an indicator that should be interpreted.
There are several situations in which a ‘bad’ histogram will
match an exposure that could be perfect for the intended
effect.
Study the Histogram examples and the explanations below.
Underexposure
Histogram display concentrated on the left with few pixels
elsewhere indicates a likely underexposure. Many details will
be lost in the shadows.
Even exposure
Histogram display spread across the full range indicates a
likely good exposure. There may still be a few pixels at the
extremes, indicating a few spectral highlights and saturated
shadows, but this is often normal in a good exposure.
Overexposure
Histogram display concentrated on the right with few pixels
elsewhere indicates a likely overexposure. Many details will be
lost in the highlights.
X1D II 50C USER GUIDE www.hasselblad.com
Contents
Page 89
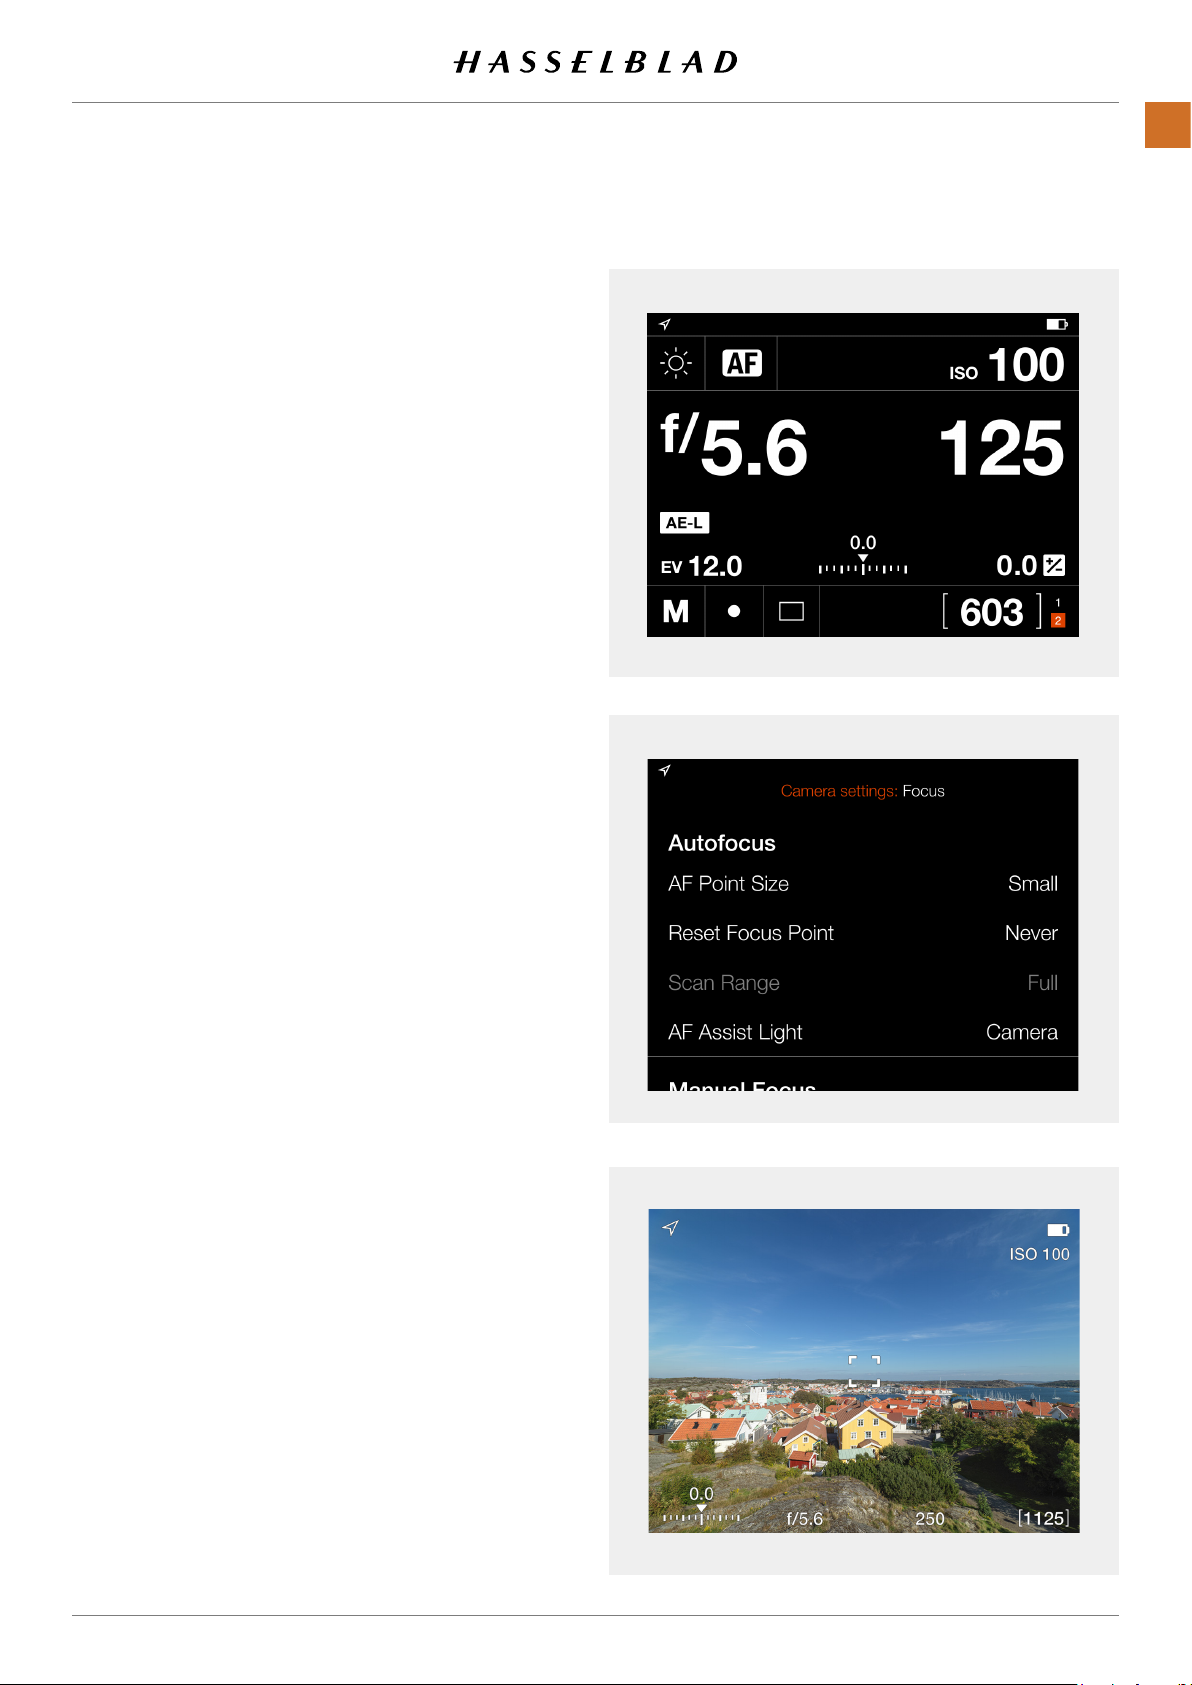
GPS
The GPS icon, when active, is displayed in the top left
corner in the Viewnder and when using the Settings
Menus. When the Control Screen is active, the GPS icon
is displayed near the centre of the display.
The GPS state is displayed in 3 different ways:
Steady icon
GPS has obtained the position.
Blinking icon
GPS has not yet obtained the position.
No icon visible
GPS is not activated in the
Note!
There are situations where the X1D II GPS module can
receive less, or no position information. These are for
example when the X1D II camera is indoors, in tunnels
and even in forests with large trees.
General > GPS
Menu.
GPS icon on Control Screen
GPS icon when in Settings Menus
FUNCTIONS
89
GPS icon in Viewnder
X1D II 50C USER GUIDE www.hasselblad.com
Contents
Page 90

5 SETTINGS
Page 91
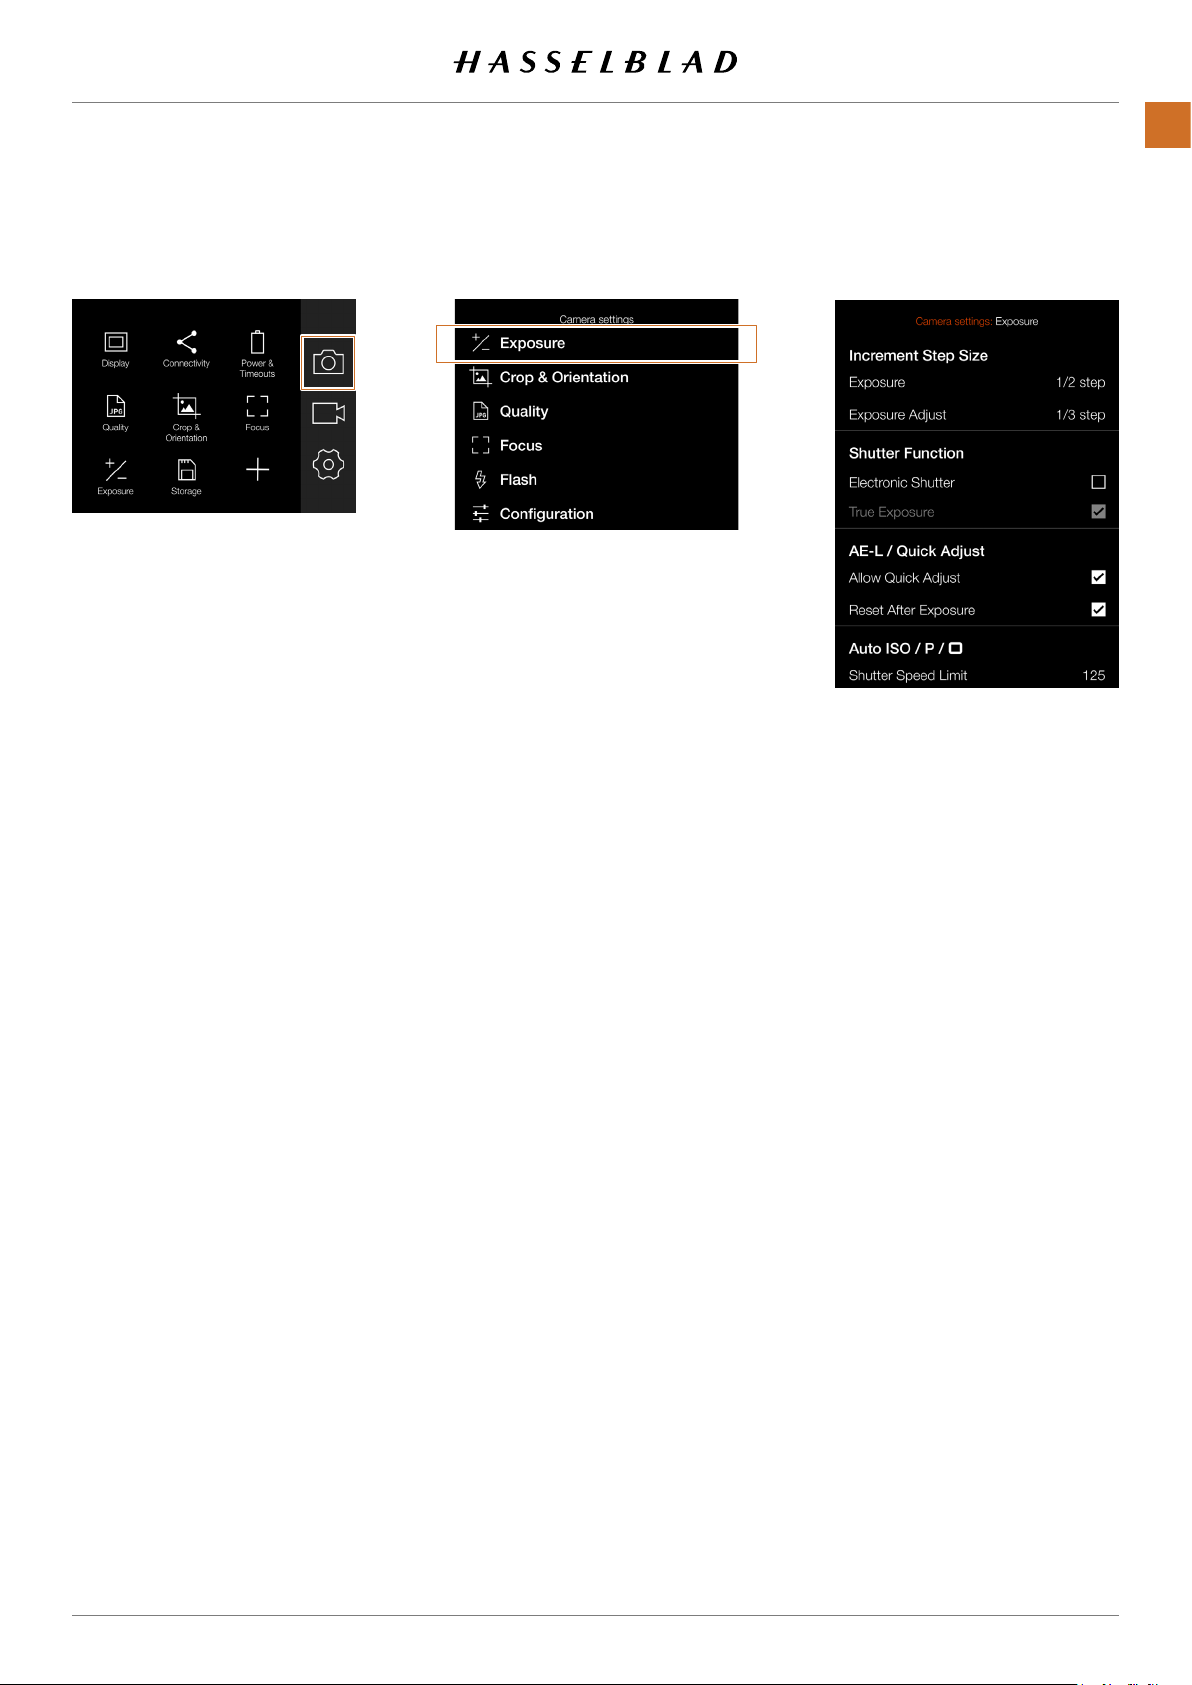
5.1 CAMERA SETTINGS MENU
SETTINGS
91
Main Menu
Camera icon
MAIN MENU > CAMERA SETTINGS > EXPOSURE
Camera Settings Menu
Exposure Settings Menu
1 Press the Camera icon on the Touch
Display.
2 The Camera Settings Menu appears.
Swipe right or press the Menu / EXIT button to
get back to the Main Menu.
X1D II 50C USER GUIDE www.hasselblad.com
Contents
Page 92

INCREMENT STEP SIZE SETTINGS
SETTINGS
92
MAIN MENU > CAMERA SETTINGS > EXPOSURE > INCREMENT STEP SIZE
1 Press the Camera icon on the Touch Display.
2 The Camera Settings Menu appears.
3 Press the Exposure Settings Menu.
Swipe right or press the Menu / EXIT button to get back to the
Main Menu.
Exposure
Select between 1, 1/2 and 1/3 stop increments.
Exposure Adjust
Select between 1, 1/2 and 1/3 stop increments.
Exposure Settings Menu
Exposure increment Setting
Exposure adjust increment Setting
X1D II 50C USER GUIDE www.hasselblad.com
Contents
Page 93

SHUTTER FUNCTION SETTINGS
SETTINGS
93
MAIN MENU > CAMERA SETTINGS > EXPOSURE >
SHUTTER FUNCTION
1 Press the Camera icon on the Touch Display.
2 The Camera Settings Menu appears.
3 Press the Exposure Settings Menu.
4 Select Shutter Function.
Swipe right or press the Menu / EXIT button to get back
to the Main Menu.
Electronic Shutter
Select On or Off. If this option is checked, the
camera will disable the lens shutter and use an
electronic shutter in the sensor instead. When
electronic shutter is active, this is indicated with an E
symbol in front of the shutter speed in Live View and
on Control Screen.
Please note the following limitations with Electronic
Shutter:
• The camera will use the Rolling Shutter available
on the sensor which has a read-out time of
approximately 300 ms. This will cause distortion
of the image if the camera or subject is moving
during the exposure. A tripod and a stationary
subject is recommended.
• ISO will be limited to 3200.
• Full image quality is not guaranteed.
• Shutter speed range is 68 minutes to 1/10000
sec.
• Flash is disabled.
• Continuous drive is disabled.
• True Exposure is disabled.
Exposure Settings Menu
Control Screen with active Electronic Shutter
True Exposure
Select On or Off. The check box will be marked with
a √ when On and the check box is empty when True
Exposure is Off.
Determines whether the exposure is automatically
adjusted to create a true exposure setting. On allows
the adjustment. Off retains the normal setting.
Note!
If using ash/strobe as the main light source and 1/800s
or shorter shutter speed (depending on lens type),
remember to turn off the True Exposure option.
Live View with active Electronic Shutter
Note!
The True Exposure feature is designed to keep shutter
speed unaffected by aperture value. See next page.
X1D II 50C USER GUIDE www.hasselblad.com
Note!
An active Electronic Shutter is indicated on the Control Screen
and in Live View with an "E" next to the shutter speed.
Contents
Page 94
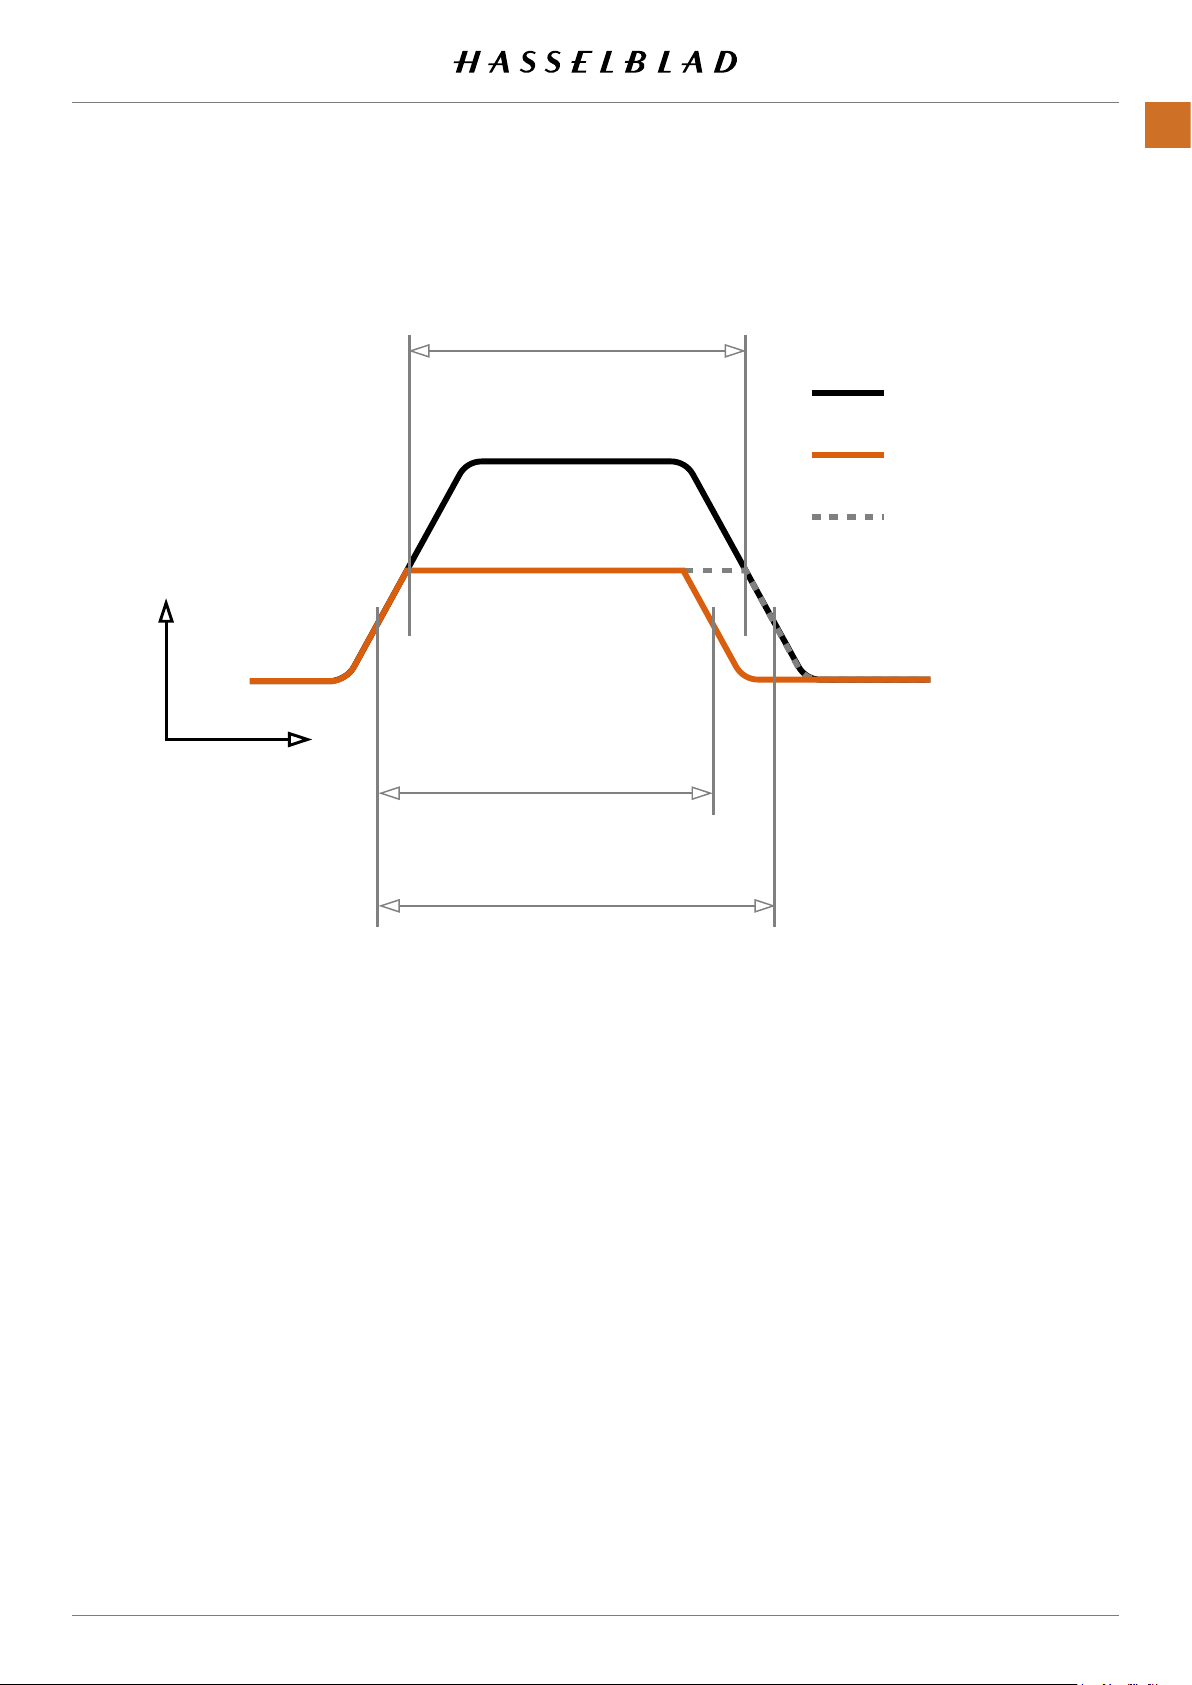
TRUE EXPOSURE EXPLAINED
Light level at
image plane
T fully open
SETTINGS
Maximum aperture
Stopped down one stop
with True Exposure ON
Stopped down one stop
with True Exposure OFF
94
Time
T stopped down = T Fully open
(Using True Exposure)
T stopped down > T Fully open
(Without True Exposure)
True Exposure is an XCD and HC/HCD lens function that
allows the shutter speed to remain unaffected when stopping
down. This effect is perhaps not so commonly understood as
it is restricted specically to integral lens shutters as opposed
to focal plane shutters.
When a lens is stopped down, the effective shutter speed
becomes longer, consequently affecting the set exposure. At
slow shutter speeds the effect is minimal but at faster speeds,
e.g. 1/500s, the effect becomes clearly visible. Automatic
compensatory measures in speed setting adjustments are
employed.
As compensation can only be put into effect where speeds
can be adjusted, this prevents the possibility of adjusting the
fastest speed. To counter this, compensatory adjustments
are therefore made to the aperture instead to retain the set
exposure. This compensation is not always required and when
using ash/strobe as the main light source it is actually undesirable because compensation will result in underexposure.
Therefore, when using ash/strobe as the main light source,
you should set True Exposure to OFF in Main Menu > Camera
Settings > Exposure > True Exposure in the Camera Display.
You can download a complete explanation of this situation
from www.hasselblad.com.
X1D II 50C USER GUIDE www.hasselblad.com
Contents
Page 95

AE-L (AE-LOCK) / QUICK ADJUST
SETTINGS
95
MAIN MENU > CAMERA SETTINGS > EXPOSURE > AE-L /
QUICK ADJUST
1 Press the Camera icon on the Touch Display.
2 The Camera Settings Menu appears.
3 Press the Exposure Settings Menu.
4 Scroll down to AE-L / Quick Adjust.
Swipe right or press the Menu / EXIT button to get back to the
Main Menu.
Allow Quick Adjust
Select On or Off. The check box will be marked with a
√ when On and the check box will be empty when Off.
When the box is checked you can use the rear Control
Wheel to input a Quick Exposure Adjustment.
Reset After Exposure
Controls if a Quick Exposure Adjustment and AE-Lock
state is reset by an exposure or not.
Exposure Settings Menu
X1D II 50C USER GUIDE www.hasselblad.com
Contents
Page 96

AUTO ISO / P / FULL AUTO
SETTINGS
96
MAIN MENU > CAMERA SETTINGS > EXPOSURE > AUTO
ISO/P/FULL AUTO
1 Press the Camera icon on the Touch Display.
2 The Camera Settings Menu appears.
3 Press the Exposure Settings Menu.
4 Scroll down to Auto ISO/P/Full Auto
Swipe right or press the Menu / EXIT button to get back to the
Main Menu.
Shutter Speed Limit
The Shutter Speed limit can be set either directly or as a
function of focal length. See illustrations to the right.
Auto ISO
be increased.
P
: If the calculated Shutter Speed is slower than the set
value, the Aperture value will be changed instead of
Shutter Speed.
: Sets the slowest Shutter Speed before ISO will
Exposure Settings Menu
Direct Shutter Speed Limit Setting
Full Auto
the set value, the Aperture value will be changed instead
of Shutter Speed.
: If the calculated Shutter Speed is slower than
Note!
The Shutter Speed Limit can still be exceeded in some cases.
For instance if using A Mode and the Maximum ISO Limit is
already reached and there is not enough light, the Shutter
Speed Limit will be exceed as a last resort to get a proper
exposure.
Shutter Speed Limit is set to:
1/125 s.
Shutter Speed Limit Setting as a
function of focal length.
With this setting and a 45mm lens,
the Shutter Speed Limit will be:
1/(2 x 45) = 1/90 s.
X1D II 50C USER GUIDE www.hasselblad.com
Contents
Page 97

CROP & ORIENTATION
SETTINGS
97
MAIN MENU > CAMERA SETTINGS >
CROP & ORIENTATION
1 Press the Camera icon on the Touch
Display.
2 The Camera Settings Menu
appears.
3 Press the Crop & Orientation Menu.
Swipe right or press the Menu / EXIT
button to get back to the Main Menu.
Crop Mask
Adds a crop mask to Live View
and the RAW le. When imported
to Phocus, the crop mask can be
modied or removed.
Crop Mode Settings:
No Crop (645)
1:1 (6x6)
7:6 (6x7)
5:4 (4x5)
11:8,5 (Letter)
297:210 (A4)
3:2 (6x9)
3:2 Crop (24x36). See Notes below.
16:9 (Sc reen)
2:1 (6x12)
65:24 (XPan)
Camera Settings Menu Crop & Orientation Menu
Live View with
No Crop
Notes:
● JPG les are not cropped.
● Crop Modes are disabled in USB
tethered mode.
● Crop Modes are not supported in Phocus Mobile 2.
● A good method is to program a button to "Crop Mode
Next" or "Crop Mode Previous". This allows quick selection
of crop format. A long press on this button will return to
"No Crop". See page 113.
● If a button is programmed to "Crop Mode Next" or "Crop
Mode Previous", 3:2 Crop (24x36) is only available when
using electronic shutter and other lenses than XCD or HC/
HCD. Useful when using 3rd party lenses designed for
24x36 mm format.
Continued on the next page.
X1D II 50C USER GUIDE www.hasselblad.com
Contents
Live View with
65x24 (XPan)
Page 98
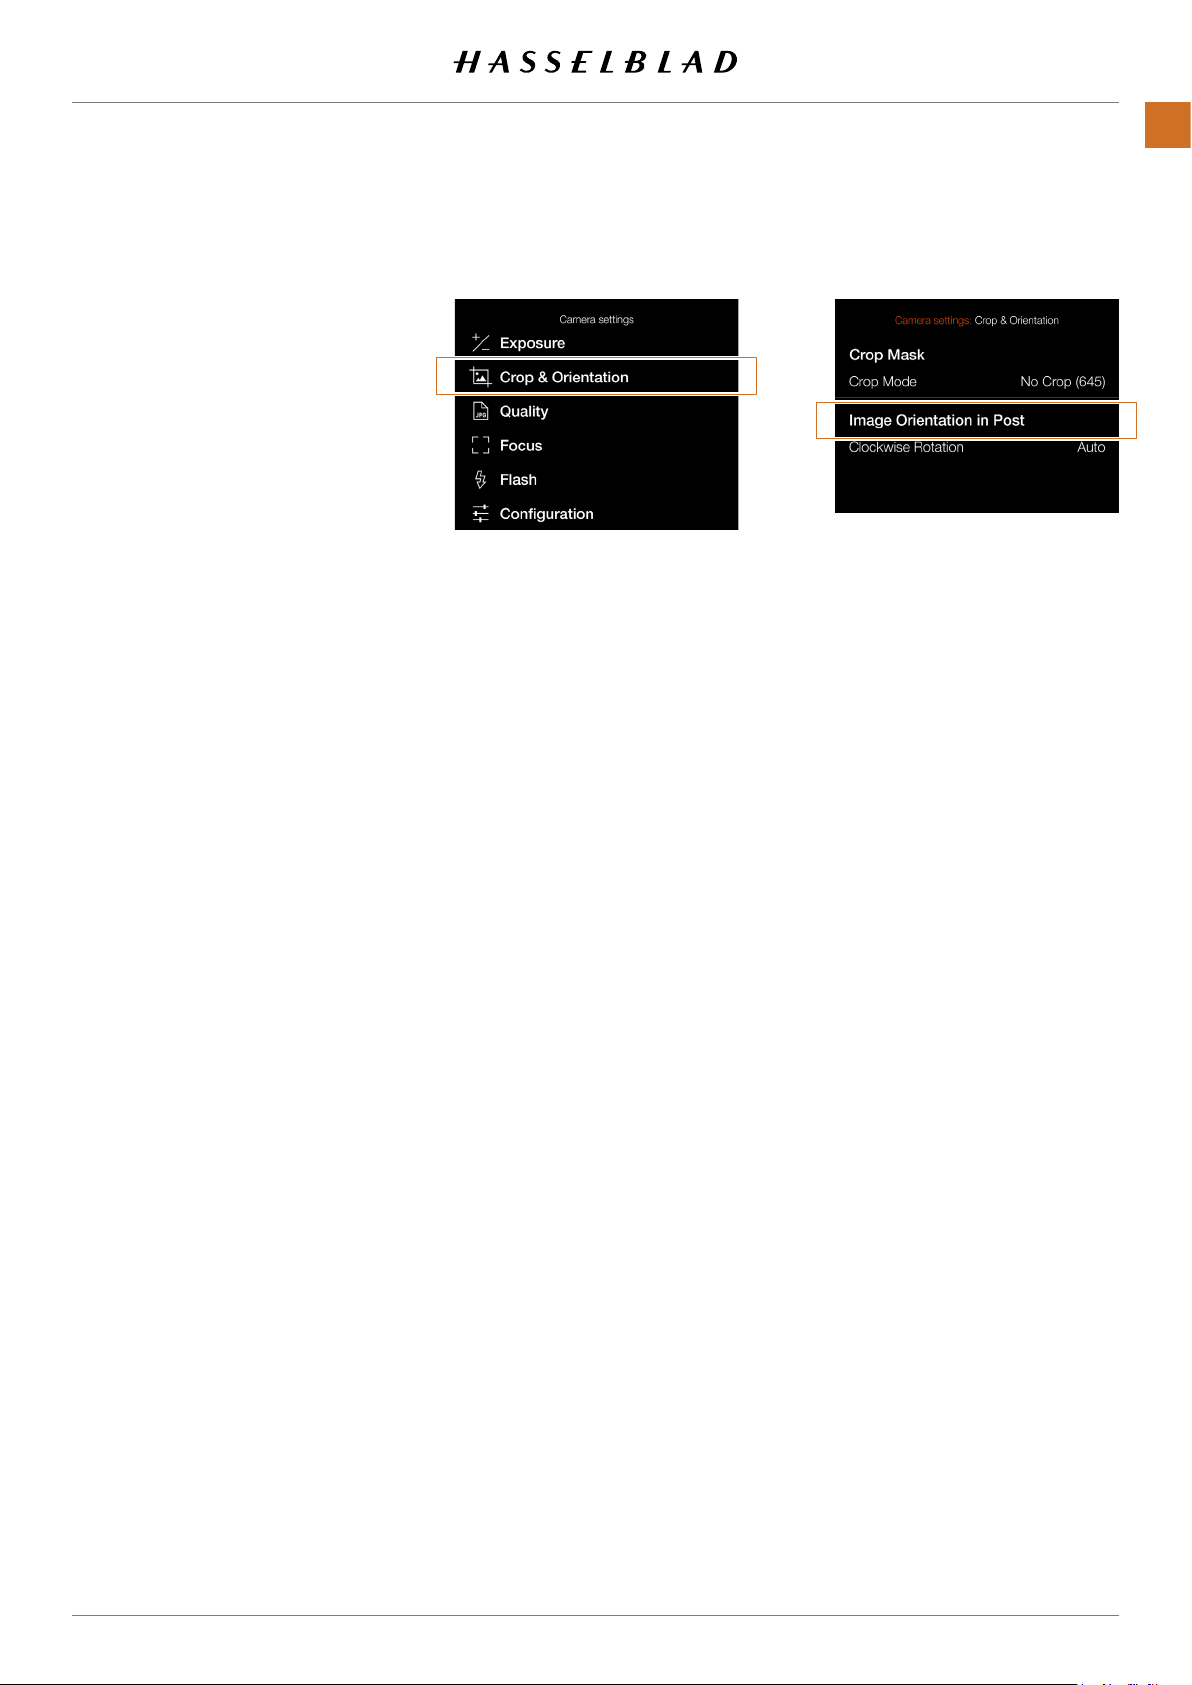
IMAGE ORIENTATION
SETTINGS
98
MAIN MENU > CAMERA SETTINGS >
CROP & ORIENTATION
1 Press the Camera icon on the Touch
Display.
2 The Camera Settings Menu
appears.
3 Press the Crop & Orientation Menu.
Swipe right or press the Menu / EXIT
button to get back to the Main Menu.
Image Orientation in Post
Sets the viewing orientation of
captures when they appear in
Phocus. To avoid unintentional
orientation changes when the
camera is pointing straight up or
down, the orientation setting can
be locked.
Clockwise Rotation Settings:
Auto.
Lock at 0 degrees.
Lock at 90 degrees.
Lock at 180 degrees.
Lock at 270 degrees.
Camera Settings Menu Crop & Orientation Menu
X1D II 50C USER GUIDE www.hasselblad.com
Contents
Page 99

5.2 IMAGE QUALITY SETTINGS
SETTINGS
99
MAIN MENU > CAMERA SETTINGS >
QUALITY
1 Select the Camera icon on the Touch
Display.
2 The Camera Settings Menu appears.
3 Press the Quality Settings Menu.
Swipe right or press the Menu / EXIT
button to get back to the Main Menu.
Image Format Settings
RAW.
RAW + JPG.
JPG.
Note!
JPG le size depends on subject and ISO
value. Subjects with many details or a high
ISO setting will give larger les.
Camera Settings Menu Quality Menu
Image Format Settings Menu
X1D II 50C USER GUIDE www.hasselblad.com
Contents
Page 100

5.3 CAMERA AUTOFOCUS SETTINGS
Camera Settings Menu Focus Menu
MAIN MENU > CAMERA SETTINGS >
FOCUS
1 Select the Camera icon on the Touch
Display.
2 The Camera Settings Menu appears.
3 Press the Focus Settings Menu
Swipe right or press the Menu / EXIT
button to get back to the Main Menu.
Autofocus
AF Point Size Settings
Select the size of the area used for
AF measurements. You can choose
between:
SETTINGS
100
Large (35 points)
Medium (63 points)
Small (117 points)
Also see page 78 on how to resize.
Reset Focus Point Settings
Select any of these two settings:
- After Exposure
- Never.
Autofocus Point can be reset to
centre position after every exposure.
If you need the Autofocus Point to
remain in the specic position, select
Never.
See section Move Autofocus Point
on page 77 for more in-depth
information.
Scan Range Settings
For lenses that support this function
(e.g. the XCD 120 Macro or the
XCD 135) is used you can choose
between:
- Near
- Far
- Full
AF Point Size Setting
Reset Focus Point Setting
Scan Range Setting
These settings will limit the focusing
scan range to scan in AF mode. If
Near or Far is selected, AF speed will
be faster.
Continued on the next page.
X1D II 50C USER GUIDE www.hasselblad.com
Note!
You can program a Custom
Button to cycle through the
Scan Range options.
Contents
 Loading...