

Page 1
User Guide
X1D User Guide 2017-12-19 Version v1.8
Page 2

Content
1 Introduction 7
1.1 Update X1D Camera Firmware 8
1.2 X1D Features 8
X1D Camera and Lenses Features 8
1.3 Delivery Check 9
1.4 X1D Technical Specications 10
1.5 System Requirements 11
1.6 New in this version 1.8 11
1.7 About this User Guide 11
Interactive PDF 11
Search Tools 11
Format and Printing the X1D User Guide 11
2 Safety 12
2.1 Safety and Warnings 13
2.2 Cautions 13
2.3 Disposal 14
2.4 FCC 15
2.5 ISED 15
2.6 Certication Information 15
USER GUIDE
2
3 Functions 16
3.1 The X1D Interaction Displays 17
3.2 Touch Display Navigation 18
Zoom in and out on the Touch Display 19
3.3 Navigating the Menus 20
Description of the Touch Display Menu Items 20
Overview of Menus and Settings on Touch Display 21
3.4 Touch Display Main Menu 22
Main Menu 22
Add shortcuts to Main Menu Favourites 22
How to Add shortcuts to Main Menu 23
How to Remove shortcuts on the Main Menu 23
Control Screen 24
Locked Programs on the Control Screen 24
Settings on the Control Screen 25
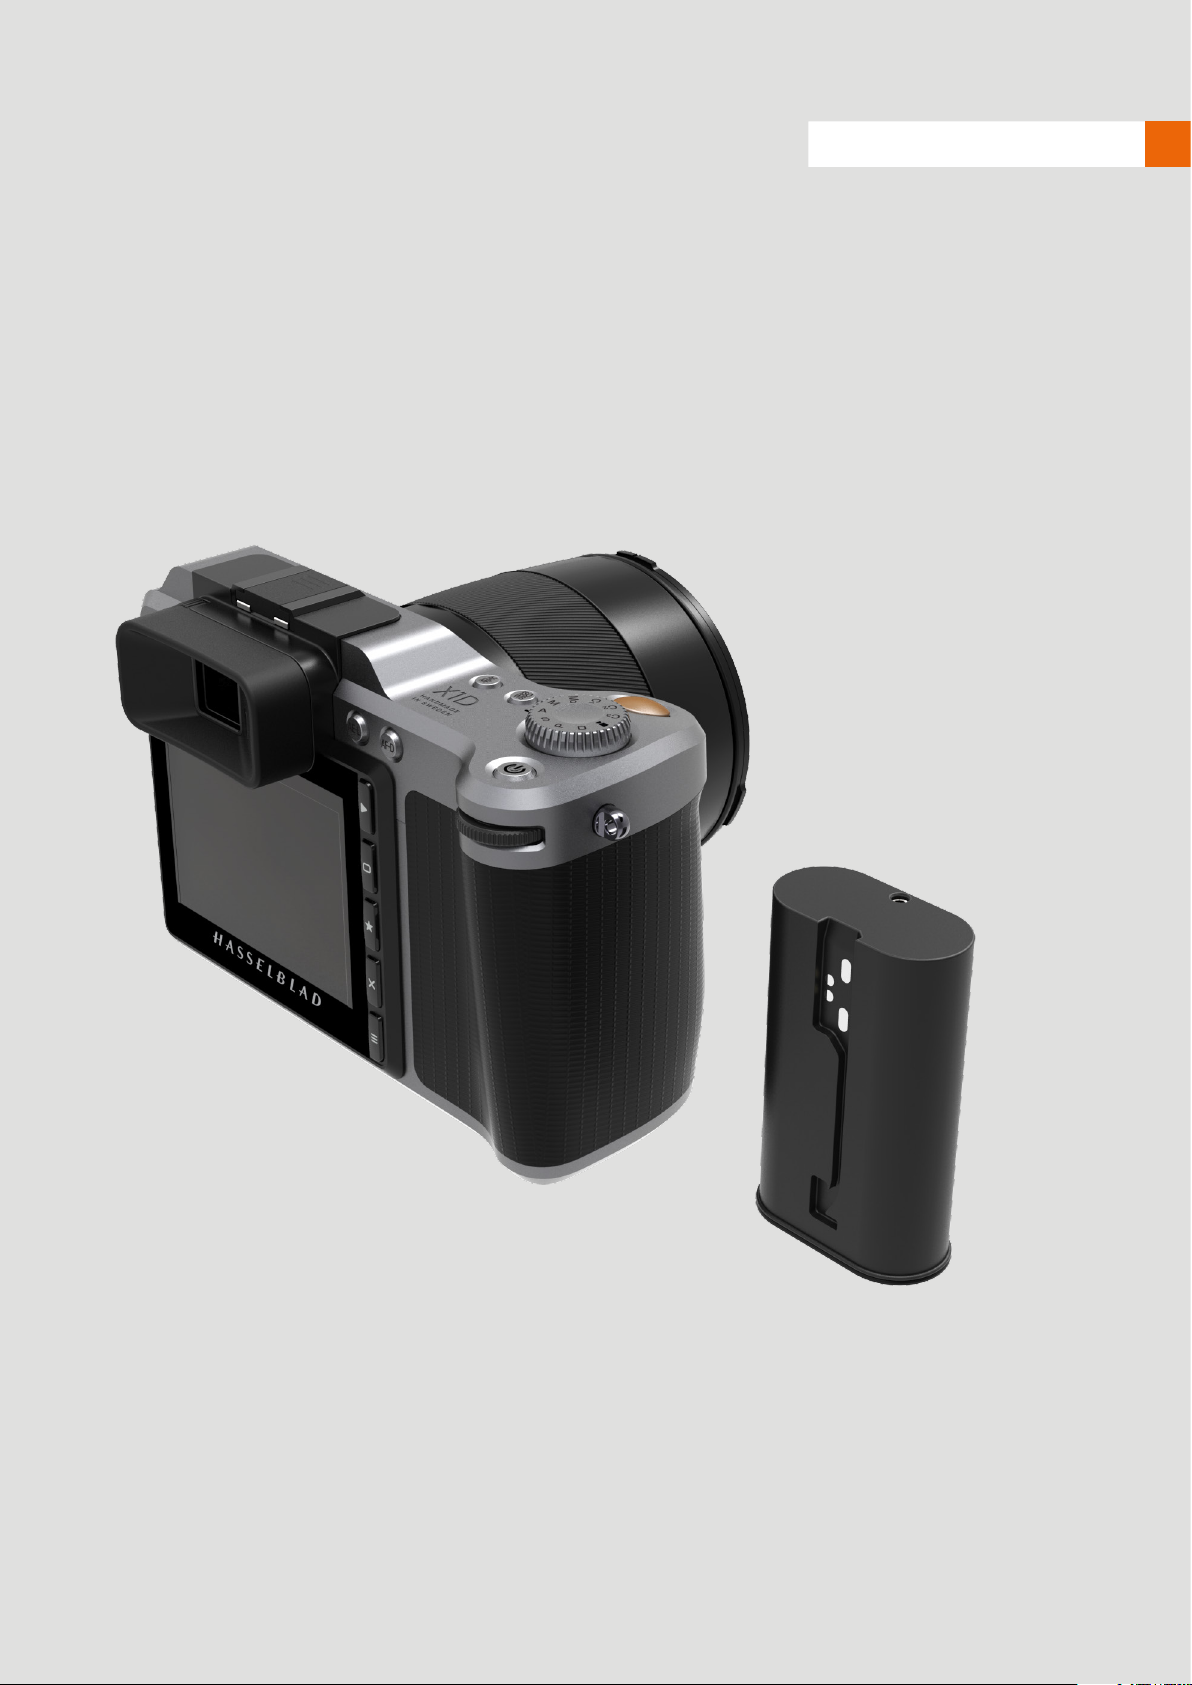
3.5 Parts, Components, Buttons and Controls 28
3.6 Grip Buttons and Controls 31
3.7 Camera Body Buttons and Controls 32
3.8 Mode Dial 33
X1D www.hasselblad.com
Page 3

USER GUIDE
3
3.9 Exposure Program Modes 34
Manual Exposure Mode 35
Manual Quick Exposure Mode 36
Mq Mode Features 36
Automatic Exposure Modes 37
Custom Modes 38
How to set a Custom Mode 38
AE-L Button 39
Fixed Exposure Compensation Setting 40
Exposure Compensation / Quick Adjust 41
3.10 Light Meter Exposure Mode 42
3.11 Video Recording 43
How To Record Video 43
How to View Recorded Video 44
3.12 Connector Ports 45
3.13 Memory Cards 46
Insert a Memory Card 47
Remove SD Memory Cards 48
Format SD Cards 49
Format Memory Cards on the Touch Display 49
3.14 XCD Lenses 50
Hasselblad XCD 3,5/45 mm 50
Hasselblad XCD 3,2/90 mm 50
Hasselblad XCD 3,5/30 mm 50
Hasselblad XCD 3,5/120 mm Macro 50
3.15 Remove and Attach a Lens 51
Remove the Lens 51
Attach the Lens 52
Remove the Lens Cap 53
Attach the Lens Cap 53
Remove the Lens Shade 54
Attach the Lens Shade 54
Filters 55
3.16 Display Information 56
3.17 Touch Display and Controls 57
3.18 Electronic Viewnder Display EVF 58
Typical Viewnder Display 58
Viewnder Display Settings 59
Camera Live View 60
Live View 61
Zooming in Live View 61
Focus in Live View 61
Live View with HDMI External Screen 62
X1D www.hasselblad.com
Page 4

USER GUIDE
4
3.19 Focus 63
Focus Assist 63
Manual Focus 64
Manual Override in Autofocus Mode 64
Auto / Manual Focus Setting 64
Autofocus 65
Single Shot Focus 66
Focus Peaking 67
3.20 Move Autofocus Point 68
3.21 Resize Autofocus Point 69
3.22 Move Autofocus Point using Touchpad 70
3.23 Stop Down Button 71
Stop Down / Depth-of-Field Preview 71
3.24 Change Settings on the Grip 72
To Adjust Shutter and Aperture on Grip 73
ISO and White Balance 74
3.25 Browsing, Preview and Histogram 75
Browse Captures 75
Select Card to Browse 76
Create New Folder 77
Standard Preview 78
9 View Mode 78
Histogram Types 79
Histogram Mode 79
Capture Details Mode 79
How to change Histogram Overlay 79
Luminance Histogram Mode 79
Separate Histogram RBG Mode 79
Histogram Exposure Mode 80
3.26 GPS Module 81
How to mount the GPS module 81
GPS Icon Status 82
Technical specication for the GPS 82
3.27 Phocus Overview 83
3.28 Phocus 84
Features in Phocus 84
3.29 Connect to a Computer 85
Phocus and Hasselblad Capture Files 86
3.30 Battery 87
Battery Charger 88
Charge the Battery 88
Rechargeable Battery Specication 89
Battery Life and Battery Warning 90
X1D www.hasselblad.com
Page 5

3.31 Temperature Warning 90
3.32 Store the Camera 90
4 Settings 91
4.1 Camera Settings Menu 92
Increment Step Size Settings 93
Shutter Function Settings 94
Flash Settings 96
Flash and Strobe Settings 97
Exposure Lock 98
AE-L (AE-Lock) / Quick Adjust 99
Image Format 100
Image Orientation 101
4.2 Image Quality Settings 102
4.3 Camera AutoFocus Settings 103
4.4 Camera Manual Focus Settings 105
4.5 Camera Self Timer Settings 106
4.6 Camera Custom Buttons Settings 107
4.7 Camera Conguration Settings 108
4.8 Video Settings Menu 109
Quality 109
Live View 109
4.9 General Settings Menu 110
4.10 General Settings Wi-Fi 110
4.11 General Settings Display 111
4.12 General Settings Touch 113
4.13 General Settings Custom Modes 114
4.14 General Settings Storage 115
How to format a Memory Card 115
Image and Video Destination 116
4.15 General Settings Date and Time 117
4.16 General Settings Power and Timeouts 118
4.17 General Settings Spirit Level 119
Calibrate Spirit Level 120
4.18 General Settings Language 121
4.19 General Settings Service 122
4.20 Update X1D Camera Firmware 123
Update X1D Firmware Procedure 123
4.21 Update X1D Lens Firmware 124
Update Lens Firmware Procedure 124
4.22 General Settings Save Log Data 125
USER GUIDE
5
X1D www.hasselblad.com
Page 6

4.23 General Settings Default Settings 126
4.24 General Settings File Counter 127
4.25 General Settings About 128
4.26 General Settings About Certication 129
5 Accessories 130
5.1 XCD Lens Range 131
XCD 30 Lens 131
XCD 90 Lens 131
XCD 45 Lens 131
XCD 120 Macro Lens 131
XH Lens Adapter 132
5.2 Optional HC Lens Accessories 132
H 13, 26 and 52 Extension Tubes 132
Macro Converter H 132
Converter H 1.7x 132
5.3 Optional Accessories 133
Pro Shade V/H 60 – 95 133
Pro Shade Adapters 133
XCD Lens Filter Dimensions 134
UV Sky Filters 134
Pola Filters 134
X1D Camera Shoulder Strap 134
USER GUIDE
6
6 Troubleshooting 135
6.1 Error Messages 137
6.2 Change from Unknown Language 138
6.3 Clean the Lens Glass 139
Remove Dust 139
Remove Smear 139
6.4 Clean the Sensor Filter 140
6.5 Information about the Hasselblad X1D User Guide 141
3D Product Images 141
Trademarks 141
Copyright 141
X1D www.hasselblad.com
Page 7
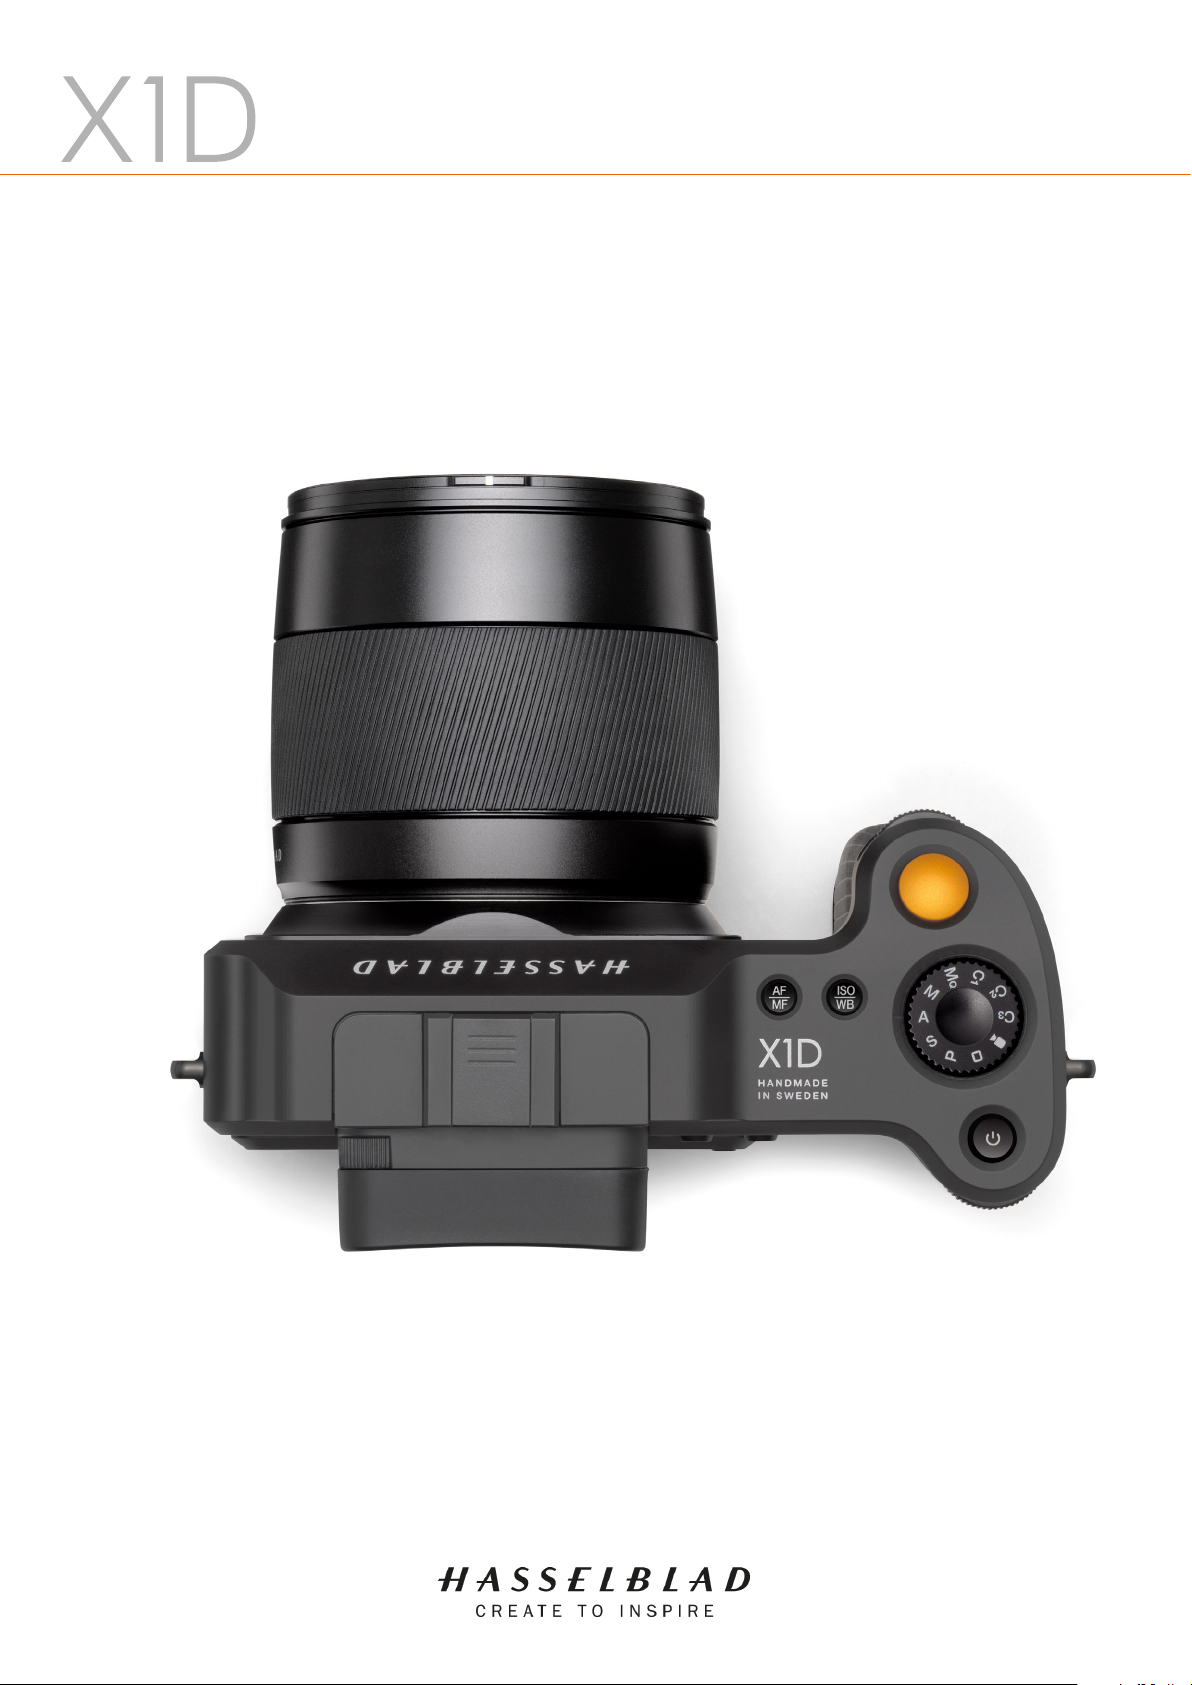
1 INTRODUCTION
Page 8
Introduction
1.1 UPDATE X1D CAMERA FIRMWARE
The X1D Camera system can be updated with
improvements and new functions.
Before you start to use your new X1D Camera, please visit
www.hasselblad.com and download the latest X1D Camera
rmware and update the Camera system to make sure you
get the latest functionality.
See specic section in this User Guide for an in depth
description on how to download the X1D Camera rmware
and update your X1D Camera.
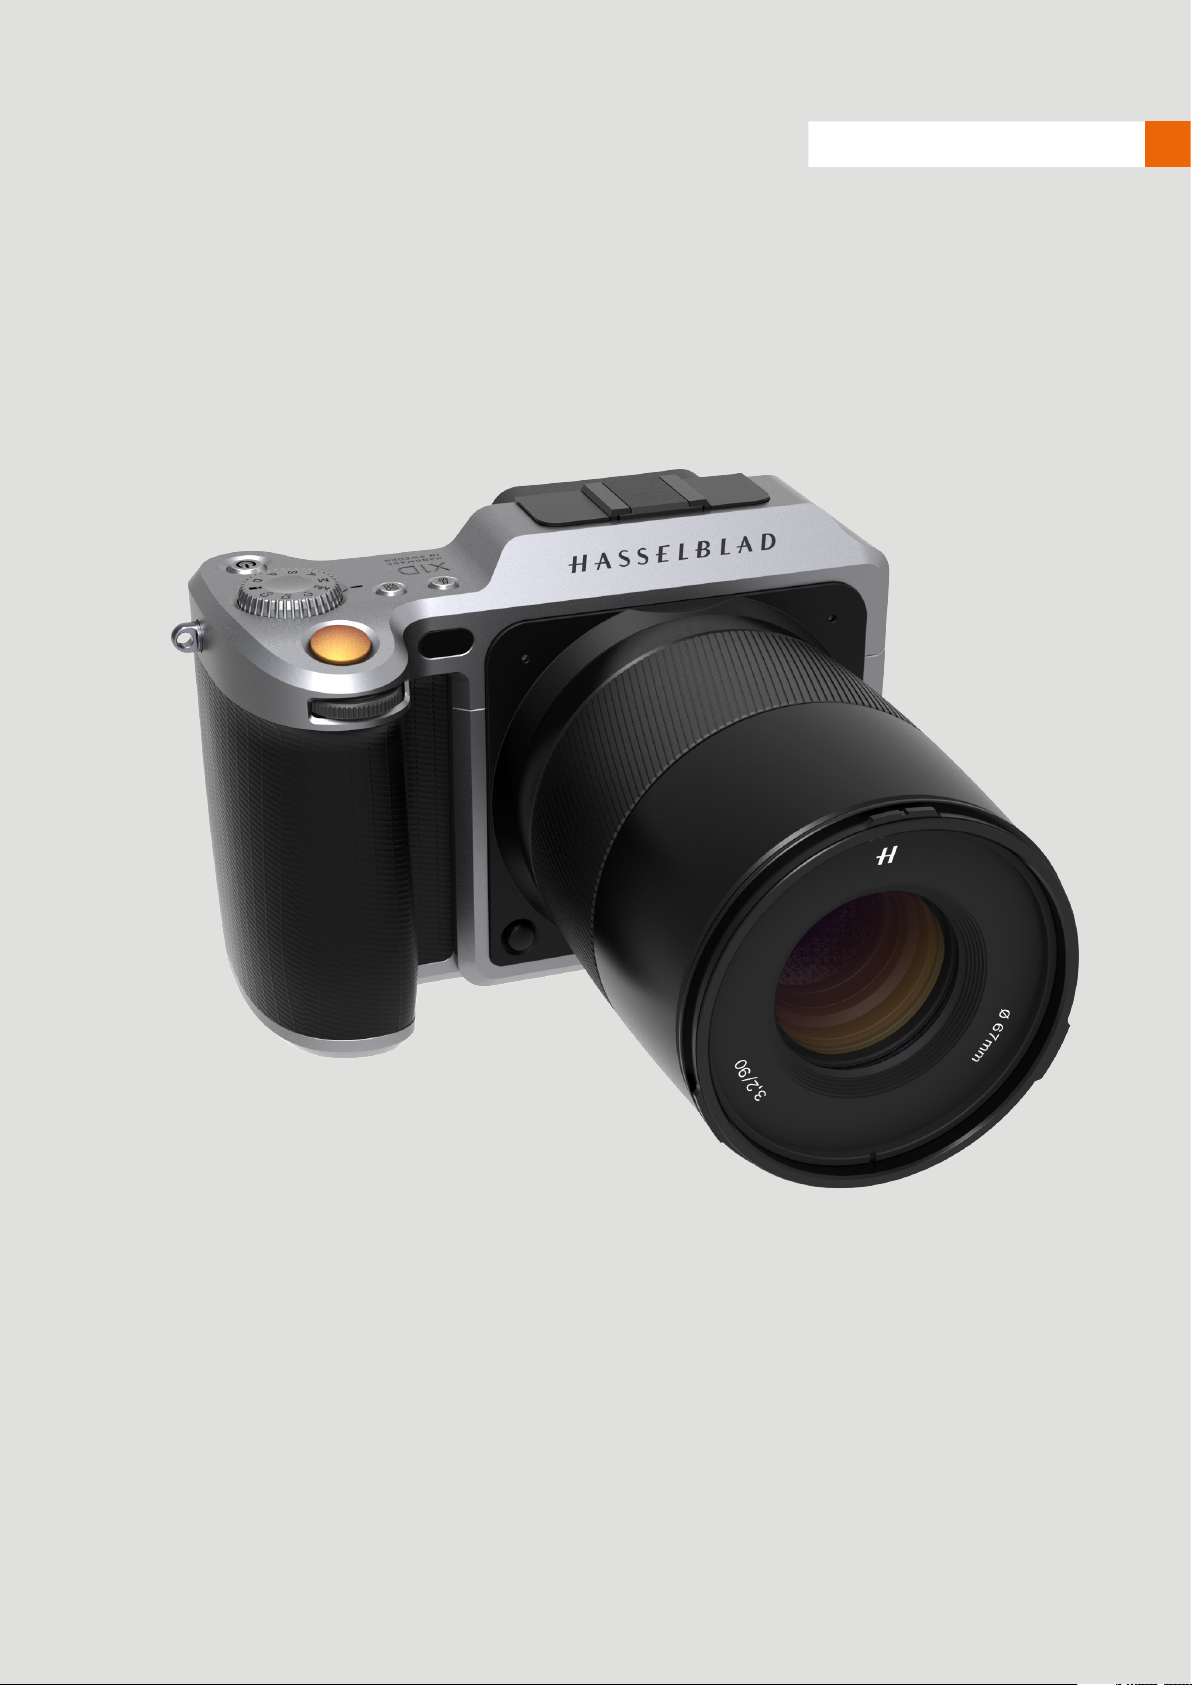
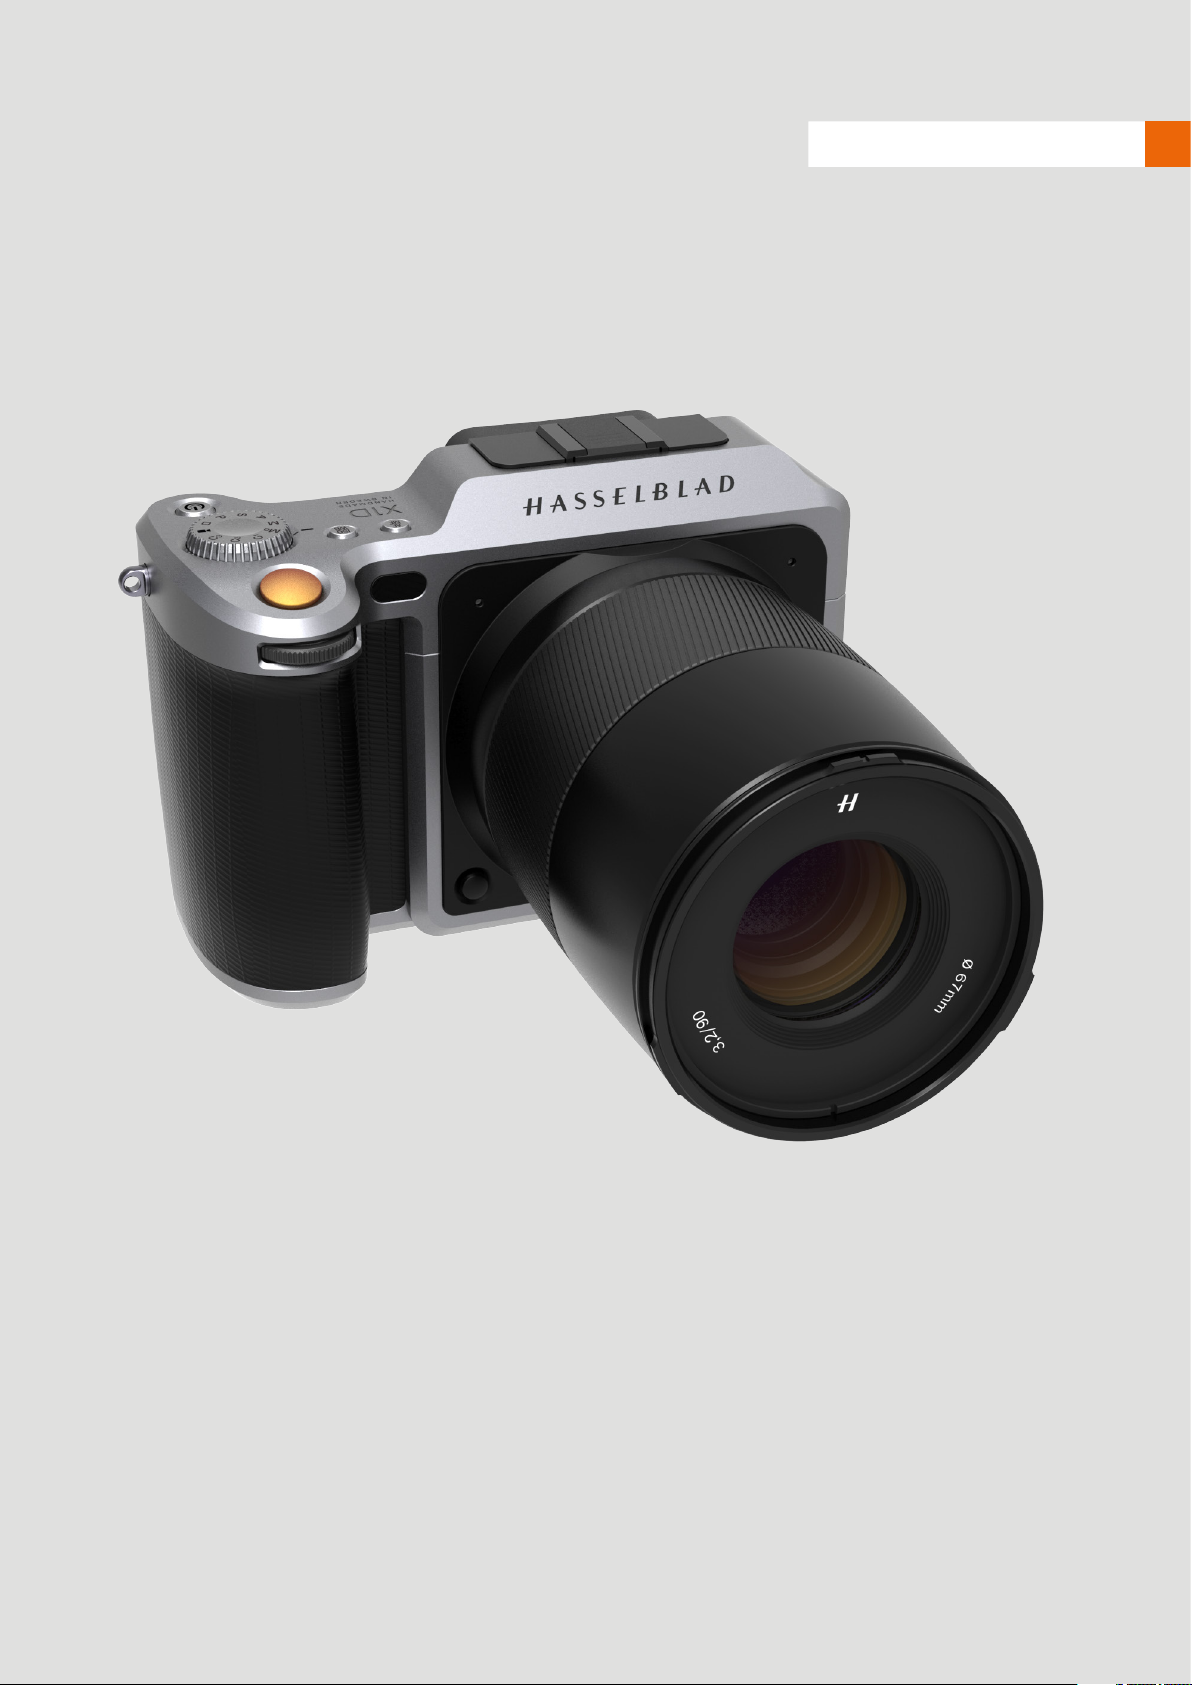
1.2 X1D FEATURES
Medium format advantages
Shallow depth of eld.
Large sensor for unbeatable image resolution.
Super smooth colour and tone rendition.
Enlargements in breathtaking quality.
USER GUIDE
XCD 45mmXCD 30mm
8
HNCS Hasselblad Natural Colour Solution
HNCS saves time and enables high Colour Quality in skin
tones and specic product tones that are going to be
rendered automatically and accurate.
JPEG & RAW les
The JPEG les are HNC proled so you can print straight
from a folder for amazing quality. RAW les are retained for
your nal masterpieces.
H.264 Video
The X1D can record HD video in H.264 format in 25 fps.
Digital Lens Correction
The Digital Lens Correction is applied at the le editing
stage, takes a discerning look at any colour aberration,
distortion and light fall off however minor (which is
inherent in any lens, anywhere) and resolves the situation
automatically.
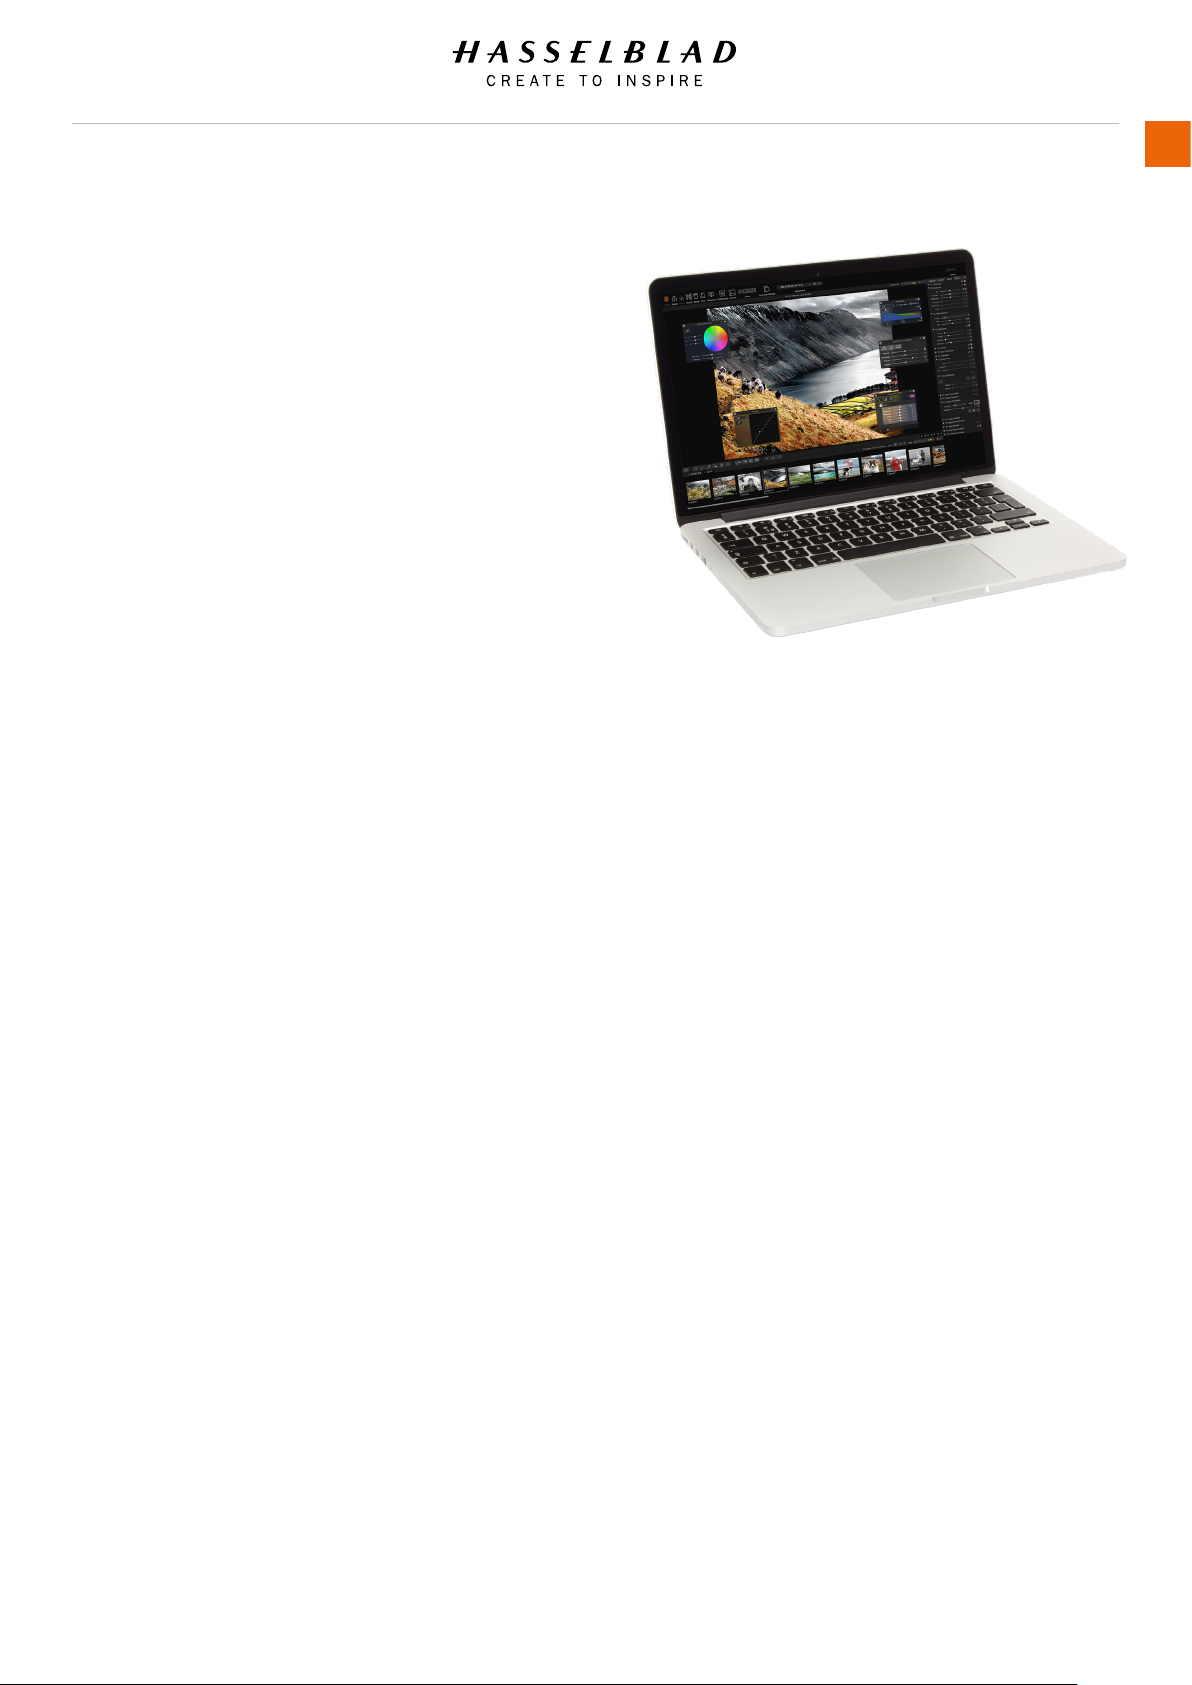
Hasselblad Phocus Digital Imaging Software
The Hasselblad Phocus Digital Imaging Software is a
Capture Processing and File Management Application
aimed primarily at Hasselblad 3F le handling.
Phocus Mobile offers remote viewing and control when
shooting tethered. Phocus mobile is free to download at
Apple´s App Store for both iPhone and iPad.
XCD 90mm XCD 120mm Macro
X1D CAMERA AND LENSES FEATURES
Stainless steel/aluminium camera body. Access to 12 H system
lenses.
XCD System lenses and accessories
XCD 30.
XCD 45.
XCD 90.
XCD 120 Macro.
H System Lenses and Accessories
XH Lens Adapter for H system Lenses. See page 132.
Lenses
24, 28, 35, 50, 80, 100, 150, 210, 300, 120 Macro, 50-110 &
35-90 zooms. 1.7x converter & Macro Converter.
Flash
Nikon Flash Product range can be used in TTL-mode.
See “Flash Settings” on page 96page 97 for details.
X1D Table of Content www.hasselblad.com
Page 9

Introduction
1.3 DELIVERY CHECK
USER GUIDE
HOT SHOE
COVER
9
BATTERY
FRONT PROTECTIVE
COVER
ELECTRONIC
VIEWFINDER
EVF
CAMERA BODY
LENS RELEASE BUTTON
LENS
Delivery Check
1 Unpack all items.
2 Verify that all the items listed on the attached package
information are supplied.
3 Inspect all the items for damage.
4 If any items are missing or damaged, write down the
product number of that item. If not, proceed to step 6.
5 Contact your Hasselblad dealer or distributor and
tell them the product number of the item missing or
damaged.
6 Keep the purchase details and the warranty in a safe
place.
In the package
USB stick with X1D User
Guide and Phocus Software.
Camera Body.
Camera Front Protective Cover.
Lens (if included in purchase).
Lens Hood.
Lens Protection lid x2.
Battery.
Battery Charger.
1 SD Card included.
USB 3 Cable.
Carrying Strap.
X1D Table of Content www.hasselblad.com
Page 10

Introduction
USER GUIDE
1.4 X1D TECHNICAL SPECIFICATIONS
Camera Type Medium Format Mirrorless Digital camera with Autofocus, Auto exposure, interchangeable Lenses.
Construction Machined aluminium. Tripod socket 1/4”.
Sensor Type CMOS, 50 mega pixels (8272 × 6200 pixels, 5.3 × 5.3 µm).
Sensor Dimensions 43.8 × 32.9 mm.
Image Size Stills: RAW 3FR capture 65 MB on average. TIFF 8 bit: 154 MB; Video: HD (1920 x 1080p, max 5 minutes/clip).
File Format
Shooting Mode Single shot stills, Video.
Colour Denition 16 bit; Dynamic range approximately 14 stops.
ISO Speed Range ISO Auto, 100, 200, 400, 800, 1600, 3200, 6400, 12800, 25600.
Storage Options Two SD cards or tethered to Mac or PC. SD Cards can be used in Overow or Bacup mode.
Colour Management Hasselblad Natural Colour Solution, HNCS.
Storage Capacity 16 GB card holds 120 images on average.
Capture Rate 1.7 frames per second (2.0 in M and MQ Mode).
Stills: Hasselblad 3FR.
Video: H.264 Compressed (25 fps).
10
User Interface
Display 3 inch TFT type, 24 bit colour, 920 K pixels.
Live View On camera, host and iOS device with high frame rate.
Viewnder (EVF) 2.4 Mega-pixel Electronic Viewnder (EVF).
Histogram Feedback Yes, on rear display.
IR Filter Mounted in front of sensor.
Software Phocus for Mac and Windows. Compatible with Adobe Camera and Adobe Photoshop Lightroom.
Platform Support Macintosh: OS X version 10.9. PC: XP/Vista/Windows 7 (32 and 64 bit)/ 8 / 10.
Host Connection Type USB 3.0 (5 Gbit/s) Type-C connector.
Additional Connections Mini HDMI, Audio In/Out.
Operating Temperature -10 to 45 ˚C. 14 to 113 ˚F.
Wi-Fi 802.11 b, g, n, a, ac (a and ac depending on region).
Dimensions Complete camera w/ XCD 45 mm lens: 148 x 97 x 125 mm [W x H x D].
Weight 1170 g (Complete camera with XCD 45 mm lens, Li-Ion battery and card).
Lenses
Shutter Electronically controlled lens shutter with speeds up to 1/2000. Flash sync at all speeds. Optional Electronic shutter
Shutter Speed Range 68 minutes to 1/2000 seconds with XCD lenses. 1/800 or 1/2000 with HC/HCD lenses. Electronic shutter 68 min to 1/10000.
Flash Sync Speed Flash can be used at all shutter speeds.
Flash Control
Flash Compatibility In TTL-mode, the following Nikon Flash products can be used: SB-300, SB-500, SB-700, SB-900, SB-910.
Focusing
Exposure Metering
Power Supply Rechargeable Li-ion battery (7.2 VDC/3200 mAh).
GPS External Module 72-channel u-blox M8 engine supporting GPS L1C/A, SBAS L1C/A, QZSS L1C/A, GLONASS L1OF and Galileo E1B/C1.
Touch functionality: Yes, full support. Touch interface including swipe, scroll and pinch/spread to zoom. Camera grip with buttons and
control wheels. Many camera functions and settings can be controlled from a tethered computer or iPhone/iPad over Wi-Fi.
Hasselblad XCD lenses with built in electronically controlled shutter and aperture. Automatic or manual focusing with instant manual
focus override. All HC/HCD lenses can be used with an adapter (optional). Lens shades can be mounted in reverse for transport.
TTL centre weighted system. Compatible with NikonTM System ashes. ISO range 100 to 6400. Flash output can be adjusted (-3 to
+3 EV) for ll-in purposes independent of ambient light. Sync at all shutter speeds.
Automatic and manual focusing. Instant manual focus override. Automatic focusing using contrast detection. 100% zoom possible in
manual focus.
Spot, centre weighted and centre spot.
Metering range. Spot: EV 2 to EV 21. Centre weighted: EV 1 to EV 21. Centre spot: EV 1 to EV 21.
X1D Table of Content www.hasselblad.com
Page 11
Introduction
1.5 SYSTEM REQUIREMENTS
Storage and editing of images requires certain minimum
computer capabilities. Large images require a reasonably
high performance computer with sufcient memory, advanced
graphics capabilities and a recent operating system.
It is recommended that the computer has a USB 3 connector,
which will allow you to load images more quickly from the
camera. A USB SD card reader is also required for image
transfer from the SD cards.
1.6 NEW IN THIS VERSION 1.8
● Crop Modes
Add a crop mask with different image formats. See page
100.
● EVF image preview
Preview images in the EVF. See page 75 and page
111.
● New storage option: “Backup”
Save same image/video to both cards. See more on
page 116.
● AF for select HC/HCD lenses with XH Adapter
See page 132.
● New Custom Button Option: Crop Mode Cycle
Program a button to quickly cycle through differnt crop
formats. See page 107.
● Added data in Spirit Level overlay
Exposure data is now shown together with Spirit Level
Overlay. See more on page 61.
● New menu item “Touch”
Touch settings are now moved from the AF menu to a
separate menu. See page 113.
● Panning in EVF Live View using Touch-pad
Zoomed-in Live View in teh EVF can now be panned using
the Touchpad function. See page 60 and page 113.
● Use Touch-pad with HDMI
The Touchpad function can be used to move AF point or
pan in Zoomed-in Live View on a connected HDMI screen.
See page 113.
● Support for additional SD Cards. See page 46.
1.7 ABOUT THIS USER GUIDE
The X1D User Guide is designed for on-screen PDF reading to
take advantage of the interactivity functions and search tools.
USER GUIDE
INTERACTIVE PDF
You can navigate the User Guide by selecting a chapter in the
Table of Contents. This interactive feature is available on nearly
all PDF readers, computer platforms and web browsers. All
pages contains a link to the Table of Content and most page
references also work as a clickable link.
SEARCH TOOLS
On most PDF readers you can use the Search Tool to nd a
specic subject, function or setting.
FORMAT AND PRINTING THE X1D USER GUIDE
Please note that the format is A4 to conform with the most
common standard. Therefore if printing to US Letter format or
similar please ensure you select “Fit to Printable Area” in the
page scaling dialogue.
Photo Credits
Page 11, 19, 56, 76, 77, 78, 85 and 86, Ian Lawson.
Page 83 and 84, Dmitry Ageev.
Page 83, Sails Chong.
Page 76 Jens Karlsson.
Page 68, 69 and 70, Damien Demolder.
Page 108, Philip Liljenberg.
11
X1D Table of Content www.hasselblad.com
Page 12
2 SAFETY
Page 13

Safety
2.1 SAFETY AND WARNINGS
Warning!
Do not place cables between camera and computer so that
there is a risk for people to trip and fall. This can cause
personal injury and/or damage to the equipment.
Warning!
If you use spare battery packs, make sure to use protective
caps on the contacts. The contacts can short circuit and catch
re, if not protected. This can cause personal injury and/or
damage to the equipment.
Warning!
Do not expose batteries (battery pack and batteries installed) to
excessive heat such as sunshine, re or similar. If exposed, the
batteries can catch re. This can cause personal injury, damage
to the equipment and the surrounding environment.
Warning!
Be careful when working with strobe and ash units. This will
prevent personal injury and/or damage to the equipment.
Warning!
Operation of this equipment in a residential area could cause
radio interference.
2.2 CAUTIONS
Caution!
Be careful when you use the camera. The camera is a precision
instrument. This will help prevent damage to the camera.
Caution!
Danger of explosion if battery is incorrectly replaced. Replace
only with the same or equivalent type.
Caution!
Do not use batteries other than specied. This can cause
damage to the batteries.
Caution!
Use protective covers as much as possible. The protective
covers will help prevent damage to the equipment.
Caution!
Use a protective case or camera bag when you transport the
equipment. This will help prevent damage to the equipment.
USER GUIDE
Caution!
Protect the equipment from oil fumes, steam, humid conditions
and dust. This will help prevent damage to the equipment.
Caution!
Seal all equipment in a plastic bag or similar if you enter damp
and humid condition from dry and cold condition. Wait until the
equipment has acclimatized to the new temperature before you
remove the equipment from bag. This will help prevent damage
to the equipment.
Caution!
Avoid frequent and high temperature changes. This can cause
damage to the equipment.
Caution!
Keep camera and equipment away from moisture. If your camera
becomes wet, disconnect from electric power and let camera
dry before further use. This will help prevent damage to the
equipment.
Caution!
Store the equipment in a dry environment. This will help prevent
damage to the equipment.
Caution!
Be careful when you attach/detach the components to/from
the camera. This will help prevent damage to the data bus
connections.
Caution!
Use the grip or strap when you lift and handle to camera. This
will help prevent damage to the camera.
Caution!
Do not insert ngers into the camera body. This can cause
damage to the equipment.
Caution!
Do not touch the lens glass surfaces with your ngers. This can
cause damage to the equipment.
Caution!
Do not touch the CMOS Sensor with your ngers. This can
cause damage to the equipment.
13
X1D www.hasselblad.com
Table of Content
Page 14

Safety
Caution!
Keep all equipment out of reach of small children. This will
prevent damage to the equipment.
Caution!
When cleaning the camera, remove the batteries. This will
prevent damage to the camera.
Caution!
If you leave the camera unused for a long period, remove the
batteries. This will prevent damage to the equipment.
Caution!
Do not try to remove the glass IR lter from the front of the
CMOS (due to dust or similar). This can cause damage to the
equipment. Always contact your local Hasselblad Authorized
Service Centre.
Caution!
If you use canned compressed air to clean the glass of IR lter,
read the instructions very carefully before use. This will help
prevent damage to the lter.
USER GUIDE
14
2.3 DISPOSAL
This product must be put in municipal waste.
Check local regulations for disposal.
X1D www.hasselblad.com
Table of Content
Page 15

Safety
USER GUIDE
15
2.4 FCC
Federal Communication Commission Interference Statement:
This equipment has been tested and found to comply with the
limits for a Class B digital device, pursuant to Part 15 of the
FCC Rules. These limits are designed to provide reasonable
protection against harmful interference in a residential
installation.
This equipment generates, uses and can radiate radio
frequency energy and, if not installed and used in accordance
with the instructions, may cause harmful interference to
radio communications. However, there is no guarantee that
interference will not occur in a particular installation. If this
equipment does cause harmful interference to radio or
television reception, which can be determined by turning the
equipment off and on, the user is encouraged to try to correct
the interference by one of the following measures:
● Reorient or relocate the receiving antenna.
● Increase the separation between the equipment and
receiver.
● Connect the equipment into an outlet on a circuit
different from that to which the receiver is connected.
● Consult the dealer or an experienced radio/TV technician
for help.
FCC Caution
Any changes or modications not expressly approved by the
party responsible for compliance could void the user’s authority
to operate this equipment.
2.5 ISED
RSS-Gen Information for the Certication of Radio Apparatus
This device complies with ISED licence-exempt RSS standard(s).
Operation is subject to the following two conditions:
1 This device may not cause interference, and
2 This device must accept any interference, including
interference that may cause undesired operation of the
device.
Cet appareil est conforme au(x) standard(s) RSS exempt(s)
de licence de ISED. Son fonctionnement est sujet aux deux
conditions suivantes:
1 cet appareil ne doit pas occasionner d’interférence
2 cet appareil doit supporter toutes les interférences, y
compris celles qui pourraient provoquer un mauvais
fonctionnement de cet appareil.
RSS-102 RF Exposure Compliance of Radiocommunication
Apparatus
The X1D-50c has been designed to comply with safety
requirements for exposure to radio waves. SAR testing has
been performed in accordance with RSS-102, with the X1D-
50c transmitting at its highest certied power level in all used
frequency bands. The highest Body SAR value for the X1D-
50c when tested was 0.10 W/kg against a limit of 1.6 W/kg.
Extremity SAR was measured to 0.33 W/kg.
Please follow the instructions included in the user guide for
product installation and use.
This device complies with Part 15 of the FCC Rules. Operation is
subject to the following two conditions:
1 This device may not cause harmful interference, and
2 This device must accept any interference received, including
interference that may cause undesired operation.
FCC Radiation Exposure Statement:
This equipment complies with FCC radiation exposure limits set
forth for an uncontrolled environment. The highest SAR value as
reported to the authorities for the X1D-50c when tested for use
by the Body is 0.10 W/kg and Extremity is 0.33W/kg against a
limit of 1.6W/kg.
Le X1D-50c a été conçu pour se conformer aux exigences de
sécurité en matière d’exposition aux ondes radio.
Des tests SAR ont été effectués conformément à la RSS-
102 avec le X1D-50c transmettant à son plus haut niveau
de puissance certié dans toutes les bandes de fréquences
utilisées.
La valeur SAR la plus élevée pour la X1D-50c lors des tests
était de 0,10 W/Kg contre une limite de 1.6 W/kg. On a mesuré
l’extrémité SAR à 0,33 W/kg.
Merci de suivre les instructions fournies dans le mode d’emploi
pour l’installation et l’utilisation du produit.
2.6 CERTIFICATION INFORMATION
Depending on region certication information in addition to what
is engraved on the camera bottom can be found on an e-label.
From the Main Menu this label is reached by pressing General
Settings > About > Certication.
X1D www.hasselblad.com
Table of Content
Page 16
3 FUNCTIONS
Page 17
Functions
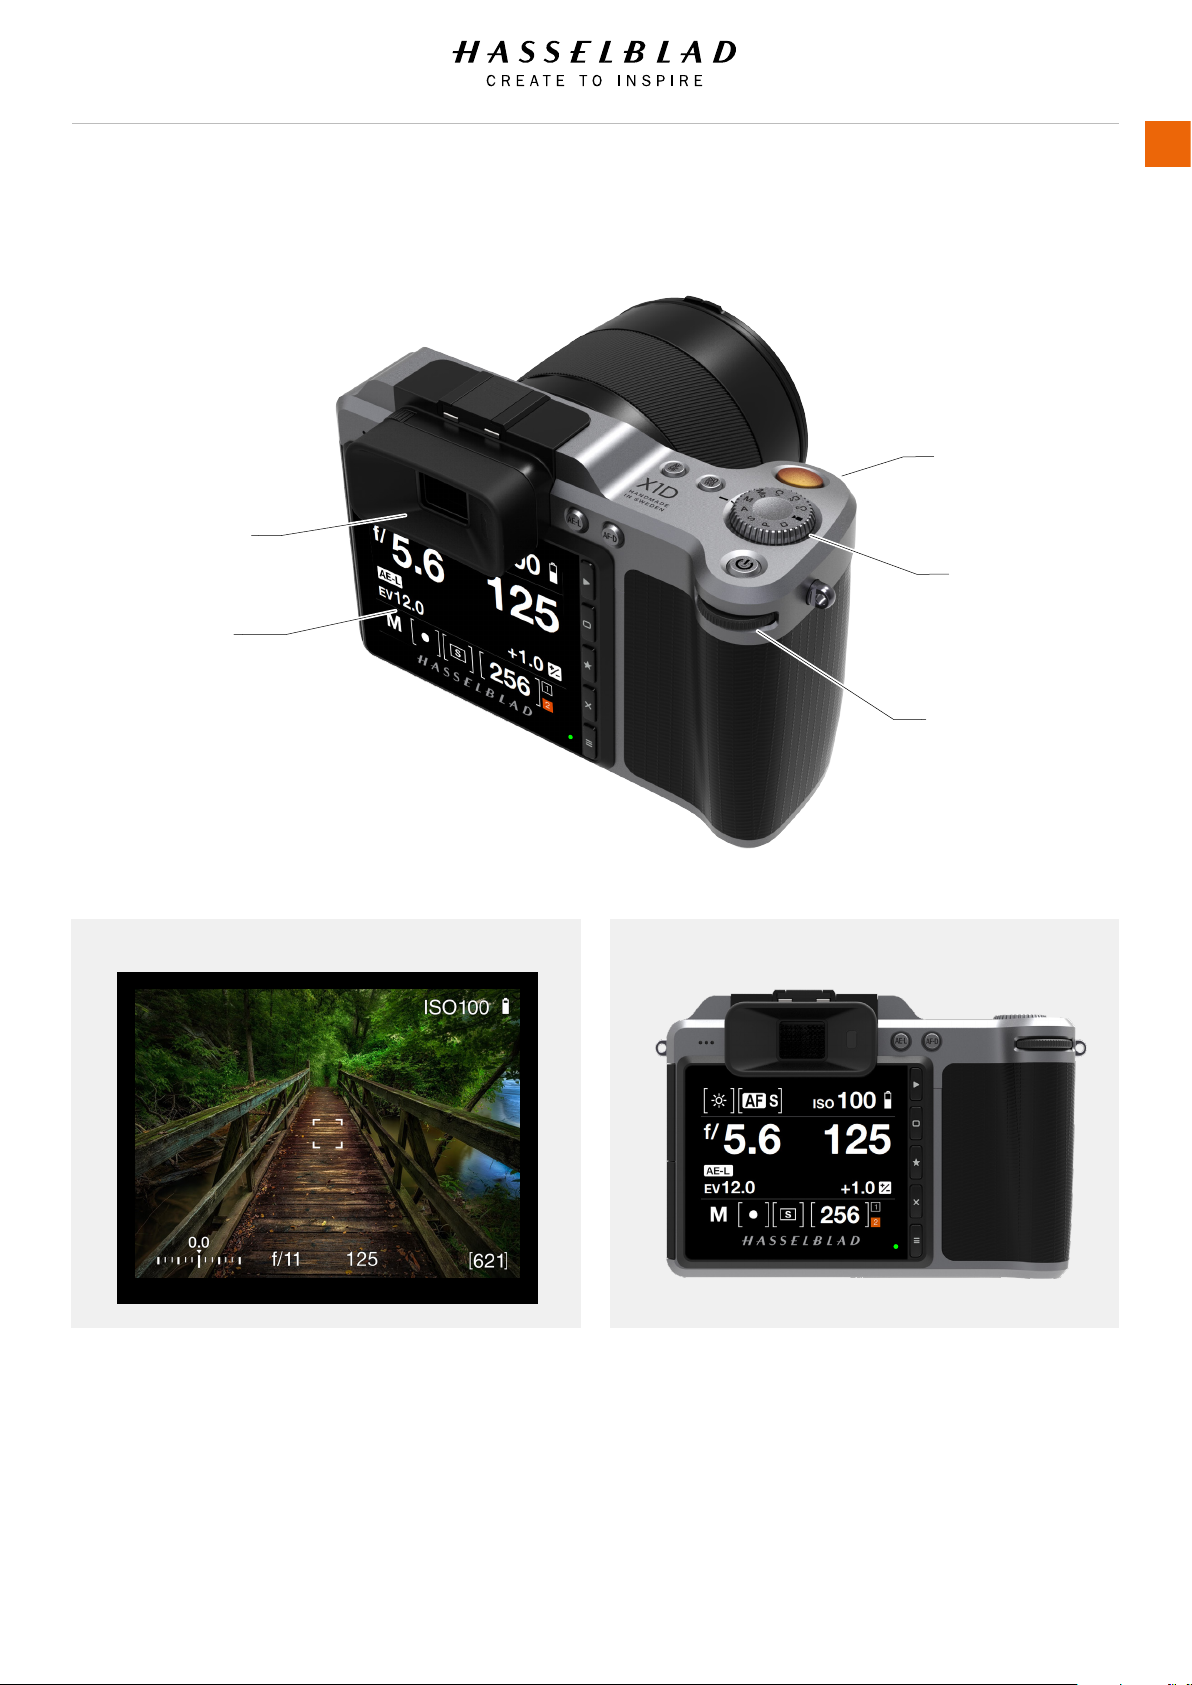
3.1 THE X1D INTERACTION DISPLAYS
EVF - ELECTRONIC
VIEWFINDER DISPLAY
TOUCH DISPLAY
USER GUIDE
FRONT SCROLL WHEEL
MODE DIAL
REAR SCROLL WHEEL
17
Electronic Viewnder Display, EVF
Electronic Viewnder Display, EVF
The EVF on the Camera displays ISO, Focus action, Exposure
compensation, Aperture, Shutter and Captures remaining. Press
the MF/AF and the ISO/WB buttons to change settings. Use the
Front Scroll Wheel or the Rear Scroll Wheel to select desired
settings. Press the same button again to Exit and Save.
Touch Display
Touch Display
The X1D display is touch sensitive and you can use it in the
same way you navigate on a smartphone. For example Swipe,
Select, Pinch and Spread to Zoom. You can also navigate by
using the 5 soft buttons to the right of the Touch Display and
Scroll Wheels on the Camera.
X1D www.hasselblad.com
Table of Content
Page 18
Functions
3.2 TOUCH DISPLAY NAVIGATION
The Touch Display on the X1D Camera is similar to a Phone or
Tablet with touch sensitivity. The following gestures can be used
to navigate and control the camera:
USER GUIDE
18
Action Function
Swipe Right Move back / Move image right.
Swipe Left Move image left. Only in Browse
mode.
Swipe Down Display Control Screen.
Swipe Up Hide Control Screen.
Tap / Press Select action / button / setting.
Double Tap Zoom in to 100%. Double Tap again
to Zoom out to full View.
Function Action
Select Tap / Press with one nger.
Display Control Screen Swipe down from the top of the
screen.
Hide Control Screen Swipe up.
Move back Swipe right.
Zoom in Spread (move two ngers apart).
Zoom out Pinch (move two ngers together).
MAIN MENU
Display Wi-Fi Exposure
RAW
JPG
Power &
Quality Autofocus
Timeouts
Storage Touch
Swipe Right
CAMERA SETTINGS: EXPOSURE
Increment Step Size
Exposure:
Exposure Adjust:
Shutter Function
Swipe Down
AF
1/2
step
1/3 step
Swipe Left
Swipe Up
MAIN MENU
Display Wi-Fi Exposure
RAW
JPG
Power &
Quality Autofocus
Timeouts
AF
Storage Touch
Display Control Screen from Main Menu
1 Swipe down over Main Menu to display the Control Screen.
2 The Control Screen displays the Camera Settings.
3 Select any of the settings to make a quick adjustment within
the Control Screen Interface.
4 Swipe Up to hide the Control Screen and display the Main
Menu.
Note!
The Control Screen is interactive and you can change most
settings. Settings that can be changed, depends on the active
Shooting Mode.
X1D www.hasselblad.com
Table of Content
1 Swipe Down 2
MAIN MENU
Display Wi-Fi Exposure
RAW
AF
JPG
Power &
Quality Autofocus
Timeouts
Storage Touch
Main Menu
Control Screen
3 Adjust settings 4 Swipe up
MAIN MENU
Display Wi-Fi Exposure
RAW
JPG
Power &
Quality Autofocus
Timeouts
Storage Touch
Control Screen
Main Menu
AF
Page 19
Functions
ZOOM IN AND OUT ON THE TOUCH DISPLAY
The following gestures can be used to Zoom in and out on the
Touch Display:
Function Action
Zoom in Spread (move two ngers apart).
Zoom out Pinch (move two ngers together).
Action Function
Double Tap Zoom in to 100%. Double Tap again
to Zoom out to full View.
Zoomed View
Standard Preview
USER GUIDE
19
9 View Mode
9 View Mode displays an overview of up to 9 captures. Scroll
down to display all Captures in the Folder.
Enter 9 View Mode by pressing the soft button with a “star”
symbol to the right of the Touch Display, or zoom out with a two
nger “pinch”.
9 View Mode
X1D www.hasselblad.com
Table of Content
Page 20
Functions
3.3 NAVIGATING THE MENUS
DESCRIPTION OF THE TOUCH DISPLAY MENU ITEMS
The X1D Display Screen is Touch Sensitive. You can tap with
one nger to select and swipe in different directions to move up,
down, forward and backward through the user interface.
Button Screen function
1 Browse Button Go to image browse
2 Soft Button Up
3 Select Button Select
4 Soft Button Down
5 Menu / (EXIT) Button Back to Main Menu
1 Browse Button
Activates the display and shows the last image. The user
can review images, browse and zoom. Preview images and
zoom in to view close-ups of previews for focus checking.
Zoom out to view several at once and nally to view and
select folders and media.
2 Soft Button
Function depends on screen information. The button
changes the overlay in Live View Mode. The button moves
the selector up when scrolling in menus. When the Control
Screen is active, the button selects parameter that can be
changed with the Scroll Wheels.
MAIN MENU
Display Wi-Fi Exposure
RAW
AF
JPG
Power &
Quality Autofocus
Timeouts
Storage Touch
USER GUIDE
20
1
2
3
4
5
3 Select Button
The Select Button toggles between 1 view and 9 view in
Browse Mode. Toggles 100% zoom-in in Live View Mode.
4 Soft Button
Function depends on screen information. The button acts
as Delete Image button in Browse Mode. The button moves
the selector down in menus. In Control Screen it selects
parameter that can be changed with the Scroll Wheels.
5 MENU / (EXIT) Button
This button opens the Main Menu. If the Main Menu is
already active, the Control Screen is shown.
It is also used for other tasks (for example EXIT button) as
you issue commands navigating the menu system.
Using the buttons on the control panel and the scroll wheels
on the grip, you can navigate through the various levels in the
menu. Here is an overview of the setting options available.
Control Screen
Main Menu
MAIN MENU
Display Wi-Fi Exposure
RAW
Power &
Timeouts
Storage Touch
JPG
Quality Autofocus
AF
X1D www.hasselblad.com
Table of Content
Page 21
Functions
OVERVIEW OF MENUS AND SETTINGS ON TOUCH DISPLAY
The Touch Display can be controlled directly on the touch
sensitive screen by pressing the menus and icons. You can
scroll up, down and from left to right as described in previous
chapters. You can also navigate the on screen menus by using
the following buttons and scroll wheels:
1 Control buttons next to the Touch Display for example
Menu / Exit button.
2 Front Scroll Wheel.
3 Shutter Release.
4 Mode Dial.
5 Rear Scroll Wheel.
MAIN MENU
Display Wi-Fi Exposure
RAW
AF
JPG
Power &
Quality Autofocus
Timeouts
Storage Touch
USER GUIDE
21
The Main Menu on the Touch Display
On the right side of the Display there are three Main Function
Settings: Camera Settings, Video Settings and General Settings.
To the left of them, the Favourite Settings Short Cuts are
displayed. You can add or delete these Short Cuts to access
your most used functions directly from the Main Menu.
1
The Menu Button (1) navigates back to Main Menu.
2
3
4
5
X1D www.hasselblad.com
Table of Content
Page 22
Functions
3.4 TOUCH DISPLAY MAIN MENU
MAIN MENU
In the Main Menu there are 3 different Main Settings. Camera
Settings (1), Video Settings (2) and General Settings (3).
The placement of these 3 Settings are xed and cannot be
changed.
The icons on the left part of the Main Menu are Favourite
Shortcuts to Functions. In this example, they are:
Display.
Wi-Fi.
Exposure (+/-).
Power & Timeouts.
Quality (RAW/JPG).
Autofocus.
Storage.
Service.
USER GUIDE
Main Menu
MAIN MENU
Display Wi-Fi Exposure
RAW
Power &
Timeouts
Storage Touch
JPG
Quality Autofocus
1 Camera Settings
2 Video Settings
3 General Settings
4 + (plus) symbol (Add Setting)
AF
22
1
2
3
4
ADD SHORTCUTS TO MAIN MENU FAVOURITES
To create and speed up your own workow you can add in the
settings you use more frequently in the Favourite settings.
These functions will then be displayed on the Main Menu
until you remove them and replace them with other Favourite
settings. To add or remove a shortcut, see the instructions on
the following page.
The available functions to add are:
Exposure
Image
Quality
Autofocus
Manual Focus
Self Timer
Custom Buttons
Conguration
Video Quality
Video Live View
Wi-Fi
Display
Custom Modes
Storage
Date & Time
Power & Timeouts
Spirit Level
Language
Service
About
Touch
See detailed description on how to add and remove functions to
your Favourite list on the following page.
X1D www.hasselblad.com
Table of Content
Page 23

Functions
USER GUIDE
23
HOW TO ADD SHORTCUTS TO MAIN MENU
1 Select the + icon (A) on the Main Menu.
2 The Add Favourite Pop up screen displays the
available options to add in a scroll list.
3 Select for example Self Timer (B).
4 The Self Timer icon is displayed on the Main Menu
and the action is saved in the Camera Memory.
HOW TO REMOVE SHORTCUTS ON THE MAIN MENU
1 Press and Hold on the icon you would like to
remove from the Main Menu Favourites. Self Timer
(C) in this example.
2 The close symbol, X, is displayed on the upper right
corner of the selected shortcut (D).
3 Select / Press the X in the orange circle to delete
the icon and remove the function from the Main
Menu Favourites.
4 The Self Timer icon is no longer displayed in the
Main Menu Favourites list. You can add the same
function later at any time.
A
B
Main Menu
MAIN MENU
Display Wi-Fi Exposure
RAW
Power &
Timeouts
Storage Touch
JPG
Quality Autofocus
AF
Add Favourite Pop up screen
C
D
Main Menu with Self Timer added
MAIN MENU
Display Wi-Fi Exposure
RAW
Power &
Timeouts
Storage Service
JPG
Quality Autofocus
AF
Self Timer
Remove Shortcut
MAIN MENU
Display Wi-Fi Exposure
Power &
Timeouts
RAW
JPG
Quality Autofocus
AF
Storage Service
X1D www.hasselblad.com
Table of Content
Self Timer
Page 24

Functions
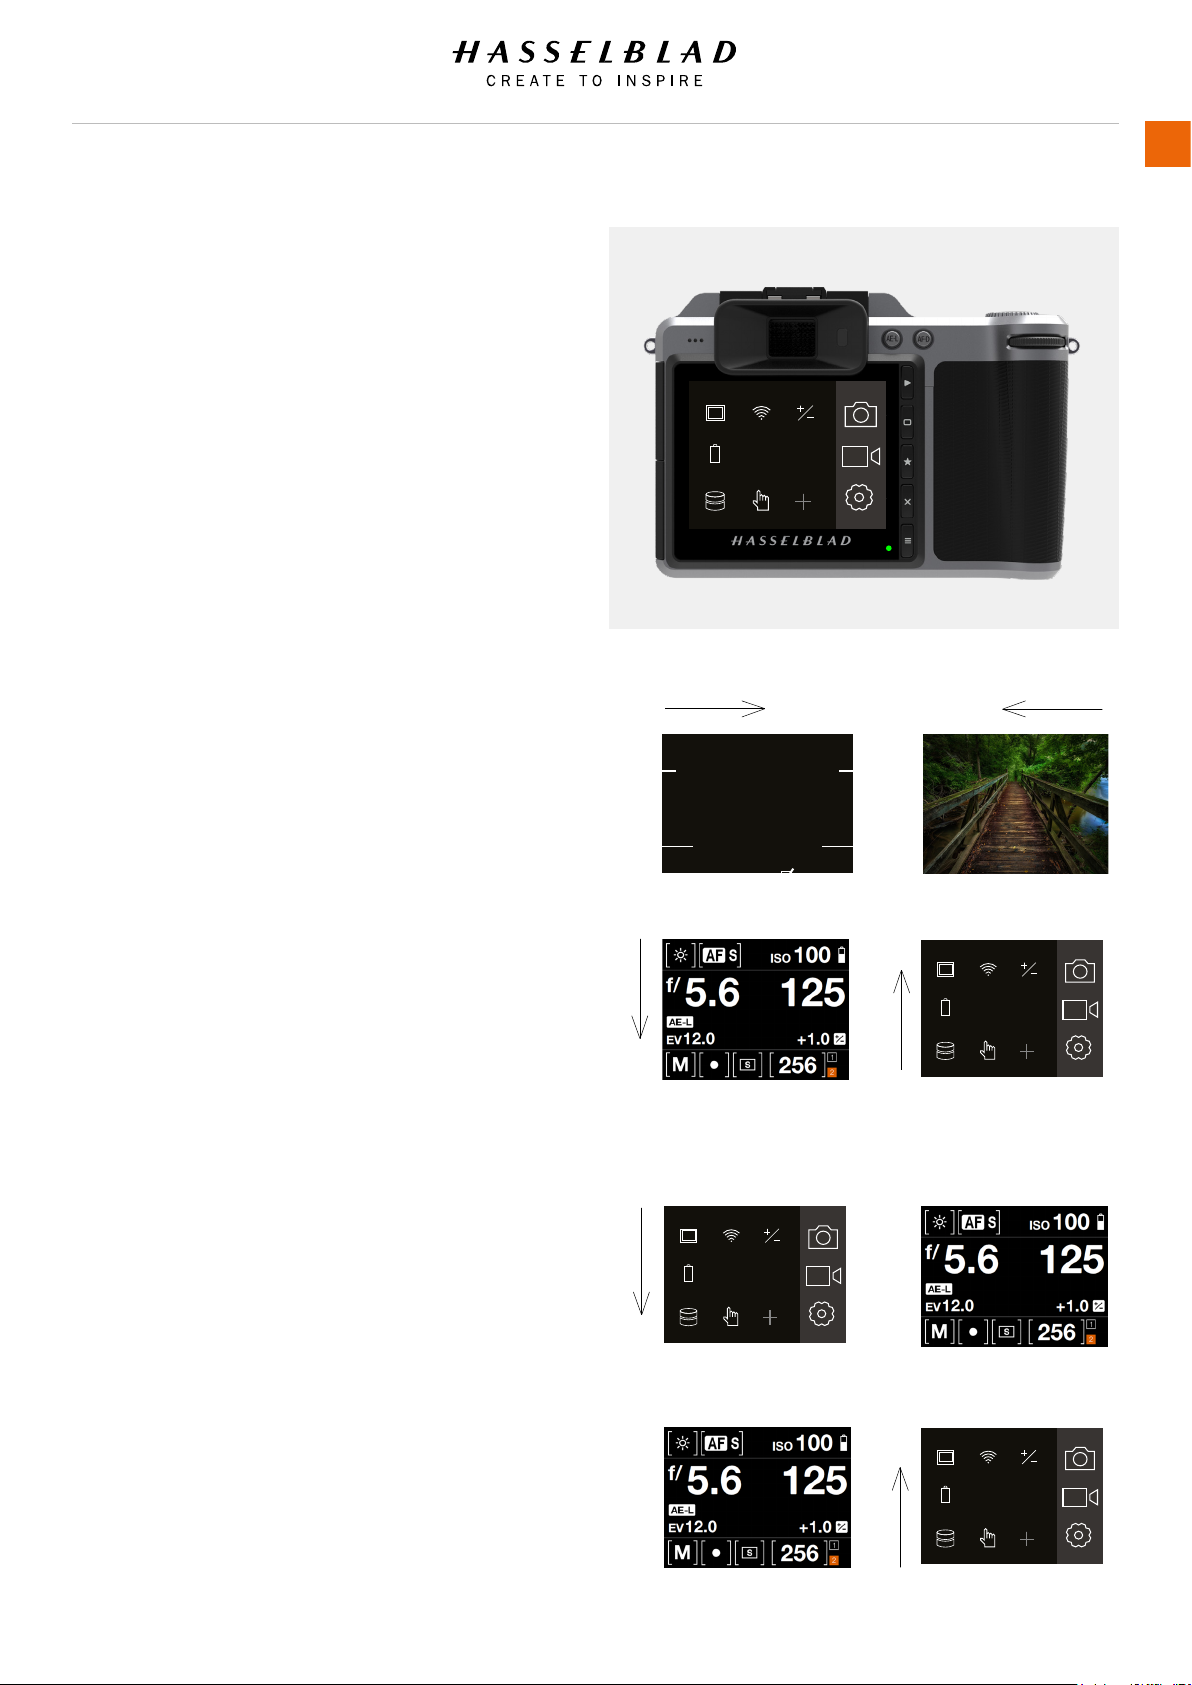
CONTROL SCREEN
You can access the most common settings using the
Control Screen. You can easily change these settings
by tapping on any function and adjust directly.
Display Control Screen
Swipe down from the top of the display on the Touch
Display or press the soft button to the right of the
display you can always display the Control Screen.
Close the Control Screen
Swipe up from the top of the display on the Touch
Display or press the soft button again the display you
can always display the Control Screen.
Note!
When Control Screen is displayed, there is no light
metering ongoing. The sensor is inactive to save
battery power.
Control Screen
USER GUIDE
24
LOCKED PROGRAMS ON THE CONTROL SCREEN
P Mode
When you select P Mode the Aperture (5.6) and
Shutter (125) are automatic and displayed in grey
colour that indicates that you cannot change these
settings.
A Mode
For Aperture priority (A) you can change the Aperture
value and the Shutter value will be automatic and
displayed in grey.
S Mode
For Shutter priority (S) you can change the Shutter
value and the Aperture value will be automatic and
displayed in grey.
Control Screen
P Mode
Control Screen
A Mode
Control Screen
S Mode
X1D www.hasselblad.com
Table of Content
Page 25
Functions
USER GUIDE
25
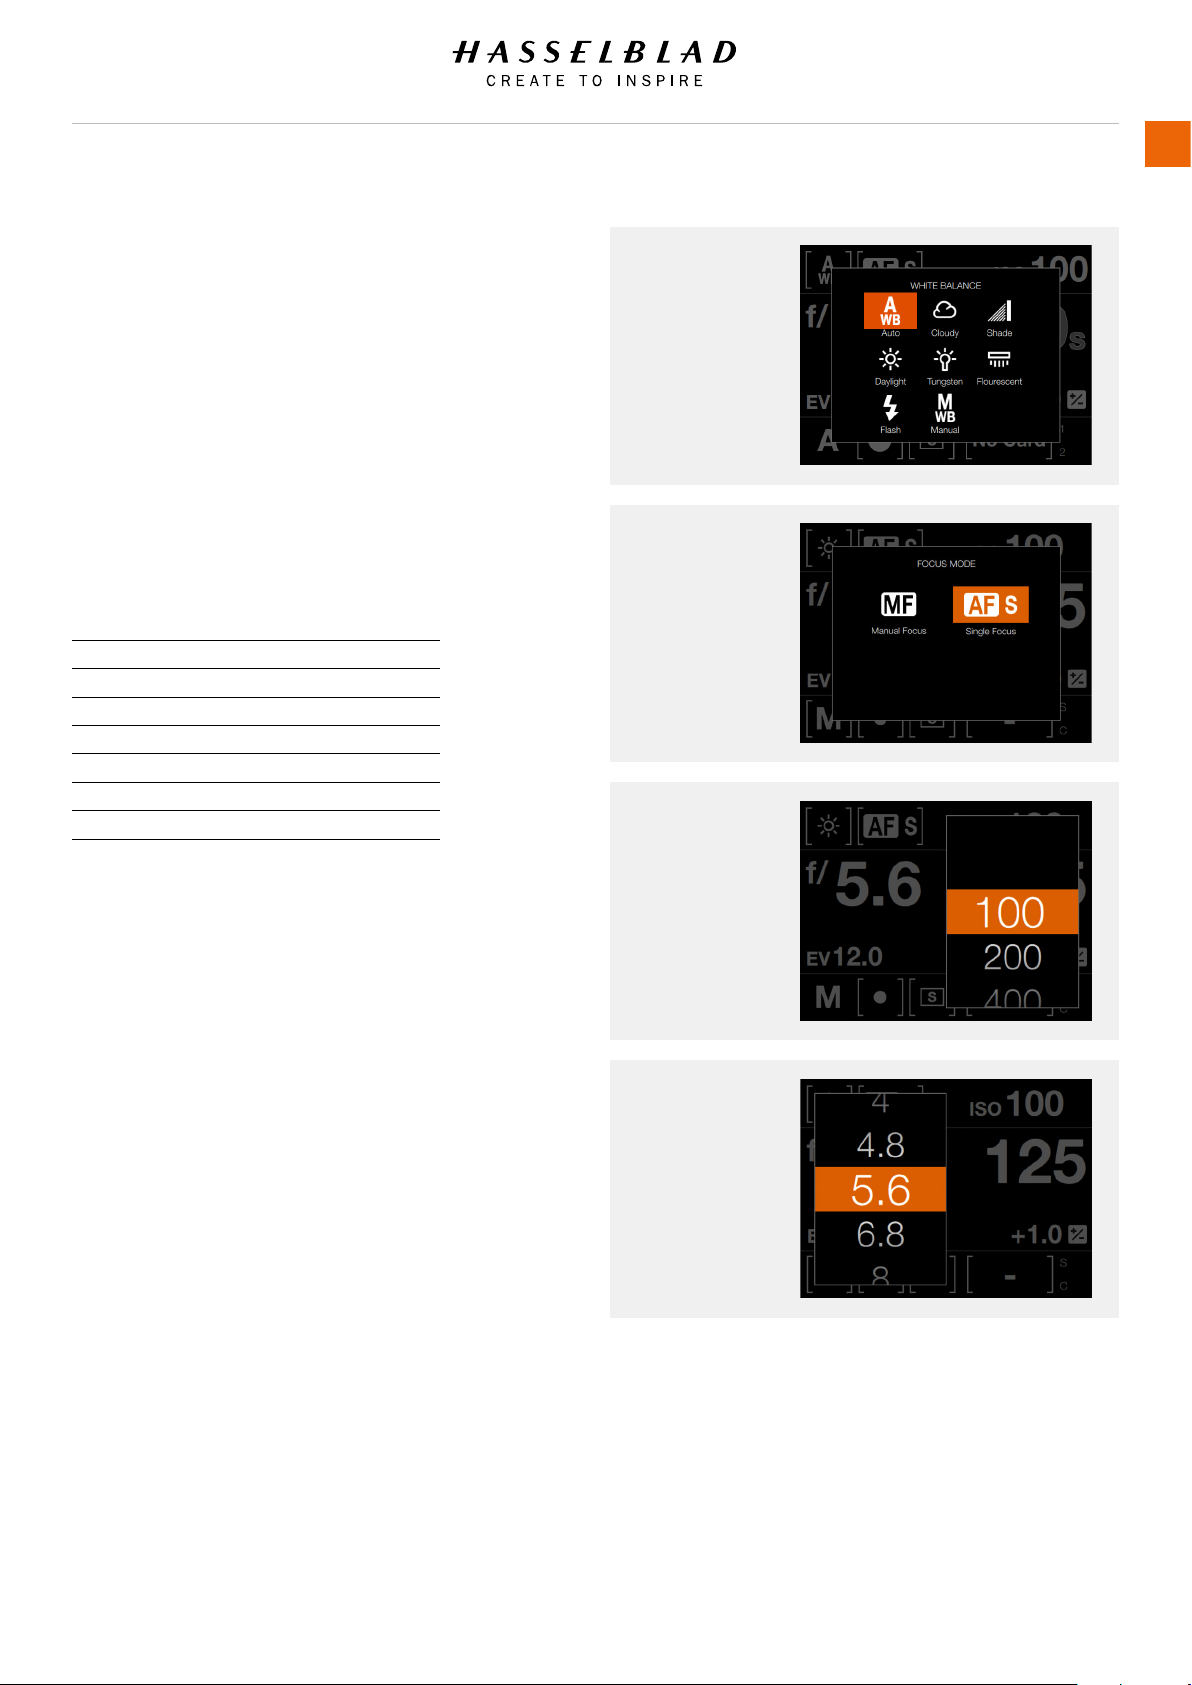
SETTINGS ON THE CONTROL SCREEN
White Balance
- Auto White Balance AWB.
- Cloudy.
- Shade.
- Daylight.
- Tungsten.
- Fluorescent.
- Flash.
- Manual WB.
Temp [ºK] Tint
Cloudy 6500 10
Shade 7500 10
Daylight 5500 10
Tungsten 2850 0
Fluorescent 3800 21
Flash 5500 0
Manual Variable 0
White Balance
Focusing
ISO
Focusing
- MF Manual Focus.
- AF-S Auto Focus Single.
ISO
- Select ISO value.
Aperture
- Select Aperture value.
This Chapter continues on the next page.
Aperture
X1D www.hasselblad.com
Table of Content
Page 26
Functions
Settings on the Control Screen
Shutter
- Select Shutter value.
Exposure Adjust
- Adjust Flash Exposure by sliding right (+) or left (-).
- Adjust Exposure by sliding right (+) or left (-).
Exposure Mode
M Manual Mode.
Mq Manual Quick Mode.
A Aperture Priority Mode.
S Shutter Priority Mode.
P Program Mode.
C1 Custom Program 1.
C2 Custom Program 2.
C3 Custom Program 3.
Video Video Mode.
Rectangle Automatic Mode (ISO are
also automatically set).
Shutter
Exposure Adjust
USER GUIDE
26
Metering Mode
- Centre Weighted.
- Spot Weighted.
- Centre Spot Weighted.
This Chapter continues on the next page.
Exposure Mode
Metering Mode
X1D www.hasselblad.com
Table of Content
Page 27
Functions
USER GUIDE
27
Settings on the Control Screen
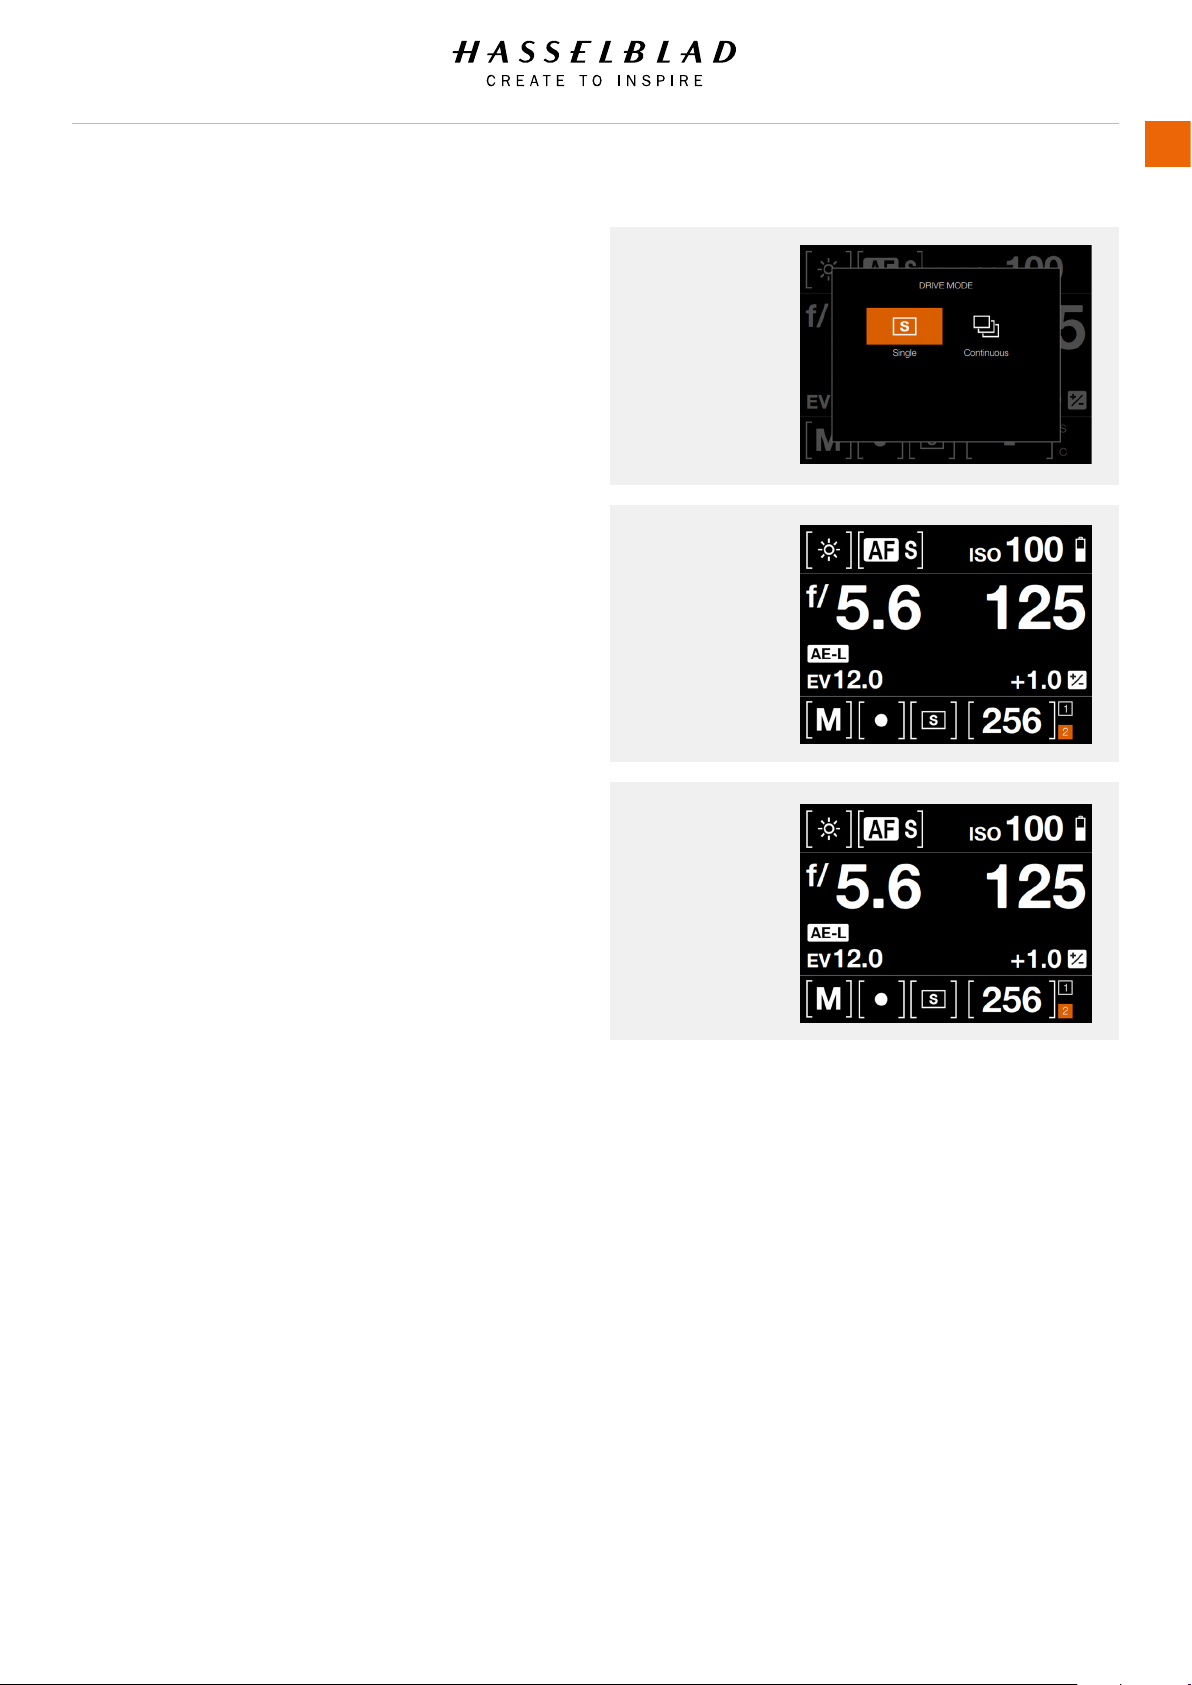
Drive Mode
- Single Drive Mode.
- Continuous Drive Mode.
Note!
Continuous drive is not available with electronic
shutter activated.
Remaining Captures
- Displays the number of remaining Captures.
Memory Card
- 1 for SD 1 or 2 for SD 2 Card.
Drive Mode
Single Drive Mode
selected.
Remaining
Captures
256
Memory Card
1 - SD 1 Card.
2 - SD 2 Card.
X1D www.hasselblad.com
Table of Content
Page 28
Functions
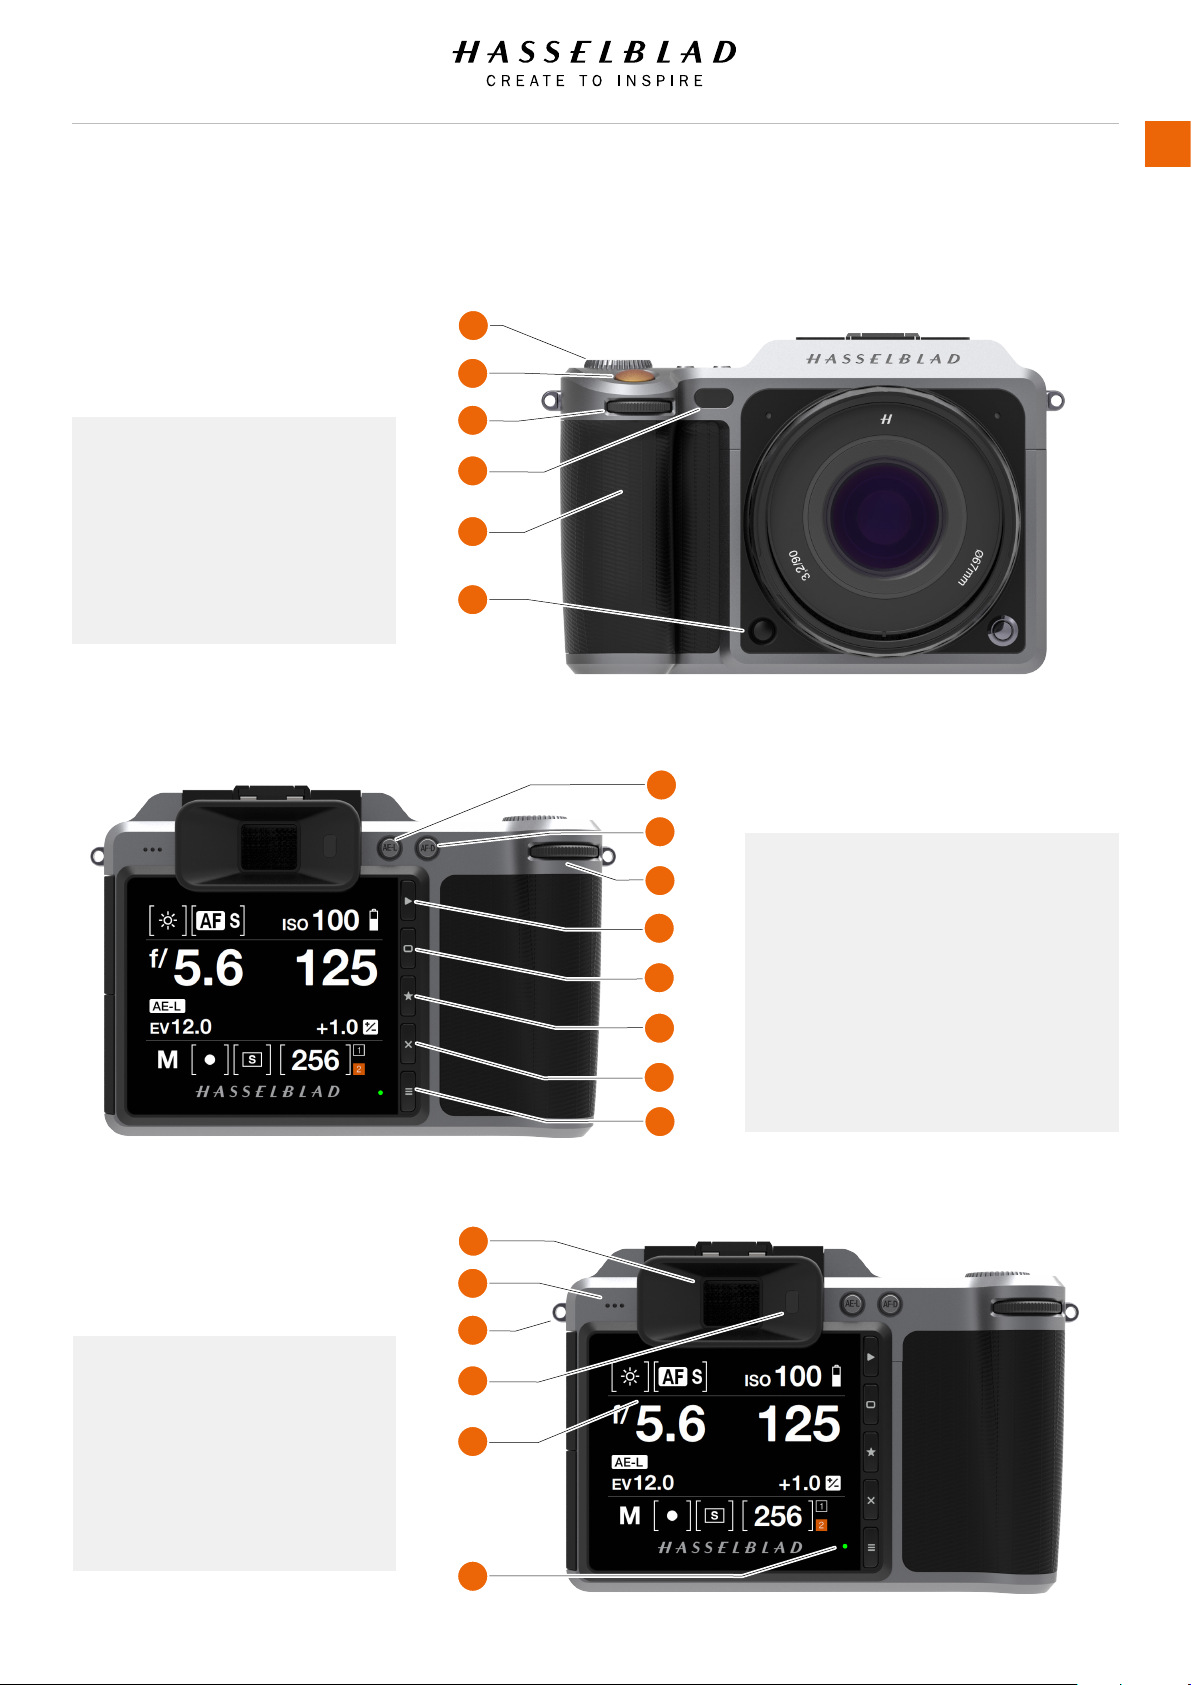
3.5 PARTS, COMPONENTS, BUTTONS AND
CONTROLS
USER GUIDE
28
All parts listed in this Chapter, are described in
detail in other specic sections.
1 Mode Dial
2 Shutter Release Button
3 Front Scroll Wheel
4 AF Illuminator LED
5 Camera Grip
6 Stop Down Button
1
2
3
4
5
6
1
2
3
4
5
6
7
1 AE Lock Button
2 AF Drive Button
3 Rear Scroll Wheel
4 Browse Button
5 Soft Button
6 Select Button
7 Delete Image / Soft Button
8 Menu Button
8
1
2
3
1 Electronic Viewnder EVF
4
2 Speaker
3 Strap Lug
5
4 Eye Sensor
5 Touch Display
6 Status LED
6
X1D www.hasselblad.com
Table of Content
Page 29
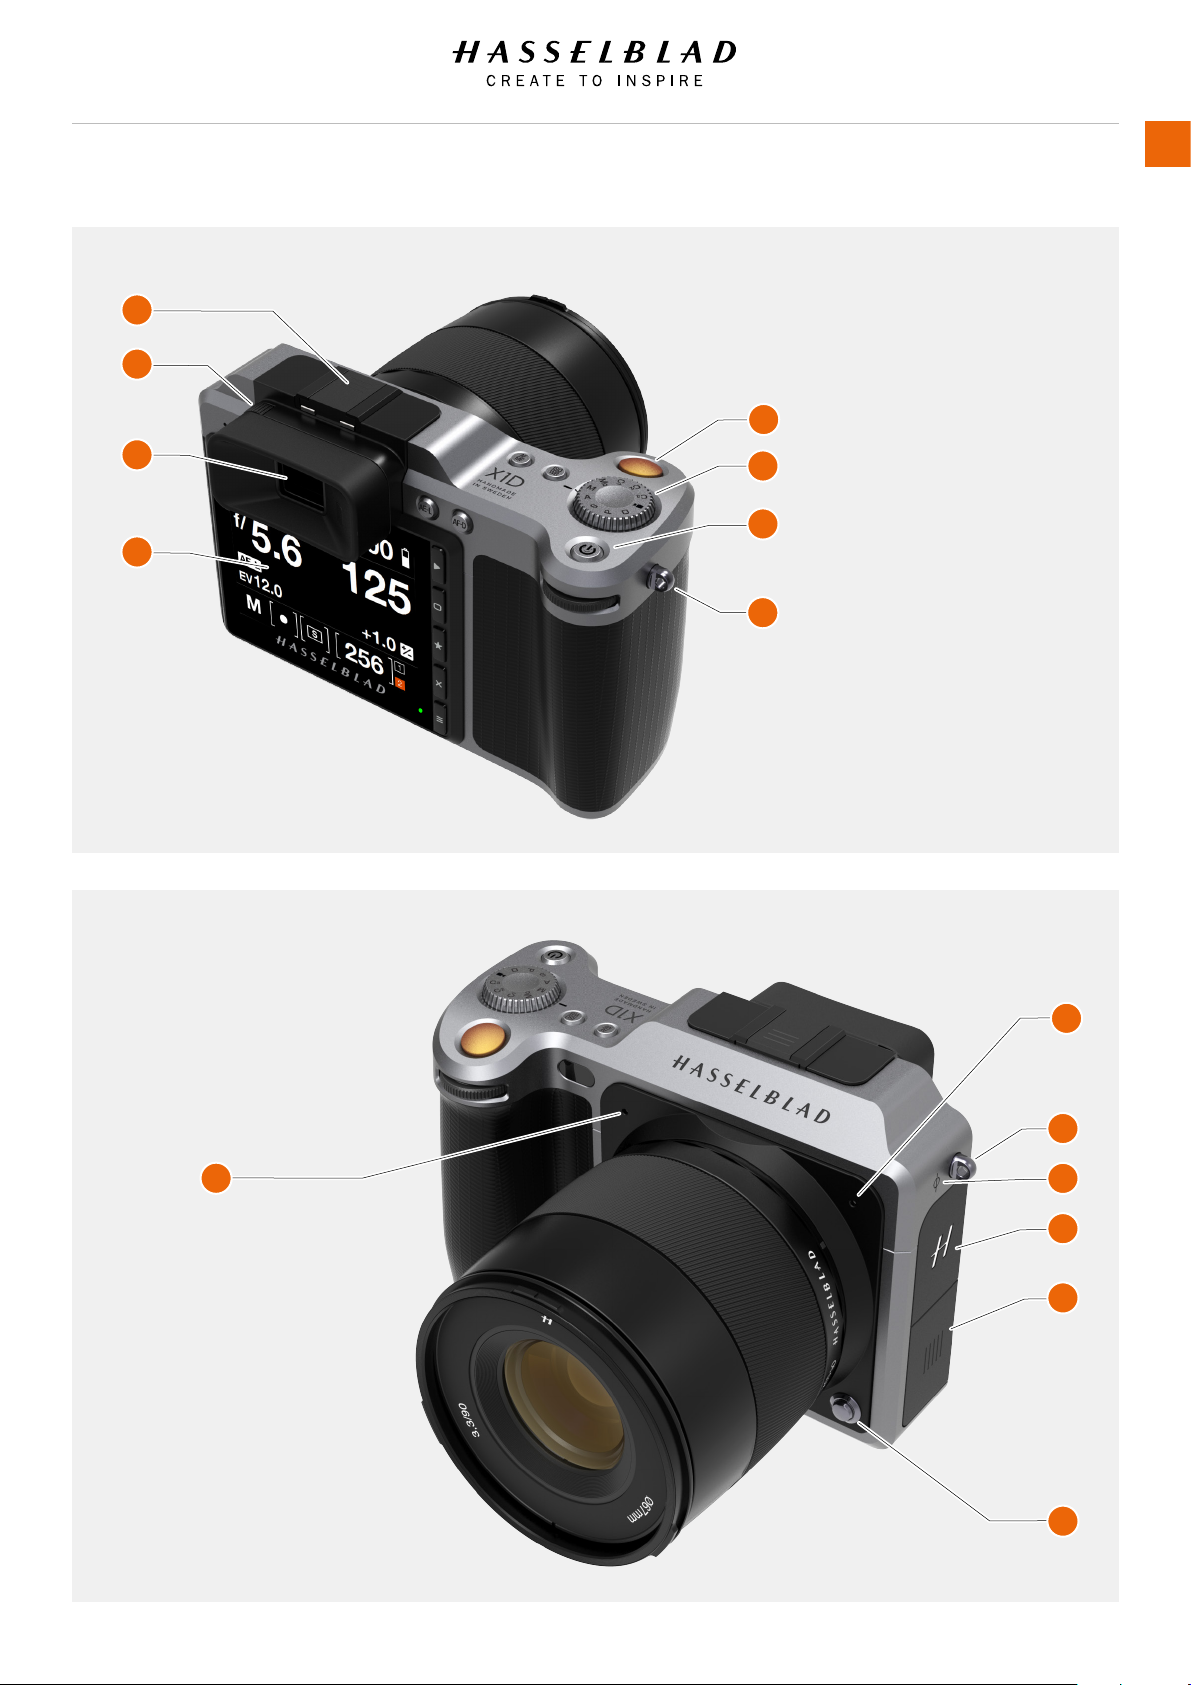
Functions
1
2
5
USER GUIDE
29
3
4
6
7
8
1 Flash Hot Shoe
2 Dioptre Adjustment Dial
3 Electronic Viewnder EVF
4 Touch Display
5 Shutter Release Button
6 Mode Dial
7 On / Off Button
8 Strap Lug
2
3
1
1 Microphone Right
4
5
6
2 Microphone Left
3 Strap Lug
4 Image Plane Mark
5 SD Cards Slot Lid
6 Connectors Slot Lid
7 Lens Release Button
7
X1D www.hasselblad.com
Table of Content
Page 30
Functions
USER GUIDE
30
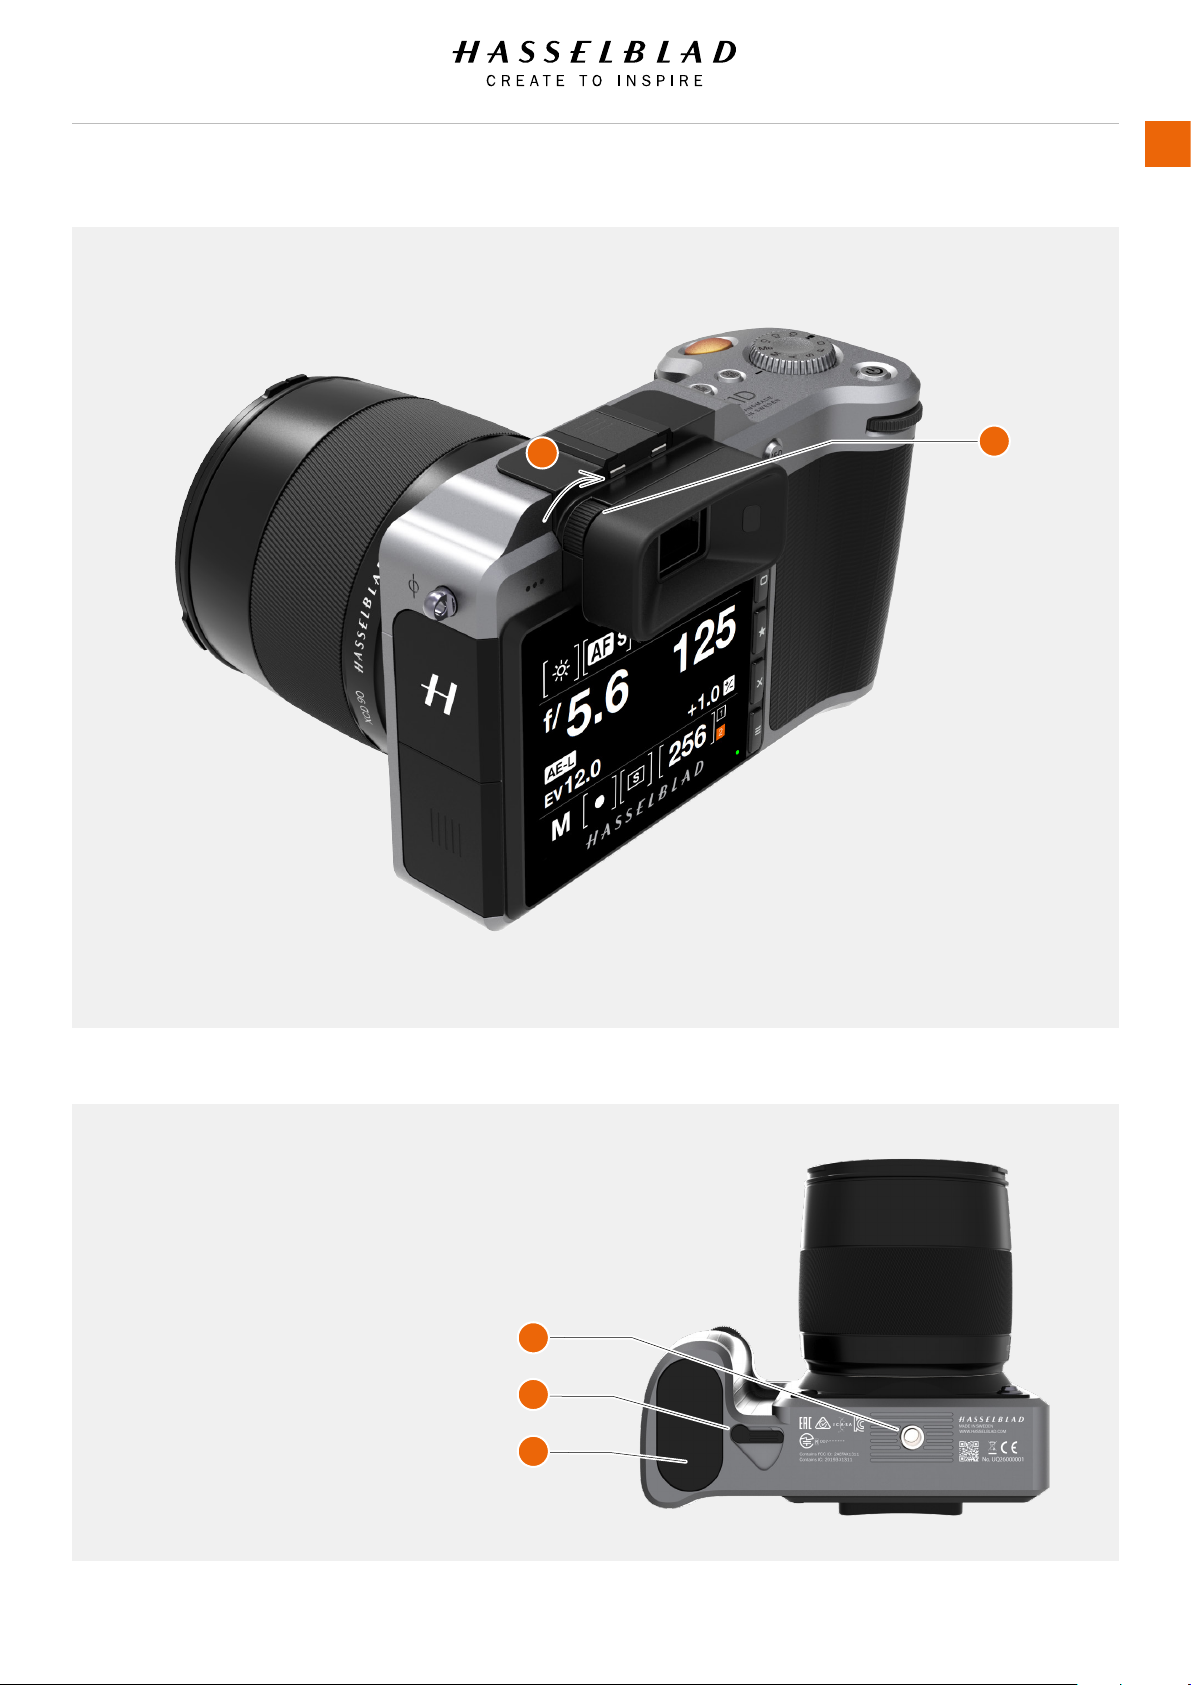
2
1
ADJUST DIOPTRE
1 Dioptre Adjustment Wheel.
2 Rotate the Dioptre Adjustment Wheel to
adjust to desired setting.
1 Tripod Thread 1/4”
2 Battery Release Lever
3 Battery
X1D www.hasselblad.com
1
2
3
Table of Content
Page 31

Functions
3.6 GRIP BUTTONS AND CONTROLS
USER GUIDE
31
3
1
1 AF/MF button
The AF/MF button toggles between Autofocus and Manual
Focus.
Can be reprogrammed as described on page 107.
2 ISO/WB button
This button provides direct access to the ISO and WB
settings. Press one time to change ISO settings. Press again
to change WB settings.
Can be reprogrammed as described on page 107.
2
5 Mode Dial
Select any of the 10 programs. Mq, M, A, S, P , Full Automatic
mode, Video mode and 3 Custom modes C3, C2 and C1.
6 ON / OFF button
Press the button for 1 second to turn on the camera. The
X1D start up logo will appear and then the main screen.
After a few seconds (customizable) the camera will enter
Display Off mode. A long press on the button turns the
camera off completely (even from Display Off mode). A short
press on the button toggles Touch Display On and Off.
4
5
6
7
3 Front Scroll Wheel
The front and Rear Scroll Wheels are used to make changes
in exposure settings, navigate the Touch Display Menu as
well as acting as browse controls.
4 Shutter Release Button
This button has two positions. Press half way (or soft) to
activate the camera, auto focus function and exposure
meter. Press all the way down (or more rm) to release the
shutter. The chosen exposure procedure and the self timer
are also activated with this button.
X1D www.hasselblad.com
Table of Content
7 Rear Scroll Wheel
The scroll wheel is used to make changes in exposure
settings, to navigate the Camera menus as well as acting as
browse control.
Note!
Some of the buttons have multiple functions according to the
settings made.
Note!
Some of the buttons can be reprogrammed to a different
function. See page 107.
Page 32

Functions
3.7 CAMERA BODY BUTTONS AND CONTROLS
USER GUIDE
1
32
1 AE-L Button
This button activates AE-L that locks a light reading made
in both automatic and manual exposure modes. It also acts
as a Zoom out button when browsing or as Exit button when
making a setting change on the Camera, according to mode.
2 AF-D Button
The AF Drive button (AF-D) starts the Autofocus process.
Press to start Autofocus and release to stop the Autofocus
function. The square symbol in the centre of the Viewnder
changes colour depending on the Autofocus process.
Black - Normal mode. Autofocus is not analysing the subject.
White - Autofocus is ongoing and analysing the subject.
Green - Autofocus performed and focus is set correct.
Red - Autofocus failed to focus and is not set correct.
3 Rear Scroll Wheel
The Rear Scroll Wheel controls different settings according
to the selected function.
4 Shutter Release Button
This button has two positions. Press half-way (or soft) to
activate the camera, auto focus function and exposure
meter. Press all the way down (or rm) to release the shutter.
The chosen exposure procedure and the self timer are also
activated with this button.
2
3
5 Front Scroll Wheel
The Front Scroll Wheel controls different settings according
to the selected function.
6 Stop Down Button
Press to make a visual check of the depth-of-eld on the
viewnder screen at the chosen aperture. The aperture will
close according to the setting and remain closed as long as
the pressure is maintained. You can alter the aper ture at the
same time to see the changes taking place.
Can be reprogrammed as described on page 107.
4
5
6
X1D www.hasselblad.com
Table of Content
Page 33

Functions
3.8 MODE DIAL
USER GUIDE
33
Mode Dial Selector
The Mode Dial Selector (1) displays the Camera Mode in use.
There are 10 different programs selectable on the Mode Dial.
The Different Camera Modes
Mq Manual Quick Mode.
M Manual Mode.
A Aperture Priority Mode.
S Shutter Priority Mode.
P Program Mode.
Rectangle Automatic Mode (ISO and WB are also
automatically set).
Video Video Mode.
C3 Custom Program 3.
C2 Custom Program 2.
C1 Custom Program 1.
1
How to lock the Mode Dial
The Mode Dial Selector can be locked by pushing it down (2).
2
Mode Dial
Unlocked (Up)
How to unlock the Mode Dial
When in locked mode, push once to unlock the Mode Dial
Selector (3).
3
Mode Dial
Locked (Down)
X1D www.hasselblad.com
Table of Content
Page 34

Functions
3.9 EXPOSURE PROGRAM MODES
USER GUIDE
34
There are 7 different xed programs and 3 Custom Programs,
C3, C2 and C1. The Programs can be selected by turning the
Mode Dial (1) to M, A, S and P.
Programs
Mq Manual Quick Mode.
M Manual Mode.
A Aperture Priority Mode.
S Shutter Priority Mode.
P Program Mode.
Rectangle Full Automatic Mode (ISO and WB are also
automatically set).
Video Video Mode.
C3 Custom Program 3.
C2 Custom Program 2.
C1 Custom Program 1.
In Manual Mode, Aperture is set by the Front Scroll Wheel and
the Shutter Speed by the Rear Scroll Wheel.
In the Automatic Modes, the Aperture and Shutter Speed
settings are controlled by the Camera, either partially or
completely according to setting. Within this mode there are
four choices. There are four automatic modes: A, S, P and Full
Automatic Mode (Rectangle).
Exposure Modes
ISO
EXPOSURE MODE
100
M A S
5.6 125
f
Manual
Aperture Shutter
P
EV
12.0
Program
0.0
331
1
1
2
X1D www.hasselblad.com
Table of Content
Page 35

Functions
MANUAL EXPOSURE MODE
Manual mode provides total user control of the shutter and
aperture settings. In this mode the aperture settings and
shutter speed are manually chosen by turning the front and rear
scroll wheels.
The standard exposure setting is obtained when the pointer over
the exposure scale is positioned above the central index (in the
viewnder display).
Any deviation from this standard setting is displayed by:
● The pointer appearing elsewhere than above the central
index
● Figures above the scale representing the amount of
adjustment in EV's.
A ‘+ 0.7’ above the scale in the display, would indicate a ‘0.7
EV overexposure’ setting. Conversely, a ‘-2’, for example,
would indicate a ‘2EV underexposure’ setting. Note that the
appearance of a +/- symbol on the display and in the viewnder,
in manual mode, means that a change has been made to the
exposure compensation setting. See later section on Exposure
compensation.
Exposure Modes
USER GUIDE
ISO
EXPOSURE MODE
M A S
5.6 125
f
Manual
P
12.0
EV
Program
100
Aperture Shutter
0.0
331
35
1
2
The actual aperture settings and shutter speeds are indicated
to the right of the exposure scale in the conventional manner.
Note!
Full-stops, half-stops and third-stops are also displayed,
according to setting (see increment setting). For example, a
setting between f/8 and f/11 will appear as f/9,5 if half-stop is
chosen.
X1D www.hasselblad.com
Table of Content
Page 36

Functions
MANUAL QUICK EXPOSURE MODE
Mq mode is a Manual mode where the camera performs as
fast and quiet as possible. In this mode, the Shutter is always
closed and the Live View is disabled. This mode works best
when the X1D Camera is used on a xed Tripod.
1 First set the Focus and Image Composition in another
Program mode like Manual mode (M) for example. Mq mode
does not support Live View.
2 Use the X1D Camera on a xed stable Tripod.
3 Select Mq mode on the Mode Dial.
MQ MODE FEATURES
- Mq mode saves Power because the Live View is Off.
- Mq mode is faster because the Shutter is already closed
and ready for exposure.
- Mq mode is more silent due to the fact that the Camera
uses less Shutter movements.
USER GUIDE
36
Note!
The White Balance mode “Auto”, AWB, requires Live View to be
active before it can set the correct White Balance. To use AWB
in Mq mode (without Live View option), start Live View in (for
example) M-mode before changing to Mq mode.
X1D www.hasselblad.com
Table of Content
Page 37

Functions
AUTOMATIC EXPOSURE MODES
USER GUIDE
37
Select Exposure Mode by turning the Mode Dial (1).
Automatic exposure provides a choice of two ways to control the
shutter speed and aperture settings semi automatically and two
ways fully automatically.
Aperture priority A
The aperture is manually chosen by turning the Front Scroll
Wheel, and the shutter speed is automatically chosen by the
camera.
Shutter priority S
The shutter speed is manually chosen by turning the Front Scroll
Wheel, and the aperture is automatically chosen by the camera.
Programmed P
In this mode, an aperture/shutter combination is chosen by
the camera according to the EV measured (metering method
remains as your choice), though only within preset appropriate
limitations to suit various requirements and applications.
Full Auto
In this mode, an aperture and shutter combination is set by the
camera. The camera is always in AF Mode and no adjustments
can be made. White Balance is set to Auto, Metering Method is
Centre Weighted and Drive Mode is set to Single Drive Mode.
Note!
In Automatic mode the Front Scroll Wheel selects alternative
aperture/shutter combinations while maintaining the same
EV and the Rear Scroll Wheel alters the amount of exposure
compensation. The compensation appears as a +/- symbol on
the Control Screen and Viewnder Display.
Exposure Modes
M, A, S, and P mode.
ISO
EXPOSURE MODE
M A S
5.6 125
f
Manual
P
12.0
EV
Program
100
Aperture Shutter
0.0
331
1
1
2
Note!
Aperture and shutter speed settings can both be changed even
while the red “busy light” on the Touch Display is ashing.
Note!
In Camera Settings, the Quick Adjust function can be set to
either adjust the following exposure only (default) or on all future
exposures.
X1D www.hasselblad.com
Table of Content
Page 38

Functions
CUSTOM MODES
The Custom Modes C3, C2 and C1 are three Modes that can be
saved with your favourite settings.
HOW TO SET A CUSTOM MODE
1 Select a mode on the Mode Dial.
M, A, S or P. M is selected in this case (A).
2 Make the changes to the Camera Settings.
Set desired ISO, AF/MF and WB for example.
3 Press the Menu Button to the right of the Touch Display to
display the Main Menu.
4 Select General Settings.
5 Select Custom Modes.
6 Select Save to C1, C2 or C3.
7 Select Save to save and Exit or select Exit to exit without
saving.
8 All the settings you made will now be easily accessed from
the Custom Mode C1.
9 Turn the Mode Dial to select C1 (B).
10 You can now use the Camera with all the specic settings
made in stage 2 of this instruction.
USER GUIDE
38
A
Repeat the step 1 to 10 to create and use your 3 different
Custom Modes, C1, C2 and C3.
B
X1D www.hasselblad.com
Table of Content
Page 39

Functions
AE-L BUTTON
USER GUIDE
39
In Live View mode, this button is used for locking the exposure
in the automatic modes (A, S P and ). In Manual mode, this
button will lock the aperture and shutter speed combination,
allowing you to shift aperture and shutter speed combination
without changing the exposure with the scroll wheels.
In Browse mode it is used to zoom out in the image (AF-D zooms
in).
In Menu mode it is used to exit one level up in the menu (AF-D
enters one level down).
Lock an EV setting in manual and automatic modes
When the button is pressed, the light metering facility is locked
to the EV setting at that moment. An L (=locked) symbol
appears between the shutter speed and the aperture indication
on the Touch Display and Electronic Viewnder Display to
conrm the status. Press the AE-L button again to unlock (a
toggle function).
In the locked setting, the aperture and shutter speed become
interlocked. In this way, a new aperture/shutter combination
that still represents the same EV, can be rapidly chosen. For
example, if the shutter is set to 1/125s and the aperture to
f/8 and are locked together, you can access new EV-equivalent
combinations of, for example, 1/30s a f/16 or 1/500s at f/4
just by moving the front scroll wheel.
1
In practice this means that you can, for example, in auto mode
position the metering area (spot setting) over an area in the
subject that you determine to be equivalent to a mid-grey and
lock it with the AE-L button. You can then recompose the picture
with the metering zone positioned over an area much brighter
or darker while still retaining the original exposure setting and
choose a new combination of aperture and shutter speed
settings.
X1D www.hasselblad.com
Table of Content
Page 40

Functions
FIXED EXPOSURE COMPENSATION SETTING
USER GUIDE
40
1 Select the Exposure Adjust setting on the Control Screen.
2 Turn the Front Scroll Wheel (B) to change the Flash
compensation and the Rear Scroll Wheel (C) on the grip to
increase or decrease the amount of Exposure Compensation
in 1/3 EV steps.
3 The amount is displayed as both an EV gure complete with
a ‘minus’ or ‘plus’ prex, and as a marker above a ‘minus’
to ‘plus’ scale,
4 Press AE-L Button (A) to reset any compensation back to
zero.
5 The settings are saved.
6 A ‘±’ symbol is then displayed between the aperture and
shutter speed setting as conrmation of the setting.
A
C
B
X1D www.hasselblad.com
Table of Content
Page 41

Functions
EXPOSURE COMPENSATION / QUICK ADJUST
The exposure compensation function, for both manual and
automatic modes can be set from -5 to +5 EV, in 1/3, 1/2 or 1
EV increments and is visible above the scale in the viewnder
and as a ± symbol on the Touch Display Control Screen.
The quickest way to make an adjustment in auto exposure mode
is to use the Rear Scroll Wheel (A).
Temporar y compensation setting in an auto-exposure mode
using the Quick Adjust function:
1 Turn the rear scroll wheel (A) to select the chosen amount of
compensation.
The amount is displayed as both an EV gure complete with
a ‘minus’ or ‘plus’ prex and as a marker above a ‘minus’ to
‘plus’ scale.
Default settings provide 1/3 EV compensation and an
immediate clearing of the setting after capture.
USER GUIDE
A
B
41
Adjust the Exposure on the Control Screen
1 Swipe Down on the Touch Display to access the Control
Screen.
2 Select Exposure Adjust (B).
3 Adjust sliders to the left or right to change values (C).
4 Close the Exposure Adjust pop up by clicking outside of it.
5 Swipe Up to exit Control Screen and return to Main Menu.
Control Screen View
Exposure Adjust.
ISO
EXPOSURE ADJUST
100
0.0 EV
5.6 125
f
+1.0 EV
EV
12.0
0.0
331
C
1
2
X1D www.hasselblad.com
Table of Content
Page 42

Functions
3.10 LIGHT METER EXPOSURE MODE
The Light Meter Mode can be changed on the Control Screen.
Use the Rear Wheel to select Mode.
USER GUIDE
Metering Modes
METER METHOD
ISO
42
100
Different Light Metering Modes
There are three reective metering modes available.
Centre Weighted.
Centre Spot.
Spot Metering.
Light Metering ModesSymbol
Centre Weighted
Used for light situations where there is no
particular dominance of light or dark areas
across the tonal range. Takes into account
approximately 25% of the image seen in the
viewnder.
5.6 125
f
EV
12.0
Centre Weighted
Centre Spot
Spot
0.0
331
1
2
Centre Spot
Emphasizes the central section of the focusing
screen equivalent to approximately 25% of the
image. This provides a balanced assessment
and is a typical choice where the main subject
is in the centre of the image.
Spot
The sensitive area is equivalent to
approximately 2.5% of the image area (the
central spot on the viewnder screen). Any
parts of the image outside of this area will
not affect the exposure reading. This provides
a very accurate measurement of specic
tones. Also excellent for tonal comparison
measurements.
Spot area is marked in Live View screen.
Live View with Spot area
X1D www.hasselblad.com
Table of Content
Page 43

10 0
Functions
3.11 VIDEO RECORDING
HOW TO RECORD VIDEO
USER GUIDE
43
First select Video Settings in the Video Settings Menu.
1 Select Video mode on the Mode Dial (B).
2 The Video Control Screen is displayed on the Touch
Display.
3 Start the Video Live View by pressing the Live View
Video icon (C).
4 The Video is displayed on the Touch Display.
5 Start Recording by pressing the Shutter Release
Button (A) or by pressing the red recording icon on
the Touch Display. The recording icon is grey during
recoding.
6 Stop the Recording by pressing the Shutter Release
Button (A) or by pressing the grey stop icon on the
Touch Display.
Note!
For best Video result, use a stable tripod with the X1D
Camera when recording Video.
Note!
The maximum length of one video clip is 5 minutes. The
number of video clips possible to save, depends on the
capacity of the inserted SD memory card.
A
B
Video Control Screen
ISO
f/
3.5 30
Note!
You can change ISO and White Balance from both Video
Control Screen and Video Live View screen by tapping the
values.
EV8.7
C
Video Display when capturing videoVideo Live View Screen
X1D www.hasselblad.com
Table of Content
Page 44

Functions
1
B0000010 17-02-01 14:29:01
00:00 00:00
USER GUIDE
A
B
44
HOW TO VIEW RECORDED VIDEO
1 Press the Browse button (A).
2 The recorded videos are displayed with a Poster
Frame (preview image) and a Play icon.
3 Select video to view.
4 Press the Play icon on the Touch Display (white
triangle) to view the selected Video.
5 Press the button (B) to stop video playback.
Note!
Videos can be previewed on the rear screen or in the
EVF, depending on which is active when the Browse
button (A) is pressed. Video playback in the EVF can
only be started by pressing the Browse button again.
Captured Video Display
1
B0000010 17-02-01 14:29:01
00:00 00:00
X1D www.hasselblad.com
Table of Content
Page 45

Functions
3.12 CONNECTOR PORTS
1 SD Card Port 1
Port for the SD Card no 1.
2 SD Card Port 2
Port for the SD Card no 2.
3 HDMI
Connector for Mini HDMI plug.
4 Audio in
Connector for Audio In Microphone 3.5 mm
stereo plug.
5 USB 3 Tethering plug
Connector for USB 3 plug.
6 Audio Out
Connector for external 3.5 mm Stereo
Audio Out Plug.
USER GUIDE
45
3
4
6
1
2
5
X1D www.hasselblad.com
Table of Content
Page 46

Functions
3.13 MEMORY CARDS
The X1D camera uses SD cards only. There are
two SD Card slots on the X1D Camera, slot no
1 and slot no 2.
USER GUIDE
46
When using a SD card, the X1D is completely
self contained. No additional wires or
connectors need to be attached.
The recommended minimum write speed is 60
MB/sec (400x) or better.
Note!
All cards must be formatted in the X1D camera
before rst use.
SD Memory Card Status Display
1 Black = Not inserted, not active (3).
2 Orange = Inserted, Active (4).
1 or 2 [0] = Full.
1 or 2 ! = Card Error.
Lock Symbol = Card Write Protected.
1
2
3
4
Currently Approved Cards
UHS-I cards:
SDHC-I SanDisk Extreme PRO 95MB/s
Wise SDXC-UHS-I U3
UHS-II cards:
SDXC UHS-II Lexar Professional 2000x
SDHC UHS-II SanDisk Extreme PRO 300MB/s
(UHS-II cards can only achieve UHS-I speed, 80 MB/s)
Delkin SD1900X
X1D www.hasselblad.com
Table of Content
Page 47

Functions
INSERT A MEMORY CARD
Insert SD card
1 Open the Memory Card Slot Cover by sliding
it towards the back of the Camera and then
rotate it clockwise.
2 When the card slot cover door is opened,
mount the SD card in the SD card slot no 1
(A) or no 2 (B).
3 Close the slot cover by rotating it counter
clockwise and pushing it in place towards
the front of the camera (C) to lock it into
position.
USER GUIDE
A
B
47
C
X1D www.hasselblad.com
Table of Content
Page 48

Functions
REMOVE SD MEMORY CARDS
Note!
Do not remove a memory card from the Camera
if the ‘ready’ light is blinking (placed in the
lower right corner on the Touch Display), as
this will corrupt the les on the card and result
in data loss. The card will also need to be
reformatted.
Remove SD card
1 Open the memory card slot cover on the
Camera (A).
2 Press the SD card no 1 (B) or no 2 (C) a
little way in and then release it. The SD card
will then move out from the SD card slot.
3 Grab the card and pull it away from the
Camera.
4 Close the slot cover (D) by rotating it counter
clockwise and pushing it in place towards
the front of the camera to lock it into
position.
USER GUIDE
A
48
D
B
C
X1D www.hasselblad.com
Table of Content
Page 49

Functions
FORMAT SD CARDS
MAIN MENU > GENERAL SETTINGS > STORAGE > FORMAT
USER GUIDE
49
The camera is only able to read and write to storage media that
have been formatted correctly. New cards sometimes have no
formatting, or you might want to convert a card that is currently
using a format that the camera cannot read. In either case, you
must reformat both SD cards within the X1D Camera to be able
to use the SD Cards.
FORMAT MEMORY CARDS ON THE TOUCH DISPLAY
MAIN MENU > GENERAL SETTINGS > STORAGE > FORMAT
1 Press MENU.
2 Navigate to Storage.
3 Navigate to Format.
4 Navigate to Format SD card.
5 Select “Format SD 1” or “Format SD 2”.
6 A Format Card Dialogue appears.
7 To conrm, select Format by pressing the Soft button marked
with a square (A). To exit without formatting, press the Soft
button marked with “X” (B).
A
GENERAL SETTINGS: STORAGE
Format Card
Format SD1
Format SD2
B
Storage Menu
GENERAL SETTINGS: STORAGE
Format Card
Format SD1
Note!
The X1D Camera is capable of writing up to 80 MB/s to SD
cards.
Note!
All SD Memory Cards should be formatted in the X1D Camera
before using them the rst time.
Format SD2
Destination
Primary Slot: SD1
Secondary Slot Usage:
Format Card Dialogue Display
Backup
Format
!
Format SD1?
All content will be erased!
Exit
X1D www.hasselblad.com
Table of Content
Page 50

Functions
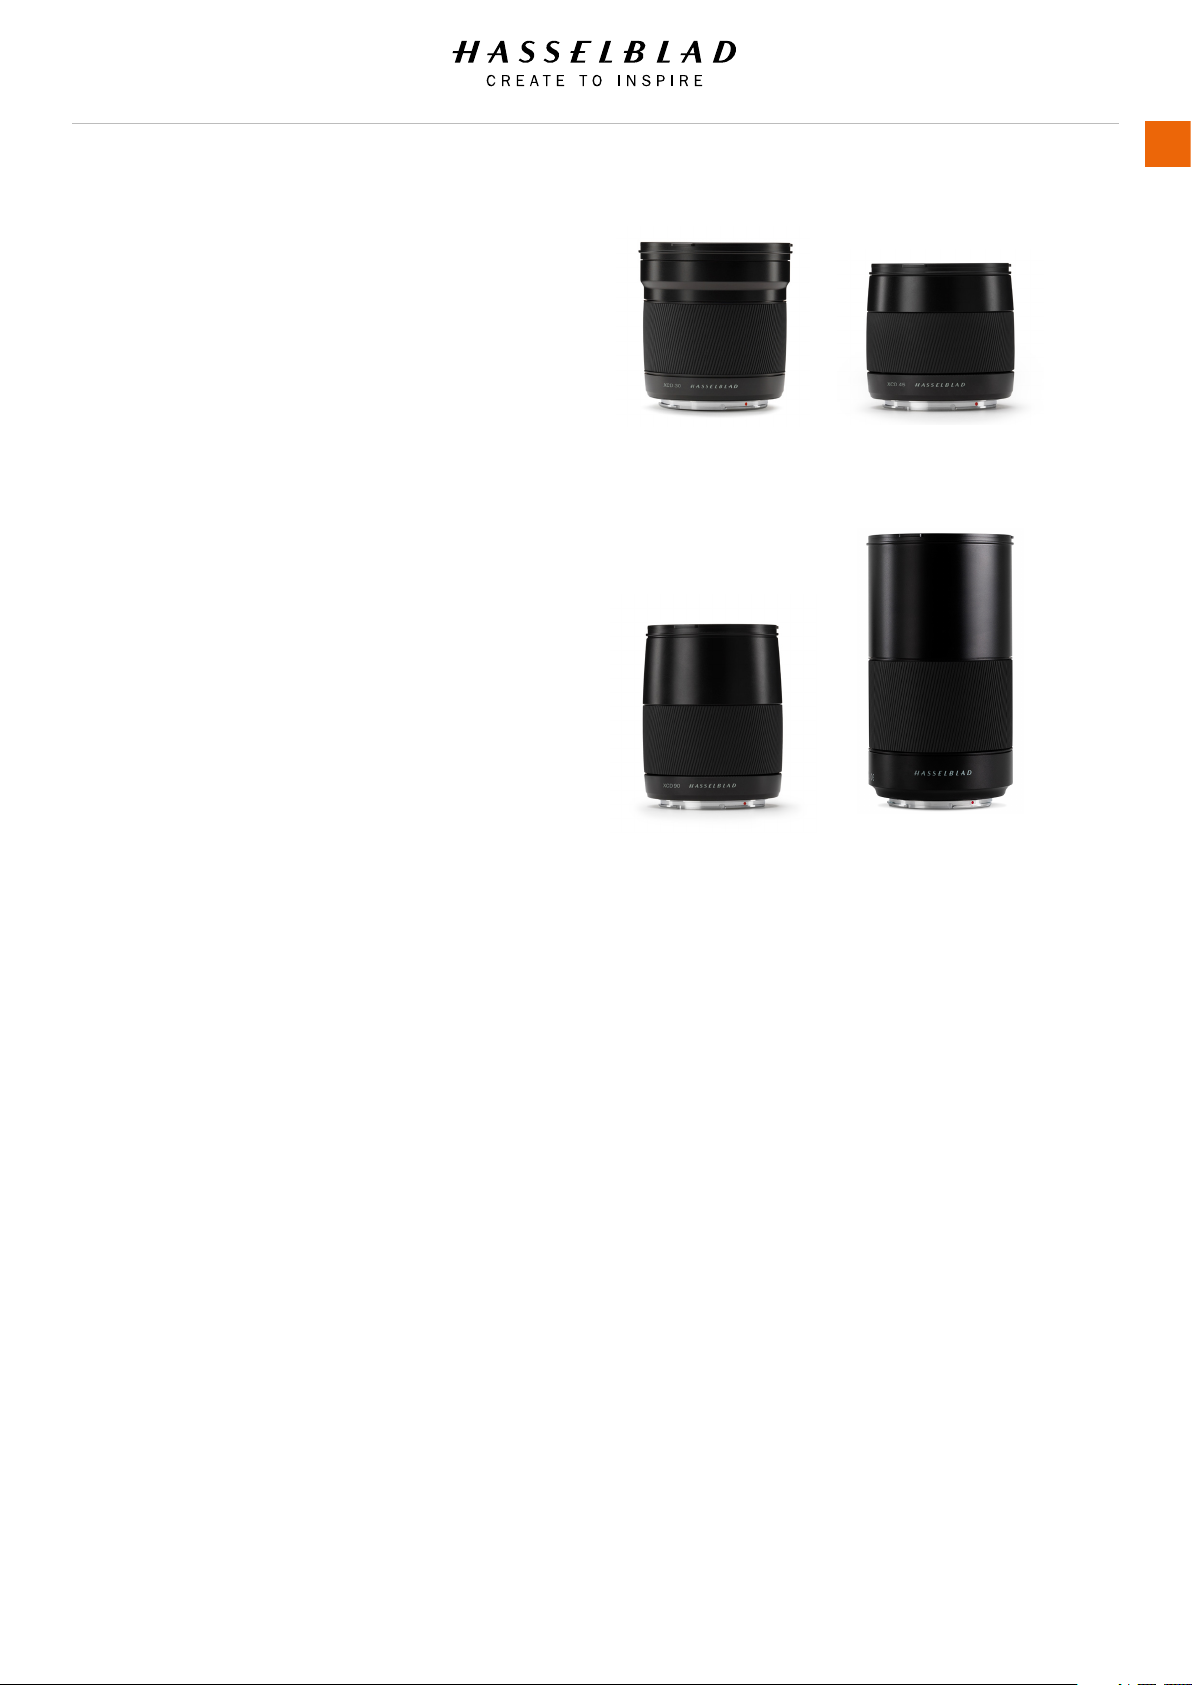
3.14 XCD LENSES
1
2
3
USER GUIDE
HASSELBLAD XCD 3,5/30 MM
The XCD 30 mm lens is the widest
angle lens for the X1D. Its focal length
provides a 24 mm equivalent eld of
view, making it the perfect landscape,
reportage and travel lens.
The lens boasts extremely high
performance and a compact build,
providing a 71° horizontal angle of view.
A unique feature is that the lens will
keep its amazing performance even
when shooting at close distance.
50
1 Lens shade index for reverse mount
2 Lens shade index
3 Focusing ring
4 Lens index
HASSELBLAD XCD 3,5/45 MM
The XCD 45 mm lens is the ideal
standard lens for the X1D. Its moderate
wide angle focal length provides a 35
mm equivalent eld of view, making it the
perfect general purpose and travel lens.
As part of the X System lens range, it´s
lightweight and compact size perfectly
complements the compact X1D body.
4
HASSELBLAD XCD 3,2/90 MM
The XCD 90 mm lens is the ideal
portrait lens for the X1D. Its moderate
telephoto focal length provides a 71
mm equivalent eld of view, making it
the perfect portrait lens.
Coupled with it´s wide aperture, the
focal length allows you to isolate
small elements in the eld of view
with a beautiful smooth bokeh.
HASSELBLAD XCD 3,5/120 MM MACRO
The XCD 120 mm Macro is a compact
macro lens for the X1D camera
featuring close focusing from innity
to an image scale of 1:2.
The optical design and internal
focusing system ensures amazing
performance at all distance settings.
You can download technical data sheets from the Hasselblad website, www.hasselblad.com.
X1D www.hasselblad.com
Table of Content
Page 51

Functions
3.15 REMOVE AND ATTACH A LENS
USER GUIDE
51
REMOVE THE LENS
Caution!
Be careful when you attach/remove the components to/from
the camera. This will help prevent damage to the data bus
connections.
Caution!
Do not insert ngers into the camera body. This can cause
damage to the equipment.
1 Hold the lens (C) with one hand and hold the camera body
(A) still.
2 Push the lens removal button (B).
3 Rotate the lens counter clockwise.
4 Push the lens (C) away from the camera body.
5 Attach the protection cover lid (D) on the camera body
directly.
6 Attach a lens protection lid on the detached lens to prevent
damage.
7 Store the lens with both lens protection lids on and the lens
hood inverted over the lens instead of in front of the lens.
A
B
C
D
X1D www.hasselblad.com
Table of Content
Page 52

Functions
ATTACH THE LENS
Caution!
Be careful when you attach/detach the components to/from
the camera. This will help prevent damage to the data bus
connections.
Caution!
Do not insert ngers into the camera body. This can cause
damage to the equipment.
1 Push the lens removal button (A) and remove protection
cover lid (B) from the camera body.
2 Rotate the lens so that the red mark on the lens (C) lines up
with the red mark (D) on the camera body.
3 Mount the lens (E) into the camera body (F) and then turn
the lens clockwise to lock its position.
4 Make sure the lens is locked to the camera body before
using or moving the camera.
B
USER GUIDE
52
A
D
C
F
E
X1D www.hasselblad.com
Table of Content
Page 53

Functions
REMOVE THE LENS CAP
1 Insert thumb and index nger into the recesses (A).
2 Pinch the recesses (A) together.
3 Remove the front lens cap.
USER GUIDE
A
A
53
ATTACH THE LENS CAP
1 Insert thumb and index nger into the recesses (A).
2 Pinch the recesses (A) together.
3 Attach the front lens cap on the lens until it snaps into
place.
A
A
X1D www.hasselblad.com
Table of Content
Page 54

Functions
REMOVE THE LENS SHADE
All lenses are supplied with lens shades that additionally
provides extra protection for transport and storage when
mounted in reverse.
1 Turn the lens shade (A) counter-clockwise.
2 Remove the lens shade (A).
A
USER GUIDE
54
ATTACH THE LENS SHADE
All lenses are supplied with lens shades that additionally
provides extra protection for transport and storage when
mounted in reverse.
1 Place the lens shade on the lens.
2 Make sure that the index on the lens shade (A) aligns with
the index on the front of the lens (B).
3 Turn the lens cap clockwise until it snaps into place.
B
A
X1D www.hasselblad.com
Table of Content
Page 55

Functions
FILTERS
The lters have a threaded tting of 67 mm for both the XCD 45
mm and the XCD 90 mm lens, and are rotated clockwise into
place. The XCD 30 mm and XCD 120 Macro lenses use a 77
mm lter.
As there is no rotation of the front section of the lens when
the focus is changed, the lter do not rotate either. This is
particularly useful when using polarizing or graduated lters
where the orientation is critical.
USER GUIDE
55
Hasselblad XCD 90 Lens, 67 mm lter
Hasselblad XCD 45 Lens, 67 mm lterHasselblad XCD 30 Lens, 77 mm lter
Hasselblad XCD 120 Macro Lens, 77 mm lter
X1D www.hasselblad.com
Table of Content
Page 56

Functions
3.16 DISPLAY INFORMATION
Viewnder information
ISO (100).
Battery Status.
Exposure Adjust (0.0).
Aperture setting (f/11).
Shutter speed (1/125).
Remaining Capture Counter
(621).
See details on page 58.
USER GUIDE
56
PHOCUS / PHOCUS MOBILE
INFORMATION
Metering method.
Aperture setting.
Shutter speed.
Exposure method.
ISO.
White Balance.
Flash indication.
Focus.
Drive.
E V.
USB 3
Wi-Fi
Touch Display information
Control Screen
White Balance (Daylight).
Focus Mode (AF-S).
ISO (100).
Aperture (f/5.6).
Shutter (1/125).
EV (12.0).
Exposure Adjust (+1.0).
Exposure Mode, Manual (M).
Meter Method (Spot).
Drive Mode (Single).
Remaining Capture Counter
(256).
Storage medium (SD2).
X1D www.hasselblad.com
Table of Content
Page 57

Functions
3.17 TOUCH DISPLAY AND CONTROLS
When shooting, the X1D Touch Display
with Live View displays the information
most often required for a quick settings
check. The Front and Rear Scroll
Wheels and Camera Buttons together
with the Touch Display are used to
navigate the Main Menu and change
settings.
The Touch Display can show all saved
captures on SD card 1 and 2. You can
Browse and Zoom in the Captures for
detailed inspection.
When shooting, you can control the
amount of information visible together
with the current preview by choosing
various modes. See options on page
61.
USER GUIDE
57
Buttons and Scroll Wheels
In Browse mode, the Scroll Wheels and AE-L
buttons are used for navigation.
Activate Browse mode by a single Press on the
top button to the right of the Touch Display.
Here you see the Main Menu on the Touch
Display. Swipe Down to display the Control
Screen.
Control Screen with Settings and Information
The Control Screen is interactive. Swipe down to
display the Control Screen. Select any of the settings
to change the value. Aperture setting, shutter speed,
focus setting, drive, EV, battery status, exposure
method, capture counter, ISO and white balance can
simultaneously be displayed and changed in the
Control Screen on the Touch Display. Swipe Up to
close the Control Screen and return to Main Menu.
MAIN MENU
Display Wi-Fi Exposure
RAW
AF
JPG
Power &
Quality Autofocus
Timeouts
Storage Touch
X1D www.hasselblad.com
Table of Content
Page 58

Functions
3.18 ELECTRONIC VIEWFINDER DISPLAY EVF
TYPICAL VIEWFINDER DISPLAY
USER GUIDE
Electronic Viewnder Display EVF visual user interfaceTouch Display
58
Wi-Fi Focus Area Indicator Battery Indicator
Self Timer
ISO SettingGPS StatusFlash Status
Manual Focus
Spot metering
area
Exposure Compensation
Setting (0.0 EV)
X1D www.hasselblad.com
AE Lock
Aperture
(f/11)
Exposure
adjustment
Table of Content
Electronic
shutter
Shutter Speed
(1/125 sec)
Remaining Frames
Counter (621 left)
Page 59

Functions
VIEWFINDER DISPLAY SETTINGS
AF indicator
The square AF indicator in the middle of the Electronic
Viewnder displays if the Autofocus is set properly or not.
Start the Autofocus function by a soft half-press on the Shutter
Release Button or by pressing the AF Drive button (AF-D).
Black - Normal mode. Autofocus is not analysing the subject.
White - Autofocus is ongoing and analysing the subject.
Green - Autofocus performed and focus is set correct.
Red - Autofocus failed to focus and is not set correct.
ISO Indicator
Displays the selected ISO setting (ISO 100).
Battery Indicator
Displays the Battery level.
USER GUIDE
White AF indicator. Normal mode.
59
Exposure Compensation Setting
Displays the EV compensation setting (0.0).
Aperture Setting
Displays the selected Aperture Setting (f/11).
Shutter Speed Setting
Displays the selected Shutter Speed setting (1/1000 sec).
Remaining Frames Counter
Displays remaining Frames (621 left).
Green AF indicator. AF set correct.
Red AF indicator. AF analysis failed to focus.
X1D www.hasselblad.com
Table of Content
Page 60

Functions
CAMERA LIVE VIEW
USER GUIDE
60
The Camera features Live View on the Touch Display by default.
In Camera Mode
Press once on the soft button marked with a star to the right of
the Touch Display to Zoom in to 100%. This gives you a detailed
view of the focus in the focus area. Rotate the Focus Ring on
the Lens to adjust Focus.
In Zoom-in mode, you can pan the image shown in the EVF with
the Touchpad function. See Touchpad settings on page 113.
Press the star button again to exit Zoom.
In full image view, you can select from four overlays with
different information. This is described on the next page.
In Video Mode
Press once on the soft button marked with a star to the right of
the Touch Display to Zoom in to 100%. This gives you a detailed
view of the focus in the focus area. Rotate the Focus Ring on
the Lens to adjust Focus.
Press the star button again to exit Zoom.
Touch Display, Live View example with grid overlay
Touch Display, Video Display when capturing video
Exposure, ISO, Battery and Time information is displayed during
Video Recording.
Note!
You can add a grid overlay to the Video Live View. See page
109.
This Chapter continuous on the next page.
3.5
X1D www.hasselblad.com
Table of Content
Page 61

Functions
LIVE VIEW
This feature is useful for accurate focusing, composition and
depth of eld preview.
1 The Camera displays Live View when you half-press Shutter
Release Button.
2 Press button B to step to next overlay.
3 Button A, or E, to Exit Live View.
Note!
If you activate the EVF (Electronic Viewnder) by approaching
the EVF with your eye and start looking into it, the Live View
function for the Touch Display will turn off the Touch Display (to
save battery) with the help of a proximity sensor to the right of
the EVF display. If you switch back again and look at the Touch
Display, the EVF is turned off and the Touch Display is activated.
Live View Settings
MAIN MENU
Display Wi-Fi Exposure
RAW
AF
JPG
Power &
Quality Autofocus
Timeouts
Storage Touch
USER GUIDE
61
A
B
C
D
E
Overlay
Select Overlay displayed during Live View. Scroll between
options with button (B).
- Exposure information (F).
- Exposure information + Grid (G).
- Exposure information + Spirit Level (H).
See chapter Spirit Level on page 119 for details.
- None (I).
ZOOMING IN LIVE VIEW
1 Double tap on Touch Display, or press the soft button
marked with a star (C) to the right of the Touch Display, to
Zoom in to Actual Pixel Size (100%) to that specic area.
2 Double tap again to Zoom out to display the entire Capture.
3 You can move around the image when zoomed in by swiping.
FOCUS IN LIVE VIEW
1 Double tap on Touch Display, or press the soft button (C)
marked with a star to the right of the Touch Display, to Zoom
in to selected Focus Area.
2 Adjust Focal Point manually on the Lens.
3 Double tap or press on the soft button again to Zoom out to
Display the entire Capture.
F
G
H
Note!
I
Live View demands higher power consumption than normal
operation. Working with Live View will shorten the usage time of
the Camera when on battery only power supply.
X1D www.hasselblad.com
Table of Content
Page 62

Functions
LIVE VIEW WITH HDMI EXTERNAL SCREEN
MAIN MENU
Display Wi-Fi Exposure
USER GUIDE
62
RAW
JPG
Power &
Timeouts
Storage Touch
Connect an external Video Screen to the HDMI connector socket
(1). On the Main Menu select LV Live View.
Touchpad (described on page 113) can be used with an
external screen connected to HDMI, in two ways:
1. In Zoomed in mode, touchpad can be used to pan the
image.
2. In normal mode, the AF point can be moved using the
touchpad function
Quality Autofocus
AF
Note!
Live View demands higher power consumption than normal
operation. Working with Live View will shorten the usage time of
the Camera when on battery only power supply.
X1D www.hasselblad.com
Table of Content
1
Page 63

Functions
3.19 FOCUS
FOCUS ASSIST
The X1D camera features automatic focus assist. A white
rectangle marked green in the middle of the view provides
conrmation of a precision focus setting and are a useful aid
when making a setting with Auto Focus.
Manual focus setting
Manual focus can be used at any time even in Auto Focus Mode.
You can also switch to Manual Focus Mode and only use the
Focus Ring manually on the lens.
1 Press once on the soft button marked with a star to the right
of the Touch Display to Zoom in to 100%. This gives you a
detailed view of the focus in the focus area.
2 Rotate the Focus Ring on the Lens to adjust Focus.
3 Press the star button again to exit Zoom.
White AF indicator.
USER GUIDE
63
For users who prefer manual focus control but would like the
benets of autofocus, one method is to set the AF-D button
to AF (Single) drive. The main subject can then be centred
and the AF-D pressed, to ensure correct focus. The camera
reverts immediately to manual focus control when the button
is released. Therefore, you can recompose the picture without
having to maintain pressure on the release button in order to
retain the newly automatically made focus setting.
Note!
The Camera will only display a green or red AF Focus Assist
indication when in AF mode. In Manual Focus mode the Camera
will not display any Focus Assist feedback.
Note!
Lens corrections can be applied when captures are imported
into Phocus. Guided by the information in the meta data
included with each individual capture, the DAC (digital lens
correction) tool uses lens-model specic calculations to adjust
for chromatic aberration, distortion and vignetting. Not only
model specications but also capture parameters are taken into
consideration for analysis. This extremely capable renement of
captures should not be overlooked when processing les! See
Phocus User Manual for details.
Green AF indicator. AF set correct.
Note!
The autofocus function is not possible with certain combinations
of lenses and accessories. However, a warning is displayed
which disappears after conrmation.
X1D www.hasselblad.com
Table of Content
Red AF indicator. AF analysis failed to focus.
Page 64

Functions
MANUAL FOCUS
USER GUIDE
64
There is both a Manual focus mode setting and a manual
override capability.
In Manual focus mode, focusing is carried out by rotating the
focus ring on the lens. The focus setting remains until changed
as with a conventional non-autofocus lens. This means that
pressing the shutter release button will not activate a focus
setting change as it does in autofocus. To change back to
autofocus, press the AF / MF button (B).
MANUAL OVERRIDE IN AUTOFOCUS MODE
Manual override is always possible in automatic focus mode
without any need to make a new setting. Just rotate the focusing
ring in the conventional manner. As the lens barrel does not
rotate in autofocus mode, you can hold the focusing ring for
instant manual adjustments. However, to retain the new manual
focus adjustments, you must maintain the pressure on the
shutter release button. You can instantly return to the automatic
focusing mode by releasing the pressure on the shutter release
button rst and then pressing the release button halfway again.
The instant manual override function produces a convenient way
of working. You can take advantage of autofocus while retaining
an instantly adjustable manual focus check if preferred for pin-
point accuracy without making any changes in the settings.
A
B
A Front Scroll Wheel
B AF / MF Button
With manual override in autofocus mode you can manually alter
a focus setting that has been made, by rotating the lens barrel
and without having to change modes. As long as the shutter
release button is kept at the half-press position, the new focus
setting is maintained.
To reactivate the autofocus function, release the shutter release
button and press again.
AUTO / MANUAL FOCUS SETTING
1 Press AF Button (B).
2 Turn the Front Scroll Wheel (A) to select Manual or AF S
Single Shot.
3 Press AF Button (B) or Shutter Release to Save.
X1D www.hasselblad.com
Table of Content
Page 65

Functions
USER GUIDE
65
AUTOFOCUS
Autofocus is activated by pressing the shutter release to the
half-press position or by pressing the AF-D button.
The operative range is from EV 1 to EV 19 at ISO 100.
Focus is determined by maximizing the contrast within the
central marked area.
Alternatively, an attached ash unit that has a similar facility (a
Nikon SB 600, for example) can also be used. This feature can
be altered in settings.
AF Assist Light
AF Assist Light (A) is automatically activated if selected. The
operative distance is approximately up to 4 metres from the
camera.
Note!
You can select position of the AF point. See page 68.
It is also possible to choose from three different sizes. See
page 69.
A
White AF indicator.
Green AF indicator. AF set correct.
X1D www.hasselblad.com
Table of Content
Page 66

Functions
SINGLE SHOT FOCUS
At Single Shot setting (AF S), the shutter
release will be blocked until the camera nds
the optimum focus setting. This ensures
that no captures are made that are not nely
focused. However, this delay is normally only a
fraction of a second in good lighting conditions
with a clear focusing pattern.
Note!
In this mode the lens will focus at one distance
and will remain focused at that distance while
pressure remains on the Shutter Release
button (A).
In this way, you can focus on a nearby object,
temporarily positioned within the focusing
zone on the viewing screen and then without
releasing pressure on the Shutter Release
button (A), recompose knowing that the focus
remains on the object chosen even though it is
now outside the focusing zone.
A
USER GUIDE
66
Releasing the pressure on the Shutter Release
button (A) and pressing again (half-press) would
now change the focus setting to the distance of
the object within the focusing zone.
See Manual override in autofocus mode for
a useful way of working with manual and
autofocus settings combined.
Focus
ISO
FOCUS MODE
5.6 125
f
EV
Manual Focus Single Focus
12.0
100
0.0
331
1
2
X1D www.hasselblad.com
Table of Content
Page 67

CAMERA SETTINGS: MANUAL FOCUS
MF Assist:
Focus Peaking
Peaking Color: Magenta
CAMERA SETTINGS: MANUAL FOCUS
MF Assist:
Focus Peaking
Peaking Color: Cyan
Functions
FOCUS PEAKING
USER GUIDE
67
Subject not in focus when Focus Peaking is active
How to use Focus Peaking
The Focus Peaking function is a Manual
Focus tool to help you identify what areas
of the subject are in focus. Focus Peaking
is not active in Auto Focus mode.
Focus Peaking display when subject parts are in focus
Manual Focus Settings Menu MF Assist dialogue
When the Focus Peaking is active and you
adjust the focus manually, the focused
area of the subject (magenta in this case)
moves in depth as you move the focus.
Manual Focus Settings Menu Contents
MF Assist
Manual Focus Assist. Choose
between:
- Focus Peaking.
- Auto Zoom.
- None.
Peaking Colour
Select Focus Peaking Colour.
- Orange.
- Yellow.
- Cyan.
- Magenta.
Manual Focus Settings Menu Peaking Colour dialogue
X1D www.hasselblad.com
Table of Content
Page 68

Functions
USER GUIDE
68
3.20 MOVE AUTOFOCUS POINT
The Autofocus point (A) can be moved, and
selected manually, to any one of the 35
AF points (B). The AF point is a rectangle
that measures 4 x 4, 2.8 x 2.8 or 2 x 2
mm. See page 69 for details on how
to resize. Also see page 70 on how to
move point while looking through the EVF.
How to move the Autofocus point on the
Touch Display in Live View Mode or in the
Electronic Viewnder EVF
1 Start Live View Mode or use the EVF.
2 The single AF point is displayed in the
centre position (A).
3 Press and hold the AF/MF button (E) for
1 second.
4 All 35 focus points are now displayed
as an overlay (B).
5 Select one of the 35 AF points by
tapping on the Touch Display or Rotate
the Rear Scroll Wheel (M) one step left
to move the AF point one step up (C).
6 Save and exit by a half-press on the
Shutter Release button (F). The AF
point is now in the new selected
location (D).
A B
C
D
E
How to use the Scroll Wheels to move the
AF point
AF point Rear Scroll Wheel (M)
Move up Rotate left
Move down Rotate right
AF point Front Scroll Wheel (G)
Move left Rotate left
Move right Rotate right
How to select AF point, save and exit
Press any of these 3 buttons:
- Half-press Shutter Release button (F).
- AF-D button (I).
- Star button (K).
- The AE-L button (H) exits without saving.
Note!
To reset the AF point back to the centre
position, press the soft button (L) marked
with an x.
H I
F
G
J K
Note!
You can set the camera to automatically reset the Focus point
to the centre position after a capture, or maintain the selected
position, in Main Menu > Camera Settings > Focus > Reset
Focus Point.
L
M
X1D www.hasselblad.com
Table of Content
Page 69

Functions
3.21 RESIZE AUTOFOCUS POINT
The Autofocus point can be resized in the AF
menu as described on page 103. It can also
be resized when the AF point grid is shown by
pressing the soft button (B).
How to resize the Autofocus point in Live View
Mode
Start Live View Mode or use the EVF.
1 The single AF point is displayed in the centre
position.
2 Press and hold the AF/MF button (A) for 1
second.
3 A grid with possible AF points is now shown.
4 Press the Soft Button (B) to cycle through the
different sizes.
5 If required, you can select an AF point by touch
or by using the scroll wheels.
6 Save and exit by a half-press on the Shutter
Release button.
A
B
USER GUIDE
69
4 mm
2.8 mm
2 mm
X1D www.hasselblad.com
Table of Content
Page 70

Functions
3.22 MOVE AUTOFOCUS POINT USING TOUCHPAD
USER GUIDE
70
The position of the Autofocus point can be
changed while viewing through the EVF by sliding a
nger on the rear display.
Make sure that the setting “Touchpad for EVF” in
the Autofocus menu is set to the desired option.
See details on page 113.
Possible settings are:
- Right
- Left
- Top-Right
- Top-Left
- Bottom-Left
- Bottom-Right
Which setting you should use, mainly depends on
which eye you use when looking through the EVF.
If the right eye is used, a good starting point is
to set “Right”. This will use the right half of the
screen as a touchpad for moving the AF point.
Moving the AF point
In this example, the “Touchpad for EVF” is set to
“Right”.
AF Point in the center
Slide the nger on the rear display to move AF point
While looking through the EVF, place your nger
on the right part of the rear display and slide
upwards and slightly to the left. In the EVF you
will see the AF point moving, and when you have
the desired position, you can release the nger
from the rear display. However, it is not necessary
to release the nger before the exposure. The
AF point will stay in its position until changed. If
the option “Reset Focus Point” is set to “After
Exposure” (See page 103), the Focus Point will
return to center after the exposure.
Note!
The movement of the AF point is relative, similar
to a touchpad on a laptop computer. This means
that if you cannot move the AF point far enough
in one movement, lift the nger and return to the
starting point and repeat the movement.
AF Point moved
X1D www.hasselblad.com
Table of Content
Page 71

Functions
3.23 STOP DOWN BUTTON
STOP DOWN / DEPTH-OF-FIELD PREVIEW
Stop Down functionality
The Aperture normally stops down only during the exposure. In
all other situations the Aperture is completely open.
The Viewnder and the Touch Display will, as a result, show a
narrow depth-of-eld regardless of the current Aperture setting.
How to preview the depth-of-eld
A visual depth-of-eld preview check can be made by following
these instructions.
1 Press the STOP DOWN button (A).
2 Hold the button (A) pressed down.
3 The lens is stopped down to the current Aperture setting.
4 A depth-of-eld preview is displayed in the Viewnder and on
the Touch Display screen, as long as the STOP DOWN button
(A) is completely pressed down.
5 Verify the depth-of-eld optically in the Viewnder or on the
Touch Display screen.
6 Release the STOP DOWN button (A) to open up the Aperture
fully again.
A
USER GUIDE
71
Note!
Depth-of-eld is not absolute. Perception of it depends on
several factors and so it should be seen only as a rough guide.
X1D www.hasselblad.com
Table of Content
Page 72

Functions
3.24 CHANGE SETTINGS ON THE GRIP
How to change AF/MF and ISO/WB settings
USER GUIDE
72
AF / MF modes
1 Select AF/MF (D) on top of the Camera Grip.
2 Press the AF/MF button to toggle between AF and MF.
ISO / WB modes
1 Select ISO/WB (C) on top of the Camera Grip.
2 Press once on the ISO/WB button to select ISO.
3 Press twice to select WB.
4 Press a third time to exit.
ISO Change ISO mode (C) by scrolling the Rear
or Front Scroll Wheel (A) left or right.
WB Mode Change WB mode (C) by scrolling the Rear or
Front Scroll Wheel (B) left or right.
When in WB M Manual Mode, use Rear
Scroll Wheel (B) to select setting.
Mode Dial
Mq Manual Quick Mode.
M Manual Mode.
A Aperture Priority Mode.
S Shutter Priority Mode.
P Program Mode.
Rectangle Automatic Mode. ISO are also
automatically set. Several functions are
limited or locked.
Video Video Mode.
C3 Custom Program 3.
C2 Custom Program 2.
C1 Custom Program 1.
Manual Quick Mode, Mq
When selecting the Manual Quick Mode (Mq) the Shutter is
closed and the Aperture is set to selected value. The Live View
is turned off. This results in the shortest possible reaction
time as well as saving battery time.
A
B
C
D
Custom Modes
C3, C2, and C1 are Custom Modes that can save the complete
Camera settings in the Camera Memory for quick access to
favourite settings.
X1D www.hasselblad.com
Table of Content
Page 73

Functions
TO ADJUST SHUTTER AND APERTURE ON GRIP
USER GUIDE
73
Note!
In manual mode both the shutter and aperture are electronically
controlled and are adjusted by the Scroll Wheels on the grip.
Note!
There are no separate manual setting rings on the lenses
or camera body. The settings are displayed in the viewnder
display.
How to adjust shutter and aperture
Turn the Front Scroll wheel (A) to adjust shutter and aperture.
Turn the Rear Scroll wheel (B) to adjust shutter and aperture.
In Manual mode (M):
Front wheel = Aperture.
Rear wheel = Shutter speed.
In Aperture priority (A) mode:
Front wheel = Aperture.
Rear wheel = Quick exposure adjustment of Shutter speed.
A
B
In Shutter priority (S) mode:
Front wheel = Shutter Speed.
Rear wheel = Quick exposure adjustment of Aperture.
In P mode:
Front wheel = Aperture/shutter speed combination.
Rear wheel = Quick exposure adjustment.
X1D www.hasselblad.com
Table of Content
Page 74

Functions
ISO AND WHITE BALANCE
USER GUIDE
74
ISO and White Balance are set either on the Camera Grip, the
Touch Display or, when tethered, in Phocus.
● On the Camera Grip, the ISO / WB Button (A) provides
immediate access to ISO and White Balance settings.
The front scroll wheel (B) and Rear Scroll Wheel (C) are
used to make the desired changes. These appear on the
Touch Display and in the Electronic Viewnder (EVF).
● For the Touch Display, settings are changed on the Touch
Display or by using the soft buttons next to the display.
The settings are automatically and simultaneously adjusted
within the Camera and changes display on both the Touch
Display and in the Electronic Viewnder.
Note!
The changes are only displayed on the Touch Display after the
settings have been saved. See more information about making
manual White Balance settings in the ‘Touch Display Settings’
section.
ISO
1 Press ISO / WB button (A).
2 Turn the Front Scroll Wheel (B) to select ISO setting.
A
B
C
White Balance WB
1 Press ISO / WB button (A).
2 Turn the Front Scroll Wheel (B) to select WB (Auto AWB,
Daylight, Shade, Cloudy, Flash, Fluorescent, Tungsten or
Manual WB).
3 To set the Colour Temperature manually, turn the Front
Scroll Wheel (B) until “M/WB” is displayed. Then the Colour
Temperature value is displayed at the bottom of the screen.
4 Use the Rear Scroll Wheel (C) to set the Manual WB.
Note!
White Balance settings are technically not necessary for 3F/3FR
les. The raw format les contain all the information required
for correction in Phocus and/or other software, regardless of
the original colour temperature of the light source or colour
temperature setting of the camera at the time of exposure.
If you intend to shoot RAW & JPEG or use Phocus for JPEG
production and plan to deliver or print the JPEG les directly,
then you should make a White Balance setting.
Note!
ISO and White Balance settings are made either on the Camera
Grip or the Touch Display. The settings are automatically
updated on both the Touch Display and the Electronic Viewnder.
ISO
EXPOSURE MODE
Auto Cloudy Shade
5.6 125
f
Daylight Tungsten
12.0
EV
Flash Manual
100
Flourescent
331
0.0
1
2
X1D www.hasselblad.com
Table of Content
Page 75

Functions
3.25 BROWSING, PREVIEW AND HISTOGRAM
USER GUIDE
75
A
BROWSE CAPTURES
Captures on the cards can be browsed on the rear display or
in the EVF. Where the captures are shown, depends on which
display is active when the Play / Browse Button (C) is pressed.
Browsing captures on the rear display
To enter Browse mode, press the Play / Browse Button (C) next
to the Touch Display.
In Browse mode, swipe right or left or use the Front Scroll Wheel
(A) on the Camera Grip to Browse captures in a folder.
In Browse mode on the Main Menu, swipe right or left to Browse
captures.
Delete Capture with the Soft Button (D).
Zoom out to Folder View to select another folder to Browse as
descibed on page 76.
Press Shutter Release Button (B) to exit Browse mode or press
the Menu Button (E).
Browsing captures in the EVF
With the EVF active, press the Play / Browse Button (C). The last
capture will be shown.
To view another image, use the front scroll wheel.
MAIN MENU
Display Wi-Fi Exposure
RAW
AF
JPG
Power &
Quality Autofocus
Timeouts
Storage Touch
B
C
D
E
To select another overlay, use the rear scroll wheel.
You can zoom in using the AF-D button. To zoom out, use the
AE-L button.
Access the Delete Image Dialogue by pressing the Soft Button
(D).
You can zoom out to 9-view by pressing the AE-L button in full
image view. You can zoom out further to view Folders and nally
select card as descibed on page 76 (Using buttons).
The Image Preview setting in the Camera Settings - Display
menu, includes a setting where you can choose to automatically
see a preview in the EVF after each capture. See more on page
111.
Video les can also be previewed in the EVF. To start video
playback, press the Play / Browse Button (C).
X1D www.hasselblad.com
Table of Content
Page 76

Functions
SELECT CARD TO BROWSE
You can select SD 1 Card or SD 2 Card to Browse Captures.
To select which card to review, navigate up in the folder structure
until you reach the “Select Card to Browse” dialog.
The folder structure is the following:
Memory Cards
Folders
9 images
1 image
It is possible to navigate to the card selection dialog either
using touch or buttons and scroll-wheels.
By touch:
1 When viewing one image (1) Pinch inwards to go to the 9
images view (2).
2 In the 9 images view - Press the “Folder Up” button (A) in the
top left corner to go to folders.
3 In the folders view - Press the “Folder Up” button in the top
left corner to go to folder level above.
4 Select Card to Browse.
5 Select folder by clicking the folder name (332HASBL).
6 Select the image you want to view from the 9 images view.
7 The selected image is shown.
Or using buttons:
1 2
3 4
BROWSE: FOLDERS
273HASBL
5
BROWSE: FOLDERS - SD1
332HASBL
7
USER GUIDE
A
BROWSE: MEMORY CARDS
Select Card to Browse
SD 1 SD 2
6
76
8 When viewing one image (1) - Press the AE-L button to go to
the 9 images view (2).
9 Continue to press the AE-L button repeatedly to go up in
folder structure.
10 Select Card to Browse using any of the scroll-wheels
11 Use the AF-D button to select card.
12 Repeatedly use scroll-wheels and AF-D button to select
folder to review.
X1D www.hasselblad.com
Table of Content
Page 77

Functions
CREATE NEW FOLDER
USER GUIDE
77
It is possible to create a new folder on the currently active
SD card. When a new folder is created, all new images will be
stored in that folder. The folder name is auto-generated and
cannot be changed.
It is not possible to store images in previous folder.
By touch:
1 When viewing one image (A), pinch inwards to go to the 9
images view (C).
2 In the 9 images view - Press the “Folder Up” button (B) in
the top left corner to go to folders.
3 In the folders view - Press the “Add folder” button (D) in the
top right corner to create a new folder.
4 In the Create Folder dialogue (E), choose Create to create a
new folder or Exit to skip.
Or using buttons:
1 When viewing one image (A) - press the AE-L button to go to
the 9 images view (C).
2 Press the AE-L button again to view the folder structure.
3 Select the “Add folder” icon (D) in the top right corner using
any of the scroll-wheels
4 Use the AF-D button to show the Create Folder dialogue (E).
5 In the dialogue, choose Create to create a new folder or Exit
to skip.
B
1-view
9-view
Folder view
332HASBL
BROWSE: FOLDERS - SD1
A
C
D
When the new folder is created, the folder view (F) will show the
new folder. To view images in the previous folder (332HASBL),
proceed as described on the previous page. New images will
automatically be stored in the new folder.
Note!
It is only possible to create a new folder on the currently active
card. When browsing the other card, the “Add Folder” icon will
not be available.
Create folder dialogue
!
Create New Folder?
A new folder “333HASBL” will be created on SD1
Folder view
BROWSE: FOLDERS - SD1
332HASBL
333HASBL
Create
E
Exit
F
X1D www.hasselblad.com
Table of Content
Page 78

Functions
STANDARD PREVIEW
USER GUIDE
78
The Standard Preview is displayed when you rst turn on the
camera and is probably the view you will use most often.
It displays a preview of your most recent capture and basic
information about the settings.
1 2 3
4 5 6 7
1 Card (1 or 2)
2 Capture Date
3 Capture Time
4 Aperture (f/8)
5 Shutter Speed (60)
6 ISO Setting (100)
7 +/- Exposure Adjust
Indicator and
Exposure Adjust
value (0.0 EV)
9 VIEW MODE
To display 9 View Mode, press the AE-L button when in Browse
Mode. In this Mode you can see an overview of up to 9
captures. If you have more than 9 captures, swipe down to scroll
through the captures.
Tap on one of the small images to view in full screen.
X1D www.hasselblad.com
Table of Content
Page 79

Functions
USER GUIDE
79
HISTOGRAM TYPES
The available Histograms are: Histogram Mode, Capture Details
Mode, Luminance Histogram Mode and Separate Histogram
RGB Mode.
HISTOGRAM MODE
Histogram mode displays RGB Histogram with separate RGB
channels visible. The RGB details are stored with the capture
le, and can be referred to in Phocus and other applications.
HOW TO CHANGE HISTOGRAM OVERLAY
Touch the lower part of the image or use the rear scroll wheel to
alter between the available Histogram representations.
LUMINANCE HISTOGRAM MODE
The Luminance Histogram mode displays the luminosity. The
luminance is represented by a White Graph.
CAPTURE DETAILS MODE
The Capture Details Mode displays SD Card (1), Date (17-02-
02), Time (14:32:08), selected Aper ture (f/11), Shutter Speed
(250), ISO (100), EV Settings (+/- 0.0), Mode (A), Light Meter
Mode (Center Weighted), White Balance (Daylight) and Lens info
(45mm).
SEPARATE HISTOGRAM RBG MODE
In Separate Histogram RGB Mode, the individual RBG channels
are displayed. The Red R channel rst, the Green G channel in
the middle and the Blue B channel below the Red and Green
channels.
X1D www.hasselblad.com
Table of Content
Page 80

Functions
HISTOGRAM EXPOSURE MODE
Underexposure Even exposure Overexposure
Histogram Exposure
The Histogram provides a graph that indicates the total number
of pixels at each brightness level, with brightness in range from
black on the left to white on the right. It is a valuable tool for
evaluating captures.
USER GUIDE
80
A well exposed shot usually has a full range of levels, while
underexposed and overexposed Captures tend to show levels
concentrated at the left or right part of the scale.
The histogram is only an indicator that should be interpreted.
There are several situations in which a ‘bad’ histogram will
match an exposure that could be perfect for the intended effect.
Study the Histogram examples and the explanations below.
Underexposure
Histogram display concentrated on the left with few pixels
elsewhere indicates a likely underexposure. Many details will be
lost in the shadows.
Even exposure
Histogram display spread across the full range indicates a likely
good exposure. There may still be a few pixels at the extremes,
indicating a few spectral highlights and saturated shadows, but
this is often normal in a good exposure.
Overexposure
Histogram display concentrated on the right with few pixels
elsewhere indicates a likely overexposure. Many details will be
lost in the highlights.
X1D www.hasselblad.com
Table of Content
Page 81

Functions
3.26 GPS MODULE
USER GUIDE
81
X1D has an external GPS that can be mounted in the Flash Hot
Shoe. The GPS turns on automatically when it is mounted in the
Flash Hot Shoe. No settings are required on the camera. The
position data is tagged to each individual image le and can be
read directly by Phocus. The GPS unit requires no extra external
battery or power source. It works seamlessly in the background
for ease of use. The position is updated once per second.
HOW TO MOUNT THE GPS MODULE
1 Hold the external GPS module (A) with the metallic contacts
facing down.
2 Remove the Camera Hot Shoe protective cover from the Hot
Shoe connector (B).
3 Insert the external GPS module in the Camera Hot Shoe
connector (C).
4 Make sure the GPS module is inserted all the way in the
Camera Hot Shoe connector.
Warning!
The external GPS module is made for the X1D Camera only. Do
not attach it to any other Camera. If you attach the X1D external
GPS module to any other Camera, it can result in damage to the
GPS module and/or the Camera.
A
B
Note!
If the external GPS module was not included in the delivery,
Hasselblad will send it free of charge, upon written request.
See information in the package.
C
X1D www.hasselblad.com
Table of Content
Page 82

Functions
GPS ICON STATUS
The GPS icon, when active, is displayed in the top left
corner in the Viewnder and when using the Settings
Menus. When the Control Screen is active, the GPS icon is
displayed near the centre of the display.
The GPS state is displayed in 3 different ways:
Steady icon
GPS has obtained the position.
Blinking icon
GPS has not yet obtained the position.
No icon visible
The GPS is not yet detected by the camera or the GPS
is not mounted on the camera.
GPS icon on Control Screen
USER GUIDE
82
Note!
There are situations where the external X1D GPS module
can receive less, or no position information. These are
for example when the X1D camera and GPS module are
indoors, in tunnels and even in forests with large trees.
TECHNICAL SPECIFICATION FOR THE GPS
Receiver type
The GPS is a 72-channel u-blox M8 engine and it is
supporting:
GPS L1C/A.
SBAS L1C/A.
QZSS L1C/A.
GLONASS L1OF.
Galileo E1B/C1.
Horizontal position accuracy
2.0 m. This includes SBAS and QZSS.
GPS icon when in Settings Menus
CAMERA SETTINGS
Exposure
Image
Quality
Autofocus
GPS icon in Viewnder
X1D www.hasselblad.com
Table of Content
Page 83

Functions
3.27 PHOCUS OVERVIEW
USER GUIDE
83
Phocus
Phocus is a Capture Processing and File Management
application aimed primarily at Hasselblad 3F le handling.
Phocus is available for both Mac and Windows.
Professional Image Quality
Phocus combines Hasselblad Natural Colour Solution (HNCS)
with Digital Auto Correction (DAC) to provide high digital
image quality in the images you create. With Phocus, the
moiré effect that can occur on even extremely high resolution
images is effectively removed automatically and directly on
the raw data, leaving the image quality intact and saves time
in post production work. Tethered shooting is efcient with
Phocus Remote camera controls providing a number of remote
functions. For example remote focusing, live view, aperture and
exposure time controls.
Phocus Mobile
Phocus Mobile is available for iPhone®, iPad® and iPod Touch®.
It enables you to connect wireless to a computer running
Phocus and to remotely browse your high-resolution RAW, JPEG
and TIFF images. This provides a solution for working with
clients in the studio, enabling each person to view images on
an individual iOS device, rather than all gathering around a
single computer. Phocus Mobile also allows users to remotely
operate and trigger a tethered camera, giving control of many
parameters, all neatly presented in a virtual camera display.
This feature is very convenient for remote control of the camera
when it’s located in a difcult to access position.
Phocus Mobile is available for free. Download Phocus Mobile in
the Apple App Store. www.apple.com.
X1D www.hasselblad.com
Table of Content
Page 84

Functions
3.28 PHOCUS
FEATURES IN PHOCUS
Professional Image Quality
● Hasselblad Natural Colour Solution (HNCS).
● Lens corrections for X, H and V system lenses (DAC). The
X1D Camera only supports X and H Lens systems.
Specialized Tools
● Advanced Tethered Camera Controls.
● Phocus Mobile*.
● Scene calibration & reproduction tools.
● Leading edge Moiré removal.
● Highlight recovery, shadow ll, clarity and dust spot
removal tools.
● Selective Adjustments.
● Easy-to-use interface.
● Extensive customization options for individual workow
scenarios.
● Import/Export of image adjustments, keywords, workow
settings.
● High quality printing.
● Slide show.
● RAW le support from more than 150 DSLR cameras.
USER GUIDE
in post production work. Tethered shooting is efcient with
Phocus Remote camera controls providing a number of remote
functions. For example remote focusing, live view, aperture and
exposure time controls.
* Phocus Mobile is available for free download in the Apple App
Store.
** Full list available at http://www.apple.com/aperture/specs/
raw.html
84
Any File from Anywhere
Phocus allows you to import image les and work in the same
intuitive processing environment, no matter where your les are
coming from. You can browse, handle, adjust, and process all
kinds of RAW and non-RAW formats.
Phocus supports RAW les from more than 150 cameras,
including Canon, Nikon, Leica, Sony, Fuji, Olympus **. The most
common le formats can be processed for example TIFF, JPEG,
DNG, and PNG. “Not all adjustments are available for 3rd party
les”.
Ultimate Image Quality
Phocus combines Hasselblad Natural Colour Solution (HNCS)
with Digital Auto Correction (DAC) to provide high digital
image quality in the images you create. With Phocus, the
moiré effect that can occur on even extremely high resolution
images is effectively removed automatically and directly on
the raw data, leaving the image quality intact and saves time
Note!
Phocus is a license free software with unlimited installations
and there is no registration needed.
X1D www.hasselblad.com
Table of Content
Page 85

Functions
3.29 CONNECT TO A COMPUTER
1 Connect a USB 3 cable to the USB port on the computer.
2 Open the hinged cover on the camera.
3 Connect the USB 3 cable to the USB port on the camera.
When initiating a shot from Phocus, the Computer sends a
signal to the X1D Camera, which triggers the shutter (and
strobe/ash, if any). The Camera then sends the capture over
the USB connection to the Computer, where it is displayed
on the Computer Screen and saved as a 16-bit 3F le in the
currently selected folder on the Computer hard disk.
Note!
When connected to a computer, the following applies:
● The destination medium and location are controlled from
Phocus.
● All exposure settings, including ISO, aperture and
exposure time, are controlled from Phocus if you choose
to expose from Phocus. In addition extra tools such
as Live Video, remote focus control are available. See
Phocus user manual for full description.
USER GUIDE
85
X1D www.hasselblad.com
Table of Content
Page 86

Functions
PHOCUS AND HASSELBLAD CAPTURE FILES
The X1D can capture les and store them as Hasselblad RAW
format les or Hasselblad RAW + JPEG formats simultaneously.
Hasselblad RAW les are initially stored in the 3FR format which
is a proprietary Hasselblad format for the temporar y storage of
captures. A 3FR le contains the complete digitized raw image
exactly as it was captured by the camera. 3FR information
requires further computing power (typically by way of Phocus) to
obtain complete development. If developed in Phocus, 3FR les
become Hasselblad 3F les – denoted by each le now bearing
the sufx “.fff”. If developed by other RAW processors, the 3FR
les are not converted to 3F but can be exported directly to TIFF
and PSD according to requirements.
When working tethered (which necessitates using Phocus) 3FR
les are automatically processed and stored in the background
on a computer appearing as 3F les on the hard disk ready for
selective adjustment and export. 3FR les stored on a SD card
can be processed using:
USER GUIDE
86
Hasselblad Phocus
Adobe Camera Raw
Adobe Lightroom
Apple Aperture
Capture les can be stored as 3FR les (from a SD card) for
later processing in Phocus or other software, or they can be
stored as 3F les (as a result of tethered shooting or 3FR les
processed and converted in Phocus). In all cases if you keep
the original 3FR/3F les, you will also retain the possibility of
reprocessing them in the future in later versions of Phocus or
other software to take advantage of eventual improvements and
developments.
Mixed formats
Phocus can also process most other capture formats, generic
and proprietary. This means you can include other formats in
your normal Phocus workow if you choose. Or if you prefer,
you can include Hasselblad les in Adobe / Apple workows as
stated above.
Note!
For best possible image result, use Hasselblad Phocus
Software. Other Digital Image Software can give you a similar
result, but not exactly the same as Hasselblad Phocus Software.
X1D www.hasselblad.com
Table of Content
Page 87

Functions
USER GUIDE
87
3.30 BATTERY
Rechargeable Battery
The environmentally approved Battery (Li-ion 3054752) is the
standard Power Source for the X1D Camera (1). It is advisable
to keep an extra fully recharged battery on hand. As is the case
with most batteries, problems might be encountered when used
in very low temperatures. In this situation it is advisable to
keep the reserve battery inside a warm pocket, for example, to
maintain it near body temperature.
How to remove a Battery
1 Remove the Battery from the camera (1) by rotating the
Battery Lever (2).
2 The Battery will move up a bit (3) automatically.
3 Then press the Battery in a bit but not all the way (4), to
release it from the Camera completely.
4 Remove the battery (5).
How to mount a Battery
1 Push the Battery (1) into the Camera Battery Compartment
until it locks into place.
1
3
2
4
5
X1D www.hasselblad.com
Table of Content
Page 88

Functions
BATTERY CHARGER
The battery charger BCX-1 (3053573) is supplied with a number
of plug attachments to suit various types of domestic electrical
sockets available worldwide. Other types of sockets will require
a domestic socket converter.
Attach the appropriate plug by sliding it into position as in the
illustration to the right. Reverse the procedure to remove the
plug.
CHARGE THE BATTERY
USER GUIDE
88
With the battery (3054752) removed from the camera, insert
the jack plug from the battery charger into the socket on the
battery (1). Insert the battery charger into a standard (100–
240V~ /50–60 Hz) domestic socket.
During the charging procedure, the lamp on the charger signies
the following:
Steady Green light
Standby (no battery connected).
Steady Red light
Charging.
Steady Green light
Ready.
Note!
It can take about 6 hours to charge the battery completely up to
100% the rst time.
1
See next page for more details and precautions.
X1D www.hasselblad.com
Table of Content
Page 89

Functions
RECHARGEABLE BATTERY SPECIFICATION
USER GUIDE
89
LI-ION/ BATTERY CHARGER 3053573 BCX-1
– PRECAUTIONS and GENERAL
The battery should be charged for approximately 6 hours before
rst time use.
The battery must be charged at room temperature.
Maximum battery capacity is reached only after the battery has
been charged and discharged several times.
Avoid frequent full discharges (a full discharge is signalled by
the appearance of the Replace battery warning). As the battery
is a Li-ion type, it has no ‘memory effect’ of practical importance
and therefore frequent recharges will cause no problems
such as loss of capacity or poor performance. It is therefore
better policy to recharge the battery at very regular intervals,
regardless of use.
Remove the battery if you intend to store the camera for some
while as it will eventually become completely drained, even
though the camera is turned off. Mount the Battery Protection
Cover when storing the Battery.
The battery should have a usable service life of around 400
recharge/discharge cycles.
Connect the battery to the camera correctly.
Keep the Battery Protection Cover in place when not in use.
(Short circuiting across keys in a pocket, for example, could
cause a risk of re).
Do not immerse the battery in liquids.
Do not incinerate the battery.
Please recycle or discard in an environmentally approved
manner.
Use indoors only (protect against moisture).
Do not short circuit the jack plug.
Do not alter the charger in any way other than changing the plug
attachment.
The battery has an integrated ‘fuel gauge’ capability that
supports the Replace battery and Battery status functions. As
with most Li-ion batteries, this capability should be occasionally
calibrated, depending on how much the battery is used. To do
this, leave the camera on (or use it), until the Replace battery
warning appears. Then, recharge the battery for 6 hours. This
will improve the accuracy of the measurements.
When removing a battery from the charger and immediately
replacing it with another, allow a few seconds to elapse so
that the charger can automatically reset for the next charging
procedure.
It is perfectly normal for the battery to become warm when being
charged.
A slight temporary loss of battery performance might be noticed
at very high or low temperatures. Take the appropriate measures
if this is the case.
If you do not intend to use the battery for a while, it is best to
store it at room temperature with an approximate 30 to 40%
charge. You can check the percentage level on the status
screen.
Note!
You can save battery consumption by changing the Display Off
/ Power Off settings as well as the Brightness settings of the
display.
X1D www.hasselblad.com
Table of Content
Page 90

Functions
BATTERY LIFE AND BATTERY WARNING
USER GUIDE
90
Battery life is dependent on a number of variable factors and
therefore cannot be exactly predicted. If the camera is left in
the active state instead of Display Off or Sleep modes for long
periods, for example, the batter y will become exhausted much
faster. A low camera batter y level is indicated by a symbol on
the display, as well as in the viewnder.
3.31 TEMPERATURE WARNING
If you take several captures within a short period of time,
the processor in the Camera will produce more heat. This,
particularly in combination with high ambient temperature, can
result in noise in the image les. To prevent this, the Camera
displays a warning icon when the temperature rises.
At approximately 60 °C a warning dialogue appears notifying
that the Camera is temporarily shutting down to allow it to cool.
3.32 STORE THE CAMERA
Caution!
If you leave the camera unused for a period of time, remove the
battery. This will prevent damage to the equipment.
Low battery warning
Caution!
Keep camera and equipment away from moisture. If your camera
becomes wet, disconnect from electric power and let camera
dry before further use. This will help prevent damage to the
equipment.
Caution!
Store the equipment in a dry environment. This will help prevent
damage to the equipment.
X1D www.hasselblad.com
Table of Content
Page 91

4 SETTINGS
MAIN MENU
Display Wi-Fi Exposure
RAW
JPG
Power &
Timeouts
Storage Touch
Quality Autofocus
AF
Page 92

Settings
4.1 CAMERA SETTINGS MENU
USER GUIDE
92
Main Menu
MAIN MENU
Display Wi-Fi Exposure
RAW
Power &
Timeouts
Storage Touch
MAIN MENU > CAMERA SETTINGS > EXPOSURE
1 Press the Camera icon on the Touch Display.
2 The Camera Settings Menu appears.
Swipe right or press Menu / EXIT button to get
back to Main Menu.
JPG
Quality Autofocus
AF
Camera icon
Camera Settings Menu
CAMERA SETTINGS
Exposure
Image
Quality
Autofocus
Manual Focus
Self Timer
Custom Buttons
Conguration
Exposure Settings Menu
CAMERA SETTINGS: EXPOSURE
Increment Step Size
Exposure:
Exposure Adjust:
1/2
1/3 step
Shutter Function
True Exposure:
Electronic Shutter:
Flash
Low Flash Warning:
Normal
Sync:
Exposure Lock
Flash Ready:
Out of Range:
AE-L / Quick Adjust
Reset After Exposure:
step
X1D www.hasselblad.com
Table of Content
Page 93

Settings
INCREMENT STEP SIZE SETTINGS
MAIN MENU > CAMERA SETTINGS > EXPOSURE > INCREMENT
STEP SIZE
1 Press the Camera icon on the Touch Display.
2 The Camera Settings Menu appears.
3 Press the Exposure Settings Menu.
USER GUIDE
Exposure Settings Menu
CAMERA SETTINGS: EXPOSURE
Increment Step Size
Exposure:
Exposure Adjust:
1/2
1/3 step
93
step
Swipe right or press Menu / EXIT button to get back to Main
Menu.
Exposure
Select between 1, 1/2 and 1/3 stop increments.
Exposure Adjust
Select between 1, 1/2 and 1/3 stop increments.
Shutter Function
True Exposure:
Electronic Shutter:
Flash
Low Flash Warning:
Normal
Sync:
Exposure Lock
Flash Ready:
Out of Range:
AE-L / Quick Adjust
Reset After Exposure:
X1D www.hasselblad.com
Table of Content
Page 94

Settings
SHUTTER FUNCTION SETTINGS
USER GUIDE
94
MAIN MENU > CAMERA SETTINGS > EXPOSURE >
SHUTTER FUNCTION
1 Press the Camera icon on the Touch Display.
2 The Camera Settings Menu appears.
3 Press the Exposure Settings Menu.
4 Select Shutter Function.
Swipe right or press Menu / EXIT button to get back to
Main Menu.
True Exposure
Select On or Off. The check box will be marked with
a √ when On and the check box is empty when True
Exposure is Off.
Determines whether the exposure is automatically
adjusted to create a true exposure setting. On allows
the adjustment. Off retains the normal setting.
Note!
If using ash/strobe as the main light source and 1/800s
or 1/1000 shutter speed (depending on lens type),
remember to turn off the True Exposure option.
Exposure Settings Menu
CAMERA SETTINGS: EXPOSURE
Increment Step Size
Exposure:
Exposure Adjust:
1/2
1/3 step
Shutter Function
True Exposure:
Electronic Shutter:
Flash
Low Flash Warning:
Normal
Sync:
Exposure Lock
Flash Ready:
Out of Range:
AE-L / Quick Adjust
Reset After Exposure:
step
Note!
The True Exposure feature is designed to keep shutter
speed unaffected by aperture value. See next page.
Electronic Shutter
Select On or Off. If this option is checked, the camera
will disable the lens shutter and use an electronic
shutter in the sensor instead. When electronic shutter
is active, this is indicated with an E symbol in front of
the shutter speed in Live View and on Control Screen.
Please note the following limitations with Electronic
Shutter:
• The camera will use the Rolling Shutter available
on the sensor which has a read-out time of
approximately 300 ms. This will cause distortion
of the image if the camera or subject is moving
during the exposure. A tripod and a stationary
subject is recommended.
• ISO will be limited to 3200.
• Full image quality is not guaranteed.
• Shutter speed range is 68 minutes to 1/10000
sec.
• Flash is disabled.
• Continuous drive is disabled.
• True Exposure is disabled.
Control Screen with active Electronic Shutter
Live View with active Electronic Shutter
Note!
An active Electronic Shutter is indicated on the Control Screen
and in Live View with an "E" next to the shutter speed.
X1D www.hasselblad.com
Table of Content
Page 95

Settings
True Exposure explained
Light level at image plane
T fully open
USER GUIDE
Maximum aperture
Stopped down one stop with True Exposure ON
Stopped down one stop with True Exposure OFF
95
T stopped down = T Fully open
(using True Exposure)
T stopped down > T Fully open
(without True Exposure)
True Exposure is an XCD and HC/HCD lens function that allows
the shutter speed to remain unaffected when stopping down.
This effect is perhaps not so commonly understood as it is
restricted specically to integral lens shutters as opposed to
focal plane shutters.
When a lens is stopped down, the effective shutter speed
becomes longer, consequently affecting the set exposure.
At slow shutter speeds the effect is minimal but at faster
speeds, 1/500s, the effect becomes clearly visible. Automatic
compensatory measures in speed setting adjustments are
employed.
As compensation can only be put into effect where speeds can
be adjusted, this prevents the possibility of adjusting the fastest
speed of 1/800s. To counter this, compensatory adjustments
Time
are therefore made to the aperture instead to retain the set
exposure. This compensation is not always required and
when using ash/strobe as the main light source it is actually
undesirable because compensation will result in underexposure.
Therefore, when using ash/strobe as the main light source,
you should set True Exposure to OFF in Main Menu > Camera
Settings > Exposure > True Exposure in the Camera Display.
You can download a complete explanation of this situation from
www.hasselblad.com.
X1D www.hasselblad.com
Table of Content
Page 96

Settings
FLASH SETTINGS
USER GUIDE
96
MAIN MENU > CAMERA SETTINGS > EXPOSURE > FLASH
1 Press the Camera icon on the Touch Display.
2 The Camera Settings Menu appears.
3 Press the Exposure Settings Menu.
4 Select Flash.
Swipe right or press Menu / EXIT button to get back to Main
Menu.
Important information!
Read the complete Chapter about ash before attaching a Flash
to the X1D Camera.
Low Flash Warning
Select On or Off.
The check box will be marked with a √ when On and the
check box will be empty when Low Flash Warning is Off.
Sync
Select Flash Sync Settings.
- Normal.
- Rear.
Exposure Settings Menu
CAMERA SETTINGS: EXPOSURE
Increment Step Size
Exposure:
Exposure Adjust:
1/2
1/3 step
Shutter Function
True Exposure:
Electronic Shutter:
Flash
Low Flash Warning:
Normal
Sync:
Exposure Lock
Flash Ready:
Out of Range:
AE-L / Quick Adjust
Reset After Exposure:
step
This Chapter continues on next page.
X1D www.hasselblad.com
Table of Content
Page 97

Settings
USER GUIDE
97
FLASH AND STROBE SETTINGS
The X1D Camera can be used together with the following ashes
in TTL mode:
Nikon:
SB-300
SB-500
SB-5000
SB-700
SB-900
SB-910
Profoto:
A1
B1
B2
General information
When using the A or S setting together with ash, the exposure
requirements of the camera will dominate which might produce
slow shutter speeds indoors, for example, requiring the use
of a tripod. If P is selected instead, a shutter speed of 1/60
or faster is automatically chosen by the camera enabling the
camera to be hand held.
Notes and Warnings!
Only ash units listed to the left can be connected to the hotshoe of the camera.
Warning!
Do not attempt to connect a ash unit dedicated for use with
another camera brand, to the X1D Camera hot shoe. The ash
unit and / or camera could be damaged.
Note!
If using ash/strobe as the main light source and 1/1000s or
shorter shutter speed, remember to turn off the True Exposure
function.
When using ash close up or when using larger aperture
settings, remember that the ash unit’s output has a specic
minimum duration which might still be too great for correct
exposure. Read the back’s output specications for further
information regarding any potential restrictions.
Rear sync is a useful feature used either for effect or to produce
a more ‘natural’ look when combining long exposures involving
light trails and ash.
To change the balance between ash output and camera
exposure requirements to produce a variety of effects, use the
exposure compensation function. For various long exposure
effects use the sync function.
X1D www.hasselblad.com
Table of Content
Page 98

Settings
EXPOSURE LOCK
USER GUIDE
98
MAIN MENU > CAMERA SETTINGS > EXPOSURE > EXPOSURE
LOCK
1 Press the Camera icon on the Touch Display.
2 The Camera Settings Menu appears.
3 Press the Exposure Settings Menu.
4 Scroll down to Exposure Lock.
Swipe right or press Menu / EXIT button to get back to Main
Menu.
Flash Ready
Select On or Off. The check box will be marked with a √
when On and the check box will be empty when it is Off.
Controls if an exposure is blocked if the ash is not ready to
re.
Out of Range
Select On or Off. The check box will be marked with a √
when On and the check box will be empty when it is Off.
Controls if an exposure is blocked if aperture, and/or shutter
speed, is outside the possible range.
Exposure Lock Settings Menu
CAMERA SETTINGS: EXPOSURE
Increment Step Size
1/2
Exposure:
Exposure Adjust:
step
1/3 step
Shutter Function
True Exposure:
Electronic Shutter:
Flash
Low Flash Warning:
Normal
Sync:
Exposure Lock
Flash Ready:
Out of Range:
AE-L / Quick Adjust
Reset After Exposure:
X1D www.hasselblad.com
Table of Content
Page 99

Settings
AE-L (AE-LOCK) / QUICK ADJUST
USER GUIDE
99
MAIN MENU > CAMERA SETTINGS > EXPOSURE > AE-L / QUICK
ADJUST
1 Press the Camera icon on the Touch Display.
2 The Camera Settings Menu appears.
3 Press the Exposure Settings Menu.
4 Scroll down to AE-L / Quick Adjust.
Swipe right or press Menu / EXIT button to get back to Main
Menu.
Reset after exposure
Select On or Off. The check box will be marked with a
√ when On and the check box will be empty when Off.
Controls if a Quick Exposure Adjustment or AE-Lock state is
reset by an exposure or not.
AE-Lock / Quick Adjust Menu
CAMERA SETTINGS: EXPOSURE
Increment Step Size
1/2
Exposure:
Exposure Adjust:
step
1/3 step
Shutter Function
True Exposure:
Electronic Shutter:
Flash
Low Flash Warning:
Normal
Sync:
Exposure Lock
Flash Ready:
Out of Range:
AE-L / Quick Adjust
Reset After Exposure:
X1D www.hasselblad.com
Table of Content
Page 100

Settings
IMAGE FORMAT
USER GUIDE
100
MAIN MENU > CAMERA SETTINGS >
IMAGE > IMAGE FORMAT
1 Press the Camera icon on the Touch
Display.
2 The Camera Settings Menu appears.
3 Press the Image Menu.
Swipe right or press Menu / EXIT button
to get back to Main Menu.
Image Format - Crop Mode
Adds a crop mask to Live View
and the RAW le. When imported
to Phocus, the crop mask can be
modied or removed.
Crop Mode Settings:
No Crop (645)
1:1 (6x6)
7:6 (6x7)
5:4 (4x5)
11:8,5 (Letter)
297:210 (A4)
3:2 (6x9)
3:2 Crop (24x36). See Notes below.
16:9 (Screen)
2:1 (6x12)
65:24 (XPan)
CAMERA SETTINGS
Exposure
Image
Quality
Autofocus
Manual Focus
Self Timer
Custom Buttons
Conguration
Image Format Settings Menu
Image Format
Crop Mode:
Mask Opacity:
No Crop (645)
Image Orientation
Orientation: Auto
XPan crop with 100% Opacity
XPan crop with 60% Opacity
CAMERA SETTINGS: IMAGE
Mask Opacity:
Sets the opacity of the mask
between 20% and 100%.
Notes:
● JPG les are not cropped.
● Crop Modes are disabled in USB tethered mode.
● Crop Modes are not supported in Phocus Mobile.
● A good method is to program a button to "Crop Mode Cycle".
This allows quick selection of crop format. A long press on
this button will return to "No Crop". See page 107.
● If a button is programmed to "Crop Mode Cycle", 3:2 Crop
(24x36) is only available when using electronic shutter and
other lenses than XCD or HC/HCD. Useful when using 3rd
party lenses designed for 24x36 mm format.
X1D www.hasselblad.com
Table of Content
1:1 (6x6) crop with 100% Opacity
 Loading...