

Page 1
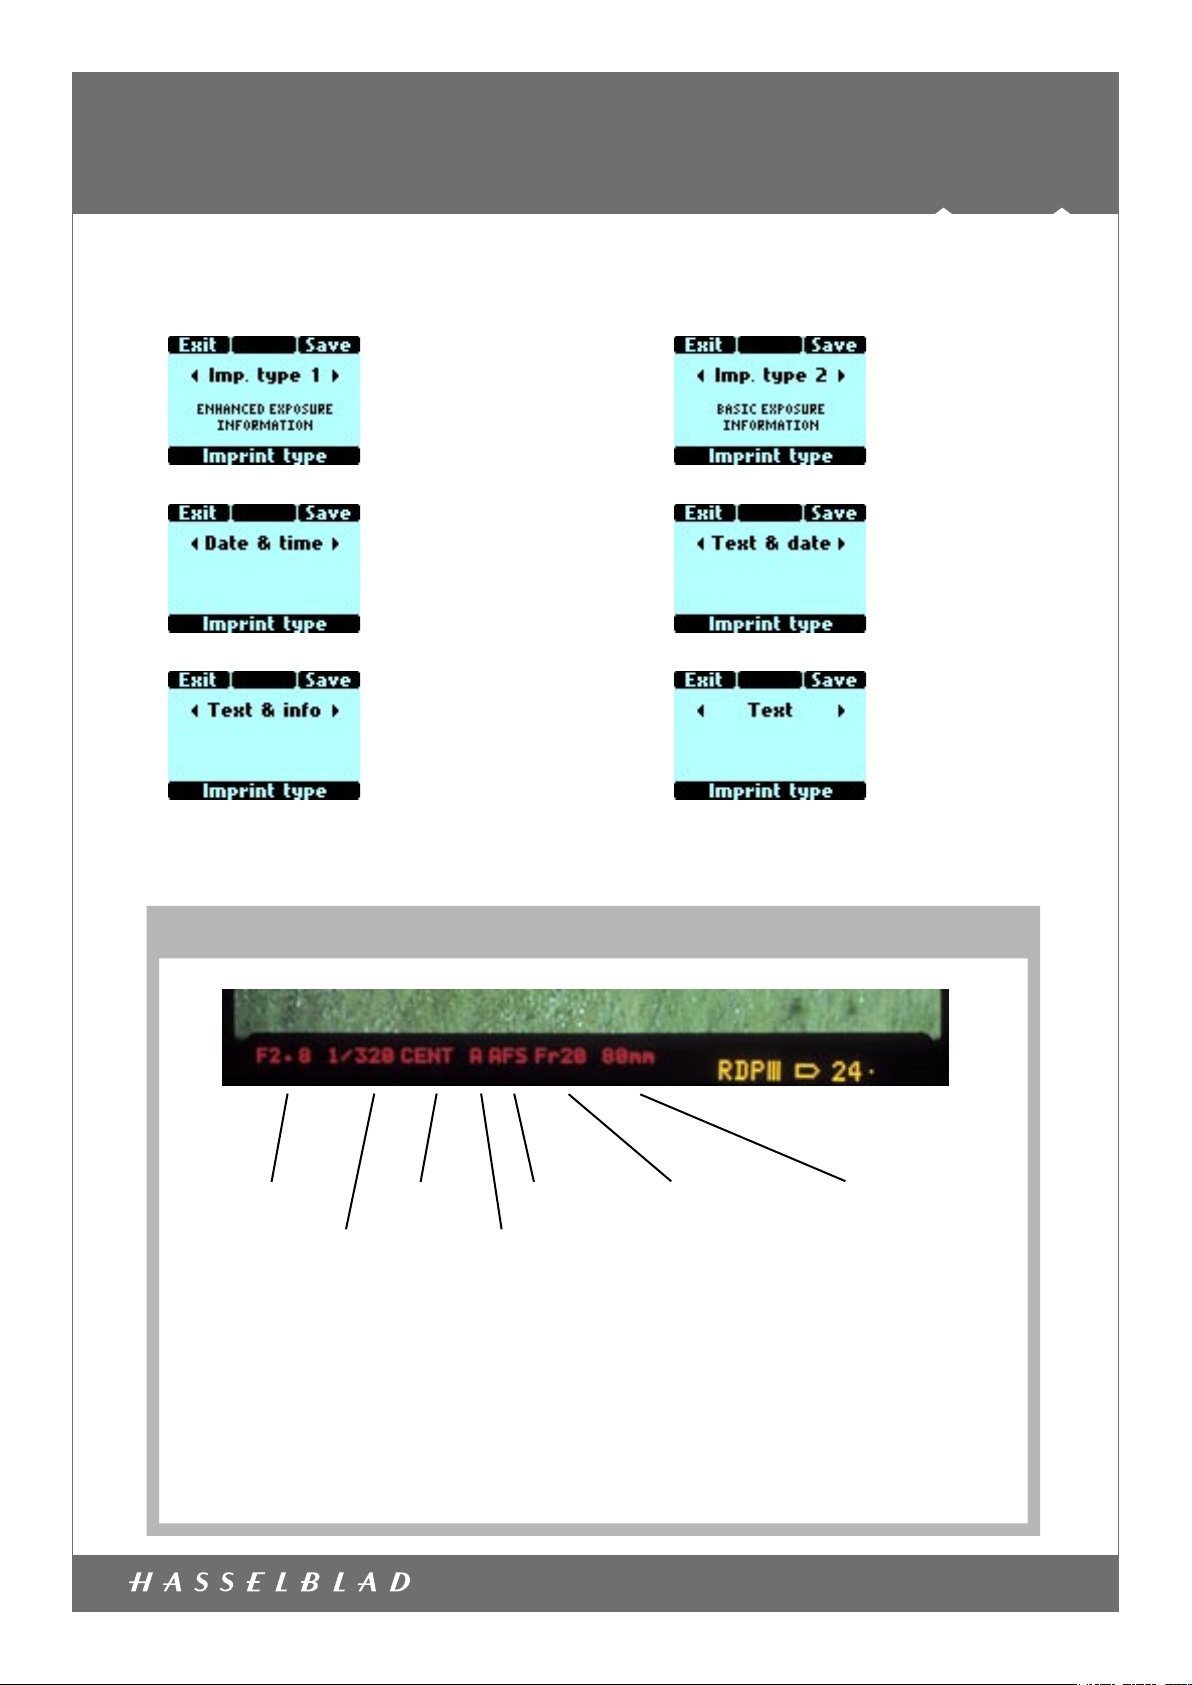
Available imprint modes of the H1
H1 IMPRINT MODE
Type 1
Prints all available
exposure info.
Type 3
Prints date and time
info only.
Type 5
Prints the text you entered together with
basic exposure information
Type 2
Prints basic exposure
info only.
Type 4
Prints the text you entered
together with date and time
Type 6
Prints the text you entered
Type 1, Enhanced exposure information:
Aperture
Shutter speed
Light metering
mode
Exposure mode
Auto focus
mode
Frame number Lens focal length
incl. converter
Notes:
1 If an exposure adjustment is set on the camera, a value will appear after the exposure mode
symbol
2 If a TTL flash is used, a flash icon appears after the exposure mode symbol
3 If a flash exposure adjustment is set, a value will appear after the flash icon
4 If all options are active, no focal length will be shown
5 Light metering mode is shown only when a viewfinder is attached
6 Autofocus mode does not appear if set to Manual focus and focus assist is set to “Off”
Document ID: H1 imprint modes.indd - 2005-05-10
www.hasselblad.com
Page 2
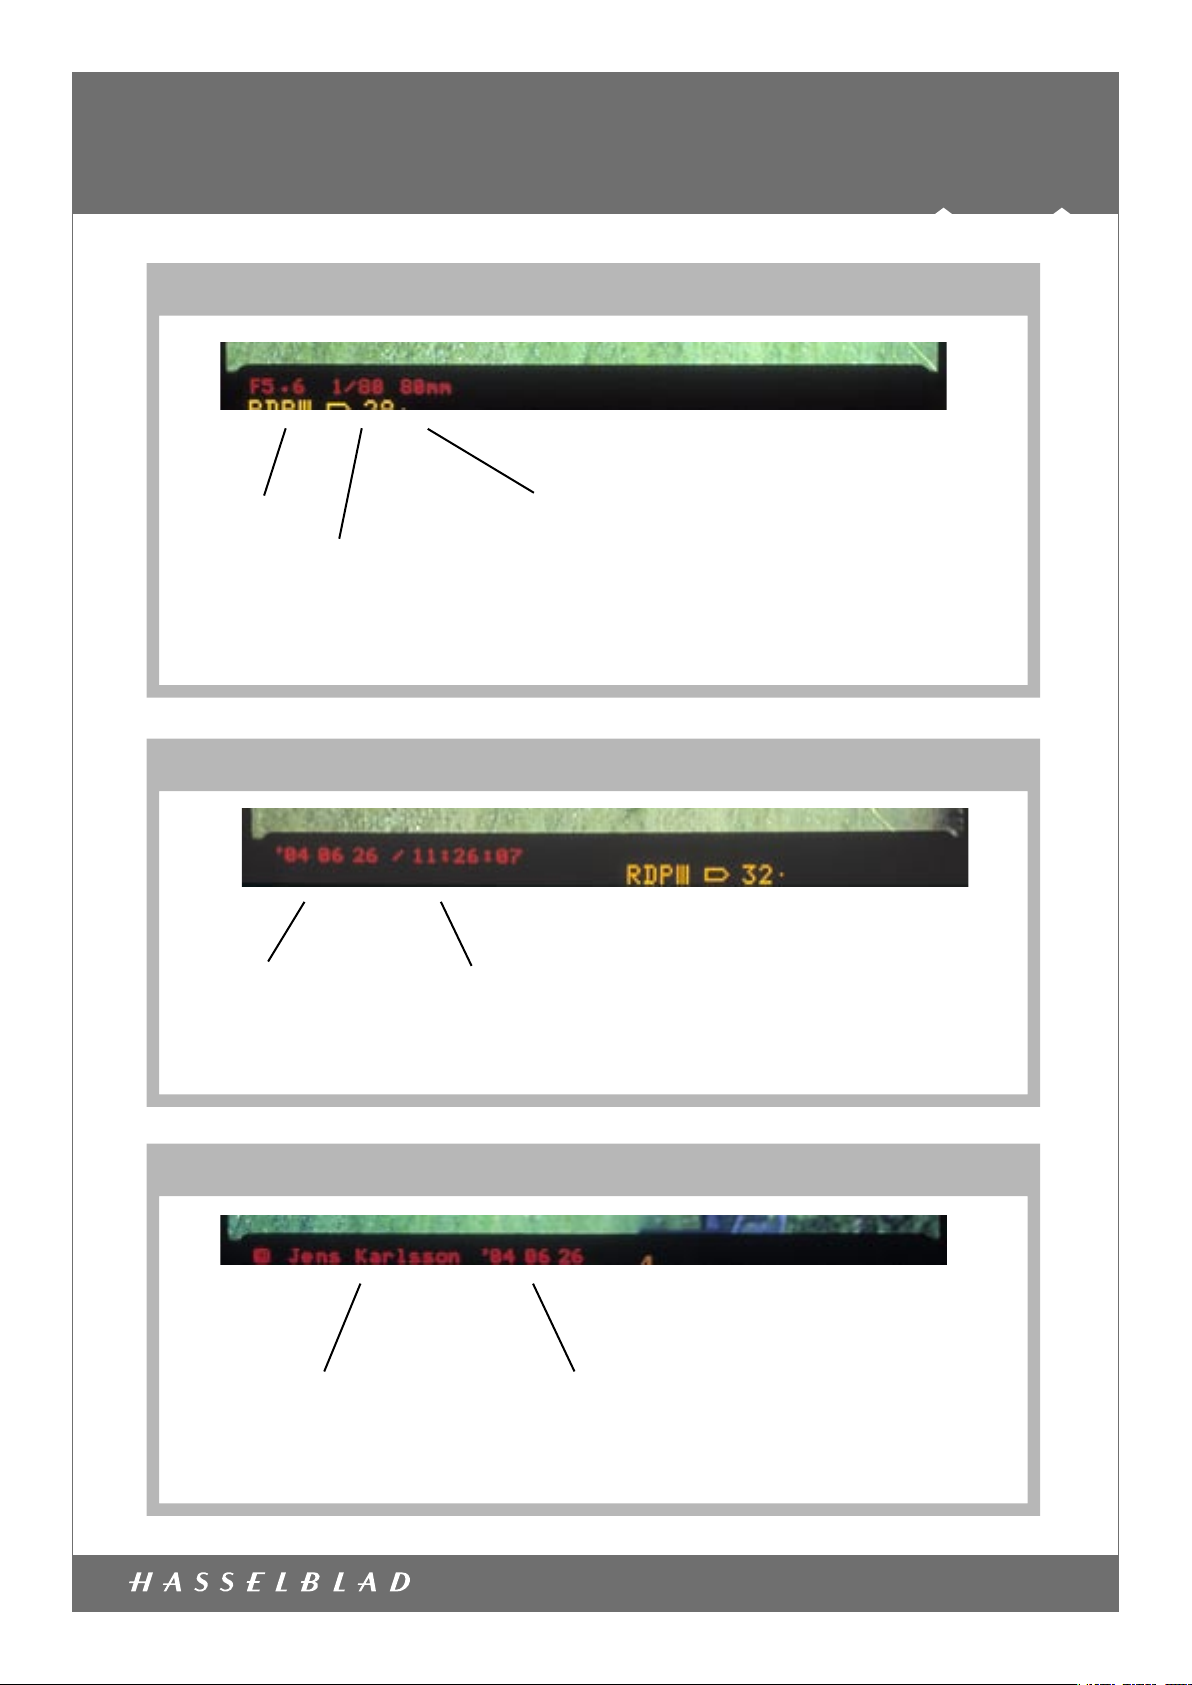
Type 2, Basic exposure information:
H1 IMPRINT MODE
Aperture
Shutter speed
Notes:
1 If an exposure adjustment is set on the camera, a value will appear between shutter
speed and focal length
Type 3, Date & Time:
Date (YY MM DD) Time (HH:MM:SS)
Notes:
1 Seconds are only shown in 24 hour time format
Lens focal length
incl. converter
Type 4, Text & Date:
Custom text Date (YY MM DD)
Notes:
1 If the text is longer than 33 characters, the date will be excluded
Document ID: H1 imprint modes.indd - 2005-05-10
www.hasselblad.com
Page 3
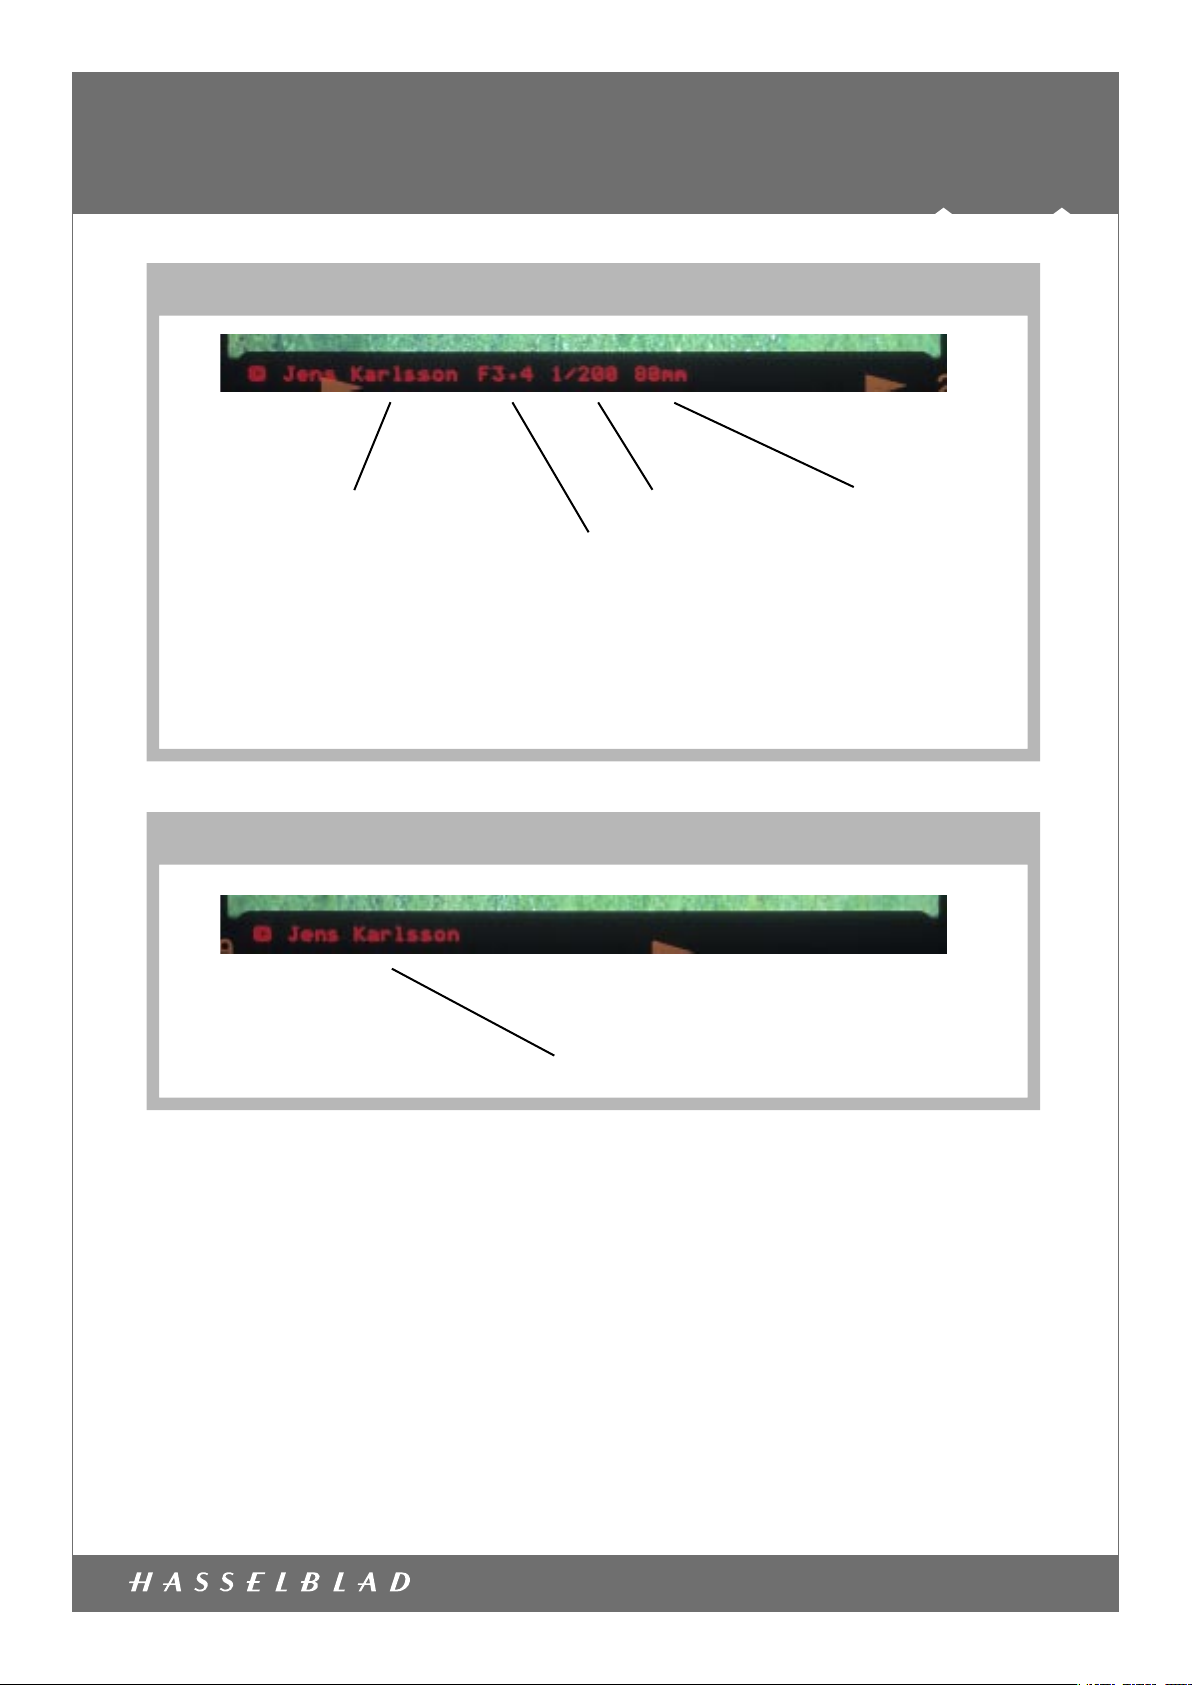
Type 5, Text & Info:
H1 IMPRINT MODE
Custom text
Aperture
Notes:
1 If an exposure adjustment is set on the camera a value will appear between shutter speed
and focal length
2 If the text is longer than 25 (19 with exposure adjustment) characters, part of the exposure
info will be excluded
Type 6, Text:
Custom text. Max 37 characters
Shutter speed Lens focal length
incl. converter
Document ID: H1 imprint modes.indd - 2005-05-10
www.hasselblad.com
Page 4

Imprint mode setting
To make a selection of type of data for imprinting, proceed as follows:
H1 IMPRINT MODE
FLASH AF DRIVE
From the normal screen
press the “MENU” button.
FLASH AF DRIVE
Scroll to the menu item
“Imprint” with the front wheel and press
“Enter”
FLASH AF DRIVE
Scroll to the menu item
“Settings” with the front wheel and press
“Enter”
FLASH AF DRIVE
Scroll to the menu item
“Imprint type” with the front wheel and press
“Enter”
Select one of the six options you want (see all
options on page 1) with the front wheel and
press “Save”
Document ID: H1 imprint modes.indd - 2005-05-10
Finally, press the shutter release halfway to save
the settings and return to normal screen.
www.hasselblad.com
Page 5

Imprint text mode setting
To enter custom text for imprinting, proceed as follows:
H1 IMPRINT MODE
From the normal
screen press the
“MENU” button.
Use the front wheel to
select the menu
“Settings”, then press
the “Drive” button.
(marked with “Enter”
on the LCD)
Use the front wheel
to select the menu
“Imprint”, then press
the “Drive” (Enter)
button.
The main text screen will now appear which,
by moving the control wheel, will display all
the available characters.
The two control wheels and the three buttons
over the LCD are used to enter the text.
How this setting is made is explained in detail
on the following pages.
Use the front wheel
to select the menu
item “Text”, then
press the “Drive”
(Enter) button.
Document ID: H1 imprint modes.indd - 2005-05-10
www.hasselblad.com
Page 6

Imprint text setting
H1 IMPRINT MODE
Use the front wheel to move
the cursor
to the left until it is over the
“X” character.
This will activate the “deletekey”
FLASH AF DRIVE
FLASH AF DRIVE
Press the button over the “Sel.”
caption (AF button) to erase the
character to the
left of the cursor in the lower row.
Keep pressing the “Sel.” button
until the whole text is erased.
FLASH AF DRIVE
FLASH AF DRIVE
The text string is erased.
FLASH AF DRIVE
Use the front and rear wheel to
find the Copyright sign. This is
located low down on the list, so
you will have to scroll down a
few screens to find it. (11 times
down with the rear wheel and 5
times to the right with the front
wheel). Now press “Sel” button
to select the © character.
FLASH AF DRIVE
Continue in the same way with
the other characters until the
complete string is ready. Maximum are 37 characters.
Find the space character left
to the exclamation mark on the
first row. Press “Sel.”.
FLASH AF DRIVE
Press the “Save” button to
store the text in the camera
Find the W character and
press “Sel.”.
The display after pressing
”Save”.
Remember to make the correct setting on the magazine to
record the text on film. See the
follwing section.
Document ID: H1 imprint modes.indd - 2005-05-10
www.hasselblad.com
Page 7

H1 IMPRINT MODE
Magazine settings
The last setting is to check that the magazine is programmed to imprint
data. This is the default setting of the magazine. Check that the caption
“DATA” is shown on the magazine LCD. If this is not the case, slide the
lock switch (4) on the right side of the magazine forward to unlock the
magazine buttons. Press the mode button (1) repeatedly until the caption “DATA” is shown together with “oFF”. Use either of the change buttons (2, 3) to change the indication to “on”. Press the rear button again.
Slide the lock switch backwards to lock the buttons again.
1 Mode button
2 Change down button
3 Change up button
4 Lock switch
Press the
Press either of the buttons to change to ”on” and press the
again to store the change.
Document ID: H1 imprint modes.indd - 2005-05-10
button until the display shows
Magazine is correctly programmed
for data imprint as indicated by the
-icon at the top of the LCD
Magazine is programmed not to imprint
data
www.hasselblad.com
 Loading...