

Page 1

User’s Guide
Batch Feeder for
Flextight 848 and 949 Scanners
by Hasselblad
Page 2

2
© 2005 Hasselblad A/S. All rights reserved.
Feeder for Hasselblad Flextight 848 and 949 Scanners User’s Guide, Part No 70030031, revision E.
e information in this manual is furnished for informational use only, is subject to change without notice, and should not be construed as a commitment by Hasselblad A/S.
Hasselblad A/S assumes no responsibility or liability for any errors or inaccuracies that may appear
in this manual.
Hasselblad A/S assumes no responsibility or liability for loss or damage incurred during or as a
result of using Hasselblad soware or products.
Hasselblad, FlexColor and Flextight are trademarks of Hasselblad A/S. Adobe and Adobe Photoshop are trademarks of Adobe Systems, Inc. Macintosh, Mac OS, FireWire and ColorSync are
registered trademarks of Apple Computer, Inc.
Printed in Denmark.
Page 3

Table of Contents
Introduction 4
Important Warnings and Restrictions 4
System Requirements 5
Batch Feeder Diagram 6
Preparing the Feeder for First Use or after Shipping 7
Mounting and Unmounting the Batch Feeder 8
Mounting the Batch Feeder 8
Unmounting the Batch Feeder 12
Loading Originals into the Feeder 14
Scanning with the Batch Feeder 16
Batch Scanning with 3F 16
Custom Setups and Single Scans 19
Troubleshooting 22
Aligning the Feeder 23
Adjusting the Feeder Angle 23
Adjusting the Load Position 25
3
Preparing the Feeder for Storage or Shipping 31
Storing the Feeder 31
Shipping the Feeder 31
Preventive Maintenance 33
Disposal 33
Technical Information 34
Specications 34
CE Declaration 35
Page 4

4
Introduction
e Batch Feeder enables you to load up to 10 original holders (up to 60
originals, depending on format) for batch scanning with your Flextight
848 or 949 Scanner.
is manual provides important information about using the Batch
Feeder for your Flextight 848 or 949 scanner.
Topics include:
Important warnings and restrictions
•
System requirements
•
Installation instructions
•
Operating instructions
•
Instructions for preparing the unit for transportation
•
Disposal instructions
•
Important Warnings and Restrictions
General
Read all of the included documentation before attempting to install
•
and use the Batch Feeder.
Never attach or detach the Feeder when the scanner is switched on.
•
Always use the standard, soware-guided procedure when mounting
•
or unmounting the Feeder from your scanner. See “Mounting and
Unmounting the Batch Feeder” on page 8 for details.
Keep the original box in which the Feeder was delivered to you. is
•
box is made of sturdy cardboard and includes a foam lining custom
cut to hold the Feeder safely and securely. Always store the Feeder in
this box when you are not using it.
Before shipping the Feeder, always ret the two transportation safety
•
screws and pack it in its original box. If you must return the Feeder to
Hasselblad for service, you must use this box for shipping or the shipment will be refused. See “Preparing the Feeder for Storage or Shipping” on page 31 for instructions.
Page 5

When you switch on the scanner, the Feeder will position itself into
•
its “home” position, if not already there. Do not touch the Feeder
while the magazine is moving.
Before servicing the scanner and/or Feeder, the power supply must be
•
disconnected from the mains (unplugged). It is not sucient simply
to press the on/o button on the scanner.
Install the scanner and Feeder in a location where they are not acces-
•
sible by children. e units contain small openings and moving parts
that can cause injury.
When using the Feeder, a huge amount of data is generated. Make
•
sure to allocate ample hard disk space for scanned images on the disk
of the attached host computer.
When Operating the Feeder
Do not touch the Feeder while the magazine is moving.
•
Do not touch the originals or the original holders during scanning.
•
Do not start scanning or previewing until an original holder with an
•
original has been mounted.
Flexible original holders are only to be mounted or removed when the
•
drum is in the load position.
5
System Requirements
For All Users
Hasselblad Flextight 848 or 949 Scanner.
•
Additional original holders.
•
For Macintosh Users
A computer running Mac OS 10.2.1 or later
•
FlexColor 4.0.2 or later for Mac OS
•
For Windows Users
A computer running Windows 2000 or XP
•
FlexColor 4.0.2 or later for Windows
•
Page 6

6
A
B
F
G
H
C
D
E
Batch Feeder Diagram
Figure 1: Hasselblad Flextight 848 Scanner with Batch Feeder
Hasselblad Flextight 848 (or 949) Scanner.
A
Batch Feeder
B
Dust cover: to protect the originals and scanner entrance from dust.
C
Magazine: showing original holder position 1.
D
Magazine: showing original holder position 10.
E
Power Indicator (Green): Remains lit when ready to scan. Flashes
F
when the scanner is switched on.
Motor Drive Indicator (Yellow): lights up when the scanner is repo-
G
sitioning the optics, drum or Feeder magazine.
Scan Indicator (Red): lights up when scanning. Do not touch the
H
scanner or Feeder while this indicator is lit. If the light is ashing
when not scanning, then an error has occurred - please contact your
Flextight dealer for assistance.
Page 7

Preparing the Feeder for First
Use or after Shipping
Before you begin to use the Feeder, you must remove the two shipping
screws that secure the magazine during shipping. ey are located near
the bottom of the Feeder on the back side, as shown in Figure 2, below.
On new Feeders, these are clearly marked by a label, which reminds you
to remove them before use.
7
Figure 2: Location of the shipping screws on the Feeder back panel
Be sure to keep both the original packaging and the two shipping screws
in a safe place. You should always store the Feeder in its original packaging while you are not using it. You must also replace the shipping screws
and use the original packaging if you need to ship the Feeder (for example, to a new studio or back to Hasselblad for service).
See also “Preparing the Feeder for Storage or Shipping” on page 31 for
more information about how to ship the Batch Feeder.
Page 8

8
Mounting and Unmounting
the Batch Feeder
e procedures for both mounting and unmounting the Feeder to/from
your scanner require that you use the soware-guided procedure, which
ensures that the mechanical pars of the scanner and Feeder are correctly
aligned for each step. Always use this soware feature when you need to
mount or unmount the Feeder. Otherwise, you may damage your Feeder
and/or scanner. Also, the unmount procedure makes sure that the Feeder
is correctly positioned for storage in its original box.
Mounting the Batch Feeder
Always use the soware-guided procedure below to mount the Feeder. It
is otherwise possible to damage the Feeder and/or scanner while mounting the Feeder
If you have not already done so, set up your Flextight Scanner, con-
1.
nect it to your computer and install the FlexColor soware as described in your scanner and soware user manuals. Conrm that the
scanner is working correctly by making a test scan using one of the
standard original holders.
If there is still an original holder mounted inside the scanner, then
2.
remove it. Close the light table, if it is open, by liing its front edge.
See your scanner manual for instructions.
Make sure the scanner is turned on and launch the FlexColor so-
3.
ware. If FlexColor is already running, then quit and restart the program.
Select Maintenance > Feeder from the FlexColor menu bar.
4.
Page 9

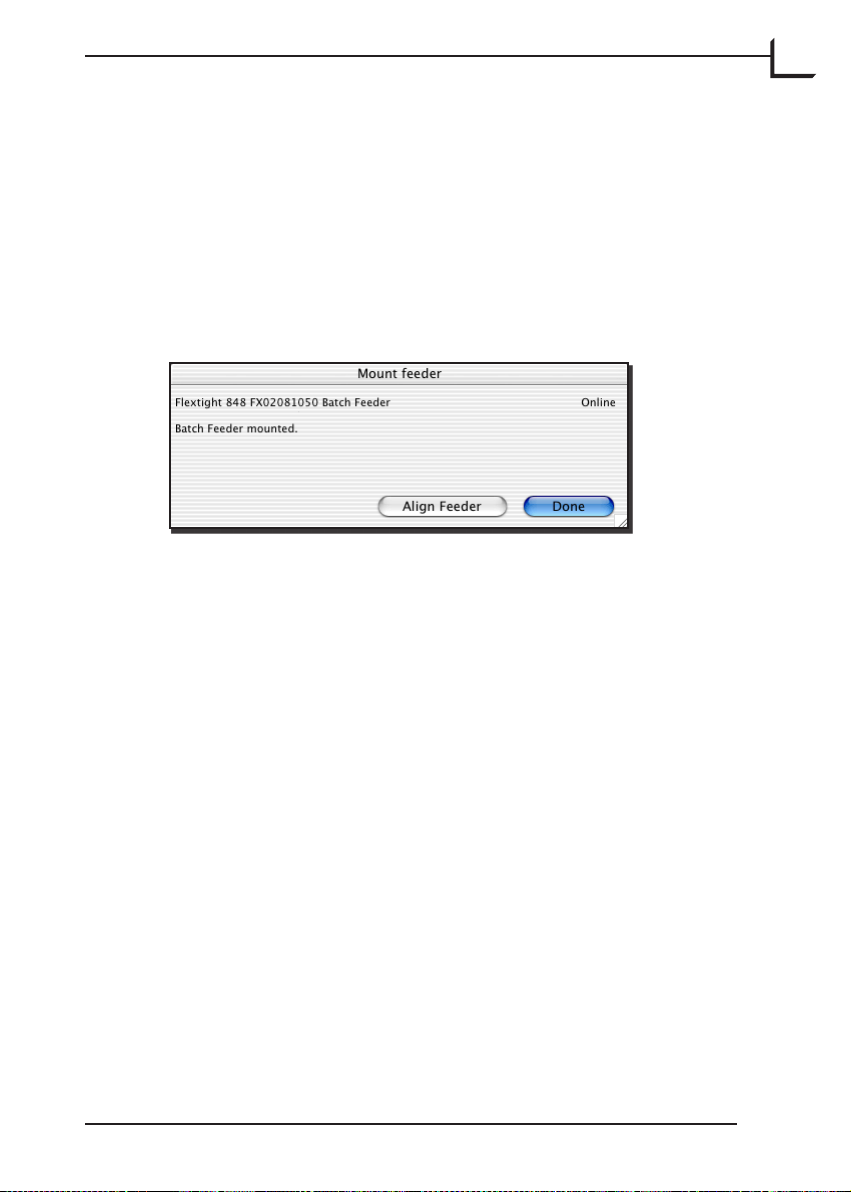
e Feeder window opens.
5.
Click on the Mount button.
e Mount feeder window opens, which guides you through each
6.
step of mounting the Feeder. e procedure here in this manual also
describes each step.
9
Click on the Continue button.
e scanner now positions itself to accept the Feeder and shuts itself
7.
down. e Mount feeder window updates with new instructions.
Page 10

10
A
B
A
B
Get the Batch Feeder and study its back panel. Here you should see an
8.
electronic connector (A) and a pair of mounting pins (B), as shown in
Figure 3, below.
Figure 3: Back panel of the Batch Feeder, showing the electronic connector (A) and mounting pins (B).
Li the batch-feeder panel on the front of the Flextight Scanner and
9.
locate the connector (A) and two mounting holes (B) inside the scanner, as shown below in Figure 4. ese match the pins and connector
of the Feeder.
Figure 4: Flextight Scanner with the batch-feeder panel open, showing
the electronic connector (A) and mounting holes (B).
Page 11
Grasp the Batch Feeder rmly with one hand while holding the
10.
batch-scan door open on the scanner with your other hand. Align the
connector and pins on the back of the Feeder with the holes and connector inside the scanner. Gently press the Feeder down and in place,
making sure that the Feeder sits rmly and has a good connection
with the connector.
Turn on the scanner by pressing its on/o switch.
11.
FlexColor detects that the scanner has been turned back on. e
12.
Mount feeder window updates with new instructions.
Click on Done to close the Mount feeder window.
If you have never used the Batch Feeder before, try to load it with a
13.
full set of 10 original holders and scan them all. If the Feeder works
smoothly, then you are ready to begin work. However, if the scanner
has trouble moving the original holders in and out, then you may
need to align the Feeder to match your individual scanner. In this
case, please see “Aligning the Feeder” on page 23.
11
Page 12

12
Unmounting the Batch Feeder
Always use the soware-guided procedure below to unmount the Feeder.
It is otherwise possible to damage the Feeder and/or scanner while unmounting the Feeder
Turn on the scanner and launch the FlexColor soware.
1.
Select Maintenance > Feeder from the menu bar.
2.
e Feeder window opens.
3.
Press the Unmount button.
e feeder moves the magazine into its storage position and FlexColor
4.
displays the Mount feeder window.
As instructed in the window, click Continue to prepare the scanner
and Feeder for unmounting.
Page 13

e scanner shuts down and the Mount feeder window updates with
5.
new instructions.
If there are original holders in the magazine, then remove them all.
ey should be very easy to remove—do not use force. When all original holders have been removed, remove the Feeder itself by liing it
up and away from the scanner. Always store your Feeder by placing
it into its original box (see also “Preparing the Feeder for Storage or
Shipping” on page 31).
Click on Done to close the Mount feeder window. You now return to
6.
the Feeder window.
13
Click on Done to close the Feeder window.
7.
If you now want to scan using the standard light table, open the light
8.
table and switch on the scanner by pressing its on/o switch.
Page 14

14
C
Pos. 1
Pos. 10
A
B
Loading Originals into the
Feeder
Figure 5: Loading originals into the Feeder
To load originals into Batch Feeder, refer to Figure 5 and do the following:
Important! Use only original holders (A) that are tted with the
1.
special plastic rail (B), otherwise the Feeder will not be able to unload the holder properly.
Place your original into an appropriate original holder (A). See your
2.
scanner documentation for a complete description of how to work
with Flextight original holders.
Place the original holder (A) into the rst empty slot in the Feeder
3.
magazine. Slide it gently into the slot until it comes to a stop. (To remove the original holder, just slide it back out.)
NOTE! We recommend that you load original holders into the
magazine from the top and down, starting from position 1.
Page 15

Continue loading originals into holders and holders into the scanner
4.
until you have either loaded all of your originals or used all 10 slots of
the Batch Feeder.
Go to your computer and run FlexColor. Use the batch scanning fea-
5.
ture of the program to scan your originals as described in “Scanning
with the Batch Feeder” on page 16. See also your FlexColor documentation for detailed instructions.
IMPORTANT: Do not touch or remove the original holders while the
scanner is running. Always stop scanning before removing holders. One
way to stop a scan in progress is to press the scanner on/o button (C);
the scanner will then stop scanning, unload the current original holder
and shut down.
15
Page 16

16
Scanning with the Batch
Feeder
Batch Scanning with 3f
e Batch Feeder is intended as a tool for scanning large numbers of
originals in a production environment. For this application, we strongly
recommend the 3f workow for maximum eciency and exibility.
e 3f image-le format preserves your full-resolution, 16-bit raw scans
and keeps a record of settings applied to each exported image. is gives
you the exibility to use all of the image correction and sizing tools in FlexColor while ensuring that no data is lost from your original scan. Once
you have made all of the required settings in FlexColor for each image,
you can export TIFF or JPEG les in which all of your FlexColor settings
are applied. Your settings are stored in the original 3f le, but not applied
to it. If you export using dierent settings, then these are also stored with
the original le, providing you with a history of all the exports you have
made from the le. A given image might, for example, be optimized several times for use in a black & white newspaper, color brochure, poster
and web page.
e 3f workow is fully described in the FlexColor User’s Guide. An example of how to use it in a production environment is briey outlined
below.
Load the Batch Feeder with up to ten originals as described in “Load-
1.
ing Originals into the Feeder” on page 14.
Page 17

Instead of using the standard preview/scan workow in FlexColor,
2.
click on the 3f button to open the Scan 3f window.
17
Make the various 3f settings as described in the FlexColor User’s
3.
Guide. Note the following:
Use the Destination setting to select a parent folder in which to
•
save your 3f les. If you would like to create a new sub-folder for
each batch, mark the Add job folder check box; then, each time
you begin a new 3f batch scan, FlexColor will create a new subfolder below the Destination folder and save the new scans there.
Either way, the contents of the most recently used folder will be
displayed in the FlexColor Thumbnails window immediately aer
the batch is nished.
All images will have a name based on the value entered in the Im-
•
age Name eld, plus a unique number.
When the Batch Feeder is mounted, the frame is always auto de-
•
tected before each scan. is is because batches are likely to contain several dierent original formats.
Page 18

18
If you have both negative and positive originals in your batch, you
•
should set Film Type to “Auto Detection”. is will cause FlexColor to analyze each image to decide whether it is negative or positive. It will then use either the Positive Setup or Negative Setup
that you have selected.
If all of your originals are either positive or negative, then you can
•
set the Film Type to match (or use auto detection). In this case,
only one setup selection will be available (Positive Setup or Neg-
ative Setup), depending on the lm type you have selected.
If you would like to export TIFF images automatically using your
•
selected setup, then mark the Save nal TIFFs check box. You
will still get the 3f images, but TIFF versions will also be saved in a
sub-folder below the 3f images.
To set highlight and shadow points automatically, mark the Auto
•
levels check box. is will result in automated ne-tuning of your
selected setup based on an analysis of each image. is is especially useful when you are using the Save nal TIFFs feature.
Usually, you should use a Scan Resolution of 100%, which en-
•
sures that your 3f les will contain the full scan data possible with
your scanner for each original format, allowing for maximum
exibility in the future. However, if you are short on disk space
and are sure that you do not need full resolution images, you may
consider reducing this value or setting a maximum size. Alternatively, if you are sure that you will use your scans for just one specic purpose with known dimensions and resolution, you might
use the Adapt to format settings.
Be sure to mark the Feeder check box and to use the From Posi-
•
tion and To Position elds to set the rst and last original you
wish to scan from the Feeder.
Click on Scan in the Scan 3f window to scan all of your selected
4.
originals to 3f les.
To use 3f les, you must use FlexColor to review, process and export the
images to standard TIFF or JPEG les, which are compatible with most
image-editing and DTP programs. FlexColor provides a virtual light
table of all 3f images from a selected folder and enables you to view details, view export history and load each image into the main FlexColor
window to make export settings.
Page 19

As you work with the 3f images in the light table, you can load each image into FlexColor to make settings and then save the settings back in the
history for the 3f image. When you have nished making settings for an
entire batch, you can then batch-process all images to save them as TIFF
or JPEG les with your settings applied.
In a production environment, you might choose to store your 3f images
on a shared network drive, allowing any computer that has FlexColor
installed to open and export images for use even while the scan workstation is busy scanning. Even at sites where there is only one Flextight scanner in use, the FlexColor license agreement permits your organization to
install FlexColor on any number of computers at the site.
Custom Setups and Single Scans
As mentioned above, we usually recommend that you use the 3f workow
when working with the Batch Feeder. However, you might sometimes
want to use the standard FlexColor batch-scan feature, which enables you
to make several dierent scans from each original and/or use a dierent
setup for each scan. e result of this workow will be a set of TIFF les
with your setups permanently applied to each of them, rather than the
more exible 3f les.
19
e standard batch-scan workow is fully described in the FlexColor
User’s Guide. An example of how to use this feature when you have the
Batch Feeder attached is given below, which includes some specic advice
for using the Feeder.
Run FlexColor and click on the Batch Scan button to open the Batch
1.
Scan window.
Page 20

20
If it is not already shown, expand the Feeder heading in the Batch
2.
Scan window by clicking on the triangle next to the heading.
Set the Position eld to the rst batch-loader position you wish to
3.
scan (1 - 10). You can enter the number directly using your keyboard,
or select it by clicking on the up and down buttons next to the eld.
Click on Preview in the main FlexColor window. e scanner then
4.
advances the Feeder to your selected original and makes a preview of
the selected original.
Select a setup and, if necessary, make image settings, such as rotation,
5.
corrections and output size, using the various FlexColor tools as described in the FlexColor User’s Guide.
Either make a nal scan now by clicking on Scan in the main Flex-
6.
Color window or add the image to the Manual list in the Batch Scan
window by clicking on the Add button there (this enables you to set
up several scans based on their previews and then scan them all at
once later).
Page 21

If you are using the Manual list, then continue taking previews and
adding scans until you have dened all of the scans you wish to make
in this batch; then click on Scan in the Batch Scan window to scan
them all.
21
For complete details about how to work with the Batch Scan window,
please see the FlexColor User’s Guide.
Page 22

22
Troubleshooting
Below are a few common problems and how to solve them.
Problem: e Feeder is not recognized by the scanner or FlexColor
soware.
Solution: e electronic connection between the scanner and feeder
is probably not secure enough. Gently, but rmly, press the
Feeder down against the scanner. When the connection is
good and the scanner is turned on, the diodes on the front of
the Feeder will light. See also “Mounting the Batch Feeder”
on page 8.
Problem: e original holders are not fully drawn in or out of the
scanner.
Solution: e Feeder is probably not aligned correctly for your indi-
vidual scanner. Check and correct the alignment as described
in “Aligning the Feeder” on page 23.
Problem: It is dicult to insert an original holder into one specic
slot of the Batch Feeder
Solution: ere may be an obstruction in the aected slot. Look all the
way inside the slot. Here you should see some strips of magnetic tape, which can sometimes come loose. If the tape has
come loose, simply press it down using the alignment tool
that came with your Feeder.
Page 23

Aligning the Feeder
e Feeder is pre-adjusted to align perfectly with most individual Flextight 848 and 949 Scanners. However, some scanners may have a drum
that is aligned slightly outside of the tolerance range of the Feeder. If your
original holders are not being drawn correctly into the scanner, then you
may need to adjust your Feeder alignment as described below. You should
check both the angle at which it hangs on the scanner and the position at
which it loads original holders. In most cases, however, this is not necessary. Usually, you will need to do this just once if at all.
Adjusting the Feeder Angle
e Feeder should hang on the scanner with an even spacing from top to
bottom. It should not sit, for example, farther from the scanner at the top
than it does from the bottom. Use the procedure below to check the angle
and correct it if necessary.
Use the soware-assisted procedure to mount the Feeder to the scan-
1.
ner as described in “Mounting the Feeder” on page 8.
23
Check that the Feeder is aligned with the front of the scanner. e air
2.
gap in the top and the bottom between the Feeder and the scanner
should be equal, as indicated in Figure 6.
Page 24

24
Figure 6: Adjusting the Feeder angle
If the Feeder looks to be hanging evenly on both the le and right
3.
sides, then you are done. Skip the rest of this procedure.
If the angle looks like it requires adjustment, then use the soware-
4.
assisted procedure to unmount the Feeder from the scanner as described in “Unmounting the Feeder” on page 12.
Find the adjustment tool that was supplied with your Batch Feeder. It
5.
is a thin metal bar with notches cut at each end.
Use the adjustment tool to loosen the nuts on the opposite side of the
6.
two adjustment bolts shown in Figure 7.
Page 25

Figure 7: Bolts for adjusting the feeder angle
Use your ngers to turn the two adjustment bolts until that they look
7.
as though they will hold the bottom of the Feeder at the correct angle.
Use the soware-assisted procedure to remount the Feeder to the
8.
scanner as described in “Mounting the Feeder” on page 8.
Check to see if the angle now looks correct. If not, then repeat this
9.
procedure until the angle is correct (always use the soware-assisted
procedure when mounting or unmounting the Feeder).
25
When the angle is set correctly, use the supplied adjustment tool to
10.
tighten the two nuts on the back of the adjustment bolts.
Adjusting the Loading Position
e Feeder must be positioned so that it inserts its original holders directly into the clasp mounted on the drum inside the scanner. Use the
procedure below only if your original holders are not being drawn in and
out of the scanner smoothly during normal operation.
If the feeder is currently mounted, then use the soware-assisted
1.
procedure to unmount the Feeder as described in “Unmounting the
Feeder” on page 12.
Page 26

26
Find the adjustment tool that was supplied with your Batch Feeder. It
2.
is a thin metal bar with notches cut at each end.
Use the adjustment tool to loosen the self-locking nut on the right
3.
side on the rear of the Feeder as indicated in Figure 8.
NOTE! Do not touch similar looking nuts to the le.
Figure 8: Unlocking/locking the Feeder position
Use the soware-assisted procedure to mount the Feeder to the scan-
4.
ner as described in “Mounting the Feeder” on page 8. However when
you get to the last step, keep the Mount feeder window open (do not
click on Done)
Page 27

Click on the Align Feeder button. e Align Feeder window opens,
5.
which will now guide you through the procedure of aligning the
feeder.
You have already loosened the nut, so just click on Continue.
e scanner moves into its adjustment (home) position and the Align
6.
Feeder window updates with new instructions.
27
Place the adjustment tool in the slit between the rst and second magazine position on the Feeder as shown in Figure 9. Position the notch
at the end of the tool over the adjustment pin inside the Feeder.
Page 28

28
X
X
Figure 9: Using the adjustment tool
Move the adjustment tool le and right to adjust the Feeder position
7.
so the Feeder is centered with reference to the grabber for the original
holder inside the scanner (see also Figure 10).
Figure 10: Adjusting the Feeder position
When you have nished adjusting the Feeder, go back to your com-
8.
puter and click on Continue in the Align Feeder window.
Page 29

e scanner now shuts down and the Align Feeder window updates
9.
with new instructions.
Remove the Feeder and use the adjustment tool to re-tighten the selflocking nut on the rear of the Feeder (see also Figure 8, above).
Re-mount the Feeder on your scanner and then turn on the scanner.
10.
When the scanner comes online, click on Continue in the Align
11.
Feeder window.
e Align Feeder window updates to tell you that the procedure is
12.
complete.
29
Click on Done to close the Align Feeder window.
Page 30

30
You now return to the Feeder window.
13.
Click on Done to close the Feeder window.
Load original holders into all 10 original holder slots and then scan
14.
all of them using FlexColor. ey should all now load smoothly in
and out of the scanner. If you still experience loading problems at one
or more positions, then repeat this procedure. If problems continue
aer this, please contact your Hasselblad dealer.
Page 31

Preparing the Feeder for
Storage or Shipping
Storing the Feeder
To store the Feeder while it is not in use:
Detach the Feeder using the soware-guided procedure given “Un-
1.
mounting the Batch Feeder” on page 12.
Retrieve the box in which your Feeder was originally delivered. is
2.
box is made of sturdy cardboard and includes a foam lining custom
cut to hold the Feeder safely and securely.
Lay the box down on the oor or on a table.
3.
Open the box, remove the top slab of foam and set it aside.
4.
Align the Feeder so that it will t into the cut foam.
5.
Lower the Feeder into the box.
6.
31
Replace the top slab and close the box.
7.
e Feeder is now prepared for storage
Shipping the Feeder
If you need to ship the feeder, for example to a new studio or back to Hasselblad for service, then do the following:
Detach the Feeder using the soware-guided procedure given “Un-
1.
mounting the Batch Feeder” on page 12.
Retrieve both the original shipping screws and storage/shipping box
2.
in which your Feeder was originally delivered.
Page 32

32
Examine the bottom of the back side of the Feeder and locate the two
3.
holes used to secure the magazine during shipping (see Figure 11,
below). Insert the shipping screws into these holes and tighten them
into place so that the magazine is secured.
Get the original box and lay down on the oor or on a table.
4.
Open the box, remove the top slab of foam and set it aside.
5.
Align the Feeder so that it will t into the cut foam.
6.
Lower the Feeder into the box.
7.
Replace the top slab and close the box.
8.
Use packaging tape to secure the top aps of the box. We recommend
9.
that you also wrap the box in strong shipping paper.
Figure 11: Holes for inserting the shipping screws on the back of the Feeder
If you need to return the Feeder to Hasselblad for repair, it must be
shipped in its original box. Hasselblad will not accept shipment if the
Feeder is shipped in anything other than its original box.
Page 33

Preventive Maintenance
All Flextight scanners should be serviced every 25,000 scans or every 12
months, whichever comes rst. If a Feeder is mounted, the recommended
number of scans is 15,000 provided that the feeder is mounted for all
scans. Please note that previews are also counted as scans.
Newer Flextight scanners have a counter installed so that the number
of scans can be monitored from FlexColor. Please refer to the FlexColor
manual to learn more about monitoring the number of scans.
Failures or faults originating from lack of service and/or daily maintenance are not covered by the factory warranty.
Disposal
If you need to dispose of the Feeder, it must be delivered to an authorized
waste plant for electronics equipment.
33
Page 34

34
Technical Information
Specications
Scanners supported Flextight 848 and 949
Scanner footprint with feeder 36 x 42 cm
Weight 3.1 kg
Maximum batch 10 Flextight original holders
(up to 60 originals, depending on
format)
Original types All transparency formats that are sup-
ported by Flexholders
Scan soware FlexColor 4.0.2 or later
Computer OS Mac OS X 10.2.1 (or later)
Windows 2000 (or later)
(See FlexColor data sheet or manual
for full computer requirements)
Maximum resolution up to 8000 ppi
Scanning speed Depends on format. For example: 50,
35 mm originals (in 5 x 35 mm holders) can be scanned to 50, 50 MB 3f
les in approximately 60 minutes.
Page 35

CE Declaration
35
Page 36

36
 Loading...