

Page 1
DCS
DCS
Pro Back 645
Pro Back 645
User’s Guide
for the DCS Pro Back 645
Page 2

Table of Contents
Contents
Overview . . . . . . . . . . . . . . . . . . . . . . . . . . . . . . . . . . . . . . . . . . . . . . . . . . . . . . . . . . .13
About This Manual . . . . . . . . . . . . . . . . . . . . . . . . . . . . . . . . . . . . . . . . . . . . . . . .13
Introduction . . . . . . . . . . . . . . . . . . . . . . . . . . . . . . . . . . . . . . . . . . . . . . . . . . . . . .14
Features . . . . . . . . . . . . . . . . . . . . . . . . . . . . . . . . . . . . . . . . . . . . . . . . . . . . . . . .15
System Requirements . . . . . . . . . . . . . . . . . . . . . . . . . . . . . . . . . . . . . . . . . . . . .16
When in Portable Mode . . . . . . . . . . . . . . . . . . . . . . . . . . . . . . . . . . . . . . . . 16
When Connected to a MACINTOSH . . . . . . . . . . . . . . . . . . . . . . . . . . . . . . 16
When Connected to a PC . . . . . . . . . . . . . . . . . . . . . . . . . . . . . . . . . . . . . . 17
Capture Workflows . . . . . . . . . . . . . . . . . . . . . . . . . . . . . . . . . . . . . . . . . . . . . . . . . . .18
Capture Workflow when the Camera is Not Connected to a Computer . . . . . . . .19
Device and Media Preparation. . . . . . . . . . . . . . . . . . . . . . . . . . . . . . . . . . . 20
Capturing and Evaluating Test Images . . . . . . . . . . . . . . . . . . . . . . . . . . . . 21
Capturing Images. . . . . . . . . . . . . . . . . . . . . . . . . . . . . . . . . . . . . . . . . . . . . 22
Capture Workflow when the Camera Is Connected to a Computer . . . . . . . . . . .26
Occasional Verification . . . . . . . . . . . . . . . . . . . . . . . . . . . . . . . . . . . . . . . . 22
Transferring Images. . . . . . . . . . . . . . . . . . . . . . . . . . . . . . . . . . . . . . . . . . . 23
Editing Images . . . . . . . . . . . . . . . . . . . . . . . . . . . . . . . . . . . . . . . . . . . . . . . 24
Back
Next
Index
Contents-2
Page 3

Table of Contents
Contents
Connecting to a Computer and Power Supply. . . . . . . . . . . . . . . . . . . . . . . 27
Starting the Capture Software . . . . . . . . . . . . . . . . . . . . . . . . . . . . . . . . . . . 27
Device and Media Preparation. . . . . . . . . . . . . . . . . . . . . . . . . . . . . . . . . . . 28
Capturing and Evaluating Test Images . . . . . . . . . . . . . . . . . . . . . . . . . . . . 28
Capturing Images. . . . . . . . . . . . . . . . . . . . . . . . . . . . . . . . . . . . . . . . . . . . . 29
Occasional Verification . . . . . . . . . . . . . . . . . . . . . . . . . . . . . . . . . . . . . . . . 29
Editing Images . . . . . . . . . . . . . . . . . . . . . . . . . . . . . . . . . . . . . . . . . . . . . . . 29
Included on the Software CD . . . . . . . . . . . . . . . . . . . . . . . . . . . . . . . . . . . . . . . .30
KODAK PROFESSIONAL DCS Capture Studio (DCS Capture Studio) . . . 30
KODAK PROFESSIONAL DCS Camera Manager (DCS Camera Manager) 31
KODAK PROFESSIONAL DCS Photo Desk (DCS Photo Desk). . . . . . . . . 31
KODAK PROFESSIONAL DCR File Format Module (DCR FFM). . . . . . . . 32
KODAK PROFESSIONAL Extended Range Imaging File Format Module (ERI
FFM) . . . . . . . . . . . . . . . . . . . . . . . . . . . . . . . . . . . . . . . . . . . . . . . . . . . . . . 32
Managing Color . . . . . . . . . . . . . . . . . . . . . . . . . . . . . . . . . . . . . . . . . . . . . . . . . .33
DCS Capture Studio . . . . . . . . . . . . . . . . . . . . . . . . . . . . . . . . . . . . . . . . . . 34
DCS Photo Desk . . . . . . . . . . . . . . . . . . . . . . . . . . . . . . . . . . . . . . . . . . . . . 36
Setting up Color in ADOBE PHOTOSHOP . . . . . . . . . . . . . . . . . . . . . . . . . 37
Back
Next
Index
Contents-3
Page 4

Table of Contents
Contents
About the DCS 645 . . . . . . . . . . . . . . . . . . . . . . . . . . . . . . . . . . . . . . . . . . . . . . . . . . .38
Overview . . . . . . . . . . . . . . . . . . . . . . . . . . . . . . . . . . . . . . . . . . . . . . . . . . . . . . .38
Rear . . . . . . . . . . . . . . . . . . . . . . . . . . . . . . . . . . . . . . . . . . . . . . . . . . . . . . . 38
Front (Attaches to Camera Body) . . . . . . . . . . . . . . . . . . . . . . . . . . . . . . . . 38
Sides . . . . . . . . . . . . . . . . . . . . . . . . . . . . . . . . . . . . . . . . . . . . . . . . . . . . . . 39
Imager . . . . . . . . . . . . . . . . . . . . . . . . . . . . . . . . . . . . . . . . . . . . . . . . . . . . . . . . .40
Masked Focus Screen . . . . . . . . . . . . . . . . . . . . . . . . . . . . . . . . . . . . . . . . . . . . .41
IR Filter . . . . . . . . . . . . . . . . . . . . . . . . . . . . . . . . . . . . . . . . . . . . . . . . . . . . . . . .42
Anti-aliasing Filter . . . . . . . . . . . . . . . . . . . . . . . . . . . . . . . . . . . . . . . . . . . . . . . . .42
Removing an IR or Anti-aliasing Filter . . . . . . . . . . . . . . . . . . . . . . . . . . . . . 43
Inserting a Filter . . . . . . . . . . . . . . . . . . . . . . . . . . . . . . . . . . . . . . . . . . . . . . 43
Image LCD . . . . . . . . . . . . . . . . . . . . . . . . . . . . . . . . . . . . . . . . . . . . . . . . . . . . . .44
How the Image LCD Works . . . . . . . . . . . . . . . . . . . . . . . . . . . . . . . . . . . . . 44
Turning the Image LCD On and Off. . . . . . . . . . . . . . . . . . . . . . . . . . . . . . . 45
Menu Bar . . . . . . . . . . . . . . . . . . . . . . . . . . . . . . . . . . . . . . . . . . . . . . . . . . . 46
Status Screen . . . . . . . . . . . . . . . . . . . . . . . . . . . . . . . . . . . . . . . . . . . . . . . . . . . .49
Digital Buttons . . . . . . . . . . . . . . . . . . . . . . . . . . . . . . . . . . . . . . . . . . . . . . . . . . .50
Menus . . . . . . . . . . . . . . . . . . . . . . . . . . . . . . . . . . . . . . . . . . . . . . . . . . . . . 47
Displaying the Status screen . . . . . . . . . . . . . . . . . . . . . . . . . . . . . . . . . . . . 49
Back
Next
Index
Contents-4
Page 5

Table of Contents
Contents
Four-way Switch . . . . . . . . . . . . . . . . . . . . . . . . . . . . . . . . . . . . . . . . . . . . . 50
Menu Button. . . . . . . . . . . . . . . . . . . . . . . . . . . . . . . . . . . . . . . . . . . . . . . . . 50
OK Button . . . . . . . . . . . . . . . . . . . . . . . . . . . . . . . . . . . . . . . . . . . . . . . . . . 50
Tag button . . . . . . . . . . . . . . . . . . . . . . . . . . . . . . . . . . . . . . . . . . . . . . . . . . 50
Cancel Button . . . . . . . . . . . . . . . . . . . . . . . . . . . . . . . . . . . . . . . . . . . . . . . 50
Quick Guide for Using the Image LCD and Digital Buttons . . . . . . . . . . . . . . . . .51
Ports . . . . . . . . . . . . . . . . . . . . . . . . . . . . . . . . . . . . . . . . . . . . . . . . . . . . . . . . . . .52
Serial Port . . . . . . . . . . . . . . . . . . . . . . . . . . . . . . . . . . . . . . . . . . . . . . . . . . 52
Power Port . . . . . . . . . . . . . . . . . . . . . . . . . . . . . . . . . . . . . . . . . . . . . . . . . . 52
IEEE 1394 Port . . . . . . . . . . . . . . . . . . . . . . . . . . . . . . . . . . . . . . . . . . . . . . 53
Video Output Port . . . . . . . . . . . . . . . . . . . . . . . . . . . . . . . . . . . . . . . . . . . . 53
The Basics . . . . . . . . . . . . . . . . . . . . . . . . . . . . . . . . . . . . . . . . . . . . . . . . . . . . . . . . . .54
Assembling the Camera . . . . . . . . . . . . . . . . . . . . . . . . . . . . . . . . . . . . . . . . . . . .54
Attaching the DCS 645 to the Camera Body and Connecting Accessories . . . . .55
Attaching the DCS 645 to the Camera Body . . . . . . . . . . . . . . . . . . . . . . . . 55
Attaching the DCS 645 to the Camera Body and Connecting Accessories . . . . .56
Disconnecting the DCS 645 from the Camera Body . . . . . . . . . . . . . . . . . . 58
Connecting Flash/Strobe Units . . . . . . . . . . . . . . . . . . . . . . . . . . . . . . . . . . 59
Back
Next
Index
Contents-5
Page 6

Table of Contents
Contents
Image Files . . . . . . . . . . . . . . . . . . . . . . . . . . . . . . . . . . . . . . . . . . . . . . . . . . . . . .59
Storing Images . . . . . . . . . . . . . . . . . . . . . . . . . . . . . . . . . . . . . . . . . . . . . . . . . . .60
Power Supply . . . . . . . . . . . . . . . . . . . . . . . . . . . . . . . . . . . . . . . . . . . . . . . . . . . .61
AC Adapter . . . . . . . . . . . . . . . . . . . . . . . . . . . . . . . . . . . . . . . . . . . . . . . . . 62
Battery . . . . . . . . . . . . . . . . . . . . . . . . . . . . . . . . . . . . . . . . . . . . . . . . . . . . . 63
Attaching a Battery. . . . . . . . . . . . . . . . . . . . . . . . . . . . . . . . . . . . . . . . . . . . 63
Removing a Battery . . . . . . . . . . . . . . . . . . . . . . . . . . . . . . . . . . . . . . . . . . . 64
Checking Battery Status . . . . . . . . . . . . . . . . . . . . . . . . . . . . . . . . . . . . . . . 65
Battery Charger . . . . . . . . . . . . . . . . . . . . . . . . . . . . . . . . . . . . . . . . . . . . . . 66
Charging Batteries . . . . . . . . . . . . . . . . . . . . . . . . . . . . . . . . . . . . . . . . . . . . 67
COMPACTFLASH (CF) Cards . . . . . . . . . . . . . . . . . . . . . . . . . . . . . . . . . . . . . . .68
Inserting a CF Card . . . . . . . . . . . . . . . . . . . . . . . . . . . . . . . . . . . . . . . . . . . 68
Ejecting a CF Card. . . . . . . . . . . . . . . . . . . . . . . . . . . . . . . . . . . . . . . . . . . . 69
Selecting a Folder . . . . . . . . . . . . . . . . . . . . . . . . . . . . . . . . . . . . . . . . . . . . 70
Accessing Images on a CF Card . . . . . . . . . . . . . . . . . . . . . . . . . . . . . . . . . 71
Formatting a CF Card . . . . . . . . . . . . . . . . . . . . . . . . . . . . . . . . . . . . . . . . . 72
Recovering Data on a CF Card . . . . . . . . . . . . . . . . . . . . . . . . . . . . . . . . . . 73
Configuring Your Camera . . . . . . . . . . . . . . . . . . . . . . . . . . . . . . . . . . . . . . . . . . . . . .74
Back
Next
Index
Contents-6
Page 7

Table of Contents
Contents
Choosing a Language . . . . . . . . . . . . . . . . . . . . . . . . . . . . . . . . . . . . . . . . . . . . .74
Setting the Date and Time . . . . . . . . . . . . . . . . . . . . . . . . . . . . . . . . . . . . . . . . . .75
Setting Camera Properties . . . . . . . . . . . . . . . . . . . . . . . . . . . . . . . . . . . . . . . . . .76
Displaying the Properties Menu . . . . . . . . . . . . . . . . . . . . . . . . . . . . . . . . . . 76
Setting Battery Save Onset . . . . . . . . . . . . . . . . . . . . . . . . . . . . . . . . . . . . . 77
Setting Display Off Time . . . . . . . . . . . . . . . . . . . . . . . . . . . . . . . . . . . . . . . 77
Long Exposure. . . . . . . . . . . . . . . . . . . . . . . . . . . . . . . . . . . . . . . . . . . . . . . 78
Resolution . . . . . . . . . . . . . . . . . . . . . . . . . . . . . . . . . . . . . . . . . . . . . . . . . . 79
Total Actuations . . . . . . . . . . . . . . . . . . . . . . . . . . . . . . . . . . . . . . . . . . . . . . 79
. . . . . . . . . . . . . . . . . . . . . . . . . . . . . . . . . . . . . . . . . . . . . . . . . . . . . . . . . . . 79
Use Folder01 . . . . . . . . . . . . . . . . . . . . . . . . . . . . . . . . . . . . . . . . . . . . . . . . 80
Video Format . . . . . . . . . . . . . . . . . . . . . . . . . . . . . . . . . . . . . . . . . . . . . . . . 80
Using Job Tracker . . . . . . . . . . . . . . . . . . . . . . . . . . . . . . . . . . . . . . . . . . . . . . . .81
Loading Job Tracker Data from a CF Card . . . . . . . . . . . . . . . . . . . . . . . . . 82
Using the Camera Connected to a Computer . . . . . . . . . . . . . . . . . . . . . . . . . . . . . . .83
Getting Started . . . . . . . . . . . . . . . . . . . . . . . . . . . . . . . . . . . . . . . . . . . . . . . . . . .83
Connecting the Camera to the Computer and Power Supply . . . . . . . . . . . . . . . .84
Connecting to a Computer. . . . . . . . . . . . . . . . . . . . . . . . . . . . . . . . . . . . . . 84
Back
Next
Index
Contents-7
Page 8

Table of Contents
Contents
Powering Your Camera . . . . . . . . . . . . . . . . . . . . . . . . . . . . . . . . . . . . . . . . . . . .85
Using the Camera in Portable Mode . . . . . . . . . . . . . . . . . . . . . . . . . . . . . . . . . . . . . .86
Getting Started . . . . . . . . . . . . . . . . . . . . . . . . . . . . . . . . . . . . . . . . . . . . . . . . . . .86
Connecting to a Power Supply . . . . . . . . . . . . . . . . . . . . . . . . . . . . . . . . . . . . . . .87
Connecting to the AC Adapter . . . . . . . . . . . . . . . . . . . . . . . . . . . . . . . . . . . 87
Conserving Batteries . . . . . . . . . . . . . . . . . . . . . . . . . . . . . . . . . . . . . . . . . . 87
Battery Save State. . . . . . . . . . . . . . . . . . . . . . . . . . . . . . . . . . . . . . . . . . . . 88
Capturing and Processing Images . . . . . . . . . . . . . . . . . . . . . . . . . . . . . . . . . . . . . . . .89
Overview . . . . . . . . . . . . . . . . . . . . . . . . . . . . . . . . . . . . . . . . . . . . . . . . . . . . . . .89
Image Format . . . . . . . . . . . . . . . . . . . . . . . . . . . . . . . . . . . . . . . . . . . . . . . . . . . .91
Intervalometer . . . . . . . . . . . . . . . . . . . . . . . . . . . . . . . . . . . . . . . . . . . . . . . . . . .92
Intervalometer Options. . . . . . . . . . . . . . . . . . . . . . . . . . . . . . . . . . . . . . . . . 93
Setting ISO . . . . . . . . . . . . . . . . . . . . . . . . . . . . . . . . . . . . . . . . . . . . . . . . . . . . . .94
White Balance . . . . . . . . . . . . . . . . . . . . . . . . . . . . . . . . . . . . . . . . . . . . . . . . . . .95
Accessing White Balance . . . . . . . . . . . . . . . . . . . . . . . . . . . . . . . . . . . . . . 95
Click Balance . . . . . . . . . . . . . . . . . . . . . . . . . . . . . . . . . . . . . . . . . . . . . . . . 96
HASSELBLAD H1 Gray Balance Function . . . . . . . . . . . . . . . . . . . . . . . . 101
Long Exposure. . . . . . . . . . . . . . . . . . . . . . . . . . . . . . . . . . . . . . . . . . . . . . 101
Back
Next
Index
Contents-8
Page 9

Table of Contents
Contents
Processing Images . . . . . . . . . . . . . . . . . . . . . . . . . . . . . . . . . . . . . . . . . . . . . . .102
Changing Processing Settings. . . . . . . . . . . . . . . . . . . . . . . . . . . . . . . . . . 104
Using the Image LCD . . . . . . . . . . . . . . . . . . . . . . . . . . . . . . . . . . . . . . . . . . . . . . . .108
Reviewing Images . . . . . . . . . . . . . . . . . . . . . . . . . . . . . . . . . . . . . . . . . . . . . . .108
Selecting a Display Mode . . . . . . . . . . . . . . . . . . . . . . . . . . . . . . . . . . . . . 108
Navigating through Displayed Images . . . . . . . . . . . . . . . . . . . . . . . . . . . . 109
Single Image Display Mode . . . . . . . . . . . . . . . . . . . . . . . . . . . . . . . . . . . . 110
Zoom Display Mode. . . . . . . . . . . . . . . . . . . . . . . . . . . . . . . . . . . . . . . . . . 110
Histogram Display Mode . . . . . . . . . . . . . . . . . . . . . . . . . . . . . . . . . . . . . . 112
Multiple Image Display Mode. . . . . . . . . . . . . . . . . . . . . . . . . . . . . . . . . . . 114
Image Delete Display Mode. . . . . . . . . . . . . . . . . . . . . . . . . . . . . . . . . . . . 115
Status Bar . . . . . . . . . . . . . . . . . . . . . . . . . . . . . . . . . . . . . . . . . . . . . . . . . 116
Location Bar. . . . . . . . . . . . . . . . . . . . . . . . . . . . . . . . . . . . . . . . . . . . . . . . 116
Deleting Groups of Images . . . . . . . . . . . . . . . . . . . . . . . . . . . . . . . . . . . . . . . . .117
Display Contrast . . . . . . . . . . . . . . . . . . . . . . . . . . . . . . . . . . . . . . . . . . . . . . . . .118
Overexposure Indicator . . . . . . . . . . . . . . . . . . . . . . . . . . . . . . . . . . . . . . . . . . .118
Tagging Images . . . . . . . . . . . . . . . . . . . . . . . . . . . . . . . . . . . . . . . . . . . . . . . . .119
Caring for Your DCS 645 . . . . . . . . . . . . . . . . . . . . . . . . . . . . . . . . . . . . . . . . . . . . . .120
Back
Next
Index
Contents-9
Page 10

Table of Contents
Contents
Cleaning . . . . . . . . . . . . . . . . . . . . . . . . . . . . . . . . . . . . . . . . . . . . . . . . . . . . . . .120
Cleaning the DCS 645 . . . . . . . . . . . . . . . . . . . . . . . . . . . . . . . . . . . . . . . . 120
Cleaning the IR or Anti-aliasing Filter . . . . . . . . . . . . . . . . . . . . . . . . . . . . 121
Storing . . . . . . . . . . . . . . . . . . . . . . . . . . . . . . . . . . . . . . . . . . . . . . . . . . . . . . . .121
Firmware . . . . . . . . . . . . . . . . . . . . . . . . . . . . . . . . . . . . . . . . . . . . . . . . . . . . . .123
Checking the Current Firmware Version . . . . . . . . . . . . . . . . . . . . . . . . . . 123
Updating Firmware. . . . . . . . . . . . . . . . . . . . . . . . . . . . . . . . . . . . . . . . . . . 124
Recycling . . . . . . . . . . . . . . . . . . . . . . . . . . . . . . . . . . . . . . . . . . . . . . . . . . . . . .125
Feature Comparison . . . . . . . . . . . . . . . . . . . . . . . . . . . . . . . . . . . . . . . . . . . . . . . . .126
Transmitting Data . . . . . . . . . . . . . . . . . . . . . . . . . . . . . . . . . . . . . . . . . . . . . . . . . . .130
Connecting a Device to the Serial Port . . . . . . . . . . . . . . . . . . . . . . . . . . . . . . .130
Accessing Serial Port Options . . . . . . . . . . . . . . . . . . . . . . . . . . . . . . . . . . . . . .131
Setting the Baud Rate . . . . . . . . . . . . . . . . . . . . . . . . . . . . . . . . . . . . . . . . 131
Serial In Mode . . . . . . . . . . . . . . . . . . . . . . . . . . . . . . . . . . . . . . . . . . . . . . 132
Serial In Status. . . . . . . . . . . . . . . . . . . . . . . . . . . . . . . . . . . . . . . . . . . . . . 134
Serial Out Mode. . . . . . . . . . . . . . . . . . . . . . . . . . . . . . . . . . . . . . . . . . . . . 135
Specifications . . . . . . . . . . . . . . . . . . . . . . . . . . . . . . . . . . . . . . . . . . . . . . . . . . . . . . .136
Back
Next
Index
Contents-10
Page 11

Table of Contents
Contents
Unsupported Features . . . . . . . . . . . . . . . . . . . . . . . . . . . . . . . . . . . . . . . . . . . . . . . .137
Unsupported or Partially Supported Features (CONTAX 645) . . . . . . . . . . . . . .137
Unsupported or Partially Supported Features (MAMIYA 645AF and 645AFD . .138
Unsupported or Partially Supported Features (HASSELBLAD H1) . . . . . . . . . .139
Using a Video Monitor . . . . . . . . . . . . . . . . . . . . . . . . . . . . . . . . . . . . . . . . . . . . . . . .140
Connecting . . . . . . . . . . . . . . . . . . . . . . . . . . . . . . . . . . . . . . . . . . . . . . . . . . . . .140
Enabling . . . . . . . . . . . . . . . . . . . . . . . . . . . . . . . . . . . . . . . . . . . . . . . . . . . . . . .141
Disabling . . . . . . . . . . . . . . . . . . . . . . . . . . . . . . . . . . . . . . . . . . . . . . . . . . . . . . .141
Navigating Through Images . . . . . . . . . . . . . . . . . . . . . . . . . . . . . . . . . . . . . . . .141
Electromagnetic Emissions . . . . . . . . . . . . . . . . . . . . . . . . . . . . . . . . . . . . . . . .142
Japan . . . . . . . . . . . . . . . . . . . . . . . . . . . . . . . . . . . . . . . . . . . . . . . . . . . . . 142
Taiwan . . . . . . . . . . . . . . . . . . . . . . . . . . . . . . . . . . . . . . . . . . . . . . . . . . . . 142
European Union (EU). . . . . . . . . . . . . . . . . . . . . . . . . . . . . . . . . . . . . . . . . 143
USA . . . . . . . . . . . . . . . . . . . . . . . . . . . . . . . . . . . . . . . . . . . . . . . . . . . . . . 143
Warnings and Cautions . . . . . . . . . . . . . . . . . . . . . . . . . . . . . . . . . . . . . . . . . . . . . . .144
Warnings . . . . . . . . . . . . . . . . . . . . . . . . . . . . . . . . . . . . . . . . . . . . . . . . . . . . . .144
Glossary . . . . . . . . . . . . . . . . . . . . . . . . . . . . . . . . . . . . . . . . . . . . . . . . . . . . . . . . . . .146
Back
Next
Index
Contents-11
Page 12

Table of Contents
Contents
Warranty . . . . . . . . . . . . . . . . . . . . . . . . . . . . . . . . . . . . . . . . . . . . . . . . . . . . . . . . . .149
Back
Next
Index
Contents-12
Page 13
Overview
Contents
Overview
About Th is Manua l
This manual describes the functions available
with the following digital camera backs:
KODAK PROFESSIONAL DCS Pro Back
645M (DCS 645M)
KODAK PROFESSIONAL DCS Pro Back
645C (DCS 645C)
KODAK PROFESSIONAL DCS Pro Back
645H (DCS 645H)
These camera backs attach to the following
camera bodies:
DCS 645M MAMIYA 645 AF
DCS 645M MAMIYA 645 AFD
DCS 645C CONTAX 645
DCS 645H HASSELBLAD H1
Throughout this manual, your digital camera
back is referred to as the DCS 645 unless a
particular model is referenced.
The term “camera” refers to the camera body
with attached DCS 645.
The manual does not describe the following:
✔ Functions available with the MAMIYA
645 AF, MAMIYA 645 AFD, CONTAX 645
or HASSELBLAD H1 camera bodies,
except to point out unsupported features
(page 137). Refer to the manual included
with your MAMIYA , CONTAX or
HASSELBLAD camera body.
✔ Functions available with the included
software except for a brief overview
(page 30). Refer to the Help on the
software CDs.
Back
Next
Index
13
Page 14

Overview
Contents
This is an online manual. Click the following
items to go to the associated topic:
✔ Entries in the Table of Contents or Index
✔ Page numbers underlined in blue
✔ The Contents, Back, Next, or Index buttons
at the bottom of each page
Introduction
Thank you for purchasing the DCS 645.
The DCS 645 is inter changeable with th e camera
body’s film magazine , l etting you use th e cam era
for digital or film photography.
You can use the DCS 645 in portable mode or
connected to a computer.
Back
Next
Index
14
Page 15

Overview
Contents
Features
✔ 16 Megapixel imager (4080 x 4080 pixels)
✔ Untethered burst rate: 1 image / 1.8
seconds, burst depth: 8 images (varies
depending on camera body (page 126),
image content and type of
COMPACTFLASH Card)
✔ ISO 100 - 400
✔ Removable IR filter
✔ Image Display LCD provides image
thumbnails and status of digital features
✔ Composite video output jack for viewing
images on an external monitor (not
included)
✔ Power source:
Included AC adapter or rechargeable
battery pack
✔ Slot for COMPACTFLASH+ Type II Card.
Card-busy LED
✔ 400 Mbps IEEE 1394 interface
Back
Next
Index
15
Page 16

Overview
Contents
System Requirements
In addition to items included with the DCS 645,
your camera body and its accessories, the
following items are required:
When in Portable Mode
✔ COMPACTFLASH Cards
✔ Card reader (to move image files to your
computer after a photo session)
☛ Unless you plan to us e a photo lab, you need
a computer with an operating system and
RAM as described in the following sections
to process your images.
When Connected to a MACINTOSH
✔ POWER MACINTOSH G3 or G4,
Multiprocessor POWER MACINTOSH G4,
POWERBOOK G3 Series, or iMac DV
✔ System 9.0, or higher (Not OS X)
✔ 512 MB of RAM
✔ If your MACINTOSH does not have IEEE
1394 ports, you need an OHCI compliant
IEEE 1394 card with a free port.
✔ IEEE 1394 cable
✔ KODAK PROFESSIONAL DCS Capture
Studio or KODAK PROFESSIONAL DCS
Camera Manager and DCS Photo Desk
Back
Next
Index
16
Page 17

Overview
Contents
When Connected to a PC
✔ WINDOWS/INTEL PC with a 300 MHz
PENTIUM II or faster processor
✔ 200 MB of free disk space
✔ One of the following operating systems:
WINDOWS 2000 or WINDOWS XP.
✔ If your PC does not have IEEE 1394 ports,
you need an OHCI compliant IEEE 1394
card with a free port.
✔ IEEE 1394 cable
✔ 256 MB of RAM
✔ KODAK PROFESSIONAL DCS Camera
Manager and DCS Photo Desk
Back
Next
Index
17
Page 18

Capture Workflows
Contents
Capture Workflows
This section outlines two general workflows to
help you manage images captured on your DCS
645.
The workflows may vary between studio
sessions and between different types of
photography jobs on locations.
While there is no simple workflow that will work
satisfactorily in all situations, the workflows
presented here may be helpful to you.
The following workflows are described:
✔ Image capture when the camera is not
connected to a computer
✔ Image capture when the camera is
connected to a computer
Back
Next
Index
18
Page 19

Capture Workflows
Contents
Capture Workflow when the Camera is Not Connected to a Computer
Device & Media
Preparation
Edit
Capture & Evalua t e
Test Images
Capture Images
Occasional
Verification
Transfer Images
Back
Next
Index
19
Page 20

Capture Workflows
Contents
Devic e and Media Preparation
These preliminary tasks prepare your equipment,
save you time on the job, and help assure image
quality.
✔ Calibrate your monitor and printers
regularly, for example, weekly.
✔ Charge one or more DCS 645 batteries
(page 67). Attach a battery (page 63).
✔ Set the date & time (page 74), if needed.
✔ If you have used a CF Card for several
sessions (two or three dozen), you may
want to format it (page 72) on the camera
you will be using so that the full capacity of
the card is available and the DCS 645
Recover Card feature (page 73) will work.
✔ Insert each CF card (page 68) to be used
and check the Status screen (page 49) to
be sure there is adequate space available.
✔ Folders create d on the DCS 645 are na med
FOLDER1, FOLDER2, etc. To create
folders with meaningful names, insert a CF
Card in a card reader and na me fol d ers, fo r
example, “outdoors”, “church”. You can
then capture images to named folders for
easy access.
✔ Set up White Balance (page 95).
To set up White Balance on the camera,
use Click Balance (page 96). Select an
image with a MACBETH color chart, a gray
or white card, or a neutral area in the image
then perform Click Balance.
To set up White Balance in the included
software, capture an ima ge of a MA CB ETH
color chart, a gr ay or whit e card, t hen adj ust
later, using the software.
✔ Set ISO (page 94) based on available light.
✔ Set up Job Tracker, if needed (page 81).
Back
Next
Index
20
Page 21
Capture Workflows
Contents
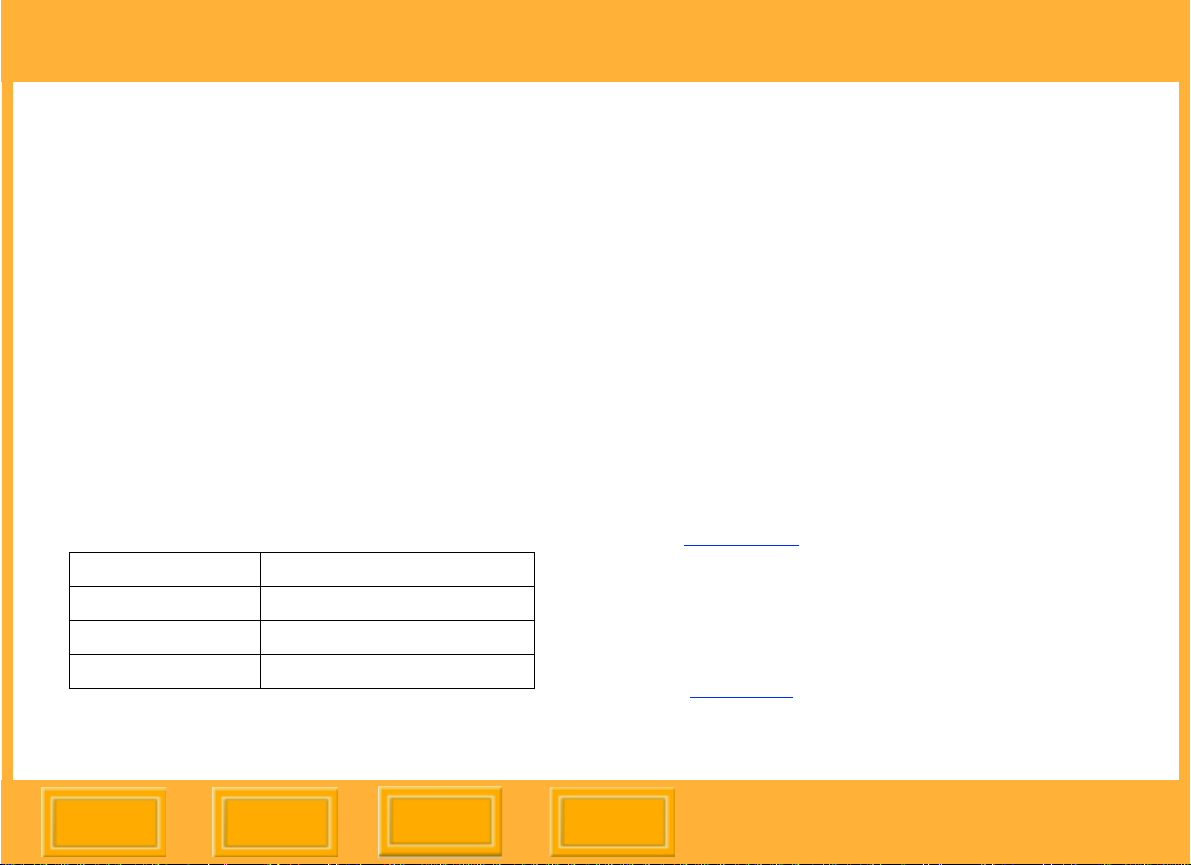
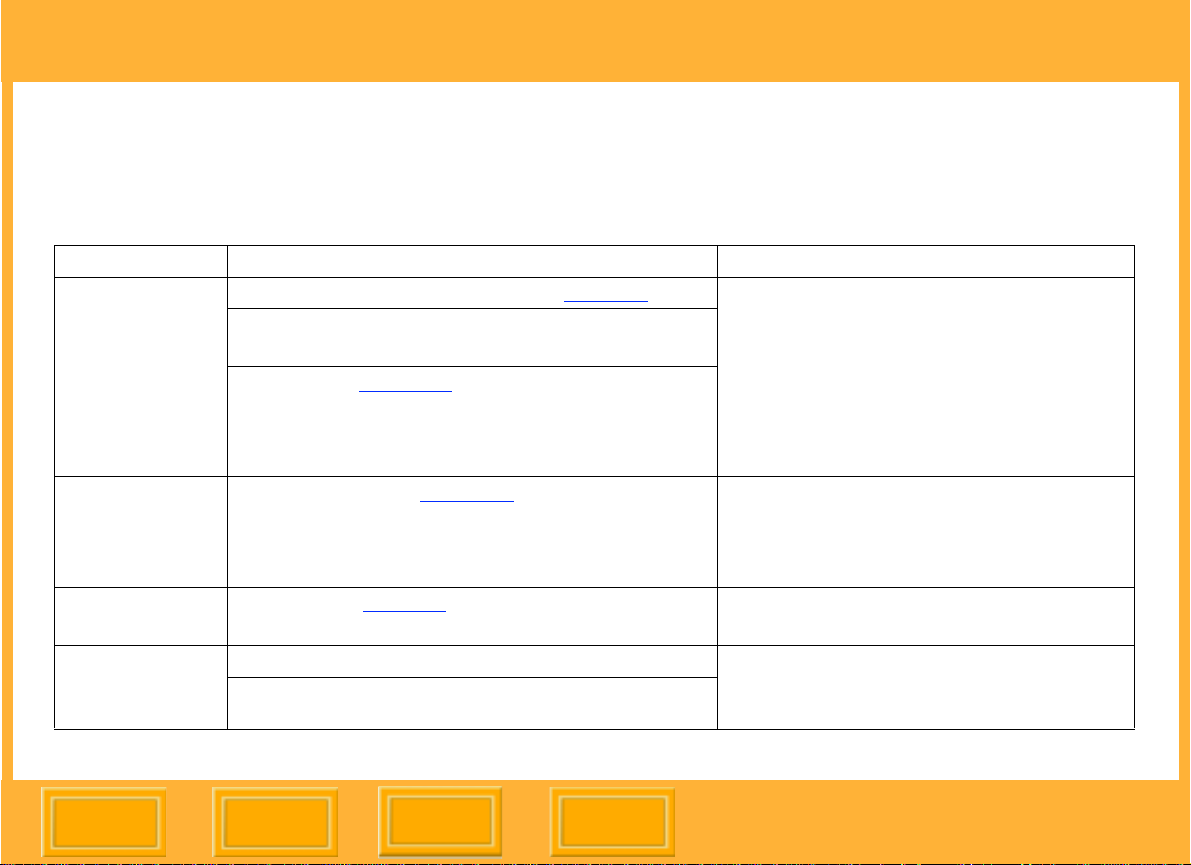
Capturing an d Eva l uat ing Test Images
Before your photo session begins, and a few times during a session, you should capture and evaluate
images to be sure that the lighting and camera setup are producing the desired results.
Image Attribute DCS 645 Tool Suggested Action
Exposure Appearan ce of im ag e on Im age L CD (pag e 4 4)
Histogram Display mode provides exposure
information about the overall image.
Luminometer (page 111)
information about a specific area of the image. Shows
the level of luminance channel saturation of pixels
below the crosshairs on the Image LCD.
Focus Zoom Display mode (page 110)
Color Click Balance (page 96)
subsequently capt ured images
Scene cont ent an d
Composition
Appearan ce of im ag e on Im age L CD Look for detai ls suc h as closed eyes, or
Zoom Display mode
provides exposure
neutraliz e s c o lor shifts in
View images and interpret information from
the tool. Adjust camera settings (aperture,
shutter speed , ISO) and/ or light ing. Recapt ure
image, if needed.
View the image at 1:1 and evaluate sharpness
and edge definition in high- contrast areas (for
example, eyes ). Adju s t lens focu s and /or
check and adjust the depth of field.
Repeat, as necessary, whe n lighting
conditions change.
undesirable details. Recapture image, if
needed.
Back
Next
Index
21
Page 22

Capture Workflows
Contents
Capturing Images
Using the DCS 645
✔ Select the desired folder to store captured
images.
✔ Enable processing if you want images
processed to ERI JPEG or TIFF RGB oncamera (page 102). Change processing
settings (page 104), if needed. (It is
recommended that you save the original
.DCR files. Consider the .DCR file as your
“digital negative.”)
Occasional Ver ification
Conditions such as lighting and composition vary
between locations (for example, between the
bride’s home, the chu rch, and th e r eceptio n si te ).
To assure the highest image quality, evaluate
test images ( page 21) at ea ch locat ion and make
necessary adjustments.
You may also want your customer to review
images while still on location.
View images using one of the following:
✔ Image LCD using one of several Display
modes (page 108)
✔ Connected video monitor (page 140) (Th e
Image LCD is disabled when this is in use)
✔ Remove the CF card fr om the DCS 645 and
plug it into a laptop computer. View the
images using the included software.
Back
Next
Index
22
Page 23

Capture Workflows
Contents
Transferring Images
When the photo session is complete, insert the
CF Card in a card reader connected to your
computer. You can then open, edit, transfer,
copy, archive, and save images using one of
several included software applications (page 30)
or send them to a lab.
✔ Create folders on the computer hard drive
in which to store your images, if needed.
Use meaningful names to help you locate
the images, when needed.
✔ It is good practice to backup your original
images on a CD or Zip disk.
.
Back
Next
Index
23
Page 24

Capture Workflows
Contents
Editing Images
Several software applica tions are included on the software CDs. This manual contai ns a short description
of each application. The following table suggests acquire and editing applications, depending on your
editing needs and experience:
Acquire / Editing Solutions
Software Description Ease of Use
DCR File Format Module
(page 32) (with ADOBE
PHOTOSHOP)
ERI JPEG File Fo rmat
Module (with ADOBE
PHOTOSHOP)
DCS Camera Manager
(page 31) and DCS Photo
Desk (page 31)
DCS Capture Studio
(MACINTOSH onl y)
(page 30)
Back
Fastest way to open .DCR files in ADOBE
PHOTOSHOP.
☛ The DCR File Format Module does not allow you
to edit .DCR files.
Required to open the ERI JPEG files created by the
DCS 645
DCS Camera Manager pro vides capture and camer a
control. DCS Photo Desk provides a browser with
easy-to-use editing tools. Produces edited RGB files.
A capture / workflow solution. Large set of editing
tools. Excellent color management.
Next
Index
Simplest
Moderate
Moderate
Most complex
24
Page 25

Capture Workflows
Contents
Third Party Solution
Kodak allows third party vendors to develop solutions using a KODAK PROFESSIONAL Software
Developer Kit (SDK). Refer to the Web site http://www.kodak.com/go/drg.
Back
Next
Index
25
Page 26

Capture Workflows
Contents
Capture Workflow when the Camera Is Connected to a Computer
o
Connect to
Computer
Capture & Evaluate
Test Images
Start Software
Capture Images
Device and Media
Preparation
Occasional
Verification
Edit
Back
Next
Index
26
Page 27

Capture Workflows
Contents
Connecting to a Computer and Power Supply
Connect the DCS 645 to your computer and
power supply (page 84)
Use the included AC adapter (page 62) as your
power supply. Alter natively you can use a battery
(page 63) but the AC adapter provides an
unlimited source of power.
Starting the Capture Softwa re
You must start one of the following included
software applications before you can proceed:
WINDOWS
✔ KODAK PROFESSIONAL DCS Camera
Manager (page 31)
MACINTOSH
✔ KODAK PROFESSIONAL DCS Camera
Manager
or
✔ KODAK PROFESSIONAL DCS Capture
Studio (page 34)
☛ When using DCS Camera Manager, you will
probably want to start KODAK
PROFESSIONAL DCS Photo Desk for
browsing and editing images.
Back
Next
Index
27
Page 28

Capture Workflows
Contents
Devic e and Media Prep aration
To help ensure a successful session:
✔ Calibrate your monitor and printers
regularly, for example, weekly.
✔ Set up folders on your computer to hold
images as they are captured. Name
according to studio needs or procedures.
Capturing and Evaluating Test Images
Review (page 29) and evaluate images as you
go. As you evaluate the images you can:
✔ Make necessary adjustments using the
included DCS Photo Desk or DCS Capture
Studio.
✔ Make adjustments using camera tools
(page 21).
Back
Next
Index
28
Page 29

Capture Workflows
Contents
Capturing Images
Using DCS Camera Manager or DCS Capture
Studio:
✔ Create or select a folder on your computer
to hold captured images.
Using DCS Camera Manager:
✔ Enable processing if you want images
processed to ERI JPEG or TIFF RGB oncamera (page 102). Change processing
settings (page 104), if needed. (It is
recommended that you save the original
.DCR files. Consider the .DCR file as your
“digital negative.”)
Occasional Verification
Captured images appear on the computer
monitor when you are running DCS Capture
Studio ( page 30) or DCS Camera Manager
(page 31) and DCS Photo Desk (page 31).
Editing Images
Refer to Help for KODAK PROFES SIONAL DCS
Capture Studio or KODAK PROFESSIONAL
DCS Photo Desk.
Back
Next
Index
29
Page 30

Using the Included Software
Contents
Included on the Software CD
The software CDs included with the DCS 645
contain several software applications. This
manual has a short description of each. For
complete information, refer to the Help for each
application.
Images captured on the DCS 645 are saved in a
proprietary .DCR format. The included software
lets you open .DCR images and save them in a
variety of formats.
The included software also lets you edit images,
manage color, and control the DCS 645 when it
is connected to a computer.
KODAK PROFESSIONAL DCS Capture S tudio (DCS Capture Studio)
Platform: MACINTOSH only
Using DCS Capture Studio you can:
✔ Capture images (MAMIYA 645 AFD and
Hasselblad H1 only)
✔ Perform advanced color management
including building color profiles
✔ Create IPTC data
✔ Save and reuse image editing settings
✔ Track job information
✔ Check camera settings
✔ Crop and rotate
✔ Sharpen by increasing contrast of edges
✔ Reduce noise (unwanted artifacts)
Back
Next
Index
30
Page 31

Page 32

Using the Included Software
Contents
KODAK PROFESSIONAL DCR File Format Module (DCR FFM)
Platforms: WINDOWS and MACINTOSH
The KODAK PROFESSIONAL DCR File Format
Module (DCR FFM) is an ADOBE PHOTOSHOP
Software Plug-in modu le for open ing DCR format
files. The DCR FFM creates a new
PHOTOSHOP Software document with the
contents of a KODAK PROFESSIONAL DCS Pro
Back .DCR image file. The DCR FFM provides
quick retrieval of full resolution DCR format files
into ADOBE PHOTOSHOP Software.
If you need to edit camera images using the
specialized functionality of DCS Photo Desk or
DCS Capture Studio, you should make the
changes in one of those software applications
before opening the file in ADOBE PHOTOSHOP.
KODAK PROFESSIONAL Extended Range Imaging File Format Module (ERI FFM)
When DCS Extended Range Imaging files are
opened in ADOBE PHOTOSHOP Software, a
separate window appears that allows the imageprocessing capabilities of KODAK
PROFESSIONAL DCS Photo Desk. The
Extended Range Imaging Technology File
Format Module (ERI FFM) allows you to make a
variety of sophisticated image-processing
decisions, such as exposur e compensation, col or
balance, color space selection, and lighting
adjustments.
Back
Next
Index
32
Page 33

Using the Included Software
Contents
Managing Color
DCS Capture Studio and DCS Photo Desk
provide tools to help you manage color.
Both software applications work with images
captured on a variety of KODAK
PROFESSIONAL digital cameras.
This section provides an overview of how to best
use the color management tools with the DCS
645. It also describes RGB setup in ADOBE
PHOTOSHOP.
Back
Next
Index
33
Page 34

Using the Included Software
Contents
DCS Capture Studio
DCS Capture Studio provides a wide range of
color management preferences and tools. This
section describes defaults and recommends
settings when using the software with the DCS
645.
Access Preferences from the DCS Capture
Studio Edit menu. Access the various tools from
the Tools menu.
Default Preferences
Default preferences are described below.
Monitor P r ofi le —Check “Use system profile” if a
system profile has b een cr eated . If th ere is none ,
a default profile is used.
Default Sou rce Profil e—It is recomm ende d that
you choose “DCSPB Daylight Source Correction”
to represent how the DCS 645 interprets color in
daylight illuminant. Tungsten and Fluorescent are
also available.
Default Loo k Profi l e—Choose “Kodak
Professional Product” for a bright saturated look
or “Kodak Professional Portrait” for flatter,
smoother images with less saturation.
Default De stinatio n Profi le—It is recomm ended
that you choose “ProPhoto RGB”.
Back
Next
Index
34
Page 35

Using the Included Software
Contents
Exposure and Tone Tools
Proper use of this tool is critical to image quality.
Neutral Reference—To ensure that there is no
color cast in a neutral area in an image, click
“Enable” then click a gray area of the image.
Profiles—Change Camera and Look profiles, if
needed.
Exposure—Evaluate the histogram for
distribution of tones:
✔ Adjust highlights and shadows by moving
the red lines on the histogram, by using the
two lower eyedroppers to cl ick a spot in the
image, or by entering numeric values.
Highlights are adjusted at the right and
shadows are adjusted at the left.
✔ Make a global exposur e sh ift by moving the
Exposure Compensation slider.
Color Adjustment Tools
These tools let you make minor adjustments to
images processed th rough profiles in the
Exposure and Tone tools.
Make minor adjustm ents using the RGB curves,
Color Balance, and Saturation features.
Back
Next
Index
35
Page 36

Using the Included Software
Contents
Composition Tools
These tools let you prepare images for output by
cropping, sharpening, and selecting an output
profile.
Noise Reduction Tools
Using these tools you can reduce noise in the
following ways:
Low—Reduces statistical noise (compares the
brightness of pixels in relation to their neighbors
and corrects small variations in the image
structure)
Medium—Reduces low-level noise and
chromatic (noise with a color component)
Moiré—Reduces low-level and medium-level
noise and color moiré (aliasing)
DCS Photo Desk
DCS Photo Desk provides a variety of color
management tools. You can access the tools
from the Image menu or from the Image Control
panel which is accessed from the View menu.
There are tools for Click Balance, Exposure
Compensation, Color Balance Lighting, and
Noise Reduction.
Back
Next
Index
36
Page 37

Using the Included Software
Contents
Setting up Color in ADOBE PHOTOSHOP
When you edit DCS 645 images in ADOBE
PHOTOSHOP (not included), you can define the
most appropriate RGB color space.
ProPhoto RGB is the default RGB color space in
both DCS Photo Desk and DCS Capture Studio.
If you plan to open images in ADOBE
PHOTOSHOP that have been edited in either
DCS Photo Desk and DCS Capture Studio, you
should select the same RGB color space in
ADOBE PHOTOSHOP.
Use ADOBE PHOTOS HOP’s Color Settings
option to set up an RGB color space.
Back
Next
Index
37
Page 38

About the DCS 645
Contents
About the DCS 645
Overview
Rear Front (Attaches to Camera Body)
Back
Next
* For your images to be sharp and in focus, you
must use either an IR filter or an
anti-aliasing filter.
Index
38
Page 39

About the DCS 645
Contents
Sides
Back
Next
Index
39
Page 40

About the DCS 645
Contents
Imager
The imager converts light into electrical charges
when you capture an image. Its specifications
are:
Horizontal pixels: 4080
V erti ca l pixels: 4080
Total pixels: 16,646,400
Horizontal acti ve area (mm): 36.72
Vertical active area (mm): 36.72
The imager is located behind the IR or
anti-aliasing filter (page 42).
Back
Next
Index
40
Page 41

About the DCS 645
Contents
Masked Focus Screen
The viewfinder’s field of view is greater than that
of the imager. Therefore, an apparent focal
length magnification or telephoto effect appears
in the captured image.
Remove your existing camera focus screen and
install the included DCS 645 focus screen.
Follow the instruction s included with your camera
body for changing a focus screen.
The Masked Focus screen has crop indicators
which indicate the area of the scene that will be
included in the image file. You can choose
between various Image Format options
(page 91).
Back
Next
Index
41
Page 42

About the DCS 645
Contents
IR Filter
A removable IR filter (page 43) is included with
the DCS 645. This filter, which is installed in front
of the imager, filters out infrared light and helps
protect the imager’s coverglass.
☛ For your images to be sharp and in focus,
you must use either an IR filter or an
anti-aliasing filter.
Anti-aliasing Filter
You can replace the IR filter with an anti-aliasing
filter which can be purchased from your Kodak
equipment dealer. Th e filte r perfo rms the IR fi lter
functions and helps reduce aliasing at certain
focal distances.
Back
Next
Index
42
Page 43

About the DCS 645
Contents
Removing an IR or Anti-aliasing Filter
CAUTION:
The Anti-aliasing filter and IR filter are fragile
devices and must be handled with care.
✔ Place a fingernail in the groove at the side
of the filter, and carefully remove the filter.
Inserting a Filter
1 Insert the two tabs at the left side of the filter
into the slots on the DCS 645.
2 Gently press the right side of the filter into
place until it is latched.
☛ Store the unused filter in the pocket of the
included body cap (page 121).
Back
Next
Index
43
Page 44

About the DCS 645
Contents
Image LCD
The two-inch diagonal Image LCD on the DCS
645 can be used to review images and change
digital settings.
When a video monitor (page 140) is in use, the
Image LCD turns off. (Pressing the OK, Cancel,
or Menu buttons (page 5 0) restores th e display to
the Image LCD and disables the external
monitor.)
How the Image LCD Works
The Image LCD i s used for convenient evaluation
and review of images captured in the camera.
Occasionally, there are individual pixels in the
LCD which are either brighter or darker than the
scene depicted. These pixels, few in number, do
not affect the Image Quality of the captured
image. Furthermore, they do not affect the
evaluation of a scene, the exposure of t he image,
color, or the control of the camera.You can view
images on the Image LCD in a variety of display
modes. You can also access options from the
Menu bar and f rom menus w hich drop dow n from
the Menu bar.
Display mode (page 108): Appears when you
turn on the Image LCD
Menu bar (page 46): Accessible from Display
mode
Menus (page 47): Accessible from the Menu
bar
Back
Next
Index
44
Page 45

About the DCS 645
Contents
Turning the Image LCD On and Off
1 Press the OK button to turn on the Image
LCD.
2 Press the Cancel button to turn off the Image
LCD. If the LCD is not in Display mode, press
the Cancel button again.
☛ Note:The Image LCD uses a lamp to
illuminate its screen. Your DCS 645 will heat
up if the Image LCD is turned on for an
extended period. Do not leave your LCD
always on; turn it on when you need it, turn it
off when you are through.
Back
Next
Index
45
Page 46

About the DCS 645
Contents
Menu Bar
The Menu bar is turned off when any Display
mode (page 108) is active. It appears when you
press the Menu button. The Menu bar appears
on the Image LCD and contains icons which
access various digital functions.
Folder icon
Menu icon
White Balance icon
Status Screen icon
Video icon (when Video is enabled)
Contrast icon
Displaying and Navigating the Menu Bar
1 Turn on the Image LCD (page 45).
2 Press the Menu button to turn on the Menu
bar.
3 Press the left or right side of the Four-way
switch to highlight the needed Menu bar icon.
4 Press the Cancel button or Menu button to
turn off the Menu bar.
Back
Next
Index
46
Page 47

About the DCS 645
Contents
Menus
Many DCS 645 functions can be accessed
through the menus on the Image LCD.
☛ Some menu screens have OK and Cancel
choices. To implement these choices, press
the OK or Cancel buttons (page 50) on the
DCS 645.
Making a Menu Selection
1 Navigate the Menu bar (page 46) until the
Folder or Menu icon is highlighted.
The appropriate menu appears.
2 Press the top or bottom of the Four-way sw itch
to highlight a menu option.
3 Press the OK button to activate the option.
Additional screens may appe ar, depending on
your choice.
4 Repeat steps 2 and 3 for each screen. (If the
choices are “horizontal” as in the example
below, use the left or right of the Four-way
switch when highlighting options.)
Back
Next
Index
47
Page 48

About the DCS 645
Contents
Menu Hierarchy
Back
Next
Index
48
Page 49

About the DCS 645
Contents
a
b
c
d
e
g
h
f
Status Screen
The Status screen p rovides a quick di splay of th e
DCS 645’s current setup.
Displaying the Status screen
✔ Highlight the Status screen icon (page 46).
The Status screen appears with the following
information:
Back
Next
a - Estimate of the numb er of images th at can b e
captured to the installed CF Card (page 68)
b - Fill level (in color) indicates the approximate
amount of space available on the active card
c - ISO setting
d - Name of active folder and the number of
images in that folder
e - DCS 645 Battery level
f - Current image format - full frame, horizontal,
or vertical (page 91)
g - Appears if the DCS 645 is connected to a
computer (page 84) and flashes if the DCS
Capture Studio or DCS Camera Manager
software is not running
h - Number of the currently selected image
(page 109)
Index
49
Page 50

About the DCS 645
Contents
Digital Buttons
The Four-way switch and the Menu, OK, Tag,
and Cancel buttons activate the digital functions.
Four-way Switch
Press the left or right side to:
✔ Navigate through images
✔ Navigate the Menu bar
✔ Move the Region of Interest box (Zoom
mode)
Press the top or bottom to:
✔ Change the Display mode
✔ Navigate a drop-down menu
✔ Move the Region of Interest box (Zoom
mode)
Menu Button
OK Button
✔ Turns on the Image LCD
✔ Enables the Region of Interest box (Zoom
mode) and implements a zoom when
Region of Interest box is enabled
✔ Implements a highlighted menu option
✔ Deletes the active image (Delete mode)
Tag button
✔ Tags or untags the selected image
Cancel Button
✔ Exits from menus without applying changes
✔ Turns off the Image LCD
✔ Disables the Region of Interest box (Zoom
mode)
✔ Toggles the Menu bar off and on
Back
Next
Index
50
Page 51

About the DCS 645
Contents
Quick Guide for Using the Image LCD and Digital Buttons
The digital buttons take on different functions, depending on the current state of the Image LCD.
Turn on the Image LCD: Press the OK button
Select a highlighted menu option: Press the OK button
Enable Region of Interest box (Zoom mode): Press the OK button
Implement a zoom (Zoom mode): Press the OK button
Delete an image (Delete mode): Press the OK button
Toggle the Menu bar on/off: Press the Menu button
Turn off the Image LCD: Press the Cancel button
Dismiss a menu without implementing change: Press the Cancel button
Disable Region of Interest box (Zoom mode): Press the Cancel button
Tag or untag an image Press the Tag button
Navigate images in all Display modes (except Zoom
when Region of Interest box is enabled):
Navigate the Menu bar and display menus: Press the left or right side of the Four-way switch
Navigate a drop-down menu: Press the top or bottom of the Four-way switch
Change to a different Display mode: Press the top or bottom of the Four-way switch
Move the Region of Interest box (Zoom mode): Press any edge of the Four-way switch
Back
Next
Press the left or right side of the Four-way switch
Index
51
Page 52

About the DCS 645
52
Page 53

About the DCS 645
Contents
Connect the 6-pin plug to the Computer
Connect the 4-pin plug to the Camera
IEEE 1394 Port
A 6-pin to 4-pin IEEE 1394 cable connects here.
Your dealer of K oda k prod ucts is th e best source
of information about purchasing supplies and
accessories. Reference catalog number 164
7668.
Video Output Port
An standard composite video cable connects
here and lets you review your images on an
external video monitor (page 140). You can
obtain this type of cable at any high-end video
dealer
Connect the 3.5mm mono plug to the DCS 645
Connect the RCA or BNC plug to your video m onit or
Back
Next
Index
53
Page 54

The Basics
54
Page 55

The Basics
Contents
Attaching the DCS 645 to the Camera Body and Connecting Accessories
Attaching the DCS 645 to the Camera Body
1 To remove the DCS 645M or 645C body cap,
rotate the DCS 645 Release button to the left
and press, then pivot the top of the cap away
from the DCS 645.
On the DCS 645H, the Release handle is on
the body cap.
To remove the DCS 645H body cap, slide the
handle to the left, then remove the top of the
cap away from the DCS 645.
.
Back
Next
Index
55
Page 56

The Basics
Contents
Attaching the DCS 645 to the Camera Body and Connecting Accessories
IMPORTANT:
Do not touch or strike the exposed IR filter or
anti-aliasing filter. Do not set the DCS 645 filter
side down on a surface.
Do not inst all the DCS 64 5 b atter y or con nect the
AC adapter to the D CS 64 5 until i t is mo unted o n
the camera body.
2 MAMIYA 645 AF or MAMIYA 645 AFD: R ot ate
the Shutter release mode selector lever to L
(lock).
CONTAX 645: Rotate the main power switch
to the Off position (red mark not visible).
HASSELBLAD H1: Press and hold the red OnOff button until the LCD is off.
Back
Next
Index
56
Page 57

The Basics
Contents
3 Using isopropyl alcohol on a lint-free lens
cleaning tissue, clean the contact pads on the
DCS 645 and the contact pins and locating
posts on the camera body.
WARNING:
Isopropyl alcohol is a f lamm able liq uid . It can
cause eye irritation and dry skin. High vapor
concentrations may cause drowsiness an d
irritation of the respiratory tract. Wash hands
with soap and water following maintenance
procedures. Refer to the material safety data
sheet from the supplier for additional safe
handling and first aid information.
4 Position the slot at the bottom of the DCS 645
in the locating hook on the camera body and
gently press the top of the DCS 645 onto the
camera body.
IMPORTANT:
Ensure that the DCS 645 is firmly atta ched
before releasing your grip.
5 You can now attach an AC adapter (page 62)
or battery (page 63) and turn on the camera
body.
Back
Next
Index
57
Page 58

The Basics
Contents
Disconnecting the DCS 645 from the Camera B ody
1 Place the camera on a table or other flat
surface.
2 If they are connected, unplug the video cable
(page 140) and the IEEE 1394 cable (page
84). Turn off and disconnect all flash and
strobe systems.
3 Turn off the camera body.
4 If the DCS 645 is being powered by battery,
remove the battery (page 64).
If the DCS 645 is being powered by AC
adapter, disconnect the AC adapter.
5 Rotate the DCS 645M or 64 5C Relea se button
to the left and press, then pivot the top of the
camera body away fr om th e DC S 645. F or th e
DCS 645H the Release handle is on the
camera body.
6 Carefully remove the DCS 645 from the
camera body.
☛ Do not store the DCS 645 with an attached
battery or with the AC adapter plugged in.
Back
Next
Index
58
Page 59

The Basics
Contents
Connecting Flash/Strobe Units
Connect flash and studio strobes following the
instructions in your camera body’s manual.
Image Files
Images capture d using th e DCS 645 are save d in
a proprietary file format with a .DCR extension.
You must use one of the following included
software packages to convert the .DCR files to a
format such as JPEG or TIFF before you can
open, view, or print them using other image
editing or processing applications. Alternatively,
you can use the DCS 645 in-camera Processing
function (page 102) to convert the .DCR files to
ERI JPEG or TIFF.
✔ DCS Capture Studio
✔ DCS Photo Desk
✔ DCR File Format Module with ADOBE
PHOTOSHOP 6.0 or greater (ADOBE
PHOTOSHOP is not included)
✔ ERI JPEG File Format Module with ADOBE
PHOTOSHOP 6.0 or greater
Back
Next
Index
59
Page 60

The Basics
Contents
Storing Images
Images are stored on either a CO MPACTFLASH
Card (p age 68) inserted i n the DCS 645 or on the
computer hard drive.
Refer to the included DCS Capture Studio, DCS
Camera Manager, or DCS Photo Desk software
Help for instructions on storing images on the
computer.
Images are stored on the computer hard drive
when the camera is connected to a computer
running DCS Capture Studio or DCS Camera
Manager with appropriate options selected.
Images are stored on an inserted
COMPACTFLASH Card when ANY of the
following conditions occur:
✔ Camera is operating in portable mode
✔ Camera is connected to a computer but the
computer is not turned on
✔ Camera is connected to a computer that is
powered but the DCS Capture Studio
software is not running
✔ Camera is con nected to a compu ter running
DCS Camera Manager with appropriate
options selected
Back
Next
Index
60
Page 61

The Basics
Contents
Power Su pply
Use the included AC adapter when the DCS 645
is connected to a computer. Use the DCS 645
battery or AC adapter when the DCS 645 is not
connected to a computer.
Two AC adapters are included with your DCS
645:
✔ 8VDC AC adapter is used wi th the DCS 645
when you have a power outlet and do not
want to use a battery
✔ 12VDC AC adapter is used with the battery
charger
IMPORTANT:
If you remove power from the DCS 645
(disconnect the AC adapter or remove the
battery) you must wait 10 seconds before
reapplying power. If you don’t the DCS 645 may
not boot.
DCS 645C: When you turn off the power on the
CONTAX 645 camera body, the DCS 645C
continues to use full pow er for approxi mately on e
hour. To prevent this, remove the battery and/or
AC adapter from the DCS 645C.
☛ You may occasionally use the DCS 645
unattached to a camer a body , for example, to
transfer images to your computer . In this
case you must turn on the Image LCD or
establish an IEEE 1394 connection. If you
don’t, the DCS 645 will go to sleep.
Back
Next
Index
61
Page 62

The Basics
Contents
AC Adapter
An 8VDC AC adapter is included with the DCS
645. Do not use any other type of AC adapter
with your camera.
Connecting an AC Adapter
Plug the AC adapter cable into the Power port on
the DCS 645, then plug the AC adapter into a
wall socket.
Back
Next
Index
62
Page 63

The Basics
Contents
Battery
A Battery kit is included with the DCS 645. This
includes a DCS 645 battery, a battery charger,
and an AC adapter for the battery charger.
☛ You must charge a battery before using it for
the first time (page 67).
WARNING:
The battery can explode , leak, or cat ch on fire
if exposed to high temperatures or fire,
opened, or disassembled. Refer to the
Warnings section (page 144) for further
information.
Attaching a Battery
1 Position the battery so its contacts align with
the contacts at the bottom of the DCS 645.
2 Slide the battery to latch it in place.
Back
Next
Index
63
Page 64

The Basics
Contents
Removing a Battery
CAUTION:
Hold the battery with one hand or place the
camera on a flat surface while removing the
battery so it does not drop and become
damaged.
✔ Press the Battery Release butt on to remove
the battery.
Back
Next
Index
64
Page 65

The Basics
Contents
Checking Battery Status
Check the Battery icon on Status screen in the
Image LCD.
Always check the battery status at the following
times:
✔ When loading a new battery
✔ After lengthy storage
✔ If the shutter does not release
✔ In cold weather
✔ Before an important assignment
The Battery icon indicates the bat tery level. If it is
insufficient or empty, the icon blinks, indicating
that you need to charge the battery.
Full
Low
Insufficient
Empty
☛ The Battery icon does not appear if an AC
adapter or a third party battery is supplying
power.
Back
Next
Index
65
Page 66

The Basics
Contents
Battery Charger
Charge a battery before using it for the first time
and whenever it is insufficient or empty. If you
plan to use your camera without the AC adapter
for an extend ed period of time, it is a go od idea to
charge one or more batteries before you begin.
An external battery charger is included with your
camera.
For the best results, store and use the battery
charger within the following temperature ranges:
Storage temperature range: -20°C to 60°C
(-68°F to 140°F)
Charging temperature range: 0°C to 40°C
(32°F to 104°F)
☛ If you charge a battery in an environment
near the high end of the charging range, its
internal temperature may exceed the rated
maximum temperature. In this case, the
charger stops charging and the yellow LED
flashes until the battery cools. Once cooled,
charging resumes. If this occurs frequently,
the battery lifetime can be shortened.
CAUTION:
Use only the DCS Pro Back 645 Ser ies batt ery
charger to charge a DCS 645 battery. Using a
different charger can dam age the battery or
the charger.
Back
Next
Index
66
Page 67

The Basics
Contents
Charging Batteries
1 Plug the cable from the charger’s AC adapter
into the battery charger port.
2 Select the appropriate included international
power cord and plug the AC adapter into a
wall outlet.
3 Insert one or two batteries in the slots in the
battery charger. (Use either slot when
charging only one battery.)
On average, batteries are rapid-charged in
approximately 2 1/2 hours. If two batteries are
inserted, they are charged simultaneously.
The following table shows the battery charger
status as indicated by each state of the LEDs.
☛ When you insert a battery, there is a slight
delay before any LED turns on.
Back
Next
Index
67
Page 68

The Basics
Contents
COMPACTFLASH (CF) Cards
The DCS 645 has a slot for a solid state or IBM
MicroDrive COMPACTFLASH+ Type II Card.
☛ When the camera is connected to a
computer and DCS Capture Studio is
running, images are saved to the computer,
regardless of whether a card is present.
Inserting a CF Card
1 Open the Card door.
2 Insert a card in the slot and press firmly until
you feel the card seat. (The card can only be
inserted in one orientation.)
3 Close the Card door.
Back
Next
Index
68
Page 69

The Basics
Contents
Ejecting a CF Card
1 Open the Card door.
CAUTION:
The Card Busy LED flashes when images are
being accessed. Do not remove the card
when the LED is flashing. Doing so could
destroy all image files on the card.
2 Press the Eject button.
3 Remove the CF Card.
4 Close the Card door.
Back
Next
Index
69
Page 70

The Basics
Contents
Selecting a Folder
This procedure applies only when you are
working in portable mode or using DCS Camera
Manager with appropriate options selected.
When DCS Capture Studio is running, images
are saved on the computer. Use DCS Capture
Studi o or DCS Camer a Manager to select fold ers
on the computer.
If no card is inserted, an x appears in the Folder
icon on the Menu bar.
x
1 Highlight the Folder icon (page 46).
2 Press the top or bottom of the Four-way sw itch
to select a folder.
The selected folder is indicated by a • symbol.
3 Press the OK button.
Back
Next
Index
70
Page 71

The Basics
Contents
Accessing Images on a CF Card
After you capture image s to a CF Card, you ne ed
to copy them to a computer with one of the
following installed:
✔ DCS Capture Studio
✔ DCS Photo Desk
✔ ADOBE PHOTOSHOP with the DCR File
Format Module
✔ ADOBE PHOTOSHOP with the ERI JPEG
File Format Module
1 Eject the CF Card (page 69) from the DCS
645.
2 If your computer has a CF Card reader, insert
the CF Card in the reader. If your computer
uses a PC Card reader, first insert the CF
Card into a PC Card adapter.
3 If DCS Capture Studio, DCS Photo Desk, or
ADOBE PHOTOSHOP with the DCR File
Format Module or the ERI JPEG File Format
Module is installed on your computer, you can
access the images directly from the CF Card
or copy them from the card to a folder on the
computer’s hard drive.
If DCS Camera Manager is installed on your
computer, you can copy the image files
directly from the tethered DCS 645 to the
computer’s hard drive.
☛ To open your images using the ERI JPG File
Format Module (page 32), you must have
processed the DCR image f iles to cr eate ERI
JPEG files. This processing is performed by
your DCS 645.
Back
Next
Index
71
Page 72

The Basics
Contents
Formatting a CF Card
Occasionally you may need to format a CF Card
if it was formatted incorrectly or if the dat a on the
card becomes corrupted.
If you have used a CF Card for several sessions
(for example, two or three dozen), you may want
to format it on the camera you will be using so
that the full capacity of the card is available.
(Deleting images does not reclaim all space on
the card.)
There are two ways to format a card:
✔ Quick format removes the directory
structure but does not erase dat a. It may be
possible to recover files (page 73) after a
Quick format.
✔ Full format erases all information and
“cleans up” the card. Im ages cannot be
recovered.
☛ Cards are formatted in PC DOS format.
1 Highlight the Menu icon (page 46), and
choose Main Menu from the drop-down menu
(page 47).
2 Choose Card from the Main menu.
3 Choose Quick Format or Full Format from the
Card menu.
4 Press the OK or Cancel button.
Back
Next
Index
72
Page 73

The Basics
Contents
Recovering Data on a CF Card
The Recover Card fea ture lets yo u recover image
files recently deleted from a CF Card. Files can
be recovered if:
✔ The card was formatted using a DCS 645
✔ The images were captured using a DCS
645
✔ The files have not been overwritten
When you recover files, a folder named Recover
is automatically created on the card, and the
recovered files are saved there.
☛ You cannot capture images to the Recover
folder. If you capture an image while the
Recover folder is selected, the image is
saved in the default folder specified in
Properties (page 73).
IMPORTANT:
Do not forma t until you save all needed images i n
another location.
1 Highlight the Menu icon (page 46), and
choose Main Menu from the drop-down menu
(page 47).
2 Choose Card from the Main menu.
3 Choose Recover Card from the Card menu.
Images that have not been overwritten are
recovered and saved in the Recover folder.
A Recovering Files screen appear s during the
recovery. When complete, another screen
displays the number of files recovered.
4 Press the OK button.
Another screen recommends that you format
the card before capturing more images.
Back
Next
5 Press the OK button.
Index
73
Page 74

Configuring Your Camera
Contents
Configuring Your Camera
Choosing a Language
You can choose the language in which text
appears in the Image LCD. At this time, you can
choose between English and Japanese.
1 Highlight the Menu icon (page 46) then
choose Languag e from the drop-do wn menu
(page 47).
2 Choose a language from the Language menu.
Back
Next
Index
74
Page 75

Configuring Your Camera
Contents
Setting the Date and Time
A date and time stamp is associated with each
image file.
Inside the DCS 645, a battery maintains the date
and time for up to 14 days. The battery is
recharged when the camera is powered. If this
battery loses its charge, you must reset the date
and time.
☛ You cannot access this battery.
To Set the Date and Time
1 Highlight the Menu icon (page 46) then
choose Main Menu from the drop-down menu
(page 47).
2 Choose Date/Time from the Main menu.
3 Press the left or right side of the Four-way
switch to sequence through the numeric fields.
4 Press the top or bottom of the Four-way sw itch
to change the highlighted numeric value.
5 Press the OK or Cancel button.
Back
Next
Index
75
Page 76

Configuring Your Camera
Contents
Setting Camera Properties
You can change the following camera properties:
✔ Delay before Battery Save mode activation
(page 77)
✔ Delay before the Image LCD display turns
off (page 77)
✔ Long exposure processing (page 78)
✔ Resolution of processed images (page 79)
✔ Default folder for image capture (page 80)
✔ Video format (page 80)
In addition, you can view the total number of
images captured by the DCS 645 (page 79).
Displaying the Properties Menu
Highlight the Menu icon (page 46) then choose
Properties from the drop-down menu (page 47).
The Properties menu appears.
Back
Next
Index
76
Page 77

Configuring Your Camera
Contents
Setting Battery Save Onset
When the DCS 645 is powered by battery and
you don’t touch any controls during the specified
Battery Save Onset time, it enters Battery Save
state. You can change the onset time (page 88)
from 1:00:00 to 23:59:59 (HH:MM:SS).
The default onset time is 60 minutes.
1 Display the Properties menu (page 76).
2 Choose Battery Save Onset from the
Properties menu.
The Battery Save Onset screen appears.
3 Press the left or right side of the Four-way
switch to sequence through the numeric fields.
4 Press the top or bottom of the Four-wa y switch
to change the highlighted numeric value.
5 Press the OK or Cancel button.
Setting Display Off Time
Extended use of the Image LCD will drain your
battery. For this reason, the LCD turns off after
the specified Display Off Time.
The default Display Off Time is 60 seconds.
1 Display the Properties menu (page 76).
2 Choose Display Off Time from the Properties
menu.
3 Press the left or right side of the Four-way
switch to sequence through the numeric fields.
4 Press the top or bottom of the Four-way sw itch
to change the highlighted numeric value.
Back
Next
5 Press the OK or Cancel button.
Index
77
Page 78

Configuring Your Camera
Contents
Long Exposure
The Long Exposure property reduces
accumulated pattern noise in long exposure
images.
Long Exposure Processing is applied
immediately after image capture. As a result,
there is a greater lag time between exposures,
thereby reducing "burst" mode capture rate and
depth. This is true even when the property is set
to "Exposures >1/4 sec." and a shutter speed
shorter than 1/ 4 sec. is use d. Fo r exam ple, i f yo u
are capturing an image using a 10 second
shutter speed, there will be 10 seconds of
processing immediately after image capture.
1 Display the Properties menu (page 76).
2 Select Long Exposure.
3 Choose one of the following:
Never Apply—Long Exposure processing is
not applied to an y image, re gardle ss of shutter
speed.
Exposures >1/4 sec.—Long Exposure
processing is applied to images ta ken with
shutter speeds longer than 1/4 second.
All Exposures—Long Exposure processing is
applied to all images after capture, regardless
of shutter speed. If you are using the long
exposure function, allow time between
exposures to allow the CCD to cool.
Back
Next
Index
78
Page 79

Configuring Your Camera
Contents
Resolution
Y ou can specify the resolu tion of the finished fi les
(TIFF RGB or ERI JPEG) produced by the DCS
645.
1 Display the Properties menu (page 76).
2 Select Resolution.
The Resolution screen appears where you set
the value for the finished images’ resolution in
either pixels/inch or pixel/cm.
Total Actuations
You can determine the number of images
captured by the DCS 645 from the time of its
manufacture.
1 Display the Properties menu (page 76).
2 Select Total Actuations.
The total number of images captured appears.
Back
Next
Index
79
Page 80

Configuring Your Camera
Contents
Use Fol der01
You can change the CF Card’s default image
capture folder.
If you do not change the default folder , the default
is the lowest numbered empty folder.
1 Display the Properties menu (page 76).
2 Select Use FOLDER01.
3 Choose Yes or No.
If you choose Yes, FOLDER01 will be active
when you insert a CF Card.
If you choose No, the lowest numbe red em pty
folder will be active when you insert a CF
Card.
Video Format
You can specify the video standard used to view
images on an external monitor (page 140):
✔ NTSC - North America (default)
✔ PAL - Europe and Asia
1 Display the Properties menu (page 76).
2 Select Video Format.
Choose NTSC or PAL on the Video Format
screen.
Back
Next
Index
80
Page 81

Configuring Your Camera
Contents
Using Job Tracker
This feature lets you enter Job Tracker data
using DCS Photo Desk or DCS Capture Studio,
load the data from a CF Card into camera
memory, then include it in image headers. The
data follows the International Press
Telecommunication Counci l (IPTC) sta ndard. Job
Tracker files have a .IPT extension.
1 Choose Job Tracker from the Main menu.
2 Select your choice from the Job Tracker Data
menu. If a Job Tracker file has already been
loaded, its name appears.
None—No Job Tracker data is written to the
image headers.
Job T rac ker file—Choo sing this option w rites
the job tracker da ta from a previously loaded
file to the header of subsequently captured
images. In the sample screen at the left, a file
named Station1 has been previously loaded.
Load fro m Card —You can load a Job Tracker
file from a PC Card.
☛ Your choice of None or a Job Tracker file
persists until you change the setting.
Back
Next
Index
81
Page 82

Configuring Your Camera
Contents
Loading Job Tracker Data from a CF Card
1 Choose Load from Card from the Job Tracker
Data menu.
2 Choose a Job Tracker file from the Load Job
Tracker Data menu.
The file is loaded from the CF Card to your
camera.
Each file must have a unique name. If you
attempt to load a file with the same name as
one on your camera, a message asks if you
want to replace the existing file.
Back
Next
Index
82
Page 83

Contents
Before You Begin
Using the Camera Connected to a Computer
Using the Camera Connected to a Computer
Getting Started
To start using your camera connected to a
computer, do the following.
☛ It is not necessary to turn off the computer.
1 Assemble the camera (page 54).
2 Install the included software, as needed
(page 30).
3 Connect the camera to the computer and
power supply (p age 84) .
4 Turn on the computer, if it isn’t already.
5 Start DCS Capture Studio or DCS Camera
Manager.
If DCS Capture Studio is running, images are
saved to the computer. If DCS Camera
Manager is running, images can be saved to
the computer or to a CF Card.
6 Capture images.
7 Review and edit images as needed, in DCS
Capture Studio, DCS Photo Desk, or ADOBE
PHOTOSHOP with the DCR File Format or
the ERI JPEG File Format Module.
8 Save the images to the computer ’s hard drive
in the desired format.
Back
Next
Index
83
Page 84

Using the Camera Connected to a Computer
Contents
Connecting the Camera to th e Compute r a nd Power Supply
Connect the DCS 645 to a computer and a DCS
Pro Back 645 battery or AC adapter.
Connecting to a Computer
In addition to included accessories, you need a
6-pin plug to 4-pin plug IEEE 1394 cable (page
53).
1 Connect the 4-pin plug on the IEEE 1394
cable to the IEEE 1394 port on the DCS 645.
2 Connect the other end of the cable into any
available port on the IEEE 1394 adapter card
on your computer.
3 If using the included AC adapter, connect the
AC adapter cable into the Power port
(page 39) on the DCS 645 and plug the AC
adapter into a wall socket.
If using battery power, attach the battery
(page 63).
Back
Next
Index
84
Page 85

Using the Camera Connected to a Computer
Contents
Powering Your Camera
✔ Turn on the camera body.
The DCS 645 a ctivates within 5 - 6 second s
after the AC Adapter or battery starts
providing power.
☛ If you turn on the Image LCD, it turns off
automatically after the time specified in the
Display Off Time property (page 77).
Back
Next
Index
85
Page 86

Using the Camera in Portable Mode
Contents
Using the Camera in Portable Mode
Getting Started
To start using your camera in portable mode (not
connected to a computer), do the following:
1 Assemble the camera (page 54).
2 Attach a DCS 645 battery or connect the AC
adapter (p age 87) .
3 Insert a CF Card (page 68).
4 Turn on the camera body.
5 Capture images.
6 Review the images (page 108) on the Image
LCD or enable the video output (page 140) to
view them on a monitor.
7 Remove the CF Card from the camera and
insert it in a card reader.
8 Copy the image files to the computer.
9 Review and edit the images, as needed, in
DCS Capture Studio, DCS Photo Desk, or
ADOBE Photoshop with DCR File Format
Module or the ERI JPEG module.
10 Save the images to the computer’s hard drive
in the desired format.
Back
Next
Index
86
Page 87

Using the Camera in Portable Mode
Contents
Connecting to a Power Supply
When you are working in por table mod e, you can
use either a DCS 645 battery or the included AC
adapter (p age 62) .
Connecting to the AC Adapter
1 Plug the AC adapter into the Power port on the
DCS 645.
Conserving Batte ries
To extend the life of the battery, remember the
following:
✔ Older batteries may not last as long as
newer batteries.
✔ Minimize use of the Image LCD and turn it
off when not in use.
✔ Track the battery’s power level by checking
its icon on the Status screen.
2 Plug the AC adapter into a wall socket.
Back
Next
Index
87
Page 88

Using the Camera in Portable Mode
Contents
Battery Save State
To conserve the battery’s charge, the DCS 645
enters Battery Save state if no DCS 645 controls
are touched for a specified period of time. When
this happens, the Image LCD and DCS 645
buttons become inactive.
The default onset of Battery Save state is 60
minutes. You can change the Batter y Save Onset
time in Properties (page 77).
To Exit Battery Save State
✔ Press the Shutter button on the camera
body.
The DCS 645 turns on with the same settings
it had before Battery Save state began.
Back
Next
Index
88
Page 89

Capturing and Processing Images
Contents
Capturing and Processing Images
Overview
Capture images using the Shutter Release
button on the camera body. Refer to the User’s
Manual for your CONTAX 645, MAMIYA 645 AF,
MAMIYA 645 AFD or HASSELBLAD H1.
Refer also to the list of features that are not
supported (page 1 37) when the DCS 645 is used
with the CONTAX 645, MAMIYA 645 AF,
MAMIYA 645 AFD or HASSELBLAD H1.
MAMIYA 645 AF: You must half-press the
Shutter Release button for 1/4 second before
capturing an image. If you press the button fully
to the release position without the half-press
delay, the shutter will not actuate. Yo u must then
fully release the Shutter Release button and
perform a half-press for 1/4 second.
To capture sequential images using a MAMIYA
645 AF camera body, you must completely lift
your finger off the camera body’s Shutter
Release button after each image capture.
Back
Next
Index
89
Page 90

Contents
Before You Begin
Capturing and Processing Images
MAMIYA 645 AFD and CONTAX 645: To
capture an image, half-p ress the Shutter Release
button for 1/5 second, then press the button fully
to the release position. If you hard-pr ess the
button without the half-press, there will be a
significant delay between the hard-press and the
image capture.
MAMIYA 645 AF and CONTAX 645: The “Card
Full” message does not appear on the Image
LCD when the CF Card is full. If images are not
being capture d, ch eck t he a vai lable sp ace on the
Status screen (page 49).
DCS 645C: The viewfinder display on the
CONTAX 645 will not turn on if a DCS 645C is
attached and captured images cannot be stored.
If the viewfinder display will not turn on and you
cannot capture images to a CF card, check the
available space on the Status screen to be sure
the card is not full. If capturing images to a
computer, DCS Capture Studio or DCS Camera
Manager must be running.
Back
Next
Index
90
Page 91

Capturing and Processing Images
Contents
Image Format
The DCS 645 has a square imager that captures
images in a square format. You can change this
format, if needed. The new format is applied to
subsequently captured images.
The Masked Focus screen (page 41) indicates
the approximate area of coverage for each
format.
5 x 5
5 x 4
5 x 5
To Format Images
1 Choose Image Format from the Main menu.
2 Choose the desired option from the Image
Format menu (Full Frame, 5x4, or 4x5).
The current format is indicated on the Status
screen (page 49).
F - Full frame image (5x5)
H - Horizontal format (5x4)
V - Vertical format (4x5)
Back
4 x 5
Next
☛ The Hasselblad H1’s grip LCD will display
an icon indicating the current Image Format
setting.
Index
91
Page 92

Capturing and Processing Images
Contents
Intervalometer
The Intervalome ter is ava ilable on th e DCS 645H
or when a DCS 645M is mounted on a MAMIYA
645 AFD. It is not avail able with the DCS 64 5C or
when the DCS 645M is used with the MAMIYA
645 AF.
The Intervalometer automatically captures a
sequence of images at specified intervals over a
specified time period. You might use the
Intervalometer to cap ture a flower bud openin g or
for unattended surveillance.
The Intervalom eter is disabled a utomatically after
the specified time period, even if the specified
number of images have not been captured. For
example, if you set the Intervalometer for 15
exposures at one second intervals, the buf fer fills
after a few exposu res, and th e cam era would not
be able to maintain the one second interval. It
would stop capturing images after 15 seconds
even though 15 images had not been captured.
☛ While the Intervalometer is enabled, the
camera does not enter Battery Save state.
1 Choose Intervalometer from the Main menu.
2 Choose the desired option from the
Intervalometer menu .
3 Change settings, as needed, on the
Intervalometer options screen s (page 93).
4 Press the left or right side of the Four-way
switch to sequence through the num eric fi elds.
Press the top or bottom of the Four-way sw itch
to change the highlighted numeric value.
Press the OK or Cancel button. (In the En able
screen, choose Yes or No.)
Back
Next
Index
92
Page 93

Capturing and Processing Images
Contents
Intervalom eter Options
Frame Count Interval Delay Enable
Screen:
Description:
Range:
Default:
Specifies the number
of frames to capture
1-9999 frames 3 seconds to 23:59:59
10 frames 10 seconds 2 seconds
Back
Next
Specifies the interval
between imag e
captures
(HH:MM:SS)
Index
Specifies the delay
before onset of the
Intervalometer
function
1 second to 23:59:59
(HH:MM:SS)
Yes enab les the
Intervalom et er w ith
the values displa yed in
the Intervalometer
screen
No disables the
Intervalometer
93
Page 94

Capturing and Processing Images
Contents
Setting ISO
The DCS 645 supports an ISO range of 100 to
400 at 1/3 stop intervals. The factory default is
ISO 100.
The ISO setting set the sensitivity of the imager’s
electronics to light. Increasing or decreasing the
ISO increases or decreases sensitivity.
1 Choose ISO from the Main menu.
2 Choose the desired setting from the ISO
menu.
The currently active ISO value is indicated by
a “•” symbol.
3 Press the OK button.
☛ The Hasselblad H1’s grip LCD will display
the current DCS 645H ISO setting if the
“Show ISO” option in the H1’s Custom
Settings menu is set to “Yes”.
Back
Next
Index
94
Page 95

Capturing and Processing Images
Contents
White Balance
The DCS 645 offers both Preset and Click White
Balance functionality.
There are five Preset options: Auto, Daylight,
Tungsten, Fluorescent, and Flash. Choose the
setting which represents the dominant type of
lighting present when the image was captured.
For example, when working in daylight, select the
Daylight setting for the best results.
Any White Balance or Click Balance setting that
you choose remains in effect until you make a
different choice.
☛ Auto White Balance evaluates the image,
determines what the illuminant was, and
what the color b alance, and exposure should
be.
Accessing White Balance
1 Select the White Balance icon on the Menu
bar.
Preset
Saved Click Balance
setting
2 Choose a Preset option, the last Click Balance
setting saved on camera (Click image 2613),
or Click Balance from the White Balance
menu.
☛ The Hasselblad H1’s grip LCD will display an
icon indicating the current White Balance
setting.
Back
Next
Index
95
Page 96

Capturing and Processing Images
Contents
Click Balance
When you use Click Balance, your clicking of a
neutral area in an image helps neutralize color
shifts. The neutral areas of subsequent images
will have RGB values that are approximately
equal.
Choosing an Image for Click Balance
For Click Balance, choose an image with a
MACBETH color chart, a gray card, a white card
or a neutral area.
Back
Next
Index
96
Page 97

Capturing and Processing Images
Contents
Performing the Click Balance Operation
1 Choose Click Balance from the White Balance
menu.
2 Press the OK button to use the current image.
A zoomed version of the current image
appears with a moveable eyedropper.
3 Press any side of the Four-way switch to move
the eyedropper over a neutral area.
If the eyedropper reaches the edge of the
screen, the image shifts in the opposite
direction of the Four-way switch manipulation.
4 Press the OK button to sample the RGB
values, update the Click Balance menu with
the current image nu mber, and apply the Click
Balance.
The setting is applied to subsequently
captured images.
☛ The Hasselblad H1’s grip LCD will display a
“C1 WB” icon when a DCS 645 Click Balance
setting is in use.
Back
Next
Index
97
Page 98

Capturing and Processing Images
Contents
Using the Click Balance Menu
1 Choose Click Balance from the White Balance
menu.
2 Press the Menu button to display the Click
Balance menu.
3 Do one of the following:
✔ Select a Click Balance setting.
✔ Delete a Click Balance setting.
✔ Load a Click Balance setting from a CF
Card
✔ Save a Click Balance setting for reuse
Selecting a Click Balance Setting
1 Select a Click Balance setting from the Click
Balance menu.
A • symbol appe ars next to th e currently ac tive
Click Balance setting.
2 Press the OK button.
Back
Next
Index
98
Page 99

Capturing and Processing Images
Contents
Deleting a Click Balance Setting
1 Choose Delete Setting from the Click Balance
menu.
2 Select the Click Balance setting to be deleted.
3 Press the OK button.
4 Press the OK button.
Loading a Click Balance Setting
You can load a Click Balance setting that has
been saved to a CF Card using KODAK
PROFESSIONAL DCS Photo Desk. (A maximum
of 10 settings can exist in camera memory.)
1 Choose Load From Card from the Click
Balance menu.
2 Select the Click Balance setting to be loaded.
3 Press the OK button.
The loaded file subsequently appears in the
Click Balance menu.
Back
Next
Index
99
Page 100

Capturing and Processing Images
Contents
Back
Next
Index
100
 Loading...