

Page 1

User Manual
English, version 3.0
Page 2

C O N T E N T S
Please see the ‘bookmark’ list in the PDF document for a comprehensive and interactive list
Gen e ral I nt r odu c ti on 5
Co m pu te r sy s te m re q ui re me nt s 5
Wa r ni ng s an d r es tr i ct io ns 5
B ef or e yo u s ta rt 6
Gen e ral ove rv i ew 7
Pa r ts , co m po ne nt s & c on tr o l pa ne l bu t to ns 9
S ho ot in g / i ma ge s to ra g e mo de s 12
S el ec t in g th e cu r re nt m ed i um 12
Us i ng c om pa c t fl a sh m em or y c ar d s 13
Wo r ki ng w it h a n Im ag eb a nk 13
Te th e re d to a c om p ut er 14
Gen e ral O ver view 15
Storag e over v iew - work ing
wit h me d ia a nd b a tc h es 18
Over view o f vi e win g , d e le t in g
and t rans ferr i ng i mage s 24
Wo rk in g wit h t he m e nu
set t in g s 30
STORAGE 35
SET T I NGS 44
Fl as h / str obe 56
Clea n ing 57
PLEASE NOTE !
The menu on the digital back can be
set to seven different languages:
Equi pme nt c a re, Ser vic e and
Gua r a nte e 59
Tec hni c al s pe c if icat ion s 60
Inset photo on user use r manual CD and user manual cover : Christian Ket tiger / Hasselblad Mas ter 2006
2
Page 3
Congratulations on your new Hasselblad CFV!
The 16 Mpix based digital back is custom built to fit the design and functionality of Hasselblad
cameras from the V-series with its range of high performance, leaf-shutter based lenses.
However, it can also fit onto view cameras using the V-system interface plate for mechanical
attachment and flash sync connection to trigger the digital capture for optimum compatibility and economy. It provides both cable free and computer tethered options to suit all types
of work. The back offers an ultra high level of integration, image quality and flexibility to the
specialist professional photographer or highend amateur user.
Instant Approval Architecture:
if the photographer cannot quickly review and select the best image. Building on the suc
cess of its Audio Exposure Feedback technology, Hasselblad has created Instant Approval
Architecture (IAA), an enhanced set of feedback tools, designed to liberate the photographer
to focus on the shoot rather than the selection process. IAA triggers audible and visible signals
for each image captured, telling the photographer immediately whether the image has a red,
yellow or green light status. The information is recorded both in the file and in the file name,
providing a quick and easy way to classify and select images, in the field or in the lab. A larger,
enhanced OLED display provides a realistic, high quality and perfect contrast image view,
even in bright sunlight, to allow instant on-site image approval. IAA is a Hasselblad trademark
and is patent pending.
Large format digital capture:
improved flexibility, all of which the CFV addresses. It uses an optical format allowing for digital
capture with a sensor 50% larger than the physical size of today’s largest 35mm DSLR cameras.
The sensor can therefore hold more and larger pixels, which secure a high-end image quality in
terms of moiré free colour rendering without gradation break-ups in even the finest lit surfaces.
“Instant” user interface: The CFV is operated with a straightforward user interface with a
series of “instant” one-button-click operations including: instant capture, instant browse, in
stant approval, instant zoom, and instant image info.
Three modes of operation and storage:
for the professional photographer. CFV offers a free choice of portable CF card storage, flexible
Imagebank drive, or tethered operation with extended, special capture controls. With these
three operating and storage options, the photographer is able to select a mode to suit the
nature of the work at hand, whether in the studio or on location.
Limitless digital image capture loses some of its potential
Today’s photographers demand higher resolution, less noise, and
Optimum portability and image storage are critical
-
-
3
Page 4
Hasselblad 3F RAW files: Hasselblad 3F image raw files carry full sets of metadata, including
capture conditions, keywords and copyright, facilitating work with image asset manage
ment solutions. The files also define the colours in the Hasselblad RGB colour space, removing
the need for experimenting with different colour profiles to get optimal colours and the need
for selective colour corrections.
-
DNG workflow:
verter, the 3FR files can be converted directly into Adobe’s raw image format DNG (‘Digital
NeGative’), bringing this new technology standard to the professional photographer for the
first time. The DNG file format enables raw, compressed image files to be opened directly in
Adobe PhotoShop. This allows photographers to operate quickly and efficiently, reducing the
“downtime” taken to process image data and enabling final images to reach the customer
more quickly. Hasselblad image files carry full sets of metadata, including capture conditions,
keywords and copyright, facilitating work with image asset management solutions.
FlexColor workflow:
of control for the studio photographer. In tethered operation tools like live video and overlay
masking help bring productivity to advanced set composition. The newest FlexColor version
allows the photographer to manipulate colour temperature and compare image details across
multiple images for precise image selection. FlexColor works on the basis of the 3FR RAW files
generated by the CFV. FlexColor runs natively on both Macintosh and Windows platforms and
is licensed to allow you to provide free copies for all your co-workers and production partners.
Colour refinement – new colour handling concept:
the past imposed limitations on professional digital photographers, particularly when captur
ing various skin tones, metals, fabrics, flowers etc. To combat this, Hasselblad has developed
a new, powerful colour engine in its FlexColor workflow software. With one camera set up,
the new optimised colour engine produces reliable out-of-the-box colour without gradation
reproducing skin tones and other difficult colours accurately.
For customers familiar with Photoshop and the Adobe Camera Raw con-
FlexColor offers an image processing workflow with the highest degree
Colour management solutions have in
-
•
This instruction manual describes in detail how to operate your camera, so please read it
carefully. If you have a query do not hesitate to contact your dealer − we want you to be 100%
satisfied!
You may also contact us directly over useability, construction, design, etc as we welcome your
feedback in order to improve our products. Your dealer can also provide you with the latest in
news and technical developments from Hasselblad.
A quarterly magazine − FORUM − is published with the emphasis on photographic imagery
featuring photographers from all over the world to provide you with inspiration!
Our internet site − www.hasselblad.com − is a source of general and technical information and
you can e-mail us for further inquiries − info@hasselblad.se.
Your new Hasselblad camera provides access to the Hasselblad potential. The realization of this
potential is only dependant upon your skill, care and judgement as a photographer. We wish
you great success and welcome you to Hasselblad, the most comprehensive medium-format
system in the world.
The supreme Hasselblad potential is there, it’s up to you to exploit it!
4
Page 5

General Introduction
Computer system requirements
Digital files naturally end up on a computer for processing. Image-storage and correction
requires a certain minimum standard regarding computer capabilities. Large images
will require a high-performance computer with plenty of memory, advanced graphics
capabilities and a recent operating system. In most cases, the computer should include
a FireWire 800/400 connector, which will enable you to load images directly from the
camera or Imagebank. To load images stored on the removable compact-flash card,
you could instead use a compact-flash card reader, but FireWire is recommended for
maximum flexibility.
e CFV saves images as 3FR or 3F files which are Hasselblad raw digital-camera capture standards. From FlexColor, you can optimize and then export the files to DNG or
TIFF or JPEG formats instead if you wish. e CFV includes the Hasselblad FlexColor
image-capture and editing application and native versions of FlexColor are provided for
both Macintosh and Windows platforms. Please see the FlexColor manual for complete
system requirements.
Warnings and restrictions
• Keep the CFV (and all computer equipment) away from moisture wherever possible.
If your camera becomes wet, disconnect from power and allow it to dry before
attempting to operate again.
• Always take great care when you remove the sensor back for cleaning—the exposed CCD sensor is vulnerable to damage.
• Keep all cables connected to or from your camera and computer out of the way
where they will not be tripped over.
• Never cover the ventilation openings on the CFV when the unit is on.
5
Page 6

Before you start
Leave protective covers on as much as possible. e CFV, in line with all Hasselblad
products, has a robust construction and is capable of withstanding fairly rough treatment but nevertheless is a precision instrument and will serve you longer if treated with
respect from the beginning.
In addition to the CFV itself, a CFV User Manual CD and a FlexColor soware CD, the
items illustrated below are also included. If anything is missing or seems faulty in any
way then you should contact your Hasselblad dealer immediately.
Please keep purchase details and the warranty in a safe place.
Protection cover CFV
FireWire cable
Exposure Cable 503
Focusing screen 36 x 36 CF-Flash card (1GB)
Flash sync input cable
Exposure Cable EL
Flash sync output cable
Adapter EL
E-wipes
Grey Card Nylon Case
6
Page 7

General overview
The 16 million pixel digital back can produce 16 bit
raw files at 33 Mbytes each at a rate of 35 frames per
minute.
FlexColor then processes these files to produce the
quality expected from Hasselblad.
In very simple terms, the CFV digital back holds a light sensitive sensor in place at the
film plane. The electronic signals from the sensor are then processed and stored as
a digital file.
As an electronic colour image is made up of three components − red, green and blue
which combine to form a so-called RGB image − the sensor’s task is to convert a
multi spectrum light image into three digital files (red, green and blue) for combina
tion later on.
-
The CFV uses a CCD (Charged Couple Device) type sensor that has 16 million light
sensitive areas on its surface each of which creates a pixel.
Each pixel in the sensor is filtered to create the three separate red, green and blue
files. Software then processes these electronic files as a package to produce the vari
ous formats − RAW, TIFF, JPEG etc.
The three components of the image file are later recombined on the computer screen
to produce the familiar full colour image.
•
The image file can be temporarily stored either in the CFV with a CF card, on a
Hasselblad Imagebank or the hard disk on a computer. Processing of these images
is carried out in conjunction with the included FlexColor software. See the separate
FlexColor manual for further details
•
The CFV is designed to fit Hasselblad V model cameras primarily. Please check the
connectivity diagram for further details about the various models, including the
possibility of connectivity to large format cameras.
7
-
Page 8

The CFV is an electronic device and consequently attention to power access is vital.
When working untethered it is therefore important to plan either battery loading or
battery replacement to ensure continued workflow.
Likewise, image storage is limited, particularly when using flash cards and appropriate steps should also be taken when planning a shoot.
External storage is accomplished by FireWire connection to a separate hard disk or
a computer.
•
When attaching and removing the back, pay particular attention to the image sen
sor area. The sensor itself is covered and therefore protected by the glass IR filter but
take great care when handling. If you need to clean the filter, see later section for
specific details. When storing separated from the camera, always ensure you have
replaced the protective cover.
If you scratch or mark the filter in any way, it will show up on every shot. Replacements
are expensive so treat the glass surface with at least as much care as you would a
lens.
The sensor itself is not accessible for any kind of cleaning or maintenance by a user.
Do not attempt any such action as you will almost certainly damage it irreparably.
As is the case with all electronic devices pay extra care when working in damp environments and avoid damp conditions for storage.
-
The menu can be displayed in one of seven different languages:
English, French, German, Italian, Spanish, Japanese or Chinese
8
Page 9

1
11
17
16
2
12
18
3
13
19
4
14
20
5
15
21
6
7
8
22
9
10
Parts, components & control panel buttons
The control panel has an OLED screen that provides a bright, highcontrast view even in bright surroundings and at fairly acute angles.
The panel is the main graphical interface for image checking and set
tings changes when not connected to a computer.
Digital back retaining catch lock 1
Ensures that the digital back is not unintentionally removed.
ON /OFF button 2
Powers the digital back.
OLED preview screen 3
Displays preview images and the menu system even in bright light
and from acute angles.
The buttons are used for browsing images and navigating the menu
system. Two of the buttons, located at the bottom-right and -left of
the screen, are given an on-screen label that changes according to the
current context (e.g., the bottom-right button sets the approval rating
when browsing images, but confirms settings when using the menus).
Menu / (Menu Exit) button 4
commands within the menu system indicated by a label beside
the button on the preview screen.
Display button 5
off and full-screen.
23
24
Opens and closes the menu system. Also used for various other tasks (Exit button, for example) as you issue
Steps through the various view modes for the preview
image: standard, histogram overlay, image details, screen
9
Page 10

Ready light indicator 6
Flashes yellow to indicate that the digital back is performing an
operation (such as saving a new capture) and is not available for
new commands. Flashes green when the back is ready.
Digital back retaining hook slots 7
Accepts digital back/magazine retaining hooks on camera body.
CCD and IR filter 8
is is the light-sensitive element, which is positioned behind a
permanently mounted IR filter. Usually, this assembly will either
be inside the camera or protected by the cover. Always be very
careful not to touch or scratch the surface of the filter when it is
exposed and to replace the plastic cover whenever the digital back
is not mounted on a camera.
WARNING: never attempt to remove the glass filter—you will
probably ruin the CCD if you do so.
Navigation button 15
A four-way rocker button enabling you to step through
preview images and navigate the menu system. To use
it, press the side of the button that corresponds to what you wish
to do (e.g., move up, le, right or down).
Digital back retaining catch 16
Locks the mounted digital back onto the camera body..
Ventilator 17
Ensures the processor is kept cool.
Flash sync IN terminal 18
Connects PC contact on C lens to back via the Flash sync input
cable for exposure sync.
See ‘Cleaning the CCD’ section for details.
Databus connectors 9
For communicating with a Hasselblad ELD model camera body or
with a modified Hasselblad 202/203/205 model camera body.
Battery (not supplied) 10
7.2V InfoLithium L type (Sony NP-F550 or similar)
Zoom-in button / SELECTION (+ button) 11
Zoom-in button (to make the view larger) for the preview
image. Also acts as a selection button when viewing
available image batches, media and value setting on the menu.
Zoom-out button / SELECTION (– button) 12
Zoom-out button (to make the view smaller) for the
preview image. You can continue to zoom out to view
several small images at once and finally to view and select batches
and media. Also acts as a selection button for value setting on
the menu.
Flash sync OUT terminal 19
Connects back to flash unit (via the Flash sync output cable) for
flash syncronization when the PC contact C lens is already in use
(as above in ‘Flash sync OUT terminal’).
FireWire connector 20
Allows the connection to a computer or Imagebank. e digital
back requires an 800 connecter whereas the computer can be
either an 800 or 400.
Battery retaining catch 21
Ensures secure mounting of battery.
CF card slot cover 22
Protects card slot.
Winder / EL terminal 23
Terminal for connection to a Hasselblad CW winder or Hasselblad
EL model camera body. Requires special cables (supplied).
Instant Approval / (OK) button 13
is button steps through the three approval levels,
thereby assigning an approval status to the image currently displayed (or selected) in the preview screen (part of the
Instant Approval Architecture system). e colour coding is
based on the traffic signal convention of green, amber (yellow)
and red.
Also acts as a confirmation button (OK button) for some types
of menu operations, such as deleting images; indicated by a label
beside the button on the preview screen.
Digital back support slots 24
Accepts digital back/magazine support hooks on camera body.
10
Page 11

As with all digital products, it is essential that you maintain a constant check on battery condition
and preferably have a fully-charged reserve battery with you at all times when not tethered to a
computer.
CAUTION
If you remove the digital back, be very careful not to touch or scratch the CCD/filter
surface while it is exposed.
Always attach the protective cover for transportation or storage.
Powering the digital back
e CFV requires power either from the battery (7.2V Sony InfoLithium L type − NP-F550
for example) or from a computer via a FireWire cable.
To attach a battery:
1. Firstly, ensure the battery is fully charged (see user appropriate manual for battery
and charger).
2. Position the battery as in the illustration.
3. Press the battery towards the camera. This automatically depresses the battery
retaining catch.
4. Slide the battery into the final position ensuring the contact prongs on the camera
are inserted into the battery. The battery retaining catch will now return to the safe
ty position
-
To remove a battery:
1. Depress the battery retaining catch and slide the battery over it. It can then be freely
removed.
FireWire connection:
1. Simply connect the FireWire cable between the FireWire connector on the digital
back and the USB port on the computer.
ON / OFF button
With a fully charged battery fitted or when tethered to a computer, press the ON/OFF
( ) button to activate the digital back. An audible signal will be heard and a Hasselblad
logo splash screen will appear on the OLED. e back will enter standby mode aer the
preset time to save the battery. Press the ON/OFF button again to turn the digital back
off. An audible signal will be heard again to confirm this.
11
Page 12

Shooting/image storage modes
e CFV can store captured images in three ways:
1. Untethered / Compact flash card mode
In this mode the CFV acts independently of other connections. Images are stored on the
internal, removable compact-flash card.
• The main advantage with this mode is the freedom of cables and extra equip-
ment.
• The main disadvantages with this mode in the field are the battery power capacity
and the size of the card’s holding capacity.
Please note that the recommended types of CF cards are Sandisk Extreme-III or Lexar
Professional 133x. Other cards will work but offer a reduced capture rate.
2. Semi-tethered / Imagebank mode
is mode enables you to attach the camera to a portable Hasselblad Imagebank via a
FireWire cable. e Imagebank features massive storage capacity and high-speed data
transfer. It is small, lightweight, battery powered and easily clips to your belt, so the
solution is just as portable as the untethered option.
• The main advantage with this mode is the great number of images that can be
stored without a pause.
• The main disadvantage with this mode is the extra equipment and cablage needed
that might restrict mobility in some cases.
3. Tethered / Studio mode
is mode enables you to connect your CFV directly to a computer and to operate the system using Hasselblad FlexColor soware and store images on a computer hard-disk.
• The main advantages with this mode are the almost limitless storage capacity and
being able to work on the images (with Hasselblad FlexColor) on a large screen.
• The main disadvantage with this mode is the lack of mobility to any great extent.
Selecting the current medium
A choice has to be made concerning where the captured images will initially be stored.
e current storage medium is the location to which new shots are saved and from which
you can browse using the navigation button. In many cases, the destination medium is
selected automatically, for example:
• When you are connected to a computer, then images are always saved directly to
the computer hard disk.
• When only one medium is connected (e.g., a compact-flash card), then this medium
is automatically selected.
However, if you are working away from your computer and have several media attached
(e.g., both a card and an Imagebank, then you may need to select a medium explicitly if
you want to browse its contents and store images new to it.
ere are two ways of selecting the current storage medium:
• See “Selecting the Current Storage Medium” for details.
• Use the zoom-out button to zoom all the way up to the top level, which shows all
connected media, and then zoom in on the appropriate medium and batch.
See “Navigating Media and Batches” for more information about selecting media
and batches in this way.
12
Page 13

1 2
Using compact flash memory cards
When shooting to a compact-flash card, the CFV is completely
self-contained. No additional wires or connectors need to be attached.
e CFV is shipped with a 1GB compact-flash card, which is able to
hold over 45 shots. Lossless compression is applied to the images,
so the actual size of each capture can vary, thereby affecting the
total number of shots you can fit on the card. You can purchase
additional, possibly larger-capacity, cards and change them as
each card becomes full.
Note that the camera can copy the contents of its compact flash
card to an Imagebank even when no computer is attached. This
enables you to backup your shots and then clear space on the card
to keep on shooting. See section on “Transferring Images”.
Inserting a card
1. Open the CF card cover to reveal the CF slot.
2. Hold the CF card so that the connector holes face into the
slot, with the brand label facing in the same direction as the
preview screen. Gently press the card into the slot.
If you encounter resistance, it might be because you are hold
ing the card backwards or upside down.
When the card is completely inserted, swing the cover shut
again.
-
1a
2a 2b
1b
Removing a card
1. With the CF card cover open, press gently on the card removal
button (1a) and then release it. It will now extend out from its
original position, as in the illustration (1b).
2. Press firmly on the card removal button (2a) to eject the card
for removal (2b).
Working with an Imagebank
ere are no practical differences between storage on the internal
CF card or on an Imagebank. However, when several media are
mounted, you must be sure to select the correct destination medium
(see also “Working with Media and Batches”).
Working with a Hasselblad Imagebank
e Imagebank is an optional add-on for your digital camera
system. It is essentially an external FireWire hard disk optimized
for digital photography, providing extensive storage space and
high-speed data transfer. It is small, light and battery powered. You
can easily clip it to your belt, so the solution is nearly as portable
as the stand-alone camera.
Older digital backs in the ‘ixpress’ line used a different exter-
nal disk and controller called simply the “Image Bank”. This
older Image Bank is not compatible with the CFV. Only use the
Hasselblad Imagebank with a CFV.
13
Page 14

To use an Imagebank with the CFV, simply assemble it as described in its manual and
connect the two with a standard FireWire 800 (IEEE 1394b) cable. See the Imagebank
manual for complete details.
To remove the Imagebank, simply disconnect the FireWire cable. e back will then
revert to saving and browsing images on the internal flash card (if available).
Tethered to a computer
Even if you never shoot while connected, you will probably connect the camera to your
computer each time you want to download your images, though you might instead use a
compact-flash card reader and/or connect your Imagebank or FireWire disk directly.
Connecting to a computer
To connect to a computer, simply attach a FireWire cable from the FireWire port on your
computer to the port on the side of the CFV. e port on the CFV is protected behind
a sliding cover.
Removing from a computer
To remove the camera from a computer, simply disconnect the FireWire cable when all
image loading activity has finished.
Shooting with FlexColor running
When you are connected to a computer, the following rules apply:
• The destination medium and location are controlled from FlexColor.
• The screen and menu system on the CFV are disabled.
• The CFV will take power from the FireWire cable if it is available (please note that
not all computers supply power here, notably PC laptops).
When initiating a shot from FlexColor, the computer sends a signal to the CFV, which
in turn triggers the shutter and flash/strobe lights (if any). e CFV then sends the
image back over the FireWire connection to the computer, where it is displayed on the
computer screen and saved as a 16-bit-per-colour 3F file in the currently selected folder
of the computer hard disk.
3F is a proprietary Hasselblad format for storing raw captures. It contains the complete
raw image exactly as it was captured by the camera, plus technical details that enable
FlexColor to process and display the image correctly. It furthermore stores a complete
history of the FlexColor settings that you have applied to each image and stores metadata such as camera settings, image name, photographer, copyright, etc. When you load
images into FlexColor from the camera or external media, the 3FR files are converted
into the 3F format. If you prefer not to use FlexColor, then you can export files directly
to DNG or other format and use Adobe Photoshop, for example.
Please refer to the FlexColor Soware Reference manual for further instructions about
taking pictures using FlexColor.
14
Page 15
General Overview
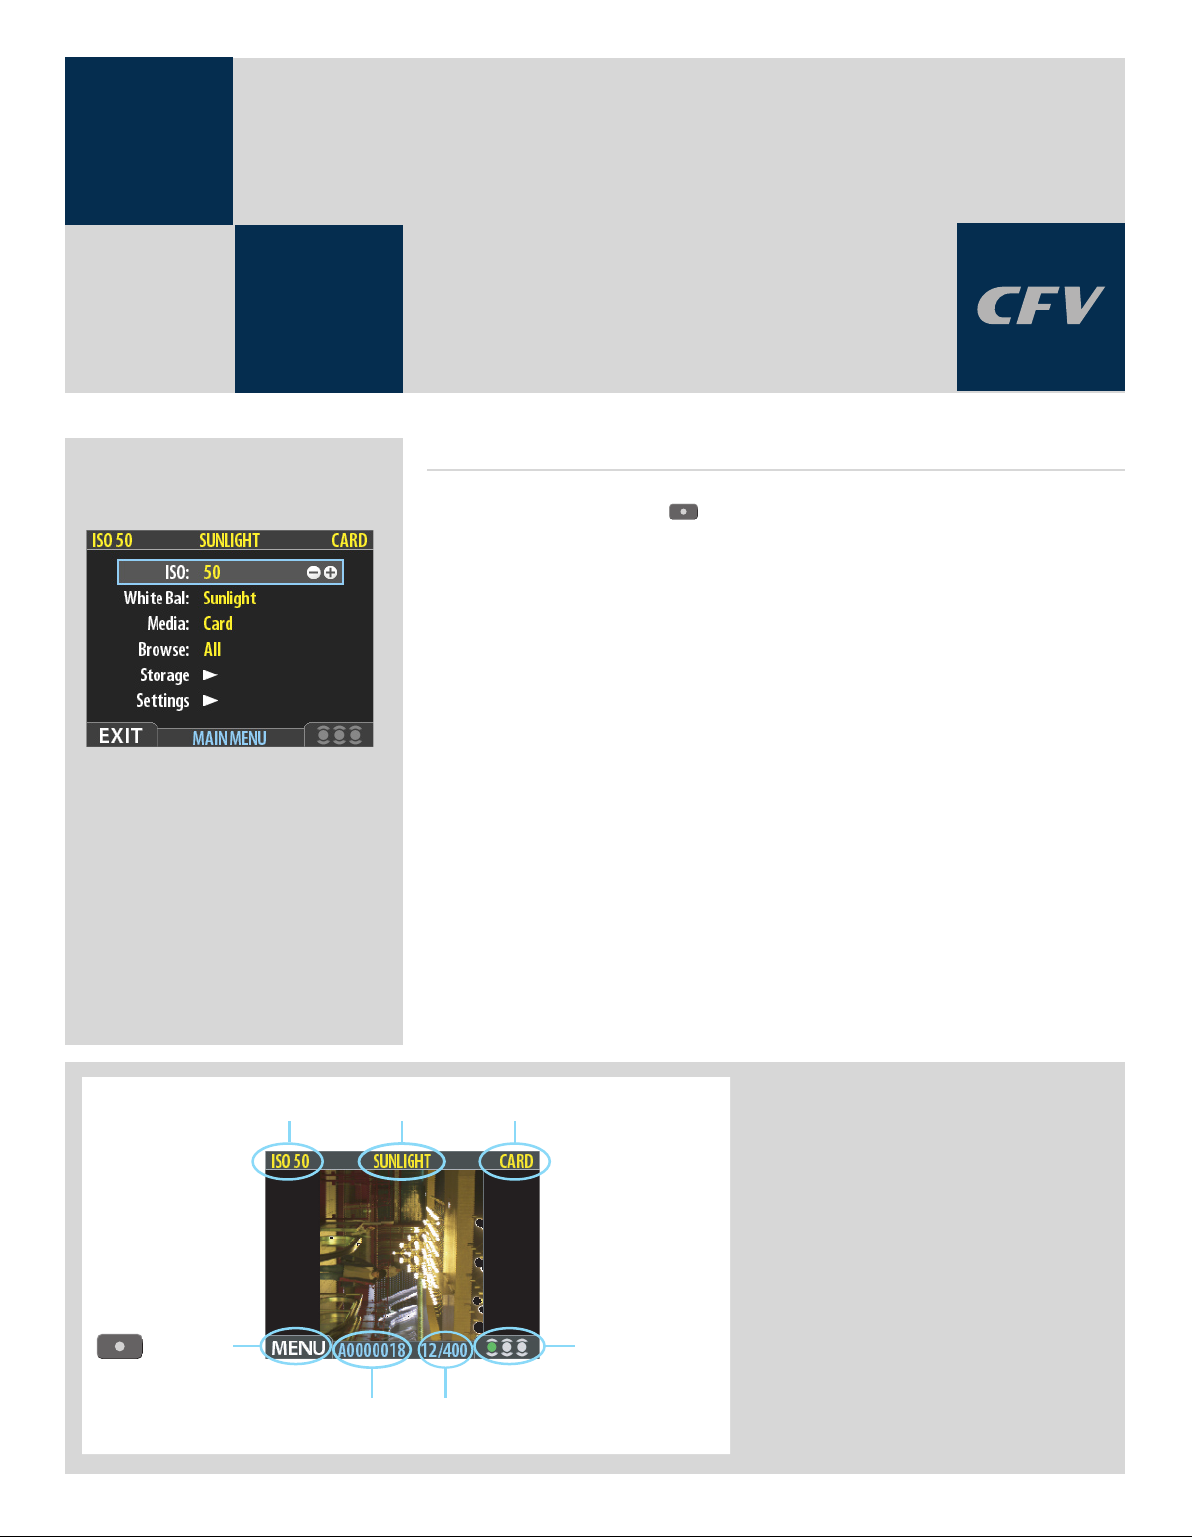
ISO setting White balance
Image file name
-Button labe
l
Approval
status and
browse filter setting
Storage capacity
(Shots taken / shot
s remaining)
Curren
t storage medium
General
Using the menu on the CFV is very similar to using a menu on a cell phone or similar. When you enter
the menu (by pressing the MENU /
ISO
White Bal.
Media
Browse
Storage
Settings
The first four items are immediately accessible for changes, indicated by the appearance of a plus
and minus sign in the highlight frame meaning the settings can be altered by the Zoom in / Zoom
out buttons. Storage and Settings are more detailed and therefore require further navigation.
button) you will be see an initial list:
It is advisable to quickly skim through this section of the manual initially to see build up a picture of
the menu structure with its various sections
On the following pages you will see an illustration of the philosophy behind the menu, its structure
and how changes in settings are made and stored.
Some of the buttons have a double function while others remain single function. For example, the
navigation button always leads you through the menu in the direction that the arrowhead illus
trates. The Zoom in/out buttons though, for example, act as image enlargers and reducers as well
as confirmation buttons, according to where you are on the menu.
The standard preview display is the one
shown when you first turn on the camera
and is probably the view you will use most
often. It features a preview of your most re
cent shot and basic information about the
settings and the image itself. Several other
display modes are also available, including
histogram, capture details, full-screen and
battery saver. Please see Preview Modes
for details.
Fur thermore, the display enables you to
navigate the menu system and make cam
era settings; see Working with the Menus
for details.
-
15
Page 16

Introductory overview of menu access, navigation and settings choice.
The menu is structured in a manner similar to cell phones
and similar electronic devices.
Various branches within the tree system are accessed by
pressing the navigation button until you reach the point
where a choice has to be made.
The OK (Approve) button or SELECTION (Zoom-in/Zoomout) buttons are then used to confirm choice.
After pressing the MENU button, the main menu list appears.
The blue frame highlights where you are on the menu. Press
on the ‘up’ and ‘down’ symbols on the navigation button to
move up and down the list.
You can return to the standard image view by pressing ei
ther on the ‘left’ symbol on the navigation button or on the
EXIT/MENU button again.
The need to continue further into the menu is indicated by
the arrowhead symbol beside the menu item.
Press the ‘right’ arrow symbol on the navigation button to
access the next part of the menu.
When you reach the final destination of your choice (this
might take several moves), PLUS and MINUS symbols ap
pear to the right in the frame round the item.
You then press the Zoom-in /Zoom-out /SELECTION but
tons to access a loop list of choices.
In the example on the left, 50 is the ISO value shown. By
pressing either button the alternatives appear – 100, 200,
400 and then back to 50 again – both on the list as well as
on the upper row to the left (in the case of ISO value).
-
-
-
Pressing the EXIT/MENU button will then confirm the new
setting.
In the next example on the left, the name of a new batch is
changed by pressing a combination of the Zoom-in /Zoomout /SELECTION buttons as well as the navigation button.
You can then confirm your choice with the OK (Approve)
button or revert to the previous status by pressing the EXIT/
MENU button.
See later sections for more comprehensive information.
16
Page 17

1 2
3 4
In this manual you will see the following kind of description
regarding settings changes (as opposed to general viewing and
browsing etc).
e method is the same for all changes, some stages taking a little
longer than others and being a little more involved.
e following is an example of a setting change :
Setting the menu language
e menu is available in English, French, German, Italian,
Spanish, Japanese and Chinese.
To choose any of the above languages, proceed as follows:
5 6
Menu Shortcuts !
1. Press the MENU/EXIT (
2. Press the NAVIGATOR button ( and ) to select the
SETTINGS sub-menu.
3. Press the NAVIGATOR button (
menu.
4. Press the NAVIGATOR button (
INTERFACE sub-menu.
5. Press either ZOOM button (
guage (in this case, Spanish).
6. Press the MENU/EXIT (
) button to open the menu.
) to open the SETTINGS
) to select the USER
or ) to choose a new lan-
) button again to close the menu.
To help you work faster, the digital back provides shortcuts to some
of the most commonly used menu commands that do not otherwise
have a dedicated button on the front panel. These are accessible by
e following shortcuts are available:
• To set the browse filter Press and hold until your preferred filter is indicated.
• To delete image s Select the target image and then press and hold until the delete dialog opens.
• To toggle the overexposure indicator Press and hold until the display begins to flash (or stops flashing) its overexposed areas.
• See also Using Instant Approval Architecture.
• See also MAIN MENU / Delete.
• See also Overexposure Indicator.
pressing and holding one of the front-panel buttons for a second or so.
These are mentioned where appropriate elsewhere in this manual, but
we summarize them here for your convenience.
17
Page 18

Storage overview –
Working with media
and batches
General
With a new CF card (or a newly formatted CF card) inserted or with an Imagebank, a
new folder (called a batch) is created automatically aer the first image has been captured.
More batches can be created whenever you choose and named for easier sorting. You
should name them straight away though as they can only be changed later on (if required)
when they have been transfered.
Organizing your work with batches
Batches help you to organize your shots as you work. ey function just like folders on
a computer. Batches have the following properties:
• When you create a new batch, you can assign a name to it.
• When you copy images from a compact-flash card, each batch is saved as a subfolder on the destination disk.
• When deleting multiple images, you are able to restrict your delete command so
that it affects just a single batch.
• When browsing images, you will only see images from the current batch.
• You can change between batches by using the navigation controls of the digital
back front panel.
• The OLED shows the date on which each batch was created.
Please note that each new image will be saved in the latest created batch only. You
cannot select any other batch to save a new image in.
Navigating media and batches
e camera always works with a current medium and a current batch. is is the location
at which the camera will save all new shots and the location in which you can browse
using the navigator button on the front panel. ere are two ways of selecting the current
medium and/or batch:
• Using the zoom and navigator buttons of the front panel. This method enables
you to select any existing batch and is therefore useful even when only one type
of medium is attached. This method is explained in the procedure below.
• Using the MAIN MENU > Storage
This is only relevant when more than one medium is attached (e.g., both a compact
flash card and an Imagebank). When you use this function, you will always go to
the most recently created batch from the medium you select. Please see Selecting
the Current Storage Medium for a complete description of this method.
18
entry of the menu system to choose a medium.
Page 19
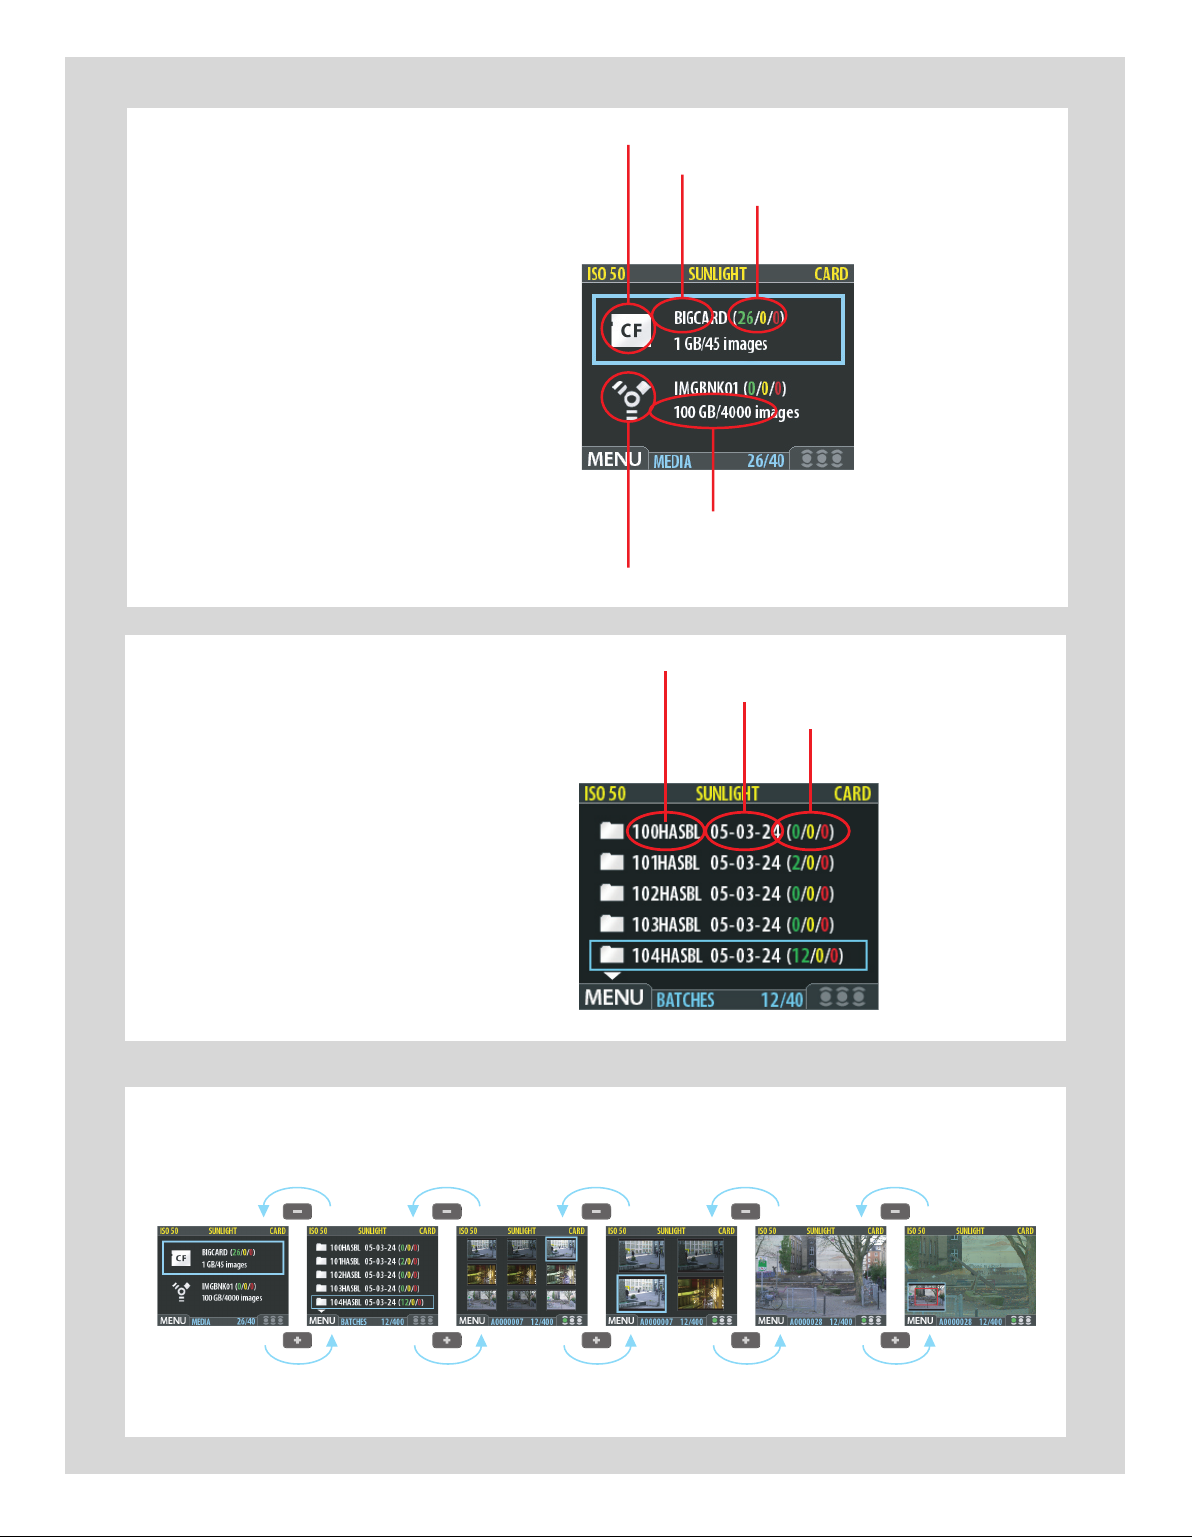
Batch name
Date the batch was created
Number of green, yellow an
d
red shots in the batc
h
The MEDIA list.
Medium-type icon (Compact Flash)
Medium-type ic
on (FireWire disk)
Medium name
Number of green, yellow and red shot
s
currentl
y stored on the medium
Medium capacity in bytes an
d
shots in the batc
h
Media list Batch list 9-Thumbnail view 4-Thumbnail view Normal view Zoomed
Continue to press (+)
to zoom fur
ther
In this example a CF card and a
FireWire disk are illustrated and there
-
fore connected.
The blue frame around the CF card
symbol tells you that captured images
will be saved to the CF card and not the
FireWire disk. This is the Current Medium
The BATCH list.
The blue frame around the middle
folder tells you that it is the Current Batch
.
You work your way deeper into the menu branching off the selected item (framed in blue) each time you
press the ‘+’ button to view media, batch, thumbnail view etc.
Conversely, you work your way back out of the menu each time you press the ‘–’ button.
19
Page 20

1 2
3 4
5 6
7 8
9 10
To select the current medium and batch using the browse controls:
1. Press the zoom-out (
the way at the top zoom level. If you start with the singleimage preview view, then you pass through the following
views to get there:
• Single-image preview
• Four-thumbnail view
• Nine-thumbnail view
• Batch list
• Media list
2. The screen now shows a list of media devices currently con
nected to the digital back. Often, there is only one.
Each medium shows a name, total size and an estimate for
how many images will fit on it. To the right of the medium
name is a set of three coloured numbers in parentheses.
These indicate the total number of images of each approval
status (green, yellow and red) that currently exist on that
medium.
For example, if you see a card that shows (
card contains a total of 26 images:
18 green (
5 yellow (
3 red (
3. If more than one medium is listed, then use
highlight the medium you wish to use.
4. The currently selected medium shows a blue border.
5. Press the zoom-in button to zoom-in on the currently high
lighted medium.
6. A list of batches on this medium now appears. Each batch
shows a folder icon, a name and the date on which it was cre
ated. As with the media list, you can read the number of shots
of each approval status that are stored in each batch.
7. As with media, use
to use.
8. The currently selected batch shows a blue border.
9. Press the zoom-in button to zoom in on the currently high
lighted batch.
10. The nine-thumbnail view of your selected batch now
appears.
approved),
unclassified) and
delete).
)button repeatedly until you are all
-
18 / 5 / 3), then that
and to
-
and to highlight the batch you wish
-
-
Creating new batches
You can create any number of batches on each medium. To create
a new batch, first make sure you have selected the correct current
medium (see Navigating Media and Batches) and then use the
MAIN MENU > STORAGE > BATCH entry of the menu system
to create the new batch. See Creating Batches for a detailed
procedure.
20
Page 21

Using Instant Approval Architecture
e Instant Approval Architecture system helps you to classify your images as quickly as
you take them. It works by supplying immediate audio feedback, which tells you instantly
whether each new picture is exposed correctly or likely to be over- or underexposed.
ereaer, the system enables you to assign each image one of three status levels. ough
you can use the system any way you like, the intention (based on the ‘traffic light’ convention) is that you should assign the levels as follows:
•
•
•
GREEN for your best shots.
YELLOW ( AMBER ) for images that need closer inspection.
RED for images that should probably not be used.
Please note, when the current storage medium is full, red-status images will be de-
leted (one at a time) to make room for new shots. You can continue shooting until no
red-status images remain; if you then try to take additional new shots you will get a
medium-full message.
Please note the two different actions of pressing (or quickly clicking) the approve button to change the status and pressing and holding to change the browse filter!
One of the greatest advantages of digital photography compared to film is that it costs
no more to shoot 100 images that it does to shoot one. Photographers therefore tend to
take many more pictures when shooting digitally. By assigning approval levels as you
work, it can be much easier to sort through and select images when you get back to your
computer.
Standard Instant Approval workflow
e standard method of working with the Instant Approval Architecture is as follows:
1. Take a shot.
2. The camera analyzes the shot to find out if it seems to be over- or underexposed. If it
suspects a problem, it does the following:
• Provides audio feedback (if this option has been chosen) by making a
warning sound, which immediately alerts you to a possible problem even if you are
not looking at the screen. The warning sound is a rapid string of notes going up the
musical scale if the image is judged as overexposed or conversely a rapid string of
notes going down the musical scale if the image is judged as underexposed
• Downgrades the approval status to yellow (if Approval is set to ‘Auto’).
21
Page 22

Note that some shots may trigger the warning even though they are exposed accord-
ing to your intentions. You should consider these warnings only as a guideline.
3. If no problem is detected, then the image is saved with green status.
If you set Approval to ‘Auto’, all images will be stored as Green if judged as correct
and Yellow if judged as technically doubtful. No images are ever stored as Red
automatically!
4. When you are browsing through your shots, keep an eye on the approval status of
each and consider whether you should promote or demote each shot based on its
appearance on the preview screen. You can also apply a browse filter to, for exam
ple, browse only red shots when looking for images to delete or to browse only green
shots to make sure you have a good version of each shot that you need.
5. When you begin working with the images on your computer, use the approval sta
tus as a guide for organizing your work. For example, you might begin by opening
and optimizing the green shots and then go to the yellow shots only if you still need
more images and then, finally, check the red shots as a last resort.
Note that the system is very flexible so you can use it in any way that you like. For exam
ple, you can set the camera to assign all new images a yellow or green status regardless
of the exposure warning. Be careful when assigning red status because red images may
be deleted if the current storage medium becomes full.
Reading and changing the approval status
e current approval status of each shot is indicated in two ways:
• In most preview modes, the current status is indicated by a coloured dot in the
bottom-right corner of the screen.
• Each image is given a name that indicates its approval status. Approved (green)
image names start with “A” (e.g., “A0000043”); warning (yellow) images start
with “B” (e.g., “B0000043”); and images marked for delete (red) start with “C”.
Because of this naming convention, you will also be able to sort your image files
by status after you have copied them to your computer (e.g., by listing the folder
by file name).
-
-
-
By keeping an eye on the file name and/or coloured dot as you browse your images at
the single-image, four-thumbnail or nine-thumbnail level, you can easily see the current
approval status of each of them.
To change the approval status of the currently displayed/selected image, simply press the
approval button until the desired approval status is shown.
Note that you can set the camera to filter by approval status as you browse, which
means that some images may be hidden (though they are still there). See “Browsing
by Approval Status”, below, for details about how to work with the filter.
Be careful when assigning red status because red images may be deleted if the current
storage medium becomes full.
Browsing by approval status
You can set the camera to browse by approval status, which means, for example, that
you will see only green-status images as you browse a batch (or both green and yellow,
or only red, etc.). e current filter setting is indicated on-screen, as illustrated. Filtered
images are still there, but they will not be shown until you change the filter setting. Also,
if you change the status of an image, the image may ‘disappear’ if it no longer passes the
filter. For example, if you have set the camera to browse only green-status images and
22
Page 23

then change an image to yellow status, that image will not be shown again until you
change the browse filter.
ere are many ways to make use of this feature. For example:
• Set the filter to show only yellow images. Then step through each image and decide
whether any of them should be promoted to green or demoted red.
• If you are running out of space, set the filter to show only red images and then
step through to find shots you can delete.
• Set the filter to show only green images. Then step through to make sure you have
at least one ‘good’ example of each shot that you need.
ere are two ways to set the browse filter:
• Press and hold
• Use the MAIN MENU > Browse entry of the menu system. See Setting the Browse
Filter for a detailed procedure.
until the filter you want to use is shown by the indicator.
Deleting by approval status
ere are many ways to delete images, including one-at-a-time and multiple delete by batch,
media and/or approval status. When deleting several images, you first pick the medium
or batch from which you want to delete and then use the MAIN MENU > STORAGE >
Delete entry to specify the status of the images to delete. You can choose to delete:
• All red-status images from the selected batch or medium
• All red- and yellow-status images from the selected batch or medium
• All images from the selected batch or medium
See MAIN MENU > Delete for detailed procedures describing each of the delete options.
Setting the default status
As outlined in “Standard Instant Approval Workflow”, the CFV normally works by assigning a green status to all images that pass a basic exposure test and a yellow status
to all images that fail the test. However, you can change this behaviour if you prefer an
alternative workflow. You have the following options:
• Auto: works as described in Standard Instant Approval Workflow.
• Green: gives all new images a green status, regardless of the exposure warning.
• Yellow: gives all new images a yellow status, regardless of the exposure warning.
Regardless of this setting, audio feedback will still be provided if an image is judged to
be badly exposed (if this option is chosen).
Use the MAIN MENU > BROWSE entry to make this setting. See also Setting the Default
Approval Status for a detailed procedure.
23
Page 24

Overview of viewing,
Media list Batch list 9-Thumbnail view 4-Thumbnail view Normal view Zoomed
Continue to press (+)
to zoom fur
ther
deleting and copying
images
Basic image browsing
e large, full-colour OLED display enables you to inspect your shots while you are still
on-location. e display offers full-screen previews, high-magnification zoom, two levels
of thumbnails and analysis tools including a full histogram and camera settings.
When you first turn on the camera, the display opens in standard browse mode, showing
the last image taken (if any) for the current medium and batch. Likewise, aer each new
shot, the display shows a preview of the shot.
To browse the images of the current batch, simply press the le and right arrows
of the navigator button.
Choosing the current batch
When you browse using the navigator button, you will only see images from the current
batch on the current medium. To view another batch, you must navigate to it by zoom
ing out to the batch or media level and then zooming in on the appropriate folder. See
Navigating Media and Batches for complete details about how to select the current
medium and/or batch.
Browsing by approval status
-
It is possible to set the camera to browse only images of one or more specific approval
levels from the current batch. You can use this, for example, to review all of your redstatus shots to make sure you don’t need them or to review all of your yellow-status shots
to decide whether they should be moved to green or red status. When you use the browse
filter, you will not see images excluded by the filter, but they are still there.
See Using Instant Approval Architecture for complete details about how to check and
set the browse filter.
Zooming in and out
As illustrated below, you can use the or button to see various levels of detail in
your images. You can furthermore zoom all the way out to view and select batches and
media.
Zooming in for more detail
e preview display has a much lower resolution than your images. You can therefore
zoom very far into the images to inspect small details. To do this:
24
Page 25

1. Browse to the image you wish to zoom into with the navigation button.
1
2
2. Press the zoom-in (
both a zoomed image and a thumbnail image that includes a red box outlining the
portion of the images currently shown.
3. You can now do the following as needed:
• Use the navigator button to move the zoom area if you wish to inspect a differ ent part of the image.
• Zoom further by pressing the zoom-in (
• Zoom back out one step by pressing the zoom-out (
4. When you are finished, press and hold the zoom-out (
ing at the standard zoom level.
) button to zoom in one step. The screen updates to show
) button more times.
) button.
) button to return to brows-
Thumbnail views
Preview thumbnails are small versions of each preview, sized to fit either four or nine
images on the screen at once. Use them to get an overview of your work so far and to
help find specific shots.
To see the thumbnails, start with the standard preview display and press the zoom-out
button once to see four thumbnails or twice to see nine.
When viewing thumbnails, the selected image shows a blue border. When an image is
selected, you can zoom in on it using the zoom-in button or delete it using MAIN MENU >
STORAGE > Delete (see also MAIN MENU > STORAGE > Delete for a detailed procedure).
Use and to scroll the thumbnails when you have more shots than can be shown.
If you continue to zoom out beyond the nine-thumb view, you will come to the batch
list and then to the media list. You can use this to select the current medium and batch
for browsing and for storing new images. See Working with Media and Batches for
3
or
or
4
details.
25
Page 26

You can cycle
through all the
available preview
modes by pressing
the View-Mode
button.
Preview Modes
Choosing the Preview mode
You can use the view-mode button to cycle through the available preview modes.
e preview screen works in several different modes:
• Standard preview:
shows a preview image surrounded by a display of few important settings.
• Histogram:
shows a preview image overlaid with a histogram.
• Histogram and full details:
shows a preview image overlaid with both a histogram and camera-setting details.
• Battery saver:
turns off the screen, but you can still use the menus and take pictures.
• Full-screen preview:
shows the preview only, with no frame or settings information.
To cycle through the various modes, press the view-mode button on the front panel. e
order is circular, as listed above. Each mode is described in detail in the sub-sections
below.
Regardless of the current mode, if you zoom in on the image or zoom out to the thumbnails,
the display reverts to showing the “standard” preview frame, which shows information
about the current image and camera settings around the edges. When you return to the
standard zoom level, however, you will then also return to your last-selected preview
mode.
Note that the screen can also operate in menu mode, which does not show a preview, but
enables you to make digital back settings. To enter menu mode, press the menu button.
See Working with the Menus for details.
26
Page 27

The standard preview display
e standard preview display is the one shown when you first turn on the camera. It
features a preview of your most recent shot and basic information about the digital back
settings and the image itself.
Using the histogram
e histogram provides a graph that indicates the total number of pixels at each brightness
level, with brightnesses going from black on the le to white on the right. It is a valuable
tool for evaluating your exposure. A well-exposed shot usually has a full range of levels,
while under- and overexposed shots tend to show levels concentrated at the le or right
part of the scale, respectively.
For example:
A
Underexposure A
A histogram that is cut-off at the le with few pixels elsewhere indicates a likely underexposure. Many details will be lost in the shadows.
Even exposure B
B
A histogram that is spread across the full range indicates a likely good exposure. ere
may still be a few pixels at the extremes, indicating a few spectral highlights and saturated
shadows, but this is oen normal in a good exposure.
Overexposure C
A histogram that is cut-off at the right with few pixels elsewhere indicates a likely overexposure Many details will be lost in the highlights
C
The histogram is only an indicator that should be interpreted—there are many situ-
ations in which a questionable histogram will match an exposure that is fine for the
intended effect (and vice-versa).
Full-details mode D
In full-details mode, you can read a complete list of camera settings, plus see the histogram and, in the background, a darkened preview of the image.
D
e camera-setting details are stored with the image, so you can refer to them using
FlexColor even aer you have loaded the image to your computer and stored it in your
archive.
27
Page 28

Battery-saver mode
In this mode, the digital back is fully responsive, so you can take pictures but the screen
is not lit up, thereby saving battery power.
You can enter the menu system while shooting in this mode (which activates the screen
until you exit the menu system again) but the approval, zoom and navigator buttons
have no effect.
You can also save battery power by turning down the brightness and/or contrast of
the display using the entries of the MAIN MENU > SETTINGS > USER INTERFACE >
DISPLAY menu. See Making Display Settings for details.
Other ways to save battery power include setting a display time-out and/or a power-
down time-out (each of these is disabled by default). Use MAIN MENU > SETTINGS
> USER INTERFACE > Power Down to set a power-down time out. Use MAIN MENU
> SETTINGS > USER INTERFACE > DISPLAY > Timeout to set a display time-out. See
also Entries of the USER INTERFACE Menu and Making Display Settings for details
about these settings.
Full-Screen Mode
In full-screen mode, you can browse your images at standard preview resolution without
any distracting data surrounding them.
Because the current approval setting is not shown in full-screen mode, the approval
button has no effect. is will prevent you from accidentally assigning the wrong status
without knowing it.
Overexposure
indicator shortcut !
There is also a one-button shortcut for toggling the overexposure marker on and off.
To use it, press and hold
until the indicator is working
as you would like (enabled or
disabled).
Overexposure indicator
ough the histogram shows you when some of your pixels are overexposed, it does not
tell you which ones. In a shot with many bright areas, it can be hard to know whether
the key parts of your image are just bright or completely overexposed. To help you find
them, the digital back can provide an overexposure indicator, which shows precisely
which areas of your shot are overexposed (i.e., pixels that are at maximum brightness,
thereby eliminating details).
When enabled, the overexposure indicator flashes the overexposed pixels from black
to white.
To enable or disable the overexposure indicator, use the MAIN MENU > SETTINGS >
USER INTERFACE > Mark Overexp. entry.
28
Page 29

Deleting images − general
Delete shortcut !
There is also a one-button shortcut for deleting single images.
To use it, select a target image
and then press and hold the
until the confirm-delete dialog
opens.
e CFV enables you to delete images using any of the following techniques:
• Delete the currently selected image only.
• Delete all images from the current batch
• Delete all images from the current medium
• Delete all red-status images from the current batch
• Delete all red-status images from the current medium
• Delete all red- or yellow-status images from the current batch
• Delete all red- or yellow-status images from the current medium
Another way of working is to simply assign unwanted images as Red. In this way, you
retain the option (for a while) of changing your mind later while allowing the system
to automatically delete the unwanted images as the storage medium fills up.
You will always be asked to confirm each delete operation.
For complete details about how to use the menu system to delete single or multiple images, please see MAIN MENU > STORAGE > Delete
.
Transferring / Copying images − general
Transferring to a computer
To transfer images stored on the compact-flash card to your computer, simply connect
the digital back to a computer using a FireWire cable and then run FlexColor, which will
automate the process. See your FlexColor manual for details.
See also Connecting to the Computer for details about how to connect to a computer.
Another way to transfer images to your computer is to remove the compact-flash card
from the digital back and insert it into a compact-flash card reader connected to a computer. See Using Compact Flash Memory Cards for details about how to remove and
insert the card.
e CFV can also function as a CF card reader for file transference. Select MAIN MENU
> SETTINGS> Misc > Interface > Disk.
Images that you have stored on an Imagebank can also be transferred to a computer by
connected the external disk to the computer with a FireWire cable and then copying the
files using the file system. See your Imagebank or hard disk documentation for details.
For complete details see
MAIN MENU > STORAGE > Copy.
Transferring to an Imagebank
e CFV enables you to work in the field, shooting to the internal card, and then transfer
images to an external hard disk even if you do not have a computer with you. In this way,
you can combine the total flexibility of shooting without any external connections with
the massive storage capacity of an external hard disk.
When the internal card gets full, just connect the camera to a Imagebank, transfer the
images, clear the card and return to shooting.
Images are not automatically deleted from the card aer copying. If you want to delete
some or all images to free up some space, then use MAIN MENU > STORAGE > Delete.
See also MAIN MENU > STORAGE > Delete
.
29
Page 30

Entry name (in white) and
current setting in yello
w
Selected entry. The + and signs indicate that you ca
n
use the (+) and (-) buttons to
change the value
Sub-menus show a right
pointing arrow,
press the right-
arrow on the na
vigator button
to open the sub-menu (or, in
some cases, a dialogue window)
-button label
(Here shown as EXIT)
-button label
(Here shown inactive)
Current menu name
(shown in upper case)
Working with the
menu settings
Menu system overview
The main menu contains those settings that you will need to access most often as you work on an
assignment. It also provides sub-menus that give you access to all other settings, most of which you
will need less often.
Navigating the menu system
To enter to the menu system, press the MENU button on the panel. Any image visible is
then replaced by the first level of the menu. Use the navigator button to scroll through
the menu items and use the and buttons to change the selected setting. See also
The Control Panel for button diagrams and descriptions.
Any given menu may include both entries and/or sub-menus.
• Entries are settings that are available at the current menu level; they show their
current settings next to the entry name. To make an entry setting, use the navigator ( ) button to select the entry and then use the zoom ( and )buttons
to select the desired option for that entry
• Sub-menus do not have settings at the current level; they lead to another menu
or dialog. Sub-menus show a right-pointing arrowhead () instead of a value.
To open a sub-menu, use the up/down arrowheads ( and ) of the navigator
button to select the sub-menu and then press the right side of the button to open
it. There can be several levels of sub-menus.
• When you are in a sub-menu, you can go back to the parent menu by pressing the
left arrowhead () of the navigator button.
• Some sub-menus open a dialog. Dialogs require that you either make a setting or
exit the dialog (e.g., to confirm or cancel a delete command). The left arrowhead
will have no effect.
30
Page 31

Menu structure
Entries of the main menu
31
Page 32

1 2
Language
1. Press the MENU button to open the menu.
3 4
5 6
1
2. Use
3. Press to open the SETTINGS menu.
4. Press to select the USER INTERFACE sub-menu.
5. Press either the
6. Press the MENU/EXIT button again to close the menu.
and to select the SETTINGS sub-menu.
or button to choose a new language
(in this case Japanese).
ISO
You are able to set the light sensitivity of the digital back to match
an equivalent ISO rating for standard film. e light meter inside
the camera body will use this setting when making automatic
exposure calculations for aperture and/or shutter settings.
e ISO rating can be set to 50, 100, 200 or 400.
To set the ISO:
1. Select the MAIN MENU > ISO entry. This is the top entry of
the top menu, so it will be selected by default when you enter
the menu system. (See also Navigating the Menu System for
details about how to find this setting.)
2. Use the
settings until the setting you want is shown.
3. Either move on to another setting by using the navigator but
ton or press the menu button to exit the menu system and
keep your setting.
or button to step through the available ISO
-
Note that the default sensitivity of the CCD sensor is ISO 50.
Higher ISO settings result in progressively noisier images (just
as higher ISO film becomes more grainy). It is recommended
that you use the lowest ISO setting possible for the lighting
situation.
2
3
32
Page 33

White balance
There are six ‘White Balance’ settings to choose from.
Sensor unit Sett ing Usage comments
Sunlight For general outdoor use in direct sunlight.
Cloudy For general outdoor use in cloudy weather.
Shadow For general outdoor use in shady locations out of direc t sunlight.
Flash For general indoor use when using a t ypical flash system.
Fluorescent For use when using fluorescent lighting.
Tungsten For use when shooting indoors under standa rd tungsten lamps.
1 2
3
Use this entry to set the white balance saved with the image and
applied to the preview.
To select a preset white balance:
1. Select the MAIN MENU > White Bal entry. The current
setting is displayed here. (See also Navigating the Menu
System for details about how to find this setting.)
2. Use the
or button to step through the available white
balance settings until the setting you want is shown.
3. Either move on to another setting by using the navigator but
ton or press the menu button to exit the menu system and
keep your setting.
Please note that white balance settings are for your viewing
convenience only. The setting is temporary for preview display
reasons and in no way affects the file which remains neutral
awaiting further processing.
Media
e storage setting controls where your digital back will store
new images and which stored images will be visible in the browse
window.
Oen, you have just one type of storage media available—the
internal compact-flash card. However, if you have several media
attached (e.g., a card and one or more external disks), then you
may need to switch between them.
If your selected storage medium has more than one batch (folder)
on it, then the batch selected when you use the storage menu entry
will be the one you most recently created.
-
To select the medium to which to save new shots and from which
to browse previous shots:
1. Press the MENU button.
2. Use
3. Use the
and to select the MEDIA sub-menu.
or button to step through the available media
until the name for destination/source you wish to use is
shown.
4. Either move on to another setting by using the navigator but
ton, or:
4. Press the MENU button to exit the menu system and keep
your setting.
Note that you can also select media using just the (+) and (-)
buttons while browsing images. This method also enables
you to select a batch as you zoom in from media to batch to
thumbnails to preview. See Navigating Media and Batches
for complete details about this method.
-
33
Page 34

1
2 3
Browse
e browse filter complements the instant-approval system by
enabling you to browse through images according to their approval
status. You have the following choices:
• All: browses all of the images in the current batch, regardless
of their approval status. is is the default.
• Red: browses only red-status images from the current batch.
ese are images that you have marked for likely deletion. You
might browse these images to make sure you have not eliminated
any usable images and/or to find images that you can delete
to make room for new shots.
• Green: browses only green-status images from the current batch.
ese are either new shots that did not trigger an exposure
warning or shots that you manually assigned to green aer
overriding an exposure warning.
• Green & Yellow: browses green and yellow-status images, but
does not show red-status images. ese are probably images
that you have either decided to keep or not yet checked for
approval status.
For more information about using the instant-approval system,
please see Using Instant Approval Architecture.
Browse shortcut !
There is also a one-button shortcut for changing the browse
filter.
To use it, press and hold (do not
click!) the Instant Approval button until the approval status
colour appears. Browsing will
then only display the images
with that classification.
To set the browse filter using the menus:
1. Select the MAIN MENU >
is displayed here.
2. Use the
(described above) until you have selected the filter you wish
to use.
3. Either move on to another setting by using the navigator but
ton or press the menu button to exit the menu system and
keep your setting.
e appearance of the ‘Empty Browse Filter’ message signifies that
there are no images with that particular approval status.
or button to step through the filter options
Browse entry. The current setting
-
34
Page 35

STORAGE
This section describes file storage, file transference,
storage organization, file classification and related
subjects.
Navigating the STORAGE settings
35
Page 36

MAIN MENU > STORAGE
1
e Storage menu provides entries for working with storage me-
dia. Here, you can format media, copy images from the camera
to a hard disk or computer and create new batches on available
media. You can also set the initial approval status (green or yellow)
assigned to new pictures.
e first item on the storage list is file deletion. e great advantage
of digital capture is course the ability to judge images on the spot,
delete them immediately if necessary and thereby make room for
2
more valuable captures. ere are several ways to delete images:
• Delete a single image
• Delete all images from a batch
• Delete all images from a medium
• Delete all images of a specified approval status (e.g., red)
from a batch or medium
3
4
In this example, one image is to be deleted from a batch containing four images.
To delete a single image:
1. From a preview image (which is being kept), use the
button to go to the four-thumbnail (in this case) view.
2. Use the navigator button to select the image you wish to
delete. When you are viewing thumbnails, the selected image
has a coloured border around it. When you are viewing single
images, the selected image is the one currently shown. (You
can delete an image either from single image view or from
thumbnail view).
3. Select MAIN MENU > STORAGE > Delete
.
or
DELETE
4. Press
5. You are now shown a full-size preview of the selected image
5
6
6. You now return to the main menu. Notice that the unwanted
to open the Delete dialog.
and asked to confirm the delete. Press OK
image has now been deleted and the batch only contains the
three remaining images. Either move on to another image by
using the navigator button or press the menu button to exit
the menu system.
.
36
Delete shortcut !
There is also a one-button shortcut for deleting single images.
To use it, select a target image
and then press and hold the
until the confirm-delete dialog
opens.
Page 37

Menus for deleting
several images from
a batch.
1
2
3
Deleting several images from a batch
To delete several images from a selected batch:
1. Starting at the single-image preview display, Select MAIN
MENU > STORAGE > Delete. (See also Navigating the
Menu System for details about how to find this setting.)
2. Use
3. Use the
to enter the Delete submenu.
or button to select:
This image - deletes the current image only
All Red in batch - deletes all red images in the current batch
All yellow/red in batch - deletes all yellow and red images
in the current batch
All in batch - deletes all images in the current batch
37
Page 38

4
4. Press OK to confirm the delete. To exit without delete, press
EXIT
.
5
6
5. You now return to the main menu. Either move on to another
setting by using the navigator button or
6. Press the menu (EXIT) button to exit the menu system.
38
Menus for deleting
several images from
all batches from a
selected storage
medium.
Page 39

1
Deleting several images from a selected medium
To delete several images at once:
1. Starting at the single-image preview display, press the
button three times to go to the list of media.
2. Use
and to select the medium from which you wish to
delete. You will be deleting from all batches stored on that
item.
2
3
Note that both each listed medium shows a set of three coloured
numbers in parentheses to the right of the medium name.
These indicate the total number of images of each approval
status (green, yellow and red) that exist on the medium. For
example, if you see a medium that shows (18/5/3), then the
medium contains a total of 26 images: 18 green (approved), 5
yellow (unclassified) and 3 red (marked for probable delete).
3. Select MAIN MENU > STORAGE > Delete. (See also
Navigating the Menu System for details about how to find
4
this setting.)
4. Press
to open the Delete Image dialog.
5
5. You must now select the approval status that you wish to
delete. All images from the selected medium that are also of
the status that you select here will be deleted by the opera
tion.
Use
and to select All Red, All Red & Yellow or All.
-
6. Then press
6
tus.
You are now asked to confirm the delete.
to open the delete dialog for your selected sta-
7. • To confirm, press the button to change the status to Yes
and then press the approve button to execute the delete.
• To cancel, press the menu button to exit; or press the
7
8
39
button to set the status to No and then press the approval
button to cancel.
You now return to the main menu. Either move on to another
setting by using the navigator button or
8. Press the menu
(EXIT) button to exit the menu system.
Page 40

FORMAT
1
e digital back is only able to read and write to media that have
been formatted.
However, new cards or disks sometimes arrive without any formatting, or you might want to convert media that are currently
using a format that the camera cannot read.
Each time you get a new compact-flash card, we recommend
that you format it using the digital back as described below,
2
3
4
even if the digital back is already able to read it. This will enable
the digital back to use the card more efficiently.
The digital back is capable of formatting any type of medium
connected to it, including compact flash cards and Imagebank
units. When you do this, you will erase all data contained on
the target medium.
You can also use the format command for the purpose of delet-
ing all images on a disk. This is sometimes faster than using the
delete function, but it is not as flexible because all data from
all batches will always be erased.
To format media:
1. If you have more than one type of medium connected (e.g.,
a compact-flash card and Imagebank), then start by select
ing the medium you wish to format using the Storage entry
of the main menu (see also Selecting the Current Storage
Medium ).
2. Select MAIN MENU > STORAGE > Format. (See also
Navigating the Menu System for details about how to find
this setting.)
3. Press the
4. You are now asked to confirm the operation.
• To confirm, press the OK button. This will execute the format
and delete all data on the current medium.
• To cancel, press the EXIT
5. You now return to the STORAGE menu. Either move on to
another setting by using the navigator button or press the
menu (EXIT) button to exit the menu system.
to open the Format Card dialog.
.
-
40
Page 41

COPY
1
2
3
4
Usually, you will copy images from a card by connecting the camera to a computer and using FlexColor. However, you might also
want to load images from a card to a portable FireWire hard disk
or Imagebank, allowing you to erase the card and keep shooting
even when you do not have a computer with you.
Aer the copy, the destination disk will have a folder named
CARDXXX, where XXX is a number that increments with each
new copy operation (e.g., CARD001 for the first copy, CARD002
for the next, etc.). Previous copies are therefore never overwritten
(provided you have fewer than 1000 folders of them). Within each
CARD folder is a sub-folder for each batch. You cannot use the
digital back to browse images copied in this way; you must connect
the disk to a computer to browse the copied folders. is operation
does not delete the copied images from the card—you must do this
manually if you want to free card space aer the copy.
To copy images from the compact-flash card to external media,
use a FireWire cable to connect the external media to the CFV
and then.
1. Press the MENU button.
2. Press to navigate down and select the Storage dialog.
3. Press
and then to navigate down and select the Copy
dialog. Press
to open the Copy dialog.
If you have only one disk attached, then skip this step.
If you have more than one disk attached, then press
select the From card to entry. Then use the
ton to select the name of the medium you want to copy to.
5
Finally, press
With the Are you sure? entry selected, you must now con
firm the operation.
• To confirm, press the (
and then press the approve (OK) button to execute the copy.
• To cancel, press the menu (EXIT) button to exit; or press the
(-) button to set the status to No and then press the approve
(OK) button to cancel.
If you chose to confirm, then the CFV now tracks the progress
of the copy operation, which can take a few minutes. You can
stop the copy at any time by pressing and holding the menu
(STOP) button.
5. You now return to the STORAGE menu. Either move on to
another setting by using the navigator button or press the
menu (EXIT) button to exit the menu system.
to go back to the Are you sure? entry.
+) button to change the status to Yes
to
or but-
-
41
Page 42

BATCH
1
2
3
Batches help you to organize your work. ey are very similar to
folders on a computer hard disk. Use the Batch command of the
STORAGE menu each time you want to create a new batch.
For more information about batches, please see Working with
Media and Batches .
To create a new batch:
1. Press the MENU button.
2. Press
Press
3 Press
• Use
• Use the
• Continue working until you have set the name you want.
4. Press the approve (OK) button to save the new batch with the
You now return to the BATCH
to navigate down and select the Storage dialog.
and then to navigate down and select Batch.
to open the Batch dialog. The new batch name will
always begin with a three-digit number, which automatically
increments by one with each new batch. Following this is five
letters, which you can assign yourself to help make the batch
easier to identify. To set the letters:
and to select one of the five letters.
or button to step the currently selected letter
up or down the alphabet until you have found the letter you
want.
name you selected.
menu. Either move on to
another setting by using the navigator button or press the
menu (EXIT) button to exit the menu system.
Remember that all new images are stored automatically in
4
the latest batch. It is not possible to store new images in older
batches.
6
42
Page 43

DEFAULT APPR. LEVEL
1
2
3
6
e Instant Approval Architecture system helps you to evaluate and mark each image based on how well it has come out. By
default, the system assigns an initial approval status for each new
shot based on an analysis of the distribution of exposure levels. In
the factory configuration, the status of each new shot is assigned
as follows:
• Green (approved):
e new shot seems to have been exposed correctly.
• Yellow / Amber (unclassified):
e new shot seems to have been over- or under-exposed.
However, you might choose instead to override this system and
have all new shots assigned either as green or yellow, regardless
of the exposure analysis results. A typical strategy could be to assign all shots to yellow and then review all of the shots later and
promote only the best ones to green status. At the same time you
might demote the most doubtful shots to red status.
See also Using Instant Approval Architecture for complete details
about working with the approval system.
To change the default status assigned to each new image:
1. Press the MENU button.
2. Press
Press
3. Use the
3. Either move on to another setting by using the navigator but
to navigate down and select the Storage level.
and then to navigate down and select Default
Appr. level. Press
tings until the default status you wish to use (auto, green or
yellow) is shown.
ton or press the menu (EXIT) button to exit the menu system
and keep your setting.
to open the Default Appr. level dialog.
or button to step through the available set-
-
43
Page 44

SETTINGS
(1 - 99, Never)
There are a number of settings grouped under the
general ‘Settings’ heading which are:
• User Interface
• Camera
• Miscellaneous
• Default
Navigating the
USER INTERFACE
settings
44
Page 45

MAIN MENU > SETTINGS > User Interface
By altering the User Interface settings, you can control the way the digital back interacts
to suit you and your preferred way of working. It also includes date and time settings.
Entries of the USER INTERFACE Menu
e user interface menu includes both entries and sub-menus. e following entries are
available here:
• Language:
e menu system can be displayed in any of seven languages. is menu entry
enables you to select your preferred language for the menus.
• Power Down:
To help preserve the charge of the battery, you can set the back to power down
aer a specified period of inactivity. e effect is exactly the same as though
you had pressed the off button on the camera. Once it has powered down, you
must turn the CFV on before you can continue working. Set this to Never to
disable this feature (this is the default setting). Set to a value between 3 and 99
minutes to establish a time-out. (Note the difference between Display ‘timeout’
and Power Down.
• Mark Overexp.:
is feature helps draw your attention to areas of your images that are overexposed. When this feature is enabled, the single-image preview display will
highlight each overexposed pixel by flashing it white and black.
Set this entry to On to enable the feature; set to Off to disable it.
• Sound:
e CFV uses audio feedback to help let you know if each new image is exposed
correctly. is is described in Using Instant Approval Architecture.
is menu entry has Volume (choose between High, Low and Off), Key Click
(choose between On and Off ) and Exposure Warning (choose between On
and Off).
• Date & Time:
e CFV has an internal clock that keeps track of the date and time. is information is used to mark each shot with the date and time at which it was taken.
It is also used to label batches with the date on which each batch was created.
• Display:
is feature sets the Timeout (2-30 seconds) on the display, which behaves
very much like a screen saver on a computer.When the timeout is reached, the
display will be turned off, but the back will still be running, so it will immediately respond to a press of the buttons. (Note the difference between Display
‘timeout’ and Power Down.
is feature also sets the level of Contrast (on a scale of 1-10) on the display.
Usually, you should leave this set to the default level of 5; however in some
viewing environments and/or with some types of images you may wish to
increase or decrease this value. A value of 10 provides maximum contrast; a
value of 0 provides no contrast (a black screen). You can also help save battery
power by using a low value here.
is feature also sets the Brightness (on a scale of 1-10) on the display. is
sets the brightness shown on the screen. Usually, you should leave this set to
the default level of 5, however in some viewing environments and/or with some
types of images you may wish to increase or decrease this value. A value of 10
provides maximum brightness; a value of 0 provides minimal brightness. You
can also help save battery power by using a low value here.
)
)
45
Page 46

1 2
Setting the options under the User Interface menu
Each of the above entries can be set by similar menu navigation.
Language, Power Down and Mark Overex can be set immediately
by the or buttons while Sound, Date & Time and Display
require another move to sub menu for final choice.
Proceed as follows:
1. Press the menu (MENU) button to open the menu.
3 4
5 6
2. Use
3. Press to open the SETTINGS menu.
4. Press
5. Use
. Press either the
6. Press the MENU/EXIT button again to save the new settings
and to select the SETTINGS sub-menu.
to select the USER INTERFACE sub-menu.
and to select the required entry.
or button to make the new settings in
the case of Language, Power Down and Mark Overex or Press
again to access Sound, Date & Time and Display
and close the menu.
46
Page 47

Navigating the
CAMERA settings
MAIN MENU > SETTINGS > Camera
All Hasselblad V-system cameras can communicate with the CFV without the need for
extra cable connections except:
• Unmodified 200 series models using CF lenses in C-mode
• ArcBody
• FlexBody
View cameras (with the appropriate adapter and cables) can also be used.
e exposure time set on the CFV sets the maximum length of exposure. e default
setting is 1/8 sec and this is the setting that can be kept for all exposures from 1/8 sec
through 1/2000sec. However, this setting should be changed in accordance with the time
required if it exceeds 1/8 sec. Times of up to 32 seconds can be set.
If you prefer, you can connect the ‘Flash sync input cable’ between the lens PC socket
and the CFV which allows you to retain the default setting of 1/8 second while still being able to use exposure times longer than 1/8 second. is method also allows the use
of the B setting.
Exposure Cable 503
Hasselblad 503CW plus winder CW
Model setting variations
Look in the list below for the camera model you are using and make the appropriate settings change. Don’t forget to change the setting if you change camera model!
CW
For use with 503 CW models:
• Make a CW
• If you want to control the camera from FlexColor, connect the ‘Exposure cable 503´
between the CFV and the Winder CW as in the illustration.
• Do not use the winder at rapid sequence setting.
ELD
For use with ELD models:
• Make an ELD
• A B setting exposure can be made by choosing the “Bulb” in the “Exposure Time” setting.
The maximum exposure time remains at 32 seconds however.
setting.
setting.
47
Page 48

Adapter EL
All Hasselblad EL models
Exposure Cable EL
All Hasselblad EL models except ELD
• The Exposure Cable EL (supplied) should be connected.
• Only the single shot function (A or AS mode camera settings) should be set on the camera.
Rapid sequence shots are not possible.
• Use the Adapter EL (supplied) to provide the necesssary extension beyond the motor hous-
ing of the EL models for battery attachment. It is attached to the CFV in the same manner
as a battery, and the battery itself is then attached to the adapter as in the illustration.
ELX
For use with 500EL/ELM and 500/553ELX models:
• Make an ELX
• The Exposure Cable EL (supplied) should be connected.
• All exposures times, including the B setting, function correctly without having to alter
the “Exposure Time” setting.
• Rapid sequence shots are not possible.
• Use the Adapter EL (supplied) to provide the necesssary extension beyond the motor hous-
ing of the EL models for battery attachment. It is attached to the CFV in the same manner
as a battery, and the battery itself is then attached to the adapter as in the illustration.
Pinhole
For use with lenses/cameras with no shutter. Intended primarily for use in a studio environment where complete darkness can be achieved and exposures made accordingly
(also useful for ‘light painting’). In this mode the CFV uses the exposure time (as well
as other required stages in a capture sequence) set in the Capture Sequence dialog. e
back can be triggered either via the START (MENU/EXIT) button or from FlexColor (see
later section for full description of Capture Sequence settings procedure).
setting.
Flash sync
For use with non-modified 200 series models (together with C-lenses in C-mode), an
ArcBody, a FlexBody or view cameras with a Hasselblad adapter.
• Make a Flash sync
• The Flash sync input cable (supplied) should be connected to the Flash sync in terminal.
• All exposures times, including the B setting, function correctly without having to alter
the “Exposure Time” setting.
• Do not use a winder at rapid sequence setting.
SWC
For use with 903 SWC and 905 SWC models.
• Make an SWC
PLEASE NOTE: Due to the mechanical design of the SWC, pressing the exposure release button
too slowly may cause a faulty capture with a magenta cast. Either press the button much more
distinctly or alternatively change the setting from SWC to Flash sync and use the flash sync
cable to connect the lens to the CFV.
200
For use with modified 202, 203 and 205 models together with F-lenses or CF-lenses in
F-mode. (Only these three models can be modified for cable-free compatibility with
the CFV. Please contact your Hasselblad dealer for further information)
• Make a 200
• A Flash sync input cable should not be used.
• All exposures times, including the B setting, function correctly without having to alter
the “Exposure Time” setting.
• Do not use a winder at rapid sequence setting.
setting.
setting.
setting.
48
Page 49

1 2
3 4
500
For use with 500C/CM, 501C/CM and 503 CX/CXi/CW models.
• Make a 500 setting.
Shutter Delay
ere can be differences in the amount of time required in preparation (raising the mirror, opening/closing the shutter etc) for digital
capture between various camera models. is corrective feature
adjusts the time a little to ensure the image is read out from the
sensor. e normal setting is Default and should only be changed
if problems are encountered.
Exposure Time
is setting should be changed for cable-free exposure times longer
than 1/8 second, ensuring that it matches the set shutter speed on the
lens. e settings range from 1/8 second to 32 seconds (1/8 second
is the default setting). e ELD also has a “Bulb” setting.
5 6
7 8
9
Capture Sequence
is feature functions in the same manner as an interval timer
and only works in conjunction with a motor or winder driven
camera model except in the case of the Pinhole setting where it is
the only way of controlling such exposures (see later section for
full details).
Initial delay: Controls the amount of time required to elapse before
the first exposure.
Delay: Controls the amount of time required between each exposure.
Count: Controls the total number of exposures required.
Setting CAMERA model and options
Proceed as follows:
1. Press the menu (MENU) button to open the menu.
2. Use
3. Press to open the SETTINGS menu.
4. Use
and to select the SETTINGS sub-menu.
and to select CAMERA.
5. Press to open the CAMERA menu.
6. Press either the or button to select camera model.
7. Use
8. Press either the
9. Press the menu (EXIT) button to exit the menu system and
49
and to select SHUTTER DELAY or EXPOSURE
TIME if required
required.
keep your settings.
.
or button to make new settings if
Page 50

Connectivity diagram
500 C/CM
501 C/CM
503 CX/CXi/CW
SWC / SWC/M
903 SWC
905 SWC
202FA/203 FE / 205 TCC /
205 FCC
With F type lenses and
CF type lenses set to F
(Requires minor camera
modification)
Hasselblad CFV
Flash sync
input cable
555 ELD
503 CW +
Winder CW
500 EL/ELM
500/553 ELX
2000 FC / FCM
2003 FCW
201 F / 203 FE
205 TCC / FCC
With C type lenses
ArcBody,
FlexBody
Requires included battery
adapter for portable use
For computer control
of 503CW+Winder CW use
Exposure cable 503 CW
For computer control of EL/
ELM and ELX use Exposure
cable ELX
Requires included battery
adapter for portable use
Note: For exposures longer
than 1 second, always use
flash sync input cable
Any view camera with
Hasselblad V system
adapter
50
Page 51

1 2
Setting CAPTURE SEQUENCE
Proceed as follows:
1. Press the menu (MENU) button to open the menu.
3 4
5 6
2. Use
3. Press
4. Use
5. Press
6. Press either the
and to select the SETTINGS sub-menu.
to open the SETTINGS menu.
and to select CAMERA.
to open the CAMERA menu.
or button to select PINHOLE.
7 8
9
10
7. Press
8. Press either or to make an exposure time setting.
9. Press
10. Press
or to select EXPOSURE TIME.
to select CAPTURE SEQUENCE.
to open the CAPTURE SEQUENCE menu.
51
Page 52

11 12
11. Press either the or button to make an INITIAL DELAY
setting.
This setting controls the amount of time that elapses
before the first exposure in the sequence.
13
15
14
16
12. Press
13. Press either
This setting controls the amount of time between each
14. Press
15. Press either
This setting controls the number of exposures in the
16. Press OK to confirm all the settings
to select DELAY.
or to make a DELAY setting.
exposure in the sequence.
to select COUNT.
or to make a COUNT setting.
sequence.
.
17
19
18
17. The CFV is now ready for sequence start. Note that the
MENU/EXIT button now diplays START instead:
18. Press START to set the sequence running
19. Note that the MENU/EXIT button now displays STOP. The
sequence can be stopped at any time by pressing this button
and the standard menu display returns
.
.
52
Page 53

Navigating the
MISCELLANEOUS settings
MAIN MENU > SETTINGS > Miscellaneous
1
2
3
e MISCELLANEOUS menu contains two settings:
Selecting an interface
e interface setting controls the way the camera will appear to you
computer when you connect it. You have the following choices:
• Camera:
e camera will present itself to your computer as a
camera. Depending on the way you have configured
your computer, this may mean that when you connect
the camera, your computer will automatically launch
FlexColor, which may then begin importing images
and converting them to 3F format.
• Disk:
e camera will present itself to your computer as a mass
storage device. is means that it will look like a hard
disk, which you can navigate to, open and read using
the standard tools for your operating system (e.g., the
Finder in Mac OS or the File Explorer in Windows).
To set the interface presented by the digital back to your operating system:
1. Select the MAIN MENU > SETTINGS > MISCELLANEOUS >
Interface entry. The current setting is shown here. (See also
Navigating the Menu System for details about how to find
this setting.)
2. Use the
tings until the interface you wish to use (camera or disk) is
shown.
3. Either move on to another setting by using the navigator but
ton or press the menu (EXIT) button to exit the menu system
and keep your setting.
or button to step through the available set-
-
53
Page 54

The About box
1
Occasionally, Hasselblad may release updates to the internal soware of the digital back (this is called “firmware”). ese updates
may fix small errors and/or add new features. You will probably
receive additional assistance from Hasselblad technical support
if and when a new update is available. In this case, it may be important to know the serial number and current firmware revision
of your digital back. To find this out:
1. Select MAIN MENU > SETTINGS > MISCELLANEOUS >
About. (See also Navigating the Menu System or details
about how to find this setting.)
2. Press
3. When you are done reading the information, press the menu
to open the About dialog, which shows the serial
number and firmware version.
(EXIT) button to return to the MISCELLANEOUS menu.
Either move on to another setting by using the navigator but
ton or press the menu (EXIT) button again to exit the menu
system.
-
2
3
54
Page 55

MAIN MENU > SETTINGS > Default
1
e DEFAULT setting will reset all custom settings you have made
back to the original default / factory settings.
To reset all settings:
1. Select the MAIN MENU > SETTINGS > DEFAULT entry.
2. Press the OK button and then the EXIT to return.
2
55
Page 56

Flash / Strobe
The CFV can be used together with most studio or
portable units.
When attached to a 503CW, the TTL function is also
available.
Most flash units are suitable for use with the CFV. However, for the sake of safety, care should be
taken when using studio flash units (strobe) and tethered to a stationary computer.
Portable units
Attach the flash sync cable to the lens (or camera body in the case of a Hasselblad 200
series model) and make the appropriate settings according to the unit.
is also applies when using studio units when:
a) tethered to a computer not connected to a regular electricity supply system.
or
b) tethered to an Imagebank or laptop computer running on batteries.
With studio type flash units (strobe) and tethered to a computer
If the CWD is tethered to a computer that is connected to a regular electricity supply
system as well as a studio flash/strobe unit that is also connected to a regular electricity
supply system/generator system, then make the following connections instead:
a) Connect the flash sync input cable from the sync contact (PC connector) on the lens
to the flash sync IN terminal on the back.
b) Connect the flash sync output cable from the flash sync OUT terminal
to a regular flash sync cable that is connected to the unit.
on the back
TTL function – 503CW only
A TTL function is only available with the 503CW. e reflective characteristics of the
digital sensor are different to film surface characteristics for which the TTL function
was originally designed. However, by changing (in effect, ‘tricking’) the setting, TTL
exposures can be made. Proceed as follows:
Move the ISO selector on the 503CW so that is becomes approximately 1⅔ f/stop higher
than the ISO setting on the CFV. erefore, for example, when the back is set at 50ISO,
the ‘film speed setting’ on the camera should read 160ISO, and so on. Testing for the most
suitable compensation that suits you is recommended.
See appropriate manuals for connection details regarding the various units and
adapters.
56
Page 57

Cleaning
Regularly check the surface of the sensor filter for
dust specks that might cause time-consuming re
touching afterwards.
Cleaning the CCD Infrared Filter
If you see dark or coloured spots or lines in your images, then you may need to clean the
outer surface of digital back’s infrared (IR) filter. In most cases, the careful use of com
2
pressed air will be adequate, but sometimes small particles will get stuck to the surface
of the IR filter, requiring for a more thorough cleaning, involving either fluid or wipes.
For a good safe cleaning, follow descriptions below.
WARNING: never attempt to remove the glass filter from the front of the CCD—you
will probably ruin the CCD if you do so. If dust manages to get between the IR filter
and CCD, please contact your Hasselblad dealer for assistance.
-
-
Basic cleaning procedure
1. Discharge any static electricity that may have built up on your body by touching the
digital back housing.
2. While keeping the magazine catch lock depressed, slide the magazine catch to the
6
right.
3. The top of the digital back will be released (while it rests on the magazine retaining
hooks) and it can be swung away from the camera body.
4. Clean the outside surface of IR Filter by spraying it with clean compressed air. If this
is not enough, then use one of the procedures outlined below.
5. If you still see spots on your shot after you have cleaned the outside of the infrared
filter, then you may have dust on either on the back side of the IR filter or on the CCD
itself. This can only be removed at the Hasselblad factory. Contact your Hasselblad
dealer for assistance.
6. When reattaching the digital back to the camera, keep the magazine catch lock
depressed and the magazine catch to the right. Check that the back is firmly in
place.
Cleaning using the HAMA Cleaning Fluid and tissues
Note! Hasselblad recommends HAMA Optic Cleaning Fluid 5902.
1. Carefully spray the fluid onto the IR filter at a distance of 10-15 cm (4-5 inches), so
that the fluid is applied onto the filter as a thin, even haze. 1-2 sprays are enough. If
you apply too little, the fluid will start to dry up before you start wiping the filter. As
57
Page 58

an alternative you can spray the fluid onto the tissue first, and then apply it to the
filter as you wipe it.
2. Fold the tissue several times to match the width of the IR filter—you might use two
or three tissues at a time if necessary (to give you a better grip). Be sure to fold the
paper so that the coated glossy side faces outwards—do not use the other side, as it
can do more harm than good!
3. Gently place the folded tissue onto the edge of the filter using two or three fingers.
Be sure to wipe the entire surface evenly. Sweep the filter only once. Do not wipe the
same area twice with the same tissue as you might reapply dirt removed in the first
sweep.
4. Finally check if the IR filter has been properly cleaned either by visual inspection or
by mounting the digital back to the camera and making a shot. If further cleaning is
needed, repeat cleaning procedure.
Cleaning with an E-Wipe
E-wipes are individually packed wet tissues.
1. Tear at the notch to break seal.
2. Remove the e-wipe from its packaging and continue without delay.
3. Fold the tissue to match the width of the IR filter.
4. Apply firm pressure using two or three fingers at the edge of the wipe to ensure an
even, firm contact with filter surface. Wipe the surface in one unbroken motion.
Note! Do not use same side of the e-wipe twice as you will be likely to reapply any
particles removed in the first sweep.
5. Finally check if the IR filter has been properly cleaned either by visual inspection or
by mounting the digital back to the camera and making a shot. If further cleaning is
needed, repeat cleaning procedure.
Cleaning the housings
If the back becomes dirty do not use any other solvents. Clean it with a so, clean cloth
lightly moistened with water only. Do not allow water to enter any sockets or openings.
58
Page 59

Equipment care,
Service and Guarantee
EQUIPMENT CARE
•
Keep all equipment and accessories out of the reach of small children.
• Do not place heavy objects on the equipment.
• Do not use the batteries except as specified.
• Use only the batteries specified for use with the CFV.
• Remove the batteries when cleaning the camera or if you intend to leave it
unused for a long period.
• If you use spare (standard or rechargeable) battery packs be particularly
careful to use the supplied protective cap when storing. There is a potential
fire risk if the contacts are short circuited across a conductive object (such as
keys in a pocket, for example).
• Take particular care when working with strobe / studio flash units to prevent
damage to equipment and personal injury.
• Do not attempt to open the CFV.
• Always replace the protective sensor filter cover when the digital back is not
mounted on a camera.
• Do not touch the exposed sensor filter with your fingers.
• Ensure that the databus connections are not damaged or soiled in any way.
• Keep all foreign objects out of the CFV openings.
• Keep the original shipping boxes for storage.
• Keep your CFV and all other computer equipment away from moisture. If
your CFV becomes wet, disconnect from power and allow it to dry before at
tempting to operate again.
• Never cover the ventilation openings on the CFV when in use.
• Never try to remove the glass IR filter from the front of the sensor; this will
probably ruin the sensor. If dust manages to get between the sensor and IR
filter, please contact your Hasselblad dealer for assistance.
•
Avoid frequent and severe temperature changes and be particularly careful
in humid environments. Allow the equipment to acclimatize whenever pos
sible before use. Try to ensure the storage conditions in such environments
are as dry as possible.
•
Prevent dust and grit from getting into your equipment. In coastal areas take
measures to protect your equipment from sand and salt water spray.
•
Avoid physical shocks to the CFV. Some form of protective case or camera
bag is advised for transportation.
• Hasselblad equipment is much sought af ter and you should take obvious
steps to prevent theft. Never leave it visible in an unattended car, for exam
ple. Separate and specific camera insurance cover should be considered by
professional users.
SERVICE
Return your equipment to a service centre for occasional checking and
preventive maintenance to ensure optimal reliability.
GUARANTEE
Provided that you bought your equipment from an authorized
Hasselblad outlet, it is covered by an international guarantee for one
year. The guarantee document and a registration card are supplied
with the CFV. Keep the guarantee document carefully, but fill in the
registration card and return it to your Hasselblad distributor.
DISPOSAL
-
If you need to dispose of the CFV, Imagebank and/or batteries, please
do so in an environmentally friendly manner at the local waste plant/
recycling centre or similar.
-
59
-
Page 60

Technical specifications
Product number
Sensor size
Sensor dimensions
Lens factor with V camera
Shooting mode
Multi shot upgrade
1 GB CF card holds
File format
Capture rate
Image storage
3034200
16 million pixels
36.7 x 36.7 mm
1.5
single shot
not available
45 images
Lossless compressed Hasselblad 3F RAW format (3FR) or 3F
35 frames per minute
• CF card type II
• 1000 GB portable Imagebank
• computer disk with tethered shooting mode
Software
Colour definition
Dynamic range
Color management
Color display
IR filter
ISO speed range
Longest shutter speed
Battery power
IAA - Instant Approval Architecture
. Histogram analysis
. Acoustic feed back
Computer support
FlexColor (included) 3FR to Adobe DNG converter utility
16 bit
12 f-stop
Hasselblad RGB
• full dynamics
• reproduction dynamics
OLED type, 2.2 inch, 24 bit color
Mounted on CCD sensor
50, 100, 200, 400
32 seconds
SONY InfoLithium L, up to 8 hours of shooting capacity
Included, with:
yes
yes
Macintosh: OSX
PC: NT, 2000, XP
Host connection
Operating temperature
FireWire 800 (IEEE1394b) output from CFV (computer FireWire input might restrict to 400).
0 – 45 deg. C / 32 – 113 deg F
60
Page 61

The in formation in this manu al is furni shed for in formation al use
only, is subje ct to cha nge witho ut notice , and sho uld not b e con
strued as a commitm ent by Victor Hasselblad AB & Hasse lblad A/S.
Vict or Hassel blad AB & Hasselb lad A/S assumes no respon sibilit y
or l iabili ty for any err ors or inaccura cies th at may a ppear in this
manual.
Vict or Hassel blad AB & Hasselb lad A/S assumes no respon sibilit y
or liabilit y for loss or damage incurred du ring or as a result of using
Hasselbla d software or produc ts.
Hasselbla d, Imacon, ixpress and FlexColo r are trademark s of Victor
Hasselb lad AB & Hasselbla d A/S. Adob e and Adobe Photo shop are
trademark s of Adobe Systems, Inc. Macintosh, Mac OS and FireWire
are regis tered trademar ks of Apple Com puter, Inc. Info Lithium is a
registered trad emark of Sony Corporation .
Copyright © 2006
Victor Hasselblad AB & Hasselblad A/S
All rights reserved.
-
61
Page 62

Victor Hasselblad AB
Hasselblad A/S
Box 220,
SE - 401 23 Göteborg,
Sweden
Product number: 3034200
62
Hejrevej 30,
DK - 2400 Copenhagen,
Denmark
 Loading...