

Page 1
fr om t he m ak er s of
USER GUIDE
Thank you for purchasing the VUGO Multimedia System.
Be sure to read and follow all
instructions carefully before
using this product.
The VUGO Multimedia System
lets you take your shows,
your music and your photos
wherever you want!
75053
™
Requires 4 x 1.5V “AAA” or LR03
size alkaline batteries (not included).
Phillips/cross head screwdriver (not
included) needed to insert batteries.
When used with an adaptor (included),
product requires 6VDC, 500mA.
TV/DVD/VCR/Cable Box or Satellite Receiver with RCA analog video out
jacks or computer with USB port required. For downloading, a high-speed
Internet connection is recommended. USB and AV cables and 6V DC
Power Adaptor included.
CAUTION-ELECTRICALLY OPERATED PRODUCT:
Not recommended for children under 8 years of age. As with all electric products,
precautions should be observed during handling and use to prevent electric shock.
DC Adaptor Specifications:
Model Number = D6500
Input Voltage = 120V AC
60Hz 18W
Output Voltage = 6V DC
Current = 500mA
Polarity:
Page 2
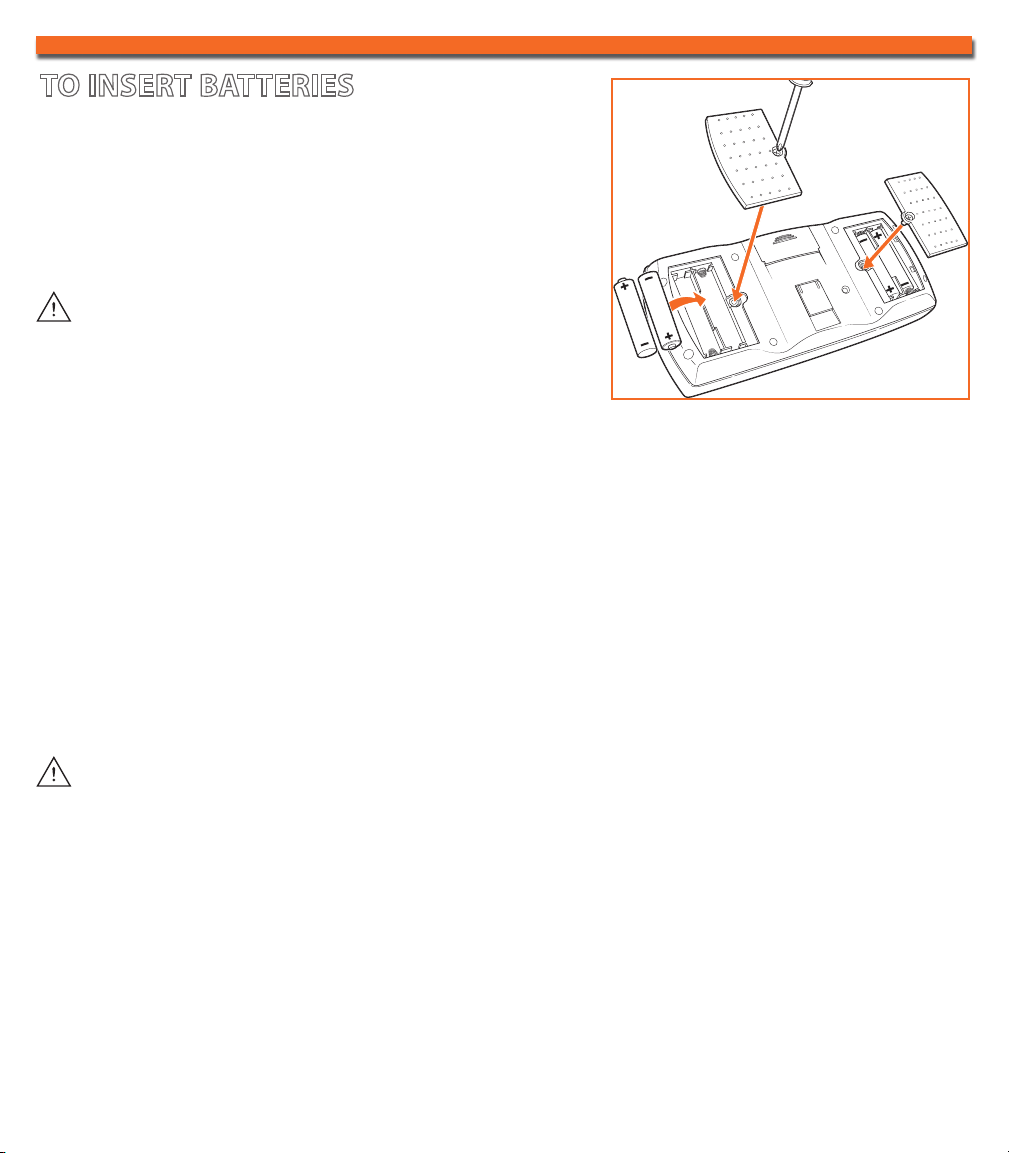
TO INSERT BATTERIES
Using a Phillips/cross head screwdriver, loosen the screws
in the battery compartment covers (screws stay attached
to covers). Remove covers. Insert 4 x 1.5V “AAA” or
R03 size batteries (not included). Alkaline batteries
recommended. Replace covers and tighten screws.
CAUTION STATEMENT:
1. As with all small batteries, the batteries used with
this toy should be kept away from small children who
still put things in their mouths. If they are swallowed,
promptly see a doctor and have the doctor phone (202) 625-3333 collect. In other
countries, have the doctor call your local poison control center.
2. Make sure the batteries are inserted correctly and always follow the toy and battery
manufacturers’ instructions;
3. Do not mix old batteries and new batteries or alkaline, standard (carbon zinc) or
rechargeable (nickel-cadmium) batteries.
IMPORTANT: BATTERY INFORMATION
Please retain this information for future reference.
Batteries should be replaced by an adult.
CAUTION:
1. Always follow the instructions carefully. Use only batteries specified and be sure to insert item correctly
by matching the + and – polarity markings.
2. Do not mix old batteries and new batteries or standard (carbon-zinc) with alkaline batteries.
3. Remove exhausted or dead batteries from the product.
4. Remove batteries if product is not to be played with for a long time.
5. Do not short-circuit the supply terminals.
6. Should this product cause, or be affected by, local electrical interference, move it away from other
electrical equipment. Reset (switching off and back on again or removing and re-inserting batteries) if
necessary.
7. RECHARGEABLE BATTERIES: Do not mix these with any other types of batteries. Always remove from
the product before recharging. Recharge batteries under adult supervision. DO NOT RECHARGE OTHER
TYPES OF BATTERIES.
8. As with all small items, these batteries should be kept away from children. If swallowed, seek medical
attention immediately.
Page 3

TABLE OF CONTENTS
GETTING STARTED 1
Getting to Know your VUGO Multimedia System .........................................
Software Installation ...................................................................................... 2
Main Menu ......................................................................................................
USING YOUR VUGO 3
To Record Television Shows ..........................................................................
VUGO Media Library ......................................................................................
Creating a Playlist ..........................................................................................
Previewing and Playing a File. ......................................................................
Transferring Files between your Computer and your VUGO ......................
VUGO.com .......................................................................................................5
File Management Menu ..................................................................................
Video Menu. ....................................................................................................
Music Menu ....................................................................................................
Photo Menu ....................................................................................................
Record Menu .................................................................................................
Timer Menu ....................................................................................................
10
10
1
3
3
4
4
5
5
6
7
8
9
System Setup Menu .......................................................................................
Earbuds/Headphones .....................................................................................12
Volume Control ..............................................................................................
Contrast Control ............................................................................................
TROUBLESHOOTING GUIDE 12
COUPON & ONLINE ENTRY CODE
12
12
11
Page 4
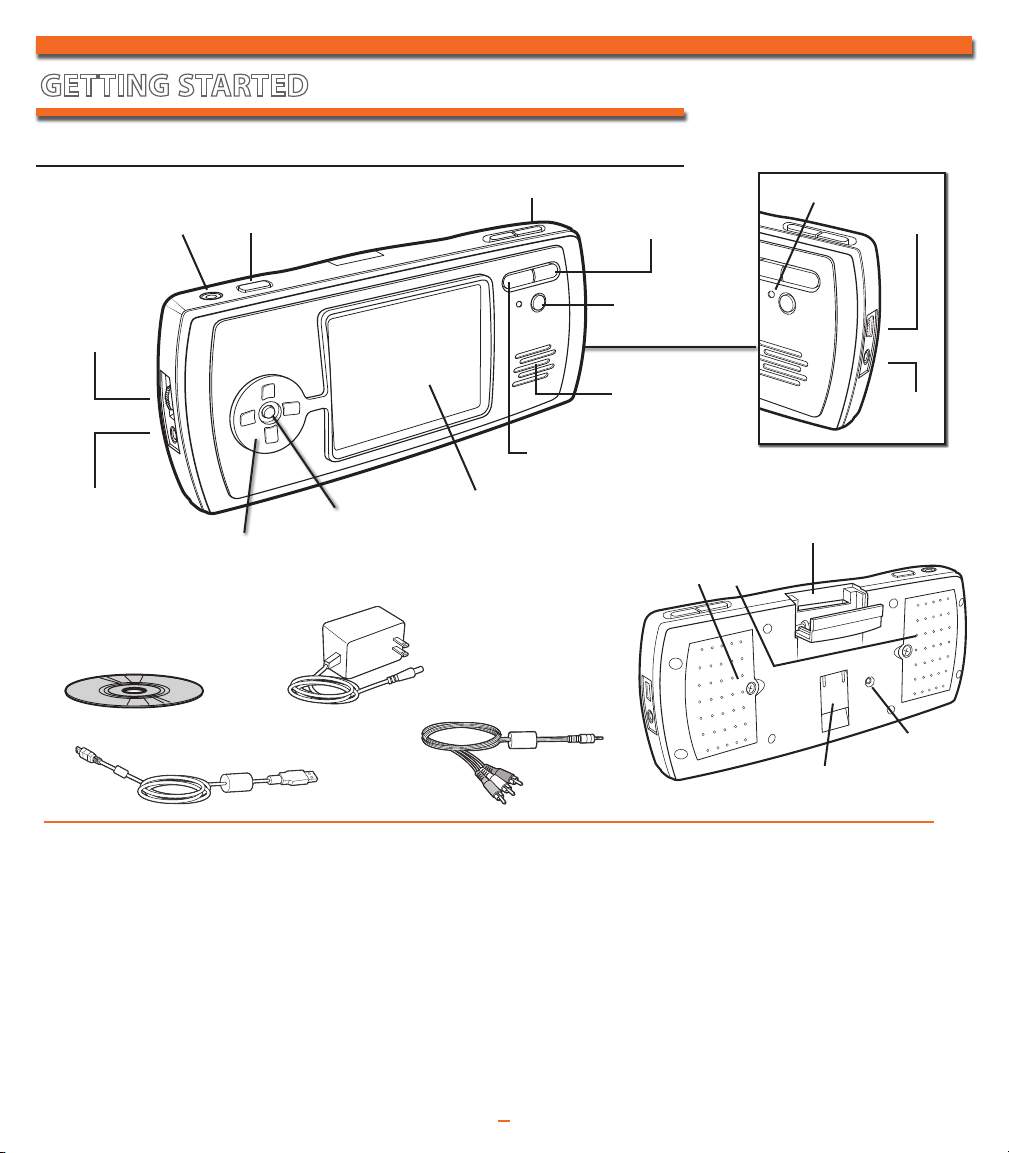
GETTING STARTED
GETTING TO KNOW YOUR VUGO MULTIMEDIA SYSTEM
Contrast
AV Port
Directional Pad
(Left, Right, Up, Down)
Software Installation CD
USB Cable
Volume Control
On/OffHeadphone Jack
Back/Cancel
LED Light
USB
Port
Record
Speaker
DC Power
Jack
Stop/Pause
Play/Enter
Screen
SD/MMC Memory Card Slot
Battery Doors
DC Power Adaptor
Use only the supplied
power adaptor
(D6500).
AV Cable
Reset
Stand
Expand your memory with an SD/MMC Memory Card. To format the SD card, follow the on-screen instructions.
PC SOFTWARE INCLUDED
Windows® System Requirements:
• Intel® Pentium® processor
• Microsoft® Windows 2000 with
Service Pack 4, Windows XP
Professional (Service Pack 1 or above),
or Home Edition (Service Pack 1 or
above), or Windows XP Tablet PC
Edition (Service Pack 1 or above).
• 128MB of RAM
• 512MB of RAM or higher
recommended
MAC® SOFTWARE AVAILABLE FOR
DOWNLOAD AT: www.VUGO.com
Mac® System Requirements:
• PowerPC® G3 processor
• Mac OS X v.10.2.8 or 10.3
• 128MB of RAM
• 512MB of RAM or higher
recommended
NOTE: For optimum performance use a high speed SD card with a
minimum transfer rate of 10MB/sec.
1
SUPPORTED DIGITAL MEDIA
TYPES
• Audio Files: MP3, WAV
• Image Files: JPEG, BMP, GIF,
PNG, TIFF
• Video Files: AVI, MPEG-1,
ASF, WMV
Page 5

.
co
m
IMPORTANT NOTE
Your VUGO Multimedia System can only be
registered and used with one computer. You cannot
use your VUGO with multiple computers.
You can register and connect up to 2 VUGO Multimedia
Systems per computer, but only 1 VUGO Multimedia System
will communicate with the computer at a time.
Note: Recorded media can only be viewed on the VUGO player from which you
recorded it.
SOFTWARE INSTALLATION [PC ONLY]
1. Plug the DC Power Adaptor into the DC Power Jack on your VUGO and into a standard outlet.
2. Plug the small end of the USB Cable into the USB Port on the right side of your VUGO.
3. Plug the other end of the USB Cable into the USB port on your PC.
4. Remove the VUGO software installation CD from the package and insert it into your CD Drive.
5. The installation application should automatically launch. If not, double click on the VUGO icon
and navigate through the on-screen installation instructions.
6. Once the software is installed, you may be asked to restart your computer.
7. Double click on the VUGO Desktop Application icon to begin.
MAC compatible
software is available for
download at:
NOTE: If you need a software installation CD, you can order it directly from Hasbro Consumer Affairs by calling 1-800-844-3733.
For troubleshooting, please call the VUGO Support Desk at 1-866-752-6280 or send an email to support@vugo.com.
NOTE: It is recommended to use the DC Power Adaptor when recording in order to
conserve battery life.
Turn VUGO on by pressing the ON/OFF button and wait for the main menu to appear. The first
time you do this, you will have to setup the date/time format, time, date and user name. Do
this by using the
ÅÇÑÉ buttons and pressing ENTER to confirm each entry. Turn off VUGO by
pressing and holding the ON/OFF button until the player shuts down.
2
Page 6

MAIN MENU
Press ENTER to select the mode highlighted and the screen will move to that specific
mode’s menu screen.
USING YOUR VUGO
TO RECORD TELEVISION SHOWS
1. Plug the DC Power Adaptor into the DC Power Jack on
your VUGO and into a standard outlet.
2. Plug the AV Cable into the AV Port on the left side of your
VUGO.
3. Insert the tri-colored plugs of the
VCR/DVD/Cable box or Satellite Receiver’s AUDIO AND
VIDEO OUT JACKS
of the connectors (white, red and yellow) to the colors of
the ports. Typically these are found
TV/VCR/DVD/Cable box or Satellite Receiver.
4. Press the VUGO power button to
Multimedia System ON. Turn on your television and
locate the TV show that you wish to record.
5. Press the
to enter the record mode, and press RECORD again to
begin recording your TV show. The LED light will stay on
while recording.
6. Press
Press
Press
stop recording and save your file.
RECORD button on the front of your VUGO
STOP/PAUSE once to pause recording.
ENTER to resume a paused recording.
STOP/PAUSE twice (or BACK/CANCEL once) to
. Make sure that you match the colors
AV Cable into your TV/
on the back of your
turn your VUGO
3
AV Port
AV Cable
On/Off
Record
Page 7

VUGO MEDIA LIBRARY
To import files from your computer to your
VUGO Media Library:
1. Click on the Get Files button.
2. Select the file type (Music, Video,
Photo).
3. Locate the desired file on your
computer.
4. Double click that file to open it up.
5. The VUGO software will automatically
convert the file into the appropriate
VUGO file type.
6. The file is now stored in your VUGO
Media Library and ready to be
uploaded to your VUGO Multimedia
System.
7. You can delete a file from your VUGO
Media Library by highlighting it and
pressing the delete button.
CREATING A PLAYLIST
You can create various video, music and
photo playlists which is an excellent way
to organize your files into groups such
as “My Favorite Videos” or “Top 10 Hip
Hop Songs.”
1. Click on the New Playlist icon.
2. Select Video, Music or Photo.
3. Name your playlist.
4. Drag and drop the files from your
VUGO Media Library to your
playlist.
4
Page 8

.
co
m
PREVIEWING AND PLAYING A FILE
1. Double click on the file in either the VUGO Media Library or your playlist to preview and
play it.
VIDEO: As an advanced option, you can use the Split Media button to separate a file into 2
parts. To split a video or music file, pause the file in playback where you would like it
to be split and click the SPLIT MEDIA button to split the file. You can also use the slide
button in the playback window to select the point where you would like to split the
media.
Note: The SPLIT MEDIA button is not active when media is playing or has been stopped.
MUSIC: You can preview the music on your playlist and as an advanced option, you can use the
Split Media button to separate a file into 2 parts.
PHOTO: As an advanced option, you can view your photos in a slideshow and rotate the view of
the photos.
TRANSFERRING FILES BETWEEN YOUR COMPUTER
AND YOUR VUGO
1. Plug the DC Power Adaptor into the DC Power Jack on your VUGO and into a
standard outlet.
2. You can drag and drop files between the My Computer section on your computer and the
My VUGO section on your VUGO player, and vice versa. VUGO will keep track of the
available storage space on your player.
3. You can manage your media while VUGO is disconnected from your computer. To
synchronize your VUGO player with your Media Library, simply plug it in to your computer!
– Your Downloading Destination
Note: Your computer must be connected
to the Internet to go shopping. A
high-speed internet connection is
recommended. You must register your
VUGO Multimedia System at vugo.com
in order to purchase and download
media.
VUGO.com is your downloading
destination! Visit vugo.com to purchase
and download many of today’s hottest
shows!
Do this by clicking on the Shop tab on
the VUGO desktop application. This will
automatically bring you to vugo.com.
Follow the on-screen instructions to register and make a
5
Page 9

File management
Video files
Music files
Photo files
MENUS
Use the ÅÇ buttons to scroll through each individual menu and press ENTER to confirm your
selection.
Select “FILE MANAGEMENT” to:
} view your video, music and photo files
} create a new folder for your files
} rename and delete your files
} move files into specific directories on your onboard
memory or SD card
• Select “VIDEO FILES” to view your video files.
• Scroll to your desired file and press ENTER to view
that file.
• Use the
to create a new folder, “RENAME” to rename an existing
file, “DELETE” and “YES” to delete a specific file or
“NO” to leave it as is.
• Select “MOVE TO FOLDER” and “ON BOARD
MEMORY” to move and save a file to your on board
memory or “SD CARD” to move and save a file to your
SD card.
Ñ button to select “MORE” and “NEW FOLDER”
• Select “MUSIC FILES” to view your music files.
• Scroll to your desired file and press ENTER to view
that file.
• Use the
Ñ button to select “MORE” and “NEW FOLDER”
to create a new folder, “RENAME” to rename an existing
file, “DELETE” and “YES” to delete a specific file or
“NO” to leave it as is.
• Select “MOVE TO FOLDER” and “ON BOARD
MEMORY” to move and save a file to your on board
memory or “SD CARD” to move and save a file to your
SD card.
6
Page 10

Video playlist
Play all
A.VLI
Play all
New playlist
Play mode
Playmode setting
Shuffle on off
Loop on off
• Select “PHOTO FILES” to view your photo files.
\PHOTO
PHO00001.TVP
PHO00002.TVP
PHO00003.TVP
PHO00004.TVP
PHO00005.TVP
PHO00006.TVP
PHO00007.TVP
• Scroll to your desired file and press ENTER to view
that file.
• Use the
Ñ button to select “MORE” and “NEW FOLDER”
to create a new folder, “RENAME” to rename an existing
file, “DELETE” and “YES” to delete a specific file or “NO”
to leave it as is.
• Select “MOVE TO FOLDER” and “ON BOARD MEMORY”
to move and save a file to your on board memory or “SD
CARD” to move and save a file to your SD card.
Select “VIDEO” to:
} view your playlists
} create a new playlist
} randomly shuffle the order of your videos
} repeat selected videos
Press ENTER to view your playlists.
Scroll to your desired playlist and press ENTER to begin
viewing that playlist.
To fast-forward or rewind, press and hold Ñ or É.
Press æ/ once to pause, press again to stop.
• To create a new playlist, press Ñ to enter the MORE
menu and select “NEW PLAYLIST”.
• Enter a name for the playlist using the
Press ENTER to confirm.
• Use the
Å and Ç
buttons to select the memory location
to add files from. Press ENTER to confirm.
• Use the
Å and Ç buttons to highlight a file and press
the É to select or unselect the file.
• Press ENTER when finished to complete your selection.
• Select “PLAY MODE” and “SHUFFLE” to randomly shuffle
the order of your videos or “LOOP” to repeat selected
videos.
• Use the
ÑÉ buttons to switch between on and off.
7
ÅÇÑÉ buttons.
Page 11

Select “MUSIC” to:
Music playlist
Play all
A.MLI
Play all
New playlist
Play mode
Playmode setting
Shuffle on off
Loop on off
} view your playlists
} create a new playlist
} randomly shuffle the order of your songs
} repeat selected songs
Press ENTER to view your playlists.
Scroll to your desired playlist and press ENTER to begin
viewing that playlist.
To fast-forward or rewind, press and hold É or Ñ.
Press æ/ once to pause, press again to stop.
To skip from track to track press
• To create a new playlist, press Ñ to enter the MORE menu
and select “NEW PLAYLIST”.
• Enter a name for the playlist using the
Press ENTER to confirm.
Å
• Use the
wish to add files from. Press ENTER to confirm.
• Use the
É to select or unselect the file.
• Press ENTER when finished to complete your selection.
• Select “PLAY MODE” and “SHUFFLE” to randomly shuffle
the order of your songs or “LOOP” to repeat selected
songs.
• Use the
and Ç buttons to select the memory location you
Å
and Ç buttons to highlight a file and press the
Ñ É buttons to switch between on and off.
É or Ñ quickly.
ÅÇÉÑ buttons.
8
Page 12

Photo files
BLUELA
~
1.TVP
COFFEE
~
1.TVP
FEATHE
~
1.TVP
CONEFI
~
1.TVP
GREENS
~
1.TVP
PRAIRI
~
1.TVP
RHODOD
~
1.TVP
Photo more
Slideshow start
Slideshow setup
Slideshow setup
Play mode
Time interval
Select “PHOTO” to:
} view your photo files
} create a slideshow
} randomly shuffle the order of your photos
} repeat selected photos
} set the timing of the slideshow
Press ENTER to view your playlists.
Scroll to your desired file and press ENTER to view that file.
Pressing É or Ñ moves to the next photo listed in that
destination (Memory/SD/MMC).
• Press Ñ to enter the MORE menu.
• Select “SLIDESHOW START” if you wish to begin viewing a
slideshow.
• Select “SLIDESHOW SETUP”, “PLAY MODE” and
“SHUFFLE” to shuffle the order of your photos or “LOOP” to
repeat the order of your photos.
• Select “TIME INTERVAL” and then “1s”, “3s” or “5s” for the
interval between the photos.
9
Page 13

Record time
Date: 1- 1-2005
Start time: 12:00 am
End time: 12:00 am
Edit timer
Turn on timer
Select RECORD to begin recording from any video or audio
source. Make sure that your supplied AV Cable is plugged in
properly to your audio or video source and press the Record
button on the front of your VUGO.
Select “TIMER” to:
} set the start and stop time of the timer
} turn the timer on and off
• Select “EDIT TIMER” and “DATE” to set the date of the TV
show you want to record.
• Select “START TIME” to enter the time that VUGO should
begin recording and “END TIME” for when VUGO should
stop recording.
• Select “TURN ON TIMER” to activate the timer.
10
Page 14

System setup
Time
Date
Date/Time format
Memory status
Memory preference
Auto off time
User name
Ver 0.8
Select “SYSTEM SETUP” to set the:
System setup
Memory status
Memory preference
Auto off time
User name
Picture quality
Format internal memory
Ver 0.8
Auto off time?
3 minutes
5 minutes
10 minutes
OFF
Date?
1- 1-2005
Date/Time format?
American format
European format
Memory preference?
On board memory
SD Card
Picture quality?
Normal quality
High quality
Time?
12:00 am
Name?DFormat internal memory
Are you sure?
Yes
No
} time
} date
} date/time format
} memory status
} memory preference
} auto turn off
} user name
} picture quality
} format internal
memory
• Select “TIME” to set the time.
• Select “DATE” to set the date.
• Select “DATE/TIME FORMAT” to select either “AMERICAN
FORMAT” or “EUROPEAN FORMAT”.
• Select “MEMORY STATUS” to view how much space is
available on your internal memory and SD CARD.
• Select “MEMORY PREFERENCE” then “ON BOARD
MEMORY” to record your files on the internal memory,
or “SD CARD” to record your files on an SD card (not
included).
• Select “AUTO OFF TIME” and “3 MINUTES”, “5 MINUTES”
or “10 MINUTES” to set the time that VUGO should
automatically turn off if idle and not plugged into a computer.
This will help conserve battery life. Select “OFF” to disable
this feature.
• Select “USER NAME” and use the
ÅÇÉ and Ñ buttons to
personalize your VUGO Multimedia System by entering
your name.
• Select “PICTURE QUALITY” to change the quality of
recording. “NORMAL QUALITY” will allow approximately
1 hour of video content on the internal memory. “HIGH
QUALITY” will give a better quality but will only allow
approximately 40 minutes of video content on the internal
memory.
• “FORMAT INTERNAL MEMORY” will delete all content from
the internal memory.
11
Page 15

EARBUDS/HEADPHONES (sold separately)
Plug into the VUGO Multimedia System and plug into a world of personal, portable
entertainment. Now you can listen to your media in private, while you’re on the go!
• Portable and lightweight
• Comfortable fit
VOLUME
To adjust the volume on your VUGO player, push the right volume button to raise your
audio level or push the left volume button to lower it.
CONTRAST
To adjust the contrast on your VUGO player, rotate the Contrast Control Dial up to
increase the contrast of the screen, or down to decrease it.
TROUBLESHOOTING GUIDE
If your player freezes up:
You will need to reset it. To do this, use a pen tip to press the Reset button on the back of the player or
simply remove the existing batteries from the player and reinsert them. None of your files will be deleted!
If your files are not transferring correctly:
Check the connections on your USB Cable and AV Cable to make sure they are firmly attached.
If performance is slow or audio is low:
Check to make sure the SD/MMC card you are using is high-speed and the transfer rate is a minimum of
10MB/Sec.
If your player is not recording:
Check to make sure the AV Cable is plugged into the AV OUT JACK. These are typically found on the back
of TV/VCR/DVD Cable box or Satellite Receiver.
Cleaning the Screen
Wipe the screen in a single direction with a clean, dry cloth.
For additional software support, email support@vugo.com
NOTE: Your VUGO and DC Power Adaptor should be periodically examined for potential hazards. If any potential hazards are found, please contact
Hasbro Consumer Affairs at 1-800-844-3733 for repair or replacement.
12
Page 16

.
co
m
COUPON & ONLINE ENTRY CODE
.
co
m
Enter VUGO1 for promotional code at checkout.
Offer ends 6/30/06.
Your Downloading Destination.
FCC STATEMENT
This equipment has been tested and found to comply with the limits for a Class B digital device, pursuant to part 15 of
the FCC Rules. These limits are designed to provide reasonable protection against harmful interference in a residential
installation. This equipment generates, uses and can radiate radio frequency energy, and, if not installed and used in
accordance with the instructions, may cause harmful interference to radio communications. However, there is no guarantee
that interference will not occur in a particular installation. If this equipment does cause harmful interference to radio or
television reception, which can be determined by turning the equipment off and on, the user is encouraged to try to correct
the interference by one or more of the following measures:
- Reorient or relocate the receiving antenna.
- Increase the separation between the equipment and the receiver.
- Connect the equipment into an outlet on the circuit different from that to which the receiver is connected.
- Consult the dealer or an experienced radio/TV technician for help.
© 2005 Hasbro. All Rights Reserved.
TM & ® denote U.S. Trademarks.
Microsoft and Windows are trademarks or registered trademarks of
Microsoft Corp. in the United States and other countries.
Mac and Mac OS are trademarks of Apple Computer, Inc., registered in the
U.S. and other countries. Intel and Pentium are trademarks or registered
trademarks of Intel Corporation or its subsidiaries in the United States and
other countries. PowerPC is a trademark of IBM All other trademarks are
the property of their respective owners.
75053 PN 65318800000
Product and colors may vary.
Questions? 1-866-752-6280
 Loading...