

Page 1

FL8300 Engelsk 12/01/98, 16:361
ENGLISH
Page 2

ENGLISH
harman/kardon
Service and Parts Office:
80 Crossways Park West, Woodbury, New York 11797 (800) 422-8027
8500 Balboa Blvd., Northridge CA 91329
A Harman International Company
harman/kardon
Power
1111-FL8300 Printed in Korea
230 Volt Version
9007018340
FL8300
123
4 5 Disc Skip
Remote Sensor
DELETE A. SPACE
C O M P A C T
D I G I T A L A U D I O
REPEAT ALL1DISC8
INTRO
TRACK MIN
SEC
FL8300 Engelsk 12/01/98, 16:362
Page 3
FL8300
ENGLISH
harman/kardon
Power
FL8300
123
4 5 Disc Skip
Remote Sensor
C O M P A C T
C O M P A C T
D I G I T A L A U D I O
D I G I T A L A U D I O
Program/Review Random Repeat Edit
AUTO
DELETE A. SPACE
REPEAT ALL1DISC8
INTRO
TRACK MIN
SEC
AUTO EDIT
EDIT
A B
1 2 3 4 5
6 7 8 9 10
11 12 13 14 15
16 17 18 19
Time Intro Delete Tape Size
Five Disc CD Player OWNER’S MANUAL
CD-W echsler BEDIENUNGSANLEITUNG
Changeur de compact disques MODE D’EMPLOI
Reproductor de CD MANUAL DEL USUARIO
Open/Close
Headphones
harman/kardo n
CD-wisselaar GEBRUIKSAANWIJZING
Five Disc CD Player Bruksanvisning
Five Disc CD Player KÄYTTÖOPAS
CD Player 5 ‰›ÛÎˆÓ O¢H°IE™ XPH™H™
FL8300 Engelsk 12/01/98, 16:363
Page 4

Harman Kardon FL8300
CAUTION
CAUTION
ENGLISH
CAUTION: TO REDUCE THE RISK OF ELECTRIC SHOCK, DO NOT REMOVE COVER (OR BACK). NO USERSERVICEABLE PARTS INSIDE. REFER SERVICING TO QUALIFIED SERVICE PERSONNEL.
The lightning flash with arrowhead
symbol, within an equilateral triangle, is
intended to alert the user to the presence
of uninsulated "dangerous voltage" within
the product's enclosure that may be of
sufficient magnitude to constitute a risk
of electric shock to persons.
WARNING: TO REDUCE THE RISK OF FIRE OR ELECTRIC SHOCK, DO NOT EXPOSE THIS APPLIANCE TO
RAIN OR MOISTURE.
RISK OF ELECTRIC SHOCK
DO NOT OPEN
The exclamation point within an
equilateral triangle is intended to alert
the user to the presence of important
operating and maintenance (servicing)
instructions in the literature
accompanying the appliance.
Harman Kardon FL8300
Date of purchase _________________________________
Purchased from __________________________________
Address of business purchased from __________________
_______________________________________________
Installed by ______________________________________
Date of installation ________________________________
Serial No. _______________________________________
UNPACKING AND
INSTALLATION
Congratulations on Your Purchase!
Your new high-fidelity 5 Disc CD
Changer is designed to deliver
maximum enjoyment and years of
trouble-free service.
Please take a few moments to read
this manual thoroughly. It will
explain the features and operation of
your
5 Disc CD Changer and help to
ensure a trouble-free installation.
Please unpack your 5 Disc CD
Changer carefully. We recommend
1
FL8300 Engelsk 12/01/98, 16:364
that you save the carton and packing
material. They will be helpful if you
ever need to move your unit and
may be required if you ever need to
return it for service.
Your 5 Disc CD Changer is designed
to be placed in a horizontal position
and it is important to allow at least
two inches of space behind your unit
for adequate ventilation and cabling
convenience. To avoid early
damage, never place the unit near
radiators, in front of heating vents, in
direct sunlight, or in excessively
humid or dusty locations.
Connect your complementary
components as illustrated in the
following section.
CLASS 1 LASER PRODUCT
CAUTION: Invisible laser radiation
when the unit is open. Do not stare
into the beam.
CAUTION: USE OF ANY
CONTROLS, ADJUSTMENT OR
PROCEDURES OTHER THAN
THOSE SPECIFIED HEREIN MAY
RESULT IN HAZARDOUS
RADIATION EXPOSURE.
CAUTION: TO PREVENT
ELECTRIC SHOCK, MATCH
WIDE BLADE OF PLUG TO
WIDE SLOT, FULLY INSERT.
ATTENTION: POUR EVITER LES
CHOCS ELECTRIQUES,
INTRODUIRE LA LAME LA PLUS
LARGE DE LA FICHE DANS LA
BORNE CORRESPONDANTE DE
LA PRISE ET POUSSER
JUSQU'AU FOND.
CLASS 1
LASER PRODUCT
Page 5
Operating Instructions
FL8300 Five Disc CD Changer
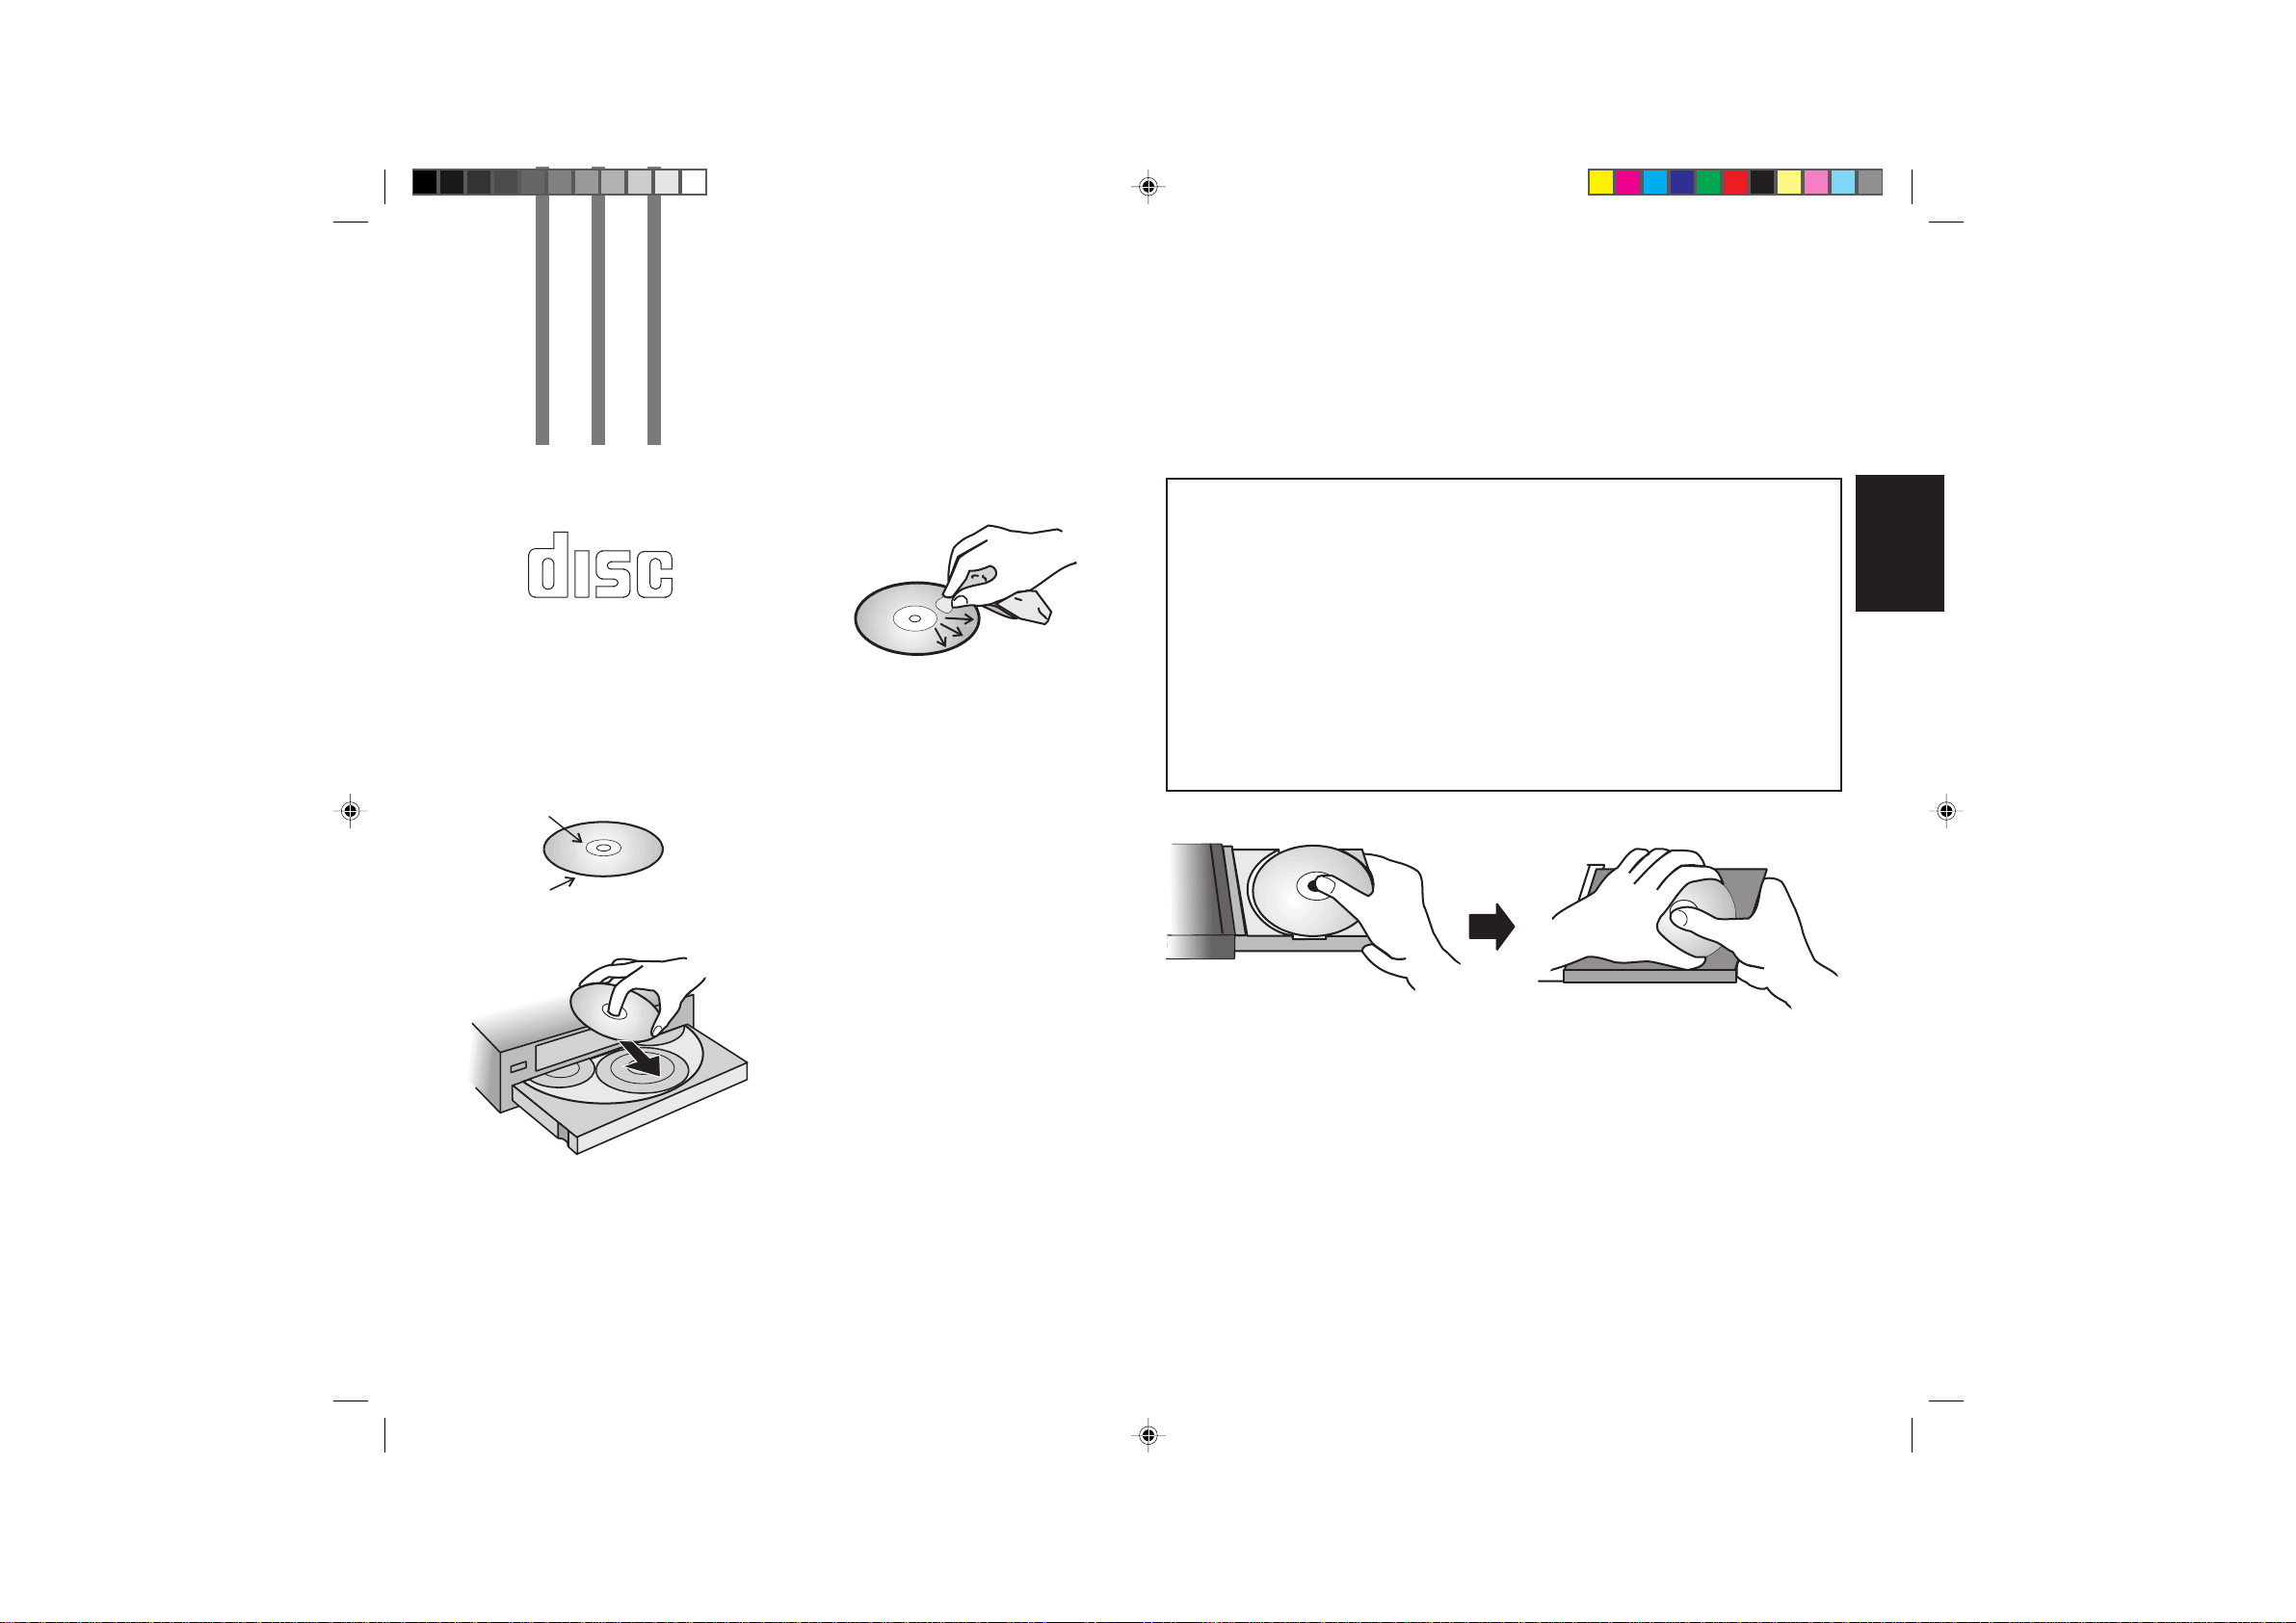
CONCERNING COMPACT DISCS
C O M P A C T
D I G I T A L A U D I O
- Only Compact discs bearing this
mark can be reproduced. No other
discs can be reproduced.
You can also play an 8cm CD on the
inside circle of the tray. Do not put a
normal CD over it.
Labelled surface
Labeled surface
Recorded surface
- Always place the compact disc in
the disc tray with the labelled side
up (compact discs can be played
only on one side).
- To remove a disc from its storage
case, press down on the center of
the case and lift the disc out of the
case, holding it carefully with the
edges.
- Fingermarks and dust should be
carefully wiped off the disc’s
recorded surface with a soft cloth.
Unlike conventional records, the
compact disc has no grooves to
collect dust and microscopic debris.
Gentle wiping with a soft cloth will
remove most particles completely.
Wipe straight from the inside to the
outside of the disc. Small dust
particles and light stains will have
absolutely no effect on sound
reproduction quality.
- Never use such chemicals as
record sprays, antistatic sprays or
fluid, benzine or thinner to clean
compact discs. Such chemicals
could damage the disc’s plastic
surface irreparably.
TABLE OF CONTENTS
Operating Instructions ............................................................................. 2
Rear Panel Connections .......................................................................... 4
Front Panel Controls ................................................................................ 5
Operations ............................................................................................... 7
Remote Controls.................................................................................... 13
Troubleshooting ..................................................................................... 15
Specifications ........................................................................................ 16
- Discs should be stored in their
cases after use to avoid serious
scratches that could cause the laser
pickup to “skip.”
- Don’t expose the discs to direct
sunlight or high humidity or
temperature for extended periods.
Long exposure to high temperatures
can warp the disc.
- Don’t stick paper or write anything
with a ball-point pen on the surface
of the labelled side.
ENGLISH
FL8300 Engelsk 12/01/98, 16:365
2
Page 6

INSTALLATION
- This unit is composed of many
sensitive electronic components,
laser pickup and LSI, etc. Therefore,
ENGLISH
avoid installing this unit under the
following conditions.
1. On an inclined or unstable
location.
2. In A/V enclosed vehicle or at high
temperatures (over 100oF; 40oC).
3. Exposed for long periods of time
in direct sunlight.
4. In very humid locations.
5. In dusty or smoky locations.
6. At very low temperatures (below
40oF; 5oC).
7. Near strong magnetic fields.
CAUTION
1. When installing your own system,
do not place the unit directly upon
an amplifier because an amplifier
can give off excessive heat.
2. Avoid installing this unit near a
tuner or television. Because it uses
high-frequency signals, this unit may
influence radio or television. If the
above precaution cannot be met,
you may have to turn off the unit
when not in use.
3. Do not rotate the carousel by
hand. If you do so, it can be put out
of order.
4. To avoid damage, remove the
discs in the tray before moving your
CD changer.
TO OBTAIN WARRANTY SERVICE
If you require warranty service,
please return the product to your
dealer. If this is not possible, please
call 1-800-422-8027, for information
on how to obtain service. If
purchased outside the United
States, contact your local dealer for
repair. Your bill of sale will be
required to obtain warranty service
and to establish date of purchase.
3
FL8300 Engelsk 12/01/98, 16:366
Page 7

1
43
Rear Panel Connections
ENGLISH
2
• Before making connections first
turn off the unit.
• See the connection diagram in the
operating instructions manual of
Harman Kardon compatible
amplifier or receiver.
FL8300 Engelsk 12/01/98, 16:377
1. CONNECTION CORDS
You will have two leads from this
unit to connect to amplifier or
receiver. One lead (WHITE) carries
the LEFT channel signal and should
be connected to the LEFT of CD (or
AUX) input of amplifier or receiver.
The other lead (RED) should be
connected to the RIGHT of CD (or
AUX) input.
2. AC INPUT CORD
Plug this cord into the switched AC
outlet of amplifier or receiver or a
household AC outlet.
3. SYSTEM REMOTE
CONTROL CORD
The remote control input jack allows
remote control of this unit via a
cable. This cable can be connected
to the remote control output jack of
another Harman Kardon product.
Alternatively, it can be connected to
an accessory device that converts
infrared remote control signals into
detected pulses. While all Harman
Kardon products with remote control
jacks are compatible with one
another, not all accessory devices or
other manufacturer’s products are.
However, it is safe to experiment.
4. DIGITAL OUT
Coaxial digital out, RCA connector.
4
Page 8

Front Panel Controls
ENGLISH
9
3
1 2 3 4 5
AUTO
EDIT
6 7 8 9 10
11 12 13 14 15
A B
16 17 18 19
19
16
8
18
5
FL8300 Engelsk 12/01/98, 16:378
2015
10
17
11
21413121
45
76
Page 9

Front Panel Contr ols
)
1. POWER SWITCH
Press the POWER switch to turn this
unit on and press it again to turn it
off. For system operation, plug the
AC input cord into the switched AC
outlet, keep the power switch ON
and control power ON/OFF with the
main POWER switch on the amplifier
or receiver.
2. MULTI-FUNCTION DISPLAY
This display shows the
corresponding information according
to each mode.
3. DISC TRAYS (1 - 5)
One disc per tray can be loaded with
the labelled side up.
4. PLAY/PAUSE BUTTON
This button is used for starting play,
pausing play at the beginning of a
track or interrupting play.
5. STOP/CLEAR BUTTON
This button is used for stopping play,
clearing programmed selections or
recovering the deleted selections.
(
( )
6. BACKWARD SKIP/
SEARCH BUTTON
This button is used for replaying
from the beginning of the current
track, returning to a previous track or
searching for a particular passage in
fast reverse.
( )
7. FORWARD SKIP/
SEARCH BUTTON
This button is used for moving on to
the next track or searching for a
particular passage in fast forward.
( )
8. REPEAT BUTTON
This button is used for repeating one
track, one disc or all discs.
9. RANDOM PLAY BUTTON
This button is used to let the unit
automatically select and play tracks
randomly on each CD or randomly
between discs and tracks.
10. TIME BUTTON
This button is used for checking the
elapsed playing time from the
beginning of the current track,
remaining playing time of the current
track or remaining playing time of the
disc.
11. DELETE BUTTON
This button is used for deleting the
undesired tracks or discs.
12. DISC
SELECTOR BUTTONS
These buttons are used for selecting
the disc to be played.
13. DISC SKIP BUTTON
Each time this button is pressed to
load or unload the disc, the carousel
will rotate to the next tray position
clockwise.
14. INFRARED
RECEIVER WINDOW
This receives the infrared signals
transmitted by the remote control
and converts it into the electrical
signal to control this unit.
15. TAPE SIZE BUTTON
This button is used for selecting the
tape length.
16. EDIT BUTTON
This button is used for editing the
tracks to be recorded onto the
cassette tape.
17. DISC INTRO BUTTON
This button is used for playing the
first 10 seconds of each track or the
first track on CDs.
18. OPEN/CLOSE BUTTON
This button is used for opening and
closing the tray.
19. PROGRAM/
REVIEW BUTTON
This button is used for programming
your favorite tracks or discs or
reviewing the programmed
selections.
20. HEADPHONE JACK
This is used for listening with
headphones.
ENGLISH
6
FL8300 Engelsk 12/01/98, 16:379
Page 10

Operations
PLAYING CD’S
CONTINUOUS PLAY
• In continuous play mode, the unit
plays from the first track on the
ENGLISH
first disc to the final track on the
fifth disc.
1. Press the POWER switch.
• The carousel will rotate to see
where the CD is.
5
34
2. Open the tray.
3. Load the disc(s) on the tray(s) with
the labelled side up.
• For loading a disc in the 5th tray,
press the DISC SKIP button.
4. Close the tray.
• To avoid damage, do not insert
any objects into the tray.
• To prevent dirt and dust from
entering the mechanism, do not
leave the tray open when not in
use.
5. Press the PLAY/PAUSE button.
• Continuous play starts from the
tray on which a CD is loaded.
MIN SEC
TRACK
1234
5
1 2 3 4 5
6 7 8 9 10
11 12
An → at the END of the music
calendar indicates that the disc
contains more than 19 tracks.
• After the last track on the 5th disc
has been played, the unit switches
to stop mode.
1 2 3 4 5
1234
5
STOP MODE
TRACK MIN SEC
6 7 8 9 10
11 12 13 14
INTERRUPTING PLAY
• Press the PLAY/PAUSE button to
temporarily interrupt play. The
sound stops and II appears on the
display.
• To resume, press the PLAY/
PAUSE button again.
1234
5
PAUSE MODE
TRACK MIN SEC
:
6 7 8 9 10
11 12
STOPPING PLAY
• Press the STOP/CLEAR button to
stop play before the end of the
last disc is reached.
SELECTING THE DESIRED
DISC WITH THE DISC
SELECTOR BUTTONS
• To start play from a disc among
five discs, press the button that
corresponds to the desired disc,
then continuous play starts from
the first track of the desired disc
without the PLAY/PAUSE button.
REPLACING DISCS DURING
CONTINUOUS PLAY
• Open the tray to replace discs,
other than the disc being played.
• Close the tray.
SELECTING THE NEXT
TRACK IN PLAY MODE
• Press the FORWARD SKIP button
( ) to advance to the beginning
of the next track.
• During normal or deleted play,
etc., if the FORWARD SKIP button
is pressed when playing the last
track on a CD, the last track is
skipped to the first track on that
CD.
• During random or programmed
play, etc., if the FORWARD SKIP
button is pressed when playing
the last track, the “End” sign
appears on the display and the
last track continues to be played.
SELECTING THE PREVIOUS
TRACK IN PLAY MODE
• If a track is playing, press the
BACKWARD SKIP button ( ) to
return to the beginning of the
track.
• Press the BACKWARD SKIP
button before a track begins
playing to move to the beginning
of the previous track.
• During normal or deleted play,
etc., if the BACKWARD SKIP
button is pressed at the beginning
of the first track on a CD, the first
track is skipped to the last track
on that CD.
• During random or programmed
play, etc., the BACKWARD SKIP
button can be pressed only to
return to the beginning of a track
or the first programmed track.
7
FL8300 Engelsk 12/01/98, 16:3710
Page 11

BEGINNING AT A SPECIFIC
PROGRAM
1
PROGRAM
1234
5
TRACK MIN SEC
TRACK IN STOP MODE
1. Repeatedly press the FORWARD
or BACKWARD SKIP button
( ) until the desired track
number appears on the display.
1 2 3 4 5
1234
5
TRACK
6 7 8 9 10
11 12 13 14 15
16 17 18 19
2. Press the PLAY/PAUSE button
4 5
1234
5
TRACK MIN SEC
6 7 8 9 10
11 12 13 14 15
16 17 18 19
SEARCHING FOR A SPECIFIC
PASSAGE IN PLAY MODE
• Press and hold down the FORWARD or BACKWARD SEARCH
button ( ). The sound level
is decreased by 1/4 (12dB)
compared with the normal level.
• Release the button when the
desired point has been reached.
• If the unit reaches the end of a CD
during forward search in normal or
deleted play mode, etc., it starts
play at the beginning of the next
CD.
• If the unit reaches the end during
forward search, it switches to stop
mode.
• If the unit reaches the beginning of
a CD during backward search in
normal or deleted play mode, etc.,
play restarts at this point.
• If the unit reaches the beginning of
a track during backward search in
random or programmed play
mode, etc., play restarts at this
point.
REPEAT PLAY
REPEAT 1 TRACK
• Select the desired track with the
FORWARD or BACKWARD SKIP
button and press the REPEAT
button. Then press the PLAY/
PAUSE button to play the track.
• Then REPEAT 1 appears on the
display and only the selected
track is played repeatedly.
• During random or disc intro play,
REPEAT 1 TRACK play is not
operative.
REPEAT 1 DISC
• Before or during play, select the
desired CD with the DISC SELECTOR buttons and press the
REPEAT button twice, then
REPEAT 1 DISC appears on the
display and only the selected CD
is played repeatedly.
• During programmed play,
REPEAT 1 DISC play is not
operative.
REPEAT ALL DISCS
• Press the REPEAT button three
times, then press the PLAY/
PAUSE button.
• Then REPEAT ALL DISCS appears
on the display and all discs are
played repeatedly.
• If the REPEAT button is pressed
once more in REPEAT ALL DISCS
play mode, repeat play mode is
cancelled.
PROGRAMMED PLAY
You can program up to 32 selections
to play in any sequence you choose.
If you exceed 32 selections, the
“FULL” sign appears to remind you
that memory is full and cannot
accept any more selections.
PROGRAMMING
1. In stop mode, press the
PROGRAM/REVIEW button (on the
remote control).
2. Select the desired disc with the
DISC SELECTOR or DISC SKIP
button(s).
Example: When you select the first
disc.
• If the PROGRAM/REVIEW button
is pressed without selecting a track,
the selected disc is programmed as
one selection.
ENGLISH
8
FL8300 Engelsk 12/01/98, 16:3711
Page 12

PROGRAM
1234
5
TRACK
3
7
SEC
PROGRAM
5
TRACK
7
SEC
PROGRAM
5
TRACK
7
SEC
MIN
After a few seconds
After a few seconds
3. Select the track with the FORWARD or BACKWARD SKIP button.
Example: When you select the 4th
track.
ENGLISH
PROGRAM
1
TRACK
• When the track of the current disc
is selected, the track can be
selected directly without selecting
the disc.
4. Press the PROGRAM/REVIEW
button.
PROGRAM
1
PROGRAM
1
TRACK
MIN
SEC
After about 1 second
TRACK
MIN
SEC
• Because it is impossible to know
the playing time of each selection
from five discs, --:-- can appear
on the time display.
After a few seconds
TRACK MIN SEC
1234
5
:
• 5. Repeat steps 2, 3 and 4 to
complete programming.
4
4
4
4
6. Press the PLAY/PAUSE button.
PROGRAM
1234
5
TRACK MIN SEC
:
4
7 9
11
• If you want continuous play
without clearing your programmed
selection during programmed
play, select the desired disc with
the DISC SELECTOR or DISC
SKIP button(s) then continuous
play starts from the first track of
that disc.
• If you want programmed play
again, press the PROGRAM/
REVIEW button in stop mode,
then the unit switches to program
mode.
CHECKING
THE PROGRAMMED SELECTIONS
You can check the programmed
selections during programming or
after completion of the program.
• Each time the PROGRAM/REVIEW
button is pressed, the
programmed selections will
appear in the programmed
sequence.
RECTIFYING ANY WRONGLY
PROGRAMMED SELECTION
When you made a mistake and
programmed the wrong selection,
you can rectify it as follows.
Example: When tracks 3, 4 and 7 of
the first disc are programmed, if you
want to program track 7 of the 5th
disc instead of track 4 of the first
disc:
1. Find track 4 of the first disc with
the PROGRAM/REVIEW button by
continuing to press the review button
until that selection appears on the
display.
PROGRAM
1
TRACK SEC
3 5
7
2. Select your desired disc with the
DISC SELECTOR or DISC SKIP
button(s).
PROGRAM
5
Only the number that corresponds to
that disc appears.
3. Select your desired track with the
FORWARD or BACKWARD SKIP
button.
PROGRAM
TRACK
5
7
4. Press the PROGRAM/REVIEW
button.
After about 1 second
CLEARING THE
PROGRAMMED SELECTIONS
• Each time the STOP/CLEAR
button is pressed during programming or after completion of
programming, the programmed
selections are cleared one by one
in the opposite sequence.
• If you want to clear a specific
selection, find that selection with
the PROGRAM/REVIEW button
and clear it with the STOP/CLEAR
button.
• By pressing the OPEN/CLOSE or
STOP/CLEAR button over 4
seconds in stop mode, all programmed selections will be
cleared.
9
FL8300 Engelsk 12/01/98, 16:3812
Page 13

PROGRAM
1
A. SPACE INTRO
TRACK MIN SEC
1 2 3 4 5
6 7 8 9 10
11 12
EDIT
A B
PROGRAM
1234
5
A. SPACE
TRACK MIN SEC
7 8 9 10
12
AUTO
EDIT
A B
After a few seconds
After about 1 second
EDIT FOR RECORDING
You can edit up to 30 tracks for auto
edit or 32 tracks for manual edit
according to the tape length. This is
possible only on the current disc.
AUTO EDIT
1. In stop mode, press the EDIT
button.
1 2 3 4 5
AUTO
EDIT
AUTO
EDIT
AUTO
EDIT
6 7 8 9 10
11 12
1 2 3 4 5
6 7 8 9 10
11 12
1 2 3 4 5
6 7 8 9 10
11 12
A. SPACE
1234
5
2. a. Select the desired tape length
with the TAPE SIZE button.
Example: When the desired tape
length is 46 minutes.
A. SPACE
1234
A. SPACE
1234
5
5
After about 2 seconds
MIN SEC
Example: When the desired tape
length of each side is 23 minutes,
press 2, 3, 0 and 0 to enter 23:00.
1 2 3 4 5
AUTO
EDIT
A. SPACE
1234
5
MIN SEC
6 7 8 9 10
11 12
3. Press the EDIT button to
automatically edit the tracks to be
recorded.
1 2 3 4 5
PROGRAM
1
TRACK MIN SEC
The tracks and the remaining time of the side A appear
After about 2 seconds
PROGRAM
1
A .SPACE INTRO
TRACK MIN SEC
The tracks and the remaining time of the side B appear
After about 2 seconds
PROGRAM
A. SPACE INTRO
1234
5
TRACK MIN SEC
Auto edit is completed
AUTO
EDIT
6 7 8 9 10
11
A
AUTO
EDIT
7 8 9 10
12
A B
1 2 3 4 5
AUTO
EDIT
6 7 8 9 10
11 12
A B
:
MANUAL EDIT
1. In stop mode, press the EDIT
button twice.
1 2 3 4 5
EDIT
A. SPACE
1234
5
6 7 8 9 10
11 12
2. Select the desired tape length like
in auto edit.
3. Press the PROGRAM/REVIEW
button to manually edit the tracks to
be recorded.
PROGRAM
A. SPACE
1234
5
TRACK MIN SEC
EDIT
A
4. Select and program the tracks to
be edited like programming for side A.
Example: When tracks 1, 2, 3, 4, 5,
6 and 11 are edited for side A.
PROGRAM
A. SPACE
1234
5
TRACK MIN SEC
:
EDIT
A
1 2 3 4 5
6
11
6. Select and program the tracks to
be edited like programming for side B.
Example: When tracks 7, 8, 9, 10
and 12 are edited for side B.
• If the PLAY/PAUSE button is
pressed after editing the tracks,
play starts from the first track of
side A for edit recording.
• If all tracks of side A have been
played, the unit switches to pause
mode.
• If the PLAY/PAUSE button is
pressed, play starts from the first
track of side B for edit recording.
ENGLISH
• Each time the TAPE SIZE button is
pressed, the tape length display
changes as follows.
C-46 C-54 C-60 C-74 C-90 C-120
b. Select the desired tape length at
your option with the NUMERIC
buttons on the self remote control.
FL8300 Engelsk 12/01/98, 16:3813
5. After editing the tracks of side A,
press the EDIT button.
PROGRAM
A. SPACE
1234
5
TRACK MIN SEC
EDIT
A B
10
Page 14

NOTE:
1. In edit mode, the auto space
function, leaving a 4-second space
between tracks, is automatically
ENGLISH
activated.
2. In edit mode, repeat and random
play, etc., are not operative.
3. Checking, clearing or rectifying the
tracks is done like programming. In
auto edit mode, only checking and
clearing all edited tracks is possible.
4. During manual edit if the ‘--:--’
sign on the time display disappears,
the total time of the edited tracks is
greater than the selected tape
length. Edit the tracks again so that
the total time doesn’t exceed the
tape length.
5. When a track whose number is
greater than 30 is edited or deleted,
the time display may show “--:--”.
DELETED PLAY
When there are undesired discs or
tracks, you can delete up to 32
selections.
DELETING
1. In stop mode, press the DELETE
button.
1 2 3 4 5
DELETE
1234
5
TRACK MIN SEC
:
2. Select the disc with the DISC
SELECTOR or DISC SKIP button(s).
Example: When you select the first
disc.
DELETE
1
• If the DELETE button is pressed
without selecting a track, the
selected disc is deleted as one
selection.
3. Select the track with the
FORWARD or BACKWARD SKIP
button.
Example: When you select the 4th
track.
DELETE
1
TRACK
6 7 8 9 10
11 12
1 2 3 4 5
6 7 8 9 10
11 12
1 2 3 4 5
6 7 8 9 10
11 12
4. Press the DELETE button.
1 2 3 5
DELETE
1
TRACK
6 7 8 9 10
11 12
5. Within 8 seconds after step 4, if
you select the undesired tracks on
that disc, repeat steps 3 and 4 and if
not, repeat steps 2, 3 and 4.
6. Press the PLAY/PAUSE button.
1 2 3 5
DELETE
1234
5
TRACK MIN SEC
6 7 8 9 10
11 12
CHECKING THE
DELETED SELECTIONS
You can check the deleted
selections during deleting or after
completion of deleting.
• Each time the DELETE button is
pressed, the deleted selections
will appear in the deleted
sequence.
RECOVERING
THE DELETED SELECTIONS
• Each time the STOP/CLEAR
button is pressed during deleting,
the deleted selections are recovered one by one in the opposite
sequence.
• If you want to recover a specific
selection, find it with the DELETE
button and recover with the
STOP/CLEAR button.
• By pressing the OPEN/CLOSE or
STOP/CLEAR button over 4
seconds in stop mode, all deleted
selections will be recovered.
RANDOM PLAY
RANDOM 1 DISC PLAY
• If the RANDOM PLAY button is
pressed, RANDOM 1 DISC
appears and the unit automatically
selects and plays tracks on the
current disc at random.
• After that disc has been played, all
tracks of each disc are played at
random from the next disc to the
5th disc.
11
FL8300 Engelsk 12/01/98, 16:3814
Page 15

1234
5
TRACK MIN SEC
7 8 9
1234
5
MIN SEC
7 8 9
1234
5
TRACK MIN SEC
7 8 9
Press
Press
Press
Time remaining of track
Time remaining of disc
Elapsed time of track
Remaining playing time of the current track
Remaining playing time of the current disc
Elapsed playing time from the beginning
of the current track
• If the FORWARD SKIP button is
pressed at the last track of a disc,
random play will start on the next
disc.
RANDOM
1234
5
1 2 3 4 5
6 7 8 9 10
11 12
The square turns clockwise until a
track on the current disc is selected.
RANDOM ALL DISCS PLAY
• If the RANDOM PLAY button is
pressed once more, RANDOM
ALL DISCS appears and the unit
will automatically select a disc
among the five discs and a track
of that disc at random.
• After that track has been played,
the unit will continue to select
other discs and tracks at random.
RANDOM
1234
RANDOM
1234
ALL 1 DISC 8
TRACK
5
After a disc is selected
ALL 1 DISC 8
5
1 2 3 4 5
6 7 8 9 10
11 12 13 14 15
16 17 18 19
1 2 3 4 5
6 7 8 9 10
11 12 13 14 15
16 17 18 19
• If the RANDOM PLAY button is
pressed once again during
random all discs play, random
play will be cancelled and normal
play will start from that track.
• If a disc is selected with the DISC
SELECTOR or DISC SKIP
button(s) during random or
introscan all discs play, random or
introscan play will be cancelled
and normal play will start from
that disc.
INTROSCAN PLAY
INTROSCAN 1 DISC PLAY
• If the DISC INTRO button is
pressed, INTRO 1 DISC appears
and the unit plays the first 10
seconds of each track from the
current disc to the 5th disc.
INTROSCAN ALL DISCS PLAY
If the DISC INTRO button is pressed
twice, INTRO ALL DISCS appears
and the unit plays the first 10
seconds of each first track on the
discs from the current disc.
• In this mode, if the DISC INTRO
button is pressed once more,
introscan play will be cancelled
and normal play will start from
that track.
• During programmed play, if the
RANDOM PLAY or DISC INTRO
button is pressed, RANDOM or
INTRO will appear and random
play or introscan of the programmed selections will start.
• During random, repeat or
introscan all discs play, etc. If the
OPEN/CLOSE button is pressed,
each play will be cancelled and
normal play will start from that
track.
TIME DISPLAY SELECTION
This unit has three different time
display modes.
Example: When a disc of 53 min. 47
sec. is playing at the point of 3 min.
15 sec. after the beginning of track 7:
6 min. 4 min.
TRACK 1 TRACK 2 TRACK 7 TRACK 8 TRACK 9
9 Tracks 53 min. 47 sec.
23 min. 47 sec.
... ...
3 min. 15 sec. point of track 7
5 min. 7 min. 8 min.
ENGLISH
NOTE:
1. When a track whose number is
greater than 30 is being played, the
remaining playing time of the track
shows “--:--”.
2. During random or programmed
play, etc., the remaining playing time
of the disc shows “--:--”.
12
FL8300 Engelsk 12/01/98, 16:3815
Page 16

Remote Controls
SYSTEM REMOTE CONTROL
This unit can be remotely controlled
by Harman Kardon RECEIVERS.
• For available control functions,
ENGLISH
refer to the receiver’s manual.
• To play a CD by the system
remote control, make sure to
connect a system remote control
cord to the remote output of the
HARMAN KARDON RECEIVER.
REMOTE CONTROL
FOR THE FL8300
1. NUMERIC (0-9)
AND DISC BUTTONS
• If you press the number that
corresponds to your desired track
with the NUMERIC buttons, the
unit plays that track immediately
without the PLAY/PAUSE button.
• To select a two-digit track number, the second digit must be
pressed within 2 seconds after the
first digit has been pressed.
• During programming or deleting,
etc., if you select a track with the
NUMERIC buttons, that track is
programmed or deleted without
the PROGRAM/REVIEW or
DELETE buttons.
• If you want continuous play from
the current disc without clearing
your programmed selections
during programmed play, select
1
2
3
the desired track on that disc with
the NUMERIC buttons. Continuous play starts from that track.
• If you want programmed play
again, press the PROGRAM/
REVIEW button in stop mode, and
then the unit switches to program
mode.
• When selecting a disc, press the
DISC button and the desired disc
number (1-5) in the NUMERIC
buttons within 2 seconds.
2. REPEAT A - B BUTTON
• During play, press this button at
the beginning of the passage you
want, then REPEAT A- appears on
the display.
• Press this button at the end of the
passage again, then REPEAT A B appears on the display and the
specific passage is played
repeatedly.
• If you want to cancel the repeat
A - B play, press the REPEAT
A - B or STOP/CLEAR button.
• During introscan play, REPEAT
A - B is not operative.
3. DISPLAY BUTTON
• Each time the DISPLAY button is
pressed, the brightness of the
display changes as follows:
ON
• In display OFF mode, if any button
is pressed, the unit switches to
display ON mode.
• DISC INTRO, PROGRAM/
REVIEW, TAPE SIZE, EDIT,
REPEAT (1/ALL), RANDOM PLAY,
DELETE, TIME, BACKWARD
SKIP, FORWARD SKIP, BACKWARD SEARCH, FORWARD
SEARCH, PAUSE, STOP/CLEAR
and PLAY BUTTONS.
These buttons have the same
functions as those on the unit.
dim
OFF
13
FL8300 Engelsk 12/01/98, 16:3816
Page 17

harman/kardon
Power
FL8300
123
4 5 Disc Skip
Remote Sensor
7 m
30° 30°
1 2 3 4
5 6 7 8
9 0
INTRO PROG/REV TAPE SIZE EDIT
REPEAT
1/ALL A B RANDOM DELETE
DISPLAY TIME
harman/kardon
Compact Disc Changer
PROGRAM RANDOM
DELETE A.SPACE INTRO
1234
DISC
D I G I T A L A U D I O
ALL 1 DISC 8
REPEAT
5
C O M P A C T
A
TRACK MIN SEC
AUTO EDIT
AUTO
EDIT
A B
AB
1 2 3 4 5
6 7 8 9 10
11 12 13 14 15
16 17 18 19
Program/Review Random Repeat Edit
Time Intro Delete Tape Size
Open/Close
Phones
Headphones
CONCERNING
USE OF BATTERIES
• Open the cover by sliding it as
shown.
• Insert two size “AA” (R6) batteries,
matching the polarity, and close
the cover.
NOTE:
1. Replace them with two new
batteries when the remote control
does not operate the unit.
2. Remove the batteries if it is not to
be used for an extended period of
time.
3. Do not use rechargeable batteries
(Ni-Cd type).
ENGLISH
FL8300 Engelsk 12/01/98, 16:3817
➞
14
Page 18

Troubleshooting Guide
Although the greatest care has been
taken in the manufacturing of this
unit, the possibility remains that a
fault could appear or that for some
reason the unit could fail to function
ENGLISH
to your complete satisfaction.
The cause, however, will not always
be found in the unit itself. External
factors and the fact that it takes time
to become accustomed to the whole
concept of the new product and the
new discs, can also play a role.
To save unnecessary calls on your
dealer or our Service Organization,
we have compiled a list of possible
faults and their causes. To even
mention some of these causes, such
as those to do with power
connection, may seem excessive.
Our experience shows, however, that
they are easily overlooked as
sources of trouble. If, by using this
list, you do not succeed in solving
the problem, stop your investigation.
Disconnect the AC cord and contact
your dealer.
Under no circumstances should you
open up the unit. If you should, this
will invalidate all your rights under
the warranty.
NOTE:
If the faults relating to the power or
the connections arise when the unit
is a part of a system, check your
operating instructions for the
amplifier of the system.
1. AFTER PRESSING
THE POWER SWITCH,
THE DISPLAY IS NOT ON OR THE
CAROUSEL DOES NOT ROTATE.
• The POWER switch is not pressed
completely.
• One of the plugs of the AC input
cord is not connected or is not
making contact.
• There is no supply at the AC
outlet. Plug in another electrical
appliance to check if the AC outlet
functions.
2. DISC IS LOADED
BUT PLAY DOES NOT START
• The disc is not loaded with the
labelled side up.
• The disc is dirty. See if cleaning
the disc or using another clean
disc clears the fault.
• The disc is defective. Try another
disc and see if that clears the
fault.
• There is an unwanted object such
as a piece of paper or a remnant
of packaging in the tray.
3. THE DISC PLAYED
AND THE TRACK NUMBER
AND THE ELAPSED TIME
INDICATORS FUNCTION WELL,
BUT THERE IS NO SOUND.
• The amplifier is not turned on.
• The position of the amplifier
source selector does not correspond with the input to which the
unit is connected.
• The amplifier or the speakers
connected to it are not working.
Check it with another sound
source to see if this is the case.
• The microprocessor has not
received the command correctly.
Turn the unit off and on again and
then try restarting to see if that
clears the fault.
• The unit is not connected to the
amplifier correctly.
• The input to which the unit is
connected is defective. Check it
by connecting the unit to another
input jack.
4. THE SOUND IS POOR
OR DISTORTED OR YOU
CAN HEAR ONLY ONE CHANNEL.
• The unit is not connected to the
CD or AUX input of the amplifier
but to the PHONO input.
• One of the plugs of the connection
cords is either not connected or
not properly connected.
• The amplifier or the speakers
connected to it are not working
properly. Check it with another
sound source to see if this is the
case.
5. PROGRAMMING
IS NOT WORKING.
• The microprocessor has not
processed the commands properly. Clear the program by
pressing the OPEN/CLOSE button
or the STOP/CLEAR button over 4
seconds. Try to program again,
restart play and check if the fault
is cleared.
• The memory was already full of 32
selections and you missed the
“FULL” sign that indicated it.
Check it with the PROGRAM/
REVIEW button.
15
FL8300 Engelsk 12/01/98, 16:3818
Page 19

Specifications FL8300
Kongevejen 194B
DK-3460 Birkerød
Danemark
We, Harman Marketing Europe a/s
Steen Michaelsen
harman marketing europe a/s
DECLARATION OF CONFORMITY
declare that the product described in
this owner's manual is in compliance
with technical standards:
Accredited test laboratory:
MIKES PRODUCT SERVICE GmbH
Ohmstrasse 2-4
D-94342 Strasskirchen
Germany
The appliance conforms with EEC directive
87/308/EEC regarding interference suppression
• TYPICAL AUDIO PERFORMANCES
Number of Channels 2
Frequency Range 20-20,000 Hz ± 0.2 dB
Signal to Noise Ratio More than 104 dB
Dynamic Range More than 94 dB
Total Harmonic Distortion Less than 0.05% at 1kHz
Audio Output Level 2 Volts RMS
• OPTICAL READOUT SYSTEM
LASER Semiconductor AlGaAs
Wave Length 760 - 800 nm
Numerical Aperture 0.45
• SIGNAL FORMAT
Sampling Frequency 44.1 kHz
D/A Conversion Dual 1 Bit
Oversampling 8 times
• GENERAL
Power Supply Voltage 230 V, 50 Hz
Power Consumption MAX. 12 Watts
Dimension (W × H × D) 440 × 95 × 380 mm
Weight 6.5 Kg (14.5 lbs)
ENGLISH
EN 55013/6.1990. EN 55020/6.1988.
EN 55022/4.1987.
• DISC
Diameter 120 mm/80 mm
Thickness 1.2 mm
Rotation Speed 500 - 200 rpm
Playing Time (Theoretical) 74 min. (stereo)
Track Pitch 1.6 um
Note: Specifications and features are subject to change without notice.
16
FL8300 Engelsk 12/01/98, 16:3819
 Loading...