

Page 1
BDT 3/BDT 30
Blu-ray Disc™ player
Owner’s Manual
Page 2

BDT 3/BDT 30
IMPORTANT SAFETY INSTRUCTIONS 3
UNPACKING 5
INSTALLATION LOCATION 5
CLEANING 5
THANK YOU FOR CHOOSING HARMAN KARDON® PRODUCTS 5
BDT 3/BDT 30 FEATURES 6
SUPPLIED ACCESSORIES 6
FRONT-PANEL CONTROLS 7
REAR-PANEL CONNECTORS 8
REMOTE CONTROL FUNCTIONS 8
CONNECTING THE PLAYER 10
Safety Instructions
PREPARING THE REMOTE CONTROL 10
SETTING UP THE PLAYER 11
PLAYING DISCS 14
PLAYING FILES FROM USB DEVICES AND CD DATA DISCS 16
USING PLAYLISTS 18
TROUBLESHOOTING 19
SPECIFICATIONS 20
22
Page 3
BDT 3/BDT 30
Important Safety Instructions
Important Safety Instructions
1. Read these instructions.
2. Keep these instructions.
3. Heed all warnings.
4. Follow all instructions.
5. Do not use this apparatus near water.
6. Clean only with a dry cloth.
7. Do not block any ventilation openings. Install in accordance with the manufacturer’s instructions.
8. Do not install near any heat sources such as radiators, heat registers, stoves or other apparatus (including amplifiers) that produce heat.
9. Do not defeat the safety purpose of the polarized or grounding-type plug. A polarized plug has two blades with one wider than the other. A grounding-type
plug has two blades and a third grounding prong. The wide blade or the third prong is provided for your safety. If the provided plug does not fit into your outlet,
consult an electrician for replacement of the obsolete outlet.
10. Protect the power cord from being walked on or pinched, particularly at plugs, convenience receptacles and the point where they exit from the apparatus.
11. Only use attachments/accessories specified by the manufacturer.
12. Use only with the cart, stand, tripod, bracket or table specified by the manufacturer or sold with the apparatus.
When a cart is used, use caution when moving the cart/apparatus combination to avoid injury from tip-over.
13. Unplug this apparatus during lightning storms or when unused for long periods of time.
14. Refer all servicing to qualified service personnel. Servicing is required when the apparatus has been damaged in any way, such as power supply cord or plug
is damaged, liquid has been spilled or objects have fallen into the apparatus, or the apparatus has been exposed to rain or moisture, does not operate normally
or has been dropped.
15. Do not expose this apparatus to dripping or splashing and ensure that no objects filled with liquids, such as vases, are placed on the apparatus.
16. To completely disconnect this apparatus from the AC Mains, disconnect the power supply cord plug from the AC receptacle.
17. The mains plug of the power supply cord shall remain readily operable.
18. Do not expose batteries to excessive heat such as sunshine, fire or the like.
CAUTION
THE LIGHTNING FLASH WITH AN ARROWHEAD SYMBOL, WITHIN AN EQUILATERAL
TRIANGLE, IS INTENDED TO ALERT THE USER TO THE PRESENCE OF UNINSULATED
“DANGEROUS VOLTAGE” WITHIN THE PRODUCT’S ENCLOSURE THAT MAY BE OF
SUFFICIENT MAGNITUDE TO CONSTITUTE A RISK OF ELECTRIC SHOCK TO PERSONS.
WARNING: TO REDUCE THE RISK OF FIRE OR ELECTRIC SHOCK, DO NOT EXPOSE THIS
APPARATUS TO RAIN OR MOISTURE.
RISK OF ELECTRIC SHOCK
DO NOT OPEN
SEE MARKING ON BACK OF PRODUCT.
THE EXCLAMATION POINT WITHIN AN EQUILATERAL TRIANGLE IS INTENDED TO
ALERT THE USER TO THE PRESENCE OF IMPORTANT OPERATING AND MAINTENANCE
(SERVICING) INSTRUCTIONS IN THE LITERATURE ACCOMPANYING THE PRODUCT.
ENGLISH
FCC Regulations
FCC Information For Users
This device complies with Part 15 of the FCC Rules. Operation is subject to the following
two conditions: (1) This device may not cause harmful interference; and (2) this device
must accept any interference received, including interference that may cause undesired
operation.
Radio and Television Interference
This equipment has been tested and found to comply with the limits for a Class B digital
device, pursuant to Part 15 of the FCC Rules. These limits are designed to provide
reasonable protection against harmful interference in a residential installation. This
equipment generates, uses and can radiate radio frequency energy and, if not installed
and used in accordance with the instructions, may cause harmful interference to radio
communications. However, there is no guarantee that interference will not occur in a
particular installation. If this equipment does cause interference to radio or television
reception, which can be determined by turning the equipment off and then on, the user is
encouraged to try to correct the interference by one or more of the following measures:
• Increase the separation between the equipment and receiver.
• Connect the equipment to a different outlet so that the equipment and receiver are
on different branch circuits.
• Consult the dealer or an experienced radio/TV technician for help.
NOTE: Changes or modifications not expressly approved by HARMAN could void the
user’s authority to operate the equipment.
IC Statement and Warning
This Class B digital apparatus complies with Canadian ICES-003. Cet appareil numérique
de la classe B est conforme à la norme NMB-003 du Canada.
3
Page 4
BDT 3/BDT 30
Important Safety Instructions
For Canadian Model
This Class B digital apparatus complies with
Canadian ICES-003. For models having a power
cord with a polarized plug:
CAUTION: To prevent electric shock, match wide
blade of plug to wide slot, fully insert.
For Canadian Model
Cet appareil numérique de la classe B est
conforme à la norme NMB-003 du Canada. Sur
les modèles dont la fiche est polarisee:
ATTENTION: Pour éviter les chocs électriques,
introduire la lame la plus large de la fiche dans
la borne correspondante de la prise et pousser
jusqu’au fond.
Instructions for Users on Removal and Disposal of Used Batteries.
Specifications of Included Battery Types.
These symbols shown on the product or the packaging or in the manual or separate
information sheet mean that the product itself, as well as the batteries included or built
into the product, should never be thrown away with general household waste. Take them
to applicable collection points, where proper treatment, recycling and recovery takes
place, in accordance with national or local legislation, or European Directives 2002/96/
EC and 2006/66/EC.
Correct handling of the product and batteries to be disposed saves resources and
prevents possible negative effects on the environment or human health.
The batteries included with your equipment may be alkaline, carbon zinc/manganese
or lithium (button cells) type. All types should be disposed of according to the above
instructions.
To remove the batteries from your equipment or remote control, reverse the procedure
described for inserting batteries in the owner’s manual.
For products with a built-in battery that lasts for the lifetime of the product, removal
may not be possible for the user. In this case, recycling or recovery centers handle the
dismantling of the product and the removal of the battery. If, for any reason, it becomes
necessary to replace such a battery, this procedure must be performed by authorized
service centers.
CAUTION: This product uses a laser system. To prevent direct exposure to the laser beam,
do not open the cabinet enclosure or defeat any of the safety mechanisms provided for
your protection. DO NOT STARE INTO THE LASER BEAM. To ensure proper use of this
product, please read the owner’s manual carefully and retain it for future use. Should
the unit require maintenance or repair, please contact your local Harman Kardon service
center. Refer servicing to qualified personnel only.
4
Page 5
BDT 3/BDT 30
Unpacking
Unpacking
The carton and shipping materials used to protect your new player during shipment were
specially designed to cushion it from shock and vibration. We suggest that you save the
carton and packing materials for use in shipping if you move or if the unit ever needs
repair.
To minimize the size of the carton in storage, you may wish to flatten it. You can do it by
carefully slitting the tape seams on the carton’s bottom and collapsing it. You can store
cardboard inserts in the same manner. Packing materials that cannot be collapsed should
be saved along with the carton in a plastic bag.
If you do not wish to save the packaging materials, please note that the carton and
other sections of the shipping-protection materials are recyclable. Please respect the
environment and discard those materials at a local recycling center.
Remove the protective plastic film from the front-panel lens. Leaving the film in place will
affect the performance of your remote control.
Installation Location
• To ensure proper operation and to avoid the potential for safety hazards, place
the unit on a firm and level surface. When placing the unit on a shelf, be certain
that the shelf and any mounting hardware can support the weight of the product.
• Provide proper space both above and below the unit for ventilation. If this product
will be installed in a cabinet or other enclosed area, make certain that there is
sufficient air movement within the area. Under some circumstances, a fan may
be required.
• Do not place the unit directly on a carpeted surface.
• Avoid installation in extremely hot or cold locations, or in an area that is exposed to
direct sunlight or heating equipment.
• Avoid moist or humid locations.
• Do not obstruct the ventilation slots on the top and sides of the unit or place objects
directly over or next to them.
• Do not place the BDT 3/BDT 30 directly on top of a product that generates
excessive heat.
• Due to the heat generated by the player and other components in your system,
there is the remote possibility that the rubber padding on the bottom of the unit’s
feet may leave marks on certain wood or wood-veneer materials. Use caution
when placing the unit on soft woods or other materials that heat or heavy objects
may damage. Some surface finishes may be particularly sensitive to absorbing
such marks, due to a variety of factors beyond Harman Kardon control, including
the nature of the finish, cleaning materials used, normal heat and vibration caused
by the use of the product, or other factors. Your warranty will not cover this type of
damage to furniture, so exercise caution in choosing an installation location for the
component and in performing normal maintenance practices.
• Your new Harman Kardon Blu-ray Disc
connection for BD-Live™ interactivity.
™
player requires a broadband Internet
Thank You for Choosing Harman Kardon® Products!
For more than fifty years, Harman Kardon products have been at the cutting edge of audio
and home theater technology. The first audio receiver wore a Harman Kardon badge, and
the company has been producing innovative entertainment products ever since. The BDT
3/BDT 30 Blu-ray Disc™ player is the latest component offered in that proud tradition.
Incorporating the latest 3-D, high-definition audio and video processing technologies, the
BDT 3/BDT 30 is an essential part of a modern home theater system. It plays your favorite
Blu-ray Disc movies with up to 1080/24p video resolution when available on the disc, and
thanks to HDMI
connectivity, lets you experience the latest 3-D home entertainment when you connect
it to a 3-D-capable TV.
Connect the BDT 3/BDT 30 to the Internet, and BD-Live
compatible discs) delivers additional features, updates and news of live events. Even your
older DVD-Video discs will deliver outstanding picture quality when they are upscaled to
1080p video resolution.
Yet with all of its sophistication, the BDT 3/BDT 30 is simple to operate. Its controls are
similar to those of DVD players, and its enhanced on-screen menu system guides you
every step of the way. Easy to use and delivering outstanding performance, the BDT 3/
BDT 30 is sure to provide enjoyment for many years to come.
If you have any questions about this product, its installation or its operation, please
contact your retailer or custom installer, or visit the Harman Kardon Web site at
www.harmankardon.com.
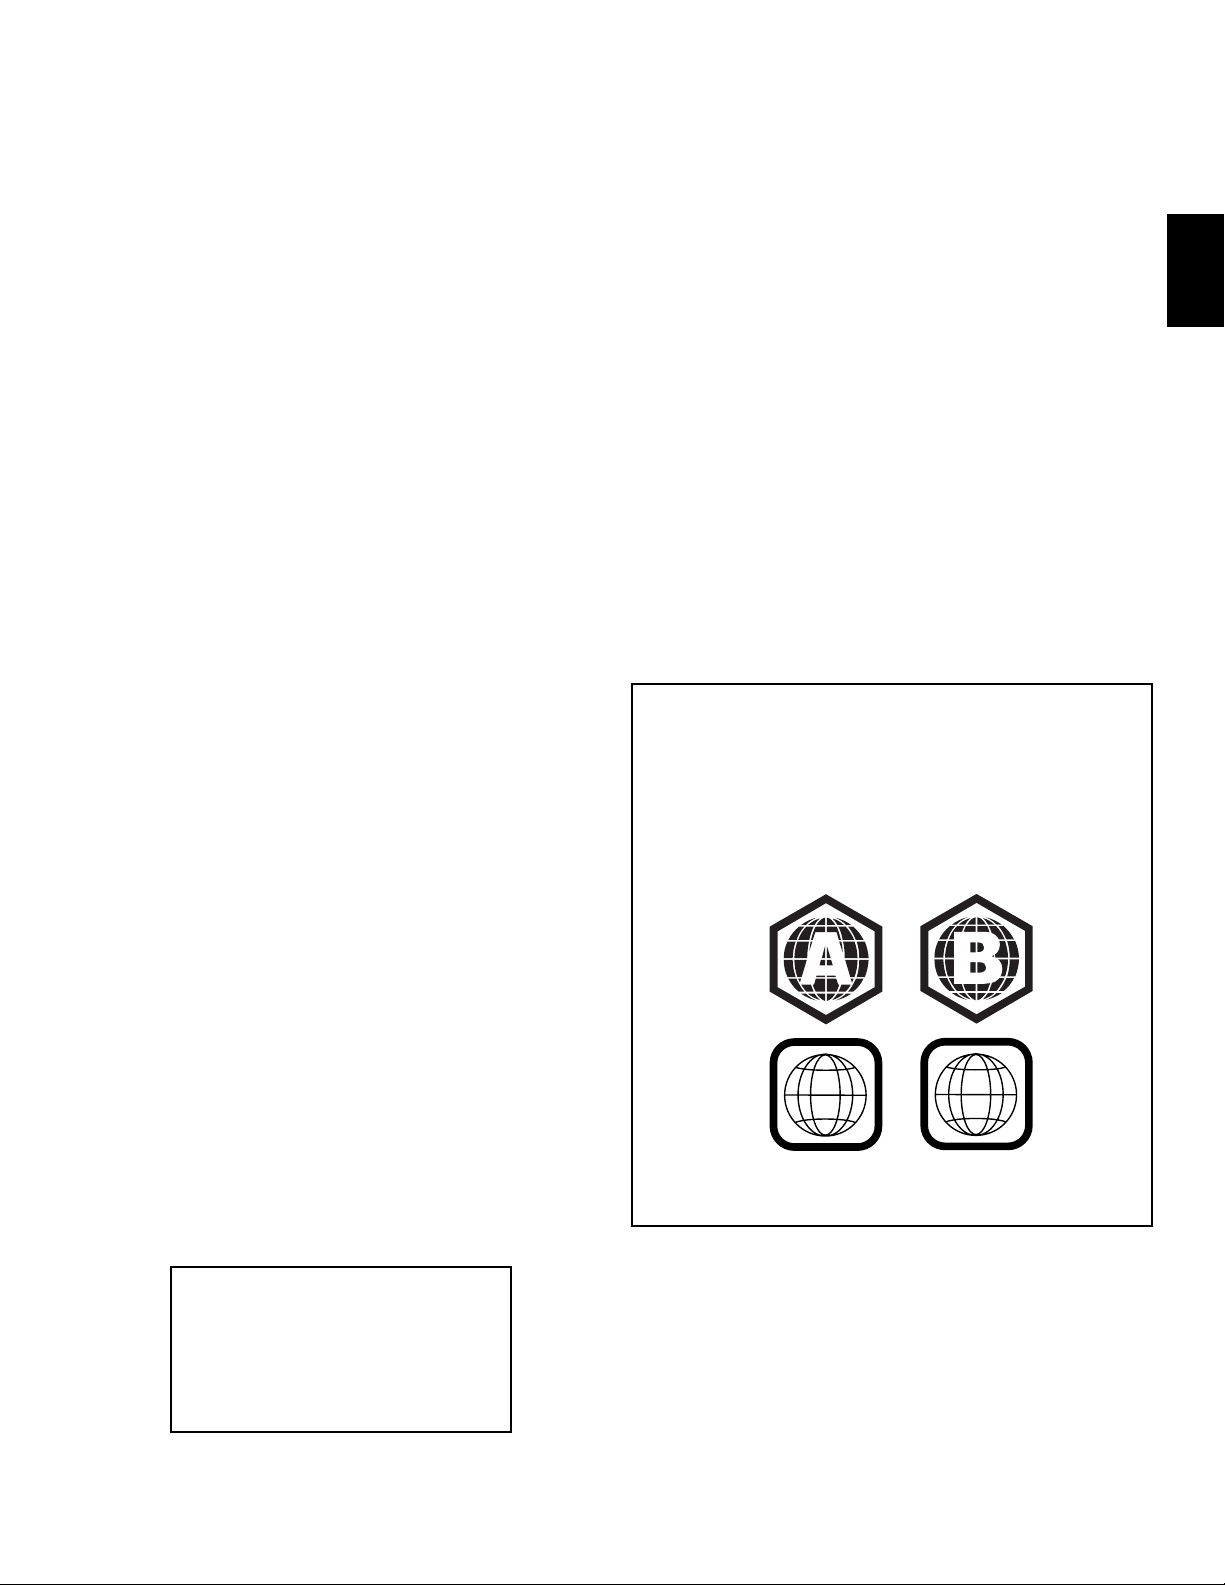
NOTE: Your Blu-ray Disc player is designed and manufactured for compatibility
with region management information that is encoded on most Blu-ray Disc
recordings and DVD recordings:
®
(High-Definition Multimedia Interface®) 1.4a with 30/36-bit Deep Color
™
interactivity (available with
• BDT 3 units are designed only for playback of discs with Blu-Ray Disc
Region Code A and DVD Region Code 1 information, or for discs that
do not contain any Region Code information.
• BDT 30 units are designed only for playback of discs with Blu-ray Disc
Region Code B and DVD Region Code 2 information, or for discs that do
not contain Region Code information.
ENGLISH
Cleaning
• When the unit gets dirty, wipe it with a clean, soft, dry cloth. If necessary, and only
after unplugging the AC power cord, wipe it with a soft cloth dampened with mild
soapy water, then a fresh cloth with clean water. Wipe it dry immediately with a
dry cloth. NEVER use benzene, aerosol cleaners, paint thinner, alcohol or any other
volatile cleaning agent. Do not use abrasive cleaners, as they may damage the
finish of metal parts. Avoid spraying insecticide near the unit.
Please register your product on our Web site at
www.harmankardon.com.
Note: You’ll need the product’s serial number.
At the same time, you can choose to be
notified about our new products and/or special
promotions.
1
If there is a Region Code on a disc other than the one your BDT player is
designed for, it will not play in your BDT player.
2
5
Page 6
BDT 3/BDT 30
BDT 3/BDT 30 Features
BDT 3/BDT 30 Features
Connectivity
• One HDMI connector
• One coaxial digital audio output connector
• Left and right analog audio output connectors
• One composite video output connector
• One USB 2.0 port that plays video, audio and photo content from USB devices
• Connects to your LAN (local area network) for BD-Live interactivity via the Internet
Ease of Use
• On-screen menu system
• Dot-matrix front-panel information display
• Full-function remote control
Disc Player Features
• HDMI 1.4a with 3-D and 30/36-bit Deep Color
• Region coding: Blu-ray Disc Region A/DVD Region 1 (BDT 3 models);
Blu-ray Disc Region B/DVD Region 2 (BDT 30 models)
• Plays 5-inch (12cm) and 3-inch (8cm) discs
• Video formats supported: BD-Video (single-layer or double-layer), BD-R, BD-RE,
DVD-Video, DVD+R/+RW, DVD-R/-RW, CD-R/RW
• Audio formats supported: Dolby
Digital, DTS-HD™ High Resolution Audio, DTS-HD Master Audio,™ CDDA (CD digital
audio), PCM, CBR @192kbps, VBR @ 355kbps, MP3: 32kbps – 320kbps bitrates,
including variable bitrate encoding
• CEC (Consumer Electronics Control) with basic controls over HDMI/CEC
• Supports JPEG still-image format
• Supports BD-Live interactivity
• Video upscaling to 720p and Full HD 1080p
• Progressive-scan video output
• JPEG resolution supported: 4,000 x 5,000 pixels (W x H), 20M pixels maximum
• JPEG still-image rotation in 90-degree increments
• Thumbnail JPEG still-image menu
• Fast play rates: 2x, 4x, 8x, 16x, 32x
• Slow play rates: 1/2x, 1/4x, 1/8x, 1/16x
• Random play (CDs only)
• Repeat play
• Parental-control system with user-programmable password
• Disc recognition for up to 10 discs
• Aspect-ratio adjustment
®
Digital, Dolby Digital Plus, Dolby TrueHD, DTS
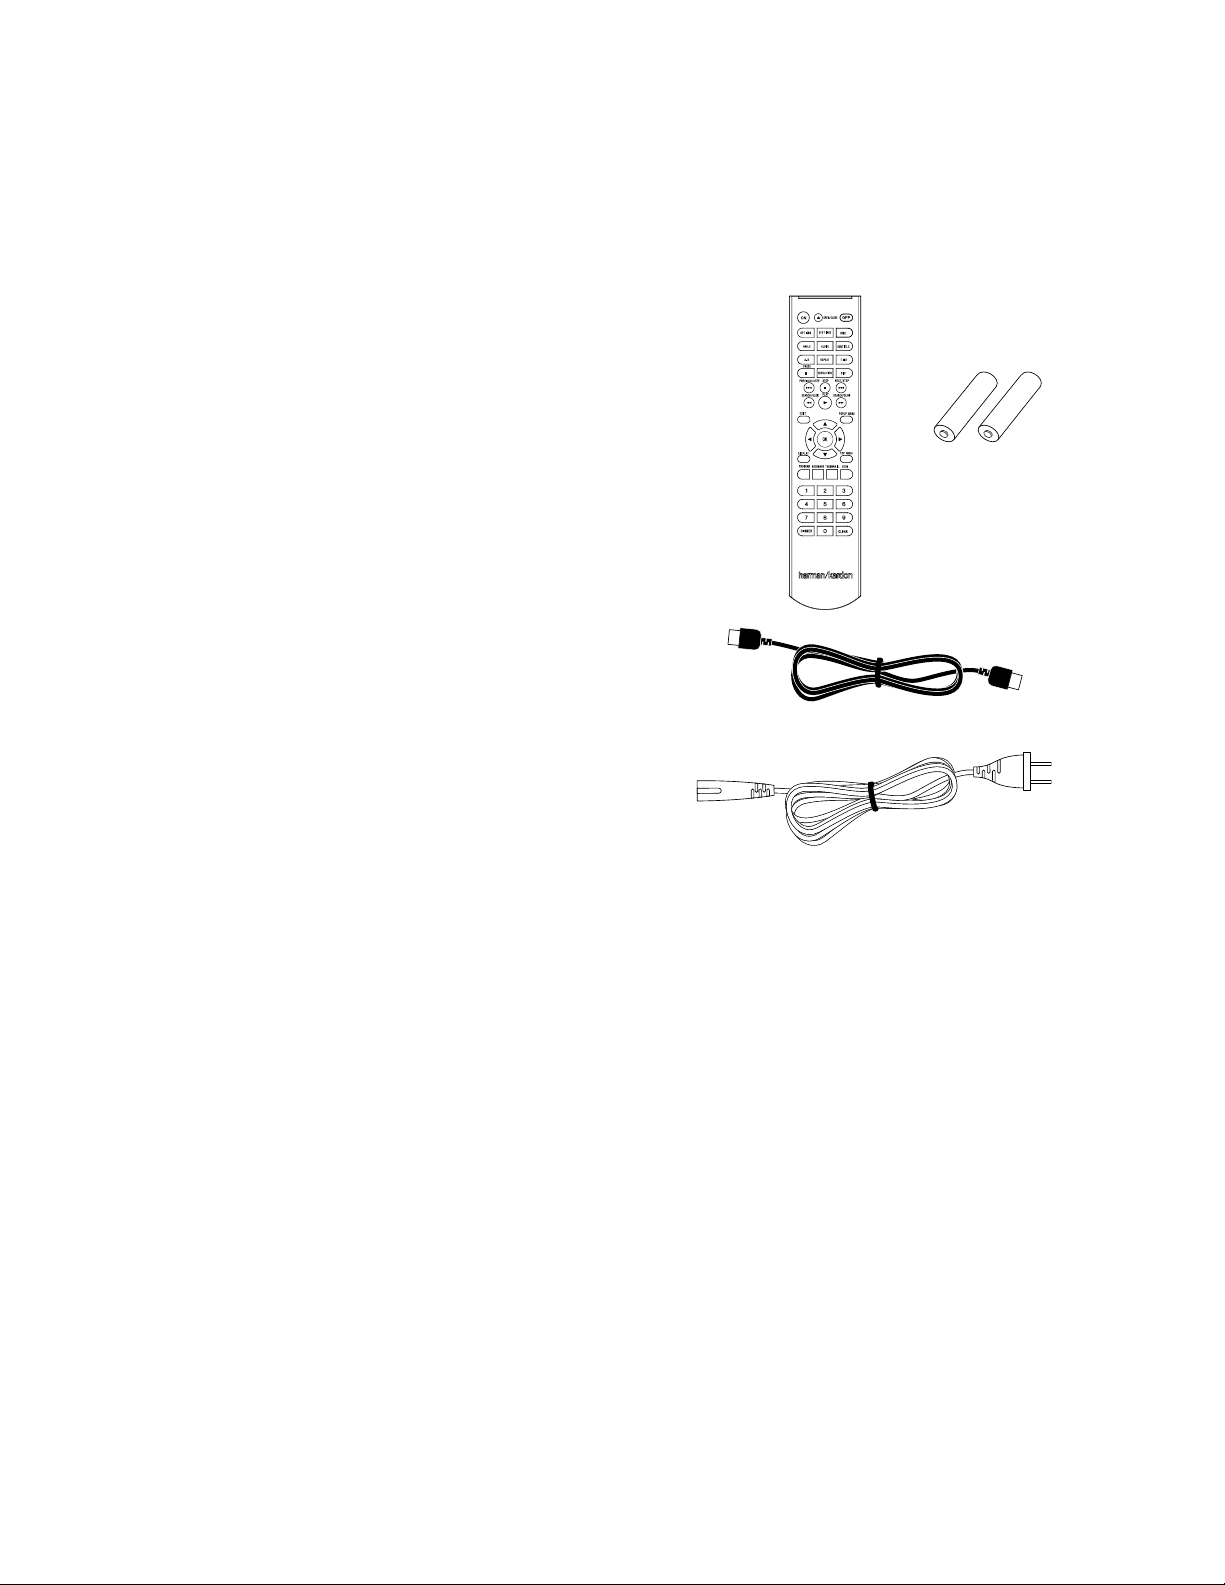
Supplied Accessories
If any of these items are missing, please contact Harman Kardon Customer Service via
www.harmankardon.com.
Remote control
®
HDMI cable
Power cord
(Note: The power cord included will vary depending on where the unit is sold.)
Two AAA batteries
6
Page 7
BDT 3/BDT 30
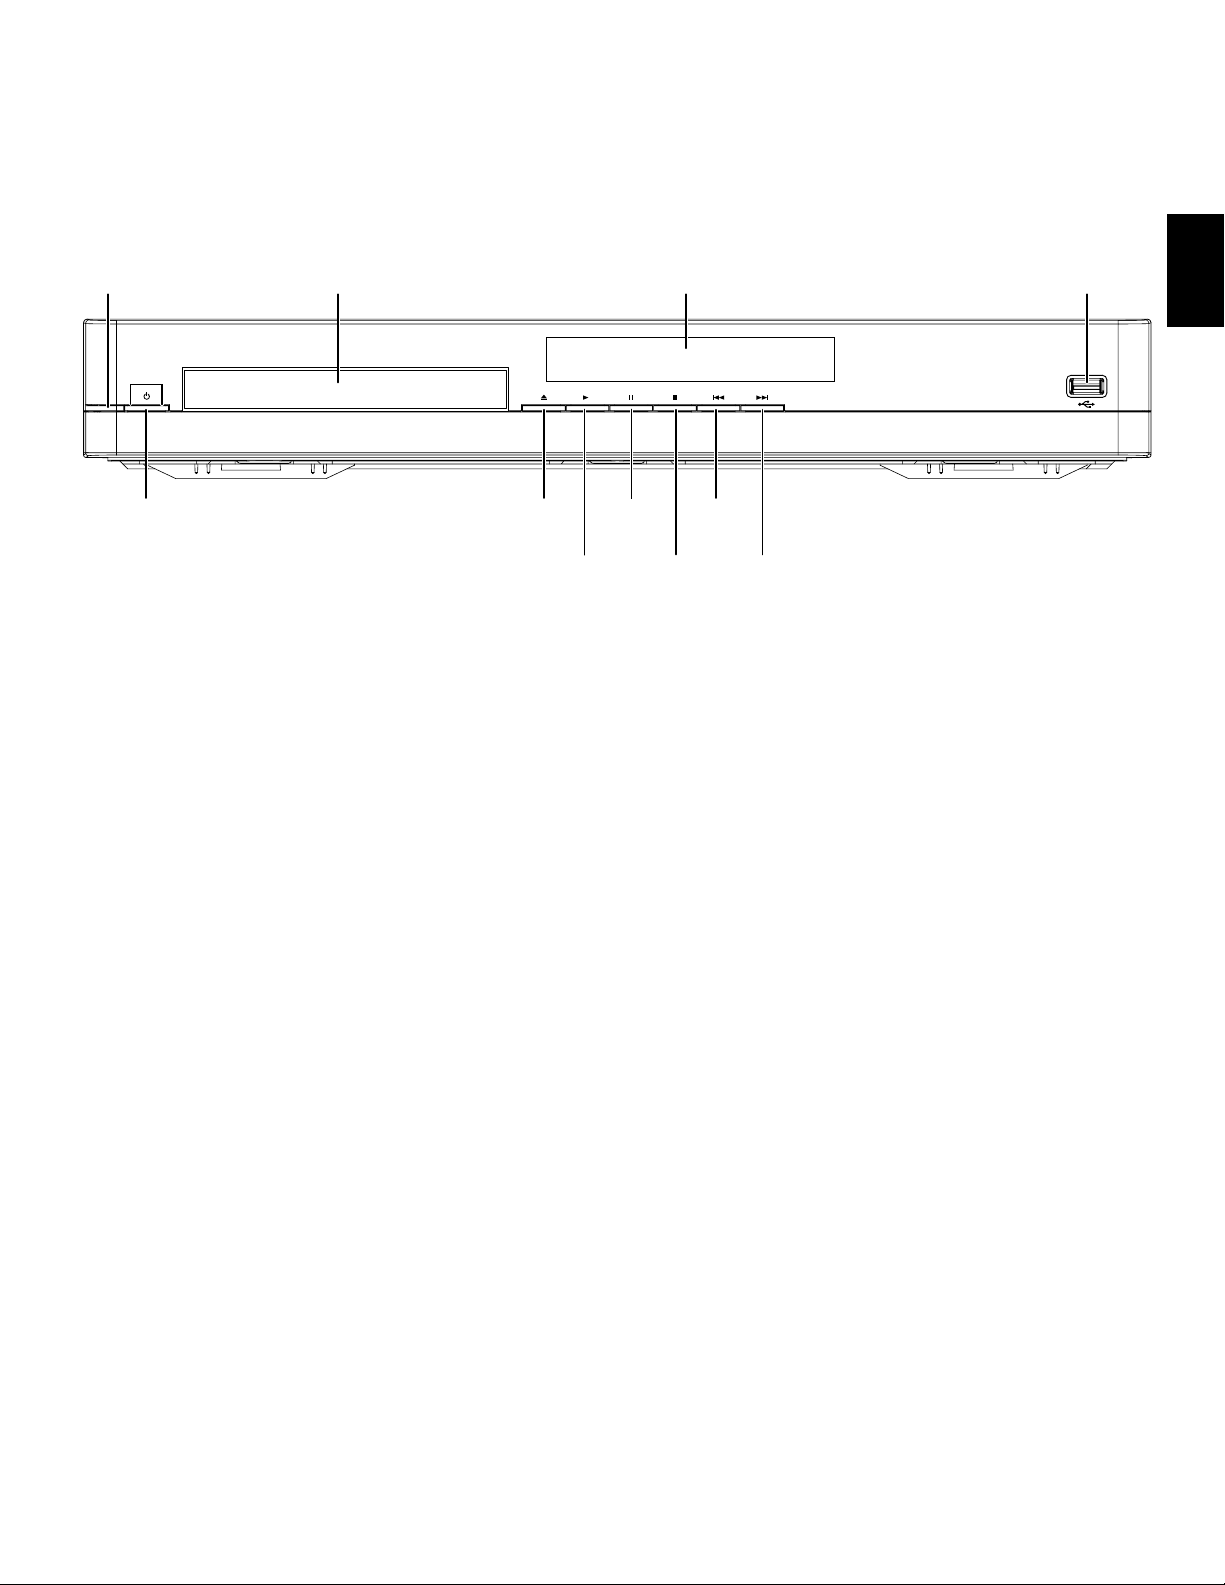
Front-Panel Controls
Front-Panel Controls
Power
Indicator
Power
Button
Power Indicator:
Main Power switch is set to “On,” the LED turns amber to indicate that the player is in
Standby mode. When you turn the BDT 3/BDT 30 on (by the Power button or the remote
control), the LED turns white.
Power Button
modes.
Disc Drawer:
5-inch (12cm) and 3-inch (8cm) discs.
Open/Close Button:
pressing this button, make sure that no objects are blocking the disc drawer.
Play Button:
drawer. Pressing this button when viewing photos begins a slide show with all photos in
the current folder.
Pause Button:
while a Blu-ray Disc program or DVD program is playing will freeze-frame on the current
video frame. Pressing the button while the disc is paused will resume play. Pressing this
button while viewing photos freezes the current photo on the screen.
Stop Button:
button will resume playback from the point where it stopped.) Press the Stop button twice
to stop playback fully.
Information Display: Previous/Step Button:
beginning of the track or chapter being played – or, when viewing photos, to the previous
When the BDT 3/BDT 30 is plugged into AC power and its rear-panel
: This button toggles the BDT 3/BDT 30 between the On and Standby
Insert a compatible disc into the drawer. The BDT 3/BDT 30 will accept
Press this button to open and close the disc drawer. Before
Press this button to play a disc that has been loaded into the player’s disc
Press this button to pause a disc that is playing. Pressing the button
Press this button to stop playback. (With some discs, pressing the Play
Disc
Drawer
Open/Close
Button
Play
Button
Press this button once to skip to the
Information
Display
Pause
Button
Previous/
Step
Button
Stop
Button
photo. Press the button twice to skip to the beginning of the previous chapter or track.
Press the button repeatedly to skip back through the previous chapters or tracks. When
video content is playing, press the Pause button, after which each press of the Previous/
Step button will step the video back by one frame.
Next/Step Button:
chapter – or, when viewing photos, to the next photo. Press the button repeatedly to skip
ahead through the subsequent chapters or tracks. When video content is playing, press
the Pause button, after which each press of the Next/Step button will step the video
forward by one frame.
USB Port:
cable to this port.
IMPORTANT:
may damage both the BDT 3/BDT 30 and your device.
Orient the device’s plug so it fits all the way into the BDT 3/BDT 30’s USB connector.
You may insert or remove the device at any time – there is no installation or ejection
procedure.
Next/Step
Button
Press this button once to skip to the beginning of the next track or
Gently insert a USB flash drive or an HDD disc drive with a USB Standard-A
Do not connect a PC or other USB host/controller to this port, or you
USB
Port
ENGLISH
7
Page 8

BDT 3/BDT 30
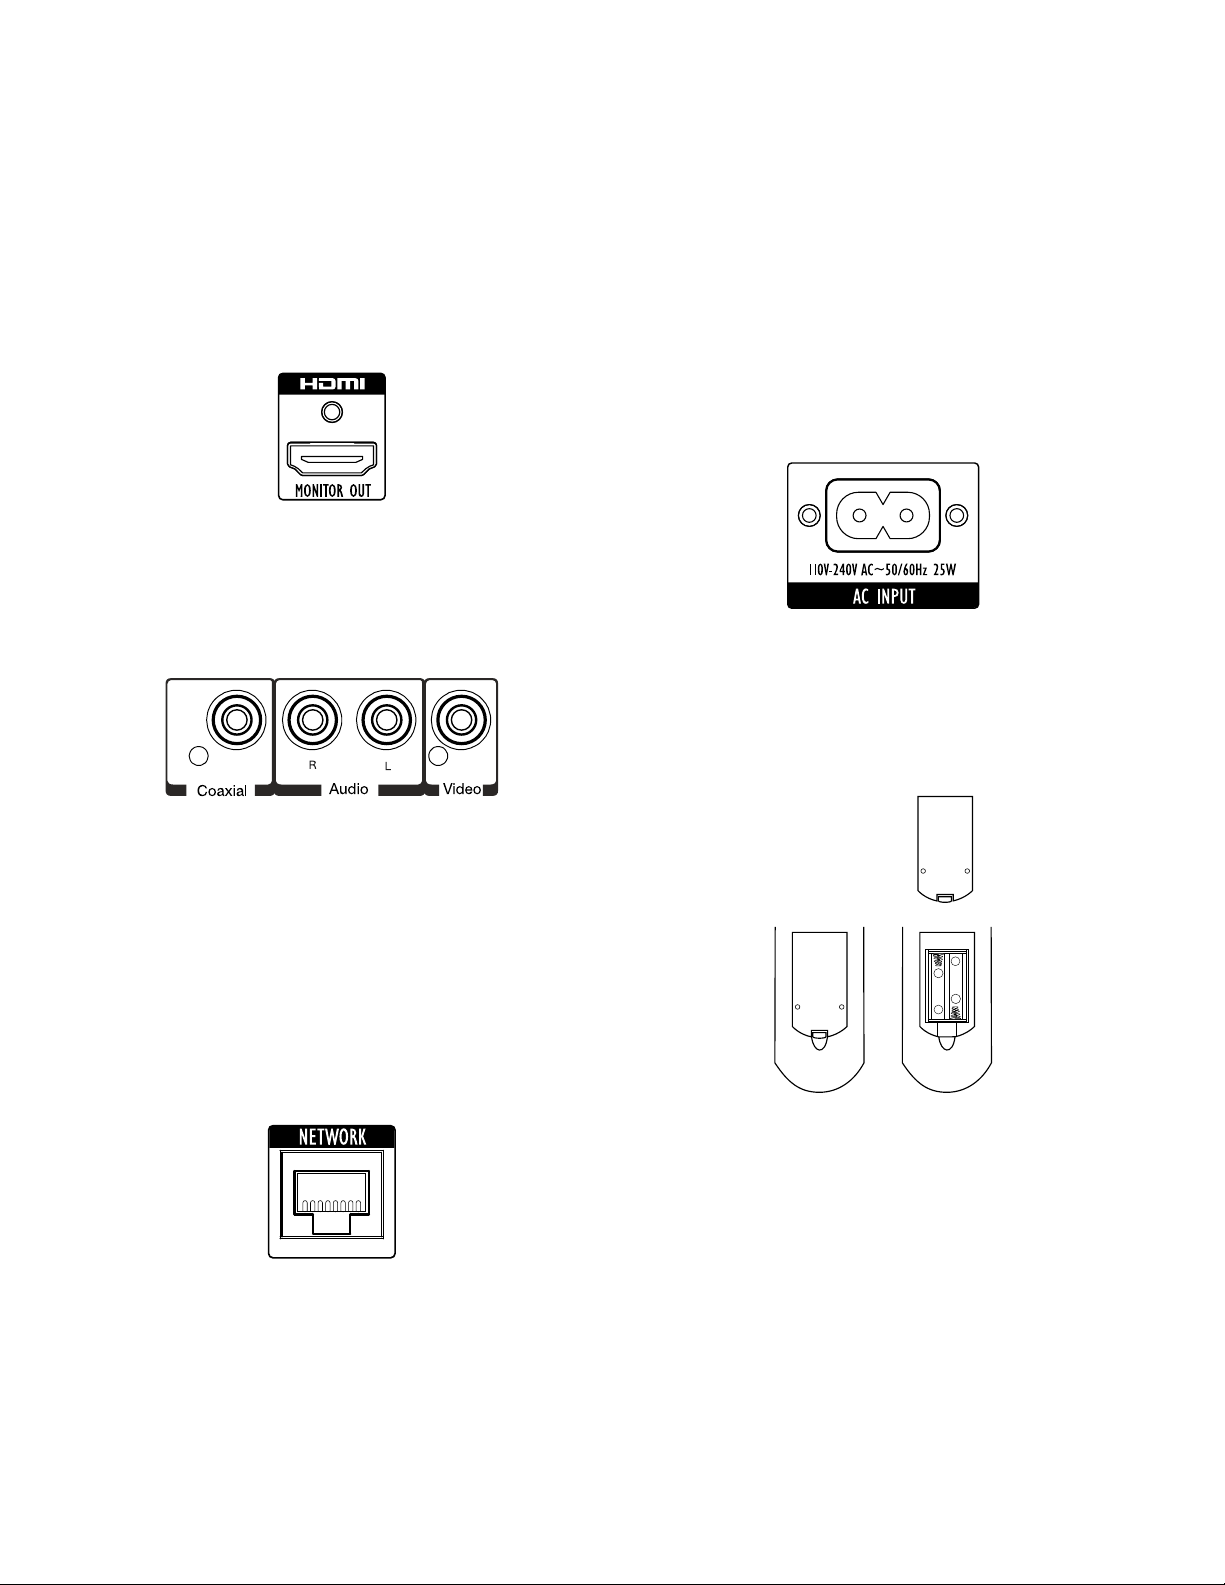
Rear-Panel Connectors
Rear-Panel Connectors/Remote Control Functions
Main Power
Switch
ON OFF
110V-240V –50/60Hz 25W
Power Cord
Connector
Analog Audio Output
Connectors
Coaxial Digital
Output Connector
R
L
Composite Video
Output Connector
HDMI Output
Connector
Network
Connector
NOTE: See Connecting the Player, on page 10, for detailed information about
making connections.
Main Power Switch: This mechanical switch turns the BDT 3/BDT 30’s power
supply on or off. After you have made and verified all connections (see Connecting
the Player, on page 10), set this switch to the “On” position. If you will not be using
the player for an extended period of time, you can set this switch to the “Off” position
to save energy.
Power Cord Connector: After you have made and verified all other connections,
plug the supplied AC power cord into this input and into an unswitched AC outlet.
Network Connector: To be able to use the BD-Live feature, connect this port to
your local area network (LAN) using a Cat. 5/Cat. 5e/RJ45 network cable. See
BD-Live Interactivity, on page 15, for more information.
Coaxial Digital Output Connector: Connect this output to the coaxial digital input
of your audio/video receiver or surround-sound processor. NOTE: If your audio/video
receiver or surround-sound processor has an HDMI connection, we recommend
using it for superior audio quality.
Analog Audio Output Connectors: Connect these outputs to your audio/video
receiver’s, surround-sound processor’s or analog recorder’s analog audio inputs.
Composite Video Output Connector: Connect this output to your TV’s or audio/
video receiver’s composite video input. NOTE: If your TV or audio/video receiver has
an HDMI connection, we recommend using it for superior video quality.
HDMI Output Connector: Connect the BDT player’s HDMI Output connector to the
HDMI input on your TV, audio/video receiver or surround-sound processor. The HDMI
cable transmits both video and audio, so if you’re connecting it directly to the TV
and are connecting the BDT 3/BDT 30’s Coaxial Digital Output connector to a home
theater audio system, we recommend that you disable the BDT 3/BDT 30’s HDMI
Audio Out to take full advantage of the home theater audio system’s superior audio
performance. See Audio Settings: Audio Output, on page 13, for more information.
IMPORTANT: Your BDT 3/BDT 30 is in compliance with HDCP (High-Definition Copy
Protection). Your TV must also be HDCP-compliant to be used with the player’s HDMI
output. For the best results, we do not recommend HDMI connections in excess
of ten feet without a repeater. If your TV has a DVI input, you may use an optional
HDMI-to-DVI cable or adapter for the video connection to the TV. (The DVI connection
is video-only.)
Fan Vents: The BDT 3/BDT 30 has a built-in fan to provide cooling air. To insure
proper operation, make sure that these vents are not blocked.
Fan
Vents
Remote Control Functions
Power On
Settings
Settings
Button
Button
Angle
Angle
Button
Button
A–B Button
A-B Button
Prev/Step
Prev/Step
Button
Button
Search/Slow
Search/Slow
Reverse Button
Reverse Button
Bookmark
Bookmark
Button
Button
Power On Button
Button
Options Button
Options Button
Repeat Button
Repeat Button
Pause Button
Pause Button
Stop Button
Stop Button
Exit Button
Exit Button
OK Button
OK Button
Display Button
Display Button
Program Button
Program Button
Dimmer Button
Dimmer Button
BLU-RAY DISC PLAYER
Open/Close
Open/Close
Button
Button
Power Off
Power Off
Button
Button
Audio Button
Audio Button
Find Button
Find Button
PIP Button
PIP Button
Search/Slow
Search/Slow
Forward Button
Forward Button
Popup Menu
Popup Menu
Button
Button
Top Menu
Top Menu
Button
Button
Zoom Button
Zoom Button
Numeric Buttons
Numeric Buttons
Clear Button
Clear Button
Home
Home
Button
Button
Subtitle
Subtitle
Button
Button
Resolution
Resolution
Button
Button
Next/Step
Next/Step
Button
Button
Play
Play
Button
Button
Cursor
Cursor
Buttons
Buttons
Thumbnail
Thumbnail
Button
Button
8
Page 9

BDT 3/BDT 30
Remote Control Functions
Power On button: Press this button when the BDT 3/BDT 30 is in the Standby mode to
turn it on.
Open/Close button: Press this button to open and close the disc drawer. Before pressing
this button, make sure that no objects are blocking the disc drawer.
Power Off button: Press this button when the BDT 3/BDT 30 is on to place it in the
Standby mode.
Settings button: Press this button to display the player’s Settings menu. See Settings
Menus, on page 12, for more information.
Options button: Press this button to display any available options for the item that is
active at the time you press the button.
Home button: Press this button to return the on-screen display to the Home screen from
whatever screen is active when the button is pressed.
Angle button: Press this button to toggle through the multiple camera-angle
optionsfor the current disc. NOTE: This feature is disc-dependent. Not all discs feature
multiplecamera angles and allow you to change camera angles.
Audio button: Press this button to toggle through the different audio tracks that are
available for a disc. NOTE: This feature is disc-dependent. Not all discs feature multiple
audio tracks and allow you to change audio tracks.
Repeat button: When the BDT 3/BDT 30 is playing a Blu-ray Disc recording or DVD,
press this button to cycle through the following repeat modes: Chapter, Title, All, Off.
When the BDT 3/BDT 30 is playing a CD, this button cycles through the following repeat
modes: Track, All, Off. NOTE: This feature is disc-dependent. Not all discs allow repeat
functions.
Subtitle button: Press this button to toggle through the different subtitle options that are
available for the current disc. NOTE: This feature is disc-dependent. Not all discs feature
multiple subtitle options.
A-B button: Press this button to activate the A-B repeat mode. The first press sets the
“A” repeat point; the second press sets the “B” repeat point and begins repeating the
section of the program between the two points. Pressing the A-B button while the A-B
repeat mode is active cancels the A-B repeat mode.
Find button: Press this button during disc playback to activate the search function,
which allows you to jump to a specific location on the disc. You can find a location by
title, chapter or elapsed time.
Pause button: Press this button to pause a disc or music file that is playing. Pressing
the button while a Blu-ray Disc program or DVD program is playing will freeze-frame on
the current video frame. Pressing the button while the disc is paused will resume play.
Pressing this button while viewing photos freezes the current photo on the screen.
PIP button: Press to switch to a secondary video stream while playing a Blu-ray Disc
recording with BonusView special features.
Previous/Step button: Press this button once to skip to the beginning of the current
track – or, when viewing photos, to the previous photo. Press the button twice to skip
to the beginning of the previous track. Press the button repeatedly to step through the
previous chapters or tracks. When video content is playing, press the Pause button, after
which each press of the Previous/Step button will reverse the video by one frame.
Next/Step button: Press this button once to skip to the beginning of the next track or,
when viewing photos, to the next photo. Press the button repeatedly to step through the
next chapters or tracks. When video content is playing, press the Pause button first; each
subsequent press of the Next/Step button advances the video one frame.
Stop button: Press this button to stop playback. (Pressing the Play button will resume
playback from the point where it stopped.) Press the Stop button twice to stop playback
fully. NOTE: Some settings and functions will be available only when the player is fully
stopped.
Search/Slow Reverse button: Press this button to reverse through the current disc
track. For Blu-ray Disc programs and DVD programs, each press cycles through 2x,
4x, 8x, 16x and 32x reverse speed. Pressing the button while a Blu-ray Disc recording
or DVD is paused will reverse through the chapter in slow motion. Each press cycles
through 1/2, 1/4, 1/8 and 1/16 normal speed.
Search/Slow Forward button: Press this button to fast-forward through a disc track.
For Blu-ray Disc recordings and DVDs, each press cycles through 2x, 4x, 8x, 16x and
32x normal speed. Pressing the button while a Blu-ray Disc recording or DVD is paused
will play through the chapter in slow motion. Each press cycles through 1/2, 1/4, 1/8 and
1/16 normal speed.
Play button: Press this button to play a disc that has been loaded into the player’s disc
drawer or a music file that has been highlighted on the on-screen menu. Pressing this
button when viewing photos begins a slide show of the photos.
Exit button: Press this button to return to the previous menu or menu level.
Popup Menu button: Pressing this button while playing a Blu-ray Disc recording or DVD
displays its popup menu. NOTE: This feature is disc-dependent. Not all discs have pop-up
menus. If a DVD has no pop-up menu, pressing the Popup Menu button may display the
disc menu, depending on how the disc’s menu system was authored.
OK button: Press this button to select a highlighted item on the on-screen menu.
Cursor buttons: Press these buttons to navigate through items on the on-screen menu.
Display button: Press this button to activate a bar display containing information about
the disc or program that is currently playing.
Top Menu button: Press this button to display the top menu of the Blu-ray Disc recording
or DVD that is playing. NOTE: This feature is disc-dependent. Not all DVDs have top
menus. If the DVD has no top menu, pressing the Top Menu button may display the disc
menu, depending on how the disc’s menu system was authored.
Bookmark (green) button: Press this button to activate the Bookmark function. See
Bookmark Function, on page 15, for more information.
Program (red) button: Press this button to create a programmed playback list for the
disc that is playing. See Programmed Play, on page 15, for more information.
Zoom (blue) button: Press this button to zoom in on or recede from a video image or
slide. Use the Navigation buttons to zoom in on different sections of the image. NOTE:
This function is disc-dependent. Not all discs allow this function.
Thumbnail (yellow) button: Press this button while playing a photo slide show to
display thumbnail images of all photos in the active directory.
Red, green, yellow and blue buttons: When the BDT 3/BDT 30 is playing a Blu-ray
Disc recording, these buttons can activate features and menus that may vary from disc
to disc. Refer to the menu instructions for each particular disc for more information.
NOTE: These Blu-ray Disc functions may override the Bookmark, Thumbnail, Program
and Zoom functions.
Numeric buttons: Press these buttons to enter numbers for various items.
Dimmer button: Press this button to toggle through the different brightness levels for the
player’s front-panel display: 100%, 50%, 25%, Auto/Off. When the brightness is set to
Off, the display will temporarily return to full brightness whenever you press any button
on the remote.
Clear button: Press this button to clear an incorrect entry made using the Numeric
buttons.
ENGLISH
9
Page 10
BDT 3/BDT 30
Connecting the Player/Preparing the Remote Control
Connecting the Player
HDMI Connection
If Your Receiver/Processor Has an HDMI Connection
Use the supplied HDMI cable to connect the player’s HDMI Output connector to your
receiver/processor’s HDMI input. Use another HDMI cable to connect your receiver/
processor’s HDMI output to your TV’s HDMI input.
If Your Receiver/Processor Does Not Have an HDMI Connection
Use the supplied HDMI cable to connect the player’s HDMI Output connector directly to
your TV’s HDMI input.
Coaxial Digital Audio Output Connection
If you did not connect the BDT 3/BDT 30’s HDMI Output connector to your receiver/
processor, connect the player’s Coaxial Digital Output connector to your receiver/
processor’s coaxial digital input.
Power Cord Connector
The BDT 3/BDT 30 comes with a detachable AC power cord. This type of cord makes it
easier for you to install and connect all other system wiring to the player’s rear panel.
NOTES:
• The power requirement for the BDT 3/BDT 30 is 110 – 240V AC, 50/60Hz, 25W.
Connecting to a power source other than the one listed may damage the player or
cause abnormal operation.
• Before connecting the AC power cord to a wall outlet, confirm that all of the other
connections have been made correctly.
• Connect the female end of the BDT 3/BDT 30’s detachable power cord to the
player’s Power Cord connector. Plug the other end into a working, unswitched
AC outlet.
Set the BDT 3/BDT 30’s Main Power switch in the “On” position. The player’s Power
indicator will turn amber, indicating that the player is in the Standby mode.
Preparing the Remote Control
Installing the Batteries
Your BDT 3/BDT 30 remote control uses two AAA batteries (supplied). Insert the batteries
as shown in the illustration, making sure to observe the correct polarity.
Analog Audio Output Connections
Connect the BDT 3/BDT 30’s Analog Audio Output connectors to your receiver/processor’s analog audio inputs or to your analog recorder’s analog audio inputs.
Composite Video Output Connection
If you did not connect the BDT 3/BDT 30’s HDMI Output connector to your TV or your
audio/video receiver, connect the player’s Composite Video Output connector to your
TV’s or audio/video receiver’s composite video input.
Network Connection
Use a Cat. 5/RJ45 network cable (not supplied) to connect the BDT 3/BDT 30’s Network connector directly to a network router, a network switch, a network modem or an
Ethernet network wall jack that has Internet access. NOTE: The BDT 3/BDT 30 cannot
access content on other networked devices. The network connection enables the BDT 3/
BDT 30’s BD-Live features. See BD-Live Interactivity, on page 15, for more information.
+
–
–
+
Using the Remote Control
When using the remote, remember to aim it toward the player’s front panel. Make sure
that no objects, such as furniture, block the remote’s view of the player. Bright lights,
fluorescent lights and plasma video displays may interfere with the function of the
remote.
• The remote has a range of about 20 feet (6.1m), depending on the lighting
conditions.
• You can use the remote at an angle of up to 30° from either side of the player.
If the remote does not seem to be operating properly, make sure that the batteries are
inserted correctly. If the remote still does not operate properly, replace both batteries
with new ones.
10
Page 11
BDT 3/BDT 30
Setup Wizard
Page: 1/5
Next
Welcome to the Harman Kardon BDT Setup
Wizard.
Some simple information is needed to ensure
you get the best experience from your product.
You can adjust these settings later in addition
to making changes to more advanced settings
by pressing the ‘Settings’ button on the
remote.
OK
Setup Wizard
Page: 2/5
Next
Please select which language you
would like the BDT menus to appear.
OK
Previous
Setup Wizard
Page: 4/5
Next
Please select the best aspect ratio
that fits your TV.
OK
Previous
16:9 Full
16:9 Normal
4:3 Pan & Scan
4:3 Letterbox
Setting Up the Player
Setting Up the Player
NOTE:
The menu screens shown in this manual are for illustrative purposes and may
differ somewhat from the actual displays.
To set up your BDT 3/BDT 30, you will use the remote to navigate through all of the onscreen menus and make selections from them.
• Use the Cursor Up/Down buttons to navigate through the menu list. When an item
is highlighted, a border will appear around it.
• To select a highlighted item, press the OK button. The screen will change
depending on your selection.
• To return to the previous screen, press the Exit button.
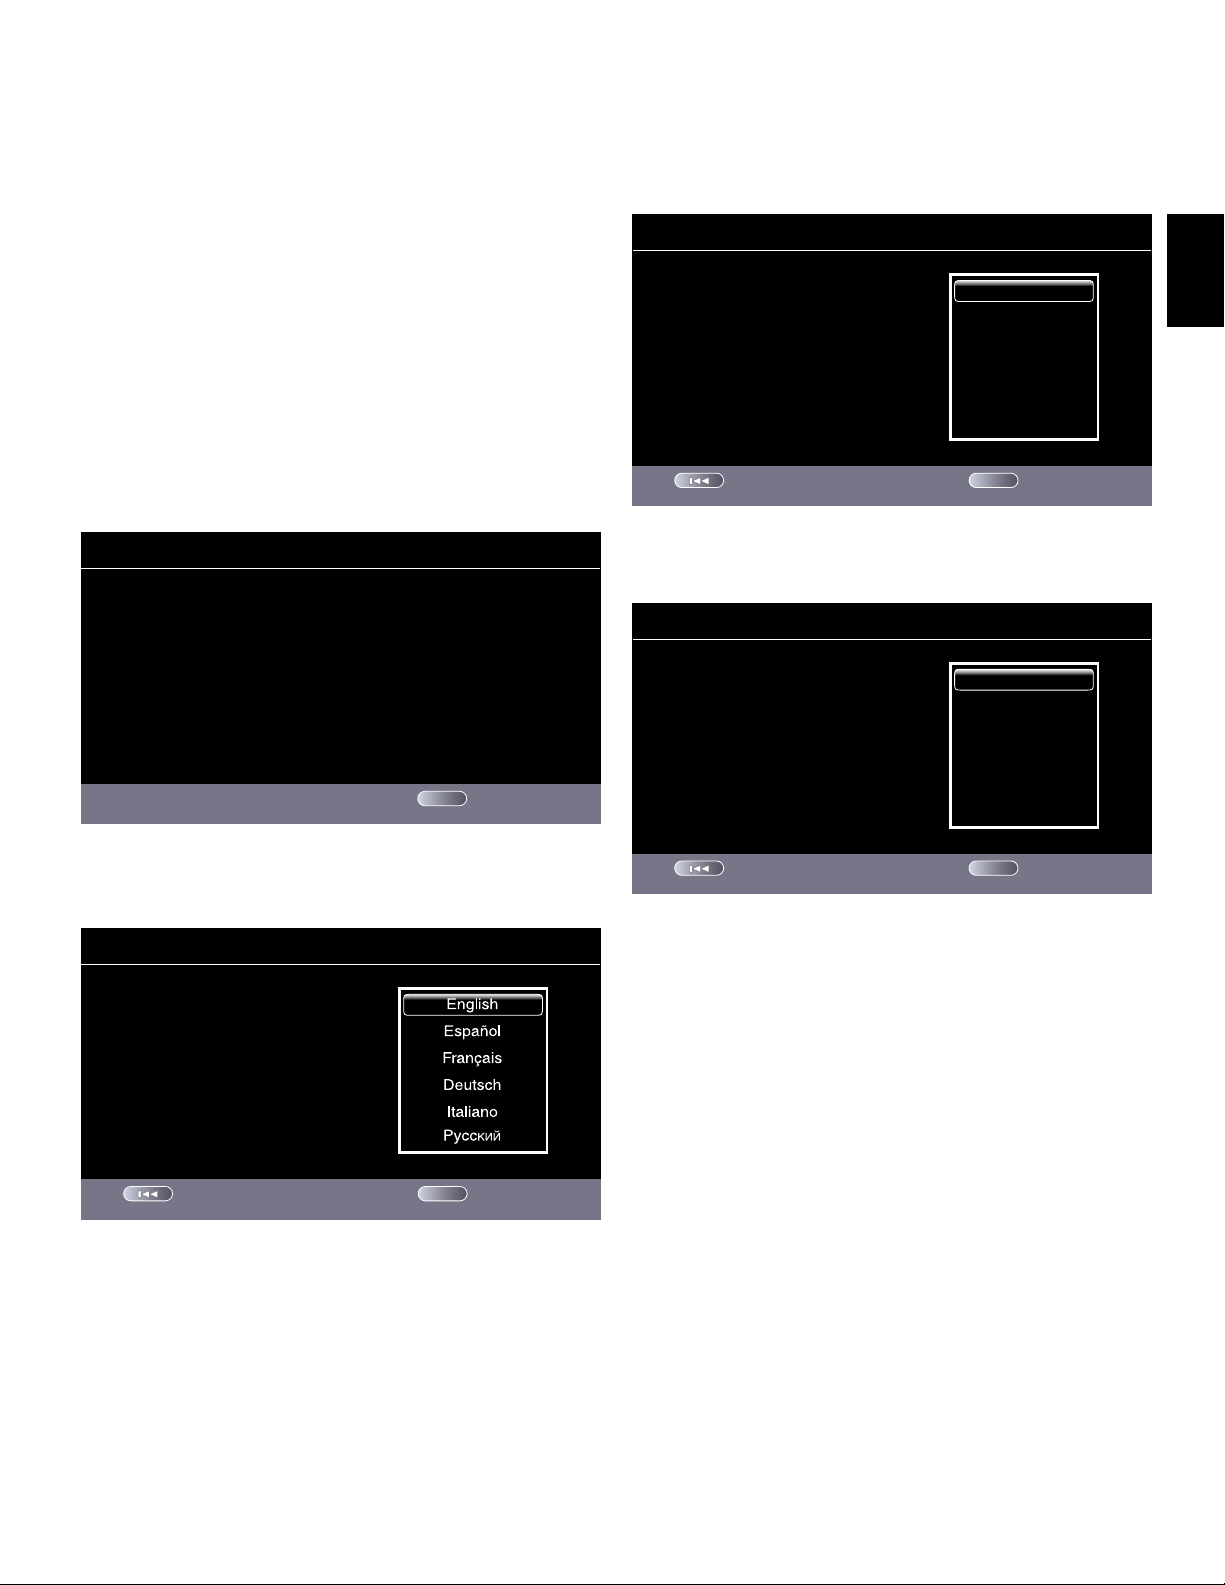
Setup Wizard
When you turn your BDT 3/BDT 30 on for the first time, the on-screen menu will display
the Setup Wizard.
Page: 3/5
Please select the highest resolution that your
TV supports. If you are unsure, select “Auto.”
Upon making a selection the screen will be
changed to the chosen resolution. You will be
presented with the option to continue with the
new resolution or “Cancel” to return to the
previous resolution. If the screen remains
blank, please wait 15 seconds without
pressing anything and the system will
automatically return to the previous resolution.
Previous
Auto
480i/576i
480p/576p
720p
1080i
1080p
Next
OK
Setup Wizard
After selecting your TV’s highest resolution, press the OK button, and the Wizard’s
aspect-ratio screen will appear. If you’re unsure of your TV’s highest resolution, select
“Auto,” and the player will automatically select the optimal resolution.
ENGLISH
Before you can use your BDT 3/BDT 30, you need to set the language and make a few
basic settings so that the player’s video output will work properly with your TV. Press the
OK button and the Wizard’s language screen will appear.
After setting the language you want the on-screen menus to use, press the OK button,
and the Wizard’s TV-resolution screen will appear.
After selecting the aspect ratio that best fits your TV, press the OK button to save your
setting, and then press it again to exit the Setup Wizard. For more information on aspect
ratios, see Aspect Ratio, on page 13.
11
Page 12
BDT 3/BDT 30
Setting Up the Player
Settings Menus
Pressing the remote’s Settings button displays the BDT player’s settings menus, which
allow you to configure the player’s functions. Use the remote’s Cursor Left/Right buttons
to change from one menu to another, use the Cursor Up/Down buttons to navigate
through the lists that appear on the various screens, and use the OK button to select
highlighted items. Press the Exit button at any time to return to the previous screen.
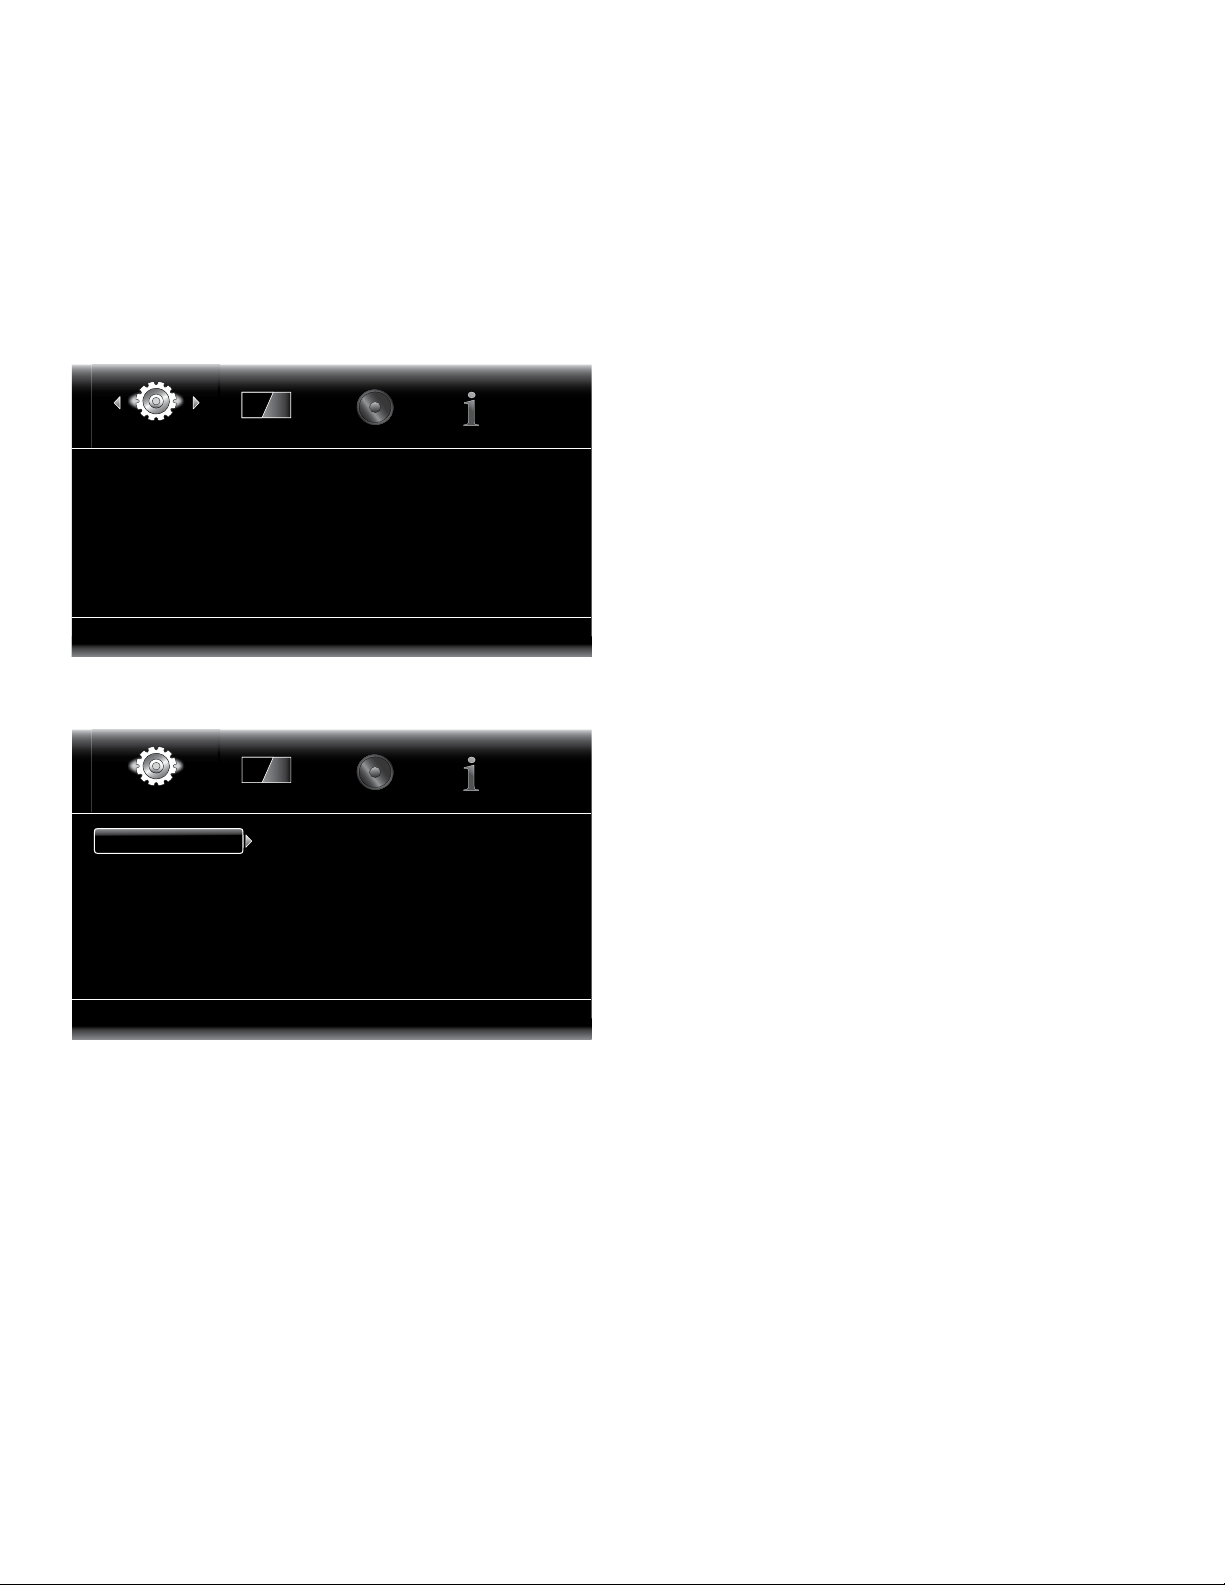
General Settings
System
Language
Playback
Parental Control
Network
Select to adjust general settings
General Settings
General Settings
System
Language
Playback
Parental Control
Network
Select to adjust system settings
System: The System option allows you to set the following system features:
• Front Panel Brightness: This option sets the brightness of the BDT 3/BDT 30’s
information display.
• Screen Saver: To prevent image burn-in, we recommended activating the Screen
Saver when using the BDT 3/BDT 30 with a CRT or plasma TV.
• Auto Power Off: This option sets the amount of time the BDT 3/BDT 30 remains on
while idle until it automatically enters the Standby mode.
• CEC: When this option is set to On, you can enable or disable the CEC One Touch
Play and One Touch Standby functions.
• One Touch Play and One Touch Standby: When these options are set to On, the
BDT 3/BDT 30 can be placed into the Play or Standby modes upon commands
from the remote control of a TV connected to the player’s HDMI Output connector.
• System Upgrade: Select this option when you want to install a firmware upgrade
for your BDT 3/BDT 30 that you’ve downloaded from a Harman Kardon source.
• Setup Wizard: This option activates the BDT 3/BDT 30’s Setup Wizard (see Setup
Wizard, on page 11).
Front Panel Brightness
Screen Saver
Auto Power Off
CEC
One Touch Play
One Touch Standby
100%
Off
Off
On
On
On
• BD-Live Storage: This option lets you set up how the BDT 3/BDT 30 will
handle stored BD-Live content. You can choose to store the content on a USB
memory device via the BDT 3/BDT 30’s USB port. See BD-Live Interactivity, on
page 15, for more information.
• Restore Defaults: This option restores the BDT 3/BDT 30 to its factory default
setting values. NOTE: This option will also reset the parental-control password
back to the factory default of 0000. See Parental Control, on this page.
Language: This setting lets you set the language for the disc player and the disc menus,
the preferred audio language and the preferred subtitle language.
• NOTE: If the selected language is not available on the particular disc being played,
use the disc’s menu to select the language from those available on the disc.
Playback: The Playback option allows you to set the following disc playback features:
• Show Angle Icon: This option lets you select whether or not the angle icon will
automatically be displayed when a disc with multiple camera angles is played.
• Auto Play: This option lets you select whether discs will automatically begin
playing when they are loaded into the player.
• Show PIP Icon: This option lets you select whether or not the picture-in-picture
icon will automatically be displayed when you play a Blu-ray Disc recording with
picture-in-picture content.
• Show Secondary Audio Icon: This option lets you select whether or not the
Secondary Audio icon will automatically be displayed when you play a Blu-ray Disc
recording with secondary audio content.
• Disc Resume: This option lets you select whether or not a disc that has been
ejected while playing will resume play from that location the next time it is inserted
into the disc player. NOTE: This feature is disc-dependent. Not all discs support
disc resume.
®
• DivX
VOD DRM: This option displays your player’s DivX registration information.
Parental Control: This option lets you set the player’s parental-control password and the
level of parental control you want active. NOTE: The default password is 0000.
Network: This option allows you to set the following network features:
• Information: This option displays your network’s IP, subnet mask, gateway and
DNS addresses.
• Test Connection: This option tests for a proper network connection to the BDT 3/
BDT 30.
• IP Configuration: This option lets you enter your network settings, either
automatically or manually. Unless your network administrator instructs you
otherwise, you should use the Auto option.
• BD-Live Connection: This option lets you set the BDT 3/BDT 30’s BD-Live
connection preferences. “Always Allow” always allows downloading of BD-Live
content. “Limit” allows content downloading only if the disc is officially BD-Live
certified. “Prohibited” does not allow any BD-Live access. See BD-Live Interactivity,
on page 15, for more information.
• Proxy Setting: “Enabled” allows you to select and set the Proxy Host and Proxy
Port if your network requires a proxy setting. “Disabled” bypasses any Proxy Host
and Proxy Port settings and prevents their selection. This option is for advanced
users only and in most cases should be left set to “Disabled.”
12
Page 13
BDT 3/BDT 30
Setting Up the Player
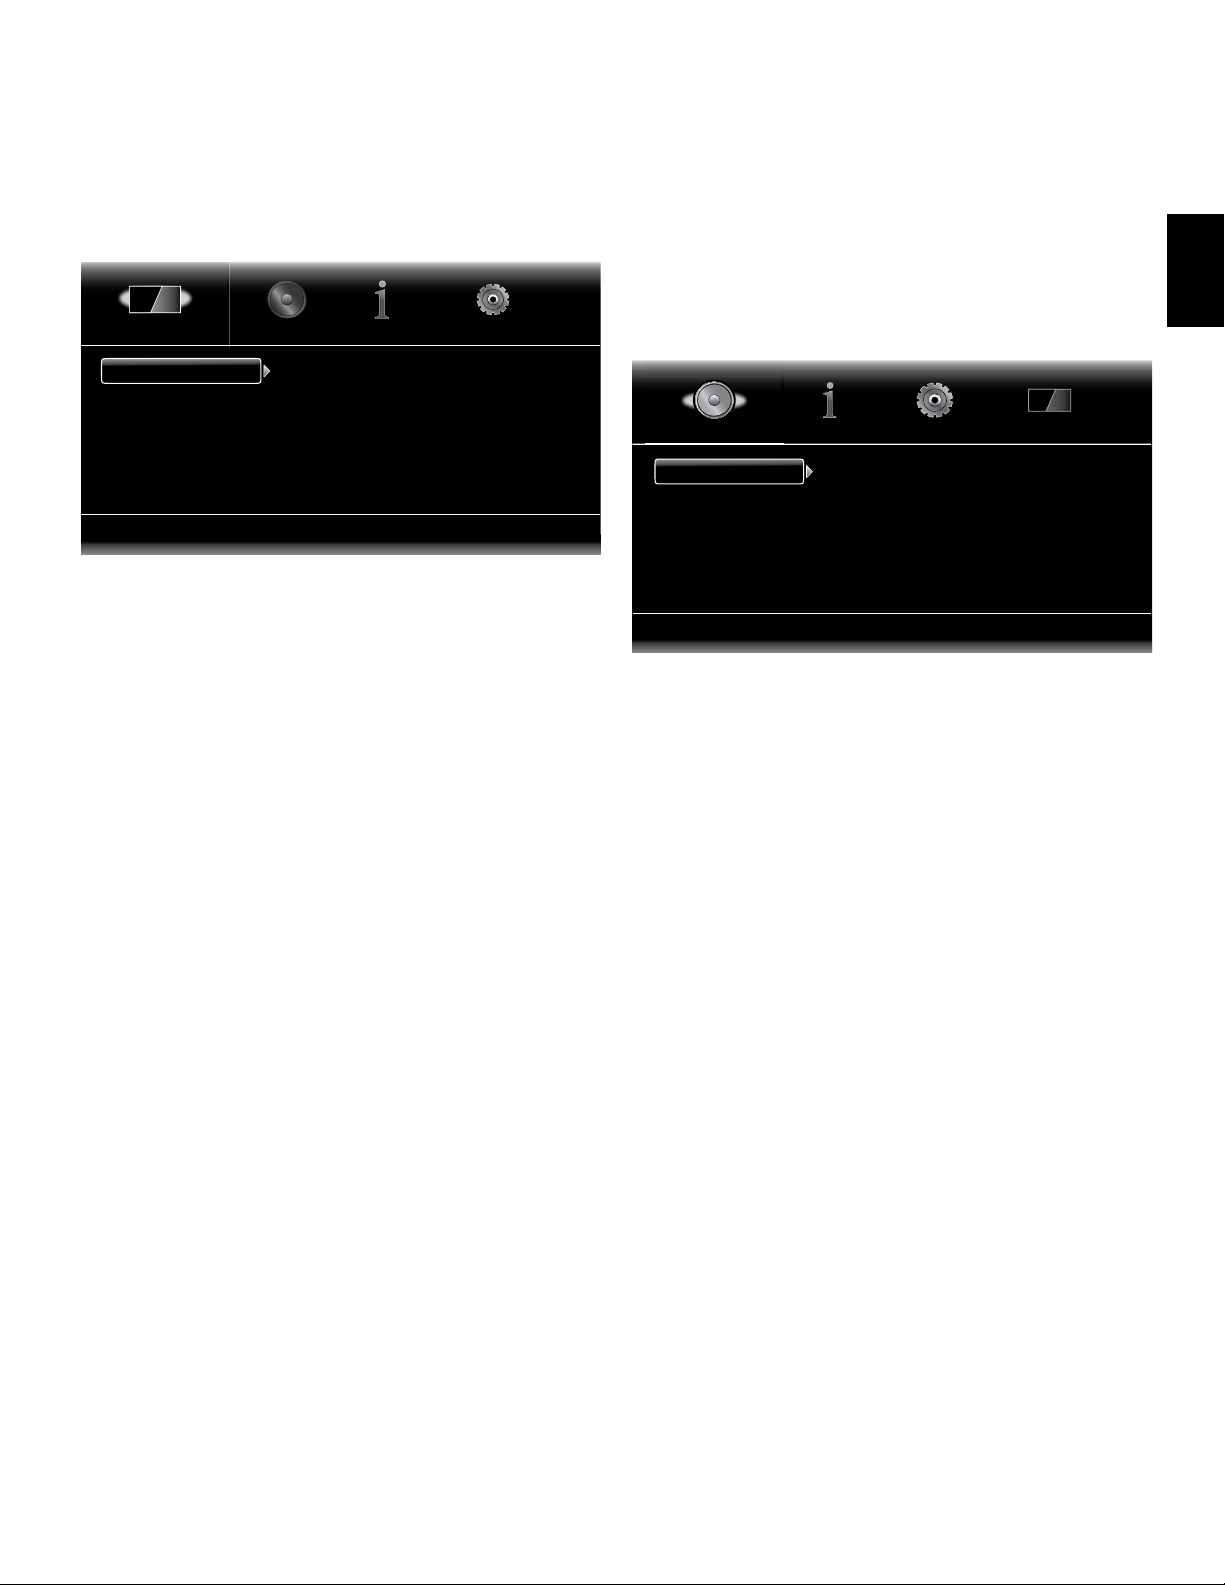
Display Settings
Display Settings
TV
Video Processing
Select to adjust display settings
TV: This option allows you to set the following display parameters:
• Aspect Ratio: This option lets you select how you want 4:3 programs displayed
on a 16:9 TV, or 16:9 programs displayed on a 4:3 TV. “16:9 Full” stretches 4:3
material to fill a 16:9 TV screen. “16:9 Normal” displays 4:3 programming on a
16:9 TV with black boxes on either side of the image, preserving its original visual
composition without distortion. “4:3 Pan & Scan” zooms in on widescreen material
to fill a 4:3 screen. “4:3 Letterbox” displays 16:9 programming with black bars
above and below the photo, preserving the program’s original visual composition
without distortion.
• Resolution: This option lets you select the video-output resolution of the BDT 3/
BDT 30. The “Auto” setting will automatically select the best resolution for your TV.
• Color Space: This option lets you select a predefined color space for the video
photo.
• Film Mode: If your TV can handle a 1080p 24Hz signal (that is, if it has 1080p
resolution and a video-refresh rate that is a whole-number multiple of 24), set this
option to “On” to get maximum resolution from Blu-ray Disc content mastered at
24 frames per second. If your display cannot handle a 1080p/24Hz signal, set this
option to “Off,” and the BDT 3/BDT 30 will upconvert 24-frame-per-second film
material to the standard video 30Hz refresh rate.
• HDMI Deep Color: This option allows you to adjust the resolution of color output
to your TV. If your TV accepts Deep Color, this option allows your TV to display an
enhanced color palette.
• On: The BDT 3/BDT 30 always outputs 36-bit or 30-bit Deep Color.
• Off: The BDT 3/BDT 30 does not output Deep Color (color resolution
remains at 24 bits).
• TV Standard: This option lets you set the standard of your TV display.
• Auto: The BDT 3/BDT 30 automatically sets the standard for your TV.
• PAL: Sets the video display to the PAL standard.
• NTSC: Sets the video display to the NTSC standard.
• HDMI 3D: This option determines how the player handles 3-D programs when
connected to a 3-D-capable TV via the HDMI connection.
• Auto: The BDT 3/BDT 30 automatically displays video in 3-D when the
program is in 3-D format.
• Off: The BDT 3/BDT 30 does not display the video in 3-D.
Video Processing: This option allows you to set the BDT 3/BDT 30’s internal video
processing.
• Video Mode: This option lets you select a preset video-processing option to
optimize the picture for the current program by adjusting the brightness, contrast,
color and sharpness.
• Standard: Neutral control settings
• Vivid: For video games
• Cinema: For movies and many television broadcasts
Aspect Ratio
Resolution
Color Space
Film Mode
HDMI Deep Color
16:9 Full
Auto
RGB
Off
Off
• Custom: This option lets you adjust the video settings manually. The
Brightness, Saturation (color saturation), Hue and Contrast settings appear
as sliders. The default setting for each adjustment is 0. Use the Cursor Left/
Right buttons to change each setting’s value.
Audio Settings
Audio Settings
Audio Out HDMI Audio Out
Coaxial Output
PCM Downsampling
Dynamic Range Ctrl
Select to adjust Audio output settings
Audio Output: This option lets you set the following items:
• HDMI Audio Out: In addition to digital video signals, the BDT 3/BDT 30’s HDMI
connection also carries digital audio signals. Four settings are available:
• Auto: This option causes the BDT player’s HDMI Output connector to output
the digital audio format that best matches the surround-sound decoding
capabilities of the component to which it’s connected.
• Bitstream Native: This option outputs the program in its native audio format
via the HDMI Output connector.
• PCM: This option outputs a two-channel downmix derived from the
program’s native audio format via the HDMI Output connector.
• Off: This option turns the BDT player’s HDMI audio output off. If you are
using the player’s HDMI connection for video only (you have connected
the player’s HDMI output directly to your TV and have connected the
BDT 3/BDT 30 Coaxial Digital Output connector to a home theater audio
system), we recommend that you set the HDMI Audio Out to “Off.”
• Coaxial Output: If you are using the BDT player’s HDMI connection for video only
and have connected its Coaxial Digital Output connector to your home theater
audio system, select one of these three options:
• Bitstream Native: This option outputs the program’s native digital audio
soundtrack via the Coaxial Digital Output connector.
• PCM: This option outputs a two-channel downmix of the original
digital soundtrack via the Coaxial Digital Output connector. (See PCM
Downsampling, below.)
• Transcode: This option transcodes a program’s lossless format (Dolby
TrueHD or DTS-HD Master Audio) program to a lossy format and outputs it
via the Coaxial Digital Output connector.
• PCM Downsampling: This option sets the sampling rate of PCM two-channel
downmixed signal. Set this option to the highest sampling rate that the connected
component can handle. NOTE: If the component can handle a 192kHz sampling
rate, set this option to “Off,” which will pass 192kHz sampled material without
downsampling.
Auto
PCM
Off
ENGLISH
13
Page 14

BDT 3/BDT 30
Setting Up the Player/Playing Discs
• Dynamic Range Ctrl: This option lets you set the dynamic range control.
• Auto: The BDT 3/BDT 30 automatically sets the dynamic range, based on the
range of volume in the audio source.
• On: The BDT 3/BDT 30 always sets the dynamic range to on.
• Off: The BDT 3/BDT 30 always sets the dynamic range to off.
Information Menu
Information
Software Version: BDT V1.04.06
MAC Address: 00 -1B -44 -12 -1D
Select to browse system information
The Information menu will display the BDT 3/BDT 30’s software/firmware version number
and the player’s factory-assigned network MAC Address. This screen is for information
only and allows no user adjustments.
Playing Discs
Disc Handling Precautions
• To keep the disc clean, handle the disc by its edge. Do not touch the surface.
• Do not stick paper or tape on the disc. If there is glue (or a similar substance) on
the disc, remove the substance completely before using the disc.
• Do not expose the disc to direct sunlight or heat sources such as hot air ducts, or
leave it in a car parked in direct sunlight, as there can be a considerable rise in
temperature inside the car.
• After playing, store the disc in its case.
• Do not write on the label side with a ballpoint pen or other sharp writing utensils.
• Be careful not to drop or bend the disc.
Disc Cleaning Precautions
• Before playing, clean the disc with a cleaning cloth. Wipe the disc from the center
out.
• Do not use solvents such as benzene, paint thinner, commercially available
cleaners or anti-static spray intended for vinyl LPs.
Regional Coding
BDT 3 players are designed only for playback of discs with Blu-Ray Disc Region Code
A and DVD Region Code 1 information, or for discs that do not contain any Region Code
information. BDT 30 players are designed only for playback of discs with Blu-ray Disc
Region Code B and DVD Region Code 2 information, or for discs that do not contain
Region Code information.
If there is a Region Code on a disc other than the one your BDT player is designed for, it
will not play in your BDT player.
Copyright
Audio-visual material may consist of copyrighted works, which must not be recorded
without the permission of the owner of the copyright. Please refer to relevant laws
covering copyright protection.
Copy Protection
Your BDT player is in compliance with HDCP (High-Definition Copy Protection). A video
display connected via the HDMI Output connector must be HDCP-compliant.
The BDT player incorporates copy-protection technology. On Blu-ray Disc media and DVD
discs that include a copy-protection code, if the contents of the disc are copied using a
VCR, the copy-protection code prevents the videotape copy from playing normally.
Supported Disc Formats
The BDT player can play the following types of discs (in 5"/12cm and 3"/8cm size):
• BD-Video (single-layer or double-layer)
• DVD-Video
• DVD+R/+RW
• DVD-R/-RW
• CDDA (CD digital audio)
• CD-R/RW
NOTE: The compatibility and performance of dual-layer discs is not guaranteed.
Supported Media Codecs
The disc player can play media recorded in the following audio/video codecs:
• MPEG 1, Layer 1
• MPEG 2, Layer 2
• MPEG 2, Layer 3
• H.264
• VC-1
• AAC
• MP3 (from CD-R/RW, DVD+R/+RW, BD-R/RE and USB)
• JPEG (from CD-R/RW, DVD+R/+RW, BD-R/RE and USB)
• DivX 3.x/4.x/5.x (from CD-R/RW, DVD+R/+RW and USB)
NOTE: Due to differences in the formats of certain discs, it is possible that some
discs may include a mix of features, some of which are not compatible with the
BDT 3/BDT 30. Similarly, although Blu-ray Disc recordings and DVDs are capable of a
wide range of features, not all discs include every capability of its system. For example,
although the player is compatible with multi-angle discs, that feature operates only when
the disc is specially encoded for multiple-angle play. To make certain that a specific
feature or soundtrack option is available, please check the options noted on the disc
jacket.
Playback capability of recordable discs may vary due to variations in the quality of the
disc and the recorder used to create the disc.
14
Page 15

BDT 3/BDT 30
00 : 32 : 37
CDDA
1 / 15
TRACK
T
Playing Discs
Loading and Playing Discs
Press the Open/Close button to open the disc drawer and insert the disc into the drawer.
Press the Open/Close button again to close the disc drawer.
• Do not load more than one disc into the disc drawer.
• Do not load the disc upside down.
After loading a disc into the player, press the Play button to begin playback.
Use the Play, Pause, Stop, Prev/Step, Next/Step, Search/Slow Forward and Search/Slow
Reverse buttons to control disc playback. See Remote Control Functions, on page 9, for
more information about the functions of these buttons.
Playback Features
Repeat: When you are playing a Blu-ray Disc recording or DVD, pressing the Repeat
button cycles through the following repeat modes: Chapter, Title, All, Off. When you
are playing a CD, this button cycles through the following repeat modes: Track, All, Off.
NOTE: Not all Blue-ray Disc recordings allow repeat.
A-B: When you are playing a Blu-ray Disc recording, DVD or music CD, pressing the A-B
button places the player into the A-B repeat mode. The first press sets the “A” repeat
point; the second press sets the “B” repeat point and begins repeating the section of
the disc between the two points. Pressing the A-B button while the player is in the A-B
repeat mode takes the player out of that mode. NOTE: Not all Blu-ray Disc recordings
allow A-B repeat.
Find: Pressing the Find button during disc playback activates the search function,
allowing you to jump to a specific location on the disc. You can find a location by title,
chapter or time. See Find button, on page 9, for more information. NOTE: If you are
playing a disc that does not allow searching by title, use the disc menu to change titles.
Options: Pressing the Options button displays any available options for the disc that
is currently playing. Blu-ray Disc options include title, chapter, time display, audio
options, angle options, subtitle options, picture-in-picture options, second audio track
options, bitrate options, stillframe options, fast advance and scene replay. DVD options
include title, chapter, time display, playback modes, audio options, angle options, bitrate
options, stillframe options, fast advance and scene replay. Audio CD options include
track selection, time display, playback modes, bitrate, instant search and instant replay.
Display Button: When you are playing Blu-ray Disc recordings and DVDs, pressing the
Display button toggles the information bar on and off.
Playback
Mode
Top Menu Button: Displays the top menu for the Blu-ray Disc recording or DVD that is
currently playing. NOTE: This feature is disc-dependent. Not all DVDs have top menus. If
a DVD that you are playing has no top menu, pressing the Top Menu button may display
the disc menu, depending on how the disc’s menu system was authored.
Popup Button: Pressing this button while playing a Blu-ray Disc recording or DVD
displays the popup menu.
Bookmark Function: The bookmark function lets you mark up to 12 locations on the
disc that is currently playing. Press the Bookmark button to mark the current location
on the disc. To play the disc from one of your selected bookmark locations, hold the
Bookmark button, which will display the bookmark list. Use the Navigation Left/Right
buttons to select the desired bookmark, and press the OK button to play the disc from
that location.
NOTE: The bookmark function is disc-dependent. Not all discs allow bookmark operation.
Disc Type
& Encoding
MPEG 1 / 8 00 : 32 : 37
DVD-VIDEO
English Dolby Digital 5.1
1/1
Audio
Mode
Current
Title
1 / 2
Current
Chapter
Time
Display
TT
“Find”
Indicators
Programmed Play: This option lets you create a programmed playlist for a disc that is
inserted in the BDT 3/BDT 30. The program function works for CDs, DVDs and
Blu-ray Disc recordings. NOTE: Not all Blu-ray Discs support programmed play.
1. Press the Program button. The Program screen will appear (CD program screen
is shown below).
Page: 1/ Program
CD Track Total: 15
1
2
3
4
5
Track: 10
Track: 05
-- -- -- --
-- -- -- --
-- -- -- --
Play Clear Stop
-- -- -- --
6
-- -- -- --
7
-- -- -- --
8
-- -- -- --
9
-- -- -- --
10
CLEAR EXIT
11
12
13
14
15
-- -- -- --
-- -- -- --
-- -- -- --
-- -- -- --
-- -- -- --
2. Press the OK button and use the Navigation Up/Down buttons to select the title on
the disc (Blu-ray Disc/DVD) or track (CD) for your first program entry. NOTE: Not all
Blu-ray Disc recordings allow selection by title.
3. Press the Navigation Right button and use the Navigation Up/Down buttons to
select the chapter for your first program entry (Blu-ray Disc/DVD only).
4. Repeat steps 2 – 3 for every entry in your programmed list.
5. When you’re finished programming your list, press the Play button to play the
programmed playlist.
BD-Live Interactivity
BD-Live interactivity is available on select Blu-ray Disc recordings. When you select the
BD-Live features from a disc’s menu, you may be able to download additional content or
other information via the Internet (through the Network connection) and onto a memory
device inserted into the BDT 3/BDT 30 USB port.
NOTE: Do not unplug the USB memory device while downloading BD-Live information. If
you do unplug the device and the Harman Kardon splash screen appears, press the Play
button to return to the beginning of the disc.
If you have difficulty accessing the Internet while using a BD-Live disc, press the
Settings button and navigate to the Network Setup menu. Select “Test Connection.”
If the BDT 3/BDT 30 is able to access the Internet, then the computer server that
the BD-Live disc is trying to access may be at fault. Check the disc jacket for more
information, or contact the online content provider. If the Test Connection function fails,
contact your Internet service provider (ISP) to obtain the correct settings for the BDT 3/
BDT 30’s IP Configuration menu. If the problem persists, contact your ISP for further
assistance.
Playing Music CDs
When the BDT 3/BDT 30 is playing a music CD, the top bar shows the current playback
mode icon, the type of disc, the track currently playing, the number of total tracks on the
disc and the time display.
Playback
Mode
Disc
Type
Current
Track
Total
Tracks
Time
Display
ENGLISH
15
Page 16

BDT 3/BDT 30
Playing Files from USB Devices and CD Data Discs
Playing Files from USB Devices and CD Data Discs
Your BDT 3/BDT 30 can play MP3 (up to 320kbps bitrate) and AAC audio files; display
JPEG photos; and show MPEG 1 (layer 1), MPEG 2 (layers 2 and 3) and DivX® (3.x, 4.x,
5.x) audio/video files stored on a USB device or a CD data disc.
IMPORTANT: Only media in the FAT32 file system are compatible with the BDT 3/
BDT 30.
To access files on a device inserted into the player’s USB port, press the Home button
and select “USB” from the source list on the screen.
Home Menu
USB
Playlist
Settings
1 / 4 Exit Option
HOME
Regardless of the device’s file structure, the screen will first show three individual folders
named “Photo,” “Music” and “Video.” Select the type of media that you want to play
from these three folders.
USB
..
Photo
Music
Video
1 / 3 Exit Option
HOME
The screen will then show the device’s file structure. Selecting a folder will show all
of the selected type of media in the folder. If there are files of the selected type in the
device’s root directory, the screen will show them as well.
To move up one directory level, press the Cursor Left button or select the arrow folder.
Type:USB
Size:595.375M
FS:FAT32
OPTIONS
Type:Folder
OPTIONS
Viewing Photos
In the top directory, select “Photo.” Select a folder containing photo files, and highlight
a photo file in the folder. A thumbnail of the highlighted photo will appear on the right
side of the screen.
USB
..
Sunset
Connie1
Connie2
Stadium
AB Stand 1
01 / 31 Exit Option
HOME
Type:JPG
Size:0.241M
Resolution:720x524
OPTIONS
Use these remote buttons while viewing photos:
Play Button: Press this button to begin a slide show that displays each photo file in the
current folder or directory level (starting with the highlighted JPEG) for 15 seconds in
order as they appear in the folder.
Pause Button: Press this button to freeze the current photo on the screen. Press the Play
button to resume the slide show.
Stop Button: Press this button to end the slide show and return to the directory.
Next/Step and Previous/Step Buttons: Press these buttons to skip to the next or
previous photo file in the slide show or directory.
Cursor Up Button: Press this button while a photo is displayed to rotate the image 180°.
Pressing this button while the directory list is displayed highlights the previous item in
the directory.
Cursor Down Button: Press this button while a photo is displayed to show a mirrorimage reflection of the image. Pressing this button while the directory list is displayed
highlights the next item in the directory.
Cursor Left Button: Press this button while a photo is displayed to rotate the image 90°
counterclockwise. Pressing this button while the directory list is displayed jumps to the
next higher directory level.
Cursor Right Button: Press this button while a photo is displayed to rotate the image
90° clockwise.
Options Button: Press this button while a photo is displayed to show the Options menu,
which gives you the following options:
File: Select a file to view.
Play Mode: View files in their normal order, in random order (until you press the Stop
button) or in shuffle order (the screen displays each image in the folder one time in
random order, then returns to the directory).
Slide Show: Select how long you want each image to be displayed: 5 seconds, 15 seconds
or 30 seconds.
Transition: Select from various types of image-to-image transitions.
Pressing the Options button when a directory is displayed shows the Playlist Options box.
See Using Playlists, on page 18, for more information.
16
Page 17

BDT 3/BDT 30
Playing Files from USB Devices and CD Data Discs
Thumbnail (yellow) Button: Press this button while playing a slide show to display
thumbnail images of all photos in the active directory. Use the Cursor and OK buttons to
highlight and select images to view.
1 / 25 PreviousMove Next
Zoom (blue) Button: Press this button during a slide show to freeze and zoom in 2x size
on the current image. Additional presses of the button change the zoom to 3x, 4x, 1/2x,
1/3x and 1/4x size.
Playing Music Files
In the top directory, select “Music.” Select a folder containing music files, and highlight
one of the files. Information about the highlighted file will appear on the right of the
screen.
USB
..
Beanwater Part 1
Laydown Delivery (Edit 1)
Madagascar Wombat
Night Crazy
The Lost Transit Center
01 / 10 Exit Option
HOME
Type:MP3
Total Time:03:29
Title:Beanwater Junction, Part 1
Artist:Jugalbandi
Album:Night Crazy
Genre:Progressive
OPTIONS
Selecting a music file plays the file. If other music files in the folder follow the selected
file, the BDT 3/BDT 30 will play each one in order as they appear on the on-screen
display. The following screen will appear while music files play:
1 / 10
Type: MP3
Total Time: 03:29
Title: Beanwater Junction, Part 1
Artist: Jugalbandi
Album: Night Crazy
Genre: Progressive
00 : 02 : 37
If a selected MP3 file has an album cover-art ID3 tag, the art will be displayed on the
screen.
Use the Play, Pause, Stop, Prev/Step, Next/Step, Search/Slow Forward and Search/Slow
Reverse buttons to control music-file playback. See Remote Control Functions, on page
9, for more information about the functions of these buttons.
When the BDT 3/BDT 30 is playing music files from a USB device or CD data disc, the
Repeat and Options functions are slightly different from their functions when the unit is
playing Blu-ray Disc recordings, DVDs and music CDs:
Repeat Button: Pressing this button cycles through the following repeat modes:
1 (song), All (folder), Off. The active repeat mode is indicated in the screen’s top bar.
Options Button: Pressing this button displays any available options for the song that is
currently playing:
xt
File: Directly selects a song to play – either the song currently playing or another song.
Time: Displays the track’s elapsed time or the track’s time remaining.
Play Mode: Plays songs in their normal order, in random order (until you press the Stop
button) or in shuffle order (plays each song in the folder one time in random order, then
returns to the directory).
Bitrate: Shows the bitrate of the song that is currently playing.
Advance: Performs a rapid audible search forward through the song.
Replay: Each press of the OK button jumps back ten seconds during play.
While playing music files from a USB device or data CD, you can also view photos that are
on the same medium. Press the Home button while a music file is playing, navigate to a
folder containing photo files, and select a photo file to begin a slide show.
ENGLISH
17
Page 18

BDT 3/BDT 30
Playing Files from USB Devices and CD Data Discs/Using Playlists
Playing Videos
In the top directory, select “Video.” Select a folder containing video files, and highlight a
video file in the active folder.
USB
..
Dodgers Sweep Yanks in ‘63
Koufax’s Perfect Game
Gagne Saves 84th Game
Krik Gibson’s Homer
Bums Champs in 1955
01 / 7 Exit Option
The video will automatically play. If there are other video files in the folder, the
BDT 3/BDT 30 will play each of them in order as they appear on the on-screen menu.
Use the Play, Pause, Stop, Prev/Step, Next/Step, Search/Slow Forward and Search/Slow
Reverse buttons to control video-file playback. See Remote Control Functions, on page 9,
for more information about the functions of these buttons.
When the BDT 3/BDT 30 is playing video files from a USB device or CD data disc, the
Repeat and Options functions are slightly different from their functions when the unit is
playing Blu-ray Disc recordings and DVDs:
Repeat Button: Press this button to cycle through the following repeat modes:
1 (current video), All (folder), Off.
Options Button: Press this button to display any available options for the video that is
currently playing:
File: Directly selects a file to play.
Title: Directly selects a title to play (if available).
Chapter: Directly selects a chapter to play (if available).
Time: Displays the elapsed time or the time remaining.
Play Mode: Plays videos in their normal order, in random order (until you press the Stop
button) or in shuffle order (plays each video in the folder one time in random order, then
returns to the directory).
Audio: Selects audio options (if available).
HOME
Type:MPEG
OPTIONS
Using Playlists
Because USB devices and CD-R data discs can contain large numbers of playable files,
you can create a playlist for each disc to help you to access selected files.
To Create a Playlist
NOTE: The procedure is the same for a CD-R playlist and a USB playlist.
1. Press the Home button. The Home menu will appear.
2. Select CD data disc or USB. The Photo, Music and Video folders will appear.
3. Select the type of file you want to create the playlist for. You can create a playlist for
each type of file.
4. Search through the directory structure. When you see a file that you want to include
in the playlist for that file type, highlight it and press the Options button. The playlist
options box will appear.
5. To add the item to the playlist, select “Add to Playlist.”
6. Repeat steps 4 – 5 for all items that you want to add to the playlist.
To create a playlist for a different file type, repeat steps 1 – 6; but in step 3, select a
different file type.
To Play a Playlist
1. Press the Home button. The Home menu will appear.
2. Select Playlist. The Photo/Music/Video screen will appear.
3. Select the file type of the playlist you want to play. The playlist will open.
4. Select the first item in the playlist and press the Play button. The playlist will play.
5. To repeat the playlist, press the Repeat button. You can repeat one item (“1” on the
screen) or the entire playlist (“All”).
18
Page 19

BDT 3/BDT 30
Troubleshooting
Troubleshooting
If your BDT 3/BDT 30 isn’t performing the way you think it should, check to see if the problem is covered in this section before calling your dealer or contacting Harman Kardon
Customer Service.
Problem Solution
ENGLISH
The player won’t power up (the Power indicator is not lit ): • Check that the player’s AC power cord is properly plugged into the player’s Power
The disc does not play: • Check that the disc is inserted correctly (label side up).
No picture: • Check the connection between the player and the TV.
No sound: • Check that the HDMI and/or coaxial digital connections are properly made.
The picture appears in the wrong aspect ratio: • Change the Aspect Ratio setting in the Display Settings menu to match the TV.
There is noise or other interference in the picture while playing a Blu-ray Disc
recording or DVD:
Cannot access media on a connected USB device: • Check that the device is formatted in the FAT32 file system. Other file systems are
The player does not respond to remote-control commands: • Replace both remote-control batteries with fresh ones, and make sure that they are
The Ø symbol appears on the screen when you press a remote-control button: • The selected function is not permitted at the time you press the button.
The player does not respond to commands, or it behaves in an erratic way: • Unplug the player’s power cord from the AC outlet, wait 30 seconds, and plug it
You can find ad ditional troublesho oting infor mation in the FAQs link on th e Suppor t page at ww w.harmanka rdon.com.
Cord connector.
• Check that the player’s AC power cord is plugged into a working AC outlet and that
the AC outlet is not controlled by a switch.
• Make sure that the Master Power switch (on the player’s rear panel) is in the “On”
position.
• Check that the disc is the correct type: BD-Video (single-layer or double-layer),
DVD-Video, DVD+R/+RW, DVD-R/-RW, CDDA (CD digital audio), CD-R/RW. Other
disc types will not play.
• Check that the TV is turned on and that it is set to the correct input source.
• Confirm that all of the choices made in the Display Settings menu are correct for
your TV.
• Check that the TV is HDCP-compliant. The player cannot be used with a TV that is
not HDCP-compliant.
• If you’re using the coaxial digital connection, check that the digital audio settings on
the connected device have been properly set.
• If you’re using only the HDMI connection, check that the HDMI audio settings on the
connected device have been properly set.
• If you’re using only the HDMI connection, check that the BDT 3/BDT 30’s HDMI
Audio Output is set to “On.”
• Check that the disc surface is clean and not scratched.
not compatible with the BDT 3/BDT 30.
installed correctly.
• Hold the remote control closer to the player.
• Check that the player’s remote sensor is in the remote control’s line of sight.
• Make sure that the protective shipping film has been removed from the player’s
front panel.
back in.
19
Page 20

BDT 3/BDT 30
Specifications
Safety Instructions
Supported disc formats: 5-inch (12cm) or 3-inch (8cm) BD-Video (single-layer or double-layer), BD-R, BD-RE,
Region code (BD/DVD): A/1 (BDT 3); B/2 (BDT 30)
Audio formats: Dolby Digital, Dolby Digital Plus, Dolby TrueHD, DTS Digital, DTS-HD High Resolution
Still-image format: JPEG
Video signal system: NTSC (BDT 3); PAL (BDT 30)
HDMI version: 1.4a with 3-D and 30/36-bit Deep Color
Power requirement: AC 110 – 240V, 50/60Hz
Power consumption: 25W maximum, <0.5W standby
Dimensions (H x W x D): 2-5/8" x 17-5/16" x 13-7/8" (66mm x 440mm x 352mm)
Weight: 8.2 lb (3.7kg)
DVD-Video, DVD+R/+RW, DVD-R/-RW, CDDA (CD digital audio), CD-R/RW discs
Audio, DTS-HD Master Audio, PCM, CBR @192kbps, VBR @ 355kbps, MP3: 32kbps –
320kbps bitrates, including variable bitrate encoding
20
Page 21

HARMAN Consumer, Inc.
8500 Balboa Boulevard, Northridge, CA 91329 USA
516.255.4545 (USA only)
Made in P.R.C.
© 2011 HARMAN International Industries, Incorporated. All rights reserved.
Harman Kardon is a trademark of HARMAN International Industries, Incorporated, registered in the United States and/or other countries.
Blu-ray Disc and BD-Live are trademarks of the Blu-ray Disc Association. DivX
®
, DivX Certified® and associated logos are registered
trademarks of DivX, Inc. and are used under license. ABOUT DIVX VIDEO: DivX® is a digital video format created by DivX, Inc. This is an official
DivX Certified device that plays DivX video. Visit www.divx.com for more information and software tools to convert your files into DivX video.
ABOUT DIVX VIDEO ON DEMAND: This DivX Certified® device must be registered in order to play DivX Video-on-Demand (VOD) content. To
generate the registration code, locate the DivX VOD section in the device’s setup menu. Go to vod.divx.com with this code to complete the
registration process and learn more about DivX VOD. Manufactured under license from Dolby Laboratories. Dolby is a registered trademark
of Dolby Laboratories. Manufactured under license under U.S. Patent #’s: 5,451,942; 5,956,674; 5,974,380; 5,978,762; 6,487,535 & other
U.S. and worldwide patents issued & pending. DTS is a registered trademark, and DTS-HD and DTS-HD Master Audio are trademarks, of DTS,
Inc. Product includes software. © DTS, Inc. All Rights Reserved. HDMI, the HDMI logo and High-Definition Multimedia Interface are registered
trademarks of HDMI Licensing LLC. This product incorporates copyright-protection technology that is protected by U.S. patents and other
intellectual-property rights. Use of this copyright-protection technology must be authorized by Rovi Corporation, and is intended for home and
other limited viewing uses only unless otherwise authorized by Rovi Corporation. Reverse engineering or disassembly is prohibited.
Features, specifications and appearance are subject to change without notice.
Part No. 950-0363-001 Rev.: A
www.harmankardon.com
Page 22

Page 23

BDT 3/BDT 30
Blu-ray Disc™ плеер
Руководство пользователя
Page 24

BDT 3/BDT 30
ВАЖНЫЕ УКАЗАНИЯ ПО БЕЗОПАСНОСТИ 3
РАСПАКОВКА 5
МЕСТО УСТАНОВКИ 5
ОЧИСТКА 5
БЛАГОДАРИМ ЗА ВЫБОР ИЗДЕЛИЯ ФИРМЫ
HARMAN KARDON® 5
ХАРАКТЕРИСТИКИ BDT 3/BDT 30 6
ПРИНАДЛЕЖНОСТИ 6
ОРГАНЫ УПРАВЛЕНИЯ НА ПЕРЕДНЕЙ ПАНЕЛИ 7
РАЗЪЕМЫ ЗАДНЕЙ ПАНЕЛИ 8
ФУНКЦИИ ПУЛЬТА ДУ 8
ПОДКЛЮЧЕНИЕ ПЛЕЕРА 10
Содержание
ПОДГОТОВКА ПУЛЬТА ДУ 10
НАСТРОЙКА ПЛЕЕРА 11
ВОСПРОИЗВЕДЕНИЕ ДИСКОВ 14
ВОСПРОИЗВЕДЕНИЕ ФАЙЛОВ С USB-УСТРОЙСТВ
И CD-ДИСКОВ С ДАННЫМИ 16
ИСПОЛЬЗОВАНИЕ СПИСКОВ ВОСПРОИЗВЕДЕНИЯ 18
ПОИСК И УСТРАНЕНИЕ НЕИСПРАВНОСТЕЙ 19
СПЕЦИФИКАЦИЯ 20
24
Page 25

BDT 3/BDT 30
Важные указания по безопасности
Важные указания по безопасности
1. Прочтите эти инструкции.
2. Сохраните эти инструкции.
3. Соблюдайте все меры предосторожности.
4. Выполняйте все инструкции.
5. Не используйте устройство вблизи воды.
6. Очищайте только сухой тканью.
7. Не закрывайте вентиляционные отверстия. Устанавливайте в соответствии с указаниями изготовителя.
8. Не устанавливайте устройство вблизи источников тепла — радиаторов, обогревателей, печей и других приборов (включая
усилители), от которых исходит тепло.
9. В целях безопасности не выключайте полярную или заземляющую вилку. Один из контактов полярной вилки шире другого.
Вилка с заземлением имеет два силовых и один заземляющий контакт. Более широкий контакт или контакт заземления
предназначены для снижения риска поражения электрическим током. Если прилагаемая вилка не подходит под Вашу
розетку, обратитесь к электрику, чтобы он заменил розетку.
10. Размещайте шнур питания таким образом, чтобы он не мешал ходить и не оказался защемленным, особенно в месте входа
в вилку, вблизи розетки или в точке выхода из устройства.
11. Используйте только указанные изготовителем дополнительные приспособления и аксессуары.
12. Используйте только вместе с подставкой, штативом, скобой или столом, как указано производителем
или как поставляется в комплектации устройства. Если используется подставка, будьте осторожны
при передвижении подставки и устройства, чтобы избежать травм от падения.
13. Отключайте устройство от сети на время грозы или когда устройство не планируется использовать в течение длительного
времени.
14. Техническое обслуживание должно выполняться только квалифицированным персоналом. Ремонт или обслуживание
необходимы при любых повреждениях, например повреждении шнура или вилки, попадании внутрь устройства жидкости
или посторонних предметов, попадании устройства под дождь или во влажную среду, а также при нарушениях в работе или
падении.
15. Следите за тем, чтобы на устройство не попадали капли или брызги, и не ставьте на устройство наполненные жидкостью
предметы, например вазы.
16. Чтобы полностью обесточить устройство, отключите шнур питания от розетки сети.
17. Не допускать повреждений вилки шнура питания!
18. Следите за тем, чтобы аккумуляторы не подвергались сильному тепловому воздействию, например от солнечных лучей,
камина и других источников тепла.
РУССКИЙ
ЗНАК МОЛНИИ С СИМВОЛОМ СТРЕЛКИ В РАВНОСТОРОННЕМ ТРЕУГОЛЬНИКЕ
ПРЕДУПРЕЖДАЕТ ПОЛЬЗОВАТЕЛЕЙ О НАЛИЧИИ НЕИЗОЛИРОВАННОГО "ОПАСНОГО НАПРЯЖЕНИЯ" ВНУТРИ ИЗДЕЛИЯ, ДОСТАТОЧНО ВЫСОКОГО ДЛЯ СОЗДАНИЯ РИСКА ПОРАЖЕНИЯ ЭЛЕКТРИЧЕСКИМ ТОКОМ.
РИСК ПОРАЖЕНИЯ ЭЛЕКТРИЧЕСКИМ ТОКОМ
ВНИМАНИЕ: В ЦЕЛЯХ СНИЖЕНИЯ РИСКА ПОЖАРА ИЛИ ПОРАЖЕНИЯ ЭЛЕКТРИЧЕСКИМ
ТОКОМ НЕ ПОДВЕРГАЙТЕ ЭТО УСТРОЙСТВО ВОЗДЕЙСТВИЮ ДОЖДЯ ИЛИ ВЛАГИ.
СМ. МАРКИРОВКУ НА ЗАДНЕЙ ЧАСТИ УСТРОЙСТВА.
НЕ ВСКРЫВАТЬ
Нормативы FCC
Информация FCC для пользователей
Это устройство соответствует положениям Статьи 15 Правил FCC.
Эксплуатация должна осуществляться с соблюдением следующих двух
условий: (1) Это устройство не должно создавать критических помех; и (2) это
устройство должно принимать любые поступающие помехи, включая помехи,
которые могут привести к неправильному функционированию.
Помехи в приеме радио- и телевизионных сигналов
Оборудование было протестировано, и установлено его соответствие ограничениям для цифрового устройства класса B в соответствии со Статьей 15
Правил FCC. Эти ограничения устанавливаются для обеспечения необходимой
защиты от критических помех в жилых помещениях. Это устройство создает,
использует и передает радиочастоты и, в случае несоблюдения инструкций по
установке и эксплуатации, может привести к созданию критических помех для
радиокоммуникаций. Однако отсутствуют гарантии того, что помехи не будут
возникать в условиях правильной установки. Если данное устройство создает
помехи при приеме радио- и телевизионных сигналов, что можно определить
путем выключения и включения устройства, пользователю рекомендуется
попытаться устранить помехи одним из следующих способов:
• Увеличьте расстояние между устройством и ресивером.
• Подключите устройство к другой розетке, чтобы устройство и ресивер
находились на параллельных цепях.
• Обратитесь за помощью к дилеру или к опытному технику, специализирующемуся на радио- и телевизионном оборудовании.
ОСТОРОЖНО!
ВОСКЛИЦАТЕЛЬНЫЙ ЗНАК В РАВНОСТОРОННЕМ ТРЕУГОЛЬНИКЕ СЛУЖИТ
ПРЕДУПРЕЖДЕНИЕМ ДЛЯ ПОЛЬЗОВАТЕЛЯ О НАЛИЧИИ ВАЖНЫХ ИНСТРУКЦИЙ
ПО ЭКСПЛУАТАЦИИ И ТЕХНИЧЕСКОМУ ОБСЛУЖИВАНИЮ (РЕМОНТУ) В СОПРОВОДИТЕЛЬНОЙ ДОКУМЕНТАЦИИ.
ПРИМЕЧАНИЕ: Изменения и модификации, не одобренные компанией
HARMAN, могут привести к отзыву права пользователя на эксплуатацию
данного устройства.
Требования и предупреждения IC
Это цифровое устройство класса B соответствует канадскому стандарту
ICES-003. Это цифровое устройство класса B соответствует канадскому
стандарту ICES-003.
25
Page 26

BDT 3/BDT 30
Важные указания по безопасности
Для канадской модели
Это цифровое устройство класса B соответствует канадской норме ICES-003. Для
моделей со шнуром питания, имеющим
полярную вилку:
BHИMАHИE: Во избежание поражения электрическим током убедитесь, что широкий
штырь вилки полностью вошел в широкое
гнездо розетки.
Для канадской модели
Cet appareil numérique de la classe B est
conforme à la norme NMB-003 du Canada. Sur
les modèles dont la che est polarisee:
ATTENTION: Pour éviter les chocs électriques,
introduire la lame la plus large de la che dans
la borne correspondante de la prise et pousser
jusqu’au fond.
BHИMАHИE: Это изделие использует лазерную систему. Во избежание
прямого воздействия лазерного луча не вскрывайте корпус изделия и не
нарушайте установленные системы безопасности. ИЗБЕГАЙТЕ ПОПАДАНИЯ
ЛАЗЕРНОГО ЛУЧА В ГЛАЗА! Для обеспечения правильного использования
этого изделия внимательно прочитайте Руководство пользователя и
сохраните его на будущее. Если необходимо обслуживание или ремонт
изделия, обратитесь в местный сервисный центр фирмы Harman Kardon.
Техническое обслуживание должно выполняться только квалифицированным
персоналом.
Инструкции для пользователя по извлечению и утилизации
использованных аккумуляторов.
Классификация типов аккумуляторов.
Эти символы (см. выше), нанесенные на изделие или упаковку, приведенные
в отдельном информационном вкладыше или руководстве по эксплуатации,
означают, что изделие, а также поставляемые вместе с изделием или
встроенные в него аккумуляторы запрещено выбрасывать вместе с
бытовыми отходами. Их следует доставить на специальный пункт приема,
где производится обработка, переработка или утилизация в соответствии
с национальным или местным законодательством либо директивами
Европейского Союза 2002/96/EC и 2006/66/EC.
Правильная утилизация отслуживших свой срок изделий и аккумуляторов
помогает сэкономить ресурсы и предотвратить возможное отрицательное
воздействие на окружающую среду и/или здоровье человека.
Поставляемые с устройством аккумуляторы могут быть щелочными,
углеродно цинковыми/ магниевыми или литиевыми (аккумуляторы типа
"таблетка"); все они подлежат утилизации в соответствии с приведенными
выше правилами. Все типы аккумуляторов должны утилизироваться в
соответствии с приведенными выше инструкциями.
Чтобы извлечь аккумулятор из устройства или пульта дистанционного
управления, выполните те же действия, что и при установке элементов питания
(как описано в руководстве по эксплуатации), только в обратном порядке.
В случае с моделями со встроенными аккумуляторами, срок службы которых
равен сроку службы устройства, пользователь, возможно, не сможет извлечь
аккумулятор. В таких случаях разборку изделия и извлечение аккумуляторов
осуществляют пункты по приему и утилизации. Если по какой-либо причине
Вам необходимо заменить такой аккумулятор, эта процедура должна
выполняться уполномоченными сервисными центрами.
26
Page 27

BDT 3/BDT 30
Распаковка
Распаковка
Упаковочные материалы данного изделия разработаны специально
для защиты изделия от ударов и вибраций во время транспортировки.
Рекомендуем сохранить упаковку на случай переезда или отправки на ремонт.
Для уменьшения занимаемого места при хранении упаковки, возможно, вы
захотите сложить ее. Вы можете сделать это, аккуратно разрезав ленточные
швы снизу коробки и затем сложив ее. Так же вы можете поступить с
картонными вставками. Упаковочные материалы, которые не могут быть
сложены, должны храниться вместе с коробкой в пластиковом мешке.
Если вы не хотите сохранять упаковку, то имейте ввиду, что упаковочные
материалы пригодны для вторичного использования. Берегите окружающую
среду и сдавайте упаковку на сборный пункт.
Снимите защитные пленки с передней панели. Если этого не сделать, это
затруднит дистанционное управление.
Место установки
• Для обеспечения правильной эксплуатации и, во избежание возможного
травмирования, устанавливайте изделие на прочную и ровную
поверхность. При установке изделия на полку обеспечьте, чтобы полка
или любое другое монтажное оборудование выдерживали вес изделия.
• Обеспечьте достаточно пространства сверху и снизу для вентиляции.
Если изделие устанавливается в шкафу или в другом закрытом
пространстве, убедитесь, что в этом пространстве имеется достаточное
движение воздуха. В некоторых случаях может понадобиться
вентилятор.
• Не устанавливайте изделие на ковровую поверхность.
• Избегайте установки в очень горячих или холодных местах, или в местах,
подверженных прямому солнечному облучению или нагреву.
• Избегайте сырых и влажных мест.
• Не загораживайте вентиляционные отверстия сверху и по бокам изделия
и не ставьте на них или рядом какие-либо предметы.
• Не устанавливайте BDT 3/BDT 30 непосредственно на предметы, излучающие избыточное тепло.
• Из-за того, что изделие и другие компоненты вашей системы излучают
тепло, существует определенная возможность, что резиновые накладки
на ножках изделия могут оставить следы на некоторых породах дерева
или шпона. Осторожно ставьте изделие на мягкие древесные или другие
материалы, которые могут повредиться от тепла или тяжести. Некоторые
виды покрытий особенно чувствительны к таким следам по ряду причин,
находящихся вне контроля фирмы Harman Kardon, включая тип покрытия,
используемые чистящие вещества, обычные нагрев и вибрации,
вызываемые изделием и другие причины. Гарантийные обязательства
не касаются таких повреждений мебели, поэтому осторожно выбирайте
место установки и обычного обслуживания изделия.
• Ваш новый Harman Kardon Blu-ray Disc
к высокоскоростному Интернету для обеспечения функционирования Bd-live™.
™
плеер требует подключения
Благодарим за выбор изделия фирмы
Harman Kardon®!
В течение более чем пятидесяти лет изделия фирмы Harman Kardon занимают
передовые позиции в области технологий аудиотехники и домашних
кинотеатров. Первый аудиоресивер носил эмблему Harman Kardon, и с тех пор
фирма производит инновационные развлекательные изделия. BDT 3/BDT 30
Blu-ray Disc™ плеер является новейшим компонентом, выполненным в этой
гордой традиции.
Применяя самые новые технологии 3D, высокого разрешения аудио и
видеосигналов, BDT 3/BDT 30 является головным устройством домашнего
кинотеатра. Он воспроизводит фильмы в формате Blu-ray с видеоразрешением
до 1080/24p, если это позволяет диск, благодаря технологии HDMI
(High-Denition Multimedia Interface®) 1.4a с 30/36-bit Deep Color сопрягаемостью,
а также позволяет вам насладиться последними 3D-технологиями, если
подключить его к ТВ, способному воспроизводить изображение 3D.
™
Подключите BDT 3/BDT 30 к Интернету, и режим BD-Live
совместимых дисках) предоставит вам новые функции, обновления и новости
о текущих событиях. Даже старые DVD-Video диски предоставят выдающееся
качество изображения вплоть до разрешения 1080p.
Несмотря на всю свою сложность, BDT 3/BDT 30 прост в обращении. Органы
управления у него такие же, как и у DVD-плееров, а его расширенное экранное
меню проведет вас шаг за шагом по нужному пути. Простой в обращении,
отличный по характеристикам, BDT 3/BDT 30 обеспечит радость на многие
годы.
Если у вас появятся вопросы об этом изделии, его установке или работе,
обратитесь к продавцу или установщику, или посетите сайт фирмы Harman
Kardon www.harmankardon.com.
ПРИМЕЧАНИЕ: Ваш Blu-ray Disc плеер спроектирован и изготовлен в
соответствии с информацией управления регионами воспроизведения
(Region Management Information) которая закодирована на большинстве
записей Blu-ray-дисков и DVD-дисков:
• Изделие BDT 3 предназначено только для воспроизведения
Blu-ray -дисков с региональным информационным кодом A и
DVD-дисков с региональным информационным кодом 1, либо
дисков, которые вообще не содержат никакого регионального
информационного кода.
• Изделие BDT 30 предназначено только для воспроизведения
Blu -ray-дисков с региональным информационным кодом В и
DVD-дисков с региональным информационным кодом 2, либо
дисков, которые вообще не содержат никакого регионального
информационного кода.
(доступен на
®
РУССКИЙ
Очистка
• Если изделие загрязнилось, очищайте его чистой мягкой сухой
тканью. Если необходимо, можно почистить его, только вынув вилку
из розетки, мягкой тканью, слегка смоченной в мыльной воде, а затем
тканью смоченной в чистой воде. Немедленно вытереть насухо сухой
тканью. НИКОГДА не используйте бензол, аэрозольные очистители,
разбавители красок, спирт и любые другие летучие чистящие средства.
Не используйте абразивные чистящие вещества, так как они могут
повредить покрытие металлических деталей. Избегайте разбрызгивания
инсектицидов вблизи изделия.
Зарегистрируйте ваше изделие на нашем сайте
www.harmankardon.com.
Примечание: вам нужен серийный номер изделия.
К тому же есть режим оповещения о наших новых
изделиях и/или специальных предложениях.
1
Если на диске имеется региональный код, для которого плеер не
предназначен, то такие диски воспроизводиться не будут.
2
27
Page 28

BDT 3/BDT 30
Характеристики BDT 3/BDT 30
Характеристики BDT 3/BDT 30
Интерфейсы
• Один HDMI-выход
• Один коаксиальный цифровой аудиовыход
• Левый и правый аналоговый аудиовыходы
• Один композитный видеовыход
• Один разъем USB 2.0 для проигрывания видео-, аудио- и фотоконтента
на USB-устройствах
• Подключается к вашей LAN (локальная сеть) для BD-Live интерактивности
через Интернет
Простота обращения
• Экранное меню
• Растровый информационный дисплей на передней панели
• Полнофункциональный пульт ДУ
Характеристики плеера
• Версия HDMI 1.4a с 30/36-bit Deep Color
• Региональные коды: Blu-ray Disc Region A/DVD Region 1 (модели BDT 3);
Blu-ray Disc Region B/DVD Region 2 (модели BDT 30);
• Работает с дисками 12 cм и 8 cм
• Поддерживаемые видеоформаты: BD-Video (однослойный или двухслойный), BD-R, BD-RE, DVD-Video, DVD+R/+RW, DVD-R/-RW, CD-R/RW
• Поддерживаемые аудиоформаты: Dolby
TrueHD, DTS® Digital, DTS-HD™ Аудио высокого разрешения, DTS-HD
Master Audio™, CDDA (цифровые аудиодиски), PCM, CBR @ 192 кбит/с,
VBR @ 355 кбит/с, MP3: 32 кбит/с – 320 кбит/с, включая кодирование с
изменяемыми битрейтами
• CEC (Электронный контроль потребителя) с основными параметрами
контроля через HDMI/CEC
• Поддерживает JPEG стоп-кадр формат
• Поддерживает BD-Live интерактивность
• Апскейлинг видео до 720 p и Full HD 1080 p
• Видеовыход с прогрессивной разверткой
• Поддерживаемое разрешение JPEG: 4 000 x 5 000 пикселей (Ш x В),
20 мегапикселей максимум
• JPEG стоп-кадр вращение: с шагом 90 градусов
• JPEG стоп-кадр меню в миникартинках
• Ускоренное воспроизведение: 2x, 4x, 8x, 16x, 32x
• Замедленное воспроизведение: 1/2x, 1/4x, 1/8x, 1/16x
• Случайное воспроизведение (только CD)
• Повторное воспроизведение
• Родительский контроль с пользовательским паролем
• Распознавание дисков до 10
• Регулировка формата кадра
®
Digital, Dolby Digital Plus, Dolby
Принадлежности
Если хоть одной позиции из указанных ниже не будет в наличии, то обратитесь
к вашему продавцу/поставщику данного изделия.
дистанционного
Пульт
управления
HDMI-кабель
Сетевой кабель
(Примечание: Тип шнура зависит от страны продажи изделия.)
Две батарейки типа AAA
28
Page 29

BDT 3/BDT 30
Органы управления на передней панели
Индикатор
питания Лоток
Органы управления на передней панели
Информационный
дисплей
USB
порт
РУССКИЙ
Кнопка
Питание
Индикатор питания:
и основной тумблер питания на задней панели установлен в положение
"On", светодиодный индикатор засветится желтым, показывая, что прибор
находится в режиме Ожидание. При включении BDT 3/BDT 30 (кнопка ON на
пульте ДУ), индикатор станет белым.
Кнопка Питание
или Ожидание.
Лоток:
Вставьте в лоток совместимый диск. BDT 3/BDT 30 совместим с
дисками диаметром 12 см и 8 см.
Кнопка Открыть/Закрыть:
нажатием кнопки убедитесь, что ничто не блокирует движение лотка.
Кнопка Воспроизведение:
ведение вставленного в лоток диска. Нажатие этой кнопки при просмотре
фотографий начинает слайд-шоу всех фотографий данной папки.
Кнопка Пауза:
Нажатие этой кнопки во время просмотра программы Blu-ray-диска или DVDдиска останавливает текущий кадр. Нажатие этой кнопки во время паузы
возобновляет воспроизведение. Нажатие этой кнопки во время просмотра
фотографий останавливает текущую фотографию.
Кнопка Стоп:
тие кнопки "Воспроизведение" возобновляет воспроизведение с точки, где
оно было остановлено.) Для полной остановки воспроизведения нажмите эту
кнопку дважды.
Если BDT 3/BDT 30 подключен к сетевой розетке
: Эта кнопка переключает BDT 3/BDT 30 в режим Включен
Эта кнопка открывает и закрывает лоток. Перед
Нажатие этой кнопки начинает воспроиз-
Нажатие этой кнопки останавливает воспроизведение.
Останавливает воспроизведение. (У некоторых дисков нажа-
Кнопка
Открыть/Закрыть
Кнопка
Воспроизведение
Кнопка
Пауза
Информационный дисплей:
ответ на команды и запрошенную информацию на этом дисплее появляются
различные сообщения о статусе устройства.
Кнопка Предыдущий/Шаг:
в начало воспроизводимой дорожки или главы, либо, при просмотре
фотографий — на предыдущую фотографию. Нажмите эту кнопку дважды для
перехода на начало предыдущей дорожки или главы. Многократное нажатие
кнопки позволяет последовательно переходить к предыдущим дорожкам
или главам. При воспроизведении видео нажмите кнопку "Пауза", после чего
нажатие кнопки "Предыдущий/шаг" позволяет продвигаться назад покадрово.
Кнопка Следующий/Шаг:
начало следующей дорожки или главы, либо, при просмотре фотографий —
на следующую фотографию. Многократное нажатие кнопки позволяет
последовательно переходить к следующим дорожкам или главам. При
воспроизведении видео нажмите кнопку "Пауза", после чего нажатие кнопки
"Следующий/шаг" позволяет продвигаться вперед покадрово.
USB-порт:
при помощи USB Standard-A кабеля.
ВАЖНО:
роллер, ибо это может повредить как BDT 3/BDT 30, так и ваше устройство.
Ориентируйте разъем подключаемого прибора так, чтобы его можно было
подключить к разъему BDT 3/BDT 30. Вы можете отключать и подключать
USB-устройства в любое время — специальных процедур подключения/
отключения не существует.
Кнопка
Предыду-
щий/Шаг
Кнопка
Стоп
Кнопка
Следующий/Шаг
Как будет показано в этом руководстве, в
Нажмите эту кнопку один раз для перехода
Нажмите эту кнопку один раз для перехода в
Предназначен для подключения карты памяти или жесткого диска
Не подключайте к этому порту ПК или другой USB-хост/конт-
29
Page 30

BDT 3/BDT 30
Разъемы задней панели
Разъемы задней панели/Функции пульта ДУ
Основной тумблер
питания
ON OFF
110V-240V –50/60Hz 25W
Разъем для
шнура питания
ПРИМЕЧАНИЕ: См.
Коаксиальный
цифровой выход
Подключение плеера
Аналоговые
аудиовыходы
R
HDMI-выход
L
Композитный
видеовыход
Разъем
сети
на стр. 10, чтобы получить
подробную информацию о подключении.
Основной тумблер питания: Этот механический тумблер включает и
выключает питание плеера BDT 3/BDT 30. После выполнения и проверки всех
соединений (см. Подключение плеера на стр. 10), установите этот тумблер
в положение "On". Если вы не будете пользоваться плеером длительное
время, для экономии энергии установите этот тумблер в положение "Off".
Разъем для шнура питания: После выполнения и проверки всех
соединений подключите прилагаемый сетевой шнур одним концом в это
гнездо, а другим — исправную розетку.
Разъем Сеть: Для того чтобы воспользоваться функцией BD-Live,
подключите этот порт к вашей локальной сети (LAN) при помощи сетевого
кабеля Cat. 5/Cat. 5e/ RJ45. См. Функция BD-Live на стр. 15.
Коаксиальный цифровой выход: Подключайте этот выход к коаксиальному цифровому входу вашего аудио/видео ресивера или процессора
пространственного звука. ПРИМЕЧАНИЕ: Если ваш аудио/видео ресивер
или процессор пространственного звука имеет HDMI-подключение, мы
рекомендуем воспользоваться им для получения наилучшего качества
аудио.
Аналоговые аудиовыходы: Подключите эти выходы к аналоговым входам
своего аудио/видео ресивера, процессора пространственного звука или
аналогового записывающего устройства.
Композитный видеовыход: Подключите этот выход к композитному
видеовходу своего ТВ или аудио/видео ресивера. ПРИМЕЧАНИЕ: Если ваш
ТВ или аудио/видео ресивер имеет HDMI-подключение, мы рекомендуем
воспользоваться им для получения наилучшего качества видео.
HDMI-выход: Подключите HDMI-выход BDT плеера к HDMI-входу вашего
ТВ, аудио/видео ресивера или процессора пространственного звука. HDMIкабель передает и видео, и аудиосигналы, поэтому если вы подключены к
ТВ по каналу HDMI, а еще и по каналу коаксиального цифрового аудио к
вашему домашнему кинотеатру, мы рекомендуем отключить канал HDMI,
чтобы полностью использовать преимущества аудиосистемы домашнего
кинотеатра. См. Настройки звука: Audio Output (Аудиовыход): на стр. 13
содержится дополнительная информация.
ВАЖНО: Ваш BDT 3/BDT 30 соответствует HDCP (защита копий высокого
разрешения). Для пользования HDMI-выходом ваш ТВ тоже должен
соответствовать HDCP. Для лучшего результата мы не рекомендуем длину
кабеля HDMI более чем 3 метра без повторителя. Если ваш ТВ имеет DVIвход, вы можете воспользоваться дополнительным кабелем HDMI-DVI или
адаптером для видео подключения ТВ. (DVI — это только видео.)
Вентиляционные отверстия: BDT 3/BDT 30 имеет встроенный вентилятор
охлаждения. Для нормальной работы прибора не загораживайте вентиляционные отверстия.
Вентиляторы
Функции пульта ДУ
Power On
Кнопка
Button
Питание вкл.
Settings
Кнопка
Установки
Button
Angle
Кнопка
Угол
Button
Кнопка A-B
A–B Button
Кнопка
Prev/Step
Предыдущий/Шаг
Button
Кнопка Искать/
Search/Slow
медленно назад
Reverse Button
Bookmark
Кнопка
Button
Закладка
Кнопка
Options Button
Опции
Кнопка Повтор
Repeat Button
Кнопка Пауза
Pause Button
Кнопка Стоп
Stop Button
Кнопка Выход
Exit Button
Кнопка OK
OK Button
Кнопка Дисплей
Display Button
Кнопка Программа
Program Button
Кнопка Подсветка
Dimmer Button
BLU-RAY DISC PLAYER
Open/Close
Кнопка
Button
Открыть/Закрыть
Кнопка
Power Off
Питание выкл.
Button
Кнопка Аудио
Audio Button
Кнопка Поиск
Find Button
PIP Button
Кнопка PIP
Кнопка Искать/
Search/Slow
медленно вперед
Forward Button
Кнопка
Popup Menu
Всплывающее
Button
меню
Кнопка
Top Menu
Главное меню
Button
Кнопка Зум
Zoom Button
Numeric Buttons
Цифровые кнопки
Кнопка Очистить
Clear Button
Кнопка
Home
Главная
Button
Кнопка
Subtitle
Субтитры
Button
Resolution
Кнопка
Разрешение
Button
Next/Step
Кнопка
Button
Следующий/
Шаг
Play
Кнопка
Button
Воспроизведение
Cursor
Кнопки
Курсор
Buttons
Thumbnail
Кнопка
Button
Миникартинки
30
Page 31

BDT 3/BDT 30
Функции пульта ДУ
Кнопка Питание вкл.: Для переключения BDT 3/BDT 30 из режима Ожидание
в рабочий режим.
Кнопка Открыть/Закрыть: Эта кнопка открывает и закрывает лоток. Перед
нажатием кнопки убедитесь, что ничто не блокирует движение лотка.
Кнопка Питание выкл.: Для переключения BDT 3/BDT 30 из рабочего режима
в режим Ожидание.
Кнопка Установки: Нажмите на эту кнопку, чтобы вывести на дисплей
Настроечное меню плеера. См. Настроечные меню на стр. 12.
Кнопка Опции: Нажмите эту кнопку, чтобы узнать все опции той позиции, в
которой вы находитесь.
Кнопка Главная: Нажмите эту кнопку для возврата на главную страницу
экранного дисплея с любой страницы, где вы находитесь.
Кнопка Угол: Переключает углы съемки камеры, доступные на данном диске.
ПРИМЕЧАНИЕ: Эта функция зависит от диска. Не все диски имеют различные
углы съемки камеры и позволяют выбирать угол съемки.
Кнопка Аудио: Переключает различные аудиодорожки, доступные на
диске. ПРИМЕЧАНИЕ: Эта функция зависит от диска. Не все диски имеют
многочисленные аудиодорожки и позволяют выбирать дорожку.
Кнопка Повтор: Когда BDT 3/BDT 30 воспроизводит Blu-ray-диск или DVD,
нажатие этой кнопки переключает следующие режимы повторения: Глава,
Название, Все, Выкл. Когда BDT 3/BDT 30 воспроизводит CD, нажатие этой
кнопки переключает следующие режимы повторения: Track (Дорожка),
All (Все), Off (Выкл). ПРИМЕЧАНИЕ: Эта функция зависит от диска. Не все
диски поддерживают функцию повтора.
Кнопка Субтитры: Этой кнопкой переключаются опции субтитров, имеющиеся
на данном диске. ПРИМЕЧАНИЕ: Эта функция зависит от диска. Не все диски
имеют опции субтитров.
Кнопка A-B: Этой кнопкой включается режим повторения A-B. Первое
нажатие устанавливает точку "A"; второе нажатие устанавливает точку "B" и
включает повторение участка между обеими точками. Нажатие кнопки A-B во
время повторения отменяет режим повторения A-B.
Кнопка Поиск: В режиме воспроизведения нажатие этой кнопки активирует
функцию поиска, что позволяет вам перейти на определенное место диска.
Поиск производится по названию, главе или времени воспроизведения.
Кнопка Пауза: Включает паузу воспроизведения диска или музыкального
файла. Нажатие этой кнопки во время просмотра программы Blu-ray-диска
или DVD-диска останавливает текущий кадр. Нажатие этой кнопки во время
паузы возобновляет воспроизведение. Нажатие этой кнопки во время
просмотра фотографий останавливает текущую фотографию.
Кнопка PIP: Нажмите, чтобы переключиться на дополнительный видеопоток
во время воспроизведения записи с Blu-ray-диска с помощью специальных
функций BonusView.
Кнопка Предыдущий/Шаг: Нажмите эту кнопку один раз для перехода
в начало воспроизводимой дорожки или главы, либо, при просмотре
фотографий — на предыдущую фотографию. Нажмите эту кнопку дважды для
перехода на начало предыдущей дорожки или главы. Многократное нажатие
кнопки позволяет последовательно переходить к предыдущей дорожке или
главе. При воспроизведении видеоконтента нажмите кнопку "Пауза", после
чего нажатие кнопки "Предыдущий/шаг" позволяет продвигаться назад
покадрово.
Кнопка Следующий/Шаг: Нажмите эту кнопку один раз для перехода в
начало следующей дорожки или главы, либо, при просмотре фотографий —
на следующую фотографию. Многократное нажатие кнопки позволяет
последовательно переходить к следующей дорожке или главе. При
воспроизведении видеоконтента нажмите кнопку "Пауза", после чего нажатие
кнопки "Следующий/шаг" позволяет продвигаться вперед покадрово.
Кнопка Стоп: Останавливает воспроизведение. (При нажатии кнопки
Воспроизведение воспроизведение начнется вновь с точки остановки.)
Для полной остановки воспроизведения нажмите эту кнопку дважды.
ПРИМЕЧАНИЕ: некоторые установки и функции доступны только при полной
остановке воспроизведения.
Кнопка Искать/медленно назад: Обратный поиск по текущей дорожке. Для
Blu-ray-программ и DVD-программ, каждое нажатие переключает скорость в
порядке 2x, 4x, 8x, 16x и 32x относительно нормальной скорости. Нажатие этой
кнопки во время паузы Blu-ray Disc или DVD, вызовет медленное движение
назад по главе. Каждое нажатие меняет скорость в следующем порядке: 1/2,
1/4, 1/8 и 1/16 от нормальной скорости.
Кнопка Искать/медленно вперед: Нажмите эту кнопку для быстрого
продвижения вперед по текущей дорожке. Для Blu-ray Disc и DVD, каждое
нажатие переключает скорость в порядке 2x, 4x, 8x, 16x и 32x от нормальной
скорости. Нажатие этой кнопки во время паузы Blu-ray или DVD, вызовет
медленное движение вперед по главе. Каждое нажатие меняет скорость в
следующем порядке: 1/2, 1/4, 1/8 и 1/16 от нормальной скорости.
Кнопка Воспроизведение: Нажмите эту кнопку для воспроизведения диска,
вложенного в лоток, или музыкального файла, выделенного в экранном меню.
Нажатие этой кнопки при просмотре фотографий запускает слайд-шоу.
Кнопка Выход: Для возврата в предыдущее меню или уровень меню.
Кнопка Всплывающее меню: При нажатии на эту кнопку во время воспроиз-
ведения Blu-ray диска или DVD на экране появляется его всплывающее меню.
ПРИМЕЧАНИЕ: Эта функция зависит от диска. Не на всех дисках есть главное
меню. Если на DVD-диске нет всплывающего меню, при нажатии на кнопку
Всплывающего меню (Popup Menu) на экран может выводиться меню диска, в
зависимости от того, кто создавал системное меню диска.
Кнопка OK: Нажмите эту кнопку для выбора подсвеченного пункта экранного
меню.
Кнопки Курсор: При помощи этих кнопок осуществляется навигация по
пунктам экранного меню.
Кнопка Дисплей: Для вызова меню с информацией о воспроизводимом диске
или программе.
Кнопка Главное меню: Нажмите на эту кнопку, чтобы вывести на дисплей
Главное меню Blu-ray диска или воспроизводимого DVD. ПРИМЕЧАНИЕ: Эта
функция зависит от диска. Не все DVD-диски имеют главное меню. Если
на DVD-диске нет главного меню, при нажатии на кнопку главного меню
(Top Menu) на экран может выводиться меню диска, в зависимости от того, кто
создавал системное меню диска.
Кнопка Закладка (зеленая): Для активации функции закладки. См. Bookmark
Function (Функция закладки): на стр. 15.
Кнопка Программа (красная): Нажмите на эту кнопку, чтобы создать список
программируемого воспроизведения для текущего диска. См. Programmed
Play (Программированное воспроизведение) на стр. 15.
Кнопка Зум (синяя): Увеличивает или уменьшает масштаб изображения. При
помощи навигационных кнопок это можно делать с отдельными участками
изображения. ПРИМЕЧАНИЕ: Эта функция за висит от диска. Не все диски
поддерживают эту функцию.
Кнопка Миникартинка (желтая): При работе со слайд-шоу эта кнопка
позволяет увидеть мини-копии всех фото активного каталога.
Красная, зеленая, желтая и синяя кнопки: Когда BDT 3/BDT 30 воспроизводит запись с Blu-ray-диска, эти кнопки активируют функции и меню, которые
могут различаться от диска к диску. Подробная информация содержится в
меню диска. ПРИМЕЧАНИЕ: Эти функции Blu-ray-диска могут отключать
функции закладки, миникартинки, программы и зума.
Цифровые кнопки: Этими кнопками можно вводить номера различных
пунктов и позиций.
Кнопка Подсветка: Этой кнопкой регулируется яркость свечения дисплея
передней панели: 100%, 50%, 25%, Авто/Выкл. При установке на Off (Выкл),
дисплей некоторое время будет светиться в полную яркость всякий раз при
нажатии какой бы то ни было кнопки на пульте ДУ.
Кнопка Очистить: Нажав эту кнопку, можно стереть цифру, неправильно
введенную при помощи цифровых кнопок.
РУССКИЙ
31
Page 32

BDT 3/BDT 30
Подключение плеера/Подготовка пульта ДУ
Подключение плеера
HDMI-подключение
Если ваш ресивер/процессор имеет HDMI-подключение
При помощи HDMI-кабеля, входящего в комплект поставки, соедините HDMIвыход плеера с HDMI-входом ресивера/процессора. При помощи другого
HDMI-кабеля соедините HDMI-выход ресивера/процессора с HDMI-входом
вашего ТВ.
Если ваш ресивер/процессор не имеет HDMI-подключения
Используйте приложенный HDMI-кабель для прямого подключения HDMIвыхода плеера непосредственно к HDMI-входу вашего ТВ.
Коаксиальный цифровой аудиовыход
Если вы не подключаете HDMI-выход плеера к вашему ресиверу/процессору,
подключите коаксиальный цифровой аудиовыход плеера к коаксиальному
цифровому входу ресивера/процессора.
Разъем для шнура питания
К BDT 3/BDT 30 прилагается съемный шнур питания. Такое решение облегчает
подключение других систем к задней панели плеера.
ПРИМЕЧАНИЯ:
• Требования по питанию для BDT 3/BDT 30: 110 – 240 В, 50/60 Гц, 25 Вт.
Питание от иного, чем вышеуказанный, источника может привести к
повреждению плеера или выходу его из строя.
• Перед включением шнура питания в розетку убедитесь, что все
остальные подключения выполнены правильно.
• Подключите разъем шнура питания к разъему плеера. Подключите вилку
шнура в рабочую, исправную розетку.
Установите основной тумблер питания плеера BDT 3/BDT 30 в положение
"On". Индикатор питания загорится желтым, показывая, что плеер находится
в режиме Ожидание.
Подготовка пульта ДУ
Установка батареек
Пульт ДУ от BDT 3/BDT 30 использует две батарейки типа AAA (входят в
комплект). Вставьте батарейки, как показано на иллюстрации, соблюдая
полярность.
Подключение аналоговых аудиовыходов
Подключите аналоговые аудиовыходы BDT 3/BDT 30 к аналоговым входам
своего ресивера/процессора или к аналоговым аудиовходам своего
аналогового записывающего устройства.
Подключение композитного видеовыхода
Если вы не подключаете HDMI-выход BDT 3/BDT 30 к вашему ТВ или к вашему
аудио/видео ресиверу, подключите композитный видеовыход плеера к
композитному входу ТВ или аудио/видео ресивера.
Подключение к сети
При помощи сетевого кабеля Cat. 5/RJ45 (в комплект не входит) подключите
Network-разъем плеера прямо к сетевому маршрутизатору, сетевому
коммутатору, модему, либо сетевой Ethernet-розетке, которая имеет выход в
Интернет. ПРИМЕЧАНИЕ: BDT 3/BDT 30 не может подключаться через другие
сетевые устройства. Сетевое подключение делает возможной для BDT 3/
BDT 30 функцию BD-Live. Более полная информация находится в разделе
Функция BD-Live, стр. 15.
+
–
–
+
Пользование пультом ДУ
При пользовании пультом ДУ направляйте его на переднюю панель плеера.
Обеспечьте, чтобы никакие предметы, например мебель, не загораживали
визуальный контакт между плеером и пультом ДУ. Яркий свет, флуоресцентные
лампы и плазменные экраны могут помешать функционированию пульта ДУ.
• Пульт ДУ имеет диапазон действия до 6,1 м, в зависимости от общей
освещенности.
• Максимальный угол отклонения пульта ДУ — 30 градусов влево/вправо
от перпендикуляра к плееру.
Если пульт ДУ функционирует не совсем правильно, удостоверьтесь, что
батарейки вставлены правильно. Если пульт ДУ по-прежнему функционирует
неправильно, замените обе батарейки новыми.
32
Page 33

BDT 3/BDT 30
Setup Wizard
Page: 1/5
Next
Welcome to the Harman Kardon BDT Setup
Wizard.
Some simple information is needed to ensure
you get the best experience from your product.
You can adjust these settings later in addition
to making changes to more advanced settings
by pressing the ‘Settings’ button on the
remote.
OK
Setup Wizard
Page: 2/5
Next
Please select which language you
would like the BDT menus to appear.
OK
Previous
Setup Wizard
Page: 4/5
Next
Please select the best aspect ratio
that fits your TV.
OK
Previous
16:9 Full
16:9 Normal
4:3 Pan & Scan
4:3 Letterbox
Настройка плеера
Настройка плеера
ПРИМЕЧАНИЕ:
служат для иллюстративных целей и могут несколько отличаться от
фактического меню.
Для настройки вашего BDT 3/BDT 30 вам необходимо будет воспользоваться
пультом ДУ, чтобы входить в экранные меню и делать в них соответствующий
выбор.
• Кнопками Курсора "вверх/вниз" производится выбор из списка меню.
Выбранный пункт заключается в рамочку.
• Выбор пункта подтверждается кнопкой "ОК". В зависимости от выбранного пункта изменяется экран.
• Для возврата к прежнему экрану нажмите кнопку "Exit".
Мастер настройки
При первом включении вашего BDT 3/BDT 30 на экране появляется Мастер
настройки.
Показанные в этом руководстве пункты экранного меню
Page: 3/5
Please select the highest resolution that your
TV supports. If you are unsure, select “Auto.”
Upon making a selection the screen will be
changed to the chosen resolution. You will be
presented with the option to continue with the
new resolution or “Cancel” to return to the
previous resolution. If the screen remains
blank, please wait 15 seconds without
pressing anything and the system will
automatically return to the previous resolution.
Previous
После выбора наиболее высокого для вашего ТВ разрешения нажмите "ОК".
Появится экран выбора формата кадра. Если вы не знаете наиболее высокое
разрешение вашего ТВ — выберите "Auto", и плеер сам автоматически
выберет оптимальное разрешение.
Auto
480i/576i
480p/576p
720p
1080i
1080p
Next
OK
Setup Wizard
РУССКИЙ
Перед началом использования вашего BDT 3/BDT 30 необходимо установить
язык и ввести еще несколько базисных установок с тем, чтобы видеовыход
плеера был согласован с вашим ТВ. Нажмите "OK", и на экране появится меню
выбора языка.
Выбрав язык, нажмите "OK", появится экран ТВ-разрешения.
Выбрав формат экрана, наиболее подходящий для вашего ТВ, нажмите
"ОК" и затем еще раз нажмите "ОК" для выхода из Мастера настройки.
Для получения дополнительной информации по форматам экранов
см. Формат экрана на стр. 13.
33
Page 34

BDT 3/BDT 30
Настройка плеера
Настроечные меню
Кнопкой "Settings" (Настройки) на пульте ДУ вызываются настроечные меню,
которые позволяют сконфигурировать функции плеера. Кнопками Курсора
"влево/вправо" осуществляется переключение между меню, кнопками
Курсора "вверх/вниз" производится выбор из списка меню и кнопкой "ОК"
подтверждается выбор. Для возврата к предыдущему экрану в любой момент
нажмите "Exit" (Выход).
General Settings
System
Language
Playback
Parental Control
Network
Select to adjust general settings
Общие настройки
General Settings
System
Language
Playback
Parental Control
Network
Front Panel Brightness
Screen Saver
Auto Power Off
CEC
One Touch Play
One Touch Standby
100%
Off
Off
On
On
On
Select to adjust system settings
System (Система): Позволяет настроить следующие характеристики:
• Front Panel Brightness (Яркость передней панели): Эта опция
устанавливает яркость информационного дисплея.
• Screen Saver (Экранная заставка): При использовании BDT 3/BDT 30 с
ТВ на базе ЭЛТ или с плазменным экраном мы рекомендуем включить
эту опцию во избежание выгорания экрана ТВ.
• Auto Power Off (Автовыключение): Эта опция устанавливает время
отсутствия сигнала, по истечении которого плеер автоматически
переключается в режим Ожидание.
• CEC: Когда эта опция установлена в "On", вы можете включить или
выключить функции CEC One Touch Play ("Воспроизведение одним
нажатием") и One Touch Standby ("Режим ожидания одним нажатием").
• One Touch Play и One Touch Standby: Когда эти опции включены ("On"),
BDT 3/BDT 30 можно переключать в режим воспроизведения или
ожидания с помощью команд с пульта ДУ телевизора, подключенного
к HDMI-выходу плеера.
• System Upgrade (Обновление системы): Выберите эту опцию, когда вы
хотите установить обновление встроенного программного обеспечения
для вашего BDT 3/BDT 30, скачанное с источника Harman Kardon.
• Setup Wizard (Мастер настройки): Эта опция активирует Мастер
настройки BDT 3/BDT 30 (см. Мастер настройки на стр. 11).
• BD-Live Storage (Хранение BD-Live): Эта опция позволяет установить
как BDT 3/BDT 30 будет хранить контент BD-Live. Вы можете сохранить
контент на USB флэш-памяти через USB-порт BDT 3/BDT 30. См. Функция
BD-Live на стр. 15.
• Restore Defaults (Заводские настройки): Эта опция восстанавливает
заводские настройки BDT 3/BDT 30. ПРИМЕЧАНИЕ: эта опция также
возвращает родительский пароль 0000. См. Родительский контроль на
этой странице.
Language (Язык): Эта опция позволяет установить язык плеера, язык меню
диска, предпочтительный язык аудио и предпочтительный язык субтитров.
• ПРИМЕЧАНИЕ: Если выбранный язык недоступен на конкретном диске,
выберите один из языков из меню диска.
Playback (Воспроизведение): Эта опция позволяет установить следующие
характеристики воспроизведения:
• Show Angle Icon (Иконка угла): Эта опция позволяет выбрать, включать
ли автоматически или нет иконку угла для диска, на котором есть
несколько углов съемки камеры.
• Auto Play (Автоматическое воспроизведение): Эта опция позволяет
выбрать, начинать или нет воспроизведение сразу после вставки диска
в лоток.
• Show PIP Icon (Иконка PIP): Эта опция позволяет выбрать, отображать
ли автоматически или нет иконку "картинка в картинке" при воспроизведении Blu-ray-диска с контентом "картинка в картинке".
• Show Secondary Audio Icon (Иконка дополнительного аудио
сопровождения): Эта опция позволяет выбрать, отображать ли авто-
матически или нет иконку дополнительного аудиосопровождения
при воспроизведении Blu-ray-диска с дополнительным аудиосопровождением.
• Disc Resume (Возобновление диска): Эта опция позволяет
выбрать, возобновится ли воспроизведение диска, извлеченного
в процессе воспроизведения, с того же места следующий раз или
нет. ПРИМЕЧАНИЕ: Эта функция зависит от диска. Не все диски
поддерживают возобновление диска.
®
• DivX
VOD DRM: Эта опция покажет регистрационную информацию DivX
вашего плеера.
Родительский контроль: Эта опция позволяет ввести родительский пароль
и степень родительского контроля. ПРИМЕЧАНИЕ: заводской пароль 0000.
Network (Сеть): Эта опция позволяет установить следующие сетевые
характеристики:
• Information (Информация): Эта опция показывает ваш сетевой IP, маску
подсети, шлюз и DNS-адрес.
• Test Connection (Тестирование): Эта опция тестирует на предмет
правильного сетевого подключения вашего BDT 3/BDT 30.
• IP Conguration (IP конфигурация): Эта опция позволяет ввести ваши
сетевые настройки автоматически или вручную. Если ваш сетевой
администратор не скажет иначе, то установите "Auto".
• BD-Live Connection (Подключение BD-Live): Эта опция позволяет
установить настройки разрешения функции BD-Live. "Always Allow"
разрешает загружать контент BD-Live всегда. "Limit" разрешает загружать
контент, только если диск официально BD-Live сертифицирован.
"Prohibited" запрещает любой доступ к BD-Live. См. Функция BD-Live
на стр. 15.
• Proxy Setting (Настройка прокси): "Enabled" разрешает выбрать и
установить прокси-хост и прокси-порт, если этого требует ваша сеть.
"Disabled" отключает любой прокси-хост и прокси-порт и не допускает
их выбор. Эта опция предназначена только для опытных пользователей
и в большинстве случаев должна быть установлена на "Disabled".
34
Page 35

BDT 3/BDT 30
Настройка плеера
Настройки дисплея
Display Settings
TV
Video Processing
Aspect Ratio
Resolution
Color Space
Film Mode
HDMI Deep Color
16:9 Full
Auto
RGB
Off
Off
Select to adjust display settings
TV(ТВ): Эта опция позволяет установить следующие параметры дисплея:
• Aspect Ratio (Формат экрана): Эта опция позволяет выбрать, как
смотреть 4:3 программы на 16:9 ТВ, или как смотреть 16:9 программы
на 4:3 ТВ. "16:9 Full" растягивает 4:3 материал для заполнения 16:9 ТВ
экрана. "16:9 Normal" показывает 4:3 программы на 16:9 ТВ с черны-ми
полосами по обеим сторонам кадра, сохраняя оригинальное изображение без искажений. "4:3 Pan & Scan" увеличивает изображение,
заполняя 4:3 экран. "4:3 Letterbox" показывает 16:9 программы с черными
полосами сверху и снизу кадра, сохраняя оригинальное изображение
без искажений.
• Resolution (Разрешение): Эта опция позволяет выбрать видеораз-
решение для BDT 3/BDT 30. Режим "Auto" автоматически выберет
наилучшее разрешение для вашего ТВ.
• Color Space (Цветовое пространство): Эта опция позволяет выбрать
предопределенное цветовое пространство видеокадра.
• Film Mode (Режим кино): Если ваш ТВ может работать с сигналом 1080 p
24 Гц (то есть с сигналом разрешением 1080 p и частотой обновления
24 Гц), установите опцию на "On", чтобы получить максимальное
разрешение для контента Blu-ray-диска, который обеспечивает частоту
кадров 24 в секунду. Если ваш ТВ не может работать с сигналом
1080 p/24 Гц, установите опцию на "Off," и тогда BDT 3/BDT 30 преобразует сигнал 24 кадра в секунду в стандартный видеосигнал с частотой
обновления 30 Гц.
• HDMI Deep Color: Эта опция позволяет регулировать цветовую гамму на
выходе плеера. Если ваш ТВ принимает Deep Color, эта опция позволит
вашему ТВ подавать изображение в расширенной цветовой палитре.
• On: BDT 3/BDT 30 всегда выводит разрешение 36-бит или 30-бит
Deep Color.
• Off: BDT 3/BDT 30 Deep Color не используется (цветовое
разрешение остается равным 24 битам).
• TV Standard: Эта опция позволяет вам установить стандарты вашего
ТВ-дисплея.
• Auto: BDT 3/BDT 30 автоматически устанавливает стандарты для
вашего ТВ.
• PAL: Настраивает видеодисплей на стандарт PAL.
• NTSC: Настраивает видеодисплей на стандарт NTSC.
• HDMI 3D: Эта опция определяет, как плеер работает с 3D-программами,
когда он с помощью HDMI-соединения подключен к ТВ, поддерживающему режим 3D.
• Auto: BDT 3/BDT 30 автоматически показывает видео в 3D-формате,
когда программа в 3D-формате.
• Off: BDT 3/BDT 30 не показывает видео в 3D.
Video Processing (Обработка видео): Эта опция позволяет установить
внутреннюю обработку видео в BDT 3/BDT 30.
• Video Mode (Режим видео): Эта опция позволяет выбрать среди заранее
установленных опций ту, которая оптимально подходит к конкретной
текущей программе путем регулировки яркости, контраста, цветности и
четкости изображения.
• Standard (Стандарт): Средние настройки.
• Vivid (Живой): Для видеоигр.
• Cinema (Кино): Для фильмов и многих телепередач.
• Custom (Пользовательский): Эта опция позволяет пользователю
самому установить настройки видео вручную. Настройки яркости,
насыщенности (цветовой насыщенности), цветового тона и контрастности на экране изображаются в виде ползунков. Заводская
установка для каждой настройки: 0. Регулировка производится
кнопками курсора влево/вправо.
Настройки звука
Audio Settings
Audio Out HDMI Audio Out
Coaxial Output
PCM Downsampling
Auto
PCM
Off
Dynamic Range Ctrl
Select to adjust Audio output settings
Audio Output (Аудиовыход): Эта опция позволяет регулировать следующее:
• HDMI Audio Out (HDMI-аудиовыход): Кроме цифрового видеосигнала
с выхода HDMI плеера BDT 3/BDT 30 поступает еще и цифровой
аудиосигнал. Имеется четыре режима для этого выхода:
• Auto: Эта опция обеспечивает на выходе HDMI цифровой аудиоформат, который наиболее подходит декодирующим возможностям
пространственного звука того устройства, к которому подключен
плеер.
• Bitstream Native (Собственный цифровой поток): Эта опция обеспечивает на выходе HDMI сигнал в собственном аудиоформате.
• PCM (ИКМ): Эта опция обеспечивает на выходе HDMI двухканальное
микширование звукового сопровождения воспроизводимой
программы.
• Off: Эта опция выключает выход HDMI BDT-плеера. Если вы используете HDMI выход только для видео (вы подключили выход HDMI
к вашему ТВ, а аудио снимаете с коаксиального цифрового
аудиовыхода), то мы рекомендуем установить "HDMI Audio Out"
на "Off".
• Coaxial Output (Коаксиальный выход): Если вы используете HDMI-
выход только для видео, а аудио подаете с коаксиального цифрового
аудиовыхода на систему домашнего кинотеатра, выберите одну из трех
нижеприведенных опций:
• Bitstream Native (Собственный цифровой поток): Эта опция выводит цифровую аудиодорожку в собственном формате через коаксиальный цифровой выход.
• PCM (ИКМ): Эта опция обеспечивает на выходе HDMI двухканальное
микширование звукового сопровождения воспроизводимой программы. (См. PCM Downsampling (ИКМ-субдискретизация) ниже.)
• Transcode (Перекодирование): Эта опция перекодирует формат без
потери данных (Dolby TrueHD или DTS-HD Master Audio) в формат с
потерями и подает его на коаксиальный цифровой выход.
• PCM Downsampling (ИКМ субдискретизация): Эта опция устанав-
ливает частоту дискретизации ИКМ двухканального микширования
с понижением сигнала. Установите наиболее высокую частоту
дискретизации, которую может обрабатывать подключенное устройство.
ПРИМЕЧАНИЕ: Если подключенное устройство может обрабатывать
частоту дискретизации 192 кГц, установите эту опцию на "Off", что
позволит передавать материал с частотой дискретизации 192 кГц без
субдискретизации.
РУССКИЙ
35
Page 36

BDT 3/BDT 30
Настройка плеера/Воспроизведение дисков
• Dynamic Range Ctrl (Управление динамическим диапазоном):
Эта опция позволяет вам настраивать управление динамическим
диапазоном.
• Auto: BDT 3/BDT 30 автоматически устанавливает динамический
диапазон в зависимости от диапазона громкости аудиоисточника.
• On: BDT 3/BDT 30 всегда включает динамический диапазон.
• Off: BDT 3/BDT 30 всегда выключает динамический диапазон.
Информационное меню
Information
Software Version: BDT V1.04.06
MAC Address: 00 -1B -44 -12 -1D
Select to browse system information
Информационное меню показывает номер версии программы/прошивки
BDT 3/BDT 30, а также сетевой MAC-адрес. Это меню служит только для
демонстрации информации и пользователем изменяться не может.
Воспроизведение дисков
Правила обращения с дисками
• Для сохранения чистоты диска берите его за края. Не касайтесь
поверхности.
• Не наклеивайте стикеры или ленты на диск. Если на диске обнаружился
клей (или любое другое загрязнение), удалите его и только потом
пользуйтесь диском.
• Не подвергайте диск прямому солнечному облучению или воздействию
тепла, например от горячего фена или вентилятора, не оставляйте в
припаркованном автомобиле под солнечными лучами, так как внутри
автомобиля в этом случае температура быстро становится очень
высокой.
• Храните диски в коробочках.
• Не пишите на маркированной стороне шариковой ручкой или другими
острыми пишущими средствами.
• Не роняйте и не сгибайте диск.
Правила очистки диска
• Перед воспроизведением диска очистите его чистящей салфеткой.
Чистить от центра наружу.
• Не используйте растворители, например бензол, растворители красок,
коммерческие очистители или антистатики для винилов.
Региональное кодирование
BDT 3 плееры предназначены только для воспроизведения Blu-ray-дисков
с региональным информационным кодом A и DVD-дисков с региональным
информационным кодом 1, либо дисков, которые вообще не содержат никакого
регионального информационного кода. BDT 30 предназначены только для
воспроизведения Blu-ray-дисков с региональным информационным кодом B и
DVD-дисков с региональным информационным кодом 2, либо дисков, которые
вообще не содержат никакого регионального информационного кода.
Если на диске имеется региональный код, для которого плеер не предназначен,
то такие диски воспроизводиться не будут.
Копирайт
Аудиовизуальный материал может содержать материал, запись которого
требует разрешения владельца авторского права. Обратитесь к соответствующему законодательству по защите авторских прав.
Защита от копирования
Ваш BDT-плеер соответствует HDCP (Защита копий высокого разрешения).
Видеодисплей, подключенный к выходу HDMI, тоже должен соответствовать
HDCP.
BDT-плеер имеет встроенную технологию защиты от копирования. Blu-rayдиски и DVD-диски, имеющие код защиты от копирования, при перезаписи
их контента на видеомагнитофон, делают невозможным правильное
воспроизведение.
Поддерживаемые типы дисков
BDT-плеер может воспроизводить следующие типы дисков (размером как
12 см, так и 8 см):
• BD-Video (однослойный или двухслойный)
• DVD-Video
• DVD+R/+RW
• DVD-R/-RW
• CDDA (CD цифровое аудио)
• CD-R/RW
ПРИМЕЧАНИЕ: Совместимость и качество воспроизведения двухслойных
дисков не гарантируется.
Поддерживаемые кодеки
Плеер может воспроизводить записи с использованием следующих аудио/
видео кодеков:
• MPEG 1, Layer 1
• MPEG 2, Layer 2
• MPEG 2, Layer 3
• H.264
• VC-1
• AAC
• MP3 (с CD-R/RW, DVD+R/+RW, BD-R/RE и USB)
• JPEG (с CD-R/RW, DVD+R/+RW, BD-R/RE и USB)
• DivX 3.x/4.x/5.x (с CD-R/RW, DVD+R/+RW и USB)
ПРИМЕЧАНИЕ: Из-за разницы форматов различных дисков может оказаться,
что некоторые диски могут иметь комплекс характеристик, некоторые из
которых не совместимы с BDT 3/BDT 30. Аналогично, хотя Blu-ray-диски
и DVD-диски обладают широким спектром характеристик, не все диски
имеют полный комплект возможных характеристик. Например, хотя плеер
совместим с дисками, имеющими запись с несколькими углами съемки, эта
функция действует только тогда, когда на диске есть такие записи. Чтобы
удостовериться, что определенная функция или опция имеется на диске,
ознакомьтесь с информацией на конверте диска.
Характеристики воспроизведения записываемых дисков изменяются в
зависимости от качества диска и примененного записывающего устройства.
36
Page 37

BDT 3/BDT 30
00 : 32 : 37
CDDA
1 / 15
TRACK
T
Воспроизведение дисков
Загрузка и воспроизведение дисков
Нажмите кнопку "Открыть/Закрыть" для открытия лотка и вставьте диск.
Снова нажмите кнопку "Открыть/Закрыть" для закрытия лотка.
• Не вставляйте в лоток более одного диска.
• Не вставляйте диск надписью вниз.
После того как диск вставлен, нажмите кнопку Воспроизведение. Начнется
воспроизведение.
Используйте кнопки Play (Воспроизведение), Pause (Пауза), Stop (Стоп), Prev/
Step (Предыдущий/шаг), Next/Step (Следующий/шаг), Search/Slow Forward
(Искать/медленно вперед) и Search/Slow Reverse (Искать/медленно назад) для
управления воспроизведением диска. См. Функции пульта ДУ на стр. 9, где
более подробно написано о функциях этих кнопок.
Функции воспроизведения
Repeat (Повтор): При воспроизведении Blu-ray-дисков или DVD-дисков,
нажатие кнопки Повтор переключает последовательно следующие режимы
повтора: Глава, Название, Все, Выкл. При воспроизведении CD эта кнопка
переключает последовательно следующие режимы повтора: Track (Дорожка),
All (Все), Off (Выкл). ПРИМЕЧАНИЕ: не все Blu-ray-диски допускают режим
повтора.
A-B: При воспроизведении Blu-ray-дисков, DVD-дисков или музыкальных
дисков, этой кнопкой включается режим повторения A-B. Первое нажатие
устанавливает точку "A"; второе нажатие устанавливает точку "B" и включает
повторение участка между обеими точками. Нажатие кнопки A-B во время
повторения отменяет режим повторения A-B. ПРИМЕЧАНИЕ: не все Blu-rayдиски допускают режим повтора A-B.
Find (Поиск): В режиме воспроизведения нажатие этой кнопки активирует
функцию поиска, что позволяет вам перейти на определенное место диска.
Поиск производится по title (название), chapter (глава) или time (время).
См. Кнопка Поиск на стр. 9. ПРИМЕЧАНИЕ: Если вы воспроизводите диск,
который не допускает поиск по названию, воспользуйтесь меню диска, чтобы
изменить названия.
Options (Опции): При помощи этой кнопки на экран вызываются все
доступные для данного диска опции. Опции Blu-ray-дисков включают:
title (название), chapter (глава), time display (отображение времени), audio
options (опции аудио), angle options (угловые опции), subtitle options (опции
субтитров), picture-in-picture options (опции картинки-в-картинке, second audio
track options (опции второй аудиодорожки), bitrate options (опции битрейта),
stillframe options (опции стоп-кадра), fast advance (быструю перемотку вперед)
и scene replay (повтор сцены). Опции DVD-дисков включают: title (название),
chapter (глава), time display (отображение времени), playback modes (режимы
воспроизведения), audio options (опции аудио), angle options (угловые опции),
bitrate options (опции битрейта), stillframe options (опции стоп-кадра), fast
advance (быструю перемотку вперед) и scene replay (повтор сцены). Опции
аудио CD включают: track selection (выбор дорожки), time display (отображение
времени), playback modes (режимы воспро изведения), bitrate (битрейт), instant
search (мгновенный поиск) и instant replay (мгновенный повтор).
Кнопка Дисплей: При воспроизведении Blu-ray-дисков или DVD-дисков, этой
кнопкой включают и выключают панель информации.
Режим
воспроизве-
дения
Кнопка Главное меню: Для вызова главного меню проигрываемого Blu-rayдиска или DVD-диска. ПРИМЕЧАНИЕ: Эта функция зависит от диска. Не все
DVD-диски имеют главное меню. Если DVD-диск не имеет главного меню,
нажатие этой кнопки может вызвать меню диска, в зависимости от того, как
выстроена система меню диска.
Popup Button (Кнопка всплывающего меню): При нажатии на эту кнопку
во время воспроизведения Blu-ray-диска или DVD на экране появляется
всплывающее меню.
Bookmark Function (Функция закладки): Функция закладки позволяет
отметить до 12 мест на воспроизводимом диске. Нажмите кнопку для отметки
текущего места на диске. Для воспроизведения диска с одного из отмеченных
закладками мест нажмите и держите кнопку до появления списка отмеченных
мест. Кнопками "влево/вправо" выберите нужное место и нажмите "OK" для
начала воспроизведения.
Тип диска и
Кодировка
MPEG 1 / 8 00 : 32 : 37
DVD-VIDEO
English Dolby Digital 5.1
1/1
Режим
аудио
Текущее
название
1 / 2
Текущая
глава
Дисплей
времени
TT
"Поиск"
Индикаторы
ПРИМЕЧАНИЕ: Функция закладки зависит от диска. Не все диски допускают
эту операцию.
Programmed Play (Программированное воспроизведение): Эта опция
позволяет создать свой список воспроизведения для диска, вставленного в
BDT 3/BDT 30. Функция программирования действительна для CD, DVD
и Blu-ray -дисков. ПРИМЕЧАНИЕ: Не все Blu-ray-диски поддерживают программируемое воспроизведение.
1. Нажмите кнопку Program. Появится экран Program (программирование)
(внизу показан экран программирования CD).
Page: 1/ Program
CD Track Total: 15
Track: 10
1
Track: 05
2
-- -- -- --
3
-- -- -- --
4
-- -- -- --
5
Play Clear Stop
2. Нажмите "OK" и кнопками "вверх/вниз" выберите название диска
(для Blu-ray /DVD) или дорожки (CD) для первого входа в программу.
ПРИМЕЧАНИЕ: Не все Blu-ray-диски допускают выбор по названию.
3. Нажмите кнопку "вправо" и затем кнопками "вверх/вниз" выберите главу
для первого входа в программу (только для Blu-ray/DVD ).
4. Повторите операции 2 – 3 для каждого входа в ваш список.
5. По окончании программирования нажмите кнопку "Play" (Воспроизведение) для начала воспроизведения запрограммированного списка.
Функция BD-Live
BD-Live доступна для некоторых Blu-ray-дисков. При выборе этой функции из
меню диска вы получаете возможность загрузить дополнительный контент
или информацию через Интернет (подключившись к сети) и на устройство
памяти, вставленное в USB-порт BDT 3/BDT 30.
ПРИМЕЧАНИЕ: Не вынимайте флэш-память во время скачивания информации
BD-Live. Если вы все же вынули память и при этом появилась заставка Harman
Kardon, нажмите кнопку Воспроизведение, чтобы вернуться в начало диска.
Если вы испытываете затруднения при подключении к Интернету, используя
BD-Live диск, нажмите "Settings" (Настройки) и выйдите в меню "Network
Setup" (Сетевые настройки). Выберите "Test Connection" (Проверка соединения). Если BDT 3/BDT 30 способен соединяться с Интернетом, возможно,
возникла ошибка на сервере, к которому пытается подключиться BD-Live
диск. Изучите информацию на конверте диска или обратитесь к провайдеру
онлайн-контента. Если Test Connection не удается, обратитесь к вашему
Интернет-провайдеру (ИП) для ввода правильных установок в меню BDT 3/
BDT 30 IP Conguration (IP конфигурация). Если проблема остается, обратитесь
к ИП для дальнейшей помощи.
Воспроизведение музыкальных CD
При воспроизведении музыкальных CD верхняя панель BDT 3/BDT 30 показывает иконку режима воспроизведения, тип диска, текущую дорожку, число
всех дорожек на диске и дисплей времени.
Режим
воспроизве-
дения
Тип
диска
Текущая
дорожка
-- -- -- --
6
-- -- -- --
7
-- -- -- --
8
-- -- -- --
9
-- -- -- --
10
CLEAR EXIT
Всего
дорожек
11
12
13
14
15
-- -- -- --
-- -- -- --
-- -- -- --
-- -- -- --
-- -- -- --
Дисплей
времени
37
РУССКИЙ
Page 38

BDT 3/BDT 30
Воспроизведение файлов с USB-устройств
и CD-дисков с данными
Воспроизведение файлов с USB-устройств
и CD-дисков с данными
Ваш BDT 3/BDT 30 может воспроизводить аудиофайлы MP3 (до 320 кбит/с) и
AAC; показывать JPEG фото; а также показывать MPEG 1 (Layer 1), MPEG 2
(Layer 2 и 3) и DivX® (3.x, 4.x, 5.x) аудио/видеофайлы, хранимые в USBустройствах или на CD данных.
ВАЖНО: С BDT 3/BDT 30 совместимы материалы только в формате FAT32.
Для доступа к файлам устройства, подключенного к USB-порту плеера,
нажмите кнопку "Главная" ("Home") и выберите "USB" из списка на экране.
Home Menu
USB
Playlist
Settings
1 / 4 Exit Option
Независимо от файловой структуры устройства на экране появятся три папки,
названые "Photo", "Music" и "Video". Выберите нужную вам папку.
HOME
USB
..
Photo
Music
Video
1 / 3 Exit Option
Экран покажет файловую структуру устройства. Выбранная папка покажет
все файлы выбранного типа в папке. Если в корневом каталоге есть файлы
выбранного типа, они будут тоже показаны.
Для перехода на один уровень выше нажмите "влево" или щелкните на папке
со стрелкой.
HOME
Type:USB
Size:595.375M
FS:FAT32
OPTIONS
Type:Folder
OPTIONS
Просмотр фото
В главном каталоге выберите "Photo". Выберите папку с фотографиями и
выделите в папке фото. С правой стороны экрана появится миникартинка
выбранного фото.
USB
..
Sunset
Connie1
Connie2
Stadium
Type:JPG
Size:0.241M
Resolution:720x524
AB Stand 1
01 / 31 Exit Option
При просмотре фото пользуйтесь следующими кнопками пульта ДУ:
Кнопка Воспроизведение: Нажмите эту кнопку для запуска слайд-шоу,
которое покажет каждое фото данной папки или каталога (начиная с
выделенного JPEG) на 15 секунд в том порядке, как они расположены в папке.
Кнопка Пауза: Эта кнопка замораживает текущее фото на экране. Нажмите
"Play" для возобновления слайд-шоу.
Кнопка Стоп: Нажмите эту кнопку для остановки слайд-шоу и возврата в
каталог.
Next/Step and Previous/Step Buttons (Следующий/шаг и Предыдущий/шаг):
Пользуйтесь этими кнопками для перехода к следующему или предыдущему
фото в слайд-шоу или каталоге.
Cursor Up Button (Вверх): При демонстрации фото эта кнопка поворачивает
изображение на 180°. Нажатие этой кнопки при демонстрации каталога
выделяет предыдущий пункт каталога.
Cursor Down Button (Вниз): При демонстрации фото эта кнопка вызывает
зеркальное отображение изображения. Нажатие этой кнопки при
демонстрации каталога выделяет следующий пункт каталога.
Cursor Left Button (Влево): При демонстрации фото эта кнопка поворачивает
изображение на 90° против часовой стрелки. Нажатие этой кнопки при
демонстрации каталога происходит переход на более высокий уровень
каталога.
Cursor Right Button (Вправо): При демонстрации фото эта кнопка поворачивает изображение на 90° по часовой стрелке.
Кнопка Опции: При демонстрации фото эта кнопка вызывает Options menu
(Меню опций), предоставляющее следующие опции:
File (Файл): Выбрать файл для демонстрации.
Play Mode (Режим воспроизведения): Просмотр файлов в нормальном поряд-
ке, случайном порядке (до нажатия кнопки "Stop") или в демо-режиме (экран
покажет каждое фото в папке один раз в случайном режиме, затем вернется
в каталог).
Slide Show (Слайд-шоу): Выберите продолжительность демонстрации каждого
изображения: 5, 15 или 30 секунд.
Transition (Переход): Выберите из различных типов перехода от изображения
к изображению.
При демонстрации каталога нажатие кнопки "Options" вызывает "Playlist
Options" (Опции списка воспроизведения). См. Использование списков
воспроизведения дополнительная информация содержится на стр. 18.
HOME
OPTIONS
38
Page 39

BDT 3/BDT 30
Воспроизведение файлов с USB-устройств
и CD-дисков с данными
Кнопка Миникартинка (желтая): При включенном слайд-шоу нажатие этой
кнопки вызовет показ миникартинок всех фото активного каталога. Кнопками
"Cursor" и "OK" выделите и выберите фото для просмотра.
1 / 25 PreviousMove Next
Кнопка Зум (синяя): Нажатие этой кнопки во время слайд-шоу замораживает
и увеличивает текущее изображение 2x. Дополнительные нажатия меняют зум
на 3x, 4x, 1/2x, 1/3x и 1/4x.
Воспроизведение музыкальных файлов
В главном каталоге выберите "Music". Выберите папку с музыкальными
файлами и выделите один из файлов. С правой стороны экрана появится
информация о выделенном файле.
USB
..
Beanwater Part 1
Laydown Delivery (Edit 1)
Madagascar Wombat
Night Crazy
The Lost Transit Center
01 / 10 Exit Option
HOME
Type:MP3
Total Time:03:29
Title:Beanwater Junction, Part 1
Artist:Jugalbandi
Album:Night Crazy
Genre:Progressive
OPTIONS
Выбрав выделенный файл, вы включите его воспроизведение. Если за
выбранным файлом последуют другие музыкальные файлы папки — BDT 3/
BDT 30 будет их воспроизводить в том порядке, как они появляются на
экранном дисплее. Во время воспроизведения музыкальных файлов появится
такой экран:
1 / 10
Type: MP3
Total Time: 03:29
Title: Beanwater Junction, Part 1
Artist: Jugalbandi
Album: Night Crazy
Genre: Progressive
Если выбранный MP3 файл имеет ID3-тег с обложкой альбома, обложка тоже
будет демонстрироваться на экране.
Используйте кнопки Play (Воспроизведение), Pause (Пауза), Stop (Стоп), Prev/
Step (Предыдущий/шаг), Next/Step (Следующий/шаг), Search/Slow Forward
(Искать/медленно вперед) и Search/Slow Reverse (Искать/медленно назад) для
управления воспроизведением музыкальных файлов. См. Функции пульта ДУ
на стр. 9, где более подробно написано о функциях этих кнопок.
Когда BDT 3/BDT 30 воспроизводит музыкальные файлы с USB-устройства
или диска данных, функции повтора и опций слегка отличаются от таких же
функций при воспроизведении Blu-ray-дисков, DVD и музыкальных CD:
Кнопка Повтор: Нажатия этой кнопки последовательно переключают
следующие режимы повтора: 1 (песня), All (папка), Off (Выкл). Текущий режим
повтора индицируется на верхней панели экрана.
Кнопка Опции: Нажатие этой кнопки показывает все доступные для данной
песни опции:
File (Файл): Прямой выбор песни для воспроизведения вне зависимости от
того, воспроизводится она в данный момент или нет.
Time (Время): Показывает прошедшее или оставшееся время дорожки.
Play Mode (Режим воспроизведения): Воспроизводит песни в нормальном
порядке, в случайном порядке (до нажатия кнопки "Стоп") или в демо-режиме
(воспроизводит каждую песню папки в случайном порядке один раз и затем
возвращается в каталог).
Bitrate (Битрейт): Показывает битрейт воспроизводимой песни.
Advance (Прогон): Ускоренное воспроизведение композиции без отключения
звука.
Replay (Повтор): Во время воспроизведения каждое нажатие кнопки "ОК"
возвращает на 10 секунд.
При воспроизведении музыкальных файлов с USB-устройства или диска
данных можно одновременно просматривать фото с того же источника.
При воспроизведении музыкального файла нажмите "Home", перейдите к
папке с фото и выберите фото, чтобы начать слайд-шоу.
00 : 02 : 37
РУССКИЙ
39
Page 40

BDT 3/BDT 30
Воспроизведение файлов с USB-устройств и CD-дисков
данных/Использование списков воспроизведения
Воспроизведение видео
В главном каталоге выберите "Video". Выберите папку с видеофайлами,
выделите видеофайл в активной папке.
USB
..
Dodgers Sweep Yanks in ‘63
Koufax’s Perfect Game
Gagne Saves 84th Game
Type:MPEG
Krik Gibson’s Homer
Bums Champs in 1955
01 / 7 Exit Option
Автоматически начнется воспроизведение. Если в папке есть еще
видеофайлы, BDT 3/BDT 30 воспроизведет их все в том порядке, в каком они
появляются в экранном меню.
Используйте кнопки Play (Воспроизведение), Pause (Пауза), Stop (Стоп), Prev/
Step (Предыдущий/шаг), Next/Step (Следующий/шаг), Search/Slow Forward
(Искать/медленно вперед) и Search/Slow Reverse (Искать/медленно назад)
для управления воспроизведением видеофайлов. См. Функции пульта ДУ на
стр. 9, где более подробно написано о функциях этих кнопок.
При воспроизведении видеофайлов с USB-устройства или диска данных,
функции повтора и опций слегка отличаются от таких же функций при
воспроизведении Blu-ray-дисков и DVD:
Кнопка Повтор: Нажатия этой кнопки последовательно переключают
следующие режимы повтора: 1 (текущее видео), All (папка), Off (Выкл).
Кнопка Опции: Нажатие этой кнопки показывает все доступные для текущего
видео опции:
File (Файл): Прямой выбор файла для воспроизведения.
Title (Название): Прямой выбор названия для воспроизведения (если доступно).
Chapter (Глава): Прямой выбор главы для воспроизведения (если доступна).
Time (Время): Показывает прошедшее или оставшееся время.
Play Mode (Режим воспроизведения): Воспроизводит видео в нормальном
порядке, в случайном порядке (до нажатия кнопки "Стоп") или в демо-режиме
(воспроизводит каждую песню папки в случайном порядке один раз и затем
возвращается в каталог).
Audio (Аудио): Выбирает опции аудио (если доступны).
HOME
OPTIONS
Использование списков воспроизведения
Поскольку USB-устройства и диски данных содержат большое количество
файлов, вы можете создать список воспроизведения для каждого диска, что
облегчит доступ к выбранным файлам.
Создание списка воспроизведения
ПРИМЕЧАНИЕ: Процедуры одинаковы для USB и дисков данных.
1. Нажмите кнопку "Home". Появится "Home menu".
2. Выберите "CD data disc" или "USB". Появятся папки "Photo", "Music" и
"Video".
3. Выберите тип файла, для которого вы хотите создать список воспроизведения. Вы можете создать список воспроизведения для каждого типа
файла.
4. Поищите в структуре каталога. Найдя файл, который вы хотите включить в
список воспроизведения для данного типа файла, выделите его и нажмите
"Options". Появится панель опций списка воспроизведения.
5. Для добавления в список выберите "Add to Playlist".
6. Повторите операции 4 – 5 для всех файлов, которые вы хотите включить
в список.
Для создания списка воспроизведения для другого типа файлов, повторите
операции 1 – 6, но в пункте 3 выберите другой тип файла.
Воспроизведение списка воспроизведения
1. Нажмите кнопку "Home". Появится "Home menu".
2. Выберите "Playlist". Появится экран Photo/Music/Video.
3. Выберите тип списка воспроизведения, который вы хотите воспроизводить.
Откроется соответствующий список воспроизведения
4. Выберите первый пункт списка и нажмите "Play". Начнется воспроизведение
списка воспроизведения.
5. Для повторного воспроизведения списка нажмите "Repeat". Вы можете
повторить одну позицию ("1" на экране) или весь список ("All").
40
Page 41

BDT 3/BDT 30
Поиск и устранение неисправностей
Поиск и устранение неисправностей
Если ваш BDT 3/BDT 30 не работает так, как вам кажется, он должен работать, прежде чем звонить дилеру и обращаться в службу технической поддержки
клиентов компании Harman Kardon, проверьте, не описана ли ваша проблема в нижеприведенной инструкции.
Проблема Решение
Отсутствует питание (индикатор питания не светится): • Проверьте, хорошо ли подк лючен шнур питания к разъему плеера.
• Проверьте, хорошо ли подключен шнур питания к рабочей розетке и что
розетка исправна.
• Проверьте, что основной тумблер питания на задней панели плеера
находится в положении "On".
Диск не воспроизводится: • Проверьте, что диск вставлен правильно (маркированной стороной
Нет изображения: • Проверьте подключение плеера к ТВ.
Нет звука: • Проверьте, что HDMI и/или коаксиальное цифровое соединение
Изобра жение имеет неправильный формат экрана: • Измените установку формата экрана в "Display Settings menu" в
Наличие шумов или других помех изображения при воспроизведении
Blu-ray-диска или DVD:
Нет доступа к подключенному USB-устройству: • Проверьте, что устройство отформатировано в файловой системе FAT32.
Плеер не отвечает на команды пульта ДУ: • Замените обе батарейки пульта, удостоверьтесь, что они установлены
При нажатии на кнопку пульта ДУ на экране появляется символ Ø: • Выбранная функция в момент нажатия кнопки не допускается.
Плеер не отвечает на команды или ведет себя странным образом: • Отключите плеер от сети, подождите 30 секунд и подключите его снова.
Дополн ительную информацию вы можете получить в раз деле часто задав аемых во просов ( FAQ) на стран ице Support сай та www.ha rmanka rdon.com.
вверх).
• Проверьте, что тип диска соответствует: BD-Video (однослойный или
двухслойный), DVD-Video, DVD+R/+RW, DVD-R/-RW, CD-DA (обычный
аудиокомпакт-диск), CD-R/RW. Другие типы дисков воспроизводиться
не будут.
• Проверьте, что ТВ включен и что он настроен на правильный входной
источник.
• Удостоверьтесь, что все настройки в "Display Settings menu" (меню
настройки дисплея) согласуются с вашим ТВ.
• Проверьте, что ваш ТВ совместим с HDCP. Плеер не может быть
использован с ТВ, несовместимым с HDCP.
выполнены правильно.
• Если вы используете коаксиальное цифровое соединение, проверьте
правильность цифровых аудионастроек на подключенном устройстве.
• Если вы используете только HDMI-соединение, проверьте правильность
HDMI аудионастроек на подключенном устройстве.
• Если вы используете только HDMI-соединение, проверьте, что HDMI-
аудиовыход плеера находится в положении "On".
соответствии с ТВ.
• Проверьте, что поверхность диска чистая и не поцарапана.
Другие файловые системы несовместимы с BDT 3/BDT 30.
правильно.
• Держите пульт ДУ ближе к плееру.
• Проверьте, что датчик пульта ДУ на плеере находится в зоне видимости ДУ.
• Удостоверьтесь, что защитная пленка снята с передней панели плеера.
РУССКИЙ
41
Page 42

BDT 3/BDT 30
Спецификация
Спецификация
Поддерживаемые типы дисков: 12 см или 8 см BD-Video (однослойный или двухслойный), BD-R, BD-RE,
Региональный код (BD/DVD): A/1 (BDT 3); B/2 (BDT 30)
Аудиоформаты: Dolby Digital, Dolby Digital Plus, Dolby TrueHD, DTS Digital, DTS-HD High
Формат изображений: JPEG
Системы цветности: NTSC (BDT 3); PAL (BDT 30)
Версия HDMI: 1,4a с 3-D и 30/36-bit Deep Color
Требования к питанию: 110 – 240 В, 50/60 Гц
Потребляемая мощность: 25 Вт максимум, < 0,5 Вт в режиме ожидания
Размеры (В x Ш x Г): 66 мм x 440 мм x 352 мм
Вес: 3,7 кг
DVD-Video, DVD+R/+RW, DVD-R/-RW, CDDA (CD цифровое аудио),
CD-R/RW диски
Resolution Audio, DTS-HD Master Audio, PCM, CBR @ 192 кбит/с, VBR
@ 355 кбит/с, MP3: 32 кбит/с – 320 кбит/с, включая кодирование с
изменяемыми битрейтами
42
Page 43

HARMAN Consumer, Inc.
8500 Balboa Boulevard, Northridge, CA 91329 USA
516-255-4545 (только США)
Сделано в КНР.
© 2011 HARMAN International Industries, Incorporated. Все права защищены.
Harman Kardon является торговой маркой фирмы HARMAN International Industries, Incorporated, зарегистрированной в США
и/или других странах. Blu-ray Disc и BD-Live являются торговыми марками компании Blu-ray Disc Association. DivX
Certied® и ассоциированные логотипы являются зарегистрированными торговыми марками фирмы DivX, Inc. и используются
по лицензии. О DIVX ВИДЕО: DivX® DivX — это цифровой видеоформат, разработанный фирмой DivX, Inc. Это официально
сертифицированное DivX устройство, способное воспроизводить DivX video. На www.divx.com вы найдете больше информации,
а также программы конвертации ваших файлов в DivX video. О функции DivX VOD: Это DivX Certied® устройство должно быть
зарегистрировано, чтобы воспроизводить DivX Video-on-Demand (VOD) контент. Чтобы сгенерировать регистрационный код,
зайдите в раздел DivX VOD в меню настроек устройства. С этим кодом зайдите на vod.divx.com для окончания процесса
регистрации и получения дополнительной информации о DivX VOD. Произведено по лицензии фирмы Dolby Laboratories. Dolby —
зарегистрированная торговая марка Dolby Laboratories. Производятся по лицензии патентов США: 5,451,942; 5,956,674;
5,974,380; 5,978,762; 6,487,535 и других мировых и патентов США, полученных и находящихся на рассмотрении. DTS —
зарегистрированная торговая марка, а DTS-HD и DTS-HD Master Audio — торговые марки DTS, Inc. В изделии используется
программное обеспечение. © DTS, Inc. Все права защищены. HDMI, логотип HDMI и High-Denition Multimedia Interface являются
зарегистрированными торговыми марками фирмы HDMI Licensing LLC. Этот продукт включает технологию защиты копирайта,
защищенного патентами США и другими правами интеллектуальной собственности. Использование этой технологии защиты
копирайта должно быть авторизовано фирмой Rovi Corporation, и предназначается для домашнего и другого ограниченного
использования, если по иному не авторизует Rovi Corporation. Инженерный анализ или разборка запрещены.
Компания вправе вносить изменения в функции, технические характеристики и внешний вид устройства без
предварительного уведомления.
®
, DivX
Номер по каталогу 950-0363-001 Версия: A
www.harmankardon.com
 Loading...