

Page 1
CAN CRUSHER
Model
95678
®
ASSEMBLY AND OPERATION INSTRUCTIONS
Due to continuing improvements, actual product may differ slightly from the product described herein.
3491 Mission Oaks Blvd., Camarillo, CA 93011
Visit our website at: http://www.harborfreight.com
TO PREVENT SERIOUS INJURY, READ AND UNDERSTAND
ALL WARNINGS AND INSTRUCTIONS BEFORE USE.
Copyright© 2006 by Harbor Freight Tools®. All rights reserved. No portion of this
manual or any artwork contained herein may be reproduced in any shape or form
without the express written consent of Harbor Freight Tools.
For technical questions or replacement parts, please call 1-800-444-3353.
Page 2
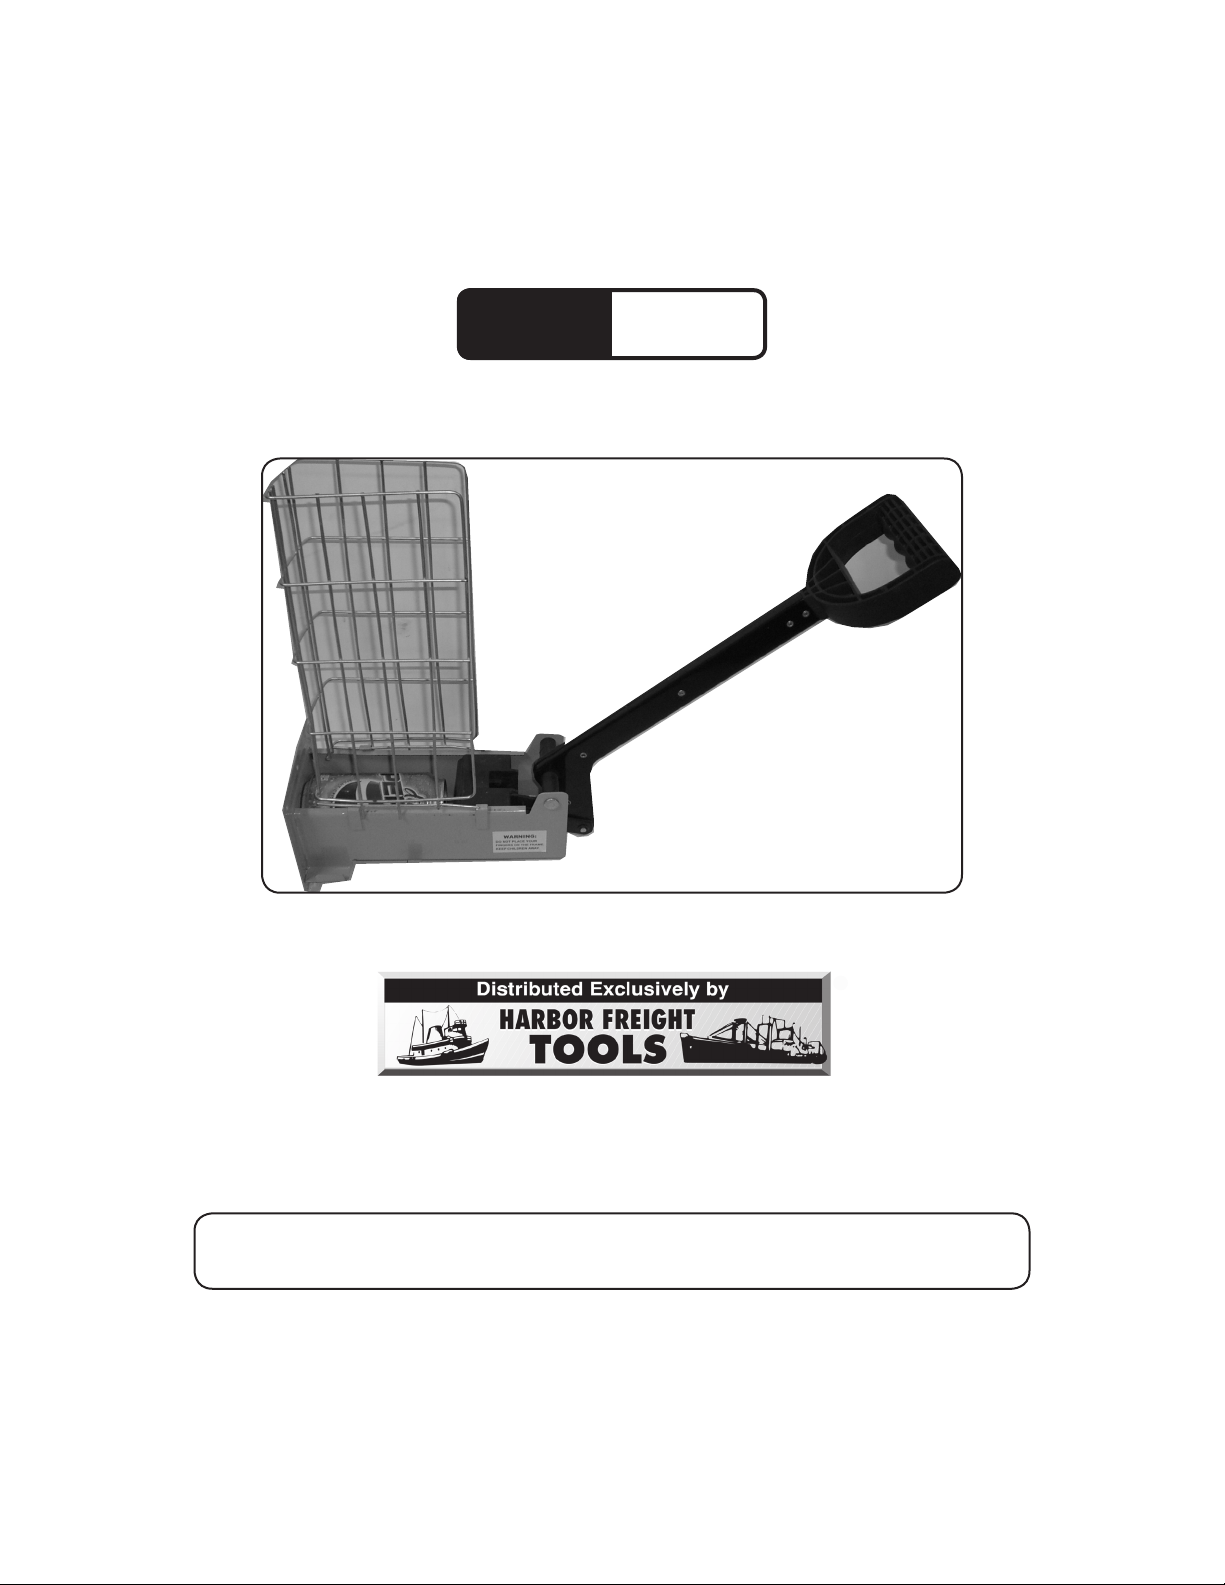
SPECIFICATIONS
Overall dimensions - Handle
up: 11-3/4”L X 4-3/4”W
X 17-3/4” H
Maximum can size: 16 OZ
Handle construction: High
impact ABS plastic
Wire Basket construction: Zinc
chrome plated steel
Maximum Can Holder quantity:
6 cans
Wire Basket dimensions:
5-1/8”L X 11-3/8”H X
3-5/16”W
Frame construction: Heavy
duty welded sheet steel
Crusher Arm length: 15”
NOTE: This Can Crusher is of heavy duty steel construction and the chrome plated Wire
Basket holds up to six cans for fast crushing action. The 15” long arm gives quick,
easy leverage. Crushed cans drop out of the bottom for fast storage.
Save This Manual
You will need this manual for the safety warnings and precautions, assembly, operating, inspection, maintenance and cleaning procedures, parts list and assembly diagram.
Keep your invoice with this manual. Write the invoice number on the inside of the front
cover. Write the product’s serial number in the back of the manual near the assembly diagram, or write month and year of purchase if product has no number. Keep this manual
and invoice in a safe and dry place for future reference.
1.
2.
3.
GENERAL SAFETY RULES
WARNING!
READ AND UNDERSTAND ALL INSTRUCTIONS
Failure to follow all instructions listed below may result in
electric shock, fire, and/or serious injury.
SAVE THESE INSTRUCTIONS
PERSONAL SAFETY
Stay alert. Watch what you are doing, and use common sense when operat-
ing.
Dress properly. Loose clothes, jewelry, or long hair can be caught in moving
parts.
Do not overreach. Keep proper footing and balance at all times. Proper footing
and balance enables better control.
For technical questions, please call 1-800-444-3353.
Page 2SKU 95678
Page 3

4.
Always wear eye protection and work gloves. Always wear ANSI-approved safety
goggles and work gloves when using or performing maintenance on this tool.
TOOL USE AND CARE
1.
2.
3.
1.
2.
Do not force the tool. Do not force this Can Crusher and do not use it for a pur-
pose for which it is not intended.
Maintain tools with care. Tag damaged tools “Do not use” until repaired.
Check for misalignment or binding of moving parts, breakage of parts, and
any other condition that may affect the Can Crusher’s operation. If damaged,
have it serviced before using. Many accidents are caused by poorly maintained
tools.
SERVICE
Tool service must be performed only by qualified repair personnel. Service or
maintenance performed by unqualified personnel could result in a risk of injury.
When servicing a tool, use only identical replacement parts. Follow instruc-
tions in the “Inspection, Maintenance, And Cleaning” section of this manual.
Use of unauthorized parts or failure to follow maintenance instructions may create
a risk of injury.
SPECIFIC SAFETY RULES
1.
2.
3.
4.
Maintain labels and nameplates on the tool. These carry important information.
If unreadable or missing, contact Harbor Freight Tools for a replacement.
Maintain a safe working environment. Make sure there is adequate space to
operate the Can Crusher.
Wear work gloves when using this Can Crusher to prevent pinching hands
and fingers.
Mount the Can Crusher high enough to prevent small children from using or
playing with this tool. The moving parts can pinch. Children should not be allowed
to use this Can Crusher without adult supervision.
For technical questions, please call 1-800-444-3353.
Page 3SKU 95678
Page 4

UNPACKING
When unpacking, check to make sure that the item is intact and undamaged. If any
parts are missing or broken, please call Harbor Freight Tools at the number shown on the
cover of this manual as soon as possible.
ASSEMBLY INSTRUCTIONS
Note: This Can Crusher comes assembled. For additional information, refer to the Parts
Diagram near the end of this manual.
MOUNTING INSTRUCTIONS
1.
2.
3.
4.
5.
6.
Remove Can Crusher from its container and mount on a solid surface high enough
to prevent small children from using it.
Remove the Steel Wire Basket (14) by squeezing it together where it joins the Can
Crusher Frame (2). A small amount of pressure will allow the rod ends to release
from their slots and the Steel Wire Basket can be set aside while mounting the Can
Crusher.
Use a pencil to mark where mounting screws will be located.
Preferred method of mounting: Find a vertical stud behind wallboard and fasten
a support board (not included) approximately the same size as the Bottom Plate
(1) to the stud. Secure it with nails (not included), or screws (not included) and
mount the Can Crusher to the support board (not included) using four wood screws
(not included). Always be careful not to nail or screw into hidden electrical wires
or cables.
Alternate method of mounting: Use dry-wall anchors (not included), one in
each corner, and screws (not included) to securely mount the Bottom Plate (1) to
drywall.
Replace the Steel Wire Basket (14) by lining up the rod ends with the holes on the
Can Crusher Frame (2), squeezing the Basket slightly and slipping the rod ends
into the holes.
1.
Usage
The Basket holds up to six cans. The 15” long arm gives quick, easy leverage.
Crushed cans drop out of the bottom of Can Crusher.
INSPECTION, MAINTENANCE, AND CLEANING
BEFORE EACH USE, inspect the general condition of the tool. Check for loose
screws, misalignment or binding of moving parts, cracked or broken parts, and any
For technical questions, please call 1-800-444-3353.
Page 4SKU 95678
Page 5

other condition that may affect its safe operation. Do not use damaged equip-
ment.
MAINTENANCE CHART
Maintenance Type
Inspect Can Crusher for
damage
(see #1, above)
Wipe off with clean, moist
cloth
Before
Use
X
After
Use
Weekly Monthly
X
Every 6
Months
TROUBLESHOOTING
Problem Possible Causes Probable Solutions
Can Crusher Handle
is hard to move.
Loose Pin, loose rubber bushings,
1. Check all Screws making sure
or loose screws.
1.
nothing is hindering the motion of
the Handle.
PARTS LIST
Part Description Q’ty
1 Bottom Plate 1
2 Can Crusher Frame 1
3 Handle 1
4 Hasp 4
5 Hasp 2
6 Handle Connecting Rod 1
7 Crushing Block 1
Part Description Q’ty
8 Pin 1
9 Screw 1
10 Rubber Bushing 2
11 Threaded Pin 1
12 Joint Pin 1
13 Hose Clamp 1
14 Steel Wire Basket 1
Yearly
PLEASE READ THE FOLLOWING CAREFULLY
THE MANUFACTURER AND/OR DISTRIBUTOR HAS PROVIDED THE PARTS LIST AND ASSEMBLY DIAGRAM IN THIS MANUAL AS A REFERENCE TOOL ONLY. NEITHER THE MANUFACTURER
OR DISTRIBUTOR MAKES ANY REPRESENTATION OR WARRANTY OF ANY KIND TO THE BUYER
THAT HE OR SHE IS QUALIFIED TO MAKE ANY REPAIRS TO THE PRODUCT, OR THAT HE OR
SHE IS QUALIFIED TO REPLACE ANY PARTS OF THE PRODUCT. IN FACT, THE MANUFACTURER
AND/OR DISTRIBUTOR EXPRESSLY STATES THAT ALL REPAIRS AND PARTS REPLACEMENTS
SHOULD BE UNDERTAKEN BY CERTIFIED AND LICENSED TECHNICIANS, AND NOT BY THE
BUYER. THE BUYER ASSUMES ALL RISK AND LIABILITY ARISING OUT OF HIS OR HER REPAIRS
TO THE ORIGINAL PRODUCT OR REPLACEMENT PARTS THERETO, OR ARISING OUT OF HIS
OR HER INSTALLATION OF REPLACEMENT PARTS THERETO.
For technical questions, please call 1-800-444-3353.
Page 5SKU 95678
Page 6

ASSEMBLY DIAGRAM
Record Product’s Serial Number Here:
Note: If product has no serial number, record month and year of purchase instead.
Note: Some parts are listed and shown for illustration purposes only, and are not available
individually as replacement parts.
For technical questions, please call 1-800-444-3353.
Page 6SKU 95678
 Loading...