

Page 1
Owner’s Manual & Safety Instructions
Save This Manual Keep this manual for the safety warnings and precautions, assembly,
operating, inspection, maintenance and cleaning procedures. Write the product’s serial number in the
back of the manual near the assembly diagram (or month and year of purchase if product has no number).
Keep this manual and the receipt in a safe and dry place for future reference.
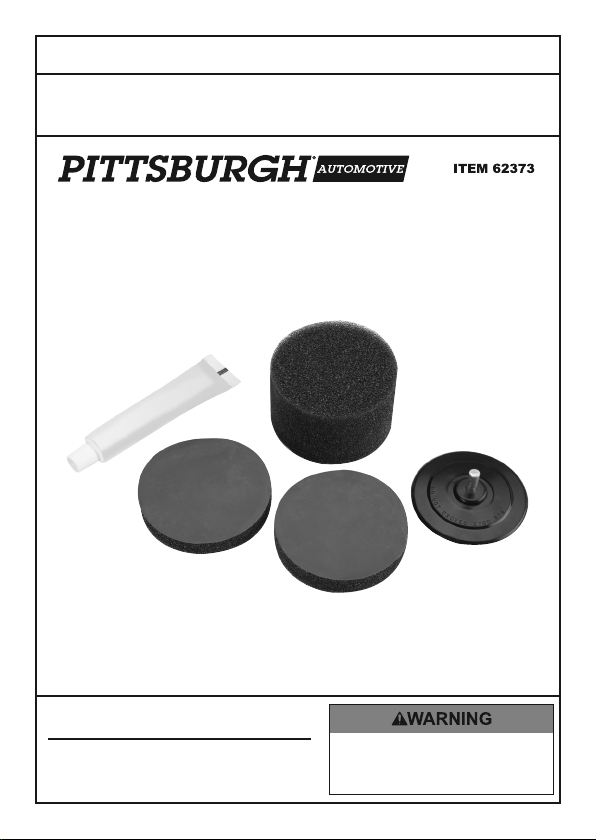
Headlamp Lens
Restoration Kit
REV 14f
When unpacking, make sure that the product is intact
and undamaged. If any parts are missing or broken,
please call 1-888-866-5797 as soon as possible.
Copyright© 2014 by Harbor Freight Tools®. All rights reserved.
No portion of this manual or any artwork contained herein may be reproduced in
any shape or form without the express written consent of Harbor Freight Tools.
Diagrams within this manual may not be drawn proportionally. Due to continuing
improvements, actual product may differ slightly from the product
described herein. Tools required for assembly and service may not be included.
Visit our website at: http://www.harborfreight.com
Email our technical support at: productsupport@harborfreight.com
Read this material before using this
product. Failure to do so can result in
serious injury. SAVE THIS MANUAL.
Page 2

Specifications
Pad Diameter 3"
Shank Diameter 1/4"
Max RPM 2700
Important Safety Information
Read the ENTIRE IMPORTANT SAFETY INFORMATION section
at the beginning of this document including all text under subheadings therein
before set up or use of this product.
Use Precautions
1. This product is not a toy. Do not allow
children to play with or near this item.
2. Use as intended only. Do not use
on eyeglasses, sunglasses, mirrors,
windshields, or windows.
3. Maintain product labels and nameplates.
These carry important safety information.
If unreadable or missing, contact
Harbor Freight Tools for a replacement.
4. Inspect before every use; do not
use if parts are damaged.
5. Wear ANSI-approved
safety goggles during use.
6. If Polishing Compound is swallowed,
contact poison control center.
7. In case of eye contact, flush
with water immediately.
8. 8. Harbor Freight Tools cannot
be responsible for misuse of this
product. Check headlights for proper
illumination after service. Permanently
damaged, deteriorated, or dimmed
headlights must be replaced.
Instructions
1. Mask area around headlight with waterresistant painter’s tape (sold separately).
2. Wash surfaces to remove dirt and debris.
3. To remove release paper on
Resurfacing Pad, push index finger
into foam and pinch down, pressing
below the white release paper.
Page 2 For technical questions, please call 1-888-866-5797. Item 62373
Note: If release paper does not lift from
adhesive, repeat the process at another
location along the circumference of the pad.
4. Completely remove release paper to
expose the adhesive side of foam.
5. Center pad on Drill Mount Plate,
and then press firmly.
Page 3

6. Mist Resurfacing Pads with water. Keep
Pads wet during entire sanding process.
7. Attach Drill Mount Plate to
drill (sold separately).
8. Place Pad on headlight and sand at
the highest speed the drill will reach.
Sand for 3-5 minutes, or until all
coatings or damage are removed.
9. Remove Resurfacing Pad before
using Polishing Pad.
10. Remove release paper from Polishing
Pad, and adhere to Drill Mount Plate.
Components
Polishing Compound
11. Place a small amount of Polishing
Compound on face of Polishing Pad.
12. Polish headlight for 3 minutes,
adding water to pad as needed.
13. Once surface shines, rinse
clean with water.
14. WARNING! Check headlights for proper
operation before driving. If headlights
are damaged, or stain is internal
instead, they will need to be replaced.
Polishing Pad
Resurfacing Pads
Drill Mount Plate
Page 3For technical questions, please call 1-888-866-5797.Item 62373
Page 4

Limited 90 Day Warranty
Harbor Freight Tools Co. makes every effort to assure that its products meet high quality
and durability standards, and warrants to the original purchaser that this product is free from
defects in materials and workmanship for the period of 90 days from the date of purchase.
This warranty does not apply to damage due directly or indirectly, to misuse, abuse, negligence
or accidents, repairs or alterations outside our facilities, criminal activity, improper installation,
normal wear and tear, or to lack of maintenance. We shall in no event be liable for death,
injuries to persons or property, or for incidental, contingent, special or consequential damages
arising from the use of our product. Some states do not allow the exclusion or limitation of
incidental or consequential damages, so the above limitation of exclusion may not apply to you.
THIS WARRANTY IS EXPRESSLY IN LIEU OF ALL OTHER WARRANTIES, EXPRESS
OR IMPLIED, INCLUDING THE WARRANTIES OF MERCHANTABILITY AND FITNESS.
To take advantage of this warranty, the product or part must be returned to us
with transportation charges prepaid. Proof of purchase date and an explanation
of the complaint must accompany the merchandise. If our inspection verifies the
defect, we will either repair or replace the product at our election or we may elect
to refund the purchase price if we cannot readily and quickly provide you with a
replacement. We will return repaired products at our expense, but if we determine
there is no defect, or that the defect resulted from causes not within the scope
of our warranty, then you must bear the cost of returning the product.
This warranty gives you specific legal rights and you may also
have other rights which vary from state to state.
3491 Mission Oaks Blvd. • PO Box 6009 • Camarillo, CA 93011 • 1-888-866-5797
 Loading...