

Page 1
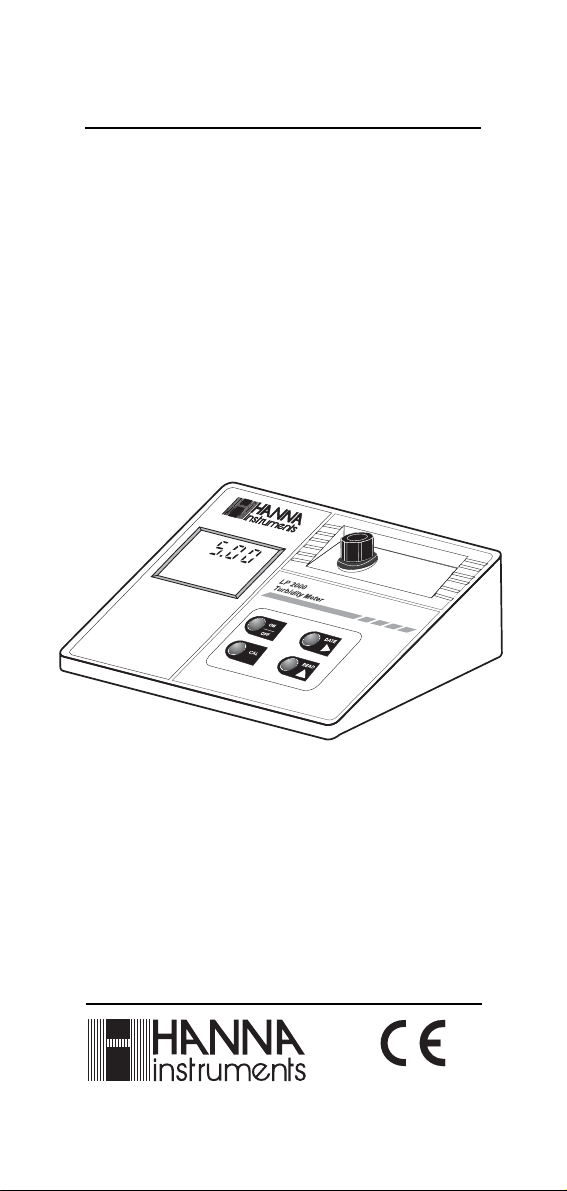
Instruction Manual
LP 2000
Microprocessor-based
Bench Turbidity Meter
www.hannainst.com
This Instrument is in Compliance
with the CE Directives
Page 2

Dear Customer,
Thank you for choosing a Hanna Product. Please read this instruction
manual carefully before using the instrument. It will provide you with
the necessary information for the correct use of the instrument, as well
as a precise idea of its versatility.
This instrument is in compliance with directives.
TABLE OF CONTENTS
PRELIMINARY EXAMINATION ...................................................... 3
GENERAL DESCRIPTION .............................................................. 3
UNITS OF MEASURE .................................................................. 4
PRINCIPLE OF OPERATION ......................................................... 4
FUNCTIONAL DESCRIPTION ........................................................ 5
SPECIFICATIONS......................................................................... 6
OPERATIONAL GUIDE ................................................................. 7
CALIBRATION ........................................................................... 10
LCD AND ERROR CODES ........................................................... 13
ACCESSORIES ........................................................................... 14
WARRANTY .............................................................................. 14
CE DECLARATION OF CONFORMITY............................................ 15
2
Page 3

PRELIMINARY EXAMINATION
Remove the instrument from the packing material and examine it to
make sure that no damage has occurred during shipping. If there is
any damage, notify your dealer immediately.
LP 2000 is supplied complete with:
• Measurement cuvette and cap
• HI 93703-0 AMCO-EPA-1 calibration solution @0 FTU (30 mL)
• HI 93703-10 AMCO-EPA-1 calibration solution @10 FTU (30 mL)
• 12VDC Transformer (HI 710005 or HI 710006)
Note: Save all packing material until you are sure that the instrument
functions correctly. Any damaged or defective item must be
returned in its original packaging with the supplied accessories.
GENERAL DESCRIPTION
LP 2000 is a bench microprocessor-based meter used to determine
the turbidity of water and wastewater. The meter covers the 0 to
1000 FTU* range with 0.01 resolution from 0.00 to 50.00 FTU* and
in single digits from 50 to 1000 FTU*. It also auto-ranges between
the two scales.
Note: LP 2000 has been designed according to the ISO 7027
International Standard. The turbidity measurement unit
is FTU (Formazine Turbidity Unit), which is identical to
NTU (Nephelometric Turbidity Unit).
LP 2000 carries the mark, in compliance with the European
directives, ensuring low emission values and accurate measurements
in presence of electromagnetic fields.
The meter is housed in a rugged and lightweight case, with an easyto-read LCD.
The meter is simple to use. All operations can be carried out with only
four keys and troubleshooting functions can be performed with error
codes on the display. An exclusive positive-locking system guarantees
that the cuvette is firmly placed in the cell. The keypad is waterresistant and can be wiped clean.
Calibration at 10 FTU* can be easily performed using the supplied
standard. In addition, LP 2000 is the first bench turbidity meter
that allows the storage and retrieval of the last calibration date.
10 FTU* was chosen as the calibration point because its value best
fits the water turbidity measurements in a wide range of applications,
from drinking water to wastewater treatment.
3
* 1 FTU = 1 NTU
Page 4
UNITS OF MEASURE
Hanna Instruments uses the primary standard AMCO-AEPA-1 to
avoid all formazine-related problems. Formazine is a toxic, unstable
substance, which requires particular care. Calibration requiring formazine
standards must be preformed immediately after preparation of the
standards. Formazine standards may not be reused because of their
short life. LP 2000 standards are extremely stable and have a shelf
life of up to six months. Uncontaminated standards may be reused.
LP 2000 can be used with both AMCO-AEPA and formazine standards.
FTU is equal to the NTU. However, other known measurements
include: Jackson Turbidity Unit or JTU (based on the old method of
Jackson's candle), and Silica Unit in mg/L of SiO2. See the conversion
table below for these units:
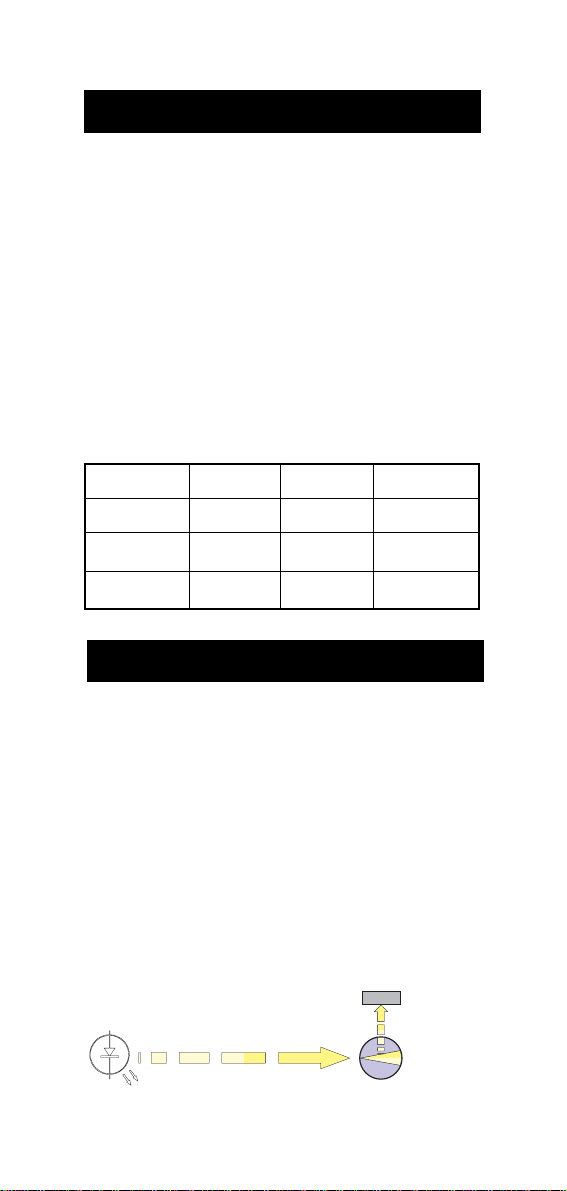
JTU FTU/NTU SiO2 (mg /L)
JTU 1 19 2.5
FTU /NTU 0.053 1 0.13
SiO2 (mg / L) 0.4 7.5 1
PRINCIPLE OF OPERATION
LP 2000 has been designed to perform measurements according to
the ISO 7027 International Standards.
The instrument functions by passing a beam of infrared light through
a vial containing the sample being measured.
The light source is a High Emission Infrared LED with a wavelength
peaking at 890 nm, which reduces interference caused by colored
samples to a minimum.
A sensor, positioned at 90° with respect to the direction of light,
detects the amount of light scattered by the undissolved particles
present in the sample. The microprocessor converts such readings into
FTU values.
IR LED
EMITTED LIGHT (890 nm)
* 1 FTU = 1 NTU
LIGHT
DETECTOR
90° SCATTERED
CUVET
LIGHT
4
Page 5

FUNCTIONAL DESCRIPTION
1) Cuvette Holder
2) Dual Level Liquid Crystal Display
3) ON/OFF
4) CAL, to enter the Calibration Mode
5) READ/▲, to perform measurements and to set the day and
month of the last calibration
6) DATE/ , to display the last calibration date and to select
the month or the day of the last calibration
i) Power Socket 12V to 20V DC
5
Page 6

SPECIFICATIONS
LP 2000
Range 0.00 to 50.00 FTU*
50 to 1000 FTU*
Resolution 0.01 / 1 FTU*
Accuracy ±0.5 FTU* or ±5%
(@ 20°C/68°F) (whichever greater)
Typical EMC 0.2 FTU*
Deviation
Light Source High Emission Infrared LED
Light Source Life Life of the instrument
Light Detector Silicon Photocell
Power Source 12VDC through
HI 710005 or HI 710006
Environment 0 to 50°C (32 to 122°F);
max. RH 95% non-condensing
Dimensions 230 x 170 x 70 mm
(9.1 x 6.7 x 2.7")
Weight 600 g (1.3 lb.)
* 1 FTU = 1 NTU
6
Page 7

OPERATIONAL GUIDE
POWER CONNECTION
Plug the 12VDC adapter (HI 710005 - 110VDC, or HI 710006 220VDC) into the DC socket (see page 5).
Plug the adapter into the outlet.
Note: Insure the main line is surge protected.
Note: Always turn the meter off before unplugging it to insure no
data is lost.
MEASUREMENT PROCEDURE
• Turn the meter on by pressing ON/OFF.
• The meter will first perform an LCD self
diagnostic test by displaying a full set of
figures. It will then switch to the measurement mode.
• When the LCD displays “----”, the meter is
ready.
• Fill a clean cuvette up to one quarter inch
(0.5 cm) from its rim with the thoroughly
agitated sample.
• Allow sufficient time for bubbles to escape
before securing the cap.
Note: Do not overtighten the cap.
• Wipe the cuvette thoroughly with
a lint-free tissue (HI 93703-70)
before inserting the cuvette into
the measurement cell. The cuvette
must be completely free of finger
marks, oil or dirt, especially in the
area where the light passes
through, i.e. approximately the
bottom 2 cm (3/4” inch) of the
cuvette.
• Place the cuvette into the holder
and check that the notch on the
cap is positioned securely into the
groove.
7
Page 8

• The mark on the cuvette cap should
point towards the keyboard.
• Press the READ/▲ key and the LCD will display an intermittent
“SIP” (Sampling In Process).
• The turbidity value will appear after approximately half a minute.
• Though LP 2000 covers a wide turbidity range, highly accurate
readings exceeding 40 FTU require dilution as recommended by
the Standard Methods.
Use the formula below to calculate the amount of HI 93703-0 or
turbidity-free water needed for accurate dilution.
The total volume = 100 mL.
Vos = 3000 / T
where:
Vos = volume of original sample (mL) to be added to HI 93703-0
to obtain the total diluted volume of 100 mL.
T = LP 2000 reading (exceeding 40 FTU)
E.g.: LP 2000 reading = 200 FTU
3000 / 200 = 15 mL (Vos)
15 mL (Vos)+85 mL (HI 93703-0) = 100 mL
At this point, take a sample of this diluted solution and measure its
turbidity.
The correct turbidity value of the original sample is derived by:
Ta= Tn x 100 mL / Vos
where:
Ta = actual turbidity value of the original sample
Tn = LP 2000 reading of the diluted solution
E.g. If Tn = 27
Ta = 27 x 10 0 mL / 15 mL = 180 FTU
8
Page 9

TIPS TO OBTAIN BEST ACCURACY
• Each time the cuvette is used, tighten the cap to the same
degree.
• Discard the sample immediately after the reading is taken to
prevent permanent clouding of the glass.
• All glassware used to contain the standards and the samples
should be kept clean, washed with HI 93703-50 cleaning
solution and rinsed with HI 93703-0 or turbidity-free water.
• Samples should be collected in clean glass or plastic bottles with
appropriate stoppers. Analysis should be performed shortly after.
If the sample requires storage, it should be kept in a cool dark
place. Stored samples should be restored to room temperature
prior to analysis. Samples may not be stored for longer than 24
hours.
• To obtain a representative sample, gently and thoroughly, stir
the solution. To prevent air bubbles from forming do not shake or
let the solution settle prior to sampling.
• Monthly calibration of the meter,
using HI 93703-10 @ 10 FTU
standard is recommended.
• Before inserting cuvettes into the
instrument, wipe them with
HI 93703-70 or a soft, lint-free
tissue. Handle vials so that no
fingerprints are left on the areas
where light passes through, i.e.
the bottom 2 cm (3/4”) of the cuvette.
If you experience any problems in taking measurements, please
contact your dealer or the nearest Hanna Customer Service Department.
SOURCES OF INTERFERENCE
• The presence of floating debris and coarse sediments which may
settle rapidly will give false readings.
• The infrared light source of LP 2000 can effectively minimize
errors due to colored substances found dissolved in solution. This
“True Color” effect is the most common interference found in
commercial instruments operating in the visible light range.
• Air bubbles and the effect of vibrations that disturb the surface of
the sample may produce false results.
• Dirty, scratched, or etched glassware will also affect readings.
9
Page 10

CALIBRATION
Calibration is recommended at least once a month. You can verify the
instrument calibration by comparing the display reading against the
supplied standard solution at 10 FTU. To check the date of the last
calibration, simply hold the DATE/ key down for a few seconds.
CALIBRATION PROCEDURE
• Turn the meter on and wait for the display
to show "----".
• Press the CAL key once. "CAL" will blink on the display for approx.
6 seconds, allowing for confirmation.
• While "CAL" is still blinking, press CAL again (otherwise, it exits
this mode). "CL" will appear on the lower part of the display.
• The date of calibration may now be edited
by simply pressing the DATE/ key. The
default parameter, which is the month
segment found on the left, will blink. To
scroll to the correct number, press the
READ/▲ key. To toggle between month
and the day display segments, press the
DATE/ key. The day segment can also
be edited with the READ/▲ key.
• To confirm the displayed values and to proceed, press CAL once
more. An intermittent "ZERO" will appear on the LCD.
10
Page 11

• Using the HI 93703-0 bottle containing
the ZERO FTU Standard (or turbidity-free
water), fill the measurement cuvette and
secure the cap.
Note: To minimize error caused by the cu-
vette, it is recommended to use the
same cuvette for calibration and measurement.
• Insert cuvette into the holder.
• Press CAL. An intermittent “SIP” indicates that the instrument is
being calibrated.
• After approximately 1 minute, the instrument will ask for the HI 93703-10
standard solution @ 10 FTU by displaying “10.0”.
• Refill the cuvette with the HI 93703-10
AMCO-AEPA-1 standard at 10 FTU and
place it into the measurement cell
• Press CAL again. After approximately 1 minute the LCD will display
"----".
The instrument is now calibrated and ready for use.
TIPS TO OBTAIN ACCURATE CALIBRATION
• All glassware that comes into contact with standards should be
kept clean. Wash with HI 93703-50 cleaning solution and rinse
with HI 93703-0 or turbidity free water.
• Rinse the cuvette twice with 5 mL of the liquid to be tested. This
removes any previous liquid and any dust or foreign matter that
may be present. Gently pour the liquid down the side of the vial
to reduce air bubbles (no mixing is required when
HI 93703-0 and HI 93703-10 AMCO-AEPA-1 standards are
used).
11
Page 12

• Before inserting the vial into the
instrument, wipe it clean with
HI 93703-70 or a soft, lint-free
tissue. Handle vials so that no fingerprints are left on the areas where
light passes through, that is the
bottom 2 cm (3/4”).
STANDARD SUSPENSION
Presently, there are only two recognized primary standards: AMCO-AEPA-1
(available through Hanna) and formazine. LP 2000 works with both
solutions.
AMCO-AEPA-1 has a much longer shelf life at all concentrations
(approximately six months, if free from contamination). In addition,
no special handling or disposal is required and a much higher
stability of suspended particles has been observed.
Formazine is highly toxic and is generated by a known carcinogen,
with poor stability (particles settle quickly). Lower concentrations
change value quickly after dilution.
The consistency of LP 2000 readings by using both standards has
been separately established by Advanced Polymer Systems and
Hanna Instruments.
Additional documentation about the formazine standard and other
calibration procedures is available upon request.
VIEWING THE CALIBRATION DATE
• Turn the meter on and wait for the
display to show "----".
• Press and hold the DATE/ key. The month and day of last
calibration ("MM.DD") appear while the key is held down.
Note: The displayed date is the date that was input by the user at
the beginning of the last calibration.
12
Page 13

LCD AND ERROR CODES
LP 2000 displays several different LCD codes to help the user to
operate the meter more efficiently.
This indicates that the meter is in a ready
state and measurement or calibration can be
performed.
This indicates that the Calibration Mode is
active. If the CAL key is not pressed within 6
seconds, the meter will automatically revert
back to the Measurement Mode.
This indicates that the Calibration Date Setting Mode is active.
This indicates that a 0 FTU standard calibration solution is required.
This indicates that the instrument is being
calibrated at zero.
This indicates that a 10 FTU standard calibration solution is required.
This shows the last calibration date (MM.DD).
This indicates that the sample is being analyzed.
This indicates that an error occurred during
calibration (for example a wrong standard
was used). Repeat the calibration with fresh
standards.
13
Page 14

ACCESSORIES
HI 710005 110VDC voltage transformer
HI 710006 220VDC voltage transformer
HI 731318 Tissue for wiping the cuvettes (4pcs)
HI 731321 Glass measurement cuvettes (4pcs)
HI 731325 Cap for cuvette (4pcs)
HI 93703-0 Solution for calibration AMCO-AEPA-1 at 0 FTU,
30 mL
HI 93703-10 Solution for calibration AMCO-AEPA-1 at 10 FTU,
30 mL
HI 93703-50 Cuvette cleaning solution, 230 mL
WARRANTY
All Hanna Instruments meters are warranted for two years
against defects in workmanship and materials when used for their
intended purpose and maintained according to instructions. This
warranty is limited to repair or replacement free of charge.
Damage due to accident, misuse, tampering or lack of prescribed
maintenance are not covered.
If service is required, contact the dealer from whom you purchased the
instrument. If under warranty, report the model number, date of
purchase, serial number and the nature of the failure. If the repair
is not covered by the warranty, you will be notified of the charges
incurred. If the instrument is to be returned to Hanna Instruments,
first obtain a Returned Goods Authorization number from the Customer Service department and then send it with shipping costs
prepaid. When shipping any instrument, make sure it is properly
packaged for complete protection.
All rights are reserved. Reproduction in whole or in part is
prohibited without the written consent of the copyright owner,
Hanna Instruments Inc., 584 Park East Drive, Woonsocket, Rhode
Island, 02895 , USA.
Hanna Instruments reserves the right to modify the design, construction and appearance of its products without advance notice.
14
Page 15

CE DECLARATION OF CONFORMITY
Recommendations for Users
Before using this product, make sure that it is entirely suitable for the environment in which it is used.
Operation of this instrument in residential area could cause unacceptable interferences to radio and TV
equipments, requiring the operator to take all necessary steps to correct interferences.
Any variation introduced by the user to the supplied equipment may degrade the instrument's EMC
performance.
To avoid electrical shock, do not use this instrument when voltages at the measurement surface exceed
24VAC or 60VDC.
To avoid injury or damage to the meter, do not perform any measurement in microwave ovens.
15
Page 16

10/02
www.hannainst.com
MANLP2000R1
 Loading...