

Page 1
ACCESSORIES
FC 202D pH electrode with built-in temperature sen-
sor, DIN connector & conic tip for use in the
food industry
HI 7004 pH 4.01 buffer solution, available in 20 mL sa-
chet (25 pcs.), 230 mL and 500 mL bottle
HI 7006 pH 6.86 buffer solution, available in 20 mL sa-
chet (25 pcs.), 230 mL and 500 mL bottle
HI 7007 pH 7.01 buffer solution, available in 20 mL sa-
chet (25 pcs.), 230 mL and 500 mL bottle
HI 7009 pH 9.18 buffer solution, available in 20 mL sa-
chet (25 pcs.), 230 mL and 500 mL bottle
HI 7010 pH 10.01 buffer solution, available in 20 mL
sachet (25 pcs.), 230 mL and 500 mL bottle
HI 70300L Electrode storage solution, 460 mL bottle
HI 7061L General purpose cleaning solution, 460 mL
bottle
HI 70630 Acid cleaning solution for meat grease and
fats, available in 20 mL sachet (25 pcs.), 230
mL and 460 mL bottle
HI 70631 Alkaline cleaning solution for meat grease and
fats, available in 230 mL and 460 mL bottle
HI 70632 Cleaning & disinfection solution for blood prod-
ucts, available in 230 mL and 460 mL bottle
HI 70640 Cleaning solution for milk deposits, available
in 20 mL sachet (25 pcs.), 230 mL and 460
mL bottle
HI 70641 Cleaning & disinfection solution for milk prod-
ucts, available in 20 mL sachet (25 pcs.), 230
mL and 460 mL bottle
HI 70642 Cleaning solution for cheese products, avail-
able in 20 mL sachet (25 pcs.), 230 mL and
460 mL bottle
HI 710007 Blue shockproof rubber boot
HI 710008 Orange shockproof rubber boot
HI 721312 Hard carrying case
HI 99161 Instruction Manual
Foodcare portable pH meter
The meter is supplied with a specially-made food electrode for direct measurement of pH in semi-solid products.
FC 202D is an “intelligent” pH electrode with built-in temperature sensor, DIN connector and conic tip designed for
the food industry.
SPECIFICA TIONS
Range pH 0.00 to 14.00 pH
Temp. 0.0 to 60.0°C / 32.0 to 140.0°F
Resolution pH 0.01 pH
Temp. 0.1°C or 0.1°F
Accuracy pH ±0.01 pH
(@20°C/68°F) Temp. ±0.5°C or ±1°F
Typical EMC pH ±0.03 pH
Deviation Temp. ±0.5°C or ±1°F
Temperature Automatic
Compensation
pH Calibration 1 or 2 point with auto-buffer recognition
pH 4.01/7.01/10.01 or pH 4.01/6.86/9.18
Probe FC202D pH/temperature probe (included)
Battery Type/Life 4 x 1.5V AAA with BEPS / 1000 hours
Environment 0 to 50°C (32 to 122°F); RH 100%
Dimensions 150x80x38mm (5.9x3.2x1.5”)
IS99161R1 06/03
www.hannainst.com
HI99161 is in compliance with the CE directives.
Page 2

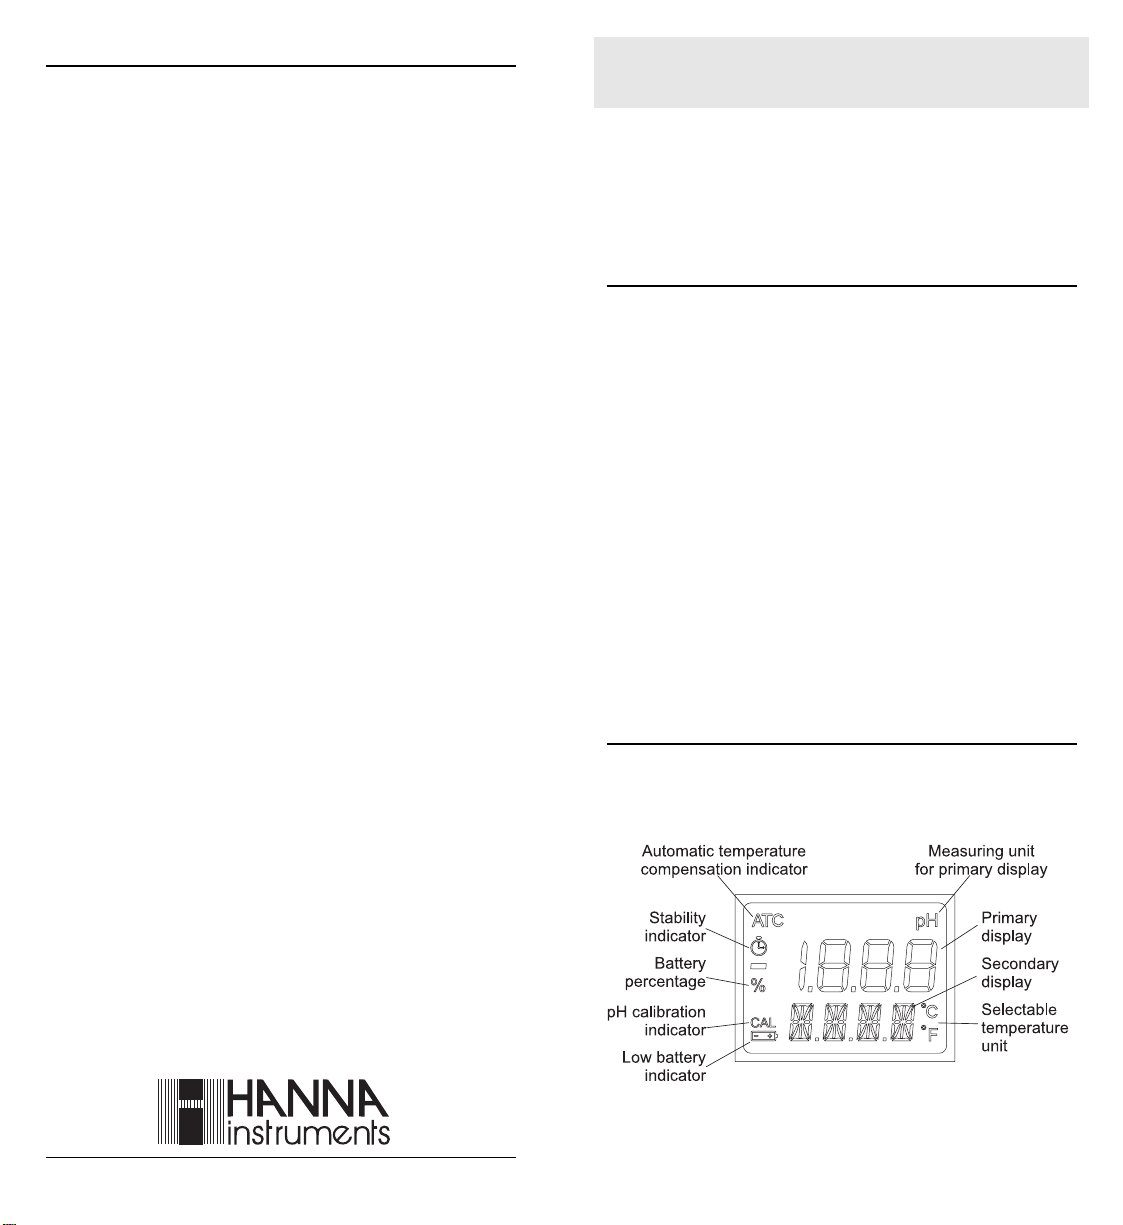
OPERA TIONAL GUIDE
To connect the probe
Connect the FC 202D probe to the DIN socket on the top of
the meter by aligning the pins and pushing in the plug. Tighten
the nut to ensure a good connection. Remove the protective
cap from the probe before taking any measurements.
To turn the meter on and to check battery status
Press and hold the ON/OFF/MODE button for 2 seconds. All
the used segments on the LCD are visible for a few seconds, followed by a percent indication of the remaining battery life (e.g. % 100 BATT).
To freeze the display
Press and hold the SET/HOLD button, until HOLD appears
on the bottom display. The reading will be frozen on the LCD
(e.g. pH 5.73 HOLD).
Press any button to return to normal mode.
To turn the meter off
From normal measuring mode, press ON/OFF/MODE. OFF
appears on the bottom display. Release the button.
pH MEASUREMENT & CALIBRATION
• Make sure the meter has been calibrated before use.
• If the electrode has been left dry, soak it in HI 70300 storage solution for one hour to reactivate.
• Insert the tip of the probe in the sample to be tested.
• Wait until the stability indicator on the LCD is turned off.
• The LCD shows the pH value automatically compensated
for temperature and the temperature of the sample.
• If measurements are taken in different samples successively, clean the probe tip thoroughly to eliminate crosscontamination. For cleaning procedure choose the suitable Hanna cleaning solution (see “Accessories” section).
pH calibration
• Press and hold the ON/OFF/MODE button, until OFF on the
bottom display is replaced by CAL.
• Release the button. The LCD displays “pH 7.01 USE” or
“pH 6.86 USE” (if you selected the NIST buffer set).
• For a single point pH calibration, place the probe in any
buffer from the selected buffer set (eg. pH 7.01 or pH 4.01
or pH 10.01). The meter automatically recognizes the buffer
value and displays OK for 1 second.
If the pH 7.01 buffer (or 6.86 if you selected the NIST buffer
set) was used, press the ON/OFF/MODE button to return to
the pH measuring mode.
• For a two point pH calibration, place the probe in pH 7.01
(or 6.86, if you selected the NIST buffer set). The LCD displays the recognized buffer value and OK for 1 second and
then “pH 4.01 USE”.
Place the probe in the second buffer solution (pH 4.01 or
10.01, or, if using NIST, pH 4.01 or 9.18). When the second
buffer is recognized, the LCD displays OK for 1 second
and the meter returns to normal measuring mode.
To reset to the default calibration
To clear a previous calibration, press the ON/OFF/MODE
button after entering the calibration mode. The bottom LCD
displays ESC for 1 second and the meter returns to normal
measuring mode. The “CAL” symbol on the LCD disappears
and the meter resets to the default calibration.
METER SETUP
• Press and hold the ON/OFF/MODE button for about 6 seconds, until CAL on the bottom display is replaced by TEMP
and the current temperature unit (e.g. TEMP °C). Then:
• for °C/°F selection, use the SET/HOLD button. After the
temperature unit has been selected, press ON/OFF/MODE
to enter the buffer set selection mode; press ON/OFF/MODE
twice to return to the normal measuring mode.
• to change the calibration buffer set, after setting the tem-
perature unit, the meter will show the current buffer set: pH
7.01 BUFF (for 4.01/7.01/10.01) or pH 6.86 BUFF (for 4.01/
6.86/9.18). Change the set with the SET/HOLD button, then
press ON/OFF/MODE to return to normal mode.
BATTERY REPLACEMENT
The meter displays the remaining percentage when turned
on. When the battery level is below 5%, the
- +
symbol on the
bottom left of the LCD lights up to indicate a low battery condition. If the battery level is low enough to cause erroneous
readings, the Battery Error Prevention System (BEPS) turns
the meter off.
The batteries are accessed by separating the front and back
halves of the meter. Unscrew the 4 screws located on the
back of the meter. Remove the back and carefully replace all
the four AAA batteries located in the battery compartment,
while paying attention to their polarity.
Re-attach the back, making sure that the gasket is in place to
ensure a watertight seal.
WARRANTY
All Hanna Instruments meters are warranted for two years
against defects in workmanship and materials when used for their
intended purpose and maintained according to instructions. The
probes are warranted for a period of six months.
This warranty is limited to repair or replacement free of charge.
Damages due to accident, misuse, tampering or lack of prescribed
maintenance are not covered.
If service is required, contact the dealer from whom you purchased
the instrument. If under warranty, report the model number, date of
purchase, serial number and the nature of the problem. If the repair
is not covered by the warranty, you will be notified of the charges
incurred. If the instrument is to be returned to Hanna Instruments,
first obtain a Returned Goods Authorization Number from the Customer Service department and then send it with shipment costs prepaid. When shipping any instrument, make sure it is properly packaged for complete protection.
 Loading...