

Page 1
pNa
HI98202
Soft Water Tester
GENERAL INFORMATION:
The pNa tester utilizes a sodium ion-selective electrode to determine the activity of free sodium in
solution.
pNa = -log a
Na
OPERATION:
• Remove the protective cap and turn
the meter on with the ON/OFF switch
located on the top.
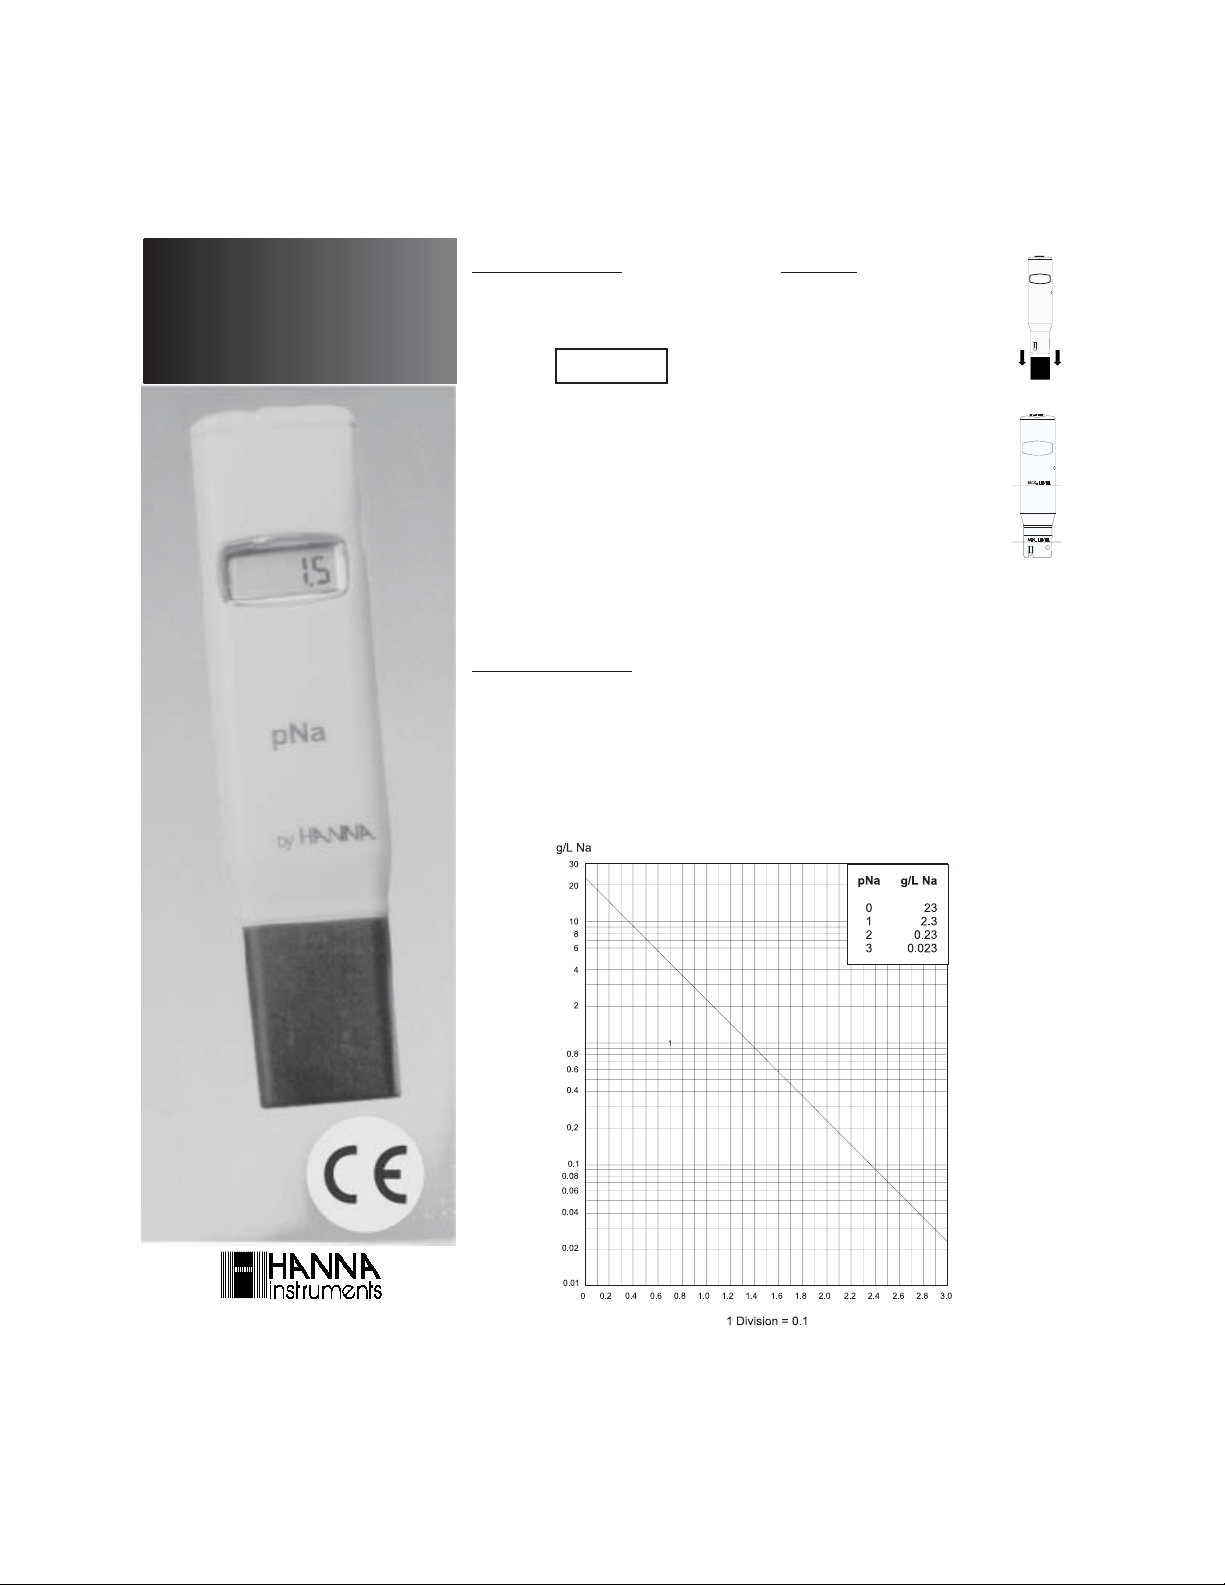
In dilute solutions, the activity coefficient is nearly 1
and in such solutions pNa is a good indicator of the
sodium ion concentration. The relationship between
the pNa scale and the g/L Na+ scale is explained
in the chart below.
A double junction reference is used to ensure a
highly stable reading. If you suspect that the
calibration has drifted, you can recalibrate the
meter by using a solution of known concentration.
Adjust the reading with the calibration trimmer.
HOW TO USE THE CHART:
• Locate the pNa reading on the horizontal axis of
the chart.
• Move vertically upwards to intersect with the 45º
line.
• Move horizontally and read the g/L Na value.
E.g. pNa = 1.4
g/L = 0.9
• Immerse it in the solution to be tested
without exceeding the maximum immersion level.
• Stir gently and wait for the reading
to stabilize.
• The reading on display is directly
expressed in pNa unit. Use the chart
below to change the value from pNa
to g/L.
• After use, switch the meter off and rinse the
electrode with water to minimize contamination.
Always replace the protective cap after use.
• Large differences in pNa readings (±0.5 pNa)
could be due to a dry electrode or lack in
calibration.
• To improve performance, immerse the meter in
HI7080 solution up to the maximum immersion
level at least once a week.
Manufacturers since 1978
Page 2
pNa
HI98202
Soft Water Tester
CALIBRATION:
• Immerse the tester in
HI7080 calibration solution,
without exceeding the maximum immersion level.
SPECIFICATIONS:
RANGE 0.03.0 pNa (230.023 g/L Na+)
RESOLUTION 0.1 pNa
ACCURACY (@20°C/68°F) ±0.2 pNa
TYPICAL EMC DEVIATION ±0.1 pNa
ENVIRONMENT 0 to 50C (32 to 122F); 95% RH
BATTERY TYPE 4 x 1.5V alkaline (included)
BATTERY LIFE approx. 800 hours of continuous use
DIMENSIONS 175x41x23 mm (7.9x1.8x1")
WEIGHT 78 g (2.7 oz.)
ACCESSORIES:
HI 7080L 2.3 g/L Na solution (460 mL bottle)
HI 7080M 2.3 g/L Na solution (230 mL bottle)
HI 7061M Electrode cleaning solution
(230 mL bottle)
HI 73202 Spare electrode
HI 731326 Calibration screwdriver (20 pcs)
ONE YEAR WARRANTY AND SERVICEABLE:ONE YEAR WARRANTY AND SERVICEABLE:
ONE YEAR WARRANTY AND SERVICEABLE:
ONE YEAR WARRANTY AND SERVICEABLE:ONE YEAR WARRANTY AND SERVICEABLE:
Covered by
manship and materials, this tester is now completely
serviceable. Contact your dealer for further information.
The
one yearone year
one year warranty against defects in work-
one yearone year
pNa pNa
pNa is in compliance with the CE directives.
pNa pNa
Visit our Internet Home Page:
http://www.hannainst.com
IS98202R3 05/01
• Allow the reading to stabilize and with a small screwdriver turn the calibration
trimmer until the display
shows "1.0" pNa.
MAINTENANCE:
In case of erroneous reading even after an accurate
calibration, the reference junction can be contaminated or clogged.
Pull out 2 mm (1/8'') of the cloth junction to renew
the electrode reference (it is recommended to cut the
cloth leaving always at least 2 mm -1/8'' over the
reference compartment) and repeat the calibration
procedure.
The cloth junction can be
pulled out approximately 20
times. After that, the electrode can be replaced (see
the Electrode Replacement
section).
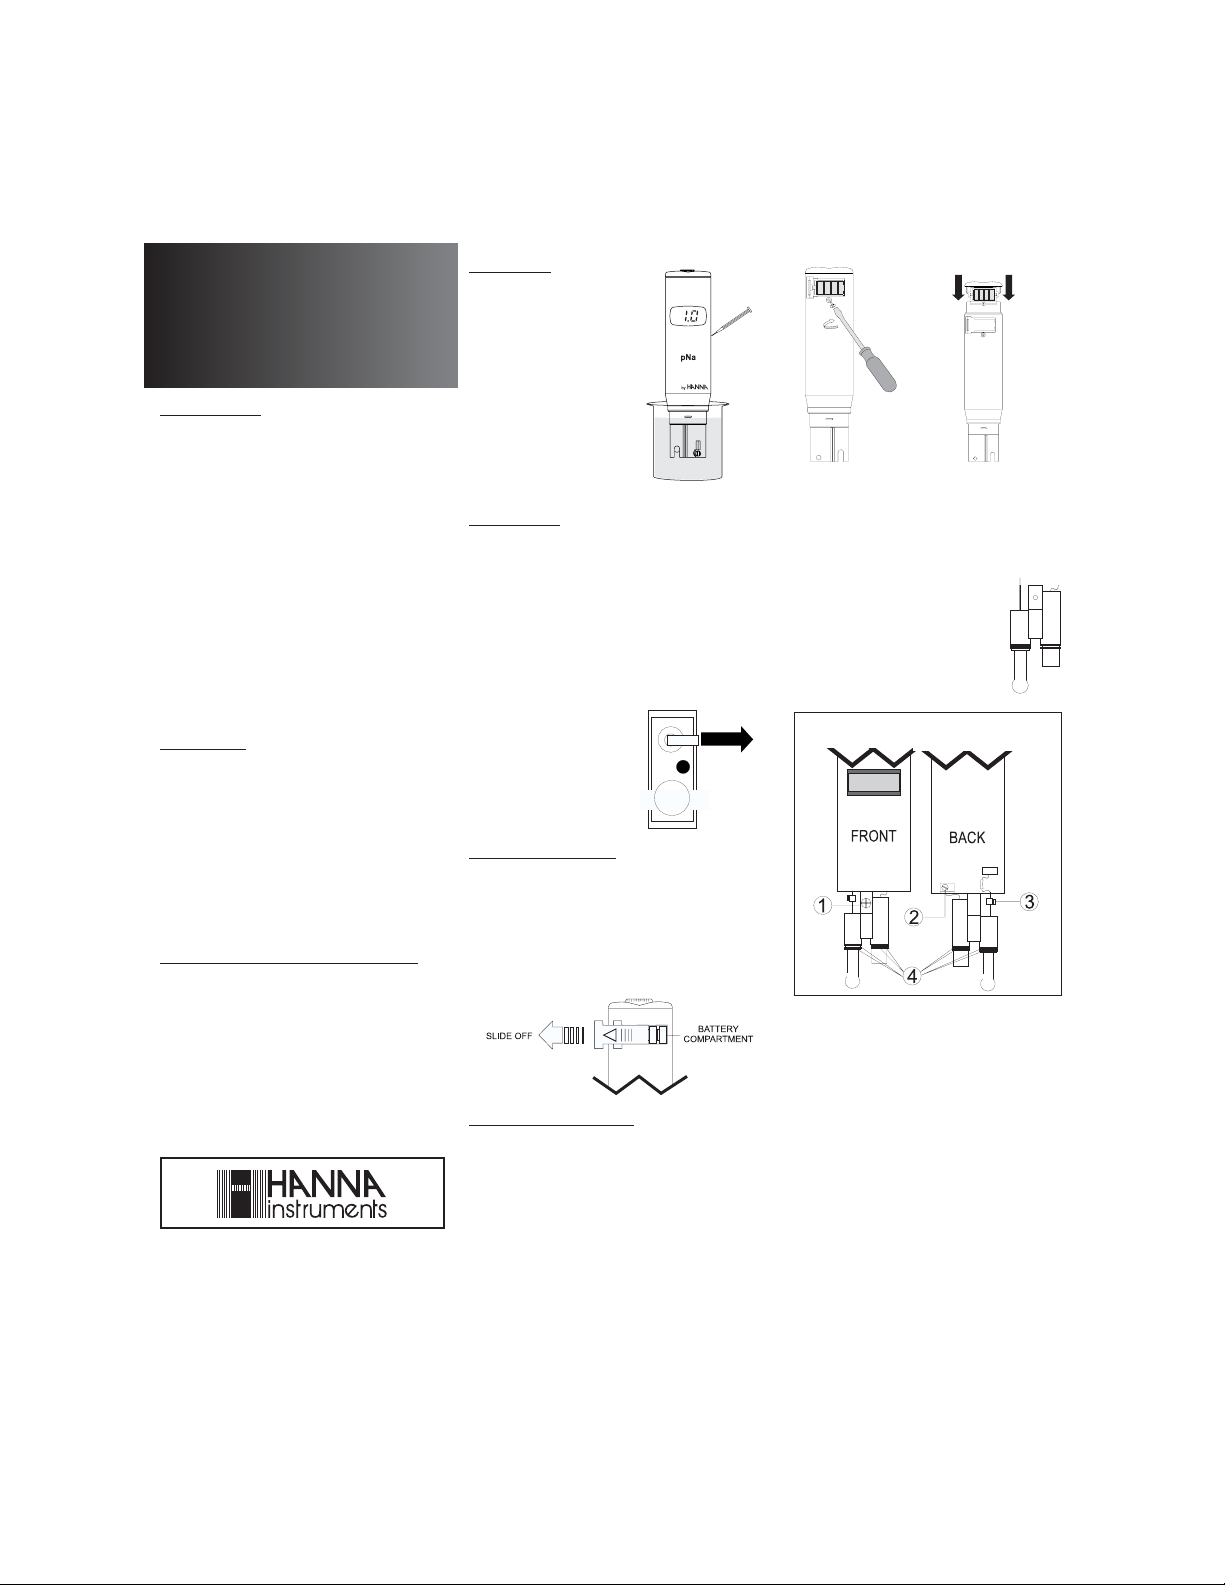
BATTERY REPLACEMENT:
If display fades or the
must be replaced. Slide off the battery compartment
cover and replace all four 1.5V batteries while
paying attention to their polarity.
ELECTRODE REPLACEMENT:
The electrode can be easily replaced in the following
way:
• Slide off the battery cover.
• Remove the screw on the back of the
below the battery compartment and slide off the
whole internal part of the tester.
• Remove the fastening screw on the front (1) to
loose the electrode.
pNapNa
pNa switches off, the batteries
pNapNa
pNapNa
pNa located
pNapNa
The internal circuit is connected to the electrode trough two wires (one for the glass
sensor and one for the reference). Remove the
two small screws (2 & 3) which
fasten the two connecting wires to
their sockets.
• Remove the electrode and replace
it with a new HI73202.
Internal circuit:
• Fasten first the screw on the front (1) to
attach the electrode to the circuit. Insert the
two small wires into their sockets and fasten
the two screws (2 & 3).
• The new electrode is supplied with four O-rings
(4). Make sure they are placed properly before
reinserting the circuit into the plastic casing.
• Reinsert the internal circuit complete with the
new electrode into the plastic casing.
• Fasten the screw on the back, below the
battery compartment.
• Reinsert the battery compartment cover.
• Recalibrate the
measurements.
pNapNa
pNa before performing new
pNapNa
 Loading...