

Page 1
Instruction Manual
HI 84529
Titratable Acidity Mini Titrator &
pH Meter for Dairy Products
Page 2

Dear
Customer
Thank you for choosing a Hanna Instrument product.
Please read this instruction manual carefully before using this instrument.
This manual will provide you with the necessary information for correct use
of this instrument, as well as a precise idea of its versatility.
If you need additional technical information, do not hesitate to e-mail us
at tech@hannainst.com or view our worldwide contact list for a Hanna
representative near you at www.hannainst.com.
All rights are reserved. Reproduction in whole or in part is prohibited without
the written consent of the copyright owner, Hanna Instruments Inc.,
Woonsocket, Rhode Island, 02895 , USA
2
www.hannainst.com
Page 3

Included ....................................................................................................................... 4
Safety Measures .........................................................................................................5
Description .............................................................................................................. 6-8
Signicance of Use ...................................................................................................................................6-7
Principle of Operation ..............................................................................................................................7-8
Diagram ................................................................................................................. 9-12
Product Diagram .................................................................................................................................... 9-10
Keypad Function .........................................................................................................................................11
Guide to Indicators ......................................................................................................................................12
Setup/ Installation .............................................................................................13-24
Dosing Pump ................................................................................................................................................13
Titrator Startup ...........................................................................................................................................13
Startup Menu ........................................................................................................................................ 14-18
Guide to Display Codes ........................................................................................................................18-20
Pump Calibration Messages ...............................................................................................................20-21
pH Calibration Messages .................................................................................................................... 21-22
Titration Messages ..............................................................................................................................22-23
Electrode Preparation Procedure. .....................................................................................................23-24
Operational Guide ..............................................................................................25-44
Electrode Calibration Procedure........................................................................................................25-28
pH Buer Temperature Dependence ..................................................................................................... 29
Dosing Pump Installation. ......................................................................................................................... 30
Dosing Pump Prime Procedure .......................................................................................................... 31-32
Pump Calibration Procedure...............................................................................................................32-34
Titration Procedure .............................................................................................................................35-38
Tips for an Accurate Measurement. ..................................................................................................38-39
Titrator GLP Information. ..........................................................................................................................40
pH Measurement. ............................................................................................................................... 40-43
pH Meter GLP Information. .......................................................................................................................43
PC Interface and Data Transfer ................................................................................................................44
Maintenance .......................................................................................................45-47
Electrode Conditioning and Maintenance..............................................................................................45
Troubleshooting Guide ........................................................................................................................46-47
Specications .................................................................................................... 48-49
Accessories .........................................................................................................50-51
Warranty .................................................................................................................... 52
Table of
Contents
www.hannainst.com
3
Page 4

Included
Please examine this product carefully. Make sure that the instrument is not
damaged. If any damage occurred during shipment, please notify your local
Hanna Representative.
Each HI 84529 mini titrator is supplied complete with:
HI 84529-70 Reagent kit for titratable acidity in dairy products
FC 260B pH electrode
HI 5315 Reference electrode
HI 7662-M Temperature probe
HI 7072 Fill solution (30 mL)
HI 700640 Cleaning solution for milk deposits (2 x 20 mL)
One capillary dropper pipette
Two 100 mL beakers
Tube set (aspiration tube with titrant bottle cap and dispensing tube with tip)
Dosing Pump Valve
5 mL Syringe
1 mL Plastic pipette
Stir bar
Power adapter
Instruction manual
Note: Save all packing material until you are sure that the instrument works
correctly. Any defective item must be returned in its original packing.
Included
4
www.hannainst.com
Page 5

Before using this product, make sure that it is entirely suitable for your
specic application and for the environment in which it is used.
Operation of this instrument may cause unacceptable interferences to other
electronic equipment, thus requiring the operator to take all necessary steps
to correct interferences. Any variation introduced by the user to the supplied
equipment may degrade the instrument’s EMC performance.
To avoid damages or burns, do not put the instrument in microwave ovens.
For your and the instrument’s safety, do not use or store the instrument in
hazardous environments.
Safety
Measures
www.hannainst.com
Safety Measures
5
Page 6

Description
The HI 84529 is a low-cost easy to use, microprocessor-based automatic
minititrator and pH meter designed for the rapid and accurate analysis of
Total Titratable Acidity in Dairy Products. The HI 84529 will quickly become
a valuable tool by eliminating subjective factors including color indicators,
errors in calculations or erratic titrant additions.
The instrument benets from Hanna’s many years of experience as a
manufacturer of quality analytical instrumentation. A clear and well-designed
user interface makes the instrument intuitive and simple to use.
By pressing the Start key in Titrator mode, the instrument will automatically
titrate the sample to the set end point, perform all necessary calculations and
display the results in the selected unit. At the end of the titration, another
titration can be started by pressing the Restart key. A dedicated HELP keys
aids in setup, calibration and troubleshooting.
Other features:
pH meter / mV meter
Stir speed control
Graphic mode to display the titration data
Data can be stored using the log feature and then exported to a USB stick or
transferred to a PC using the USB connection
Log on demand for up to 400 samples (200 pH/mV measurements; 200 for
titration results)
GLP feature, to view calibration data for the pH electrode and pump
Signicance
of Use
Description
6
Titratable acidity can be expressed in several units; % lactic acid (% l.a.),
degree Soxhlet Henkel (°SH), degree Dornic (°D) or degree Thörner (°TH).
Each of these units corresponds to a specic procedure used to titrate dairy
products.
Soxhlet Henkel degrees (°SH) - mostly used in Central Europe. This value is
obtained by titrating 100 mL of milk with 0.25N NaOH, using phenolphtalein
as indicator.
www.hannainst.com
Page 7

Thorner degrees (°Th) - mostly used in Sweden and the CIS. This value is
obtained by titrating 100 mL of milk, diluted with 2 parts of distilled water,
with 0.1N NaOH, using phenolphtalein as indicator.
Dornic degrees (°D) - mostly used in Netherlands and France. This value is
obtained by titrating 100 mL of milk, diluted with 2 parts of distilled water,
with N/9 NaOH, using phenolphtalein as indicator.
Percent lactic acid (%l.a.) - frequently used in the UK, USA, Canada, Australia
and New Zeeland. This value is obtained in the same way as °D, dividing the
result by 100.
The titratable acidity values will vary depending on the method used. Select
Low 50 to titrate a non diluted sample, or select Low 20 / High 20 to titrate
20 mL or 20 g samples that are diluted with twice its volume of deionized a
distilled water. The HI 84529 uses methods based on AOAC International
and Standard Methods for the Examination of Dairy Products. Both of these
method report titratable acidity as % lactic acid, a rough conversion factor
can be used to convert the results to the other available units:
From: To: Divide By:
%l.a. °SH 0.0225
%l.a. °D 0.0100
%l.a. °TH 0.0090
Signicance
of Use
The HI 84529 can be customized to meet the needs of any dairy analysis lab.
Samples can be titrated by weight or volume, diluted or nondiluted (low range
only) and titrated to a xed pH end point that can be adjusted by the user.
The methodology for titratable acidity in dairy products is based on
neutralization reaction where the acids in the sample (i.e. lactic acid) reacts
with a base (i.e. sodium hydroxide) to produce water:
H++OH¯—>H2O
www.hannainst.com
Principle of
Operation
Description
7
Page 8

Principle of
Operation
In an ideal solution, the endpoint of an acid titration corresponds
stoichiometrically to the complete neutralization of the acids present.
This endpoint for this reaction can be determined visually using a color
indicator (i.e. phenolphthalein), however this endpoint becomes very
objective in opaque and colored samples. The HI 84529 removes this issue
by titrating to a xed pH endpoint that can be set by the user. The HI 84529
can be customized to meet individual needs with samples titrated by mass or
by volume, in two dierent ranges, with diluted and non diluted (low range
only). For precise analysis the sample size, volume of titrant added and titrant
concentration must be known.
The HI 84529 Titratable Acid in Dairy Products Minititrator utilizes a simple
sample preparation, a high quality dosing pump for titrant additions,
potentiometric endpoint determination and instantaneous computations.
To maintain the high accuracy of the minititrator a simple pump calibration
is required. The pump calibration uses a known quantity of a known solution
to compensate for changes in the dosing system, this procedure should be
performed regularly.
8
Description
www.hannainst.com
Page 9
1. Titrant bottle
2. Liquid Crystal Display (LCD)
3. Keypad
4. Electrode holder
5. Dispensing tube
Product
Diagram
Overhead View
www.hannainst.com
Front View
Product Diagram
9
Page 10
Product
Diagram
1
15
2
3
4
Product Diagram
10
Rear View
5
6
7
8
9
1. Dispensing tube
2. pH Electrode
3. Temperature probe
4. Reference electrode
5. Syringe
6. Electrode holder
7. Power switch
8. USB connector (PC interface)
10
11
9. USB connector
(Storage interface)
10. Power adapter
11. BNC electrode connector
12. Temperature connector
13. Reference connector
14. Titrant bottle
15. Dosing Pump Valve
www.hannainst.com
14
13
12
Page 11
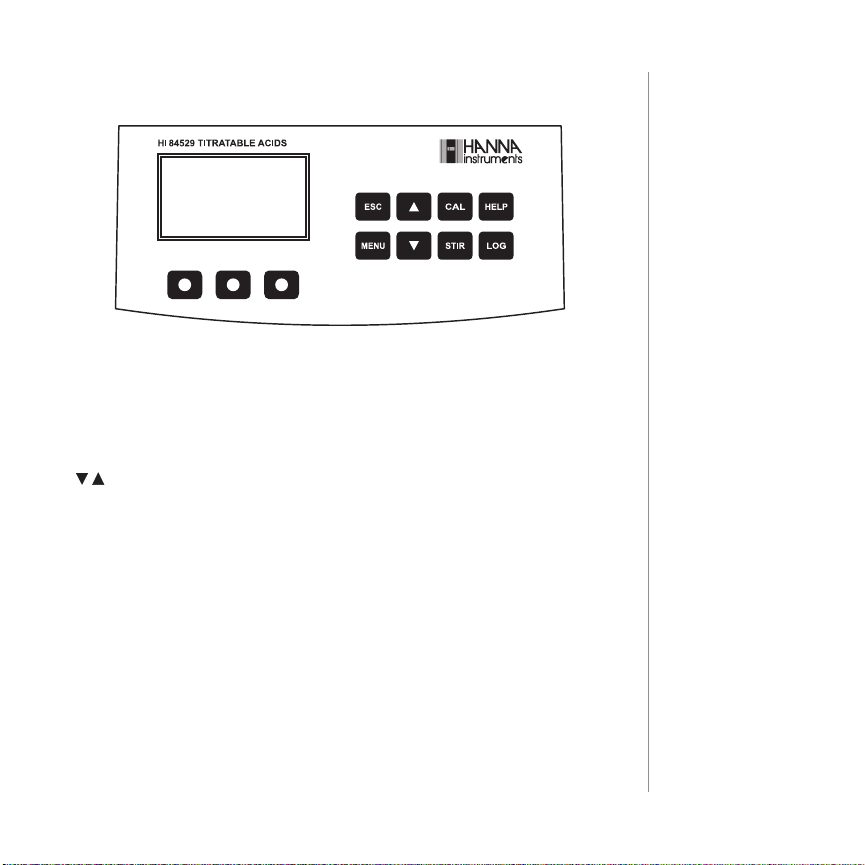
Keypad
Function
ESC - used to leave the current
screen and to return either to the
previous screen or to the main
screen. In Setup, exits a parameter
without changing the value
/ - used to modify the parameters’
values, to scroll the information
displayed while viewing a help
screen or to move between the
options from the instrument’s Setup
CAL - used to access the Electrode
and Pump calibration options
HELP - used to access/exit the
instrument’s contextual help
www.hannainst.com
LOG - used to save the current pH/
mV reading in pH meter mode and
the titration result
MENU -used to enter Setup, Recall
or GLP selection menu, while
instrument is in pH or titration mode
STIR - used to start/stop the stirrer
Note: The stirrer starts automatically
during pump calibration and
titration, it cannot be stopped by
pressing STIR key.
Product Diagram
11
Page 12
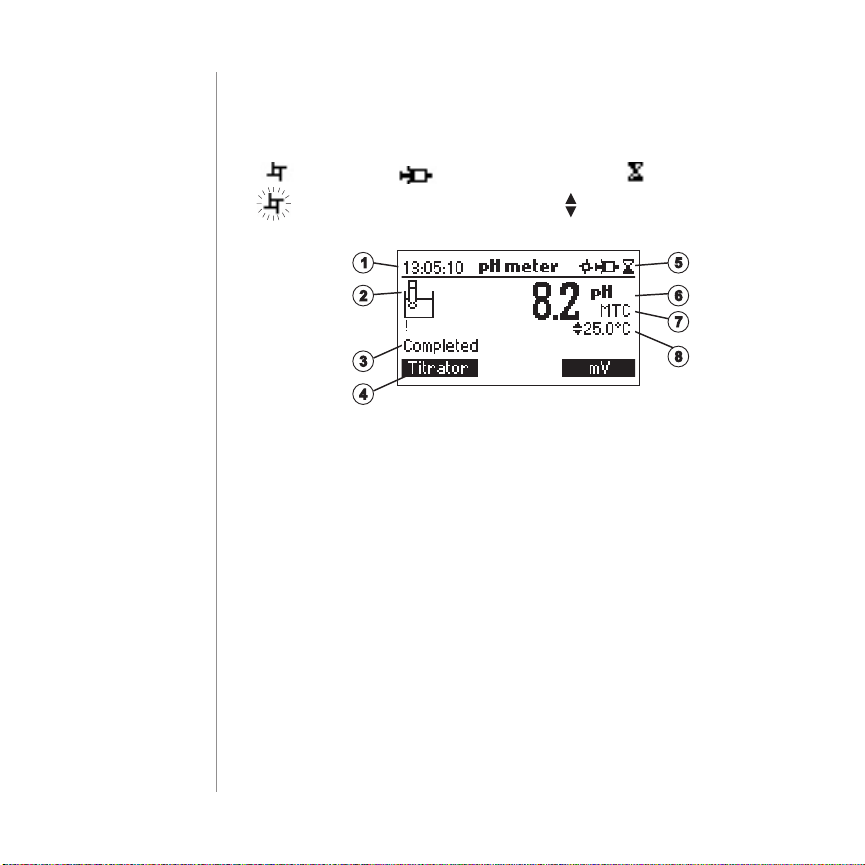
Guide to
Indicators
During the instrument’s operation a set of information are displayed on
the LCD. Displayed icons:
Stirrer on Pump running Unstable reading
Stirrer is not working properly Parameter can be modied
1. Current time and instrument mode
information (pH meter or Titrator)
2. Procedural Indicators
3. Instrument status
4. Virtual option keys
5. Stirrer and reading status
6. Main reading information
7. pH temperature compensation
mode (Manual or Automatic)
8. Temperature reading
Product Diagram
12
Note: If temperature probe is not connected, Manual Temperature Compensation
is used and MTC appears on the right side of the screen. If Automatic Temperature
Compensation is in use the ATC appears on the right side of the screen.
www.hannainst.com
Page 13

The dosing pump is based on a valve that automatically moves the titrant
between the titrant bottle and syringe when lling the syringe and between
the syringe and sample when dispensing. A replaceable 5 mL plastic syringe is
used to limit the amount of titrant used per test to ensure the highest possible
accuracy. Before a set of titrations, it is necessary to prime the dosing system.
Note: Once titrations have been completed, the dosing system should be
cleaned with deionized water using the prime feature.
Dosing
Pump
This is a general outline of the steps required to perform a titration. The
following topics are expanded upon in each section that follows.
1. Place the instrument on a at table. Do not place the instrument in direct sun
light.
2. Connect the power adapter to the instrument.
3. Turn the instrument ON using the power switch on the rear panel of the
instrument.
4. Set up the instrument. See the “Setup Menu” section for details.
5. Connect the pH electrode to the instrument.
6. Connect the reference electrode to the instrument. Connect the
temperature probe to the instrument.
7. Calibrate the pH electrode.
8. Connect the tubes and the valve. See the “Dosing Pump Installation”
section for the procedure.
9. Remove the titrant bottle cap and replace it with the bottle cap with
tubes. Place the titrant bottle in the appropriate place on the titrator top.
Note: Dierent titrants are required based on the concentration. See
“Pump Calibration Procedure” for details.
10. Prime the syringe. To assure high accuracy, verify there are no air bubbles
in the syringe or tubing. Calibrate the pump.
Note: Dierent volumes of standards are required based on the
concentration. See “Pump Calibration Procedure” for details.
11. Prepare the sample.
12. Run a titration and log sample results.
www.hannainst.com
Titrator
Startup
Setup/Installation
13
Page 14
Startup
Menu
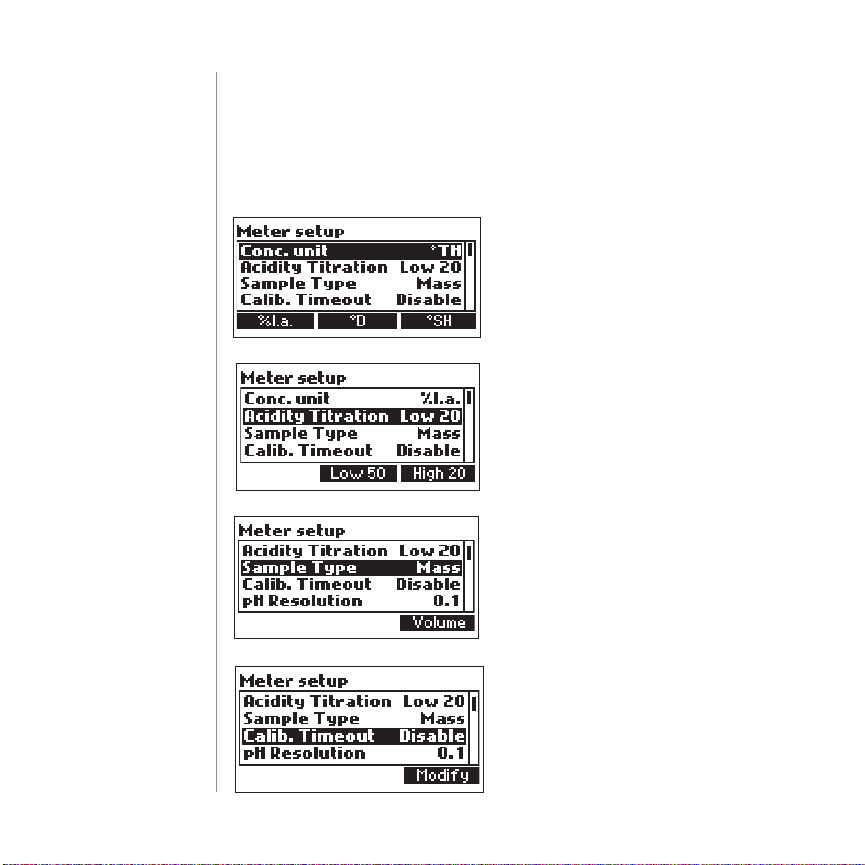
The titrator’s setup menu may be accessed from the main screen or titration
screens (meter or titrator) by pressing the MENU key, then SETUP. A list of setup
parameters will be displayed with currently congured settings. While in the
setup menu, it is possible to modify the instrument’s operation parameters.
The ARROW keys permit the user to scroll the setup parameters. Press HELP to
view the contextual help. Press ESC to return to the main screen.
Concentration Unit
% l.a., °SH, °D, °TH
Press the corresponding virtual option
key to change the option.
% l.a. - % lactic acid; °SH - °Soxhlet
Henkel; °D - °Dornic; °TH - °Thörner
Acid Titration
Low 20, Low 50 or High 20
Press the corresponding virtual option
key to select the desired range.
Note: Dierent titrants are required for
each range.
Sample Type
Mass or Volume.
Samples can be added by volume or by
mass. For improved accuracy all samples
should be added by mass.
Setup/Installation
14
Calibration Timeout
Disabled or 1 to 7 days. This option is used
to set the number of days before the pH
calibration expired warning message is
displayed. Press MODIFY to access the
calibration timeout screen.
www.hannainst.com
Page 15
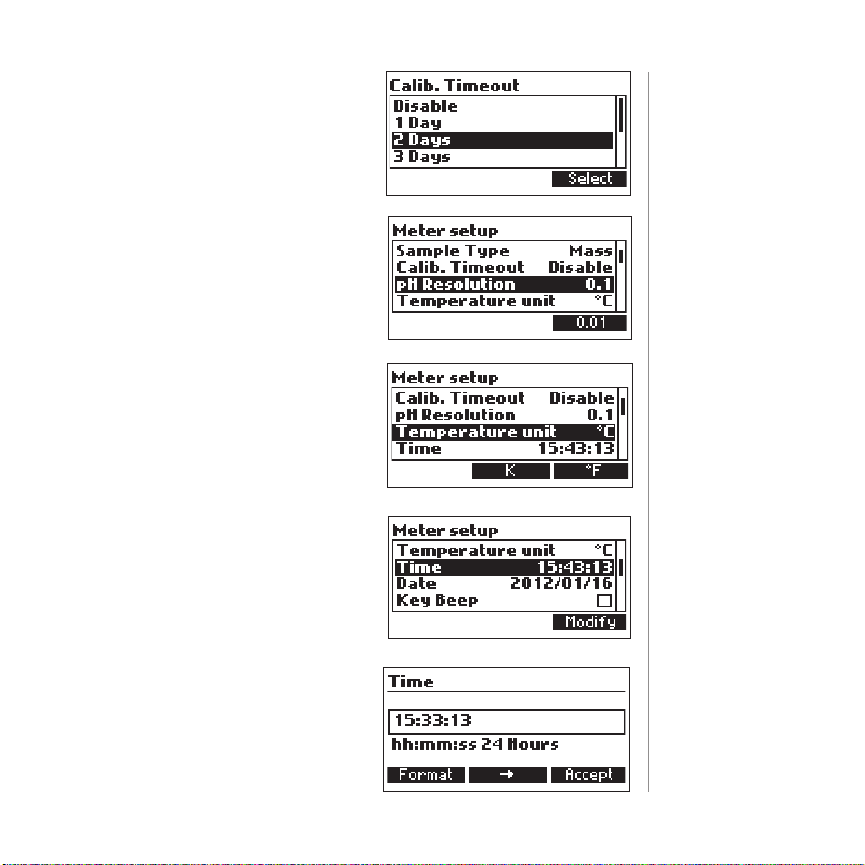
Use the ARROW keys to select the value.
Press Accept to conrm or ESC to return
to the setup menu without saving the
changes.
pH Resolution
0.1 or 0.01.
Press the displayed virtual option key to
change the option.
Temperature Unit
°C, °F or K.
Press the virtual option key to change the
option.
Time
Press the Modify key to change the time
and time format
Startup
Menu
Press Format to switch between 12
hour (am/pm) and 24 hour mode. Press
the arrow to highlight the value to be
modied. Use the ARROW keys to change
the value. Press Accept to conrm the
new value or ESC to return to the setup.
www.hannainst.com
Setup/Installation
15
Page 16
Startup
Menu
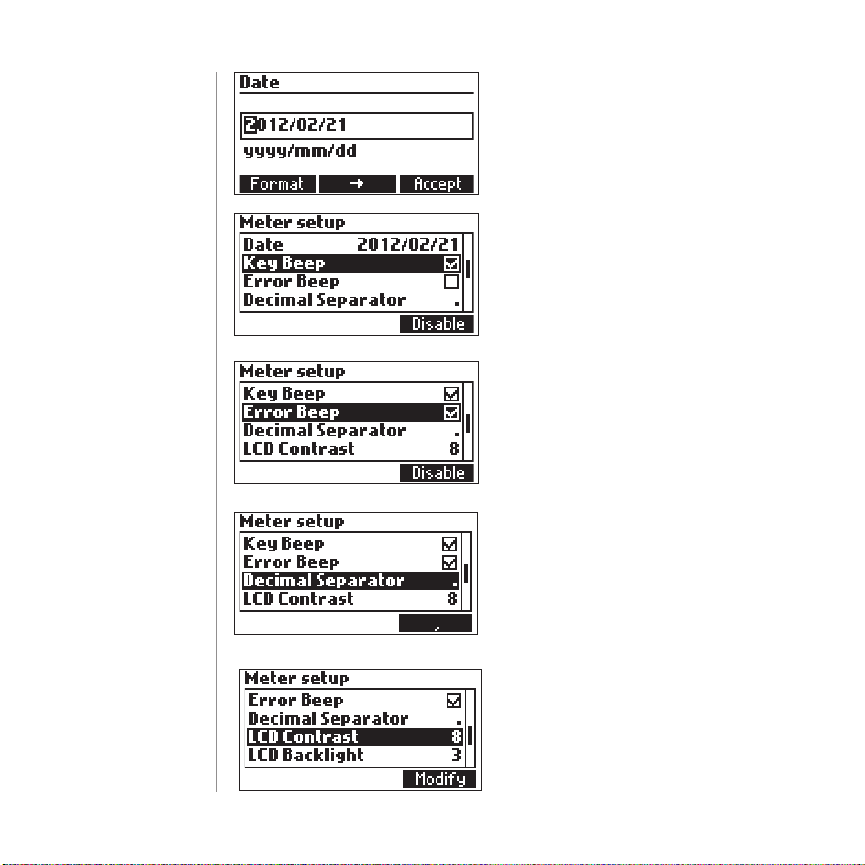
Date
Press the MODIFY key to change the date
and date format.
Key Beep
Select ENABLE to activate or DISABLE
to deactivate the Key Beep function. If
enabled, a short beep will be heard every
time a key is pressed.
Error Beep
Select ENABLE to activate or DISABLE to
deactivate the Error Beep function.
If enabled, a beep will be heard when an
error condition occurs.
Decimal Separator
Select the symbol used for a decimal
separator. You can chose either period or
a comma.
Setup/Installation
16
LCD Contrast
This option is used to set the display’s
contrast. Press MODIFY to change the
display’s contrast. The default value is 8.
www.hannainst.com
Page 17

Use the ARROW keys or ← / → to increase/
decrease the value. Press ACCEPT to
conrm the value or ESC to return to the
setup menu.
LCD Backlight
Press Modify to change the backlight
level. The default value is 3.
Use the ARROW keys or ← / → to increase/
decrease the backlight level.
Press ACCEPT to conrm or ESC to return
to the setup menu.
Language
Press the corresponding virtual option key
to change the language. If the selected
language cannot be loaded, the previously
selected language will be reloaded. If no
language can be loaded at startup, the
instrument will work in “safe mode”. In “safe
mode” all messages are displayed in English.
Startup
Menu
Tutorial
ENABLE or DISABLE the Tutorial. This
helpful tool oers additional information
that guides the user step by step during
calibration and titration.
www.hannainst.com
Setup/Installation
17
Page 18

Startup
Menu
Meter Information
Press SELECT to view the rmware
version, language version, mV factory
calibration date and time and temperature
factory calibration date and time.
Press ESC to return to the Setup mode.
Restore Factory Settings
Press SELECT to restore factory settings
Press YES to conrm the restore process
or NO to return without restoring.
Press ESC to return to the Setup mode.
Guide to
Setup/Installation
18
Display
Codes
This screen appears when the instrument
is turned on during the initialization
process.
www.hannainst.com
Page 19

Titration screen display.
Titration screen when a titration is in
progress.
Prime burette screen.
Prime burette screen when the dosing
system is running.
Guide to
Display
Codes
This error message appears when the
pump is not working properly. Check the
tubing, valve and syringe. Press RESTART
to try again
www.hannainst.com
Setup/Installation
19
Page 20

Guide to
Display
Codes
This screen appears when the titrator
is in calibration mode. Press PUMP to
calibrate Pump. Press ELECTRODE to
calibrate pH electrode.
Pump
Calibration
Messages
Pump calibration is initiated by pressing
the START key.
This screen appears while pump
calibration is in progress. Press ESC
or STOP key to return to the Pump
Calibration screen.
This error message appears during pump
calibration when the endpoint cannot
be reached and the maximum amount
of titrant is exceeded. Check standard,
electrode and/or dosing system and try
again
The calibration was outside the
acceptable limits. Prepare a new standard
and try again.
Setup/Installation
20
www.hannainst.com
Page 21

This error message appears when the
pH reading exceeds the acceptable input
limits (pH <-2.00 or pH> 16.00).
This screen appears when the stirrer is
not working properly. Check the stir bar
and beaker content. Press RESTART to try
again.
This error message appears when the
pump is not working properly. Check the
tubing, valve and syringe. Press RESTART
to try again.
Pump
Calibration
Messages
pH calibration mode.
When the reading has stabilized, press
CONFIRM to accept the calibration or
CLEAR to restore the default calibration.
www.hannainst.com
pH
Calibration
Messages
Setup/Installation
21
Page 22

pH
Calibration
Messages
The “Wrong Buer” message is displayed
when the pH value is outside of the
acceptable range. Clean the electrode by
following the cleaning procedure and/or
check the buer value before continuing
the pH calibration. Press the ESC key to
exit pH calibration mode.
Titration
Messages
This screen is displayed when the
instrument is in titration mode. Press
START to begin a titration, METER to
enter pH meter mode or PRIME to enter
into the prime function.
The titration result, expressed as
concentration in selected unit, is displayed
automatically at the end of the titration.
Press RESTART to start another titration
or ESC to return to the main screen.
This error message appears when the
input reading (pH or temperature)
exceeds the specied limits. The pH or
temperature value and concentration will
blink indicating an error.
This screen appears when the sample
concentration is out of range.
Setup/Installation
22
www.hannainst.com
Page 23

This screen appears when the stirrer is
not working properly. Check the stir bar
and beaker content. Press RESTART to
try again.
This error message appears when the
pump is not working properly. Check the
tubing, valve and syringe. Press RESTART
to try again.
Titration
Messages
1. Remove the electrode protective
cap.
2. If the bulb is dry, soak the electrode
in HI 70300 Storage Solution for at
least one hour.
3. Preparation of reference electrode:
4. Unwrap Paralm™ seal found over
ceramic junction on inner stern of
the reference electrode and discard.
This is only used for shipping.
5. Rinse inner stern with deionized
water, making certain to wet o-ring
found on the inner stern.
6. Reassemble reference electrode by
gently pushing the inner assembly
into the outer body (from the
bottom), slide spring and cap down
the cable and over the top of the
inner stern. Screw the cap into
place.
7. Unscrew and remove the ll hole
www.hannainst.com
Electrode
Preparation
Procedure
Setup/Installation
23
Page 24

Electrode
Preparation
Procedure
plug and o-ring on ll hole spout.
8. Using the dropper pipette provided, add a few drops of HI 7072 ll
solution to the electrode. Invert electrode to wet the o-ring and rinse
the electrolyte chamber.
9. Holding the body of the electrode gently press the cap with your thumb.
This permits the ll solution to drain out of the body. Release your thumb
and verify electrode returns to its original position (you may need to
gently assist for this to occur).
10. Fill electrode body with HI 7072 ll solution until solution volume is just
below ll hole.
Note: During measurement always operate reference electrode with the ll
hole open.
Measurement
Place pH electrode and reference electrode into electrode holder and connect
the electrodes to the instrument.
Rinse the pH and reference electrodes with distilled or deionized water.
Immerse the pH and reference electrodes 1.5 cm (0.6”) in the sample and stir
gently for a few seconds.
For a faster response and to avoid cross-contamination of the samples, rinse
the electrodes with a few drops of the solution to be tested, before taking
measurements.
Electrode
Calibration
Procedure
Setup/Installation
24
It is recommended to calibrate the instrument frequently, especially if high
accuracy is required. The pH electrode should be recalibrated:
1. Whenever the pH electrode is replaced
2. At least once a week, but daily is advised
3. After testing aggressive chemicals and after the electrode is cleaned
4. When high accuracy is required
5. If the pH calibration expired warning is displayed during measurement
Every time you calibrate the instrument use fresh buers and clean the
electrode.
www.hannainst.com
Page 25

Procedure
A single one, two or three-point calibration can be performed, using the four
predened buers 4.01, 6.00, 8.30 and 10.01 pH. For a single point calibration
any of the four buers may be used, 8.30 pH is recommended.
Note: The HI 84529 will not accept other pH buers for calibration.
1. Pour small quantities of selected buer solutions into clean beakers. For
accurate calibration used two beakers for each buer solution, the rst
one for rinsing the electrode and the second one for calibration.
2. Put a magnetic stir bar in the beaker that will be used for calibration.
3. Remove the protective cap and rinse the electrode with some of the
buer solution to be use for the rst calibration point.
4. Put the rst beaker with calibration buer in the beaker holder.
5. Place the electrode holder on the top of the beaker and secure it by
turning clockwise and press STIR.
6. Immerse the pH electrode and the temperature probe approximately
2 cm (0.8”) into the buer, paying attention not to touch the stir bar.
To enter Electrode Calibration follow the next steps:
1. Press CAL function key then ELECTRODE.
2. The electrode calibration screen will be displayed.
3. Press CLEAR to delete the previous calibration.
1 Point Calibration
1. The 8.30 buer will be selected
by default. If necessary, press the
ARROW keys in order to select a
dierent buer value.
2. The (unstable measurement)
symbol will be shown on the display
until the reading becomes stable.
3. When the reading is stable and
close to the selected buer, the
(unstable measurement) symbol will
disappear and the CONFIRM key will
become active.
4. Press CONFIRM to conrm the
Electrode
Calibration
Procedure
www.hannainst.com
Operational Guide
25
Page 26

Electrode
Calibration
Procedure
calibration or ESC to exit calibration.
5. After the calibration point has been conrmed, press ESC to exit without
performing the second calibration point.
2 Point Calibration
1. After pressing CONFIRM in step 4 of
1 point calibration procedure of the
calibrated value will be shown on
the display and the second expected
buer value will be displayed.
2. Remove the electrode holder with
electrodes from the top of the beaker.
3. Place the second beaker with calibration buer in the beaker holder.
Rinse the electrodes in a beaker containing the second buer rinsing
solution.
4. Place the electrode holder (with electrodes) on the top of the beaker
and secure it by turning clockwise and press STIR.
5. If necessary, press the ARROW keys in order to select a dierent buer
value. The (unstable measurement) symbol will be shown on the
display until the reading becomes stable.
6. When the reading is stable and close to the selected buer, the (unstable
measurement) symbol will disappear and the Conrm key will become active.
7. Press CONFIRM to conrm the calibration.
8. The calibrated value will be shown on the display and the third expected
buer value will be automatically selected.
9. After the second calibration point has been conrmed, press ESC to exit
without performing the third calibration point.
3 Point Calibration
1. Remove the electrode holder with
electrode from the top of the beaker.
2. Place the third beaker with calibration
buer in the beaker holder. Rinse the
electrodes in a beaker containing the
third buer rinsing solution.
3. Place the electrode holder (with
electrodes) on the top of the beaker and secure it by turning clockwise
Operational Guide
26
www.hannainst.com
Page 27

and press STIR. If necessary press the ARROW keys in order to select a
dierent buer value.
4. The (unstable measurement) symbol will be shown on the display until
the reading becomes stable.
5. When the reading is stable and close to the selected buer, the
(unstable measurement) symbol will disappear and the CONFIRM key
will become active.
6. Press CONFIRM to conrm the calibration. The instrument stores the
calibration value and returns to calibration menu, where the date and
time for the pH calibration will be updated.
Note: A buer conrmed during the calibration process is removed from
the list of available buers. If the value measured by the instrument is
not close to the selected buer, a “Wrong Buer” error message will
be shown on the display. Check if the correct buer has been used or
regenerate the pH electrodes by following the Cleaning Procedure. If
necessary change the buer or the electrode.
If the measured oset isn’t within the preset limits (±45 mV), the meter will
display the message “Buer Contaminated” alternatively with ”Electrode
Dirty/Broken”.
If the computed slope isn’t within the
preset limits, the meter will display the
message “Wrong Slope”. If the slope is too
high the symbol will be displayed. If
the slope is too low the symbol will
be displayed.
Electrode
Calibration
Procedure
www.hannainst.com
Operational Guide
27
Page 28

Electrode
Calibration
Procedure
If the “Wrong Old Slope” error message
is displayed, an inconsistency exists
between the current and the previous
(old) calibration. Clear the previous
calibration by pressing CLEAR and
proceed with calibration from the current
calibration point. The instrument will
keep all the conrmed values during the
current calibration.
If the temperature reading is out of
the dened temperature range of the
buer (0 to 45 °C), the “Wrong Buer
Temperature” error message will be
displayed, and the temperature symbol
will blink on the display. Calibration
cannot be conrmed in this situation.
Note: To clear a previous calibration
and to return to the default value,
press CLEAR at any time after entering
calibration mode. If CLEAR is invoked
during the rst calibration, point the
instrument returns to the measurement
mode. The CLEAR key is displayed only if
a previous calibration exists.
Operational Guide
28
www.hannainst.com
Page 29

Temperature has an eect on pH. The calibration buer solutions are
aected by temperature changes to a lesser degree than normal solutions.
During calibration, the instrument will automatically calibrate to the pH value
corresponding to the measured or set temperature.
During calibration the instrument will display the pH buer value at 25 ºC.
Temp pH Buers
ºC ºF
0 32
5 41
10 50
15 59
20 68
25 77 4.01 7.01 8.30 10.01
30 86
35 95
40 104
45 113
4.01 7.01 8.20 10.01
4.01 7.13 8.38 10.32
4.00 7.10 8.34 10.24
4.00 7.07 8.31 10.18
4.00 7.04 8.27 10.12
4.00 7.03 8.23 10.06
4.02 7.00 8.17 9.96
4.03 6.99 8.14 9.92
4.04 6.98 8.11 9.88
4.05 6.98 8.08 9.85
pH Buer
Temperature
Dependence
www.hannainst.com
Operational Guide
29
Page 30

Dosing Pump
Installation
To install the dosing pump follow the procedure below:
1. Extend the plunger on the 5 mL syringe to its maximum volume.
2. Place the syringe in the dedicated spot on the top of the meter (1).
3. Arrange the bottom of the syringe into the holder on the pump (2). Once
the syringe is in place lower the barrel until it sits ush on the holder.
4. Put the o-ring and syringe-xing nut over the syringe (3) and turn
clockwise to secure it in place (4).
5. Place the valve on the top of the syringe (5). Ensure it ts securely.
6. Insert the aspiration tube into the left side of the valve (6) and replace
the titrant bottle cap with the attached cap (7).
7. Insert the dispensing tube into the top of the valve (8).
Dosing
Pump Prime
Procedure
Operational Guide
30
Prime cycle should be performed:
1. If you notice there is no titrant in the tip
2. Whenever the dosing system tubes are replaced
3. Whenever a new bottle of titrant is used
4. Before starting a pump calibration
5. Before starting a series of titrations
The prime cycle is used to ll the syringe before starting a set of titrations. Two
rinse cycles of the syringe are shown in the gure below. The dispensing tube is
connected to the top of the valve and the aspiration tube on the left side.
www.hannainst.com
Page 31

Note: The aspiration tube must be inserted in the titrant bottle. The dosing
tip must be placed over a rinse beaker.
Before starting the prime procedure, make sure you are using the appropriate
titrant solution for the selected range.
To prime the burette, select PRIME option
from TITRATION mode.
Adjust the rinses number by pressing the
and keys and press START.
The number of syringe rinses can be set
between 1 and 5 (at least three rinses
are recommended to ensure that the air
bubbles are completely removed).
Dosing
Pump Prime
Procedure
To pause the prime process press
the PAUSE key; to continue press the
CONTINUE key. To stop the prime process
press the STOP key.
www.hannainst.com
Operational Guide
31
Page 32

Dosing
Pump Prime
Procedure
NOTE: This error message appears when
the pump is not working properly. Check
the tubing, valve and syringe. Press
RESTART to try again.
Calibration
Procedure
Operational Guide
32
Pump
The calibration of the pump must be performed every time the syringe, pump
tube, the titrant bottle or the pH electrode is changed. It is recommended to
perform the pump calibration before each set of titrations, after the titrator is
left idle for several hours, or once daily.
Press MENU, select SETUP and select the corresponding measurement range
according to the table below:
Unit Low Range 20 or 50 High Range 20
%l.a 0.01 to 0.20 0.1 to 2.0
°SH 0.4 to 8.9 4.4 to 88.9
°D 1.0 to 20.0 10 to 200
°TH 1.1 to 22.2 11.1 to 222.2
Verify the electrode has been calibrated in 8.30 pH buer.
Ensure the pump is primed with the correct titrant for the selected range (HI
84529-50 Low Range 20 Titrant or HI 84529-52 Low Range 50 Titrant, HI
84529-51 High Range 20 Titrant).
Sample preparation: Use a clean pipette add a precisely measured amount of
HI 84529-55 Calibration Standard to a clean beaker as indicated below:
Low Range 20 - 1 mL
Low Range 50 - 2 mL
High Range 20 - 10 mL
Note: Failure to use a clean pipette will result in erroneous readings.
Fill the beaker up to the 50 mL mark with the distilled or deionized water.
Press CAL key. The instrument displays the date and time of the last electrode
calibration, and the last pump calibration. Press Pump key.
www.hannainst.com
Page 33

NOTE: DO NOT PLACE THE DISPENSING
TIP INTO THE CALIBRATION BEAKER,
PLACE THE TIP OVER A WASTE BEAKER.
A SMALL AMOUNT OF TITRANT IS
DISPENSED WHEN THE PUMP RESETS.
Press START, wait for the syringe to rell.
Place the stir bar in the beaker and put
the beaker in the minititrator top.
Place the probe holder on the top of the
beaker and secure it by turning clockwise.
Rinse the pH electrode, reference electrode
and temperature probe with deionized
water and immerse them roughly 1.5 cm
(0.6”) into the sample. Be sure that the tip
of the electrode is not hitting the stir bar. If
necessary, additional distilled or deionized
water can be added.
Insert the dosing tip into the titrant tube
sleeve. IT IS CRITICAL THAT THE TIP BE
IMMERSED APPROXIMATELY 0.25 CM (0.1")
INTO THE SOLUTION BEING TITRATED.
Press CONTINUE to begin the calibration
and STOP to abort it. At the end of the
calibration, ”Calibration Completed“
appears on display. To repeat the calibration
press Restart or ESC to return to the main
screen.
Note: If temperature probe is not
connected, Manual Temperature
Compensation is used and MTC appears
on the right side of the screen. If
Automatic Temperature Compensation is
in use the ATC appears on the right side
of the screen.
www.hannainst.com
Pump
Calibration
Procedure
Operational Guide
33
Page 34

Pump
Calibration
Procedure
If an erroneous situation is encountered
during the calibration, an error message is
displayed and the calibration can be restarted
by pressing RESTART. Prepare a new
standard, rinse the electrode, temperature
probe and dosing tip and try again.
If the calibration doesn’t complete and the
max titrant volume of titrant is reached,
an error message will be displayed. The
calibration can be restarted by pressing
RESTART. Prepare a new standard, rinse
electrode, temperature probe and dosing
tip and try again.
This error message appears when the
pH reading exceeds the acceptable input
limits (pH> -2.00 or pH > 16.00).
This screen appears when the stirrer is
not working properly. Check the stir bar
and beaker content. Press RESTART to
try again.
Operational Guide
34
This error message appears when the
pump is not working properly. Check the
tubing, valve and syringe. Press RESTART
to try again.
www.hannainst.com
Page 35

For best accuracy, before taking any measurement, ensure that the pump is
calibrated on the selected range following the “Pump Calibration Procedure”.
Note: Verify that the instrument has been calibrated (pH and pump) before
performing any titrations.
Refer to “Setup Menu” to set up the instrument for your measurement. Select
the corresponding measurement range.
Unit Low Range 20 and 50 High Range 50
%l.a 0.01 to 0.20 0.1 to 2.0
°SH 0.4 to 8.9 4.4 to 88.9
°D 1.0 to 20.0 10 to 200
°TH 1.1 to 22.2 11.1 to 222.2
By Mass:
Place a clean 100 mL plastic beaker on an
analytical balance. Zero the balance.
Add 20 ± 1 g (Low 20, High 20) or 50 ± 1 g
(Low 50) to the beaker.
Record the reading once it has stabilized.
Remove the beaker from the balance.
By Volume:
Volumetrically add 20 mL( Low 20, High
20) or 50 mL (Low 50) to a clean 100mL
plastic beaker.
Note: Failure to use a clean pipette will
result in erroneous readings.
Note: DO NOT PLACE THE TIP INTO THE
SAMPLE BEAKER. PLACE THE TIP OVER
A WASTE BEAKER. A SMALL AMOUNT OF
TITRANT IS DISPENSED WHEN THE PUMP
RESETS.
Press START to begin a titration.
For samples by mass the “Edit Sample
Mass” screen will be displayed. Use the
ARROW keys to enter the exact sample
mass then press ACCEPT.
www.hannainst.com
Titration
Procedure
Operational Guide
35
Page 36

Titration
Procedure
For 20 g and 20 mL samples add deionized
or distilled water to the 60 mL mark.
Place the stir bar in the beaker and put
the beaker in the mini titrator top.
Place the probe holder on the top of the
beaker and secure it by turning clockwise.
Rinse the pH electrode, reference electrode
and temperature probe with deionized
water and immerse it roughly 1.5 cm (0.6”)
into the sample. Be sure that the tip of the
electrode is not hitting the stir bar. Insert
the dosing tip into the titrant tube sleeve.
IT IS CRITICAL THAT THE TIP BE IMMERSED
APPROXIMATELY 0.25 CM (0.1") INTO THE
SOLUTION BEING TITRATED.
Press CONTINUE to begin the titration
and STOP to abort it.
The instrument will continuously update
the concentration on the display. The
value will be displayed blinking. When
the reading is under range “----” symbol
appears blinking.
The titration curve can be visualized
during a titration by pressing Plot ON.
Press Plot OFF or ESC to exit this mode.
Operational Guide
36
www.hannainst.com
Page 37

At the end of the titration, the concentration
is displayed in the selected unit. The titration
curve can be viewed by pressing Plot ON.
Press Plot OFF or ESC to exit this mode.
Press LOG to record the concentration
value and the titration curve into the
instrument’s memory. A message will be
displayed for a few seconds indicating
the amount of free log space. Up to
200 log samples can be recorded in the
instrument’s memory.
Press RESTART to begin a new titration or
ESC to return to the titration menu.
If the concentration exceeds the range
limits (>0.01 %l.a. for Low Range, >2.0
%l.a. for High Range), the exceeded
range limit will be displayed blinking.
Another titration can be started by
pressing Restart.
Titration
Procedure
“Wrong input” error message appears
when the input reading (pH, temperature)
exceeds the specied limits. The pH or
temperature value and the concentration
will blink indicating an error.
www.hannainst.com
Operational Guide
37
Page 38

Titration
Procedure
This screen appears when the stirrer is
not working properly. Check the stir bar
and beaker content. Press RESTART to
try again.
This error message appears when the
pump is not working properly. Check the
tubing, valve and syringe. Press Restart
to try again.
Tips for an
Accurate
Measurement
Operational Guide
38
The instructions listed below should be followed carefully to ensure
measurements are conducted with the highest possible accuracy and precision.
IT IS CRITICAL THAT THE TIP BE IMMERSED IN THE SOLUTION BEING TITRATED
(APPROXIMATELY 0.25 CM).
• Calibrate the pump prior to each series
of titrations.
• Calibrate the pump if the meter is left
idle for several hours.
• Analyze the sample immediately after
it is obtained.
• Clean the electrode with HI 70640
cleaning solutions specially designed
for milk industry.
View/Delete Titrator Recorded Data
Press MENU key then Recall to access the
titrator logs.
When an external USB storage device is
connected, the Export key is displayed. It
saves the meter and titrator logs in two
www.hannainst.com
Page 39

text format les on the storage device.
Press METER or TITRATOR to view the
respective logs.
The instrument will display a list of all the
records stored in the log.
Use the ARROW keys to scroll the list of
records.
If the saved concentration was out
of range, the “<” or “>” symbols are
displayed in front of the reading.
Press DELETE to delete the selected log
from the memory.
Press DEL.ALL to delete all records.
Press INFO to see detailed information
about the highlighted record.
The selected record data and the titration
curve data le name are displayed.
Press ESC to return to the previous screen.
Press PLOT to visualize the titration curve
or ESC to return to the previous screen. On
the titration curve, the endpoint volume
and pH are displayed. The titration data
(Total Titrant Volume on the x-axis and pH
on the y-axis) can be scanned through with
the dotted line by using the ARROW keys.
To zoom on the titration curve press
ZOOM.
If DELETE or DEL.ALL is pressed the
instrument will ask for conrmation.
Press YES to delete the record or NO to
return to the previous screen.
Deleting a single record will renumber
the list of records.
If the titrator log is empty, the message
“No records available!” will be displayed.
Tips for an
Accurate
Measurement
www.hannainst.com
Operational Guide
39
Page 40

Titrator GLP
Information
Press MENU then GLP (Good laboratory
Practice).
From this screen it is possible to select
ELECTRODE or the PUMP GLP.
Press PUMP to view the pump’s last
calibration date, time, and slope.
If a calibration hasn’t been performed,
the message “Not Calibrated” will be
displayed.
pH
Measurement
Operational Guide
40
The HI 84529 can be used as a pH meter for direct measurements.
Verify that the instrument has been calibrated before taking pH measurements.
Set the instrument to pH meter. From titrator mode press Meter until pH units
are displayed. If an electrode calibration hasn’t been performed, or the number of
days exceeds the calibration time out value set, the message “CAL DUE” will blink
on the left side of the display (see Calibration timeout option in Setup for details).
www.hannainst.com
Page 41

If CAL DUE is displayed perform an
electrode calibration.
Options:
Press MENU to access the instrument’s
menu.
Press HELP to view the contextual help
whenever time you need additional
information.
Press STIR to start/stop the stirrer.
Press TITRATOR to enter titration mode.
Press CAL to access the calibration menu.
Press LOG to save the current reading. A
message indicating the free log space will
be displayed for a few seconds.
In order to take pH measurements,
follow the next steps: Submerge the pH
electrode 2 cm (0.8’’) and the temperature
probe into the sample to be tested and
stir gently. Allow time for the electrode
to stabilize. When the reading becomes
stable, the (unstable measurement)
symbol will disappear.
If the pH reading is less than -2.00 pH or
greater than 16.00 pH, the closest fullscale value will be displayed blinking.
If measurements are taken successively
in dierent samples, it is recommended
to rinse the electrodes thoroughly with
deionized or distilled water and then
with some of the next sample to prevent
cross-contamination.
pH
Measurement
The pH measurements are aected by temperature. In order to have accurate
pH measurements, the temperature eect must be compensated for. To use the
Automatic Temperature Compensation (ATC) feature, connect and submerge
the HI 7662-T temperature probe into the sample as close as possible to the
electrode and wait for a few seconds. The “ATC” message will be shown on the
www.hannainst.com
Operational Guide
41
Page 42

pH
Measurement
display. Automatic Temperature Compensation will provide pH corrected values
for the measured temperature. If Manual Temperature Compensation (MTC) is
desired, the temperature probe must be disconnected from the instrument.
The default temperature of 25 °C (77 °F) or the last temperature reading will
be displayed, preceded by the symbol and the “MTC” message.
The temperature can be adjusted with the ARROW keys (from -20.0 to 120.0 °C).
View/Delete Titrator Recorded pH Data
To view or delete previously logged pH
records press MENU key while in pH
meter screen then RECALL to access the
meter logs.
A list of records is stored in the pH log.
When an external USB storage device is
connected, the Export key is displayed.
It saves the meter and titrator logs in two
text format les on the storage device.
If the saved mV/pH measurements are
out of range, the “<“ or “>” symbols are
displayed in front of the reading.
Press ESC to return to the previous screen
Operational Guide
42
If DELETE or DEL.ALL is pressed the
instrument will ask for conrmation.
Press YES to delete the record or NO to
return to the previous screen without
deleting. Deleting a single record will
renumber the list of records.
www.hannainst.com
Page 43

If the pH log is empty, the message “No
records available!” will be displayed.
pH
Measurement
The pH meter GLP screens displays the
last pH calibration data.
To view this information press MENU key
then GLP.
Press ELECTRODE to view information
regarding electrode calibration.
The following items are included in
electrode GLP: the time and date of the
last calibration,
oset, slope, electrode condition,
calibration timeout and the calibration
buers. The buers highlighted are from
the previous calibration. If a calibration
hasn’t been performed, the message
“Not Calibrated” will be displayed.
pH Meter
GLP
Information
www.hannainst.com
Operational Guide
43
Page 44

PC Interface
and Data
Transfer
Data stored on the meter with the LOG
function during mV measurement and
titrations can be transferred from the
meter to a USB stick using the Export
function from the log recall menu.Two
text les are transferred on the USB
stick. These les can be used for further
analysis on a PC. The logged data can
also be transferred from the instrument
to the PC using a USB cable.Connect the
USB cable and the following screen will
be displayed.
Press METER to generate the text le
with Meter log data.
Press TITRATOR to generate the text le
with Titrator log data.
Press PLOT to generate the text les with
Titration Plots.
The generated les are now visible and can be used for further analysis. If the
instrument has no logged Meter or Titrator records, the PC connected screen
is displayed.
Operational Guide
44
www.hannainst.com
Page 45

Storage Procedure
To assure a quick response time, the glass bulb should be kept moist and not
allowed to dry out. Replace the solution in the protective cap with a few drops
of HI 70300 or HI 80300 Storage Solution. The HI 5315 Reference may be
stored with its black cap and Fill hole covered. Rinse and rell before using.
Follow the Preparation Procedure on page 20 before taking measurements.
Periodic Maintenance
Inspect the electrodes and the cables. The cable used for connection to the
instrument must be intact and there must be no points of broken insulation
on the cable or cracks on the electrode stem or bulb. Connectors must be
perfectly clean and dry. If any scratches or cracks are present, replace the
electrode. Rinse o any salt deposits with distilled/deionized water.
pH Cleaning Procedure
General Soak in Hanna HI 7061 or HI 8061 General Cleaning
Solution for approximately ½ hour.
Milk deposits Soak in Hanna HI 70640 Cleaning Solution for milk
deposits for approximately ½ hour (pH half cell only).
Protein Soak in Hanna HI 7073 or HI 8073 Protein Cleaning
Solution for 15 minutes.
IMPORTANT: After performing any of the cleaning procedures, rinse the
electrode thoroughly with distilled or deionized water and soak the electrode
in HI 70300 or HI 80300 Storage Solution for at least 1 hour before taking
measurements.
Reference Electrode Cleaning
Drain the old ll solution, rinse with a few drops of HI 7072 solution, drain,
then rell with HI 7072 solution. Do not use an electrode if crystallized salts
are visible inside the electrode. Drain electrode, disassemble and rinse internal
body with deionized water. Reassemble and rell with fresh ll solution. The
internal chamber of this electrode is gell lled. If the electrode has been left dry
for long periods of time the gel may be dehydrated and stable measurements
may not be obtainable. Disassemble electrode and soak internal assembly in
HI 7072 ll solution. Verify the ceramic is wetted by the ll solution. Warming
the solution slightly (50°C) before soaking will hasten this process. Permit the
electrode to cool completely while immersed in this solution.
www.hannainst.com
Electrode
Conditioning
and
Maintenance
Maintenance
45
Page 46

Troubleshooting
Guide
Symptoms Problem Solution
Soak the electrode tip HI 70640
Slow response/excessive
drift.
Dirty pH or reference
electrode.
solution for 30 minutes and
follow the cleaning procedure.
Rell reference electrode with
new ll solution.
Reading uctuates up and
down (noise).
While in pH reading mode,
-2.00 or 16.00 pH is displayed
blinking.
The meter does not accept
the pH buer solution for
calibration.
The pump calibration can't be
performed.
The temperature probe is
connected, but the meter
displays "MTC".
Clogged/dirty junction.
Low electrolyte level
(reference electrode).
Cable connection.
Reading out of range.
Broken pH or reference
electrode.
Broken pump tubing.
Wrong or contaminated
pump calibration solution.
Broken pH electrodes.
Broken temperature
probe.
Clean the pH electrode. Rell
reference electrode with fresh ll
solution. Check cable connection
to meter and verify protective
cap is o.
Check cable connection to meter
and verify protective cap is o.
Check the quality of the sample.
Clean the electrodes. Rell with
fresh ll solution.
Follow the electrode cleaning
procedure. If the error persists
replace the electrode or contact
your local Hanna Representative.
Verify tubing, valve, syringe
are intact and solution passes
when pump is primed and no air
bubbles are present. Check the
pump calibration solution. Verify
electrodes are calibrated. Prepare
another standard, prime the
pump and restart the calibration.
Replace temperature probe.
46
Maintenance
www.hannainst.com
Page 47

Symptoms Problem Solution
After a titration the following
is displayed blinking: Low
Range: 0.20 %I.a., 8.9 °SH,
20.0 °D or 22.2 °TH. High
Range: 0.1 %l.a., 4.4 °SH, 10
°D or 11.1 °TH.
Broken electrode.
Instrument not
calibrated. Wrong sample.
Concentration out of
range.
Check/clean the electrodes.
Recalibrate the instrument
(pump and pH). Use care during
sample preparation. Check
sample size and permitted range.
Troubleshooting
Guide
At startup, the meter displays
the Hanna logo permanently.
"Error x" message is
displayed.
"Stirrer error" message is
displayed at the end of pump
calibration or titration.
Non-spinning stirrer icon
blinking in pH calibration and
meter mode.
"Pump error" message is
displayed.
At startup the meter displays
"Methods corrupted".
www.hannainst.com
One of the keys is stuck.
Internal error.
Check the stir bar and
beaker content.
Check the stir bar and
beaker content.
Check the tubing, valve
and syringe.
The method le was
corrupted.
Check the keyboard or contact
your local Hanna Representative.
Power o the meter and then
power it on again. If the error
persists, contact your local Hanna
Representative.
If the error persists, contact your
local Hanna Representative.
If the error persists, contact your
local Hanna Representative.
If the error persists, contact your
local Hanna Representative.
Contact your local Hanna
Representative.
Maintenance
47
Page 48

Specications
Titrator
Range
Resolution
Accuracy (@25ºC/77ºF)
Method
Principle
Sampl e Size LR 20
Sampl e Size LR 50
Sampl e Size HR 20
Pump speed
Stirring Speed
Logging Data
pH Meter
Range
Resolution
Accuracy (@25ºC/77ºF)
Calibration
Temperature Compensation
Logging Data
mV Meter
Range
Resolution
Accuracy
(Low Ra nge): %l.a.: 0.01 to 0 .20; ºSH: 0.4 to 8.9; º D: 1.0 to
20.0; ºTH : 1.1 to 22.2
(High Ra nge): %l.a.: 0.1 to 2 .0; ºSH: 4.4 to 88.9; ºD : 10 to 200;
ºTH: 11 .1 to 222.2
(Low Ra nge): %l.a.: 0.01 ; ºSH: 0.1; ºD: 0.1 ; ºTH: 0.1
(High Ra nge): %l.a.: 0.1 ; ºSH: 0.1; ºD: 1; º TH: 0.1
(Low Ra nge): ± 0.01 %l.a. (Hi gh Range): ± 0.1 %l. a.
Acid-base titration
Endpo int titra tion, 8.30 pH ad justabl e pH 8.1 - 8.4
20 mL or 20 g
50 mL or 50 g
20 mL or 20 g
10 mL/mi n
800 (Lo w Range) / 1000 (Hi gh Range)
up to 200 s amples (pH o r mV)
-2.0 to 16.0 pH / -2.0 0 to 16.00 pH
0.1 pH / 0.01 pH
±0.01 pH
one, t wo or three- point cali bration (p H 4.01, 6.00, 8.30,
10.01)
manua l or automat ic from -20 to 12 0°C (-4 to 248°F)
up to 50 s amples
-2000.0 to 2000.0 mV
0.1 mV
± 1.0 mV
48
Specications
www.hannainst.com
Page 49

Temperature
Range
Resolution
Accuracy
Additional Specifications
pH Electrode
Reference Electrode
Temperature Probe
Environment
Power Supply
Dimensions
Weight
Specications
-20.0 to 120 .0°C (-4.0 to 248.0°F)
0. 1°C
±0.4°C without probe error
FC 260B p H electro de with 1 m (3.3 ’) cable ( included) ,
HI 5315 re ference pr obe with 1 m (3 .3’) cabl e (include d)
HI 7662-M s tainless s teel tempe rature pr obe with 1 m (3 .3’)
cable (included)
0 to 50°C ( 32 to 122°F) ; RH max 95% non- condensi ng
12 VDC ad apter (inc luded)
235 x 200 x 1 50 mm (9.2 x 7.9 x 5.9”)
1.9 kg (67.0 oz.)
www.hannainst.com
Specications
49
Page 50

Accessories
Reagents
HI 84529 -50 Titran t solutio n for Low Ran ge 20 (120 ml)
HI 84529 -51 Ti trant sol ution for H igh Range 2 0 (120 ml)
HI 84529-52 Titr ant solut ion for Low Ra nge 50 (120 ml )
HI 84529 -55 Pump C alibratio n Standard ( 230 mL)
pH Calibration Solutions
HI 7004M Buf fer soluti on pH 4.01 (230 mL)
HI 7006 0M Buf fer soluti on pH 6.00 (230 mL)
HI 70083M Buf fer solut ion pH 8.30 (230 m L)
HI 7010M Buf fer soluti on pH 10.01 (230 mL)
Electrode Fill and Storage Solutions
HI 7072 Refere nce elec trode fil l soluti on (4 x 30 mL)
HI 70300 L El ectrode s torage s olution (50 0 mL)
Cleaning Solution
HI 70640L Cle aning solu tion for re maining milk d eposits (5 00 mL)
HI 70641 L Cle aning and dis infecti ng for dair y product s (500 mL)
HI 7064 2L Clean ing soluti on for remai ning chees e deposit s (500 mL)
HI 7077L Electr ode clean ing solut ion for oil s (500 mL)
50
Accessories
www.hannainst.com
Page 51

Electrodes
FC 260B pH electrode
HI 5315 Reference electrode
HI 7662-M Temperature probe
Other Accessories
HI 7050 0 Tube s et with cap f or titran t bottle, t ip and valve
HI 71005/8 1 15 Vac to 12 Vdc, 80 0 mA
HI 71006/8 2 30 Vac to 12 Vdc, 80 0 mA
HI 731319 Stir bar, 25 x 7 mm (10 p cs.)
HI 740036P 100 mL B eaker (10 pcs .)
HI 74 003 7P 20 mL Bea ker (10 pcs.)
HI 740236 5 mL syringe f or minitit rator
HI 920013 P C Connection Cable
Accessories
www.hannainst.com
Accessories
51
Page 52

Warranty
HI 84529 is guaranteed for two years against defects in workmanship and
materials when used for it’s intended purpose and maintained according
to instructions. Electrodes and probes are guaranteed for six months. This
warranty is limited to repair or replacement free of charge. Damage due
to accidents, misuse, tampering or lack of prescribed maintenance is not
covered. If service is required, contact your local Hanna Representative from
whom you purchased the instrument. If under warranty, report the model
number, date of purchase, serial number and the nature of the problem. If
the repair is not covered by the warranty, you will be notied of the charges
incurred. If the instrument is to be returned to Hanna Instruments, rst
obtain a Returned Goods Authorization number from the Technical Service
department and then send it with shipping costs prepaid. When shipping
any instrument, make sure it is properly packed for complete protection. To
validate your warranty, ll out and return the enclosed warranty card within
14 days from the date of purchase.
52
Warranty
Hanna Instruments reserves the right to modify the design, construction or appearance of its products
without advance notice.
www.hannainst.com
Page 53

Notes
www.hannainst.com
Warranty
53
Page 54

contacts
World
Headquarters
Local Oce
Hanna Instruments Inc.
Highland Industrial Park
584 Park East Drive
Woonsocket, RI 02895
www.Hannainst.com
Hanna Instruments USA
270 George Washington Highway
Smitheld, RI 02917
Phone: 800.426.6287
Fax: 401.765.7575
e-mail: tech@Hannainst.com
Printed in USA MAN84500 3/13
 Loading...