

Page 1
Instruction Manual
C 125
Portable Limpidity Meter
for Rosè & White Wine
www.hannainst.com
1
Page 2

2
Page 3

Dear Customer,
Thank you for choosing a Hanna product.
Please read this instruction manual carefully before using the meter. This
manual will provide you with the necessary information for a correct use.
If you need additional technical information, do not hesitate to e-mail us at
tech@hannainst.com or contact your nearest technical office.
This instrument is in compliance with the directives.
WARRANTY
All Hanna Instruments meters are warranted for two years against defects in
workmanship and materials when used for their intended purpose and maintained
according to instructions.
This warranty is limited to repair or replacement free of charge. Damage due to
accidents, misuse, tampering or lack of prescribed maintenance are not covered.
If service is required, contact the dealer from whom you purchased the instrument.
If under warranty, report the model number, date of purchase, serial number and
the nature of the problem. If the repair is not covered by the warranty, you will be
notified of the charges incurred. If the instrument is to be returned to Hanna
Instruments, first obtain a Returned Goods Authorization number from the Customer
Service department and then send it with shipping costs prepaid.
When shipping any instrument, make sure it is properly packaged for complete
protection.
TABLE OF CONTENTS
Preliminary examination .............................................................. 4
Principle of operation ................................................................... 4
General description ...................................................................... 5
Functional description .................................................................. 6
Specifications ................................................................................7
Operational guide .......................................................................8
Calibration................................................................................. 10
Tips for accurate operation ......................................................... 12
Battery replacement ..................................................................13
Accessories .................................................................................. 14
CE Declaration of Conformity ....................................................... 15
3
Page 4

PRELIMINARY EXAMINATION
Remove the instrument from the packing material and examine it to make sure that
no damage has occurred during shipping. If there is any damage, notify your Dealer.
C125 is supplied complete with:
• Glass Cuvette & Cap (2 pcs.)
• Calibration solutions HI93703-0, HI93703-10 and HI93703-5
• Tissue for wiping cuvettes (HI731318)
• 1.5V AA alkaline batteries (4 pcs.)
• Instruction manual
• Rugged carrying case
Note: Save all packing material until you are sure that the meter functions
correctly. All defective items must be returned in its original packaging
with the supplied accessories.
PRINCIPLE OF OPERATION
C125 has been designed to perform measurements according to the ISO 7027
International Standard.
The instrument functions by passing a beam of infrared light through a vial
containing the sample being measured.
The light source is a High Emission Infrared LED with a wavelength peaking at 890
nm, ensuring that the interference caused by colored samples is minimum.
A sensor, positioned at 90° with respect to the direction of light, detects the amount
of light scattered by the undissolved particles present in the sample.
The microprocessor converts such readings into FTU (=FNU) values.
4
Page 5

GENERAL DESCRIPTION
C125 is a portable, microprocessor-based limpidity meter, especially designed for
application in wine making process for white and rosè wines.
Wine limpidity, like all other liquids, is determined by suspended small particles that
deviate the light beams.
During wine making process, the wine turbidity can be caused by several
phenomena, which can reduce the limpidity degree and render the product not
appreciable for the consumer.
A reduced wine limpidity often goes together with unpleasant fragrance and flavor.
The most common causes of wine turbidity are:
• salts (salts of tartaric acid, calcium, iron and copper)
• enzymes
• colloids (proteins, polyphenols)
• biological factors
For preventing turbidity, the wine can be treated with particular additives which
act as wine limpidity stabilizers for long time.
During wine production the limpidity is measured on three critical steps:
1. Alcoholic fermentation: expected value is below 600 FTU
2. Malolactic fermentation: expected value is below 100 FTU
3. Filtration: expected value is within the 0.3 to 0.5 FTU range
Normally the limpidity value for bottled wine should not be greater than 4.00 FTU.
The below table gives a correspondence between limpidity values and product
appearance:
Limpidity value (FTU) Appearance
0.10 to 0.50 Very limpid
0.50 to 1.00 Limpid
1.00 to 1.80 Slightly blurred
1.80 to 3.00 Blurred
3.00 to 4.00 Opalescent
> 4.00 Cloudy
5
Page 6

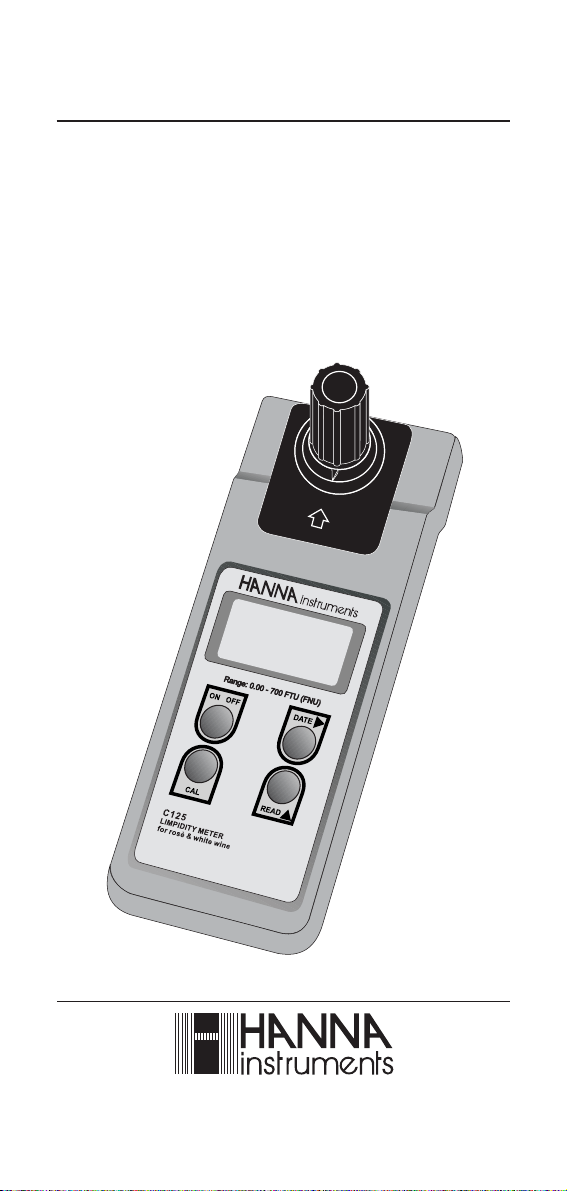
FUNCTIONAL DESCRIPTION
1) Measurement cell
2) Liquid Crystal Display
3) ON/OFF key, to switch the meter ON and OFF
4) CAL key, to enter the calibration mode
5) READ/ key, to perform measurements and to set the date (day & month)
of last calibration
6) DATE/ key, to display the last calibration date and to select either the
month or the day of last calibration
6
Page 7

SPECIFICATIONS
Range 0.00 to 50.00 FTU (FNU)
50 to 700 FTU (FNU)
Resolution 0.01 and 1 FTU (FNU)
Accuracy ±5% full scale (0 to 10 FTU)
±10% full scale (10 to 50 FTU)
±5% full scale (50 to 700 FTU)
Typical EMC Deviation ±2% full scale
Light Source IR LED @890 nm
Light Source Life Life of the instrument
Light Detector Silicon Photocell
Power Source 4 x 1.5V AA alkaline batteries
Battery Life 60 hours or 900 measurements
Auto-off After 5 minutes of non-use
Environment 0 to 50°C (32 to 122°F);
95% RH (non-condensing)
Dimensions 220 x 82 x 66 mm (8.7 x 3.2 x 2.6")
Weight 510 g (18 oz.)
7
Page 8

OPERATIONAL GUIDE
The instrument is supplied complete with batteries. Before starting operations, install
the batteries while paying attention to their polarity (see also “Battery Replacement”
section). To maximize the battery life the meter automatically switches off after 5
minutes of non-use. For reactivating it, simply press the ON/OFF key.
TAKING MEASUREMENTS
• Turn the meter ON by pressing the ON/OFF key.
• At start-up the meter will show the full display for
a few seconds, then changes to the measurement
mode.
• When the LCD displays “-- --” the meter is ready
to measure.
• Fill a clean cuvette up to 0.5 cm (one quarter inch)
from its rim with the thoroughly agitated sample.
• Allow sufficient time for bubbles to escape before securing the cap.
Note: Do not over-tighten the cap.
• Wipe the cuvette thoroughly with a lint-free tissue
(HI731318) before inserting into the measurement cell.
The cuvette must be completely free of fingerprints
and other oil or dirt, particularly in the area where
the light goes through (approximately the bottom 2 cm/1 inch of the cuvette).
• Place the cuvette into the cell and check that the
notch on the cap is positioned securely into the
groove.
• The mark on the cuvette cap should point towards
the LCD.
8
Page 9

• Press the READ/ key and the LCD will display a blinking “SIP” (Sampling
In Progress). The limpidity value will appear after approximately 25 seconds.
SOURCES OF INTERFERENCE
• Presence of floating debris and coarse sediment which settle out rapidly will give
false readings.
• The infrared light source used for C125 limpidity meter can effectively minimize
errors due to coloured dissolved substances. This effect, named “true colour”,
is a common interference for most commercially available instruments operating
in the range of visible light.
• Air bubbles and the effect of vibrations that disturb the surface of the sample
will give false results.
• Dirty glassware could also affect readings along with scratched or edged cuvette.
9
Page 10

CALIBRATION
If repeated measurements differ more than an acceptable value, check if the meter
calibration status by measuring a standard solution.
Anyway, it is recommended to perform a monthly calibration of the meter, or more
frequently for greatest accuracy.
To check the date of last calibration, press and hold the DATE/ key down for few
seconds.
CALIBRATION PROCEDURE
• Turn the meter on and wait for the
display to show “----”.
• Press the CAL key once, the “CAL”
message will blink on the display for
about 6 seconds, then the calibration
mode stops.
• While the “CAL” message is still blinking, press CAL again. The instrument is
now in the calibration mode and a “CL” will appear on the lower part of the
display.
The date of calibration can be edited
now by simply pressing the DATE/
key. To scroll to the correct number press
the READ/ key.
The first blinking parameter is the month, on the left hand of the display
(MM.DD).
• To confirm the displayed data values
and to go to the next step, press the
CAL key once. A blinking “ZERO” message will appear.
• Fill the measurement cuvette with HI 93703-0
standard (@ ZERO FTU, or turbidity-free water).
Note: In order to minimize any error introduced by the
cuvette, it is recommended to use the same cuvette during calibration and for
measurements.
• Insert the cuvette with the ZERO FTU
standard solution (or turbidity-free
dilution water) into the measurement
cell and press the CAL key.
10
Page 11

“SIP” and “CL” will start blinking.
After approximately 50 seconds the instrument
will ask for the HI 93703-10 standard solution
(10 FTU) by displaying “10.0”.
• Fill the cuvette the HI93703-10 standard, insert into the measurement cell and
press the CAL key again.
• After the second calibration point (10 FTU) has
been accepted, the meter will display “500”,
asking for the 500 FTU solution to be placed
in the cuvette holder.
Note: At this point the user can exit the calibration mode and save the two-point
calibration by pressing READ.
• To perform a three-point calibration, place a cuvette filled with HI93703-5
standard solution (500 FTU) in the cuvette holder.
• Press the CAL key. “SIP” and “CL” will start blinking.
• After approximately 30 seconds, the display
will show “----”.
Now the meter is calibrated and ready for use.
Note: If “Err1” is displayed, the calibration data
are maintained
STANDARD SUSPENSION
Hanna Instruments supplies C125 with the AMCO-AEPA-1 standards which has a
long shelf life at all concentrations (approximately six months, if free from
contamination). In addition, no special handling or disposal is required and a much
higher stability of suspended particles has been observed.
On the other hand, the formazine-based standards are very toxic, carcinogen and
unstable (particles flocculate and settle quickly). Lower concentrations change value
within a few days or hours after dilution from stock solutions.
The consistency of C125 readings by using both standards has been separately
established by Advanced Polymer Systems and Hanna Instruments.
Additional documentation about the formazine standard and more complex
calibration procedures is available upon request.
11
Page 12

VIEWING THE CALIBRATION DATE
• Turn the meter on and wait for the
display to show “----”.
• Press and hold the DATE/ key
and a “MM.DD” message appears
while the key is held.
Note: The displayed date is the date entered by the user at the beginning of the
last calibration.
TIPS FOR ACCURATE OPERATION
The instructions listed below should be carefully followed during testing and during
calibration.
• All glassware that comes into contact with standards should be maintained
clean. Wash with HI93703-50 cleaning solution and rinse with HI93703-0
or turbidity free water.
• For consistent readings, it is recommended to perform measurement immediately
after collecting sample.
• To obtain a representative sample, gently mix the liquid before samples are
taken. Do not shake (to prevent air bubbles) and do not let the sample settle.
• Rinse the cuvette twice with 5 ml of the liquid to be tested for removing the effect
of dust or any previous liquid. Gently pour the liquid down the side of the cuvette
to reduce air bubbles.
• Try to tighten the cuvette cap always to the same degree.
• Before inserting the cuvette into the instrument, wipe it with soft, lint-free tissue.
Handle cuvettes so that no fingerprints can get on the areas where light passes
(approximately 2 cm/1 inch from the bottom of the cuvette).
• Discard the sample soon after the reading is taken to avoid permanently clouding
the glass.
If any problem is experienced during measurements, please contact your dealer or
the nearest Hanna Instruments Customer Service Department.
12
Page 13

BATTERY REPLACEMENT
In order to minimize the battery consumption, the meter is equipped with an autoshut off function which switches the meter off after 5 minutes of non-use.
The meter is powered by 4 alkaline batteries (1.5V AA), which are constantly
monitored by the meter to ensure reliable readings.
A "LO BAT" indication will appear on the display
when the batteries become weak and require
replacement; the instrument can perform only 50
more measurements.
A "-BA-" message will appear on the display when
the batteries level is too low for performing measurements; the message appears for a few seconds, then
the meter automatically shuts off; immediately
replace the batteries.
Battery replacement must only take place in a non
hazardous area using 4 alkaline batteries, 1.5V AA
size.
Turn the meter off, unscrew the 2 screws on the back
of the instrument and remove the battery cover.
Substitute the rundown batteries with new ones,
while paying attention to their polarity. Reattach
the battery cover and tighten the 2 screws.
13
Page 14

ACCESSORIES
HI731313 Maintenance kit: rugged carrying case with HI93703-0
and HI93703-10 calibration solutions, HI93703-50
cleaning solution, tissue for wiping cuvettes and 2
measurement cuvettes
HI 731318 Tissue for wiping cuvettes (4 pcs)
HI731321 Spare measurement cuvettes (4 pcs)
HI93703-0 Calibration solution, standard AMCO-AEPA-1 at 0 FTU,
30 mL bottle
HI93703-10 Calibration solution, standard AMCO-AEPA-1 at 10 FTU,
30 mL bottle
HI93703-5 Calibration solution, standard AMCO-AEPA-1 at 500 FTU,
30 mL bottle
HI93703-50 Cleaning solution, 230 mL bottle
Recommendations for Users
Before using this product, make sure that it is entirely suitable for the environment in which it is used.
Operation of this instrument in residential area could cause unacceptable interferences to radio and TV equipments,
requiring the operator to take all necessary steps to correct interferences.
Any variation introduced by the user to the supplied equipment may degrade the instrument's EMC performance.
To avoid electrical shock, do not use this instrument when voltages at the measurement surface exceed 24VAC or
60VDC.
To avoid damages or burns, do not perform any measurement in microwave ovens.
Hanna Instruments reserves the right to modify the design, construction and
appearance of its products without advance notice.
14
Page 15

CE DECLARATION OF CONFORMITY
15
Page 16

SALES AND TECHNICAL SERVICE CONTACTS
Australia:
Tel. (03) 9769.0666 • Fax (03) 9769.0699
China:
Tel. (10) 88570068 • Fax (10) 88570060
Egypt:
Tel. & Fax (02) 2758.683
Germany:
Tel. (07851) 9129-0 • Fax (07851) 9129-99
Greece:
Tel. (210) 823.5192 • Fax (210) 884.0210
Indonesia:
Tel. (21) 4584.2941 • Fax (21) 4584.2942
Japan:
Tel. (03) 3258.9565 • Fax (03) 3258.9567
Korea:
Tel. (02) 2278.5147 • Fax (02) 2264.1729
Malaysia:
Tel. (603) 5638.9940 • Fax (603) 5638.9829
Singapore:
Tel. 6296.7118 • Fax 6291.6906
South Africa:
Tel. (011) 615.6076 • Fax (011) 615.8582
Taiwan:
Tel. 886.2.2739.3014 • Fax 886.2.2739.2983
Thailand:
Tel. (2) 619.0285 • Fax (2) 619.0284
United Kingdom:
Tel. (01525) 850.855 • Fax (01525) 853.668
USA:
Tel. (401) 765.7500 • Fax (401) 765.7575
For e-mail contacts and complete list of Sales and Technical
offices, please see www.hannainst.com
MANC125 06/04
16
 Loading...