

Page 1
Quick Guide
Validation / Calibration
Incyte
Page 2

Validation/Calibration Incyte – Quick Guide
3
Intended Use
The Incyte Sensor Unit is designed to measure permittivity in a liquid
medium. The permittivity may be correlated to the viable cell density. Incyte
also measures conductivity. The measurement may be used for the control
of bioprocess within the defined specifications (please see the Cell Density
Monitoring Operating Instructions, Chapter 16).
About this Quick Guide
The Quick Guide will help the users to validate and calibrate the Incyte Unit.
Every 6 months of running time a verification of the sensor calibration is requested. Calibration of a Sensor Unit is required if the Sensor Unit verification
did not pass successfully or, if a new sensor respectively a new pre-amplifier
is connected to an existing counterpart. The Quick Guide does not replace
the Operating Instructions, which are available at www.hamiltoncompany.com.
All further information such as Liability, the Safety Precautions, Disposal
Instructions and the Operation description are available in the Operating
Instructions.
ATTENTION! Complete Instructions are available in the Cell
Density Monitoring System Operating Instructions, Ref 624702.
1 Hardware Compatibility
ATTENTION! Fogale devices are only par tially compatible
with Hamilton products.
Please do not combine Hamilton labelled Pre-Amplifier and sensors with a
Control Unit having a software version below 3.0.
Evo200 and ibiomass cannot be updated with the current Hamilton
Software.
2 Mount the Incyte Unit
1. Align the pins of the M12 connector and connect the Pre-amplifier to
the Arc View Controller using the Sensor Unit Cable.
2. Verify that the sensor’s male VP connector and the Pre-amplifier’s
female VP connector are dry and clean.
3. Align the sensor VP head and the Pre-amplifier connector and connect
the Sensor in the Pre-amplifier.
4. Hand-tighten the connecting nut of the Pre-amplifier’s VP Connector
to ensure a robust and waterproof seal.
HAMILTON WARRANTY
Please refer to the General Terms of Sales (GTS).
IMPORTANT NOTE
Copyright © 2017 Hamilton Bonaduz AG, Bonaduz Switzerland. All rights
reser ved. The reproduction of any part of this document in any form is
forbidden without the express written agreement of Hamilton Bonaduz AG.
Contents of this manual can be modified without previous announcement.
Technical modifications reser ved. Greatest possible care was used on the
correctness of the information in this manual. If errors should be discovered
nevertheless, Hamilton Bonaduz AG is pleased to be informed about it.
Regardless of this, Hamilton Bonaduz AG cannot assume liabilit y for any
errors in this manual or for their consequences.
Page 3
Validation/Calibration Incyte – Quick Guide
5
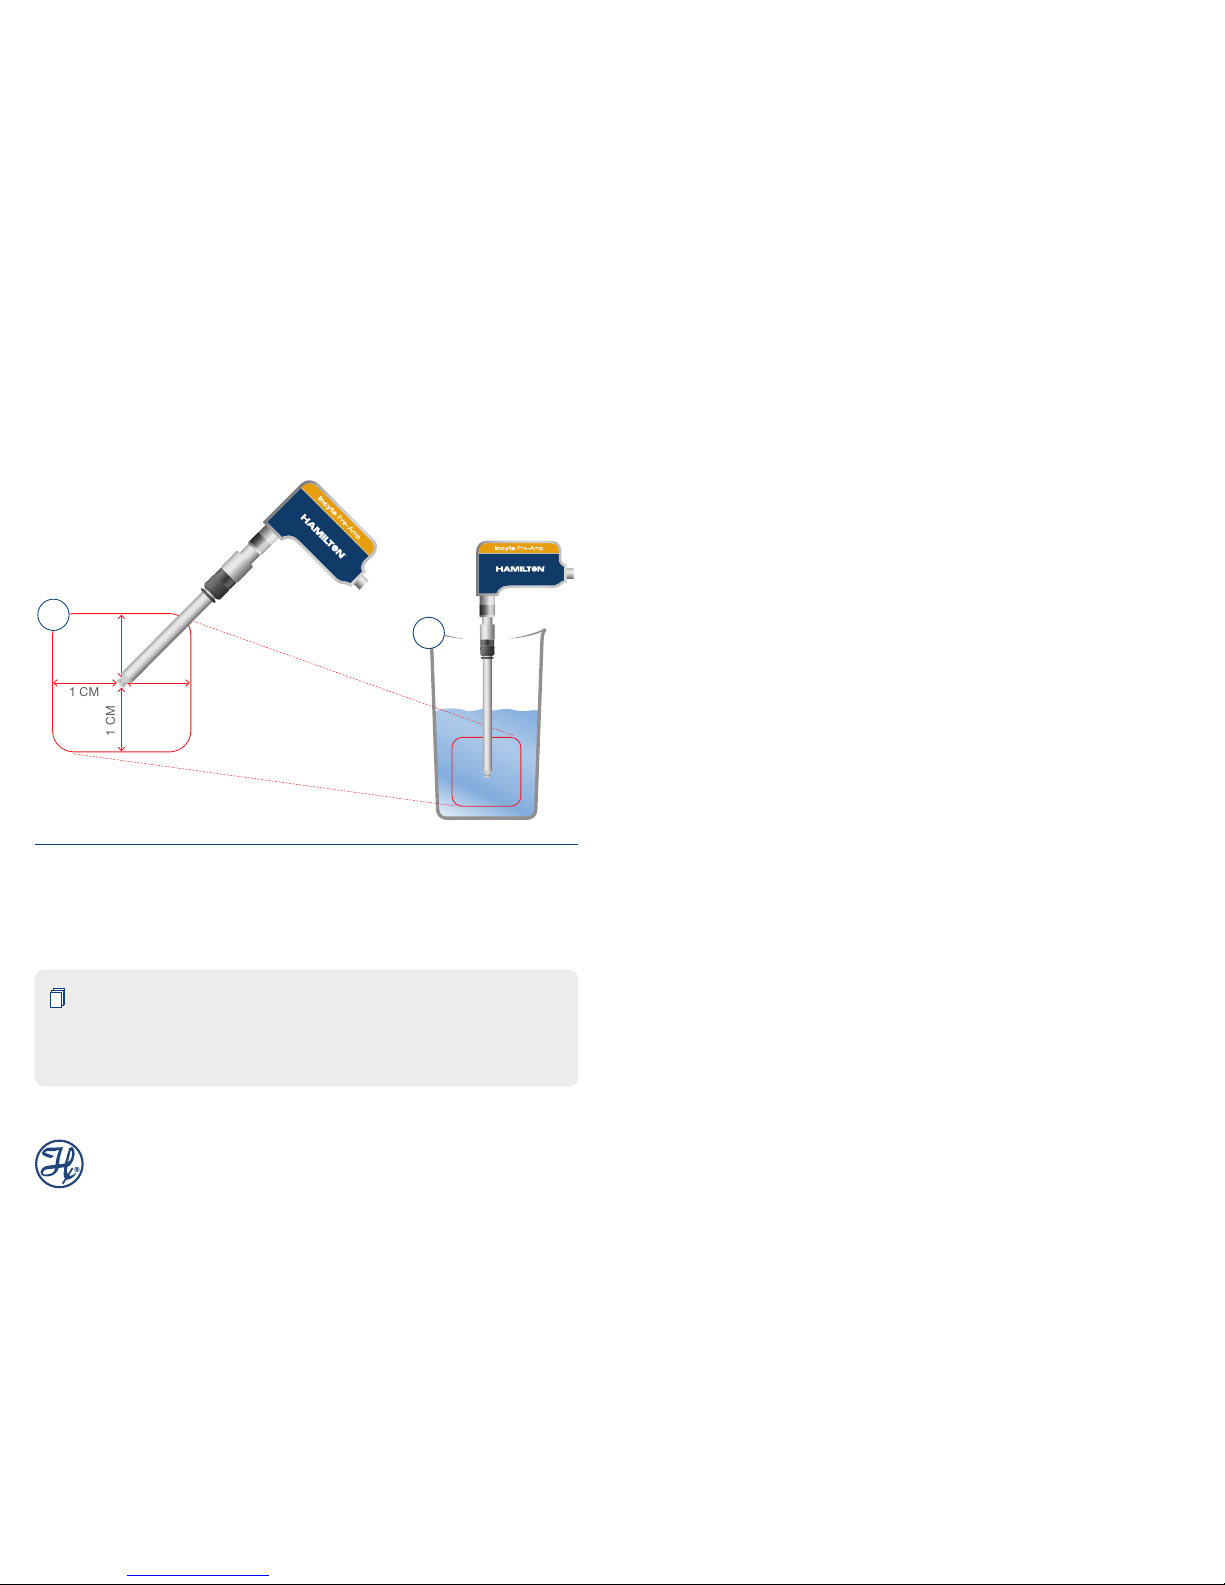
5. Mount the Unit in a stand and place in a 500 mL beaker (Figure 1). Select
the most appropriate position for the sensor. The electrodes of the
Incyte sensor have to be kept at least 1 cm away from the beaker wall.
1 CM
1 CM
A
B
Figure 1: Mounting restrictions, A: Space requirements / B: Reactor mounting restrictions.
3 Verify the Incyte Sensor Unit
NOTE: The Capacitance Simulator (Ref 243743) and Hamilton
12880 μS/cm Conductivity Standard (Ref 238988), formerly called
Solution A, as well as a thermometer are needed to perform the
Sensor Unit Verification.
1. Connect the Incyte Unit and power on the Arc View Controller and equili brate for at least 30 minutes prior to starting the Verification Procedure.
2. Go to the Main Menu and enter the Calibration Menu. Select the
Validation / Check Unit Calibration to start the Verification Procedure.
3. Select the channel. The sensor type is automatically detected.
4. Enter the user name.
5. Connect the Capacitance Simulator and press Test Pre-amplifier
Calibration to start the Verification Procedure. The successful
verification is indicated. If this procedure fails it is recommended
to perform a calibration.
6. Connect the Incyte Sensor to the Pre-amplifier.
7. Select the Manual temperature correction mode. The Automatic
mode is disabled.
8. Pour Hamilton 12880 μS/cm Conductivity Standard in a clean beaker.
Make sure the sensor mounting instructions are followed.
9. Measure the temperature of the Standard with an external thermometer.
Enter the conductivity value according to the temperature correction
table on the bottle of the Conductivity Standard.
10. Press Test Sensor Calibration to start the Verification. The successful
Verification is indicated. If this procedure fails it is recommended to
perform a calibration.
4 Calibrate the Incyte Sensor Unit
The Calibration procedure of an Incyte Sensor Unit is a five-step guided
procedure. It takes about an hour to perform this procedure.
Page 4
Validation/Calibration Incyte – Quick Guide
7
ATTENTION! Do not disconnect the Unit from the Arc View
Controller, or the Sensor from the Pre-amplifier during the
Calibration procedure.
NOTE: Make sure to prepare following equipment in addition to the
Val/Cal Kit: stirrer-plate, thermometer
1. Connect the Unit and power on the Arc View Controller and equilibrate
for at least 30 minutes prior to starting the Calibration procedure.
2. Go to the Main Menu and enter the Calibration Menu. Select Calibrate
Unit to star t the Calibration procedure.
3. Select the channel. The sensor type is automatically detected.
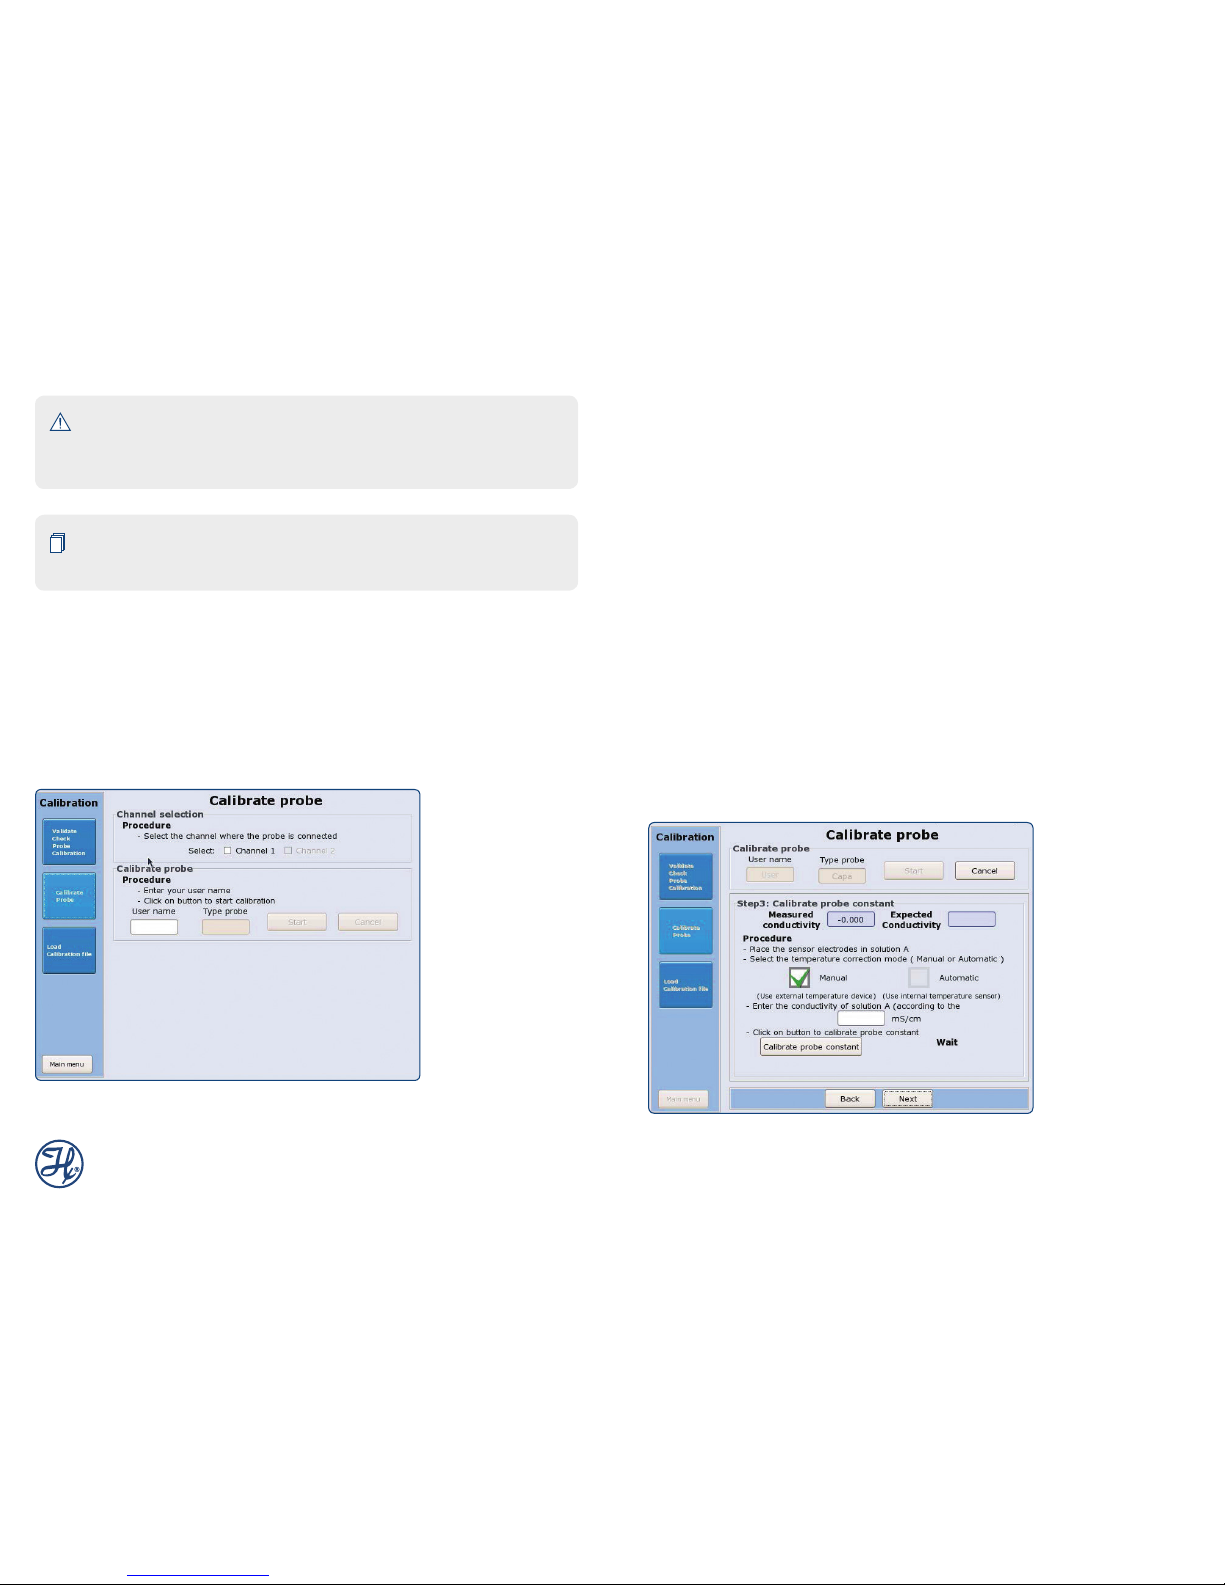
4. Enter the user name and press start (Figure 2).
Figure 2: Start of the sensor unit calibration.
5. Connect the Capacitance Simulator and press Test Pre-amplifier
Calibration to start the Calibration procedure. The successful test is
indicated. If this procedure fails it is recommended to contact the local
representative.
6. Replace the Simulator by the Incyte Sensor and Press measure in air to
calibrate at zero conductivity. If this procedure fails it is recommended
to contact the local representative.
7. Select Manual temperature correction mode. The Automatic mode is
disabled.
8. Pour Hamilton 12880 μS/cm Conductivity Standard in a clean beaker.
Make sure the sensor mounting instructions are followed.
9. Measure the temperature of the Standard with an external thermometer.
Enter the conductivity value according to the temperature correction
table on the bottle of the Conductivity Standard.
10. Press Calibrate sensor constant to start the Calibration (Figure 3).
The successful Calibration is indicated. If this procedure fails it is
recommended to contact the local representative.
Figure 3: Calibration of
the Sensor Constant.
Page 5
Validation/Calibration Incyte – Quick Guide
9
11. Rinse the Sensor with deionized water.
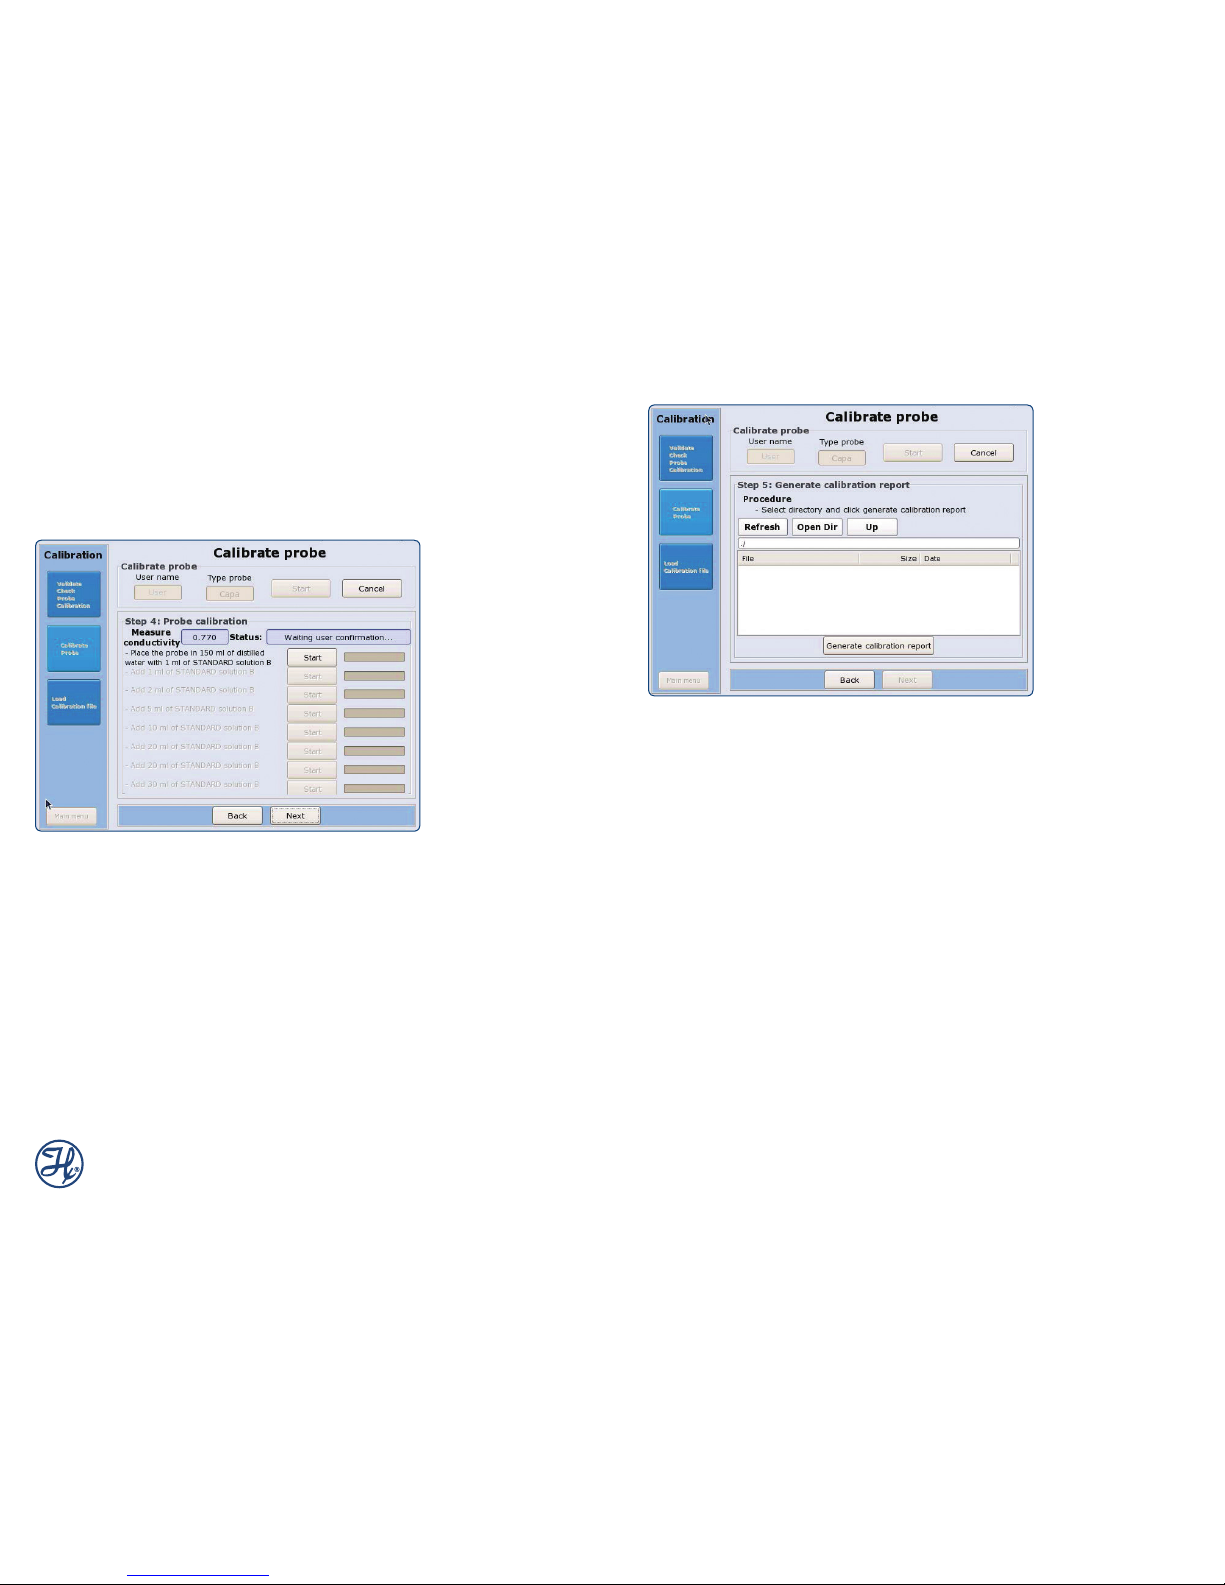
12. Pour 150 mL deionized water in a clean beaker. In the following steps
1 to 30 mL of Solution B is added gradually to the deionized water.
Press start (Figure 4).
13. Add the required amount of Solution B. Press Star t.
Figure 4: In cyte Se nsor Ca libration.
15. The successful Calibration is indicated. If this procedure fails it is
recommended to contact the local representative.
16. Choose the directory, where the Calibration Report should be stored
and press Generate Calibration Report (Figure 5). The valid calibration
is automatically saved in the memory of the Pre-amplifier.
Figure 5: Generation of a Ca libration Re port.
Page 6

Validation/Calibration Incyte – Quick Guide
11
Page 7

© 2017 Hamilton Bonaduz AG. All rights reserved.
624859/02 — 06/2017
Web: www.hamiltoncompany.com
USA: 800-648-5950
Europe: +41-58-610-10-10
Hamilton Americas & Pacific Rim
4970 Energy Way
Reno, Nevada 89502 USA
Tel: +1-775-858-3000
Fax: +1-775-856-7259
[email protected]
Hamilton Europe, Asia & Africa
Via Crusch 8
CH-7402 Bonaduz, Switzerland
Tel: +41-58- 610-10-10
Fax: +41-58-610-00-10
[email protected]
To find a representative
in your area, please visit
www.hamiltoncompany.com.
This guide may be available in other languages.
Visit www.hamiltoncompany.com for more information.
 Loading...