

Page 1
00055105-11.04
hama@hama.de
www.hama.de
Fax +49 (0)9091 /502-274
Tel. +49 (0) 90 91/502-0
www.hama.de
86651 Monheim/Germany
Hama GmbH & Co KG
Postfach 80
Digitale Fotolijst
Cadre Photo Numérique
Digital Picture Frame
Digitaler Bilderrahmen
00055105
Page 2

Inhaltsverzeichnis
VORSICHTSMASSNAHMEN UND WARTUNG........... 5
EINLEGEN VON SPEICHERKARTEN............................. 7
ANZEIGEN VON BILDERN..............................................8
POSITIONEN DER FUNKTIONSTASTEN......................9
EINLEGEN UND ERSETZEN DER BATTERIE................9
WIEDERGABE VON MP3-MUSIKDATEIEN................10
ABSPIELEN VON VIDEOS.............................................10
ANZEIGEN DER DATEISTRUKTUR..............................11
TV-ANSCHLUSS.............................................................11
ANSCHLIESSEN VON LAUTSPRECHERN..................12
WANDBEFESTIGUNG DES DIGITALEN
BILDERRAHMENS.........................................................12
ERWEITERTE EINSTELLUNGEN..................................13
WIEDERGABE VON BILDERN MIT MP3-MUSIK......13
EINSTELLUNGSMENÜ..................................................13
ERSTE SCHRITTE.............................................................6
FUNKTIONEN....................................................................4
l Digitaler Bilderrahmen Bedienungsanleitung
2
ABMESSUNGEN UND GEWICHTE............................. 18
BETRIEBSBEDINGUNGEN...........................................18
TECHNISCHE DATEN....................................................18
PRÜFZEICHEN/NORMEN..............................................18
FEHLERBEHEBUNG.......................................................15
FRAGEN UND ANTWORTEN....................................... 16
OSD LANG..................................................................14
Default (Standardeinstellungen)............................ 14
Referenzen......................................................................14
TV Ty pe (TV-Format).................................................14
Video Output..............................................................14
Movie Setup (Filmwiedergabe einrichten)..............14
Interval Time (Intervallzeit)......................................14
Repeat Mode (Wiederholmodus)...........................14
Tr ansition (Übergangseffekt).................................. 14
Der digitale Bilderrahmen unterstützt folgende gängige Speicherkartenformate: SD™, MultiMedia
Card™, SmartMedia®, CompactFlash®, Microdrive™, Memory Stick® und Memory Stick PRO®.
Slideshow Setup (Diashow einrichten)....................13
Slideshow Mode (Diashow-Modus)......................13
Folder Repeat (Ordner-Wiederholung)..................14
Interval Time (Intervallzeit)......................................14
Auswahl stehen, sowie einzelne Bilder anzeigen. Dazu ist weder ein Computer noch eine digitale
Kamera oder eine Internet-Verbindung erforderlich.
Kamera anzeigen. Sie können eine Diashow abrufen, für die verschiedene Übergangseffekte zur
Music Setup (Musikwiedergabe einrichten).......... 13
Repeat Mode (Wiederholmodus)...........................13
santen und praktischen Funktionen Ihres digitalen Bilderrahmens.
Mit dem digitalen Bilderrahmen können Sie digitale Fotos direkt von der Speicherkarte Ihrer
ren Sie sie zum späteren Nachschlagen auf. Diese Anleitung erläutert Ihnen die vielen interes-
Photo Setup (Bildwiedergabe einrichten)...............13
Thumbnail Digest......................................................13
Tr ansition Mode (Übergangsmodus).....................13
Herzlichen Glückwunsch zum Kauf dieses digitalen Bilderrahmens.
Lesen Sie sich vor der Inbetriebnahme des Geräts diese Anleitung sorgfältig durch, und bewah-
Einführung
3
Page 3

*Bei Speicherkarten mit geringen Übertragungsgeschwindigkeiten werden Video-Dateien mögli-
cherweise nicht ordnungsgemäß wiedergegeben.
4
•Diashow mit MP3-Wiedergabe als Hintergrundmusik.
•Benutzerfreundliches Bildschirmmenü zum bequemen Zugriff auf alle Funktionen.
•Heller 5,6-Zoll-TFT-Active-Matrix-LCD-Bildschirm.
•Automatische Diashow mit mehreren Übergangseffekten und einstellbarer Anzeigedauer.
•Unterstützung von JPEG-Fotos und JPEG-Videodateien der gängigsten digitalen Kameras.
•Mit Fernbedienung im Kreditkartenformat
•Direkte Wiedergabe von MPEG-II-Dateien auf unterstützten Compact Flash-Karten (CF)*.
•Unterstützung von Bilddateien im JPEG-Format mit einer Größe von bis zu 12 Megapixel.
•Direkte Wiedergabe von MP3-Musikdateien über die integrierten Lautsprecher.
•Direkte Wiedergabe von MPEG-I-Dateien auf unterstützten Speicherkarten*.
Compact Flash (CF).
•Der Bilderrahmen unterstützt Speicherkarten des Ty ps Secure Digital Card (SD),
MultiMedia Card (MMC), SmartMedia, Memory Stick, Memory Stick Pro, Microdrive und
•Legen Sie einfach eine unterstützte Speicherkarte in den digitalen Bilderrahmen ein, um
Ihre Fotos anzuzeigen, MP3-Stücke abzuspielen oder unterstützte Videodateien
wiederzugeben (Speicherkarte nicht im Lieferumfang enthalten).
Funktionen
•Anzeige von digitalen Bildern (JPEG) ohne Computer.
Kapitel 1
•Wenn Sie ein handelsübliches LCD-Reinigungskit verwenden, dürfen Sie die
Reinigungsflüssigkeit nicht direkt auf den LCD-Bildschirm aufbringen. Befeuchten Sie ein
Reinigungstuch mit der Flüssigkeit, und reinigen Sie damit den Bildschirm.
5
•Wenn der LCD-Bildschirm durch Fingerabdrücke oder Staub verschmutzt ist, reinigen Sie
Bilderrahmens ist aus Glas und kann daher leicht zerkratzen oder brechen.
ihn mit einem weichen, fusselfreien Tu ch (beispielsweise mit einem Reinigungstuch für
Kameralinsen).
Reinigung des LCD-Bildschirms
•Gehen Sie mit dem Bildschirm stets vorsichtig um. Der Bildschirm des digitalen
•Der digitale Bilderrahmen darf keiner Kondensationsfeuchtigkeit ausgesetzt werden.
die Gefahr von Stromschlägen. Das Öffnen des Gehäuses führt zum Erlöschen der Garantie.
•Das Gehäuse des digitalen Bilderrahmens darf nicht geöffnet werden. Andernfalls besteht
Speicherkarten herauszunehmen.
•Betätigen Sie stets die Auswurftasten an den Speicherkartenaufnahmen, um
Sonneneinstrahlung kann das Gerät beschädigen.
•Setzen Sie den digitalen Bilderrahmen keinem direkten Sonnenlicht aus. Direkte
•Die Belüftungsöffnungen an der Geräterückseite dürfen nicht blockiert werden.
Feuchtigkeit ausgesetzt werden.
•Um Stromschläge und Brandgefahr zu vermeiden, darf das Gerät keiner Nässe oder
vorgesehen.
Vorsichtsmaßnahmen und Wartung
•Der digitale Bilderrahmen ist ausschließlich für die Verwendung im Innenbereich
Kapitel 2
Page 4
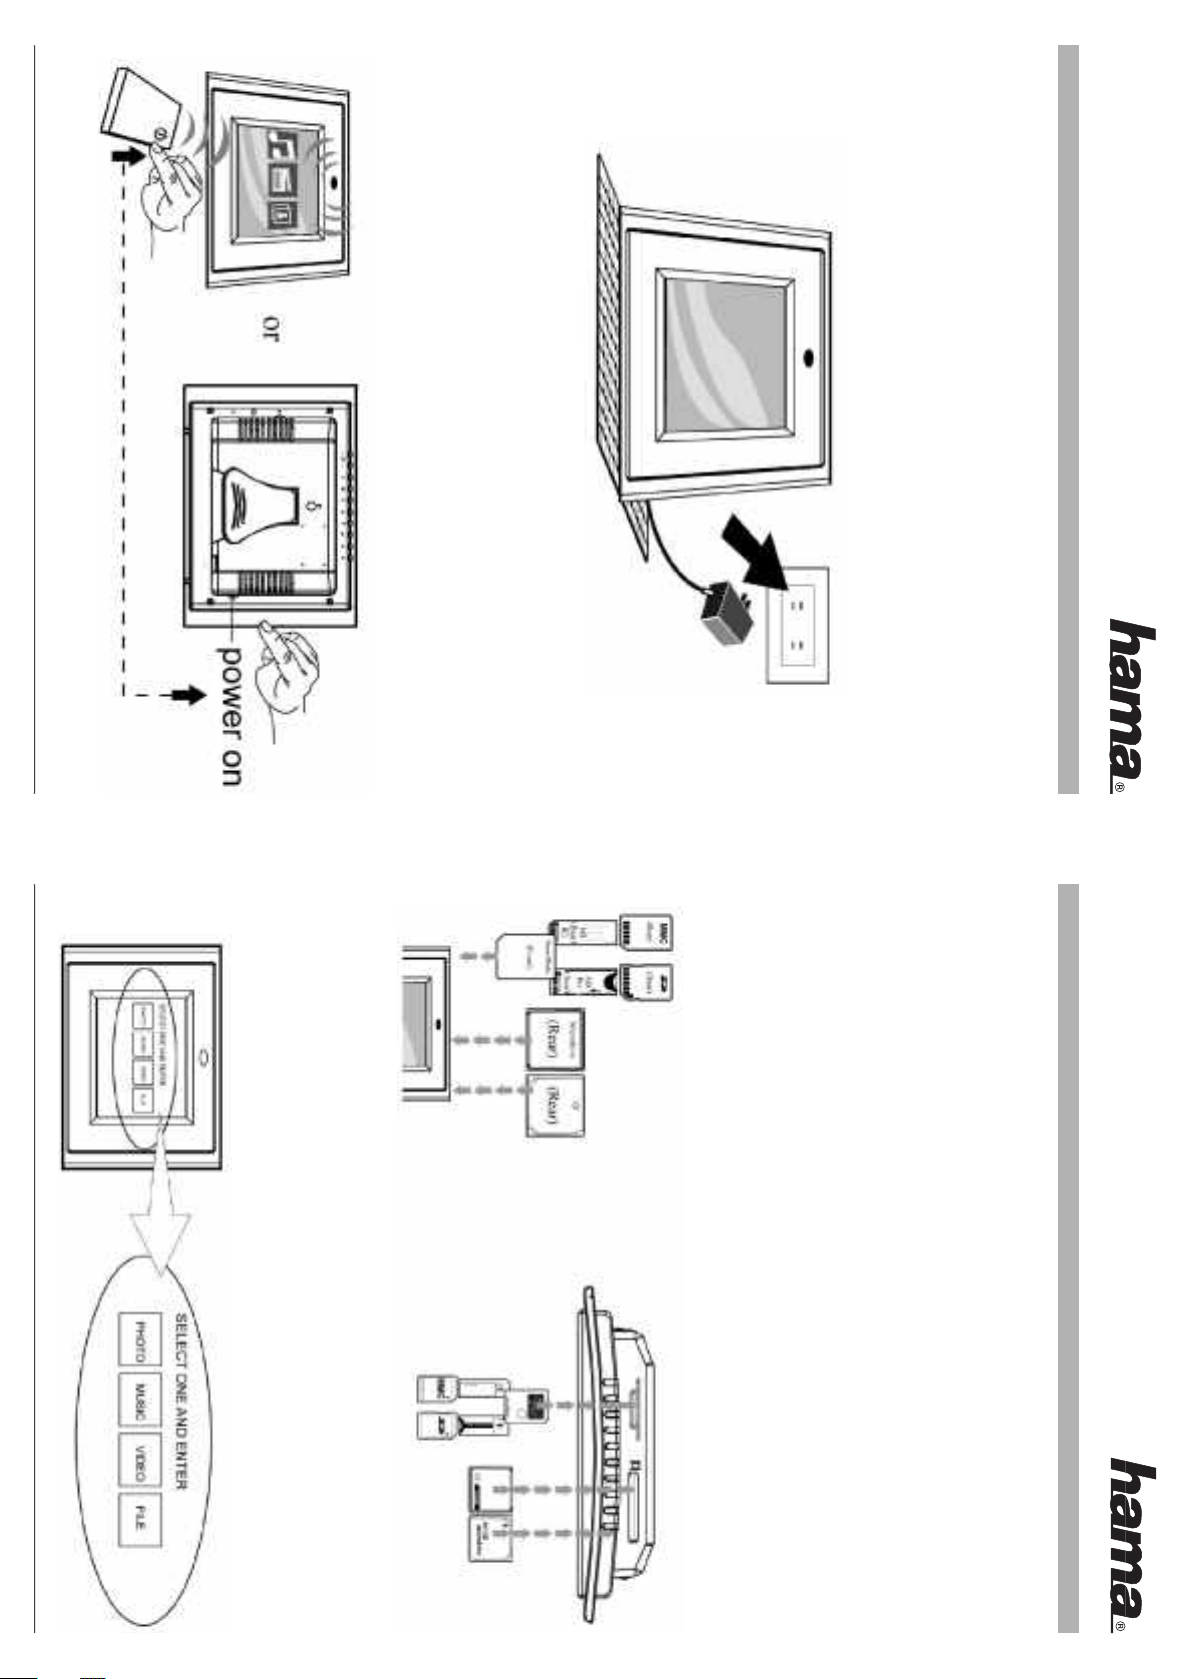
2. Schalten Sie den digitalen Bilderrahmen mit der Ein/Aus-Taste auf der Fernbedienung oder mit
der Ein/Aus-Taste an der linken Seite des digitalen Bilderrahmens ein.
kann.
6
Hinweis: Die Halterung an der Rückseite des digitalen Bilderrahmens bietet drei
Einstellpositionen. Lassen Sie die Halterung vor der Inbetriebnahme
mindestens in die erste Position einrasten, damit das Gerät nicht umfallen
kel ein, damit das Gerät nicht umfallen kann. Stecken Sie anschließend den Netzstecker ein.
Erste Schritte
1. Stellen Sie die Halterung an der Rückseite des digitalen Bilderrahmens auf den weitesten Win-
Kapitel 3
Hinweis: Der digitale Bilderrahmen unterstützt ausschließlich digitale Bilder im JPEG-Format.
Bilder, die in anderen digitalen Formaten gespeichert wurden, werden vom Gerät nicht erkannt.
Wenn Sie die Speicherkarte ordnungsgemäß eingesetzt haben, wird der folgende Bildschirm
angezeigt. Stellen Sie sicher, dass sich auf der Speicherkarte mindestens ein Bild befindet. Wenn
die Speicherkarte kein Bild enthält, arbeitet der digitale Bilderrahmen nicht ordnungsgemäß.
7
herum eingelegt.
•CompactFlashTM-Karten (CF)
•Microdrive®
•SmartMediaTM-Karten
•Memory StickTM & Memory Stick ProTM
Achten Sie beim Einlegen der Speicherkarte darauf, dass die Beschriftung in die Ihnen entgegen-
gesetzte Richtung weist. Drücken Sie die Speicherkarte nicht mit Gewalt in die Aufnahme. Wenn
sich die Speicherkarte nicht vollständig einschieben lässt, haben Sie sie möglicherweise falsch
•Secure DigitalTM-Karten (SD)
•MultiMediaTM-Karten (MMC)
Der digitale Bilderrahmen unterstützt folgende Speicherkarten:
Einlegen von Speicherkarten
Page 5
Weitere Informationen finden Sie im Abschnitt „Erweiterte Einstellungen“.
8
einrichten), Slideshow Mode (Diashow-Modus) und Manual (Manuell). Sie können zum
nächsten bzw. zum vorherigen Bild wechseln, indem Sie die Ta ste Nächstes (15)
bzw. Vorheriges (16) betätigen.
10. Um die Diashow-Funktion zu deaktivieren, wählen Sie Setup, Slideshow Setup (Diashow
Hinweis: Die Intervallzeit-Funktion kann nur verwendet werden, wenn der
Slide Show Mode (Diashow-Modus) auf Auto gesetzt ist.
Richtungstaste Nach rechts die Zeitabschnitte ein. Navigieren Sie nach oben bzw. nach
unten, um die gewünschte Übergangszeit auszuwählen, und drücken Sie Enter, um die
Auswahl zu bestätigen. Drücken Sie die Ta ste Setup, um das Einstellungsmenü zu beenden.
9. Wählen Sie mit der Ta ste Nach unten die Intervallzeit aus. Geben Sie mit der
8. Wechseln Sie mit der Ta ste Nach unten zum Eintrag Slideshow Setup (Diashow einrichten).
Drücken Sie Enter, um fortzufahren.
6. Mit der Ta ste Helligkeit (13) können Sie die Helligkeit einstellen.
7. Drücken Sie die Ta ste Setup auf der Fernbedienung, um das Einstellungsmenü zu öffnen.
4. Wählen Sie ein Bild aus, und drücken Sie Enter, um es anzuzeigen.
5. Mit dem Kontrasteinstellrad auf der rechten Seite des Rahmens können Sie den Kontrast
einstellen.
3. Wechseln Sie mit der Fernbedienung zum Ordner Photo, und wählen Sie ihn aus.
(Navigieren Sie mit den Richtungstasten Nach rechts, Nach links auf der Fernbedienung
zum gewünschten Eintrag, und wählen Sie ihn mit Enter aus.)
2. Ziehen Sie auf der Unterseite der Fernbedienung ggf. die Kunststoffisolierung der Batterie
ab, und vergewissern Sie sich, dass eine Batterie eingelegt ist. Informationen zum
Austausch der Batterie finden Sie im Abschnitt „Einlegen und Ersetzen der Batterie“.
Gerätetasten bedienen. Weitere Informationen finden Sie im nächsten Abschnitt unter
„Positionen der Funktionstasten“.
Anzeigen von Bildern
1. Sie können den Bilderrahmen wahlweise über die Fernbedienung oder über die
Einlegen und Ersetzen der Batterie
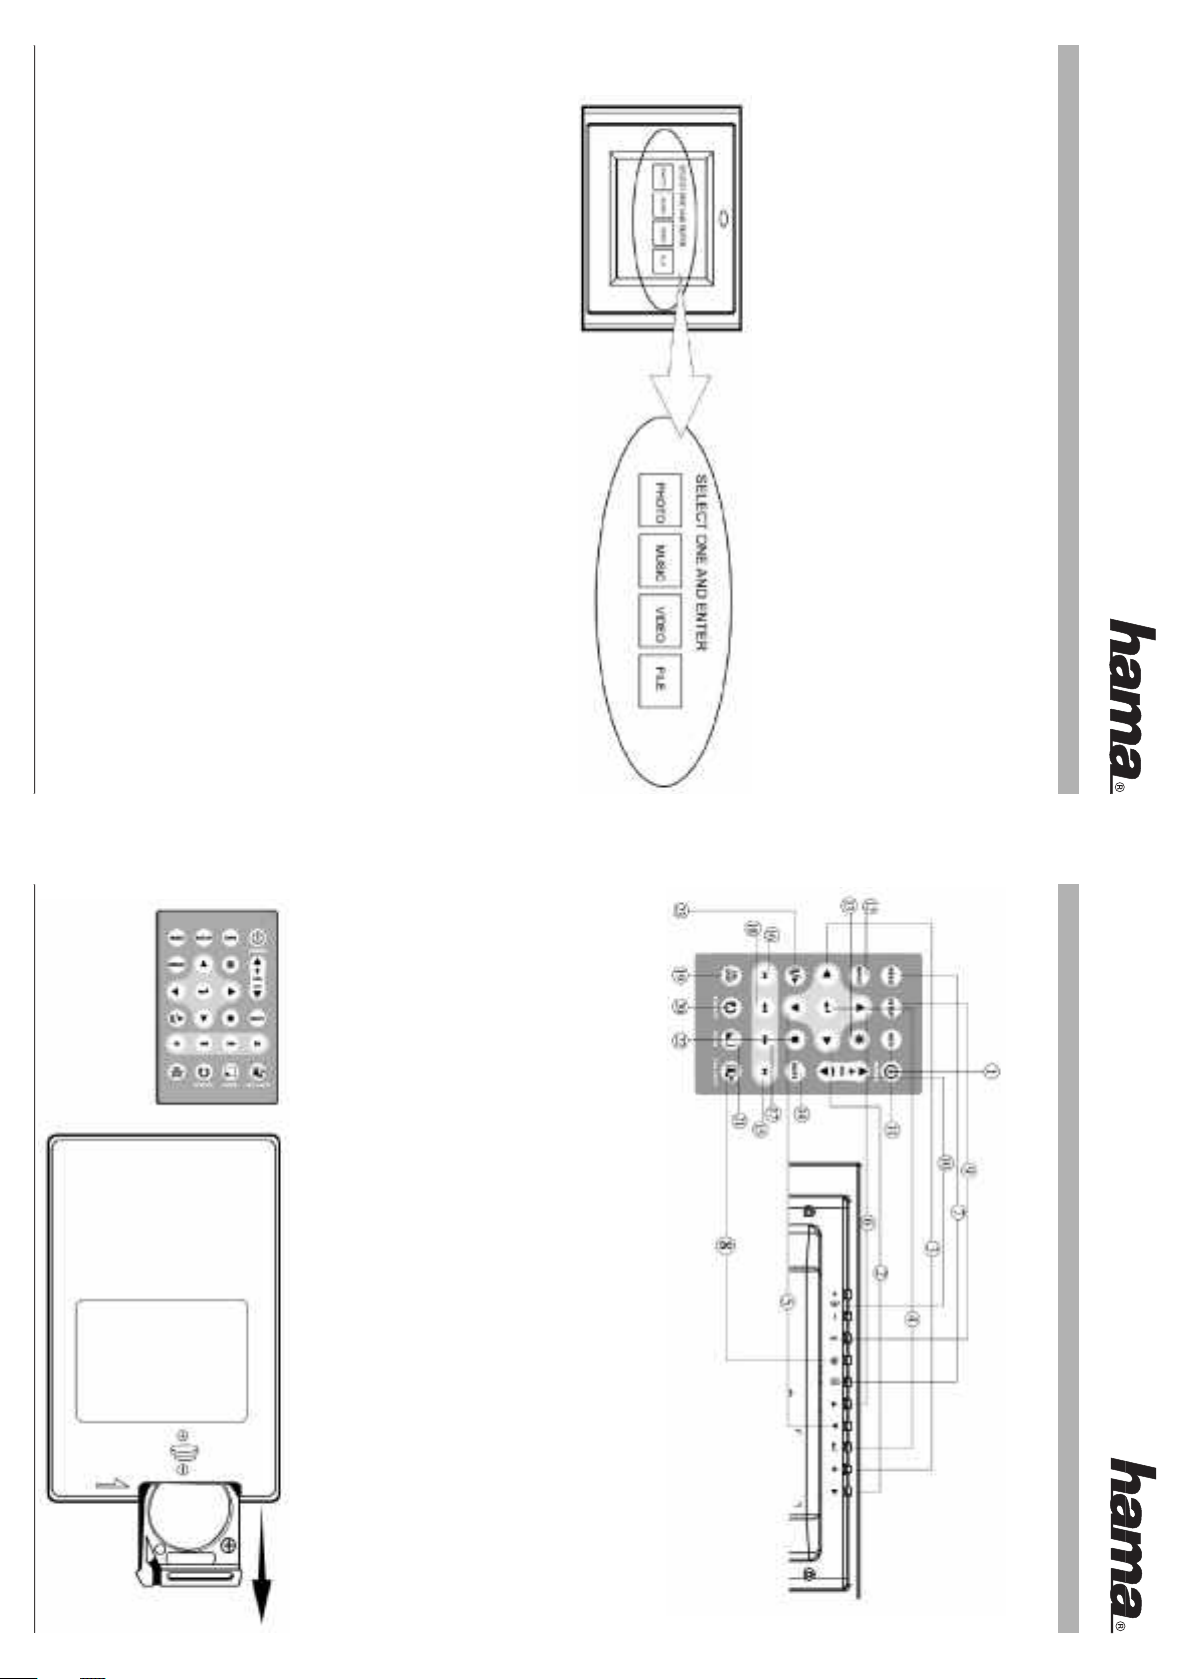
1. Drehen Sie die Fernbedienung so, dass die Ta sten nach unten weisen.
2. Drücken Sie den geriffelten Bereich auf der Batterie nach unten, und ziehen Sie die
3. Legen Sie eine Lithium-Batterie CR2025 ein, wobei der Pluspol „+“ in Ihre Richtung
4. Schließen Sie das Batteriefach.
Batteriehalterung heraus.
weisen muss.
9
(5) Nach unten
(6) Nach oben
(7) Menü
(8) PIC+MP3
(13) Helligkeit
(14) Stumm
(15) Nächstes
(16) Vorheriges
(21) Vergrößern/Verkleinern
(22) Stopp
(23) Wiedergabe/Pause
(1) Ein/Aus
(2) Nach rechts
(3) Nach links
(4) Enter
(9) Setup
(10) Lautstärke +/-
(11) Info
(12) Wiederholen
(17) FF (Schneller Vorlauf)
(18) FR (Schneller Rücklauf)
(19) NTSC/PAL
(20) Bild drehen
Positionen der Funktionstasten
Page 6
Um Videos abspielen zu können, müssen Sie mindestens eine Videodatei auf die Speicherkarte
überspielen.
•MPEG-II (Nur CF-Karten. Bei anderen Karten erfolgt die Wiedergabe möglicherweise nicht
•MPEG-I
ordnungsgemäß.)
10
Der digitale Bilderrahmen unterstützt folgende Videoformate:
•Motion JPEG (AVI): Das von den meisten digitalen Kameras verwendete Videoformat.
4. Mit den Ta sten FF (17) und FR (18) können Sie vor- und zurückspulen.
5. Drücken Sie die Ta ste Nächstes (15) oder Vorheriges (16), um das nächste bzw. das
vorherige Musikstück auszuwählen.
3. Passen Sie die Lautstärke mit der Ta ste Lautstärke +/- an (10).
2. Wählen Sie mit den Richtungstasten die gewünschte Musikdatei aus, und drücken Sie
die Ta ste Enter.
Ordner Music, und wählen Sie ihn aus.
Weitere Informationen finden Sie im Abschnitt „Erweiterte Einstellungen“.
Abspielen von Videos
Antworten“).
1. Wechseln Sie mit den Ta sten Nach rechts und Nach links auf der Fernbedienung zum
Wiedergabe von MP3-Musikdateien
Bevor Sie die MP3-Funktion verwenden können, müssen Sie mindestens eine MP3-Musikdatei
auf die Speicherkarte überspielen (weitere Informationen finden Sie im Abschnitt „Fragen und
In der Dateistruktur können Sie zu allen Bild-, Musik- und Videodateien navigieren. Mit der Ta ste
Enter können Sie unterstützte Dateien auswählen und abspielen.
TV-Anschluss
Schließen Sie den digitalen Bilderrahmen mit dem beiliegenden S-Video-Kabel an einen Fernse-
her an. Schalten Sie sowohl den Bilderrahmen als auch den Fernseher aus, bevor Sie die Verbin-
dung herstellen.
11
Wechseln Sie zum Ordner File (Datei), und wählen Sie ihn aus.
4. Mit den Ta sten FF (17) und FR (18) können Sie vor- und zurückspulen.
5. Drücken Sie die Ta ste Nächste (15) oder Vorherige (16), um das nächste bzw. das
vorherige Video auszuwählen.
3. Passen Sie die Laustärke mit der Ta ste Lautstärke +/- an (10).
2. Wählen Sie mit den Richtungstasten die gewünschte Videodatei aus, und drücken Sie
1. Wechseln Sie zum Ordner Video, und wählen Sie ihn aus.
die Ta ste Enter.
Weitere Informationen finden Sie im Abschnitt „Erweiterte Einstellungen“.
Anzeigen der Dateistruktur
Page 7
Hinweis: Es wird empfohlen, eine 6-mm-Schraube zu verwenden.
12
Bilderrahmen vorsichtig auf.
können Sie den Rahmen an einer Wand befestigen. Vergewissern Sie sich vor der Wandmonta-
ge, dass die 6-mm-Schraube ordnungsgemäß in der Montagebohrung sitzt, und schieben Sie den
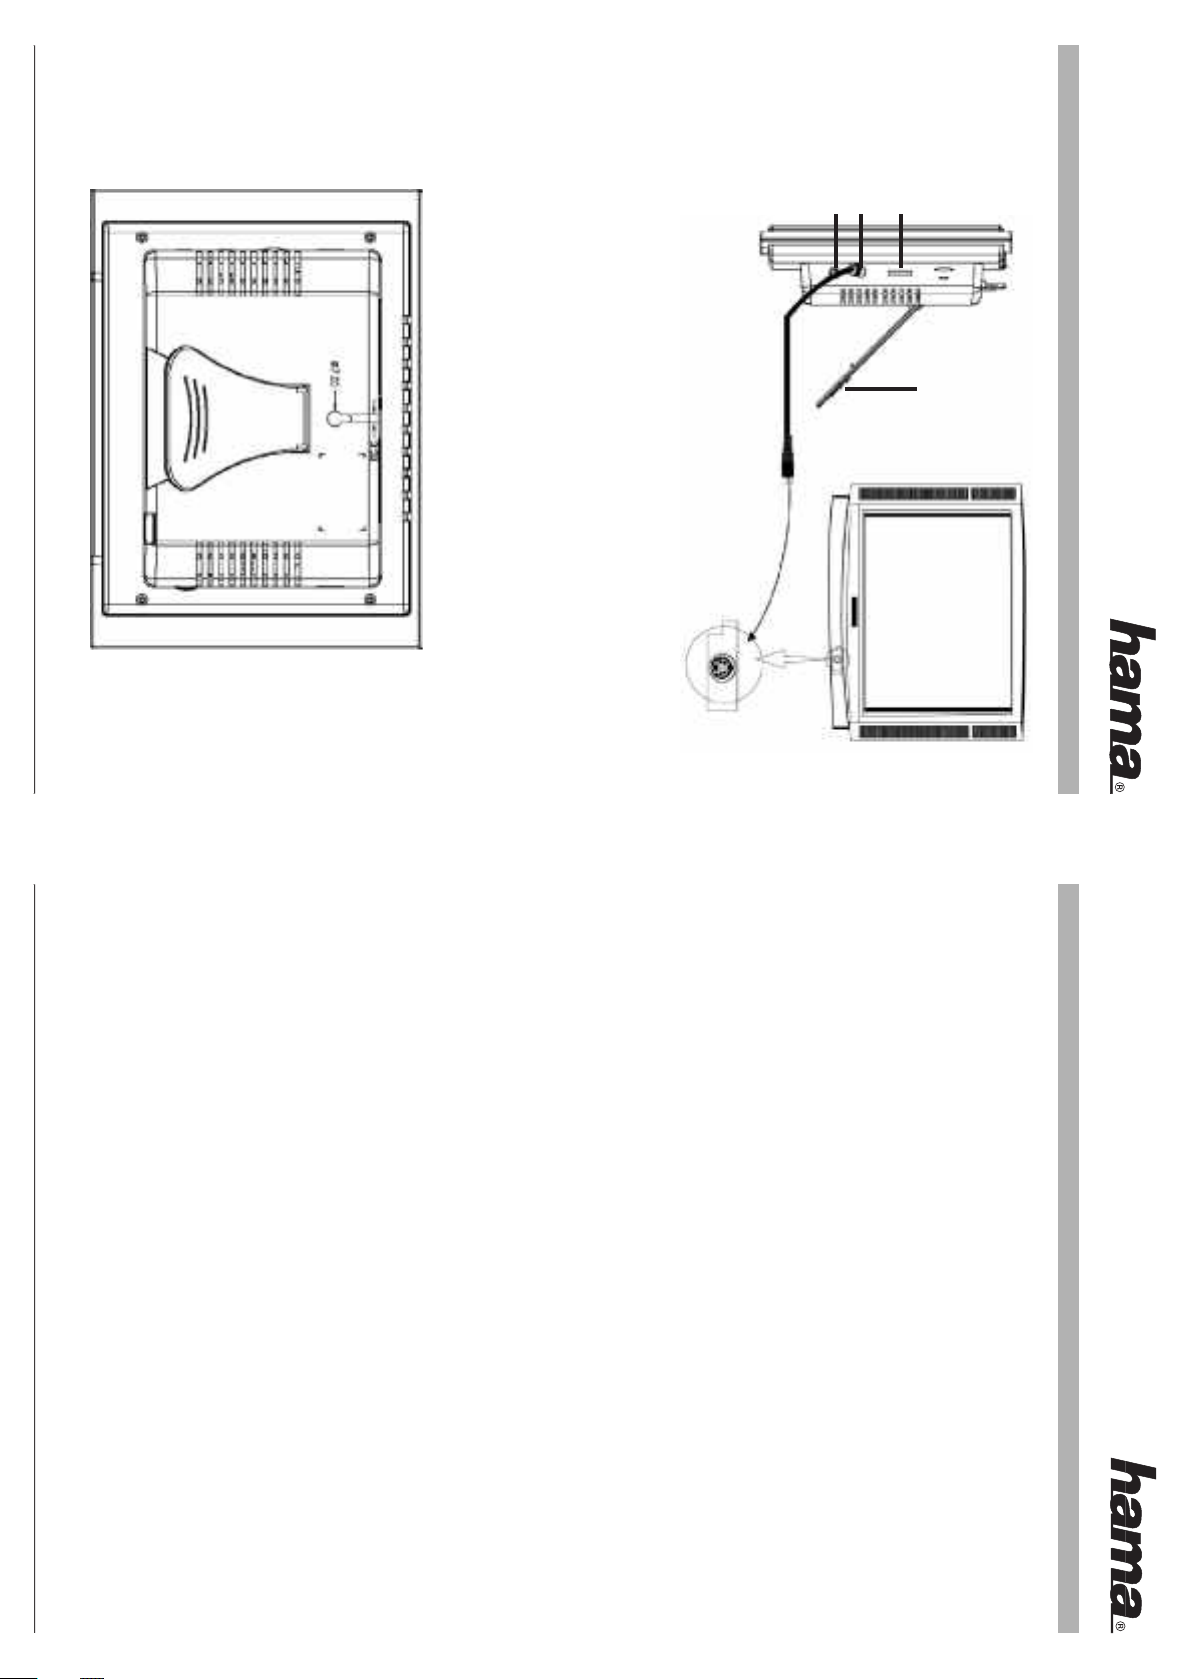
Wandbefestigung des digitalen Bilderrahmens
Mithilfe der 7-mm-Montagebohrung auf der Rückseite des digitalen Bilderrahmens (siehe unten)
Schließen Sie Ihre Lautsprecher an den Kopfhörerausgang an der rechten Seite des Bilderrah-
mens an.
Anschließen von Lautsprechern
Kopfhörer-Anschluss
TV-Ausgang
Kontrast
Halterung
Bewegliche
wenn Sie die wiederzugebenden Bilder manuell auswählen möchten.
13
Slideshow Mode (Diashow-Modus)
•Manual (Manuell): Zum Ausschalten der Diashow-Funktion. Wählen Sie diese Option,
Slideshow Setup (Diashow einrichten)
•Off: Wiederholmodus deaktivieren
Repeat Mode (Wiederholmodus)
•One: Eine Musikdatei wiederholen
•All: Gesamte Wiedergabeliste wiederholen
Music Setup (Musikwiedergabe einrichten)
•Slow (Langsam): Langsamer Übergang zum nächsten Bild bei der Diashow.
Transition Mode (Übergangsmodus)
•Fast (Schnell): Rascher Übergang zum nächsten Bild bei der Diashow.
•Normal: Normaler Übergang zum nächsten Bild bei der Diashow.
3. Drücken Sie die Ta ste PIC.+MP3 (8) erneut, um die Wiedergabe zu beenden.
Einstellungsmenü
Einige der auf dem Setup-Bildschirm angezeigten Einstellungen werden hier nicht erläutert.
Diese werden zwar angezeigt, sind jedoch ohne Funktion. Bitte übergehen Sie diese Einstellun-
gen.
Drücken Sie die Ta ste Setup auf der Fernbedienung, um das Einstellungsmenü zu öffnen.
Photo Setup (Bildwiedergabe einrichten)
Thumbnail Digest
Nicht verfügbar
2. Drücken Sie die Ta ste PIC.+MP3 (8) auf der Fernbedienung, um die Bilder mit
Wiedergabe von Bildern mit MP3-Musik
1. Wählen Sie im Hauptmenü den Ordner Photo.
Kapitel 4
Erweiterte Einstellungen
MP3-Hintergrundmusik anzuzeigen.
Page 8

•Off: Die Diashow endet nach dem letzten Bild.
•On: Die Diashow beginnt nach dem letzten Bild von Neuem.
Folder Repeat (Ordner-Wiederholung)
•Auto: Wenn Sie diese Option auswählen, wird bei Auswahl der Funktion Photo automatisch
der Diashow-Modus aktiviert.
Referenzen
Video Output
Nicht verfügbar
OSD LANG
Wählen Sie die Sprache für das Bildschirmmenü aus.
Default (Standardeinstellungen)
Mit dieser Option können Sie die Standardeinstellungen wiederherstellen.
14
TV Ty pe (TV-Format)
Sie können zwischen den TV-Formaten Multi System, NTSC und PAL wählen.
•All: Gesamte Wiedergabeliste wiederholen
Repeat Mode (Wiederholmodus)
•Off: Wiederholmodus deaktivieren
•One: Eine Videodatei wiederholen
Interval Time (Intervallzeit)
Setzen Sie die Intervallzeit zwischen zwei Videodateien auf Fast (Schnell) bzw. auf Normal.
Interval Time (Intervallzeit)
Legen Sie die Anzeigedauer der einzelnen Bilder in der Liste fest. Diese Funktion kann nur ver-
wendet werden, wenn der Slideshow Mode (Diashow-Modus) auf Auto gesetzt ist.
Transition (Übergangseffekt)
Wählen Sie in der Liste den Übergangseffekt für die Diashow aus. Rollen Sie die Liste mit der
Ta ste Nach unten, um alle Übergangseffekte anzuzeigen. Drücken Sie Enter, um den ausgewähl-
ten Übergangseffekt zu übernehmen.
Movie Setup (Filmwiedergabe einrichten)
•Auf der Speicherkarte sind keine Musikdateien
gespeichert.
15
PIC + MP3-Taste ohne Funktion. •Ungültiger Vorgang.
nicht unterstützt.
>Der digitale Bilderrahmen unterstützt ausschließlich das
JPEG-Format. Die Formate TIFF, BMP, GIF usw. werden
>Unterstütztes Bildformat: JPEG
mindestens eine unterstützte Bilddatei befindet.
Bei Auswahl der Funktion PHOTO •Das Dateiformat wird nicht unterstützt.
wird kein Bild angezeigt. •Auf der Speicherkarte sind keine Bilddateien gespeichert.
>Stellen Sie sicher, dass sich auf der Speicherkarte
MPEG-II.
>Unterstütztes Bildformat: JPEG
>Unterstütztes Musikformat: MP3
>Unterstützte Videoformate: Motion JPEG (AVI), MPEG-I,
>Stellen Sie sicher, dass sich auf der Speicherkarte
mindestens eine unterstützte Foto-, Musik- oder
Videodatei befindet.
eingelegt ist. Die Beschriftung muss in die Ihnen
entgegengesetzte Richtung weisen. Drücken Sie die
Speicherkarte nicht mit Gewalt in die Aufnahme.
Kein Startbildschirm. •Die Speicherkarte ist nicht ordnungsgemäß eingesetzt.
•Auf der Speicherkarte sind keine Bild-, Musik- oder
•Das Dateiformat wird nicht unterstützt.
>Überprüfen Sie, dass die Speicherkarte ordnungsgemäß
Videodateien gespeichert.
Kapitel 5
Fehlerbehebung
Fehler
Der digitale Bilderrahmen kann •Das Netzkabel ist nicht ordnungsgemäß angeschlossen.
nicht eingeschaltet werden. >Vergewissern Sie sich, dass der Rahmen ordnungsgemäß
mit dem Netzadapter verbunden ist. Wenn das Gerät mit
einem Netzadapter verbunden ist und Sie es einschalten,
wird ein leerer weißer Bildschirm angezeigt (auch wenn
keine Speicherkarte eingelegt ist). Wenn der weiße
Bildschirm nicht angezeigt wird, überprüfen Sie die
Verbindung des digitalen Bilderrahmens mit dem
Netzadapter.
Ursache/Abhilfe
Page 9

•Drücken Sie die Ta ste PAL/NTSC, um die gewünschte
Einstellung zu wählen.
TV-Ausgang ohne Funktion. •Überprüfen Sie die Einstellung NTSC/PAL.
>Drücken Sie die Ta ste PIC + MP3 erst, nachdem Sie den
>Stellen Sie sicher, dass sich auf der Speicherkarte
Ordner PHOTO geöffnet haben.
mindestens eine MP3-Musikdatei befindet.
>Wählen Sie zuerst den Ordner PHOTO aus.
Video-Wiedergabe nicht •Übertragungsgeschwindigkeit der Speicherkarte zu
ordnungsgemäß. gering.
>Verwenden Sie zur Wiedergabe von Videodateien eine
Hi-Speed-Speicherkarte.
>Die meisten digitalen Kameras zeichnen Videos mit einer
Auflösung von 320x240 oder geringer auf. Für Fotos und
Videobild zu klein. >Zu geringe Bildauflösung.
>MPEG-II-Videos können nur von CompactFlash-Karten
aus wiedergegeben werden.
Um das Bild herum werden
Fragen und Antworten
Frage
Welche Bild-, Musik- und •Foto: JPEG
Videoformate werden von dem •Musik: MP3
digitalen Bilderrahmen unterstützt? •Video: Motion JPEG (AVI), MPEG-I, MPEG-II.
Welche Speicherkarten werden •Secure Digital-Karten (SD)
von dem digitalen Bilderrahmen •MultiMedia-Karten (MMC)
unterstützt? •SmartMedia-Karten
•Microdrive
•CompactFlash-Karten (CF)
•Memory Stick und Memory Stick Pro
Antwort
Bildauflösung auf 640x480 setzen.
16
schwarze Balken angezeigt.
>Mit einer Foto-Bearbeitungssoftware können Sie die
nach Modell unterschiedliche Auflösungen (Pixel)
verwenden.
>Dies ist darauf zurückzuführen, dass digitale Kameras je
können Sie das Bild vergrößern.
Videos wird maximal eine Auflösung von 640x480
unterstützt. Mit der ZOOM-Taste auf der Fernbedienung
CompactFlash-Karten abspielen? können möglicherweise mit einer Hi-Speed-SD-Karte
Mein Fernseher verfügt über keinen •Besorgen Sie sich einen S-Video/Composite-
S-Video-Eingang. Was kann ich tun? Videoadapter, und verbinden Sie den Bilderrahmen
Bildschirmauflösung? 640x480.
Kann ich MPEG-I- und MPEG-II- •MPEG-I-Videos können von allen unterstützten
Dateien auch von anderen als Speicherkarten abgespielt werden. MPEG-II-Dateien
Können beliebige AVI-Videodatei- •Nein. Das Gerät unterstützt lediglich die AVI-Dateiformate
typen wiedergegeben werden? der gängigsten Digitalkameras.
Welches ist die beste •Der Bilderrahmen bietet eine Auflösung von bis zu
Welche Bildgröße kann der digitale •Der digitale Bilderrahmen kann Bilder mit einer Größe von
Bilderrahmen anzeigen? bis zu 12 Megapixel anzeigen.
Kann ich mehrere Speicherkarten •Ja. Schalten Sie das Gerät stets ein, bevor Sie eine Karte
einlegen? einlegen. Auf dem Bildschirm wird angezeigt, welche
einen integrierten Speicher? Mediendateien gespeichert werden. Zur Wiedergabe von
Verfügt der Bilderrahmen über •Nein. Auf dem digitalen Bilderrahmen können keine
Meine Speicherkarte wird von dem •Verwenden Sie einen Speicherkartenadapter, der mit
digitalen Bilderrahmen nicht einer der unterstützten Speicherkarten kompatibel ist.
unterstützt. Was kann ich tun? Wenn Sie beispielsweise eine Xd-Karte verwenden,
Wie speichere ich Musikdateien? •Mit einem Computer und einer gängigen Audio-
•Übertragen Sie die MP3-Datei mit einem
Bearbeitungssoftware wie MusicMatch können Sie Ihre
Musikstücke in das MP3-Format umwandeln.
besorgen Sie sich einen Xd-auf-CF-
Speicherkartenadapter, und verbinden Sie die Xd-
Mediendateien müssen Sie eine unterstützte
Speicherkarten sich in den Aufnahmen befinden. Wählen
Sie mit der Fernbedienung die gewünschte Speicherkarte
darüber mit Ihrem Fernseher.
17
ebenfalls ordnungsgemäß wiedergegeben werden.
aus.
Speicherkarte verwenden.
Speicherkarte über den Adapter mit dem Bilderrahmen.
Speicherkartenleser auf die Speicherkarte.
Page 10

Bei den Produkt- und Markennamen in dieser Anleitung handelt es sich um Marken oder einge-
tragene Marken der jeweiligen Rechteinhaber. Änderungen der technischen Daten ohne vorheri-
ge Ankündigung vorbehalten.
Kann ich Bilder auf dem Bildschirm •Ja. Mit der ROTATE-Taste auf der Fernbedienung können
Kann ich die Farben des Bildes •Nein. Alle Farbeinstellungen sind ab Werk voreingestellt.
Fernbedienung: Fernsteuerung
Stromversorgung:
Prüfzeichen/Normen
CE, FCC, UL
Abmessungen und Gewichte
Abmessungen: 210 x 150 x 45 mm (L x B x H)
Gewicht: 600 g
Betriebsbedingungen
Betrieb: 0 bis 35° C, Feuchtigkeit 0 bis 85 %
Lagerung: -20 bis 60° C, Feuchtigkeit 10 bis 90 %
E/A: Kopfhöreranschluss
Technische Daten
Bildschirm: Active-Matrix-LCD, 5,6 Zoll
Speicher: 1 MB Core-Flash
anpassen? Sie können jedoch die Helligkeit und den Kontrast des
drehen? Sie das Bild drehen.
8 MB SDRAM
Lautsprecher (Stereo)
S-Video (NTSC/PAL)
Netzadapter; Eingang 100 - 240 V; Ausgang 12 V, 1,5 A
Bildschirms anpassen.
18
GETTING STARTED........................................................23
VIEWING PICTURES......................................................25
LOCATIONS OF CONTROLS..........................................26
INSTALLING AND REPLACING BATTERY.................. 26
LISTENING TO MP3 MUSIC.........................................27
WATCHING VIDEO.........................................................27
VIEWING FILE STRUCTURE......................................... 28
TV CONNECTION........................................................... 28
SPEAKER CONNECTION...............................................29
MOUNTING DIGITAL PICTURE FRAME..................... 29
ADVANCED SETTINGS................................................. 30
PLAY PICTURE WITH MP3 MUSIC............................. 30
SETUP MENU................................................................. 30
INSERTING MEMORY CARDS.....................................24
•Hinweis: Wenn Sie den digitalen Bilderrahmen
ausschalten, wird das Bild wieder in die ursprüngliche
Position gedreht.
MAIN FEATURES............................................................21
PRECAUTIONS & MAINTENANCE.............................22
L Digital Picture Frame User's Manual
Table of Contents
19
ENVIRONMENTAL OPERATING RANGES..................35
MECHANICAL.................................................................35
Default........................................................................ 31
TROUBLESHOOTING.....................................................32
Q & A................................................................................33
SPECIFICATIONS...........................................................34
CERTIFICATION..............................................................35
References......................................................................31
TV Ty pe........................................................................31
Video Output...............................................................31
OSD LANG..................................................................31
Movie Setup................................................................... 31
Interval Time...............................................................31
Repeat Mode............................................................. 31
Tr ansition....................................................................31
Slideshow Setup........................................................... 30
Slideshow Mode....................................................... 30
Folder Repeat.............................................................31
Interval Time...............................................................31
Music Setup................................................................... 30
Repeat Mode............................................................. 30
Photo Setup.................................................................... 30
Thumbnail Digest...................................................... 30
Tr ansition Mode.........................................................30
Page 11

Introduction
Congratulations on your purchase of this Digital Picture Frame.
Before operating the unit, please read this manual thoroughly, and retain it for future reference.
This manual will help you use many of the exciting and useful features to make your Digital Pictu-
re Frame viewing more enjoyable.
This Digital Picture Frame lets you view digital pictures directly from your camera's memory
cards. Yo u will be able to create a slideshow using multiple transition effects or display one pic-
ture at a time. No computer, digital camera or Internet connection is required.
Digital Picture Frame is compatible with the following popular memory card formats: SD™, Multi-
MediaCard™, SmartMedia®, CompactFlash®, Microdrive™, Memory Stick®, and Memory Stick
PRO®.
20
*Video files may not play properly if stored on a low speed card.
21
•Plays slide show with MP3 music on the background.
•User-friendly on-screen display lets you access all controls easily.
•Automatic slide show with multiple transition effects and display times.
•Bright 5.6” TFT active matrix LCD screen.
•Compatible with most digital cameras' stored JPEG images and motion JPEG files.
•Includes a credit card style remote control
•Instantly plays MPEG-II files stored on Compact Flash Card (CF)*.
•Supports up to 12 Mega Pixels image files (JPEG format).
•Instantly plays MP3 music with the integrated speakers.
•Instantly plays MPEG-I files stored on supported memory cards*.
SmartMedia, Memory Stick, Memory Stick Pro, Microdrive, & Compact Flash (CF).
•Compatible memory cards include Secure Digital Card (SD), MultiMedia Card (MMC),
MP3 music or supported video files (memory card not included).
•Simply insert a compatible memory card into the digital frame to show photos, play
Main Features
•Displays digital pictures (JPEG) without a computer.
Chapter 1
Page 12

Cleaning the LCD screen
•Treat the screen gently. The screen on the Digital Picture frame is made of glass and can
•If fingerprints or dust make the LCD screen dirty, we recommend using a soft, non-abrasive
•If you use the LCD Cleaning Kit sold on the market, do not apply the cleaning liquid directly
be scratched or broken.
to the LCD screen. Clean the LCD screen with cleaning cloth moistened with the liquid.
22
cloth such as the camera lens cloth to clean the LCD screen.
damage may result.
•Do not use the Digital Picture frame if conditions could allow condensation to occur, or
•Do not open the case of the Digital Picture frame. There is a risk of electric shock, and
storage cards.
there are no user serviceable parts inside. Opening the case will void your warranty.
•Keep your digital picture frame out of sunlight. Direct sunlight may cause damage.
•Always use the eject buttons on the memory storage cards slots to remove the memory
•Do not block the ventilation holes on the back of the Digital Picture frame at any time.
•To reduce the risk of fire or electric shock do not expose this appliance to rain or moisture.
Precautions & Maintenance
•The digital picture frame is for indoor use only.
Chapter 2
2. Power on the Digital Picture Frame by pressing the power button on the remote control or on
the left side of the digital frame.
23
Note: There are three stages for the Digital Picture Frame bracket, please adjust
it to at least the first stage for product stability before initial use.
then Plug the power adapter into an electrical outlet.
Getting Started
1. Adjust the Digital Picture Frame bracket on the back to the widest degree for propping stability
Chapter 3
Page 13

Insert the memory card with the front label facing AWAY from you. Do not force the memory card
into the memory slot. If you are not able to easily insert the memory card completely, you may
Note: The digital picture frame will ONLY recognised digital pictures stored in JPEG format.
Digital pictures stored in other formats will be ignored by the device.
You will see the following screen if you insert the memory card correctly. Make sure you have
at least one picture stored on the memory card. The frame will not function properly without a
stored picture.
24
have inserted it the wrong way.
•SmartMediaTM Card
•Memory StickTM & Memory Stick ProTM
•CompactFlashTM (CF) Card
•Microdrive®
•Secure DigitalTM Card (SD)
•MultiMedia Card TM (MMC)
The digital picture frame is compatible with the following memory cards:
Inserting Memory Cards
See “Advance Settings” section for more control settings.
sure the remote control has a battery installed. See “Installing and replacing battery”
section if you need a new battery.
2. Remove the plastic battery insulator (if any) on the bottom of the remote control and make
4. Highlight a picture and press Enter to view the picture.
5. Adjust the contrast of the screen using the Contrast Dial on the right side of the frame.
6. Press the Brightness key (13) to adjust the brightness setting.
7. Press Setup button on the remote control to enter the Setup Menu.
8. Move to Slideshow Setup by pressing the Down button. Press Enter to continue.
sections. Move up and down to select the desired transition time of a picture and press
Enter to select. Press Setup button to exit the Setup menu.
9. Use the Down key to select the Interval Time. Use the Right direction key to enter the time
10. To disable the slideshow function, select Setup, Slideshow Setup, Slideshow Mode and
Note: The Interval Ti me functions only when the Slide Show Mode is set to Auto.
Manual. Yo u will be able to change the displayed picture by pressing Next (15) or
Previous (16) key.
25
3. Use the remote control to highlight and select the Photo folder (Use the direction keys
Right, Left on the remote control to navigate and press Enter to select).
Viewing Pictures
1. You can use either the remote control or the on-board buttons to control the Picture Frame.
Please refer to the next section “Locations of Controls” for details.
Page 14

Installing and replacing battery
1. Place the Remote Control with the control buttons facing downward.
2. While pressing down on the ridged area of the battery cover pull the tray out.
3. Place a “CR2025” lithium battery on the tray with the positive “+” end facing toward you.
4. Close the tray.
(8) PIC+MP3
(16) Previous
26
(4) Enter
(5) Down
(6) Up
(7) Menu
(12) Repeat
(13) Brightness
(14) Mute
(15) Next
(20) Picture Rotate
(21) Zoom in/out
(22) Stop
(23) Play/pause
(2) Right
(3) Left
(10) Volume up/down
(11) Info
(18) FR(Fast Rewind)
(19) NTSC/PAL
(1) Power on/off
(9) Setup
(17) FF(Fast Forward)
Locations of Controls
Listening to MP3 music
Before you are able to listen to the MP3 music, you must first store MP3 music files on the
Before you are able to watch video, you must first store video files on the memory card.
•MPEG-I
•MPEG-II (stored on CF Card only. Other memory cards may not play properly)
The Digital Picture Frame supports the following video formats:
•Motion JPEG (avi): video format used by most digital cameras
Watching video
See “Advance Settings” section for more control settings.
5. Press Next (15) or Previous (16) key to select a different music file.
3. Adjust the volume by using volume up/down key (10).
4. Fast forward or rewind by pressing the FF (17) or FR (18) key.
2. Highlight and select the music file you want to play by pressing the direction keys
memory card (see Q&A section for more information).
1. Use the Remote Control's Right and Left key highlight and select the Music folder.
and the Enter button.
27
Page 15

TV Connection
Use the supplied S-video out cable to connect the digital picture frame to a TV. Turn off both the
frame and the TV before you make the connection.
You can browse all the picture, music and video files under the File structure. You can also select
and play any supported file by pressing the Enter button.
Highlight and select the File folder.
5. Press Next (15) or Previous (16) key to select a different video clip.
2. Highlight and select the video you want to watch by pressing the direction keys and
3. Adjust the volume by using volume up/down key (10).
4. Fast forward or rewind by pressing the FF (17) or FR (18) key.
1. Highlight and select the Video folder.
See “Advance Settings” section for more control settings.
Viewing File Structure
the Enter button.
28
Note: For the appropriate screw size #6 is advised.
29
then mount the picture frame directly and slightly.
Earphone Jack
Contrast
TV-out
Movable
Bracket
Speaker Connection
Connect speakers to the earphone jack located on the right side of the picture frame.
Mounting Digital Picture Frame
The 7mm mounting hole on the back of the Digital Picture Frame as below is used to mount your
Digital Picture Frame. When wall mounted, make sure the mounting hole aims at the #6 screw
Page 16

Slideshow Setup
Slideshow Mode
•Manual: Tu rn OFF the slideshow function. Select this option if you want to manually select
the picture to display.
30
•Off: Tu rn off the repeat mode.
•All: Repeat the entire play list.
•One: Repeat one music file.
Repeat Mode
•Slow: Slow slide transition effect.
•Normal: Normal slideshow transition effect.
Music Setup
•Fast: Set the slideshow's transition effect to fast.
Transition Mode
3. Press PIC.+MP3 button (8) again to stop playing.
Setup Menu
Some of the settings not described in this section but found on the Setup screen are not enabled
by the manufacturer. You should ignore these settings.
Press the SETUP button on the remote control to enter the Setup Menu.
Photo Setup
Thumbnail Digest
Function not used.
1. On the main Menu, select the Photo folder.
2. Press PIC.+MP3 button (8) on the remote control to play photo and music.
Play Picture with MP3 music
Chapter 4
Advanced Settings
References
Video Output
Function not used.
OSD LANG
Select On-screen Display Language.
Default
This option will reset all the settings to the original manufacturer's default.
31
TV Ty pe
Set the TV type to Multi System, NTSC or PAL.
•All: Repeat the entire play list
•One: Repeat one video file
Repeat Mode
•Off: Tu rn off the repeat mode
Interval Time
Set the interval time between video files to fast or normal.
Interval Time
Select the display time of each picture on the list. This feature works only if the Slideshow mode
is set to Auto.
Transition
Select the transition effect of the slideshow from the list. Continue to scroll down the list by using
the Down button to see all the transition effects. Press Enter to set the transition effect.
Movie Setup
•On: The slideshow will repeat itself if you select this option.
•Off: The slideshow will stop after it displays all the pictures once.
Folder Repeat
•Auto: The Picture Frame will automatically enter the Slideshow mode when you select the
Photo option.
Page 17

TV-OUT does not work. •Check if the NTSC/PAL setting is correct.
PIC + MP3 button does not work. •Incorrect operation
The picture does not appear on the •Incompatible file format.
screen after selecting the PHOTO •No picture file is on the memory card.
function.
No Start-up screen. •Memory card is not inserted correctly.
Digital Frame doesn't power on. •The POWER connector to the unit is not securely inserted.
Chapter 5
Troubleshooting
Symptom Cause and/or Corrective Actions
32
•Press PAL/NTSC button to set the correct setting
memory card.
What can I do? example, if you own a xD memory card, you can buy a xD
>Make sure you store at least one MP3 music file on the
with the digital frame. compatible with one of the supported memory cards. For
from you. Do not force the memory card into the slot.
Q & A
sure the front label of the memory card is facing AWAY
>Verify if the way you inserted the card is correct. Make
and make sure it is securely attached.
Black bands appear around the •This is normal since different digital cameras take
picture
should see a blank white screen. If you don't see the lit
screen, check if the power connector to the digital frame
•No music file stored on the memory card.
>Select PHOTO folder first.
>Press PIC + MP3 button after entering the PHOTO folder.
My memory card is not compatible •You should be able to buy a memory card adapter that is
only. The device does not support TIFF, BMP, GIF etc.
>The digital frame is compatible with the JPEG file format
stored on the memory card.
How do I store music files? •Using a personal computer and a popular audio editing
>Make sure there is at least one supported picture file
>Compatible Photo format: JPEG
MPEG-II.
What memory cards are compatible •Secure Digital Card (SD)
with the digital frame? •MultiMedia Card (MMC)
>Compatible Video format: Motion JPEG (avi), MPEG-I,
formats are supported by the •Music: MP3
digital frame? •Video: Motion JPEG (avi), MPEG-I, MPEG-II.
or video file on the memory card.
What photo, music, and video •Photo: JPEG
Question Answer
>Make sure there is at least one supported photo, music,
>Compatible Photo format: JPEG
>Compatible Music format: MP3
•No photo, music, or video file on the memory card.
•Incompatible file format.
and power up the unit, even without a memory card, you
>Make sure you connect the AC adapter to the frame
properly. When you connect the AC adapter to the frame
Small video size on the screen. •Low video resolution
Video file does not play properly •Slow memory card.
.
>Make sure you use a high-speed memory card to play
to CF memory card adapter, and use the adapter to
connect the frame to the xD memory card.
33
Card Reader.
•Transfer the MP3 file to the memory card using a Memory
MP3 format.
•Microdrive
software such as MusicMatch to covert your music to
•SmartMedia Card
•Memory Stick & Memory Stick Pro
•CompactFlash (CF) Card
>Use a photo editing software to resample the picture's
resolution to 640x480.
pictures in varieties of resolutions (or pixels).
control to enlarge it.
resolution. The best supported resolution of a photo or
video is 640x480. Use the Zoom button on the remote
>Most digital cameras take video in 320x240 or lower
>If you want to play a MPEG-II video make sure you store
the file on a CompactFlash Card.
video files.
Page 18

Remote Control: Remote Controller
Power:
I/O: Earphone Jack
Memory: 1MB Core Flash
Specifications
Display:
Can I adjust the colours of the •No. All colour settings are preset at the factory. Yo u can
picture? only adjust the brightness and contrast of the screen.
Can I rotate a picture on the •Yes. Use the ROTATE button on the remote control to
screen? rotate a picture.
What is the maximum picture size •The digital frame is able to display pictures up to
the digital frame can display? 12 Mega Pixels.
Does it play every type of AVI video •The device works with the avi files taken
file? by most digital cameras.
What is the best picture resolution •The frame's best resolution is 640x480.
displayed on the screen?
Can I play MPEG-I and MPEG-II •You can play MPEG-I video properly using any supported
files stored on memory cards other memory card. You maybe able to play MPEG-II files
than the CompactFlash card? properly using a high speed SD card.
My TV does not have a S-Video •Buy a S-Video to composite video adapter and use it to
input. What can I do? connect the frame to your TV.
Can I insert multiple memory cards? •Yes. Turn on the unit before you insert any card. The
Does the digital frame have •No. The digital frame does not have any internal memory
built-in memory? to store media file. You must use a compatible memory
AC Adapter; Input 100-240V; Output 12V, 1.5A
34
S-Video (NTSC/PAL)
5.6” Active Matrix LCD.
8MB SDRAM
Speakers (stereo)
•Note: The rotated picture will return to it’s original
orientation after you power down the digital frame.
Product and brand names mentioned in this manual are trademarks or registered trademarks of
their respective holders. Specifications subject to change without notice.
Storage: -20 ~ 60¢J, Humidity 10 ~ 90%
Operation: 0 ~ 35¢J, Humidity 0 ~ 85%
Environmental Operating Ranges
slots. Use the remote control to select the memory card.
Weight: 600g
screen will show what types of memory cards are in the
Mechanical
Dimension: 210 x 150 x 45mm (L x W x H)
card to play your media files.
CE, FCC, UL
Certification
35
Page 19

MISE EN ROUTE.............................................................40
AFFICHER DES IMAGES............................................... 42
POSITIONS DES TOUCHES DE FONCTION............... 43
INSERTION ET REMPLACEMENT DES PILES...........43
LECTURE DE FICHIERS MUSIQUE MP3.....................44
LECTURE DE VIDEOS.................................................... 44
AFFICHER LA STRUCTURE DES FICHIERS................45
CONNEXION A UN TELEVISEUR................................. 45
BRANCHEMENT DE HAUT-PARLEURS......................46
FIXATION DU CADRE PHOTO NUMERIQUE AU
MUR................................................................................. 46
PARAMETRES AVANCES............................................. 47
LECTURE D'IMAGE AVEC MUSIQUE MP3.................47
MENU DE REGLAGE...................................................... 47
36
ELIMINATION DES PANNES........................................49
CONDITIONS DE SERVICE........................................... 52
DIMENSIONS ET POIDS...............................................52
CARACTERISTIQUES TECHNIQUES........................... 52
CERTIFICATIONS............................................................52
QUESTIONS ET REPONSES......................................... 50
Default (Paramètres par défaut)............................ 48
Références......................................................................48
TV Ty pe (Norme TV)..................................................48
Video Output...............................................................48
OSD LANG..................................................................48
Movie Setup (Configuration de la lecture vidéo)... 48
Interval Time (Temps d'intervalle)..........................48
Repeat Mode (Mode de répétition)....................... 48
MISE EN PLACE DE CARTES MEMOIRE....................41
Slideshow Setup (Configuration du diaporama).....47
Slideshow Setup (Mode diaporama)..................... 47
Folder Repeat (Répétition du classeur).................48
Interval Time (Temps d'intervalle)..........................48
Tr ansition (Effet de transition).................................48
CONSIGNES DE SECURITE ET ENTRETIEN...............39
Music Setup (Configuration de la lecture de
musique)..........................................................................47
Repeat Mode (Mode de répétition)....................... 47
Thumbnail Digest......................................................47
Tr ansition Mode (Mode de transition)...................47
¬ Cadre photo numérique Mode d'emploi
Photo Setup (Configuration de la lecture d'image)47
Sommaire
FONCTIONS.................................................................... 38
Introduction
Nous vous remercions d'avoir acheté ce cadre photo numérique.
Avant d'utiliser cet appareil, lisez attentivement le présent mode d'emploi et conservez-le à
portée de main afin de pouvoir le consulter en cas de besoin. Le mode d'emploi contient des
remarques importantes concernant l'utilisation et les fonctions pratiques du cadre photo
numérique.
Le cadre photo numérique vous permet d'afficher des photos directement à partir de la carte
mémoire de votre appareil photo numérique. Vous pouvez afficher un diaporama des images,
pour lequel vous pouvez choisir des effets prédéfinis, ou bien afficher vos photos favorites une
par une. Le cadre photo numérique vous permet de visualiser vos photos sans ordinateur,
appareil photo numérique ou connexion à Internet.
Le cadre photo numérique supporte les types de carte mémoire suivants : SD™, MultiMedia
Card™, SmartMedia®, CompactFlash®, Microdrive™, Memory Stick® et Memory Stick PRO®.
37
Page 20

*En cas d'utilisation de carte mémoire à faible vitesse de transmission, la qualité de la lecture
des fichiers vidéo peut être insuffisante.
•Menu à l'écran convivial permettant d'accéder à toutes les fonctions.
38
•Diaporama avec lecture de fichiers MP3 comme musique de fond.
•Diaporama avec effets de transition sélectionnables et temps d'affichage réglable.
•Avec télécommande au format carte de crédit
•Écran LCD TFT Active Matrix 5,6 pouces.
•Supporte des fichiers image en format JPEG d'une taille maximum de 12 méga pixels.
•Supporte les fichiers image et vidéo JPEG des caméras numériques courantes.
•Lecture directe de fichiers MPEG-I enregistrés sur une carte mémoire supportée*.
•Lecture directe de fichiers MPEG-II enregistrés sur carte Compact Flash-(CF)*.
•Écoutez directement vos fichiers musique MP3 avec les haut-parleurs intégrés.
SmartMedia, Memory Stick, Memory Stick Pro, Microdrive et Compact Flash (CF).
•Pour la lecture et l'écriture de cartes Secure Digital Card (SD), MultiMedia Card (MMC),
afficher vos photos, écouter des fichiers MP3 ou lire des fichiers vidéo supportés (carte
mémoire non fournie).
•Insérez simplement une carte mémoire supportée dans le cadre photo numérique pour
Fonctions
•Affichage de photos numériques (JPEG) sans ordinateur.
Chapitre 1
Nettoyage de l'écran LCD
•Manipulez l'écran avec précaution. L'écran du cadre photo numérique est en verre et
•Pour retirer de la poussière et des traces de doigts de l'écran, nettoyez-le avec un torchon
•Si vous utilisez un kit de nettoyage d'écran LCD commercial, n'appliquez pas directement
doux et non fibreux (p.ex. avec un chiffon de nettoyage pour objectifs).
le liquide de nettoyage sur l'écran LCD. Appliquez le liquide de nettoyage sur un chiffon et
nettoyez l'écran avec le chiffon humide.
39
peut facilement se rayer ou se briser.
•N'exposez pas le cadre photo numérique à l'humidité de condensation.
•Utilisez toujours les touches d'éjection pour retirer les cartes mémoire des emplacements.
•N'ouvrez pas le boîtier du cadre photo numérique. Sinon, il y a risque d'électrocution.
L'ouverture du boîtier supprimera la garantie.
•Protégez le cadre photo numérique des rayons directs du soleil. Les rayons directs du
soleil peuvent endommager l'appareil.
•Afin d'éliminer tout risque d'électrocution et d'incendie, n'exposez jamais l'appareil à
•Veillez à ne pas bloquer les prises d'air sur la face arrière de l'appareil.
l'humidité ni à l'eau.
Consignes de sécurité et entretien
•N'utilisez pas le cadre photo numérique à l'extérieur.
Chapitre 2
Page 21

2. Mettez le cadre sous tension en appuyant sur la touche Marche/arrêt sur la télécommande ou
sur la touche la touche Marche/arrêt sur la face gauche du cadre photo numérique.
40
réglage. Avant la mise en marche, assurez-vous que le support se trouve au
moins dans la première position afin de garantir la stabilité du cadre.
Remarque: Le support sur la face arrière du cadre photo numérique offre 3 positions de
garantir la stabilité. Branchez ensuite l'appareil à une prise de courant.
Mise en route
1. Réglez le support sur la face arrière du cadre photo numérique sur un angle maximum pour en
Chapitre 3
Insérez la carte de mémoire de manière que l'inscription est orientée dans la direction opposée à
vous. Insérez la carte mémoire dans l'emplacement sans forcer. Si vous ne pouvez pas insérer la
Remarque: Le cadre photo numérique supporte uniquement des images numériques en format
JPEG. Les images enregistrées en d'autres formats ne sont pas reconnues.
Si vous avez insérez la carte mémoire correctement, l'écran suivant apparaît. Assurez-vous que
la carte mémoire contient au moins une image. Si la carte mémoire ne contient pas d'image, le
cadre photo numérique ne fonctionne pas correctement.
41
carte mémoire complètement, vous l'avez peut-être introduite à l'envers.
•Carte CompactFlashTM (CF)
•Microdrive®
•Carte SmartMediaTM
•Memory StickTM & Memory Stick ProTM
•Carte Secure DigitalTM (SD)
•Carte MultiMediaTM (MMC)
Le cadre photo numérique supporte les types de carte mémoire suivants :
Mise en place de cartes mémoire
Page 22

Pour plus d'informations, référez-vous à la section « Paramètres avancés ».
(15) et Précédente (16).
42
10. Pour désactiver la fonction diaporama, sélectionnez Setup (Configuration), Slideshow
Setup (Configuration du diaporama), Slideshow Mode (Mode diaporama) et Manual
(Manuel). Vous pouvez passez à l'image suivante ou précédente avec les touches Suivante
utiliser la fonction temps d'intervalle.
Enter. Appuyez sur la touche Setup pour quitter le menu de réglage.
Remarque : Le Slide Show Mode (Mode diaporama) doit être réglé sur Auto pour pouvoir
9. Sélectionnez le temps d'intervalle avec la touche Flèche bas. Indiquez les intervalles avec
la touche Flèche droit. Sélectionnez le temps de transition désiré et appuyez sur la touche
2. Enlevez l'isolation de la pile en plastique se trouvant sur le dessous de la télécommande si
nécessaire, et assurez-vous que le compartiment comporte une pile. Pour des information
sur le remplacement des piles, référez-vous à la section « Insertion et remplacement des
touches fonction».
désirée avec le touches Flèche droite et Flèche gauche sur la télécommande et
sélectionnez-la avec Enter).
3. Passez au classeur Photo avec la télécommande et sélectionnez-le. (Passez à l'option
piles » à la page xx.
4. Sélectionnez une image, et appuyez sur Enter pour l'afficher.
5. La roue de réglage du contraste sur le côté droit du cadre vous permet de régler le
6. La touche Luminosité (13) permet de régler la luminosité.
7. Appuyez sur la touche Setup sur la télécommande pour accéder au menu de réglage.
8. Passez à l'option Slideshow Setup (Configuration du diaporama) avec la touche Flèche bas.
Appuyez sur Enter pour continuer.
contraste.
Afficher des images
1. Vous pouvez opérer votre cadre numérique à partir de la télécommande ou avec les
touches de l'appareil. Pour plus d'informations, référez-vous à la section « Positions des
Insertion et remplacement des piles
1. Prenez la télécommande en main de manière que les touches sont orientées vers le bas.
2. Poussez la surface cannelée de la pile vers le bas, et retirez le support de la pile.
3. Insérez une pile Lithium CR2025 de manière que le pôle positif (+) est orienté vers vous.
4. Fermez le compartiment de la pile.
43
(5) To uche flèche bas
(6) To uche flèche haut
(7) Menu
(8) PIC+MP3
(13) Luminosité
(14) Muet
(15) Suivant
(16) Précédent
(21) Agrandir/réduire
(22) Stop
(23) Lecture/pause
(1) Marche/arrêt
(2) To uche flèche droit
(3) To uche flèche gauche
(4) Enter
(9) Réglage
(10) Volume +/-
(11) Info
(12) Répétition
(17) FF (Avance Rapide)
(18) FR (Retour Rapide)
(19) NTSC/PAL
(20) To urner l'image
Positions des touches de fonction
Page 23

Lecture de fichiers musique MP3
Pour pouvoir utiliser la fonction MP3, vous devez enregistrer au moins un fichier MP3 sur la carte
Pour pouvoir utiliser la fonction vidéo, vous devez enregistrer au moins un fichier vidéo sur la
carte.
•MPEG-I
•MPEG-II (uniquement cartes CF). Pour d'autres cartes mémoire, la qualité de la lecture
des fichiers vidéo peut être insuffisante.)
44
Le cadre photo numérique supporte les formats vidéo suivants :
•Motion JPEG (AVI) : Le format vidéo utilisé par la plupart des caméras numériques.
4. Les touches FF (17) et FR (18) activent l'avance et le retour rapide.
5. Appuyez sur la touche Suivant (15) ou Précédent (16) pour sélectionner le morceau de
musique suivant ou précédent.
3. La touche Volume +/- permet de régler le volume (10 ).
2. Sélectionnez le fichier musique désiré avec les touches de direction, et appuyez sur la
touche Enter.
télécommande.
Pour plus d'informations, référez-vous à la section « Paramètres avancés ».
Lecture de vidéos
(pour plus d'informations, référez-vous à la section « Questions et réponses ».
1. Sélectionnez le classeur Music avec les touches Flèche droite et Flèche gauche sur la
La structure des fichiers vous donne accès à tous vos fichiers image, musique et vidéo. Pour
démarrer la lecture d'un fichier supporté, sélectionnez-le et appuyez sur la touche Enter .
Connexion à un téléviseur
Connectez le cadre photo numérique à votre téléviseur à l'aide du câble S-Video fourni. Éteignez
le cadre photo numérique et votre téléviseur avant de les connecter.
45
Passez au classeur File et sélectionnez-le.
4. Les touches FF (17) et FR (18) activent l'avance et le retour rapide.
5. Appuyez sur la touche Suivant (15) ou Précédent (16) pour sélectionner le fichier vidéo
suivant ou précédent.
2. Sélectionnez le fichier vidéo désirée avec les touches de direction, et appuyez sur la
3. La touche «Volume +/-» permet de régler le volume (10 ).
touche Enter.
1. Passez au classeur Video et sélectionnez-le.
Pour plus d'informations, référez-vous à la section « Paramètres avancés ».
Afficher la structure des fichiers
Page 24

Remarque: Nous recommandons d'utiliser une vis 6 mm.
46
dessus avec précaution.
Sortie casque
Sortie TV
Contraste
Support
mobile
Branchement de haut-parleurs
Branchez vos haut-parleurs à la sortie casque sur le côté droit du cadre photo numérique.
Fixation du cadre photo numérique au mur
Le perçage de fixation 7 mm sur l'arrière du cadre photo numérique vous permet de fixer le cadre
au mur. Assurez-vous que la vis 6 mm est centrée dans le perçage de fixation et placez le cadre
47
Slideshow Setup (Mode diaporama)
•Manual (Manuel) : Pour désactiver la fonction diaporama. Sélectionnez cette option pour
afficher vos images manuellement.
Slideshow Setup (Configuration du diaporama)
•Off : Désactiver le mode de répétition
•One : Répéter un fichier de musique
•All : Répéter la liste de lecture entière
Music Setup (Configuration de la lecture de musique)
Repeat Mode (Mode de répétition)
•Normal : Tr ansition normale à la prochaine image du diaporama.
•Slow (Lent) : Tr ansition lente à la prochaine image du diaporama.
Transition Mode (Mode de transition)
•Fast (Rapide) : Tr ansition rapide à la prochaine image du diaporama.
Photo Setup (Configuration de la lecture d'image)
Thumbnail Digest
Non disponible
Appuyez sur la touche Setup sur la télécommande pour accéder au menu de réglage.
Certains paramètres affichés sur l'écran de réglage ne figurent pas dans les explications ci-des-
sous. Ces paramètres n'ont pas de fonction et peuvent être ignorés.
Menu de réglage
3. Pour arrêter la lecture, appuyez de nouveau sur la touche PIC.+MP3 (8).
2. Appuyez sur la touche PIC.+MP3 (8) sur la télécommande pour afficher les images avec
de la musique de fond (MP3).
Lecture d'image avec musique MP3
1. Sélectionnez le classeur Photo dans le menu principal.
Chapitre 4
Paramètres avancés
Page 25

Références
Video Output
Non disponible
OSD LANG
Sélectionnez la langue pour le menu à l'écran.
Default (Paramètres par défaut).
Vous pouvez rétablir les paramètres de défaut à l'aide de cette option.
48
TV Ty pe (Norme TV)
Vous pouvez choisir entre les normes Multi System, NTSC et PAL.
•All : Répéter la liste de lecture entière
•Off : Désactiver le mode de répétition
•One : Répéter un fichier vidéo
Repeat Mode (Mode de répétition)
Interval Time (Temps d'intervalle)
Réglez le temps d'intervalle entre deux fichiers vidéo sur Fast (Rapide) ou Normal.
Interval Time (Temps d'intervalle)
Sélectionnez la durée d'affichage des photos dans la liste. Le Slide Show Mode (Mode
diaporama) doit être réglé sur Auto pour pouvoir utiliser cette fonction.
Transition (Effet de transition)
Sélectionnez l'effet de transition pour le diaporama dans la liste. Faites défiler la liste avec la tou-
che Flèche bas pour afficher tous les effets de transition disponibles. Appuyez sur Enter pour
appliquer l'effet de transition sélectionné.
Movie Setup (Configuration de la lecture vidéo)
•On : Le diaporama redémarre après la dernière image.
•Off : Le diaporama s'arrête après la dernière image.
Folder Repeat (Répétition du classeur)
•Auto : Si vous sélectionnez cette option, le mode diaporama est activé automatiquement
lorsque vous entrez en mode Photo
Chapitre 5
Elimination des pannes
Problème
Le cadre photo numérique ne •Le câble secteur n'est pas branché correctement.
•La carte mémoire ne contient pas de fichiers image,
musique ou vidéo.
Pas d'écran de départ. •La carte mémoire n'est pas insérée correctement.
apparaît en blanc (même si le cadre ne comporte pas de
carte mémoire). Si l'écran blanc n'apparaît pas, vérifiez la
connexion du cadre numérique avec l'adaptateur secteur.
Aucune image apparaît en mode •Le format de fichier n'est pas supporté.
La touche PIC + MP3 ne fonctionne •Opération non valide.
pas.
•La carte mémoire ne contient pas de fichiers musique.
>Sélectionnez d'abord le classeur Photo.
>N'appuyez sur la touche PIC + MP3 qu'après avoir ouvert
le classeur PHOTO.
49
BMP, GIF etc. ne sont pas supportés.
>Format d'image supporté : JPEG
>Le cadre photo numérique supporte uniquement des
images numériques en format JPEG. Les formats TIFF,
PHOTO. •La carte mémoire ne contient pas de fichiers image.
>Assurez-que la carte mémoire contient au moins un
fichier image supporté.
>Formats vidéo supportés : Motion JPEG (AVI), MPEG-I,
MPEG-II.
>Format musique supporté : MP3
>Format image supporté : JPEG
fichier image, musique ou vidéo supporté.
>Assurez-que la carte mémoire contient au moins un
•Le format de fichier n'est pas supporté.
>Assurez-vous que le carte mémoire est insérée
correctement. L'inscription doit être orientée dans la
direction opposée à vous. Insérez la carte mémoire dans
l'emplacement sans forcer.
adaptateur secteur et vous l'allumez, un écran vide
s'allume pas. >Assurez-vous que le cadre est branché correctement à
Cause / Solution
l'adaptateur secteur. Lorsque l'appareil est branché à un
Page 26

musique ? format MP3 avec votre ordinateur et un logiciel de
Comment enregistrer des fichiers •Vous pouvez convertir vos morceaux de musique en
numérique ? •Cartes SmartMedia
Quels cartes mémoire sont •Cartes Secure Digital (SD)
supportées par le cadre photo •Cartes MultiMedia (MMC)
par le cadre photo numérique ? •Musique : MP3
Quels formats vidéo sont supportés •Photo : JPEG
Questions et réponses
Question
Des barres noires apparaissent
autour de l'image.
L'image vidéo est trop petite. >Résolution d'image insuffisante.
Les vidéos ne sont pas lus •La vitesse de transmission de la carte mémoire est
correctement. insuffisante.
La sortie TV ne fonctionne pas. •Vérifiez le réglage de la norme TV (NTSC/ PAL).
>Utilisez une carte mémoire de transmission rapide pour
mémoire ? carte mémoire. Les cartes de mémoire insérées sont
lus à partir d'une carte CompactFlash.
Peut on insérer plusieurs cartes •Oui. Allumez toujours l'appareil avant d'y installer une
>Les fichiers vidéo en format MPEG-II ne peuvent qu'être
lire des fichiers vidéo.
Le cadre numérique dispose-t-il •Non. Vous ne pouvez pas enregistrer de fichier média sur
d'une mémoire interne ? le cadre photo numérique. Utilisez une carte mémoire
>Ce problème est dû au fait que les caméras numériques
utilisent des résolution d'image (nombre de pixels)
différentes.
Peut-on afficher tous les types de •Non. Le cadre supporte uniquement les formats AVI des
fichier AVI? caméras numériques les plus courantes.
Quelle est la meilleure résolution •La résolution maximale est de 640x480.
photos et les vidéos. La touche ZOOM sur la
télécommande vous permet d'agrandir l'image.
photo numérique? .
MPEG-II enregistrés sur des cartes les cartes mémoire supportées. Il est éventuellement
>Vous pouvez régler la résolution de l'image sur 640x480 à
l'aide d'un logiciel de traitement d'images.
d'écran?
Peut-on lire des fichiers MPEG-I et •Vous pouvez lire des fichiers MPEG-I à partir de toutes
•Microdrive
•Cartes CompactFlash (CF)
•MS Memory Stick et MemoryStick Pro
•Vidéo : Motion JPEG (AVI), MPEG-I, MPEG-II.
Réponse
traitement audio courant comme MusicMatch.
50
autres que CompactFlash ? possible de lire des fichiers MPEG-II à l'aide d'une carte
Mon téléviseur n'a pas d'entrée •Utilisez un adaptateur S-Video/Composite pour connecter
S-Video. Que faire ?
Peut-on faire tourner les images •Oui. La touche ROTATE sur la télécommande vous permet
Peut-on modifier les couleurs de •Non. To us le paramètres de couleur sont préréglés à
l'image ? l'usine. Vous pouvez uniquement modifier la luminosité
sur l'écran ? de faire tourner les images.
supporte une résolution maximale de 640x480 pour les
Quelle est la taille d'image •Le cadre photo numérique supporte une taille d'image
maximale supportée par le cadre maximale de 12 méga pixels
>La plupart des caméras numériques enregistre les vidéos
avec une résolution de 320x240 ou plus faible. Le cadre
•Appuyez sur la touche PAL/NTSC pour sélectionner le
réglage désiré.
supporte pas ma carte mémoire. une des cartes mémoire supportée. Si vous utilisez p.ex.
Que faire ? une carte Xd, connectez-là au cadre photo à l'aide d'un
>Assurez-vous que la carte mémoire contient au moins un
fichier MP3.
Le cadre photo numérique ne •Utilisez un adaptateur carte mémoire compatible avec
et le contraste de l'image.
51
l'image reprend son orientation originale.
SD à transmission rapide.
le cadre photo à votre téléviseur.
affichées à l'écran. Sélectionnez la carte mémoire
désirée avec la télécommande.
supportée pour lire vos fichiers média.
adaptateur carte mémoire Xd sur CF.
•Remarque : Si vous éteignez le cadre photo numérique,
•Chargez le fichier MP3 sur la carte mémoire à l'aide d'un
lecteur de cartes.
Page 27

Caractéristiques techniques
Écran: LCD Active Matrix 5,6 pouces
Mémoire: Core Flash 1 Mo
S-Video (NTSC/PAL)
E/S: Sortie casque
Haut-parleur (stéréo)
8 Mo SDRAM
Les noms de produit et les marques cités dans le présent mode d'emploi sont des marques ou
des marques déposées de leurs détenteurs respectifs. Sous réserve de modifications techniques
sans préavis.
52
Stockage : -20 à 60° C, humidité 10 à 90 %
Télécommande: Commande à distance
Alimentation électrique: Adaptateur secteur; entrée 100 - 240 V; sortie 12 V, 1,5 A
Certifications
CE, FCC, UL
Dimensions et poids
Dimensions : 210 x 150 x 45 mm (L x L x H)
Poids : 600 g
Conditions de service
Marche : 0 à 35° C, humidité 0 à 85 %
: Digitale fotolijst Gebruiksaanwijzing
Inhoudsopgave
FUNCTIES........................................................................55
Repeat Mode (herhaalmodus).....................................64
VOORZORGSMAATREGELEN EN ONDERHOUD.......56
Photo Setup (fotoweergave inrichten)......................64
Thumbnail Digest...........................................................64
Tr ansition Mode (overgangsmodus).......................... 64
Music Setup (muziekweergave inrichten)...............64
EERSTE STAPPEN..........................................................57
WEERGEVEN VAN FOTO'S...........................................59
POSITIES VAN DE FUNCTIETOETSEN....................... 60
PLAATSEN EN VERVANGEN VAN DE BATTERIJ..... 60
WEERGAVE VAN MP3-MUZIEKBESTANDEN...........61
AFSPELEN VAN VIDEO'S..............................................61
WEERGEVEN VAN DE BESTANDSSTRUCTUUR.......62
TV-AANSLUITING..........................................................62
AANSLUITEN VAN LUIDSPREKERS...........................63
WANDBEVESTIGING VAN DE DIGITALE
FOTOLIJST.......................................................................63
OVERIGE INSTELLINGEN............................................. 64
WEERGAVE VAN FOTO'S MET MP3-MUZIEK.......... 64
INSTEL-MENU................................................................64
53
Interval Time (intervaltijd)............................................ 65
Referenties..................................................................... 65
TV Ty pe (tv-formaat)......................................................65
Video-output...................................................................65
OSD LANG.......................................................................65
Default (standaard instellingen)..................................65
VERHELPEN VAN STORINGEN....................................66
VRAAG EN ANTWOORD...............................................67
TECHNISCHE GEGEVENS.............................................69
KEURMERKEN/NORMEN..............................................69
AFMETINGEN EN GEWICHTEN...................................69
OMGEVINGSVOORWAARDEN.................................... 69
Repeat Mode (herhaalmodus).....................................65
Movie Setup (filmweergave inrichten).....................65
PLAATSEN VAN GEHEUGENKAARTEN......................58
Slideshow Setup (diashow inrichten)...................... 64
Slideshow Mode (diashow-modus)............................64
Folder Repeat (herhaling map)....................................65
Interval Time (intervaltijd)............................................ 65
Tr ansition (overgang)....................................................65
Page 28

Inleiding
Van harte gefeliciteerd met de aankoop van deze digitale fotolijst.
Lees de gebruiksaanwijzing, voordat u het apparaat in gebruik neemt, zorgvuldig door en bewaar
deze om later als naslagwerk te kunnen gebruiken. In deze gebruiksaanwijzing worden veel inter-
essante en praktische functies van uw digitale fotolijst beschreven.
Met de digitale fotolijst kunt u digitale foto's direct van de geheugenkaart vanaf uw camera
weergeven. U kunt ook een diashow activeren, waarbij u de keuze heeft uit verschillende over-
gangseffecten, of afzonderlijke foto's weergeven. Daarvoor heeft u noch een computer, noch een
digitale camera of internet-verbinding nodig.
De digitale fotolijst ondersteunt de volgende gangbare geheugenkaartformaten: SD™, MultiMe-
dia Card™, SmartMedia®, CompactFlash®, Microdrive™, Memory Stick® en Memory Stick
PRO®.
54
*Bij geheugenkaarten met een lage overgangssnelheid, kan het zijn dat videobestanden niet
goed worden weergegeven.
55
•Diashow met MP3-weergave als achtergrondmuziek.
•Gebruiksvriendelijk beeldschermmenu voor gemakkelijk navigeren naar alle functies.
•Duidelijk 5,6-Zoll-TFT-Active-Matrix-LCD-beeldscherm.
•Automatische diashow met meerdere overgangseffecten en instelbare weergaveduur.
•Ondersteuning van JPEG-foto's en JPEG-videobestanden van gangbare digitale camera's.
•Met afstandsbediening ter grootte van een creditcard.
•Directe weergave van MPEG-II-bestanden op compatibele Compact-Flash-kaarten (CF)*.
•Ondersteuning van fotobestanden in JPEG-formaat met een resolutie van maximaal
12 megapixels.
•Directe weergave van MP3-muziekbestanden via de geïntegreerde luidsprekers.
•Directe weergave van MPEG-I-bestanden op compatibele geheugenkaarten*.
•De fotolijst ondersteunt de volgende geheugenkaarten: Secure Digital Card (SD),
MultiMedia Card (MMC), SmartMedia, Memory Stick, Memory Stick Pro, Microdrive
en Compact Flash (CF).
•Plaats een compatibele geheugenkaart in de digitale fotolijst om uw foto's weer te geven,
MP3-muziekbestanden af te spelen of compatibele videobestanden weer te geven
(geheugenkaart niet bij de verpakking inbegrepen).
Functies
•Weergave van digitale foto's (JPEG) zonder computer.
Hoofdstuk 1
Page 29

Reiniging van het LCD-beeldscherm
•Behandel het beeldscherm zorgvuldig. Het beeldscherm van de digitale fotolijst is van glas
•Als het LCD-beeldscherm vuil is door vingerafdrukken of stof, reinig het dan met een
•Als u een gangbare LCD-reinigingskit gebruikt, mag de vloeistof niet direct op het
en kan daardoor krassen oplopen of breken.
zachte, pluisvrije doek (bijvoorbeeld met een reinigingsdoek voor cameralenzen).
LCD-beeldscherm worden aangebracht. Breng de vloeistof op een reinigingsdoek aan
en reinig daarmee het beeldscherm.
56
•De digitale fotolijst mag niet aan condensvocht worden blootgesteld.
van een elektrische schok! Als de behuizing geopend wordt, is de garantie niet meer
geldig.
•De behuizing van de digitale fotolijst mag niet worden geopend. Anders ontstaat het risico
geheugenkaart uit het apparaat te nemen.
•Maak bij het opnemen op geheugenkaarten altijd gebruik van de uitwerp-toetsen om de
•Stel de digitale fotolijst niet bloot aan directe zonnestralen. Hierdoor kan het apparaat
beschadigd raken.
worden.
•Ter voorkoming van elektrische schokken en brandgevaar, mag het apparaat niet in
•De ventilatieopeningen aan de achterzijde van het apparaat mogen niet geblokkeerd
aanraking komen met water of vocht.
Voorzorgsmaatregelen en onderhoud
•De digitale fotolijst is uitsluitend bedoeld voor gebruik binnenshuis.
Hoofdstuk 2
2. Schakel de digitale fotolijst in met de aan-/uit-toets op de afstandsbediening of met de
aan-/uit-knop aan de linkerzijde van de digitale fotolijst.
57
Attentie: De houder aan de achterzijde van de digitale fotolijst kan in drie posities
worden ingesteld. Zet de houder voor de ingebruikname in de eerste positie,
zodat het apparaat niet kan omvallen.
apparaat niet kan omvallen. Sluit vervolgens de netstekker aan.
Eerste stappen
1. Stel de houder aan de achterzijde van de digitale fotolijst in op de grootste hoek, zodat het
Hoofdstuk 3
Page 30

Plaatsen van geheugenkaarten
Let er bij het plaatsen van de geheugenkaart op dat u de kaart zodanig plaatst dat het opschrift
omgekeerd is. Duw de geheugenkaart niet met geweld in de sleuf. Als de geheugenkaart niet vol-
Attentie: De digitale fotolijst ondersteunt automatisch digitale foto's in JPEG-formaat. Foto's die
in een ander digitaal formaat zijn opgeslagen, worden door het apparaat niet herkend.
Als u de geheugenkaart correct heeft geplaatst, verschijnt het volgende beeldscherm. Controleer
of er op de geheugenkaart ten minste één foto staat. Als de geheugenkaart leeg is, functioneert
de digitale fotolijst niet goed.
58
ledig kan worden ingeschoven, houdt u de kaart waarschijnlijk verkeerd.
•CompactFlashTM-kaarten (CF)
•Microdrive®
•SmartMediaTM-kaarten
•Memory StickTM & Memory Stick ProTM
De digitale fotolijst ondersteunt de volgende geheugenkaarten:
•Secure DigitalTM-kaarten (SD)
•MultiMediaTM-kaarten (MMC)
Meer informatie vindt u in de paragraaf “Overige instellingen“.
2. Verwijder van de onderzijde van de afstandsbediening, indien aanwezig, de kunststof
isolatie van de batterij en controleer of er een batterij geplaatst is. Informatie over het
vervangen van de batterij vindt u in de paragraaf “Plaatsen en vervangen van de batterij“.
functietoetsen“.
en selecteer deze met Enter.)
3. Ga met de afstandsbediening naar de map Photo en selecteer deze. (Navigeer met de
richtingstoetsen Naar rechts, Naar links op de afstandsbediening naar de gewenste optie
4. Selecteer een foto en druk op Enter om hem weer te geven.
5. Stel met de contrastinstelling aan de rechter zijde van de lijst het contrast in.
6. Stel met de toets Lichtsterkte (13) de lichtsterkte in.
7. Druk de toets Setup op de afstandsbediening in om het instel-menu te activeren.
8. Ga met de toets Naar beneden naar de optie Slideshow Setup (diashow configureren).
selecteren. Druk op Enter om de selectie te bevestigen. Druk de toets Setup in om het
de tijden in. Navigeer naar boven of naar beneden om de gewenste overgangstijd te
9. Selecteer met de toets Naar beneden de intervaltijd. Voer met de richtingtoets Naar rechts
Druk op Enter om verder te gaan.
10. Selecteer, om de diashow-functie te deactiveren, Setup, Slideshow Setup (diashow
instel-menu te verlaten.
Attentie: de intervaltijd-functie kan alleen worden gebruikt als de Slide Show Mode
(diashow-modus) op Auto staat.
configureren), Slideshow Mode (diashow-modus) en Manual (handmatig). U gaat naar
de volgende of vorige foto door de toets Volgende (15) of Vorige (16) in te drukken.
59
Weergeven van foto's
1. U kunt de fotolijst naar keuze via de afstandsbediening of met de knoppen op het apparaat
bedienen. Meer informatie vindt u in de volgende paragraaf onder “Posities van de
Page 31

Plaatsen en vervangen van de batterijen
1. Draai de afstandsbediening om, zodat de toetsen naar beneden wijzen.
2. Druk het geribbelde gedeelte op het batterijvak naar beneden en trek de batterijhouder
3. Plaats een lithium-batterij CR2025 en let erop dat de pluspool „+“ in de juiste richting
4. Sluit het batterijvak.
eruit.
gelegd wordt.
60
(5) Naar beneden
(6) Naar boven
(7) Menu
(8) PIC+MP3
(13) Lichtsterkte
(14) Mute
(15) Volgende
(16) Vorige
(21) Vergroten/Verkleinen
(22) Stop
(23) Weergave/Pauze
(2) Naar rechts
(3) Naar links
(4) Enter
(10) Volume +/-
(11) Info
(12) Herhalen
(18) FR (Fast Rewind)
(19) NTSC/PAL
(20) Foto draaien
(1) In/Uit
(9) Setup
(17) FF (Fast Forward)
Posities van de functietoetsen
Weergave van MP3-muziekbestanden
Voordat u gebruik kunt maken van de MP3-functie, moet er ten minste één MP3-muziekbestand
Om video's te kunnen afspelen, moet er ten minste één videobestand op de geheugenkaart staan.
•MPEG-I
•MPEG-II (alleen CF-kaarten. Bij andere kaarten kan het zijn dat de weergave niet goed is.)
61
De digitale fotolijst ondersteunt de volgende videoformaten:
•Motion JPEG (AVI): het videoformaat dat door de meeste digitale camera's wordt gebruikt.
5. Druk de toets Volgende (15) of Vorige (16) in om naar het volgende of vorige muziekstuk
te gaan.
3. Regel het volume met de toets Volume +/- (10).
4. Met de toetsen FF (17) en FR (18) kunt vooruit- en terugspoelen.
2. Selecteer met de richtingstoetsen het gewenste muziekbestand en druk op de toets Enter.
en selecteer deze map.
Meer informatie vindt u in de paragraaf “Overige instellingen“.
Afspelen van video's
op de geheugenkaart staan (meer informatie vindt u in de paragraaf „Vraag en antwoord“).
1. Ga met de toetsen Naar rechts en Naar links op de afstandsbediening naar de map Music
Page 32

In de bestandsstructuur kunt u naar alle foto-, muziek- en videobestanden navigeren. Met de
toets Enter kunt u de ondersteunde bestanden selecteren en afspelen.
Tv-aansluiting
Sluit de digitale fotolijst met de meegeleverde S-video-kabel aan op een tv. Schakel zowel de
fotolijst als de tv uit voordat u de twee apparaten op elkaar aansluit.
62
Ga naar de map File (bestand) en selecteer deze.
4. Met de toetsen FF (17) en FR (18) kunt vooruit- en terugspoelen.
5. Druk de toets Volgende (15) of Vorige (16) in om naar de volgende of vorige video te gaan.
3. Regel het volume met de toets Volume +/- (10).
2. Selecteer met de richtingstoetsen het gewenste videobestand en druk op de toets Enter.
1. Ga naar de map Video en selecteer deze.
Meer informatie vindt u in de paragraaf “Overige instellingen“.
Weergeven van de bestandsstructuur
Attentie: wij adviseren u een 6-mm-schroef te gebruiken.
63
schroef goed in het montagegat zit en schuif de fotolijst voorzichtig erop.
Aansluiting koptelefoon
Tv-uitgang
Contrast
houder
Flexibele
Aansluiten van luidsprekers
Sluit uw luidsprekers aan op de uitgang voor de koptelefoon aan de rechter zijde van de fotolijst.
Wandbevestiging van de digitale fotolijst
Met behulp van de 7-mm-montagegaten aan de achterzijde van de digitale fotolijst (zie afbeelding
onder), kunt u de lijst aan de wand bevestigen. Controleer, voor de wandmontage, of de 6-mm-
Page 33

als u de weergegeven foto's handmatig wilt weergeven.
64
Slideshow Setup (diashow configureren)
Slideshow Mode (diashow-modus)
•Manual (handmatig): voor het uitschakelen van de diashow-functie. Selecteer deze optie
•One: een muziekbestand herhalen
•All: alle muziekbestanden uit de weergavelijst herhalen
•Off: Herhaalmodus deactiveren
Music Setup (muziekweergave configureren)
Repeat Mode (herhaalmodus)
•Slow (langzaam): langzame overgang naar de volgende foto bij de diashow.
Transition Mode (overgangsmodus)
•Fast (snel): snelle overgang naar de volgende foto bij de diashow.
•Normal: normale overgang naar de volgende foto bij de diashow.
3. Druk de toets PIC.+MP3 (8) nogmaals in om de weergave stop te zetten.
MP3-achtergrondmuziek te activeren.
Instel-menu
Een paar instellingen in het Setup-beeldscherm worden hier niet nader verklaard. Deze instellin-
gen worden weliswaar weergegeven maar hebben geen functie. Sla deze instellingen over.
Druk de toets Setup op de afstandsbediening in om het instel-menu te activeren.
Photo Setup (fotoweergave configureren)
Thumbnail Digest
Niet beschikbaar
2. Druk de toets PIC.+MP3 (8) op de afstandsbediening in om de foto's met
1. Selecteer in het hoofdmenu de map Photo.
Weergave van foto's met MP3--muziek
Hoofdstuk 4
Overige instellingen
Referenties
Video Output
Niet beschikbaar
OSD LANG
Selecteer de taal voor het beeldschermmenu.
Default (standaard instellingen)
Met deze optie kunt u de standaard instellingen weer oproepen.
65
TV Ty pe (Tv-formaat)
U heeft de keuze tussen de tv-formaten Multi System, NTSC en PA L.
•All: alle videobestanden uit de weergavelijst herhalen
•Off: herhaalmodus deactiveren
•One: een videobestand herhalen
Repeat Mode (herhaalmodus)
Interval Time (intervaltijd)
Zet de intervaltijd tussen twee videobestanden op Fast (snel) of op Normal.
Interval Time (intervaltijd)
Leg de weergaveduur van bepaalde foto's in de lijst vast. Van deze functie kan alleen gebruik
worden gemaakt als de Slide Show Mode (diashow-modus) op Auto staat.
Transition (overgang)
Selecteer in de lijst het overgangseffect voor de diashow. Ga in de lijst met de toets Naar bene-
den om alle overgangseffecten te bekijken. Druk op Enter om het gewenste overgangseffect vast
te leggen.
Movie Setup (filmweergave configureren)
Folder Repeat (herhaling map)
•On: de diashow begint na de laatste foto opnieuw.
•Off: de diashow wordt na de laatste foto stopgezet.
•Auto: als u deze optie selecteert, wordt de diashow-modus bij de selectie van de functie
Photo automatisch geactiveerd.
Page 34

>Selecteer eerst de map PHOTO.
66
PIC + MP3-toets zonder functie. •Ongeldige procedure.
•Op de geheugenkaart zijn geen muziekbestanden
opgeslagen.
niet ondersteund.
>De digitale fotolijst ondersteunt uitsluitend foto's in
JPEG-formaat. De formaten TIFF, BMP, GIF, enz., worden
>Ondersteund fotoformaat: JPEG
compatibel fotobestand staat.
PHOTO wordt er geen foto
weergegeven.
•Op de geheugenkaart zijn geen fotobestanden
>Controleer of er op de geheugenkaart ten minste één
opgeslagen.
Bij de selectie van de functie
>Ondersteund muziekformaat: MP3
>Ondersteund videoformaat: Motion JPEG (AVI), MPEG-I,
•Het bestandsformaat wordt niet ondersteund.
MPEG-II.
>Ondersteund fotoformaat: JPEG
compatibel foto-, muziek- of videobestand staat.
>Controleer of er op de geheugenkaart ten minste één
opschrift omgekeerd is. Duw de geheugenkaart niet met
geweld in de sleuf.
>Controleer of de geheugenkaart correct geplaatst is. De
geheugenkaart moet zodanig geplaatst zijn dat het
Geen start-beeldscherm. •De geheugenkaart is niet correct geplaatst.
•Op de geheugenkaart zijn geen foto-, muziek- of
•Het bestandsformaat wordt niet ondersteund.
videobestanden opgeslagen.
Hoofdstuk 5
Verhelpen van storingen
Storing Oorzaak/oplossing
De digitale fotolijst kan niet worden •De netkabel is niet goed aangesloten.
ingeschakeld. >Controleer of de fotolijst goed is aangesloten op de
netadapter. Als het apparaat op een netadapter is
aangesloten en u schakelt het in, verschijnt er een wit
leeg beeldscherm (ook als er geen geheugenkaart
geplaatst is). Als het witte beeldscherm niet wordt
weergegeven, controleer dan de aansluiting van de
digitale fotolijst en de netadapter.
67
Hoe sla ik muziekbestanden op? •Met een computer en een gangbare audio-
bewerkingssoftware, zoals MusicMatch, kunt u uw
muziekstukken naar MP3-formaat converteren.
•Microdrive
•CompactFlash-kaarten (CF)
•Memory Stick en Memory Stick Pro
Videobeeld te klein. >Te lage beeldresolutie.
>De meeste digitale camera's nemen video's met een
resolutie van 320x240 of minder op. Foto's en video's
>MPEG-II-video's kunnen alleen door CompactFlash-
kaarten worden weergegeven.
van het model gebruik maken van verschillende resoluties
(pixels).
Om de foto staan zwarte balken. >Dit heeft als oorzaak dat digitale camera's, afhankelijk
ondersteund. Met de ZOOM-toets op de
afstandsbediening kunt u het beeld vergroten.
worden met een resolutie van maximaal 640x480
Vraag en antwoord
Welke foto-, muziek- en •Foto: JPEG
videoformaten worden door de •Muziek: MP3
digitale fotolijst ondersteund? •Video: Motion JPEG (AVI), MPEG-I, MPEG-II.
Welke geheugenkaarten worden •Secure Digital-kaarten (SD)
door de digitale fotolijst •MultiMedia-kaarten (MMC)
ondersteund? •SmartMedia-kaarten
>Met een foto-bewerkingssoftware kunt u de resolutie op
640x480 zetten.
Slechte video-weergave. •Overdrachtssnelheid van de geheugenkaart is te laag.
>Gebruik voor het weergeven van videobestanden een
Hi-Speed-geheugenkaart.
Tv-uitgang zonder functie. •Controleer de instelling NTSC/PAL.
•Druk de toets PA L/NTSC in om de gewenste instelling te
selecteren.
>Controleer of er op de geheugenkaart ten minste één
MP3-muziekbestand staat.
>Druk de toets PIC + MP3 pas in nadat u de map PHOTO
geopend heeft.
Page 35

aanpassen? de lichtsterkte en het contrast van het beeldscherm
Kan ik kleuren op de foto •Nee. Alle kleuren zijn in de fabriek ingesteld. U kunt wel
Kan ik foto's op het beeldscherm •Ja. Met de ROTATE-toets op de afstandsbediening kunt u
draaien?
Wat kan ik hieraan doen? daarmee de fotolijst op uw tv aan.
Mijn tv heeft geen S-video-ingang. •Schaf een S-video/composite-videoadapter aan en sluit
Kan ik MPEG-I- en MPEG-II- •MPEG-I-video's kunnen door alle ondersteunde
bestanden ook van andere kaarten geheugenkaarten worden afgespeeld. MPEG-II-
dan CompactFlash-kaarten bestanden kunnen eventueel ook met een Hi-Speed-
afspelen? SD-kaart goed worden weergegeven.
Welke is de beste beeldschermr •De fotolijst biedt een resolutie aan van maximaal 640x480.
esolutie?
Kan elk willekeurig AVI- •Nee. Het apparaat ondersteunt alleen de AVI-
videobestandstype worden weer
gegeven?
Welke foto-afmeting kan de digitale •De digitale fotolijst kan foto's met een afmeting van
fotolijst weergeven? maximaal 12 megapixels weergeven.
Kan ik meer dan een geheugenkaart •Ja. Schakel het apparaat altijd in voordat u een
plaatsen? geheugenkaart plaatst. Op het beeldscherm wordt
Beschikt de fotolijst over een •Nee. Op de digitale fotolijst kunnen geen bestanden
geïntegreerd geheugen? bestanden gebruik van een compatibele geheugenkaart.
Mijn geheugenkaart wordt niet door •Gebruik een geheugenkaartadapter die compatibel is met
de digitale fotolijst ondersteund. de ondersteunde geheugenkaarten. Als u bijvoorbeeld
Wat kan ik hieraan doen? een Xd-kaart gebruikt, schaf dan een Xd-op-CF-
•Attentie: zodra u de fotolijst uitschakelt, wordt de foto
geheugenkaartadapter aan en sluit de Xd-geheugenkaart
Afstandsbediening: Bediening op afstand
via de adapter aan op de fotolijst.
I/U: Aansluiting koptelefoon
Geheugen: 1 MB Core-Flash
weergegeven welke geheugenkaarten in de kaartsleuf
zitten. Selecteer met de afstandsbediening de gewenste
Afmetingen: 210 x 150 x 45 mm (L x B x H)
Afmetingen en gewichten
geheugenkaart.
Keurmerk/normen
CE, FCC, UL
Stroomtoevoer: Netadapter; ingang 100 - 240 V; uitgang 12 V, 1,5 A
bestandsformaten van de meest gangbare digitale
Bewaren bij: -20 tot 60° C, vochtigheidsgraad 10 tot 90 %
camera's.
Omgevingsvoorwaarden
Gebruik bij: 0 tot 35° C, vochtigheidsgraad 0 tot 85 %
Gewicht: 600 g
het beeld draaien.
aanpassen.
68
weer in de oorspronkelijke positie teruggedraaid.
van de betreffende eigenaar van het auteursrecht. Wijzigingen van technische gegevens, zonder
voorafgaande aankondiging voorbehouden.
Bij de product- en merknamen in deze gebruiksaanwijzing, gaat het om geregistreerde merken
de geheugenkaart over.
Beeldscherm: Active-Matrix-LCD, 5,6 inch
•Draag het MP3-bestand met een geheugenkaartlezer op
Technische gegevens
8 MB SDRAM
Luidspreker (stereo)
S-video (NTSC/PAL)
69
 Loading...