

Page 1

D
GB
Operating Instructions
Bedienungsanleitung
Traveller 150 Premium DuoTripod
Dreibeinstativ
00
004265
Page 2

Page 3
1
2
3
3
5
5
6
4
4
4
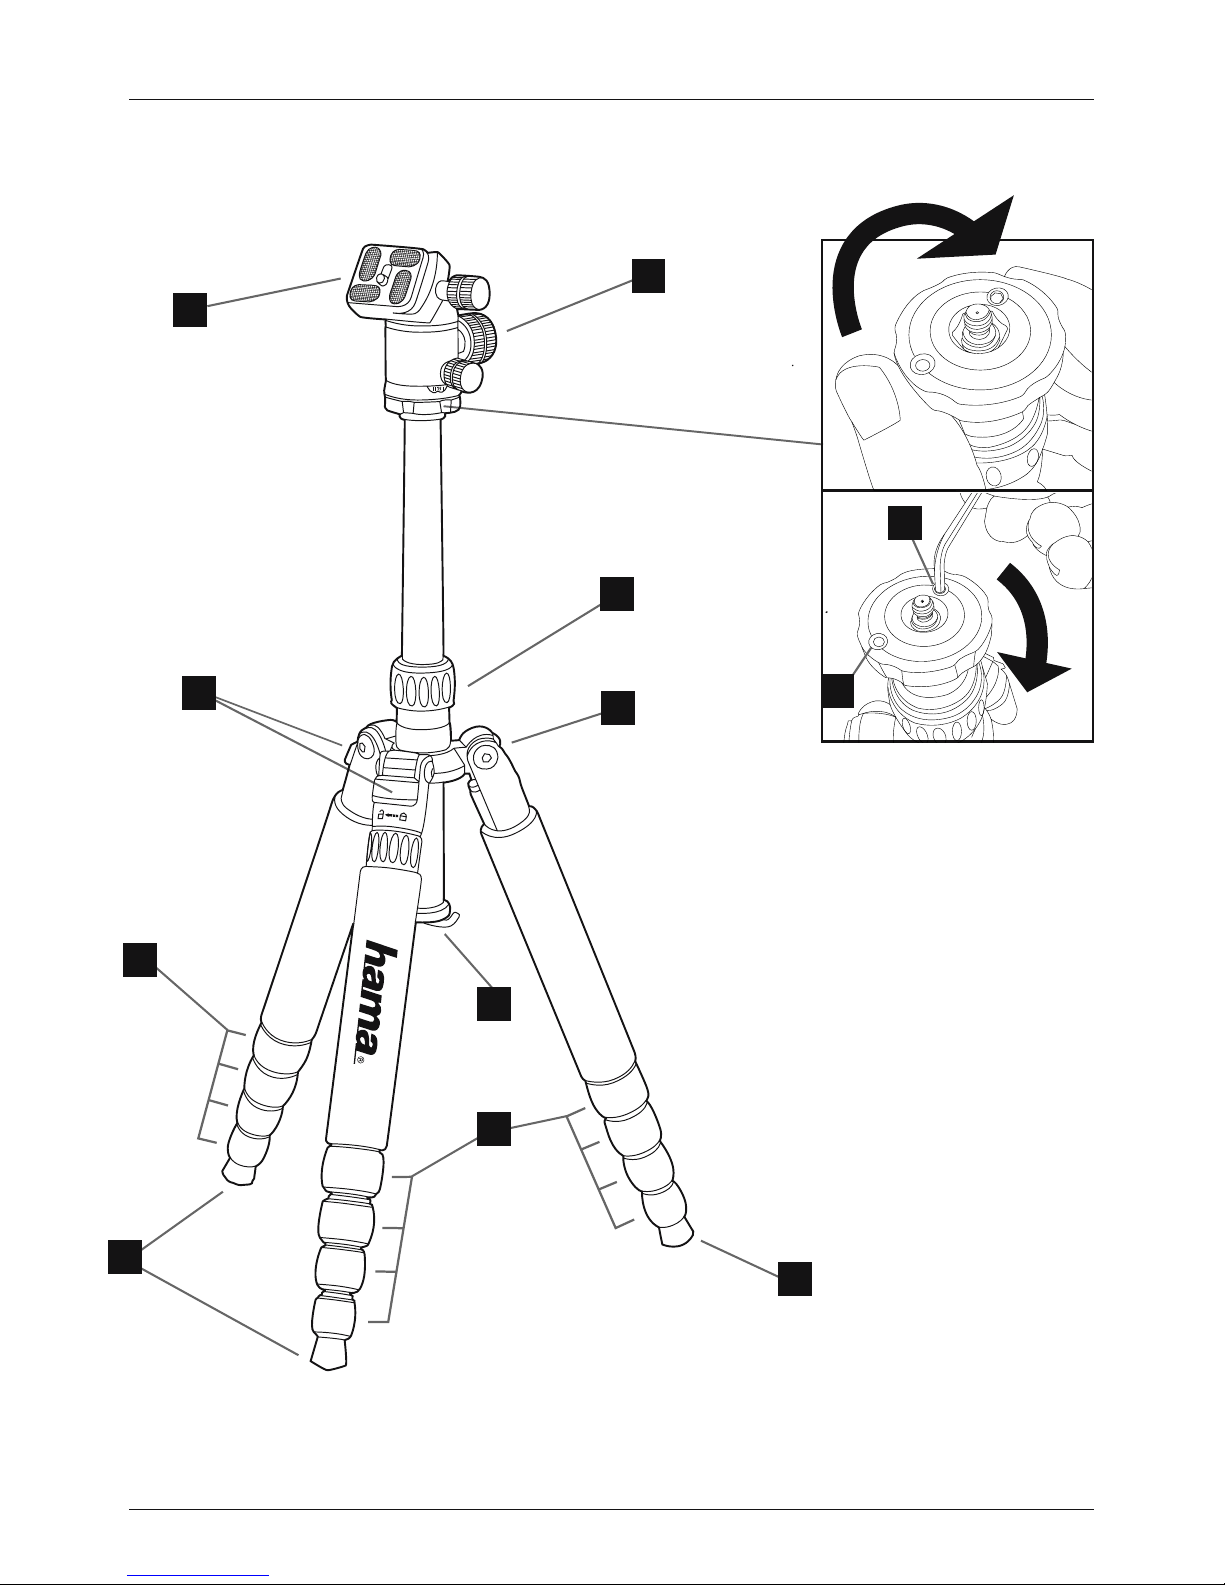
G Tripod mounting plate
assembly and allen key locking
D Stativ Montageplatte:
Montage und Sicherung mit
Inbus-Madenschraube
8
7
Page 4

2
G Operating instruction
Thank you for choosing a Hama product.
Take your time and read the following instructions and
information completely. Please keep these instructions in a
safe place for future reference.
Controls
1. 3D ball head
2. Quick-release plate
3. Tripod leg adjustment release
4. Screw clamps
5. Rubber feet
6. Weight hook (detachable)
1. Explanation of Warning Symbols and Notes
Warning
This symbol is used to indicate safety instructions or to
draw your attention to specic hazards and risks.
Note
This symbol is used to indicate additional information or
important notes.
2. Package Contents
•1„Traveller 150 Premium Duo” tripod
•1Allen key, metric, 3mm
•2Allen key, metric, 4mm
•Storage bag
•3Spikes
•This operating instruction
3. Safety Notes
•The product is intended for private, non-commercial use
only.
•Protect the product from dirt, moisture and overheating
and use it in dry rooms only.
•Do not drop the product and do not expose it to any
major shocks.
•Do not operate the product outside the power limits given
in the specications.
•Keep the packaging material out of the reach of children
due to the risk of suffocation.
•Dispose of packaging material immediately according to
locally applicable regulations.
•Do not modify the product in any way. Doing so voids the
warranty.
4. Startup and Operation
Hinweis - Twist-on connecting devices
Do not completely loosen the twist-on connecting
devices. You only need to loosen them 1 to 1.5 rotations
to make adjustments. If you loosen them more,
components of the tripod could fall out.
4.1 Setting up the tripod
•Open the tripod legs until they reach the rst position.
•If you want to set the tripod to one of the other 3
possible angles, pull the releases (3) and adjust the tripod
legs to the desired angle.
•You can adjust the length of the tripod legs in order to
achieve the desired height for taking photos.
•To do this, loosen the screw clamps (4) by turning them
approximately a half a turn clockwise (when viewed from
above) until you no longer feel any resistance. The tripod
leg segment being adjusted then automatically extends
to its full length.
•If desired, adjust it to the length you want and then lock
it by turning the screw clamp (4) counter-clockwise until
it is secure.
•Repeat this step for the other two legs.
Note - Tripod legs
The legs of the Traveller 146 Premium Duo can be
vertically swivelled by up to 180° in three stages, which
makes it especially compact and easy to pack or store.
• Extend the middle column completely – this ensures
that the tripod will be as compact as possible after
the legs have been folded up.
• Pull the release on the hinge of one of the tripod legs.
• Move the tripod leg up fully onto the middle column.
The rubber feet (5) of the tripod legs can be removed
and replaced with spikes. The spikes are located in the
inner pocket of the storage bag.
4.2 Adjusting the height of the middle column
The height of the middle column can be innitely adjusted
using a screw clamp (4).
• To do this, loosen the screw clamp (4) by turning it
approximately a half a turn counter-clockwise (when
viewed from above) until you no longer feel any
resistance.
• Pull the middle column out to the desired length and hold
it in place.
• Lock the middle column in place by turning the screw
clamp (4) clockwise (when viewed from above) until
secure.
Page 5

3
4.3 Weight hook and removable middle column
A weight hook (6) is located on the bottom end of the
middle column. You can hang weight (for example: your
camera bag) on this hook to further stabilize the tripod.
The weight hook (6) can be unscrewed and removed and
the middle column can be removed, ipped by 180° and
re-inserted in order to take photos close to the ground.
• Remove the weight hook (6) by unscrewing it.
• Open the lower screw clamp (4) by turning it counter-
clockwise and pull the middle column upwards out of the
tripod base.
• Flip the middle column by 180° and insert it into the
tripod basis from the bottom, set the desired length and
lock the middle column using the screw clamp (4).
Warning - Don’t forget the weight hook!
• Screw the weight hook (6) back on. It prevents the
middle column from slipping out and damaging your
valuable camera equipment when the screw clamps
(4) are opened.
4.4 Integrated monopod
A stable monopod can be created from the middle column
and one of the tripod legs (labelled with the Hama logo on
the rubber coating).
• Remove the middle column as described in point 4.3.
Do not reattach the weight hook (6).
• Unscrew the tripod leg with the Hama logo and remove
it from the tripod base.
• Screw the middle column and the threaded tripod leg
together until it is hand tight.
• Adjust the monopod you have just created to the desired
length.
4.5 Ball head
The ball head (1) is equipped with a large xing screw
for the ball head function and a small xing screw for the
panorama function.
• Unscrew the large xing screw so it is loose enough
that the camera can move and the ball head (1) can be
adjusted.
• Next, tighten the xing screw again and ensure that the
ball head (1) is also secured.
Warning - Ensure that your camera is
secure!
• Hold your camera securely with one hand when you
adjust the ball head (1).
• Unscrew the small xing screw in order to be able to
take panorama shots. The slight resistance allows you
to turn the camera smoothly and evenly.
4.6 Quick-release plate
Note
A safety thread essentially prevents the quick-release
plate (2) from falling out; however you should always
hold on to your camera to be safe.
• Ensure that the ball head (1) pivot is secured.
• Unscrew the xing screw until it is loose enough that the
quick-release plate (2) can be removed from its xture by
tilting it slightly upwards.
• Attach the quick-release plate (2) to your camera.
• Place your camera with the quick-release plate (2)
attached into the xture slightly tiled upwards and turn
the xing screw until the camera is securely in place.
4.7 Head mounting plate
•This tripod is also equipped with a universal mounting
plate (2) so that supporting heads can be used other
than the one that came attached to the tripod. The
mounting plate (2) can be used with both 1/4” and 3/8”
threads.
Note - Allen grub securing screw
The mounting plate is equipped with two Allen grub
screws. Tighten them carefully!
• The screw (7) that can be accessed from the bottom
is used to prevent the ball head from accidentally
becoming unscrewed from the tripod.
• The screw (8) that can be accessed from the top of
the mounting plate after the ball head is removed is
used to secure the ball head to the middle column.
• The 3 mm Allen key for these screws is included with
the product.
• Lock the panorama function of the ball head (1) with the
small xing screw.
• Screw the knurled mounting plate (2) below the degree
display of the ball head (1). It’s possible that the Allen
screw (8) on the bottom of the mounting plate (2) will
have to be loosened a bit.
• If necessary, loosen the Allen screw (8) on the top of the
mounting plate (2) if the mounting plate (2) can not be
removed from the middle column.
• Turn the screw if you want to attach a different ball head
(1) with a 1/4” thread.
• Screw the mounting plate (2) onto the ball head (1)
again until it is securely in place.
• Always screw in the Allen screw carefully in order to
prevent damage to the ball head (1) and the mounting
plate (2).
Page 6

4
5. Care and Maintenance
•Only clean this product with a slightly damp, lint-free
cloth and do not use aggressive cleaning agents.
• The included Allen key can be used for the ball head and
mounting plate (3 mm Allen key) as well as to adjust
the mobility of the tripod legs on the tripod base (4 mm
Allen key).
6. Warranty Disclaimer
Hama GmbH & Co. KG assumes no liability and provides no
warranty for damage resulting from improper installation/
mounting, improper use of the product or from failure to
observe the operating instructions and/or safety notes.
7. Service und Support
Please contact Hama Product Consulting if you have any
questions about this product.
Hotline: +49 9091 502-115 (German/English)
Further support information can be found here:
www.hama.com
Page 7

5
D Bedienungsanleitung
Vielen Dank, dass Sie sich für ein Hama Produkt
entschieden haben! Nehmen Sie sich Zeit und lesen Sie
die folgenden Anweisungen und Hinweise zunächst
ganz durch. Bewahren Sie diese Bedienungsanleitung
anschließend an einem sicheren Ort auf, um bei Bedarf
darin nachschlagen zu können.
Bedienungselemente
1. 3D Kugelkopf
2. Schnellwechselplatte
3. Entriegelung der Stativbeinverstellung
4. Drehklemmen
5. Gummifüsse
6. Beschwerungshaken
1. Erklärung von Warnsymbolen und Hinweisen
Warnung
Wird verwendet, um Sicherheitshinweise zu
kennzeichnen oder um Aufmerksamkeit auf besondere
Gefahren und Risiken zu lenken.
Hinweis
Wird verwendet, um zusätzlich Informationen oder
wichtige Hinweise zu kennzeichnen.
2. Packungsinhalt
•1Dreibeinstativ „Traveller 150 Premium Duo”
•1Inbusschlüssel, 3mm
•2Inbusschlüssel, 4mm
•Aufbewahrungstasche
•3Spikes
•diese Bedienungsanleitung
3. Sicherheitshinweise
•Das Produkt ist für den privaten, nicht-gewerblichen
Haushaltsgebrauch vorgesehen.
•Schützen Sie das Produkt vor Schmutz, Feuchtigkeit und Überhitzung und verwenden Sie es nur in trockenen Räumen.
•Lassen Sie das Produkt nicht fallen und setzen Sie es
keinen heftigen Erschütterungen aus.
•Betreiben Sie das Produkt nicht außerhalb seiner in den
technischen Daten angegebenen Leistungsgrenzen.
•Halten Sie Kinder unbedingt von dem
Verpackungsmaterial fern, es besteht Erstickungsgefahr.
•Entsorgen Sie das Verpackungsmaterial sofort gemäß den
örtlich gültigen Entsorgungsvorschriften.
•Nehmen Sie keine Veränderungen am Produkt vor.
Dadurch verlieren sie jegliche Gewährleistungsansprüche.
4. Inbetriebnahme und Betrieb
Hinweis - Drehklemmen
Lösen Sie die Drehklemmen nicht vollständig. Es
genügt, sie lediglich 1- 1,5 Umdrehungen zu lösen,
um Einstellungen vorzunehmen. Es können sonst
Komponenten des Statives herausfallen.
4.1 Aufstellen des Statives
•Klappen Sie die Stativbeine bis zum ersten Rastpunkt aus.
•Ziehen Sie die Entriegelungen (3), wenn Sie einen anderen
der 3 möglichen Einstellwinkel der Stativbeine wünschen,
und stellen Sie den entsprechenden Winkel ein.
•Stellen Sie dann die Länge der Stativbeine ein, um die
gewünschte Arbeitshöhe zu erreichen.
•Lösen Sie dazu die Drehklemmen (4) im Uhrzeigersinn (von
oben gesehen) ca. eine halbe Umdrehung, bis Sie keinen
Widerstand mehr spüren. Das jeweilige Stativbeinsegment
fährt dann automatisch auf seine volle Länge aus.
•Stellen Sie ggf. die gewünschte Länge ein und arretieren
Sie das Stativbeinsegment, indem Sie die Drehklemme (4)
gegen den Uhrzeigersinn (von oben gesehen) fest drehen.
•Wiederholen Sie diese Einstellungen an den übrigen
Stativbeinen.
Hinweis - Stativbeine
Das Traveller 150 Premium Duo verfügt über die
3 Stufen hinaus um bis zu 180° vertikal schwenkbare
Stativbeine, so dass es sich besonders platzsparend im
Gepäck verstauen oder aufbewahren lässt.
• Fahren Sie die Mittelsäule komplett aus – so ergibt sich
nach dem Umklappen der Stativbeine das kleinste Packmaß.
• Ziehen Sie die Entriegelung am Gelenk des jeweiligen
Stativbeines.
• Klappen Sie die Stativbeine komplett nach oben an
die Mittelsäule.
Die Gummifüße (5) der Stativbeine können abgeschraubt und durch die Spikes ersetzt werden. Die Spikes
nden Sie im Innenfach der Aufbewahrungstasche.
4.2 Höhenverstellung der Mittelsäule
Die Mittelsäule ist durch eine Drehklemme (4) stufenlos in
der Höhe verstellbar.
• Lösen Sie dazu die Drehklemme (4) gegen den
Uhrzeigersinn (von oben gesehen) ca. eine halbe
Umdrehung, bis Sie keinen Widerstand mehr spüren.
• Ziehen Sie die Mittelsäule auf die gewünschte Länge aus
und halten Sie es fest.
• Arretieren Sie die Mittelsäule, indem Sie die Drehklemme
(4) mit dem Uhrzeigersinn (von oben gesehen) fest drehen.
Page 8

6
4.3 Beschwerungshaken und entnehmbare
Mittelsäule
Am unteren Ende der Mittelsäule bendet sich ein Beschwerungshaken (6), an den zur weiteren Stabilisierung des Statives ein
Gewicht angehängt werden kann (z.B. die Fototasche). Der
Beschwerungshaken (6) kann durch Abschrauben entfernt und
die Mittelsäule entnommen und für bodennahe Aufnahmen um
180° gewendet wieder eingesetzt werden.
• Entfernen Sie den Beschwerungshaken (6) durch
Abschrauben.
• Öffnen Sie die untere Drehklemme (4) durch Drehen
gegen den Uhrzeigersinn und ziehen Sie die Mittelsäule
nach oben aus der Stativbasis.
• Führen Sie die Mittelsäule um 180° gewendet von unten
in die Stativbasis wieder ein, stellen Sie die gewünschte
Länge ein und arretieren Sie die Mittelsäule mit der
Drehklemme (4).
Warnung - Beschwerungshaken nicht vergessen!
• Schrauben Sie den Beschwerungshaken (6) wieder
ein, dieser sichert die Mittelsäule und Ihr wertvolles
Kamera-Equipment vor einem ungewollten Herausrutschen beim Öffnen der Drehklemmen (4)!
4.4 Integriertes Einbeinstativ
Aus der Mittelsäule und einem Stativbein (gekennzeichnet
durch das Hama-Logo in der Gummierung) kann ein
stabiles Einbeinstativ zusammen gesetzt werden.
• Entfernen Sie die Mittelsäule wie unter Pkt. 4.3
beschrieben. Bringen Sie den Beschwerungshaken (6)
diesmal nicht wieder an.
• Schrauben Sie das mit dem Hama-Logo gekennzeichnete
Stativbein aus der Stativbasis.
• Schrauben Sie die Mittelsäule und das mit einem
Gewinde versehene Stativbein handfest zusammen.
• Stellen Sie das entstandene Einbeinstativ auf die
gewünschte Länge ein.
4.5 Kugelkopf
Der Kugelkopf (1) verfügt über eine große Fixierschraube
für die Kugelkopf- und eine kleine Fixierschraube für die
Panoramafunktion.
• Lösen Sie die große Fixierschraube soweit, bis sich die
Kamera bewegen und der Kugelkopf (1) verstellen lässt.
• Ziehen Sie anschließend die Fixierschraube wieder fest
und stellen Sie sicher, dass der Kugelkopf (1) sicher
xiert ist.
Warnung - Sichern Sie ihre Kamera!
• Halten Sie ihre Kamera mit einer Hand sicher fest,
wenn Sie den Kugelkopf (1) verstellen.
• Öffnen Sie kleine Fixierschraube, um Panoramaaufnahmen machen zu können. Der leichte Widerstand
ermöglicht eine gleichmäßige Drehung.
4.6 Schnellwechselplatte
Hinweis
Die Schnellwechselplatte (2) ist durch einen Sicherungsstift weitgehend gegen ein unbeabsichtigtes Herausfallen
geschützt. Halten Sie dennoch Ihre Kamera immer sicher fest.
• Achten Sie darauf, dass das Gelenk des Kugelkopfes (1)
xiert ist.
• Lösen Sie die Fixierschraube, bis die Schnellwechselplatte (2) leicht angewinkelt nach oben aus ihrer
Aufnahme entnommen werden kann.
• Befestigen Sie die Schnellwechselplatte (2) an Ihrer
Kamera.
• Setzen Sie die Kamera mit der Schnellwechselplatte (2)
leicht angewinkelt von oben in die Aufnahme ein und
ziehen Sie die Fixierschraube an, bis die Kamera sicher
sitzt.
4.7 Kopf-Montageplatte
•Dieses Stativ verfügt über eine universelle Montageplatte
(2), so dass neben dem im Auslieferungszustand
montierten auch andere Stativköpfe eingesetzt werden
können. Die Montageplatte (2) besitzt dazu eine
Wendeschraube für 1/4‘‘ und 3/8‘‘ Gewinde.
Hinweis - Sicherungsschraube Inbus
In der Montageplatte benden sich zwei 3mm InbusMadenschrauben. Ziehen Sie diese stets mit Gefühl an!
• Die von unten zugängliche Inbusschraube (7) dient
der Sicherung des Kugelkopfes vor versehentlicher
Lockerung der Schraubverbindung zum Stativ.
• Die von der Oberseite der Montageplatte nach
Abschrauben des Kugelkopfes zugängliche
Inbusschraube (8) sichert diese auf der Mittelsäule.
• Der für diese Schraube passende 3mm Inbusschlüssel
liegt dem Produkt bei.
• Arretieren Sie die Panoramafunktion des Kugelkopfes (1)
mit der kleinen Fixierschraube.
• Schrauben Sie die gerändelte Montageplatte (2)
unterhalb der Gradanzeige des Kugelkopfes (1) ab.
Eventuell muss dazu die Inbusschraube (8) an der
Unterseite der Montageplatte (2) etwas gelockert
werden.
Page 9

7
• Lockern Sie ggf. die Inbusschraube (8) auf der Oberseite
der Montageplatte (2), wenn sich die Montageplatte (2)
nicht von der Mittelsäule abschrauben lässt.
• Wenden Sie die Schraube, wenn Sie einen alternativen
Kugelkopf (1) mit ¼‘‘ Gewinde montieren möchten.
• Schrauben Sie die Montageplatte (2) wieder in den
Kugelkopf (1), bis sie fest sitzt.
• Ziehen Sie die Inbusschrauben stets mit Gefühl an, um
Kugelkopf (1) und Montageplatte (2) zu sichern.
5. Wartung und Pflege
•Reinigen Sie dieses Produkt nur mit einem fusselfreien,
leicht feuchten Tuch und verwenden Sie keine
aggressiven Reiniger.
• Mit den beiliegenden Inbusschlüsseln lassen sich nicht
nur Kugelkopf und Montageplatte sichern (3mm Inbus),
sondern auch die Gängigkeit der Stativbeine an der
Stativbasis einstellen, bzw. nachjustieren (4mm Inbus).
6. Gewährleistungsausschluß
Die Hama GmbH & Co. KG übernimmt keinerlei Haftung
oder Gewährleistung für Schäden, die aus unsachgemäßer
Installation, Montage und unsachgemäßem Gebrauch
des Produktes oder einer Nichtbeachtung der
Bedienungsanleitung und/oder der Sicherheitshinweise
resultieren.
7. Service und Support
Bitte wenden Sie sich bei Fragen zum Produkt gerne an die
Hama-Produktberatung.
Hotline: +49 9091 502-115 (Deu/Eng)
Weitere Supportinformationen nden sie hier:
www.hama.com
Page 10

00004265/10.15
All listed brands are trademarks of the corresponding companies. Errors and omissions excepted,
and subject to technical changes. Our general terms of delivery and payment are applied.
Hama GmbH & Co KG
86652 Monheim
/ Germany
www.hama.com
 Loading...