


Hama GmbH & Co KG
D-86651 Monheim/Germany
www.hama.com
All list ed brand s are trademar ks of the corr espond ing comp anies. Errors and omissions excepted,
and subject to technical changes. Our general terms of delivery and payment are applied.
00090924/08.09

DIGITAL PHOTO
00090924/08
09
Digitales Photoalbum 2.4
»Shake-a-Pix«
Digital Photo Album
.
00090924

d Bedienungsanleitung
Allgemeine Pfl egehinweise
• Schützen Sie das Gerät vor Herunterfallen, Werfen und starkem Druck auf die
Oberfl äche. Durch starken Druck auf die Oberfl äche kann der LCD-Monitor
beschädigt werden.
• Um Datenverlust zu vermeiden, darf der USB-Stecker während der Bildübertragung
nicht gezogen werden.
• Vermeiden Sie den Kontakt mit Wasser oder Feuchtigkeit. Das Gerät darf nicht in
Wasser getaucht werden.
• Im Shake-a-pix-Modus können die Wechselintervalle variieren.
2
Reinigen des Shake-a-pix
• Der Shake-a-pix darf nur im ausgeschalteten Zustand gereinigt werden.
• Sprühen oder gießen Sie Flüssigkeiten nie direkt auf den Bildschirm oder die Abdeckung.
So reinigen Sie den Bildschirm:
1. Wischen Sie den Bildschirm mit einem sauberen, weichen, fl usenfreien Tuch ab.
Damit entfernen Sie Staub und andere Partikel.
2. Wenn dies nicht ausreicht, geben Sie eine kleine Menge ammoniak- und alkoholfreien
Glasreiniger auf ein sauberes, weiches, fl usenfreies Tuch, und reinigen Sie den
Bildschirm damit.
So reinigen Sie die Abdeckung:
1. Wischen Sie die Abdeckung mit einem sauberen, trockenen Tuch ab.
2. Wenn dies nicht ausreicht, geben Sie eine kleine Menge ammoniak- und alkoholfreien
Glasreiniger auf ein sauberes, weiches, fl usenfreies Tuch, und reinigen Sie die
Abdeckung damit.
3
Einführung
Der nur kreditkartengroße digitale Bilderrahmen Shake-a-pix passt in jede Tasche,
Brieftasche oder Geldbörse und bietet Platz für bis zu 90 Bilder (8 MB).
Mit seinem kristallklaren 2,4-Zoll TFT-LCD-Bildschirm und mehreren Anzeigemodi ist er
der ideale Begleiter, mit dem Sie Ihre schönsten Erinnerungen jederzeit zur Hand haben.
4

Leistungsmerkmale
• Kompatibel mit Windows 2000/XP/Vista
• Integrierte Windows Pop-up-Anwendung zusätzliche Software ist nicht erforderlich
• Kompakt und leicht
• Diaschau- / Schüttelmodus
• 2.4 TFT LCD
• 3 LED-Leuchtanzeigen
• Aufl ösung 320 x 240
• Schwerkraftsensor für die Bewegungserkennung
5

Lieferumfang
Überprüfen Sie bitte den Packungsinhalt auf Vollständigkeit. Sollte etwas fehlen, wenden
Sie sich bitte unmittelbar an Ihren Händler.
• Shake-a-pix digitaler Bilderrahmen
• Bedienungsanleitung
• Halsband
• USB-Kabel (Option)
6
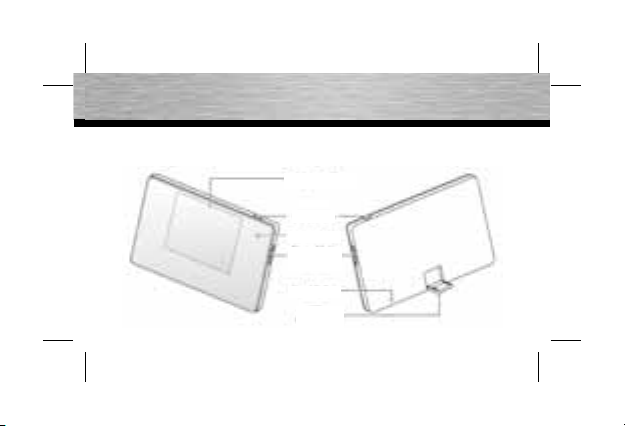
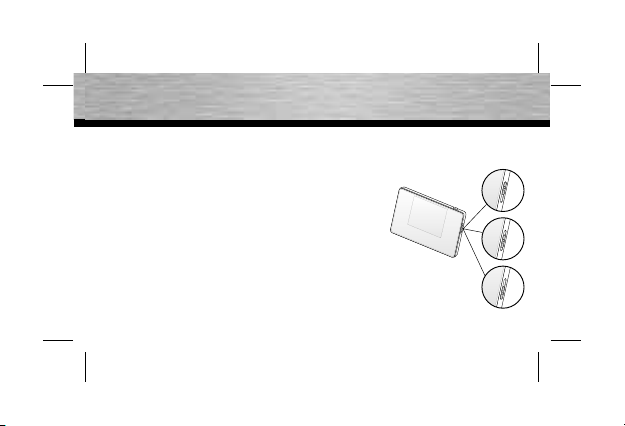
Info über Shake-a-pix
Lieferzustand
Anzeigedisplay
Haltetaste
LED-Anzeige
Power/Mode
Umschaltung
Reset-Taste
USB
Anschluss
7
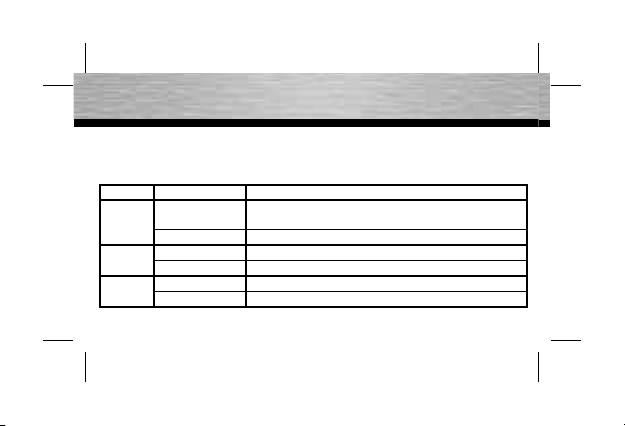
Funktionen der LED-Anzeige
Der digitale Bilderrahmen Shake-a-pix verfügt über drei LED-Anzeige-Modi (blau, grün
und rot), die Sie über unterschiedliche Betriebszustände informieren.
LED Status Beschreibung
Blau Blinken Schnellindex-Modus - Fortschritt nach Dianummer oder
Dauerleuchten Aktuelles Bild halten
Grün Blinken Übertragen von Daten an den Shake-a-pix
Dauerleuchten Akku voll geladen
Rot Blinken Akku muss geladen werden
Dauerleuchten Akku wird geladen
Vgl. hierzu auch den Punkt „Verwendung des digitalen Bilderrahmens“ auf Seite 19
8
um jeweils 20 Bilder

Erste Schritte
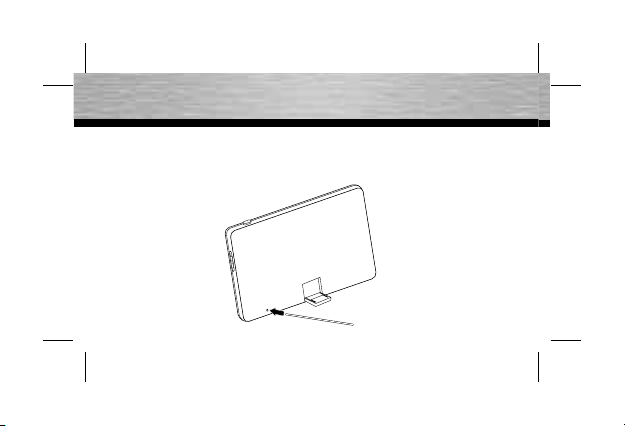
Laden des Akkus
Hinweis: Beim ersten Verbinden mit einem PC oder Notebook ist der Akku des Shake-a-
pix mindestens drei Stunden zu laden. Beachten Sie zum Laden folgende Hinweise:
1. Verbinden Sie das mitgelieferte USB-Kabel mit dem entsprechenden Anschluss auf
der Rückseite des Shake-a-pix.
2. Verbinden Sie das andere Ende mit Ihrem PC oder Notebook.
Die LED-Anzeige leuchtet rot, um anzuzeigen, dass der Akku lädt.
ACHTUNG: Lassen Sie das Gerät nicht fallen, vermeiden Sie Gewalteinwirkungen oder
Schläge auf die Oberfl äche, um Schäden am LCD zu vermeiden.
ACHTUNG: Trennen Sie während der Bildübertragung nicht die USB-Verbindung.
Andernfalls kann dies zu Datenverlust führen.
9
Anschluss an einen PC:
Der digitale Bilderrahmen unterstützt die
Verbindung mit Windows 2000/XP/Vista PCs und
Notebooks über das mitgelieferte USB-Kabel.
Sie können Ihre Bilder über Ihren Computer-Bildschirm auf den digitalen Bilderrahmen laden und
verwalten. Um den digitalen Bilderrahmen mit
einem PC oder Notebook zu verbinden, folgen Sie
den Hinweisen im Abschnitt „Laden des Akkus“
auf Seite 9.
Auf dem Shake-a-pix wird der Bildschirm für das
Laden und den Download per USB angezeigt und
auf dem Computerbildschirm erscheint die Pop-upAnwendung des digitalen Bilderrahmens.
10
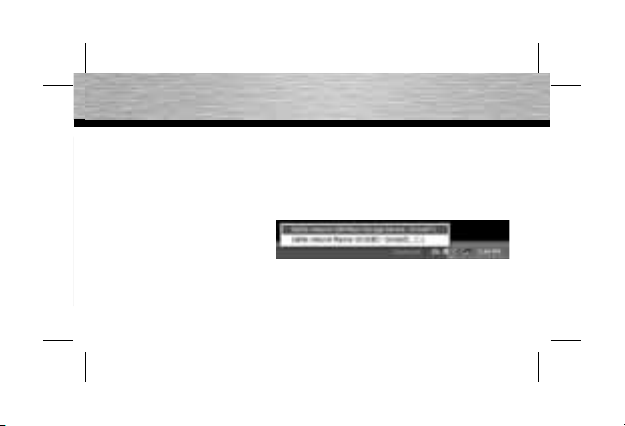
Trennen vom PC
Wenn der Ladevorgang des digitalen Bilderrahmens abgeschlossen ist oder wenn Sie
das Verwalten der Bilder beendet haben, trennen Sie den Shake-a-pix folgendermaßen
vom PC:
1. Gehen Sie zum USB-Symbol in der Windows Taskbar (hier rot markiert).
2. Klicken Sie mit der linken Maustaste auf dieses Symbol und wählen Sie aus dem
Pop-up-Menü den Shake-a-pix.
Hinweis: Möglicherweise stehen mehrere Optionen zur Auswahl; wenn Sie nicht sicher
sind, wählen Sie „USB Mass Storage Device“ (USB-Massenspeicher).
3. Trennen Sie den Shake-a-pix vom Computer, wenn Sie dazu aufgefordert werden.
11
Zurücksetzen des Shake-a-pix
Sie können Ihren Shake-a-pix manuell in den Auslieferungszustand zurücksetzen, indem
Sie einen passenden Gegenstand in die Öffnung hinten am Gerät stecken und die ResetTaste drücken.
12
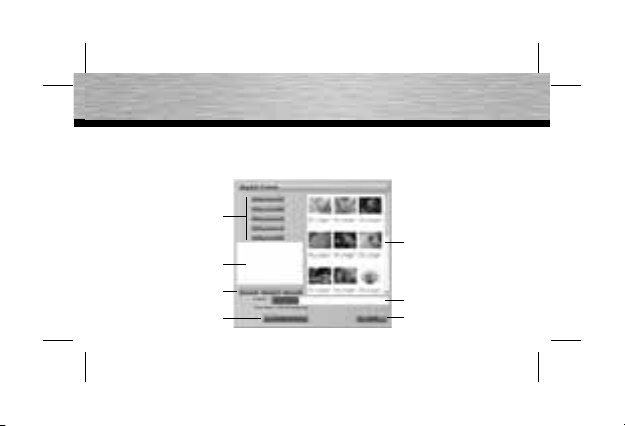
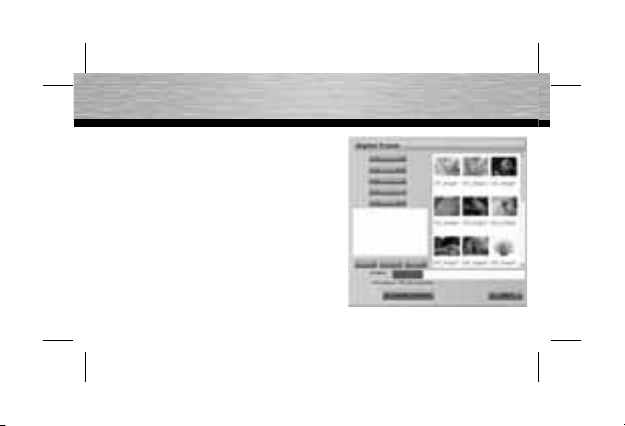
Bilder laden
Nachdem Sie den digitalen Bilderrahmen mit Ihrem PC oder Ihrem Notebook verbunden
haben, wird auf dem Bildschirm des digitalen Bilderrahmens folgendes angezeigt:
Fotoalbum
Aktionen
Vorschauanzeige
Vorschauaktionen
Übertragungstaste
Fotoalbum
Anzeige freier
Speicherplatz
Exit-Taste
13
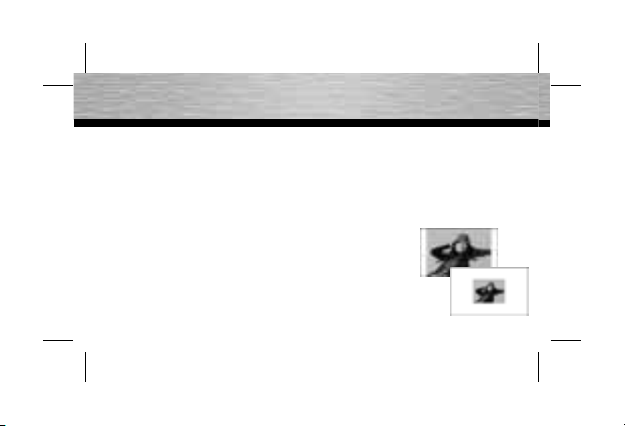
Bilder hinzufügen
Hinzufügen eines Bildes zum Fotoalbum des digitalen Bilderrahmens:
1. Klicken Sie auf „Add Photo“ (Foto hinzufügen) und wählen Sie den Ordner,
in dem das gewünschte Foto abgelegt ist.
2. Wählen Sie das Foto und klicken Sie auf „Open“ (Öffnen).
Das Foto wird in der Voransicht angezeigt.
Verkleinern und Vergrößern
Die Bildgröße passen Sie mit den Zoom-In- und Zoom-OutVorschau-Tasten an.
Die gestrichelte Linie stellt die Bildschirmgröße des Shake-apix dar. Passen Sie das Bild so an, dass es die gestrichelte Linie nicht
überlappt wird, um es vollständig darzustellen oder wählen Sie den
wiederzugebenden Ausschnitt.
14

Importieren
Klicken Sie auf die Schaltfl äche „Vorschau importieren“, um Ihre Auswahl temporär dem
Fotoalbum hinzuzufügen.
Hinweis: Die ausgewählten Fotos werden dem Shake-a-pix erst durch Klicken auf die
Schaltfl äche „An Gerät übertragen“ hinzugefügt.
15
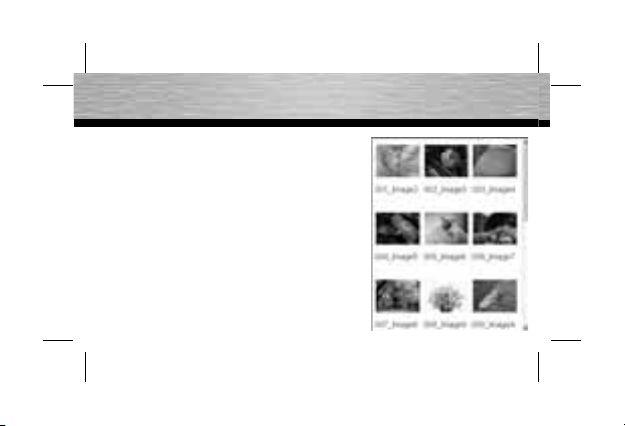
Organisieren Ihrer Fotos
Über die Ansicht Fotoalbum können Sie die Reihenfolge
festlegen, in der der Shake-a-pix Ihre Bilder anzeigen
soll. Nach oben und nach unten
Wählen Sie die gewünschten Bilder aus der Ansicht
Fotoalbum und klicken Sie auf „Move up“ (Nach oben)
oder „Move down“ (Nach unten), um die Reihenfolge zu
ändern, in der die Bilder angezeigt werden.
Hinweis: Sie können mehrere Fotos auswählen, indem
Sie die Umschalttaste auf Ihrer Computertastatur
gedrückt halten.
16
Bilder löschen
Wählen Sie die gewünschten Bilder aus der Ansicht Fotoalbum und klicken Sie auf
„Delete“ (Löschen), um die Auswahl aus dem Album zu löschen.
Hinweis: Ihre Auswahl wird erst vom digitalen Bilderrahmen gelöscht, wenn Sie die
Taste „Transfer to Device“ („An das Gerät übertragen“) drücken.
Alle Bilder löschen
Sie können den gesamten Inhalt Ihres Fotoalbums löschen und ein neues Album anlegen,
indem Sie „Clear All“ (Alle löschen) drücken.
Hinweis: Ihre Auswahl wird erst vom digitalen Bilderrahmen gelöscht, wenn Sie die
Taste „Transfer to Device“ („An das Gerät übertragen“) drücken.
17
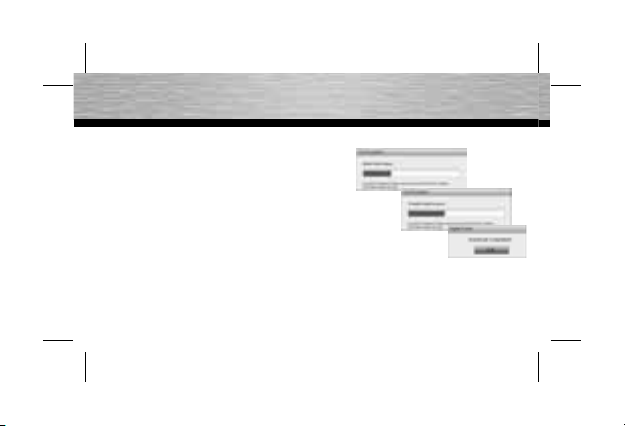
Übertragen von Fotos an Shake-a-pix
Die Taste „Transfer to Device“ (An das Gerät
übertragen) ist der letzte Schritt beim Hinzufügen,
Verwalten und Löschen von Bildern auf Ihrem
Shake-a-pix.
Alle Aktionen in der Anwendung auf dem Bildschirm
Ihres PCs werden erst dann wirksam, wenn Sie auf
die Taste „Transfer to Device“ drücken.
Klicken Sie OK, wenn die drei Übertragungsschritte abgeschlossen sind und trennen
Sie Ihren Shake-a-pix vom Computer. Jetzt ist Ihr digitaler Bilderrahmen bereit für den
Einsatz unterwegs.
18
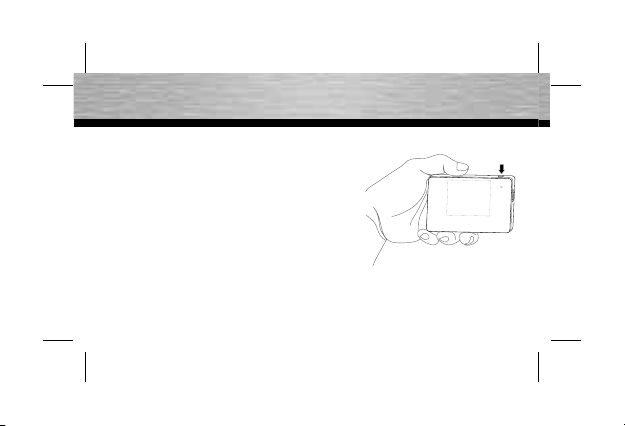
Verwendung des digitalen Bilderrahmens
Ein- und ausschalten
Mit dem Schiebeschalter (drei Positionen) schalten Sie
Ihren Shake-a-pix ein:
• Diaschau-Modus - Dieser Modus wird aktiviert, indem
sie den Schalter in die obere Position bringen.
• Shake-a-pix-Modus - Dieser Modus wird aktiviert,
indem sie den Schalter in die untere Position bringen.
• Ausschalten - Bringen Sie den Schalter in die mittlere
Position, um den Shake-a-pix auszuschalten.
19
Diaschau-Modus
Im Diaschau-Modus stellt Shake-a-pix die Bilder
in Ihrem Fotoalbum automatisch nacheinander dar.
Drücken Sie die Modus-Taste an der Oberseite des
Shake-a-pix, um den Anzeigemodus zu ändern.
• Drücken Sie die Modus-Taste einmal, um in den
„Fast Index mode“ (Schnellindex-Modus) zu
gelangen. Die Diaschau wird schneller angezeigt
und Bildnummern werdne unten rechts auf dem
Bildschirm eingeblendet.
• Drücken Sie die Modus-Taste zweimal, um das aktuelle Bild so lange auf dem
Bildschirm zu halten, bis Sie die Modus-Taste erneut drücken.
20

Shake-a-pix-Modus
Im Shake-a-pix-Modus wechselt der digitale Bilderrahmen durch die Bilder in Ihrem Fotoalbum, wenn der
Schwerkraftsensor eine Bewegung feststellt bzw. wenn
das Gerät geschüttelt wird. Bewegen Sie den Shake-a-pix
nach oben oder unten, um durch das Fotoalbum zu wechseln. Drücken Sie die Modus-Taste an der Oberseite des
Shake-a-pix, um den Anzeigemodus zu ändern.
• Drücken Sie die Modus-Taste, um das aktuelle Bild so
lange auf dem Bildschirm zu halten, bis Sie die Modus-
Taste loslassen.
• Drücken Sie die Modus-Taste, um jeweils 20 Bilder aus Ihrem Album anzuzeigen.
Hinweis: Die Anzahl der in der Diaschau angezeigten Bilder kann unterschiedlich sein.
21
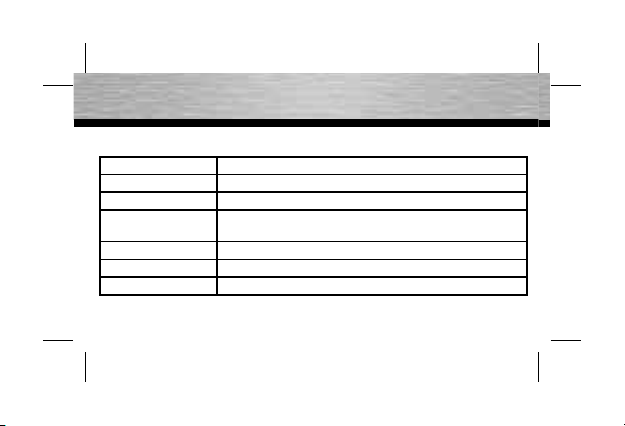
Technische Daten
Angabe Beschreibung
LCD-Bildschirm 2,4-Zoll, sehr hell, sehr guter Kontrast, TFT
Aktiver Bereich (mm) 48,96 (B) * 36,72 (H)
QVGA/Display
Abmessungen (mm)
Unterstützte Formate JPG, BMP
Aufl ösung 320 x 240
Interner Speicher 90 Bilder/64 MBit (8MByte)
22
43,5 (B) * 60,2 (H) * 3 (D)
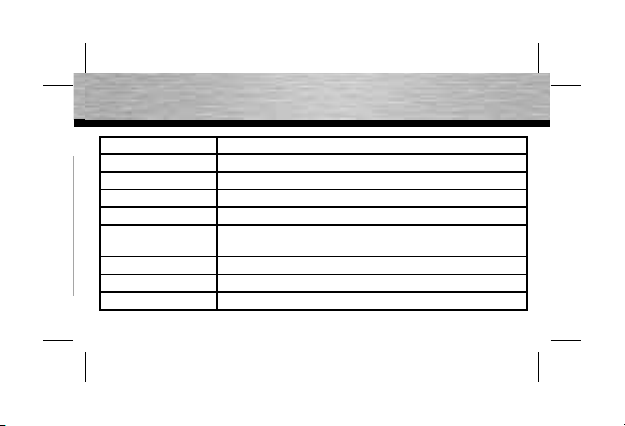
Angabe Beschreibung
Wiedergabemodi Diashow-Modus, Schüttelmodus
Wiedergabezeit 2,5 Stunden
Stromversorgung Slim-Akku (Lithium) 200 mA
Sicherheitsmaßnahmen
Unterstützte
Betriebssysteme
Anwendungssoftware Integrierte Windows-Anwendung
G-Sensor Links-Mitte-Rechts; Shake-a-pix-Funktion
Taste Bild anhalten/Schnellindex
Überspannungsschutz
Windows 2000/XP/Vista
23
Angabe Beschreibung
LEDs Blau Leuchtet: Bild anhalten
Drei-Modi-Schalter Diashow, Ausschalten, Shake-a-pix
Maße (mm) 60 (H) x 5 (B) x 90 (L)
Gewicht (g) 50
Zertifi zierung FCC, CE
24
Blinkt: Schnellindex-Modus
Grün Leuchtet: Akku vollständig geladen
Blinkt: Datenübertragung
Rot
Blinkt: Akku aufl aden
Leuchtet: USB-Kabel angeschlossen/Ladevorgang

Support- und Kontaktinformationen
Bei defekten Produkten:
Bitte wenden Sie sich bei Produktreklamationen an Ihren Händler oder an die Hama
Produktberatung.
Internet/World Wide Web
Produktunterstützung, neue Treiber oder Produktinformationen bekommen Sie unter
www.hama.com
Support Hotline – Hama Produktberatung:
Tel. +49 (0) 9091 / 502-115
Fax +49 (0) 9091 / 502-272
e-mail: produktberatung@hama.de
25

g Operating Instruction
General Care
• Protect the device from being dropped, thrown or excessive force
to the surface. Excessive force to the surface causes damage to
the LCD.
• To prevent data loss, do not disconnect the USB while transferring
images.
• Keep the device dry at all times. Protect from getting wet and do
not submerge in water.
• Cycle increments may vary in Shake-a-pix Mode.
26

Cleaning the Shake-a-pix
• Make sure the Shake-a-pix is turned off.
• Never spray or pour liquid directly on the screen or cover.
To Clean the Screen:
1. Wipe the screen with a clean, soft, lint-free cloth. This removes dust and
other particles.
2. If it still is not clean, apply a small amount of non-ammonia, non-alcohol
based glass cleaner on a clean, soft, lint-free cloth to clean the screen.
To Clean the Cover:
1. Use a soft, dry cloth.
2. If it still is not clean, apply a small amount of non-ammonia, non-alcohol
based, and mild non-abrasive detergent on a clean, soft, lint-free cloth to
clean the cover.
27
Introduction
The Shake-a-pix credit card-sized digital frame fi ts easily into your pocket, Wallet, or
purse, and can easily accommodate up to 90 photos (8 MB).
With its crystal-clear, 2.4 TFT LCD screen, and multiple display modes the Shake-a-pix is
perfect for your memories at your fi nger tips.
28

Features
• Compatible with Windows 2000/XP/Vista
• Integrated Windows Popup Application—no extra software needed
• Compact, light-weight design
• Slide Show / Shake
• 2.4 TFT LCD
• 3 LED indicators
• 320 x 240 resolution
• G-Sensor motion detection
29

Components and Accessories
Please check that all components and accessories are included in the box.
If anything is missing, please contact your retailer immediately.
• Shake a pix device
• User’s Manual
• Neck Strap
• USB cable (optional)
30

About the Shake-a-pix
Out of the Box
Display Screen
Hold Button
Indicator LED
Power/Mode
Switch
Reset Button
USB
Connector
31

LED Indicator Description
The Shake-a-pix incorporates three LED indicators, blue, green, and red, to inform you of
various modes and conditions.
LED State Description
Blue Blinking Fast Index mode—advance by frame number or advance
Solid Hold current image
Green Blinking Transferring data to Shake-a-pix
Solid Battery charge Full
Red Blinking Battery requires charging
Solid Charging battery
See “Using Your Shake-a-pix” on page 43 for more information on modes.
32
20 images at a time

Getting Started
Charging Your Shake-a-pix
Note: You should charge the Shake-a-pix battery for at least 3 hours the fi rst time you
connect it to your PC or notebook. To charge your Shake-a-pix, follow these guidelines:
1. Attach the supplied USB cable to the Shake-a-pix rear connector.
2. Connect the other end to your PC or notebook.
The Indicator LED lights red to indicate that the battery is charging.
CAUTION: To prevent damage to the LCD, do not drop, apply force or strike the device
on a surface.
CAUTION: To prevent data loss, do not disconnect the USB while transferring images.
33

Connecting to a PC
The Shake-a-pix supports connection to Windows
2000/XP/Vista PCs and notebooks through the
supplied USB cable.
You can upload and manage your photos on your
computer screen. To connect your Shake-a-pix
to a PC or notebook, follow the guidelines under
“Charging Your Shake-a-pix” on page 33.
The USB Charging and Download screen displays
on the Shake-a-pix and the Digital Frame screen
displays on your computer monitor.
34

Disconnecting from a PC
When you have fi nished charging your Shake-a-pix or managing your photos, follow
these guidelines to disconnect your Shake-a-pix:
1. Locate the USB icon in your Windows taskbar (marked by the red box).
2. Left-click the icon and select the Shake-a-pix from the pop-up window.
Note: There may be several options to choose from; select USB Mass Storage Device
if unsure.
3 Unplug the Shake-a-pix from the computer when prompted.
35

Resetting Your Shake-a-pix
You can manually reset your Shake-a-pix by inserting a suitable object in to the rear of
the Shake-a-pix and pressing the Reset button.
36

Loading Images
After connecting the Shake-a-pix to your PC or notebook, the Digital Frame screen
displays.
Photo Album
Actions
Preview Panel
Preview Actions
Transfer Button
Photo Album
Free Space
Indicator
Exit Button
37

Adding Photos
To add a photo to your Shake-a-pix photo album:
1. Click Add Photo and browse to the location of the desired photo.
2. Select the photo and click Open.
The photo displays in the Preview Panel.
Zooming In and Out
Adjust the photo size using the Zoom In and Zoom Out Preview
Action buttons.
The dotted line represents the Shake-a-pix screen size; adjust your
photo so that it does not overlap the dotted area to display the entire
photo, or zoom in to display a close up of a the image.
38

Importing
Click the Import Preview Action button to temporarily add your selection to
the Photo Album.
Note: Your selections are not added to the Shake-a-pix until you click the
Transfer to Device button.
39

Organizing Your Photos
Use the Photo Album panel to organize the order in
which your Shake-a-pix displays your selections.
Moving Up and Down
Select the desired photo(s) in the Photo Album panel
and click Move Up or Move Down to change the display
order.
Note: You can select a range of photos by holding
<Shift> on your computer keyboard.
40

Deleting Photos
Select the desired photo(s) in the Photo Album panel and click Delete to remove the
selection from the album.
Note: Your selections are not deleted from the Shake-a-pix until you click the Transfer to
Device button.
Deleting All Photos
You can delete the entire contents of your Photo Album and start a new album by clicking
Clear All.
Note: Your selections are not deleted from the Shake-a-pix until you click the Transfer to
Device button.
41

Transferring Photos to Shake-a-pix
The Transfer to Device button is the fi nal stage of
adding, organizing, and deleting photos from your
Shake-a-pix.
All actions in the Digital Frame screen are temporary until you click Transfer to Device.
Once the three transfer stages are complete, click OK and disconnect your Shake-a-pix
to begin viewing your photo album on the move!
42

Using Your Shake-a-pix
Powering On and Off
Power on the Shake-a-pix using the three position power
switch:
• Slideshow Mode—fl ick the power switch to the up
position to activate this mode.
• Shake-a-pix Mode—fl ick the power switch to the down
position to activate this mode.
• Power Off—fl ick the power switch to the central position
to power off the Shake-a-pix.
43

Slideshow Mode
In Slideshow mode, the Shake-a-pix cycles automatically through your photo album. Press the Mode
button located on the top edge of the Shake-a-pix to
change display modes:
• Press once to enter Fast Index mode—the
slideshow speed increases and photo numbers are
displayed at the bottom right of the screen.
• Press twice to hold the current image on screen until you press the Mode
button again.
44

Shake-a-pix Mode
In Shake-a-pix mode, the Shake-a-pix cycles through
your photo album when the G-Sensor detects movement
or shaking. Flick the Shake-a-pix up or down to cycle
through your photo album.
Press the Mode button located on the top edge of the
Shake-a-pix to change display modes:
• Press the Mode button to hold the current image on
screen until you release it.
• Press and hold the Mode button to cycle through your
album by increments of 20.
Note: Slideshow cycling increments may vary.
45

Specifi cations
Specifi cation Description
LCD Panel 2.4 High-Brightness, High-Contrast TFT
Active Area (mm) 48.96 (W) * 36.72 (H)
QVGA/Display
Dimensions (mm)
Supported Formats JPG, BMP
Resolution 320 x 240
Internal Memory 90 pcs/64 MBit (8MByte)
46
43.5 (W) * 60.2 (H) * 3 (D)

Specifi cation Description
Play Modes Slideshow mode, shake mode
Playtime 2.5 hours
Power Source Slim type rechargable 200 mA lithium battery
Safeguards Power Protection Circuit
Supported
Operating Systems
Application Software Integrated Windows Popup
G-Sensor Left-Center-Right; Shake-a-pix function
Button Hold Image/Quick Indexing
Windows 2000/XP/Vista
47

Specifi cation Description
LEDs Blue Solid: hold Image
3 Mode Switch Slideshow, Power off, Shake-a-pix
Dimensions (mm) 60 (H) x 5 (W) x 90 (L)
Weight (g) 50
Certifi cation FCC, CE
48
Blinking: fast index mode
Green Solid: battery charge full
Blinking: data transfer
Red Solid: USB connected/charging
Blinking: battery requires charging

Support and contact information
If the product is defective:
Contact your retailer or Hama Product Consulting if you have any product claims.
Internet/World Wide Web
Product support, new drivers and product information are available at www.hama.com.
Support hotline – Hama Product Consulting:
Tel. +49 (0) 9091 / 502-115
Fax +49 (0) 9091 / 502-272
E-mail: produktberatung@hama.de
49

f Mode d´emploi
Soins de base
• Protégez l‘appareil de toute chute et n‘exercez aucune pression excessive sur sa
surface. Toute pression excessive sur sa surface est susceptible d‘endommager
l‘écran LCD.
• Ne débranchez pas le câble USB pendant le transfert d‘images afi n d‘éviter toute perte
de données.
• Protégez l‘appareil de l‘humidité. Protégez-le des éclaboussures d‘eau et ne
l‘immergez pas dans de l‘eau.
• Les incréments de cycle sont susceptibles de varier en mode Shake-a-pix.
50

Nettoyage du Shake-a-pix
• Vérifi ez que le Shake-a-pix est hors tension.
Ne vaporisez ou ne versez en aucun cas du liquide directement sur l‘écran ou le couvercle.
•
Nettoyage de l’écran :
1. Essuyez l’écran avec un chiffon doux, non fi breux et propre afi n d‘en retirer la
poussière et les autres particules.
2. Utilisez une petite quantité de produit de nettoyage pour le verre exempt d‘alcool et
d‘ammoniaque et imbibez-en un chiffon doux, non fi breux et propre si nécessaire.
Nettoyage du couvercle :
1. Utilisez un chiffon propre et sec.
2. Utilisez une petite quantité de produit de nettoyage pour le verre non abrasif, exempt
d‘alcool et d‘ammoniaque et imbibez-en un chiffon doux, non fi breux et propre si
nécessaire.
51

Introduction
Le cadre numérique Shake-a-pix de la taille d‘une carte de crédit tient facilement dans
votre poche, votre portefeuille ou votre sac à main et peut contenir jusqu‘à 90 photos
(8Mo).
Equipé d‘un écran TFT à cristaux liquides (polysilicium haute température) de 2.4 et de
différents modes d‘affi chage, le cadre Shake-a-pix vous permet d‘avoir vos souvenirs
« à portée de doigts ».
52

Caractéristiques
• Compatible avec Windows 2000/XP/Vista
• Application Windows Popup intégrée – aucun logiciel supplémentaire n‘est nécessaire
• Design compact et léger
• Diaporama/Secousse (Shake)
• TFT LCD 2.4
• 3 voyants DEL
• Résolution 320 x 240
• Détection des mouvements par capteur de gravité
53

Composants et accessoires
Veuillez contrôler que tous les composants et accessoires se trouvent dans la boîte.
Si une pièce manque, veuillez contacter immédiatement votre revendeur.
• Appareil Shake-a-pix
• Manuel d‘utilisation
• Dragonne tour de cou
• Câble USB (en option)
54

Au sujet de l‘appareil Shake-a-pix
Une nouvelle création sort de sa boîte...
Ecran d‘affi chage
Bouton de
verrouillage
(Hold)
Voyant DEL
Interrupteur
marche-arrêt/
mode
Touche reset
Connecteur
USB
55

Description des voyants DEL
L‘appareil Shale-a-pix comporte 3 voyants DEL (bleu, vert et rouge) servant à informer
l‘utilisateur des différents modes et états.
DEL Etat Description
Bleue Clignotement bref Mode de recherche rapide – avance par numéro de
En permanence Conserve l‘image actuelle
Verte Clignotement bref Transfert des données sur le Shake-a-pix
En permanence Batterie complètement rechargée
Rouge Clignotement bref La batterie doit être rechargée
En permanence Charge de la batterie
Pour plus d‘informations sur les modes, consultez « Utilisation de votre Shake-a-pix » à la page 67.
56
photo ou par bloc de 20 images

Premiers pas
Chargement de votre Shake-a-pix
Remarque : vous devez charger la batterie du Shake-a-pix pendant au moins 3 heures la
première fois en le connectant à votre PC ou à votre ordinateur portable.
Pour charger votre Shake-a-pix, suivez les consignes ci-dessous :
1. Branchez le câble USB fourni au connecteur à l‘arrière du Shake-a-pix.
2. Branchez l‘autre extrémité à votre PC ou à votre ordinateur portable.
Le voyant DEL s‘allume en rouge pour indiquer que la batterie est en cours de
chargement.
ATTENTION : Pour éviter d‘endommager la dalle LCD, ne faites pas tomber l‘appareil,
n‘usez pas de la force et ne cognez pas l‘appareil contre une surface.
ATTENTION : Pour éviter toute perte de données, ne débranchez pas le câble USB lors
du transfert des images.
57

Connexion à un PC
L‘appareil Shake-a-pix prend en charge la connexion à un PC ou ordinateur portable (avec système
d‘exploitation Windows 2000/XP/Vista) au moyen du
câble USB fourni.
Vous pouvez télécharger et gérer vos photos sur
l‘écran de votre ordinateur. Pour connecter votre
Shake-a-pix à un PC ou à un ordinateur portable,
suivez les instructions fournies au paragraphe
« Chargement de votre Shake-a-pix », à la page 57.
L‘écran de chargement USB et de téléchargement
en aval apparaît sur le Shake-a-pix et l‘écran du
cadre numérique apparaît sur l‘écran de votre
ordinateur.
58

Déconnexion du PC
Une fois que vous avez fi ni de charger votre Shake-a-pix ou de gérer vos photos, suivez
les instructions ci-dessous pour déconnecter votre Shake-a-pix :
1. Repérez l‘icône USB dans la barre de tâches Windows (représentée par une boîte
rouge).
Faites un clic gauche sur l‘icône et sélectionnez le Shake-a-pix dans la fenêtre contextuelle.
2.
Remarque : il est possible de sélectionner parmi plusieurs options ;
sélectionnez Périphérique de stockage USB en cas de doute.
3. Débranchez le Shake-a-pix de l‘ordinateur lorsque ce dernier vous y invite.
59

Réinitialisation de votre Shake-a-pix
Vous pouvez réinitialiser manuellement votre Shake-a-pix en appuyant avec un objet
pointu sur le bouton reset à l‘arrière du Shake-a-pix.
60

Chargement des images
Une fois que le Shake-a-pix a été connecté à votre PC ou à votre ordinateur portable,
l‘écran du cadre numérique s‘allume.
Album photos
Actions du champ
d‘aperçud‘aperçu
Bouton de transfert
Actions
Champ d‘aperçu
Album photos
Indication
de l‘espace libre
Bouton Quitter
61

Ajout de photos
Pour ajouter des photos dans l‘album photos Shake-a-pix :
1. Cliquez sur Ajouter photo et parcourez les dossiers pour trouver la photo désirée.
2. Sélectionnez la photo et cliquez sur Ouvrir.
La photo s‘affi che à l‘écran dans le champ d‘aperçu.
Zoom avant et zoom arrière
Ajustez la taille de la photo à l‘aide des boutons Zoom avant et
Zoom arrière en-dessous du champ d‘aperçu.
La ligne en pointillés représente la taille de l‘écran du Shake-a-pix
; si vous voulez affi cher la photo en entier, ajustez-la de sorte qu‘elle
ne dépasse pas de la surface en pointillés ; pour affi cher un détail de
l‘image, effectuez un zoom avant.
62

Importation
Cliquez sur le bouton « Import Preview Action » afi n d‘ajouter temporairement une
sélection à votre album de photos.
Remarque : vos sélections ne seront ajoutées au Shake-a-pix qu‘une fois que vous
appuierez sur le bouton « Transfer to Device ».
63

Organisation de vos photos
Utilisez l‘album photos pour organiser le dossier dans
lequel votre Shake-a-pix affi che vos sélections.
Déplacer vers le haut et vers le bas Sélectionnez la/les
photo(s) désirée(s) dans l‘album photos et cliquez sur
Déplacer vers le haut ou Déplacer vers le bas pour
changer l‘ordre d‘affi chage.
Remarque : vous pouvez sélectionner une série de
photos en maintenant la touche <Maj> (Shift) enfoncée
sur le clavier de votre ordinateur.
64

Suppression des photos
Sélectionnez la/les photo(s) désirée(s) dans l‘album photos et cliquez sur Supprimer pour
retirer la sélection de l‘album.
Remarque : vos sélections ne sont pas effacées du Shake-a-pix tant que vous n‘appuyez
pas sur le bouton Transfert vers appareil.
Suppression de toutes les photos
Vous pouvez supprimer tout le contenu de votre album photos et démarrer un nouvel
album en appuyant sur Tout effacer.
Remarque : vos sélections ne sont pas effacées du Shake-a-pix tant que vous n‘appuyez
pas sur le bouton Transfert vers appareil.
65

Transfert des photos vers le Shake-a-pix
Le bouton Transfert vers appareil est la dernière
étape des opérations d‘ajout, d‘organisation et de
suppression des photos de votre Shake-a-pix.
Toutes les actions dans le cadre numérique ne sont
défi nitives que lorsque vous cliquez sur Transfert
vers appareil.
Une fois que les trois étapes de transfert sont terminées, cliquez sur OK et déconnectez
votre Shake-a-pix pour commencer le visionnement en mouvement de votre album
photos.
66

Utilisation de votre Shake-a-pix
Mise sous et hors tension
Mettez le Shake-a-pix sous tension à l‘aide de l‘interrupteur
marche-arrêt à trois positions :
• Mode Diaporama – mettez l‘interrupteur sur la position
supérieure pour activer ce mode.
• Mode Shake-a-pix – mettez l‘interrupteur sur la position
inférieure pour activer ce mode.
• Mise hors tension – mettez l‘interrupteur sur la position
centrale pour mettre le Shake-a-pix hors tension.
67

Mode Diaporama
En mode Diaporama, le Shake-a-pix feuillette automatiquement votre album photos. Appuyez sur le bouton
Mode situé sur le coin supérieur du Shake-a-pix pour
changer de mode d‘affi chage :
• Appuyez une seule fois pour accéder au mode de
recherche rapide – la vitesse de diaporama
augmente et les numéros de photo sont affi chés en
bas à droite de l‘écran.
• Appuyez deux fois pour conserver l‘image actuelle à l‘écran jusqu‘à ce que vous
appuyiez à nouveau sur le bouton Mode.
68

Mode Shake-a-pix
En mode Shake-a-pix, le Shake-a-pix feuillette votre
album photos à chaque fois que le capteur de gravité
détecte un mouvement ou une secousse. Secouez le
Shake-a-pix vers le haut ou vers le bas pour feuilleter
votre album photos.
Appuyez sur le bouton Mode situé sur le coin supérieur du
Shake-a-pix pour changer de mode d‘affi chage :
• Appuyez sur le bouton Mode pour conserver l‘image
actuelle à l‘écran jusqu‘à le bouton soit relâché.
• Appuyez et maintenez enfoncé le bouton Mode pour feuilleter votre album de 20 en 20.
Remarque : ce nombre de photos sautées lors du diaporama peut varier.
69

Spécifi cations
Spécifi cations Description
Dalle LCD TFT 2.4 haute luminosité, haut contraste
Surface active (mm) 48,96 (l) x 36,72 (h)
Ecran QVGA
Dimensions (mm)
Formats de fi chiers supportés JPG, BMP
Résolution 320 x 240
Mémoire interne 90 images/8 Mo
70
43,5 (l) x 60,2 (h) x 3 (p)

Spécifi cations Description
Modes de lecture mode slideshow (diaporama), mode shake
Autonomie (lecture) 2,5 heures
Source d’alimentation batterie mince au lithium rechargeable 200 mA
Dispositif de protection circuit de protection de puissance
Systèmes d‘exploitation
pris en charge
Logiciel d‘application Application Windows intégrée
Capteur G gauche-centre-droite ; fonction Shake-a-pix
Bouton maintien de l‘image/indexation rapide
Windows 2000/XP/Vista
71

Spécifi cations Description
LEDs bleue allumée en permanence : maintien de l‘image
3 Commutateur de modes
Dimensions (mm) 60 (H) x 5 (l) x 90 (L)
Poids (g) 50
Certifi cations FCC, CE
72
clignotement : mode d‘indexation rapide
allumée en permanence : batterie complètement rechargée
verte
clignotement : transfert de données
rouge allumée en permanence : connexion/recharge USB
clignotement : la batterie doit être rechargée
slideshow (diaporama), mise hors tension, Shake-a-pix

Support technique et contact
En cas d’appareils défectueux :
En cas de réclamation concernant le produit, veuillez vous adresser à votre revendeur ou
au département conseil produits de Hama.
Internet / World Wide Web
Notre support technique, les nouveaux pilotes et les informations produits sont
disponibles sous : www.hama.com
Ligne téléphonique directe d’assistance – Conseil produits Hama :
Tél. +49 (0) 9091 / 502-115
Fax +49 (0) 9091 / 502-272
e-mail : produktberatung@hama.de
73

e Instrucciones de uso
Cuidados generales
• Proteja el aparato de las caídas, golpes y presión excesiva sobre la superfi cie.
Una presión excesiva puede causar daños en el LCD.
• Para evitar la pérdida de datos, no desconecte el USB durante la transferencia de
imágenes.
• Mantenga siempre seco el aparato. Protéjalo de la humedad y no lo sumerja en agua.
• Los aumentos en el avance pueden variar en el modo Shake-a-pix.
74

Limpieza del Shake-a-pix
• Asegúrese de que el Shake-a-pix está apagado.
• Nunca pulverice ni vierta líquidos directamente en la pantalla o en la cubierta.
Para limpiar la pantalla:
1. Limpie la pantalla con un paño limpio, suave que no deje pelusa. Con ello eliminará el
polvo y otras partículas.
2. Si así no queda limpio, aplique una pequeña cantidad de limpiador de cristales que no
contenga amoniaco ni alcohol en un paño limpio, suave y que no deje pelusa para
limpiar la pantalla.
Para limpiar la cubierta:
1. Utilice un paño suave y seco.
2. Si así no queda limpio, aplique una pequeña cantidad de detergente suave y no abrasivo,
que no contenga amoniaco ni alcohol en un paño limpio, suave y que no deje pelusa
para limpiar la cubierta.
75

Introducción
El marco digital Shake-a-pix, del tamaño de una tarjeta de crédito, cabe fácilmente en un
bolsillo, cartera o bolso y puede almacenar hasta 90 fotografías (8 MB).
Con su cristalina pantalla TFT LCD de 2.4 y múltiples modos de visualización, el
Shake-a-pix es perfecto para tener sus recuerdos al alcance de la mano.
76

Características
• Compatible con Windows 2000/XP/Vista
• Aplicación Windows Popup integrada, no es necesario ningún software adicional
• Diseño compacto y ligero
• Presentación de diapositivas / Agitar
• TFT LCD de 2.4
• 3 indicadores LED
• Resolución 320 x 240
• Detección de movimiento por sensor G
77

Componentes y accesorios
Compruebe que en la caja se encuentran todos los componentes y accesorios.
Si faltase algo, póngase en contacto con su proveedor sin demora.
• Dispositivo Shake a pix
• Manual del usuario
• Cinta para el cuello
• Cable USB (opcional)
78

Acerca de Shake-a-pix
Desembalado
Pantalla de visualización
Botón Retener
Indicador LED
Interruptor de
alimentación/
modo
Botón de
restablecimiento
Conector
USB
79

Descripción del indicador LED
El dispositivo Shake-a-pix incorpora tres indicadores LED de color azul, verde y rojo, que
le informan sobre varios modos y condiciones.
LED Estado Descripción
Azul Intermitente Modo Indexado rápido: desplazamiento por número de
Estático Retener la imagen actual
Verde Intermitente Transferencia de datos a Shake-a-pix
Estático Nivel de carga de la batería Lleno
Rojo Intermitente Es necesario cargar la batería
Estático Cargando la batería
Consulte “Usar el dispositivo Shake-a-pix” en la página 91 para obtener más información sobre los modos.
80
fotograma o avanzar 20 imágenes cada vez

Presentación
Cargar el dispositivo Shake-a-pix
Nota: Debe cargar la batería del Shake-a-pix durante un mínimo de 3 horas la primera
vez que lo conecte al PC u ordenador portátil. Para cargar el Shake-a-pix, siga estas
guías:
1. Conecte el cable USB suministrado al conector de la parte posterior del Shake-a-pix.
2. Conecte el otro extremo a su PC u ordenador portátil.
El indicador LED se ilumina en color rojo para indicar que la batería se está cargando.
PRECAUCIÓN: Para evitar daños en el LCD, no deje caer el dispositivo, no lo fuerce ni
golpee contra una superfi cie.
PRECAUCIÓN: Para evitar la pérdida de datos, no desconecte el USB durante la transferencia de imágenes.
81

Conexión al PC
El Shake-a-pix se puede conectar a PC y ordenadores portátiles que ejecuten Windows 2000/XP/Vista
a través del cable USB suministrado.
Puede cargar y administrar sus fotografías desde
la pantalla de su ordenador. Para conectar su
Shake-a-pix a un PC u ordenador portátil, siga las
guías que encontrará en “Cargar el dispositivo
Shake-a-pix”, en la página 81.
En el Shake-a-pix aparece la pantalla USB
Charging and Download (Cargando mediante
USB y Descarga), mientras que en el monitor del
ordenador se muestra la pantalla Digital Frame
(Marco digital).
82

Desconexión del PC
Cuando haya terminado de cargar su Shake-a-pix o de administrar sus fotografías, siga
estas guías para desconectar el Shake-a-pix:
1. Busque el icono del USB en la barra de tareas de Windows (marcado con un
cuadro rojo).
2. Haga clic con el botón izquierdo del ratón en el icono y seleccione el Shake-a-pix en
la ventana emergente.
Nota: Es posible que se muestren varias opciones. En caso de duda, seleccione
Dispositivo de almacenamiento masivo USB.
3. Desconecte el Shake-a-pix del ordenador cuando se le indique.
83

Restablecer la confi guración del Shake-a-pix
Puede restablecer manualmente la confi guración de su Shake-a-pix introduciendo
un objeto adecuado en la parte trasera del dispositivo y pulsando con él el botón de
restablecimiento.
84

Carga de imágenes
Después de conectar el Shake-a-pix al PC u ordenador portátil, se muestra la pantalla
Digital Frame (Marco digital).
Acciones del
álbum de fotografías
Panel de vista
Acciones de vista previa
Botón de transferencia
Álbum de fotografías
Indicador de
espacio libre
Botón Exit (Salida)
85

Añadir fotografías
Para añadir una fotografía a su álbum de fotografías de Shake-a-pix:
1. Haga clic en Add Photo (Añadir fotografía) y busque la ubicación de la fotografía deseada.
2. Seleccione la fotografía y haga clic en Open (Abrir).
La fotografía se muestra en el panel de vista previa.
Ampliar y reducir
Ajuste el tamaño de la fotografía usando los botones de acción de
vista previa Zoom In (Aumentar) y Zoom Out (Reducir).
La línea de puntos representa el tamaño de la pantalla del Shakea-pix; ajuste la fotografía de modo que no sobrepase la zona
delimitada por los puntos para que se muestre la fotografía entera, o
bien auméntela para que se muestre un primer plano de la imagen.
86

Importar
Haga clic en el botón de vista previa de importación Import para añadir temporalmente
su selección al álbum de fotos.
Nota: Los elementos seleccionados no se añaden al Shake-a-pix hasta que haga clic en
el botón Transfer to Device (Transferir al dispositivo).
87

Organizar sus fotografías
Utilice el panel Álbum de fotografías para organizar el
orden en el que el Shake-a-pix debe mostrar los elementos seleccionados. Subir y bajar
Seleccione la fotografía o fotografías que desee en
el panel Álbum de fotografías y haga clic en Move Up
(Subir) o Move Down (Bajar) para cambiar el orden de
visualización.
Nota: Puede seleccionar una serie de fotografías
manteniendo pulsada la tecla <Mayús> en el teclado
del ordenador.
88

Eliminar fotografías
Seleccione la fotografía o fotografías que desee en el panel Álbum de fotografías y haga
clic en Delete (Eliminar) para quitar los elementos seleccionados del álbum.
Nota: Los elementos seleccionados no se eliminarán del Shake-a-pix hasta que haga clic
en el botón Transfer to Device (Transferir al dispositivo).
Eliminar todas las fotografías
Puede eliminar todo el contenido de su álbum de fotografías y empezar un álbum nuevo
haciendo clic en Clear All (Borrar todo).
Nota: Los elementos seleccionados no se eliminarán del Shake-a-pix hasta que haga clic
en el botón Transfer to Device (Transferir al dispositivo).
89

Transferir fotografías a Shake-a-pix
El botón Transfer to Device (Transferir al dispositivo)
es el último paso para añadir, organizar y eliminar
fotografías de su Shake-a-pix.
Todas las acciones realizadas en la pantalla Digital
Frame (Marco digital) son temporales hasta que
haga clic en Transfer to Device (Transferir al
dispositivo).
Una vez completados los tres pasos para la
transferencia, haga clic en OK (Aceptar) y desconecte el Shake-a-pix para empezar
a ver su álbum de fotografías dondequiera que vaya.
90

Usar el dispositivo Shake-a-pix
Encendido/Apagado
Encienda el Shake-a-pix utilizando el interruptor de
alimentación de tres posiciones:
• Modo Presentación de diapositivas (mueva el interruptor
de alimentación hasta la posición superior para activar
este modo).
• Modo Shake-a-pix (mueva el interruptor de alimentación
hasta la posición inferior para activar este modo).
• Apagado (mueva el interruptor de alimentación hasta la
posición central para apagar el Shake-a-pix).
91

Modo Presentación de diapositivas
En el modo Presentación de diapositivas, el Shakea-pix avanza automáticamente por su álbum de
fotografías. Pulse el botón de modo situado en el
extremo superior del Shake-a-pix para
cambiar los modos de visualización:
• Púlselo una vez para activar el modo Indexado
rápido (la velocidad de la presentación de
diapositivas aumenta y se muestran los números
de las fotografías en la esquina inferior derecha de la pantalla).
• Púlselo dos veces para retener la imagen actual en la pantalla hasta que pulse de
nuevo el botón de modo.
92

Modo Shake-a-pix
En el modo Shake-a-pix, el dispositivo hace avanzar su
álbum de fotografías cuando el sensor G detecta movimiento o que se agita el dispositivo. Mueva el Shake-a-pix
hacia arriba o abajo para hacer avanzar el álbum de
fotografías.
Pulse el botón de modo situado en el extremo superior del
Shake-a-pix para cambiar los modos de visualización:
• Pulse el botón de modo dos veces para retener la
imagen actual en la pantalla hasta que lo suelte.
• Mantenga pulsado el botón de modo para hacer
avanzar el álbum en pasos de 20 fotografías.
Nota: Los aumentos en el avance de la presentación de diapositivas pueden variar.
93

Especifi caciones
Especifi caciones Descripción
Panel LCD TFT de 2.4 de alto brillo y alto contraste
Área activa (mm) 48,96 (anchura) * 36,72 (altura)
QVGA/Pantalla
Dimensiones (mm)
Formatos compatibles: JPG, BMP
Resolución: 320 x 240
Memoria interna: 90 pcs/64 MBit (8MByte)
94
43,5 (anchura) * 60,2 (altura) * 3 (profundidad)

Especifi caciones Descripción
Modos de reproducción
Autonomía 2,5 horas
Fuente de alimentación
Protecciones Circuito de protección de potencia
Sistemas operativos
soportados
Software de aplicación Windows Popup integrado
Sensor G Izquierda-Centro-Derecha; Función Shake-a-pix
Botón Retener imagen/Índice rápido
Modo de diapositivas, modo shake
Pila recargable de litio de 200 mA tipo slim
Windows 2000/XP/Vista
95

Especifi caciones Descripción
LEDs Azul Estático: Retener imagen
Conmutador de 3 modos
Dimensiones (mm) 60 (Al) x 5 (An) x 90 (L)
Peso (g) 50
Certifi cados FCC, CE
96
Intermitente: Modo de índice rápido
Verde Estático: Nivel de carga de la batería llena
Intermitente: Transferencia de datos
Rojo Estático: USB conectado/cargando
Intermitente: Es necesario cargar la batería
Diapositivas, desconectado, Shake-a-pix

Información de contacto y de soporte
En caso de productos defectuosos:
Si tiene que hacer alguna reclamación sobre nuestros productos, diríjase a su proveedor
o a su asesor de productos Hama.
Internet/World Wide Web
Encontrará soporte para sus productos, nuevos controladores o información sobre los
productos en www.hama.com
Línea directa de soporte – Asesoramiento sobre productos Hama:
Tel. +49 (0) 9091 / 502-115
Fax +49 (0) 9091 / 502-272
e-mail: produktberatung@hama.de
97
 Loading...