

Page 1

00
186353
123126
Weather Station
Wetterstation
EWS-152
Operating Instructions
Bedienungsanleitung
Mode d‘emploi
Instrucciones de uso
Gebruiksaanwijzing
Istruzioni per l‘uso
Gebruiksaanwijzing
Οδηγίες χρήσης
Instrukcja obsługi
Használati útmutató
GB
D
F
E
RUS
I
NL
GR
PL
H
Page 2
A
1
2
3
6
4
5
MODE
8
9
7
10
B
11
12
13
Page 3
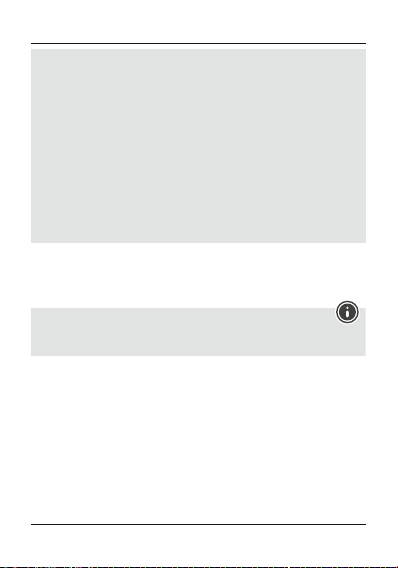
G Operating instruction
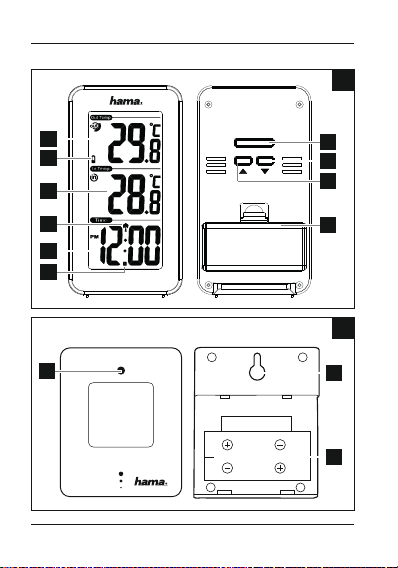
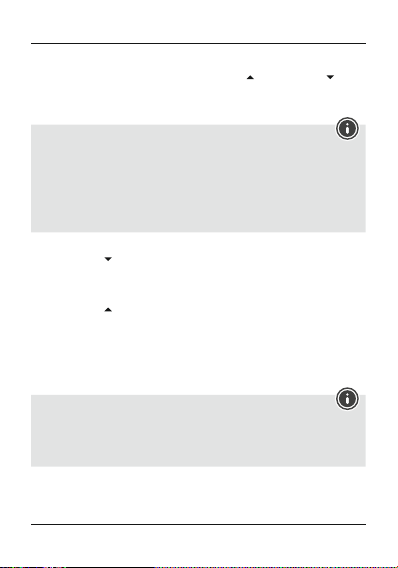
Controls and Displays
ABase station
1. Outdoor temperature
2. Battery symbol
3. Room temperature
4. Time
5. Summer time
6. Wireless symbol
button =Increases thecurrent setting/Toggles 12/24 hour format/Manual
7.
search for signal fromthe measuring station
8. MODE button =Settings/Conrms the setting
9. button =Decreases the current setting/Toggles between °C and °F/Activates/
deactivates manual radio signal reception
10. Battery compartment
BMeasuring station
11. Transmission indicator lamp
12. Opening for wall mounting
13. Battery compartment
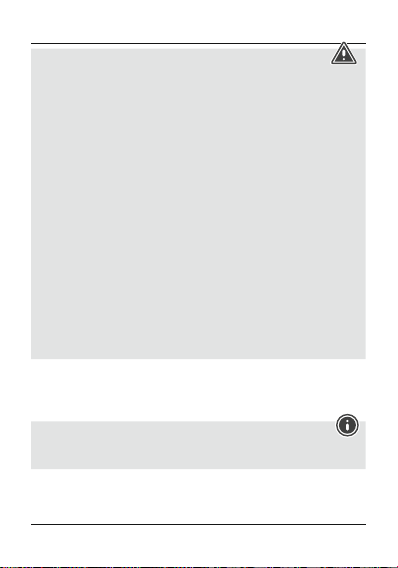
1. Explanation of Warning Symbols and Notes
Warning
This symbol is used to indicate safety instructions or to draw your attention to
specichazards and risks.
Note
This symbol is used to indicate additional information or important notes.
2. Package Contents
•Weather Station EWS-152
(base station for indoor/outdoor measuring station)
•4AAAbatteries
•These operating instructions
2
Page 4

3. Safety Instructions
•The product is intended for private, non-commercial use only.
•Donot operate the product outside the power limits given in the specications.
•Donot use the product in moist environments and avoid splashes.
•Donot use the product in the immediate vicinity of heaters or other heat sources
or in direct sunlight.
•Donot use the product in areas wherethe use of electronic devices is not permitted.
•Donot place the product near interference elds, metal frames, computers, TVs,
etc. Electronic devices and window frames can negatively affect the product’s
functionality.
•Donot drop the product and do not expose it to any major shocks.
•Donot open the device or continue to operate it if it becomes damaged.
•Donot attempt to service or repair the product yourself.Leave any and all service
work to qualied experts.
•Keep the packaging material out of the reach of children due to the risk of suffocation.
•Dispose of packaging material immediately according to locally applicable
regulations.
•Donot modify the product in any way.Doing so voids the warranty.
•Use the product for its intended purpose only.
•Use the item only in moderate climatic conditions.
•Keep this product, as all electrical products, out of the reach of children!
3
Page 5
Warning –Batteries
•When inserting batteries, note the correct polarity (+ and -markings) and insert the
batteries accordingly.Failure to do so could result in the batteries leaking or exploding.
•Only use batteries (or rechargeable batteries) that match the specied type.
•Beforeyou insert the batteries, clean the battery contacts and the polar contacts.
•Donot allow children to change batteries without supervision.
•Donot mix old and new batteries or batteries of adifferent type or make.
•Remove the batteries from products that arenot being used for an extended period
(unless these arebeing kept ready for an emergency).
•Donot short-circuit batteries.
•Donot charge batteries.
•Donot throw batteries in a re.
•Keep batteries out of the reach of children.
•Never open, damage or swallow batteries or allow them to enter the environment. They
can contain toxic, environmentally harmful heavy metals.
•Immediately remove and dispose of dead batteries from the product.
•Avoid storing, charging or using the device in extreme temperatures and
extremely low atmospheric pressure(for example, at high altitudes).
4. Getting Started
4.1 Measuring station
•Open the battery compartment (13) and insert two AAA batteries with the correct
polarity.Close the battery compartment.
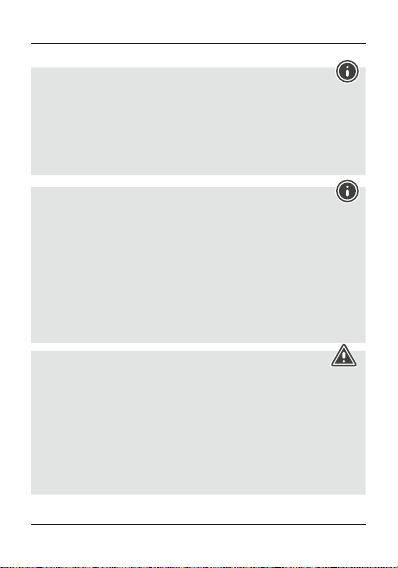
Note
Beforeuse, ensureyou insert the batteries in the measuring station rst and then
in the base station.
4.2 Base station
•Open the battery compartment (10) and insert two AAA batteries with the correct
polarity.Close the battery compartment.
4
Page 6
5. Installation
Note –Installation
•Werecommend initially placing the base and measuring stations in the intended
locations without installing them and making all the settings described in 6.
Operating –todo
•Only install the stations once the appropriate settings have been made and a
stable wireless connection is established between the stations.
•Donot mount the product above locations wherepersons might linger.
Note
•The wireless transmission range between the measuring and base stations is up
to 30 minopen spaces.
•Beforeinstallation, ensurethat wireless transmission will not be disrupted by
interference or obstacles like buildings, trees, vehicles, high-voltage lines, etc.
•Beforethe nal installation, ensurethat thereissucient reception between the
intended installation locations.
•When installing the measuring station, ensurethat it is protected from direct
sunlight and rain.
•The international standardheight for measuring air temperatureis1.25 m(4
ft) above ground.
Warning
•Buy special or suitable installation material from aspecialised dealer for
wall-mounting.
•Ensurethat no faulty or damaged parts areinstalled.
•Never apply force during installation. This could damage the product.
•Beforeinstallation, ensurethat the chosen wall is suitable for the weight to be
installation, and make surethat thereare no electrical wires, water,gas or other
lines at the installation site on the wall.
5.1 Base station
•Use the base to position the base station on alevel surface.
5
Page 7
5.2 Measuring station
•You can also position the measuring station on alevel outdoor surface.
•Werecommend installing the measuring station securely on an outdoor wall using
the opening (12). Install an anchor,screw,nail, etc. in the wall of your choice.
•Hang up the base/measuring station using the opening intended for this purpose.
6. Operation
Note –Input
Hold down the button (7) or the button (9) to select values faster.
6.1 Connection to the measuring station
•After you insert the batteries, the base station automatically searches for a
connection to the measuring station and performs initial setup.
Note
•Initial setup takes approx. 3minutes.
•Donot press any buttons during setup. Otherwise, values may not be transmitted
correctly and thereisarisk of value errors and inaccuracies.
•The setup process is completed when the indoor (3) and outdoor (1)
measurement data is displayed.
•Ifthe base station still does not receive asignalfrom the measuring station ,press
and hold the button (7) for approx. 3secondsto start the manual search for
the signal.
6
Page 8
6.2 Basic and manual settings
Automatic setting using the DCF signal
•After the base station is switched on for the rst time and successful transmission
is established between the base station and the measuring station, the clock will
automatically search for aDCF signal. During the search, the wireless symbol (6)
will ash.
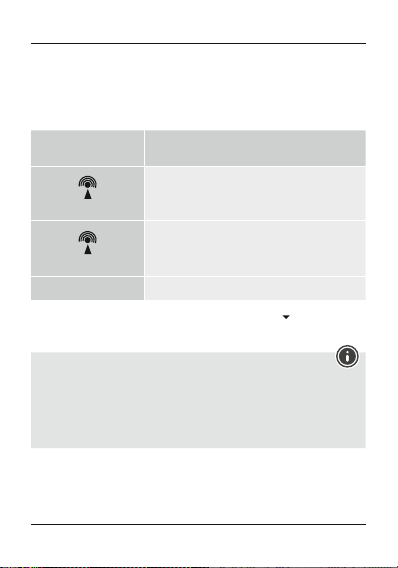
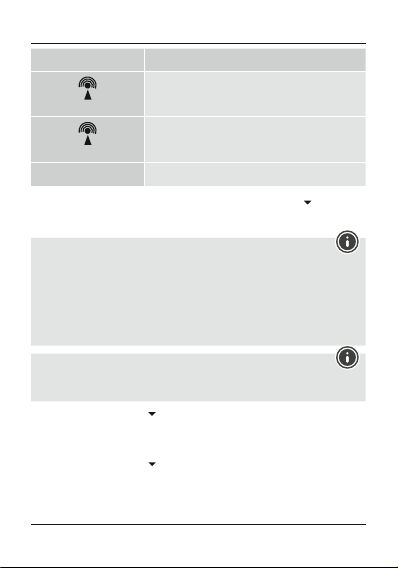
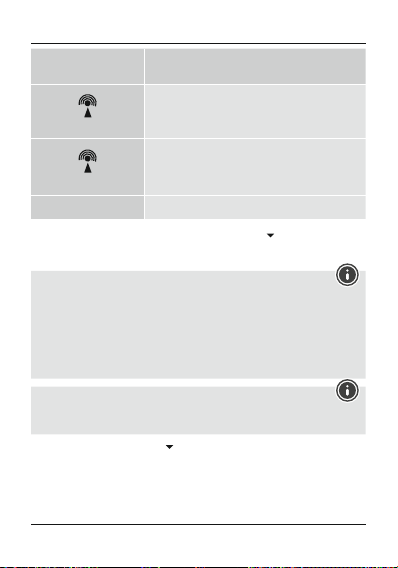
Display Searching for the DCF signal
Flashing
Displayed continuously
No display Deactivated
•Ifthe station still does not receive asignal, press and hold the button (9) for
approx. 3seconds to start the manual search for the DCF signal. The wireless
symbol (6) will start to ash.
Note –Time settings
•The search process takes about 7minutes.If the search fails, it ends and is
repeated at the next clock hour.The wireless symbol (6) will go out.
•Inthe meantime you can, however,set the time and the date manually.
•The clock automatically continues to search for the DCF signal on adaily basis
(between 1:00 a.m. and 3:00 a.m.). If the signal is received successfully,the
manually-set time and date areoverwritten.
Active
Successful –signal is being received
7
Page 9
Note –Summer time
•The clock automatically switches to summer time. S appears on the display as
long as summer time is activated.
•Press and hold the button (9) again for approx. 3seconds to stop the manual
search.
Manually setting the date/time
•Press and hold the button (9) for approx. 3secondsto stop the search for the
DCF signal. The wireless symbol (6) goes out and you can set the time manually.
•Press and hold the MODE button (8) for approx. 3seconds to start manually setting
the date/time.
•Set the following information in the order listed:
•Time zone (difference in hours), hour,minute.
•Toselect individual values, press the button (7) or the button (9) and conrm
each selection by pressing the MODE button (8). .
•Ifyou do not make an entry for 20 seconds, you automatically exit setup mode.
Note –Time zone
•The DCF signal can be received over long distances, but always transmits the
current Central European Time in Germany.Make sureyou account for the time
difference in countries with another time zone.
•Ifyou areinMoscow,the time is 3hours later than in Germany.This means that
you should set +3 for the time zone. The clock then automatically sets the time
to 3hours after the DCF signal received or relative to the manually set time.
Celsius/Fahrenheit
•Press the button (9) to switch between °C and °F for the temperaturedisplay.
12/24 hour format
button (7) to switch the time between the 12 and 24 hour format.
•Press the
6.3 Low battery capacity
As soon as the battery symbol (2) appears on the display of the base station, the
capacity of the batteries in the measuring station is very low.Replace the batteries
immediately.
8
Page 10

Note –Replacing the batteries
•Note that the stations have to be resynchronised each time after you change the
batteries in the measuring or base station.
•Todothis, remove the batteries from the other station and then reinsert them, or
change them as required.
7. Care and Maintenance
Only clean this product with aslightlydamp, lint-free cloth and do not use aggressive
cleaning agents.
8. Warranty Disclaimer
Hama GmbH &CoKG assumes no liability and provides no warranty for damage
resulting from improper installation/mounting, improper use of the product or from
failuretoobserve the operating instructions and/or safety notes.
9
Page 11
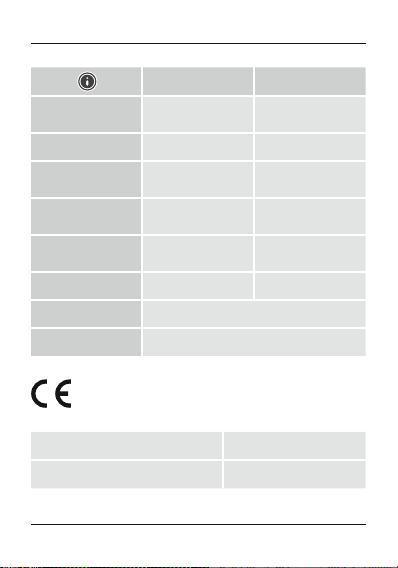
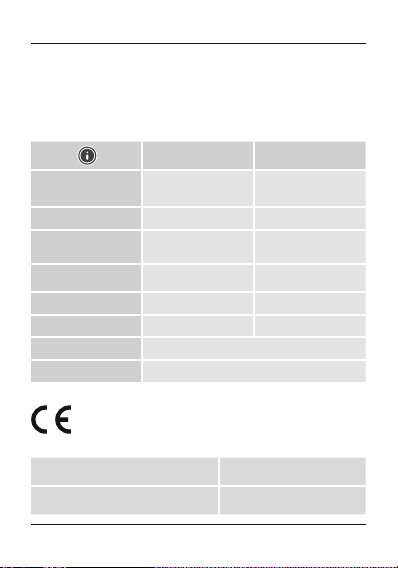
9. Technical Data
Base station Measuring station
Power supply
Power consumption 0.5 mA 3mA
Measuring range
Temperature
Measuring increments
Temperature
Temperaturemeasurement
cycle
Radio-controlled DCF clock YesNo
Frequency 433 MHz
Range ≤ 50 m
10. Declaration of Conformity
Hereby,Hama GmbH &CoKG declares that the radio equipment type
[00186353, 00123126] is in compliance with Directive 2014/53/EU.The
full text of the EU declaration of conformity is available at the following
internet address: www.hama.com -> 00186353, 00123126 -> Downloads.
Frequency band(s) 433 MHz
Maximum radio-frequency power transmitted 0,015 mW
10
3.0 V
2xAAA batteries
0°C –+50°C/
32°F –122°F
0.1°C/0.1°F 0.1°C/0.1°F
43 –47s43–47 s
3.0 V
2xAAA batteries
-20°C –+60°C/
-4°F –140°F
Page 12

D Bedienungsanleitung
Bedienungselemente und Anzeigen
ABasisstation
1. Außentemperatur
2. Batteriesymbol
3. Raumtemperatur
4. Uhrzeit
5. Sommerzeit
6. Funksymbol
-Taste =Erhöhungdes aktuellen Einstellungswertes /Wechsel 12/24-Stunden-
7.
Format /ManuelleSuche nach Signal von der Messstation
8. MODE-Taste =Einstellungen /Bestätigung des Einstellungswerts
9. -Taste=Verringerungdesaktuellen Einstellungswertes /Wechsel zwischen °C
und °F /Aktivierung/ Deaktivierung manueller Funksignal-Empfang
10. Batteriefach
BMessstation
11. Kontrollleuchte Übertragung
12. Aussparung für Wandmontage
13. Batteriefach
1. Erklärung von Warnsymbolen und Hinweisen
Warnung
Wirdverwendet, um Sicherheitshinweise zu kennzeichnen oder um Aufmerksamkeit
auf besondereGefahren und Risiken zu lenken.
Hinweis
Wirdverwendet, um zusätzlich Informationen oder wichtige Hinweise zu
kennzeichnen.
2. Packungsinhalt
•Wetterstation EWS-152
(Basisstation für den Innenbereich /Messstation für den Außenbereich)
•4AAABatterien
•diese Bedienungsanleitung
11
Page 13

3. Sicherheitshinweise
•Das Produkt ist für den privaten, nicht-gewerblichen Haushaltsgebrauch
vorgesehen.
•Betreiben Sie das Produkt nicht außerhalb seiner in den technischen Daten
angegebenen Leistungsgrenzen.
•Verwenden Sie das Produkt nicht in einer feuchten Umgebung und vermeiden Sie
Spritzwasser.
•Betreiben Sie das Produkt nicht in unmittelbarer Nähe der Heizung, anderer
Hitzequellen oder in direkter Sonneneinstrahlung.
•Benutzen Sie das Produkt nicht in Bereichen, in denen elektronische Produkte nicht
erlaubt sind.
•Positionieren Sie das Produkt nicht in der Nähe von Störfeldern, Metallrahmen,
Computern und Fernsehern etc. Elektronische Geräte sowie Fensterrahmen
beeinträchtigen die Funktion des Produktes negativ.
•Lassen Sie das Produkt nicht fallen und setzen Sie es keinen heftigen
Erschütterungen aus.
•Öffnen Sie das Produkt nicht und betreiben Sie es bei Beschädigungen nicht weiter.
•Versuchen Sie nicht, das Produkt selbst zu warten oder zu reparieren. Überlassen Sie
jegliche Wartungsarbeit dem zuständigen Fachpersonal.
•Halten Sie Kinder unbedingt von dem Ve rpackungsmaterial fern, es besteht
Erstickungsgefahr.
•Entsorgen Sie das Verpackungsmaterial sofort gemäß den örtlich gültigen
Entsorgungsvorschriften.
•Nehmen Sie keine Veränderungen am Produkt vor.Dadurch verlieren Sie jegliche
Gewährleistungsansprüche.
•Verwenden Sie das Produkt ausschließlich für den dazu vorgesehenen Zweck.
•VerwendenSie den Artikel nur unter moderaten klimatischen Bedingungen.
•Dieses Produkt gehört, wie alle elektrischen Produkte, nicht in Kinderhände!
12
Page 14
Warnung -Batterien
•BeachtenSie unbedingt diekorrektePolarität (Beschrif tung +und-) der
Batterien undlegen Siediese entsprechendein. BeiNichtbeachtungbesteht
dieGefahr desAuslaufens oder einerExplosion der Batterien.
•Verwenden Sieausschließlich Akkus (oderBatterien), diedem angegebenen
Typentsprechen.
•ReinigenSie vordem Einlegender Batterien dieBatteriekontakteund die
Gegenkontakte.
•Gestatten SieKindernnicht ohne Aufsicht dasWechseln vonBat terien.
•Mischen Siealteund neue Batterien ni cht,sowie Batterien unterschiedlichen
Typs oder Herstellers.
•Entfernen SieBatterien ausProdukten,die längereZeitnicht benutztwerden.
(außerdiese werden füreinen Notfall bereitgehalten)
•Schließen Siedie Batterien nicht kurz.
•Laden SieBatterien nicht.
•Werfen SieBatterien nicht ins Feuer.
•BewahrenSie Batterien außerhalb der Reichweite vonKindern auf.
•Batterien nieöffnen,beschädigen,verschlucken oder in dieUmweltgelangen
lassen. Siekönnen giftige undumweltschädlicheSchwermetalleenthalten.
•Entfernen undentsorgen SieverbrauchteBat terien unver züglich ausdem
Produkt.
•Vermeiden Sie Lagerung, Laden und Benutzung bei extremen Temperaturen und
extrem niedrigem Luftdruck (wie z.B. in großen Höhen).
4. Inbetriebnahme
4.1 Messstation
•Öffnen Sie das Batteriefach (13) und legen Sie zwei AAA Batterien polrichtig ein.
Schließen Sie die Batteriefachabdeckung anschließend.
Hinweis
Beachten Sie, dass Sie bei der Inbetriebnahme immer zuerst die Batterien in die
Messstation, und dann in die Basisstation einlegen.
4.2 Basisstation
•Öffnen Sie das Batteriefach (10) und legen Sie zwei AAA Batterien polrichtig ein.
Schließen Sie die Batteriefachabdeckung anschließend.
13
Page 15
5. Montage
Hinweis –Montage
•Eswirdempfohlen, die Basis- und Messstation zunächst an den gewünschten
Aufstellorten ohne Montage zu platzieren und alle Einstellungen -wie in 6.
Betrieb beschrieben –vorzunehmen.
•Montieren Sie erst nach korrekter Einstellung und stabiler Funkverbindung die
Station/en.
•Montieren Sie das Produkt nicht an Orten, unter denen sich Personen aufhalten
könnten.
Hinweis
•Die Reichweite der Funkübertragung zwischen der Mess- und Basisstation
beträgt im freien Gelände bis zu 30m.
•Achten Sie vor der Montage darauf,dass die Funkübertragung nicht
durch Störsignale oder Hindernisse wie Gebäude, Bäume, Fahrzeuge,
Hochspannungsleitungen, u.a. beeinusst wird.
•Stellen Sie vor der endgültigen Montage sicher,dass zwischen den gewünschten
Aufstellorten ausreichender Empfang besteht.
•Achten Sie bei der Montage der Messstation darauf,dass diese vor direkter
Sonne und Regen geschützt positioniert ist.
•Die internationale Standardhöhe für die Messung der Lufttemperatur beträgt
1,25 m(4ft)über Grund.
Warnung
•Besorgen Sie sich spezielles bzw.geeignetes Montagematerial im Fachhandel für
die Montage an der vorgesehenen Wand.
•Stellen Sie sicher,dass keine fehlerhaften oder beschädigten Teile montiert
werden.
•Wenden Sie bei der Montage niemals Gewalt oder hohe Kräfte an. Diese können
das Produkt beschädigen.
•Prüfen Sie vor Montage die Eignung der vorgesehenen Wand für das
anzubringende Gewicht und vergewissern Sie sich, dass sich an der
Montagestelle in der Wand keine elektrischen Leitungen, Wasser-, Gas- oder
sonstige Leitungen benden.
14
Page 16
5.1 Basisstation
•Stellen Sie die Basisstation mithilfe des Standfußes auf einer ebenen Fläche auf.
5.2 Messstation
•Die Messstation können Sie ebenfalls auf einer ebenen Fläche im Außenbereich
aufstellen.
•Eswirdempfohlen, die Messstation sicher und fest an einer Außenwand mithilfe der
Aussparung (12) zu montieren. Befestigen Sie Dübel, Schraube, Nagel, etc. inder
dafür vorgesehenen Wand.
•Hängen Sie die Messstation mit der dafür vorgesehenen Aussparung daran ein.
6. Betrieb
Hinweis –Eingabe
Halten Sie die -Taste (7) oder die -Taste (9) gedrückt, um die Werte schneller
auswählen zu können.
6.1 Verbindung zur Messstation
•Nach dem Einlegen der Batterien sucht die Basisstation automatisch nach einer
Verbindung zur Messstation und führt die Ersteinrichtung durch.
Hinweis
•Die Ersteinrichtung dauert ca. 3Minuten.
•Vermeiden Sie in dieser Zeit jegliche Betätigung der Tasten! Andernfalls können
Fehler und Ungenauigkeiten bei den Werten und deren Übertragung entstehen.
•Der Vo rgang ist beendet, sobald die Messdaten für Innen- (3) und Außenbereich
(1) angezeigt werden.
•Wirdwiederholt kein Signal von der Messstation empfangen, drücken und halten
Sie die -Taste (7)für ca. 3Sekunden, um die manuelle Suche nach dem Signal
zu starten.
6.2 Grundeinstellungen und manuelle Einstellungen
Automatische Einstellung nach DCF-Signal
•Nach dem ersten Einschalten der Basisstation und erfolgreicher Übertragung
zwischen Basis- und Messstation, beginnt die Uhr automatisch die Suche nach
einem DCF-Signal. Während des Suchvorgangs blinkt das Funksymbol (6) auf.
15
Page 17
Anzeige Suche nach DCF-Signal
Blinkende Anzeige
Dauerhafte Anzeige
Keine Anzeige Inaktiv
•Wirdwiederholt kein Signal empfangen, drücken und halten Sie die -Taste (9)
für ca. 3Sekunden, um die manuelle Suche nach dem DCF-Signal zu starten. Das
Funksymbol (6) beginnt zu blinken.
Hinweis –Uhrzeiteinstellung
•Der Suchvorgang dauert etwa 7Minuten. Falls dieser fehlschlägt, wirddie Suche
beendet und zur nächsten vollen Stunde wiederholt. Das Funksymbol (6) erlischt.
•Sie können währenddessen eine manuelle Einstellung von Uhrzeit und Datum
vornehmen.
•Die Uhr sucht automatisch weiterhin täglich (zwischen 01:00 und 03:00 Uhr)
nach dem DCF-Signal. Bei erfolgreichem Signalempfang werden die manuell
eingestellte Uhrzeit und das Datum überschrieben.
Hinweis –Sommerzeit
•Die Uhrzeit stellt sich automatisch auf die Sommerzeit um. Solange die
Sommerzeit aktiv ist, wirdauf dem Display S angezeigt.
•Drücken und halten Sie die -Taste (9) erneut für ca. 3Sekunden, um den
manuellen Suchvorgang zu beenden.
Manuelle Einstellung Datum/ Uhrzeit
•Drücken und halten Sie die -Taste (9) für ca. 3Sekunden, um den Suchvorgang
nach dem DCF-Signal zu beenden. Das Funksymbol (6) erlischt und Sie können die
Uhrzeit manuell einstellen.
•Drücken und halten Sie die MODE-Taste (8) für ca. 3Sekunden, um die manuelle
Einstellung von Datum/ Uhrzeit zu starten.
16
Aktiv
Erfolgreich –Signal wirdempfangen
Page 18
•Stellen Sie die folgenden Informationen nacheinander ein:
•Zeitzone (Abweichung in Stunden), Stunde, Minute .
•Drücken Sie zum Auswählen der einzelnen Werte die
(9) und bestätigen Sie die jeweilige Auswahl durch Drücken der MODE-Taste (8).
•Erfolgt 20 Sekunden keine Eingabe, wirdder Einstellungsmodus automatisch
verlassen.
Hinweis –Zeitzone
•Das DCF-Signal kann weitläugempfangen werden, entspricht jedoch immer der
MEZ, die in Deutschland gilt. Beachten Sie daher,dass Sie in Ländern mit anderer
Zeitzone die Zeitverschiebung beachten.
•Benden Sie sich in Moskau, ist es dort bereits 3Stunden später als in
Deutschland. Stellen Sie daher bei der Zeitzone +3 ein. Die Uhr stellt sich dann
immer nach Empfang des DCF-Signals bzw.inBezug auf die manuell eingestellte
Uhrzeit automatisch 3Stundenweiter.
Celsius /Fahrenheit
•Drücken Sie die
zu wechseln.
12/24-Stunden-Format
•Drücken Sie die
Format zu wechseln.
6.3 Niedrige Batteriekapazität
Sobald das Batteriesymbol (2) auf dem Display der Basisstation angezeigt wird, ist
die Kapazität der Batterien in der Messstation sehr gering. Wechseln Sie die Batterien
umgehend aus.
Hinweis –Batteriewechsel
•Beachten Sie, dass Sie nach jedem Batteriewechsel an Mess- oder Basisstation
eine neue Synchronisation der Stationen erfolgen muss.
•Nehmen Sie dazu die Batterien der anderen Station heraus und setzen Sie erneut
ein oder wechseln Sie diese bei Bedarf ebenfalls aus.
7. Wartung und Pflege
Reinigen Sie dieses Produkt nur mit einem fusselfreien, leicht feuchten Tu ch und
verwenden Sie keine aggressiven Reiniger.
-Taste (9), um bei der Te mperaturanzeige zwischen °C und °F
-Taste (7), um bei der Uhrzeit zwischen dem 12- und 24-Stunden-
-Taste (7) oder die -Taste
17
Page 19
8. Haftungsausschluss
Die Hama GmbH &Co. KG übernimmt keinerlei Haftung oder Gewährleistung für
Schäden, die aus unsachgemäßer Installation, Montage und unsachgemäßem
Gebrauch des Produktes oder einer Nichtbeachtung der Bedienungsanleitung und/oder
der Sicherheitshinweise resultieren.
9. Technische Daten
Basisstation Messstation
Stromversorgung
Stromaufnahme 0,5 mA 3mA
Messbereich
Temperatur
Messschritte
Temperatur
Messzyklus Te mperatur 43 –47s 43 –47s
DCF-Funkuhr Ja Nein
Frequenz 433 MHz
Reichweite ≤ 50 m
10. Konformitätserklärung
Hiermit erklärt die Hama GmbH &CoKG,dass der Funkanlagentyp
[00186353, 00123126] der Richtlinie 2014/53/EU entspricht. Der
vollständige Te xt der EU-Konformitätserklärung ist unter der folgenden
Internetadresse verfügbar: www.hama.com -> 00186353, 00123126 -> Downloads.
Frequenzband/Frequenzbänder 433 MHz
Abgestrahlte maximale Sendeleistung 0,015 mW
18
3,0 V
2xAAA Batterie
0°C –+50°C/
32°F –122°F
0,1°C /0,1°F 0,1°C /0,1°F
3,0 V
2xAAA Batterie
-20°C –+60°C/
-4°F –140°F
Page 20
F Mode d‘emploi
Éléments de commande et d‘affichage
AStation de base
1. Températureextérieure
2. Icône de pile
3. Températureambiante
4. Heure
5. Heured‘été
6. Icône radio
7. Touche
8. Touche MODE =réglages /conrmation de la valeur sélectionnée
9. Touche =diminution de la valeur actuelle /commutation entre°Cet°F/
10. Compartiment àpiles
BStation de mesure
11. Témoin de contrôle transmission
12. Fente pour installation murale
13. Compartiment àpiles
1. Explication des symboles d‘avertissement et des remarques
2. Contenu de l‘emballage
•Station météo EWS-152
•4pilesLR03/AAA
•Mode d‘emploi
=augmentation de la valeur actuelle /commutation format horaire
12/24 heures /recherche manuelle du signal provenant de la station de mesure
activation /désactivation de la réception manuelle du signal radio
Avertissement
Ce symbole est utilisé pour indiquer des consignes de sécurité ou pour attirer votre
attention sur des dangers et risques particuliers.
Remarque
Ce symbole est utilisé pour indiquer des informations supplémentaires ou des
remarques importantes.
(station de base pour l‘intérieur /station de mesurepour l‘extérieur)
19
Page 21
3. Consignes de sécurité
•Ceproduit est destiné àune installation domestique non commerciale.
•N‘utilisez pas le produit en dehors des limites de puissance indiquées dans les
caractéristiques techniques.
•N‘utilisez pas le produit dans un environnement humide et évitez toute projection
d‘eau.
•Évitez d’utiliser le produit àproximité immédiate d‘un chauffage, d’autres sources
de chaleur ou exposé aux rayons directs du soleil.
•N‘utilisez pas le produit dans les zones dans lesquelles l‘utilisation d‘appareils
électroniques est interdite.
•Neplacez pas le produit àproximité de champs parasites, de cadres métalliques,
d’ordinateurs, de téléviseurs, etc. Les appareils électroniques ainsi que les cadres de
fenêtreont une inuence négative sur le fonctionnement du produit.
•Protégez le produit des secousses violentes et évitez tout choc ou toute chute.
•Netentez pas d‘ouvrir le produit en cas de détérioration et cessez de l’utiliser.
•Netentez pas de réparer l’appareil vous-même ni d’effectuer des travaux
d’entretien. Déléguez tous travaux d‘entretien àdes techniciens qualiés.
•Tenez les emballages d‘appareils hors de portée des enfants, risque d‘étouffement.
•Recyclez les matériaux d’emballage conformément aux prescriptions locales en
vigueur.
•N’apportez aucune modication àl’appareil. Des modications vous feraient perdre
vos droits de garantie.
•Utilisez le produit exclusivement conformément àsadestination.
•Utilisez l’article uniquement dans des conditions climatiques modérées.
•Cet appareil, comme tout appareil électrique, doit êtregardé hors de portée des
enfants !
Avertissement concernant les piles
•Respectez impérativement la polarité de la pile (marquage +et-)lors de
l‘insertion dans le boîtier ;risques d‘écoulement et d‘explosion des piles si tel
n‘est pas le cas.
•Utilisez exclusivement des batteries (ou des piles) du type indiqué.
•Avant d‘insérer les piles, nettoyez-en les contacts, ainsi que les contacts
d‘accouplement.
•N‘autorisez pas àdes enfants de remplacer les piles d‘un appareil sans
surveillance.
20
Page 22
•N’utilisez pas simultanément des piles usagées et des piles neuves ou des piles
de différents types.
•Retirez les piles des produits que vous ne comptez pas utiliser pendant un certain
temps (à l‘exception des produits d‘alarme en veille).
•Necourt-circuitez pas les piles.
•Netentez pas de recharger les piles.
•Nejetez pas de piles au feu.
•Conservez les piles hors de portée des enfants.
•Netentez pas d‘ouvrir les piles, faites attention ànepas les endommager,les
jeter dans l’environnement et àceque des petits enfants ne les avalent pas. Les
piles sont susceptibles de contenir des métaux lourds toxiques et nocifs pour
l‘environnement.
•Retirez les piles usagées immédiatement du produit pour les recycler.
•Évitez de stocker,charger et utiliser le produit àdes températures extrêmes et à
une pression atmosphérique extrêmement basse (à haute altitude, par exemple).
4. Mise en service
4.1 Station de mesure
•Ouvrez le compartiment àpiles (13) et insérez deux piles LR03/AAA conformément
aux indications de polarité. Refermez le couvercle du compartiment.
Remarque
Lors de la premièremise en service, veuillez premièrement insérer les piles dans la
station de mesure, puis dans la station de base.
4.2 Station de base
•Ouvrez le compartiment àpiles (10) et insérez deux piles LR03/AAA conformément
aux indications de polarité. Refermez le couvercle du compartiment.
21
Page 23

5. Installation
Remarque concernant l‘installation
•Nous vous recommandons de positionner la station de base et la station de
mesuredans les endroits envisagés sans effectuer le montage, puis d‘effectuer
les réglages tels que décrits au chapitre 6. (fonctionnement).
•Procédez ensuite àl‘installation des stations après avoir effectué le réglage et
reçu une connexion radio stable.
•N‘installez pas le produit àunendroit où des personnes sont susceptibles de
se tenir.
Remarque
•Laportée de la transmission radio entrelastation de base et la station de mesure
est de 30 mdans un espace dégagé.
•Veuillez contrôler,avant l‘installation, que la portée radio ne soit pas altérée par
des interférences ou des obstacles tels que bâtiments, arbres, véhicules, lignes
haute tension, etc.
•Veuillez contrôler,avant l‘installation dénitive, la bonne qualité de la
transmission entreles deux stations.
•Veuillez également protéger les stations de l‘ensoleillement direct et de la pluie
lors de l‘installation.
•Lahauteur standardinternationale de mesuredelatempératuredel‘air est de
1,25 m(4ft)au-dessus du sol.
Avertissement
•Envue de l‘installation, procurez-vous le matériel d‘installation adéquat pour le
mur concerné dans un commerce spécialisé.
•Veuillez contrôler que l‘emballage ne contienne aucune pièce erronée ni
endommagée.
•N‘appliquez en aucun cas une force excessive lors de l‘installation. Une force
excessive est susceptible d‘endommager le produit.
•Avant l‘installation, vériez que le mur prévu pour recevoir le produit dispose
d‘une force portante susante et qu‘aucune conduite d‘électricité, d‘eau, de gaz
ni aucune autreconduite ne passe dans cette partie de la cloison.
5.1 Station de base
•Placez la station de base sur une surface plane àl‘aide de son pied.
22
Page 24
5.2 Station de mesure
•Vous pouvez également placer la station de mesureàl‘extérieur,sur une surface
plane, àl‘a ide de son pied.
•Nous vous recommandons d‘installer solidement la station de mesureàune paroi
extérieureenutilisant l’encoche (12). Fixez cheville, vis, clou, etc. dans la paroi
prévue pour recevoir l‘installation.
•Suspendez la station de mesureàl‘aide de l’encoche prévue àcet effet.
6. Fonctionnement
Remarque concernant la saisie
Maintenez la touche (7) ou la touche (9) enfoncée andefairedéler
rapidement les chiffres.
6.1 Connexion vers la station de mesure
•Lastation de base recherche automatiquement une connexion àlastation de
mesureeteffectue la premièreconguration après avoir inséré les piles.
Remarque
•Lapremièreconguration dureenviron 3minutes.
•N‘appuyez sur aucune touche pendant cette phase ;des erreurs ou des
inexactitudes de mesureoudetransmission pourraient en résulter.
•Laconguration est terminée dès que les valeurs mesurées pour la zone
intérieure(3) et pour la zone extérieure(1) apparaissent àl‘écran.
•Encas de nouvel échec de réception, appuyez sur la touche (7) pendant environ
3secondes andelancerune recherche manuelle du signal horaire.
6.2 Réglages de base et paramétrage manuel
Réglage automatique sur la base du signal horaire DCF
•Après avoir mis la station de base sous tension et en cas de transmission
correcte entrelastation de base et la station de mesure, l‘horloge recherche
automatiquement le signal horaireDCF.L’icôneradio(6) clignote pendant la
recherche du signal horaire.
23
Page 25
Achage Recherche du signal horaireDCF
Achage clignotant
Achage permanent
Aucun achage Inactif
•Encas de nouvel échec de réception, maintenez la touche (9) enfoncée pendant
environ 3secondes andelancer une recherche manuelle du signal horaireDCF.
L’icône radio (6) se met àclignoter.
Remarque concernant le réglage de l‘heure
•Laprocédurederecherchedureenviron 7minutes. En cas d‘échec de détection
du signal, le réveil recommence àrechercher le signal àl‘heurepleine suivante.
L’icône radio (6) s’éteint.
•Vous pouvez également régler l‘heureetladate manuellement.
•L’horloge continue àrechercher quotidiennement le signal horaireDCF (entre
1h00 et 3h00 Uhr). Les réglages manuels de l‘heureetdeladate seront corrigés
dès que la station reçoit correctement le signal horaireDCF.
Remarque concernant l‘heured‘été
•Leréveil s‘adapte automatiquement àl‘heured‘été. S apparaît àl’écran pendant
la durée de l’heured’été.
•Maintenez ànouveaula touche (9) enfoncée pendant environ 3secondes an
d’interromprelarecherchemanuelle.
24
Recherche aboutie -signal en cours de réception
Recherche active
Page 26

Réglage manuel de la date /del'heure
•Maintenez la touche (9) enfoncée pendant environ 3secondes and’interrompre
la recherche du signal DCF.L’icône radio (6) s’éteint et vous pouvez régler l’heure
manuellement.
•Appuyez sur la touche mode MODE (8) pendant environ 3secondes ande
démarrer le réglage manuel de la date /del‘heure.
•Vous pouvez régler successivement les valeurs suivantes :
•Fuseau horaire(différence en heures), heure, minute.
•Appuyez sur la touche
différentes valeurs, puis conrmez votresélection en appuyant sur la touche
MODE (8).
•Lemode de paramétrage s‘interrompt automatiquement lorsque vous n‘appuyez sur
aucune touche pendant plus de 20 secondes.
Remarque concernant les fuseaux horaires
•Ilest possible de recevoir le signal horaireàgrande distance ;cesignal ne
correspond toutefois pas toujours àGMT +1,l‘heureenvigueur en Allemagne.
Veuillez donc noter qu‘un décalage horairedoit êtreadopté dans les pays situés
dans un autrefuseau horaire.
•Sivous vous trouvez, par exemple, àMoscou, le décalage horaireentreMoscou
et l‘Allemagne est de 3heures (l‘heuredeMoscou est en avance). Réglez donc
le fuseau horairesur +3. L‘horloge s‘adapteraalors automatiquement àl‘heure
captée par le signal horaireDCF (ou àl‘heureréglée manuellement) et lui
ajoutera3heures.
Degrés Celsius /Fahrenheit
•Appuyez sur la touche
Fahrenheit.
Format horaire 12/24 heures
•Appuyez sur la touche (7) +(2) andecommuter entrel’achage de l’heureau
format 12 heures ou 24 heures.
(7) ou sur la touche (9) andesélectionner les
(9) andesélectionnerl‘achage en degrés Celsius ou
25
Page 27
6.3 Piles faibles
La capacité des piles de la station de mesureest très basse dès que l’icône de pile (2)
apparaît àl‘écran de la station de base. Veuillez remplacer les piles au plus vite.
Remarque concernant le remplacement des piles
•Veuillez noter qu‘après chaque remplacement de piles de la station de base ou
de la station de mesure, vous devrez effectuer une nouvelle synchronisation
der stations.
•Lors de cette synchronisation, extrayez également les piles de la station qui
continuait àfonctionner,puis réinsérez-les ou remplacez ces dernières.
7. Soins et entretien
Nettoyez la balance uniquement àl’aide d’un chiffon non breux légèrement humide ;
évitez tout détergent agressif.
8. Exclusion de garantie
La société Hama GmbH &Co. KG décline toute responsabilité en cas de dommages
provoqués par une installation, un montage ou une utilisation non conformes du
produit ou encoreprovoqués par un non respect des consignes du mode d‘emploi et/
ou des consignes de sécurité.
26
Page 28

9. Caractéristiques techniques
Station de base Station de mesure
Alimentation en électricité
Consommation de courant 0,5 mA 3mA
Plage de mesure
Température
incrément de mesure
Température
Cycle de mesuredela
température
Horloge radio-pilotée DCF oui non
Fréquence 433 MHz
Portée ≤ 50 m
10. Déclaration de conformité
Le soussigné, Hama GmbH &CoKG,déclareque l‘équipement
radioélectrique du type [00186353, 00123126] est conforme àladirective
2014/53/UE. Le texte complet de la déclaration UE de conformité est
disponible àl‘a dresse internet suivante: www.hama.com->00186353,
00123126-> Downloads.
Bandes de fréquences 433 MHz
Puissance de radiofréquence maximale 0,015 mW
3,0 V
2piles LR03/AAA
0°C–+50 °C /
32 °F –122 °F
0,1° C/0,1° F0,1° C/0,1° F
43 –47s43–47s
2piles LR03/AAA
-20 °C –+60 °C /
-4 °F –140 °F
3,0 V
27
Page 29

E Instrucciones de uso
Elementos de manejo eindicadores
AEstación base
1. Temperaturaexterior
2. Símbolo de pila
3. Temperaturaambiente
4. Hora
5. Horario de verano
6. Símbolo de radiofrecuencia
=Aumento del valor de ajuste actual /cambio de formato 12/24 horas /
7. Tecla
búsqueda manual de la señal de la estación de medición
8. Tecla MODE =Ajustes /conrmación del valor de ajuste
9. Tecla =Disminución del valor de ajuste actual /cambio entre°Cy°F /
activación/desactivación de la recepción manual de la señal de radiofrecuencia
10. Compartimento parapilas
BEstación de medición
11. Luzdecontrol de transmisión
12. Aberturaparaelmontaje en pared
13. Compartimento parapilas
1. Explicación de los símbolos de aviso ydelas indicaciones
Aviso
Se utiliza paracaracterizar las indicaciones de seguridad oparallamar la atención
sobrepeligros yriesgos especiales.
Nota
Se utiliza paracaracterizar informaciones adicionales oindicacionesimportantes.
2. Contenido del paquete
•Estación meteorológica EWS-152
(Estación base parainterior /estación de medición paraelexterior)
•4pilas AAA
•Estas instrucciones de manejo
28
Page 30

3. Instrucciones de seguridad
•Elproducto es paraelusodoméstico privado, no comercial.
•Noopereelproducto fueradelos límites de potencia indicados en los datos
técnicos.
•Noutilice el producto en entornos húmedos yevite el contacto con las salpicaduras
de agua.
•Noopereelproducto en las inmediaciones de la calefacción, de otras fuentes de
calor obajo la radiación directa del sol.
•Noutilice el producto en áreas donde no se permitan aparatos electrónicos.
•Nocoloque el producto cerca de campos de interferencia, marcos de metal,
ordenadores ytelevisores, etc. Losdispositivos electrónicos ylos marcos de ventanas
inuyen negativamente en el funcionamiento del producto.
•Nodeje caer el producto ni lo someta asacudidas fuertes.
•Noabraelproducto ynolosiga operando de presentar deterioros.
•Nointente mantener oreparar el aparato por cuenta propia. Encomiende cualquier
trabajo de mantenimiento al personal especializado competente.
•Mantenga el material de embalaje fueradel alcance de los niños, existe peligro
de asxia.
•Deseche el material de embalaje en conformidad con las disposiciones locales sobre
el desecho vigentes.
•Norealicecambios en el aparato. Esto conllevaría la pérdida de todos los derechos
de la garantía.
•Emplee el producto exclusivamente paralafunción paralaque fue diseñado.
•Utilice el artículo exclusivamente con condiciones climáticas moderadas.
•Este aparato, como todos los aparatos eléctricos, no debe estar en manos de los
niños.
Aviso –Pilas
•Observe siemprelacorrecta polaridad (inscripciones +y-)delas pilas ycoloque
éstas de forma correspondiente. La no observación de lo anterior conlleva el
riesgo de derrame oexplosión de las pilas.
•Utilice exclusivamente pilas recargables (o pilas) que sean del mismo tipo.
•Antes de colocar las pilas, limpie los contactos ylos contra-contactos de éstas.
•Nopermita alos niños cambiar las pilas sin la supervisión de una persona
adulta.
•Nomezcle pilas viejas ynuevas, ni tampoco pilas de tipos ofabricantes
diferentes.
29
Page 31

•Saque las pilas de los productos que no se vayan autilizardurante un periodo
prolongado de tiempo. (A no ser de que estén pensados parauncaso de
emergencia).
•Nocortocircuite las pilas.
•Nocargue las pilas.
•Noarroje las pilas al fuego.
•Mantenga las pilas fueradel alcance de los niños.
•Nunca abra, deterioreoingierapilas opilas recargables ni las deseche en el
medioambiente. Pueden contener metales pesados tóxicos ydañinos parael
medioambiente.
•Retireydeseche de inmediato las pilas gastadas del producto.
•Evite almacenar,cargar yutilizar el despertador atemperaturas extremas ycon
presiones de aireexageradamente bajas (p. ej. bajas temperaturas).
4. Puesta en funcionamiento
4.1 Estación de medición
•Abraelcompartimento parapilas (13) ycoloque dos pilas AAAatendiendo ala
polaridad correcta. Acontinuación, cierrelacubierta del compartimento parapilas.
Nota
En la puesta en funcionamiento, es importante que coloque las pilas en la estación
de medición, en primer lugar,y,seguidamente, en la estación base.
4.2 Estación base
•Abraelcompartimento parapilas (10) ycoloque dos pilas AAA atendiendo ala
polaridad correcta. Acontinuación, cierrelacubierta del compartimento parapilas.
5. Montaje
Nota –Montaje
•Serecomiendacolocar primero, sin montar,laestación de base ylaestaciónde
medición, en los lugares de instalación deseados yllevar acabo todos los ajustes
tal ycomo se describe en 6. Funcionamiento de la estación base.
•Proceda amontar la(s) estación(es) únicamente cuando haya podido realizar
correctamente los ajustes ycuente con una conexión inalámbrica estable.
•Nomonte el producto en lugares por debajo de los cuales se puedan encontrar
personas.
30
Page 32

Nota
•Elalcance de la transmisión por radio entrelaestación base ylaestación de
medición al airelibreesdehasta 30 m.
•Antes de proceder al montaje, preste atención aque la transmisión por radio no
se vea inuida, entreotros, por interferencias uobstáculos tales como edicios,
árboles, vehículos olíneas de alta tensión.
•Antes de proceder al montaje denitivo, asegúrese de que cuenta con recepción
suciente entrelos lugares de instalación deseados.
•Almontar la estación de medición, procuresituarla de maneraque quede
protegida de la radiación directa del sol ydelalluvia.
•Laalturaestándar internacional paralamedición de la temperaturadel airees
de 1,25 m(4pies) sobreelsuelo.
Aviso
•Adquieramaterial de montaje especial oadecuado en un comercio especializado
paraelmontaje en la pared prevista.
•Compruebe que no haya piezas deterioradas odefectuosas.
•Noejerza nunca fuerza durante el montaje. El producto podría verse dañado.
•Antes de empezar con el montaje, compruebe que la pared puede soportar el
peso que se va amontar yasegúrese de que por el punto de montaje de la pared
no pasan cables eléctricos ni tuberías de agua, gas odeotrotipo.
5.1 Estación base
•Coloque la estación base sobreuna supercie plana utilizando el pie.
5.2 Estación de medición
•Igualmente, puede colocar la estación de medición sobreuna supercie plana en
el exterior.
•Serecomienda jar laestaciónde medición auna pared exterior de forma seguray
able utilizando la abertura(12). Fije el taco, el tornillo, el clavo, etc., en la pared
prevista.
•Cuelgue la estación de medición utilizando la aberturaprevista paraello.
31
Page 33

6. Funcionamiento
Nota –Introducción de datos
Mantenga pulsadas las teclas (7) olatecla (9) paraseleccionar los valores
más rápidamente.
6.1 Conexión con la estación de medición
•Una vez colocadas las pilas, la estación base busca automáticamente una conexión
con la estación de medición, realizando entonces el ajuste inicial.
Nota
•Elajuste inicial duraaprox. 3minutos.
•Nopulse ninguna tecla mientras dureelajuste. De lo contrario, pueden
producirse fallos oimprecisiones en los valores ysutransmisión.
•Elproceso naliza en cuanto se visualizan los valores de medición registrados
parainterior (3) yexterior (1).
•Sinoserecibeninguna señal de la estación de medición repetidamente, mantenga
pulsada la tecla
de la seña.
6.2 Ajustes básicos yajustes manuales
Ajuste automático según la señal DCF
•Encendida la estación base por primeravez ytrasuna transmisión correcta entre
la estación base ylaestación de medición, el reloj inicia automáticamente la
búsqueda de una señal DCF.Elsímbolo de radiofrecuencia (6) parpadea durante el
proceso de búsqueda.
32
(7) durante aprox. 3segundos parainiciar la búsqueda manual
Page 34

Visualización Búsqueda de señal DCF nach DCF-Signal
Parpadea
Visualización permanente
Ninguna visualización Inactivo
•Sinoserecibieraseñal repetidamente, pulse ymantengapulsada la tecla °C /°F(9)
durante aprox. 3segundos parainiciar la búsqueda de señal DCF de forma manual.
El símbolo de radiofrecuencia (6) comienza aparpadear.
Nota –Ajuste de hora
•Elproceso de búsqueda duraaproximadamente 7minutos. Si la búsqueda
falla, ésta se termina yserepite alasiguiente horaenpunto. El símbolo de
radiofrecuencia (6) se apaga.
•Mientras tanto, puede realizar un ajuste manual de la horaylafecha.
•Encualquier caso, el reloj sigue buscando la señal DCF diariamente (entrelas
01:00 ylas 03:00). En caso de recibirse la señal correctamente, la horaylafecha
ajustadas se sobrescriben.
Nota –Horario de verano
•Lahoraseajusta automáticamente al horario de verano. Durante el horario de
verano, en la pantalla se visualiza S.
•Pulse ymantengapulsada nuevamente la tecla (9) durante aprox. 3segundos
para nalizar el proceso de búsqueda manual.
Ajuste manual de fecha/hora
•Pulse ymantengapulsada la tecla (9) durante aprox. 3segundospara nalizar el
proceso de búsqueda de la señal de radiofrecuencia. El símbolo de radiofrecuencia
(6) seapaga, permitiéndole ajustar la horadeforma manual.
La búsqueda ha nalizado con éxito, se recibe la señal
Activa
33
Page 35

•Pulse ymantengapulsada la tecla MODE (8) durante aprox. 3segundos para
iniciar el ajuste manual de fecha/hora.
•Ajuste sucesivamente los siguientes datos:
•Zona horaria (diferencia en horas), hora, minuto.
•Paraseleccionar cada valor,pulse la tecla (7) olatecla (9) yconrme la
selección correspondiente pulsando la tecla MODE (8). .
•Sinoseintroduce ningún dato en 20 segundos, se sale automáticamente del modo
de ajuste.
Nota –Zona horaria
•Laseñal DCF puede recibirse agrandistancia, correspondiéndose siemprecon la
HCE vigente en Alemania. Porello, tenga en cuenta la posible diferencia horaria
en países situados en otrazona horaria.
•SiseencuentraenMoscú, la diferencia es de 3horas de adelanto con
respecto aAlemania.Porello, debe ajustar la zona horaria +3. Se sumarán
automáticamente 3horas alahorarecibida oajustada manualmente tras la
recepción de la señal DCF.
Celsius /Fahrenheit
•Pulse la tecla (9) paraconmutar entre°Cy°F en la visualización de la
temperatura.
Formato de 12/24 horas
•Pulse la tecla (7) paraconmutar entrelos formatos de 12 y24horas.
6.3 Capacidad de pilas baja
Si se visualiza el símbolo de pila (2) en la pantalla de la estación base, la capacidad de
las pilas de la estación de medición. Sustituya las pilas de forma inmediata.
Nota –Cambio de pilas
•Tenga en cuenta que es necesario resincronizar las estaciones tras realizar un
cambio de pilas en la estación de medición obase.
•Paraello, retirelas pilas de la otraestación yvuelva acolocarlas o, de ser
necesario, proceda asustituirlas.
7. Mantenimiento ycuidado
Limpie este producto sólo con un paño ligeramente humedecido que no deje pelusas y
no utilice detergentes agresivos.
34
Page 36

8. Exclusión de responsabilidad
Hama GmbH &CoKG no se responsabiliza ni concede garantía por los daños que
surjan por una instalación, montaje omanejo incorrectos del producto opor la no
observación de las instrucciones de manejo y/o de las instrucciones de seguridad.
9. Datos técnicos
Estación base Estaciónde medición
Alimentación de corriente
Consumo de corriente 0,5 mA 3mA
Rango de medición
Temperatura
Intervalos de medición
Temperatura
Ciclo de medición de la
temperatura
Radiorreloj por
radiofrecuencia
Frecuencia 433 MHz
Alcance ≤ 50 m
10. Declaración de conformidad
Porlapresente, Hama GmbH &CoKG,declaraque el tipo de equipo
radioeléctrico [00186353, 00123126] es conforme con la Directiva
2014/53/UE. El texto completo de la declaración UE de conformidad está
disponible en la dirección Internet siguiente: www.hama.com -> 00186353,
00123126-> Downloads.
Banda obandas de frecuencia 433 MHz
Potencia máxima de radiofrecuencia 0,015 mW
3,0 V
2pilas AAA
0°C –+50°C/
32°F –122°F
0,1°C /0,1°F 0,1°C /0,1°F
43 –47s 43 –47s
Sí No
3,0 V
2pilas AAA
-20°C –+60°C/
-4°F –140°F
35
Page 37

R Руководство по эксплуатации
Органы управления ииндикации
A Основной блок
1. Наружная температура
2. Значок батареи
3. Температура впомещении
4. Время
5. Индикация летнеговремени
6. Значок коррекции по радиосигналу точноговремени
7. Кнопка
8. Кнопка MODE = настройка / подтверждение ввода значения параметра
9. Кнопка = уменьшение настраиваемогозначения / выбор единицы
10. Отсекбатарей
ВБлок внешнего датчика
11. Лампа индикации передачи данных
12. Отверстие для настенногомонтажа
13. Отсекбатарей
1. Предупредительные пиктограммы иинструкции
2. Комплект поставки
• Метеорологический прибор EWS-152
•4батареи ААА
• Настоящая инструкция
36
= увеличение настраиваемогозначения / выбор формата
индикации времени (12/24) / включение принудительногопоиска сигнала
внешнегодатчика
измерения температуры (°C, °F) / включение/ выключение принудительного
приема радиосигнала
Внимание
Данным значком отмечены инструкции, несоблюдение которых может
привести копасной ситуации.
Примечание
Дополнительная или важная информация.
(основной блок для контроля воздуха внутри помещения, блок датчика
внешних атмосферных условий)
Page 38

3. Техника безопасности
• Изделие предназначено толькодля домашнегоприменения.
• Соблюдатьтехнические характеристики.
• Беречь от влаги ибрызг.
• Не эксплуатировать внепосредственной близости снагревательными
приборами иберечь от прямых солнечных лучей
• Не применять взапретных зонах.
• Не размещайте устройство рядом смагнитными полями, металлическими
рамами, компьютером, телевизором ит.д.Электронные приборы
отрицательно влияютнаработу устройства.
• Не ронять. Беречь от сильных ударов.
• Изделие не открывать. Запрещается эксплуатировать неисправное изделие.
• Запрещается самостоятельно ремонтировать устройство. Ремонт разрешается
производить толькоквалифицированному персоналу.
• Упаковку не давать детям: опасность асфиксии.
• Утилизировать упаковку всоответствии сместными нормами.
• Запрещается вносить изменения вконструкцию. Впротивном случае
гарантийные обязательства аннулируются.
• Запрещается использовать не по назначению.
• Используйте изделие тольковумеренных климатических условиях.
• Не давать детям!
Батареи. Те хникабезопасности
• Соблюдатьполярность батарей (+ и -). Несоблюдение полярности может
статьпричиной взрыва батарей.
• Разрешается применять аккумуляторы толькоуказанноготипа.
• Перед загрузкой батарей почистить контакты.
• Запрещается детям заменять батареи без присмотра взрослых.
• Не применять различные типы или новые истарыебатареи вместе.
• Вслучае большогоперерыв вэксплуатации удалить батареи из устройства
(кроме случаев, когдаизделие применяется вкачестве аварийного).
• Не закорачивать контакты батарей.
• Обычные батареи не заряжать.
• Батареи вогоньне бросать.
• Батареи хранить вбезопасном месте инедавать детям.
• Не открывайте, не разбирайте, не глотайте инеутилизируйте батареи
сбытовым мусором. Вбатареях могут содержаться вредные тяжелые
металлы.
37
Page 39

• Израсходованные батареи немедленно удалять из прибора и
утилизировать.
• Избегайте хранения, зарядки ииспользования при экстремальных
температурах иэкстремально низком атмосферном давлении (например,
на большой высоте).
4. Ввод вэксплуатацию
4.1 Блок внешнего датчика
• Откройте крышку отсека батарей (13) ивставьте две батареи AAA, соблюдая
полярность. Закройте крышку отсека батарей.
Примечание
При вводе вэксплуатацию всегда сначала вставляйте батареи вблок
наружногодатчика, азатемвосновной блок.
4.2 Основной блок
• Откройте крышку отсека батарей (10) ивставьте две батареи AAA, соблюдая
полярность. Закройте крышку отсека батарей.
5. Монтаж
Примечание. Монтаж
• Перед тем как монтировать блоки, рекомендуется сначала завершить
настройки вместах будущей установки (см.6). Смотрите описание работы
• Монтаж следует производить после того, как правильные настройки
обеспечатнадежную радиосвязь между блоками.
• Запрещается производить монтаж над теми местами, гдемогут находиться
люди.
38
Page 40

Примечание
• Максимально допустимое расстояние между блоками составляет 30
метров.
• Монтируя блоки, следует учесть, чторазличные препятствия (стены,
деревья, автомобили, высоковольтные линии идр.) создаютпомехи
радиосвязи между блоками.
• Перед монтажом убедитесь, чтовместах расположения блоков
обеспечивается устойчивая радиосвязь.
• Блок внешнегодатчика должен размещаться вместе, защищенном от
воздействия прямых солнечных лучей иосадков.
• Международный стандартвысоты для измерения влажности воздуха
составляет 1,25 метра (4 фута) над землей.
Предупреждение
• Подготовьте монтажный материал (приобретается отдельно),
соответствующий свойствам стены.
• Перед началом эксплуатации убедитесь вотсутствии дефектных или
поврежденных деталей.
• При монтаженеприменять чрезмерных усилий. Впротивном случае можно
повредить устройство.
• Убедитесь, чтостена подходит для монтажа. Встене на месте монтажа не
должно быть электрической проводки, газопровода, водопровода идругих
трубопроводов.
5.1 Основной блок
• Спомощью подставки установите основной блок на ровную поверхность.
5.2 Блок внешнего датчика
• Блок внешнегодатчика можно разместить на улице спомощьюподставки.
• Однакорекомендуется монтировать внешний блок на стене спомощью
соответствующегопаза (12). Спомощьюдюбеля закрепите шуруп на стене.
• Подвесьте блок за соответствующий паз.
39
Page 41

6. Эксплуатация
Вводданных
Чтобы ускорить изменение значения во время настройки, удерживайтекнопку
(7) или кнопку (9).
6.1 Соединение сблоком внешнего датчика
• После загрузки батарей основной блок начинает автоматический поиск
сигнала внешнегодатчика ивыполняет операцию ввода устройства в
эксплуатацию.
Примечание
• Автоматическая настройка при вводе вэксплуатацию длится ок.3минут.
• Втечение этого времени не нажимайте кнопки устройства! Впротивном
случае можетвозникнуть сбой точной настройки значений ипередачи
сигнала.
• Автоматическая настройка завершена, когданадисплее начнут
отображаться данные измерения внутри помещения (3) ивне помещения
(1).
• Если сигнал внешнегодатчика автоматически принять не удается, нажмите и
ок.3секунд удерживайте кнопку
радиосигнала.
6.2 Основные параметры иручные настройки
Автоматический прием радиосигнала DCF
• После первоговключения основногоблока иустановки радиосвязи сблоком
внешнегодатчика часы прибора автоматически начинаютпоиск радиосигнала
точноговремени (DCF). Во время этого процесса на дисплее мигает значок
радиосигнала точноговремени (6) .
Индикация Поиск сигнала DCF
(3), чтобы принудительно включить поиск
мигает
40
активный
Page 42

горит непрерывно
не горит неактивный
• Если сигнал автоматически принять не удается, нажмите иок.3секунд
удерживайте кнопку (9), чтобы включить поиск радиосигнала DCF вручную.
Значок радиосигнала (6) мигает.
Настройкачасов. Примечания
• Поиск сигнала продолжается ок.7минут. Если сигнал принять не
удалось, операция завершается автоматически. Повторная попытка будет
произведена вследующий полный час. Значок радиосигнала точного
времени (6) гаснет.
• При необходимости часы икалендарь можно настроить вручную.
• Часы производит автоматический поиск радиосигнала DCF каждый сутки
(между 01:00 и 03:00). При успешном приеме радиосигнала введенные
вручную значения времени икалендаря заменяются.
Индикация летнеговремени
• Переключение на летнее время происходит автоматически. Во время
индикации летнеговремени на дисплее отображается S.
• Чтобы принудительно завершить поиск радиосигнала, нажмите иок.3секунд
удерживайте кнопку
Настройка календаря ичасов вручную
• Чтобы принудительно завершить поиск радиосигнала DCF, нажмите иок.3
секунд удерживайте кнопку (9). Значок радиосигнала DCF (6) не горит. Часы
можно настроить вручную.
• Нажмите иок.3секунд удерживайте кнопку MODE (8), чтобы вручную
настроить календарь ичасы.
• Настройка параметров осуществляется вследующей последовательности:
• часовой пояс (отклонение вколичестве часов), час, минуты.
• Установите значение кнопкой (7) или кнопкой (9), затем подтвердите
выбор кнопкой MODE (8).
• Режим настройки выключается автоматически, если нажатий на кнопки не
производилось втечение 20 секунд.
(9).
сигнал принят успешно
41
Page 43

Часовые пояса
• Радиосигнал точноговремени DCF соответствует среднеевропейскому
времени. Если часы эксплуатируютсявдругом часовом поясе, то их
необходимо настроить соответствующим образом.
• Например, разница во времени между Москвой иБерлином составляет 3
часа. ВМоскве, таким образом, необходимо сделать поправку в +3 часа.
Вэтомслучае кпоказателю времени (установленному автоматически по
радиосигналу DCF или вручную) часы автоматически будут прибавлять
3 часа.
Единицы измерения температуры (Цельсий / Фаренгейт)
• Кнопкой (9) установите единицу измерения температуры (°C или °F).
Формат индикации времени (12/24)
• Кнопкой (7) установите 12-часовой или 24-часовой форматвремени.
6.3 Разряд батарей
Если на дисплее основногоблока отображается значок батареи (2), значит
батареи блока внешнегодатчика разряжены. Замените батареи.
Замена батарей. Примечание
• После замены батарей основногоблока иблокавнешнегодатчика
необходимо заново выполнить синхронизацию блоков.
• Для этого необходимо удалить батареи втом числе из другогоблока, а
затем снова загрузить их вотсек батарей.
7. Уход итехническое обслуживание
Чистку изделия производить толькобезворсовой слегка влажной салфеткой.
Запрещается применять агрессивные чистящие средства.
8. Отказ от гарантийных обязательств
Компания Hama GmbH &CoKGне несет ответственность за ущерб, возникший
вследствие неправильногомонтажа, подключения ииспользования изделия не
по назначению, атакже вследствие несоблюдения инструкции по эксплуатации и
техники безопасности.
42
Page 44

9. Технические характеристики
Основной блок Блок внешнегодатчика
Питание
Токпотребления 0,5 мА 3 мА
Диапазон измерения
Температура
Шаг шкалы
Температура
Цикл измерения
температуры
Часы скоррекцией по
радиосигналу точного
времени
Частота:433 МГц
Дальность действия ≤ 50 м
10. Декларация производителя
Настоящим компания Hama GmbH &CoKGзаявляет, что
радиооборудование типа [00186353, 00123126] отвечает
требованиям директивы 2014/53/ЕС. Сполным текстом декларации о
соответствии требованиям ЕС можно ознакомиться здесь:
www.hama.com-> 00186353, 00123126 ->Downloads.
Диапазон/диапазоны частот 433 МГц
Максимальная излучаемая мощность 0,015 mW
3,0 В
2 батареи AAA
0°C –+50°C/
32°F –122°F
0,1°C /0,1°F 0,1°C /0,1°F
43 –47с 43 –47с
Да Нет
3,0 В
2 батареи ААА
-20°C –+60°C/
-4°F –140°F
43
Page 45

I Istruzioni per l‘uso
Elementi di comando eindicazioni
Stazione base A
1. Temperaturaesterna
2. Simbolo batterie
3. Temperaturaambiente
4. Ora
5. Oralegale
6. Simbolo radio
=aumento del valorediimpostazione attuale /cambio di formato 12/24
7. Tasto
ore/ricerca manuale del segnale dalla stazione di misurazione
8. Tasto MODE =impostazioni /conferma del valored‘impostazione
9. Tasto =diminuzione del valored’impostazione attuale /passaggio tra°Ce°F /
attivazione/disattivazione manuale della ricezione di segnale radio
10. Vano batterie
BStazione di misura
11. Spia di controllo trasmissione
12. Foro per montaggio aparete
13. Vano batterie
1. Spiegazione dei simboli di avvertimento edelle indicazioni
Attenzione
Viene utilizzato per contrassegnareleindicazioni di sicurezza oppureper rivolgere
l‘attenzione verso particolari rischi epericoli.
Avvertenza
Viene utilizzato per contrassegnareinformazioni supplementari oindicazioni
importanti.
2. Contenuto della confezione
•stazione meteo EWS-152
(stazione base per interni /stazione di misurazione per esterni)
•4batterie AAA
•Queste istruzioni per l’uso
44
Page 46

3. Avvertenze di sicurezza
•Ilprodotto èconcepito per l’uso domestico privato, non commerciale.
•Non mettereinesercizio il prodotto al di fuori dei suoi limiti di rendimento indicati
nei dati tecnici.
•Non usareilprodottoin ambienti umidi ed evitareilcontatto con gli spruzzi.
•Evitaredimettereinesercizio il prodotto in prossimità di riscaldamento, altrefonti di
caloreolaluce diretta del sole.
•Non utilizzareilprodottoin zone in cui non sono ammesse le apparecchiature
elettroniche.
•Non posizionareilprodotto nelle vicinanze di campi di disturbo, telai metallici,
computer etelevisori ecc. Gli apparecchi elettronici compromettono negativamente
il funzionamento del prodotto.
•Non farecadereilprodotto enonsottoporlo aforti scossoni!
•Non aprireilprodotto enonutilizzarlo più se danneggiato
•Non tentarediaggiustareoripararel’apparecchio da soli. Fare eseguirequalsiasi
lavorodiriparazione al personale specializzato competente.
•Tenerel’imballo fuori dalla portata dei bambini, pericolo di soffocamento!
•Smaltireimmediatamente il materiale d‘imballaggio attenendosi alle prescrizioni
locali vigenti.
•Non apportaremodiche all’apparecchio per evitarediperdereidiritti di garanzia.
•Utilizzareilprodotto esclusivamente per lo scopo previsto.
•Utilizzarel’articolo solo nelle condizioni climatiche moderate.
•Tenerequesto apparecchio, come tutte le apparecchiatureelettriche, fuori dalla
portata dei bambini!
Attenzione –Batterie
•Attenersi semprealla corretta polarità (scritte +e-)delle batterie einserirle di
conseguenza. La mancata osservanza comporta la perdita di potenza oilrischio
di esplosione delle batterie.
•Utilizzareunicamente accumulatori (o batterie) conformi al tipo indicato.
•Prima di inserirelebatterie, pulireicontatti eicontrocontatti.
•Ibambini possono sostituirelebatteriesolo sotto la sorveglianza degli adulti.
•Non utilizzarebatterie di tipi ocostruttori diversi, né mischiarebatterie vecchie
enuove.
•Toglieresemprelebatterie dai prodotti che non vengono utilizzati per un lungo
periodo (a meno che non vengano tenuti aportata di mano per un‘emergenza).
•Non cortocircuitarelebatterie.
•Non caricarelebatterie.
45
Page 47

•Non gettarelebatterienel fuoco.
•Conservarelebatterie al di fuori della portata dei bambini.
•Non aprire, danneggiare, ingerireodisperderemai nell’ambiente le batterie.
Possono conteneremetalli pesanti dannosi etossici.
•Rimuovereesmaltireimmediatamente le batterie scariche.
•Evitarediconservare, caricareeutilizzarelabatteriaatemperatureestreme. e
con pressione atmosferica molto bassa (come ad es. ad alta quota).
4. Messa in esercizio
4.1 Stazione di misurazione
•Aprireilvano batterie (13) einseriredue batterie AAA con la polarità corretta.
Quindi chiudereilcoperchio del vano batterie.
Nota
Permettereinservizio l‘apparecchio, inseriresempreprima le batterie nella stazione
di misura, quindi nella stazione base.
4.2 Stazione base
•Aprireilvano batterie (10) einseriredue batterie AAA con la polarità corretta.
Quindi chiudereilcoperchio del vano batterie.
5. Montaggio
Avvertenza –montaggio
•Siconsiglia di collocarelastazione base edimisuranel luogo di montaggio
desiderato senza montarla edieffettuaretutte le impostazioni come descritto al
capitolo 6. Messa in esercizio della.
•Montarela/le stazioni solo dopo avereeffettuato l‘impostazione corretta eun
collegamento radio stabile.
•Non montaremai il prodotto in punti dove potrebberosostaredelle persone.
46
Page 48

Nota
•Laportata della trasmissione radio tralastazione base edimisurazione
all‘aperto èdimax. 30m.
•Prima del montaggio prestareattenzione che la trasmissione radio non venga
impedita da segnali di disturbo oostacoli come edici, alberi, veicoli, linee di
alta tensione ecc.
•Prima del montaggio denitivo, accertarsi che trailuoghi di montaggio
desiderati vi sia una ricezione suciente.
•Durante il montaggio della stazione di misurazione, accertarsi che il luogo
d‘installazione sia protetto dalla luce diretta del sole edalla pioggia.
•L‘altezza standardinternazionale per la misurazione della temperaturadell‘aria è
pari a1,25 m(4ft) dal suolo.
Attenzione
•Procurarsi il materiale di installazione idoneo per il montaggio alla parete
prevista presso irivenditori specializzati.
•Vericareche non vengano montati pezzi difettosi odanneggiati.
•Non usaretroppa forza, né violenza durante il montaggio per evitaredi
danneggiareilprodotto.
•Prima di procederealmontaggio, vericareche la parete sia idonea per il peso
da montareeaccertarsi che nel punto della parete dove si desideraappendere
l’orologio non vi siano cavi elettrici, né tubazioni di acqua, gas oaltro.
5.1 Stazione base
•Posizionarelastazione base con il piedino di sostegno su una supercie piana.
5.2 Stazione di misurazione
•Anche la stazione di misurazione si può posizionaresuuna supercie piana
all‘esterno.
•Siconsiglia di montarelastazione di misurazione in modo sicuroestabile su una
parete esterna (12). Fissaretasselli, viti, chiodi ecc. alla parete prevista.
•Agganciarelastazione di misurazione con il foroprevisto.
47
Page 49

6. Esercizio
Nota –Immissione
Tenerepremuto il tasto (7) oiltasto (9) per poter selezionarepiù rapidamente
ivalori.
6.1 Connessione alla stazione di misurazione
•Dopo avereinserito le batterie, la stazione base ricerca automaticamente la
connessione alla stazione di misurazione.
Nota
•Laprima congurazione duraca. 3minuti.
•Non premerealcun tasto in questo lasso di tempo per evitareerrori eimprecisioni
dei valori edella lorotrasmissione.
•Laproceduraèconclusa non appena vengono visualizzati idati di misurazione
per l‘interno (3) el‘esterno (1).
•Seper diverse volte non viene ricevuto alcun segnale dalla stazione di misurazione,
tenerepremuto il tasto
segnale.
6.2 Impostazioni di base emanuali
Impostazione automatica dopo il segnale DCF
•Dopo la prima accensione della stazione base elatrasmissione trastazione base e
di misurazione, l‘orologio inizia automaticamente acercareunsegnale DCF.Durante
il processo di ricerca, il simbolo della radio (6) lampeggia.
Indicazione Ricerca del segnale DCF
(7) per ca. 3secondi, per avviarelaricerca manuale del
Indicazione lampeggiante
Indicazione ssa
48
Attiva
Ricerca riuscita -ilsegnale viene ricevuto
Page 50

Nessuna indicazione Non attiva
•Seper diverse volte non viene ricevuto alcun segnale, tenerepremuto il tasto (9)
per ca. 3secondi, per avviarelaricerca manuale del segnale DCF.Ilsimbolo radio
(6) iniziaalampeggiare.
Nota –Impostazione dell‘ora
•Questo procedimento duracirca 7minuti. Se la ricerca non ha successo, viene
terminata eriprende alla prossima orapiena. Il simbolo radio (6) si spegne.
•Inquesto lasso di tempo si può effettuareun‘impostazione manuale di orae
data.
•L‘orologio continua acercareautomaticamente ogni giorno (tral’1:00 ele3:00)
il segnale DCF.Seiltentativo di ricezione ha successo, l‘oraeladata impostate
manualmente vengono sovrascritte.
Nota –Ora legale
•L‘orario si regola automaticamente sull‘oralegale. Se èattiva l‘oralegale, sul
display viene visualizzato S.
•Tenerenuovamente premuto il tasto (9) per ca. 3secondiper terminarelaricerca
manuale.
Impostazione manuale data/ora
•Tenerenuovamente premuto il tasto (9) per ca. 3secondiper terminarelaricerca
manuale dopo il segnale DCF.Ilsimbolo della radio (6) si spegne ed èpossibile
impostarel‘ora manualmente.
•Tenerepremuto il tasto MODE (8) per ca. 3secondi per avviarel‘impostazione
manuale della data edell‘ora.
•Impostareinsequenza le seguenti informazioni:
•fuso orario (differenza in ore), ore, minuti.
•Per selezionareisingoli valori, premereiltasto (7) oiltasto (9) econfermare
di volta in volta la selezione con il tasto MODE (8).
•Seper 20 secondi non si effettua alcuna immissione, si esce automaticamente dalla
modalità d‘installazione.
49
Page 51

Nota –Fuso orario
•Ilsegnale DCF può esserericevuto in tutto il mondo ma corrisponde sempreal
CET vigente in Germania. Nei paesi con altri fusi orari deve essereconsiderata
la variazione dell‘ora.
•Secisitrova aMosca, dove l‘oraèspostata in avanti di 3ore rispetto alla
Germania, occorreimpostareper il fuso orario +3. Dopo la ricezione del
segnale DCF odell‘impostazione manuale, l‘orologio si porta quindi sempre
automaticamente 3ore avanti.
Celsius /Fahrenheit
•Premereiltasto (9) per commutaretra °C e°Fdurante la visualizzazione della
temperatura.
Formato da 12/24 ore
•Premereiltasto (7), per passaretra iformati 12 e24ore.
6.3 Capacità ridotta delle batterie
Quando il simbolo della batteria (2) vienevisualizzato sul display della stazione
base, la capacità delle batterie nella stazione di misurazione èmolto bassa. Sostituire
immediatamente le batterie.
Avvertenza –sostituzione delle batterie
•Accertarsi che dopo ogni sostituzione delle batterie sulla stazione di misurazione
osulla stazione base avvenga una nuova sincronizzazione delle stazioni.
•Estrarreanche le batterie dall‘altrastazione einserirlenuovamente o, se
necessario, sostituirle.
7. Manutenzione ecura
Pulirequesto prodotto solo con un panno umido eche non lascia pelucchi enon
utilizzaremai detergenti aggressivi.
8. Esclusione di garanzia
Hama GmbH &Co.KGnon si assume alcuna responsabilità per idanni derivati dal
montaggio ol‘utilizzo scorretto del prodotto, nonché dalla mancata osservanza delle
istruzioni per l‘uso e/o delle indicazioni di sicurezza.
50
Page 52

9. Dati tecnici
Stazione base Stazione di misurazione
Alimentazione elettrica
Potenza assorbita 0,5 mA 3mA
Campo di misurazione
Temperatura
Passi di misura
Temperatura
Ciclo di misurazione
temperatura
Segnale orario via
radio DCF
Frequenza 433 MHz
Portata ≤ 50 m
10. Dichiarazione di conformità
Il fabbricante, Hama GmbH &CoKG,dichiarache il tipo di
apparecchiaturaradio[00186353,00123126] èconforme alla direttiva
2014/53/UE. Il testo completo della dichiarazione di conformità UE è
disponibile al seguente indirizzo Internet: www.hama.com-> 00186353,
00123126-> Downloads.
Bande di frequenza 433 MHz
Massima potenza aradiofrequenza trasmessa 0,015 mW
3,0 V
2batteria AAA
0°C –+50°C/
32°F –122°F
0,1°C /0,1°F 0,1°C /0,1°F
43 –47s 43 –47s
Sì No
2batterie AAA
-20°C –+60°C/
-4°F –140°F
3,0 V
51
Page 53

N Gebruiksaanwijzing
Bedieningselementen en weergaven
ABasisstation
1. Buitentemperatuur
2. Batterijsymbool
3. Temperatuur binnen
4. Tijd
5. Zomertijd
6. Zendsymbool
7. -toets =verhogen van de huidige ingestelde waarde /omschakelen 12h/24h-
tijdnotatie /handmatig zoeken naar signaal van het meetstation
8. MODE-toets =instellingen /bevestiging van de ingestelde waarde
9. -toets =verlagen van de huidige ingestelde waarde /omschakelen tussen °C
en °F /activeren/deactiveren handmatige ontvangst radiograsch signaal
10. Batterijvakje
BMeetstation
11. Controlelampje zenden
12. Uitsparing voor wandmontage
13. Batterijvakje
1. Verklaring van waarschuwingssymbolen en instructies
Waarschuwing
Wordtgebruikt voor veiligheidsinstructies of om de aandacht te trekken op
bijzonderegevaren en risico‘s.
Aanwijzing
Wordtgebruikt voor extrainformatie of belangrijke informatie.
2. Inhoud van de verpakking
•Weerstation EWS-152
•(basisstation voor opstelling binnen /meetstation voor opstelling buiten)
•4AAA-batterijen
•Deze bedieningsinstructies
52
Page 54

3. Veiligheidsinstructies
•Het product is bedoeld voor niet-commercieel privegebruik in huiselijke kring.
•Gebruik hetproduct nietbuiten de in de technische gegevens vermelde vermogensgrenzen.
•Gebruik het product niet in een vochtige omgeving en voorkom spat- en spuitwater.
•Gebruik het product niet in de onmiddellijke nabijheid van een verwarming of
anderewarmtebronnen en stel het niet bloot aan directe zonnestralen.
•Gebruik het product niet binnen omgevingen, waarin elektronische apparatuur niet
is toegestaan.
•Plaats het product niet in de buurt van storing veroorzakende bronnen, metalen
frames, computers, televisietoestellen, enz. Elektronische apparatuur alsmede
metalen kozijnen hebben een negatieve invloed op de werking van het product.
•Laat het product niet vallen en stel het niet bloot aan zwareschokken of stoten.
•Open het product niet en gebruik het niet meer als het beschadigd is.
•Probeer niet het product zelf te onderhouden of te repareren. Laat onderhouds- en
reparatiewerkzaamheden door vakpersoneel uitvoeren.
•Het verpakkingsmateriaal mag absoluut niet in handen van kinderen komen;
verstikkingsgevaar.
•Het verpakkingsmateriaal direct en overeenkomstig de lokaal geldende
afvoervoorschriften afvoeren.
•Verander niets aan het toestel. Daardoor vervalt elke aanspraak op garantie.
•Gebruik het product uitsluitend voor het doel waarvoor het gemaakt is.
•Gebruik het artikel alleen onder gematigde klimatologische omstandigheden.
•Elektrische apparaten dienen buiten het bereik van kinderen gehouden te worden!
Waarschuwing -Batterijen
•Let absoluut op de correcte polariteit (opschrift +en-)van de batterijen en
plaats deze dienovereenkomstig in het batterijvakje. Indien de batterijen verkeerd
worden geplaatst kunnen deze gaan lekken of zelfs exploderen.
•Gebruik uitsluitend accu’s(of batterijen), welke met het vermelde type
overeenstemmen.
•Reinig vóór het plaatsen van de batterijen de batterijcontacten en de contacten
in het product.
•Laat kinderen nooit zonder toezicht batterijen vervangen.
•Gebruik geen oude en nieuwe batterijen tegelijkertijd alsmede geen batterijen
van een verschillende soort of fabrikaat.
53
Page 55

•Verwijder batterijen uit producten welke gedurende langeretijd niet worden
gebruikt. (behoudens indien deze voor een noodgeval stand-by moeten blijven)
•Debatterijen niet kortsluiten.
•Debatterij niet opladen.
•Debatterijen niet in vuur werpen.
•Batterijen buiten het bereik van kinderen opbergen.
•Batterijen nooit openen, beschadigen, inslikken of in het milieu terecht laten
komen. Zij kunnen giftige en zwaremetalen bevatten die schadelijk zijn voor
het milieu.
•Lege batterijen direct uit het product verwijderen en afvoeren.
•Vermijd opslag, opladen en gebruik bij extreme temperaturen en extreem lage
luchtdruk (bijv.opgrote hoogte).
4. Ingebruikname
4.1 Meetstation
•Open het batterijvakje (13) en plaats twee AAA-batterijen met de polen (+) en (-) in
de juiste richting. Sluit vervolgens het deksel van het batterijvakje weer.
Aanwijzing
Let erop dat bij de inbedrijfstelling de batterijen altijd eerst in het meetstation en
dan pas in het basisstation worden geplaatst.
4.2 Basisstation
•Open het batterijvakje (26) en plaats twee nieuwe AA-batterijen en let daarbij op de
juiste polariteit (+) en (-)
•Sluit vervolgens weer het deksel van het batterijvakje.
5. Montage
Aanwijzing –Montage
•Het is aan te raden het basis- en meetstation allereerst op de gewenste plaatsen
van opstelling zonder montage neer te zetten en alle instellingen -zoals in 6.
Gebruik en werking is beschreven –uit te voeren.
•Monteer pas na een correcte instelling en stabiele draadloze verbinding het/
de station/s.
•Monteer het product niet op plaatsen waaronder zich personen kunnen begeven.
54
Page 56

Aanwijzing
•Het bereik van de draadloze verbinding tussen het meet- en basisstation
bedraagt in het open veld max. 30m.
•Let er vóór de montage op dat de draadloze verbinding niet door storende
signalen of obstakels zoals gebouwen, bomen, voertuigen, hoogspanningskabels
o.a. negatief wordt beïnvloed.
•Vergewis uervóór de denitieve montage van dat er tussen de gewenste
plaatsen van opstelling voldoende ontvangst c.q. een stabiele draadloze
verbinding bestaat.
•Let er bij de montage van het meetstation op dat dit tegen direct zonlicht en
regen beschermd is gepositioneerd.
•Deinternationale standaardhoogte voor het meten van de luchttemperatuur
bedraagt 1,25 m(4ft) boven het maaiveld.
Waarschuwing
•Schaf in de vakhandel speciaal resp. geschikt montagemateriaal aan voor de montage aan
de beoogde wand.
•Vergewisuervandat er geen defecte of beschadigde onderdelen worden gemonteerd.
•Gebruik tijdens de montage nooit geweld of grote kracht. Dit kan het product beschadigen.
•Controleervóór de montage of de wand waaraan het product wordt bevestigd het aan te
brengen gewicht kan dragen en vergewis uervan dat er zich bij de montageplaats in de
wand geen elektrische bedrading, water-, gas- of andereleidingen bevinden.
5.1 Basisstation
•Zet het basisstation met behulp van de voet op een vlakke ondergrond neer.
5.2 Meetstation
•Het meetstation kunt utevens op een vlakke ondergrond buiten opstellen.
•Het is aan te raden het meetstation veilig en stevig met behulp van de uitsparing
(12) op een buitenwand te monteren.
•Bevestig plug, schroef,spijker,enz. in de daarvoor bestemde wand.
•Hang het meetstation met de daarvoor bedoelde uitsparing (23) daaraan op.
55
Page 57

6. Gebruik
Aanwijzing –Invoer
Houd de -toets (13) of de -toets (9) ingedrukt om de waarden sneller te kunnen
selecteren.
6.1 Verbinding met het meetstation
•Nahet plaatsen van de batterijen zoekt het basisstation automatisch naar een
verbinding met het meetstation en voert de eerste conguratie uit.
Aanwijzing
•Deeerste conguratie duurt ca. 3minuten.
•Gebruik gedurende deze tijd de toetsen niet! Anders kunnen er fouten en
onnauwkeurigheden bij de waarden en de overdracht ervan optreden.
•Deze procedureisvoltooid zodrademeetwaarden voor binnen (3) en buiten (1)
worden weergegeven.
•Indien er bij herhaling door het meetstation geen signaal wordt ontvangen, houd
-toets (7) gedurende ca. 3seconden ingedrukt om het handmatig zoeken
dan de
naar het signaal te starten.
6.2 Basisinstellingen en handmatige instellingen
Automatische instelling aan de hand van het DCF-signaal
•Nahet voor de eerste maal inschakelenvanhet basisstationeneensuccesvol totstand
gekomenverbinding tussen basis- en meetstation, begint de klokautomatisch methet
zoekennaareen DCF-signaal. Tijdens hetzoekenknipperthetzendsymbool (6).
56
Page 58

Weergave zendsymbool Zoeken naar DCF- radiograsch tijdsignaal
Knipperende indicator
Continu brandende indicator
Geen indicator Inactief
•Indien er bij herhaling geen signaal wordt ontvangen, houd dan de -toets (9)
gedurende ca. 3seconden ingedrukt om het handmatig zoeken naar het DCFsignaal te starten. Het zendsymbool (6) begint te knipperen.
Aanwijzing –Instellen van de tijd
•Het zoeken duurt ca. 7minuten. Indien dit mislukt, wordt het zoeken beëindigd
en op het volgende hele uur herhaald. Het zendsymbool (6) gaat uit.
•Ukunt ondertussen de tijd en datum handmatig instellen.
•Deklok zoekt dagelijks (tussen 01:00 en 03:00 uur) automatisch verder naar
het DCF-signaal. Bij een succesvolle signaalontvangst worden de handmatig
ingestelde tijd en datum aangepast.
Aanwijzing –Zomertijd
•Detijd wordt automatisch aangepast aan de zomertijd. Zolang de zomertijd
actief is, wordt op de display S weergegeven.
•Houd de -toets (9) opnieuw gedurende ca. 3seconden ingedrukt om het
handmatig zoeken te beëindigen.
Actief
Succesvol –signaal
wordt ontvangen
57
Page 59

Handmatige instelling datum/ tijd
-toets (9) gedurende ca. 3seconden ingedrukt om het zoeken naar
•Houd de
het DCF-signaal te beëindigen. Het zendsymbool (6) gaat uit en ukunt de tijd
handmatig instellen.
•Houd de MODE-toets (8) gedurende ca. 3seconden ingedrukt om de handmatige
instelling van datum/ tijd te starten.
•Stel de volgende informatie achtereenvolgens in:
•tijdzone (afwijking in uren), uur,minuten.
•Druk voor het selecteren van de afzonderlijke waarden op de
-toets (9) en bevestig de respectievelijke selectie door op de MODE-toets (8) te
drukken.
•Indien er gedurende 20 seconden niets wordt ingevoerd, wordt de modus voor de
instellingen automatisch verlaten.
Aanwijzing –Tijdzone
•Het DCF-tijdsignaal kan over een enorme oppervlakte worden ontvangen, het
komt echter te allen tijde overeen met de CET,die o.a. in Nederland geldt. Denk
er daarom aan dat uinlanden met een anderetijdzone met het tijdsverschil
rekening moet houden.
•Bevindt uzichbijv.inMoskou, dan is het daar al 3uur later dan in Nederland.
Dan dient uindit geval dus +3 bij de tijdzone in te stellen. De klok zal zich dan
altijd, na ontvangst van het DCF-tijdsignaal resp. in relatie tot de handmatig
ingestelde tijd, automatisch 3uur later instellen.
Celsius /Fahrenheit
•Druk op de
12h/24h-tijdnotatie
•Druk op de -toets (7) om bij de tijd tussen de 12h/24h-tijdnotatie om te
58
-toets (9) om bij de temperatuurweergave tussen °C en °F om te
schakelen.
schakelen.
-toets (7) of de
Page 60

6.3 Lage batterijcapaciteit
Zodrahet batterijsymbool (2) op de display van het basisstation wordt weergegeven,
is de capaciteit van de batterijen in het meetstation zeer gering. Vervang de batterijen
dan direct.
Aanwijzing –Batterijen vervangen
•Denk er na het vervangen van de batterijen van het meet- of basisstation steeds
aan dat er een nieuwe synchronisatie van deze stations moet worden uitgevoerd.
•Verwijder daartoe de batterijen uit het anderestation en plaatst ze opnieuw of
vervang deze eventueel ook, als dat nodig is.
7. Onderhoud en verzorging
Reinig dit product uitsluitend met een pluisvrije, licht vochtige doek en maak geen
gebruik van agressieve reinigingsmiddelen.
8. Uitsluiting van garantie en aansprakelijkheid
Hama GmbH &CoKG aanvaardt geen enkele aansprakelijkheid of garantieclaims
voor schade of gevolgschade, welke door ondeskundige installatie, montage en
ondeskundig gebruik van het product ontstaan of het resultaat zijn van het niet in acht
nemen van de bedieningsinstructies en/of veiligheidsinstructies.
59
Page 61

9. Technische specificaties
Basisstation Meetstation
Spanningsvoorziening
Stroomverbruik 0,5 mA 3mA
Meetbereik Te mperatuur
Meetstappen Te mperatuur 0,1°C /0,1°F 0,1°C /0,1°F
Meetcyclus temperatuur 43 –47s 43 –47s
Radiograsche DCF-klok Ja Nee
Frequentie 433 MHz
Bereik ≤ 50 m
10. Conformiteitsverklaring
Hierbij verklaar ik, Hama GmbH &CoKG, dat het type radioapparatuur
[00186353, 00123126] conform is met Richtlijn 2014/53/EU.Devolledige
tekst van de EU-conformiteitsverklaring kan worden geraadpleegd op het
volgende internetadres:
www.hama.com-> 00186353 ,00123126-> Downloads.
Frequentieband(en) 433 MHz
Maximaal radiofrequent vermogen 0,015 mW
60
3,0 V
2xAAA-batterij
0°C –+50°C/
32°F –122°F
3,0 V
2xAAA-batterij
-20°C –+60°C/
-4°F –140°F
Page 62

J Οδηγίες χρήσης
Στοιχεία χειρισμού και ενδείξεις
A Κύρια μονάδα
1. Εξωτερική θερμοκρασία
2. Σύμβολο μπαταρίας
3. Εσωτερική θερμοκρασία
4. Ώρα
5. Θερινή ώρα
6. Σύμβολο ασύρματης λήψης
-Πλήκτρο =Αύξησητης τρέχουσας τιμής ρύθμισης/ Αλλαγή μεταξύ 12/24ωρης
7.
μορφής ώρας/ Χειροκίνητη αναζήτηση σήματος από τη μονάδα μέτρησης
8. Πλήκτρο MODE =Ρυθμίσεις/ Επιβεβαίωση της τιμής ρύθμισης
9. -Πλήκτρο = Μείωση της τρέχουσας τιμής ρύθμισης / Αλλαγή μεταξύ °C και °F /
Ενεργοποίηση/ απενεργοποίηση χειροκίνητης λήψης ασύρματου σήματος
10. Θήκη μπαταριών
B Μονάδα μέτρησης
11. Ενδεικτική λυχνία μετάδοσης
12. Εγκοπή για επιτοίχια τοποθέτηση
13. Θήκη μπαταριών
1. Επεξήγηση συμβόλων προειδοποίησης και υποδείξεων
Προειδοποίηση
Χρησιμοποιείται για τη σήμανση υποδείξεων ασφαλείας ήγια να επιστήσει την
προσοχήσειδιαίτερους κινδύνους.
Υπόδειξη
Χρησιμοποιείται για τη σήμανση επιπλέον πληροφοριών ήσημαντικών υποδείξεων.
2. Περιεχόμενα συσκευασίας
• Μετεωρολογικός σταθμός EWS-152
(Κύρια μονάδα για εσωτερικόχώρο / μονάδα μέτρησης για εξωτερικόχώρο)
•4μπαταρίες ΑΑΑ
• Αυτό το εγχειρίδιο χρήσης
61
Page 63

3. Υποδείξεις ασφαλείας
• Το προϊόν προορίζεται για σκοπούς οικιακής χρήσης.
• Μην χρησιμοποιείτε τη συσκευή εκτός των ορίων απόδοσης που περιγράφονται στα
τεχνικάχαρακτηριστικά.
• Μην χρησιμοποιείτε το προϊόν σε υγρό περιβάλλον καιαποφεύγετε τις σταγόνες
νερού.
• Μην χρησιμοποιείτε το προϊόν κοντάσεκαλοριφέρ, άλλες πηγές θερμότητας ήσε
σημεία όπου δέχεται άμεση ηλιακή ακτινοβολία.
• Μην χρησιμοποιείτε το προϊόν σε περιοχέςόπου δεν επιτρέπονται ηλεκτρονικές
συσκευές.
• Μην τοποθετείτε το προϊόν κοντάσεπεδία παρεμβολών, μεταλλικάπλαίσια,
υπολογιστές, τηλεοράσεις κλπ. Οι ηλεκτρονικές συσκευές καθώς καιταπλαίσια των
παραθύρων επηρεάζουν αρνητικάτηλειτουργία τουπροϊόντος.
• Το προϊόν δεν επιτρέπεται να πέφτει κάτω, ούτε καιναδέχεται δυνατάχτυπήματα.
• Μην ανοίγετε το προϊόν καιμην το χρησιμοποιείτε αν χαλάσει.
• Μην επιχειρήσετε να συντηρήσετε ήναεπισκευάσετε τη συσκευή εσείς οι ίδιοι. Οι
εργασίες συντήρησης πρέπει να γίνονται από εξειδικευμέναάτομα.
• Τα παιδιά δεν επιτρέπεται να έρχονται σε επαφή με το υλικότης συσκευασίας,
υπάρχεικίνδυνος ασφυξίας.
• Απορρίψτε κατευθείαν το υλικόσυσκευασίας σύμφωναμετους ισχύοντες τοπικούς
κανονισμούς απόρριψης.
• Μην κάνετε μετατροπές στη συσκευή. Κατ‘ αυτόν τοντρόπο παύει να ισχύει η
εγγύηση.
• Το προϊόν πρέπει να χρησιμοποιείται αποκλειστικάγια το σκοπό που προβλέπεται.
• Χρησιμοποιήστε το προϊόν μόνοσεήπιες κλιματικές συνθήκες.
• Μην αφήνετε τα παιδιά να αγγίζουν αυτή ήοποιαδήποτε άλλη ηλεκτρική συσκευή.
62
Page 64

Προειδοποίηση – Μπαταρίες
• Προσέξτε οπωσδήποτε τη σωστή πολικότητα (επιγραφή + και -) των μπαταριών
καιτοποθετήστε τις ανάλογα. Ημητήρηση μπορεί να οδηγήσει σε διαρροή του
υγρού ήσεέκρηξητων μπαταριών.
• Χρησιμοποιείτε αποκλειστικάαπλές ήεπαναφορτιζόμενες μπαταρίες του
προβλεπόμενου τύπου.
• Πριν την τοποθέτηση των μπαταριών καθαρίστε τις επαφές των μπαταριών καιτις
επαφές τουπροϊόντος.
• Τα παιδιά δεν επιτρέπεται να αλλάζουν μπαταρίες χωρίς επίβλεψη.
• Μην μπερδεύετε παλιές καικαινούριες μπαταρίες, καθώς κα ιμπαταρίες
διαφορετικού τύπου καικατασκευαστή.
• Αφαιρέστετις μπαταρίες από προϊόνταπου δεν έχουν χρησιμοποιηθεί για μεγάλο
χρονικόδιάστημα (εκτόςανθέλετε να τα χρησιμοποιήσετε σε περιπτώσεις
έκτακτης ανάγκης)
• Μην βραχυκυκλώνετε τις μπαταρίες.
• Μην φορτίζετε τις απλές μπαταρίες.
• Μην πετάτε τις μπαταρίες στην φωτιά.
• Φυλάτε τις μπαταρίες μακριά από παιδιά.
• Οι μπαταρίες δεν πρέπει να ανοίγονται, να καταστρέφονται, να καταπίνονται ήνα
καταλήγουν στοπεριβάλλον. Μπορεί να περιέχουν δηλητηριώδη καιβλαβερά για
το περιβάλλον βαρέα μέταλλα.
• Αφαιρέστεκαι απορρίψτε τις χρησιμοποιημένες μπαταρίες αμέσως από το
προϊόν.
• Μην αποθηκεύετε, φορτίζετε καιμην χρησιμοποιείτε τη μονάδα σε ακραίες
θερμοκρασίες καιυπερβολικάχαμηλή ατμοσφαιρική πίεση (όπως π.χ. σε μεγάλα
ύψη).
4. Έναρξη χρήσης
4.1 Μονάδα μέτρησης
• Ανοίξτετηθήκη μπαταριών (13) καιτοποθετήστε δύο μπαταρίες AAΑμεσωστή
πολικότητα. Στη συνέχεια, κλείστε το κάλυμμα της θήκης μπαταριών.
Υπόδειξη
Λάβετε υπόψη ότι κατά την έναρξη χρήσης, πρέπει πρώτανατοποθετήσετε τις
μπαταρίες στη μονάδα μέτρησης καιμετάστην κύρια μονάδα.
63
Page 65

4.2 Κύρια μονάδα
• Αφαιρέστε την προστατευτική μεμβράνη από την οθόνη.
• Ανοίξτετηθήκη μπαταριών (10) καιτοποθετήστε δύο μπαταρίες AAA με σωστή
πολικότητα.
5. Τοποθέτηση
Υπόδειξη – Το ποθέτηση
• Συνιστάται ηαρχική τοποθέτηση της κύριας μονάδας καιτης μονάδας μέτρησης
στοεπιθυμητόσημείο χωρίς συναρμολόγηση καιηεκτέλεση όλων των
ρυθμίσεων, όπως περιγράφονται στοκεφάλαιο 6. Λειτουργία.
• Εγκαταστήστε τη μονάδα/τις μονάδες αφού γίνει σωστή ρύθμιση και
σταθεροποιηθεί ηασύρματη σύνδεση.
• Μην τοποθετείτε το προϊόν σε σημεία κάτω από τα οποία μπορεί να βρίσκονται
άτομα.
Υπόδειξη
• Ηασύρματη μετάδοση ανάμεσα στη μονάδα μέτρησης καιτην κύρια μονάδα έχει
εμβέλεια 30 m σε ανοιχτόχώρο.
• Πριν από την τοποθέτηση λάβετε υπόψη ότι ηασύρματη μετάδοση δεν πρέπει να
παρεμποδίζεται από παρεμβαλλόμενασήματαήεμπόδια, όπως κτίρια, δέντρα,
οχήματα, αγωγούς υψηλής τάσης κ.α.
• Πριν από την τελική τοποθέτηση βεβαιωθείτε ότι γίνεται επαρκής λήψη ανάμεσα
σταεπιθυμητάσημεία τοποθέτησης.
• Κατά την τοποθέτηση της μονάδας μέτρησης, λάβετε υπόψη ότι πρέπει να είναι
προστατευμένη από άμεση ηλιακή ακτινοβολία καιβροχή.
• Το διεθνές τυπικόυψόμετρο για τη μέτρηση της θερμοκρασίας αέρα είναι 1,25 m
(4 ft) πάνω από το έδαφος.
64
Page 66

Προειδοποίηση
• Προμηθευτείτε ειδικάήενδεδειγμέναυλικάαπό το εμπόριο για την τοποθέτηση
στον προβλεπόμενοτοίχο.
• Βεβαιωθείτε ότι δεν θα τοποθετήσετε ελαττωματικάήχαλασμέναεξαρτήματα.
• Κατά την τοποθέτηση μην ασκείτε βία ούτε υπερβολική δύναμη. Μπορεί να
προκληθεί ζη μιά στοπροϊόν.
• Πριν από την τοποθέτηση ελέγξτε αν οπροβλεπόμενος τοίχος είναι κατάλληλος
για το βάρος που πρόκειται να τοποθετηθεί καιβεβαιωθείτε ότι στοσημείο
τοποθέτησης στον τοίχοδεν υπάρχουν ηλεκτρικάκαλώδια, σωλήνες νερού,
αερίου ήάλλου είδους αγωγοί.
5.1 Κύρια μονάδα
• Τοποθετήστε την κύρια μονάδα σε μια επίπεδη επιφάνεια μέσω τουποδιού στήριξης.
5.2 Μονάδα μέτρησης
• Με παρόμοιο τρόπο, μπορείτε να τοποθετήσετε
τη μονάδα μέτρησης σε μια επίπεδη επιφάνεια,
σε εξωτερικόχώρο.
• Συνιστάταιηασφαλής καισταθερή τοποθέτηση της μονάδας μέτρησης σε έναν
εξωτερικότοίχομεχρήση της εγκοπής (12).
• Στερεώστε τα ούπα, τις βίδες, τα καρφιά κλπ. στον προβλεπόμενοτοίχο.
• Αναρτήστε τημονάδα μέτρησης χρησιμοποιώντας την προβλεπόμενη εγκοπή.
6. Λειτουργία
Υπόδειξη – Εισαγωγή
Γιαπιο γρήγορη επιλογή των τιμών πατήστε παρατεταμένατοπλήκτρο (13) ήτο
πλήκτρο (17).
6.1 Σύνδεση με τη μονάδα μέτρησης
• Μετάτην τοποθέτηση των μπαταριών ηκύρια μονάδα αναζητάαυτόματασύνδεση με
τη μονάδα μέτρησης καιπραγματοποιεί την αρχική διαμόρφωση.
65
Page 67

Υπόδειξη
• Ηαρχική διαμόρφωση διαρκεί 3 λεπτάπερίπου.
• Μην πατάτε τα πλήκτρα όσοδιαρκεί αυτή ηδιαδικασία! Διαφορετικά, μπορεί να
παρουσιαστούν σφάλματακαι ανακρίβειες στις τιμές καιστη μετάδοσή τους.
• Ηδιαδικασία θα ολοκληρωθεί όταν εμφανιστούν τα δεδομέναμέτρησης για τον
εσωτερικό (3) καιτον εξωτερικό χώρο (1).
• Αν ημονάδα μέτρησης δεν μπορεί να εντοπίσει το σήμα μετάαπό πολλές
προσπάθειες, πατήστε παρατεταμένατο -πλήκτρο (7) για 3 δευτερόλεπτα
περίπου, ώστε να ξεκινήσει ηχειροκίνητη αναζήτηση σήματος.
6.2 Βασικές ρυθμίσεις και χειροκίνητες ρυθμίσεις
Αυτόματη ρύθμιση σύμφωνα με το σήμα DCF
• Μετάτην πρώτη ενεργοποίηση της κύριας μονάδας καιτην επιτυχή μετάδοση
ανάμεσα στην κύρια μονάδα καιτημονάδα μέτρησης το ρολόιξεκινάαυτόματη
αναζήτηση σήματος DCF. Όσοδιαρκεί ηαναζήτηση, αναβοσβήνει το σύμβολο
ασύρματης λήψης (6).
Ένδειξη συμβόλου
ασύρματης λήψης
Αναζήτηση ασύρματου σήματος DCF
Ηένδειξη αναβοσβήνει
Ηένδειξη ανάβει σταθερά
Καμία ένδειξη Ανενεργή
• Αν δεν μπορεί να εντοπιστεί το σήμα μετάαπό πολλές προσπάθειες, πατήστε
παρατεταμένατο -πλήκτρο (9) για 3 δευτερόλεπταπερίπου, για να ξεκινήσετε τη
χειροκίνητη αναζήτηση σήματος DCF. Το σύμβολο ασύρματης λήψης (6) θα αρχίσει
να αναβοσβήνει.
66
Ενεργή
Επιτυχής - Γίνεται λήψη τουσήματος
Page 68

Υπόδειξη – Ρύθμιση ώρας
• Αυτή ηδιαδικασία αναζήτησης διαρκεί περίπου 7 λεπτά. Αν αποτύχει, η
αναζήτηση θα τερματιστεί καιθαεπαναληφθεί μετάαπό μία ώρα. Το σύμβολο
ασύρματης λήψης (6) θα σβήσει.
• Στοδιάστημα αυτόμπορείτε να ρυθμίσετε την ώρα καιτην ημερομηνία
χειροκίνητα.
• Το ρολόισυνεχίζει καθημερινάνααναζητά αυτόματα (μεταξύ 01:00 και 03:00)
σήμα DCF. Αν γίνει επιτυχής λήψη σήματος, θα διαγραφούν ηώρα καιη
ημερομηνία που ρυθμίστηκαν χειροκίνητα.
Υπόδειξη – Θερινή ώρα
• Ηώρα ρυθμίζεται αυτόματαστη θερινή ώρα. Όσοισχύει ηθερινή ώρα, στην
οθόνη εμφανίζεται ηένδειξη S.
• Πατήστε πάλι παρατεταμένατο -πλήκτρο (9) για 3 δευτερόλεπταπερίπου, για να
ολοκληρώσετε τη χειροκίνητη αναζήτηση.
Χειροκίνητη ρύθμιση ημερομηνίας/ ώρας
• Πατήστε παρατεταμένατο
τερματίσετε την αναζήτηση σήματος DCF. Το σύμβολο ασύρματης λήψης (6) θα
σβήσει καιμπορείτε να ρυθμίσετε την ώρα χε ιροκίνητα.
• Πατήστε παρατεταμένατοπλήκτρο MODE (8) για 3 δευτερόλεπταπερίπου, ώστε να
αρχίσει ηχειροκίνητηρύθμιση ημερομηνίας/ ώρας.
• Ρυθμίστε διαδοχικάταπαρακάτω στοιχεία:
• Ζώνη ώρας (απόκλιση σε ώρες), ώρα, λεπτά.
• Γιαναεπιλέξετε τις τιμές, πατήστε το -πλήκτρο (7) ήτο -πλήκτρο (9) και
επιβεβαιώστε την κάθε επιλογή με το πλήκτρο MODE (8).
• Εάν δεν γίνει καμία εισαγωγή δεδομένων για 20 δευτερόλεπτα, ημονάδα θα εξέλθει
αυτόματααπό τη λειτουργία ρύθμισης.
-πλήκτρο (9) για 3 δευτερόλεπταπερίπου, για να
67
Page 69

Υπόδειξη – Ζώνη ώρας
• Μπορεί να γίνει ευρεία λήψη σήματος DCF, αυτόόμως αντιστοιχεί πάνταστην
Ώρα Κεντρικής Ευρώπης (CET) που ισχύει στη Γερμανία. Ως εκ τούτου, σε χώρες
με άλλη ζώνη ώρας πρέπει να λάβετε υπόψη τη διαφορά ώρας.
• Αν βρίσκεστε στη Μόσχα, ηώρα είναι 3 ώρες μπροστάαπό αυτήν της Γε ρμανίας.
Ως εκ τούτου, ηζώνηώρας πρέπει να ρυθμιστεί σε +3. Το ρολόιθαρυθμιστεί
αυτόματα 3 ώρες αργότερα αφού ληφθεί σήμα DCF ήσύμφωναμετην ώρα που
ρυθμίστηκε χειροκίνητα.
Βαθμοί Κελσίου / Φαρενάιτ
• Γιανααλλάξετε την ένδειξη θερμοκρασίας μεταξύ °C και °F, πατήστε το -πλήκτρο
(9).
12/24ωρη μορφή ώρας
• Πατήστε το -πλήκτρο (7) για να πραγματοποιήσετε εναλλαγή μεταξύ της 12ωρης
καιτης 24ωρης μορφής ώρας.
6.3 Χαμηλή στάθμη μπαταρίας
Όταν εμφανιστεί στην κύρια μονάδα το σύμβολο μπαταρίας (2), αυτόσημαίνει ότι η
στάθμη των μπαταριών στη μονάδα μέτρησης είναι χαμηλή. Αντικαταστήστε αμέσως
τις μπαταρίες.
Υπόδειξη –
Αντικατάσταση μπαταριών
• Λάβετε υπόψη ότι μετάαπό κάθε αντικατάσταση μπαταριών στη μονάδα μέτρησης
ήστην κύρια μονάδα πρέπει να γίνει νέος συγχρονισμός των μονάδων.
• Γι‘ αυτό, πρέπει να αφαιρέσετε τις μπαταρίες της άλλης μονάδας, να τις
τοποθετήσετε ξανάή,αν χρειάζεται, να τις αντικαταστήσετε.
7. Συντήρηση και φροντίδα
Καθαρίζετε αυτότοπροϊόν μόνομεένα ελαφρώς βρεγμένοπανί χωρίς χνούδια καιμην
χρησιμοποιείτε επιθετικάκαθαριστικά.
8. Απώλεια εγγύησης
Ηεταιρεία Hama GmbH &CoKGδεν αναλαμβάνει καμία ευθύνη ήεγγύηση για ζημιές,
οι οποίες προκύπτουν από λανθασμένη εγκατάσταση καισυναρμολόγηση ήλανθασμένη
χρήση τουπροϊόντος ήμητήρηση των οδηγιών λειτουργίας και/ήτων υποδείξεων
ασφαλείας.
68
Page 70

9. Τεχνικά χαρακτηριστικά
Κύρια μονάδα Μονάδα μέτρησης
Ηλεκτρική τροφοδοσία
Κατανάλωση ρεύματος 0,5 mA 3mA
Εύρος μέτρησης
Θερμοκρασία
Βήματαμέτρησης
Θερμοκρασία
Κύκλος μέτρησης
θερμοκρασίας
Ώρα μέσω ασύρματου
σήματος DCF
Συχνότητα 433 MHz
Εμβέλεια ≤ 50 m
10. Δήλωση συμμόρφωσης
Με την παρούσα ο/η Hama GmbH &CoKG, δηλώνει ότι ο
ραδιοεξοπλισμός [00186353, 00123126] πληροί την οδηγία 2014/53/ΕΕ.
Το πλήρες κείμενοτης δήλωσης συμμόρφωσης ΕΕ διατίθεται στην
ακόλουθη ιστοσελίδα στοδιαδίκτυο:
www.hama.com-> 00186353, 00123126 -> Downloads..
Ζώνη συχνοτήτων/Ζώνες συχνοτήτων 433MHz
Μέγιστη εκπεμπόμενη ισχύς 0,015 mW
3,0 V
2xμπαταρίες AAA
0°C –+50°C/
32°F –122°F
0,1°C /0,1°F 0,1°C /0,1°F
43 –47δευτ.43–47 δευτ.
Ναι Όχι
2xμπαταρίες AAA
-20°C –+60°C/
3,0 V
-4°F –140°F
69
Page 71

P Instrukcja obsługi
Elementy obsługi isygnalizacji
AStacja bazowa
1. Temperaturazewnętrzna
2. Symbol baterii
3. Temperaturawpomieszczeniu
4. Godzina
5. Czas letni
6. Symbol sygnałuradiowego
7.Przycisk
8. Przycisk MODE =ustawienia/ potwierdzanie ustawionej wartości
9. Przycisk =zmniejszanie aktualnie ustawionej wartości /zmianamiędzy °C i°F/
10. Schowek na baterie
BStacja pomiarowa
11. Kontrolka transferu
12. Otwór do mocowania na ścianie
13. Schowek na baterie
1. Objaśnienie symboli ostrzegawczych iwskazówek
2. Zawartość opakowania
•stacja pogodowa EWS-152
•4baterie AAA
•niniejsza instrukcja obsługi
70
=zwiększanie aktualnie ustawionej wartości /zmiana formatu 12/24 -
godzinnego /ręczne wyszukiwanie sygnałuzestacji pomiarowej
włączanie/ wyłączanie ręcznego odbioru sygnałuradiowego
Ostrzeżenie
Używane wcelu zwrócenia uwagi na szczególne niebezpieczeństwo lub ryzyko.
Wskazówki
Używane wcelu zwrócenia uwagi na szczególnie przydatne informacje.
(stacja bazowa do stosowania wewnątrz /stacja pomiarowa do stosowania na
zewnątrz)
Page 72

3. Wskazówki bezpieczeństwa
•Produkt jest przeznaczony do prywatnego, niekomercyjnego użytku domowego.
•Nie stosować produktu poza zakresem mocy podanym wdanych technicznych.
•Nie stosować produktu wwilgotnym otoczeniu ichronić go przed bryzgami wody.
•Nie używać produktu wbezpośredniej bliskości ogrzewania, innych źródeł ciepłaani
nie wystawiać go na bezpośrednie promieniowanie słoneczne
•Nie używać produktu wmiejscach, gdzie nie jest dozwolone stosowanie urządzeń
elektronicznych.
•Nie ustawiać produktu wpobliżu źródeł zakłóceń,ram metalowych, komputerów,
telewizorów itp. Urządzenia elektroniczne ifutryny okienne wpływają negatywnie
na działanie produktu.
•Chronić produkt przed upadkiem isilnymi wstrząsami.
•Nie otwierać produktu inie używać go, gdy jest uszkodzony.
•Nie próbować naprawiać samodzielnie urządzenia. Prace serwisowe zlecać
wykwalikowanemu personelowi fachowemu.
•Materiałyopakowaniowe trzymać koniecznie zdala od dzieci, istnieje
niebezpieczeństwo uduszenia.
•Materiałyopakowaniowe należynatychmiast poddać utylizacji zgodnie z
obowiązującymi przepisami miejscowymi.
•Nie modykować urządzenia. Prowadzi to do utraty wszelkich roszczeń ztytułu
gwarancji.
•Stosować produkt wyłącznie zgodnie zprzewidzianym przeznaczeniem.
•Używać produktu wyłącznie wumiarkowanych warunkach klimatycznych.
•Trzymać urządzenie, jak wszystkie urządzenia elektryczne, zdala od dzieci!
71
Page 73

Ostrzeżenie -baterie
•Wkładającbaterie, zwrócić koniecznie uwagę na właściwe podłączenie biegunów
(znak +i-). Nieprzestrzeganie grozi wyciekiem lub wybuchem baterii.
•Używać wyłącznie akumulatorów (lub baterii) odpowiadających podanemu
typowi.
•Przed włożeniem baterii wyczyścić styki baterii iprzeciwległestyki.
•Nie pozwalać dzieciom na wymianę baterii bez nadzoru.
•Nie mieszać starych inowych baterii ani baterii różnych typów lub producentów.
•Jeżeli produkt nie jest używany przez dłuższy czas, należywyjąć zniego baterie.
(chyba żesłużą one do zasilania awaryjnego)
•Nie zwierać baterii.
•Nie ładować baterii.
•Nie wrzucać baterii do ognia.
•Przechowywać baterie poza zasięgiem dzieci.
•Nie otwierać,nie uszkadzać ani nie połykać baterii, atakżechronić je przed
kontaktem ze środowiskiem. Mogą one zawierać toksyczne iszkodliwe dla
środowiska metale ciężkie.
•Natychmiast usunąć zproduktu zużyte baterie ipoddać je utylizacji.
•Unikać przechowywania, ładowania istosowania wekstremalnych temperaturach
iprzy bardzo niskim ciśnieniu powietrza (np. na dużych wysokościach).
4. Uruchamianie
4.1 Stacja pomiarowa
•Otworzyć pokrywę schowka na baterie (13) iwłożyćdwie baterie AAA, zwracając
uwagę na właściwą biegunowość.Następnie zamknąć pokrywę schowka na baterie.
Wskazówki
Przed uruchomieniem należypamiętać,aby zawsze włożyć najpierw baterie do stacji
pomiarowej, anastępnie do stacji bazowej.
4.2 Stacja bazowa
•Otworzyć pokrywę schowka na baterie (10) iwłożyćdwie baterie AAA, zwracając
uwagę na właściwą biegunowość.Następnie zamknąć pokrywę schowka na baterie.
72
Page 74

5. Montaż
Wskazówka -Montaż
•Zaleca się ustawić najpierw wwybranym miejscu stację bazową istację
pomiarową bez montażuiskongurować wszystkie ustawienia -jakopisano w
punkcie 6. Obsługa stacji bazowej.
•Zamontować stacje dopieropoprawidłowej konguracji ustawień iznalezieniu
stabilnej łączności radiowej.
•Nigdy nie montować produktu wmiejscach, pod którymi mogą przebywać ludzie.
Wskazówka
•Zasięgtransmisji radiowej między stacją pomiarową istacją bazową wynosi na
otwartym terenie maks. 30 m.
•Przed montażem zwrócić uwagę,aby żadne sygnałyzakłócające lub przeszkody,
takie jak budynki, drzewa, pojazdy,linie wysokiego napięcia itp., nie wpływały
na transmisję radiową.
•Przed ostatecznym montażem upewnić się,czy między wybranymi miejscami
ustawienia występuje dostateczny odbiór radiowy.
•Podczas montażustacji pomiarowej należypamiętać,aby zamontować ją w
miejscu zabezpieczonym przed bezpośrednim promieniowaniem słonecznym i
deszczem.
•Międzynarodowa standardowa wysokość dla pomiaru temperatury powietrza
wynosi 1,25 m(4stopy) nad ziemią.
Ostrzeżenie
•Nabyć wspecjalistycznymsklepie odpowiednie materiałymontażowe do montażu
na przewidzianej ścianie.
•Sprawdzić,czy nie są montowane wadliwe bądź uszkodzone części.
•Podczas montażunigdy nie wywierać nadmiernej siły. Możetospowodować
uszkodzenie produktu.
•Przed montażem sprawdzić,czy przewidziana ściana jest odporna na przyjęcie
ciężaru mocowanego produktu, iupewnić się, żewmiejscu montażunaścianie
nie są zainstalowane przewody elektryczne, wodne, gazowe bądź inne przewody.
5.1 Stacja bazowa
•Zapomocą podpórki ustawić stację bazową na równym podłożu.
73
Page 75

5.2 Stacja pomiarowa
•Stację pomiarową można takżeustawić za pomocą podpórki na równym podłożu
na zewnątrz.
•Zaleca się bezpieczne itrwałezamontowanie stacji pomiarowej na ścianie
zewnętrznej za pomocą otworu (12). Zamocować kołki rozporowe, śruby,gwoździe
itp. na przewidzianej ścianie.
•Naprzeznaczonych do tego otworach zawiesić stację bazową/stacjępomiarową.
6. Obsługa
Wskazówka –wprowadzanie danych
Trzymać wciśnięty przycisk (7) lub (9) ,aby przyspieszyć nastawę wartości.
6.1 Połączenie ze stacją bazową
•Powłożeniu baterii stacja bazowa automatycznie wyszukuje połączenie ze stacją
pomiarową iprzeprowadza pierwszą kongurację.
Wskazówka
•Pierwsza konguracja trwa ok. 3minuty.
•Nie naciskać wtym czasie żadnych przycisków! Wprzeciwnym razie wartości iich
transmisja mogą zawierać błędy iniedokładne dane.
•Proces jest zakończony,gdy wyświetlane są dane pomiarowe dla pomieszczenia
(3) inazewnątrz(1).
•Jeżeli ze stacji pomiarowej ponownie nie zostanie odebrany żaden sygnał ,nacisnąć
itrzymać wciśnięty przez ok. 3sekundy przycisk (7) ,abyrozpocząć ręczne
wyszukiwanie radiowego sygnałuczasowego.
6.2 Ustawienia podstawowe ikonfiguracja ręczna
Automatyczne ustawianie wg sygnałuczasowego DCF
•Popierwszym włączeniu stacji bazowej iudanej transmisji sygnałów między stacją
bazową istacją pomiarową,zegar automatycznie rozpoczyna wyszukiwanie
radiowego sygnałuczasowegoDCF.Podczas wyszukiwania symbol sygnału
radiowego (6) zaczyna migać.
74
Page 76

Wskaźnik Wyszukiwanie sygnałuczasowego DCF
Migający wskaźnik
Staływskaźnik
Brak wskaźnika Nieaktywny
•Jeżeli sygnał ponownie nie zostanie odebrany,nacisnąć itrzymać wciśnięty przez ok.
3sekundy przycisk (9) ,aby rozpocząć ręczne wyszukiwanie radiowego sygnału
czasowego DCF.Symbol sygnałuradiowego(6) zaczyna migać.
Wskazówka –ustawianie zegara
•Proces ręcznego wyszukiwania trwa ok. 7minut. Jeżeli wyszukiwanie ręczne
nie powiedzie się,proces wyszukiwania jest przerywany iwznawiany okolejnej
pełnej godzinie. Symbol sygnałuradiowego(6) gaśnie.
•Wtym czasie można ręcznie ustawić godzinę idatę.
•Zegar będzie codziennie szukał automatycznie (między godziną 01:00 i03:00)
sygnałuDCF.Popomyślnym odbiorze sygnałuręcznie ustawiona godzina idata
są nadpisywane.
Wskazówka –czas letni
•Czas zegarajest automatycznie przestawiany na czas letni. Gdy czas letni jest
aktywny,naekranie wyświetlany jest symbol S.
•Ponownie nacisnąć itrzymać wciśnięty przez ok. 3sekundy przycisk (9) ,aby
zakończyć proces ręcznego wyszukiwania.
Proces powiódł się -sygnał jest odbierany
Aktywne
75
Page 77

Ręczne ustawianie daty /godziny
•Nacisnąć itrzymaćwciśnięty przez ok. 3sekundy przycisk (9) ,aby zakończyć
proces ręcznego wyszukiwania sygnałuDCF.Symbol sygnałuradiowego(6) gaśnie i
można ręcznie ustawiać godzinę.
•Nacisnąć itrzymaćwciśnięty przez ok. 3sekundy przycisk MODE (8), aby uruchomić
ręczne ustawianie daty /godziny.
•Pokolei ustawić następujące informacje:
•Strefa czasowa (różnica wgodzinach), godziny,minuty .
•Aby wybrać poszczególne wartości, nacisnąć przycisk
wybór,naciskającprzycisk MODE (8). .
•Jeżeli wciągu 20 sekund nie zostanie wprowadzona żadna wartość,trybustawiania
jest automatycznie zamykany.
Wskazówka –strefa czasowa
•Sygnał czasowy DCF możebyćodbierany na całym świecie, jednakżeodpowiada
on zawsze streeczasu środkowoeuropejskiego (CET) obowiązującego w
Niemczech. Należypamiętać,abywkrajachoinnej streeczasowej przesunąć
czas.
•Np. wMoskwiejest 3godziny później niż wNiemczech. Przy streeczasowej
należywtedy ustawić wartość +3. Po odbiorze sygnałuczasowego DCF,wzgl.
wodniesieniu do ręcznie ustawionego czasu zegara, zegar ustawia się wtedy
zawsze o3godziny później.
Celsjusz /Fahrenheit
•Nacisnąć przycisk
Format 12/24-godzinny
•Nacisnąć przycisk (7), aby przy ustawianiu godziny przełączać między formatem
12 i24-godzinnym.
76
(9), aby przełączać między jednostkami temperatury °C i°F.
(7) lub (9) ipotwierdzić
Page 78

6.3 Niski stan naładowania baterii
Wyświetlenie na ekranie stacji bazowej symbolu baterii (2) oznacza bardzo niski
poziom naładowania baterii wstacji pomiarowej. Natychmiast wymienić baterie.
Wskazówka –wymiana baterii
•Należypamiętać, żepokażdej wymianie baterii wstacji pomiarowej lub bazowej
konieczna jest ponowna synchronizacja stacji.
•Wtym celu wyjąć baterie zdrugiej stacji iponownie je włożyć lub wrazie
potrzeby wymienić.
7. Czyszczenie
Produkt można czyścić jedynie lekko zwilżoną szmatką.Doczyszczenia nie należy
używaćżadnych silnych iagresywnych detergentów.
8. Wyłączenie odpowiedzialności
Hama GmbH &Co. KG nie udziela gwarancji ani nie odpowiada za szkody wskutek
niewłaściwej instalacji, montażuoraznieprawidłowego stosowania produktu lub
nieprzestrzegania instrukcji obsługi i/lub wskazówek bezpieczeństwa.
77
Page 79

9. Dane techniczne
Stacja bazowa Stacja pomiarowa
Zasilanie elektryczne
Pobór prądu 0,5 mA 3mA
Zakres pomiarowy
Temperatura
Rozdzielczość pomiaru
Temperatura
Cykl pomiaru temperatury 43 –47s 43 –47s
Zegar radiowy DCF Ja Nein
Częstotliwość 433 MHz
Zasięg ≤ 50 m
10. Deklaracja zgodności
Hama GmbH &CoKG niniejszym oświadcza, żetyp urządzenia radiowego
[00186353, 00123126] jest zgodny zdyrektywą 2014/53/UE. Pełny tekst
deklaracji zgodności UE jest dostępny pod następującym adresem
internetowym:
www.hama.com-> 00186353, 00123126 -> Downloads.
Częstotliwość transmisji 433 MHz
Maksymalna moc transmisji 0,015 mW
78
3,0 V
2baterie typu AAA
0°C –+50°C/
32°F –122°F
0,1°C /0,1°F 0,1°C /0,1°F
3,0 V
2baterie typu AAA
-20°C –+60°C/
-4°F –140°F
Page 80

H Használati útmutató
Kezelőelemek és kijelzők
Abázisállomás
1. Külső hőmérséklet
2. Akkumulátor szimbólum
3. Beltéri hőmérséklet
4. Időpont
5. Nyári időszámítás
6. Rádiós szimbólum
7. -gomb=az aktuális beállítási érték növelése/12/24 órás formátum módosítása/
kézi keresést amérőállomásról
8. MODE gomb =beállítások/beállítási érték nyugtázása
9. -gomb=aktuális beállítási érték csökkentése/váltás °C és °F között/manuális
rádiójel vételének be- és kikapcsolása
10. Elemók
BMérőállomás
11. Adatátviteli ellenőrző lámpa
12. Horony falraszereléshez
13. Elemók
1. Figyelmeztető szimbólumok és előírások ismertetése
Figyelmeztetés
Figyelmeztető jeleket használunk abiztonsági tényezőkbemutatására, ill. felhívjuk a
gyelmet akülönleges veszélyekreéskockázatokra.
Hivatkozás
Az itt látható gyelmeztető jeleket használjuk fel, ha kiegészítő információkat
közlünk vagy fontos tudnivalókrahívjuk fel a gyelmet.
2. Acsomag tartalma
•Időjárás-előrejelző állomás EWS-152
(Bázisállomás belterülethez /mérőállomás külső részhez)
•4xAAA elem
•ezakezelési útmutató
79
Page 81

3. Biztonsági előírások
•Atermék amagánháztartási, nem üzleti célú alkalmazásrakészül.
•Neüzemeltesse aterméket aműszaki adatokban megadott teljesítményhatárain túl.
•Nehasználja aterméket párás környezetben, és kerülje az érintkezést fröccsenő
vízzel.
•Aterméket ne használja afűtés és egyéb hőforrások közelében, vagy közvetlen
napsütésnek kitéve.
•Nehasználja aterméket olyan helyen, ahol elektronikus készülékek nincsenek
megengedve.
•Nehelyezze aterméket interferencia mezők, fémkeretek, számítógépek,
tévékészülékek stb. közelébe. Az elektronikus készülékek és az ablakkeretek
negatívan befolyásolják atermék működését.
•Neejtse le aterméket és ne tegye ki heves rázkódásnak.
•Nenyissa ki aterméket és sérülés esetén ne üzemeltesse tovább.
•Nekísérelje meg akészülék saját karbantartását vagy javítását. Bármely
karbantartási munkát bízzon illetékes szakemberre.
•Feltétlenültartsa távol agyermekeket acsomagolóanyagtól, mert fulladásveszély
áll fenn.
•Azonnal ártalmatlanítsa acsomagolóanyagot ahelyileg érvényes ártalmatlanítási
előírások szerint.
•Nevégezzen módosítást akészüléken. Ebben az esetben minden garanciaigény
megszűnik.
•Aterméket kizárólag az előírt célrahasználja.
•Aterméket csak mérsékelt éghajlati feltételek között használja.
•Ezakészülék, mint minden elektromos készülék, nem gyermekek kezébe való!
Figyelmeztetés -Elemek
•Feltétlenül ügyeljen az elemek megfelelő polaritására(+és-felirat), és ennek
megfelelően tegye be őket. Ennek gyelmen kívül hagyása esetén az elem
kifolyásának vagy felrobbanásának veszélye áll fenn.
•Kizárólag amegadotttípusnak megfelelő akkumulátort (vagy elemet) használjon.
•Azelem behelyezése előtt tisztítsa meg az elemérintkezőket és az
ellenérintkezőket.
•Neengedje meg agyermekeknek az elemcserét felügyelet nélkül.
•Nekeverje össze arégi és az új elemeket, valamint akülönböző típusú vagy más
gyártótól származó elemeket.
80
Page 82

•Távolítsa el az elemeket azon termékekből, amelyeket hosszabb ideig nem
használ. (kivéve ha azokat vészhelyzetretartalékolja)
•Nezárja rövidreazelemeket.
•Netöltse fel az elemeket.
•Nedobja tűzbe az elemeket.
•Azelemeket gyermekek számáraelzárt helyen tárolja.
•Azakkumulátorokat és elemeket soha ne nyissa fel, károsítsa, nyelje le
vagy juttassa akörnyezetbe. Mérgező és környezetrekáros nehézfémeket
tartalmazhatnak.
•Haladéktalanul távolítsa el alemerült elemeket atermékből, majd ártalmatlanítsa
őket.
•Kerülje atárolást, aberakodást és afelhasználást szélsőséges hőmérsékleteken
és rendkívül alacsony légnyomáson (pl. nagy magasságban).
4. Üzembe helyezés
4.1 Mérőállomás
•Nyissa ki az elemtartót (13) és helyezzen be helyes polaritással két AAA-elemet.
Ezután zárja be az elemtartó fedelét.
Hivatkozás
Ügyeljen arra, hogy üzembe helyezéskor az elemeket először mindig amérőállomás,
és csak azután abázisállomásba helyezze be.
4.2 Bázisállomás
•Távolítsa el avédőfóliát akijelzőről. Nyissa ki az elemtartót (10) és helyezzen be
helyes polaritással két AAA-elemet. Ezt követően zárja be az elemtartó fedelét.
5. Szerelés
Hivatkozás –Szerelés
•Javasoljuk, hogy abázis- és mérőállomást először felszerelés nélkül helyezze
el akívánt felállítási helyen, és végezze le abeállításokat –a6. Használat c.
részben leírtaknak megfelelően.
•Azállomás(oka)t csak amegfelelő beállítás és stabil rádiós kapcsolat felállítása
után szerelje fel.
•Sohasem szerelje fel aterméket olyan helyen, amely alatt személyek
tartózkodhatnak.
81
Page 83

Hivatkozás
•Arádióátviteli hatótávolság amérő-és
abázisállomás között szabad területen maximum 30 m.
•Szerelés előtt ügyeljen arra, hogy arádióátviteltzavaró jelek vagy akadályok,
például épületek, fák, járművek, nagyfeszültségű vezetékek ne befolyásolhassák.
•Avégső felszerelés előtt győződjön meg
arról, hogy akívánt felállítási helyek között megfelelő avétel.
•Amérőállomás felszerelésekor ügyeljen arra, hogy anap és az eső közvetlen
behatásától védett helyet válasszon.
•Aszabványos nemzetközi magasság alevegő-hőmérséklet méréséhez aföld
felett 1,25 m(4láb).
Figyelmeztetés
•Amegfelelő falon történő szereléshez szerezzen be szakkereskedelemben
kapható speciális, illetve arraalkalmas szerelőanyagot.
•Bizonyosodjon meg arról, hogy nem szerel fel hibás, vagy meghibásodott
alkatrészeket.
•Aszerelésnél ne fejtsen ki túlzott erőt. Ezek ugyanis atermék károsodásához
vezethetnek.
•Szerelés előtt ellenőrizze, hogy akiszemelt fal alkalmas-e arászerelendő
súly megtartására, és bizonyosodjon meg arról, hogy aszerelés helyén nem
találhatóak afalban villamossági, víz-, gáz- vagy egyéb vezetékek.
5.1 Bázisállomás
•Állítsa abázisállomást az állvány segítségével
egy egyenletes felületre.
5.2 Mérőállomás
•Amérőállomást kültéri egyenletes felületen szintén felállíthatja.
•Javasoljuk, hogy amérőállomást rögzítse stabilan és szorosan egy külső falfelülethez
az erreacélraszolgáló horony segítségével (12).
•Rögzítsen dübelt, csavart, szöget stb. az erreacélrakiszemelt falon.
•Amérőállomást az erreacélraszolgáló horony segítségével erreakassza fel.
82
Page 84

6. Használat
Hivatkozás –Bevitel
Az értékek gyorsabb kiválasztásához tartsa lenyomva a gombot (7) vagy a
–gombot (9).
6.1 Kapcsolódás amérőállomással
•Azelemek behelyezése után abázisállomás automatikusan megkísérel kapcsolatot
létesíteni amérőállomással, és elvégzi akezdeti beállításokat.
Hivatkozás
•Akezdeti beállítás kb. 5percet vesz igénybe.
•Ezen idő alatt kerülje agombok bárminemű megnyomását! Ellenkező esetben az
értékek, illetve azok átvitele hibás és pontatlan lehet.
•Aművelet akkor zárult le, ha abelső (7) és akültéri(6) mérési adatok
megjelennek.
•Haabázisállomás többször egymás után nem kap jelet amérőállomástól, akkor
nyomja meg, és kb. 3mp-ig tartsa lenyomva a
kézi keresését.
6.2 Alapbeállítások és kézi beállítások
DCF-jel szerinti automatikus beállítás
•Abázisállomás első bekapcsolása és abázisállomás és amérőállomás közötti
sikeres átvitel után az óraautomatikusan elkezdi keresni aDCF jelet. Akeresés alatt
arádió szimbólum (5) villog.
-gombot (7), hogy elindítsa ajel
83
Page 85

Rádiószimbólum kijelzés DCF-jel keresése
Villogó kijelző
Tartós kijelzés
Nincs kijelzés Inaktív
•Haabázisállomás többször egymás után nem kap jelet, akkor nyomja meg, és kb.
3mp-ig tartsa lenyomva a -gombot (9), hogy elindítsa aDCF-jel kézi keresését. A
rádió szimbólum (6) villogni kezd.
Hivatkozás –Apontos idő beállítása
•Akeresés nagyjából 7percet vesz igénybe. Ha nem sikerülne, akeresés leáll, és a
következő egész órában újraindul. Arádió szimbólum (6) kialszik.
•Ezalatt elvégezheti adátum és az idő kézi beállítását.
•Azóra mindennap (01:00 –03:00 között) továbbraisautomatikusan keresi a
DCF-jelet. Sikeres jelvétel esetén felülírja akézzelbeállított időpontot és dátumot.
Hivatkozás –Nyári időszámítás
•Azóra automatikusan átáll nyári időszámításra. Amíg anyári idő aktív, S jelenik
meg akijelzőn.
•Tartsa nyomva újraa -gombot(9) kb. 3másodpercig akézi keresés befejezéséhez.
Dátum/pontos idő manuális beállítása
•Tartsa nyomva a -gombot (9) kb. 3másodpercig aDCF-jel keresésének
befejezéséhez. Arádió szimbólum (6) kialszik, és az időpontot manuálisan
beállíthatja.
•Nyomja meg és tartsa lenyomva aMODE gombot (8) kb. 3másodpercig adátum/
idő manuális beállításához.
•Adja meg egymás után akövetkező információkat:
•Időzóna (eltérés órákban), óra, perc.
84
Aktív
Sikeres jelvétel
Page 86

•Azegyes értékek kiválasztásához nyomja meg a gombot (7) vagy a -gombot (9),
és erősítse meg az adott kiválasztást a MODE gomb (8) megnyomásával.
•Amennyiben 20 mp-ig semmilyen értéket nem ad meg, arendszer abeállítási
üzemmódból automatikusan kilép.
Hivatkozás –Időzóna
•ADCF-jel szélesen fogható, azonban minden esetben aNémetországban
érvényes CET (Közép-európai idő)szerinti időpontot tartalmazza. Ezt az
időeltérést amás időzónájú országokban ezért gyelembe kell venni.
•Hapéldául Moszkvában van, akkor Németországhoz képest ott már 3órával
több van. Ezért az időzónánál +3 értéket kell beállítania. Az óraezután aDCF-jel
vételét követően, illetve amanuálisan beállított időponthoz képest mindig 3
órával előbbreállítja magát.
Celsius /Fahrenheit
•Nyomja meg a
12/24 órás formátum
•Nyomja meg az -gombot (7) apontos idő 12 és 24 órás időformátuma közötti
váltáshoz.
6.3 Alacsony elemkapacitás
Amint az akkumulátor szimbóluma (2) megjelenik abázisállomás kijelzőjén, a
mérőállomásban lévő akkumulátorok kapacitása nagyon alacsony.Cserélje ki azonnal
az elemeket. .
Hivatkozás –Elemcsere
•Ügyeljen arra, hogy amérő-ésbázisállomás minden elemcseréjét követően az
állomásokat újraszinkronizálni kell.
•Ehhez vegye ki amásik állomás elemeit, majd helyezze vissza, illetve szükség
esetén cserélje ki azokat.
7. Ka rbantartás és ápolás
•Ezt aterméketcsak szöszmentes, kissé benedvesített kendővel tisztítsa, és ne
használjon agresszív tisztítószert.
-gombot (9) a°Cés°Fhőmérséklet-kijelzés közötti váltáshoz.
85
Page 87

8. Szavatosság kizárása
AHama GmbH &CoKG semmilyen felelősséget vagy szavatosságot nem vállal a
termék szakszerűtlen telepítéséből, szerelésébőlésszakszerűtlen használatából, vagy a
kezelési útmutató és/vagy abiztonsági előírások be nem tartásából eredő károkért.
9. Műszaki adatok
Bázisállomás Mérőállomás
Tápellátás 3,0 V2db AAA elem 3,0 V2db AAA elem
Áramfelvétel 0,5 mA 3mA
Mérési tartomány
Hőmérséklet
Mérési lépésközök
Hőmérséklet
Hőmérséklet mérőciklus 43 –47mp43–47 mp
DCF rádióvezérelt óraIgen Nem
Frekvencia 433 MHz
Hatótávolság ≤ 50 m
10. Megfelelőségi nyilatkozat
Hama GmbH &CoKG igazolja, hogy a[00186353, 00123126] típusú
rádióberendezés megfelel a2014/53/EU irányelvnek. Az EU-megfelelőségi
nyilatkozat teljes szövege elérhető akövetkező internetes címen:
www.hama.com-> 00186353, 00123126 -> Downloads.
Az(ok) afrekvenciasáv(ok) 433 MHz
Maximális jelerősség 0,015 mW
86
0°C –+50°C/ 32°F –
122 °F
0,1°C /0,1°F 0,1°C /0,1°F
-20°C –+60°C/ -4°F
–140°F
Page 88

Hama GmbH &CoKG
86652 Monheim /Germany
Service &Support
www.hama.com
+49 9091 502-0
DG
www.hama.com/nep
Alllisted brandsaretrademarksofthe correspondingcompanies.
Errors andomissionsexcepted,and subjecttotechnicalchanges.
Ourgeneralterms of deliveryandpaymentareapplied.
00186353_00123126/12.19
 Loading...