

Page 1
00
123126
Weather Station
Wetterstation
EWS-152
Operating Instructions
Bedienungsanleitung
Mode d‘emploi
Instrucciones de uso
Gebruiksaanwijzing
Istruzioni per l‘uso
Οδηγίες χρήσης
Instrukcja obsługi
Návod kpoužití
Návod na použitie
Manual de instruções
Manual de utilizare
Bruksanvisning
Käyttöohje
GB
D
F
E
RUS
I
GR
PL
CZ
SK
P
RO
S
FIN
Page 2
A
1
2
3
6
4
5
MODE
8
9
7
10
B
11
12
13
Page 3
G Operating instruction
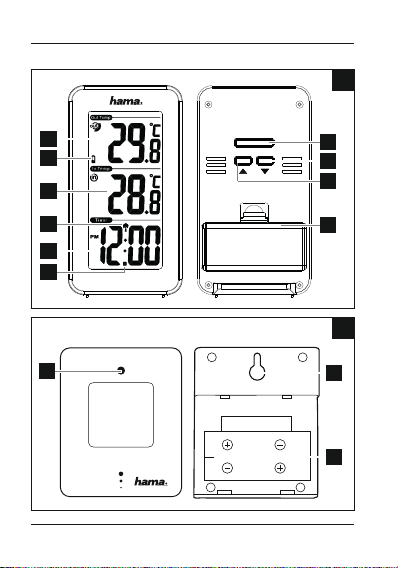
Controls and Displays
ABase station
1. Outdoor temperature
2. Battery symbol
3. Room temperature
4. Time
5. Summer time
6. Wireless symbol
button =Increasesthecurrentsetting/Toggles 12/24 hour format/Manual
7.
search for signal from the measuring station
8. MODE button =Settings/Conrms the setting
9. button =Decreases the current setting/Toggles between °C and °F/Activates/
deactivates manual radio signal reception
10. Battery compartment
BMeasuring station
11. Transmission indicator lamp
12. Opening for wall mounting
13. Battery compartment
Thank you for choosing aHama product.
Take your time and read the following instructions and information completely.Please
keep these instructions in asafe place for futurereference. If you sell the device, please
pass these operating instructions on to the new owner.
1. Explanation of Warning Symbols and Notes
Warning
This symbol is used to indicate safety instructions or to draw your attention to
specic hazards and risks.
2
Page 4

Note
This symbol is used to indicate additional information or important notes.
2. Package Contents
•Weather Station EWS-152
(base station for indoor/outdoor measuring station)
•4AAAbatteries
•These operating instructions
3. Safety Instructions
•The product is intended for private, non-commercial use only.
•Donot operate the product outside the power limits given in the specications.
•Donot use the product in moist environments and avoid splashes.
•Donot use the product in the immediate vicinity of heaters or other heat sources
or in direct sunlight.
•Donot use the product in areas wherethe use of electronic devices is not permitted.
•Donot place the product near interference elds, metal frames, computers, TVs,
etc. Electronic devices and window frames can negatively affect the product’s
functionality.
•Donot drop the product and do not expose it to any major shocks.
•Donot open the device or continue to operate it if it becomes damaged.
•Donot attempt to service or repair the product yourself.Leave any and all service
work to qualied experts.
•Keep the packaging material out of the reach of children due to the risk of
suffocation.
•Dispose of packaging material immediately according to locally applicable
regulations.
•Donot modify the product in any way.Doing so voids the warranty.
3
Page 5
Warning –Batteries
•Immediately remove anddispose of dead batteriesfromthe product.
•Onlyuse batteries(or rechargeable batteries) that matchthespeciedtype.
•Donot mixold andnew batteriesorbatteriesofadifferent type or make.
•When inserting batteries, note thecorrect polarity(+and -markings) and
insert thebatteriesaccordingly. Failure todosocouldresultinthe batteries
leakingorexploding.
•Donot charge batteries.
•Keepbatteriesout of thereach of children.
4. Getting Started
4.1 Measuring station
•Open the battery compartment (13) and insert two AAA batteries with the correct
polarity.Close the battery compartment.
Note
Beforeuse, ensureyou insert the batteries in the measuring station rst and then
in the base station.
4.2 Base station
•Open the battery compartment (10) and insert two AAA batteries with the correct
polarity.Close the battery compartment.
4
Page 6
5. Installation
Note –Installation
•Werecommend initially placing the base and measuring stations in the
intended locations without installing them and making all the settings described
in 6. Operating –todo
•Only install the stations once the appropriate settings have been made and a
stable wireless connection is established between the stations.
Note
•The wireless transmission range between the measuring and base stations is up
to 30 minopen spaces.
•Beforeinstallation, ensurethat wireless transmission will not be disrupted by
interference or obstacles like buildings, trees, vehicles, high-voltage lines, etc.
•Beforethe nal installation, ensurethat thereissucient reception between the
intended installation locations.
•When installing the measuring station, ensurethat it is protected from direct
sunlight and rain.
•The international standardheight for measuring air temperatureis1.25 m(4
ft) above ground.
Warning
•Buy special or suitable installation material from aspecialised dealer for
wall-mounting.
•Ensurethat no faulty or damaged parts areinstalled.
•Never apply force during installation. This could damage the product.
•Beforeinstallation, ensurethat the chosen wall is suitable for the weight to be
installation, and make surethat thereare no electrical wires, water,gas or other
lines at the installation site on the wall.
5
Page 7

5.1 Base station
•Use the base to position the base station on alevel surface.
5.2 Measuring station
•You can also position the measuring station on alevel outdoor surface.
•Werecommend installing the measuring station securely on an outdoor wall using
the opening (12). Install an anchor,screw,nail,etc. in the wall of your choice.
•Hang up the base/measuring station using the opening intended for this purpose.
6. Operation
Note –Input
Hold down the button (7) or the button (9) to select values faster.
6.1 Connection to the measuring station
•After you insert the batteries, the base station automatically searches for a
connection to the measuring station and performs initial setup.
Note
•Initial setup takes approx. 3minutes.
•Donot press any buttons during setup. Otherwise, values may not be
transmitted correctly and thereisarisk of value errors and inaccuracies.
•The setup process is completed when the indoor (3) and outdoor (1)
measurement data is displayed.
•Ifthe base station still does not receive asignal from the measuring station ,press
and hold the
the signal.
6
button (7) for approx. 3seconds to start the manual search for
Page 8
6.2 Basic and manual settings
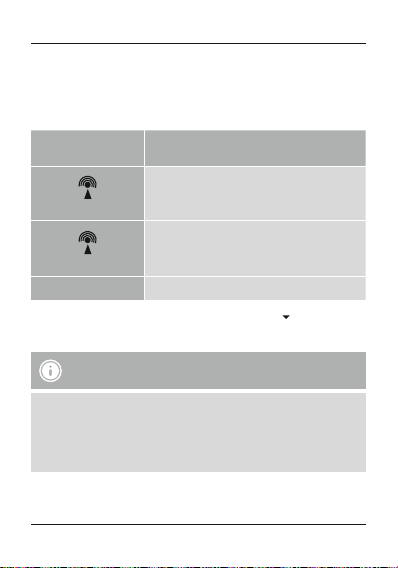
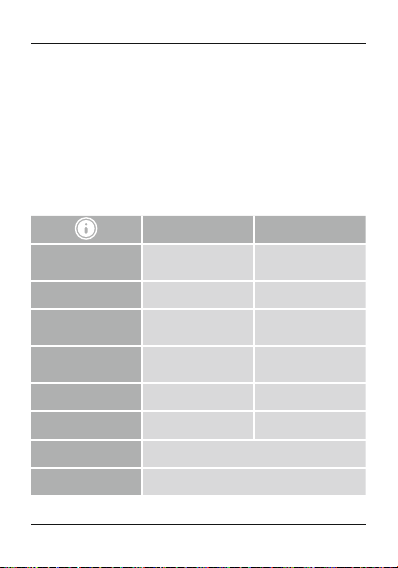
Automatic setting using the DCF signal
•After the base station is switched on for the rst time and successful transmission
is established between the base station and the measuring station, the clock will
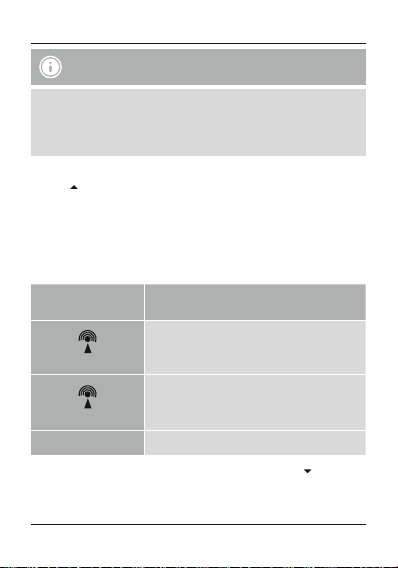
automatically search for aDCF signal. During the search, the wireless symbol (6)
will ash.
Display Searching for the DCF signal
Flashing
Displayed continuously
No display Deactivated
•Ifthe station still does not receive asignal, press and hold the button (9) for
approx. 3seconds to start the manual search for the DCF signal. The wireless
symbol (6) willstarttoash.
Note –Time settings
•The search process takes about 7minutes. If the search fails, it ends and is
repeated at the next clock hour.The wireless symbol (6) will go out.
•Inthe meantime you can, however,set the time and the date manually.
•The clock automatically continues to search for the DCF signal on adaily basis
(between 1:00 a.m. and 3:00 a.m.). If the signal is received successfully,the
manually-set time and date areoverwritten.
Active
Successful –signal is being received
7
Page 9
Note –Summer time
•The clock automatically switches to summer time. S appears on the display as
long as summer time is activated.
•Press and hold the
search.
Manually setting the date/time
•Press and hold the button (9) for approx. 3seconds to stop the search for the
DCF signal. The wireless symbol (6) goes out and you can set the time manually.
•Press and hold the MODE button (8) for approx. 3seconds to start manually setting
the date/time.
•Set the following information in the order listed:
•Time zone (difference in hours), hour,minute.
•Toselect individual values, press the button (7) or the button (9) andconrm
each selection by pressing the MODE button (8). .
•Ifyou do not make an entry for 20 seconds, you automatically exit setup mode.
•The DCF signal can be received over long distances, but always transmits the
current Central European Time in Germany.Make sureyouaccountforthetime
difference in countries with another time zone.
•Ifyou areinMoscow,the time is 3hours later than in Germany.Thismeansthat
you should set +3 for the time zone. The clock then automatically sets the time
to 3hours after the DCF signal received or relative to the manually set time.
Celsius/Fahrenheit
•Press the button (9) to switch between °C and °F for the temperaturedisplay.
12/24 hour format
•Press the button (7) to switch the time between the 12 and 24 hour format.
8
button (9) again for approx. 3seconds to stop the manual
Note –Time zone
Page 10
6.3 Low battery capacity
As soon as the battery symbol (2) appears on the display of the base station, the
capacity of the batteries in the measuring station is very low.Replace the batteries
immediately.
Note –Replacing the batteries
•Note that the stations have to be resynchronised each time after you change
the batteries in the measuring or base station.
•Todothis, remove the batteries from the other station and then reinsert them,
or change them as required.
7. Care and Maintenance
Only clean this product with aslightly damp, lint-free cloth and do not use aggressive
cleaning agents.
8. Warranty Disclaimer
Hama GmbH &CoKG assumes no liability and provides no warranty for damage
resulting from improper installation/mounting, improper use of the product or from
failuretoobserve the operating instructions and/or safety notes.
9. Service and Support
Please contact Hama Product Consulting if you have any questions about this product.
Hotline: +49 9091 502-115 (German/English)
Further support information can be found here:
www.hama.com
9
Page 11
10. Technical Data
Base station Measuring station
Power supply
Power consumption 0.5 mA 3mA
Measuring range
Temperature
Measuring increments
Temperature
Temperaturemeasurement
cycle
Radio-controlled DCF clock YesNo
Frequency 433 MHz
Range ≤50m
11. Recycling Information
Note on environmental protection:
After the implementation of the European Directive 2012/19/EU and
2006/66/EU in the national legal system, the following applies: Electric
and electronic devices as well as batteries must not be disposed of with
household waste. Consumers areobliged by law to return electrical and
electronic devices as well as batteries at the end of their service lives to
the public collecting points set up for this purpose or point of sale. Details to this are
dened by the national law of the respective country.This symbol on the product, the
instruction manual or the package indicates that aproduct is subject to these
regulations. By recycling, reusing the materials or other forms of utilising old devices/
batteries, you aremaking an important contribution to protecting our environment.
10
3.0 V
2xAAA batteries
0°C –+50°C/
32°F –122°F
0.1°C/0.1°F 0.1°C/0.1°F
43 –47s43–47 s
3.0 V
2xAAA batteries
-20°C –+60°C/
-4°F –140°F
Page 12
12. Declaration of Conformity
Hereby,Hama GmbH &CoKG declares that the radio equipment type
[00123126] is in compliance with Directive 2014/53/EU.The full text of
the EU declaration of conformity is available at the following internet
address: www.hama.com-> 00123126-> Downloads.
Frequency band(s) 433 MHz
Maximum radio-frequency power transmitted 0,015 mW
11
Page 13
D Bedienungsanleitung
Bedienungselemente und Anzeigen
ABasisstation
1. Außentemperatur
2. Batteriesymbol
3. Raumtemperatur
4. Uhrzeit
5. Sommerzeit
6. Funksymbol
-Taste =Erhöhungdes aktuellen Einstellungswertes /Wechsel12/24-Stunden-
7.
Format /Manuelle Suche nach Signal von der Messstation
8. MODE-Taste =Einstellungen /Bestätigung des Einstellungswerts
9. -Taste=Verringerungdes aktuellen Einstellungswertes /Wechsel zwischen °C
und °F /Aktivierung/ Deaktivierung manueller Funksignal-Empfang
10. Batteriefach
BMessstation
11. Kontrollleuchte Übertragung
12. Aussparung für Wandmontage
13. Batteriefach
Vielen Dank, dass Sie sich für ein Hama Produkt entschieden haben!
Nehmen Sie sich Zeit und lesen Sie die folgenden Anweisungen und Hinweise zunächst
ganz durch. Bewahren Sie diese Bedienungsanleitung anschließend an einem sicheren
Ort auf,umbei Bedarf darin nachschlagen zu können. Sollten Sie das Gerät veräußern,
geben Sie diese Bedienungsanleitung an den neuen Eigentümer weiter.
1. Erklärung von Warnsymbolen und Hinweisen
Warnung
Wirdverwendet, um Sicherheitshinweise zu kennzeichnen oder um
Aufmerksamkeit auf besondereGefahren und Risiken zu lenken.
12
Page 14
Hinweis
Wirdverwendet, um zusätzlich Informationen oder wichtige Hinweise zu
kennzeichnen.
2. Packungsinhalt
•Wetterstation EWS-152
(Basisstation für den Innenbereich /Messstation für den Außenbereich)
•4AAABatterien
•diese Bedienungsanleitung
3. Sicherheitshinweise
•Das Produkt ist für den privaten, nicht-gewerblichen Haushaltsgebrauch
vorgesehen.
•Betreiben Sie das Produkt nicht außerhalb seiner in den technischen Daten
angegebenen Leistungsgrenzen.
•Verwenden Sie das Produkt nicht in einer feuchten Umgebung und vermeiden Sie
Spritzwasser.
•Betreiben Sie das Produkt nicht in unmittelbarer Nähe der Heizung, anderer
Hitzequellen oder in direkter Sonneneinstrahlung.
•Benutzen Sie das Produkt nicht in Bereichen, in denen elektronische Produkte nicht
erlaubt sind.
•Positionieren Sie das Produkt nicht in der Nähe von Störfeldern, Metallrahmen,
Computern und Fernsehern etc. Elektronische Geräte sowie Fensterrahmen
beeinträchtigen die Funktion des Produktes negativ.
•Lassen Sie das Produkt nicht fallen und setzen Sie es keinen heftigen
Erschütterungen aus.
•Öffnen Sie das Produkt nicht und betreiben Sie es bei Beschädigungen nicht weiter.
•Versuchen Sie nicht, das Produkt selbst zu warten oder zu reparieren. Überlassen Sie
jegliche Wartungsarbeit dem zuständigen Fachpersonal.
•Halten Sie Kinder unbedingt von dem Verpackungsmaterial fern, es besteht
Erstickungsgefahr.
•Entsorgen Sie das Verpackungsmaterial sofort gemäß den örtlich gültigen
Entsorgungsvorschriften.
•Nehmen Sie keine Veränderungen am Produkt vor.Dadurch verlieren Sie jegliche
Gewährleistungsansprüche.
13
Page 15
Warnung -Batterien
•Entfernen undentsorgen SieverbrauchteBatterien unverzüglich ausdem
Produkt.
•Verwenden Sieausschließlich Akkus (oderBatterien), diedem angegebenen
Typentsprechen.
•Mischen Siealteund neue Batterien nicht,sowie Batterienunterschiedlichen
Typs oder Herstellers.
•BeachtenSie unbedingt diekorrektePolarität (Beschriftung +und -) der
Batterien undlegen Siediese entsprechendein. BeiNichtbeachtungbesteht
dieGefahr desAuslaufens oder einerExplosion der Batterien.
•Laden SieBatterien nicht.
•BewahrenSie Batterien außerhalbder Reichweite vonKindernauf.
•Schließen SieAkkus/Batterien nicht kurz undhaltenSie sie von blanken
Metallgegenständen fern.
4. Inbetriebnahme
4.1 Messstation
•Öffnen Sie das Batteriefach (13) und legen Sie zwei AAA Batterien polrichtig ein.
Schließen Sie die Batteriefachabdeckung anschließend.
Hinweis
Beachten Sie, dass Sie bei der Inbetriebnahme immer zuerst die Batterien in die
Messstation, und dann in die Basisstation einlegen.
4.2 Basisstation
•Öffnen Sie das Batteriefach (10) und legen Sie zwei AAA Batterien polrichtig ein.
Schließen Sie die Batteriefachabdeckung anschließend.
14
Page 16

5. Montage
Hinweis –Montage
•Eswirdempfohlen, die Basis- und Messstation zunächst an den gewünschten
Aufstellorten ohne Montage zu platzieren und alle Einstellungen -wie in 6.
Betrieb beschrieben –vorzunehmen.
•Montieren Sie erst nach korrekter Einstellung und stabiler Funkverbindung die
Station/en.
Hinweis
•Die Reichweite der Funkübertragung zwischen der Mess- und Basisstation
beträgt im freien Gelände bis zu 30m.
•Achten Sie vor der Montage darauf,dass die Funkübertragung nicht
durch Störsignale oder Hindernisse wie Gebäude, Bäume, Fahrzeuge,
Hochspannungsleitungen, u.a. beeinusst wird.
•Stellen Sie vor der endgültigen Montage sicher,dass zwischen dengewünschten
Aufstellorten ausreichender Empfang besteht.
•Achten Sie bei der Montage der Messstation darauf,dass diese vor direkter
Sonne und Regen geschützt positioniert ist.
•Die internationale Standardhöhe für die Messung der Lufttemperatur beträgt
1,25 m(4ft) über Grund.
15
Page 17
Warnung
•Besorgen Sie sich spezielles bzw.geeignetes Montagematerial im Fachhandel
für die Montage an der vorgesehenenWand.
•Stellen Sie sicher,dass keine fehlerhaften oder beschädigten Teile montiert
werden.
•Wenden Sie bei der Montage niemals Gewalt oder hohe Kräfte an. Diese
können das Produkt beschädigen.
•Prüfen Sie vor Montage die Eignung der vorgesehenen Wand für das
anzubringende Gewicht und vergewissern Sie sich, dass sich an der
Montagestelle in der Wand keine elektrischen Leitungen, Wasser-, Gas- oder
sonstige Leitungen benden.
5.1 Basisstation
•Stellen Sie die Basisstation mithilfe des Standfußes auf einer ebenen Fläche auf.
5.2 Messstation
•Die Messstation können Sie ebenfalls auf einer ebenen Fläche im Außenbereich
aufstellen.
•Eswirdempfohlen, die Messstation sicher und fest an einer Außenwand mithilfe der
Aussparung (12) zu montieren. Befestigen Sie Dübel, Schraube, Nagel, etc. in der
dafür vorgesehenen Wand.
•Hängen Sie die Messstation mit der dafür vorgesehenen Aussparung daran ein.
6. Betrieb
Hinweis –Eingabe
Halten Sie die -Taste (7) oder die -Taste (9) gedrückt, um die Werte schneller
auswählen zu können.
6.1 Verbindung zur Messstation
•Nach dem Einlegen der Batterien sucht die Basisstation automatisch nach einer
Verbindung zur Messstation und führt die Ersteinrichtung durch.
16
Page 18
Hinweis
•Die Ersteinrichtung dauert ca. 3Minuten.
•Vermeiden Sie in dieser Zeit jegliche Betätigung der Tasten! Andernfalls können
Fehler und Ungenauigkeiten bei den Werten und deren Übertragung entstehen.
•Der Vorgang ist beendet, sobald die Messdaten für Innen- (3) und
Außenbereich (1) angezeigt werden.
•Wirdwiederholt kein Signal von der Messstation empfangen, drücken und halten
-Taste (7)für ca. 3Sekunden, um die manuelle Suche nach dem Signal
Sie die
zu starten.
6.2 Grundeinstellungen und manuelle Einstellungen
Automatische Einstellung nach DCF-Signal
•Nach dem ersten Einschalten der Basisstation und erfolgreicher Übertragung
zwischen Basis- und Messstation, beginnt die Uhr automatisch die Suche nach
einem DCF-Signal. Während des Suchvorgangs blinkt das Funksymbol (6) auf.
Anzeige Suche nach DCF-Signal
Blinkende Anzeige
Dauerhafte Anzeige
Keine Anzeige Inaktiv
•Wirdwiederholt kein Signal empfangen, drücken und halten Sie die -Taste (9)
für ca. 3Sekunden, um die manuelle Suche nach dem DCF-Signal zu starten. Das
Funksymbol (6) beginnt zu blinken.
Aktiv
Erfolgreich –Signal wirdempfangen
17
Page 19
Hinweis –Uhrzeiteinstellung
•Der Suchvorgang dauert etwa 7Minuten. Falls dieser fehlschlägt, wirddie
Suche beendet und zur nächsten vollen Stunde wiederholt. Das Funksymbol
(6) erlischt.
•Sie können währenddessen eine manuelle Einstellung von Uhrzeit und Datum
vornehmen.
•Die Uhr sucht automatisch weiterhin täglich (zwischen 01:00 und 03:00 Uhr)
nach dem DCF-Signal. Bei erfolgreichem Signalempfang werden die manuell
eingestellte Uhrzeit und das Datum überschrieben.
Hinweis –Sommerzeit
•Die Uhrzeit stellt sich automatisch auf die Sommerzeit um. Solange die
Sommerzeit aktiv ist, wirdauf dem Display S angezeigt.
•Drücken und halten Sie die -Taste (9) erneut für ca. 3Sekunden, um den
manuellen Suchvorgang zu beenden.
Manuelle Einstellung Datum/ Uhrzeit
•Drücken und halten Sie die
nach dem DCF-Signal zu beenden. Das Funksymbol (6) erlischt und Sie können die
Uhrzeit manuell einstellen.
•Drücken und halten Sie die MODE-Taste (8) für ca. 3Sekunden, um die manuelle
Einstellung von Datum/ Uhrzeit zu starten.
•Stellen Sie die folgenden Informationen nacheinander ein:
•Zeitzone (Abweichung in Stunden), Stunde, Minute .
•Drücken Sie zum Auswählen der einzelnen Werte die
(9) und bestätigen Sie die jeweilige Auswahl durch Drücken der MODE-Taste (8).
•Erfolgt 20 Sekunden keine Eingabe, wirdder Einstellungsmodus automatisch
verlassen.
18
-Taste (9) für ca. 3Sekunden, um den Suchvorgang
-Taste (7) oder die -Taste
Page 20
Hinweis –Zeitzone
•Das DCF-Signal kann weitläug empfangen werden, entspricht jedoch immer
der MEZ, die in Deutschland gilt. Beachten Sie daher,dass Sie in Ländern mit
anderer Zeitzone die Zeitverschiebung beachten.
•Benden Sie sich in Moskau, ist es dort bereits 3Stunden später als in
Deutschland. Stellen Sie daher bei der Zeitzone +3 ein. Die Uhr stellt sich
dann immer nach Empfang des DCF-Signals bzw.inBezug auf die manuell
eingestellte Uhrzeit automatisch 3Stundenweiter.
Celsius /Fahrenheit
•Drücken Sie die -Taste (9), um bei der Temperaturanzeige zwischen °C und °F
zu wechseln.
12/24-Stunden-Format
•Drücken Sie die -Taste (7), um bei der Uhrzeit zwischen dem 12- und 24-StundenFormat zu wechseln.
6.3 Niedrige Batteriekapazität
Sobald das Batteriesymbol (2) auf dem Display der Basisstation angezeigt wird, ist
die Kapazität der Batterien in der Messstation sehr gering. Wechseln Sie die Batterien
umgehend aus.
Hinweis –Batteriewechsel
•Beachten Sie, dass Sie nach jedem Batteriewechsel an Mess- oder Basisstation
eine neue Synchronisation der Stationen erfolgen muss.
•Nehmen Sie dazu die Batterien der anderen Station heraus und setzen Sie
erneut ein oder wechseln Sie diese bei Bedarf ebenfalls aus.
7. Wartung und Pflege
Reinigen Sie dieses Produkt nur mit einem fusselfreien, leicht feuchten Tuch und
verwenden Sie keine aggressiven Reiniger.
19
Page 21
8. Haftungsausschluss
Die Hama GmbH &CoKG übernimmt keinerlei Haftung oder Gewährleistung für
Schäden, die aus unsachgemäßer Installation, Montage und unsachgemäßem
Gebrauch des Produktes oder einer Nichtbeachtung der Bedienungsanleitung und/oder
der Sicherheitshinweise resultieren.
9. Service und Support
Bitte wenden Sie sich bei Fragen zum Produkt gerne an die Hama-Produktberatung.
Hotline: +49 9091 502-115 (Deu/Eng)
WeitereSupportinformationen nden sie hier:
www.hama.com
10. Technische Daten
Basisstation Messstation
Stromversorgung
Stromaufnahme 0,5 mA 3mA
Messbereich
Temperatur
Messschritte
Temperatur
Messzyklus Temperatur 43 –47s 43 –47s
DCF-Funkuhr Ja Nein
Frequenz 433 MHz
Reichweite ≤50m
20
3,0 V
2xAAA Batterie
0°C –+50°C/
32°F –122°F
0,1°C /0,1°F 0,1°C /0,1°F
3,0 V
2xAAA Batterie
-20°C –+60°C/
-4°F –140°F
Page 22

11. Entsorgungshinweise
Hinweis zum Umweltschutz:
Ab dem Zeitpunkt der Umsetzung der europäischen Richtlinien 2012/19/
EU und 2006/66/EG in nationales Recht gilt folgendes: Elektrische und
elektronische Geräte sowie Batterien dürfen nicht mit dem Hausmüll
entsorgt werden. Der Verbraucher ist gesetzlich verpichtet, elektrische
und elektronische Geräte sowie Batterien am Ende ihrer Lebensdauer an
den dafür eingerichteten, öffentlichen Sammelstellen oder an die Verkaufsstelle
zurückzugeben. Einzelheiten dazu regelt das jeweilige Landesrecht. Das Symbol auf
dem Produkt, der Gebrauchsanleitung oder der Verpackung weist auf diese
Bestimmungen hin. Mit der Wiederverwertung, der stoichen Verwertung oder
anderen Formen der Verwertung vonAltgeräten/BatterienleistenSieeinen wichtigen
Beitrag zum Schutz unserer Umwelt.
12. Konformitätserklärung
Hiermit erklärt die Hama GmbH &CoKG,dass der Funkanlagentyp
[00123126] der Richtlinie 2014/53/EU entspricht. Der vollständige Text
der EU-Konformitätserklärung ist unter der folgenden Internetadresse
verfügbar: www.hama.com-> 00123126-> Downloads.
Frequenzband/Frequenzbänder 433 MHz
Abgestrahlte maximale Sendeleistung 0,015 mW
21
Page 23
F Mode d‘emploi
Éléments de commande et d‘affichage
AStation de base
1. Températureextérieure
2. Icône de pile
3. Températureambiante
4. Heure
5. Heured‘été
6. Icône radio
7. Touche
8. Touche MODE =réglages /conrmation de la valeur sélectionnée
9. Touche =diminution de la valeur actuelle /commutation entre°Cet°F/
10. Compartiment àpiles
BStation de mesure
11. Témoin de contrôle transmission
12. Fente pour installation murale
13. Compartiment àpiles
Nous vous remercions d’avoir choisi un produit Hama.
Veuillez prendreletemps de lirel‘ensemble des remarques et consignes suivantes.
Veuillez conserver ce mode d‘emploi àportée de main an de pouvoir le consulter en
cas de besoin. Transmettez-le au nouveau propriétaireavec l’appareil le cas échéant.
1. Explication des symboles d‘avertissement et des remarques
=augmentation de la valeur actuelle /commutation format horaire
12/24 heures /recherche manuelle du signal provenant de la station de mesure
activation /désactivation de la réception manuelle du signal radio
Avertissement
Ce symbole est utilisé pour indiquer des consignes de sécurité ou pour attirer votre
attention sur des dangers et risques particuliers.
22
Page 24

Remarque
Ce symbole est utilisé pour indiquer des informations supplémentaires ou des
remarques importantes.
2. Contenu de l‘emballage
•Station météo EWS-152
(station de base pour l‘intérieur /station de mesurepour l‘extérieur)
•4pilesLR03/AAA
•Mode d‘emploi
3. Consignes de sécurité
•Ceproduit est destiné àune installation domestique non commerciale.
•N‘utilisez pas le produit en dehors des limites de puissance indiquées dans les
caractéristiques techniques.
•N‘utilisez pas le produit dans un environnement humide et évitez toute projection
d‘eau.
•Évitez d’utiliser le produit àproximité immédiate d‘un chauffage, d’autres sources
de chaleur ou exposé aux rayons directs du soleil.
•N‘utilisez pas le produit dans les zones dans lesquelles l‘utilisation d‘appareils
électroniques est interdite.
•Neplacez pas le produit àproximité de champs parasites, de cadres métalliques,
d’ordinateurs, de téléviseurs, etc. Les appareils électroniques ainsi que les cadres de
fenêtreont une inuence négative sur le fonctionnement du produit.
•Protégez le produit des secousses violentes et évitez tout choc ou toute chute.
•Netentez pas d‘ouvrir le produit en cas de détérioration et cessez de l’utiliser.
•Netentez pas de réparer l’appareil vous-même ni d’effectuer des travaux
d’entretien. Déléguez tous travaux d‘entretien àdes techniciens qualiés.
•Tenez les emballages d‘appareilshorsdeportéedesenfants,risqued‘étouffement.
•Recyclez les matériaux d’emballage conformément aux prescriptions locales en
vigueur.
•N’apportez aucune modication àl’appareil. Des modications vous feraient perdre
vos droits de garantie.
23
Page 25
Avertissement concernant les piles
•Retirezles pilesusagées immédiatementduproduit pourles recycler.
•Utilisez exclusivementdes batteries(ou despiles)dutype indiqué.
•N’utilisez passimultanémentdes piles usagées et despiles neuvesoudes
pilesdedifférentstypes.
•Respectezimpérativementlapolaritédelapile(marquage+et-)lorsde
l‘insertiondansleboîtier ;risques d‘écoulement et d‘explosiondespilessi
teln‘est paslecas.
•Netentez pas de recharger les piles.
•Conservez lespiles hors de portée desenfants.
•Necourt-circuitezpas les batteries/pilesetéloignez-les desobjets
métalliques.
4. Mise en service
4.1 Station de mesure
•Ouvrez le compartiment àpiles (13) et insérez deux piles LR03/AAA conformément
aux indications de polarité. Refermez le couvercle du compartiment.
Remarque
Lors de la premièremise en service, veuillez premièrement insérer les piles dans la
station de mesure, puis dans la station de base.
4.2 Station de base
•Ouvrez le compartiment àpiles (10) et insérez deux piles LR03/AAA conformément
aux indications de polarité. Refermez le couvercle du compartiment.
24
Page 26
5. Installation
Remarque concernant l‘installation
•Nous vous recommandons de positionner la station de base et la station de
mesuredans les endroits envisagés sans effectuer le montage, puis d‘effectuer
les réglages tels que décrits au chapitre 6. (fonctionnement).
•Procédez ensuite àl‘installation des stations après avoir effectué le réglage et
reçu une connexion radio stable.
Remarque
•Laportée de la transmission radio entrelastation de base et la station de
mesureest de 30 mdans un espace dégagé.
•Veuillez contrôler,avant l‘installation, que la portée radio ne soit pas altérée par
des interférences ou des obstacles tels que bâtiments, arbres, véhicules, lignes
haute tension, etc.
•Veuillez contrôler,avant l‘installation dénitive, la bonne qualité de la
transmission entreles deux stations.
•Veuillez également protéger les stations de l‘ensoleillement direct et de la pluie
lors de l‘installation.
•Lahauteur standardinternationale de mesuredelatempératuredel‘air est de
1,25 m(4ft) au-dessus du sol.
25
Page 27
Avertissement
•Envue de l‘installation, procurez-vous le matériel d‘installation adéquat pour le
mur concerné dans un commerce spécialisé.
•Veuillez contrôler que l‘emballage ne contienne aucune pièce erronée ni
endommagée.
•N‘appliquez en aucun cas une force excessive lors de l‘installation. Une force
excessive est susceptible d‘endommager le produit.
•Avant l‘installation, vériez que le mur prévu pour recevoir le produit dispose
d‘une force portante susante et qu‘aucune conduite d‘électricité, d‘eau, de
gaz ni aucune autreconduite ne passe dans cette partie de la cloison.
5.1 Station de base
•Placez la station de base sur une surface plane àl‘aide de son pied.
5.2 Station de mesure
•Vous pouvez également placer la station de mesureàl‘extérieur,sur une surface
plane, àl‘aide de son pied.
•Nous vous recommandons d‘installer solidement la station de mesureàune paroi
extérieureenutilisant l’encoche (12). Fixez cheville, vis, clou, etc. dans la paroi
prévue pour recevoir l‘installation.
•Suspendez la station de mesureàl‘aide de l’encoche prévue àcet effet.
6. Fonctionnement
Remarque concernant la saisie
Maintenez la touche (7) ou la touche (9) enfoncée an de fairedéler
rapidement les chiffres.
6.1 Connexion vers la station de mesure
•Lastation de base recherche automatiquement une connexion àlastation de
mesureeteffectue la premièreconguration après avoir inséré les piles.
26
Page 28

Remarque
•Lapremièreconguration dureenviron 3minutes.
•N‘appuyez sur aucune touche pendant cette phase ;des erreurs ou des
inexactitudes de mesureoudetransmission pourraient en résulter.
•Laconguration est terminée dès que les valeurs mesurées pour la zone
intérieure(3) et pour la zone extérieure(1) apparaissent àl‘écran.
•Encas de nouvel échec de réception, appuyez sur la touche
3secondes an de lancer une recherche manuelle du signal horaire.
6.2 Réglages de base et paramétrage manuel
Réglage automatique sur la base du signal horaireDCF
•Après avoir mis la station de base sous tension et en cas de transmission
correcte entrelastation de base et la station de mesure, l‘horloge recherche
automatiquement le signal horaireDCF.L’icôneradio (6) clignote pendant la
recherche du signal horaire.
Achage Recherche du signal horaireDCF
(7) pendant environ
Achage clignotant
Achage permanent
Aucun achage Inactif
•Encas de nouvel échec de réception, maintenez la touche (9) enfoncée pendant
environ 3secondes an de lancer une recherche manuelle du signal horaireDCF.
L’icône radio (6) se met àclignoter.
Recherche aboutie -signal en cours de réception
Recherche active
27
Page 29
Remarque concernant le réglage de l‘heure
•Laprocédurederecherchedureenviron 7minutes. En cas d‘échec de détection
du signal, le réveil recommence àrechercher le signal àl‘heurepleine suivante.
L’icône radio (6) s’éteint.
•Vous pouvez également régler l‘heureetladate manuellement.
•L’horloge continue àrechercher quotidiennement le signal horaireDCF (entre
1h00 et 3h00 Uhr). Les réglages manuels de l‘heureetdeladate seront
corrigés dès que la station reçoit correctement le signal horaireDCF.
Remarque concernant l‘heured‘été
•Leréveil s‘adapte automatiquement àl‘heured‘été. S apparaît àl’écran
pendant la durée de l’heured’été.
•Maintenez ànouveau la touche (9) enfoncée pendant environ 3secondes an
d’interromprelarecherchemanuelle.
Réglage manuel de la date /del'heure
•Maintenez la touche
la recherche du signal DCF.L’icône radio (6) s’éteint et vous pouvez régler l’heure
manuellement.
•Appuyez sur la touche mode MODE (8) pendant environ 3secondes an de
démarrer le réglage manuel de la date /del‘heure.
•Vous pouvez régler successivement les valeurs suivantes :
•Fuseau horaire(différence en heures), heure, minute.
•Appuyez sur la touche
différentes valeurs, puis conrmez votresélection en appuyant sur la touche
MODE (8).
•Lemode de paramétrage s‘interrompt automatiquement lorsque vous n‘appuyez sur
aucune touche pendant plus de 20 secondes.
28
(9) enfoncée pendant environ 3secondes an d’interrompre
(7) ou sur la touche (9) an de sélectionner les
Page 30
Remarque concernant les fuseaux horaires
•Ilest possible de recevoir le signal horaireàgrande distance ;cesignal ne
correspond toutefois pas toujours àGMT +1,l‘heureenvigueur en Allemagne.
Veuillez donc noter qu‘un décalage horairedoit êtreadopté dans les pays situés
dans un autrefuseau horaire.
•Sivous vous trouvez, par exemple, àMoscou, le décalage horaireentreMoscou
et l‘Allemagne est de 3heures (l‘heuredeMoscou est en avance). Réglez donc
le fuseau horairesur +3. L‘horloge s‘adapteraalors automatiquement àl‘heure
captée par le signal horaireDCF (ou àl‘heureréglée manuellement) et lui
ajoutera3heures.
Degrés Celsius /Fahrenheit
•Appuyez sur la touche (9) an de sélectionner l‘achage en degrés Celsius ou
Fahrenheit.
Format horaire 12/24 heures
•Appuyez sur la touche (7) +(2) an de commuter entrel’achage de l’heureau
format 12 heures ou 24 heures.
6.3 Piles faibles
La capacité des piles de la station de mesureest très basse dès que l’icône de pile (2)
apparaît àl‘écran de la station de base. Veuillez remplacer les piles au plus vite.
Remarque concernant le remplacement des piles
•Veuillez noter qu‘après chaque remplacement de piles de la station de base ou
de la station de mesure, vous devrez effectuer une nouvelle synchronisation
der stations.
•Lors de cette synchronisation, extrayez également les piles de la station qui
continuait àfonctionner,puis réinsérez-les ou remplacez ces dernières.
7. Soins et entretien
Nettoyez la balance uniquement àl’aide d’un chiffon non breux légèrement humide ;
évitez tout détergent agressif.
29
Page 31

8. Exclusion de garantie
La société Hama GmbH &CoKG décline toute responsabilité en cas de dommages
provoqués par une installation, un montage ou une utilisation non conformes du
produit ou encoreprovoqués par un non respect des consignes du mode d‘emploi et/
ou des consignes de sécurité.
9. Service et assistance
En cas de question concernant le produit, veuillez vous adresser au service de conseil
produits de Hama.
Ligne téléphonique directe :+49 9091 502-115 (allemand/anglais)
Vous trouverez ici de plus amples informations concernant l‘assistance :www.hama.
com
10. Caractéristiques techniques
Station de base Station de mesure
Alimentation en électricité
Consommation de courant 0,5 mA 3mA
Plage de mesure
Température
incrément de mesure
Température
Cycle de mesuredela
température
Horloge radio-pilotée DCF oui non
Fréquence 433 MHz
Portée ≤50m
30
3,0 V
2piles LR03/AAA
0°C–+50 °C /
32 °F –122 °F
0,1° C/0,1° F0,1° C/0,1° F
43 –47s43–47s
3,0 V
2piles LR03/AAA
-20 °C –+60 °C /
-4 °F –140 °F
Page 32

11. Consignes de recyclage
Remarques concernant la protection de l’environnement:
Conformément àladirective européenne 2012/19/EU et 2006/66/CE, et
an d‘atteindreuncertain nombred‘objectifs en matièredeprotection de
l‘environnement, les règles suivantes doivent êtreappliquées: Les
appareils électriques et électroniques ainsi que les batteries ne doivent pas
êtreéliminés avec les déchets ménagers. Le pictogramme “picto” présent
sur le produit, son manuel d‘utilisation ou son emballage indique que le produit est
soumis àcette réglementation. Le consommateur doit retourner le produit/la batterie
usager aux points de collecte prévus àcet effet. Il peut aussi le remettreàun
revendeur.Enpermettant enn le recyclage des produits ainsi que les batteries, le
consommateur contribueraàlaprotection de notreenvironnement. C‘est un acte
écologique.
12. Déclaration de conformité
Le soussigné, Hama GmbH &CoKG,déclareque l‘équipement
radioélectrique du type [00123126] est conforme àladirective 2014/53/
UE. Le texte complet de la déclaration UE de conformité est disponible à
l‘adresse internet suivante: www.hama.com-> 00123126-> Downloads.
Bandes de fréquences 433 MHz
Puissance de radiofréquence maximale 0,015 mW
31
Page 33

E Instrucciones de uso
Elementos de manejo eindicadores
AEstación base
1. Temperaturaexterior
2. Símbolo de pila
3. Temperaturaambiente
4. Hora
5. Horario de verano
6. Símbolo de radiofrecuencia
=Aumento del valor de ajuste actual /cambio de formato 12/24 horas /
7. Tecla
búsqueda manual de la señal de la estación de medición
8. Tecla MODE =Ajustes /conrmación del valor de ajuste
9. Tecla =Disminución del valor de ajuste actual /cambio entre°Cy°F /
activación/desactivación de la recepción manual de la señal de radiofrecuencia
10. Compartimento parapilas
BEstación de medición
11. Luzdecontrol de transmisión
12. Aberturaparaelmontaje en pared
13. Compartimento parapilas
Le agradecemos que se haya decidido por un producto de Hama.
Tómese tiempo yléase primerolas siguientes instrucciones eindicaciones. Después,
guarde estas instrucciones de manejo en un lugar seguroparapoder consultarlas
cuando sea necesario. Si vende el aparato, entregue estas instrucciones de manejo al
nuevo propietario.
1. Explicación de los símbolos de aviso ydelas indicaciones
Aviso
Se utiliza paracaracterizar las indicaciones de seguridad oparallamar la atención
sobrepeligros yriesgos especiales.
32
Page 34

Nota
Se utiliza paracaracterizar informaciones adicionales oindicaciones importantes.
2. Contenido del paquete
•Estación meteorológica EWS-152
(Estación base parainterior /estación de medición paraelexterior)
•4pilas AAA
•Estas instrucciones de manejo
3. Instrucciones de seguridad
•Elproducto es paraeluso doméstico privado, no comercial.
•Noopereelproducto fueradelos límites de potencia indicados en los datos
técnicos.
•Noutilice el producto en entornos húmedos yevite el contacto con las salpicaduras
de agua.
•Noopereelproducto en las inmediaciones de la calefacción, de otras fuentes de
calor obajo la radiación directa del sol.
•Noutilice el producto en áreas donde no se permitan aparatos electrónicos.
•Nocoloque el producto cerca de campos de interferencia, marcos de metal,
ordenadores ytelevisores, etc. Losdispositivos electrónicos ylos marcos de ventanas
inuyen negativamente en el funcionamiento del producto.
•Nodeje caer el producto ni lo someta asacudidas fuertes.
•Noabraelproducto ynolosiga operando de presentar deterioros.
•Nointente mantener oreparar el aparato por cuenta propia. Encomiende cualquier
trabajo de mantenimiento al personal especializado competente.
•Mantenga el material de embalaje fueradel alcance de los niños, existe peligro
de asxia.
•Deseche el material de embalaje en conformidad con las disposiciones locales sobre
el desecho vigentes.
•Norealicecambios en el aparato. Esto conllevaría la pérdida de todos los derechos
de la garantía.
33
Page 35

Aviso –Pilas
•Retire ydeseche de inmediato laspilasgastadasdel producto.
•Utilice exclusivamente pilasrecargables(opilas) queseandel mismotipo.
•Nomezclepilas viejasynuevas, ni tampocopilas de tiposofabricantes
diferentes.
•Observe siemprelacorrectapolaridad(inscripciones+y-) de laspilasy
coloqueéstasdeforma correspondiente. La no observacióndeloanterior
conlleva el riesgo de derrameoexplosióndelaspilas.
•Nocargue laspilas.
•Mantengalas pilasfuera del alcancedelos niños.
• No cortocircuitelaspilas recargables/baterías ymanténgalas alejadas de
objetosmetálicos.
4. Puesta en funcionamiento
4.1 Estación de medición
•Abraelcompartimento parapilas (13) ycoloque dos pilas AAAatendiendo ala
polaridad correcta. Acontinuación, cierrelacubierta del compartimento parapilas.
Nota
En la puesta en funcionamiento, es importante que coloque las pilas en la estación
de medición, en primer lugar,y,seguidamente, en la estación base.
4.2 Estación base
•Abraelcompartimento parapilas (10) ycoloque dos pilas AAA atendiendo ala
polaridad correcta. Acontinuación, cierrelacubierta del compartimento parapilas.
34
Page 36

5. Montaje
Nota –Montaje
•Serecomiendacolocar primero, sin montar,laestación de base ylaestación
de medición, en los lugares de instalación deseados yllevar acabo todos los
ajustes tal ycomo se describe en 6. Funcionamiento de la estación base.
•Proceda amontar la(s) estación(es) únicamente cuando haya podido realizar
correctamente los ajustes ycuente con una conexión inalámbrica estable.
Nota
•Elalcance de la transmisión por radio entrelaestación base ylaestación de
medición al airelibreesdehasta 30 m.
•Antes de proceder al montaje, preste atención aque la transmisión por radio no
se vea inuida, entreotros, por interferencias uobstáculos tales como edicios,
árboles, vehículos olíneas de alta tensión.
•Antes de proceder al montaje denitivo, asegúrese de que cuenta con recepción
suciente entrelos lugares de instalación deseados.
•Almontar la estación de medición, procuresituarla de maneraque quede
protegida de la radiación directa del sol ydelalluvia.
•Laalturaestándar internacional paralamedición de la temperaturadel airees
de 1,25 m(4pies) sobreelsuelo.
35
Page 37

Aviso
•Adquieramaterial de montaje especial oadecuado en un comercio
especializado paraelmontaje en la pared prevista.
•Compruebe que no haya piezas deterioradas odefectuosas.
•Noejerza nunca fuerza durante el montaje. El producto podría verse dañado.
•Antes de empezar con el montaje, compruebe que la pared puede soportar
el peso que se va amontar yasegúrese de que por el punto de montaje de la
pared no pasan cables eléctricos ni tuberías de agua, gas odeotrotipo.
5.1 Estación base
•Coloque la estación base sobreuna supercie plana utilizando el pie.
5.2 Estación de medición
•Igualmente, puede colocar la estación de medición sobreuna supercie plana en
el exterior.
•Serecomiendajar la estación de medición auna pared exterior de forma seguray
able utilizando la abertura(12). Fije el taco, el tornillo, el clavo, etc., en la pared
prevista.
•Cuelgue la estación de medición utilizando la aberturaprevista paraello.
6. Funcionamiento
Nota –Introducción de datos
Mantenga pulsadas las teclas (7) olatecla (9) paraseleccionar los valores
más rápidamente.
6.1 Conexión con la estación de medición
•Una vez colocadas las pilas, la estación base busca automáticamente una conexión
con la estación de medición, realizando entonces el ajuste inicial.
36
Page 38

Nota
•Elajuste inicial duraaprox. 3minutos.
•Nopulse ninguna tecla mientras dureelajuste. De lo contrario, pueden
producirse fallos oimprecisiones en los valores ysutransmisión.
•Elproceso naliza en cuanto se visualizan los valores de medición registrados
parainterior (3) yexterior (1).
•Sinoserecibeninguna señal de la estación de medición repetidamente, mantenga
pulsada la tecla
de la seña.
6.2 Ajustes básicos yajustes manuales
Ajuste automático según la señal DCF
•Encendida la estación base por primeravez ytrasuna transmisión correcta entre
la estación base ylaestación de medición, el reloj inicia automáticamente la
búsqueda de una señal DCF.Elsímbolode radiofrecuencia (6) parpadea durante el
proceso de búsqueda.
(7) durante aprox. 3segundos parainiciar la búsqueda manual
Visualización Búsqueda de señal DCF nach DCF-Signal
Parpadea
Visualización permanente
Ninguna visualización Inactivo
•Sinoserecibieraseñal repetidamente, pulse ymantenga pulsada la tecla °C /°F(9)
durante aprox. 3segundos parainiciar la búsqueda de señal DCF de forma manual.
El símbolo de radiofrecuencia (6) comienza aparpadear.
La búsqueda ha nalizado con éxito, se recibe la señal
Activa
37
Page 39

Nota –Ajuste de hora
•Elproceso de búsqueda duraaproximadamente 7minutos. Si la búsqueda
falla, ésta se termina yserepite alasiguiente horaenpunto. El símbolo de
radiofrecuencia (6) se apaga.
•Mientras tanto, puede realizar un ajuste manual de la horaylafecha.
•Encualquier caso, el reloj sigue buscando la señal DCF diariamente (entrelas
01:00 ylas 03:00). En caso de recibirse la señal correctamente, la horayla
fecha ajustadas se sobrescriben.
Nota –Horario de verano
•Lahoraseajusta automáticamente al horario de verano. Durante el horario de
verano, en la pantalla se visualiza S.
•Pulse ymantenga pulsada nuevamente la tecla (9) durante aprox. 3segundos
paranalizar el proceso de búsqueda manual.
Ajuste manual de fecha/hora
•Pulse ymantenga pulsada la tecla
proceso de búsqueda de la señal de radiofrecuencia. El símbolo de radiofrecuencia
(6) se apaga, permitiéndole ajustar la horadeforma manual.
•Pulse ymantenga pulsada la tecla MODE (8) durante aprox. 3segundos para
iniciar el ajuste manual de fecha/hora.
•Ajuste sucesivamente los siguientes datos:
•Zona horaria (diferencia en horas), hora, minuto.
•Paraseleccionar cada valor,pulse la tecla
selección correspondiente pulsando la tecla MODE (8). .
•Sinoseintroduce ningún dato en 20 segundos, se sale automáticamente del modo
de ajuste.
38
(9) durante aprox. 3segundos paranalizar el
(7) olatecla (9) yconrme la
Page 40

Nota –Zona horaria
•Laseñal DCF puede recibirse agrandistancia, correspondiéndose siemprecon
la HCE vigente en Alemania. Porello, tenga en cuenta la posible diferencia
horaria en países situados en otrazona horaria.
•SiseencuentraenMoscú, la diferencia es de 3horas de adelanto con
respecto aAlemania. Porello, debe ajustar la zona horaria +3. Se sumarán
automáticamente 3horas alahorarecibida oajustada manualmente tras la
recepción de la señal DCF.
Celsius /Fahrenheit
•Pulse la tecla (9) paraconmutar entre°Cy°F en la visualización de la
temperatura.
Formato de 12/24 horas
•Pulse la tecla (7) paraconmutar entrelos formatos de 12 y24horas.
6.3 Capacidad de pilas baja
Si se visualiza el símbolo de pila (2) en la pantalla de la estación base, la capacidad de
las pilas de la estación de medición. Sustituya las pilas de forma inmediata.
Nota –Cambio de pilas
•Tenga en cuenta que es necesario resincronizar las estaciones tras realizar un
cambio de pilas en la estación de medición obase.
•Paraello, retirelas pilas de la otraestación yvuelva acolocarlas o, de ser
necesario, proceda asustituirlas.
7. Mantenimiento ycuidado
Limpie este producto sólo con un paño ligeramente humedecido que no deje pelusas y
no utilice detergentes agresivos.
39
Page 41

8. Exclusión de responsabilidad
Hama GmbH &CoKG no se responsabiliza ni concede garantía por los daños que
surjan por una instalación, montaje omanejo incorrectos del producto opor la no
observación de las instrucciones de manejo y/o de las instrucciones de seguridad.
9. Servicio ysoporte
Si tiene que hacer alguna consulta sobreelproducto, diríjase al asesoramiento de
productos Hama.
Línea directa: +49 9091 502-115 (Alemán/Inglés)
Encontrar más información de soporte aquí:
www.hama.com
10. Datos técnicos
Estación base Estación de medición
Alimentación de corriente
Consumo de corriente 0,5 mA 3mA
Rango de medición
Temperatura
Intervalos de medición
Temperatura
Ciclo de medición de la
temperatura
Radiorreloj por
radiofrecuencia
Frecuencia 433 MHz
Alcance ≤50m
40
3,0 V
2pilas AAA
0°C –+50°C/
32°F –122°F
0,1°C /0,1°F 0,1°C /0,1°F
43 –47s 43 –47s
Sí No
3,0 V
2pilas AAA
-20°C –+60°C/
-4°F –140°F
Page 42

11. Instrucciones para desecho yreciclaje
Nota sobrelaprotección medioambiental:
Después de la puesta en marcha de la directiva Europea 2012/19/EU y
2006/66/EU en el sistema legislativo nacional, se aplicaralosiguiente: Los
aparatos eléctricos yelectrónicos, así como las baterías, no se deben
evacuar en la basuradoméstica. El usuario está legalmente obligado a
llevar los aparatos eléctricos yelectrónicos, así como pilas ypilas
recargables, al nal de su vida útil alos puntos de recogida comunales oadevolverlos
al lugar donde los adquirió. Losdetalles quedaran denidos por la ley de cada país. El
símbolo en el producto, en las instrucciones de uso oenelembalaje hace referencia a
ello. Gracias al reciclaje, al reciclaje del material oaotras formas de reciclaje de
aparatos/pilas usados, contribuye Usted de forma importante alaprotección de
nuestromedio ambiente.
12. Declaración de conformidad
Porlapresente, Hama GmbH &CoKG,declaraque el tipo de equipo
radioeléctrico [00123126] es conforme con la Directiva 2014/53/UE. El
texto completo de la declaración UE de conformidad está disponible en la
dirección Internet siguiente: www.hama.com-> 00123126-> Downloads.
Banda obandas de frecuencia 433 MHz
Potencia máxima de radiofrecuencia 0,015 mW
41
Page 43

R Руководство по эксплуатации
Органы управления ииндикации
AОсновной блок
1. Наружная температура
2. Значок батареи
3. Температура впомещении
4. Время
5. Индикация летнеговремени
6. Значок коррекции по радиосигналу точноговремени
7. Кнопка
8. Кнопка MODE =настройка /подтверждение ввода значения параметра
9. Кнопка =уменьшениенастраиваемогозначения /выбор единицы
10. Отсекбатарей
ВБлок внешнего датчика
11. Лампа индикации передачи данных
12. Отверстие для настенногомонтажа
13. Отсекбатарей
Благодарим за покупку изделия фирмы Hama.
внимательно ознакомьтесь снастоящей инструкцией. Храните инструкцию в
надежном месте для справок вбудущем. Вслучае передачи изделия другому
лицу приложите иэту инструкцию.
1. Предупредительные пиктограммы иинструкции
42
=увеличение настраиваемогозначения /выбор формата
индикации времени (12/24) /включение принудительногопоиска сигнала
внешнегодатчика
измерения температуры (°C, °F) /включение/ выключение принудительного
приема радиосигнала
Внимание
Данным значком отмечены инструкции, несоблюдение которых может
привести копасной ситуации.
Page 44

Примечание
Дополнительная или важная информация.
2. Комплект поставки
•Метеорологический прибор EWS-152
(основной блок для контроля воздуха внутри помещения, блок датчика
внешних атмосферных условий)
•4батареи ААА
•Настоящая инструкция
3. Техника безопасности
•Изделие предназначено толькодля домашнегоприменения.
•Соблюдать технические характеристики.
•Беречь от влаги ибрызг.
•Неэксплуатировать внепосредственной близости снагревательными
приборами иберечь от прямых солнечных лучей
•Неприменять взапретных зонах.
•Неразмещайте устройство рядом смагнитными полями, металлическими
рамами, компьютером, телевизором ит.д. Электронные приборы
отрицательно влияютнаработу устройства.
•Неронять. Беречь от сильных ударов.
•Изделие не открывать. Запрещается эксплуатировать неисправное изделие.
•Запрещается самостоятельно ремонтировать устройство. Ремонт разрешается
производить толькоквалифицированному персоналу.
•Упаковку не давать детям: опасность асфиксии.
•Утилизировать упаковку всоответствии сместными нормами.
•Запрещается вносить изменения вконструкцию. Впротивном случае
гарантийные обязательства аннулируются.
43
Page 45

Батареи. Техникабезопасности
•Израсходованныебатареинемедленноуд алятьиз прибораи
утилизировать.
•Разрешается применять аккумуляторытолькоуказанного типа.
•Неприменять различныетипы илиновые истарые батареивместе.
•Соблюдатьполярностьбатарей(+ и-). Несоблюдение полярности
можетстатьпричиной взрыва батарей.
•Обычные батареи не заряжать.
•Батареи хранить вбезопасном местеине даватьдетям.
•Незакорачиватьконтактыбатарей.Нехранитьрядомс
металлическими объектами.
4. Ввод вэксплуатацию
4.1 Блок внешнего датчика
•Откройте крышку отсека батарей (13) ивставьте две батареи AAA, соблюдая
полярность. Закройте крышку отсека батарей.
Примечание
При вводе вэксплуатацию всегда сначала вставляйте батареи вблок
наружногодатчика, азатем восновной блок.
4.2 Основной блок
•Откройте крышку отсека батарей (10) ивставьте две батареи AAA, соблюдая
полярность. Закройте крышку отсека батарей.
44
Page 46

5. Монтаж
Примечание. Монтаж
•Перед тем как монтировать блоки, рекомендуется сначала завершить
настройки вместах будущей установки (см. 6). Смотрите описание работы
•Монтаж следует производить после того,как правильные настройки
обеспечатнадежную радиосвязь между блоками.
Примечание
•Максимально допустимое расстояние между блоками составляет 30
метров.
•Монтируя блоки, следует учесть, чторазличные препятствия (стены,
деревья, автомобили, высоковольтные линии идр.) создаютпомехи
радиосвязи между блоками.
•Перед монтажом убедитесь, чтовместах расположения блоков
обеспечивается устойчивая радиосвязь.
•Блок внешнегодатчика должен размещаться вместе, защищенном от
воздействия прямых солнечных лучей иосадков.
•Международный стандартвысоты для измерения влажности воздуха
составляет 1,25 метра (4 фута) над землей.
45
Page 47

Предупреждение
•Подготовьте монтажный материал (приобретается отдельно),
соответствующий свойствам стены.
•Перед началом эксплуатации убедитесь вотсутствии дефектных или
поврежденных деталей.
•При монтаженеприменять чрезмерных усилий. Впротивном случае
можно повредить устройство.
•Убедитесь, чтостена подходит для монтажа. Встене на месте монтажа не
должно быть электрической проводки, газопровода, водопровода идругих
трубопроводов.
5.1 Основной блок
•Спомощью подставки установите основной блок на ровную поверхность.
5.2 Блок внешнего датчика
•Блок внешнегодатчика можно разместить на улице спомощью подставки.
•Однакорекомендуется монтировать внешний блок на стене спомощью
соответствующегопаза (12). Спомощью дюбеля закрепите шуруп на стене.
•Подвесьте блок за соответствующий паз.
6. Эксплуатация
Вводданных
Чтобы ускорить изменение значения во время настройки, удерживайтекнопку
(7) или кнопку ´(9).
6.1 Соединение сблоком внешнего датчика
•После загрузки батарей основной блок начинает автоматический поиск
сигнала внешнегодатчика ивыполняет операцию ввода устройства в
эксплуатацию.
46
Page 48

Примечание
•Автоматическая настройка при вводе вэксплуатацию длится ок. 3минут.
•Втечение этого времени не нажимайте кнопки устройства! Впротивном
случае можетвозникнуть сбой точной настройки значений ипередачи
сигнала.
•Автоматическая настройка завершена, когданадисплее начнут
отображаться данные измерения внутри помещения (3) ивне помещения
(1).
•Если сигнал внешнегодатчика автоматически принять не удается, нажмите и
ок. 3секунд удерживайте кнопку
радиосигнала.
6.2 Основные параметры иручные настройки
Автоматический прием радиосигнала DCF
•После первоговключения основногоблока иустановки радиосвязи сблоком
внешнегодатчика часы прибора автоматически начинаютпоиск радиосигнала
точноговремени (DCF). Во время этого процесса на дисплее мигает значок
радиосигнала точноговремени (6) .
Индикация Поиск сигнала DCF
(3), чтобы принудительно включить поиск
мигает
горит непрерывно
не горит неактивный
•Если сигнал автоматически принять не удается, нажмите иок. 3секунд
удерживайте кнопку (9), чтобы включить поиск радиосигнала DCF вручную.
Значок радиосигнала (6) мигает.
активный
сигнал принят успешно
47
Page 49

Настройкачасов. Примечания
•Поиск сигнала продолжается ок. 7минут. Если сигнал принять не
удалось, операция завершается автоматически. Повторная попытка будет
произведена вследующий полный час. Значок радиосигнала точного
времени (6) гаснет.
•При необходимости часы икалендарь можно настроить вручную.
•Часы производит автоматический поиск радиосигнала DCF каждый сутки
(между 01:00 и03:00). При успешном приеме радиосигнала введенные
вручную значения времени икалендаря заменяются.
Индикация летнеговремени
•Переключение на летнее время происходит автоматически. Во время
индикации летнеговремени на дисплее отображается S.
•Чтобы принудительно завершить поиск радиосигнала, нажмите иок. 3секунд
удерживайте кнопку (9).
Настройка календаря ичасов вручную
•Чтобы принудительно завершить поиск радиосигнала DCF,нажмите иок. 3
секунд удерживайте кнопку
можно настроить вручную.
•Нажмите иок. 3секунд удерживайте кнопку MODE (8), чтобы вручную
настроить календарь ичасы.
•Настройка параметров осуществляется вследующей последовательности:
•часовой пояс (отклонение вколичестве часов), час, минуты.
•Установите значение кнопкой
выбор кнопкой MODE (8).
•Режимнастройки выключается автоматически, если нажатий на кнопки не
производилось втечение 20 секунд.
48
(9). Значок радиосигнала DCF (6) не горит. Часы
(7) или кнопкой (9), затем подтвердите
Page 50

Часовые пояса
•Радиосигнал точноговремени DCF соответствует среднеевропейскому
времени. Если часы эксплуатируютсявдругом часовом поясе, то их
необходимо настроить соответствующим образом.
•Например, разница во времени между Москвой иБерлином составляет 3
часа. ВМоскве, таким образом, необходимо сделать поправку в+3часа.
Вэтомслучае кпоказателю времени (установленному автоматически по
радиосигналу DCF или вручную) часы автоматически будут прибавлять
3часа.
Единицы измерения температуры (Цельсий /Фаренгейт)
•Кнопкой (9) установите единицу измерения температуры (°C или °F).
Формат индикации времени (12/24)
•Кнопкой (7) установите 12-часовой или 24-часовой форматвремени.
6.3 Разряд батарей
Если на дисплее основногоблока отображается значок батареи (2), значит
батареи блока внешнегодатчика разряжены. Замените батареи.
Замена батарей. Примечание
•После замены батарей основногоблока иблокавнешнегодатчика
необходимо заново выполнить синхронизацию блоков.
•Для этого необходимо удалить батареи втом числе из другогоблока,а
затем снова загрузить их вотсекбатарей.
7. Уход итехническое обслуживание
Чистку изделия производить толькобезворсовой слегка влажной салфеткой.
Запрещается применять агрессивные чистящие средства.
49
Page 51

8. Отказ от гарантийных обязательств
Компания Hama GmbH &CoKGненесет ответственность за ущерб, возникший
вследствие неправильногомонтажа, подключения ииспользования изделия не
по назначению, атакже вследствие несоблюдения инструкции по эксплуатации и
техники безопасности.
9. Отдел техобслуживания
По вопросам ремонтаили замены неисправных изделий обращайтесь к
продавцу или всервисную службукомпании Hama.
Горячая линия отдела техобслуживания:
+49 9091 502-115 (немецкий, английский)
Подробнее смотрите здесь: www.hama.com
10. Технические характеристики
Основной блок Блок внешнегодатчика
Питание
Токпотребления 0,5 мА 3мА
Диапазон измерения
Температура
Шаг шкалы
Температура
Цикл измерения
температуры
Часы скоррекцией по
радиосигналу точного
времени
Частота:433 МГц
Дальность действия ≤50м
50
3,0 В
2батареи AAA
0°C –+50°C/
32°F –122°F
0,1°C /0,1°F 0,1°C /0,1°F
43 –47с 43 –47с
Да Нет
3,0В
2батареи ААА
-20°C –+60°C/
-4°F –140°F
Page 52

11. Инструкции по утилизации
Охрана окружающей среды:
Смоментапереходанациональногозаконодательства на
европейские нормативы 2012/19/EU и2006/66/EU действительно
следующее: Электрические иэлектронные приборы, атакже батареи
запрещается утилизировать собычным мусором. Потребитель,
согласно закону, обязан утилизировать электрические иэлектронные
приборы, атакжебатареи иаккумуляторы после их использования вспециально
предназначенных для этого пунктах сбора, либо впунктах продажи. Детальная
регламентация этих требований осуществляется соответствующим местным
законодательством. Необходимость соблюдения данных предписаний
обозначается особым значком на изделии, инструкции по эксплуатации или
упаковке. При переработке, повторном использовании материалов или при
другой форме утилизации бывших вупотреблении приборов Вы помогаете
охране окружающей среды. Всоответствии спредписаниями по обращению с
батареями, вГермании вышеназванные нормативы действуютдля утилизации
батарей иаккумуляторов.
12. Декларация производителя
Настоящим компания Hama GmbH &CoKGзаявляет, что
радиооборудование типа [00123126] отвечает требованиям
директивы 2014/53/ЕС. Сполным текстом декларации осоответствии
требованиям ЕС можно ознакомиться здесь:
www.hama.com-> 00123126-> Downloads.
Диапазон/диапазоны частот 433 МГц
Максимальная излучаемая мощность 0,015 mW
51
Page 53

I Istruzioni per l‘uso
Elementi di comando eindicazioni
Stazione base A
1. Temperaturaesterna
2. Simbolo batterie
3. Temperaturaambiente
4. Ora
5. Oralegale
6. Simbolo radio
=aumento del valorediimpostazione attuale /cambio di formato 12/24
7. Tasto
ore/ricerca manuale del segnale dalla stazione di misurazione
8. Tasto MODE =impostazioni /conferma del valored‘impostazione
9. Tasto =diminuzione del valored’impostazione attuale /passaggio tra°Ce°F /
attivazione/disattivazione manuale della ricezione di segnale radio
10. Vano batterie
BStazione di misura
11. Spia di controllo trasmissione
12. Foro per montaggio aparete
13. Vano batterie
Grazie per avereacquistato un prodotto Hama!
Prima della messa in esercizio, leggete attentamente le seguenti istruzioni e
avvertenze, quindi conservatele in un luogo sicuroper una eventuale consultazione.
In caso di cessione dell‘apparecchio, consegnate anche le presenti istruzioni al nuovo
proprietario.
1. Spiegazione dei simboli di avvertimento edelle indicazioni
Attenzione
Viene utilizzato per contrassegnareleindicazioni di sicurezza oppureper rivolgere
l‘attenzione verso particolari rischi epericoli.
52
Page 54

Avvertenza
Viene utilizzato per contrassegnareinformazioni supplementari oindicazioni
importanti.
2. Contenuto della confezione
•stazione meteo EWS-152
(stazione base per interni /stazione di misurazione per esterni)
•4batterie AAA
•Queste istruzioni per l’uso
3. Avvertenze di sicurezza
•Ilprodotto èconcepito per l’uso domestico privato, non commerciale.
•Non mettereinesercizio il prodotto al di fuori dei suoi limiti di rendimento indicati
nei dati tecnici.
•Non usareilprodotto in ambienti umidi ed evitareilcontatto con gli spruzzi.
•Evitaredimettereinesercizio il prodotto in prossimità di riscaldamento, altrefonti di
caloreolaluce diretta del sole.
•Non utilizzareilprodotto in zone in cui non sono ammesse le apparecchiature
elettroniche.
•Non posizionareilprodotto nelle vicinanze di campi di disturbo, telai metallici,
computer etelevisori ecc. Gli apparecchi elettronici compromettono negativamente
il funzionamento del prodotto.
•Non farecadereilprodotto enon sottoporlo aforti scossoni!
•Non aprireilprodotto enon utilizzarlo più se danneggiato
•Non tentarediaggiustareoripararel’apparecchio da soli. Fare eseguirequalsiasi
lavorodiriparazione al personale specializzato competente.
•Tenerel’imballo fuori dalla portata dei bambini, pericolo di soffocamento!
•Smaltireimmediatamente il materiale d‘imballaggio attenendosi alle prescrizioni
locali vigenti.
•Non apportaremodiche all’apparecchio per evitarediperdereidiritti di garanzia.
53
Page 55

Nota –batterie
•Rimuovereesmaltire immediatamente le batterie scariche.
•Utilizzare unicamente accumulatori (o batterie)conformialtipo indicato.
•Non utilizzare batterie di tipiocostruttoridiversi,némischiarebatterie
vecchieenuove.
•Attenersi sempre alla corretta polarità(scritte+e-)dellebatterie einserirle
•diconseguenza. La mancata osservanzacomportala perdita di potenzaoil
rischiodiesplosione delle batterie.
•Non caricarelebatterie.
•Conservare le batterie al di fuoridella portatadei bambini
•Non cortocircuitarelebatterieetenerlelontano da oggettimetallici.
4. Messa in esercizio
4.1 Stazione di misurazione
•Aprireilvano batterie (13) einseriredue batterie AAA con la polarità corretta.
Quindi chiudereilcoperchio del vano batterie.
Nota
Permettereinservizio l‘apparecchio, inseriresempreprima le batterie nella
stazione di misura, quindi nella stazione base.
4.2 Stazione base
•Aprireilvano batterie (10) einseriredue batterie AAA con la polarità corretta.
Quindi chiudereilcoperchio del vano batterie.
54
Page 56

5. Montaggio
Avvertenza –montaggio
•Siconsiglia di collocarelastazione base edimisuranel luogo di montaggio
desiderato senza montarla edieffettuaretutte le impostazioni come descritto al
capitolo 6. Messa in esercizio della.
•Montarela/le stazioni solo dopo avereeffettuato l‘impostazione corretta eun
collegamento radio stabile.
Nota
•Laportata della trasmissione radio tralastazione base edimisurazione
all‘aperto èdimax. 30m.
•Prima del montaggio prestareattenzione che la trasmissione radio non venga
impedita da segnali di disturbo oostacoli come edici, alberi, veicoli, linee di
alta tensione ecc.
•Prima del montaggio denitivo, accertarsi che trailuoghi di montaggio
desiderati vi sia una ricezione suciente.
•Durante il montaggio della stazione di misurazione, accertarsi che il luogo
d‘installazione sia protetto dalla luce diretta del sole edalla pioggia.
•L‘altezza standardinternazionale per la misurazione della temperaturadell‘aria
èpari a1,25 m(4ft) dal suolo.
55
Page 57

Attenzione
•Procurarsi il materiale di installazione idoneo per il montaggio alla parete
prevista presso irivenditori specializzati.
•Vericareche non vengano montati pezzi difettosi odanneggiati.
•Non usaretroppa forza, né violenza durante il montaggio per evitaredi
danneggiareilprodotto.
•Prima di procederealmontaggio, vericareche la parete sia idonea per il peso
da montareeaccertarsi che nel punto della parete dove si desideraappendere
l’orologio non vi siano cavi elettrici, né tubazioni di acqua, gas oaltro.
5.1 Stazione base
•Posizionarelastazione base con il piedino di sostegno su una supercie piana.
5.2 Stazione di misurazione
•Anche la stazione di misurazione si può posizionaresuuna supercie piana
all‘esterno.
•Siconsiglia di montarelastazione di misurazione in modo sicuroestabile su una
parete esterna (12). Fissaretasselli, viti, chiodi ecc. alla parete prevista.
•Agganciarelastazione di misurazione con il foroprevisto.
6. Esercizio
Nota –Immissione
Tenerepremuto il tasto (7) oiltasto (9) per poter selezionarepiù
rapidamente ivalori.
6.1 Connessione alla stazione di misurazione
•Dopo avereinserito le batterie, la stazione base ricerca automaticamente la
connessione alla stazione di misurazione.
56
Page 58

Nota
•Laprima congurazione duraca. 3minuti.
•Non premerealcun tasto in questo lasso di tempo per evitareerrori e
imprecisioni dei valori edella lorotrasmissione.
•Laproceduraèconclusa non appena vengono visualizzati idati di misurazione
per l‘interno (3) el‘esterno (1).
•Seper diverse volte non viene ricevuto alcun segnale dalla stazione di misurazione,
tenerepremuto il tasto
segnale.
6.2 Impostazioni di base emanuali
Impostazione automatica dopo il segnale DCF
•Dopo la prima accensione della stazione base elatrasmissione trastazione base e
di misurazione, l‘orologio inizia automaticamente acercareunsegnaleDCF.Durante
il processo di ricerca, il simbolo della radio (6) lampeggia.
Indicazione Ricerca del segnale DCF
(7) per ca. 3secondi, per avviarelaricerca manuale del
Indicazione lampeggiante
Indicazione ssa
Nessuna indicazione Non attiva
•Seper diverse volte non viene ricevuto alcun segnale, tenerepremuto il tasto (9)
per ca. 3secondi, per avviarelaricerca manuale del segnale DCF.Ilsimbolo radio
(6) inizia alampeggiare.
Ricerca riuscita -ilsegnale viene ricevuto
Attiva
57
Page 59

Nota –Impostazione dell‘ora
•Questo procedimento duracirca 7minuti. Se la ricerca non ha successo, viene
terminata eriprende alla prossima orapiena. Il simbolo radio (6) si spegne.
•Inquesto lasso di tempo si può effettuareun‘impostazione manuale di ora
edata.
•L‘orologio continua acercareautomaticamente ogni giorno (tral’1:00 ele3:00)
il segnale DCF.Seiltentativo di ricezione ha successo, l‘oraeladata impostate
manualmente vengono sovrascritte.
Nota –Ora legale
•L‘orario si regola automaticamente sull‘ora legale. Se èattiva l‘oralegale, sul
display viene visualizzato S.
•Tenerenuovamente premuto il tasto (9) per ca. 3secondi per terminarelaricerca
manuale.
Impostazione manuale data/ora
•Tenerenuovamente premuto il tasto
manuale dopo il segnale DCF.Ilsimbolo della radio (6) si spegne ed èpossibile
impostarel‘ora manualmente.
•Tenerepremuto il tasto MODE (8) per ca. 3secondi per avviarel‘impostazione
manuale della data edell‘ora.
•Impostareinsequenza le seguenti informazioni:
•fuso orario (differenza in ore), ore, minuti.
•Per selezionareisingoli valori, premereiltasto
di volta in volta la selezione con il tasto MODE (8).
•Seper 20 secondi non si effettua alcuna immissione, si esce automaticamente dalla
modalità d‘installazione.
58
(9) per ca. 3secondi per terminarelaricerca
(7) oiltasto (9) econfermare
Page 60

Nota –Fuso orario
•Ilsegnale DCF può esserericevuto in tutto il mondo ma corrisponde sempreal
CET vigente in Germania. Nei paesi con altri fusi orari deve essereconsiderata
la variazione dell‘ora.
•Secisitrova aMosca, dove l‘oraèspostata in avanti di 3ore rispetto alla
Germania, occorreimpostareper il fuso orario +3. Dopo la ricezione del
segnale DCF odell‘impostazione manuale, l‘orologio si porta quindi sempre
automaticamente 3ore avanti.
Celsius /Fahrenheit
•Premereiltasto (9) per commutaretra °C e°Fdurante la visualizzazione della
temperatura.
Formato da 12/24 ore
•Premereiltasto (7), per passaretra iformati 12 e24ore.
6.3 Capacità ridotta delle batterie
Quando il simbolo della batteria (2) viene visualizzato sul display della stazione
base, la capacità delle batterie nella stazione di misurazione èmolto bassa. Sostituire
immediatamente le batterie.
Avvertenza –sostituzione delle batterie
•Accertarsi che dopo ogni sostituzione delle batterie sulla stazione di misurazione
osulla stazione base avvenga una nuova sincronizzazione delle stazioni.
•Estrarreanche le batterie dall‘altrastazione einserirle nuovamente o, se
necessario, sostituirle.
7. Manutenzione ecura
Pulirequesto prodotto solo con un panno umido eche non lascia pelucchi enon
utilizzaremai detergenti aggressivi.
59
Page 61

8. Esclusione di garanzia
Hama GmbH &CoKG non si assume alcuna responsabilità per idanni derivati dal
montaggio ol‘utilizzo scorretto del prodotto, nonché dalla mancata osservanza delle
istruzioni per l‘uso e/o delle indicazioni di sicurezza.
9. Assistenza esupporto
In caso di domande sul prodotto, rivolgersi alla ConsulenzaprodottoHama.
Hotline: +499091 502-115 (ted./ing.)
Ulteriori informazioni sul supporto sono disponibiliqui:www.hama.com
10. Dati tecnici
Stazione base Stazione di misurazione
Alimentazione elettrica
Potenza assorbita 0,5 mA 3mA
Campo di misurazione
Temperatura
Passi di misura
Temperatura
Ciclo di misurazione
temperatura
Segnale orario via
radio DCF
Frequenza 433 MHz
Portata ≤50m
60
3,0 V
2batteria AAA
0°C –+50°C/
32°F –122°F
0,1°C /0,1°F 0,1°C /0,1°F
43 –47s 43 –47s
Sì No
3,0 V
2batterie AAA
-20°C –+60°C/
-4°F –140°F
Page 62

11. Indicazioni di smaltimento
Informazioni per protezione ambientale:
Dopo l’implementazione della Direttiva Europea 2012/19/EU e2006/66/
EU nel sistema legale nazionale, ci sono le seguenti applicazioni: Le
apparecchiatureelettriche ed elettroniche elebatterie non devono essere
smaltite con iriuti domestici. Iconsumatori sono obbligati dalla legge a
restituireIdispositivi elettrici ed elettronici elebatterie alla ne della loro
vita utile ai punti di raccolta pubblici preposti per questo scopo onei punti vendita.
Dettagli di quanto riportato sono deniti dalle leggi nazionali di ogni stato. Questo
simbolo sul prodotto, sul manuale d’istruzioni osull’imballo indicano che questo
prodotto èsoggetto aqueste regole. Riciclando, ri-utilizzando imateriali outilizzando
sotto altraforma ivecchi prodotti/le batterie, darete un importante contributo alla
protezione dell’ambiente.
12. Dichiarazione di conformità
Il fabbricante, Hama GmbH &CoKG,dichiarache il tipo di
apparecchiaturaradio[00123126] èconforme alla direttiva 2014/53/UE. Il
testo completo della dichiarazione di conformità UE èdisponibile al
seguente indirizzo Internet: www.hama.com-> 00123126-> Downloads.
Bande di frequenza 433 MHz
Massima potenza aradiofrequenza trasmessa 0,015 mW
61
Page 63

J Οδηγίες χρήσης
Στοιχεία χειρισμού και ενδείξεις
AΚύρια μονάδα
AΚύρια μονάδα
1. Εξωτερική θερμοκρασία
2. Σύμβολο μπαταρίας
3. Εσωτερική θερμοκρασία
4. Ώρα
5. Θερινή ώρα
6. Σύμβολο ασύρματης λήψης
7. Πλήκτρο =Αύξησητης τιμής ρύθμισης /αλλαγή μεταξύ 12/24ωρης μορφής
ώρας /χειροκίνητηαναζήτηση σήματος από τη μονάδα μέτρησης
8. Πλήκτρο MODE =Ρυθμίσεις/ επιβεβαίωση της τιμής ρύθμισης
9. Πλήκτρο =Μείωση της τρέχουσας τιμής ρύθμισης /αλλαγή μεταξύ °C και°F/
ενεργοποίηση/ απενεργοποίηση χειροκίνητης λήψης ασύρματου σήματος
10. Θήκη μπαταριών
ΒΜονάδα μέτρησης
11. Μετάδοση λυχνίας ελέγχου
12. Εγκοπή για επιτοίχια τοποθέτηση
13. Θήκη μπαταριών
Σας ευχαριστούμε για την αγορά αυτού τουπροϊόντος. της Hama!
Διαβάστε προσεκτικάτις παρακάτω οδηγίες καιυποδείξεις. Στη συνέχεια, φυλάξτε αυτό
το εγχειρίδιο σε ασφαλές μέρος για μελλοντική χρήση. Σε περίπτωση που πουλήσετε
της συσκευή, παραδώστε αυτότοεγχειρίδιο στον επόμενοαγοραστή.
1. Επεξήγηση συμβόλων προειδοποίησης και υποδείξεων
Προειδοποίηση
Χρησιμοποιείται για τη σήμανση υποδείξεων ασφαλείας ήγια να επιστήσει την
προσοχήσειδιαίτερους κινδύνους.
62
Page 64

Υπόδειξη
Χρησιμοποιείται για τη σήμανση επιπλέον πληροφοριών ήσημαντικών υποδείξεων.
2. Περιεχόμενο συσκευασίας
•Μετεωρολογικός σταθμός EWS-152
(Κύρια μονάδα εσωτερικού χώρου /μονάδα μέτρησης εξωτερικού χώρου)
•4μπαταρίες ΑΑΑ
•Αυτότοεγχειρίδιο χειρισμού
3. Υποδείξεις ασφαλείας
•Τοπροϊόν προορίζεται για σκοπούς οικιακής χρήσης.
•Μην χρησιμοποιείτε τη συσκευή εκτός των ορίων απόδοσης που περιγράφονται στα
τεχνικάχαρακτηριστικά.
•Μην χρησιμοποιείτε το προϊόν σε υγρό περιβάλλον καιαποφεύγετε τις σταγόνες
νερού.
•Μην χρησιμοποιείτε το προϊόν κοντάσεκαλοριφέρ, άλλες πηγές θερμότητας ήσε
σημεία όπου δέχεται άμεση ηλιακή ακτινοβολία.
•Μην χρησιμοποιείτε το προϊόν σε περιοχέςόπου δεν επιτρέπονται ηλεκτρονικές
συσκευές.
•Μην τοποθετείτε το προϊόν κοντάσεπεδία παρεμβολών, μεταλλικάπλαίσια,
υπολογιστές, τηλεοράσεις κλπ. Οι ηλεκτρονικές συσκευές καθώς καιταπλαίσια των
παραθύρων επηρεάζουν αρνητικάτηλειτουργίατουπροϊόντος.
•Τοπροϊόν δεν επιτρέπεται να πέφτει κάτω, ούτε καιναδέχεται δυνατάχτυπήματα.
•Μην ανοίγετε το προϊόν καιμην το χρησιμοποιείτε αν χαλάσει.
•Μην επιχειρήσετε να συντηρήσετε ήναεπισκευάσετε τη συσκευή εσείς οι ίδιοι. Οι
εργασίες συντήρησης πρέπει να γίνονται από εξειδικευμέναάτομα.
•Ταπαιδιά δεν επιτρέπεται να έρχονται σε επαφή με το υλικότης συσκευασίας,
υπάρχεικίνδυνος ασφυξίας.
•Απορρίψτε κατευθείαν το υλικόσυσκευασίας σύμφωναμετους ισχύοντες τοπικούς
κανονισμούς απόρριψης.
•Μην κάνετε μετατροπές στη συσκευή. Κατ‘ αυτόν τοντρόπο παύει να ισχύει η
εγγύηση.
63
Page 65

Προειδοποίηση -Μπαταρίες
•Αφαιρέστε καιαπορρίψτε τιςχρησιμοποιημένεςμπαταρίεςαμέσωςαπό
το προϊόν
•Χρησιμοποιείτεαποκλειστικάαπλέςήεπαναφορτιζόμενες μπαταρίεςτου
προβλεπόμενουτύπου.
•Μην μπερδεύετε παλιέςκαι καινούριες μπαταρίες,καθώςκαιμπαταρίες
διαφορετικού τύπουκαι κατασκευαστή.
•Προσέξτεοπωσδήποτετησωστήπολικότητα(επιγραφή +και -) των
μπαταριών καιτοποθετήστε τις ανάλογα.Ημητήρησημπορείναοδηγήσει
σε διαρροήτου υγρούήσε έκρηξητωνμπαταριών.
•Μην φορτίζετε τις απλές μπαταρίες.
•Φυλάτετις μπαταρίες μακριά απόπαιδιά.
•Μην βραχυκυκλώνετετις απλές/επαναφορτιζόμενες μπαταρίεςκαι μηντις
φέρνετεσεεπαφήμεγυμνά μεταλλικάαντικείμενα.
4. Έναρξη χρήσης
4.1 Μονάδα μέτρησης
•Ανοίξτε τη θήκη μπαταριών (13) καιτοποθετήστε δύο μπαταρίες AAΑ με σωστή
πολικότητα. Στη συνέχεια κλείστε το καπάκι της θήκης μπαταριών.
Υπόδειξη
Λάβετε υπόψη ότι κατά την έναρξη χρήσης οι μπαταρίες πρέπει να τοποθετηθούν
πρώταστη μονάδα μέτρησης καιμετάστην κύρια μονάδα.
4.2. Κύρια μονάδα
•Ανοίξτε τη θήκη μπαταριών (10) καιτοποθετήστε δύο μπαταρίες AAΑ με σωστή
πολικότητα. Στη συνέχεια κλείστε το καπάκι της θήκης μπαταριών.
64
Page 66

5. Συναρμολόγηση
Υπόδειξη –Τοποθέτηση
•Συνιστάται ητοποθέτηση της κύριας μονάδας καιτης μονάδας μέτρησης στο
επιθυμητόμέρος χωρίς συναρμολόγηση καιηεκτέλεση όλων των ρυθμίσεων όπως περιγράφεται στοκεφάλαιο 6. Λειτουργία της κύριας μονάδας.
•Συναρμολογήστε τη μονάδα/τις μονάδες αφού γίνει σωστή ρύθμιση και
σταθεροποιηθεί ηασύρματη σύνδεση.
Υπόδειξη
•Ηασύρματη μετάδοση ανάμεσα στη μονάδα μέτρησης καιτην κύριαμονάδα έχει
εμβέλεια 30m σε ανοιχτόχώρο.
•Πριν από την τοποθέτηση λάβετε υπόψη ότι ηασύρματη μετάδοση δεν πρέπει
να παρεμποδίζεται από παρεμβολέςήεμπόδια όπως κτίρια, δέντρα, οχήματα,
αγωγούς υψηλής τάσης κ.α.
•Πριν την τελική τοποθέτηση βεβαιωθείτε ότι γίνεται επαρκής λήψη ανάμεσα στα
επιθυμητάσημεία τοποθέτησης.
•Κατάτην τοποθέτηση της μονάδας μέτρησης λάβετε υπόψη ότι πρέπει να είναι
προστατευμένη από άμεση ηλιακή ακτινοβολία καιβροχή.
•Τοδιεθνές τυπικόυψόμετρο για μέτρηση της θερμοκρασίας αέρα είναι 1,25 m(4
πόδια) πάνω από το έδαφος.
65
Page 67

Προειδοποίηση
•Προμηθευτείτε ειδικάήενδεδειγμέναυλικάαπό το εμπόριο για την τοποθέτηση
στον προβλεπόμενοτοίχο.
•Βεβαιωθείτε ότι δεν τοποθετούνται ελαττωματικάήχαλασμέναεξαρτήματα.
•Κατάτησυναρμολόγηση τουστηρίγματος μην χρησιμοποιείτε βία ούτε πολλή
δύναμη. Αυτό μπορεί να προκαλέσει ζημιά στοπροϊόν.
•Πριν από την τοποθέτηση ελέγξτε αν οπροβλεπόμενος τοίχος είναι κατάλληλος
για το βάρος που πρόκειται να τοποθετηθεί καιβεβαιωθείτε πως στοσημείο
τοποθέτησης στον τοίχοδεν υπάρχουν σωλήνες νερού, αερίου, ηλεκτρικά
καλώδια ήάλλου είδους αγωγοί.
5.1. Κύρια μονάδα
•Τοποθετήστε την κύρια μονάδα σε μια επίπεδη επιφάνεια μέσω τουποδιού στήριξης.
5.2. Μονάδα μέτρησης
•Μπορείτε να τοποθετήσετε καιτημονάδα μέτρησης σε μια επίπεδη επιφάνεια
εξωτερικά.
•Συνιστάται ηασφαλής καισταθερή τοποθέτηση της μονάδας μέτρησης σε έναν
εξωτερικότοίχομέσω της εγκοπής (12). Διαφορετικά, στερεώστε τα ούπα, τις βίδες,
τα καρφιά κλπ. στον προβλεπόμενοτοίχο.
•Αναρτήστε την κύρια μονάδα μέσω της προβλεπόμενης εγκοπής.
6. Λειτουργία
Υπόδειξη –Πληκτρολόγηση
et und zur nächsten vollen Stunde wiederholt. Γιαναεπιλέξετε τις τιμές
γρηγορότερα κρατήστε πατημένοτοπλήκτρο (7) ήτοπλήκτρο (9).
6.1. Σύνδεση με τη μονάδα μέτρησης
•Μετάτην τοποθέτηση των μπαταριών ηκύρια μονάδα αναζητάαυτόματασύνδεση με
τη μονάδα μέτρησης καιπραγματοποιεί την πρώτη εγκατάσταση.
66
Page 68

Υπόδειξη
•Ηπρώτη εγκατάσταση διαρκεί 3λεπτά.
•Κατάτηδιαδικασία αυτή μην πατάτε τα πλήκτρα! Διαφορετικάμπορεί να
παρουσιαστούν σφάλματακαι ανακρίβειες στις τιμές καιτημετάδοσή τους.
•Ηδιαδικασία ολοκληρώνεται όταν προβληθούν τα δεδομέναμέτρησης για τον
εσωτερικό(3) καιτον εξωτερικό χώρο (1).
•Ανεπανειλημμέναδεν μπορεί να εντοπιστεί το σήμα, πατήστε καικρατήστε
πατημένοτοπλήκτρο
αναζήτηση τουσήματος DCF.
6.2. Βασικές ρυθμίσεις και χειροκίνητες ρυθμίσεις
Αυτόματη ρύθμιση σύμφωνα με το σήμα DCF
•Μετάτην πρώτη εγκατάσταση της κύριας μονάδας καιτην επιτυχή μεταφορά
ανάμεσα στην κύρια μονάδα καιτημονάδα μέτρησης το ρολόιξεκινά αυτόματη
αναζήτηση σήματος DCF.Όσοδιαρκεί ηαναζήτηση αναβοσβήνει το σύμβολο
ασύρματης λήψης (6).
Ένδειξη Αναζήτηση τουσήματος DCF
(7) για 3δευτερόλεπτα, ώστε να αρχίσει ηχειροκίνητη
Ηένδειξη αναβοσβήνει
Μόνιμη ένδειξη
Καμία ένδειξη Ανενεργή
•Ανεπανειλημμέναδεν μπορεί να εντοπιστεί το σήμα πατήστε καικρατήστε πατημένο
το πλήκτρο
(9) για 3δευτερόλεπτα, ώστε να αρχίσει ηχειροκίνητη αναζήτηση του
σήματος DCF.Τοσύμβολο ασύρματης λήψης (6) αρχίζεινααναβοσβήνει.
Ενεργή
Επιτυχώς -Γίνεται λήψη τουσήματος
67
Page 69

Υπόδειξη -Ρύθμιση της ώρας
•Αυτή ηδιαδικασία διαρκεί περίπου 7λεπτά. Αν ηαναζήτηση αποτύχει,
τερματίζεται καιεπαναλαμβάνεταιμετάαπό μία ώρα. Το σύμβολο ασύρματης
λήψης (6) σβήνει.
•Στο διάστημα αυτόμπορείτε να ρυθμίσετε την ώρα καιτην ημερομηνία
χειροκίνητα.
•Τορολόι συνεχίζει καθημερινάνααναζητά αυτόματα(μεταξύ 01:00 και
03:00) σήμα DCF.Ανγίνει επιτυχής λήψη σήματος διαγράφονται ηώρα καιη
ημερομηνίαπου ρυθμίστηκαν χειροκίνητα.
Υπόδειξη –Θερινή ώρα
•Ηώρα ρυθμίζεται αυτόματαστη θερινή ώρα. Όσοισχύει ηθερινή ώρα, στην
οθόνη εμφανίζεται το σύμβολο S.
•Πατήστε πάλι καικρατήστε πατημένογια 3δευτερόλεπτατοπλήκτρο (9) για να
ολοκληρώσετε τη χειροκίνητη αναζήτηση.
Χειροκίνητη ρύθμιση ημερομηνίας/ ώρας
•Πατήστε πάλι καικρατήστε πατημένογια 3δευτερόλεπτατοπλήκτρο
ολοκληρώσετε την αναζήτηση σήματος DCF.Τοσύμβολο ασύρματης λήψης (6)
ανάβει καιμπορείτε να ρυθμίσετε την ώρα χειροκίνητα.
•Πατήστε καικρατήστε πατημένοτοπλήκτρο MODE (8) για 3δευτερόλεπτα, ώστε να
αρχίσει ηχειροκίνητηρύθμιση ημερομηνίας/ ώρας.
•Ρυθμίστε διαδοχικάταπαρακάτω:
•Ζώνη ώρας (απόκλιση σε ώρες), ώρα, λεπτό.
•Για επιλογή των τιμών πατήστε το πλήκτρο
επιβεβαιώστε την επιλογή πατώντας το πλήκτρο MODE (8).
•Εάν δεν γίνει κάποια εισαγωγή δεδομένων για 20 δευτερόλεπτα, ησυσκευή
εξέρχεταιαυτόματααπό τη λειτουργία ρυθμίσεων.
68
(7) ήτοπλήκτρο (9) και
(9) για να
Page 70

Υπόδειξη –Ζώνη ώρας
•Μπορεί να γίνει ευρεία λήψη σήματος DCF,αυτόόμως αντιστοιχεί πάνταστην
Ώρα Κεντρικής Ευρώπης (CET) που ισχύει στη Γερμανία. Ως εκ τούτου, σε χώρες
με άλλη ζώνη ώρας πρέπει να λάβετε υπόψη τη διαφορά ώρας.
•Ανβρίσκεστε στη Μόσχαείστε 3ώρες μπροστάαπό τη Γερμανία. Ως εκ τούτου,
στη ζώνη ώρας πρέπει να ρυθμίσετε +3. Το ρολόιθαρυθμιστεί αυτόματαμετά
τη λήψη τουσήματος DCF ήανάλογα με την ώρα που ρυθμίστηκε χειροκίνητα
3ώρες αργότερα.
Βαθμοί Κελσίου /Φαρενάιτ
•Για να αλλάξετε τις μονάδες θερμοκρασίας μεταξύ °C και°Fπατήστε το πλήκτρο
(9).
12/24ωρη μορφή ώρας
•Πατήστε το πλήκτρο (7) για να αλλάξετε μεταξύ της 12ωρης καιτης24ωρης
μορφής ώρας.
6.3. Χαμηλή στάθμη μπαταρίας
Όταν εμφανιστεί στην οθόνη της κύριας μονάδας το σύμβολο μπαταρίας (2) ηστάθμη
των μπαταριών στη μονάδα μέτρησης είναι χαμηλή. Αντικαταστήστε κατευθείαν τις
μπαταρίες.
Υπόδειξη –Αλλαγή μπαταριών
•Λάβετε υπόψη ότιμετάαπό κάθε αλλαγή μπαταρίας στη μονάδα μέτρησης ή
στην κύρια μονάδα πρέπει να γίνει νέος συγχρονισμός των μονάδων.
•Για να γίνει αυτόπρέπει να αφαιρέσετε τις μπαταρίες της άλλης μονάδας, να τις
επανατοποθετήσετε ή, αν χρειάζεται,να τις αντικαταστήσετε.
7. Συντήρηση και φροντίδα
Καθαρίζετε αυτότοπροϊόν μόνομεένα ελαφρώς βρεγμένοπανί χωρίς χνούδια καιμην
χρησιμοποιείτε επιθετικάκαθαριστικά.
69
Page 71

8. Απώλεια εγγύησης
Ηεταιρεία Hama GmbH &CoKGδεν αναλαμβάνει καμία ευθύνη ήεγγύηση για ζημιές,
οι οποίες προκύπτουν από λανθασμένη εγκατάσταση καισυναρμολόγηση ήλανθασμένη
χρήση τουπροϊόντος ήμητήρηση των οδηγιών λειτουργίας και/ήτων υποδείξεων
ασφαλείας.
9. Σέρβις και υποστήριξη
Γιαερωτήσεις σχετικάμετοπροϊόν απευθυνθείτε στην υπηρεσία εξυπηρέτησης
πελατών της Hama.
Γραμμή υποστήριξης: +49 9091 502-115 (Γερμανικά/Αγγλικά)
Περισσότερες πληροφορίες υποστήριξης θα βρείτε στη διεύθυνση: www.hama.com
10. Τεχνικά χαρακτηριστικά
Κύρια μονάδα Μονάδα μέτρησης
Ηλεκτρική τροφοδοσία
Κατανάλωση ρεύματος 0,5 mA 3mA
Εύρος μέτρησης
Θερμοκρασία
Βήματαμέτρησης
Θερμοκρασία
Κύκλος μέτρησης
θερμοκρασίας
Ασύρματη ώρα DCF Ναι Όχι
Συχνότητα433 Mhz
Εμβέλεια ≤50m
70
3,0 V
2xμπαταρίες AAA
0°C –+50°C/
32°F –122°F
0,1°C /0,1°F 0,1°C /0,1°F
43 –47s 43 –47s
3,0 V
2xμπαταρίες AAA
-20°C –+60°C/
-4°F –140°F
Page 72

11. Υποδείξεις απόρριψης
Υπόδειξη σχετικάμετην προστασία περιβάλλοντος:
Από τη στιγμή που ηΕυρωπαϊκή Οδηγία 2012/19/EU και2006/66/EE
ενσωματώνεται στοεθνικόδίκαιο ισχύουν τα εξής: Οι ηλεκτρικές καιοι
ηλεκτρονικές συσκευές καθώς καιοιμπαταρίες δεν επιτρέπεται να
πετιούνται σταοικιακάαπορρίμματα. Οι καταναλωτές υποχρεούνται από
τοννόμοναεπιστρέφουν τις ηλεκτρικές καιηλεκτρονικές συσκευές καθώς
καιτις μπαταρίεςστο τέλος της ζωής τους σταδημόσια σημεία περισυλλογής που έχουν
δημιουργηθεί γι’ αυτότοσκοπό ήστα σημεία πώλησης. Οι λεπτομέρειες ρυθμίζονται
στη σχετική νομοθεσία. Το σύμβολο πάνω στοπροϊόν, στοεγχειρίδιο χρήσης ήστη
συσκευασία παραπέμπει σε αυτές τις διατάξεις. Με την ανακύκλωση,
επαναχρησιμοποίηση των υλικών ήμεάλλεςμορφές χρησιμοποίησης παλιών
συσκευών /Μπαταριών συνεισφέρετε σημαντικάστην προστασία τουπεριβάλλοντος.
Στη Γερμανία ισχύουν αντίστοιχαοιπαραπάνω κανόνες απόρριψης σύμφωναμετον
κανονισμό για μπαταρίες καισυσσωρευτές.
12. Δήλωση συμμόρφωσης
Με την παρούσα ο/η Hama GmbH &CoKG,δηλώνει ότι ο
ραδιοεξοπλισμός [00123126] πληροί την οδηγία 2014/53/ΕΕ. Το πλήρες
κείμενοτης δήλωσης συμμόρφωσης ΕΕ διατίθεται στην ακόλουθη
ιστοσελίδα στοδιαδίκτυο: www.hama.com-> 00123126-> Downloads.
Ζώνη συχνοτήτων/Ζώνες συχνοτήτων 433 Mhz
Μέγιστη εκπεμπόμενη ισχύς 0,015 mW
71
Page 73

P Instrukcja obsługi
Elementy obsługi isygnalizacji
AStacja bazowa
1. Temperaturazewnętrzna
2. Symbol baterii
3. Temperaturawpomieszczeniu
4. Godzina
5. Czas letni
6. Symbol sygnału radiowego
7. Przycisk
8. Przycisk MODE =ustawienia/ potwierdzanie ustawionej wartości
9. Przycisk =zmniejszanie aktualnie ustawionej wartości /zmiana między °C i°F/
10. Schowek na baterie
BStacja pomiarowa
11. Kontrolka transferu
12. Otwór do mocowania na ścianie
13. Schowek na baterie
Dziękujemy za zakup naszego produktu!
Przed pierwszym użyciem należy dokładnie przeczytać instrukcję obsługi. Instrukcję
należy przechować, gdyż może być jeszcze potrzebna.
1. Objaśnienie symboli ostrzegawczych iwskazówek
72
=zwiększanie aktualnie ustawionej wartości /zmiana formatu 12/24 -
godzinnego /ręcznewyszukiwanie sygnału ze stacji pomiarowej
włączanie/ wyłączanie ręcznego odbioru sygnału radiowego
Ostrzeżenie
Używane wcelu zwrócenia uwagi na szczególne niebezpieczeństwo lub ryzyko.
Wskazówki
Używane wcelu zwrócenia uwagi na szczególnie przydatne informacje.
Page 74

2. Zawartość opakowania
•stacja pogodowa EWS-152
(stacja bazowa do stosowania wewnątrz /stacja pomiarowa do stosowania na
zewnątrz)
•4baterie AAA
•niniejsza instrukcja obsługi
3. Wskazówki bezpieczeństwa
•Produkt jest przeznaczony do prywatnego, niekomercyjnego użytku domowego.
•Nie stosować produktu poza zakresem mocy podanym wdanych technicznych.
•Nie stosować produktu wwilgotnym otoczeniu ichronić go przed bryzgami wody.
•Nie używać produktu wbezpośredniej bliskości ogrzewania, innych źródeł ciepła ani
nie wystawiać go na bezpośrednie promieniowanie słoneczne
•Nie używać produktu wmiejscach, gdzie nie jest dozwolone stosowanie urządzeń
elektronicznych.
•Nie ustawiać produktu wpobliżu źródeł zakłóceń, rammetalowych, komputerów,
telewizorów itp. Urządzenia elektroniczne ifutryny okienne wpływają negatywnie
na działanie produktu.
•Chronić produkt przed upadkiem isilnymi wstrząsami.
•Nie otwierać produktu inie używać go, gdy jest uszkodzony.
•Nie próbować naprawiać samodzielnie urządzenia. Prace serwisowe zlecać
wykwalikowanemu personelowi fachowemu.
•Materiały opakowaniowe trzymać koniecznie zdala od dzieci, istnieje
niebezpieczeństwo uduszenia.
•Materiały opakowaniowe należy natychmiast poddać utylizacji zgodnie z
obowiązującymi przepisami miejscowymi.
•Nie modykować urządzenia. Prowadzi to do utraty wszelkich roszczeń ztytułu
gwarancji.
73
Page 75

Ostrzeżenie -baterie
•Natychmiast usunąćzproduktu zużyte baterieipoddaćjeutylizacji.
•Używaćwyłącznieakumulatorów (lub baterii) odpowiadających podanemu
typowi.
•Nie mieszać starych inowychbaterii ani bateriiróżnych typówlub
producentów.
•Wkładającbaterie, zwrócić koniecznie uwagęnawłaściwe podłączenie
biegunów (znak+i-).Nieprzestrzeganiegroziwyciekiem lub wybuchem
baterii.
•Nie ładować baterii.
•Przechowywać baterie poza zasięgiem dzieci.
•Nie zwierać akumulatorów /bateriioraztrzymać je zdalaododkrytych
przedmiotów metalowych.
4. Uruchamianie
4.1 Stacja pomiarowa
•Otworzyć pokrywę schowka na baterie (13) iwłożyć dwie baterie AAA, zwracając
uwagę na właściwą biegunowość. Następnie zamknąć pokrywę schowka na baterie.
Wskazówka
Przed uruchomieniem należy pamiętać, aby zawsze włożyć najpierw baterie do
stacji pomiarowej, anastępnie do stacji bazowej.
4.2 Stacja bazowa
•Otworzyć pokrywę schowka na baterie (10) iwłożyć dwie baterie AAA, zwracając
uwagę na właściwą biegunowość. Następnie zamknąć pokrywę schowka na baterie.
74
Page 76

5. Montaż
Wskazówka -Montaż
•Zaleca się ustawić najpierw wwybranym miejscu stację bazową istację
pomiarową bez montażu iskongurować wszystkie ustawienia -jak opisano w
punkcie 6. Obsługa stacji bazowej.
•Zamontować stacje dopieropoprawidłowej konguracji ustawień iznalezieniu
stabilnej łączności radiowej.
Wskazówka
•Zasięg transmisji radiowej między stacją pomiarową istacją bazową wynosi na
otwartym terenie maks. 30 m.
•Przed montażem zwrócić uwagę, aby żadne sygnały zakłócające lub przeszkody,
takie jak budynki, drzewa, pojazdy,linie wysokiego napięcia itp., nie wpływały
na transmisję radiową.
•Przed ostatecznym montażem upewnić się, czy między wybranymi miejscami
ustawienia występuje dostateczny odbiór radiowy.
•Podczas montażu stacji pomiarowej należy pamiętać, aby zamontować ją w
miejscu zabezpieczonym przed bezpośrednim promieniowaniem słonecznym
ideszczem.
•Międzynarodowa standardowa wysokość dla pomiaru temperatury powietrza
wynosi 1,25 m(4stopy) nad ziemią.
75
Page 77

Ostrzeżenie
•Nabyć wspecjalistycznym sklepie odpowiednie materiały montażowe do
montażu na przewidzianej ścianie.
•Sprawdzić, czy nie są montowane wadliwe bądź uszkodzone części.
•Podczas montażu nigdy nie wywierać nadmiernej siły.Może to spowodować
uszkodzenie produktu.
•Przed montażem sprawdzić, czy przewidziana ściana jest odporna na przyjęcie
ciężaru mocowanego produktu, iupewnić się, że wmiejscu montażu na
ścianie nie są zainstalowane przewody elektryczne, wodne, gazowe bądź inne
przewody.
5.1 Stacja bazowa
•Zapomocą podpórki ustawić stację bazową na równym podłożu.
5.2 Stacja pomiarowa
•Stację pomiarową można także ustawić za pomocą podpórki na równym podłożu
na zewnątrz.
•Zaleca się bezpieczne itrwałe zamontowanie stacji pomiarowej na ścianie
zewnętrznej za pomocą otworu (12). Zamocować kołki rozporowe, śruby,gwoździe
itp. na przewidzianej ścianie.
•Naprzeznaczonych do tego otworach zawiesić stację bazową/ stację pomiarową.
6. Obsługa
Wskazówka –wprowadzanie danych
Trzymać wciśnięty przycisk (7) lub (9) ,abyprzyspieszyć nastawę wartości.
6.1 Połączenie ze stacją bazową
•Powłożeniu baterii stacja bazowa automatycznie wyszukuje połączenie ze stacją
pomiarową iprzeprowadza pierwszą kongurację.
76
Page 78

Wskazówka
•Pierwsza konguracja trwa ok. 3minuty.
•Nie naciskać wtym czasie żadnych przycisków! Wprzeciwnym razie wartości i
ich transmisja mogą zawierać błędy iniedokładne dane.
•Proces jest zakończony,gdy wyświetlane są dane pomiarowe dla pomieszczenia
(3) inazewnątrz (1).
•Jeżeli ze stacji pomiarowej ponownie nie zostanie odebrany żaden sygnał ,nacisnąć
itrzymać wciśnięty przez ok. 3sekundy przycisk
wyszukiwanie radiowego sygnału czasowego.
6.2 Ustawienia podstawowe ikonfiguracja ręczna
Automatyczne ustawianie wg sygnału czasowego DCF
•Popierwszym włączeniu stacji bazowej iudanej transmisji sygnałów między stacją
bazową istacją pomiarową, zegar automatycznie rozpoczyna wyszukiwanie
radiowego sygnału czasowego DCF.Podczas wyszukiwania symbol sygnału
radiowego (6) zaczyna migać.
Wskaźnik Wyszukiwanie sygnału czasowego DCF
(7) ,aby rozpocząć ręczne
Migający wskaźnik
Stały wskaźnik
Brak wskaźnika Nieaktywny
•Jeżeli sygnał ponownie nie zostanie odebrany,nacisnąć itrzymać wciśnięty przez ok.
3sekundy przycisk (9), aby rozpocząć ręczne wyszukiwanie radiowego sygnału
czasowego DCF.Symbol sygnału radiowego (6) zaczyna migać.
Proces powiódł się -sygnał jest odbierany
Aktywne
77
Page 79

Wskazówka –ustawianie zegara
•Proces ręcznego wyszukiwania trwa ok. 7minut. Jeżeli wyszukiwanie ręczne
nie powiedzie się, proces wyszukiwania jest przerywany iwznawiany okolejnej
pełnej godzinie. Symbol sygnału radiowego (6) gaśnie.
•Wtym czasie można ręcznie ustawić godzinę idatę.
•Zegar będzie codziennie szukał automatycznie (między godziną 01:00 i03:00)
sygnału DCF.Popomyślnym odbiorze sygnału ręcznie ustawiona godzina idata
są nadpisywane.
Wskazówka –czas letni
•Czas zegarajest automatycznie przestawiany na czas letni. Gdy czas letni jest
aktywny,naekranie wyświetlany jest symbol S.
•Ponownie nacisnąć itrzymać wciśnięty przez ok. 3sekundy przycisk (9) ,aby
zakończyć proces ręcznego wyszukiwania.
Ręczne ustawianie daty /godziny
•Nacisnąć itrzymać wciśnięty przez ok. 3sekundy przycisk
proces ręcznego wyszukiwania sygnału DCF.Symbol sygnału radiowego (6) gaśnie i
można ręcznie ustawiać godzinę.
•Nacisnąć itrzymać wciśnięty przez ok. 3sekundy przycisk MODE (8), aby uruchomić
ręczne ustawianie daty /godziny.
•Pokolei ustawić następujące informacje:
•Strefa czasowa (różnica wgodzinach), godziny,minuty .
•Aby wybrać poszczególne wartości, nacisnąć przycisk
wybór,naciskając przycisk MODE (8). .
•Jeżeli wciągu 20 sekund nie zostanie wprowadzona żadna wartość, tryb ustawiania
jest automatycznie zamykany.
78
(9), aby zakończyć
(7) lub (9) ipotwierdzić
Page 80

Wskazówka –strefa czasowa
•Sygnał czasowy DCF może być odbierany na całym świecie, jednakże odpowiada
on zawsze stree czasu środkowoeuropejskiego (CET) obowiązującego w
Niemczech. Należy pamiętać, aby wkrajach oinnej stree czasowej przesunąć
czas.
•Np. wMoskwie jest 3godziny później niż wNiemczech. Przy stree czasowej
należy wtedy ustawić wartość +3. Po odbiorze sygnału czasowego DCF,wzgl.
wodniesieniu do ręcznie ustawionego czasu zegara, zegar ustawia się wtedy
zawsze o3godziny później.
Celsjusz /Fahrenheit
•Nacisnąć przycisk (9), aby przełączać między jednostkami temperatury °C i°F.
Format 12/24-godzinny
•Nacisnąć przycisk (7), aby przy ustawianiu godziny przełączać między formatem
12 i24-godzinnym.
6.3 Niski stan naładowania baterii
Wyświetlenie na ekranie stacji bazowej symbolu baterii (2) oznacza bardzo niski
poziom naładowania baterii wstacji pomiarowej. Natychmiast wymienić baterie.
Wskazówka –wymiana baterii
•Należy pamiętać, że po każdej wymianie baterii wstacji pomiarowej lub
bazowej konieczna jest ponowna synchronizacja stacji.
•Wtym celu wyjąć baterie zdrugiej stacji iponownie je włożyć lub wrazie
potrzeby wymienić.
7. Czyszczenie
Produkt można czyścić jedynie lekko zwilżoną szmatką. Do czyszczenia nie należy
używać żadnych silnych iagresywnych detergentów.
79
Page 81

8. Wyłączenie odpowiedzialności
Hama GmbH &CoKG nie udziela gwarancji ani nie odpowiada za szkody wskutek
niewłaściwej instalacji, montażu oraz nieprawidłowego stosowania produktu lub
nieprzestrzegania instrukcji obsługi i/lub wskazówek bezpieczeństwa.
9. Serwis ipomoc techniczna
Wrazie pytań dotyczących produktu prosimy zwrócić się do infolinii Hama.
Gorąca linia: +49 9091 502-115 (niem./ang.)
Dodatkowe informacje są dostępne na stronie: www.hama.com
10. Dane techniczne
Stacja bazowa Stacja pomiarowa
Zasilanie elektryczne
Pobór prądu 0,5 mA 3mA
Zakres pomiarowy
Temperatura
Rozdzielczość pomiaru
Temperatura
Cykl pomiaru temperatury 43 –47s 43 –47s
Zegar radiowy DCF Ja Nein
Częstotliwość 433 MHz
Zasięg ≤50m
80
3,0 V
2baterie typu AAA
0°C –+50°C/
32°F –122°F
0,1°C /0,1°F 0,1°C /0,1°F
3,0 V
2baterie typu AAA
-20°C –+60°C/
-4°F –140°F
Page 82

11. Informacje dotycząca recyklingu
Wskazówki dotyczące ochrony środowiska:
Od czasu wprowadzenia europejskiej dyrektywy 2012/19/EU i2006/66/EU
do prawa narodowego obowiązują następujące ustalenia: Urządzeń
elektrycznych, elektronicznych oraz baterii jednorazowych nie należy
wyrzucać razem zcodziennymi odpadami domowymi! Użytkownik
zobowiązany prawnie do odniesienia zepsutych, zniszczonych lub
niepotrzebnych urządzeń elektrycznych ielektronicznych do punktu zbiórki lub do
sprzedawcy.Szczegółowe kwestie regulują przepisy prawne danego kraju. Informuje o
tym symbol przekreślonego kosza umieszczony na opakowaniu. Segregując odpady
pomagasz chronić środowisko!
12. Deklaracja zgodności
Hama GmbH &CoKG niniejszym oświadcza, że typ urządzenia radiowego
[00123126] jest zgodny zdyrektywą 2014/53/UE. Pełny tekst deklaracji
zgodności UE jest dostępny pod następującym adresem internetowym:
www.hama.com-> 00123126-> Downloads.
Częstotliwość transmisji 433 MHz
Maksymalna moc transmisji 0,015mW
81
Page 83

C Návod kpoužití
Ovládací prvky aindikace
AZákladna
1. Venkovní teplota
2. Symbol baterie
3. Teplota vmístnosti
4. Hodinový čas
5. Letní čas
6. Rádiový symbol
7. Tlačítko
8. Tlačítko MODE =nastavení/potvrzení nastavené hodnoty
9. Tlačítko =snížení aktuální nastavené hodnoty přepínání mezi °C a°F/aktivace/
10. Přihrádka na baterie
BBezdrátový senzor
11. Kontrolka přenosu
12. Otvor pronástěnnou montáž
13. Přihrádka na baterie
Děkujeme, že jste si vybrali výrobek Hama.
Přečtěte si, prosím, všechny následující pokyny ainformace. Uchovejte tento text pro
případné budoucí použití. Pokud výrobek prodáte nebo darujete, předejte tento návod
novému majiteli.
1. Vysvětlení výstražných symbolů apokynů
82
=zvýšení aktuální nastavené hodnoty/změna časového formátu
12/24/manuální vyhledávání signálu senzoru
deaktivace manuálního příjmu rádiového signálu
Upozornění
Tento symbol označuje bezpečnostní upozornění, které poukazuje na určitá rizika
anebezpečí.
Page 84

Poznámka
Tento symbol označuje dodatečné informace nebo důležité poznámky.
2. Obsah balení
•Meteorologická stanice EWS-152
(základna po vnitřní prostory /bezdrátový senzor provenkovní prostory)
•4baterie typu AAA
•tento návod kpoužití
3. Bezpečnostní pokyny
•Výrobek je určen knekomerčnímu použití vdomácnosti.
•Přístroj nepoužívejte mimo rozsah předepsaných hodnot vtechnických údajích.
•Výrobek nepoužívejte ve vlhkém prostředí azabraňte styku svodou.
•Výrobek nepoužívejte vbezprostřední blízkosti zdrojů tepla, ani nevystavujte
působení přímého slunečního záření.
•Výrobek nepoužívejte na místech, kde je používání elektronických zařízení zakázáno.
•Výrobek neumisťujte do blízkosti zdrojů rušení, kovových rámů, počítačů, televizorů
atd. Elektronická zařízení akovové rámy oken mohou negativně ovlivnit fungování
výrobku.
•Výrobek chraňte před pádem avelkými otřesy.
•Výrobek neotvírejte avpřípadě poškození již dále nepoužívejte.
•Dovýrobku nezasahujte aneopravujte ho. Veškeré úkony údržby přenechejte
příslušnému odbornému personálu.
•Obalový materiál odložte mimo dosahu dětí, hrozí riziko udušení.
•Vybité baterie bez odkladu vyměňte azlikvidujte dle platných předpisů.
•Výrobek žádným způsobem neupravujte, ztratíte tím nárok na záruku.
83
Page 85

Upozornění –baterie
•Vybité baterie bez odkladu vyměňte azlikvidujte dle platných předpisů.
•Používejte výhradně akumulátory (nebo baterie) odpovídající udanému typu.
•Pro napájení tohoto výrobku nekombinujte staré anové baterie, ani různé typy
aznačky baterií.
•Při vkládání baterií vždy dbejte na správnou polaritu (+ a-). Při nesprávné
polaritě hrozí nebezpečí vytečení baterií nebo exploze.
•Baterie nenabíjejte.
•Baterie uchovávejte mimo dosah dětí.
•Akumulátory/baterie nezkratujte azabraňte jejich umístění vblízkosti
neizolovaných kovových předmětů.
4. Uvedení do provozu
4.1 Bezdrátový senzor
•Otevřete přihrádku na baterie (13) adle správné polarity vložte dvě baterie AAA.
Poté uzavřete kryt přihrádky na baterie.
Poznámka
Upozorňujeme, že při uvádění do provozu je nutné vždy nejprve vložit baterie do
senzoru, apotom teprve do základny.
4.2 Základna
•Otevřete přihrádku na baterie (10) adle správné polarity vložte dvě baterie AAA.
Poté uzavřete kryt přihrádky na baterie.
84
Page 86

5. Montáž
Poznámka –montáž
•Doporučujeme základnu asenzor nejprve umístit na požadovaném místě
instalace bez montáže aprovést všechna nastavení -jak je popsáno vkapitole
6. Provoz.
•Základnu/senzor instalujte až po správném nastavení apři stabilním rádiovém
spojení.
Poznámka
•Dosah rádiového přenosu mezi senzorem azákladnou je na volném prostranství
až 30 m.
•Před montáží dbejte na to, aby nebyl rádiový přenos ovlivněn rušivými signály
nebo překážkami, jako jsou budovy,stromy,vozidla, vedení vysokého napětí
apod.
•Před konečnou montáží se ujistěte, zda je mezi požadovanými místy instalace
dostatečný příjem.
•Senzor namontujte na místě chráněném před přímým sluncem adeštěm.
•Mezinárodní standardní výška proměření teploty vzduchu je 1,25 m(4stopy)
nad povrchem.
85
Page 87

Upozornění
•Speciální resp. vhodný montážní materiál promontáž na určené zdi kupte ve
specializované prodejně.
•Zajistěte, aby nedošlo kmontáži vadných nebo poškozených dílů.
•Při montáži nikdy nepoužívejte násilí ani hrubou sílu. Mohlo by dojít kpoškození
výrobku.
•Před montáží zkontrolujte, zda zeď, na které chcete držák umístit, vykazuje
dostatečnou nosnost proinstalovaný přístroj, aujistěte se, že se na místě
montáže ve zdi nenachází elektrické kabely,vodní, plynová nebo jiná vedení.
5.1 Základna
•Pomocí podstavce postavte základnu na rovnou plochu.
5.2 Bezdrátový senzor
•Senzor můžete taktéž umístit na rovné ploše ve venkovním prostoru.
•Doporučujeme senzor bezpečně apevně namontovat na venkovní zeď pomocí
otvoru (12). Upevněte hmoždinku, šroub, hřebík apod. vurčené zdi.
•Nanizavěste senzor pomocí příslušného otvoru.
6. Provoz
Poznámka –zadání
Prorychlejší zvolení hodnot držte stisknuto tlačítko (7) nebo tlačítko (9).
6.1 Spojení sbezdrátovým senzorem
•Povložení baterií základna automaticky vyhledá spojení se senzorem aprovede
první nastavení.
86
Page 88

Poznámka
•První nastavení trvá cca 3minuty.
•Běhemtéto doby se nedotýkejte žádných tlačítek. Uhodnot ajejich přenosu by
mohlo dojít kchybám anepřesnostem.
•Proces je ukončen, jakmile jsou zobrazena naměřená data provnitřní (3) a
venkovní oblast (1).
•Pokud není opakovaně přijímán žádný signál senzoru, stiskněte apodobu cca 3
sekund držte stisknuto tlačítko
6.2 Základní nastavení amanuální nastavení
Automatické nastavení podle signálu DCF
•Poprvním zapnutí základny aúspěšném přenosu mezi základnou asenzorem zahájí
hodiny automaticky vyhledávání signálu DCF.Během vyhledávání bliká rádiový
symbol (6).
Indikace Vyhledávání signálu DCF
(7) prospuštění manuálního hledání signálu.
Blikající indikace
Svítící indikace
Žádná indikace Neaktivní
•Pokud není opakovaně přijímán žádný signál senzoru, stiskněte apodobu cca 3
sekund držte stisknuté tlačítko (9) prospuštění manuálního hledání signálu DCF.
Začne blikat rádiový symbol (6).
Aktivní
Úspěšná –příjem signálu
87
Page 89

Poznámka –nastavení času
•Tento proces trvá asi 7minut. Pokud je neúspěšný, vyhledávání se ukončí a
bude se opakovat vdalší celou hodinu. Rádiový symbol (6) zhasne.
•Mezitím můžete provést manuální nastavení času adata.
•Hodiny nadále automaticky hledají každý den (v době mezi 01:00 a03:00 hod)
rádiový signál DCF.Vpřípadě úspěšného příjmu signálu se manuálně nastavený
čas adatum přepíší.
Poznámka –letní čas
•Čas se automaticky přepne na letní čas. Když je aktivní letní čas, na displeji
se zobrazí S.
•Stiskněte apodobu cca 3sekund držte stisknuto tlačítko (9) proukončení
manuálního hledání.
Manuální nastavení data/času
•Stiskněte apřidržte tlačítko
DCF.Rádiový symbol (6) zhasne amůžete čas nastavit ručně.
•Stiskněte apřidržte tlačítko MODE (8) na cca 3sekundy,tím se spustí manuální
nastavení data/času.
•Postupně nastavte tyto informace:
•Časové pásmo (rozdíl vhodinách), hodiny,minuty.
•Pro výběr jednotlivých hodnot stiskněte tlačítko
volbu stisknutím tlačítka MODE (8).
•Pokud po dobu 20 sekund neproběhne žádné zadání, režim nastavení se
automaticky ukončí.
88
(9) cca 3sekundy proukončení vyhledávání signálu
(7) nebo tlačítko (9) apotvrďte
Page 90

Poznámka –časové pásmo
•Signál DCF může být přijímán na velkou vzdálenost, ale vždy odpovídá SEČ,
který platí vNěmecku. Zohledněte proto vzemích sjiným časovým pásmem
časový posun.
•Pokud se nacházíte vMoskvě, pak je tam o3hodiny více než vNěmecku. Proto
učasového pásma nastavte +3. Hodiny pak vždy po příjmu signálu DCF resp.
podle manuálně nastaveného času automaticky nastaví o3hodiny více.
Celsius/Fahrenheit
•Stiskněte tlačítko (9) propřepínání jednotek uindikace teploty z°Cna°F.
12-/ 24-hodinový formát
•Pro přepnutí mezi 12-hodinovým a24-hodinovým formátem stiskněte tlačítko (7).
6.3 Nízká kapacita baterie
Jakmile je na displeji základně zobrazen symbol baterie (2), je kapacita baterií v
senzoru příliš nízká. Baterie ihned vyměňte.
Poznámka –výměna baterie
•Upozorňujeme, že po každé výměně baterií vsenzoru nebo základně musí
proběhnout nová synchronizace stanic.
•Zatímto účelem vyjměte baterie izdruhé stanice avložte je znovu zpět, nebo je
vpřípadě potřeby také vyměňte.
7. Údržba ačištění
Tento výrobek čistěte pouze mírně navlhčeným hadříkem nepouštějícím vlákna a
nepoužívejte agresivní čisticí prostředky.Dbejte na to, aby se do výrobku nedostala
voda.
89
Page 91

8. Vyloučení záruky
Hama GmbH &CoKG nepřebírá žádnou odpovědnost nebo záruku za škody
vzniklé neodbornou instalací, montáží nebo neodborným použitím výrobku nebo
nedodržováním návodu kpoužití a/nebo bezpečnostních pokynů.
9. Servis apodpora
Máte otázky kproduktu ?Obraťte se na poradenské oddělení Hama.
Horká linka: +49 9091 502-115 (německy/anglicky)
Další podpůrné informace naleznete na adrese: www.hama.com
10. Technické údaje
Základna Bezdrátový senzor
Napájení Napájení
Příkon 0,5 mA 3mA
Rozsah měření
Teplota
Rozlišení
Teplota
Cyklus měření teploty 43 –47s 43 –47s
Rádiové hodiny DCF Ano Ne
Frekvence 433 MHz
Dosah ≤50m
90
3,0 V
2x baterie typu AAA
0°C –+50°C/
32°F –122°F
0,1°C /0,1°F 0,1°C /0,1°F
3,0 V
2x baterie typu AAA
-20°C –+60°C/
-4°F –140°F
Page 92

11. Pokyny klikvidaci
Ochrana životního prostředí:
Evropská směrnice 2012/19/EU a2006/66/EU ustanovujete následující:
Elektrická aelektronická zařízení stejně jako baterie nepatří do domovního
odpadu. Spotřebitel se zavazuje odevzdat všechna zařízení abaterie po
uplynutí jejich životnosti do příslušných sběren.Podrobnostistanoví zákon
příšlušné země. Symbol na produktu, návod kobsluze nebo balení na toto
poukazuje. Recyklací ajinými způsoby zužitkování přispíváte kochraně životního
prostředí.
12. Prohlášení oshodě
Tímto Hama GmbH &CoKG prohlašuje, že typ rádiového zařízení
[00123126] je vsouladu se směrnicí 2014/53/EU.Úplné znění EU
prohlášení oshodě je kdispozici na této internetové adrese:
www.hama.com-> 00123126-> Downloads.
Kmitočtové pásmo (kmitočtová pásma) 433 MHz
Maximální radiofrekvenční výkon vysílaný 0,015 mW
91
Page 93

Q Návod na použitie
Ovládacie prvky aindikácie
AZákladňa
1. Vonkajšia teplota
2. Symbol batérie
3. Vnútorná teplota
4. Čas
5. Letný čas
6. Symbol rádiového spojenia
7. Tlačidlo
8. Tlačidlo MODE =Nastavenia /potvrdenie nastavovanej hodnoty
9. Tlačidlo =Zníženie aktuálnej hodnoty /prepínanie medzi °C a°F/aktivácia /
10. Batériová priehradka
BBezdrôtový senzor
11. Kontrolka prenosu
12. Otvor prenástennú montáž
13. Batériová priehradka
Ďakujeme, že ste sa rozhodli prevýrobok Hama.
Prečítajte si všetky nasledujúce pokyny ainformácie. Uchovajte tento návod na použitie
preprípadné budúce použitie. PAkvýrobok predáte alebo darujete, dajte tento návod
novému majiteľovi.
1. Vysvetlenie výstražných symbolov aupozornení
=Zvýšenie aktuálnej hodnoty /striedanie 12-/24-hodinového formátu /
manuálne vyhľadávanie signálu senzora
deaktivácia manuálneho príjmu rádiového signálu
Upozornenie
Tento symbol označuje bezpečnostné upozornenie, ktoré poukazuje na určité riziká
anebezpečenstva.
92
Page 94

Poznámka
Tento symbol označuje dodatočné informácie, alebo dôležité poznámky.
2. Obsah balenia
•Meteostanica EWS- 152
(základňa preinteriér /vonkajší senzor preexteriér)
•4AAA batérie
•tento návod na použitie
3. Техника безопасности
•Výrobok je určený na nekomerčné použitie vdomácnosti.
•Prístroj nepoužívajte mimo rozsahu predpísaných hodnôt vtechnických údajoch.
•Výrobok nepoužívajte vo vlhkom prostredí azabráňte styku svodou.
•Výrobok nepoužívajte vbezprostrednej blízkosti zdrojov tepla, ani nevystavujte
pôsobeniu priameho slnečného žiarenia.
•Výrobok nepoužívajte na miestach, kde je používanie elektronických zariadení
zakázané.
•Výrobok nepoužívajte na miestach, kde je používanie elektronických zariadení
zakázané.
•Výrobok chráňte pred pádmi aveľkými otrasmi.
•Výrobok neotvárajte avprípade poškodenia ho ďalej nepoužívajte.
•Dovýrobku nezasahujte aneopravujte ho. Akékoľvek úkony údržby prenechajte
príslušnému odbornému personálu.
•Obalový materiál odložte mimo dosahu detí, hrozí riziko udusenia.
•Obalový materiál zlikvidujte podľa platných predpisov olikvidácii.
•Výrobok žiadnym spôsobom neupravujte, stratíte tým nárok na záruku.
93
Page 95

Upozornenie -batérie
•Vybitébatériebezodkladne vymeňte azlikvidujte podľa platných predpisov.
•Používajtevýhradne akumulátory(alebobatérie)zodpovedajúceudanému
typu.
•Nanapájanie tohto výrobku nekombinujte staré anové batérie, ani rôzne
typy aznačky batérií.
•Pri vkladaníbatérií vždy dbajtenasprávnu polaritu (+ a-). Prinesprávnej
polarite hrozínebezpečenstvovytečenia batériíalebo explózie.
•Batérie nenabíjajte.
•Batérie uchovávajtemimodosahudetí.
•Akumulátory/batérieneskratujte azabráňteich umiestneniu vblízkosti
neizolovaných kovových predmetov.
4. Uvedenie do prevádzky
4.1 Bezdrôtový senzor
•Otvorte batériovú priehradku (13) avložte dve AAA batérie; dbajte na správnu
polaritu (symboly +a-). Zatvorte kryt batériovej priehradky.
Poznámka
Pri uvádzaní do prevádzky dbajte na to, aby boli vždy vkladané najprv batérie do
bezdrôtového senzoraaažpotom do základne.
4.2 Základňa
•Otvorte batériovú priehradku (10) avložte dve AAA batérie; dbajte na správnu
polaritu (symboly +a-). Zatvorte kryt batériovej priehradky.
94
Page 96

5. Montáž
Poznámka –montáž
•Odporúča sa umiestniť základňu asenzor najprv na miesta inštalácie bez
montáže aurobiť všetky nastavenia -podľa opisu vodseku
6. Prevádzka.
•Základňu/senzor namontujte až po správnom nastavení adosiahnutí stabilného
rádiového spojenia.
Poznámka
•Dosah rádiového prenosu medzi senzorom azákladňou je na voľnom
priestranstve až 30 m.
•Predmontážou dbajte na to, aby rádiový prenos nebol ovplyvnený rušivými
signálmi alebo prekážkami, ako sú budovy,stromy,vozidlá, vysokonapäťové
vedenia atď.
•Preddenitívnou montážou sa ubezpečte, že medzi želanými miestami inštalácie
existuje dostatočný príjem.
•Pri montáži senzoru dbajte na to, aby na tomto mieste senzoru účinkom
priameho slnečného žiarenia adažďa.
•Medzinárodná štandardná výška merania teploty vzduchu je 1,25 m(4ft) nad
povrchom.
95
Page 97

Upozornenie
•Potrebný špeciálny montážny materiál preinštaláciu na určenú stenu si
zaobstarajte všpecializovanej predajni.
•Neinštalujte chybné alebo poškodené súčasti.
•Pri montáži nikdy nepoužívajte násilie alebo veľkú silu. Môžete tak poškodiť
výrobok.
•Predmontážou skontrolujte, či je stena, na ktorú chcete prístroj inštalovať,
vhodná zhľadiska hmotnosti zariadenia. Ubezpečte sa, že sa vmieste montáže
vstene nenachádzajú elektrické káble, plynové alebo vodovodné potrubie ani
iné vedenia.
5.1 Základňa
•Postavte základňu pomocou stojančeka na rovnú plochu.
5.2 Bezdrôtový senzor
•Bezdrôtový senzor môžete postaviť na rovnú plochu vexteriéri.
•Odporúča sa senzor bezpečne apevne namontovať na vonkajšiu stenu pomocou
otvoru (12). Namontujte hmoždinku, skrutku, klinec atď. do vybranej steny.
•Senzor na ňu/neho zaveste pomocou otvoru na zadnej strane.
6. Prevádzka
Poznámka –zadávanie
Podržte stlačené tlačidlo (7) alebo tlačidlo (9), umožní sa tak rýchlejšia
voľba hodnôt.
6.1 Spojenie so senzorom
•Povložení batérií vyhľadáva základňa automaticky spojenie so senzorom avykoná
prvé nastavenie.
96
Page 98

Poznámka
•Prvé nastavenie trvá asi 3minúty.
•Počas tejto doby sa nedotýkajte žiadneho tlačidla! Inak by mohli byť hodnoty
nesprávne alebo nepresne prenesené.
•Proces je ukončený, keď sa zobrazia namerané hodnoty preinteriér (3) a
exteriér (1).
•Aksenzor opakovane neprijíma žiadny signál, podržte na asi 3sekundy stlačené
(7) na spustenie manuálneho hľadania signálu DCF.
tlačidlo
6.2 Základné amanuálne nastavenia
Automatické nastavenie pomocou signálu DCF
•Poprvom zapnutí základne aúspešnom prenose medzi základne spustia hodiny
automaticky vyhľadávanie signálu DCF.Počas hľadania sa rozbliká symbol rádiového
spojenia (6).
Indikácia Vyhľadávanie signálu DCF
Blikajúca indikácia
Trvalá indikácia
Žiadna indikácia Neaktívny stav
Aktívny stav
Úspešný výsledok -signál sa prijíma
97
Page 99

•Aksaopakovane neprijíma žiadny signál, podržte na asi 3sekundy stlačené
tlačidlo (9) prespustenie manuálneho hľadania signálu DCF.Rozbliká sa symbol
rádiového spojenia (6).
Poznámka –nastavenie času
•Hľadanie trvá asi 7minút. Vprípade neúspechu sa hľadanie ukončí aopakuje
sa vnasledujúcej celej hodine. Symbol rádiového spojenia (6) zhasne.
•Medzitým môžete manuálne nastaviť čas adátum.
•Hodiny ďalej automaticky vyhľadávajú každý deň (medzi 01:00 a03:00) signál
DCF.Poúspešnom príjme signálu sa ručne nastavené hodnoty času adátumu
prepíšu.
Poznámka –letný čas
•Čas sa na letný čas prestavuje automaticky.Nadispleji je zobrazený znak S
počas trvania letného času.
•Podržte opäť asi 3sekundy stlačené tlačidlo
vyhľadávania.
Manuálne nastavenie dátumu/času
•Podržte na asi 3sekundy stlačené tlačidlo (9) na ukončenie vyhľadávania signálu
DCF.Symbol rádiového spojenia (6) zhasne ateraz môžete čas nastaviť manuálne.
•Podržte asi 3sekundy stlačené tlačidlo MODE (8) na spustenie manuálneho
nastavenia dátumu/času.
•Nastavte po sebe nasledujúce informácie:
•Časová zóna (rozdiel vhodinách), hodina, minúta.
•Nazvolenie jednotlivých hodnôt stlačte tlačidlo (7) alebo tlačidlo (9) a
príslušnú voľbu potvrďte stlačením tlačidla MODE (8).
•Akvpriebehu 20 sekúnd nebudú zadané žiadne hodnoty,ukončí sa nastavovací
režim automaticky.
98
(9) na ukončenie manuálneho
Page 100

Poznámka –časová zóna
•DCF signál môže byť prijatý na veľmi veľkú vzdialenosť, ale prijatý čas vždy
zodpovedá centrálnemu európskemu času vNemecku. Vkrajinách vinom
časovom pásme musíte vždy pričítať/odčítať časový rozdiel.
•Akste napr.vMoskve, je tam o3hodiny viac než vNemecku. To znamená, že
pri časovej zóne by ste mali nastaviť +3. Zariadenie si automaticky pripočíta 3
hodiny kčasu prijatému pomocou rádiového DCF signálu.
Celzius /Fahrenheit
•Naprepínanie medzi zobrazením teploty v°Ca°F stlačte tlačidlo (9).
12-/24-hodinový formát
•Stlačte tlačidlo (7) na prepínanie času medzi 12- a24-hodinovým formátom.
6.3 Nízka kapacita batérií
•Aksanadispleji základne zobrazí symbol batérie (2), je kapacita batérií vsenzore
veľmi nízka. Batérie ihneď vymeňte.
Poznámka –výmena batérií
•Uvedomte si, že sa po každej výmene batérií vrádiolokačnej alebo základňovej
stanici musí vykonať nová synchronizácia staníc.
•Vyberte batérie druhej stanice aopäť ich vložte alebo vymeňte ich tiež podľa
potreby.
7. Údržba astarostlivosť
•Zariadenie čistite jemne navlhčenou handričkou, ktorá nezanecháva žmolky.Pri
čistení nepoužívajte agresívne čistiace prostriedky.
99
 Loading...