

Page 1
00054849
(CDR70BT)
DABVehicle Retrot
DAB-Fahrzeugnachrüstung
QUICK GUIDE
KURZANLEITUNG
Quick Guide
Kurzanleitung
Notice d’utilisation
Instrucciones breves
Краткое руководство
Istruzioni brevi
Beknopte bedieningsinstructies
Σύντομες οδηγίες
Krótka instrukcja obsługi
Rövid útmutató
Stručný návod
Stručný návod
Instruções resumidas
Kısa kullanımkılavuzu
Instrucțiuni scurte
Snabbguide
Lyhyt ohje
Kort vejledning
Kortveiledning
GB
D
F
E
RUS
I
NL
GR
PL
H
CZ
SK
P
TR
RO
S
FIN
DK
N
Page 2
Technical data/
Technische Daten
Radio Receiver/
Radio Empfänger
DAB
ü
DAB+
ü
FM
-
Display/ Bildschirm 2“ Mono Colour LCD
DAB+ Frequencies/
Frequenzen
FM Transmitter/
Senderfrequenzen
Bluetooth
wer input/ Stromeingang 5V
Po
Power Consumption /
Stromaufnahme
Band III, 174 -240 MHz
87.6 -107.9 MHz
V4.2+EDR
A2DPV1.3, AVRCPV1.5
0.2 A
1W
Anschlüsse/ Input&Output Antenna, 3.5mmLine Out,DCSocket
Presets/Favoriten
Codec/ Formate
UI Languages/ UI Sprachen
Package Content /
Verpackungsinhalt
DAB/DAB+:
30
DAB:
MP2, AAC
English,German, France, Italian,Norwegian,Swedish, Danish, Suomi, Polska,
Czetsch,Slovak, Nederlands
CDR70BT digital radio, vehicle USB power supply unit, Micro-USB adapter cable,
Mount for ventilation holes,Mount with self-adhesivepad, Glassadhesive antenna
with SMB connector,Quick guide
Dimensions/ Größe(BxHxT) 9,6 x6,0 x2,75 cm
Weight / Gewicht 99 g
Internet
-
Spotify
-
rther information and features areavailable on
Fu
itereInformationen und Features nden Sie hier
We
www.hama.com -> 00054849
/
Page 3
1
A
2
3 4 6 7 8
5
B
9 10 11 12 13
14 15 16
Page 4

a) Mounting on ventilation slots /Montage an Lüftungsschlitzen
b) Mounting with self-adhesive pad /Montage mit selbstklebendem Pad
25
Page 5

Page 6
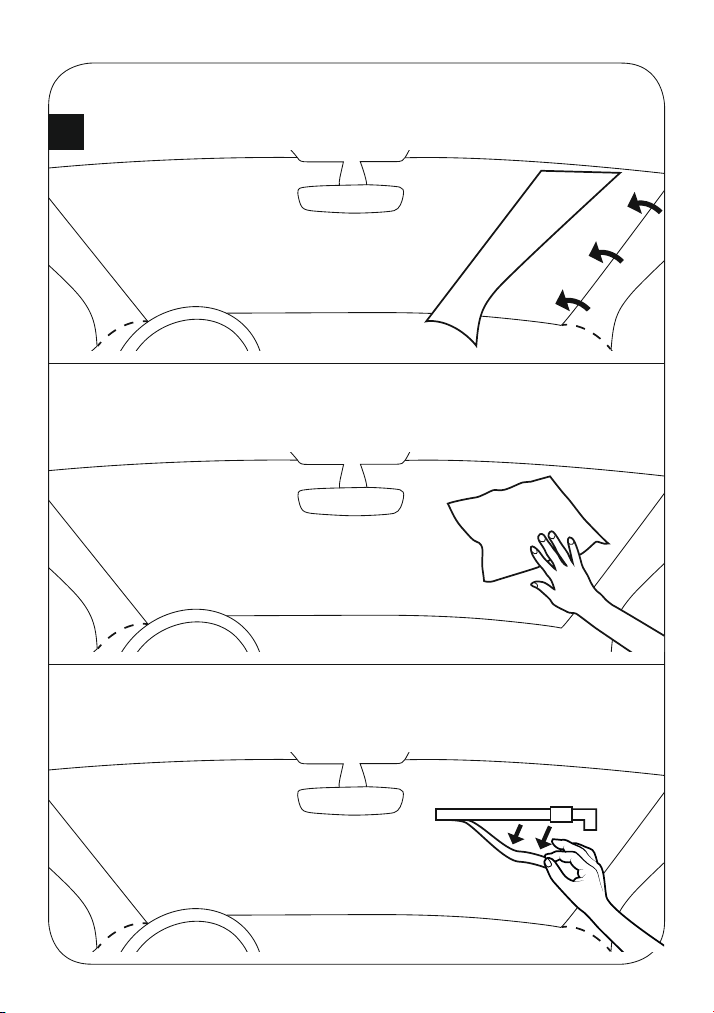
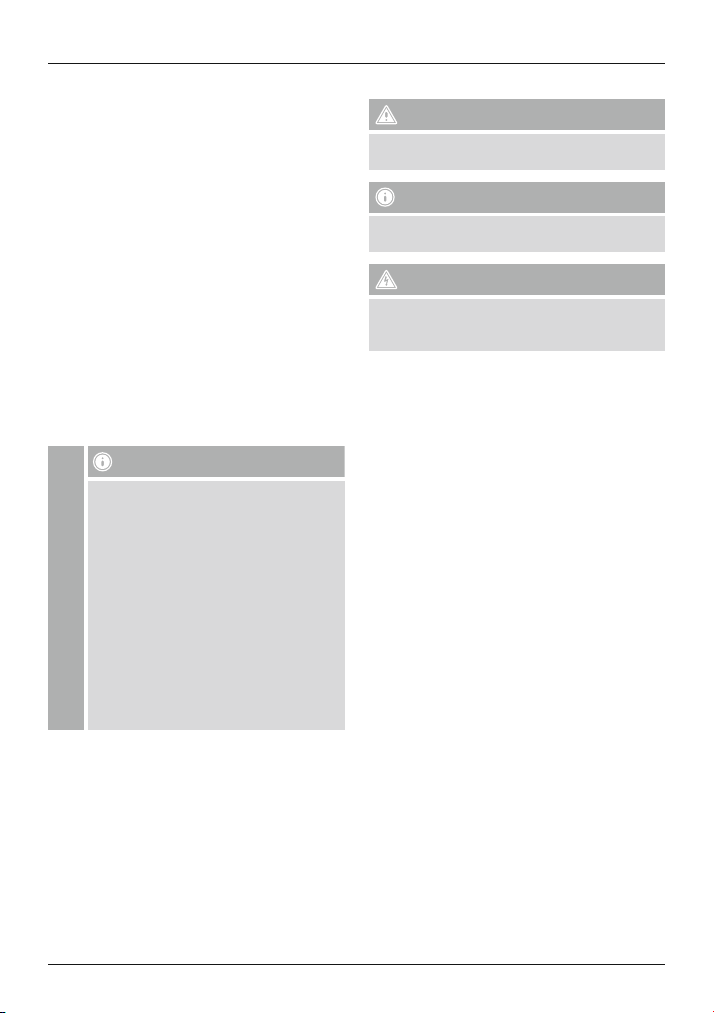
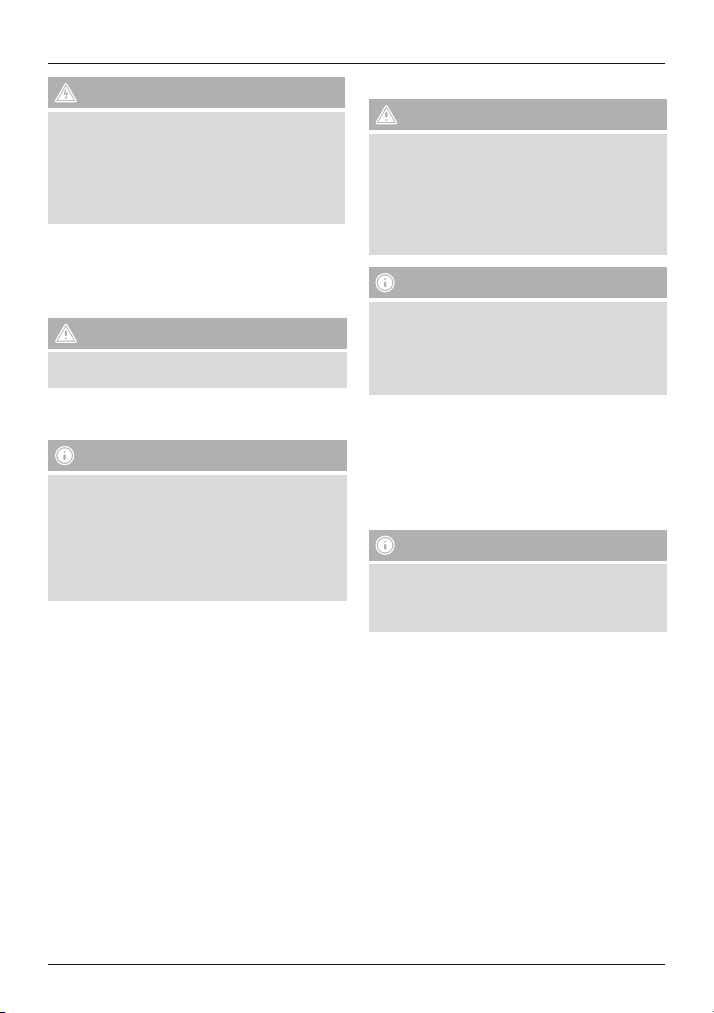
1) Carefully remove your vehicle’spanelling. /
Entfernen Sie vorsichtig die Verkleidung Ihres Fahrzeugs.
D
2) Clean the glass surface to which the antenna will be attached. /
Reinigen Sie die Glasäche, auf der die Antenne angebracht werden soll.
3) Uncover the adhesive strip on the back of the antenna. /
Ziehen Sie den Klebestreifen auf der Rückseite der Antenne ab.
Page 7
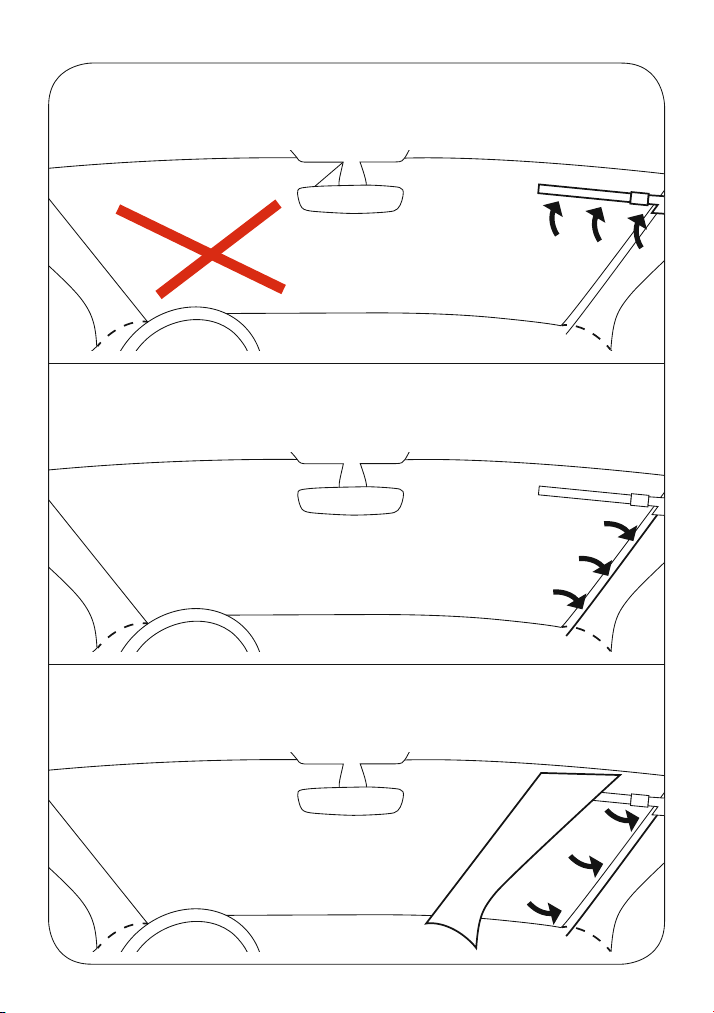
4) Position the antenna. Be surenot to block your eld of vision. /
Positionieren Sie die Antenne. Achten Sie darauf,das Sichtfeld nicht zu beeinträchtigen.
5) Run the cable. /Verlegen Sie das Kabel.
6) Reattach the panelling. /Bringen Sie die Verkleidung wieder an.
Page 8
G Quick Guide
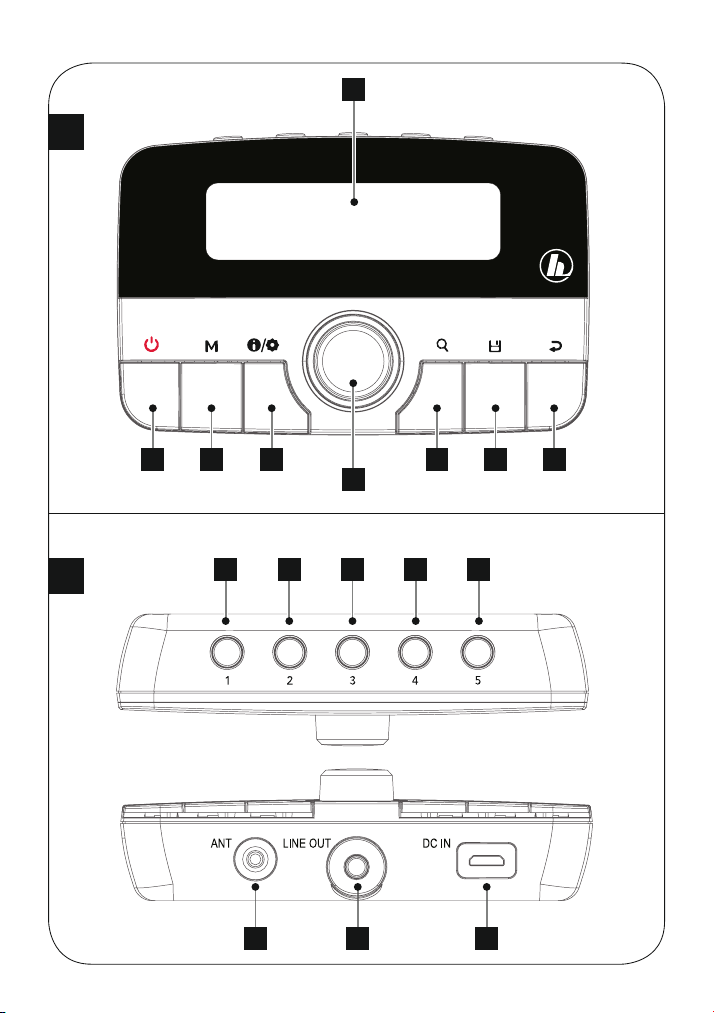
Controls and Displays
A. Front
1. Display
2. [Power]
3. [Mode]
4. Info/Settings
5. [VOLUME/SELECT/NAVIGATE]
6. [Search]
7. [Save]
8. [Previous]
B. Rear
9. Presets
10. Presets
11. Presets
12. Presets
13. Presets
14. Antenna
15. Lineout
16. Micro-USB connection
Important note -Quick Guide:
• This is aquick guide to provideyou with the
most important basic information, such as safety
warnings andhow to getstarted usingthe
product.
• Forthe sake of protecting the environment and
saving valuableresources, Hama dispenses witha
printedinstruction manual and provides this only
in the form of aPDF le available fordownload.
!
• Thecomplete instruction manual is available
at: www.hama.com -> 00054849 ->
Downloads
• Savethe instructionmanual to your computer’s
hard drivefor futurereference, or print it out if
necessary.
1. Explanation of Warning Symbols and Notes
Warning
This symbol is used to indicate safety instructions or to
draw your attention to specichazardsand risks.
Note
This symbol is used to indicate additional information or
important notes.
Risk of electric shock
This symbol indicatesproduct parts energized with a
ous voltage of sucient magnitude to constitute
danger
arisk of electric shock.
2. PackageContents
• CDR70BT digital radio
• Vehicle USB power supply unit
• Micro-USB adapter cable
• Mount for ventilation holes
• Mount with self-adhesivepad
• Glass adhesive antenna with SMBconnector
• Quick guide
3. Safety notes
• This product is intended for private, non-commercial
use only.
• Protect the product from dirt, moistureand overheating,
and only use it in dry locations.
• Keep this product, as allelectricalproducts, out of the
reach of children!
• Children arenot permitted to play with the device.
Children may not clean the productorperform user
maintenancewithout supervision.
• Do not drop the productand do not expose it to any
major shocks.
• Do not operate the product outsidethe powerlimits
given in the specications.
• Keep children away from the packaging materialasthere
is arisk of suffocation.
• Dispose of packaging material immediately according to
locally applicable regulations.
• Do not modify the device in any way.Doing so voids the
warranty.
• Do not allow yourself to be distracted by the product,
for example when driving avehicle or operating sports
equipment. Always pay attention to the surrounding
tracand yourenvironment.
2
Page 9
Risk of electric shock
• Do not open the device or continuetooperate it if it
becomes damaged.
• Do not use the product if the ACadapter,adapter
cable or power cable is damaged.
• Do not attempttoserviceorrepair the device
yourself.Leave any service work to qualied experts.
4. Mounting and getting started
This product is supplied with amount for vehicle
ventilation holesand aself-adhesive mount for at
surfaces.
Warning
Makesurethat any cables for power supply and
antenna connection do not affect driving safety.
4.1 Antenna connection/alternative solutions
(pic. D)
Note
• To optimise reception, the glass adhesiveantenna
should be ttedsuch that it is in contact with the
vehicle body.
• If your vehicle’s Apillar is coveredwith fabric or other
insulatingmaterial, tthe metalfoil thereanyway.
• Consult alocal car workshop regarding the antenna’s
contact with the vehicle body.
• Fit the antenna at the edge of the windscreen (preferably
on the passenger side) and connectthe metal foil to
your vehicle’sApillar.
• Then connectthe SMB connector of the antenna cable
to the antenna input (14)ofthe adapter.
4.2 Mounting
Warning –Risk of injury
• Take carethat components such as airbags, safety
areas, controls, instruments, etc. and visibility arenot
blocked or restricted.
• Do not allowyourself to be distracted by the product,
for example when driving avehicle or operating
sports equipment. Always pay attention to the
surrounding tracand your environment.
Note
• Beforemounting the holder,check the installation
optionsin your vehicle. If in doubt, consult the
manual for yourvehicleorcontact the manufacturer.
• Strictly avoid usingundue force whenusing the
productorduringinstallation.
A) Mounting to ventilation grille
• Fit the mounting adapter for ventilationapertures to the
back of the product. (FigureA)
•Now insert the device into the ventilationgrille.
• The peg for the mount in the ventilationgrille can be
turned 360° so thatyou can adjust alignment.
B) Mounting using the adhesive pad
Note –Mounting surface
Please note thatthe selected mountingsurface (e.g.
dashboard) should be free of dust and grease. Use a
suitable cleaningagent from aspecialised dealer to
clean the surface.
• Fit the mounting adapter with the adhesive pad to the
back of the product (FigureB).
• Clean the surface to which the adhesive pad is to be
axed.
• Now removethe protective lm from the adhesive pad
and mount the adapter on the chosen surface.
3
Page 10

4.3 Connection
Note
• Only use original accessories (or accessories approved
by Hama), to prevent damage to the product.
• Connect the supplied USB charging cabletothe USB
port (16) of the device.
• Connect the unused plugon the USB cable to a12V
socket of your vehicle.
4.4 Switching on /Standby /Initialsetup
Switching on the product
• Press and hold [
the device.
Switching off the product
• Press and hold [ ](2) for about 3seconds to activate
the standby mode.
Note
To switchoff the radio completely,disconnect it from the
power supply.
Initialsetup
Note
• Make surethat the antennahas been properly
connected.
• When you switch on for the rst time, the device is
in DAB/DAB+ mode and begins immediately with the
stationsearch.
• Press [
manually at alater time.
[VOLUME/SELECT/NAVIGATE](5) has two different
functions:
• Turn [VOLUME/SELECT/NAVIGATE]toselectamong
menu items.
• Conrm the selection by pressing[VOLUME/SELECT/
NAVIGATE].
• Press [
](2) for about 3secondstoswitch on
](6) if you would like to start the search
]toreturn to the previous menu level.
4.5 Language setting
At initial startup,the language of the radio defaults to
English. To change the language, please proceed as
follows:
• Press and hold [
access the settings menu.
• Turn [VOLUME/SELECT/NAVIGATE] to navigate to the
‘System’ menu item.
• Conrm the selection by pressing [VOLUME/SELECT/
NAVIGATE].
• Turn [VOLUME/SELECT/NAVIGATE] to get to the
‘Language’ menu item. Conrm the selection by pressing
[VOLUME/SELECT/NAVIGATE].
• Turn [VOLUME/SELECT/NAVIGATE] to select your desired
system language.
• Conrm the selection by pressing [VOLUME/SELECT/
NAVIGATE].
Note
• Only operate the productinambient temperatures
between-10°C and 50°C.
• Only storethe product in ambienttemperatures
between-20°C and 60°C.
5. Care and Maintenance
• Only cleanthis product with aslightly damp, lint-free
cloth and do not use aggressive cleaning agents.
• If you do not use the product for along time, turn off
the deviceand disconnect it from the power supply.
Storeitin aclean, dry place out of direct sunlight.
6. Warranty Disclaimer
Hama GmbH&Co. KG assumes no liability and provides
no warranty for damage resultingfromimproper
installation/mounting, improper use of the product or from
failuretoobserve the operating instructionsand/or safety
notes.
7. Service and Support
Please contact Hama ProductConsulting if you haveany
questions aboutthis product.
Hotline: +49 9091 502-115 (German/English)
Further support information can be found here:
www.hama.com
The complete instruction manual is available at:
www.hama.com -> 00054849 -> Downloads
](4) for about 3seconds to
4
Page 11

8. Recycling Information
Note on environmental protection:
After the implementation of the European
Directive2012/19/EU and 2006/66/EU in the
national legal system, the following applies:
Electric and electronic devices as well as batteries
must not be disposed of with household waste. Consumers
areobliged by law to return electricaland electronic
devices as well as batteries at the end of their service lives
to the public collecting points set up for this purpose or
pointofsale. Details to this aredened by the national
law of the respective country.This symbolonthe product,
the instruction manual or the package indicates that a
product is subject to these regulations. By recycling,
reusing the materials or otherforms of utilising old
devices/Batteries, you aremaking an important
contribution to protecting our environment.
9. Declaration of Conformity
Hereby,Hama GmbH &CoKGdeclares that the
radio equipment type [00054849] is in compliance
with Directive 2014/53/EU.The full text of the EU
declaration of conformity is available at the following
internet address:
www.hama.com->00054849->Downloads.
Frequency band(s)
Bluetooth: 2.402 –2.480GHz
FM TX: 87.6 –107.9 MHz
Maximum radio-frequency
power transmitted
Bluetooth: 6dBm (EIRP)
FM TX: -43.23 dBm
5
Page 12

D Schnellstartanleitung
Bedienungselemente und Anzeigen
A. Frontseite
1. Display
2. [POWER]
3. [MODE]
4. Info/Settings
5. [VOLUME/SELECT/NAVIGATE]
6. [SEARCH]
7. [SAVE]
8. [PREVIOUS]
B. Rückseite
9. Presets
10. Presets
11. Presets
12. Presets
13. Presets
14. Antenne
15. LINEOut
16. Micro-USB-Anschluss
WichtigerHinweis-Kurzanleitung:
• Dies ist eine Kurzanleitung,die Sie mit
den wichtigsten Basis-Informationenwie
Sicherheitshinweisen und der Inbetriebnahme
IhresProduktes versorgt.
• Aus Gründen desUmweltschutzesund der
Einsparung wertvoller Rohstoffe verzichtet die
Firma Hama aufeinegedruckte Langanleitung
undbietetdiese ausschließlichals PDF-Download
an.
!
• Die vollständige Langanleitung istunterder
folgendenInternetadresse verfügbar:
www.hama.com -> 00054849 ->
Downloads
• SpeichernSie dieLanganleitungzum
Nachschlagen auf IhremComputer und drucken
Siediese nachMöglichkeitaus.
1. Erklärung von Warnsymbolen und Hinweisen
Gefahr eines elektrischen Schlages
Dieses Symbol weistauf eine Berührungsgefahr mit nicht
isoliertenTeilendes Produkteshin, die möglicherweise
eine gefährlicheSpannung von solcherHöhe führen,
dass die Gefahr eines elektrischen Schlags besteht.
Warnung
Wirdverwendet, um Sicherheitshinweisezu
kennzeichnenoder um Aufmerksamkeit auf besondere
Gefahren und Risiken zu lenken.
Hinweis
Wirdverwendet, um zusätzlich Informationen oder
wichtigeHinweise zu kennzeichnen.
2. Packungsinhalt
• Digitalradio „CDR70BT“
• Kfz-USB-Netzteil
• Micro-USB-Adapterkabel
• Befestigung für Lüftungsschlitze
• Befestigung mit selbstklebendemPad
• Glasklebeantenne mit SMB-Anschluss
• Kurzanleitung
3. Sicherheitshinweise
• Das Produkt ist für den privaten, nicht-gewerblichen
Haushaltsgebrauch vorgesehen.
• SchützenSie das Produkt vor Schmutz,Feuchtigkeit und
Überhitzung und verwenden Sie es nur in trockenen
Räumen.
• Dieses Produkt gehört,wie alle elektrischen Produkte,
nicht in Kinderhände!
• Kinder dürfen nichtmit dem Gerätspielen.Reinigung
und Benutzerwartungdürfen nicht von Kindernohne
Beaufsichtigungdurchgeführt werden.
• Lassen Sie das Produktnicht fallenund setzenSie es
keinen heftigen Erschütterungenaus.
• BetreibenSie das Produktnicht außerhalb seiner in den
technischen Daten angegebenen Leistungsgrenzen.
• Halten Sie Kinder unbedingtvon dem
Verpackungsmaterial fern, es besteht Erstickungsgefahr.
• Entsorgen Sie das Verpackungsmaterial sofort gemäß
den örtlich gültigen Entsorgungsvorschriften.
• NehmenSie keineVeränderungen am Gerätvor.Dadurch
verlieren Sie jegliche Gewährleistungsansprüche.
• Lassen Sie sich auf der Fahrt mit einem Kraftfahrzeug
oder Sportgerät nicht durch Ihr Produkt ablenken und
achten Sie auf die Verkehrslage und ihreUmgebung.
6
Page 13
Gefahr eines elektrischen Schlages
• Öffnen Sie das Produkt nicht und betreiben Sie es bei
Beschädigungen nicht weiter.
• Verwenden Sie das Produkt nicht, wenn der
AC-Adapter, das Adapterkabeloder die Netzleitung
beschädigt sind.
• Versuchen Sie nicht, das Produkt selbst zu warten oder
zu reparieren. Überlassen Sie jeglicheWartungs-arbeit
dem zuständigen Fachpersonal.
4.2 Montage
Warnung –Verletzungsgefahr
• BeachtenSie, dass keineKomponenten,wie der
Airbag, Sicherheitsbereiche,Bedienelemente,
Instrumente,etc. oder die Sicht, verdeckt oder
eingeschränkt sind.
• Lassen Sie sich auf der Fahrt mit einem Kraftfahrzeug
oder Sportgerät nichtdurch Ihr Produkt ablenkenund
achten Sie auf die Verkehrslage und IhreUmgebung.
4. Montage und Inbetriebnahme
DiesesProdukt wirdmit einerBefestigung für KfzLüftungsschlitze und einer selbstklebenden Befestigung für
gerade Flächen ausgeliefert.
Warnung
Achten Sie darauf,dass etwaigeKabel zur
Stromversorgung und Antennenverbindung die
Fahrsicherheit nichtbeeinussen.
4.1 Antennenanschluss /Alternativlösungen
Antennenanschluss (Bild D)
Hinweis
• Um den Empfang zu optimieren, sollte die
Glasklebeantenne mit Kontakt zur Karosserie
angebracht werden.
• Sollte die A-Säule Ihres Fahrzeugs mit Stoff oder
einemanderen isolierenden Material bezogensein,
bringen Sie die Metallfolie trotzdem dort an.
• Wenden Sie sich an eine lokale Kfz-Werkstatt, um
einenKontakt mitder Karosserie herzustellen.
• Bringen Sie die Antenne am Rand der Windschutzscheibe
(bevorzugt auf der Beifahrerseite) an und verbindenSie
die Metallfolie mit der A-Säule des Fahrzeugs.
• Verbinden Sie anschließend den SMB-Anschluss des
Antennenkabels mit dem Antenneneingang (14) des
Adapters.
Hinweis
• Prüfen Sie vor der Montage der Halterung die
Einbaumöglichkeiten in Ihrem Fahrzeug. Im
Zweifelsfall ziehen Sie dazu die Betriebsanleitung
des Fahrzeugs zu Rate oder wendenSie sich an den
Fahrzeughersteller.
• Wenden Sie im Umgang mit dem Produkt und bei der
Montage niemals Gewaltoder hohe Kräfte an.
A) MontageanLüftungsgitter
• Montieren Sie den Befestigungsadapter für
Lüftungsauslässe an der Rückseite des Produktes. (Bild A)
• Stecken Sie nun das Gerät in das Lüftungsgitter.
• Der Zapfen für die Befestigung im Lüftungsgitterist um
360°drehbar, um dieAusrichtung anzupassen.
B) Montagemit Klebepad
Hinweis –Montageäche
Beachten Sie, dassdie gewünschte Montageäche
(z.B. Armaturenbrett) staub-und fettfreisein muss.
Verwenden Sie dazu einen geeigneten Reiniger aus dem
Fachhandel.
• Bringen Sie das Befestigungsadapter mit dem Klebepad
an der Rückseite des Produktes an (Bild B).
• Säubern Sie die Fläche, auf welcher das Klebepad
angebracht werden soll.
• ZiehenSie nun die Schutzfolie vom Klebepadund bringen
Sie den Adapter auf der vorgesehenen Fläche an.
7
Page 14
4.3 Anschluss
Hinweis
• Verwenden Sie ausschließlich Originalzubehör (oder:
von Hama freigegebenes Zubehör), um Schädenam
Produkt zu vermeiden.
• Schließen Sie das mitgelieferte USB-Ladekabel am USBAnschluss (16) des Geräts an.
• Schließen Sie den freien Stecker des USB-Kabels an eine
12 VSteckdose Ihres Fahrzeugs an.
4.4 Einschalten /Standby /Ersteinrichtung
Einschalten
• Drücken und haltenSie [
das Gerät einzuschalten.
Ausschalten
• Drücken und haltenSie [
den StandbyModuszuaktivieren.
Hinweis
Um das Radio vollständig auszuschalten, trennen Sie es
von der Stromversorgung.
Ersteinrichtung
Hinweis
• StellenSie sicher,dass die Antennenverbindung
ordnungsgemäß hergestellt wurde.
• Nach dem Einschalten bendet sich das GerätimModus
DAB/DAB+ und beginnt sofort mit dem Sendersuchlauf.
• Durch Drücken von [
einem späteren Zeitpunkt manuellgestartet werden.
[VOLUME/SELECT/NAVIGATE](5) hat eine duale
Funktionsbelegung:
• Durch Drehen von [VOLUME/SELECT/NAVIGATE]im
Menü wählenSie einzelne Menüpunkteaus.
• Durch Drücken von [VOLUME/SELECT/NAVIGATE]
bestätigen Sie die Auswahl.
• Drücken Sie [
zurückzukehren.
](2) für ca. 3Sekunden, um
](2) für ca. 3Sekunden, um
](6) kann der Suchvorgang zu
], um auf die vorherige Menüebene
8
4.5 Spracheinstellung
Bei Erstinbetriebnahme ist als Standardsprache des Radios
Englisch eingestellt. Gehen Sie wie folgt vor,umdie
Sprache anzupassen:
• Drücken und halten Sie [
um in das Einstellungsmenü zu gelangen.
• Navigieren Sie durch Drehen von [VOLUME/SELECT/
NAVIGATE]zum Menüpunkt „System“.
• Bestätigen Sie die Auswahldurch Drückenvon
[VOLUME/SELECT/NAVIGATE].
• Durch Drehen von [VOLUME/SELECT/NAVIGATE]
gelangenSie zum Eintrag „Language“. BestätigenSie
die Auswahl durch Drücken von [VOLUME/SELECT/
NAVIGATE].
• Wählen Sie durch Drehen von [VOLUME/SELECT/
NAVIGATE]Ihregewünschte Systemsprache aus.
• Bestätigen Sie diese durch Drücken von [VOLUME/
SELECT/NAVIGATE].
Hinweis
• Betreiben Sie das Produkt nur bei einer
Umgebungstemperatur von -10°Cbis 50°C.
• Lagern Sie das Produkt nur bei einer
Umgebungstemperatur von -20 °C bis 60°C.
5. Wartung und Pflege
• Reinigen Sie dieses Produkt nur mit einem fusselfreien,
leicht feuchten Tuch und verwenden Sie keine
aggressivenReiniger.
• Sollten Sie das Produkt längereZeit nichtnutzen,
schalten Sie das Gerät aus und trennenesvon der
Stromversorgung. Lagern Sie es an einem sauberen,
trockenen Ort ohne direkte Sonneneinstrahlung.
6. Haftungsausschluss
Die Hama GmbH &Co. KGübernimmt keinerlei Haftung
oderGewährleistung für Schäden, die aus unsachgemäßer
Installation,Montage und unsachgemäßemGebrauch
des Produktes oder einer Nichtbeachtung der
Bedienungsanleitungund/oder der Sicherheitshinweise
resultieren.
7. Service und Support
Bittewenden Sie sich bei Fragen zum Produkt gerneandie
Hama-Produktberatung.
Hotline: +49 9091 502-115 (Deu/Eng)
WeitereSupportinformationen nden siehier: www.hama.com
Die vollständige Langanleitung ist unter der folgenden
Internetadresse verfügbar:
www.hama.com -> 00054849 -> Downloads
](4) für ca. 3Sekunden,
Page 15
8. Entsorgungshinweise
Hinweis zum Umweltschutz:
Ab dem Zeitpunkt der Umsetzungder europäischen
Richtlinien2012/19/EUund 2006/66/EGin
nationales Rechtgiltfolgendes: Elektrische und
elektronische Gerätesowie Batterien dürfen nicht
mit dem Hausmüllentsorgtwerden. DerVerbraucher ist
gesetzlich verpichtet, elektrische undelektronische Geräte
sowie Batterien am Ende ihrer Lebensdauer an den dafür
eingerichteten, öffentlichenSammelstellen oder an die
Verkaufsstelle zurückzugeben. Einzelheiten dazu regeltdas
jeweiligeLandesrecht. DasSymbol aufdem Produkt,der
Gebrauchsanleitung oder der Verpackungweist auf diese
Bestimmungenhin. Mitder Wiederverwertung,der
stoichenVerwertung oderanderen Formen der
Verwertung vonAltgeräten/Batterien leisten Sie einen
wichtigen Beitrag zumSchutzunserer Umwelt.
9. Konformitätserklärung
Hiermit erklärt die Hama GmbH&CoKG, dass der
Funkanlagentyp [00054849] der Richtlinie
2014/53/EU entspricht. Der vollständige Text der
EU-Konformitätserklärungist unterder folgenden
Internetadresse verfügbar:
www.hama.com->00054849->Downloads.
Frequenzband/
Frequenzbänder
Abgestrahlte maximale
Sendeleistung
Bluetooth: 2.402 –2.480GHz
FM TX: 87.6 –107.9 MHz
Bluetooth: 6dBm (EIRP)
FM TX: -43.23 dBm
9
Page 16

F Notice d’utilisation
Éléments de commandeetd'affichage
A. Face avant
1. Écran
2. [Power]
3. [Mode]
4. Info/réglages
5. [VOLUME/SELECT/NAVIGATE]
6. [Search]
7. [Save]
8. [Previous]
B. Face arrière
9. Préréglages
10. Préréglages
11. Préréglages
12. Préréglages
13. Préréglages
14. Antenne
15. Sortie audio (LINEOUT)
16. Port microUSB
Remarque importante-Notice
d’utilisation:
• Ceci est un mode d’emploiabrégé :ilvous fournit
des informations de base essentielles, par ex.
des consignes de sécurité et desinformations
concernant la mise en service de votre produit.
• Pour des raisons écologiques et and’économiser
de précieuses matières premières,l’entreprise
Hama renonce àimprimer la versionlongue du
moded’emploi et propose ce dernier uniquement
entéléchargement au formatPDF.
!
• La version intégrale du mode d’emploi est
disponible àl‘adresseInternetsuivante:
www.hama.com -> 00054849 ->
Downloads
• Enregistrezcetteversion longuesur votre
ordinateur pour la consulter ultérieurement et
imprimez-la,danslamesuredupossible.
10
1. Explication des symboles d‘avertissement et des
remarques
Avertissement
Ce symbole est utilisé pour indiquer des consignesde
sécurité ou pour attirer votreattention sur des dangers
et risques particuliers.
Remarque
Ce symbole est utilisé pour indiquer des informations
supplémentaires ou des remarques importantes.
Risque d’électrocution
Ce symbole indiqueunrisque de contact avec des
parties non isolées du pr
un courant électriquecapable de provoquer un risque
d‘électrocution.
2. Contenudel‘emballage
• Radio numérique “CDR70BT”
• Bloc secteur USB pourvéhicule
• Câble adaptateur microUSB
• Fixation sur fentes d'aération
• Fixation avec coussinet auto-adhésif
• Antenne autocollante pour pare-brise avec connexion SMB
• Notice d’utilisation
3. Consignes de sécurité
• Ce produit est destiné àunusage domestique non
commercial.
• Protégez-le de toute saleté, humidité, surchauffe et
utilisez-le uniquement dans des locaux secs.
• Ce produit, comme tout produit électrique, doit êtretenu
hors de portée des enfants.
• Ne laissez pas les enfants jouer avec le produit. Les
enfants ne sont pas autorisés àeffectuer des tâches de
nettoyage et d’entretien du produit sans surveillance.
• Protégez le produit des secousses violentes et évitez
toute chute.
• N'utilisez pas le produit au delà des indications
mentionnées dans les caractéristiques techniques.
• Tenez les emballages hors de portée des enfants, risque
d'étouffement.
• Recyclez les emballages conformément aux prescriptions
locales en vigueur.
• N’apportez aucune modication au produit. Des
modications vous feraient perdrevos droits de garantie.
• Ne laissez pas le produit capter votreattention lorsque
vous pilotez un véhicule ou un appareil de sport et
veuillez concentrer toute votreattention sur la circulation
et votreenvironnement.
oduitsusceptibles de conduir
e
Page 17

Risqued’électrocution
• Ne tentez pas d‘ouvrir l‘appareil et cessezdel‘utiliser
en cas de détérioration.
• Cessez de l‘utiliserencas de détérioration de
l‘adaptateur CA,ducâble adaptateur ou du câble
d‘alimentation.
• Ne tentez pas de réparer l’appareil vous-même ni
d’effectuer des travauxd’entretien. Faites appel àdes
techniciens qualiéspour effectuer tous les travaux
d’entretien.
4. Installationetmise en service
Ce produit est livré avec une xation pourfentes
d'aération et une xation auto-adhésive pour surfaces
planes.
Avertissement
Veillez àceque les câbles d’alimentation électrique et
de connexion de l’antenne ne compromettent pas votre
sécurité au volant.
4.1 Connexion de l’antenne /solutions alternatives
pour la connexion de l’antenne (fig. D)
Remarque
• Pour optimiser la réception, l’antenne autocollante
pourpare-brise doit êtreapposée de façon àcequ’un
contact avec la carrosserie soit établi.
• Appliquezquand mêmelafeuille métallique sur le
montantAdevotrevéhicule dans le cas où il est
revêtu de tissu ou d’un autrematériau isolant.
• Contactez votregarage pourlaréalisation d’un
contact avec la carrosserie.
• Placez l’antenne sur le borddupare-brise (côté
passageravant, de préférence)etraccordez la feuille
métalliqueaumontant Adevotrevéhicule.
• Branchez ensuite la connexion SMB du câble d’antenne
àl’entrée d’antenne (14) de l’adaptateur.
4.2 Installation
Avertissement –Risque de blessure
• Veuillez contrôler que le produitn'affecte le
fonctionnement d'aucunélémentdesécurité tel qu'un
airbag,zone de sécurité, élément de commande,
instrument, etc. et qu'il n'entrave pas la visibilité.
• Ne laissezpas le produit capter votreattention
lorsquevous pilotez un véhicule ou un appareil de
sport et veuillez concentrer toute votreattention sur la
circulation et votreenvironnement.
Remarque
• Avant de commencer l'installation du système de
xation, veuillez contrôlerles possibilités d’installation
de votrevéhicule.Encas de doute, veuillez consulter
le mode d’emploidevotrevéhicule ou contacter le
fabricant de ce dernier.
• N'appliquez en aucun cas une force excessive lors de
l'utilisation ou de l'installation du produit.
A) Installation sur une grilled'aération
• Installez l’adaptateur de xation pouroricesde
ventilation au dos du produit (g. A).
• Insérez l’appareil dans la grille d'aération.
• La broche de xation àlagrille de ventilation pivotesur
360° ande pouvoir ajuster l’orientation.
B) Installation avec coussinet adhésif
Remarque concernant la surface
d'installation
Veuillez contrôlerlaparfaite propreté (poussière, graisse)
de la surface d’installation dans votrevéhicule (tableau
de bord, etc.). Utilisez un détergent spécial disponible
dans le commerce spécialisé.
• Appliquez l’adaptateur de xation avec le coussinet
adhésif au dos du produit (g. B).
• Nettoyezla surface sur laquelle vous souhaitez appliquer
le coussinet adhésif.
• Retirez le lm de protection du coussinetadhésif et
appliquez l’adaptateur sur la surfaceprévue.
11
Page 18
4.3 Connexion
Remarque
• Utilisez exclusivement les accessoires d'origine(ou
des accessoires autorisés par Hama) and'éviter tout
endommagementduproduit.
• Raccordez le câble de charge USB fourni au port USB
(16) du produit.
• Insérez le connecteur libreducâble USB dans une prise
de courant (12 V) de votrevéhicule.
4.4 Mise soustension/mode veille/première
configuration
Mise soustension
• Maintenez la touche [
secondes ande mettreleproduit sous tension.
Mise horstension
• Maintenez la touche [
secondes ande mettreleproduit hors tension.
Remarque
Coupez l’alimentation de la radio pour la mettre
complètementhors tension.
Première conguration
Remarque
• Contrôlez la conformitédelaconnexion de l’antenne.
• Après la mise sous tension, le produit est en mode DAB/
DAB+ et procède immédiatement àune recherche de
stations.
• Appuyez sur [
àunmoment ultérieur.
Le bouton [VOLUME/SELECT/NAVIGATE](5) dispose
d’une double fonction :
• Vous pouvez sélectionner une option du menu en
tournant le bouton [VOLUME/SELECT/NAVIGATE].
• Conrmez votresélectionenappuyant sur le bouton
[VOLUME/SELECT/NAVIGATE].
• Appuyez sur la touche [
précédent
4.5 Paramétrage de la langue
L’anglais est la langue par défaut lors de la premièremise
en service. Procédez commesuit ande sélectionner une
autrelangue :
• Maintenez la touche [
3secondespour ouvrir le menu de réglage.
• Tournez le bouton[VOLUME/SELECT/NAVIGATE]an
de sélectionner l’option “System”.
](2) enfoncée pendant env.3
](2) enfoncée pendant env.3
](6) pour lancer une recherche manuelle
]anderetourner au menu
](4) enfoncée pendant env.
• Conrmez votresélection en appuyant sur le bouton
[VOLUME/SELECT/NAVIGATE].
• Tournez le bouton [VOLUME/SELECT/NAVIGATE]
and’ouvrir l’option“Language”.Conrmez votre
sélectionenappuyant sur le bouton [VOLUME/SELECT/
NAVIGATE].
• Sélectionnez la languedésirée en tournant le bouton
[VOLUME/SELECT/NAVIGATE].
• Conrmez votresélection en appuyant sur le bouton
[VOLUME/SELECT/NAVIGATE].
Remarque
• Utilisez le produit uniquement àune température
ambiante située entre-10 °C et 50 °C.
• Entreposez le produit uniquement àune température
ambiante située entre-20 °C et 60 °C.
5. Nettoyage et entretien
• Nettoyezce produit uniquement àl’aide d’un chiffon
non pelucheuxlégèrement humide ;évitez tout
détergentagressif.
• Débranchez l‘adaptateur CA de la source de courant
si vous ne comptez pas utiliser l‘appareil pendant un
certain temps. Entreposez-le dans un local sec, propreet
protégé des rayons directs du soleil.
6. Exclusion de garantie
La société Hama GmbH &Co. KG décline toute
responsabilité en cas de dommages provoqués par une
installation, un montage ou une utilisation non conformes
du produit ou encoreprovoqués par un non respect des
consignes du moded‘emploi et/ou des consignes de
sécurité.
7. Service et assistance
En cas de question concernant le produit, veuillez vous
adresserauservice de conseil produits de Hama.
Ligne téléphonique directe :+49 9091 502-115
(allemand/anglais)
Vous trouverez ici de plus amples informationsconcernant
l‘assistance :www.hama.com
La versionintégrale du mode d’emploiest disponible à
l‘adresse Internet suivante :
www.hama.com -> 00054849 -> Downloads
12
Page 19
8. Consignes de recyclage
Remarques concernant la protection de
l’environnement:
Conformément àladirectiveeuropéenne
2012/19/EU et 2006/66/CE, et and‘atteindreun
certain nombred‘objectifs en matière de
protection de l‘environnement, les règlessuivantes
doivent êtreappliquées: Les appareils électriques et
électroniques ainsique les batteries ne doivent pas être
éliminés avecles déchets ménagers. Le pictogramme
“picto” présentsur le produit, son manuel d‘utilisation ou
son emballage indique que le produit est soumis àcette
réglementation. Le consommateur doit retourner le
produit/la batterie usager aux points de collecte prévus à
cet effet. Il peut aussi le remettreàun revendeur.En
permettant ennlerecyclage des produits ainsi que les
batteries, le consommateur contribueraàlaprotectionde
notreenvironnement. C‘estunacte écologique.
9. Déclaration de conformité
Le soussigné, Hama GmbH &CoKG, déclareque
l‘équipementradioélectrique du type [00054849]
est conformeàladirective 2014/53/UE. Le texte
complet de la déclaration UE de conformité est disponible
àl‘adresse internet suivante:
www.hama.com->00054849->Downloads.
Banda obandas de
frecuencia Banda o
bandasdefrecuencia
Bluetooth: 2.402 –2.480GHz
FM TX: 87.6 –107.9 MHz
Potencia máximade
radiofrecuencia
Bluetooth: 6dBm (EIRP)
FM TX: -43.23 dBm
13
Page 20

E Instrucciones breves
Elementos de manejo eindicadores
A. Lado frontal
1. Pantalla
2.[Power]
3. [Mode]
4. Info/Ajustes
5. [VOLUME/SELECT/NAVIGATE]
6. [Search]
7. [Save]
8. [Previous]
B. Parte posterior
9. Preajustes
10. Preajustes
11. Preajustes
12. Preajustes
13. Preajustes
14. Antena
15. LINEOut
16. Puerto MicroUSB
Nota importante -Instrucciones
breves:
• Éstas son unasinstruccionesbreves quele
facilitan las informacionesbásicas importantes,
como lasindicacionesdeseguridad ylapuesta en
funcionamiento de su producto.
• Pormotivos de protección medioambiental
yparaahorrar valiosas materias primas,la
empresa Hama prescindedeinstruccionesde
manejo impresasyofrece éstas únicamente como
descargadePDF.
!
• Las instruccionescompletas estándisponibles
en la siguiente dirección de Internet:
www.hama.com -> 00054849 ->
Downloads
• Guarde estasinstrucciones completasensu
ordenadorpara nesdeconsultaeimprímalas de
ser posible.
1. Explicación de los símbolos de aviso ydelas
indicaciones
Aviso
Se utiliza paracaracterizarlas indicaciones de
seguridad oparallamar la atención sobre peligrosy
riesgos especiales.
Nota
Se utiliza paracaracterizarinformaciones adicionales o
indicaciones importantes.
Peligrodesufrir una descarga eléctrica
Este símbolo hace referencia al peligrodecontactocon
partes no aisladasdel pr
una tensión peligrosa de una intensidad tal que puede
provocar una descarga eléctrica.
2. Contenido del paquete
• Radio digital «CDR70BT»
• Fuente de alimentación USB paravehículo
• Cable adaptador MicroUSB
• Fijación pararanuradeventilación
• Fijación con almohadilla autoadhesiva
• Antena adhesiva paracristal con conexión SMB
• Instrucciones breves
3. Instrucciones de seguridad
• El productoesparaeluso domésticoprivado, no
comercial.
• Proteja el producto de la suciedad, la humedad, el calor
excesivoyutilícelo sólo en recintos secos.
• Este producto, como todos los productos eléctricos, no
debe estar en manos de los niños.
• Losniños no deben jugar con el aparato. Losniños no
deben realizarlalimpiezayelmantenimiento arealizar
por el cliente sin ser supervisados.
• No deje caer el producto ni lo someta asacudidas
fuertes.
• No opereelproducto fueradelos límites de potencia
indicados en los datostécnicos.
• Mantenga el material de embalaje fueradel alcance de
los niños, existe peligrodeasxia.
• Desecheelmaterial de embalaje en conformidad con las
disposiciones locales sobreeldesechovigentes.
• No realice cambios en el aparato. Esto conllevaría la
pérdida de todoslos derechos de la garantía.
• Durante los desplazamientoscon un vehículo oaparato
deportivo, no se distraiga con el producto ypreste
atenciónaltráco yaalentorno.
oducto que pueden conducir
14
Page 21
Peligrodesufrir una descargaeléctrica
• No abraelproducto ynolosiga operando de
presentar deterioros.
• No utilice el productosieladaptador de AC,el
adaptador del cable oelcable eléctrico están
dañados.
• No intente mantener oreparar el productopor
cuenta propia.-Encomiendecualquier trabajo de
mantenimiento al personal especializado competente.
4.2 Montaje
Aviso –Peligrodesufrir lesiones
• •Asegúrese de que ni la vista ni ningún componente,
como los airbags,áreas de seguridad, elementos
de manejo, instrumentos, etc., se verán tapadoso
limitados.
• •Durante los desplazamientoscon un vehículo o
aparato deportivo, no se distraiga con el producto y
preste atención al tráco yasuentorno.
4. Montaje ypuesta en funcionamiento
Este producto se suministracon una jaciónparalaranura
de ventilación del vehículo yuna jación autoadhesiva
parasupercies rectas.
Aviso
Asegúrese de que ciertos cables,comopuedenser el
del suministrodecorriente olaconexión de antena, no
afectan alaseguridad durante la conducción.
4.1 Conexión de antena /Soluciones alternativas
para la conexión de antena (ImagenD)
Nota
• Para optimizar la recepción, la antenaadhesiva para
cristal debe colocarse haciendo contacto con la
carrocería.
• Aunque el montante Adesuvehículo esté recubierto
con tejido ocualquier otromaterial aislante, instale la
lámina de metalahí mismo.
• Diríjase auntaller local de vehículos paraestablecer
un contacto con la carrocería.
• Coloque la antena al borde del parabrisas
(preferentemente en el lado del copiloto)yconecte la
lámina de metal con el montante Adel vehículo.
• Seguidamente, conecte la conexión SMBdel cable de
antena con la entrada de antena (14) del adaptador.
Nota
• Antes del montaje del soporte, compruebe las
diferentes posibilidades de montaje dentro de su
vehículo. En caso de duda, consulte paraelloel
manual de instruccionesdel automóvil odiríjase al
fabricante del automóvil.
• No fuerce nuncaelproducto durantesumanejo o
montaje.
A) Instalación en las rejillasdeventilación
• Monte el adaptador para jación asalidas de ventilación
en la parte posteriordel producto. (FiguraA)
•Inserte ahoraeldispositivoenlarejilla de ventilación.
• El pivote paralajaciónalarejilla de ventilaciónse
puede girar 360° paraadaptar la orientación.
B) Montaje con almohadilla adhesiva
Nota –Supercie de montaje
Tenga en cuenta que la supercie de montaje sobre
la que se desee trabajar(p. ej. el salpicadero) debe
estar libredepolvo ygrasas oaceites. Utilice para
ello un limpiadoradecuado aadquirir en un comercio
especializado.
• Coloqueeladaptador para jación con la almohadilla
adhesivaenlaparte posterior del producto (guraB).
• Limpie la supercie sobrelaque quieracolocarla
almohadilla adhesiva.
• Retireahoralalámina protectoradelaalmohadilla
adhesivaycoloque el adaptador sobre la supercie
prevista.
15
Page 22

4.3 Conexión
Nota
• Utiliceúnicamente accesorios originales (o: accesorios
autorizadospor Hama)paraevitar daños en el
producto.
• Conecte el cable de carga USB suministrado al puerto
USB (16) del dispositivo.
• Conecte ahoralaclavija libredel cable USB aunenchufe
de 12 Vdesuvehículo.
4.4 Encendido /Standby/Ajuste inicial
Encendido
• Pulse ymantenga pulsada[
segundos paraencender el dispositivo.
Apagado
• Pulse ymantenga pulsada[
segundos paraactivar el modo Standby.
Nota
Para apagar completamente la radio, desconéctela de la
alimentación de corriente.
Conguración inicial
Nota
• Asegúrese de que la conexióndelaantena se ha
efectuado correctamente.
• Tras el encendido, el dispositivo se encuentraenelmodo
DAB/DAB+ ycomienza inmediatamente con la búsqueda
de emisoras.
• Pulsando [
búsqueda manualmente en un momento posterior.
[VOLUME/SELECT/NAVIGATE](5) tiene una doble
asignación de funciones:
• Girando[VOLUME/SELECT/NAVIGATE]dentro del
menú,puede seleccionar opciones individuales.
• Pulsando [VOLUME/SELECT/NAVIGATE]puede
conrmar la selección.
• Pulse [
](6) es posible iniciar el proceso de
]paravolver al nivel de menú previo
](2) durante aprox. 3
](2) durante aprox. 3
4.5 Ajuste de idioma
En la primera puesta en funcionamiento se ajustaelinglés
como idioma estándar de la radio. Proceda de la siguiente
forma paraajustar el idioma:
• Pulse ymantengapulsadas [
segundos paraacceder al menú de conguración.
• Girando [VOLUME/SELECT/NAVIGATE], naveguehasta
el punto de menú«System».
• Conrmelaselección pulsando [VOLUME/SELECT/
NAVIGATE].
• Girando [VOLUME/SELECT/NAVIGATE], accederá
al punto «Language».Conrme la selección pulsando
[VOLUME/SELECT/NAVIGATE].
• Girando [VOLUME/SELECT/NAVIGATE], seleccione el
idioma deseado paraelsistema.
• Conrmepulsando[VOLUME/SELECT/NAVIGATE].
Nota
• Opereel producto exclusivamente auna temperatura
ambiente situada entre-10 °C y50°C.
• Almacene el producto exclusivamente auna
temperaturaambientesituadaentre-20 °C y60°C.
5. Mantenimiento ycuidado
• Limpie este producto sólo con un paño ligeramente
humedecido que no deje pelusas ynoutilice detergentes
agresivos.
• Si no va autilizarelproducto durante un periodo
prolongado de tiempo, apague el aparato y
desconéctelo de la alimentación de corriente. Guárdelo
en un lugar limpio yseco que no esté expuestoala
radiación directa del sol.
6. Exclusión de responsabilidad
Hama GmbH&CoKGnose responsabilizani concede
garantíapor los daños que surjan por una instalación,
montaje omanejo incorrectos del producto opor la no
observación de las instrucciones de manejo y/o de las
instrucciones de seguridad.
7. Servicio ysoporte
Si tiene que hacer alguna consulta sobre el producto,
diríjase al asesoramiento de productosHama.
Línea directa: +49 9091 502-115 (Alemán/Inglés)
Encontrar más información de soporte aquí:
www.hama.com
Las instrucciones completas están disponiblesenla
siguiente dirección de Internet:
www.hama.com -> 00054849 -> Downloads
](4) durante aprox. 3
16
Page 23
8. Instrucciones para desecho yreciclaje
Nota sobrelaprotección medioambiental:
Después de la puesta en marcha de la directiva
Europea2012/19/EU y2006/66/EU en el sistema
legislativonacional,seaplicaralosiguiente: Los
aparatos eléctricosyelectrónicos, así comolas
baterías, no se deben evacuar en la basura doméstica. El
usuario está legalmente obligado allevar los aparatos
eléctricos yelectrónicos, así comopilas ypilas recargables,
al naldesuvida útil alos puntos de recogidacomunales
oadevolverlos al lugar donde los adquirió. Losdetalles
quedaran denidos por la ley de cada país. El símbolo en
el producto, en las instrucciones de uso oenelembalaje
hace referencia aello. Gracias al reciclaje,alreciclaje del
material oaotras formas de reciclaje de aparatos/pilas
usados, contribuyeUsted de forma importante ala
protección de nuestromedio ambiente.
9. Declaración de conformidad
Porlapresente, Hama GmbH&CoKG, declara
que el tipo de equiporadioeléctrico [00054849]
es conformecon la Directiva 2014/53/UE. El texto
completo de la declaración UE de conformidad está
disponible en la dirección Internet siguiente:
www.hama.com->00054849->Downloads.
Banda obandas de
frecuencia Banda o
bandasdefrecuencia
Bluetooth: 2.402 –2.480GHz
FM TX: 87.6 –107.9 MHz
tencia máximade
Po
radiofrecuencia
Bluetooth: 6dBm (EIRP)
FM TX: -43.23 dBm
17
Page 24
R Краткое руководство
Органы управления ииндикации
A. Передняя панель
1. Дисплей
2. [Power] (питание)
3. [Mode] (режим)
4. Info/Settings (информация/настройки)
5. [VOLUME/SELECT/NAVIGATE](громкость/выбор/
навигация)
6. [Search] (поиск)
7. [Save] (сохранить)
8. [Previous] (предыдущая)
B. Задняя панель
9. Сохраненные настройки
10. Сохраненные настройки
11. Сохраненные настройки
12. Сохраненные настройки
13. Сохраненные настройки
14. Антенна
15. LINE Out
16. Разъем Micro-USB
Важноепримечание - Краткое
руководство:
• Внастоящем краткомруководствеприводятся
основныесведения по технике безопасностии
вводувэксплуатацию устройства.
• Из соображений охраны окружающейсреды
иэкономии ценныхсырьевыхресурсов
фирма Hama отказывается от использования
печатных руководств ипредлагает их
исключительно длязагрузки вформате PDF.
!
• Сполнымтекстом Руководства можно
ознакомитьсяздесь:
www.hama.com -> 00054849 -> Загрузка
• Сохраните настоящее руководствопо
эксплуатации на компьютередля справок и
при необходимости распечатайте его.
1. Предупредительные пиктограммы и
инструкции
Внимание
Данным значкомотмечены инструкции,
несоблюдениекоторых можетпривестикопасной
ситуации.
Примечание
Дополнительная или важная информация.
Опасность пораженияэлектрическим
током
Значок предупреждает об опасностипораж
высокимнапряжением вслучае касания
неизолированных токоведущих деталей.
2. Комплект поставки
• Цифровой радиоприемник CDR70BT
• Автомобильныйблок питания USB
• Кабель-переходник Micro-USB
• Крепление для вентиляционных отверстий
• Крепление ссамоклеящейсяподкладкой
• Антеннадля наклеивания на стекло сразъемом SMB
• Краткое руководство
3. Техникабезопасности
• Изделиепредназначено толькодля домашнего
применения.
• Беречь от грязи, влаги иисточниковтепла.
Эксплуатировать тольковсухих помещениях.
• Не давать детям!
• Не разрешать детям играть сприбором. Детям
запрещается выполнятьочистку итехническое
обслуживаниеприбора без присмотра взрослых.
• Не ронять. Беречь от сильныхударов.
• Соблюдатьтехнические характеристики.
• Упаковку не давать детям: опасность асфиксии.
• Сразу утилизировать упаковку всоответствии с
местными нормами.
• Запрещается вносить изменения вконструкцию.
Впротивномслучае гарантийные обязательства
аннулируются.
• Эксплуатация изделиянедолжна отвлекать от
вожденияавтомобиля, дорожногодвижения и
окружающих условий.
ения
18
Page 25
Опасностьпоражения током
• Изделие не открывать. Запрещается
эксплуатировать неисправное изделие.
• Запрещается эксплуатация при неисправном блоке
питания или поврежденном кабеле питания.
• Запрещается самостоятельно выполнять
техническое обслуживание или ремонт устройства.
Любые работы по техническому обслуживанию
или ремонту разрешается выполнять только
квалифицированному персоналу.
4. Монтаж иввод вэксплуатацию
Этоизделие поставляетсяскреплением для
вентиляционных отверстийавтомобиля и
самоклеящейся подкладкой для ровных поверхностей.
Внимание
Следите за тем, чтобы кабель для питания и
подключения антенныненарушал безопасность
водителя.
4.1 Подключение антенны/альтернативные
решения для подключенияантенны (Рис.D)
Примечание
• Для оптимизации приемаантеннадля
наклеивания на стекло должнаконтактироватьс
кузовом автомобиля.
• Еслипередняя стойка кузова вашегоавтомобиля
облицована тканью или другими изолирующими
материалами, поместите на нее металлическую
фольгу.
• Обратитесьвместную автомастерскую для
установления контактаскузовом.
• Установите антеннуукрая лобовогостекла
(предпочтительно со стороны переднегопассажира) и
соедините металлическую фольгу спередней стойкой
автомобиля.
• Затем подключите разъем SMB антенногокабеля с
гнездом для антенны (14) адаптера.
4.2 Монтаж
Внимание – Опасность травмирования!
• Запрещается препятствовать обзору, атакже
функциональности подушекбезопасности,
органов управления, приборов ит.д.
• Эксплуатация изделия не должна отвлекать от
вождения автомобиля, дорожного движения и
окружающих условий.
Примечание
• Перед началомработы определите условия
монтажа держателя вавтомобиле. Изучите
инструкциюпоэксплуатации автомобиля или
обратитесь за консультацией кпроизводителю
автомобиля.
• При эксплуатации имонтаже не применяйте
чрезмерных усилий.
A) Монтажнавентиляционную решетку
• Установите адаптердля крепления на
вентиляционные отверстия на заднюю сторону
изделия (рис. А).
• Вставьте устройство ввентиляционную решетку.
• Цапфа для крепления на вентиляционную решетку
вращается на 360° для регулировки положения.
B) Монтажспомощью клейкой ленты
Примечание – Монтаж
Очиститемонтажную поверхность (например,
приборную панель) от пыли иобезжирьте ее.
Воспользуйтесь соответствующим чистящим
средством, которое можно приобрести в
специализированном магазине.
• Наклейте крепежный адаптер на заднююповерхность
изделия спомощью клейкой прокладки (рис. В).
• Очистите поверхность, на которую будет наклеено
изделие.
• Снимите защитнуюпленку из клейкой подкладки и
установите адаптер на поверхность.
19
Page 26
4.3 Подключение
Примечание
• Разрешаетсяприменять толькозаводские
принадлежности (или допущенные компанией
Hama принадлежности) во избежание
поврежденияизделия
• Подключите зарядный кабель USB (вкомплекте) к
USB-разъему (16) изделия.
• Другой конец кабеля USB подключите кразъему 12 В
автомобиля.
4.4
чение/
Вклю
первоначальная настройка
Включение
• Нажмите иудерживайте кнопку [
примерно 3 с, чтобы включить устройство.
Выключение
• Нажмите иудерживайте кнопку [
примерно 3 с, чтобы активировать режим ожидания.
Примечание
для того чтобы полностьювыключить
радиоприемник отключите егоот сети питания.
Первоначальная настройка
Примечание
• Убедитесьвтом, чтоантенна подключена
правильно.
• При включении устройство переходит врежим DAB/
DAB+ инемедленно начинает поиск сигнала.
• Поискможно такжевлюбое времязапустить вручную,
нажавкнопку [
Кнопка [VOLUME/SELECT/NAVIGATE](громкость/выбор/
навигация)(5) выполняетдвойнуюфункцию:
• вращением кнопки [VOLUME/SELECT/NAVIGATE]
(громкость/выбор/навигация) выберитеотдельные
пунктыменю;
• подтвердите выборнажатием на кнопку [VOLUME/
SELECT/NAVIGATE] (громкость/выбор/навигация).
• Для возврата на предыдущий уровень менюнажмите
кнопку [
4.5 Выборязыка
При первомвводе вэксплуатацию по умолчанию
настроен английский язык интерфейса. Выберите язык
интерфейса следующим образом:
• нажмите иудерживайте кнопку [
примерно 3 сдля входавменю настроек;
режиможи
](6).
].
дания
/
](2) втечение
](2) втечение
](4) втечение
• вращайте кнопку [VOLUME/SELECT/NAVIGATE]
(громкость/выбор/навигация) для переходавменю
System (система);
• подтвердите выбор нажатием на кнопку [VOLUME/
SELECT/NAVIGATE](громкость/выбор/навигация);
• вращая кнопку [VOLUME/SELECT/NAVIGATE]
(громкость/выбор/навигация) перейдите вменю
Language (язык); подтвердите выборнажатием на
кнопку [VOLUME/SELECT/NAVIGATE](громкость/
выбор/навигация);
• вращая кнопку [VOLUME/SELECT/NAVIGATE]
(громкость/выбор/навигация) выберитенужный язык;
• подтвердите нажатием на кнопку [VOLUME/SELECT/
NAVIGATE](громкость/выбор/навигация).
Примечание
• Используйте изделиетолькопри окружающей
температуре от -10 до 50° C.
• Храните изделие толькопри окружающей
температуре от -20 до 60° C.
5. Уход итехобслуживание
• Чистку изделия производить толькобезворсовой
слегкавлажнойсалфеткой. Запрещается применять
агрессивныечистящие средства.
• Если изделие не используется на протяжениидолгого
времени, выключите егоиотключите от сети. Храните
еговчистом сухом месте, недоступномдля прямого
солнечногоизлучения.
6. Отказотгарантийных обязательств
Компания Hama GmbH &Co. KG не несет
ответственность за ущерб, возникшийвследствие
неправильногомонтажа, подключения и
использованияизделия не по назначению, атакже
вследствие несоблюдения инструкции по эксплуатации
итехники безопасности.
7. Отделтехобслуживания
По вопросам ремонта или заменынеисправных
изделий обращайтесь кпродавцу или всервисную
службу компании Hama.
Горячая линия отдела техобслуживания:
+49 9091502-115 (немецкий, английский)
Подробнее смотритездесь:www.hama.com
Сполным текстом Руководства можно ознакомиться
здесь:www.hama.com -> 00054849 -> Загрузка
20
Page 27

8. Инструкции по утилизации
Охрана окружающей среды:
Смоментапереходанационального
законодательства на европейские нормативы
2012/19/EU и 2006/66/EU действительно
следующее: Электрические иэлектронные
приборы, атакже батареи запрещаетсяутилизировать с
обычныммусором. Потребитель, согласно закону,
обязан утилизировать электрическиеиэлектронные
приборы, атакже батареи иаккумуляторы послеих
использованиявспециально предназначенныхдля этого
пунктахсбора, либо впунктах продажи. Детальная
регламентация этих требований осуществляется
соответствующимместнымзаконодательством.
Необходимость соблюденияданныхпредписаний
обозначается особым значком на изделии, инструкции
по эксплуатации или упаковке. Припереработке,
повторном использованииматериалов илипри другой
форме утилизации бывших вупотреблении приборов Вы
помогаете охранеокружающей среды. Всоответствии с
предписаниями по обращениюсбатареями, вГермании
вышеназванныенормативыдействуютдля утилизации
батарейиаккумуляторов.
9. Декларация производителя
Настоящим компания Hama GmbH &CoKG
заявляет, чторадиооборудование типа
[00054849] отвечает требованиям директивы
2014/53/ЕС. Сполным текстом декларации о
соответствии требованиям ЕС можно ознакомиться
здесь:
www.hama.com->00054849->Downloads.
Диапазон/диапазоны
частот
Максимальная
излучаемая мощность
Bluetooth: 2.402 –2.480GHz
FM TX: 87.6 –107.9 MHz
Bluetooth: 6dBm (EIRP)
FM TX: -43.23 dBm
21
Page 28

I Istruzioni brevi
Elementi di comando eindicazioni
A. Lato anteriore
1. Display
2. [Power]
3. [Mode]
4. Info/Impostazioni
5. [VOLUME/SELECT/NAVIGATE]
6. [Search]
7. [Save]
8. [Previous]
B. Lato posteriore
9. Pre-impostazioni
10. Pre-impostazioni
11. Pre-impostazioni
12. Pre-impostazioni
13. Pre-impostazioni
14. Antenna
15. LINEOut
16. Attacco microUSB
Avvertenza importante -Istruzioni
brevi:
• Questeistruzioni brevi forniscono informazioni di
baseimportanticomeleavvertenzedisicurezza e
la messa in eserciziodel proprio prodotto.
• Perragioni di tutela ambientale eper il risparmio
di preziose materie prime,l’aziendaHamaha
decisodinon stampareleistruzioni perl’usoele
mette adisposizione esclusivamente in formato
PDFdascaricare.
!
• Le istruzionisono reperibili all’indirizzointernet
riportato qui di seguito:
www.hama.com -> 00054849 ->
Downloads
• Salvarequeste istruzioni complete per l’usosul
computerper unasuccessiva consultazione ed
eventualmente stamparle.
22
1. Spiegazione dei simboli di avvertimento edelle
indicazioni
Attenzione
Viene utilizzatoper contrassegnareleindicazioni
di sicurezza oppureper rivolgerel‘attenzione verso
particolari rischi epericoli.
Nota
Viene utilizzatoper contrassegnareinformazioni
supplementari oindicazioni importanti.
Pericolo dovuto ascossaelettrica
Questo simbolo indica un pericolodovutoalcontatto
con parti non isolatedel pr
provocareuna tensione pericolosadientitàtale da
generareilpericolo di una scossaelettrica.
2. Contenuto dellaconfezione
• Radio digitale “CDR70BT”
• Cavo di rete USB per auto
• AdattatoremicroUSB
• Supporto per le bocchette dell’aria
• Supporto con pad autoadesivo
• Antenna da applicaresul parabrezza con collegamentoSMB
• Istruzioni brevi
3. Avvertenze di sicurezza
• Il prodotto èconcepito perl’uso domestico privato, non
commerciale.
• Proteggereilprodotto da sporco, umidità, surriscaldamento
eutilizzarlo unicamente in localiasciutti.
• Tenerequesto prodotto,cometutte le apparecchiature
elettriche, lontanodalla portatadei bambini!
• Nonlasciaregiocareibambini conl'apparecchio.La
pulizia elamanutenzione nondevono essere effettuateda
bambini nonsorvegliati.
• Nonfarecadereilprodotto enon sottoporlo aforti
scossoni.
• Nonmettere in funzione il prodottoaldifuori dei suoi limiti
di rendimentoindicatinei datitecnici.
• Tenereilmaterialediimballaggio lontano dalla portata dei
bambini, pericolo di soffocamento!
• Smaltireimmediatamente il materialed'imballaggio
attenendosi alle prescrizioni locali vigenti.
• Non apportaremodicheall’apparecchio in modo da non
perdereidiritti di garanzia.
• Quando si viaggia su un autoveicoloosi utilizza un
attrezzo sportivo, non farsi distrarre dal prodotto eprestare
attenzione alla situazione deltraco edell’ambiente
circostante.
odotto che potr
ebber
o
Page 29

Pericolo dovuto ascossa elettrica
• Non aprireilprodotto enon utilizzarlo più se
danneggiato
• Non utilizzare il prodotto se l‘adattatore AC,ilcavo
adattatore oilcavo di rete sono danneggiati.
• Non tentarediaggiustareoripararel’apparecchio da
soli. Fare eseguirequalsiasi lavoro di riparazione al
personale specializzato competente.
4. Montaggio emessainfunzione
Questo prodotto viene fornito con un supporto che si può
ssare alle bocchette dell’aria eunsupporto autoadesivo
per le superci lisce.
Attenzione
Fare attenzione che icavi di alimentazioneedel
collegamento all’antenna non siano d’impedimento alla
sicurezza di guida.
4.1 Collegamento dell’antenna/ Soluzioni alternative
per il collegamento dell’antenna (Figura D)
Nota
• Permigliorarelaricezione, l’antenna applicabile sul
parabrezza dovrebbeesseremontata acontatto con
la carrozzeria.
• Se il treno anteriore delproprio autoveicolo è
ricoperto di stoffa ocon un altromateriale isolante,
applicarvi in ogni caso la pellicola metallizzata.
• Rivolgersi ad una autocina di ducia per realizzare
un contatto con la carrozzeria.
• Applicarel’antennasul bordo del parabrezza(consigliamo
il lato del passeggero) ecollegarelapellicola metallizzata
con il treno anteriore dell’autoveicolo.
• Quindi collegareilcollegamento SMB del cavo
dell’antenna con l’entrata dell’antenna (14)
sull’adattatore.
4.2 Montaggio
Attenzione –Rischio di ferite
• Prestareattenzione che nessun componente,come
airbag, settori di sicurezza,elementi di comando,
strumenti, ecc. oppurelavista venga coperto o
limitato.
• Quando si viaggia su un autoveicolo osiutilizza un
attrezzo sportivo, non farsi distrarredal prodotto
eprestareattenzione alla situazione del traco e
dell’ambiente circostante.
Nota
• Primadimontareil supporto, vericarele
possibilità d’installazione nel proprio autoveicolo.
In caso di dubbio,consultareilmanuale operativo
dell’autoveicolo orivolgersi al costruttore
dell’autoveicolo.
• Non usaretroppa forza, né violenza quando si utilizza
il prodotto eneanche durante il suo montaggio.
A) Montaggio sulla griglia di aerazione
• Montarel’adattatoredisupportoper le bocchette
dell’aria sulla parteposterioredel prodotto. (FiguraA)
•Fissare oral’apparecchio alla grigliadiaerazione.
• Il perno del supporto della griglia di aerazionepuò essere
ruotato a360° in modo da posizionarebene la griglia.
B) Montaggio con pad adesivo
Nota –Supercie di montaggio
Assicurarsi che la supercie di montaggio desiderata
(ad es. cruscotto) sia priva di polvere eunto. Utilizzare
aquesto scopo un detergente idoneo reperibile presso i
rivenditori specializzati.
• Fissare l’adattatore di montaggio con il pad autoadesivo
sul lato posterioredel prodotto (guraB).
• Pulirelasupercie su cui si vuole applicareilpad
autoadesivo.
• Staccare quindi la pellicolaprotettiva dal pad autoadesivo
e ssare l’adattatoresulla supercie desiderata.
23
Page 30

4.3 Attacco
Nota
• Perevitaredanni al prodotto, utilizzareesclusivamente
accessori originali (oppure: accessori
autorizzati da Hama).
• Collegareilcavo di carica USB in dotazione all'attacco
USB (16) dell'altoparlante.
• Collegarelaspina liberadel cavo USB auna presa da 12
Vliberadell’autovettura.
4.4 Accendere /Standby /Prima configurazione
Accendere
• Peraccendereildispositivo.premereemantenere
premuto [
Spegnere
• Premereemantenerepremuto [
secondi per attivarelamodalità standby.
Perspegnerecompletamente la radio, scollegarla
dall’alimentazione di rete.
Primacongurazione
• Accertarsi che il collegamento con l’antenna sia stato
• Dopo l’accensionel’apparecchio si trova in stato DAB/
DAB+ einizia la ricerca delle emittenti.
• Premendo [
in un secondo tempo.
[VOLUME/SELECT/NAVIGATE](5) ha una funzione
doppia:
• Selezionaresingole voci di menuruotando[VOLUME/
SELECT/NAVIGATE].
• Confermarelaselezione premendo [VOLUME/SELECT/
NAVIGATE].
• Pertornareindietropremere[
del menu
](2) per circa 3secondi.
](2) per circa 3
Nota
Nota
effettuato correttamente.
](6) èpossibile iniziarelaricerca manuale
]sul livello precedente
4.5 Impostazionedella lingua
Con la prima messa in funzioneviene impostato l’inglese
come lingua standarddella radio. Permodicarelalingua
procede come segue:
• premereetenerepremuto [
per andarealmenu di impostazione.
• Navigare ruotando [VOLUME/SELECT/NAVIGATE] no a
giungerealpuntodel menu “Sistema”.
• Confermarelaselezione premendo[VOLUME/SELECT/
NAVIGATE].
• Ruotando [VOLUME/SELECT/NAVIGATE] si arrivaalpunto
“Lingua”. Confermarelaselezione premendo[VOLUME/
SELECT/NAVIGATE].
• Selezionarelalinguadisistema desiderata ruotando
[VOLUME/SELECT/NAVIGATE].
• Confermarelaselezione premendo[VOLUME/SELECT/
NAVIGATE].
Nota
• BetreibenSie das Produkt nur bei einer
Umgebungstemperatur von -10°Cbis 50°C.
• Lagern Sie das Produkt nur bei einer
Umgebungstemperatur von -20 °C bis 60°C.
5. Cura emanutenzione
•Pulirequesto prodotto solo con un panno umido e
che non lascia pelucchienon utilizzaremai detergenti
aggressivi.
•Senon si utilizzailprodotto per un lungoperiodo di
tempo, spegnereildispositivoescollegarlo dalla rete
elettrica.Conservarlo.Inunluogo pulito, asciutto e
lontano dalla luce diretta del sole.
6. Esclusione di garanzia
Hama GmbH&Co.KGnon si assume alcunaresponsabilità
per idanni derivati dal montaggio ol‘utilizzo scorretto del
prodotto,nonché dallamancata osservanza delle istruzioni
per l‘uso e/o delle indicazionidisicurezza.
7. Assistenza esupporto
In casodidomande sul prodotto, rivolgersialla Consulenza
prodotto Hama.
Hotline: +49 9091 502-115(ted./ing.)
Ulterioriinformazionisul supporto sono disponibili qui:
www.hama.com
Le istruzionisono reperibili all’indirizzo internet riportato
qui di seguito: www.hama.com->00054849 ->
Downloads
](4) per ca. 3secondi
24
Page 31

8. Indicazioni di smaltimento
Informazioni per protezione ambientale:
Dopo l’implementazione della Direttiva Europea
2012/19/EU e2006/66/EUnel sistemalegale
nazionale,cisono le seguenti applicazioni: Le
apparecchiatureelettriche ed elettroniche ele
batterie non devono esseresmaltite con iriuti domestici.
Iconsumatori sono obbligati dalla legge arestituireI
dispositivi elettrici ed elettronici elebatterie alla ne della
lorovita utile ai punti di raccolta pubblici preposti per
questo scopo onei punti vendita. Dettaglidiquanto
riportato sono denitidalle leggi nazionali di ogni stato.
Questo simbolo sul prodotto,sul manuale d’istruzionio
sull’imballo indicano che questo prodottoèsoggetto a
queste regole.Riciclando, ri-utilizzandoimateriali o
utilizzando sotto altraforma ivecchi prodotti/le batterie,
darete un importante contributo alla protezione
dell’ambiente.
9. Dichiarazione di conformità
Il fabbricante, Hama GmbH &CoKG, dichiarache
il tipo di apparecchiaturaradio [00054849] è
conforme alla direttiva2014/53/UE. Il testo
completo della dichiarazione di conformità UE è
disponibile al seguente indirizzo Internet:
www.hama.com->00054849->Downloads.
Bande di frequenza
Massima potenza
aradiofrequenza
trasmessa
Bluetooth: 2.402 –2.480GHz
FM TX: 87.6 –107.9 MHz
Bluetooth: 6dBm (EIRP)
FM TX: -43.23 dBm
25
Page 32

N Beknopte bedieningsinstructies
Bedieningselementen en indicaties
A. Voorzijde
1. Display
2. [Power]
3. [Mode]
4. Info/Instellingen
5. [VOLUME/SELECT/NAVIGATE]
6. [Search]
7. [Save]
8. [Previous]
B. Achterzijde
9. Voorkeurzenders
10. Voorkeurzenders
11. Voorkeurzenders
12. Voorkeurzenders
13. Voorkeurzenders
14. 14 Antenne
15. 15 LINE Out
16. 16 Micro-USB-aansluitpunt
Belangrijke aanwijzing -Beknopte
bedieningsinstructies:
• Dit zijn beknopte bedieningsinstructies, waarin
udebelangrijkste basisinformatie, zoals
veiligheidsinstructies en de inbedrijfstelling van
uw product, kunt lezen.
• Inhet kader van de milieubescherming
endaarmee het besparen op waardevolle
grondstoffen laatdermaHama de uitvoerige
bedieningsinstructies in drukvormachterwegeen
biedt deze uitsluitend alsPDF-download aan.
!
• De volledige uitvoerige bedieningsinstructies
zijn onderhet volgende internetadres ter
beschikking:
www.hama.com -> 00054849 ->
Downloads
• Sladeuitvoerigebedieningsinstructies op uw
computeropals naslagwerk voor op eenlater
tijdstipenprintdeze naar mogelijkheid.
1. Verklaring van waarschuwingssymbolen en
instructies
Waarschuwing
Wordtgebruikt voor veiligheidsinstructies of om de
aandacht te trekken op bijzondere gevaren en risico‘s.
Aanwijzing
Wordtgebruikt voor extrainformatie of belangrijke
informatie.
Gevaar voor een elektrische schok
Dit symbool duidt op gevaar bij aanraking van niet-
de onder
geïsoleer
onder een zodanig gevaarlijke spanning staan,dat het
gevaar voor een elektrische schok aanwezig is.
2. Inhoud van de verpakking
• Digitale radio „CDR70BT“
• USB-voedingsadapter voor in de auto
•
o-USB-a
Micr
• Bevestiging voor ventilatiesleuf
• Bevestiging met zelfklevende plakstrook
• Glasplakantennemet SMB-aansluiting
• Beknopte handleiding
3. Veiligheidsinstructies
• Het productisbedoeld voor niet-commercieel
privégebruik in huiselijke kring.
• Product beschermen tegen vuil, vocht en oververhitting.
Alleen in droge ruimtes gebruiken.
• Dit product moet, net zoals alle elektrische producten,
buiten het bereik van kinderen worden gehouden!
• Kinderen mogen niet met het product spelen. Het
reinigen en onderhoudenmag niet door kinderen zonder
toezichtworden uitgevoerd.
• Laat het product niet vallen en stel het niet bloot aan
zwareschokken of stoten.
• Gebruik het product niet buiten de in de technische
gegevens vermelde vermogensgrenzen.
• Het verpakkingsmateriaal mag absoluut niet in handen
van kinderen komen; verstikkingsgevaar.
• Voer het verpakkingsmateriaal direct en overeenkomstig
de lokaal geldendeafvoervoorschriftenaf.
• Verander niets aan het apparaat. Daardoor vervalt elke
aanspraak op garantie.
• Laat uzich in een motorvoertuig of op een
sporttoestel niet door uw product aeiden en let op de
verkeerssituatie en uw omgeving.
delen van het pr
erkab
dapt
oduct, wel
ke mogelijk
el
26
Page 33

Gevaar voor een elektrische schok
• Open het product niet en gebruik het niet meerbij
beschadigingen.
• Gebruik het productniet indien de AC-adapter,de
adapterkabel of de voedingskabel is beschadigd.
• Probeer het product niet zelf te onderhouden
of te repareren. Laatonderhouds- en
reparatiewerkzaamheden door vakpersoneel uitvoeren.
4. Montage en inbedrijfstelling
Dit productwordt inclusiefeen bevestiging voor
ventilatiesleuven in de auto en een zelfklevende bevestiging
voor vlakke oppervlakkengeleverd.
Waarschuwing
Let erop dat mogelijke kabels voor de
spanningsvoorziening en antenneverbinding de
rijveiligheid niet beïnvloeden.
4.1 Antenne-aansluiting /Alternatieve oplossingen
antenne-aansluiting (Afbeelding D)
Aanwijzing
• Om de ontvangst te optimaliseren, dient de
glasplakantenne contactmet de carrosserie te maken
als hij wordt aangebracht.
• Indien de A-zuil van uw voertuig met stof of een
andereisolerend materiaal is bekleed,breng de
metalen folie dan toch daar aan.
• Vraag evt. een plaatselijke garage om een contact
met de carrosserie tot stand te brengen.
• Breng de antenne aan de rand van de voorruit (bij
voorkeur aan de zijdevan de bijrijder) aan en verbindde
metalen folie met de A-zuil van het voertuig.
• VerbindvervolgensdeSMB-aansluiting van de
antennekabel met de antenne-ingang (14) van de
adapter.
4.2 Montage
Waarschuwing–gevaar voor letsel
• Let erop dat geen componentenzoals de
airbag, andereveiligheidsvoorzieningen,
bedieningselementen, instrumenten, enz., of het vrije
zicht, bedektofbeperkt zijn.
• Laat uzich in een motorvoertuig of op een
sporttoestel niet dooruwproductaeiden en let op
de verkeerssituatie en uw omgeving.
Aanwijzing
• Controleer vóórdemontage van de houder
de inbouwmogelijkheden in uw voertuig.In
twijfelgevallen kunt uhet instructieboekjevan het
voertuig raadplegenofcontactopnemen met de
fabrikant van het voertuig.
• Tijdens de omgang met,enbij de montagevan het
product nooit geweld of brute kracht gebruiken.
A) Montageopeen ventilatierooster
• Monteer de bevestigingsadapter voor ventilatieroosters
op de achterzijde van het product. (Afbeelding A)
• Steek nu het apparaat in het ventilatierooster.
• De scharnierpen voor de bevestiging in ventilatieroosters
kan 360°worden gedraaid om de juistepositie in te
stellen.
B) Montagemet plakstrook
Aanwijzing –montage-oppervlak
Let erop dat het beoogde montage-oppervlak(bijv.
dashboard) stof- en vetvrij dient te zijn. Maak hiervoor
gebruik van een geschikt reinigingsmiddeluit de
vakhandel.
• Breng de bevestigingsadapter met de plakstrook op de
achterzijde van het product aan (Afbeelding B).
• Maak het oppervlakschoon waarop de plakstrook dient
te worden aangebracht.
• Trek nu de beschermfolie van de plakstrook en breng de
adapter op het beoogde oppervlak aan.
27
Page 34

4.3 Aansluiting
Aanwijzing
• Gebruik uitsluitend de originele toebehoren (of: door
Hama goedgekeurdtoebehoren) om beschadigingen
van het product te voorkomen.
• Sluit de meegeleverdeUSB-laadkabelophet USBaansluitpunt(16) van het apparaat aan.
• Sluit de vrije stekker van de USB-kabel op een 12
V-stopcontactvan uw voertuig aan.
4.4 Inschakelen /Stand-by/Eerste configuratie
Inschakelen
](2) gedurende ca. 3secondeningedrukt om het
• Houd [
apparaat in te schakelen.
Uitschakelen
](2) gedurende ca. 3seconden ingedruktomde
• Houd [
stand-by-modus te activeren.
Aanwijzing
Om de radio volledig uit te schakelen, dient deze van de
stroomvoorzieningteworden gescheiden.
Eersteconguratie
Aanwijzing
• Controleerofdeantenneverbinding correct tot stand
is gebracht.
• Na het inschakelen bevindt het apparaat zich in de
modusDAB/DAB+ en start direct met het zoeken naar
zenders.
• Door op [
[VOLUME/SELECT/NAVIGATE](5) heeft een dubbele
functiebezetting:
• Door in het menuaan [VOLUME/SELECT/NAVIGATE]te
• Door op [VOLUME/SELECT/NAVIGATE]te drukken,
• Druk op [
](6) te drukkenkan het zoeken op een later
tijdstip handmatig worden gestart.
draaien, selecteertudeafzonderlijkemenu-onderdelen.
bevestigt udeselectie.
]omterug te keren naar het voorgaande
menu-onderdeel.
28
4.5 Taalinstelling
Bij de eersteinbedrijfstelling is als standaardtaal van de
radio Engelsingesteld.Gaals volgt te werk om de taal aan
te passen:
• Houd [
om in het instellingenmenu terecht te komen.
• Navigeer door het draaien van [VOLUME/SELECT/
NAVIGATE]naarhet menu-onderdeel„System“.
• Bevestig de selectie door op [VOLUME/SELECT/
NAVIGATE]tedrukken.
• Door [VOLUME/SELECT/NAVIGATE] te draaien,komt u
in de keuze „Language“. Bevestig de selectie door op
[VOLUME/SELECT/NAVIGATE]tedrukken.
• Selecteer uw gewenste systeemtaal door[VOLUME/
SELECT/NAVIGATE]tedraaien.
• Bevestig de selectie door op [VOLUME/SELECT/
NAVIGATE]tedrukken.
• Gebruik het product alleen bij een
• Berghet productalleen op bij een
5. Onderhoud en verzorging
• Reinig dit product alleen met een pluisvrije, iets vochtige
doek en gebruik geen agressievereinigers.
• Indien uhet product gedurende langeretijd niet gebruikt,
dan schakelt uhet toestel uit en trekt de stekkeruit
het stopcontact. Berghet toestel op een schone, droge
plaatsopalwaar het niet aan directe zonnestraling wordt
blootgesteld.
6. Uitsluiting van garantieenaansprakelijkheid
Hama GmbH &Co. KG aanvaardtgeen enkele
aansprakelijkheid of garantieclaims voor schadeof
gevolgschade, welkedoor ondeskundige installatie,
montage en ondeskundig gebruikvan het product ontstaan
of het resultaat zijn van het niet in acht nemen van de
bedieningsinstructiesen/of veiligheidsinstructies.
7. Service en support
Neem bij vragen over het product contact op met de
afdeling Productadviesvan HAMA.
Hotline: +49 9091502-115 (Duits/Engels)
Meer support-informatie vindt uhier:
www.hama.com
De volledige uitvoerige bedieningsinstructies zijn onderhet
volgende internetadres ter beschikking:
www.hama.com -> 00054849->Downloads
](4) gedurende ca. 3seconden ingedrukt
Aanwijzing
omgevingstemperatuur van -10°Ctot 50 °C.
omgevingstemperatuur van -20 °C tot 60 °C.
Page 35

8. Aanwijzingen overdeafvalverwerking
Notitie aangaandedebescherming van het milieu:
Tengevolgevan de invoering van de Europese
Richtlijn 2012/19/EU en 2006/66/EU in het
nationaal juridisch system, is het volgende van
toepassing: Elektrische en elektronische
apparatuur,zoals batterijen mag niet met het huisvuil
weggegooid worden. Consumenten zijn wettelijk verplicht
om electrische en elctronische apparaten zoals batterijen
op het einde van gebruikintedienen bij openbare
verzamelplaatsen speciaal opgezet voordit doeleindeof
bij een verkooppunt.Verderespecicaties aangaande dit
onderwerp zijn omschreven doordenationale wet van het
betreffende land.Dit symbool op het product,de
gebruiksaanwijzing of de verpakking duidt erop dat het
product onderworpenisaan deze richtlijnen. Door te
recycleren, hergebruiken van materialen of andere vormen
van hergebruikenvan oude toestellen/batterijen, levert u
een grote bijdrage aan de bescherming van het mileu.
9. Conformiteitsverklaring
Hama GmbH &Co. KG verklaarthierbij dat dit
toestelzich in overeenstemming met de essentiële
eisen en aan de overige relevante bepalingen van
de Richtlijn 2014/53/EU bevindt. De
conformiteitsverklaring overeenkomstig de desbetreffende
Richtlijn vindt uonder www.hama.com
->00054849->Downloads.
Frequentieband(en)
Bluetooth: 2.402 –2.480GHz
FM TX: 87.6 –107.9 MHz
Maximaal radiofrequent
vermogen
Bluetooth: 6dBm (EIRP)
FM TX: -43.23 dBm
29
Page 36

J Σύντομες οδηγίες
Στοιχεία χειρισμούκαι ενδείξεις
A. Πρόσοψη
1. Οθόνη
2. [Power]
3. [Mode]
4. Info/Settings
5. [VOLUME/SELECT/NAVIGATE]
6. [Search]
7. [Save]
8. [Previous]
B. Πίσω πλευρά
9. Προεπιλογές
10. Προεπιλογές
11. Προεπιλογές
12. Προεπιλογές
13. Προεπιλογές
14. Κεραία
15. LINEOut
16. Υποδοχή microUSB
Σημαντική υπόδειξη - Σύντομες
οδηγίες:
• Το παρόν είναιέναςσύντομοςοδηγόςπου σας
παρέχει τις πιοσημαντικές πληροφορίες, όπως
οδηγίες ασφαλείαςκαι οδηγίες για τηνέναρξη
χρήσης τουπροϊόντος.
• Γιαλόγους προστασίας τουπεριβάλλοντος και
εξοικονόμησηςπολύτιμων πρώτων υλών η
εταιρεία Hama δεν παρέχει εκτυπωμένοαναλυτικό
εγχειρίδιο καιτοπροσφέρει αποκλειστικά ως
αρχείο PDF για ηλεκτρονικήλήψη.
!
• Το πλήρες αναλυτικόεγχειρίδιο είναι
διαθέσιμο στην ακόλουθη ιστοσελίδα στο
διαδίκτυο:
www.hama.com -> 00054849 ->
Downloads
• Αποθηκεύστε αυτότοαναλυτικό εγχειρίδιο στον
υπολογιστήσας γιαμελλοντικήαναφορά και
εκτυπώστετοεφόσονείναι δυνατόν.
30
1. Επεξήγηση συμβόλων προειδοποίησης και
υποδείξεων
Προειδοποίηση
Χρησιμοποιείται για τη σήμανσηυποδείξεων ασφαλείας
ήγια να επιστήσει την προσοχήσε ιδιαίτερουςκινδύνους.
Υπόδειξη
Χρησιμοποιείται για τη σήμανσηεπιπλέον πληροφοριών
ήσημαντικών υποδείξεων.
Κίνδυνος ηλεκτροπληξίας
Αυτό το σύμβολοπροειδοποιείγια κίνδυνο από επαφή
με μη μονωμέν
μπορεί να φέρουν τόση τάση ώστεναπροκληθεί
ηλεκτροπληξία.
2. Περιεχόμενα συσκευασίας
• Ψηφιακόραδιόφωνο "CDR70BT"
• Τροφοδοτικό USB αυτοκινήτου
•Καλώδιοπροσ
• Στερέωση στους αεραγωγούς
• Στερέωση με την αυτοκόλλητη βάση
• Αυτοκόλλητη κεραίατζαμιού με υποδοχήσύνδεσης SMB
• Σύντομες οδηγίες
3. Υποδείξεις ασφαλείας
• Το προϊόν προορίζεταιγια ιδιωτική, οικιακή χρήση καιόχι
γιαεμπορικούς σκοπούς.
• Προστατεύετετοπροϊόν από βρομιά, υγρασία και
υπερθέρμανση καιχρησιμοποιείτετομόνοσεστεγνούς
χώρους.
• Αυτή ησυσκευή όπως καιοιάλλες ηλεκτρικέςσυσκευές
δενείναι παιχνίδιγια τα παιδιά!
• Τα παιδιάδεν επιτρέπεταιναχρησιμοποιούν τη συσκευή ως
παιχνίδι. Οκαθαρισμόςκαι ησυντήρηση δενεπιτρέπεται να
γίνονται από παιδιά χωρίς επίβλεψη ενήλικα.
• Μην αφήνετε το προϊόνναπέσεικάτωκαι μην το
υποβάλλετεσεισχυρούςκραδασμούς.
• Μηνχρησιμοποιείτετοπροϊόνεκτός των ορίωνισχύος που
περιγράφονται στατεχνικάχαρακτηριστικά.
• Τα παιδιάδεν επιτρέπεταιναέρχονταισεεπαφή με τα
υλικάτης συσκευασίας, καθώς υπάρχεικίνδυνος ασφυξίας.
• Απορρίψτε κατευθείαν τα υλικάσυσκευασίας σύμφωνα με
τους ισχύοντες τοπικούς κανονισμούς απόρριψης.
• Μηνκάνετεμετατροπές στησυσκευή. Κατ' αυτόν τον
τρόποπαύουν να ισχύουν οι απαιτήσειςπου απορρέουν
απότην εγγύηση.
• Κατά την οδήγηση με αυτοκίνητοήαθλητικόόργανο, μην
αφήνετετοπροϊόν να αποσπάσει τηνπροσοχή σαςκαι
προσέξτε την κυκλοφορία γύρω σας.
αεξαρτήματ
αρμογέαmicroUSB
ατο
υπροϊόντ
ος, τα οποία
Page 37

Κίνδυνος ηλεκτροπληξίας
• Μην ανοίγετε τη συσκευή καιμην τη χρησιμοποιείτε
αν χαλάσει.
• Μην χρησιμοποιείτε τη συσκευή αν έχουν
υποστεί ζημιά ομετασχηματιστής, το καλώδιο του
μετασχηματιστή ήτοκαλώδιοτου ρεύματος.
• Μην επιχειρήσετε να συντηρήσετε ήναεπισκευάσετε
τη συσκευή εσείς οι ίδιοι. Οι εργασίες συντήρησης
πρέπει να γίνονται από εξειδικευμέναάτομα.
4. Τοποθέτηση και έναρξη χρήσης
Αυτό το προϊόν παρέχεταιμεμια βάση για στερέωσηστον
αεραγωγό τουαυτοκινήτουκαι μιααυτοκόλλητηβάση για
επίπεδες επιφάνειες.
Προειδοποίηση
• Προσέξτεώστε τα καλώδια τροφοδοσίας και
σύνδεσηςτης κεραίας να μην επηρεάζουν την
ασφάλειατου αυτοκινήτου.
4.1 Σύνδεση κεραίας / Εναλλακτικέςλύσεις για τη
σύνδεση της κεραίας (Εικόνα D)
Υπόδειξη
• Γιατηβελτιστοποίηση της λήψης ηαυτοκόλλητη
κεραία τζαμιού πρέπει να έρχεταισεεπαφήμετοσασί
τουαυτοκινήτου.
• Ανοικολόνες στοπαρμπρίζ τουαυτοκινήτου σας
είναι καλυμμένες με ύφασμαήάλλουλικόμόνωσης,
πρέπει παρολαυτά να τοποθετήσετε το μεταλλικό
φύλλο σε αυτές.
• Απευθυνθείτεσεένα συνεργείο αυτοκινήτων, για να
δημιουργήσετε επαφήμετοπλαίσιο.
• Τοποθετήστε την κεραία στοπλαίσιο τουπαρμπρίζ (κατά
προτίμηση στην πλευρά τουσυνοδηγού) καιπροσαρτήστε
το μεταλλικόφύλλοστην κολόναστο παρμπρίζ του
αυτοκινήτου.
• Κατόπιν, συνδέστε την υποδοχή SMB τουκαλωδίου
κεραίας με την είσοδο κεραίας (14) τουπροσαρμογέα.
4.2 Τοποθέτηση
Προειδοποίηση – Κίνδυνος τραυματισμού
• Προσέξτεώστε να μην παρεμποδίζεταιήπεριορίζεται
ηχρήση εξαρτημάτων όπως οαερόσακος, τα σημεία
ασφαλείας, τα χειριστήρια, τα όργανα κλπ ήη
ορατότητάσας.
• Κατά την οδήγηση με αυτοκίνητοήαθλητικόόργανο,
μην αφήνετε το προϊόννααποσπάσειτην προσοχή
σας καιπροσέξτετην κυκλοφορία γύρω σας.
Υπόδειξη
• •Πριν από την τοποθέτηση της βάσηςελέγξτε τις
δυνατότητες τοποθέτησης στοαυτοκίνητόσας.
Σε περίπτωση αμφιβολίας, συμβουλευτείτε το
εγχειρίδιο οδηγιών τουοχήματος ήαπευθυνθείτε στον
κατασκευαστή τουοχήματος.
• •Μην ασκείτε βία ήέντονη δύναμη κατά τονχειρισμό
καιτην τοποθέτηση τουπροϊόντος.
A) Τοποθέτηση στοπλέγματου αεραγωγού
• Τοποθετήστε τονπροσαρμογέα στερέωσης για τους
αεραγωγούςστην πίσω πλευρά τουπροϊόντος.(ΕικόναΑ)
•Κατόπιν, τοποθετήστε τη συσκευήστο πλέγμα του
αεραγωγού.
• Μπορείτε να περιστρέψετε τους πείρουςγια τη στερέωση
στοπλέγματου αεραγωγούκατά 360°, ώστε να
προσαρμόσετε τονπροσανατολισμό της συσκευής.
B) Τοποθέτηση με αυτοκόλλητη βάση
Υπόδειξη – Επιφάνεια τοποθέτησης
Λάβετευπόψη ότι ηεπιθυμητή επιφάνεια τοποθέτησης
(π.χ. ταμπλόοργάνων) πρέπει να μην έχει σκόνη
καιλιπαρότητα. Γι' αυτόν το σκοπό, χρησιμοποιήστε
κατάλληλοκαθαριστικό τουεμπορίου.
• Τοποθετήστε τονπροσαρμογέα στερέωσηςμετην
αυτοκόλλητη βάση στην πίσω πλευρά τουπροϊόντος
(εικόναΒ).
• Καθαρίστε την επιφάνεια στηνοποία θα τοποθετήσετε την
αυτοκόλλητη βάση.
• Κατόπιν, αφαιρέστε το φύλλοπροστασίας από την
αυτοκόλλητη βάση καιτοποθετήστε τονπροσαρμογέα
στην προβλεπόμενη επιφάνεια.
31
Page 38

4.3 Σύνδεση
Υπόδειξη
• Χρησιμοποιείτεαποκλειστικάγνήσια εξαρτήματα
(ήεξαρτήματαεγκεκριμένααπό τη Hama), για να
αποφύγετε βλάβες στοπροϊόν.
• Συνδέστε το παρεχόμενο καλώδιοφόρτισης USB στην
υποδοχή USB (16) της συσκευής.
• Συνδέστε το ελεύθερο βύσμα τουκαλωδίου USB σε μια
ελεύθερη υποδοχή 12 V τουαυτοκινήτου σας.
4.4 Ενεργοποίηση / Αναμονή / Πρώτη ρύθμιση
Ενεργοποίηση
• Πατήστε παρατεταμένατοπλήκτρο [
δευτερόλεπταπερίπου, για να ενεργοποιήσετε τη
συσκευή.
Απενεργοποίηση
• Πατήστε παρατεταμένατοπλήκτρο [
δευτερόλεπταπερίπου, για να ενεργοποιήσετε τη
λειτουργία αναμονής.
Υπόδειξη
Γιανααπενεργοποιήσετε πλήρως το ραδιόφωνο,
αποσυνδέστε το από την παροχή ρεύματος.
Πρώτηρύθμιση
Υπόδειξη
• Εξασφαλίστε ότι ησύνδεση της κεραίαςέχει
πραγματοποιηθεί σωστά.
• Μετάτην ενεργοποίηση ησυσκευή εισέρχεταιστη
λειτουργία DAB/DAB+ καιξεκινάαμέσως την αναζήτηση
καναλιών.
• Μπορείτε να ξεκινήσετε αργότερατηδιαδικασία
αναζήτησης χειροκίνητα πατώντας το πλήκτρο [
Στοπλήκτρο [VOLUME/SELECT/NAVIGATE](5) έχουν
αντιστοιχιστεί δύο λειτουργίες:
• Περιστρέφονταςτοπλήκτρο [VOLUME/SELECT/
NAVIGATE] στομενού μπορείτεναεπιλέξετε επιμέρους
στοιχεία τουμενού.
• Πατώντας το πλήκτρο [VOLUME/SELECT/NAVIGATE]
μπορείτε να επιβεβαιώσετε την επιλογή.
• Πατήστε το πλήκτρο [
προηγούμενοεπίπεδο τουμενού
4.5 Ρύθμιση γλώσσας
Κατά την πρώτη χρήση το ραδιόφωνο έχει ωςβασική
γλώσσα τα Αγγλικά. Εκτελέστε τα ακόλουθα βήματαγια να
ορίσετε τη γλώσσα:
], για να επιστρέψετε στο
](2) για 3
](2) για 3
](6).
• Πατήστε παρατεταμένατα πλήκτρα [
δευτερόλεπταπερίπου, για να μεταβείτε στομενού
ρυθμίσεων.
• Μεταβείτεστο στοιχείο μενού "System" περιστρέφοντας
το πλήκτρο [VOLUME/SELECT/NAVIGATE].
• Επιβεβαιώστε την επιλογή σας πατώντας το πλήκτρο
[VOLUME/SELECT/NAVIGATE].
• Μεταβείτε στοστοιχείο εισαγωγής "Language"
περιστρέφοντας το πλήκτρο [VOLUME/SELECT/
NAVIGATE]. Επιβεβαιώστε την επιλογή σας πατώντας το
πλήκτρο [VOLUME/SELECT/NAVIGATE].
• Επιλέξτε την επιθυμητή γλώσσα τουσυστήματος
περιστρέφοντας το πλήκτρο [VOLUME/SELECT/
NAVIGATE].
• Επιβεβαιώστε την πατώντας το πλήκτρο [VOLUME/
SELECT/NAVIGATE].
Υπόδειξη
• Χρησιμοποιείτε το προϊόν μόνοσεθερμοκρασία
περιβάλλοντος μεταξύ -10°Cκαι 50°C.
• Φυλάσσετε το προϊόνμόνοσε θερμοκρασία
περιβάλλοντος μεταξύ -20 °C και 60°C.
5. Συντήρηση και φροντίδα
• Καθαρίζετε αυτή τη συσκευήμόνομεένα ελαφρώς
βρεγμένοπανί χωρίς χνούδια καιμην χρησιμοποιείτε
καυστικά καθαριστικά.
• Αν πρόκειται να μη χρησιμοποιήσετε τη συσκευή για
μεγάλο διάστημα απενεργοποιήστε την καιαποσυνδέστε
τη από το ηλεκτρικόρεύμα. Φυλάσσετε τη σε καθαρό,
ξηρό μέρος χωρίς κατευθείανηλιακήακτινοβολία.
6. Απώλεια εγγύησης
Ηεταιρεία Hama GmbH &CoKGδεν αναλαμβάνει καμία
ευθύνη ήεγγύηση για ζημιές, οι οποίες προκύπτουν
από λανθασμένηεγκατάσταση καισυναρμολόγηση ή
λανθασμένη χρήση τουπροϊόντος ήμητήρηση των οδηγιών
λειτουργίας και/ήτων υποδείξεωνασφαλείας.
7. Σέρβις και υποστήριξη
Γιαερωτήσεις σχετικάμετοπροϊόν απευθυνθείτε στην
υπηρεσία εξυπηρέτησης πελατών της Hama.
Γραμμή υποστήριξης:+49 9091 502-115 (Γερμανικά/
Αγγλικά)
Περισσότερες πληροφορίες υποστήριξης θα βρείτε στη
διεύθυνση:www.hama.com
Το πλήρες αναλυτικό εγχειρίδιοείναι διαθέσιμο στην
ακόλουθη ιστοσελίδα στοδιαδίκτυο:
www.hama.com -> 00054849->Downloads
](4) για 3
32
Page 39

8. Υποδείξειςαπόρριψης
Υπόδειξησχετικάμετην προστασία
περιβάλλοντος:
Από τη στιγμή που ηΕυρωπαϊκή Οδηγία
2012/19/EU και 2006/66/EE ενσωματώνεται στο
εθνικόδίκαιοισχύουν τα εξής: Οι ηλεκτρικές καιοι
ηλεκτρονικές συσκευές καθώς καιοιμπαταρίες
δεν επιτρέπεται να πετιούνται σταοικιακάαπορρίμματα. Οι
καταναλωτές υποχρεούνται από τοννόμοναεπιστρέφουν
τις ηλεκτρικές καιηλεκτρονικέςσυσκευές καθώς καιτις
μπαταρίες στοτέλος της ζωής τους σταδημόσια σημεία
περισυλλογής που έχουν δημιουργηθείγι’αυτότοσκοπό ή
στασημεία πώλησης. Οι λεπτομέρειες ρυθμίζονται στη
σχετική νομοθεσία. Το σύμβολο πάνω στοπροϊόν, στο
εγχειρίδιο χρήσης ήστη συσκευασία παραπέμπει σε αυτές
τις διατάξεις. Με την ανακύκλωση, επαναχρησιμοποίηση
των υλικών ήμεάλλες μορφές χρησιμοποίησης παλιών
συσκευών / Μπαταριών συνεισφέρετεσημαντικάστην
προστασία τουπεριβάλλοντος. Στη Γερμανίαισχύουν
αντίστοιχαοιπαραπάνω κανόνες απόρριψης σύμφωναμε
τονκανονισμόγια μπαταρίες καισυσσωρευτές.
9. Δήλωση συμμόρφωσης
Με την παρούσαο/ηHama GmbH &CoKG,
δηλώνει ότι οραδιοεξοπλισμός [00054849]
πληροίτην οδηγία 2014/53/ΕΕ. Το πλήρες
κείμενοτηςδήλωσης συμμόρφωσης ΕΕ διατίθεταιστην
ακόλουθη ιστοσελίδα στοδιαδίκτυο:
www.hama.com->00054849->Downloads.
Ζώνη συχνοτήτων/Ζώνες
συχνοτήτων
Bluetooth: 2.402 –2.480GHz
FM TX: 87.6 –107.9 MHz
Μέγιστη εκπεμπόμενη
ισχύς
Bluetooth: 6dBm (EIRP)
FM TX: -43.23 dBm
33
Page 40

P Krótka instrukcja obsługi
Elementy obsługi isygnalizacji
A. Przód
1. Wyświetlacz
2. [Power]
3. [Mode]
4. Info/Settings
5. [VOLUME/SELECT/NAVIGATE]
6. [Search]
7. [Save]
8. [Previous]
B. Tył
9. Ustawienia zaprogramowane
10. Ustawienia zaprogramowane
11. Ustawienia zaprogramowane
12. Ustawienia zaprogramowane
13. Ustawienia zaprogramowane
14. Antena
15. LINEOut
16. Port microUSB
Ważna wskazówka -Krótka instrukcja
obsługi:
• Dokumentten jest krótką instrukcją obsługi
zawierającą najistotniejsze podstawowe
informacje dotyczące np.bezpiecznego
użytkowaniaiuruchamiania produktu.
• Ze względu na ochronęśrodowiska ioszczędne
gospodarowanie cennymisurowcami rmaHama
rezygnuje zpublikowania kompletnej instrukcji
obsługiwformie drukowanejiudostępnia je
wyłącznie jakoplikiPDF do pobrania.
!
• Pełny tekst kompletnej instrukcjiobsługi jest
dostępnypod poniższym adreseminternetowym:
www.hama.com -> 00054849 ->
Downloads
• Zapisać kompletną instrukcję obsługi na
komputerze do późniejszegoużytku iwrazie
potrzebywydrukować ją.
34
1. Objaśnienie symboli ostrzegawczych i
wskazówek
Ostrzeżenie
Używanewcelu zwrócenia uwaginaszczególne
niebezpieczeństwolub ryzyko.
Wskazówki
Używanewcelu zwrócenia uwaginaszczególnie
przydatne informacje.
Ryzyko porażenia prądem
elektrycznym
Sy
mbol ten wskazuje niebezpieczeństwodotknięcia
nieizolowanych części produktu, którą mogą być pod
napięciemgrożącymporażeniem prądem elektrycznym.
2. Zawartość opakowania
• Radio cyfrowe „CDR70BT”
• Zasilacz samochodowy USB
•Kabel
adapteramicroUSB
• Uchwyt do mocowania na kratce wentylatora
• Mocowaniezapomocą podkładki samoprzylepnej
• Antena do mocowania na szybie ze złączem SMB
• Krótka instrukcja obsługi
3. Wskazówki bezpieczeństwa
• Produkt jest przeznaczony do prywatnego,
niekomercyjnego użytku domowego.
• Chronić produkt przed zanieczyszczeniem, wilgocią
iprzegrzaniem oraz stosować go tylko wsuchych
pomieszczeniach.
• Trzymać ten produkt, jak wszystkieurządzenia
elektryczne, zdala od dzieci!
• Dzieciomnie wolno bawić się tym urządzeniem.
Czyszczenie ikonserwacja urządzenia przez dzieci nie
możeodbywać się bez nadzoru.
• Chronić produkt przed upadkiem isilnymi wstrząsami.
• Nie stosować produktu poza zakresem mocy podanym w
danych technicznych.
• Materiałyopakowaniowe trzymać koniecznie zdala od
dzieci, istnieje niebezpieczeństwo uduszenia.
• Materiałyopakowaniowe należynatychmiast poddać
utylizacji zgodniezobowiązującymi przepisami
miejscowymi.
• Nie modykować urządzenia. Prowadzi to do utraty
wszelkich roszczeń ztytuługwarancji.
• Podczas jazdy pojazdem mechanicznym bądź używania
przyrządu sportowego nie dopuścić do odwrócenia
uwagi na skutekkorzystania zproduktu oraz stale
obserwować otoczenie isytuację wruchu drogowym.
Page 41

Ryzyko porażenia prądem elektrycznym
• Nie otwierać produktu inie używać go, gdy jest
uszkodzony.
• Nie używać produktu,jeżeli zasilacz sieciowy,kabel
zasilacza bądź przewód sieciowysąuszkodzone.
• Nie próbować samodzielnie naprawiać produktu.
Prace serwisowe zlecać wykwalikowanemu
personelowi fachowemu.
4. Montaż iuruchamianie
Niniejszy produkt dostarczany jest zuchwytem do
mocowania wotworze wentylacyjnym pojazduorazz
podkładką samoprzylepną do powierzchni płaskich.
Ostrzeżenie
• Zwracać uwagę,aby ewentualne kable do zasilania
ipołączenia zanteną nie miaływpływu na
bezpieczeństwo jazdy.
4.1 Podłączanie anteny/alternatywne podłączanie
anteny (Ilustracja D)
Wskazówki
• Aby zasięgbyłoptymalny,antenę do montażuna
szybie należyzamocować stykiem zwróconym w
kierunku karoserii.
• Jeślisłupek przedni pojazdu jest obłożony okładziną
tekstylną lub innym materiałem izolującym, to mimo
to zamocować folię metalową wtym miejscu.
• Wcelu utworzenia połączenia zkaroseria zwrócić się
opomocdolokalnego warsztatu samochodowego.
• Zamocować antenę na brzeguprzedniejszybu (najlepiej
po stronie pasażera) ipołączyć folię metalową ze
słupkiem przednim pojazdu.
• Następnie umieścić złączeSMB kabla antenowegow
wejściu antenowym (14) adaptera.
4.2 Montaż
Ostrzeżenie –Niebezpieczeństwo zranienia
• Uważać,aby żadne komponenty,takie jak poduszki
powietrzne, strefy bezpieczeństwa, elementyobsługi,
przyrządyitp., nie byłyzakryte lub widoczność nie była
ograniczona.
• Podczas jazdy pojazdemmechanicznym bądź
używaniaprzyrządu sportowegonie dopuścić do
odwrócenia uwagi na skutek korzystania zproduktu
oraz stale obserwować otoczenie isytuację wruchu
drogowym.
Wskazówki
• Przed montażem uchwytusprawdzić możliwości
montażuwpojeździe. Wrazie wątpliwości skorzystać
zinstrukcji obsługipojazdu lub zwrócić się do
producentapojazdu.
• Podczas montażuiobsługiproduktu nigdy nie
wywierać nadmiernej siły.
A) Montaż na kratce wentylatora
• Adapter mocowania do otworów wentylacyjnych
zamontować wtylnej częściproduktu. (Rysunek A)
• Umieścić urządzenie wkratce wentylatora.
• Zaczep do mocowania na kratce wentylatoramożna
obracać wzakresie 360° iwten sposób ustalić
odpowiednikierunek.
B) Montaż zpodkładką samoprzylepną
Wskazówki –powierzchnia montażowa
Wybrana powierzchnia montażowa (np. deska
rozdzielcza)musi być wolna od pyłuitłuszczu. Do
czyszczenia powierzchni użyć odpowiedniego detergentu
dostępnego whandlu.
• Adapter do mocowania za pomocą podkładki
samoprzylepnej zamontować wtylnej częściproduktu
(Rysunek B).
• Oczyścić powierzchnię,na którejzamocowanamabyć
podkładka samoprzylepna.
• Zdjąć folię ochronna zpodkładkiizamontować adapter
na przewidzianej wtym celu powierzchni.
35
Page 42

4.3 Przyłącze
Wskazówki
• Stosować wyłącznie oryginalne akcesoria (bądź
akcesoria autoryzowane przez rmę Hama), aby
uniknąć uszkodzenia produktu.
• Podłączyć dołączony kabel ładujący USB do gniazdaUSB
(16) urządzenia.
• Podłączyć wolny wtykkabla USB do gniazda 12 Vw
pojeździe.
4.4 Włączanie/standby/pierwsza konfiguracja
Włączanie
• Wcisnąć iprzytrzymać przezok. 3sprzycisk [
włączyć urządzenie.
Wyłączanie
• Wcisnąć iprzytrzymać przez ok. 3sprzycisk[
włączyć tryb standby.
Wskazówki
Aby całkowicie wyłączyć radio, odłączyć je od zasilania.
Pierwsza konguracja
Wskazówki
• Upewnić się, żepołączenie zanteną zostało
prawidłowo wykonane.
• Po włączeniu urządzenie znajduje się wtrybie DAB/DAB+
inatychmiast rozpoczyna wyszukiwaniestacji.
• Wciskającprzycisk [ ](6) możnaręcznie uruchomić
proces wyszukiwania wpóźniejszym terminie.
Przycisk [VOLUME/SELECT/NAVIGATE](5) ma przypisane
podwójne funkcje:
• Obracającprzycisk [VOLUME/SELECT/NAVIGATE]w
menu,można wybrać poszczególne punkty.
• Wciskającprzycisk [VOLUME/SELECT/NAVIGATE],
możnapotwierdzić wybór.
• Wcisnąć przycisk[
poziomu menu.
], aby wrócić do poprzedniego
](2), aby
](2), aby
4.5 Ustawienia językowe
Po pierwszymuruchomieniu wurządzeniujest ustawiony
język angielski. Aby zmienić język, należypostępować w
następujący sposób:
• Wcisnąć iprzytrzymać przez 3sprzycisk [
przejść do menu ustawień.
• Obracającprzycisk [VOLUME/SELECT/NAVIGATE],
przejść do punktu menu„System”.
• Wciskającprzycisk [VOLUME/SELECT/NAVIGATE],
potwierdzić wybór.
• Obracającprzycisk [VOLUME/SELECT/NAVIGATE],
przejść do punktu „Language”. Wciskającprzycisk
[VOLUME/SELECT/NAVIGATE],potwierdzić wybór.
• Obracającprzycisk [VOLUME/SELECT/NAVIGATE],
wybraćżądanyjęzyk.
• Wciskającprzycisk [VOLUME/SELECT/NAVIGATE],
potwierdzić wybór.
Wskazówki
• Produktu używać wyłączniewtemperaturze otoczenia
od -10°C do 50°C.
• Produkt przechowywać wyłącznie wtemperaturze
otoczenia od -20°Cdo60°C.
5. Czyszczenie
• Czyścić produkt tylko przy użyciu niestrzępiącej się,
lekko zwilżonejszmatki inie stosować agresywnych
detergentów.
• Wprzypadku dłuższego nieużywania wyłączyć
urządzenie iodłączyć od sieci prądu. Przechowywać
produkt wczystym,suchym miejscu bez bezpośredniego
promieniowania słonecznego.
6. Wyłączenie odpowiedzialności
Hama GmbH &Co. KG nie udziela gwarancji ani nie
odpowiada za szkody wskutek niewłaściwej instalacji,
montażuoraznieprawidłowego stosowania produktu
lub nieprzestrzegania instrukcji obsługi i/lub wskazówek
bezpieczeństwa.
7. Serwis ipomoc techniczna
Wrazie pytań dotyczących produktu prosimyzwrócić się do
infolinii Hama.
Gorąca linia: +49 9091502-115 (niem./ang.)
Dodatkowe informacje są dostępne na stronie:
www.hama.com
Pełny tekst kompletnej instrukcjiobsługi jest dostępny pod
poniższym adresem internetowym:
www.hama.com -> 00054849->Downloads
](4), aby
36
Page 43

8. Informacje dotycząca recyklingu
Wskazówki dotyczące ochrony środowiska:
Od czasu wprowadzenia europejskiej dyrektywy
2012/19/EU i2006/66/EU do prawa narodowego
obowiązują następujące ustalenia: Urządzeń
elektrycznych,elektronicznych oraz baterii
jednorazowych nie należywyrzucać razem zcodziennymi
odpadami domowymi! Użytkownik zobowiązany prawnie
do odniesienia zepsutych,zniszczonych lub niepotrzebnych
urządzeń elektrycznych ielektronicznych do punktu zbiórki
lub do sprzedawcy.Szczegółowe kwestie regulują przepisy
prawnedanegokraju. Informuje otym symbol
przekreślonego kosza umieszczony na opakowaniu.
Segregującodpady pomagasz chronićśrodowisko!
9. Deklaracja zgodności
Hama GmbH &CoKGniniejszymoświadcza, że
typ urządzenia radiowego [00054849] jest zgodny
zdyrektywą 2014/53/UE. Pełny tekstdeklaracji
zgodności UE jest dostępny pod następującym adresem
internetowym:
www.hama.com->00054849->Downloads.
Częstotliwość transmisji
Maksymalna moc
transmisji
Bluetooth: 2.402 –2.480GHz
FM TX: 87.6 –107.9 MHz
Bluetooth: 6dBm (EIRP)
FM TX: -43.23 dBm
37
Page 44

H Rövid útmutató
Kezelőelemek és kijelzők
A. Elülső oldal
1. Kijelző
2. [Power]
3. [Mode]
4. Info/beállítások
5. [VOLUME/SELECT/NAVIGATE]
6. [Search]
7. [Save]
8. [Previous]
B. Hátoldal
9. Presets
10. Presets
11. Presets
12. Presets
13. Presets
14. Antenna
15. LINEkimenet
16. MicroUSB csatlakozó
Fontosmegjegyzés -Rövid útmutató:
• Ez egyrövid útmutató, amely ellátjaÖnt a
legfontosabb alapinformációkkal,mint a
biztonsági előírások és aterméküzembe
helyezése.
• Környezetvédelmiokokból és az értékes
nyersanyagok megtakarítása érdekében aHama
céglemond apapírra nyomtatott használati
útmutatóról és eztkizárólagletölthető PDF
formábanállítja rendelkezésre.
!
• A használati útmutató teljesszövegea
következő internetes címenérhető el:
www.hama.com -> 00054849 ->
Downloads
• Mentse el ezt ahasználati útmutatót a
számítógépére akésőbbi fellapozáshozés
lehetőség szerint nyomtassa ki.
1.
Figyelmeztető szimbólumok és előírásokismertetése
Figyelmeztetés
Figyelmeztető jeleket használunk abiztonságitényezők
bemutatására, ill. felhívjuk a gyelmet akülönleges
veszélyekreéskockázatokra.
Hivatkozás
Az itt látható gyelmeztető jeleket használjuk fel,
ha kiegészítő információkat közlünk vagy fontos
tudnivalókrahívjuk fel a gyelmet.
Áramütés veszélye
Ez aszimbólum atermék azon nem szigetelt részeinek
megérintésér
szintű veszélyes feszültségenlehetnek, ami miatt
áramütésveszélye áll fenn.
2. Acsomag tartalma
• „CDR70BT“ digitális rádió
• Gépkocsi USB modul
• MikroUSB adapterkábel
• Rögzítőelem szellőzőrácsra
• Rögzítésöntapadó párnával
• Üvegreragaszthatóantenna SMB-csatlakozóval
• Rövid útmutató
3. Biztonsági utasítások
• Atermék magáncélú, és nem üzleticélú alkalmazásra
készült.
• Óvja meg aterméket szennyeződéstől, nedvességtől
és túlmelegedéstől, és kizárólag zárt helyiségekben
használja.
• Ez atermék,mint minden elektromos termék, nem
gyermekek kezébe való!
• Agyermekek nem játszhatnak akészülékkel. Atisztítást
és felhasználói karbantartást nem végezhetik gyermekek
felnőtt felügyelete nélkül.
• Ne ejtse le aterméket és ne tegye ki heves rázkódásnak.
• Ne üzemeltesse aterméket aműszakiadatokban
szereplő teljesítményhatárokon kívül.
• Feltétlenül tartsa távol agyermekeket a
csomagolóanyagtól, mertfulladásveszély áll fenn.
• Azonnalártalmatlanítsa acsomagolóanyagot ahelyileg
érvényesártalmatlanítási előírások szerint.
• Ne végezzenmódosítást akészüléken. Ebben az esetben
minden garanciaigény megszűnik.
• Gépjárművön vagy sporteszközön haladva ne hagyja
gyelmét elterelni atermék által, és ügyeljen aforgalmi
helyzetre,valamint környezetére.
evonatkozóveszélyr
eutal, amelyekolyan
38
Page 45

Áramütés veszélye
• Ne nyissa ki aterméket és sérülésesetén ne
üzemeltesse tovább.
• Ne használja aterméket, ha az AC-adapter, az
adapterkábel vagy ahálózati kábel megsérült.
• Ne kísérelje meg akészülék saját karbantartását
vagy javítását. Bármely karbantartási munkátbízzon
illetékes szakemberre.
4. Csatlakoztatás és üzembehelyezés
Atermékhez gépkocsi-szellőzőrácshoz való rögzítőelemet,
és egy sík felületekhez való öntapadórögzítőpárnát
mellékelünk.
Figyelmeztetés
Ügyeljen arra, hogy atápkábelek és az antennakábelek
ne befolyásolják avezető látómezejét.
4.1 Antennacsatlakozás/alternatív megoldások
antenna csatlakoztatásához (D ábra)
Hivatkozás
• Avételoptimalizálása érdekében az üvegre
ragasztható antennának érintkeznie kell a
karosszériával.
• Ha ajárműve A-oszlopa szigetelőanyaggal lenne
bevonva,ragassza fel oda afémfóliát.
• Akarosszériávalvaló érintkezéslétrehozásához
forduljonegy helyiszerelőműhelyhez.
• Ragassza fel az antennát aszélvédő keretére(lehetőleg
az utasoldalra), és kösse össze afémfóliát ajármű
A-oszlopával.
• Ezután csatlakoztassa az antennakábelSMB-csatlakozóját
az adapter antennabemenetére(14).
4.2 Szerelés
Figyelmeztetés –Balesetveszély
• Ügyeljen arra, hogy az olyan komponenseket, mint
alégzsák, abiztonságizónák,akezelőelemek,
aműszerek stb. vagy akilátástnetakarja vagy
korlátozza semmi.
• Ha gépjárművel közlekedik vagy sporteszközt használ,
ne hagyja, hogyatermék elterelje a gyelmét.
Ügyeljen aforgalmi helyzetre, valamint környezetére.
Hivatkozás
• Atartó felszerelése előtt győződjön meg agépkocsiba
való beszerelhetőség lehetőségeiről. Kétség esetén
kövesse agépkocsi üzembe helyezési útmutatójának
az utasításait, vagyforduljon agépkocsigyártójáhozr.
• Atermék használata közben és aszerelésnél ne
fejtsen ki túl nagy erőt.
A) Rögzítésaszellőzőrácsra
• Illessze fel aszellőzőrácshozvaló rögzítőadaptert a
termék hátuljára.(Aábra)
• Mostillesszebeakészüléket aszellőzőrácsba.
• Aszellőzőrácsba rögzítő fül 360°-banelfordítható, hogy
amegfelelő irány biztosítható legyen.
B) Felszerelés öntapadóval
Hivatkozás –szerelési felület
Ügyeljen arra, hogy akívánt szerelési felület (pl.
műszerfal)por-észsírmentes legyen. Ehhez egy
megfelelő tisztítót használjon aszakkereskedésből.
• Illessze fel arögzítőadaptert az öntapadópárnávala
term
ék hátuljára (B ábra).
• Tisztítsa meg afelületet, ahováazöntapadó párnát fel
szeretnéragasztani.
• Most húzza le avédőfóliát az öntapadó párnáról, és
ragassza fel az adaptert akívánt felületre.
39
Page 46

4.3 Csatlakoztatás
Hivatkozás
• Kizárólag eredeti (vagy aHama által jóváhagyott)
tartozékot használjon atermékkárosodásának
elkerülése érdekében.
• Csatlakoztassa amellékelt USB-töltőkábelt az eszköz USB-
csatlakozójához (16).
• Csatlakoztassa az USB kábelszabad csatlakozóját ajármű
egyik 12 V-os csatlakozóaljzatához.
4.4 Bekapcsolás/készenlét/első beállítás
Bekapcsolás
• Nyomja meg és tartsa kb. 3másodpercig lenyomva a[
gombot (2) akészülék bekapcsolásához.
Kikapcsolás
• Nyomja le és tartsa lenyomva kb. 3másodpercig a[
(2) gombot akészenléti mód aktiválásához.
Hivatkozás
Arádió teljes kikapcsolásához válasszale akészüléket a
tápellátásról.
Első beállítás
Hivatkozás
• Győződjön meg róla, hogy az antennát
rendeltetésszerűen csatlakoztatta.
• Bekapcsolásután akészülék DAB/DAB+ üzemmódban
van, és azonnal elkezdiazállomáskeresést.
]gomb (6) megnyomásával akeresés egy későbbi
• A[
időpontban manuálisan is elkezdhető.
A[VOLUME/SELECT/NAVIGATE](5) kettősfunkcióval
rendelkezik:
• A[VOLUME/SELECT/NAVIGATE]gomb elforgatásával
kiválaszthatja az egyes menüpontokat.
• A[VOLUME/SELECT/NAVIGATE]gomb megnyomásával
nyugtázhatja aválasztást.
]gomb megnyomásával visszatérhet az előző
• A[
menüszintre.
]
4.5 Nyelvbeállítás
Az első beállítás során arádió alapértelmezett nyelve az
angol. Anyelv módosításáhozjárjon el akövetkezőképpen:
• Nyomja le a[
beállítási menübe való belépéshez.
• A[VOLUME/SELECT/NAVIGATE]gomb forgatásával
navigáljon a„Rendszer“ menüpontra.
• A[VOLUME/SELECT/NAVIGATE]gomb megnyomásával
nyugtázhatja aválasztást.
• A[VOLUME/SELECT/NAVIGATE]gomb forgatásával
lépjena„Nyelv“ elemre. A[VOLUME/SELECT/
NAVIGATE]gombmegnyomásával nyugtázhatja a
választást.
• A[VOLUME/SELECT/NAVIGATE]gomb forgatásával
]
válassza ki akívánt rendszernyelvet.
• A[VOLUME/SELECT/NAVIGATE] gomb megnyomásával
nyugtázhatja aválasztást.
Hivatkozás
• Aterméketcsak -10°Cés50°Cközötti környezeti
hőmérsékleten szabad üzemeltetni.
• Aterméketcsak -20 °C és 60 °C közöttikörnyezeti
hőmérsékleten szabad tárolni.
5. Karbantartásésápolás
• Ezt aterméket csak szöszmentes, kissé benedvesített
kendővel tisztítsa,ésnehasználjon agresszív tisztítószert.
• Amennyiben aterméket hosszabb ideig nem használja,
kapcsolja ki akészüléket és válassza le az elektromos
hálózatról. Tárolja tiszta,száraz, közvetlen napfénytől
védett helyen.
6. Szavatosságkizárása
AHama GmbH &Co. KG semmilyenfelelősséget
vagy szavatosságotnem vállal atermék szakszerűtlen
telepítéséből, szerelésébőlés szakszerűtlen használatából,
vagy akezelési útmutató és/vagy abiztonsági előírásokbe
nem tartásából eredő károkért.
7. Szerviz és támogatás
Kérjük, hogy atermékkel kapcsolatos kérdéseivelforduljon
aHama terméktanácsadásához.
Közvetlen vonal Közvetlenvonal:
+49 9091502-115 (Deu/Eng)
További támogatási információtitt talál:
www.hama.com
Ahasználati útmutató teljes szövege akövetkező
internetes címenérhető el:
www.hama.com -> 00054849->Downloads
](4) gombot kb. 3másodpercrea
40
Page 47

8. Ártalmatlanítási előírások
Környezetvédelmi tudnivalók:
Az európai irányelvek 2012/19/EU és 2006/66/EU
ajánlása szerint, amegjelölt időponttól kezdve,
minden EU-s tagállamban érvényesek a
következők: Az elektromos és elektronikai
készülékeket és az elemeket nem szabad aháztartási
szemétbe dobni! Aleselejtezett elektromos és elektronikus
készülékeket és elemeket, akkumulátorokat nem szabad a
háztartási szemétbe dobni. Az elhasznált és
működésképtelenelektromos és elektronikus készülékek
gyűjtéséretörvényi előírás kötelez mindenkit, ezért azokat
el kell szállítani egy kijelölt gyűjtő helyrevagy visszavinni a
vásárlás helyére. Atermék csomagolásán feltüntetett
szimbólum egyértelmű jelzést ad errevonatkozóan a
felhasználónak. Arégi készülékek begyűjtése, visszaváltása
vagy bármilyen formában történő újrahasznosítása közös
hozzájárulás környezetünk védelméhez.
9. Megfelelőséginyilatkozat
Hama GmbH &CoKGigazolja, hogy a
[00054849] típusú rádióberendezés megfelela
2014/53/EU irányelvnek. Az EU-megfelelőségi
nyilatkozat teljes szövege elérhető akövetkező internetes
címen:
www.hama.com->00054849->Downloads.
Az(ok) a
frekvenciasáv(ok)
Bluetooth: 2.402 –2.480GHz
FM TX: 87.6 –107.9 MHz
Maximális jelerősség
Bluetooth: 6dBm (EIRP)
FM TX: -43.23 dBm
41
Page 48

C Stručný návod
Ovládací prvky aindikace zobrazit
A. Přední strana
1. Displej
2. [Power]
3. [Mode]
4. Info/Settings
5. [VOLUME/SELECT/NAVIGATE]
6. [Search]
7. [Save]
8. [Previous]
B. Zadní strana
9. Přednastavení
10. Přednastavení
11. Přednastavení
12. Přednastavení
13. Přednastavení
14. Anténa
15. LINEOut
16. Mikro-USB přípojka
Důležité upozornění -Stručný návod:
• Jedná se stručný návod, který vámposkytuje
nejdůležitější základní informace, jako jsou
bezpečnostnípokyny ainformace ouvedení
vašeho výrobku do provozu.
• Zdůvodu ochrany životního prostředí aúspory
cenných surovin rmaHama nedodává návod k
použití vtištěné formě anabízí ho výhradně ke
stažení ve formátuPDF .
• Kompletní návodkpoužití je kdispozicina
!
následujícíchwebovýchstránkách:
www.hama.com->00054849 ->
Downloads
• Tento návod kpoužitísipro pozdější použití
uložtenasvémpočítačiapodle možnosti si ho
vytiskněte.
1. Vysvětlení výstražných symbolů apokynů
Upozornění
Tento symboloznačuje bezpečnostní upozornění, které
poukazuje na určitárizika anebezpečí.
Poznámka
Tento symboloznačuje dodatečnéinformace nebo
důležité poznámky.
Nebezpečíporanění elektrickýmproudem
Tento symbolupozorňuje na nebezpečípřidotyku
neizolovaných částí pr
nebezpečné napětí otakové síle, že hrozí nebezpečí
poranění elektrickým proudem.
2. Obsah balení
• Digitálnírádio „CDR70BT“
• Napájecí zdroj sUSB přípojkou do auta
• Kabel adaptéru mikro-USB
• Upevnění provětrací mřížku
• Upevnění pomocí samolepicí podložky
• Anténa propřilepení na sklo spřípojkouSMB
• Stručný návod
3. Bezpečnostní pokyny
• Výrobek je určen prosoukromé, nekomerční použití.
• Chraňte výrobek před znečištěním, vlhkostí apřehřátím a
používejte pouze vsuchých prostorách.
• Tento produkt,stejně jako všechnyostatní elektrické
produkty,nepatřído rukou dětem.
• Děti nesmípřístroj používat jako hračku. Čištění aúdržbu
nesmí děti provádětbez dozoru.
• Zabraňte páduvýrobku anevystavujte velkým otřesům.
• Výrobek neprovozujte mimo meze výkonu uvedenév
technických údajích.
• Obalovýmateriál nepatřídorukou dětem,hrozí
nebezpečíudušení.
• Obalovýmateriál ihned zlikvidujtepodle platných
místníchpředpisů prolikvidaciodpadů.
• Na zařízení neprovádějte žádné změny.Vtakovém
případě zanikajíveškeré nároky na záruku.
• Přijízdě autem nebonasportovním zařízení neodvracejte
svou pozornostoddopravní situace adění ve svém okolí.
oduktu,které by mohly vést
42
Page 49

Nebezpečíporanění elektrickým proudem
• Výrobek neotvírejte avpřípadě poškozeníjiž dále
nepoužívejte.
• Výrobek nepoužívejte,pokud je AC-adaptér,kabel
adaptéru nebo síťové vedení poškozeno.
• Do výrobkusamovolně nezasahujte aneopravujte
ho. Veškeré úkony údržbypřenechejte příslušnému
odbornému personálu.
4. Montáž auvedení do provozu
Tento produkt je dodáván supevněním do větrací mřížky v
autě asamolepicím upevněním na rovné plochy.
Varování
Dbejte na to, aby případné kabely pronapájení aanténu
neovlivňovaly bezpečnost jízdy.
4.1 Připojení antény/alternativní řešení připojení
antény(obrázek D)
Upozornění
• Prooptimalizaci příjmujetřeba spojit nalepovací
okenní anténu skarosérií vozidla.
• Ikdyž je A-sloupek vozidla potaženýlátkou nebo
jinýmizolačnímmateriálem, přestonanějupevněte
kovovou fólii.
• Provytvoření kontaktu skarosérií se obraťte na svůj
servis.
• Umístěte anténu na okraj čelního skla (nejlépe na straně
spolujezdce) aspojte kovovou fólii sA-sloupkem vozidla.
• Následně spojte přípojku SMB kabelu antény se vstupem
antény (14) na adaptéru.
4.2 Montáž
Varování –Nebezpečíporanění
• Dbejte na to, aby nedošlo kzakrytí nebo omezení
funkce komponent, jako airbagu, bezpečnostních
oblastí, ovládacích prvků,přístrojů atd. nebo k
omezenívýhledu.
• Přijízdě autem nebo na sportovním zařízení
neodvracejte pozornost od dopravní situace adění ve
svém okolí.
Upozornění
• Předmontáží držákuzkontrolujte možnosti instalace
ve svém vozidle. Pokud budete mít pochyby,podívejte
se do návodu kpoužití vozidla nebo se obraťte na
výrobce vozidla.
• Přimanipulacisvýrobkem nebo přimontáži nikdy
nepoužívejte násilí nebo velkousílu.
A) Montáž na větrací mřížku
• Namontujte adaptér upevnění provětrací otvorynazadní
stranu výrobku. (obrázekA)
•Nynínastrčte zařízení do větrací mřížky.
• Čep proupevnění ve větrací mřížce lze otočit o360° a
jeho pomocí můžete upravit polohu.
B) Montáž pomocí lepicí podložky
Upozornění–montážní plocha
Upozorňujeme,žepožadovaná montážní plocha
(např.přístrojová deska) musí být očištěna od prachu
amastnoty.Kočištěnípoužijte příslušný prostředekze
specializované prodejny.
• Pomocílepicí podložky umístěteupevňovací adaptérna
zadnístranu výrobku (obrázekB).
• Vyčistěte plochu, na kterou chcete lepicí podložku
připevnit.
• Nyní stáhněte ochrannou fólii zlepicí podložky aadaptér
umístěte na požadované místo.
43
Page 50

4.3 Přípojka
Upozornění
• Používejte výhradně originálnípříslušenství (nebo
příslušenství schválenéznačkou Hama), aby nedošlo k
poškození výrobku.(3.6.2)
• Připojte dodanýnabíjecí kabelUSB do USB přípojky
přístroje (16).
• Volný konektor USB kabelu připojte do zásuvky12 Vve
vozidle.
4.4 Zapnutí /Pohotovostní režim /První nastavení
Zapnutí
• Stisknutím apodrženímtlačítka [
zařízení zapněte.
Vypnutí
• Stisknutím apodrženímtlačítka [
aktivujte pohotovostní režim.
Upozornění
Proúplné vypnutí rádia vypojte zařízení znapájení.
První nastavení
Upozornění
• Zajistěte, aby bylo vytvořeno správné připojení antény.
• Po zapnutí je zařízení vrežimu DAB/DAB+ azačne ihned
vyhledávatstanice.
• Stisknutím tlačítka [ ](6) můžete později vyhledávání
spustit ručně.
[VOLUME/SELECT/NAVIGATE](5) má dvojí funkci:
• Otočením [VOLUME/SELECT/NAVIGATE]vybíráte
jednotlivé body menu.
• Stisknutím [VOLUME/SELECT/NAVIGATE]výběr
potvrdíte.
• Stiskněte tlačítko[ ]pro návrat na předchozí úroveň
menu
](2) na cca 3sekundy
](2) na cca 3sekund
4.5 Nastavení jazyka
Připrvním uvedení do provozu je jako standardní jazyk
rádia nastavená angličtina.Jazyk nastavíte následujícím
způsobem:
• Stiskněte apřidržte tlačítka[
sekund propřístup do menu nastavení.
• Otáčením [VOLUME/SELECT/NAVIGATE]přejděte k
bodumenu „System“.
• Stisknutím [VOLUME/SELECT/NAVIGATE]výběr
potvrdíte.
• Otáčením [VOLUME/SELECT/NAVIGATE]přejdete
kbodu „Language“.Stisknutím [VOLUME/SELECT/
NAVIGATE]výběrpotvrdíte.
• Otáčením [VOLUME/SELECT/NAVIGATE]sivyberte
požadovaný jazyk systému.
• Stisknutím [VOLUME/SELECT/NAVIGATE]výběr
potvrdíte.
Upozornění
• Výrobek používejte pouze přiteplotě prostředí od −10
°C do +50 °C.
• Výrobek skladujte pouzepřiteplotě prostředí od −20
°C do +60 °C.
5. Údržbaačištění
• Tento výrobek čistěte pouze mírně navlhčeným hadříkem
nepouštějícím vlákna anepoužívejte agresivní čisticí
prostředky.
• Pokud nebudetevýrobek po delší dobupoužívat, přístroj
vypněte aodpojte ho od napájení. Skladujte ho na
čistém,suchémmístě bez příméhoslunečního záření.
6. Vyloučení záruky
Hama GmbH &Co. KG nepřebírá žádnou odpovědnost
nebo záruku za škody vzniklé neodbornou instalací, montáží
nebo neodborným použitím výrobku nebo nedodržováním
návodukpoužití a/nebo bezpečnostníchpokynů.
7. Servisapodpora
Máte otázkykproduktu ?Obraťte na na poradenské
oddělení Hama.
Horká linka: +49 9091 502-115 (německy/anglicky)
Další podpůrné informace naleznete na adrese:
www.hama.com
Kompletní návod kpoužitíjekdispozici na
následujících webových stránkách:
www.hama.com -> 00054849->Downloads
](4) po dobu cca 3
44
Page 51

8. Pokyny klikvidaci
Ochrana životního prostředí:
Evropská směrnice 2012/19/EU a2006/66/EU
ustanovujete následující: Elektrická a
elektronická zařízenístejně jako baterie nepatřído
domovníhoodpadu. Spotřebitel se zavazuje
odevzdat všechna zařízení abaterie po uplynutí jejich
životnosti do příslušnýchsběren. Podrobnosti stanoví
zákonpříšlušné země.Symbolnaproduktu,návod k
obsluze nebobalení na toto poukazuje. Recyklací ajinými
způsoby zužitkování přispíváte kochraně životního
prostředí.
9. Prohlášeníoshodě
Tímto Hama GmbH &CoKGprohlašuje,žetyp
rádiového zařízení [00054849] je vsouladu se
směrnicí 2014/53/EU.Úplné zněníEUprohlášení o
shodě je kdispozici na této internetové adrese:
www.hama.com->00054849->Downloads.
Kmitočtové pásmo
(kmitočtová pásma)
Maximální
radiofrekvenční výkon
vysílaný
Bluetooth: 2.402 –2.480GHz
FM TX: 87.6 –107.9 MHz
Bluetooth: 6dBm (EIRP)
FM TX: -43.23 dBm
45
Page 52

Q Stručný návod
Ovládacie aindikačné prvky
A. Čelná strana
1. Displej
2. [Power]
3. [Mode]
4. Informácie/nastavenia
5. [VOLUME/SELECT/NAVIGATE]
6. [Search]
7. [Save]
8. [Previous]
B. Zadná strana
9. Predvoľby
10. Predvoľby
11. Predvoľby
12. Predvoľby
13. Predvoľby
14. Anténa
15. LINEOut
16. Prípojka mikroUSB
Dôležité upozornenie -Stručný návod:
• Toto je stručný návod, ktorývám poskytuje
dôležité základné informácie akobezpečnostné
upozornenia auvedenievášho výrobku do
prevádzky.
• Zdôvodu ochranyživotného prostrediaaúspory
hodnotných surovín upúšťaspoločnosť Hama od
vytlačenéhokompletnéhonávodu aponúka ho
na stiahnutie výlučne vo formáte PDF.
• Kompletný návod je kdispozíciina
!
nasledujúcej internetovej adrese:
www.hama.com -> 00054849 ->
Downloads
• Tento kompletný návod si uložte preprípad
neskoršej potrebynavašom počítačiapodľa
možnostisihovytlačte.
1. Vysvetlenie výstražných symbolov aupozornení
Upozornenie
Tento symboloznačuje bezpečnostné upozornenie, ktoré
poukazuje na určitériziká anebezpečenstva.
Poznámka
Tento symboloznačuje dodatočnéinformácie,alebo
dôležité poznámky.
Nebezpečenstvo elektrického úderu
Tento symbolupozorňuje na nebezpečenstvo dotyku
neizolovaných častí výr
vysokým nebezpečným napätím, že hrozí nebezpečenstvo
elektrického úderu.
2. Obsah balenia
• Digitálnerádio „CDR70BT“
• Sieťový zdroj USB do auta
• Adaptérový kábelmikroUSB
• Upevnenie prevetracie štrbiny
• Upevnenie pomocousamolepiacejpodložky
• Nalepovacia anténanasklo sprípojkouSMB
• Stručný návod na používanie
3. Bezpečnostné upozornenia
• Tento výrobok je určený presúkromné, nie prekomerčné
použitie vdomácnosti.
• Výrobok chráňte pred znečistením, vlhkosťou a
prehriatímapoužívajte ho len vsuchýchpriestoroch.
• Tento výrobok, rovnakoako všetky elektrické výrobky,
nepatriadorúk detí!
• Deti sa so zariadením nesmú hrať. Čistenieaúdržbu
vykonávanú používateľomnesmú vykonávať deti, pokiaľ
nie sú pod dozorom.
• Výrobok nenechajte spadnúť anevystavujtehosilným
otrasom.
• Výrobok neprevádzkujte mimo svojich výkonových medzí
uvedených vtechnických údajoch.
• Obalovýmateriál bezpodmienečne uchovávajte mimo
dosahu detí, hrozí nebezpečenstvo udusenia.
• Obalovýmateriál okamžite zlikvidujtepodľaplatných
miestnych predpisov.
• Na prístroji nerobte žiadne zmeny.Mátozanásledok
stratu akýchkoľvek nárokov na plnenie zo záruky.
• Počas jazdy smotorovým vozidlomalebo športovým
zariadením sa nenechajterozptýliť výrobkom adbajte na
dopravnú situáciu aokolité prostredie.
obku, ktoré sú eventuálne pod tak
46
Page 53

Nebezpečenstvo elektrického úderu
• Výrobok neotvárajte aneprevádzkujte ho ďalej, ak je
poškodený.
• Výrobok nepoužívajte, ak sú poškodené AC adaptér,
adaptérový kábel alebo sieťové vedenie.
• Nepokúšajte sa výrobok samostatne ošetrovať alebo
opravovať.Prenechajte akékoľvek úkony údržby
kompetentnémuodbornémupersonálu.
4. Montáž auvedenie do prevádzky
Tento výroboksadodáva supevnenímpre vetracie štrbiny
auta asamolepiacimupevnením na rovné plochy.
Varovanie
Dbajte na to, aby prípadné káble na napájanie
elektrickým prúdom apripojenie antény neovplyvňovali
bezpečnosť jazdy.
4.1 Pripojenie antény/alternatívne riešenia
pripojenia antény (obrázok D)
Upozornenie
• Na optimalizáciu príjmu by nalepovacia anténa na
sklo mala byť umiestnenátak, aby mala kontakt s
karosériou.
• Ak je stĺpik Avášhovozidla potiahnutýlátkou alebo
iným izolačnýmmateriálom, napriektomutam
umiestnite kovovú fóliu.
• Na vytvorenie kontaktu skarosériou sa obráťte na
miestnu autodielňu.
• Anténu umiestnitenaokraj čelného skla (prednostnena
mieste spolujazdca) akovovú fóliu spojte so stĺpikom A
vozidla.
• Následne spojte prípojku SMB kábla antény so vstupom
antény (14) adaptéra.
4.2 Montáž
Výstraha –nebezpečenstvo poranenia
• Dbajte na to, aby neboli zakryté aleboobmedzené
výhľad ani žiadne komponenty ako airbag,
bezpečnostné oblasti, ovládacie prvky, prístrojeatď.
• Počas jazdy motorovým vozidlomalebo na športovom
zariadenísanenechajte rozptyľovať výrobkom adbajte
na dopravnú situáciu aokolitéprostredie.
Upozornenie
• Pred montážou držiaka skontrolujte možnosti
montáževosvojom vozidle.Vprípade pochybností
si preštudujtenávod na používanie vozidla alebo sa
obráťte na výrobcu vozidla.
• Pri manipulácii svýrobkomapri montáži nikdy
nepoužívajte násilie aleboveľkú silu.
A) Montáž na vetraciu mriežku
• Upevňovacíadaptérpre vetracie výpusty namontujte na
zadnústranu výrobku. (ObrázokA)
•Zariadenie teraz zasuňte do vetracejmriežky.
• Čap na upevnenie vo vetracej mriežke sa dá otáčať o
360°naprispôsobenie smerovania.
B) Montáž slepiacou podložkou
Upozornenie –montážna plocha
Dbajtenato, aby bola želanámontážna plocha
(napr.prístrojová doska) zbavenáprachu amastnoty.
Na očistenie použite vhodný čistiaci prostriedok zo
špecializovaného obchodu.
• Upevňovací adaptér pripevnite pomocou lepiacej
podložky na zadnústranu výrobku (obrázok B).
• Očistite plochu, na ktorú sa má lepiaca podložka
umiestniť.
• Stiahnite ochrannú fóliu zlepiacej podložky aumiestnite
adaptér na pripravenú plochu.
47
Page 54

4.3 Pripojenie
Upozornenie
• Používajte výlučne originálne príslušenstvo (alebo:
spoločnosťou Hama schválené príslušenstvo), aby sa
predišlopoškodeniu výrobku. (3.6.2)
• Pripojte dodanýUSB nabíjací kábel na prípojkuUSB (16)
zariadenia.
• Pripojte voľný konektor USB kábla do 12 Vzásuvky vášho
vozidla.
4.4 Zapnutie/pohotovostný režim/prvénastavenie
Zapnutie
• Zariadenie zapnete stlačením apodržaním tlačidla [
(2) cca na 3sekundy.
Vypnutie
• Stlačteapodržte tlačidlo [
aktivujete pohotovostný režim.
Upozornenie
Na úplné vypnutie odpojte rádio od elektrickej siete.
Prvé nastavenie
Upozornenie
• Uistitesa, že pripojenie antény bolo riadne vytvorené.
• Po zapnutí sa zariadenie nachádza vrežime DAB/DAB+ a
ihneď začne vyhľadávať stanice.
• Stlačením tlačidla [ ](6) je možné vyhľadávanie
manuálne spustiť neskôr.
Tlačidlo [VOLUME/SELECT/NAVIGATE](5) má duálne
funkčné obsadenie:
• Otáčaním tlačidla [VOLUME/SELECT/NAVIGATE]v
menu vyberietejednotlivé položky menu.
• Výber potvrdíte stlačením tlačidla [VOLUME/SELECT/
NAVIGATE].
• Na návrat na predchádzajúcu úroveň menu stlačte
tlačidlo [
].
](2) na cca 3sekundy, čím
4.5 Nastavenie jazyka
Pri prvom uvedení do prevádzky je štandardným jazykom
rádia angličtina. Pri zmene jazyka postupujte nasledovne:
• Stlačteapodržte tlačidlo [ ](4) na cca 3sekundy,
aby ste sa dostali do menu nastavení.
• Otáčaním tlačidla [VOLUME/SELECT/NAVIGATE]
prejdite na položku menu„Systém“.
• Výberpotvrdíte stlačením tlačidla[VOLUME/SELECT/
NAVIGATE].
• Otáčaním tlačidla [VOLUME/SELECT/NAVIGATE]sa
dostanete kpoložke„Language (jazyk)“. Výber potvrdíte
stlačením tlačidla [VOLUME/SELECT/NAVIGATE].
• Otáčaním tlačidla [VOLUME/SELECT/NAVIGATE]zvoľte
požadovaný jazyk systému.
](2)
• Výberpotvrdíte stlačením tlačidla[VOLUME/SELECT/
NAVIGATE].
Upozornenie
• Výrobok používajte len pri teplote prostredia od -10
°C do 50 °C.
• Výrobok skladujte len pri teploteprostredia od -20 °C
do 60 °C.
5. Údržbaastarostlivosť
• Na čistenie tohto výrobku používajte len navlhčenú
utierku, ktorá nepúšťavlákna anepoužívajte žiadne
agresívne čistiace prostriedky.
• Ak výrobok nebudete dlhšiu dobu používať,vypnite
zariadenie aodpojte ho od napájania. Uschovajte ho na
čistom, suchom mieste bez priameho slnečného žiarenia.
6. Vylúčenie záruky
Firma HamaGmbH &CoKGneručí/nezodpovedáza
škody vyplývajúce zneodbornejinštalácie, montáže alebo
neodborného používania výrobkualebo znerešpektovania
návodunapoužívanie a/alebo bezpečnostných pokynov.
7. Servisapodpora
Sotázkami týkajúcimi sa výrobku sa prosím obráťtena
poradenskéoddelenie rmyHama.
Hotline: +49 9091502-115 (nem./angl.)
Ďalšieinformácie opodporenájdete tu:
www.hama.com
Kompletný návod je kdispozíciinanasledujúcej
internetovej adrese:
www.hama.com -> 00054849->Downloads
48
Page 55

8. Pokyny pre likvidáciu
Ochrana životného prostredia:
Európskasmernica 2012/19/EU a2006/66/EU
stanovuje:Elektrické aelektronické zariadenia,
rovnako ako batérie sa nesmú vyhadzovať do
domácehoodpadu. Spotrebiteľ je zo zákona
povinný zlikvidovať elektrickéaelektronickézariadenia,
rovnako ako batérie na miesta ktomu určené. Symbolizuje
to obrázok vnávodenapoužitie, alebo na balenívýrobku.
Opätovnýmzužitkovaním alebo inou formourecyklácie
starých zariadení/batérií prispievate kochrane životného
prostredia.
9. Vyhlásenie ozhode
Hama GmbH &CoKGtýmtovyhlasuje, že rádiové
zariadenie typu [00054849] je vsúlade so
smernicou 2014/53/EÚ. Úplné EÚ vyhlásenie o
zhode je kdispozícii na tejto internetovej adrese:
www.hama.com->00054849->Downloads.
Frekvenčnépásmo resp.
pásma
Bluetooth: 2.402 –2.480GHz
FM TX: 87.6 –107.9 MHz
Maximálny
vysokofrekvenčný
Bluetooth: 6dBm (EIRP)
FM TX: -43.23 dBm
49
Page 56

O Instruções resumidas
Elementos de comando eindicadores
A. Parte frontal
1. VISOR
2. [POWER]
3. [MODE]
4. INFO/SETTINGS
5. [VOLUME/SELECT/NAVIGATE]
6. [SEARCH]
7. [SAVE]
8. [PREVIOUS]
B. Parte traseira
9. Presets
10. Presets
11. Presets
12. Presets
13. Presets
14. Antena
15. LINEOut
16. Entrada microUSB
Nota importante -Instruções
resumidas:
• Opresente documento contém instruções
resumidasque lhe fornecem as informações
básicasmais importantes,comoindicações de
segurançaeinformações sobreacolocaçãoem
funcionamento do seuproduto.
• Pormotivos de proteção ambiental ede
poupança de recursosvaliosos,aempresa Hama
prescindedeummanual de instruções longo
impressoedisponibiliza-oexclusivamente como
cheiroPDF para download.
!
• O manual de instruções longo completo está
disponível no seguinte endereço da Internet:
www.hama.com -> 00054849 ->
Downloads
• Guarde omanualdeinstruçõeslongo para
consulta no seucomputadorouimprima-o
conforme necessário.
1. Descrição dos símbolos de aviso edas notas
Aviso
Éutilizado paraidenticar informações de segurança ou
chamar aatenção paraperigos eriscos especiais.
Nota
Éutilizado paraidenticar informações adicionais ou
notas importantes.
Perigo de choqueeléctrico
Este símbolo remete paraumperigo de toque de partes
não isoladas do pr
tensão perigosa que poderão representar um perigo de
choque eléctrico.
2. 2. Conteúdodaembalagem
• Rádio digital "CDR70BT"
• Fonte de alimentação USB paraveículo
• Cabo adaptador microUSB
• Fixação pararanhuras de ventilação
• Fixação com base adesiva
• Antena paracolagem em vidrocom ligaçãoSMB
• Instruções resumidas
3. Indicações de segurança
• Oproduto destina-se apenas autilização privadaenão
comercial.
• Proteja oproduto contrasujidade, humidade e
sobreaquecimento eutilize-o somente em espaços secos.
• Este produto não deve ser manuseado por crianças, tal
como qualquer produto elétrico!
• As crianças não podem brincarcom oaparelho. A
limpeza eamanutenção por partedoutilizador não
podem ser realizadas por crianças sem supervisão.
• Não deixe cair oproduto, nem osubmeta aimpactos
fortes.
• Não utilize oproduto forados limites de desempenho
indicados nas especicações técnicas.
• Mantenha aembalagem foradoalcance das crianças.
Existe perigo de asxia.
• Elimine imediatamente omaterial da embalagem em
conformidade com as normas locais aplicáveis.
• Não efetuemodicações no aparelho.Caso contrário,
perde todososdireitos de garantia.
• Não se distraia com oproduto durante acondução de
veículosouaoutilizar aparelhos desportivos etenha
sempreatenção ao trânsito.
oduto eventualmente condutor
as de
50
Page 57

Perigo de choque elétrico
• Não abraoproduto, nem ocontinue autilizar em
caso de danos.
• Não utilize oproduto se otransformador CA,o
cabo adaptador ou ocabo de alimentação estiver
danicado.
• Não tente fazer qualquer manutenção ou reparação
do produto.Qualquer trabalhodemanutenção deve
ser executado por técnicos especializados.
4. Montagemecolocação em funcionamento
Este produto éfornecido com uma xação pararanhuras
de ventilação de automóveleuma xação adesivapara
superfícieslisas.
Aviso
Garanta que os cabos de alimentação de energia e
de ligação de antenanão afetam asegurança de
condução.
4.1 Ligaçãodeantena/solução alternativa para
ligação de antena (Figura D)
Nota
• Para otimizar areceção, aantenaparacolagem
em vidrodeve ser colocadaemcontacto com a
carroçaria.
• Se opilar Adoseu veículo estiver revestido com
tecido ou outromaterial isolante, coloque aí a
película de metal mesmoassim.
• Dirija-se auma ocinalocalparaestabelecercontacto
com acarroçaria.
• Coloque aantena na margem do para-brisas (de
preferência do lado do passageiro)eligue apelícula de
metalàcoluna Adoveículo.
• Em seguida, ligue aligação SMB do cabodeantenaà
entrada de antena (14) do adaptador.
4.2 Montagem
Aviso -perigo de ferimentos
• Assegure-se de que não sejam tapados quaisquer
componentes, comoairbags, áreas de segurança,
elementos de comando, instrumentos, etc., ou que a
área de visão não seja afetada.
• Não se distraia com oproduto durante acondução de
veículos ou ao utilizar aparelhos desportivos etenha
sempreatenção ao trânsito eaomeio circundante.
Nota
• Antes da montagem do suporte, verique as
possibilidades de montagemnoseu veículo. Em caso
de dúvida, consulteomanual de instruçõesdoveículo
ou contacte ofabricantedoveículo.
• Ao utilizar oproduto ou montá-lo, nunca apliqueuma
força excessiva.
A) Montagem na grelha de ventilação
• Monte oadaptador parasaídas de ventilação na traseira
do produto. (FiguraA)
•Coloque agoraodispositivo na grelha de ventilação.
• Opino para xaçãonagrelha de ventilação pode ser
rodado em 360° paraadaptar adireção.
B) Montagem com base adesiva
Nota –Superfície de montagem
Certique-se de que asuperfície de montagem
pretendida (por ex., tablier) não tem qualquer
poeiraougordura. Para tal, utilize um produto de
limpeza adequado, disponível num estabelecimento
especializado.
• Coloque oadaptador de xação com abase adesivana
traseiradoproduto (guraB).
• Limpeasuperfície aque abase adesiva deveser colada.
• Retireapelícula de proteção da base adesiva ecoloque o
adaptador na superfície pretendida.
51
Page 58

4.3 Ligação
Nota
• Utilizeexclusivamente acessórios originais (ou:
autorizadospela Hama) paraevitar danos no produto.
(3.6.2)
• Ligue ocabo de carregamento USB fornecido àentrada
USB (16) do dispositivo.
• Ligue oconectorlivredocabo USB auma tomada de 12
Vdoseu veículo.
4.4 Ligar/Standby/Configuraçãoinicial
Ligar
• Prima emantenha[
segundos paraligar odispositivo.
Desligar
• Prima emantenhaobotão [
aprox. 3segundosparaativaromodo Standby.
Nota
Para desligarcompletamente orádio, desligue-o da
alimentaçãoelétrica.
Conguração inicial
Nota
• Garanta que aligaçãodeantena foi estabelecida
corretamente.
• Após aligação, odispositivoencontra-se no modo
DAB/DAB+ ecomeça imediatamente asintonização de
emissoras.
• Pressionando [
iniciado manualmente mais tarde.
[VOLUME/SELECT/NAVIGATE](5) tem função dupla:
• Ao rodar obotão [VOLUME/SELECT/NAVIGATE],
seleciona itens individuais do menu.
• Ao premir obotão [VOLUME/SELECT/NAVIGATE],
conrma aseleção.
• Pressione [
](2) premidoduranteaprox. 3
](2) premido durante
]6), oprocesso de busca pode ser
]pararegressar ao item de menuanterior
4.5 Definição do idioma
Durante aprimeira colocação em funcionamento,oidioma
padrão do rádio está denido parainglês.Proceda da
seguinte forma paraalterar oidioma:
• Pressione emantenha [
aprox. 3segundos paraaceder ao menudas denições.
• Rodando [VOLUME/SELECT/NAVIGATE], aceda ao item
de menu "System".
• Conrme aseleção pressionando[VOLUME/SELECT/
NAVIGATE].
• Rodando [VOLUME/SELECT/NAVIGATE], aceda à
entrada "Language". Conrme aseleção pressionando
[VOLUME/SELECT/NAVIGATE].
• Rodando [VOLUME/SELECT/NAVIGATE], selecione o
idioma de sistema pretendido.
• Conrme pressionando [VOLUME/SELECT/NAVIGATE].
Nota
• Utilizeoproduto apenas auma temperaturaambiente
de -10°Ca50°C.
• Armazene oproduto apenas auma temperatura
ambiente de -20 °C a60°C.
5. Manutençãoeconservação
Limpe oproduto apenas com um pano sem pelos
ligeiramente humedecido enão utilize produtos de limpeza
agressivos.
Caso não pretenda utilizar oproduto durante um período
prolongado, desligue-o eretireacha da tomadaelétrica.
Armazene-o num locallimpo eseco, sem exposiçãosolar
direta.
6. Exclusão de responsabilidade
AHama GmbH &CoKGnão assumequalquer
responsabilidade ou garantia por danos provocadospor
uma instalação, montagem ou manuseamento incorreto
do produto ou pelo não cumprimento das instruções de
utilização e/ou das informações de segurança.
7. Contactos eapoio técnico
Em caso de dúvidas sobreoproduto, contacte oserviço de
assistência ao produto da Hama.
Linha direta: +49 9091 502-115 (alemão/inglês)
Para mais informaçõesdeassistência, visite:
www.hama.com
Omanual de instruções longo completo está disponível no
seguinte endereço da Internet:
www.hama.com -> 00054849->Downloads
](4) premido durante
52
Page 59

8. Indicações de eliminação
Indicação relativa àproteção do ambiente:
Apartir do momento da implementação das
diretivas comunitárias2012/19/EU e2006/66/CE
na legislaçãonacional, aplica-se oseguinte: Os
aparelhos elétricos eeletrónicos, bem como pilhas
ebaterias não podem ser eliminados juntamentecom o
lixo doméstico. Oconsumidor élegalmenteobrigadoa
devolver aparelhos elétricos eeletrónicos, assimcomo
pilhasebaterias, no mda sua vida útil, aos pontos de
recolha públicos instalados paraoefeito ou ao posto de
venda. As particularidades são regulamentadas pela
respetiva legislação nacional. Osímbolo no produto, nas
instruções de utilização ou na embalagem remete para
estas disposições.Com areciclagem,areutilizaçãode
materiais ou outras formas de reutilização de aparelhos/
pilhas/baterias velhos, está acontribuir paraaproteção do
nossomeio ambiente.
9. Declaração de conformidade
O(a) abaixo assinado(a) HamaGmbH &CoKG
declaraque opresente tipo de equipamento de
rádio [00054849]está em conformidade com a
Diretiva 2014/53/UE. Otexto integral da declaração de
conformidade está disponível no seguinte endereço de
Internet:
www.hama.com->00054849->Downloads.
Banda(s) de frequências
Bluetooth: 2.402 –2.480GHz
FM TX: 87.6 –107.9 MHz
Potência máxima
transmitida
Bluetooth: 6dBm (EIRP)
FM TX: -43.23 dBm
53
Page 60

T Kısa kullanımkılavuzu
Kumanda ve gösterge elemanları
A. Ön yüzü
1. Ekran
2. [Power]
3. [Mode]
4. Bilgi/Ayarlar
5. [VOLUME/SELECT/NAVIGATE]
6. [Search]
7. [Save]
8. [Previous]
B. Arka yüz
9. Ön ayarlar
10. Ön ayarlar
11. Ön ayarlar
12. Ön ayarlar
13. Ön ayarlar
14. Anten
15. LINEOut
16. Micro-USB bağlantısı
Önemli uyarı -Kısa kullanımkılavuzu:
• Bu kısa kılavuz, güvenlikuyarıları ve ürününüzün
devreyealınması gibiönemlitemel bilgileri sağlar.
• Çevre koruması ve değerli ham maddelerin
korunması amacıylaHama rması,ürünebasılı
bir uzun kılavuz eklemedi ve kılavuzusadece PDF
dosyası olarak sunmaktadır.
• Kapsamlı uzunkılavuz aşağıdaki internet
adresinden alınabilir:
!
www.hama.com -> 00054849 ->
Downloads
• Uzun kılavuzu başvuru kaynağı olarak
bilgisayarınızda kaydedin ve imkanlarınızagöre
yazdırın.
1. Uyarı sembollerinin ve uyarılarınaçıklanması
Uyarı
Güvenlikuyarılarını işaretlemekveya özellikle tehlikeli
durumlara dikkat çekmek için kullanılır.
Not
Ek bilgileri veya önemli uyarıları işaretlemek için
kullanılır.
Elektrik çarpması tehlikesi
Bu sembol üründeki yalıtılmamış parçalaratemasetme
tehlikesine işar
çarpması tehlikesi oluşturabilecek yükseklikte tehlikeli
gerilimler taşıyor olabilir.
2. Paketin içindekiler
• Dijital radyo "CDR70BT"
• Araç USB adaptörü
• Micro-USB adaptör kablosu
• Havalandırma yarıkları için sabitleme
• Kendinden yapışkanpedli sabitleme
• SMB bağlantılı cama yapışan anten
• Kısa kullanımkılavuzu
3. Güvenlik uyarıları
• Bu ürün ticari olmayan özelevsel kullanımiçin
öngörülmüştür.
• Cihazı pisliklere, neme ve aşırıısınmaya karşı koruyunuz
ve sadece kuru mekanlarda kullanınız.
• Bu ürün,her türlü elektrikli ürün gibi,çocuklar
tarafındankullanılmamalıdır!
• Çocuklarıncihazla oynaması yasaktır. Temizlik ve
kullanıcı bakımişlemlerinin çocuklar tarafından yetişkin
nezareti olmadanyapılması yasaktır.
• Ürünü yeredüşürmeyinveçok aşırı sarsıntılaramaruz
bırakmayın.
• Bu ürünüteknik bilgilerde verilen kapasite sınırları
dışında kullanmayın.
• Çocukları ambalajmalzemelerindenuzak tutun, boğulma
tehlikesimevcuttur.
• Ambalajmalzemelerini yerel kurallarauygun olarak atık
toplamaya verin.
• Cihazdaherhangi bir değişiklik yapmayınız. Aksi takdirde
her türlügaranti hakkınızkaybolur.
• Bir motorlu araç veya spor cihazı ile sürüş esnasında bu
üründendolayı trağin durumunaveçevreye dikkatinizin
dağılmasınaizin vermeyin.
et etmektedir
.Buparçalar bir elektrik
54
Page 61

Elektrik çarpması tehlikesi
• Ürünün içini açmayınvehasarlı ürünleri çalıştırmayın.
• AC adaptörü, adaptör kablosu veya şebekekablosu
arızalı olan ürünükullanmayın.
• Ürünü kendiniz onarmayaveya bakımını yapmaya
çalışmayın. Tüm bakımçalışmalarını yetkili uzman
personeleyaptırın.
4. Montaj ve devreyealma
Bu ürün motorlu araçlarınhavalandırma yarıkları için bir
sabitlemeile ve düz yüzeyler için kendinden yapışkanlı bir
sabitlemeile teslim edilir.
Uyarı
Elektrik beslemesi ve anten bağlantısı kablolarından
dolayı sürüş güvenliğinin etkilenmemesine dikkat edin.
4.1 Anten bağlantısı /Alternatif çözümler Anten
bağlantısı (Resim D)
Not
• Yayınalışını en iyi duruma getirmek için, cama yapışan
anten karoseriye temas ettirilerektakılmalıdır.
• AracınızınAsütunukumaşla veya başka izole edici bir
malzemeyle kaplanmış olduğunda bile,metal folyoyu
bu konumda tutturun.
• Karoseriye bir temas oluşturmak için, yakınınızdakibir
oto tamirhanesine danışın.
• Anteni ön camınkenarında (tercihen yolcu koltuğu
tarafında) takınve metal folyoyu aracınAsütununa
bağlayın.
• Sonraanten kablosunun SMB bağlantısını adaptörün
antengirişine (14) bağlayın.
4.2 Montaj
Uyarı -yaralanmatehlikesi
• Hava yastığı,güvenlik alanları,kumanda elemanları,
aletler vb. gibi komponentlerden dolayı görüş alanının
kapalı ya da kısıtlı olmamasına dikkatediniz.
• Bir motorlu araç veya spor cihazı ile sürüş esnasında
bu üründen dolayı trağin durumuna ve çevreye
dikkatinizin dağılmasına izin vermeyin.
Not
• Tutucuyu monte etmedenönce aracınızdakimontaj
olanaklarını kontrol edin.Kuşkulu bir durumdaaracın
işletme kılavuzunu inceleyin ya da araç üreticisine
danışın.
• Ürünü monte ederken asla zorlamayınveya aşırı
kuvvetuygulamayın.
A) Havalandırma ızgarasında montaj
• Havaçıkışlarınaait sabitleme adaptörünüürününarka
kısmına monteedin. (Resim A)
• Şimdicihazı havalandırma ızgarasına takın.
• Hizayı ayarlamak için, havalandırma ızgarasındaki
sabitleme pimi 360°döndürülebilir.
B) Yapışkanpedle montaj
Not –Montaj yüzeyi
İstediğiniz montaj yüzeyinin (örneğin gösterge
panosunun)mutlaka tozsuz ve yağsızolmasına dikkat
edin. Bunun için yetkili bayidenalınabilen uygun bir
temizleyiciyi kullanın.
• Yapışkanped ile sabitlemeadaptörünücihazınarka
kısmına takın(ResimB).
• Yapışkanpedin tutturulacağı yüzeyi temizleyin.
• Şimdiyapışkan pedden koruyucu folyoyu çekip alınve
adaptörü öngörülen yüzeyeyapıştırın.
55
Page 62

4.3 Bağlantı
Not
• Sadeceorijinal aksesuarlar kullanın(veya: Hama
tarafından onaylı aksesuar), böylececihazınzarar
görmesiniönleyin.(3.6.2)
• Birlikte verilmiş olan USB şarj kablosunu cihazınUSB
bağlantısına (16) takın.
• USB kablosunun boşşini aracınızınbir 12 Vprizine
bağlayın.
4.4 Çalıştırmak /Standby / İlk kurulum
Çalıştırmak
• Cihazı çalıştırmak için [
tutun.
Kapatmak
• Standby modunu etkinleştirmek için [
3saniye basıptutun.
Not
Radyoyu tamamenkapatmak için, elektrik kaynağından
ayırın.
İlk kurulum
Not
• Anten bağlantısınındüzgün şekilde yapıldığından
emin olun.
• Cihaz açıldıktan sonraDAB/DAB+ modundadırvehemen
istasyon aramaya başlar.
](6) üzerine basıldığında arama işlemi daha sonraki
• [
bir zamanda manüel olarak başlatılabilir.
[VOLUME/SELECT/NAVIGATE](5) için ikili bir işlev
ataması var:
• Menüde [VOLUME/SELECT/NAVIGATE]
döndürüldüğünde tek menü öğelerini seçebilirsiniz.
• [VOLUME/SELECT/NAVIGATE]üzerinebasıldığında
seçimionaylamış olursunuz.
• Önceki menü düzeyine geri gitmek için [
](2) üzerine yakl. 3saniye basıp
](2) üzerine yakl.
]üzerinebasın
4.5 Dil ayarı
İlk kez devreye alırken radyonun standart dili olarak
İngilizce ayarlıdır. Dili uyarlamak için şuişlemi yapın:
• Ayar menüsüne girmek için [
saniye basıptutun.
• [VOLUME/SELECT/NAVIGATE]döndürerek "System"
menüöğesine gezinin.
• [VOLUME/SELECT/NAVIGATE]üzerinebasarak seçimi
onaylayınız.
• [VOLUME/SELECT/NAVIGATE]döndürerek "Language"
sekmesine gelebilirsiniz. [VOLUME/SELECT/NAVIGATE]
üzerine basarak seçimi onaylayınız.
• [VOLUME/SELECT/NAVIGATE]döndürerek istediğiniz
sistemdilini seçin.
• [VOLUME/SELECT/NAVIGATE]üzerinebasarak dili
onaylayın.
Not
• Ürünüsadece -10°Cile 50 °C arasındaki bir ortam
sıcaklığındaçalıştırın.
• Ürünüsadece -20 °C ile 60°C arasındakibir ortam
sıcaklığındadepolayın.
5. Bakımve temizlik
Bu ürünü sadecelif bırakmayan, hafnemli bir bezle silin
ve agresif temizleyiciler kullanmayın.
Ürünüuzunca bir sürekullanmayacaksanızcihazı kapatıp
elektrik şini çekin. Ürünü, doğrudan güneş almayan temiz,
kuru bir yerde saklayın.
6. Sorumsuzluk beyanı
Hama GmbH &Co. KG şirketi yanlış kurulum,montaj ve
ürününamacına uygunolarak kullanılmaması durumunda
veya kullanımkılavuzu ve/veya güvenlikuyarılarına
uyulmaması sonucuoluşanhasarlar için sorumluluk kabul
etmezvebudurumda garanti hakkı kaybolur.
7. Servisvedestek
Ürünle ilgili herhangi bir sorunuz varsa,lütfen HAMA ürün
danışmanlığına başvurunuz.
Destekhattı:+49 9091502-115 (Alm/İng)
Diğer destek bilgileriiçin, bkz.:
www.hama.com
Kapsamlı uzun kılavuz aşağıdakiinternet adresinden
alınabilir:
www.hama.com -> 00054849->Downloads
](4) üzerine yakl. 3
56
Page 63

8. Atıktoplama bilgileri
Çevrekorumauyarısı:
2012/19/EU ve 2006/66/AB Avrupa direktierinin
ulusalmevzuata geçirildiğitarihtenitibaren
aşağıdakikurallar geçerlidir:Elektrikli cihazlar,
elektronik cihazlar ve piller normal evsel çöpe
atılamaz. Tüketiciler,kullanımömürlerinin sonuna gelmiş
elektrikli ve elektronik cihazları ve pilleri,kamuya ait
toplama yerlerine veya satınalındıkları yerlereiade
etmekle yükümlüdürler.Bukonu ile ilgili ayrıntılarulusal
yasalarla düzenlenmektedir.Ürün üzerinde, kullanım
kılavuzundaveya ambalajda bulunan bu sembol tüketiciyi
bu konudauyarır. Eski cihazların/pillerin geri kazanımı,
yapıldıkları malzemelerin değerlendirilmesiveya diğer
değerlendirme şekilleri ile, çevrekorumasına önemli bir
katkıda bulunursunuz.
9. Uygunluk beyanı
İş bu belge ile HamaGmbH &CoKGkablosuz
sistem tipin [00054849] 2014/53/AB sayılı
direktife uygun olduğunubeyan eder.AB
Uygunluk Beyanınıntam metni aşağıdaki internet
adresinde incelenebilir:
www.hama.com->00054849->Downloads.
Frekans bandı/frekans
bantları
Bluetooth: 2.402 –2.480GHz
FM TX: 87.6 –107.9 MHz
İletilen maksimum radyo
frekans gücü
Bluetooth: 6dBm (EIRP)
FM TX: -43.23 dBm
57
Page 64

M Instrucțiuni scurte
Elemente de comandășiașaje
A. Față
1. Display
2. [Power]
3. [Mode]
4. Info/Setări
5. [VOLUME/SELECT/NAVIGATE]
6. [Search]
7. [Save]
8. [Previous]
B. Spate
9. Preselecții
10. Preselecții
11. Preselecții
12. Preselecții
13. Preselecții
14. Antenă
15. LINEOut
16. RacordmicroUSB
Indicație importantă-Instrucțiuni
scurte:
• Acestea sunt instrucțiuni scurte carevăasigură
cele mai importante informații de bază legate de
siguranța șipunerea în funcțiune aprodusului.
• Din motivedeprotecție amediului șide
economisiredematerii prime de valoare, rma
Hama renunță la tipărireapelargainstrucțiunilor
șileoferă numai ca document PDFpentru
descărcare.
!
• Textulcomplet al instrucțiunilor pe larg este
accesibil la următoarea adresă de internet:
www.hama.com -> 00054849 ->
Downloads
• Pentruoconsultare ulterioară memorați
instrucțiunile complete pe calculator șitipăriți-le
dacă avețiposibilități.
1. Explicarea simbolurilor de avertizare șiindicații
Avertizare
Se folosește la marcarea instrucțiunilor de siguranță sau
la concentrarea atențieiîncaz de pericol șiriscuri mari.
Indicație
Se folosește pentrumarcarea suplimentară a
informațiilor șiinstrucțiunilorimportante.
Pericol de electrocutare
Acest simbol semnalizează pericol la atingerea
componentelor neizolateale pr
tensiuneatât de înaltă încâtpot duce la electrocutare.
2. Conținutul pachetului
• Radio digital „CDR70BT“
• Elementderețea USB autovehicul
• Cablu adaptor microUSB
• Elementdexarepentru fanta de aerisire
• Elementdexarecusuport autoadeziv
• Antenă de lipit pe geamcuracordSMB
• Instrucțiuni scurte
3. Instrucțiuni de siguranță
• Produsul este conceput numai pentru utilizareprivatăși
nu profesională.
• Protejațiprodusul de impurități, umiditate, supraîncălzire
șiutilizați-l numai în încăperi uscate.
• Acest produs, ca de altfel toată produsele electrice,nu
arececăuta în mâinilecopiilor!
• Copiii nu au voie să se joace cu aparatul. Curățarea
șiîntreținerea făcută de utilizator nu au voie săe
executate de copii nesupravegheați.
• Nu lăsațiprodusul să cadășinuîlsupunețitrepidațiilor
puternice.
• Nu exploatațiprodusul în afaralimitelor de putere
indicateîndatele tehnice.
• Nu lăsațicopiii să se joace cu materialulpachetului,
prezintă pericol de sufocare.
• Reciclareamaterialului pachetului se execută conform
normelor locale de salubrizareînvigoare.
• Nu executațimodicări la aparat. În acest fel pierdeți
orice drept la garanție.
• În timpul conducerii unui autovehicul sau utilaj de
agrement nu vă lăsațidistras de produs și țiatent la
situația tracului șiaîmprejurimilor.
odusului car
epot avea o
58
Page 65

Pericoldeelectrocutare
• Nu deschidețiaparatul șinu-l utilizațiîncontinuare în
caz de deteriorare.
• Nu utilizațiprodusul dacă adaptorul AC,cablul
adaptor sau conductorulrețelei sunt deteriorate.
• Nu încercațisăreparațisau să depanațiaparatul.
Operațiile de reparații se execută numai de personal
de specialitate.
4. Montaj șipunere în funcțiune
Produsul se livrează cu un element de xarepentru fanta de
aerisiredin autovehicul șiunelement de xareautoadeziv
pentru suprafețeplane.
Avertizare
Cablurile electrice de alimentare șiracordul antenei nu
trebuie să inuențeze siguranțaconducerii.
4.1 Racordantenă/Soluțiialternativelaracord
antenă (Fig. D)
Indicație
• Pentru optimizarea recepției, antena se conecteazăși
cu caroseria.
• Folia de metal se xeazășipestâlpul Achiar dacă
acesta este capitonat cu stofă sau alt material
izolator.
• Pentru executarea contactului cu caroseria, adresați-
vă unui atelier auto.
• Fixațiantena la margineaparbrizului (de preferat pe
partea însoțitorului) șiconectațifolia de metal cu stâlpul
A.
• Conectațiracordul SMB de la cablul anteneicuintrarea
antenei (14) la adaptor.
4.2 Montaj
Avertizare-Pericol de accidentare
• Nici un component precum airbag-ul, domeniul de
siguranță,elemente de comandă,instrumente sau
vizibilitatea, nu arevoie săeacoperit sau restrâns.
• În timpul călătorieicuunautovehicul sau utilaj de
agrementnuvălăsațidistras de produs și țiatentla
situația tracului șiaîmprejurimilor.
Indicație
• Înainte montajului dispozitivului de xarevericați
soluțiile de instalare în autovehicul. Dacă nu sunteți
sigur citițimanualul de folosirealautovehiculului sau
adresați-vă producătorului.
• Nu folosiținiciodată forțasau violențalamontajul și
utilizarea produsului.
A) Montaj la grătarul de aerisire
• Montațiadaptorul de xarepentru grătarul de aerisire pe
spatele produsului. (Foto A)
• Introducețiaparatul în grătarul de aerisire.
• Pentru reglarefolosițipivotuldexareîngrătarul de
aerisirerabatabil 360°.
B) Montaj cu suportadeziv
Indicație –Suprafață montaj
Suprafațade montaj (de ex. tabloul de bord) trebuie să
ecurată de grăsimi șipraf. În acest sens folosițiun
material de curățaredin comerțulspecializat.
• Cu ajutorulsuportuluiadeziv plasațiadaptorul de xare
pe spatele produsului (Foto B).
•
Curățațisuprafațade plasare.
• Îndepărtațifolia de protecție asuportului adeziv șiplasați
adaptorul pe suprafațaprevăzută.
59
Page 66

4.3 Racord
Indicație
• Pentru evitareadeteriorării produsului utilizaținumai
accesorii originale (sau: accesorii autorizate de Hama).
(3.6.2)
• Conectațicablul USB de încărcarelivrat la racordul USB
(16) al aparatului.
• Conectațimufa liberă acablului USB la opriză de 12 Va
autovehiculului.
4.4 Pornire/Standby/Configurare inițială
Pornire
• Pentru pornireapăsațicca 3secunde [
Oprire
• Pentru activarearegimuluiStandbyapăsațicca 3secunde
](2).
[
Indicație
Pentru oprirecompletă scoatețiaparatul din priza de
curent.
Congurareinițială
Indicație
• Racordarea anteneitrebuie executată conform
instrucțiunilor.
• După pornireaparatul este în regimul DAB/DAB+ și
începeimediat procesul de căutare aposturilor de radio.
• Prin apăsarea pe [
pornitmanual mai târziu.
[VOLUME/SELECT/NAVIGATE](5) areoalocaredublă a
funcțiilor:
• Prin rotirea [VOLUME/SELECT/NAVIGATE]în meniu,
selectațipuncte separate.
• Prin apăsarepe[VOLUME/SELECT/NAVIGATE]
conrmațiselecția.
• Pentru areveni la nivelul anterior al meniului apăsați
].
[
](6) procesul de căutare poate
](2).
4.5 Setare limbă
La prima punereînfuncțiune engleza este setată ca limbă
standard. Pentru adaptarealimbii executațiurmătoarele:
• Pentru aajunge în meniul de setareapăsațicca 3
secunde [
• Prin rotirea [VOLUME/SELECT/NAVIGATE]navigațiîn
meniu până la punctul „System“.
• Prin apăsare pe [VOLUME/SELECT/NAVIGATE]
conrmațiselecția.
• Prin rotirea [VOLUME/SELECT/NAVIGATE]ajungețila
punctul „Language“.Prin apăsarepe[VOLUME/SELECT/
NAVIGATE]conrmațiselecția.
• Prin rotirea [VOLUME/SELECT/NAVIGATE]selectați
limbadorită.
• Prin apăsare pe [VOLUME/SELECT/NAVIGATE]
conrmațiselecția.
• Utilizațiprodusul numai la temperaturamediului
înconjurător între-10°C și50°C..
• Depozitațiprodusul numailatemperaturamediului
înconjurător între-20°C și60°C..
5. Revizie șiîntreținere
Limpe oproduto apenas com um pano sem pelos
ligeiramente humedecido enão utilize produtos de limpeza
agressivos.
Caso não pretenda utilizaroproduto durante um período
prolongado, desligue-o eretireacha da tomadaelétrica.
Armazene-o num locallimpo eseco, sem exposiçãosolar
direta.
6. Excluderearesponsabilității
Hama GmbH &Co. KG nu îșiasumă nici orăspundere
sau garanție pentru pagube cauzate de montarea,
instalarea sau folosirea necorespunzătoareaprodusului
sau nerespectarea instrucțiunilor de folosire și/sau a
instrucțiunilor de siguranță.
7. Service șisuport
Dacă avețiîntrebări adresați-vă la Hamaconsultanță pentru
produse.
Hotline: +49 9091502-115 (Ger/Ang)
Alte informații de suport găsițiaici:
www.hama.com
Textul complet al instrucțiunilor pe largeste accesibil la
următoarea adresă de internet:
www.hama.com -> 00054849->Downloads
](4).
Indicație
60
Page 67

8. Informații pentru salubrizare
Instrucțiunipentru protecțiamediului înconjurător:
Din momentul aplicării directiveloreuropene
2012/19/EU şi2006/66/CE în dreptulnațional
sunt valabile următoarele:Aparatele electrice şi
electronice precum şibateriile nu pot salubrizate
cu gunoiul menajer.Consumatorul este obligat prin lege
să înapoiezeaparatele electrice şielectronice precum şi
bateriile la sfârşitul duratei lor de folosință la locurile de
colectarelocale amenajate special pentru acestea sau de
unde au fost cumpărate. Detaliile sunt reglementate de
cătrelegislația ecărei țări. Simboluldepeprodus, în
instrucțiunile de utilizaresau pe ambalajindică această
reglementare. Prin reciclarea, valoricarea materială sau
alte forme ale valoricării aparatelor vechi/bateriilor uzate
contribuițiînmaremăsură la protecția mediului nostru
înconjurător.
9. Declarație de conformitate
Prin prezenta, HamaGmbH &CoKG, declară că
tipuldeechipamente radio [00054849] este în
conformitate cu Directiva 2014/53/UE. Textul
integral al declarațieiUEdeconformitateeste disponibil la
următoarea adresă internet:
www.hama.com->00054849->Downloads.
Banda (benzile) de
frecvențe
Puterea maximă
Bluetooth: 2.402 –2.480GHz
FM TX: 87.6 –107.9 MHz
Bluetooth: 6dBm (EIRP)
FM TX: -43.23 dBm
61
Page 68

S Snabbguide
Manöverelementoch indikeringar
A. Framsida
1. Display
2. [Power]
3. [Mode]
4. Info/Settings
5. [VOLUME/SELECT/NAVIGATE]
6. [Search]
7. [Save]
8. [Previous]
B. Baksida
9. Presets
10. Presets
11. Presets
12. Presets
13. Presets
14. Antenna
15. LINEOut
16. Micro USB-anslutning
Viktig information -Snabbguide:
• Detta är en snabbguide som innehåller den
viktigaste grundläggande informationen som
säkerhetsanvisningar föroch idrifttagningav
produkten.
• Av miljöhänsynoch föratt sparapåvärdefullt
råmaterialhar Hama valt att inte publicera
bruksanvisningen itryckt form, utan erbjuderden
enbartför nedladdningipdf-format.
!
• En fullständig version av bruksanvisningen kan
laddas ner på följande adress:
www.hama.com -> 00054849 ->
Downloads
• Förvaradenna fullständiga bruksanvisning för
framtida bruk och skriv vidbehov ut den.
1. Förklaring av varningssymboler och anvisningar
Varning
Användsför att markerasäkerhetshänvisningar eller för
att rikta uppmärksamhet mot speciella faror och risker.
Information
Användsför att markerainformationeller viktiga
anvisningar.
Fara för elektrisk stöt
Denna symbol hänvisar tillfaravid beröringav
ade pr
oisoler
spänningatt det nns risk för elektrisk stöt.
2. Förpackningens innehåll
• Digitalradio ”CDR70BT”
• USB-nätaggregatför bil
• MicroUSB-adapterkabel
• Fäste för ventilationsöppning
• Fäste med självhäftande dyna
• Fästantenn för glas med SMB-anslutning
• Snabbguide
3. Säkerhetsanvisningar
• Produktenäravsedd för hemmabruk, inte yrkesmässig
användning.
• Skydda produkten mot smuts, fukt och överhettningoch
använd den barainomhus.
• Denna produkt ska, som alla elektriska produkter,
förvaras utom räckhåll för barn!
• Barn får inte leka med apparaten.Barn får inte rengöra
eller skötaapparaten utan uppsikt.
• Tappa inte produkten och utsätt den inte för kraftiga
vibrationer.
• Använd inte produkten utanfördekapacitetsgränser
som är angivna för den iden tekniska datan.
• Det är viktigtatt barn hålls borta från
förpackningsmaterialet. Det nns risk för kvävning.
• Kasseraförpackningsmaterialet direkt enligt lokalt
gällandebestämmelser för avfallshantering.
• Ändraingentingpåprodukten. Annars upphör garantin
att gälla.
• Låt dig inte distraherasavdin produkt när du är på
väg med ett motorfordon eller sportutrustningoch var
uppmärksam på trakenoch omgivningenrunt omkring
dig.
oduktdelar som kan ha en så pass hög
62
Page 69

Fara för elektrisk stöt
• Öppna inte produkten och använd den inte mer om
den är skadad.
• Använd inte produkten om AC-adaptern,
adapterkabeln eller elsladden är skadade.
• Försök inte utföra service på produktensjälv eller
repareraden. Överlåt allt servicearbete tillkompetent
fackpersonal.
4. Monteringoch idrifttagande
Vid leveransen av den här produkten medföljerett fäste för
en fordons-ventilationsöppning och ett självhäftande fäste
för plana ytor.
Varning
Kontrolleraatt eventuella strömförsörjningskablar och
antennförbindelser inte påverkar körsäkerheten.
4.1 Antennanslutning/alternativalösningar för
antennanslutning (Bild D)
Observera
• Mottagningen blir bäst om fästantennen för glas sätts
fast på så sätt att den har kontakt med karossen.
• Om fordonets A-pelarehar belagts med tyg eller
något annat isoleringsmaterial ska du ändå sätta fast
metallfoliet där.
• Kontakta en lokal bilverkstad för att få kontakt med
karossen.
• Sätt fast antennen på vindrutekanten (helst på
passagerarsidan)och koppla ihop metallfolietmed
fordonets A-pelare.
• Koppla sedan ihop antennkabelns SMB-anslutning med
adapterns antenningång (14).
4.2 Montering
Varning-skaderisk
• Tänk på att inga komponenter är övertäckta eller
begränsade, som airbagen, säkerhetsområden,
manöverelement, instrument, osv.eller sikten.
• Låt dig inte distraheras av din produkt när du är på
väg med ett motorfordon eller sportutrustning och
var uppmärksam på traken och omgivningen runt
omkring dig.
Observera
• Kontrolleravilka monteringsalternativ du kan
använda dig av ifordonetinnan du monterar
fästet. Vid osäkerhet ska man konsulterafordonets
bruksanvisning eller kontakta fordonstillverkaren.
• Du ska aldrig använda våld eller ta imed extrakraft
vid produkthanteringen och monteringen.
A) Montering vid äktgallret
• Monterafästadaptern för ventilationsutsläppen på
produktens baksida. (Bild A).
• Sätt nu fast produkten iventilationsgallret.
• Det går att ändrainriktningen genom att roteratappen
för fastsättningen iventilationsgallret med 360°.
B) Montering med klisterdyna
Observera–underlaget
Observeraatt underlaget (t.ex. instrumentbrädan)
måste varafritt från damm och fett. Använd ett lämpligt
specialrengöringsmedel.
• Sätt fast fästadapterntillsammans med klisterdynan på
produktens baksida(bild B).
• Rengör ytan där klisterdynan ska fästas.
• Draavklisterdynans skyddsfolie och fäst adaptern på den
avsedda ytan.
63
Page 70

4.3 Anslutning
Observera
• Använd endast originaltillbehör (eller: tillbehör som
har godkäntsavHama) för att undvika skador på
produkten. (3.6.2)
• anslutden medföljande USB-laddningskabeln till
enhetens USB-anslutning (16).
• AnslutUSB-kabelns lediga kontakt till ett 12 V-uttag i
fordonet.
4.4 Påslagning/standby/första idrifttagning
Påslagning
• Tryck på och håll [
slå på enheten.
Avstängning
• Tryck på och håll [
aktivera standby-läget.
Observera
Koppla bort radion från strömförsörjningen för att
stängaavden helt.
Förstaidrifttagning
Observera
• Kontrolleraatt antennförbindelsen har upprättats på
rätt sätt.
• När enhetenhar slagits på är den iDAB/DAB+ -läget och
börjargenastatt söka efter program.
• Om man trycker på [
manuellt vid en senaretidpunkt.
[VOLUME/SELECT/NAVIGATE](5) har två funktioner:
• Genomatt vridapå[VOLUME/SELECT/NAVIGATE]i
menynväljer man två menypunkter.
• Man bekräftar valet genomatt trycka på [VOLUME/
SELECT/NAVIGATE].
• Tryck på [
menynivån
](2) intryckt ica3sekunder för att
](2) intryckt ica3sekunderför att
](6) kan man starta sökningen
]för att gå tillbaka till den tidigare
4.5 Språkinställning
Vid den första idrifttagningen är radions standardspråk
engelska. Så här gör du för att justeraspråkinställningarna:
• Tryck på och håll [
att komma till inställningsmenyn.
• Vrid på [VOLUME/SELECT/NAVIGATE]för att navigera
till menypunkten “System“.
• Bekräfta valet genom att trycka på [VOLUME/SELECT/
NAVIGATE].
• Vrid på [VOLUME/SELECT/NAVIGATE]för att komma till
posten “Language“. Bekräfta valet genom att trycka på
[VOLUME/SELECT/NAVIGATE].
• Vrid på [VOLUME/SELECT/NAVIGATE]för att välja
önskat systemspråk.
• Bekräftagenom att trycka på [VOLUME/SELECT/
NAVIGATE].
Observera
• Använd endast produkten vid en
omgivningstemperatur på från -10°Ctill 50 °C.
• Förvara endast produktenvid en
omgivningstemperatur på från -20 °C till 60 °C.
5. Underhåll och skötsel
• Använd baraenluddfri, lätt fuktad trasa för att rengöra
produktenoch använd inga aggressiva rengöringsmedel.
• Stäng av radion och draursladden om den inte ska
användas på ett tag. Förvaraden på en renoch torr plats
utan direkt solljus.
6. Garantifriskrivning
Hama GmbH &Co. KG tar inget ansvareller ger ingen
garanti för skador som beror på olämplig installation eller
montering och olämplig produktanvändning eller på att
bruksanvisningen och/eller säkerhetshänvisningarna inte
följts.
7. Service och support
Kontakta gärna Hamas produktrådgivning om du har frågor
om produkten.
Support: +49 9091 502-115 (ty/eng)
Du hittarmer supportinformation här:
www.hama.com
En fullständig version av bruksanvisningenkan laddas ner
på följande adress:
www.hama.com -> 00054849->Downloads
](4) intryckt ica3sekunder för
64
Page 71

8. Kasseringsinformation Miljöskydd:
Från den tidpunktnär de europeiska direktiven
2012/19/EU och 2006/66/EG börjadegälla iden
nationella lagstiftningen gäller följande: Elektriska
och elektroniska apparater samt batterier får inte
kastasihushållssoporna. Förbrukarenhar enligt lag
skyldighet att lämnaelektriskaoch elektroniska apparater
samt batterier till inrättade, allmännainsamlingsställen
eller tillinköpsställetnär produkterna når slutet av sin
livslängd. Detaljer regleras idet aktuella landets
lagstiftning. Symbolen på produkten, bruksanvisningen
eller förpackningen pekarpådessa bestämmelser.Med
återanvändningen, materialåtervinningen eller andra
former av återvinning av gamla produkter/batterier,bidrar
du till att skydda vår miljö.
9. Försäkran om överensstämmelse
Härmedförsäkrar Hama GmbH &CoKG, att
denna typ av radioutrustning [00054849]
överensstämmer med direktiv 2014/53/EU.Den
fullständiga texten till EU-försäkranomöverensstämmelse
nns på följande webbadress:
www.hama.com->00054849->Downloads.
Eller de frekvensband
Bluetooth: 2.402 –2.480GHz
FM TX: 87.6 –107.9 MHz
Maximala
radiofrekvenseffekt
Bluetooth: 6dBm (EIRP)
FM TX: -43.23 dBm
65
Page 72

L Lyhyt ohje
Käyttöelementit ja näytöt
A. Etupuoli
1. Näyttö
2. [Power]
3. [Mode]
4. Info/asetukset
5. [VOLUME/SELECT/NAVIGATE]
6. [Search]
7. [Save]
8. [Previous]
B. Taustapuoli
9. Esiasetukset
10. Esiasetukset
11. Esiasetukset
12. Esiasetukset
13. Esiasetukset
14. Antenni
15. LINEOut
16. Micro-USB-liitäntä
Tärkeä ohje -Lyhyt ohje:
• Tämä on pikaohje, jossa annetaantärkeimmät
perustiedot, kuten turvallisuusohjeetjatuotteen
käyttöönoton opastus.
• Ympäristönsuojelemiseksi ja arvokkaiden
raaka-aineiden säästämiseksi Hamaeitoimita
painettuja käyttöohjeita vaan tarjoaa ne
ainoastaan ladattavina PDF-tiedostoina.
• Laaja käyttöohjeonsaatavilla seuraavasta
!
internetosoitteesta:
www.hama.com -> 00054849 ->
Downloads
• Tallenna käyttöohje tietokoneellesi ja tulostase
tarpeen vaatiessa.
1. Varoitusten ja ohjeiden selitykset
Varoitus
Käytetään turvaohjeiden merkitsemiseen ja huomion
kiinnittämiseenerityisiinvaaroihin ja riskeihin.
Ohje
Käytetään lisätietojen tai tärkeiden ohjeiden
merkitsemiseen.
Sähköiskun riski
Tämä symboliviittaa tuotteen eristämättömien osien
kosketusta aiheutuvaan vaar
niin suuren jännitteen, että on olemassa sähköiskun
vaara.
2. Pakkauksen sisältö
• Digitaalinen radio ”CDR70BT”
• Auton USB-verkkolaite
• Micro-USB-adapterikaapeli
• Tuuletuslovien kiinnitys
• Kiinnitysjaitsestään liimautuva tarratyyny
• Lasiin liimattavaantenni ja SMB-liitäntä
• Pikaohje
3. Turvallisuusohjeita
• Tuote on tarkoitettu yksityiseen, ei-kaupalliseen
kotikäyttöön.
• Tuote tuleesuojata lialta, kosteudelta ja
ylikuumenemiselta. Käyttöonsallittua vain kuivissa
tiloissa.
• Tuote, kuten muutkaan sähkökäyttöisettuotteet, ei kuulu
lasten käsiin!
• Lapset eivät saa leikkiälaitteella. Lapset eivät saa
puhdistaa tai huoltaa laitetta ilman valvontaa.
• Tuotetta ei saa päästää putoamaan eikä sitä saa altistaa
voimakkaalle tärinälle.
• Tuotetta ei saa käyttää sen teknisissä tiedoissa
ilmoitettujen suorituskykyrajojen ulkopuolella.
• Pakkausmateriaalit voivat aiheuttaa tukehtumisvaaran ja
ne on siksi pidettävä pois lasten ulottuvilta.
• Pakkausmateriaalit tulee hävittää heti paikallisten
jätehuoltomääräysten mukaisesti.
• Laitteeseen ei saa tehdä muutoksia.Muutosten
tekeminen johtaa takuun raukeamiseen.
• Älä anna tuotteen viedähuomiotasi moottoriajoneuvolla
tai urheilulaitteellaajaessasi. Ota huomioon liikenne ja
ympäristö.
aan,joka saattaa aiheuttaa
66
Page 73

Sähköiskunriski
• Älä avaa tuotetta,äläkä käytä sitä enää, jos se on
vaurioitunut.
• Älä käytä tuotetta, jos AC-adapteri, adapterinjohto tai
virtajohtoonvaurioitunut.
• Älä yritä huoltaa tai korjata tuotettaitse. Jätä kaikki
huoltotyöt vastuulliselleammattihenkilöstölle
4. Asennus ja käyttöönotto
Tuote toimitetaan auton tuuletuslovien kiinnityksellä
ja tasaisille aloilletarkoitetulla itsestään liimautuvalla
kiinnityksellävarustettuna.
Varoitus
Varmista,että virransyöttöön tai antenninliittämiseen
käytettävät kaapelit eivät vaikuta ajoturvallisuuteen.
4.1 Antenniliitäntä /antenniliitännänvaihtoehtoiset
ratkaisut (Kuva D)
Ohje
• Lasiin liimautuva antenni tulee viedäkosketuksiin
ajoneuvonkorin kanssa vastaanoton optimoimiseksi.
• Mikäli ajoneuvon A-pilarionpäällystetty kankaalla tai
muulla eristävällä materiaalilla, metallikalvo tuleesiitä
huolimatta kiinnittää.
• Ota yhteyttä paikalliseen autokorjaamoon luodaksesi
kontaktin ajoneuvonkorin kanssa.
• Kiinnitä antenni tuulilasin reunaan (mieluiten
etumatkustajan puolelle) ja liitä metallikalvo ajoneuvon
A-pilarin kanssa.
• Liitä sen jälkeenantennikaapelin SMB-liitäntäadapterin
antennitulon (14)kanssa.
4.2 Asennus
Varoitus -loukkaantumisvaara
• Komponentteja, kutenturvatyynyä, turva-alueita,
käyttöelementtejä, instrumentteja jne. tai näkyvyyttä
ei saa peittää eikä rajoittaa.
• Älä anna tuotteenviedä huomiotasi
moottoriajoneuvolla tai urheilulaitteella ajaessasi. Ota
huomioonliikenne ja ympäristö.
Ohje
• Tarkista ennen pidikkeenasennustamahdolliset
asennuspaikatajoneuvossa. Lisätietoja on ajoneuvosi
käyttöohjeessa, tai käännytarvittaessa ajoneuvon
valmistajan puoleen.
• Älä koskaankäytä väkivaltaa tai voimaa tuotetta
käsitellessäsi tai asentaessasi.
A) Asennus ilmastointiritilään
• Asenna tuuletusaukkojen kiinnitysadapteri tuotteen
taustapuolelle. (Kuva A)
• Työnnä laite sen jälkeen tuuletusritilään.
• Tuuletusritilän kiinnityksen kiinnitystappia voi kääntää
360°suuntauksen parantamiseksi.
B) Asennus tarratyynyllä
Ohje –asennuspinta
Huomaa, että asennuspinnan (esim. kojelauta) on oltava
pölytön ja rasvaton. Käytä puhdistukseen alan liikkeistä
saatavaa soveltuvaapuhdistusainetta.
• Kiinnitä kiinnitysadapteri tarratyynyllä tuotteen
taustapuolelle (kuva B).
• Puhdista pinta, jolle tarratyyny on tarkoitus kiinnittää.
• Irrota sen jälkeen suojakalvotarratyynystä ja kiinnitä
adapteri halutulle pinnalle.
67
Page 74

4.3 Liitäntä
Ohje
• Käytä ainoastaanalkuperäisiä lisävarusteita (tai
Hamanhyväksymiä lisävarusteita) tuotevaurioiden
välttämiseksi. (3.6.2)
• Kytke toimitukseen sisältyvä USB-latauskaapeli laitteen
USB-liitäntään (16).
• Kytke USB-johdon vapaa pistoke tietokoneen ajoneuvon
12 V-pistorasiaan.
4.4 Päälle kytkeminen /standby/ensiasetukset
Päälle kytkeminen
• Paina ja pidä [POWER]-painiketta (2) painettunan.kolme
sekuntia laitteen kytkemiseksi päälle.
Kytkeminen pois päältä
• Paina ja pidä [
sekuntia standby-tilan aktivoimiseksi.
Ohje
Erota radio sähköverkosta kytkeäksesi sen kokonaan
pois päältä.
Ensimmäiset asetukset
Ohje
• Varmista, että antenniyhteys on luotu ohjeiden
mukaisesti.
• Laite on päälle kytkemisen jälkeen tilassaDAB/DAB+ ja
aloittaa kanavahaun välittömästi.
• Painamalla [
myöhempänä ajankohtana.
[VOLUME/SELECT/NAVIGATE]-napilla (5) on duaalinen
toimintovaraus:
• Kiertämällä valikosta [VOLUME/SELECT/NAVIGATE]-
nappia valitaan yksittäisiävalikkokohtia.
• Valinta vahvistetaan painamalla [VOLUME/SELECT/
NAVIGATE].
• Paina [
]-painiketta (2) painettunan.kolme
]-painiketta (6) haun voi käynnistää
]palataksesi aiemmalle valikkotasolle
4.5 Kieliasetus
Radion vakiokieleksi on asetettu ensimmäisen käyttöönoton
yhteydessä englanti. Menettele seuraavasti kielen
vaihtamiseksi:
• Paina ja pidäpainiketta[
sekuntia päästäksesi asetusvalikkoon.
• Navigoi [VOLUME/SELECT/NAVIGATE]-nappia
kiertämällä valikkokohtaan ”Järjestelmä”.
• Vahvistavalinta nappia [VOLUME/SELECT/NAVIGATE]
painamalla.
• Kiertämällä nappia [VOLUME/SELECT/NAVIGATE]
pääset kohtaan ”Kieli”. Vahvistavalinta nappia
[VOLUME/SELECT/NAVIGATE]painamalla.
• Valitse haluttu järjestelmäkieli nappia[VOLUME/
SELECT/NAVIGATE]kiertämällä.
• Vahvistavalinta nappia [VOLUME/SELECT/NAVIGATE]
painamalla.
Ohje
• Tuotetta saa käyttää vain ympäristönlämpötilan
ollessa -10°C-50°C.
• Tuotteensaa varastoida vain ympäristön lämpötilan
ollessa -20 °C -60°C.
5. Hoito ja huolto
• Puhdista tämä tuote ainoastaan nukkaamattomalla,
kevyesti kostutetulla liinalla äläkä käytä syövyttäviä
puhdistusaineita.
• Mikäli et käytä tuotetta pidempään aikaan, kytke
laite pois päältä ja erota se sähköverkosta. Varastoi
se puhtaassa, kuivassa tilassa ilmansuoraa auringon
säteilyä.
6. Vastuun rajoitus
Hama GmbH &Co. KG ei vastaamillään tavalla
vahingoista, jotka johtuvat epäasianmukaisesta
asennuksesta tai tuotteen käytöstäeikä käyttöohjeen ja/tai
turvaohjeiden vastaisesta toiminnasta.
7. Huoltojatuki
Tuotetta koskevissa kysymyksissä pyydämme kääntymään
Hamantuoteneuvonnan puoleen.
Hotline: +49 9091502-115 (saksa/englanti)
Lisää tukitietoja on osoitteessa
www.hama.com
Laaja käyttöohje on saatavilla seuraavasta
internetosoitteesta:
www.hama.com -> 00054849->Downloads
](4) painettuna noin 3
68
Page 75

8. Hävittämisohjeet
Ympäristönsuojeluakoskeva ohje:
Siitä lähtien, kun Euroopan unionindirektiivit
2012/19/EU ja 2006/66/EY otettiin käyttöön
kansallisessa lainsäädännössä, pätevät seuraavat
määräykset: Sähkö- ja elektroniikkalaitteita ja
paristoja ei saa hävittää talousjätteen mukana. Kuluttajalla
onlain mukaan velvollisuus toimittaasähkö- ja
elektroniikkalaitteet sekä akut niidenkäyttöiän päätyttyä
niille varattuihin julkisiin keräyspisteisiin tai palauttaane
myyntipaikkaan. Tähän liittyvistä yksityiskohdista
säädetäänkulloisenkin osavaltion laissa. Näistä
määräyksistä mainitaan myös tuotteen symbolissa,
käyttöohjeessa tai pakkauksessa. Uudelleenkäytöllä,
materiaalien uudelleenkäytöllä tai muilla vanhojen
laitteiden/akkujen uudelleenkäyttötavoillaontärkeä
vaikutus yhteisen ympäristöömme.
9. Vaatimustenmukaisuusvakuutus
Hama GmbH &CoKGvakuuttaa, että
radiolaitetyyppi[00054849] on direktiivin
2014/53/EU mukainen.
EU-vaatimustenmukaisuusvakuutuksen täysimittainen
teksti on saatavilla seuraavassa internetosoitteessa:
www.hama.com->00054849->Downloads.
Radiotaajuudet
Suurin mahdollinen
lähetysteho
radiotaajuuksilla
Bluetooth: 2.402 –2.480GHz
FM TX: 87.6 –107.9 MHz
Bluetooth: 6dBm (EIRP)
FM TX: -43.23 dBm
69
Page 76

K Kort vejledning
Betjeningselementer og visninger
A. Forside
1. Display
2. [Power]
3. [Mode]
4. Info/Settings
5. [VOLUME/SELECT/NAVIGATE]
6. [Search]
7. [Save]
8. [Previous]
B. Bagside
9. Presets
10. Presets
11. Presets
12. Presets
13. Presets
14. Antenna
15. LINEOut
16. Micro-USB-tilslutning
Vigtig henvisning -Kort vejledning:
• Dette er en kort vejledning,som giver digde
vigtigste basis-informationer om ibrugtagning af
ditprodukt og sikkerhedshenvisninger.
• Af miljømæssige årsagerundlader rmaet Hama
at printeden langebetjeningsvejledning for at
undgå spildafværdifulde råstoffer og tilbyder
den derforudelukkendesom PDF-download.
• Denfuldstændige lange vejledning kan ndes
!
på følgende internetadresse:
www.hama.com -> 00054849 ->
Downloads
• Gemden lange betjeningsvejledningfor at kunne
søge efter informationer idenne på dincomputer,
og print denomnødvendigtud.
1. Forklaring af advarselssymboler og henvisninger
Advarsel
Anvendes til at markeresikkerhedshenvisninger eller til
at gøreopmærksom på særlige farer og risici.
Bemærkning
Anvendes til at markereyderligereinformationer eller
vigtige henvisninger.
Fare for elektriskstød
Dette symbol henvisertil farefor berøring med
oduktets uisoler
pr
spænding, der er så kraftig, at der er farefor elektrisk
stød.
2. Pakningsindhold
• Digital radio „CDR70BT“
• Køretøj-USB-netdel
• Micro-USB-adapterkabel
• Fastgørelse til ventilationsåbninger
• Fastgørelse med selvklæbende pad
• Glasklæbeantenne med SMB-tilslutning
• Kort vejledning
3. Sikkerhedshenvisninger
• Produkteterberegnet til privat, ikke-erhvervsmæssig
husholdningsbrug.
• Beskyt produktet mod smuds, fugtighedog
overophedning,oganvenddet kun itørre omgivelser.
• Dette produkt skal, som alle elektriske produkter,
opbevaresutilgængeligt for børn!
• Børn må ikke lege med enheden. Rengøring og
brugerens vedligeholdelse må ikke udføresafbørnuden
opsyn.
• Tabikke produktet, og udsæt det ikke for kraftige
rystelser.
• Anvend ikke produktetuden for dets ydelsesgrænser,der
er angivetide tekniskedata.
• Hold ubetinget børn borte fraemballeringsmaterialet,
der er farefor kvælning.
• Bortskafstraks emballeringsmaterialet ihenhold til de
lokalt gældendeforskrifter for bortskaffelse.
• Undlad at foretageændringerpåapparatet. Derved
bortfalder alle garantikrav.
• Lad ikke dit produkt aede din opmærksomhed under
en kørselmed en bil eller et sportsapparat, og vær
opmærksom på traksituationen og dine omgivelser.
ede dele,som muligvis leder en farlig
70
Page 77

Fare for elektriskstød
• Åbn ikke produktet, og anvend det ikke længereved
beskadigelser.
• Anvend ikke produktet,hvis AC-adapteren,
adapterkablet eller netledningenerbeskadiget.
• Forsøg aldrig selv at vedligeholde eller reparere
produktet.Overladalle vedligeholdelsesarbejder til det
ansvarligefagpersonale.
4. Monteringogibrugtagning
Dette produkt leveresmed en fastgørelse til køretøjets
ventilationsåbninger og en selvklæbende fastgørelse til lige
ader.
Advarsel
Vær opmærksompå, at nogle kabler til
strømforsyningen og antenneforbindelsen ikke påvirker
køresikkerheden.
4.1 Antennetilslutning/alternative løsninger
antennetilslutning (BilledeD)
Bemærk
• Foratoptimeremodtagelsen skal glasklæbeantennen
placeres med kontakttil karosseriet.
• HvisA-søjlen idit køretøj er betrukket med stof eller
med et andet isolerende materiale, skal du alligevel
placeremetalfolien dér.
• Kontakt et lokalt bilværksted for at etablere en
kontakt med karosseriet.
• Anbring antennen på forrudens kant (fortrinsvistpå
passagersiden),ogforbind metalfolien med køretøjets
A-søjle.
• Forbindderefterantennekablets SMB-tilslutning med
adapterens antenneindgang (14).
4.2 Montering
Advarsel -farefor kvæstelser
• Vær opmærksom på, at komponenter,som
f.eks. airbag, ikke tildækkerellerindskrænker
sikkerhedsområder,betjeningselementer,
instrumenter,etc. eller udsynet.
• Lad ikke dit produkt aede din opmærksomhed under
en kørselmed en bil eller et sportsapparat, og vær
opmærksom på traksituationen og dine omgivelser.
Bemærk
• Kontrollér før monteringen af holderne
monteringsmulighederneidit køretøj. Se itilfælde
af tvivl idriftsvejledningen til køretøjet, eller kontakt
køretøjsproducenten.
• Anvend aldrig vold ellerstor kraft ved håndtering af
produktet og ved monteringen.
A) Montering på ventilationsgitter
• Montér fastgørelsesadapteren til ventilationsudgangene
på bagsidenafproduktet. (Billede A)
• Sæt nu apparatet ind iventilationsgitteret.
• Tappen til fastgørelsen iventilationsgitteret kan drejes
360°for at tilpassejusteringen.
B) Montering med klæbepude
Bemærk –monteringsade
Vær opmærksom på, at den ønskedemonteringsade
(f.eks. instrumentbrættet) skal værestøv- og fedtfri.
Anvend dertiletegnet rengøringsmiddel frafaghandlen.
• Anbring fastgørelsesadapteren med klæbepuden på
bagsiden af produktet(billede B).
• Rengør aden, som klæbepuden skal anbringes på.
• Træk nubeskyttelsesfolien af klæbepuden, og anbring
adapteren på den pågældende ade.
71
Page 78

4.3 Tilslutning
Bemærk
• Anvend udelukkendeoriginalt tilbehør (eller: tilbehør,
der er godkendt af Hama) for at undgå skader på
produktet. (3.6.2)
• Tilslut det medfølgendeUSB-ladekabel til apparatets
USB-tilslutning(16).
• Tilslut det fri stik på USB-kablet til en 12 V-stikdåse på
dit køretøj.
4.4 Tilkobling/standby/første indstilling
Tilkobling
• Tryk på [
Frakobling
• Tryk på [
Førsteindstilling
• Efter tilkoblingen bender apparatet sig på modusDAB/
• Vedattrykke på [ ](6) kan søgningen startes manuelt
[VOLUME/SELECT/NAVIGATE](5) har en dobbelt
funktionskonguration:
• Vedatdreje [VOLUME/SELECT/NAVIGATE]imenuen
• Vedattrykke på [VOLUME/SELECT/NAVIGATE]
• Tryk på [
](2), og hold den inde ica. 3sekunder for at
tilkoble apparatet.
](2), og hold den inde ica. 3sekunder for at
aktivere standby-modus.
Bemærkning
Afbrydradioen frastrømforsyningenfor at slukke den
fuldstændigt.
Bemærk
• Sørgfor,atantenneforbindelsen blev etableret korrekt.
DAB+ og begynderstationssøgningen med det samme.
på et seneretidspunkt.
vælgerduenkelte menupunkter.
bekræfter du valget.
]for at vende tilbage til det forrige
menuniveau
4.5 Sprogindstilling
Vedførste idrifttagning er engelsk indstilletsom radioens
standardsprog. Gå frem på følgende mådefor at tilpasse
sproget:
• Tryk på [
at kommetil indstillingsmenuen.
• Navigér til menupunktet„System“ ved at dreje
[VOLUME/SELECT/NAVIGATE].
•Bekræft valget ved at trykkepå[VOLUME/SELECT/
NAVIGATE].
• Vedatdreje [VOLUME/SELECT/NAVIGATE]kommerdu
til punktet „Language“. Bekræft valget ved at trykkepå
[VOLUME/SELECT/NAVIGATE].
• Vælgdet ønskedesystemsprogved at dreje [VOLUME/
SELECT/NAVIGATE].
• Bekræftdet ved at trykke på [VOLUME/SELECT/
NAVIGATE].
• Anvend kun produktetved en omgivelsestemperatur
fra-10 °C til 50 °C.
• Anvend kun produktetved en omgivelsestemperatur
fra-20 °C til 60°C.
5. Vedligeholdelse og pleje
• Rengør kun dette produkt med en fnugfri, let fugtet klud,
og anvend ikke aggressive rengøringsmidler.
• Hvis du ikke anvendes produktet ilængeretid, skal du
slukkeapparatet og afbryde det frastrømforsyningen.
Opbevar det på et rent, tørt sted uden sollys.
6. Udelukkelse af garantikrav
Hama GmbH &Co. KG påtagersig ikke ansvar ellergaranti
for skader,der skyldes ukorrekt installation,montering og
ukorrekt brug af produktet eller manglende overholdelse af
betjeningsvejledningen og/eller sikkerhedshenvisningerne.
7. Service og support
Kontakt venligst Hama-produktrådgivningen,hvis du har
spørgsmål vedrørende produktet.
Hotline: +49 9091502-115 (tysk/engelsk)
Du nder eresupportinformationer på:
www.hama.com
Den fuldstændige langevejledning kan ndes på følgende
internetadresse:
www.hama.com -> 00054849->Downloads
](4), og hold den inde ica. 3sekunder for
Bemærk
72
Page 79

8. Bortskaffelseshenvisninger
Henvisninger vedrørende miljøbeskyttelse:
Fraogmed indførelsen af EU-direktiverne
2012/19/EU og 2006/66/EF inationalret gælder
følgende:Elektrisk og elektronisk udstyr samt
batterier må ikke bortskaffes sammen med
almindeligt husholdningsaffald. Forbrugerenerlovmæssigt
forpligtet til at aevereudtjent elektrisk og elektronisk
udstyrsamt batteriertil dertil indrettede, offentlige
indsamlingsstedereller til forhandleren. De nærmere
bestemmelser vedr.dette fastlægges af lovgivningenidet
pågældende land. Symbolet på produktet,
brugsvejledningen eller emballagen henvisertil disse
bestemmelser.Ved genbrug, genvinding eller andre former
for nyttiggørelse af udtjent udstyr/batteriergiver du et
vigtigtbidrag til beskyttelse af miljøet.
9. Overensstemmelseserklæring
HermederklærerHama GmbH &CoKG, at
radioudstyrstypen [00054849] er i
overensstemmelse med direktiv 2014/53/EU.
EU-overensstemmelseserklæringens fulde tekst kan ndes
på følgende internetadresse:
www.hama.com->00054849 -> Downloads.
Frekvensbånd
Bluetooth: 2.402 –2.480GHz
FM TX: 87.6 –107.9 MHz
Maksimal
radiofrekvenseffekt
Bluetooth: 6dBm (EIRP)
FM TX: -43.23 dBm
73
Page 80

V Kortveiledning
Betjeningselementer og indikatorer
A. Forside
1. Display
2. [Power]
3. [Mode]
4. Info/Settings
5. [VOLUME/SELECT/NAVIGATE]
6. [Search]
7. [Save]
8. [Previous]
B. Bakside
9. Presets
10. Presets
11. Presets
12. Presets
13. Presets
14. Antenna
15. LINEOut
16. Mikro-USB-forbindelse
Viktig henvisning -Kortveiledning:
• Dette er en kortveiledning som gir degde
viktigste, grunnleggendeinformasjoner som
sikkerhetshenvisningerogidriftsettelse av
produktet ditt.
• På grunn av miljøvernogsparing av verdifulle
råstofferhar ikke rmaet Hama en utskrevet, lang
veiledning og tilbyr denne veiledningenkun som
PDF-nedlastning.
!
• Den komplette lange veiledningen nnes på
følgende Internettadresse:
www.hama.com -> 00054849 -> Downloads
• Vi ber degomålagreden lange veiledningen på
din datamaskin, skrivden eventuelt ut.
1. Forklaring av faresymboler og merknader
Advarsel
Benyttesfor åmerke sikkerhetsinformasjoneller for å
rette oppmerksomheten mot spesielle farer og risikoer.
Merknad
Benyttesfor åmerke informasjon ellerviktige merknader
ytterligere.
Fare for elektriskstøt
Dette symbolet visertil farefor berøringavproduktdeler
som ikke er isolertogsom potensielt leder farlig
spenningmed en styrke som kan forårsake elektriske
støt.
2. Pakkeinnhold
• Digitalradio «CDR70BT»
• USB-nettadapter for bil
• Mikro-USB-adapterkabel
• Fastgjøringfor spjeld
• Fastgjøringmed selvklebende pute
• Vinduantenne med SMB-forbindelse
• Kort veiledning
3. Sikkerhetsanvisninger
• Produkteterberegnet på privat,ikke-kommersiell bruk i
husholdninger.
• Ikke utsett apparatet for smuss, fuktighet og
overoppheting, og bruk det kun itørre rom.
• Detteproduktet skal, som alle elektriske apparater,
oppbevares utilgjengelig for barn!
• Barn må ikke leke med produktet. Rengjøring og
brukervedlikeholdmåikke utføres av barn uten tilsyn.
• Produktetskal ikke falle ned frahøyder, og må ikke
utsettes for kraftigevibrasjoner.
• Produktetskal ikke benyttesutenfor de ytelsesgrensene
som er angitt under tekniske spesikasjoner.
• På grunnav farefor kvelning skal små barn holdes unna
emballasjen.
• Fjern emballasjen umiddelbart ihenhold til gyldige
lokale forskrifter for avfallshåndtering.
• Foreta aldri endringerpåapparatet. Hvis detteblir gjort,
har du ikke krav på noen som helst garanti.
• Ikke la deg distrahereavproduktet når du kjører
et motorkjøretøyeller sportsutstyr,ogtahensyn til
trakksituasjonenog omgivelsene.
74
Page 81

Fare for elektriskstøt
• Produktet skalikke åpnes og ikke benyttesdersom det
er skadet.
• Produktet skalikke benyttes dersom AC-adapteren,
adapterkabelen eller nettledningenerskadet
• Prøv aldri åvedlikeholde eller reparereproduktet på
egenhånd. Vedlikeholdsarbeid skal kun utføres av
ansvarlig fagpersonell.
4. Monteringogigangsetting
Dette produktet leveres med en fastgjøring for spjeld ibiler
og en selvklebende fastgjøring for rette ater.
Advarsel
• Se til at kablertil strømforsyningog
antenneforbindelse ikke påvirkerkjøresikkerheten.
4.1 Antenneforbindelse /alternative løsninger
antenneforbindelse(Bilde D)
Merknad
• Foråfåoptimalt mottak bør vindusantennen
monteres med kontakt til karosseriet.
• Dersom A-stolpenibilendin er overtrukket med
stoffeller et annet isolerende materialemonterer du
allikevel metallfolien på den.
• Henvend deg til et lokaltbilverksted for åopprette en
kontakt med karosseriet.
• Antennen monteres på kanten av bilruten (helstpå
passasjersiden), og metallfolien forbindes med A-stolpen
ibilen.
• Deretter kobles antennekabelens SMB-forbindelse til
adapterens antenneinngang (14).
4.2 Montering
Advarsel -farefor skade
• Se til at ingen komponenter,som f.eks. kollisjonspute,
tildekker eller begrenser sikkerhetsområder,
betjeningselementer,instrumenter etc.eller hindrer
sikten.
• Ikke la deg distrahereavproduktet når dukjører
et motorkjøretøy ellersportsutstyr, og ta hensyntil
trakksituasjonen og omgivelsene.
Merknad
• Før montering av holderen må du kontrollere
monteringsmulighetene ibilen din. Se
bruksanvisningen til bilen eller kontakt bilprodusenten
ved tvil.
• Bruk aldri makt eller stor kraft ved håndtering av
produktet og ved monteringen.
A) Montering på ventilasjonsanlegg
• Monter fastgjøringsadapter for ventilasjonsanlegg på
baksiden av produktet. (Bilde A)
• Sett så enheten inn iventilasjonsanlegget.
• Tappene for fastgjøring iventilasjonsanlegget kan dreies
360°for åtilpasse utrettingen.
B) Montering med klebepute
Merknad -monteringsate
Se til at ønsket monteringsate (f.eks. dashbord) er
uten støv og fett. Bruk et egnet rengjøringsmiddel fra
fagforhandler.
• Fastgjøringsadapteren monteres på baksidenav
produktet(bilde B) med klebeputen.
• Flatensom klebeputen skal monteres på, må rengjøres.
• Nå trekkes folienavklebeputen, og adapteren monteres
på tiltenkt ate.
75
Page 82

4.3 Tilkobling
Merknad
• Bruk kun originaltilbehør (eller: tilbehørsom er
godkjent av Hama)for åunngåskader på produktet.
(3.6.2)
• LevertUSB-ladekabel kobles til enhetens USB-forbindelse
(16).
• USB-kabelens ledigestøpselkoblestil en 12 Vstikkontakt
ibilen din.
4.4 Innkobling/standby /førsteinnretting
Innkobling
• Trykk og hold nede [
enheten.
Slå av
• Trykk og hold nede [
standbymodus.
Merknad
Koble radioen frastrømforsyningenfor åslå den helt av.
Førsteinnretting
Merknad
• Se til at antenneforbindelsen ble riktig opprettet.
• Etter innkobling er enhetenimodus DAB/DAB+ og starter
øyeblikkelig med søk etter kanaler.
• Vedåtrykke på [ ](6) kan søket startes manueltpået
senere tidspunkt.
[VOLUME/SELECT/NAVIGATE](5) har en dobbel funksjon:
• Vedådreie på [VOLUME/SELECT/NAVIGATE]imenyen
velger du ut enkelte menypunkter.
• Du bekrefter valget ved åtrykke på [VOLUME/SELECT/
NAVIGATE].
• Trykk på [
](2) ica. 3sekunder for åslå på
](2) ica. 3sekunder, for åaktivere
], for åkomme tilbake til forrige menynivå.
4.5 Språkinnstilling
Vedførste igangsetting er engelsk innstilt som
standardspråk for radioen. Gå frem på følgende måtefor å
endrespråket:
• Trykk og hold nede [
komme til innstillingsmenyen.
• Vedådreie på [VOLUME/SELECT/NAVIGATE]navigerer
du til menypunktet «System».
• Bekreft ved åtrykke på [VOLUME/SELECT/NAVIGATE].
• Vedådreie på [VOLUME/SELECT/NAVIGATE] kommer
du til punktet«Language». Bekreft ved åtrykkepå
[VOLUME/SELECT/NAVIGATE].
• Vedådreie på [VOLUME/SELECT/NAVIGATE]velgerdu
ut ønsket språk for systemet.
• Bekreft dette ved åtrykkepå[VOLUME/SELECT/
NAVIGATE].
Merknad
• Bruk produktet kun ved en omgivelsestemperatur på
-10°Ctil 50 °C.
• Lagreproduktet kun ved en omgivelsestemperatur på
-20°Ctil 60 °C.
5. Vedlikehold og pleie
• Dette produktet skal kun rengjøres med en lofri, lett
fuktetklut, uten aggressiverengjøringsmidler.
• Hvis produktet ikke skal benyttes på en stund, må det
koblesutogkobles frastrømforsyningen.Produktet må
lagres på et rent, tørt sted, uten direkte solinnstråling.
6. Fraskrivelseavansvar
Hama GmbH &Co. KG overtar ingen form for ansvar
eller garanti for skader som kan tilbakeføres til ukyndig
installering eller monteringeller ukyndig bruk av produktet
eller som følge av at produktet har blitt benyttet uten at
bruksveiledningen og/eller sikkerhetsanvisningeneertatt
hensyntil.
7. Service og support
Hama-produktservice hjelper deg gjerne videre dersomdu
har spørsmålomproduktet.
Telefonsupport: +49 9091502-115 (tysk/engelsk)
Her nner du ytterligeresupportinformasjon:
www.hama.com
Den komplette lange veiledningen nnes på følgende
Internettadresse:
www.hama.com -> 00054849->Downloads
](4) ica. 3sekunder,for å
76
Page 83

8. Avfallshåndtering
Informasjon om miljøvern
Fratidspunktet for omsetning av europeisk direktiv
2012/19/EU og 2006/66/EF inasjonal lov,gjelder
følgende:Elektriskeogelektroniske apparater og
batterier skal ikke deponeressammenmed
husholdningsavfall. Forbrukerenerlovmessig forpliktettil
ålevereinn elektriske og elektroniskeapparater og
batterier til de offentligesamlestedene eller til salgsstedet
når de ikkevirker lenger.Detaljer angåendedette
reguleres ibrukslandet. Symbolet på produktet,
bruksveiledningeneller emballasjen henviser til denne
bestemmelsen. Med gjenvinningen, resirkuleringenavstoff
eller andreformer for resirkulering av gamle apparater/
batterier bidrar du betydelig for åbeskytte miljøetvårt.
9. Samsvarserklæring
HermederklærerHama GmbH &CoKGat
radioanleggtypen[00054849] tilsvarer direktiv
2014/53/EU.Den komplette teksten til EUsamsvarserklæringen nnespåfølgende Internettadresse:
www.hama.com->00054849 -> Downloads.
Frekvensbånd/
frekvensbånd
Bluetooth: 2.402 –2.480GHz
FM TX: 87.6 –107.9 MHz
Avstråltmaksimal
sendeeffekt
Bluetooth: 6dBm (EIRP)
FM TX: -43.23 dBm
77
Page 84

Hama GmbH &CoKG
86652 Monheim/Germany
www.hama.com
The Spotify softwareissubject to thirdparty licenses found here:
www.spotify.com/connect/third-party-licenses
The Bluetooth®wordmark and logos areregistered trademarksowned by Bluetooth SIG, Inc. and
any use of such marks by Hama GmbH &CoKGisunder license. Other trademarks and trade names
arethose of their respective owners.
Alllistedbrands are trademarksofthe correspondingcompanies.Errorsand omissions excepted,
andsubjec ttotechnicalchanges. Our generalterms of deliveryand paymentare applied.
00054849/04.19
 Loading...