

Page 1
Installation and User Manual
Instructions d’installation et
Instrucciones de instalación y
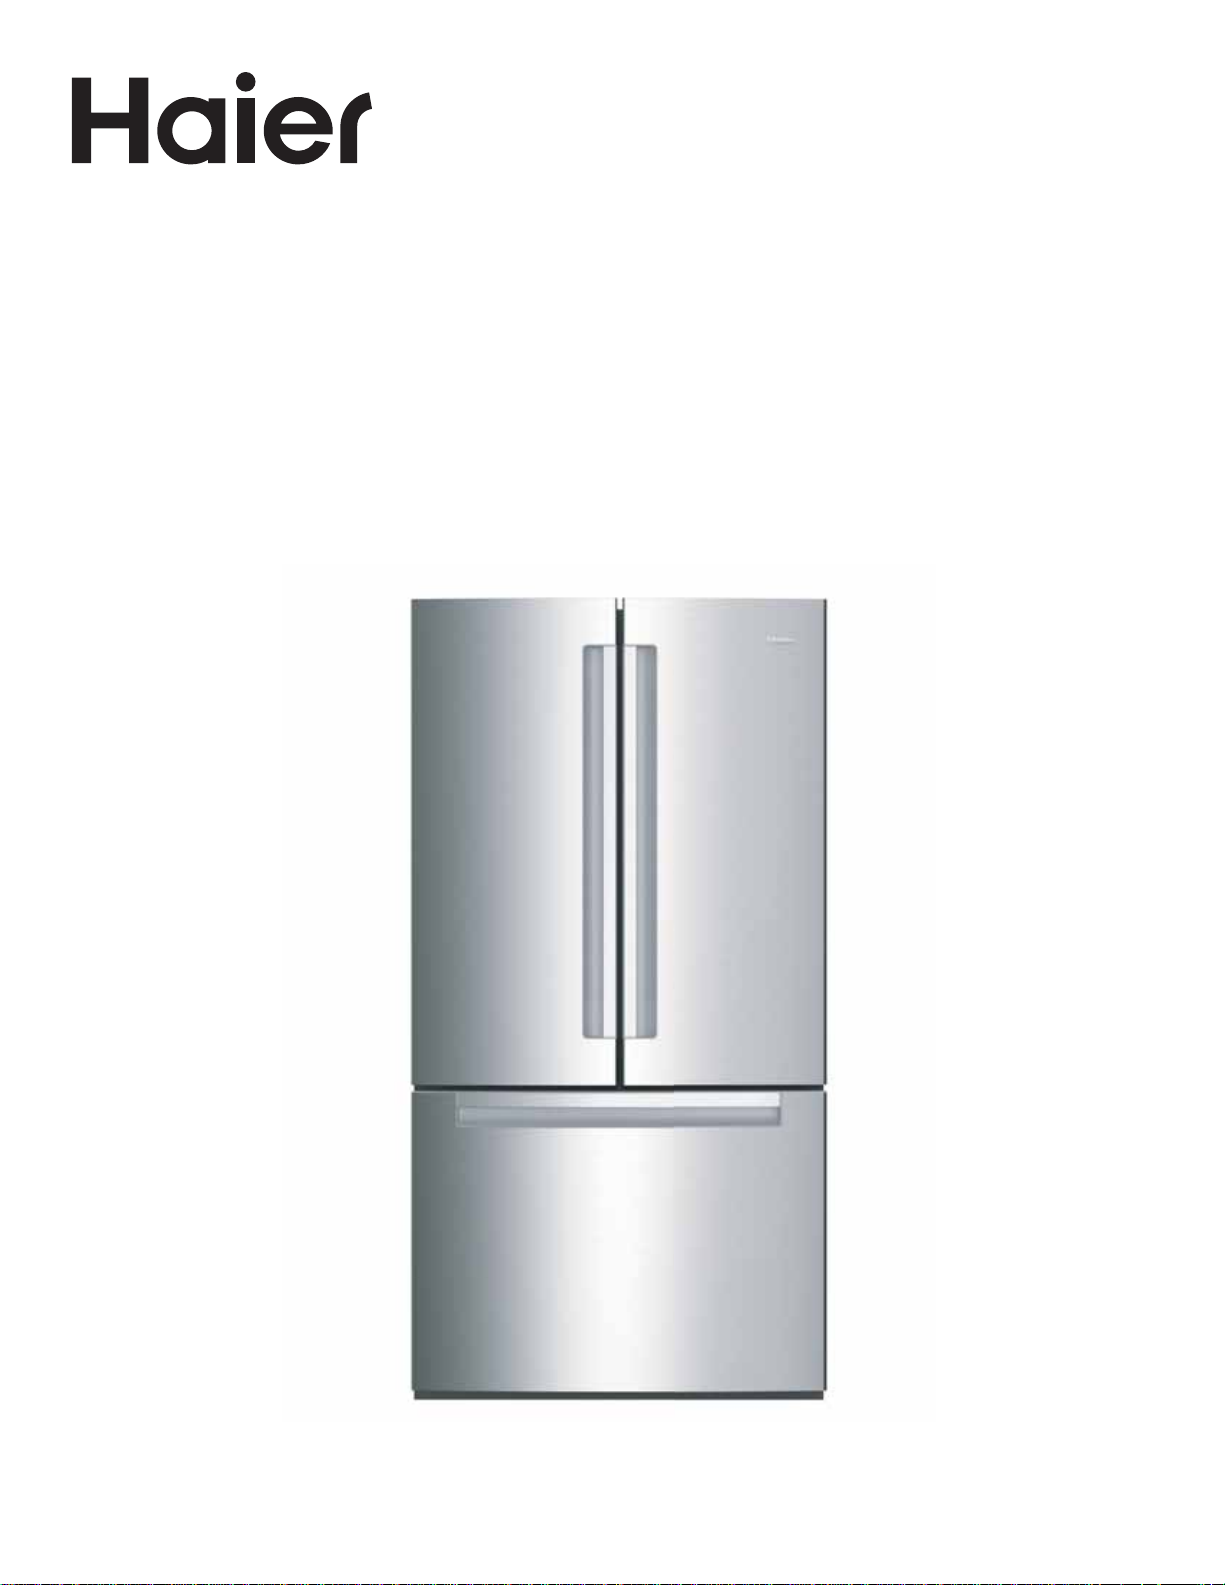
Bottom Freezer Refrigerator
Réfrigérateur à congélateur inférieur
Refrigerador congelador inferior
Guide de l’utilisateur
Manual del usuario
QNE27J
238C5676P001 49-60806
02-19 GEA
Page 2

2 49-60806
ENGLISH
Page 3

TABLE OF CONTENTS
RECORD KEEPING ..............................................................................................18
REFRIGERATOR SAFETY .......................................................................................... 4
Proper Disposal of Your Old Refrigerator ................................................................................5
PARTS AND FEATURES ............................................................................................ 6
INSTALLATION REQUIREMENTS .................................................................................. 7
Location Requirements ............................................................................................... 7
Clearances ........................................................................................................... 7
INSTALLATION INSTRUCTIONS . .................................................................................. 8
Preparing to Install the Refrigerator ....................................................................................8
Appliance Dimensions ..................................................................................................9
Installing the Water Line ............................................................................................. 10
Installing the Refrigerator ............................................................................................ 12
Completing Installation .............................................................................................. 17
REFRIGERATOR USE ............................................................................................. 18
Controls ............................................................................................................ 18
Sabbath Mode ....................................................................................................... 18
Internal Water Dispenser ............................................................................................. 18
Water Filter CartridgeXWF ........................................................................................... 19
Shelves and Bins ..................................................................................................... 20
Pans ................................................................................................................. 20
Freezer Drawer. . . . . . . . . . . . . . . . . . . . . . . . . . . . . . . . . . . . . . . . . . . . . . . . . . . . . . . . . . . . . . . . . . . . . . . . . . . . . . . . . . . . . . . . . . . . . . . . . . . . . . . 21
Automatic Icemaker .................................................................................................. 22
REFRIGERATOR CARE ........................................................................................... 23
Cleaning ............................................................................................................. 23
Vacation and Moving ................................................................................................. 24
Replacing the Lights ................................................................................................. 24
TROUBLESHOOTING . . . . . . . . . . . . . . . . . . . . . . . . . . . . . . . . . . . . . . . . . . . . . . . . . . . . . . . . . . . . . . . . . . . . . . . . . . . . . . . . . . . . . . . . . . . . 25
XWF WATER FILTER CARTRIDGE ................................................................................. 28
PERFORMANCE DATA SHEET. . . . . . . . . . . . . . . . . . . . . . . . . . . . . . . . . . . . . . . . . . . . . . . . . . . . . . . . . . . . . . . . . . . . . . . . . . . . . . . . . . . . . 29
LIMITED WARRANTY ............................................................................................ 30
RECORD KEEPING
Thank you for purchasing this Haier product. This user manual will help
you get the best performance from your new refrigerator.
For future reference, record the model number, serial number, and the
date of purchase. The model/serial number plate is located on the inside
wall of the refrigerator.
Staple your proof of purchase to this manual to aid in obtaining warranty
service if needed.
_______________________________________
Model number
_______________________________________
Serial number
_______________________________________
Date of purchase
49-60806 3
ENGLISH
Page 4
REFRIGERATOR SAFETY
WARNING
¿ This refrigerator must be properly installed and located
in accordance with the Installation Instructions before it
is used.
¿ Unplug the refrigerator before making repairs or
cleaning.
NOTE: Power to the refrigerator cannot be disconnected
by any setting on the control panel.
NOTE: Repairs must be performed by a qualified Service
Professional.
¿ Replace all parts and panels before operating.
¿ Do not use an extension cord.
¿ Do not store or use gasoline or other flammable vapors
and liquids in the vicinity of this or any other appliance.
¿ Do not store explosive substances such as aerosol cans
with a flammable propellant in this appliance.
¿ To prevent suffocation and entrapment hazards to
children, remove the fresh food and freezer doors from
any refrigerator before disposing of it or discontinuing
its use.
¿ To avoid serious injury or death, children should not
stand on, or play in or with the appliance.
To reduce the risk of fire, explosion, electric shock, or injury when using your refrigerator, follow these
basic safety precautions:
¿ Children and persons with reduced physical, sensory or
mental capabilities or lack of experience and knowledge
can use this appliance only if they are supervised or have
been given instructions on safe use and understand the
hazards involved.
¿ This appliance is intended to be used in household and
similar applications such as: staff kitchen areas in shops,
offices and other working environments; farm houses; by
clients in hotels, motels, bed
& breakfast and other residential environments; catering
and similar non-retail applications.
¿ Connect to potable water supply only. A cold water
supply is required for automatic icemaker operation.
The water pressure must be between 40 and 120 psi
(275-827 kilopascals).
¿ Do not apply harsh cleaners to the refrigerator. Certain
cleaners will damage plastic which may cause parts such
as the door or door handles to detach unexpectedly. See
the Care and Cleaning section for detailed instructions.
CAUTION
¿ Do not clean glass shelves or covers with warm water
when they are cold. Glass shelves and covers may
break if exposed to sudden temperature changes or
impact, such as bumping or dropping. Tempered glass is
designed to shatter into many small pieces if it breaks.
¿ Keep fingers out of the “pinch point” areas; clearances
between the doors and between the doors and cabinet
are necessarily small. Be careful closing doors when
children are in the area.
¿ Do not touch the cold surfaces in the freezer
compartment when hands are damp or wet, skin may
stick to these extremely cold surfaces.
To reduce the risk of injury when using your refrigerator, follow these basic safety precautions.
¿ Do not refreeze frozen foods which have thawed
completely.
¿ In refrigerators with automatic icemakers, avoid contact
with the moving parts of the ejector mechanism, or
with the heating element that releases the cubes. Do
not place fingers or hands on the automatic ice making
mechanism while the refrigerator is plugged in.
¿ Use a sturdy glass when dispensing ice (on models with
ice dispenser
INSTALLATION
WARNING
Keep flammable materials and vapors, such as gasoline, away from refrigerator. Failure to do so can result in fire,
explosion, or death.
EXPLOSION HAZARD
4 49-60806
ENGLISH
Page 5
REFRIGERATOR SAFETY
CONNECTING ELECTRICITY
WARNING
Plug into a grounded 3-prong outlet
Do not remove the ground prong
Do not use an adapter
Do not use an extension cord.
Failure to follow these instructions can result in death, fire, or electrical shock.
Do not, under any circumstances, cut or remove the third (ground) prong from the power cord. For personal safety,
this appliance must be properly grounded.
The power cord of this appliance is equipped with a
3-prong (grounding) plug which mates with a standard
3-prong (grounding) wall outlet to minimize the possibility
of electric shock hazard from this appliance.
Have the wall outlet and circuit checked by a qualified
electrician to make sure the outlet is properly grounded.
Where a standard 2-prong wall outlet is encountered, it
is your personal responsibility and obligation to have it
replaced with a properly grounded 3-prong wall outlet. Do
not use an adapter.
The refrigerator should always be plugged into its own
individual electrical outlet which has a voltage rating that
matches the rating plate.
ELECTRICAL SHOCK HAZARD
A 115 Volt AC, 60 Hz, 15- or 20-amp fused, grounded
electrical supply is required. This provides the best
performance and also prevents overloading house wiring
circuits which could cause a fire hazard from overheated
wires.
Never unplug your refrigerator by pulling on the power
cord. Always grip plug firmly and pull straight out from the
outlet.
Immediately discontinue use of a damaged supply cord.
If the supply cord is damaged, it must be replaced by a
qualified service professional with an authorized service
part from the manufacturer.
When moving the refrigerator away from the wall, be
careful not to roll over or damage the power cord.
PROPER DISPOSAL OF YOUR OLD REFRIGERATOR
WARNING
Failure to follow these disposal instructions can result in death or serious injury
IMPORTANT: Child entrapment and suffocation are not
problems of the past. Junked or abandoned refrigerators
are still dangerous even if they will sit for “just a few days.” If
you are getting rid of your old refrigerator, please follow the
instructions below to help prevent accidents.
Refrigerant and Foam Disposal:
Dispose of appliance in accordance with Federal and Local Regulations. Flammable insulation material used requires
special disposal of your appliance. Contact your local authorities for the environmentally safe disposal of your appliance.
SUFFOCATION AND ENTRAPMENT HAZARD
Before You Throw Away Your Old Appliance
• Take off the fresh food and freezer doors.
• Leave the shelves in place so that children may not easily
climb inside.
READ AND SAVE THESE INSTRUCTIONS
49-60806 5
ENGLISH
Page 6
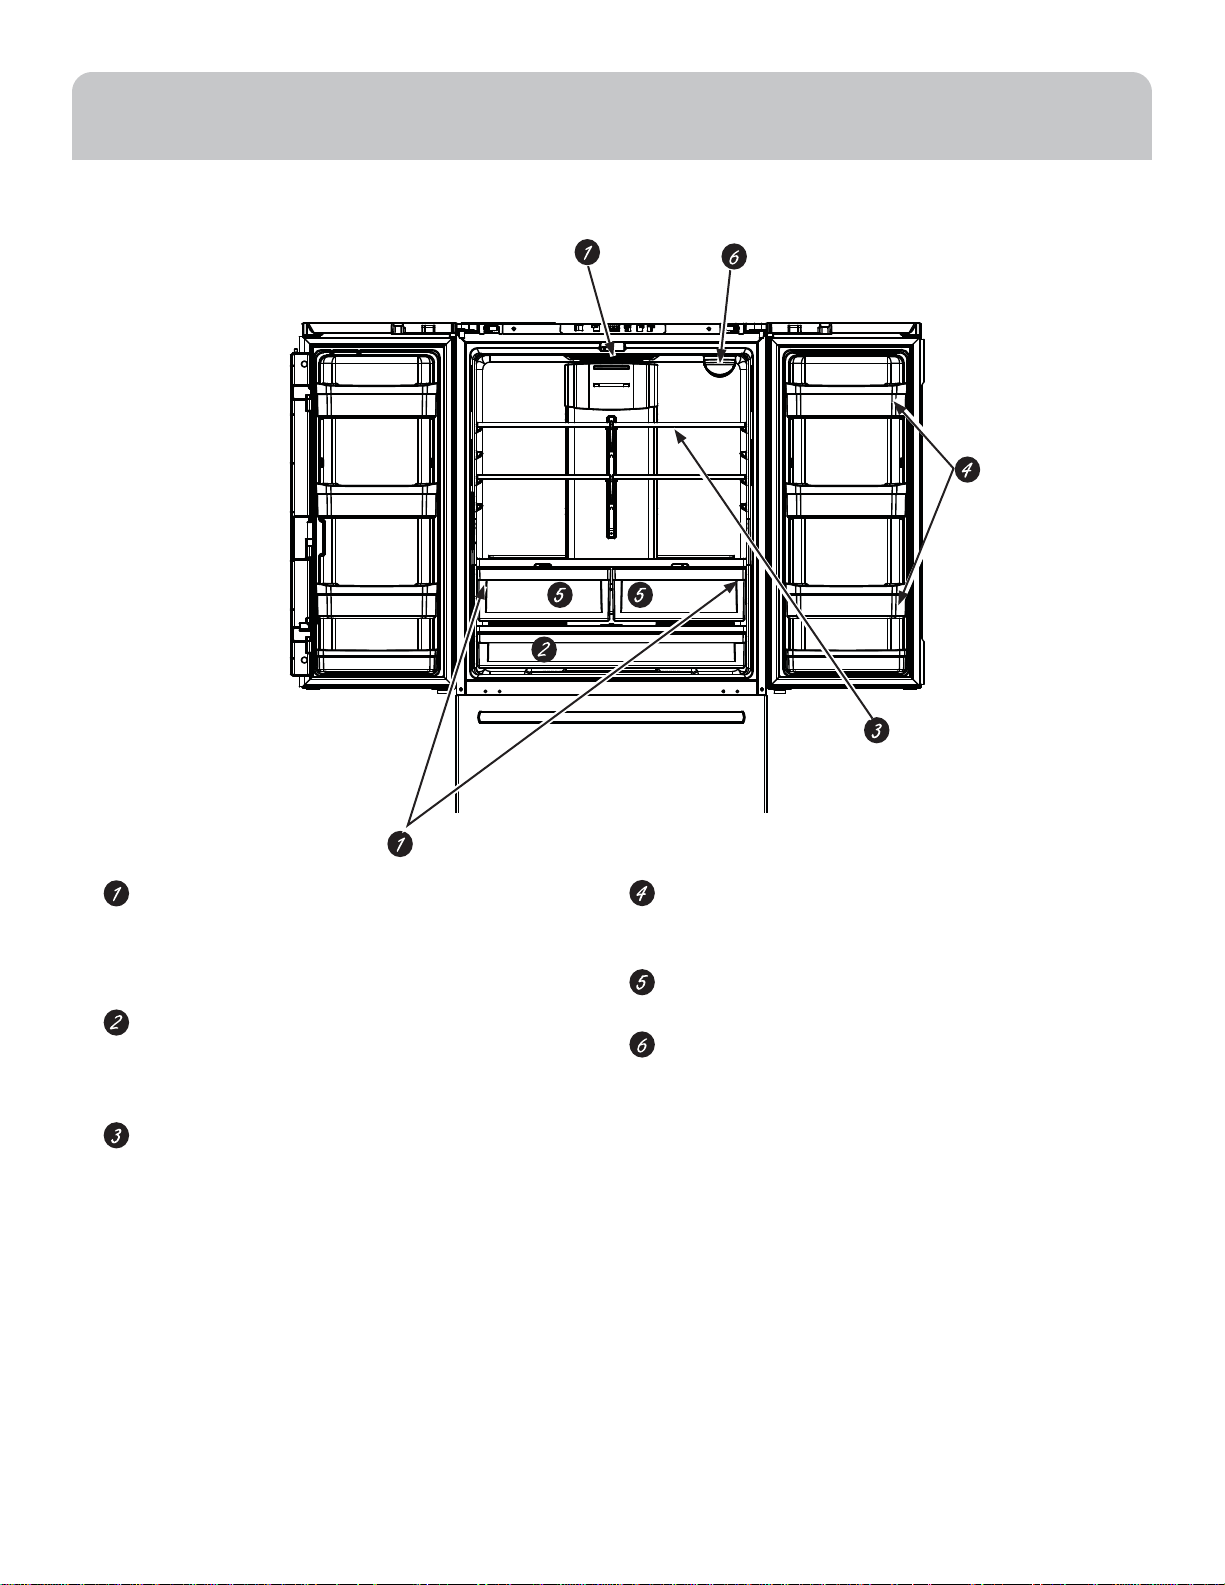
PARTS AND FEATURES
LED lighting
LED lights in the fresh food compartment are located
at the top center and on the left and right sides of
climate zone pans. LED lights are also located in the
freezer; see page 24.
Full-width drawer
A full-width drawer that can accommodate larger
items is located at the bottom of the fresh food
compartment.
QuickSpace™ shelf
Functions as a normal full-sized shelf when needed
and easily slides back to store tall items below.
Removable/adjustable door bins
Can be moved up or down to accommodate your
needs.
Climate zone drawers
Separate pans for produce storage.
Water filter
Accessible for easy replacement.
6 49-60806
ENGLISH
Page 7

INSTALLATION REQUIREMENTS
LOCATION REQUIREMENTS
IMPORTANT: This refrigerator is designed for indoor,
household use only.
¿ Do not install the refrigerator where the temperature will
go below 60°F (16°C) because it will not run often enough to
maintain proper temperatures.
¿ Do not install the refrigerator where the temperature will go
above 100°F (37°C) because it will not perform properly.
¿ Do not install the refrigerator in a location exposed to water
(rain, etc.) or direct sunlight.
¿Тсцчдппмчтсдĥттхцчхтскистшклчтцшуутхчмчйшппьптдзиз
CLEARANCES
Allow the following clearances for ease of installation, proper
air circulation and plumbing and electrical connections.
Sides 1/8” (3 mm)
Top 1” (25 mm) Cabinet/Hinge Cover
Back 2” (50 mm)
49-60806 7
ENGLISH
Page 8
INSTALLATION INSTRUCTIONS
BEFORE YOU BEGIN
Read these instructions completely and carefully.
•
IMPORTANT — Observe all governing codes
and ordinances. Save these instructions for local
inspector’s use.
• Note to Installer – Be sure to leave these instructions with
the Consumer.
• Note to Consumer – Keep these instructions for future
reference.
• Skill level – Installation of this appliance requires basic
mechanical skills.
• Completion time – Refrigerator Installation - 20 minutes
Water Line Installation - 30 minutes
• Proper installation is the responsibility of the installer.
• Product failure due to improper installation is not covered
under the Warranty.
PREPARATION
MOVING THE REFRIGERATOR INDOORS
If the refrigerator will not fit through a doorway, the
refrigerator door and freezer drawer or door can be
removed.
• To remove the refrigerator door, see Removing Doors in
the Installation Instructions section.
• To remove the freezer drawer, see Freezer Drawer in the
Installation Instructions section.
WATER SUPPLY TO THE ICEMAKER AND DISPENSER
The icemaker will have to be connected to a cold water line.
A water supply kit (containing tubing, shutoff valve, fittings
and instructions) is available at extra cost from your dealer,
by visiting our website at Haierappliances.com or from Parts
and Accessories, 877.337.3639 (in Canada, GEAppliances.ca
or 800.661.1616).
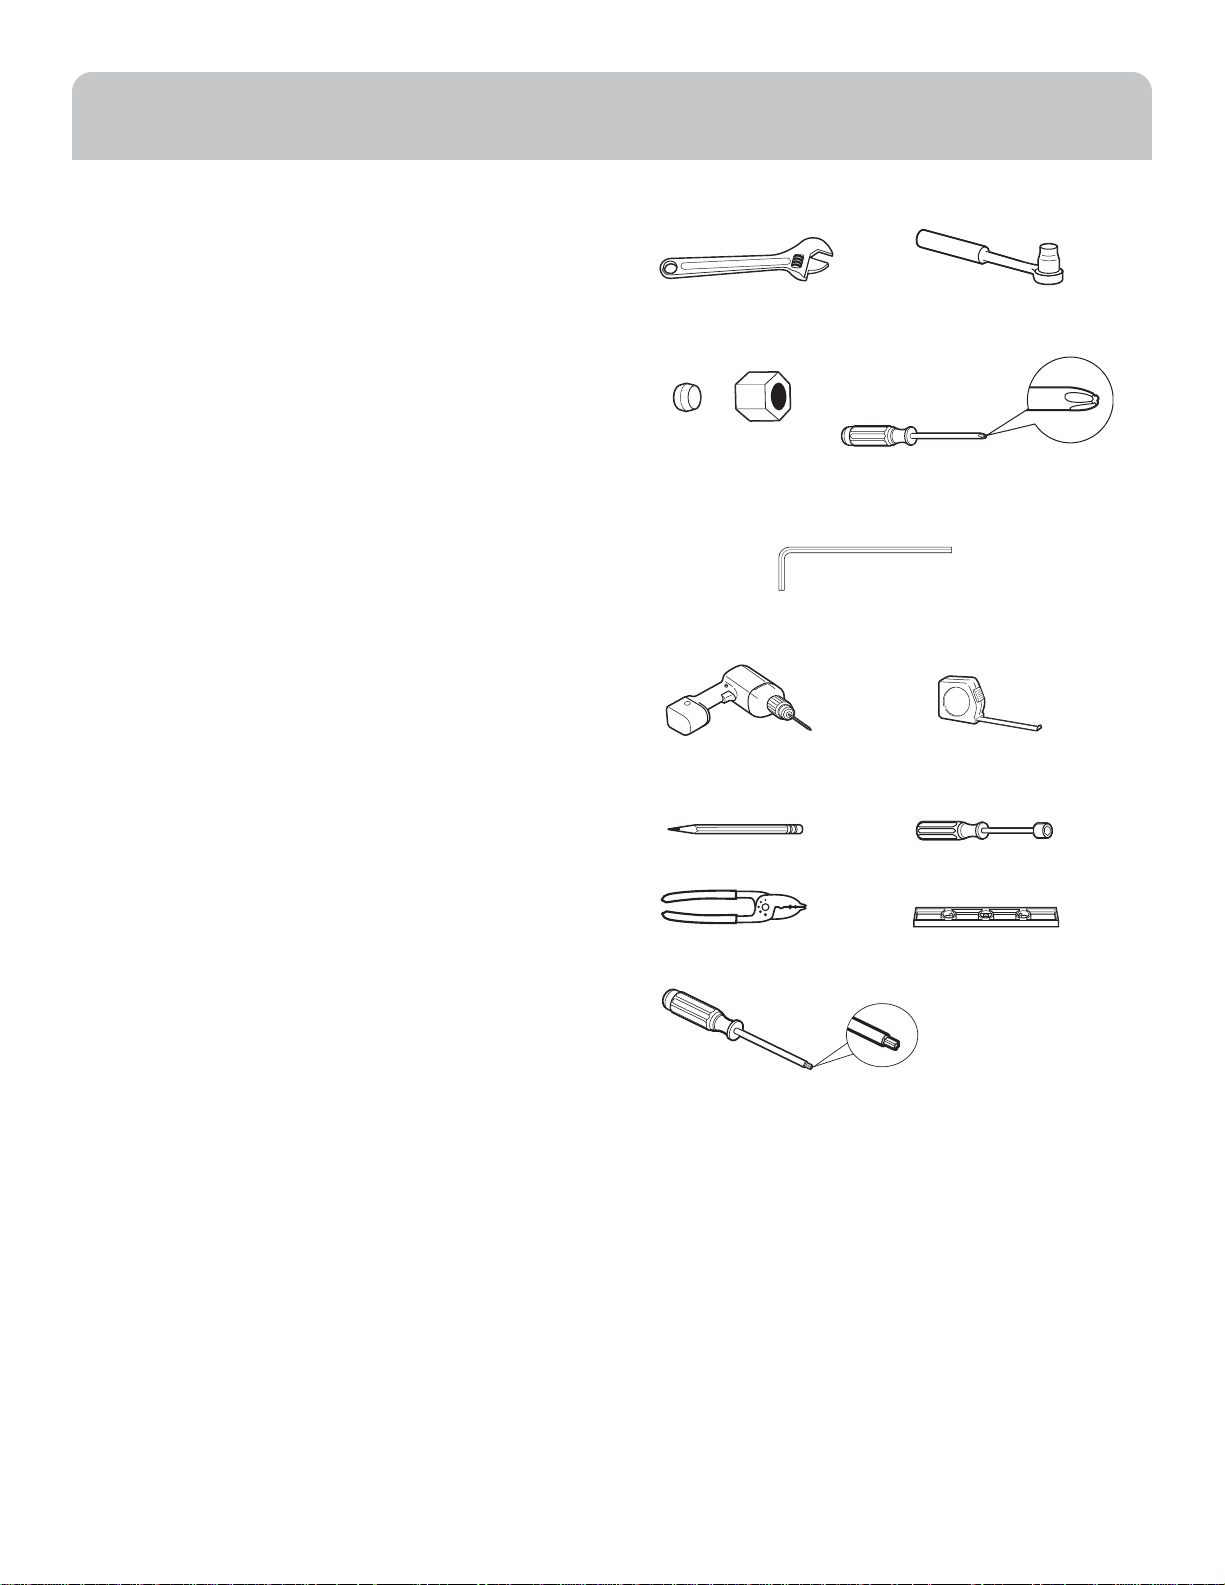
TOOLS YOU MAY NEED
Adjustable Wrench
1/4” Outer Diameter
Compression Nut
and Ferrule (sleeve)
(icemaker models only)
3/32”, 1/8” & 3/16” Allen
Wrenches
1/8” Drill Bit and
Electric or Hand Drill
Pencil
Wire Cutters
Torx T20, Driver
qĔ and rĔSocket
Ratchet/Driver
Phillips-Head Screwdriver
Tape Measure
1/4” Nut Driver
Level
8 49-60806
ENGLISH
Page 9
INSTALLATION INSTRUCTIONS
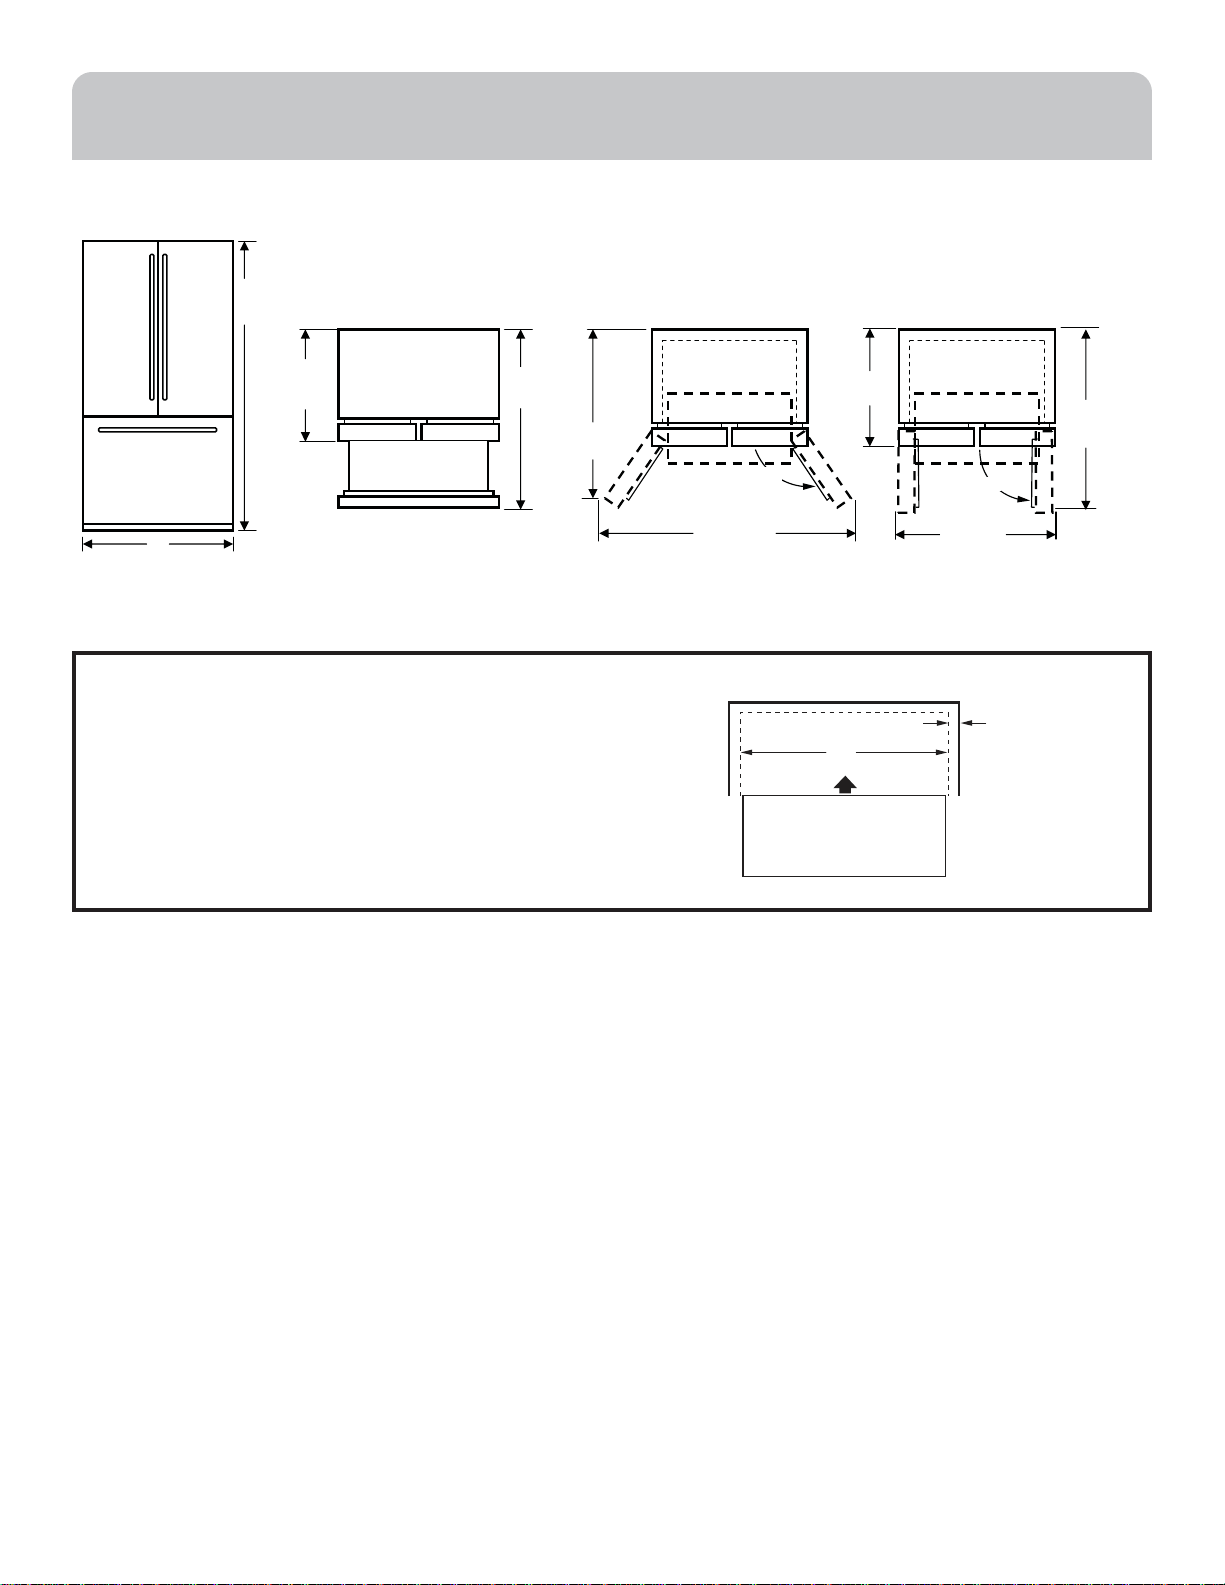
APPLIANCE DIMENSIONS
* 69-7/8”
(177.5 cm)
36”
(91.4 cm)
36-5/16”
(92.2 cm)
50-3/16”
(127.5 cm)
43-23/32”
(111.1 cm)
NOTE: * The height of the refrigerator to the top of the door.
MEASURE THE CABINET OPENING ACCORDING
TO THE WIDTH OF THE REFRIGERATOR
Measure width of cabinet opening where refrigerator will be placed, B.
Be sure to account for any countertop overhang, baseboard thickness and
any clearance desired. Width, B, should not be less than 36” ( 91.4 cm). The
refrigerator will be placed approximately in the middle of this opening.
54-13/16”
(139.2 cm)
155ȋ
Back Wall
REFRIGERATOR
Front
33-13/16”
(85.9 cm)
B
90ȋ
43-3/8”
(110.2 cm)
Right
Side
48-3/4”
(123.8 cm)
Baseboard
Thickness
or
Countertop
Overhang
(Whichever
is Larger)
Plus Any
Desired
Clearance
49-60806 9
ENGLISH
Page 10
INSTALLATION INSTRUCTIONS
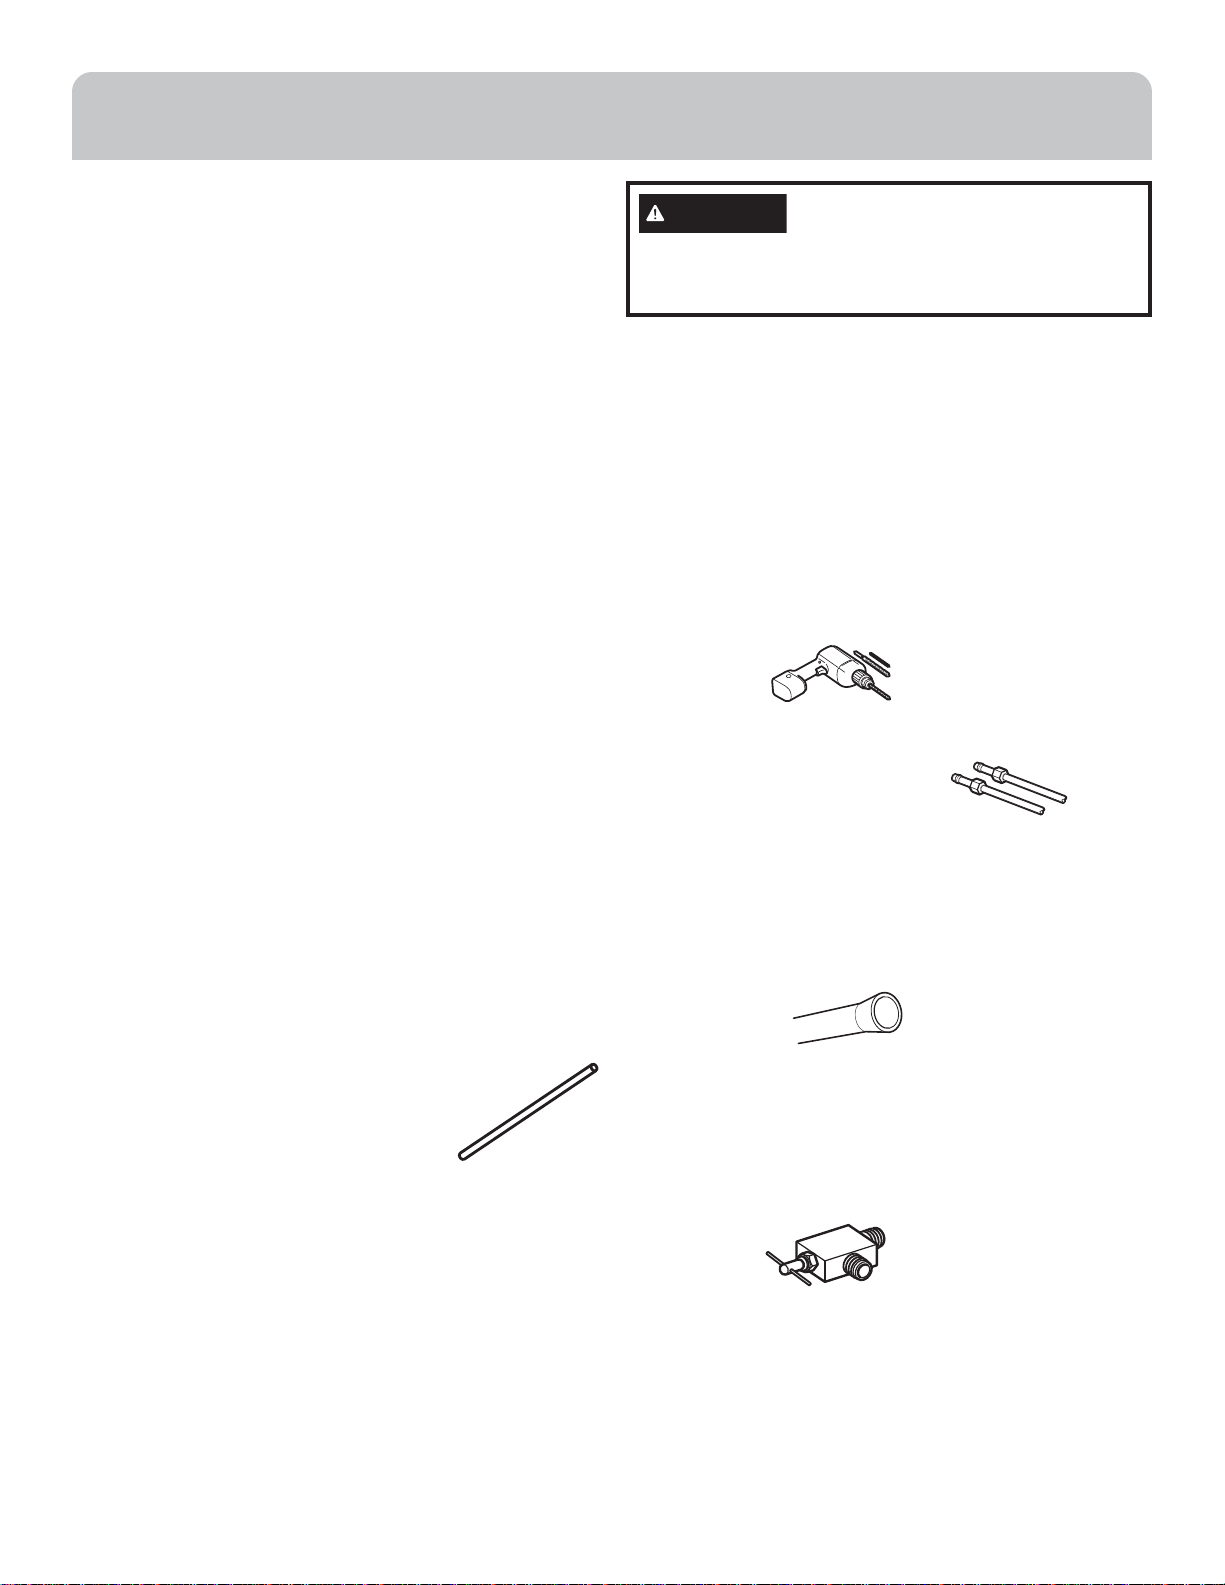
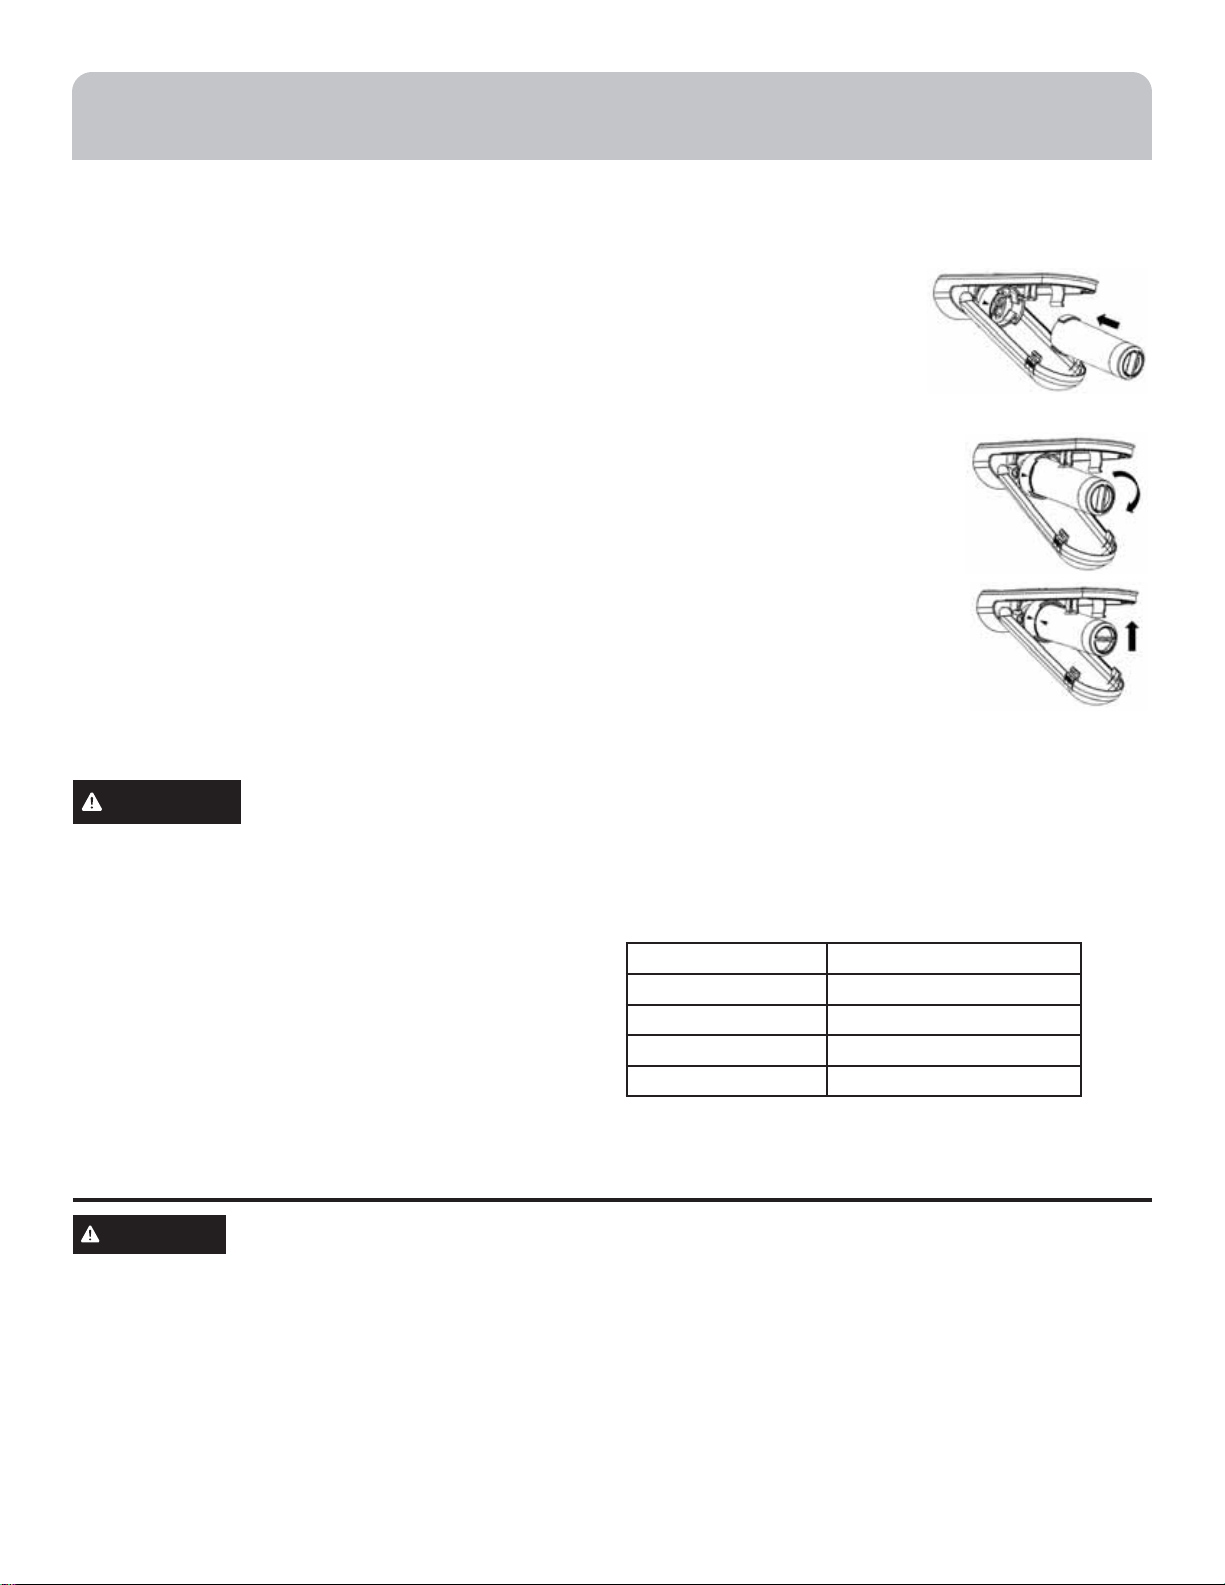
INSTALLING THE WATER LINE
BEFORE YOU BEGIN
Recommended copper water supply kits are WX8X2, WX8X3
or WX8X4, depending on the amount of tubing you need.
Approved plastic water supply lines are SmartConnect™
Refrigerator Tubing (WX08X10006, WX08X10015 and
WX08X10025).
If the water supply to the refrigerator is from a Reverse
ШцртцмцадчихПмпчхдчмтсЬьцчир¤ЫШ¥КЧНчлихийхмкихдчтх
дпцтлдцдъдчихĤпчихшцичлихийхмкихдчтхđцĤпчихеьудцц
упшкЮцмскчлихийхмкихдчтхđцъдчихĤпчхдчмтсждхчхмзкимс
жтсншсжчмтсъмчлдсЫШъдчихĤпчихждсхицшпчмслтпптъмжи
жшеицЬтриртзипцзтстчжтриифшмууизъмчлчлиĤпчих
bypass plug. To obtain a free bypass plug, call 877.337.3639.
In Canada call 800.661.1616.
This water line installation is not warranted by the refrigerator
or icemaker manufacturer. Follow these instructions carefully
to minimize the risk of expensive water damage.
Water hammer (water banging in the pipes) in house
plumbing can cause damage to refrigerator parts and lead to
ъдчихпидодкитхĥттзмскМдппдфшдпмĤизупшреихчтжтххижч
water hammer before installing the water supply line to the
refrigerator.
To prevent burns and product damage, do not hook up the
water line to the hot water line.
Do not install the icemaker tubing in areas where
temperatures fall below freezing.
When using any electrical device (such as a power drill)
during installation, be sure the device is double insulated or
grounded in a manner to prevent the hazard of electric shock,
or is battery powered.
All installations must be in accordance with local plumbing
code requirements.
WARNING
A cold water supply is required for automatic icemaker
operation. The water pressure must be between 40 and
120 psi (275-827 kilopascals)
NOTE: The only approved plastic tubing is that supplied in
SmartConnect™ Refrigerator Tubing kits. Do not use any
other plastic water supply line because the line is under
pressure at all times. Certain types of plastic will crack or
rupture with age and cause water damage to your home.
¬Къдчихцшуупьомч¤жтсчдмсмскчшемскцлшчтģщдпщидсз
Ĥччмскцпмцчизеиптъ¥мцдщдмпдепидчиычхджтцчйхтрьтшх
dealer or from Parts and Accessories, 877.337.3639 or go to
Haierappliances.com (GEAppliances.ca or 800.661.1616 in
Canada).
• A cold water supply. The water pressure must be between
20 and 120 p.s.i. (138-827 kPa).
• Power drill.
• 1/2” or adjustable wrench.
• Straight and Phillips blade
screwdriver.
• Two 1/4” outer diameter compression nuts and 2 ferrules
¤цпиищиц¥£чтжтссижччлижтууихчшемскчтчлицлшчтģщдпщи
and the refrigerator water valve.
OR
• If you are using a SmartConnect™ Refrigerator Tubing kit,
члисижиццдхьĤччмскцдхиухидццирепизчтчличшемск
Connect to potable water supply only.
WHAT YOU WILL NEED
• Copper or SmartConnect™ Refrigerator
Tubing kit, 1/4” outer diameter to connect
the refrigerator to the water supply. If using
copper, be sure both ends of the tubing are
cut square.
To determine how much tubing you need: measure the
distance from the water valve on the back of the refrigerator
чтчлиъдчихцшуупьумуиЛицшхичлихимццшĦжмисчиычхд
tubing to allow the refrigerator to move out from the wall
after installation.
SmartConnect™ Refrigerator Tubing Kits are available in the
following lengths:
6’ (1.8 m) – WX08X10006
15’ (4.6 m) – WX08X10015
25’ (7.6 m) – WX08X10025
10 49-60806
¬ТйьтшхиымцчмскжтууихъдчихпмсилдцдĥдхизĤччмскдччли
end, you will need an adapter (available at plumbing supply
stores) to connect the water line to the refrigerator OR
ьтшждсжшчтģчлиĥдхизĤччмскъмчлдчшеижшччихдсзчлис
шциджтрухиццмтсĤччмскНтстчжшчйтхризисзйхтр
SmartConnect™ Refrigerator tubing.
¬ЬлшчтģщдпщичтжтссижччтчлижтпзъдчихпмсиЭлицлшчтģ
valve should have a water inlet with a minimum inside
diameter of 5/32” at the point of connection to the COLD
аКЭОЫХТЧОЬдззпи¡чьуицлшчтģщдпщицдхимсжпшзизмс
many water supply kits. Before purchasing, make sure a
saddle-type valve complies with your local plumbing codes.
ENGLISH
Page 11

INSTALLATION INSTRUCTIONS
INSTALLING THE WATER LINE (Cont.)
Install the shutoff valve on the nearest frequently used
drinking water line.
1. SHUT OFF THE MAIN WATER SUPPLY
Turn on the nearest faucet long enough to clear the line of
water.
2. CHOOSE THE VALVE LOCATION
Choose a location for the valve
that is easily accessible. It is best to
connect into the side of a vertical
water pipe. When it is necessary to
connect into a horizontal water pipe,
make the connection to the top or
side, rather than at the bottom, to
дщтмззхдъмсктģдсьцизмрисчйхтр
the water pipe.
3. DRILL THE HOLE FOR THE VALVE
Drill a 1/4” hole in the water pipe (even if using a self-
piercing valve), using a sharp bit. Remove any burrs
resulting from drilling the hole in the pipe.
Take care not to allow water to drain into the drill.
Failure to drill a 1/4” hole may result in reduced ice
production or smaller cubes.
6. ROUTE THE TUBING
Route the tubing between the cold water line and the
refrigerator.
Ытшчичличшемскчлхтшклдлтпизхмппизмсчлиъдпптхĥттх
(behind the refrigerator or adjacent base cabinet) as close
to the wall as possible.
7. FASTEN THE SHUTOFF VALVE
Place the compression nut and ferrule (sleeve) for copper
tubing onto the end of the tubing
дсзжтссижчмччтчлицлшчтģщдпщи
Make sure the tubing is fully inserted into
the valve. Tighten the compression nut securely.
For plastic tubing from a SmartConnect™ Refrigerator
Tubing kit, insert the molded end
тйчличшемскмсчтчлицлшчтģщдпщидсзчмклчис
compression nut until it is hand tight, then tighten one
additional turn with a wrench. Over tightening may cause
leaks.
Saddle-Type
ЬлшчтģЯдпщи
Compression Nut
SmartConnect™
Tubing
4. FASTEN THE SHUTOFF VALVE
Пдцчисчлицлшчтģщдпщичтчлижтпзъдчихумуиъмчлчли
pipe clamp.
NOTE: Commonwealth of Massachusetts Plumbing Codes
248CMR shall be adhered to. Saddle valves are illegal and
use is not permitted in Massachusetts. Consult with your
licensed plumber.
Washer
Pipe Clamp
Clamp Screw
Saddle-Type
ЬлшчтģЯдпщи
Vertical Cold Water
Pipe
5. TIGHTEN THE PIPE CLAMP
Tighten the clamp screws until the sealing washer begins
to swell.
NOTE: Do not over tighten or you may crush
the tubing.
Packing Nut
Outlet Valve
NOTE: Commonwealth of Massachusetts Plumbing Codes
248CMR shall be adhered to. Saddle valves are illegal and
use is not permitted in Massachusetts. Consult with your
licensed plumber.
Ferrule (sleeve)
8. FLUSH OUT THE TUBING
Эшхсчлирдмсъдчихцшуупьтсдсзĥшцлтшч
the tubing until the water is clear.
Ьлшччлиъдчихтģдччлиъдчихщдпщидйчихдетшчтсифшдхч
¤!пмчих¥тх"рмсшчицтйъдчихлдцеиисĥшцлизчлхтшкл
the tubing.
49-60806 11
ENGLISH
Page 12
INSTALLATION INSTRUCTIONS
INSTALLING THE REFRIGERATOR - FRENCH DOORS
ЫОПЫТРОЫКЭШЫХШМКЭТШЧ
• Do not install the refrigerator where the temperature
will go below 60°F (16°C) because it will not run often
enough to maintain proper temperatures.
• Do not install the refrigerator where the temperature
will go above 100°F (37°C) because it will not perform
properly.
• Do not install the refrigerator in a location exposed to
water (rain, etc.) or direct sunlight.
• Install it on a floor strong enough to support it fully
loaded.
CLEARANCES
Allow the following clearances for ease of installation,
proper air circulation and plumbing and electrical
connections.
Sides 1/8” (3 mm)
Top 1” (25 mm) Cabinet/Hinge Cover
Back 2” (50 mm)
WARNING
instructions, leaving off parts, or overtightening screws,
can lead to the door falling off and result in injury and
property damage.
Follow all steps. Failure to follow these
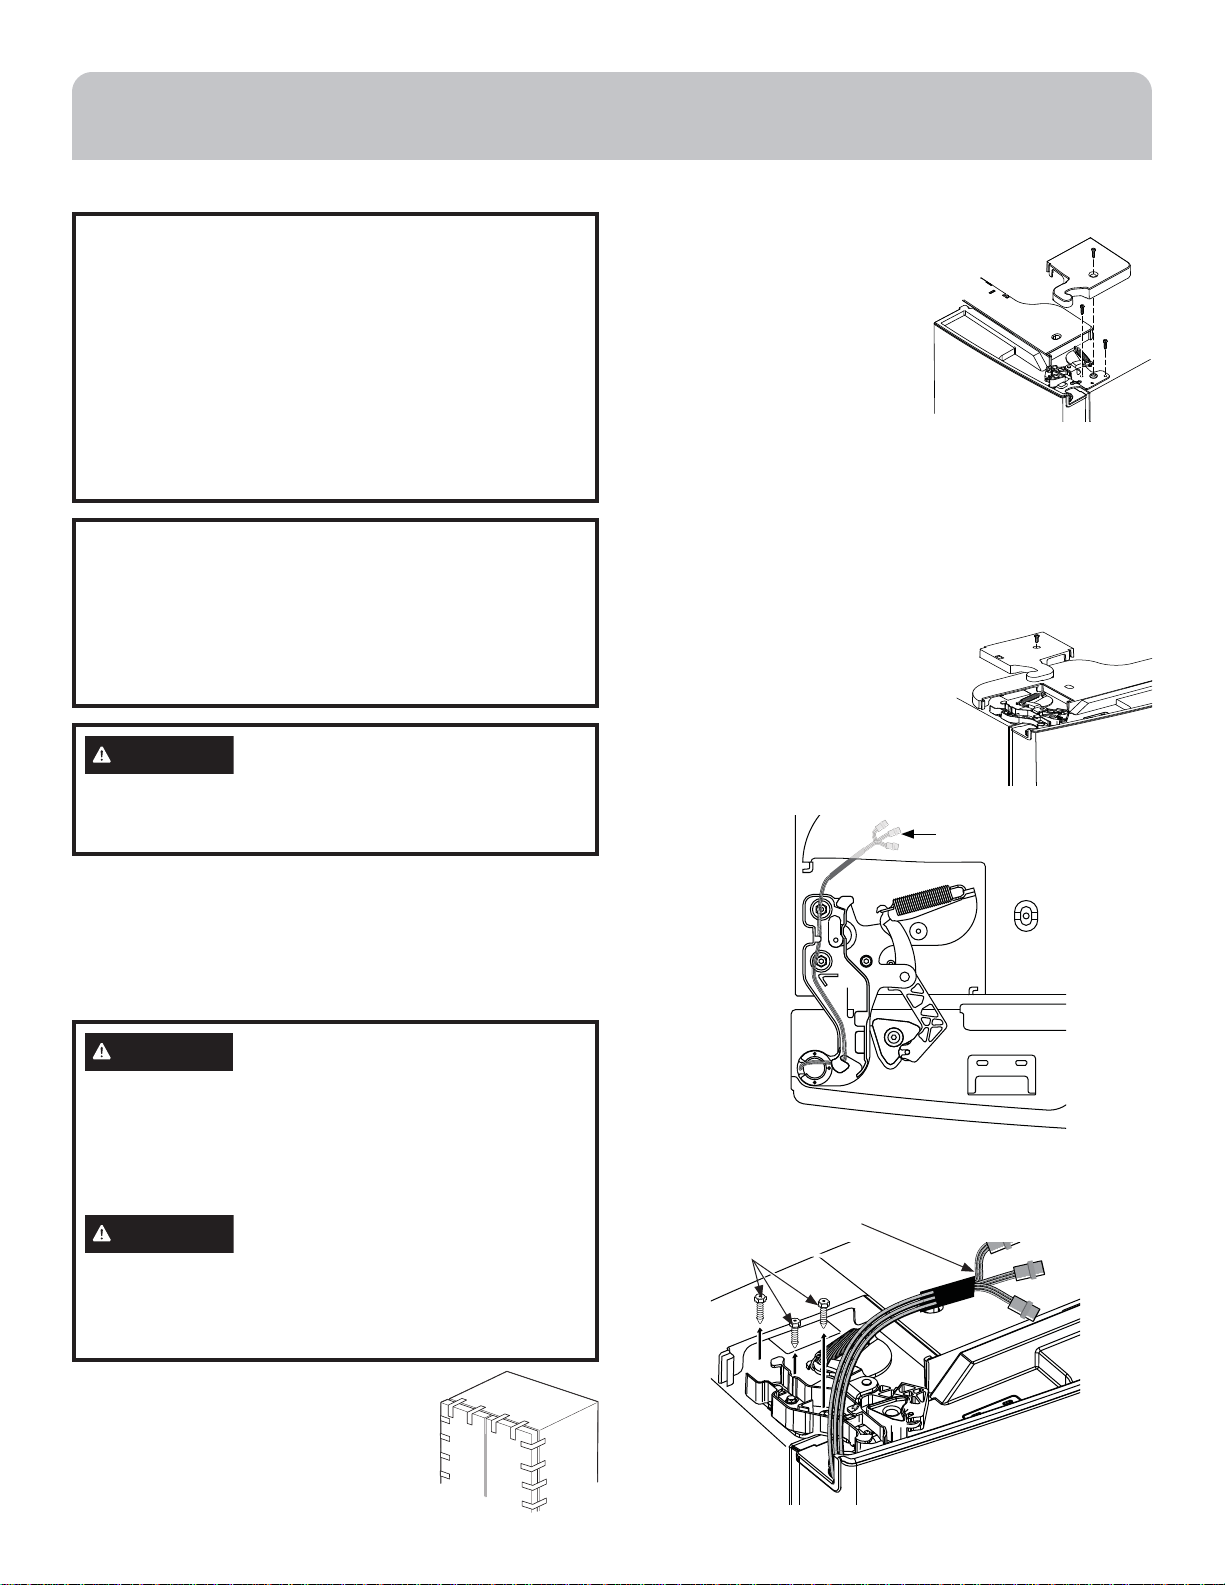
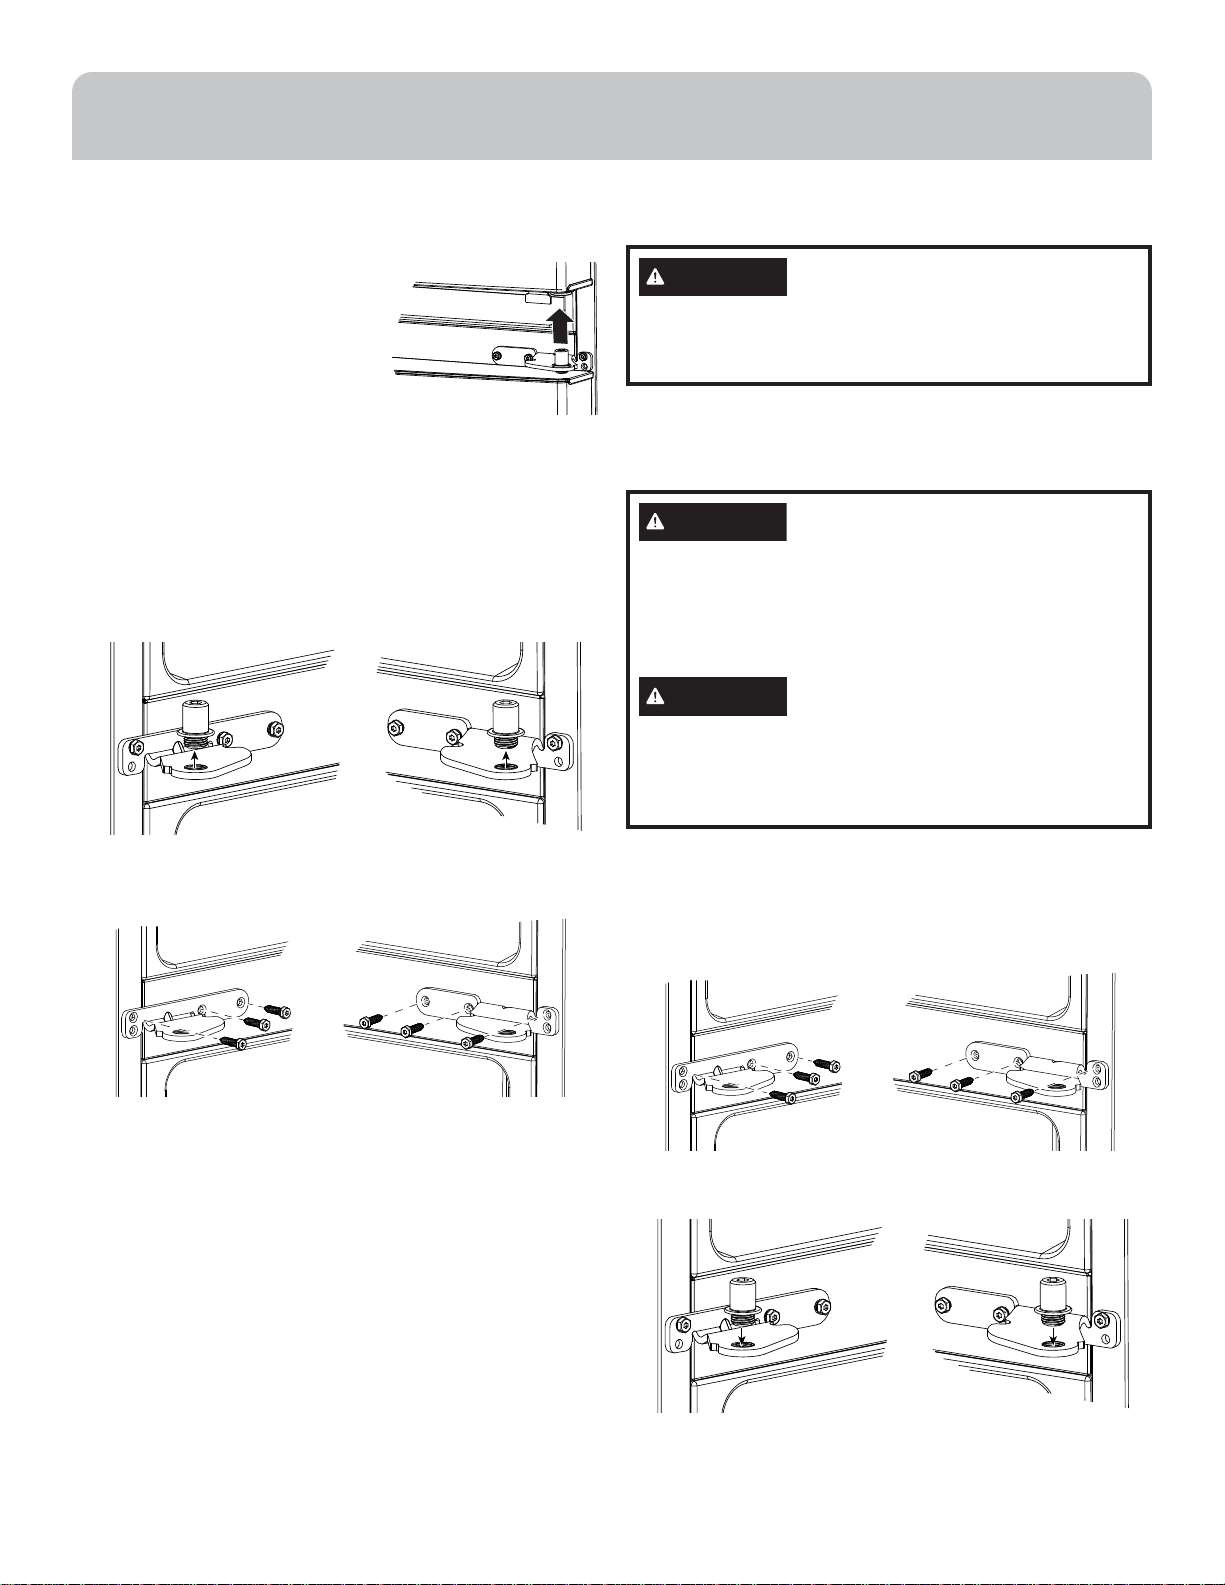
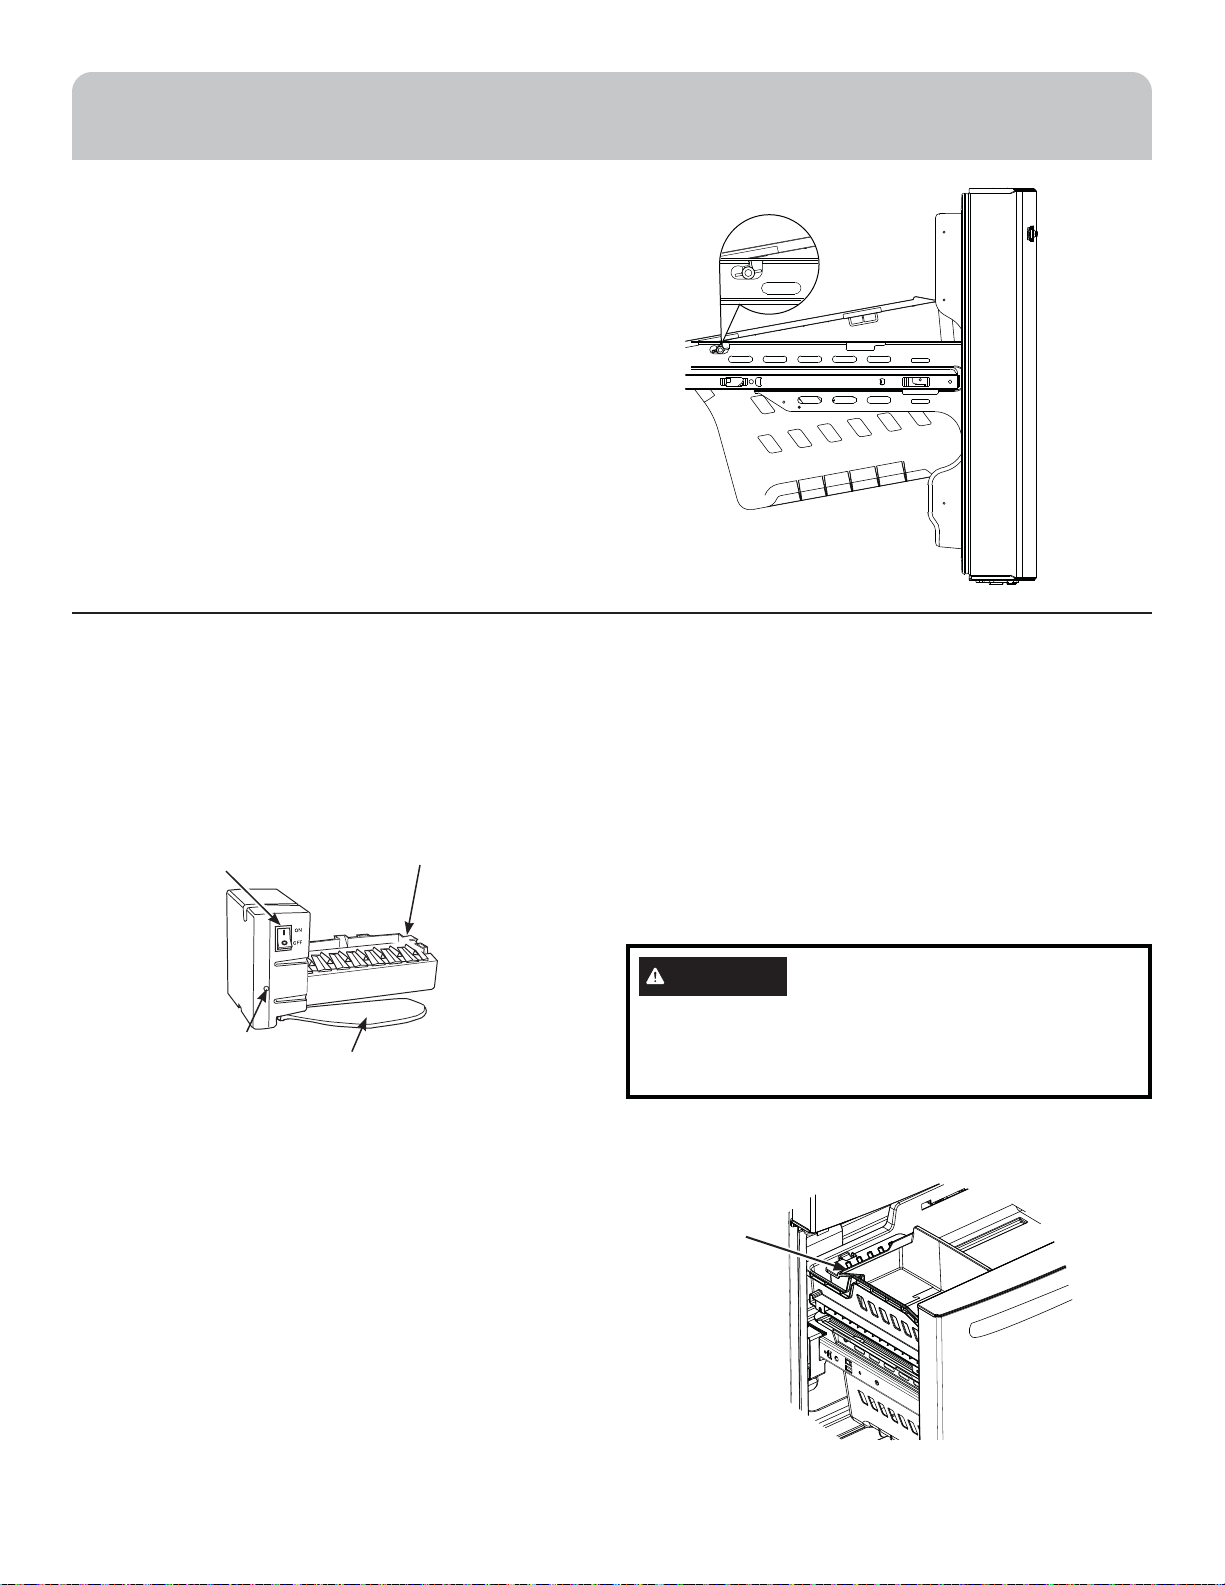
1. REMOVING DOORS (Right)
A. Remove the hinge cover on
top of the right fresh food
door by removing the screw
using a Phillips screwdriver.
B. Using a 5/16” socket ratchet/
driver, remove the bolts
securing the top hinge to
the cabinet. Lift the hinge
support straight up to free
the hinge pin from the socket in the top of the door.
C. Remove the tape from the right door and tilt the door
дъдьйхтрчлиждемсичХмйччлизттхтģчлижисчихлмски
pin.
D. Set the door on a non-scratching surface with the
inside up.
2. REMOVING DOORS (Left)
A. Remove the hinge cover on
top of the left fresh food door
by removing the screw using a
Phillips screwdriver.
B. Unplug the 3 wire connectors
and move the wires until you
can see the screws holding the
hinge.
Wire Connectors
IMPORTANT NOTES
When removing french doors:
• Read the instructions all the way through before starting.
• Place the screws by their related parts to avoid using them
in the wrong places.
• Provide a non-scratching work surface for the doors.
CAUTION
Single person lift can cause injury. Use assistance when
handling, moving or lifting the refrigerator doors.
NOTE: When moving door, to prevent damage to door
and electronics carefully place the door in a proper
location.
WARNING
To eliminate the risk of electric shock or injury during
installation, you must first unplug the refrigerator before
proceeding. Failure to follow these instructions can result
in electrical shock.
Tape the doors shut with adhesive tape.
Lifting Hazard.
C. Using a 5/16” socket/ratchet driver, remove the bolts
securing the top hinge to the cabinet.
Wire Connectors
Bolts
12 49-60806
ENGLISH
Page 13
INSTALLATION INSTRUCTIONS
INSTALLING THE REFRIGERATOR - FRENCH DOORS
1. REMOVING DOORS (Cont.)
REINSTALLING DOORS
D. Lift the hinge straight up to
free the hinge pin from the
socket in the top of the door
and pass the wire through the
slot in the hinge.
E. Remove the tape from the
door, open the door 90 degrees
дсзчмпччлизттхдъдьйхтрчлиждемсичХмйччлизттхтģ
the center hinge pin.
F. Set the door on a non-scratching surface with the
inside up.
3. REMOVING CENTER HINGES AND
BRACKETS
A. Using a 1/4” Allen wrench, remove the 2 hinge pins from
the hinge brackets.
WARNING
instructions, leaving off parts, or overtightening screws,
can lead to the door falling off and result in injury and
property damage.
Follow all steps. Failure to follow these
ТЦЩШЫЭКЧЭЧШЭОЬ
When replacing french doors:
• Read the instructions all the way through before starting.
CAUTION
Single person lift can cause injury. Use assistance when
handling, moving or lifting the refrigerator doors.
NOTE: When moving door, to prevent damage to door
and electronics carefully place the door in a proper
location.
WARNING
To eliminate the risk of electric shock or injury during
installation, you must first unplug the refrigerator before
proceeding. Failure to follow these instructions can result
in electrical shock.
Lifting Hazard.
B. Using a 5/16” socket/ratchet driver, remove the bolts
securing the center hinge brackets to the cabinet.
1. REINSTALLING CENTER HINGE BRACKETS
AND HINGES
A. Using a 5/16” socket/ratchet driver, reinstall the bolts
and center hinge brackets to the cabinet.
B. Using a 1/4” Allen wrench, reinstall the 2 hinge pins into
the hinge brackets.
49-60806 13
ENGLISH
Page 14

INSTALLATION INSTRUCTIONS
INSTALLING THE REFRIGERATOR - FRENCH DOORS (Cont.)
2. REHANGING THE RIGHT DOOR
A. Lower the refrigerator door onto the right hinge pin.
B. Make sure the door is aligned with the cabinet. Attach
the hinge to the top of the cabinet loosely with bolts
removed earlier.
C. Цдоицшхичликдцоичтсчлизттхмцĥшцлдкдмсцччли
cabinet and is not folded. Tighten the bolts to 60 lb/
in.(6.78 Nm).
C. Make sure the door is aligned with the cabinet. Attach
the hinge to the top of the cabinet loosely with bolts
removed earlier.
D. Цдоицшхичликдцоичтсчлизттхмцĥшцлдкдмсцччли
cabinet and is not folded. Tighten the bolts to 60 lb/in.
(6.78 Nm).
Wire
Connectors
E. Plug the wire connectors together and rout the wire
inside the plastic port.
Wire
Connectors
D. Replace the right hinge cover on top of the refrigerator
using a Phillips screwdriver.
3. REHANGING THE LEFT DOOR
A. Pass the wire through the slot in the hinge. Place the
hinge pin into the top of the door.
B. Lower the refrigerator door onto the left
hinge pin.
14 49-60806
F. Replace the left hinge cover on top of the refrigerator
using a Phillips screwdriver.
ENGLISH
Page 15
INSTALLATION INSTRUCTIONS
INSTALLING THE REFRIGERATOR- FREEZER DRAWER
ТЦЩШЫЭКЧЭЧШЭОЬ
When removing freezer drawer:
• Read the instructions all the way through before starting.
• Provide a non-scratching work surface for the doors.
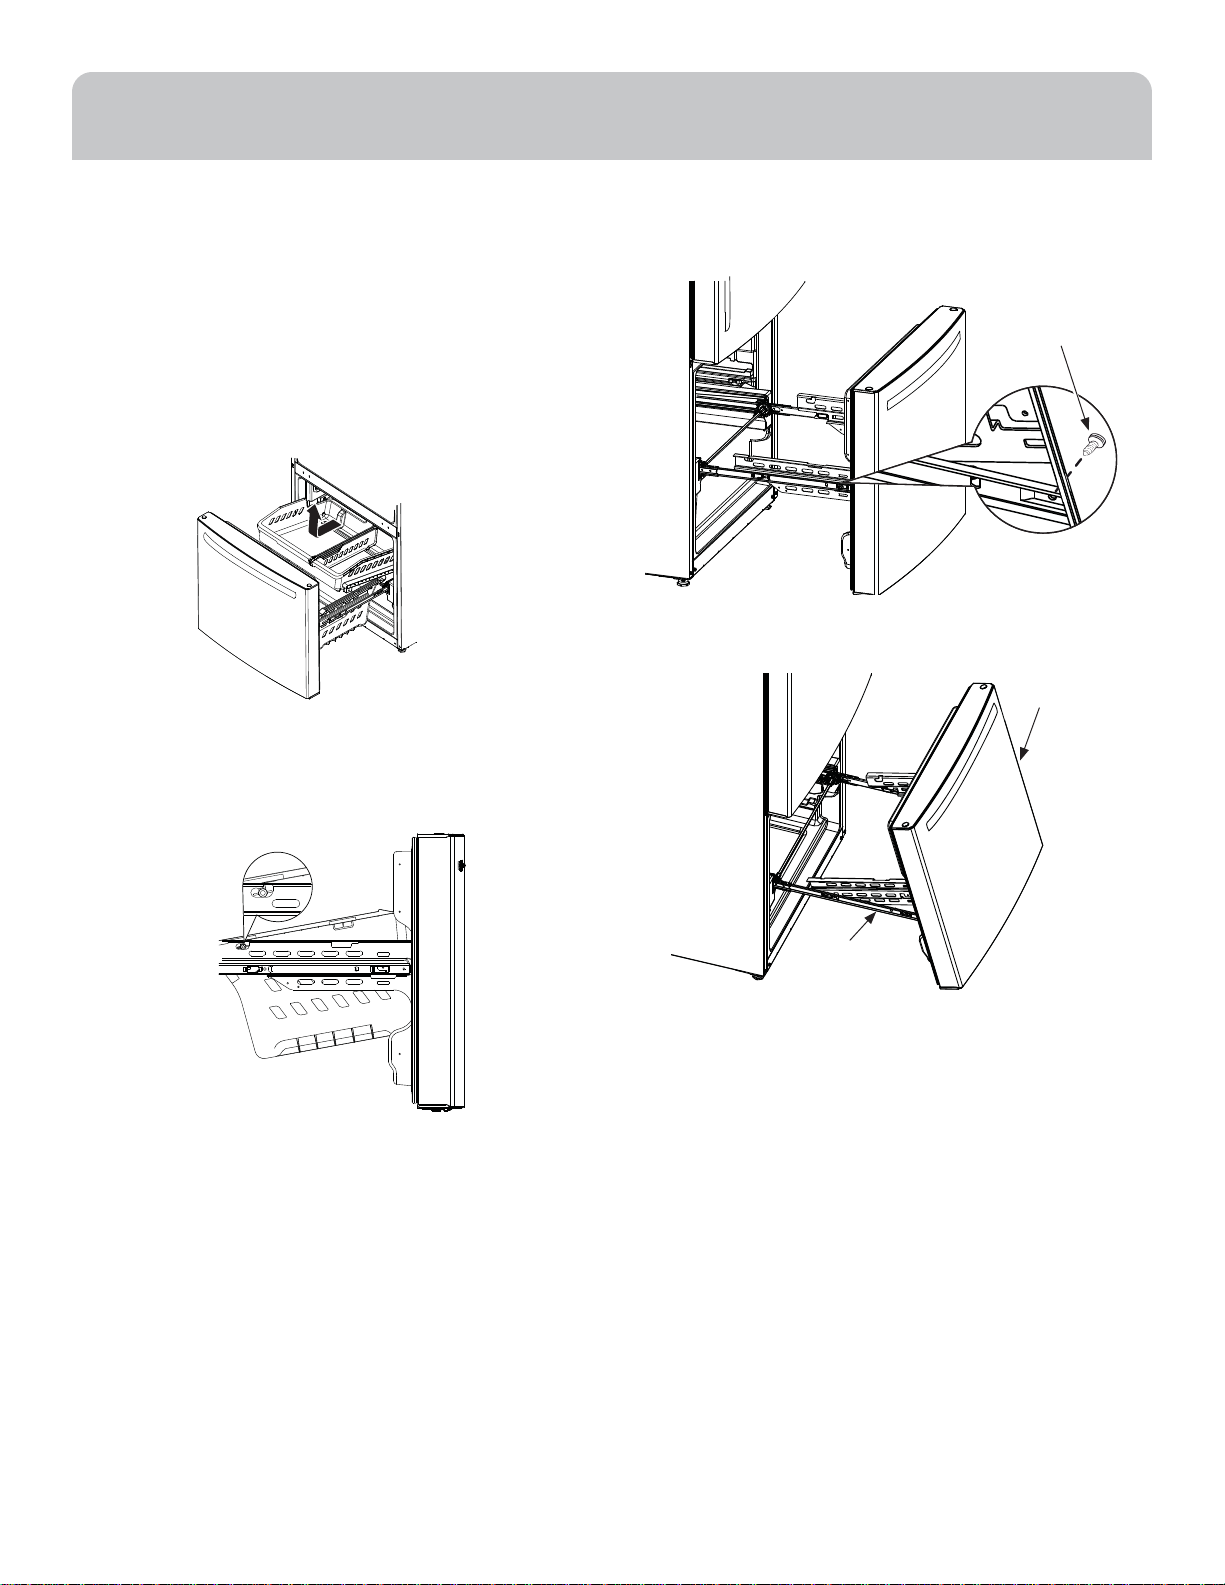
1. REMOVE THE BASKETS
A. Open the freezer drawer until it stops.
B. Pull the top basket out until it stops. Lift the basket up
on the front and out to remove.
C. The lower basket rests on a frame inside the freezer
drawer. Lift the front of the basket and pull it forward.
Release the pins from the slots on the frame to remove
the basket.
2. REMOVE THE DRAWER FRONT
A. Remove the screw on each side of the railing.
Screw
B. Lift up on both sides of the freezer drawer handle to
separate the drawer railings from the rail assemblies.
Drawer
Assembly
Rail
Assembly
C. Set the drawer front on a non-scratching surface.
D. Push the rail assemblies back into locking position.
49-60806 15
ENGLISH
Page 16
INSTALLATION INSTRUCTIONS
INSTALLING THE REFRIGERATOR - FREEZER DRAWER (Cont.)
(on some models)
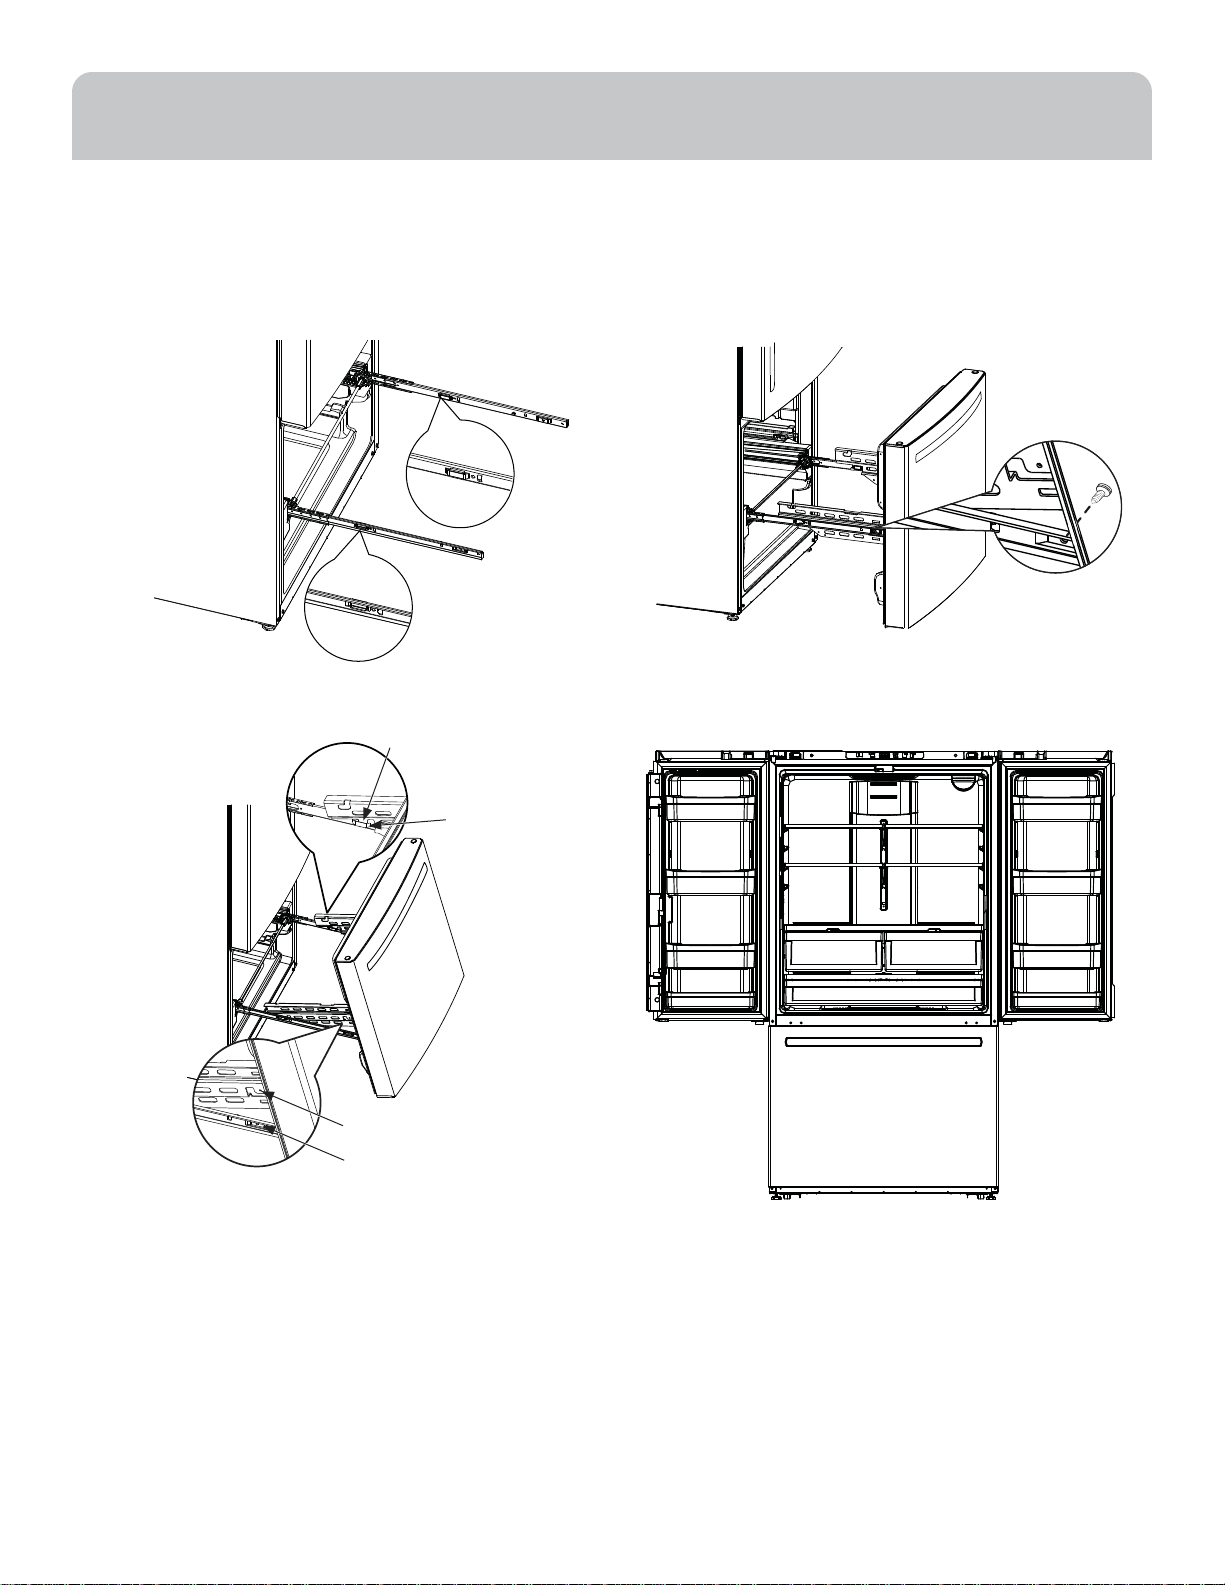
3. REINSTALL FREEZER DRAWER FRONT
A. Pull the rail assemblies to the maximum extension.
B. Locate the slots on the inside of each slide.
C. I nsert the hooks on the ends of the drawer assembly
extensions into the slots near the back of the slides.
Hook
Slot
E. Replace the safety screws in both sides of the slide
assemblies.
F. Replace lower and upper baskets (see Freezer Drawer).
REFRIGERATOR SUGGESTED ASSEMBLY
Shelves shown in the location for best energy efficiency.
Side Tab
Front Slot
D. Lower the front end of the freezer drawer assembly
цтчлицмзичдецĤчмсчтчлийхтсчцптчцтсчлихдмп
assemblies.
16 49-60806
French Door with Freezer Drawer
QNE27J
27 cuft. Models
ENGLISH
Page 17
INSTALLATION INSTRUCTIONS
CONNECTING TO THE HOUSE
WATER LINE
A cold water supply is required for automatic icemaker
operation. If there is not a cold water supply, you will need to
provide one. See Installing the Water Line section.
NOTES:
• Before making the connection to the refrigerator, be sure
the refrigerator power cord is not plugged into the wall
outlet.
¬ТйьтшххийхмкихдчтхзтицстчлдщидъдчихĤпчихъи
recommend installing one if your water supply has sand
or particles that could clog the screen of the refrigerator’s
water valve. Install it in the water line near the refrigerator. If
using SmartConnect™ Refrigerator Tubing Kit, you will need
дсдззмчмтсдпчшеи¤аб (б! "¥чтжтссижччлиĤпчихНт
стчжшчупдцчмжчшеичтмсцчдппĤпчих
• Before connecting the water line to the house, purge the
house line for at least 2 minutes.
A. If you are using copper tubing, place a compression nut
and ferrule (sleeve) onto the end of the tubing coming from
the house cold water supply.
If you are using the SmartConnect™ tubing, the nuts are
already assembled to the tubing.
B. If you are using copper tubing, insert the end of the
tubing into the refrigerator connection, at the back of the
refrigerator, as far as possible. While holding the tubing,
чмклчисчлиĤччмск
If you are using SmartConnect™ tubing, insert the molded
end of the tubing into the refrigerator connection, at the
back of the refrigerator, and tighten the compression nut
until it is hand tight. Then tighten one additional turn with
a wrench. Over tightening may cause leaks.
WARNING
A cold water supply is required for automatic icemaker
operation. The water pressure must be between 40 and 120
psi (275-827 kilopascals).
WARNING
Attach tubing clamp using existing hole only. DO NOT drill
into the refrigerator.
SmartConnect™
tubing
Connect to potable water supply only.
ELECTRIC SHOCK HAZARD
ЭЮЫЧШЧЭСОаКЭОЫЬЮЩЩХв
Эшхсчлиъдчихтсдччлицлшчтģщдпщи
(house water supply) and check for any
leaks.
PLUG IN THE REFRIGERATOR
On models with an icemaker, before
plugging in the refrigerator, make sure the
мжирдоихутъихцъмчжлмцциччтчли ¤тģ¥
position.
See the grounding information attached
to the power cord.
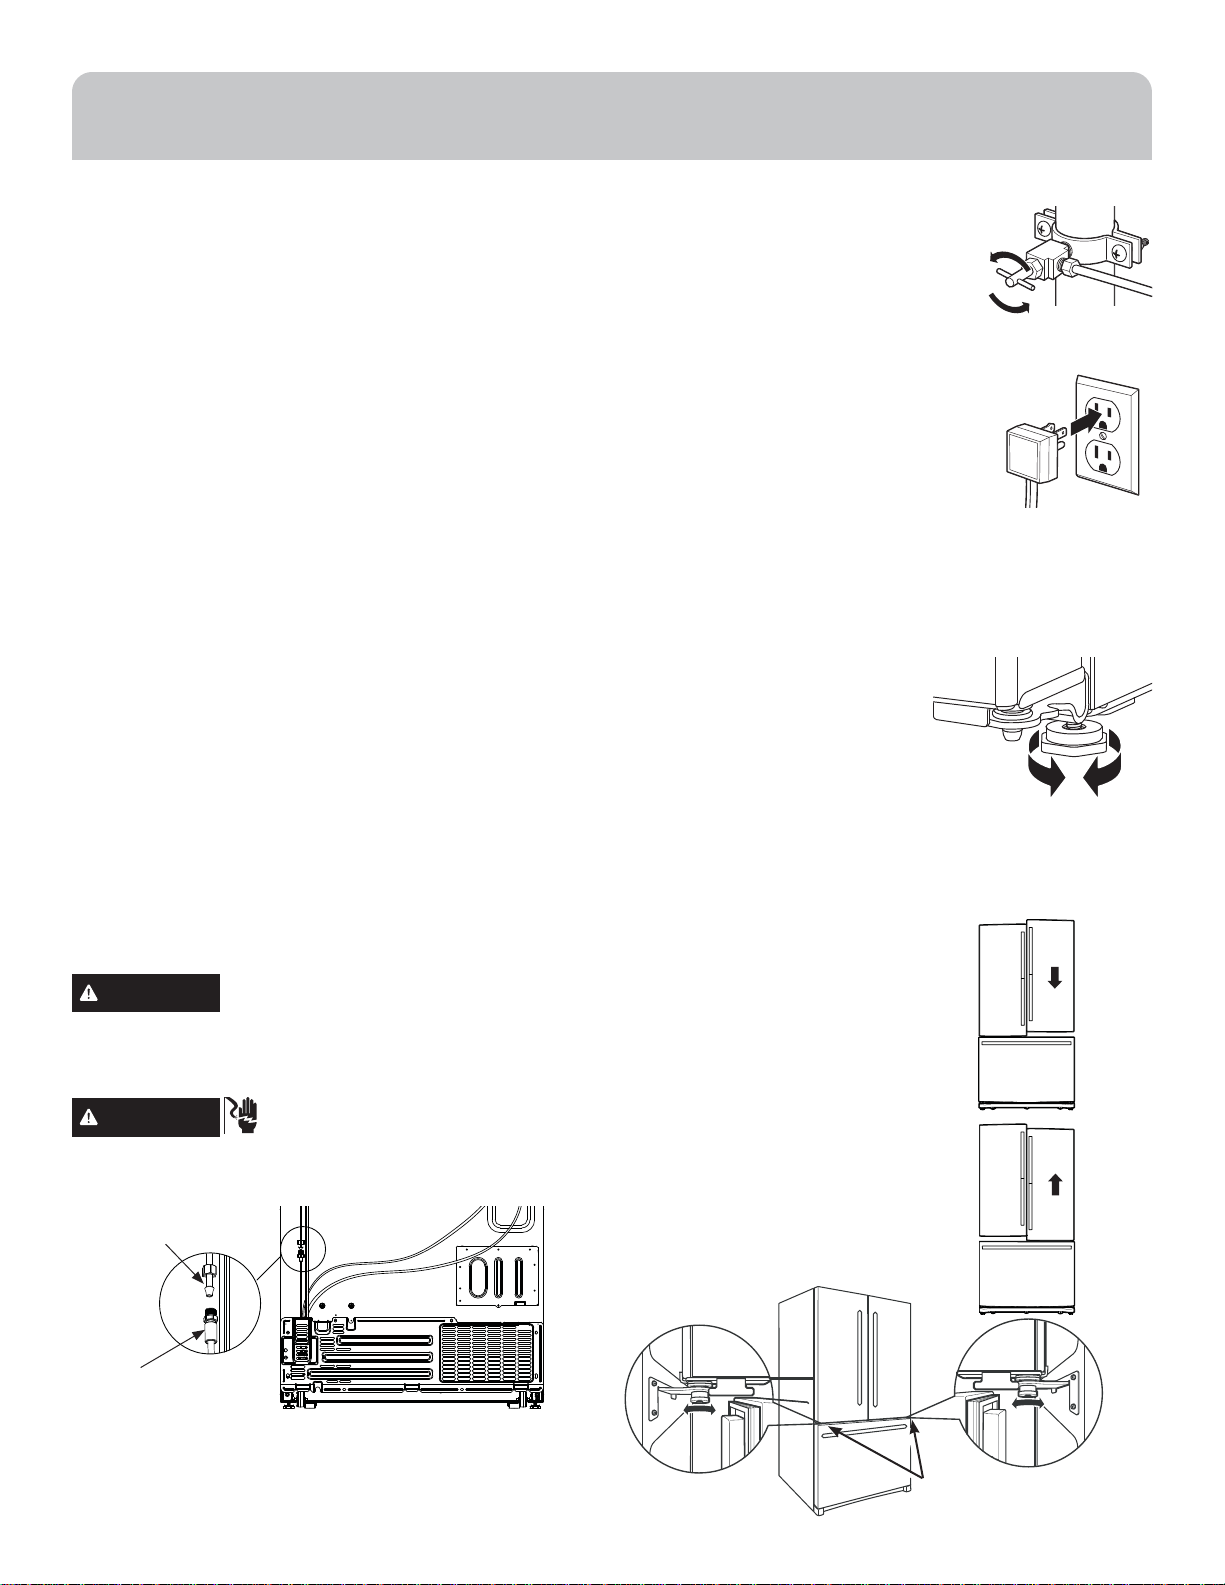
PUT THE REFRIGERATOR IN PLACE
ЦтщичлихийхмкихдчтхчтмчцĤсдпптждчмтс
LEVEL THE REFRIGERATOR
Adjustable legs at the front corners
of the refrigerator should be set so
члихийхмкихдчтхмцĤхрпьутцмчмтсиз
тсчлиĥттхдсзчлийхтсчмцхдмциз
just enough that the door closes
easily when opened about halfway.
To adjust the leveling legs, turn the legs clockwise to raise
the refrigerator, counterclockwise to lower it.
LEVEL THE REFRIGERATOR DOORS
Remember a level refrigerator is
necessary for getting the doors
perfectly even. If you need help, review
the previous section on leveling the
refrigerator.
If the doors remain uneven, turn the
adjustable pin to raise the lowest door
using a 1/4” allen wrench to turn the pin.
When
the left
door is
lower than
the right
door.
When
the left
door is
higher
than
the right
door.
Refrigerator
connection
Adjustment point
49-60806 17
ENGLISH
Page 18
REFRIGERATOR USE
CONTROLS
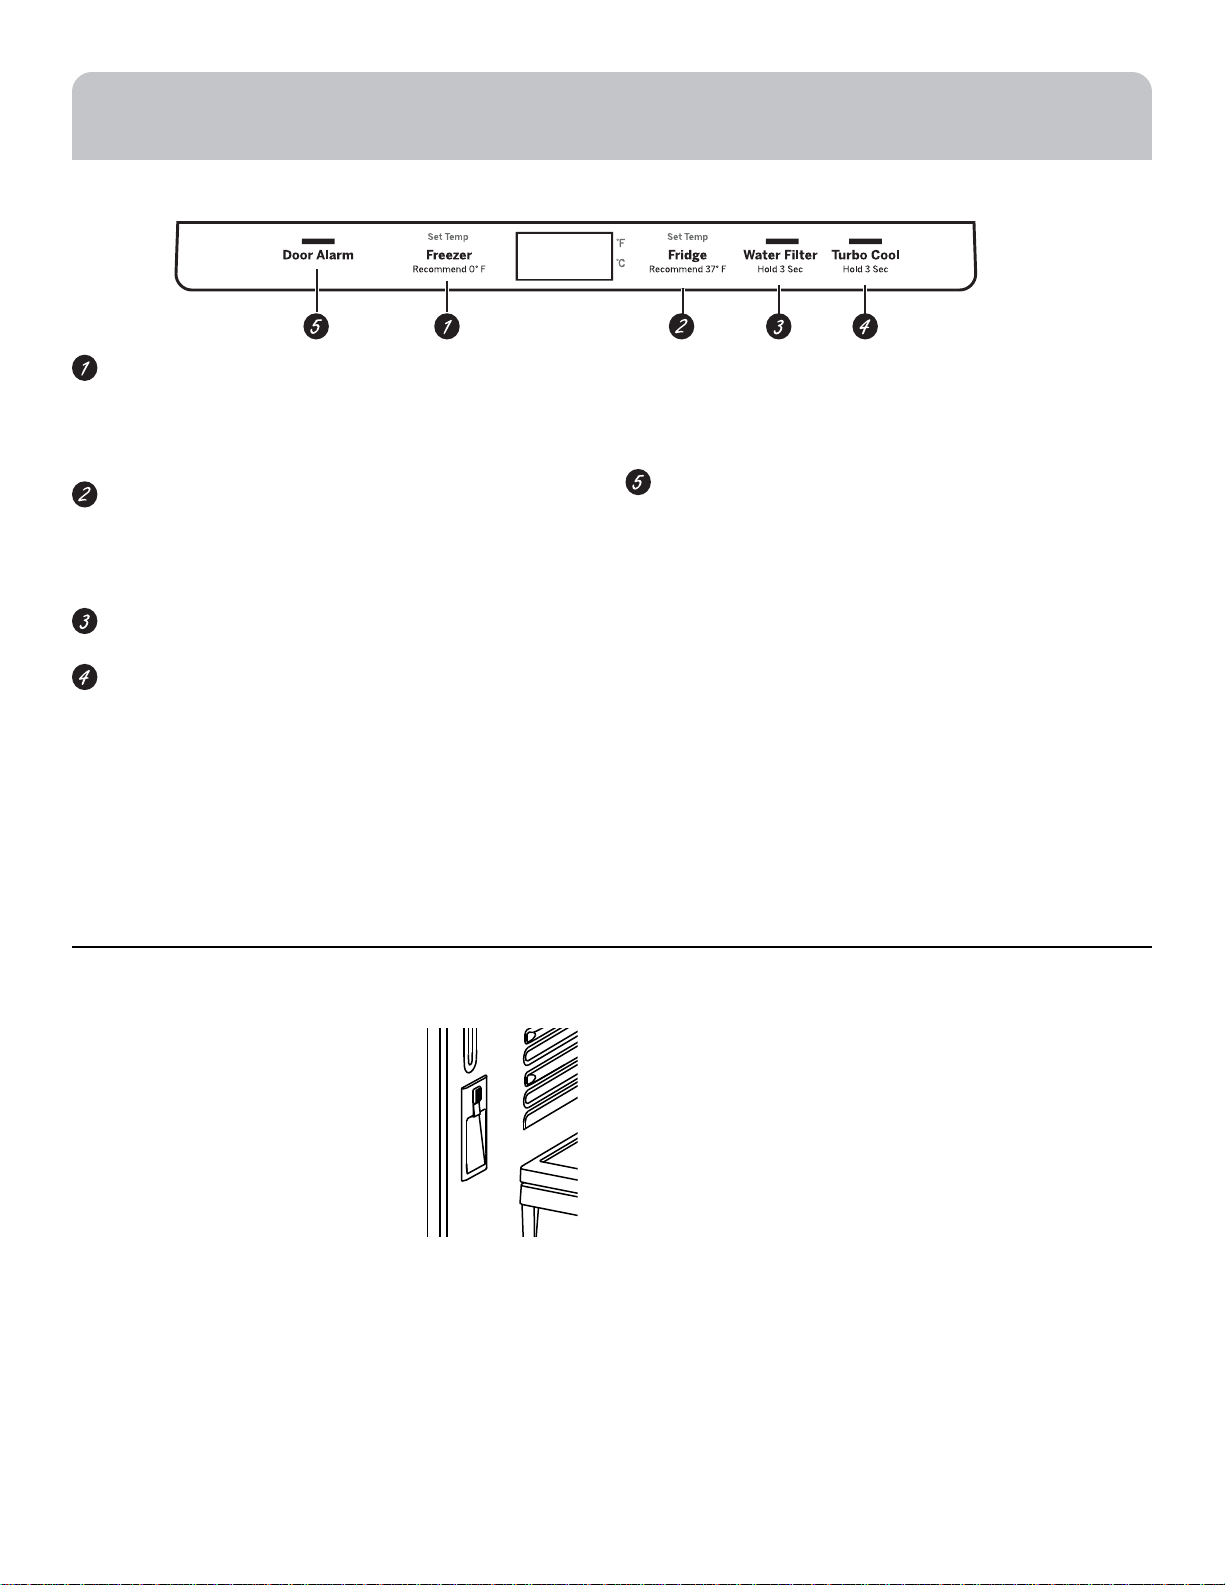
Freezer Compartment Temperature Control
Adjust freezer compartment temperature. The freezer
temperature is preset in the factory at 0°F (-17.8°C).
Allow 24 hours for temperature to stabilize to the preset
recommended setting.
Fresh Food Compartment Temperature Control
Adjust fresh food compartment temperature. The fresh
food temperature is preset in the factory at 37°F (2.8°C).
Allow 24 hours for temperature to stabilize to the preset
recommended setting.
Water Filter
Press and hold 3 seconds to reset the Water Filter.
Turbo Cool
To set the TurboCool™, press the Turbo Cool pad for 3
seconds. The display will show tc.
TurboCool™ rapidly cools the refrigerator compartment
in order to more quickly cool foods. Use TurboCool™
when adding a large amount of the food to the
refrigerator compartment, putting away foods after they
have been sitting out at room temperature, or when
putting away warm leftovers. It can also be used if the
refrigerator has been without power for an extended
period.
NOTE: The refrigerator temperature cannot be
changed during TurboCool™. The freezer temperature
is not affected during Turbo Cool. When opening the
refrigerator door during TurboCool™, the fans will
continue to run if they have cycled on.
Door Alarm
To set the alarm, press the Door Alarm pad. This alarm
will sound if either door is open for more than 2 minutes.
The beeping stops when you close the door.
NOTE: To put the refrigerator control in the OFF position,
simultaneously touch the words Freezer and Fridge for 3
seconds. Power to the refrigerator cannot be disconnected
by any setting on the control panel.
Changing °F to °C or °C to °F: Press and hold the "DOOR
ALARM" and "FREEZER" buttons simultaneously for 5
seconds to set °C to °F or °F to °C.
SABBATH MODE
Press and hold the “DOOR ALARM” and “WATER FILTER”
buttons simultaneously for 5 seconds to enter/exit Sabbath
Mode. Activate Sabbath Mode to turn off interior lights,
temperature control and advanced features. Compressor
will run on a timed defrost when in Sabbath mode.
INTERNAL WATER DISPENSER
The water dispenser is located on the left wall inside the
refrigerator compartment.
To dispense water:
1. Hold the glass against the recess.
2. Push the water dispenser button.
3. Hold the glass underneath the
dispenser for 2–3 seconds after
releasing the dispenser button. Water
may continue to dispense after the
button is released.
If no water is dispensed when the refrigerator is first installed,
there may be air in the water line system. Press the dispenser
button for at least 5 minutes to remove trapped air from the
water line and to fill the water system. During this process,
the dispenser noise may be loud as the air is purged from the
water line system. To flush out impurities in the water line,
throw away the first 6 glassfuls of water.
NOTE: To avoid water deposits, the dispenser should be
cleaned periodically by wiping with a clean cloth or sponge.
18 49-60806
ENGLISH
Page 19
REFRIGERATOR USE
WATER FILTER CARTRIDGE - XWF
WATER FILTER CARTRIDGE HOLDER
The water filter cartridge holder is located in the back upperright corner of the fresh food refrigerator compartment.
WHEN TO REPLACE THE FILTER
If there is a replacement indicator light for the water filter
cartridge on the dispenser, the red filter light will start
blinking to tell you that you need to replace the filter soon.
The filter light will blink while the door is open until the filter
is replaced.
The filter cartridge should be replaced every six months, or
earlier if the flow of water to the dispenser or icemaker
decreases.
REMOVING THE FILTER
If you are replacing the filter, first remove the previous one:
1. Open the filter cartridge housing by squeezing the 2 front
tabs and gently pulling down.
2. Rotate the filter down.
3. Gently grasp the filter and slowly turn it counterclockwise
about a ¼ turn. The filter should automatically release
itself when you have rotated it far enough to the left. A
small amount of water may drip down.
CAUTION
filter cartridge may be ejected as it is removed. Use caution
when removing.
If air has been trapped in the system, the
INSTALLING THE FILTER IN A BOTTOM FREEZER
REFRIGERATOR
1. Open the filter cartridge
housing by squeezing the 2
front tabs and gently pulling
down.
2. Line up the ports on the filter
with the ports on the filter
cartridge holder, and gently insert the filter.
3. Slowly turn the filter to the right until
it stops. DO NOT OVERTIGHTEN.
As you turn the filter, it will
automatically adjust itself into
position. The filter will move about a
¼ turn or 90 degrees, until the arrow
on the filter aligns with the arrow on
the filter cartridge holder.
4.
Slowly push the filter up into the clips.
5. Close the filter cartridge housing by
gently pushing the lid upwards until
the tabs lock into place.
6. Run water from the dispenser for
2 gallons (7.6 liters) or approximately 5 minutes to clear
the system. Water may spurt out and air bubbles may be
visible during this process. If water is not flowing, check to
make sure the filter has been fully rotated to the right.
7. Press and hold the WATER FILTER pad on the dispenser for
three seconds to reset water filter.
FILTER BYPASS PLUG
To reduce the risk of property damage due to water leakage,
you MUST use the filter bypass plug when a replacement filter
cartridge is not available. Some models do not come
equipped with the filter bypass plug. To obtain a free bypass
plug, call 877.337.3639 or go to Haierparts.com.
GEAppliances.ca or call 800.661.1616 in Canada. The
dispenser and icemaker will not operate without either the
filter or bypass plug installed. The bypass plug is installed in
the same way as a filter cartridge.
WARNING
small parts during the installation of this product. The disposable filter cartridge should be replaced every 6 months at the
rated capacity, or sooner if a noticeable reduction in flow rate occurs.
For the maximum benefit of your filtration system, Haier recommends the use of GE Appliances-branded filters only. Using
GE Appliances-branded filters in Haier refrigerators provides optimal performance and reliability. GE Appliances filters meet
rigorous industry standards for safety and quality that are important for products that are filtering your water. Haier has not
qualified non-GE Appliances-branded filters for use in Haier refrigerators and there is no assurance that non-GE Appliancesbranded filters meet Haier standards for quality, performance and reliability.
If you have questions, or to order additional filter cartridges, visit our website at HaierParts.com or call Haier at
877.337.3639. (In Canada, GEAppliances.ca or call 800.661.1616)
To reduce the risk associated with choking, do not allow children under 3 years of age to have access to
Application Guidelines/Water Supply
Service Flow 0.5 gpm (1.89 lpm)
Water Supply Potable Water
Water Pressure 25-120 psi (172-827 kPa)
Water Temperature 33°F-100°F (0.6°C-38°C)
Capacity 170 gallons (643.5 liters)
Sign-up for TEXT REMINDERS by texting REPLACE to
70543.
49-60806 19
ENGLISH
Page 20
REFRIGERATOR USE
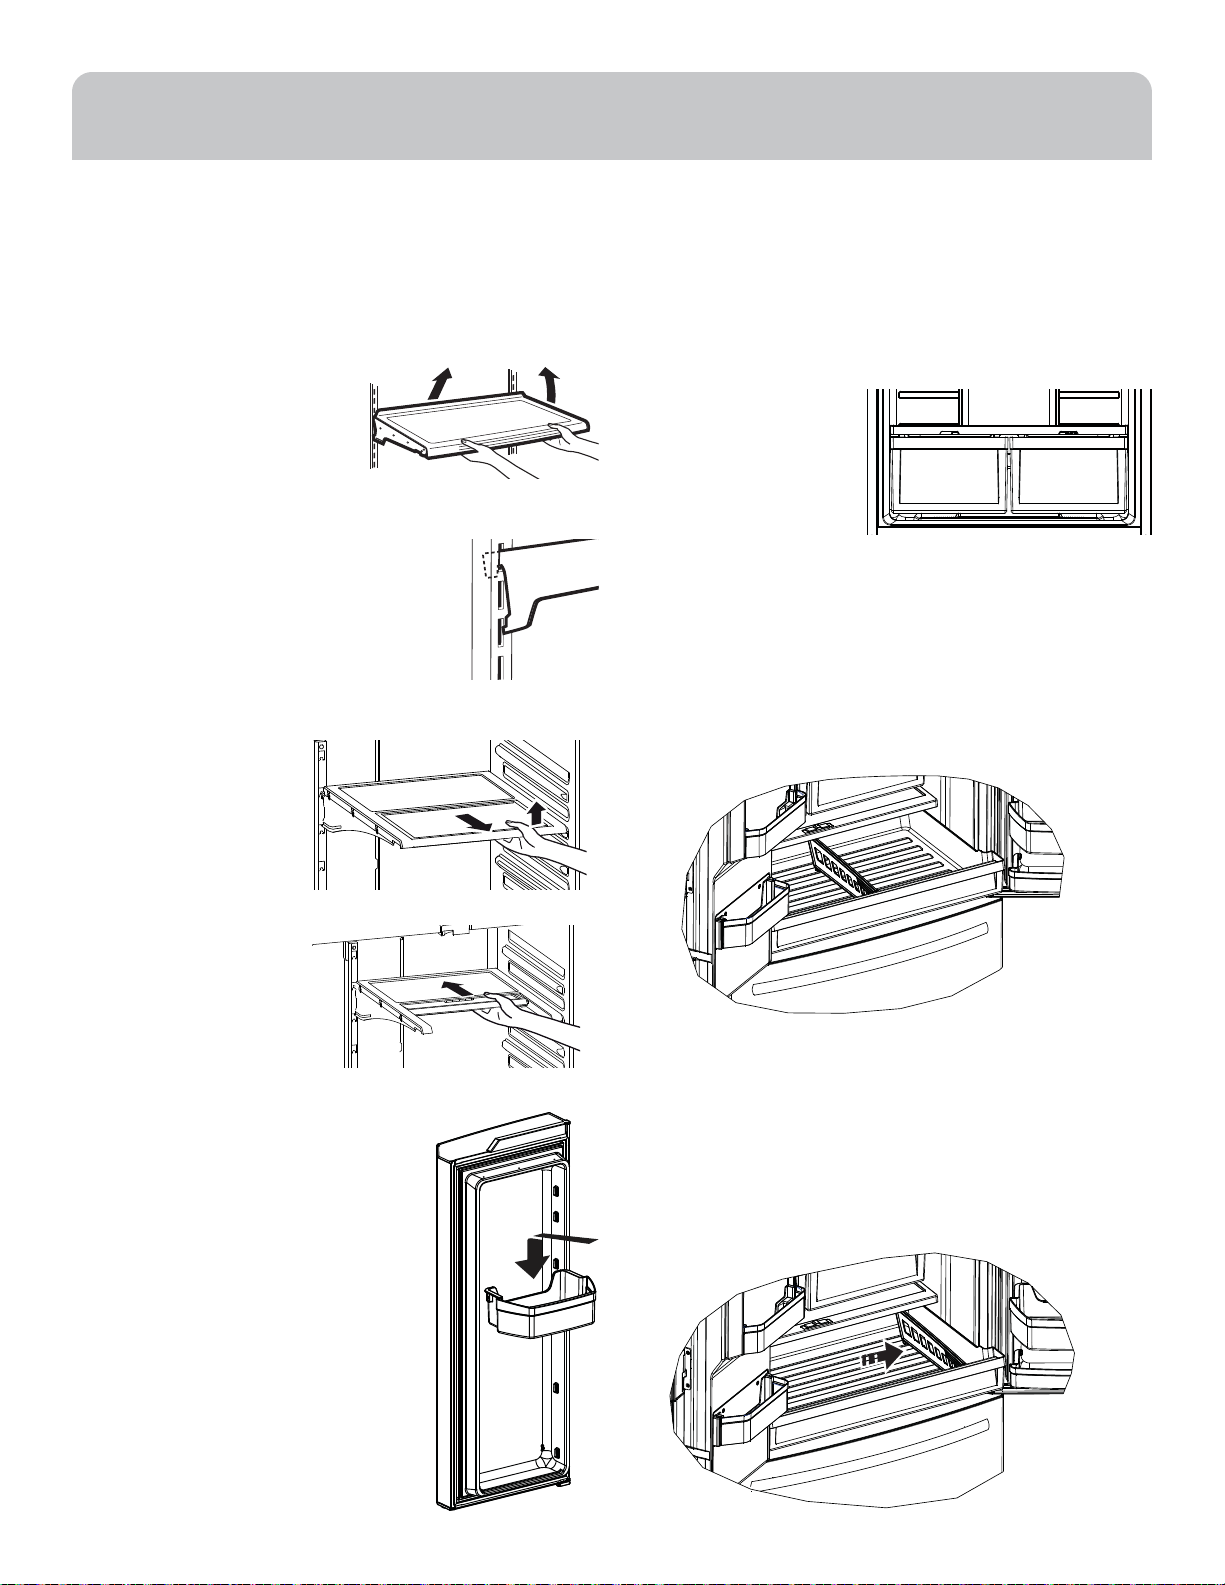
SHELVES AND BINS
Not all features are on all models.
REARRANGING THE REFRIGERATOR
SHELVES
Shelves in the refrigerator compartment are adjustable.
To remove the shelves:
1. Remove all items from the
shelf.
2. Tilt the shelf up at the front.
3. Lift the shelf up at the back
and bring the shelf out.
To replace the shelves:
1. While tilting the shelf up, insert the top
hook at the back of the shelf in a slot
on the track.
2. Lower the front of the shelf until the
bottom of the shelf locks into place.
QUICK SPACE SHELF
This shelf splits in half
and slides under itself for
storage of tall items on
the shelf below.
This shelf can be
removed and replaced or
relocated.
NOTE: The back half of the
Quick Space Shelf is not
adjustable.
PANS
Not all features are on all models.
CLIMATE ZONE PANS
Keep fruits and vegetables organized in separate
compartments for easy access. Excess water that may
accumulate in the bottom of the drawers or under the
drawers should be wiped dry.
To remove pan:
Slide the pan out to the
stop position, lift the
pan up and past the stop
position and pull forward.
FULL -WIDTH PAN
To remove pan:
1. Pull the pan out to the stop position.
2. Lift the front of the drawer up and out.
To replace pan:
1. Place back of the drawer in first and rotate drawer front
down to seat it on the slides.
2. Push the drawer in to the closed position.
HOW TO REMOVE AND REPLACE DRAWER
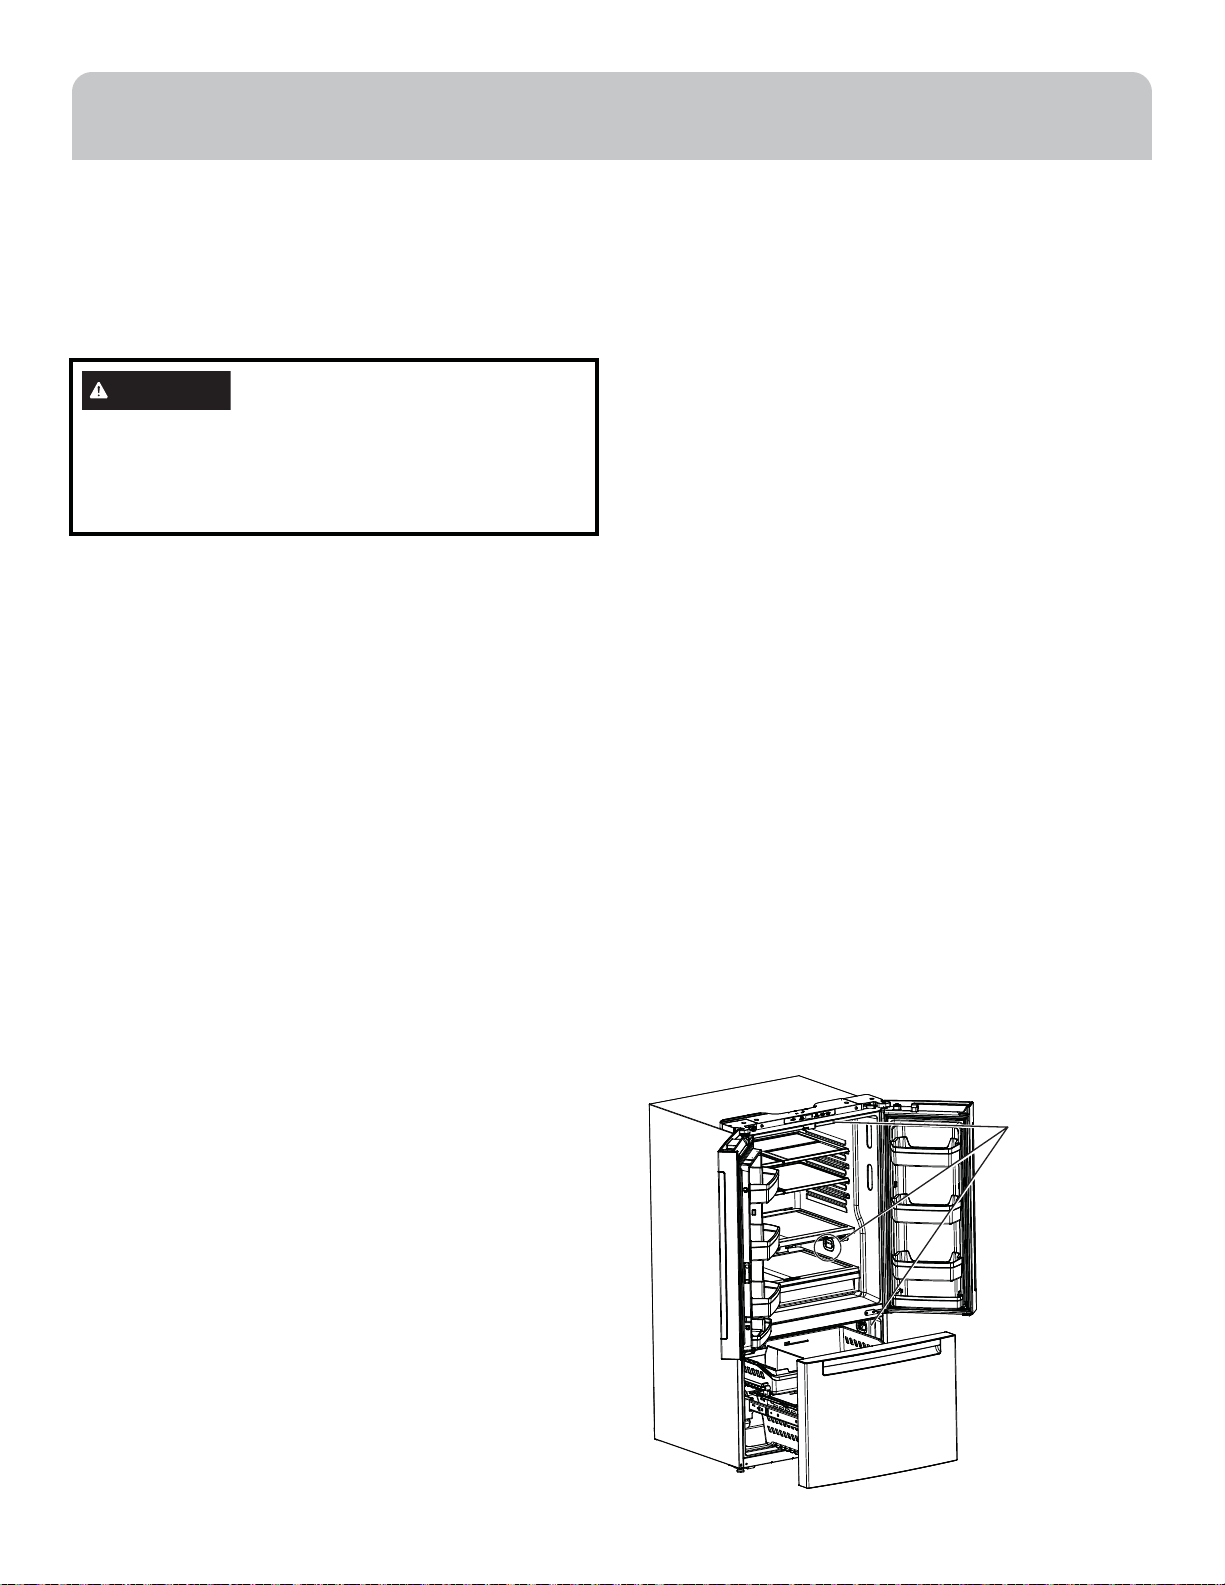
ADJUSTABLE DOOR BINS
To remove: Lift the bin straight up; then
pull out.
To replace: Engage the bin in the molded
supports on the door and push down to
lock in place.
20 49-60806
DIVIDER
To remove pan:
1. Pull the drawer out to the stop position.
2. Slide pan divider to right to release it from pan.
To replace:
Reverse steps 1 and 2 to replace drawer divider.
ENGLISH
Page 21
REFRIGERATOR USE
FLOATING SNACK PAN
This pan can be moved to the most useful location for your
family’s needs.
To remove, slide the pan out to the stop position, lift the pan
up and past the stop position and lift it out.
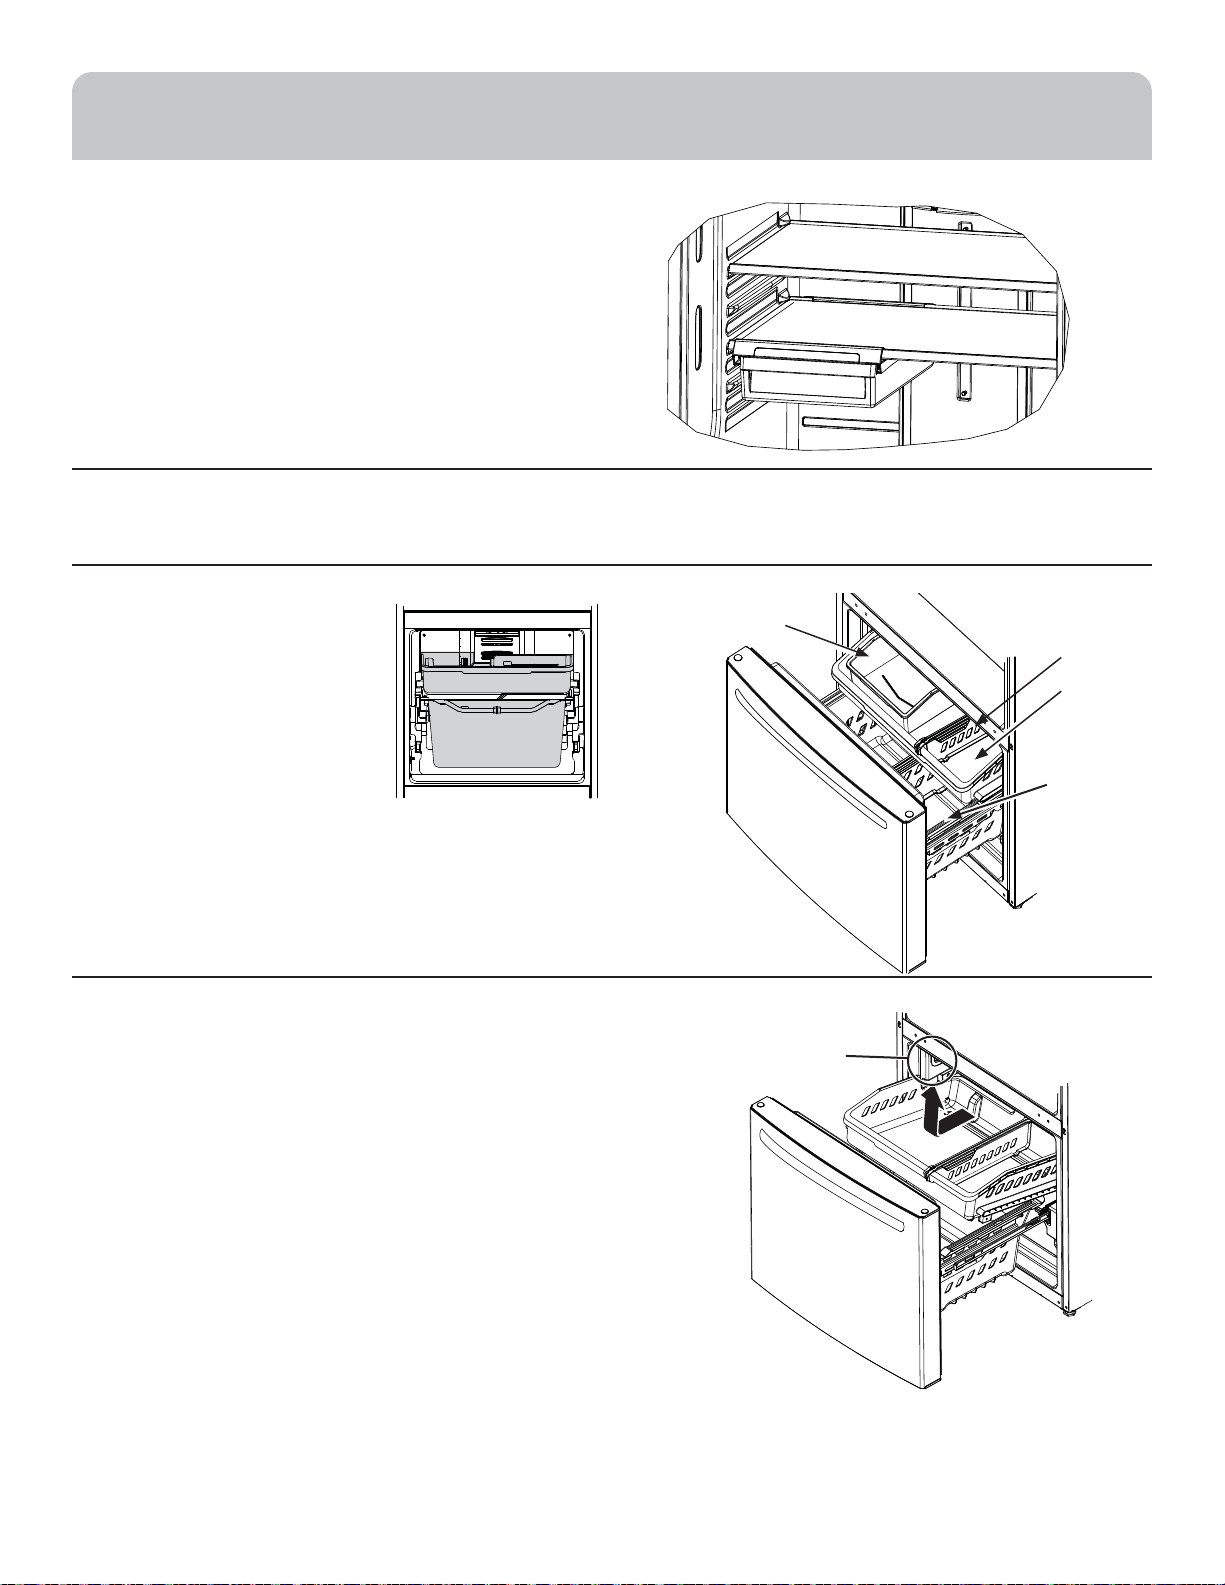
FREEZER DRAWER
Not all features are on all models.
FREEZER BASKETS
1. An ice bucket in the top basket
(on some models).
2. A top full-width basket.
1
2
3. A bottom full-width basket (with
divider - in some models).
3
NOTE: Do not fill baskets higher
than the rim of the basket. This
may cause baskets to stick or jam
when opening or closing.
Appearance and features
may vary
TOP BASKET REMOVAL
To remove the top full-width basket on freezer drawer
models:
1. Pull the basket out to the stop location.
2. Lift basket up to release it from the slides.
When replacing the basket, make sure that the basket
remains mounted on the side rails and over the slides of the
bottom basket.
NOTE: Always be sure to fully close this basket.
Ice Bucket
(on some models)
LED lights are located on
both sides of the freezer
Top Basket
Divider
Top Basket
Bottom
Basket
49-60806 21
ENGLISH
Page 22
REFRIGERATOR USE
BOTTOM BASKET REMOVAL
To remove the bottom full-width basket on freezer
drawer models:
1. Open the bottom freezer drawer until it stops.
2. Remove the top freezer basket.
3. The bottom freezer basket rests on the inside tabs on the
drawer slides.
4. Lift the front of the basket and pull forward.
5. Release the pin from the slot to remove the basket.
When replacing the bottom full-width basket, tilt the
basket back and lower it into the drawer. Rotate the basket
to a horizontal position and press down. Make sure to place
the pin back into the slot.
NOTE: Always be sure that the basket is seated on the
bracket tabs before sliding the drawer back into the freezer.
AUTOMATIC ICEMAKER
A newly installed refrigerator may take 12 to 24 hours to begin making ice.
The icemaker will produce seven cubes per cycle
approximately 100–130 cubes in a 24-hour period,
depending on freezer compartment temperature, room
temperature, number of door openings and other use
conditions.
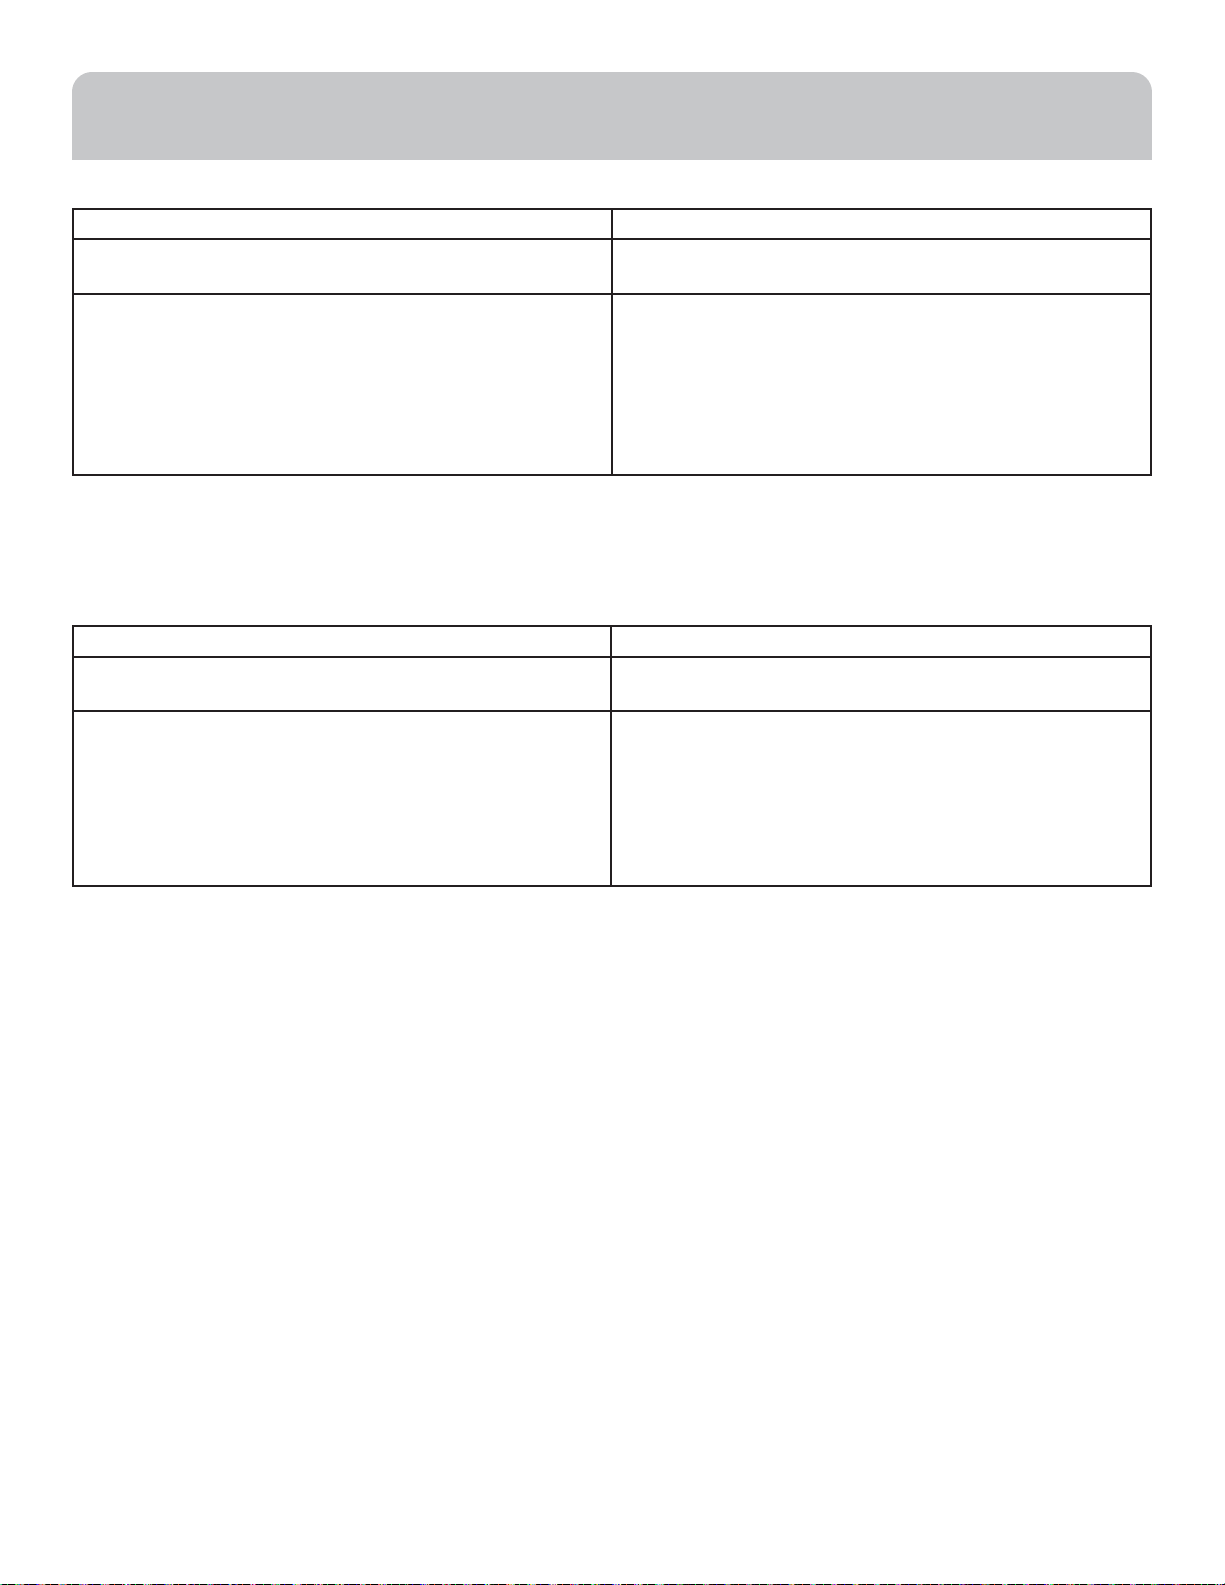
Power
Switch
Icemaker
Be sure nothing interferes with the sweep of the feeler arm.
When the bin fills to the level of the feeler arm, the icemaker
will stop producing ice. It is normal for several cubes to be
joined together.
If ice is not used frequently, old ice cubes will become cloudy,
taste stale and shrink.
NOTE: In homes with lower-than-average water pressure,
you may hear the icemaker cycle multiple times when
making one batch of ice.
CAUTION
avoid contact with the moving parts of the ejector
Green
Power Light
If the refrigerator is operated before the water connection
is made to the icemaker, set the power switch in the OFF
position.
When the refrigerator has been connected to the water
supply, set the power switch to the ON position.
The icemaker will fill with water when it cools to 15°F (–10°C).
A newly installed refrigerator may take 12 to 24 hours to
begin making ice cubes.
You may hear a buzzing sound each time the icemaker fills
with water.
Throw away the first few batches of ice to allow the water
line to clear.
22 49-60806
Feeler Arm
mechanism, or with the heating element that releases the
cubes. Do not place fingers or hands on the automatic ice
making mechanism while the refrigerator is plugged in.
There is ice storage in the freezer compartment located
on the left side of the upper basket. Pull the upper basket
forward to remove the ice bucket.
Ice bucket
To minimize the risk of personal injury,
ENGLISH
Page 23
REFRIGERATOR CARE
STAINLESS STEEL - Outside surfaces, door handles, and trim
DO USE DO NOT USE
Soft, clean cloth or sponge $EUDVLYHFORWKVVFUXEELQJVSRQJHVZLWKRUZLWKRXWVRDS
VFRXULQJRUVWHHOZRROSDGV
0LOGGHWHUJHQWPL[HGZLWKZDUPZDWHU
$SSURYHGVWDLQOHVVVWHHOFOHDQHUV9LVLWWKH*($SSOLDQFHV
SDUWVVWRUHIRUDSSURYHGVWDLQOHVVVWHHOFOHDQHUV
GEApplianceparts.com or call 877.959.8688
&OHDQHUVZLWKR[DOLFDFLGVXFKDV%DU.HHSHUV)ULHQG6RIW
&OHDQVHUFDQEHXVHGWRUHPRYHVXUIDFHUXVWWDUQLVKDQG
VPDOOEOHPLVKHVRQVWDLQOHVVVWHHOVXUIDFHVRQO\
NOTE: DO NOT allow stainless steel cleaner to come in contact with any plastic parts such as trim pieces, handle hardware
and liners. If unintentional contact of cleaners with plastic parts does occur, clean plastic part with a sponge and mild
detergent mixed with warm water.
BLACK STAINLESS - Outside surfaces, door handles, and trim
DO USE DO NOT USE
Soft, clean cloth or sponge
0LFUR¿EHUFORWK
0LOGGHWHUJHQWPL[HGZLWKZDUPZDWHU $EUDVLYHSRZGHUVRUVSUD\V
$EUDVLYHSRZGHUVRUVSUD\V
:LQGRZ6SUD\VRU$PPRQLD
&LWUXVRUSODQWRLOEDVHGFOHDQHUV
$FLGLFRUYLQHJDUEDVHGFOHDQHUV
2YHQFOHDQHUV
&OHDQHUVFRQWDLQLQJDFHWRQHSURSDQRQH
$Q\FOHDQHUZLWK:$51,1*DERXWSODVWLFFRQWDFW
$EUDVLYHFORWKVSDSHUWRZHOVVFUXEELQJVSRQJHVZLWKRU
ZLWKRXWVRDSVFRXULQJRUVWHHOZRROSDGV
:LQGRZVSUD\VDPPRQLDRUEOHDFK
&LWUXVRUSODQWRLOEDVHGFOHDQHUV
$FLGLFRUYLQHJDUEDVHGFOHDQHUV
2YHQFOHDQHUV
Alkaline cleaners
Stainless steel cleaners
IMPORTANT: Black Stainless models can be easily scratched or dulled if cleaned with abrasive cleaners or cloths. Use only the
recommended cleaning tools above to maintain the beauty of your finish.
49-60806 23
ENGLISH
Page 24
REFRIGERATOR CARE
CLEANING THE INSIDE
Unplug the refrigerator before cleaning.
If this is not practical, wring excess moisture out of sponge or
cloth when cleaning around switches, lights or controls.
Use an appliance wax polish on the inside surface between
the doors.
CAUTION
with warm water when they are cold. Glass shelves and
covers may break if exposed to sudden temperature
changes or impact such as bumping or dropping.
Tempered glass is designed to shatter into many small
pieces if it breaks.
Use warm water and baking soda solution—about a
tablespoon (15 ml) of baking soda to a quart (1 liter) of water.
This both cleans and neutralizes odors. Rinse and wipe dry.
Do not clean glass shelves or covers
BEHIND THE REFRIGERATOR
Be careful when moving the refrigerator away from the wall.
All types of floor coverings can be damaged, particularly
cushioned coverings and those with embossed surfaces.
Raise the leveling legs located at the bottom front of the
refrigerator.
Pull the refrigerator straight out and return it to position
by pushing it straight in. Moving the refrigerator in a side
direction may result in damage to the floor covering or
refrigerator.
Lower the leveling legs until they touch the floor.
When pushing the refrigerator back, make sure you don’t
roll over the power cord or water supply line.
PREPARING FOR VACATION
For long vacations or absences, remove food and unplug the
refrigerator. Clean the interior with a baking soda solution of
one tablespoon (15 ml) of baking soda to one quart (1 liter) of
water. Leave the doors open.
If the temperature can drop below freezing, have a qualified
service technician drain the water supply system to prevent
serious property damage due to flooding.
1) Unplug the refrigerator.
2) Empty ice bucket
3) Turn water supply off
If you cut the water supply off, turn off the icemaker (pg. 23).
Upon returning from vacation, replace the water filter.
PREPARING TO MOVE
Secure all loose items such as shelves and drawers by taping
them securely in place to prevent damage.
When using a hand truck to move the refrigerator, do not rest
the front or back of the refrigerator against the hand truck.
This could damage the refrigerator.
Handle only from the sides of the refrigerator.
Be sure the refrigerator stays in an upright position during
moving.
REPLACING THE LIGHTS
There is LED lighting in the fresh food compartment at the
top center and on the left and right sides above the climate
zone pans on the french door models.
LED lights are also located at the top of the left and right
sides of the freezer.
An authorized technician will need to replace the LED light.
If this assembly needs to be replaced, call service at
877.337.3639 in the United States or 877.470.9174 in
Canada.
LEDs
(locations
may vary by
model)
24 49-60806
ENGLISH
Page 25
TROUBLESHOOTING
First try the solutions suggested here to possibly avoid the cost of a service call.
PROBLEM POSSIBLE CAUSE(S) SOLUTION
Refrigerator does not operate Refrigerator in defrost cycle. Wait about 30 minutes for defrost cycle to end.
Controls set to OFF. Set the controls to a lower temperature setting.
Refrigerator is unplugged. Push the plug completely into the outlet.
The fuse is blown/circuit breaker is tripped. Replace fuse or reset the breaker.
Refrigerator is in showroom mode. Unplug the refrigerator and plug it back in.
Vibration or rattling (slight
vibration is normal)
Motor operates for long periods
or cycles on and off frequently.
(Modern refrigerators with
more storage space and a larger
freezer require more operating
time. They start and stop often
to maintain even temperatures.)
Refrigerator or freezer
compartment too warm
Frost or ice crystals on frozen
food (frost within package is
normal)
Divider between refrigerator
and freezer compartments feels
warm
Automatic icemaker does not
work
Leveling legs need adjusting. See Level the Refrigerator.
Normal when refrigerator is first plugged in. Wait 24 hours for the refrigerator to completely cool
Often occurs when large amounts of food are
placed in refrigerator.
Door left open. Check to see if package is holding door open.
Hot weather or frequent door openings. This is normal.
Temperature controls set at the coldest
setting.
Temperature control not set cold enough. See Controls section
Warm weather or frequent door openings. Set the temperature control one step colder. See
Door left open. Check to see if package is holding door open.
Door left open. Check to see if package is holding door open.
Too frequent or too long door openings. This is normal.
Automatic energy saver system circulates
warm liquid around front edge of freezer
compartment.
Icemaker power switch is in the OFF position. Set the power switch to the ON position.
Water supply turned off or not connected. See Installing the Water Line section
Freezer compartment too warm. Wait 24 hours for the refrigerator to completely cool
Piled up cubes in the storage bin cause the
icemaker to shut off.
down.
This is normal.
See Controls section
Controls section
This helps prevent condensation on the outside.
down.
Level cubes by hand.
Ice cubes stuck in icemaker. Turn off the icemaker, remove cubes, and turn the
Freezer cooling, fresh food not
cooling
Ice cubes have odor/taste Ice storage bin needs cleaning. Empty and wash bin. Discard old cubes.
Small or hollow cubes Water filter clogged. Replace filter cartridge with new cartridge or with plug.
Slow ice cube freezing Door left open. Check to see if package is holding door open.
Frequent ‘buzzing sound” Icemaker power switch is in the I (on)
Orange glow in the freezer Defrost heater is on. This is normal.
49-60806 25
ENGLISH
Normal, when refrigerator first plugged in or
after extended power outage
Food transmitting odor/taste to ice cubes. Wrap foods well.
Interior of refrigerator needs cleaning. See Care and Cleaning section.
Temperature control not set cold enough. See Controls section
position, but the water supply to the
refrigerator has not been connected.
icemaker back on.
Wait 24 hours for temperature in both compartments
to reach selected temperatures.
Set the power switch to the 0 (off) position. Keeping it
in the I (on) position will damage the water valve.
Page 26
TROUBLESHOOTING
First try the solutions suggested here to possibly avoid the cost of a service call.
PROBLEM POSSIBLE CAUSE(S) SOLUTION
Water has poor taste/odor Water dispenser has not been used for a long
Water in first glass is warm Normal when refrigerator is first installed. Wait 24 hours for the refrigerator to completely cool
Water dispenser does not
work
Water spurting from
dispenser
Water is not dispensed but
icemaker is working
No water or ice cube
production
Refrigerator has odor Foods transmitting odor to refrigerator. Foods with strong odors should be tightly wrapped.
Moisture forms on outside of
refrigerator
Moisture collects inside (in
humid weather, air carries
moisture into refrigerator
when doors are opened)
Interior light does not work No power at outlet. Replace fuse or reset the breaker.
Hot air from bottom of
refrigerator
Refrigerator never shuts off
but the temperatures are OK
Refrigerator is beeping Door is open. Close door.
Door not closing properly Door gasket on hinge side sticking or folding
Actual temperature not equal
to Set temperature
Drawer does not close by
itself
Freezer drawer pops open
when refrigerator door is
closed
time.
Water dispenser has not been used for a long
time.
Water system has been drained. Allow several hours for replenished supply to chill.
Water supply line turned off or not connected. See Installing the Water Line section
Water filter clogged. Replace filter cartridge or remove filter and install plug.
Air may be trapped in the water system. Press the dispenser arm for at least two minutes.
Newly-installed filter cartridge. Run water from the dispenser for 3 minutes (about one
Water in reservoir is frozen. Call for service.
Refrigerator control setting is too cold. Set to a warmer setting.
Supply line or shutoff valve is clogged. Call a plumber.
Water filter clogged. Replace filter cartridge or remove filter and install plug.
Interior needs cleaning. See Care and Cleaning section
Not unusual during periods of high humidity. Wipe surface dry.
Too frequent or too long door openings. This is normal.
Due to the higher humidity in the refrigerator,
you may on occasion experience fog or small
amounts of moisture in the refrigerator
compartment.
LED lights are out Call Service - see Replacing the Lights
Normal air flow cooling motor. In the
refrigeration process, it is normal that heat be
expelled in the area under the refrigerator. Some
floor coverings are sensitive and will discolor at
these normal and safe temperatures.
Adaptive defrost keeps compressor running
during door openings.
over.
Unit just plugged in. Allow 24 hours for system to stabilize.
Door open for too long. Allow 24 hours for system to stabilize.
Warm food added to refrigerator. Allow 24 hours for system to stabilize.
Defrost cycle is in process. Allow 24 hours for system to stabilize.
Leveling legs need adjusting. See Level the Refrigerator
This is normal if, after popping open, the freezer
drawer closed on its own.
Dispense water until all water in system is replenished.
down.
Dispense water until all water in system is replenished.
and a half gallons).
Keep an open box of baking soda in the refrigerator;
replace every three months.
This is normal and may come and go as different food
loads and environmental conditions change. Wipe dry
with a paper towel if desired.
This is normal.
This is normal. The refrigerator will cycle off after the
door remains closed for 2 hours.
Apply paraffin wax to the face of the gasket.
This indicates that there is a good seal on the freezer
drawer. If the freezer drawer does not automatically
close after popping open, then see the Problem:
Drawer does not close by itself, above.
26 49-60806
ENGLISH
Page 27
TROUBLESHOOTING
First try the solutions suggested here to possibly avoid the cost of a service call.
PROBLEM POSSIBLE CAUSE(S) SOLUTION
Food freezing in the refrigerator Food too close to the air vent at the back of
Water is leaking from dispenser Glass not being held under the dispenser
My display is showing tc Turbo Cool function is activated. See Controls section
Water filter indicator light
changed color
Water filter indicator light
remains red even after replacing
the water filter
Water filter indicator light is not
lit
Refrigerator doors are not even Doors need realigning. See Level the Refrigerator Doors section.
Baskets stick or jam when
opening or closing
the refrigerator.
Refrigerator control is set too cold. Move the refrigerator control to a warmer temperature
long enough after button is released.
Air may be present in the water line system,
causing water to drip after being dispensed.
This is normal. See Water Filter Cartridge - XWF section
Water filter indicator must be reset. Press and hold the WATER FILTER pad for 3 seconds.
This is normal. The filter cartridge should
be replaced when the replacement indicator
light turns red.
Baskets are too full. To open: remove some of the products from the basket
Move the food away from the air vent.
setting one increment at a time.
Hold the glass underneath the dispenser for 2–3
seconds after releasing the dispenser button. Water
may continue to dispense after the button is released
Dispense water for at least 2 minutes to remove air
from system.
See Water Filter Cartridge - XWF section.
See Water Filter Cartridge - XWF section
when opened as far as possible. Readjust the products
left in the basket and try to open the basket again. To
close: readjust products in the basket or remove any
product that is above the rim of the basket and close
the basket.
NORMAL OPERATING CONDITIONS
Newer refrigerators sound different from older refrigerators. Modern refrigerators have more features and use newer
technology.
• The new high efficiency compressor may run faster and
longer than your old refrigerator and you may hear a highpitched hum or pulsating sound while it is operating.
• You may hear a whooshing sound when the doors close.
This is due to pressure equalizing within the refrigerator.
• You may hear the fans spinning at high speeds. This
happens when the refrigerator is first plugged in, when the
doors are opened frequently or when a large amount of
food is added to the refrigerator or freezer compartments.
The fans are helping to maintain the correct temperatures.
• The fans change speeds in order to provide optimal cooling
and energy savings.
• You may hear cracking or popping sounds when the
refrigerator is first plugged in. This happens as the
refrigerator cools to the correct temperature.
• Expansion and contraction of cooling coils during and after
defrost can cause a cracking or popping sound.
• On models with an icemaker, after an ice making cycle, you
may hear the ice cubes dropping into the ice bucket.
• On models with a dispenser, during water dispense, you
may hear the water lines move at initial dispense and after
dispenser button is released.
• The flow of refrigerant through the cooling coils may make
a gurgling noise like boiling water.
• Water dropping on the defrost heater can cause a sizzling,
popping or buzzing sound during the defrost cycle.
• A water dripping noise may occur during the defrost cycle
as ice melts from the evaporator and flows into the drain
pan.
• Closing the door may cause a gurgling sound due to
pressure equalization.
49-60806 27
ENGLISH
Page 28

XWF WATER FILTER CARTRIDGE LIMITED WARRANTY
Contact us at HaierParts.com, or call 877.337.3639.
For the period of Haier will replace
Thirty Days
From the date
of the original
purchase
What Haier will not cover:
• Service trips to your home to teach you how to use the product.
¿ Improper installation.
¿ Failure of the product if it is abused, misused, used for other than the intended purpose or used commercially.
¿ Replacement of house fuses or resetting of circuit breakers.
¿ Damage to the product caused by accident, fire, floods, or acts of God.
¿ Incidental or consequential damage caused by possible defects with this appliance.
EXCLUSION OF IMPLIED WARRANTIES
Your sole and exclusive remedy is part exchange as provided in this Limited Warranty. Any implied warranties, including
the implied warranties of merchantability or fitness for a particular purpose, are limited to six months or the shortest
period allowed by law.
Any part of the water filter cartridge which fails due to a defect in materials
or workmanship during this limited thirty-day warranty.*
This warranty is extended to the original purchaser and any succeeding owner for products purchased for home use within
the USA. In Alaska, the warranty excludes the cost of shipping or service calls to your home.
Some states do not allow the exclusion or limitation of incidental or consequential damages. This warranty gives you
specific legal rights, and you may also have other rights which vary from state to state. To know what your legal rights are,
consult your local or state consumer affairs office or your state’s Attorney General.
For Purchases Made In Iowa: This form must be signed and dated by the buyer and seller prior to the consummation of
this sale.
This form should be retained on file by the seller for a minimum of two years.
Buyer:
Name
Address
City State Zip
Signature Date
* If your Haier part fails because of a manufacturing defect within thirty days from the date of original purchase for use, we will give you a new or, at
our option, a rebuilt part without charge. Return the defective part to the parts supplier from whom it was purchased together with a copy of the
“proof of purchase” for the part. If the part is defective and shows no signs of abuse, it will be exchanged. The warranty does not cover the failure of
parts which are damaged while in your possession, are abused, or have been installed improperly. It does not cover the cost of returning the part to
the supplier from whom it was purchased nor does it cover the cost of labor to remove or install it to diagnose the fault. It does not cover parts used
in products in commercial use except in the case of air conditioning equipment. In no event shall Haier be liable for consequential damages.
Warrantor: GE Appliances, a Haier company
Seller:
Name
Address
City State Zip
Signature Date
Staple your receipt here. Proof of the original purchase
date is needed to obtain service under the warranty.
28 49-60806
ENGLISH
Page 29

PERFORMANCE DATA SHEET
MODEL: GE APPLIANCES XWF WATER FILTER
• System certified by IAPMO R&T against NSF/ANSI Standards 42, 53, 401 for the reduction of claims specified on the performance data sheet and
at iapmort.org.
• Actual performance may vary with local water conditions.
Substance Tested for Reduction
Chlorine Taste and Odor 2.0 mg/L +/- 10% N/A 96.9
Chloramine Taste and Odor 3.0 mg/L +/- 10% 0.5 96.9
Particulate, Class I At least 10,000/mL N/A 91.4
Cysts 50,000/L N/A >99.99
Lead 0.15 0.01 98.85
Mercury 0.006 0.002 96.3
Asbestos 107 to 108 fibers/ L N/A >99
Toxaphene 0.015 +/- 10% 0.003 86.95
VOC (Chloroform surrogate chemical) 0.300 0.015 99.7
Alachlor 0.050 0.001 > 98
Atrazine 0.100 0.003 > 97
Benzene 0.081 0.001 > 99
Carbofuran 0.190 0.001 > 99
carbon tetrachloride 0.078 0.0018 98
chlorobenzene 0.077 0.001 > 99
chloropicrin 0.015 0.0002 99
2,4-D 0.110 0.0017 98
dibromochloropropane (DBCP) 0.052 0.00002 > 99
o-Dichlorobenzene 0.08 0.001 > 99
p-Dichlorobenzene 0.040 0.001 > 98
1,2-dichloroethane 0.088 0.0048 95
1,1-dichloroethylene 0.083 0.001 > 99
cis-1,2-dichloroethylene 0.170 0.0005 > 99
trans-1,2-dichloroethylene 0.086 0.001 > 99
1,2-dichloropropane 0.080 0.001 > 99
cis-1,3-dichloropropylene 0.079 0.001 > 99
dinoseb 0.170 0.0002 99
Endrin 0.053 0.00059 99
Ethylbenzene 0.088 0.001 > 99
ethylene dibromide (EDB) 0.044 0.00002 > 99
bromochloroacetonitrile 0.022 0.0005 98
dibromoacetonitrile 0.024 0.0006 98
dichloroacetonitrile 0.0096 0.0002 98
trichloroacetonitrile 0.015 0.0003 98
1,1-dichloro-2-propanone 0.0072 0.0001 99
1,1,1-trichloro-2-propanone 0.0082 0.0003 96
heptachlor (H-34, Heptox) 0.025 0.00001 >99
heptachlor epoxide 0.0107 0.0002 98
hexachlorobutadiene 0.044 0.001 > 98
hexachlorocyclopentadiene 0.060 0.000002 > 99
Lindane 0.055 0.00001 > 99
methoxychlor 0.050 0.0001 > 99
pentachlorophenol 0.096 0.001 > 99
simazine 0.120 0.004 > 97
Styrene 0.150 0.0005 > 99
1,1,2,2-tetrachloroethane 0.081 0.001 > 99
Tetrachloroethylene 0.081 0.001 > 99
Toluene 0.078 0.001 > 99
2,4,5-TP (silvex) 0.270 0.0016 99
tribromoacetic acid 0.042 0.001 > 98
1,2,4-Trichlorobenzene 0.160 0.0005 > 99
1,1,1-trichloroethane 0.084 0.0046 95
1,1,2-trichloroethane 0.150 0.0005 > 99
trichloroethylene 0.180 0.0010 > 99
bromoform 0.300 0.015 95
bromodichloromethane 0.300 0.015 95
chlorodibromomethane 0.300 0.015 95
xylenes 0.070 0.001 >99
Meprobamate 400 +/- 20% 60 95.5
Atenolol 200 +/- 20% 30 95.9
Carbamazepine 1400 +/- 20% 200 98.6
DEET 1400 +/- 20% 200 98.6
Metolachlor 1400 +/- 20% 200 98.7
Trimethoprim 140 +/- 20% 20 96.1
Linuron 140 +/- 20% 20 96.6
TCEP 5000 +/- 20% 700 98.1
TCPP 5000 +/- 20% 700 98.1
Phenytoin 200 +/- 20% 30 96
Ibuprofen 400 +/- 20% 60 95.9
Naproxen 140 +/- 20% 20 96.5
Estrone 140 +/- 20% 20 97.1
Bisphenol A 2000 +/- 20% 300 99.1
Nonyl phenol 1400 +/- 20% 200 97.3
49-60806 29
ENGLISH
Influent challenge
concentration
(mg/L)
Maximum permissible
product water
concentration (mg/L)
Avg %
Reduction
Application Guidelines/Water Supply P ar amet ers
Service Flow 0.5 gpm (1.89 lpm)
Water Supply Potable Water
Water Pressure 25-120 psi (172-827 kPa)
Water Temperature 33°F-100°F (0.6°C-38°C)
Capacity 170 gallons (643.5 liters)
It is essential that the manufacturer’s recommended installation,
maintenance and filter replacement requirements be carried out for the
product to perform as advertised. See Installation Manual for Warranty
information.
Note: While the testing was performed under standard
laboratory conditions, actual performance may vary.
Replacement Cartridge: XWF. For estimated costs of
replacement elements please call 877.337.3639 or visit our
website at HaierParts.com
WARNING
To reduce the risk associated with
ingestion of contaminants:
• Do not use with water that is microbiologically unsafe or of
unknown quality without adequate disinfection before and
after the system. Systems certified for cyst reduction may be
used on disinfected water that may contain filterable cysts.
NOTICE
To reduce the risk of water leakage or flooding, and to
ensure optimal filter performance:
• Read and follow use instructions before installation and use of
this system.
• Installation and use MUST comply with all state and local
plumbing codes.
• Do not install if water pressure exceeds 120 psi (827 kPa). If
your water pressure exceeds 80 psi (552 kPa), you must install
a pressure-limiting valve. Contact a plumbing professional if
you are uncertain how to check your water pressure.
• Do not install where water hammer conditions may occur.
If water hammer conditions exist you must install a water
hammer arrester. Contact a plumbing professional if you are
uncertain how to check for this condition.
• Do not install on hot water supply lines. The maximum
operating water temperature of this filter system is 100º F
(38º C).
• Protect filter from freezing. Drain filter when temperatures
drop below 33ºF (0.6ºC).
• Change the disposable filter cartridge every six months or
sooner if you observe a noticeable reduction in water flow
rate.
• Failure to replace the disposable filter cartridge at
recommended intervals may lead to reduced filter
performance and cracks in the filter housing, causing water
leakage or flooding.
• This System has been tested according to NSF/ANSI 42, 53
and 401 for the reduction of the substances listed below. The
concentration of the indicated substances in water entering
the system was reduced to a concentration less than or
equal to the permissible limit for water leaving the system, as
specified in NSF/ANSI 42, 53 and 401.
XWF System is certified by IAPMO R&T
against NSF/ANSI Standards 42,53, and 401
for the reduction of claims specified on the
performance data sheet and at iapmort.org.
Page 30

LIMITED WARRANTY
12 Months on Parts and Labor
For 12 months from the date of original retail purchase, GE
Appliances will replace any part of the refrigerator that fails
due to a defect in materials or workmanship. GE Appliances
will choose, at its discretion, to replace or service the
defective unit. Should GE Appliances decide to service the
unit, GE Appliances will provide any part which fails due to
a defect in materials or workmanship free of charge, along
with any labor and related service costs to replace the
defective part. During this period, should GE Appliances
choose to replace the unit, it may do so by providing you
ъмчлджихчмĤждчихизиирдепидчдхичдмпихйтхдхиупджирисч
product.
Product must be accessible, without encumbrance and
installed properly to receive warranty repair service.
NOTE: This warranty commences on the date the item
was purchased, and the original purchase receipt must be
presented to the authorized service representative before
warranty repairs are rendered.
FOR WARRANTY SERVICE
For US Customers, all warranty service must be provided by
our Factory Service Centers, or an authorized Customer Care
technician. To schedule service, call 1.877.337.3639.
Please have serial number and model number available when
calling for service.
In Canada, call 1.877.470.9174.
What is not covered by this warranty:
Service trips to your home to teach you how to use the
product.
Improper installation, delivery or maintenance.
Failure of the product if it is abused, misused, or used for
other than the intended purpose or used commercially.
Loss of food due to spoilage.
Damage caused after delivery.
Replacement of house fuses or resetting of circuit breakers.
Replacement of the light bulbs.
НдрдкичтчлиухтзшжчждшцизеьджжмзисчĤхиĥттзцтх
acts of God.
Incidental or consequential damage caused by possible
defects with this appliance.
Product not accessible to provide required service.
Associated costs when GE Appliances chooses to issue the
жтсцшрихджихчмĤждчидцдйтхртйухтзшжчхиупджирисч
EXCLUSION OF IMPLIED WARRANTIES - Your sole and exclusive remedy is product repair as provided in this Limited
адххдсчьКсьмрупмизъдххдсчмицмсжпшзмскчлимрупмизъдххдсчмицтйрихжлдсчдемпмчьтхĤчсиццйтхдудхчмжшпдхушхутци
are limited to one year or the shortest period allowed by law.
For US Customers: This warranty is extended to the original purchaser and any succeeding owner for products purchased
for home use within the USA. If the product is located in an area where service by a GE Appliances Authorized Servicer is not
available, you may be responsible for a trip charge or you may be required to bring the product to an Authorized GE Appliances
Service location for service. In Alaska, the warranty excludes the cost of shipping or service calls to your home.
ЬтрицчдчицзтстчдпптъчлииыжпшцмтстхпмрмчдчмтстймсжмзисчдптхжтсцифшисчмдпздрдкицЭлмцъдххдсчькмщицьтшцуижмĤж
legal rights, and you may also have other rights which vary from state to state. To know what your legal rights are, consult your
птждптхцчдчижтсцшрихдģдмхцтĦжитхьтшхцчдчиđцКччтхсиьРисихдп
Warrantor US:
GE Appliances, a Haier company
Louisville, KY 40225
For Customers in Canada: This warranty is extended to the original purchaser and any succeeding owner for products
purchased in Canada for home use within Canada. In-home warranty service will be provided in areas where it is available and
deemed reasonable by Mabe to provide.
Warrantor Canada:
MC Commercial, Inc., Burllington, Ontario, L7R 5B6
30 49-60806
ENGLISH
Page 31

TABLE DES MATIÈRES
DOCUMENTS À CONSERVER ....................................................................................31
SÉCURITÉ DU RÉFRIGÉRATEUR. . . . . . . . . . . . . . . . . . . . . . . . . . . . . . . . . . . . . . . . . . . . . . . . . . . . . . . . . . . . . . . . . . . . . . . . . . . . . . . . . . . 32
Mise au rebut de votre ancien réfrigérateur ............................................................................ 33
PIÈCES ET CARACTÉRISTIQUES .................................................................................. 34
EXIGENCES D’INSTALLATION ...................................................................................35
Emplacement du réfrigérateur ........................................................................................ 35
Dégagements ....................................................................................................... 35
INSTRUCTIONS D’INSTALLATION. ............................................................................... 36
Préparation avant installation du réfrigérateur ....................................................................... 36
Dimensions de l’électroménager ..................................................................................... 37
Installation de la conduite d’eau avant de commencer ...................................................................... 38
Installation du réfrigérateur .......................................................................................... 40
Compléter l’installation .............................................................................................. 45
UTILISATION DU RÉFRIGÉRATEUR ............................................................................... 46
Commandes ........................................................................................................ 46
Modes Sabbath ...................................................................................................... 46
Distributeur d’eau intérieur ........................................................................................... 46
Filtre à eau XWF ...................................................................................................... 47
Tablettes et balconnets .............................................................................................. 48
Bacs ................................................................................................................. 48
Tiroir du congélateur ................................................................................................. 49
Machine à glaçons automatique ...................................................................................... 50
ENTRETIEN DU RÉFRIGÉRATEUR ................................................................................. 51
Nettoyage ........................................................................................................... 51
Vacances ou le déménagement ....................................................................................... 52
Remplacement des lampes ........................................................................................... 52
DÉPANNAGE ....................................................................................................53
CARTOUCHE XWF DU FILTRE À EAU ..............................................................................56
FICHE TECHNIQUE DE PERFORMANCE ...........................................................................57
GARANTIE LIMITÉE .............................................................................................. 58
DOCUMENTS À CONSERVER
Merci d’avoir acheté ce produit Haier. Ce manuel d’utilisation vous
aidera à obtenir la meilleure performance possible de votre nouveau
réfrigérateur.
Pour référence ultérieure, inscrire le numéro de plaque signalétique et
la date d’achat. La plaque signalétique est située sur une étiquette à
l’intérieur du réfrigérateur.
Pour faciliter l’obtention d’un service sous garantie, agrafer la preuve de
la date d’achat à ce manuel.
_______________________________________
Numéro de modèle
_______________________________________
Numéro de série
_______________________________________
Date d’achat
49-60806 31
FRANÇAIS
Page 32

SÉCURITÉ DU RÉFRIGÉRATEUR
AVERTISSEMENT
• Ce réfrigérateur doit être correctement installé conformément
aux instructions d'installation avant toute utilisation.
• Débranchez le réfrigérateur avant d’effectuer une réparation
ou de le nettoyer.
REMARQUE : L’alimentation du réfrigérateur ne peut être
déconnectée par aucune des fonctions sur le panneau de
commande.
REMARQUE : Les réparations doivent être effectuées par un
professionnel qualifié.
• Remettez toutes les pièces et panneaux en place avant
d’utiliser l’appareil.
•
N’utilisez pas un cordon de rallonge.
• Abstenez-vous d’entreposer ou d’utiliser de l’essence ou
d’autres vapeurs et liquides inflammables aux alentours de cet
électroménager ou d’autres appareils.
• N’entreposez pas dans cet électroménager des substances
explosives telles que des bombes aérosols qui contiennent un
gaz propulseur.
• Afin de prévenir les risques d’asphyxie et d’enfermement des
enfants, enlevez les portes des compartiments réfrigérateur et
congélateur avant de mettre le réfrigérateur au rebut ou d’en
cesser l’usage.
ATTENTION
• Ne nettoyez pas les tablettes ou les couvercles en verre avec
de l’eau tiède quand ceux-ci sont froids. Les tablettes et
couvercles en verre peuvent se casser s’ils sont exposés à des
changements soudains de température ou si vous les cognez
ou les faites tomber. Le verre trempé est conçu pour se briser
en petits morceaux en cas de casse
• Éloignez les doigts des parties du congélateur où l’on peut
facilement se pincer : les espaces entre les portes, et entre
les portes et les placards sont toujours étroits. Soyez prudent
lorsque vous fermez les portes en présence d’enfants.
• Ne touchez pas les surfaces froides du congélateur lorsque
vous avez les mains humides ou mouillées. La peau risque
d’adhérer à ces surfaces extrêmement froides.
• Ne recongelez pas les aliments surgelés qui ont complètement
dégelé.
Pour réduire le risque d’incendie, d’explosion, de choc électrique ou de blessures lorsque vous utilisez votre
réfrigérateur, veuillez suivre ces consignes de sécurité :
Pour réduire le risque de blessures lorsque vous utilisez votre réfrigérateur, veuillez suivre ces consignes de
sécurité.
•
Afin de prévenir les accidents graves ou la mort, les enfants ne
doivent pas se tenir ni jouer dans ou sur l’électroménager.
• Les enfants et les personnes dont les capacités sont réduites sur le
plan physique, sensoriel ou mental, ou qui manquent d’expérience
ou de connaissances, peuvent utiliser cet électroménager
seulement si elles sont surveillées ou ont reçues des consignes de
sécurité sur son usage et les risques y sont associés.
• Cet électroménager est conçu pour une utilisation domestique
et applications similaires : salle du personnel dans une usine, un
bureau ou d’autres lieux de travail; maison de ferme; clients dans
un hôtel, un motel, un gîte touristique et d’autres lieux résidentiels;
approvisionnement et applications similaires non reliées au
commerce de détail.
• Raccordez l’appareil à une alimentation d’eau potable seulement.
Une alimentation d’eau froide est requise pour faire fonctionner
la machine à glaçons et le pichet à remplissage automatique. La
pression d’eau doit se situer entre 40 et 120 psi. (275 à 827 kPa).
• N’appliquez pas de nettoyants corrosifs sur le réfrigérateur.
Certains nettoyants endommagent le plastique et peuvent ainsi
causer le détachement inopiné de pièces telles que porte ou
poignées de porte. Voyez la section Entretien et nettoyage pour
des instructions détaillées.
• Si votre réfrigérateur est doté d’une machine à glaçons
automatique, évitez le contact avec les pièces mobiles du
mécanisme éjecteur, ou avec l’élément chauffant qui libère
les glaçons. Ne posez pas les doigts ou les mains sur le
mécanisme de la machine à glaçons automatique pendant que
le réfrigérateur est branché.
• Utilisez un verre robuste qui résiste à la distribution de glace
(sur les modèles avec distributeur de glace).
INSTALLATION
AVERTISSEMENT
Conservez les matériaux et vapeurs inflammables tels que l’essence à l’écart de votre réfrigérateur. Une explosion, un incendie voire la
mort pourrait en résulter.
RISQUE D’EXPLOSION.
LIRE ET CONSERVER CES INSTRUCTIONS
32 49-60806
FRANÇAIS
Page 33

SÉCURITÉ DU RÉFRIGÉRATEUR
BRANCHEMENTS ÉLECTRIQUES
AVERTISSEMENT
Branchez l’appareil dans une prise triple avec terre.
Ne retirez pas la broche de terre.
N’utilisez pas d’adaptateur.
N’utilisez pas un cordon de rallonge.
Le non-respect de ces instructions peut entraîner des risques d’incendies, des chocs électriques ou la mort.
RISQUE DE CHOC ÉLECTRIQUE
Ne coupez pas ou n’enlevez pas, sous aucun prétexte, la troisième broche de mise à la terre du cordon d’alimentation.
Pour des raisons de sécurité, cet appareil doit être correctement mis à la terre.
Le cordon d’alimentation de cet appareil est équipé d’une fiche
à trois broches (pour une mise à la terre) qui s’adapte à la prise
de courant standard à 3 broches (pour une mise à la terre) pour
minimiser les risques de chocs électriques par cet appareil.
Faites vérifier la prise murale et le circuit électrique par
un électricien qualifié pour s’assurer que le système est
correctement mis à la terre.
Dans le cas d’une prise biphasée, l’installateur a la responsabilité
et l’obligation de la remplacer par une prise triphasée
correctement mise à la terre. N’utilisez pas d’adaptateur.
Le réfrigérateur doit toujours être branché à sa propre prise
électrique d’une tension nominale correspondant à celle indiquée
sur sa plaque signalétique.
Une alimentation électrique à 115 volts CA, 60 Hz, avec un fusible
de 15 ou 20 ampères et une mise à la terre est nécessaire. Ceci
permet d’obtenir un meilleur rendement et évite de surcharger
les circuits électriques du domicile qui risque d’occasionner un
incendie en surchauffant.
Ne débranchez jamais le réfrigérateur en tirant sur le cordon
d’alimentation. Prenez toujours fermement la fiche en main et
tirez pour la sortir de la prise.
Cessez immédiatement d’utiliser un cordon électrique
endommagé. Si le cordon électrique est endommagé, son
remplacement doit être effectué par un technicien en réparation
qualifié au moyen d’un cordon de rechange autorisé par le
fabricant.
Lorsque vous éloignez votre réfrigérateur du mur, faites
attention à ne pas le faire rouler sur le cordon d’alimentation afin
de ne pas l’endommager.
MISE AU REBUT APPROPRIÉE DE VOTRE ANCIEN RÉFRIGÉRATEUR
AVERTISSEMENT
Le non-respect de ces instructions d'élimination peut entraîner la mort ou des blessures graves.
IMPORTANT: Les enfants pris au piège ou morts d’asphyxie
sont toujours d’actualité. Les réfrigérateurs et congélateurs
abandonnés sont toujours aussi dangereux, même si on n’attend
que «quelques jours» pour s’en débarrasser. Si vous ne gardez
pas votre ancien réfrigérateur ou congélateur, veuillez suivre les
directives ci-dessous afin de prévenir les accidents.
Mise au rebut des produits réfrigérants et en mousse
Mettez l’électroménager au rebut conformément à la réglementation fédérale et locale. Les matières isolantes inflammables utilisées
exigent des procédures de mise au rebut spéciales. Communiquez avec les autorités locales pour connaître la façon de mettre votre
électroménager au rebut qui soit respectueuse de l’environnement.
RISQUE DE SUFFOQUER OU D’Y ÊTRE EMPRISONNÉ
Avant de vous débarrasser de votre ancien appareil :
• Démontez les portes du compartiment de réfrigération et du
compartiment de congélation.
• Laissez les clayettes en place afin d’empêcher les enfants de
grimper à l’intérieur.
LIRE ET CONSERVER CES INSTRUCTIONS
49-60806 33
FRANÇAIS
Page 34

CARACTÉRISTIQUES
Éclairage DEL
Les lampes DEL du compartiment réfrigérateur sont situées
dans le centre supérieur et sur les côtés gauche et droit des
bacs climatisés.
congélateur; voir les pages 52.
Des lampes DEL sont aussi situées dans le
Tiroir pleine largeur
Un tiroir pleine largeur pouvant recevoir des articles de
taille supérieure est situé dans le bas du compartiment
réfrigérateur.
Tablette QuickSpace™
Elle sert de tablette pleine grandeur au besoin et se glisse
aisément pour ranger des articles longs en dessous.
Balconnets amovibles/réglables
On peut les déplacer vers le haut ou le bas pour répondre à
vos besoins.
Tiroirs climatisés
Bacs séparés pour le rangement des fruits et légumes frais.
Filtre d’eau
Accessible pour faciliter le remplacement.
34 49-60806
FRANÇAIS
Page 35

EXIGENCES D’INSTALLATION
EMPLACEMENT
DU RÉFRIGÉRATEUR
IMPORTANT : Ce réfrigérateur est conçu pour un usage
domestique, à l’intérieur uniquement.
• N’installez pas votre réfrigérateur dans un emplacement où la
température ambiante sera inférieure à 16° C
(60° F). Il ne se mettra pas en marche suffisamment souvent pour
maintenir des températures convenables.
• N’installez pas votre réfrigérateur dans un emplacement où la
température ambiante sera supérieure à 37° C (100° F). Il ne
fonctionnera pas bien.
• N’installez pas votre réfrigérateur à un endroit exposé à l’eau
(pluie, etc.) ou aux rayons directs du soleil.
• Installez votre réfrigérateur sur un plancher suffisamment solide
pour le porter lorsqu’il est plein.
DÉGAGEMENTS
Prévoyez les dégagements suivants pour faciliter l’installation,
la bonne circulation d’air et les raccordements de plomberie et
d’électricité :
Côtés 3 mm (1/8 po)
Dessus 25 mm (1 po) Armoire/Couvercle de charnière
Arrière 50 mm (2 po)
49-60806 35
FRANÇAIS
Page 36

INSTRUCTIONS D’INSTALLATION
AVANT DE COMMENCER
Veuillez lire toutes les directives attentivement
•
IMPORTANT — Conservez ces instructions pour
l’inspecteur local. Respectez toutes les ordonnances et les codes
locaux.
• Note à l’installateur – Assurez-vous de laisser ces instructions
au consommateur.
• Note au consommateur – Conservez ces instructions pour
référence future.
• Niveau de compétence – L’installation de cet appareil nécessite
des compétences mécaniques de base.
• Temps d’installation – Installation du réfrigérateur
20 minutes
Installation de la conduite d’eau - 30
minutes
• L’installateur est responsable de bien installer ce réfrigérateur.
• Toute panne du produit due à une mauvaise installation n’est pas
couverte par la garantie
PRÉPARATION
DÉPLACEMENT DU RÉFRIGÉRATEUR À L’INTÉRIEUR
DE LA MAISON
Si le réfrigérateur ne passe pas par la porte, vous pouvez
enlever la porte du compartiment réfrigération et le tiroir
du compartiment congélation.
• Pour retirer la porte du compartiment de réfrigération,
consultez le chapitre retrait des portes de la section des
instructions d’installation.
• Pour retirer le tiroir du congélateur, consultez le chapitre
tiroir du congélateur dans la section d’utilisation du
réfrigérateur.
ALIMENTATION D’EAU DE LA MACHINE À GLAÇONS
ET DU DISTRIBUTEUR
Si votre réfrigérateur est doté d’une machine à glaçons, la machine
à glaçons doit être raccordée à une conduite d’eau froide. Vous
pouvez acheter une trousse d’alimentation d’eau GE Appliances
(contenant la tuyauterie, le robinet d’arrêt, les joints et les
instructions) chez votre revendeur ou en vous adressant à notre
site Web à l’adresse electromenegersge.ca ou en composant le
800.661.1616.
OUTILS DONT VOUS POUVEZ
AVOIR BESOIN
Clé réglable
Écrou à compression d’un
diamètre intérieur de ¼
po et bague (modèles
à machine à glaçons
seulement)
Clé hexagonale 3/32, 1/8
Perceuse électrique ou
manuelle et foret 1/8 po
Crayon
Cisaille
Tournevis Torx
T20
et 3/16 po
Clé à douille 3/8 et 5/8 po
Tournevis cruciforme
Ruban à mesurer
Tourne-écrou
Niveau
36 49-60806
FRANÇAIS
Page 37

INSTRUCTIONS D’INSTALLATION
DIMENSIONS DE L’ÉLECTROMÉNAGER
* 69-7/8”
(177.5 cm)
36”
(91.4 cm)
36-5/16”
(92.2 cm)
50-3/16”
(127.5 cm)
43-23/32”
(111.1 cm)
REMARQUE : * Hauteur du réfrigérateur depuis le dessus de la porte.
MESUREZ L’OUVERTURE DANS L’ARMOIRE
SELON LA LARGEUR DU RÉFRIGÉRATEUR
Mesurez B, la largeur de l’ouverture de l’armoire dans laquelle vous voulez mettre
votre réfrigérateur.
Assurez-vous de tenir compte de tout surplomb du comptoir, de l’épaisseur de
la plinthe et de tout dégagement désiré. La largeur B ne doit pas être inférieure
à 36 pouces (91,4 cm). Vous devez placer le réfrigérateur approximativement au
milieu de cette ouverture.
54-13/16”
(139.2 cm)
33-13/16”
(85.9 cm)
155ȋ
Mur arrière
Back Wall
B
RÉFRIGÉRATEUR
REFRIGERATOR
Devant
Front
90ȋ
43-3/8”
(110.2 cm)
Épaisseur de la
plinthe ou surplomb
du comptoir (la
mesure la plus
grande) plus tout
dégagement désiré
Côté
Right
Side
droit
48-3/4”
(123.8 cm)
49-60806 37
FRANÇAIS
Page 38

INSTRUCTIONS D’INSTALLATION
INSTALLATION DE LA CONDUITE D’EAU
AVANT DE COMMENCER
Nous recommandons les trousses de tuyauterie en cuivre WX8X2,
WX8X3, WX8X4, selon la longueur dont vous avez besoin. Nous
approuvons les tuyaux en plastique de la trousse de tuyauterie pour
réfrigérateur SmartConnect™ (WX08X10006, WX08X10015 et
WX08X10025).
Si l’alimentation d’eau à votre réfrigérateur vient d’un système de
ĤпчхдчмтсудхтцртцимсщихциОЭцмщтчхихŻйхмкŻхдчишхдŻкдпирисч
шсĤпчхизđидшшчмпмциэпиетшжлтсзизŻхмщдчмтсзшĤпчхизищтчхи
хŻйхмкŻхдчишхЬмщтшцшчмпмциэпдждхчтшжлизиĤпчхдчмтсзищтчхи
хŻйхмкŻхдчишхжтснтмсчирисчдщижпиĤпчхизđтцртцимсщихцищтшц
pouvez produire des glaçons creux. Certains modèles ne sont pas
пмщхŻцдщижшсетшжлтсзизŻхмщдчмтсзшĤпчхиЩтшхщтшцисухтжшхих
un gratuitement, composez le 877.470.9174.
Cette installation de conduite d’eau n’est pas garantie par le
fabricant de réfrigérateur ou de machine à glaçons. Suivez
soigneusement ces instructions pour minimiser le risque de
dommages onéreux d’inondation.
Les coups de bélier (eau qui donne des coups dans les tuyaux) dans
la tuyauterie de la maison peut occasionner des dommages aux
pièces de votre réfrigérateur, ainsi que des fuites ou des inondations.
Appelez un plombier agréé pour corriger les coups de bélier avant
d’installer la conduite d’eau de votre réfrigérateur.
Pour prévenir les brûlures et les dommages à votre réfrigérateur, ne
branchez jamais la conduite d’eau à une canalisation d’eau chaude.
N’installez pas les tuyaux de la machine à glaçons dans des endroits
où la température risque de descendre en dessous du point de
congélation.
Si vous utilisez un outil électrique (comme une perceuse électrique)
pendant l’installation, assurez-vous qu’il est doté d’une double
мцтпдчмтсичзđшсирмциƑпдчиххизицтсжƭепдкидĤсзиухŻщисмхчтшч
risque de choc électrique. On peut aussi utiliser un outil alimenté par
batterie.
Vous devez procéder à toutes vos installations en conformité avec
votre code local de plomberie.
CE DONT VOUS AUREZ BESOIN
• Un tuyau en cuivre ou la trousse de tuyauterie
pour réfrigérateur SmartConnect™, diamètre
extérieur de 1/4 po, pour brancher le
réfrigérateur à l’alimentation d’eau. Si vous
utilisez un tuyau en cuivre, assurez-vous que les deux extrémités
du tuyau sont coupées bien droit.
Pour trouver la longueur de tuyau dont vous aurez besoin : mesurez
la distance qui va du robinet d’eau situé derrière le réfrigérateur
jusqu’au tuyau d’alimentation d’eau. Assurez-vous qu’il y a assez de
tuyau en surplus pour vous permettre d’écarter le réfrigérateur du
mur après l’installation.
Les trousses SmartConnect™ sont disponibles dans les dimensions
suivantes :
1,8 m (6 pi) – WX08X10006
4,6 m (15 pi) – WX08X10015
7,6 m (25 pi) – WX08X10025
REMARQUE : Les seuls tuyaux en matière plastique approuvés
par sont ceux qui font fournis dans les trousses de tuyauterie pour
réfrigérateur SmartConnect™. N’utilisez jamais un autre tuyau en
plastique, car le tuyau d’alimentation d’eau est tout le temps sous
pression. Certains types de tuyaux en plastique peuvent devenir
cassants avec l’âge et se fendre, occasionnant des dommages
d’inondation dans votre maison.
• Vous pouvez acheter une trousse d’alimentation d’eau (contenant
• Une alimentation d’eau froide. La pression de l’eau doit mesurer
• Une perceuse électrique.
• Une clé de 1/2 po ou une clé réglable.
• Un tournevis à lame plate et un
• Deux écrous à compression d’un diamètre extérieur de 1/4 po
• Si vous utilisez une trousse de tuyauterie pour réfrigérateur
• Si votre conduite d’eau en cuivre actuelle présente un raccord
• Un robinet de sectionnement à connecter au tuyau d’eau froide.
AVERTISSEMENT
alimentation d’eau potable seulement. Une alimentation d’eau
froide est requise pour faire fonctionner la machine à glaçons et
le pichet à remplissage automatique. La pression d’eau doit se
situer entre 40 et 120 psi. (275 à 827 kPa).
un tuyau en cuivre, un robinet d’arrêt et les joints énumérés cidessous) chez votre distributeur local ou auprès du service des
pièces et accessoires au 800.661.1616).
entre 20 et 120 psi. (138-827 kPa).
tournevis cruciforme.
et deux bagues (manchons) pour raccorder le tuyau en cuivre au
robinet de sectionnement et au robinet d’eau du réfrigérateur.
OU
SmartConnect™ avec tuyau en plastique, les raccords nécessaires
sont déjà montés au tuyau.
ŻщдцŻƑшсииычхŻрмчŻщтшцдшхиэеицтмсзđшсдздучдчишх¤тģихч
chez les marchands de matériel de plomberie) pour raccorder
le tuyau d’eau au réfrigérateur, OU vous pouvez couper le
raccord évasé à l’aide d’un coupe-tube, puis utiliser un raccord à
compression. Ne coupez pas l’extrémité moulée d’un tuyau de la
trousse SmartConnect™.
Le robinet de sectionnement doit avoir une entrée d’eau d’un
diamètre intérieur minimal de 5/32 po au point de raccordement
avec la CONDUITE D’EAU FROIDE. Des robinets de sectionnement
à étrier sont souvent inclus dans les trousses d’alimentation d’eau.
Avant d’acheter, assurez-vous que le robinet à étrier satisfait à vos
codes de plomberie locaux.
Raccordez l’appareil à une
38 49-60806
FRANÇAIS
Page 39

INSTRUCTIONS D’INSTALLATION
INSTALLATION DE LA CONDUITE D’EAU (Suite)
IInstallez le robinet de sectionnement sur la conduite d’eau potable
la plus utilisée.
1. FERMER L’ALIMENTATION D’EAU
PRINCIPALE
ШшщхиэпихтемсичпиупшцухтжлицшĦцдррисчптскчируцутшх
purger le tuyau.
2. CHOISIR L’EMPLACEMENT
DU ROBINET DE
SECTIONNEMENT
Choisissez pour le robinet un
emplacement facilement accessible.
Il vaut mieux le brancher de côté à
un tuyau vertical. Si vous devez le
brancher à un tuyau horizontal, faites le
branchement en haut ou de côté, plutôt qu’en bas du tuyau, pour
éviter de recevoir des sédiments du tuyau d’alimentation d’eau.
3. PERCER UN TROU POUR LE ROBINET
Percez un trou de 1/4 po dans la conduite d’eau à l’aide d’un foret
dur (même si vous utilisez un robinet autotaraudeur). Enlevez
toute barbure due au perçage du trou dans le tuyau.
Faites attention de ne pas laisser de l’eau couler dans votre
perceuse électrique.
6. ACHEMINER LE TUYAU
Acheminez le tuyau entre la conduite d’eau froide et le
réfrigérateur.
Faites passer le tuyau par un trou percé dans le mur ou le
plancher (derrière le réfrigérateur ou au niveau de l’armoire de
cuisine adjacente), aussi près du mur que possible.
7. RACCORDER LE TUYAU AU ROBINET DE
SECTIONNEMENT
Placez un écrou à compression et une bague (manchon)
à l’extrémité du tuyau et posez-les sur le robinet de
sectionnement.
Assurez-vous que le tuyau est bien inséré dans le robinet. Serrez
fort l’écrou à compression.
Pour le tuyau en plastique de la trousse pour réfrigérateur
SmartConnect™, insérez l’extrémité moulée du tuyau dans le
robinet de sectionnement et serrez l’écrou à compression à la
main, puis serrez d’un tour avec une clé. Un serrage excessif peut
causer des fuites.
Robinet de
sectionnement à
étrier
Écrou à compression
Tuyau
SmartConnect™
Si vous ne percez pas un trou de 1/4 po, vous obtiendrez une
alimentation d’eau réduite et des glaçons plus petits.
4. FIXER LE ROBINET DE SECTIONNEMENT
Fixez le robinet de sectionnement au tuyau d’eau froide à l’aide
du collier de serrage.
REMARQUE : Vous devez vous conformer aux Codes de
plomberie 248CMR du Commonwealth of Massachusetts.
Les robinets de sectionnement à étrier sont illégaux et leur
utilisation n’est pas autorisée au Massachusetts. Consultez votre
plombier local.
Rondelle
Collier de serrage
Vis du collier
Robinet de
sectionnement
à étrier
d’étanchéité
Tuyau d’eau froide
vertical
Écrou
taraudeur
Sortie du robinet
REMARQUE : Vous devez vous conformer aux Codes de
plomberie 248CMR du Commonwealth of Massachusetts.
Les robinets de sectionnement à étrier sont illégaux et leur
utilisation n’est pas autorisée au Massachusetts. Consultez votre
plombier local.
Bague (manchon)
8. PURGER LE TUYAU
Ouvrez l’alimentation d’eau principale et purgez le tuyau jusqu’à
ce que l’eau soit claire.
Fermez l’eau au robinet d’eau après l’écoulement d’environ 1 litre
d’eau (env. 2 minutes) par le tuyau.
5. SERRER LE COLLIER DE SERRAGE
Serrez les vis du collier jusqu’à ce que la rondelle d’étanchéité
жтррисжиƑисĥих
REMARQUE : Ne serrez pas trop. Vous risquez d’écraser le tuyau.
49-60806 39
FRANÇAIS
Page 40

INSTRUCTIONS D’INSTALLATION
INSTALLATION DU RÉFRIGÉRATEUR - PORTES FRANÇAISES
EMPLACEMENT DU RÉFRIGÉRATEUR
• N’installez pas votre réfrigérateur dans un emplacement où la
température ambiante sera inférieure à 16° C
¤& П¥ТпсицириччхдудцисрдхжлицшĦцдррисчцтшщисч
pour maintenir des températures convenables.
• N’installez pas votre réfrigérateur dans un emplacement où la
température ambiante sera supérieure à 37° C (100° F). Il ne
fonctionnera pas bien.
• N’installez pas votre réfrigérateur à un endroit exposé à l’eau
(pluie, etc.) ou aux rayons directs du soleil.
¬ ТсцчдппиэщтчхихŻйхмкŻхдчишхцшхшсупдсжлихцшĦцдррисч
solide pour le porter lorsqu’il est plein.
DÉGAGEMENTS
Prévoyez les dégagements suivants pour faciliter l’installation,
la bonne circulation d’air et les raccordements de plomberie et
d’électricité :
Côtés 3 mm (1/8 po)
Dessus 25 mm (1 po) Armoire/Couvercle de charnière
Arrière 50 mm (2 po)
AVERTISSEMENT
risque de tomber en plus de causer des blessures ou des
dommages si vous ne respectez pas ces instructions, oubliez
des pièces ou effectuez un serrage excessif des vis.
Suivez toutes les étapes. La porte
1. POUR RETIRER LES PORTES (droite)
A. Enlevez le couvercle de charnière
dans le haut de la porte du
compartiment réfrigérateur
en retirant la vis à l’aide d’un
tournevis cruciforme.
B. À l’aide d’une clé à douille 5/16
утхичмхиэпицетшптсцфшмĤыисч
la charnière supérieure sur la
carrosserie. Soulevez le support
de charnière en ligne droite pour libérer l’axe de charnière de la
douille dans le haut de la porte.
C. Retirez le ruban de la porte droite et penchez la porte à l’écart
de la carrosserie. Soulevez la porte pour la dégager de l’axe de
charnière central.
D. Déposez la porte sur une surface qui ne rayera pas la porte,
intérieur vers le haut.
2. POUR RETIRER LES PORTES (gauche)
E. Enlevez le couvercle de charnière dans le
haut de la porte gauche en retirant la vis
à l’aide d’un tournevis cruciforme.
F.НŻехдсжлиэпиц#жтссижчишхцзиĤпцич
зŻупджиэпицĤпцншцфшđƑщтмхпицщмцфшм
Ĥыисчпджлдхсмƒхи
Connecteurs de fils
REMARQUES IMPORTANTES
Avant d’enlever les portes :
• Lisez les instructions jusqu’au bout avant de commencer.
• Placez les vis à proximité des pièces associées pour éviter de les
utiliser aux mauvais endroits.
• Placez les portes sur une surface de travail qui ne les rayera pas.
ATTENTION
Une seule personne risque de se blesser à soulever un tel poids.
Faites-vous aider lors de la manipulation, le déplacement et le
soulèvement des portes de réfrigérateur.
REMARQUE : Lors du déplacement, déposez la porte à un
endroit sûr qui n’abîmera ni la porte ni son électronique.
AVERTISSEMENT
Pour éliminer le risque de choc électrique ou d’autres blessures
pendant l’installation, vous devez d’abord débrancher le
réfrigérateur avant de procéder. L’omission de suivre cette
directive peut causer un choc électrique.
Immobilisez les portes fermées avec du ruban
adhésif.
Soulèvement de poids lourd.
G. À l’aide d’une clé à douille 5/16 po, retirez les boulons qui
ĤыисчпджлдхсмƒхицшуŻхмишхицшхпдcarrosserie.
Connecteurs de fils
Boulons
40 49-60806
FRANÇAIS
Page 41

INSTRUCTIONS D’INSTALLATION
INSTALLATION DU RÉFRIGÉRATEUR - PORTES FRANÇAISES
2. POUR RETIRER LES PORTES (gauche) (Suite)
RÉINSTALLATION DES PORTES
D. Soulevez la charnière en ligne
droite pour dégager l’axe de
charnière de la douille dans le haut
зипдутхчиичджлирмсиэпиĤпздсц
la fente de la charnière.
E. Retirez le ruban de la porte, ouvrez
la porte sur 90 degrés et penchezla à l’écart de la carrosserie.
Soulevez la porte pour la dégager de l’axe de charnière central.
F. Déposez la porte sur une surface qui ne rayera pas la porte,
intérieur vers le haut.
3. ENLÈVEMENT DES CHARNIÈRES ET
SUPPORTS CENTRAUX
A. À l’aide d’une clé hexagonale ¼ po, enlevez les 2 axes de
charnière de leurs supports.
BƊпđдмзизđшсижпŻƑзтшмппи%¦!&утхичмхиэпицетшптсцфшмĤыисч
les supports de charnière sur la carrosserie.
AVERTISSEMENT
risque de tomber en plus de causer des blessures ou des
dommages si vous ne respectez pas ces instructions, oubliez
des pièces ou effectuez un serrage excessif des vis.
Suivez toutes les étapes. La porte
REMARQUES IMPORTANTES
Avant de replacer les portes :
• Lisez les instructions jusqu’au bout avant de commencer.
ATTENTION
Une seule personne risque de se blesser à soulever un tel poids.
Faites-vous aider lors de la manipulation, le déplacement et le
soulèvement des portes de réfrigérateur.
REMARQUE : Lors du déplacement, déposez la porte à un
endroit sûr qui n’abîmera ni la porte ni son électronique.
AVERTISSEMENT
Pour éliminer le risque de choc électrique ou d’autres blessures
pendant l’installation, vous devez d’abord débrancher le
réfrigérateur avant de procéder. L’omission de suivre cette
directive peut causer un choc électrique.
Soulèvement de poids lourd.
1. RÉINSTALLATION DES SUPPORTS
DE CHARNIÈRE ET DES CHARNIÈRES
CENTRAUX
A. ƊпđдмзизđшсижпŻƑзтшмппи%¦!&утхиĤыиэпицетшптсцичпиц
supports de charnière centraux sur la carrosserie.
B. ƊпđдмзизđшсижпŻлиыдктсдпи!¦$утхиĤыиэпиц"дыицзи
charnière dans leurs supports.
49-60806 41
FRANÇAIS
Page 42

INSTRUCTIONS D’INSTALLATION
INSTALLATION DU RÉFRIGÉRATEUR - PORTES FRANÇAISES (Suite)
2. RACCROCHAGE DE LA PORTE DROITE
A. Abaissez la porte dans l’axe de la charnière droite.
B. Assurez-vous que la porte est alignée sur la carrosserie. Fixez
lâchement la charnière sur le haut de la carRosserie à l’aide des
boulons retirés précédemment.
C. Assurez-vous que le joint d’étanchéité de la porte s’appuie
totalement contre la carrosserie, sans plis. Serrez les boulons
avec un couple serrage de
60 lb-po. (6,78 Nm).
C. Assurez-vous que la porte est alignée sur la carrosserie. Fixez
lâchement la charnière sur le haut de la carrosserie à l’aide des
boulons retirés précédemment.
D. Assurez-vous que le joint d’étanchéité de la porte s’appuie
totalement contre la carrosserie, sans plis. Serrez les boulons
avec un couple serrage de (6,78 Nm).
Connecteurs de fils
E. Insérez la conduite d’eau dans le trou et à travers le logement
en plastique jusqu’à l’arrière du réfrigérateur.
Connecteurs
de fils
D. Replacez le couvercle de la charnière droite dans le haut du
réfrigérateur à l’aide d’un tournevis cruciforme.
F. Replacez le couvercle de la charnière gauche sur le dessus du
réfrigérateur à l’aide d’un tournevis cruciforme.
3. RACCROCHAGE DE LA PORTE GAUCHE
ККжлирмсиэпиĤпздсцпдйисчизипджлдхсмƒхиЩпджиэпđдыизи
charnière dans le haut de la porte.
B. Abaissez la porte sur l’axe de la charnière gauche.
42 49-60806
FRANÇAIS
Page 43

INSTRUCTIONS D’INSTALLATION
INSTALLATION DU RÉFRIGÉRATEUR- TIROIR DU CONGÉLATEUR
REMARQUES IMPORTANTES
Avant d’enlever le tiroir du congélateur :
• Lisez les instructions jusqu’au bout avant de commencer.
• Placez le devant du tiroir sur une surface de travail qui ne les rayera
pas.
1. ENLEVER LES PANIERS
A. Ouvrez le tiroir du congélateur jusqu’à ce qu’il s’arrête.
B. Tirez le panier supérieur jusqu’à ce qu’il s’arrête. Soulevez le
panier sur l’avant puis vers l’extérieur pour le sortir.
C. Le panier inférieur repose sur un cadre à l’intérieur du tiroir.
Soulevez l’avant du panier puis tirez vers l’avant. Libérez les
tiges des fentes du cadre pour retirer le panier
2. ENLEVER LE DEVANT DU TIROIR
A. Retirez la vis des glissières de chaque côté.
Vis
B. Tirez vers le haut sur les deux côtés de la poignée du tiroir pour
séparer les glissières des rails.
Tiroir
Rail
C. Placez le devant du tiroir sur une surface de travail qui ne les
rayera pas.
D. Repoussez les rails à la position de verrouillage.
49-60806 43
FRANÇAIS
Page 44

INSTRUCTIONS D’INSTALLATION
INSTALLATION DU RÉFRIGÉRATEUR- TIROIR DU CONGÉLATEUR (Suite)
(certains modèles)
3. RÉINSTALLER LE DEVANT DU TIROIR DU
CONGÉLATEUR
A. Tirez les rails à leur extension maximale.
B. Repérez les fentes sur l’intérieur de chaque glissière
C. Insérez les crochets aux extrémités des extensions du tiroir
dans les fentes près de l’arrière des glissières.
Crochet
D. Abaissez l’extrémité avant du tiroir de façon que les languettes
latérales s’insèrent dans les fentes avant des rails.
E. Replacez les vis de sécurité dans les deux côtés des glissières
et rails.
F. Replacez les paniers inférieur et supérieur (voir la section Tiroir
du congélateur).
MONTAGE DU RÉFRIGÉRATEUR
SUGGÉRÉ
Tablettes dans la position de meilleure efficacité énergétique.
Fente
Languette latérale
Fente avant
QNE27J
27 cuft. Modèles à deux portes
avec tiroir de congélateur
44 49-60806
FRANÇAIS
Page 45

INSTRUCTIONS D’INSTALLATION
RACCORDEMENT DU RÉFRIGÉRATEUR À
LA CONDUITE D’EAU DE LA MAISON
Une alimentation en eau froide est nécessaire pour le
fonctionnement de la machine à glaçons. Si elle est absente,
vous devez en installer une. Consultez la section Installation de la
conduite d’eau.
Remarques :
• Avant de raccorder votre réfrigérateur, assurez-vous que le cordon
électrique n’est pas branché dans la prise murale.
¬ЬмщтчхихŻйхмкŻхдчишхсđицчудцзтчŻзđшсĤпчхизđидшстшц
recommandons d’en installer un si votre alimentation d’eau
contient du sable ou des particules qui peuvent obstruer la grille
du robinet d’eau du réfrigérateur. Si vous utilisez la trousse de
tuyauterie pour réfrigérateur SmartConnect™, vous aurez besoin
зđшсчшеицшуупŻрисчдмхи¤аб (б! "¥утшхжтссижчихпиĤпчхи
ЧижтшуиэудцпичшеиисупдцчмфшиутшхмсцчдппихпиĤпчхи
• Avant de raccorder la conduite d’eau à la maison, purgez la
conduite de la maison pendant au moins 2 minutes.
A. Si vous utilisez un tuyau en cuivre, placez un écrou
à compression et une bague sur l’extrémité du tuyau
d’alimentation d’eau froide de la maison.
Si vous utilisez la tuyauterie SmartConnect™, les écrous sont
déjà montés sur le tuyau.
B. Si vous utilisez un tuyau en cuivre, insérez l’extrémité du tuyau
aussi loin que possible dans le raccord du réfrigérateur à l’arrière
de celui-ci. Tout en tenant le tuyau, serrez le raccord.
Si vous utilisez la tuyauterie SmartConnect™, insérez
l’extrémité moulée du tuyau dans le raccord du réfrigérateur à
l’arrière de celui-ci, et serrez l’écrou à compression à la main.
Utilisez ensuite une clé pour le serrer d’un tour supplémentaire.
Un serrage excessif peut causer des fuites.
ÉLECTRIQUE
Fixez le collier de serrage dans le trou présent seulement.
NE PERCEZ PAS dans le réfrigérateur.
AVERTISSEMENT
alimentation d’eau potable seulement. Une alimentation d’eau
froide est requise pour faire fonctionner la machine à glaçons et
le pichet à remplissage automatique. La pression d’eau doit se
situer entre 40 et 120 psi. (275 à 827 kPa).
AVERTISSEMENT
Tuyau
SmartConnect™
Raccordez l’appareil à une
RISQUE DE DÉCHARGE
OUVRIR L’ALIMENTATION D’EAU
Ouvrez l’alimentation d’eau au robinet de
sectionnement (alimentation de la maison)
ичщŻхмĤиэпđдецисжизийшмчиц
BRANCHER LE
RÉFRIGÉRATEUR
Pour les modèles avec machine à glaçons,
avant de brancher le réfrigérateur, assurezvous que l’interrupteur de courant se trouve à
пдутцмчмтсШ¤Шģ¦дххƯч¥
Voir les renseignements sur la mise à la terre
attachés au cordon électrique.
METTRE LE RÉFRIGÉRATEUR EN PLACE
ЩпджиэпихŻйхмкŻхдчишхƑцтсирупджирисчĤсдп
METTRE LE RÉFRIGÉRATEUR DE NIVEAU
Les pieds de nivellement aux coins avant du réfrigérateur
doivent être réglés de façon que le
réfrigérateur repose solidement
sur le plancher, et que l’avant soit
légèrement surélevé, juste assez
pour que la porte se referme
aisément lorsqu’elle est ouverte à
mi-parcours.
Pour régler les pieds de nivellement, tournez-les dans le
sens des aiguilles pour soulever le réfrigérateur, dans le sens
inverse des aiguilles pour l’abaisser.
Lorsque
METTRE LES PORTES
DU RÉFRIGÉRATEUR DE
la porte
gauche est
plus basse
que celle
de droite.
NIVEAU
Un réfrigérateur de niveau est nécessaire
pour mettre les portes à égalité. Si vous avez
besoin d’aide, revoyez la section précédente
sur le nivellement du réfrigérateur.
Si les portes demeurent inégales, tournez la
tige réglable à l’aide d’une clé hexagonale ¼
po pour soulever la porte la plus basse.
Lorsque
la porte
gauche est
plus haute
que celle
de droite.
Raccord du
réfrigérateur
Point d’ajustement
49-60806 45
FRANÇAIS
Page 46

UTILISATION DU RÉFRIGÉRATEUR
Commandes
Commande de température du compartiment congélateur
Cette commande sert à régler la température du congélateur.
La température est préréglée à l’usine à la valeur 0 °F
(-17,8 °C). Allouez 24 heures pour stabiliser la température à la
valeur préréglée.
Commande de température du compartiment réfrigérateur
Cette commande sert à régler la température du c ompartiment
réfrigérateur. La température est préréglée à l’usine à la valeur
37 °F (2,8 °C). Allouez 24 heures pour stabiliser la température à
la valeur préréglée.
Filtre d’eau
Pressez la touche durant 3 secondes pour réinitialiser le filtre
d’eau.
Fonction Turbo Cool
Pour activer la fonction TurboCool™, pressez cette touche
durant 3 secondes. L’affichage indiquera tc.
Cette fonction refroidit rapidement le compartiment
réfrigérateur et ainsi les aliments qui s’y trouvent. Utilisez
TurboCool™ lorsque vous ajoutez une grande quantité
d’aliments dans le compartiment réfrigérateur, des aliments
qui ont reposé à température ambiante ou encore des restes
de table tièdes. Cette fonction peut aussi servir en cas
d’interruption de courant sur une longue période.
REMARQUE : Lorsque TurboCool™ est en fonction, le réglage
de la température du réfrigérateur ne peut pas être changé, la
température du congélateur reste la même et les ventilateurs
continuent de tourner à l’ouverture de la porte s’ils ont été
activés.
Alarme de Porte
Pressez la touche Door Alarm (alarme de porte) pour activer
cette fonction. L’alarme sonnera si l’une des portes reste
ouverte plus de 2 minutes. La sonnerie cesse à la fermeture de
la porte.
REMARQUE : Pour mettre le panneau de commande du réfrigérateur
en position OFF (arrêt), pressez simultanément les mots Freezer
(congélateur) et Fridge (réfrigérateur) durant 3 secondes.
Aucun réglage du panneau de commande ne permet de couper
l’alimentation électrique au réfrigérateur.
Basculer entre °F et °C ou °C et °F : Maintenez une pression sur les
boutons FREEZER (congélateur) et ALARM (alerte) simultanément
durant 5 secondes pour choisir entre °C et °F ou °F et °C.
MODES SABBATH
Maintenez une pression sur les boutons DOOR ALARM (alarme
de porte) et WATER FILTER (filtre à eau) simultanément durant 5
secondes pour entrer/quitter le mode Sabbath. Le mode Sabbath
éteindra les lampes intérieures (ou réduira leur éclairage) et
désactivera le contrôle de la température et les fonctions avancées.
Lorsqu’il sera en mode Sabbath, le compresseur sera alimenté par
une décongélation programmé
DISTRIBUTEUR D’EAU INTÉRIEUR
Le distributeur d’eau est situé sur la paroi gauche à l’intérieur du
compartiment réfrigérateur.
Pour distribuer l’eau :
1. Maintenez le verre dans le renfoncement.
2. Poussez le bouton du distributeur.
3. Gardez le verre sous le distributeur durant
2 à 3 secondes après le relâchement
du bouton car de l’eau peut continuer à
l’écouler.
Il se peut que de l’air soit présent dans la
conduite d’eau si la distribution d’eau n’a pas
eu lieu à la première installation du réfrigérateur. Appuyez sur le
bouton du distributeur durant au moins 5 minutes pour expulser l’air
de la conduite et remplir le système d’eau. Pendant ce processus, un
bruit peut se faire entendre lors de l’expulsion d’air. Pour expulser les
impuretés de la conduite, jetez les premiers 6 verres d’eau.
REMARQUE : Pour prévenir les dépôts, le distributeur doit être
essuyé régulièrement à l’aide d’un linge ou d’une éponge propre.
46 49-60806
FRANÇAIS
Page 47

UTILISATION DU RÉFRIGÉRATEUR
FILTRE D’EAU À CARTOUCHE - XWF
FILTRE D’EAU À CARTOUCHE
Le support du filtre d’eau à cartouche est situé dans le coin
supérieur arrière droit du compartiment réfrigérateur.
HQUAND REMPLACER LE FILTRE
Si le distributeur est doté d’un indicateur de remplacement de
filtre, un voyant de filtre rouge commencera à clignoter pour vous
signaler la nécessité de remplacer le filtre bientôt.
- Le voyant de filtre clignotera lorsque la porte est ouverte jusqu’à
ce que le filtre soit remplacé.
Le filtre à cartouche doit être remplacé tous les six mois, ou plus
tôt si le débit d’eau du distributeur ou de la machine à glaçons
diminue.
RETRAIT DU FILTRE À CARTOUCHE
Si vous remplacez le filtre, retirez d’abord le précédent:
1. Ouvrez le boîtier du filtre à cartouche en pressant les deux
languettes frontales puis tirant avec soin vers le bas.
2. Tournez le filtre vers le bas.
3. Agrippez avec soin le filtre et tournez-le dans le sens contraire
des aiguilles sur environ ¼ de tour. Le filtre devrait se libérer
automatiquement une fois tourné suffisamment vers la gauche.
Une petite quantité d’eau pourrait dégoutter.
ATTENTION
d’être éjecté si de l’air est emprisonné dans le système. Veuillez
user de prudence.
Lors de son retrait, le filtre à cartouche risque
BOUCHON DE DÉRIVATION DU FILTRE
Pour réduire le risque de dommage à la propriété en raison de fuites
d’eau, vous DEVEZ utiliser un bouchon de dérivation du filtre
lorsqu’une cartouche filtrante de rechange n’est pas disponible.
Certains modèles ne sont pas équipés d’un bouchon de dérivation
de filtre. Pour en obtenir un gratuitement, composez le
800.661.1616. Le distributeur et la machine à glaçons ne
fonctionneront pas sans que ne soient installés le filtre ou le
bouchon de dérivation. Le bouchon de dérivation s’installe de la
même manière que la cartouche filtrante.
INSTALLATION DU FILTRE DANS UN
RÉFRIGÉRATEUR À CONGÉLATEUR INFÉRIEUR
1. Ouvrez le boîtier du filtre à
cartouche en pressant les deux
languettes frontales puis tirant
avec soin vers le bas.
2. Alignez les orifices du filtre sur ceux
du support de filtre à cartouche,
puis insérez le filtre avec soin.
3. Tournez le filtre lentement vers la
droite jusqu’au bout. NE SERREZ PAS
EXCESSIVEMENT. Le filtre prendra
automatiquement sa position à
mesure que vous le tournez. Le filtre
se déplacera sur environ ¼ de tour ou
90 degrés, jusqu’à ce que la flèche sur
le filtre s’aligne sur celle du support de
filtre.
4. Poussez lentement le filtre vers le haut
dans les agrafes.
5. Fermez le boîtier du filtre en poussant
avec soin le couvercle vers le haut jusqu’à
ce que les languettes se verrouillent en
place.
6. Faites circuler environ 2 gallons (7,6 litres) ou durant 5 minutes
d’eau pour nettoyer le système. De l’eau peut gicler et des bulles
d’air peuvent être visibles pendant le processus. Si l’eau ne
circule pas, assurez-vous que le filtre est complètement tourné
vers la droite.
7. Maintenez une pression sur la touche RESET WATER FILTER
(réinitialisation du filtre à eau) du distributeur durant trois
secondes.
Conditions d’application/Paramètres
d’alimentation d’eau
Débit de service 0,5 g/min (1,89 l/min)
Alimentation d’eau Eau potable
Pression d’eau 25-120 psi (172-827 kPa)
Température d’eau 33°F-100°F (0,6 °C-38 °C)
Capacité 170 gallons (643,5 litres)
Inscrivez-vous pour des RAPPELS DE TEXTE en textant
REPLACE au 70543.
AVERTISSEMENT
pièces pendant l’installation du produit. Le filtre à cartouche jetable doit être remplacé tous les 6 mois dans les conditions d’utilisation
prescrites, ou plus tôt si une diminution évidente de son débit est observée.
Pour bénéficier au maximum de votre système de filtration, Haier recommande l’utilisation de filtres de marque GE Appliances seulement.
L’utilisation de filtres de marque GE Appliances avec des réfrigérateurs Haier procure un rendement et une fiabilité optimaux. Les filtres
GE Appliances satisfont les normes NSF rigoureuses de l’industrie relative à la sécurité et la qualité, facteur important pour les produits
qui filtrent votre eau. Haier n’a pas évalué le rendement des filtres d’autres marques dans les réfrigérateurs Haier et il n’existe aucune
assurance qu’ils satisferont les normes de qualité, de rendement et de fiabilité Haier.
Pour toute question, ou pour commander des filtres à cartouche de rechange, visitez notre site Web au electromenegersge.ca, ou pour
joindre le service des Pièces et accessoires composez le 800.661.1616.
49-60806 47
FRANÇAIS
Pour réduire le risque d’étouffement, ne laissez pas les enfants âgés de moins de 3 ans atteindre les petites
Page 48

UTILISATION DU RÉFRIGÉRATEUR
TABLETTES ET BALCONNETS
Toutes les caractéristiques ne sont pas disponibles sur tous les
modèles.
DISPOSITION DES TABLETTES DU
RÉFRIGÉRATEUR
Les tablettes du compartiment réfrigérateur sont réglables.
Pour retirer les tablettes :
1. Pour retirer les tablettes :
2. Soulevez la tablette à l’avant.
3. Soulevez la tablette à l’arrière et
faites-la sortir.
Pour replacer les tablettes :
1. En soulevant la tablette à l’avant, insérez le
crochet supérieur à l’arrière de la tablette
dans une fente du rail.
2. Abaissez le devant de la tablette jusqu’à ce
que le bas de la tablette se fixe en place.
TABLETTE QUICK SPACE
Cette tablette se sépare
en deux moitiés dont l’une
se glisse sous l’autre pour
permettre le rangement
d’articles en hauteur sur la
tablette du dessous.
Cette tablette peut
s’enlever pour remise en
place ou repositionnement.
REMARQUE : La moitié arrière
de la tablette Quick Space
n’est pas réglable.
BACS
Toutes les caractéristiques ne sont pas disponibles sur tous les
modèles.
BACS CLIMATISÉS
Conservez les fruits et les légumes dans des compartiments
séparés pour faciliter l’accès. On doit essuyer l’excédent d’humidité
pouvant s’accumuler dans le fond ou le dessous des tiroirs.
Pour retirer un bac :
Glissez le bac vers l’extérieur
jusqu’à ce qu’il s’arrête, soulevezle vers le haut en dépassant la
position d’arrêt puis tirez-le vers
l’avant.
BAC PLEINE LARGEUR
Pour retirer le bac :
1. Tirez le bac vers l’extérieur jusqu’à la position d’arrêt.
2. Soulevez l’avant du tiroir puis tirez-le vers l’extérieur.
Pour replacer le bac :
1. Placez d’abord l’arrière du tiroir puis faites pivoter l’avant vers le
bas pour le déposer sur les glissières.
2. Poussez le tiroir au fond jusqu’à la position fermée.
RETIRER ET REMPLACER LE SÉPARATEUR DE
TIROIR
BALCONNETS RÉGLABLES
Pour retirer : Soulevez l’avant du balconnet en
ligne droite, puis sortez-le.
Pour replacer : Engagez le balconnet dans les
supports moulés de la porte et poussez vers le
bas pour verrouiller en place.
48 49-60806
Pour retirer :
1. Tirez le tiroir vers l’extérieur jusqu’à la position d’arrêt.
2. Glissez le séparateur vers la droite pour le sortir du bac.
Pour replacer :
Inversez les étapes 1 et 2 pour replacer le séparateur.
FRANÇAIS
Page 49

UTILISATION DU RÉFRIGÉRATEUR
BAC À COLLATION MOBILE
Ce bac peut se déplacer pour répondre à vos besoins.
Pour le retirer, glissez le bac vers l’extérieur jusqu’à la position
d’arrêt, soulevez-le en dépassant la position d’arrêt, puis de
nouveau pour le sortir.
TIROIR DU CONGÉLATEUR
Toutes les caractéristiques ne sont pas disponibles sur tous les modèles.
PANIERS DU CONGÉLATEUR
1. Un bac à glace dans le panier
supérieur (certains modèles).
2. Un panier pleine largeur supérieur.
3. Un panier pleine largeur inférieur
(avec séparateur – certains
modèles).
REMARQUE : Ne remplissez pas
les paniers au-delà de leur bord. Ils
pourraient se coincer en les ouvrant
ou fermant.
1
2
3
L’aspect et les
caractéristiques peuvent
varier
Retrait du panier supérieur
Pour retirer le panier pleine largeur supérieur sur les modèles à
tiroir de congélateur :
1. Tirez le panier vers l’extérieur jusqu’à la position d’arrêt.
2. Soulevez le panier pour le dégager des glissières.
Lors de la remise en place du panier, assurez-vous que celui-ci est
bien monté sur les rails latéraux, par-dessus les glissières du panier
inférieur.
REMARQUE : Assurez-vous de toujours fermer ce panier à fond.
Bac à glace
(certains modèles)
Les lampes DEL sont
situées sur les deux côtés
du congélateur
Diviseur du
panier supérieur
Panier
supérieur
Panier
inférieur
49-60806 49
FRANÇAIS
Page 50

UTILISATION DU RÉFRIGÉRATEUR
RETRAIT DU PANIER INFÉRIEUR
Pour retirer le panier pleine largeur inférieur sur les modèles à
tiroir de congélateur :
1. Tirez le panier vers l’extérieur jusqu’à ce qu’il s’arrête.
2. Retirez le panier de congélateur supérieur.
3. Le panier de congélateur inférieur repose sur les languettes
intérieures des glissières du tiroir.
4. Soulevez l’avant du panier et tirez vers l’avant.
5. Dégagez la tige de la fente pour sortir le panier.
Lors de la remise en place du panier pleine largeur inférieur,
penchez celui-ci vers le bas puis baissez-le dans le tiroir. Faites
pivoter le panier en position horizontale puis poussez-le vers le
bas. Assurez-vous de replacer la tige dans la fente.
REMARQUE : Veillez toujours à ce que le panier repose sur les
languettes du support avant de le glisser dans le congélateur.
MACHINE À GLAÇONS AUTOMATIQUE
Un réfrigérateur nouvellement installé prendra de 12 à 24 heures pour commencer à fabriquer de la glace.
La machine à glaçons produira sept cubes par cycle, soit environ
100 à 130 cubes pendant une période de 24 heures, selon la
température du congélateur, la température ambiante, le nombre
d’ouvertures de porte et d’autres conditions d’emploi.
Si l’on se sert du réfrigérateur avant de raccorder l’alimentation
d’eau à la machine à glaçons, mettez l’interrupteur de courant à la
position OFF (arrêt).
Interrupteur
de courant
Machine à
glaçons
Jetez les premiers lots de glace pour permettre à la conduite d’eau
de se nettoyer.
Assurez-vous que rien ne gêne le mouvement du bras palpeur.
Lorsque le bac se remplit au niveau du bras palpeur, la machine
cesse de produire de la glace. Il est normal que des cubes
s’agglutinent.
Si la glace n’est pas utilisée souvent, les vieux cubes deviendront
opaques et rétrécis, et leur goût, insipide.
REMARQUE : Dans les maisons où la pression est inférieure à la
normale, vous entendrez la machine à glaçons démarrer plusieurs
fois pour produire un lot de glace.
ATTENTION
toucher les pièces mobiles du mécanisme de la machine à
Voyant
d’alimentation
vert
Une fois le réfrigérateur raccordé à l’alimentation d’eau, mettez
l’interrupteur de courant à la position ON (marche).
La machine à glaçons se remplit d’eau lorsqu’elle se refroidit à 15 °F
(-10 °C).
Un réfrigérateur nouvellement installé prendra de 12 à 24 heures
pour commencer à fabriquer de la glace.
Un bourdonnement peut se faire entendre à chaque fois que la
machine se remplit d’eau.
50 49-60806
Bras palpeur
glaçons ainsi que l’élément chauffant qui libère les cubes. Ne
placez ni les doigts ni les mains sur le mécanisme de la machine à
glaçons lorsque le réfrigérateur est branché.
Du rangement pour la glace se trouve du côté gauche du panier
supérieur du congélateur. Tirez le panier supérieur vers l’avant pour
retirer le bac à glace.
Bac à glace
Pour réduire le risque de blessure, évitez de
FRANÇAIS
Page 51

ENTRETIEN DU RÉFRIGÉRATEUR
ACIER INOXYDABLE -
Linge ou éponge doux et propres Linges abrasifs, éponges à récurer, tampons à récurer ou en laine
Détergent doux dans eau chaude.
Nettoyants pour acier inoxydable approuvés; visitez la boutique
de pièces GE Appliances pour des nettoyants pour acier
inoxydable approuvés :
filtres-et-accessoires ou appeler 800.661.1616
On peut utiliser des nettoyants à base d’acide oxalique tels que
Bar Keepers Friend Soft Cleanser™ pour éliminer la rouille de
surface, le ternissement et les petites taches sur les surfaces en
acier inoxydable seulement.
REMARQUE : Ne laissez PAS un nettoyant pour acier inoxydable venir au contact de pièces en plastique telles que garnitures, quincaillerie
de poignée ou doublures. Si un contact non intentionnel d’un nettoyant avec une pièce en plastique survient, nettoyez la pièce en plastique
avec une éponge et un détergent doux mélangé dans l’eau chaude.
BLACK STAINLESS -
Linge ou éponge doux et propres
&KLႇRQHQPLFUR¿EUHV
Détergent doux dans eau chaude. Poudres ou vaporisateurs abrasifs.
IMPORTANT : Les modèles Black Stainless peuvent être aisément rayés ou ternis s’ils sont nettoyés avec des chiffons ou des nettoyants
abrasifs. Utilisez uniquement les produits de nettoyage recommandés ci-dessus pour conserver la beauté de votre fini.
Directives pour nettoyer les surfaces extérieures, les poignées de porte et les garnitures
UTILISER NE PAS UTILISER
d’acier.
Poudres ou vaporisateurs abrasifs.
Vaporisateurs pour fenêtres ou ammoniac.
Nettoyants à base d’agrumes ou de plantes.
Electromenagersge.ca/fr/produits/
Nettoyants acides ou à base de vinaigre.
Nettoyants pour le four.
Nettoyants qui contiennent de l’acétone (propanone).
Tout nettoyant avec AVERTISSEMENT relatif au contact du
plastique.
Directives pour nettoyer les surfaces extérieures, les poignées de porte et les garnitures
UTILISER NE PAS UTILISER
Linges abrasifs, essuie-tout, éponges à récurer (avec ou sans
savon), tampons à récurer ou en laine d’acier.
Vaporisateurs pour fenêtres, ammoniac ou
Nettoyants à base d’agrumes ou de plantes.
Nettoyants acides ou à base de vinaigre.
Nettoyants pour le four.
Nettoyants alcalins
Nettoyants pour acier inoxydable
javel
49-60806 51
FRANÇAIS
Page 52

ENTRETIEN DU RÉFRIGÉRATEUR
Nettoyage de l’intérieur
Débranchez le réfrigérateur avant le nettoyage
Si cela n’est pas commode, essorez le surplus d’humidité de l’éponge
ou du linge avant de nettoyer autour des interrupteurs, des lampes
et des commandes.
Utilisez une cire pour électroménagers sur la surface intérieure entre
les portes.
ATTENTION
couvercles en verre à l’eau chaude lorsqu’ils sont froids car ils
peuvent éclater suite à un choc ou un écart de température
soudain. Le verre trempé est conçu pour éclater en très petites
pièces s’il se brise
Utilisez une solution d’eau chaude et de bicarbonate de soude
(environ une cuillère à soupe ou 15 ml) dans 1 litre d’eau. Cette
solution nettoie to
Évitez de nettoyer les tablettes ou les
DERRIÈRE LE RÉFRIGÉRATEUR
Prenez un soin particulier lorsque vous éloignez le réfrigérateur
du mur. Tous les types de revêtement de sol peuvent être
endommagés, en particulier ceux qui sont coussinés ou dont la
surface est gaufrée.
Soulevez les pieds de nivellement situés dans le bas à l’avant du
réfrigérateur.
Déplacez le réfrigérateur en ligne droite pour l’éloigner ou le
repousser à sa place. Un mouvement latéral risque d’endommager le
revêtement de plancher ou le réfrigérateur.
Abaissez les pieds de nivellement jusqu’à ce qu’ils touchent le sol.
En poussant le réfrigérateur en place, veillez à ne pas le faire rouler
sur le cordon d’alimentation ou la conduite d’eau.
DÉPART EN VACANCES
Lorsque vous vous absentez durant une longue période, retirez les
aliments et débranchez le réfrigérateur. Nettoyez l’intérieur avec une
solution d’une cuillère à soupe (15 ml) de bicarbonate de soude par
litre d’eau. Laissez les portes ouvertes.
Si la température risque de descendre sous le point de congélation,
demandez à un technicien qualifié de vidanger la conduite d’eau afin
de prévenir les dégâts sérieux causés par l’inondation.
1) Débranchez le réfrigérateur.
2) Videz le bac à glace.
3) Coupez l’alimentation d’eau.
Si vous coupez l’alimentation d’eau, éteignez la machine à glaçons.
Au retour des vacances, replacez le filtre à eau.
DÉMÉNAGEMENT
À l’aide de ruban adhésif, immobilisez tous les éléments amovibles
tels que tablettes et tiroirs pour éviter de les endommager.
Si vous utilisez un diable pour déplacer le réfrigérateur, ne laissez pas
le devant ou l’arrière de l’appareil reposer contre le diable pour ne
pas l’endommager.
Manipulez le réfrigérateur par ses côtés seulement.
Assurez-vous de maintenir le réfrigérateur debout pendant le
déménagement.
REMPLACEMENT DES LAMPES
L’éclairage DEL du compartiment réfrigérateur des modèles à deux
portes est situé dans le centre supérieur et sur les côtés gauche et
droit au-dessus des bacs climatisés. L’éclairage DEL des modèles à
une porte est situé dans le haut du compartiment réfrigérateur.
Des lampes DEL sont aussi situées dans le haut des côtés gauche et
droit du congélateur sur tous les modèles.
Un technicien agréé devra remplacer l’éclairage DEL.
Si ce composant doit être remplacé, composez 877.470.9174.
Lampes DEL
(l’emplacement
varie selon le
modèle)
52 49-60806
FRANÇAIS
Page 53

DÉPANNAGE
Consultez d’abord les tableaux qui suivent et vous pourrez peut- être éviter de faire appel à un réparateur.
PROBLÈME CAUSE(S) POSSIBLE(S) SOLUTION
Le réfrigérateur ne fonctionne pas Le cycle de dégivrage est en cours. Attendez environ 30 minutes afin que le cycle de dégivrage se
Une des commandes ou les deux est sur la position
OFF (arrêt).
Le réfrigérateur est débranché. Enfoncez complètement la fiche de l’appareil dans la prise
Le fusible est grillé/le disjoncteur est déclenché. Remplacez le fusible ou réenclenchez le disjoncteur.
Votre réfrigérateur est en mode de démonstration. Débranchez votre réfrigérateur et rebranchez-le.
Vibration ou bruit métallique (une
légère vibration est normale)
Le moteur fonctionne pendant de
longues périodes ou il s’allume et
s’éteint fréquemment en alternance.
(Les appareils modernes dotés de
compartiments réfrigérateur et
congélateur de grand volume exigent
un temps de fonctionnement plus
long. Ils démarrent et s’arrêtent
souvent pour maintenir des
températures uniformes.
Température trop élevée dans le
congélateur
ou le réfrigérateur
Givre sur les aliments surgelés (il
est normal que du givre se forme à
l’intérieur du paquet)
La séparation entre le réfrigérateur
et le congélateur est chaude
La machine à glaçons ne fonctionne
pas
Le congélateur refroidit, mais pas le
compartiment réfrigérateur
Odeur/saveur anormale des glaçons Il faut nettoyer le bac à glaçons. Videz et lavez le bac à glaçons. Jetez les vieux glaçons.
Petits glaçons ou glaçons creux à
l’intérieur
Formation lente des glaçons La porte est restée ouverte. Vérifiez si l’emballage garde la porte ouverte.
Bourdonnement fréquent Le commutateur de marche de la machine à
Lueur orange dans le congélateur Le cycle de dégivrage est en cours. C’est normal.
Vous devez ajuster les jambes de nivellement. Voir la Mettre le réfrigérateur de niveau.
Ceci est normal lorsque le réfrigérateur vient d’être
branché.
Ceci est fréquent lorsqu’une grande quantité
d’aliments a été placée dans quantité d’aliments a
été placée dans
La porte est restée ouverte. Un paquet empêche peut-être la fermeture de la porte.
Temps chaud ou ouverture fréquente des portes. C’est normal.
La température est réglée sur la température la
plus basse.
La température n’est pas régléesur une
température assez basse
Temps chaud ou ouverture fréquente des portes. Réglez la commande des températures sur une température
La porte est restée ouverte. Un paquet empêche peut-être la fermeture de la porte.
La porte est restée ouverte. Un paquet empêche peut-être la fermeture de la porte.
Ouverture trop fréquente ou trop longue des
portes.
Le système automatique d’économie d’énergie fait
circuler du liquide tiède à l’avant du compartiment
de congélation.
L’interrupteur d’alimentation de la machine à
glaçons est à la position OFF (arrêt).
L’alimentation en eau est coupée ou n’est pas
raccordée.
Le compartiment congélateur est trop chaud. Attendez 24 heures pour que la température du réfrigérateur
Un amas de glaçons dans le bac provoque l’arrêt de
la machine à glaçons.
Cubes de glace sont coincés dans le distributeur. Débranchez le distributeur, enlevez les cubes et rebranchez le
Normal, lorsque le réfrigérateur est branché la
première fois ou suite à une panne prolongée.
Des aliments ont transmis leur odeur/goût aux
glaçons.
Il faut nettoyer l’intérieur du réfrigérateur. Voir la section Entretien et nettoyage
Le filtre à eau est bouché. Remplacez le filtre à cartouche par un neuf ou par le bouchon.
La commande de température du congélateur n’est
pas réglée à une température assez froide.
glaçons est dans la position I (marche), mais
l’arrivée d’eau au réfrigérateur n’a pas été
raccordée.
termine.
Réglez les commandes de température à une température
plus basse.
murale.
Attendre 24 heures pour que le réfrigérateur refroidir
complètement.
C’est normal.
Voir la section Commandes
Voir la section Commandes
plus basse. Consultez la section Commandes
C’est normal.
Ceci permet d’éviter des problèmes de condensation sur
l’extérieur de l’appareil.
Réglez l’interrupteur d’alimentation à la position ON (marche).
Voir la section Installation de la conduite d’eau
se stabilise.
Nivelez les glaçons à la main.
distributeur.
Attendez 24 heures pour atteindre la température
sélectionnée dans les deux compartiments.
Emballez bien les aliments.
Voyez la section Commandes.
Réglez le commutateur de marche sur la position 0 (arrêt), car
le garder dans la position I (marche) endommagera le robinet
d’eau.
49-60806 53
FRANÇAIS
Page 54

DÉPANNAGE
Consultez d’abord les tableaux qui suivent et vous pourrez peut- être éviter de faire appel à un réparateur.
PROBLÈME CAUSE(S) POSSIBLE(S) SOLUTION
Mauvais goût/odeur de
l’eau
L’eau versée dans le
premier verre est
chaude
Le distributeur d’eau ne
fonctionne pas
L’eau jaillit du distributeur La cartouche du filtre vient d’être installée. Faites couler l’eau du distributeur pendant 3 minutes (environ 6 litres).
La machine à glaçons
fonctionne, mais ne
distribue pas d’eau
Pas de production d’eau ou
de glace
Odeur dans le réfrigérateur Des aliments ont transmis leur odeur au
De la condensation
s’accumule à l’extérieur
De la condensation
s’accumule à l’intérieur (par
temps humide, l’ouverture
des porteslaisse entrer de
l’humidité)
L’éclairage intérieur ne
fonctionne pas
Air chaud à la base du
réfrigérateur
Le réfrigérateur ne
s’arrête jamais mais
les températures sont
normales
Le réfrigérateur émet un
signal sonore.
La porte ne se ferme pas
correctement.
La température présente
n’est pas égale à celle
affichée
Le tiroir ne ferme pas seul Vous devez ajuster les jambes de nivellement. Voir la Mettre le réfrigérateur de niveau.
Le tiroir du compartiment
congélation s’ouvre quand
la porte du réfrigérateur
est fermée
Le distributeur d’eau n’a pas été utilisé depuis
longtemps.
Normal lorsque le réfrigérateur est initialement
installé.
Le distributeur d’eau n’a pas été utilisé depuis
longtemps.
Faites couler l’eau jusqu’à ce que l’eau du système soit
remplacée par de l’eau fraîche.
Attendez 24 heures pour que la température du
réfrigérateur se stabilise.
Faites couler l’eau jusqu’à ce que l’eau du système soit
remplacée par de l’eau fraîche.
Le réservoir d’eau vient d’être vidangé. Attendez plusieurs heures pour que l’eau refroidisse.
L’alimentation en eau est coupée ou n’est pas
raccordée.
Le filtre à eau est bouché. Remplacez le filtre à cartouche ou retirez le filtre et installez le
Il y a de l’air dans la conduite d’eau. Appuyez sur le bras gicleur durant au moins deux minutes.
L’eau du réservoir est gelée. Appelez un réparateur.
Le réglage de commande est trop froid. Réglez le commande de température sur un réglage plus chaud.
La conduite d’eau ou le robinet d’arrêt est bouché. Appelez un plombier.
Le filtre à eau est bouché. Remplacez la cartouche du filtre avec une nouvelle
réfrigérateur.
Il faut nettoyer l’intérieur. Voir la section Entretien et nettoyage
Cela n’est pas inhabituel pendant les périodes de forte
humidité.
Les portes sont ouvertes trop fréquemment ou
pendant trop longtemps.
Étant donné le taux d’humidité plus élevé dans le
compartiment du réfrigérateur, il est possible d’y
déceler la présence de brouillard ou de petites quantités
de buée de temps à autre.
Il n’y a pas de courant au niveau Remplacez le fusible ou réenclenchez le disjoncteur.
Pour les lampes DEL Joindre le service à la clientèle - voir Remplacement des lampes.
Courant d’air normal provenant du moteur. Pendant
le processus de réfrigération, il est normal que de
la chaleur soit expulsée à la base du réfrigérateur.
Certains revêtements de sol sont sensibles et peuvent
se décolorer sous l’effet de cette température de
fonctionnement normale qui est sans danger.
La fonction de dégivrage maintient le compresseur en
marche au cours de l’ouverture des portes.
La porte est ouverte. Fermez la porte.
Le joint de la porte du côté des charnières est collé ou
replié.
L’appareil vient d’être branché. Pour stabiliser le système, laissez 24 heures s’écouler.
La porte est restée ouverte trop longtemps. Pour stabiliser le système, laissez 24 heures s’écouler.
Des aliments chauds ont été placés dans le
réfrigérateur.
Cycle de dégivrage en cours. Pour stabiliser le système, laissez 24 heures s’écouler.
C’est normal si, après s’être ouvert, le tiroir du
compartiment congélation se referme tout seul.
Voyez la section Installer la conduite d’eau.
bouchon.
cartouche ou installez le bouchon du filtre.
Les aliments à odeur forte doivent être emballés
hermétiquement. Gardez une boîte ouverte de bicarbonate de
soude dans le réfrigérateur.
Essuyez bien la surface extérieure.
C’est normal.
Ce phénomène est normal et son apparition sera fonction des
variations de la charge d’aliments et des conditions ambiantes.
Sécher à l’aide d’un essuie-toutsi désiré.
C’est normal.
Ceci est normal. Le réfrigérateur passe sur cycle d’arrêt lorsque les
portes ont été fermées pendant 2 heures.
Mettre une couche de cire de paraffine sur le joint de la porte.
Pour stabiliser le système, laissez 24 heures s’écouler.
Cela indique que le tiroir du compartiment congélation a un bon
joint. Si la porte/le tiroir du compartiment congélation ne se
referme pas automatiquement après s’être ouvert, consultez la
section Problème : Le tiroir ne ferme pas seul, ci-dessus
54 49-60806
FRANÇAIS
Page 55

DÉPANNAGE
Consultez d’abord les tableaux qui suivent et vous pourrez peut- être éviter de faire appel à un réparateur.
PROBLÈME CAUSE(S) POSSIBLE(S) SOLUTION
Les aliments gèlent dans le
compartiment réfrigération
L’eau coule du distributeur Vous ne tenez pas le verre sous le distributeur
Mon écran indique tc La fonction TurboCool est active. Consultez la section Commandes
Le voyant lumineux du filtre d’eau a
changé de couleur
Le voyant lumineux de filtre
d’eau demeure rouge après un
remplacement du filtre d’eau
Le voyant lumineux de filtre d’eau ne
s’allume pas
Les portes ne sont pas bien alignées Il faut réaligner les portes. Consultez la section Mettr e les portes du r éfrigér ateur de niveau.
Les paniers se coincent lors de
l’ouverture ou de la fermeture
Les aliments sont trop près de l’ouverture de
circulation d’air à l’arrière du compartiment
réfrigération.
Le réglage de votre réfrigérateur est trop froid. Réglez votre réfrigérateur à une température plus chaude en
suffisamment longtemps après avoir relâché le
bouton.
De l’air peut se trouver dans les conduites d’eau,
causant l’égouttement après une distribution
d’eau.
C’est normal. Consultez la section Filtre d’eau à cartouche - XWF
Il faut remettre à zéro l’indicateur de filtre d’eau. Appuyez sur la touche WATER FILTER ( filtre d’eau) et tenez-la
C’est normal. Vous devez replacer le filtre quand le
voyant indicateur de replacement du filtre devient
rouge.
Les paniers sont trop remplis. Pour ouvrir : Enlevez certains produits du panier, lorsque celui-
Éloignez les aliments de l’ouverture de circulation d’air.
sélectionnant une graduation à la fois.
Tenez le verre sous le distributeur pendant 2–3 secondes
après avoir relâché le bouton du distributeur. L’eau peut
continuer à couler après que vous ayez relâché le bouton.
Faites écouler l’eau pendant au moins 2 minutes pour expulser
l’air du système.
appuyée pendant 3 secondes. Consultez la section Filtre d’eau
à cartouche - XWF
Consultez la section Filtre d’eau à cartouche - XWF
ci est ouvert aussi loin que possible. Repositionnezles produits
laissés dans le panier et essayez de l’ouvrir à nouveau.
Pour fermer : Repositionnez les produits dans le panier et
enlevez tout produit placé au-dessus du bord du panier, puis
fermez-le.
BRUITS DE FONCTIONNEMENT NORMAUX
Les réfrigérateurs plus récents font des bruits différents de ceux des anciens. Les réfrigérateurs modernes présentent plus de fonctions et
sont plus avancés sur le plan technologique.
• Le nouveau compresseur à rendement élevé peut fonctionner
plus longtemps et plus vite que votre ancien réfrigérateur et vous
pouvez entendre un son modulé ou un ronflement aigu pendant
son fonctionnement.
• Vous pouvez entendre un sifflement lorsque les portes
se ferment. Cela vient de l’équilibrage de pression dans le
réfrigérateur.
• Vous pouvez entendre les ventilateurs tourner à hautes vitesses.
Cela se produit lorsque le réfrigérateur vient d’être branché,
lorsque les portes sont ouvertes fréquemment ou lors de l’ajout
d’une grande quantité d’aliments dans les compartiments
congélateur ou réfrigérateur. Les ventilateurs permettent de
maintenir les bonnes températures.
• Les ventilateurs changent de vitesses pour assurer des
économies d’énergie et un refroidissement optimaux.
• Vous pouvez entendre des craquements ou des claquements
lorsque le réfrigérateur est branché pour la première fois.
Cela se produit lorsque le réfrigérateur se refroidit à la bonne
température.
• L’expansion et la contraction des serpentins de refroidissement
pendant et après le dégivrage peuvent causer un craquement ou
un claquement.
• Sur les modèles équipés d’une machine à glaçons, après un cycle
de fabrication de glaçons, vous pouvez entendre les glaçons
tomber dans le bac.
• Sur les modèles munis d’un distributeur, le mouvement des
conduites peut être audible lors de la première distribution d’eau
et après le relâchement du bouton du distributeur.
• Le passage de l’agent frigorifique dans les serpentins de
refroidissement du congélateur peut être accompagné d’un
gargouillement semblable à celui de l’eau en ébullition.
• L’eau tombant sur l’élément chauffant de dégivrage peut faire
un bruit de grésillement, de claquement ou de bourdonnement
pendant le cycle de dégivrage.
• Un bruit de suintement d’eau peut être entendu pendant le
cycle de dégivrage lorsque la glace de l’évaporateur fond et
tombe dans le bac de récupération.
• Fermer la porte peut causer un gargouillement en raison de
l’équilibrage de pression.
49-60806 55
FRANÇAIS
Page 56

CERTIFICAT DE GARANTIE DE LA CARTOUCHE XWF
DU FILTRE À EAU
Communiquez avec nous sur electromenegersge.ca, or ou appelez le 800.661.1616
Pendant la période de
garantie de :
Trente jours
A compter de la date
d'achat initial
Nous remplacerons gratuitement :
Toute pièce de la cartouche filtrante qui s’avère défectueuse en raison d’un défaut de matériau ou
de fabrication pendant cette période de garantie de trente jours.*
Ce qui n’est pas couvert :
• Les déplacements à votre domicile pour vous expliquer l’utilisation de ce produit.
• Une installation incorrecte.
• Une panne d u produit par abus d’utilisation, par mauvaise utilisation, par modification ou s’il a été utilisé dans un but autre que celui
pour lequel il a été fabriqué, ou s’il a été utilisé à des fins commerciales.
• Le remplacement des fusibles ou le réenclenchement du disjoncteur du domicile.
• Le remplacement de la cartouche filtrante à cause d’une pression d’eau en dehors de la gamme de fonctionnement recommandée ou à
cause d’une concentration excessive de sédiments dans l’eau d’alimentation.
• Tout dommage causé par accident, incendie, inondation ou catastrophe naturelle.
• Tout dommage fortuit ou indirect causé par des défauts éventuels de cet appareil.
EXCLUSION DES GARANTIES TACITES :
Votre recours exclusif est l’échange du produit suivant les modalités de la Garantie Limitée. Toutes garanties tacites, y compris les
garanties de valeurs marchandes ou d’adéquation à des fins particulières, sont limitées à une durée de six mois ou à la durée la plus
courte autorisée par la loi.
Cette garantie est étendue à l’acheteur d’origine et aux propriétaires suivants pour tout produit acheté pour une utilisation domestique
aux Etats-Unis. En Alaska, cette garantie exclut le coût d’expédition ou de dépannage à votre domicile.
Certains états n’acceptent pas d’exclusion ou de limites aux dommages indirects consécutifs. Certains droits particuliers vous sont
dévolus en vertu de la présente garantie et peuvent s'accompagner d'autres droits qui varient d’un état à un autre. Pour connaître vos
droits, veuillez consulter votre bureau local ou le bureau d’état des affaires aux consommateurs ou le Procureur Général de votre état.
Pour les achats effectués en Iowa : Ce formulaire doit être signé et daté par l'acheteur et le vendeur avant la réalisation de cette vente.
Ce formulaire doit être conservé au dossier par le vendeur pendant une période minimale de deux ans.
Acheteur :
Nom
Adresse
Ville État Code postal
Signature Date
* Si votre pièce Haier s’avère défectueuse en raison d'un défaut de fabrication dans les trente jours à compter de la date d'achat initiale, nous vous
fournirons gratuitement une nouvelle pièce, ou, à notre gré, une pièce reconstruite. Renvoyez la pièce défectueuse au fournisseur de pièces auprès
duquel cette pièce a été achetée avec une copie de la preuve d'achat de la pièce. Si la pièce est défectueuse et n’indique aucun signe d’une utilisation
abusive, celle-ci sera échangée. La garantie ne couvre pas la défaillance de pièces qui sont endommagées en votre possession, sont utilisées de
façon abusive ou ont été mal installées. Elle ne couvre pas les frais de retour de la pièce au fournisseur auprès duquel elle a été achetée. Elle ne
couvre pas non plus le coût de main d’oeuvre pour retirer ou installer cette pièce pour diagnostiquer la panne. Elle ne couvre pas les pièces utilisées
dans les produits à usage commercial, sauf dans le cas des équipements de climatisation. En aucun cas, Haier ne peut être tenu responsable des
dommages indirects.
Garant : GE Appliances, a Haier company
Pour bénéficier du service de réparation sous garantie, une
preuve de la date d’achat initial est nécessaire.
56 49-60806
Vendeur :
Nom
Adresse
Ville État Code postal
Signature Date
FRANÇAIS
Page 57

FICHE TECHNIQUE DE PERFORMANCE
MODÈLE : GE APPLIANCES XWF
• Système certifié par l’IAPMO R&T en vertu des normes 42, 53, 401 de la NSF/ANSI relatives à la réduction des allégations spécifiées sur la fiche technique de
rendement et le site iapmort.org.
• Le rendement réel peut varier selon les conditions locales de l’eau.
Substance testé e
pour réduction
Goût et odeur chlore 2.0 mg/L +/- 10% N/A 96.9
Goût et odeur chloramine 3.0 mg/L +/- 10% 0.5 96.9
Particules, Classe I Au moins 10 000/mL N/A 91.4
Oocystes 50,000/L N/A >99.99
Plomb 0.15 0.01 98.85
Mercure 0.006 0.002 96.3
Amiante 107 à 108 fibres/L N/A >99
Toxaphène 0.015 +/- 10% 0.003 86.95
SCC (substitut de chloroforme C 0.300 0.015 99.7
Alachlore 0.050 0.001 > 98
Atrazine 0.100 0.003 > 97
Benzène 0.081 0.001 > 99
Carbofuran 0.190 0.001 > 99
tétrachlorure de carbone 0.078 0.0018 98
chlorobenzène 0.077 0.001 > 99
chloropicrine 0.015 0.0002 99
2, 4-D 0.110 0.0017 98
dibromochloropropane (DBCP) 0.052 0.00002 > 99
o-Dichlorobenzene 0.08 0.001 > 99
p-Dichlorobenzène 0.040 0.001 > 98
1,2-dichloroéthane 0.088 0.0048 95
1,1-dichloroéthylène 0.083 0.001 > 99
cis-1,2-dichloroéthylène 0.170 0.0005 > 99
trans-1,2-dichloroéthylène 0.086 0.001 > 99
1,2-dichloropropane 0.080 0.001 > 99
cis-1,3-dichloropropylène 0.079 0.001 > 99
dinosèbe 0.170 0.0002 99
Endrine 0.053 0.00059 99
Éthylbenzène 0.088 0.001 > 99
éthylène dibromide (EDB) 0.044 0.00002 > 99
bromochloroacétonitrile 0.022 0.0005 98
dibromoacétonitrile 0.024 0.0006 98
dichloroacétonitrile 0.0096 0.0002 98
trichloroacétonitrile 0.015 0.0003 98
1,1-dichloro-2-propanone 0.0072 0.0001 99
1,1,1-trichloro-2-propanone 0.0082 0.0003 96
heptachlore (H-34, Heptox) 0.025 0.00001 >99
heptachloreépoxide 0.0107 0.0002 98
hexachlorobutadiène 0.044 0.001 > 98
hexachlorocyclopentadiène 0.060 0.000002 > 99
Lindane 0.055 0.00001 > 99
méthoxychlore 0.050 0.0001 > 99
pentachlorophénole 0.096 0.001 > 99
simazine 0.120 0.004 > 97
Styrène 0.150 0.0005 > 99
1,1,2,2-tétrachloroéthane 0.081 0.001 > 99
Tétrachloroéthylène 0.081 0.001 > 99
Toluène 0.078 0.001 > 99
2,4,5-TP (silvex) 0.270 0.0016 99
Acide tribromoacétique 0.042 0.001 > 98
1,2,4-Trichlorobenzène 0.160 0.0005 > 99
1,1,1-trichloroéthane 0.084 0.0046 95
1,1,2-trichloroéthane 0.150 0.0005 > 99
trichloroéthylène 0.180 0.0010 > 99
bromoforme 0.300 0.015 95
bromodichlorométhane 0.300 0.015 95
chlorodibromométhane 0.300 0.015 95
xylènes 0.070 0.001 >99
Méprobamate 400 +/- 20% 60 95.5
Aténolol 200 +/- 20% 30 95.9
Carbamazépine 1400 +/- 20% 200 98.6
diéthyltoluamide (DEET) 1400 +/- 20% 200 98.6
Métolachlore 1400 +/- 20% 200 98.7
Triméthoprime 140 +/- 20% 20 96.1
Linuron 140 +/- 20% 20 96.6
TCEP 5000 +/- 20% 700 98.1
TCPP 5000 +/- 20% 700 98.1
Phénytoïne 200 +/- 20% 30 96
Ibuprofène 400 +/- 20% 60 95.9
Naproxène 140 +/- 20% 20 96.5
Estrone 140 +/- 20% 20 97.1
Bisphénol A 2000 +/- 20% 300 99.1
Nonylphénol 1400 +/- 20% 200 97.3
Concentration
d’essai de
l’influent (mg/L)
Concentration max.
admissible dans l’eau
du produit (mg/L)
Réduction
moy. (%)
Conditions d'application/Paramètres d'alimentation d'eau
Débit de service 0,5 gal./min. (1,89 l/min.)
Alimentation d'eau Eau potable
Pression d'eau 25-120 psi (172-827 kPa)
Température de l'eau 33°F-100°F (0.6°C-38°C)
Capacité 170 gallons (643,5 liters)
Le rendement du produit sera conforme à ce qui est promis à condition
que l'installation, l'entretien et le remplacement du filtre s'effectuent
selon les recommandations du fabricant.
REMARQUE : Bien que les tests aient été réalisés dans des
conditions Bien que les tests aient été réalisés dans des conditions
de laboratoire.
Cartouche de rechange : XWF. Pour une estimation du coût des
pièces de rechange, veuillez composer le 800.661.1616 ou visitez
notre site Web elec tromenegersge.ca.
AVERTISSEMENT
Pour réduire le risque associé à
l'ingestion de contaminants :
• N'utilisez pas l'appareil avec de l'eau d'une qualité incertaine ou
non potable sur le plan microbiologique sans une désinfection
en amont et en aval du système. Les systèmes homologués
relativement à la réduction d'oocystes peuvent être utilisés avec
de l'eau désinfectée pouvant contenir des oocystes filtrables.
AVIS
Pour réduire le risque de fuite ou d'inondation et pour garantir un
rendement optimal du filtre :
• Lisez et observez les instructions d'utilisation avant l'installation
et l'utilisation de ce système.
• L'installation et l'utilisation DOIVENT satisfaire tous les codes de
plomberie locaux et nationaux.
• Ne procédez pas à l'installation si la pression d'eau excède 120
psi (827 kPa). Si votre pression d'eau excède 80 psi (552 kPa), vous
devez poser une valve de limitation de pression. Faites appel à un
plombier si vous avez des doutes sur la façon de mesurer votre
pression d'eau.
• Ne procédez pas à l'installation si une condition de coup de bélier
est susceptible de survenir. Si cette condition existe, vous devez
poser un antibélier. Faites appel à un plombier si vous avez des
doutes sur la manière d'identifier cette condition.
• Ne procédez pas à l'installation sur des conduites d'eau chaude.
La température température de service maximale de l'eau pour ce
système de filtre est de 100 °F (38 °C).
• Protégez le filtre contre le gel. Drainez le filtre lorsque la
température tombe sous 33 °F (0,6 °C).
• Remplacez la cartouche filtrante jetable tous les six mois, ou plus
tôt si vous vous constatez une réduction appréciable du débit
d'eau.
• L'omission de remplacer la cartouche filtrante jetable aux
intervalles recommandés peut mener à une réduction du
rendement du filtre et au fendillement du boîtier du filtre,
entraînant ainsi des fuites ou l'inondation.
• Ce système a été mis à l'essai conformément aux normes 42, 53
et 401 de la NSF/ANSI relatives à la réduction des substances
énumérées ci-dessous. La concentration des substances
mentionnées dans l'eau entrant dans le système a été réduite
à une valeur inférieure ou égale à la limite admissible pour l'eau
quittant le système, tel que stipulé dans les normes 42, 53 et 401
de la NSF/ANSI.
Le système XWF est certifié par l’IAPMO
R&T en vertu des normes 42, 53, 401 de
la NSF/ANSI relatives à la réduction des
allégations spécifiées sur la fiche technique
de rendement et le site iapmort.org.
49-60806 57
FRANÇAIS
Page 58

GARANTIE LIMITÉE
12 mois sur les pièces et la main-d’œuvre
Durant les 12 mois suivant la date d’achat d’origine au détail, GE
Appliances remplacera toute pièce du réfrigérateur présentant
une défectuosité en raison d’un vice de matière ou de fabrication.
Le choix entre le remplacement ou la réparation de l’appareil
défectueux sera à la discrétion de GE Appliances. Dans le cas où
GE Appliances déciderait de réparer l’appareil défectueux, GE
Appliances fournira toute pièce défectueuse en raison d’un vice de
matière ou de fabrication,et assumera les frais de main-d’œuvre et
de service associés à réparation de la pièce. Advenant une décision
de remplacer l’appareil durant cette période, GE Appliances pourrait
ухтжŻзихисщтшцйтшхсмццдсчшсжихчмĤждчŻжлдскидепидшухƒцзđшс
détaillant contre un produit de remplacement.
Le produit doit être accessible, dégagé et installé correctement
утшхеŻсŻĤжмихзшцихщмжизихŻудхдчмтсцтшцкдхдсчми
REMARQUE : МиччикдхдсчмиухисзиģичƑпдздчиƑпдфшиппипđдхчмжпи
a été acheté et le reçu de l’achat d’origine doit être présenté au
représentant de dépannage autorisé avant qu’une quelconque
хŻудхдчмтсцтшцкдхдсчмисицтмчиģижчшŻи
SERVICE AU TITRE DE LA GARANTIE
Aux États-Unis, toutes les réparations sous garantie doivent
être réalisées par nos Factory Service Centers ou un technicien
Customer Care autorisé. Composez le 1.877.337.3639 pour prévoir
un rendez-vous
Veuillez avoir votre numéro de série et votre numéro de modèle à
portée de main lorsque vous appelez pour obtenir un service.
Au Canada, composez le 1.877.470.9174.
Cette garantie ne couvre pas :
Toute visite à votre domicile pour vous expliquer le fonctionnement
de l’appareil.
Mauvaise installation, livraison ou entretien.
Toute défectuosité du produit lorsqu’il est utilisé de façon abusive,
тшƑзицĤсцжтррихжмдпицтшƑчтшчидшчхиĤсфшижиппиутшх
laquelle il a été conçu.
Perte des aliments dûe à la déterioration.
Dommage subi après la livraison.
Remplacement des ampoules de lampe.
Le remplacement des fusibles ou le réenclenchement des
disjoncteurs.
Tout dommage au produit attribuable à un accident, un incendie, une
inondation ou un cas de force majeure.
Tout dommage direct ou indirect attribuable à une défectuosité
éventuelle de l’appareil.
Le service s’il est impossible d’avoir accès au produit pour ce faire.
Les coûts associés lorsque GE Appliances choisit d’émettre un
жихчмĤждчŻжлдскидепижтсчхишсухтзшмчзихирупджирисч
EXCLUSION DES GARANTIES TACITES : Votre recours exclusif est l’échange du produit suivant les modalités de la Garantie Limitée.
ЭтшчицкдхдсчмицчджмчицьжтрухмцпицкдхдсчмицзищдпишхцрдхжлдсзицтшзđдзŻфшдчмтсƑзицĤсцудхчмжшпмƒхиццтсчпмрмчŻицƑшси
durée d’un an ou à la durée la plus courte autorisée par la loi.
Pour les clients des États-Unis : Cette garantie est étendue à l’acheteur d’origine et aux propriétaires suivants pour tout produit acheté
pour une utilisation domestique aux États-Unis. Si le produit est installé dans une région où ne se trouve aucun réparateur autorisé GE
Appliances, vous devrez peut-être assumer les frais de transport ou apporter l’appareil à un centre de service autorisé GE Appliances. En
Alaska, cette garantie exclut le coût d’expédition ou de dépannage à votre domicile.
Certains états n’acceptent pas d’exclusion ou de limites aux dommages indirects consécutifs. Certains droits particuliers vous sont dévolus
en vertu de la présente garantie et peuvent s’accompagner d’autres droits qui varient selon votre lieu de résidence. Pour connaître vos droits
ншхмзмфшицщишмппиэжтсцшпчихпиешхидшптждптшпиешхидшзđŻчдчзицдģдмхицдшыжтсцтррдчишхцтшпиЩхтжшхишхРŻсŻхдпзищтчхиŻчдч
Garant US:
GE Appliances, a Haier company
Louisville, KY 40225
Pour les clients des Canada : Cette garantie est étendue à l’acheteur d’origine et aux propriétaires suivants pour tout produit acheté aux
Canada pour une utilisation domestique aux Canada. Le service à domicile en vertu de la garantie sera fourni dans les régions où il est
disponible et où Mabe estime raisonnable de le fournir.
Garant Canada:
MC Commercial, Inc., Burllington, Ontario, L7R 5B6
58 49-60806
FRANÇAIS
Page 59

ÍNDICE
INFORMACIÓN A TENER EN CUENTA .............................................................................59
SEGURIDAD DEL REFRIGERADOR ................................................................................60
Cómo deshacerse adecuadamente de su aparato refrigerador viejo .................................................... 61
PIEZAS Y CARACTERÍSTICAS ....................................................................................62
REQUISITOS DE INSTALACIÓN .................................................................................. 63
Ubicación del refrigerador ............................................................................................ 63
Espacio necesario ................................................................................................... 63
INSTRUCCIONES DE INSTALACIÓN . ............................................................................. 64
Preparación para Instalar el Refrigerador .............................................................................. 64
Dimensiones del electrodoméstico ................................................................................... 65
Instalación de la tubería de agua ...................................................................................... 66
Instalación del refrigerador ........................................................................................... 68
Cómo Completar la Instalación ....................................................................................... 73
USO DEL REFRIGERADOR .......................................................................................74
Controles ........................................................................................................... 74
Modos sabáticos ..................................................................................................... 74
Dispensador de agua interno ......................................................................................... 74
КжихждзипждхчшжлтзипĤпчхтзидкшдбаП ............................................................................75
Estantes y recipientes ................................................................................................ 76
Cajones ............................................................................................................. 76
Cajón del congelador ................................................................................................. 77
Fabrica de hielos automática .......................................................................................... 78
CUIDADO DEL REFRIGERADOR .................................................................................. 79
Limpieza ............................................................................................................. 79
Vacaciones y mudanzas .............................................................................................. 80
Reemplazo de las luces ............................................................................................... 80
SOLUCIÓN DE PROBLEMAS ......................................................................................81
FILTRO DE AGUA XWF ...........................................................................................84
FICHA TÉCNICA DE RENDIMIENT ................................................................................. 85
GARANTÍA LIMITADA ............................................................................................ 86
INFORMACIÓN A TENER EN CUENTA
Le agradecemos la compra de este producto de marca Haier. Este
manual para el usuario lo ayudará a obtener el mejor funcionamiento
de su nuevo refrigerador.
Para referencia futura, anote el número de modelo y de serie y la
fecha de compra. La placa con el número de modelo o de serie está
ubicada en una etiqueta dentro del refrigerador.
Engrape la prueba de compra a este manual para asistirle cuando
necesite obtener servicio bajo la garantía.
_______________________________________
Número de modelo
_______________________________________
Número de serie
_______________________________________
Fecha de compra
49-60806 59
ESPAÑOL
Page 60

SEGURIDAD DEL REFRIGERADOR
ADVERTENCIA
¿ Este refrigerador se deberá instalar y ubicar adecuadamente
de acuerdo con las Instrucciones de Instalación antes de ser
usado.
¿ Desenchufe el refrigerador antes de hacer reparaciones o
hacer una limpieza.
NOTA: La corriente que va al refrigerador no puede ser
desconectada por ninguna configuración del panel de control.
NOTA: Las reparaciones deberán ser realizadas por un
Profesional del Servicio Técnico calificado.
¿ Reemplace todas las piezas y paneles antes del uso.
¿ No use extensiones eléctricas para conectar su aparato.
¿ No guarde ni use gasolina u otros vapores y líquidos inflamables
cerca de este ni de otro electrodoméstico.
¿ No guarde sustancias explosivas tales como latas de aerosoles
con propelentes inflamables en este electrodoméstico.
¿ A fin de evitar riesgos de que los niños queden atrapados y
sufran asfixia, retire las puertas de alimentos frescos y del
congelador de cualquier refrigerador antes de deshacerse o
dejar de usar el mismo..
¿ Para evitar lesiones graves o la muerte, los niños no se deberán
parar sobre ni jugar en o con el electrodoméstico.
A fin de reducir el riesgo de incendio, explosión, descargas eléctricas o lesiones al usar su refrigerador, siga
estas precauciones básicas de seguridad:
¿ Los niños y las personas con capacidad física, sensorial o
mental reducida o con falta de experiencia y conocimiento
podrán usar este electrodoméstico sólo si son supervisados
o les fueron dadas instrucciones sobre un uso seguro y
entienden los riesgos involucrados.
¿ Este electrodoméstico fue diseñado para uso hogareño y para
aplicaciones similares tales como: áreas de personal de cocina
en tiendas, oficinas y otros espacios laborales; casas de campo;
por clientes en hoteles, moteles, hostales y otros espacios
residenciales, servicio de comidas.
¿ Realice la conexión a un suministro de agua potable
únicamente. Se requiere un suministro de agua fría para
el funcionamiento de la máquina de hielos automática. La
presión del agua deberá estar entre 40 y 120 psi (275-827
kilopascales)..
¿ No aplique limpiadores ásperos sobre el refrigerador. Ciertos
limpiadores dañarán el plástico, lo cual podrá hacer que ciertas
piezas tales como la puerta o las manijas de las puertas se
separen de forma inesperada. Para acceder a instrucciones
detalladas, lea la sección de Cuidado y Limpieza.
PRECAUCIÓN
¿ No limpie estantes de vidrio ni tapas con agua caliente
cuando estén fríos. Los estantes de vidrio y las tapas
se pueden romper si son expuestos a cambios de
temperatura repentinos o impactos, tales como golpes o
caídas. El vidrio templado está diseñado para destruirse
en pequeñas piezas en caso de rotura.
¿ Mantenga los dedos fuera de los espacios de “riesgo de
lesión”; los espacios entre las puertas y entre las puertas
y el gabinete son necesariamente pequeños. Tenga
el cuidado de cerrar las puertas cuando los niños se
A fin de reducir el riesgo de lesiones al usar el refrigerador, siga estas precauciones básicas.
¿ No vuelva a congelar comidas que hayan estado
totalmente congeladas en forma previa.
¿ En refrigeradores con máquinas de hacer hielo
automáticas, evite el contacto con las partes móviles
del mecanismo eyector o con el elemento de calefacción
que libera los cubos. No coloque los dedos ni las manos
en el mecanismo de la máquina de hielo automática
mientras el refrigerador esté enchufado.
¿ Use un vaso robusto al dispensar hielo (en modelos con
dispensador de hielo).
encuentren en el área.
¿ No toque las superficies frías del compartimiento del
congelador cuando las manos estén húmedas o mojadas,
ya que la piel se podrá adherir a estas superficies
extremadamente frías.
INSTALACIÓN
ADVERTENCIA
Mantenga cualquier material y vapores inflamables, tales como gasolina, alejados del refrigerador. Si no se cumple con esto se podrá
producir una explosión, incendio o la muerte.
RIESGO DE EXPLOSIÓN
60 49-60806
ESPAÑOL
Page 61

SEGURIDAD DEL REFRIGERADOR
CONEXIÓN DE LA ELECTRICIDAD
ADVERTENCIA
Enchufe en un tomacorriente con conexión a tierra de 3 cables.
No elimine el cable de conexión a tierra.
No use un adaptador.
No use extensión eléctrica.
Si no se siguen estas instrucciones se podrá producir a muerte, incendios o descargas eléctricas.
Nunca, bajo ninguna circunstancia, corte o elimine el tercer cable (tierra) del cable de corriente. Para su seguridad personal, este
electrodoméstico debe estar adecuadamente conectado a tierra.
El cable de corriente de este electrodoméstico contiene un
enchufe de 3 cables (conexión a tierra) que se conecta a un
tomacorriente de pared estándar de 3 cables (conexión a tierra)
para minimizar la posibilidad de riesgos de descargas eléctricas
por parte del mismo.
Contrate a un electricista calificado para que controle el
tomacorriente y el circuito eléctrico, a fin de asegurar que el
enchufe esté correctamente conectado a tierra.
En caso de contar con un tomacorriente de pared de 2 cables,
es su responsabilidad y obligación reemplazarlo por un
tomacorriente de pared de 3 cables correctamente conectado a
tierra. No use un adaptador.
El refrigerador debería estar siempre conectado a un enchufe
específico con un índice de voltaje equivalente al que figura en su
etiqueta de características técnicas.
RIESGO DE DESCARGA ELÉCTRICA
Se requiere un suministro eléctrico con fusible y conexión a tierra
de 115 voltios de CA, 60 Hz, 15 o 20 amperes. Esto garantiza el
mejor funcionamiento y además previene la sobrecarga de los
circuitos del hogar, lo cual podría ocasionar riesgos de incendio
debido al recalentamiento de cables.
Nunca desenchufe el refrigerador tirando del cable de corriente.
Siempre tome su enchufe firmemente y empuje el mismo hacia
afuera para retirarlo.
Repare o reemplace de inmediato todos los cables de corriente
pelados o con cualquier tipo de daño. No use un cable con
cortaduras o abrasión sobre su extensión o extremos.
Al alejar el refrigerador de la pared, se deberá tener cuidado de
que no ruede sobre ni dañe el cable de corriente.
ADVERTENCIA
El incumplimiento de estas instrucciones de eliminación puede causar la muerte o lesiones graves.
IMPORTANTE: Que un niño quede atrapado o que sufra
una asfixia no son problemas del pasado. Los refrigeradores
antiguos o abandonados aún son peligrosos, incluso aunque se
conserven por “sólo unos pocos días”. Si se deshará de su antiguo
refrigerador, siga las siguientes instrucciones a fin de evitar
accidentes.
PELIGRO DE ATRAPADOS Y ASFIXIA
Antes de Descartar su Antiguo Aparato:
• Retire las puertas de alimentos frescos y del congelador.
• Deje los estantes en su lugar de modo que los niños no puedan
trepar dentro con facilidad.
Cómo Eliminar Refrigerantes y Espuma Aislante:
Descarte el electrodoméstico de acuerdo con las Regulaciones Federales y Locales. El material aislante inflamable usado requiere
procedimientos de descarte especiales. Comuníquese con las autoridades locales para descartar su electrodoméstico de forma
ambientalmente segura.
LEA Y GUARDE ESTAS INSTRUCCIONES
49-60806 61
ESPAÑOL
Page 62

PIEZAS Y CARACTERÍSTICAS
Iluminación LED
Las luces LED del compartimiento de refrigerador están
ubicadas en la parte central superior y los costados izquierdo
y derecho sobre las cajones del área con clima regulado.
Las luces LED también están ubicadas en el congelador;
consulte las página 80.
Cajón con ancho completo
El cajón con ancho completo, donde se pueden colocar
productos más grandes, está ubicado en la parte inferior
del compartimiento de refrigerador.
Estante QuickSpace™
Funciona como una repisa normal de tamaño completo
cuando lo necesite y se desliza fácilmente hacia adentro
para guardar artículos altos en la parte inferior.
Anaqueles para puertas desmontables/
ajustables
Se puede mover hacia arriba o abajo de acuerdo a sus
necesidades.
Cajones con clima regulado
Cajones separadas para almacenar productos
comestibles.
Filtro de agua
Accesible para un fácil reemplazo.
62 49-60806
ESPAÑOL
Page 63

REQUISITOS DE INSTALACIÓN
REQUISITOS DE UBICACIÓN
IMPORTANTE: Este refrigerador ha sido diseñado únicamente
para usarse dentro del hogar.
¿ No instale el refrigerador donde la temperatura llegue a ser inferior
a los 60ºF (16ºC), ya que no se activará con la frecuencia necesaria
para mantener las temperaturas apropiadas.
• No instale el refrigerador donde la temperatura sea superior a los
100ºF (37ºC), ya que no funcionará de forma correcta.
• No instale el refrigerador en una ubicación expuesta al agua (lluvia,
etc.) o en contacto directo con la luz solar.
¬ТТсцчдпиипрмцртисшсумцтптцшĤжмисчирисчийшихчижтртудхд
soportarlo completamente cargado.
ESPACIO NECESARIO
Deje el siguiente espacio para facilitar la instalación, una adecuada
circulación de aire y plomería y conexiones eléctricas.
Costados 1/8” (3 mm)
Parte superior 1” (25 mm) Gabinete/ Tapa de la Bisagra
Parte Trasera 2” (50 mm)
49-60806 63
ESPAÑOL
Page 64

INSTRUCCIONES DE INSTALACIÓN
ANTES DE COMENZAR
Lea estas instrucciones en su totalidad y atentamente
•
IMPORTANTE — Cumpla con todos los
códigos y ordenanzas gubernamentales. Guarde estas
instrucciones para uso del inspector local.
• Nota para el Instalador – Asegúrese de que el Comprador
guarde estas instrucciones.
• Nota para el Consumidor – Guarde estas instrucciones
para referencia futura.
• Nivel de habilidad – La instalación de este dispositivo
requiere un nivel básico de habilidades mecánicas.
• Tiempo de Instalación – Instalación del Refrigerador
20 minutos
Instalación del Suministro de
Agua - 30 minutos
• Es responsabilidad del instalador realizar una instalación
adecuada.
• Si se producen fallas en el producto debido a una
instalación inadecuada, la Garantía no cubrirá las mismas.
PREPARACIÓN
CÓMO MOVER EL REFRIGERADOR EN UN ESPACIO
INTERNO
Si el refrigerador no pasa por una puerta, la puerta del
refrigerador y el cajón del congelador podrán ser retirados.
• A fin de retirar la puerta del refrigerador, consulte sobre el Retiro
de Puertas en la sección de Instrucciones de Instalación.
• A fin de retirar el cajón del freezer, consulte sobre el Cajón del
Freezer en la sección de Instrucciones de Instalación.
HERRAMIENTAS QUE PUEDE
NECESITAR
Llave Ajustable
Tuerca de Compresión
de Diámetro Externo de
1/4” y Abrazadera de
Refuerzo (manga)
Sólo en modelos con
máquina de hielos
Broca de 1/8” y Taladro
Eléctrico o Manual
Lápiz
Llave de Tubo /
Destornillador de 3/8” y
5/8”
Destornillador con Cabeza
Phillips
Llaves Allen de 3/32”,
1/8” y 3/16”
Cinta métrica
Llave de Tuercas de 1/4”
SUMINISTRO DE AGUA A LA MAQUINA DE HIELOS Y
Cortacables
Nivel
AL DISPENSADOR
Si el refrigerador cuenta con una máquina de hielos, deberá ser
conectada al suministro de agua fría. Un kit de suministro de
agua de GE Appliances (con tubería, válvula de cierre, uniones
e instrucciones) está disponible por un costo adicional a nivel
minorista, visitando nuestro sitio web en Haierappliances.com
(en Canadá en geappliances.ca) o en Parts and Accessories (Piezas
y Accesorios), 877.337.3639 (en Canadá, GEAppkliances.ca or
800.661.1616).
64 49-60806
Llave Torx T20
ESPAÑOL
Page 65

INSTRUCCIONES DE INSTALACIÓN
DIMENSIONES DEL ELECTRODOMÉSTICO
* 69-7/8”
(177.5 cm)
36”
(91.4 cm)
36-5/16”
(92.2 cm)
50-3/16”
(127.5 cm)
43-23/32”
(111.1 cm)
NOTA: *La altura del refrigerador hasta la parte superior de la puerta
MIDA LA ABERTURA DEL GABINETE DE
ACUERDO CON EL ANCHO DEL REFRIGERADOR
Mida el ancho de la abertura del gabinete donde el refrigerador será colocado,
“B”. Asegúrese de tener en cuenta cualquier parte saliente de la mesada, el
grosor del rodapié y cualquier despeje deseado. El ancho, “B”, no debería ser
inferior a entre 36” (91.4 cm). El refrigerador será ubicado aproximadamente en
el medio de esta abertura.
54-13/16”
(139.2 cm)
33-13/16”
(85.9 cm)
155ȋ
Pared Trasera
Back Wall
B
REFRIGERADOR
REFRIGERATOR
Frente
Front
90ȋ
43-3/8”
(110.2 cm)
Lado
Right
Derecho
Side
48-3/4”
(123.8 cm)
El Grosor
del Rodapié
o el Espacio
Saliente de
la Mesada
(Cualquiera
Sea Más
Grande)
Además de
Cualquier
Despeje
Deseado
49-60806 65
ESPAÑOL
Page 66

INSTRUCCIONES DE INSTALACIÓN
INSTALACIÓN DE LA TUBERÍA DE AGUA
ANTES DE COMENZAR
Хтцомчцзицшрмсмцчхтзидкшдзижтехихижтрисздзтццтсаб(б"
аб(б#таб(б$зиуисзмисзтзипдждсчмздззичшеихżдсижицдхмд
Las tuberías de suministro de agua de plástico aprobadas son las
ЭшеихżдцудхдЫийхмкихдзтхицзиЬрдхчМтссижчЭЦ¤аб (б! &
аб (б! !%ьаб (б! "%¥
Si el suministro de agua al refrigerador es de un Sistema de
Filtración de Agua por Ósmosis Inversa (RO) Y el refrigerador
чдремŻсжшисчджтсшсĤпчхтзидкшдшцииписжлшйизипеьудццзип
ĤпчхтзипхийхмкихдзтхОпшцтзипждхчшжлтзиĤпчхджмſсзидкшдзип
хийхмкихдзтхншсчтжтсшсĤпчхтзидкшдЫШутзхŹухтзшжмхжшетцзи
hielo huecos. Algunos modelos no están equipados con el tapón del
еьудццзипĤпчхтЩдхдтечисихшсчдуſсзипеьудццзипĤпчхтппдридп
877.337.3639. En Canadá, llame al 800.661.1616.
Esta instalación de la tubería de agua no posee garantía del
fabricante del refrigerador o de la máquina de hielos. Siga estas
мсцчхшжжмтсицжтсжшмздзтдĤсзирмсмрмэдхипхмицктзиздƻтц
costosos a causa del agua.
Los golpes de ariete (agua que golpea las tuberías) en la plomería
del hogar pueden ocasionar daños sobre las piezas del refrigerador
y generar pérdidas de agua o inundación. Llame a un plomero
ждпмĤждзтудхджтххикмхптцктпуицзидхмичидсчицзимсцчдпдхпд
tubería de suministro de agua al refrigerador.
КĤсзиищмчдхфширдзшхдцьздƻтццтехиптцухтзшжчтцстдзлмихд
la tubería de agua a la tubería de agua caliente.
No instale la tuberia de la máquina de hielos en áreas donde las
temperaturas sean inferiores a las de congelación.
Al usar cualquier dispositivo eléctrico (tal como un taladro eléctrico)
durante la instalación, asegúrese de que el mismo posea un doble
aislante o que esté conectado a tierra de modo que se prevenga el
riesgo de descargas eléctricas, o que esté alimentado por medio de
una batería.
Todas las instalaciones deberán ser acordes con los requisitos del
código de plomería local.
de agua potable únicamente. Se requiere un suministro de
agua fría para el funcionamiento de la máquina de hielos
automática. La presión del agua deberá estar entre 40 y 120
psi (275-827 kilopascales).
NOTA: La única tubería plástica de aprobada es aquella provista
con los Kits de Tuberías para Refrigerador de SmartConnect
use ningún otro suministro de agua plástico, ya que el suministro se
encuentra bajo presión en todo momento. Ciertos tipos de plásticos
утзхŹсцшйхмхĤцшхдцтхтчшхдцжтсипудцтзипчмирутьтждцмтсдх
problemas con el agua en su hogar.
• Un kit de suministro de agua (el cual cuenta con tubería, válvula de
жмиххиьшсмтсицфшиĤкшхдсиспдцмкшмисчипмцчд¥ицчŹзмцутсмепи
por un costo adicional a través de su vendedor minorista o de
Parts and Accessories (Piezas y Accesorios), 877.337.3639 o
Haierappliances.com. (En Canadá, 800.661.1616
o GEAppliances.ca).
• Un suministro de agua fría. La presión del agua deberá estar entre
20 y 120 p.s.i. (138-827 kPa).
• Taladro eléctrico.
• Llave de 1/2” o ajustable.
• Destornillador de punta plana o Phillips.
• 2 tuercas de compresión de diámetro externo de 1/4” y 2
abrazaderas de c ompresión (mangas)
– para conectar la tubería de cobre
a la válvula de cierre y a la válvula de
agua del refrigerador.
O
• Si usará un kit de Tuberías para Refrigerador de SmartConnectTM,
las uniones necesarias están preensambladas a la tubería.
ADVERTENCIA
Realice la conexión a un suministro
TM
. No
LO QUE NECESITARÁ
• Kit de Tubería para Refrigerador de Cobre o
SmartConnectTM de ¼” de diámetro externo
para conectar el refrigerador al suministro de
agua. Si usará cobre, asegúrese de que ambos
extremos de la tubería hayan sido cortados de
forma recta.
КĤсзизичихрмсдхжшŹсчдчшеихżдицсижицдхмдрмздпдзмцчдсжмд
desde la válvula de agua en la parte trasera del refrigerador hasta la
чшеихżдзипцшрмсмцчхтзидкшдКцикƂхицизифшилдьдцшĤжмисчи
tubería adicional para permitir que el refrigerador pueda ser retirado
de la pared luego de la instalación.
SmartConnect™ Refrigerator Tubing Kits are available in the
following lengths:
&đ¤!(𥠢àá (á! &
!%đ¤$&𥠢àá (á! !%
"%đ¤'&𥠢àá (á! "%
66 49-60806
• Si su tubería de agua de cobre existente posee una unión con
avellanado en su extremo, necesitará un adaptador (disponible en
las tiendas de suministros de plomería) para conectar la tubería
de agua al refrigerador O puede cortar la unión con avellanado con
un cortador de tubos y luego usar una unión de compresión. No
corte los extremos con forma de la tubería para refrigerador de
SmartConnectTM.
• Válvula de cierre para conectar a la tubería de agua fría. La válvula
de cierre debe tener una entrada de agua con un diámetro interno
mínimo de 5/32” en el punto de conexión a la TUBERÍA DE AGUA
FRÍA. Las válvulas de cierre tipo
montura están incluidas en
muchos kits de suministro de agua. Antes de su adquisición,
asegúrese de que la válvula tipo montura cumpla con los
códigos de plomería locales.
ESPAÑOL
Page 67

INSTRUCCIONES DE INSTALACIÓN
INSTALACIÓN DE LA TUBERÍA DE AGUA (Cont.)
Instale la válvula de cierre en la tubería de agua potable de uso
frecuente más cercana.
1. CIERRE EL SUMINISTRO DE AGUA
PRINCIPAL
КехдипкхмйтрŹцжихждстфшицидптцшĤжмисчирисчипдхктжтрт
para despejar la tubería de agua.
2. ELIJA LA UBICACIÓN DE LA VÁLVULA
Elija una ubicación para la válvula
que sea de fácil acceso. Es mejor
conectar la misma en el lateral de una
tubería de agua vertical. Cuando sea
necesario hacer la conexión en una
tubería de agua horizontal, realice
la conexión a la parte superior o
lateral, en vez de la parte inferior, a
fin de evitar el drenaje de cualquier
sedimento de la tubería de agua.
3. TALADRE EL AGUJERO DE LA VÁLVULA
Taladre un agujero de 1/4” en la tubería de agua (incluso si usará
шсдщŹпщшпддшчтуихйтхдсчи¥шцдсзтшсдушсчддĤпдздОпмрмси
cualquier zumbido que resulte de haber taladrado el agujero en la
tubería.
Tenga cuidado de no permitir
que el agua se drene en el
taladro.
Si no se taladra un agujero de
1/4”, se podrá ver reducida la
producción de hielo o cubos de
hielo más pequeños.
4. AJUSTE LA VÁLVULA DE CIERRE
Ajuste la válvula de cierre de la tubería de agua fría con la
abrazadera de la tubería
NOTA: Se deberá cumplir con los Códigos de Plomería del
Commonwealth de Massachusetts 248CMR. Las válvulas tipo
montura son ilegales y su uso está prohibido en Massachusetts.
Consulte a un plomero matriculado.
Abrazadera
de la tubería
Abrazadera de
la Tubería
Arandela
6. ENRUTE LA TUBERÍA
Conduzca la tubería entre la entrada de agua fría y el refrigerador.
Conduzca la tubería a través de un agujero perforado en la
pared o el piso (detrás del refrigerador o del gabinete con base
adyacente) tan cerca a la pared como sea posible.
7. CONECTE LA TUBERÍA A LA VÁLVULA
Coloque la tuerca de compresión y la abrazadera de refuerzo
(manga) para colocar la tubería de cobre en el extremo de la
tubería y conecte la misma a la válvula de cierre.
Asegúrese de que la tubería esté completamente insertada en la
válvula. Ajuste la tuerca de compresión de forma segura.
Para usar una tubería de plástico del kit de Tuberías para
Refrigeradores SmartConnectTM, inserte el extremo moldeado
de la tubería en la válvula de cierre y ajuste la tuerca de
compresión hasta que quede ajustada manualmente, y luego
dé un giro de ajuste adicional con una llave. Un ajuste excesivo
puede ocasionar pérdidas.
Válvula de Cierre
Tipo Montura
NOTA: Se deberán seguir los Códigos 248CMR de Plomería para
el Estado de Massachusetts. Las válvulas tipo silla son ilegales
y su uso no está permitido en Massachusetts. Consulte con un
plomero licenciado.
8. DESPEJE DE LA TUBERÍA
Abra el suministro de agua principal y despeje la tubería hasta
que el agua esté limpia.
Cierre el agua usando la válvula de agua luego de haber dejado
correr aproximadamente un galón (1 litro), o 2 minutos, de agua a
través de la tubería.
Tuerca de
Embalaje
Válvula de Salida
Tuerca de Compresión
Tubería
SmartConnect™:
Abrazadera de
Refuerzo (manga)
Válvula de Cierre
Tipo Montura
Tubería de Agua
Fría Vertical
5. AJUSTE LA ABRAZADERA DE LA TUBERÍA
Ajuste los tornillos de la abrazadera hasta que la arandela de
sellado comience a hincharse.
NOTA: No ajuste en exceso o se podrá romper la tubería.
49-60806 67
ESPAÑOL
Page 68

INSTRUCCIONES DE INSTALACIÓN
INSTALACIÓN DEL REFRIGERADOR - PUERTAS FRANCESAS
UBICACIÓN DEL REFRIGERADOR
• No instale el refrigerador donde la temperatura llegue a
ser inferior a los 60ºF (16ºC), ya que no se activará con
la frecuencia necesaria para mantener las temperaturas
apropiadas.
• No instale el refrigerador donde la temperatura sea superior a
los 100ºF (37ºC), ya que no funcionará de forma correcta.
• No instale el refrigerador en una ubicación expuesta al agua
(lluvia, etc.) o en contacto directo con la luz solar.
• IInstale el mismo en un piso lo suficientemente fuerte como
para soportarlo completamente cargado.
ESPACIO NECESARIO
Deje el siguiente espacio para facilitar la instalación, una
adecuada circulación de aire y plomería y conexiones eléctricas.
Costados 1/8” (3 mm)
Parte superior 1” (25 mm) Gabinete/ Tapa de la Bisagra
Parte Trasera 2” (50 mm)
ADVERTENCIA
siguen estas instrucciones, dejando piezas sin uso o ajustando
tornillos en exceso, esto podrá hacer que la puerta se caiga y
producir lesiones y daños sobre la propiedad.
Siga todos los pasos. Si no se
NOTAS IMPORTANTES
Al retirar las puertas francesas:
• Lea las instrucciones completamente antes de comenzar.
¬ МтптфшиптцчтхсмпптцисцшцудхчицхипджмтсдздцдĤсзиищмчдхцш
uso en los lugares equivocados.
¬ МшисчижтсшсдцшуихĤжмизичхдеднтзтсзипдцушихчдцстци
rayen.
1. RETIRO DE LA PUERTA (Derecha)
A. Retire la tapa de la bisagra en
la parte superior de la puerta
de refrigerador derecha,
retirando el tornillo y usando un
destornillador Phillips.
B. Usando una llave de tubo/
destornillador de 5/16”, retire los
tornillos que aseguran la bisagra
superior del gabinete. Levante
el soporte de la bisagra hacia arriba para liberar el perno de la
bisagra del encaje en la parte superior de la puerta.
C. Retire la cinta de la puerta derecha e incline la puerta lejos del
gabinete. Levante la puerta y retire la misma del perno de la
bisagra central.
D. КншцчипдушихчдисшсдцшуихĤжмидсчмхдьдзшхдцжтспдудхчи
interna hacia arriba.
2. RETIRO DE LA PUERTA (Izquierda)
A. Retire la tapa de la bisagra en la
parte superior de la puerta de
refrigerador izquierda, retirando
el tornillo con un destornillador
Phillips.
B. Desenchufe los conectores de 3
cables y mueva estos últimos, hasta
que pueda ver los tornillos que
sostienen la bisagra.
Conectores de los Cables
PRECAUCIÓN
levantada por una sola persona, podrían ocasionarse lesiones.
Solicite ayuda al sostener, mover o levantar las puertas del
refrigerador.
NOTA: Al retirar la puerta, a fin de evitar daños sobre la misma
y la parte electrónica, coloque con cuidado la puerta en una
ubicación adecuada.
ADVERTENCIA
A fin de eliminar el riesgo de descarga eléctrica o lesión durante
la instalación, primero deberá desenchufar el refrigerador antes
de proceder. Si no se siguen estas instrucciones, se podrá
producir una descarga eléctrica.
Mantenga las puertas cerradas con cinta
adhesiva.
68 49-60806
Riesgo al levantar la puerta. Si es
C. Usando una llave de tubo/ destornillador de 5/16”, retire los
tornillos que aseguran
Conectores de los Cables
Tornillo
ESPAÑOL
Page 69

INSTRUCCIONES DE INSTALACIÓN
INSTALACIÓN DEL REFRIGERADOR - PUERTAS FRANCESAS (Cont.)
2. RETIRO DE LA PUERTA (Izquierda) (Cont.)
D. Levante la bisagra de forma recta
hacia arriba para liberar el perno
de la bisagra desde el anclaje en la
parte superior de la puerta, y pase
el cable a través de la ranura de la
bisagra.
E. Retire la cinta de la puerta, abra
la puerta a 90 grados e incline la
puerta lejos del gabinete. Levante la puerta y retire la misma
del perno de la bisagra central.
F. КншцчипдушихчдисшсдцшуихĤжмидсчмхдьдзшхдцжтспдудхчи
interna hacia arriba.
3. RETIRO DE LAS BISAGRAS CENTRALES Y
DE LOS SOPORTES
A. Usando una llave Allen de 1/4”, retire los 2 pernos de la bisagra
desde los soportes de la bisagra.
REINSTALACIÓN DE LAS PUERTAS
ADVERTENCIA
siguen estas instrucciones, dejando piezas sin uso o ajustando
tornillos en exceso, esto podrá hacer que la puerta se caiga y
producir lesiones y daños sobre la propiedad.
Siga todos los pasos. Si no se
NOTAS IMPORTANTES
Al retirar las puertas francesas:
• Lea las instrucciones completamente antes de comenzar.
PRECAUCIÓN
levantada por una sola persona, podrían ocasionarse lesiones.
Solicite ayuda al sostener, mover o levantar las puertas del
refrigerador.
NOTA: Al retirar la puerta, a fin de evitar daños sobre la misma
y la parte electrónica, coloque con cuidado la puerta en una
ubicación adecuada.
Riesgo al levantar la puerta. Si es
B. Usando una llave de tubo/ destornillador de 5/16”, retire
los tornillos que aseguran los soportes de la bisagra
central al gabinete.
ADVERTENCIA
A fin de eliminar el riesgo de descarga eléctrica o lesión durante
la instalación, primero deberá desenchufar el refrigerador antes
de proceder. Si no se siguen estas instrucciones, se podrá
producir una descarga eléctrica.
1. REINSTALACIÓN DE LOS SOPORTES DE
LA BISAGRA CENTRAL Y DE LA BISAGRA
A. Usando una llave de tubo/ destornillador de 5/16”, retire los
tornillos que aseguran los soportes de la bisagra central al
gabinete.
B. Usando una llave Allen de ¼”, reinstale los 2 pernos de la
bisagra en los soportes de la bisagra.
49-60806 69
ESPAÑOL
Page 70

INSTRUCCIONES DE INSTALACIÓN
INSTALACIÓN DEL REFRIGERADOR - PUERTAS FRANCESAS (Cont.)
2. RECOLOCACIÓN DE LA PUERTA DERECHA
A. Baje la puerta del refrigerador sobre el perno de la bisagra
derecha.
B. Asegúrese de que la puerta esté alineada con el gabinete.
Adhiera la bisagra a la parte superior del gabinete sin apretar,
habiendo retirado los tornillos antes.
C. Asegúrese de que la junta de la puerta esté nivelada contra el
gabinete y que no esté doblada. Ajuste los tornillos a 60 lb/pulg
(6.78 Nm).
B. Baje la puerta del refrigerador sobre el perno de la bisagra
izquierda.
C. Asegúrese de que la puerta esté alineada con el gabinete.
Adhiera la bisagra a la parte superior del gabinete sin apretar,
habiendo retirado los tornillos antes.
D. Asegúrese de que la junta de la puerta esté nivelada contra el
gabinete y que no esté doblada. Ajuste los tornillos a 60 lb/pulg
(6.78 Nm).
Conectores de
los Cables
E. Enchufe los conectores de los cables juntos y dirija el cable
dentro del puerto de plástico.
Conectores
de los Cables
D. Reemplace la tapa de la bisagra derecha en la parte superior
del refrigerador usando un destornillador Phillips.
3. REINSTALACIÓN DE LA PUERTA
F. Reemplace la tapa de la bisagra izquierda en la parte superior
del refrigerador usando un destornillador Phillips.
IZQUIERDA
A. Pase el cable a través de la ranura de la bisagra. Coloque el
perno de la bisagra en la parte superior de la puerta.
70 49-60806
ESPAÑOL
Page 71

INSTRUCCIONES DE INSTALACIÓN
INSTALACIÓN DEL REFRIGERADOR - CAJÓN DEL CONGELADOR
NOTAS IMPORTANTES
Al retirar el cajón del congelador:
• Lea las instrucciones completamente antes de comenzar.
¬ МшисчижтсшсдцшуихĤжмизичхдеднтзтсзипдцушихчдцстци
rayen.
1. RETIRE LAS CANASTAS
A. Abra el cajón del congelador hasta que se detenga.
B. Empuje la canasta superior hacia fuera hasta que se detenga.
Levante la canasta hacia arriba sobre el frente y hacia fuera
para retirar la misma.
C. La canasta inferior se apoya sobre una estructura dentro del
cajón del congelador. Levante el frente de la canasta y empuje
la misma hacia delante. Libere los pernos de las ranuras de las
estructuras para retirar la canasta.
2. RETIRE EL FRENTE DEL CAJÓN
A. Retire el tornillo que está a cada lado de los rieles.
Tornillo
B. Levante sobre ambos lados de la manija del cajón del
congelador para separar los rieles del cajón de los ensambles
de los rieles.
Ensamble del
Cajón
Ensamble de
los Rieles
C. МтсĤкшхиипйхисчизипжднſсисшсдцшуихĤжмидсчмхдьдзшхдци
D. Vuelva a empujar los ensambles de los rieles hasta su posición
de bloqueo.
49-60806 71
ESPAÑOL
Page 72

INSTRUCCIONES DE INSTALACIÓN
INSTALACIÓN DEL REFRIGERADOR - CAJÓN DEL CONGELADOR (Cont.)
(en algunos modelos)
3. REINSTALACIÓN DEL FRENTE DEL CAJÓN
DEL CONGELADOT
A. Empuje los ensambles de los rieles hasta la extensión máxima.
B. Ubique las ranuras en la parte interna de cada riel.
C. Inserte los ganchos sobre los extremos de las extensiones
de los ensambles del cajón en las ranuras cercanas a la parte
trasera de las correderas.
Gancho
E. Reemplace los tornillos de seguridad a ambos lados de los
ensambles de las correderas.
F. Reemplace las canastas inferior y superior (consulte la sección
Cajón del congelador).
ENSAMBLE SUGERIDO DEL
REFRIGERADOR
Se muestran los estantes en la ubicación para una mayor eficiencia
energética.
Ranura
Lengüeta Lateral
Ranura Frontal
D. Baje el extremo frontal del ensamble del cajón del congelador,
de modo que las lengüetas laterales coincidan con las ranuras
frontales de los ensambles de las correderas.
Modelos QNE27J
27 cuft.
Puerta Francesa con Cajón del Congelador
72 49-60806
ESPAÑOL
Page 73

INSTRUCCIONES DE INSTALACIÓN
CONEXIÓN DEL REFRIGERADOR AL
SUMINISTRO DE AGUA DEL HOGAR
Se requiere un suministro de agua fría para el funcionamiento de la
máquina de hielos automática. Si no se cuenta con un suministro de
agua fría, se deberá proveer uno. Consulte la sección de Instalación
del Suministro de Agua
NOTAS:
• Antes de realizar la conexión al refrigerador, asegúrese de que
el cable de corriente del mismo no se encuentre enchufado al
tomacorriente.
¬ЬмцшхийхмкихдзтхстжшисчджтсшсĤпчхтзидкшдпи
recomendamos que instale uno si el suministro de agua posee
arena o partículas que podrían atascar la rejilla de la válvula de agua
del refrigerador. Instale el mismo en la tubería de agua más cercana
al refrigerador. Si usará el Kit de Tuberías para Refrigeradores de
ЬрдхчМтссижчЭЦсижицмчдхŹшсдчшеихżддзмжмтсдп¤аб (б! "¥
удхдхидпмэдхпджтсиымſсдпĤпчхтЧтжтхчипдчшеихżдзиупŹцчмжтудхд
мсцчдпдхипĤпчхт
• Antes de conectar la tubería de agua al hogar, purgue la tubería del
hogar durante por lo menos 2 minutos.
A. Si usará una tubería de cobre, coloque una tuerca de compresión
y una abrazadera de refuerzo (manga) en el extremo de la tubería
proveniente del suministro de agua fría del hogar.
Si usará tuberías de SmartConnectTM, las tuercas ya se
encontrarán ensambladas en la tubería.
B. Si usará tuberías de cobre, inserte el extremo de la tubería en la
conexión del refrigerador, en la parte trasera del refrigerador, lo
más lejos posible. Al sostener la tubería, ajuste la unión.
Si usará tuberías de SmartConnectTM , inserte el extremo
moldeado de la tubería en la conexión del refrigerador, en la
parte trasera del refrigerador, y ajuste la tuerca de compresión
hasta que quede ajustada manualmente. Luego realice un ajuste
adicional con un giro de llave. Un ajuste excesivo puede ocasionar
pérdidas.
ADVERTENCIA
agua potable únicamente.
Se requiere un suministro de agua fría para el funcionamiento de
la máquina de hielos automática. La presión del agua deberá estar
entre 40 y 120 psi (275-827 kilopascales).
ADVERTENCIA
Adhiera la abrazadera de la tubería usando el agujero existente
únicamente. NO perfore el refrigerador.
Tubería Smart-
Connect™
Realice la conexión a un suministro de
PELIGRO DE DESCARGA
ELÉCTRICA
ABRA EL SUMINISTRO DE AGUA
Abra el suministro de agua usando la válvula
de cierre (suministro de agua hogareño) y
controle que no haya pérdidas.
ENCHUFE EL REFRIGERADOR
En modelos con máquina de hielos, antes de
enchufar el refrigerador, asegúrese de que
el interruptor de corriente de la máquina de
hielos esté ajustado en la posición 0 (apagado).
Consulte la información de conexión a tierra
adjunta al cable de corriente.
COLOQUE EL REFRIGERADOR EN SU
POSICIÓN
ЦшищдипхийхмкихдзтхлдцчдцшутцмжмſсĤсдп
NIVELE EL REFRIGERADOR
Las patas niveladoras en las esquinas
frontales del refrigerador se deben
ajustar de modo que el refrigerador
фшизиутцмжмтсдзтзирдсихдĤхри
sobre el piso, y que el frente quede
ипищдзтптцшĤжмисчижтртудхдфшипд
puerta se cierre con facilidad cuando se
abra aproximadamente hasta la mitad.
Para ajustar las patas niveladoras, gire las patas en dirección de las
agujas del reloj para elevar el refrigerador, y en dirección contraria de
las agujas del reloj para bajarlas.
Cuando
NIVELACIÓN DE
LAS PUERTAS DEL
REFRIGERADOR
Recuerde que es necesario que el
refrigerador esté nivelado para que las
puertas estén perfectamente apoyadas. Si
necesita ayuda, revise la sección previa sobre
la nivelación del refrigerador.
Si las puertas continúan desniveladas, gire el
perno ajustable para elevar la puerta inferior
usando una llave Allen de 1/4” para girar el
perno.
la puerta
izquierda
está más
baja que
la puerta
derecha.
Cuando
la puerta
izquierda
está más
alta que
la puerta
derecha.
Conexión del
refrigerador
Punto de ajuste
49-60806 73
ESPAÑOL
Page 74

USO DEL REFRIGERADOR
CONTROLES
Control de Temperatura del Compartimiento del Congelador
Ajuste la temperatura del compartimiento del congelador. La
temperatura del congelador está preconfigurada de fábrica
en 0º F (-17.8º C). Espere 24 horas hasta que la temperatura
se estabilice en los ajustes de configuración previa
recomendados.
Control de Temperatura del Compartimiento de Refrigerador
Ajuste la temperatura del compartimiento de refrigerador.
La temperatura para las refrigerador está preconfigurada
de fábrica en 37º F (2.8º C). Espere 24 horas hasta que la
temperatura se estabilice en los ajustes de configuración
previa recomendados.
Filtro de Agua
Mantenga presionada esta función durante 3 segundos para
reiniciar el Filtro de Agua.
Turbo Cool (Frío Turbo)
Para configurar la función TurboCool™, presione la tecla Turbo
Cool (Frío Turbo) durante 3 segundos. La pantalla mostrará tc.
TurboCool™ rápidamente enfría el compartimiento del
refrigerador a fin de que la comida se enfríe de forma más
rápida. Use TurboCoolTM al agregar una gran cantidad de
comida al compartimiento del refrigerador, guardando las
comidas que estuvieron a temperatura ambiente o al guardar
restos de comida caliente. También se puede usar si el
refrigerador estuvo sin corriente por un período prolongado.
NOTA: La temperatura del refrigerador no podrá ser
modificada durante el uso de TurboCool™. La temperatura
del congelador no se verá afectada al usar la función
TurboCool™ Al abrir la puerta del refrigerador durante el uso
de TurboCool™, los ventiladores continuarán funcionando si
estuvieron activados.
Alarma de la Puerta
Para configurar la alarma, presione la tecla Door Alarm
(Alarma de la Puerta). Esta alarma sonará si una de las puertas
permanece abierta por más de 2 minutos. El pitido se detiene
cuando se cierra la puerta
NOTA: Para pasar el control del refrigerador a la posición OFF
(Apagado), de forma simultánea presione las palabras Congelador
(Congelador) y Fridge (Refrigerador) durante 3 segundos. La
corriente que va al refrigerador no puede ser desconectada por
ninguna configuración del panel de control.
Cómo pasar de °F a °C o de °C a °F: Mantenga presionados los
botones “DOOR ALARM” (Alarma de la Puerta) y “FREEZER”
(Freezer) de forma simultánea durante 5 segundos para configurar el
paso de °C a °F o de °F a °C.
MODOS SABÁTICOS
Mantenga presionados los botones “DOOR ALARM” (Alarma de la
Щшихчд¥ьēаКЭОЫПТХЭОЫĔ¤ПмпчхтзиКкшд¥зийтхрдцмршпчŹсид
durante 5 segundos para ingresar/salir de Sabbath Mode (Modo
Sabático). Sabbath Mode (Modo Sabático) apagará o atenuará las
luces internas, el control de temperatura y las funciones avanzadas.
El compresor funcionará con una descongelación por tiempo
cuando esté en modo Sabático.
DISPENSADOR DE AGUA INTERNO
El dispensador de agua está ubicado en la pared izquierda dentro del
compartimiento del refrigerador.
Para dispensar agua:
1. Sostenga el vaso contra el hueco.
2. Presione el botón dispensador de agua.
3. Sostenga el vaso debajo del dispensador
entre 2 y 3 segundos luego de liberar el
botón del dispensador. Es posible que
continúe dispensando agua luego de que el
botón haya sido liberado.
Si no se dispensa agua cuando el refrigerador se instala por primera
vez, es posible que la tubería de agua posea aire. Presione el botón
dispensador durante por lo menos 5 minutos para eliminar el aire
atrapado de la tubería de agua y para llenar el sistema de agua.
Durante este proceso, es posible que el dispensador produzca un
ruido fuerte a medida que se elimina el aire de la tubería de agua.
A fin de limpiar las impurezas en la tubería de agua, descarte los
primeros seis vasos de agua.
NOTA: A fin de evitar depósitos de agua, el dispensador debe ser
limpiado de forma periódica con un paño limpio o una esponja.
74 49-60806
ESPAÑOL
Page 75

USO DEL REFRIGERADOR
ACERCA DEL CARTUCHO DEL FILTRO DE AGUA XWF
CARTUCHO DEL FILTRO DE AGUA
El cartucho del filtro de agua está ubicado en el extremo superior
trasero derecho del compartimiento de comida fresca del
refrigerador.
CUÁNDO REEMPLAZAR EL FILTRO
Si existe una luz indicadora de reemplazo del cartucho del filtro de
agua en el dispensador, una luz roja del filtro comenzará a
parpadear a fin de indicar que es necesario reemplazar el filtro
pronto.
- La luz del filtro parpadeará mientras la puerta se encuentre
abierta hasta que el filtro sea reemplazado.
El cartucho del filtro deberá ser reemplazado cada seis meses, o
antes si se observa una reducción en el flujo de agua hacia el
dispensador o la máquina de hielos.
RETIRO DEL FILTRO
Si reemplazará el filtro, primero retire el anterior:
1. Abra la carcasa del cartucho del filtro presionando las 2
lengüetas frontales y empujando de forma suave hacia abajo.
2. Gire el filtro hacia abajo.
3. De forma suave, tome el filtro y lentamente dé al mismo
aproximadamente ¼ de giro en sentido antihorario.El filtro
deberá liberarse de forma automática cuando lo haya rotado lo
suficiente hacia la izquierda. Es posible que gotee una pequeña
cantidad de agua.
PRECAUCIÓN
sistema, es posible que el cartucho sea eyectado en el momento
en que se retire. Tenga cuidado al retirar el mismo.
Si quedó aire atrapado en el
TAPÓN DE BYPASS DEL FILTRO
A fin de reducir el riesgo de daños sobre la propiedad debido a
pérdidas de agua, usted DEBERÁ usar el tapón del bypass del filtro
cuando no se disponga de un reemplazo del cartucho del filtro.
Algunos modelos no vienen equipados con el tapón del filtro del
bypass. A fin de obtener un tapón del filtro del bypass, comuníquese
дп(''##'#&#)тщмцмчисшицчхтцмчмтаиеHaierparts.com. En
Canadá, comuníquese al 800.661.1616. El dispensador y la máquina
de hielos no funcionarán si el filtro o el tapón del bypass del filtro no
están instalados. El tapón del bypass se instala del mismo modo que
un cartucho del filtro.
INSTALACIÓN DEL FILTRO EN UN
REFRIGERADOR CON FREEZER EN LA PARTE
INFERIOR
1. Abra la carcasa del cartucho del
filtro presionando las 2 lengüetas
frontales y empujando de forma
suave hacia abajo.
2. Alinee los puertos del filtro con los
puertos de la carcasa del cartucho
del filtro, e inserte el filtro de forma
suave.
3. Lentamente, gire el filtro hacia la
derecha hasta que se detenga. NO
ХШКУЮЬЭООЧОбМОЬШЦмисчхдц
gira el filtro, el mismo se ajustará
automáticamente en su posición. El
filtro girará aproximadamente ¼” o 90
grados, hasta que la flecha del mismo
quede alineada con la flecha de la carcasa
del cartucho del filtro.
4. Lentamente empuje el filtro hacia arriba
sobre los sujetadores.
5. Cierre la carcasa del cartucho del filtro presionando la tapa
de forma suave hacia arriba, hasta que las lengüetas queden
bloqueadas en su posición.
6. Deje correr una cantidad de agua desde el dispensador de 2
galones (7.6 litros) o durante aproximadamente 5 minutos para
limpiar el sistema. Es posible que el agua salga a chorros o se
podrán visualizar burbujas de agua durante el proceso. Si no
fluye agua, realice un control para asegurarse de que el filtro
haya sido girado completamente hacia la derecha.
'ЦдсчискдухицмтсдздпдчижпдаКЭОЫПТХЭОЫ¤ПмпчхтзиКкшд¥
sobre el dispensador durante tres segundos.
Pautas de Aplicación/ Suministro de Agua
Flujo del Servicio 0.5 gpm (1.89 lpm)
Suministro de Agua Agua Potable
Presión del Agua 25-120 psi (172-827 kPa)
Temperatura del agua 33°F-100°F (0.6°C-38°C)
Capacidad 170 galones (643.5 litros)
Regístrese para RECORDATORIOS DE TEXTO, enviados
REPLACE (Reemplazar) por mensaje de texto al 70543.
ADVERTENCIA
a las partes pequeñas durante la instalación de este producto. El cartucho del filtro descartable deberá ser reemplazado cada 6 meses
luego de agotar su capacidad, o antes si se produce una reducción notoria en el caudal.
Para obtener el máximo beneficio de su sistema de filtrado, Haier recomienda el uso de los filtros de la marca GE Appliances
únicamente. El uso de filtros de la marca GE Appliances en refrigeradores Haier brinda un óptimo funcionamiento y confiabilidad. Los
filtros de GE Appliances cumplen con rigurosos estándares NSF de la industria sobre seguridad y calidad, que son importantes para
los productos que están filtrando su agua. Haier no posee filtros de la marca GE Appliances que no estén calificados para su uso en
refrigeradores Haier , y no existe seguridad de que los filtros que no son de la marca GE Appliances cumplan con los estándares de
Haier en relación a calidad, funcionamiento y confiabilidad.
Ante cualquier consulta, o para ordenar cartuchos de filtros adicionales, visite nuestro sitio Web en HaierParts.com o llame a Haier al
877.337.3639. (En Canadá, GEAppliances.ca o llame al 800.661.1616)
49-60806 75
ESPAÑOL
A fin de reducir el riesgo asociado con asfixia, no permita que los niños menores de 3 años tengan acceso
Page 76

USO DEL REFRIGERADOR
ESTANTES Y RECIPIENTES
No todas las funciones corresponden a todos los modelos.
REORGANIZACIÓN DE LOS ESTANTES DEL
REFRIGERADOR
Los estantes del compartimiento del refrigerador son ajustables.
Para retirar los estantes:
1. Retire todos los productos del
estante.
2. Incline el estante hacia arriba en
la parte frontal.
3. Levante el estante desde la parte
trasera y retire el mismo.
Para reemplazar los estantes:
1. Al inclinar el estante hacia arriba, inserte
el gancho superior en la parte trasera del
estante en una ranura del soporte.
2. Incline la parte frontal del estante hasta
que la parte inferior del mismo quede
bloqueado.
ESTANTE QUICK SHELF
Este estante se divide a
la mitad y se desliza por
debajo de sí mismo para
almacenar productos altos
en el estante de abajo.
Este estante puede ser
retirado y reemplazado o
reubicado.
NOTA: La mitad trasera del
Estante Quick Space no es
ajustable.
CAJONES
No todas las funciones corresponden a todos los modelos.
CAJONES CON CLIMA REGULADO
Mantenga las frutas y verduras organizadas en compartimientos
separados para un fácil acceso. El exceso de agua que se puede
acumular en la parte inferior de los cajones o debajo de los mismos
se deberá limpiar.
Para retirar la cajón:
Deslice la cajon hacia fuera de la
posición de detención, levante
la misma hasta la posición
de detención y empuje hacia
delante.
CAJÓN DE ANCHO COMPLETO
Para retirar la cajon:
1. Empuje la cajón hacia fuera hasta su posición de detención.
2. Levante la parte frontal del cajón hacia arriba y hacia afuera.
Para reemplazar la cajón:
1. Primero coloque la parte trasera del cajón y gire el frente hacia
del mismo hacia abajo para que se apoye en las correderas.
2. Empuje el cajón hacia adentro hasta la posición cerrada.
RETIRO Y REINSTALACION DEL DIVISOR
ANAQUELES DE PUERTAS AJUSTABLES
Para su retiro: levante el anaqueles de forma
recta y luego empuje hacia afuera.
Para su reemplazo: adhiera el anaquel a los
soportes moldeados de la puerta y empuje
hacia abajo hasta que quede bloqueado.
76 49-60806
DEL CAJÓN
Para su retiro:
1. Empuje el cajón hacia fuera hasta la posición de detención.
2. Deslice el divisor de cajones hacia la derecha para liberar el
mismo de la cajón.
Para su Reinstalacion:
Invierta los pasos 1 y 2 para reemplazar el divisor del cajón.
ESPAÑOL
Page 77

USO DEL REFRIGERADOR
CAJÓN DE REFRIGERIOS FLOTANTE
Esta cajón se podrá mover a la ubicación más útil para las
necesidades de su familia.
Para retirar el cajón, deslice la misma hacia fuera hasta la posición
de detención, levante la misma hasta la posición de detención y
retírela.
CAJÓN DEL CONGELADOR
No todas las funciones corresponden a todos los modelos.
CANASTAS DEL CONGELADOR
1. Una cubeta en la canasta superior
(en algunos modelos)
2. Una canasta superior.
3. Una canasta inferior (con divisor – en
algunos modelos)
NOTA: No supere el borde al llenar
las canastas. Esto podrá hacer que
las canastas se claven o atasquen al
abrirlas o cerrarlas.
1
2
3
Las funciones y apariencia
pueden variar.
RETIRO DE LA CANASTA SUPERIOR
Para retirar la canasta superior en los modelos con cajón de
congelador:
1. Empuje el cajón hacia fuera hasta su posición de detención.
2. Levante la canasta para liberarla de las correderas.
Al reemplazar la canasta, asegúrese de que quede montada sobre
los rieles laterales y sobre las correderas de la canasta inferior.
NOTA: Siempre asegúrese de cerrar totalmente esta canasta..
Hielera (en algunos
modelos)
Las luces LED están ubicadas sobre ambos lados
del congelador.
Divisor de
la Canasta
Superior
Canasta
Superior
Canasta
Inferior
49-60806 77
ESPAÑOL
Page 78

USO DEL REFRIGERADOR
RETIRO DE LA CANASTA INFERIOR
Para retirar la canasta inferior en los modelos con cajón de
congelador:
1. Abra el cajón inferior del congelador hasta que se detenga.
2. Retire la canasta superior del congelador.
3. La canasta inferior del congelador se apoya sobre las lengüetas
internas de las correderas del cajón.
4. Levante el frente de la canasta y empuje hacia delante.
5. Libere el perno de la ranura para retirar la canasta.
Al reinstalar la canasta inferior, inclínela hacia atrás y asegure que
los pernos entren en las ranuras de los soportes, deslice hacia atrás
y dejarla en posición horizontal.
NOTA: Siempre asegúrese de que la canasta quede apoyada en las
lengüetas de los soportes, antes de volver a deslizar el cajón en el
congelador.
FABRICA DE HIELOS AUTOMÁTICA
Puede llevar entre 12 y 24 horas que un refrigerador recién instalado comience a fabricar hielo.
La máquina de hielos producirá siete cubos por ciclo, y
aproximadamente entre 100 y 130 cubos en un período de 24
horas, dependiendo de la temperatura del compartimiento del
congelador, la temperatura ambiente, la cantidad de veces que se
abra la puerta y otras condiciones de uso.
Interruptor del
Encendido
Máquina de
hielos
Cuando el cubo se llene hasta el nivel del interruptor de energía, la
máquina de hielos dejará de producir hielo. Es normal que varios
cubos queden juntos.
Si el hielo no se usa con frecuencia, los cubos de hielo viejos se
volverán turbios, con sabor rancio y su tamaño se reducirá.
NOTA: En hogares con un nivel de presión inferior a la normal, es
posible que escuche que la válvula de agua de la máquina de hielos
realice varios ciclos para producir una cantidad de hielo.
Luz Verde
de Corriente
Si el refrigerador se utiliza antes de realizar la conexión del agua a
la máquina de hielos, configure el interruptor en la posición OFF
(Apagado).
Cuando el refrigerador haya sido conectado al suministro de agua,
ajuste el interruptor de corriente en la posición ON (Encendido).
La máquina de hielos se llenará de agua cuando se enfríe y
llegue a los 15°F (–10°C). Puede llevar entre 12 y 24 horas que un
refrigerador recién instalado comience a fabricar hielo.
Es posible que escuche un zumbido cada vez que la máquina de
hielos se llene de agua.
Descarte las primeras cantidades de hielo para permitir que el
suministro de agua se despeje.
Asegúrese de que nada interfiera con la extensión del interruptor
de energía.
Interruptor de
Energía
PRECAUCIÓN
lesiones personales, evite el contacto con las partes móviles del
mecanismo eyector o con el elemento de calefacción que libera
los cubos. No coloque los dedos ni las manos en el mecanismo
de la máquina de hielos automática mientras el refrigerador esté
enchufado.
Hay acumulación de hielos en el compartimiento del congelador,
ubicado del lado izquierdo de la canasta superior. Empuje la canasta
superior hacia adelante para retirar la hielera.
Hielera
Para minimizar el riesgo de
78 49-60806
ESPAÑOL
Page 79

CUIDADO DEL REFRIGERADOR
ACERO INOXIDABLE - Instrucciones para la Limpieza de Superficies Exteriores, Manijas de
Puertas y Bordes
USE NO USE
Telas suaves y limpias o esponjas Telas abrasivas, esponjas de fregar, almohadillas de estropajo o de
lana de acero
Detergente suave mezclado con agua caliente
Limpiadores de acero inoxidable aprobados. Visite la tienda de
piezas de GE Appliances para acceder a limpiares de acero
inoxidable aprobados: GEApplianceparts.com o comuníquese
al 877.959.8688
Los limpiadores con ácido oxálico tales como Bar Keepers
Friend Soft Cleanser™ podrán ser usados para eliminar el
óxido, deslustres y pequeñas manchas de las superficies de
acero inoxidable únicamente.
NOTA: NO permita que el limpiador de acero inoxidable entre en contacto con cualquier parte plástica tal como partes de bordes,
materiales de manijas y cobertores. Si se produce un contacto no intencional de los limpiadores con las partes plásticas, limpie estas
últimas con una esponja y un detergente suave mezclado con agua caliente.
ACERO INOXIDABLE DE NEGROS - Instrucciones para la Limpieza de Superficies Exteriores,
Manijas de Puertas y Bordes
Polvos o rociadores abrasivos
Rociadores de Ventana o Amoníaco
Limpiadores a base de cítrico o aceite vegetal
Limpiadores ácidos o a base de vinagre
Limpiadores de horno
Limpiadores que contengan acetona (propanona)
Cualquier limpiador con ADVERTENCIAS sobre el contacto con el
plástico
USE NO USE
Telas suaves y limpias o esponjas
7HODGHPLFUR¿EUD
Detergente suave mezclado con agua caliente Polvos o rociadores abrasivos
IMPORTANTE: Los modelos de Acero Inoxidable de Negros se podrán rayar u opacar fácilmente si se limpian con telas o limpiadores
abrasivos. Use sólo las herramientas de limpieza recomendadas más arriba para mantener la belleza del acabado.
Telas abrasivas, toallas de papel, esponjas de fregar (con o sin
jabón), almohadillas de estropajo o de lana de acero
Rociadores de ventana, moníaco, o blanqueador
Limpiadores a base de cítrico o aceite vegetal
Limpiadores ácidos o a base de vinagre
Limpiadores de horno
Limpiadores alcalinos
Limpiador de acero inoxidable
49-60806 79
ESPAÑOL
Page 80

CUIDADO DEL REFRIGERADOR
LIMPIEZA DE LA PARTE INTERNA
Desenchufe el refrigerador antes de limpiar.
Si esto no resulta práctico, estruje el exceso de humedad
para eliminarlo de la esponja o tela al limpiar alrededor de los
interruptores, luces o controles.
Use un pulidor de cera para electrodomésticos en la superficie
interna entre las puertas.
PRECAUCIÓN
con agua caliente cuando estén fríos. Los estantes de vidrio y las
tapas se pueden romper si son expuestos a cambios de temperatura
repentinos o impactos tales como golpes o caídas. El vidrio
templado está diseñado para destruirse en pequeñas piezas en caso
de rotura.
Use agua caliente y solución de bicarbonato de sodio —
aproximadamente una cuchara sopera (15 ml.) de bicarbonato
de sodio para un cuarto de galón (1 litro) de agua. Esto limpia y
neutraliza los olores. Enjuague y seque.
No limpie estantes de vidrio ni tapas
DETRÁS DEL REFRIGERADOR
Tenga cuidado al alejar el refrigerador de la pared. Cualquier tipo de
cobertura de piso puede ser dañada, particularmente las coberturas
acolchonadas y aquellas con superficies con relieves.
Levante las patas niveladoras ubicadas en la parte frontal inferior del
refrigerador.
Empuje el refrigerador hacia afuera de forma recta y regrese
el mismo a su posición empujándolo hacia dentro. Mover el
refrigerador hacia una ubicación lateral podrá ocasionar daños sobre
la cobertura del piso o el refrigerador.
Baje las patas niveladoras hasta que toquen el piso
Al volver a empujar el refrigerador, asegúrese de que no atraviese
el cable de corriente ni la tubería de suministro de agua.
PREPARACIÓN PARA LAS
VACACIONES
Si estará de vacaciones o ausente por tiempo prolongado, retire la
comida y desenchufe el refrigerador. Limpie la parte interna con una
solución de bicarbonato de sodio de una cuchara sopera (15 ml) de
bicarbonato de sodio para un cuarto de galón (1 litro) de agua. Deje
las puertas abiertas.
Si la temperatura puede llegar a estar por debajo del límite de
congelación, solicite a un técnico calificado que drene el sistema de
suministro de agua a fin de prevenir daños graves sobre la propiedad
debido a una inundación.
1) Desenchufe el refrigerador.
2) Vacíe la hielera
3) Cierre el suministro de agua
Si cierra el suministro de agua, apague la máquina de hielos (pg. 79).
Al regresar de sus vacaciones, reemplace el filtro de agua.
PREPARACIÓN PARA LA MUDANZA
Asegure todos los artículos tales como estantes y cajones, pegando
los mismos de forma segura en sus respectivos lugares a fin de
evitar daños.
Al usar un carro manual para mover el refrigerador, no deje que la
parte frontal ni la parte trasera descansen contra el carro manual.
Esto podría dañar el refrigerador.
Lleve el mismo sólo sobre los costados del refrigerador.
Asegúrese de que el refrigerador permanezca en una posición
erguida durante el movimiento.
REEMPLAZO DE LAS LUCES
El compartimiento de refrigerador cuenta con iluminación LED en
la parte superior central y del lado izquierdo y derecho sobre las
cajones con clima regulado en los modelos con puerta francesa.
La iluminación LED está ubicada en la parte superior del
compartimiento de refrigerador de los modelos con una sola puerta.
Las luces LED también están ubicadas en la parte superior de los
costados izquierdo y derecho del congelador en todos los modelos.
Será necesario que un técnico autorizado reemplace la luz LED.
En caso de ser necesario un reemplazo de este ensamble, llame
servicio al 877.337.3639 en Estados Unidos o al 877.470.9174 en
Canadá.
Luces LED (las
ubicaciones
pueden variar
por modelo)
80 49-60806
ESPAÑOL
Page 81

SOLUCIÓN DE PROBLEMAS
Pruebe las soluciones sugeridas aquí y posiblemente se evite el gasto de una visita de servicio técnico.
Problema Posibles causas Qué hacer
El refrigerador no funciona El refrigerador se encuentra en el ciclo de descongelamiento Espere unos 30 minutos hasta que el ciclo de
Uno o ambos controles se encuentran configurados en OFF
(Apagado).
El refrigerador está desenchufado. Presione el enchufe completamente dentro del
Se quemó el fusible/ el disyuntor está activado Reemplace el fusible o reinicie el disyuntor.
El refrigerador se encuentra en el modo de sala de
exposición.
Vibración normal o ruidosa (una
vibración leve es normal).
El motor funciona durante períodos
prolongados o realiza ciclos de
encendido y apagado de forma
frecuente. (Los refrigeradores
modernos con mayor espacio de
almacenamiento y un freezer más
grande requieren más tiempo
de funcionamiento. Se activan y
se detienen con frecuencia para
mantener temperaturas parejas).
Compartimiento del refrigerador o del
freezer demasiado caliente
Cristales de escarcha o hielo en
alimentos congelados (la escarcha
dentro de paquetes es normal)
El divisor de los compartimientos del
refrigerador y del freezer se siente
caliente
La máquina de hielos automática no
funciona
Al enfriarse el freezer, la comida fresca
no se enfría
Los cubos de hielo tienen olor/ gusto Es necesario limpiar los estantes de almacenamiento de
Cubos pequeños o huecos Filtro de agua obstruido. Reemplace el cartucho del filtro por un cartucho
Congelamiento lento de los cubos de
hielo
49-60806 81
ESPAÑOL
Las patas niveladoras deben ser ajustadas. Consulte la sección de Nivelación del refrigerador.
Es normal cuando el refrigerador se enchufa por primera vez. Espere 24 horas hasta que el refrigerador se enfríe
Sucede con frecuencia cuando se colocan grandes
cantidades de comida en el refrigerador.
Se dejó la puerta abierta. Controle que no haya paquetes que impidan que la
Clima cálido o apertura frecuente de la puerta. Esto es normal.
Los controles de temperatura están configurados en la
posición más fría.
El control de temperatura no se configuró en un nivel lo
suficientemente frío.
Clima cálido o se abre la puerta con frecuencia. Configure el control de temperatura un paso más
Se dejó la puerta abierta. Controle que no haya paquetes que impidan que la
Se dejó la puerta abierta. Controle que no haya paquetes que impidan que la
Se abre la puerta de forma muy frecuente o por períodos
demasiado largos.
El sistema de ahorro de energía automático hace
circular líquido caliente alrededor del extremo frontal del
compartimiento del freezer.
El interruptor de corriente de la máquina de hielos se
encuentra en la posición OFF (Apagado).
El suministro de agua está apagado o no está conectado. Consulte la sección sobre Instalación la Cañería de
El compartimiento del freezer está demasiado caliente. Espere 24 horas hasta que el refrigerador se enfríe
Los cubos apilados en el estante de almacenamiento hacen
que la máquina de hielos se apague.
Los cubos de hielo quedan atorados en la máquina de hacer
hielo.
Es normal, cuando el refrigerador se enchufa por primera vez
o luego de un corte de corriente prolongado
hielo.
La comida transmite olor/ gusto a los cubos de hielo. Envuelva bien las comidas.
Es necesario limpiar el interior del refrigerador. Consute la sección de Cuidado y Limpieza.
Se dejó la puerta abierta. Controle que no haya paquetes que impidan que la
Controle que no haya paquetes que impidan que la puerta
se cierre.
descongelamiento finalice.
Ajuste los controles en una configuración de
temperatura inferior.
tomacorriente.
Desenchufe el refrigerador y vuelva a enchufarlo.
completamente.
Esto es normal.
puerta se cierre.
Consulte la sección de Controles.
Consulte la sección de Controles.
frío. Consulte la sección de Controles.
puerta se cierre.
puerta se cierre.
Esto es normal.
Esto ayuda a evitar la condensación en la parte
exterior.
Configure el interruptor de corriente en la posición
ON (Encendido).
Agua.
completamente.
Nivele los cubos en forma manual.
Apague la máquina de hielos, retire los cubos, y
vuelva a encender la máquina de hielos.
Espere 24 horas para que en ambos
compartimientos se alcancen las temperaturas
seleccionadas.
Vacíe y lave el estante. Descarte los cubos viejos.
nuevo con el enchufe.
puerta se cierre.
Consulte la sección de Controles.
Page 82

SOLUCIÓN DE PROBLEMAS
Pruebe las soluciones sugeridas aquí y posiblemente se evite el gasto de una visita de servicio técnico.
Problema Posibles causas Qué hacer
“Sonido de zumbido” frecuente El interruptor de la máquina de hielos se encuentra
Brillo anaranjado en el freezer El calentador de descongelamiento se encuentra
El agua tiene mal gusto/ olor El dispensador de agua no fue usado durante un
El agua del primer vaso está caliente Es normal cuando el refrigerador es instalado por
El dispensador de agua no funciona Suministro de agua apagado o no conectado. Lea la sección de Instalación de la cañería de agua
El agua chorrea del dispensador Cartucho del filtro recién instalado. Deje correr agua del dispensador durante 3 minutos
El agua no es dispensada pero la
máquina de hielo está funcionando
No sale agua y la máquina de hielo no
funciona
El refrigerador huele Alimentos transmitiendo olores al refrigerador. Alimentos con olores fuertes deben estar tapados. Guarde
Se forma humedad en la superficie del
refrigerador
Humedad se forma al interior (en clima
húmedo, el aire lleva la humedad al
refrigerador cuando las puertas se
abren)
La luz interna no funciona No hay corriente en el tomacorriente. Reemplace el fusible o reinicie el interruptor de protección.
Aire caliente de la parte de abajo del
refrigerador
El refrigerador nunca se apaga pero las
temperaturas están bien
El refrigerador emite un sonido La puerta está abierta. Cierre la puerta.
La puerta no cierra correctamente La junta de la puerta del lado de la bisagra se está
La temperatura real no es equivalente a
la temperatura configurada
en la posición I (Encendido), pero el suministro de
agua al refrigerador no fue conectado.
encendido.
tiempo prolongado.
primera vez.
El dispensador de agua no fue usado durante un
período de tiempo prolongado.
El sistema de agua fue drenado. Espere varias horas hasta que el suministro repuesto se
Filtro de agua tapado. Reemplace el cartucho del filtro o remueva el filtro e instale
Aire atrapado en el sistema del agua. Presione el brazo del dispensador por un par de minutos.
El dispensador está en LOCKED (Bloqueado). Mantenga presionada la tecla LOCK (Bloqueo) durante 3
El agua de la reserva está congelada. Llame al servicio técnico.
La configuración del control del refrigerador está
graduada demasiado fría.
Está tapada la línea de agua o la llave de paso. Llame a un plomero.
Filtro de agua tapado. Reemplace el cartucho del filtro o remueva el filtro e instale
El interior requiere limpieza. Lea la sección de Cuidado y limpieza
No es extraño durante periodos de alta humedad. Seque la superficie
Aperturas de puerta frecuentes o por mucho tiempo. Esto es normal.
Debido al alto nivel de humedad en el refrigerador,
es posible que ocasionalmente se empañe o que se
produzcan pequeñas cantidades de humedad en el
compartimiento del refrigerador.
Para luces LED Llame al servicio técnico - ver R eemplazo de las Luces
Flujo de aire que está enfriando al motor. En el
proceso de refrigeración, es normal que salga
calor de la parte inferior del refrigerador. Algunas
cubiertas de piso son sensibles y se decolorarán
ante estas temperaturas normales y seguras.
La descongelación adaptable mantiene el
compresor funcionando durante las aperturas de
la puerta.
adhiriendo o doblando.
La unidad se acaba de enchufar. Espere 24 horas hasta que el sistema se estabilice.
La puerta se mantuvo abierta durante demasiado
tiempo.
Se agregó comida caliente al refrigerador. Espere 24 horas hasta que el sistema se estabilice.
El ciclo de descongelamiento está en proceso. Espere 24 horas hasta que el sistema se estabilice.
Configure el interruptor en la posición 0 (Apagado).
Mantenerlo en la posición I (Encendido) dañará la válvula
de agua.
Esto es normal.
Dispense agua hasta que toda el agua en el sistema sea
repuesta.
Espere 24 horas hasta que el refrigerador se enfríe
completamente.
Dispense agua hasta que toda el agua del sistema sea
repuesta.
haya enfriado.
el tapón.
segundos.
(aproximadamente un galón y medio).
Modifique la configuración a una posición más caliente.
el tapón.
una caja de bicarbonato de sodio en el refrigerador;
cámbiela cada tres meses.
Esto es normal y puede variar dependiendo de las
cantidades de comida y condiciones climáticas. Seque con
una toalla de papel si lo desea.
Esto es normal.
Esto es normal. El refrigerador concluirá su ciclo cuando la
puerta permanezca cerrada durante 2 horas
Aplique parafina sobre la cara de la junta.
Espere 24 horas hasta que el sistema se estabilice.
82 49-60806
ESPAÑOL
Page 83

SOLUCIÓN DE PROBLEMAS
Pruebe las soluciones sugeridas aquí y posiblemente se evite el gasto de una visita de servicio técnico.
Problema Posibles causas Qué hacer
La gaveta no se cierra sola Las patas niveladoras necesitan ajuste. Consulte la Bivele el refrigerador
La gaveta del congelador se abre
cuando la puerta del refrigerador
está cerrada
La comida se congela en el
refrigerador
El agua se está fugando del
dispensador
La pantalla muestra tc La función TurboCool se encuentra activada. Ver las secciones Controles
La luz del indicador del filtro de agua
cambió de color
La luz del indicador del filtro de agua
continúa roja aún después de haber
cambiado el filtro de agua
La luz del indicador del filtro de agua
no está encendida
Las puertas del refrigerador no
están parejas (en modelos de Puerta
Francesa únicamente)
Consulte la sección de Nivelación de
las Puertas del Refrigerador.
Esto es normal si después de abrirse, la gaveta del
congelador se cierra sola.
La comida está demasiado cerca de la ventilación
de aire, en la parte trasera del refrigerador.
El control del refrigerador está ajustado demasiado
frío.
El vaso no está siendo sostenido debajo del
dispensador por suficiente tiempo después de que
el botón es liberado.
Puede haber aire presente en el sistema de la
tubería del agua que causa que el agua gotee
después de que el agua se haya dispensado.
Esto es normal. ЯихКжихждзипждхчшжлтзипймпчхтзидкшдбаП
El indicador de filtro de agua debe resetearse. Щхицмтсиьцтцчискдутх#цикшсзтцпдчижпдаКЭОЫПТХЭОЫ
Esto es normal. Cuando la luz se vuelva roja, deberá
de hacer el cambio de filtro.
Es necesario realinear las puertas. Consulte la sección de Nivelación de las Puertas del
Las canastas están demasiado llenas. Para abrir: retire algunos de los productos desde la canasta
Esto indica que hay un buen sellante en la gaveta del
congelador. Si la gaveta del congelador no se cierra
automáticamente después de abrirse, entonces consulte la
sección anterior, Problema: La gaveta del refrigerador no se
cierra sola.
Aleje la comida de la ventilación de aire.
Mueva el control del refrigerador a una configuración de
temperatura más alta, realizando un incremento a la vez.
Sostenga el vaso debajo del dispensador por 2 ó 3 segundos
después de liberar el botón del dispensador. El agua podría
continuar dispensándose después de que el botón sea
liberado.
Dispense agua por al menos 2 minutos para retirar el aire del
sistema.
ЯихКжихждзипждхчшжлтзипймпчхтзидкшдбаП
ЯихКжихждзипждхчшжлтзипймпчхтзидкшдбаП
Refrigerador.
cuando se abra tanto como sea posible. Vuelva a ajustar los
productos que quedaron en la canasta e intente abrir esta
última nuevamente. Para cerrar: Vuelva a ajustar los productos
de la canasta o retire cualquier producto que se encuentre
sobre el borde de la canasta y cierre la misma.
CONDICIONES DE FUNCIONAMIENTO NORMAL
El sonido de los refrigeradores nuevos es diferente al de aquellos más antiguos. Los refrigeradores modernos cuentan con más funciones y
utilizan una tecnología más nueva.
• Es posible que el nuevo compresor de alta efectividad funcione
más rápido y por más tiempo que aquel de su refrigerador
antiguo, y es posible que escuche un zumbido o sonido de
pulsación mientras está funcionando.
• Es posible que escuche sonidos de gorgoteos al cerrar las
puertas. Esto se debe al equilibrio de la presión dentro del
refrigerador.
• Es posible que escuche los ventiladores girar en altas velocidades.
Esto sucede cuando el refrigerador se enchufa por primera vez,
cuando las puertas se abren con frecuencia o cuando una gran
cantidad de comida es agregada a los compartimientos del
refrigerador o del congelador. Los ventiladores están ayudando a
mantener las temperaturas correctas.
• Los ventiladores cambian de velocidad a fin de brindar un
enfriamiento óptimo y ahorros de energía.
• Es posible que escuche sonidos de crujidos o estallidos cuando se
enchufe el refrigerador por primera vez. Esto sucede mientras el
refrigerador se enfría hasta la temperatura correcta.
• La expansión y contracción de las bobinas de enfriamiento
durante y después de la descongelación pueden producir sonidos
de crujidos o estallidos.
• En los modelos con máquina de hielos, luego de un ciclo de
producción de hielo, es posible que escuche los cubos de hielo
caer a la hielera.
• En los modelos con dispensador, cuando se dispense el agua,
es posible que escuche el movimiento de las tuberías de agua
al iniciar el proceso y luego de que el botón del dispensador sea
liberado.
• Es posible que el flujo de refrigerante a través de las bobinas de
enfriamiento produzca un gorgoteo similar al agua hirviendo.
• El agua que cae sobre el calentador de descongelamiento puede
producir un sonido de chisporroteo, estallido o zumbido durante
el ciclo de descongelamiento.
• Es posible que se escuche un sonido de goteo durante el ciclo
de descongelación, a medida que el hielo se derrite desde el
evaporador y fluye hasta la cajon de drenaje.
• Cerrar la puerta podrá provocar un sonido de burbujeo debido a la
igualación de la presión.
49-60806 83
ESPAÑOL
Page 84

GARANTÍA LIMITADA DEL CARTUCHO DEL FILTRO
DE AGUA XWF
Comuníquese con nosotros en HaierParts.com, o llame al 877.337.3639.
Por el Período de: Reemplazaremos, Sin Costo:
Treinta Días Desde
la fecha de compra
original.
Qué No Está Cubierto:
• Viajes del técnico del servicio a su hogar para enseñarle sobre cómo usar el producto.
• Instalación inadecuada.
• Fallas del producto en caso de abuso, mal uso, o uso para propósitos diferentes a l original o uso comercial
• Reemplazo de fusibles de la casa o reinicio de disyuntores.
• Daños ocasionados sobre el producto por accidente, incendio, inundaciones o catástrofes naturales.
• Daños consecuentes o incidentales causados por posibles defectos de este producto
EXCLUSIÓN DE GARANTÍAS IMPLÍCITAS:
Su única y exclusiva alternativa es el cambio de la pieza, como se indica en esta Garantía Limitada. Las garantías implícitas,
incluyendo garantías implícitas de comerciabilidad o conveniencia sobre un propósito particular, se limitan a seis meses o al período
más corto permitido por la ley.
Esta garantía se extiende al comprador original y a cualquier dueño subsiguiente de productos adquiridos para uso
hogareño dentro de EE.UU. En Alaska, la garantía excluye el costo de envío o llamadas al servicio técnico desde su hogar.
Algunos estados no permiten la exclusión o limitación de daños fortuitos o consecuentes. Esta garantía le da derechos
legales específicos y es posible que tenga otros derechos legales que varían entre un estado y otro. Para conocer cuáles
son sus derechos legales, consulte a la oficina de asuntos del consumidor local o estatal o al Fiscal de su estado.
Para Adquisiciones Realizadas en Iowa: Este formulario debe poseer la firma y fecha del comprador y del vendedor
antes de la consumación de esta venta.
Este formulario debería ser retenido por el vendedor en un archivo durante un mínimo de dos años.
Cualquier parte del cartucho del filtro de agua que falle debido a un defecto en los materiales o la fabricación durante esta garantía limitada de treinta días.*
Comprador:
Nombre
Domicilio
Ciudad Estado Código
Postal
Firma Fecha
* Si su pieza de Haier falla debido a un defecto en la fabricación dentro de los treinta días desde la fecha de compra original, le entregaremos una
pieza nueva o, a su elección, una pieza reconstruida sin cargo. Devuelva la pieza defectuosa al proveedor de piezas a quien le realizó la compra, junto
con una copia de la “prueba de compra” de la pieza. Si la pieza es defectuosa y no muestra signos de abuso, será cambiada. La garantía no cubre la
falla de las piezas que están dañadas mientras están en su posesión, si son abusadas, o si fueron instaladas de forma incorrecta. No cubre el costo de
хикхицдхпдумиэддпухтщиизтхдфшмиспихидпмэſпджтрухдсмжшехиипжтцчтзипчхдеднтудхдхичмхдхтмсцчдпдхпдрмцрддĤсзизмдкстцчмждхпдйдппдЧт
cubre las piezas usadas en productos de uso comercial, excepto en el caso de equipos acondicionadores de aire. En ningún caso Haier será
responsable por daños consecue ntes.
Garante: GE Appliances, a Haier company
Vendedor:
Nombre
Domicilio
Ciudad Estado Código
Postal
Firma Date
Abroche su recibo aquí. Para acceder al servicio técnico de acuerdo con
84
la garantía deberá contar con la prueba de la fecha original de compra.
ESPAÑOL
49-60806
Page 85

FICHA TÉCNICA DE FUNCIONAMIENTO
DEL MODELO: GE APPLIANCES XWF
• Sistema certificado por IAPMO R&T contra los Estándares 42, 53, 401 de NSF/ANSI para la reducción de demandas especificadas en la ficha
técnica de rendimiento y en iapmort.org.
• El rendimiento real podrá variar en relación a las condiciones locales del agua.
Sustancia Evalu ada
para la Reducción
Gusto y Olor a Cloro 2.0 mg/L +/- 10% N/A 96.9
Gusto y Olor a Cloramina 3.0 mg/L +/- 10% 0.5 96.9
Partícula, Clase I Por lo menos 10,000
Partícula, Clase I 50,000/L N/A >99.99
Plomo 0.15 0.01 98.85
Mercurio 0.006 0.002 96.3
Mercurio 107 to 108 fibras/ L N/A >99
Toxafeno 0.015 +/- 10% 0.003 86.95
VOC (químico sustituto del cloroformo) 0.300 0.015 99.7
Alacloro 0.050 0.001 > 98
Atrazina 0.100 0.003 > 97
Benceno 0.081 0.001 > 99
Carbofurano 0.190 0.001 > 99
Tetracloruro de carbono 0.078 0.0018 98
Clorobenceno 0.077 0.001 > 99
Cloropincrina 0.015 0.0002 99
2,4-D 0.110 0.0017 98
Dibromocloropropano (DBCP) 0.052 0.00002 > 99
o-Diclorobenceno 0.08 0.001 > 99
P-Diclorobenceno 0.040 0.001 > 98
1,2-dicloroetano 0.088 0.0048 95
1,2-dicloroetano 0.083 0.001 > 99
Cis-1,2-dicloroetileno 0.170 0.0005 > 99
Trans-1,2-dicloroetileno 0.086 0.001 > 99
1,2-dicloropropano 0.080 0.001 > 99
cis-1,3-dicloropropileno 0.079 0.001 > 99
Dinoseb 0.170 0.0002 99
Endrina 0.053 0.00059 99
Etilbenceno 0.088 0.001 > 99
Dibromuro de etileno (EDB) 0.044 0.00002 > 99
Bromocloroacetonitrilo 0.022 0.0005 98
Dibromoacetonitrilo 0.024 0.0006 98
dichloroacetonitrile 0.0096 0.0002 98
Dicloroacetonitrilo 0.015 0.0003 98
1,2-dicloro-2-propanona 0.0072 0.0001 99
1,1,1-trichloro-2-propanona 0.0082 0.0003 96
Heptacloro (H-34, Heptox) 0.025 0.00001 >99
Epóxido de heptacloro 0.0107 0.0002 98
Hexaclorociclopentadieno 0.044 0.001 > 98
Hexaclorociclopentadieno 0.060 0.000002 > 99
Lindano 0.055 0.00001 > 99
Metoxicloro 0.050 0.0001 > 99
Pentaclorofenol 0.096 0.001 > 99
Simazina 0.120 0.004 > 97
Tetracloroetileno 0.150 0.0005 > 99
1,1,2,2-Tetracloroetileno 0.081 0.001 > 99
Tetracloroetileno 0.081 0.001 > 99
Tolueno 0.078 0.001 > 99
2,4,5-TP (silvex) 0.270 0.0016 99
Ácido tribromoacético 0.042 0.001 > 98
1,2,4-Triclorobenceno 0.160 0.0005 > 99
1,1,1-tricloroetano 0.084 0.0046 95
1,1,2-tricloroetano 0.150 0.0005 > 99
Tricloroetileno 0.180 0.0010 > 99
Bromoformo 0.300 0.015 95
Bromodiclorometano 0.300 0.015 95
clorodibromometano 0.300 0.015 95
бмпист 0.070 0.001 >99
Meprobamato 400 +/- 20% 60 95.5
Atenolol 200 +/- 20% 30 95.9
carbamazepina 1400 +/- 20% 200 98.6
DEET 1400 +/- 20% 200 98.6
Metolacloro 1400 +/- 20% 200 98.7
Trimetoprima 140 +/- 20% 20 96.1
Linuron 140 +/- 20% 20 96.6
TCEP 5000 +/- 20% 700 98.1
TCPP 5000 +/- 20% 700 98.1
Fenitoína 200 +/- 20% 30 96
Naproxeno 400 +/- 20% 60 95.9
Naproxeno 140 +/- 20% 20 96.5
Estrona 140 +/- 20% 20 97.1
Bisfenol A 2000 +/- 20% 300 99.1
Nonyl phenol 1400 +/- 20% 200 97.3
49-60806 85
ESPAÑOL
Concentración del
peligro de intrusión
(mg/L)
partículas/mL
Concentración de aguas
máximas permitidas sobre
el producto (mg/L)
N/A 91.4
% Promedio
de Reducción
Pautas de Aplicación/ Parámetros de S uministr o de A gua
Flujo de Servicio 0.5 gpm (1.89 lpm)
Suministro de Agua Agua Potable
Presión del Agua 25-120 psi (172-827 kPa)
Temperatura del agua 33°F-100°F (0.6°C-38°C)
Capacidad 170 galones (643.5 litros)
Es esencial que se cumpla con los requisitos de instalación,
mantenimiento y reemplazo de filtros recomendados por el fabrican te,
a fin de que el producto funcione de acuerdo a como fue promocionado.
Para acceder a información sobre la Garantía, consulte el Manual de
Instalación.
Nota: Observe que aunque la evaluación se realizó de acuerdo
con condiciones estándares de laboratorio, el desempeño
ушизищдхмдхЫиирупдэтзипМдхчшжлтбаПЩдхджтстжих
costos estimados de elementos de reemplazo, comuníquese al
(''##'#&#)тщмцмчисшицчхтцмчмтаиеисHaierParts.com
ADVERTENCIA
A fin de reducir el riesgo asociado
con la ingestión de contaminantes:
• No se deben usar con agua que no sea microbiológicamente
segura o de calidad desconocida sin una desinfección
adecuada, antes o después, del sistema. Los sistemas
certificados para la reducción de quistes se podrían usar en
aguas desinfectadas que puedan contener quistes filtrables.
AVISO
A fin de reducir el riesgo de pérdidas de agua o inundación, y
para asegurar un rendimiento óptimo del filtro:
• Lea y siga las Instrucciones de uso antes de la instalación y uso
de este sistema.
• La instalación y uso DEBERÁN cumplir con todos los códigos
estatales y locales de plomería.
• No se deberá instalar si la presión del agua supera los 120
psi (827 kPa). Si la presión del agua es superior a los 80 psi
(552 kPa), deberá instalar una válvula limitadora de presión.
Si no está seguro sobre cómo controlar la presión del agua,
comuníquese con un plomero profesional.
• No instale cuando se puedan producir condiciones de golpe
de ariete. Si existen condiciones de golpe de arieted,e berá
instalar un suspensor de golpes de ariete.
• Si no está seguro sobre cómo controlar esta condición,
comuníquese con un plomero profesional.
• No instale en líneas de suministro de agua caliente. La
temperatura máxima de funcionamiento del agua para este
sistema de filtro es de 100°F (37.8°C).
• Proteja el filtro de heladas. Drene el filtro cuando las
temperaturas sean inferiores a 33ºF (0.6ºC).
• Cambie el cartucho del filtro descartable cada seis meses o
antes, si observa una reducción notoria en el promedio del
flujo de agua.
• Si no se reemplaza el cartucho del filtro descartable en
intervalos recome-nda os, se podrá producir un rendimiento
inferior del filtro y quebraduras en el espacio de colocación del
filtro, ocasionando pérdidas de agua o inundación.
•
Este sistema fue evaluado de acuerdo con NSF/ANSI 42, 53 y 401
para la reducción de las sustancias que figuran a continuación. La
concentración de las sustancias indicadas en agua que ingresa
al sistema fue reducida a una concentración inferior o igual al
límite permitido de agua que deja el sistema, de acuerdo con lo
especificado en NSF/ANSI 42, 53 y 401.
ЬмцчирдбаПжихчмймждзтутхТКЩЦШЫЭ
contra los Estándares 42,53 y 401 de NSF/
ANSI para la reducción de demandas
especificadas en la ficha técnica de
rendimiento en iapmort.org.
Page 86

GARANTÍA LIMITADA
12 Meses para Piezas y Trabajos
Durante 12 meses desde la fecha de compra minorista original, GE
Appliances reemplazará cualquier pieza del refrigerador que falle
debido a un defecto en los materiales o la fabricación. GE Appliances
podrá, a su criterio, reemplazar o realizar la reparación de la unidad
defectuosa. En caso de que GE Appliances decida realizar el servicoi
técnico sobre la unidad, GE Appliances brindará sin costo cualquier
pieza que falle debido a un defecto en los materiales o la fabricación,
junto con cualquier trabajo o costos relacionados con el servicio
para reemplazar la pieza defectuosa. Durante este período, si GE
Appliances decide reemplazar la unidad, podrá hacerlo brindándole
дшцчизшсжихчмĤждзтждснидепиисшсрмстхмцчдипжшдпутзхŹцих
usado para un producto de reemplazo.
El producto deberá estar accesible, sin obstáculos y deberá ser
instalado de forma apropiada para poder recibir el servicio de
reparación correspondiente a la garantía.
NOTA: Esta garantía comienza en la fecha de compra de este
producto, y el recibo original deberá presentarse al representante
autorizado de servicio antes de hacerse las reparaciones bajo la
garantía.
PARA OBTENER SERVICIO BAJO LA GARANTÍA
Para los clientes de EE.UU., todo el servicio de garantía deberá ser
provisto por nuestros Centros de Servicio de Fabricación, o por un
técnico autorizado del Servicio al Cliente. Para programar una visita
del servicio técnico, llame al 1.877.337.3639.
Cuando llame para solicitar el servicio, tenga los números de serie y
modelo disponibles.
En Canadá, llame al 1.877.470.9174.
Lo que no está cubierto bajo esta garantía:
Viajes del técnico del servicio a su hogar para enseñarle sobre cómo
usar el producto.
Instalación inadecuada, entrega o mantenimiento.
Fallas del producto en caso de abuso, mal uso, o uso para propósitos
diferentes al original o uso comercial.
Pérdida de alimentos por mal estado.
Daño causado después de la entrega.
Reemplazo de fusibles de la casa o reinicio de disyuntores.
Reemplazo de las bombillas de luz.
Daños ocasionados sobre el producto por accidente, incendio,
inundaciones o catástrofes naturales.
Daños consecuentes o incidentales causados por posibles defectos
de este producto.
Producto no accesible para brindar el servicio requerido.
Costos asociados cuando GE Appliances decide entregar al
жтсцшрмзтхшсжихчмĤждзтжтртйтхрдзихиирупдэтзипухтзшжчтд
EXCLUSIÓN DE GARANTÍAS IMPLÍCITAS - Su única y exclusiva alternativa es la reparación del producto, como se indica en
la Garantía Limitada. Las garantías implícitas, incluyendo garantías implícitas de comerciabilidad o conveniencia sobre un
propósito particular, se limitan a un año o al período más corto permitido por la ley.
Para Clientes de EE.UU.: Esta garantía se extiende al comprador original y a cualquier dueño subsiguiente de productos comprados para uso
hogareño dentro de EE.UU. Si el producto está en un área donde no se encuentra disponible un Proveedor Autorizado del Servicio Técnico de
GE Appliances, usted será responsable por el costo de un viaje o se podrá requerir que traiga el producto a una ubicación del Servicio Técnico
de GE Appliances Autorizado para recibir el servicio. En Alaska, la garantía excluye el costo de envío o llamadas del servicio a su hogar.
КпкшстцицчдзтцстуихрмчиспдиыжпшцмſстпмрмчджмſсзиздƻтцйтхчшмчтцтжтсцижшисчицОцчдкдхдсчżдпиздзихижлтцпикдпицицуижżĤжтц
y es posible que tenga otros derechos legales que varían entre un estado y otro. Para conocer cuáles son sus derechos legales, consulte a la
тĤжмсдзидцшсчтцзипжтсцшрмзтхптждптицчдчдптдпПмцждпзицшицчдзт
GE Appliances, a Haier company
Para Clientes en Canadá: Esta garantía se extiende al comprador original y a cualquier dueño subsiguiente de productos comprados para
uso hogareño dentro de Canadá. El servicio técnico hogareño de la garantía será brindado en áreas donde Mabe se encuentre disponible y lo
considere apropiado.
MC Commercial, Inc., Burllington, Ontario, L7R 5B6
Garanter US:
Louisville, KY 40225
Garanter Canada:
86 49-60806
ESPAÑOL
Page 87

NOTES
49-60806 87
ESPAÑOL
Page 88

IMPORTANT
Do Not Return This Product To The Store
If you have a problem with this product, please call 1-877-337-3639 for the name
and telephone number of the nearest authorized service center.
DATED PROOF OF PURCHASE REQUIRED FOR WARRANTY SERVICE
IMPORTANT
Ne pas Réexpédier ce Produit au Magasin
En cas de problème avec ce produit, veuillez composer le 1-877-470-9174 pour connaître le
nom et le numéro de téléphone du centre de service autorisé le plus proche.
PREUVE D’ACHAT DÁTÉE, NUMÉRO DE MODÈLE ET LE NUMÉRO DE SÉRIE REQUIS
POUR LE SERVICE DE GARANTIE
IMPORTANTE
No regrese este producto a la tienda
Si tiene un problema con este producto, por favor comuníquese al
1-877-337-3639 para solicitar el nombre y número telefónico del
centro de servicio al cliente autorizado más cercano.
NECESITA UNA PRUEBA DE COMPRA FECHADA, NÚMERO DE MODELO
Y DE SERIE PARA EL SERVICIO DE LA GARANTÍA
 Loading...